1
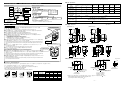
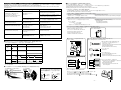
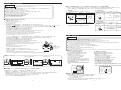
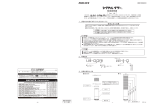
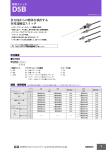
2178-A
A95100178
Rev.1.3
製品保証規定
この保証規定は、お買い上げいただいた製品に対して株式会社パトライト(以下弊社)がお客様に保証する内容について明記しています。
■ 製品保証について
取扱説明書等の注意書きに基づくお客様の正常なご使用状態のもとで、保証期間内に万一故障した場合、無償にて故障箇所の修理または製品の交
換をさせていただきます。製品保証の原則は故障箇所の修理です。
■ 保証期間
製品はお客様がお買い求めいただいてから12ヶ月間の保証を致します。
保証期間経過後は有償修理扱いとなります。 保証期間内に製品の修理・交換対応があったとしても、保証期間はその製品のお買い上げ日より12ヶ月
間をもって満了となります。
■ 保証内容について
保証は製品の無償修理または交換に限定され、お客様の故障品調査や作業人件費、交通費・付属品など、製品以外に関する費用は保証の対象では
ありません。
■ 保証範囲除外事項
以下の場合、または以下のように見受けられる場合は、製品の無償修理または交換の対象となりません。
・モータ・電球・ロータゴム・パッキン・Oリング・キセノン基板・その他消耗部品の磨耗や寿命の場合
・ 火災、地震、落雷、塩害、風水雪害、その他天災地変、または異常電圧などによる故障・損傷の場合
・ 停電、電源・ケーブルなどの故障による電気の切断に起因する故障・損傷の場合
・ 製品を取付け又は接続しているお客様の装置・機器・車両・船舶などとの間に生じる独特の動作不具合や故障の場合
・ 指定環境や推奨環境以外でのご使用により発生する不具合や故障の場合
・ 製品性能を超える環境やご使用方法により発生する不具合や故障の場合
・ お客様の使用上の誤りやお客様が独自に改造・修理・部品交換をされたことに起因する故障・損傷の場合
・ 交換/取付作業による製品破損(例:物理的破損、静電気によるデバイスなどの損傷)の場合
・ 輸送・移動時の落下衝撃等、お客様の取扱いが適正でないために生じた故障・損傷の場合
・ 故意または過失による製品の故障または破損の場合
・ 製品が日本以外の国で使われている場合
■ 保証免責事項
お買い上げ製品(ソフトウエアを含む)の故障もしくは動作不具合により直接または間接的に生じた被害・損害、設備および財産への損害、お客様および
関係する第三者の製品やシステムへの損害、顧客からの信用、またはそれらを修復する際に生じる費用(人件費、交通費、復旧費)など、一切の保証
は致しかねます。
■ 責任制限
・ 弊社の責任範囲は、製品の故障箇所の修理または交換のみに限ります。 従いまして、製品自体または製品の使用から直接または間接的に生じたい
かなる損害についても、弊社に故意または重大なる過失がある場合を除き、一切責任を負うものではありません。 また、弊社が責任を負う場合でも、
重大な人身損害の場合を除き、お客様が購入された製品価格を超えて責任を負うものではありません。
・ 製品の修理や交換がサービス応答時間内に対処できないことから発生する直接的及び間接的損失または損害、並びに逸失利益の責任を弊社は負
いません。
・ 弊社が発行する製品取扱説明書その他の文書、または情報に印刷上、事務上、その他誤りまたは記述漏れがある場合は、弊社は責任なしに修正す
ることができます。また、そこから発生するあらゆる損失または損害において弊社は一切責任を負うものではありません。
注)この保証書は本書に明示した期間・条件のもとで無償修理または交換をお約束するもので、お客様の法律上の権利を制限するものではありません。
壁面取付けセンサ付き回転灯
Revolving Warning Light
Wall mounted rotating light
Revolving Warning Light
Wall mounted rotating light with sensor
[ MODEL : WH(B)-A / WK(B)-A ]
[ MODEL : WHS(B)-A / WKS(B)-A ]
取扱説明書
INSTRUCTION MANUAL
このたびは、
をお買い上げいただきましてありがとうございます。ご使用の前にこの取扱説明書をよくお読みのうえ、正しくお使いください。
また本書は大切に保管してください。保守・点検や補修などをするときには必ず本書を読み直してください。
なおご不明な点は最終ページに記載しています各営業所もしくは技術相談窓口へお問い合わせください。
Thank you for specifying
for your application. Please read these instructions carefully before you perform installation, maintenance and repair. Store this manual
carefully for easy reference. If you have any questions about this product, please contact PATLITE Corporation.
安全上のご注意 NOTES TO BE OBSERVED FOR SAFE OPERATION
お使いになる人や他の人への危害、財産への損害を未然に防ぐため、必ずお守りいただくことを、次のように説明しています。
Note to be followed to prevent any damage to the user and other personnel or to assets are as follows:
■表示内容を無視して誤った使い方をしたときに生じる危害や損害の程度を、次の表示で区分し説明しております。
The indications for warning are divided into the following classes according to the degree of danger or damage incurred when the warning is not taken into consideration
and the product is not correctly used.
危険 DANGER
この表示の欄は「死亡または重傷などを負う危険が切迫して生じることが想定される」内容です。
Indicates an imminently dangerous condition: failure to follow the instructions may lead to death or serious injury.
警告 Warning
この表示の欄は「死亡または重傷などを負う可能性が想定される」内容です。
Indicates a potentially dangerous condition: failure to follow the instructions may lead to death or serious injury.
注意Caution
この表示の欄は「傷害を負う可能性または物的損害のみが発生する可能性が想定される」内容です。
Indicates a potentially dangerous condition: failure to follow the instructions may lead to slight injury or property damage.
1.安全のため必ずお守りいただきたいこと
To operate this product safely, please observe the followings.
危険 DANGER
発火注意
caution. risk of fire
注意 Caution
壁面取付け小型回転灯
● 回転灯が点灯しているときに紙や布などの燃えやすいものをかぶせないでください。火災の原因となります。
Do not put the flammable material, such as paper or cloth, on the rotating light while it is in operation. It may cause a fire.
警告 Warning
● この説明書注意事項に記載した警告事項・注意事項に反したお取扱い,改造や天災などによって生じた故障や損害などについては、
責任を負いかねますのでご了承ください。
We are not in a position to be responsible for damage and trouble caused by handling against caution and warning described in this instruction manual.
● 寸法・仕様および構造などは、改善のため予告なく変更することがありますので、御了承ください。
Specifications may change without notice due to continual product improvement.
● 配線時は必ず電源を切りおこなってください。ショートによる内部回路の焼損や感電の危険があります。
Turn off the power supply before making wiring connections. Neglecting to so may cause an electric shock.
● グローブを外した状態や、割れた状態での放置・使用はしないでください。反射鏡の回転による負傷、電球の熱に火傷、あるいは漏電など非常に危険です。
Do not use this product without dome or with cracked dome. It may cause electric shock.
● 電球交換など補修をされる際は感電や火傷防止のため、必ず電源を切り、電球の熱が十分に下がってからおこなってください。
Make sure power is turned off and the temperature of electric bulb falls down for repair to avoid electric shock and burn.
● 配線および工事を伴う設置は専門業者または電気的知識のある技術者がおこなってください。感電・火災・落下・故障などの危険があります。
Ask a specialist or an electric engineer about wiring or a construction. Electric shock, fire and fall may occur.
注意 Caution
● 直流・交流および使用電圧を間違えないよう確かめてからご使用ください。
Use only specified operating voltage range. Excess voltage hastens degradation.
● 使用電球は「仕様」の項に表示された電球以外は、使用しないでください。製品の故障や電源焼損の原因となります。
Make sure not to use any other bulbs except ones described in specifications.
● 配線例のように電源側には必ず外部接点用ヒューズを入れてください。配線間違いなど、万一の場合の電源焼損が防げます。
Make sure to set fuse in a power supply side, please connect a fuse. When you use this product for security purpose, routine inspection must be done.
● 本製品を安全重視の保安目的でご使用される場合には必ず日常点検を実施し、万一の不具合・故障発生時のために、他の機器との併用をおこなってください。
Just in case of emergency we recommend you to use this product together with other security product.
● センサを強い熱源の近くで、または熱源に向けての使用、急激な温度変化の発生する場所での使用はしないでください。センサの故障の原因になります。
(センサ付き(WHS(B)、WKS(B)型)のみ)
センサに関する注意(センサ付(WHS(B),WKS(B)型)のみ)
2178-A
-8-
'10.6.NHI
● 本製品のセンサは人体検知ではなく、赤外線で温度変化を検知するものです。したがって、人体以外の熱源が検知エリアを横切れば、同様に検知します。また、検知エリア
内に人がいても動かなければ検知しません。また、レンズに汚れなどが付着すると透過する赤外線の効率が低下し、検知感度にも悪影響を及ぼします。
● 結露、氷結、低温低湿度などにより検知距離低下や不動作が発生する場合があります。取付場所によっては正常に動作しないことがあります。必ず正しい設置場所を選んでください。
● 金属、木材、紙、透明ガラスなどは遠赤外線を透過しないため、これらの物体が検知エリア内にあるとエリアが遮られることになります。
● 検知エリアの先は、壁、ブロックなどで遮るようにしてください。
● 次のような場所には取り付けて使用しないでください。誤動作の原因となります。
・ 検知エリア正面から太陽光、車のヘッドライト、外部照明灯などが直接当たる場所。
・ 検知エリア内に洗濯物、樹木の木・葉、カーテンなど動くものがある場所。
・ 検知エリア内で強風が吹く場所。
・ 蒸気、油煙、エアコンなどからの温・冷風が直接当たったり、ストーブやヒーターがあるような、急激な温度変化が起きる場所。お風呂などの多湿な場所。
・ 強い振動、衝撃などにより本体が動いてしまう場所。
・ ホースやバケツなどの水が直接掛かる場所。
・ 静電気や雷が多発する場所。
-1-
2. 各部の名称と呼称表示
各部の名称 Parts name
WH(B)-12A
WK(B)-12A
WH(B)-24A
WK(B)-24A
WH(B)-24AAC
WK(B)-24AAC
WH(B)-100A
WK(B)-100A
WH(B)-120A
WK(B)-120A
WH(B)-200A
WK(B)-200A
WH(B)-240A
WK(B)-240A
WHS(B)-100A
WKS(B)-100A
定格電圧
Rated voltage
12V DC
24V DC
24V AC
100V AC
120V AC
200V AC
240V AC
100V AC
使用電圧範囲
Operating voltage range
9~16V DC
20~30V DC
20~30V AC
90~110V AC
定格電流
Rated current
0.8A
0.5A
0.5A
0.07A
WHB-100A
固定プレート
Mounting plate
電球
Bulb
シリーズ名(グローブ形状)
Series name(shape of dome)
WH もしくは WK
WH or WK
反射鏡
Reflector
Oリング
O-ring
防水パッキン
Waterproof packing
ケース
Case
3. 取付方法
型 式
Model
呼称表示 Model No. configuration
グローブ
Dome
ブザー穴
Buzzer hole
(ブザー付(WH(S)B、WK(S)B 型)のみ)
(WH(S)B, WK(S)B only)
■ 仕様 Specifications
Parts name and Model No. configuration
B : ブザー付
With buzzer
定格電圧 Rated voltage
12 : 12V DC 120 : 120V AC
24 : 24V DC 240 : 240V AC
100 : 100V AC 24AC : 24V AC
200 : 200V AC
閃光数
Flash par minute
WHSB-100A
銘板
Name plate
※ロット番号を表示しています
Lot number indicated.
センサー Sensor
(センサ付(WHS(B)、WKS(B)型)のみ)
(WHS(B), WKS(B) only)
シリーズ名(グローブ形状)
Series name(shape of dome)
WH もしくは WK
WH or WK
B : ブザー付
With buzzer
S : センサ付
With sensor
定格電圧 Rated voltage
100 : 100V AC
0.55kg
0.75kg
0.85kg
単位 Unit:mm
【MODEL WH(B)-A】
【MODEL WK(B)-A】
14
本体と取付面とのすき間
Between the wall and the mounting plate.
● 配線および工事を伴う設置は専門業者、または電気的知識のある技術者がおこなってください。感電、
火災、落下、故障などの危険があります。
0.1A
12V5W
G18/BA15S
■ 外観図 Dimensions
注意 Caution
0.03A
最大音圧 90dB (at 1m) ・A特性 音量調整不可
90dB max (at 1m) min・Characteristic A
(WH(S)B, /WK(S)B型のみ Model WH(S)B, WK(S)B only)
質量 Mass
Installation (Mounting)
0.03A
24V10W
G18/BA15S
ブザー音圧
Peak sound lebel
※グローブ形状は、「7.仕様-外観図」を参照ください。
Please refer to "7. Sspecifications - Dimensions" for shape of dome.
0.07A
90~110V AC
170 回/分 170 flashes per minute
12V10W
G18/BA15S
使用電球
Type of bulb
110~130V AC 180~220V AC 220~240V AC
14
68
110
100
Please select the mounting wall with enough strength and low vibration.
68
110
100
Ask a specialist or an electric engineer about wiring or a construction.Electric shock, fire and fall may occur.
● 取付けは振動が少なく、十分強度のある面を選び、確実におこなってください。破損、落下の恐れがあります。
● 高所へ設置される場合、補修のしやすい足場のある場所をお選びください。
When installing the unit in a high place, choose the place where a foothold can be secured for case in repairs.
M
● 取付面に凹凸があり防水性が保てない場合は、本体と取付面とのすき間や固定プレートのコード取出口周辺、
ねじ取付部を防水シール剤などでコーティングしてください。(図1参照)
When the mounted wall surface is not flat enough and can not avoid water intrusion, please provide seal coating between the wall
and the mounting plate and around the wire entry hole of the mounting plate and the installation department of the screw. (Refer to
Figure 1)
55
Do not install on a column or a wall experiencing vibration.
55
Do not install directly on vibrating or shock-produsing equipment.
(b) 振動・衝撃のあるものへの取付けは、必ず緩衝性をもたせてください。
面 face
ur
取付
gs
n
i
t
n
u
o
140
147
Follow the precautions below to maintain bulb life.
(a) 振動・衝撃の加わる状態での取付け方はしないでください。
140
147
● 振動・衝撃が激しい場所へ取付けの場合は、電球の寿命が短くなりますので、次の事柄をお守りください。
142
固定プレート
Mounting plate
コード取出口周辺
Around the wire entry hole of the mounting plate
● 固定プレートとケースは確実に取り付けてください。(完全に取り付けていないと点灯しなかったり、ケースが
外れて落ちる恐れがあります。)
142
【MODEL WHS(B)-A】
【MODEL WKS(B)-A】
142
100
The mounting plate and the unit must be securely fitted. Otherwise, it dose not work or falling.
142
100
110
11
110
11
● 温度変化の激しい場所や周囲温度の高い場所では、ケースと固定プレートとの境界のすき間が大きくなる恐れ
がありますので、そのような場所で使用される場合はA穴(7.仕様-取付面寸法図参照)を利用した2点止めに
て取り付けてください。
(232)
(184)
147
55
14.5
14.5
When this product is exposed to high temperature or sudden change in temperature, the gap between a case and fixing plate might
be wider. Place fix the plate on a mounting surface at two points using hole A when used under such environment.
53
53
● 短時間で温度変化の激しい場所で使用すると結露して閃光数が極端に低下する場合がありますので、そのよう
な場所でのご使用は避けてください。
図 1 Figure 1
■ 取付面寸法図 Dimensions of installation
75
80
53
コード取出口
Wire exit hole
( 16)
It is possible to mount the unit at 4 different directions as shown below.
Make sure that Waterproof packing properly placed in the position.
The unit with buzzer(WHB / WKB) should be mounted as only upright position. (meet IP23)
逆方向取付
Upside down
横方向取付
Horizontal
下方向取付
Downward
機種名
Model
取付場所
Mounting place
WH/WK
屋内 Indoor
WH/WK
屋外 Outdoor
WHB, WKB
屋内 Indoor
WHB, WKB
屋外 Outdoor
WHS(B), WKS(B) 屋内外 Indoor & outdoor
-2-
正方向取付
Upright
○
○
○
○
○
取付方向 Directions
逆方向取付 横方向取付
Upside down
Horizontal
○
○
○
×
×
○
○
○
×
×
下方向取付
Downward
○
○
○
×
×
取付穴
Installation hole
固定プレート外形
Mounting plate
通常取付時
Mounting template
10
80
取付方向は下図の4方向が可能ですが、逆方向取付の際、防水パッキンが落ちたり、折れ曲がらないよう注意してください。
ブザー付仕様の屋外での使用については、正方向取付のみ可能です(IP23)。
センサ付仕様は、ブザーの有無にかかわらず、屋内・屋外とも正方向取付のみ可能です。
正方向取付
Upright
A孔
[Hole A]
28
53
■ 取付方向 Mounting direction
コード取出口
Wire exit hole
( 16)
A孔
[Hole A]
(取付ピッチ66~84)
(Wall install pitch 66~84)
固定プレート外形
Mounting plate
スイッチボックス使用時
Installation to a switch box
(JIS C 8435 , JIS C 8340)
※ 取付穴寸法は、使用するねじ、ボルト等に適した穴径としてください。(固定プレートの取付用穴径は 6.5です。)
Drill the unstallation hole that matches the diameter of fixing bolt and nut.
The mounting hole diameter of the fixing plate is 6.5.
-7-
単位 Unit:mm
R2.1
9
When this product is exposed to sudden change in temperature, flashing cycle might be slower owing to dew condensation. Please
do not use this product under such environment.
31.5
75
(取付ピッチ66~84)
(Wall install pitch 66~84)
Do not drop, give impact or handling with excessive force. It may cause damage the unit.
(232)
(184)
147
55
ねじ取付部(4箇所)
the installation department
of the screw (4 places)
140
Do not remove provided sealing gasket.
● 本体に衝撃や落下、無理な力を加えないでください。破損する恐れがあります。
140
● 防水パッキンを外さないでください。防水構造に支障をきたす恐れがあります。
R2.1
A穴拡大図
Enlarged view hole A
■ 取付方法(図2参照) Installation(Refer to figure 2)
Before requesting service
修理を依頼される前に、下表の内容をご確認ください。それでも動作しない場合は、修理をご依頼ください。なお、ご不明な点は、最終ページに記載しています最寄りの
弊社各営業所へお問い合わせください。お問い合わせの際は銘板に明記していますロット番号をご連絡ください。
Please check the list shown below before requesting repairs. If the product still not work, please contact us for repairs. Please feel free to contact our sales office with any questions
concerning the product.
症状
Problems
点検項目
Where to check
反射鏡が回転せず、電球が点灯しない。
ブザー付仕様でブザーも鳴らない。
The reflector would not rotate and bulb stays turned off.
The buzzer dose not work. (buzzer type only)
処理方法
What to do
(1) 固定プレートの取付け How to install a fixing plate
電源側の接続・コンセント・ヒューズを確認してください。
Check the power wiring, plug connection and fuse.
電源は供給されていますか ?
Is the power on?
スイッチを設けている場合は、スイッチを確認してください。
If a switch is installed, check to see that it is turned on.
センサは正常に検知していますか ?
(センサ付(WHS(B),WKS(B))のみ)
センサの検知方向をセットし直してください。
センサの照度設定・検知距離設定を確認してください。
反射鏡は回転するが、電球が点灯しない。
The reflector rotatesbut the lamp is off.
電球切れが起こっていませんか ?
Is the light bulb burned out ?
電球切れが起こっている場合は新しい電球と交換してください。
If it is, replace it with a new one.
電球は点灯するが反射鏡が回転しない。
The bulb is turned on but the reflector stays stopped.
モータの回転が停止していませんか ?
モータに注油していませんか ?
Is the motor stopped ?
Is the motor lubricated ?
モータの寿命か故障です。
修理をご依頼ください。
The motor is broken or has reached
the end of its life. Request a repair.
ブザー付仕様で、ブザーのみ鳴らない。
The buzzer dose not work. (buzzer type only)
DC12V/24V仕様で極性が逆になっていませんか ?
Is the power polarity opposite on the 12V
or 24V DC type ?
極性を確認してください。
Check and correct the polarity.
電源を入れると回転灯が回り続け、止まらない。
時間調整用ボリュームが「-」(5秒)の位置に
設定されていますか ?
(センサ付(WHS(B),WKS(B))のみ)
時間調整用ボリュームを「-」(5秒)の位置に戻し、
再度電源を入れ直してください。
7. 仕様
固定プレートを取付面に取り付け、固定プレートにケースを取り付けてください。
ケースを固定するときの天井面とのすき間(A部)と、ケースをねじ止めするドライバーが入るすき間(B部)を十分にお取りください。
Install a mounting plate to the wall surface, and attach a case to the mounting plate.
When selecting a mounting place, be sure to leave enough space for a screwdriver to fasten the screw.
ケース側は自重が重いため、固定プレートは安定した取付面に、ぐらつきなどがないよう強固に取り付けてください。
Be sure to install a mounting plate securely to a flat surface to avoid wobbling.
① 壁面への取付け (図3参照) Installation to a wall surface(Refer to figure 3)
② 壁面への取付け (図4参照) Installation to a wall surface(Refer to figure 4)
<コンクリート壁などで、通常のねじ(ボルト),ナットで取付けできない場合>
市販のアンカー(ボルト、ナット)等を使用して取り付けてください。
※アンカー参考品番
ユニカ(株)製 ルーティカット 6CA型
ボルトプラグ #300型
(ご使用のアンカーに記載の取付方法に準じて作業をおこなってください。)
スイッチボックスのねじピッチ(83.5mm)に対応しています。
付属のねじなどを使用して取り付けてください。
※スイッチボックス:JIS C 8435-1998、JIS C 8340-1991
■ 動作タイミングチャート (センサ付(WHS(B),WKS(B)型)のみ (WHS(B),WKS(B) only))
A
※ センサ底面にある照度調整用ボリュームを「暗」に設定し、夜間のみ作動させた場合。
電源
図5 スイッチボックス一例
Figure 5 Example:Switch box
This product can be installed to a switch box with
screw pitch in 83.5mm with included screws.
※Switch box:JIS C 8435-1998、JIS C 8340-1991
図2 ねじ(ボルト)、ナットを使用した取付け例
Figure 2 Installation
製品出荷設定時
<When installing on the concrete wall or other surfaces that supplied screws and nuts cannot be used>
Install the product with anchors, bolts or nuts on the market.
※Reference part number
Rooty-cut 6CA type (Yunika Corporation)
Volt-plug #300 type (Yunika Corporation)
③ スイッチボックスへの取付け (図5参照) Installation to a switch boxRefer to figure 5)
Specifications
初期動作
<When installing with included screws and nuts>
Install this product with included screws and nuts according to the following mounting diagram.
<ねじ(ボルト)、ナットを使用できる場合>
付属のねじ(ボルト)、ナット等を使用して取り付けてください。
83.5
6. 修理を依頼される前に
図4 コンクリート壁などでアンカーを使用して取り付ける場合の取付け例
Figure 4 Mounting example to concrete wall with anchors
固定プレート
Mounting plate
① 取付面寸法図をもとに取付穴位置を正確にケガき、
下穴をあける。 (穴寸法は、使用するアンカーに
準じた穴径としてください。)
Layout the mounting holes precisely with dimensional mounting
drawing and prepare the drill holes.
(Hole size should be based on the anchor size.)
つめ
Notch
通常動作
ON
② アンカーをセットする。
Set the anchor.
アンカー
Anchor
照度
明
暗
ケース
Case
B
③ 打ち込み棒で打ち込む。
(アンカー外筒の先端が開き、固定される。)
Knock the anchor into the hole.
(Tip of the anchor external cylinder will be opened and fixed)
ねじ
Screw
検知
センサ検知
回転灯
図3 ねじ(ボルト)、ナットを使用した取付け例
Figure 3 Mounting example
ON
〔T0〕
〔T1〕
固定プレート
Mounting plate
〔T1〕
ナット
Nut
※ T0:初期センサ起動(初期電源投入時よりセンサ動作スタンバイするまでの間)〔T0〕は、回転灯が回り続けます。
※ 時間調整用ボリュームを5秒(最短)の位置に設定するとT0は約30秒となります。
※ T1:センサ設定時間
取付ねじ
Installation screw
センサ部可動範囲
回転灯部
●パトカーのような警告灯を発光します
センサ部
●上下の可動範囲は水平方向より下方向60°
底
●最大検知距離は10m
面
か
検知エリア可動範囲
ら
の
60°
図
検知エリア
0
3m
10m
センサ部
左記の検知範囲はセンサに対して左右に横切る場合(図8)で、
センサに向かって直進する場合(図9)は、検知物の状態変化が
少なくなり、感度が鈍くなります。センサ設定(設置)時は図8の
状態になることをお薦めします。
検知エリア
可動範囲
右回転
180°
図8
検知エリア
120°
左回転
180°
検知エリア可動範囲
-6-
10m
ボルト・ワッシャ
Bolt・Washer
10以下
10 or less
■ センサ検知エリア (センサ付(WHS(B),WKS(B)型)のみ (WHS(B),WKS(B) only))
センサ検知範囲(取付けの高さ2.5mの場合)
④ ボルト,ねじなどで固定プレートを取り付ける。
※取付け後のボルト(ねじ)頭の飛び出しが、取付面より
10mm以下となるように設置ください。
Fix the plate with bolts and nuts.
※Screw head should not stick out more than 10mm
from mounting surface.
固定プレート
Mounting plate
図9
検知物の
移動方向
検知エリア
検知物の
移動方向
(2) ケースの取付け How to install a case
固定プレートにケースを傾けながらつめ(2ヶ所)を挿入(矢印 1 )し、固定プレート側へ
ケースを押さえ(矢印 2 )、ねじ(矢印 3 )で取り付けてください。
Tilt a case and insert its two holding tabs to the notches of mounting plate ( 1 ).
Attach the bottom of case to the plate ( 2 ), and fix the case and plate with included screw ( 3 ).
1
2
3
検知エリア
-3-
Wiring procedure
注意 Caution
● 使用電圧がDCの場合、
■ センサの各種設定方法 (センサ付(WHS(B), WKS(B)型)のみ For WHS(B),WKS(B))
の極性を間違えないよう確かめてから配線してください。
本製品のセンサは、暗くなって周囲照度が設定以下になったとき、人体などの温度変化を検知し、設定時間だけ回転灯を作動させる機能を持っております。
したがいまして周囲照度および、回転灯作動時間の設定が必要になりますので、下記の要領で照度・時間の設定をおこなってください。
Use under proper polarity for DC version.
● 配線例のように電源側には必ず外部接点保護用ヒューズを入れてください。配線間違いなど、万一の場合の電源焼損が防げます。
Make sure to set fuse in a power supply side, please connect a fuse.
When you use this product for security purpose, routine inspection must be done.
【(2)作業時間調整】
【(1)照度調整】
センサの底面にある照度調整用ボリュームにて調整をおこなってください。
● 突入電流は定格電流の約10倍です。スイッチまたはリレーなどは突入電流を考慮して選定してください。
Choose the switches and relays in consideration of starting current.
The starting current must be with in 10 times as high as high as the rated current.
照度調整用ボリューム
● ブザー付仕様(WH(S)B, WK(S)B)のブザーは回転灯と連動します。
ブザーのみもしくは回転灯のみの動作はできません。
明
Buzzer and rotating light activates at the same time (WH(S)B, WK(S)B).
Buzzer or rotating light cannot be operated independently.
LUX
暗
※ 使用環境のノイズの影響で、ブザー音の周期が早くなることがあります。
この場合、ノイズ対策部品(フェライトコア)を電源線もしくはアース線に取り付けるなどの対策で
図6 Figure 6
改善できることがあります。
The cycle of the buzzer sound might be early because of the noise of the environment used.
In this case, if noise suppression parts (ferritic core) are installed in the power supply wire or earth wire, it might be ameliorable.
(AC200V/AC240 型のみ )
(Only 200V AC and
240V AC type)
【24V AC / 100V AC / 120V AC】
ヒューズ
Fuse
3A
電源
Power supply
外部配線 Outer wiring
外部配線 Outer wiring
15分
+
昼間・夜間関係なく検知
明るい場所での検知用
5秒
TIME
-
時間設定
-:
約5秒
+:
約980秒(15分)
製品出荷時の設定
製品出荷時は
「5秒」の方に設定
されております
【(3)検知距離調整】
センサの底面にある検知距離調整用ボリュームにて調整をおこなってください。
※ 照度ボリュームをMINの状態から、センサが検知するまで徐々に
上げていく方法で調整すれば、比較的簡単に設定できます。
(検出させたい明るさの場所で調整をおこなってください。)
設定距離
距離調整用ボリューム
10m
+
METER
1m
約1m
:
狭いエリアを検知させたいとき
-
-
+: 約10m(通常使用状態)
広いエリアを検知させたいとき
5. 補修
製品出荷時の設定
製品出荷時は
「10m」の方に設定
されております
Maintenance
注意 Caution
● 使用される電球は必ず「7.仕様」の項、または「銘板」に表示された指定の電球を使用してください。
Do not use any bulb other than specified on name 7.specification and plate.
● 電球交換など補修される際は感電や火傷防止のため必ず電源を切り、電球の熱が十分に下がってからおこなってください。
Make sure power is turned off and the temperature of electric bulb falls down for repair to avoid electric shock and burn.
● グローブやケースの汚れは水を含んだ柔らかい布で拭いてください。シンナー・ベンジン・ガソリン・油などで拭くと表面を侵し変色,変形する恐れがあります。
To clean dome and body, wipe with water or glass cleaner soaked soft cloth.
Do not use thinner, benzine, gasoline or oil as these cause color change or deform the surface.
● モータおよびロータ部へは注油しないでください。モータ内に油が入り故障の原因となります。
Do not lubricate oil to the motor and rotor.
● 手で反射鏡を回さないでください。回転不具合など故障の原因となります。
Do not use the hands to rotate the reflector.
グローブを交換される際は下記の要領でおこなってください。
Please follow procedure mentioned below to change to dome.
① 電源を切る。(スイッチOFFにする。)
Make sure power is turned off when changing dome.
② グローブを左方向へ回し、ボディより取り外す。
Remove the dome turning it to the left.
③ 新しいグローブを取り付け、右方向に回しボディへ取り付ける。
New dome is attached, it turns right ward and it attached in a body.
ヒューズ Fuse
1A
外部配線 Outer wiring
■ 動作確認 (センサ付(WHS(B), WKS(B)型)のみ For WHS(B), WKS(B))
配線がおわりましたら下記の要領でセンサが正常に検知するか、動作確認をおこなってください。
※動作確認時、センサの各種調整ボリューム「製品出荷時の設定」にておこなってください。
① 電源をONにし、回転灯にAC100Vを供給してください。このとき、センサが安定状態になるまでの30秒間は、センサの検知に関係なく回転灯が作動します。
② 約30秒間後回転灯が止まりましたら、センサが待機状態になりますのでセンサの向きを検知させたい方向へ調整してください。
③ センサの向きが決まれば、実際に検知し、回転灯が作動するか、検知エリアの確認をしてください。
④ 検知エリアが定まれば、照度・時間・距離の調整をおこなってください。
-4-
夜間暗くなってからや
暗い場所での検知用
(1) グローブ交換 Change of Dome
【200V AC/240V AC】
ヒューズ Fuse
24V AC:3A
100V AC/ 120V AC:1A
時間調整用ボリューム
■ 補修方法 Maintenance procedure
■ 配線例 Wiring example
【12V DC / 24V DC】
センサの底面にある時間調整用ボリュームにて調整をおこなってください。
製品出荷時の設定
製品出荷時は
「明」の方に設定
されております
■ 配線手順 How to make wiring connection
(1) 配線前に必ず電源を切ってください。
Make sure power is off when making connections.
(2) 端子台カバーを外してください。
Remove terminal base cover.
(3) 電源線の先端に付属の圧着端子を圧着して、圧着状態を確認後、端子台部の内側2ヶ所に接続してください。
DC仕様の場合、 ・ 極性を間違えないよう、端子台部に接続してください。ケース側の極性は、圧着端子付リード線の色が赤は 、黒は になっています。
付属の圧着端子の適用電線範囲は0.25~1.65mm2ですので、それ以外のリード線をご使用いただく場合には新たにご購入願います。
適用圧着端子のねじ穴径は 3mmです。また外経は 9mmまで使用可能です。
なお、付属圧着端子の推奨圧着工具型番はYNT-2216(日本圧着端子)です。
Connect the lead wires in attached crimp terminal. Confirm the state of the crimp.
Connect the lead wires to the inner 2 points on the terminal. Be sure of the polarity of lead wires when wiring to DC type.
As per the case side, the polarity of red lead wire is positive and black lead wire is negative.
Usable wire is applied from 0.25mm2 (20AWG) to 1.65mm2 (16AWG). The size of the crimp terminals is φ3mm.
The model number of the tool to recommend of attached crimp terminal is YNT-2216 (JST).
※ AC200V/AC240V型のみ Only 200V AC / 240V AC type
ねじでとめている圧着端子を取り外し、アース線の先端に圧着端子を圧着して、圧着状態を確認後、アース端子部(元の位置)に接続してください。
付属の圧着端子の適用電線範囲は0.57~1.44mm2ですので、それ以外のリード線をご使用いただく場合には新たにご購入願います。
適用圧着端子のねじ穴径は 4mmです。また外経は 10mmまで使用可能です。
なお、付属圧着端子の推奨圧着工具型番はYHT-2210(日本圧着端子)です。
Remove crimp terminal tightened with the screw. Connect the earth wire in attached crimp terminal.
Confirm the state of the crimp. Connect the lead wires to the earth terminal.
コード取出口
Usable wire is applied from 0.57mm2 (22AWG) to 1.44mm2 (16AWG). The size of the crimp terminals is φ4mm.
Wire entry hole
The model number of the tool to recommend of attached crimp terminal is YHT-2210 (JST).
(4) 配線の取出し How to wire
アース線
図6のように固定プレート中央の穴よりコードを通してください。
Earth wire
Through the mounting plate as shown in figure 6.
使用環境
~
4. 配線方法
※ ボディに取り付けられているOリングは必ず再利用してください。
防水性能に支障をきたします。
Please be sure to reuse waterproofing packing attached in a
body.
しまる
Install
(2) 電球交換 Change Bulb
電球を交換される際は下記の要領でおこなってください。
Please follow procedure mentioned below to change to bulb.
① 電源を切る。(スイッチにOFFする。)
Make sure power is turned off when changing dome.
② グローブを外す。(上記"グローブ交換"参照)
Remove the dome turning it to the left. (Refer to the"Change dome)
③ 電球を下方へ押し、左方向へ回し取り外す。
Press the bulb and turn it to the left to detach from the socket.
④ 新しい電球を下方へ押し、右方向へ回し取り付ける。
Fix new bulb into the socket by pressing right ward.
⑤ グローブを取り付ける。(上記"グローブ交換"参照)
The dome is attached. (Refer to the"Change dome")
※ 使用される電球は、必ず銘板に表示された電球を使用してください。
Make sure not to use any other bulbs except ones described in name plate.
下方向へ押す
Push to downward
ゆるむ
Remove
右へまわす
(取り付ける)
Turn to right
(Install)
Oリング
O-ring
■ 補修パーツ Replacement procedure
・ 各タイプ別に補修用パーツを揃えています。ご購入は販売店などにご相談ください。
The replacement parts are prepared. Please ask your local distributor for availability.
・グローブ ・反射鏡 ・電球 ・モータ ・Oリング
Dome ・Reflector・Bulb ・Mator ・O-ring
※ その他のパーツについては、営業所へお問い合わせください。補修用電球は、DIY店などでも取り扱っています。
If you have question please feel to contact us about other parts.
-5-
左へまわす
(外れる)
Turn to left
(Remove)