1
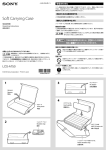
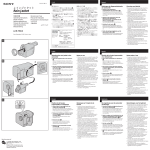
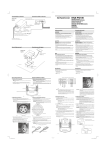
11 ラッチレバー 12 O リング * イラストは収納参考例のため、ビデオカメラや周辺アクセサリーは同梱していません。 4-128-645-01(1) Specifications 使用上のご注意 ハードキャリングケース Hard Carrying Case Valise rigide 日本語 LCH-GT1BP は、ソニーのデジタルビデオカメラ HVR-Z5、HVR-Z7、HVR-Z1、HVR-V1、および周辺アクセサリー用のハードキャリングケー 取扱説明書 ス(以下、ケースとする。)です。対象のビデオカメラはすべての国や地域で取り扱いをしているわけではありません。お使いになる前に、 この取扱説明書をよくお読みください。 Operating Instructions 安全のために Mode d‘emploi Manual de instrucciones ソニー製品は安全に充分配慮して設計されています。しかし、まちがった使いかたをすると、人身事故が起きる恐れがあり危険です。 事故を防ぐために次のことを必ずお守りください。 Bedienungsanleitung ● 安全のための注意事項を守る ● 破損したら使わない Istruzioni per l’uso お買い上げ店、またはソニー業務用商品相談窓口にご相談ください。 ビデオカメラをケースに装着するときは以下の点にご注意ください。 クッションに引っ掛かり、乗りあがりがないこと フードを先にクッションにあてるようにし、ジャックカバーがクッションに乗りあがらないようにすること(イラスト ) キャリーハンドルを使うときは以下の点をご注意ください。 長さ調整をするときは、キャリーハンドルを手でもちながら調整をしてください。手を離して調整すると自重で急に落下することがあ ります。 キャリーハンドルを持ってケース本体を持ち上げたり、振り回したり、倒したり、起こしたり、ひねったりしないでください。 キャリーハンドルにもたれかかったりしないでください。 重量制限を超えた収納物を入れないでください。 強い振動や衝撃を与えないでください。 収納物を入れた状態でケースを転がさないでください。 トップケースを閉める際、書類の挟み込みがないか確認してください。 各収納スペースが変形するような収納のしかたをしないでください。 ラッチレバーが閉まらない場合は、O リングが浮いていることがあります。浮いている部分を指で奥まで押して戻してください。 お手入れの際、アルコール、ベンジン、シンナーなどを使用しないでください。汚れのひどいときは、水でうすめた中性洗剤でふきとっ てください。 直射日光の当たる場所や、閉め切った自動車内、熱器具などの近くに放置しないでください。ケースが変形、変色したり、収納している ビデオカメラなどが故障したりする原因となります。 クッション 1、2、3 以外のクッションは、はずしたり分解したりしないでください。ビデオカメラや周辺アクセサリーの収納、保護機能 が損なわれる原因となります。 飛行機にお持ちになる際は、ビデオカメラなどは預け荷物にせず、席にお持ちになることをおすすめします。 約 629 × 498 × 303 mm(幅/高さ/奥行き)( 突起部を除く ) 約 10.5 kg 10 kg 以下 ハードキャリングケース(1)、クッション(3)、印刷物一式 警告表示の意味 この取扱説明書および製品では、次のような表示をしています。 表示の内容をよく理解してから本文をお読みください。 この表示の注意事項を守らないと、事故などにより死亡や大けがなど人身事故の原因となります。 行為を禁止する記号 LCH-GT1BP 行為を指示する記号 注意を促す記号 この取扱説明書をもう一度ご覧になってお調べください。 HVR-V1 ご購入いただいた特約店、またはソニー業務用商品相談窓口にご相談ください。 ご相談になるときは次のことをお知らせください。 型名:LCH-GT1BP 転倒して大けがの原因となります。 English LCH-GT1BP is a Hard Carrying Case (referred to below as “case”) designed for the HVR-Z5, HVR-Z7, HVR-Z1, HVR-V1 Sony Digital Video Camera Recorders (referred to below as “video camera”) and their accessories. Not all modes of the video camera are available in all countries or regions. Read this Operating Instructions carefully before use. 収納品の総重量(制限重量)を守る Before Use 制限重量を超えると、ハードキャリングケースが破損したりしてけがの原因となることが あります。 下記の注意事項を守らないと、けがをしたり周辺の物品に損害を与えたりすることがあります。 改造しない 改造するとハードキャリングケースの強度が低下し、収納している製品が落下して、けが の原因となることがあります。 ぐらついた台の上や傾いたところに置くと、倒れたり動いたり落ちたりして、けがの原因 になることがあります。 Check the cushion combination with your camera with the below table. “” represents using the cushion; “” represents no cushion. Cushion 1 is “”, Cushion 2, and Cushion 3 are “” at purchase. 収納する機器の電源を切る 発熱や発火により、やけどの原因となります。 Model name ハードキャリングケースの開閉は注意して行う HVR-Z5 慌てて行うと、トップケース、ボトムケース、ラッチレバー等で指を挟むことがあります。 HVR-Z7 キャリーハンドルを収納するときは注意して行う 慌てて行うと、キャリーハンドルで指や手を挟むことがあります。 6 1 12 3 4 2 10 HVR-Z1 HVR-V1 お使いになる前に ビデオカメラをケースに装着する前に、電池、テープ、標準レンズ、ワイドコンバージョンレンズ、ワイドズームレンズ、およびそのフー ド以外は取りはずしてください。 HVR-Z1 のワイドコンバージョンレンズとそのフードははずして、標準レンズとそのフードを装着してください。 ワイドズームレンズ(VCL-308BWH)装着の場合は、フードキャップをはずしてください。 AC アダプター/チャージャーやビデオライトのバッテリーははずしてください。 ビデオカメラのビューファインダー、液晶パネルを元の位置に戻してください。 ジャックカバーはクッションに乗りあがらないよう、全て閉じておいてください。 ビデオカメラにあったクッションの組み合わせを用意してください。 O リングが浮いたり、溝からはずれたりしていないことを確認してください。 クッションの組み合わせ お使いになるビデオカメラに合わせて、クッションの組み合わせを下記の表でご確認ください。 「○」はクッションあり、「−」はクッションなしをあらわしています。 出荷時は、クッション 1「○」、クッション 2 とクッション 3 は「−」となっています。 9 11 機種名 8 HVR-Z5 7 HVR-Z7 HVR-Z1 HVR-V1 レンズ クッション 1(-) 2(-) 3(-) ○ - - - - - ○ - - - ○ - 標準レンズ ○ - - 標準レンズ ○ ○ ○ - ○ ○ 標準レンズ ワイドコンバージョンレンズ(VCL-HG0872K) 標準レンズ ワイドズームレンズ(VCL-308BWH) ワイドコンバージョンレンズ(VCL-HG0862K) ご注意 クッションは底がつくようにしっかりと装着し、浮き上がりがないことを確認してください。 各部の名前 5 この説明書は、 古紙70%以上の再生紙と、VOC(揮発 性有機化合物) ゼロ植物油型インキを使用しています。 Printed on 70% or more recycled paper using VOC (Volatile Organic Compound)-free vegetable oil based ink. 1 2 3 4 5 6 7 8 9 10 Before storing the video camera in the case, remove the accessories attached to the video camera other than the battery pack and tape, the standard lens, wide conversion lens or wide zoom lens and its hood. When using the HVR-Z1, remove the wide conversion lens and its hood and attach the standard lens and its hood. When attaching the wide zoom lens (VCL-308BWH) to the video camera, remove its hood cap. Remove the battery packs attached to the AC adaptor/charger and video light. Return the view finder and LCD screen of the video camera to their original positions. Close all of the jack covers so that they do not get caught on the cushion. Have the cushion fitted with your video camera ready. Check that the O-ring does not come loose or move upward. Combination of the Cushion and Video Camera 不安定な場所に置かない トップケース AC アダプター/チャージャー(AC-VQL1BP)用スペース ビデオライト(HVL-LBP、HVL-LBPA)用スペース 書類スペース キャリーハンドル バッテリー用スペース テープ用スペース ケーブル用スペース ボトムケース ビデオカメラ用スペース Lens 1 (-) 2 (-) 3 (-) Objectif standard Convertisseur grand angle (VCL-HG0872K) Objectif standard Objectif grand angle (VCL-308BWH) Objectif standard Objectif standard Convertisseur grand angle (VCL-HG0862K) Identification des différents éléments 故障の状態:できるだけ詳しく お買い上げ年月日 ハードキャリングケースの上に乗ったり、腰掛けたりしない ©2008 Sony Corporation Printed in Japan Rembourrage Objectif Remarques Fixez le rembourrage correctement, de sorte qu’il soit placé correctement au fond de la valise. Vérifiez qu’il n’est pas trop lâche et relevé. トップケースを閉めたり、閉まったりすると窒息することがあります。 運搬中にトップケースが開き、収納している製品が落下して、大けがの原因になることが あります。 Combinaison du rembourrage et caméscope HVR-Z1 ハードキャリングケースの中に入ったり、生き物を入れない ラッチレバーを確実にしめる Avant de ranger le caméscope dans la valise, retirez les accessoires fixés sur le caméscope, à l’exception de la batterie, la cassette, l’objectif standard, le convertisseur grand angle ou l’objectif grand angle et son pare-soleil. Lorsque vous utilisez le HVR-Z1, retirez le convertisseur grand angle et son pare-soleil et fixez l’objectif standard et son pare-soleil. Lorsque vous fixez l’objectif grand angle (VCL-308BWH) sur le caméscope, retirez son pare-soleil. Retirez les batteries installées sur l’adaptateur secteur/le chargeur et la lampe vidéo. Remettez le viseur et l’écran LCD du caméscope dans leur position initiale. Fermez tous les caches prises de sorte qu’ils ne se coincent pas dans le rembourrage. Mettez le rembourrage en place une fois votre caméscope prêt. Vérifiez que le joint torique ne se relâche pas et qu’il ne se déplace pas vers le haut. 調子が悪いときはまずチェックを 下記の注意事項を守らないと、事故などにより死亡や大けがなどの人身事故の原因となります。 この取扱説明書には、事故を防ぐための重要な注意事項と製 品の取り扱いかたを示しています。この取扱説明書をよくお 読みのうえ、製品を安全にお使いください。お読みになった あとは、いつでも見られるところに必ず保管してください。 A lire avant toute utilisation アフターサービス 安全のための注意事項を守らないと、火災や 人身事故になることがあります。 La LCH-GT1BP est une valise rigide (désignée ci-après par le terme « valise ») conçue pour les caméscopes numériques Sony HVR-Z5, HVR-Z7, HVR-Z1, HVR-V1 (désignés ci-après par le terme « caméscope ») et leurs accessoires. Il est possible que tous les modèles ci-dessus ne soient pas disponibles dans tous les pays ou toutes les régions. Lisez attentivement ce mode d’emploi avant toute utilisation. HVR-Z7 お買い上げいただきありがとうございます。 Français HVR-Z5 それでも具合の悪いときは この表示の注意事項を守らないと、けがをしたり周辺の物品に損害を与えたりすることがあります。 Design and specifications are subject to change without notice. Nom du modèle 仕様および外観は、改良のため予告なく変更することがありますが、ご了承ください。 使用说明书 Approx. 629 × 498 × 303 mm (w/h/d) (24 7/8 × 19 5/8 × 12 in.) (excluding the projecting parts) Approx. 10.5 kg (23 lb 2 oz) 10 kg (22 lb 1 oz) or less Hard Carrying Case (1), Cushion (3), Set of printed documentation Vérifiez la combinaison du rembourrage avec votre caméscope à l’aide du tableau ci-dessous : « » avec le rembourrage et « » sans le rembourrage. Le rembourrage 1 correspond à « » et les rembourrages 2 et 3 correspondent à « » à l’achat. 主な仕様 外形寸法 質量 収納物重量制限 同梱物 Dimensions Mass Storage weight limit Included items Cushion 1 (-) 2 (-) 3 (-) Standard lens Wide conversion lens (VCL-HG0872K) Standard lens Wide zoom lens (VCL-308BWH) Standard lens Standard lens Wide conversion lens (VCL-HG0862K) Notes Attach the cushion firmly so that the cushion fits with the bottom of the case. Check that it is not loose and coming up. Identifying the Parts 1 Partie supérieure de la valise 2 Espace de rangement de l’adaptateur secteur/le chargeur (AC-VQL1BP) 3 Espace de rangement de la lampe vidéo (HVL-LBP, HVL-LBPA) 4 Espace de rangement des documents 5 Poignée de transport 6 Espace de rangement de la batterie 7 Espace de rangement de la cassette 8 Espace de rangement du câble 9 Partie inférieure de la valise 10 Espace de rangement du caméscope 11 Levier de fermeture 12 Joint torique * L’illustration indique un exemple de rangement. Le caméscope et ses accessoires ne sont pas fournis. Remarques sur l’utilisation Prenez les précautions suivantes lorsque vous rangez le caméscope dans la valise : Le caméscope ne doit pas se coincer ni être soulevé par le rembourrage. Placez le pare-soleil du caméscope en premier sur le rembourrage. Prenez garde de ne pas faire chevaucher le cache prise sur le rembourrage (illustration ). Prenez les précautions suivantes lorsque vous utilisez la poignée de transport : Lorsque vous ajustez la longueur, tenez la poignée de transport avec votre main. Si vous lâchez la poignée pendant l’ajustement de la longueur, la valise pourrait tomber brusquement en raison de son propre poids. Ne soulevez pas, ne balancez pas et ne posez pas la valise en la tenant par la poignée. Ne tordez pas la poignée. Ne vous appuyez pas sur la poignée. Ne rangez pas des accessoires dépassant la limite du poids de stockage. Ne soumettez pas la valise à des chocs ou des vibrations violentes. Ne faites pas rouler la valise remplie. Lorsque vous fermez la partie supérieure de la valise, vérifiez que les documents ne sont pas coincés dans la valise. Ne rangez pas des éléments susceptibles de déformer l’espace de rangement. Si vous ne pouvez pas fermer le levier de fermeture correctement, le joint torique risque de se relâcher et de se déplacer vers le haut. Appuyez doucement sur la partie du joint torique relevée avec votre doigt afin de le remettre dans sa position initiale. N’utilisez pas d’alcool, d’essence ni de diluant pour nettoyer la valise. Si elle est sale, nettoyez-la à l’aide d’un chiffon doux légèrement imprégné d’une solution détergente neutre. Ne laissez pas la valise à un endroit exposé à la lumière directe du soleil, dans une voiture fermée ou à proximité d’une source de chaleur. Ceci pourrait la déformer ou la décolorer ou le caméscope et les accessoires rangés à l’intérieur risqueraient d’être endommagés. Ne retirez pas et ne démontez pas le rembourrage, à l’exception des rembourrages 1, 2 et 3. Ceci pourrait gêner la fonction de rangement et de protection du caméscope et de ses accessoires. Lorsque vous prenez l’avion avec la valise, n’enregistrez pas le caméscope ou les accessoires. Gardez-les avec vous dans l’avion. Caractéristiques techniques Dimensions Poids Limite du poids de stockage Articles inclus environ 629 × 498 × 303 mm (l/h/p) (24 7/8 × 19 5/8 × 12 po.) (parties saillantes non comprises) environ 10,5 kg (23 li 2 oz) 10 kg (22 li 1 oz) maximum Valise rigide (1), rembourrage (3), jeu de documents imprimés La conception et les spécifications peuvent être modifiées sans préavis. Español 1 Top case 2 AC adaptor/charger (AC-VQL1BP) storage space 3 Video light (HVL-LBP, HVL-LBPA) storage space 4 Document storage space 5 Carry handle 6 Battery pack storage space 7 Tape storage space 8 Cable storage space 9 Bottom case 10 Video camera storage space 11 Latch lever 12 O-ring * The illustration is an example of storing. A video camera and its accessories are not supplied. Antes de guardar la videocámara en el estuche, extraiga los accesorios fijados a la videocámara, excepto la batería, la cinta, el objetivo estándar, el objetivo de conversión para gran angular o el objetivo de zoom panorámico y el parasol. Si utiliza el modelo HVR-Z1, extraiga el objetivo de conversión para gran angular y su cubierta y fije el objetivo estándar y su cubierta. Cuando coloque el objetivo de zoom panorámico (VCL-308BWH) en la videocámara, extraiga la tapa del parasol. Extraiga las baterías colocadas en el adaptador/cargador de ca y la lámpara para vídeo. Coloque el visor y la pantalla de cristal líquido de la videocámara en su posición original. Cierre todas las cubiertas de las tomas para no queden atrapadas en la almohadilla. Ajuste la almohadilla con la videocámara preparada. Compruebe que la junta tórica no se afloje ni se mueva hacia arriba. Notes on Use Combinación de la almohadilla y la videocámara When storing the video camera in the case, be careful of the following. The video camera should not get caught on or lifted by the cushion. Fit the hood of the video camera to the cushion first. Be careful not to let the jack cover ride over the cushion. (illustration ) When using the carry handle, be careful of the following. When adjusting the length, hold the carry handle with your hand. If you take your hand off of the carry handle when adjusting the length, the case may drop suddenly under its own weight. Do not lift, swing, lay down or lift the case by holding the carry handle. Do not twist the carry handle. Do not lean on the carry handle. Do not store items heavier than the storage weight limit. Do not expose the case to strong vibrations or shocks. Do not roll the case that is storing items. When closing the top case, check that the document is not caught by the case. Do not store items that may deform the storage space. If you cannot close the latch lever firmly, the O-ring may come loose and move upward. Press the portion of the O-ring that is coming up properly with your finger to place it the original position. Do not use alcohol, benezine or thinner to clean the case. If the case gets dirty, wipe the case clean using a soft cloth slightly dampened with a mild detergent solution. Do not leave the case in direct sunlight, in closed cars or near a heater. Doing so may deform or discolor the case, or cause the video camera and its accessories stored inside to malfunction. Do not remove or disassemble the cushion other than the cushion 1, 2, and 3. Doing so may reduce the function of storing and protecting the video camera and its accessories. When travelling with the case by air, do not check the video camera or the accessories. Carry them to the seat with you. El modelo LCH-GT1BP es un estuche duro de transporte (en adelante, “estuche”) diseñado para las videocámaras digitales Sony HVR-Z5, HVR-Z7, HVR-Z1, HVR-V1 (en adelante, “videocámara”) y para sus accesorios. No todos los modos de la videocámara se encuentran disponibles en todos los países o regiones. Lea atentamente este manual de instrucciones antes de utilizarlo. Antes del uso Compruebe la combinación de la almohadilla con su cámara mediante la tabla que se muestra a continuación. “” representa el uso de la almohadilla; “” indica que no hay ninguna almohadilla. La almohadilla 1 se representa con “”; la almohadilla 2 y la almohadilla 3 se representan con “” en el momento de la compra. Modelo HVR-Z5 HVR-Z7 HVR-Z1 HVR-V1 Objetivo Almohadilla 1 (-) 2 (-) 3 (-) Objetivo estándar Objetivo de conversión para gran angular (VCL-HG0872K) Objetivo estándar Objetivo de zoom panorámico (VCL-308BWH) Objetivo estándar Objetivo estándar Objetivo de conversión para gran angular (VCL-HG0862K) Notas Fije firmemente la almohadilla para que se adapte al fondo del estuche. Compruebe que no está suelta y que no se levanta. (Continúa en la página posterior) * 图示为收纳示例。摄像机及其配件并未提供。 Español Identificación de los componentes 1 Parte superior del estuche 2 Espacio de almacenamiento del adaptador/cargador de ca (AC-VQL1BP) 3 Espacio de almacenamiento de la lámpara para vídeo (HVL-LBP, HVL-LBPA) 4 Espacio de almacenamiento de documentos 5 Asa de transporte 6 Espacio de almacenamiento de la batería 7 Espacio de almacenamiento de cintas 8 Espacio de almacenamiento de cables 9 Parte inferior del estuche 10 Espacio de almacenamiento de la videocámara 11 Palanca del pestillo 12 Junta tórica * La ilustración muestra un ejemplo de almacenamiento. La videocámara y los accesorios no se suministran. Notas sobre el uso Al guardar la videocámara en el estuche, preste atención a las instrucciones siguientes. La almohadilla no debería atrapar ni levantar la videocámara. En primer lugar, ajuste el parasol de la videocámara en la almohadilla. Procure evitar que la cubierta de la toma salga de la almohadilla (ilustración ). Cuando utilice el asa de transporte, preste atención a los puntos siguientes. Al ajustar la longitud, sujete el asa de transporte con la mano. Si retira la mano del asa de transporte mientras ajusta la longitud, el estuche podría caer de repente con todo su peso. No levante, balancee ni tumbe el estuche mientras lo sujeta por el asa de transporte. No retuerza el asa de transporte. No se apoye en el asa de transporte. No almacene elementos con un peso superior al límite de peso de almacenamiento. No exponga el estuche a vibraciones o golpes fuertes. No balancee el estuche cuando contenga accesorios. Al cerrar la parte superior del estuche, compruebe que el estuche no atrapa el documento. No almacene accesorios que puedan deformar el espacio de almacenamiento. Si no puede cerrar la palanca del pestillo firmemente, es posible que la junta tórica se afloje y se mueva hacia arriba. Presione adecuadamente con el dedo la parte de la junta tórica que se levanta para devolverla a su posición original. No utilice alcohol, bencina ni disolvente para limpiar el estuche. Si el estuche se ensucia, límpielo con un paño suave ligeramente humedecido con una solución de detergente poco concentrada. No deje el estuche en un lugar expuesto a la luz solar directa, en un automóvil con las puertas cerradas ni cerca de un calefactor. Si lo hace, el estuche podría deformarse o desteñirse, o provocar fallos de funcionamiento en la videocámara o en los accesorios almacenados en su interior. No extraiga ni desmonte otras almohadillas que no sean la 1, la 2 y la 3. Si lo hace, podría anular la función de almacenamiento y de protección de la videocámara y de sus accesorios. Si viaja en avión con el estuche, no facture la videocámara ni los accesorios. Llévelos con usted en la cabina de pasajeros. Especificaciones Dimensiones Aprox. 629 × 498 × 303 mm (an/al/prf) (excluyendo las partes salientes) Peso Aprox. 10,5 kg Límite de peso de almacenamiento 10 kg o menos Elementos incluidos Estuche duro de transporte (1), almohadilla (3), juego de documentación impresa El diseño y las especificaciones están sujetos a cambios sin previo aviso. Deutsch Der Tragekoffer LCH-GT1BP (im Folgenden als „Koffer“ bezeichnet) wurde für die digitalen Videokameras HVR-Z5, HVR-Z7, HVR-Z1, HVR-V1 von Sony (im Folgenden als „Videokamera“ bezeichnet) und deren Zubehör konzipiert. Nicht alle Videokameramodelle sind in allen Ländern bzw. Regionen erhältlich. Lesen Sie diese Bedienungsanleitung vor Gebrauch bitte sorgfältig durch. Vorbereitungen Bevor Sie die Videokamera in den Koffer legen, nehmen Sie alle an der Videokamera angebrachten Zubehörteile mit Ausnahme von Akku und Kassette, Standardobjektiv, Weitwinkelkonverter oder Weitwinkel-Zoomobjektiv und dazugehöriger Gegenlichtblende ab. Beim Modell HVR-Z1 nehmen Sie den Weitwinkelkonverter und die dazugehörige Gegenlichtblende ab und bringen das Standardobjektiv und die dazugehörige Gegenlichtblende an. Wenn Sie das Weitwinkel-Zoomobjektiv (VCL-308BWH) an der Videokamera anbringen, nehmen Sie dessen Schutzkappe ab. Nehmen Sie die am Netzteil/Ladegerät angebrachten Akkus und die Videoleuchte ab. Bringen Sie den Sucher und den LCD-Bildschirm der Videokamera in die jeweilige Ausgangsposition. Schließen Sie alle Buchsenabdeckungen, damit diese sich nicht im Polster des Koffers verfangen. Halten Sie das zu Ihrer Videokamera passende Polster bereit. Vergewissern Sie sich, dass sich der Dichtungsring nicht löst und nach oben wandert. Kombinationen aus Polster und Videokamera Es sind unterschiedliche Kombinationen aus Polster und Videokamera möglich, wie in der folgenden Tabelle angegeben. „“ bedeutet, dass das betreffende Polster verwendet wird, „“ bedeutet, dass das betreffende Polster nicht verwendet wird. Beim Kauf ist Polster 1 in den Koffer eingelegt („“), Polster 2 und 3 jedoch nicht („“). Modellbezeichnung Objektiv HVR-Z5 HVR-Z7 HVR-Z1 HVR-V1 中文(繁) Technische Daten (Continuación de la página frontal) Polster 1 (-) 2 (-) 3 (-) Standardobjektiv Weitwinkelkonverter (VCL-HG0872K) Standardobjektiv Weitwinkel-Zoomobjektiv (VCL-308BWH) Standardobjektiv Standardobjektiv Weitwinkelkonverter (VCL-HG0862K) Hinweis Legen Sie die Polster so in den Koffer ein, dass diese fest auf dem Boden des Koffers aufliegen. Vergewissern Sie sich, dass sich kein Polster lösen und nach oben wandern kann. Lage der Teile 1 Kofferdeckel 2 Fach für Netzteil/Ladegerät (AC-VQL1BP) 3 Fach für Videoleuchte (HVL-LBP, HVL-LBPA) 4 Fach für Dokumente 5 Tragegriff 6 Fach für Akku 7 Fach für Kassette 8 Fach für Kabel 9 Koffer 10 Fach für Videokamera 11 Verschluss 12 Dichtungsring * Die Abbildung zeigt als Beispiel, wie die verschiedenen Teile verstaut werden können. Es werden jedoch keine Videokamera und kein Zubehör mitgeliefert. Hinweise zur Verwendung Wenn Sie die Videokamera in den Koffer legen, beachten Sie bitte Folgendes. Die Videokamera darf nicht auf dem Polster aufliegen, sondern muss richtig in die Aussparung im Polster eingepasst werden . Legen Sie zuerst die Gegenlichtblende an der Videokamera richtig in das Polster ein. Achten Sie darauf, dass die Buchsenabdeckung nicht auf dem Polster liegt (Abbildung ). Beachten Sie beim Verwenden des Tragegriffs bitte Folgendes. Halten Sie den Tragegriff beim Einstellen der Länge mit der Hand gut fest. Wenn Sie die Hand beim Einstellen der Länge versehentlich vom Tragegriff nehmen, fällt der Koffer unvermittelt herunter. Schwingen Sie den Koffer nicht am Tragegriff und stützen Sie den Koffer unten ab, wenn Sie ihn abstellen oder anheben. Verdrehen Sie den Tragegriff nicht. Stützen Sie sich nicht auf den Tragegriff. Legen Sie keine Teile in den Koffer, die schwerer sind als das zulässige Gesamtgewicht des Inhalts. Schützen Sie den Koffer vor starken Erschütterungen oder Stößen. Rollen Sie den Koffer mit Inhalt nicht. Achten Sie beim Schließen des Kofferdeckels darauf, dass Ihre Dokumente gegebenenfalls nicht eingeklemmt werden. Legen Sie keine Teile ein, die die Fächer verformen könnten. Wenn Sie den Verschluss nicht fest schließen können, kann sich der Dichtungsring lösen und nach oben wandern. Drücken Sie den Teil des Dichtungsrings, der nach oben steht, mit den Fingern sorgfältig wieder zurück in die Ausgangsposition. Reinigen Sie den Koffer nicht mit Alkohol, Benzin oder Verdünner. Wenn der Koffer verschmutzt ist, reinigen Sie ihn mit einem weichen Tuch, das Sie leicht mit einer milden Reinigungslösung angefeuchtet haben. Lassen Sie den Koffer nicht in direktem Sonnenlicht, in geschlossenen Fahrzeugen oder in der Nähe von Heizkörpern stehen. Andernfalls kann sich der Koffer verformen oder verfärben und an der darin aufbewahrten Videokamera und dem Zubehör können Fehlfunktionen auftreten. Nehmen Sie mit Ausnahme der Polster 1, 2 und 3 keine weiteren Polster heraus. Versuchen Sie auch nicht, Polster zu zerlegen. Andernfalls wird die Schutzfunktion für die Videokamera und das Zubehör unter Umständen beeinträchtigt. Wenn Sie den Koffer auf eine Flugreise mitnehmen, geben Sie die Videokamera und das Zubehör nicht am Gepäckschalter auf. Nehmen Sie sie als Handgepäck mit. Abmessungen Gewicht Zulässiges Gesamtgewicht des Inhalts Mitgeliefertes Zubehör LCH-GT1BP 是專為 HVR-Z5、HVR-Z7、HVR-Z1、HVR-V1 Sony 數位攝像機(下稱“攝像機”)及其配件設計的鋁箱。並非所有型號 的攝像機均在各個國家或地區銷售。使用之前,請仔細閱讀本使用說明書。 ca. 629 × 498 × 303 mm (B/H/T) (ohne vorstehende Teile) ca. 10,5 kg maximal 10 kg Tragekoffer (1), Polster (3), Anleitungen 使用之前 Änderungen bei Design und technischen Daten bleiben ohne vorherige Ankündigung vorbehalten. Italiano LCH-GT1BP è una custodia di trasporto rigida (di seguito chiamata “custodia”) progettata per l’uso con le videocamere digitali Sony HVR-Z5, HVR-Z7, HVR-Z1, HVR-V1 (di seguito chiamati “videocamera”) e con i relativi accessori. Alcuni dei modelli di videocamera riportati sopra potrebbero non essere disponibili in tutti paesi o regioni. Prima dell’uso, leggere attentamente le presenti Istruzioni per l’uso. Prima dell’uso Prima di riporre la videocamera nella custodia, rimuovere tutti gli accessori ad essa collegati tranne il blocco batteria e la cassetta, l’obiettivo standard, l’obiettivo ad ampia conversione o l’obiettivo ad ampio zoom e il relativo paraluce. Se viene utilizzata una videocamera HVR-Z1, rimuovere l’obiettivo ad ampia conversione e il paraluce, quindi applicare l’obiettivo standard e il relativo paraluce. Per collegare l’obiettivo ad ampio zoom (VCL-308BWH) alla videocamera, rimuovere il relativo copriobiettivo. Rimuovere i blocchi batteria collegati all’alimentatore/caricatore CA e alla lampada video. Riportare il mirino e lo schermo LCD della videocamera alla loro posizione originale. Chiudere tutti i copripresa per evitare che restino impigliati nel cuscinetto. Tenere a portata di mano il cuscinetto in dotazione con la videocamera. Assicurarsi che la guarnizione toroidale non si allenti o si sposti in avanti. Combinazione di cuscinetto e videocamera HVR-Z5 HVR-Z7 HVR-Z1 HVR-V1 Obiettivo Cuscinetto 1 (-) 2 (-) 3 (-) Obiettivo standard Obiettivo ad ampia conversione (VCL-HG0872K) Obiettivo standard Obiettivo ad ampio zoom (VCL-308BWH) Obiettivo standard Obiettivo standard Obiettivo ad ampia conversione (VCL-HG0862K) Note Applicare saldamente il cuscinetto in modo che lo stesso combaci con la parte inferiore della custodia. Assicurarsi che il cuscinetto non si allenti o fuoriesca. Identificazione delle parti 1 Parte superiore della custodia 2 Spazio per l’alimentatore/caricatore CA (AC-VQL1BP) 3 Spazio per la luce video (HVL-LBP, HVL-LBPA) 4 Spazio per il documento 5 Maniglia per il trasporto 6 Spazio per il blocco batteria 7 Spazio per la cassetta 8 Spazio per i cavi 9 Parte inferiore della custodia 10 Spazio per la videocamera 11 Leva del dispositivo di blocco 12 Guarnizione toroidale * L’illustrazione è un esempio di conservazione. Una videocamera e i relativi accessori non sono in dotazione. Note sull’uso Prima di riporre la videocamera nella custodia, accertarsi di verificare quanto segue. La videocamera non deve rimanere incastrata nel cuscinetto né deve essere sollevata da quest’ultimo. Per prima cosa inserire il paraluce della videocamera nel cuscinetto. Prestare attenzione a non far toccare il cuscinetto dal copripresa (illustrazione ). Durante l’uso della maniglia per il trasporto, prestare attenzione a quanto segue. Durante la regolazione della lunghezza, afferrare in modo saldo la maniglia per il trasporto con la mano. Se si lascia la maniglia per il trasporto durante la regolazione della lunghezza, la custodia potrebbe cadere. Non sollevare, fare ondeggiare o spingere verso il basso la custodia tenendola per la maniglia per il trasporto. Non ruotare la maniglia per il trasporto. Non appoggiarsi alla maniglia per il trasporto. Non conservare oggetti con un peso superiore a quello consentito. Non esporre la custodia a urti o vibrazioni. Non ruotare la custodia con oggetti al suo interno. Prima di chiudere la parte superiore della custodia, accertarsi che il documento non rimanga incastrato nella custodia stessa. Non riporre oggetti che potrebbero deformare la custodia. Se non è possibile chiudere in modo saldo la leva del dispositivo di blocco, la guarnizione toroidale potrebbe allentarsi e spostarsi in avanti. Premere con forza con il dito sulla parte della guarnizione toroidale che si è spostata per riportarla nella sua posizione originale. Per pulire la custodia, non utilizzare alcol, benzina o trielina. Per pulire la custodia, utilizzare un panno morbido leggermente inumidito con una soluzione detergente neutra. Non lasciare la custodia in luoghi esposti alla luce solare diretta, in un’auto chiusa o in prossimità di un radiatore, onde evitare problemi di funzionamento della videocamera e dei relativi accessori o che la custodia stessa si deformi o scolorisca. Non rimuovere o smontare il cuscinetto diverso dal cuscinetto 1, 2 e 3. Ciò potrebbe impedire la conservazione e la protezione corrette della videocamere e dei relativi accessori. Durante un viaggio aereo con la custodia, non controllare la videocamera o gli accessori. Tenere la videocamera e gli accessori accanto a sé. Caratteristiche tecniche Dimensioni Peso Peso massimo consentito Accessori inclusi circa 629 × 498 × 303 mm (l/a/p) (escluse le parti sporgenti) circa 10,5 kg 10 kg o inferiore Custodia di trasporto rigida (1), Cuscinetto (3), Corredo di documentazione stampata Disegno e caratteristiche tecniche sono soggetti a modifiche senza preavviso. 軟墊和攝像機的組合 參閱下表核對軟墊和攝像機的組合。 “”代表使用軟墊;“”代表無軟墊。購買時,軟墊 1 為“”,軟墊 2 和軟墊 3 為“”。 型號名稱 HVR-Z5 HVR-Z7 HVR-Z1 Accertarsi che la combinazione del cuscinetto e della videocamera corrisponda a quanto riportato nella seguente tabella. “” indica l’uso del cuscinetto; “” indica l’assenza del cuscinetto. Al momento dell’acquisto, il cuscinetto 1 è “”, mentre i cuscinetti 2 e 3 sono “”. Nome del modello 將攝像機收納到鋁箱之前,請取下安裝到攝像機上的配件(電池和磁帶、標準鏡頭、廣角鏡頭或廣角變焦鏡頭及其遮光罩除外)。 使用 HVR-Z1 時,請取下廣角鏡頭及其遮光罩並安裝標準鏡頭及其遮光罩。 將廣角變焦鏡頭 (VCL-308BWH) 安裝到攝像機時,請取下遮光罩蓋。 取下安裝到電源配接器 / 充電器和攝像燈的電池。 將攝像機的取景器和液晶顯示屏返回各自的原始位置。 關閉所有插口蓋,使其不會碰到軟墊。 準備適合攝像機的軟墊。 確認O形環沒有鬆動或突出。 HVR-V1 軟墊 鏡頭 1 (-) 2 (-) 3 (-) 廣角鏡頭 (VCL-HG0872K) 標準鏡頭 廣角變焦鏡頭 (VCL-308BWH) 標準鏡頭 標準鏡頭 设计或规格如有变动,恕不另行通知。 廣角鏡頭 (VCL-HG0862K) 索尼公司 出版日期:2008 年 11 月 케이스에 비디오 카메라를 수납하기 전에 배터리팩과 테이프, 표준 렌즈, 와이드 컨버전 렌즈나 와이드 줌 렌즈 및 후드 이외의 액세서리는 비디오 카메라에서 분리하십시오. HVR-Z1을 사용할 때에는 와이드 컨버전 렌즈 및 후드를 분리하고 표준 렌즈 및 후드를 장착하십시오. 비디오 카메라에 와이드 줌 렌즈(VCL-308BWH)를 장착할 때에는 후드 캡을 분리하십시오. AC 어댑터/충전기 및 비디오 라이트에 장착된 배터리팩은 분리하십시오. 비디오 카메라의 뷰파인더와 LCD 화면은 원래 위치로 되돌려 놓으십시오. 단자 커버는 쿠션에 걸리지 않도록 모두 닫으십시오. 비디오 카메라에 맞추어 쿠션을 준비하십시오. O링이 느슨하거나 들뜨지 않았는지 확인하십시오. 쿠션과 비디오 카메라의 조합 規格 約 629×498×303 mm(寬 / 高 / 深) (不包括突出部份) 約 10.5 kg 10 kg 或以下 鋁箱 (1)、軟墊 (3)、成套印刷文件 設計和規格有所變更時,恕不另行奉告。 中文(简) LCH-GT1BP 是专为 HVR-Z5、HVR-Z7、HVR-Z1、HVR-V1 Sony 数码摄像机(下称“摄像机”)及其配件设计的铝箱。并非所有型号 的摄像机均在各个国家或地区销售。使用之前,请仔细阅读本使用说明书。 使用之前 将摄像机收纳到铝箱之前,请取下安装到摄像机上的配件(电池和磁带、标准镜头、广角镜或广角变焦镜头及其遮光罩除外)。 使用 HVR-Z1 时,请取下广角镜及其遮光罩并安装标准镜头及其遮光罩。 将广角变焦镜头 (VCL-308BWH) 安装到摄像机时,请取下遮光罩盖。 取下安装到电源适配器 / 充电器和摄像灯的电池。 将摄像机的取景器和液晶显示屏返回各自的原始位置。 关闭所有插孔盖,使其不会碰到软垫。 准备适合摄像机的软垫。 确认O形环没有松动或突出。 软垫和摄像机的组合 参阅下表核对软垫和摄像机的组合。 “”代表使用软垫;“”代表无软垫。购买时,软垫 1 为“”,软垫 2 和软垫 3 为“”。 HVR-Z1 HVR-V1 质量 收纳重量限制 所含物品 사용하기 전에 將攝像機收納到鋁箱時,請注意下列事項。 攝像機不得碰到軟墊或被其抬高。 首先將攝像機遮光罩安裝到軟墊。請注意不要讓插口蓋壓在軟墊上。 (圖 ) 使用攜帶把手時,請注意下列事項。 調整長度時,請用手握住攜帶把手。如果調整長度時用手鬆開攜帶把手,則鋁箱可能由於自身重量而突然掉落。 請勿握持攜帶把手舉起、搖擺或丟棄鋁箱。請勿扭曲攜帶把手。 請勿倚靠攜帶把手。 請勿收納重量超過收納重量限制的物品。 請勿強烈振動或撞擊鋁箱。 請勿滾動收納著物品的鋁箱。 關閉頂蓋時,請確認檔案被鋁箱卡住。 請勿收納可能致使收納處變形的物品。 如果無法牢牢關閉閉鎖桿,則O形環可能鬆動並向上突起。請適當用手指按下O形環突起的部位,使其返回原始位置。 請勿使用酒精、汽油或稀釋劑清潔鋁箱。如果鋁箱變臟,則請用輕蘸中性洗滌劑溶液的軟布擦拭鋁箱。 請勿將鋁箱置於直射陽光下、密閉車內或加熱器附近。否則可能會致使鋁箱變形或變色,或者造成內部收納的攝像機及其配件 故障。 請勿取出或拆卸軟墊 1、2 和 3 以外的軟墊。否則可能會降低收納和保護攝像機及其配件的功能。 乘坐飛機攜帶鋁箱旅行時,請勿托運攝像機或配件。請隨座進行攜帶。 質量 收納重量限制 所含物品 约 629×498×303 mm(宽 / 高 / 长) (不包括突出部位) 约 10.5 kg 10 kg 或以下 铝箱 (1)、软垫 (3)、成套印刷文件 한국어 使用注意事項 尺寸 尺寸 LCH-GT1BP는 Sony 디지털 비디오 카메라 레코더(이하 "비디오 카메라"라 함) HVR-Z5, HVR-Z7, HVR-Z1, HVR-V1 및 그 액세서리용 휴대용 하드 케이스(이하 "케이스"라 함)입니다. 비디오 카메라의 모델 중에는 일부 국가나 지역에서 판매되지 않는 모델이 있습니다. 사용하기 전에 본 사용설명서를 자세히 읽으십시오. 1 頂蓋 2 電源配接器 / 充電器 (AC-VQL1BP) 收納處 3 攝像燈 (HVL-LBP,HVL-LBPA) 收納處 4 檔案收納處 5 攜帶把手 6 電池收納處 7 磁帶收納處 8 電纜收納處 9 底蓋 10 攝像機收納處 11 閉鎖桿 12 O形環 * 圖示為收納示例。攝像機及其配件並未提供。 HVR-Z7 规格 識別部件 HVR-Z5 将摄像机收纳到铝箱时,请注意下列事项。 摄像机不得碰到软垫或被其抬高。 首先将摄像机遮光罩安装到软垫。请注意不要让插孔盖压在软垫上。 (图 ) 使用携带把手时,请注意下列事项。 调整长度时,请用手握住携带把手。如果调整长度时用手松开携带把手,则铝箱可能由于自身重量而突然掉落。 请勿握持携带把手举起、摇摆或丢弃铝箱。请勿扭曲携带把手。 请勿倚靠携带把手。 请勿收纳重量超过收纳重量限制的物品。 请勿强烈振动或撞击铝箱。 请勿滚动收纳着物品的铝箱。 关闭顶盖时,请确认文件未被铝箱卡住。 请勿收纳可能致使收纳处变形的物品。 如果无法牢牢关闭闭锁杆,则O形环可能松动并向上突起。请适当用手指按下O形环突起的部位,使其返回原始位置。 请勿使用酒精、汽油或稀释剂清洁铝箱。如果铝箱变脏,则请用轻蘸中性洗涤剂溶液的软布擦拭铝箱。 请勿将铝箱置于直射阳光下、密闭车内或加热器附近。否则可能会致使铝箱变形或变色,或者造成内部收纳的摄像机及其配件 故障。 请勿取出或拆卸软垫 1、2 和 3 以外的软垫。否则可能会降低收纳和保护摄像机及其配件的功能。 乘坐飞机携带铝箱旅行时,请勿托运摄像机或配件。请随座进行携带。 標準鏡頭 注意 牢固安裝軟墊,使軟墊與鋁箱底部吻合。確認沒有鬆動和突出。 型号名称 使用注意事项 镜头 软垫 1 (-) 2 (-) 3 (-) 标准镜头 广角镜 (VCL-HG0872K) 标准镜头 广角变焦镜头 (VCL-308BWH) 标准镜头 标准镜头 广角镜 (VCL-HG0862K) 注意 牢固安装软垫,使软垫与铝箱底部吻合。确认没有松动和突出。 识别部件 1 顶盖 2 电源适配器 / 充电器 (AC-VQL1BP) 收纳处 3 摄像灯 (HVL-LBP,HVL-LBPA) 收纳处 4 文件收纳处 5 携带把手 6 电池收纳处 7 磁带收纳处 8 电缆收纳处 9 底盖 10 摄像机收纳处 11 闭锁杆 12 O形环 * 图示为收纳示例。摄像机及其配件并未提供。 使用注意事项 将摄像机收纳到铝箱时,请注意下列事项。 摄像机不得碰到软垫或被其抬高。 首先将摄像机遮光罩安装到软垫。请注意不要让插孔盖压在软垫上。 (图 ) 使用携带把手时,请注意下列事项。 调整长度时,请用手握住携带把手。如果调整长度时用手松开携带把手,则铝箱可能由于自身重量而突然掉落。 请勿握持携带把手举起、摇摆或丢弃铝箱。请勿扭曲携带把手。 아래 표에서 카메라와 쿠션의 조합을 확인하십시오. ""는 쿠션을 사용하고 ""는 쿠션을 사용하지 않습니다. 구입 당시는 쿠션 1는 "", 쿠션 2 및 쿠션 3은 ""으로 되어 있습니다. 모델명 HVR-Z5 HVR-Z7 HVR-Z1 HVR-V1 쿠션 렌즈 1 (-) 2 (-) 3 (-) 표준 렌즈 와이드 컨버전 렌즈 (VCL-HG0872K) 표준 렌즈 와이드 줌 렌즈 (VCL-308BWH) 표준 렌즈 표준 렌즈 와이드 컨버전 렌즈 (VCL-HG0862K) 주의점 쿠션은 케이스 바닥에 맞도록 확실히 끼워 주십시오. 느슨하거나 들뜨지 않았는지 확인하십시오. 각 부분 명칭 1 위 케이스 2 AC 어댑터/충전기(AC-VQL1BP) 수납 공간 3 비디오 라이트(HVL-LBP, HVL-LBPA) 수납 공간 4 서류 수납 공간 5 운반용 핸들 6 배터리팩 수납 공간 7 테이프 수납 공간 8 케이블 수납 공간 9 아래 케이스 10 비디오 카메라 수납 공간 11 래치 레버 12 O링 * 그림은 수납한 예입니다. 비디오 카메라와 액세서리는 부속되지 않았습니다. 사용상의 주의 케이스에 비디오 카메라를 수납할 때에는 다음과 같은 점에 주의하십시오. 비디오 카메라가 쿠션에 걸리거나 쿠션 때문에 들뜨지 않도록 하십시오. 먼저 비디오 카메라 후드를 쿠션에 맞추십시오. 단자 커버가 쿠션에 걸리지 않도록 하십시오. (그림 ) 운반용 핸들을 사용할 때에는 다음과 같은 점에 주의하십시오. 길이는 운반용 핸들을 잡고 조절하십시오. 길이를 조절할 때 운반용 핸들을 놓으면 케이스의 자체 무게로 갑자기 떨어지는 경우가 있습니다. 운반용 핸들을 잡고 케이스를 들거나 흔들거나 넘어뜨리거나 세우지 마십시오. 운반용 핸들을 비틀지 마십시오. 운반용 핸들에 기대지 마십시오. 허용 수납 중량 이상은 수납하지 마십시오. 강한 진동이나 충격을 가하지 마십시오. 수납물을 넣은 케이스를 굴리지 마십시오. 위 케이스를 닫을 때에는 서류가 케이스에 끼지 않았는지 확인하고 닫으십시오. 수납 공간이 변형될 위험이 있는 물건은 수납하지 마십시오. 래치 레버가 완전히 닫히지 않을 때에는 O링이 느슨해져 들떠있을 가능성이 있습니다. O링의 들뜬 부분을 눌러서 원래 위치에 끼워 주십시오. 케이스를 청소할 때 알코올이나 벤진, 시너는 사용하지 마십시오. 케이스가 더러워졌을 때에는 묽은 중성 세제를 살짝 적신 부드러운 헝겊으로 닦아내십시오. 케이스는 직사광선이 닿는 곳이나 창문을 닫은 자동차 안, 난방기구 가까이에 방치하지 마십시오. 그렇지 않으면 케이스가 변색 또는 변형되거나 수납한 비디오 카메라나 액세서리가 고장 나는 원인이 됩니다. 쿠션 1, 2, 3 이외의 쿠션을 빼거나 분해하지 마십시오. 비디오 카메라와 액세서리의 수납 기능이나 보호 기능이 저하되는 원인이 됩니다. 비행기를 탈 때에는 비디오 카메라나 액세서리는 부치지 말고 들고 타십시오. 주요 제원 외형 치수 중량 허용 수납 중량 동봉품 약 629 × 498 × 303 mm (w/h/d) (돌출 부분은 제외) 약 10.5 kg 10 kg 이하 휴대용 하드 케이스(1), 쿠션(3), 도큐먼트 세트 디자인 및 주요 제원은 예고없이 변경할 경우가 있습니다.