1
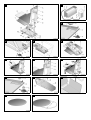
ELAN 550
DE
Badewannenlifter
Bedienungsanleitung
EN
Bathlift
Operating instructions
DE
WICHTIG!
Bitte lesen Sie diese Bedienungsanleitung
aufmerksam durch, bevor Sie den Badewannenlifter AQUATEC ELAN 550 benutzen.
Beachten Sie alle Hinweise, insbesondere die
Sicherheitshinweise, und handeln Sie danach.
EN
IMPORTANT
Before you use the AQUATEC ELAN 550
bathlift, please read these operating instructions carefully. Pay attention to all instructions,
especially those regarding safety, and follow
them at all times.
1
2
3
4
5
6
7
8
9
10
11
12
13
14
15
DE
1
2
3
4
5
6
7
8
9
10
11
12
13
14
Einschaltdauer
Sicherung
Konformitätskennzeichnung
EAN-Code
Symbol Medizinprodukt
laufende Gerätenummer
Produktionstag (1 bis 365 Tage)
letzte Ziffer des Produktionsjahres
Gerätetyp
Schutzart
Hinweis (Bedienungsanleitung lesen)
Produktionszeitraum
Nennspannung/Nennaufnahme
Belastbarkeit
EN
1
2
3
4
5
6
7
8
9
10
11
12
13
14
Duty cycle
Fuse
Declaration of conformity
EAN code
Medical product symbol
Serial number
Day of production (1 to 365)
Last digit of year of production
Device type
Degree of protection
Instruction to read operating instructions
Period of production
Rated voltage/consumption
Load capacity
目次
1
1.1
1.2
1.3
1.4
1.5
1.6
本製品について . . . . . .
取扱説明書 . . . . . . . .
本製品の用途 . . . . . . .
保証 . . . . . . . . . . .
再利用/再生 . . . . . . .
廃棄処理 . . . . . . . . .
CE(Consumer Europe)マーク
.
.
.
.
.
.
.
.
.
.
.
.
.
.
4
4
4
4
4
4
4
2
2.1
2.2
2.3
2.4
2.5
安全上の注意 . . . . . .
絵表示 . . . . . . . . .
一般的な注意 . . . . . .
使用上の注意 . . . . . .
お手入れの際の注意 . . .
バッテリーおよび充電器に
関する注意 . . . . . . .
.
.
.
.
.
.
.
.
.
.
.
.
.
.
.
5
5
5
6
6
3
3.1
3.2
3.3
3.4
本製品の構造 . .
本体および付属品
別売付属品 . . .
技術的仕様 . . .
概略 . . . . . .
.
.
.
.
.
4
運搬 . . . . . . . . . . . . . 9
5
5.1
5.2
5.2.1
5.2.2
5.2.3
5.2.4
5.3
5.4
5.5
運転を開始する前に . . . . .
バッテリーの充電 . . . . . .
吸盤の取り付け . . . . . . .
取り付け前の準備 . . . . . .
前方の吸盤の取り付け . . . .
後方の吸盤の取り付け . . . .
取り付けの完了 . . . . . . .
浴槽内への設置 . . . . . . .
浴槽内での折りたたみ . . . .
高さ調節アダプター(別売)の
取り付け . . . . . . . . . .
取り付け前の準備 . . . . . .
前方の高さ調節アダプターの
取り付け . . . . . . . . . .
後方の高さ調節アダプターの
取り付け . . . . . . . . . .
取り付けの完了 . . . . . . .
足台(別売)の取り付け . . .
5.5.1
5.5.2
5.5.3
5.5.4
5.6
JA
.
.
.
.
.
.
.
.
.
.
.
.
.
.
.
.
.
.
.
.
. . . 6
.
.
.
.
.
.
.
.
.
.
5.6.1
5.6.2
足台の取り付け . . . . . . . . 14
足台の取り外し . . . . . . . . 14
6
6.1
6.1.1
6.1.2
6.1.3
6.2
6.3
6.4
操作方法 . . . . .
制御 . . . . . . .
上昇 . . . . . . .
下降 . . . . . . .
非常時 . . . . . .
入浴 . . . . . . .
移乗介助器具の使用
不具合が生じたら .
.
.
.
.
.
.
.
.
.
.
.
.
.
.
.
.
.
.
.
.
.
.
.
.
.
.
.
.
.
.
.
.
.
.
.
.
.
.
.
.
15
15
15
15
15
16
16
17
7
7.1
7.1.1
7.1.2
7.2
7.3
メンテナンスとお手入れ
シート/背もたれ . . .
汚れの落とし方 . . . .
お手入れ . . . . . . .
充電器およびバッテリー
メンテナンス . . . . .
.
.
.
.
.
.
.
.
.
.
.
.
.
.
.
.
.
.
.
.
.
.
.
.
18
18
18
18
18
18
.
.
.
.
.
.
.
.
7
7
8
8
9
. 9
. 9
. 10
. 10
. 10
. 11
. 11
. 11
. 12
. 13
. 13
. 13
. 14
. 14
. 14
3
1
本製品について
1.1 取扱説明書
本取扱説明書には、入浴リフト AQUATEC
ELAN 550 を正しく安全に使用するための注
意と説明が記載されています。
使用者の怪我や AQUATEC ELAN 550 の故障を
防止するため、記載事項を十分にご確認くだ
さい。
本取扱説明書の文には、図の番号と図中の参
照箇所を示す番号が含まれています。これら
の番号は、カッコで囲まれています。
例: (図 1-3)とあるときは、図 1 の 3 番を
ご覧ください。
AQUATEC ELAN 550 の付属資料は大切に保管
してください。
1.2 本製品の用途
1.4 再利用/再生
AQUATEC ELAN 550 は再利用を意図して設計
されています。最大利用回数は、各製品の状
態によって異なります。
AQUATEC ELAN 550 の再生は、AQUATEC 社の再
生・衛生ガイドラインに従って行う必要があ
ります。AQUATEC 社までお問い合わせくださ
い。
1.5 廃棄処理
重要
AQUATEC ELAN 550 の材質は有害物質
を含んでおりません。
耐用期間が過ぎ、不要になっ
た AQUATEC ELAN 550 を廃棄するときは、お
住まいの地域の廃棄処理規則に従う必要があ
ります。各部品をそれぞれの材質に応じた処
理場へお引渡しください。
AQUATEC ELAN 550 は、浴槽内での入浴を介
助するための機器です。
故障したバッテリーまたは耐用期間が過ぎた
バッテリーは、再生のための処理場へお引渡
しください。
それ以外の目的に使用することはできませ
ん。
1.6 CE(Consumer Europe)マーク
AQUATEC ELAN 550 を浴槽以外への移乗や物
体の移動に使用したり、敷き台、載せ台とし
て使用したりしないでください。
AQUATEC ELAN 550 は、EU 指令に基づく医用
機器規格(93/42/EEC)に適合しています
1.3 保証
AQUATEC ELAN 550 の保証期間はお引渡し日
より 3 年間です。
カバー、吸盤、バッテリーは保証の対象とな
りません。
お引渡し日は AQUATEC の納品書に記載されて
います。
4
JA
2
安全上の注意
2.1 絵表示
本取扱説明書では、次のような絵表示を使用
しています。
警告
この表示は、危険が伴う可能性
を示しています。
*
注意内容に従わないと人体への
傷害または物的損害が発生する
可能性があります。
重要
この表示は、さらに詳しい注意や情
報、ヒントなどを示します。危険性を
伴う内容ではありません。
2.2 一般的な注意
AQUATEC ELAN 550 は、浴槽内での入
浴を介助する目的だけに使用してく
ださい。
一人で入浴できる状態にない方は、
必ず介助者の付き添いのもとでご入
浴ください。
例: 必要なときにリモコンの非常ボ
タンを押すことが困難な方。
AQUATEC ELAN 550 を幼児や青少年が
遊び道具として使用しないようにご
注意ください。
幼児や青少年が AQUATEC ELAN 550
を使用する場合は、必ず大人の方が
付き添うようにしてください。
AQUATEC ELAN 550 を清潔に保ち、お
手入れに関する注意に従ってくださ
い。
故障や不具合の際には、お買い上げ
の販売店へご連絡ください。
ご自分での修理や改造はご遠慮くだ
さい。
* この位置に危険性の具体的な内容を表す
絵が表示されます。
JA
5
2.3 使用上の注意
2.4 お手入れの際の注意
入浴前に、AQUATEC ELAN 550 が正し
く機能するかどうかをお試しくださ
い *。
AQUATEC ELAN 550 のお手入れの際
は、回転部分や交差脚の間に手を挟
まれないようにご注意ください。
AQUATEC ELAN 550 のご使用前に、浴
槽のお湯が適温であることをご確認
ください。
浴槽にお湯を張るときは最高 60 ℃、
実際の入浴時は最高 45 ℃ のお湯を
使用します。
背もたれを洗浄する際は、圧力をか
けすぎないようにご注意ください。
製品ラベルに記載されている仕様を
確認し、AQUATEC ELAN 550 に耐荷重
量を超える負荷をかけないようご注
意ください。
入浴剤をご使用の場合は、メーカー
が定めた使用量に従ってください。
入浴剤が原因で交差脚がスムーズに
動かなくなることがあります。
本体を運搬する場合や長期間使用し
ない場合は、バッテリーを外すよう
にしてください。必ず AQUATEC
ELAN 550 付属のバッテリーをご使用
ください。
お手入れには必ず無溶剤の家庭用洗
剤、または AQUATEC 公認の洗剤およ
び方法をご使用ください。
最高 60 ℃ のお湯を使って汚れを落
としてください。
AQUATEC ELAN 550 の修理は、必ず販
売店へご依頼ください。
2.5 バッテリーおよび充電器に関す
る注意
絶対にバッテリーを火中へ投じたり、
火の近くに置いたりしないでくださ
い。
バッテリーを開けないでください。
絶対に台板とシートの間には手を入
れないでください。
バッテリーが損傷して漏れた希硫酸
が肌や衣服に付いた場合は、ただち
に水でよく洗い落としてください。
* 何も載せていない状態でリフトを一度上
下させます。
6
JA
希硫酸が目に入った場合は、ただち
に水で目を洗い、眼科医にご相談く
ださい。
3
本製品の構造
3.1 本体および付属品
伝導性の物体(針など)でバッテ
リーの接点に触れたり、バッテリー
を水中に入れたりしないでください。
AQUATEC ELAN 550 は、以下のコンポーネン
トで構成されています(図 1 ~図 2)
。
バッテリーは使用後すぐに充電して
ください。その際、必ず付属の充電
器を使用してください。
入浴リフト(図 1)
長期間使用しない場合は、月に一度
バッテリーを充電すると、バッテ
リーの寿命が短くなるのを防ぐこと
ができます。
バッテリーの充電は、浴室ではなく
湿度の低い場所で行ってください。
不要になったバッテリーは、廃棄処
理規則に従って廃棄してください。
バッテリーは AQUATEC ELAN 550 だけ
に使用し、充電器は付属のバッテ
リーの充電だけに使用してください。
充電器にバッテリーを挿入していな
い状態で電源を入れないでください。
1
2
3
4
5
6
7
8
9
10
11
12
13
14
15
サイドシート
カバー(別売)
シート
プラグ付きバッテリー挿入口
リモコン
モーターケース
リモコン用コイルコード
背もたれ
スピンドル
スピンドル下端
スピンドル受け
交差脚
台板
スライドシュー
スライドレール
吸盤(図 1)
16 前方用吸盤
(ツメ 1 つ)
17 後方用吸盤
(ツメ 2 つ)
バッテリーおよび充電器(図 2)
2
5
バッテリー
充電器
取り扱い説明書(図なし)
カバー
シート用カバー
背もたれ用カバー
JA
7
3.2 別売付属品
AQUATEC ELAN 550 には次のような別売付属
品があります。
高さ調節アダプター(図 10)
浴槽の内側の高さが 55 cm を超える場合は、
高さ調節アダプター(図 10-3)を使用しま
す。高さ調節アダプターを使用すると
AQUATEC ELAN 550 が 2、4、または 6 cm 高く
なり、シートを浴槽の縁と同じ高さにするこ
とができます。
高さ調節アダプターの取り付けについては、
5.5 をご覧ください。
サイドシートフック(図 12)
サイドシートフックは、浴槽の取っ手に引っ
掛けます。サイドシートフックはガイドレー
ルの機能を果たします。サイドシートフック
を使用すると、シートの上昇時に AQUATEC
ELAN 550 のサイドシートが浴槽の取っ手で
ブロックされてしまうのを防ぐことができま
す。
吸盤(図なし)
床面にすべり止め加工を施した浴槽や、汚れ
防止のコーティングを施した浴槽用に、サイ
ズの大きい吸盤をご用意しています。
3.3 技術的仕様
入浴リフト
リフトの奥行き:
590 mm
シートの幅
(サイドシートを開いた状態):
700 mm
シートの幅
(サイドシートを折りたたんだ状態):380 mm
シートの高さ(最低位置):
95 mm
シートの高さ(最高位置):
550 mm
シートの奥行き
(背もたれからシートの前端まで): 460 mm
背もたれの幅:
715 mm
背もたれの幅:
360 mm
全体の長さ(折りたたんだ状態):
880 mm
全体の長さ(開いた状態):
700 mm
耐荷重量:
120 kg
総重量(バッテリーを除く):
15.2 kg
バッテリーの重量:
1.4 kg
上昇/下降にかかる時間
(荷重 80kg の場合):
上昇 約 56 秒
下降 約 45 秒
動作電圧:
12 V
最大消費電流:
8 A
定格消費電力:
75 W
モーター音(荷重ゼロ)の音量
(ドイツ工業規格 DIN 3746)
:
47 dB(A)
タイプ B の医用機器
保護等級:
IP 54
電源投入時間:
5 %
バッテリー:
内蔵ヒューズ:
12 V/ 鉛
5 A(慣性)
足台
浴槽の内側の長さが 100 cm に満たない場合
は、足台(図 1-2)を使用します。浴槽の長
さは、上縁の部分で測定してください。
重要
内側の長さが 100 cm を超える浴槽で
は、足台を使用しないでください。
足台はガイドの機能を果たします。足台を使
用すると、シートの上昇/下降時に足が挟ま
るのを防止することができます。
足台の取り付けについては、5.6 をご覧くだ
さい。
8
充電器
入力:
出力:
重量:
充電時間
(低圧を示すランプが
ついた状態から):
100 V AC、50/60
55 mA/10.5
12 V DC、400
0.5
Hz
VA
mA
kg
約 5 時間
重要なデータについては、AQUATEC ELAN 550
の製品ラベル(図 15)をご覧ください。
製品ラベルは背もたれの裏面にあります。
JA
3.4 概略
AQUATEC ELAN 550 の部品のほとんどは頑丈
なプラスチックでできています。交差脚とス
ピンドルはステンレス製です。
シート用カバーと背もたれ用カバーの材質
は、ラテックスを含んでいません。カバーは
外して洗濯できます。
リモコンは完全防水で、水に浮きます。リモ
コンには、すべての操作ボタンとバッテリー
の状態を表す制御ランプが装備されていま
す。
5
運転を開始する前に
重要
運転を開始する前に、輸送によって部
品に損傷が生じていないかどうかをご
確認ください。
5.1 バッテリーの充電
警告
感電する危険性があります。
バッテリーの充電は、浴室ではなく
湿度の低い場所で行ってください。
充電器は、充電器に記載されている電流/電
圧でしか使用できません。充電制御ランプ
は、充電の状態を示します。
4
運搬
重要
● 運搬の際、吸盤は外さないでくださ
い。
●
背もたれの部分にバッテリーが挿入
されたままの状態で運搬しないでく
ださい。
まず背もたれの部分からバッテリーを外し、
AQUATEC ELAN 550 を折りたたんで運搬しま
す。折りたたむ方法については、5.4 をご覧
ください。
重要
● ご使用の前に、毎回バッテリーを完
全に充電してください。
●
お住まいの地域の電流/電圧が充電
器に記載されている値と一致してい
なければなりません。
1. 充電器(図 2-5)のジャック(図 2-1)
をバッテリー(図 2-2)のソケット(図
2-6)に差し込みます。
2. 充電器のプラグ(図 2-3)をコンセント
に差し込みます。
充電中は赤い制御ランプ(図 2-4)が点灯し
ます。
3. 制御ランプが消えたら、プラグをコンセ
ントから抜きます。
4. 充電器のジャックをバッテリーのソケッ
トから抜きます。
JA
9
5.2 吸盤の取り付け
警告
交差脚が動いて手を挟まれる危険性
があります。
取り付けの間、交差脚の間に手を入
れないようにしてください。
重要
吸盤の取り外しは、取り付けと逆の順
序で行います。
5.2.1 取り付け前の準備
1. リフトを横に倒します。
2. 背もたれを軽く持ち上げます。
台板とシートの間のロックが自動的に解除さ
れます。
3. 台板(図 1-13)とシート(図 1-3)の間
をゆっくりと広げます。
リフトが横倒しの状態で安定します。
5.2.2 前方の吸盤の取り付け
重要
● 右側と左側は同じ方法で取り付けま
す。
ツメが 1 つとはめ込み用の突起が付
いている吸盤が前方用です。
1. 台板の穴(図 3-3)の裏側から赤い吸盤
キャップ(図 3-2)を押し、外します。
●
重要
クリームの膜によってはめ込みがス
ムーズになります。
2. 吸盤の突起(図 3-4)に市販のスキンク
リームを薄く塗ります。
重要
吸盤は、ツメを下に向けてはめ込みま
す。
3. 穴の円状になっている部分に吸盤の突起
を挿入します。
4. 吸盤の突起を引っ張り、穴の細い部分へ
移動させます。
5. ツメ(図 3-5)を上へ曲げ、ツメの先端
を溝(図 3-1)に引っ掛けます。
6. 赤い吸盤キャップを元の位置にはめま
す。
10
JA
5.2.3 後方の吸盤の取り付け
5.3 浴槽内への設置
重要
● 右側と左側は同じ方法で取り付けま
す。
警告
吸盤の吸着力が弱いとリフトがすべ
ります。
●
ツメが 2 つとネジ山の付いた吸盤が
後方用です。
●
リフトを設置する前に、浴槽と
吸盤の汚れを落としてください。
●
リフトを浴槽内に設置したときに各
吸盤の片方のツメが外に出るように
取り付ける必要があります。
●
AQUATEC ELAN 550 を一度浴槽に
設置したら、位置を変えないで
ください。
吸盤(図 4-1)を裏側から吸盤用ネジ穴(図
4-2)に差し込みます。
ネジ穴は、台板(図 4-3)のうち、スピンド
ル受け(図 4-4)が付いている側にありま
す。
重要
● 吸盤が取り付けられていることを確
認してください。
●
バッテリーが充電されていることを
確認してください。
●
AQUATEC ELAN 550 の重量は(バッテ
リーを外した状態で)約 15.2 kg で
す。持ち上げる際は十分に注意して
ください。
●
浴槽に取っ手が付いている場合は、
サイドシートフック(別売)をご使
用ください。
●
浴槽の長さが100 cmに満たない場合
は、足台(別売)をご使用くださ
い。
5.2.4 取り付けの完了
1. 交差脚をゆっくりとたたみます。
2. 背もたれを完全に折りたたみます。
台板とシートの間が自動的にロックされま
す。
3. 取り付けた吸盤を下にしてリフトを立て
ます。
1. AQUATEC ELAN 550(図 5-2)をお湯の
入っていない浴槽の床に置きます。その
際、スピンドル受け(図 5-3)が排水口
(図 5-1)と反対側を向くようにします。
重要
長さが 100 cm に満たない浴槽では、
スピンドル受けが浴槽の後ろ端に位置
することになります(図 5)。
JA
11
警告
スピンドル下端が外れて損傷する可
能性があります。
警告
短い浴槽の場合、手を挟まれる危険
性があります。
背もたれを立てた後、スピンドル下
端がスピンドル受けの中に固定され
ていることを確認してください。
背もたれを倒すときは、サイドに手
を掛けるようにしてください。
2. 背もたれ(図 6-1)の上端に手を掛け、
まっすぐになるまで開きます(図 6)。ス
ピンドル下端(図 6-2)がスピンドル受
け(図 6-3)にはまり、自動的に固定さ
れます。
重要
背もたれを倒す際、リモコンのコイル
コードを挟み込まないように注意して
ください。
3. 足台(別売)を前へ開きます(図 7-1)
。
7. 背もたれの上端に横から手を掛け、完全
に前へ倒します(図 9-5)
。
4. サイドシートを外側へ開きます
(図 7-2)。
台板とシートの間が自動的にロックされま
す。
5. 充電したバッテリー(図 8-2)を背もた
れにある挿入口(図 8-3)へ上から差し
込みます。
重要
● 後方の 2 つの吸盤は、同時にゆるめ
てください。
6. バッテリーを一番下まで押します。カ
チッという音がしてバッテリーが定位置
にはまります。
●
これで AQUATEC ELAN 550 が使用できる状態
になりました。
5.4 浴槽内での折りたたみ
1. 浴槽のお湯を抜きます。
2. 下降ボタン(図 11-5)を押し
て AQUATEC ELAN 550 を下降させます
(図 9-1)。
重要
バッテリーをしっかり支えるため、
取っ手に深く手を入れてください。
3. バッテリーの取っ手(図 8-1)を軽く上
へ引っ張り、固定解除します。
AQUATEC ELAN 550 の重量は(バッテ
リーを外した状態で)約 15.2 kg で
す。持ち上げる際は十分に注意して
ください。
8. 後方の吸盤(図 1-17)のツメを上へ引
き、浴槽から外します。
9. リフトの後ろの部分をさらに高く持ち上
げます(図 9-6)
。
前方の吸盤が自然に外れます。
重要
高さ調節アダプター(別売)を取り付
けてある場合は、前方の吸盤もツメを
引かないと外れません。
10. リフトを浴槽の外へ出します。
11. AQUATEC ELAN 550 のすべてのコンポーネ
ントを慎重に収納します。
4. バッテリーを上へずらして挿入口から外
します(図 9-2)。
5. サイドシートを内側へ折りたたみます
(図 9-3)。
6. 足台(別売)を後ろへ折りたたみます
(図 9-4)。
12
JA
5.5 高さ調節アダプター(別売)の
取り付け
警告
交差脚が動いて手を挟まれる危険性
があります。
取り付けの間、交差脚の間に手を入
れないようにしてください。
吸盤の吸着力が弱いとリフトがすべ
ります。
1 つの吸盤に 4 つ以上のアダプター
を使用しないでください。
重要
● 高さ調節アダプターの取り外しは、
取り付けと逆の順序で行います。
●
複数の高さ調節アダプターを使用す
る場合は、すでに取り付けたアダプ
ターのネジ穴に次のアダプターを差
し込みます。
5.5.1 取り付け前の準備
1. リフトを横に倒します。
2. 背もたれを軽く持ち上げます。
台板とシートの間のロックが自動的に解除さ
れます。
3. 台板(図 1-13)とシート(図 1-3)の間
をゆっくりと広げます。
5.5.2 前方の高さ調節アダプターの取り
付け
重要
● 右側と左側は同じ方法で取り付けま
す。
高さ調節アダプターは、リフトの付
属品として含まれている吸盤には取
り付けられません。
1. 台板の穴(図 3-3)の裏側から赤い吸盤
キャップ(図 3-2)を押し、外します。
●
2. ツメの先端(図 3-5)を溝(図 3-1)か
ら外します。
3. 吸盤を後ろへ引っ張り、外します。
4. 赤い吸盤キャップを元の位置にはめま
す。
重要
調節アダプターキャップの裏側にある
ピボットが台板の溝にはまることを確
認してください。
5. 高さ調節アダプターのキャップ
(図 10-1)を、台板の穴の覆われていな
い部分(図 10-2)にはめ込みます。
6. 高さ調節アダプター(図 10-3)を裏側か
らキャップのネジ穴に差し込み、回して
締めます。
7. 調節アダプター付属の新しい吸盤(ツメ
が 2 つ)
(図 10-4)を調節アダプターに
差し込み、回して締めます。
リフトが横倒しの状態で安定します。
JA
13
5.5.3 後方の高さ調節アダプターの取り
付け
5.6 足台(別売)の取り付け
重要
右側と左側は同じ方法で取り付けま
す。
1. 吸盤を回し、台板から外します。
5.6.1 足台の取り付け
2. 高さ調節アダプターを台板の裏側からネ
ジ穴に差し込み、回して締めます。
3. 吸盤を高さ調節アダプターに差し込み、
回して締めます。
5.5.4 取り付けの完了
1. 交差脚をゆっくりとたたみます。
2. 背もたれを完全に折りたたみます。
台板とシートの間が自動的にロックされま
す。
3. 吸盤を下にしてリフトを立てます。
1. シート用カバーの前端にあるボタン(3
つ)を外し、カバーを後ろへずらしま
す。
重要
足台は、すべり止め加工が施された面
が表です。
2. 足台のツメをシート前方の溝に差し込み
ます。
3. カチッという音がしてツメがフックには
まるまで足台を深く挿入します。
4. シート用カバーのボタンを足台にはめま
す。
5.6.2 足台の取り外し
1. シート用カバーのボタンを足台から外し
ます。
2. ツメがはまっているフックを押しながら
足台を前へ引っ張ります。
3. 足台をシートの溝から引き抜きます。
4. シート用カバーのボタンをはめます。
14
JA
6
操作方法
重要
背もたれを折りたたむときは、浴槽に
お湯が入っていないことを確認してく
ださい。
6.1 制御
重要
バッテリー制御ランプ(図 11-2)が
赤く点灯しているときは、バッテリー
が十分に充電されていません。リフト
の下降機能が自動的に使用不可能にな
ります。上昇機能は作動します。リフ
トを上昇させた後、すぐにバッテリー
を充電してください。
AQUATEC ELAN 550 は、リモコンで制御しま
す(図 11)。
6.1.1 上昇
重要
ボタンから手を離すと、リフトはすぐ
に停止します。
6.1.2 下降
重要
ボタンから手を離すと、リフトはすぐ
に停止します。
リモコン(図 11-4)の上昇ボタン(図 11-5)
を押します。
シートが下降します。
6.1.3 非常時
重要
非常時以外に非常ボタンを押さないで
ください。
上昇ボタンや下降ボタンがうまく作動しない
場合などの非常時には、非常ボタン
(図 11-1)を押します。
AQUATEC ELAN 550 がただちに停止します。
非常ボタンを離し、必要に応じて不具合を直
したら、上昇/下降機能を再び使用すること
ができます。
リモコン(図 11-4)の上昇ボタン(図 11-3)
を押します。
シートが上昇します。
JA
15
6.2 入浴
警告
吸盤の吸着力が弱いとリフトがすべ
ります。
浴槽内で AQUATEC ELAN 550 を使用
する前に、リフトがすべらないこ
と、倒れる危険性がないこと、スピ
ンドル下端がスピンドル受けに固定
されていることを確認してくださ
い。
AQUATEC ELAN 550 が 5.3 の説明に従って設
置されています。
1. 上昇ボタン(図 11-3)を使ってシートを
浴槽の縁と同じ高さまで上昇させます。
サイドシートと足台(別売)が浴槽の縁と
まっすぐに並びます。
6.3 移乗介助器具の使用
移乗介助器具を使用するとAQUATEC ELAN 550
に楽に移乗できるようになります。
適切な移乗介助器具の種類については、医用
品販売店にご相談ください。
AQUATEC DISK XL(図 13)
AQUATEC DISK XL は、AQUATEC ELAN 550 の
シートの上に設置して使用し、体の回転を容
易にしてくれます。
AQUATEC TRANS XL(図 14)
AQUATEC TRANS XL は、AQUATEC ELAN 550 の
シートの上に設置して使用し、移乗と体の回
転を容易にしてくれます。
2. 浴槽にお湯を入れ、お湯の温度を点検し
ます。
3. 手前にあるサイドシートに腰掛けます。
4. 体を後ろへずらし、シートの中央まで移
動します。
5. 体を回転させ、入浴する姿勢になりま
す。その際、片足ずつ浴槽の縁をまたぎ
ます。
6. シートの中央にまっすぐ腰掛けたら、下
降ボタン(図 11-5)を押してお湯の中へ
入ります。
浴槽から出るときは、逆の順序で操作しま
す。
上昇するためには、上昇ボタン(図 11-3)
を押します。
7. 5.1 の説明に従ってバッテリーを外し、
充電します。5.4 にある説明に従って
AQUATEC ELAN 550 を折りたたみます。
16
JA
6.4 不具合が生じたら
重要
次の表は、リフトの不具合とその原因をまとめたものです。アドバイスに従って
も不具合が直らない場合は、お買い上げの販売店にご連絡ください。
不具合
モーター音がしない/リフト
が動かない
考えられる原因
バッテリーが正しく挿入され
ていない
バッテリーが空になっている
リフトが上昇しかしない
上昇の際にリフトが停止した
まま
バッテリーを充電します
( 5.1 を参照)
バッテリーの接点が汚れてい
る
バッテリーの接点をきれいに
します
コードの一部がつぶれている
お買い上げの販売店にコード
の取り替えを依頼します
バッテリーを充電します
バッテリーの低圧制御機能が
作動した
荷重の掛けすぎ
バッテリーが充電できない
ヒューズが故障している
リフトがすべってしまう
バッテリーが故障している
吸盤が古くなっているか、損
傷している
JA
アドバイス
バッテリーを正しく挿入しま
す(5.3 を参照)
体重が 120 kg を超える方は
AQUATEC ELAN 550 をご使用に
なれません
お買い上げの販売店にバッテ
リーの点検を依頼します
バッテリーを取り替えます
吸盤を取り替えます
17
7
メンテナンスとお手入れ
7.1 シート/背もたれ
警告
交差脚が動いて手を挟まれる危険性
があります。
シートのお手入れの際は、特にご注
意ください。
重要
浴室では特に衛生面での配慮が大切で
す。シートおよび背もたれは清潔に保
ち、こまめに汚れを落とすように心が
けてください。
7.1.1 汚れの落とし方
重要
磨き粉は使用しないでください。
1. 市販の中性洗剤/消毒剤とスポンジまた
はブラシを使って AQUATEC ELAN 550 の汚
れを落とします。
7.2 バッテリーと充電器
警告
感電する危険性があります。
●
お手入れの前に、必ず充電器の
プラグをコンセントから抜いて
ください。
●
伝導性の物体(針、金属の棒な
ど)でバッテリーのソケットに
触れないでください。
●
バッテリーと充電器は、必ず乾
いた布でふいてください。
乾いた布でバッテリーと充電器の汚れを落と
します。
7.3 メンテナンス
AQUATEC ELAN 550 は、上記の注意点を守っ
てお手入れをすればメンテナンスの必要があ
りません。
2. お湯で AQUATEC ELAN 550 をすすぎます。
3. 布で AQUATEC ELAN 550 の水気をふき取り
ます。
7.1.2 お手入れ
1. シート、背もたれ、および足台のカバー
(別売)のボタンを外します。
警告
損傷する危険性があります。
カバーを乾燥機に入れないでくださ
い。
2. カバーを洗濯機で洗濯する場合は、ウー
ル用洗剤を使い、最高 60 ℃ のお湯で洗
います。
3. 7.1.1 の説明に従ってリフトをすすぎま
す。
4. スライドレール(図 1-15)に少量のワセ
リンを塗ります。
18
JA
Inhaltsverzeichnis
1
1.1
1.2
1.3
1.4
1.5
1.6
Grundlegende Hinweise . . . . . . .20
Einleitung . . . . . . . . . . . . . . . . . . . .20
Verwendung. . . . . . . . . . . . . . . . . .20
Garantie . . . . . . . . . . . . . . . . . . . . .20
Wiederverwendung/
Aufbereitung. . . . . . . . . . . . . . . . . .20
Entsorgung. . . . . . . . . . . . . . . . . . .20
CE-Kennzeichnung . . . . . . . . . . . .20
2
2.1
2.2
2.3
2.4
2.5
Sicherheitshinweise . . . . . . . . . .21
Warnhinweise und Symbole . . . . .21
Allgemeine Hinweise . . . . . . . . . . .21
Hinweise zum Betrieb . . . . . . . . . .22
Hinweise zur Pflege . . . . . . . . . . . .22
Hinweise zum Akku und
zum Ladegerät . . . . . . . . . . . . . . . .22
3
3.1
3.2
3.3
3.4
Beschreibung . . . . . . . . . . . . . . . .23
Lieferumfang . . . . . . . . . . . . . . . . .23
Zubehör . . . . . . . . . . . . . . . . . . . . .24
Technische Daten . . . . . . . . . . . . .24
Kurzbeschreibung . . . . . . . . . . . . .25
4
Transportieren . . . . . . . . . . . . . . .25
5
5.1
5.2
5.2.1
5.2.2
5.2.3
5.2.4
5.3
5.4
5.5
In Betrieb nehmen . . . . . . . . . . . .25
Akku laden . . . . . . . . . . . . . . . . . . .25
Sauger montieren . . . . . . . . . . . . .26
Montage vorbereiten . . . . . . . . . . .26
Vordere Sauger montieren. . . . . . .26
Hintere Sauger montieren . . . . . . .27
Montage abschließen. . . . . . . . . . .27
In der Badewanne aufbauen . . . . .27
In der Badewanne abbauen. . . . . .28
Höhenadapter (Option)
montieren . . . . . . . . . . . . . . . . . . . .29
Montage vorbereiten . . . . . . . . . . .29
Vorderen Höhenadapter
montieren . . . . . . . . . . . . . . . . . . . .29
Hinteren Höhenadapter
montieren . . . . . . . . . . . . . . . . . . . .30
Montage abschließen. . . . . . . . . . .30
5.5.1
5.5.2
5.5.3
5.5.4
DE
5.6
5.6.1
5.6.2
Fußplatte (Option) montieren . . . . 30
Fußplatte anbauen . . . . . . . . . . . . 30
Fußplatte abnehmen . . . . . . . . . . . 30
6
6.1
6.1.1
6.1.2
6.1.3
6.2
6.3
Bedienen . . . . . . . . . . . . . . . . . . . 31
Steuern . . . . . . . . . . . . . . . . . . . . . 31
Heben . . . . . . . . . . . . . . . . . . . . . . 31
Senken . . . . . . . . . . . . . . . . . . . . . 31
NOT-AUS . . . . . . . . . . . . . . . . . . . 31
Baden . . . . . . . . . . . . . . . . . . . . . . 32
Transferhilfen nutzen . . . . . . . . . . 32
7
7.1
7.1.1
7.1.2
7.2
7.3
Pflegen und warten . . . . . . . . . . . 34
Sitz und Rückenstütze . . . . . . . . . 34
Sauber halten . . . . . . . . . . . . . . . . 34
Reinigen . . . . . . . . . . . . . . . . . . . . 34
Ladegerät und Akku . . . . . . . . . . . 34
Warten. . . . . . . . . . . . . . . . . . . . . . 34
19
1
1.1
Grundlegende Hinweise
Einleitung
In dieser Bedienungsanleitung finden Sie
Informationen und Hinweise, wie Sie den
Badewannenlifter AQUATEC ELAN 550
sicher und sachgerecht benutzen.
Wenn Sie die Hinweise beachten, vermeiden
Sie Gefahren und erhöhen die Lebensdauer
des AQUATEC ELAN 550.
Der Text dieser Bedienungsanleitung enthält
Hinweise auf Bildnummern und Positionsnummern in den Bildern. Diese Angaben sind
in Klammern gesetzt.
Beispiel: (3, Bild 1) bedeutet Bild 1,
Position 3.
Bewahren Sie alle Unterlagen zum
AQUATEC ELAN 550 sorgfältig auf.
1.2
Verwendung
1.4
Wiederverwendung/
Aufbereitung
Der AQUATEC ELAN 550 ist für den Wiedereinsatz bestimmt. Die Anzahl der maximalen
Wiedereinsätze ist abhängig vom jeweiligen
Gerätezustand.
Bei der Aufbereitung des AQUATEC
ELAN 550 sind die AQUATEC-Aufbereitungsund Hygienerichtlinien zu beachten. Diese
werden auf Anfrage von AQUATEC zur Verfügung gestellt.
1.5
Entsorgung
Wichtig!
Der AQUATEC ELAN 550 beinhaltet
keine gefährlichen Stoffe.
Nach der Produktlebenszeit entsorgen Sie
bitte den AQUATEC ELAN 550 ordnungsgemäß. Führen Sie die einzelnen Teile entsprechend der Materialkennung Ihrer örtlichen
Entsorgung zu.
Der AQUATEC ELAN 550 ist ausschließlich
zum Baden von Personen innerhalb der
Badewanne bestimmt.
Beschädigte oder verbrauchte Akkus führen
Sie bitte der Wiederverwertung zu.
Jede weitere Verwendung ist nicht erlaubt.
1.6
Den AQUATEC ELAN 550 dürfen Sie nicht
als Hilfe zum Ein- oder Aussteigen, zum Aufoder Absteigen, als Unterlage, als Hebebühne oder zu ähnlichen Zwecken benutzen.
Der AQUATEC ELAN 550 entspricht den
Bestimmungen der Medizinprodukte-Richtlinie 93/42/EWG.
1.3
CE-Kennzeichnung
Garantie
AQUATEC gewährt auf den AQUATEC
ELAN 550 eine Garantie von 3 Jahren.
Ausgenommen hiervon sind Bezüge, Sauger
und der Akku.
Das Auslieferungsdatum auf dem AQUATECLieferschein gilt als Garantiebeginn.
20
DE
2
Sicherheitshinweise
2.1
Warnhinweise und Symbole
In dieser Bedienungsanleitung finden Sie folgende Warnhinweise und Symbole:
VORSICHT!
Dieser Hinweis kennzeichnet eine
mögliche Gefährdung.
*
Wenn Sie die Hinweise nicht
beachten, können Personenschäden oder Sachschäden die Folge
sein.
Wichtig!
Dieser Hinweis kennzeichnet zusätzliche Hinweise, Infos oder Tipps. Der
Hinweis steht nur, wenn keine Gefährdungen vorliegen.
2.2
Allgemeine Hinweise
Benutzen Sie den AQUATEC
ELAN 550 nur innerhalb der Badewanne zum Baden von Personen.
Baden Sie, wenn Ihr Gesundheitszustand ein selbstständiges Baden
nicht erlaubt, nur unter Aufsicht.
Beispiel: Sie erreichen die NOT-AUSTaste an der Handsteuerung während der Bedienung nicht jederzeit.
Überlassen Sie den AQUATEC
ELAN 550 nie Kindern und Jugendlichen zum Spielen.
Lassen Sie Kinder und Jugendliche
den AQUATEC ELAN 550 nur unter
Aufsicht bedienen.
Halten Sie den AQUATEC ELAN 550
sauber und befolgen Sie die Pflegevorschriften.
Wenden Sie sich bei Funktionsstörungen bitte sofort an Ihren Fachhändler.
Nehmen Sie keine eigenmächtigen
Veränderungen oder Umbauten vor.
* An dieser Stelle finden Sie eine Darstellung, die die Art der Gefahr veranschaulicht.
DE
21
2.3
Hinweise zum Betrieb
2.4
Hinweise zur Pflege
Überzeugen Sie sich vor dem Baden
durch einen Probelauf* von der ordnungsgemäßen Funktion des
AQUATEC ELAN 550.
Achten Sie beim Reinigen des
AQUATEC ELAN 550 auf die Klemmgefahr im Schwenkbereich und im
Bereich zwischen der Hubschere.
Prüfen Sie vor der Benutzung des
AQUATEC ELAN 550 die Temperatur
des Badewassers.
Beim Befüllen der Wanne darf die
Temperatur maximal 60 °C betragen,
beim Baden maximal 45 °C.
Reinigen Sie niemals die Rückenstütze mit Hochdruck.
Benutzen Sie zum Reinigen nur
lösungsmittelfreie Haushaltsreiniger
oder von AQUATEC freigegebene
Reinigungsmittel und Verfahren.
Beachten Sie die Angaben auf dem
Typschild. Überlasten Sie den
AQUATEC ELAN 550 nicht.
Verwenden Sie nur Wasser mit einer
Temperatur von max. 60 °C.
Achten Sie, wenn Sie Badeöle oder
Badesalze verwenden, auf die empfohlene Dosierung. Die Zusätze können das Gleitverhalten der Hubschere beeinträchtigen.
Nehmen Sie den Akku beim Transport oder wenn Sie das Gerät nicht
benutzen aus der Führung. Verwenden Sie für den AQUATEC ELAN 550
ausschließlich den mitgelieferten
Akku.
Greifen Sie niemals zwischen Grundplatte und Sitzplatte.
Lassen Sie Reparaturen am
AQUATEC ELAN 550 nur vom Fachhändler durchführen.
2.5
Hinweise zum Akku und zum
Ladegerät
Werfen Sie den Akku niemals ins
Feuer und lagern Sie den Akku nicht
in der Nähe von Feuer.
Öffnen Sie den Akku nicht.
Wenn nach einer Beschädigung des
Akkus verdünnte Schwefelsäure mit
der Haut oder der Kleidung in Berührung kommt, waschen Sie die Stelle
sofort gründlich mit Wasser.
* Unbelasteten Lifter einmal nach oben und
wieder nach unten fahren.
22
DE
Gelangt verdünnte Schwefelsäure in
die Augen, waschen Sie die Augen
sofort mit viel Wasser aus und gehen
Sie zum Arzt.
Berühren Sie die Kontakte des Akkus
nicht mit leitenden Gegenständen
(z. B. Stricknadeln) und tauchen Sie
den Akku nicht ins Wasser.
Laden Sie den Akku nach der Benutzung möglichst sofort wieder. Benutzen Sie zum Laden ausschließlich
das mitgelieferte Ladegerät.
Laden Sie den Akku zur Erhöhung
der Lebensdauer bei längerem Nichtgebrauch einmal im Monat nach.
Laden Sie den Akku nur in trockenen
Räumen (nicht im Badezimmer).
Entsorgen Sie einen alten Akku
sachgemäß.
Verwenden Sie den Akku ausschließlich zum Betrieb des AQUATEC
ELAN 550 und das Ladegerät ausschließlich zum Laden des mitgelieferten Akkus.
Verbinden Sie das Ladegerät nur mit
dem Stromnetz, wenn der Akku am
Ladegerät angeschlossen ist.
3
3.1
Beschreibung
Lieferumfang
Im Lieferumfang des AQUATEC ELAN 550
sind folgende Teile enthalten (Bild 1 und
Bild 2):
Badewannenlifter (Bild 1) bestehend aus:
1
2
3
4
5
6
7
8
9
10
11
12
13
14
15
Seitenklappe
Fußplatte (Option)
Sitzplatte
Akkuführung mit Stecker
Handsteuerung
Antriebsverkleidung
Spiralkabel Handsteuerung
Rückenstütze
Spindel
Spindelfuß
Spindelfußaufnahme
Hubschere
Grundplatte
Gleitschuh
Gleitschiene
Sauger (Bild 1)
16 vorderer Sauger
(einlaschig mit Kopf)
17 hinterer Sauger
(zweilaschig mit Gewinde)
Akku und Ladegerät (Bild 2)
2
5
Akku
Ladegerät
Bedienungsanleitung (ohne Abbildung)
Bezug
Bezug Sitz
Bezug Rückenstütze
DE
23
3.2
Zubehör
Für den AQUATEC ELAN 550 ist folgendes
Zubehör lieferbar:
Höhenadapter (Bild 10)
Die Höhenadapter (3, Bild 10) sind bei Badewannen zu verwenden, deren Innenhöhe
mehr als 55 cm beträgt. In Schritten von 2, 4
oder 6 cm wird mit den Höhenadaptern der
AQUATEC ELAN 550 so angepasst, dass die
Sitzfläche des AQUATEC ELAN 550 mit dem
Badewannenrand abschließt.
Die Montage der Höhenadapter ist im
Abschnitt 5.5 beschrieben.
Seitenklappenabweiser (Bild 12)
Der Seitenklappenabweiser wird auf einen
Haltegriff bei der Badewanne aufgesteckt.
Der Seitenklappenabweiser hat die Funktion
einer Führungsschiene. Der Seitenklappenabweiser verhindert, dass beim Hochfahren
der Sitzfläche der Haltegriff die Seitenklappe
des AQUATEC ELAN 550 blockiert.
Sauger (ohne Abbildung)
Für Badewannen mit strukturiertem Boden
oder mit einer Anti-Schmutz-Beschichtung
sind vergrößerte Sauger lieferbar.
Fußplatte
Die Fußplatte (2, Bild 1) ist bei Badewannen
zu verwenden, deren Innenlänge weniger als
100 cm beträgt. Die Länge ist am oberen
Wannenrand zu messen.
Wichtig!
Bei Badewannen mit einer Innenlänge
über 100 cm darf die Fußplatte nicht
verwendet werden.
Die Fußplatte hat die Funktion einer Führung.
Die Fußplatte verhindert, dass in kurzen
Wannen beim Hoch- oder Runterfahren der
Sitzfläche die Füße eingeklemmt werden.
Die Montage der Fußplatte ist im
Abschnitt 5.6 beschrieben.
24
3.3
Technische Daten
Badewannenlifter
Länge Sitz:
590 mm
Breite Sitz bei ausgeklappten
Seitenteilen:
700 mm
Breite Sitz bei eingeklappten
Seitenteilen:
380 mm
Höhe des Sitzes in tiefster
Position:
95 mm
Höhe des Sitzes in höchster
Position:
550 mm
Sitztiefe von Unterkante Rückenstütze bis Vorderkante Sitzfläche:
460 mm
Rückenstützenhöhe:
715 mm
Rückenstützenbreite:
360 mm
Gesamtlänge zusammengeklappt: 880 mm
Gesamtlänge aufgeklappt:
700 mm
Belastung max.:
120 kg
Gesamtgewicht ohne Akku:
15,2 kg
Gewicht Akku:
1,4 kg
Dauer Hub-/Senkvorgang
(bei 80 kg Belastung):
AUF ca. 56 s
AB ca. 45 s
Betriebsspannung:
12 V
max. Stromaufnahme:
8A
Nennaufnahme:
75 W
Geräusch des unbelasteten
Antriebs (nach DIN 3746):
47 dB (A)
Medizinisches Gerät vom
Typ B
Schutzart:
IP 54
Einschaltdauer:
5%
12 V/Blei
5 A (träge)
Akku:
inklusive Sicherung:
Ladegerät
Eingang:
100 V AC, 50/60 Hz,
55 mA/10,5 VA
12 V DC, 400 mA
0,5 kg
Ausgang:
Gewicht:
Ladezeit ab
Unterspannungsanzeige:
ca. 5 h
Dem Typschild des AQUATEC ELAN 550
(Bild 15) können Sie wichtige Informationen
entnehmen.
Das Typschild ist auf der Rückseite der
Rückenstütze angebracht.
DE
3.4
Kurzbeschreibung
Der AQUATEC ELAN 550 besteht im
Wesentlichen aus stabilen Kunststoffen. Die
Schere und die Spindel sind aus rostfreiem
Edelstahl gefertigt.
Die Bezüge für Sitzplatte und Rückenstütze
sind latexfrei. Die Bezüge sind zur Reinigung
abnehmbar.
Die Handsteuerung ist wasserdicht und
schwimmfähig. Sie enthält alle Bedienelemente und eine Akkukontrollanzeige.
Das Ladegerät ist nur für das auf dem Gerät
angegebene Stromnetz geeignet. Das Ladegerät hat eine Ladekontroll-Leuchte zur
Anzeige des Ladevorgangs.
4
Transportieren
Wichtig!
P Die Sauger bleiben beim Transport
angebaut.
P Der Akku darf beim Transport nicht
in die Führung auf der Rückenstütze
eingeschoben sein.
Nehmen Sie den Akku aus der Führung und
transportieren Sie den AQUATEC ELAN 550
nur in zusammengeklapptem Zustand. Die
Beschreibung des Zusammenklappens finden Sie im Abschnitt 5.4.
5
In Betrieb nehmen
Wichtig!
Prüfen Sie vor der Inbetriebnahme die
Teile auf Transportschäden.
5.1
Akku laden
VORSICHT!
Gefahr durch elektrischen Strom
Laden Sie den Akku nur in trockenen Räumen (nicht im Badezimmer).
Wichtig!
P Laden Sie den Akku vor jeder
Benutzung ganz auf.
P Die Spannungsangabe auf dem
Ladegerät muss mit der Spannung
Ihres Stromnetzes übereinstimmen.
1. Den Klinkenstecker (1, Bild 2) des Ladegerätes (5, Bild 2) in die Buchse (6,
Bild 2) am Akku (2, Bild 2) stecken.
2. Den Netzstecker (3, Bild 2) des Ladegerätes in eine Steckdose stecken.
Die rote Kontroll-Leuchte (4, Bild 2) am Ladegerät leuchtet so lange, bis der Akku geladen
ist.
3. Den Netzstecker des Ladegerätes aus
der Steckdose ziehen.
4. Den Klinkenstecker des Ladegerätes aus
der Buchse am Akku ziehen.
DE
25
5.2
Sauger montieren
VORSICHT!
Klemmgefahr durch bewegliche
Hubscheren
Fassen Sie während der Montage
nicht in den Bereich zwischen der
Hubschere.
Wichtig!
Der Abbau der Sauger erfolgt in umgekehrter Reihenfolge.
5.2.1 Montage vorbereiten
1. Den Lifter auf die Seite legen.
2. Die Rückenstütze leicht anheben.
Die Verriegelung zwischen Grundplatte und
Sitzplatte öffnet automatisch.
5.2.2 Vordere Sauger montieren
Wichtig!
P Die Montage ist für die rechte und
linke Seite gleich.
P Die vorderen Sauger haben nur eine
Lasche und einen Kopf zum Einstecken.
1. Den roten Saugerdeckel (2, Bild 3) von
unten aus der Schlüssellochbohrung (3,
Bild 3) der Grundplatte drücken.
Wichtig!
Der Gleitfilm erleichtert das Einsetzen.
2. Den Kopf des Saugers (4, Bild 3) mit
einer handelsüblichen Hautcreme dünn
eincremen.
Wichtig!
Die Lasche mit dem Knebel muss beim
Einsetzen nach hinten zeigen.
3. Die Grundplatte (13, Bild 1) und die Sitzplatte (3, Bild 1) vorsichtig auseinander
ziehen.
3. Den Kopf des Saugers von unten in die
große Öffnung der Schlüssellochbohrung
einführen.
Der Lifter liegt jetzt stabil auf der Seite.
4. Den Kopf des Saugers ganz nach vorne
in den kleineren Kreis der Schlüssellochbohrung ziehen.
5. Die Lasche (5, Bild 3) hochbiegen und
den Knebel in die Nut (1, Bild 3) einhängen.
6. Den roten Saugerdeckel wieder hineindrücken.
26
DE
5.2.3 Hintere Sauger montieren
Wichtig!
P Die Montage ist für die rechte und
linke Seite gleich.
P Die hinteren Sauger haben zwei
Laschen und ein Gewinde.
P Die Montage muss so erfolgen,
dass an jedem Sauger eine Lasche
greifbar ist, wenn der Lifter in der
Badewanne aufgebaut ist.
Den Sauger (1, Bild 4) von unten ganz in die
dafür vorgesehene Gewindebuchse (2,
Bild 4) hineindrehen.
Die Gewindebuchse liegt an der Seite der
Grundplatte (3, Bild 4), an der sich die Spindelfußaufnahme (4, Bild 4) befindet.
5.2.4 Montage abschließen
1. Die Hubschere vorsichtig wieder zusammenschieben.
2. Die Rückenstütze ganz anklappen.
Die Verriegelung zwischen Grundplatte und
Sitzplatte schließt automatisch.
3. Den Lifter auf die montierten Sauger stellen.
5.3
In der Badewanne aufbauen
VORSICHT!
Wegrutschen des Sitzes durch
schlecht haftende Sauger
P Reinigen Sie vor dem Aufstellen
die Badewanne und die Sauger.
P Verändern Sie die Position des
aufgestellten AQUATEC
ELAN 550 in der Badewanne
nicht mehr.
Wichtig!
P Die Sauger müssen montiert sein.
P Der Akku muss geladen sein.
P Beachten Sie beim Heben das
Gewicht: Der AQUATEC ELAN 550
wiegt ca. 15,2 kg (ohne Akku).
P Wenn bei der Badewanne ein Haltegriff montiert ist, benutzen Sie den
Seitenklappenabweiser (Option).
P Wenn die Badewanne kürzer als
100 cm ist, benutzen Sie die Fußplatte (Option).
1. Den AQUATEC ELAN 550 (2, Bild 5) auf
den Boden der leeren Badewanne stellen. Die Spindelfußaufnahme (3, Bild 5)
zeigt dabei zum Badewannenende, das
dem Ablauf (1, Bild 5) gegenüberliegt.
Wichtig!
In Wannen, die kürzer als 100 cm sind,
muss der Spindelfuß fast am Wannenende anstehen (Bild 5).
DE
27
VORSICHT!
Defekt durch Herausrutschen des
Spindelfußes
Kontrollieren Sie nach dem Hochklappen der Rückenstütze, ob der
Spindelfuß in der Spindelfußaufnahme steht und verriegelt ist.
2. Die Rückenstütze (1, Bild 6) seitlich am
Kopfende anheben und ganz nach hinten
klappen (Bild 6). Der Spindelfuß (2,
Bild 6) steht in der Spindelfußaufnahme
(3, Bild 6) und verriegelt automatisch.
3. Die Fußplatte (Option) nach vorne klappen (1, Bild 7).
4. Die Seitenklappen nach außen klappen
(2, Bild 7).
5. Den geladenen Akku (2, Bild 8) von oben
in die Führung (3, Bild 8) an der Rückenstütze einführen.
6. Den Akku ganz nach unten schieben. Der
Akku rastet ein.
Der AQUATEC ELAN 550 ist betriebsbereit.
5.4
In der Badewanne abbauen
VORSICHT!
Klemmgefahr bei kurzen Wannen
Fassen Sie beim Umklappen die
Rückenlehne nur seitlich.
Wichtig!
Achten Sie beim Umklappen der
Rückenstütze darauf, dass das Spiralkabel der Handsteuerung nicht eingeklemmt wird.
7. Die Rückenstütze seitlich am Kopfende
greifen und ganz nach vorne klappen (5,
Bild 9).
Die Verriegelung zwischen Grundplatte und
Sitzplatte schließt automatisch.
Wichtig!
P Lösen Sie beide hinteren Sauger
gleichzeitig.
P Beachten Sie beim Heben das
Gewicht: Der AQUATEC ELAN 550
wiegt ca. 15,2 kg (ohne Akku).
8. Die hinteren Sauger (17, Bild 1) durch
Hochziehen der Lasche des Saugers
lösen.
1. Das Wasser aus der Badewanne ablassen.
9. Den Sitz hinten weiter anheben (6,
Bild 9).
2. Den AQUATEC ELAN 550 mit der ABTaste (5, Bild 11) absenken (1, Bild 9).
Die vorderen Sauger lösen sich von selbst.
Wichtig!
Greifen Sie tief in den Griff, um den
Akku sicher zu halten.
3. Den Akku durch leichtes Hochziehen des
Haltegriffs (1, Bild 8) entriegeln.
4. Den Akku nach oben aus der Führung
ziehen (2, Bild 9).
5. Die Seitenklappen am Sitz nach innen
klappen (3, Bild 9).
Wichtig!
Bei montierten Höhenadaptern
(Option) müssen Sie die vorderen Sauger ebenfalls durch Ziehen an den
Laschen lösen.
10. Den Lifter aus der Badewanne herausheben.
11. Alle Teile des AQUATEC ELAN 550 sorgfältig verstauen.
6. Die Fußplatte (Option) am Sitz nach hinten klappen (4, Bild 9).
28
DE
5.5
Höhenadapter (Option)
montieren
VORSICHT!
Klemmgefahr durch bewegliche
Hubscheren
Fassen Sie während der Montage
nicht in den Bereich zwischen der
Hubschere.
Wegrutschen des Sitzes durch
schlecht haftende Sauger
Verwenden Sie in keinem Fall mehr
als drei Höhenadapter pro Sauger.
Wichtig!
P Der Abbau der Höhenadapter erfolgt
in umgekehrter Reihenfolge.
P Müssen Sie mehrere Höhenadapter
verwenden, drehen Sie die weiteren
Höhenadapter in die Gewinde der
bereits montierten Höhenadapter.
5.5.1 Montage vorbereiten
1. Den Lifter auf die Seite legen.
2. Die Rückenstütze leicht anheben.
Die Verriegelung zwischen Grundplatte und
Sitzplatte öffnet automatisch.
3. Die Grundplatte (13, Bild 1) und die Sitzplatte (3, Bild 1) vorsichtig auseinander
ziehen.
5.5.2 Vorderen Höhenadapter
montieren
Wichtig!
P Die Montage ist für die rechte und
linke Seite gleich.
P Die Originalsauger können mit dem
Höhenadapter nicht mehr verwendet werden.
1. Den roten Saugerdeckel (2, Bild 3) von
unten aus der Schlüssellochbohrung (3,
Bild 3) der Grundplatte drücken.
2. Den Knebel der Lasche (5, Bild 3) aus der
Nut (1, Bild 3) aushängen.
3. Den Sauger nach hinten ziehen und
abnehmen.
4. Den Saugerdeckel wieder in die Schlüssellochbohrung hineindrücken.
Wichtig!
Der Zapfen auf der Unterseite des
Adaptereinsatzes muss in die Nut in
der Grundplatte eingreifen.
5. Den Adaptereinsatz (1, Bild 10) in die verbleibende Bohrung (2, Bild 10) einsetzen.
6. Den Höhenadapter (3, Bild 10) von unten
in das Gewinde des Adaptereinsatzes
hineindrehen.
7. Den beiliegenden neuen Sauger (zweilaschig) (4, Bild 10) in den Höhenadapter
hineindrehen.
Der Lifter liegt jetzt stabil auf der Seite.
DE
29
5.5.3 Hinteren Höhenadapter
montieren
5.6
Wichtig!
Die Montage ist für die rechte und linke
Seite gleich.
1. Den Sauger aus der Grundplatte herausdrehen.
5.6.1 Fußplatte anbauen
2. Den Höhenadapter von unten in die
Gewindebuchse in der Grundplatte hineindrehen.
3. Den Sauger in den Höhenadapter hineindrehen.
5.5.4 Montage abschließen
1. Die Hubschere vorsichtig wieder zusammenschieben.
2. Die Rückenstütze ganz anklappen.
Die Verriegelung zwischen Grundplatte und
Sitzplatte schließt automatisch.
3. Den Lifter auf die Sauger stellen.
Fußplatte (Option) montieren
1. Den Bezug vorne von der Sitzplatte
abknöpfen (3 Klipps) und den Bezug
zurückschlagen.
Wichtig!
Die Seite der Fußplatte mit den Noppen zeigt nach oben.
2. Die Stecklaschen der Fußplatte von
vorne in die Führungen an der Sitzplatte
einführen.
3. Die Fußplatte ganz einschieben, bis die
Rastnasen an den Stecklaschen einrasten.
4. Den Bezug der Sitzplatte an der Fußplatte anknöpfen.
5.6.2 Fußplatte abnehmen
1. Den Bezug der Sitzplatte von der Fußplatte abknöpfen.
2. Die Rastnasen an den Stecklaschen der
Fußplatte eindrücken und dabei die Fußplatte etwas nach vorne ziehen.
3. Die Fußplatte ganz nach vorne aus den
Führungen an der Sitzplatte herausziehen.
4. Den Bezug an der Sitzplatte anknöpfen.
30
DE
6
Bedienen
Wichtig!
Klappen Sie die Rückenstütze nur um,
wenn sich kein Wasser mehr in der
Badewanne befindet.
6.1
Steuern
Wichtig!
Falls der Akku nicht ausreichend geladen ist, leuchtet die Akkukontrollanzeige (2, Bild 11) rot. Die Absenkfunktion des Lifters wird gesperrt. Das
Hochfahren ist jedoch noch möglich.
Laden Sie den Akku in diesem Fall
nach dem Hochfahren sofort auf.
Das Steuern des AQUATEC ELAN 550
erfolgt über die Handsteuerung (Bild 11).
6.1.1 Heben
Wichtig!
Der Lifter bleibt beim Loslassen der
Taste sofort in der momentanen Position stehen.
6.1.2 Senken
Wichtig!
Der Lifter bleibt beim Loslassen der
Taste sofort in der momentanen Position stehen.
Die AB-Taste (5, Bild 11) an der Handsteuerung (4, Bild 11) drücken.
Der Sitz fährt nach unten.
6.1.3 NOT-AUS
Wichtig!
Drücken Sie die rote NOT-AUS-Taste
nur, wenn eine Notsituation vorliegt.
In einer Notsituation, wenn z. B. die AUFoder AB-Taste klemmt, die NOT-AUS-Taste
(1, Bild 11) drücken.
Die Bewegung des AQUATEC ELAN 550
wird sofort gestoppt.
Nach dem Loslassen der NOT-AUS-Taste
und ggf. der Beseitigung der Störung ist der
AQUATEC ELAN 550 wieder einsatzbereit.
Die AUF-Taste (3, Bild 11) an der Handsteuerung (4, Bild 11) drücken.
Der Sitz fährt nach oben.
DE
31
6.2
Baden
VORSICHT!
Wegrutschen des Sitzes durch
schlecht haftende Sauger
Vergewissern Sie sich vor der
Benutzung vom rutschsicheren und
kippsicheren Stand des AQUATEC
ELAN 550 in der Badewanne und
dem richtigen Sitz des Spindelfußes
in der Spindelfußaufnahme.
Der AQUATEC ELAN 550 ist wie im
Abschnitt 5.3 beschrieben in der Badewanne
aufgebaut.
1. Den Sitz mit der AUF-Taste (3, Bild 11)
auf eine Höhe mit dem Badewannenrand
fahren.
Die Seitenklappen und die Fußplatte (Option)
liegen eben auf dem Badewannenrand auf.
2. Das Badewasser einlassen und die Wassertemperatur prüfen.
6.3
Transferhilfen nutzen
Das Übersetzen auf den AQUATEC
ELAN 550 wird durch die Verwendung von
Transferhilfen erheblich erleichtert.
Ihr Sanitätsfachhändler berät Sie gerne bei
der Auswahl der für Sie geeigneten Transferhilfen.
AQUATEC DISK XL (Bild 13)
Die AQUATEC DISK XL wird auf die Sitzfläche des AQUATEC ELAN 550 gelegt. Sie
dient zum Drehen von Personen in die Badeposition.
AQUATEC TRANS XL (Bild 14)
Die AQUATEC TRANS XL wird auf die Sitzfläche des AQUATEC ELAN 550 gelegt. Sie
dient zum Schieben und Drehen von Personen in die Badeposition.
3. Auf die Ihnen zugewandte Seitenklappe
wie auf einen Stuhl setzen.
4. Bis zur Mitte des Sitzes nach hinten rutschen.
5. In Badeposition drehen. Dazu ein Bein
nach dem anderen über den Wannenrand
schwenken.
6. Bei richtiger Sitzposition den Sitz durch
Drücken der AB-Taste (5, Bild 11) in die
Badewanne absenken.
Das Aussteigen aus der Badewanne erfolgt in
umgekehrter Reihenfolge.
Zum Hochfahren die AUF-Taste (3, Bild 11)
drücken.
7. Den Akku aus der Führung nehmen und
wie im Abschnitt 5.1 beschrieben laden
oder
den AQUATEC ELAN 550 wie im
Abschnitt 5.4 beschrieben in der Badewanne abbauen.
32
DE
6.4
Störungen beseitigen
Wichtig!
Die folgende Tabelle gibt Ihnen Hinweise auf Störungen und deren mögliche Ursachen. Können Sie die Störung anhand der genannten Abhilfen nicht beseitigen,
wenden Sie sich bitte direkt an Ihren Fachhändler.
Störung
mögliche Ursache
kein Motorengeräusch hörbar/ Akku nicht richtig eingesetzt
der Lifter bewegt sich nicht
Abhilfe
Akku einsetzen (siehe
Abschnitt 5.3)
Akku ist leer
Akku laden (siehe
Abschnitt 5.1)
Kontakte verschmutzt
Kontakte reinigen
Kabel gequetscht
Lifter fährt nur nach oben
Lifter bleibt beim Hochfahren
stehen
Akku lädt sich nicht auf
kein rutschsicherer Stand
DE
Kabel durch Ihren Fachhändler
wechseln lassen
Unterspannungsüberwachung Akku laden
hat angesprochen
Hublast zu hoch
Personen mit einem Gewicht
über 120 kg dürfen den
AQUATEC ELAN 550 nicht
benutzen
Akku durch Ihren Fachhändler
Sicherung defekt
prüfen lassen
Akku defekt
Sauger alt oder beschädigt
Akku austauschen
Sauger austauschen
33
7
7.1
Pflegen und warten
7.2
VORSICHT!
Gefahr durch elektrischen Strom
Sitz und Rückenstütze
P Ziehen Sie vor dem Reinigen des
Ladegeräts immer den Netzstecker aus der Steckdose.
VORSICHT!
Klemmgefahr durch bewegliche
Hubscheren
P Fahren Sie nicht mit leitenden
Gegenständen (z. B. Stricknadel,
Metallstift) in die Buchse des
Akkus.
Seien Sie beim Reinigen des Sitzes
besonders vorsichtig.
Wichtig!
Die Hygiene ist im Bereich des Bades
besonders wichtig. Halten Sie deshalb
den Sitz und die Rückenstütze sauber
und reinigen Sie beide regelmäßig.
7.1.1 Sauber halten
Wichtig!
Verwenden Sie keine scheuernden
Mittel.
1. Den AQUATEC ELAN 550 mit handelsüblichen Reinigungs- und Desinfektionsmitteln sowie einem Lappen oder einer
Bürste abwaschen.
Ladegerät und Akku
P Reinigen Sie das Ladegerät und
den Akku nur mit einem trockenen Tuch.
Das Ladegerät und den Akku mit einem trockenen Tuch abwischen.
7.3
Warten
Bei Einhaltung der oben genannten Pflegehinweise ist der AQUATEC ELAN 550 wartungsfrei.
2. Den AQUATEC ELAN 550 mit warmem
Wasser abbrausen.
3. Den AQUATEC ELAN 550 mit einem
Lappen abtrocknen.
7.1.2 Reinigen
1. Die Bezüge von Sitz, Rückenstütze und
Fußplatte (Option) abknöpfen.
VORSICHT!
Gefahr der Beschädigung
Trocknen Sie die Bezüge nicht in
einem Wäschetrockner.
2. Die Bezüge bei max. 60 °C mit Feinwaschmittel in der Waschmaschine
waschen.
3. Den Lifter wie im Abschnitt 7.1.1
beschrieben abwaschen.
4. Die Gleitschiene (15, Bild 1) mit Vaseline
leicht einfetten.
34
DE
Contents
1
1.1
1.2
1.3
1.4
1.5
1.6
General instructions . . . . . . . . . .36
Introduction . . . . . . . . . . . . . . . . . .36
Proper use . . . . . . . . . . . . . . . . . . .36
Warranty . . . . . . . . . . . . . . . . . . . .36
Re-use/Reconditioning. . . . . . . . . .36
Disposal . . . . . . . . . . . . . . . . . . . . .36
CE marking . . . . . . . . . . . . . . . . . .36
2
2.1
2.2
2.3
2.4
2.5
Safety instructions. . . . . . . . . . . .37
Warnings and symbols. . . . . . . . . .37
General instructions . . . . . . . . . . . .37
Operating instructions . . . . . . . . . .38
Instructions on care . . . . . . . . . . . .38
Instructions on the battery
and charger . . . . . . . . . . . . . . . . . .38
3
3.1
3.2
3.3
3.4
Description . . . . . . . . . . . . . . . . . .39
Scope of delivery . . . . . . . . . . . . . .39
Accessories . . . . . . . . . . . . . . . . . .40
Technical data . . . . . . . . . . . . . . . .40
Brief description . . . . . . . . . . . . . . .41
4
Transport . . . . . . . . . . . . . . . . . . .41
5
5.1
5.2
5.2.1
5.2.2
Setting up . . . . . . . . . . . . . . . . . . .41
Recharging the battery. . . . . . . . . .41
Attaching the suction cups . . . . . . .42
Preparing for assembly . . . . . . . . .42
Attaching the front
suction cups . . . . . . . . . . . . . . . . . .42
Attaching the rear
suction cups . . . . . . . . . . . . . . . . . .43
Completing assembly. . . . . . . . . . .43
Setting up the bathlift
in the bathtub . . . . . . . . . . . . . . . . .43
Removing the bathlift
from the bathtub. . . . . . . . . . . . . . .44
Attaching the height
adapters (optional) . . . . . . . . . . . . .45
Preparing for assembly . . . . . . . . .45
Attaching the front
height adapters . . . . . . . . . . . . . . .45
5.2.3
5.2.4
5.3
5.4
5.5
5.5.1
5.5.2
EN
5.5.3
5.6.1
5.6.2
Attaching the rear
height adapters . . . . . . . . . . . . . . . 46
Completing assembly . . . . . . . . . . 46
Attaching the foot plate
(optional) . . . . . . . . . . . . . . . . . . . . 46
Installing the foot plate . . . . . . . . . 46
Removing the foot plate . . . . . . . . 46
6
6.1
6.1.1
6.1.2
6.1.3
6.2
6.3
Operation . . . . . . . . . . . . . . . . . . . 47
Control. . . . . . . . . . . . . . . . . . . . . . 47
Lifting. . . . . . . . . . . . . . . . . . . . . . . 47
Lowering . . . . . . . . . . . . . . . . . . . . 47
Emergency stop . . . . . . . . . . . . . . 47
Using the bathlift . . . . . . . . . . . . . . 48
Using transfer aids . . . . . . . . . . . . 48
7
7.1
7.1.1
7.1.2
7.2
7.3
Care and maintenance . . . . . . . . 50
Seat and backrest . . . . . . . . . . . . . 50
Keeping clean . . . . . . . . . . . . . . . . 50
Cleaning . . . . . . . . . . . . . . . . . . . . 50
Charger and battery . . . . . . . . . . . 50
Maintenance . . . . . . . . . . . . . . . . . 50
5.5.4
5.6
35
1
1.1
General instructions
Introduction
These operating instructions contain information and instructions regarding the safe and
proper use of your AQUATEC ELAN 550
bathlift.
By following these instructions, you prevent
hazards and enhance the service life of your
AQUATEC ELAN 550.
In the text, we refer to figures and individual
items within the figures. These references are
shown in brackets.
Example: (3, figure 1) refers to figure 1,
item 3.
Keep the documents supplied with your
AQUATEC ELAN 550 in a safe place for
future reference.
1.2
Proper use
The AQUATEC ELAN 550 is designed exclusively for lowering and lifting a person in a
bathtub.
Any other use is prohibited.
1.4
Re-use/Reconditioning
The AQUATEC ELAN 550 is designed for
repeated use. The maximum number of times
you can re-use the device depends on its
general state and condition.
For the reconditioning of the AQUATEC
ELAN 550 always comply with the AQUATEC
reconditioning and hygiene instructions.
These are available on request from
AQUATEC.
1.5
Disposal
Important
The AQUATEC ELAN 550 does not
contain any hazardous substances.
Always dispose of your AQUATEC ELAN 550
according to the applicable statutory regulations. Dispose of the individual parts at your
local facility according to the material identification labels on the parts.
Please recycle damaged or spent batteries.
1.6
CE marking
The AQUATEC ELAN 550 complies with EU
Directive 93/42/EEC for medical equipment.
Never use the AQUATEC ELAN 550 as an
aid to climb in or out of the bath, as a support,
lifting platform or for other similar purposes.
1.3
Warranty
AQUATEC provides the AQUATEC
ELAN 550 with a 3 year warranty.
The covers, suction cups and the battery are
not covered by the warranty.
The warranty period begins at the delivery
date as shown on the AQUATEC delivery
note.
36
EN
2
Safety instructions
2.1
Warnings and symbols
The following warnings and symbols are used
in these operating instructions:
CAUTION
This notice indicates a potential
hazard.
*
Not following these instructions
can result in injury or damage.
Important
This symbol indicates additional
instructions, information or tips. This
note only appears when there is no
direct hazard.
2.2
General instructions
The AQUATEC ELAN 550 may only
be used for lowering and lifting a person within a bathtub.
If you are unable to take a bath on
your own, use the device only under
supervision.
Example: You might not always be
able to reach the emergency stop
button on the hand control while you
are operating the device.
Never allow children or adolescents
to play with the AQUATEC
ELAN 550.
Children and adolescents may only
operate the AQUATEC ELAN 550
under the supervision of an adult.
Keep your AQUATEC ELAN 550
clean and follow the care instructions
given here.
If you detect any malfunction, please
contact your authorised dealer immediately.
Do not modify or reconstruct the
device.
* In the text, a picture illustrating the type of
risk replaces the asterisk.
EN
37
2.3
Operating instructions
2.4
Before you take a bath, do a test run*
to make sure that the AQUATEC
ELAN 550 functions properly.
When cleaning the AQUATEC
ELAN 550, beware of the risk of
injury in the pivot range and in the
area between the lifting scissors.
Also check the water temperature
before you use the AQUATEC
ELAN 550.
When filling the bath, the temperature
may not be more than 60 °C, when
bathing, not more than 45 °C.
Never clean the backrest with a high
pressure cleaner.
When cleaning, only use solvent-free
household detergents or methods
and cleaning agents approved by
AQUATEC.
Observe the information on the label.
Do not overload the AQUATEC
ELAN 550.
Only use water at a maximum temperature of 60 °C.
If you are using bath oils or bath
salts, do not exceed the recommended dosage. These additives
may impair the operation of the lifting
scissors.
When you transport the device or
when you are not using it, remove the
battery from the guide. Only use the
battery supplied for your AQUATEC
ELAN 550.
Never reach between the base plate
and the seat plate.
Instructions on care
Only authorised dealers may repair
the AQUATEC ELAN 550.
2.5
Instructions on the battery and
charger
Never throw the battery into a fire. Do
not store it near naked flames.
Do not open the battery.
If the battery becomes damaged and
diluted sulphuric acid comes into
contact with skin or clothing, wash
the area immediately with plenty of
water.
* Run the lift unloaded once to the top and
then back to the bottom.
38
EN
If diluted sulphuric acid comes into
contact with eyes, immediately rinse
the eye with plenty of water and go to
a doctor.
Do not touch the battery contacts
with objects made of conducting
materials (e.g. knitting needles). Do
not immerse the battery in water.
Recharge the battery as soon as possible after each use. Only use the
charger supplied to recharge the battery.
To increase the life of the battery,
recharge it once a month if you do
not use the device for extended periods.
Only recharge the battery in dry
rooms (not in the bathroom).
Dispose of old batteries appropriately.
Use the battery only for running your
AQUATEC ELAN 550 and use the
charger only for recharging the battery supplied.
Only plug the charger into the mains
when the battery is connected to the
charger.
3
3.1
Description
Scope of delivery
The following parts are supplied with the
AQUATEC ELAN 550 (figures 1 and 2):
Bathlift (figure 1) consisting of:
1
2
3
4
5
6
7
8
9
10
11
12
13
14
15
Sideflap
Foot plate (optional)
Seat plate
Battery guide with plug
Hand control
Drive unit cover
Curled cable for hand control
Backrest
Spindle
Spindle foot
Spindle foot retainer
Lifting scissors
Base plate
Gliding shoe
Track
Suction cups (figure 1)
16 Front suction cup
(single strap with head)
17 Rear suction cup
(double strap with thread)
Battery and charger (figure 2)
2
5
Battery
Charger
Operating instructions (not illustrated)
Cover
Seat cover
Backrest cover
EN
39
3.2
Accessories
The following accessories are available for
your AQUATEC ELAN 550:
Height adapters (figure 10)
The height adapters (3, figure 10) are
required for bathtubs with an inner height of
more than 55 cm. Using the height adapters,
you can adjust the height of the AQUATEC
ELAN 550 in steps of 2, 4 or 6 cm to make
the seat surface of the AQUATEC ELAN 550
level with the edge of the bath.
For instructions on installing the height adapters, please refer to section 5.5.
Sideflap diverter (figure 12)
The sideflap diverter is mounted to a handrail
in the bath. The sideflap diverter acts as a
guide rail and prevents the handrail from
obstructing the sideflap when you raise the
AQUATEC ELAN 550.
Suction cups (not illustrated)
Special large-size suction cups are available
for bathtubs with textured bases or dirt-repellent coatings.
Foot plate
The foot plate (2, figure 1) is required for
bathtubs with an inner length of less than
100 cm. Measure the length at the top of the
bathtub.
Important
Do not use the foot plate for bathtubs
with an inner lenght of more than
100 cm.
The foot plate acts as a guide. The foot plate
prevents your feet from being caught when
the seat is raised or lowered.
For instructions on installing the foot plate,
please refer to section 5.6.
3.3
Technical data
Bathlift
Seat length:
590 mm
Seat width with folded out
sideflaps:
700 mm
Seat width with folded up
sideflaps:
380 mm
Seat height at lowest
position:
95 mm
Seat height at highest
position:
550 mm
Seat depth from the lower edge
of the backrest to the front edge
of the seat surface:
460 mm
Backrest height:
715 mm
Backrest width:
360 mm
Total length, folded:
880 mm
Total length, open:
700 mm
Maximum load:
120 kg
Total weight without battery:
15.2 kg
Weight of battery:
1.4 kg
Time to lift/lower
(with 80 kg load):
UP approx. 56 sec.
DOWN approx. 45 sec.
Operating voltage:
12 V
Max. current consumption:
8A
Rated consumption:
75 W
Noise emission of drive
without load
(according to DIN 3746):
47 dB (A)
Medical device of type B
Degree of protection:
IP 54
Duty cycle:
5%
Battery:
Included fuse:
Charger
Input:
Output:
Weight:
Recharge time from
low-voltage warning:
12 V/lead
5 A (slow-blow)
100 V AC, 50/60 Hz,
55 mA/10.5 VA
12 V DC, 400 mA
0.5 kg
approx. 5 h
The label on the AQUATEC ELAN 550
(figure 15) provides important information.
The label is on the rear side of the backrest.
40
EN
3.4
Brief description
The main components of the AQUATEC
ELAN 550 are made of robust plastic materials. The lifting scissors and the spindles are
made of stainless steel.
The optional covers for the seat plate and
backrest are free of latex. The covers are
detachable for cleaning.
5
Setting up
Important
Before setting up, inspect all parts for
damage caused by transport.
5.1
Recharging the battery
The hand control is waterproof and floats. It
contains all operating controls and a pilot light
for the battery.
CAUTION
There is a risk of injury from electric
shock.
The charger is only suitable for connection to
the mains supply as specified on the device.
The charger has an indicator lamp to show
when it is charging.
Only recharge the battery in dry
rooms (not in the bathroom).
4
Transport
Important
P Do not remove the suction cups
when transporting the bathlift.
P You may not transport the device
with the battery inserted into the
guide on the backrest.
Take the battery out of the guide and only
transport the AQUATEC ELAN 550 when it is
folded together. For a description of how to
fold up the device, please refer to section 5.4.
Important
P Recharge the battery completely
each time before you use the bathlift.
P Make sure that the voltage specifications shown on the charger correspond to those of the power mains.
1. Insert the jack plug (1, figure 2) of the
charger (5, figure 2) into the socket (6,
figure 2) of the battery (2, figure 2).
2. Insert the power plug (3, figure 2) of the
charger into the power socket.
The red indicator lamp (4, figure 2) on the
charger stays on until the battery is fully
recharged.
3. Pull the charger out of the power socket.
4. Disconnect the jack plug of the charger
from the battery socket.
EN
41
5.2
Attaching the suction cups
CAUTION
There is a risk of injury when the lifting scissors move.
Do not reach between the lifting
scissors during assembly.
Important
To detach the suction cups, follow
these instructions in reverse order.
5.2.1 Preparing for assembly
1. Place the lift on its side.
2. Lift up the backrest slightly.
The locking mechanism between the base
plate and seat plate opens automatically.
3. Carefully pull the base plate (13, figure 1)
and the seat plate (3, figure 1) apart.
The lift is now stable lying on its side.
5.2.2 Attaching the front suction cups
Important
P The procedure is the same for the
right and the left sides.
P The front suction cups have one
strap and a head that can be
inserted into the plate.
1. Press the red suction cup lid (2, figure 3)
upwards out of the slotted hole (3,
figure 3) in the base plate.
Important
Lubricant film facilitates assembly.
2. Apply a thin layer of commercial skin
cream to the head of the suction cup (4,
figure 3).
Important
The strap with the toggle must point
backwards when you insert it.
3. Insert the suction cup head from the bottom into the large opening in the slotted
hole.
4. Pull the suction cup head all the way to
the front of the smaller opening of the
slotted hole.
5. Bend up the strap (5, figure 3) and hook
the toggle into the groove (1, figure 3).
6. Push the red suction cup lid back in.
42
EN
5.2.3 Attaching the rear suction cups
Important
P The procedure is the same for the
right and the left sides.
P The rear suction cups have two
straps and a thread.
P Attach the suction cups in such a
way that you can reach one strap of
each suction cup when the lift is set
up in the bath.
Screw the suction cup (1, figure 4) from
below into the threaded liner (2, figure 4) provided for this.
The threaded liner is located on the same
side of the base plate (3, figure 4) as the spindle foot retainer (4, figure 4).
5.2.4 Completing assembly
1. Carefully push the lifting scissors back
together.
5.3
Setting up the bathlift in the
bathtub
CAUTION
The seat may slip if the suction cups
do not adhere properly.
P Before you set up the lift, clean
the bathtub and the suction cups.
P Do not move the AQUATEC
ELAN 550 once you have
installed it in the bathtub.
Important
P The suction cups have to be
attached.
P The battery must be fully charged.
P When lifting, please remember that
the AQUATEC ELAN 550 weighs
about 15.2 kg (without battery).
2. Fold the backrest completely open.
P If your bath has a handrail, use the
sideflap diverter (optional).
The locking mechanism between the base
plate and seat plate closes automatically.
P If the bathtub is shorter than 100 cm
ist, use the foot plate (optional).
3. Place the lift on the attached suction
cups.
1. Place the AQUATEC ELAN 550 (2,
figure 5) onto the base of the empty bathtub. The spindle foot retainer (3, figure 5)
must point towards the end of the bath
opposite the drain (1, figure 5).
Important
In bathtubs shorter than 100 cm the
spindle foot must almost reach the end
of the bathtub (figure 5).
EN
43
CAUTION
There is a risk of damage if the spindle foot slips out.
CAUTION
There is a danger of being caught in
short baths.
After you have folded the backrest
out, check that the spindle foot is in
the spindle foot retainer and is
locked.
Always hold the back rest by the
sides when folding it.
2. Lift the backrest (1, figure 6) at the head
end and fold it backwards completely
(figure 6). The spindle foot (2, figure 6)
should be in the spindle foot retainer (3,
figure 6) and lock automatically.
3. Fold the foot plate (optional) all the way
forward (1, figure 7)
4. Fold the sideflaps outwards (2, figure 7).
Important
When folding the backrest, ensure that
the curled cable of the hand control
does not get caught.
7. Take hold of the side of the backrest at
the head-end and fold it all the way forward (5, figure 9).
The locking mechanism between the base
plate and seat plate closes automatically.
5. Insert the charged battery (2, figure 8)
into the guide (3, figure 8) in the backrest
from above.
Important
P Release both rear suction cups
simultaneously.
6. Push the battery down completely. It
should click in.
P When lifting, please remember that
the AQUATEC ELAN 550 weighs
about 15.2 kg (without battery).
The AQUATEC ELAN 550 is now ready for
use.
5.4
Removing the bathlift from the
bathtub
1. Let the water out of the bath.
2. Lower the AQUATEC ELAN 550 (1,
figure 9) by pressing the DOWN-button
(5, figure 11).
Important
Grasp deep into the grip so that you
can hold the battery safely.
3. Unlock the battery by pulling the grip (1,
figure 8) up slightly.
8. To release the rear suction cups, pull the
straps (17, figure 1).
9. Lift the rear end of the seat further (6,
figure 9).
This releases the front suction cups.
Important
If you have installed the height adapters (optional), you also have to pull the
straps on the front suction cups to
release them.
10. Take the lift out of the bath.
11. Carefully put away all components of the
AQUATEC ELAN 550.
4. Pull the battery upwards out of the guide
(2, figure 9).
5. Fold the sideflaps on the seat inwards (3,
figure 9).
6. Fold back the footplate (optional) on the
seat (4, figure 9).
44
EN
5.5
Attaching the height adapters
(optional)
CAUTION
There is a risk of injury when the lifting scissors move.
Do not reach between the lifting
scissors during assembly.
The seat may slip if the suction cups
do not adhere properly.
Never use more than 3 height adapters on each suction cup.
Important
P To remove the height adapters, follow the instructions in reverse order.
P If you have to use several height
adapters on a suction cup, screw
the additional height adapters into
the threads of the ones that are
already attached.
5.5.1 Preparing for assembly
1. Place the lift on its side.
2. Lift up the backrest slightly.
The locking mechanism between the base
plate and seat plate opens automatically.
3. Carefully pull the base plate (13, figure 1)
and the seat plate (3, figure 1) apart.
5.5.2 Attaching the front height
adapters
Important
P The procedure is the same for the
right and the left sides.
P You cannot use the original suction
cups with the height adapters.
1. Press the red suction cup lid (2, figure 3)
upwards out of the slotted hole (3,
figure 3) in the base plate.
2. Unhook the toggle on the strap (5,
figure 3) from the groove (1, figure 3).
3. Pull the suction cup towards the back and
remove it.
4. Press the suction cup lid back into the
slotted hole.
Important
The peg on the base of the adapter
insert must engage in the groove of the
base plate.
5. Insert the adapter insert (1, figure 10) into
the open section of the hole (2, figure 10).
6. Screw the height adapter (3, figure 10)
into the thread in the adapter insert from
below.
7. Screw the new suction cup supplied (double-strap) (4, figure 10) into the height
adapter.
The lift is now stable lying on its side.
EN
45
5.5.3 Attaching the rear height
adapters
Important
The procedure is the same for the right
and the left sides.
1. Unscrew the suction cup from the base
plate.
2. Screw the height adapter into the
threaded liner in the base plate from
below.
5.6
Attaching the foot plate
(optional)
5.6.1 Installing the foot plate
1. Undo the three clips on the cover at the
front of the seat plate and fold back the
cover.
Important
The studded side of the foot plate
faces upwards.
3. Screw the suction cup onto the height
adapter.
2. Insert the tabs on the foot plate into the
guides on the seat plate from the front.
5.5.4 Completing assembly
3. Push the foot plate in until the lugs catch
in the tabs.
1. Carefully push the lifting scissors back
together.
2. Fold the backrest completely open.
The locking mechanism between the base
plate and seat plate closes automatically.
3. Place the lift on the suction cups.
4. Clip the cover of the seat plate onto the
foot plate.
5.6.2 Removing the foot plate
1. Unclip the cover of the seat plate from the
foot plate.
2. Push in the lugs on the tabs on the foot
plate while slightly pulling the foot plate
forward.
3. Pull the foot plate all the way forward out
of the guides on the seat plate.
4. Clip the cover onto the seat plate.
46
EN
6
Operation
Important
Do not fold the backrest down if there
is water in the bath.
6.1
Control
Important
If the battery does not have enough
charge, the red battery pilot light goes
on (2, figure 11). In this case, the lowering function is disabled. However,
you can still raise the lift. Recharge the
battery immediately after you have
raised it.
You use the hand control (figure 11) to control
the AQUATEC ELAN 550.
6.1.1 Lifting
Important
If you let go of the button, the lift stops
instantly in its position.
6.1.2 Lowering
Important
If you let go of the button, the lift stops
instantly in its position.
Press the DOWN-button (5, figure 11) on the
hand control (4, figure 11).
The seat moves downwards.
6.1.3 Emergency stop
Important
Only press the red emergency stop
button in the case of an emergency.
In an emergency situation, such as if the UP
or DOWN button is jammed, press the emergency stop button (1, figure 11).
The AQUATEC ELAN 550 stops moving
immediately.
When the emergency stop button is released,
the AQUATEC ELAN 550 can again be operated normally, provided that no repairs are
needed.
Press the UP-button (3, figure 11) on the
hand control (4, figure 11).
The seat moves upwards.
EN
47
6.2
Using the bathlift
CAUTION
The seat may slip if the suction cups
do not adhere properly.
Before you use the AQUATEC
ELAN 550, make sure that it is
securely positioned and cannot tip
over, and that the spindle foot is sitting properly in the spindle foot
retainer.
Section 5.3 describes how to set up the
AQUATEC ELAN 550 in the bathtub.
1. Raise the seat until it is level with the
edge of the bath by pressing the UP-button (3, figure 11).
The sideflaps and the foot plate (optional)
should be level and rest on the edge of the
bathtub.
6.3
Using transfer aids
Transfer aids make it substantially easier to
position yourself on the AQUATEC
ELAN 550.
Your medical supplies dealer can advise you
on choosing a suitable transfer aid.
AQUATEC DISK XL (figure 13)
The AQUATEC DISK XL is placed onto the
seat surface of the AQUATEC ELAN 550. It
helps you to rotate into the bathing position.
AQUATEC TRANS XL (figure 14)
The AQUATEC TRANS XL is placed onto
the seat surface of the AQUATEC ELAN 550.
It helps you to slide and rotate into the bathing position.
2. Fill the bath with water and check the
temperature.
3. Sit down on the sideflap nearest to you as
you would sit down on a chair.
4. Slide backwards until you are sitting in the
middle of the seat.
5. Turn yourself so that you can be comfortably lowered into the water. Lift one leg
after the other over the edge of the bathtub.
6. Once you are sitting correctly, press the
DOWN-button (5, figure 11) to lower the
seat into the water.
To get out of the bath, follow the above steps
in reverse order.
To lift the seat, press the UP-button (3,
figure 11).
7. After a bath, take the battery out of the
guide and recharge it as described in section 5.1
or
take the AQUATEC ELAN 550 out of the
bath as described in section 5.4.
48
EN
6.4
Troubleshooting
Important
The following table provides information on faults and their probable cause. If you
cannot rectify a fault using the table, please contact your authorised dealer directly.
Problem
No motor noise/lift does not
move
Possible causes
The battery is not properly
inserted
Remedy
Insert the battery
(see section 5.3)
The battery is flat
Recharge the battery
(see section 5.1)
The contacts are dirty
Clean the contacts
The cable is damaged
The lift can be raised but not
lowered
The lift stops while being
raised
The battery cannot be
recharged
The bathlift slips
EN
Have your authorised dealer
replace the cable
Low-voltage protection is acti- Recharge the battery
vated
The load is excessive
People who weigh more than
120 kg may not use the
AQUATEC ELAN 550
Have your authorised dealer
The fuse is faulty
check the battery
The battery is faulty
The suction cups are old or
damaged
Replace the battery
Replace the suction cups
49
7
7.1
Care and maintenance
7.2
CAUTION
There is a risk of injury from electric
shock.
Seat and backrest
CAUTION
There is a risk of injury when the lifting scissors move.
P Before cleaning the charger,
always pull the plug out of the
power socket.
Be especially careful when cleaning
the seat.
Important
Hygiene is very important around the
bath. Thus you need to clean the seat
and backrest regularly and keep them
clean.
7.1.1 Keeping clean
Important
Do not use abrasive cleaning agents.
1. Wash the AQUATEC ELAN 550 with
commercial detergents and disinfectants
using a cloth or brush.
Charger and battery
P Never insert objects made of conducting material (e. g. knitting
needles, metal pins) into the battery socket.
P Only use a dry cloth to clean the
charger and the battery.
Wipe down the charger and the battery with a
dry cloth.
7.3
Maintenance
The AQUATEC ELAN 550 is maintenancefree provided you follow the care instructions
described above.
2. Rinse the AQUATEC ELAN 550 with
warm water.
3. Dry the AQUATEC ELAN 550 with a
cloth.
7.1.2 Cleaning
1. Remove the covers from the seat, backrest and foot plate (optional).
CAUTION
There is a risk of damage.
Do not tumble-dry the covers.
2. Wash the covers in the washing machine
at maximum 60 °C using a mild detergent.
3. Clean the lift as described in
section 7.1.1.
4. Lightly grease the track (15, figure 1)
using Vaseline.
50
EN
JA
D
NICHII GAKKAN Co., Ltd.
2-9 Kanda-Surugadai
Chiyoda-ku Tokyo
Japan 101 - 8688
Telephone +81 3 3291 - 5805
Telefax
+81 3 3291 - 5684
E-Mail
[email protected]
URL
www.nichiigakkan.co.jp
A
Telefon
Telefax
E-Mail
Internet
07562 700-0
07562 700-66
[email protected]
www.aquatec.de
CH
MOBITEC
Mobilitätshilfen GmbH
Herzog Odilostraße 101
A-5310 Mondsee
Telefon
Telefax
E-Mail
AQUATEC/DOLOMITE
Alemannenstraße 10
D-88316 Isny
06232 5535-00
06232 5535-4
[email protected]
GB
01207 5850-00
01207 5850-85
[email protected]
CDN
05640 1520-0
05640 1520-1
[email protected]
www.alberag.ch
CLARKE HEALTH CARE
PRODUCTS Inc.
1003 International Dr.
USA-Oakdale, PA 15071-9226
Telephone
Telefax
E-Mail
Internet
+1 724 69 52 122
+1 724 69 52 922
[email protected]
www.clarkehealthcare.com
F
DOLOMITE HOME CARE
PRODUCTS Inc.
50 Shields Court
CDN Markham
On. L3R 9T5
Telephone
Telefax
E-Mail
Internet
Telefon
Telefax
E-Mail
Internet
USA
BISON BEDE Ltd.
Unit 9
N°1 Industrial Estate
Medomsley Road
Consett, County Durham
DH8 6ST
Telephone
Telefax
E-Mail
ALBER AG
Kesselstrasse 2
CH-8957 Spreitenbach
0905 4790391
0905 4799227
[email protected]
www.dolomitehcp.com
MOBITEC Sarl
Parc du Moulin à Vent
F-69693 Vénissieux
Téléphone 0472 7850-50
Téléfax
0472 7850-55
E-Mail
[email protected]
AQT-0011-00XJ
© 2003 AQUATEC/DOLOMITE D-88316 Isny
Art.-Nr.: 16351 - Stand 03/03


![付属品の確認 ナビゲーションの取り付け位置について 取付説明書[本体用]](http://vs1.manualzilla.com/store/data/006657321_2-dc0c456dd7855f2a2de77478d0b0a837-150x150.png)