1
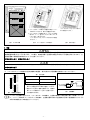
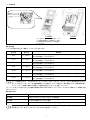
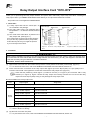
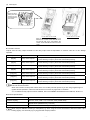
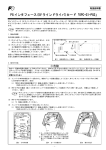
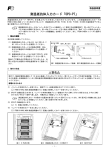
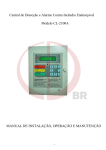
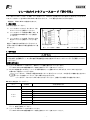
リレー出力インタフェースカード「OPC-RY2」
リレー出力インタフェースカード(以降,リレー出力カード)「OPC-RY2」をお買上げいただきましてありがとうございます。
このリレー出力カードを FRENIC-HVAC/AQUA に取り付けることで,7×1a 接点を出力することができます。
本製品は、FRENIC-MEGA には適用できません。
1. 製品の確認
次の項目を確認してください。
(1) リレー出力カードおよび,ねじ(M3×8:4 本)
が入っていることを確認してください。
ねじ取付け用穴(左)
形式
取外し用つまみ
CN1
(2) リレー出力カード上の部品の異常,凹み,反
りなど輸送時での破損がないことを確認し
てください。
(3) リレー出力カード上に形式「OPC-RY2」が印
刷されていることを確認してください(図
1)。
製品にご不審な点や不具合などございましたら,
お買上げ店または最寄りの弊社営業所までご連
絡ください。
取付け位置決め部
図1
ねじ取付け用穴(右)
リレー出力カード表面
図2
リレー出力カード裏面
2. 取付け方法
取付け・配線は電源を遮断して 10 分以上経過してから行ってください。更にチャージランプの消灯を確認後,テスター
などを使用し主回路端子 P(+)-N(-)間の直流中間回路電圧が安全な値(DC+25V 以下)に下がっていることを確認してから行
ってください。
感電のおそれあり
(1) インバータ本体のカバーを取り外し,制御プリント基板を露出させてください(図 3)。
FRENIC-HVAC/AQUA 取扱説明書の「2.2 配線」を参照してカバーを取り外してください。
(2) OPC-RY2 の裏面(図 2)の CN1 を,インバータ本体の制御プリント基板の B-Port(CN5)または,C-Port(CN6)へ差し込み,
付属のねじで固定してください(図 4)。
リレー出力カードの取付け位置決め部(図 1)がツメ(図 4①)にセットされ,CN1(図 4②)が確実に差し込まれて
いることを確認してください。図 5 は取付け完了を示します。
リレー出力カードは A-port(CN4)に取り付けないでください。接続すると破損する可能性があります。
■ 取付け可能なオプションポート
ポート
A-port
B-port
C-port
出力信号
出力信号の割り付け
接続しないでください。
リレー出力 6
機能コード o01
リレー出力 7
機能コード o02
リレー出力 8
機能コード o03
リレー出力 9
機能コード o04
リレー出力 10
機能コード o05
リレー出力 11
機能コード o06
リレー出力 12
機能コード o07
(3) OPC-RY2 の配線を行います。
「3. 配線」を参照してください。
(4) インバータ本体のカバーを元に戻してください。
FRENIC-HVAC/AQUA 取扱説明書の「2.2 配線」を参照してカバーを取り付けてください。
- 1 -
②
取り付け可能 C-Port
CN6
①
CN5
取り付け可能 B-Port
ツメ
CN4
取り付け不可 A-Port
① リレー出力カードの取付け位置決め部をインバー
タ本体のツメに合わせ,取付け位置を決めます。
(リレー出力カードを C-port に取り付
けた場合を示します。)
② リレー出力カード裏面の CN1 を,インバータ本体の
制 御 プ リ ン ト 基 板 の B-port(CN5) ま た は
C-port(CN6)へ差し込みます。
(リレー出力カードを C-port に取り付ける場合を
示します。)
図3
0.75kW の例
図 4 リレー出力カードの取付け
図5
取付け完了
3. 配線
一般的に制御信号線の被覆は強化絶縁されていませんので,主回路活電部に制御信号線が直接触れると,何らかの原因で
絶縁被覆が破壊されることがあります。この場合,制御信号線に主回路の高電圧が印加される危険性がありますので,主
回路活電部に制御信号線が触れないように注意してください。
事故のおそれあり,感電のおそれあり
インバータ,モータ,配線からノイズが発生します。周辺のセンサーや機器の誤動作防止対策をとってください。
事故のおそれあり
(1) リレー出力カードへの配線は下記の接続端子配置図,端子仕様および回路構成を参照して行ってください。
9A
表1
端子仕様
6C
9C 10A 10C
6A
7A
端子サイズ
M3
締付トルク
0.5 N·m
推奨電線サイズ*
0.75 ㎜ 2
7C
8C
11A 11C 12A 12C
8A
図6
接続端子配置図
* 使用する電線は許容温度 75℃ 600V HIV 絶縁電
線です。周囲温度 50℃の条件で選定しています。
* 推奨サイズを超えた電線を使用すると,配線本
数によっては表面カバーを正しく装着できなく
なる場合があります。
6A~12A
o01~o07 信号 駆動
RY
6C~12C
回路
図7
回路構成
ノイズによる誤動作を防ぐため,リレー出力カードの配線は,主回路の配線とは可能な限り離して配線してくださ
い。インバータ内部のリレー出力カードの配線は,主回路活電部(例えば主回路端子台部)に直接接触しないように
内部で束線固定などの処理を行ってください。
- 2 -
(2) 配線処理
配線がツメに(3 箇
所)かからないよう
に注意してくださ
い。
0.75kW の例
37kW の例
リレー出力カードからの配線処理は,インバ
ータ本体の制御端子台と左側面カバーの間,
および制御端子台と表面カバーの間を通して
行ってください。
■ 端子機能
リレー出力端子の出力は,機能コード o01~o07 に従います。
端子記号
端子名称
機能説明
6A/6C
リレー出力 6
機能コード o01 で設定した各種信号(運転中信号,周波数到達信号,モータ過負荷予報信号
など)を接点信号として出力できます。
7A/7C
リレー出力 7
機能コード o02 で設定した各種信号(運転中信号,周波数到達信号,モータ過負荷予報信号
など)を接点信号として出力できます。
8A/8C
リレー出力 8
機能コード o03 で設定した各種信号(運転中信号,周波数到達信号,モータ過負荷予報信号
など)を接点信号として出力できます。
9A/9C
リレー出力 9
機能コード o04 で設定した各種信号(運転中信号,周波数到達信号,モータ過負荷予報信号
など)を接点信号として出力できます。
10A/10C
リレー出力 10
機能コード o05 で設定した各種信号(運転中信号,周波数到達信号,モータ過負荷予報信号
など)を接点信号として出力できます。
11A/11C
リレー出力 11
機能コード o06 で設定した各種信号(運転中信号,周波数到達信号,モータ過負荷予報信号
など)を接点信号として出力できます。
12A/12C
リレー出力 12
機能コード o07 で設定した各種信号(運転中信号,周波数到達信号,モータ過負荷予報信号
など)を接点信号として出力できます。
リレーが励磁されると,それぞれ 6A-6C,7A-7C,8A-8C,9A-9C,10A-10C,11A-11C,12A-12C 間が短絡となります。
本リレー出力カードはインバータの制御電源が OFF の場合は,すべての接点 A-C 間が開放します。負論理を使用し
てフェールセーフ機能に適用する場合は,論理矛盾を起こさないよう注意してください。
リレー出力として割り付けられる機能の詳細は FRENIC-HVAC/AQUA ユーザーズマニュアルの「6.1 機能コードの概要」を参
照してください。
■ 電気的仕様
項目
仕様
接点容量
AC250V 0.3A(cosφ=0.3)又は,DC48V 0.5A(抵抗負荷)
接点寿命
20 万回(1 秒間隔で ON,OFF させた場合)
適合安全規格
EN61800-5-1:2007 Over Voltage CategoryⅡ(強化絶縁)AC250V
頻繁な ON/OFF 動作が予想される場合(例えば,インバータ出力制限中の信号を選択して電流制限を積極的に利用す
る場合など)には,端子 Y1~Y4(トランジスタ出力)を使用してください。
- 3 -
富士電機株式会社
パワエレ機器事業本部
ドライブ事業部
〒141-0032 東京都品川区大崎1-11-2 ゲートシティ大崎イーストタワー
URL
発行
http://www.fujielectric.co.jp/
富士電機株式会社
技術相談窓口
鈴鹿工場
TEL:0120-128-220
〒513-8633
三重県鈴鹿市南玉垣町 5520 番地
FAX:0120-128-230
INR-SI47-1641-JE
- 4 -
Instruction Manual
Relay Output Interface Card "OPC-RY2"
Thank you for purchasing this relay output interface card (herein after called relay output card) "OPC-RY2". Installing this
relay output card to your FRENIC-HVAC/AQUA series allows you to output seven SPST-NO contacts.
This product can not be applied to FRENIC-MEGA.
1. Check that :
(1) A relay output card and four screws (M3 × 8)
Screw hole (left)
are contained in the package.
(2) The relay output card is not damaged during
transportation --- no defective devices, dents or
warps.
(3) The model name "OPC-RY2" is printed on the
relay output card. (See Figure 1.)
Model name
Release knob
CN1
If you suspect the product is not working properly
or if you have any questions about your product,
contact the shop where you bought the product
or your local Fuji branch office.
Positioning cutout
Figure 1
card
Screw hole (right)
Front of relay output card
Figure 2 Back of relay output
2. Installation
Before starting installation and wiring, turn OFF the power and wait at least 10 minutes. Further, make sure charging lamp
is turned OFF and check that the DC link bus voltage between the terminals P(+) and N(-) has dropped to the safe level
(+25 VDC or below) using a multimeter or a similar instrument.
Otherwise, electric shock could occur.
(1) Remove the front cover from the inverter and expose the control printed circuit board (control PCB). (Figure 3)
To remove the front cover, refer to the FRENIC-HVAC/AQUA Instruction Manual, Section 2.2.
(2) Insert connector CN1 on the back of the relay output card (Figure 2) into the B-port (CN5) or C-port (CN6) on the
inverter's control PCB. Then tighten the screws that come with the relay output card. (Figure 4)
Check that the positioning cutout (Figure 1) is fitted on the tab (c in Figure 4) and connector CN1 is fully
inserted (d in Figure 4). Figure 5 shows the relay output card correctly mounted. Do not connect the relay
output card to the A-port (CN4). Doing so may damage the relay output card.
■ Ports available for the relay output card
Port
A-port
B-port
C-port
Output signal
Assignment
Do not connect the relay output card to this port.
Relay contact output 6
Function code o01
Relay contact output 7
Function code o02
Relay contact output 8
Function code o03
Relay contact output 9
Function code o04
Relay contact output 10
Function code o05
Relay contact output 11
Function code o06
Relay contact output 12
Function code o07
(3) Perform wiring on the relay output card.
Refer to Section 3 "Wiring".
(4) Put the front cover back into place.
To put back the front cover, refer to the FRENIC-HVAC/AQUA Instruction Manual, Section 2.2.
- 1 -
②
C-Port
CN6
Available
B-Port
CN5
Available
①
Tab
CN4
Not available A-Port
c Fit the positioning cutout of the relay output
card over the tab on the inverter to
determine the mounting position.
d Insert connector CN1 on the relay output
card into the B-port (CN5) or C-port (CN6)
on the inverter's control PCB.
(This figure shows the insertion into
the C-port.)
(This figure shows the insertion into the
C-port.)
Figure 3 In the case of 0.75 kW
Figure 4 Mounting relay output card
Figure 5 Mounting Completed
3. Wiring
In general, the covers of the control signal wires are not specifically designed to withstand a high voltage (i.e., reinforced
insulation is not applied). Therefore, if a control signal wire comes into direct contact with a live conductor of the main
circuit, the insulation of the cover might break down, which would expose the signal wire to a high voltage of the main
circuit. Make sure that the control signal wires will not come into contact with live conductors of the main circuit.
Failure to observe this precaution could cause electric shock or an accident.
Noise may be emitted from the inverter, motor and wires.
Take appropriate measures to prevent the nearby sensors and devices from malfunctioning due to such noise.
An accident could occur.
(1) Perform wiring properly, referring to the "Terminal Allocation and Symbol Diagram", "Terminal Specifications" and
"Internal Block Diagram" shown below.
Table 1 Terminal Specifications
9A
6C
9C 10A 10C
6A
7A
7C
8C
11A 11C 12A 12C
8A
Figure 6 Terminal Allocation
and Symbol Diagram
Terminal Size
M3
Tightening Torque
0.5 N·m
Recommended Wire Gauge *
0.75 mm
6A to 12A
2
* 600 V class of polyethylene-insulated HIV wires
with allowable temperature of 75ºC, at the
ambient temperature of 50ºC.
* Using wires exceeding the recommended sizes
may lift the front cover depending upon the
number of wires used and equips front cover
incorrectly.
oO1~o07
Driver
signal
Circuit
RY
6C to 12C
Figure 7 Internal Block Diagram
To prevent malfunctioning due to noise, separate signal wires for the relay output card as far apart as possible from
those for the main circuits. Also, inside the inverter, bundle and fix the wires for the relay output card so that they do
not come into direct contact with live parts of the main circuits (e.g. the main circuit terminal block).
- 2 -
(2) Wire layout
Route the wires,
taking care not to
let them go over
the three tabs on
the inverter.
In the case of 0.75 kW
In the case of 37 kW
Pass the wires from the relay output card
between the control circuit terminal block
and the left side cover, and between the
control circuit terminal block and the front
cover.
■ Terminal Functions
Outputs from the relay output terminals on this relay output card are dependent on function code o01 to o07 settings
specified.
Symbol
Name
Descriptions
[6A]/[6C]
Relay contact output 6
Relay contacts to output signals selected by function codes o01, such as
Inverter Running, Frequency Arrival and Overload Early Warning.
[7A]/[7C]
Relay contact output 7
Relay contacts to output signals selected by function codes o02, such as
Inverter Running, Frequency Arrival and Overload Early Warning.
[8A]/[8C]
Relay contact output 8
Relay contacts to output signals selected by function codes o03, such as
Inverter Running, Frequency Arrival and Overload Early Warning.
[9A]/[9C]
Relay contact output 9
Relay contacts to output signals selected by function codes o04, such as
Inverter Running, Frequency Arrival and Overload Early Warning.
[10A]/[10C]
Relay contact output 10
Relay contacts to output signals selected by function codes o05, such as
Inverter Running, Frequency Arrival and Overload Early Warning.
[11A]/[11C]
Relay contact output 11
Relay contacts to output signals selected by function codes o06, such as
Inverter Running, Frequency Arrival and Overload Early Warning.
[12A]/[12C]
Relay contact output 12
Relay contacts to output signals selected by function codes o07, such as
Inverter Running, Frequency Arrival and Overload Early Warning.
The corresponding relays are driven (excited) so that each of 6A-6C, 7A-7C, 8A-8C, 9A-9C, 10A-10C, 11A-11C and
12A-12C is short-circuited.
When the inverter's control power is OFF, all the A-C contact pairs are opened. If you are using negative logic to
realize fail-safe operation, make sure that this does not cause any logic fault or confliction.
For details of relay output functions available, refer to the FRENIC-HVAC/AQUA User's Manual, Section 6.1.
■ Electrical Specifications
Item
Specifications
Contact capacity
250 VAC, 0.3A, cosΦ = 0.3, or 48 VDC, 0.5A (resister load)
Contact life
200,000 times (ON/OFF every 1 second)
Safety Standards
EN61800-5-1:2007 Over Voltage Category Ⅱ (Reinforce insulation) 250VAC
When frequent ON/OFF switching is anticipated (e.g. when using the current limit function with the inverter output
limiting signal), use terminals [Y1] to [Y4] (transistor outputs) instead.
- 3 -
Fuji Electric Co., Ltd.
Gate City Ohsaki, East Tower, 11-2, Osaki 1-chome, Shinagawa-ku, Tokyo, 141-0032, Japan
Phone: +81 3 5435 7058
Fax: +81 3 5435 7420
URL http://www.fujielectric.com/
INR-SI47-1641-JE
- 4 -