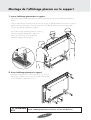
1
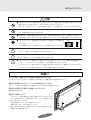
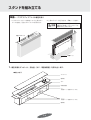
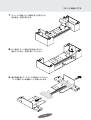
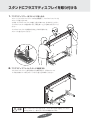
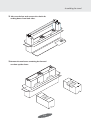
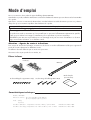
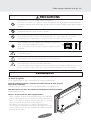
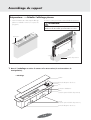
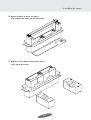
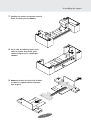
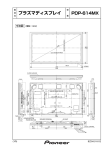
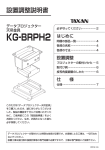
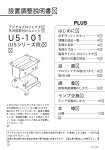
テーブルトップスタンド Table top stand Support de couverture de table PDK-TS06 取扱説明書 Operating instructions Mode d’emploi 取扱説明書 このたびはプラズマディスプレイ専用スタンド PDK-TS06 をお買い上げいただきありがとうございました。 ご使用の前に、本機の機能を十分生かしてご利用いただくために、この「取扱説明書」を最後までお読みください。 お読みになったあとは、いつでも見られる所に大切に保存してください。 万一、ご使用中にわからないことや不具合が生じたとききっとお役に立ちます。 ★本機は、パイオニア製 61V 型プラズマディスプレイ(PDP-614MX)専用です。 [据付工事]について ● 本機は十分な技術・技能を有する専門業者が据え付けを行うことを前提に販売されているものです。 据え付け・取り付けは必ず、工事専門業者または販売店にご依頼ください。 ● なお、据え付け・取り付けの不備、誤使用、改造、天災などによる事故損傷については、弊社は一切 責任を負いません。 販売店様・工事店様へ お客様の安全のため取り付け場所の強度には、プラズマディスプレイおよび 各ユニット等の荷重に耐えるよう十分注意のうえ、設計施工をお願いいたします。 各取り付けに際しましては、必ず 3 人以上で行ってください。 取りはずしたネジなどは、紛失しないようご注意ください。 同梱の部品一覧 ●フット(2個) ●バー(1個) ●取扱説明書(本書) ●ディスプレイ取付け用ネジ―M6×50(4個) P D K -T S 06 ●スタンド組立て用ネジ―M4×14(8個) 仕様 型 式:PDK-TS06 外形寸法:(W)1125 ×(H)207.4 ×(D)440mm 質 量:8.8kg 使用環境:温度 0℃∼ 40℃ 湿度 20%∼ 80% 保管条件:温度 -10℃∼ 50℃ 湿度 10%∼ 90% 必ず守ってください ご使用の前に 絵表示について この「取扱説明書」では、製品を安全に正しくお使いいただき、あなたや他の人々への危害や財産への損害を 未然に防止するために、いろいろな絵表示をしています。その表示と意味は次のようになっています。内容を よく理解してから本文をお読みください。 警告 この表示を無視して、誤った取り扱いをすると、人が死亡や大けがをするなど 人身事故の原因となります。 注意 この表示を無視して、誤った取り扱いをすると、人がけがをしたり周囲の家財に 損害をあたえたりすることがあります。 絵表示の例 記号は注意(警告を含む)をうながす内容があることを告げるものです。 図の中に具体的な注意内容が描かれています。 記号はしてはいけないことを表しています。 図の中に具体的な禁止内容が描かれています。 記号はしなければならないことを表しています。 図の中に具体的な指示内容が描かれています。 警告 ● プラズマディスプレイを設置する際は、必ず販売店へ依頼し、本書に基づいて行なってください。 誤った設置はプラズマディスプレイが転倒してけがの原因となります。 ● 安全確保のため、ボルトおよびねじ類は確実に締めつけてください。 プラズマディスプレイが転倒してけがの原因となります。 ● 部品を改造しないでください。 プラズマディスプレイが転倒してけがの原因となります。 ● こわれた部品を使用しないでください。プラズマディスプレイが転倒してけがの原因となります。 万一、部品がこわれた場合は販売店にご相談ください。 ● 各ユニットはパイオニア製 61V 型プラズマディスプレイ(PDP-614MX)専用です。 それ以外の機器を取付けないでください。転倒してけがの原因となります。 ● ぐらついた台の上や傾いたところなど、不安定な場所に置かないでください。 落ちたり、倒れたりしてけがの原因となります。また、乗り物の中には設置しないでください。 J-2 必ず守ってください 注意 ● プラズマディスプレイの通風孔をふさがないでください。通風孔をふさぐと内部に熱がこもり、火災の 原因となることがありますので、次のような使い方はしないでください。 たとえば、プラズマディスプレイを狭い風通しの悪いところに設置する・カバーなどでおおい隠すなど。 ● プラズマディスプレイを冷暖房の吐き出し口や振動のおおい場所には設置しないでください。 火災・感電の原因となることがあります。 ● 湿気やほこり、油煙や湯気の当たるようなところ(調理台や加湿器のそばなど)に設置しないでください。 火災の原因となることがあります。屋外で使用しないでください。火災・感電の原因となることがあります。 ● プラズマディスプレイを設置するときは図のように周囲から十分な間隔をあ けてください。 50mm 50mm 十分な間隔をあけないと内部に熱がこもり火災の原因となることがあります。 50mm 50mm 壁 50mm ● プラズマディスプレイを各ユニットに取り付けるときは、プラズマディスプレイをおさえながら行って ください。転倒してけがの原因となることがあります。 ● キャスター付き置き台にプラズマディスプレイを設置する場合には、キャスター止めをしてください。 動いたり倒れたりしてけがの原因となることがあります。 ● プラズマディスプレイは重いので、安定したところに設置してください。また、転倒防止の処置を行って ください。プラズマディスプレイが転倒し、けがの原因となることがあります。 プラズマディスプレイは重心が高いので、開梱や持ち運びは必ず3人以上で機器の上下を支えながら行っ てください。誤った作業は、倒れたりしてけがの原因となることがあります。 お願い ホコリや湿気、油煙やタバコの煙の多い部屋はさけてください プラズマディスプレイのスクリーン前面に汚れが付着して、画像が悪くなる原因となります。 直射日光や照明の光がスクリーンにあたる場所はさけてください スクリーンに周辺の光が直接あたると画面が白っぽくなり見にくい画面となります。 高温または低温になる場所には設置しないでください 故障の原因となります。 転倒防止の補助について ・ ディスプレイに添付の転倒防止金具をご利用いただきプラズマディス プレイを壁面や柱など、堅牢部に固定するか、スタンド後部の穴を利 用して台に固定してください。 (別売の壁掛けユニットなどでは使用しません。) ・ 移動させるときは、ひもに注意してください。 ・ 壁面、柱や台に固定するネジは添付されていません。固定物に合わせて お客様によりご用意願います。 J-3 スタンドを組み立てる 準備・・・プラズマディスプレイの梱包を解く 2.上側のダンボールを引き抜き、保護シートを開く。 1.プラズマディスプレイを梱包している上側のダン ボールを開き、発泡スチロール 3 つを取り外す。 注意 開封後は速やかに設置してください。 放置すると転倒してディスプレイを 破損することがあります。 発泡スチロール 保護シート 1. 梱包を解きダンボール、添付品(ネジ・取扱説明書)を取り出します。 ●梱包の様子 ダンボール 緩和箱 ネジ 取扱説明書 バー (保護シートで覆われています) フット (保護シートで覆われています) 緩和箱 J-4 スタンドを組み立てる 2. バーを取り出し、左右の緩和箱を取り出します。 3. フットが入っている箱 2 つを取り出し、裏返して置いてください。 J-5 スタンドを組み立てる 4. フットを覆っている保護シートを中央 の切れ目からめくり、取付部が見える ようにします。 切れ目 5. 2 . で取り出しておいたバーの保護 シートを取り、フットのガイドピンに合 わせてはめ込み、添付のスタンド組立て 用ネジで止めてください。 注意 ネジは確実に締め付けてくだ さい。 倒れたりしてけがの原因にな ります。 ガイドピン 6. フットが入っている箱を持ってもう 一度裏返して置きます。 J-6 スタンドを組み立てる 7. スリットに挟まっている部分を上に持ち上げ、 1 引き抜き、手前に倒します。 2 1 2 1 8. バー側はスリット部分を引き抜いてから、 図のように折り、手前に倒してください。 2 9. 箱の前後を倒して、スタンドを取出してください。 フットを覆っている保護シートを取り外します。 J-7 スタンドにプラズマディスプレイを取り付ける 1. プラズマディスプレイをスタンドに差し込む。 スタンドとプラズマディスプレイの向きを確認し、プラズマディスプレイを スタンドに差し込みます。 この際、プラズマディスプレイは重く、重心が高いので、必ず3人以上で行い、 プラズマディスプレイ背面の取っ手と下側を持って上下を支えながら行ってく ださい。 プラズマディスプレイを両側から持ち上げ本体下部の穴を スタンドに差し込んでください。 2. プラズマディスプレイとスタンドを固定する プラズマディスプレイ上部を手前に引き寄せながら、添付のディスプ レイ取付け用ネジ 4 本をスタンドの穴に差し込み締めてください。 注意 スタンドにディスプレイを立てたら、すぐにネジを止めて固定してください。 ネジを止めないと、倒れたりしてけがの原因になります。 J-8 この取扱説明書は再生紙を使用しています。 2004パイオニア株式会社 禁無断転載 Printed in Japan / Imprimé au Japon <7S801662> Operating Instructions Thank you for purchasing the PDK-TS06 Plasma Display Stand. Before using this product, please read this Operating Instructions thoroughly so that you can use this product at its full functionality. After reading, retain this Operating Instructions in an easily accessible location so that you can refer to this manual whenever you have a problem or trouble during use. * This plasma display stand is designed specifically for use with PIONEER 61-inch plasma displays(PDP-614MX). Notes on Installation Work: This product is marketed assuming that it is installed by qualified personnel with enough skill and competence. Always have an installation specialist or your dealer install and set up the product. PIONEER cannot assume liabilities for damage caused by mistake in installation or mounting, misuse, modification or a natural disaster. Attention: Sales Agents and Technicians To ensure the user’s safety, be sure to select a place sufficiently strong to bear the weight of the Plasma Display and the different units. Installation should be performed by a minimum of three persons. Be careful not to lose removed screws, etc. Parts Included * Feet (2) * Bar (1) * Operating instructions (this instructions) Stand assembly screws M4 x 14 (8) Display mounting screws M6 x 50 (4) 06 TS KD P Specifications Model: PDK-TS06 External dimensions: (W) 1125 x (H) 207.4 x (D) 440 mm (W) 44.3 x (H) 8.2 x (D) 17.3 inchs Weight: 8.8 kg 19.4 lbs Oparating conditions: Temperature 0˚ to 40˚C / 32˚F to 104˚F Storage conditions: Temperature -10˚ to 50˚C / 14˚F to 122˚F Humidity 20%~80% Humidity 10%~90% Always Heed the Following Before Use... Symbols Various symbols are used in this Handling Instructions for the safe and proper use of the product as well as preventing any injury or damage to persons or property. These symbols and their meanings are described below. Please have a good understanding of these matters before reading the main text of the manual. WARNING Ignoring this indication and improper handling could be the cause of personal injury such as a serious injury or death. CAUTION Ignoring this indication and improper handling could cause injury to a person or damage to the surrounding household belongings. Examples of Symbols This symbol informs that there are contents that demand caution (including warnings). Concrete details of the caution are written within the diagram. This symbol indicates a prohibited matter. Concrete details of the prohibition are written within the diagram. This symbol indicates something that must be done. Concrete details of the prohibition are written within the diagram. WARNING - Be sure to have the Plasma Display installed by your store of purchase following the instructions in this manual. If installed incorrectly, the Plasma Display could tip over, resulting in injury. - To ensure safety, tighten bolts and screws securely. Failure to do so could cause the Plasma Display to tip over, resulting in injury. - Do not modify parts. Doing so could cause the Plasma Display to tip over, resulting in injury. - Do not use damaged parts. Doing so could cause the Plasma Display to tip over, resulting in injury. If a part should be damaged, contact the store of purchase. - Each unit is designed specifically for use with PIONEER 61-inch(PDP-614MX) plasma displays. Please do not mount any other equipment with these items. Doing so may cause the item to fall over and result in injury. - Do not set on shaky stands, tilted surfaces or other unstable places. Doing so could cause the Plasma Display to tip over or fall, resulting in injury. Moreover, Do not install into a vehicle. E-2 Always Heed the Following CAUTIONS - Do not obstruct the Plasma Display’s ventilation holes. If the ventilation holes are covered, the heat will build up inside, and this could lead to fire. For example, do not install the Plasma Display in narrow spaces where ventilation is poor, do not place covers over it, etc. - Do not install the Plasma Display near air conditioner air outlets or in places where vibrations are strong. Doing so could lead to fire or electric shock. - Do not install the Plasma Display in humid or dusty places or places exposed to soot or vapor (such as in kitchens, near humidifiers, etc.). Doing so could lead to fire. Do not install the Plasma Display outdoors. Doing so could lead to fire or electric shock. - When installing the Plasma Display, leave sufficient space around it, as shown in the diagram. Failure to do so could cause heat to build up inside, leading to fire. 50mm 50mm 50mm 50mm Wall 50mm - Hold the Plasma Display securely when mounting the units on it. Failure to do so could cause the Plasma Display to fall, resulting in injury. - When installing the Plasma Display on a stand with casters, be sure to block the casters. If the stand should move, the Plasma Display could fall, resulting in injury. - The Plasma Display is heavy, so be sure to install in a stable place and take measures to prevent it from tipping over and causing injury. The Plasma Display has a high center of gravity. It should be unpacked and moved by a minimum of three people, holding it at the top and bottom. Failure to do so could cause the Plasma Display to fall, resulting in injury. NOTES Avoid dusty or humid rooms and rooms filled with soot or cigarette smoke. The Plasma Display’s screen could get dirty, resulting in poor picture quality. Avoid places where the screen is exposed to direct sunlight or strong artificial light. If surrounding light should shine on the screen, the screen will appear white and be hard to see. Do not install in places where the temperature is high or low. Doing so could result in damage. Additional fall prevention measures - Either use the tip prevention fitting included with the display to fix the plasma display to a wall, pillar or other strong place or use the holes on the back on the stand to fix to a table, etc..(Do not use with the separately sold wall mount unit.) - Pay attention to the rope when moving the Plasma Display. - The screws for fastening the display to the wall, a pillar or a stand are not included. Please obtain screws suited for the surface on which the display is to be mounted. E-3 Assembling the stand Preparations••••Unpack the plasma display. 1. Open the top of the cardboard in which the plasma display is packed and remove the three pieces of styrofoam. 2. Remove the cardboard from the top and open the protective sheet. CAUTION: Set up the Plasma Display promptly after unpacking. Leaving it could result in the display falling over and breaking. Styrofoam Protective sheet 1. Open the package and take out the cardboard and accessories (screws and handling instructions). * Package Cardboard Shock absorbing boxes Screws Operating instructions Bar (covered with a protective sheet) Feet (covered with a protective sheet) Shock absorbing boxes E-4 Assembling the stand 2. Take out the bar and remove the shock absorbing boxes from both sides. 3. Remove the two boxes containing the feet and set them upside-down. E-5 Assembling the stand 4. Lift up the protective sheet covering the foot starting from the perforated line in the center to reveal the mounting surface. Perforated line 5. Remove the cover of the bar removed in step 2, insert the bar on the guide pins, and tighten with the included stand assembly screws. CAUTION: Tighten the screws securely. If not, the monitor could tip over, resulting in injury. guide pins 6. Grasp the two boxes containing the feet and turn them upside-down again. E-6 Assembling the stand 7. Lift the section stuck into the slit upwards, 1 pull it out, then fold it down. 2 1 2 8. On the bar side, after pulling out the slit 1 section, bend as shown in the diagram then fold down. 2 9. Fold down the front and rear of the box and remove the stand. Remove the cover from the foot. E-7 Mounting the plasma display on the stand 1. Insert the plasma display into the stand. Check that the stand and plasma display are facing the proper direction, then insert the plasma display into the stand. This procedure should be done by at least three persons, since the plasma display is heavy and has a high center of gravity. Hold the bottom and the grips on the back of the plasma display and support the top when inserting the plasma display into the stand. Hold both sides of the plasma display and lift it up, then place the plasma display onto the stand so that the holes located at the bottom of the display engage with the stand. 2. Fasten the plasma display and stand. Pull the top of the plasma display forward and while doing so, insert the four supplied display mounting screws into the holes in the stand and tighten them. CAUTION: Tighten the screws immediately after placing the display on the stand. If not, the display could tip over, resulting in injury. E-8 Mode d’emploi Nous vous remercions d’avoir acheté le support d’affichage plasma PDK-TS06. Avant d’utiliser ce produit, veuillez lire attentivement ces instructions d’utilisation de manière à pouvoir utiliser toutes les fonctionnalités de ce produit. Après lecture, conserver ces instructions d’utilisation dans un endroit facilement accessible de manière à pouvoir vous y référer à chaque fois que vous rencontrez un problème dans l’utilisation de ce produit. * TCe support d’affichage plasma est conçu spécialement pour être utilisé avec les affichages plasma 61 pouces PIONEER (PDP-614MX). Remarques sur I'installation: Ce produit est vendu en assumant qu´il sera installé par un personnel suffisamment expérimenté et qualifié. Faites toujours réaliser le montage et I´installation par un spécialiste ou par votre revendeur. PIONEER ne peut être tenu responsable pour tout dommage causé par une erreur d´installation ou de montage, une mauvaise utilisation ou un désastre naturel. Attention : Agents de vente et techniciens Pour assurer la sécurité de l'utilisateur, assurez-vous de choisir un endroit suffisamment solide pour supporter le poids de l'écran à plasma et les différentes unités. L'installation doit être effectuée par au moins trois personnes. Assurez-vous de ne pas perdre les vis retirées, etc. Pièces incluses * Pieds (2) * Barre (1) Vis de montage de l’affichage M6 x 50 (4) P D K -T S 06 Vis d’assemblage du support M4 x 14 (8) * Mode d‘emploi (ces instructions) Caractéristiques techniques Modèle : PDK-TS06 Dimensions externes : (L) 1125 x (H) 207,4 x (P) 440 mm (L) 44,3 x (H) 8,2 x (P) 17,3 pouces Poids : 8,8 kg 19,4 livres Conditions d’utilisation : Température entre 0°C et 40°C / 32°F et 104°F Conditions de stockage : Température entre –10°C et 50°C / 14°F et 122°F Humidité entre 20% et 80% Humidité entre 10% et 90% Faites toujours attention à ce qui suit Avant l'utilisation... Symboles Différents symboles sont utilisés dans ce manuel d'installation pour permettre une utilisation sûre et correcte du produit ainsi que pour éviter toute blessure ou dégât sur les personnes ou les objets. Ces symboles et leur signification sont décrits ci-dessous. Prière de s'assurer de bien comprendre ces éléments avant de lire le reste du manuel. ATTENTION Le fait d'ignorer cette indication et une mauvaise manipulation peuvent être la cause de blessures personnelles telles que des blessures sérieuses ou la mort. PRECAUTIONS A PRENDRE Le fait d'ignorer cette indication et une mauvaise manipulation peuvent être la cause de blessures à des individus ou de dégâts sur les objets situés aux alentours. Exemples de Symboles Ce symbole informe qu'il y a des éléments qui demandent de faire attention (y compris des avertissements). Les détails concret de l'attention sont écrits dans le schéma. Ce symbole indique un élément interdit. Les détails concret de l'interdiction sont écrits dans le schéma. Ce symbole indique qu'il faut faire quelque chose. Les détails concret de l'interdiction sont écrits dans le schéma. ATTENTION - S'assurer de faire installer l'écran à plasma par le magasin où il a été acheté dans le respect des instructions de ce manuel. En cas de mauvaise installation, l'écran à plasma pourrait se renverser et causer des blessures. - Pour assurer la sécurité, serrer les boulons et les vis fermement. Sinon, l'écran à plasma pourrait se renverser et causer des blessures. - Ne pas modifier les pièces. Sinon, l'écran à plasma pourrait se renverser et causer des blessures. - Ne pas utiliser de pièces endommagées. Sinon, l'écran à plasma pourrait se renverser et causer des blessures. Si une pièce est endommager, contacter le magasin où elle a été achetée. - Chaque unité est conçue spécialement pour être utilisée avec les affichages plasma 61 pouces PIONEER (PDP614MX). Veuillez ne pas monter d’autre équipement avec ces éléments. Cela pourrait entraîner la chute de l’élément et causer des blessures. - Ne pas monter sur des supports qui bougent, des surfaces inclinées ou d’autres endroits instables. Cela pourrait entraîner le renversement de l’affichage plasma ou sa chute et ainsi causer des blessures. Ne pas installer dans un véhicule non plus. F-2 Faites toujours attention à ce qui suit PRECAUTIONS - N'obstruez pas les orifices de ventilation de l'écran à plasma. Si les orifices de ventilation sont couverts, la chaleur s'accumulera à l'intérieur, et l'appareil pourrait prendre feu. Par exemple, n'installez pas l'écran à plasma dans des endroits étroits où la ventilation est faible, ne placez pas de couvertures dessus, etc. - N'installez pas l'écran à plasma près des sorties d'air d'un climatiseur ou à des endroits où il y a de fortes vibrations. Cela pourrait causer un incendie ou un choc électrique. - N'installez pas l'écran à plasma dans des endroits humides ou poussiéreux ou des endroits exposés à la suie ou à de la vapeur (comme dans les cuisines, près d'humidificateurs, etc.). Cela pourrait causer un incendie. N'installez pas l'écran à plasma dehors. Cela pourrait causer un incendie ou un choc électrique. - Lors de l'installation de l'écran à plasma, laissez suffisamment d'espace tout autour, comme cela est indiqué sur le schéma. Sinon, de la chaleur pourrait s'accumuler à l'intérieur et l'appareil pourrait prendre feu. 50mm 50mm 50mm 50mm Mur 50mm - Tenez fermement l'écran à plasma lorsque vous montez les unités dessus. Sinon, l'écran à plasma pourrait tomber et causer des blessures. - Lors de l'installation de l'écran à plasma sur un support à roulettes, assurez-vous de bloquer les roulettes. Si le support bougeait, l'écran à plasma pourrait tomber et causer des blessures. - L'écran à plasma est lourd. Assurez-vous donc de l'installer à un endroit stable et prenez les mesures nécessaires pour l'empêcher de se renverser et de causer des blessures. Le centre de gravité de l’écran à plasma est haut. L’écran à plasma doit être déballé et déplacé par au moins trois personnes, le tenant en haut et en bas. Sinon, l’écran à plasma pourrait tomber et causer des blessures. REMARQUES Evitez les pièces poussiéreuses ou humides et les pièces remplies de suie ou de fumée de cigarette. L'écran à plasma pourrait se salir ce qui entraînerait une mauvaise qualité d'image. Evitez les endroits où l'écran est exposé à la lumière directe du soleil ou à une forte lumière artificielle. Si la lumière alentour se reflète sur l'écran, l'écran apparaîtra blanc et sera difficile à voir. N'installez pas l'écran dans des endroits où la température est élevée ou faible. Cela pourrait l'endommager. Mesures de prévention de chute supplémentaires - Utiliser soit l’attache de prévention de basculement fournie avec l’affichage pour fixer l’affichage plasma à un mur, un pilier ou un autre endroit solide, ou utiliser les trous à l’arrière du support pour fixer à une table, etc.. (Ne pas utiliser avec l’unité de montage mural vendue séparément.) - Faire attention à la corde lorsque vous déplacez l’affichage plasma. - Les vis de fixation de l’affichage à un mur, un pilier ou un support, ne sont pas fournies. Veuillez vous procurer des vis adaptées à la surface sur laquelle l’affichage doit être monté. F-3 Assemblage du support Préparations••••Déballer l’affichage plasma. 1. Ouvrir le haut du carton dans lequel l’affichage plasma est emballé et retirer les trois pièces de polystyrène. 2. Retirer le carton par le haut et ouvrir la feuille de protection. ATTENTION: Installer l’écran plasma rapidement après l’avoir déballé. S’il est abandonné sans être installé, il pourrait tomber et se casser. Polystyrène Feuille de protection 1. Ouvrir l’emballage et retirer le carton et les accessoires(vis et instructions de manipulation). * Emballage Carton Boîtes d’absorption des chocs Vis Instructions d’utilisation Barre (couverte par une feuille de protection) Pieds (couverts par une feuille de protection) Boîtes d’absorption des chocs F-4 Assemblage du support 2. Retirer la barre et retirer les boîtes d’absorption des chocs par les deux côtés. 3. Retirer les deux boîtes contenant les pieds et les placer à l’envers. F-5 Assemblage du support 4. Soulever la feuille de protection couvrant le pied, en commençant par la ligne perforée au centre pour découvrir la surface de montage. Ligne perforée 5. Retirer la protection de la barre retirée à l’étape 2, insérer la narre dans les goupilles guides, et serrer avec les vis d’assemblage de support fournies. ATTENTION : Serrer fermement les vis. Sinon, le moniteur pourrait se renverser et causer des blessures. Goupilles pins guides guide 6. Saisir les deux boîtes contenant les pieds et les renverser de nouveau. F-6 Assemblage du support 7. Soulever la section se trouvant entre la 1 fente, la retirer puis la rabattre. 2 1 2 8. Sur le côté de la barre, après avoir 1 retiré la section de la fente, plier comme indiqué sur le schéma puis rabattre. 2 9. Rabattre l’avant et l’arrière de la boîte et retirer le support. Retirer la protection du pied. F-7 Montage de l’affichage plasma sur le support 1. Insérer l’affichage plasma dans le support. Vérifier que le support et l’affichage plasma sont dans la bonne direction, puis insérer l’affichage plasma dans le support. Cette procédure doit être accomplie par au moins trois personnes, car l’affichage plasma est lourd et son centre de gravité est haut. Tenir par la base et les poignées à l’arrière de l’affichage plasma et soutenir le haut pendant l’insertion de l’affichage plasma dans le support. Tenir les deux côtés de l’affichage plasma et le soulever, puis placer l’affichage plasma dans le support de manière à ce que les trous situés à l’arrière de l’affichage s’engagent dans le support. 2. Visser l’affichage plasma et le support. Tirer la partie supérieure de l’écran à plasma vers soi, insérer en même temps les quatre vis fournies pour le montage de l’écran dans les trous situés dans le support puis les serrer. ATTENTION: Visser les vis immédiatement après avoir placé l’affichage dans le stand. Sinon, l’affichage pourrait se renverser et cause des blessures. F-8