1
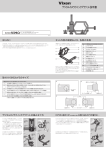
ケーブルレリーズブラケット説明書
使用イメージ
54キ‐1‐(8167)‐0.5S‐(水)
はじめに
構成部品一覧表
このたびは、ビクセン「ケーブルレリーズブラケット」をお買い求めいただき、誠にありがとうございます。
本製品はカメラ用ケーブルレリーズを取付けるためのブラケットです。
ケーブルレリーズは別売となっておりますので、別途お買い求めください。
バッテリーやメモリーカード・フィルムの交換時にこの製品の取外しが必要となる場合がありますので、各種カメラや
ケーブルレリーズに付属の取扱説明書を併せてお読みください。
① ②
③
④
⑤
⑥ ⑦
⑧
取付けできるカメラ・ケーブルレリーズのサイズ
❶
カ メ ラ
❶
シャッターボタン位置は
突起部を含め22mm以内
❷
カメラの高さの最大は
突起部を含め80mm以内
❸
三脚ネジ穴中央までの長さ
は突起部を含め80mm以内
ケーブルレリーズ
❹
12mm以上
❺
7mm以内
シャッターボタン
⑨
部品番号
❷
❹
ストラップ
取付金具等
三脚
ネジ穴
❸
❺
部 品 名
個数
部品番号
⑩
⑪
⑫
部 品 名
注 記
個数
①
レリーズホルダーナット
1
⑦
角度変更ボルト用ゴム
⑥角度変更ボルトに貼付
1
②
角度変更ナット
1
⑧
側面ゴム
⑤本体ステーに貼付
2
③
レリーズステー
1
⑨
下敷きゴム
⑤本体ステーに貼付
2
④
レリーズホルダー
1
⑩
カメラ固定ネジ
⑤
本体ステー
1
⑪
カメラ固定ネジ用ゴム
⑩カメラ固定ネジに貼付
1
⑥
角度変更ボルト
1
⑫
シャッターボタン保護ゴム
同梱部品
4
1
-
コンパクトカメラへの取付け方法 ①
⑴ カメラのシャッターボタンにシャッターボタン保護ゴムを取付けます。
このとき、シャッターボタンに汚れ等が付着していますと保護ゴムの粘着
シートがはがれやすくなり、紛失につながります。 カメラの説明書にありま
すお手入れ方法に従いクリーニングを行なってください。
⑵ 角度変更ナットをゆるめ、レリーズステーを上にずらします。一番上ま
で引き上げましたら、角度変更ナットを軽くしめ、各パーツが急に動かない
程度にしめつけます。
しめつけが足りないとパーツが動きカメラ等にキズを付けてしまう場合が
ありますのでご注意ください。
⑶ 市販のケーブルレリーズ(注意※1)をレリーズホルダーに取付けます。
強くしめ過ぎますとパーツを破損する場合がありますのでご注意ください。
また、本製品をカメラ本体に取付けた後にケーブルレリーズを取付けま
すと、カメラの電源を入れたときにシャッターボタンが押された状態となり、
思わぬ誤作動につながる場合がありますのでご注意ください。
⑷ キズ防止のため柔らかい布などを敷き、レンズ部を上にしてカメラを置き
ます。角度変更ボルトがカメラ本体に接触しないように注意しながら、カメラ
固定ネジをカメラ本体の三脚ネジ穴に取付けます。
※ 取付けの際はしめ過ぎにはご注意ください。カメラ本体の三脚ネジ穴が
破損する場合があります。
⑴
シャッターボタン
保護ゴム
⑵
レリーズステー
ケーブルレリーズ
1mm
程度
あける
カメラ固定ネジ
⑸ 角度変更ナットとレリーズホルダーナットをゆるめます。ケーブルレリー
ズを押し込んだときにシャッターボタンの中心付近を押せるよう、レリーズ
ステーの角度と、レリーズホルダーの位置を調整します。調整ができたら
各ナットをしめつけます。
⑸ レリーズ
ステー
レリーズ
ホルダー
レリーズ
ホルダー
ナット
角度変更
ナット
角度変更ナット
⑶
角度変更ボルト
⑷
⑹ ⑸の調整だけではケーブルレリーズを押し込んだときにシャッターボタン
の中心付近を押せるように調整ができない場合、一度、カメラ固定ネジをゆ
るめて本体ステーを回転させ、しめつけることによりレリーズホルダーの位
置を前後に微調整することができます。
⑹
レリーズホルダー
レリーズホルダー
本体ステー
カメラ固定ネジ
コンパクトカメラへの取付け方法 ②
⑺ カメラの電源を入れ、ケーブルレリーズの操作が確実かつスムーズに行
えることを確認しましょう。引っかかったように感じる場合は、ケーブルレ
リーズが折曲がっていないか、またシャッターボタンを押す位置がずれて
いないかを確認し、スムーズな動きが得られるように⑸⑹の調整を繰り返し
ます。(注意※2)
⑻ スムーズにシャッターボタンを押すことができればケーブルレリーズブラ
ケットの取付けは完了です。
取外しの際はカメラを傷付けないように注意し、逆の手順で行ってくださ
い。(注意※3)(注意※4)
⑺
⑻
(注意 ※1)
本製品に適合する市販品(取付けできるカメラ・ケーブルレリーズのサイズ参照)をご使
用ください。
天体写真撮影用としてご使用の場合は(オート)ストップ機構付きを推奨いたします。
ケーブルレリーズのご使用方法は、その製品に付属しております説明書をご覧くださ
い。
(注意 ※2)
古いケーブルレリーズや動きの渋くなったものなどは、振動によるブレやシャッター
チャンスを逃す原因となります。必ず動作の確認を行った上でご使用ください。
(注意 ※3)
バッテリーやメモリーカード等の交換の際、ケーブルレリーズと本製品の取外しが必
要となる場合がございます。本製品を取付けたまま無理に交換等を行いますと、カメ
ラやケーブルレリーズを破損したり、データを消失する原因となります。
(注意 ※4)
カメラ固定ネジの底面に三脚取付けネジが切られています。市販のカメラ三脚やユ
ニバーサルデジタルカメラアダプター等と併用してご使用いただけます。
ユニバーサルデジタルカメラ
アダプターと併用した例
Instruction Manual for Cable Release Bracket
Shown with a digital camera sold separately.
Preface
Parts Descriptions
Thank you for your purchase of a Vixen cable release bracket.
This product is a bracket for installing a camera cable release on it. The camera cable release is sold
separately. Purchase one that is appropriate to your camera. It may be necessary to detach your compact digital
camera or camera cable release from the cable release bracket when you exchange the battery or data memory
card. For details please refer to instructions on your camera or camera cable release.
① ②
③
④
⑤
⑥ ⑦
⑧
Dimensions of Camera and Camera Cable Release available for this product
❶
Maximum dimensions of camera
❶
22mm in distance from the side of the camera body
(incl. projection) to the center of the shutter button
❷
80mm in height from the bottom of the
camera body to the top (incl. projection)
❸
80mm in distance from the side of the camera body
(incl. projection) to the tripod socket.
Minimum dimensions of camera cable release
❹
More than 12mm in length
❺
Less than 7mm in width
Shutter Button
⑨
Part Number
❷
Strap
Eyelet
❹
Tripod
Socket
❸
❺
Part Name
⑩
Quantity Part Number
⑪
⑫
Part Name
Quantity
①
Cable release retaining nut
1
⑦
Protection rubber (Pre-attached on the angle bolt)
1
②
Angle setting nut
1
⑧
Protection rubbers (Pre-attached on the side of the camera bracket)
2
③
Cable release bracket
1
⑨
Protection rubbers (Pre-attached on the bottom of the camera bracket)
2
④
Cable release head holder
1
⑩
Fixing screw
1
⑤
Camera bracket
1
⑪
⑥
Angle bolt
1
⑫
1
Shutter protection rubbers
4
Attaching the Cable Release Bracket to a Compact Digital Camera
( 1 ) Attach the shutter protection rubber onto the shutter button of
the camera. Any strain on the shutter button may prevent the
shutter protective rubber from sticking on it securely and it will
lead you to the loss of the shutter protection rubber. Make
sure to clean the shutter button before you put the shutter
protective rubber on it.
( 2 ) Loosen the angle setting nut and shift the cable release
bracket fully to the upright position. Then, tighten the angle
setting nut until the cable release bracket is locked stably.
( 4 ) Place the camera on a soft cloth with the lens facing upward
to avoid scratching the camera body. Install the camera onto
the camera bracket so as not to hit the side of the camera
body against the tip of the angle bolt, but as close as possible.
(1 )
Shutter protection
rubber
(2 )
Cable release bracket
screw into the tripod socket on the bottom of the camera.
( 5 ) Loosen the angle setting nut and the cable release head
holder and adjust the angle of the cable release bracket so
that the cable release head comes just above the shutter
scratching the camera.
shutter button when the cable is pushed down. Then tighten
the angle setting nut and cable release head holder again.
Angle setting nut
( 3 ) Attach a commercially available cable release to the cable
release head holder*1. Do not forcedly screw the cable
release into the cable release head holder as it may damage
the threads. Be sure to attach the cable release into the cable
release head holder before you mount the camera on the
camera bracket.
(3 )
Camera cable release
( 6 ) If the adjustment above ( 5 ) is not successful and the cable
does not hit the center of the shutter button, loosen the
Angle bolt
(4 )
Keep a space
of about 1mm.
Fixing screw
( 5 ) Cable release
bracket
Cable release
retaining nut
Cable release
head holder
Angle setting
nut
(6 )
Cable release head holder
forth slightly so that the cable release head comes just above
the center of the shutter button.
Cable release head
holder
Camera bracket
Fixing screw
Using the Cable Release Bracket with a Compact Digital Camera
(7 )
cable release works correctly and smoothly when the cable is
pushed down. When you feel a clogging of the cable, check if the
cable is forcedly bent halfway or check if the tip of the cable is
away from center of the shutter button. If this is the case, repeat
the procedures ( 5 ) and ( 6 ) until you get smooth movements.*2
( 8 ) You are successful in attaching the cable release bracket if
you can push down the cable smoothly without clogging. Take
reverse procedures with care not to scratch the camera body
when you remove the camera from the cable release bracket.
*3,*4
(7 )
*1
cable release bracket.
When you use the cable release bracket for astrophotography, a camera
cable release with self-stopper is recommended. Please read instructions
for the camera cable release use it correctly.
*2
vibration or missing a shutter chance. Check movements of the camera
cable release before you use it.
(8 )
*3 You may need to detach the camera cable release from the cable
release bracket when you exchange the battery or data memory card.
Do not attempt exchanging the battery or data memory card forcedly
with the camera attached. The camera may damage or the data may
disappear.
*4
cable release bracket can be used with a camera tripod and it will be
convenient to use in conjunction with an optional universal digital camera
adapter.
Shown with an optional Universal
digital camera adapter.