1
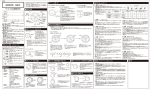
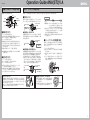
Operation Guide ANA(ST3)V.A
MA0606-B
時刻・カレンダーの合わせ方
※ 機種により形状は異なります。
本機は、1/100 秒単位で 59 分 59 秒(60 分計)まで計測でき、以後 0 に戻って計測し続けます。
分針
■ 計測のしかた
日付
時針
1段引き
(日付合わせ)
24時間針
秒針
ストップウオッチの使い方
2段引き
(時刻合わせ)
リューズ
■ 時刻の合わせ方
(1)リューズを 2 段引きます。
※ この時、
秒針が12時の位置まで移動して止まります。
(2)リューズを回して、時刻を合わせます。
(3)リューズを押し込みます。
※ 時刻を合わせるときは、針を正転方向(進む方向)に
回して合わせてゆき、分針を正しい時刻より 4 ∼ 5
分進めてから逆に戻して合わせると正確に合わせる
ことができます。
※ 時報は「時報サービス 117 番」が便利です。
★ 24 時間針は時・分針に連動しています(24 時間で
1 回転します)。
■ 日付の合わせ方
(1)リューズを 1 段引きます。
(2)リューズを回して、日付を合わせます。
(3)リューズを押し込みます。
※ 日付は 31 日制になっていますので、2、4、6、9、
11 月の月末には必ず修正してください。
※ 午後 9 時∼午前 1 時の間は、日付合わせを行なわな
いでください(この間に日付合わせをすると翌日に
なっても変わらないことがあります)
。
計測の流れ
Aボタンを押すごとに計測がスタート/ストップします。
※ リューズを引いた状態では計測を行なわないでください。
ストップウオッチ用
1/100秒針
ストップウオッチ用
分針
計測開始後60秒ま
では秒を表します。
ストップウオッチ用
秒針
● 計測開始∼ 60 秒までは
計測開始と同時にストップウオッチ用の 1/100 秒針
と秒針が動き始めます。それぞれ、計測時間の 1/100
秒と秒を表します。
ストップウオッチ用
1/100秒針
ストップウオッチ用
秒針
例) 計測時間
44秒30
● 計測開始後 60 秒を過ぎると
計測開始後60秒を過ぎると同時にストップウオッチ用
の1/100秒針が12時の位置で止まり、
秒針と分針が動
き続けます。それぞれ、計測時間の秒と分を表します。
※ 1分経過するたびに 1/100 秒針が 1 回転します。
※ 計測ストップ後、A ボタンを押すと 1/100 秒を表
すことができます。1/100秒針が動いている間に計
測ストップしたときはそのまま 1/100 秒を表しま
すので、A ボタンを押す必要はありません。
ストップウオッチ用
秒針
防水時計の一部(特に 10 気圧・20 気圧防水)でリューズがネジ
込み式になっているものは時刻・カレンダーを合わせる際は左回
しにしてネジ込みをゆるめた後、リューズを引いてください。
(無
理に引っ張らないでください。
)
なお、リューズをゆるめた状態では防水機能を保てませんので、合
わせ終わったら必ずネジ込みをしてください。
ストップ
リセット
■ ストップウオッチ用針位置の修正
計測ストップ後に B ボタンを押しても 1/100 秒針と
秒針が“0”の位置に戻らないときは、以下の操作を行
なってください。
(1)リューズを 2 段引きます。
(2)A ボタンを押して、1/100 秒針を“0”の位置に
合わせます。
(3)B ボタンを押して、秒針を“0”の位置に合わせ
ます。
(4)リューズを押し込みます。
(リューズを引いている
間は、通常時刻の針も止まりますので時刻を合わ
せ直してください。)
ストップウオッチ用
1/100秒針
ストップウオッチ用
分針
● リューズについて
スタート
※ 積算計測…ロスタイムのある場合は、ストップ後リ
セットせずに再スタート(Aボタン)すれ
ば、
表示タイムに引き続き計測を始めます。
※ 計測をリセットすると、ストップウオッチ用の
1/100 秒針と分針が早く回り出して、“0”に戻り
ます。秒針は現在時刻の秒に戻ります。
※ 針が早く回っている間はボタン操作はできませんの
でご注意ください。
例) 計測時間
2分44秒30
リューズ
2段引き
● 回転ベゼルのついているものは
スタート
回転ベゼルを回し、▼ マークを分針に合わせる
と、その位置をスタートとして経過時間を知る
ことができます。
※ 内転ベゼル方式になっているものは右上の
リューズを回すとベゼルが回転します。
ゆるめる
経過時間
現在
1
Operation Guide ANA(ST3)V.A
Setting the Time and Date
Using the Stopwatch
Hour hand
• Some water resistant models are equipped with
a screw lock crown.
• With such models, you must unscrew the crown
in the direction noted in the illustration to loosen
it before you can pull it out. Do not pull too
forcibly on such crowns.
• Also note that such watches are not water
resistant while their crowns are loosened. Be
sure to screw the crowns back in as far as they
will go after making any setting.
Minute hand
First click (Setting day)
Second click
(Setting time)
Day
24-hour hand
Second hand
1. Pull the crown out to the second click.
• At this time, the second hand will move to the 12
o’clock position and stop there.
2. Set the hands by rotating the crown. Rotate the
crown to move the hands clockwise. Move the
minute hand four or five minutes past the time
you want to set, and then back it up to the proper
setting.
● The watch attached with a bezel can
measure the elapsed time. Align the ▼
mark on the bezel with the minute hand by
turning it so that the time elapsed from the
▼ mark can be measured.
Start
• Make sure that you also set the 24-hour hand to the
correct hour of the day.
3. Push the crown back in to the normal position to
restart timekeeping.
Stopwatch second
hand
4. Check the elapsed time.
• The example below shows an elapsed time of two
minutes, 44.30 seconds.
Stopwatch minute
hand
[2 minutes]
The stopwatch lets you measure elapsed time up to
59 minutes, 59.99 seconds.
1. Press A to start the stopwatch.
2. Press A to stop the stopwatch.
• Press B to reset the stopwatch.
This will enter the Timekeeping Mode.
• You can resume the measurement operation by
pressing A again.
3. Check the elapsed time.
• The example below shows an elapsed time of
44.30 seconds.
Stopwatch second
hand
[44 seconds]
Stopwatch 1/100
second hand
[30]
Stopwatch second hand
[44 seconds]
To measure elapsed time (First 60 seconds)
Stopwatch 1/100
second hand
[30]
• Press B to reset the stopwatch.
This will enter the Timekeeping Mode.
To set the day
To measure elapsed time (After the first 60 seconds)
1. Pull the crown out to the first click.
2. Set the day by rotating the crown towards you.
3. Push the crown back in to the normal position.
1. Press A to start the stopwatch.
• Avoid changing the date setting while the current time
is between 9:00 p.m. and 1:00 a.m.
Elapsed
time
Stopwatch 1/100
second hand
Crown (Normal position)
To set the time
Crown
Stopwatch minute
hand
* This hand rotates
and indicates the
second count
during the first 60
seconds.
• During elapsed time measurement, the stopwatch
1/100 second hand automatically rotates for the
final second of each minute.
2. Press A to stop the stopwatch.
• You can resume the measurement operation by
pressing A again.
3. Press the A button, and the stopwatch 1/100
second hand will move to the 1/100 second
count.
• If the elapsed time operation was stopped during
the final second of each minute, the stopwatch
1/100 second hand will already be pointing at the
1/100 second count. Do not press the A button at
this time, because doing so will restart the elapsed
time operation.
Notes:
• Do not try to perform stopwatch operations while the
crown is pulled out either to the first or second click. If
you try to press a button, you might accidentally
cause the crown to rotate and change the current
time or day setting.
• If the starting positions of the stopwatch second hand
and 1/100 second hand become misaligned, use the
following procedures to adjust the positions of the
hands so they point to 12 o’clock when the stopwatch
is reset.
To adjust the positions of the stopwatch hands
1. Press B to reset the stopwatch, and check the
alignment of the stopwatch second hand and
1/100 second hand.
2. Pull out the crown to the second click.
3. Press A to move the stopwatch 1/100 second
hand.
4. If the stopwatch minute hand is aligned
correctly, proceed to step 5. If the stopwatch
minute hand is also misaligned, press B to
move the stopwatch second hand.
5. After making the adjustments you want, push
the crown back in to its normal position.
• Note that pulling the crown out also stops the
timekeeping second hand. After performing the
above procedure, you should also adjust the
timekeeping setting.
2