1
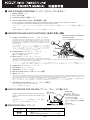
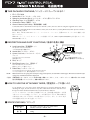
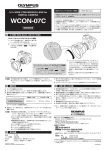
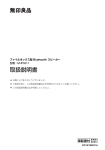
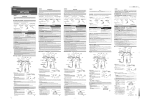
■ THIS PACKAGE CONTAINS/パッケージに入っているもの: 1. PD-7,PD-9 (PAD)/PD-7、PD-9(パッド)本体 2. Connection Cable/接続ケーブル 3. Owner's Manual (this leaflet)/取扱説明書(本紙) Please use the PD-7 or PD-9 as a snare/tom/cymbal pad. To connect the PD-7 or PD-9 to a Roland sound module equipped with a trigger interface (such as the TD-7 or SPD11), use the supplied stereo cable. If you use a monaural cable, you will not be able to obtain the rim-shot and choking techniques. PD-7、PD-9は、スネア/タム/シンバル・パッドとして使用してください。 TD-7やSPD-11など、ローランド社製のトリガー・インターフェース付き音源と接続するときには、付属のステレ オ・ケーブルを使用してください。モノラル・ケーブルを使用した場合は、リム・ショット奏法およびチョーク奏 法はできません。 ■ PAD DESCRIPTION/PART FUNCTIONS/各部の名称と機能 A A Pad Head/打面(ヘッド部) B B Pad Rim/打面(リム部) C Polarity Switch/ポラリティー・スイッチ For a detailed explanation about this function, see page 4. E 機能については別項をご覧ください。 D Output Jack/アウトプット・ジャック D C E Stand Fixing Screw/スタンド取り付けネジ As shown below, you can attach the PD-7 or PD-9 to a drum stand in two different ways. To change the angle for inserting the rod, first loosen the Stand Fixing Screw and then rotate the eyebolt by degrees. 図の様に、ドラムスタンドのロッドに2通りの取り付け方ができます。ロッドの差込み方向を変えるときは、いった んスタンド取り付けネジをゆるめてからアイボルトを90°回転してください。 Method A Method B Eyebolt アイボルト NOTE If you use method B, do not try to insert the rod into the eyebolt by force, as it will not go any further than a predetermined point. ご注意 (B)の取り付け方をするとき、ロッドはある長さ以上は差し込めないようになっていますので、無理やり差し込ま ないようにしてください。 ■ SPECIFICATIONS/スペック PD-7 Dimensions 寸 法 Weight 重 量 PD-9 Dimensions 寸 法 Weight 重 量 7-9/16 (W)×9-1/16 (D)×2-9/16 (H) inches 192 (W)×230 (D)×65 (H) mm 1 lb 13 oz 800 g 10 (W)×11-1/2 (D)×2-11/16 (H) inches 254 (W)×292 (D)×68 (H) mm 3 lbs 9 oz 1600 g –1– 26055321 '98-9-A4-81S ■ THIS PACKAGE CONTAINS/パッケージに入っているもの: 1. 2. 3. 4. Beater/専用ビーター KD-7/KD-7本体 Connection Cable/接続ケーブル Owner's Manual (this leaflet)/取扱説明書(本紙) The kick pedal is not included in this package. The KD-7 can be used with any kick pedal on the market. To set up the KD-7 with the Sound Module, use the supplied stereo cable. このパッケージには、キック・ペダルは含まれていません。KD-7は、市販のキック・ペダルを装着して使用してく ださい。 音源との接続には、付属のステレオ・ケーブルを使用してください。 ■ DESCRIPTION AND PART FUNCTIONS/各部の名称と機能 The beater should be connected as shown in this figure: A Output Level Control/アウトプット・レベル・コントロール ビーターは矢印の方向へ差し込みます。 Connecting another KD-7 to the MIX IN jack on the first KD-7 lets you fine-tune the output of the two KD-7 units with the Output Level control. To lower the unit's output level, use a flathead screwdriver to turn the Output Level control counterclockwise. The Output Level control should normally be left at its maximum setting. もう一台のKD-7をミックス・イン・ジャックに接続するときに、二台のKD-7の 出力をアウトプット・レベル・コントロールで微調整することができます。マ イナス・ドライバーを使ってアウトプット・レベル・コントロールを反時計回 りに回すと、本体の出力レベルが下がります。一台で使用するときはアウトプ ット・レベル・コントロールを最大にしてご使用下さい。 H I G F B Polarity Switch/ポラリティー・スイッチ For a detailed explanation about this function, see page 4. 機能については別項をご覧ください。 E C Mix In Jack/ミックス・イン・ジャック D C B A Connecting the OUTPUT jack on another KD-7 to the MIX IN jack on the first KD-7 lets you use the setup as a double kick drum. To use MIX IN jack, you will need to re-adjust the trigger parameter on the sound module, since the output level will be reduced compared with times when only one KD-7 is used. Be sure that you connect the second KD-7 to the MIX IN jack. ミックス・イン・ジャックをもう一台のKD-7のアウトプット・ジャックに接続することによって、ダブル・キック・ドラムとして使用できます。ミック ス・イン・ジャックを使用した場合、KD-7一台を使用するときよりも出力レベルが下がりますので、音源側のトリガー・パラメーターを調節してください。 D E F G H Output Jack/アウトプット・ジャック Foot Plate/フット・プレート Anchor Bolt/アンカー・ボルト Pad Face (with sensor)/打面(センサー内蔵) Beater/ビーター Attach as shown and securely fasten the screw of the kick pedal. After a long period of operation, the mechanical components for the KD-7 (such as Beater and/or Sensor) may deteriorate. At the appropriate time, these parts should be replaced. Component parts are available at the retailer from whom you have purchased your KD-7. For details, contact the authorized Roland distributor or local Service Station in your country. 図のように取り付けてキック・ペダルの止めネジを確実に締めてください。KD-7の機構部品のビーター、センサーは消耗部品です。消耗部品は有償にて お分けしておりますので、お買い上げの販売店もしくは最寄りの当社営業所またはサービス・ステーションまでご相談ください。 I Kick Pedal (on the market)/キック・ペダル(市販品) The beater should be connected as shown in this figure. ビーターは矢印の方向へ差し込みます。 ■ HOW TO USE THE FOOT PLATE/フット・プレートの使いかた Using your kick pedal, adjust the height of the foot plate so that the beater strikes the rubber pad squarely. Kick Pedal キック・ペダル お手持ちのキック・ペダルを使用して、最も安定し て叩けるように高さを調整してください。 Floor / 床 ■ SPECIFICATIONS/スペック Dimensions 寸 法 Weight 重 量 6-13/16 (W)×4-7/16 (D)×3-15/16 (H) inches 172 (W)×112 (D)×100 (H) mm 3 lbs 2 oz 1410 g (including the beater) (ビーターを含む) –2– Anchor Bolt アンカー・ボルト Rotate the anchor bolt to join it to the foot plate and then adjust the height. アンカー・ボルトを回して、フット・ プレートと結合させ、高さを調節し ます。 Foot Plate フット・プレート ■ THIS PACKAGE CONTAINS/パッケージに入っているもの: 1. 2. 3. 4. 5. 6. FD-7/FD-7本体 Anchor Bolt × 2/アンカー・ボルト×2 Spring for the Anchor Bolt × 2/アンカー・ボルト用スプリング×2 Attaching Tape × 3/固定用テープ×3 Connection Cable/接続ケーブル Owner's Manual (this leaflet)/取扱説明書(本紙) Connect the FD-7 to the Hi-Hat Control Jack on the TD-5, TD-7, TD-10 or SPD-11 using the supplied stereo cable. If you have connected the FD-7 to the Hi-hat Control Jack on the SPD-11, set the [HH CONT/EXT 4] select switch to the HH CONT position. TD-5、TD-7、TD-10、SPD-11のハイハット・コントロール・ジャックに、付属のステレオ・ケーブルを使用して接 続してください。 SPD-11のハイハット・コントロール・ジャックに接続するときは、SPD-11の[HH CONT/EXT 4] 切り替えスイッチを HH CONT 側にします。 ■ DESCRIPTION AND PART FUNCTIONS/各部の名称と機能 D A Load Control Nut/荷重調整ナット E This adjusts the load (feel) of the pedal. F a ペダルを踏む時の重さを調整できます。 B Anchor Bolt/アンカー・ボルト C Control Out Jack/コントロール・アウト・ ジャック b You can adjust the travel of the pedal by changing the length of the Rod. Connect this jack to the sound module. ロッドの長さを変えることで、 踏み込み量を変えることができます。 音源に接続します。 A D Rod/ロッド E Rod Fixing Screw/ロッド固定ネジ B C Fasten this firmly when you use the FD-7. 使用するときはしっかり締めてください。 F Pedal Plate/ペダル・プレート You can adjust the travel of the pedal by changing the length of the Rod. ロッドの長さを変えることで、踏み込み量を変えることができます。 NOTE When the FD-7 is not going to be used for a long period of time, set the Rod as shown fig b. Do not leave the FD-7 for a long time with the Pedal Plate depressed. ご注意 長期間使用しないときは、ロッドをb図の状態で保管してください。また、ペダル・プレートを踏み込んだままの状 態で長時間放置しないでください。故障の原因となります。 ■ HOW TO USE THE ATTACHING TAPES/固定用テープの使いかた To use the FD-7 on a loop type carpet, attach the tapes as shown in the figure. Before attaching the tapes, be sure to remove any dirt or dust from the FD-7. Note that once the tape has been attached and then removed, it will be less adhesive. ループ・タイプのじゅうたん等の上で使用するときは、図の位置に固定用テープを貼 り付けてじゅうたんに固定してください。テープを貼り付けるときは、FD-7の貼り付 け面の汚れやほこりをよく落としてから貼り付けてください。また、テープは一度は がすと粘着力が弱くなるので注意してください。 ■ SPECIFICATIONS/スペック Dimensions 寸 法 Weight 重 量 6-3/4 (W)×15-9/16 (D)×6-3/4 (H) inches 170 (W)×394 (D)×170 (H) mm 4 lbs 4 oz 1910 g –3– The PD-7, PD-9, and KD-7 are equipped with Polarity Switches which change the polarity of the trigger signal generated by hitting the PD-7/PD-9/KD-7. Set the Polarity Switch to the position required by the trigger interface you are using. If the polarity is not correct, the sound level may be reduced or the signal delayed. Set it to the “–” position when using a TD-5 , TD-10 or SPD-11. When using a TD-7, either position will do. PD-7、PD-9、KD-7にはそれぞれポラリティー・スイッチが付いています。これは、PD-7/PD-9/KD-7を叩いたときに 出るトリガー信号の極性を切り替えます 。ポラリティー・スイッチを接続するトリガー・インターフェースの極性 に合わせてください。極性が合ってないと、音が小さくなったり、発音が少し遅れる場合があります。TD-5、TD-10 やSPD-11に接続するときは、– 側に設定してください。TD-7に接続するときはどちらでもかまいません。 SW= + When the Polarity Switch is set to the “+” position, the trigger signal will begin on the positive side of the ground level. Trigger signal トリガー信号 ポラリティー・スイッチが + の時は、トリガー信号の始まりが グランド・レベルよりプラス側に立ち上がります。 Ground level グランド・レベル SW= – When the Polarity Switch is set to the “–” position, the trigger signal will begin on the negative side of the ground level. ポラリティー・スイッチが – の時は、トリガー信号の始まりが グランド・レベルよりマイナス側に立ち上がります。 ■ IMPORTANT NOTES/使用上の注意 ● 次のような場所での使用や保存はしないでください。 ○ 温度が極端に高い場所(直射日光の当たる場所、暖房機器 の近く、発熱する機器の上など) ○ 水気の近く(風呂場、洗面台、濡れた床など)や湿度の高 い場所 ○ ホコリの多い場所 ○ 振動の多い場所 ● お子さまをドラム・セットのまわりで遊ばせないで下さい 。 スタンドなどが倒れてけがをする恐れがあります。 ● パッドをマウントに取り付ける時は、スタンド取り付けネジ を確実に締めて下さい。確実に取り付けられていないとパッ ドが落下してけがをする恐れがあります。 ● KD-7は演奏中のずれを防止するためにアンカー・ボルトが備 えられています。セットするときにけがをしないよう十分注 意してください。 ● KD-7の打面とビーターの間に手などを挟まないように注意し てください。 ● FD-7のフット・プレートの下に手などを挟まないように注意 してください。 ● 直射日光の当たる場所や、発熱する機器の近く、閉め切った 車内などに放置しないでください。変形、変色することがあ ります。 ● PD-7、PD-9、KD-7、FD-7は演奏時の打撃音、操作音を小さく する設計になっていますが、床や壁を通じての振動は、意外 によく伝わるものです。とくに夜間の演奏は、隣近所に迷惑 がかからないように注意しましょう。 ● 当社では、この製品の補修用性能部品(製品の機能を維持するために 必要な部品)を、製造打切後6年間保有しています。この部品保有期 間を修理可能の期間とさせていただきます。なお、保有期間が経過し た後も、故障箇所によっては修理可能の場合がありますので、お買い 上げ店、または最寄りのローランド・サービスにご相談ください。 ● Never use or store the unit in places that are: ・ Subject to temperature extremes (e.g., direct sunlight in an enclosed vehicle, near a heating duct, on top of heatgenerating equipment); or are ・ Damp (e.g., baths, washrooms, on wet floors); or are ・ Humid; or are ・ Dusty; or are ・ Subject to high levels of vibration. ● To prevent accidents, never allow small children to play near the drum kit. ● When attaching the pads to the mounts, be sure to tighten the stand fixing screws securely. If any of them remain loose, the pad could fall off. ● The KD-7 is provided with an anchor bolt which prevents it from sliding while being played. Please be careful so as not to hurt yourself while setting it. ● While playing the KD-7, please be careful so as not to get anything caught between the pad face and the beater. ● While playing the FD-7, please be careful so as not to get anything caught under the pedal plate. ● Do not expose the unit to direct sunlight, place it near devices that radiate heat, leave it inside an enclosed vehicle, or otherwise subject it to temperature extremes. Excessive heat can deform or discolor the unit. ● Although the PD-7,PD-9,KD-7 and FD-7 were carefully designed so as to reduce to the absolute minimum the unwanted sound that might be produced when played (impact and other operational sounds), even small amounts of such vibrational sounds can quite easily be transmitted through floors and walls. For this reason, we suggest that you exercise caution (especially in the late hours of the night) to avoid disturbing others within your residence or the immediate neighborhood. ■ MAINTENANCE/お手入れについて ● For everyday cleaning wipe the unit with a soft, dry cloth or one that has been slightly dampened with water. To remove stubborn dirt, use a cloth impregnated with a mild, non-abrasive detergent. Afterwards, be sure to wipe the unit thoroughly with a soft, dry cloth. ● Never use benzene, thinners, alcohol or solvents of any kind, to avoid the possibility of discoloration and/or deformation. ● 通常のお手入れは、柔らかい布で乾拭きするか、堅く絞った 布で汚れを拭き取ってください。汚れが激しいときは、中性 洗剤を含んだ布で汚れを拭き取ってから、柔らかい布で乾拭 きしてください。 ● 変色や変形の原因となるベンジン、シンナーおよびアルコー ル類は、使用しないでください。 Copyright 1997 ROLAND CORPORATION All rights reserved. No part of this publication may be reproducted in any form without the written permission of ROLAND CORPORATION. 1997 ローランド 本書の一部もしくは全部を無断で複写・転載することを禁じます。 –4–