1
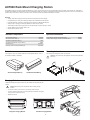
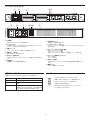
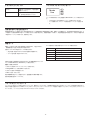
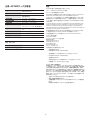
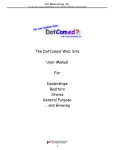
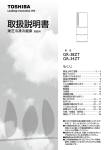
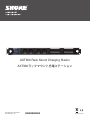
AXT900 Rack Mount Charging Station
AXT900ラックマウント充電ステーション
© 2012 Shure Incorporated
27A16720 (Rev. 3)
*27A16720*
Printed in China
IMPORTANT SAFETY INSTRUCTIONS
1.
2.
3.
4.
5.
6.
7.
8.
9.
10.
11.
12.
13.
READ these instructions.
KEEP these instructions.
HEED all warnings.
FOLLOW all instructions.
DO NOT use this apparatus near water.
CLEAN ONLY with dry cloth.
DO NOT block any ventilation openings. Allow sufficient distances for adequate ventilation and install in accordance with the manufacturer’s instructions.
DO NOT install near any heat sources such as open flames, radiators, heat registers,
stoves, or other apparatus (including amplifiers) that produce heat. Do not place any open
flame sources on the product.
DO NOT defeat the safety purpose of the polarized or groundingtype plug. A polarized
plug has two blades with one wider than the other. A grounding type plug has two blades
and a third grounding prong. The wider blade or the third prong are provided for your
safety. If the provided plug does not fit into your outlet, consult an electrician for replacement of the obsolete outlet.
PROTECT the power cord from being walked on or pinched, particularly at plugs, convenience receptacles, and the point where they exit from the apparatus.
ONLY USE attachments/accessories specified by the manufacturer.
USE only with a cart, stand, tripod, bracket, or table specified by the manufacturer, or sold with the apparatus. When a cart is used, use caution when
moving the cart/apparatus combination to avoid injury from tip-over.
UNPLUG this apparatus during lightning storms or when unused for long
periods of time.
14. REFER all servicing to qualified service personnel. Servicing is required when the apparatus has been damaged in any way, such as power supply cord or plug is damaged,
liquid has been spilled or objects have fallen into the apparatus, the apparatus has been
exposed to rain or moisture, does not operate normally, or has been dropped.
15. DO NOT expose the apparatus to dripping and splashing. DO NOT put objects filled with
liquids, such as vases, on the apparatus.
16. The MAINS plug or an appliance coupler shall remain readily operable.
17. The airborne noise of the Apparatus does not exceed 70dB (A).
18. Apparatus with CLASS I construction shall be connected to a MAINS socket outlet with a
protective earthing connection.
19. To reduce the risk of fire or electric shock, do not expose this apparatus to rain or
moisture.
20. Do not attempt to modify this product. Doing so could result in personal injury and/or
product failure.
21. Operate this product within its specified operating temperature range.
This symbol indicates that dangerous voltage constituting a risk of
electric shock is present within this unit.
This symbol indicates that there are important operating and maintenance instructions in the literature accompanying this unit.
WARNING: This product contains a chemical known to the State of California to cause cancer and birth
defects or other reproductive harm.
WARNING: Danger of explosion if battery incorrectly replaced. Operate only with Shure compatible batteries.
WARNING
• Battery packs may explode or release toxic materials. Risk of fire or burns. Do not open, crush, modify, disassemble, heat above 140°F (60°C), or
incinerate
• Follow instructions from manufacturer
• Never put batteries in mouth. If swallowed, contact your physician or local poison control center
• Do not short circuit; may cause burns or catch fire
• Do not charge or use battery packs with other than specified Shure products
• Dispose of battery packs properly. Check with local vendor for proper disposal of used battery packs
Note:
• This equipment is intended to be used in professional audio applications.
• EMC conformance is based on the use of supplied and recommended cable types. The use of other cable types may degrade EMC performance.
• Use this battery charger only with the Shure charging modules and battery packs for which it is designed. Use with other than the specified modules
and battery packs may increase the risk of fire or explosion.
• Changes or modifications not expressly approved by Shure Incorporated could void your authority to operate this equipment.
安全にお使いいただくために
危険や損害の大きさと切迫の程度を明示するために、誤った扱いをすると生じることが想定される内容を次の定義のように「警
告」「注意」の二つに区分しています。
警告
注意
この表示内容を無視して誤った取り扱いをすると、死亡または重傷を負う可能性が想定される内容です。
この表示内容を無視して誤った取り扱いをすると、傷害を負う可能性または物的損害が発生する可能性が
想定される内容です。
警告
•
整備の際は、資格のある整備担当者に必ずご相談ください。電源コードやプラグの損傷、液体や異物が装置内に入り込
んだ場合、装置が雨や湿気にさらされた場合、正常に作動しない場合、装置を落とした場合など、装置が何らかの状態
で損傷した場合は、整備が必要です。
•
装置に水滴やしぶきが付かないようにしてください。装置の上に花瓶などの液体の入った物を置かないでください。
•
本製品の改造は試みないでください。改造した場合には怪我や製品故障の原因となります。
注意
•
この製品は水の近くで使用しないでください。
•
掃除は、必ず乾いた布で拭いてください。
•
通風口を塞がないようにしてください。使用説明書に従って設置してください。
•
ラジエーターや暖房送風口、ストーブ、その他、熱を発生する機器(アンプなど)の近くには設置しないでください。
•
有極プラグやアース付きプラグは安全のために用いられています。無効にしないようにしてください。有極プラグは、2
本のブレードのうち一方が幅広になっています。アース付きプラグは、2本のブレードの他に、3本目のアースの棒がつ
いています。幅広のブレードや3本目の棒は、安全のためにあるものです。これらのプラグがコンセントの差し込み口に
合わない場合は、電気工事業者に相談し、コンセントを交換してもらってください。
•
電源コードは、特にプラグ差し込み部分、延長コード、機器から出ている部分において、引っかかって抜けたり挟まれ
たりしないように保護してください。
•
アタッチメントや付属品は、必ずメーカー指定のものをご利用ください。
•
カートやスタンド、三脚、ブラケット、テーブル等は、メーカー指定のものか、この装置用に販売されているものを必
ずご利用ください。カートを使用する場合は、装置を載せて移動する際、怪我をしないよう注意してください。
•
雷を伴う嵐の際、または長期間使用しない場合は、プラグをコンセントから抜いてください。
●送信機技術基準適合証明ラベルについて
送信機は電波法で規定される技術基準適合証明品です。証明番号を記した証明ラベルが1台ずつ貼ってあります。表示の改変、
除去は法律で禁じられていますので、みだりに剥がしたり、損傷することのないよう注意してください。
●違法改造について
機器を分解したり、内部の部品に触れたりしないでください。改造等は法律で禁じられています。
警告:不適切な電池を使用すると爆発の危険があります。Shure対応電池のみを使用してください。
警告
• バッテリーパックからは爆発または有毒な物質が放出される場合があります。火災または火傷の恐れがあります。 開けたり、押し潰したり、改造し
たり、分解したり、60℃以上の熱に曝したり、焼却したりしないでください。
• メーカーの指示に従ってください。
• 口の中に電池を決して入れないでください。飲み込んだ場合は医師または最寄りの中毒事故管理センターまで連絡してください。
• ショートさせないでください。火傷または火災の原因となります。
• 指定されたShure製品以外の充電や使用はしないでください。
• バッテリーパックは正しく処分してください。使用済みバッテリーパックの正しい処分方法については、各地域販売店にお問い合わせください。
注:
• 本機器はプロのオーディオ用途用です。
• EMC適合性は同梱および推奨のケーブル使用に基づきます。別種のケーブルを使用した場合はEMC性能が低下します。
• この充電器はShure社の充電モジュールと指定電池パックにのみ使用してください。 指定のモジュールと電池パック以外のものに使用すると、発火
や爆発の危険性が高まります。
• 本機器の変更・改造は、Shure Incorporated によって書面で認可されたものを除き、装置の使用の権限を無効にする場合があります。
AXT900 Rack Mount Charging Station
The AXT900 charges up to 8 Shure rechargeable batteries in a single, compact rackmount housing. Interchangeable charging modules accommodate any combination of
handheld and bodyback transmitter batteries. The front panel display provides easy metering of all battery parameters, including charge status, time to full, and battery temperature. When connected to a network, parameters can be monitored remotely using Wireless Workbench® 6 software.
Features
• Touring-ready battery charging and storage solution with comprehensive status display
• Configurable bays for mixing and matching 8 bodypack and handheld transmitter batteries
• Fully networkable for monitoring of all charging status parameters in Wireless Workbench 6
• Storage mode for charging or discharging batteries to optimal storage voltage
• Tracks battery health using charging cycle count and percentage of original capacity as metrics
• Charges batteries to 50% capacity within 1 hour
• Simple 3-button interface control
Optional Accessories
Included Components
IEC AC Power Cable (1)
IEC AC Extension Cable (1)
Shielded 3-foot Ethernet Cable (1)
Shielded 8-inch Ethernet Jumper Cable (1)
Hardware Kit (1)
Mounting Screws for Charger Modules (8)
2-bay charging module for bodypack battery
95A9128
AXT902 2-bay charging module for handheld battery
95A9129
C803
C8006
30B13476
Mounting Instructions
This component is designed to fit into an audio rack.
This charger is only for use with Shure lithium-ion rechargeable batteries, such as
the AXT910, AXT920, or AXT920SL.
WARNING: To prevent injury this apparatus must be securely attached
to the rack.
AXT920 Handheld Battery
Charging Modules
Handheld and bodypack charger modules may be installed interchangeably into the
charger.
Caution! Remove AC power and batteries when installing charger
modules.
• To remove a module, remove the four (4) mounting screws and pull.
• To install, slide the module into the housing (noting the orientation of the guide
rails) until it is flush with the housing.
• Replace the screws.
Bodypack Charging Module
AXT902
90XN1371
Batteries
AXT910 Bodypack Battery
AXT901
Handheld Charging Module
5
Controls And Connectors
②
①
④⑤
③
AXT 900
SET
Charger System
⑫
⑥
⑦
⑨⑧⑩
⑪
AXT900
① LCD screen
⑦ AC power cascade
② Control keys
⑧ Ethernet ports (2)
Displays battery status and menu settings
Powers additional units.
For navigating the LCD screen. Press and hold both arrow keys to enter or
exit the utility menu.
Connect to an Ethernet network to enable remote control and monitoring.
⑨ Network status LED (green)
③ Charging module
Off = No network link
On = Network link active
Flashing = Network link active, flash rate corresponds to traffic volume.
Interchangeable modules for handheld and bodypack batteries.
④ Charge Status LED
⑩ Network speed LED (amber)
Indicates battery charge status
Off = 10 Mbps
On = 100 Mbps
⑤ Monitoring Selection LED
This white LED shows which battery is selected in the monitoring menu.
⑪ Cooling fan vent
⑥ AC power in
Clean fan screen as needed to maintain airflow.
Connect to AC mains with supplied power cable.
⑫ Power switch
Powers the unit on and off.
Charge Status LED
Controls
Each charger bay has an LED to indicate the status of the battery.
Red
battery charging
Green
charging complete
Off
battery inserted incorrectly or battery depleted below
3.0 volts.
Amber
charging stopped at reduced capacity (not less than
75% capacity) because the battery is too warm. To
reach 100% capacity, a battery must be cooled to below 45°C.
▲
IP Mode:
SET
Automatic
1.Use the arrow keys to scroll to the desired menu.
2.Press the SET key to enter the selected menu item.
3.Use the arrow keys to change a menu parameter.
4.Press SET to save the setting.
▲
Press and hold both arrow keys to enter or exit the Utility
menu.
6
Inserting Batteries into the Charging Bay
Slide the battery into the charging bay until it locks into place. The charge LED illuminates and the charge cycle begins.
Home Screen
The following messages may be display next to the bay number to indicate battery
status:
When powered on, the charger displays the home screen. Icons indicate the charge
level of each battery, and the display alternates to show approximate hours and
minutes remaining until the battery is fully charged.
The numbers on the screen correspond to the charging bays 1 through 8 from left
to right.
5
6
7
8
▲
SET
calculating time to full
COLD
battery cold
WARM
battery warm
HOT
battery hot
Recovery
recovery mode active
Error
error - press SET key for info
▲
1
2
3
4
CALC
Monitoring Menu
Use the monitoring menu to access detailed information about each battery.
1. From the home screen, use the arrow keys to highlight the number of the battery you want to monitor.
The white LED next to the selected battery illuminates.
2. Press the SET key to access the monitoring menu.
3. Use the arrow keys to scroll through the menu screens.
Press SET key at any time to return to the home screen.
Time to Full
Charge Status
IMPORTANT: Battery might not be charged to full capacity if any of the following
status indicators appear:
Batt. Temp. (Battery Temperature)
Displays the time remaining until the battery is fully charged.
Displays charge as a percentage of the total battery capacity. Also displays charge
in milliampere-hours (mAh).
Displays both the battery temperature (in Celsius and Fahrenheit) and the status, as
follows:
Cold
Charging stopped because battery temperature is too cold. Charging will
resume when battery temperature increases.
[Normal]
Battery temperature = 0°C to 45°C (32°F to 113°F).
Warm
Battery charging to less than full capacity (not less than 75%) because of
elevated temperature. The amber LED will illuminate when charging has
stopped.
[Cold]
Battery temperature = 0°C (32°F) or lower.
[Warm]
Battery temperature = 45°C to 60°C (113°F to 140°F) .
Hot
Charging stopped because battery temperature is too hot.
[Hot]
Battery temperature = 60°C (140°F) or higher.
Battery Health
This displays the health of a selected battery as a percentage of the charge capacity
of a new battery. Charge capacity (battery life when fully charged) will decline as a
result of repeated charge cycles, age, or storage conditions.
Note: If warm or hot, try setting the fan to Always On or increasing ventilation to the
rack.
Network Status
Cycle Count
Active
Indicates connectivity with other devices on the network.
Displays the total number of times that the battery has undergone one full count of
discharge and charge. Recharging after discharging half way counts as one half of
a cycle. Recharging after discharging a quarter of the way counts as one quarter of
a cycle.
Inactive
No connectivity with other devices on the network.
Note: IP address must be valid to enable networked control.
7
Utility Menu
Press and hold both arrow keys to enter and exit the utility menu, which is used to access network and display settings.
[ AXT900 ]
▲
SET
hold both arrow keys
▲
Device ID:
Device ID
MAC (MAC Address)
Displays the MAC address, which is an embedded, uneditable identification number unique to each device. Used by the network and WWB software to identify
components.
This eight-character name is displayed when this device is detected on other network devices or in WWB software.
1. Press SET key to enable editing.
Display Invert
2. Use the arrow keys to change the characters.
This changes the LCD menu from white text on dark background to dark text on a
light background.
3. To finish editing, press the SET key until none of the characters are highlighted.
IP Address Mode: Automatic
Firmware
This is the default setting for use with a DHCP server, which automatically assigns
an IP address.
Displays the version of firmware installed on this device.
1. Navigate to the IP Mode menu and press the SET key.
Fan (Cooling Fan Mode)
2. Use the arrow keys to highlight Automatic.
Automatic
The fan is enabled and adjusts speed based on the internal temperature of the
unit.
3. Press the SET key.
4. Use the arrow keys to move the ► to select OK to save or Cancel to discard, and
then press the SET key.
Always on
The fan runs continuously at maximum speed to provide maximum cooling in
warm environments.
IP Address Mode: Manual
Serial Number
Use manual IP addressing to set the IP address and subnet mask when a DHCP
server is not available.
Displays the serial number.
1. Navigate to the IP mode menu and press the SET key.
Brightness
2. Use the arrow keys to highlight Manual.
Sets the brightness of the LCD to low, medium, or high.
3. Press the SET key to enable editing of the IP address and the subnet mask.
Storage Mode
4. Use the arrow keys to move the ► to select IP: or Sub:
OFF
Normal charge.
5. Use the arrow keys and the SET key to edit the IP address and subnet mask.
Store at 3.8 V
Charges or discharges all batteries to bring them to a 3.8 volts, ideal for long
term storage.
6. Use the arrow keys to move the ► to select OK to save or Cancel to discard, and
then press the SET key.
8
Service Fans Maintenance Message
Troubleshooting
Battery is inserted incorrectly or battery
cannot accept a charge. Check battery
temperature.
Battery does not charge
Battery discharged below 3.0 volts. Try
another battery.
▲
Service
Fans
SET
▲
Charge status LED does
not illuminate.
The charger displays the Service Fans message when the fans are unable to cool
efficiently.
• Press any key to suppress the message for 20 seconds.
• Service the fans or increase ventilation to the unit to clear the message.
Recovering a Battery from Deep Discharge
A deeply discharged battery is one that has been discharged to less than 3.0 volts. When the charger detects a deeply discharged battery, it automatically enters recovery
mode, which charges the battery using a reduced current. The Recovery icon is displayed next to the bay number on the home screen. If recovery is successful, the charger
exits recovery mode and charges the battery to capacity. If the battery cannot be recovered in less than 30 minutes, an error message is displayed and charging stops.
Storage Mode
The following indicators appear on the home screen next to each bay number:
When set to storage mode (Storage Mode = Store at 3.8 V), all batteries are
charged or discharged to 3.8 volts, which is ideal for long-term storage.
The charge status LEDs indicate the voltage state:
• Red flashing = battery charging or discharging to 3.8 volts.
• Amber flashing = battery voltage at 3.8 volts.
Rdy
battery at 3.8 V, ready for storage
Cold
battery cold
Wrm
battery warm
Hot
battery hot
Err
Error, press SET key for info
%
percentage of charge
Charging or discharging may take several hours. The remaining time is displayed as
Time to 3.8 V in the battery monitoring menu (instead of Time to Full).
To exit storage mode:
1. Enter the utility menu by holding both arrow keys.
2. Navigate to the Storage Mode menu and press the SET key.
3. Use the arrow keys to select Off.
4. Press the SET key to exit.
When batteries are ready for storage, they should be removed from the charger and
placed into a temperature controlled area. Recommended battery storage temperature is 0°C (10°F) to 25°C (77°F).
Firmware Updates
Firmware is embedded software in each component that controls functionality. Periodically, new versions of firmware are developed to incorporate additional features and
enhancements. To take advantage of design improvements, new versions of the firmware can be uploaded and installed using the Firmware Update Manager tool available in
WWB6 software. Firmware is available for download from http://www.shure.com.
9
Specifications- AXT900 Rack Charger
Certifications
Conforms to electrical safety requirements based on IEC 60065.
Battery Type
Up to 8 rechargeable Li-Ion batteries
(AXT910/920/920SL)
Charge Time
50%=1 hour; 100%=3 hours
Charging Module
Type
Up to 4 charging modules (AXT901 or AXT902) in any
combination
Operating
Temperature
Range
-18°C (0°F) to 63°C (145°F)
Battery Charging
Temperature
Range
0°C (32°F) to 60°C (140°F)
Storage
Temperature
Range
-29°C (-20°F) to 74°C (165°F)
Dimensions
44 mm x 483 mm x 366 mm (1.7 in. x 19.0 in. x 14.4 in.),
HxWxD
Weight
4.4 kg (9.8 lbs), without batteries or charging modules
Housing
Steel; Extruded aluminum
Power
Requirements
100 to 240 V AC, 50-60 Hz
Current Drain
2.5 A RMS (referenced at 120 V AC)
c UL us listed by Underwriters Laboratories, Inc.
Authorized under the verification provision of FCC Part 15B.
This Class B digital apparatus complies with Canadian ICES-003. Cet appareil numérique de la classe B est conforme à la norme NMB-003 du Canada.
This device complies with Industry Canada licence-exempt RSS standard(s).
Operation of this device is subject to the following two conditions: (1) this device
may not cause interference, and (2) this device must accept any interference, including interference that may cause undesired operation of the device.
Le présent appareil est conforme aux CNR d'Industrie Canada applicables aux appareils radio exempts de licence. L'exploitation est autorisée aux deux conditions
suivantes : (1) l'appareil ne doit pas produire de brouillage, et (2) l'utilisateur de
l'appareil doit accepter tout brouillage radioélectrique subi, même si le brouillage est
susceptible d'en compromettre le fonctionnement.
The CE Declaration of Conformity can be obtained from Shure Incorporated or any
of its European representatives. For contact information please visit www.shure.com
The CE Declaration of Conformity can be obtained from: www.shure.com/europe/
compliance
Authorized European representative:
Shure Europe GmbH
Headquarters Europe, Middle East & Africa
Department: EMEA Approval
Jakob-Dieffenbacher-Str. 12
75031 Eppingen, Germany
Phone: 49-7262-92 49 0
Fax: 49-7262-92 49 11 4
Email: [email protected]
Meets essential requirements of the following European Directives:
• Low Voltage Directive 2006/95/EC
Networking
• WEEE Directive 2002/96/EC, as amended by 2008/34/EC
Network Interface
Dual Port Ethernet 10/100
Network
Addressing
Capability
DHCP or Manual IP address
• RoHS Directive 2002/95/EC, as amended by 2008/35/EC
Note: Please follow your regional recycling scheme for electronic waste
• Battery Directive 2006/66/EC
Please follow your regional recycling scheme for battery disposal.
• Conforms to European Regulation (EC) No. 1275/2008, as amended.
Information to the user
This equipment has been tested and found to comply with the limits for a Class B
digital device, pursuant to Part 15 of the FCC Rules. These limits are designed to
provide reasonable protection against harmful interference in a residential installation. This equipment generates uses and can radiate radio frequency energy and,
if not installed and used in accordance with the instructions, may cause harmful
interference to radio communications. However, there is no guarantee that interference will not occur in a particular installation. If this equipment does cause harmful
interference to radio or television reception, which can be determined by turning the
equipment off and on, the user is encouraged to try to correct the interference by
one or more of the following measures:
• Reorient or relocate the receiving antenna.
• Increase the separation between the equipment and the receiver.
• Connect the equipment to an outlet on a circuit different from that to which the
receiver is connected.
• Consult the dealer or an experienced radio/TV technician for help.
10
AXT900ラックマウント充電ステーション
AXT900は1台のコンパクト・ラックマウントハウジングで最大8本のShure充電池を充電することができます。交換可能な充電モジュールは、ハンドヘルド送信機電池およ
びボディパック送信機電池を自由に組み合わせられます。フロントパネルディスプレイには、充電ステータス、充電完了までの時間、電池温度等すべての電池パラメータが
表示されます。ネットワークに接続すると、Wireless Workbench® 6ソフトウェアを使ってリモートでパラメータを監視することができます。
オプションのアクセサリー
付属品
IEC AC電源ケーブル(1本)
シールド付90cmイーサネットケーブル(1本)
シールド付20cmイーサネットジャンパーケーブル(1本)
ハードウェアキット(1個)
充電器モジュール用取り付けネジ(8本)
ボディパック電池用2ベイ充電モジュール
95A9128
IEC AC延長ケーブル(1本)
ハンドヘルド電池用AXT902 2ベイ充電モジュール
95A9129
C803
C8006
30B13476
取り付け方法
本ユニットはラックマウント用としてデザインされています。
この充電器には、AXT910、AXT920、またはAXT920SL等、Shureリチウムイオン
充電池に対してのみ使用できます。
警告:怪我防止のため機器は確実にラックに固定してください。
AXT920ハンドヘルド用電池
充電モジュール
ハンドヘルド用およびボディパック用充電器モジュールは入れ替えて充
電器に取り付けることができます。
注意!充電モジュール取り付け時はAC電源と電池を外してください。
• モジュールを外すには、4本の取り付けネジを外して引っ張ります。
• 取り付けるには、モジュールをハウジングにスライドさせ、ハウジングと水
平になるようにします(ガイドレールの向きに注意)。
• ネジを元の通りに付けます。
ボディパック充電モジュール
AXT902
90XN1371
電池
AXT910ボディパック用電池
AXT901
ハンドヘルド充電モジュール
11
コントロールとコネクター
②
①
④⑤
③
AXT 900
SET
Charger System
⑫
⑥
⑦
⑪
⑨⑧⑩
AXT900
① LCD画面
⑦ AC電源カスケード
② コントロールキー
⑧ イーサネットポート(2ポート)
③ 充電モジュール
⑨ ネットワークステータスLED(緑色)
電池のステータスとメニュー設定を表示します
他のユニットに電源を供給します。
LCD画面のナビゲート。両方の矢印キーを押したままにすると、ユーティリ
ティメニューを表示したり終了できます。
イーサネットネットワークに接続してリモートコントロールとモニタリングを
可能とします。
ハンドヘルドとボディパック電池の、交換可能なモジュール
消灯 = ネットワークリンク無効
点灯 = ネットワークリンク有効
点滅 = ネットワークリンクは有効で、点滅速度はトラフィック量に対応
④ 充電ステータスLED
電池の充電ステータスを表示します
⑩ ネットワーク速度LED(オレンジ)
⑤ モニタリング選択LED
オフ = 10 Mbps
オン = 100 Mbps
この白色のLEDにより、モニタリングメニューで選択されている電池を示し
ます。
⑪ 冷却ファン通気口
⑥ AC電源イン
必要に応じてファンスクリーンの汚れを取り除き空気の流れを確保してくだ
さい。
付属電源ケーブルでAC電源に接続します。
⑫ 電源スイッチ
ユニットの電源をオン/オフします。
充電ステータスLED
コントロール
充電器ベイにはそれぞれLEDがあり、電池のステータスを表示します。
赤色
電池充電中
緑色
充電完了
消灯
電池が正しく挿入されていないか、電池残量が3.0V
未満
オレンジ
電池の温度が高すぎるため容量を減らして充電を停止
(容量の75%以下にはなりません)100%の容量を得る
には、電池を45°C未満に冷やす必要があります。
▲
IP Mode:
SET
Automatic
1.矢印キーで任意のメニューにスクロールします。
2.SETキーを押して選択したメニュー項目を表示します。
3.矢印キーでメニューパラメータを変更します。
4.SETを押して設定を保存します。
▲
両方の矢印キーを押したままにすると、ユーティリティメ
ニューを表示したり終了できます。
12
充電器のベイに電池を挿入する
電池がロックされるまで、電池を充電器ベイにスライドさせます。充電LEDが点灯し充電が始まります。
ホーム画面
以下の電池ステータスを表すメッセージが、ベイの番号の横に表示されることがあ
ります:
電源を入れると、充電器にはホーム画面が表示されます。アイコンは各電池の充電
レベルを表し、ディスプレイには電池の充電が完了するまでのおおよその時間と交
互に表示されます。
画面の数字は左から右に充電ベイ1から8に対応しています。
5
6
7
8
▲
SET
フル充電までの所要時間の計算中
COLD
電池温度が低い
WARM
電池温度が高い
HOT
電池が熱くなっている
Recovery
リカバリモード実行中
Error
エラー - SETを押して詳細を表示
します
▲
1
2
3
4
CALC
モニタリングメニュー
各電池の詳細はモニタリングメニューを使用してアクセスします。
1. ホーム画面から、矢印キーを押して監視したい電池の番号をハイライトします。
選択した電池の横の白色LEDが点灯します。
2. SETキーを押してモニタリングメニューを表示します。
3. 矢印キーで任意のメニュー画面にスクロールします。
SETキーを押せばいつでもホーム画面に戻ることができます。
Time to Full
Batt. Temp.(電池温度)
電池の充電が完了するまでの残り時間を表示します。
電池温度(摂氏と華氏)とステータスを次のように表示します:
[Normal]
電池温度 = 0°C ~ 45°C (32°F ~ 113°F)
重要:次のステータスインジケータが表示される場合は完全に充電されない場合が
あります:
[Cold]
電池温度 = 0°C (32°F) 以下
Cold
電池の温度が低すぎるため充電を停止しました。電池温度が上がれば充電は再
開されます。
[Warm]
電池温度 = 45°C ~ 60°C (113°F ~ 140°F)
Warm
温度が上昇したためフル充電が行われません(ただし75%以下ではありませ
ん)。充電が停止するとオレンジのLEDが点灯します。
[Hot]
電池温度 = 60℃ (140°F) 以上
注:温度が高い場合や熱い場合は、ファンをAlways Onに設定するか、ラックの換気
量を増やします。
Hot
電池の温度が熱くなったため充電を停止しました。
Battery Health
Network Status
これは、新品時の電池の充電容量に対する割合として、選択した電池のヘルス状態
を表示されます。充電容量(完全に充電した際の持続時間)は、充電の回数、使用
期間の長さ、保管条件によって低下していきます。
Active
ネットワーク上の他の機器と接続していることを表します。
Inactive
ネットワーク上の他の機器との接続がないことを表します。 Cycle Count
放電と充電を行った合計数を表示します。半分放電後に充電した場合は0.5サイク
ルとしてカウントされます。1/4放電後の充電は1/4サイクルとしてカウントされま
す。
注: ネットワークコントロールには正しいIPアドレスに設定することが必要です。
Charge Status
総電池容量に対する割合として充電量を表示します。ミリアンペアアワー(mAh)
としても表示します。
13
ユーティリティメニュー
両方の矢印キーを押したままにすると、ユーティリティメニューを表示/終了できます。このメニューではネットワークと表示設定を変更することができます。
[ AXT900 ]
▲
SET
▲
Device ID:
両方の矢印キーを押したま
まにする
Device ID
MAC(MACアドレス)
MACアドレスを表示します。これは埋め込まれた編集できない識別番号で、各機
器固有のものです。ネットワークとWWBソフトウェアによってユニットの識別に
使用されます。
この機器が他のネットワーク機器またはWWBソフトウェアで検出された場合、こ
の8文字の名前が表示されます。
1. SETキーを押して編集を有効にします。
Display Invert
2. 矢印キーを使って文字を変更します。
LCDメニューを白文字で黒背景から黒文字で白背景に変更します。
3. 編集を終了するには、どの文字もハイライトされなくなるまでSETキーを押し
ます。
Firmware
IPアドレスモード:Automatic
この機器にインストールされているファームウェアのバージョンを表示します。
これはIPアドレスを自動的に割り当てるDHCPサーバーとともに使用する、工場出
荷時の設定です。
Fan(冷却ファンモード)
Automatic
ファンが有効になり、ユニットの内部温度に応じて速度が調整されます。
1. IPモードメニューを開きSETキーを押します。
2. 矢印キーを使用してAutomaticをハイライトします。
Always on
ファンは最高速度で稼働し続け、高温環境下で最高の冷却機能を提供します。
3. SETキーを押します。
4. 矢印キーを使って►を動かし、OKを選択して保存するか、Cancelを選択して取
りやめ、SETキーを押します。
製造番号
IPアドレスモード:Manual
Brightness
1. IPモードメニューを開きSETキーを押します。
Storage Mode
製造番号を表示します。
DHCPサーバーが使用できない場合は、マニュアルIPアドレスを使用してIPアドレ
スとサブネットマスクを設定します。
LCDの明るさを低、中、高に設定します。
OFF
通常の充電
2. 矢印キーを使用してManualをハイライトします。
3. SETキーを押してIPアドレスとサブネットマスクの編集を有効にします。
Store at 3.8 V
すべての電池を充電または放電して3.8ボルト(長期保管に適した値)にしま
す。
4. 矢印キーを使用して►を動かしIP:またはSub:を選択します 5. 矢印キーとSETキーを使ってIPアドレスとサブネットマスクを編集します。
6. 矢印キーを使って►を動かし、OKを選択して保存するか、Cancelを選択して取
りやめ、SETキーを押します。
14
ファンのメンテナンスメッセージ
トラブルシューティング
電池が正しく挿入されていないか、電池に
充電することができません。電池の温度を
確認してください。
充電されない
電池が3.0ボルト未満まで放電されていま
す。他の電池と取り換えてください。
▲
Service
Fans
SET
▲
充電ステータスLEDが点
灯しない。
ファンの冷却効率が低下すると充電器にはService Fansメッセージが表示されま
す。
• いずれかのボタンを20秒間押すとメッセージが表示されなくなります
• ファンを掃除するか、ユニットへの換気を増やしてメッセージを消去しま
す。
深放電状態から電池を回復する
深放電状態の電池とは、残量が3.0ボルト未満の電池を指します。充電器が電池の深放電を検知した場合、回復モードに自動的に入り、低電流状態で充電を開始します。ホ
ーム画面のベイ番号の横にRecoveryアイコンが表示されます。回復に成功すると、充電器は回復モードを終了し、電池を規定容量まで充電します。30分以内に回復できな
い場合はエラーメッセージが表示され、充電が停止します。
保管モード
ホーム画面で各ベイ番号の横に次のインジケーターが表示されます:
保管モードに設定した場合(Storage Mode = Store at 3.8 V)、電池は3.8ボルト
(長期保管に適した値)まで充電または放電されます。
充電ステータスLEDには電圧のステータスが表示されます:
• 赤色の点滅 = 電池は3.8ボルトになるまで充電または放電中です。
• オレンジ色の点滅 = 電圧は3.8ボルトです。
Rdy
電池が3.8 Vになっており保管できる状態
Cold
電池温度が低い
Wrm
電池温度が高い
Hot
電池が熱くなっている
Err
エラー。SETを押して詳細を表示します
%
充電割合
充電または放電には数時間かかる場合があります。残り時間は電池モニタリングメ
ニューにTime to FullではなくTime to 3.8 Vとして表示されます。
保管モードを終了するには:
1. 矢印キーを両方押してユーティリティメニューを表示します。
2. Storage Modeメニューを開きSETキーを押します。
3. 矢印キーを使用してOffを選択します。
4. SETキーを押して終了します。
電池の保管準備が整ったら、充電器から外し、温度管理された場所に保管します。
推奨の電池保管温度は0°C~25°Cです。
ファームウェアアップデート
ファームウェアは各ユニットに組み込まれたソフトウェアで、動作をコントロールします。追加機能や改善点を取り入れた新しいファームウェアが定期的に公開されます。
改良された設計を適用するには、WWB6ソフトウェアのファームウェアアップデートマネージャーツールを使用して最新バージョンのファームウェアをアップロードしイン
ストールします。ファームウェアはhttp://www.shure.comからダウンロードできます。
15
仕様- AXT900ラック充電器
認証
IEC 60065に基づく電気安全要件に適合しています。
電池タイプ
充電式リチウムイオン電池8本まで
(AXT910/920/920SL)
充電時間
50%=1 時間; 100%=3 時間
充電モジュールタイプ
最大 4本充電モジュール (AXT901 or AXT902)
任意の組み合わせ
動作温度範囲
-18°C (0°F) ~ 63°C (145°F)
電池充電温度範囲
0°C (32°F) ~ 60°C (140°F)
保管温度範囲
-29°C (-20°F) ~ 74°C (165°F)
寸法
44 mm x 483 mm x 366 mm (1.7 インチ x
19.0 インチ x 14.4 インチ), 高さ×幅×奥行き
質量
4.4 kg (9.8 lb), 電池除く または 充電モジュ
ール
外装
スチール、押出成型アルミニウム
使用電源
100 ~ 240 V AC, 50-60 Hz
消費電流
2.5 A RMS (120 V AC基準)
c UL us、Underwriters Laboratories, Inc.記載
FCCパート15Bの認証条項により認可。
本クラスBデジタル機器はCanadian ICES-003に適合しています。Cet appareil numérique de la classe B est conforme à la norme NMB-003 du Canada.
このデバイスは、カナダ産業省ライセンス免除RSS基準に適合しています。本装
置の操作は次の2つの条件の対象となります:(1) 装置は干渉を起こしてはならな
い、(2) 装置は、望まない操作を起こす干渉を含め、あらゆる干渉を受け入れなけ
ればならない。
Le présent appareil est conforme aux CNR d'Industrie Canada applicables aux appareils radio exempts de licence.L'exploitation est autorisée aux deux conditions
suivantes :(1) l'appareil ne doit pas produire de brouillage, et (2) l'utilisateur de
l'appareil doit accepter tout brouillage radioélectrique subi, même si le brouillage est
susceptible d'en compromettre le fonctionnement.
CE適合宣言書はShure社またはShure社の欧州担当部より入手することができま
す。問い合わせ先についてはvisit www.shure.comを参照してください
CE適合宣言書は以下より入手可能です:www.shure.com/europe/compliance
ヨーロッパ認可代理店:
Shure Europe GmbH
ヨーロッパ、中東、アフリカ地区本部:
部門:EMEA承認
Jakob-Dieffenbacher-Str. 12
75031 Eppingen, Germany
Tel: 49-7262-92 49 0
Fax: 49-7262-92 49 11 4
Eメール: [email protected]
次の欧州指令の必須要件を満たします:
ネットワーク
ネットワークインターフェース
デュアルポートイーサネット 10/100
ネットワークアドレス容量
DHCPまたはマニュアルIPアドレス
• 低電圧指令2006/95/EC
• WEEE指令2002/96/EC(2008/34/EC改正)
電子廃棄物については地域のリサイクル方法に従ってください
• RoHS指令2002/95/EC(2008/35/EC改正)
• 電池指令2006/66/EC
電池の処分方法については各地域のリサイクル方法に従ってください。
• 欧州規制(EC)1275/2008(改正)に適合。
ユーザーの方へのお知らせ
本機器はテストされFCC規定パート15に従いクラスBデジタル機器に適合します
が、制限があります。これらの制限は、住宅地域において設置する際、有害な電波
干渉から機器を適度に保護するためのものです。本機器は電磁波を発生・使用し、
放射する場合があります。取扱説明書に従って設置しないと無線通信に電波干渉が
起こります。また、設置状況に関わらず妨害を引き起こす可能性もあります。本機
器によりラジオやテレビの受信に電波干渉が起こるようであれば(これは、機器の
電源を一度切ってから入れるとわかります)、次の手段を1つまたは複数用いて電
波干渉を防いでください。
• 受信アンテナを別の方向に向けるか、別の場所に移す。
• 機器と受信機の設置間隔を広げる。
• 受信機を接続しているコンセントとは別の回路にあるコンセントに機器を接
続する。
• 販売店または熟練したラジオ/テレビ技術者に相談する。
16
United States, Canada, Latin
America, Caribbean:
Shure Incorporated
5800 West Touhy Avenue
Niles, IL 60714-4608 USA
Phone: 847-600-2000
Fax: 847-600-1212 (USA)
Fax: 847-600-6446
Email: [email protected]
www.shure.com
©2012 Shure Incorporated
Europe, Middle East, Africa:
Shure Europe GmbH
Jakob-Dieffenbacher-Str. 12,
75031 Eppingen, Germany
Phone: 49-7262-92490
Fax: 49-7262-9249114
Email: [email protected]
Asia, Pacific:
Shure Asia Limited
22/F, 625 King’s Road
North Point, Island East
Hong Kong
Phone: 852-2893-4290
Fax: 852-2893-4055
Email: [email protected]