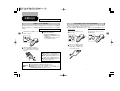
1
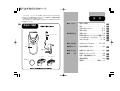
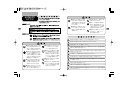
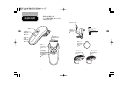
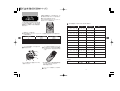
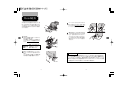
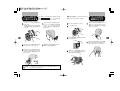
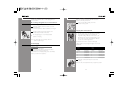
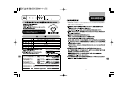
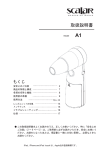
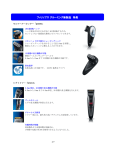
フィリップス ヘアーカッター 保証書
この保証書は、
「無料修理規定」記載内容で無料修理を行うことをお約束するものです。
お買い上げの日から下記期間中に故障が発生した場合は、本書をご提示のうえ、
お買い上げの販売店に修理をご依頼ください。
フィリップス ヘアーカッター
電動ヘアーカッター
QC5170
品
番
QC5170
本体(刃・ラージコーム・スモールコーム・
細部トリマー・充電アダプタを除く)
★ 保証書は再発行しませんので、大切に保管してください。
★ ご販売店様へ この保証書はお客様へのアフターサービスの実施と責任を明確にするものです。
贈答品、記念品の場合も含めて必ず記入捺印してお客様にお渡しください。
★ 製品に関するお問い合わせ
フィリップスお客様情報センター
ナビダイヤル(全国共通)
0570(07)6666
ナビダイヤルにかからない時は
電話 06(6261)8230 FAX 06(6264)5170
フィリップスコンシューマーライフスタイル事業部
日本販売総代理店 小泉成器株式会社
〒541-0051 大阪市中央区備後町3-3-7
★ 修理に関するお問い合わせ
小泉成器修理センター
ナビダイヤル(全国共通)
0570(09)8888
ナビダイヤルにかからない時は
小泉成器東日本修理センター 電話 048(718)3340
〒334-0127 埼玉県春日部市水角1190
小泉成器西日本修理センター 電話 06(6613)3145
〒559-0033 大阪市住之江区南港中1丁目3番98号
★ 部品に関するお問い合わせ
小泉成器部品センター
ナビダイヤル(全国共通)
ナビダイヤルにかからない時は
電話 06(6613)3211
取 扱 説 明 書
0570(09)2222
受付時間:平日9:
00∼17:30 (土・日・祝日・夏期休暇・年末年始を除く)
4222.002.8028.1
保証書付
保証書は、この取扱説明書の
最終ページについておりますの
で記入を受けてください。
フィリップス ヘアーカッターをお買い上げいただき、まことにありがとう
ございます。長い間ご愛用いただくために、ご使用前にこの取扱説明書を
よくお読みのうえ、正しくお使いください。
また、お読みになった後は、お使いになる方がいつでも見られるところに
必ず保管してください。
目 次
●は じ め に
商品のご確認
商品のご確認
………………………… 1
目次
…………………………………… 2
必ずお守りください
……………… 3・4
各部の名称
………………………… 5・6
●ご使用方法
クリーニングブラシ
充電の仕方
………………………… 7・8
基本的な使い方/ヘアーカッ
トの準備 9・
10
コームの使い方/カッ
トの仕方 …11∼16
お手入れ方法
………………… 17・18
5
1
2
4
3
3
本体
充電アダプタ
ラージコーム
スモールコーム
●英 文 解 説
………
Guidance
in English
19∼29
●廃棄について
……………… 30
製品を廃棄するとき
●困ったとき
故障かな?
と思ったら ……………… 31
●保 証
保証とアフターサービス
…………… 32
仕様/お客様情報センター
………… 33
無料修理規定
……………………… 34
細部トリマー
保証書
最終ページ
……………………… 1
2
必ずお守り
ください
●刃は強く押さえない。破損して肌
を傷つけることがあります。
●充電アダプタの電源プラグを抜く
ときは、電源コード部を持たずに必
ず先端の電源プラグ部を持って引
き抜く。感電やショートして発火す
ることがあります。
●刃やコームが破損または故障した
場合は、本製品を使用しないでくだ
さい。ケガの原因になります。交換
の際には必ずフィリップス社製の
同型部品とお取り替えください。
●充電時以外は、充電アダプタをコ
ンセントから抜く。ケガややけど、絶
縁劣化による感電・漏電・火災の
原因となります。
●電源コネクタ受部にピンやごみを
付 着させない 。感 電・ショート・
発火の原因になります。
本製品は人の頭髪のカット専用です。それ以外の目的で使用しないでください。
本製品を水や液体の中に浸したり、水道水ですすいだりしないでください。
本製品を浴室やシャワー中に使用しないでください。
●本体・充電アダプタを水につけた
り、水をかけたりしない。故障や、
ショート・感電の原因になります。
●本製品の電源を入れる前に、充電
アダプタ及び本体に表示されている
電圧が、
ご使用になる地域の電圧
に適しているか確認してください。
●本体ならびに充電アダプタは改造し
ない。また、修理技術者以外の人
は、分解したり修理をしない。火災、
感電、ケガの原因となります。修理は
お買い上げの販売店または小泉成
器修理センターにご相談ください。
●お手入れの際は必ず充電アダプタ
の電源プラグをコンセントから抜く。
また、濡れた手で抜き差ししない。
感電やケガをすることがあります。
●充電アダプタが傷んだり、
コンセントの
差込みが緩いときは使用しない。感
電・ショート・発火の原因になります。
本製品の使用、充電、保管は室温15℃∼35℃の環境下で行ってください。
(尚、低温や高温で
充電すると、充電池の寿命が短くなります。)
●充電アダプタを傷付けたり、電源
コードを無理に曲げたり、引っ張っ
たり、ねじったり、
たばねたり、重い
物を載せたり、挟み込んだり、加工
したりしない。電源コードが破損
し、火災・感電の原因となります。
室温、気圧、湿度が急激に変化する状況でご使用になる場合は、本製品をその環境下で30分
ほど慣らしてからお使いください。
●乳幼児の手の届くところに本製品
を置かないでください。
極端に高温または低温の場所、直射日光の当たる場所には保管しないでください。夏場、車の
中に放置しないでください。
●充電アダプタには変圧器が内蔵さ
れています。充電アダプタを切り離
して別のプラグに接続するのは危
険ですのでおやめください。
本製品は、使用の都度、掃除をしてください。
刃の清掃やコームの着脱は必ずスイッチを切ってから行ってください。 切れ味が衰えてきたり、刃が破損した場合は、使用せず必ず新しい刃と交換してください。
充電アダプタは付属の専用アダプタを使用してください。 充電アダプタが破損、故障した場合は、事故を避けるために必ずフィリップス社製の同型充電
アダプタをお求めください。
3
4
各部分を使用する
ページ数も記載しましたので、
ご参照ください。
各部の名称
電源コネクタ部
電源スイッチ
充電表示ランプ
充電アダプタ
クリーニング
ブラシ
充電の仕方
お手入れ方法
P.7∼8
P.17∼18
充電の仕方
P.7∼8
CHA
RGE
刃
カットの仕方
ごく短くカットする
電源コネクタ
受部
P.15
充電の仕方
P.7∼8
細部トリマー
カットの仕方
細部の仕上げ
回転ヘッド
P.16
カットの仕方
P.13∼14
5
1
2
長さ調整目盛
長さ調整用ボタン
4
3
3
ラージコーム
スモールコーム
コームの使い方
コームの使い方
P.11
P.11
コームの使い方
P.11
5
6
充電の仕方
お客様による充電池の交換はできません。
充電式(コードレス)で使う場合
交流式(充電アダプタをつなげたまま)で使う場合
購入後初めてお使いになるときや半年以上ご使用にならなかったときは、少なくとも8時間以上
充電してからお使いください。本製品は完全に充電した状態で、約60分間コードレスでご使用に
なれます。
●交流式でお使いの場合でも、充電残量がない状態でご使用されますと、作動しない場合が
あります。約3分位の充電を行ってから、ご使用ください。
●交流式での使用でも、充電池は消耗します。また、充電アダプタはご使用の都度コンセントか
ら抜いてください。
この商品は通常約8時間充電です。
2∼3秒後に充電表示ランプが点灯し、充
電中であることを示します。
(満充電で約60分間使用できます。)
充電する際には、必ず電源スイッチを
OFFにしてください。
※充電が完了しても充電表示ランプは点
灯のままです。
※約8時間を目安に充電アダプタをコン
セントからはずしてください。
約 3 分 位 待って からスイッチを
ONにします。
ヘアーカッターの電源スイッチを
OFFにします。
ON
CHAR
GE
CHAR
OFF
OFF
CHAR
GE
充電アダプタの電源コネクタ部を
ヘアーカッター本体の電源コネク
タ受部に差し込み、充電アダプタを
コンセントに差し込みます。
充電アダプタの電源コネクタ部をヘアー
カッター本体の充電コネクタ受部に差し
込み、充電アダプタをコンセントに差し
込みます。
ポイント
●充電・ご使用中、
テレビ等に雑音が入る
場合、
別のコンセントで充電してください。
●充電・ご使用中は本体・充電アダプタが
多少熱くなりますが、
異常ではありません。
●充電池の寿命は使用・保管などの状
態により大きく変化します。
注意
●過充電を防ぐため、24時間以上の長時間充電はしないでください。
●つぎ足し充電を行うと充電池の寿命が短くなります。
●当社専用の充電アダプタ以外での充電はしないでください。
●長期間使用しない場合や、使ったり使わなかったりして保管しておく
と充電池が過放電や液漏れして使えなくなります。
7
8
GE
基本的な使い方
ヘアーカットの準備
コームの取り付け
コームの取り外し
コームを本体の溝に、カチッと音がするまで
差し込みます。
コームを本体から引き抜いて取り外します。
※引き抜く際は必ずコームの根元部分を持
ち、回転ヘッド部分を引っ張らないでくだ
さい。
用意するもの
・ヘアーカッター
・くし
・水スプレー
・首に巻くタオル
・肩にかけるケープ
・毛払いブラシ
カチッ
※コームが溝にきちんと装着されているか
確認してください。
準備する
室内でカットするときは、下に新聞紙か
ビニールクロスなどを敷きます。
髪を毛の流れに沿ってとかします。
電源スイッチのON/OFF
電源スイッチを押し上げるとON、下げる
とOFFになります。
首から肩にタオルをかけて、ケープをと
めます。このとき、タオルの端がケープ
から少しはみだすようにします。
ON
OFF
1=ON
0=OFF
CHAR
GE
注意
9
●洗髪後、髪を乾かした状態で使用してください。
髪がぬれた状態でヘアーカッターを使用しないでください。
●整髪剤は使用しないでください。
10
本製品には2種類のコームが付属しており、10
通りの髪の長さが選べます。カット後の長さは、
最短が3mmで、最長は21mmです。
仕上がりの髪の長さに応じて、スモールコーム
またはラージコームを使用します。
コーム
の使い方
カット後の地肌からの髪の長さは下の表の通
りです。長さの設定値(1∼5)が長さ赤色の
調整用ボタンの両側にある長さ調整目盛に
表示されます。
長さの設定値は、下の表にメモをしておけば、便利です。
カットした日付
コーム
長さ調整目盛
年 月 日
スモール ラージ
1 2 3 4 5
年 月 日
スモール ラージ
1 2 3 4 5
年 月 日
スモール ラージ
1 2 3 4 5
年 月 日
スモール ラージ
1 2 3 4 5
年 月 日
スモール ラージ
1 2 3 4 5
年 月 日
スモール ラージ
1 2 3 4 5
年 月 日
スモール ラージ
1 2 3 4 5
年 月 日
スモール ラージ
1 2 3 4 5
年 月 日
スモール ラージ
1 2 3 4 5
年 月 日
スモール ラージ
1 2 3 4 5
年 月 日
スモール ラージ
1 2 3 4 5
年 月 日
スモール ラージ
1 2 3 4 5
2009年 10月 1日
スモール ラージ
1 2 3 4 5
使用するコームを選びます。
長さの設定値と、スモールコームとラージコームを使用した場合のそれぞれの髪の長さは、
下の表の通りです。
長さ調整目盛
スモールコーム使用時
ラージコーム使用時
1
2
3
4
5
3mm
5mm
7mm
9mm
11mm
13mm
15mm
17mm
19mm
21mm
備考
お気に入りのヘアスタイルに使用した設定をメモしておけば、次回のカットの参考になり便利です。
コームをお好みの髪の長さにセットしま
す。長さをセットするには、赤色の調整用
ボタン①を押して、②左右どちらかに回
します。
コームを本体の溝に、カチッと音がする
まで差し込みます。
カチッ
※記入例
※長さ調整用ボタンは、最大設定値(設定値
5)より先へは回さないでください。
故障の原因となります。
※コームが溝にきちんと装着されているか
確認してください。
ヘアーカッターの電源スイッチをONに
します。
11
12
短めにカット
カットの仕方
刃が前方を向いた位置を0°
の起点として、回
転ヘッドは左右45°
または90°
回転させるこ
とができます。カットする部分に合わせて刃
の向きを調整できるので、使いやすい角度で
カットできます。
ヘアーカッターをすべらすようにゆっくり
動かして髪をカットします。効率よく髪を
カット す るには 毛 の 流 れ に 逆らって ヘ
アーカッターを動かしてください。
90º
45º
18
0º
0º
操作手順
お好みの位置まで回転ヘッドをカチッと
音がするまで回します。
刃の位置は、必ず回転ヘッドで調節してく
ださい。刃やコームを直接回さないでく
ださい。
注意
回転ヘッドは、左右90 °以
上回転させないでください。
故障の原因となります。
90º
45º
頭髪は部位によって毛の向きが異なりま
す。毛の向きに合わせてカットする方向
( 上 下・左 右 )を 変えてみてください 。
カットの仕上がりが均一になるように、
コームの平らになった部分が常に頭皮に
密着するようにヘアーカッターを動かし
てください。
カチッ
回転ヘッドで角度を合わせ、ヘアーカッター
をヘアーブラシのように持ち、使うことがで
きます。
カットする部位により回転ヘッドを調整し、腕
を楽に動かせる位置に調整してください。
使い方のコツ
最初はラージコームの設定値を最大にしてカットし、徐々に髪の長さの設定値を短くし
ていくことをお勧めします。コームにカットした髪の毛がたまった場合は、電源をOFFに
し、
カッターからコームを取り外し、髪を吹き飛ばすまたは振り落としてください。コームを
取り外しても髪の長さの設定値は変わりません。お気に入りのヘアースタイルに使用
した設定をメモしておけば、次回のカットの参考になり便利です。
13
14
カットの仕方
ごく短くカットする
刈りあげたり、えり足や耳のまわりを整えたりする場
合は、コームを装着せず にヘアーカッターを使いま
す。髪の長さは約0.8mmにカットできます。
えり足やもみあげの形を整えるときは、
ヘアーカッターの向きを変え下向きに動
かします。ヘアーカッターをすべらすよう
にゆっくりと滑らかに、髪の生え際に沿っ
て動かします。
コームをヘアーカッターから引き抜いて
取り外します。
※引き抜く際は必ずコームの根元部分を
持ち、回転ヘッド部分を引っ張らないで
ください。
細部トリマ ーを使うと、えり足や 耳のまわりをより
簡単かつきれいに仕上げることができます。
カットの仕方
細部の仕上げ
髪の生えている逆方向に細部トリマーを
動かすと、カットしやすくなります。また、
細部トリマーが常に頭皮にぴったり接触す
るようにしてください。
必ずスイッチをOFFにしてください。
コームを取り外します。
刃の中央部に親指を当てて刃を上方に押
して、刃を外します。
耳のまわりのラインを整える前に、髪が耳
にかぶさるようにくしでとかします。
耳まわりを仕上げる際には、耳たぶが邪魔
にならないよう図のように手前にぴったり
と押しつけると、カットしやすくなります。
頭の輪郭に沿って楽に動かせるように、
回転ヘッドの向きを調整します。
耳のまわりのラインを整えるときは刃の
一端だけが毛先に触れるようにし、毛先
だけをカットします。髪の際が耳に近くな
るようにします。
細部トリマーの突起部を溝に差し込んで
から、バネとバネ受けを合わせてカチッと
音がするまで押して装着します。
溝
カチッ
バネ受け
注意
バネ
コームを装着せずにカットするときは、刃が触れた部分の髪がすべて
カットされますのでご注意ください。
15
16
お手入れ方法
※本製品はご使用のたびに掃除をしてください。
注意
●本体の汚れは、乾いた布で拭取ってください。取れにくい汚れは中
性洗剤を含ませた布で拭取り、
その後水分や洗剤を拭取ってくださ
い。本体を水に浸したり水洗いする事は故障の原因となりますので
絶対におやめください。
●ベンジン、ベンゾール、
シンナー、ガソリンなどを使用しますと変形、
変色、変質の原因となりますので使用しないでください。
掃除後、
刃の突起部を溝に差し込んでから、
バネとバネ受けを合わせて、カチッと音が
するまで押して元の状態に戻します。
付属のクリーニングブラシで刃を掃除し
ます。
カチッ
掃除をする前に、スイッチがOFFになって
いること、また充電アダプタに接続されて
いないことを確かめてください。
コームを取り外します。
溝
付属のクリーニングブラシで回転ヘッド
部を掃除します。
バネ受け
バネ
刃の中央部に親指を当てて刃を上方に押
して、外します。刃を床に落とさないよう
に気をつけてください。
部品の取り替え
注意
注意
本製品に潤滑剤を使う必要はありません。
17
刃やコームが破損・摩耗した場合
は、必ずフィリップス社製の純正部
品とお取り替えください。
本体は水洗いできません。必
ず付属のクリーニングブラシ
でお手入れしてください。
18
General description
A On/off slide
B Charging light
C Adapter (2.5V)
E
D Precision trimmer
A
E Cutting element
B
F Swivel head
RGE
F
G
1
5
CH A
2
G Length setting indication
window
4
3
3
H
H Length selector
I Cleaning brush
J Large comb attachment
(13-21mm)
C
K Small comb attachment
(3-11mm)
I
J
K
D
Important
Read this user manual carefully before you use the
appliance and save it for future reference.
Danger
- Make sure the adapter does not get wet.
19
Warning
- Check if the voltage indicated on the adapter and on
the appliance corresponds to the local mains voltage
before you connect the appliance.
- The adapter contains a transformer. Do not cut
off the adapter to replace it with another plug, as
this causes a hazardous situation.
This appliance is not intended for use by persons
(including children) with reduced physical, sensory
or mental capabilities, or lack of experience and
knowledge, unless they have been given supervision
or instruction concerning use of the appliance by a
person responsible for their safety.
- Children should be supervised to ensure that they
do not play with the appliance.
Caution
- Never immerse the appliance nor rinse it under the tap.
- Do not use the appliance in the bath or in the shower.
- Use, charge and store the appliance at a temperature
between 15 and 35 .
- Only use the adapter supplied to charge the appliance.
- If the adapter is damaged, always have it replaced
with one of the original type in order to avoid a hazard.
- Do not use the appliance when the clipping
attachment or one of the comb attachments is
damaged or broken, as this may cause injury.
- This appliance is only intended for clipping human
scalp hair. Do not use it for any other purpose.
- If the appliance is subjected to a major change in
temperature, pressure or humidity, let the appliance
acclimatise for 30 minutes before you use it.
Compliance with standards
- This Philips appliance complies with all standards
regarding electromagnetic fields (EMF). If handled
properly and according to the instructions in this user
manual, the appliance is safe to use based on scientific
evidence available today.
20
Charging
Using the appliance
A fully charged appliance has a cordless clipping time of
up to one hour.
Make sure your hair is clean and dry. Do not use the
appliance on freshly washed hair.
Do not charge the appliance for more than 24 hours.
The ideal charging time is 8 hours.
Comb your hair with a styling comb in the
direction of hair growth.
Charge the appliance for 8 hours before you use it
for the first time.
Make sure the appliance is switched off when you charge it.
Insert the appliance plug into the appliance and
insert the adapter into the wall socket.
The charging light goes on to indicate that the
appliance is charging.
Note: The charging light does not indicate when the
appliance is fully charged.
Clipping with comb attachment
Use the small or large comb attachment, depending
on the desired hair length. The remaining hair
length after cutting is indicated in mm on the comb
attachments. The selected hair length setting (1-5) is
shown in the two length setting indication windows
on both sides of the length selector.
See the table below for an overview of the length
settings and the corresponding hair lengths of each comb
attachment.
Corded clipping
Only run the appliance from the mains when the
battery is empty.
Switch off the hair clipper.
Connect the hair clipper to the mains and wait a
few seconds before you switch it on.
If the batteries are completely empty, wait a few minutes
before you switch on the appliance.
Large
comb
Small
comb
setting
1
2
3
4
5
hair length
3mm/0.12in
5mm/0.20in
7mm/0.28in
9mm/0.35in
11mm/0.43in
setting
1
2
3
4
5
hair length
13mm/0.51in
15mm/0.59in
17mm/0.67in
19mm/0.75in
21mm/0.83in
Attach the comb attachment to the swivel head
( ‘click’ ).
Make sure the comb attachment locks properly into position.
21
22
Set the comb attachment to the desired hair
length. To do this, press the release button on the
length selector (1) and slide it to the left or right (2).
Do not slide the length selector beyond the highest hair
length setting (5).
Switch on the appliance.
Tips
- We advise you to start clipping at the highest setting of the large
comb attachment and to reduce the hair length setting gradually.
- If a lot of hair has accumulated in the comb attachment, remove it
from the clipper and blow and/or shake the hair out of it. When
you remove the comb attachment, the hair length setting does
not change.
- Write down the hair length settings you use to create a certain
hairstyle as a reminder for future clipping sessions.
Move the clipper through the hair slowly.
Using the swivel head
90º
45º
18
0º
0º
90º
45º
From its starting position of 0゚ (pointing forwards),
you can turn the swivel head 45゚or 90゚to the left
or right. In this way, you can adjust the position of
the cutting element to the part of your head you
are clipping. This makes it much easier to clip your
own hair.
Set the cutting element to the desired position by
turning the swivel head ( ‘click’ ).
Always adjust the position of the cutting element with the swivel
head. Do not turn the cutting element or the comb attachment.
Do not turn the swivel head more than 90゚to the left
or right.
The swivel head allows you to hold and use the
appliance like a brush.
The hair on different parts of your head grows in
different directions. You may want to try different
clipping directions (upwards, downwards and across).
To clip in the most effective way, move the
appliance against the direction of hair growth.
Turn the swivel head to the position that is most comfortable for
your arm when clipping the different parts of your head.
Make sure that the flat part of the comb attachment is fully in
contact with the scalp to obtain an even cutting result.
Clipping without comb attachment
You can use the clipper without comb attachment to clip
your hair very close to the skin (0.8mm) or to contour
the neckline and the area around the ears.
Note: When you use the hair clipper without a comb
attachment, the clipper cuts the hair very close to the skin.
Remove the comb attachment by pulling it off the
swivel head.
Never pull at the flexible top of the comb attachment.
Always pull at the bottom part.
23
24
When you contour the hair around the ears, only cut the hair
ends. The hairline should be close to the ear.
Insert the lug of the precision trimmer into the slot and push
the precision trimmer onto the swivel head ( ‘click’ ).
To contour the neckline and the sideburns, turn the
clipper and make downward strokes.
Cleaning
Do not use abrasives, scourers or liquids such as alcohol,
petrol or acetone to clean the appliance.
Move slowly and smoothly. Just follow the natural hairline.
Only clean the appliance and the adapter with the brush supplied.
Be careful that the cutting element does not fall on the floor.
Adjust the position of the swivel head to make contouring easier.
Clean the appliance every time you have used it.
Using the precision trimmer
You can use the appliance with the precision trimmer to
contour the neckline and the area around the ears more
easily and more precisely.
Make sure the appliance is switched off and
disconnected from the mains before you clean it.
Remove the comb attachment.
Make sure the appliance is switched off.
Remove the comb attachment by pulling it off the swivel head.
Apply pressure to the centre of the cutting element
to open it. Remove the cutting element from the
swivel head.
Apply pressure to the centre of the cutting element to open it.
Remove the cutting element from the swivel head.
Clean the cutting element with the brush supplied.
25
26
Clean the swivel head with the brush supplied.
7
Insert the lug of the cutting element into the slot
and push the cutting element back onto the swivel
head ( ‘click’ ).
The appliance does not need any lubrication.
- The built-in rechargeable batteries contain substances
that may pollute the environment. Always remove
the batteries before you discard and hand in the
appliance at an official collection point. Dispose
of the batteries at an official collection point for
batteries. If you have trouble removing the batteries,
you can also take the appliance to a Philips service
centre. The staff of this centre will remove the
batteries for you and will dispose of them in an
environmentally safe way.
Disconnect the appliance from the mains and let
the appliance run until the motor stops.
Remove the upper housing part of the appliance.
Replacement
Only replace a worn or damaged cutting element with an
original Philips cutting element.
Remove the batteries. Pry them out of the
appliance.
Environment
Removing the batteries
Only remove the batteries when you discard the
appliance. Make sure the batteries are completely empty
when you remove them.
Cut the wires with a pair of household scissors
and dispose of the batteries properly.
Do not connect the appliance to the mains again after
the batteries have been removed.
- Do not throw away the appliance with the normal
household waste at the end of its life, but hand it in
at an official collection point for recycling. By doing
this, you help to preserve the environment.
27
28
製品を廃棄
するとき
Guarantee and service
If you need service or information or if you have a
problem, please visit the Philips website at
www.philips.com or contact the Philips Consumer Care
Centre in your country (you find its phone number in
the worldwide guarantee leaflet). If there is no Consumer
Care Centre in your country, go to your local Philips
dealer.
ニッケル水素電池のリサイクルについて
この製品はニッケル水素電池を使用しています。ニッケル水素電池はリサイクル
可能な貴重な資源です。ご使用済みの製品の廃棄に際しては、ニッケル水素電池を
取り出し、各自治体の処理方法に従いリサイクル協力店にお持ちください。
※ご不明な場合は、お客様情報センター(P.33)までお問い合わせください。
●製品を廃棄するとき以外は、絶対に本体を分解しないでください。
●充電池の取り外しは、充電池が完全に空の状態のときに行ってください。
●下記1∼4は製品廃棄の際の充電池の取り外し方の説明です。製品使
用中の充電池交換は、
お買い求めの販売店に依頼してください。専用
部品が必要となりますので、
お客様による充電池の交換はできません。
充電池の取り外し方
ヘアーカッターを充電アダプタから外し、モーターが自然に止まるまでヘアーカッターを作動
させます。
コームをヘアーカッターから取り外します。
充電池をドライバーで外します。
ドライバーを使って本体の上部カバーを
取り外します。
工具でワイヤーを充電池に近いところで
切断し、充電池を外してください。
※充電池を取り外した後は、ヘアーカッターを電源に接続しないでください。
29
30
故障かな?
と思ったら
充電しても使用
時間が極端に短い
保証と
アフターサービス
●刃、ヘアーカッターの掃除はしていますか?
●ヘアーカッターが完全に止まるまで作動させてか
らもう一度約8時間充電してください。
保証期間
お買上げ日から2年間
対象部分
本体(刃・ラージコーム・スモールコーム・
細部トリマー・充電アダプタを除く)
●それでも改善されないときは、充電池の寿命です。
使用時間が3分の2程度になったら
充電池交換が必要です。
だんだん切れ味が
悪くなった
●刃が損傷または摩耗していませんか?
スイッチを押しても
作動しない
●刃の掃除はしていますか?
●充電はされていますか?
約8時間、充電をしてください。
異常な音がする
●刃に傷が付いていませんか?
●刃が正しくセットされていますか?
充電できない
刃の寿命は1回約30分、
月2回の使用で約5年が
目安ですが、使用時間・回数により異なります。
●充電アダプタの電源コードが断線していませんか?
新しい充電アダプタをお買い求めください。
●充電アダプタの電源プラグ部はコンセントにきちん
と差し込まれていますか?
本体の電源コネクタ受部に充電アダプタのコネクタ部が
きちんと差し込まれていますか? 確認してください。
以上の処置により、正常な状態に戻らない場合は、
お買い求めの販売店か小泉成器修理センターへお問い合わせ願います。
31
Philips Consumer Lifestyle
Service Department
P.O.Box 20100
9200 CA DRACHTEN
The Netherlands
Fax:+31 51 259 2785
32
無料修理規定
用の製品の点
ご使
故障した場合には、無料修理します。
!
検を
長年
1.取扱説明書、本体貼付ラベル等の注意書に従った正常な使用状態で保証期間内に
このような症状の時は、故障や事故防止のため、
スイッチを切り、充電アダプタをコンセントから外
して、必ず販売店にご相談ください。
QC5170
充電・交流式(専用充電アダプタ使用)
交流使用時約3.4W
充電時約1.15W
AC100 - 240V(50/60Hz)
約187g
8時間
フィリップス
コンシューマー ライフスタイル事業部
製品に関するお問い合わせ:
フィリップスお客様情報センター
修理に関するお問い合わせ:
小泉成器修理センター
部品に関するお問い合わせ:
小泉成器部品センター
ナビダイヤル
(全国共通番号)
ナビダイヤル
(全国共通番号)
ナビダイヤル
(全国共通番号)
■ ナビダイヤルにかからない時は
小泉成器東日本修理センター 電話 048(718)3340 〒334-0127 埼玉県春日部市水角1190
小泉成器西日本修理センター 電話 06(6613)3145 〒559-0033 大阪市住之江区南港中1丁目3番98号
33
34