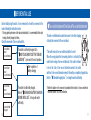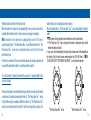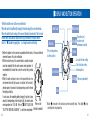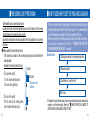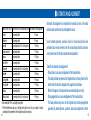
1
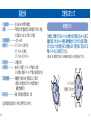
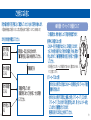
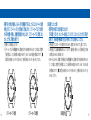
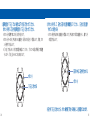
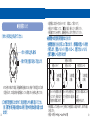
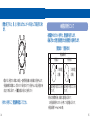
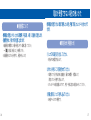
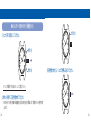
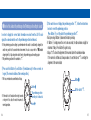
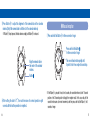
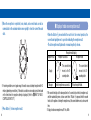
7B22
BSB7B22-A0505
7B32
http://www.seiko-watch.co.jp/
お客様相談窓口 全国フリーダイヤル 0120-612-911(下記の最寄地に着信いたします)
お客様相談室
東京
〒101-0044 東京都千代田区鍛冶町 2-1-10
大阪
〒550-0013 大阪市西区新町 1-4-24
大阪四ツ橋新町ビルディング 8階
お客様相談係
札幌
〒060-0061 札幌市中央区南一条西 7-20-1 札幌スカイビル 4階 セイコーサービスセンター内
福岡
〒810-0801 福岡市博多区中洲 5-1-22
松月堂ビル 6階 セイコーサービスセンター内
I N S T R U C T I O N S
C
この度は弊社製品をお買い上げいただき、
誠にありがとうございました。
ご使用の前にこの説明書をよくお読みの上
正しくご愛用くださいますよう、
お願い申し上げます。
なお、
この説明書はお手元に保管し必要に応じてご覧ください。
※ お買い求めの際の金属バンドの調整はお買い上げ店・弊社お客様相談窓口(裏表
紙に記載)にて承っておりますが、
その他のお店では有料もしくはお取扱いいただけな
い場合があります。
警告
取扱いを誤った場合に、重傷を負うなどの重大な
結果になる危険性が想定されることを示します。
注意
以下の場所での携帯・保管は避けてください
乳幼児の手の届くところに時計本体や部品を置かないでください
警 告
部品を乳幼児が飲み込んでしまうおそれがあります。
万一飲み込んだ場合は、身体に害があるため、
ただちに医師とご相談ください。
注 意
次のような場合、
ご使用を中止してください
警 告
○ 時計本体やバンドが腐食等により鋭利になった場合
○ バンドのピンが飛び出してきた場合
取扱いを誤った場合に、軽傷を負う危険性や物質的
損害をこうむることが想定されることを示します。
○
○
○
○
揮発性の薬品が発散しているところ(除光液などの化粧品・防虫剤・シンナーなど)
5℃∼35℃から外れる温度に長期間なるところ ○ 高湿度なところ
磁気や静電気の影響があるところ ○ ホコリの多いところ
強い振動のあるところ
アレルギーやかぶれを起こした場合
注 意
ただちに時計の使用をやめ、皮膚科など専門医に相談してください。
注意
その他のご注意
注 意
※ すぐに、
お買い上げ店・弊社お客様相談窓口(裏表紙に記載)にご相談ください
2
○ 提げ時計やペンダント時計のひもや
○ 乳幼児に時計が触れないように
チェーンが衣類や手・首などを傷つける
おそれがありますのでご注意ください。
ご注意ください。ケガやアレルギー
をひき起こすおそれがあります。
○ 商品の分解・改造はしないでください。
3
操作について
特長
製品仕様
ご使用にあたって
ご使用になる前に
各部の名称とはたらき
ネジロックリュウズについて
ご使用方法
6
8
9
12
16
17
18
電波が受信できない場合の使いかた
電波(修正)時計とは
時差修正について
針位置自動修正機能について
使用電源について
異常な動きになった場合
(システムリセットについて)
27
31
35
38
39
40
ご注意いただきたいこと
アフターサービスについて
保証について
お手入れについて
防水性能について
耐磁性能について
バンドについて
こんなときには
4
42
44
46
48
52
54
56
操 作 に つ い て
特長
この時計は、標準電波を受信して正確な時刻やカレンダー表示をする電波修正機能を持っ
ています。文字板の下にあるソーラセルが、受けた光を「電気エネルギー」に換え時計
を駆動させます。また、ある一定時間光が当たらないと、時計の消費電力を抑えるパワー
セーブ機能、磁気等の外部影響により時刻がずれた場合でも自動補正する「針位置自動
修正機能」を搭載しています。
● 受信レベル表示機能・・・・強制受信中、受信状況に応じた電波受信レベルを秒針により
表示します。受信レベルが高いときは秒針が「50秒」位置を示
します。受信レベルが低いときは秒針が「40秒」位置を示します。
受信できない場合は秒針が「20秒」位置を示します。
● 針位置自動修正機能・
・
・
・
・外部影響等で時刻がずれた場合、針位置を自動的に修正します。
を受信し、時刻を修正します。
● 電波修正機能・・・・・・・・・毎日、自動的に標準電波(JJY)
40kHz(福島局)
と60kHz(九州局)
を自動的に選択し、受信し
(2局自動選択受信)
ます。強制受信も可能です。
● 受信結果表示機能・・・・・・受信(自動または強制受信)の受信結果を表示できます。
前回の受信が成功している場合は秒針が「10秒」位置を示しま
す。前回の受信に失敗している場合は秒針が「20秒」位置を示
します。
6
● 時差修正機能・・・・・・・・・時差のある地域へ旅行する際に、時差の設定ができます。
● 充電機能・・・・・・・・・・・・・光を「電気エネルギー」に換え、二次電池に充電します。フル充
電で約6ヶ月動きつづけます。
● パワーセーブ機能・・・・・・光があたらない時間が72時間以上継続した場合に作動する「パ
ワーセーブ1」
と、
一定の充電量を下回った場合に作動する「パワー
セーブ2」の消費電力を抑える機能をもっています。
7
ご使用にあたって
製品仕様
1. 水晶振動数・・・・・・・・・・・32,768Hz(Hz=1秒間の振動数)
2. 精度・・・・・・・・・・・・・・・・平均月差±15秒(電波受信による時刻修正が行われない場合、
かつ気温5℃∼35℃において腕につけた場合)
3. 作動温度範囲・・・・・・・・・・−10℃∼+60℃
4. 駆動方式・・・・・・・・・・・・・ステップモーター式(時・分針)
ステップモーター式(秒針)
ステップモーター式(カレンダー)
5. 使用電源・・・・・・・・・・・・・二次電池:1個
6. 持続時間・・・・・・・・・・・・・約6ヶ月(フル充電で、パワーセーブが作動しない場合)
※フル充電をした状態からパワーセーブが作動した場合は最大約1.5年
7. 電波受信機能・・・・・・・・・・自動受信(午前2時、4時。受信状況によって異なる)
※受信から次の受信まではクオーツの精度で動きます。
強制受信機能付き。
8. 電子回路・・・・・・・・・・・・・発振、分周、駆動、受信回路:IC 3個
●充電のしかた
この時計は、文字板の下にあるソーラーセルが受けた光を「電気エネルギー」に換え二
次電池に蓄え、そのエネルギーを利用し時計を駆動させていますので、快適にご使用い
ただくためには、十分な充電をすることをお勧めします。充電の際は、下図のように文
字板(ソーラーセル)に光を当ててください。
※使い始め、
または充電不足で停止している時計を動かす場合は、十分な充電を心掛けてください。
光
6
ソーラーセルは
文字板の下にあります
6
※上記の製品仕様は改良のため、予告なく変更することがあります。
8
9
ご注意
(充電時のご注意)
・充電の際、写真証明ライト、スポットライト、白熱ライト(球)などに、近づけ過ぎると、時計体が
高温になり内部の部品等が損傷を受ける恐れがありますのでご注意ください。
・太陽光にて充電する際も、車のダッシュボード等では、かなりの高温となりますので、ご注意く
ださい。
・時計体が60℃以上にならないようにしてください。
●充電所要時間の目安
照度lx(ルックス) 光源
500
白熱球
700
蛍光灯
1000
蛍光灯
3000
蛍光灯
5000
蛍光灯
1万
蛍光灯
1万
太陽光
10万
太陽光
10
環境(目安) フル充電までの充電所要時間 確実に1秒運針になるまでの充電所要時間★ 1日動かすために必要な充電所要時間
60W 60cm
−
−
5時間
一般オフィス内
−
−
3時間
30W 70cm
−
120時間
2時間
30W 20cm
90時間
30時間
30分
30W 12cm
70時間
24時間
24分
30W 5cm
25時間
8時間
9分
曇天
25時間
8時間
9分
快晴(夏の日直射日光下)
8時間
2時間
3分
※左記の表の数値は、
目安としてご使用ください。
★この欄にある数値は、止っていた時計に光をあて、
「2秒運針」、
「5秒運針」から脱し、
「確実な1秒運針」になるまでに必要となる充電所要時間です。
この所要時間まで充電しなくても、1秒運針になりますが、その状態では、すぐに「2
秒運針」になる場合もありますので、この時間を目安に充電してください。
※左記の充電に必要な時間の目安は、
モデルによって若干異なります。
〈過充電防止機能について〉
文字板の下にあるセルが、受けた光を「電気エネルギー」に換え、二次電池に蓄積され
ます。二次電池がフル充電になると、それ以上充電されないように自動的に過充電防止
機能がはたらきます。よって、
「フル充電までの充電所要時間」を超えて充電しても時
計が破損することはありませんのでご安心ください。
11
ご使用になる前に
時計の運針状態を下記手順に沿って確認をしていただいた後のご使用をお勧めします。
※電波時計を快適にご使用いただくには、常に充電を心掛けてご使用していただくことをお勧めします。
まず、秒針の動きを確認してください。
秒針が1秒毎、
動いている。
秒針が2秒運針
している。
秒針が5秒運針
している。
秒針が停止して
いる。
12
充電量は、一定以上あると思われます。
「■ご使用方法」に進み次の操作をしてください。
充電量終了後
●2秒運針・パワーセーブ・5秒運針について
この電波時計は、秒針の動きによって充電状態を確認できます。
〈携帯中に2秒運針になった時〉
・エネルギー切れ予告機能がはたらくと、
「2秒運針」になります。
さらにその状態が継続すると「秒針が5秒運針」その後、時計が
停止しますので、
「●充電所要時間の目安」を参照に十分充電を
してください。
6
※「2秒運針」では、ボタン・リュウズ操作ともできませんが、故障ではありません
ので、注意してください。
〈パワーセーブになった時〉
充電量が不足しています。
「■ご使用にあたって」を参照に、十分な充電を
してください。
光があたらない状態では、無駄なエネルギーの消費を防止するパワーセーブ機能
が自動的に作動します。
・光があたらない状態が72時間以上継続した場合、
「パワーセーブ1」に入ります。
「パワーセーブ1」では、秒針が15秒位置で停止します。時・分・カレンダーも停止
していますが、自動受信は行っております。
現在時刻に戻すには5秒以上光をあててください。
13
・充電不足の状態が継続し、ある一定の充電量を下回ると、さらにエネルギーの消費
を防止する「パワーセーブ2」が自動的に作動します。
「パワーセーブ2」では秒針
が45秒位置へ移動し、自動受信機能は中止します。
「パワーセーブ2」状態になっ
たら、ただちに充電が必要です。
〈5秒運針になった時〉
・充電不足の状態では5秒運針になります。
「5秒運針」
(時・分・カレンダーは停止しています。)になったら、ただちに充電が
必要です。
「●充電所要時間の目安」を参照に十分な充電をしてください。
※充電中は、
「5秒運針」になります。
※「パワーセーブ2」が長時間継続すると、電源が低下し内部時刻が失われます。この場合は、充電完
了後(照度によっては、長時間かかる場合があります。)AM 12:00から運針を開始しますので、
「■
ご使用方法(時刻・カレンダーの合わせかた)」を参照に時刻・カレンダー合わせをしてください。
※「5秒運針」では、ボタン・リュウズ操作ともできませんが、故障ではありませんので、注意してください。
※「5秒運針」では、
自動受信機能は中止していますので、通常運針へ移行したら、
「強制受信」で正確
な時間に合わせることをお勧めします。
※光が十分にあたらない環境で「5秒運針」が長時間継続すると、電源が低下し内部時刻が失われま
す。この場合は、充電完了後(照度によっては、長時間かかる場合があります。)AM 12:00から運
針を開始しますので、
「■ご使用方法(時刻・カレンダーの合わせかた)」を参照に時刻・カレンダー合
わせをしてください。
6
6
6
14
パワーセーブ1状態
パワーセーブ2状態
5秒運針
15
各部の名称とはたらき
時針
ネジロックリュウズにつ いて
・操作しない時に、
リュウズをネジでロックできる構造のモデルがあります。
・ロックすることで誤操作の防止や防水性の向上が図られます。
・操作をするときはロックを解除し、操作が終わったらロックしておいてください。
分針
ボタンA (受信レベル・結果表示、
アンテナ位置
強制受信)
(この位置に受信用
アンテナがあります)
リュウズ
6
秒針
2段目:時刻合わせ状態
1段目:日付の合わせ状態
通常位置
ボタンB (時差修正)
日付
※ボタンBは誤入力防止のため、
ケースに埋め込まれています。操作のためには先が細いものをご使用くだ
さい。
16
●ネジロックリュウズの操作方法
・リュウズを操作する際に、ロックを解除する必要があります。
※リュウズ操作する時以外は、常にロック状態にしておいてください。
【ロック解除のしかた】
リュウズを左に回してください。
ネジがゆるんでリュウズが操作できる
ようになります。
ロック状態
ロック解除した状態
【ロックのしかた】
リュウズ操作が終わったら、リュウズ
をケースに押しつけながら、右に止ま
るところまでしっかりネジ込んでくだ
さい。
※この状態からリュウズが
引き出せます。
17
ご使用方法( 時刻・カレンダーの合わせかた )
・この時計は標準電波を受信して正確な時刻を表示することが出来ます。
ご購入後お使いになる前に、標準電波を受信してからご使用ください。
・「●ご使用になる前に」を参照に確実に秒針が1秒毎、動いている状態で以下
の操作をしてください。
操作全体の流れ
1. カレンダーの基準位置合わせ
2. 強制受信
●カレンダーの基準位置の合わせかた(基準位置合わせ)
標準電波から得た日付情報を正確に表示するために「カレンダーの基準位置」合わ
せが必要です。
※充電不足の状態で、基準位置合わせを行うと「5秒運針」になることがあります。
その場合は、「●充電所要時間の目安」を参照に十分な充電をした後、操作してください。
※カレンダーの基準位置は「1日」です。
①ボタンA、ボタンBを同時に3秒以上押してください。
(リュウズ位置は、通常位置)
※時・分・秒針は停止します。
ボタンA
3. 受信結果を確認
受信成功確認 ご使用開始
18
※受信が成功しなかった場合は、受信環境を変えて強制受信をするか「●電波が受信できない場
合の使いかた」をお読みください。
6
現在設定されている基準位置を
示します。
ボタンB
※この状態で8秒以上操作がないと、通常運針に戻りますのでご注意ください。
19
②基準位置が「1日」でない場合は以下の方法で合わせてください。
ボタンAを押して日付を基準位置の「1日」に合わせてください。
※ボタンAを1回押す毎に1日分、日付を送ります。
※ボタンAを1∼2秒、押し続けると連続送り(最大31日分送り)を開始します。再度、ボタ
③ボタンBを押して、日付と日窓の位置を微調整してください。(日付と窓位置が
ずれていた場合のみ)
※ボタンBを押し続けると連続送りを開始します。押し続けてる間は連続送りをし、離すとそ
の位置で停止します。
ンAを押すと停止します。
※「31日」で停止させ、日付と窓位置を確認してください。ずれている場合は手順③で微調整
をしながら「1日」合わせることをお勧めします。
1
日窓の中心に日付を合わせる。
ボタンA
ボタンB
1
「1日」に合わせる
④日付を「1日」に合わせたら、ボタン操作終了時から8秒後に、通常運針になります。
20
21
●強制受信のしかた
①ボタンAを3秒以上押し続けてください。
ボタンAを3秒以上押し続ける
1
秒針が「0秒」位置に早送りして停止します。
「受信結果表示」機能がはたらき、秒針が「10秒位置」または「20秒
※ボタンA押しが3秒以下の場合、
位置」を示します。この場合は秒針が通常運針になってから、再度、ボタンAを3秒以上押してください。
22
②この状態で受信状態になりますので、電波が受信しやすい場所に置いてください。
(例、窓際で他の電子機器の影響のない場所)受信中の時分針は通常の運針とは異
なります。
※通常受信には約2分∼約12分かかります。(環境によって異なります。)
※受信しやすい環境については、「■電波(修正)時計とは」をご参照ください。
※受信状態でボタンAを押すと、強制受信を中止しますので押さないでください。
★強制受信中は受信状態表示機能がはたらきます。
・強制受信開始約1分後(状況によって異なります)、標準電波の受信レベルを秒針
が表示します。
(受信レベルハイ:H 受信レベルロー:L 受信できないレベル:N)
・全部で3種類のレベル表示があります
レベル
表
示
方
法
受信レベル表示
受信レベルロー
受信レベルハイ
受信できないレベル
H
「50秒位置」
に移動
「40秒位置」
に移動
L
「20秒位置」
に移動
N
受信レベルが比較的高い状態 受信レベルが低い状態を示して 受信できない環境にあることを
説明 を示しています。受信が成功す います。受信できない場合もあ 示します。
る可能性が高い環境にあります。 ります。
強制受信を中止します。
※受信環境によっては「受信レベルハイ」を表示しても受信成功しない場合があります。あくまでも目安と
お考えください。
23
※受信レベル表示 H=High, L=Low, N=Noの略
③受信が終了すると、時、分、秒針およびカレンダーが早送りして時刻表示に戻り
ます。
●受信結果表示について
・通常運針中にボタンAを押すと、受信結果を表示します。
・最後に行なった受信(自動受信または強制受信)の結果を示します。
(受信成功:Y 受信失敗:N)
6
受信結果表示
結果
※電波が正しく受信できない環境にある場合、一定時間受信を継続した後自動的に受信を中止します。
受信継続時間は環境等によって異なりますが、最大約12分です。受信を中止した場合、受信前の時
刻に基づく表示に戻ります。
(→「■電波(修正)時計とは」を参照ください)
表
示
方
法
説明
受信成功
Y
受信失敗
「10秒位置」
に移動
「20秒位置」
に移動
N
前回の受信が成功したことを示 前回の受信が失敗したことを示
しています。
しています。
※秒針は約5秒間表示後、自動的に通常運針に戻ります。
④ボタンAを押して、受信結果を確認してください。
また受信結果表示中にボタンAを押しても通常運針に戻ります。
※受信結果表示 Y=Yes, N=Noの略
24
25
電波が受信できない 場合の使い かた
●自動受信について
・標準電波が受信しやすいとされる時間帯(午前2時、4時)に自動的に受信します。
・自動受信中は、秒針が0秒位置に止まります。
※自動受信の時間帯は、時計を受信しやすい場所に置いてください。
→「■電波(修正)時計とは」を参照ください。
※自動受信中にボタンAを押すと、受信を中止します。
標準電波が受信できない環境で使用したい場合、手動で時刻、カレンダーの合わせがで
きます。
●時刻合わせ(手動合わせ)
①リュウズを2段目に引き出してください。
※秒針が12時位置で停止します。
②ボタンAを押して、時刻を合わせてください。
※1回押しで1分、押し続けると連続送り(最大12時間分)を開始します。
再度、ボタンAを押すと停止します。
※カレンダーも時刻と連動しますので、午前・午後に注意し時刻合わせをしてください。
③時報と同時にリュウズを押し込んでください。
※時報サービス117が便利です。
26
272
●カレンダーの合わせかた(手動合わせ)
ボタンA
①リュウズを1段目にしてください。
6
ボタンA
1
ボタンB
③日付を合わせたら、リュウズを押し込んでください。
※リュウズ2段目へ引き出さないようご注意ください。
6
②ボタンAを押して日付を合わせてください。
※ボタンAを1∼2秒、押し続けると連続送り
(最大31日分送り)
を開始します。再度、ボタンAを押すと停
止します。
28
29
電波( 修正 )時計とは
●電波修正機能とは
この時計は、標準電波(JJY)を受信できる環境での使用目的に作られております。
手動による時刻合わせでのご使用はあくまでも暫定的なご使用としてお考えください。
標準電波を受信して使用されることをお勧めします。
尚、手動で時刻を合わせた場合でも、一定時間毎に標準電波を受信していますので、
受信成功後、正確な時刻・カレンダーを表示します。
(日付を正しく表示させるため
には、カレンダー基準位置合わせが必要です。)
・正確な時刻およびカレンダー情報等をのせた標準電波を受信することにより、現
在時刻等を表示する機能です。
●いつも受信結果が「受信失敗」を表示する場合
●標準電波(JJY)とは
・「■電波(修正)時計」とは」の内容をよくお読みいただき、強制受信をするこ
とをお勧めします。
(→「●強制受信のしかた」を参照)
・情報通信研究機構が運用している時刻情報をのせた電波で、国内2箇所の標準電波
送信所からそれぞれ異なる周波数で送信されています。
福島局(おおたかどや山:40 kHz) 九州局(はがね山:60 kHz)
・標準信号の時刻情報はおよそ10万年に1秒の誤差という超高精度を保つ『セシウ
ム原子時計』によるものです。
330
311
●電波受信について
ご注意
・各々の送信所からの受信範囲の目安は、条件にも異なりますがおおむね1,000km
です。個別の状況により異なりますが、東日本地域は40kHz(福島送信所)、西日本
地区は60kHz(九州送信所:福岡と佐賀の県境)の電波が受信しやすいと想定され
ます。
・ただし、天候、置き場所、時計の向き、
時間帯あるいは地形や建物などの影響
によって、受信できない場合があります。
1000km
500km
はがね山
はがね山
標準電波送信所
標準電波送信所
(60kHz)
(60kHz)
432
おおたかどや山
おおたかどや山
標準電波送信所
(40kHz)
標準電波送信所
(40kHz)
500km
1000km
・電波障害等により、誤った受信をした際は、誤った時刻を表示する場合があります。
また、受信場所・電波状況によっては受信できないことがあります。このようなときは、
受信を行なう場所を変えてお使いください。
・受信できない場合は、クオーツの精度で動きます。
・設備のメンテナンスや落雷の影響などにより停波することがあります。
停波に関する情報は、情報通信研究機構(日本標準時グループ)のホームページ
(http://jjy.crl.go.jp/)をご覧になるか、お客様相談室にお問い合わせください。
●ご使用場所
本製品は、テレビやラジオと同様に電波を受信するものです。受信の際はできるだ
け電波を受けやすい窓際などに置いてください。また、電波ノイズを発生させるも
のの近くでのご使用は避けてください。
333
時差修正につ いて
アンテナ位置
6
地図を参照に、近い送信所のある方向に
9時位置のアンテナ部を向けるとより良
い受信環境になります。
自動受信開始時刻(午前2時、4時)には、
受信しやすい場所に時計を置くよう心掛
けましょう!
※安定した受信をするために、受信中は時計を動
かさないでください。
・日本時間と時差のある地域へ行った際、現地の時刻に合わせることができます。
この時、現地の日付に自動的に合います。秒針は、設定されている時差をインジケー
ター表示します。
※2秒運針、5秒運針中は、時差修正はできません。
①ボタンBを押してください。秒針が時差をインジケータ表示します。
−5
0 +4
秒針0秒位置=時差±0の意
−10
送信所
その他、次のような環境下では正確に受信できないことがあります。
a)ビルの中、ビルの谷間、地下。
b)高圧線、テレビ塔、電車の架線の近く。
c)テレビ、冷蔵庫、エアコン、携帯電話、パソコン、ファクシミリ等の家電製品やOA機
器の近く。
※照明器具等を使用して充電している時には、
これらの器具の影響で受信できないことがあります。
d)工事現場、空港の近く、軍事基地や交通量の多い場所など、電波障害の起きる場所。
e)乗り物の中(自動車、電車、飛行機など)
スチール机等の金属製の家具の上や近く。
134 f)
−15
−20
ボタンB
②ボタンAを押す毎に秒針が1秒、時・分針が1時間進み、ボタンBを押す毎に秒針も1
秒戻り、時・分針が1時間戻ります。
※0秒位置(12時位置)が日本時間になります。日本時間に対し+4時間∼−20時間まで設定できます。
※時差設定中は、受信(自動および強制)を行いません。
③早送りが終了して5秒後に通常運針を開始します。
351
●日本時間との時差について
※都市名・秒針インジケーター位置と時差は以下のとおりです。
都市名
ウエリントン★
ヌメア
シドニー★
東京
香港
バンコク
ダッカ
カラチ
ドバイ
モスクワ★
カイロ★
336
秒針インジケーター位置
3秒位置
2秒位置
1秒位置
0秒位置(12時位置)
59秒位置
58秒位置
57秒位置
56秒位置
55秒位置(11時位置)
54秒位置
53秒位置
日本時間との時差
+3時間
+2時間
+1時間
±0時間
−1時間
−2時間
−3時間
−4時間
−5時間
−6時間
−7時間
都市名
パリ★
ロンドン★
アゾレス諸島★
リオデジャネイロ★
カラカス
ニューヨーク★
シカゴ★
デンバー★
ロサンゼルス★
アンカレッジ★
ホノルル
ミッドウエイ島
秒針インジケーター位置
52秒位置
51秒位置
50秒位置(10時位置)
48秒位置
47秒位置
46秒位置
45秒位置(9時位置)
44秒位置
43秒位置
42秒位置
41秒位置
40秒位置(8時位置)
日本時間との時差
−8時間
−9時間
−10時間
−12時間
−13時間
−14時間
−15時間
−16時間
−17時間
−18時間
−19時間
−20時間
★…サマータイム有り
※各都市の時差、
およびサマータイムは国または地域の都合により変更する場合があります。 373
針位置自動修正機能につ いて
この時計は、一定時間毎に針位置をチェックし、ずれている場合は、自動的に修正します。
通常、秒針は1分毎、時・分針は12時間毎行います。
〈こんな時に役立ちます〉
・強い衝撃を受けて針位置がずれた場合
落としたり、強くぶつけたことにより、針位置がずれることがあります。
この場合も自動的に針位置を修正します。
・磁気の影響により針位置がずれた場合
携帯電話や音響機器スピーカーなどの磁気の影響で、針位置がずれることがあ
ります。
この場合も自動的に針位置を修正します。
・充電量がなくなり、時計が止ってしまった場合
複雑な操作なしに、充電後すべての針の基準位置を自動的に修正します。
138
使用電源につ いて
・この時計には、一般の電池とは、異なる専用の二次電池を使用しており、
一般の酸化銀電池のように定期的な交換の必要はありません。
・この二次電池は、環境に対して影響の少ないクリーンなものです。
ご注意
二次電池を交換の際は、この時計専用の二次電池をご使用ください。
一般の酸化銀電池が組み込まれると、破裂、発熱、発火などの恐れがありますので、ご注意
ください。
万が一組み込まれても、導通がとれない構造となっています。
3922
異常な動きになった場合(システムリセットについて)
万が一異常な動きになった場合、または充分な充電を行なったが1秒運針にならない場
合は以下の操作を行ってください。
時計内部のシステムがリセットされ、正常に機能するようになります。
●システムリセットとその後のご使用方法について
①リュウズを2段目にしてください。
②ボタンA、ボタンBを同時に3秒押して、はなしてください。
※時・分針が、早送りをした後、12時位置に停止します。
※充電不足の場合、12時位置になるのに時間がかかるので、
「●充電の所要時間の目安」を参照に十
分な充電をしてください。
③12時位置で針が停止したら、リュウズを通常位置に押し込み「■ご使用方法(時刻・
カレンダーの合わせかた)」を参照に、時刻・カレンダー合わせをしてください。
1240
ご 注 意 い た だ き た い こと
アフターサービスについて
修理用部品について
○ この時計の修理用部品の保有期間は通常7年間を基準としています。
○
修理の際、一部代替部品を使用させていただくことがありますのでご了承ください。
オーバーホール(分解掃除)について
保証と修理について
○
修理やオーバーホールの際は、
お買い上げ店・弊社お客様相談窓口にご相談ください。
○
保証期間内の場合は必ず保証書を添えてください。
○
保証内容は保証書に記載したとおりです。よくお読みいただき大切に保管してください。
時計は精密機械です。部品の油切れや磨耗により止まり遅れが生じることがあります。
その際にはオーバーホールをご依頼ください。
2242
4322
保証について
取扱説明書にそった正常な使用により、お買い上げ後1年以内に
不具合が生じた場合には、下記の保証規定によって無料で修理・調整いたします。
保証は、保証書に明示した期間・条件のもとにおいて、無料修理をお約束するものです。
これによりお客様の法律上の権利を制限するものではありません。保証書は日本国内のみ有効です。
保証の対象部分
保証を受ける手続き
○
時計本体(ムーブメント・ケース)及び金属バンドです。
保証の適用除外(保証期間内あるいは保証対象部分であっても、次のような場合には有料になります)
○
皮革・ウレタン・布等のバンドの交換
○
事故または不適切な取扱いによって生じた故障および損傷
○ ご使用中に生じるキズ・汚れ等
144
○ 保証対象の不具合が生じた場合は、
時計と別紙保証書をご持参の上、
お買い上げ店にご依頼ください。
○ お買い上げ店の保証が受けられない場合には、
「セイコーウオッチ株式会社
お客様相談窓口」に保証書を添えてご依頼ください。
その他
修理の際、
ケース・文字板・針・ガラス・バンド等は一部代替部品を使用する
場合があります。ご使用部品の保有期間は本取扱説明書(P.42)をご参照ください。
○
火災・水害・地震等の天災地変による故障及び損傷
○
○
保証書記載項目の全てが記入された保証書のみが有効です。
故意に字句を書き換えた場合は規定の無償修理は受けられません。
○ 金属バンド等の調整は、
お買い上げ店または弊社お客様相談窓口に
ご依頼ください。上記以外の販売店での調整は有料になります。
451
お手入れについて
時計の裏ぶたでも性能と型式の確認ができます
防水性能
日頃からこまめにお手入れしてください
○
水分や汗、汚れはこまめに柔らかい布で拭き取るように心掛けてください。
○ すきま
(金属バンド、
りゅうず周り、裏ぶた周りなど)の汚れは柔らかい歯ブラシが有効です。
海水に浸けた後は、必ずためた真水でよく洗ってから拭き取ってください。
りゅうずは時々回してください
○ りゅうずの錆び付きを防止するために、
時々りゅうずを回してください。
○ ねじロック式りゅうずの場合も同様です。
(りゅうずを引く必要はありません)
耐磁性能
「 耐磁性能に
ついて」
を参照
型式番号
お客様の時計の
種類を示す番号
3346
○
4722
防水性能について
お買い上げいただいた時 計の防水性能を
下記の表でご確認の上ご使用ください。
(「P.47」をご覧ください)
裏ぶた表示
表示なし
WATER RESISTANT
WATER RESISTANT 5 BAR
WATER RESISTANT 10 (20) BAR
2248
防水性能
非防水です。
日常生活用防水です。
日常生活用強化防水で5気圧防水です。
日常生活用強化防水で10(20)気圧防水です。
お取扱方法
水滴がかかったり、汗を多くかく場合には、使用しないで下さい。
日常生活での「水がかかる」程度
の環境であれば使用できます。
警告 水泳には使用しないで下さい。
水泳などのスポーツに使用できます。
空気ボンベを使用しないスキンダイビングに使用できます。
4912
警告
この時 計はスキューバダイビングや飽和潜 水には
絶対に使用しないで下さい
BAR(気圧)表示防水時計はスキューバダイビングや飽和潜水用
の時計に必要とされる苛酷な環境を想定した様々な厳しい検査を
行っていません。専用のダイバーズウオッチをご使用下さい。
注意
※ 万一、ガラス内面にくもりや水滴が発生し、長時間消えない場合は防水不良です。
お早めに、お買い上げ店・弊社お客様相談窓口(裏表紙に記載)にご相談ください。
注意
水や汗、汚れが付着したままにしておくのは避けて下さい
防水時計でもガラスの接着面・パッキンの劣化や、
ステンレスが錆びることにより、防水不良になる恐れがあります。
入浴やサウナの際はご使用を避けてください
蒸気や石けん、温泉の成分などが防水性能の劣化を早めてしまうからです。
直接蛇口から水をかけることは避けてください
水分のついたまま、りゅうずやボタンを
操作しないで下さい
水道水は非常に水圧が高く、
日常生活用強化防水の
時計でも防水不良になる恐れがあります。
時計内部に水分が入ることがあります。
1150
5133
耐磁性能について(磁気の影響)
時計に影響を及ぼす身の周りの磁気製品例
アナログクオーツ時計は、身近にある磁気の影響を受け、
時刻が狂ったり止まったりします。
携帯電話(スピーカー部)
磁気健康バンド
バッグ(磁石の止め金)
磁気ネックレス
交流電気かみそり
磁気健康マット
携帯ラジオ(スピーカー部)
磁気健康枕
電磁調理器
など
※磁気により時刻が狂っても、
遠ざければ正常に動きます。時刻を合わせ直してお使いください。
裏ぶた表示
表示なし
お取扱方法
磁気製品より10cm以上遠ざける必要があります。
磁気製品より5cm以上遠ざける必要があります。
(JIS水準1種)
磁気製品より1cm以上遠ざける必要があります。
(JIS水準2種)
2252
アナログクオーツ時計が
磁気の影響を受ける理由
内蔵されているモーターは磁石を使用しており、
外からの強い磁力で互いに影響し合い、
モーターを止めたり、無理に回転させてしまうためです。
5333
バンドについて
バンド は直接肌に触れ、汗やほこりで汚れます。
そのため、
手入れが悪いとバンドが早く傷んだり、
肌のかぶれ・そで口の汚れなどの
原因になります。長くお使いになるためには、
こまめなお手入が必要です。
金 属 バンド
○ ステンレスバンドも水・汗・汚れをそのままにしておくとさび易くなります。
○ 手入れが悪いとかぶれやワイシャツの袖口が黄色や金色に汚れる原因になります。
○ 水や汗・汚れは、早めに柔らかな布で取り除いてください。
○ バンドのすき間の汚れは、水で洗い、柔らかな歯ブラシ等で取り除いてください。
ポリウレタンバンド
○ 光で色が褪せたり、溶剤や空気中の湿気などにより劣化する性質があります。
○ 特に半透明や、
白色、淡色のバンドは、他の色を吸着し易く、
また変色をおこします。
○ 汚れたら水で洗い、乾いた布で良く拭き取ってください。
(時計本体は水にぬれないように台所用ラップなどで保護しておきましょう)
○ 弾力性がなくなり、
ひび割れを生じたら取り替え時期です。
(時計本体は水にぬれないように台所用ラップなどで保護しておきましょう)
皮 革 バンド
○ 水や汗、直射日光には弱く、色落ちや劣化の原因になります。
○ 水がかかった時や汗をかいた後は、
すぐに乾いた布などで吸い取るように軽く拭いてください。
○ 直接日光にあたる場所に放置しないでください。
○ 色味の薄いバンドは、汚れが目立ちやすいので、
ご使用の際はご注意ください。
3354
かぶれやアレルギー
について
バンドサイズの
目安について
バンドによるかぶれは、金属や皮革が原因となるアレルギー反応や、
汚れもしくはバンドとのすれなど不快感が原因となる場合など、
いろいろな発生原因があります。
バンドは多少余裕をもたせ通気性をよくしてご使用ください。
時計をつけた状態で、指一本入る程度が適当です。
5522
こんなときには
現象
2256
考えられる原因
このようにしてください
秒針が2秒運針をしている
充電した電気エネルギーが残り少なくなった。
1日以内に5秒運針に移行する可能性がありますので、
「●充電所要時間の目安」を参照に充電してく
ださい。
毎日携帯しているが、たびたび2秒
運針をみることがある。
時計が、衣類の袖の中に隠れているなど、十分な光があ
たっていない。
携帯中はなるべく時計が袖などにかくれないようにしてください。また時計を外した際にもなるべく明る
い場所に置くことを心掛けましょう。
※時計が60℃以上にならないように気をつけてください。
秒針が5秒運針をしている
充電不足の状態です。
ただちに、充電してください。→詳しくは「■ご使用になる前に」を参照
秒針が15秒位置または45秒位置に
停止している状態から動きだした。
無駄なエネルギーの消費を抑えるため、パワーセーブ機
能が作動していた。
秒針が「5秒運針」の場合は、
ただちに充電してください。
→詳しくは「■ご使用になる前に」を参照
受信できない。
受信結果表示が「受信失敗」になる
受信中の時計の向きが送信所の方向を向いていない。
受信中の時計の向きを変えてみてください。 →詳しくは「■電波(修正)時計とは」を参照
標準電波(JJY)送信所の都合で停波している。
停波に関する情報は、情報通信研究機構のホームページ
(http://jjy.crl.go.jp/)をご覧ください。
自動受信時間帯に時計を置いている場所の電波が弱い、
または電波の届かない環境下にある。
標準電波を受信できていない。
受信結果を確認し「受信失敗」の場合は、標準電波をより受信しやすい環境で強制受信してください。
また、自動受信時間帯(午前2時、4時)に時計を置いている場所を変えてみましょう。
5722
現象
考えられる原因
このようにしてください
ノイズ等の影響で間違った時刻を受信した。
(誤受信)
ノイズを発生するものから遠ざけ、標準電波をより受信しやすい環境で強制受信してください。
暑いところ、または寒いところに放置した。
常温に戻れば元の精度に戻ります。必要に応じて強制受信をしてください。元に戻らない場合は、
お買上げ店にご相談ください。
磁気や衝撃による影響で針位置がずれた。
針位置自動修正機能がはたらき、自動的に修正されます。→詳しくは「■針位置自動修正機能について」を参照
秒針の基準位置がずれている。
針位置自動修正機能がはたらき、自動的に修正されます。→詳しくは「■針位置自動修正機能について」を参照
修正されない場合は、
システムリセットをしてください。→詳しくは「■異常な動きになった場合」を参照
それでも元に戻らない場合は、お買上げ店にご相談ください。
磁気や衝撃等の影響でカレンダーの基準位置がずれて
いる。
カレンダー基準位置合わせをしてください。→詳しくは「●カレンダーの基準位置の合わせかた」
を参照
時刻が数時間単位でずれている。
時差修正が行われている。
強制受信ができない。
時差修正が行われている。
時差の設定が不要の場合は時差を日本時間に戻してください。
→詳しくは「■時差修正について」を参照
ボタン・リュウズ操作ができない。
充電した電気エネルギーが残り少なくなり、2秒運針また
は5秒運針をしている。
時計が一時的に進む/遅れる
「受信結果表示」や「受信レベル表
示」で秒針が示す位置がずれている
受信結果表示が「受信成功」である
が、日付が正しくない。
1158
充電してください。
→詳しくは「■ご使用になる前に」を参照
5922
現象
考えられる原因
止まってしまった時計に光をあて「フ
ル充電までの充電所要時間」以上充
電したが、1秒運針にならない。
あてる光が弱い、または充電中で光のあたりかたが変わ
った。
このようにしてください
光のあたりかたが変わらないように、
また充分な照度のある環境下で、充電をしてください。
時計内部のシステムが不安定な状態になっている。
システムリセットをしてください。→詳しくは「■異常な動きになった場合」を参照
ガラスのくもりが消えない
パッキンの劣化などにより時計内部に水分が入った
お買い上げ店にご相談ください。
※その他の現象は、お買上げ店にご相談ください。
33360
61333
Thank you very much for choosing a SEIKO watch.
For proper and safe use of your SEIKO watch,
please read carefully the instructions
in this booklet before using.
Keep this manual handy for easy reference.
※Length adjustment service for metallic bands is available at the retailer from
whom the watch was purchased or SEIKO CUSTOMER SERVICE CENTER
(listed on the back cover). The service may also be available on a chargeable
basis at other retailers, however, some retailers may not undertake the
service.
6322
WARNING
WARNING
To indicate the risks of serious consequences such as severe injuries
unless the following safety regulations are strictly observed.
Keep the watch and accessories out of the reach of
babies and children.
Care should be taken to prevent a baby or a child accidentally swallowing the
battery or accessories.
If a baby or child swallows the battery or accessories, immediately consult a
doctor, as it will be harmful to the health of the baby or child.
CAUTIONS
Avoid the following places for wearing or keeping the watch.
CAUTIONS
Immediately stop wearing the watch in following cases.
WARNING
○ If the watch body or band becomes edged by corrosion etc.
○ If the pins protrude from the band.
To indicate the risks of light injuries or material damages unless the
following safety regulations are strictly observed.
○ Places where volatile agents (cosmetics such as polish remover, bug repellent,
thinners etc.) are vaporizing
○ Places where the temperature drops below 5 °
C or rises above 35 °
C for a long time
○ Places of high humidity ○ Places affected by strong magnetism or static electricity
○ Dusty places ○ Places affected by strong vibrations
※ Do not leave a dead battery within the watch for a long time as leakage might occur.
If you observe any allergic symptoms or skin irritation
CAUTIONS
Stop wearing the watch immediately and consult a specialist such as a dermatologist
or an allergist
注意
Other cautions
CAUTIONS
※Immediately consult the retailer from whom the watch was purchased or SEIKO CUSTOMER SERVICE CENTER (listed on the back cover).
33364
○ Keep the watch out of the reach of
○ Note that there is a risk of damaging
your clothes, hand or neck with the
babies and children. Extra care should
band, cord or chain of the pocket watch
be taken to avoid risks of any injury or
or pendant watch.
allergic rash or itching that may be
caused when they touch the watch.
○ Do not disassemble or tamper with the watch.
65333
CONTENTS
HOW TO USE
FEATURES
SPECIFICATIONS
REMARKS ON BATTERY CHARGING BEFORE INITIAL USE
BEFORE INITIAL USE
DISPLAY AND BUTTON OPERATION
THE SCREW LOCK TYPE CROWN
HOW TO USE (HOW TO SET THE TIME AND CALENDAR)
WHEN THE WATCH IS UNABLE TO RECEIVE RADIO SIGNALS (MANUL TIME SETTING)
WHAT IS A RADIO-CONTROLLED WATCH?
TIME ZONE ADJUSTMENT
AUTOMATIC HAND ALIGNMENT
POWER SOURCE
ABNORMAL DISPLAY OR IMPROPER FUNCTION (HOW TO RESET THE BUILT-IN IC)
68
71
72
76
81
82
83
93
97
101
105
107
108
TO PRESERVE THE QUALITY OF YOUR WATCH
After-sale service
Guarantee
Daily care
Water Resistance
Magnetic resistance(affect of magnetic field)
Band (maintenance procedure)
TROUBLE SHOOTING
66
110
112
114
116
120
122
124
HOW TO USE
■FEATURES
This radio-controlled watch displays precise time by automatically receiving and
synchronizing itself with the radio signal of the official standard frequency in Japan.
A solar cell underneath the dial converts any form of light into “electrical energy”
to power the watch. The watch also features a power save function, which is
automatically activated when the watch is not exposed to adequate light for a
certain period of time, to limit energy consumption, and an automatic hand
alignment function that corrects hand alignment when the hand positions deviate
and display incorrect time
as a result of influence of external sources such as
magnetism.
●Automatic Time Setting・・・ The watch maintains precise time by automatically
(Automatic selection of receiving and synchronizing itself with the official standard
either of two JJY-LF frequency and time transmitter, the JJY-LF radio signal.
stations)
The watch automatically selects either the JJY-LF:40kHz
(Fukushima signal) or the JJY-LF:60kHz (Kyushu signal),
whichever is strongest.
Manual reception is also possible.
33368
●Display of Radio Wave ・・・ Reception level (automatic or manual reception) can be
Reception Result
confirmed following reception of radio waves.
When reception was successful, the second hand rapidly
moves to the 10-second position.
When reception failed, the second hand rapidly moves to
the 20-second position.
●Display of Radio Wave ・・・・ During the manual reception, the second hand indicates
Reception Level
the reception level of radio signals.
When the reception level is high, the second hand points
to the 50-second position.
When the reception level is low, the second hand points to
the 40-second position.
When the watch is unable to receive radio signals, the
second hand points to the 20-second position.
●Automatic Hand ・・・・・・・・・・・ When the hand positions deviate to display incorrect time
Alignment
as a result of influence of various external sources, the
watch automatically corrects the hand alignment itself. 6933
■SPECIFICATIONS
●Time Zone Adjustment
・・The
watch can be set to local time in a different time zone
from Japan Standard Time.
●Rechargeable Battery ・・・・The watch converts any form of light into “electrical
energy” and stores the power in a secondary battery.
Once fully charged, the watch continues to run for
approximately six months.
●Power Save ・・・・・・・・・・・・・・・・The watch is equipped with two power save modes to limit
energy consumption; “the Power Save One” which is
activated when the watch is left without an adequate light
source for a period of time longer than 72 hours, and “the
Power Save Two” which is activated when the amount of
stored power falls below a certain level.
5570
1. Frequency of crystal ・・・・・・・・ 32,768 Hz (Hz = Hertz ... Cycles per second)
oscillator
2. Loss/gain (monthly rate) ・・・・ Less than 15 seconds (Except during automatic time setting,
worn on the wrist within normal temperature range between 5℃
and 35℃.)
3. Operational temperature ・・・ Between -10℃ and +60℃
range
4. Driving systems ・・・・・・・・・・・・・ Step motor (hour and minute hands)
Step motor (second hand)
Step motor (calendar)
5. Power source ・・・・・・・・・・・・・・・・ Secondary battery, 1 piece
6. Duration of operation ・・・・・・・ Approximately 6 months (Fully charged, the Power Save not
activated)
※If fully charged and the Power Save is activated, the watch
continues to run for approximately one year and a half.
7. Time setting by receiving ・・・ Automatic reception (between 2:00 AM and 4:00 AM, attempts
the JJY-LF radio signal
of reception depends on radio wave receiving conditions)
※After having received the JJY-LF radio signal, the watch
moves depending on the quartz movement until the next
reception. Manual reception is also possible.
8. IC (Integrated Circuit) ・・・・・・・ Oscillator, frequency divider and driving circuit C-MOS-IC, 3
pieces
※The specifications are subject to change without prior notice for product improvements.
7133
■REMARKS ON BATTERY CHARGING BEFORE INITIAL USE
●How to charge the watch
NOTICE
This watch is a solar-powered watch containing a solar cell underneath the dial to
convert any form of light into“electrical energy”and store the power in a
secondary battery.
To enjoy optimal performance of this watch, it is recommended that the watch be
kept sufficiently charged at all times.
To charge the watch, expose the dial (solar cell) to adequate light as illustrated
below.
※Before initially using the watch or when the watch has stopped as a result of complete
depletion of stored power, charge the watch sufficiently.
Light
6
6
Solar Cell
underneath the dial
3372
(Notes on charging the watch)
・When charging the watch, do not place the watch in close proximity to an
intense light source such as lighting equipment for photography, spotlights or
incandescent lights, as the watch may be excessively heated resulting in
damage to its internal parts.
・When charging the watch by exposure to direct sunlight, avoid places that
easily reach high temperatures, such as a car dashboard.
・Always keep the watch temperature under 60℃.
〈Overcharge prevention function〉
The solar cell underneath the dial converts light into“electrical energy”and stores
the power in a secondary battery. When the secondary battery is fully charged, the
overcharge prevention function is automatically activated to avoid further charging.
There is no need to worry about damage caused by overcharging no matter how
much the secondary battery is charged in excess of the “time required for fully
charging the watch”.
7333
●Standard charging time
Illumination (LUX)
Light source
500
700
1000
3000
5000
10000
10000
Incandescent light
Fluorescent light
Fluorescent light
Fluorescent light
Fluorescent light
Fluorescent light
Sunlight
Condition (Example)
60W 60cm
General offices
30W 70cm
30W 20cm
30W 12cm
30W 5cm
Cloudy day
Sunny day (Under the direct
100000
Sunlight
sunlight on a summer day)
※The table above is only provided as an approximation.
Time required for fully
charging the watch
−
−
−
90 hours
70 hours
25 hours
25 hours
8 hours
★The figures in the table above refer to the time required to charge the stopped
watch by exposure to light until the watch moves at steady one-second intervals,
through two-second intervals and five-second intervals.
Even if the watch is partially charged for a period shorter than the time provided in
2274
Time required for charging the watch to
start moving at one- second intervals ★
−
−
120 hours
30 hours
24 hours
8 hours
8 hours
2 hours
Time required for charging
the watch to run for one day
5 hours
3 hours
2 hours
30 minutes
24 minutes
9 minutes
9 minutes
3 minutes
the above table, it will resume one-second interval movement, however, the onesecond interval movement will change to two-second interval movement shortly. To
avoid this and charge the watch to a sufficient level, use the charging time
mentioned above as a measure.
※The required charging time slightly varies depending on the model of the watch.
7533
■BEFORE INITIAL USE
Before initially using the watch, it is recommended to check the movement of the
hands following the instructions below.
※To enjoy optimal performance of the radio-controlled watch, it is recommended that the watch
be kept sufficiently charged at all times.
Check the movement of the second hand first.
The second hand
moves at
one-second intervals.
The second hand
moves at
two-second intervals.
The second hand
moves at
five-second intervals.
The watch is sufficiently charged. Go to
“■HOW TO USE (HOW TO SET THE TIME AND
CALENDAR)”, to proceed to the next operation.
After completion of
battery charging
The watch is insufficiently charged.
Refer to“■REMARKS ON BATTERY CHARGING
BEFORE INITIAL USE”, to charge the watch
sufficiently.
●Two-second interval movement, Power Save and Five-second interval movement
This radio-controlled watch enables the wearer to check the charging
status by the movement of the second hand.
6
〈The watch moves at two-second intervals while it is worn〉
When the energy depletion forewarning function is activated, the
watch starts moving at two-second intervals. If the watch continues
to be in the state of two-second interval movement, the watch
switches to five-second interval movement, followed by a completely stopped state.
Refer to “● Standard charging time”, to charge the watch sufficiently.
※Neither the buttons nor the crown can be operated while the watch is in two-second interval
movement, however, this is not a malfunction.
The second hand
is stopped.
3376
773
〈When the watch enters the Power Save modes〉
When the watch is not exposed to an adequate light source, power save function is
automatically activated in order to reduce unnecessary energy consumption.
●When the watch is not exposed to an adequate light source for 72 hours or
longer, the watch enters “the Power Save One” mode. When the watch is in “the
Power Save One” mode, the second hand rotates to point to the 15-second
position and stops.
In this state, movement of the hour and minute hands and calendar operation will
cease, but the watch will continue to conduct automatic reception.
watch will also stop conducting automatic reception.
When the watch enters “the Power Save Two” mode, immediately charge the
watch.
※While the watch is being charged, the second hand moves at five-second intervals.
※ If“the Power Save Two” mode is prolonged, the amount of stored power drops and the
internal time settings will be lost.
In such a case, after completing battery charging (it takes a longer amount of time depending on
the intensity of light), the watch resumes normal operation from 12:00 AM. Refer to “■HOW
TO USE (HOW TO SET THE TIME AND CALENDAR)”, to set the time and calendar.
To reset the watch to display the current time, expose it to adequate light for five
seconds or longer.
6
If the watch continues to be insufficiently charged, and the stored power falls below
a certain level, the watch automatically switches to “the Power Save Two” mode,
to limit further energy consumption. When the watch is in“the Power Save Two”
mode, the second hand rotates to point to the 45-second position and stops. The
278
“the Power Save One”mode
6
“the Power Save Two”mode
793
■DISPLAY AND BUTTON OPERATION
〈When the watch moves at five-second intervals〉
When the watch is insufficiently charged, it starts moving at five-second intervals.
When the watch starts moving at five-second intervals (movement of the hour and
minute hands and calendar operation will stop), immediately charge the watch.
Refer to “● Standard charging time”, to charge the watch sufficiently.
※Neither the buttons nor the crown can be operated while the watch is in five-second interval
movement, however, this is not a malfunction.
※While the watch moves at five-second intervals, automatic reception
cannot be conducted. After the watch resumes normal operation, it is
recommended that the watch be reset to the correct time by manual
reception.
※When the watch continues to move at five-second intervals in an
6
environment where the light source is insufficient for the watch to
generate power, the amount of stored power drops and the internal
time settings will be lost.
In such a case, after completing battery charging (it may take a longer
amount of time depending on the intensity of light), the watch resumes
Five-second
normal operation from 12:00 AM. Refer to“■HOW TO USE (HOW
TO SET THE TIME AND CALENDAR)”, to set the time and calendar. interval movement
380
Minute hand
Hour hand
Button
Antenna
(The receiving antenna
is at this position)
(Reception level,
reception result
and manual reception)
Crown
Second click: time setting
First click: date setting
Normal position
6
Second hand
Button
(Time zone adjustment)
Date
※Button
is recessed in the watchcase to prevent accidental input. Press Button
something with a long tapered tip
using
813
■THE SCREW LOCK TYPE CROWN
・Some models have a screw lock type crown.
・Locking the crown will prevent operating errors and will ensure that the water
resistant features of the watch function correctly.
・Unscrew the crown before the crown operation. When the operation is over, screw in
the crown.
●How to operate the screw lock type crown.
・If the crown of your watch is the screw lock type crown, unscrew it before the
crown operation.
・Unscrew the crown only when turning it.
Locked
【To unscrew the crown】
Unlocked
Turn the crown counterclockwise.
※The crown can be
The crown can be pulled out.
pulled out.
【To screw in the crown】
With the crown at the normal position,
turn it clockwise while pressing it.
282
■HOW TO USE (HOW TO SET THE TIME AND CALENDAR)
・This radio-controlled watch displays precise time by automatically receiving
and synchronizing itself with the JJY-LF radio signal. It is recommended that
you set the time by receiving the JJY-LF radio signal before first use.
・Before proceeding to the following sections, make sure that the watch moves
at normal one-second intervals. Refer to “REMARKS ON BATTERY
CHARGING BEFORE INITIAL USE” as needed.
Operational flow
1. Setting the calendar to the preliminary position
2. Manual reception
3. Confirmation of reception result
Start to use
※If reception fails, place the watch where it can receive radio signals easily and conduct manual
reception, or set the time manually, referring to “■ WHEN THE WATCH IS UNABLE TO
RECEIVE RADIO SIGNALS (MANUL TIME SETTING)”.
831
●How to set the calendar to the preliminary position (Preliminary position setting for calendar)
In order to display the correct date information received from the JJY-LF radio
signal, the calendar must be set to the preliminary position beforehand.
※If the preliminary position setting is performed when the watch is insufficiently charged, the
watch may switch to 5-seccond interval movement. In such a case, refer to“● Standard
charging time”, to fully charge the watch, then try the preliminary position setting again.
※The preliminary position of the calendar is“1”.
②If the watch does not display the preliminary position“1”, follow the instructions
below to correct the preliminary position.
Press Button A to set the date to the preliminary position“1”.
※Each pressing of Button A advances the date by one day.
※If Button A is kept pressed for one to two seconds, the date advances rapidly for
maximum 31days. Press Button A again to stop.
※Stop at“31”to check the alignment of the numeral date in the calendar window.
If the numeral is shifted out, follow procedure 3 to set the date to“1”correcting the
alignment of the numeral date.
①Press and hold Button A and Button B simultaneously for three seconds or
longer. (The crown should be at the normal position.)
※The hour, minute and second hands will stop.
Button
Button
※If the watch is left untouched for eight seconds
or longer in this state, the watch resumes its
normal operation.
284
6
The preliminary position
currently set is indicated.
1
Set the date to“1”.
Button
852
③Press Button B to adjust the alignment of the numeral date in the calendar
window. (Only if the numeral date is shifted out of the calendar window.)
※If Button B is kept pressed, the date advances rapidly until Button B is released.
●Manual reception
①Press and hold the Button A for three seconds or longer.
Press and hold the Button
for three seconds or longer.
1
Align the numeral date in
the center of the calendar
window.
Button
④After setting the date to“1”, the watch resumes its normal operation eight
seconds after the button operation is completed.
186
1
The second hand rotates rapidly until
it points to the 0-second position and stop.
※If the Button A is pressed for less than 3 seconds, the second hand moves to the 10-second
position or the 20-second position to display the reception result. In this case, wait until the
second hand resumes its normal movements, and then press and hold the Button A for 3
seconds or longer.
87
②The watch automatically starts receiving radio signals. Put the watch where it can
easily receive radio signals.
(For example, at the window and far from other electronic equipment.)
While receiving radio signals, the hour and minute hands move differently from
their usual way of moving.
※It takes about 2 to 12 minutes for a successful reception of radio signals.
(It depends on where the watch is put.)
※Refer to“■ WHAT IS RADIO-CONTROLLED WATCH”to see where the watch can easily
receive radio signals.
※Do not press Button A while the watch is receiving radio signals, as it terminates manual
reception.
★During the manual reception, the watch displays the reception level of radio
signals.
・After about one minute since the watch started receiving radio signals (depending
on circumstances), the second hand moves to show the reception level.
・Three degrees of reception levels will be displayed.
188
Reception levels
Degree of
reception level
High
Low
Unable to receive
radio signals
The second hand
moves to the 50second position.
The second hand
moves to the 40second position
The second hand
moves to the 20second position.
The reception level is
relatively high. The
watch has a good
chance of successful
reception.
The reception level is
low. The watch may
not be able to receive
radio signals
H
L
Display
N
The watch is placed
where it is unable to
receive radio signals.
Message
Thus the manual
reception should be
stopped.
※Please note that, depending on environment in which the watch is placed, it may not receive
radio signals successfully even though the reception level is high.
※Display of reception level H=High, L=Low, N=No
893
③When the reception is completed, hour, minute, and second hands as well as
numeral date in the calendar window move rapidly to show the current time and
date.
6
●Display of radio wave reception result
・When the Button A pressed while the watch is in the normal operation, the
second hand rapidly moves to a position indicating the reception result.
・The last reception result (automatic or manual reception) is shown.
Reception result
Reception result display
Reception successful
Reception failed
Y
Display
※If receiving conditions are not good enough, the watch ceases to attempt reception within 12
minutes (depending on conditions). If the watch is unable to receive a radio signal, time based
on the time before the reception attempt is displayed. (Refer to“■WHAT IS RADIOCONTROLLED WATCH?”.)
④Press Button A to view reception result.
90
Message
The second hand
moves to the 10second position.
The last reception was successful.
N
The second hand
moves to the 20second position.
The last reception failed.
※The second hand stays at the above positions for 5 seconds to show the last reception result,
and then automatically moves to show current time. If Button A is pressed while the second
hand is at the position of showing the reception result, the second hand moves to show current
time.
※Display of radio wave reception result Y=Yes, N=No
91
■“WHEN THE WATCH IS UNABLE TO RECEIVE RADIO SIGNALS (MANUL TIME SETTING)”
●Automatic reception
If you would like to use the watch where it is unable to receive the official standard
frequency (JJY), the time and calendar can be set manually.
・The watch automatically receives radio signals between 2:00 AM and 4:00 AM,
when it can easily receive the official standard frequency (JJY-LF).
・During the automatic reception, the second hand stays at the 0-second position.
●How to set the time (Manual time setting)
※During the automatic reception, place the watch where it can receive radio signals easily.
Refer to“■WHAT IS RADIO-CONTROLLED WATCH?”.
※If the Button A is pressed during the automatic reception, the watch will stop receiving radio
signals.
①Pull out the crown to the second click.
※The second hand rotates until it points to the 12 o’clock position and stops.
②Press Button A to set the time.
※Each pressing of Button A advances the second hand by one minute, if Button A is kept
pressed, the second hand advances rapidly for the maximum range 12 hour time display.
Press Button A once again to stop.
※The calendar operation is linked with the time setting. Make sure that AM/PM is correctly set.
③Push the crown back in simultaneously with a time signal
※The telephone time signal service 117 is helpful in time settings.
92
93
●How to set the calendar (Manual calendar setting)
② Press Button A to set the date.
Button
①Pull out the crown to the first click.
6
Button
※When Button A is kept pressed for one to two seconds, the numeral date advances rapidly for
the maximum range 31 day date display. Press Button A once again to stop.
1
Button
③After completing date setting, push the crown back in.
※Do not pull the crown out to the second click.
6
94
95
■WHAT IS A RADIO-CONTROLLED WATCH?
This watch is to be used where it can receive the official standard frequency in
Japan (JJY). Please note that the manual time setting should be conducted only
temporarily. It is recommended that the watch receive radio signals to set the
time.
Even if the time was set manually, the watch starts receiving time signals on the
official standard frequency (JJY) at regular intervals. After successful time signal
reception, the watch will display the correct time and date. To display the correct
date, the preliminary calendar setting must be performed beforehand.
●When the watch always shows“reception failed”
・In this case, manual reception is recommended.
Read carefully“■WHAT IS RADIO-CONTROLLED WATCH?”before conducting
manual reception.
(Refer to“●Manual reception”.)
96
●Automatic time adjustment
・This radio-controlled watch displays current time by receiving and synchronizing
it with the official standard frequency in Japan Standard Time.
●The official standard frequency(JJY-LF)
・JJY-LF is the standard frequency that transmits time signal from Communications
Research Laboratory(CRL), a national institution of Japan. There are two JJY-LF
stations in Japan, and one station transmits 40kHz frequencies and another
transmits 60kHz frequencies.
・Time Signal transmitted from CRL is based on a super accurate“Cesium atomic
clock” that may have 1 second loss or gain per hundred thousand years.
97
●Radio signal reception
・The reception range from JJY-LF stations are approximately 1,000km, depending
on conditions. It depends on conditions, however, JJY-LF(40kHz) is easily
received in Eastern Japan and JJY-LF(60kHz) is easily received in Western Japan.
・The watch may be unable
to receive radio signal
due to the position of the
1000km
watch, the location, the
おおたかどや山
Mt.
Ootakadoya(40kHz)
500km
time or radio disturbances
はがね山
such as tall buildings,
500km
1000km
標準電波送信所
準電波送信所
(60kHz)
Mt. Hagane
climatic conditions, and
geographic locations.
Notice
・The watch may display the wrong time if it fails to receive radio signals properly
because of interference. The watch may also fail to receive radio signals properly
depending on the location or radio wave receiving conditions. In this case, move the
watch to another place where it can receive radio signals.
・When the watch is out of reception range, its accurate quartz movement will continue
to keep the time.
・The time signals transmission is stopped every hour for one minute when a call sign is
being sent at 15 and 45 minutes. The transmission of time signal may also be stopped
during maintenance of CRL facilities or because of a lighting strike. See CRL website
(http://jjy.crl.go.jp) for further information.
●Proper place to put the watch
The watch receives radio signals in the same way as a TV or radio. Keep the watch
where it can easily receive signals, close to a window. Keep the watch away from
objects that cause radio static.
98
99
■TIME ZONE ADJUSTMENT
6
Turn the antenna of the watch (at the 9 o'clock
position) toward the direction of the JJY-LF
station to receive radio signals more easily.
Leave the watch where it can receive radio
signals during the automatic reception
period(2:00AM ∼ 4:00AM).
※To enhance the reception of radio signals, do not
move the watch while it is receiving radio signals.
Please note that the watch may be unable to receive radio signals property under
the following conditions.
a)Inside a building, between tall buildings, underground.
b)Close to overhead power lines, TV stations, train cables.
c)Close to home electrical appliances or OA devises such as TV's, refrigerators,
air conditioners, air cleaners, PC's, fax machines.
※While charging the watch by using a light source from a lighting apparatus, equipment
may interfere with reception of radio signals.
100
d)In places generating radio interference, such as construction sites, airports,
military bases or heavy traffic.
e)Inside a vehicle, train, or airplane.
f)Close to furniture made of steel, such as a steel desk.
The watch can be set to local time in a different time zone from the Japan Standard
Time
The watch automatically corrects the date accordingly.
The second hand operates as an indicator of the time difference.
※While the watch moves at two-second or five-second intervals, the time zone cannot be
adjusted.
①Press Button B. The second hand indicates the time difference.
−5
−10
0 +4
The second hand points to the 0 position:
no time difference.
−15
−20
Button B
101
②Each pressing of Button A moves the second hand forward by one-second and
the hour and minute hands by one hour. Each pressing of Button B moves the
second hand backward by one-second and the hour and minute hands by one
hour.
※The 0 position (12 o’clock position) indicates the Japan Standard Time.
The time difference can be adjusted within a range between + 4 hours and - 20 hours based
on the Japan Standard Time.
※While the watch is set to local time in different time zones from the Japan Standard Time,
automatic or manual reception of radio signals cannot be conducted.
③Upon completion of time difference adjustment, the hands move rapidly, and after
5 seconds the watch resumes its normal operation.
102
●Time differences with the Japan Standard Time
※Refer to the table below for time differences from the Japan Standard Time in major cities and
the corresponding positions that the second hand indicates.
Names of the cities
Wellington★
Nouméa
Sydney★
Tokyo
Hong Kong
Bangkok
Dacca
Karachi
Dubai
Moscow★
Cairo★
Position that the second hand indicates Time difference with Japan Time
3-second position
+ 3 hours
2-second position
+ 2 hours
1-second position
+ 1 hours
0-second position (12-o’clock position)
±0
59-second position
−1 hour
58-second position
−2 hours
57-second position
−3 hours
56-second position
−4 hours
55-second position (11-o’clock position)
−5 hours
54-second position
−6 hours
53-second position
−7 hours
103
■AUTOMATIC HAND ALIGNMENT
Names of the cities
Paris★
London★
Azores★
Rio de Janeiro★
Caracas
New York★
Chicago★
Denver★
Los Angels★
Anchorage★
Honolulu
Midway Islands
Position that the second hand indicates Time difference with Japan Time
52-second position
−8 hours
51-second position
−9 hours
50-second position (10-o’clock position)
−10 hours
48-second position
−11 hours
47-second position
−12 hours
46-second position
−13 hours
45-second position (9-o’clock position)
−14 hours
44-second position
−15 hours
43-second position
−16 hours
42-second position
−17 hours
41-second position
−18 hours
40-second position (8-o’clock position)
−19 hours
Cities marked with“★”use daylight saving time.
※The time differences and use of daylight saving time in each city are subject to change
according to the governments of the respective countries or regions.
104
Automatic hand alignment is responsible for periodic checks of the hand
positions and correction of any misalignments found.
Under normal operation, periodic checks of each hand position are
performed once every one-minute for the second hand position, and once
every twelve hours for the hour and minute hand positions.
〈Benefits of automatic hand alignment〉
・Strong shocks can cause misalignment of the hand positions
The hand positions may move out of alignment due to strong shocks to the
watch when the watch is dropped or hits against a hard surface.
When this happens, the hand positions are automatically corrected.
・Strong magnetism can cause misalignment of the hand positions.
The hand positions may move out of alignment due to strong magnetism
generated by mobile phones, speakers, and audio equipment or other
105
■POWER SOURCE
magnetized objects.
When this happens, the hand positions are automatically corrected.
・When the watch is stopped due to complete depletion of stored power
After battery charging, all hand positions are automatically corrected,
omitting the complicated procedures such as preliminary position settings,
which must be performed otherwise automatic hand alignment will not
function.
106
The battery used in this watch is a special secondary battery, which is different from
ordinary batteries. Unlike an ordinary silver oxide battery, the secondary battery
does not require periodic replacement.
The secondary battery is an environmentally friendly, clean energy storage device.
Notice
When replacing the secondary battery, make sure that the exclusive secondary
battery for this watch is used. Installation of an ordinary silver oxide battery can
generate heat that can cause bursting or ignition.
Even when a silver oxide battery is substituted, electrical continuity cannot be
obtained.
107
■ABNORMAL DISPLAY OR IMPROPER FUNCTION (HOW TO RESET THE BUILT-IN IC)
When the watch shows an abnormal display or does not properly function, or does
not move at one-second intervals even after being sufficiently charged, follow the
instructions below to reset the built-in IC. Then the watch will resume its normal
operation.
●The IC reset and how to restart using the watch
①Pull out the crown to the second click.
②Press Button A and Button B at the same time and release.
※The hour and minute hands rotate rapidly until they point to the 12 o’clock position and stop.
※When the watch is insufficiently charged, it takes some time for the hands to move to point to
the 12 o’clock position. In such a case, refer to“●Standard charging time”, to charge the
watch sufficiently.
①When the hands stop and point to the 12 o’clock position, push the crown back in.
Refer to“■ HOW TO USE (HOW TO SET THE TIME AND CALENDAR)”, to set the
time and calendar.
108
TO PRESERVE THE QUALITY OF YOUR WATCH
■After-sale service
●Repair parts
○
The repair parts of this watch will be retained usually for 7 years.
○
Some alternative parts may be used for repair if necessary.
●Notes on overhaul
●Notes on guarantee and repair
Contact the retailer the watch was purchased from or SEIKO CUSTOMER
SERVICE CENTER for repair or overhaul.
○
○
Within the guarantee period, present the certificate of guarantee to receive repair services.
○
Guarantee coverage is provided in the certificate of guarantee. Read carefully and retain it.
The watch is a precision device. If the parts run short of the oil or get worn out,
the watch may stop its operation or lose time. In such a case, have the watch
overhauled.
110
111
■Guarantee
Within one year from the date of purchase, we guarantee free repair/adjustment service
Free repair services are guaranteed only under the period and conditions specified
against any defects according to the following guarantee regulations,
in the certificate of guarantee. It does not affect specific legal rights of a consumer.
provided that the watch was properly used as directed in this instruction booklet.
●Guarantee coverage
○ The watch body (movement・case) and metallic band.
●Exceptions from guarantee
In following cases, repair/adjustment services will be at cost even
within the guarantee period or under guarantee coverage.
○ Change of leather/urethane/cloth band
○ Troubles or damage caused by accidents or improper usage
○ Scratches or grime caused by use
○ Problems and damage caused by acts of god, natural disasters including fire,
floods or earthquakes.
○ The certificate of guarantee is valid only if all the necessary items are properly
filled in. We will not honor an altered or tampered certificate of guarantee for free
repair services.
112
The certificate of guarantee is valid only in Japan.
●Procedure to claim free repair services
○ For any defects under guarantee, submit the watch together with the attached
certificate of guarantee to the retailer from whom the watch was purchased.
○ If repair services cannot be provided by the retailer from whom the watch was
purchased, contact SEIKO CUSTOMER SERVICE CENTER. In this case,
the attached certificate of guarantee is also needed.
●Others
○ The case, dial, hands, glass and bracelet, or parts thereof may be repaired with substitutes
if the originals are not available. If necessary, movements will be replaced.
○ For length adjustment service of a metallic band, ask the retailer from whom the
watch was purchased or SEIKO CUSTOMER SERVICE CENTER.
Other retailers may undertake the service on a chargeable basis.
113
■Daily care
●The watch requires good daily care
Wipe away moisture, sweat or dirt with a soft cloth
○ To clean the clearances (around the metallic band, crown or case back),
a soft toothbrush is convenient.
○ After soaking the watch in seawater, be sure to wash the watch in clean
pure water and wipe it dry carefully.
○
●The case back shows the caliber and performance of your watch
Water resistant
performance
Caliber Number
Magnetic resistant performance
Refer to "Water
resistance".
The number to identify
the type of your watch
Refer to "Magnetic
resistance".
●Turn the crown from time to time
EL
TE
R
E
T.
S
123456
123456
R
114
WATER RESISTANT 10 BAR
ST. STEEL
7N01-0B40 R2 AG
TE
WA
In order to prevent corrosion of the crown, turn the crown from time to time.
○ The same practice should be applied to a screw lock type crown.
(No need to pull out the screw lock type crown.)
○
S
SI
7 N S TA N T 10 BA R
010B 40 R 2 AG
115
■Water Resistance
Refer the table below for the description of each degree of
water resistant performance of your watch before using.
(Refer to " P.115 ")
Indication on the case back
No indication
WATER RESISTANT
WATER RESISTANT 5 BAR
WATER RESISTANT 10 (20) BAR
116
Water resistant performance
Non-water resistance
Water resistance for everyday life
Water resistance for everyday life at
5 barometric pressures
Water resistance for everyday life at
10(20) barometric pressures.
Condition of Use
Avoid drops of water or sweat
The watch withstands accidental contact
with water in everyday life.
WARNING Not suitable for swimming
The watch is suitable for sports such as swimming.
The watch is suitable for diving not using an air cylinder.
117
WARNING
Do not use the watch in scuba diving or
saturation diving.
The various tightened inspections under simulated harsh environment, which are
usually required for watches designed for scuba diving or saturation diving, have
not been conducted on the water-resistant watch with the BAR (barometric
pressure) display. For diving, use special watches for diving.
CAUTION
※
If the inner surface of the glass is clouded with condensation or water droplets appear
inside of the watch for a long time, the water resistant performance of the watch is
deteriorated. Immediately consult the retailer from whom the watch was purchased or
SEIKO CUSTMER SERVICE CENTER (listed on the back cover).
Do not turn or pull out the crown when the
watch is wet.
Water may get inside of the watch.
118
CAUTION
Do not leave moisture, sweat and dirt on the
watch for a long time.
Be aware of a risk that a water resistant watch may lessen its water
resistant performance because of deterioration of the adhesive on
the glass or gasket, or the development of rust on stainless steel.
Do not wear the watch while taking a bath or a sauna.
Steam, soap or some components of a hot spring may accelerate the
deterioration of water resistant performance of the watch.
Do not pour running water directly from faucet.
The water pressure of tap water from a faucet is high enough to
degrade the water resistant performance of a water resistant watch
for everyday life.
119
■Magnetic resistance(affect of magnetic field)
Affected by nearby magnetism,
a quartz watch may temporarily gain or lose time or stop operating.
※This defective condition caused by magnetism will be corrected soon after the watch is
removed from the magnetic source. Reset the time once again before using the watch.
Indication on the case back
No indication
Cellular phone
(speaker)
Magnetic health belt
Bag (with magnet buckle)
Magnetic necklace
AC-powered shaver
Magnetic health mat
Portable radio
Magnetic health pillow
Condition of use
Keep the watch more than 10 cm away from
magnetic products.
Keep the watch more than 5 cm away from
magnetic products. (JIS level-1 standard)
Keep the watch more than 1 cm away from
magnetic products. (JIS level-2 standard)
120
Examples of common magnetic products that may affect watches
(speaker)
Magnetic cooking device etc
The reason why analogue
quartz watch is affected
by magnetism.
It is because the built-in motor of the watch, which harnesses
magnetic power and external strong magnetism, affect each other
to stop the motor or suppresses the turn of the motor.
121
■Band (maintenance procedure)
The band touches the skin directly and becomes dirty with sweat or dust.
Therefore, lack of care may accelerate deterioration of the band or cause skin irritation
or stain on the sleeve edge. The watch requires a lot of attention for long usage.
Metallic band
○ Moisture, sweat or soil will cause rust even on a stainless steel band if they are left for a long time.
○ Lack of care may cause a yellowish or gold stain on the lower sleeve edge of shirts.
○ Wipe off moisture, sweat or soil with a soft cloth as soon as possible
○ To clean the soil around the joint gaps of the band, wipe it out in water and then brush it
off with a soft toothbrush.
(Protect the watch body from water splashes by wrapping it up in plastic wrap etc.)
Leather band
○ A leather band is susceptible to discoloration and deterioration from moisture, sweat and
direct sunlight.
○ Wipe off moisture and sweat as soon as possible by gently blotting them up with a dry cloth.
122
Polyurethane band
○ A polyurethane band is susceptible to discoloration from light, and may be
deteriorated by solvent or atmospheric humidity.
○ Especially a translucent, white, or pale colored band easily adsorbs other colors,
resulting in color smears or discoloration.
○ Wash out dirt in water and clean it off with a dry cloth.
(Protect the watch body from water splashes by wrapping it up in plastic wrap etc.)
○ When the band becomes less flexible or cracked, replace the band with a new one.
Notes on skin
irritation and allergy
Skin irritation caused by a band has various reasons such as
allergy to metals or leathers, or skin reactions against friction on
dust or the band itself.
Notes on the
length of the band
Adjust the band to allow a little clearance with your wrist to
ensure proper airflow. When wearing the watch, leave enough
room to insert a finger between the band and your wrist.
123
■TROUBLE SHOOTING
Trouble
The second hand moves at twosecond intervals.
I wear the watch everyday but the
watch often displays two-second
interval movement.
The second hand moves at fivesecond intervals.
The stopped second hand pointing
to the 15-second position or 45second position started moving.
The watch is unable to receive
radio signals.
The reception result displays
reception failure.
124
The Power Save is activated to limit energy
consumption.
Solution
The watch may switch to five-second interval movement within one day.
Refer to “● Standard charging time” to recharge the watch.
Do not conceal the watch under a sleeve.
When taking the watch off, place the watch in as bright a location as possible.
*Make sure that the watch temperature is always kept below 60 ℃.
Immediately charge the watch.
For details, refer to“■ REMARKS ON BATTERY CHARGING BEFORE INITIAL USE”.
If the watch moves at five-second intervals, immediately charge the watch.
For details, refer to“■ REMARKS ON BATTERY CHARGING BEFORE INITIAL USE”.
The antenna of the watch is not turned toward the
direction of the JJY-LF station.
JJY-LF stations may stop transmitting time signals for
some reasons.
During automatic reception, the watch was left where
radio signals were weak or where it could not receive
radio signals.
The watch was unable to receive radio signals.
Change the orientation of the watch.
For details, refer to“■ WHAT IS RADIO-CONTROLLED WATCH? ”.
See the website of Communication Research Laboratory (CRL) (http://jjy.crl.go.jp/) for further
information concerning the transmission of time signals.
Check the number of reception failures. If reception failures continue, put the watch where it
can receive radio signals more easily to conduct the manual reception.
Change the place to leave the watch during automatic reception between AM2:00 and
AM4:00.
Cause
The stored electric power is running short.
The watch is in a condition where it cannot get
sufficient light, for instance, the watch is concealed
under long sleeve shirts.
The watch is insufficiently charged.
125
Trouble
The watch temporarily gains or
loses time.
The second hand is not correctly
positioned while in the reception
result display or reception level
display.
The reception result display
confirms successful reception but
the wrong date is displayed.
126
Cause
The watch fails to receive radio signals properly
because of radio noise.
The watch has been left in extremely high or low
temperatures for a long time.
The hand positions were misaligned as a result of
influence of strong magnetism or shocks.
The second hand is out of preliminary position.
The calendar is out of preliminary position as a result
of influence of strong magnetism or shocks.
Solution
Keep the watch away from objects that cause radio noise, and put the watch where it can
receive radio signals more easily to conduct the manual reception.
When the watch returns to normal temperature, the condition will be corrected. Conduct the
manual reception if necessary.
If the watch hands are not set to current time even after conducting the manual reception,
consult the retailer from whom the watch was purchased.
Automatic hand alignment will be activated to correct the hand positions. For details, refer to
“■ AUTOMATIC HAND ALIGNMENT”.
Automatic hand alignment will be activated to correct the hand positions. For details, refer to
“■ AUTOMATIC HAND ALIGNMENT”.
If the second hand position cannot be corrected, reset the built-in IC.
For details, refer to“■ ABNORMAL DISPLAY OR IMPROPER FUNCTION”.
If problem still persists, consult the retailer from whom the watch was purchased.
Perform the preliminary position settings for calendar.
For details, refer to“● How to set the calendar to the preliminary position”.
127
Trouble
The time displayed on the watch is
several hours before or ahead of
the current time.
Manual reception cannot be
conducted.
The buttons or crown cannot be
operated.
The stopped watch was exposed
to adequate light for a longer time
than“the time required for fully
charging the watch,”however, it
does not resume its normal onesecond interval movements.
Blur on the dial glass persists.
Cause
The watch may be set to the time in different time
zone from Japan Standard Time.
The watch may be set to the time in different time
zone from Japan Standard Time.
The stored electric power is running short causing the
watch to move at two-second intervals or five-second
intervals.
The light is too weak or the manner of lighting the
watch has been altered while the watch is being
charged.
The built-in IC has fallen into an unstable condition.
Small amount of water has got inside the watch due
to deterioration of the gasket, etc.
※For the solution of troubles other than the above, contact the retailer from whom the watch
128 was purchased.
Solution
If it is not necessary to set the watch to the time in different time zone, reset the time to
Japan Time.
For details, refer to“■ TIME ZONE ADJUSTMENT”.
Charge the watch.
For details, refer to“■ REMARKS ON BATTERY CHARGING BEFORE INITIAL USE”.
Charge the watch under an environment where the watch can be exposed to an adequate
intensity of light in a stable condition.
Reset the built-in IC.
For details, refer to“■ ABNORMAL DISPLAY OR IMPROPER FUNCTION”.
Contact the retailer from whom the watch was purchased.
129