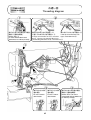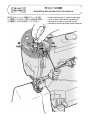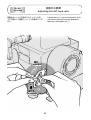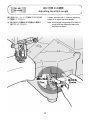
1
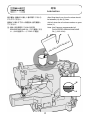
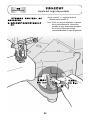
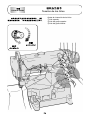
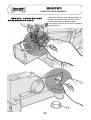
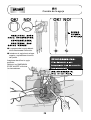
CW600
取扱説明書
CW600 Series 2・3 本針シリンダーベッド型偏平縫いミシン
INSTRUCTIONS
CW600 Series 2 or 3-needle sylinder bed interlock machine
ISTRUZIONI
Serie CW600
Macchina “interlock” a braccio cilindrico
a 2 o 3 aghi
はじめに
このたびは、ペガサス CW600 シリーズミシンをお
買い上げいただき、ありがとうございます。
ミシンをお使いになる前に、この説明書をよくお読み
いただき、末ながくご愛用くださいますようお願い致
します。
なお、この説明書にはミシンを効率的にご使用いただ
くために、日常の点検事項と、安全に関する注意事項
を載せています。
日常のミシンの点検と同時に、皆様ご自身の安全にも
十分ご配慮くださいますようお願い致します。
INTRODUCTION
Thank you very much for purchasing Pegasus
CW600 Series machine.
This instruction manual describes daily routine
maintenance and safety precautions to keep the
machine in the best possible conditions.
Please study this manual very carefully before
operating the machine.
INTRODUCCION
Le felicitamos por la compra de su máquina
Pegasus de la serie CW600.
En este manual de instrucciones de servicio se
describen los trabajos de mantenimiento diarios
y las normas de seguridad, que deberán
cumplirse estrictamente, para de esa forma
evitar daños en la máquina y lesiones de la
persona que atienda la misma.
Antes de poner la máquina en marcha, le
rogamos estudie detenidamente estas
instrucciones de servicio.
安全のために
CAUTION
OBSERVE THESE SAFETY PRECAUTIONS
ミシン本体及び装置は、安全のために十分配慮して
ありますが、基本的な操作手順を守って、安全に作
業して下さい。
●安全のための装置や部品を取り外して使用するこ
とは、非常に危険ですので絶対に取り外して使用
しないで下さい。
●ミシンを使用するときは、ミシンテーブルの上に
道具や工具、その他縫製に必要の無いものを置か
ないで下さい。
●ミシンの点検や調節、掃除、糸通し、針の交換な
どをするときは、事故防止のため必ず電源を切っ
て、ミシンペダルを踏んでもミシンが動かないこ
とを確かめてから行って下さい。
注
1を
クラッチ式モーターをご使用の場合には、電源⃝
切った後もモーターは慣性で暫く回り続けます。こ
2 を踏むと不意にミシン
の時不注意でミシンペダル⃝
が作動しますので危険です。
1 を切った後も、ミシンが停止するまでミシン
電源⃝
2 を踏みつづけて下さい。
ペダル⃝
Though Pegasus takes the utmost care to produce
safe sewing machines and devices, operators should
follow these basic safety rules.
● To prevent accidents, do not remove safety
devices or parts while operating the machine.
● Do not leave tools or other unnecessary objects
on the machine table while operating the
machine.
● Before maintenance, adjusting, cleaning,
threading or replacing the needle, and to prevent
accidents, be sure the power is turned off. Check
that the machine will not operate when the pedal
is pressed.
Note
In case a crutch type motor is used, it will keep on
1.
rotating by inertia after turning off power suppluy ⃝
2 is stepped on inadvertently, it
If the machine pedal ⃝
is dangerous because the machine will move
unexpectedly. Keep on stepping on the machine
2 until the machine comes to a stop after
pedal ⃝
1.
turning off power supplly ⃝
1
⃝
2
⃝
●ミシンテーブルを離れるときは、必ず電源を切っ
て下さい。
● Turn the power off before leaving the machine
table.
●停電したときは、必ず電源を切って下さい。
● In the event of a power failure, be sure to turn the
machine off.
●いつも安全で快適にご使用頂くために、日常の保
守点検を欠かさないよう、お願いいたします。
● Check that the machine is securely grounded.
ATENCION
Tenga muy en cuenta estas normas de seguridad
Aunque Pegasus realiza todos los enfuerzor en
fabricar máquinas seguras, es imprescindible que la
persona que atiende la máquina observe
estrictamente todas las normas de seguridad
correspondientes.
● Para evitar accidente, no está permitido usar la
máquina sin las tapas y los correspondientes
dispositivos de protección.
● No deje ninguna herramienta ni otros objetos
innecesarios en la mesa de la máquina durante
la operación de la misma.
● El enhebrado, el cambio de las agujas, la
limpieza de la máquina y los ajustes sólo
deberán realizarse después de haber
desconectado el motor.-El el caso de motores de
embrague accionados mecánicamente, habrá
que asegurarse de que la máquina no se pone
en marcha al accionar el pedal.
Nota importante:
Los motores de embrague accionados
mecánicamente, debido a la energia acumulada en
la masa centrifuga, continúan marchado un cierto
tiempo después de desconectarlos eléctricamente.
El accionamiento involuntario del pedal durante ese
tiempo, podria causar una marcha por inercia
imprevista de la máquina, con el consiguiente
peligro de lesiones de la operaria o de deterioros de
la máquina.-Por esta razón, cuando se utilicen
dichos motores, antes de realizar los trabajos arriba
indicados y después de la desconexión eléctrica
habrá que accionar el pedal repetidamente hasta
que la máquina deje de marchar.
1
⃝
2
⃝
● Antes de abandonar el puesto de trabajo, habrá
que desconectar el motor.
● Cuando se corte la corriente, habrá que
desconectar inmediatamente el motor.
● La máquina deberá estar conectada a tierra.
目次 CONTENTS
INDICE
■ご使用の前に
BEFORE OPERATING
■
ANTES DE LA PUESTA EN MARCHA
○給油
Lubrication
2
○手差し給油
Manual lubrication
3
○HR 装置への給油
Filling the HR device with silicon oil
4
○糸の通し方
Threading
5
○糸通し図
Threading diagram
6
○
Lubrlcación
18
Lubrlcación manual
19
Rellenado de los depósitos de aceite de silicona
20
Enhebrado
21
Enhebrado (2,3 agujas)
22
○
○
○
○
■試し縫い
TEST SEWING
■
COSUTURA DE PRUEBA
○押ェ圧力の調節
Adjusting the presser foot pressure
7
○差動比の調節
Adjusting the diff. feed ratio
8
○縫い目長さの調節
Adjusting the stitch length
9
○糸調子の調節
Adjusting the thread tension
○
23
Ajuste del arrastre diferencial
24
Ajuste del largo de puntada
25
Tensión de los hilos
26
○
○
○
10
■ご使用中の保全
MAINTENANCE DURING USE
■
MANTENIMIENTO
○ミシンの掃除
Cleaning the machine
11
○針の取り替え
Replacing the needle
12
○オイル循環の点検
Checking the oil circulation
13
○オイルエレメントの点検と交換
Checking and replacing the oil filter
14
○オイル交換
Replacing the oil
15
○調整基準表
Adjustment dimentions
32
○標準使用針一覧表
Standard needle
32
針番手対照表
Comparison table of equivalent sizes
Presión del prensatelas
○
Limpieza de la máquina
27
Cambio de la aguja
28
Control de la circulación del aceite
29
Control y cambio del filtro del aceite
30
Cambio del aceite
31
VALORES DE AJUSTE
32
○
○
○
○
○
○
1
Aguja astándar Tabla de comparación de grosores de aguja equivalentes 32
給油
ご使用の前に
BEFORE OPERATING
Lubrication
油の量は、油面が H 線と L 線の間にくるよう
に入れてください。
After filing the oil pan, the oil surface should
lie between (H) and (L) lines.
油面が L 線より下がった場合は、油を補給し
てください。
Add oil, when the oil surface reaches or goes
below (L).
注: 油は、
当社指定の「HIGH SPEED
SEWING MACHINE OIL」をご使用くださ
い。(ISO 粘度グレード VG22 に相当)
Note: Use Pegasus recommended oil
「HIGH SPEED SEWING MACHINE
OIL」(ISO VG22)
HIG
H
ED
SPE
SE
G
WIN
MA
C
E
HIN
OIL
H
L
2
手差し給油
ご使用の前に
BEFORE OPERATING
Manual lublication
手差し給油は、はじめて使用するときと、暫く
使わなかったときに 2 ∼ 3 滴給油してくださ
い。
Apply 2 or 3 drops of oil by hand when the
machine is used for the first time or has been
left unused for some time.
注: 油は、
当社指定の「HIGH SPEED
SEWING MACHINE OIL」をご使用くださ
い。(ISO 粘度グレード VG22 に相当)
Note: Use Pegasus recommended oil
「HIGH SPEED SEWING MACHINE
OIL」(ISO VG22)
HIGH SPEED SEWING MACHINE OIL
3
HR 装置への給油
ご使用の前に
BEFORE OPERATING
Filling the HR device with silicon oil
糸切れ、地糸切れ防止のために、HR 装置へ
の給油は早めにしてください。
Fill the HR device with oil befor it is too low in
order to prevent needle thread breakage and
fabric damage.
注: シリコンオイルは、
当社指定のオイル
〔日本ユニカー(株)L45(10)をご使用く
ださい。
〕
Note: Use Pegasus recommended silicon oil
〔UNION CARBIDE CORPORATION〕
UCC L-45(10)
4
糸の通し方
ご使用の前に
BEFORE OPERATING
1
⃝
Threading
アイガードとカバー(3ケ所)を開けて
ください。
押す。(下糸繰りが
跳ね上がります。)
糸を通した後、
押し戻す。
Open the eye guard and
three covers.
Press down. (The
looper thread takeup lifts up.
Replace the looper
thread take-up after
threading.
2
⃝
4
⃝
あらかじめ通してある糸に
縫製用の糸を結んでください。
3
⃝
Knot the preset thread and the
thread being used together to
thread the machine.
針糸
糸の結び目を針の手前まで引き
出し、一旦結び目を切り落とし
てから改めて針に通し直してく
ださい。
Needle thread
Trim the knots off neatly before
passing through the eye of the
needle to rethread.
5
⃝
ミシンに糸が通っていない場合には、
糸通し図を見て正しく糸を通してく
ださい。(6頁)
6
⃝
ルーパー糸、上飾り糸
結び目が出てくるまで糸を引き
出してから、先端をハサミで切
り揃えてください。
Be sure to thread the machine correctly
by referring to the threading diagram.
(See P.6)
Looper thread, Top cover thread
Trim the knots off neatly after
passing through the eye of the
looper
5
糸通し図
ご使用の前に
BEFORE OPERATING
Threading diagram
1
⃝
2
⃝
A
⃝
B
⃝
伸びの大きい糸を使用する場合、
A (通常は実線)
破線 ⃝
A
Broken lines ⃝
for more stretchable thread
(Solid lines for ordinary thread)
D
⃝
C
⃝
B
D
飾り糸がしまりすぎる場合= ⃝
飾り糸がゆるみすぎる場合= ⃝
C
に通してもゆるみすぎる場合= ⃝
If the top cover thread is too
D .
In the top cover thread is too loose, use broken tight, use broken line ⃝
B . If the top cover thread is still too loose
line ⃝
B , use broken line ⃝
C .
after threading with broken line ⃝
1
⃝
2
⃝
3
⃝
4
⃝
3
⃝
伸びの大きい糸を
通す場合
For more stretchable threads
伸びの小さい糸を
通す場合
For less stretchable threads
4
⃝
伸びの大きい糸を通す場合、
E (通常は実線)
破線 ⃝
E for more
Broken lines ⃝
stretchable thread (Solid lines
for ordinary thread)
E
⃝
6
押エ圧力の調節
試し縫い
TEST SEWING
Adjusting the presser foot pressure
1 を緩めてナット⃝
2 を回
押エ圧力は、ナット⃝
して調節してください。安定した縫い目が得ら
れる範囲で、できるだけ弱くしてください。
1 and turn adjusting
Loosen adjusting nut ⃝
2 to adjust the presser foot pressure.
nut ⃝
It should be as light as possible, yet be
sufficient to obtain the proper stitch formation.
2
⃝
1
⃝
強
Heavy
弱
Light
7
差動比の調節
試し縫い
TEST SEWING
Adjusting the diff. feed ratio
1 を弛めてから、レバー⃝
2を
差動比はナット⃝
1 を締めてくだ
上下に動かして調節し、ナット⃝
さい。
1 and move the lever up ⃝
2
Loosen the nut ⃝
and down to obtain the correct differential
1.
feed ratio, then tighten nut ⃝
縮む
To shrink
2
⃝
1
⃝
伸びる
To stretch
8
縫い目長さの調節
試し縫い
TEST SEWING
Adjusting the stitch rength
1 を緩めてネジ⃝
2 を回
縫い目長さは、ナット⃝
して調節してください。
1 and turn adjusting
Loosen adjusting nut ⃝
2 to adjust the stitch length.
screw ⃝
注 : 縫い目長さの調節は必ず差動比の調節の
後に、行ってください。
Note: Stitch length adjustment must only be
made after the differential feed ratio
has been changed.
細かくなる
Fine
9
粗くなる
Coarse
糸調子の調節
試し縫い
TEST SEWING
Adjusting the thread tension
1 、上飾り糸調子ナ
糸調子は針糸調子ナット⃝
2 、下ルーパー調子ナット⃝
3 で調節して
ット⃝
ください。
ゆるむ
To loosen
Make tension adjustments with the needle
1 , the top cover thread knob ⃝
2,
thread knob ⃝
3.
and the lower looper knob ⃝
しまる
To tighten
1
⃝
2
⃝
3
⃝
10
ミシンの掃除
ご使用中の保全
MAINTENANCE
DURING USE
Cleaning the machine
ミシンの掃除は針板の溝及び送り歯の周辺と
1 を外した内部を主に行
ミシン背面のゴム栓⃝
ってください。
Clean mainly the slots of the needle plate, the
feed rows, and the inside of the machine.
1 to clean the inside.
Take off rubber plug ⃝
1
⃝
11
ご使用中の保全
MAINTENANCE
DURING USE
OK!
針の取り替え
Replacing the needle
NO!
OK! NO!
エグリ部分
Scarf
針の表裏をよく確かめて、エグリを
ミシンの後方に向けて、取付けてく
ださい。
針は、しっかり奥まで差し込んでく
ださい。
標準使用針は巻末調整基準表を参
照してください。
Check the needle carefully to see
that the scarf is turned to the rear
of the machine.
赤い柄のレンチ(付属品)を使用
してください。
Insert the needle to the proper
depth, and fasten securely.
Be sure to use the red‐handled
hex driver packaged in the accessory
box.
Be sure to use standard
needle.
Refer to ADJUSTMENT
DIMENSIONS on the end
of instructions.
【注】ネジは抜き取らないでください。
【Note】Do not remove the screw.
12
ご使用中の保全
MAINTENANCE
DURING USE
オイル循環の点検
Checking the oil circulation
OK!
13
運転中
Operating
ご使用の前に
BEFORE OPERATING
オイルエレメントの点検と交換
Checking and replacing the oil filter
オイルエレメントは、6ヶ月ごとにはずして
点検または、交換してください。
Check and replace the oil filter every six
months.
点検と交換は6ヶ月ごとに!
CHECK AND REPLACE
EVERY 6 MONTH!
14
オイル交換
ご使用中の保全
MAINTENANCE
DURING USE
Replacing the oil
オイルは、使いはじめてから 1 カ月目と、その
後は 6 カ月ごとに交換してください。
Replace the oil one month after the first use
and every six months thereafter. (See p2.)
給油は 2 頁を参照してください。
15
16
17
ANTES DE LA PUESTA
EN MARCHA
Lubrlcación
Después de rellenar de aceite la bandeja, el
nivel de aceite deberá estar entre la marca
(H) y la (L). Rellene de aceite cuando el nivel
de aceite esté en (L) o por debajo.
Nota : Utilice 「HIGH SPEED SEWING
MACHINE OIL」 recomendado por Pegasus
(ISO VG22).
H
HIG
ED
SPE
G
WIN
E
HIN
OIL
C
MA
SE
H
L
18
ANTES DE LA PUESTA
EN MARCHA
Lubrlcación manual
Provea manualmente los puntos indicados
con 2 a 3 gotas de aceite si la máquina se ha
puesto en marcha por primera vez o ha
estado parada bastante tiempo.
Nota : Utilice 「HIGH SPEED SEWING
MACHINE OIL」 recomendado por Pegasus
(ISO VG22).
HIGH SPEED SEWING MACHINE OIL
19
ANTES DE LA PUESTA
EN MARCHA
Rellenado de los depósitos de aceite de silicona
Los depósitos de aceite de silicona deberán
rellenarse siempre a tiempo para evitar la
rotura del hilo y deterioros delmaterial
Nota: Utilice únicamente el aceite de silicona
recomendado por Pegasus:
〔UNION CARBIDE CORPORATION〕
UCC L-45(10)
20
ANTES DE LA PUESTA
EN MARCHA
Enhebrado
1
⃝
2
⃝
4
⃝
3
⃝
5
⃝
6
⃝
21
ANTES DE LA PUESTA
EN MARCHA
Enhebrado (2,3 agujas)
1
⃝
2
⃝
A
⃝
B
⃝
D
⃝
C
⃝
1
⃝
2
⃝
3
⃝
4
⃝
3
⃝
4
⃝
E
⃝
22
COSTRA DE PRUEBA
Presión del prensatelas
Realice el ajuste girando el tornillo regulador
2 y después de aflojar la tuerca ⃝
1.
⃝
La presión del prensatelas deberá ser lo más
mínima posible, pero lo suficientemente
fuerte para garantizar uma impecable
formación de puntada.
2
⃝
1
⃝
23
COSTRA DE PRUEBA
Ajuste del arrastre diferencial
1 y regule el largo de
Afloje la tuerca ⃝
2.
puntada con la palanca ⃝
2
⃝
1
⃝
24
COSTRA DE PRUEBA
Ajuste del largo de puntada
1 y regule el largo de
Afloja la tuerca ⃝
2 .
puntada con el tornillo ⃝
Nota: Cada vez que se modifique la relación
del arrastre diferencial, se modifica
también el largo de puntada completo.
En tal caso, habrá que corregir
convenientemente el largo de puntada.
25
COSTRA DE PRUEBA
Tensión de los hilos
Ajuste de la tensión de los hilos.
① hilo superior
② hilo del garfio superior
③ hilo del garfio inferior
1
⃝
2
⃝
3
⃝
26
MANTENIMENTO
Limpieza de la máquina
Sobre todo la ranura de la placa de aguja, el
dentado del transportador y el interior de la
máquina deberán mantenerse limpios.
Para limpiar el interior de la máquina, retire el
1.
tapón de goma ⃝
1
⃝
27
MANTENIMENTO
OK!
Cambio de la aguja
NO!
OK! NO!
● La garganta de la aguja deberá
mirar exactamente hacia atrás.
● Introduzca la aguja hasta el tope
superior y apriete bien el tornillo
de fijación.
Asegùrese de utilizar la aguja
estándar.
Refiera a las DIMENSION
ES DE AJUSTE al final de
las instrucciones.
28
MANTENIMENTO
Control de la circulación del aceite
OK!
29
MANTENIMENTO
Control y cambio del filtro del aceite
Efectúe el control y la limpieza (en caso de
estar deteriorado, intercámbiese) del filtro del
aceite cada 6 meses.
30
MANTENIMENTO
Cambio del aceite
El primer cambio de aceite deberá realizarse
pasado un mes de la primera puesta en
marcha de la máquina.
Seguidamente, cada 6 meses.
Véase la página 18.
31
32
7.5
7.1
7.5
7.1
248
256
264
356
364
CW664-03
CW664-08
9
65
#
Nm
7.9
8.3
240
CW664-02
8.8
232
CW664-01
70
10
75
11
3.1~3.4
3.5~3.8
3.1~3.4
3.5~3.8
3.9~4.2
4.3~4.6
4.7~5.0
90
14
100
16
7.5~7.9
7.5~7.9
7.5~7.9
7.5~7.9
7.5~7.9
7.5~7.9
7.5~7.9
110
18
17.0
17.0
17.0
17.0
17.0
17.0
17.0
130
21
9S
9S
10S
10S
248
256
264
356
364
CW664-03
CW664-08
9S
9S
240
CW664-02
9S
232
CW664-01
0.8~1.2
0.8~1.2
0.8~1.2
0.8~1.2
0.8~1.2
0.8~1.2
0.8~1.2
本社 〒553-0002 大阪市福島区鷺洲 5-7-2 TEL(06) 6458-4739
PEGASUS SEWING MACHINE MFG. CO., LTD.
5-7-2, Sagisu, Fukushima-ku, Osaka 553-0002, Japan. Phone : (06)6458-4739
1
Cat. No. 9A21450△
November 2004
1999 PEGASUS SEWING MACHINE MFG. CO., LTD.
この使用説明書に記載されている内容は、改良のため予告なく変更することがあります。
The description in this INSTRUCTIONS is subject to change without prior notice for improvement.
El contenido de estas INSTRUCCIONES puede modificarse sin previo aviso.