1
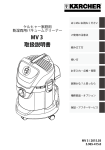
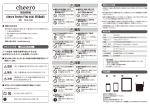
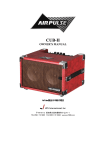
Fig. 1
Fig. 2
Fig. 3
取扱説明書 /Instruction Manual
cheero INGRESS POWER CUBE 12000mAh
Model No. CHE-058
ティ・アール・エイ株式会社
〒540-0031 大阪市中央区北浜東6番6号7F
TRA COMPANY LTD., Aqua Tower 7F,
Kitahama-higashi 6-6 Chuo-ku, Osaka, 540-0031 JAPAN
2
1
iPod/iPhone series
Micro-USB Smartphones
iPad series
[email protected]
http://www.cheero.net
※FOR OTHER COUNTRIES,PLEASE CONTACT YOUR LOCAL DISTRIBUTOR
Micro-USB
Origin of print: Printed in China
■お問い合わせは
● 小さなお子様の手の届くところで使用・保管しない
感電やけがの原因になります。
異常を感じたり製品に不具合があった場合などはただちに使用を中止し、
1、不具合内容( 具体的に) 2、購入店舗 ( Amazon/ 楽天市場/cheero.net など)
3、注文番号を上記アドレスまでメールにてご連絡ください。
● ケーブルを接続する際は端子にゴミが付着していないことを
ご確認ください
発熱や発火の原因になります。
● アダプターで本製品を充電される際は、必ず定格出力電流
2A(2アンペア)のアダプターをご使用ください
発熱や発火の原因になります。
日本語
対応機種
注意
iPod/各種iPhone , microUSB対応スマートフォン , 各種iPad ,
microUSB対応WiFiルーター
● −10℃∼40℃以外の場所で使用しない
電池が液もれ・発熱・破裂する原因になります。
● 衝撃や振動を与えたり、投げたりしない
発熱や発火、感電、けがの原因になります。
ポータブルゲーム機、MP3 プレイヤ等機種によっては、
充電できないものもあ
※ その他、
ります。
①
②
③
④
⑤
⑥
● 使い捨てタイプのバッテリーを接続しない
発熱や発火、
感電の原因になります。
残容量インジケーター
電源ボタン
LEDボタン
Micro-USB 入力口
USB 2.1A 出力口
USB 1A 出力口
● 充電中に携帯電話などの電子機器を接続しない
● 付属品
•
•
•
•
故障の原因になります。
● カバンの中など目に届かない場所で充電しない
発熱や発火の原因になります。
● 充電完了後は本体から接続ケーブルをはずす
バッテリー消耗の原因になります。
● 発熱時はケーブルをはずしてしばらく放置する
発熱や発火の原因になります。
本体充電用USB-microUSBケーブル
ポーチ
取扱説明書
保証書(1年保証)
※ 本製品にはUSB-micro USB以外のケーブルは付
属しておりません。
各デバイスへの充電は各デバイスに応じたUSB
ケーブルをご利用下さい。
安全上のご注意
● 誤った使い方をしたときに生じる危害や損害の程度を区分して、説明して
います。
2 充電用ケーブル(付属)のUSB側をパソコンに接続する。またはケーブルを
USB ACアダプタ(別売り)に接続し、アダプタを家庭用コンセントに接続
する。
「死亡や重傷を負うおそれがある内容」です。
注意
危険
「軽傷を負うことや、財産の損害が発生する
おそれがある内容」です。
● 異臭や本体の発熱、ひずみ、変色などの異変に気づいたら使
用を続けない
発熱や破裂、
発火の原因になります。
多湿、
火気やハイボルテージ・デバイスの近
● 直射日光、高温、
くで使用・保管しない
発熱や破裂、
発火の原因になります。
● 電解液が漏れている場合は使用を続けない
発熱や破裂、発火の原因になります。
● 分解・改造しない
発熱や発火、感電の原因になります。
● 水やその他の液体を入れたり、濡らしたりしない
発熱や発火の原因になります。
● 断線したケーブルを使用しない
発熱や発火の原因になります。
● 金属性製品の近くで使用・保管をしない
短絡(ショート)の原因になります。
接続した電子機器への充電が始まります。
• 電子機器を充電している間、LEDライトは点灯・消灯を繰り返します。LEDライ
トの点灯・消灯を止めるには、電源ボタンを長押ししてください。
※
本体充電が開始し、
インジケーターのランプが順番に点滅します。
4つ全てが点灯したら、充電完了です。
3 充電が終われば充電用ケーブルを本製品からはずす
• 充電時間:約10時間 (別売り2Aアダプタ使用で)
(初回充電時はさらに時間がかかる場合があります。)
• 本製品を充電しながら他機器への充電ができません。
• 長期間使用しないとバッテリーが自然放電して劣化しますので、3ヶ月に一度
は本製品の充電を行ってください。
● 残容量に応じて下記のようにインジケーターが光ります
0 - 25%
26 - 50% 51 - 75% 76 - 99%
充電用ケーブルがしっかり差し込まれているか確認し
てください。
充電が途切れる
4 充電が終われば充電用ケーブルをはずす
しばらくすると本製品の電源が自動でオフになります。
•「USB 1A 出力口」
と
「USB 2.1A 出力口」を同時に使って2台の電子機器を
同時充電することが可能です。
(2本目の充電ケーブルはご用意ください。)
電源ボタンを押してから充電開始まで約1分程度か
• 充電する電子機器によって、
かる場合があります。
iPadなど2A充電対応機種の場合、
対応機種に付属のケーブルを使って
•
「USB2.1A 出力口」から充電すると充電時間が短縮されます。
バッテリー残容量を確認するには
電源ボタンを押して残容量インジケーターを確認する
4つのインジケーターの点灯数によって残容量を示します。
• インジケーターが1つも点灯しない場合は残容量がありません。本製品の充電
操作を行ってください。
• インジケーターが1つだけ点灯/点滅している場合は残容量がわずかです。
この
状態で他機器への充電は、
約1分程度で終了する場合があります。
本製品の充電操作を行ってください。
● 電源ボタンを押すと残容量に応じて下記のようにインジケーターが光ります
100%
0%
2 ケーブルのUSB側を、本製品の「USB1A出力口」または「USB2.1A出力
口」に接続する
• 充電する電子機器によっては「USB 2.1A 出力口」が使用できない場合があ
ります。その場合は「USB 1A 出力口」をお使いください。
(2.1AはiPad用に
設計されています。)
26 - 50% 51 - 75% 76 - 100%
LEDライトの操作方法
LEDボタンを長押しすると、エンブレムの外でもLEDライトが点灯・消灯を繰り返しま
す。再びLEDボタンを長押しすると、エンブレム外のライトは消灯します。
ケーブルを抜き充電を終了すると、約2分後に全てのLEDライトが消灯いたします。電
子機器の充電をしていない時でも、本製品の電源ボタンを押すとLEDが点灯し同様の
操作が可能です。ただし、約2分で全て消灯いたします。LEDライトを全て消すには電
源ボタンを長押ししてください。
※LEDライトを消灯後、2分以内に再点灯させるには電源ボタンではなくLEDボタンを押してく
ださい。
故障かな?と思ったら
本製品のバッテリー残容量が不足している(電
源ボタンを押すと残容量インジケータが消灯あ
るいは1つだけ点灯/点滅)
1 お手持ちの機器用のケーブルのmicro USB側あるいは機器に対応したコ
ネクタを、充電したい電子機器に接続する
USBケーブルは本製品を充電するためのものです。お手持
ちの機器を充電される際はお手持ちの機器用のケーブルをご使用ください。
6 - 25%
本製品にはLEDライトを使用した仕掛けが施されています。本製品で電子機器の充電
を開始すると、エンブレム上で白・緑・青の3色のLEDライトが点灯・消灯を繰り返しま
す。側面のLEDボタンを1度押すと緑1色、もう1度押すと青1色に変化し、さらにもう1度
押すと最初の状態に戻ります。
他機器への充電方法
※ 本製品付属のUSB-micro
1 - 5%
本製品を再度、充電してください。
充電できない
電源ボタンを押していない
再度、電源ボタンを押してください。
スマートフォンの機 種によって充電開始までに
時間がかかる場合があります
しばらくお待ちください。
機器を固定しない状態で充電している
固定した状態で充電してください。
充電ケーブルが付属のものでない
スマートフォンなどに付属されている充電ケーブルを
使ってください。
● 上記をお試しいただいても正常に充電できない場合は、お手数ですが
下記をお試しのうえ、本紙記載の「お問い合わせ先」にご連絡ください。
① お手持ちの他のケーブルで充電可能か
(極力、各デバイスに付属の純正ケーブルでお試しください)
② 他のデバイスは充電可能か
電源ボタンを
押していないのに
ケーブルを
接続すると充電が
始まる
本製品は、電源ボタンを押してから約2分間は電源
ONの状態になっております。そのため、ケーブルを
接続する前にバッテリー残容量を確認するために
電源ボタンを押すなどしていると、ケーブルを接続
すると他機 器 への充電が 始まる場合があります。
(本製品の充電直後も同様の操作となります。)
*上記以外にも使用上、故障かな?と思われた場合は、本紙記載の
「お問い合わせ先」にご連絡ください。
サポート窓口より対応させていただきます。
よくあるお問い合わせ(Q&A)
Q.
1 充電用ケーブル(付属)
のmicroUSB側を本製品の「microUSB入力口」
に接続する
危険
充電用ケーブルの差し込みが不完全である
3 本製品の電源ボタンを押す
本製品の充電方法
人への危害、財産の損害を防止するため、必ずお守りいただくことを説明して
います。
「死亡や重傷を負うおそれが大きい内容」です。
AC
Micro-USB WiFi routers
Version: version no. 1.0
Date of publication: 01.2015
各部のなまえ
USB
A.
Q.
200Vなどの海外電圧に対応していますか?
本製品はUSBから充電する仕様となり、
コンセントから直接充電することはでき
ません。ただし、
スマートフォンなどに付属しているUSBコンセントによる充電は
可能です。お使いのUSBコンセントの対応電圧と各国のコンセント電圧、
コンセ
ント形状をご確認ください。
飛行機に持ち込めますか?
A.
お使いになる航空会社にお問い合わせください。2015年1月時点では、多く
の航空会社で手荷物として持ち込みが可能となっております。
Q.
バッテリーの実効容量は?
A.
本製品のバッテリー実効容量は電圧変換時のロスなどにより6∼7割程度と
なっております。各デバイスのバッテリー容量については各デバイスの説明書
を参照してください。
製品仕様
型番 : CHE-058 cheero INGRESS POWER CUBE 12000mAh
寸法(mm) : 156.5(L) x 72(W) x 19(H)
重量 : 275g
入力 : DC 5V/1.6A max
出力1 : DC 5V/1A max 出力2 : DC 5V/2.1A max
内蔵電量 : 3.7V 12000mAh (44.4wh) (リチウム・ポリマーバッテリー)
本体充電時間 : 約10時間 (別売り2Aアダプタ使用の場合)
使用回数 : 500回まで
各種保護機能
○過充電(電圧/電流)時、過放電(電圧/電流)時、短絡化(ショート)時、発熱時 自動
停止機能
○デバイス充電完了時自動停止機能
※未対応機種もございます。
English
* In addition, some portable game machines and MP3 players are supported.
There are also types of devices that cannot be charged using this product.
Please refer to Fig. 3.
1 Connect the micro-USB plug of the charging cable
(accessory) to the “micro-USB input port” of this product.
2 Connect the USB plug of the charging cable (accessory)
Intended User
Users for mobile devices for intended use of this device.
Children must be supervised by a responsible adult for safety.
Condition for Use
Operating temperature : 14℉ - 104℉ (-10℃ to 40℃)
Part Names
①
②
③
④
⑤
⑥
Troubleshooting
How to Charge This Product
Intended Use
Charging for supported devices such as Fig. 1.
Remaining battery level indicators
Power button
LED button
Micro-USB input port
USB 2.1A output port
USB 1A output port
● Accessories
• USB to micro-USB charging cable (for charging the product)
* To charge non-micro-USB devices, use a commercial USB cable with the type of
USB connector supported by each device.
* There are also types of devices that cannot be charged using this product.
• Carrying pouch
• Instruction Manual
to 2A USB-AC adaptor (not attached) and then,connect
the adaptor to a wall socket.
The product starts charging itself, with the remaining battery level
indicator flashing. Charging is complete when the white flashing
lights stop flashing and are all lit.
cable from the product.
• Charging time: around 10 hours (with 2A adaptor, not attached)
(For the initial charging, the product may take a longer time.)
• Please avoid charging another device while charging the product.
• The internal battery will discharge by itself and deteriorate in capacity
if not used for a long time. Please charge the product once in
every three months.
Explanation of safety signal word
WARNING
Warning indicates a hazardous situation that, if
not avoided, could result in death or serious injury.
CAUTION
Caution indicates a potentially hazardous
situation which, if not avoided, may result in
minor or moderate injury.
General Precautions
● Read all instructions prior to using this product.
● Keep this instruction for use for future use.
● Design and specifications are subject to change without notice.
● Dry location use only.
● Do not use at potentially explosive atmosphere.
WARNING
● Do not disassemble this product or attempt to re-purpose or modify it in any
manner.
● Do not short circuit this product. To avoid short -circuiting, keep this
product away from all metal objects (e.g. coins, hair-pins, keys, etc.).
● If you feel any abnormality, such as excessive heat, during the use of this
product, add immediately stop of use. Contact with the e-mail address.
26 - 50% 51 - 75% 76 - 99%
100%
How to Charge Your Device
1 Connect this product with your device by attached USB
to micro-USB charging cable or by your device set cable.
The product starts charging the connected electronic device.
• LED lights on the emblem keep flashing while charging your devices.
3 When charging is complete, disconnect the charging cable.
The product will automatically power off after a while when the
charging is completed.
• Depending on the electronic device to be charged, the product may
take about 1 minute to start charging after you press the power button.
To Check the Remaining Battery Level
Press the power button and check the remaining battery
level indicator.
You can know the remaining battery level by 4 LED cell indicators
as shown in the table below.
• When none of the indicators are on, the battery has no remaining
charge. Follow the steps to charge the product.
● Battery level indication after pressing the button
0%
1 - 5%
6 - 25%
26 - 50% 51 - 75% 76 - 100%
* If one LED is blinking, the remaining battery level becomes very low and this
product needs to be recharged.
How to Play with Flashing Lights
● Do not drop, place heavy weight on, or allow strong impact this product.
● While in use, do not cover this product with materials such as blankets.
● Do not expose this product in high temperature environment, including
intense sunlight.
● Keep away from high temperature or high humidity.
● Keep this product dry at all times.
● The contact surface of this product must always be kept clean.
This product is equipped with LED flashing lights, imitating INGRESS scenery.
While charging some device with use of this product, each of white, green, and
blue lights on the emblem turn on and off repeatedly.Press the LED button on
the side once, and the lights will turn green; press it once again, and the lights
will turn blue.The lights will turn back to the original way of flashing by pressing
the LED button once more.
Note
All of LED lights will turn off automatically in 2 minutes after disconnecting the
device or when the charging is completed. LED lights turn on by pressing the
power button, too, and turn off automatically in about 2 minutes if no device is
connected to charging.To turn off the lights completely, long-press the power
button, and hold it down for a few seconds.
● The product may become hot when charging. This is normal. Use caution
when handling.
The charging cable is not inserted firmly.
Make sure that the charging cable is inserted firmly.
Charging is
interrupted
If you want to flash additional background LED lights too, long-press the LED
button and hold it down for a few seconds. Background LED lights turn off the
same way by long-pressing the LED button and holding it down for another few
seconds.
* To turn LED lights on again within 2 minutes after turning them off, press the LED button
instead of the power button.
The device is not being charged in a fixed state.
Charge the device in a fixed state.
The charging cable is not an accessory item.
Use the charging cable supplied with your smartphone
or device.
● Battery level indication during charging the unit
0 - 25%
Recharge the product.
The power button is not pressed.
Press the power button again.
The product may take time to start charging for a
certain smartphone model.
Wait for a while.
3 When charging is complete, disconnect the charging
2 Press the power button on this product.
Safety Precautions
My
smartphone
cannot be
charged
The product’s remaining battery level is insufficient.
(The remaining battery level indicator doesn’t flash or
only one white LED flashes when you press the power
button.)
● If any of these remedies do not provide successful charging,
try the following checks and contact the Email address
indicated in this manual.
① Is the device chargeable using another cable you have?
End of Life
If this product becomes very short time charging, even if this
product is fully charged, this product has reached the end of its
service life.
Purchase a new product (service life varies depending on use).
Disposal of This Product
Never dispose of this product in the garbage.
Dispose of batteries according to your local environmental laws
and regulations.
Frequently Asked Questions (Q & A)
Q. Does this product conform to voltage such as AC 230 V?
A. This product is designed to be charged via USB and cannot
be charged directly from a wall socket.
Q. Can I carry this product on the airplane?
Check this with airline. Also refer to IATA home page:
A. http://www.iata.org/whatwedo/cargo/dgr/Pages/
lithium-batteries.aspx
(Try using the genuine cable supplied with each device as much as possible.)
② Is anothe r device chargeable?
Connecting
the cable
causes
charging to
start, although
I have not
pressed the
power button
This product remains on for about 2 minutes after the
power button is pressed. Therefore, if you have pressed
the power button to check the remaining battery level
before connecting the cable for example, the product may
start charging your device when you connect the cable.
(Similar phenomenon also occurs immediately after
charging this product.)
* In addition to the above phenomena, if you suspect that the product is
faulty, contact the Email address indicated in this manual. Our customer
support will be pleased to help you.
FCC Information
This device complies with part 15 of the FCC Rules. Operation is subject to the
following two conditions: (1) This device may not cause harmful interference,
and (2) this device must accept any interference received, including
interference that may cause undesired operation.
NOTE: This equipment has been tested and found to comply with the limits for
a Class B digital device, pursuant to part 15 of the FCC Rules.
These limits are designed to provide reasonable protection against harmful
interference in a residential installation. This equipment generates uses and
can radiate radio frequency energy and, if not installed and used in accordance
with the instructions, may cause harmful interference to radio communications.
However, there is no guarantee that interference will not occur in a particular
installation. If this equipment does cause harmful interference to radio or
television reception, which can be determined by turning the equipment off and
on, the user is encouraged to try to correct the interference by one or more of
the following measures:
• Reorient or relocate the receiving antenna.
• Increase the separation between the equipment and receiver.
• Connect the equipment into an outlet on a circuit different from that to which
the receiver is connected.
• Consult the dealer or an experienced radio/TV technician for help.
Changes or modifications not expressly approved by our company may cause
interference and void the user’s authority to operate the equipment.
Canada, Industry Canada (IC) Notices
This Class B digital apparatus complies with Canadian ICES-003.
Product Specifications
Model No.: CHE-058 cheero INGRESS POWER CUBE 12000mAh
Dimensions (mm): 156.5 (L) x 72 (W) x 19 (H)
(inch): 6.2 (L) x 2.8 (W) x 0.7 (H)
Weight: 275 g/9.7 oz (excluding accessories)
Input: DC 5 V/1.6 A max
Output 1: DC 5 V/1 A max, Output 2: DC 5 V/2.1 A max
Internal battery: DC 3.7 V 12000mAh (44.4wh) (Lithium polymer battery)
UN PLIII and S38.3.
Charging time with 2A USB AC adaptor (not attached) : Around 10 hours
Intended charging / discharging cycle: 500 times
Protective functions: •
•
•
•
•
Automatic shutdown at overcharge (voltage / current)
Overdischarge (voltage / current)
Short circuit
Overheating
Automatic shutdown at completion of device charge
* Not supported depending on the model.
Declaration of Conformity
This product complies with the EMC Directive 2004/109/EC,
the LVD Directive 2006/95/EC, Erp Directive 2009/125/EC
and ROHS Directive 2011/65/EU.