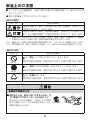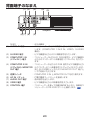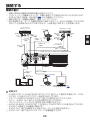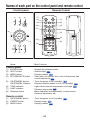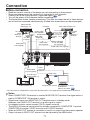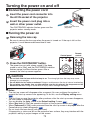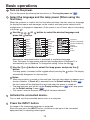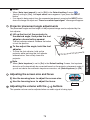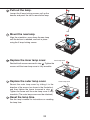
1
プロジェクター 取扱説明書(日本国内用) 形名 準 備 IPSiO PJ X3131 IPSiO PJ WX3131 IPSiO PJ X3241 ご 使 用 の 前 に 使 い か た メンテナンス そ の 他 ●このたびはリコープロジェクターをお買い上げいただきまして、まことにありが とうございます。 ●お求めのリコープロジェクターを正しく使っていただくために、お使いになる前 にこの「取扱説明書」をよくお読みください。 ●お読みになったあとはいつも手元においてご使用ください。 ●安全に正しくお使いいただくために、操作の前には必ず本書の「安全上のご注意」 をお読みください。 ●保証書を必ずお受け取りください。 ●製造番号は品質管理上重要なものです。お買い上げの際は、本機背面に表示され た製造番号と保証書に表示された製造番号が一致しているかご確認ください。 ご使用の前に 安全上のご注意 ● ここに示した注意事項は、安全に関する重大な内容を記載していますので必ず 守ってください。 ● 表示と意味は以下のようになっています。 [表示の説明] 表 示 表示の意味 “取扱いを誤った場合、使用者が死亡または重傷※ 1 を負うこと が想定されること”を示します。 “取扱いを誤った場合、使用者が傷害※ 2 を負うことが想定され るか、または物的損害※ 3 の発生が想定されること”を示します。 ※ 1:重傷とは、失明やけが、やけど ( 高温・低温 )、感電、骨折、中毒などで、後遺症 が残るものおよび治療に入院・長期の通院を要するものをさします。 ※ 2:傷害とは、治療に入院や長期の通院を要さない、けが・やけど・感電などをさします。 ※ 3:物的損害とは、家屋・家財および家畜・ペット等にかかわる拡大損害をさします。 [図記号の例] 図記号 図記号の意味 は、禁止(してはいけないこと)を示します。 禁 止 具体的な禁止内容は、図記号の中や近くに絵や文章で示します。 は、指示する行為の強制(必ずすること)を示します。 指 示 具体的な強制内容は、図記号の中や近くに絵や文章で示します。 は、注意を示します。 注 意 具体的な注意内容は、図記号の中や近くに絵や文章で示します。 ◆異常や故障のとき ■煙が出ている、変なにおいがするときは、す ぐに電源プラグをコンセントから抜くこと 煙が出なくなるのを確認し、お買い上げの販売 店にご連絡ください。そのまま使用すると、火災・ 感電の原因となります。 プラグを抜け ◆異常や故障のとき(つづき) ■内部に水や異物がはいったら、すぐに電源 プラグをコンセントから抜くこと そのまま使用すると、火災・感電の原因となり ます。お買い上げの販売店に点検をご依頼くだ さい。 プラグを抜け ■落としたり、キャビネットを破損したときは、 すぐに電源プラグをコンセントから抜くこと そのまま使用すると、火災・感電の原因となり ます。お買い上げの販売店に点検をご依頼くだ さい。 プラグを抜け ■電源コードが傷んだり、電源プラグが発熱し たときは、すぐに電源を切り、電源プラグが 冷えたのを確認してコンセントから抜くこと そのまま使用すると、火災・感電の原因となり ます。電源コードが傷んだら、お買い上げの販 売店に交換をご依頼ください。 プラグを抜け ◆設置されるとき ■屋外や風呂、シャワー室など、水のかかる おそれのある場所には置かないこと 火災・感電の原因となります。 水かけ禁止 ■電源プラグは交流 100V のコンセントに 接続すること 交流 100V 以外を使用すると、火災・感電の原 因となります。 指 示 ■ぐらつく台の上や傾いた所など、不安定な 場所や振動のある場所に置かないこと 本機が落ちて、けがの原因となります。 禁 止 ■上にものを置かないこと ● 金属類や、花びん・コップなどにはいった 液体や化粧液などが内部にはいった場合、 火災・感電の原因となります。 ● 重いものなどが置かれて落下した場合、け がの原因となります。 上載せ禁止 ご 使 用 の 前 に ◆設置されるとき(つづき) ■小さなお子様の手の届くところには、 設置・ 保管しないこと 落ちたり、 倒れたりして、 けがの原因となるこ とがあります。 禁 止 ◆ご使用になるとき ■修理・改造・分解はしないこと 火災・感電の原因となります。 点検・調整・修理はお買い上げの販売店にご依 頼ください。 分解した場合、保証やその他のサービスは受け られません。 分解禁止 ■通風孔などから異物を入れないこと 金属類や紙などの燃えやすいものが内部には いった場合、火災・感電の原因となります。特に お子様のいる環境ではご注意ください。 異物挿入禁止 ■水にぬらさないこと 火災・感電の原因となります。雨天、降雪中、海岸、 水辺では特にご注意ください。 水ぬれ禁止 ■電源コードは ● 傷つけたり、延長するなど加工したり、加 熱したりしないこと ● 引っ張ったり、重いものを載せたり、はさ んだりしないこと ● 無理に曲げたり、ねじったり、束ねたりし ないこと ● 付属品以外の電源コードセットを使用しな いこと 火災・感電の原因となります。 ● 付属の電源コードセットは、他の機器に使 用しないこと 火災・感電の原因となります。 禁 止 ◆ご使用になるとき(つづき) ■雷が鳴りだしたら、本機、接続ケーブル、 電源プラグなどに触れないこと 感電の原因となります。 触手禁止 ■点灯中はレンズや通風孔をのぞかないこと 点灯している状態でレンズや通風孔をのぞき込 まないでください。強い光が出ていますので視 力障害などの原因となります。特にお子様のい る環境ではご注意ください。 禁 止 ■電源プラグは必ず根元まで確実に差し込む こと 差し込みが不完全ですと、感電や発熱の原因に なります。 傷みやゆるみのあるコンセントは使 用しないでください。 指 示 ◆お手入れについて ■時々電源プラグを抜き、刃や刃の取付面にゴ ミやほこりが付着している場合はきれいに掃 除すること 電源プラグの絶縁低下によって、火災の原因と なります。 指 示 ご 使 用 の 前 に ◆お手入れについて(つづき) ■ランプ交換は必ず 専用の IPSiO PJ 交換用ランプ タイプ 1 ( 別売 ) を使用すること 専用以外を使用すると故障や破損してけがの原 因となります。また、古いランプは使用しない でください。 指 示 ■天吊り使用時のランプ交換や清掃は販売店 に依頼すること ● 高所での作業をお客様ご自身で行うと、転 落などによってけがの原因となります。 ● 天吊り使用時はお客様ご自身でランプカ バーを開けないでください。ランプカバー が落下したり、また万一、ランプが破裂し ているとガラス破片が落下してけがの原因 になります。 禁 止 ◆設置されるとき ■温度の高い場所に置かないこと 直射日光の当たる場所・閉めきった自動車内・ ストーブのそばなどに置くと、火災・感電の原 因となることがあります。 禁 止 ■湿気・油煙・ほこりの多い場所に置かないこと 加湿器・調理台のそばや、ほこりの多い場所な どに置くと、内部にほこりなどが蓄積して、火災・ 感電の原因となることがあります。 禁 止 ■設置の際は通風孔をふさがないこと 内部温度が上昇し、火災の原因となることがあ ります。 ● 壁に押しつけないでください。 禁 止 ● 押し入れや本箱など風通しの悪い所に押し 込まないでください。 ● テーブルクロス・カーテンなどを掛けたり しないでください。 ● じゅうたんや布団の上に置かないでください。 ◆設置されるとき(つづき) ■移動させる場合は、電源プラグ・外部との 接続線をはずすこと 電源プラグを抜かずに運ぶと、電源コードが傷 つき火災・感電の原因となることや、接続線な どをはずさずに運ぶと、本機が転倒し、けがの 原因となることがあります。 指 示 ■本機を他の機器に積み重ねたり、本機の上 に他の機器を載せないこと 上面、底面が熱くなりますので、他の機器へ損 害を与えることがあります。 禁 止 ■電源プラグのアース端子は、必ずアースに 接続すること 接続しないと、感電の原因となることがありま アースを接続する す。 ■通気の悪い状態で使用しないこと 本機を箱などに入れた状態で使用しないで く だ さ い。 内 部 温 度 が 上 昇 し、 火 災 の 原 因 となることがあります。 禁 止 ◆ご使用になるとき ■電源プラグを抜く場合は、電源コードを 引っ張って抜かないこと 電源コードを引っ張って抜くと、電源コードや 電源プラグが傷つき、火災・感電の原因となり ます。電源プラグを持って抜いてください。 引っ張り禁止 ■ぬれた手で電源プラグを抜き差ししないこ と 感電の原因となることがあります。 ぬれ手禁止 ■旅行などで長期間ご使用にならないとき は、安全のため電源プラグをコンセントか ら抜くこと 万一故障したとき、火災の原因となることがあ ります。 プラグを抜け ご 使 用 の 前 に ◆ご使用になるとき(つづき) ■排気孔、ランプカバー、底面は特に熱くな るので触れないこと やけどや他の機器への損害を与える原因となり ますので、触ったり、排気孔の近くに他の機器 を設置したりしないでください。 また、排気孔の近くに置かれた金属製のものは 特に熱くなりますので注意してください。 触手禁止 ■本機の上や排気孔の近くに、感熱紙の資料や 変形しやすいものを長時間放置しないこと 熱で感熱紙などの情報が消えたり、色が変わっ たり、変形することがあります。 禁 止 ■本機を立てて使用しないこと 本機を立てて使用すると、倒れてけがの原因と なります。 禁 止 ■リモコンに使用している乾電池は、 ● 指定以外の電池は使用しないこと ● 極性表示[( + ) と ( − )]を指示と逆に挿入しないこと ● 充電・加熱・分解・ショートしたり、火の中に入れないこと ● 乾電池に表示されている[使用推奨期間]を過ぎたり、使い切った乾電池はリモ コンに入れておかないこと ● 種類の違う乾電池、新しい乾電池と使用した乾電池を混ぜて使用しないこと これらを守らないと、液もれ・破裂などによって、やけど・けがの原因となることが あります。もし、液に触れたときは、水でよく洗い流し医師に相談してください。器 具に付着した場合は、液に直接触れないでティッシュペーパーなどでふき取ってくだ さい。(液をふき取ったティッシュペーパーなどは、水を含ませてから燃やせるごみ として廃棄してください) 禁 止 ■動作時にレンズの前に物を置かないこと 物が高温になり、やけどや火災の原因になる場 合があります。 映像を一時的に消す場合にはリモコンのミュー トをお使いください。 禁 止 ◆お手入れについて ■ランプを交換するときは、電源を切り、必 ず 1 時間以上たって、本機が冷えてから行 うこと 光源ランプユニットは高温となっている部分が ありますので特にご注意ください。やけど・け がの原因となります。 使用済みのランプは、破損させないように取扱 いに注意してください。 指 示 ■お手入れの際は、安全のため必ず電源プラ グをコンセントから抜いて行うこと 感電の原因となることがあります。 プラグを抜け ■定期的に本機内部の清掃をお買い上げの販 売店にご相談ください 内部にほこりがたまったまま使用すると、火災・ 故障の原因となることがあります。 特に、湿気の多くなる梅雨期の前に行うとより 効果的です。内部の清掃費用についても、お買 い上げの販売店にご相談ください。 指 示 ご 使 用 の 前 に ◆ランプについて 本機の光源には、点灯時に内部気圧が高くなる水銀ランプが使われています。このラン プには以下の特性がありますので、内容をよく理解して、取扱いには十分注意してくだ さい。 ● 衝撃や劣化などによって、ランプが破裂して大きな音がしたり、寿命が尽きて点灯 しなくなることがあります。 ● 破裂や寿命に至るまでの時間には、ランプによって大きな差があり、使い始めてま もなく破裂することもあります。 ● 交換時期を過ぎて使用すると、破裂しやすくなります。 ● ランプが破裂すると、ガラスの破片が本機の内部に飛び散ったり、通気孔などから 外に出たりすることがあります。 ● ランプが破裂すると、ランプの内部に封入された微量の水銀ガスがガラスの粉塵と ともに本機の排気孔などから放出されることがあります。 ■画面にランプ交換の表示が出たら、すみやかに新しいランプに交換してくだ さい ● 交換時期になると「ランプが寿命です。交換してください。」というメッセージが 画面に表示されます。 ● そのまま使い続けると、ランプが破裂する可能性が高くなります。 ● 時々ランプの使用時間を確認して、交換時期が近づいたら新しいランプをご用意く ださい。( p.43 ページの「状態表示」をご覧ください) ■ランプが割れたときには・・・ ● 万一、ランプやレンズなどのガラス部品が割れた際には、ガラス破片で けがなどをしないように取扱いに注意し、お買い上げの販売店に修理を 依頼してください。 ● 万一、ランプが破裂した際には、本機の電源コードを抜き、退室して室 内を十分に換気してください。その後、本機の周囲を念入りに清掃して、 その場に置かれていた食品は捨ててください。 ● ランプが破裂した際に、ガラスの粉塵や水銀ガスが目にはいったり、吸 い込んだりしたと思われるときは、すみやかに医師に相談してください。 10 指 示 使用上のお願い ◆取り扱いに関すること ■振動や衝撃が加わるような輸送の際は、お買い上げの際に本機がはいっていた梱包箱と キャリングバッグをご使用ください。付属のキャリングバッグなどのままの状態でト ラックなどで輸送すると、振動や衝撃によって本機が故障することがあります。また、 傷んだ梱包箱で輸送すると同様に故障の原因となります。新しい梱包箱の入手について お買い上げの販売店にご相談ください。 ■殺虫剤や揮発性のものをかけたりしないでください。また、ゴムやビニール製品などを 長時間接触させないでください。変色したり、塗装がはげるなどの原因となります。 ■本機は、24 時間動作などの長期連続運転で使用されることは意図していません。この ような条件や、箱などに入れた状態で使用して故障した場合は、保証期間であっても有 料修理とさせていただきます。 ■電源オフ直後の本体は高温(特に排気孔、ランプカバー、底面など)になっていますの で取り扱いにご注意ください。 ◆置き場所や置きかたに関すること ■暖房機具の近くなど、温度の高い場所に置いて使用しないでください。故障や寿命を縮 める原因となります。 ■油煙やたばこの煙にさらされる場所は避けてください。光学部品に汚れが付着して、寿 命を縮めたり、画面が暗くなったりする原因となります。 ■本機をテレビやラジオの近くで使用すると、画像や音声に悪い影響を与えることがあり ます。このような場合にはテレビやラジオから離してください。 ■低温の場所から高温の場所に移動したときなどには、結露によって本機のレンズや内部 の部品などに水滴が付くことがあります。そのまま使用すると、故障の原因となること がありますので、結露(水滴)が自然に消えるまでお待ちください。 ■高地では空気が希薄なため、本機の冷却効率が低下しますので「ファンモード」の設定 を「高」にしてご使用ください。 p.42 ■本機を立てたり、極端に傾けた状態 ( ± 20 度以上 ) で使用しないでください。故障や 寿命を縮める原因となります。 ■延長コードやテーブルタップを使う場合は、つなぐ機器の消費電力の合計が延長コード やテーブルタップの定格電力を超えない範囲でお使いください。超えて使用すると発熱 し、火災の原因となります。 ■電源ケーブルや接続ケーブルは足を引っ掛けて転倒したりしないように配線してください。 セットが落下してけがの原因となることがあります。 11 ご 使 用 の 前 に 使用上のお願い(つづき) ◆お手入れに関すること ■ベンジン、シンナーは絶対使用しないでください。変形、変色、塗装がはげるなどの原 因となります。 ■化学ぞうきんは使用しないでください。 ■エアフィルターはこまめに清掃してください。目詰まりすると、本機内部の温度が上が り、液晶パネルなどの光学部品の寿命を縮める原因となります。 ◆著作権について 本機を用いて、市販映像ソフトや放送・有線放送番組を、個人の視聴以外の目的で上映・ 伝達する行為、フリーズ、リサイズ機能等によって改変する行為、画面サイズ切り換え機 能によって、映像の縦横比を変えて表示するなどの行為は、いずれも権利者に無断で行う と当該映像ソフトや放送番組等の著作権や著作隣接権を侵害するおそれがあるため、事前 に権利者から使用許諾を受ける等適正な権利処理をしてください。 その他のご注意とお知らせ ◆電波障害について 本機は、情報技術装置からの妨害波の許容値を定めた規格 J55022(H14)のクラス B 情報技術装置です。本機がラジオやテレビジョン受信機に近接して使用されると、受信障 害を引き起こすことがあります。取扱説明書にしたがって正しい取り扱いをしてください。 ◆廃棄について 本機には、人体や環境に有害とされる以下の物質が含まれています。 ・無機水銀 ( ランプ) 本機または使用済みランプ、使用済み乾電池を廃棄するときは、地方自治体の条例または 規則にしたがって処理してください。詳しくは地方自治体にお問い合わせください。 ◆免責事項について ■地震や雷などの自然災害、火災、第三者の行為、その他の事故、お客様の故意または過 失、誤用、その他異常な条件下での使用によって生じた損害に関して、当社は一切の責 任を負いません。 ■本機の使用または使用不能から生ずる付随的な損害(事業利益の損失、事業の中断など) に関して、当社は一切の責任を負いません。 ■取扱説明書の記載内容を守らないことによって生じた損害に関して、当社は一切の責任 を負いません。 ■当社が関与しない接続機器、ソフトウェアとの組み合わせによる誤動作などから生じた 損害に関して、当社は一切の責任を負いません。 12 その他のご注意とお知らせ(つづき) ◆商標について • • • • • VGA、SVGA、XGA、SXGA、UXGA 、WXGA は、International Business Machines Corporation の商標または登録商標です。 Microsoft、Windows、Windows 2000、Windows XP、Windows Vista、Windows 7、PowerPoint は、米国 Microsoft Corporation の米国およびその他の国に おける登録商標または商標です。 Mac は、Apple Computer Inc. の登録商標です。 Adobe, Acrobat Reader は、Adobe Systems Incorporated(アドビシステムズ社) の商標または登録商標です。 説明書に記載のメーカー名および商品名は、各社の登録商標です。 ◆日本国内用です 本機を使用できるのは日本国内のみです。外国では電源電圧が異なりますので使えません。 This Projector is designed for use in Japan only and cannot be used in any other country. ◆この取扱説明書の表記について ■関連する説明の参照先ページ番号を以下のように表記します。 26 ページを参照していただく場合の例: p.26 ■本書中のイラストはイメージイラストです。実際の製品とは形状などが異なる場合があ ります。 ■本書中のイラストは PJ X3131/WX3131 のイラストです。PJ X3241 とは形状の 異なる部分があります。 安全に関する本機の表示について ◆警告、注意のラベル位置 本機には、下記に示す位置に安全にお使いいただくための、 警告、 注意のラベルま たは刻印があります。表示にしたがって安全にお使いください。 1 吸気孔、排気孔をふさがないこと。内部の発 1 2 熱によって火災などの原因となります。 排気孔、ランプカバーの近くに手や顔を近づけ たり、ものや他の機器を置かないこと。やけ どや変形、変色、機器の故障の原因となります。 2 動作中はレンズをのぞかないこと。視力障害 などの原因となります。 3 3 動作時にレンズの前に物を置かないこと。物 が高温になり、やけどや火災の原因になる場 合があります。映像を一時的に消す場合には リモコンのミュートをお使いください。 13 ご 使 用 の 前 に もくじ ご使用の前に 安全上のご注意.................................................................................................... 2 使用上のお願い................................................................................................. 11 その他のご注意とお知らせ.............................................................................. 12 安全に関する本機の表示について.................................................................. 13 もくじ................................................................................................................ 14 準備 同梱品の確認..................................................................................................... 16 本体各部のなまえ............................................................................................. 17 本体操作部、リモコン各部のなまえ.............................................................. 18 背面端子のなまえ............................................................................................. 20 リモコンの準備と使いかた.............................................................................. 21 設置する............................................................................................................. 22 接続する............................................................................................................. 25 使いかた 電源の入れかたと切りかた.............................................................................. 26 基本操作............................................................................................................. 28 便利な機能を使う............................................................................................. 31 自動設定をする ( オートセット ) コンピューターの信号のみ................. 31 台形歪みを補正する ( キーストン )............................................................ 31 映像を拡大する(リサイズ)........................................................................ 32 映像と音声を一時的に消す(ミュート).................................................... 33 画質を変える................................................................................................. 33 画面サイズを変える...................................................................................... 33 映像を静止させる(フリーズ).................................................................... 34 パスワード設定をする.................................................................................. 34 メニューを使う................................................................................................. 36 設定表示の設定............................................................................................. 36 映像調整メニュー.......................................................................................... 37 表示設定メニュー.......................................................................................... 38 初期設定メニュー.......................................................................................... 41 状態表示......................................................................................................... 43 メンテナンス エアフィルターの清掃..................................................................................... 44 レンズ、本体の清掃......................................................................................... 45 ランプの交換..................................................................................................... 45 14 その他 インジケーターによる異常表示...................................................................... 48 故障かな・・・と思ったときは...................................................................... 49 仕 様................................................................................................................ 51 お問い合わせ先のご案内.................................................................................. 55 FAQ................................................................................................................... 56 消耗品について................................................................................................. 56 関連商品について............................................................................................. 56 お客様登録の方法............................................................................................. 57 はがきで登録する.......................................................................................... 57 インターネットで登録する.......................................................................... 57 15 ご 使 用 の 前 に 準備 同梱品の確認 本体以外に箱の中に以下のものがはいっているか、ご確認ください。万一不足しているも のがあるときには、すぐにお買い上げの販売店にご連絡ください。 (1) (5) (2) (6) (3) (7) (8) (4) □ (1) リモコン □ (5) RGB ケーブル (3m) ※ □ (2) リモコン用単四形乾電池 R03(2 個 ) □ (6) 電源コードセット ( 日本国内専用 ) ※ □ (3) CD-ROM □ (7) 保証書 □ (8) キャリングバッグ □ (4) 取扱説明書 ( 簡易版 ) ※ 本来の性能を維持するため、付属のケーブルをお使いください。 ◆付属の CD-ROM について 付属の CD-ROM には、簡易版取扱説明書で省略された内容を含む取扱説明書が PDF 形 式で収録されています。 (PDF: Portable Document Format) この取扱説明書をご覧になるためには Acrobat Reader 5 以上を使ってご覧ください。 ■ Adobe® Acrobat® Reader®、または Adobe® Reader® について 本 CD-ROM には Acrobat® Reader® は収録していません。 ご使用のパソコンで PDF が開けられない場合は、アドビシステムズ社のホームページ から Acrobat Reader をダウンロードしてパソコンにインストールしてください。 ■取扱説明書をご覧になるとき CD-ROM を CD-ROM ドライブにセットします。インストール画面でご覧になる説明 書をクリックします。 インストール画面が表示されないときは、CD-ROM の中の PDF をダブルクリックし ます。 Acrobat® Reader® が起動し、取扱説明書の表紙の画面と「しおり」が表示されます。 「し おり」のタイトルをクリックすると、その説明のページにジャンプすることができます。 また、本文中の p. をクリックすると、参照先のページにジャンプすることができま す。Acrobat® Reader® の詳細は [ ヘルプ ] メニューをご覧ください。 16 本体各部のなまえ (1) (2) (3) (4) (5) (6) (7) (8) (9) なまえ (14) (15) (16)(15) (14) : おもな機能 (1) 本体操作部 : 本機を操作します。 p.18 (2) ズームレバー : 画面のサイズを調整します。 p.29 (3) フォーカスレバー : 画面のピントを調整します。 p.29 (4) ランプカバー : ランプを交換するときに取りはずします。 p.46 (5) 排気孔 (6) 吸気孔 (7) レンズキャップ (8) レンズ (9) リモコン受光部 : 内部で高温になった空気を排出します。 : 外部から冷却用に空気を取り入れます。 : 本機を使用しないときは、レンズ保護のためキャップを 取り付けた状態にします。 : 映像(光)を拡大投写します。 : リモコン操作を受け付けます。 p.21 (10) AC IN ソケット (11) 背面端子部 : 付属の電源コードセットを接続します。 : 外部機器を接続します。 p.20 (12) スピーカー : 音声を鳴らします。 (13) 盗難防止ロック穴 : 盗難防止用のチェーンなどを取り付けます。 (14) フットアジャスター解除ボタン : フットアジャスターを出すときや収納するとき押します。 p.29 (15) フットアジャスター : 上向きの投写角度を調整します。 p.29 (16) エアフィルター : 内部へのほこりやごみの侵入を防ぎます。 p.44 17 準 備 (10)(11) (12) (13) 本体操作部、リモコン各部のなまえ 本体操作部 (7) (6) リモコン (7) (5) (8) (1) (9) (2) (10) (3) (11) 電池カバー (8) (4) (5) (12) (6) (1) (13) (4) (3) (2) なまえ : おもな機能 本体操作部 (1) 決定ボタン (2) 入力ボタン : 選択したモードを決定します。 : 入力切換をします。 p.28 (3) メニューボタン : メニューの表示をします。 p.36 (4) 戻る /AV ミュートボタン : 一つ前の表示に戻します。また、映像と音声を一時的に 消します。 p.32 (5) 電源ボタン / 電源インジケーター : 電源を入り / 切り ( スタンバイ ) します。 p.26 : 電源の入り / 切り ( スタンバイ ) の状態を表示します。 p.26 (6) 温度インジケーター : 内部温度の異常を知らせます。 p.48 (7) ランプインジケーター : ランプのモードを表示します。 p.48 (8) 選択ボタン : メニューでの選択・調整や音量、台形歪みを調整します。 18 なまえ : おもな機能 リモコン : 電源の入り/切り(スタンバイ)をします。 p.26 (2) フリーズボタン (3) メニューボタン : 映像を静止します。 p.34 : メニューの表示をします。 p.36 (4) (5) (6) (7) (8) (9) 決定ボタン 拡大ボタン、縮小ボタン 画面サイズボタン AVミュートボタン 自動設定ボタン 入力ボタン : : : : : : 選択したモードを決定します。 (10) (11) (12) (13) 戻るボタン 選択ボタン 映像モードボタン テンキーボタン : : : : 一つ前の表示に戻します。 メニューでの選択・調整や音量、台形歪みを調整します。 映像モードを切り換えます。 p.33 パスワードの設定時に使用します。 映像の拡大表示の倍率を変更します。 p.32 画面サイズを切り換えます。 p.33 映像と音声を一時的に消します。 p.33 コンピューター入力時の設定をします。 p.31 入力切換をします。 p.28 リモコン リモコン 入力項目 入力項目 ボタン ボタン 1 「1」 7 「7」 2 「2」 8 「8」 3 「3」 9 「9」 4 「4」 0 「0」 5 「5」 6 「6」 1文字消去します。 お知らせ ● 本書の以降の説明では、ボタンを以下のように表記します。 選択ボタン⇒ 、決定ボタン⇒ 19 準 備 (1) 電源ボタン 背面端子のなまえ (1) (2) (3) (6)(7) (8) (9) なまえ (4) (5) : おもな機能 (1) AUDIO IN 端子 (2) (3) (4) (5) (6) (7) (8) (9) : コンピューターやビデオ機器などからの音声信号を入力 します。(COMPUTER 1 IN/2 IN、VIDEO、S-VIDEO 兼用)。 S-VIDEO 端子 : ビデオ機器などからの S 映像信号を入力します。 COMPUTER1 IN : コンピューターなどからの RGB 信号か、ビデオ機器な どからのコンポーネント映像信号 (Y/P B /P R ) を入力し (Y/PB/PR1) 端子 ます。 COMPUTER 2 IN : コンピューターなどからの RGB 信号やビデオ機器などか (Y/PB/PR2)/MONITOR らのコンポーネント映像信号 (Y/P B /P R ) を入力します。 また (5) の切換スイッチにより MONITOR OUT 端子と OUT 端子 してご利用いただけます。 切換スイッチ : COMPUTER 2 IN と MONITOR OUT を切り換えます。 AC IN ソケット : 付属の電源コードセットを接続します。 AUDIO OUT 端子 : 音声信号を出力します。 VIDEO 端子 : ビデオ機器などからの映像信号を入力します。 CONTROL 端子 : コンピューターを使って本機を操作するときに、制御用コ ンピューターの RS-232C ポートと接続します。 p.54 20 リモコンの準備と使いかた ■リモコンに乾電池を入れる ■リモコン操作のしかた ① 電池カバーをはずす 本機のリモコン受光部に向けてリモコ ンのボタンを押す • 本機の前方から操作する ② 乾電池を入れる 単四形乾電池 R03 を 2 個使用。 ③ 電池カバーを閉める • • • • • • • • • • 準 備 乾電池の+、−を確かめて入れてください。 本機の後方からリモコン操作する場合、投 写面の反射を利用しての操作になりますの で、投写面の形状や材質によって到達距離 が短くなります。 乾電池について 取扱いの際は「安全上のご注意」に記載された事項をお守りください。 長時間使用しないときは、乾電池を取り出してください。 リモコンが動作しなかったり、到達距離が短くなったときは、すべて新しい電池と交 換してください。( 単四型乾電池 R03 を 2 個ご使用ください ) 乾電池は乳幼児や幼児の手の届くところに置かないでください。 飲み込んだりノドに詰まらせることがあります。万一飲み込んだ場合は、ただちに医 師にご相談ください。 リモコンについて リモコン受光部に太陽光や蛍光灯などの強い光があたると、リモコンが動作しないこ とがあります。 落としたり、衝撃をあたえないでください。 高温になる場所や湿度の高い場所に置かないでください。 水をかけたり、ぬれたものの上に置かないでください。 分解しないでください。 使用場所や周囲の状況によっては、まれにリモコン操作を受け付けにくいことがあり ます。このようなときは、リモコンを本機に向け直し、再度操作をしてください。 21 設置する 設置状態 本機は下図の 4 とおりの設置状態に対応しています。 工場出荷時は「床置き正面投写」に設定されています。設置方法に合わせて「初期設定 2 メニュー」p.42 で [ 設置状態 ] の設定をしてください。 床置き正面投写 床置き背面投写 天吊り正面投写 天吊り背面投写 • • • 設置の際には「安全上のご注意」に記載された事項を守ること。 天吊り設置には専用の天井取付金具(別売り)と専門知識が必要です。設置工事に 不備があると、落下などによる事故の原因になりますので、必ず販売担当者に依頼 すること。 天吊り設置する場合は、異常時に電源を切るためのブレーカを設置すること。また、 そのことは本機を使用するすべての人が知っているようにすること。 22 投写距離と画面サイズについて 下図と下表や計算式を参考にして画面サイズと投写距離を決めてください。(画面サイズ は、フルサイズの映像を台形補正なしで投写したときのおよその値です) PJ X3131 スクリーン 上から見た図 a ( 最短 )= 投写画面サイズ ( 型 ) - 0.795 32.885 a ( 最長 )= 投写画面サイズ ( 型 )- 0.673 27.397 90° 30 (76) 40 (102) 横から見た図 50 (127) 60 (152) レンズの中心 70 (178) 80 (203) 90° 90 (229) 100 (254) a 120 (305) aはレンズからスクリーンまでの距離(m) 150 (381) で、O.89 m~10.93 m の範囲に対応し 200 (508) 250 (635) ます。 Hは、画面下端からレンズ中心までの高さ 300 (762) です。 PJ WX3131 スクリーン 上から見た図 a ( 最短 )= 投写画面サイズ ( 型 ) - 0.758 31.022 a ( 最長 )= 投写画面サイズ ( 型 )- 0.643 25.845 画面サイズ 型 (cm) 90° 横から見た図 レンズの中心 90° a a はレンズからスクリーンまでの距離(m) で、0.94 m~11.58 m の範囲に対応し ます。 レンズの中心が、画面の下端になります。 投写距離 a (m) 高さ (H) 最短 最長 (cm) ( ズーム最大) ( ズーム最小) 0.89 1.07 6.50 1.19 1.44 8.70 1.50 1.80 10.90 1.80 2.17 13.10 2.10 2.53 15.20 2.41 2.90 17.40 2.71 3.26 19.60 3.02 3.63 21.80 3.63 4.36 26.10 4.54 5.45 32.70 6.06 7.28 43.50 7.58 9.10 54.40 9.10 10.93 65.30 30 (76) 40 (102) 50 (127) 60 (152) 70 (178) 80 (203) 90 (229) 100 (254) 120 (305) 150 (381) 200 (508) 250 (635) 300 (762) 23 投写距離 a (m) 最短 最長 ( ズーム最大) ( ズーム最小) 0.94 1.14 1.27 1.52 1.59 1.91 1.91 2.30 2.23 2.68 2.55 3.07 2.88 3.46 3.20 3.84 3.84 4.62 4.81 5.78 6.42 7.71 8.03 9.65 9.65 11.58 準 備 画面サイズ 型 (cm) 設置する(つづき) PJ X3241 スクリーン 上から見た図 a ( 最短 )= 投写画面サイズ ( 型 ) - 0.890 32.863 a ( 最長 )= 投写画面サイズ ( 型 )- 0.748 27.363 画面サイズ 型 (cm) 90° 横から見た図 レンズの中心 90° a 30 (76) 40 (102) 50 (127) 60 (152) 70 (178) 80 (203) 90 (229) 100 (254) 120 (305) 150 (381) 200 (508) 250 (635) 300 (762) 投写距離 a (m) 高さ (H) 最短 最長 (cm) ( ズーム最大) ( ズーム最小) 0.89 1.07 6.50 1.19 1.44 8.70 1.49 1.80 10.90 1.80 2.17 13.10 2.10 2.53 15.20 2.41 2.90 17.40 2.71 3.26 19.60 3.02 3.63 21.80 3.62 4.36 26.10 4.54 5.46 32.70 6.06 7.28 43.50 7.58 9.11 54.40 9.10 10.94 65.30 aはレンズからスクリーンまでの距離(m)で、O.89 m~10.94 m の範囲に対応します。 Hは、画面下端からレンズ中心までの高さです。 24 接続する 接続の前に • 本機に接続する機器の取扱説明書もお読みください。 • コンピューターの機種によっては、本機に接続してご使用になれないものもあります。 • • RGB 出力端子の有無、対応信号 p.52 などを確認してください。 接続の際には、各機器の電源を「切り」にしてください。 図は接続例です。すべての機器を同時に接続できること、あるいは接続しなければな らないことを意味するものではありません。(点線は差し換えることを意味します) ビデオ デッキや DVD プレーヤーなど 映像 出力 へ S 映像出力へ S 映像ケーブル (市販品) RGB ケーブル ( 付属品 ) ビデオケーブル (市販品) RGB 出力へ 音声 出力へ 音声出力へ 白 (L) / 赤 (R) モニターケーブル ミニ D-sub15P-BNC (市販品) 音声ケーブル (市販品) 音声ケーブル (市販品) 変換アダプター BNC- ピン ( 市販品 ) Y,CB,CR 出力へ 緑 (Y), 青 (CB), 赤 (CR) 音声ケーブル (市販品) ※ COMPUTER 2の入力は、COMPUTER1と同様に接続できます。 音声ケーブル (市販品) コントロー ルケーブル(市販品) RS-232C 端子へ 音声入力へ 白 (L) /赤 (R) オーディオアンプなど • • • • • • モニター p.54 コンピューター ( 制御用 ) お知らせ 切換スイッチで、MONITOR OUT に切り換える必要があります。p.20 COMPUTER 2 IN 端子を MONITOR OUT 端子として使用する場合には、COMPUTER 1 IN 端子に入力されている信号が出力されます。 スタンバイ状態でも MONITOR OUT 端子から信号が出力されています。 ただし、AUDIO OUT 端子からは音声信号は出力されません。 パソコンモニターで Y/PB/PR 信号は正常に受像できません。 AUDIO IN 端子は COMPUTER 1 IN 端子と COMPUTER 2 IN 端子および VIDEO、 S-VIDEO に接続される機器で兼用です。 AUDIO OUT 端子を接続すると本体のスピーカーから音声は出ません。 AUDIO OUT 端子の出力は VOL ボタンで音量調整できます。 25 準 備 音声出力へ 白 (L) / 赤 (R) DVDビデオレコーダなど コンピューター 使いかた 電源の入れかたと切りかた ■ 電源コードセットを接続する 1 本機の AC IN ソケットに電源コードセットのコ ネクターを差し込む 2 壁などのコンセントに電源プラグを差し込む 電源コードセット ( 付属品 ) のコネクター 電源インジケーターが緑色に点滅し、スタンバイモー ドになります。 • • • • • 電源プラグは交流 100V のコンセントに接続すること。 緊急な場合にコンセントをすぐに抜けるよう、障害物などを置かない こと。 電源プラグのアース線は必ずアースに接続すること。 アース線は必ず、電源プラグをコンセントに差し込む前に接続 すること。また、アース線をはずす場合は、その前に必ず電源 プラグをコンセントから抜くこと。 ぬれた手で電源プラグを抜き差ししないこと。 ■ 電源の入れかた 1 レンズキャップをはずす 電源を入れるときは、必ずレンズキャップをはずしてくだ さい。付けたままにしておくと、熱で変形することがあり ます。 2 電源ボタンを押す 本体操作部 リモコン ビープ音の設定が [ 入り ] のときビープ音がなって電 源がはいり、電源のインジケーターが橙色に点滅した あと、緑色に点滅します。しばらくするとスタート画 面が映し出されます。 • • • 動作中はレンズをのぞかないこと。視力障害などの原因となります。 吸気孔、排気孔をふさがないこと。内部の発熱によって火災などの原因となります。 排気孔、ランプカバーの近くに手や顔を近づけたり、ものや他の機器を置かないこと。 やけどや変形、変色、機器の故障の原因となります。 26 • • • • • • お知らせ スタート画面は、しばらくすると消えます。また、表示されないように [ 表示設定メ ニュー ] p.38 で設定することもできます。 ご購入後はじめてご使用になるときは、スタート画面が消えるとスタートメニューが 表示されます。 p.28 ビープ音は [ 初期設定 1 メニュー ] p.41 で鳴らないように設定することもできます。 キーロックが [ 入り ] に設定されていると本体の操作ボタンは働きません。 p.42 パスワードが [ 入り ] に設定されていると、パスワードを入力し、パスワード入力画面 が消えるとスタート画面が表示されます。 p.35 レンズに直接手を触れないこと。 投写レンズ面に指紋や汚れがつくと、映像不良の原因となることがあります。 ■ 電源の切りかた 1 電源ボタンを押す 本体操作部 2 もう一度電源ボタンを押す リモコン ビープ音の設定が [ 入り ] のとき音がなり、画面は消えま すが内部の冷却が続き、その後スタンバイ状態に戻ります。 冷却中は電源のインジケーターが点滅します。インジケーター が点滅中は再び電源を入れることができません。 この途中で電源プラグをコンセントから抜いても差し支え ありません。 3 レンズキャップを取り付ける ご使用後はレンズキャップを取り付けてください。 • • お知らせ 本機はスタンバイ状態で 4.5W 程度の電力を消費します。長時間ご使用にならないときは、 電源プラグを抜くことをおすすめします。 お願い 電源を切って、すぐにまた電源を入れるときは、ランプが冷えるまで 5 分程度待って ください。ランプが高温になっていると、点灯しないことがあります。 27 使 い か た ビープ音の設定が [ 入り ] のとき音がなり、電源オフの確認メッセージが画面に表示 されます。このメッセージは、しばらくすると消えます。(メッセージが消えた場合、 この操作は無効になります。) 基本操作 1 電源を入れる 「電源の入れかた」 p.26 にしたがって電源を入れます。 2 言語、ランプパワーを選択する ( はじめてお使いになるとき ) ご購入後はじめてお使いになるときは、言語選択 ( 画面に表示されるメニューの言語 やメッセージ )、およびランプパワーを設定するスタートメニューが表示されます。 (画 面のフォーカスが合っていないときは、手順 6 によって調整してください) ① ボタンで希望の言語を選び、 ........... 英語 ......... フランス語 .........ドイツ語 ........... イタリア語 ......... スペイン語 ...... ポルトガル語 ....... ロシア語 ......... スウェーデン語 ............トルコ語 ボタンを押す ............ ポーランド語 ............ ノルウェー語 ............ フィンランド語 .......... チェコ語 .......... ハンガリー語 ....... ギリシャ語 ............ デンマーク語 .... オランダ語 ........ ルーマニア語 ............... 日本語 ..... 中国語(簡体字) ..... 中国語(繁体字) ................ 韓国語 .......... インドネシア語 .......... タイ語 .......... アラビア語 設定の結果を確認するメッセージが選択した言語で表示されます。 次に、ランプパワーの設定メニューが表示されます。 そのまま、何もしなければ「標準」に設定されます。変更したいときは、②の操 作をしてください。 ② ボタンでランプパワーを選び、 ボタンを押す ボタンを押さなくても、設定を変えるとランプパワーは切り換わり、表示は数秒 後自動的に消えます。 • • • お知らせ 次回以降は電源を入れたときにスタートメニューは表示されません。ただし、「初 期設定 2 メニュー」 p.42 で [ すべてを初期化 ] を実行した場合には、その次に電 源を入れたときにスタートメニューが表示されます。 言語は「表示設定メニュー」 p.38 、ランプパワーは「初期設定 1 メニュー」 p.41 でも設定することができます。 この取扱説明書は、日本語が選択された状態を想定して記載しています。 3 接続した機器を動作状態にする 接続したコンピューターなどの電源を入れ、起動します。 4 入力ボタンを押す 接続した機器の映像が映し出されます。 入力ボタンを押すたびに、映像信号が出力されている接続機器の入力に切り換わりま す。 28 お知らせ 1 メニュー」 p.41 で [ 自動入力検索 ] を [ 切り ] に設定 • 「初期設定 • ( 購入時は [ 入り ]) しておくと、入力ボタンを押すと、[ 入力切換 ] メニューが表示されます。 他の接続機器から映像信号が出力されていないときは、入力ボタンを押しても入 力は切り換わらず、「他に入力信号がありません」とメッセージが表示されます。 5 設置角度を調整する フットアジャスターで設置角度を変えて、投写画面の高さを調整することができます。 ①お好みの角度になるように本機の前部を持ち上げ、フットアジャスター解 除ボタンを上向きに押す フットアジャスターが伸び、ボタンを離す とその位置に固定されます。 • フットアジャスターを収納するときは、本 機を支えながらフットアジャスター解除ボ タンを押し、そのままゆっくりと本機を降 ろしてください。 お知らせ • 「初期設定1メニュー」の「自動台形補正」が「入り」に設定されていると、本機 の設置角度に合わせて、画面の台形歪みが自動的に補正されます。自動台形補正 を実行しない場合は、「自動台形補正」を「切り」に設定してください。 6 画面の大きさを調整し、ピントを合わせる ①ズームレバーで投写画面の大きさを調整する ②フォーカスレバーでピントを合わせる 7 ボタンで音量を調整する 音声信号が入力されているときにスピーカの音量を調整できます。 29 使 い か た ②角度を微調整するときは、フットアジャ スターを回す 基本操作(つづき) • • • お願い ランプの特性によって、まれに明るさがわずかに変動することがあります。ご了承くださ い。 本機に使用している液晶パネルは高精度な技術で作られておりますが、一部に非点灯、 常時点灯部分が存在することがあります。これは故障ではありませんので、ご了承くだ さい。 お知らせ ランプは消耗品です。長時間使用しますと映像が暗くなったり、切れて点灯しなくなっ たりすることがあります。これはランプの特性であり、故障ではありません。 • 本機はさまざまな種類の RGB 信号 p.52 に対応しますが、XGA(X3131/X3241)、 WXGA(WX3131)以外の信号では拡大・圧縮表示されるため画質が多少劣化します。 良好な画質でご覧いただくために、接続するコンピューターの外部出力の設定を XGA (X3131/X3241)、WXGA(WX3131)に合わせることをおすすめします。 • 液晶ディスプレイなどを用いたコンピューターの機種によっては、コンピューター側 のモニター表示とプロジェクターへの出力とを同時に行なうと、画面が正しく映らな い場合があります。このような場合には、コンピューターの液晶ディスプレイの表示 を切ってください。液晶ディスプレイ表示の切換方法などは、コンピューターの取扱 説明書を参照してください。 • 接続機器から信号が入力されていないときや、表示中に信号がなくなったときは「無 信号」が表示されます。 • 本機が対応していない信号が入力されると、「非対応信号」が表示されます。 • 実行できない操作ボタンを押すと 、ビープ音の設定が [ 入り ] のとき「ピー」というビー プ音がなり、アイコン が表示されます。 コンピューターの DVD 再生ソフトで再生した動画映像を本機で映すと、映像の動きが • 不自然になることがありますが、故障ではありません。 液晶パネルについて 液晶パネルには寿命があります。長くご使用いただくために以下の点にご注意ください。 ● 液晶パネルの寿命をのばすために、使用していないときは必ず電源を切り、ランプが消え ていることを確認してください。ランプが消えていると省エネ効果も大きくなります。 ● エアフィルターがよごれて目詰まりすると、本機内部の温度が高くなり液晶パネルの 寿命を短くするとともに、故障の原因になります。こまめに清掃することをおすすめ します p.44 。 ● エアフィルターが傷んだときは、販売担当者にご相談のうえ、新しいものと交換して ください。傷んだまま使用すると、ほこりやごみが本機の内部に入り、動作停止や故 障の原因となります。 30 便利な機能を使う ■ 自動設定をする ( オートセット ) コンピューターの信号のみ 入力信号の種類に応じてサンプリング位相・周波数、画面位置、クランプなどを自動 的に調整することができます。 リモコンの自動設定ボタンを押す 処理中はアイコン リモコン が表示されます。 [ 映像調整メニュー ] の [ オートセット ] p.37 でも自動設定できます。 • • お知らせ 本機が対応している入力信号 p.52 、 p.53 以外では、映像が出な かったり、正しい自動調整ができないことがあります。 正しく調整ができなかった場合は、[ 映像調整メニュー ] p.37 の [ 位置 ] で手動調整してください。 使 い か た ■ 台形歪みを補正する ( キーストン ) スクリーンに対し設置角度を変えて投写すると、投写画面が歪みます。 本機では、この台形歪みを補正することができます。 補正前 補正後 プロジェクターの設置角度にあわせて自動的に台形補正が行われます。 台形歪みを手動で補正する場合 本体操作部 リモコン ボタンで歪みを調整する • • • • お知らせ 台形補正のどあいや映像の内容によっては、 一部情報が欠けたり、画質が劣化する場合が あります。 自動台形補正が「入り」のときでも、台形補 正を手動で調整できますが、設置角度に変化 があると、再び自動調整されますのでご注意 ください。 自動台形補正が「入り」のときは、電源が入るたびに自動台形補正が実行されます。 台形補正の状態は本機の電源を切っても記憶されますので、本機とスクリーンと の設置状態が固定されている場合は、自動台形補正を「切り」にしておくことを おすすめします。 31 便利な機能を使う(つづき) ■ 映像を拡大する(リサイズ) 投写している映像を拡大(リサイズ)表示させることができます。 1 リモコンの拡大ボタンを押す 拡大ボタンを押すたびに拡大倍率が上がります。ボタンを押し続けることもできま す。 2 拡大倍率を下げるときは、リモコンの縮小ボタンを押す 縮小ボタンを押すたびに拡大倍率が下がります。ボタンを押し続けることもできま す。(もとの大きさよりも小さくすることはできません) リモコン 3 拡大部分を移動するときは、 ボタンを押し続けることもできます。 ボタンを押す 4 3 1 2 4 縮小ボタンでもとの大きさまで戻ると、リサイズが解除されます。 リサイズ中に戻るボタンを押しても、リサイズは解除されます。 • • • • お知らせ リサイズ中はアイコン が表示されます。 ミュート以外の操作をしたときは、リサイズは解除されます。 デジタル処理で拡大するため、拡大するにつれて映像があらくなります。 拡大中や拡大部分を移動中、まれに画像が乱れることがあります。 32 ■ 映像と音声を一時的に消す(ミュート) スクリーンに他のプロジェクターや OHP などの映像を一時的に投写 したいようなとき、本機の映像と音声を消すことができます。 リモコン リモコンの AV ミュートボタンあるいは本体操作部の戻る /AV ミュートボタンを押す 映像と音声が消えます。(もう一度 AV ミュートボタンあるいは戻 る /AV ミュートボタンを押すと、ミュートが解除されて映像と音 声が出ます) 本体操作部の戻る /AV ミュートボタンは、リサイズ中、設定メ ニュー表示中はミュートされません。 お知らせ ミュート中は、アイコン が表示されます。 他の操作をすると、ミュートが解除されます。 ■ 画質を変える リモコン 投写中の映像モードを選択します。 リモコンの映像モードボタンを押す ボタンを押すごとに、1/2/3 の順に換わります。 1: 明るさ優先 2: 標準 3: 色優先 • お知らせ [ 映像調整メニュー ] の [ 映像モード ] でも切り換えることができ ます。 p.37 ■ 画面サイズを変える リモコン 投写中の画面サイズを変えます。 リモコンの画面サイズボタンを押す ボタンを押すごとに、以下の順で切り換わります。 X3131/X3241 : ノーマル / フル / スルー / ワイド WX3131 : ノーマル / フル / スルー /4:3 ズーム • • • • お知らせ スルー表示はコンピューター映像のときだけ可能です。 ワイド、4:3 ズーム表示は、Y/PB/PR、ビデオ /S- ビデオ映像のときだけ可能です。 [ 表示設定メニュー ] の [ 画面サイズ ] でも切り換えることができます。 p.38 p.39 市販映像ソフトや放送・有線放送番組に対して、この機能を個人の視聴以外の目 的で使用すると、著作権法で保護されている著作権を侵害するおそれがあります。 33 使 い か た • • 便利な機能を使う(つづき) ■ 映像を静止させる(フリーズ) 投写中の映像を静止させることができます。ビデオの映像を止めてプ レゼンテーションしたいときなどにお使いいただけます。 リモコン リモコンのフリーズボタンを押す 映像が静止します。(もう一度フリーズボタンを押すと、フリーズ が解除されます) お知らせ • • • • フリーズ中は、アイコン が表示されます。 その他の操作をすると、フリーズは解除されます。 本機で映像を静止させても、ビデオ機器などの映像は変化しています。 市販映像ソフトや放送・有線放送番組に対して、この機能を個人の視聴以外の目 的で使用すると、著作権法で保護されている著作権を侵害するおそれがあります。 ■ パスワード設定をする ●パスワードの変更のしかた お買い上げ時のパスワードは「000000」です。 2 メニュー」の [ パスワード ] を選択し、 1 「初期設定 を押す または 2 パスワード登録、設定メニューの [ パスワード登録 ] を選択し、 を押す ボタン ボタン パスワード入力画面が表示されます。 3 現在のパスワード(数字 6 桁)をリモコンのテンキーボタンで入力する • • はじめて変更するときは「000000(ゼロを 6 個)」を入力する。 パスワードは表示されません。画面には「*」が表示されます。 4 次に新しいパスワード(数字 6 桁)を入力する 5 もう一度、新しいパスワードを入力する • お知らせ パスワードは忘れないようにしてください。もしパスワードを忘れた場合、 お客様ご自身で解除することはできません。 このようなときは、お買い上げの販売担当者にお問い合わせください。 34 ●パスワードの設定のしかた (「切り」から「入り」にするとき ) 2 メニュー」の [ パスワード ] を選択し、 1 「初期設定 を押す または ボタン 2 [ パスワード登録 ] と [ パスワード設定 ] のうち、[ パスワード設定 ] を選 択し、 または ボタンを押す 3 [ 入り ] を選択する 4 [OK] を選択し、 ボタンを押す パスワード入力画面が表示されます。 5 リモコンのテンキーボタンで数字 6 桁のパスワードを入力する 6 パスワード設定が「入り」に設定されます。 1 電源を入れる 2 ランプが点灯し、パスワード入力画面が表示される 3 リモコンのテンキーボタンでパスワードを入力する パスワードが正しいときは、スタートアップ画面が表示され通常の状態になります。 パスワードを間違えて入力したときは、メッセージが表示され、再びパスワード入 力画面が表示されます。パスワードを 5 回間違えると自動的に電源が切れスタン バイ状態になります。 • お知らせ パスワード設定が「入り」に設定されている場合、パスワード機能が有効になるのは、 電源プラグををいったん抜き再度入れたあと、最初に電源を入れたときのみです。それ 以後、電源プラグを抜かずに、スタンバイ状態から電源を入れても、パスワード機能は 働きません。 ●パスワードの設定のしかた (「入り」から「切り」にするとき ) 2 メニュー」の [ パスワード ] を選択し、 1 「初期設定 パスワード入力画面が表示されます。 または ボタンを押す 2 リモコンのテンキーボタンでパスワードを入力する 3 [ パスワード登録 ] と [ パスワード設定 ] のうち、[ パスワード設定 ] を選 択し、 または ボタンを押す 4 [ 切り ] を選択する 5 [OK] を選択し、 ボタンを押す 35 使 い か た ●パスワードが [ 入り ] での操作のしかた メニューを使う 本機操作部やリモコンのメニューボタン 調整や設定をすることができます。 p.18 で画面にメニューを表示して、さまざまな ■ 設定表示の設定 メニューの図は操作説明用であり、実際の表示と異なる場合があります。 1.メニューボタンを押す [設定表示]メニューを表示させる 2.カテゴリーを選択する でカテゴリーを選択します。 以下の5種類のカテゴリー があります。 選択されたカテゴ リーの現在の調整 ·設定状態が表示 されます。 灰色で表示される 項 目は、現 在 選 択 されている入力で は 調 整 · 設 定 がで きません。 [映像調整] p.37 [表示設定] p.38 [初期設定1] p.41 [初期設定2] p.42 [状態表示] p.43 3.調整・設定をする または でメニューを開きます。 項目 調整値や設定値 で調整や 設定をすること を示します。 または で 選択肢のリスト を表示させるこ とを示します。 表示されたリストから で選びます。 選んだら、 で決定します。 で項目を選び で選択し を押す で決定します。 青 または で 設定画面を表示 させることを示 します。 ※変更がない場 合 を押しま す。 ● 図は説明用の表示です。項目によって異なることがありますので、 以降のページを参照してください。 ● ひとつ前の項目に戻すには、 戻るボタンを押します。 4.終了 もう一度、メニューボタンを押す (メニュー画面は、何も操作しないと30秒で自動的に消えます。) 36 ■ 映像調整メニュー このメニューでは、映像に関する項目について調整・設定をすることができます。 入力の種類によって調整・設定ができる項目 ( ○ ) とできない項目 ( − ) があります。 ( 灰色で表示される項目は、そのとき選択されている入力では調整・設定ができません ) 項 目 内 容 コントラスト 映像のコントラスト(濃淡)を調整する 弱く(淡く) 明るさ 映像の明るさを調整する 暗く 色の濃さ 強く(濃く) 明るく 映像の色の濃さを調整する 淡く 濃く シャープネス 映像の鮮鋭さを調整する ソフトに ノイズリダクション※1 画面上のノイズを減らす働きを設定する 入り 切り を押し、映像モードを / で切り換える 1/2/3 赤レベル 映像の赤色を調整する 赤を弱く 緑レベル 映像の緑色を調整する 緑を弱く 青レベル 緑を強く 映像の青色を調整する 青を弱く NTSCモード※2 赤を強く 青を強く Y/PB/PR ビデオ S-ビデオ ○ ○ ○ ○ ○ ○ ○ ○ ― ○ ○ ○ ○ ○ ○ ○ ― ○ ○ ○ ○ ○ ○ ○ ○ ○ ○ ○ ○ ○ ○ ○ ○ ○ ○ ○ ― ― ○ ○ ○ ― ― ― ○ ― ― ― ○ ― ― ― ○ ― ― ― ○ ― ― ― ○ ― ― ― ○ ― ― ― ○ ― ― ― 黒レベルを で設定する US : NTSC(US)モード JAPAN : NTSC(JAPAN)モード オートセット 入力信号の種類に応じて、 サンプリング 位相などを自動的に調整する 位置 を押し、 モードを / で切り換え で調整 サンプリング位相 画面のちらつきがなくなるように調整する サンプリング周波数 細かい縦縞を映したときの周期的な 模様やちらつきがなくなるように調整する 水平位置 映像の水平位置を調整する 垂直位置 映像の垂直位置を調整する クランプ 1 クランプパルスの位置を調整する クランプ 2 クランプパルスの幅を調整する ※ 1: [ ノイズリダクション ] は、信号の種類によって調整できないことがあります。 ※ 2: [NTSC モード ] は、ビデオ信号 が[NTSC]と[NTSC4.43]のときだけ表示され、 調整できます。また、言語が日本語に設定されたときは、JAPAN に設定されます。 他の言語のときは、US に設定されます。 37 使 い か た 映像モード シャープに コンピューター メニューを使う(つづき) ■ 表示設定メニュー このメニューでは、画面表示に関する項目について設定をすることができます。 ( 灰色で表示される項目は、そのとき選択されている入力では設定ができません ) 内 容 項 目 画面サイズ 画面サイズの設定 [ または :設定にはいる ] [ :選択 ] [ 決定: ] X3131/X3241 : ノーマル / フル / スルー / ワイド WX3131 : ノーマル / フル / スルー /4:3 ズーム 上下シフト 画面サイズ設定が以下の表示の際に上下に投写映像を移動させる X3131/X3241 : ワイド(1024 × 768 の範囲内) WX3131 : 4:3 ズーム(1280 × 800 の範囲内) 画面が下がる 画面が上がる 黒板モード スクリーン以外に投写するとき、投写面の色に合わせて設定 言語 メニューやメッセージの表示に使用する言語を以下から選択 を押し、 [ または で切り換える :設定にはいる ] / / / / / 切り / 緑 / 黒 / 茶 / 青 / ベージュ [ :選択 ] / / / / / / [ 決定: / / / ] / / / / / / / / Indonesia/ / 無信号背景 入力信号がないときの画面表示 [ または :設定にはいる ] [ :選択 ] [ 決定: ] ロゴ / 青 / なし アイコン表示 機能をガイドするアイコンの表示 入り 切り スタート画面 電源を入れたときの初期画面の表示 入り 切り ユーザーロゴ スタート画面および無信号ロゴをユーザーロゴにすることができる [ または : 設定にはいる ] ロゴ登録 [ :選択 ] を押すと登録メニューになる 表示方法 背景 ロゴ確認 ロゴ初期化 黒 青 白 を押す はい いいえ 38 ●各項目の詳しい説明 [画面サイズ] • ノーマル • フル • スルー • お知らせ 市販映像ソフトや放送・有線放送番組に対して画面サイズ設定機能を使って、個 人視聴以外の目的で元の映像と異なる縦横比で表示すると、著作権法で保護され ている著作権を侵害するおそれがあります。 [上下シフト] (X3131/X3241) • [画面サイズ]が[ワイド]のときに上下に映像を移動できます。 [画面サイズ]が[4:3 ズーム]のときに上下に映像を移動できます。(WX3131) [黒板モード] • 黒板モードを設定することによって、スクリーンに投写したときの色合いに近づ けて投写することができます • お願い 投写面と同じ色で設定しても黒板、壁などの種類、色調、材質によって効果が異 なりますのでご了承ください。 [無信号背景] • ご購入時の [ ロゴ ] は RICOH が登録されています。 • ユーザーロゴが登録されているとき、[ ロゴ ] に設定しておくと、登録した画面 が無信号のときに表示されます。 [スタート画面] ユーザーロゴが登録されているとき [ 入り ] に設定しておくと、登録した画面がスター トアップ画面として表示されます。 [ユーザーロゴ] コンピューターから入力されている映像の一部を静止画として取り込み、その画面 をスタートアップ画面や無信号ロゴとして表示させることができます。 39 使 い か た : 映像信号のアスペクト比を変えずに、画面いっぱいに表示します : 1024 × 768 ドットで、画面全体に表示します。(X3131/X3241) 1280 × 800 ドットで、画面全体に表示します。(WX3131) : 映像信号の解像度のまま表示します。Y/P B /P R、ビデオ、S- ビ デオの各入力時は選択できません。 画面よりも大きい映像は画面の外にはみ出ます。映像の周波数に よっては、映像が縦長になる場合があります。 : アスペクト比が 16:9 になるように、縦方向を縮めて画面中央 • ワイド (X3131/X3241) にワイド画面で表示します。コンピューター入力時は選択できま せん。 • 4:3 ズーム: アスペクト比が 4:3 になるように、縦方向を伸ばして、画面の (WX3131) 上下に映像をはみ出して表示します。コンピューターの入力時は 選択できません。 • Y/PB/PR 入力は、映像信号のアスペクト比が 16:9 のときは設定できません。 メニューを使う(つづき) 〈ロゴ登録〉 ユーザーロゴ登録のしかた 1 登録する映像を映す 2 [ 表示設定メニュー ] の [ ユーザーロゴ ] を選択し、 押す 3 表示された項目から〈ロゴ登録〉を選択し、 または ボタンを ボタンを押す 4 登録確認用に登録範囲が表示され、[OK] を選択し、 • ボタンを押す 登録した映像が表示範囲内にない場合は、コンピューター側を操作し、画面 を動かしてください。 5 登録するときは [ はい ] を選択し、 ボタンを押す 6 登録が開始される • • • • • • 登録中はメッセージが表示されます。 お知らせ <ロゴ登録>は、コンピューターの入力時に有効です。 登 録 で き る サ イ ズ は、 画 面 中 央 の 512 × 384 ド ッ ト (X3131/X3241)、 640 × 400 ドット (WX3131) です。会社のロゴなどを登録する場合は、この 範囲内で作成してください。 登録できるロゴは 1 画面のみです。登録するごとに前に登録したものは消去され ます。 絵柄の情報量によって登録時間および表示時間は異なります。 市販映像ソフトや放送・有線放送番組に対して、この機能を個人の視聴以外の目 的で使用すると、著作権法で保護されている著作権を侵害するおそれがあります。 〈表示方法〉 登録したロゴの表示サイズを選択します。 :登録した映像のサイズで画面の中央に表示します。 :登録した映像を画面いっぱいに拡大して表示します。 ( デジタル処理で拡大するため、映像はあらくなります ) 〈背景〉 [ 表示方法 ] を [ 中央 ] に設定したときの、背景画面の色を設定します。 〈ロゴ確認〉 登録したロゴを確認することができます。 〈ロゴ初期化〉 登録したロゴ、表示方法、背景の設定をご購入時の状態に戻すことができます。 ( スタート画面、無信号時のロゴがご購入時の状態に戻ります ) 40 ■ 初期設定メニュー このメニューでは、設置状態などの設定をすることができます。 初期設定 1 メニュー 内 容 項 目 自動台形補正 常に自動台形補正を実行 入り 切り 無信号電源オフ 無信号状態で最後に操作したときから電源が切れるまでの時間を設定 切り ( 切れない ) 30 分後 自動入力検索 入力切換時信号のある入力だけを選ぶかを設定 入り 切り ビープ音 操作時に操作音を出す 入り 切り 電源オン 電源ボタンで電源を入れる ( 手動 ) か、電源コードで電源を入れる ( 自動 ) か を設定 ランプパワー 手動 自動 低 標準 ランプパワーを設定 [入力切換メニュー] [自動入力検索] [ 入り ]:投写可能な信号を自動検索します。 入力ボタンを押すごとに、接続機器の 映像信号が出力されている入力に切り 換わります。接続されていても映像信 号が出力されていないときは、その入 力はとばされます。 [ 切り ]:入 力 ボ タ ン を 押 す と、[ 入 力 切 換 メ ニュー ] が表示されます。 入力切換 コンピューター 1 Y/PB/PR 1 コンピューター 2 Y/PB/PR 2 ビデオ S-ビデオ / は信号のあり/無しを表示します。 ボタンで選択し、 ボタンを 押す ( 信号がない入力も選択できます ) • お知らせ 通常は [ 入り」にしてご使用ください。[ 入力切換メニュー ] から直接、入力を選 択したいときや画像が正しく表示されなかったときなどは、 [自動入力検索]を[切 り]にしてご利用ください。 [電源オン] [自動]に設定した場合、電源が供給されると、本機の電源がオンになりますので、 停電復旧後などご注意ください。 [ランプパワー] [低]に設定すると画面は暗くなりますが、冷却音を小さくできます。 41 使 い か た ●各項目の詳しい説明 メニューを使う(つづき) 初期設定 2 メニュー 内 容 項 目 設置状態 設置状態 p.22 に合わせて投写を設定 (標準) (背面) ファンモード ファンの回転を設定 キーロック 本体の操作ボタンをロック [ [ (天吊り) (背面天吊り) 標準 または :設定にはいる ] [ :入り、切りを選択 ] :OK で設定完了 ] [ キャンセル ] で戻り 高 [ :確認 ] クローズドキャ クローズドキャプションの表示方法を設定 プション を押し、 で切り換える。 切り /CC1/CC2/CC3/CC4/T1/T2/T3/T4 すべてを初期化 を押す ( パスワードとユーザーロゴは初期化されません ) すべての調整・設定を購入時の状態に戻す パスワード はい いいえ パスワード設定 p.35 を押す パスワード登録 / パスワード設定 ●各項目の詳しい説明 [ファンモード] [高]に設定すると冷却ファンの回転数が上がります。( 冷却音は大きくなります ) 高地 ( およそ標高 1500m をこえる地域 ) などでお使いになるときに設定してください。 • 高地以外でご使用のときは、[ 高 ] に設定しないでください。 [キーロック] 本体の操作ボタンをロックして、誤操作を防ぐことができます。( リモコンでの操作 は可能です。) キーロックは [ 入り ] に設定が完了したときから適用され、本体の操作ボタンでは操 作できなくなります。 • キーロックの解除はリモコンでの操作で [ 切り ] に設定するか、または本体の [ 戻 る /AV ミュート ] ボタンを 10 秒間押しつづけても [ 切り ] に設定することがで きます。( 本体で操作のときはランプ、温度の 2 個のインジケーターが橙色に 3 秒点灯し、同時にビープ音がなります。) [ クローズドキャプション] : クローズドキャプションを表示しません。 • 切り • CC1-CC4 : クローズドキャプションに対応している番組やビデオなどの会話や (キャプション) ナレーションの字幕を表示します。 • T1-T4 : クローズドキャプションに対応している放送の受信が可能な状況に (テキスト) おいて、番組等に関連のない文字情報を表示します。(株式市況や 天気予報など) 42 • • お知らせ [ クローズドキャプション ] は、ビデオ , S- ビデオの入力時に有効です。 本機では、クローズドキャプションに対応しています。これは、米国の FCC (Federal Communications Commission) での規定に準拠した字幕機能のこと です。この規定に準拠した放送が実施されていない地域では、放送形式、信号形 式が異なりますので対応できない場合があります。 • 録画状態や信号の受信状態によって、正しく表示されないことがあります。 • [ テキスト ] の利用ができない場合、黒い背景画面のみが表示されることがありま す。この背景を表示しないようにするには、クローズドキャプションを「切り」 に設定してください。 ■ 状態表示 入力信号の情報やランプ使用時間などの情報を表示させることができます。 入力 モード名 解像度 周波数 同期 信号フォーマット ビデオモード ランプ時間 ランプリセットカウント トータル時間 バージョン 内 容 入力ソースの名称 RGB入力のモード ※1 解像度(ドット数) 同期周波数 同期信号極性 ※2 Y/PB/PR信号のフォーマット ビデオ信号のカラー方式 ランプの使用時間 ※3 ランプ交換回数 本機の総使用時間 ファームウェアのバージョン ※4 コンピューター Y/PB/PR ビデオ S-ビデオ ○ ○ ○ ○ ○ − − ○ ○ ○ ○ ○ − − − − ○ − ○ ○ ○ ○ ○ − − − − − ○ ○ ○ ○ ○ ○ − − − − − ○ ○ ○ ○ ○ ※ 1: RGB 対応信号のモード p.52 が表示されます。 ※ 2: 同期信号の極性を[水平 / 垂直]の配置で、P( 正極性 ), N( 負極性 ) で表示します。 ※ 3:[ランプ時間]はランプ交換時期 p.47 の目安として表示しています。ランプ保証時 間のカウンターとしてはご使用になれません。 ※ 4: [ バージョン ] は本機内部の制御プログラムのバージョンです。アフターサービスな どの際に参照します。 • お知らせ 表示された情報は、状況が変わっても更新されません。更新するときは、表示さ れた情報をいったん消してから、もう一度表示させてください。 43 使 い か た 項 目 メンテナンス エアフィルターの清掃 エアフィルターは、内部へのほこりやごみの侵入を防ぐ部品です。フィルターをはずした 状態での使用は絶対におやめください。エアフィルターは、こまめに清掃していただくこ とをおすすめします。 ● 100時間ごとに「エアフィルターのよごれを確認してください。」とメッセージが表示 されます。 (このメッセージは使用時間が100時間を過ぎ、次に電源を入れた一回目に、 映像が出たときに約30秒間表示されます。この表示は何か操作をすると消えます。) ● エアフィルターの汚れを確認し、埃、ゴミなどがついているときは、以下の手順で掃除 してください。 天吊り設置での清掃などのメンテナンスは、販売担当者に依頼すること。 ● 1 電源プラグを抜く 2 エアフィルターをはずす エアフィルターの図の部分をつかんで引き出します。 3 掃除をする エアフィルターのほこりやよごれを掃除機などでてい ねいに吸い取ります。 4 エアフィルターを差し込み カチッと音がするまでしっかり差し込んでください。 お知らせ エアフィルターにほこりがたまると、空気の通りが悪くなって本機内部の温度が上昇 ● し、動作停止や故障の原因となります。 エアフィルターは最後まできちんと取り付けてください。すき間があいていると、ほこ ● りやごみが本機の内部に入り、動作停止や故障の原因となります。 エアフィルターを水洗いしたときは、完全に乾いてから取り付けてください。 エアフィルターが傷んだときは、販売担当者にご相談のうえ、新しいものと交換してく ● ● ださい。傷んだまま使用すると、ほこりやごみが本機の内部に入り、動作停止や故障の 原因となります。 44 レンズ、本体の清掃 • 天吊り設置での清掃などのメンテナンスは、 販売担当者に依頼すること。 ■レンズの清掃 • レンズは市販のブローワーやメガネ拭き用クロス、ク • リーニングペーパー、レンズクリーナー等で清掃して ください。 レンズの表面は傷つきやすいため、かたいものでこすっ たり、たたいたりしないでください。 ■本体の清掃 • 電源プラグを抜いてから清掃をしてください。 • 本機のよごれは、柔らかい布で軽くふき取ってくだ • • • さい。 水でふくと内部に水がしみこんで、感電や故障の原 因となることがありますので、やめてください。 ベンジン、シンナーは絶対に使用しないでください。 変形、変色、塗装がはげるなどの原因となります。 化学ぞうきんは使用しないでください。 ランプの交換 • • 天吊り設置でのランプ交換は、販売店に依頼すること。 天吊り状態ではランプカバーを開けないでください。万一、ランプが破裂していると、 ガラス破片が落下して危険です。また高所での作業は危険ですからランプが破裂し ていなくてもお客様ご自身でランプの交換は行わないでください。 交換の際は必ず IPSiO PJ 交換用ランプ タイプ 1(別売)を使用すること。 • 使用直後のランプは高温になっているので、さわらないこと。さわるとやけどの原 因となります。十分に冷えてから(1 時間以上待ってから)交換をしてください。 • 万一、ランプが割れた際には、ガラス片でけがなどをしないように取扱いに注意し ( p.10 )、販売担当者に修理を依頼すること。 45 メンテナンス ランプは消耗品です。長時間使用しますと映像が暗くなったり、ランプが切れて点灯しな くなったりすることがあります。これはランプの特性であり、故障ではありません。(ラ ンプの寿命は使用状態によって異なります)このようなときには、新しいランプと交換し てください。 ランプの交換(つづき) 1 電源プラグを抜く 2 ランプが十分に冷えるのを待つ 1 時間以上待ってください。 3 ランプ外カバーをはずす 側面のねじ1個をゆるめ図のようにスライドさせ て、ランプ外カバーをはずします。 ランプ外カバー ランプ内カバー 4 内カバーをはずす ねじ 2 個をはずし、ランプ内カバーをはずします。 はずしたねじは、なくさないように注意してくだ さい。 5 ランプを引き出す ランプ固定ねじ 3 個をゆるめ、取っ手をおこし、 ツメを押しながらランプを引き出します。 ツメ 6 新しいランプを取り付ける 方向を合わせ、下に当たるまで差し込み、ランプ固 定ねじ 3 個を回してしめます。 46 7 内カバーを取り付ける ランプ内カバー 手順 4 ではずしたねじ 2 個で内カバーが浮かな いように最後までしめます。 8 ランプ外カバーを取り付ける ランプ外カバー 外カバーを載せ方向を合わせ、矢印の方向にスライ ドさせて、手順 3 でゆるめたねじ 1 個をランプ 外カバーが浮かないように最後までしめます。(ラ ンプ外カバーは必ず取り付けてください) 9 ランプ時間をリセットする リセットのしかたについては、ランプの取扱説明書 をご覧ください。 お知らせ、お願い の中の[ランプ時間]に、ランプの使用時間(目安)が表示されます。 • 「状態表示メニュー」 p.43 1 メニュー」の[ランプパワー]を「標準」でご使用の場合は 2000 時間、 • 「初期設定 • • ●ランプ交換メッセージについて 本機のランプ交換メッセージは、[ランプパワー]の「標準」/「低」でのそれ ぞれの使用時間から適切な時期を表示します。 交換時期に達すると電源を入れたとき、 「ランプが寿命です。交換してください。」 を押すと消えます。 のメッセージが表示されます。この表示は 使用済みのランプについて 本機のランプには環境に有害な微量の無機水銀が使われています。使用済みのランプ は、破損させないように取扱いに注意し、地方自治体の条例または規則にしたがって 処理していただくか、または販売担当者までご連絡ください。 47 メンテナンス 「低」でご使用の場合は 3000 時間を目安に交換してください。 p.41 ランプは、目安時間に達する前や交換メッセージが表示される前に、点灯しなくなる ことがあります。 • ランプ外カバーは、浮かないように必ず正しく取り付けてください。正しく取り付け られていないと電源がはいらない、ランプが点灯しないなど 誤動作の原因となります。 • ランプを交換するときは、必ず新品のランプを使用してください。 • ランプはガラス製品ですので、ガラス面を素手でさわったり、強い衝撃をあたえたり、 傷つけたりしないでください。(よごれ、衝撃、傷などによって割れることがあります) • その他 インジケーターによる異常表示 内部に異常が生じると、インジケーターの点灯とビープ音 ( ピーピーピー・・・) で知ら せます。 電源がはいらない ⇒本機の異常です。 • 電源プラグを抜き、販売担当者に連絡してください。 (消灯) 使用中にランプが消えた、またはランプが点灯しない (赤点滅) または (赤点灯) (赤点灯) (赤点灯) ⇒ランプが高温になって点灯しづらくなっているか、ランプの寿命 または本機の異常です。 • 電源プラグを抜き、しばらく放置してから、再度電源を入れて ください。 • ランプが切れたときは、新しいランプに交換してください。 使用中に電源が切れた (赤点滅) (赤点灯) ⇒内部が高温になっている。または気温の高いところで使っている。 • 吸気孔、排気孔をふさがないように設置してください。 • 電源プラグを抜き、しばらく放置してから、再度電源を入れて ください。 ※電源が切れる前にアイコン が表示されます。 使用中に電源が切れた (緑点滅) (赤点灯) ⇒本機内部の冷却ファンの異常です。 • 電源プラグを抜き、販売店に連絡してください。 ※電源が切れる前にアイコン が表示されます。 使用中に電源が切れた、または電源がはいらない (橙点滅) (赤点灯) ⇒ランプカバーが正しく取り付けられていません。 • 電源プラグを抜き、ランプカバーを取り付けなおしてください。 p.46 使用中に電源が切れた (橙点灯) • (赤点灯) ⇒本機内部の異常です。 • 電源プラグを抜き、しばらく放置してから、再度電源を入れて ください。 • それでも、直らない場合は、電源プラグを抜き、販売担当者に 連絡してください。 ※電源が切れる前にアイコン が表示されます。 お知らせ 異常が生じたあとは、電源プラグを抜くまで異常状態が保持されます。 48 故障かな・・・と思ったときは 故障かな ?・・・とお思いのときは、アフターサービスをご依頼になる前に、次のことを お調べください。「インジケーターによる異常表示」 p.48 もご覧ください。 症 状 電源がはいらない。 お調べいただくことがら ・ 電源コードのプラグ、コネクターが抜けていませんか。 ・ ランプ外カバーがはずれていませんか。 p.46 使用中に電源が切れる。 ・ 使用している周囲の温度が高くありませんか。 p.48 ・ 吸気孔や排気孔がふさがれていませんか。 p.48 映像が出ない。 ・ 入力切換が間違っていませんか。([ 自動入力検索 ) が「切り」のとき ) p.41 ・ ミュート機能が働いていませんか。 p.33 ・ 明るさ調整が最小になっていませんか。 p.37 ・ 接続に間違いがありませんか。 p.25 ・ 接続している機器は正常に動作していますか。 音声が出ない。 ・ 入力ボタンを押しましたか。 p.28 ・ ミュート機能が働いていませんか。 p.33 ・ 音量調整が最小になっていませんか。 p.29 ・ 接続に間違いがありませんか。 p.25 ・ 接続している機器は正常に動作していますか。 映像が正常に映らない。 ・ 本機が対応できない信号を入力していませんか。 p.52 p.53 ・ ビデオテープなど、信号発生側に異常はありませんか。 映像がぼやける。 ・ レンズがよごれていませんか。 p.45 映像の一部がピントが ・ レンズのピントが最良に調整されていますか。 p.29 合わない。 ・ 投写距離が本機の対応範囲内になっていますか。 p.23 ・ 本機やスクリーンの設置角度を傾けすぎていませんか。 p.29 ・ サンプリング位相、シャープネスの調整がずれていませんか。 p.37 ・ 明るさ、コントラストの調整がずれていませんか。 p.37 ・ ランプ使用時間が寿命に近づいていませんか。 p.43 色がうすい。 色あいが悪い。 ・ 色の濃さ、赤レベル、緑レベル、青レベルの調整がずれていませ んか。 p.37 ・ スクリーンがよごれていませんか。 ・ 黒板モードは正しく設定されていますか。 p.38 ・ ランプ使用時間が寿命に近づいていませんか。 p.43 本体の操作キーが働か ・ キーロック機能が働いていませんか。 p.42 ない。 49 そ の 他 映像が暗い。 故障かな・・・と思ったときは(つづき) 症 状 お調べいただくことがら リモコンが働かない。 ・ リモコンの電池が消耗していませんか。 ・ リモコンの電池は正しく入れられていますか。 p.21 ・ リモコンの有効操作範囲をこえていませんか。 p.21 ・ リモコンと本機の間に障害物が置かれていませんか。 ・ 蛍光灯やその他の強い光が本機のリモコン受光部に当っていませんか。 50 仕 様 ■一般仕様一覧 • 項 目 お知らせ 意匠、仕様などは改良のため予告なく変更することがあります。 ■別売品 IPSiO PJ 交換用ランプ タイプ 1 IPSiO PJ 交換用フィルター タイプ 1 51 そ の 他 仕 様 270 W X3131/WX3131: 1.8kg 質 量 X3241: 1.9kg X3131/WX3131: 幅 272 ×高さ 82 ×奥行 189mm 外形寸法 ( 突起部含む ) X3241: 幅 295 ×高さ 82 ×奥行 196mm キャビネット材質※ PC+ABS 樹脂および PC 樹脂(一部マグネシウム合金) 使用環境条件 温度:5℃~ 35℃、相対湿度:30%~ 70%表示 液晶パネル 表示方式 透過型三板式 X3131: 0.63 型 パネルサイズ WX3131: 0.59 型 X3241: 0.70 型 液晶パネル TFT アクティブマトリクス 駆動方式 X3131/X3241: 786,432 画素(水平 1024 ×垂直 768) 画素数 WX3131: 1,024,000 画素(水平 1280 ×垂直 800) X3131/WX3131: F=1.7 ~ 1.87 f=19.2 ~ 23.00mm レンズ X3241: F=1.6 ~ 1.76 f=21.5 ~ 25.80mm ランプ 高圧水銀ランプ(180W) 投写画面サイズ 30 ~ 300 型 X3131: 0.89m ~ 10.93m 投写距離 WX3131: 0.94m ~ 11.58m X3241: 0.89m ~ 10.94m スピーカー 1W ( モノラル ) 接 COMPUTER-1 IN 端子 ミニDサブ 15 ピン RGB / Y/PB/PR( 兼用 ) COMPUTER-2 IN 端子 ミニDサブ 15 ピン RGB / Y/PB/PR / MONITOR OUT( 兼用 ) S-VIDEO 端子 ミニ DIN 4 ピン 続 VIDEO 端子 RCA ピンジャック、1V(p-p)、75 Ω φ 3.5mm ステレオミニジャック :1.5 V(rms)、22 kΩ以上 端 AUDIO IN 端子 COMPUTER 1 IN, 2 IN/VIDEO/S-VIDEO( 兼用) AUDIO OUT 端子 φ 3.5 mm ステレオミニジャック 子 CONTROL 端子 D サブ 9 ピン (RS-232C) 「JIS C 61000-3-2 適合品」 ※JIS C 61000-3-2 適合品とは、日本工業規格「電磁両立性ー第 3-2 部:限度値ー高 調波電流発生限度値 (1 相当たりの入力電流が 20A 以下の機器 )」に基づき、商用電 力系統の高調波環境目標レベルに適合して設計・製造した製品です。 ※本機は、ご愛用終了時に再資源化の一助としておもなプラスチック部品に材料名を表 示しています。 消費電力 仕 様(つづき) ■対応信号一覧(RGB 信号) 本機は下表の RGB 信号に対応しています。ただし、コンピューターの機種によっては異 なることがありますので、画面にちらつきやにじみがあるときは調整してください。 解像度 モード リフレッシュレート (Hz) 水平周波数 (kHz) クロック (MHz) 720 x 400 720x400_85 85.039 37.927 35.500 640 x 480 VGA_60 59.940 31.469 25.175 VGA_72 72.809 37.861 31.500 VGA_75 75.000 37.500 31.500 VGA_85 85.008 43.269 36.000 SVGA_56 56.250 35.156 36.000 800 x 600 SVGA_60 60.317 37.879 40.000 SVGA_72 72.188 48.077 50.000 SVGA_75 75.000 46.875 49.500 SVGA_85 85.061 53.674 56.250 832 x 624 MAC16" 74.550 49.725 57.283 1024 x 768 XGA_60 60.004 48.363 65.000 XGA_70 70.069 56.476 75.000 XGA_75 75.029 60.023 78.750 XGA_85 84.997 68.667 94.500 MAC19" 74.700 60.134 79.857 SXGA1_75 75.000 67.500 108.000 WXGA_60 59.880 49.580 83.300 QuadVGA_60 60.000 60.000 108.000 QuadVGA_85 85.002 85.938 148.500 SXGA3_60 60.020 63.981 108.000 SXGA3_75 75.025 79.976 135.000 SXGA3_85 85.024 91.146 157.500 1400 x 1050 SXGA+ 59.978 65.317 121.750 1600 x 1200 UXGA_60 60.000 75.000 162.000 UXGA_65 65.000 81.250 175.500 UXGA_70 70.000 87.500 189.000 UXGA_75 75.000 93.750 202.500 UXGA_85 85.000 106.250 229.500 1152 x 864 ※ 1280 x 800 1280 x 960 1280 x 1024 ※1280 × 800 は、WX3131 のみ • お知らせ 以下の画素をこえる解像度の信号では圧縮表示されるため、情報の一部が欠けたり、 画質が劣化することがあります。 X3131/X3241 : 1024 × 768 画素 WX3131 : 1280 × 800 画素 52 ■対応信号一覧(コンポーネント信号) 信号フォーマット 480i(525i)@60Hz 480p(525p)@60Hz 576i(625i)@50Hz 576p(625p)@50Hz 720p(750p)@60Hz 720p(750p)@50Hz 1080i(1125i)@60Hz 1080i(1125i)@50Hz 1080p(1125p)@60Hz 1080p(1125p)@50Hz fh(kHz) 15.73 31.47 15.63 31.25 45.00 37.50 33.75 28.13 67.50 56.25 fv(Hz) 59.94 59.94 50.00 50.00 60.00 50.00 60.00 50.00 60.00 50.00 ■対応信号一覧(ビデオ、S- ビデオ信号) ビデオモード NTSC PAL SECAM PAL-M PAL-N PAL-60 NTSC4.43 fh(kHz) 15.73 15.63 15.63 15.73 15.63 15.73 15.73 fv(Hz) 60 50 50 60 50 60 60 fsc(MHz) 3.58 4.43 4.25 or 4.41 3.58 3.58 4.43 4.43 ■ COMPUTER 1 IN、COMPUTER 2 IN、MONITOR 端子 のピン配列 11 6 15 10 1 5 ピン番号 ミニ D-sub 15 ピンコネクタ • RGB 入力 R, G, B 信号 : 0.7V(p-p) 75 Ω 水平同期信号 : TTL レベル(正 / 負極性) 垂直同期信号 : TTL レベル(正 / 負極性) • Y/PB/PR 入力 Y 信号 : 1.0V(p-p) 75 Ω PB,PR 信号 : 0.7V(p-p) 75 Ω ※何も接続しないでください。 53 そ の 他 入力信号 1 2 3 4 5 6 7 8 9 10 11 12 13 14 15 信号内容 RGB 入力時 Y/PB/PR 入力時 映像信号 (R) 色差信号 (PR) 映像信号 (G) 輝度信号 (Y) 映像信号 (B) 色差信号 (PB) GND ※ GND ※ GND(R) GND(PR) GND(G) GND(Y) GND(B) GND(PB) N.C ※ GND ※ GND ※ N.C ※ 水平同期信号 ※ 垂直同期信号 ※ N.C ※ 仕 様(つづき) ■ CONTROL 端子 ● ピン配列 ピン番号 信号名 1 D サブ 9 ピンコネクタ 内 容 DCD キャリア検出 2 TXD 送信データ 3 RXD 受信データ 4 DTR データ端末レディ 5 GND 信号グランド 6 DSR データセットレディ 7 RTS 送信要求 8 CTS 送信可能 9 RI 被呼表示 ● インターフェースのフォーマット 1. 通信方法 RS-232C、9600bps、パリティなし、データ長:8 ビット、 ストップビット:1 ビット 2. 通信フォーマット STX (02h) Command (3Byte) ETX (03h) 一回の通信で 1 コマンドだけ有効。 3. データフォーマット 入力コマンドは、ASC II 準拠の大文字英数だけ。 4. 返信 応 答 ACK (06h) CR(0Dh) Data ・・・正常終了 非応答 NAK (15h) ACK (06h) ESC(1Bh) ・・・異常終了 コマンドを続けて送信する場合は、次のコマンドを送る前にプロジェクターの返信を 待ってください。 ● おもなコマンド 項 目 電源オン 電源オフ OSD 表示オン OSD 表示オフ オートセット(RGB 入力) 状態表示オン 状態表示オフ コマンド PON POF MO0 MO1 PAT DON DOF 54 お問い合わせ先のご案内 ■消耗品に関するお問い合わせ 弊社製品に関する消耗品は、お買い上げの販売担当者にご注文ください。 ■保守部品について 補修用性能部品及び消耗品の最低保有期間は、本機の製造中止後、7 年間です。したがっ て、本期間以降は、修理をお引き受けできない場合があります。 ■故障・保守サービスに関するお問い合わせ 故障・保守サービスについては、販売担当者にお問い合わせください。修理範囲(サー ビスの内容)、修理費用の目安、修理期間、手続きなどをご要望に応じて説明いたします。 転居の際は、販売担当者にご連絡ください。転居先の販売担当者をご紹介いたします。 ■操作方法、製品の仕様に関するお問い合わせ 操作方法や製品の仕様については、「お客様相談センター」にお問い合わせください。 • 受付時間:平日(月~金)9 時 ~18 時/土曜日 9 時 ~12 時、13 時 ~17 時(祝 祭日、弊社休業日を除く) • 通話料は無料です。 • 音声ガイダンスに従い製品別の番号をプッシュトーンでお知らせください。トーン 信号が出せない電話機の場合は、そのまましばらくお待ちいただきますとオペレー ターに接続します。 ※お問い合わせの内容は対応状況の確認と対応品質の向上のため、通話を録音・記録 させていただいております。 http://www.ricoh.co.jp/SOUDAN/index.html 保守サービスのために必要な補修用性能部品および消耗品の最低保有期間は、本製品 の製造中止後、7年間です。したがって、本期間以後は、修理をお引き受けできない 場合があります。 そ の 他 55 FAQ プロジェクターについての疑問や質問は、よくある質問をまとめた FAQ をご覧ください。 リコーのホームページ(http://www.ricoh.co.jp/)で、よくある質問に対する回答集を ご覧いただけます。 • • • お知らせ インターネットに接続している場合に利用できます。 インターネットの通信料金がかかります。 FAQ ページ: http://www.ricoh.co.jp/support/qa/ 消耗品について 消耗品の商品名をご確認ください。 ご注文の際は、ご購入された販売担当者までご連絡ください。 ■交換用ランプ IPSiO PJ 交換用ランプ タイプ 1 ■エアフィルター IPSiO PJ 交換用フィルター タイプ 1 関連商品について RGB ケーブル、天吊り金具などがあります。 関連商品については、販売担当者までお問い合わせください。 56 お客様登録の方法 製品保証、保守サービスやサポートなどの提供をスムーズに受けられるよう、必ずお客様 登録を行ってください。 お客様登録の方法は、お客様登録はがきを返送していただく方法と、インターネットで登 録する方法の 2 種類があります。 • • • お知らせ 保証書の再発行はできませんので、大切に保管してください。 ご登録がない場合は保守サービスなどの手続きに時間がかかる場合があります。 どちらか 1 つの方法でお客様登録してください。 はがきで登録する はがきでお客様登録をします。 必要事項をご記入の上、ご返送ください。 • お知らせ 登録はがきを返送された場合は、オンラインでの登録は不要です。 インターネットで登録する インターネットでお客様登録をします。 「製品名」と「製造機番(製品番号)」の入力が必要ですので、プロジェクターに付属の「保 証書」をご用意ください。 • • • お知らせ インターネットに接続している場合に利用できます。 インターネットの通信料金がかかります。 インターネットで登録される場合、お客様登録はがきの送付は不要です。 リコーホームページからご登録ください。 お客様登録ページ:http://www.ricoh.co.jp/IPSiO/regist/ そ の 他 57 Preparations Operations Maintenance OWNER’S MANUAL Others IPSiO PJ X3131 IPSiO PJ WX3131 IPSiO PJ X3241 PROJECTOR Before Using CONTENTS Preparations Checking the package contents................................................................... 62 Names of each part on the main unit........................................................... 63 Names of each part on the control panel and remote control...................... 64 Names of the terminals on the rear panel.................................................... 66 Preparing and using the remote control....................................................... 67 Placement.................................................................................................... 68 Connection................................................................................................... 71 Operations Turning the power on and off........................................................................ 72 Basic operations........................................................................................... 74 Using handy features................................................................................... 77 Using auto setting (For computer input only)............................................ 77 Correcting the keystone distortion............................................................ 77 Resizing image......................................................................................... 78 Cutting off the picture and sound temporarily (Mute)................................ 79 Changing picture mode............................................................................. 79 Changing screen size............................................................................... 79 Freezing the image (Freeze)..................................................................... 80 Setting the password................................................................................ 80 Using the menus.......................................................................................... 82 Setup using the Setting display................................................................. 82 The image adjustment menu.................................................................... 83 The display setting menu.......................................................................... 85 The Default setting menu.......................................................................... 88 Displaying Information (Status display)..................................................... 90 60 Maintenance Lamp replacement....................................................................................... 92 Air filter cleaning........................................................................................... 95 Lens and main unit cleaning........................................................................ 96 Others Trouble indications........................................................................................ 97 Troubleshooting............................................................................................ 98 Specifications............................................................................................. 100 61 Preparations Checking the package contents Please make sure that the following items are included in the box, along with the main unit. If any item is missing, immediately contact the store where you purchased the product. (1) (4) (2) (5) (3) (6) (7) (1) Remote control (2) R03 (SIZE AAA) batteries for remote control (2) (3) CD-ROM (4) Owner’s Manual [Note 1] (5) RGB cable (3 m) [Note 1, 2] (6) Power cord (7) Carrying bag Notes 1: To maintain original performance, always use the supplied cables. 2: The shape and number of supplied power cords vary depending on the product destination. Save Original Packing Materials The original shipping carton and packing materials will come in handy if you ever have to ship your projector. For maximum protection when shipping your projector, repack the set as it was originally packed at the factory. The Supplied CD-ROM The supplied CD-ROM contains an owner’s manual including information not available for the printed Owner’s manual (Getting started) in Portable Document Format (PDF). Please use Acrobat Reader 5 or later version to view the manual. ® ® ® ® ® Adobe Acrobat Reader or Adobe Reader The supplied CD-ROM does not contain Acrobat® Reader®. If you cannot read PDF files, please install Acrobat Reader software in your computer by downloading it from the Adobe Systems website. Viewing the manual Insert the CD-ROM in the CD-ROM drive of your computer. On the installation screen, click the title of the manual you want to read. If the installation screen does not appear, double-click the PDF file on the CD-ROM. Acrobat® Reader® launches, and the Owner’s Manual cover and list of bookmarks appear. Click on a bookmark title to view that section of the manual. Click on p. to view a reference page with related information. See the Help menu for more information about Acrobat® Reader®. 62 Names of each part on the main unit (3) (2) (4) (5) (6) (7) (8) (9) (10)(11) (12) (13) (14) (15) Back (1) (2) (3) (4) (5) (6) Name Control panel Zooming lever Focusing lever Lamp cover Air exhaust Air intake Front : : : : : : : (7) Lens cap : (8) (9) (10) (11) (12) (13) (14) (15) (16) : : : : : : : : : Lens Infrared remote sensor AC IN socket Terminals on the rear panel Speaker Antitheft lock slot Foot adjuster release button Foot adjuster Air filter (16)(15) (14) Function Operates the projector. p.64 Adjusts screen size. p.75 Adjusts screen focus. p.75 Remove to replace lamp. p.92 Expels air that has grown hot inside the projector. Draws in air from outside the projector for internal cool down. Replace the cap when not using the projector to protect the lens. Projects expanded image. Senses commands from the remote control. p.67 Connects the supplied power cord here. Connects external devices. p.66 Outputs audio sound. Attach a safety cable or any other antitheft device. Press to set up or stow the foot adjuster. p.75 Adjusts the vertical projection angle. p.75 Prevents dirt and dust from getting into the inside of the projector. p.95 63 Preparations (1) Names of each part on the control panel and remote control Control panel (7) (6) Remote Control (7) (5) (8) (1) (9) (2) (10) (3) (11) Battery cover (8) (4) (5) (12) (6) (1) (13) (4) (3) (2) Name : Main Function Control panel (1) (2) (3) (4) ENTER button INPUT button MENU button RETURN/MUTE button : : : : (5) ON/STANDBY button/ ON/STANDBY indicator (6) TEMP indicator (7) LAMP indicator (8) Selection button : : : : : Accepts the selected mode. Selects input. p.74 Displays menus. p.82 Goes back one screen. Also, cuts off the picture and sound temporarily. p.78 Turns the power on/off (standby). p.72 Displays whether power is on or off (standby). p.72 Lights when internal temperature is too high. p.97 Displays lamp mode. p.97 Menu selections and adjustments, volume control, Keystone adjustment, etc. Remote control (1) ON/STANDBY button (2) FREEZE button (3) MENU button : Turns the power on/off (standby). p.72 : Pauses image. p.80 : Displays menus. p.82 64 Name : ENTER button : ZOOM IN/ZOOM OUT button : SCREEN SIZE button : MUTE button : AUTO SET button : INPUT button : : RETURN button Selection button : (12) PICTURE button (13) Ten-Key button Main Function Accepts the selected mode. Changes the zoom ratio of the image. p.78 Changes screen size. p.79 Cuts off the picture and sound temporarily. p.79 Performs auto-adjustment of input signals from computer. p.77 Selects input. p.74 Goes back one screen. Menu selections and adjustments, volume control, Keystone adjustment, etc. : Changes image mode. p.79 : Use when entering password. Remote control button Input items Remote control button Input items 1 [1] 7 [7] 2 [2] 8 [8] 3 [3] 9 [9] 4 [4] 0 5 [5] 6 [6] Note [0] Deletes one character. • For the remainder of this manual, buttons are referred to as follows: Selection buttons ⇒ ; ENTER button ⇒ 65 Preparations (4) (5) (6) (7) (8) (9) (10) (11) Names of the terminals on the rear panel (1) (2) (3) (6)(7) (8) (9) (4) (5) Name (1) AUDIO IN terminal (2) (3) (4) (5) (6) (7) (8) (9) : Main Function : Input audio signals from a computer or video equipment. (Multiple use for COMPUTER 1 IN/2 IN, VIDEO and S-VIDEO) S-VIDEO terminal : Input S video signals from video equipment. COMPUTER 1 IN (Y/PB/PR 1) terminal : Input analog RGB signal from a computer, or a component video signal (Y/PB/PR) from video equipment. COMPUTER 2 IN (Y/PB/PR 2) terminal/MONITOR OUT terminal : Inputs analog RGB signal from a computer or a component video signal (Y/PB/PR) from video equipment. It can also be used as MONITOR OUT terminal by the switch of (5). Switch : Switches between COMPUTER 2 IN and MONITOR OUT. AC IN socket : Connects the supplied power cord here. AUDIO OUT terminal : Outputs audio signals. VIDEO terminal : Input video signals from video equipment. CONTROL terminal : When operating the projector via a computer, connect this to the controlling computer’s RS-232C port. p.103 66 Preparing and using the remote control Loading dry-cell batteries into the remote control 1 Operating the remote control Point toward the projector’s infrared remote sensor, and press any button on the remote control. Remove the battery cover. 2 Insert the dry-cell batteries. Approx.15° Be sure to align the plus and minus ends of the batteries properly. Ap pro x.5 When operating the remote control from behind the projector, the infrared signal is reflected on the projecting surface and may travel a shorter distance to reach the projector depending on the shape and material of the projecting surface. Two batteries (R03, SIZE AAA) are used. 3 m Replace the battery cover. Dry-cell batteries • Before using the batteries, be sure to observe the Safety Precautions described in previous pages. • Remove batteries from remote control when not using for extended periods. • If the remote control stops working, or if its range decreases, replace all the batteries with new ones. (2 batteries (R03, SIZE AAA)) • Keep the batteries away from the reach of children. Batteries are choking hazards and can be very dangerous if swallowed. If the batteries are swallowed, seek medical assistance immediately. The remote control • The remote control may fail to operate if the infrared remote sensor is exposed to bright sunlight or fluorescent lighting. • Do not drop or bang. • Do not leave in hot or humid locations. • Do not allow it to get wet or place it on top of wet objects. • Do not take apart. • In rare cases, ambient conditions could impede the operation of the remote control. If this happens, point the remote control at the main unit again, and repeat the operation. 67 Preparations • Operating the projector from the front Placement Placement Styles As shown in the figures below, this device can be placed in 4 different styles. The factory setting is “floor-mounted front projection.” Set the [Projection mode] in the Default setting 2 menu p.89 , in accordance with your needs. Floor-mounted front projection Floor-mounted rear projection Ceiling-mounted front projection Ceiling-mounted rear projection WARNING • Always obey the instructions listed in IMPORTANT SAFETY INSTRUCTIONS when placing the unit. Attempting to clean and replace the lamp in a high location by yourself may cause you to fall, resulting in injury. • If you wish to mount the projector on the ceiling, be sure to ask your sales representative before doing so. Mounting the projector on a ceiling requires special ceiling brackets (sold separately) and specialized knowledge. Improper mounting could cause the projector to fall, possibly resulting in injury and damage, to the unit. • If the projector is ceiling-mounted, install the breaker for turning off the power in case of anomaly. Let everyone involved with the use of the projector know that fact. 68 Projection Distance and Size Use the figures, tables, and formulas below to determine the projection size and projection distance. (Projection sizes are approximate values for full-size picture with no keystone adjustment.) Screen As seen from above Projection distance a Projection min length max length size (zooming max) (zooming min) 90° As seen from the side Lens center 90° a a is the distance (m, feet) between the lens and the screen, and corresponds to a range of 0.89 m (2.92 ft.) to 10.93 m (35.86 ft.). H is the height from the image bottom to the center of the lens. PJ WX3131 Screen Projection size (inches) - 0.795 32.885 Projection size (inches) - 0.673 a (max length) = 27.397 a (min length) = As seen from above 30 inches 40 inches 50 inches 60 inches 70 inches 80 inches 90 inches 100 inches 120 inches 150 inches 200 inches 250 inches 300 inches 0.89 m (2.92 ft.) 1.19 m (3.90 ft.) 1.50 m (4.92 ft.) 1.80 m (5.91 ft.) 2.10 m (6.89 ft.) 2.41 m (7.91 ft.) 2.71 m (8.89 ft.) 3.02 m (9.91 ft.) 3.63 m (11.91 ft.) 4.54 m (14.90 ft.) 6.06 m (19.88 ft.) 7.58 m (24.87 ft.) 9.10 m (29.86 ft.) 1.07 m (3.51 ft.) 1.44 m (4.72 ft.) 1.80 m (5.91 ft.) 2.17 m (7.12 ft.) 2.53 m (8.30 ft.) 2.90 m (9.51 ft.) 3.26 m (10.70 ft.) 3.63 m (11.91 ft.) 4.36 m (14.30 ft.) 5.45 m (17.88 ft.) 7.28 m (23.88 ft.) 9.10 m (29.86 ft.) 10.93 m (35.86 ft.) Projection size (inches) - 0.758 31.022 Projection size (inches) - 0.643 a (max length) = 25.845 a (min length) = Projection distance a Projection min length max length size (zooming max) (zooming min) 90° As seen from the side Lens center 90° a a is the distance (m, feet) between the lens and the screen, and corresponds to a range of 0.94 m (3.08 ft.) to11.58 m (37.99 ft.). The lens center is in the same level with an image bottom. 30 inches 40 inches 50 inches 60 inches 70 inches 80 inches 90 inches 100 inches 120 inches 150 inches 200 inches 250 inches 300 inches 0.94 m (3.08 ft.) 1.27 m (4.17 ft.) 1.59 m (5.22 ft.) 1.91 m (6.27 ft.) 2.23 m (7.32 ft.) 2.55 m (8.37 ft.) 2.88 m (9.45 ft.) 3.20 m (10.50 ft.) 3.84 m (12.60 ft.) 4.81 m (15.78 ft.) 6.42 m (21.06 ft.) 8.03 m (26.35 ft.) 9.65 m (31.66 ft.) 69 1.14 m (3.74 ft.) 1.52 m (4.99 ft.) 1.91 m (6.27 ft.) 2.30 m (7.55 ft.) 2.68 m (8.79 ft.) 3.07 m (10.07 ft.) 3.46 m (11.35 ft.) 3.84 m (12.60 ft.) 4.62 m (15.16 ft.) 5.78 m (18.96 ft.) 7.71 m (25.30 ft.) 9.65 m (31.66 ft.) 11.58 m (37.99 ft.) Height (H) 6.50 cm (0.21 ft.) 8.70 cm (0.29 ft.) 10.90 cm (0.36 ft.) 13.10 cm (0.43 ft.) 15.20 cm (0.50 ft.) 17.40 cm (0.57 ft.) 19.60 cm (0.64 ft.) 21.80 cm (0.72 ft.) 26.10 cm (0.86 ft.) 32.70 cm (1.07 ft.) 43.50 cm (1.43 ft.) 54.40 cm (1.78 ft.) 65.30 cm (2.14 ft.) Preparations PJ X3131 Placement (Continued) PJ X3241 Projection size (inches) - 0.890 32.863 Projection size (inches) - 0.748 a (max length) = 27.363 a (min length) = Screen As seen from above Projection distance a Projection min length max length size (zooming max) (zooming min) 90° As seen from the side Lens center 90° a 30 inches 40 inches 50 inches 60 inches 70 inches 80 inches 90 inches 100 inches 120 inches 150 inches 200 inches 250 inches 300 inches 0.89 m (2.92 ft.) 1.19 m (3.90 ft.) 1.49 m (4.89 ft.) 1.80 m (5.91 ft.) 2.10 m (6.89 ft.) 2.41 m (7.91 ft.) 2.71 m (8.89 ft.) 3.02 m (9.91 ft.) 3.62 m (11.88 ft.) 4.54 m (14.90 ft.) 6.06 m (19.88 ft.) 7.58 m (24.87 ft.) 9.10 m (29.86 ft.) 1.07 m (3.51 ft.) 1.44 m (4.72 ft.) 1.80 m (5.91 ft.) 2.17 m (7.12 ft.) 2.53 m (8.30 ft.) 2.90 m (9.51 ft.) 3.26 m (10.70 ft.) 3.63 m (11.91 ft.) 4.36 m (14.30 ft.) 5.46 m (17.91 ft.) 7.28 m (23.88 ft.) 9.11 m (29.89 ft.) 10.94 m (35.89 ft.) Height (H) 6.50 cm (0.21 ft.) 8.70 cm (0.29 ft.) 10.90 cm (0.36 ft.) 13.10 cm (0.43 ft.) 15.20 cm (0.50 ft.) 17.40 cm (0.57 ft.) 19.60 cm (0.64 ft.) 21.80 cm (0.72 ft.) 26.10 cm (0.86 ft.) 32.70 cm (1.07 ft.) 43.50 cm (1.43 ft.) 54.40 cm (1.78 ft.) 65.30 cm (2.14 ft.) a is the distance (m, feet) between the lens and the screen, and corresponds to a range of 0.89 m (2.92 ft.) to 10.94 m (35.89 ft.). H is the height from the image bottom to the center of the lens. 70 Connection Before connection • Read the owner’s manual of the device you are connecting to the projector. • Some computers cannot be used with or connected to this projector. Check for an RGB output terminal, supported signal p.101 , etc. • Turn off the power of both devices before connecting. • The figure below shows sample connections. This does not mean that all of these devices can or must be connected simultaneously. (Dotted lines mean items can be exchanged.) To audio output White (L)/ Red (R) Computer S-video cable To To (not supplied) video S-video output To RGB output output RGB cable (supplied) Video cable (not supplied) Audio cable (not supplied) Audio cable (not supplied) DVD video recorder, etc. Conversion adapter BNC-pin (not supplied) To Y/CB/CR output Green(Y)/Blue(CB)/ To audio Red (CR) To audio output White (L)/ Red (R) output Monitor cable Mini D-sub 15P-BNC (not supplied) Audio cable (not supplied) Audio cable (not supplied) Control cable (not supplied) To RS-232C terminal p.103 To audio input White (L)/Red ( R) Audio amplifier, etc. Monitor Computer (for control) It is necessary to switch to MONITOR OUT by the switch. p.66 * The connection for COMPUTER 1 IN terminal described here is also applicable for COMPUTER 2 IN terminal. Notes • When COMPUTER 2 IN terminal is used as MONITOR OUT terminal, the signal which is input to COMPUTER 1 IN terminal is output. • Signals are output from MONITOR OUT terminal even in standby mode. However, from AUDIO OUT terminal, no audio signal is output. • A computer monitor cannot accept Y/PB/PR signals correctly. • The AUDIO IN terminal can be used for devices connected to COMPUTER 1 terminal, COMPUTER 2 terminal, VIDEO terminal and S-VIDEO terminal. • When an AUDIO OUT terminal is connected, sound is not output from the projector speaker. • Output volume of AUDIO OUT terminal can be adjusted by the VOL button. 71 Preparation Video recorder, DVD player, etc. Operations Turning the power on and off Connecting the power cord 1 Insert the power cord connector into the AC IN socket of the projector. 2 Insert the power cord plug into a wall or other power outlet. The ON/STANDBY indicator flashes green and the projector enters standby mode. Power cord connector (Supplied) Turning the power on 1 Removing the lens cap Be sure to remove the lens cap when the power is turned on. If the cap is left on the projector, it could become deformed due to heat. Control panel Remote control 2 Press the ON/STANDBY button. The power turns on with a beep sound (if the beep sound is set to [On]), and the ON/STANDBY indicator flashes orange, and then flashes green. After a moment, the start-up screen appears. CAUTION • Do not look into the lens while the lamp is on. The strong light from the lamp may cause damage to your eyesight. • Do not block the air intake or exhaust. Doing so could cause a fire due to internal overheating. • Do not place your hands, face, or other objects near the air exhaust, the lamp cover or the bottom of the unit. Doing so could result in injury and/or damage the object. Notes • The start-up screen will disappear after a moment. You can configure the system to prevent the start-up screen from appearing. To do this, use the Display setting menu p.85 . • The first time you use the projector after purchase, after the start-up screen disappears, the start menu is displayed p.74 . • You can disable the beep sound in the Default setting 1 menu p.88 . • When [Key lock] is [On], the operation buttons of the projector do not work p.89 . • When [Password] is [On], enter password then the start-up screen is displayed after the Password entry screen disappears p.81 . • Do not touch the lens directly with your hand. If fingerprints or stains are left on the projection lens surface, they may interfere with the projector’s ability to project images on the screen. 72 Turning the power off 1 Press the ON/STANDBY button. When the setting of beep sound is [On], the projector beeps, and a message appears on the screen, confirming that you wish to shut off the power. To shut off the power, press the ON/STANDBY button again. If you do not wish to shut off the power, wait for a while without conducting any operations. This message will disappear after a moment. (This operation is no longer valid after the message disappears.) 2 Press the ON/STANDBY button again. When the setting of beep sound is [On], the projector beeps, and the screen disappears, but the internal cooling fan continues to operate. Then, the projector goes into standby mode. During cooling, the ON/STANDBY indicator flashes. While the indicator is flashing, the power can not be turned back on. There is no problem with unplugging the power cord in this state. Control panel Remote control Operations 3 Replace the lens cap. After use, replace the lens cap. Note • The projector consumes about 4.5W of power in standby. We recommend that you unplug the power cord if you will not be using the projector for an extended period. Precautions • When you wish to restart the projector again right after turning off the power, give the lamp time (about 5 minutes) to cool before plugging it back in. If the lamp overheats, it may fail to light. • Right after turning off the power, the unit may become very hot, especially air exhaust, lamp cover or the bottom of the unit. Please handle with care to avoid burn injuries. 73 Basic operations 1 Turn on the power. Turn on the power by following the instructions in “Turning the power on” p.72 . 2 Select the language and the lamp power (When using the first time). When the projector is used for the first time after purchase, the start menu for language (to display the menus and messages on the screen) and lamp power selection and configuration is displayed in Japanese. (If the screen is out of focus, adjust it according to the step 6 .) 1 Use the , , or press the button. button to select the desired language and English French German Italian Spanish Portuguese Russian Swedish Turkish Polish Norwegian Finnish Czech Hungarian Greek Danish Dutch Rumanian Japanese Chinese (simplified) Chinese (traditional) Korean Indonesian Thai Arabic Message for setup confirmation is displayed in a selected language. Then, the menu for lamp power selection and configuration is displayed. It is automatically set as Standard. To change the setting, follow the step 2 . 2 Use the button. or button to select the lamp power and press the The lamp power, if selected, will be toggled without pressing the automatically disappears in a few seconds. button. The display Notes • When the projector is turned on the next time, the start menu does not appear upon startup. However, if [Reset all] is executed from the Default setting 2 menu p.89 , the start menu will be displayed the next time when the power is turned on. • The language can also be set via the Display setting menu p.85 and Lamp power via the Default setting 1 menu p.88 . • This owner’s manual assumes that English has been selected. 3 Activate the connected device. Turn on and start the connected device such as a computer. 4 Press the INPUT button. An image of the connected equipment is projected. Each time you press the INPUT button, it switches to the input of the connected equipment that is outputting video signals. 74 Notes • When [Auto input search] is set to [Off] in the Default setting 1 menu p.88 (factory setting is [On]), the Input select menu appears if you press the INPUT button. • If no signal is being output from the connected equipment, pressing the INPUT button does not change the input and “There is no other input signal.” message will appear. 5 Projector placement angle adjustments The placement angle and the height of the projected image can be adjusted by the foot adjuster. 1 Lift up the front of the projector to the desired angle, then press the foot adjuster release button upward. The foot adjuster extends. Release the button to lock the position. To fine adjust the angle, twist the foot adjuster. • To stow the foot adjuster, hold up the projector while pressing the foot adjuster release button, then slowly lower the projector. Note • When [Auto keystone] is set to [On] in the Default setting 1 menu, the keystone distortion will automatically be corrected based on the projector placement angle. If you do not desire the automatic keystone correction, set [Auto keystone] to [Off]. 6 Adjusting the screen size and focus 1 Use the zooming lever to adjust the screen size. 2 Use the focusing lever to adjust the focus. 7 Adjusting the volume with the Front buttons The speaker volume can be adjusted when an audio signal is being input. 75 Operations 2 Basic operations (Continued) Precautions • Lamp characteristics may rarely cause the brightness to fluctuate slightly. • The LCD panel is made using extremely advanced technology. There may be black spots (pixels that do not light) or bright spots (pixels that are constantly lit) on the panel. These are intrinsic characteristics of the technology and are not malfunctions. Notes • A lamp is consumable item. If used for extended periods, images will appear dark, and the lamp could burn out. This is characteristic of a lamp, and is not malfunction. (The lifetime of the lamp depends on conditions of use.) • Although this projector supports a wide range of RGB signals p.101 , any resolutions not supported by this projector (XGA for X3131/X3241, WXGA for WX3131) will be expanded or shrunk, which will affect image quality slightly. To view high-quality images, set the computer’s external output to XGA for X3131/X3241, WXGA for WX3131. • With some models of computer having LCD displays or the like, displaying images simultaneously on the projector and the monitor’s display may prevent the images from displaying properly. If this happens, turn off the computer’s LCD display. For information on how to turn off the LCD display, see the computer’s owner’s manual. • If no signal is being input from the connected equipment or signal input is stopped while projecting, the “No signal” message will appear. • If a signal not supported by the projector is input, the “Unsupported signal” message will appear. • If an unavailable operation button is pressed, the icon will appear with a beep sound (if the beep sound is set to [On]). • Moving pictures played back on computers using DVD software may appear unnatural when projected with this projector. However, it is not a malfunction of the projector. LCD Panels LCD panels wear out. In order to prolong the lifetime of your LCD panel, take the following precautions. • In order to extend the lifetime of the LCD panel, always turn off the power when not in use, and make sure that the lamp is off. Keeping the lamp off is also very effective at saving electricity. • If the air filter becomes dirty and clogged, the projector’s internal temperature will rise, shortening the lifetime of the LCD panel and causing malfunctions. We recommend regular and thorough cleaning of the air filter p.95 . • If the air filter becomes damaged, replace it. Contact your sales representative for a new filter. If you continue to use the projector when its filter is damaged, dust and dirt will enter the interior and this could cause the projector to stop working or break down. 76 Using handy features Using auto setting (For computer input only) This function automatically sets up the projector to the optimum state. It sets up sampling phase, frequency and screen position, for each type of the input signal by using simple operations. Remote control Press the remote control’s AUTO SET button. The icon will appear during processing. You can set as well by selecting [Auto setting] in the Image adjustment menu p.83 . Notes • The image may not be projected or auto adjustment/setting may not be performed correctly for input signals other than those supported by the projector p.101 , p.103 . • If auto setting fails adjustment, adjust manually with [Position] in the Image adjustment menu p.83 . Correcting the keystone distortion When the projector placement angle against the screen is changed while projecting the image, the picture will undergo keystone (trapezoidal) distortion. This projector is capable of correcting this keystone distortion. After correction • The keystone distortion will be corrected automatically based on the projector’s placement angle. Adjusting Keystone distortion Manually Use the buttons for keystone adjustment. Notes Control panel Remote control • Depending on the amount of keystone adjustment and the content of images, some information may be lost, or the picture quality may suffer. • Even if [Auto keystone] is set to [On], keystone distortion can be adjusted manually. Note that if you change the position or angle of the projector, automatic keystone correction will be performed again. • When [Auto keystone] is set to [On], the automatic keystone correction will be performed each time the power is turned on. • The keystone correction settings are memorized after the power has been turned off. Therefore, it is recommended that you set [Auto keystone] to [Off], if the case is that the projector placement angle against the screen remains unchanged and you do not wish to change the keystone adjustment that you set. 77 Operations Before correction Using handy features (Continued) Resizing image The projected image can be resized (zoomed in/out). 1 Press the remote control’s ZOOM IN button. Each time you press the ZOOM IN button, zoom ratio is up. You can keep pressing. 2 To zoom out, press the remote control’s ZOOM OUT button. Each time you press the ZOOM OUT button, zoom ratio is down. You can keep pressing. (However, the image cannot be smaller than the original size.) Remote control 4 3 3 To move the area to zoom in, use the buttons. You can keep pressing. 4 When the image returns to the original size by pressing ZOOM OUT button several times, the zoom will be reset. Pressing the RETURN button during resizing also resets the zoom. Notes • The icon appears while resizing. • Operating a function other than Mute will release resizing. • As zooming is processed digitally, the image quality is degraded in larger zoom ratio. • During resizing or moving the zooming area, the image may be distorted. 78 1 2 Cutting off the picture and sound temporarily (Mute) When you want to project the images of another projector, overhead projector, etc. temporarily, this projector’s images and sound can be turned off. Remote control Press the remote control's MUTE button or the RETURN/ MUTE button on the projector control panel. The picture and sound are cut off. (Pressing the MUTE button or the RETURN/MUTE button again cancels the Mute function and restores the picture and sound.) The RETURN/MUTE button on the control panel cannot be used for muting in the following situations: • The projected image is resized. • A menu is displayed. Notes • The icon will appear while mute is in effect. • Operating any other functions will also cancel the muting. The projected image mode can be selected. Remote control Operations Changing picture mode Press the remote control’s PICTURE button. Pressing the button switches 1/2/3 in turn. 1: Bright 2: Standard 3: True color Note • [Picture mode] of the Image adjustment menu has the same function p.83 . Changing screen size The screen size for the projected image can be changed. Remote control Press the remote control’s SCREEN SIZE button. Pressing the button switches in turn as follows: X3131/X3241 : Normal/Full/Thru/Wide WX3131 : Normal/Full/Thru/4:3 zoom • • • • Notes Thru display is available for Computer-input images. Wide or 4:3 zoom display is available for Y/PB/PR, Video and S-video-input images. [Screen size] of the Display setting menu has the same function p.85 p.86 . If you use this function on commercial video software, broadcast or cablebroadcasting except for the purpose of your private viewing and listening, it may infringe the copyright protected by the copyright laws. 79 Using handy features (Continued) Freezing the image (Freeze) The projected image can be frozen. This function is to be used to pause a video during a presentation, etc. Remote control Press the remote control’s FREEZE button. The picture pauses. (The Freeze function is released by pressing the FREEZE button again.) Notes • The icon will appear while freeze is in effect. • Other operations will also release the freeze. • Even if an image is frozen on the projector, the pictures are running on the video or other equipment. • If you use this function on commercial video software, broadcast or cable-broadcasting except for the purpose of your private viewing and listening, it may infringe the copyright protected by the copyright laws. Setting the password How to change password The default password is 000000. 1 Select [Password] in the Default setting 2 menu and press the button. or 2 Select [Password registration] in the password registration, setting menu, and press the button. The password entry screen is displayed. 3 Enter the current password (6-digit number) using numeric keys of the remote control. • Enter [000000] (6 zeros) for the first change. • The password is not displayed. Instead it appears as [******]. 4 Enter a new password (6-digit number). 5 Re-enter the same password for confirmation. Note • Please do not forget your password. If you forget the password, you can not release the password by yourself. In such a case, please inquire your sales representative. 80 How to set password (from [Off] to [On]) 1 Select [Password] in the Default setting 2 menu and press the button. 2 Select [Password setting] next, and press the 3 Select [On]. 4 Select [OK] and press the or or button. button. The password entry screen is displayed. 5 Enter the password using numeric keys of the remote control. 6 The password setting will be set as [On]. How to operate when password is [On] If the entered password is correct, the start-up screen appears and the projector goes into normal operation. If the password is wrong, a message appears to prompt you to re-enter the password, and again the password entry screen is displayed. If you enter a wrong password for more than 5 times, the projector will automatically power off and enter standby mode. Note • When the password setting is [On], the password function will be enabled only when the projector is restarted after the power cord has been unplugged. The password that you set will not be enabled when restarting from standby mode without unplugging the power cord. How to set password (from [On] to [Off]) 1 Select [Password] in the Default setting 2 menu and press the button. or The password entry screen is displayed. 2 Enter the password using numeric keys of the remote control. 3 Select [Password setting] next, and press the 4 Select [OFF]. 5 Select [OK] and press the button. 81 or button. Operations 1 Turn on the power. 2 The lamp lights and the password entry screen appears. 3 Enter the password using numeric keys of the remote control. Using the menus You can call up on-screen menus, and conduct a number of adjustments and settings using the MENU button p.64 on the control panel (main unit side) and remote control. Setup using the Setting display The menu shown below is for operation instructions purposes and might differ from the actual display. 1. Press the MENU button 2. Select a Category Select a category by using Display the Setting display menu. . Displays the current adjustments and settings of selected category. Item shown with gray cannot be adjusted with the current input source. There are following 5 categories: Image adjustment menu p.83 Display setting menu p.85 Default setting 1 menu p.88 Default setting 2 menu p.89 Status display menu p.90 3. Adjustments & Settings Press or to open the menu. Item Adjustment/Setting Value These marks signify the items can be adjusted/set by using . These marks signify the items can be selected from the list by using . After an item is selected, apply it by pressing . These marks signify that there are setting screens. Press or to display a list of setting screens. These marks signify that there are options. Press or to display a list of options. * When no item is changed, press Toggle items with Select items with Fix selection with . and press . . . • The figure shows displays given for operation instructions purposes. As the display may differ depending on the item, refer to the following applicable pages for the menu item you desire. • To return to previous item, press the RETURN button. 4. End Press the MENU button once more. (The menu will disappear automatically after 30 seconds, if no operation is conducted.) 82 The image adjustment menu Item Description Computer Y/PB/PR Video S-video Yes Yes Yes Yes Yes Yes Yes Adjust the color of the image. Deeper Lighter No Yes Yes Yes Sharpness Adjust the sharpness of the image. Sharper Softer Yes Yes Yes Yes Noise reduction*1 Set the function to reduce screen noise. On (Enable) Off (Disable) No Yes Yes Yes Picture mode Press with Yes Yes Yes Yes R-level Adjust red of the image color. More red Less red Yes Yes Yes Yes G-level Adjust green of the image color. Less green More green Yes Yes Yes Yes B-level Adjust blue of the image color. More blue Less blue Yes Yes Yes Yes No No Yes Yes Yes No No No Press then change mode using and adjust with Yes No No No Phase Adjust to eliminate flicker. Yes No No No Frequency Adjust to eliminate periodic patterns and flickering when many fine vertical lines appear on the screen. Yes No No No H-position Adjust the horizontal position of the image. Yes No No No Contrast Adjust the image contrast. Higher Lower Yes Brightness Adjust the brightness of the image. Brighter Darker Color . Toggle the picture mode . 1/2/3 . NTSC mode*2 Set the black level with US : NTSC (US) mode JAPAN: NTSC (JAPAN) mode Auto setting Automatically adjusts items such as the sampling phase depending on the type of input signal. Position 83 Operations Use this menu to set or adjust image-related items. Items that can be set or adjusted are marked “Yes”, and those that cannot are marked “No”. (When an item is masked, it indicates that you cannot select for the current input.) Using the menus (Continued) Item Position Description Computer Y/PB/PR Video S-video V-position Adjust the vertical position of the image. Yes No No No Clamp 1 Adjusts the clamp pulse position. Yes No No No Clamp 2 Adjusts the clamp pulse width. Yes No No No *1: [Noise reduction] may not work depending on signal type. *2: [NTSC mode] can be displayed and adjusted only when the video signal is set to [NTSC] or [NTSC4.43]. NTSC mode is set to JAPAN when the language is set to Japanese. It is set to US for other languages. 84 The display setting menu Use this menu to set screen display-related items. (The items in gray color cannot be set with the current input selection.) Description Item Screen size Screen size setting [ or : Enter setting] [ :Selection] X3131/X3241 : Normal/Full/Thru/Wide WX3131 : Normal/Full/Thru/4:3 zoom Up/down shift [Enter: ] Lets the projected images shift vertically when the screen size setting is selected Wide for X3131/X3241 (within the range of 1024 x 768) and 4:3 zoom for WX3131 (within the range of 1280 ×800). Lower the image Raise the image Language Select one of the languages below to use for displaying the menu and messages [ or : Enter setting] [ :Selection] [Enter: ] / / / / / / / / / / / / / / / / / / / / / / Indonesia / / Background Screen to display when there is no input signal [ or : Enter setting] [ :Selection] [Enter: Logo/Blue/None ] Icon Display icons as function guides On Off Start-up screen Display start-up screen when power is turned on On Off User logo Display a logo customized by the user for the start-up screen or when there is no input signal. [ or : Enter setting] [ : Selection] Logo registration Press to display the registration menu. Display style Background Black Logo confirmation Press Reset logo Yes 85 Blue . No White Operations Blackboard When projecting on a non-screen surface, select a color in accordance with the mode projecting surface. Press and switch with and . Off/Green/Black/Brown/Blue/Beige Using the menus (Continued) Detailed description [Screen size] • Normal • • • • • : Enlarge an input image to fit the screen without changing the aspect ratio of video signals. Full : Displays an input image in 1024 × 768 dot resolution by enlarging it to fill the entire screen. (X3131/X3241) Displays an input image in 1280 x 800 dot resolution by enlarging it to fill the entire screen. (WX3131) Thru : Displays an input image in the native resolution of the video signals. Thru display is not available for Y/PB/PR, Video and S-Video-input images. The larger image than the screen size will be displayed over the screen. The input image may appear vertically long with some frequencies of video signals. Wide : Displays an input image in the center of the screen with a 16:9 aspect (X3131/X3241) ratio by enlarging it to fit the width of the screen. The upper and lower portions of the image will be compressed. Wide display is not available for Computer-input images. 4:3 zoom : Displays an input image with a 4:3 aspect ratio by enlarging it (WX3131) vertically. The enlarged image will be displayed over the screen. 4:3 zoom display is not available for computer images. For Y/PB/PR input, screen size setting function is not available for the video signals with a 16:9 aspect ratio. Note • If you use the screen size setting function on commercial video software, broadcast or cable-broadcasting programs to display images with the varying aspect ratio except for the purpose of your private viewing and listening, it may infringe the copyright protected by the copyright laws. [Up/down shift] Shifts the projected image vertically when [Screen size] is [Wide] for X3131/X3241. Shifts the projected image vertically when [Screen size] is [4:3 zoom] for WX3131. [Blackboard mode] Projects the image in colors more like projecting on a screen. Precaution • The projected image may differ depending on the type, color, and material of the blackboard and wall even if the selected color is the same as the projected screens. [Background] • RICOH is set for [Logo] by factory setting. • If user’s logo has been registered, it is displayed when [Logo] is set for background. [Start-up screen] If user’s logo has been registered and this setting is [On], the logo is displayed at start-up. [User logo] Registers a part of the image that is input from computer, as a stationary picture and displays it as a logo at start-up and when no signal is input. 86 <Logo registration> How to register user logo 1 Project a picture to register. 2 Select [User logo] in the Display setting menu, and press the button. or 3 Select <Logo registration> from the displayed menu list and press the button. 4 The registration area is displayed for confirmation. Select [OK] and press the button. • If the registered picture does not fall within the display area, operate the computer to scroll the screen. 5 Select [Yes] to register and press the 6 Registration starts. button. • A message is displayed while registration is in process. <Display style> Select the size of the registered logo. : Displays the registered image in original size at center of the screen. : Displays the registered image by enlarging fully in the screen. (As processed digitally, the image quality is degraded.) <Background> Sets background color when [Center] is selected for the logo [Display style]. <Logo confirmation> You can preview the registered logo. <Reset logo> You can reset the registered logo, display style and background to the factory setting. (The logo set for the start-up screen and background is reset.) 87 Operations Notes • You can register a logo when the input is set to Computer. • The area that can be registered is 512 x 384 dots for X3131/X3241 and 640 x 400 dots for WX3131, at the center of the screen. To register a company logo, prepare the image within the limit. • Only one logo can be registered. When a new image is registered, the old one is erased. • The time needed to register or display the image varies depending on the data size. • If you use this function on commercial video software, broadcast or cablebroadcasting except for the purpose of your private viewing and listening, it may infringe the copyright protected by the copyright laws. Using the menus (Continued) The Default setting menu This menu shows placement status and other settings. Default setting 1 menu Description Item Auto keystone Always correct keystone distortion automatically. On Off No signal power off Set the time to wait for the power to be turned off after the last operation is Off (not turned off) 30 min. made with no input signal. Auto input search Set whether the input with signals is only selected or not. On Off Beep Beep when operation is made. On Off Power on Sets whether to turn on the power when the ON/STANDBY button is pressed (Manual), or when the power cord is plugged in (Auto). Manual Auto Lamp power Set the lamp power. Low Detailed description Standard Input select menu [Auto input search] Input select [On]: Automatically searches the signals that can be Computer 1 projected, and switches input from the connected Y/PB/PR 1 device that outputs the video signals each time Computer 2 the INPUT button is pressed. The input from the Y/PB/PR 2 connected device that outputs no video signals is Video skipped. S-video [Off]: Displays the Input select menu. / shows whether signal is Toggle with buttons and press button. (The input without signals can be also selected.) input or not. Note • In normal operation, set [Auto input search] to [On]. Set to [Off] when you want to select the input source from Input select menu, or if the image does not appear properly. [Power on] If [Power on] is set to [Auto] and there is a power outage, the projector will come on once power is restored. [Lamp power] When [Lamp power] is set to [Low], the screen becomes a little darker, but the cooling fan noise gets quieter. 88 Default setting 2 menu Description Item Projection mode Sets projection mode in accordance with Placement Style. p.68 Fan mode Sets the cooling fan speed. Key lock Lock the control panel buttons. [ or : Enter setting] [ :Select OK to end] [ Press [Cancel] to return. (Standard) Closed Caption Closed Caption settings. Press and switch with (Rear) (Ceiling) (Rear ceiling) Standard and : Select On/Off] [ High : Confirm] . Off/ CC1/ CC2/CC3/CC4/T1/T2/T3/T4 Reset all Press . (The password and user logo are not reset.) Resets all adjustments and settings to their factory settings. Yes Password Password setting p.80 Press . Password registration/Password setting No Setting [Fan mode] to [High] increases the cooling fan speed. (The cooling fan noise gets louder.) Set this option to use the projector, for example, at high altitude (over 1,500 meters above sea level). • Do not set Fan mode to [High] when using the projector at a lower altitude. [Key lock] Protect from operating errors by locking on the control panel buttons of the projector. (The remote control operations are available.) Control panel operations are locked after the setting is done, and accordingly operation with the control panel buttons is disabled. • To release the key lock, set the [Key lock] to [Off] using remote control. Pressing the [RETURN/MUTE] button on the projector for 10 seconds also sets the [Key lock] to [Off]. (When operating the main unit, the 2 indicators of LAMP and TEMP light orange for 3 seconds, and at the same time the projector beeps.). [Closed Caption] • Off : Closed Caption is not displayed. • CC1-CC4: Displays the dialogue and narration of TV programs and videos that are (Caption) closed captioned. • T1-T4 : Displays information not related to the current program, such as weather, (Text) stock data or the like, when it is provided by individual station. Note • Closed Caption is available for Video and S-Video input images. • This projector supports a special feature called closed captioning which allows subtitles to be displayed at the bottom of the picture. This is pursuant to the Regulations set forth by the US Federal Communications Commission (FCC). Due to the different broadcasting or signaling system, it may not operate correctly in other regions or countries where TV programs do not support closed captioning. • Closed Caption may not appear correctly depending on the signal conditions or the recording conditions of videotapes. • If text is not available, only a black rectangle background may appear on screen. To prevent this from appearing, set the Closed Caption to [Off]. 89 Operations Detailed description [Fan mode] Using the menus (Continued) Displaying Information (Status display) This displays information about the input signal, lamp use time, etc. “Yes”: displayed, “No”: not displayed Item Input Mode name Resolution Frequency Description Input source name RGB input mode [Note 1] Resolution (in dots) Sync frequency Computer Yes Yes Yes Yes Y/PB/PR Yes No No No Video Yes No No No S-video Yes No No No Sync Sync signal polarity [Note 2] Yes No No No Signal format Y/PB/PR signal format No Yes No No Video mode Lamp time Lamp reset count Total time Color method of video signal Time of lamp use [Note 3] The count for lamp replacement The total time that this projector is used. Firmware version [Note 4] No Yes Yes No Yes Yes Yes Yes Yes Yes Yes Yes Yes Yes Yes Yes Yes Yes Yes Yes Version Notes 1: The mode of supported RGB signals p.101 is shown. 2: Sync signal polarity shown as P (positive) or N (negative) for [H/V]. 3: Displays [Lamp time] as a measure of when the lamp should be replaced. (Cannot be used as a counter of guaranteed lamp time.) 4: [Version] shows the version of the projector’s internal control program. This version will be requested for customer service purposes. Note • The displayed information will not be refreshed if the status changes. To refresh the information, dismiss the display, then display it again. 90 91 Operations Maintenance Lamp replacement A lamp is consumable supplies. If used for extended periods, images will appear dark, and the lamp could burn out. This is characteristic of a lamp, and is not malfunction. (The lifetime of the lamp depends on condition of use.) If this happens, replace it with a new one. WARNING • If the projector is mounted on the ceiling, it is recommended to use your sales representative when the lamp has to be exchanged. Uncovering the lamp while the projector is mounted on a ceiling may lead to a danger of damage from falling pieces of glass if the lamp is broken. Besides, working at high elevations can also be hazardous. Do not attempt to replace the lamp by yourself. • When replacing, always use lamp “IPSiO PJ Replacement Lamp Type1” (sold separately). If the lamp other than the specified one is used, it may cause a malfunction or damage to the unit due to the difference in the connector shape or the lamp rate. CAUTION • If you have been using the projector, the lamp will be very hot, and may cause burn injuries. Wait for the lamp to cool (for longer than 1 hour) before replacing it. • If the lamp should break, please handle with care to avoid injury due to broken pieces and contact your sales representative for repair service. 1 Unplug power cord. 2 Wait until lamp is sufficiently cooled. Wait for at least 1 hour. 3 Remove the outer lamp cover. Outer lamp cover To remove the outer lamp cover, loosen the screw on the side of the projector, and then slide the cover out and up (as shown in the illustration). Inner lamp cover 4 Remove the inner lamp cover. To remove the inner lamp cover, fully remove both screws, and then lift the cover (as shown in the illustration). Be careful not to loose the screws. 92 5 Pull out the lamp. Loosen the 3 lamp locking screws, pull up the handle, and press the tab to remove the lamp. Tab 6 Mount the new lamp. Align the orientation, press down the new lamp until the bottom is reached, and lock in place using the 3 lamp locking screws. 7 Replace the inner lamp cover. Inner lamp cover 8 Replace the outer lamp cover. Reseat the outer lamp cover by sliding it in the direction of the arrows (as shown in the illustration), and then tighten the screw loosened in step 3 . Tighten the screw until the outer lamp cover is fully immobile. (The outer lamp cover must be attached.) 9 Reset the lamp time. See the lamp’s manual for instructions on resetting the lamp time. 93 Outer lamp cover Maintenance Reattach both screws removed in step 4 . Tighten the screws until the inner lamp cover is fully immobile. Lamp replacement (Continued) Notes and Precautions • The [Lamp time] item in the Status display menu indicates the time of lamp use (as a rough guide) p.90 • Please replace the lamp after 2000 hours of use with [Lamp power] in the Default setting 1 menu set to [Standard], and 3000 hours of use with [Lamp power] in the Default setting 1 menu set to [Low]. p.88 • There are cases that the lamp can not work before the above mentioned period expires or before the replacement message is displayed. • Attach the outer lamp cover correctly so that it is not loose. If it is not attached correctly, the projector may fail to be powered on or the lamp may fail to come on. • Always replace the lamp with a new one. • The lamp is made out of glass. Do not touch the glass surface with your bare hands, bang it, or scratch it. (Dirt, jolts, scratches and the like could break the lamp.) About lamp replacement messages • The lamp replacement message of this projector displays an appropriate period according to the use period for [Standard] / [Low] of the [Lamp power] respectively. • When the replacement time approaches, the message of “The lamp life is ending. Please change the lamp.” is displayed every time the power is turned on. This display disappears when you press the button. Used Lamps This projector’s lamps contain trace amounts of environmentally harmful inorganic mercury. Be careful not to break used lamps, and dispose of them in accordance with local regulations or contact your sales representative. 94 Air filter cleaning The air filter prevents dust and debris from getting inside the projector. Never run the projector with the filter removed. It is recommended that the air filter is cleaned regularly. • The message “Check the air filter for dirt.” is displayed every 100 hours. (If the usage time exceeds 100 hours, this message is displayed for about 30 seconds when the image is displayed for the first time after power is turned on. This display will be dismissed with any operation.) • Check out the filter and any debris is found, use the following procedure for cleaning. WARNING • Request cleaning and maintenance of a ceiling-mounted unit from your sales representative. 1 Unplug power cord. 2 Remove the air filter. Pull out the air filter by holding the release knob with your fingers as shown in the figure. 3 Clean the filter. 4 Replace the air filter. Insert the air filter firmly until you hear a click. Notes • When dirt and dust build up in the air filter, the air circulation inside the projector is affected and the internal temperature will rise, causing the projector to stop working or malfunction. • Push the air filter fully in. If the projector is used with the air filter only partially inserted, dust and dirt will enter the interior and this could cause the projector to stop working or break down. • If you wash the air filer with water, make sure to dry it completely before replacing it. • If the air filter becomes damaged, replace it. Contact your sales representative for a new filter. If you continue to use the projector when its filter is damaged, dust and dirt will enter the interior and this could cause the projector to stop working or break down. 95 Maintenance Carefully remove the dust and dirt from the air filter with a vacuum cleaner or the like. Lens and main unit cleaning WARNING • Request cleaning and maintenance of a ceiling-mounted unit from your sales representative. Attempting to clean or replace the lamp in a high location by yourself may cause you to fall, resulting in injury. Lens cleaning • Clean the lens with a commercially available blower and/or lens cleaner. • The lens is easily scratched, so do not rub it with hard objects, or strike it. Main unit cleaning • Unplug the power cord before cleaning the main unit. • Wipe dirt off the main unit gently with a soft cloth. • Do not wipe the main unit with a damp cloth. Doing so may allow water to get inside, resulting in an electric shock or unit failure. • Do not use benzene, thinner and the like as they may deform or discolor the unit or damage the paint surface. • Do not use a chemically saturated cloth. 96 Others Trouble indications The indicator illuminates and a beep sound informs you of internal abnormalities. No power ⇒ Problem with projector (OFF) • Unplug the power cord, and contact your sales representative. Lamp went out during use, or won’t come on (Red flashing) (Red lit) or (Red lit) ⇒ Lamp temperature is high so that it is difficult to turn on, the lifetime of the lamp has ended or the projector is malfunctioning. • Unplug the power cord and wait for a short while, then turn the power back on. • If a lamp burns out, replace it with a new one. (Red lit) Power went out during use (Red (Red lit) flashing) ⇒ Internal overheating, or the outside temperature is too high. • Place the projector so that the air intake and exhaust are not blocked. • Unplug the power cord and wait for a short while, then turn the power back on. icon will appear before the power goes out. The Power went out during use (Green (Red lit) flashing) ⇒ Problem with internal cooling fan. • Unplug the power cord, and contact your sales representative. icon will appear before the power goes out. The Power went out during use, or power won’t come on (Orange flashing) (Red lit) ⇒ The lamp cover is not properly attached. • Unplug the power cord, and reattach the lamp cover. p.92 Power went out during use (Orange lit) (Red lit) ⇒ Problem inside the projector. • Unplug the power cord and wait for a short while, then turn the power back on. • If the above action will not clear the problem, unplug the power cord, and contact your sales representative. icon will appear before the power goes out. The Note Others • After there is an abnormal indication, the abnormal status remains until the power cord is unplugged. 97 Troubleshooting If you think something is wrong, check the followings before contacting customer service. Please see “Trouble indications” p.97 as well. If This Happens Check No power • Is the power cord plugged in? Is it connected to the projector? • Is the outer lamp cover attached properly? p.92 Power goes out during use • Is the ambient temperature high? p.97 • Is the air intake or air exhaust blocked? p.97 No picture • Is the input source selected correctly? (When [Auto input search] is [Off]) p.88 • Is the mute function on? p.79 • Is the brightness setting minimized? p.83 • Are the connections set up correctly? p.71 • Are all the connected devices functioning properly? No audio • • • • • Picture not displayed correctly • Is the input signal supported by the projector? p.101 p.103 • Is there something generating an abnormal video signal, for instance the video tape? Picture blurred Part of picture out of focus • Is the lens dirty? p.96 • Is the lens focus adjusted optimally? p.75 • Is the projection distance within the projector’s supported range? Did you press the input button? p.74 Is the mute function on? p.79 Is the volume setting minimized? p.75 Are the connections set up correctly? p.71 Are all the connected devices functioning properly? p.69 • Is the projector’s screen placement angle tilted too far? p.75 • Are the sharpness or sampling phase adjustments off? p.83 Image is dark • Are the brightness or contrast adjustments off? p.83 • Is the lamp nearing the end of its service life? p.90 Colors too light Bad shading • • • • Are the color, R-level, G-level, or B-level adjustments off? p.83 Is the screen dirty? Is the blackboard mode set properly? p.85 Is the lamp nearing the end of its service life? p.90 Control panel key • Is the key lock function on? p.89 doesn’t work 98 If This Happens • • • • Are the remote control’s batteries drained? Are the batteries inserted into the remote control correctly? p.67 Is the remote control being used within the effective range? p.67 Are there any obstructions between the remote control and projector? • Are there any fluorescent or other bright lights shining at the projector’s infrared remote sensor? Others Remote control doesn’t work Check 99 Specifications List of general specifications Item Consumption Power Weight External Dimensions (including protruding parts) Cabinet material Conditions for usage environment Display method Panel size LCD Panel Drive system Picture elements Lens Lamp Projection screen size Projection distance Connection terminal Speaker COMPUTER 1 IN terminal COMPUTER 2 IN terminal S-VIDEO terminal VIDEO terminal AUDIO IN terminal AUDIO OUT terminal CONTROL terminal Specification 270 W X3131/WX3131: 1.8 kg X3241: 1.9 kg X3131/WX3131: 272 × 82 × 189 mm (W × H × D) X3241: 295 × 82 × 196 mm (W × H × D) PC+ABS resin and PC resin (Some parts including Mg alloy) Temp: 5°C to 35°C; relative humidity: 30% to 70% 3-panel transmission X3131: 0.63 type WX3131: 0.59 type X3241: 0.70 type TFT active matrix X3131/X3241: 786,432 pixels (1024 H × 768 V) WX3131: 1,024,000 pixels (1280 H × 800 V) X3131/WX3131: F=1.7 ~ 1.87 f=19.2 ~ 23.00 mm X3241: F=1.6 ~ 1.76 f=21.5 ~ 25.80 mm High-pressure mercury lamp (180 W) 30-300 inches X3131: 0.89 m ~ 10.93 m WX3131: 0.94 m ~ 11.58 m X3241: 0.89 m ~ 10.94 m 1 W (Mono) Mini D sub 15 pin RGB / Y/PB/PR (dual use) Mini D sub 15 pin RGB / Y/PB/PR/MONITOR OUT (multiple use) Mini DIN 4 pin RCA Pin Jack, 1 V (p-p), 75 Ω 3.5 mm dia. stereo mini-jack: 1.5 V (rms), 22 kΩ or more COMPUTER 1 IN, 2 IN/VIDEO/S-VIDEO (multiple use) 3.5 mm dia. stereo mini-jack D sub 9 pin (RS-232C) Notes • This model complies with the above specifications. • Designs and specifications are subject to change without notice. • This model may not be compatible with features and/or specifications that may be added in the future. Separately sold product IPSiO PJ Replacement Lamp Type1 IPSiO PJ Replacement Air filter Type1 100 List of supported signals (RGB signals) Resolution Mode Refresh rate (Hz) H-frequency (kHz) Clock (MHz) 720 x 400 720x400_85 85.039 37.927 35.500 25.175 640 x 480 800 x 600 VGA_60 59.940 31.469 VGA_72 72.809 37.861 31.500 VGA_75 75.000 37.500 31.500 VGA_85 85.008 43.269 36.000 SVGA_56 56.250 35.156 36.000 SVGA_60 60.317 37.879 40.000 SVGA_72 72.188 48.077 50.000 SVGA_75 75.000 46.875 49.500 SVGA_85 85.061 53.674 56.250 832 x 624 MAC16" 74.550 49.725 57.283 1024 x 768 XGA_60 60.004 48.363 65.000 XGA_70 70.069 56.476 75.000 XGA_75 75.029 60.023 78.750 XGA_85 84.997 68.667 94.500 MAC19" 74.700 60.134 79.857 108.000 1152 x 864 SXGA1_75 75.000 67.500 *1280 x 800 WXGA_60 59.880 49.580 83.300 1280 x 960 QuadVGA_60 60.000 60.000 108.000 QuadVGA_85 85.002 85.938 148.500 SXGA3_60 60.020 63.981 108.000 SXGA3_75 75.025 79.976 135.000 SXGA3_85 85.024 91.146 157.500 SXGA+ 59.978 65.317 121.750 162.000 1280 x 1024 1400 x 1050 1600 x 1200 UXGA_60 60.000 75.000 UXGA_65 65.000 81.250 175.500 UXGA_70 70.000 87.500 189.000 UXGA_75 75.000 93.750 202.500 UXGA_85 85.000 106.250 229.500 *: 1280 x 800 is available only for WX3131 Note • Signals whose resolution exceeds the native resolution mentioned below will be compressed. For this reason, some information may be lost, or image quality may be affected. X3131/X3241 : 1024 × 768 resolution WX3131 : 1280 × 800 resolution 101 Others This projector supports the following RGB signals. Note, however, that depending on the computer model, the screen may show flicker or streaking. Please adjust the projector if this happens. Specifications (Continued) List of supported signals (Component signals) Signal format 480i(525i)@60Hz 480p(525p)@60Hz 576i(625i)@50Hz 576p(625p)@50Hz 720p(750p)@60Hz 720p(750p)@50Hz 1080i(1125i)@60Hz 1080i(1125i)@50Hz 1080p(1125p)@60Hz 1080p(1125p)@50Hz fh(kHz) 15.73 31.47 15.63 31.25 45.00 37.50 33.75 28.13 67.50 56.25 fv(Hz) 59.94 59.94 50.00 50.00 60.00 50.00 60.00 50.00 60.00 50.00 List of supported signals (Video, S-Video signals) Video mode NTSC PAL SECAM PAL-M PAL-N PAL-60 NTSC4.43 fh(kHz) 15.73 15.63 15.63 15.73 15.63 15.73 15.73 fv(Hz) 60 50 50 60 50 60 60 fsc(MHz) 3.58 4.43 4.25 or 4.41 3.58 3.58 4.43 4.43 Pin assignment of COMPUTER 1 IN, COMPUTER 2 IN & MONITOR terminals 11 6 15 10 1 5 Mini D sub 15 Pin connector Input Signal • RGB input RGB signals: 0.7 V (p-p) 75 Ω Horizontal sync signal: TTL level (Pos/neg polarity) Vertical sync signal: TTL level (Pos/neg polarity) • Y/PB/PR input Y signal: PB/PR signals: Pin description During RGB input During Y/PB/PR input 1 Video signal (R) Color difference signal (PR) 2 Video signal (G) Luminance signal (Y) 3 Video signal (B) Color difference signal (PB) 4 GND * 5 GND * 6 GND(R) GND(PR) 7 GND(G) GND(Y) 8 GND(B) GND(PB) 9 N.C * 10 GND * 11 GND * 12 N.C * 13 Horizontal sync signal * 14 Vertical sync signal * 15 N.C * * Do not connect anything. Pin No. 1.0 V (p-p) 75 Ω 0.7 V (p-p) 75 Ω 102 CONTROL terminal Pin assignment Pin No. Signal Name D sub 9 pin connector Description 1 DCD Data carrier detect 2 TXD Sending data 3 RXD Receiving data 4 DTR Data terminal ready 5 GND Signal ground 6 DSR Data set ready 7 RTS Request to send 8 CTS Consent to send 9 RI Ring indicator Interface format 1. Communication methodRS-232C, 9600 bps, No Parity, Data Length: 8 bits; Stop Bit Length: 1 bit STX (02 h) Command (3 Byte) ETX (03 h) 2. Communication format Only 1 command valid per communication. 3. Data formatFor input commands, only ASCII-compliant alluppercase alphanumeric characters supported. 4. Replies Acknowledge ACK (06 h) CR(0 Dh) Data ... Normally ended ACK (06 h) ESC(1 Bh) ... Aborted No acknowledge NAK (15 h) If commands are to be sent consecutively, wait for the response from the projector before sending the next command. Main Commands Item Power on Power off Icon display on Icon display off Auto setting (RGB input) Status display on Status display off Command PON POF MO0 MO1 PAT DON DOF 103 Others J A JP EN JP 2011 年 7 月 Y006-6121