1
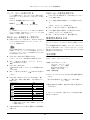
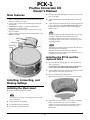
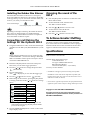
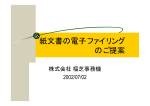
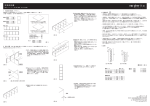
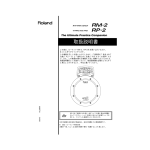
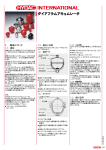
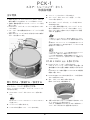
PCK-1
スネア・トレーニング・キット
取扱説明書
4. メッシュ・ヘッドの上にフープをのせます。
主な特長
5. チューニング・ボルトにワッシャーを通し、フープを
シェルに取り付けます。
• お持ちの 14 インチ・アコースティック・スネア・ドラムを、
静かな練習パッドに変えるトレーニング用のキットです。
• 打感触/静粛性に優れた 14 インチ・メッシュ・ヘッドを付
属しています。
• RT-5S スネア・トリガーは、ヘッドとリムを別々にトリガリ
ングできます。
• リム・ショット 時の打撃音を 抑えるフー プ・ラバーを付 属
しています。
• 別売りのリズム・コーチ(RM-2)を取り付けできる専用ブ
ラケットを付属しています。
6. すべてのチューニング・ボルトを、フープに軽くあたる
まで締め付けます。
7. ヘッドの張り具合を調整します。チューニング・キーを
使って対角線上にチューニング・ボルトを締め、ヘッド
のテンションを均一で強めにします(特性に大きく影響
するため、重要です)
。
1 ケ所のチューニング・ボルトを一度に強く締めないでください。
ヘッドを均一に張ることができないため、誤動作の原因となりま
す。
張り具合は、アコースティック・ドラムの打感触と同じくらいか
それより強めが適切です。張り具合が弱いと、トリガリングに問
題が起こることがあります。
RM-2(別売)
RT-5S ケーブル
メッシュ・ヘッド
フープ・ラバー
ブラケット
パッドを長く使っていると、ヘッドの張り具合が変わってくるこ
とがあります。必要に応じて調整しなおしてください。
ヘッドの張り具合の調整は、打感触の調整を行うもので、アコー
スティック・ドラムのように、音の高さ(ピッチ)を調整するも
のではありません。
RT-5S と RM-2(別売) を取り付ける
1. RT-5S(スネア・トリガー)を取り付けます。
このとき、チューニング・ボルトが干渉しない位置で、演
奏の邪魔にならない位置(演奏者と反対側)に取り付けま
す。
RT-5S のセンサーの高さ調整については、RT-5S の取扱説
明書をご覧ください。
2. RT-5S の RIM レベルつまみを右に回して、リム信号の出
力レベルを最大にします。
3. 次に、ブラケットと RM-2 を取り付けます。
図のようにボルトを 2 個所締めます。
取り付ける/接続する/設定する
メッシュ・ヘッドを取り付ける
スネア・ドラムのヘッドを外し、14 インチ・メッシュ・ヘッ
ドを取り付けます。
1. すべてのチューニング・ボルトとワッシャーを取り外し
ます。
4. 手順 3 で取り付けたブラケットの固定ねじを締めて、スネ
ア・ドラムのフープに取り付けます。
このとき、演奏者側から見て RT-5S のすぐ右隣のチュー
ニング・ボルトが干渉しない位置に取り付けます。
取り外したチューニング・ボルトやワッシャー をなくさないよう
ご注意ください。
2. フープとヘッドを取り外します。
3. シェルの上に付属のメッシュ・ヘッドをのせます。
1
PCK-1 スネア・トレーニング・キット 取扱説明書
フープ・ラバーを取り付ける
RM-2(別売) の音色を設定する
フープの種類に応じて、スチール(プレス)用またはダイ
カスト用フープ・ラバーをスネア・ドラムのフープに取り
付けます。
このとき、演奏者側に取り付けてください。
1. [SEL]ボタンを何回か押して、「PAD INST」インジケー
ターを点滅させます。
2. ヘッドの音色を設定する場合は、ヘッド部分をたたきま
す。
断面形状
スチール(プレス)用
ダイカスト用
「TRIG1」インジケーターが点滅します。
3. [▲]/[▼]ボタンを押して、音色を選びます。
4. リムの音色を設定する場合は、リム部分をたたきます。
「TRIG2」インジケーターが点滅します。
フープの形状によっては、フープ・ラバーが外 れやすい場合があ
ります。その場合は、必要に応じてフープと フープ・ラバーの間
に両面テープを貼り、固定してください。
5. [▲]/[▼]ボタンを押して、音色を選びます。
RM-2 (別売) を接続する/設定する
静音性を高めるには
1. 付属のステレオ・ケーブルを使って、RT-5S の OUTPUT
ジャックと RM-2 の TRIG1 ジャック(トリガー・イン
プット 1)を接続します。
ストレイナーのレバーで、スナッピーを外して使用してくださ
い。
さらに静 音効果 を高めた い場合は、ス トレイナ ーのネ ジでス
ナッピーを更にゆるくしたり、スナッピーとボトム・ヘッドの
間にスポンジをはさんだりしてください。ボトム・ヘッドの振
動を抑えることができます。
RT-5S を接続する場合、ケーブルは必ずトリガー・インプット 1
に接続し、トリガー・インプット 2 には何も接続しないでくださ
い。トリガー・インプット 2 にケーブルが接続されていると、RM2 が正常に動作しなくなります。
主な仕様
2. [SEL]ボタンを押しながら電源を入れます。
トリガー・パラメーターを設定できる状態になります。
PCK-1:スネア・トレーニング・キット
3. [▲]/[▼]ボタンを押して、インプット・モードを
(Head&Rim)にします。
内容物:RT-5S スネア・トリガー
14 インチ・メッシュ・ヘッド
消音用フープ・ラバー 2 種類
RM-2 取り付け用ブラケット
接続ケーブル(0.2m)
付属品:取扱説明書
4. [SEL]ボタンを押します。
と表示された後、ト リガー・タイプが選択でき るよ
うになります。
5. [▲]/[▼]ボタンを押して、
(PD-120)を選んで
ください。
※ スネア・ド ラムによっ ては、取り付け が不可能な 場合があ
ります。
[▲]
6. [SEL]ボタンを押してパラメーターを切り替え、
/[▼]ボタンを押して値を変更し、以下の表のように
設定します。
パラメーター
値
(スレッショルド)
8
11
(センシティビティ)
(ベロシティー・カーブ)
(LNR)
32(3.2msec)
(スキャン・タイム)
(リトリガー・キャンセル)
10
(クロストーク・キャンセル)
(OFF)
8(8msec)
(マスク・タイム)
(リム・センシティビティ)
15
(リム・ゲイン)**1
20
取り付け可能な目安:リム上端からヘッドまでの高さ
11 ∼ 15mm
※ 製品の 仕様および外 観は、改良のため 予告なく変 更するこ
とがあります。
202
© 2003 ローランド株式会社 本書の一部、もしくは全部を無断で複写・
転載することを禁じます。
*1:リム・センシティビティを設定した後、[TAP]ボタ
ンを押しながら[SEL]ボタンを押すと、リム・ゲイ
ンを設定できます。
7. [METRONOME]ボタンを押して通常のテンポ表示画面
に戻ります。
2
PCK-1
Practice Conversion Kit
Owner’s Manual
Main Features
5. Pass the tuning bolts through the washers, then attach the
hoop to the shell.
• This is a training kit that turns your 14-inch acoustic snare
drum into a quiet practice pad.
• It comes with a 14-inch mesh head offering superior feel
and quietness.
• The RT-5S Snare Trigger is capable of independent
triggering for the head and rim.
• A rubber rim silencer that suppresses the sounds of rim
shots is included.
• A special bracket for installing the optional Rhythm Coach
(RM-2) is included.
6. Tighten all the tuning bolts until they lightly contact the
hoop.
7. Adjust the tension of the head, being careful to tighten the
lugs at a diagonal so that the head is tuned evenly. (This
is important because it affects response and triggering
characteristics.)
Never fully tighten a single tuning bolt all at once. Doing
so makes it impossible to tension the head evenly.
It should feel about the same as an acoustic drum, or a
even slightly tighter. Tension that is too loose may cause
triggering problems.
RM-2 (option)
Cable
RT-5S
Mesh head
Rubber rim
silencer
Bracket
The tension may change when the pad has been in use for
some time. Re-tune as required.
Adjusting the head tension affects response and
triggering, and does not change the pitch of the sound, as
it would on an acoustic drum.
Installing the RT-5S and the
Optional RM-2
1. Mount the RT-5S (Snare Trigger) so it does not interfere
with your playing.
For information on adjusting the height of the RT-5S's
sensor, refer to the owner's manual for the RT-5S.
2. Turn the RIM level knob for the RT-5S clockwise to set the
output level for rim signals at maximum.
3. Next, attach the bracket and the RM-2.
Tighten the bolts at the two locations shown in the figure.
Installing, Connecting, and
Making Settings
Installing the Mesh Head
1. Remove all tuning bolts and washers.
Be careful not to lose any of the tuning bolts and washers
that you removed.
4. Tighten the mounting screw for the bracket you installed
in step 3 to attach the hoop to the snare drum.
Install at a location where it does not interfere with the
tuning bolt to the immediate right of the RT-5S (see
illustration).
2. Detach the hoop and the head.
3. Place the mesh head on the shell.
4. Place the hoop on the mesh head.
1
PCK-1 Practice Conversion Kit Owner's Manual
Changing the sound of the
RM-2
Installing the Rubber Rim Silencer
Attach the either the rubber rim silencer for a steel (press)
hoop or the rubber rim silencer for a die-cast hoop, depending
on the type of hoop on your snare drum. Attach it on the side
closest to you, where you will make rim shots.
1. Press the [SEL] button several times to make the "PAD
INST" indicator flash.
2. To select the head sound, strike the head.
The "TRIG1" indicator flashes.
Cross-section shape:
For a steel (press) hoop For a die-cast hoop
3. Press the [
]/[
] buttons to choose a tone.
4. To select the rim sound, hit the rim.
The "TRIG2" indicator flashes.
Depending on the shape of the hoop, the rubber rim silencer
may come loose. If this happens, use double-sided tape
between the hoop and the rubber rim silencer as required to
secure the rubber rim silencer in place.
5. Press the [
]/[
] buttons to choose a tone.
To Achieve Greater Muffling
Connecting and Making the
Settings for the Optional RM-2
We advise to use this system with the snares turned OFF.
If you want even more of a muffled effect, insert a sponge or
cloth between the snare strainer and the bottom head. This
suppresses vibration and resonance of the bottom head.
1. Using the included stereo cable, connect the OUTPUT jack
on the RT-5S to the TRIG1 jack (TRIGGER INPUT 1) on the
RM-2.
Specifications
When connecting the RT-5S, be sure to connect the cable
to TRIGGER INPUT 1, and connect nothing to TRIGGER
INPUT 2. The RM-2 will not operate correctly if a cable is
connected to TRIGGER INPUT 2.
PCK-1: Practice Conversion Kit
Contents: RT-5S Snare Drum Trigger
14-inch Mesh Head
Two types of Rubber Rim Silencers
RM-2 Mounting Bracket
Connection Cable (0.2 m / 7-7/8 inches)
Accessory: Owner's Manual
2. Hold down the [SEL] button and switch on the power.
This is how you can set the trigger parameters.
3. Press the [ ]/[ ] buttons to change the input mode to
(Head & Rim).
* Installation on all types of snare drums may not be possible.
4. Press the [SEL] button.
After
is displayed, you can select the trigger type.
5. Press the [
]/[
] buttons to choose
Installation on some snare drums may NOT be possible if the
height from the upper edge of the rim to the head is more or less
than 7/16–5/8 inch (11–15 mm).
(PD-120).
6. Make settings as shown below, pressing the [SEL] button
to change parameters and the [ ]/[ ] buttons to change
values.
Parameter
(Threshold)
(Sensitivity)
(Velocity curve)
(Scan time)
(Retrigger cancel)
(Crosstalk cancel)
(Mask time)
(Rim sensitivity)
(Rim gain) *1
* In the interest of product improvement, the specifications and/or
appearance of this unit are subject to change without prior notice.
Value
8
11
202
(LNR)
32 (3.2 msec)
10
(OFF)
8 (8 msec)
15
20
Copyright © 2003 ROLAND CORPORATION
All rights reserved. No part of this publication may be
reproduced in any form without the written permission of
ROLAND CORPORATION.
*1: After setting the rim sensitivity, holding down the
[TAP] button and pressing the [SEL] button enables
you to set the rim gain.
7. Press the [METRONOME] button to return to the normal
tempo-display screen.
2
03348267
1RAD