1
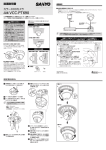
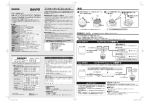
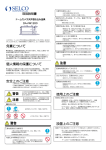
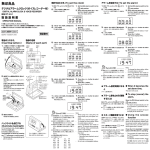
00_L9ZZN_WA_ ダミーカメラ 07.5.11 3:16 PM ページ 1
取扱説明書
Instruction Manual
■ 仕様 (Specifications)
ダミーカメラ
¡質量 (Weight):約370 g (Approx. 370 g/0.8 lbs.)
¡外形寸法 (Dimensions)
Dummy Camera
151 mm/6.0"
品番
VC-0450
Model VC-0450
116 mm/4.6"
100 mm/4.0"
ご使用の前にこの説明書をよくお読みのうえ、正しくお使いください。
尚、本機は、ダミーカメラとして使用するものです。
国内マーケティング本部
マーケティング統括部 システム商品企画部
〒110-8534 東京都台東区上野1丁目1番10号
1 東京(03)6364-3463
パーソナルモバイルグループ
DIカンパニー DCS事業推進部 DS商品部
〒574-8534 大阪府大東市三洋町1番1号
1 大東(072)870-6277
この取扱説明書は、古紙配合率100%、白色度70%の再生紙を使用しています。
Printed on recycled paper
1AC6P1P3224-L9ZZN/WA (0507KR-SY)
SANYO Electric Co., Ltd.
Printed in Japan
For proper use, it is recommended to first carefully read these instructions.
This device is used as a dummy camera.
注意
この表示を無視して、誤った取扱いをすると、人が傷害を負う可能
性が想定される内容および、物的損害のみの発生が想定される内容
を示しています。
CAUTION
This mark indicates instructions that if neglected may lead to
personal injury or property damage.
00_L9ZZN_WA_ ダミーカメラ 07.5.11 3:16 PM ページ 3
設置のしかた / Installation method
1
ベース板ロック(A)を押しながら矢印の方向に開ける
Pushing the base plate lock (A), open the base plate in the arrowed direction.
3
カメラユニットのリブ(C)とフック(D)にベース板の切り込みを合わせ、ロック音がす
るまでカメラユニットを押し込む
¡カメラユニットとベース板が確実に合致しているかをご確認ください。
(A)
Aligning the ribs (C) and hook (D) on the camera unit with the slot on the base plate,
push the camera unit until it clicks.
¡Make sure that the camera unit and base plate fit perfectly.
(C)
2
ベース板を天井に合わせ、市販のネジとワッシャ(B)でしっかりと固定する
Set the base plate on the ceiling and tighten it securely using suitable screws and
washers (B).
(D)
(B)
(B)
¡長さ (Length):35.0 mm/1.4" or more
¡直径 (Diameter):3.5 mm/0.1" ∼ 5.0 mm/0.2"
¡ネジ頭の高さ(ワッシャ含む)
(Height of screw head, washer included): 5.0 mm/0.2" or less
取り付けネジは確実に取り付けてください。
指定寸法以外を使用すると落下することがあります。
Make sure to tighten the screws properly.
Using screws of sizes other than specified may cause the
unit to fall.
設置時の注意
¡本機を設置する面が十分な強度をもっていることを設置前に確認してください。凹凸のない平らな天
井面に設置してください。
¡天井面に取り付ける際は、天井穴に対する防水処理を正しく行ってください。
¡設置後はカメラに触れないでください。
CAUTION
¡Check that the installation location is strong enough to bear the camera before proceeding. Install to a
ceiling with no unevenness in its surface.
¡Waterproof the ceiling hole properly when installing the camera on the ceiling.
¡Do not touch the camera after installation.