1
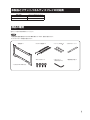
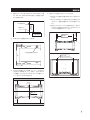
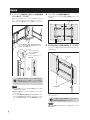
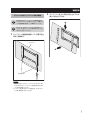
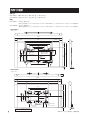
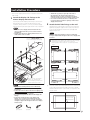
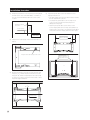
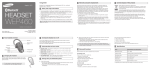
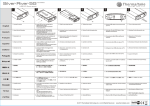
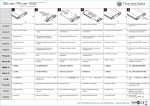
*Voir et Entendre n’a jamais eu autant de sens 「据付工事」について 本機は十分な技術・技能を有する専門業者が据え付けを 行うことを前提に販売されているものです。据え付け・ 取り付けは必ず工事専門業者または販売店にご依頼くだ さい。 なお、据え付け、取り付けの不備、誤使用、改造、天災 などによる事故損傷については、弊社は一切責任を負い ません。 This product is sold assuming that it will be installed by a qualified installation technician with the required level of knowledge and skill. Always have an installation specialist or your dealer install and mount this product. Pioneer shall not be held liable for any damage or injuries resulting from this product's improper installation or mounting, improper use, modification, or natural disasters. En vendant ce produit, Pioneer suppose qu’il sera installé par un installateur qualifié doté des connaissances et des compétences nécessaires. Faites toujours installer ou monter ce produit par un installateur spécialisé ou par votre revendeur. Pioneer ne saura être tenu responsable des dommages matériels ou corporels qui résulteraient d’une installation ou d’un montage défaillant, d’une mauvaise utilisation, de la modification de ce produit ou encore de catastrophes naturelles. 据付工事専門業者取扱品 このたびは、パイオニア製品をお買い求めいただきまして まことにありがとうございます。お使いになる前には取扱 説明書をよくお読みになり、安全に正しくご使用ください。 また、お読みになったあとも、この取扱説明書は大切に保 管してください。 「据付工事」について ◦本機は十分な技術・技能を有する専門業者が据え付 けを行うことを前提に販売されているものです。据 え付け・取り付けは必ず工事専門業者または販売店 にご依頼ください。 ◦なお、据え付け、取り付けの不備、誤使用、改造、 天災などによる事故損傷については、弊社は一切責 任を負いません。 安全上のご注意 ご注意 安全上の絵表示について 取扱説明書および製品に記されている注意事項には、損害 のレベルや内容を示す絵表示が付けられていることがあり ます。それら絵表示の意味は以下のとおりです。 警告 人が死亡または重傷を負う恐れが ある内容を示します。 注意 人がけがをしたり財産に損害を受 ける恐れがある内容を示します。 警告・注意(気をつけること) 禁止(やってはいけないこと) 指示・強制(しなければならないこと) 警告 異常時の処理 異常や不具合が発見されたら、すみやかに修理を 工事専門業者に依頼してください。 設置 2 Ja 本機は十分な技術・技能を有する専門業者が取り付 けを行うことを前提に販売されているものです。据 え付け・取り付けは必ず工事専門業者または販売店 にご依頼ください。工事が不完全ですと、破損や落 下など、事故の原因になります。 設置場所は金具とディスプレイの質量に十分耐えう る強度を持つ場所を選定してください。破損や落下 など事故の原因になります。また、壁の構造強度に より取り付けできない場合がありますので、工事専 門業者へご相談ください。 ディスプレイ周囲温度が 40 ℃を超えないよう空気 の流通を確保してください。ディスプレイ内部に熱 がこもり故障の原因となることがあります。 ディスプレイの通風孔をふさがないでください。通 風孔をふさぐと内部に熱がこもり、火災の原因とな ることがあります。 人が容易にぶら下がったり寄り掛かれる場所には設 置しないでください。破損や落下など、事故の原因 になります。 振動や衝撃の加わるような場所には設置しないでく ださい。破損や落下など、事故の原因になります。 屋外や温泉、海辺の近くには設置しないでください。 ディスプレイを長期間ご使用になりますと、ディス プレイの熱や空気の流れで壁面が変色することがあ りますのでご注意ください。 組み立ての手順を守り、指定の箇所はすべて確実に ネジ留めしてください。指定を守らないと、破損や 落下など、事故の原因になります。 各部のネジを緩めたりすると落下などの事故の原因 になりますので、絶対に緩めないでください。 指定外のディスプレイへの取り付けや、改造および 他の用途での使用はしないでください。破損や落下 など、事故の原因になります。 安全のため、必ず二重安全の落下防止対策を行って ください。 安全のため、60 型ディスプレイの場合は必ず3人 以上、50 型ディスプレイの場合は必ず2人以上で 設置を行ってください。 その他の設置場所については、ディスプレイ本体の 取扱説明書を熟読し、その内容を必ず守ってくださ い。 使用方法 ぶら下がったり、寄り掛かったりしないでくださ い。破損や落下など、事故の原因になります。 ディスプレイ金具内部や壁取り付け部など、目に 付かないところが破損し、ディスプレイが落下す る危険を生じることがあります。ディスプレイな どの修理点検時やお店の内装工事の時など、必ず 工事専門業者に点検を依頼してください。できれ ば、定期的に工事専門業者に点検を依頼してくだ さい。 本金具を長期使用されると、環境によっては経年 変化で強度が不足する場合があります。5年を目 安として、工事専門業者に点検を依頼し、使用し て問題ないことをお確かめください。 注意 作業の際には、ディスプレイと周辺機器の電源を切 り、電源プラグをコンセントから抜いてください。 ディスプレイの取り付け、取り外しの時に指を挟 まないようご注意ください。 本製品とフラットパネルディスプレイの対応表 壁掛け金具 フラットパネルディスプレイ KRP-WM01 KRP-600 シリーズ KRP-WM02 KRP-500 シリーズ 部品の確認 組み立ての前に部品を確認してください。 ご注意 ◦壁側金具を壁面に固定するためのネジ類は付属していません。別途ご用意ください。 ◦プラスドライバーを別途ご用意ください。 • 壁側金具 ×1 • ディスプレイ側金具 ×2 • ワッシャー(M8用)×8 • 目印ラベルシート ×1 • M8ツバ付ボルト ×4 • 六角レンチ ×1 (M8用:対辺6 mm) • 取扱説明書(本書)×1 ※イラストはKRP-WM01です。 3 Ja 設置手順 ※ディスプレイのイラストは KRP-600M です。 ◦落下防止対策の壁側のアイプレート(またはヒートン)は、 ディスプレイの重さに十分耐える強度のある場所に取り 付けてください。 ◦ワイヤーの先端がディスプレイの通風孔などから内部に 1 ディスプレイにディスプレイ側金具を取り付 ける。 ディスプレイとディスプレイ側金具を、上下をまちが えないように M8 ツバ付ボルトで固定してください (4 カ所)。 ご注意 ◦ディスプレイにキズおよび破損が生じないように、シー トのようなものを敷いてください。 ◦必ず安定したテーブルなどの上で取り付けてください。 ディスプレイ側金具に落下 防止用のワイヤーを通す。 入らないよう、端末処理にご注意ください。 2 壁側金具を壁に取り付ける。 左右対称の位置に固定してください。(8 カ所以上) このとき使用するネジ、ボルト類は壁の強度や材質に 適したものを別途ご用意ください。 ご注意 取り付け場所に、金具とディスプレイの質量に十分耐える強 度があることを確認してください。 :取り付け穴(左右対称の位置に固定:8カ所以上) ※8カ所以上取り付ける場合は、他の取り付け穴を使用して ください。 KRP-WM01 こちらを上に してください。 KRP-WM02 落下防止用 ネジ ケーブル スピーカーケーブルなどは、必ず ディスプレイと落 下 防止 用ネジ の間を通してください。 ご注意 ◦スピーカーを取り付ける場合は、この段階で取り付けて ください。取り付け方はスピーカーの取扱説明書をご覧 ください。 ◦各種ケーブル類は、この段階で取り付けてください。 また、各種ケーブル類は、周辺機器側には接続しないで ください。 ◦ディスプレイ側金具で、ケーブル類を挟まないようご注 意ください。 ◦この状態の時にワイヤーをディスプレイ側金具に取り付 けてください。落下防止用のワイヤー、カラビナ、アイ プレート(またはヒートン)はディスプレイの重さに十 分耐える強度を持つ市販品をお求めください。 4 Ja カラビナ アイプレート ヒートン ① はじめに壁や梁の強度を確認しながらディスプレイを 取り付ける位置を決め、画面センターの位置を出す。 画面センター 設置手順 ② 画面センターから上側 192 mm(KRP-WM01 の場 合)、94 mm(KRP-WM02 の場合)に位置出し用の ネジを仮留めする。 ⑤ 目印ラベルを壁およびディスプレイに貼る。 ◦ 目印ラベルは壁掛け位置の目印にする一時的なラベ ルです。 ◦ あらかじめ目印ラベルを壁の目立たない場所にため し貼りして、壁紙に影響がないことをお確かめくだ さい。 ネジを仮留めする 画面センター * : KRP-WM01 ** : KRP-WM02 目印ラベルを 壁に貼る 150 mm 192 mm* 94 mm** ◦ 目印ラベルをディスプレイの表面に貼ると、糊のこ りを起こす可能性がありますので、図のようにディ スプレイの背面側に貼ってください。 ③ 手順②のネジに壁側金具を引っ掛ける。 ネジに壁側金具を引っ掛ける 目印ラベルを ディスプレイに貼る ④ 天井から壁側金具までの距離(A1、A2)、または床か ら金具までの距離(B1、B2)を測り、水平になるよ うに調整してから壁へネジまたはボルトに付属のワッ シャーを付けて8カ所に固定する。 天井 A1 A1 = A 2 または B 1 = B2 A2 画面センター B2 B1 床 5 Ja 設置手順 3 ディスプレイ側金具の上部のツメを壁側金具 に引っ掛ける。(2 カ所) 4 ディスプレイの位置を調整する。 目印ラベルに合わせてディスプレイを取り付けてくだ さい。上部のツメがきちんと引っ掛かり、ディスプレイ が水平で正しい位置に取り付いたか確認してください。 左右方向にディスプレイの位置を微調整することがで きます。 ディスプレイ 壁掛け金具 ディスプレイ側金具の上部のツメを壁側金具に引っ掛け、 ワイヤーをカラビナに通し、壁に取り付けたアイプレート (またはヒートン) に固定する。 カラビナ 5 落下防止用ネジで金具を固定する。(2 カ所) ディスプレイ側金具下の落下防止用ネジが止まるまで 締め込みます。 ワイヤーをテープなどで リアケースに仮固定して から取り付ける アイプレート (またはヒートン) に固定する ディスプレイ 安全のため、60 型ディスプレイの取り付け作 業は必ず 3 人以上、50 型ディスプレイの取り 付け作業の場合は必ず 2 人以上で行ってくださ い。 ご注意 ◦取り付けの際、スピーカーを付けた場合はスピーカー部 分を持たないでください。 ◦配線などが金具やディスプレイに挟まれたりしないよう にしてください。 ◦ディスプレイ側金具を壁側金具に引っ掛けた状態で、ディ スプレイの下側を強く引っ張らないでください。ディス プレイの上側が壁に当たり、キズや故障の原因となりま す。 落下防止用ネジ 固定したあとは目印ラベル、落下防止の注意タグをは がしてください。 必ず落下防止用ネジを締め込み、ディスプレイ 側金具と壁側金具を固定してください。 ご注意 落下防止の注意タグをはがすときに、指を切らないようにご 注意ください。 6 Ja 設置手順 フラットパネルディスプレイを外す場合 2 ディスプレイを少し手前に持ち上げてから、 真上に持ち上げて外す。 作業を始める前にディスプレイと周辺機器の電源 プラグをコンセントから抜いてください。必要に応 じて周辺機器側の配線ケーブル類を外してください。 安全のため、60 型ディスプレイの場合は必ず 3 人以上、50 型ディスプレイの場合は必ず 2 人以上 で取り外しを行ってください。 1 ディスプレイ側金具を固定している落下防止 用ネジを緩める。 ディスプレイ 落下防止用ネジ ご注意 ◦落下防止用ネジにはストッパーがついているため、取り 外しはできません。ディスプレイ下側を手前に引けるよ うになるまで緩めてください。 ◦ワイヤーで落下防止をしている場合には、必ずワイヤー も一緒に取付具から外してください。 7 Ja 外形寸法図 外形寸法 KRP-WM01:994 mm (W) × 694 mm (H) × 25 mm (D) KRP-WM02:645 mm (W) × 516 mm (H) × 22 mm (D) 質量 KRP-WM01:6.6 kg(金具のみ) 60.6 kg(金具+フラットパネルディスプレイ< KRP-600 シリーズのディスプレイとスピーカー取付時>) KRP-WM02:3.7 kg(金具のみ) 38.2 kg(金具+フラットパネルディスプレイ< KRP-500 シリーズのディスプレイとスピーカー取付時>) KRP-WM01 ( 単位:mm) 1677 106 1465 235.5 106 994 64 235.5 928 168 822 642 422 192 160 10-8.5 x 20.5 694 876 18-6 x 63 画面センター 220 243 183 30 320 175 532 14 25 KRP-WM02 ( 単位:mm) 67*1 1399 83 1233 294 645 64*2 191 294 83 573 469 723 94 画面センター 2-6 x 120 4-6 x 63 170 516 149.5 44.5 173.5 84.5 60.5 200 10-8.5 x 20.5 8 Ja 16 22 *1:スピーカー取付金具までの奥行き寸法 *2:ディスプレイの奥行き寸法 ©2008 パイオニア株式会社 禁無断転載 Product Requiring Professional Installation Thank you for buying Pioneer’s product. Please read through the Operating Instructions to learn how to operate your model safely and properly. Please be advised to keep the Operating Instructions in your place for future reference. Notes on Installation: • This product is sold assuming that it will be installed by a qualified installation technician with the required level of knowledge and skill. Always have an installation specialist or your dealer install and mount this product. • Pioneer shall not be held liable for any damage or injuries resulting from this product's improper installation or mounting, improper use, modification, or natural disasters. • Do not install the display outdoors, at a hot spring, or near a beach. • Use of the display for a long time may cause discoloration of the wall due to the heat of the display and the air flow. • Follow the described assembly procedure and securely fix the screws in all the specified locations. Failure to so do may cause the display to break or fall. • Loosening any of the screws may cause the display to fall, so absolutely never loosen the screws. • Do not mount the Pioneer display and television other than specified, do not modify it, and do not use it for other than its intended purposes, as this may cause it to break or fall. • Be sure to implement double fall prevention measures to be safe. • In the case of a 60-inch display, always have three or more persons on hand when installing the display. In the case of a 50-inch display, have two or more persons on hand. • Thoroughly read the operating instructions of the Pioneer display and television for additional information about installation locations, and be sure to follow this information. Usage Method • Do not hang from or lean against the display, as this may cause it to break or fall. SAFETY CAUTIONS Handling in Case of Anomaly If you detect an anomaly or fault, promptly have a qualified technician perform repairs. • The metal fittings inside the display, the wall mounting parts, and other places hidden from sight may suffer damage and cause the display to fall. Therefore, when having the display inspected or repaired, or when performing interior finish work at your shop, be sure to have a qualified technician inspect these items. If possible, have these items checked periodically. • The metal fittings of the display may undergo changes due to environmental factors when used for a long time, and lose some of their strength as a result. After five years or so, have a qualified technician inspect them to make sure that they can safely continue to be used. Installation • This product is sold assuming that it will be installed by a qualified installation technician with the required level of knowledge and skill. Always have an installation specialist or your dealer install and mount this product. Improper installation may cause the product to break or fall. • Select a location that is strong enough to support the weight of the wall mount and display to prevent the product from getting damaged or falling down. Some walls may lack the structural strength required for mounting this product, so consult with a qualified technician. Before starting, switch off the power of the display and peripheral devices, and disconnect all power plugs from the power outlets. Be careful not to get your hands caught when mounting and removing the display. • Ensure that there is sufficient ventilation so that the ambient temperature around the display does not exceed 40 °C Heat accumulation inside the display may cause display failure. • Do not block the ventilation openings of the display, as this would cause heat to build up inside and may result in fire. • Do not install this product in a location where people may hang from it or lean against it, as this may cause the product to break or fall. • Do not install this product in a location where it will be subjected to vibration or shocks, as this may cause the product to break or fall. 9 En Correspondence Between this Product and Pioneer Displays and Televisions Wall mount unit Pioneer displays and televisions KRP-WM01 PRO-141FD/KRP-600M/KRP-600A KRP-WM02 PRO-101FD/KRP-500M/KRP-500A Checking the Parts Check the parts before beginning assembly. Ìi • Screws for fixing the wall side fittings to the wall are not included. Purchase them separately. • A Phillips driver (not included) is also required for assembly. • Wall side fittings ×1 • Display side fittings ×2 • M8 Allen bolts ×4 * Illustration shows the KRP-WM01. 10 En • Washer (for M8 use) ×8 • Allen wrench ×1 (6 mm for M8 use) • Guide label ×1 • Operating instructions (this document) ×1 Installation Procedure * The Pioneer display and television illustration shows the KRP-600M. • Attach the eye plate (or eye bolt) on the side of the wall where the fall-prevention measure is implemented at a location of sufficient strength to resist the weight of the Pioneer display and television. • Be careful to terminate the wires so that they will not get inside the ventilation openings of the Pioneer display and television. 1 Attach the display side fittings to the Pioneer display and television. Securely attach the display side fittings to the Pioneer display and television with the M8 Allen bolts (four locations), being careful to correctly orient the display side fittings the right side up as shown in the illustration. Ìi • Place the Pioneer display and television down on a sheet or similar material to protect it from scratches and damage. • Always place the Pioneer display and television on a stable surface such as a table. Pass a safety wire through the holes of the display side fittings. 2 Attach the Wall side fittings to the wall. Attach the wall side fittings to the wall in a horizontally symmetrical pattern (eight or more locations). Be sure to use screws and bolts suited for the strength and material of the wall. Ìi Make sure that the installation location is sufficiently strong to withstand the weight of the Pioneer display and television. : Attachment holes (attach wall side mount at horizontally symmetrical locations, eight or more locations) * If using eight or more locations, use other attachment holes. KRP-WM01 Place is so the top is here. KRP-WM02 Fall prevention screw Cables Be sure to pass the speaker cables, etc., between the Pioneer display and television and fall-prevention screw. Ìi • If you plan to install speakers, do so at this stage. For the installation procedure, refer to the operating instructions. • Connect the various cables to the Pioneer display and television at this stage. Do not yet connect the various cables to their respective peripherals. • Be careful not to pinch the cables in the display side fittings. • In this state, attach the wire to the display side fittings. Use a commercially available safety wire, spring hook, and eye plate (or eye bolt) of sufficient strength to support the weight of the Pioneer display and television. Spring hook Eye plate 1 First select the Pioneer display and television attachment location by checking the strength of the wall or beam, and then determine the location that corresponds to the screen center. Screen center Eye bolt 11 En Installation Procedure 2 Temporarily attach the screw used for positioning about 192 mm (in the case of the KRP-WM01), or 94 mm (in the case of the KRP-WM02) above the screen center location. 5 Attach the guide labels to the wall and the Pioneer display and television. •The guide labels are provisional labels used to indicate the wall attachment locations. •First attach the guide labels to an inconspicuous location on the wall and check that they do not damage the wall paper. Screencenter * : KRP-WM01 **: KRP-WM02 Attach the guide labels to the wall. 3 Hang the wall side fittings on the screw referred to in step 2. Hang the wall side fittings on the screw. 4 Measure the distance from the ceiling to the wall side fittings (A1, A 2), and the distance from the floor to the fitting (B1, B2), and after adjusting the wall side fittings so that is level, fasten it to the wall with screws or bolts fitted with supplied washers. Ceiling A1 A1 = A2 or B1 = B2 A2 Screen center B1 B2 Floor 12 En Attach the guide labels to the Pioneer display and television. 150 mm •Attaching the guide labels to the surface of the Pioneer display and television may cause adhesive to remain stuck to the surface, so attach the guide labels on the rear side of the display as shown in the figure. 192mm* 94 mm** Temporarily attach the screw. Installation Procedure 3 Hang the hooks at the top of the display side fittings to the wall side fittings (two locations). 4 Adjust the Pioneer display and television position. Attach the Pioneer display and television so that it aligns with the guide labels. Check that the top hooks are firmly hung and that the Pioneer display and television is attached in its correct position and is level. The position of the Pioneer display and television can be fine-adjusted horizontally and vertically. Pioneer display and television Wall mount unit Hang the hooks at the top of the display side fittings to the wall side fittings, pass a wire in each spring hook, and attach it to the eye plate (or eye bolt) attached to the wall. Spring hook 5 Fix the fittings with the fall-prevention screws (two locations). Attach the wire after temporarily attaching it to the rear case with tape, etc. Tighten the two fall-prevention screws of the display side fittings all the way. Fix the wire to the eye plate (or eye bolt). Pioneer display and television In the case of a 60-inch display, always have three or more persons on hand when installing the display. In the case of a 50-inch Caution display, have two or more persons on hand. Ìi • If speakers are attached, do not hold the speakers when performing this attachment. • Make sure that the wiring, etc., does not get caught in the fittings or the Pioneer display and television. • Do not forcefully pull down the bottom of the Pioneer display and television when the display side fittings hang from the wall side fittings because this may cause the top part of the Pioneer display and television to touch the wall, resulting in scratches or damage. Fall-prevention screws After fixing the fittings, remove the guide labels and the fall prevention caution tag. Be sure to tighten the fall-prevention screws to securely fix the display side fittings and Caution the wall side fittings. Ìi When removing the fall-prevention caution tag, be careful not to cut your fingers. 13 En Installation Procedure Removing the Pioneer display and television Before beginning this procedure, remove the power plugs of the Pioneer display and television and peripheral equipment from their outlets. If Caution necessary, also remove the connecting cables on the peripheral equipment side. In the case of a 60-inch display, always have three or more persons on hand when removing Caution the display. In the case of a 50-inch display, have two or more persons on hand. 1 Loosen the fall-prevention screws fixing the display side fittings. Pioneer display and television Fall-prevention screws Ìi • The fall-prevention screws cannot be removed because they have a stopper. Loosen them until the lower part of the Pioneer display and television can be pulled toward you. • If a security wire is used for fall prevention, be sure to remove also the wire from the fittings. 14 En 2 After lifting the Pioneer display and television slightly toward you, remove it by gently lifting it straight up. External Dimensions Diagram External Dimensions KRP-WM01: 994 mm (W) × 694 mm (H) × 25 mm (D) (39-1/8 in. (W) × 27-5/16 in. (H) × 31/32 in. (D)) KRP-WM02: 645 mm (W) × 516 mm (H) × 22 mm (D) (25-13/32 in. (W) × 20-5/16 in. (H) × 7/8 in. (D)) Weight KRP-WM01: 6.6 kg (14.6 lbs) (fittings only) 60.6 kg (133.6 lbs) (fittings + Pioneer display and television <PRO-141FD/KRP-600M/KRP-600A display with speakers>) KRP-WM02: 3.7 kg (8.2 lbs) (fittings only) 38.2 kg (84.2 lbs) (fittings + Pioneer display and television <PRO-101FD/KRP-500M/KRP-500A display with speakers>) KRP-WM01 Unit: mm (inch) 1677 (66-1/32) 106 (4-3/16) 1465 (57-11/16) 235.5 (9-9/32) 106 235.5 (9-9/32) (4-3/16) 994 (39-1/8) 64 (2-17/32) 928 (36-17/32) 422 (16-5/8) 694 (27-5/16) 192 (7-9/16) Screen center 175 (6-7/8) 30 (1-3/16) 160 (6-5/16) 10-8.5 x 20.5 (10-11/32 x 13/16) 18-6 x 63 (18-1/4 x 2-15/32) 220 (8-21/32) 243 (9-9/16) 183 (7-7/32) 320 (12-19/32) 876 (34-1/2) 168 (6-5/8) 822 (32-3/8) 642 (25-9/32) 14 (9/16) 532 (20-15/16) 25 (31/32) KRP-WM02 (2-5/8*1) 67*1 Unit: mm (inch) 1399 (55-3/32) 1233 (48-17/32) 645 (25-13/32) Screen center 2-6 x 120 (2-1/4 x 4-23/32) 4-6 x 63 (4-1/4 x 2-15/32) 170 (6-11/16) 149.5 (5-7/8) 516 (20-5/16) 94 (3-11/16) 60.5 (2-3/8) 200 (7-7/8) 84.5 (3-5/16) 44.5 (1-3/4) 64*2 (2-17/32*2) 723 (28-15/32) 573 (22-9/16) 469 (18-15/32) *1 Depth to the speaker brackets *2 Depth of the Pioneer display and television 83 (3-9/32) 191 (7-17/32) 294 (11-9/16) 294 (11-9/16) 10-8.5 x 20.5 (10-11/32 x 13/16) 16 (5/8) 83 (3-9/32) 173.5 (6-27/32) 22 (7/8) Published by Pioneer Corporation. Copyright © 2008 Pioneer Corporation. All rights reserved. 15 En Produit devant être installé par un professionnel Nous vous remercions d’avoir choisi un produit Pioneer. Veuillez lire attentivement ce mode d’emploi pour savoir comment utiliser votre pied de table correctement et en toute sécurité. Nous vous conseillons de conserver soigneusement ce mode d’emploi à portée de main et dans un endroit sûr afin de pouvoir vous y référer le cas échéant. Remarques sur l’installation : • En vendant ce produit, Pioneer suppose qu’il sera installé par un installateur qualifié doté des connaissances et des compétences nécessaires. Faites toujours installer ou monter ce produit par un installateur spécialisé ou par votre revendeur. • Pioneer ne saura être tenu responsable des dommages matériels ou corporels qui résulteraient d’une installation ou d’un montage défaillant, d’une mauvaise utilisation, de la modification de ce produit ou encore de catastrophes naturelles. • N’installez pas ce produit à un endroit où des gens pourraient se pendre à lui ou s’adosser contre lui, il pourrait tomber ou se casser. • N’installez pas ce produit à un endroit où il serait soumis à des vibrations ou à des chocs, il pourrait tomber ou se casser. • N’installez pas l’écran en extérieur, près d’une source d’eau chaude ou à proximité d’une plage. • L’utilisation de l’écran pendant une durée prolongée peut entraîner une décoloration du mur en raison de la chaleur de l’écran et de la ventilation. • Suivez la procédure de montage décrite et vissez les vis dans les endroits indiqués. Si vous ne le faites pas, l’écran pourrait tomber ou se casser. • Si vous desserrez l’une des vis, l’écran pourrait tomber. Aussi ne desserrez absolument jamais les vis. • N’installez pas le moniteur et téléviseur Pioneer autrement que conformément aux instructions, ne le modifiez pas et ne l’utilisez pas à des fins autres que celles pour lesquelles il est prévu. Il pourrait tomber ou se casser. • Pour plus de sécurité, doublez les mesures pour empêcher les chutes. • Dans le cas d’un écran 60 pouces, faites-vous toujours aider d’au moins trois personnes lors de l’installation. Dans le cas d’un écran 50 pouces, faites-vous aider d’au moins deux personnes. • Lisez attentivement le mode d’emploi du moniteur et téléviseur Pioneer pour de plus amples informations sur les lieux d’installation et suivez les consignes qui vous sont données. AVERTISSEMENTS Mode d’utilisation • Ne vous pendez pas à l’écran et ne vous adossez pas contre lui, il risquerait de tomber ou de se casser. Marche à suivre en cas d’anomalie Si vous détectez une anomalie ou un défaut, faites effectuer les réparations nécessaires dans les meilleurs délais par un technicien qualifié. Installation • En vendant ce produit, Pioneer suppose qu’il sera installé par un installateur qualifié doté des connaissances et des compétences nécessaires. Faites toujours installer ou monter ce produit par un installateur spécialisé ou par votre revendeur. Une mauvaise installation peut entraîner la casse ou la chute du produit. • Sélectionnez un endroit suffisamment solide pour supporter le poids des fixations murales et de l’écran afin d’éviter que ce dernier ne soit endommagé ou ne tombe. Certains murs peuvent ne pas être assez solides pour que l’écran y soit installé, aussi consultez un technicien qualifié. • Veillez à ce que la pièce soit suffisamment aérée et à ce que la température ambiante à proximité de l’écran ne dépasse pas les 40 °C. Une accumulation de chaleur à l’intérieur de l’écran peut être à l’origine de pannes. • N’obstruez pas les trous d’aération de l’écran, la chaleur s’accumulerait à l’intérieur et pourrait provoquer un incendie. 16 Fr • Les fixations en métal qui se trouvent à l’intérieur de l’écran, les pièces de la structure d’installation murale et d’autres endroits non visibles peuvent être endommagés et provoquer la chute de l’écran. Par conséquent, lorsque vous faites réparer ou inspecter l’écran, ou lors de la réalisation de travaux de finition intérieure dans votre magasin, faites-les inspecter par un technicien qualifié. Si possible, faites contrôler ces pièces périodiquement. • En cas d’utilisation prolongée, les fixations en métal de l’écran peuvent se modifier sous l’action de facteurs environnementaux et perdre de leur solidité. Au bout d’environ cinq ans d’utilisation, faites-les inspecter par un technicien qualifié pour vous assurer qu’elles peuvent être encore utilisées en toute sécurité. Avant de commencer, mettez l’écran et tous les périphériques hors tension et débranchez tous les cordons d’alimentation. Veillez à ne pas vous faire coincer les mains lors de l’installation ou de la désinstallation de l’écran. Correspondance entre ce produit et les moniteurs et téléviseurs Pioneer Kit d’installation murale Moniteurs et téléviseurs Pioneer KRP-WM01 PRO-141FD/KRP-600M/KRP-600A KRP-WM02 PRO-101FD/KRP-500M/KRP-500A Contrôler les pièces Inspectez les pièces avant de commencer le montage. ,i>ÀµÕi • Les vis d’installation des fixations murales sur le mur ne sont pas fournies. Achetez-les séparément. • Un tournevis cruciforme est également nécessaire pour le montage (non fourni). • Fixations murales ×1 • Fixations de l’écran ×2 • Boulons à tête creuse hexagonale M8 ×4 * Le schéma montre le KRP-WM01. • Rondelle (pour boulons M8) ×8 • Clé hexagonale ×1 (6 mm pour l’utilisation de boulons M8) • Etiquettes-guides ×1 • Mode d’emploi (ce document) ×1 17 Fr Procédure d’installation * Le schéma du moniteur et téléviseur Pioneer montre le KRP-600M. • Posez le piton du côté du mur ou la mesure anti-chute est mise en œuvre à un endroit suffisamment résistant pour supporter le poids du moniteur et téléviseur Pioneer. • Veillez à rentrer les fils de façon à ce qu’ils n’obstruent pas les trous d’aération du moniteur et téléviseur Pioneer. 1 Posez les fixations de l’écran sur le moniteur et téléviseur Pioneer. Fixez solidement les fixations de l’écran sur le moniteur et téléviseur Pioneer à l’aide des boulons à tête creuse hexagonale M8 (quatre emplacements), en veillant à orienter correctement les fixations de l’écran dans le bon sens comme indiqué sur le schéma. ,i>ÀµÕi • Couchez le moniteur et téléviseur Pioneer sur un drap ou un morceau de tissu pour éviter les éraflures et les détériorations. • Placez toujours le moniteur et téléviseur Pioneer sur une surface stable, comme une table par exemple. Passez un fil de sécurité dans les trous des fixations de l’écran. 2 Installer les fixations murales au mur. Installez les fixations murales au mur en les disposant de façon symétrique horizontalement (huit emplacements ou plus). Veillez à bien utiliser des vis et des boulons adaptés à la résistance et à la composition du mur. ,i>ÀµÕi Veillez à ce que l’endroit choisi pour l’installation soit suffisamment solide pour résister au poids du moniteur et téléviseur Pioneer. : Trous de fixation (disposez les fixations murales de façon horizontalement symétrique, huit emplacements ou plus) *Si vous utilisez huit emplacements ou plus, utilisez d’autres trous de fixation. KRP-WM01 Placez-le de façon à ce que le haut se trouve ici. KRP-WM02 Vis anti-chute Câbles Veillez à bien faire passer les câbles d’enceintes, etc. entre le moniteur et téléviseur Pioneer et la vis anti-chute. ,i>ÀµÕi • Si vous souhaitez installer des enceintes, faites-le à ce moment-là. Pour la procédure d’installation, consultez le mode d’emploi. • Branchez maintenant les différents câbles sur le moniteur et téléviseur Pioneer. Ne les raccordez toutefois pas encore aux périphériques correspondants. • Veillez à ne pas coincer les câbles dans les fixations de l’écran. • A ce moment-là, attachez le fil sur les fixations de l’écran. Utilisez un fil de sécurité vendu dans le commerce, un mousqueton et un piton suffisamment solides pour supporter le poids du moniteur et téléviseur Pioneer. 18 Fr Mousqueton Patte de fixation Piton 1 Commencez par choisir l’endroit où vous allez installer le moniteur et téléviseur Pioneer en vérifiant la solidité du mur ou de la poutre, puis déterminez l’endroit qui correspond au centre de l’écran. Centre de l’écran Procédure d’installation 2 Posez provisoirement la vis utilisée pour le positionnement environ 192 mm (dans le cas du KRPWM01) ou 94 mm (dans le cas du KRP-WM02) au dessus du centre de l’écran. 5 Posez les étiquettes-guides sur le mur ainsi que sur le moniteur et téléviseur Pioneer. •Les étiquettes-guides sont des étiquettes provisoires utilisées pour indiquer les points de fixation sur le mur. •Tout d’abord, collez les étiquettes-guide à un endroit où elles sont peu visibles sur le mur et vérifiez qu’elles n’endommagent pas le papier peint. Centre de l’écran * : KRP-WM01 **: KRP-WM02 Collez les étiquettes-guides sur le mur. 150 mm •Si des étiquettes-guides sont posées sur la surface du moniteur et téléviseur Pioneer, de l’adhésif peut rester coller sur la surface. Posez-les donc à l’arrière de l’écran comme indiqué sur le schéma. 192mm* 94 mm** Posez provisoirement la vis. 3 Suspendez les fixations murales à la vis mentionnée à l’étape 2. Suspendez les fixations murales à la vis. Collez les étiquettes-guides sur le moniteur et téléviseur Pioneer. 4 Mesurez la distance entre le plafond et les fixations murales (A1, A 2) ainsi que la distance entre le sol et les fixations (B1, B2) et, après avoir ajusté les fixations murales de façon à ce qu’elles soient au même niveau, fixez-les au mur à l’aide des vis ou boulons ainsi que des rondelles qui sont fournies. Plafond A1 A1 = A2 ou B1 = B2 A2 Centre de l’écran B1 B2 Sol 19 Fr Procédure d’installation 3 Suspendez les crochets situés en haut des fixations de l’écran aux fixations murales (deux emplacements). 4 Réglez la position du moniteur et téléviseur Pioneer. Posez le moniteur et téléviseur Pioneer de façon à ce qu’il soit aligné sur les étiquettes-guides. Vérifiez que les crochets du haut sont bien accrochés et que le moniteur et téléviseur Pioneer est droit et fixé au bon endroit. La position du moniteur et téléviseur Pioneer peut être réglée de façon précise horizontalement et verticalement. Moniteur et téléviseur Pioneer Kit d'installation murale Suspendez les crochets qui se trouvent en haut des fixations de l’écran aux fixations murales, passez un fil dans chaque mousqueton et attachez-le au piton qui est fixé au mur. Mousqueton Attachez le fil après l’avoir attaché provisoirement à l’arrière avec du ruban adhésif, etc.. 5 Posez les fixations à l’aide des vis antichute (deux emplacements). Serrez complètement les deux vis anti-chute des fixations de l’écran. Fixez le fil sur le piton. Attention Moniteur et téléviseur Pioneer Dans le cas d’un écran 60 pouces, faites-vous toujours aider d’au moins trois personnes lors de l’installation. Dans le cas d’un écran 50 pouces, faites-vous aider d’au moins deux personnes. ,i>ÀµÕi • Si des enceintes sont installées, ne saisissez pas l’écran par les enceintes pendant l’installation. • Veillez à ce que les câbles, etc. ne se coincent pas dans les fixations ou dans le moniteur et téléviseur Pioneer. • Ne forcez pas sur la partie basse du moniteur et téléviseur Pioneer pour la faire baisser lorsque les fixations de l’écran sont accrochées aux fixations murales. La partie supérieure du moniteur et téléviseur Pioneer pourrait toucher le mur et provoquer des éraflures ou des dommages. Vis anti-chute Une fois les fixations posées, retirez les étiquettesguides et l’étiquette de prévention des chutes. Attention Veillez à bien serrer les vis anti-chute pour que les fixations de l’écran et les fixations murales soient solidement maintenues. ,i>ÀµÕi 20 Fr Faites attention de ne pas vous couper les doigts en retirant l’étiquette de prévention des chutes. Procédure d’installation Désinstaller le moniteur et téléviseur Pioneer Attention Attention Avant de commencer, débranchez la prise du moniteur et téléviseur Pioneer et de tous les périphériques. Si nécessaire, retirez également les câbles de raccordement côté périphériques. 2 Après avoir soulevé le moniteur et téléviseur Pioneer légèrement dans votre direction, retirez-le en le soulevant un peu verticalement. Dans le cas d’un écran 60 pouces, faites-vous toujours aider d’au moins trois personnes lors de l’installation. Dans le cas d’un écran 50 pouces, faites-vous aider d’au moins deux personnes. 1 Desserrez les vis anti-chute qui maintiennent les fixations de l’écran. Moniteur et téléviseur Pioneer Vis anti-chute ,i>ÀµÕi • Les vis anti-chute ne peuvent être retirées parce qu’elles sont équipées d’une butée. Desserrez-les jusqu’à ce que vous parveniez à tirer vers vous la partie basse du moniteur et téléviseur Pioneer. • Si un fil de sécurité a été utilisé pour empêcher les chutes, veillez à le retirez lui-aussi des fixations. 21 Fr Schéma de dimensions Dimensions extérieures KRP-WM01 : 994 mm (largeur) × 694 mm (hauteur) × 25 mm (profondeur) KRP-WM02 : 645 mm (largeur) × 516 mm (hauteur) × 22 mm (profondeur) Poids KRP-WM01 :6,6 kg (fixations seules) 60,6 kg (fixations + moniteurs et téléviseurs Pioneer <moniteur PRO-141FD/KRP-600M/KRP-600A avec enceintes>) KRP-WM02 :3,7 kg (fixations seules) 38,2 kg (fixations + moniteurs et téléviseurs Pioneer <moniteur PRO-101FD/KRP-500M/KRP-500A avec enceintes>) KRP-WM01 Unità : mm 1677 106 1465 235,5 106 994 64 235,5 928 822 168 642 422 192 10-8,5 x 20,5 18-6 x 63 694 876 30 160 183 320 220 243 Centre de l’écran 175 532 14 25 KRP-WM02 Unità : mm 67*1 1399 1233 83 294 83 294 645 191 573 64*2 469 723 94 2-6 x 120 170 516 149,5 Centre de l’écran 44,5 173,5 84,5 60,5 200 10-8,5 x 20,5 *1 Profondeur des supports d’enceintes *2 Profondeur du moniteur et téléviseur Pioneer 22 Fr 16 4-6 x 63 22 Publication de Pioneer Corporation. © 2008 Pioneer Corporation. Tous droits de reproduction et de traduction réservés. Produkt erfordert professionelle Installation Wir danken Ihnen, dass Sie sich für den Kauf dieses Produkts der Firma Pioneer entschieden haben. Bitte lesen Sie die Bedienungsanleitung aufmerksam, um sich damit vertraut zu machen, Ihr Modell richtig und sicher zu handhaben. Wir empfehlen Ihnen, die Bedienungsanleitung gut aufzubewahren, um sie künftig im Bedarfsfalle jederzeit zu Rate ziehen zu können. Hinweise zur Installation: • Dieses Produkt wird in der Annahme verkauft, dass es von einem qualifizierten Techniker mit dem erforderlichen Wissens- und Fähigkeitsstand installiert wird. Lassen Sie dieses Produkt immer von einem Installationsspezialisten oder Ihrem Händler installieren. • Pioneer soll für keinerlei Schäden oder Verletzungen haftbar gemacht werden, die infolge von unsachgemäßer Installation oder Befestigung, falscher Nutzung, Modifizierung oder Naturkatastrophen entstehen. • Installieren Sie dieses Produkt nicht an einem Platz, an dem sich Personen daran hängen oder anlehnen könnten. Das Produkt könnte beschädigt werden oder herunterfallen. • Installieren Sie dieses Produkt nicht an einem Platz, wo es Vibrationen oder Erschütterungen ausgesetzt ist. Das Produkt könnte beschädigt werden oder herunterfallen. • Installieren Sie den Bildschirm weder unter freiem Himmel, noch an einer heißen Quelle oder in Strandnähe. • Die Nutzung des Bildschirms über einen längeren Zeitraum hätte zur Folge, dass die Wand sich aufgrund der Hitze im Bildschirm und des Luftstroms verfärbt. • Befolgen Sie den beschriebenen Aufbauvorgang und ziehen Sie die Schrauben an den angegebenen Stellen fest. Andernfalls könnte der Bildschirm beschädigt werden oder herunterfallen. • Durch das Lösen der Schrauben könnte der Bildschirm herunterfallen. Lösen Sie deshalb in keinem Fall die Schrauben. • Montieren Sie den Pioneer Bildschirm und Fernseher nur auf die hier beschriebene Weise, nehmen Sie keine Änderungen vor und nutzen Sie das Gerät nur für die vorgesehenen Zwecke. Andernfalls könnte das Produkt beschädigt werden oder herunterfallen. • Achten Sie darauf, sicherheitshalber die doppelten Maßnahmen zu ergreifen, um das Herunterfallen des Produkts zu verhindern. • Im Falle eines 60-Zoll-Bildschirms müssen immer drei oder mehr Personen für die Installation des Bildschirms bereitstehen. Im Falle eines 50-Zoll-Bildschirms sollten zwei oder mehr Personen verfügbar sein. SICHERHEITSHINWEISE Handhabung im Falle einer Unregelmäßigkeit Wenn Sie eine Unregelmäßigkeit oder Störung feststellen, lassen Sie Reparaturen durch einen qualifizierten Techniker durchführen. Installation • Dieses Produkt wird in der Annahme verkauft, dass es von einem qualifizierten Techniker mit dem erforderlichen Wissens- und Fähigkeitsstand installiert wird. Lassen Sie dieses Produkt immer von einem Installationsspezialisten oder Ihrem Händler installieren. Eine unsachgemäße Installation kann zur Folge haben, dass das Produkt beschädigt wird oder herunterfällt. • Wählen Sie einen geeigneten Platz, der das Gewicht der Wandbefestigung und des Bildschirms abstützt und verhindert, dass das Produkt beschädigt wird oder herunterfällt. Einige Wände weisen eine Struktur auf, die sich nicht zur Befestigung dieses Produkt eignet. Dies sollten Sie mit einem qualifizierten Techniker besprechen. • Stellen Sie sicher, dass eine ausreichende Belüftung gewährleistet ist, sodass die Temperatur rund um den Bildschirm 40 °C nicht übersteigt. Ein Hitzestau im Inneren des Geräts kann eine Anzeigestörung zur Folge haben. • Blockieren Sie nicht die Belüftungsöffnungen des Bildschirms. Dies hätte einen Hitzestau und einen Brand im Inneren des Bildschirms zur Folge. • Lesen Sie die Bedienungsanleitungen des Pioneer Bildschirms und Fernsehers sorgfältig durch, wenn Sie weitere Informationen über Installationsplätze benötigen. Achten Sie darauf, diese Informationen zu befolgen. Nutzungsmethode • Hängen oder lehnen Sie sich nicht gegen den Bildschirm. Dieser könnte beschädigt werden oder herunterfallen. • Die Beschläge im Inneren des Bildschirms, die Wandbefestigungsteile und andere unsichtbare Stellen könnten beschädigt werden oder zur Folge haben, dass der Bildschirm herunter fällt. Wenn Sie den Bildschirm inspizieren oder reparieren lassen oder in Ihrem Laden Innenausbauarbeiten durchführen, sollten Sie diese Bauteile von einem qualifizierten Techniker überprüfen lassen. Lassen Sie diese Bauteile gegebenenfalls regelmäßig überprüfen. • Die Beschläge des Bildschirms können sich aufgrund von Umweltfaktoren verändern, wenn Sie über lange Zeit verwendet werden und infolgedessen an Stabilität verlieren. Nach etwa fünf Jahren sollten Sie diese Teile durch einen qualifizierten Techniker überprüfen lassen, um sicherzustellen, dass sie weiterhin verwendet werden können. Schalten Sie zunächst den Bildschirm und die Peripheriegeräte aus und ziehen Sie alle Stecker aus den Steckdosen. Achten Sie darauf, Ihre Hände beim Befestigen und Entfernen des Bildschirms nicht einzuklemmen. Veröffentlicht von Pioneer Corporation. Urheberrechtlich geschützt © 2008 Pioneer Corporation. Alle Rechte vorbehalten. 23 Ge Prodotto che necessita di un’installazione professionale Grazie per aver acquistato un prodotto Pioneer. Per imparare ad usare il vostro modello in modo sicuro e corretto, leggete accuratamente le istruzioni per l’uso. Vi consigliamo di tenere le istruzioni per l’uso a portata di mano per future consultazioni. Note sull’installazione: • Al momento della vendita, si presuppone che il prodotto venga installato da un tecnico qualificato con un adeguato livello di conoscenze e competenze. Rivolgetevi sempre a un installatore professionista o al vostro rivenditore per installare e montare questo prodotto. • Pioneer non si assume alcuna responsabilità per danni o infortuni causati da una scorretta installazione o montaggio o uso di questo prodotto, eventuali modifiche apportatevi o calamità naturali. • Non installate questo prodotto in un luogo in cui possa essere soggetto a vibrazioni o urti che potrebbero farlo cadere e danneggiarlo. • Non installate il display all’aperto, vicino a una fonte di calore o su una spiaggia. • L’uso prolungato del display potrebbe scolorire la parete a causa del calore dello stesso e del flusso di aria. • Seguite la procedura di assemblaggio descritta e stringete le viti saldamente nei punti specificati. In caso contrario, il display potrebbe cadere o rompersi. • Allentando le viti potreste far cadere il display, perciò non allentatele mai. • Non montate il display e il televisore Pioneer diversamente da come specificato, non modificatelo, né usatelo per scopi estranei a quello preposto: potrebbe cadere o rompersi. • Assicuratevi di applicare due volte le misure anticaduta per essere sicuri. • In caso di display da 60-pollici, assicuratevi che ci siano almeno due o tre persone al momento dell’installazione. In caso di un display da 50-pollici, assicuratevi che ci siano due o più persone disponibili. • Leggete attentamente le istruzioni per l’uso del display e televisore Pioneer per ulteriori informazioni circa i luoghi di installazione e seguitele. Metodo d’uso PRECAUZIONI DI SICUREZZA Comportamento in caso di anomalie Qualora doveste individuare anomalie o difetti, rivolgetevi immediatamente a un tecnico qualificato per eseguire le riparazioni. Installazione • Al momento della vendita, si presuppone che il prodotto venga installato da un tecnico qualificato con un adeguato livello di conoscenze e competenze. Rivolgetevi sempre a un installatore professionista o al vostro rivenditore per installare e montare questo prodotto. Se installato in modo scorretto, il prodotto potrebbe cadere o rompersi. • Scegliete un luogo che sia sufficientemente resistente per sostenere il peso dell’unità da parete e del display per evitare che il prodotto cada o si danneggi. Alcune pareti potrebbero non essere sufficientemente resistenti dal punto di vista strutturale per il montaggio del prodotto, perciò consultate un tecnico qualificato. • Non appendetevi né appoggiatevi al display: potreste farlo cadere o danneggiarlo. • Gli accessori metallici all’interno del display, le parti per il montaggio sulla parete, e altre componenti nascoste alla vista potrebbero danneggiarsi e far cadere il display. Perciò, quando fate controllare o riparare il display o eseguite lavori di rifinitura interna presso il vostro rivenditore, assicuratevi di rivolgervi a tecnici qualificati per controllare tali accessori. Se possibile, fateli controllare regolarmente. • Se usati a lungo, gli accessori metallici del display possono subire modifiche dovute a fattori ambientali, e di conseguenza perdere un po’ della loro forza. Dopo 5 anni o più, fateli controllare da un tecnico qualificato per assicurarvi che possano continuare a essere usati in modo sicuro. Prima di cominciare, spegnete il display e le periferiche, e staccate tutte le spine dalle prese di corrente. Fate attenzione a non schiacciarvi le dita mentre montate e togliete il display. • Assicuratevi che il luogo sia sufficientemente aerato di modo che la temperatura ambiente attorno al display non superi i 40 °C. L’accumulo di calore all’interno del display potrebbe provocare un guasto. • Non bloccate le prese di aerazione del display: il calore accumulato potrebbe provocare un incendio. • Non installate questo prodotto in un luogo in cui le persone potrebbero appendersi o appoggiarsi: potrebbe cadere o rompersi. 24 It Pubblicato da Pioneer Corporation. Copyright © 2008 Pioneer Corporation. Tutti i diritti riservati. Dit product dient door een deskundige te worden geïnstalleerd Hartelijk dank voor de aanschaf van dit product van Pioneer. Lees s.v.p. de gebruiksaanwijzing door voor informatie omtrent de juiste bediening van uw product. Bewaar de gebruiksaanwijzing zorgvuldig zodat u deze naderhand nogmaals kunt raadplegen. Opmerkingen bij de installatie: • Dit product wordt verkocht onder de veronderstelling dat het wordt geïnstalleerd door een deskundige installateur die de juiste kennis en vaardigheden daartoe bezit. Zorg ervoor dat dit product te allen tijde door een deskundige of uw leverancier wordt geïnstalleerd en gemonteerd. • Pioneer draagt geen verantwoordelijkheid voor schade of letsel door onjuiste installatie van dit product, onjuiste montage en onjuist gebruik, wijziging of natuurrampen. • Dit product mag niet op een plaats worden geïnstalleerd zodat je eraan kunt hangen of tegenaan kunt leunen, omdat het product daardoor kan breken of omvallen. • Plaats dit product niet waar deze blootstaat aan trillen of schokken omdat het product daardoor kan breken of omvallen. • Installeer de display niet buiten, en niet bij een warmwaterbron of bij het strand. • Door langdurig gebruik van de display is het mogelijk dat de wand verkleurt door de warmte van de display en de luchtstroom. • Volg de beschreven montageprocedure en draai de schroeven op alle aangegeven plaatsen stevig aan. Bij gebreke daarvan is het mogelijk dat de display breekt of omvalt. • Door het losdraaien van schroeven kan de display omvallen; draai de schroeven daarom nooit los. • Monteer de Pioneer Display en Televisie nooit op een andere dan de aangegeven wijze, breng geen wijzigingen aan, en gebruik hem niet voor andere doeleinden dan waarvoor hij bestemd is, omdat het product daardoor kan breken of omvallen. • Zorg ervoor dat voor de veiligheid extra maatregelen tegen omvallen worden genomen. • Zorg er ingeval van een display van 60 inch voor dat er altijd tenminste drie personen beschikbaar zijn bij het installeren van de display. Ingeval van een display van 50 inch dienen tenminste twee personen beschikbaar te zijn. VEILIGHEIDSMAATREGELEN • Lees de gebruiksaanwijzing van de Pioneer Display en Televisie aandachtig door voor meer gegevens over de plaats van installatie, en zorg ervoor dat deze gegevens worden opgevolgd. Maatregelen in geval van afwijkingen Gebruiksmethode In het geval dat u een afwijking of fout bespeurt, laat dan onmiddellijk een deskundige een reparatie uitvoeren. • Zorg ervoor dat er niet aan de display wordt gehangen of tegenaan geleund omdat hij daardoor kan breken of omvallen. Installatie • De metalen montageonderdelen binnenin de display, de onderdelen voor wandbevestiging en overige niet zichtbare onderdelen kunnen beschadigd raken en de display kan daardoor omvallen. Laat daarom een deskundige de onderdelen onderzoeken wanneer de display wordt gecontroleerd of gerepareerd, of tijdens de afwerking binnenin door uw verkooppunt. Laat deze onderdelen indien mogelijk regelmatig nakijken. • Dit product wordt verkocht onder de veronderstelling dat het wordt geïnstalleerd door een deskundige installateur die de juiste kennis en vaardigheden daartoe bezit. Zorg ervoor dat dit product te allen tijde door een deskundige of uw leverancier wordt geïnstalleerd en gemonteerd. Door onjuiste installatie kan het product breken of omvallen. • Kies een plaats die sterk genoeg is om het gewicht van de eenheid voor wandbevestiging en de display te kunnen dragen, zodat het product niet beschadigd raakt of omvalt. De structuur van sommige wanden is niet sterk genoeg voor montage van dit product; raadpleeg daarom een deskundige. • Zorg voor voldoende ventilatie zodat de omgevingstemperatuur rondom de display niet hoger is dan 40 °C. Door ophoping van warmte binnenin de display kan de display mogelijk niet meer goed functioneren. • De ventilatieopening van de display mag niet worden geblokkeerd omdat daardoor ophoping van warmte ontstaat en kan ontaarden in brand. • Het is mogelijk dat de metalen montageonderdelen van de display door omgevingsfactoren bij langdurig gebruik enigszins veranderen en daardoor aan stevigheid verliezen. Laat na een jaar of vijf een deskundige de onderdelen onderzoeken zodat ze veilig kunnen blijven worden gebruikt. Voordat u begint, dient de display en de randapparatuur te worden uitgeschakeld, en alle snoeren van de netspanning te worden verwijderd. Zorg ervoor dat uw handen niet bekneld raken wanneer de display wordt gemonteerd en verwijderd. Uitgegeven door Pioneer Corporation. Copyright © 2008 Pioneer Corporation. Alle rechten voorbehouden. 25 Du Este producto requiere una instalación profesional Gracias por comprar un producto Pioneer. Tenga la amabilidad de leer el Manual de Instrucciones para saber cómo utilizar este modelo de una forma segura y adecuada. Asimismo, le recomendamos que conserve el Manual de Instrucciones para futuras referencias. Notas acerca de la instalación: • Este producto se vende partiendo de la base de que será instalado por un técnico de montaje debidamente cualificado y con los conocimientos adecuados. Encargue siempre la instalación y el montaje de este producto a un instalador profesional o a su distribuidor. • Pioneer no será responsable de los daños o lesiones que se hayan producido como consecuencia de una instalación o un montaje del producto deficientes, de un uso del producto incorrecto, de una modificación del mismo, o a causa de catástrofes naturales. • No instale este producto en un lugar en el que la gente pueda colgarse de él o apoyarse en el mismo, puesto que ello podría ocasionar su rotura o caída. • No instale este producto en un lugar en el que esté sujeto a vibraciones o sacudidas, puesto que ello podría ocasionar su rotura o caída. • No instale el monitor en el exterior, junto a una fuente de aguas termales ni cerca de una playa. • El empleo de este monitor durante un período de tiempo prolongado puede provocar que la pared pierda su color como consecuencia del calor del monitor y la circulación del aire. • Siga el procedimiento de montaje descrito y atornille firmemente los pernos en todos los lugares especificados; de lo contrario, el monitor podría estropearse o caerse. • Si afloja cualquiera de los pernos, el monitor podría caerse. Por consiguiente, nunca, bajo ningún concepto, deberá aflojar ninguno de los pernos. • Siempre deberá montar el monitor y televisor Pioneer con arreglo a las instrucciones especificadas. No lo modifique ni lo utilice para un propósito distinto del previsto, ya que el producto podría estropearse o caerse. • Para extremar las precauciones, asegúrese de que adopta medidas anticaída adicionales. • En el montaje de un monitor de 60 pulgadas siempre deberán intervenir tres personas o más. En el montaje de un monitor de 50 pulgadas siempre deberán intervenir dos personas o más. PRECAUCIONES DE SEGURIDAD • Para más información acerca de dónde instalar el producto, lea atentamente el manual de instrucciones del monitor y televisor Pioneer y siga al pie de la letra los procedimientos indicados. Método de uso Manipulación en caso de anomalía Si detecta una anomalía o avería, póngase en contacto de inmediato con un técnico cualificado para que efectúe las reparaciones necesarias. Instalación • Este producto se vende partiendo de la base de que será instalado por un técnico de montaje debidamente cualificado y con los conocimientos adecuados. Encargue siempre la instalación y el montaje de este producto a un instalador profesional o a su distribuidor. Una instalación incorrecta podría provocar la rotura o caída del producto. • Realice la instalación en un lugar que sea lo bastante resistente para aguantar el peso del montaje mural y del monitor y evitar que el sistema pueda estropearse o caerse. Es posible que algunas paredes carezcan de la resistencia estructural necesaria para admitir el montaje de este producto. Consúltelo con un técnico cualificado. 26 Sp • No colgarse del monitor ni apoyarse en él, ya que ello podría ocasionar su rotura o caída. • Los accesorios de montaje metálicos alojados en el interior del monitor, los dispositivos para el montaje mural y otras piezas ocultas pueden dañarse y provocar la caída del monitor. Por lo tanto, cuando se realice una inspección o reparación del monitor, o cuando su establecimiento lleve a cabo tareas de acabado interior en el producto, asegúrese de que un técnico cualificado inspecciona estas piezas. De ser posible, encargue una revisión periódica de las mismas. • Es posible que, tras un largo período de uso, los accesorios de montaje metálicos del monitor sufran cambios debido a factores ambientales y pierdan parte de su resistencia. Cuando hayan transcurrido unos cinco años desde la fecha de la instalación, asegúrese de que un técnico cualificado revisa los accesorios para tener la certeza de que se pueden seguir utilizando sin peligro. • Asegúrese de que hay una ventilación suficiente, de modo que la temperatura ambiente alrededor del monitor no sea superior a los 40 °C. La acumulación de calor en el interior del monitor podría provocar una avería en el mismo. Antes de empezar, apague el monitor y los dispositivos periféricos, y desenchufe todos los aparatos de las tomas de la pared. • No bloquee las rendijas de ventilación del monitor, puesto que ello provocaría la acumulación de calor en el interior del aparato y podría producirse un incendio. Tenga cuidado de no pillarse las manos a la hora de montar y extraer el monitor. Publicado por Pioneer Corporation. Copyright © 2008 Pioneer Corporation. Todos los derechos reservados. 需要專業安裝技術的產品 感謝您購買本先鋒產品。 為使您熟知本機的正確操作方式,務求詳閱本「操作手冊」。 在您閱讀完手冊的內容後,請妥為保存,以備日後參考之用。 安裝注意事項: • 本產品的售出是以具有相關知識與技術等級的合格技師 進行安裝為前提,請務必由專業安裝人員或您的經銷商 安裝本產品。 • 對於不當安裝本產品、不當使用或自然災害而導致的任 何損壞或人員受傷,先鋒公司概不擔負任何責任。 安全注意事項 異常情況的處理 若您發現有任何異常情況或故障,請立即交由專業技師進行 修復。 安裝 • 本產品的售出是以具有相關知識與技術等級的合格技師進 行安裝為前提,請務必由專業安裝人員或您的經銷商安裝本 產品,不當的安裝可能導致本產品損壞或掉落。 • 請選擇強度足以支撐壁掛架與顯示器重量的安裝位置,以 避免本產品受損或掉落;某些牆壁缺乏懸掛本產品所需的 結構強度,因此請務必諮詢專業技師。 • 請確定通風良好,以避免顯示器的周邊環境溫度超過 40 ˚C; 顯示器內部所累積的熱量可能導致機械故障。 • 請勿堵塞顯示器的通風孔,否則將導致內部熱量累積並造成 起火。 • 請勿將本產品安裝在可能會有人員懸掛於其上方或倚靠其上 的位置,否則可能導致本產品損壞或掉落。 • 請勿將本產品安裝於會遭受震動或撞擊的位置,否則可能導 致本產品損壞或掉落。 • 請勿將顯示器安裝於室外、溫泉或鄰近海邊的位置。 • 長時間使用顯示器,可能導致牆面因顯示器的散熱和送出的 氣流而變色。 • 請遵循所描述的組裝程序,並牢固地將螺絲固定於各指定位 置,否則可能導致顯示器損壞或掉落。 • 任何一枚螺絲的鬆脫均可能導致顯示器掉落,因此請您切勿 鬆開螺絲。 • 請勿將先鋒顯示器及電視懸掛於非指定位置或擅自進行改 裝,並請勿使用在原本用途以外的任何用途,否則可能導致 本產品損壞或掉落。 • 請確定執行保持安裝防止掉落的雙重措施。 • 若為 60 吋顯示器,安裝時務必至少由三人共同搬運;若為 50 吋顯示器,請至少由兩人共同搬運。 • 如需有關安裝位置的其他資訊,請詳閱先鋒顯示器及電視的 操作手冊, 並確定依照操作手冊中的各項資訊執行安裝程序。 使用方法 • 請勿懸空吊掛或倚靠於顯示器上,否則可能導致本產品損壞 或掉落。 • 顯示器內部的金屬元件、壁掛零件及其他無法看見的隱藏位 置可能受損,並導致顯示器掉落。因此,在您檢查或修復顯 示器,或於購買處執行內部整理工作時,請務必由專業合格 技師進行相關檢查,並儘可能定期執行各項檢查項目。 • 經長期使用後,顯示器的金屬元件可能因環境因素而有所變 化,並因而失去某種程度的堅固性。大約五年後,請將本產 品交由專業合格技師檢查其金屬元件,以確定可繼續安全地 進行使用。 卸下本產品之前,請先關閉顯示器及周邊裝置的電源,並拔除 電源插座上的所有電源插頭。 請小心勿以溼手懸掛或卸下顯示器。 日本先鋒公司出版。 版權 ©2008 日本先鋒公司。 版權所有。 27 ChH Продукт требует профессиональной установки Спасибо за покупку продукта Pioneer. Пожалуйста, прочтите данные инструкции по эксплуатации, чтобы знать, как безопасно и правильно обращаться с этой моделью. Сохраните данные инструкции по эксплуатации в надежном месте для использования в будущем. Замечания по установке: • Этот продукт продается при условии, что он будет устанавливаться квалифицированным специалистом по установке с необходимым уровнем знаний и навыков. Всегда обращайтесь к специалисту по установке или вашему дилеру по вопросам установки и монтажа этого продукта. • Pioneer не несет ответственности за любые повреждения или травмы, возникшие по причине ненадлежащей установки или ненадлежащего монтажа этого продукта, ненадлежащего использования, модификации или стихийных бедствий. ВНИМАНИЕ Это обозначение относится к опасности или опасному режиму работы, которые могут привести к физическим повреждениям или повреждениям имущества. МЕРЫ ПРЕДОСТОРОЖНОСТИ • Не устанавливайте этот продукт в таком месте, где можно повиснуть или облокотиться на него, так как это может привести к поломке или падению продукта. • Не устанавливайте этот продукт в месте, подверженном вибрации или ударам, так как это может привести к поломке или падению продукта. • Не устанавливайте дисплей вне помещения, вблизи огня или вблизи воды. • Использование дисплея в течение длительного времени может вызвать обесцвечивание стены из-за нагрева дисплея и потока воздуха. • Следуйте описанной процедуре сборки и надежно крепите винты во всех указанных местах. Несоблюдение этой процедуры может вызвать поломку или падение дисплея. • Ослабление любого из винтов может вызвать падение дисплея, так что никогда не допускайте ослабления винтов. • Не монтируйте дисплей и телевизор Pioneer иным образом, чем указано, не модифицируйте его и не используйте его не по назначению, так как это может привести к его поломке или падению. • Обязательно примите меры предосторожности для предотвращения падения. • В случае 60-дюймового дисплея всегда используйте трех или более человек при установке дисплея. В случае 50-дюймового дисплея используйте двух или более человек. • Внимательно прочитайте инструкцию по эксплуатации дисплея и телевизора Pioneer для получения дополнительной информации о местах установки и обязательно руководствуйтесь этой информацией. Способ обращения Работа в случае нарушений Если вы обнаружили нарушение или неисправность, то для выполнения ремонтных работ незамедлительно обратитесь к квалифицированному специалисту. Установка • Этот продукт продается при условии, что он будет устанавливаться квалифицированным специалистом по установке с необходимым уровнем знаний и навыков. Всегда обращайтесь к специалисту по установке или вашему дилеру по вопросам установки и монтажа этого продукта. Ненадлежащая установка может привести к поломке или падению продукта. • Выберите место, достаточно прочное, чтобы выдерживать вес настенного устройства и дисплея для предотвращения повреждения или падения продукта. Так как некоторым стенам может не хватить конструкционной прочности, необходимой для монтажа этого продукта, обращайтесь к квалифицированному специалисту. • Обеспечьте достаточную вентиляцию с тем, чтобы температура воздуха вокруг дисплея не превышала 40 °C. Перегрев дисплея может привести к его неисправности. • Не закрывайте вентиляционные отверстия дисплея, так как это может привести к внутреннему перегреву и пожару. 28 Ru • Не давите и не облокачивайтесь на дисплей, так как это может привести к поломке или падению продукта. • Металлические фитинги внутри дисплея, детали крепления настенного устройства со временем могут утратить свои характеристики, что может привести к падению дисплея. Следовательно, при проверке или ремонте дисплея или выполнении крепежных работ обязательно привлекайте квалифицированных специалистов для проверки этих деталей. По возможности, выполняйте периодическую проверку этих деталей. • При использовании в течение длительного времени металлические фитинги дисплея могут подвергаться изменениям из-за факторов окружающей среды и, в результате, могут потерять часть свой прочности. Если у вас возникли сомнения, пригласите квалифицированного специалиста для их осмотра, чтобы убедиться, что их можно продолжать безопасно использовать. Перед началом работ отключите питание дисплея и внешних устройств и выньте вилки всех кабелей питания из стенных розеток. Следите за тем, чтобы не прищемить руки при монтаже и снятии дисплея. Издано Pioneer Corporation. © Pioneer Corporation, 2008. Все права защищены. Примечание: В соответствии со статьей 5 Закона Российской Федерации “О защите прав потребителя” и Указанием Правительства Российской Федерации № 720 от 16 июня 1997 года, корпорация Pioneer Europe NV устанавливает условие на следующую продолжительность срока службы официально поставляемых на Российский рынок товаров. Аудио и видеооборудование: 7 лет Переносное аудиооборудование: 6 лет Другое оборудование (наушники, микрофон и т.д.): 5 лет Автомобильная электроника: 6 лет D3-7-10-6_A_Ru 〒153-8654 東京都目黒区目黒1丁目4番1号 PIONEER CORPORATION 4-1, Meguro 1-Chome, Meguro-ku, Tokyo 153-8654, Japan Корпорация Пайонир 4-1, Мегуро 1-Чоме, Мегуро-ку, Токио 153-8654, Япония PIONEER ELECTRONICS (USA) INC. P.O. BOX 1540, Long Beach, California 90801-1540, U.S.A. TEL: (800) 421-1404 PIONEER ELECTRONICS OF CANADA, INC. 300 Allstate Parkway, Markham, Ontario L3R 0P2, Canada TEL: 1-877-283-5901, 905-479-4411 PIONEER EUROPE NV Haven 1087, Keetberglaan 1, B-9120 Melsele, Belgium TEL: 03/570.05.11 PIONEER ELECTRONICS ASIACENTRE PTE. LTD. 253 Alexandra Road, #04-01, Singapore 159936 TEL: 65-6472-7555 PIONEER ELECTRONICS AUSTRALIA PTY. LTD. 178-184 Boundary Road, Braeside, Victoria 3195, Australia, TEL: (03) 9586-6300 PIONEER ELECTRONICS DE MEXICO S.A. DE C.V. Blvd.Manuel Avila Camacho 138 10 piso Col.Lomas de Chapultepec, Mexico, D.F. 11000 TEL: 55-9178-4270 K002_WL ©2008パイオニア株式会社 禁無断転載 Published by Pioneer Corporation. Copyright © 2008 Pioneer Corporation. All rights reserved. Publication de Pioneer Corporation. © 2008 Pioneer Corporation. Tous droits de reproduction et de traduction réservés. <AZR1282-A> Printed in Japan Imprimé au Japon