1
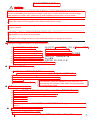
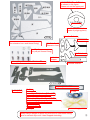
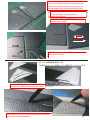
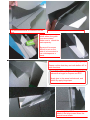
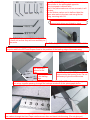
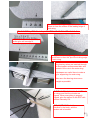
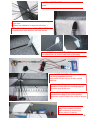
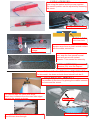
Southern Cross
サザンクロス
SouthernX-AM 組み立て/取扱説明書
Assembly/manual
SouthernX-AM was designed for indoor freestyle and
SouthernX-AMは室内で行うフリースタイル競技
aeromusical flying.
(エアロミュージカル)用に設計されました。
It can make tighter turns in a small gym than a general 3D aerobatic model.
狭い体育館を広く使えるように、
一般的な室内アクロ機より一回り小さくなっており、
It is not as easy to break as a standard Depron machine due to a hybrid
EPP・デプロンのハイブリッド構造のため一般的なデプロン機よりも壊れにくく、
structure of EPP and Depron, which also produces a lighter airframe.
より軽量な機体になっています。
Moreover, you get the rigid feeling of a Depron machine with a firm airframe,
また、機体の約半分がEPP製であるにもかかわらず、
and the rudder works very accurately even though half of it is made of EPP.
デプロン機の剛性感はしっかりあり、
非常に正確に舵が利く機体になっています。
無料で使えるRCシミュレーターFMS用のSouthernX-AMの機体データは、
The airframe data of the SouthernX-AM for the FMS RC simulator can be
RC飛行機実験工房のホームページからダウンロードできますので、
downloaded free of charge from the homepage of the 'RC airplane experiment
飛行練習にお役立てください。
atelier'. Please use this for flight practice.
RC airplane experiment
atelier homepage :
RC飛行機実験工房ホームページ
http://rcp.web.infoseek.co.jp/
FMS用SouthernX-AM
Please
read from the beginning.
はじめにお読みください
Warnings
! 注意事項
-----------------------------------------------------------------------------------Please
never use radio equipment within a 2km range of an official RC Club.
周囲2km以内にラジコンクラブなどがある場所では、絶対に電波を出さないでください。
There
is a possibility that a serious accident could occur if radio interference caused a large電波が混信し大型機が墜落した場合、人身事故などの重大な事故が発生する可能性があります。
scale
machine
to crash. Also, please do fly near buildings, power lines, or busy roads.
また、人のいる所、建物、送電線、道路の近くでは飛行させないでください。
-----------------------------------------------------------------------------------The propeller is sharp, never touch it while it is rotating.
プロペラ先端は鋭くなっていますので、回転中は絶対に手を触れないでください。
Please be careful of the propeller when hand launching the model.
機体を手投げする場合には、プロペラに充分注意してください。
Building this model requires using retractable knives etc. While building, please be careful not
製作中は、カッターナイフなどを使っての作業がありますので、
to injure yourself.
怪我の無いように十分に注意して製作してください。
-----------------------------------------------------------------------------------機体の製作、飛行は、製作者及び操縦者の責任にて行ってください。
Please fly responsibly. The manufacturer or place of purchase cannot assume any
販売元、製造元は製作、飛行、その他、いかなるトラブルにおいても責任は負いかねます。
responsibility in the event of an accident.
また、本製品は都合により突然生産を終了することや、設計変更をしたり価格を改定
する場合がありますので、ご了承ください。
Changes to the design and price of the model are subject to change at any time.
Example of suggested power unit and equipment.
●搭載するパワーユニットやメカなどの例
*
*
*
*
*
*
*
*
(for indoors)
(for outdoors)
20g以下のブラシレスモーター
:AXi2203/52(インドア推奨) 2203/46(アウトドア推奨)
Brushless Motor of 20g or less
Propeller that suits motor
モーターに適合するプロペラ
:GWSスローフライペラ8x4.3等
GWS Slowfly 8x4.3 etc
2x 4.7g servos for elevator & ladder :Tahmazo
4.7gサーボ エレベータ&ラダー用
DymondTS-1002かTS-1006
D47, Ripmax SD-100
8g
or
lighter
servo
for
ailerons
8g以下のサーボ エルロン用
:FUTABA
デジタルマイクロサーボ
S3154推奨 FUTABA
digital microservo S3154
10g
or
lighter
speed
controller
10g以下のスピコン
:Phoenix-10 THUNDERBIRD-9等
4g Receiver with 4 channels or more :Berg4推奨
4g程度の4チャンネル以上の受信機
300mAh 2 cell Lipo battery of ~ 20g :HYPERION HP-LVX300-2S 等
20g程度の300mAh2セルLipoバッテリー
1g以下のコネクター(BECコネクターでも可)
Connector of 1g or less for lipo and speed controller
Items necessary for assembly
● 組み立てに必要な物
* ポリプロピレンが接着できる接着剤 Adhesive with which polypropylene can be bonded
(スコッチ3M強力接着剤プラスチック用か、コニシボンドのGPクリアー)
(UHU POR, UHU Creativ or clear Scotch 3M strong plastic adhesive)
* スーパーXなどの弾性接着剤
Epoxy adhesive
* 瞬間接着剤(中粘度と低粘度)
Instant adhesive - CA (medium viscosity and low viscosity)
Hinge tape
* ヒンジテープ In this manual, when the adhesive is not specified, it is
この説明書では、特に接着剤の指定の無い部分は
* グラステープ
Glass tape (Filament Tape)
assumed that the adhesive with which the polypropylene
ポリプロピレンが接着できる接着剤を使用することとします。
can be bonded is used.
● 道具
Tools required for assembly
*
*
*
*
*
*
*
Knife (A (穴を開ける作業が多いので、細工カッター用30度鋭角刃が便利です)
knife with a 30º blade is recommended)
カッター
Needle (Use it attaching the kevlar thread to the tail)
針 (尾翼に張線を行うために使います)
Lighter (Use it to heat the shrink tubing. )
ライター (収縮チューブを加熱するために使います)
ラジオペンチ
Long nosed pilers
ハサミ
Scissors
ニッパー
Cutters
1.2mmドリル(マウントのネジ穴を開けたり車輪の穴を広げるため)
1.2mm drill (To make screw holes in the motor mount and to enlarge the holes in the
wheels )
● その他
あると便利な物
Additionally
items that might be useful.
*使わなくなったVHSビデオテープ8本
Eight unused VHS videotapes
(機体を裏返しにして作業したり、主翼取り付けジグとして使います)
(To hold the airframe during building, and also used as a main wing installation jig. )
①
機
首
斜
�
機
首
横
板
For
the AXi2203 motor
AXi2203モーターの場合は
Asこの図の通りに
shown in this figure
Please
cut out the upper part
上部を切り取ってください。
機首斜め
機首縦板
翼端
翼端板
機首横板
ラダー
翼端板
マウントの絵は
Actual Size
原寸です
翼
モーターマウント
Motor
mount
(ポリプロピレン製)
(made
of polypropylene)
翼端
翼
エレベータ端
エレベータホーン
Elevator horn
EPP材
Rudder horn
ラダーホーン
Micro screw
マイクロネジ
(for extension horn and thread fixing)
(延長ホーン・リンケージ糸固定用)
エルロンサーボ
Aileron servo
延長ホーン
Extension horn
2mmワッシャー
2mm washer
(リンケージ糸固定用)
(for pull-pull thread fixing)
Aileron horn
エルロンホーン
ホイール
Wheel
ストッパー
Stopper
タッピングビス(モーター取り付け用)
Self-Tapping Screws (for motor installation)
�
�
�
�
�
�
�
�
Pushrod retainer
リンケージ抜け止め
胴体横板
�
�
�
エレベータ
胴体縦板
デプロン材
Body diagonal
reinforcement
胴体斜め補強
Wheels
タイヤ
キャノピー
Canopy
収縮チューブ(リンケージロッド用)
Shrinkage tube(for linkage rod)
ケブラー糸(張線用) Kevlar string(for bracing wire)
PEライン(ワイヤーリンケージ用)
PE line(for pull-pull linkages)
丸いケント紙(胴体補強用)
Round Kent paper(for body reinforcement)
カーボンロッド 1.2mm 1.5mm
Carbon rod 1.2mm 1.5mm
カーボンシート
Carbon strip
Piano wire 1mm
ピアノ線 1mm
Sponge
スポンジ
Other parts
その他の部品
PE line
PEライン
ケブラー糸(黄色)
Kevlar
string (yellow)
PEラインは、事前に2kg程度のオモリをぶら下げて数日放置し、
Please
hang a weight of about 2kg from the PE line before using,
充分に伸びを取っておいてください。
leave
for several days until it has stopped stretching.
②
Glue the body, nose, and canopy together as
胴体と機首とコックピット部を
shown
in the photograph.
写真のように組み合わせて接着します。
Glue the round Kent
paper on both sides of
丸いケント紙を
the fuselage as shown
写真の位置に貼ります。
in the photograph.
Glue
the elevator and
エレベーターとラダーも
the
rudder together also
それぞれ組み合わせて
as
shown.
接着します。
端面どうしを接着する場合には、
When
you bond the edges It is possible to bond more
接着剤が糸を引くまで、それぞれの材料を
strongly by repeatedly joining and separating each
付けたり離したり繰り返してから
material
until the adhesive pulls apart leaving strings.
くっつけるとより強力に接着できます。
If theデプロン材の端面が
edge of the Depron material is not completely
square,
it is possible to mold it by rubbing several
完全に直角になっていない場合は、
times
with
the side of a pen until it becomes completely
ペンの軸などで数回擦ると
square.
直角に成形することが出来ます。
Cut the edge of the carbon strip with scissors. You can then tear 3mm
カーボンシートの端にハサミを入れ、
wide strips to glue to the trailing edge of the main wing, and the aileron
幅3mmに裂いて主翼後縁・エルロン・翼端の間に貼り付けます。
tips.
主翼前縁の補強だけは、4mm以上の幅に裂いて使ってください。
Please tear a strip 4mm wide or more to reinforce the leading edge of the
(これは主翼上下面にカーボンを少しはみ出させ乱流効果を得るためです)
the main wing. (The purpose of this is to achieve a turbulent flow of air on
the upper and lower sides of the main wing.)
カーボンシートの端面は大変鋭くなっていますので、
The
edges of the carbon strip will be very sharp.
手を切らないように気をつけてください。
Be
careful you do not cut yourself!
The
trailing edge
後縁は
CF
is
flush.
はみ出させない
主翼の厚みより
CF strip extends
太くして
slightly
above and
上下面に少し
below
the leading
edge.
はみ出させる
③
Cut
a 45º bevel on the hinge side of the aileron.
エルロンのヒンジ側を45度斜めにカットします。
Please
note that the right and left ailerons are
サーボを中心に搭載しない関係で
different,
the slits for the aileron horns are at
ホーンの付くスリットは、
different
angles
due to the servo being offset.
左右で角度が違いますので注意してください。
The
aileron and the elevator hinges
この機体のヒンジは、
are
on the upper surface, and the
エルロンとエレベーターが上面、
rudder
is a left side.
ラダーが左面です。
Bevel the rudder and the vertical stabiliser
同じようにラダーと胴体縦板も、
with the same angle.
それぞれ斜めにカットしてください。
Nose
機首方向
胴体横板とエレベーターも斜めにカットします。
Bevel the elevator and horizontal board also
エレベーターのスリットは中心にありませんので、
with the same angle.
裏表を間違えないようにしてください。
エルロンと翼端部を接着します。
この部分はカーボンを挟むように接着することになります。
ン
ボ
カー
で
ま
ここ
The carbon is glued to the trailing edge of
エルロンの後縁にもカーボンを貼ります。
the aileron to absorb the impact of a crash.
翼端部は墜落の衝撃を吸収するため途中までとします。
④
Draw lines to use as guides when gluing the fuselage
胴体縦板と横板に接着時のガイドになる線を引きます。
and horizontal board together.
④
The horizontal board is inserted from the
Please insert the elevator at this time.
後ろから胴体横板を差し入れていきます。 この時エレベーターも入れておいてください。
back.
Apply
adhesive to the
ラインを引いた部分に
areas
where the guide
接着剤を塗り、
lines
were
drawn.
それぞれを接着します。
Make sure to attach the
parts
squarely.
直角になるように
注意してください。
Because it becomes
difficult
to put on the
テーブルに置きにくく
table
it is convenient to
なりますので
use
videotapes as a
ビデオテープなどを
stand.
台にすると便利です。
Install the elevator and rudder using hinge tape.
エレベーターとラダーを
ヒンジテープで取り付けます。
Please confirm that they can both deflect 45º in
確実に45度動くかどうか確かめてください。
both directions.
ヒンジテープは、デプロンやEPPには
The
hinge tape doesn't have enough
充分な接着力を持ちません。
adhesive
strength for Depron and EPP.
ヒンジテープを貼る部分に、
事前にスコッチなどの接着剤を塗って
Apply
glue to the areas beforehand, and
べた付かない位に乾燥させてから
when
dry apply hinge tape.
ヒンジテープを貼ってください。
ホーンが付く付近は
Apply
hinge tape to the opposite
裏面にもヒンジテープを
sides
of the hinge areas where the
貼ってください。
control horns locate.
⑤
ピアノ線を曲げて、
By cutting
and bending the piano wire make the
このようなパーツを作っておきます。
parts
shown in the photograph opposite.
Thisこの写真は、ほぼ原寸大です。
photograph is almost size.
Even
if the parts made are not too accurate, it will
それぞれの寸法は
be okay.
それほど正確じゃなくても大丈夫です。
Cut the thicker carbon rod in half and bind the
カーボンロッド(太いほう)をちょうど半分に折り、
piano
wire axels to the two rods using Kevlar
脚用のピアノ線をケブラー糸で巻いて
string,
securing with CA.
瞬間接着剤で固めます。
カーボンロッドは手で爪を立てて折ると、
The
carbon rod breaks more cleanly if it is
ニッパーなどを使うよりも綺麗に折れます。
gripped
with pliers and folded by hand.
Enlarge
the holes in the wheels using a
車輪の穴は1mmよりも少し小さいので、
1.2mm
drill so that they will turn smoothly on
1.2mmドリルなどでスムーズに回るように
the axels.
加工してください。
タイヤストッパーを挿し込み、抜け止めにスーパーXを塗ります。
The wheel stopper is held in place with adhesive.
The main wing胴体横板の下面に主翼を接着します。
is bonded under a body horizontal board.
The point where
the EPP and Depron meet is the position of the leading edge of the main wing.
EPPとデプロンの境目がちょうど主翼前縁の位置になります。
Tiny holes are
opened to the
胴体に小さな穴を開ける
body.
Bond carbon strip
to the trailingカーボンシートを
edge.
後縁に接着
加重のほとんどは張線にかかるので、
Because
most of the wing's weight is
全面接着する必要はありません。
supported by the bracing rods, it is not
接着剤を塗るのは
necessary
to glue the entire area.
フチの部分だけでOKです。
Use a 3mm wide piece of carbon strip (about 85mm in length) and bond the trailing edges of
カーボンシートを3mmに裂いた物(長さ85mm程度)を主翼の後縁に接着して、
both wings together passing through the fuselage as shown in the photograph above.
左右のカーボンを連結してください。
Make a small
cut in the leading edge of each wing, 30mm from the horizontal board. Push the landing
胴体から30mmの前縁部分にカッターで切込みを入れて、
⑥
(接着はまだしないでください)
gear carbon
through the Kent Paper reinforcement disc and insert
into the wing. (Do not glue yet.)
脚を胴体補強部分で交差させて差し込んでおきます。
A carbon
rod bracing wire goes from a point
カーボンロッドの張線を差し込むため、
30mm
in
from
the radius of the leading edge of
主翼前縁のRが始まる部分から
each
wing.
約30mmの所にカッターで切れ目を入れます。
切れ目の方向は、胴体の丸いケント紙の補強に向けて斜めに開けてください。
Make small diagonal cuts aiming in the direction of the reinforcement circle
マジックなどで
印を付けないでください。
Do
not use ink to mark position,
瞬間接着剤を垂らすと
as the glue will smudge it.
にじんでしまいます。
Another carbon bracing wire goes from a
point 同じように、主翼後縁の翼端から
40mm in from the tip of the trailing edge
40mmの所に斜めに切れ目を入れます。
of each wing.
All
of the four carbon rods for the main
主翼張線用カーボンロッド4本を
wing
bracing wires are inserted through
すべて丸いケント紙の補強に差し込み、
the
Kent paper reinforcement disc and
主翼の切れ目に差し込みます。
located in the cuts in the main wing.
張線は出来る限り
直線になるようにしてください。
Videotapes are useful here to make a
たわんでいると
jig for supporting the main wing.
充分な剛性が得られなくなります。
ケント紙の穴は大きくなっても
Make sure the bracing wires are a
かまいません
straight as possible.
ビデオテープを重ねて
主翼のジグにすると便利です。
接着前に主翼にゆがみやねじれが無いか
Make
sure there is no twist or distortion in
充分に確認してください。
the
wings and that the wheels are
aligned.
When everything is properly
また、車輪に定規などを当てて、
aligned,
glue the carbon to the EPP with
左右の接地面が水平になっていることと、
medium
viscosity CA.
車輪が進行方向に真っ直ぐ向いている
ことを確認してください。
Epoxy
is painted on the parts that
完全に位置が決まったら、
intersect
in the body, and the
主翼EPPとカーボンロッドを
carbon
rod
is bonded.
中粘度瞬間接着剤で接着します。
胴体で交差する部分にスーパーXを塗り、
カーボンロッドどうしを接着します。 ⑦
一晩置いて接着剤が固まったら、
Leave
overnight to harden then trim excess with
カーボンロッドの不要な部分を
cutters.
ニッパーで切ります。
The aileron is attached to the main wing using
hinge tape.
主翼にエルロンをヒンジテープで取り付けます。
(Please use adhesive to improve adhesion. )
(必ずスコッチ接着剤を併用してください。)
尾翼と同じように、ホーンの付く部分は裏側にも
Please
attach hinge tape to the other side in the
ヒンジテープを貼ってください。
area
where the horn attaches just like the tail.
先端の丸いものでよく擦って密着させてください。
各動翼にホーンを接着します。
Horns are
glued to each moving surface.
The aileron
horn is on the lower side of the wing.
エルロンホーンは下面に付きます。
メカ類をすべて繋いで、
Connect
all the electronics and confirm that
正しく作動するか確認し、
everything
operates correctly.
サーボのニュートラルを
Ensure that the servos are in their neutral
出しておいてください。
positions.
The center of gravity position for the model
should
be 90mm from the leading edge of
この機体の重心位置は、
the main
wing at the root.
主翼中央の最先端から90mmになります。
The installation positions might have to be
使用するモーターやメカ類によっては
changed
according to the motor and the
搭載位置を変えて重心を調整することが
equipment
used to adjust the center of gravity.
必要になる場合があります。
Arrange the electronics on the
body胴体にメカを並べてみて
of the model to find the
重心が合うかどうかを
best locations to achieve the
確かめてください。
correct
center of gravity.
⑧
The aileron servo extension horn is
エルロンサーボの延長ホーンを
attached to a standard servo horn
付属のネジで取り付けます。
with the screws provided.
純正ホーンの不要部分は
Please cut away an unnecessary
切り取ってください。
material from the standard horn.
If using 推奨メカの場合、
the recommended equipment
写真の位置に穴を開けて
then install
the aileron servo in the position
サーボを搭載してください。
shown in the photograph.
(Please
remove EPP in the position of the
(サーボのつばの部分のEPPは
aileron
servo completely. )
完全に取り除いてください。)
機首方向
Nose
機首方向
Glue位置が決まったら、サーボとデプロンを
the servo to the Depron using UHU Por
when
the position is decided.
スーパーXで点付けしてください。
front主翼前縁
of the main
wing
エルロンホーンは、写真のように
The
aileron horn should point to the
機首に向かって開いた形になります。
back
of the model as in the photo.
The aileron
linkages are made by joining the
カーボンロッドとピアノ線を
carbon
rod
and
the piano wire using shrink tube.
収縮チューブで繋いで
エルロンリンケージを作ります。
Shrink収縮チューブをライターなどであぶって、
the tube with a lighter. The length can be
adjusted
later by gently warming the shrink tube
後から長さを調整できる位に
with aゆるく収縮させておいてください。
lighter.
Secure the piano wire of the aileron
linkage to the horn using the supplied stopper. Glue
エルロンの動翼側ピアノ線は、リンケージ抜け止めを入れて
this in position with Epoxy so it cannot
come off.
先端にスーパーXを塗って抜けないようにしてください。
バッテリーを繋いでニュートラルを出した状態で長さを微調整し、
The length
is fine-tuned with the battery connected and the servo in it's neutral position.
収縮チューブ内に低粘度瞬間接着剤を染み込ませてリンケージを固定します。
Low viscosity instant adhesive (CA) is soaked into the shrink tube and the linkage is fixed.
Nose
direction
機首方向
Install the elevator and the rudder
エレベーターとラダーサーボは
servos at these positions.
この位置に搭載してください。
(This is a photograph from
(これは裏から見た写真です)
underneath. )
コードの長さが
Ensure that the servo wires
足りなくならないように注意。
will reach the receiver.
The servo is attached using
エルロンと同じようにサーボを
UHU Por just like the aileron.
スーパーXで点付けします。
Make
sure the holes are long
ホーンをいっぱいまで動かしても
enough
so that the horns do not
接触しない位の
contact
the body even at full throw.
長穴を開けてください。
⑨
PEラインを半分に切り、
Cut the
PE line in half, and it attach it to the servo
写真のようにホーンに通し
horn using the washer and the screw supplied.
The 付属のワッシャーとネジで押さえます。
neutral position can be adjusted by loosening
このネジを緩めることによって
this screw.
ニュートラルの調整が出来ます。
Linkage of rudder servo
ラダーサーボのリンケージ
Elevator servo
エレベーターサーボの
Linkage
リンケージ
ネジを入れる穴は
Countersink
the
入り口を少し
servo
horn hole
削ってください。
Put the screw in an outer hole on the
エレベーターサーボの方は、
elevator servo horn so that it avoids contact
ネジとラインが接触するのを避けるため
with the rudder control line.
一つ先端側の穴にネジを付けてください。
Pass
the control line through the
動翼のホーンの穴にラインを通し、
horn,
wrap the line around several
数回ねじって瞬間接着剤で留めます。
times
and secure with instant
ラインは後で解くことが出来るように
adhesive.
Trim excess line once dry.
少し長めに残して切断してください。
Be
careful not to drop any instant
デプロンに瞬間接着剤を
adhesive
(CA) onto the Depron!
落とさないように注意してください。
マウントにモーターを取り付け、機首に接着します。
The motor
is screwed to the mount, and then glued to the nose.
この機体はダウン・サイドともスラストは0度です。
On this model,
the down and side thrust should both be 0º.
プロペラを付けてみて、胴体に対して
Attaching
the propeller helps confirm it is straight.
真っ直ぐ付いていることを必ず確認してください。
It is possible to fine-tune it by placing the washer between
the微調整はモーターとマウントの間に
motor and the mount.
ワッシャーを挟むことによって出来ます。
Cut filamentグラステープを3mm幅に裂き、
tape into 3mm wide strips.
Attach it so 機首端面とマウントにまたがるように
it extends from the nose side edges
and onto the貼ってください。
mount as shown.
Please機首横板に穴を開けてスピコンのコードを
puncture a nose horizontal board and
通しておいてください。
pass the esc wires through.
グラステープ
Filament tape
Attach
it back past the wing
主翼の中ほどまで貼る
⑩
ホーンやリンケージに接触しないような位置に穴を開けて、各種コードを通します。
A position
that doesn't interfere with the horn and the linkages is cut to pass wires through
The battery裏面の主翼後端付近に穴を開けて、バッテリーを差し込めるようにします。
can be inserted by cutting a hole in the back of the main wing near the fuselage.
抜け止めのために、付属のスポンジを貼り付けてください。
Use the supplied
sponge to hold the battery in position.
ト側)
(canopy
ピッside)
ク
ッ
上(コ
(wheel
side)
下(車輪側)
Cut 45º
bevels on the diagonal EPP nose
機首斜め補強用のEPP材の接着面を
reinforcements
and glue in position on the
45度にカットして接着します。
underside
of the nose.
裏表と上下に注意してください。
Direction
機首方向of nose
The body diagonal reinforcement is glued in position.
胴体斜め補強を接着します。
It is quite tricky, so practice several times first so you can assemble it quickly.
この作業は結構難しいので、何度か予行練習して手早く行ってください。
Apply glue to the side edges of the
接着剤は端面にしごくように
diagonal reinforcement as shown.
付けていきます。
Excess glue can be removed from
接着跡がデプロンに付いた場合は
the Depron with tape.
テープをペタペタすれば、
ある程度取れます。
⑪
Please
trim the rear end a little so as not to hit the
エレベーターリンケージが当たらないように
elevator
linkage.
後端を少し切り取ってください。
Carbon strip尾ソリ部分と胴体下にカーボンシートを貼ります。
is glued under the tail and main part of the body.
垂直尾翼と水平尾翼に、ケブラー糸で張線をしてください。
Brace the fin, rudder
and the horizontal tail with Kevlar string. It is not necessary to make this too tight.
それほど強く張る必要はありません。 位置が決まったらスーパーXで固定します。
When the position is decided glue in place using UHU Por.
翼端板を取り付けます。
The SFG's make a difference to how the model
標準の角度は、写真のようにカウンター部分の
flys. The angle shown in the photograph is
斜めラインより少し浅い位となります。
recommended, although you may like to try
different angles by attaching using tape to begin
これは飛ばす人の好みがあると思いますので、
with. When the optimal position is decided please
まずセロテープなどで仮止めして、
attach firmly using UHU Por.
飛ばしながら調整するといいでしょう。
(ニチバンのセロテープはEPPにくっつきます)
この機体は翼端板があることを前提に設計されています。
The model is designed assuming that SFG's will be
取り外すとナイフエッジで浮きにくくなったり、
used. If not used then knife-edge flight and axial rolls
ロールの軸が通りにくくなったりするので、
become more difficult. For outdoor use it is
アウトドアで元気に飛ばしたい人は進行方向に対して
recommended that they are attached facing forwards
真っ直ぐ付けるといいでしょう。
rather than not being used at all.
翼端板を付ける位置が決まったら
Note
that the angle of the SFG shown
必ず翼にしっかりと接着してください。
in the photograph is a little shallower
翼端板がグラグラしていると、
than
the angle of the aileron tip.
飛行に大きな癖が出てしまいます。
⑫
Electronics
Layout Photograph.
メカ配置写真
Rudder servo
ラダーサーボ
Receiver
受信機
Aileron servo
エルロンサーボ
Battery
バッテリー
Elevator servo
エレベーターサーボ
Recommended Settings
SouthernX-AMのセッティングについて
The standard travel of each surface should be 45 degrees.
標準の舵角は各舵とも45度、EXPはエレベーターのみ30%です。
30% Expo is recommended for the elevator.
(テールサーボがハイスピードタイプの場合は、エレベーター50%、ラダー20%)
(When using high speed servos, 50% expo is recommended for the elevator and
ナイフエッジミキシングの必要はありません。
20% is recommended for the rudder)
もちろん各自好みのセッティングで飛ばしてかまいません。
There is no need for knife edge mixing.
この手の機体を飛ばすのが初めての人の場合は、
舵角を半分以下に減らしてください。
Please decrease the aileron throw by half for a beginner to fly.
Please store the model by hanging it by string wrapped
保管は出来る限りプロペラセーバー部にヒモを引っ掛け、
around the prop saver if possible.
上から吊るしておいてください。
アウトドアで舗装されていないフィールドで飛ばす場合は、
Due
to the small wheels, there is a possibility of cracking the Depron if the wheels get
タイヤが小さいため着陸時に草や石に必ず引っかかりますので、
caught
in grass or hit stones when landing at speed. When flying at a field without a paved
スピードを出したまま着陸させると脚の後ろのデプロンに亀裂が入る可能性があります。
runway it is recommended that the model is caught by hand or landed softly in a harrier
出来る限りハンドキャッチするか、フカフカの草むらにコブラ状態のまま
style.
(Ofふわっと降ろすことをお勧めします。
course there is no problem at all when landing in a gym. )
(もちろん体育館での着陸ではまったく問題ありません。)
Comments
from
the designer
設計者
(Sekiai)
から(Sekiai)
When you fly the SouthernX-AM you will immediately
SouthernX-AMを実際に飛ばしてみると、
notice how quickly and precisely the model will
その反応の良さと操縦フィーリングは
respond to your control inputs.
特筆すべきものだということが
すぐに判るでしょう。
During
flight it feels like you are directly connected to
the model.
Iまるで、スティックと機体が
hope that your enjoyment of flying RC is increased
直結したかのようなフライトは、
by many factors.
RCを飛ばす楽しみを何倍にも高めることと思います。
Please
try new techniques with this airframe. And,
是非この機体で新しい技に挑戦してみてください。
when you become accustomed to the behavior of the
そして、充分に機体の挙動に慣れたら、
airframe
I will recommend that you put on your
好きな音楽にのせてフライト(エアロミュージカル)
favorite
music and fly to it (aeromusical).
させてみることをお勧めします。
⑬