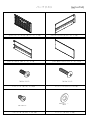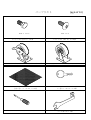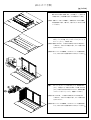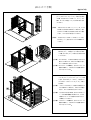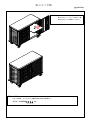
1
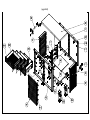
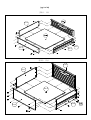
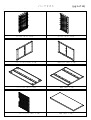
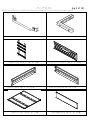
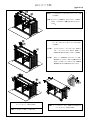
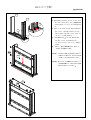
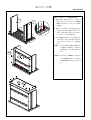
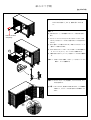
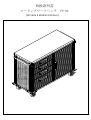
取扱説明書
ASSEMBLY
INSTRUCTIONS
Rolling Workbench (Model No. 20244B)
ローリングワークベンチ
FP-02
(121.9cm X 50.8cm X 95.2cm)
(pg 1 of 14)
#4
#4
#11
#11
#16
#16
#19
#19
(pg 2 of 14)
Small引出し(小)
Drawer Assembly
#12-3
#12-3
#16
#12-5
#12-2
#12-5
#16
#12-2
引出し(大)
Large
Drawer Assembly
#13-1
#13-3
#12-4
#13-4
#13-2
パーツリスト
(pg 3 of 14)
Please check the parts carefully according to the parts list. If you are missing any parts, please
contact our customer service department (please refer to page 14 of 14).
左パネル(#1)×1枚
右パネル(#2)×1枚
フロントパネル(#3)×1枚
背面パネル(#4)×1枚
ベースパネル(#5)×1枚
棚板(#6)×1枚
ステンレスドア(#7)×1枚
天板(#8)×1枚
パーツリスト
(pg 4 of 14)
Please check the parts carefully according to the parts list. If you are missing any parts, please
contact our customer service department (please refer to page 14 of 14).
ハンドルバー(#9)×2本
右引出しスライドサポート(#11)×1個
小 (#12-2)×3枚
引出し左パネル○
引出ベースパネル(#12-4)×4枚
バンパー(#10)×4個
小 (#12-1)×3枚
引出しフロントパネル○
小 (#12-3)×3枚
引出し右パネル○
小 (#12-5)×3枚
引出し背面パネル○
パーツリスト
大 (#13-1)×1枚
引出しフロントパネル○
大 (#13-3)×1枚
引出し右パネル○
M8×18L
スクリューC(#14)×16個
M4×8L
スクリューE(#16)×142個
(pg 5 of 14)
大 (#13-2)×1枚
引出し左パネル○
大 (#13-4)×1枚
引出し背面パネル○
M4×30L
スクリューA(#15)×16個
M8X20
M8 pcs
ワッシャー(#17)×4枚
パーツリスト
M8×18L
スクリューB(#18)×4個
(pg 6 of 14)
M4×8L
スクリューD(#19)×24個
スイベルキャスター・ロック付(#20)×2個
固定キャスター・ロックなし(#21)×2個
引出し用マット(#22)×4枚
ドア用キー(#23)×2個
スクリュードライバー(#24)×1個
レンチ(#25)×1個
組み立て手順
(pg 7 of 14)
手順1:段ボールを開封します。全てのパーツを取り出し、作業の邪
Step魔にならない場所へ移動します。次に天板(#1)を取り出
1. Remove and place to the side, the parts
し開封します。
(天板は薄い段ボールに梱包されています。
)
packed
above the
Solid Hardwood Board (#8). Please
note, the Solid Hardwood Board is packed within an
※注意
:作業スペースを十分に確保し、床面に段ボールなどを敷き、
inner
cardboard box.
各部品が組立て前に、壊れたり、傷ついたりしないよう注意
してください。
Step 2. [ Use the Wrench (#25) for this step ] Open
the cardboard box containing the Solid Hardwood
手順2:
天板(#8)を開封したら、レンチ(#2)を使用し、背面
Board
(#8). Locate the Back Frame (#4) and using
パネル(#4)を天板(#8)にスクリューB(#18)と
Screw
B (#18) and Washers (#17), attach the "Top" of
ワッシャー(#17)で固定します。
the Back Frame (#4), as indicated by the attached
※注意
1:背面パネルには、上下左右の向きを示すラベルが貼られて
sticker,
to the Solid Hardwood Board (#8). The screw
いますので、そのラベルの指示に従い、正しい向きに取り
holes have some tolerance, so make sure that the
付けてください。
rear and
sides are as flush as possible with those of
the Solid Hardwood Board – this may save time by
※注意
2:各スクリューの本締めは、全てのスクリューの仮組みが終
avoiding
having to make slight adjustments later. The
わり、
パネルを正しい位置に合わせてから行ってください。
Solid Hardwood
Board (#8) has no set front or back
end.
#18
Please Note: These assembly instructions for the
Rolling Workbench Cabinet have you assembling the
unit upside down. The screw holes used for attaching
the Back Frame and the Front Frame to the wood
board have some tolerance, as do the other parts. Be
aware that should a piece not fit correctly, the parts
can be moved around and adjusted slightly to achieve
a proper fit. When assembling a part, do not tighten
any one screw until all the screws for that part have
been partially screwed in.
手順3:スクリューE(#16)で右パネル(#2)を背面パネル
(#4)と天板(#8)に取り付けます。この際、右パネル
(#2)の取り付け方向に注意してください。作業は付属の
スクリュードライバー(#24)を使用してください。
※注意
1:右パネルには、上下左右の向きを示すラベルが貼られて
Step
3. [Use Screw E (#16) for this step] Attach
Right いますので、そのラベルの指示に従い、正しい向きに取り
Panel (#2) to Back Frame (#4), making sure the
"Top"付けてください。
of Right Panel (#2) is on the Solid Hardwood
Board (#8).
※注意 2:各スクリューの本締めは、全てのスクリューの仮組みが終
わり、パネルを正しい位置に合わせてから行ってください。
組み立て手順
(pg 8 of 14)
手順4:右引出しスライドサポート(#11)と背面パネル
(#4)をスクリューE(#16)で取り付けます。
Step 4.
[Use Screw E (#16) & Screwdriver (#24)
この際、右引出しスライドサポート(#11)の上
for this
step] Attach Right Drawer Slide Support
面は、ぴったりと天板(#8)に合わせて取り付け
(#11) てください。
to the Back Frame (#4), making sure the
"Top" of Right Drawer Slide Support (#11) is
closest:右引出しスライドサポート(#11)は、上下左
to the Solid Hardwood Board (#8). Again,
※注意1
the “Top”
is indicated by a sticker on one of the
右の取り付け方向が決められていますので、貼り
vertical 付けられている取り付け方向を示すラベルに指示
columns. Note: the Drawer Slides will
face those
on the Left Side Panel (#1).
に従い、正しい方向に取り付けてください。
※注意2:右引出しスライドサポートのスライドレールは、
左パネル(#1)側に向いていることを確認して
ください。
#1
手順 5:スクリューE(#16)で左パネル(#1)を背
面パネル(#4)と天板(#8)に取り付けます。
Step 5. この際、左パネル(#1)の取り付け方向に注意
[Use Screw E (#16) for this step] Attach
してください。
Left Side Panel (#1) to Back Frame (#4). Again,
the "Top" of the Side Panel should be on the
※注意
1: 左パネルには、上下左右の向きを示すラベルが
Solid
Hardwood
Board (#8).
貼られていますので、そのラベルの指示に従い、
正しい向きに取り付けてください。
※注意 2: 各スクリューの本締めは、全てのスクリューの
仮組みが終わり、パネルを正しい位置に合わせ
てから行ってください。
手順6:フロントパネル(#3)を天板(#8)に、スク
リューB(#18)とワッシャー(#17)で取
り付け、左右パネル(#1&#2)
、右引出しス
ライドサポートにスクリューE(#16)で取り
Step 6. [Use
Screw E (#16) and Screw B(#18) &
付けます。
Washer
(#17)
for this step] Using Screw B (#18)
※注意1:フロントパネルには、上下左右の向きを示すラ
and Washer
(#17), attach the "Top" of the Front
ベルが貼られていますので、そのラベルの指示
Frame (#3)に従い、正しい向きに取り付けてください。
to the Solid Hardwood Board (#8).
Then,
using
Screw E (#16), attach the Right
※注意2:左パネルに取り付ける際、左パネルのスライド
Drawer Slide
Support (#11) and both Right & Left
レールが作業の邪魔になりますので、25mm
Side Panels程度スライドレールを手前に引き出してから
(#1 & #2) to the Front Frame (#3).
The ball bearing
track will have to be slid out
作業を行ってください。
about
1" to各スクリューの本締めは、全てのスクリューの
expose the screw hole used for
※注意3:
fastening 仮組みが終わり、パネルを正しい位置に合わせ
to the Front Frame (#3).
てから行ってください。
組み立て手順
(pg 9 of 14)
Step
7. [Use Screw E (#16) for this step] Attach the
手順7
:ベースパネル(#5)をスクリューE(#16)で取
Baseり付けます。
Panel (#5) to the rest of the unit.
※注意: 各スクリューの本締めは、全てのスクリューの組みが
終わり、パネルを正しい位置に合わせてから行ってく
ださい。
手順 8:スイベルキャスター・ロック付(#20)、固定キャス
ター・ロックなし(#21)をスクリューC(#14)で取
り付けます。
Step:スイベルキャスター・ロック付(#20)
8. [Use Screw C (#14) for this step] Attach
※注意1
、固定キャ
Wheels (#20 & #21). Make sure that the Fixed
スター・ロックなし(#21)は必ず、左側もしく
Wheels w/o Brakes (#21) are on the same end (right
は右側の同じ側に取り付けてください。
(図参照)
or left side) of the Work Bench. Also, there is some
tolerance in the holes of the wheel frame, so make
※注意2
sure:各スクリューの本締めは、全てのスクリューの仮
that the two wheels w/o brakes are parallel
キャスターを正しい位置に合わせて
both to組みが終わり、
each other and
with the frame of the unit.
から行ってください。すべてのキャスター位置は前
後左右偏らないよう均等に取り付けてください。
手順9:バンパー(#10)を底面の各コーナーにスク
Step
9. [Use Screw A (#15) for this step] Attach
リューA(#15)で取り付けます。
Bumpers (#10) to the bottom four corners of
Work Bench. Then, rotate/stand the Work
手順10:キャビネットをひっくり返します。
Bench upright.
Step 10.:
[Use
Screw D (#19) for this step] Attach
手順11
ハンドルバー(#9)を左右パネル上部にスク
Handle Bars (#9) on both the Left and Right Side
リューD(#19)で取り付けます。
Panels (#1 & #2).
組み立て手順
(pg 10 of 14)
#12-3
手順12:引出し(小)を組み立てます。
Step 11. [Use Screw E (#16) for this step] Fit
#12-2
#16
#12-1
attach Small Drawer
Side Panels
(#12-2 &
a).and
左右の引出しパネル
小 (#12-2、
#12-3)を引
○
#12-3),
one
at
a
time,
into
the
back
of
the
出しフロントパネル○
小 (#12-1)の裏面の両端
stainless
steel Small Drawer Front (#12-1).
にそれぞれスクリューE(#16)で取り付けま
Make
sure
the Small Drawer Side Panels are
す。
in all the way, making contact with the
b).placed
引出しベースパネル(#12-4)を引出し左パネル
rear of the Small Drawer Front Panel, so that
小 (#12-2)、引出し右パネル ○
小 (#12-3)、
○
when placed correctly, the screw tabs of the
フロント引出しパネル○
小 (#12-1)にスクリュ
Small Drawer Side Panels
are hidden from
ーE(#16)で取り付けます。
view under the rear surface of the Small
c).
引出し背面パネル
小 (#12-5)を引出し左パ
○
Drawer
Front.
ネル○
小 (#12-2)
、引出し右パネル○
小
(#12-3)にスクリューE(#16)で取り付
けます。
d).
a)からc)までの作業を繰り返し、合計3つ
の引出し○
小 を組み立てます。
#12-4
Step 12. [Use Screw E (#16) for this step]
From above, fit and attach the Drawer Base
※注意1:各パネルには取り付け方向を示すラベル
Panel (#12-4) in between the two sides and
が貼られていますので、そのラベルの指
into the back of the Small Drawer Front Panel
示に従い、正しく取り付けてください。
(#12-1). Again, do not tighten any one screw
fully until they (screws) are all in partially.
※注意 2: 各スクリューの本締めは、全てのスクリュ
ーの仮組みが終わり、パネルを正しい位置
に合わせてから行ってください。
Step 13. [Use Screw E (#16) for this step] Attach the Small
Drawer Back Panel (#12-5) to the rest of the assembled
drawer. Once you have the first small drawer assembled,
repeat steps 11-13 to assemble the other two small drawers.
Once completed, you should have three small drawers.
組み立て手順
(pg 11 of 14)
#13-3
#13-2
#13-1
Large
Drawer Assembly: Repeat Steps 11-13
手順13:引出し(大)を組み立てます。
using the: Large Drawer Side Panel (left)
a). 左右の引出しパネル○
大 (#13-2、 #13-3)を
(#13-2); Large Drawer Side Panel (right) (#13引出しフロントパネル○
大 (#13-1)の裏面の
3); Large Drawer Front Panel (#13-1); Large
両端にそれぞれスクリューE(#16)で取り
Drawer
Back Panel (#13-4); and the Drawer
付けます。
Base Panel (#12-4). Once assembled, you
b). 引出しベースパネル
should
have one large (#12-4)
drawer. を引出し左パネ
ル○
大(#13-2)
、引出し右パネル○
大(#13-3)、
フロント引出しパネル○
大(#13-1)にスクリ
ューE(#16)で取り付けます。
c).引出し背面パネル○
大 (#13-4)を引出し左
パネル○
大(#13-2)、引出し右パネル○
大(#
13-3)にスクリューE(#16)で取り付け
ます。
※注意1:各パネルには取り付け方向を示すラベ
ルが貼られていますので、そのラベル
の指示に従い、正しく取り付けてくだ
さい。
※注意 2: 各スクリューの本締めは、全てのスク
リューの仮組みが終わり、パネルを正
しい位置に合わせてから行ってくださ
い。
組み立て手順
(pg 12 of 14)
Step 14. Place the Drawers.
警告:次の手順に進む前に、フロントパネル内に取り付けら
れているドア用キー(#23)を取り外してくださ
1). Pull out the sliders completely, then put the
い。
drawer to the sliders, make sure the square holes
on the drawer side panels are line up, and the
drawer is hook on the sliders completely.
手順14:
a).一番下の引出し(大)用の両側のスライドレールを手前に引出し
2). Using (#16) Screw E to tigthen the drawer
Pull out the slide
completely.
ます。
slides,
b).
and put (#22) Drawer Mat into the drawer.
スライドレールのフックに付いているプラスチックカバーを外
します。
(各スライドレールには、前後2か所フックが設けられて
います。
)
c).
引出し側のレールに設けられている、四角い穴にスライドレール
側のフックを差し込みます。
d).
左右4か所の穴にフックがしっかりとはまっているか確認した
ら、スクリューE(#16)でレールどうしを固定します。
e).
付属の引出し用マット(#22)を引出しベースパネルに敷きま
す。
手順15:手順14と同じ手順で、引出し(小)をスライドレールに
固定し、マットを敷きます。
手順16Step
:スクリューE(#16)を使用し、ステンレスドア(#7)
15. [Use Screw E (#16) for this step] Attach
theを取り付けます。
stainless steel Door (#7) to the unit. Note
that the screw holes on the door hinge have
※注意:ドアヒンジには、多少あそびがありますので、ドアの開閉が
tolerance, enabling the door to be adjusted and
できるよう、ドアフレーム中央に合わせてから固定してく
centered
in the door frame.
ださい。
組み立て手順
(pg 13 of 14)
Step 16.
Place the Shelf (#6) in the unit at
手順17:
棚板(#6)を取り付けます。この際、前
the desired
height and ensure that all four
後4か所のコーナーにフックがきちんと棚
corners板にはめられているか確認してください。
are secured on the hooks in the
front and back.
[!]警告
For:安全のため、引出しは一段ずつ開けてください。同時に複数の引出しを開けて使用しないでください。
SAFETY:
Only open
one drawer at a time. 40lbs. maximum loading for each drawer.
バランスを崩し、キャビネットが転倒する恐れがあり危険です。
各引出しの耐荷重は40kgです。
(pg 14 of 14)
◎故障について
故障と思われる場合には、お手数ですがお買い上げの販売店又は販売元までお問い合わせ下さい。
◎お問合せ先
株式会社ワールドツール
〒361-0056 埼玉県行田市持田2091-1
電話:048-564-6970(代)
FAX:048-564-6971
◎カスタマーサービス
TEL:048-564-3727
受付時間:月~金
10:00~18:00