1
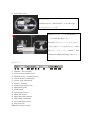
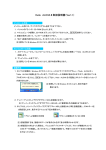
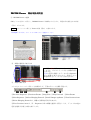
DICOM Viewer
簡易取扱説明書
① DICOM Viewer の起動
CD をパソコンに投入して頂くと、DICOM Viewer が自動的に立ち上がり、同意文章が英記された画面
(図1)になります。
I Agree をクリックして頂くと Viewer 画面(図2)に変わります。
*自動起動しない時は、マイコンピュターより CD ドライブを選択して下さい。
図1
②
図2
画像の選択及び表示方法
左画面の赤丸がディスクに入っている検査デ
ータです。ダブルクリックすると画像が表示
されます。
青丸の箇所に選択したデータの各 Sequence
別の画像が表示されます。選択したい
Sequence をクリックすると表示されます。
③
画像の操作方法
マウスをスクロールして頂いても結構ですが、下図のボタンでも操作可能です。
①Previous Sequence ②Previous Frame ③Stop Cine ④Play Forward ⑤Next Frame
⑥Next Sequence ⑦Select Hanging Protocol ⑧Scroll Images up/down ⑨View Previous item
⑦Select Hanging Protocol は、画像の分割数を変更が出来ます。
⑨View Previous item は、同一 Sequence 以外の画像を選択する際もしくは、ディスク内の他の
患者を選択する場合に順に表示します。
④
Scout Line の表示
右クリックで
Change Layout →Series Areas→1×2 の順に選び、
1×2 の所でクリックする。
2 画面になります。一方を Scout 画像、もう
一方を Axial 像を選択します。
Scout 像をダブルクリックする。左上方に○
で囲った様なマークが表記されます。Scout
像の方で、右クリックし Cutlines、how
Cutlines of Displayed Image の順にクリッ
ク。
⑤ 各コマンド
① Window/Level by ROI
② Invert current window level
③ Window center/window presets
④ Create distance annotation
⑤ Create angle annotation
⑥ Zoom1×viewport
⑦ Zoom image original size
⑧ Magnifying glass
⑨ Zoom image
⑩ Presentation states
⑪ Show hide report
⑫ Show hide Date Selector
⑬ Hide image annotation
⑭ Set annotation to basic
⑮ Flip xertically
⑯Rotate 90 degrees right