1
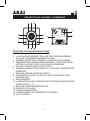
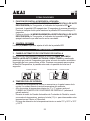
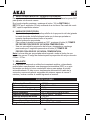
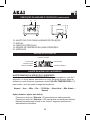
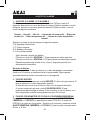
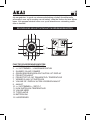
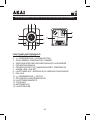
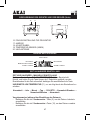
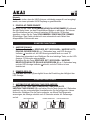
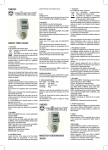
1
9
17
26
35
44
MANUEL D’UTILISATION
USER MANUAL
MANUEL DEL USUARIO
MANUAL DE INSTRUÇÕES
HANDLEIDING
BEDIENUNGSANLEITUNG
ACP-64
Lire attentivement la notice avant d’utiliser l’appareil
Before operating this product, please read user manual completely
Lea atentamente el manual del usuario antes de utilizar el aparato
Lea atentamente o manual de instruções antes de utilizar o aparelho
Less de handleiding door voordat u deze eenheid gebruikt
Lesen Sie die Bedienungsanleitung bevor Sie das Gerät gebrauchen
Avant de commencer
Merci d’avoir acheté le AKAI ACP-64: un radio réveil doté d’une double alarme
avec projection.
Ce produit est votre garantie de qualité, de performance et de valeur. Nos
ingénieurs ont inclus de nombreuses fonctionnalités utiles et pratiques dans
ce produit. Veuillez lire ce manuel d’instructions entièrement afin d’assurer la
meilleure performance de chaque fonction.
Ce produit a été fabriqué en utilisant des composants de qualité et dans les
normes de fabrication.
Le AKAI ACP-64: a été testé par les inspecteurs et trouvé en parfait état de
fonctionnement avant de quitter notre usine. Pour référence ultérieure, noter le
numéro de série dans l’espace prévu.
Model No: ACP-64:
N° de série
CONSIGNES DE SECURITE IMPORTANTES
ATTENTION
Ce symbole indique qu’une tension
dangereuse représentant un risque
d’electrocution est présente dans cet
appareil.
RISQUE D’ÉLECTROCUTION
NE PAS OUVRIR
ATTENTION: POUR RÉDURE LE RISQUE
D’ÉLECTROCUTION, NE PAS RETIRER LE COUVERCLE
L’INTÉRIEUR DE L’APPAREIL NE COMPORTE AUCUNE PIÉCE
UTILE À L’UTILISATEUR
CONFIEZ-EN L’ENTRETIEN A DU PERSONNEL QUALIFIE
1.
2.
3.
4.
5.
6.
7.
8.
Ce symbole indique que les documents
fournis avec cet appareil contiennent
des instructions importantes relatives au
fonctionnement et à l’entretien
Ne placez aucune flamme, telle qu’une bougie, sur l’appareil.
Ne placez pas l’appareil dans un endroit clos, tel qu’une bibliothèque fermée
ou étagère sans une ventilation adéquate.
Lorsque le dispositif de mise hors tension est la fiche secteur, celle-ci doit
rester accessible et opérationnelle.
N’obstruez pas les grilles de ventilation avec des objets tels que journaux,
nappes de table, rideaux, etc. :
N’exposez pas l’appareil à des projections de liquides et assurez-vous
qu’aucun objet contenant de l’eau, tel qu’un vase, ne soit placé sur
l’appareil.
Ne branchez pas l’antenne FM sur une antenne extérieure.
N’exposez pas l’appareil au rayonnement direct du soleil, aux extrêmes de
températures, à l’humidité, aux vibrations ou à un environnement
poussiéreux.
Ne nettoyez pas la surface de l’appareil à l’aide de produits abrasifs, de
benzène, de diluants ou d’autres solvants. Nettoyez-la avec une solution de
détergent doux et non-abrasif et un chiffon propre et doux.
1
9. Ne tentez jamais d’insérer des fils de fer, aiguilles ou autres objets similaires
dans les grilles de ventilation ou autres orifices de l’appareil.
10.Avertissement concernant la mise hors tension de l’appareil : la mise hors
tension s’effectue en débranchant la fiche secteur. De ce fait, celle-ci doit
toujours rester accessible et opérationnelle.
11. N’exposez pas les piles à une chaleur extrême, telle que le rayonnement
direct du soleil, le feu etc.
12.Produit LED Classe 1
Mise en garde
Il existe un risque d’explosion en cas de remplacement non-conforme de la pile.
Replacez-la uniquement par une pile du même type ou d’un type équivalent
CONNEXION AU SECTEUR & SYSTEME DE SAUVEGARDE
Branchez le cordon AC sur une prise secteur AC. Cet appareil est doté d’un
système d’alimentation de secours par pile nécessitant une pile plate au
lithium 3V de type CR2032 (non fournie). Insérez la pile dans le compartiment
en respectant la polarité (bornes + and -) indiquée sur la plaque à l’intérieur
du compartiment. En cas de coupure de l’alimentation AC, l’horloge bascule
automatiquement sur l’alimentation par pile et continue de fonctionner; idem
pour la minuterie. Lorsque l’alimentation AC est rétabli, l’horloge rebascule sur
l’alimentation AC.
2
DESCRIPTION DE L’APPAREIL & COMMANDES
Vues de dessus, face et cotés
14
15
FONCTIONS TOUCHES MULTIFONCTIONS
1. REGLAGE ALARME 1 MARCHE / ARRET
2. << RECHERCHE ARRIERE / REGLAGE DES STATIONS ARRIERE /
REGLAGE CALENDRIER ANNEE/MOIS/ JOUR
3. ALARME A REPETITION / SOMMEIL / VARIATEUR D’ECLAIRAGE
4. MEMORISATION STATION RADIO/ MEMOIRE +/ FONCTION SIESTE /
ACTIVER OU DESACTIVER L’AFFICHAGE AUTOMATIQUE
5. ACTIVER / DESACTIVER LA PROJECTION
6. INVERSION PROJECTION HEURE 180° / HORLOGE / TEMPERATURE
INTERIEUR
7. REGLAGE ALARME 2 MARCHE / ARRET
8. AUGMENTER VOLUME / ACTIVER ou DESACTIVER AFFICHEUR
AUTOMATIQUE
9. MARCHE/ARRET
10.>> RECHERCHE AVANT/ REGLAGE DES STATIONS AVANT/REGLAGE
HEURE D’ETE /C°- °F.
11. REGLAGE HORLOGE/TEMPERATURE
12.DIMINUER LE VOLUME
13.PLAQUE SIGNALETIQUE
14.COMPARTIMENT PILE (ARRIERE DE L’APPAREIL)
15.HAUT- PARLEUR
DESCRIPTION DE L’AFFICHEUR & INDICATEURS
3
DESCRIPTION DE L’APPAREIL & COMMANDES (Suite)
16
17
18
19
20
16.MOLETTE DE MISE AU POINT DU PROJECTEUR
17.ECRAN LCD
18.CORDON D’ALIMENTATION AC
19.CAPTEUR DE TEMPERATURE (INTERIEUR)
20.ANTENNE FM
DESCRIPTION DE L’AFFICHEUR
HEURE
INDICATEUR PM
INDICATEUR FM
INDICATEUR VEILLE
INDICATEUR ALARME 1
INDICATEUR ALARME 2
REGLAGE DE L’HEURE & DE LA DATE
1. REGLAGE MANUEL DE L’HORLOGE ET DU CALENDRIER
A. Réglage de l’heure et le calendrier
En mode veille, appuyez longuement (2 sec) sur le bouton CLOCK ADJ/
TEMPERATURE (11) pour entrer en mode Réglage Horloge. Une fois en mode
Réglage, appuyez de nouveau sur la touche CLOCK ADJ/TEMPERATURE (11)
pour afficher les champs à régler dans la séquence suivante:
Normal → Année → Mois → Jour → 12/24 H → Heure en temps réel →
Minutes en temps réel → Normale
Ajustements pour le réglage:
- Appuyez sur le bouton <</ Tune - (2) pour diminuer la valeur.
- Appuyez sur >> / Tune + touche (10) pour augmenter la valeur.
- Maintenez les touches << ou >> pendant 2 secondes pour accélérer
l’ajustement
4
REGLAGE DE L’ALARME
1.
Réglage de l’alarme
En mode veille, appuyez longuement sur la touche ALARM 1 (1) ou ALARM
2 (7) pour entrer en mode réglage de l’heure de l’alarme. Une fois dans le
réglage, appuyez de nouveau sur la touche ALARM 1 (1) ou ALARM 2 (7)
pour afficher les champs à régler dans la séquence suivante :
Mode Normal → Heure Alarme → Minute Alarme → Jours de semaine
Alarme →
Alarme SONNERIE → Alarme RADIO → Volume réveil Alarme → Retour en
mode Normal
Sélectionnez la récurrence de l’alarme parmi les options suivantes :
1-5: Du Lundi au Vendredi
1-7: Tous les jours de la semaine
6-7: Samedi & Dimanche
1-1: Un jour par semaine
Ajustements pour le réglage:
- Appuyez sur le bouton <</ Tune - (2) pour diminuer la valeur.
- Appuyez sur >> / Tune + touche (10) pour augmenter la valeur.
- Maintenez les touches << ou >> pendant 2 secondes pour accélérer
l’ajustement.
Durée de l’alarme :
Le réveil par la sonnerie ou par la radio sonne pendant 30 minutes si aucune
touche n’est actionnée & l’alarme s’arrête automatiquement. L’alarme sonnera
de nouveau à la même heure en fonction de la récurrence programmée dans
les réglages.
2. FONCTION SNOOZE: Alarme à répétition
Lorsque l’alarme sonne, appuyez sur la touche ‘Snooze’ (3) pour activer la
fonction « Alarme à répétition ». L’alarme, qu’il soit réglé sur sonnerie ou sur
radio, s’arrête et sonnera de nouveau 9 minutes plus tard.
Pour désactiver la fonction Snooze, appuyez sur la touche ‘ON/OFF’ (9). Si
aucune touche n’est actionnée, l’alarme retentira pendant 30 minutes puis
s’arrêtera automatiquement.
3. FONCTION NAP : Sieste
Cette fonction sert à définir la durée d’une sieste sans modifier le réglage de
l’alarme déjà programmée pour le lendemain.
5
Lorsque l’appareil est en mode veille, appuyez sur la touche “ MEMORY. SET
/ MEMORY+ / NAP ” (4) pour entrer en mode SIESTE. Appuyez plusieurs fois
sur la touche “ MEMORY. SET / MEMORY+ / NAP ” (4) pour programmer la
minuterie de 90 minutes à 10 minutes. Une fois le temps écoulé la sonnerie
retentit.
Pour arrêter la sonnerie d’alarme, appuyez sur le bouton ON/OFF (9) (si vous
appuyez sur le bouton “ MEMORY. SET / MEMORY+ / NAP ” (4) cela n’aura
aucun effet). Si aucune touche n’est actionnée la sonnerie d’alarme retentira
pendant 30 minutes puis s’arrêtera automatiquement.
FONCTIONNEMENT RADIO
1. ECOUTER LA RADIO
Appuyez sur la touche ‘ON/OFF’ (9) pour allumer la radio.
Réglez la station FM à l’aide des boutons de syntonisation ‘Tune –’ (2) ou ‘Tune
+’ (10).
Appuyez 1 seconde sur l’un des boutons de syntonisation ‘Tune –’ (2) ou ‘Tune
+’ (10), puis relâchez, l’appareil recherche la prochaine station de la radio
disponible sur la bande de fréquence.
Pour éteindre la radio appuyez sur la touche ‘ON/OFF’ (9).
Remarque:
Assurez-vous que l’antenne FM est complètement déroulée pour assurer une
meilleure réception FM.
2. MEMORISER ET RAPPELER STATIONS DE RADIO PREREGLEES
Appuyez sur la touche ‘ON/OFF’ (9) pour allumer l’appareil.
Réglez la station FM désirée à l’aide des boutons de syntonisation ‘Tune –’ (2)
ou ‘Tune +’ (10).
Appuyez sur la touche ‘MEMORY/ MEM +’ (4) & “P02” clignote à l’écran.
Appuyez une nouvelle fois sur la touche ‘MEM SET/ MEM +’ (4) pour mémoriser
la station radio.
Répéter les étapes 2 à 4 afin de mémoriser jusque 10 stations de radio FM.
Lorsque “P01-P10” clignote, sélectionnez le numéro de préréglage à l’aide des
boutons ‘Tune +’ ou ‘Tune –’.
Pour rappeler une station préréglée, appuyez sur ‘MEM SET/ MEM +’ (4) pour
sélectionner le numéro de préréglage souhaité.
3. FONCTION SOMMEIL (ARRET DIFFERE)
Lorsque vous écoutez la radio, appuyez sur le bouton « SNOOZE/SLEEP/
DIMMER » (3) pour entrer en mode « Arrêt différé ». Appuyez plusieurs fois sur
la touche « SNOOZE/SLEEP/ DIMMER » (3) pour programmer l’arrêt différé de
90 minutes à 15 minutes. L’appareil s’éteint automatiquement un fois le temps
écoulé.
6
AUTRES FONCTIONS
1. -
-
FONCTION AFFICHAGE AUTOMATIQUE.
Appuyez longuement (environ 3 secondes) sur la touche « Memory. set
/ Memory+ / Display light auto on- off/ NAP » (4), l’indicateur s’affiche
sur l’écran LED. L’affichage s’éteint automatiquement après 15 secondes.
Appuyez sur n’importe quelle touche pour activer l’affichage pendant 15
secondes.
Appuyez sur la touche « Memory. set / Memory+ / Display light auto onoff/ NAP » (4) pendant 3 secondes, l’indicateur disparaît de l’écran LED,
la fonction est désactivée.
2. VARIATEUR DE LUMINOSITE (DIMMER)
Le bouton de variateur de luminosité « DIMMER » (3) vous permet de régler la
luminosité de l’écran.
AUTRES FONCTIONS (SUITE)
3. AFFICHAGE EN BOUCLE
En mode veille, appuyez longuement (environ 2 secondes) sur la touche
VOLUME UP/ DISPLAY AUTO CHANGE ON/OFF (8) pour afficher l’année.
Appuyez une nouvelle fois pour afficher le mois le jour et la température. Au
bout the 5 secondes l’heure s’affiche de nouveau.
Indicateur de l’année
L’indicateur du mois
Indicateur du jour
4. HEURE D’ETE (DST)
Pour les pays introduisant l’heure d’été (Une heure de différence entre l’heure
d’été et l’heure d’hiver), ce radio réveil offre l’option ‘ heure d’été’ ce qui vous
permettra de régler automatiquement l’heure d’été.
En mode veille, maintenez enfoncé la touche >>/TUNE+/DST/C-F (10) pendant
2 sec, l’heure avance automatiquement d’une heure. Pour désactiver la fonction
‘Heure d’été’ répétez l’opération en maintenant enfoncé la touche >>/TUNE+/
DST/C-F (10).
5. TEMPERATURE INTERIEURE
Un fil capteur de la température intérieure de la pièce est situé à l’arrière de
l’appareil.
7
Pour passer d’un affichage de la température en °C à °F, appuyez longuement
(environ 3 secondes) sur la touche >>/TUNE +/ DST/ °C-°F (10). Les plages de
température, pour une utilisation intérieure, sont comprises entre 0° et 50°C ou
32° et 122°F.
6. PROJECTEUR
1. Réglez l’intensité de l’image et la mise au point en tournant la molette (11)
jusqu’à ce que l’heure, affichée sur le mur ou au plafond, apparaisse de
façon nette.
2. Régler la direction de la projection
3. Pour inverser le sens de l’’affichage, appuyez sur la PROJECTION TIME
180 ° FLIP / TIME- TEMPERATURE (6).
4. Pour passer de la projection de l’heure à celle de la température,
appuyez longuement sur la touche PROJECTION TIME 180 ° FLIP / TIME TEMPERATURE (6).
REMARQUE: L’heure doit être projetée sur le mur ou sur le plafond d’une pièce
obscure. La portée de la projection se situe entre 0.90m ~ 2.70m.
7. -
-
REMISE A ZERO
Le fonctionnement normal de l’appareil peut-être gêné par de fortes
interférences électromagnétiques ou à une surtension, dans de cas
réinitialiser l’appareil pour reprendre un fonctionnement normal.
Il suffit de débrancher le cordon d’alimentation secteur et retirez la batterie
de sauvegarde, attendez au moins 3 minutes, puis configurer l’appareil de
nouveau en suivant le manuel d’utilisation.
SPECIFICATIONS TECHNIQUES
Référence Modèle
Alimentation
Consommation en mode marche
Consommation en mode veille
Pile de sauvegarde
Fréquence Radio Puissance de sortie AUDIO Poids de l’appareil
Dimensions
• ACP-64
• AC 230 ~ 50 Hz
• 5W
• <1 W
• 3V (CR2032 Flat Lithium battery x 1)
• FM: 87.5MHz - 108 MHz
• 150 MW
• 0.423 g
• 121×121×68 mm
En raison de la révision et de l’amélioration constante quant à la
conception de nos produits, les spécifications sont sujettes à modification
sans préavis.
8
BEFORE WE BEGIN
Thank you for purchasing the AKAI ACP-64: A dual Alarm Clock Radio with
Projection.
This is your assurance of quality, performance and value. Our engineers have
included many useful and convenient features in this product. Please be sure
to read this instruction Manual completely to make sure you are getting the
maximum benefit from each feature.
This product was manufactured using the highest quality components and
standards of workmanship. It was tested by inspectors and found to be in perfect
working order before it left our factory.
For future reference, record the serial number in the space provided.
Model No: AKAI ACP-64:
Serial Number:
IMPORTANT SAFETY INSTRUCTIONS
The lightning flash with arrowhead symbol, within an equilateral triangle, is intended to alert the user
to the presence of uninsulated “dangerous voltage” within the product’s enclosure that may be of
sufficient magnitude to constitute a risk of electric shock to persons
The exclamation point within an equilateral triangle is intended to alert the user to the presence of
important operating and maintenance (servicing) instructions in the literature accompanying the
appliance.
1.
2.
3.
4.
5.
6.
7.
8.
No naked flame sources, such as lighted candles, should be placed on the
apparatus.
Do not place the product in closed bookcases or racks without proper
ventilation.
Where the mains plug is used as the disconnect device, the disconnect
device shall remain readily operable.
The ventilation should not be impeded by covering the ventilation openings
with items, such as newspapers, table-cloths, curtains, etc.
It shall not be exposed to dripping or splashing and that no objects filled with
liquids, such as vases, shall be placed on the apparatus.
Do not connect FM antenna to outside antenna.
The unit should not be exposed to direct sunlight, very high or low
temperature, moisture, vibrations or placed in dusty environment.
Do not use abrasive, benzene, thinner or other solvents to clean the surface
of the unit. To clean, wipe it will mild non-abrasive detergent solution and
clean soft cloth.
9
9. Never attempt to insert wires, pins or other such objects into the vents or
opening of the unit.
10.Disconnect device warning: Mains plug is used as the connection, so it
should always remain ready operate.
11. Batteries shall not be exposed to excessive heat such as sunshine, fire or
the like.
12.Class 1LED product.
CAUTION
Danger of explosion if battery is incorrectly replaced. Replace only with the
same or equivalent type.
POWER SUPPLY & BATTERY BACK-UP SYSTEM
Plug the AC power cord to a household outlet AC source. This unit is equipped
with a battery back-up system, it requires a 3V CR2032 flat lithium battery
(not included). Insert the battery in the battery compartment, making certain
that the positive and negative (+ and -) battery terminals are attached to the
corresponding terminals on the plate in the battery compartment. If an AC power
failure occurs, the clock automatically switches to the battery power supply, the
clock and timer memory continue running. When the AC power resumes, the
clock switches back to AC again.
10
DESCRIPTION OF UNIT AND CONTROLS
Vues de dessus, face et cotés
14
15
FUNCTION AND CONTROLS
1. ALARM 1 ON / OFF SET
2. << / TUNE - / YEAR/MONTH/DAY
3. SNOOZE / SLEEP / DIMMER
4. MEMORY/MEMORY+/NAP/AUTO OFF DISPLAY
5. PROJECTION ON/OFF
6. PROJECTION TIME 180° FLIP/TIME- TEMPERATURE
7. ALARM 2 ON / OFF SET
8. VOLUME UP / DISPLAY AUTO CHANGE ON/OFF
9. ON / OFF
10.>> / TUNE + / DST/C-F
11. CLOCK.ADJUSTEMENT/ TEMPERATURE
12.VOLUME DOWN
13.RATING LABEL
14.BATTERY COMPARTMENT
15.SPEAKER
DESCRIPTION DE L’AFFICHEUR & INDICATEURS
DESCRIPTION DE L’APPAREIL & COMMANDES (Suite)
11
DESCRIPTION OF UNIT AND CONTROLS (Suite)
16
17
18
19
20
16.FOCUS ADJUSTMENT FOR PROJECTION UNIT
17.DISPLAY
18.AC POWER CORD
19.TEMPERATURE SENSOR (IN DOOR)
20.FM ANTENNA
DISPLAY DESCRIPTION
TIME Indicator
PM Indicator
MHz Indicator
STANDBY Indicator
ALARM 1 Indicator
ALARM 2 Indicator
TIME & CALENDAR SETTING
TIME AND CALENDAR MANUAL SETTING
Press CLK.ADJ.TEMPERATURE button (11), in standby mode, and keep
depress over 2 seconds to enter time set mode, after enter the setting mode,
press CLK.ADJ.TEMPERATURE button (11) to change the mode cycle as
follows :
Normal → Year → Month → Day → 12/24 H → Real time Hour → Real time
Min → Normal
Action (during data adjustment):
- Press << / Tune - button (2) to adjust data backward.
- Press >> / Tune + button (10) to adjust data forward.
- Keep depressed << or >> button for 2 seconds to enable auto forward.
12
ALARM SETTING
1. SETTING ALARM 1 AND ALARM 2
Press alarm set button (1/7) during normal mode and keep depress over 2
seconds to enter alarm set mode, after enter the setting mode, press alarm set
button (1/7) to change the mode cycle as follows :
Normal → AL Hour → AL Min → AL weekday Alarm → AL wake beep → AL
wake radio → AL wake radio volume → Normal.
Select alarm weekday mode as follows
1-5: Monday to Friday
1-7: Whole week
6-7: Saturday & Sunday
1-1: One day of week
-
-
-
-
Action (during data adjustment):
Press << / TUNE - button (2) to adjust data backward.
Press >> / TUNE + button (10) to adjust data forward.
Keep depressed << or >> button for 2 seconds to enable auto forward.
Alarm duration
Alarm Duration – Beep alarm or radio alarm will continue output for 30 minutes
if no key press, then it will stop automatically and wait for same alarm time on
next day.
2.
-
-
-
SNOOZE FUNCTION
During alarming, press SNOOZE button (3) will enable snooze function,
Beep alarm or Radio alarm will stop.
Snooze interval is 9 minute (not include second offset)
Snooze will continue unless press ON/OFF button (9) to alarm off of Buzzer
alarm or Radio Alarm stop automatically after 30 minutes.
3. NAP TIMER FUNCTION (COUNT DOWN TIMER)
During radio off mode, press MEMORY.SET / MEMORY+ / NAP button (4) to
turn on NAP mode, the NAP time will keep by 5 seconds; within 5 seconds
and press MEMORY.SET / MEMORY+ / NAP button (4) button can change the
duration from 90 min – 10 min.
The alarm buzzer will sound for 30 min and then shut off automatically. To stop
the alarm buzzer, press the ON/OFF button (9).
Press the MEMORY.SET / MEMORY+ / NAP button (4) has no effect during
alarm operation.
13
Press ON/OFF button (9) to cancel NAP function.
Note: The NAP does not include the wake up light function.
RADIO OPERATION
1.
-
-
-
LISTENING TO RADIO
Press the ON/OFF button (9) to turn the unit on.
Use the TUNE + or TUNE – button to select the desired radio station. If
you press and hold the TUNE + or TUNE – button, then release, the unit will
automatically scan to the next broadcasting station.
Press the ON/OFF button (9) to turn off the radio.
2. TO SET / RECALL THE PRESET RADIO STATIONS
- Press the ON/OFF button (9) to turn the unit ON.
- Use the TUNE + or TUNE - button to select the desired radio station.
- Press the MEMORY / MEMORY + button; “P02” will blink in the display.
- Press the MEMORY / MEMORY + button again to set the preset.
Repeat steps 2 through 4 to set more presets.
The unit can preset 10 stations totally for FM.
When “P01-P10” is blinking, press the TUNE + or TUNE - button to select the
preset number.
When recalling preset stations, press MEMORY / MEMORY +/NAP button to
select the preset number.
Note:
- Ensure that the FM antenna is completely unrolled and extended for best
FM reception.
3. SLEEP OPERATION
When listening to radio, press SNOOZE/SLEEP/DIMMER button (3) to enter
sleep mode. You can just adjust the sleep timer from 90 minutes to 15 minutes
by pressing the SNOOZE/SLEEP/DIMMER button (3). The unit will automatically
turn off after the selected time.
OTHER FUNCTIONS
1.
-
-
DISPLAY ON/OFF FUNCTION
Press MEMORY. SET / MEMORY+ / DISPLAY AUTO ON-OFF /NAP button
(4) for 3 seconds, the LED display Indicator will light on, the LED display
will turn off after 15 seconds automatically. Press any button to maintain the
LED display for 15 seconds.
Press MEMORY. SET / MEMORY+ / DISPLAY LIGHT AUTO ON-OFF /NAP
button (4) for 3 seconds, the LED display Indicator will light off to cancel
this function.
14
2. DIMMER CONTROL
The DIMMER switch (3) allows you to set the brightness of the LED display
OTHER FUNCTIONS
3. AUTO CHANGE DISPLAY CONTENT
In radio off mode, press the VOLUME UP / DISPLAY AUTO CHANGE ON/OFF
button (8) and keep depress over 2 seconds to enter time display auto change
mode to display the Year. Press again to display Month/Day/Temperature, the
display returns to time display after 5 seconds.
YEAR Indicator
4.
-
-
-
-
MONTH Indicator
DAY Indicator
INDOOR TEMPERATURE
Indoor temperature sensor is at the back of the unit. The unit detects the
current environment temperature.
In order to display the indoor temperature in °C or °F, first turn on the
“AUTO CHANGE DISPLAY CONTENT” (refer to the corresponding above
paragraph).
During Auto Change display content mode, when temperature is displayed,
press on >> (10) key to toggle between temperature in Celsius to
Fahrenheit.
The detection range of indoor temperature is between 0°C & 50°C or 32°F &
122°F.
5. SELECT DST (DAYLIGHT SAVING TIME) MODE
For countries with daylight saving time (DST), the clock radio offers you DST
option to adjust summer time.
In standby mode press and hold >> / TUNE +/DST/C-F button (10) for 2
seconds. The clock advances by one hour. To exit DST mode, repeat the above
operation.
6.
-
-
-
PROJECTION UNIT
Focus setting: Adjust the projection clock brightness/focus by turning the
brightness/focus adjustment wheel unit the projected time is clearly shown
on the ceiling or wall.
Adjust projected direction.
To flip projected image by 180°, press PROJECTION TIME 180° FLIP/TIMETEMPERATURE button (6).
15
- Converted the projection time or temperature, keep depressed over 2
seconds to enter PROJECTION TIME 180° FLIP/TIME-TEMPERATURE
button (6).
Note: The time must be projected on the wall or on the ceiling of a darkened
room. The distance range for the clock projection is between 0.90m ~ 2.70m.
7. RESET
If the system does not respond or exhibits erratic or intermittent operation, you
may have experienced an electrostatic discharge (ESD) or a power surge that
triggered the internal microcontroller to shut down automatically. If this occurs,
simply disconnect the ac power cord and remove the system backup battery,
wait at least 3 minutes and then setup the unit again by following the manual.
SPECIFICATIONS
Model Reference Power supply
Power consomption Standby mode consomption
Battery back up
Radio Frequency coverage Audio output power Product weight
Product Dimensions
Indoor temperature range
• ACP-64
• AC 230 V ~ 50 Hz
•5W
• <1 W
• 3V (CR2032 Flat Lithium battery x 1)
• FM: 87.5MHz - 108 MHz
• 150 MW
• 0.423 g
• 121×121×68 mm
• 0 to +50°C or 32 to 122°F
IMPORTANT:
Due to continual revision and improvement on our products design,
specifications are subject to change without further notice.
16
ANTES DE COMENZAR
Gracias por su compra del AKAI ACP-64: Radio Reloj de Alarma Dual con
Proyección.
Esta es su garantía de calidad, rendimiento y valor. Nuestros ingenieros han
incluido varias funciones útiles y convenientes en este producto. Por favor,
asegúrese de leer este Manual de Instrucciones de manera completa a fin de
asegurarse de obtener el mayor beneficio de cada función.
Este producto fue fabricado usando componentes de la más alta calidad y
estándares de mano de obra. Fue probado por inspectores y encontrado en
perfecto estado de funcionamiento antes de salir de nuestra fábrica.
Para referencia futura, registre el número de serie en el espacio provisto.
Modelo No: AKAI ACP-64
Número de Serie:
IMPORTANTES INSTRUCCIONES SOBRE SEGURIDAD
The lightning flash with arrowhead symbol, within an equilateral triangle, is intended to alert the user
to the presence of uninsulated “dangerous voltage” within the product’s enclosure that may be of
sufficient magnitude to constitute a risk of electric shock to persons
The exclamation point within an equilateral triangle is intended to alert the user to the presence of
important operating and maintenance (servicing) instructions in the literature accompanying the
appliance.
PRECAUCION
RIESGO DE GOLPE ELECTRICO
NO ABRIR
El símbolo de relámpago con una flecha dentro de un triángulo equilátero
indica al usuario la presencia de una tensión sin aislar dentro del producto de
suficiente magnitud que podría constituir un riesgo de golpe eléctrico para las
personas
El signo de exclamación dentro de un triángulo equilátero avisa al usuario de
que existen importantes instrucciones de funcionamiento y mantenimiento
(servicio) en la literatura que acompaña a este aparato.
1. No debe colocarse sobre el aparato ninguna fuente inflamable o encendida,
tales como velas.
17
2. No coloque el producto en una biblioteca cerrada o estanterías sin
ventilación apropiada.
3. A pesar de desconectar el aparato de la corriente, el mismo quedará
activado para su funcionamiento.
4. La ventilación no debe ser impedida bloqueando las aberturas específicas
de ventilación, con elementos tales como periódicos, manteles, cortinas,
etc.
5. No deberá ser expuesto a goteos o salpicaduras y no deberán colocarse
sobre el aparato elementos llenos de líquidos, tales como floreros.
6. No conecte la antena FM a una antena de exterior.
7. La unidad no debe ser expuesta a luz solar directa, muy altas o bajas
temperaturas, humedad, vibraciones o colocada en ambientes con polvo.
8. No utilizar solventes abrasivos, benzina, thinner u otros para limpiar la
superficie de la unidad. Para limpiarla, pase un paño con detergente suave
no abrasivo y seque con otro paño suave.
9. Jamás intente insertar cables, alfileres u objetos similares en las
ventilaciones u otras aberturas de la unidad.
10.Advertencia sobre la desconexión de la unidad: El enchufe principal es
usado para la conexión, de manera que debe permanecer siempre listo para
funcionar.
11. Las pilas no deberán se expuestas a calor excesivo tales como luz solar,
fuego o similares.
12.producto de LED Clase 1
PRECAUCION
Peligro de explosión si la pila es reemplazada de manera incorrecta.
Reemplace solamente con pila igual o equivalente.
ALIMENTACION Y SISTEMA DE RESGUARDO A PILA
Enchufe el cable de alimentación al tomacorrientes. Esta unidad está equipada
con un sistema de resguardo a pila, el cual requiere una pila plana de litio de
3V CR2032 (no incluida). Inserte la pila en su compartimiento, asegurándose
que los bornes de la pila, positivo y negativo (+ y -) sean conectados a las
terminales correspondientes de la placa en el compartimiento. En caso de falla
de la corriente eléctrica, el reloj automáticamente cambiará a la alimentación a
pila, y así el reloj y memoria del temporizador seguirán funcionando. Cuando se
restaure la corriente eléctrica, el reloj cambiará nuevamente a alimentación por
corriente eléctrica.
18
DESCRIPCION DE LA UNIDAD Y CONTROLES
Vues de dessus, face et cotés
14
15
FUNCIONES Y CONTROLES
1. AJUSTE DE ALARMA 1 ACTIVADA / DESACTIVADA
2. << / SINTONIA - / AÑO / MES / DIA
3. SNOOZE / DORMIR / DIMER
4. MEMORIA/MEMORIA+/SIESTA/PANTALLA DE AUTO DESCONEXION
5. PROYECCION ACTIVADA / DESACTIVADA
6. TIEMPO DE PROYECCION GIRO DE 180° / HORA- TEMPERATURA
7. AJUSTE DE ALARMA 2 ACTIVADA / DESACTIVADA
8. SUBIR VOLUMEN / PANTALLA DE AUTO CAMBIO ACTIVADA /
DESACTIVADA
9. ACTIVADO / DESACTIVADO
10.>> / SINTONIA + / DST / °C-F
11. AJUSTE DEL RELOJ / TEMPERATURA
12.BAJAR VOLUMEN
13.ETIQUETA DE CLASIFICACION
14.COMPARTIMENTO PARA PILAS
15.PARLANTE
\
19
DESCRIPCION DE LA UNIDAD Y CONTROLES (Conjunto)
16
17
18
19
20
16.AJUSTE DEL ENFOQUE DE LA UNIDAD PROYECTORA
17.PANTALLA
18.CABLE PARA LA CORRIENTE
19.SENSOR DE TEMPERATURA (INTERIORES)
20.ANTENA FM
DESCRIPCION DE LA PANTALLA
Indicador de HORA
Indicador PM
Indicador MHz
Indicador STANDBY
Indicador de ALARMA 1
Indicador de ALARMA 2
AJUSTES DE HORA Y CALENDARIO
AJUSTES MANUALES DE LA HORA Y CALENDARIO
Presione el botón (11) AJUSTE DEL RELOJ / TEMPERATURA, en el modo
standby y mantenga presionado por más de 2 segundos para entrar al modo de
ajuste de hora; tras haber ingresado al modo de ajuste, presione el botón (11)
AJUSTE DEL RELOJ / TEMPERATURA para cambiar el modo ciclado de la
manera siguiente:
Normal → Año → Mes → Día → 12/24 Hs → Hora Real → Minutos de la
hora Real → Normal
Acción (durante el ajuste de datos):
- Presione el botón (2) << / Sintonía – para ajustar los datos hacia atrás.
- Presione el botón (10) >> / Sintonía + para ajustar los datos hacia adelante.
- Mantenga presionado << o el botón >> por 2 segundos para activar el auto
avance.
20
AJUSTES DE LA ALARMA
1. AJUSTE DE LA ALARMA 1 Y DE LA ALARMA 2
Presione el botón de ajuste de la alarma (1/7) durante el modo normal y
manténgalo presionado por más de 2 segundos para entrar al modo de ajuste
de la alarma; tras haber ingresado al modo de ajuste, presione el botón de
ajuste de alarma (1/7) para cambiar el modo ciclado de la manera siguiente:
Normal → Hora AL → Min AL → AL Alarma de día de la semana → AL
pitido para levantarse → AL despertar con la radio → AL volumen de
despertar con la radio → Normal.
Seleccione el modo de alarma de día de la semana de la siguiente manera:
1-5: Lunes a Viernes
1-7: Toda la semana
6-7: Sábado y Domingo
1-1: Un día de la semana
-
-
-
-
Acción (durante el ajuste de datos):
Presione el botón (2) << / Sintonía – para ajustar los datos hacia atrás.
Presione el botón (10) >> / Sintonía + para ajustar los datos hacia adelante.
Mantenga presionado << o el botón >> por 2 segundos para activar el auto
avance.
Duración de la Alarma
Duración de la Alarma – Alarma de pitido o radio alarma continuará activa por
30 minutos si no se presiona tecla alguna, luego se detendrá automáticamente
y esperará a la misma hora de alarma al día siguiente.
2. FUNCION DE SNOOZE
- Durante la alarma, presione el botón (3) SNOOZE y habilitará la función
snooze, el pitido o radio alarma se detendrán.
- El intervalo de snooze es de 9 minutos (no incluye segunda compensación)
- Snooze continuará a menos que presione el botón (9) ACTIVADO /
DESACTIVADO para apagar la alarma de Campana o la Radio Alarma y se
detendrá automáticamente tras 30 minutos.
3. FUNCION DE TEMPORIZADOR DE SIESTA (TEMPORIZADOR DE
CUENTA REGRESIVA)
Durante el modo de radio apagada, presione el botón (4) MEMORIA/
MEMORA+/SIESTA para activar el modo de SIESTA, el modo SIESTA se
mantendrá de 5 segundos; dentro de los 5 segundos presione el botón (4)
21
MEMORIA/MEMORA+/ SIESTA para cambiar la duración de 90 min. – 10 min.
La campana de la alarma sonará por 30 min. y luego se apagará
automáticamente. Para detener la campana de la alarma, presione el botón (9)
ACTIVADO/DESACTIVADO.
Presionando el botón (4) MEMORIA/MEMORA+/SIESTA no tendrá efecto
durante el funcionamiento de la alarma.
Presione el botón (9) ACTIVADO/DESACTIVADO para cancelar la función de
SIESTA.
Nota: La SIESTA no incluye función de luz para despertarse.
1.
-
-
-
FUNCIONAMIENTO DE LA RADIO
ESCUCHAR RADIO
Presione el botón (9) ACTIVADO/DESACTIVADO para encender la unidad.
Use el botón SINTONIA + o SINTONIA – para seleccionar la estación de
radio deseada. Si presiona y mantiene el botón SINTONIA + o SINTONIA –
y lo suelta, la unidad escaneará automáticamente la siguiente estación
emisora.
Presione el botón (9) ACTIVADO/DESACTIVADO para apagar la radio.
2. AJUSTE / LLAMADO DE EMISORAS DE RADIO PREFIJADAS
- Presione el botón (9) ACTIVADO/DESACTIVADO para encender la unidad.
- Use el botón SINTONIA + o SINTONIA – para seleccionar la estación de
radio deseada.
- Presione el botón MEMORIA / MEMORIA +; “P02” titilará en la pantalla.
- Presione nuevamente el botón MEMORIA / MEMORIA + para preajustar
estaciones.
Repita los pasos 2 al 4 para preajustar más estaciones.
La unidad puede preajustar un total de 10 estaciones de FM.
Cuando titilen “P01-P10”, presione el botón SINTONIA + o SINTONIA – para
seleccionar el número prefijado.
Cuando llame estaciones prefijadas, presione el botón MEMORIA/MEMORIA+/
SIESTA para seleccionar el número prefijado.
Nota:
- Asegúrese que la antena FM esté completamente desenrollada y extendida
para la mejor recepción FM.
3. FUNCION DORMIR
Cuando escuche la radio, presione el botón (3) SNOOZE/DORMIR/DIMER para
entrar al modo dormir. Puede ajustar el temporizador para dormir desde 90
minutos a 15 minutos presionando el botón (3) SNOOZE/DORMIR/DIMER. La
unidad se apagará automáticamente tras el tiempo seleccionado.
22
OTRAS FUNCIONES
1.
-
-
FUNCION DE PANTALLA ENCENDIDA / APAGADA
Presione el botón (4) MEMORIA/MEMORA+/SIESTA/PANTALLA DE AUTO
DESCONEXION por 3 segundos, el indicador de la pantalla LED se
iluminará, la pantalla LED apagará tras 15 segundos de manera automática.
Presione cualquier botón para mantener la pantalla LED encendida por 15
segundos.
Presione el botón (4) MEMORIA/MEMORA+/SIESTA/PANTALLA DE AUTO
DESCONEXION por 3 segundos, el indicador de la pantalla LED se
apagará indicando que esta función se ha cancelado.
2. CONTROL DE DIMER
La llave (3) DIMER le permite ajustar el brillo de la pantalla LED
OTRAS FUNCIONES
3. CAMBIO AUTOMATICO DE CONTENIDO DE PANTALLA
En el modo de radio apagada, presione el botón (8) SUBIR VOLUMEN /
PANTALLA DE AUTO CAMBIO ACTIVADA / DESACTIVADA y manténgalo
presionado por más de 2 segundos para entrar al modo de cambio automático
de pantalla de hora, para mostrar el Año. Presione nuevamente para mostrar
el Mes/Día/Temperatura, la pantalla retornará a la pantalla de hora tras 5
segundos.
Indicador de AÑO
Indicador de MES
Indicador de DIA
4.
-
-
-
-
TEMPERATURA DE INTERIOR
El sensor de la temperatura interior se encuentra en la parte trasera de la
unidad. La unidad detecta la actual temperatura del ambiente.
A fin de mostrar la temperatura interior en °C o °F, primero active el
“CAMBIO AUTOMATICO DE CONTENIDO DE PANTALLA” (referirse al
párrafo anterior).
Durante el modo de Cambio Automático de Contenido de Pantalla, cuando
se muestre la temperatura, presione la tecla (10) >> para intercambiar entre
temperatura en Celsius o Fahrenheit.
El rango de detección de la temperatura interior es entre 0°C y 50°C o 32°F
y 122°F.
23
5. SELECCIONAR MODO DST (HORARIO DE VERANO)
Para países con horario de verano (DST), el radio reloj les ofrece la opción DST
para ajustar a la hora de verano.
En el modo standby presione y sostenga el botón (10) >>/SINTONIA +/
DST/°C-F por 2 segundos. El reloj avanzará de a una hora. Para salir del modo
DST, repita la operación anterior.
6. UNIDAD DE PROYECCION
- Ajuste del enfoque: Ajuste el enfoque/brillo de la proyección del reloj girando
la rueda de ajuste de brillo/enfoque hasta que la hora proyectada se
muestre claramente sobre el techo o la pared.
- Ajuste la dirección proyectada.
- Para voltear la imagen proyectada en 180°, presione el botón (6) TIEMPO
DE PROYECCION GIRO DE 180°/HORA-TEMPERATURA.
- Una vez convertida la proyección de la hora o temperatura, mantenga
presionado por 2 segundos para entrar al botón (6) TIEMPO DE
PROYECCION GIRO DE 180°/HORA- TEMPERATURA.
Nota: La hora debe ser proyectada sobre la pared o sobre el techo de una
habitación oscura. El rango de distancia para la proyección del reloj es de entre
0.90m ~ 2.70m.
7. REAJUSTE
Si el sistema no responde o exhibe funcionamiento errático o intermitente,
podría haber experimentado una descarga electroestática (ESD) o un pico
de tensión que activó el micro controlador interno para apagar la unidad
automáticamente. Si ésto ocurre, simplemente desconecte el cable de la
corriente y remueva la pila de resguardo del sistema, espere al menos 3
minutos y vuelva a activar la unidad siguiendo el manual.
ESPECIFICACIONES
Referencia del modelo Alimentación
Consumo eléctrico Consumo en modo Standby
Pila de resguardo
Cobertura de Radio Frecuencia
Potencia de salida del Audio
Peso del producto
Dimensiones del producto
Rango de temperatura interior
• ACP-64
• AC 230 V ~ 50 Hz
•5W
• <1 W
• 3V (1 pila CR2032 Plana de Litio)
• FM: 87.5MHz - 108 MHz
• 150 MW
• 0.423 gr.
• 121×121×68 mm
• 0 a +50°C o 32 a 122°F
24
IMPORTANTE:
Debido a la continua revisión y mejoras al diseño de nuestros productos,
las especificaciones pueden cambiar sin aviso previo.
25
ANTES DE COMEÇAR
Obrigado por comprar o AKAI ACP-64: Um rádio relógio despertador com
Projeção.
Este é o seu seguro de qualidade, performance e valor. Nossos engenheiros
incluiram muitos detalhes úteis e convenientes neste produto. Por favor leia
este Manual de Instruções na sua totalidade para ter certeza de tirar o máximo
proveito de cada característica.
Este produto foi produzido utilizando componentes e mão de obra das mais
altas qualidades. Foi testado por inspetores e declarado em perfeitas condições
de funcionamento ao deixar a fábrica.
Para referência no futuro, quarde o número de série no espaço provisto.
Modelo Número: AKAI ACP-64:
Número de Série:
INSTRUÇÕES MPORTANTES DE SEGURANÇA
The lightning flash with arrowhead symbol, within an equilateral triangle, is intended to alert the user
to the presence of uninsulated “dangerous voltage” within the product’s enclosure that may be of
sufficient magnitude to constitute a risk of electric shock to persons
The exclamation point within an equilateral triangle is intended to alert the user to the presence of
important operating and maintenance (servicing) instructions in the literature accompanying the
appliance.
CUIDADO
RISCO DE CHOQUE ELÉTRICO
NÃO ABRA
O símbolo de um relâmpago com uma ponta de flecha dentro de um triângulo
equilátero tem o objetivo de alertar o usuário sobre a presença de voltagem
não isolada dentro do produto. A exposição pode ser de tal magnitude que haja
risco de choque elétrico para as pessoas.
O ponto de exclamação dentro de um triângulo equilátero tem o objetivo de
alertar o usuário sobre a presença de instruções importantes sobre a operação
e a manutenção (serviço) na literatura que acompanha o produto.
1. Nenhuma fonte de fogo vivo, como velas acesas, devem ser colocados
sobre o aparelho.
26
2. Não coloque o produto em estantes fechadas ou sem a correta ventilação.
3. Quando a tomada é utilizada para desligar o aparelho, esta deve estar em
lugar de fácil acesso.
4. A ventilação não deve ser impedida ao se cobrir as aberturas de ventilação
com itens como jornais, panos de mesa, cortinas, etc.
5. O produto não deve ser exposto à gotas ou jatos d´água, e objetos com
líquidos, como vasos, não devem ser colocados sobre o mesmo.
6. Não conecte a antena FM à uma antena externa.
7. Esta unidade não deve ser exposta à luz direta do sol, temperaturas muito
altas ou baixas, umidade, vibrações ou estar em lugares com poeira.
8. Não utilize produtos abrasivos, benzina, removerdor ou solventes para
limpar a superficie da unidade. Para limpar, utilize um pano macio e limpo e
um detergente não abrasivo.
9. Nunca tente colocar fios, pregos ou outros objetos nas aberturas da
ventilação ou em outras aberturas da unidade.
10.Aviso para desligar o aparelho: A tomada principal é utilizada como
conexão, por isso deve ser de fácil acesso sempre.
11. As baterias não devem ser expostas ao calor em excesso como a luz do
sol, fogo ou outros.
12.Produto classe LED 1.
PRECAUÇÃO
Perigo de explosão se a bateria for incorretamente trocada.
Troque somente por outra do mesmo tipo ou equivalente.
FONTE DE ENERGIA E SISTEMA DE BATERIA DE APOIO
Ligue o cabo de energia AC à fonte de energia AC. Esta unidade está
equipada com um sistema de bateria de apoio. Precisa uma bateria pequena
de lítio de 3V CR2032 (não incluida). Coloque a bateria no compartimento
da bateria, controlando que as terminais positiva e negativa (+ e -) da bateria
estejam conectadas às terminais correspondentes na placa do compartimento
da bateria. Se houver uma falha na energia AC, o relógio mudará
automáticamente para a fonte de energia da bateria. O relógio e a memória
do cronômetro continuarão a funcionar. Quando a energia AC voltar, o relógio
mudará para a energia AC novamente.
27
DESCRIÇÃO DA UNIDADE E DOS CONTROLES
Vues de dessus, face et cotés
14
15
DESCRIÇÃO DA UNIDADE E DOS CONTROLES
1. AJUSTE LIGAR/DESLIGAR DO ALARME 1
2. << / SINTONIZAR - /ANO/MÊS/DIA
3. SNOOZE/DORMIR/INTENSIDADE DA LUZ
4. MEMÓRIA/MEMÓRIA+/COCHILO/AUTO DESLIGAR DISPLAY
5. LIGAR/DESLIGAR PROJEÇÃO
6. GIRAR PROJEÇÃO DA HORA 180°/HORA- TEMPERATURA
7. AJUSTE LIGAR/DESLIGAR DO ALARME 2
8. AUMENTAR VOLUME/LIGAR/DESLIGAR AUTO MUDANÇA DO DISPLAY
9. LIGAR/DESLIGAR
10.>> /SINTONIA +/ DST/C-F
11. AJUSTE DO RELÓGIO/TEMPERATURA
12.DIMINUIR VOLUME
13.ETIQUETA DE VOLTAGEM
14.COMPARTIMENTO DA BATERIA
15.ALTO-FALANTES
28
DESCRIÇÃO DA UNIDADE E CONTROLES (continuação)
16
17
18
19
20
16.AJUSTE DO FOCO PARA A UNIDADE DE PROJEÇÃO
17.DISPLAY
18.CABO DE POTÊNCIA AC
19.SENSOR DE TEMPERATURA (PARA INTERIORES)
20.ANTENA FM
DESCRIÇÃO DO DISPLAY
Indicador da HORA
Indicador PM
Indicador MHz
Indicador PAUSA
Indicador ALARME 1
Indicador ALARME 2
AJUSTE DA HORA E DO CALENDÁRIO
AJUSTE MANUAL DA HORA E DO CALENDÁRIO
Mantenha a tecla CLK.ADJ.TEMPERATURA (11) pressionada por mais de 2
segundos, no modo pausa, para entrar no modo de ajuste da hora. Após ter
entrado no modo de ajuste, pressione a tecla CLK.ADJ.TEMPERATURA (11)
para mudar o ciclo do modo na seguinte sequência:
Normal → Ano → Mês → Dia → 12/24 Hrs → Hora Atual → Min. Atuais →
Normal
Ação (durante o ajuste dos dados):
- Pressione a tecla << / Sintonia - (2) para ajustar os dados para trás.
- Pressione a tecla >> / Sintonia + (10) para ajustar os dados para adiante.
- Mantenha pressionada a tecla << ou >> por 2 segundos para ativar o
adiantamento automático.
29
AJUSTE DO ALARME
1. AJUSTAR O ALARME 1 E O ALARME 2
Mantenha pressionada a tecla de ajuste do alarme (1/7) por mais de 2
segundos para entrar no modo de ajuste do alarme. Após ter entrado no modo
de ajuste, pressione a tecla de ajuste do alarme (1/7) para mudar o ciclo do
modo na seguinte sequência:
Normal → Hora AL → Min. AL → Alarme dia da semana AL → Bipe para
acordar AL → Rádio despertador AL → Volume do rádio despertador →
Normal.
Selecione o modo do dia do alarme da seguinte maneira:
1- 5: Segunda à Sexta-feira
1- 7: Toda a semana
6 -7: Sábado e Domingo
1- 1: Um dia da semana
- -
- - Ação (durante o ajuste dos dados):
Pressione a tecla << / SINTONIA – (2) para ajustar os dados para trás
Pressione a tecla >> / SINTONIA + (10) para ajustar os dados para adiante
Mantenha pressionada a tecla << ou >> por 2 segundos para ativar o
adiantamento automático.
Duração do Alarme
Duração do alarme – O bipe do alarme ou o rádio despertador continuarão
a soar por 30 minutos se nenhuma tecla for pressionada. Depois parará
automaticamente e soará na mesma hora no dia seguinte.
2. FUNÇÃO SNOOZE
- Durante o alarme, pressionar a tecla SNOOZE (3) ativa a função snooze. O
bipe do alarme ou o rádio despertador pararão.
- O intervalo do snooze é de 9 minutos (não inclui a segunda ativação)
- O snooze continuará até que a tecla LIGAR/DESLIGAR (9) seja
pressionada para desligar o alarme. Caso contrário, o som do alarme ou o
rádio despertador pararão automaticamente após 30 minutos.
3. FUNÇÃO CRONOMETRO DO COCHILO (CONTAGEM REGRESSIVA)
Durante o modo de desligar o rádio, pressione a tecla AJUSTE MEMÓRIA
/ MEMÓRIA + / COCHILO (4) para ativar o modo COCHILO. O tempo de
COCHILO se mede em 5 segundos. Durante os 5 segundos, pressione a tecla
AJUSTE MEMÓRIA / MEMÓRIA + / COCHILO (4) para mudar a duração entre
90 min. e 10 min.
30
O alarme soará por 30 min. e desligará automaticamente. Para desligar o som
do alarme, pressione a tecla LIGAR / DESLIGAR (9).
Pressionar a tecla AJUSTE MEMÓRIA / MEMÓRIA + / COCHILO (4) não tem
nenhum efeito durante o funcionamento do alarme.
Pressione a tecla LIGAR / DESLIGAR (9) para cancelar a função COCHILO.
Nota: O COCHILO não inclui a função da luz para acordar.
FUNCIONAMENTO DO RÁDIO
1.
-
-
-
ESCUTAR O RÁDIO
Pressione a tecla LIGAR / DESLIGAR (9) para ligar a unidade.
Utilize a tecla SINTONIA + ou SINTONIA – para selecionar a estação de
rádio desejada. Se mantiver a tecla SINTONIA + ou SINTONIA –
pressionada, e depois soltar, a unidade automaticamente procurará a
seguinte estação.
Pressione a tecla LIGAR / DESLIGAR (9) para desligar o rádio.
2. PARA AJUSTAR / VOLTAR ÁS ESTAÇÕES DE RÁDIO MEMORIZADAS
- Pressione a tecla LIGAR / DESLIGAR (9) para ligar a unidade.
- Utilize a tecla SINTONIA + ou SINTONIA – para selecionar a estação de
rádio desejada.
- Pressione a tecla MEMÓRIA / MEMÓRIA +; “P02” vai piscar no display.
- Pressione a tecla MEMÓRIA / MEMÓRIA + novamente para reajustar.
Repita os passos 2 a 4 para mais memorizações.
A unidade pode memorizar um total de 10 estações para FM.
Quando “P01 – P10” estiverem piscando, pressione a tecla SINTONIA + ou
SINTONIA – para selecionar o número memorizado.
Para sintonizar uma estação memorizada, pressione a tecla MEMÓRIA /
MEMÓRIA + / COCHILO para selecionar o número memorizado.
Nota:
- Verifique que a antena FM esteja completamente desenrolada e esticada
para uma recepção FM melhor.
3. FUNÇÃO DORMIR
Ao escutar o rádio, pressione a tecla SNOOZE / DORMIR / DIMINUIR A LUZ
(3) para entrar no modo dormir. Pode-se ajustar o cronômetro de dormir de 90
a 15 min. pressionando a tecla SNOOZE / DORMIR / DIMINUIR A LUZ (3). A
unidade desligará automaticamente após o tempo selecionado.
31
OUTRAS FUNÇÕES
1.
-
-
FUNÇÃO LIGAR/DESLIGAR DISPLAY
Mantenha a tecla AJUSTE MEMÓRIA / MEMÓRIA + / AUTO LIGAR/
DESL LUZ DO DISPLAY / COCHILO (4) pressionada por 3 segundos. O
Indicador LED do display se iluminará e apagará automaticamente após
15 segundos. Pressione qualquer tecla para manter o display LED aceso
durante 15 segundos.
Mantenha a tecla AJUSTE MEMÓRIA / MEMÓRIA + / AUTO LIGAR/DESL
LUZ DO DISPLAY / COCHILO (4) pressionada por 3 segundos. O Indicador
LED do display apagará cancelando a função.
2. CONTROLE DA INTENSIDADE DA LUZ
A tecla da INTENSIDADE DA LUZ (3) permite ajustar o brilho do display LED.
OUTRAS FUNÇÕES
3. MUDANÇA AUTOMÁTICA DO CONTEÚDO DO DISPLAY
No modo do rádio desligado, mantenha a tecla AUMENTAR VOLUME /
MUDANÇA AUTOMÁTICA DO DISPLAY ENTRE LIGAR/DESLIGAR (8) por
mais de 2 segundos para entrar no modo automático do display e mostrar
o Ano. Pressione novamente para mostrar Mês/Dia/Temperatura. O display
voltará à hora normal após 5 segundos.
Indicador do ANO
Indicador do MÊS
Indicador do DIA
4. -
-
-
-
TEMPERATURA NO INTERIOR
O sensor da temperatura no interior está na parte de trás da unidade. A
unidade detecta a temperatura atual do ambiente.
Para mostrar a temperatura do interior em C° ou F°, primeiro ative a
“MUDANÇA AUTOMÁTICA DO CONTEÚDO DO DISPLAY” (veja o
parágrafo acima que corresponda).
Durante o modo de Mudança Automática do Conteúdo do Display, quando
a temperatura for mostrada, pressione a tecla >> (10) para mudar entre a
temperatura em graus Celsius e Fahrenheit.
A amplitude da variação da temperatura no interior é de entre 0°C e 50° ou
32°F e 122°F.
32
5. SELECIONAR O MODO DST (HORARIO DE VERÃO)
Para países com horário de verão (DST), o rádio relógio oferece a opção de
ajustar para o horário de verão.
No modo pausa, mantenha pressionada a tecla >> / SINTONIA + / DST / C-F
(10) por 2 segundos. O relógio adiantará uma hora. Para sair do modo DST,
repita a operação acima.
6. UNIDADE DE PROJEÇÃO
- Ajuste do foco: Ajuste o brilho/foco da projeção do relógio girando a roda de
ajuste do brilho/foco até a que a hora projetada se veja claramente no teto
ou na parede.
- Ajuste a direção da projeção.
- Para girar a projeção em 180°, pressione a tecla GIRAR PROJEÇÃO DA
HORA 180° / HORA-TEMPERATURA (6).
- Uma vez mudada a projeção da hora ou temperatura, mantenha a
tecla GIRAR A PROJEÇÃO DA HORA 180° / HORA-TEMPERATURA (6)
pressionada por mais de 2 segundos para guardar.
Nota: A hora deve ser projetada numa parede ou no teto de um quarto escuro.
A distância da projeção do relógio é de entre 0,90 m e 2,70 m.
7. REAJUSTE
Se o sistema não responder ou tiver um funcionamento errático ou intermitente,
pode ter ocorrido uma descarga eletrostática (ESD) ou uma variação
no suprimento de eletricidade que ativou o desligamento automático do
microcontrole interno. Se isso acontecer, simplesmente desligue da tomada
e remova a bateria de apoio, espere pelo menos 3 minutos e depois ajuste a
unidade novamente seguindo as instruções do manual.
ESPECIFIÇÕES
Referência do Modelo Fonte de energia
Consumo de energia Consumo no modo pausa
Bateria de apoio
Cobertura da rádio frequência Potência de saída áudio Peso da unidade
Dimensões do produto
Variação da temperature interior
• ACP-64
• AC 230 V ~ 50 Hz
•5W
• <1 W
• 3V (Bateria pequena de lítio CR2032 x 1)
• FM: 87,5MHz - 108 MHz
• 150 MW
• 0,423 g
• 121×121×68 mm
• 0 a +50°C ou 32 a 122°F
33
IMPORTANTE:
Devido à constante revisão e melhoramente no desenho dos nossos
pordutos, as espicificações estão sujeitas a mudanças sem aviso prévio.
34
VOORDAT WE BEGINNEN
Bedankt voor uw aankoop van deze AKAI ACP-64: de tweevoudige
wekkerradio met projectie.
Dit is uw garantie voor kwaliteit, performance en waarde. Onze ingenieurs
hebben in dit apparaat vele nuttige en handige functies verwerkt. Gelieve deze
Gebruiksaanwijzing aandachtig te lezen om het beste uit elke functie te kunnen
halen.
Dit product is met de hoogste normen van vakmanschap vervaardigd uit
onderdelen van de beste kwaliteit. Het is door inspecteurs getest en in perfecte
staat van werking bevonden toen het onze fabriek verliet.
Vul als referentie voor later het serienummer van uw apparaat hieronder in.
Modelnr.: AKAI ACP-64:
Serienummer:
BELANGRIJKE VEILIGHEIDSVOORZORGEN
The lightning flash with arrowhead symbol, within an equilateral triangle, is intended to alert the user
to the presence of uninsulated “dangerous voltage” within the product’s enclosure that may be of
sufficient magnitude to constitute a risk of electric shock to persons
The exclamation point within an equilateral triangle is intended to alert the user to the presence of
important operating and maintenance (servicing) instructions in the literature accompanying the
appliance.
OPGELET
RISICO VOOR ELEKTRISCHE SCHOKKEN
NIET OPENMAKEN
Het symbool van de bliksemschicht met pijl in een gelijkbenige driehoek wil de
gebruiker attent maken op de aanwezigheid van niet-geïsoleerde gevaarlijke
voltages binnenin de behuizing van dit product, die voldoende krachtig zijn om
elektrische schokken bij mensen te kunnen veroorzaken.
Het symbool van het uitroepteken in een gelijkbenige driehoek wil de gebruiker
attent maken op het feit dat belangrijke instructies voor het gebruik en
onderhoud (reparatie) zijn ingesloten in de documentatie die bij dit apparaat
werd meegeleverd.
35
BESCHRIJVING VAN HET APPARAAT EN DE BEDIENINGSKNOPPEN
1. Zet geen naakte vlam zoals van brandende kaarsen bovenop het apparaat
neer.
2. Zet dit apparaat niet in een gesloten boekenkast of rek waardoor de
ventilatie belemmerd wordt.
3. De stekker doet dienst als hoofdmiddel om dit apparaat van de netvoeding
los te koppelen en dient te allen tijde bereikbaar te zijn.
4. De ventilatie mag niet belemmerd worden door de ventilatieopeningen van
het apparaat af te dekken met bijvoorbeeld kranten, tafelkleden, gordijnen
enz.
5. Dit apparaat mag niet worden blootgesteld aan druppelende of spattende
vloeistof en voorwerpen die met water gevuld zijn, zoals vazen, mogen niet
op dit apparaat worden neergezet.
6. Sluit de FM-antenne niet aan op een buitenantenne.
7. Dit apparaat mag niet worden blootgesteld aan rechtstreeks zonlicht,
extreem hoge of lage temperaturen, vochtigheid, trilling of omgevingen met
veel stof.
8. Gebruik geen schuurmiddelen, benzeen, thinner of andere chemische
producten om de behuizing van dit apparaat te reinigen. Veeg de behuizing
schoon met een mild sopje en een zachte, schone doek.
9. Probeer in geen geval kabels, pinnen of andere voorwerpen in de openingen
of ventilatiesleuven van dit apparaat te stoppen.
10.Waarschuwing betreffende het ontkoppelen van dit apparaat: de stekker
doet dienst als hoofdmiddel om het apparaat van de netvoeding los te
koppelen en dient daarom te allen tijde bereikbaar te zijn.
11. De batterijen mogen niet worden blootgesteld aan overmatige hitte zoals
van zonneschijn of vuur.
12.LED-apparaat van de Categorie 1.
VOORZICHTIG
Ontploffingsgevaar wanneer de batterij verkeerd is ingezet.
Vervang de batterij uitsluitend door een batterij van hetzelfde of gelijkaardige
type.
STROOMVOEDING & BACK-UPSYSTEEM MET BATTERIJ
Stop de stekker van het wisselstroom netsnoer in een wisselstroom stopcontact.
Dit apparaat is uitgerust met een back-upsysteem met een batterij, waarvoor
een platte lithiumbatterij van het type 3V CR2032 (niet meegeleverd) nodig
is. Zet de batterij in het batterijvak, erop lettend dat de positieve en negatieve
(+ en -) batterijcontacten op de overeenkomstige contacten in het batterijvak
36
zijn aangesloten. In geval van stroomonderbreking schakelt de wekkerradio
automatisch over op de voeding van de batterij, zodat de klok en de timer blijven
lopen. Het apparaat schakelt weer over op de wisselstroom netvoeding zodra
deze is hersteld.
BESCHRIJVING VAN HET APPARAAT EN BEDIENINGSKNOPPEN
14
15
FUNCTIES EN BEDIENINGSKNOPPEN
1. WEKKER 1 AAN / UIT INSTELLEN
2. << / AFSTEMMEN - / JAAR/MAAND/DATUM
3. SLUIMER / SLAAP / DIMMER
4. GEHEUGEN/GEHEUGEN+/DUT/AUTOM. UIT DISPLAY
5. PROJECTIE AAN/UIT
6. PROJECTIE TIJD 180° DRAAIEN/TIJD- TEMPERATUUR
7. WEKKER 2 AAN / UIT INSTELLEN
8. VOLUME OP / DISPLAY AUTOM. WISSELEN AAN/UIT
9. AAN/UIT
10.>> / AFSTEMMEN + / DST/C-F
11. KLOK INSTELLEN/ TEMPERATUUR
12.VOLUME NEER
13.TYPEPLAATJE
14.BATTERIJVAK
15.LUIDSPREKER
37
BESCHRIJVING VAN HET APPARAAT EN BEDIENINGSKNOPPEN (vervolg)
16
17
DESCRIPTION DE L’APPAREIL & COMMANDES (Suite)
18
19
20
16.SCHERPSTELLING VOOR PROJECTIE-EENHEID
17.DISPLAY
18.WISSELSTROOM NETSNOER
19.TEMPERATUURSENSOR (BINNEN)
20.FM-ANTENNE
BESCHRIJVING VAN DE DISPLAY
TIJD-indicator
PM-indicator
MHz-indicator
STAND-BY-indicator
WEKKER 1-indicator
WEKKER 2-indicator
DE TIJD & KALENDER INSTELLEN
DE TIJD EN KALENDER HANDMATIG INSTELLEN
Houd in de modus stand-by de toets TIJD.INST.TEMPERATUUR (11) minstens
2 seconden lang ingedrukt om de instelmodus voor de tijd binnen te gaan. Druk
daarna op de toets TIJD.INST.TEMPERATUUR (11) om achtereenvolgens
doorheen de onderstaande modi te verrollen:
Normaal → jaar → maand → datum → 12/24u → uur van de huidige tijd →
minuten van de huidige tijd → normaal
Actie (tijdens het instellen van gegevens):
- Druk op de toets << / Afstemmen - (2) om achteruit te gaan.
- Druk op de toets >> / Afstemmen + (10) om vooruit te gaan.
Houd de toets << of >> 2 seconden lang ingedrukt om automatisch vooruit
te gaan.
38
DE WEKKERS INSTELLEN
1. WEKKER 1 EN WEKKER 2 INSTELLEN
Houd in de normale modus de insteltoets voor de wekker (1/7) minstens 2
seconden lang ingedrukt om de instelmodus voor de wekker binnen te gaan.
Druk daarna op de insteltoets voor de wekker (1/7) om achtereenvolgens
doorheen de onderstaande modi te verrollen:
Normaal → WEK uur → WEK minuten → WEK weekdag Wekker → WEK
pieptoon → WEK radio → WEK radiovolume → Normaal.
Selecteer een weekdagmodus voor de wekker als volgt:
1-5: maandag tot vrijdag
1-7: hele week
6-7: zaterdag & zondag
1-1: één dag van de week
-
-
-
-
Actie (tijdens het instellen van gegevens):
Druk op de toets << / AFSTEMMEN - (2) om achteruit te gaan.
Druk op de toets >> / AFSTEMMEN + (10) om vooruit te gaan.
Houd de toets << of >> 2 seconden lang ingedrukt om automatisch vooruit
te gaan.
Duur van de wekker
Duur van de wekker: de pieptoon- of radiowekker klinkt gedurende 30 minuten
wanneer geen enkele toets wordt ingedrukt en stopt dan automatisch om de
volgende dag op dezelfde wekkertijd weer te activeren.
2.
-
-
-
SLUIMERFUNCTIE
Druk terwijl de wekker afgaat op de toets SLUIMER (3) om de sluimerfunctie
te activeren en de pieptoon- of radiowekker tijdelijk te stoppen.
De tussentijd van de sluimerstand is 9 minuten (afgeronde seconden niet
meegeteld)
De sluimerstand blijft geactiveerd tot u op de toets AAN/UIT (9) drukt om de
zoemer- of radiowekker uit te schakelen, of stopt automatisch na 30
minuten.
3. DE FUNCTIE DUT-TIMER (AFTELTIMER)
Druk terwijl de radio is uitgeschakeld op de toets GEHEUGEN.INSTELLEN /
GEHEUGEN+ / DUT (4) om de DUT-modus in te schakelen. De insteltijd voor
een dutje is 5 seconden: druk binnen de 5 seconden op de toets GEHEUGEN.
INSTELLEN / GEHEUGEN+ / DUT (4) om een tijd in te stellen tussen 90 min
en 10 min.
39
The wekkerzoemer klinkt 30 min. lang en schakelt daarna automatisch uit. Druk
op de toets AAN/UIT (9) om de wekkerzoemer eerder te stoppen.
Drukken op de toets GEHEUGEN.INSTELLEN / GEHEUGEN+ / DUT (4) heeft
geen enkel effect terwijl de wekker afgaat.
Druk op de toets AAN/UIT (9) om de DUT-functie te annuleren.
Opmerking: de functie wekkerlicht werkt niet terwijl de DUT-functie is
ingeschakeld.
BEDIENING VAN DE RADIO
1.
-
-
-
NAAR DE RADIO LUISTEREN
Druk op de toets AAN/UIT (9) om het apparaat in te schakelen.
Gebruik de toets AFSTEMMEN + of AFSTEMMEN – om de gewenste
radiozender te selecteren. Houd de toets AFSTEMMEN + of AFSTEMMEN
– ingedrukt en laat dan los om automatisch naar de eerstvolgende
radiozender te scannen.
Druk op de toets AAN/UIT (9) om de radio uit te schakelen.
2. OM VOORKEUZEZENDERS IN TE STELLEN / OP TE ROEPEN
- Druk op de toets AAN/UIT (9) om het apparaat IN te schakelen.
- Gebruik de toets AFSTEMMEN + of AFSTEMMEN - om de gewenste
radiozender te selecteren.
- Druk op de toets GEHEUGEN / GEHEUGEN +, zodat “P02” op de display
gaat knipperen.
- Druk nogmaals op de toets GEHEUGEN / GEHEUGEN + om de zender in
te stellen als voorkeuzezender.
Herhaal de stappen 2 tot en met 4 om andere zenders in te stellen als
voorkeuzezender.
U kunt tot 10 radiozenders op FM instellen als voorkeuzezender.
Druk terwijl “P01-P10” knippert op de toets AFSTEMMEN + of AFSTEMMEN –
om een cijfer voor de voorkeuzezender te selecteren.
Druk op de toets GEHEUGEN / GEHEUGEN +/DUT om het cijfer van de
gewenste voorkeuzezender te selecteren en deze voorkeuzezender op te
roepen.
Opmerking:
- Let erop dat de FM-antenne volledig uitgetrokken en gestrekt is voor een
optimale FM-ontvangst.
3. BEDIENING VAN DE INSLAAPFUNCTIE
Druk terwijl u naar de radio luistert op de toets SLUIMER/SLAAP/DIMMER (3)
om de slaapmodus binnen te gaan. U kunt de inslaaptimer instellen tussen 90
minuten en 15 minutes door te drukken op de toets SLUIMER/SLAAP/DIMMER
(3). Het apparaat schakelt na de geselecteerde tijd automatisch uit.
40
OVERIGE FUNCTIES
1.
-
-
DE FUNCTIE DISPLAY AAN/UIT
Houd de toets GEHEUGEN. INSTELLEN / GEHEUGEN+ / DISPLAY
AUTOM. AAN-UIT /DUT (4) 3 seconden lang ingedrukt. De LED-indicator
gaat op de display branden en schakelt 15 seconden later automatisch weer
uit. Druk op eender welke toets om de LED-display 15 seconden langer te
laten verlichten.
Houd de toets GEHEUGEN. INSTELLEN / GEHEUGEN+ / DISPLAY LICHT
AUTOM. AAN-UIT /DUT (4) 3 seconden lang ingedrukt. De LED-indicator
dooft op de display, aangevend dat deze functie is geannuleerd.
2. DE DIMMER INSTELLEN
U kunt met de DIMMER-schakelaar (3) de helderheid van de LED-display naar
wens instellen.
3. AUTOMATISCH DE INFO OP DE DISPLAY WISSELEN
Houd terwijl de radio is uitgeschakeld de toets VOLUME OP / DISPLAY
AUTOM. WISSELEN AAN/UIT (8) minstens 2 seconden lang ingedrukt om de
functie automatisch info wisselen van de tijddisplay binnen te gaan en het jaartal
te zien. Druk nogmaals op de toets om de maand/datum/temperatuur op de
display te zien, de display keert na 5 seconden terug naar de tijddisplay.
JAAR-indicator
MAAND-indicator
4.
-
-
-
-
DATUM-indicator
BINNENTEMPERATUUR
De sensor voor de binnentemperatuur bevindt zich op de achterzijde van het
apparaat. Het apparaat detecteert de huidige omgevingstemperatuur.
Om de binnentemperatuur in °C of °F aan te geven, dient u eerst de functie
“AUTOMATISCH DE INFO OP DE DISPLAY WISSELEN” te activeren (zie
voorgaande paragraaf).
Druk in de modus automatisch de info op de display wisselen terwijl de
temperatuur is aangegeven op de toets AAN >> (10) om af te wisselen
tussen de temperatuureenheden Celsius en Fahrenheit.
Het metingsbereik van de kamertemperatuur ligt tussen 0°C & 50°C of 32°F
& 122°F.
41
5. DE DST-MODUS (ZOMERTIJD) SELECTEREN
Voor landen waar een zomertijd (DST) van kracht is, is de wekkerradio uitgerust
met een DST-optie die de zomertijd instelt.
Houd in de modus stand-by de toets >> / AFSTEMMEN +/DST/C-F (10)
2 seconden lang ingedrukt. De klok gaat een uur vooruit. Herhaal de
bovenstaande bewerking om de DST-modus te annuleren.
6. DE PROJECTOR
- Scherpstelling: stel de helderheid/scherpte van de projectieklok in door het
instelwiel voor de helderheid/scherpte te draaien tot de tijd helder op de
wand of zoldering is geprojecteerd.
- Stel de richting van het geprojecteerde beeld in.
- Druk op de toets PROJECTIE TIJD 180° OMDRAAIEN/TIJD TEMPERATUUR (6) om de geprojecteerde tijd 180° te draaien.
- Houd de toets PROJECTIE TIJD 180° OMDRAAIEN/TIJD-TEMPERATUUR
(6) minstens 2 seconden lang ingedrukt om de tijd ondersteboven te zien.
Opmerking: de tijd moet worden geprojecteerd op de wand of zoldering van
een verduisterde kamer. Het afstandsbereik van de tijdprojectie bedraagt tussen
0,90 m en 2,70 m.
7. TERUGSTELLEN
Wanneer het systeem vastloopt of onbetrouwbaar lijkt te werken, kan dit te
wijten zijn aan elektrostatische ontlading (ESD) of een stroomstoot die de
interne microcontroller automatisch heeft uitgeschakeld. In dit geval haalt u
eenvoudig de stekker uit het stopcontact en verwijdert u de back-upbatterij van
het systeem. Wacht tenminste 3 minuten en stel dan het apparaat opnieuw in
volgens de gebruiksaanwijzing.
TECHNISCHE GEGEVENS
Model referentie Stroomvoeding
Stroomverbruik Verbruik in de modus stand-by Back-up batterij Bereik radiofrequentie Vermogen geluiduitgang Gewicht van het product Afmetingen van het product
Bereik van de binnentemperatuur • ACP-64
• 230 V ~ 50 Hz wisselstroom
• 5W
• <1 W
• 3V (CR2032 platte lithiumbatterij x 1)
• FM: 87.5MHz - 108 MHz
• 150 MW
• 0,423 g
• 121×121×68 mm
• 0 tot +50°C of 32 tot 122°F
42
BELANGRIJK:
Als gevolg van voortdurende herziening en verbetering van het ontwerp
van onze producten kunnen de uiteindelijke technische gegevens zonder
voorafgaande kennisgeving gewijzigd zijn.
43
BEVOR WIR BEGINNEN
Vielen Dank für den Kauf dieses Dual-Alarm Weckerradios mit Zeitprojektion.
Wir versichern Ihnen hiermit, dass dieses Produkt höchsten Ansprüchen
hinsichtlich Qualität, Funktion und Wert genügt. Unsere Ingenieure haben
dieses Gerät mit vielen nützlichen und leicht zu bedienenden Funktionen
ausgestattet. Bitte lesen Sie diese Bedienungsanleitung vollständig durch, um
sicher zu stellen, dass Sie alle Funktionen optimal nutzen können.
Dieses Gerät wurde unter Verwendung höchst-qualitativer Komponenten
und unter Anwendung strenger Produktionsstandards geschaffen. Es wurde
von Inspektoren in unserem Werk getestet und war vor der Auslieferung in
perfektem Funktionszustand.
WICHTIGE SICHERHEITSHINWEISE
Das Blitzsymbol soll den Benutzer auf die Gegenwart gefährlicher Spannung
im Inneren des Gerätes hinweisen, und dass sich der Benutzer durch
Berühren der inneren Teile der Gefahr lebensbedrohlicher Stromschläge und
Personenverletzungen aussetzt.
Das Ausrufezeichen weist den Benutzer auf wichtige Betriebshinweise in dieser
Bedienungsanleitung hin.
1. Halten Sie offenes Feuer, wie z.B. Kerzen von dem Gerät fern, und stellen
Sie diese niemals auf das Gerät.
2. Platzieren Sie das Gerät niemals in geschlossenen Bücherregalen oder
anderen Regalen wo keine ausreichende Belüftung des Gerätes
gewährleistet ist.
3. Das Netzkabel dient zum Abtrennen des Gerätes von der
Netzstromversorgung, und das von der Stromversorgung abgetrennte Gerät
kann auch in abgetrenntem Zustand betrieben werden.
4. Die Belüftungsöffnungen im Gehäuse des Geräte sollten nicht durch
Gegenstände, wie z.B. Zeitungen, Tischdecken, Vorhänge, etc. abgedeckt
oder verschlossen werden.
5. Setzen Sie das Gerät niemals Tropf- oder Spritzwasser aus, und achten Sie
darauf, dass niemals mit Wasser gefüllte Gegenstände, wie z.B.
Blumenvasen auf dem Gerät abgestellt werden.
6. Schließen Sie niemals eine externe UKW-Antenne an der Antenne des
Gerätes an.
7. Das Gerät sollte möglichst nicht direkter Sonneneinstrahlung, extrem hohen
oder niedrigen Temperaturen, Feuchtigkeit, Vibrationen oder Staub
ausgesetzt werden. Vermeiden Sie die Aufstellung an solchen Orten.
8. Verwenden Sie niemals scharfe Reiniger wie z.B. Benzin, Verdünner oder
andere Lösungsmittel zur Reinigung der Oberflächen des Gerätes. Reinigen 44
Sie die Oberflächen des Gerätes nur mit einem milden, nicht scheuernden
Reinigungsmittel und einem sauberen, leicht feuchten Tuch.
9. Versuchen Sie niemals Kabel, Stifte oder andere Gegenstände in die
Belüftungsschlitze des Gerätes einzuführen.
10.Warnhinweis zum Abtrennen von der Stromversorgung: Der Netzstecker
trennt das Gerät von der Netzstromversorgung, und Sie sollten stets darauf
achten, dass der Netzstecker leicht erreichbar ist.
11. Batterien sollten niemals heiß werden, und vermeiden Sie es diese direkter
Sonneneinstrahlung, Feuer oder der Wärme von anderen Wärmequellen
auszusetzen.
12.LED-Produkt der Klasse 1.
VORSICHT
Explosionsgefahr bei falschem Einlegen der Batterien. Ersetzen Sie die
Batterien nur durch Batterien des selben oder eines äquivalenten Typs.
STROMVERSORGUNG & STÜTZBATTERIE
Verbinden Sie den Netzstecker des Gerätes mit einer AC-Netzdose.
Dieses Gerät ist mit einer Stützbatterie ausgerüstet, und benötigt eine 3V
Lithiumbatterie (nicht mitgeliefert) des Typs CR2032. Legen Sie die Batterie in
das Batteriefach ein, und achten Sie auf die korrekte Ausrichtung der Angaben
für die Batteriekontakte für Plus und Minus (+ and -) im Batteriefach. Wenn ein
Stromausfall während der Nacht auftritt, dann schaltet das Gerät automatisch
die Stromversorgung auf die Stützbatterie um, und die Zeit und der Timer
werden korrekt erhalten. Sobald die Netzstromversorgung wieder hergestellt ist,
schaltet das Gerät automatisch wieder auf die AC-Netzstromversorgung um.
45
BESCHREIBUNG DES GERÄTES UND DER BEDIENUNGSELEMENTE
14
15
FUNKTIONEN UND BEDIENUNG
1. ALARM 1 EIN / AUS SET
2. << / SENDERSUCHE -/JAHR/MONAT/TAG
3. SCHLUMMERN / EINSCHALFEN / DIMMER
4. SPEICHER/SPEICHER+/NICKERCHEN/AUTO AUS ANZEIGE
5. PROJEKTION EIN/AUS
6. PROJEKTION ZEIT 180° UMKEHRUNG/ZEIT- TEMPERATUR
7. ALARM 2 EIN / AUS SET
8. LAUTSTÄRKE AUF / ANZEIGE AUTO UMSCHALTUNG EIN/AUS
9. EIN / AUS
10.>> / SENDERSUCHE + / DST/C-F
11. ZEIT EINSTELLUNG/TEMPERATUR
12.LAUTSTÄRKE ABWÄRTS
13.TYPSCHILD
14.BATTERIEFACH
15.LAUTSPRECHER
BESCHRIJVING VAN HET APPARAAT EN BEDIENINGSKNOPPEN (vervolg)
46
BESCHREIBUNG DES GERÄTES UND DER REGLER (Suite)
16
17
18
19
20
16.FOKUS-EINSTELLUNG FÜR PROJEKTOR
17.ANZEIGE
18.AC-NETZKABEL
19.TEMPERATUR-SENSOR (INNEN)
20.UKW-ANTENNE
ANZEIGE BESCHREIBUNG
ZEIT-Indikator
PM-Indikator
MHZ-Indikator
BEREITSCHAFT-Indikator
ALARM 1 Indikator
ALARM 2 Indikator
ZEIT & KALENDER EINSTELLUNG
ZEIT UND KALENDER – MANUELLE EINSTELLUNG
Betätigen Sie die Taste CLK.ADJ.TEMPERATUR (11) im BereitschaftModus, und halten Sie die Taste länger als 2 Sekunden gedrückt, um den
Einstellmodus für die Zeit aufzurufen; betätigen Sie anschließend die Taste
UHR.EINSTELLEN.TEMPERATUR (11), um wie folgt durch die Einstellmodi zu
schalten:
Normalzeit → Jahr → Monat → Tag → 12/24 STD → Normalzeit Stunden →
Normalzeit Minuten → Normalzeit
Vorgehensweise (während der Einstellung des Datums):
- Betätigen Sie die << / Sendersuche - Taste (2), um das Datum rückwärts
einzustellen.
- Betätigen Sie die >> / Sendersuche + Taste (10), um das Datum vorwärts
einzustellen.
47
-
Halten Sie die Tasten << oder >> 2 Sekunden lang gedrückt, um die
Einstellung schnell vorwärts oder rückwärts vorzunehmen.
ALARM EINSTELLUNG
1. EINSTELLUNGEN ALARM 1 UND ALARM 2
Halten Sie die Alarm-Einstelltaste (1/7) länger als 2 Sekunden im NormalzeitModus gedrückt, um den Alarm-Einstellmodus aufzurufen; schalten Sie durch
die Einstellsequenz mittels der Alarm-Einstellen-Taste (1/7) wie nachfolgend
beschrieben:
Normalzeitanzeige → AL Stunde → AL Minute → AL Wochentag-Alarm
→ AL Alarmton → AL Alarm Radio → AL Alarm Radio Lautstärke →
Normalzeitanzeige.
Stellen Sie den Wochentag-Alarmmodus wie folgt ein:
1-5: Montag bis Freitag
1-7: Ganze Woche
6-7: Samstag & Sonntag
1-1: Ein Tag der Woche
- Vorgehensweise (während der Einstellung):
- Betätigen Sie die Taste << / SENDERSUCHE - (2), um die Einstellung
rückwärts vorzunehmen.
- Betätigen Sie die Taste >> / SENDERSUCHE + (10), um die Einstellung
vorwärts vorzunehmen.
- Halten Sie die Tasten << oder >> ca. 2 Sekunden lang, um die Einstellung
schnell vorwärts laufen zu lassen.
Alarmdauer
Alarmdauer – Der Summeralarm oder der Radioalarm dauern 30 Minuten
lang an, wenn keine Tastenbetätigung erfolgt; anschließend schaltet sich die
Alarmfunktion automatisch ab, und der Alarm ertönt am nächsten Tag zur
gleichen Zeit erneut.
2.
-
-
-
SCHLUMMERN-FUNKTION
Betätigen Sie die Schlummern-Taste SNOOZE (3), um die
Alarmwiederholung zu aktivieren. Der Summeralarm, oder der Radioalarm
werden abgeschaltet.
Das Intervall für die Alarmwiederholung beträgt 9 Minuten (ausschließlich
des Sekundenüberlaufs)
Die Alarmwiederholung wird so lange fortgesetzt bis Sie die Taste EIN/
AUS (9) betätigen, um die Alarmfunktion abzuschalten, oder der Summeroder Radioalarm wird nach 30 Minuten automatisch abgeschaltet.
48
3. NICKERCHEN-TIMER FUNKTION (COUNT-DOWN TIMER)
Betätigen sie die SPEICER.SET / SPEICHER+ / NICKERCHEN-Taste (4)
während das Radio ausgeschaltet ist, um den NICKERCHEN-Modus (NAP)
einzuschalten; die NICKERCHEN-Zeit wird nun 5 Sekunden lang angezeigt,
und Sie können innerhalb von 5 Sekunden mittels der Tasten SPEICHER.
SET/SPEICHER+ / NICKERCHEN (4) die Dauer des Nickerchens zwischen 90
Minuten – 10 Minuten einstellen.
Der Summer-Alarm ertönt 30 Minuten lang und schaltet sich dann automatisch
aus. Betätigen Sie die Taste EIN/AUS (9), um den Summer-Alarm abzuschalten.
Betätigen der Taste SPEICHER.SET / SPEICHER+ / NICKERCHEN (4) hat
keine Wirkung während der Alarm ertönt.
Betätigen Sie die Taste EIN/AUS (9), um die NICKERCHEN-Funktion
abzuschalten.
Hinweis: Beim Einsatz der NICKERCHEN-Funktion wird das Aufwachlicht nicht
aktiviert.
RADIO BETRIEB
1.
-
-
-
RADIO HÖREN
Betätigen Sie die EIN/AUS-Taste (9), um das Gerät einzuschalten.
Verwenden Sie die Tasten SENDERSUCHE + oder SENDERSUCHE –,
um einen gewünschten Radiosender auszuwählen. Wenn Sie die Tasten
SENDERSUCHE + oder SENDERSUCHE – gedrückt halten, dann sucht
das Gerät automatisch die nächste Sendestation auf.
Betätigen Sie die EIN/AUS-Taste (9), um das Radio auszuschalten.
2. SENDESTATION PROGRAMMIEREN/AUFRUFEN
- Betätigen Sie die Taste EIN/AUS (9), um das Gerät EIN zu schalten.
- Verwenden Sie die Tasten SENDERSUCHE + oder SENDERUCHE - , um
eine gewünschte Sendestation auszuwählen.
- Betätigen Sie die Taste SPEICHER / SPEICHER +; “P02” blinkt nun in der
Anzeige.
- Betätigen Sie die Taste SPEICHER / SPEICHER + nochmals, um eine
Sendestation zu programmieren.
Wiederholen Sie die Schritte 2 bis 4, um weitere Sendestationen zu
programmieren.
Das Gerät kann insgesamt 10 UKW Sender speichern.
Betätigen Sie die Tasten SENDERSUCHE + oder SENDERSUCHE - während
“P01-P10” in der Anzeige blinkt. Betätigen Sie die Taste SPEICHER /
SPEICHER +/NICKERCHEN, um eine vorprogrammierte Station auszuwählen.
49
Hinweis:
Stellen Sie sicher, dass die UKW-Antenne vollständig ausgerollt und ausgelegt
wurde, um einen optimalen UKW-Empfang zu gewährleisten.
3. EINSCHLAF-TIMER EINSATZ
Betätigen Sie die Taste SCHLUMMERN/EINSCHLAFEN/DIMMER (3) während
Sie das Radio hören, um den Einschlaftimer-Modus zu aktivieren. Sie können
den Einschlaftimer auf ein Intervall zwischen 90 Minute bis 15 Minuten
einstellen, indem Sie die Taste SCHLUMMERN / EINSCHALFEN / DIMMER
(3) betätigen. Das Gerät schaltet sich nun automatisch nach Ablauf des
ausgewählten Zeitintervalls aus.
SONSTIGE FUNKTIONEN
1.
-
-
ANZEIGE EIN/AUS
Betätigen Sie die Taste SPEICHER. SET / SPEICHER+ / ANZEIGE AUTO
EIN-AUS /NICHERCHEN (4) ca. 3 Sekunden lang, und LED-AnzeigeIndikator
leuchtet auf; die LED-Anzeige schaltet sich nun nach 15
Sekunden automatisch aus. Betätigen Sie eine beliebige Taste, um die LEDAnzeige 15 Sekunden einzuschalten.
Betätigen Sie die Taste SPEICHER. SET / SPEICHER+ / ANZEIGE
BELEUCHTUNG AUTO EIN-AUS /NICKERCHEN (4) ca. 3 Sekunden lang,
und der LED-Anzeige-Indikator erlischt, und die Funktion ist nun
deaktieviert.
2. DIMMER-REGLER
Der DIMMER-REGLER (3) ermöglicht Ihnen die Einstellung der Helligkeit der
LED-Anzeige.
SONSTIGE FUNKTIONEN
3. AUTOMATISCHE UMSCHALTUNG DER ANZEIGE
Betätigen Sie die Taste LAUTSTÄRKE AUF / ANZTEIGE AUTO
UMSCHALTUNG EIN/AUS (8), und halten Sie die Taste länger als 2 Sekunden
gedrückt, um den automatischen Umschaltmodus für die Anzeige des Jahres
aufzurufen. Betätigen Sie die Taste nochmals, um Monat/Tag/Temperatur
anzuzeigen; die Anzeige schaltet nach 5 Sekunden wieder zur Zeitanzeige
zurück.
JAHR-INDIKATOR
MONAT-INDIKATOR
50
DATUM-INDIKATOR
4.
-
-
-
-
INNENTEMPERATUR
Der Sensor für die Innentemperatur befindet sich an der Rückseite
des Gerätes. Mittels dieses Sensor misst das Gerät die aktuelle
Umgebungstemperatur.
Um die aktuelle Zimmertemperatur in °C oder °F anzuzeigen, aktivieren Sie
zuerst die Funktion “AUTO UMSCHALTUNG ANZEIGE-INHALT” (beachten
Sie entsprechen den obigen Abschnitt).
Während der Anzeigemodus für die automatische Anzeigeumschaltung
aktiviert ist, können Sie mittels der Taste >> (10) zwischen der
Temperaturanzeige in Grad Celsius oder Grad Fahrenheit umschalten.
Der Messbereich für die Innentemperatur reicht von 0°C bis 50°C oder 32°F
bis 122°F.
5. DST-MODUS (SOMMERZEIT)
Für Länder die auf Sommerzeit (DST) umschalten, verfügt dieses Weckerradio
über eine DST-Umschaltung auf die Sommerzeit.
Halten Sie die Taste >> / TUNE +/DST/C-F (10) 2 Sekunden im SommerzeitModus gedrückt. Die Uhr stellt die Zeitanzeige nun eine Stunde vorwärts
ein. Wiederholen Sie den obigen Vorgang, um die Anzeige vom DST
Sommerzeitmodus wieder in den Normalzeitmodus zurück zu schalten.
6. ZEITPROJEKTION
- Fokus einstellen: Stellen Sie die Helligkeit/den Focus der projizierten
Uhrzeit ein, indem Sie den Helligkeits-/Fokus-Regler so lange einstellen, bis
die Projektion der Uhrzeit scharf an der Wand oder der Decke erscheint.
- Einstellen der Projektionsrichtung.
- Betätigen Sie die Taste PROJEKTION ZEIT 180° UMKEHRUNG/ZEIT TEMPERATUR (6), um die Anzeige um 180° zu drehen.
- Halten Sie die Taste PROJEKTION ZEIT 180° UMKEHRUNG/ZEIT TEMPERATUR (6) länger als 2 Sekunden gedrückt, um zwischen der Zeit und Temperaturanzeige umzuschalten.
Hinweis: Die Zeit muss an die Wand oder Decke eines abgedunkelten Zimmers
projiziert werden. Die Projektionsdistanz beträgt zwischen 0.90m ~ 2.70m.
51
TECHNISCHE DATEN
Modell
Stromversorgung
Leistungsaufnahme Bereitschaftmodus Leistungsaufnahme
Stützbatterie
Radio Frequenzbereich Audio Ausgangsleistung Produktgewicht
Produkt-Abmessungen
Innentemperatur Messbereich
• ACP-64
• AC 230 V ~ 50 Hz
•5W
• <1 W
• 3V (CR2032 flache LithiumBatterie x 1)
• UKW: 87.5MHz - 108 MHz
• 150 MW
• 0.423 g
• 121×121×68 mm
• 0 bis +50°C oder 32 bis 122°F
WICHTIG:
Im Interesse der fortlaufenden Produktverbesserung behalten wir uns
Änderungen technischer Daten und anderer Leistungsmerkmale ohne
Vorankündigung vor.
52
www.akai-france.com
ACP-64