1
EN
IMPORTANT SAFETY INSTRUCTIONS
When using an electrical appliance, basic safety should always be followed, including the following:
Read all instructions before using this sewing machine.
DANGER - To reduce the risk of electric shock:
1. An appliance should never be left unattended when plugged in.
2. Always unplug this appliance from the electric outlet immediately after using and before cleaning.
3. Always unplug before re-lamping. Replace bulb with same type rated 10 watts (110-120V area) or
15 watts (220-240V area).
WARNING - To reduce the risk of burns, fire, electric shock, or injury to persons:
1. Read the instruction carefully before you use the machine.
2. Keep the instructions at a suitable place close to the machine and hand it over if you give the
machine to a third party.
3. Use the machine only in dry locations.
4. This appliance can be used by children aged from 8 years and above and persons with reduced
physical, sensory or mental capabilities or lack of experience and knowledge if they have been
given supervision or instruction concerning use of the appliance in a safe way and understand the
hazards involved.
5. Children shall not play with the appliance.
6. Cleaning and user maintenance shall not be made by children without supervision.
7. Always switch off the machine if you carry out preparation for work (change the needle, feed the
yarn thru the machine, change the footer, etc.).
8. Always unplug the machine if you leave it unattended, to avoid injury by inadvertently switch on
the machine.
I
9. Always unplug the machine if you changing the lamp or carry out maintenance (oiling, cleaning).
10.Don't use the machine if it's wet or in humid environment.
11.Never pull at the cord, always unplug the machine by gripping the plug.
12.Never place anything on the foot controller.
13.Never use the machine if the air vents are blocked keep the air vents of the machine and the foot
controller free from dust, fusel and leftovers.
14.The machine must only be used with foot controller type KD-1902, FC-1902 (110-120V area)/ KD2902, FC-2902D (220-240V area)manufactured by ZHEJIANG FOUNDER MOTOR CORPORATION
LTD. (China)/ 4C-316B (110-125V area)/ 4C-326G (230V area)manufactured by Wakaho Electric Ind.
Co., Ltd. (Vietnam).
15.If the supply cord connected with foot controller is damaged, it must be replaced by the
manufacturer or its service agent or a similarly qualified person, in order to avoid a hazard.
16.The sound pressure level at normal operation is smaller than 75dB(A).
17.Do not dispose of electrical appliances as unsorted municipal waste, use separate collection
facilities.
18.Contact your local government for information regarding the collection systems available.
19.If electrical appliances are disposed of in landfills or dumps, hazardous substances can leak into
the groundwater and get into the food chain, damaging your health and well-being.
20.When replacing old appliances with new ones, the retailer is legally obligated to take back your old
appliance for disposal at least for free of charge.
SAVE THESE INSTRUCTIONS
This sewing machine is intended for household use only.
II
F
INSTRUCTIONS IMPORTANTES DE SÉCURITÉ
Lors de l'utilisation d'un appareil électrique, il est important de toujours suivre certaines précautions de
sécurité dont certaines sont les suivantes :
Lire toutes les instructions avant d'utiliser votre machine à coudre :
DANGER - Pour éviter tout risque d'électrocution :
1. Lorsque la machine est branchée, ne jamais la laisser sans surveillance.
2. Toujours débrancher la machine à coudre de la prise de courant immédiatement après l'usage et
avant l'entretien.
3. Toujours débrancher la machine avant de changer l'ampoule.
Remplacer cette dernière par une ampoule de même type d'une puissance de 10 watts (pour une
alimentation de 110-120V) ou 15 watts (pour une alimentation de 220-240V).
WARNING - To reduce the risk of burns, fire, electric shock, or injury to persons:1.
Lire attentivement les instructions avant de commencer à utiliser la machine.
2. Gardez toujours votre livret d'instructions à proximité de votre machine ainsi qu'en cas de prêt de votre
machine.
3. Utilisez votre machine uniquement dans un endroit sec
4. Ne laissez jamais votre machine sous tension sans surveillance en présence d'un enfant ou d'une
personne déficiente qui ne serait pas en mesure d'estimer le risque potentiel de la machine.
5. Cette machine peut être utilisée par un enfant à partir de l'âge de 8 ans ou par une personne
déficiente mentalement uniquement si une explication complète sur l'utilisation de la machine et les
consignes de sécurité, leur ont été transmise par une personne qui s'est assurée de la bonne
compréhension des instructions fournies.
I
6. Les enfants ne doivent pas jouer avec la machine
7. Le nettoyage et l'entretien de la machine ne doivent pas être fait par un enfant.
8. Toujours mettre la machine hors tension pour toute manipulation comme le changement d'une aiguille,
l'enfilage du fil...
9. Débranchez votre machine dès que vous avez terminé de l'utiliser pour éviter tout accident dû à une
mise sous tension accidentelle.
10.Toujours débrancher la machine du secteur, pour toute manipulation d'entretien (huiler, changer
l'ampoule...)
11.Ne jamais utiliser la machine dans un environnement humide ou mouillé
12.Ne débranchez pas la machine en tirant sur le câble. Toujours saisir la prise pour débrancher la
machine.
13.Remplacez toujours l'ampoule de votre machine par une ampoule ayant les mêmes caractéristiques
14.Ne placez jamais rien sur votre pédale
15.N'utilisez pas votre machine si le système de ventilation de la machine est obstrué. Gardez toujours le
système de ventilation de la machine et la pédale, propre et n'utilisez votre machine que dans un
endroit propre et non souillé.
16.La machine doit être utilisée avec une pédale de type KD-1902, FC-1902 (pour une alimentation de
110-120V area)/ KD-2902, FC-2902D (pour une alimentation de 220-240V area) fabriquée par
ZHEJIANG FOUNDER MOTOR CORPORATION LTD. (China)/ 4C-316B (pour une alimentation de
110-125V area)/ 4C-326G (pour une alimentation de 230V area) fabriquée par Wakaho Electric Ind.
Co., Ltd. (Vietnam).
17.Si le câble et la pédale de votre machine sont endommagés ils doivent être remplacés par le fabricant
ou son agent ou à défaut par toute personne qualifiée, pour éviter tout problème.
18.Le son produit par la machine lors d'une utilisation normale est inférieur à 75dB(A)
II
19.Ne jetez pas votre machine à la poubelle, mais déposez-la dans les déchèteries prévues à cet effet.
20.Contactez votre collectivité pour avoir les informations de collecte.
21.Ne jetez pas votre machine en décharge sauvage, celle ci peut comporter des substances nocives
pour la santé qui peuvent polluer les couches souterraines et nappes phréatiques et causer des
problèmes environnementaux et de santé.
22.En cas de remplacement d'un ancien matériel électrique par un nouveau, le revendeur est tenu de
reprendre l'ancien matériel et ce gratuitement.
GARDER CE MODE D'EMPLOI
Cette machine à coudre est destinée à un usage domestique exclusif.
III
DE
WICHTIGE SICHERHEITSVORSCHRIFTEN
Wenn Sie ein elektrisches Gerät benutzen, sollten Sie immer die grundlegenden Sicherheitshinweise
beachten.
Lesen Sie alle Bedienungsanleitungen bevor Sie die Nähmaschine benutzen.
Gefahr - wie das Risiko eines Stromschlages reduziert wird:
1. Die Nähmaschine sollte nie unbeaufsichtigt eingeschaltet sein.
2. Bitte ziehen Sie den Netzstecker immer sofort nach der Benutzung aus der Steckdose.
Dies gilt auch vor dem Reinigen und anderen Wartungsvorgängen.
3. Die Nähmaschine vor dem Austausch der Glühlampe immer von der Stromversorgung trennen.
Die Glühlampe durch eine neue Glühlampe gleichen Typs mit einer Leistung von 10W (110-120-VNetz) oder 15W (220-240-V-Netz) ersetzen.
Achtung - wie das Risiko eines Brandes, eines Feuers oder einer Verletzung verringert wird:
1. Lesen Sie alle Anweisungen, bevor Sie die Nähmaschine benutzen.
2. Bewahren Sie die Gebrauchsanweisung an einem geeigneten Ort in der Nähe des Gerätes auf.
Händigen Sie die Gebrauchsanleitung bei der Weitergabe des Gerätes an Dritte ebenfalls mit aus.
3. Verwenden Sie die Maschine immer nur in trockenen Räumen.
4. Lassen Sie Kinder, gebrechliche oder behinderte Personen nicht unbeaufsichtigt mit der Maschine
umgehen, da diese mögliche Gefahren nicht immer richtig einschätzen können.
5. Dieses Gerät kann von Kindern ab 8 Jahren und darüber sowie von Personen mit verringerten
physischen, sensorischen oder mentalen Fähigkeiten oder Mangel an Erfahrung und Wissen
benutzt werden, wenn sie beaufsichtigt oder bezüglich des sicheren Gebrauchs des Gerätes
unterwiesen wurden und die daraus resultierenden Gefahren verstehen.
I
6. Kinder dürfen nicht mit dem Gerät spielen.
7. Reinigung und Benutzer-Wartung dürfen nicht von Kindern ohne Beaufsichtigung durchgeführt
werden.
8. Schalten Sie die Maschine immer aus, wenn Sie Einstellungen oder Arbeiten im Bereich der
Nadel durchführen, wie Nadel einfädeln oder wechseln, Spule einfädeln oder wechseln, Nähfuß
wechseln und so weiter.
9. Ziehen Sie immer den Stecker aus der Steckdose, wenn Sie die Maschine unbeaufsichtigt lassen
um Verletzungen durch versehentliches einschalten zu vermeiden.
10.Ziehen Sie immer den Stecker aus der Steckdose, wenn Sie die Glühlampe wechseln oder
Wartungsarbeiten wie ölen oder reinigen und der gleichen durchführen.
11. Benutzen Sie die Maschine nicht in feuchtem Zustand oder Umgebung.
12.Ziehen Sie den Netzstecker nicht am Kabel aus der Steckdose. Greifen Sie beim herausziehen
den Stecker und nicht das Kabel.
13.Wechseln Sie die Glühlampe nur gegen eine Glühlampe gleichen Typs 10W (110-120-V-Netz)
oder 15W (220-240-V-Netz) ersetzen.
14.Stellen Sie niemals etwas auf das Fußpedal.
15.Betreiben Sie die Maschine niemals mit blockierten Belüftungsöffnungen. Halten Sie die
Belüftungsöffnungen der Maschine sowie dem Fußpedal frei von Fusseln, Staub und
Stoffabfällen.
16.Die Nähmaschine darf nur mit dem Fußpedal vom Typ KD-1902, FC-1902 (110-120V area)/ KD2902, FC-2902D (220-240V area) des Herstellers ZHEJIANG FOUNDER MOTOR CORPORATION
LTD. (China)/ 4C-316B (110-125V area)/ 4C-326G (230V area) des Herstellers Wakaho Electric Ind.
Co., Ltd. (Vietnam) benutzt werden.
17.Die Anschlussleitung des Fußpedals kann nicht ersetzt werden. Bei Beschädigung der Leitung ist
das Fußpedal zu verschrotten.
II
18.Der Schalldruckpegel unter normalen Bedingungen ist kleiner als 75dB(A).
19.Entsorgen Sie elektrische Geräte nicht im Hausmüll, nutzen Sie die Sammelstellen der
Gemeinde.
20.Fragen Sie ihre Gemeindeverwaltung nach den Standorten der Sammelstellen.
21.Wenn elektrische Geräte unkontrolliert entsorgt werden, können während der Verwitterung
gefährliche Stoffe ins Grundwasser und damit in die Nahrungskette gelangen, oder die Flora und
Fauna auf Jahre vergiftet werden.
22.Wenn Sie das Gerät durch ein neues ersetzen, ist der Verkäufer gesetzlich verpflichtet, das alte
mindestens kostenlos zur Entsorgung entgegenzunehmen.
Verwahren Sie diese Bedienungsanleitung
Diese Nähmaschine ist nur für den Haushalt gedacht.
III
EN Congratulations
F Félicitations
As the owner of a new sewing
machine, you will enjoy precision
quality stitching on all types of
fabrics, from multiple layers of
denim to delicate silks.
Vous venez de faire l'acquisition
d'une machine ce dont nous vous
félicitons. Vous avez en effet opté
pour un produit de qualité qui a été
fabriqué avec le plus grand soin.
Your sewing machine offers the
ultimate in simplicity and ease of
operation. For your safety and to
fully enjoy the many advantages
and ease of operation of your
sewing machine, we recommend
that you read all the important
safeguards and use and care
instructions in this instruction book.
Ce livret d'instructions vous
informe sur toutes les possibilités
offertes par votre machine à
coudre. Si vous désirez recevoir un
complément d'informations,
n'hésitez pas à vous adresser aux
vendeurs.
May we suggest that before you
start to use your sewing machine,
you discover the many features
and advantages by going through
this instruction book, step by step,
while seated at your sewing
machine.
Il ne nous reste qu'à vous
souhaiter beaucoup de plaisir et de
succès.
DE Herzliche Glückwünsche !
Sie sind Besitzer einer neuen
Nähmaschine. Beim Nähen
verschiedenster Stoffsorten, von
mehreren Lagen Jeans-Stoff bis
zur feinsten Seide werden Sie
Qualität und Präzision dieses
Geräts zu schätzen lernen.
Diese Nähmaschine wurde für
einfachste Inbetriebnahme und
Verwendung gebaut.
Zu Ihrer Sicherheit, zur optimalen
Nutzung aller Vorteile und zur
Erleichterung des
Einsatzes
dieses Geräts empfehlen wir Ihnen,
alle in der vorliegenden Anleitung
enthaltenen Empfehlungen und
G e b r a u c h s - u n d
Instandhaltungsanweisungen
einzuhalten.
Vor der ersten Verwendung dieser
Nähmaschine empfehlen wir
zudem, sich vor das Gerät zu
setzen und sich mittels der
Anleitung schrittweise mit den
verschiedenen Funktionen vertraut
zu machen.
IV
EN
List of contents
Details of the Machine ...............................................................2/4
Overlock stitches ........................................................................45
Accessories ..................................................................................6
Sewing on buttons ......................................................................47
Fitting the snap-in sewing table ....................................................8
How to sew buttonholes..............................................................49
Connecting machine to power source ........................................10
Zippers and piping ......................................................................51
Changing the bulb.......................................................................12
Sewing with hemmer foot ...........................................................53
Two-step presser foot lifter .........................................................14
3-step zig-zag .............................................................................55
Adjusting presser foot pressure (optional) ..................................14
Stitch selection............................................................................57
Attaching the presser foot holder................................................16
Smocking stitch...........................................................................59
Winding the bobbin .....................................................................18
Sewing with the cording foot.......................................................61
Inserting the bobbin ....................................................................20
Darning .......................................................................................63
Inserting the needle (System 130/705H) ....................................22
Practical stitches.........................................................................65
Threading the upper thread ........................................................24
Quilting........................................................................................67
Automatic needle threader (optional)..........................................26
Gathering ....................................................................................69
Thread tension............................................................................28
Patch work ..................................................................................71
Bringing up the lower thread.......................................................30
Applique......................................................................................73
Reverse sewing/ Remove the work/ Cutting the thread..............32
Twin needle (optional) ................................................................75
Matching needle/ fabric/ thread ..................................................34
Monogramming and embroidering with embroidery hoop* ....77/79
How to choose your pattern........................................................37
The walking foot accessory ........................................................81
Straight stitching and needle position .........................................39
Maintenance ...............................................................................83
Zigzag stitching...........................................................................41
Trouble shooting guide ...............................................................85
Blind hem/ lingerie stitch.............................................................43
V
F
Sommaire
Détails de la machine...............................................................3/5
Ourlet au point invisible.............................................................44
Accessoires.................................................................................7
Ponit overlock ...........................................................................46
Mise en place de la tablette de travail.........................................9
Pose des boutons .....................................................................48
Branchement de la machine à une source d'alimentation ........11
Confection des boutonnières ....................................................50
Changement de l'ampoule ........................................................13
Pose d'une fermeture à glissière...............................................52
Levier du pied-de-biche à deux positions .................................15
Coudre avec le pied ourleur......................................................54
Réglage de la pression du pied presseur (optionnel) ...............15
Point zig-zag cousu...................................................................56
Montage du support de pied-de-biche ......................................17
Sélection des points..................................................................58
Remplissage de la canette........................................................19
Point nid d'abeille ......................................................................60
Insertion de la canette...............................................................21
Coudre avec le pied pour cordonnet.........................................62
Insertion et remplacement de l'aiguille Système 130/705H ......23
Reprise......................................................................................64
Enfilage supérieur .....................................................................25
Points utilitaires.........................................................................66
Enfileur automatique (optionnel) ...............................................27
Matelassage..............................................................................68
Tension du fil.............................................................................29
Fronçage .................................................................................70
Remonter le fil inférieur.............................................................31
Patchwork .................................................................................72
Couture en marche arrière........................................................33
Applique ....................................................................................74
Pour retirer le travail en cours...................................................33
Aiguille double (optionnel).........................................................76
Pour couper le fil .......................................................................33
Réalisation de monogrammes et
Tableau des aiguilles et filsl ......................................................35
broderie avec cercle à broder*...................................78/80
Sélection des points..................................................................38
Pied à double entraînement......................................................82
Punto recto y posición de la aguja ............................................40
Entretien ...................................................................................84
Zigzag .......................................................................................42
Comment remédier soi-même aux petits problemes ................86
VI
DE
Inhaltsverzeichnis
Die Nähmaschine im Einzelnen.............................................. 3/5
Blindsaum / Wäschestich .........................................................44
Zubehör ......................................................................................7
Overlock-Stich ..........................................................................46
Montage des Anschiebertischs...................................................9
Knopfannähen ..........................................................................48
Maschine an das Netz anschließen..........................................11
Nähen von Knopflöchern ..........................................................50
Austausch der Birne .................................................................13
Reißverschlüsse und Paspeln ..................................................52
2-Positions-Nähfußheber..........................................................15
Nähen mit dem Säumerfuß ......................................................54
Einstellung der Nähfuß-Anpresskraft (Option)..........................15
Zickzack in 3 Stufen .................................................................56
Befestigung der Nähfußhalterung ............................................17
Dreifach Stiche .........................................................................57
Aufspulen der Unterfadenspule ................................................19
Stretch-Stich .............................................................................60
Einsetzen der Unterfadenspule ................................................21
Nähen mit Kordelfuß.................................................................62
Einsetzen der Nadel .................................................................23
Stopfen .....................................................................................64
Einfädeln des Oberfadens ........................................................25
Praktische Stiche .....................................................................66
Automatischer Nadeleinfädler (Option) ....................................27
Steppen ....................................................................................68
Fadenspannung........................................................................29
Fälteln ......................................................................................70
Anheben des Unterfadens........................................................31
Patchwork.................................................................................72
Rückwärtsnähen.......................................................................33
Doppelnadel (Option) ...............................................................74
Freisetzen des Nähwerks .........................................................33
Aufnähen ..................................................................................76
Durchtrennen des Fadens ........................................................33
Stickereien mit Stickrahmen*...............................................78/80
Nadel-/Faden-Tabelle ...............................................................36
Doppelantriebsfuß ....................................................................82
Stichwahl .................................................................................38
Instandhaltung .........................................................................84
Stichbreite und Nadelposition...................................................40
Auffinden und Beheben von Störungen....................................87
Nähen mit Zickzackstich...........................................................42
VII
EN
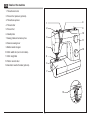
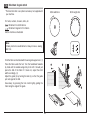
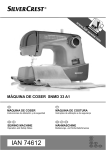
Details of the machine
1. Thread tension dial
2. Presser foot pressure (optional)
3. Thread take-up lever
4. Thread cutter
5. Presser foot
1
8
2
9
10
6. Needle plate
3
7. Sewing table and accessory box
11
8. Reverse sewing lever
4
9. Bobbin winder stopper
12
10. Stitch width dial (not on all models)
11. Stitch length dial
5
12. Pattern selector dial
6
13. Automatic needle threader (optional)
7
13
2
F
DE
Détails de la machine
Die Nähmaschine im Einzelnen
1. Molette de tension du fil
1. Fadenspannung
2. Tendeur de fil
2. Nähfußdruck (nicht bei allen Modellen)*
3. Réglage de pression du pied presseur (optionnel)
3. Fadenspanner
4. Coupe-fil
4. Fadenabschneider
5. Pied presseur
5. Nähfuß
6. Plaque à aiguille
6. Stichplatte
7. Table d'extension / Boîte d'accessoires
7. Anschiebertisch / Zubehörkasten
8. Levier de marche arrière
8. Rückwärtslauf-Hebel
9. Arrêtoir de canette
9. Unterfadenspule-Stopper
10. Molette de commande de largeur de point (optionnel)
10. Stichbreitenknopf (für dreiknopfmodell)
11. Molette de longueur de point
11. Stichlängenknopf (für zweiknopfmodell)
12. Cadran de sélection du point
12. Stichanzeige
13. Enfileur automatique (optionnel)
13. Automatischer nadeleinfädler (Option)
3
EN
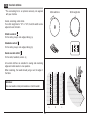
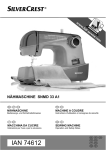
Details of the machine
14. Horizontal spool pin
15. Bobbin winder spindle
16. Hole for second spool pin
14
17. Handwheel
18. Power switch
20
15
19. Main plug socket
20. Bobbin thread guide
21. Upper thread guide
22. Handle
16
21
17
22
23
23. Face plate
24
24. Presser foot lifter
25. Foot control
26. Power cord
18
19
25
26
4
F
DE
Détails de la machine
Die Nähmaschine im Einzelnen
14. Porte-bobine
14. Spulenhalter
15. Axe de bobinage de la canette
15. Spuler
16. Orifice pour second porte-bobine
16. Öffnung für zweiten Spulenhalter
17. Volant
17. Handrad
18. Interrupteur Marche / Arrêt
18. Ein-/Ausschalter
19. Prise de courant
19. Netzanschluss
20. Guide d'enfilage de canette
20. Unterfadenspule-Einfädelhilfe
21. Guide du fil supérieur
21. Oberfaden-Führung
22. Poignée de transport
22. Transportgriff
23. Plaque frontale
23. Frontplatte
24. Levier releveur de pied presseur
24. Lüfterhebel
25. Pédala de commanda
25. Fußanlasser
26. Fil électrique
26. Netzstecker
5
EN
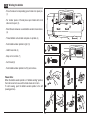
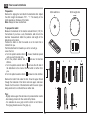
Accessories
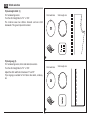
Standard accessories
Standard accessories
a. All purpose foot
b. Zipper foot
c. Buttonhole foot
d. Button sewing foot
e. L-screwdriver
f. Seam ripper/ brush
g. Oil bottle
h. Pack of needle (3x)
i. Edge/ quilting guide
j. Bobbin (3x)
k. Darning plate
I. Spool holder (large&small)
m. Second spool pin
n. Spool pin felt
a
b
006806008
e
006905008
c
d
006909008
006914008
g
f
h
j
i
l
m
k
n
Extra accessories (optional)
Extra accessories (optional)
o. Satin stitch foot
p. Overcasting foot
q. Blind hem foot
r. Darning/ embroidery foot
s. Hemmer foot
t. Cording foot
u. Quilting foot
v. Gathering foot
w. Walking foot
x. Twin needle
o
p
006804008
s
006803008
t
006800008
u
006812008
w
006810008
v
006916008
6
q
006815008
006917008
r
006016008
x
F
DE
Accessoires
Zubehör
Accessoires standard
a. Pied multifonctions
b. Pied pour fermetures à glissière
c. Pied pour boutonnières
d. Pied à boutons
e. Tournevis coudé
f. Couteau à boutonnière / brosse de nettoyage
g. Burette d'huile
h. Lot d'aiguilles (3)
i. Guide de piquage
j. Canettes (3)
k. Plaquette couvre-entraînement
l. Support de bobine
m. Seconde tige porte-bobine
n. Feutre
Standardausrüstung
a. Allzweck-Nähfuss a. d. Maschine
b. Reissverschlussfuss
c. Knopflochfuss
d. Knopfannähfuss
e. Schraubendreher
f. Pinsel/Pfeiltrenner
g. Ölflasche
h. Nadeln(3x)
i. Kantenlineal
j. Spulen(3x)
k. Stick-und Stopfplatte
l. Garnrollenkappe
m. Garnrollenstift
n. Spulen fils
Extra Pieds-de-biche
o. Pied pour point passé
p. Pied overlock
q. Pied pour ourlet invisible
r. Pied à repriser
s. Pied ourleur
t. Pied pour cordonnet
u. Pied pour quilt
v. Pied fronceur
w. Pied à double entraînement
x. Aiguille double
Extra Zubehör
o. Stickfuss
p. Overlockfuss
q. Blindsaumfuss
r. Stopffuss
s. Säumerfuss
t. Kordelfuss
u. Quiltfuss
v. Kräuselfuss
w. Obertransportfuss
x. Doppelnadel
7
EN
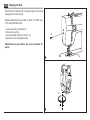
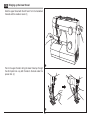
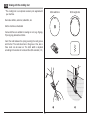
Fitting the snap-in sewing table
Keep the snap-in sewing table horizontal, and push it in the
direction of the arrow. (1)
1
The inside of the snap-in sewing table can be utilized as an
accessory box.
To open, flip cover down as shown. (2)
2
8
F
DE
Mise en place de la tablette de travail
Montage des Anschiebertischs
Pousser la tablette de travail dans le sens de la flèche jusquà
ce qu'elle prenne l'encoche. (1)
Den Anschiebertisch waagrecht halten und in Pfeilrichtung
drücken. (1)
Si l'on doit coudre sur le bras libre, il faut alors enlever la
tablette de travail dans le sens contraire.
Der Innenraum des Anschiebertischs kann für die Aufbewahrung
von Zubehör verwendet werden.
L'intérieur de la tablette de travail est prévu pour les
accessoires. (2)
Zum Öffnen ist der Deckel in Pfeilrichtung abzuheben. (2)
9
EN
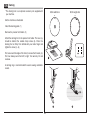
Connecting machine to power source
Connect the machine to a power source as illustrated. (1)
For appliance is equipped with a polarized plug which must be
used with the appropriate polarized outlet. (2)
Attention:
Unplug power cord when machine is not in use.
A
Foot control
Foot control regulates the sewing speed. (3)
Attention:
Consult a qualified electrician if in doubt as to connect
machine to power source.
Unplug power cord when machine is not in use.
Sewing light
Press main switch (A) for power and light on. (" l ")
IMPORTANT NOTICE
For appliance with a polarized plug (one blade is wider than
the other).
To reduce the risk of electric shock, this plug is intended to
fit in a polarized outlet only one way. If it does not fit fully in
the outlet, reverse the plug. If it still does not fit, contact a
qualified electrician to install the proper outlet. Do not
modify the plug in any way. (2)
1
Polarized attachment plug
Conductor intended
to be grounded
2
10
3
F
DE
Branchement de la machine à une source d'alimentation
Branchez la machine tel qu'illustré en (1). La fiche de la machine
est dotée de broches normalisées et doit être utilisée avec une
prise de courant conforme aux normes en vigueur. (2)
Maschine an das Netz anschließen
Schließen Sie die Maschine wie abgebildet an. (1)
Verwenden Sie für den Stecker auch die richtige Steckdose.
Achtung:
Stecken Sie die Maschine aus, wenn sie nicht in Betrieb ist.
Attention:
Débranchez le fil d'alimentation lorsque la machine n'est pas
utilisée.
Fußanlasser
Der Fußanlasser regelt die Geschwindigkeit mit der sie nähen
wollen. (2)
Pédale de commande
A l'aide du rhéostat, vous contrôlez la vitesse de couture de la
machine. (3)
Achtung:
Falls Sie Probleme mit dem Netzstecker haben, fragen Sie
einen qualifizierten Elektriker.
Attention:
Consultez un électricien qualifié si vous doutez du branchement
de la machine.
Débranchez la machine quand celle-ci n'est pas en service.
Nählicht
Drücken Sie den Hauptschalter (A) um das Licht und den Strom
einzuschalten.
Eclairage
Appuyez sur l'interrupteur d'alimentation (A): l'ampoule s'allume
et la machine est prête à l'emploi.
Achtung:
Wenden Sie sich an einen qualifizierten Techniker, wenn es
beim. Anschließen der Maschine ans Stromnetz Zweifel gibt.
Trennen Sie die Maschine vom Netz, wenn die Maschine
nicht in Betrieb ist.
REMARQUE IMPORTANTE
La prise de la machine comporte des broches polarisées
(l'une est plus large que l'autre). Afin de réduire les risques
de choc électrique, la fiche ne se branche que dans une
prise de courant polarisée et dans un sens seulement.
Si la fiche ne peut être branchée complètement dans la prise,
l'inverser. Si la difficulté persiste, contacter un électricien. Ne
pas modifier la fiche de quelque façon que ce soit.
11
EN
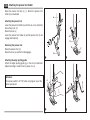
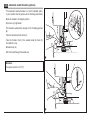
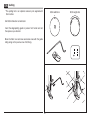
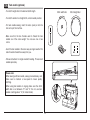
Changing the bulb
Disconnect the machine from the power supply by removing
the plug from the main socket!
Replace bulb with same type rated 10 watts (110-120V area)
or 15 watts (220-240V area).
- Loosen screw (A) as illustrated. (1)
- Remove the cover (B).
- Unscrew the bulb and fit new one (C). (2)
- Replace the cover and tighten screw.
B
A
Should there be any problem. Ask your local dealer for
advice.
1
C
2
12
F
DE
Changement de l'ampoule
Austausch der Birne
Débranchez la machine de la prise de courant avant de changer
l'ampoule.
Die Nähmaschine durch Abziehen des Netzsteckers von
derSteckdose von der Stromversorgung trennen.
Remplacez cette dernière par une ampoule de 10 watts (110120V area) ou 15 watts (220-240V area) du même type.
- Die Schraube (A) wie gezeigt (1) losschrauben.
- Die Abdeckung (B) abnehmen.
- Desserrez la vis (A) comme indiqué. (1)
- Die Birne (C) herausschrauben und an ihrer Stelle eine neue
Birne einschrauben. (2)
- Enlevez le couvercle latéral (B).
- Dévissez l'ampoule et installez une nouvelle (C). (2)
- Die Abdeckung wieder aufsetzen und mit der Schraube
befestigen.
- Replacez le couvercle et serrez la vis.
En cas de problèmes, adressez-vous à votre revendeur local.
Bei Problemen ist bei der Vertriebsstelle rückzufragen, wo die
entsprechenden Auskünfte erhalten werden können.
13
EN
Two-step presser foot lifter
When sewing several layers or thick fabrics, the presser foot
can be raised a second stage for easy positioning of the work.
(A)
A
EN
Adjusting presser foot pressure (optional)
1
The presser foot pressure of the machine has been pre-set
and requires no particular readjustment according to the type
of fabric (light-or-heavy weight).
However, if you need to adjust the presser foot pressure, turn
the presser adjusting screw with a coin.
For sewing very thin fabric, loosen the pressure by turning the
screw counter clockwise, and for heavy fabric, tighten by
turning it clockwise.
2
14
F
DE
Levier du pied-de-biche à deux positions
Pour la couture des tissus très épais, on peut augmenter
l'espace entre le pied-de-biche et la plaque à aiguille, en
relevant le pied d'un cran. (A)
F
2-Positions-Nähfußheber
Sollen mehrere Stofflagen oder dicker Stoff genäht werden, so
kann der Nähfuß in eine zweite Position angehoben werden,
um ein leichteres Positionieren des Nähwerks zu ermöglichen
.(A)
DE
Réglage de la pression du pied presseur (optionnel)
La pression du pied presseur a été ajustée à une valeur
maximale et ne demande pas d'autres réglages pour la plupart
des travaux de couture. (poids légers à lourds).
Einstellung der Nähfuß-Anpresskraft (Option)
Die Anpresskraft des Nähfußes wurde voreingestellt und erfordert
keine besondere Einstellungen für verschiedene (leichte oder
schwere) Stoffsorten. Ist jedoch eine Einstellung erforderlich, so
kann mittels einer Münze die Einstellschraube verdreht werden.
Cependant, si vous désirez ajuster la pression du pied presseur,
tournez le bouton de réglage.
Zum Nähen sehr feiner Stoffe ist der Druck durch Drehen der
Schraube im Gegenuhrzeigersinn zu vermindern. Bei schweren
Stoffen kann der Druck durch Drehen im Uhrzeigersinn erhöht
werden.
Pour la couture de tissus fins, diminuez la pression en tournant
le bouton dans le sens anti-horaire.
Pour la couture de tissus très épais, augmentez la pression en
tournant le bouton dans le sens horaire.
15
EN
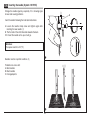
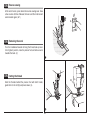
Attaching the presser foot holder
Raise the presser foot bar (a). (1) Attach the presser foot
holder (b) as illustrated.
a
Attaching the presser foot
Lower the presser foot holder (b) until the cut-out (c) is directly
above the pin (d). (2)
Raise the lever. (e)
Lower the presser foot holder (b) and the presser foot (f) will
engage automatically.
a
e
c
b
Removing the presser foot
Raise the presser foot. (3)
Raise the lever (e) and the foot disengages.
Attaching the edge/ quilting guide
Attach the edge/ quilting guide (g) in the slot as illustrated.
Adjust according to need for hems, pleats, etc. (4)
d
f
b
1
Attention:
Turn power switch to off ("O") when carrying out any of the
above operations!
2
e
3
16
g
4
F
DE
Montage du support de pied-de-biche
Befestigung der Nähfußhalterung
Relever la barre du pied-de-biche (a). Monter le support (b)
comme indiqué sur le schéma. (1)
Das Nähfußbein (a) hochfahren. (1) Die Nähfußhalterung (b)
wie gezeigt befestigen.
Mise en place du pied-de-biche
Abaisser le support du pied-de-biche (a) jusqu'à ce que la
rainure (c) ce trouve positionnée juste au-dessus de la broche
(d). (2)
Appuyer légèrement le levier (e) vers l'avant. Abaisser la barre
du pied-de-biche (a). Le pied-de-biche (f) s'encliquète.
Befestigung des Nähfußes
Die Nähfußhalterung (b) senken, bis sich der Ausschnitt (c)
direkt über der Achse (d) befindet. (2)
Den Hebel (e) in Pfeilrichtung drücken.
Die Nähfußhalterung (b) soweit senken, bis der Nähfuß (f)
automatisch einrastet.
Retrait du pied-de-biche
Relever le pied-de-biche. (3)
Appuyer légèrement le levier (e) vers l'avant, de manière à
dégager le pied.
Ausbau des Nähfußes
Den Nähfuß (3) anheben.
Den Hebel (e) in Pfeilrichtung drücken, worauf der Nähfuß
freigesetzt wird.
Mise en place du guide
Introduire le guide (g) avec précaution, en procédant comme
indiqué sur le schéma. Le guide s'utilise pour les ourlets, les
plis etc. (4)
Befestigung der Einstechführung
Die Einstechführung (g) wie gezeigt in die Nut einführen. Sie für
Säume, Falten, usw. den Anforderungen gemäß einstellen. (4)
Attention:
Pour toutes ces manipulations, interrupteur principal sur ("O").
Achtung:
Zur Durchführung der obigen Maßnahmen ist der Ein/Ausschalter auf Position Aus ("O") zu stellen.
17
EN
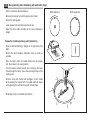
Winding the bobbin
- Place thread and corresponding spool holder onto spool pin.
(1)
- For smaller spools of thread place spool holder with small
side next to spool. (2)
- Wind thread clockwise around bobbin winder tension discs.
(3)
- Thread bobbin as illustrated and place on spindle. (4)
- Push bobbin winder spindle to right. (5)
- Hold thread end. (6)
1
- Step on foot control. (7)
- Cut thread. (8)
2
- Push bobbin winder spindle to left (9) and remove.
Please Note:
When the bobbin winder spindle is in "bobbin winding" position,
the machine will not sew and the hand wheel will not turn.
To start sewing, push the bobbin winder spindle to the left
(sewing position).
3
6
18
4
7
5
8
9
F
DE
Remplissage de la canette
- Placer le fil et le porte-bobine sur l'axe de la bobine. (1)
Aufspulen der Unterfadenspule
- Den Faden und die Spulenaufnahme auf den Spulenhalter (1)
setzen.
- Si la bobine est plus petite, placer le porte-bobine avec le petit
côté faisant face à la bobine. (2)
- Für kleine Fadenspulen ist das kleine Ende der Spulenaufnahme
auf Seite der Spule (2) zu platzieren.
- Enrouler le fil dans le sens horaire autour des disques de
tension de l'enrouleur de canette. (3)
- Den Faden im Uhrzeigersinn um die Spannscheiben der
Aufspulvorrichtung (3) wickeln.
- Glisser le fil dans la canette tel qu'illustré et placer celle-ci sur
l'axe. (4)
- Die Unterfadenspule wie gezeigt einführen und auf den Stift
(4) setzen.
- Pousser la canette vers la droite. (5)
- Die Unterfadenspule nach rechts drücken. (5)
- Tenir l'extrémité du fil. (6)
- Das Ende des Fadens (6) festhalten.
- Appuyer le pied sur la pédale de commande de la machine. (7)
- Auf das Steuerpedal (7) drücken.
- Couper le fil (8). Pousser la canette vers la gauche (9) puis la
retirer.
- Den Faden (8) abschneiden.
- Die Unterfadenspule nach links drücken (9) und entfernen.
Veuillez noter:
lorsque l'axe de l'enrouleur de canette est dans la position
d'enroulement du fil, la machine ne coud pas et le volant
reste immobile. Pour commencer la couture, pousser l'axe
de l'enrouleur de canette vers la gauche (position de couture).
Folgendes beachten:
Wenn sich der Spulenstift in Position "Aufspulen der
Unterfadenspule" befindet, kann die Nähmaschine nicht
nähen und das Handrad ist blockiert. Um mit dem Nähen zu
beginnen, ist der Spulenstift nach links zu drücken
(Nähposition).
19
EN
Inserting the bobbin
When inserting or removing the bobbin, the needle must
be fully raised.
- Open the hinged cover. (1)
- Hold the bobbin case with one hand. Insert the bobbin so that
the thread runs in a clockwise direction (arrow). (2)
- Put the thread under the tension spring. (3)
1
2
3
4
- Hold the bobbin case by the hinged latch. (4)
- Insert it into the shuttle. (5)
Attention:
Turn power switch to off ("O").
5
20
F
DE
Insertion de la canette
Einsetzen der Unterfadenspule
Lors de la mise en place et du retrait de la canette, veillez à
ce que l'aiguille se trouve à sa plus haute position.
Zum Einführen und Entfernen der Unterfadenspule muss die
Nadel unbedingt vollständig gehoben sein.
- Ouvrez le couvercle à charnière du bras libre. (1)
- Die Klappe öffnen. (1)
- Tenez le boîtier à canette d'une main. Introduisez la canette de
façon à que le fil s'enroule dans le sens des aiguilles d'une
montre (flèche) (2).
- Mit einer Hand die Spulenkapsel festhalten und die
Unterfadenspule so einführen, dass der Faden im
Uhrzeigersinn (Pfeilrichtung) abspult. (2)
- Engagez le fil dans la fente et tirez-le vers la gauche et sous le
ressort jusqu'à ce que le fil apparaisse dans l'ouverture
rectangulaire (3). Laissez dépasser le fil environ 15cm (6").
- Den Faden unter der Spannfeder durchführen. (3)
- Maintenez le loquet du boîtier à canette entre le pouce et
l'index. (4)
- Sie in das Schiffchen einführen. (5)
- Die Spulenkapsel an der Kapselklappe halten. (4)
- Glissez le boîtier à canette dans la coursière du crochet, en
vous assurant que le doigt du boîtier s'insère complètement
dans la fente de la coursière. (5)
Achtung:
Den Ein-/Ausschalter auf Aus (Position "O") stellen.
Attention:
Assurez-vous de placer l'interrupteur principal en position ("O")
avant d'insérer ou de retirer la canette.
21
EN
Inserting the needle (System 130/705H)
Change the needle regularly, especially if it is showing signs
of wear and causing problems.
D
Insert the needle following the illustrated instructions.
A
A. Loosen the needle clamp screw and tighten again after
inserting the new needle. (1)
B. The flat side of the shaft should be towards the back.
C/D. Insert the needle as far up as it will go.
Attention:
Turn power switch to off ("O").
B
C
Needles must be in perfect condition. (2)
1
Problems can occur with:
A. Bent needles
B. Blunt needles
C. Damaged points
B
2
22
A
C
F
DE
Insertion et remplacement de l'aiguille Système 130/705H
Remplacer l'aiguille à intervalles réguliers; la remplacer
immédiatement dès que les premiers signes d'usure se
manifestent. Mettez l'aiguille en place en suivant les indications
du croquis.
Einsetzen der Nadel
Die Nadel muss regelmäßig ersetzt werden, insbesondere, wenn
Abnutzungserscheinungen oder andere Probleme eintreten.
Die Nadel den nebenstehenden Abbildungen gemäß einsetzen.
A. Die Nadelbefestigungsschraube lösen und nach dem
Einsetzen einer neuen Nadel (1) wieder festziehen.
Insérez l'aiguille tel qu'illustré ci-dessous:
B. Die flache Seite des Nadelkolbens muss nach hinten zeigen.
A. Desserrez la vis du pince-aiguille et resserrez-la après avoir
inséré une nouvelle aiguille. (1)
B. Insérez la nouvelle aiguille avec le côté plat de la tige vers
l'arrière.
C/D. Insérez l'aiguille jusqu'au maximum de sa course.
C/D. Die Nadel so weit wie möglich nach oben drücken.
Achtung:
Den Ein-/Ausschalter auf Aus (Position "O") stellen.
Attention:
Mettez l'interrupteur d'alimentation sur arrêt ("O") avant
d'insérer ou de retirer l'aiguille.
Es darf nur mit Nadeln genäht werden, die sich in einwandfreiem
Zustand befinden. (2)
Folgende Probleme können eintreten:
A. Verbogene Nadel
Les aiguilles doivent être en parfait état. (2)
B. Beschädigte Spitze
Des problèmes peuvent survenir si:
A. L'aiguille est tordue
B. L'aiguille est épointée
C. L'extrémité de l'aiguille est endommagée
C. Abgestumpfte Nadel
23
EN
Threading the upper thread
This is a simple operation but it is important to carry out correctly
as by not doing so several sewing problems could result.
- Start by raising the needle to its highest point (1), and also
raise the presser foot to release the tension discs.
Note: For safety, it is strongly suggested you turn off the
power before threading.
- Lift up the spool pin. Place the spool of thread on the holder
with the thread coming off the spool as shown. For small
thread spools, place small side of spool holder next to spool.
(2)
- Draw thread from spool through the upper thread guide. (3)
- Guide thread around thread guide (4) pulling thread through
pre-tension spring as illustrated.
- Thread tension module by leading thread down right channel
and up left channel (5). During this process it is helpful to
hold the thread between the spool and thread guide.
- At the top of this movement pass thread from right to left through
the slotted eye of the take-up lever and then downwards again.
(6)
- Now pass thread behind the thin wire needle clamp guide (7)
and then down to the needle which should be threaded from
front to back.
- Pull about 6-8 inches of thread to the rear beyond the needle
eye. Trim thread to length with built in thread cutter. (8)
Note:
If your sewing machine is equipped with the factory
installed optional automatic needle threader, instructions for
use can be found on page 14.
1
2
3
4
5
6
7
8
24
F
DE
Enfilage supérieur
Einfädeln des Oberfadens
Das Einfädeln des Oberfadens ist einfach, muss jedoch
unbedingt richtig ausgeführt werden, da sonst diverse Probleme
beim Nähen auftreten können.
Cette opération est simple. Néanmoins, il est important de
l'exécuter correctement sous peine de faire éventuellement face
à plusieurs problèmes de couture.
- Tournez le volant pour lever l'aiguille dans sa position la plus
haute (1) et relevez le pied presseur pour libérer les disques
de tension .
Note: Pour des raisons de sécurité, il est fortement
recommandé de couper l'alimentation électrique avant l'enfilage.
- Bringen Sie die Nadel in Hochstellung (1) und heben Sie
danach den Nähfuß an, um die Spannungsscheiben zu lösen.
Hinweis: Aus Sicherheitsgründen wird dringend empfohlen,
dass Sie die Maschine vor dem Einfädeln ausschalten.
- Heben Sie den Garnrollenstift an. Stecken Sie eine Garnrolle so
auf den Halter, dass der Faden wie abgebildet von der Rolle
läuft. Bei kleinen Garnrollen sollte die schmale Seite des
Garnrollenständers neben der Garnrolle positioniert werden. (2)
- Ziehen Sie den Faden wie abgebildet von der Garnrolle durch die
Oberfadenführung (3) und dann durch die Vorspannungsfeder. (4)
- Fädeln Sie den Faden durch das Spannungsmodul, indem Sie
den Faden erst im rechten Schlitz nach unten und dann im
linken Schlitz wieder nach oben führen (5). Dabei ist es hilfreich,
wenn Sie den Faden zwischen der Garnrolle und Fadenführung
festhalten.
- Führen Sie den Faden ganz oben von rechts nach links durch die
Öse des Fadenhebels und anschließend wieder nach unten. (6)
- Fädeln Sie den Faden nun durch die Nadelklammerführung aus
dünnem Draht (7) und dann nach unten zur Nadel, die
anschließend von vorne nach hinten eingefädelt werden sollte.
- Ziehen Sie den Faden ca. 15 cm unter dem Nähfuß nach hinten
heraus. Schneiden Sie den Faden mit dem integrierten
Fadenschneider auf die richtige Länge zu. (8)
- Levez le porte-bobine horizontal. Placez une bobine de fil sur
le porte-bobine, le fil sortant de la bobine tel qu'illustré en (2).
- Passez le fil de la bobine à travers le guide-fil supérieur. (3)
Guider le fil autour du guide en le tirant à travers le ressort de
pré tension tel qu'illustré. (4)
- Enfilez le module de tension en guidant le fil vers le bas via la
rainure droite et vers le haut via la rainure gauche (5). Au
cours de cette opération, il est utile de tenir le fil entre la
bobine et le guide-fil (4) et de le tirer doucement vers le haut.
- Enfilez maintenant l'oeillet du releveur de fil en y passant le fil
de droite à gauche et guidez le fil à nouveau vers le bas (6).
- Passez le fil dans le guide-fil horizontal qui se trouve sur le
pince-aiguille. (7)
- Enfilez ensuite le chas de l'aiguille de l'avant vers l'arrière et
tirez à peu près 15 cm de fil vers l'arrière de la machine.
Coupez le fil à la longueur désirée à l'aide du coupe-fil
incorporé. (8)
Note:
Si votre machine à coudre est équipée d'un enfileur automatique déjà installé en sortie d'usine, tournez à la page 14
pour des instructions d'usage.
Achtung:
Wenn Ihre Maschine mit einem automatischen Nadeleinfädler
ausgestattet ist, dann verwenden Sie diesen wie auf Seite 14
beschrieben.
25
EN
Automatic needle threader (optional)
* The automatic needle threader is a factory installed option.
If your machine has this option use the following instructions:
A
- Raise the needle to its highest position.
B
- Press lever (A) right down.
A
- The threader automatically swings to the threading position
(B).
C
D
- Take the thread round the hook (C).
B
- Take the thread in front of the needle round the hook (D)
from bottom to top.
C
- Release lever (A).
- Pull the thread through the needle eye.
1
Attention:
Turn power switch to off ("O")!
A
2
26
D
F
DE
Enfileur automatique (optionnel)
* L'enfileur automatique est une option qui est installée à l'usine.
Automatischer Nadeleinfädler (Option)
- Die Nadel zu ihrem höchsten Punkt anheben.
Si votre machine est équipée de cette option, suivez les
instructions ci-dessous:
- Den Hebel (A) drücken, um alles nach unten zu führen.
- Relevez l'aiguille à sa position la plus élevée.
- Der Einfädler kippt automatisch zur Einfädelposition (B).
- Descendez le levier (A) autant que possible.
- Den Faden um den Haken (C) führen.
- L'enfileur tournera automatiquement à la position d'enfilage (B).
- Den Faden vor der Nadel von unten nach oben um de Haken
(D) führen.
- Passez le fil au tour du guide-fil (C) comme illustré. (D)
- Passez le fil devant l'aiguille et sous le crochet du bas en haut.
- Den Hebel (A) freigeben.
- Lâchez le levier (A).
- Den Faden durch das Nadelöhr ziehen.
- Le chas de l'aiguille sera enfilé automatiquement.
Achtung:
Den Ein-/Ausschalter auf Aus (Position "O") stellen.
Attention:
Mettez l'interrupteur à ("O") avant d'enfiler l'aiguille!
27
EN
Thread tension
Upper thread tension
Basic thread tension setting: "4". (1)
To increase the tension, turn the dial to the next number up.
To reduce the tension, turn the dial to the next number down.
A. Normal thread tension.
B. Upper thread tension too loose.
C. Upper thread tension too tight.
Lower thread tension
To test the bobbin thread tension, remove the bobbin case
and bobbin and hold it by suspending it by the thread. Jerk it
once or twice. If the tension is correct, the thread will unwind
by about an inch or two. If the tension is too tight, it does not
unwind at all. If the tension is too loose, it will drop too much.
To adjust, turn the small screw on the side of the bobbin case.
(2)
1
A
Note:
The bobbin thread tension does not normally have to be
adjusted.
B
C
3
28
2
F
DE
Tension du fil
Fadenspannung
Spannung des Oberfadens
Normale Einstellung der Fadenspannung: "4" (1)
Zur Erhöhung der Spannung das Stellrad zur nächst höheren
Ziffer drehen. Um die Spannung zu vermindern zur nächst
niedrigeren Ziffer drehen.
A. Normale Fadenspannung
B. Oberfaden unzureichend gespannt
C. Oberfaden zu stark gespannt
Tension du fil supérieur
Réglage de base pour la tension du fil: "4" (1)
Pour augmenter la tension, tournez la molette vers une valeur plus
élevée. Pour réduire la tension, tournez la molette vers la valeur
immédiatement inférieure.
A. Tension de fil normale pour une couture en point droit.
B. Tension trop basse en point droit, tournez la molette vers un
chiffre plus élevé.
C. Tension trop élevée en point droit, tournez la molette vers un
chiffre plus bas.
D. Tension de fil normale pour une couture en point zigzag. (normal
= le fil de l'aiguille apparaît légèrement à l'envers du tissu)
Unterfadenspannung
Zur Überprüfung der Fadenspannung an der Unterfadenspule,
die Spulenkapsel mit der Unterfadenspule herausnehmen und
am Faden aufgehängt halten. Dann ein oder zwei Mal kurz
schütteln. Bei richtiger Fadenspannung muss die Spule um 3
bis 5 cm Faden abspulen. Ist der Faden zu stark gespannt, so
wickelt er überhaupt nicht ab. Bei zu geringer Spannung sinkt
die Spule hingegen stärker ab. Zur Einstellung der Spannung
die kleine, auf der Seite der Spulenkapsel befindliche Schraube
drehen. (2)
Tension du fil inférieur
Pour tester la tension du fil de canette, vous tenez le boîtier à
canette par un bout de fil d'environ 10 cm et vous faites sauter le
boîtier en tirant doucement sur le bout de fil. A peu près 5 cm de fil
peut se dérouler. Si trop de fil se déroule, vous pouvez corriger la
tension en tournant la vis de tension à droite.
Il est important de refaire le test. Si trop peu de fil se déroule, vous
pouvez corriger la tension en tournant la vis de tension à gauche. Il
est important de refaire le test. (2)
Veuillez noter :
- Un réglage de tension correct est important pour obtenir de beaux
résultats.
- Il n'existe pas de réglage de tension standard pour tous les points,
fils et tissus.
- Une tension équilibrée (points identiques à l'endroit et à l'envers
du tissu) n'est habituellement souhaitable que pour la couture en
point droit.
- 90% de tous les travaux de couture requièrent un réglage de
tension compris entre "3" et "5" .
- Pour les points zigzag et décoratifs, la tension du fil devrait
généralement être inférieure à celle utilisée pour la couture en
point droit.
- Pour tous les travaux de couture décoratifs, vous obtiendrez
toujours des points de meilleure finition et moins de plis dans le
tissu lorsque le fil supérieur apparaît à l'envers de votre tissu.
Hinweis:
Die Spannung des Fadens der Unterfadenspule muss
normalerweise nicht eingestellt werden.
29
EN
Bringing up the lower thread
Hold the upper thread with the left hand. Turn the handwheel
forwards until the needle is raised. (1)
Pull on the upper thread to bring the lower thread up through
the stitch plate hole. Lay both threads to the back under the
presser foot. (2)
1
2
30
F
DE
Pour remonter le fil de canette
Anheben des Unterfadens
Tenir le fil supérieur avec la main gauche. Tourner le volant (1)
vers vous (sens anti-horaire) pour abaisser et lever l'aiguille.
Den Oberfaden mit der linken Hand halten. Das Handrad nach
vorn drehen bis die Nadel vollständig hochgefahren ist. (1)
Tirer doucement vers le haut sur le fil supérieur de la bobine
pour faire passer le fil de la canette à travers l'orifice de la
plaque à aiguille.
So am Oberfaden ziehen, dass der Unterfaden durch die
Öffnung der Stichplatte nach oben steigt. Die beiden Fäden
nach hinten unter dem Nähfuß (2) wegnehmen.
Reposer les deux fils à l'arrière sous le pied presseur. (2)
31
EN
Reverse sewing
At the end of seam, press down the reverse sewing lever. Sew
a few reverse stitches. Release the lever and the machine will
sew forwards again. (A/1)
A
EN
Removing the work
Turn the handwheel towards to bring the thread take up lever
to its highest position, raise the presser foot and remove work
towards the back. (2)
1
EN
Cutting the thread
B
Hold the threads behind the presser foot with both hands,
guide them to the slit (B) and press down. (3)
2
32
3
F
DE
Couture en marche arrière
Afin de renforcer le début et la fin d'une couture, appuyez sur le
levier de marche arrière et faites quelques points en marche
arrière. Lâchez le levier et la machine coudra à nouveau en
avant. (A/1)
F
Am Ende der Naht angelangt auf den Rückwärtslauf-Hebel
drücken. Einige Stiche rückwärts nähen. Den Hebel loslassen,
worauf die Nähmaschine wieder nach vorn zu nähen beginnt .
(A/1)
DE
Pour retirer le travail en cours
Tournez le volant dans le sens anti-horaire afin d'amener le
releveur de fil à sa position la plus élevée, levez le pied
presseur et retirez le travail se trouvant en arrière du pied
presseur et de l'aiguille. (2)
F
Rückwärtsnähen
Freisetzen des Nähwerks
Das Handrad nach vorn drehen, um den Fadenspanner
möglichst weit anzuheben. Den Nähfuß hochfahren und das
Nähwerk nach hinten drücken, um es freizusetzen. (2)
DE
Pour couper le fil
Tirez les deux fils vers l'arrière du pied presseur. Guidez-les le
long de la plaque frontale et placez-les dans le coupe-fil (B).
Tirez les fils vers le bas pour les couper. (3)
Durchtrennen des Fadens
Die Fäden mit beiden Händen hinter dem Nähfuß ergreifen, in
die Kerbe (B) einführen und die Hände nach unten bewegen. (3)
33
EN
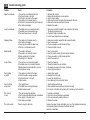
Matching needle/ fabric/ thread
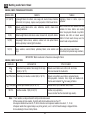
NEEDLE, FABRIC, THREAD SELECTION GUIDE
NEEDLE SIZE
FABRICS
THREAD
9-11(65-75)
Lightweight fabrics-thin cottons, voile, serge, silk, muslin, Qiana, interlocks,
cotton knits, tricot, jerseys, crepes, woven polyester, shirt & blouse fabrics.
Light-duty thread in cotton, nylon or
polyester.
12(80)
Medium weight fabrics-cotton, satin, kettleclote, sailcloth, double knits,
lightweight woollens.
14(90)
Medium weight fabrics-cotton duck, woolen, heavier knits, terrycloth, denims.
16(100)
Heavyweight fabrics-canvas, woolens, outdoor tent and quilted fabrics,
denims, upholstery material (light to medium).
Most threads sold are medium size and
suitable for these fabrics and needle
sizes. Use polyester threads on synthetic
materials and cotton on natural woven
fabrics for best results. Always use the
same thread on top and bottom.
18(110)
Heavy woollens, overcoat fabrics, upholstery fabrics, some leathers and
vinyls.
Heavy duty thread, carpet thread.
(Use heavy foot pressure-large numbers.)
IMPORTANT: Match needle size to thread size and weight of fabric
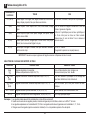
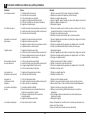
NEEDLE, FABRIC SELECTION
NEEDLES
EXPLANATION
TYPE OF FABRIC
Standard sharp needles. Sizes range thin to large.
9 (65) to 18(110)
Natural woven fabrics-wool, cotton, silk, etc. Qiana.
Not recommended for double knits.
15 1/705H(SUK)
Semi-ball point needle, scarfed. 9(65) to 18(110)
Natural and synthetic woven fabrics, polyester blends.
Knits-polyesters, interlocks, tricot, single and double knits.
Can be used instead of 15 1 for sewing all fabrics.
15 1/705H(SUK)
Full ball point needle. 9(65) to 18(110)
Sweater knits, Lycra, swimsuit fabric, elastic.
Leather needles. 12(80) to 18(110)
Leather, vinyl, upholstery.
(Leaves smaller hole than standard large needle.)
HA 1
15 1
130 PCL
Note: 1. Twin needles, can be purchased for utility and decorative work.
2. When sewing with twin needles, the stitch width dial should be set at less than "3".
3. European needles show sizes 65, 70, 80 etc. American and Japanese needles show size 9, 11, 12 etc.
4. Replace needle often (approximately every other garment ) and / or at first thread breakage or skipped stitches.
5. Use a backing for fine or stretchy fabrics.
34
F
Tableau des aiguilles et fils
GROSSEUR DE
LAIGUILLE
TISSUS
FILS
9-11(65-75)
Tissus Légers: Coton léger, voile, serge, mousseline, tricot de coton,
jersey, crêpes, polyester, tissu pour blouse ou chemise.
Fil de coton, fil de soie, fil de nylon ou fil synthétique.
12(80)
Tissus moyens: Coton moyen, satin, toile, tricot double, lainage
léger.
14(90)
Tissus moyens à épais: Coton épais, lainages, tricot épais, ratine,
denim, velours côtelé.
16(100)
Tissus épais: canevas, lainage épais, toile de tente, tissu piqué,
denim, tissu à recouvrement (léger à moyen).
Les fils vendus en magasin conviennent à tous ces
tissus et grosseurs d'aiguilles.
Utiliser le fil synthétique pour les tissus synthétique et
le fil de coton pour les tissus en fibre naturelle.
Assurez-vous d' avoir le même fil sur le dessus et
dans la canette.
18(110)
Tissus épais: Lainages à manteau, tissu pour vêtements d'extéieur,
certains cuir et vinyle.
Fil fort, fil à denim.
(Augmenter la pression sur le pied presseur).
IMPORTANT: Assurez-vous que la grosseur de l'aiguille convienne à l'épaisseur du tissu à coudre
SÉLECTION DE L'AIGUILLE PAR RAPPORT AU TISSU
AIGUILLES
Ha 1
15 1
15 1/705H
(SIN)
15 1/705HS
(SUK)
15 x 1/ 705 HJ
130 PCL
DESCRIPTIONS
GENRE DE TISSUS
Aiguilles régulières et universelles.
Grosseurs disponibles de 9 (65) à18 (110).
Tissu en fibre naturelle: coton, lainage, soie.
Non recommand é pour tricot- double.
Aiguilles à demi-bille. Grosseurs disponibles 9 (65) à 18 (110).
Pour fibre naturelle et synthétique ou un mélange des
deux fibres: étoffe tissé, tricot, interlock etc.
Aiguilles à bille entière. Grosseurs disponibles 9 (65) à 18 (110).
Tricot à chandail, lycra, tissu pour costume de bain,
élastique.
Aiguilles robustes à pointe universelle, 14 (90) à 18 (110).
Denim, canevas, tissu à recouvrement, toile.
Aiguilles avec pointe en forme d'angle acéré, 12 (80) à 18 (110).
Cuir, vinyle, plastique souple.
Remarque: 1. Les aiguilles jumelles peuvent être achetées dans un but utilitaire ou décoratif.
2. Quand vous cousez avec les aiguilles jumelles, le bouton de largeur de point doit être au moins sur le chiffre "3" et moins.
3. Les aiguilles européennes sont numérotées 65, 70, 80 etc. Les aiguilles américaines et japonaises sont numérotées 9, 11, 12 etc.
4. Changer souvent les aiguilles (après le couture d'un vêtement) et / ou à la première rupture du fil ou des points.
35
DE
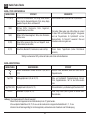
Nadel-/Faden-Tabelle
NADEL-, STOFF- UND FADENWAHL
NADELSTÄRKE
STOFFART
9-11(65-75)
Feine Stoffe: feine Baumwolle, Voile, Serge, Seide, Musselin,
Qiana, Interlock, Baumwollstricksache, Tricot, Jersey, Krepp,
gewebter Polyester, Rock- und Blusenstoff.
FADENSORTE
12(80)
Mittlere Stoffe: Baumwolle, Satin, Segeltuch,
Doppelstricksache, feine Wolle.
14(90)
Mittlere Stoffe: Bauwollsegeltuch, Wolle, dicke Stricksache,
Frottee, Jeans.
16(100)
Dicke Stoffe: Leinwand, Wolle, Zelt- und Steppstoff, Jeans,
Polstermaterial (fein bis mittlel).
18(110)
Dicke Wolle, Mantelstoff, Polstermaterial, Leder und Vinyl.
Feiner Baumwollfaden, Nylonfaden oder Polyesterfaden.
Die meisten Fäden weisen eine mittlere Dicke auf und sind
für diese Stoffe und Nadelstärken geeignet. Vorzugsweise
wird der Polyesterfaden für Synthetikstoff und der
Baumwollfaden für Naturstoff verwendet. Ober-und
Unterfaden sollte immer gleich sein.
Dicker Faden, Teppichfaden (Hohen Nähfußdruck
benutzen)
Wichtig: Je schwerer der Stoff, je dicker der Faden, desto stärker sollte die Nadel sein.
NADEL- UND STOFFWAHL
NADELSTÄRKE
BESCHREIBUNG
STOFFART
HA 1
15 1
Scharfe Standardnadel. Schwach bis stark. 9 (65) bis 18
(110)
Naturstoff: Wolle, Baumwolle, Seide usw. Qiana. Nicht für
Doppelstricksache
Halbkugelspitznadel. 9 (65) bis 18 (110)
Natur- und Synthetikstoff. Polyesterstricksache, Interlock,
Tricot, Doppelstricksache. 15x1 für alle Stoffe ersetzen
kann.
Kugelspitznadel 9 (65) bis 18 (110)
Pulloverstricksache, Lycra, Badeanzugstoff, elastischer Stoff
Ledernadel. 12 (80) bis 18 (110)
Leder, Vinyl, Polster (Öse ist größer als die der dicken
Standardnadel).
15 1/705H
15 1/705H (SUK)
130 PCL
Achtung: 1. Die Doppelnadel wird für Ziernaht verwendet.
2. Beim Einsatz der Doppelnadel soll der Stichbreitenknopf unter "3" gestellt werden.
3. Die europäische Nadelstärke ist 65, 70, 80 usw. und die amerikanische und japanische Nadelstärke ist 9, 11, 12 usw.
4. Ersetzen Sie die Nadel regelmäßig (für alle Kleidungsstücke) und/oder beim ersten Fadenbruch oder Stichübersprung.
36
EN
How to choose your pattern
For straight stitch, select pattern " " or " " with pattern
selector dial. Adjust the stitch length with the stitch length dial.
You may choose any needle position, by turning the stitch
width dial.
a
b
c
For zigzag stitch, select pattern "
" or " " with pattern
selector dial. Adjust the stitch length and stitch width according
to the fabric being used.
d
To obtain the other patterns, turn the stitch length dial to "S1"
or "S2", select the pattern desired with pattern selector dial,
and adjust the stitch width with the stitch width dial (for 3-dial
model).
Stitch width dial
a. Reverse sewing lever
b. Stitch width dial
c. Stitch length dial S1-S2
d. Pattern selector dial
37
3
2 1
0
5
4
Stitch length dial
F
DE
Sélection des points
Stichwahl
Für den Geradstich den Stichwahlknopf (d) drehen bis das
gewünschte Symbol oder der Buchstabe im Sichtfenster " " oder
" " erscheint (c). Nadelposition von Links bis Mitte wählbar indem
Sie den Stichbreitenknopf drehen. (b) Die Stichlänge mit dem
Stichlängenknopf (a) einstellen.
Pour sélectionner un point, il suffit de tourner le bouton de
sélection de points. Le sélecteur de points peut se tourner dans
n'importe quel sens (vers la droite ou vers la gauche)
Pour le point droit, sélectionnez le point " " ou " " à l'aide du
bouton de sélection de points. Réglez la longueur de point à
l'aide du bouton de réglage de longueur.
Für Zickzack-Stich den Stichwahlknopf (d) drehen bis das
gewünschte Symbol, oder der Buchstabe im Sichtfenster "
"
oder " " erscheint (c). Die Stichlänge und die Stichbreite je nach
dem verwendeten Stoff einstellen.
Pour le point zig zag, sélectionnez le point "
" ou " " à
l'aide du bouton de sélection de points. Réglez la longueur et la
largeur de point, en fonction du type de tissu.
Für die anderen Stiche den Stichwahlknopf drehen bis das
gewünschte Symbol, oder der Buchstabe im Sichtfenster
erscheint. Die Stichlänge und Stichbreite je nach Bedarf
einstellen.
Pour obtenir les autres points, mettre le bouton de longueur de
point sur "S1" ou "S2", sélectionnez ensuite le point désiré à
l'aide du bouton de sélection de points, puis réglez la largeur de
point à l'aide du bouton de réglage de la largeur.
Nous vous conseillons de consulter le tableau des points cidessous.
a. Rückwärtsnähtaste
b. Stichbreitenknopf (für dreiknopfmodell)
c. Bstichlängenknopf S1-S2 (für dreiknopfmodell)
d. Stichwahlknopf
a. Bouton de marche arrière
b. Bouton de largeur de point
c. Bouton de longueur de point S1-S2
d. Bouton de sélection de points
38
EN
Straight stitching and needle position
Turn the stitch selection dial so that the pointer is set to the
straight stitch position.
Choose your needle position, from center needle position or
right needle position.
Straight stitches
Generally speaking, the thicker the fabric, thread and needle,
the longer the stitch should be. For a fine stitch set length at
"1" or "2".
Stitch length dial
Stitch width dial
5
2.5
39
4
3 2 1
0
5
0
0.5
1
2
3
4
F
DE
Punto recto y posición de la aguja
Punto recto y posición de la aguja
Gire el disco selector de la puntada, de modo que la pantalla de
la puntada indique la posición del punto recto.
Mustereinstellrad drehen, bis die Markierung auf den
Geradstich zeigt.
En terminos generales, cuanto más grosor tenga la tela, el hilo
y la aguja, más larga debería ser la puntada. Para puntada
delgada seleccione la longitud del punto entre "1" y "2".
Nadelposition Links bis Mitte wählen, indem Sie den Stichbreitenknopf drehen.
Im allgemeinen gilt: je stärker Stoff, Garn und Nadel, desto
größer die Stichlänge. Für feine Stiche Stichlänge auf "1" oder
"2" einstellen.
Seleccione la posición de su aguja, desde la posición izquierda
a la posición derecho de la aguja, girando el disco para
puntada zigzag desde "0" a "5".
40
EN
Zigzag stitching
Turn the stitch selection dial to "
" or "
".
Function of zigzag dial
The maximum zigzag stitch width for zigzag stitching is "5",
however, the width can be reduced on any patterns. The width
increases as you move zigzag dial from "0" to "5". For twin
needle sewing, never set the width wider than "3". (1)
5
4
3
5
1
4
2
1
0.5
0
3 2 1
0
Function of stitch length dial while zigzaging
The density of zigzag stitches increase as the setting of stitch
length dial approaches "0".
Neat zigzag stitches are usually achieved at "2.5" or below. (2)
Satin stitch
When the stitch length is set between "0" - "1", the stitches are
very close together producing the "satin stitch" which is used
for making buttonholes and decorative stitches.
Stitch length dial
Stitch width dial
2
For 2-dial model
Fine fabric
When sewing on very fine fabric, place a piece of thin paper
under the fabric. It is easy to tear the paper and remove the
paper after you have finish your seam.
41
1
2
3
4
F
DE
Zigzag
Gira el botón selector de puntos a "
" ou "
Nähen mit Zickzackstich
Für den Zickzack-Stich den Stichwahlknopf drehen bis das
gewünschte Symbol, oder der Buchstabe im Sichtfenster "
"
oder " " erscheint, Es sind drei Zickzack- Breiten wählbar.
".
Función del disco de ancho de la puntada
El ancho máximo de la puntada en zig-zag es de "5"; sin embargo, el
ancho puede reducirse en cualquier dibujo. El ancho aumenta cuando
desplaza el disco del zig-zag desde "0" a "5". Para el cosido de aguja
doble, nunca adusta el ancho a más de "3". (1)
Funktion des Stichbreitenknopfs beim Zickzack-Stich
Die max. Zickzack-Stichbreite ist "5".
Jedoch kann die Breite verkleinert werden. Der Zickzack-Stich
wird mit dem Stichbreitenknopf im Bereich "0" - "5" eingestellt.
Für Doppelnadel nie über die Breite "3" wählen. (1)
Función del disco del largo de la puntada mientras se realiza el
zig-zag
La densidad de las puntadas en zig-zag aumenta cuando el ajuste del
disco de largo de la puntada se aproxima a "0".
Las puntadas en zig-zag mejor ejecutadas se suelen conseguir en "2.5"
o menor. (2)
Funktion der Stichlängenknopfs beim Zickzack-Stich
Die Dichte des Zickzack-Stiches kann mit dem Stichlängenknopf
von "0.5" bis "4" variiert werden.
Die normale Einstellung ist bei "2.5". (2)
Dichte Zickzack-Stiche siehe Zierstiche.
Las puntadas en zig-zag cerradas (más próximas) se denominan
puntada de raso.
42
EN
Blind hem/ lingerie stitch
* The blind hem foot is an optional accessory not supplied with
your machine.
Stitch width dial
5
4
3 2 1
0
For hems, curtains, trousers, skirts, etc.
Blind hem for stretch fabrics.
Blind hem/ lingerie for firm fabrics.
Set the machine as illustrated.
Stitch length dial
Note:
It takes practice to sew blind hems. Always make a sewing
test first.
Fold the fabric as illustrated with the wrong side uppermost. (1)
Place the fabric under the foot. Turn the handwheel forwards
by hand until the needle swings fully to the left. It should just
pierce the fold of the fabric. If it does not, adjust the stitch
width accordingly. (2)
Adjust the guide (3) by turning the knob (4) so that the guide
just rests against the fold.
Sew slowly, by pressing the foot control lightly guiding the
fabric along the edge of the guide.
1
2
4
3
43
F
DE
Ourlet au point invisible
Blindsaum / Wäschestich
* Le pied pour ourlet invisible est un accessoire disponible en
option. Il n'est pas fourni d'origine avec la machine.
* Der Blindsaum ist ein Zubehörteil, dass nicht mit der Maschine
mitgeliefert wird.
Pour ourlets, rideaux, pantalons, jupes etc.
Für Säume von Vorhängen, Hosen, Röcken, usw.
Ourlet au point invisible pour tissus élastiques.
Blindsaum für dehnbare Stoffe.
Ourlet au point invisible/point de lingerie pour tissus
stables.
Blindsaum für starke Stoffe.
Den Nähfuß gegen den Blindsaumfuß austauschen.
Régler la machine comme indiqué sur le schéma.
Hinweis:
Zum Nähen von Blindsäumen ist Übung erforderlich.
Vor dem Durchführen der endgültigen Nähte sind deshalb
zunächst Versuche durchzuführen.
Attention:
La réalisation d'un ourlet au point invisible requiert un peu
d'exercice. Le mieux est donc de toujours faire un échantillon
d'essai.
Den Stoff der Abbildung entsprechend (1) mit der Rückseite
nach oben umschlagen.
Den Stoff unter dem Fuß platzieren. Das Handrad nach vorn
drehen bis die Nadel vollständig nach links verschoben ist. Sie
darf gerade die Stofffalte durchdringen. (2)
Die Führung (3) durch Drehen des Rads (4) so einstellen, dass
die Führung gerade gegen die Falte drückt.
Vorsichtig nähen, hierzu leicht auf das Steuerpedal drücken und
den Stoff am Rand der Führung entlangschieben.
Plier l'ouvrage comme indiqué sur le schéma-l'envers se
trouvant en haut. (1)
Placer l'ouvrage sous le pied-de-biche. Tourner le volant vers
l'avant jusqu'à la position extrême gauche de l'aiguille.
Celle-ci ne doit piquer que sur le bord du pli. Si ce n'est pas le
cas, rectifier la largeur de tissu. (2)
Poser le guide (3) sur le pli du tissu en tournant le bouton. (4)
Piquer lentement et guider soigneusement l'ouvrage afin que la
position ce dernier par rapport au guide ne se trouve trouve à
aucun moment modifiée.
Ajuster le bouton de réglage de la vitesse sur minimum!
44
EN
Overlock stitches
* The overcasting foot is an optional accessory not supplied
with your machine.
Stitch width dial
5
4
3 2 1
0
Seams, neatening, visible hems.
Turn stitch length dial to "S1" or "S2", the stitch width can be
adjusted to suit the fabric.
Stitch length dial
Stretch overlock:
For fine knits, jerseys, neck edges, ribbing. (a)
Standard overlock:
For fine knits, jerseys, neck edges, ribbing. (b)
Double overlock stitch:
For fine knits, handknits, seams. (c)
All overlock stitches are suitable for sewing and neatening
edges and visible seams in one operation.
When neatening, the needle should just go over the edge of
the fabric.
Attention:
Use new needles or ball point needles or stretch needle!
a
45
b
c
F
DE
Point overlock
Overlock-Stich
* Le pied overlock fait parti des accessoires optionnels et n'est
pas fourni avec la machine.
* Der overlockfuß ist ein Zubehörteil, dass nicht mit der Maschine
mitgeliefert wird.
Coutures, plquage et surfilage des bords, ourlet visible.
Placer sur position "S1" ou "S2" le bouton pour la longueur de
point.
La largeur du point peut être adaptée au tissu.
Für Nähte, Nähen und Versäubern von Kanten, Sichtsaum.
Point overlock:
Pour étoffes à fines mailles, tricots, encolures, bordures. (1)
Overlock-Stich:
Für feine Stricksachen, Jersey, Kragenrand, Rippen. (1)
Point overlock standard:
Pour étoffes à mailles fines, tissus de tricot, encolures, bordures.
(2)
Standard-Overlock:
Für feine Stricksachen, Jersey, Kragenrand, Rippen. (2)
Den Stichlängenknopf auf "S1" oder "S2" drehen.
Die Stichbreite kann aufgrund des Stoffes eingestellt werden.
Doppel-Overlock-Stich:
Für feine Stricksachen, Handstricksache, Nähte. (3)
Point overlock double:
Pour ouvrages tricotés fins, éléments tricotés à la main,
coutures. (3)
Alle Overlockstiche eignen sich zum Nähen und Versäubern
von Kanten und Sichtsäumen in einem Arbeitsgang.
Beim Versäubern sollte die Stoffkante von der Nadel knapp
übernäht werden.
Tous les points overlock peuvent être utilisés pour le piquage et
le surfilage des bords en une seule opération. Suivant l'effet
recherché, on peut surfiler directement le bord coupé ou piquer
au ras celui-ci.
Achtung:
Neue Kugelspitznadel verwenden!
Attention:
Utiliser une nouvelle aiguille ou une aiguille à pointe sphérique!
46
EN
Sewing on buttons
Install the darning plate. (1)
Stitch width dial
5
Position the work under the foot. Place the button in the
desired position, lower the foot. Set the pattern selector knob
on zig-zag stitch " ". Adjust the stitch width to "3" - "5"
according to the distance between the two holes of the button.
Turn the handwheel to check that the needle goes cleanly into
the left and right holes of the button. Set the pattern selector
knob on straight stitch " ", and sew a few securing stitches.
Set the pattern selector knob on zig-zag stitch " ", and slowly
sew on the button with about 10 stitches. Set the pattern
selector knob on straight stitch " ", and sew a few securing
stitches. (2) (for 3-dial model)
4
3 2 1
0
Change presser foot to button sewing foot.
Position the work under the foot. Place the button on the
marked position and lower the foot. Set the pattern selector
knob on " " and sew a few securing stitches. Select the zigzag stitch width according to the distance between the two
holes of the button. Turn the handwheel to check if the needle
goes into the right and the left hole of the button without any
obstruction (adjust the stitch width according to the button).
Slowly sew on the button with about 10 stitches. Select pattern
" " and sew a few securing stitches. (2) (for 2-dial model)
Stitch length dial
1
If a shank is required, place a darning needle on top of the
button and sew. (3) For buttons with 4 holes, sew through the
front two holes first (2), push work forward and then sew
through the back two holes as described. (3)
2
47
3
F
DE
Pose des boutons
Placer la plaquette de reprisage sur la plaque aiguille. (1)
Knopf annähen
Stopfplatte einsetzen. (1)
Mettez en place le pied bouton.
Enlever le pied-de-biche zigzag et le remplacer par le pied pour
la pose des boutons. Glisser l'ouvrage sous le pied-de-biche,
placer le bouton sur le repère et abaisser le pied-de-biche.
Tourner le bouton de sélection des points à "
" et coudre
quelques points d'arrêt. Régler la largeur du zigzag selon la
distance entre les deux trous du bouton. À l'aide du volant, faire
un point de contrôle pour vous assurer que l'aiguille pénètre
exactement dans le trou de gauche du bouton (la largeur du
point varie en fonction du bouton), coudre le bouton. Placer le
sélecteur de point sur " ", puis faire quelques points pour
arrêter la piqûre. (2) (pour modèle à 2 boutons)
Legen Sie das Nähgut unter den Nähfuss. Legen Sie den Knopf
an die gewünschte Stelle und senken Sie den Nähfuss. Drehen
Sie den Stichwahlknopf auf Position B und nähen Sie einige
Sicherheitsstiche. Wählen Sie die Stichbreite gemäss dem
Abstand der beiden Löcher im Knopf. Drehen Sie am Handrad
um zu kontrollieren, ob die Nadel ins rechte und linke Loch des
Knopfes sticht ohne anzustossen. Nähen Sie langsam auf dem
Knopf etwa 10 Stiche. Drehen Sie den Stichwahlknopf auf
Position B und nähen Sie einige Sicherheitsstiche.
Ist ein Hals erwünscht, wird eine Stopfnadel auf den Knopf
gelegt und übernäht. (3) Bei den Knöpfen mit 4 Löchern mit den
beiden vorderen beginnen (Bild 2), dann Nähgut nach vorne
schieben und gleich vorgehen wie beschrieben. (3)
Placez l'ouvrage sous le pied. Positionnez le bouton à l'endroit
désiré et abaissez le pied presseur. Réglez le sélecteur de motif
en position zigzag " " et réglez la largeur de points entre "3" et
"5" selon l'écartement des trous du bouton. Tournez le volant
pour vous assurer que l'aiguille traverse librement les trous
gauche et droit du bouton. En plaçant le sélecteur de points sur
la position " ", piquez quelques points d'arrêt, puis replacez le
sélecteur sur " " et piquez lentement une dizaine de points.
Replacez le sélecteur en position " " et piquez quelques points
d'arrêt. (2) (pour modèle à 3 boutons)
Si vous souhaitez coudre un bouton à queue, placez une
aiguille à repriser au dessus du bouton avant de le coudre sur
l'ouvrage (3). Pour coudre un bouton à 4 trous, piquez tout
d'abord les deux premiers trous (2), puis déplacez votre
ouvrage pour piquer les deux autres trous (3).
48
EN
How to sew buttonholes
Preparation:
Remove the zigzag foot and attach the buttonhole foot. Adjust
the stitch length dial between "0.5" - "1". The density of the
stitch depends on thickness of the fabric.
Note: Always test sew a buttonhole.
Stitch width dial
5 4
Stitch length dial
3
2
1 0
To prepare the fabric:
Measure the diameter of the button and add 0.3cm (1/8") for
the bartacks. If you have a very thick button, add more to the
diameter measurement. Mark the position and length of the
buttonhole on the fabric.
Position the fabric so that the needle is on the mark that is
furthest from you.
Pull the buttonhole foot towards you as far as it will go.
Lower the foot.
1
a. Turn the pattern selector dial to . Sew at moderate speed
until you reach the end mark.
4
b. Turn the pattern selector dial to 2 and sew 5-6 bartack
stitches.
c. Turn the pattern selector dial to 3 and sew the left side of
the buttonhole to the mark at the end which is further from
you.
4
d. Turn the pattern selector dial to 2 and sew bar tack stitches.
4
3
a
Remove the fabric from under the foot. Draw the upper thread
through the backside of the fabric and knot upper and lower
threads. Cut the center of the buttonhole with the seam ripper,
being careful not to cut the stitches on either side.
e
Tips:
- Slightly reduce upper thread tension to produce better results.
- Use backing material for fine and stretchy fabrics.
- It is advisable to use a gimp cord for stretch or knit fabrics.
The zigzag should sew over the gimp. (e)
49
b
1
2
c
d
F
DE
Confection des boutonnières
Préparation:
Poser le pied pour boutonnières.
Régler la longueur du point entre "0.5" - "1". La densité du point
dépend de l'épaisseur du tissu.
Note: Toujours faire une boutonnière d'essai.
Vorbereitungen:
Den Zickzackfuß entfernen und den Fuß für Knopflöcher montieren.
Die Stichlängen-Einstellung zwischen "0,5" und "1" einstellen. Die
Stichdichte hängt von der Stoffdicke ab.
Hinweis: Immer ein Test-Knopfloch anfertigen.
Vorbereitung des Stoffs:
Den Knopfdurchmesser messen und dem festgestellten Maß 0,3
cm für die Versteifungen zufügen. Bei sehr dicken Knöpfen zum
gemessenen Knopfdurchmesser mehr hinzuaddieren. Position und
Länge des Knopflochs auf dem Stoff markieren.
Den Stoff so positionieren, dass die Nadel auf die entferntere
Markierung zeigt.
Den Knopflochfuß so weit wie möglich von der Nähmaschine
wegziehen. Den Fuß senken.
a. Die Stich-Wahlscheibe auf " " drehen. Mit mäßiger Geschwindigkeit
bis zur Endmarkierung nähen.
b. Die Stich-Wahlscheibe auf " " stellen und 5 bis 6 Verstärkungsstiche
nähen.
c. Die Stich-Wahlscheibe auf "
" drehen und den linken Teil des
Knopflochs bis zum entfernten Ende nähen.
d. Die Stich-Wahlscheibe auf " " drehen und einige Verstärkungsstiche
nähen.
Den Stoff unter dem Fuß vorziehen. Den Oberfaden von der
Rückseite durch den Stoff ziehen und Oberfaden und Unterfaden
verknoten. Die Knopflochöffnung mit dem Knopflochmesser
aufschneiden. Dabei darauf achten, nicht auf einer Seite in die
Stiche zu schneiden.
Mesurer le diamètre du bouton et ajouter 0.3cm pour la bride.
Si vous avez un bouton épais, il faut ajouter à la longueur.
Marquer la position et la longueur de la boutonnière sur le tissu.
Placer le tissu afin que l'aiguille soit au bout de la marque le
plus éloigné de vous.
Tirer le pied à boutonnière vers vous jusqu'au bout et abaisser
le pied.
a. Tourner le sélecteur de point à
jusqu'au bout de la marque.
. Coudre à vitesse modérée
b. Tourner le sélecteur de point à
et coudre 5-6 points d'arrêt.
c. Tourner le sélecteur de point à et coudre le côté gauche de
la boutonnière jusqu'au point de départ.
d. Tourner le sélecteur de point à
Nähen von Knopflöchern
et coudre les points d'arrêt.
Suggestions:
- Pour de meilleurs résultats, réduire légèrement la tension du
fil supérieur.
- Utiliser une feuille de papier pour éviter les distorsions sur les
tissus très fins ou synthétiques.
- Pour les tissus extensibles ou les tricots, il est préférable
d'utiliser un cordonnet. Le point doit couvrir complètement le
cordonnet. (e)
Ratschläge:
- Durch leichte Reduzierung der Oberfadenspannung können
bessere Ergebnisse erhalten werden.
- Für feine und dehnbare Stoffe Verstärkungsmaterial verwenden.
- Für dehnbare und Trikotstoffe wird die Verwendung eines.
Einsatzes empfohlen. Der Zickzackstich muss über den Einsatz
Laufen. (E)
50
EN
Zippers and piping
Set the machine as illustrated.
Stitch width dial
The zip foot can be inserted right or left, depending on which
side of the foot you are going to sew. (1)
3
2 1
0
5
4
Stitch length dial
To sew past the zip pull, lower the needle into the fabric, raise
the presser foot and push the zip pull behind the presser foot.
Lower the foot and continue to sew.
It is also possible to sew in a length of cord, into a bias strip to
form a "welt".
Set stitch length control between "1" - "4" (according to
thickness of fabric). (2)
1
51
2
F
DE
Pose d'une fermeture à glissière
Reißverschlüsse und Paspeln
Maschine wie abgebildet einstellen.
Régler la machine comme indiqué sur le schéma.
Régler la longueur de point entre "1" et "4" selon l'épaisseur du
tissu.
Der Reissverschlussfuss kann rechts oder links eingesetzt
werden, je nachdem auf welcher Seite des Nähfusses genäht
wird. (1)
Le pied pour fermeture à glissière peut être fixer du côté
gauche ou du côté droit dépendant quel côté du fermoir à
glissière vous désirez coudre. (1)
Um dem Reissverschluss-Schieber auszuweichen, Nadel im
Stoff stecken lassen, Nähfuss anheben und Schieber hinter den
Fuss rücken.
Pour éviter de dévier lorsque vous arrivez près du curseur,
laisser l'aiguille piquée dans le tissu. Lever le pied-de-biche,
puis pousser le curseur derrière le pied-de-biche. Abaisser ce
dernier puis continuer à coudre.
Es ist auch möglich, eine Kordel einzunähen.
Den Stichlängenknopf zwischen "1" - "4" stellen (je nach der
Stoffdicke). (2)
Il est également possible d'utiliser le pied pour fermeture à
glissière pour coudre un cordonnet ou passe-poil. (2)
52
EN
Sewing with the hemmer foot
* The hemmer foot is an optional accessory not supplied with
your machine.
Stitch width dial
4
3
2 1
0
5
For hems in fine or sheer fabrics.
Stitch length dial
Set the machine as illustrated.
Neaten the edge of the fabric. At the beginning of the hem,
turn under the edge twice by about 3mm (1/8") and sew 4-5
stitches to secure. Pull the thread slightly towards the back.
Insert the needle into the fabric, raise the presser foot and
guide the fold into the scroll on the foot. (1)
Gently pull the fabric edge towards you and lower the presser
foot. Begin sewing, guiding the fabric into the scroll by holding
it upright and slightly to the left. (2)
1
53
2
F
DE
Coudre avec le pied ourleur
Nähen mit dem Säumerfuß
* Le pied ourleur est un accessoire optionnel qui n'est pas fourni
avec votre machine.
* Der Säumerfuß ist ein Zubehörteil, dass nicht mit der Maschine
mitgeliefert wird.
Pour ourler les tissus fins et légers.
Für Säume an dünnen oder durchsichtigen Stoffen.
Régler la machine comme indiqué sur le schéma.
Maschine wie abgebildet einstellen.
Le tissu à ourler doit être coupé droit au préalable. Replier
l'extrême bord du tissu en formant un double pli d'env. 3mm et
le maintenir par 4 ou 5 points. Tirer légèrement les fils d'aiguille
et de canette vers l'arrière, piquer l'aiguille dans le tissu.
Relever le pied-de-biche. Guider le bord vif du tissu pour qu'il
s'engage dans le cornet de l'ourleur. (1)
Den Stoffrand umklappen.
Zu Beginn des Saums zweimal um ungefähr 3 mm um den
Rand fahren und 4 bis 5 Verwahrungsstiche anbringen.
Den Faden leicht nach hinten ziehen. Die Nadel in den Stoff
einführen, den Nähfuß anheben und die Faltung in der Nut des
Fußes führen. (1)
Continuer de piquer en veillant à ce que le tissu pénètre
uniformément dans le cornet de l'ourleur. (2)
Den Stoffrand vorsichtig von der Maschine wegziehen und den
Nähfuß senken. Zu Nähen beginnen und dabei den Stoff in der
Nut führen. Ihn hierzu anheben und leicht nach links halten. (2)
54
EN
3-step zig-zag
Sewing on lace and elastic, darning, mending, reinforcing
edges.
Stitch width dial
5
4
3 2 1
0
Set the machine as illustrated.
Stitch length dial
Place patch in position. The stitch length can be shortened to
produce very close stitches. (1)
When mending tears, it is advisable to use a piece of backing
fabric to reinforce. The stitch density can be varied by
adjusting the stitch length. First sew over the center and then
overlap on both sides. Depending on the type of fabric and
damage, sew between 3 and 5 rows. (2)
Sewing elastic
1. Place the elastic on the fabric.
2. As you sew, stretch the elastic both in the front and behind
the presser foot as shown in fig. (3)
Joining fabric
The elastic stitch can be used to join two pieces of fabric
together and is very effective when sewing knitted fabrics. If
nylon thread is used, the stitch will not be visible.
1. Place the edges of the two pieces of fabric together and
center them under the presser foot.
2. Sew them together using the elastic stitch taking care to
keep the two fabric edges close together as shown in fig. (4)
1
3
55
2
4
F
DE
Point zig-zag cousu
Zickzack in 3 Stufen
Pose d'élastique et de dentelle, ravaudage, racommodage de
dechirures, renforcement de bords.
Nähen auf Spitzen und Gummibändern, Stopfen, Aufnähen von
Flecken, Verstärkung von Rändern.
Régler la machine comme indiqué sur le schéma.
Die Nähmaschine der Abbildung gemäß einstellen.
Poser le morceau d'étoffe sur le tissu endommagé. (1)
Das Teil positionieren. Durch Verkürzung der Stichlänge können
die Stiche sehr dicht nebeneinander angebracht werden. (1)
Pour le raccommodage de déchirures, il est conseillé de placer
un tissu de renforcement sur l'envers. Commencer par coudre
sur le milieu, puis coudre sur les deux côtés. Selon le genre de
tissu et la nature des dommages, faire 3 à 5 passages. (2)
Zum Stopfen eines Risses wird empfohlen, die Rückseite mit
einem Stoffstück zu verstärken. Durch Änderung der Stichlänge
können die Stiche mehr oder weniger dicht nebeneinander
angebracht werden. Zunächst in der Mitte und dann über die
beiden Seiten nähen. Entsprechend der Art des Stoffs und der
Schäden sind 3 bis 5 Stichreihen zu nähen. (2)
Poser un élastique
1. Placez l'élastique sur le tissu.
2. Lors de la couture, maintenez fermement l'élastique à
l'arrière et à l'avant du pied, comme montré sur le dessin (3).
Assembler
Le point élastique est conseillé pour assembler deux ouvrages
ensemble, surtout lorsque le l'ouvrage en question est du tricot.
1. Placez les deux ouvrages côte à côte et centrez les sous le
pied de biche.
2. Coudre à l'aide du point élastique en prenant soin de bien
maintenir les deux ouvrages bord à bord.
56
EN
Stitch selection
Triple straight stitch: (1)
For hardwearing seams.
Turn the stitch length dial to "S1" or "S2".
The machine sews two stitches forwards and one stitch
backwards. This gives triple reinforcement.
Stitch width dial
3
2 1
0
5
4
Stitch length dial
1
Triple zig-zag: (2)
For hardwearing seams, hems and decorative seams.
Turn the stitch length dial to "S1" or "S2".
Adjust the stitch width dial to between "3" and "5".
Triple zig-zag is suitable for firm fabrics like denim, corduroy,
etc.
Stitch width dial
2
57
4
3 2 1
0
5
Stitch length dial
F
DE
Sélection des points
Triple point droit: (1)
Pour coutures à toute épreuve.
Placer sur position "S1" ou "S2" le bouton pour longueur de
point.
Placer le bouton pour largeur de point en position "0".
La machine effectue deux points en avant et un point en arriére
ce qui permet d'obtenir une couture a triple renfort.
Dreifach Stiche
Dreifach-Geradstich für Strapaziernähte. (1)
Stichwahl " " oder " " wählen.
Stichlängenknopf auf "S1" oder "S2" drehen.
Die Maschine näht zwei Stiche vorwärts und einen Stich zurück.
Dies ergibt eine 3fache Verstärkung.
Dreifach-Zickzack-Stich: (2)
Stichwahl " " wählen.
Für Strapaziernähte und Säume sowie Ziernähte.
Stichlängenknopf auf "S1" oder "S2" drehen.
Stichbreitenknopf zwischen "3" und "5" stellen. (für dreiknopfmodell)
Dreifach-Zickzack-Stich eignet sich für feste Stoffe, wie Jeans,
Kordsamt usw.
Point zigzag triple: (2)
Pour coutures à toute épreuve, ourlets et coutures décoratives.
Placer sur position "S1" ou "S2" le bouton pour longueur de
point.
Placer le bouton pour largeur de point entre les positions 3-5.
Le triple point zigzag convient pour les tissus résistants tels que
jeans, velours côtelé, etc.
58
EN
Smocking stitch
Seams, hems, T-shirts, underwear, etc.
Stitch width dial
Set the machine as illustrated.
This stitch can be used for all types of jersey as well as for
woven fabrics. (1)
4
3 2 1
0
5
Stitch length dial
Sew at 1cm (1/4") from the fabric edge and trim the surplus
fabric. (2)
1
59
2
F
DE
Point nid d'abeille
Stretch-Stich
Coutures, ourlets, T-shirts, sous-vêtements, etc.
Verbindungen, Säume, T-Shirts, Unterkleidung, usw..
Régler la machine comme indiqué sur le schéma.
Die Nähmaschine der Abbildung gemäß einstellen.
Ce point peut être utilisé pour différents types de jersey
(tricot) ainsi que pour les étoffes tissées. (1)
Dieser Stich kann für alle Arten von Jersey, sowie für gewebte
Stoffe verwendet werden. (1)
Coudre l'ourlet à env. 1 cm du bord coupé, puis couper le
surplus de tissu. (2)
Einen cm vom Stoffrand nähen und überschüssigen Stoff
abschneiden. (2)
60
EN
Sewing with the cording foot
* The cording foot is an optional accessory not supplied with
your machine.
Stitch width dial
5
4
3 2 1
0
Decorative effects, cushions, tablecloths, etc.
Stitch length dial
Set the machine as illustrated.
Various stitches are suitable for sewing on cord, e.g. Zig-zag,
Triple zig-zag, decorative stitches.
Insert the cord between the spring covering the cord groove
and the foot. The cord should run in the groove. One, two or
three cords can be sewn on. The stitch width is adjusted
according to the number of cords and the stitch selected. (1/2)
1
61
2
F
DE
Coudre avec le pied pour cordonnet
Nähen mit Kordelfuß
* Le pied pour cordonnet est un accessoire optionnel qui n'est
pas fourni avec votre machine.
* Der Kordelfuß ist ein Zubehörteil, dass nicht mit der Maschine
mitgeliefert wird.
Décorations, coussins, nappes etc.
Verzierungen, Kissen, Tischdecken und ähnliches.
Régler la machine comme indiqué sur le schéma.
Die Nähmaschine gemäß der Abbildung einstellen. Zum Nähen
von Kordeln können verschiedene Stiche verwendet werden,
zum Beispiel Zickzack, Dreifach-Zickzack oder Zierstiche.
On peut utiliser divers points tels le zigzag, le triple zigzag,
points décoratifs, etc.
Faire passer les fils dans le ressort de guidage puis les
disposer vers l'arrière, sous le pied-de-biche. Veiller à ce que
les fils se trouvent dans les rainures (tenir compte de
l'épaisseur du cordonnet). Le pied pour cordonnet permet de
coudre un, deux ou trois fils. La largeur de point varie en
fonction du nombre de fils et du point choisi. (1/2)
Die Kordel zwischen der die Nut überdeckenden Feder und
dem Fuß einführen. Die Kordel muss in der Nut laufen. Es
können eine, zwei oder drei Kordeln genäht werden. Die
Stichbreite wird in Abhängigkeit von der Anzahl der Kordeln und
dem gewählten Stich eingestellt (1/2).
62
EN
Darning
* The darning foot is an optional accessory not supplied with
your machine.
Stitch width dial
4
3
2 1
0
5
Set the machine as illustrated.
Stitch length dial
Install the darning plate. (1)
Remove the presser foot holder. (2)
Attach the darning foot to the presser foot holder. The lever (a)
should be behind the needle clamp screw (b). Press the
darning foot on firmly from behind with your index finger and
tighten the screw (c). (3)
First sew round the edge of the hole (to secure the threads). (4)
First row: Always work from left to right. Turn work by 1/4 and
oversew.
1
A darning ring is recommended for easier sewing and better
results.
a
b
c
4
2
63
3
F
DE
Reprise
Stopfen
* Le pied à repriser est un accessoire optionnel qui n'est pas
fourni avec votre machine.
* Der Stopffuß ist ein Zubehörteil, dass nicht mit der Maschine
mitgeliefert wird.
Régler la machine comme indiqué sur le schéma.
Placer la plaquette de prisage sur la plaque aiguille. (1)
Die Nähmaschine gemäß der Abbildung einstellen.
Die Greiferabdeckplatte montieren. (1)
Retirer le support de pied-de-biche. (2)
Den Nähfuß entfernen. (2)
Fixer le pied à repriser à la barre. Le levier (a) doit se trouver
derrière, au dessus de la vis de fixation de l'aiguille (b). Avec
l'index, appuyer fermement par l'arrière sur le pied à repriser,
puis serrer la vis (c). (3)
Den Stopffuß auf der Nähfußhalterung montieren. Der Hebel (A)
muss sich hinter der Spannschraube der Nadel befinden (B).
Den Stopffuß fest mit dem Zeigefinger von hinten eindrücken
und die Schraube (C) festziehen. (3)
Commencer par coudre tout autour du trou (pour empêcher les
mailles de filer). (4)
Première rangéé Travailler toujours de gauche à droite.
Tourner l'ouvrage d'un quart et finir la reprise.
Zunächst um den Rand des Lochs nähen (um alle Fäden zu
verwahren). (4)
Erste Reihe: Immer von links nach rechts arbeiten. Das
Nähwerk um eine Vierteldrehung schwenken und darübernähen.
Pour obtenir un meilleur résultat, nous conseillons d'utiliser un
tambour à repriser.
Zur Erleichterung des Nähens und zur Verbesserung des
Ergebnisses wird die Verwendung eines Stopfrings empfohlen.
64
EN
Practical stitches
Set the machine as illustrated.
Stitch width dial
5
4
3 2 1
0
Shell hem (1)
For decorative edges.
Suitable for edges on sheer, fine and stretch fabrics. The
larger stitch should go just over the edge of the fabric to create
the shell effect.
- This stitch requires a tighter thread tension than normal.
- Place the fabric under the presser foot so that it will be sewn
along the bias with the straight stitches sewn on the
seamline and the zigzag stitches sewn slightly over the
folded edge.
- Sew at a slow speed.
Stitch length dial
Rampart (2)
For flat joining seams, sewing on elastic, visible hems.
This stitch can be used for firm, thicker fabrics.
Bridging (3)
For seams, place mats, tablecloths.
Decorative joining seam for a fagoted effect. Gathering with
cord or shirring elastic.
1
65
2
3
F
DE
Points utilitaires
Praktische Stiche
Die Nähmaschine wie in der Abbildung (1) gezeigt einstellen.
Die Stichlängen-Einstellung dem verwendeten Stoff gemäß regeln.
Régler la machine comme indiqué sur le schéma.
La largeur et la longueur des points peuvent être adaptées à la
nature des tissus.
Muschelsaum (1)
Für Zierränder.
Für Ränder transparenter, dünner und dehnbarer Stoffe
geeignet. Der breiteste Stich muss gerade über den Stoffrand
reichen, um die Muschenwirkung zu schaffen.
Point coquille pour ourlets (1)
Pour renforcements décoratifs de bords.
Convient pour bordures de matériaux minces, stables ou
élastiques. Le grand point devrait déborder trés légèrement du
tissu, pour donner cet effet de coquille.
Zinnen (2)
Für flache Verbindungen, Nähen auf Gummibändern, sichtbare
Säume.
Dieser Stich kann für stärkste und dickste Stoffe verwendet
werden.
Point de fronces (2)
Pour ourlets, sets nappes.
Coutures trés décoratives avec effet d'ourlet à jours. Réalisation
des rangées avec du fil normal ou du fil élastique.
Point universel (3)
Pour coutures de raccords plates, coutures de bandes
élastiques, ourlets visibles.
Ce point permet de travailler sur divers matériaux stables ou à
mailles.
Klammern (3)
Für Verbindungen, Servietten, Tischtücher.
Locker wirkende Zierverbindungen. Fältelungen mit Kordel oder
Gummizug.
66
EN
Quilting
* The quilting foot is an optional accessory not supplied with
this machine.
Stitch width dial
4
5
Insert the edge/quilting guide in presser foot holder and set
the space as you desired.
Move the fabric over and sew successive rows with the guide
riding along on the previous row of stitching.
67
3
2 1
0
Set Pattern Selector as illustrated.
Stitch length dial
F
DE
Matelassage
Steppen
* Le pied pour quilt est un accessoire optionnel qui n'est pas
vendu avec cette machine.
* Der Quiltfuß ist ein Zubehörteil, dass nicht mit der Maschine
mitgeliefert wird.
Régler la machine comme indiqué sur le schéma.
Die Stichwahl der Abbildung gemäß einstellen.
Insérez le guide de matelassage dans le support de pied
presseur et réglez l'espace selon vos désirs.
Die Steppführung in die Nähfußhalterung einführen und den
Abstand wunschgemäß einstellen.
Faites avancer le tissu et cousez des rangs successifs en
faisant passer le guide tout au long du rang de points précédent.
Den Stoff vorlaufen lassen und aufeinanderfolgende Reihen
nähen, wobei die Führung längs der vorangehenden Stichreihe
zu führen ist
68
EN
Gathering
* The gathering foot is an optional accessory not supplied with
this machine.
Stitch width dial
4
5
1. Attach the gathering foot.
2. Sew a single row or multiple rows of straight stitches. Pull
the Lower thread to gather more of the material.
3. If more gathering in required, loosen the upper thread (to
about 2) so that the lower thread lies on the under side of
the material.
4. Pull the lower thread to gather more of the material.
69
3
2 1
0
Set the Pattern Selector as illustrated.
Stitch length dial
F
DE
Fronçage
Fälteln
* Le pied fronceur est un accessoire optionnel qui n'est pas
vendu avec cette machine.
* Der Kräuselfuß ist ein Zubehörteil, dass nicht mit der Maschine
mitgeliefert wird.
Réglez le sélecteur de point comme illustré.
Die Stichwahl entsprechend nebenstehender Abbildung regeln.
1. Montez le pied fronceur.
1. Den Fältelfuß montieren.
2. Cousez un seul rang ou plusieurs rangs de points droits.
Tirez le fil inférieur pour faire froncer plus le tissu.
2. Eine einzige oder mehrere Reihen gerader Stiche nähen.
Den Unterfaden ziehen, um den Stoff stärker zu fälteln.
3. S'il faut faire froncer encore plus, détendez le fil supérieur
(jusqu'à 2 environ) de manière à ce que le fil inférieur passe
sur l'envers du tissu.
3. Soll noch stärker gefältelt werden, so ist der Oberfaden zu
lockern (bis zu ungefähr 2), so dass der Unterfaden auf der
Rückseite des Stoffs austritt.
4. Tirez le fil inférieur pour faire froncer plus le tissu.
4. Den Unterfaden ziehen, um den Stoff stärker zu fälteln.
70
EN
Patch work
These stitches are used to join two pieces of fabric while
leaving a space between their edges.
Stitch width dial
2. Set the Pattern selector as illustrated. Turn the stitch length
dial to "S1".
3. Stitch along the edge, pulling both threads slightly when
beginning to sew.
* Use thicker than normal threads for sewing.
4. After sewing, remove the basting and the paper. Finish by
tying knots on the reverse side at the beginning and the end
of the seams.
71
4
3 2 1
0
5
1. Fold over the edges of the two pieces of fabric for the hem and
baste the edges to a thin piece of paper leaving a small space
between them.
Stitch length dial
F
DE
Patchwork
Patchwork
Ces points sont destinés à unir deux pièces de tissu tout en
laissant un espace libre entre les deux rebords.
Diese Stiche werden verwendet, um zwei Stoffstücke zu verbinden
und dabei einen leichten Zwischenraum zwischen ihnen zu lassen.
1. Pliez les rebords pour former un ourlet et bâtissez les bords
sur une fine feuille de papier en laissant un petit espace libre
entre les deux.
1. Die Ränder der beiden Stoffstücke für den Saum
zurückschlagen und auf einem dünnen Papierstück festheften,
wobei zwischen ihnen ein kleiner Abstand zu lassen ist.
2. Placez la sélection de motif sur " ".
Placer sur position "S1" le bouton pour longueur de point.
2. An der Stichwahl die Position " " einstellen.
Die Stichlängen-Einstellung auf "S1" stellen.
3. Cousez le long du rebord en tirant les deux fils de côté au
début de la couture. Utilisez un fil plus épais que les fils
standards habituels.
3. Längs des Rands einstechen und beim Beginn des Nähens
leicht an den beiden Fäden ziehen.
* Zum Nähen einen etwas dickeren Faden als für normale
Arbeiten wählen.
4. Eliminez les surfils et le papier après la couture. Nouez les
fils (début et fin de couture) sur l'envers pour arrêter.
4. Nach Beenden des Nähens die Heftung und das Papier
entfernen. Zum Abschluss am Anfang und am Ende der
Verbindung auf der Rückseite Knoten anbringen.
72
EN
Applique
- Turn stitch length dial to the desired length.
Stitch width dial
- Turn pattern selector dial to small zig zag width.
5
- Sew slowly around the edge of the design.
- Trim excess material outside the stitching. Make sure not to
cut any stitches.
- Remove the basting thread.
- Tie top and bottom thread under the applique to avoid
unraveling.
73
4
3 2 1
0
- Cut out the applique design and baste it to the fabric.
Stitch length dial
F
DE
Applique
Aufnähen
- An der Stichlängen-Einstellung die gewünschte Länge wählen.
- Tournez la molette de longueur de point sur la longueur
désirée.
- An der Stichwahlscheibe einen Zickzackstich geringer Breite
wählen.
- Amenez le cadran du sélecteur de points sur un zigzag de
faible largeur.
- Découpez le motif de l'applique et bâtissez-le sur le tissu.
- Das aufzunähende Muster ausschneiden und auf dem Stoff
auflegen und festheften.
- Cousez lentement tout autour du motif.
- Langsam um das Muster nähen.
- Coupez l'excédent de matériau en-dehors de points. Prenez
garde à ne pas couper de points.
- Das außerhalb der Stiche gelegene überschüssige Material
abschneiden. Darauf achten, nicht in die Stiche zu schneiden.
- Enlevez le fil du bâti.
- Den Heftfaden entfernen.
- Nouez les fils supérieur et inférieur sous l'applique de manière
à éviter tout effilochage.
- Ober und Unterfaden unter dem Aufnähstück verknoten, um
jegliches Austreten zu vermeiden.
74
EN
Twin needle (optional)
- Turn stitch length dial to the desired stitch length.
Stitch width dial
- Turn stitch selector to straight stitch, center needle position.
5
4
3
- For twin needle sewing, insert the extra spool pin into the
hole on top of the machine.
- Make sure that the two threads used to thread the twin
needle are of the same weight. You can use one or two
colors.
- Insert the twin needle in the same way as single needle. Flat
side of needle should face away from you.
- Follow instructions for single needle threading. Thread each
needle separately.
Please note:
When sewing with twin needle, always proceed slowly, and
make sure to maintain a low speed to insure quality
stitching.
When using twin needle on zig-zag make sure the stitch
width dial is set between "0" and "3". Do not use twin
needle at setting above "3" (for 3-dial model).
75
2 1 0
Stitch length dial
F
DE
Aiguille double (optionnel)
- Réglez la longueur de point comme souhaité.
Doppelnadel (Option)
Maschine wie abgebildet einstellen.
Mittlere Nadelposition wählen.
Die Stichlänge je nach Bedarf wählen.
- Réglez le bouton de sélection sur le point droit, et centrez la
position d'aiguille.
- Pour coudre à l'aide de l'aiguille double, insérez la tige porte
bobine supplémentaire, dans le trou situé sur le dessus de la
machine.
- Darauf Achten, daß die zwei verwendeten Fäden die gleiche
Dicke aufweisen. Die Fäden können gleichfarbig sein oder
unterschiedliche Farbe aufweisen.
- Assurez vous que les deux fils utilisés, sont de même
grosseur.
- Die Doppelnadel wie normale Nadel einsetzen. Die flache
Kolbenseite muß hinten sein.
- Insérez l'aiguille double de la même manière qu'une aiguille
simple. Le coté plat de l'aiguille doit toujours être placé vers
l'arrière de la machine.
Achtung:
Beim Einsatz der Doppelnadel immer langsam nähen, um
die Stichqualität zu gewährleisten.
Beim Einsatz der Doppelnadel für Zickzack-Stich den
Stichbreitenknopf nur zwischen "0" und "3" stellen. (für
dreiknopfmodell)
*Über "3" könnte zu Nadelbruch führen.
- Enfilez les aiguilles séparément de la même manière que
pour une aiguille simple.
Note :
Pour la couture avec une aiguille double, il est fortement
conseillé de coudre lentement. Assurez vous de maintenir
une vitesse réduite pour une réalisation de qualité.
Pour la couture avec une aiguille double en point zig zag,
réglez la largeur de points entre "0" et "3". Ne pas utiliser
d'aiguille double avec un réglage de largeur supérieur à "3"
(pour les modèles à 3 boutons)
76
EN
Monogramming and embroidering with embroidery hoop*
- Set the machine as illustrated above.
Stitch width dial
- Remove the presser foot and the presser foot holder.
5
- Lower presser foot lever before starting to sew.
- Adjust the stitch width according to the size of lettering or
design.
Preparation for Monogramming and Embroidering
- Draw the desired lettering or design on the right side of the
fabric.
- Stretch the fabric between embroidery hoop as firmly as
possible.
- Place the fabric under the needle. Make sure the presser
foot bar is down in its lowest position.
- Turn the balance wheel towards you to bring up the lower
thread through the fabric. Sew a few securing stitches at the
starting point.
- Hold the hoop with thumb and forefingers of both hands
while pressing the material with the middle and third fingers
and supporting the outside of hoop with smaller finger.
* Embroidery hoop not included with machine.
77
4
3 2 1
0
- Attach the darning plate.
Stitch length dial
F
Réalisation de monogrammes et broderie avec cercle à broder*
DE
Stickereien mit Stickrahmen*
- Réglez la machine comme illustré ci-contre.
Abdecken der Greifer des Antriebs
- Déposez le pied presseur et son support.
- Die Nähmaschine entsprechend nebenstehender Abbildung
einstellen.
- Montez la plaque couvre-entraînement.
- Den Nähfuß und seine Halterung abbauen.
- Abaissez le levier releveur de pied presseur avant de
commencer à coudre.
- Die Greiferabdeckplatte montieren.
- Vor Beginn des Nähens den 2-Positions-Nähfußheber senken.
- Ajustez la largeur du point en fonction de la taille des lettres
ou du motif.
- Die Stichbreite der Breite von Buchstaben oder Muster
entsprechend einstellen.
Préparation en vue de la réalisation d'un monogramme et
d'une broderie
Vorbereitungen zur Erstellung eines Zeichens oder einer
Stickerei
- Dessinez les lettres ou le motif désiré sur l'envers du tissu.
- Die gewünschten Buchstaben oder Muster auf der Rückseite
des Stoffs aufzeichnen.
- Tendez le tissu le plus possible sur le cercle à broder.
- Placez le tissu en dessous de l'aiguille. Assurez-vous que le
montant du pied presseur est descendu à sa position la plus
basse.
- Den Stoff auf dem Stickrahmen möglichst stark spannen.
- Den Stoff unter die Nadel platzieren. Sicherstellen, dass das
Nähfußbein auf seine tiefste Position herabgefahren ist.
- Tournez la commande d'équilibrage vers vous de manière à
faire remonter le fil inférieur à travers le tissu. Cousez
quelques points d'arrêt au point de départ de la broderie.
- Die Ausgleichbedienung zum Benutzer hin von der Maschine
weg drehen, so dass der Unterfaden durch den Stoff
angehoben wird. Am Anfangsstich der Stickerei einige
Verwahrungsstiche nähen.
- Maintenez le cercle à broder au moyen du pouce et de l'index
de chaque main, tout en appuyant sur le tissu avec le majeur
et l'annulaire et en soutenant l'extérieur du cercle avec
l'auriculaire.
- Den Stickrahmen mit Daumen und Zeigefinger jeder Hand
festhalten und dabei mit Mittel- und Ringfinger auf den Stoff
drücken und den Außenrand des Rahmens mit dem kleinen
Finger abstützen.
* Le cercle à broder n'est pas fourni avec la machine.
* Der Stickrahmen wird nicht mit der Nähmaschine geliefert.
78
EN
Monogramming and embroidering with embroidery hoop*
Monogramming
1. Sew, moving the hoop slowly along the lettering at a
constant speed.
2. Secure with a few straight stitches at the end of the last
letter.
Embroidering
1. Stitch the outline of the design by moving the embroidery
hoop.
2. Fill in the design working from the outline of the design to
the inside and from the inside to the edge of the outline until
the design is completely filled in. Keep the stitching close
together.
* A long stitch is made by moving the hoop rapidly and a
short stitch is made by moving it slowly.
3. Secure with a few Straight Stitches at the end of the design.
1
2
3
4
79
F
Réalisation de monogrammes et broderie avec cercle à broder*
DE
Stickereien mit Stickrahmen*
Zeichen
1. Nähen und dabei den Rahmen entsprechend der Form der
Zeichen mit konstanter Geschwindigkeit verschieben.
Monogrammes
1. Cousez en déplaçant lentement le cercle selon le tracé des
lettres à vitesse constante.
2. Une fois la dernière lettre achevée, arrêtez en cousant
quelques points droits.
2. Nach Beenden des letzten Zeichens den Faden durch Nähen
einiger gerader Stiche verwahren.
Broderie
Stickerei
1. Den Umriss des Musters durch Verschieben des
Stickrahmens anstechen.
1. Piquez le contour du motif en déplaçant le cercle à broder.
2. Remplissez le motif en partant de son contour en allant vers
l'intérieur et de l'intérieur vers l'extérieur jusqu'à ce que le
remplissage soit complet. Faites des points très proches les
uns des autres.
2. Das Muster ausgehend von seiner Umfangslinie zum Innern
hin und dann wieder von Innen nach außen bewegen, bis das
entsprechende Teil vollständig gefüllt ist. Die einzelnen
Stiche sehr eng nebeneinanderlegen.
* Zur Durchführung eines langen Stichs wird der Rahmen
schnell und zur Durchführung eines kurzen Stichs langsam
verschoben.
* On réalise un point long en déplaçant le cercle rapidement
et un point court en le déplaçant lentement.
3. Arrêtez au moyen de quelques points droits à la fin du motif.
3. Nach Fertigstellung des Musters den Faden mittels einiger
gerader Stiche verwahren.
80
EN
The walking foot accessory
* The walking foot accessory is optional. It is not included with
this machine.
Fork arm
Needle bar
Always try to sew first without the walking foot accessory
which should be used only when necessary.
Fork arm
It is easier to guide the fabric and you have a better view of
the seam when using the standard, regular foot on your
machine. Your sewing machine offers excellent stitch quality
on a wide range of fabrics from delicate chiffons to multiple
layers of denim.
The "Walking foot" accessory equalizes the feeding of the
upper and lower layers of fabric and improves the matching of
plaids, stripes and patterns. This foot helps to prevent uneven
feeding of very difficult fabrics.
Needle
screw & clamp
Attaching head
1
1. Lift the presser foot bar.
2. Remove the "foot holder" by opening counter clockwise the
presser bar attaching screw. (3)
3. Attach the "walking foot" to the machine in the following way.
I) The fork arm should fit into the needle screw and clamp. (2)
ii) Slide the plastic "attaching head" from your left to right so
that it is fitted into the "presser foot bar".
iii) Lower the "presser foot bar".
iv) Replace and tighten clockwise the "presser bar attaching
screw".
4. Make sure both the "needle screw" and the "presser bar
attaching screw" are tightly secured.
5. Draw the bobbin thread up and place both the bobbin
thread and the needle thread behind the walking foot
attachment.
2
Presser foot bar
3
81
Presser bar attaching screw
Needle
F
DE
Pied à double entraînement
* Le pied à double entraînement est un accessoire disponible en
option. Il n'est pas fourni d'origine avec la machine.
Doppelantriebsfuß
* Der Doppelantriebsfuß ist ein Zubehörteil, das nicht mit der
Maschine mitgeliefert wird.
Immer zunächst versuchen ohne Doppelantriebsfuß zu nähen;
Dieser darf nur verwendet werden, wenn dies unbedingt
erforderlich ist.
Die Führung des Stoffs ist einfacher und die Verbindung kann
besser eingesehen werden, wenn der normalerweise auf der
Nähmaschine montierte Standardfuß verwendet wird. Dieser
ermöglicht qualitätsgerechte Arbeiten über einen weitgespannten
Stoffbereich, von feinsten Musselinstoffen bis hin zu Jeansstoffen
in mehreren Lagen.
Der als Option verfügbare Doppelantriebsfuß gleicht den Vorlauf
oberer und unterer Stofflagen aus und verbessert das Aussehen
von Karo-, Streifen- und ähnlichen Mustern. Er verhindert ein
unregelmäßiges Vorlaufen sehr schwieriger Stoffe.
1. Das Nähfußbein hochfahren.
2. Die Fußhalterung abbauen. Hierzu die diese auf dem Nähfußbein
haltende Schraube im Gegenuhrzeigersinn drehen. (3)
3. Den Doppelantriebsfuß auf folgende Weise an der Nähmaschine
montieren:
I) Die Gabel muss in die Nadel-Festschraubvorrichtungeingreifen.
(2)
ii) Den Kunststoff-Befestigungskopf so von links nach rechts
verschieben, dass er in das Nähfußbein eingreift.
iii) Das Nähfußbein senken.
iv)Die Nähfußbein-Befestigungsschraube wieder anbringen Und
im Uhrzeigersinn drehen.
4. Sicherstellen, dass Nadel-Befestigungsschraube und NähfußbeinBefestigungsschraube richtig festgezogen sind.
5. Den Faden der Unterfadenspule hoch ziehen und ihn zusammen
mit dem Faden der Nadel hinter dem Doppelantriebsfuß platzieren.
Essayez toujours de coudre tout d'abord sans le pied à double
entraînement; celui-ci ne doit être utilisé qu'en cas d'absolue
nécessité.
En effet, il est plus facile de guider le tissu et vous avez une meilleure
vision de l'assemblage lorsque vous vous servez du pied standard
normalement monté sur la machine. Celle-ci permet de réaliser des
travaux d'excellente qualité sur un vaste éventail de tissu allant des
mousselines les plus délicates à la toile de jeans en plusieurs
épaisseurs.
Le pied à double entraînement disponible en option égalise l'avance
des couches supérieure et inférieure de tissu et améliore la mise en
regard des carreaux, rayures et autres motifs. Ce pied contribue à
empêcher une avance irrégulière des tissus très difficiles.
1. Relevez le montant du pied presseur.
2. Déposez le "support de pied" en tournant la vis de fixation sur le
montant dans le sens inverse des aiguilles d'une montre. (3)
3. Fixez le pied à double entraînement à la machine en procédant
comme suit:
i) Le bras fourchu doit s'engager dans le dispositif de serrage à
vis de l'aiguill. (2)
ii) Faites coulisser la "tête de fixation" en plastique de gauche à
droite de manière à ce qu'elle s'enclenche dans le "montant de
pied presseur".
iii) Abaissez le "montant de pied presseur".
iv) Remettez la "vis de fixation du montant de pied presseur" en
place et tournez-la dans le sens des aiguilles d'une montre.
4. Assurez-vous que la "vis de serrage de l'aiguille" et la "vis de
fixation du montant de pied presseur" sont toutes deux solidement
vissées.
5. Tirez le fil de la canette vers le haut et placez-le, en même temps
que le fil de l'aiguille, par-derrière le pied à double entraînement.
82
EN
Maintenance
Attention:
Disconnect the machine from the electricity supply by
removing the plug from the mains socket. When cleaning
the machine, it must always be disconnected from the
electricity supply.
Remove the stitch plate:
Turn the handwheel until the needle is fully raised. Open the
hinged front cover and unscrew the needle plate screws with
the screw driver. (1)
Cleaning the feed dog:
Remove the bobbin case and use the brush supplied to clean
the whole area. (2)
1
Cleaning and lubricating the hook:
Remove the bobbin case. Snap the two hook retaining arms (a)
outwards. Remove the hook race cover (b) and the hook (c)
and clean with a soft cloth. Lubricate at the point (d) (1-2
drops) with sewing machine oil. Turn the handwheel until the
hook race (e) is in the left position. Replace the hook (c).
Replace the hook race cover and snap back the two hook
retaining arms. Insert the bobbin case and bobbin and replace
the stitch plate.
2
d
e
Important:
Fabric fluff and threads must be removed regularly. Your
machine should be serviced at regular intervals at one of
our service agencies.
c
b
a
83
F
DE
Entretien
Instandhaltung
Attention:
Isolez la machine de l'alimentation électrique en débranchant
la fiche de son cordon d'alimentation de la prise de courant.
Lors du nettoyage de la machine, cette dernière doit toujours
être isolée de l'alimentation électrique.
Achtung:
Die Nähmaschine von der Stromversorgung trennen, wozu
der Stecker aus der Steckdose zu ziehen ist. Bei allen
Reinigungsarbeiten muss die Nähmaschine von der
Stromversorgung getrennt sein.
Dépose de la plaque à aiguille:
Tournez le volant jusqu'à ce que l'aiguille soit relevée à fond.
Ouvrez le capot frontal articulé et dévissez les vis de la plaque
à aiguille au moyen du tournevis. (1)
Ausbau der Stichplatte:
Durch Drehen des Handrads die Nadel vollständig anheben.
Die Frontklappe öffnen und die Schrauben der Stichplatte mit
dem Schraubenzieher (1) entfernen.
Nettoyage des griffes d'entraînement:
Sortez la boîte à canette et servez-vous de la brosse fournie
pour nettoyer toute la zone. (2)
Reinigung der Greifer:
Die Spulenkapsel herausnehmen und den gesamten Bereich (2)
mit der gelieferten Bürste reinigen.
Nettoyage et lubrification du crochet:
Sortez la boîte à canette. Pivotez les deux loquets de maintien
du crochet (a) vers l'extérieur. Enlevez l'étrier de la coursière (b)
et le crochet (c) et nettoyez avec un chiffon doux. Lubrifiez en
déposant 1 ou 2 gouttes d'huile pour machines à coudre au point
indiqué (d). Tournez le volant jusqu'à ce que la coursière (e) se
trouve à gauche. Remettez le crochet (c) en place et rabattez
ses deux loquets de maintien. Remontez la boîte à canette et la
canette et remettez la plaque à aiguille en place.
Reinigung und Schmierung des Hakens (3)
Die Spulenkapsel herausnehmen. Die beiden Hakenhalter (a)
nach außen drehen. Den Bügel der Schiffchenbahn (b) und den
Haken (c) entfernen und mit einem weichen Lappen reinigen.
Zum Schmieren ein oder zwei Tropfen Nähmaschinenöl an der
gezeigten Stelle (d) auftragen. Das Handrad soweit drehen bis
sich die Schiffchenbahn (e) links befindet. Den Haken (c)
wieder einsetzen und die beiden Halter wieder nach innen
drehen. Die Spulenkapsel und die Unterfadenspule montieren
und die Stichplatte wieder einsetzen.
Important:
La bourre et les débris de fil doivent être éliminés
périodiquement. Par ailleurs, la machine doit être confiée
pour révision à l'une de nos agences de service à intervalles
réguliers.
Wichtig:
Flusen und Fadenreste müssen regelmäßig entfernt werden.
Außerdem muss die Nähmaschine in regelmäßigen
Zeitabschnitten einer unserer Kundendienststellen zur
Revision überlassen werden.
84
EN
Trouble shooting guide
Problem
Cause
Correction
Upper thread breaks
1. The machine is not threaded correctly
2. The thread tension is too tight
3. The thread is too thick for the needle
4. The needle is not inserted correctly
5. The thread is round wound the spool holder pin
6. The needle is damaged
1. Rethread the machine
2. Reduce the thread tension (lower number)
3. Select a larger needle
4. Remove and reinsert the needle (flat side towards the back)
5. Remove the reel and wind thread onto reel
6. Replace the needle
Lower thread breaks
1. The bobbin case is not inserted correctly
2. The bobbin case is threaded wrongly
3. The lower thread tension is too tight
1. Remove and reinsert the bobbin case and pull on the thread.
The thread should pull easily
2. Check both bobbin and bobbin case
3. Loosen lower thread tension as described
Skipped stitches
1. The needle is not inserted correctly
2. The needle is damaged
3. The wrong size needle has been used
4. The foot is not attached correctly
1. Remove and reinsert needle (flat side towards the back)
2. Insert a new needle
3. Choose a needle to suit the thread and fabric
4. Check and attach correctly
Needle breaks
1.The needle is damaged
2.The needle is not correctly inserted
3.Wrong needle size for the fabric
4.The wrong foot is attached
1. Insert a new needle
2. Insert the needle correctly (flat side towards the back)
3. Choose a needle to suit the thread and fabric
4. Select the correct foot
Loose stitches
1. The machine is not correctly threaded
2. The bobbin case is not correctly threaded
3. Needle/ fabric/ thread combination is wrong
4. Thread tension wrong
1. Check the threading
2. Thread the bobbin case as illustrated
3. The needle size must suit the fabric and thread
4. Correct the thread tension
Seams gather
or pucker
1. The needle is too thick for the fabric
2. The stitch length is wrongly adjusted
3. The thread tension is too tight
4. Fabric puckers.
1. Select a finer needle
2. Readjust the stitch length
3. Loosen the thread tension
4. Use a backing for fine or stretchy fabrics.
Uneven stitches,
uneven feed
1. Poor quality thread
2. The bobbin case is wrongly threaded
3. Fabric has been pulled
1. Select a better quality thread
2. Remove bobbin case and retread and insert correctly
3. Do not pull on the fabric while sewing, let it be taken up by the machine
The machine
is noisy
1. The machine must be lubricated
2. Fluff or oil have collected on the hook or needle bar
3. Poor quality oil has been used
4. The needle is damaged
1. Lubricate as described
2. Clean the hook and feed dog as described
3. Only use good quality sewing machine oil
4. Replace the needle
The machine jams
Thread is caught in the hook
Remove the upper thread and bobbin case, turn the handwheel backwards
and forwards by hand and remove the thread remands.
Lubricate as described
85
F
Comment remédier soi-même aux petits problèmes
Problème
Cause
Remède
Le fil supérieur casse
1. L'enfilage du fil est incorrect
2. La tension du fil est trop forte
3. Le fil est trop épais pour l'aiguille
4. L'aiguille n'est pas montée correctement
5. Le fil s'est entortillé sur la broche de la bobine
6. L'aiguille est endommagée
1. Enfiler à nouveau le fil à travers la machine et l'aiguille
2. Réduire la tension du fil supérieur (chiffre inférieur)
3. Utiliser une aiguille plus grosse
4. Enlever l'aiguille, puis la remettre en place (talon dirigé vers l'arrière)
5. Retirer la bobine et bobiner le fil
6. Remplacer l'aiguille
Le fil inférieur casse
1. La boîte à canette n'est pas placée correctement
2. La boîte à canette n'est pas enfilée correctement
3. La tension du fil est trop forte
1. Enlever la navette, puis la remettre en place et tirer sur le fil. Si le fil
se déroule facilement, la navette est bien en place
2. Contrôler la canette et la navette
3. Rectifier la tension du fil inferiéur de la maniere prescrite
Les points ne se forment
pas toujours
1. L'aiguille n'est pas montée correctement
2. L'aiguille est tordue ou épointée
3. L'aiguille n'a pas la classe ou la grosseur correcte
4. Le pied-de-biche ne convient pas
1. Enlever l'aiguille puis la remettre en place (talon dirigé vers l'arrière)
2. Remplacer l'aiguille
3. Choisir une aiguille dont la grosseur est adaptée au fil et à l'étoffe
4. Vérifier si le pied-de-biche utilisé convient pour l'ouvrage
L'aiguille casse
1. L'aiguille est tordue ou épointée
2. La boîte à canette n'est pas enfilée correctement
3. Tissu top épais/grosseur incorrecte de l'aiguille
4. Le pied-de-biche ne convient pas
1. Remplacer l'aiguille
2. Enlever l'aiguille puis la remettre en place (talon dirigé vers l'arrière)
3. Choisir une aiguille dont la grosseur est adaptée au fil et à l'étoffe
4. Changer si le pied-de-biche
Des noeuds se forment
au cours du travail
1. Le fil n'est pas enfilé correctement
2. La boîte à canette n'est pas enfilée corretecment
3. Le rapport aiguille/tissu/fil est incorrect
4. Le fil n'est pas tendu correctement
1. Enfiler correctement le fil dans la machine
2. Enfiler la navette de la manière prescrite
3. Choisir une aiguille dont la grosseur est adaptée au fil et a l'étoffe
4. Rectifier la tension du fil
Les coutures se
rétractent ou se froncent
1. L'aiguille est trop grosse pour le tissu
2. La tension du fil est trop forte
1. Utiliser une aiguille plus fine
2. Rectifier la tension du fil
Les points et
l'entraînement sout
irréguliers
1. Le fil n'est pas assez solide
2. La boîte à canette n'est pas enfilée correctement
3. Le tissu est tiré lors du piquage
1. Utiliser un fil de meilleure qualité
2. Enfiler à nouveau la boîte à canette, puis la remettre en place
3. Ne pas tirer le tissu. Celui-ci doit être entraîné automatiquement
La machine est bruyante
et dure
1. La machine doit être lubrifiée
2. Présence de bourre ou de traces d'huile sur le
crochet ou sur la barre à aiguille
3. L'huilage a été effectué avec une huile de
mauvaise qualité
4. L'aiguille est tordue ou épointée
1. Huiler la machine en suivant les instructions
2. Nettoyer le crochet et la griffe d'entraînement en suivant les
instructions
3. Pour l'huilage, utiliser exclusivement une huile spéciale pour
machines à coudre
4. Remplacer l'aiguille
La machine est bioquée
Le fil est coincé dans le crochet.
Enlever fil supérieur et navette, tourner le volant par secousses à la
mainen avant et en arrière.
Enlever les restes de fil. Huiler selon les instructions
86
DE
Auffinden und Beheben von Störungen
Problem
Riss des Oberfadens
Ursache
1. Die Nähmaschine wurde nicht richtig eingefädelt.
2. Der Faden ist zu stark gespannt.
3. Der Faden ist für die Nadel zu dick.
4. Die Nadel wurde nicht richtig eingesetzt.
5. Der Faden ist um den Spulenaufnahmeschaft gewickelt.
6. Die Nadel ist beschädigt.
Lösung
1. Die Nähmaschine neu einfädeln.
2. Die Fadenspannung reduzieren (kleinere Ziffer).
3. Eine dickere Nadel wählen.
4. Die Nadel entfernen und wieder einsetzen (abgeflachte Seite nach hinten).
5. Die Spule entfernen und den Faden daraufrollen.
6. Die Nadel ersetzen.
Riss des Unterfadens
1. Die Spulenkapsel wurde nicht richtig eingesetzt.
2. Die Spulenkapsel ist schlecht eingefädelt.
3. Der Unterfaden ist zu stark gespannt.
1. Die Spulenkapsel entfernen und wieder einsetzen und am Faden ziehen.
Der Faden muss leicht austreten.
2. Die Unterfadenspule und die Spulenkapsel prüfen.
3. Die Spannung des Unterfadens wie beschrieben vermindern.
Übersprungene Stiche
1. Die Nadel wurde nicht richtig eingesetzt.
2. Die Nadel ist beschädigt.
3. Die benutzte Nadel hat nicht die richtige Größe.
4. Der Fuß ist nicht richtig befestigt.
1. Die Nadel entfernen und wieder einsetzen (abgeflachte Seite nach hinten)
2. Eine neue Nadel montieren.
3. Eine für Faden und Stoff geeignete Nadel verwenden.
4. Die Nadel prüfen und richtig befestigen.
Bruch der Nadel
1. Die Nadel ist beschädigt.
2. Die Nadel wurde nicht richtig eingesetzt.
3. Die Nadel hat nicht die richtige Größe für den
erwendeten Stoff.
4. Der eingesetzte Fuß ist nicht der richtige.
1. Eine neue Nadel montieren.
2. Die Nadel richtig montieren (abgeflachte Seite nach hinten).
3. Eine für Faden und Stoff geeignete Nadel verwenden.
4. Den geeigneten Fuß wählen.
Zu lose Stiche
1. Die Nähmaschine wurde nicht richtig eingefädelt.
2. Die Spulenkapsel wurde nicht richtig eingefädelt.
3. Die verwendete Kombination Nadel/ Stoff/ Faden ist
nicht richtig.
4. Die Fadenspannung ist nicht richtig.
1. Die Einfädelung prüfen.
2. Die Spulenkapsel wie gezeigt einfädeln.
3. Die Größe der Nadel muss unbedingt dem Faden und dem Stoff
entsprechen.
4. Die Fadenspannung korrigieren.
Bei Verbindungen
entstehen unerwünschte
Falten
1. Die Nadel ist zu dick für den Stoff.
2. Die Stichlänge ist schlecht eingestellt.
3. Der Faden ist zu stark gespannt.
1. Eine dünnere Nadel wählen.
2. Die Stichlänge einstellen.
3. Den Faden entspannen.
Unregelmäßige Stiche,
Unregelmäßige Vorlauf
1. Der Faden ist von schlechter Qualität.
2. Die Spulenkapsel ist schlecht eingefädelt.
3. Der Stoff wurde gezogen.
1. Einen Faden besserer Qualität wählen.
2. Die Spulenkapsel herausnehmen, neu einfädeln und wieder richtig einsetzen.
3. Während des Nähens nicht am Stoff ziehen. Die Nähmaschine
vorschieben lassen.
Geräuschvolle
Maschine
1. Die Nähmaschine muss unbedingt geschmiert werden.
2. Flausen-oder Ölablagerungen auf Haken oder
Nadelstange.
3. Verwendung von Öl schlechter Qualität.
4. Die Nadel ist beschädigt.
1. Den Angaben gemäß schmieren.
2. Den Haken und die Greifer wie gezeigt reinigen.
3. Nur Nähmaschinenöl guter Qualität verwenden.
4. Die Nadel ersetzen.
Verstopfungen
Der Faden ist im Haken eingeklemmt.
Den Oberfaden und die Spulenkapsel entfernen, das Handrad vor- und
zurückdrehen und die Fadenreste entfernen. Den Angaben gemäß schmieren.
87
Do not dispose of electrical appliances as unsorted municipal waste, use separate collection
facilities.
Contact your local government for information regarding the collection systems available.
If electrical appliances are disposed of in landfills or dumps, hazardous substances can leak into the
groundwater and get into the food chain, damaging your health and well-being.
When replacing old appliances with new once, the retailer is legally obligated to take back your old
appliance for disposal at least for free of charge.
Veuillez noter qu'en cas de destruction, ce produit doit bénéficier d'un recyclage sécurisé, conforme
à la législation nationale applicable aux produits électriques/électroniques. En cas de doute, veuillez
contacter votre distributeur agréé.
Entsorgen Sie elektrische Geräte nicht im Hausmüll, nutzen Sie die Sammelstellen der Gemeinde.
Fragen Sie ihre Gemeindeverwaltung nach den Standorten der Sammelstellen.
Wenn elektrische Geräte unkontrolliert entsorgt werden, können während der Verwitterung
gefährliche Stoffe ins Grundwasser und damit in die Nahrungskette gelangen, oder die Flora und
Fauna auf Jahre vergiftet werden.
Wenn Sie das Gerät durch ein neues ersetzen, ist der Verkäufer gesetzlich verpflichtet, das alte
mindestens kostenlos zur Entsorgung entgegenzunehmen.