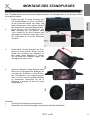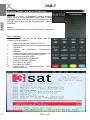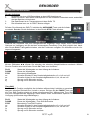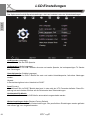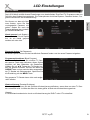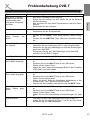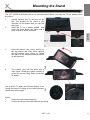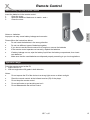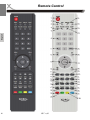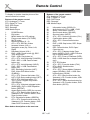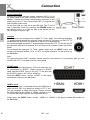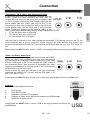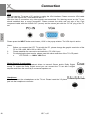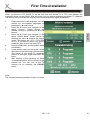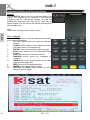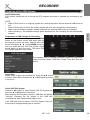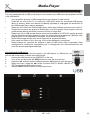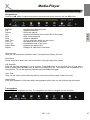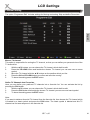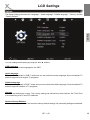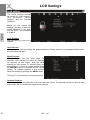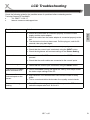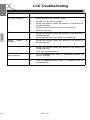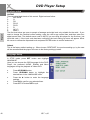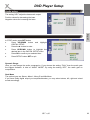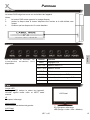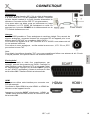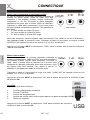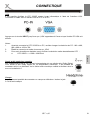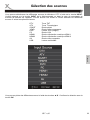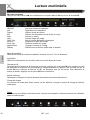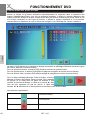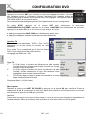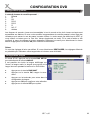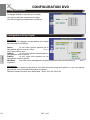
1
LCD TV with DVD, DVB, 2x HDMI, USB, PVR
Ready, Time Shift and Multimedia-Player
HTC 2232D
OPERATION MANUAL
BEDIENUNGSANLEITUNG
MODE D'EMPLOI
Inhaltsangabe
Sicherheitshinweise
Elektronische Sicherheit .................................................................................................. 5
Deutsch
Hinweise
Kompatibilität des Laufwerkes ......................................................................................... 9
Recycling Informationen .................................................................................................. 9
Verpackungsinhalt ......................................................................................................... 10
Merkmale ....................................................................................................................... 10
Montage des Standfuß
Assemblierung ............................................................................................................... 11
Schnellstart
Schnellstart .................................................................................................................... 12
Anschlüsse
Rückseite ....................................................................................................................... 13
Rechte Seite .................................................................................................................. 14
Vorderseite..................................................................................................................... 14
Fernbedienung
Einlegen der Batterien in die Fernbedienung................................................................. 15
Reichweite ..................................................................................................................... 15
Fernbedienung............................................................................................................... 16
Verbinden
Strom ............................................................................................................................. 18
Antenne.......................................................................................................................... 18
SCART........................................................................................................................... 18
HDMI.............................................................................................................................. 18
Y Pb Pr........................................................................................................................... 19
CVBS ............................................................................................................................. 19
USB Anschluss .............................................................................................................. 19
VGA (PC-RGB) .............................................................................................................. 20
Kopfhörerausgang ......................................................................................................... 20
Digitaler Tonausgang (Koaxial)...................................................................................... 20
Erstinstallation
Suchlauf für analoge und digitale TV Sender ................................................................ 21
Quellenauswahl
Auswahl der unterschiedlichen Eingänge, TV Tuner und DVD-Player .......................... 22
DVB-T
DVB-T Aktivieren ........................................................................................................... 23
Wichtige Tasten und Funktionen ................................................................................... 23
Elektronischer Programmführer (EPG) .......................................................................... 26
ATV
ATV starten .................................................................................................................... 28
Wichtige Tasten und Funktionen ................................................................................. 228
HTC 2232D
3
Deutsch
Inhaltsangabe
Rekorder
Vorbereitung des Datenträgers ...................................................................................... 29
Format............................................................................................................................ 30
Time Shift Größe definieren ........................................................................................... 30
Direkte Aufnahme .......................................................................................................... 31
Time Shift Funktion ........................................................................................................ 31
Aufnahmeliste ................................................................................................................ 32
Aufnahmeprogrammierung aus EPG ............................................................................. 33
Media-Player
USB Datenträger anschließen ....................................................................................... 34
Bilder .............................................................................................................................. 35
Musik.............................................................................................................................. 36
Video .............................................................................................................................. 37
LCD Einstellungen
Allgemein ....................................................................................................................... 39
Kanaleinstellungen......................................................................................................... 40
Bildeinstellungen ............................................................................................................ 44
Toneinstellungen............................................................................................................ 47
Zeiteinstellungen ............................................................................................................ 48
Optionen......................................................................................................................... 50
Sperren .......................................................................................................................... 51
Problembehandlung LCD / DVB-T / ATV.................................................................... 52
DVD-Player
DVD Modus starten........................................................................................................ 54
Disk einlegen.................................................................................................................. 54
Wichtige Funktionen....................................................................................................... 54
Dateibrowser .................................................................................................................. 60
DVD Einstellungen ......................................................................................................... 62
Problemlösung DVD-Player ........................................................................................... 65
Spezifikationen
Allgemeine Spezifikationen ............................................................................................ 66
Erlaubte Pixelfehler ........................................................................................................ 66
4
HTC 2232D
SICHERHEITSHINWEISE
ACHTUNG
STROMSCHLAGGEFAHR!
Das Dreieckszeichen mit Ausrufungszeichen verweist auf wichtige Funktions- und
Wartungshinweise (Reparatur) in der dem Gerät beigelegten Bedienungsanleitung.
Deutsch
Das Dreieckszeichen mit Blitzsymbol verweist auf gefährliche Spannungen im Gerätegehäuse, die so hoch sein können, dass sie eine Gefahr von Stromschlägen bilden.
DIESES GERÄT ERFÜLLT DIE ANFORDERUNGEN DES PARAGRAFEN 15 DER
FCC-VERORDNUNG. ZUM BETRIEB DES GERÄTS MÜSSEN FOLGENDE BEDINGUNGEN ERFÜLLT SEIN: (1) DIESES GERÄT DARF KEINE SCHÄDLICHE INTERFERENZ VERURSACHEN, UND (2) DIESES GERÄT MUSS SÄMTLICHE EMPFANGENDE INTERFERENZ AUFNEHMEN, MIT EINGESCHLOSSEN INTERFERENZ
DIE MÖGLICHERWEISE FUNKTIONSSTÖRUNGEN VERURSACHEN KÖNNTE.
Bedienungsanleitung
1.
Folgen Sie den Sicherheitshinweisen und Instruktionen dieses Handbuches.
2.
Dieses Handbuch sollte für späteres Nachschlagen sicher aufbewahrt werden.
3.
Alle Hinweise und Warnungen, die in diesem Handbuch erwähnt werden, müssen eingehalten werden.
Laser
Dieses Gerät enthält ein Lasersystem der Klasse 1.
1.
Um austretende Strahlung zu vermeiden, sollte das Gerät nicht geöffnet werden.
2.
Die Laserstrahlung kann Augenschäden hervorrufen.
3.
Sollten Reparaturarbeiten notwendig sein, kontaktieren Sie einen Fachmann oder wenden
Sie sich an Ihren Händler.
4.
Das Gerät ist nur von Servicemitarbeitern zu öffnen.
5.
Sollte das Gerät in anderer Weise als der hier beschriebenen genutzt werden, könnte dies
zum Austritt von gefährlicher Laserstrahlungen führen.
Verwendung
1.
Empfangen von TV Fernsehprogrammen mit analog und/oder digital (DVB-T) TV Tuner mit
Videotext und EPG (EPG nur bei DVB-T).
2.
Verwenden Sie den integrierten DVD-Player nur zu dem Abspielen von Video-DVD, VideoCD und Audio-CD.
3.
Sie können externe Geräte an den vorgegeben Anschlüssen (HDMI, PC-VGA, YUV, SCART
und S-Video) anschließen.
4.
Aufnahme von DVB-T Sendungen auf USB Speichermedien.
5.
Zeitversetztes Fernsehen (Time Shift) durch angeschlossenen USB Speicher.
6.
Wiedergabe von Medieninhalten von USB Speicher, unterstützt HD Auflösungen bis zu 720p.
7.
Jede andere Verwendung ist nicht gestattet.
HTC 2232D
5
Deutsch
SICHERHEITSHINWEISE
Stromversorgung
1.
Fassen Sie das Gerät niemals mit feuchten oder nassen Händen an.
2.
Das Gerät kann nur mit der auf der Rückseite beschriebenen Voltzahl betrieben werden.
Sollten Sie die Stromstärke nicht kennen, fragen Sie bitte einen Elektriker.
3.
Um eine Überlastung zu vermeiden, betreiben Sie nicht zu viele weitere Geräte an der gleichen Steckdose.
4.
Verlegen Sie Stromkabel unbedingt immer so, dass niemand darüber stolpern kann.
5.
Das Kabel ist ummantelt und isoliert den Strom. Stellen Sie bitte keine Gegenstände auf das
Kabel, da dadurch die Schutzfunktion verloren gehen könnte. Vermeiden Sie große Belastungen des Kabels, insbesondere an Buchsen und Steckern.
6.
Wenn Sie den Stecker aus der Steckdose herausziehen wollen, ziehen Sie immer am Stecker und nicht am Kabel. Das Kabel könnte ansonsten reißen.
7.
Wenn Sie das Gerät für längere Zeit nicht mehr nutzen, ziehen Sie unbedingt das Stromkabel
ab.
8.
Das Gerät hat einen Überladungsschutz. Sollte dieser vom Fachmann ausgetauscht werden,
vergewissern Sie sich, dass das Gerät wieder sicher funktioniert. Um das Gerät vor einem
Blitzeinschlag zu schützen, sollten Sie es aus der Steckdose entfernen. Dies gilt auch für den
Fall, dass das Gerät längere Zeit nicht genutzt wird.
9.
Für zusätzlichen Schutz des Gerätes während eines Gewitters oder wenn es längere Zeit
unbeaufsichtigt ist: Ziehen Sie den Stecker aus der Steckdose und der Antenne/Kabel . Dies
verhindert Schäden aufgrund von Blitzschlägen.
10.
Eine Außenantenne sollte nicht in der Nähe von Stromleitungen oder sonstigen Stromkreisen
angebracht werden. Beim Anbringen solcher Antennen ist extreme Vorsicht geboten, da der
Kontakt mit solchen Leitungen tödlich enden kann.
11.
Überspannen Sie keine Steckdosen, Verlängerungskabel oder sonstige Leitungen, da dies zu
Bränden oder elektrischen Schocks führen kann.
12.
In die Öffnungen des Gerätes dürfen keine Gegenstände eingeführt werden, da an einigen
Stellen Strom fließt und der Kontakt Feuer oder einen Stromschlag hervorrufen kann.
13.
Entfernen Sie nie die Abdeckung - es befinden sich keine Teile im Inneren, die vom Benutzer
selbst repariert werden können.
14.
Ziehen Sie für die Reinigung den Netzstecker aus der Steckdose.
15.
Benutzen Sie keine Flüssigreiniger oder Reinigungssprays. Das Gerät darf nur mit einem
feuchten Tuch gereinigt werden.
Antenne
Der analoge und/oder digitale TV Tuner wird an einer Antenne angeschlossen.
1.
Wenn Sie die Antenne anschließen oder entfernen möchten, bitte schalten Sie das Gerät
vorher aus und ziehen Sie die Stecker aus der Steckdose. Andernfalls könnte es zu Rückkoppelungen und Schädigungen der angeschlossen Geräte kommen.
2.
Sollten Sie das Gerät in Verbindung mit einer Außenantenne nutzen, vergewissern Sie sich,
dass diese oder das Kabel geerdet sind.
3.
Wenn Sie das Gerät für längere Zeit nicht mehr nutzen, ziehen Sie unbedingt das Antennenkabel ab.
6
HTC 2232D
SICHERHEITSHINWEISE
Deutsch
Betrieb und Aufstellung
1.
Stellen Sie das Gerät nicht auf eine instabile Fläche. Das Gerät könnte beschädigt oder Personen verletzt werden. Jegliche Befestigungen sollten nur nach den Herstellerinformationen
angebracht werden oder von dem Hersteller bezogen werden.
2.
Dieses Gerät darf nicht in der Nähe von Feuchtigkeit und Wasser positioniert werden.
3.
Dieses Produkt sollte in einem TV-Regal mit Rollen vorsichtig bewegt werden. Ruckartige
Stopps, unebene Flächen könnten dafür sorgen, dass der Wagen evtl. umkippt.
4.
Das Gerät muss mindestens 5 cm (2 Zoll) von der Wand entfernt aufgestellt werden.
5.
Das Gerät muss mindestens 10 cm zur Seite und mindestens 20 cm zur Decke/Regalbogen
entfernt aufgestellt werden.
6.
Betreiben Sie das Gerät nie permanent im 4:3 Modus. Dies könnte bei längere Benutzung zu
Schäden am Bildschirm führen.
7.
Klopfen Sie niemals auf das Gerät und rütteln Sie nie daran.
8.
Während der Wiedergabe in dem integrierten DVD-Player dreht sich die Disk sehr schnell.
Bitte öffnen und bewegen Sie das Gerät nicht, sonst könnte die CD beschädigt werden.
9.
Der Player kann auf unbeschränkte Zeit ein Standbild auf dem Bildschirm bzw. auf dem Fernseher anzeigen. Hierbei können Schäden am Bildschirm entstehen. Aktivieren Sie den Bildschirmschoner oder schalten Sie das Gerät aus.
10.
Erhöhen Sie nicht die Lautstärke, wenn gerade eine leise Passage abgespielt wird. Dies
könnte zu Schäden an den Lautsprechern führen, wenn eine laute Passage kommt.
11.
Legen Sie ausschließlich CDs oder DVDs der Größe 12 cm in das Laufwerk.
12.
Schalten Sie das Gerät aus und trennen Sie die Stromverbindung, wenn Sie das Gerät länger
nicht nutzen.
13.
Die Öffnungen des Gehäuses dienen der Lüftung, damit das Gerät nicht überhitzt. Diese
müssen immer frei gehalten werden.
14.
Das Gerät sollte nicht in der Nähe von Hitzequellen, wie z.B. Öfen, Heizungen positioniert
werden.
15.
Vermeiden Sie Hitzestau am Gerät.
16.
Schützen Sie das Gerät vor Feuchtigkeit und Witterungseinflüssen.
17.
Stellen Sie keine Gefäße mit Flüssigkeiten auf das Gerät.
18.
Setzen Sie das Gerät und die Fernbedienung nicht direkter Sonnenstrahlung aus. Dies beeinträchtigt die Funktion und könnte zu Schädigungen führen.
19.
Sollten Sie das Gerät in Verbindung mit einer Außenantenne nutzen, vergewissern Sie sich,
dass diese oder das Kabel geerdet sind.
20.
Schließen Sie keine Zusatzgeräte an, die nicht vom Hersteller empfohlen sind.
USB Anschluss
1.
Schließen Sie am USB Anschluss aufgrund von CE-Richtlinien nur USB Flashspeichemedien
(USB Sticks) an.
2.
USB Speicher oder Speicherkarten können bis zu 8 GB unterstützt werden. Leider gibt es
eine Vielzahl von unterschiedlichen USB-Sticks und nicht alle können unterstützt werden.
3.
Bei USB Speichermedium wird FAT 32 oder auch NTFS unterstützt wird. Falls ein Medium
mit einem anderen Dateisystem formatiert ist, dann wird diese nicht erkannt.
4.
USB Speicher müssen für die Aufnahme vorbereitet werden. Dabei wird der Speicher komplett formatiert und alle vorhandenen Daten werden gelöscht. Nutzen Sie für die Aufnahme
oder Time Shift immer nur denselben vorbereiteten USB Speicher.
5.
Sichern Sie immer alle Daten von dem USB Speicher, wenn dieser an dem Gerät benutzt
wird.
HTC 2232D
7
Deutsch
SICHERHEITSHINWEISE
Servicefall
1.
Führen Sie Reparaturen niemals selber durch, bitte überlassen Sie dies immer qualifiziertem
Personal.
2.
Kontaktieren Sie den Reparaturdienst bei folgenden Fehlern:
a.
Wenn das Netzteil oder Netzkabel defekt ist.
b.
Wenn Gegenstände in das Gerät gefallen sind.
c.
Wenn das Gerät mit Flüssigkeiten in Berührung gekommen oder in das Gerät eingedrungen ist.
d.
Wenn eine Substanz oder ein Gegenstand versehentlich in die Belüftungsschlitze
eindringt;
d.
Wenn das Gerät trotz richtiger Anwendung nicht funktioniert. Ändern Sie nur die Einstellungen, die hier beschrieben werden. Das Ändern anderer Einstellung zieht eine
kostspielige Instandsetzung eines Technikers nach sich.
e.
Wenn das Gerät fallen gelassen wurde und wenn das Produkt Leistungsschwankungen aufweist.
3.
Verwenden Sie originale Ersatzteile oder Teile, die die selben Eigenschaften besitzen. Falsche Ersatzteile können zu Kurzschlüssen oder Feuer und anderen Pannen führen.
4.
Nach jeder Reparatur sollte der Techniker Sicherheitschecks durchführen, um die richtige
Funktionsweise sicherzustellen.
5.
Bitte beachten Sie im Abschnitt Fehlerbehebung unsere Serviceadressen und Telefonnummern.
6.
Starke Nikotinfreisetzung durch Rauchen schädigt die Elektronik des Gerätes. Dies ist eine
unsachgemäße Nutzung des Gerätes und im Servicefall entfällt der Garantieanspruch.
Dies ist jedoch keine Garantie dafür, dass diese Störungen nie auftreten können. Sollten diese Störungen bei Ihnen auftreten, probieren Sie bitte folgendes:
•
Positionieren oder richten Sie die Empfangs-Antenne anders aus.
•
Vergrößern Sie den Abstand zwischen dem DVD-Player und dem gestörten Gerät.
•
Stecken Sie den Netzstecker des DVD Players in eine andere Steckdose als das gestörte
Gerät.
•
Setzen Sie sich mit dem Händler oder einem Radio/Fernsehtechniker in Verbindung.
Pixelfehler
Die in den Spezifikationen definierten Pixelfehler (Helle, Dunkle Pixel, Liniendefekte und Helligkeitsunterschiede) beschreiben die maximal erlaubten Defekte in Art und Anzahl, welche von der Garantie
ausgeschlossen sind.
Macrovision
U.S. Patens Nos. 4,631,603; 4,577,216; 4,819,098; 4,907,093; 5,315,448 and 6,516,132
"This product incorporates copyright protection technology that is protected by U.S. patents and other
intellectual property rights. Use of this copyright protection technology must be authorized by
Macrovision, and is intended for home and other limited viewing uses only unless otherwise
authorized by Macrovision. Reverse engineering or disassembly is prohibited."
Dolby
Manufactured under license from Dolby Laboratories. “Dolby” and the double-D symbol are
trademarks of Dolby Laboratories. Confidential Unpublished works. 1992-1997 Dolby Laboratories,
Inc. All rights reserved.
8
HTC 2232D
HINWEISE
Kompatibilität des DVD Laufwerks
1.
2.
4.
5.
Deutsch
3.
Abhängig von den Bedingungen bei dem Brennen, der DVD-Player unterstützt eine Reihe
von selbst erstellten Medien. Zum Beispiel CD-R, CD-RW, DVD-R, DVD+R, DVD-RW,
DVD+RW, DVD+R DL, DVD-R DL, DVD-ROM, CD-ROM und CD-DA.
Manche oben genannten Medien werden hier nicht erkannt. Bitte nutzen Sie deshalb immer
nur Markenrohlinge, wie z. B. Ricoh, Verbatim, TDK oder Maxell.
Kleben Sie keine Aufkleber oder Labels auf die Disk, weder auf die beschreibbare noch auf
die andere Seite.
Benutzen Sie immer nur runde Disk und keine anders geformten Scheiben.
Manche Funktionen bei Video-DVD, VCD oder SVCD werden nicht erkannt, weil die entsprechende Authoringsoftware nicht kompatibel arbeitet.
Recycling Informationen
Wiederverwertung von Elektrogeräte
Das Produkt wurde mit hochwertigen Materialien und Komponenten entwickelt und
hergestellt, die recylingfähig sind und wieder verwendet werden können. Diese durchkreuzte Mülltonne auf dem Produkt oder auf der Verpackung bedeutet, dass das Produkt der Europäischen Richtlinie 2002/96/EC entspricht.
Informieren Sie sich über die vor Ort geltende Bestimmungen zur separaten Entsorgung elektronischer Geräte. Beachten Sie die örtlichen Bestimmungen und entsorgen
Sie keine alten Produkte mit dem normalen Hausmüll. Durch eine richtige Entsorgung
alter Produkte tragen Sie zum Umweltschutz und zur Gesundheit der Menschen bei.
Wiederverwertung von Papier und Pappe
Das Materialwiederverwertungssymbol auf dem Verpackungskarton und Benutzerhandbuch bedeutet, dass sie recyclingfähig sind. Entsorgen Sie sie nicht mit dem normalen
Hausmüll.
Wiederverwertung von Kunststoffen
Das Materialwiederverwertungssymbol auf Kunststoffteilen bedeutet, dass sie recyclingfähig sind. Entsorgen Sie sie nicht mit dem normalen Hausmüll.
Der Grüne Punkt
Der Grüne Punkt auf Kartons bedeutet, dass die MAS Elektronik AG eine Abgabe an die
Gesellschaft für Abfallvermeidung und Sekundärrohstoffgewinnung zahlt.
V
X
x
Batterien
1.
Die Batterien können nach Gebrauch in der Verkaufsstelle oder in
deren unmittelbarer Nähe unentgeltlich zurückgegeben werden.
2.
Der Endverbraucher ist zur Rückgabe gebrauchter Batterien gesetzlich verpflichtet.
3.
Die Symbole gemäß Anhang 1 Nr. 1 und 3 der BattV folgende Bedeutung haben: Kennzeichnungspflichtige Batterien sind mit einem der beiden nachstehenden
Zeichen, bestehend aus einer durchgestrichenen Mülltonne und dem chemischen Symbol
des für die Einstufung als schadstoffhaltig ausschlaggebenden Schwermetalls zu versehen.
4.
Die Entscheidung welches Zeichen verwendet wird, trifft der zur Kennzeichnung Verpflichtete. Beide Zeichen haben die gleiche Bedeutung.
5.
Batterien, die Schadstoffe enthalten, sind durch chemische Symbole gekennzeichnet: Pb =
Batterie enthält Blei, Cd = Batterie enthält Cadmium, Hg = Batterie enthält Quecksilber.
Jeder Verbraucher ist gesetzlich verpflichtet, diese Batterien bei einer Sammelstelle seiner Gemeinde
oder im Handel abzugeben, damit sie einer umweltschonenden Entsorgung zugeführt werden können. Gebrauchte Batterien entsorgen auch wir kostenlos und umweltgerecht für Sie. Einfach an uns
zurücksenden.
HTC 2232D
9
HINWEISE
Packungsinhalt
Deutsch
Folgende Bestandteile sollte sich in der Verpackung befinden:
•
•
•
•
•
•
•
Xoro HTC HTC 2232D LCD-TV Fernsehgerät
Fernbedienung mit Batterien
Anleitung
Videoadapterkabel Klinke auf Cinch für Komponenteneingang
Netzadapter
Stromkabel
Garantiekarte
Falls eines dieser Teile fehlen sollte, wenden Sie sich schnellstmöglich an Ihren Händler.
Bewahren Sie die Originalverpackung für den Fall auf, dass das Gerät an den Händler zurückgeschickt werden muss.
Eigenschaften
•
•
•
•
•
•
•
•
•
•
•
•
•
•
•
•
10
LED Hintergrundbeleuchtung für ein erstklassiges Bild und niedrigen Stromverbrauch
Full-HD Auflösung 1920 x 1080 Pixel im 16:9 Seitenverhältnis
Vielfältige Anschlussmöglichkeiten wie VGA, Antenne (RF), Komponenteneingang mit progressive Scan, VIDEO, SCART und 2x HDMI
HDMI 1.3 mit HDCP Unterstützung
Unterstützt bei HDMI Videoeingangssignale bis zu 1080p
Stereo-Audio-Eingänge (für Video, Komponenten und VGA)
USB 2.0 High Speed Anschluss
PVR Ready - nimmt DVB-T Sendungen auf USB Speicher auf
Zeitversetztes Fernsehen (Time Shift) von DVB-T Sendungen mit USB speicher
HD Multimedia-Player - Unterstützt die Wiedergabe von hochauflösende Video bis zu 1080p
in MPEG-2 Codec (MPG oder M2T)
Wiedergabe von Videos (MKV, AVI, MP4, MPG, TS), Musik (MP3, AAC, WMA) und Bilder
(JPEG, BMP, PNG) von USB Speicher
Integrierter analoger TV Tuner mit Teletext
Integrierter digitaler TV Tuner (DVB-T) mit Teletext und EPG
Integrierter MPEG-4 DVD-Player
Automatische und manuelle Kanalsuche
Automatische Abschaltung als Stromsparfunktion, wenn kein Signaleingang vorliegt
HTC 2232D
MONTAGE DES STANDFUSSES
Die TV Geräte werden ohne montierten Standfuß geliefert. Die Montage kann in vier Schritten einfach
durchgeführt werden.
1.
3.
Positionieren Sie den Standfuß am Fernseher mit einem kleinen Winkel und verbinden Sie vorsichtig den Standfuß mit
dem Halter (siehe Abbildung 2). Drehen
Sie vorsichtig den Standfuß gegen den
Uhrzeigersinn (nach Links).
4.
Wenn der Standfuß richtig einrastet, dann
hören Sie ein Klickgeräusch. Bewegen Sie
vorsichtig den Standfuß in beide Richtungen (Uhrzeigersinn und Gegenuhrzeigersinn), um sich von der korrekten Montage
zu überzeugen. Überprüfen Sie wie in
Abbildung 3 gezeigt, ob der Fuß richtig
eingerastet ist.
Deutsch
2.
Packen Sie das TV Gerät vorsichtig aus.
Der Standfußhalter ist schon vormontiert.
An der Unterseite enthält der Halter zwei
Steckverbindungen. Diese dürfen während
des Auspackens nicht beschädigt werden.
Legen Sie den LCD Fernseher auf eine
feste Unterlage wie zum Beispiel einen
Tisch. Nutzen Sie für den Fernseher eine
Unterlage wie Handtuch, Decke oder Folie.
Die Vorderseite ist mit einem Klavierlack
versehen.
Hinweise:
•
Führen Sie die Montage vorsichtig durch.
•
Überprüfen Sie nach der Montage vorsichtig den Halt des Standfußes.
HTC 2232D
11
Schnellstart
1.
2.
Deutsch
3.
4.
5.
6.
7.
12
Montieren Sie den Standfuß gemäß der Beschreibung auf der vorherigen Seite.
Schließen Sie die Antenne bzw. Eingangsquelle am entsprechenden Eingang (z.B. HDMI,
SCART ect.) auf der Rückseite des Geräts an.
Stecken Sie den kleinen, runden Stecker des Stromadapterkabels in den Stromeingang auf
der Rückseite des Geräts.
Verbinden Sie das Stromkabel mit dem Stromadapter und der Steckdose.
Schalten Sie das Gerät ein, indem Sie bei den Bedienelementen direkt am Gerät oder auf der
Fernbedienung die Taste POWER drücken. Die LED fängt daraufhin an, grün zu leuchten.
Drücken Sie die INPUT Taste am Gerät bzw. auf der Fernbedienung und ein Auswahlmenü
der Quellen wird eingeblendet. Zur Auswahl stehen: TV, SCART, YUV, Video, VGA, HDMI1,
HDMI2, DVB-T, USB und DVD. Navigieren Sie mit den Pfeiltasten OBEN oder UNTEN zu der
gewünschten Option und bestätigen Sie mit der OK Taste. Sie können sowohl mit den Bedienelementen auf der Vorderseite des Geräts als auch mit der Fernbedienung die Lautstärke
anpassen oder einen Kanal auswählen.
A. DVB-T Modus:
Schalten Sie das Gerät an und drücken sie die INPUT-Taste. Drücken Sie mehrmals die
Pfeiltaste OBEN/UNTEN, bis rechts oben „DVB“ angezeigt wird und bestätigen Sie die Auswahl mit der OK Taste. Nun befindet sich der HTC 2232D im DVB-T Modus. Bei der ersten
Inbetriebnahme werden Sie zu dem Programmsuchlauf weitergeleitet. Der Suchlauf wird auf
Seite 21 beschrieben.
B. DVD-Player:
Schalten Sie das Gerät an und drücken sie die INPUT-Taste. Drücken Sie mehrmals die
Pfeiltaste OBEN/UNTEN, bis rechts oben „DVD“ angezeigt wird und bestätigen Sie die Auswahl mit der OK Taste. Nun befindet sich der HTC 2232D im DVD Modus.
C. Analoger TV Tuner (z.B. Kabelnetz):
Schalten Sie das Gerät an und drücken sie die INPUT-Taste. Drücken Sie mehrmals die
Pfeiltaste OBEN/UNTEN, bis rechts oben „ATV“ angezeigt wird und bestätigen Sie die Auswahl mit der OK Taste. Nun befindet sich der HTC 2232D im TV Modus. Bei der ersten Inbetriebnahme werden Sie zu dem Programmsuchlauf weitergeleitet. Der Suchlauf wird auf Seite
21 beschrieben.
Um das Gerät für kurze Zeit auszuschalten, drücken Sie die Taste POWER. Daraufhin wechselt es in den Bereitschaftsmodus (Stand-By), und die LED leuchtet rot. Falls Sie das Gerät
über einen längeren Zeitraum nicht nutzen, schalten Sie es komplett aus, indem Sie das
Stromkabel abziehen.
HTC 2232D
Anschlüsse
Rückseite
Deutsch
Bezeichnung
Funktionsbeschreibung
POWER
DC Stromeingang
USB
USB Anschluss zum Abspielen von Bilder, Musik und Videos
HDMI2
2. HDMI Audio/Video Eingang
HDMI1
1. HDMI Audio/Video Eingang
SCART
EuroAV (SCART) Eingang
PC-IN
Audio Eingang für VGA
VGA
VGA-Signal vom Computer
COAX
Digitaler Tonausgang koaxial (Cinch Buchse)
Headphone
Audio-Ausgang für Kopfhörer (Klinkenbuchse)
Y Pb Pr
Video-Komponenteneingang (Klinkenbuchse)
VIDEO
CVBS (FBAS) Video-Eingang (Cinch Buchse)
L-in + R-in
Audio-Signaleingang für Video und YPbPr
RF
Anschließen einer Antenne oder eines Empfangskabels
HTC 2232D
13
Bedienelemente
Rechte Seite
Deutsch
Auf der rechten Seite befindet sich das DVD-Laufwerk.
Hinweise:
1.
Der DVD-Player hat ein Slot-In Laufwerk.
2.
Führen Sie die Disk richtig ein. Die bedruckte bzw. beschriebene Seite (LABEL
SIDE) der Disk zeigt nach hinten. Die verspiegelte Seite (MIRROR SIDE) der
Disk zeigt nach vorne.
3.
Nutzen Sie ausschließlich nur 12 cm Disk.
Oberseite
Auf der Oberseite finden Sie folgende Tasten:
Taste
Funktion
MENU
LCD Einstellungen
CH+ / CH-
TV Kanal ändern
VOL+ / VOL-
Lautstärke ändern
INPUT
Quelle wählen
PLAY
Abspielen (DVD-Player)
EJECT
POWER
Öffnen und Schließen des DVD Laufwerks
An / Aus (Stand-By) Modus
Vorderseite
LED
Die LED signalisiert den Status des Gerätes. ROT =
Stand-By Modus und GRÜN = Eingeschaltet.
LCD Panel
IR
Infrarotempfänger
Lautsprecher
Die Lautsprecher befinden sich Unten auf rechten und
linken Seite des Gerätes
IR = Empfänger für Fernbedienung
LED (Rot = Stand-By / Grün = An)
14
LCD Panel
LCD Bildschirm
HTC 2232D
Fernbedienung
Einlegen der Batterien in die Fernbedienung
Hinweise zu den Batterien
Falsche Behandlung der Batterien kann dazu führen, dass Batteriesäure
austritt. Dies führt zu schädlicher Korrosion und möglicherweise zu einem
dauerhaften Defekt an der Fernbedienung.
Deutsch
Um die Fernbedienung verwenden zu können, legen Sie die Batterien in
das Batteriefach.
1.
Öffnen Sie das Batteriefach
2.
Legen Sie die mitgelieferten Batterien ein und achten Sie auf die
richtige Ausrichtung der Polung.
3.
Schließen Sie das Batteriefach.
Beachten Sie daher folgende Regeln:
• Achten Sie immer auf eine korrekte Polung der Batterien. Legen Sie diese nur so ein, wie im
Batteriefach anhand der Symbole + und - dargestellt
• Verwenden Sie nie zwei verschiedene Batterietypen und mischen Sie nie alte und neue Batterien. Benutzen Sie ausschließlich AAA 1,5 V Batterien.
• Sollten Sie die Fernbedienung längere Zeit nicht benutzen, nehmen Sie bitte die Batterien aus
dem Batteriefach. So beugen Sie möglichen Korrosionsschäden vor.
• Arbeitet die Fernbedienung nicht korrekt oder nimmt Ihre Reichweite ab, tauschen Sie die Batterien gegen neue aus.
• Sollten Batterien auslaufen, wischen Sie das Batteriefach aus und legen neue ein.
•
Verbrauchte Batterien gehören nicht in den Hausmüll. Geben Sie verbrauchte Batterien bei autorisierten Sammelstellen (im Handel oder an Servicestationen) ab.
Reichweite der Fernbedienung
Zeigen Sie mit der Fernbedienung auf den Infrarotsensor des Fernsehers und drücken Sie die gewünschte Taste. Der maximale Abstand sollte nicht mehr als 5 Meter und der maximale Winkel nicht
mehr als etwa 30° Grad in beiden Richtungen betragen.
Hinweise zur Fernbedienung
Richten Sie die Fernbedienung auf den Infrarotempfänger des Gerätes.
•
•
•
•
•
Vermeiden Sie eine Beschädigung der Fernbedienung durch Herunterfallen oder heftige Stöße.
Legen Sie die Fernbedienung niemals an einen sehr heißen oder feuchten Platz.
Schütten Sie keine Flüssigkeiten über die Fernbedienung. Öffnen Sie nie das Gehäuse der Fernbedienung
Achten Sie darauf, dass der Infrarotempfänger sich nicht im Einstrahlbereich direkten Sonnenlichts oder einer starken Lampe befindet. Das Gerät könnte möglicherweise sonst nicht mehr auf
die Signale Ihrer Fernbedienung reagieren.
HTC 2232D
15
Deutsch
Fernbedienung
16
HTC 2232D
Fernbedienung
Für die bessere Darstellung hier in der Anleitung wurde die Fernbedienung invertiert.
1.
2.
3.
4.
5.
6.
7.
8.
9.
10.
11.
12.
13.
14.
15.
16.
17.
18.
19.
20.
An/Aus Schalter (POWER)
Beenden Taste (EXIT)
LCD Einstellungstaste (MENU)
Bildeinstellungstaste (PICTURE)
Stummschaltung (MUTE)
Numerische Tasten (0 ... 9)
ATV + DTV: Letzter Kanal Taste (RECALL)
Lautstärke erhöhen Taste (VOL+)
Navigationskreuz (Oben, Unten, Links,
Rechts)
Lautstärke verringern Taste (VOL-)
DVD + USB: Pause Taste (||); REC: Time
Shift Taste
DVD + USB: Abspielen Taste (>)
ATV + DTV: Videotext verstecken Taste
(CANCEL); DVD + REC + USB: Schneller
Vorlauf (>>)
ATV + DTV: Videotext anhalten Taste
(HOLD); DVD + REC + USB: Schneller
Rücklauf (<<)
REC: Aufnahmeliste Taste (LIST); DVD:
Video-DVD Menü Taste (D.MENU)
ATV + DTV: Kanalliste (CH/LIST): DVD:
Einstellungsmenütaste (SET)
ATV + DTV: Videotext Taste (TV TEXT):
DVD: Programm Taste (PROGRAM)
ATV + DTV: Videotext Unterseite Taste
(SUBPAGE); DVD + USB: Wiederholungstaste (REPEAT)
Seitenverhältnis Taste für alle Quellen;
LCD: Rote Funktionstaste im Menü; ATV +
DTV: Rote Videotext Taste; DVD: Vergrößern Taste (ZOOM)
LCD: Grüne Funktionstaste; DTV: Planungsliste Taste; ATV + DTV: Grüne Videotext Taste: DVD: Video-DVD Titel Taste (TITLE)
21.
22.
23.
24.
25.
26.
27.
28.
29.
30.
31.
32.
33.
34.
35.
36.
37.
38.
Informationsanzeige (DISPLAY)
Audio Taste
Sleeptimer Taste (SLEEP)
Toneinstellungstaste (SOUND)
Quellen Taste (INPUT)
ATV + DTV: Kanal Auf Taste (CH+)
Bestätigen Taste (OK)
ATV + DTV: Kanal Unten Taste (CH-)
DVD + USB: Stoppen Taste (STOP);
REC: Aufnahme beenden Taste
REC: Aufnahme Taste; DVD: Öffnen und
Schließen Taste des Laufwerkes
ATV + DTV: Videotext Indexseite Taste
(INDEX); DVD + USB: Vorherige Datei
bzw. Kapitel (|<<)
ATV + DTV: Videotext Seite vergrößern
(SIZE); DVD + USB: Nächste Datei / Kapitel (>>|)
DTV: EPG Taste
ATV + DTV: Favoritentaste (FAV)
DTV + DVD: Untertitel Taste (SUBTITLE)
ATV + DTV: Versteckte Videotextseiten
anzeigen Taste (REVEAL); DVD + USB:
Langsame Wiedergabe (SLOW)
Blaue Funktionstaste im Menü; ATV +
DTV: Blaue Videotext Taste; USB: Bildschirm AUS Taste (SCREEN)
Gelbe Funktionstaste im Menü; ATV +
DTV: Gelbe Videotext Taste; DVD: Gehe
zu Taste (GOTO)
Deutsch
Tasten der Fernbedienung:
ATV: Analoger TV Tuner
DTV: Digitaler TV Tuner
DVD: DVD Player
REC: Rekorder
USB: Multimedia-Player
Tasten der Fernbedienung:
ATV: Analoger TV Tuner
DTV: Digitaler TV Tuner
DVD: DVD Player
REC: Rekorder
USB: Multimedia-Player
Weitere Beschreibungen in der nächsten
Spalte!
HTC 2232D
17
Deutsch
VERBINDEN
Stromverbindung
Verbinden Sie das Stromkabel mit dem kleinen Stecker an
dem Stromeingang des Fernsehers (POWER). Verbinden Sie
den Stromstecker des AC/DC Stromadapters mit der Steckdose.
An der Vorderseite leuchtet dann eine rote LED. Der Fernseher befindet sich nun im Stand-By Modus. Drücken Sie entweder die POWER Taste auf der Fernbedienung oder auf der
Oberseite des Gerätes. Die rote LED wechselt zu einer grünen LED Anzeige.
Antenne
Der HTC Fernseher verfügt über einen analogen und einen digitalen TV Tuner. Für
den analogen TV Empfang schließen Sie das Antennenkabel entweder mit der VHF/
UHF Dachantenne oder mit dem analogen Kabelanschluss an.
Für den digitalen terrestrischen (DVB-T) TV Empfang schließen Sie den Fernseher
entweder an die Dachantenne (für den besten DVB-T Empfang) oder an eine DVB-T
Zimmerantenne an.
Drücken Sie mit der INPUT Taste und wählen Sie im Auswahlmenü „ATV“ für analogen TV Empfang oder zu „DTV“ bei digitalen terrestrischen TV Empfang.
Hinweis:
Den besten Empfang für DVB-T erhalten Sie mit einer Dachantenne. Falls Sie nur eine Zimmerantenne benutzen können, achten Sie hier auf die Ausrichtung der Antenne und nutzen Sie ggf. eine aktive
Zimmerantenne.
SCART Eingang
Audio- und Videosignale können Sie z.B. von einem Videorekorder oder einer Setopbox via der SCART Schnittstelle übertragen. Verbinden Sie ein entsprechendes Endgerät mit einem SCART Kabel an dem SCART Eingang
des HTC Fernseher an.
Drücken Sie mit der INPUT Taste und wählen Sie im Auswahlmenü „SCART“.
HDMI 1 und 2
Wenn Sie ein Endgerät mit HDMI, wie z.B. eine PS3
Spiele Konsole an dem HTC 2232D nutzen möchten,
verbinden Sie den Fernseher mit einem HDMI Kabel an
dem HDMI Eingang (HDMI1 oder HDMI2) und dem
HDMI Ausgang des entsprechenden Endgerätes.
Drücken Sie mit der INPUT Taste und wählen Sie im Auswahlmenü „HDMI1“ oder „HDMI2“ je nachdem Sie das entsprechende Endgerät angeschlossen haben.
Der HTC 2232D verfügt über zwei gleichberechtigte HDMI Eingänge.
18
HTC 2232D
VERBINDEN
Deutsch
Komponenten Videoeingang und Stereo Audioeingang
Sie können ein weiteres Endgerät (welches einen YUV Videoausgang besitzt) über den Komponenteneingang verbinden. Verbinden Sie das mitgelieferte Video Adapterkabel mit
dem Klinkenstecker in die „YPbPr“ Klinkenbuchse des HTC
2232D. Verbinden Sie jetzt mit dem dreipoligen Videokabel
mit dem Adapterkabel und dem Endgerät.
Achten Sie auf die Farbbelegung zwischen dem Endgerät
und dem Adapterkabel, so dass z.B. der Grüne Kabelstrang jeweils mit dem Stecker „Y“, der Blaue
Kabelstrang mit dem Stecker „Pb“ und der Rote Kabelstrang mit dem Stecker „Pr“ beidseitig verbunden wird.
Um auch den Ton zu übertragen, müssen Sie eine Tonverbindung etablieren. Verbinden Sie dazu
den weiß und rot markierten Kabelstrang mit dem entsprechenden Audio-Ausgang „L“ und „R“ des
Endgerätes und den Cinch-Stecker „L-in“ und „R-in“ Eingang des Fernsehers.
Drücken Sie mit der INPUT Taste und wählen Sie im Auswahlmenü „YPbPr“.
CVBS Videoeingang und Audioeingang
Sie können ein weiteres Endgerät (welches einen CVBS Videoausgang besitzt) über den Video Eingang verbinden. Verbinden
Sie das entsprechende Endgerät mit dem Videokabel (Gelbe
Cinch-Stecker) mit dem „VIDEO“ Eingang des Fernsehers.
Verbinden Sie dazu den weiß und rot markierten Kabelstrang mit
dem entsprechenden Audio-Ausgang „L“ und „R“ des Endgerätes und den Cinch-Stecker „L-in“ und „R-in“ mit dem Eingang des
Fernsehers.
Drücken Sie die INPUT Taste und wählen Sie im Auswahlmenü „AV“.
USB Anschluss
Der USB Anschluss hat unterschiedliche Funktionen:
1.
2.
3.
4.
Nach dem Anschluss eines USB Massenspeichers kann auf diesem DVB-T
Sendungen aufgenommen werden.
Zum Abspielen aufgenommener DVB-T Sendungen.
Abspielen von Medieninhalten wie Video, Musik und Bilder von USB Speicher
Zu dem Einspielen neuer Firmwareversionen.
Drücken Sie die INPUT Taste und wählen Sie im Auswahlmenü „USB“.
Hinweis:
Schließen Sie am USB Anschluss aufgrund von CE-Richtlinien nur USB Flashspeichemedien (USB
Sticks) an.
HTC 2232D
19
VERBINDEN
VGA
Sie können den HTC 2232D auch als PC Monitor betreiben. Verbinden Sie Ihren Computer (PC) per
VGA Kabel mit dem VGA Eingang des Fernsehers.
Deutsch
Drücken Sie die INPUT Taste und wählen Sie im Auswahlmenü „PC“.
Hinweise:
1.
Bitte wechseln Sie die Auflösung des Computers zu einer der folgenden Auflösungen, bevor
Sie die Verbindung herstellen: 640 x 480, 800 x 600 oder 1024 x 768.
2.
Verbinden Sie die beiden Geräte und aktivieren Sie nun den PC-VGA Eingang des Fernsehers.
3.
Sie können nun die optimale Auflösung des Fernsehers an Ihrem Computer einstellen. Diese
ist 1920 x 1080 Pixel
Kopfhörer Ausgang
Sie haben die Möglichkeit am dem Fernseher auch einen Kopfhörer anzuschließen. Verbinden Sie den Kopfhörer mit einen 3,5 mm Klinkenstecker an
dem Kopfhörerausgang.
Digitaler Tonausgang
Sie haben die Möglichkeit den Fernseher durch ein koaxiales Kabel mit einem externen
Dolby Digital Verstärker zu verbinden.
20
HTC 2232D
Erstinstallation
Wenn Sie den HTC 2232D zum ersten Mal benutzen, dann startet der Installationsführer. Mit dieser
Hilfe können Sie alle Programme - analog und digital - suchen. Der Suchlauf beinhaltet sowohl die
analogen Frequenzen wie auch die Frequenzen des digitalen Free-to-Air DVB-T Programms.
Deutsch
1. Wählen Sie die Sprache des OSD aus. Die
einzelnen Sprachen können Sie mit den Pfeiltasten ◄ oder ► weiterklicken.
2. Drücken Sie die dann die Pfeiltaste ▼ und
navigieren Sie zu der Option Land. Wählen Sie
das gewünschte Land mit den Pfeiltasten ◄
oder ► aus.
3. Drücken Sie die dann die Pfeiltaste ▼ und
navigieren Sie zu der Option Suchmodus.
Wählen Sie zwischen den Optionen ATV+DTV,
DTV oder ATV die gewünschte Option aus.
Falls Sie nur DVB-T wünschen, dann nutzen
Sie nur die Option DTV.
4. Starten Sie den automatischen Suchlauf mit
der OK Taste.
5. Jetzt wird ein neues Fenster eingeblendet, wo
der Fortschritt des Suchlaufes dokumentiert
wird. Dort werden dann die Anzahl der gefundenen analogen, der digitalen und der Radio
Programmen aufgelistet.
6. Nach Beenden des Suchlaufes werden alle
gefundenen TV- und Radio-Programme gespeichert.
7. Der Fernseher wechselt sofort zu dem TV
Tuner.
Hinweis:
Der komplette Suchlauf dauert einige Minuten.
HTC 2232D
21
Deutsch
Quellenauswahl
Die einzelnen Quellen des Fernsehers können mit Hilfe der INPUT Taste anwählen. Drücken Sie die
INPUT Taste auf der Fernbedienung oder die INPUT Taste am oberen Bedienfeldes des Geräte,
dann erscheint auf dem Bildschirm ein Fenster mit den unterschiedlichen Quellen.
Die Optionen sind:
DTV
DVB-T TV Tuner
ATV
Analoger TV Tuner
SCART
SCART Video/Audio-Eingang
YPbPr
Video-Komponenteneingang
DVD
DVD Player (intern)
PC
VGA Anschluss
HDMI1
HDMI Video/Audio-Eingang
HDMI2
HDMI Video/Audio-Eingang
AV
CVBS (FBAS) Videoeingang
USB
Multimedia-Player
Die unterschiedlichen Quellen können Sie mit den ▲/▼ Tasten ansteuern. Bestätigen Sie die Auswahl mit der OK Taste.
22
HTC 2232D
DVB-T
Wichtige Tasten und deren Funktionen
DVB-T Modus aufrufen
Wenn Sie das terrestrische digitale Fernsehen (DVB-T) nutzen möchten, dann müssen Sie den Fernseher in den DVB-T Modus schalten. Drücken Sie dazu die INPUT Taste, wählen Sie mit den ▲/▼
Tasten „DTV“ aus und bestätigen Sie die Auswahl mit der OK Taste.
Deutsch
Kanalliste
Rufen Sie die Kanalliste durch das Drücken der CH/LIST Taste auf. Die Kanalliste
wird durch Drücken der EXIT Taste beendet.
Senderwechsel
Mit den Tasten CH+/ CH- können Sie den TV Sender wechseln.
Senderanwahl
Über die Zifferntasten 1 bis 9 können Sie direkt auf die TV Sender zugreifen und wechseln. Mit der 10
Taste wechseln Sie zu der zweistelligen Anzeige und Sie können dann z.B. 20 eingeben. Danach
wird der 20te TV Sender (wie in der Senderliste gespeichert) angezeigt.
Letzter TV Sender
Durch Drücken der RECALL Taste auf der Fernbedienung gelangen Sie zu dem vorherigen (aktiven) TV Sender zurück.
Lautstärke
Mit den Tasten VOL+ / VOL- ändern Sie die Lautstärke des DVB-T Empfängers.
TV / Radio Wechsel
Drücken Sie die CH/LIST Taste um die Kanalliste aufzurufen. Wenn Sie zwischen TV und Radio
wechseln möchten, dann drücken Sie die ► Taste mehrmals, bis die Radioliste erscheint. Wählen
Sie nun mittels der ▲/▼ Tasten den gewünschten Radio Sender und bestätigen Sie die Auswahl mit
der OK Taste.
Hinweis:
In Deutschland werden über DVB-T keine digitalen oder analogen Radiosender übertragen.
EPG
Mit Drücken der EPG Taste wird der elektronische Programm Führer aktiviert. Bitte
lesen Sie dazu den Abschnitt EPG.
Favoritenliste
Wenn Sie im Vorfeld Favoriten definiert haben, dann können Sie durch das Drücken
der FAV Taste einen direkten Zugriff zu den Favoriten erhalten.
HTC 2232D
23
DVB-T
Deutsch
Wichtige Tasten und deren Funktionen
Untertitel
Wenn Sie zu einem TV Programm Untertitel anzeigen
wollen, drücken Sie die SUBTITLE Taste. Falls Untertitel
angeboten werden, dann erscheint ein Auswahlfenster. Mit
der OK Taste können Sie die entsprechenden Untertitel
auswählen.
Hinweis:
In Deutschland werden keine Untertitel bei DVB-T übertragen.
Tele- / Videotext
Videotext aktivieren Sie über die TV TEXT Taste. Der
Videotext wird nun geladen.
1
2
3
4
5
6
7
8
9
10
24
Startet bzw. Beendet Videotext (TV/TXT)
Blendet Videotext aus, läuft im Hintergrund weiter
(CANCEL)
Anzeige von verborgenen Videotextseiten
(REVEAL)
Videotext anhalten während des Suchlaufes oder
bei einer wechselnden Unterseite (HOLD)
Vergrößert Videotext (SIZE)
Zeigt Unterseiten an (SUBPAGE)
Videotext Indexseite (INDEX)
Eine Seite zurück (ROT)
Eine Seite vor (GRÜN)
Schnellzugriff zu senderspezifischen Seiten
(GELB und BLAU)
HTC 2232D
DVB-T
Wichtige Tasten und deren Funktionen
Hinweis:
In Deutschland wird nur bei nur ausgewählten TV Programmen ein Mehrkanalton angeboten.
Deutsch
Audiosprache
Wenn Sie die Audiosprache oder ggf. zu einer digitalen
Mehrkanaltonspur wechseln möchten, dann drücken Sie die
AUDIO Taste. Es erscheint ein Popup-Fenster, wo Sie die
Sprache oder ggf. Mehrkanaltonspur auswählen. Benutzen
Sie dazu die ▲/▼ Tasten und bestätigen Sie die Auswahl
mit OK.
Kurzinformationsanzeige
Drücken Sie die OK Taste während des Live-Bildes, dann erscheint ein Popup-Fenster mit der TV
Programmtitel, Datum, aktuelle Uhrzeit, Laufzeit der aktuellen Sendung, Auflösung der Sendung (z.B.
576i) und ob Videotext (Teletext) verfügbar ist.
Auf der rechten Seite befindet sich ein Hinweis zu der nächsten Sendung. Wenn Sie nun die ► Taste
drücken, dann wird der Programmtitel der nächsten Sendung, Laufzeit etc. angezeigt.
Informationsanzeige
Drücken Sie die DISPLAY Taste während einer Sendung, dann werden detaillierte Informationen
eingeblendet.
Neben den Informationen wie TV Programmtitel, Datum- und Zeitangabe, aktueller Uhrzeit, Laufzeit
der aktuellen Sendung, Auflösung der Sendung (z.B. 576i) und ob Videotext (Teletext) verfügbar ist,
wird nun die EPG Information zur aktuellen Sendung eingeblendet. Die EPG Informationen können
Sie mit den Pfeiltasten ▲/▼ weiterblättern. Mit der ► Taste haben Sie die Möglichkeit, die EPG Informationen der nächsten Sendung zu lesen.
HTC 2232D
25
DVB-T
Elektronischer Programmführer (EPG)
Deutsch
Der Elektronische Programmführer (EPG) wird durch die EPG Taste gestartet. Es wird ein großes
Popup-Fenster eingeblendet.
Das EPG Fenster ist wie folgt aufgebaut:
Links
Sortierungsart (z.B. Zeit), Datum mit Uhrzeit und Senderliste
Rechts
Ausführliche Programminformationen
Unten
Tasten für die Navigationshilfe
Sortierungsart
Sie können die EPG Anzeige entweder nach der aktuellen Zeit oder nach Sender sortieren.
Zeit
Die EPG Liste wird nun nach der Zeit angezeigt. Zu jedem Sender wird dann das aktuelle Programm
angezeigt (siehe obige Ansicht). Mit den ▲ oder ▼ Tasten wechseln Sie den TV Sender. Mit den ◄
oder ► Tasten können Sie zu den nächsten bzw. vorherigen Seite blättern.
Sender
Die EPG Liste wird hiermit nach Sender sortiert.
Alle TV Programme der nächsten 7 Tage werden zu jedem TV Sender in einer Liste dargestellt. Ist der TV Sender gelb markiert, dann
können Sie diesen mit den ◄ oder ► Tasten
wechseln.
Mit den ▲ oder ▼ Tasten wechseln Sie den TV
Programme. Mit den ◄ oder ► Tasten können
Sie zu den nächsten bzw. vorherigen Seite blättern.
26
HTC 2232D
TV (Analog)
Elektronischer Programmführer (EPG)
Die Navigationshilfen eröffnen innerhalb des EPG Fensters weitere Möglichkeiten.
Schaltet zwischen den beiden Sortierungsarten Zeit und Sender
Programmiert das ausgewählte TV Programm für die Aufnahme
Startet den Fernseher im DVB-T Modus
Ruft die Timerprogrammierungsliste auf
Deutsch
INDEX
RECORD
GRÜN
GELB
Mit der INDEX Taste wechseln Sie die Sortierungsfolge. Der Cursor ist auf dem obersten Feld (links),
so dass Zeit bzw. Sender gelb hintergelegt ist. Wechseln Sie nun mit den ◄ oder ► Tasten die Sortierungsfolge.
Möchten Sie eine Sendung für die Aufnahme programmieren, dann drücken Sie die RECORD Taste.
Auf dem Bildschirm erscheint ein Fenster, in dem Sie die Parameter der Aufnahme. Detaillierte Beschreibung finden Sie auf Seite 33.
Möchten Sie regelmäßig eine bestimmte Sendung anschauen,
dann können Sie die Erinnerungsfunktion aktivieren. Drücken
Sie die GRÜNE Taste auf einer Sendungen und dann können
Sie die Parameter einstellen.
Die nebenstehende Abbildung zeigt die Optionen des Popup
Fensters. Ändern Sie ggf. die Einstellungen in dem Sie mit den
▲ oder ▼ Tasten zu den einzelnen Optionen wechseln. Diese
sind „Modus“, „Minute“, „Stunde“, „Datum“ und „Monat“.
Die Optionen können mit den ◄ oder ► Tasten auf Ihre Wünsche angepasst werden.
Mit der GELBE Taste haben Zugriff auf die Timerprogrammierungen. Dort werden alle programmierte Events gelistet. Innerhalb dieser Liste können Sie auch Events wieder löschen.
Wählen Sie einen entsprechende Programmierung aus und
drücken Sie die ROTE Taste zu löschen aus der Liste.
Mit der MENU Taste kehren in Regel immer eine Ebene höher
zurück. Mit der EXIT Taste beenden Sie das EPG Fenster
komplett und Sie gelangen ins Livebild des aktiven Senders.
HTC 2232D
27
TV (Analog)
Deutsch
Wenn Sie den analogen TV Tuner (z.B. Kabel) nutzen möchten, dann müssen Sie den HTC Fernseher in den TV Modus schalten. Drücken Sie dazu die INPUT Taste und wählen Sie mit den ▲/▼
Tasten „TV“ aus und bestätigen Sie die Auswahl mit der OK Taste.
Mit der Erstinstallation wurden die analogen TV Sender schon gefunden. Falls nicht, dann müssen
Sie gemäß der Anleitung (Seite 21 oder Seite 31) den Suchlauf wiederholen.
Kanalliste
Rufen Sie die Kanalliste durch das Drücken der CH/LIST Taste auf. Die Kanalliste
wird durch das Drücken der EXIT Taste geschlossen.
Senderwechsel
Mit den Tasten CH+/ CH-) können Sie den TV Sender wechseln.
Senderanwahl
Über die Zifferntasten 1 bis 9 können Sie direkt auf die TV Sender zugreifen und wechseln. Mit der 10
Taste wechseln Sie zu der zweistelligen Anzeige und Sie können dann z.B. 20 eingeben. Danach
wird der 20te TV Sender (wie in der Senderliste) angezeigt.
Letzter TV Sender
Drücken Sie die RECALL Taste auf der Fernbedienung und Sie gelangen zu dem
vorherigen (aktiven) TV Sender zurück.
Lautstärke
Mit den Tasten VOL+ / VOL- ändern Sie die Lautstärke an dem DVB-T Empfänger.
Teletext
Bei Teletext gibt es keinen Unterschied welche TV Empfänger aktiv ist. Analog TV und DVB-T sind in
dieser Hinsicht gleich. Bitte entnehmen Sie die Beschreibung des Teletextes von Seite 24 in dieser
Anleitung.
28
HTC 2232D
REKORDER
Vorbereitung des Datenträgers
Der Rekorder arbeitet ausschließlich im DVB-T Modus. Bitte beachten folgenden Regeln:
1.
Schließen Sie einen USB Massenspeicher an dem USB Anschluss an.
2.
Während der Aufnahme entfernen Sie nicht die Stromverbindung des Fernsehers.
3.
Bereiten Sie den USB Speicher vor der Aufnahme vor. Folgen Sie den nachstehenden Anweisungen.
Deutsch
Nach dem Anschließen des Speichers, drücken
Sie die MENU Taste auf der Fernbedienung und
wählen Sie mit den Pfeiltasten das Menü Kanal
mit den Pfeiltasten ◄/► aus. Drücken Sie Pfeiltaste UNTEN solange, bis Sie das Untermenü
PVR Dateisystem (PVR File System) erreichen.
Drücken Sie die ► Taste, damit sich die weiteren Menü öffnen.
Das Menü PVR Dateisystem enthält folgende Optionen: Speicher Wählen (Select Disc), Dateisystem Überprüfen (Check
PVR File System), USB Disk (USB Disc), Format, Time Shift
Größe (Time Shift Size) und Geschwindigkeit (Speed).
Speicher wählen
Wählen sie einen Ort zum Speichern der Aufnahmen und
drücken sie OK.
PVR Dateisystem überprüfen
Wählen sie Check PVR File System und drücken OK.
Nach der Überprüfung wird bei dem USB Medium
„Erfolgreich“ stehen, was bedeutet, dass der Speicher für
PVR nun benutzt werden kann.
Generell wird eine Formatierung des Speichers benötigt.
Sollte das Dateisystem nicht korrekt sein erscheint eine
Nachricht die danach fragt, ob der Speicher formatiert werden soll. Unter Umständen kann aber auch nach der Formatierung der Speicher nicht genutzt werden.
HTC 2232D
29
REKORDER
Vorbereitung des Datenträgers
Deutsch
Format
Wählen sie Format und wählen OK.
Wählen sie nun das Dateisystem und die Größe des Speichers .
Warnung:
•
Alle Daten gehen beim Formatieren Verloren.
•
Sichern Sie vorher alle Daten des Datenträgers.
•
Es wird empfohlen den USB Speicher nur für dieses
Gerät zu benutzen. Andere Daten auf dem Speicher
können dazu führen, dass bei Aufnahmen das Dateisystem beschädigt wird und der Speicher
neu formatiert werden muss.
Dateisystem
Zur Auswahl stehen FAT32 und Hi Speed FS. Wechseln Sie das Dateisystem mit den Pfeiltasten ◄/
►. Bestätigen die komplette Auswahl mit der OK Taste.
FAT32
Dieses Dateisystem ist kompatibel zu allen Computer, so dass der Datenträger auch nach der Aufnahme gelesen werden kann.
Hi Speed FS
Dies ist ein proprietäres Dateisystem, welches auf Geschwindigkeit währen der Aufnahme optimiert
ist.
Nach der Auswahl können Sie die Partitionsgröße definieren, die für das Hi Speed FS Dateisystem
genutzt wird. Empfehlenswert ist eine Größe von 50% des Datenträgers in Hi Speed FS Dateisystem.
Die Partition wird vorformatiert und belegt.
Nach der Aufnahme wird die Datei im der FAT32 Partition abgelegt, so dass diese auch an einem
Computer gelesen und bearbeitet werden kann.
Time Shift Größe
Nach dem Formatieren wird dieses Menü angezeigt.
Wählen sie hier die maximale Größe für eine Time Shift Datei
aus. Das Maximum beträgt 8 GB. Bestätigen sie mit OK.
Geschwindigkeit (Speed)
Dieses Menü zeigt Datentransferrate und freien Speicherplatz
des USB Mediums an.
Das nebenstehende Bild zeigt den betriebsbereiten Datenträger an.
30
HTC 2232D
REKORDER
Funktionen des Rekorders
Drücken Sie während des DVB-T Livebildes die AUFNAHME Taste und die Aufnahme startet. Beenden Sie die Aufnahme, in dem Sie die STOP Taste drücken.
Deutsch
Direkte Aufnahme
1.
Schließen Sie einen USB Datenträger an dem USB Anschluss an.
2.
Stellen Sie sicher, dass dieser USB Speicher für die Aufnahme vorbereitet wurde, andernfalls
wird der Speicher nicht erkannt.
3.
Das Dateiformat ist ein Transportstrom mit dem Suffix TS.
4.
Die Aufnahme kann nur im DVB-T Modus erfolgen.
Während der Aufnahme wird eine Navigationsleiste angezeigt. Damit stehen Ihnen verschiedene
Optionen zur Verfügung, wie Sie bei dem zeitversetzten Fernsehen (Time Shift) möglich sind. Nachdem Sie die PLAY Taste gedrückt haben, sind die Funktionen verfügbar. Die Aufnahme wird im Hintergrund fortgesetzt.
Mit den Pfeiltasten ◄/► können Sie zwischen den einzelnen Abspielfunktionen wechseln. Wählen
Sie eine Funktion aus und drücken Sie die OK Taste zum Ausführen.
PLAY
PAUSE
STOP
<<
>>
|<
>|
Startet die Wiedergabe von dem Anfang der Aufnahme
Pause der Wiedergabe
Beendet die Wiedergabe
Schneller Rücklauf in den Geschwindigkeitsstufen x2, x4, x8 und x16
Schneller Vorlauf in den Geschwindigkeitsstufen x2, x4, x8 und x16
Sprung um 30 Sekunden zurück
Sprung um 30 Sekunden vorwärts
Time-Shift
Die Time-Shift Funktion ermöglicht die Aufnahme während des Livebildes zu pausieren
oder den schnellen Rücklauf bzw. Vorlauf zu nutzen. Drücken Sie die PAUSE Taste und
die Time Shift Funktion startet mit einem eingefrorenen Bild. Während des Time Shift
wird eine Navigationsleiste angezeigt. Damit stehen Ihnen verschiedene Optionen zur
Verfügung (siehe beide obige Abbildungen):
PLAY
PAUSE
STOP
<<
>>
|<
>|
Startet die Wiedergabe von dem Anfang der Aufnahme
Pause der Wiedergabe—Time Shift läuft weiter
Beendet die Time Shift Funktion
Schneller Rücklauf in den Geschwindigkeitsstufen x2, x4, x8 und x16
Schneller Vorlauf in den Geschwindigkeitsstufen x2, x4, x8 und x16
Sprung um 30 Sekunden zurück
Sprung um 30 Sekunden vorwärts
HTC 2232D
31
REKORDER
Funktionen des Rekorders
Deutsch
Liste der aufgenommen Sendungen
Wenn Sie schon Sendungen auf dem USB Speicher aufgenommen
haben, dann können Sie diese Liste mit der LIST Taste aktivieren. Die
Liste erscheint auf dem Bildschirm. Erneutes Drücken der LIST Taste
ändert die Anordnung der Aufnahmen.
Information der Datei
Drücken Sie die RECHTE Navigationstaste oder die INFO Taste auf
einer Aufnahme und Sie erhalten Basisinformationen der Datei.
Abspielen
Wählen Sie eine Aufnahme aus und drücken Sie die OK oder die PLAY Taste zum Abspielen. Während des Abspielens stehen Ihnen folgenden Tasten zur Verfügung:
<< / >>
|<< / >>|
STOP
PAUSE
32
Schneller Rück– bzw. Vorlauf
Sprung um 30 zurück bzw. vorwärts
Beenden der Wiedergabe
Pausieren der Wiedergabe
HTC 2232D
REKORDER
Aufnahmeprogrammierung aus EPG heraus
Sie können aus dem EPG heraus den Recorder für eine bestimmt Sendung programmieren:
1.
3.
4.
5.
6.
Deutsch
2.
Öffnen sie mit der EPG Taste den Elektronischen Programmführer (EPG)
Wählen Sie bei der Sortierungsfolge ggf.
zu dem TV Sender
Wählen sie eine aufzunehmende Sendung
aus
Drücken sie AUFNAHME Taste
Tätigen sie ihre Letzten Einstellungen, wie
z.B. Anpassung der Start oder Endzeit.
Bestätigen mit der OK Taste
Nach dem Bestätigen wird ihre Timerprogrammierung in dieser
Liste angezeigt.
Hinweise:
•
Wenn der Fernseher zum Zeitpunkt der programmierten Sendung im Stand-By ist wird die Aufnahme aus
dem Stand-By heraus getätigt.
•
Die Aufnahme endet automatisch, je nach Einstellung
Sie können ggf. auch diese aus der Liste entfernen. Drücken Sie dazu die GELBE Taste auf der
Fernbedienung.
Sie können aus dieser Liste auch schon programmierte Aufnahmen wieder löschen. Drücken Sie
dazu die ROTE Taste und der entsprechende
Eintrag wird gelöscht.
Hinweise:
1.
Die programmierte Aufnahme findet auch im Stand-By Modus statt. Dabei startet der Fernseher nicht vollständig. Es wird kein Bild anzeigt und es ist auch kein Ton hörbar.
2.
Die Aufnahme endet zu den vorgegebenen Zeitpunkt und der Fernseher verbleibt im StandBy Modus.
HTC 2232D
33
Media-Player
Der Fernseher enthält einem USB Anschluss, mit dem Sie von einem USB-Speicher Dateien abspielen können.
Deutsch
•
•
•
•
•
•
•
Die Geschwindigkeit des USB-Speicher kann von Speicher zu Speicher variieren.
Bitte nicht den Fernseher anschalten oder den USB-Speicher entfernen, solange auf dem
USB-Speicher zugegriffen wird. Wenn der Speicher plötzlich getrennt oder ausgeschaltet
wird, können die gespeicherten Dateien oder der USB-Speicher beschädigt werden.
Bitte benutzen Sie nur ein USB-Speicher, das normale Musik-, Film-, Text- oder Bilddateien
zum abspielen auf dem Fernseher. Kopieren Sie nie Dateien auf einen USB-Speicher welcher ausschließlich für die Aufnahme präpariert worden ist.
Bitte verwenden Sie nur USB-Speicher mit FAT32-Dateisystem, welches von Windows formatiert wurde. Falls der USB-Speicher mit einem anderen PC-Programm formatiert wurde,
kann es unter Umständen nicht erkannt werden.
Nicht alle USB-Speicher werden unterstützt oder können ohne Probleme betrieben werden.
Wenn der Name eines Ordners oder einer Datei zu lang ist, wird dieser nicht angezeigt und
kann nicht anerkannt werden.
Bitte sichern Sie die wichtige Dateien auf dem USB-Speicher.
Anschließen eines USB-Speichers
Genießen Sie die Foto-, Musik-, Film- und Textdateien von dem USB-Speicher. Sie
können keine neuen Ordner hinzufügen oder löschen.
1.
2.
3.
4.
5.
34
Schließen Sie den USB-Speicher an dem USB Anschluss an.
Schalten Sie das Gerät ein und drücken Sie die INPUT Taste, um in das Source-Menü zu gelangen.
Drücken Sie die ▲ ▼ Taste bis zu der Option „USB“ und drücken Sie die OKTaste. Der Multimedia-Player startet und ließt des Inhalt des Speichers aus.
Wählen Sie die Option Photo, Musik, Film oder Text mit den ◄► Tasten aus
und bestätigen Sie die Auswahl mit der OK Taste.
Beenden Sie die ausgewählte Option (Photo, Musik, Film oder Text) mit der
EXIT Taste und Sie gelangen in das Hauptmenü des Media-Players zurück.
HTC 2232D
Media-Player
Bilder abspielen
Sie können Bilder in den Formaten JPEG (jpg), Bitmap (bmp) oder Portable Netzwerkdateien (png)
abspielen. Um die Bilder in voller Bildschirmauflösung anzuzeigen, nutzen Sie die Auflösungen 1280
x 720 oder 1920 x 1080 Pixel.
1.
2.
3.
4.
5.
6.
Drücken Sie die ◄ / ► Taste und wählen Sie die Option Photo aus. Bestätigen Sie die Option mit der OK Taste.
Drücken Sie ▲ / ▼ Taste und wählen Sie einen Ordner aus, in dem sich die Bilder befinden.
Bestätigen Sie die Auswahl mit der OK Taste. Der Ordnerinhalt wird angezeigt.
Drücken Sie die Navigationstasten (▲ / ▼ / ◄ / ► ) und wählen Sie ein Bild aus. Auf der
rechten Seite wird das ausgewählte Bild in einer Vorschau dargestellt und darunter finden Sie
einige Informationen des Bildes.
Sie können auch eine Playlist erstellen. Wählen Sie die Bilder aus und bestätigen Sie jedes
mit der OK Taste. Diese Bilder werden dann mit einem roten Häkchen versehen.
Drücken Sie die Abspielen Tast (>) und dann wird das Bild im Vollbild angezeigt.
Mit der STOP Taste beenden Sie die Vollbildanzeige der Bild und kehren zu dem Dateibrowser zurück.
Deutsch
Alle anderen Auflösungen werden entsprechend des Seitenverhältnisses angezeigt und können deshalb Ränder enthalten.
In der Vollbildansicht wird eine Navigationsleiste angezeigt. Mit den ◄ / ► Tasten können Sie die
einzelnen Funktionen anwählen und mit der OK Taste ausführen. Mit der EXIT Taste wird die Leiste
ausgeblendet.
Mit den ▲ / ▼ Tasten rufen Sie in der Vollbildwiedergabe die Playliste bzw. den Ordnerinhalt auf.
Dort können Sie die auch die einzelnen Bilder des aktuellen Ordner anwählen.
HTC 2232D
35
Media-Player
Musik abspielen
Der Media-Player kann Musikdateien in den Formaten AAC, MP3, WAVE und WMA abspielen.
Deutsch
1.
2.
3.
4.
5.
6.
7.
8.
Drücken Sie die ◄ / ► Taste und wählen Sie die Option Musik aus. Bestätigen Sie die Option mit der OK Taste.
Drücken Sie ▲ / ▼ Taste und wählen Sie einen Ordner aus, in dem sich die Musikdateien
befinden. Bestätigen Sie die Auswahl mit der OK Taste. Der Ordnerinhalt wird angezeigt.
Drücken Sie ▲ / ▼ Taste und wählen Sie ein Musikstück aus. Der Fernseher startet die Wiedergabe automatisch.
Sie können mehrere Musikdateien mit der OK Taste markieren. Drücken Sie die ► (PLAY)
Taste um die ausgewählten Stücke nacheinander abzuspielen.
Wenn kein Stück markiert wurde, dann wird der ganze Ordnerinhalt abgespielt.
Drücken Sie die Pause Taste (||) um die Wiedergabe zu unterbrechen. Setzen Sie die Wiedergabe mit der PLAY Taste fort.
Mit den Tasten >> oder << können Sie innerhalb eines Musikstückes sich schnell vorwärts
bzw. rückwärts bewegen. Drücken Sie mehrmals dies Taste, so ändert sich die Geschwindigkeit. Mit der PLAY Taste kehren Sie in die normale Geschwindigkeit zurück.
Drücken Sie die STOP Taste um die Wiedergabe zu beenden. Sie kehren damit in den Dateibrowser zurück.
Übersicht der Dateien im Ordner.
Das Musikstück startet automatisch
nachdem es markiert wurde.
Vollbildansicht. Nachdem Sie ein
Musikstück mit der PLAY Taste gestartet haben, wechselt der MedienPlayer in den Vollbildmodus.
Rechts erscheint die Liste entweder
aller markierter Stücke oder der gesamte Ordnerinhalt.
Hinweis:
Während der Musikwiedergabe haben Sie die Möglichkeit den Bildschirm mit der BLAUE Taste auszuschalten, dies spart auch Strom.
36
HTC 2232D
Media-Player
Videos abspielen
Sie können mit dem Media-Player Videodateien in den Formaten AVI, MPG, VOB, MOV, MKV, M2T,
TS und TRP von USB Speicher abspielen.
Deutsch
Einschränkungen:
1.
Unterstützt wird die Wiedergabe von MPEG-2 in MPG oder M2T Container bis zu einer Auflösung von 1920 x 1080 Pixel.
2.
Achten Sie bei der Wiedergabe von MPEG-2 Videos auf eine Bitrate von ca. max. 15.000
kbps.
Navigation:
1.
Drücken Sie die ◄ / ► Taste und wählen Sie die Option Video aus. Bestätigen Sie die Option mit der OK Taste.
2.
Drücken Sie ▲ / ▼ Taste und wählen Sie einen Ordner aus, in dem sich die Videodateien
befinden. Bestätigen Sie die Auswahl mit der OK Taste. Der Ordnerinhalt wird angezeigt.
3.
Drücken Sie ▲ / ▼ Taste und wählen Sie eine Videodatei aus. Der Fernseher startet die
Wiedergabe in dem Vorschaufenster automatisch.
4.
Drücken Sie die ► (PLAY) Taste um das ausgewählte Video in Vollbildmodus abzuspielen.
5.
Drücken sie OK um ein Video zu markieren oder die Markierung auf zu heben.
6.
Drücken Sie die Pause Taste (||) um die Wiedergabe zu unterbrechen. Setzen Sie die Wiedergabe mit der PLAY Taste fort.
7.
Mit den Tasten >> oder << können Sie innerhalb eines Videos sich schnell vorwärts bzw.
rückwärts bewegen. Drücken Sie mehrmals dies Taste, so ändert sich die Geschwindigkeit.
Mit der PLAY Taste kehren Sie in die normale Geschwindigkeit zurück.
8.
Drücken Sie die |<< oder >>| Taste um die vorherige oder nächste Videodatei zu starten.
9.
Drücken Sie die STOP Taste um die Wiedergabe zu beenden. Sie kehren damit in den Dateibrowser zurück.
Während der Wiedergabe erscheint unten im Bild eine Navigationsleiste mit vielen Optionen.
HTC 2232D
37
Media-Player
Deutsch
Navigationsleiste
Mit den ◄ / ► Tasten können Sie die einzelnen Funktionen anwählen und mit der OK oder der INFO
Taste ausführen.
REPEAT
A-B Wiederholung
Playlist
Info
Slow
Step
Goto Time
ZOOM IN
ZOOM OUT
Aspect Ratio
Anzeige
Umschalten des Wiederholungsmodus
Segment Wiederholung
Abspielliste
Informationsanzeige
Langsames Abspielen
Schrittweise Wiedergabe
Suche bzw. Eingabe eines Zeitindices
Video vergrößern
Video verkleinern
Umschalten des Seitenverhältnisses
Anzeige der Videos in dem aktuellen Ordner
Wiederholungsmodus
Hier können Sie zwischen Alle, Einzel oder Keine Wiederholung auswählen.
Information
Rufen diese Option auf, dann erscheint am rechten Rand des Fernseher eine Informationsanzeige.
A-B Segment
Markieren Sie während der Wiedergabe zwei Punkte A und B und der Media-Player wiederholt diesen Abschnitt in einer Endlosschleife. Beenden können die A-B Segmentwiedergabe mit der OK
Taste.
Suche
Rufen Sie diese Funktion auf, dann können Sie einen Zeitindex eingeben und der Media-Player
springt zu diesem hin.
Seitenverhältnis
Sollte das Video nicht richtig dargestellt werden, dann können Sie mit dieser Option das Seitenverhältnis anpassen.
Text Wiedergabe
Der Media-Player kann auch Textdateien auf dem Bildschirm darstellen.
38
HTC 2232D
LCD Einstellungen
Drücken Sie die MENU Taste und Sie bekommen Zugang zu den unterschiedlichen LCD Einstellungen.
Deutsch
Hauptmenü
Untermenüs
Die einzelnen Hauptkategorien werden mit den ◄/► Tasten in den Vordergrund gedreht. Zugriff zu
den Kategorien erhalten Sie, wenn Sie die ▼ Taste drücken. Die entsprechende Hauptkategorie ist
nun aktiv. Die LCD Einstellungen sind in die Hauptkategorien „Zeit“, „Kanal“, „Sperren“, „Optionen“,
„Ton“ und „Bild“ unterteilt. Die Hauptkategorien werden auch durch ein dazugehörendes Symbol
charakterisiert.
Zeit
Uhr, Anschaltzeit, Abschaltzeit, Sleeptimer, Zeitzone und Auto Sleep
Ton
Soundmodus, Höhen, Bass, Balance, Auto-Lautstärke, Surround Modus und SPDIF Modus
Bild
Bildmodus, Kontrast, Helligkeit, Farbe, Schärfe, Sättigung, Farbtemperatur, Seitenverhältnis, Rauschreduzierung und Bildschirm (nur bei VGA)
Kanal
Automatische Suche, DTV Manuelle Suche, ATV Manuelle Suche, Programm-Bearbeitung und Signal Information
Lock
Kanal sperren, Passwort, Programme blockieren, Kindersicherung
Optionen
Sprache, Audiosprache, Untertitelsprache, Land, Werkseinstellungen
Die Untermenüs innerhalb einer Kategorie werden mit den Pfeiltasten ▲/▼ angesteuert und mit den
◄/► Tasten geändert.
Mit der EXIT oder der MENU Taste werden die LCD Einstellungen beendet.
HTC 2232D
39
LCD Einstellungen
Kanaleinstellungen
Deutsch
Die Kanaleinstellungen enthalten die Optionen Automatische Suche, DTV Manuelle Suche, ATV
Manuelle Suche, Programmbearbeitung.
Automatischer Suchlauf
Mit dieser Option können Sie den Suchlauf für analoges
und digitales Fernsehen durchführen. Aktivieren Sie die
Option mit ▼ Taste , so dass die Option markiert ist.
1. Danach erscheint ein weiteres Popupfenster, wo Sie
das gewünschte Land auswählen können. Mit der Pfeiltaste ► können Sie die Länder weiterklicken.
2. Nach der Auswahl der Landes, drücken Sie die Pfeiltaste ▼ damit Sie den Suchmodus auswählen können. Zur Auswahl stehen ATV + DTV, DTV usw.. Mit der Pfeiltaste ► können Sie die Option auswählen.
3. Drücken Sie die OK Taste und starten Sie den Suchlauf.
4. Jetzt wird ein neues Fenster eingeblendet, wo der Fortschritt des Suchlaufes dokumentiert wird.
Dort werden dann die Anzahl der gefundenen analogen, der digitalen und der Radio Programmen
gelistet.
5. Nach dem beenden des Suchlaufes werden alle gefundenen TV- und Radio-Programme gespeichert.
Hinweis:
Der komplette Suchlauf dauert einige Minuten.
40
HTC 2232D
LCD Einstellungen
Kanaleinstellungen
Mit der EXIT oder der MENU Taste verlassen Sie die manuelle
Suche.
Deutsch
DTV Manuelle Suche
Mit der Pfeiltaste ► können Sie die manuelle DTV Suche starten.
1.
Mit den ◄/► Tasten wird der Kanal geändert, an dem
Suche durchgeführt werden soll.
2.
Starten Sie die Suche nach Auswahl des Kanals mit der
OK Taste.
ATV Manuelle Suche
Mit der Pfeiltaste ► können Sie die manuelle ATV
Suche starten. Die Unteroptionen sind:
•
Speichern zu Kanal (Storage TO)
•
Audiosystem (B/G für Westeuropa, I für England, D/K für Osteuropa, L oder LL für Teile
Frankreichs)
•
Aktueller Kanal (Current CH)
•
Suche (SEARCH)
•
Feinsuche (Fine-Tune)
1.
2.
3.
4.
Mit den Pfeiltasten ▲/▼ werden die einzelnen
Unteroptionen angesteuert.
Wählen Sie mit den ◄/► Tasten den Kanalplatz aus, den der TV Sender erhalten soll.
Wählen Sie mit den ◄/► Tasten das Audiosystem aus.
Navigieren Sie zur Option Suche, und starten Sie den Suchlauf mit ► Taste.
Feineinstellung (Fine Tune):
Sie können mit den ◄/► Tasten die Frequenz fein einstellen, wenn der aktuelle Kanal ein schwaches Signal aufweist.
Mit der ROTEN Taste können die Änderungen der Einstellungen (z.B. Audiosystem und ähnliches)
speichern.
Mit der EXIT oder der MENU Taste verlassen Sie die manuelle Suche.
HTC 2232D
41
LCD Einstellungen
Kanaleinstellungen
Deutsch
Programmbearbeitung
Bewegen von TV Sender (Move)
Mit dieser Option können Sie einzelne TV Sender eine neue Position in der Kanalliste zuweisen. Die
Vorgehensweise:
1.
2.
3.
4.
5.
Mit den ▲/▼ Tasten wählen Sie den entsprechenden TV Sender aus.
Drücken Sie die GELBE Taste auf der Fernbedienung und am ausgewählten TV Sender
erscheint ein Pfeilsymbol.
Mit den ▲/▼ Tasten wählen Sie die neue Position des TV Senders aus.
Drücken Sie die OK oder GELBE Taste um die Verschiebung auszuführen.
Mit der EXIT Taste verlassen Sie die Programmbearbeitung.
Einteilung in Favoriten
Hiermit können Sie einzelne TV Sender in einer Favoritenliste einteilen. Diese Liste können Sie später mit der FAV Taste aufrufen.
Die Vorgehensweise ist::
1.
Mit den ▲/▼ Tasten wählen Sie den entsprechenden TV Sender aus.
2.
Drücken Sie die FAV Taste auf der Fernbedienung und am ausgewählten TV Sender erscheint ein Herzsymbol. Der TV Sender wird nun in die Favoritenliste einsortiert.
3.
Mit der EXIT Taste verlassen Sie den Kanalorganisator und die neuen Einstellungen werden
gespeichert. Eine Meldung wird angezeigt, dass das System aktualisiert wird.
Hinweis:
Wenn Sie einen TV Sender wieder aus der Favoritenliste entfernen möchten, dann steuern Sie den
TV Sender in der Programmbearbeitung an (markiert mit einem Herzsymbol) und drücken Sie erneut
die FAV Taste. Das Herzsymbol wird nun entfernt und der TV Sender erscheint nicht mehr in der
Favoritenliste.
42
HTC 2232D
LCD Einstellungen
Kanaleinstellungen
Kanal überspringen (Skip)
Mit dieser Option können Sie einzelne TV Sender zum Überspringen markieren, so dass diese nicht
mehr direkt mit den numerischen Tasten angewählt werden können. Die Vorgehensweise ist:
3.
Mit den ▲/▼ Tasten wählen Sie den entsprechenden TV Sender aus.
Drücken Sie die BLAUE Taste auf der Fernbedienung und am ausgewählten TV Sender
erscheint ein Verbots-Symbol.
Mit der EXIT Taste verlassen Sie den Kanalorganisator und die neuen Einstellungen werden
gespeichert.
Deutsch
1.
2.
Kanal umbenennen (Rename) —- Nur bei analogen TV Sendern möglich
Mit dieser Option können Sie einzelne analoge TV Sender umbenennen und so einen neuen Namen
zuweisen können. Die Vorgehensweise ist:
1.
2.
3.
4.
5.
6.
Mit den ▲/▼ Tasten wählen Sie den entsprechenden TV Sender aus.
Drücken Sie die GRÜNE Taste auf der Fernbedienung und am ausgewählten TV Sender
erscheint ein grünes Symbol.
Mit den ▲/▼ Tasten können Sie auf der einzelnen Position das Zeichen ändern.
Mit den Tasten ◄/► wechseln Sie von einer Position zur anderen.
Speichern Sie die Änderung des Namens mit der MENU Taste.
Mit der EXIT Taste verlassen Sie den Kanalorganisator und die neuen Einstellungen werden
gespeichert.
TV Sender entfernen (Löschen)
Mit dieser Option können Sie einzelne TV Sender aus der Kanalliste löschen. Die Vorgehensweise
ist:
1.
2.
3.
Mit den ▲/▼ Tasten wählen Sie den entsprechenden TV Sender aus.
Drücken Sie die ROTE Taste auf der Fernbedienung und der ausgewählten TV Sender wird
sofort gelöscht.
Drücken Sie solange die EXIT Taste auf der Fernbedienung, bis Sie wieder das laufende
Programm sehen. Eine Meldung wird angezeigt, dass das System aktualisiert wurde.
Signalinformation
Blendet einige Informationen zu dem aktuellen Kanal ein.
Software Update
Hiermit können Sie ein Update für den HTC 2232D installieren. Das Update wird über USB installiert.
Aufnahme starten
Startet direkt die Aufnahme bei dem aktiven Sender.
Aufnahmeliste
Blendet die Aufnahmeliste ein.
Timerprogrammierung
Blendet die Timerprogrammierung ein.
Timerprogrammierungsliste
Blendet die Liste aller Timerprogrammierungen ein.
PVR Dateisystem
Bereitet den USB Speicher für die Aufnahme oder Time Shift vor (siehe Seite 29).
HTC 2232D
43
LCD Einstellungen
Bildeinstellungen
Deutsch
Die Bildeinstellungen enthalten die Optionen Bildmodus, Kontrast, Helligkeit, Farbe, Schärfe, Farb-
temperatur, Seitenverhältnis und Rauschunterdrückung.
Bildmodus
Mit den Tasten ◄/► wird der Bildmodus und somit die Darstellung des Bildes eingestellt. Die voreingestellten Unteroptionen sind Standard, Dynamisch, Benutzer und Mild.
Sie haben auch die Möglichkeit eigene Einstellungen zu definieren. Nutzen Sie dazu die Benutzer
(User) Unteroption.
Helligkeit (Brightness)
Mit den Tasten ◄/► wird die Helligkeit des Bildes eingestellt. Diese Option ist nur dann aktiv, wenn
im Bildmodus die Benutzereinstellung gewählt wurde.
Kontrast (Contrast)
Mit den Tasten ◄/► wird der Kontrast des Bildes eingestellt. Diese Option ist nur dann aktiv, wenn
im Bildmodus die Benutzereinstellung gewählt wurde.
Farbe (Colour)
Mit den Tasten ◄/► wird die Farbe des Bildes eingestellt. Diese Option ist nur dann aktiv, wenn im
Bildmodus die Benutzereinstellung gewählt wurde.
Schärfe (Sharpness)
Mit den Tasten ◄/► wird die Bildschärfe eingestellt. Diese Option ist nur dann aktiv, wenn im Bildmodus die Benutzereinstellung gewählt wurde.
Farbton (Tint)
Mit den Tasten ◄/► wird der Farbton eingestellt. Diese Option ist nur dann aktiv, wenn im Bildmodus
die Benutzereinstellung gewählt wurde.
44
HTC 2232D
LCD Einstellungen
Bildeinstellungen
Farbtemperatur (Color Temperature)
Mit den Tasten ◄/► wird die Farbtemperatur und somit die Darstellung des Bildes eingestellt. Die
voreingestellten Unteroptionen sind Kalt, Warm, Medium und Benutzer.
Deutsch
Sie haben auch die Möglichkeit eigene Einstellungen zu definieren. Nutzen Sie dazu die Benutzer
(User) Unteroption. Danach haben Sie Zugriff auf die separaten Farben Rot (RED), Grün (Green) und
Blau (Blue).
Seitenverhältnis (Aspect Ratio)
Mit den Tasten ◄/► wird das Seitenverhältnis und somit die Darstellung des Bildes auf dem Bildschirm eingestellt. Die Unteroptionen sind:
•
•
•
•
•
•
16:9 — Das Bild wird immer als Vollbild dargestellt, unabhängig von dem vorgegebenen Seitenverhältnis
4:3 — Das Bild wird immer als 4:3 Bild mit schwarzen Balken rechts und links dargestellt,
unabhängig von dem vorgegebenen Seitenverhältnis
Auto — Passt das Bild immer automatisch an. Liegt ein 16:9 Bild vor, dann erscheint ein
Vollbild, liegt ein 4:3 Bild vor, dann erscheint das Bild als 4:3 Bild mit seitlichen Balken.
Zoom 1 — Diese Option kann bei einem 4:3 Bild verwendet werden. Das Bild wird dann auf
Vollbild vergrößert unter Beibehaltung des Seitenverhältnisses. Jedoch gehen bei dieser
Zoomstufe Bildinhalt verloren.
Zoom 2— Diese Option kann bei einem 16:9 Widescreenbild verwendet werden. Das Bild
wird dann unter Beibehaltung des Seitenverhältnisses auf Vollbild vergrößert. Jedoch gehen
bei dieser Zoomstufe Bildinhalte verloren.
Panorama - Gute Einstellung wenn Film in CinemaScope Format gesendet wird. Das Bild
wird soweit vergrößert, bis die scharzen Ränder oben und Unten verschwinden. Jedoch gehen auf der rechten und linken Seite auch Bildinformationen verloren.
Zugriff haben Sie auf diese Optionen auch mit der ROTE Taste, außer bei dem internen DVD-Player.
Rauschunterdrückung (Noise Reduction)
Mit den Tasten ◄/► wird das Rauschunterdrückungssystem aktiviert:
•
OFF (Aus)
Rauschunterdrückung wird ausgeschaltet.
•
•
•
•
Niedrig (low)
Startet eine leichte Rauschunterdrückung
Medium (middle)
Mittlere Stärke der Rauschunterdrückung
Hoch (high)
Starke Rauschunterdrückung - oft mit einer Überschärfung
Standard (Default)
Standardeinstellung
HTC 2232D
45
LCD Einstellungen
Bildeinstellungen
Im VGA Modus enthalten die Bildeinstellungen noch zusätzliche Optionen. Sie sind für die vertikale
und horizontale Ausrichtung und die Bildgröße zuständig. Diese weiteren Unteroption befinden sich
im SCREEN Menü.
Deutsch
Mit der Pfeiltaste ► können Sie die weiteren Unteroptionen auf dem Bildschirm darstellen.
Autom. Position
Mit der Taste ► können Sie die folgenden Einstellungen automatisch konfigurieren.
Horizontale und vertikale Position
Mit den Tasten ◄/► können Sie die Position des Bildes auf dem Bildschirm in der Höhe, wie auch in
der Breite einstellen.
Größe (Size)
Mit den Tasten ◄/► können Sie die Größe des Bildes auf dem Bildschirm einstellen.
Phase
Mit den Tasten ◄/► wird die Phase der ADC-Sampling-Uhr im Verhältnis zum H-Sync-Signal eingestellt, bis ein stabiles, klares und schärferes Bild erreicht wird.
Speichern Sie die Änderung mit der MENU Taste. Mit der EXIT Taste verlassen Sie die Bildeinstellungen und die neuen Einstellungen werden gespeichert.
46
HTC 2232D
LCD Einstellungen
Toneinstellungen
Die Toneinstellungen enthalten Optionen für Soundmodus, Höhen, Bass, Balance, Auto Lautstärke,
Surround und SPDIF Modus.
Deutsch
Soundmodus
Mit den Tasten ◄/► wird der Soundmodus und somit die Tonausgabe eingestellt. Die voreingestellten Unteroptionen sind Musik, Film, Sport, Standard und Benutzer.
Sie haben auch die Möglichkeit, eigene Einstellungen zu definieren. Nutzen Sie dazu die Benutzer
(User) Unteroption. Danach haben Sie Zugriff auf die Höhen– und Basseinstellungen.
Höhe (Treble) und Bass
Mit den Tasten ◄/► lässt sich die Klang ändern. Diese Optionen sind nur dann aktiv, wenn im
Soundmodus die Benutzereinstellung gewählt wurde.
Balance
Mit den Tasten ◄/► können Sie die Links-/Rechtsbalance des Tons einstellen.
Auto Lautstärke (Auto Volume)
Diese Option ermöglicht die automatische Dämpfung der Lautstärke, wenn Passagen mit sehr lautem
Ton vorkommen. Dies ist eine Art von Nachtmodus. Mit den Tasten ◄/► wird dies Option verändert.
Surround Sound
Diese Option aktiviert die Tonausgabe mit Surroundeffekten. Mit den Tasten ◄/► wird diese Option
aktiviert bzw. ausgeschaltet.
SPDIF Modus
Hiermit definieren Sie die Art und Weise des digitalen Tonausganges. Die Optionen sind Aus, PCM
oder AUTO.
HTC 2232D
47
LCD Einstellungen
Zeiteinstellungen
Deutsch
Die Zeiteinstellungen enthalten Optionen für Uhr/Datum, automatische Ausschaltzeit, automatischen
Anschaltzeit, Schaltuhr, automatischer Stand-By und die Zeitzone.
Uhr/Datum (Clock)
Wählen Sie mit der Pfeiltaste die Option an und drücken Sie die OK Taste zum Bearbeiten der Uhrzeit und des Datums. Ein weiteres Popupfenster erscheint auf dem Bildschirm.
Mit den Tasten ◄/► wird die jeweils aktive Option geändert. Mit den ▲/▼ Tasten navigieren zu der
nächsten Unteroption. Diese sind Tag (Date), Monat (Month), Jahr (Year), Stunde (Hour) und Minute
(Minute).
Bestätigen Sie die Änderung mit der OK Taste.
Automatischer Ausschalzeit (Off Time)
Mit dieser Option können Sie den HTC Fernseher automatisch
zu einer bestimmten Zeit ausschalten lassen. Aktivieren Sie die
Option mit der ► Taste und ein neues Popupfenster erscheint
auf dem Bildschirm. Dort definieren Sie den Modus und die
dazugehörende Uhrzeit.
•
Wiederholen (Repeat)
Diese Option enthält die möglichen Einstellungen für
Einmal (Once), Täglich (every day), Montag-Freitag (Mon.-Fri), Montag-Samstag (Mon.-Sat.),
Samstag-Sonntag (Sat.-Sun.), Sonntag (Sun) oder Aus.
•
Stunde (Hour) - Hier definieren Sie die Uhrzeit in Stunden.
•
Minuten (Minute) - Hier definieren Sie die Uhrzeit in Minuten.
Eine Einstellung könnte zum Beispiel lauten: Montag-Freitag, 18:05 Uhr. Zu diesem Zeitpunkt würde
der HTC Fernseher immer automatisch abgeschaltet.
48
HTC 2232D
LCD Einstellungen
Zeiteinstellungen
•
•
•
•
•
•
Wiederholen (Repeat)
Diese Option enthält die möglichen Einstellungen für
Einmal (Once), Täglich (every day), Montag-Freitag
(Mon.-Fri), Montag-Samstag (Mon.-Sat.), SamstagSonntag (Sat.-Sun.), Sonntag (Sun) oder Aus.
Stunde (Hour) - Hier definieren die Uhrzeit in Stunden.
Minute (Minute) - Hier definieren Sie die Uhrzeit in Minuten.
Lautstärke (Volume) - Hier definieren Sie den Lautstärkepegel.
Quelle (Mode) - Hier definieren Sie die Quelle, mit welcher der HTC Fernseher gestartet werden soll. Zur Auswahl stehen DTV, ATV und Radio.
Kanaleingabe - Hier definieren bei Auswahl von DTV bzw. ATV den zu startenden Kanal
Deutsch
Automatische Einschalzeit (On Time)
Mit dieser Option können Sie den HTC Fernseher automatisch
zu einer bestimmten Zeit einschalten lassen. Aktivieren Sie die
Option mit der ► Taste und ein neues Popupfenster erscheint
auf dem Bildschirm. Dort definieren Sie den Modus und die
dazugehörende Uhrzeit.
Eine Einstellung könnte zum Beispiel lauten: Montag-Freitag, 8:05 Uhr, Lautstärke 40, DTV und Kanal 2.
Somit würde der Fernseher immer automatisch mit dem zuletzt aktiven digitalen TV Sender bei einer
Lautstärke von 40 eingeschaltet.
Schaltuhr (Sleeptimer)
Mit dieser Option programmieren Sie die Schaltuhr in vorgegebenen Minutenschritten, wann der HTC
Fernseher automatisch ausgeschaltet werden soll.
Hinweis:
Diese Funktion können Sie auch mit der SLEEP Taste auf der Fernbedienung einstellen.
Automatischer Stand-By (Auto Sleep)
Mit dieser Option schaltet sich der HTC Fernseher immer automatisch nach einigen Minuten ab,
wenn kein aktives Signal an der Quelle (DVD, HDMI, VGA etc.) anliegt.
Zeitzone (Time Zone)
Mit dieser Option definieren Sie die Zeitzone, in der sich der Fernseher befindet. Wenn Sie schon bei
dem Suchlauf das entsprechende Land gewählt haben, dann ist in der Regel die zugehörige Einstellung richtig.
HTC 2232D
49
LCD Einstellungen
Optionen
Deutsch
Das Optionsmenü enthält Spracheinstellungen, das Land und das Laden der Werkseinstellungen.
OSD Sprache (Language)
Hier definieren Sie die OSD Sprache.
Audiosprache (Audio Language)
Hier definieren Sie im DVB-T Betrieb die erste und zweite Sprache, bei mehrsprachigen TV Sender
bzw. Sendungen.
Untertitelsprache (Subtitle Language)
Hier definieren Sie im DVB-T Betrieb die erste und zweite Untertitelsprache, falls diese übertragen
werden.
Hinweis:
In Deutschland gibt es keine Untertitel bei DVB-T.
Land (Country)
Hier definieren Sie im DVB-T Betrieb das Land, in dem sich der HTC Fernseher befindet. Diese Einstellung hat auch direkten Einfluss auf die Zeitzone bei den Zeiteinstellungen.
Ausblendzeit für Menüs
Hier definieren Sie wann die OSD Menüs automatisch ausgeschaltet werden.
Werkseinstellungen laden (Restore Factory Default)
Mit dieser Option laden Sie die Werkseinstellungen. Alle persönlichen Einstellungen werden gelöscht
und müssen ggf. neu eingestellt werden.
50
HTC 2232D
LCD Einstellungen
Sperren Menü
Das LOCK Menü enthält diverse Einstellungen zum beschränkten Zugriff auf TV Programme oder zur
Definition des Kindersicherungslevels. Die Unteroptionen sind Kanal sperren, Passwort ändern, Programme blockieren und Kindersicherung.
Deutsch
Sie können nur dann die Optionen ändern, wenn Sie das
voreingestellte Passwort eingeben. Geben Sie nach der
Passwortabfrage das vierstellige Passwort 0 0 0 0 ein.
Kanal sperren (Lock System)
Hiermit schalten Sie die Option
frei, ob ein Kanal gesperrt
werden soll oder nicht.
Passwort ändern (Set Password)
Mit dieser Option können Sie das vordefinierte Passwort ändern und ein neues Passwort eingeben.
Programme blockieren (Block Program)
Mit dieser Option können Sie einzelne TV Sender sperren. Nach dem Aktivieren dieser Option
erscheint auf dem Bildschirm die Senderliste.
Wählen Sie mit ▲/▼ Tasten den TV Sender aus,
den Sie sperren möchten. Drücken Sie dann die
GRÜNE Taste und es erscheint beim ausgewählten TV Sender ein Schlosssymbol. Speichern Sie
die Einstellung mit der MENU Taste.
Der gesperrte TV Sender kann nicht mehr aufgerufen werden.
Kindersicherung (Parental Guidance)
Mit dieser Option können Sie die Stufe der Kindersicherung definieren, wenn diese von dem TV Sender unterstützt wird. Je höher der Wert ist, desto größer ist auch der Kindersicherungsschutz.
Hinweis:
In Deutschland werden keine Level zur Kindersicherung bei DVB-T oder ATV unterstützt.
HTC 2232D
51
Problembehandlung
Lesen Sie bitte die folgenden Informationen, um die mögliche Ursache zu einem Problem herauszufinden, bevor Sie sich an den Kundendienst wenden.
•
Technischer Kundendienst von Xoro/MAS: Tel.:: 040/77 11 09 17
Deutsch
•
Internet: www.xoro.de/support.htm
Problem
TV lässt sich nicht
einschalten
Lösung
•
Überprüfen Sie, ob das Stromkabel korrekt an der Steckdose und
dem Stromadapter angeschlossen ist.
•
Überprüfen Sie, ob das Kabel des Stromadapters korrekt am TVGerät angeschlossen ist.
•
Der elektronische Schaltkreis wurde evtl. zurückgesetzt.
Ziehen Sie den Stecker heraus, warten Sie 1 Minute, und schließen Sie dann den Stecker wieder an.
Kein Strom
•
Verbinden Sie das Gerät mit dem Stromnetz und schalten Sie
den Empfänger ein.
Kein Bild
•
•
Überprüfen Sie, ob das Antennenkabel korrekt angeschlossen ist.
Überprüfen Sie, ob der richtige Eingang ausgewählt wurde; verwenden Sie die Taste INPUT.
Überprüfen Sie die Helligkeit- und Kontrasteinstellungen im Bildeinstellungen.
•
Kein Ton
•
•
•
Bild weist
Farben auf
falsche
Das Bild ist instabil bei
Nutzung mit einem PC
Es gibt einige farbige
Punkte auf dem Bildschirm
•
•
•
•
•
•
Bild falsch gestreckt
an den Quellen
•
Fernbedienung arbeitet nicht
•
•
•
52
Überprüfen Sie, ob der Ton ausgeschaltet oder die Stummschaltung aktiviert ist (MUTE).
Erhöhen Sie vorsichtig die Lautstärke.
Prüfen Sie, ob die Audio-Kabel an den korrekten Eingängen angeschlossen sind.
Prüfen Sie, ob der korrekte Eingang ausgewählt ist; verwenden
Sie die Taste INPUT.
Überprüfen Sie die Verbindung zum TV Fernsehgerät.
Überprüfen Sie die Videoeinstellungen.
Überprüfen Sie, ob die Einstellungen bei den Bildeinstellungen
mit den Video-Ausgangseinstellungen des PCs übereinstimmen.
Hochauflösende LCD-Bildschirme weisen häufig einige, wenige
fehlerhafte Pixel auf. Achten Sie bei den Spezifikationen auf die
erlaubten Pixelfehler.
Dies ist normal und innerhalb der Grenzen unserer Qualitätskontrollen.
Der LCD befindet sich im falschen Anzeigemodus. Bitte betätigen
Sie die ROTE Taste um das Anzeigeformat von 16:9 auf 4:3 zu
ändern.
Wechseln Sie die Batterien.
Benutzen Sie die Fernbedienung in der spezifizierten Reichweite
(max. 5 Meter und 30 °)
Vermeiden Sie direkte Lichteinstrahlung in den Infrarotsensor.
HTC 2232D
Problembehebung DVB-T
Ursache und Lösung
Kein DVB-T Empfang /
Bildstörungen mit starken Mosaiken oder
Artefakten / Eingefrorene Bilder
•
•
•
Kein DVB-T Empfang in Ihrer Gegend.
Richten Sie die Antenne neu aus. Achten Sie auf die Richtung
des Sendemastes.
Bitte benutzen Sie eine aktive Zimmerantenne oder eine Dachantenne.
Weiderholen Sie den Suchlauf.
Kein Suchlauf möglich
•
•
Richten Sie die Antenne neu aus.
Kontrollieren Sie die Suchparameter.
Audio oder Untertitel
ohne
Funktion
bei
DVB-T
•
Drücken Sie die AUDIO Taste. Keine weitere Tonspur verfügbar.
Drücken Sie die SUBTITLE Taste. Oder keine Untertitel verfügbar.
Keine DVB-T Aufnahme möglich
•
•
•
•
•
•
•
Schließen Sie einen USB Datenträger am USB Anschluss an.
Überprüfen Sie den Datenträger am PC auf die Funktionalität.
Überprüfen Sie ggf. den Datenträger mit Hilfe der Einstellungen,
siehe dazu Seite 29ff.
Formatieren Sie ggf. den USB Datenträger, siehe Seite 29ff
Aufnahme nur bei DVB-T möglich
Kein Time Shift möglich
Siehe Fehlerbeschreibung „Keine DVB-T Aufnahme möglich“.
Media-Player:
Keine Bilder angezeigt
•
•
•
•
Media-Player:
Keine Musik abgespielt
•
•
•
•
Media-Player:
Keine Videos
spielt
USB Anschluss
abge-
•
•
•
•
•
•
•
Deutsch
Symptom
Schließen Sie einen USB Datenträger an dem USB Anschluss
an.
Wechseln Sie mit der INPUT Taste zu der USB Quelle.
Wählen Sie die Option Photo.
Stellen Sie sicher, dass der Datenträger Bilder in den Formaten
JPEG, BMP oder PNG enthält.
Schließen Sie einen USB Datenträger an dem USB Anschluss
an.
Wechseln Sie mit der INPUT Taste zu der USB Quelle.
Wählen Sie die Option Musik.
Stellen Sie sicher, dass der Datenträger Musikdateien in den
Formaten MP3, AAC, WMA oder WAVE enthält.
Erhöhen Sie die Lautstärke oder Drücken Sie die MUTE Taste.
Schließen Sie einen USB Datenträger an dem USB Anschluss
an.
Wechseln Sie mit der INPUT Taste zu der USB Quelle.
Wählen Sie die Option Video.
Achten Sie auf die beschriebenen Einschränkungen auf Seite
37.
Verbinden Sie den USB Datenträger vorsichtig mit dem TV.
Achten Sie auf die Hinweise auf Seite 7 und auf der Seite 30 bei
der Benutzung von USB Datenträger.
HTC 2232D
53
Hinweise für den DVB-T Empfang
Bildqualität
Deutsch
Die Bildqualität bei DVB-T ist in den einzelnen Ländern unterschiedlich. Im wesentlichen wird die
Qualität durch die verwendete Bitrate und den Sendeempfang beeinflusst.
Die gesendete Bitrate wird von den einzelnen TV Stationen festgelegt und kann auch nur von diesen
geändert werden. Falls Sie starke Mosaike, Artefakte oder ein unscharfes Bild empfangen, können
Sie ggf. versuchen, die Position der Antenne zu ändern, um einen besseren Empfang zu gewährleisten. Jedoch ist es z.B. selbst bei optimalen Empfangsbedingungen nicht möglich, bei einigen TV
Stationen eine bessere Qualität zu gewährleisten, denn die gesendeten Bitraten sind zu niedrig.
Hier einige Beispiele für Deutschland der unterschiedlichen Bitraten:
ZDF
2700 bis 4500 kbps
ARD
2000 bis 4500 kbps
Dritte Programme
1800 bis 3500 kbps
Private TV Sender
1800 bis 2700 kbps
Je höher die gesendete Bitrate ist, desto besser kann die Bildqualität sein und das Bild beinhaltet
weniger Artefakte, Mosaike oder Störungen.
Die Schärfe des Bildes ist neben der Bitrate auch von der gesendeten Auflösung und vom Quellmaterial abhängig. Verallgemeinert kann gesagt werden: je höher die Auflösung ist, desto schärfer ist das
Bild. Manche TV Stationen senden mit kleineren Auflösungen als andere.
Hier einige Beispiele für Deutschland der unterschiedlichen Auflösungen:
Öffentlich Rechtliche TV Sender
720x576 oder 704x576
Einzelne Private TV Sender
544x576 oder 528x576
Die Empfangsbedingungen können Sie teilweise selbst beeinflussen. Häufiges Kennzeichen eines
schlechten Empfangs ist z.B. ein eingefrorenes Bild oder die Meldung „Kein Signal“. Sie haben verschiedene Möglichkeiten, den Empfang zu verbessern. Es gibt drei verschiedene Antennenarten: die
passive, die aktive oder die Dachantenne.
Die passive oder aktive Antennen sind so genannte Zimmerantennen. Richten Sie die Antenne immer
so aus, dass Sie den besten Empfang haben. Achten Sie ggf. auch auf die Positionen der Sendemasten. Verwenden Sie nach Möglichkeit immer hochwertige Antennen.
Der beste Empfang ist durch eine Dachantenne gewährleistet, wie sie für den Empfang von analogen
terrestrischen Programme installiert war. Hier können Sie auch durch die Ausrichtung der Dachantenne ein besseres Bildergebnis erzielen.
Informationen zum Sendegebiet und den Positionen der Sendemasten erhalten Sie im Internet unter:
http://www.ueberallfernsehen.de. Dort finden Sie auch eine Übersicht der TV Sender, die digital empfangen werden können.
54
HTC 2232D
DVD-Player
Drücken Sie die INPUT Taste auf der Fernbedienung wählen Sie DVD, um den internen DVD-Player
zu aktivieren.
Deutsch
Nun hören Sie ein Geräusch des Laufwerkes, welches geöffnet wird. Das Laufwerk (Slot-In Loader) befindet sich auf der rechten Seite des Fernsehers. Legen
Sie die Disc mit der bedruckten oder beschrifteten Seite nach hinten ein (achten
Sie auf die Hinweise am Slot-in Loader). Die verspiegelte Seite zeigt nach vorne
und ist Ihnen zugewandt. Die Disc wird automatisch eingezogen und der DVDPlayer analysiert den Inhalt.
Hinweise:
•
Falls Sie eine Disc mit der bedruckten oder beschrifteten Seite nach vorne eingelegt haben,
versucht das Laufwerk den Inhalt der Scheibe zu lesen. Dieser Vorgang dauert länger als im
regulären Fall. Es folgt dann die Meldung „Keine Disc“, das Laufwerk öffnet sich und schiebt
die Disc nach draußen.
•
Um eine CD oder DVD aus dem Laufwerk auszuwerfen, muss sich das Gerät im DVD Modus
befinden. Drücken Sie dazu die OPEN/CLOSE Taste (▲) auf der Fernbedienung. Wenn das
Gerät sich nicht im DVD Modus befindet, bleibt diese Taste ohne Funktion. Drücken Sie die
INPUT Taste und wählen Sie „DVD“.
Funktionen des DVD-Players
Informationsanzeige
Es wird eine OSD-Anzeige (On Screen Display) auf dem oberen Teil des Bildschirms
eingeblendet, wenn bestimmte Funktionen ausgeführt werden oder die DISPLAY
Taste auf der Fernbedienung gedrückt wird. Das OSD ist eine benutzerfreundliche
Oberfläche zum Anzeigen des Wiedergabetyps. Die OSD-Darstellung variiert nach
den unterschiedlichen Speichermedien (DVD, CD, Musik-Disc).
Bei einer Video-DVD erscheint folgende OSD Informationsleiste mit folgenden Infos: Anzahl der Titel,
aktueller Titel (TT 1/2), der Anzahl von Kapitel in einem Titel (CH 33/35) und der bis dahin abgelaufenen
Abspielzeit im aktuellen Kapitel.
Beim erneuten Drücken der DISPLAY Taste wird dann bei einer Video-DVD angezeigt:
(Aktive Tonspur / Format der Tonspur DD 5.1 CH (Kanal) /
Untertitel (hier im Beispiel sind keine vorhanden (OFF) /
Weitere Perspektiven (in diesem Beispiel sind zur Zeit
keine andere Perspektiven aktiv).
Bei einer MPEG-4 Video Datei werden andere Informationen angezeigt als bei einer Video-DVD.
Wichtige Information bei einer ISO Datendisk mit
MPEG-4 Dateien sind:
Disk Format (hier CDROM) / Anzahl der Stücke oder
Tracks und der aktuell abgespielte Track (TRK 1/12) / Mit oder ohne Ton / Abgelaufene Zeit
HTC 2232D
55
DVD-Player
Funktionen des DVD-Players
Deutsch
Öffnen/Schließen
Um das Laufwerk (Slot-In Loader) zu öffnen oder zu schließen, drücken Sie die
OPEN/CLOSE Taste am Gerät oder der Fernbedienung.
Hinweise:
1.
Nun ist ein Geräusch zu hören, welches das Laufwerk des DVD-Players in den Zustand der
Diskaufnahme versetzt (geöffnet). Entweder betätigen Sie die Taste erneut, damit die Disk
eingezogen wird oder Sie schieben die Disk sanft in das Laufwerk, bis diese automatisch
weiter eingezogen wird.
2.
Um eine CD oder DVD aus dem Laufwerk auszuwerfen, muss sich das Gerät im DVD Modus
befinden.
3.
Achten Sie bei dem Einlegen der Disk, dass Sie die verspiegelt (unbedruckte) Seite sehen
können.
4.
Legen Sie ausschließlich 12 cm Disk in das Laufwerk.
Abspielen
Drücken Sie die Wiedergabe Taste, um die Disc abzuspielen.
Pause
Um die Wiedergabe zu unterbrechen, drücken Sie die Pause Taste. Der Film oder die
Musik wird angehalten. Im Falle eines Filmes sehen Sie ein „eingefrorenes“ Bild.
Setzen Sie den Film oder die Musik mit der Wiedergabe Taste fort.
Stopp
Mit der STOP Taste können Sie die Wiedergabe auf zwei Arten anhalten:
1.
Wenn Sie die STOP Taste einmal drücken, wird der Unterbrechungspunkt
gespeichert, und das OSD zeigt PRESTOP (Vorstopp) an. Die Wiedergabe
wird mit der Wiedergabe-Taste fortgesetzt.
2.
Drücken Sie die STOP Taste zweimal, wird die Disk komplett angehalten. Auf dem OSD ist
“STOP” zu lesen; die Wiedergabe-Taste setzt die Disc fort.
Nächstes Kapitel / Stück
Mit der >>| Taste springen Sie zum nächsten Kapitel einer Video-DVD oder zum
nächsten Song / Stück einer Audio-CD / MPEG-4 Video Datei.
Hinweis:
Bei einer DVD mit einem Kapitel oder einer CD mit einem Song ist Springen nicht möglich.
Vorheriges Kapitel / Stück
Mit der |<< Taste springen Sie zum vorherigen Kapitel einer Video-DVD oder zum
vorherigen Song /Stück einer Audio-CD / MPEG-4 Video Datei.
Hinweis:
Bei einer DVD mit einem Kapitel oder einer CD mit einem Song ist Springen nicht möglich.
56
HTC 2232D
DVD-Player
Funktionen des DVD-Players
Schneller Rück– oder Vorlauf
Mit dieser Taste können Sie die Disc zurückspulen. Drücken Sie mehrmals die Taste,
um die Geschwindigkeit zu erhöhen.
Hinweise:
•
Die Geschwindigkeit des schnellen Vor– und Rücklaufes ändert sich in folgender Weise:
Normal —> x2 —> x4 —> x8 —> x20 —> Normal
•
Mit der Wiedergabe-Taste kann die normale Wiedergabe fortgesetzt und der schnelle Rück–
oder Vorlauf beendet werden.
•
Der Player ist während des Suchlaufes stumm geschaltet.
Deutsch
Mit dieser Taste können Sie die Disc vorspulen. Drücken Sie mehrmals die Taste, um
die Geschwindigkeit zu erhöhen.
Menü
Wenn Sie während der Wiedergabe einer DVD die Taste D.MENU drücken, kehren Sie
zum Startmenü der DVD zurück.
Titel
Wenn Sie während der Wiedergabe einer Video-DVD die Taste TITLE drücken, kehren
Sie in das Titelmenü einer Video-DVD zurück.
Gehezu / Suche (Goto)
1.
Drücken Sie die Taste GOTO.
2.
Mit dem Cursor, den numerischen und der Taste OK können Sie den gewünschten Menüpunkt für die Auswahl Wiedergabezeit, Titel, Kapitel oder
Track bestimmen.
3.
Über die Taste OK bestätigen Sie die Auswahl.
4.
Über die Wiedergabe setzt sich an dem ausgewählten Punkt fort.
Numerische Tasten
Die numerischen Tasten (0 — 9) ermöglichen einen direkten Zugriff auf die Stücke, Dateien oder Songs einer Disk.
1.
Um direkt auf ein DVD-Kapitel oder einen CD-Song zuzugreifen, geben
Sie mit den Zahlentasten das gewünschte Kapitel bzw. den Song ein.
2.
Geben Sie Daten für das DVD-Startmenü oder das Einstellungsmenü des
Players ein.
Hinweis:
Von einigen DVDs wird der Direktzugriff nicht unterstützt.
Untertitel
Drücken Sie während der DVD-Wiedergabe wiederholt die Taste SUBTITLE, um den
gewünschten Untertitel auszuwählen. Eine DVD kann bis zu 32 auswählbare Untertitel enthalten.
HTC 2232D
57
DVD-Player
Funktionen des DVD-Players
Deutsch
Wiederholung (REPEAT)
Drücken Sie die REPEAT Taste um den Wiederholungsmodus zu starten. Mehrmalige Drücken der Teste verändert den Modus wie folgt:
Im Video-DVD
REP. CHAPTER
REP. TITLE
REP. OFF
Kapitel wiederholen
Titel wiederholen
Wiederholen aus
Daten Disc (JPEG, MP3, WMA, Videos)
REP. Track
REP. Folder
REP. ALL
REP. OFF
Datei wiederholen
Ordner wiederholen
Disc wiederholen
Wiederholen aus
VCD, SVCD, Audio CD
REP. 1
REP. ALL
REP. OFF
Song wiederholen
Disc wiederholen
Wiederholen aus
Hinweis:
Von einigen DVDs wird die Wiederholungsfunktion nicht unterstützt.
Audio-Sprache
Drücken Sie während der DVD-Wiedergabe wiederholt die Taste AUDIO, um die gewünschte Tonspur auszuwählen. Eine DVD kann bis zu 8 auswählbare Tonspuren enthalten.
Hinweis:
Das DVD-Startmenü kann Einstellungsmöglichkeiten für Winkel, Untertitel und Tonspur bieten, d. h.
Sie können diese Einstellungen möglicherweise auch dort vornehmen.
ZOOM
Drücken Sie die ZOOM Taste wiederholt. Es wird Folgendes auf dem TV-Bildschirm
angezeigt: Normal —> x2 —> x3 —> x4 —> x1/2 —> x1/3 —> x1/4 —> ZOOM OFF
Bei Wiedergabe eines JPEG-Fotos:
Drücken Sie die Zoom-Taste nacheinander für die Zoom-Faktoren x1/2, x1/3, x1/4; mit der Richtungstaste drehen Sie das Bild. Wenn Sie während der Anzeige des Zoom-Faktors x2, x3 oder x4 die Richtungstaste drücken, verschieben Sie die Bildposition.
Langsame Wiedergabe
Drücken Sie die SLOW Taste und die Abspielgeschwindigkeit verringert sich. Mehrmalige Drücken der Taste verändert diese:
Normal —> x1/2 -> x1/3 -> x1/4 -> x1/5 -> x1/6 -> x1/7 -> Normal
58
HTC 2232D
DVD-Player
Funktionen des DVD-Players
Programm Wiedergabe
Drücken Sie die Taste PROGRAM, um das Programm-Menü zu starten. Erneutes
Drücken ermöglicht auch das sofortige Beenden des Programm-Menüs.
Deutsch
Im DVD-Modus
Wenn das Programm-Menü angezeigt wird, geben Sie
die Titel- und Kapitelnummer ein. Sie können mit den
Pfeiltasten zu den entsprechenden Positionen wechseln
und auch Play oder Clear aktivieren.
Drücken Sie die Wiedergabetaste (PLAY) zum Starten
des Programms.
Drücken Sie die Taste OK auf dem CLEAR-Feld, wenn
Sie eine falsche Eingabe gemacht haben. Wenn Sie
CLEAR erneut drücken, werden alle Tracks abgebrochen.
Im CD-Modus
Wenn das Programm-Menü angezeigt wird, geben Sie die Songnummer ein, und drücken Sie die
Taste OK, wenn die Programmierung abgeschlossen ist. Drücken Sie die Wiedergabe-Taste (Play)
zum Starten des Programms. Drücken Sie die Taste OK auf dem CLEAR-Feld wenn Ihre Eingabe
falsch war oder Sie den Song abbrechen möchten. Wenn Sie die Taste OK auf dem CLEAR-Feld
erneut drücken, werden alle Songs abgebrochen.
Um den Programm-Modus zu verlasen, drücken Sie zweimal die STOP-Taste.
Hinweis:
•
Von einigen DVDs wird die Programmbearbeitung nicht unterstützt.
•
Discs mit nur einer Spur können nicht programmiert werden.
Stummschaltung
Drücken Sie die MUTE Taste um den Player stumm zu schalten. Zum aktivieren des Tones, drücken
Sie MUTE erneut.
Lautstärke ändern
Ändern Sie die Lautstärke in dem Sie die VOL -/+ Tasten auf der Fernbedienung nutzen.
HTC 2232D
59
DVD-Player
Datenspeicher mit Musik-, JPEG– oder Video-Dateien
Deutsch
Legen Sie einen Datenträger in das Laufwerk ein. Der DVD-Player durchsucht automatisch die Verzeichnisse nach gespeicherten Musik-/JPEG/Video-Dateien. Der Dateibrowser hat folgendes Aussehen:
Der DVD-Player enthält eine fest eingestellte Filterfunktion. Damit können Sie zwischen Musikdateien, Bilder oder Videodateien filtern. Der DVD-Player startet mit der Musikwiedergabe, falls Musikdateien im MP3 oder WMA Format vorliegen. Falls nur Bilder auf der Disk vorhanden sind, dann startet
der DVD-Player mit dem Dateibrowser. Sind nur Videodateien auf dem Datenträger gespeichert,
dann startet die Wiedergabe mit dem Dateibrowser.
Bei Datendisk mit unterschiedlichen Inhalten wie Musik, Bilder und Video startet der DVD-Player mit
der Musikwiedergabe und zeigt auch nur Musikdateien an.
Möchten Sie Bilder anschauen, dann müssen Sie mit der ►
Taste zu den unteren Symbolen wechseln. Mit den Tasten
◄/► können Sie eines der drei Symbole rot markieren. Bestätigen Sie die Auswahl mit der OK Taste.
Die Symbole bedeuteten:
Musikdateien
Bilder
Videodateien
60
HTC 2232D
DVD-Player
Datenspeicher mit Musik-, JPEG– oder Video-Dateien
Datendisk mit JPEG, MP3 oder MPEG Videos
Der Player unterstützt die Wiedergabe von JPEG Bilder.
Der Player unterstützt die Wiedergabe von MP3 und WMA Musikdateien.
Deutsch
Bitte beachten Sie bei Videodateien die folgenden Regeln:
1.
Die Auflösung der Filmdateien sollten maximal 720x576 Pixel betragen.
2.
Der Dateiname sollte nicht mehr als 10 Zeichen enthalten.
3.
Falls ein Zeichen nicht richtig erkannt wird (z.B. Sonderzeichen), so erscheint an der Stelle
dieses „_“ Zeichen.
4.
Falls bei MPEG-4 Dateien der Abstand der einzelnen I-Frames mehr als 30 Sekunden beträgt, dann kann es zu Störungen während des Abspielens kommen.
5.
Bitte beachten Sie bei dem Erstellen der MPEG-4 Dateien, dass Video und Audio nur mit der
„interleave“ Option abgespielt werden können.
6.
Dateien mit der Endung *.avi, *.mpg und *.mpeg werden angezeigt und ggf. abgespielt. Andere Formate sind unbekannt und werden ggf. auch nicht angezeigt.
7.
Verschiedene MPEG-4 Codices werden unterstützt. Sie müssen/sollten nach dem anerkannten Standard MPEG-4 Part 2 (MPEG-4 SP/ASP) erstellt worden sein. Andernfalls kann es zu
Fehlern bei der Darstellung kommen.
8.
Container Formate wie MKV, MP4 oder ähnliche werden nicht unterstützt.
9.
Der Codec H.264 oder VC1 wird nicht unterstützt.
10.
Unterstütze Audioformate in den MPEG-x Dateien sind:
•
MPEG-4:
AC3, MP3
•
MPEG-1/2:
MP2 / MPA
•
Sampling Frequenz:
8 - 48 kHz (MP3)
•
Bitrate:
8 bis 320 kbps (MP3)
Alle weiteren Funktion zum Abspielen von Musikdateien, Bilder oder Videodateien entnehmen Sie
den vorangegangenen Seiten in dieser Anleitung.
HTC 2232D
61
DVD-Player Einstellungen
SYSTEM SETUP
Deutsch
Um das Einstellungsmenü des Players aufzurufen, drücken Sie die Taste SET. In
diesem Menü können Sie Detaileinstellungen für das Gerät vornehmen. Markieren
Sie mit den Richtungstasten die Funktionssymbole. Drücken Sie die Taste OK zum
Bestätigen einer Auswahl.
Systemeinstellungen (SYSTEM SETUP)
Wählen Sie mit der Auf-/Abwärtstaste die entsprechende Option aus. Drücken Sie die Taste
ENTER, um das entsprechende Untermenü
anzuzeigen.
• Drücken Sie die Auf / Abwärtstaste, um die gewünschte Option zu markieren.
• Bestätigen Sie Ihre Eingabe mit der Taste OK.
TV-SYSTEM
Es stehen drei Modi zur Auswahl, die für Ihr TV-System in Frage kommen: NTSC / PAL / AUTO.
Falls der TV-Modus nicht stimmt, blinkt das Display des DVD-Players und der Bildschirm ist farblos.
Die Standardeinstellung ist PAL.
TV-Type
4:3 LB
Das Bild wird vollflächig dargestellt, dafür geht ein großer Teil der
Bildinformation verloren, da gewissermaßen nur der wichtige Bereich einer Szene gezeigt wird.
4:3 PS
Alle Bildinhalte werden dargestellt, allerdings wirkt das Bild durch die
schwarzen Balken am oberen und unteren Bildrand beengt.
16:9 (Breitbild)
Die Begriffe Breitbild oder Widescreen (engl. für Breitbild) wird allgemein, für alle Bildformate verwendet, die breiter als das Standardfernsehformat von 1,33:1 (4:3) sind, unabhängig davon, ob der
Film im Letterbox-Format innerhalb eines 4:3-Rahmens oder anamorph gespeichert ist – in der Regel
in Formaten ab etwa 1,66:1, häufig 2,35:1 und bis hin zu 2,76:1. Als „Breitbildfernseher“ werden meist
Geräte mit einem Seitenverhältnis von 16:9 (ca. 1,78:1, nahezu dem ebenfalls gängigen Kinoformat
von 1,85:1 entsprechend) bezeichnet.
Kennwort (PASSWORD)
Bewegen Sie den Cursor zum Eintrag PASSWORD (Kennwort), drücken Sie die Taste OK, und geben Sie den Geheimcode „0 0 0 0“ (wenn dies der erste Gebrauch ist) ein. Nach der Bestätigung
müssen Sie einen neuen Geheimcode eingeben und diesen mit OK bestätigen.
Hinweis:
Bitte merken Sie sich den neuen Geheimcode, da Sie die Kindersicherung ansonsten nicht mehr
ändern können. Falls Sie den Code vergessen haben, kontaktieren Sie Ihren Händler oder unser
Unternehmen.
62
HTC 2232D
DVD-Player Einstellungen
Deutsch
Kindersicherung (RATING)
Es gibt acht Stufen für diese Einstellung:
1.
KID-SAFE (kindersicher)
2.
2. G
3.
3. PG
4.
4. PG13
5.
5. PG-R
6.
6. R
7.
7. NC-17
8.
8. ADULT (Erwachsene)
Die erste Stufe ist für Discs, die für jedes Alter geeignet sind, und die achte Stufe für Discs, die nur
für Erwachsene bestimmt sind. Wenn Sie die Kindersicherungseinstellung ändern möchten, wählen
Sie die entsprechende Einstellung aus, und geben Sie dann den vierstelligen Geheimcode ein. Die
Werkseinstellung für den Code lautet 8357 (wenn Sie den Player zum ersten Mal verwenden, geben
Sie einfach diesen Code ein). Wurde der eingegebene Code bestätigt, wird die Stufeneinstellung
angezeigt. Bewegen Sie den Cursor zur gewünschten Stufe, und drücken Sie die Taste OK zum
Bestätigen und Speichern.
Standardeinstellungen (DEFAULT)
Mit dieser Funktion (Default) können Sie die Werkseinstellungen wiederherstellen. Wenn Sie RESTORE (Wiederherstellen) auswählen, werden die letzten Benutzereinstellungen rückgängig gemacht und
der Player auf die Werkseinstellungen zurückgesetzt.
Spracheinstellungen
Drücken Sie im Stopp-Modus die Taste DVD-SETUP,
und wählen Sie LANGUAGE (Sprache) aus.
•
•
•
•
•
Drücken Sie die > Taste, um in das Sprachmenü einzutreten.
Drücken Sie die Auf-/Abwärtstaste / .
Drücken Sie die Taste OK; das Untermenü
wird auf dem Bildschirm angezeigt.
Markieren Sie mit der Auf-/Abwärtstaste /
den gewünschten Eintrag im Menü.
Bestätigen Sie mit OK den ausgewählten
Eintrag.
OSD Sprache
Audio Sprache
Untertitel Sprache
Menü Sprache
Definieren Sie die OSD Sprache
Definieren Sie die bevorzugte Audio-Sprache bei einer Video-DVD
Definieren Sie die bevorzugte Untertitel-Sprache bei einer Video-DVD
Definieren Sie die bevorzugte Menü-Sprache bei einer Video-DVD
HTC 2232D
63
DVD-Player Einstellungen
Audio Lautsprecher-Einstellungen
Die AUDIO Einstellung enthält nur eine Option.
Deutsch
Positive Werte erhöhen die Höhen.
Negative Werte erhöhen die Bässe.
Digital-Einstellungen
Die Digital-Einstellungen enthalten zwei Optionen,
den dynamischen Bereich und Dual Mono.
Dynamische Bandbreite
Mit der Option „dynamische Bandbreite“ können Sie
das Maß der Dämpfung definieren. Bei der Einstellung
„Full“ wird die Ausgabe am stärksten gedämpft. Der
so genannte Nachtmodus.
Bei der Option „Aus“ wird die Tonausgabe nicht verändert und keine Kompression findet statt.
Dual Mono
Die Optionen bei Dual Mono sind:
Stereo
Der linke Monosound wird zu dem linken Lautsprecher gesendet und der rechte Monosound zu dem
rechten Lautsprecher.
L-Mono
Der linke Monosound wird zu beiden Lautsprecher gesendet.
R-Mono
Der rechte Monosound wird zu beiden Lautsprecher gesendet.
Mix-Mono
Linker und rechter Monosound wird vermischt an beide Lautsprecher gesendet.
64
HTC 2232D
Problemlösung DVD-Player
Sollte es Probleme mit Ihrem DVD-Player geben, prüfen Sie die folgende Liste, bevor Sie sich an den
Kundendienst wenden. Technischer Kundendienst von Xoro/MAS:
•
•
Tel.: 040-77 11 09 17
Internet: www.xoro.de/support.htm
Prüfen und Maßnahme
•
•
Keine Wiedergabe von Disk
•
•
•
•
•
•
Keine Disc eingelegt. Legen Sie eine Disc ein.
Disc wurde falsch herum eingelegt. Legen Sie die Disc mit der beschrifteten Seite nach hinten ein.
Regionaleinstellung der Disc stimmt nicht mit der des Players überein.
Alterseinstufung der Disc ist höher als Einstellung bei Kindersicherung.
Disc-Typ ist nicht für den Player geeignet.
Disc ist beschädigt oder Gerät war bereits ein oder zwei Stunden eingeschaltet.
Im Player ist es möglicherweise zu Kondensationen gekommen. Entnehmen Sie die Disc, und lassen Sie das Gerät ein oder zwei Stunden eingeschaltet.
Dateninhalt ist nicht konform
Deutsch
Symptom
Bild verrauscht/ Die Disc ist verschmutzt oder beschädigt. Säubern Sie die Disc, oder legen Sie
verzerrt
eine andere Disc ein.
Kein Vollbild
Springen und
Suchen nicht
möglich
Wählen Sie das Bildschirmformat im Einstellungsmenü des Players aus.
Manche Discs sind so programmiert, dass Benutzer einige Abschnitte nicht überspringen oder einen Suchlauf durchführen können (insbesondere im WARNUNGAbschnitt). Bei Discs mit nur einem Kapitel ist die Springen-Funktion nicht möglich.
•
Fernbedienung
funktioniert
nicht
•
•
•
•
Beseitigen Sie eventuelle Sichthindernisse zwischen Fernbedienung und
Player.
Richten Sie die Fernbedienung auf den Empfangssensor des Players.
Überprüfen Sie, ob die Batterien in der Fernbedienung korrekt eingelegt
sind (achten Sie auf die Polarität).
Tauschen Sie die Batterien der Fernbedienung aus.
Nutzen Sie nur die vom internen DVD-Player unterstützten Tasten.
HTC 2232D
65
Deutsch
Spezifikationen
Allgemeine Informationen
Strom
AC 100 - 240 V bei 50/60 Hz
DC 12V mit 5 A
Verbrauch
max. 55 Watt
Stand-By < 1 Watt
Maße
535 x 396 x 165 mm (inkl. Standfuß)
535 x 396 x 55 mm (ohne Standfuß)
Gewicht
4,8 kg (inkl. Standfuß)
Betriebsbedingungen
Temperatur
0 - 40° C
Feuchtigkeit
5 - 90% (nicht kondensierend)
DVB-T TV Tuner
Modulation
Audiosystem
TV Norm
COFDM,2k/8k, QPSK, 16QAM, 64QAM
MPEG-1 Layer 2, AC-3
PAL/SECAM
Anschlüsse
Video
Audio
TV Tuner
Andere
2x HDMI 1.3 mit HDCP, Videokomponenten, SCART, FBAS, VGA
Stereo IN, PC Audio IN, Digitalausgang (Koaxial), Kopfhörerausgang
DVB-T, Analog (CATV RF)
USB 2.0, DVD-Player
Bildschirm
Typ
Bildschirmgröße
Auflösung
Hintergrund
Kontrast
Helligkieit
Reaktionszeit
TFT LCD Panel
54,8 cm (21,6 Zoll)
1920 x 1080 mit 16:9 Seitenverhältnis
LED (Ecken)
1000:1
250 cd/m2
5 ms (Tr + Tf)
Audio
Lautsprecher
Audiosystem
Stereo Sound
2x 3 Watt
B/G, D/K, I,
NICAM/A2
Pixelfehler
Die auf dieser Seite definierten Pixelfehler (Helle, Dunkle Pixel, Liniendefekte und Helligkeitsunterschiede) beschreiben die maximal erlaubten Defekte in Art und Anzahl, welche von der Garantie
ausgeschlossen sind.
Helle Pixel (Bright Dot)
Dunkle Pixel (Dark Dot)
Helle + Dunkle Pixel
Liniendefekte
Helligkeitsunterschiede (Mura)
66
≤2
≤5
≤5
Nein
Nein
HTC 2232D
Contents
Safety information
Safety information's ............................................................................................... 5
Notes
Compatibility of Discs ............................................................................................ 9
Recycling ............................................................................................................... 9
In the box ............................................................................................................. 10
Features............................................................................................................... 10
Mounting the Stand ..................................................................................................... 11
Connectors
Rear Side ............................................................................................................. 13
Right Side............................................................................................................. 14
Top Side............................................................................................................... 14
Front Side............................................................................................................. 14
English
Quick Start Guide......................................................................................................... 12
The Remote Control
Insert Battery........................................................................................................ 15
Operation range ................................................................................................... 15
Buttons ................................................................................................................. 16
Connection
Power................................................................................................................... 18
Antenna ............................................................................................................... 18
SCART................................................................................................................. 18
HDMI.................................................................................................................... 18
YUV ..................................................................................................................... 19
CVBS ................................................................................................................... 19
USB Port .............................................................................................................. 19
VGA ..................................................................................................................... 20
Coaxial ................................................................................................................. 20
Headphone .......................................................................................................... 20
First Time Installation.................................................................................................. 21
Sources......................................................................................................................... 22
DVB-T Mode
Getting into DVB-T mode..................................................................................... 23
Important buttons and there functions ................................................................. 23
EPG ..................................................................................................................... 26
Analog TV Tuner
Getting into analog TV mode ............................................................................... 28
Important buttons and there functions ................................................................. 28
HTC 2232D
3
Contents
English
RECORDER
Preparing the USB storage .................................................................................. 29
Format.................................................................................................................. 30
Time Shift Size..................................................................................................... 30
Direct Recording .................................................................................................. 31
Time Shift Function .............................................................................................. 31
Media-Player
Connecting USB .................................................................................................. 33
Photos.................................................................................................................. 34
Music.................................................................................................................... 35
Video.................................................................................................................... 36
Text ...................................................................................................................... 37
LCD Settings
General ................................................................................................................ 38
Channel Setting ................................................................................................... 39
Picture Setting...................................................................................................... 43
Sound Setting ...................................................................................................... 46
Time Setting......................................................................................................... 47
Options................................................................................................................. 49
Lock Setting ......................................................................................................... 50
Troubleshooting LCD, ATV & DVB-T.......................................................................... 51
DVD Player
Getting into DVD mode ........................................................................................ 54
Important buttons and there functions ................................................................. 54
Data memories with Music-, JPEG or Video files ................................................ 59
DVD Setup ........................................................................................................... 61
Troubleshooting DVD........................................................................................... 64
Specification
General Specifications ......................................................................................... 66
Pixel Errors .......................................................................................................... 66
4
HTC 2232D
Safety Information
The lightning flash with an arrowhead symbol within an equilateral triangle is intended
to alert the user of the presence of un-insulated "dangerous voltage" within the
product's enclosure that may be of sufficient magnitude to constitute a risk of electric
shock to persons.
THIS DEVICE COMPLIES WITH PART 15 OF THE FCC RULES. OPERATION IS
SUBJECT TO THE FOLLOWING TWO CONDITIONS: (1)THIS DEVICE MAY NOT
CAUSE HARMFUL INTERFERENCE, AND (2) THIS DEVICE MUST ACCEPT ANY
INTERFERENCE RECEIVED. INCLUDING INTERFERENCE THAT MAY CAUSE
UNDESIRED OPERATION.
English
The exclamation point within an equilateral triangle is intended to alert the user of the
presence of important operating and
maintenance (servicing) instructions in the literature accompanying the appliance.
User Manual
1.
All the safety and operating instructions should be read before the product is operated.
2.
Retain Instructions - The safety and operating instructions should be retained for
future reference.
3.
All warnings on the product and in the operating instructions should be adhered to.
4.
All operating and use instructions should be followed.
Laser
This Digital Video Disc Player employs a Laser System of the class 1.
1.
Make sure the device is shut down prior to opening player lid.
2.
Do not open the appliance. Do not attempt to dismantle the appliance.
3.
In order to avoid any danger: Have service work only carried out by the manufacturer or an
authorized service workshop.
4.
Visible laser radiation when open and interlocks defeated.
5.
Use of controls or adjustments or performance of procedures other than those specified
herein may result in hazardous radiation exposure.
Operation
1.
Receiving analogue or digital TV broadcast.
2.
Playing of Video DVD, Video CD or Audio-CD. USB and card reader are part of the internal
DVD-Player.
3.
Connecting external devices by HDMI, video components (YUV), SCART, VIDEO or VGA.
4.
Record DVB-T broadcast on USB storage.
5.
Using Time Shift function with connected USB storage.
6.
Playback of media contents from USB storage, supports HD resolutions until 720p
7.
No other operation are allowed.
HTC 2232D
5
English
Safety Information
Power Supply
1.
Never touch the plug with wet hands.
2.
The device can be operated only with the number of voltage described on the back. If you do
not know the current you ask an electrician.
3.
To prevent overloading, you have many more devices on the same wall.
4.
If you want to pull the plug out of the plug socket, always pull directly on the plug. Never pull
on the cable as it could tear.
5.
Make sure that the power cable is not bent, caught or run over and that it does not come into
contact with heat sources.
6.
Make sure that the power cable is not wound around the device while in operation.
7.
Never place the machine on the power cable while it is being operated.
8.
Only use extension cables that are designed for the power consumption level of the machine.
9.
Keep the appliance away from rain and any moisture.
10.
Only operate the machine if the electrical voltage stated on the type plate beneath the
machine agrees with the voltage on your plug socket. The wrong voltage can destroy the
machine.
11.
Do not stand vases etc. on the appliance.
12.
Water could seep into the appliance.
13.
Do not open the appliance.
14.
Pull out the mains plug if the appliance is not to be used over a longer period of time.
15.
Take care that nobody can trip over the power supply cable.
Antenna
The device can be connected to an antenna.
1.
Unplug the power cord cable from the mains outlet before connecting or disconnecting the
DVB-T to/from the antenna, otherwise both might be damaged.
2.
If an outside antenna or cable system is connected to the product, be sure the antenna or
cable system is grounded so as to provide some protection against voltage surges and builtup static charges.
3.
Pull out the antenna connection if the appliance is not to be used over a longer period of time.
6
HTC 2232D
Safety Information
English
Operation and Position
1.
Do not place this product on an unstable cart, stand, tripod, bracket, or table. The product
may fall, causing serious injury to a child or adult, and serious damage to the product
2.
Protect the device against weather influences, moistures and high temperature.
3.
Never spill liquid of any kind on the product.
4.
During playback, the disc rotates very fast. Do not open or do not move the player during
playback. Otherwise the disc can be damaged.
5.
Do not connect accessories on the player which are not defined by the manufacture.
6.
Any mounting of the product should follow the manufacturer's instructions, and should use a
mounting accessory recommended by the manufacturer.
7.
A product and cart combination should be moved with care. Quick stops, excessive force,
and uneven surfaces may cause the product and cart combination to overturn.
8.
The internal player or a connected DVD-Player is able to show a still image on the TV screen
or monitor over an unlimited period of time. This can cause damage to the screen. It is
therefore advisable to activate the screen saver. Or switch the player off, if the device is not in
use.
9.
Do not uses the device permanent in the 4:3 mode. This can cause damage to the screen.
10.
Do not increase the volume when the device is just playing very quiet sections. This cold
damage the speaker if very loud passages starts all of a sudden after the quiet section.
11.
Place only 12 cm CDs or DVDs into the tray.
12.
Switch the device off by the Off/On switch if it is not going to used for a longer period of time.
13.
Disconnect the main plug during thunderstorms.
14.
Slots and openings in the cabinet are provided for ventilation and to ensure reliable operation
of the product and to protect it from overheating, and these openings must not be blocked or
covered.
15.
The openings should never be blocked by placing the product on a bed, sofa, rug, or other
similar surface.
16.
This product should not be placed in a built-in installation such as a bookcase or rack unless
proper ventilation is provided or the manufacturer's instructions have been adhered to.
17.
Do not expose the device and the remote control to direct sunlight.
18.
If an outside antenna or cable system is connected to the product, be sure the antenna or
cable system is grounded so as to provide some protection against voltage surges and builtup static charges.
USB port
1.
Due to legal requirements of CE-conformity, the customer is asked to only connect USBSticks to the USB port.
2.
The USB port can be supported up to 8 GB flash memory size. In order to the many different
USB-Sticks and the build-in electronics components a support of all USB-Sticks can not
guaranteed.
3.
Please format the USB-Sticks only with FAT 32 or NTFS file system. Other file systems are
not supported and can not recognizes by the USB port.
4.
The USB-Sticks will be prepared for recording. Thereby the storages needs to be formatted.
All data’s will be loosed. Please uses every time the same USB stick for recording or Time
Shift.
5.
Save all data’s from the USB memory before you connect to the TV set.
HTC 2232D
7
English
Safety Information
Defect
1.
Servicing - Do not attempt to service this product yourself as opening or removing covers
may expose you to dangerous voltage or other hazards. Refer all servicing to qualified
service personnel.
2.
Damage Requiring Service - Unplug this product from the wall outlet and refer servicing to
qualified service personnel under the following conditions:
a.
When the power-supply cord or plug is damaged.
b.
If liquid has been spilled, or objects have fallen into the product.
c.
If the product has been exposed to rain or water.
d.
If the product does not operate normally by following the operating instructions.
Adjust only those controls that are covered by the operating instructions as an improper
adjustment of other controls may result in damage and will often require extensive work by a
qualified technician to restore the product to its normal operation.
e.
If the product has been dropped or damaged in any way, and
3.
When the product exhibits a distinct change in performance this indicates a need for service.
4.
When replacement parts are required, be sure the service technician has used replacement
parts specified by the manufacturer or have the same characteristics as the original part.
Unauthorized substitutions may result in fire, electric shock, or other hazards.
5.
Please read in the section Troubleshooting our service address and phone number.
6.
Nicotine can be destroyed the electronically components and can pollute the LCD TFT panel.
Pixel Errors
The pixel errors (bright, dark pixel, line defects and brightness differences) defined in the
specifications describe the maximum allowed defects in type and number, which are excluded from
coverage.
Dolby
Manufactured under license from Dolby Laboratories. “Dolby” and the double-D symbol are
trademarks of Dolby Laboratories. Confidential Unpublished works. 1992-1997 Dolby Laboratories,
Inc. All rights reserved.
Macrovision
U.S. Patens Nos. 4,631,603; 4,577,216; 4,819,098; 4,907,093; 5,315,448 and 6,516,132
"This product incorporates copyright protection technology that is protected by U.S. patents and other
intellectual property rights. Use of this copyright protection technology must be authorized by
Macrovision, and is intended for home and other limited viewing uses only unless otherwise
authorized by Macrovision. Reverse engineering or disassembly is prohibited."
8
HTC 2232D
Notes
Recycling Information
English
Disc Compatibility
1.
Do you uses only 12 cm disc.
2.
Depending on the conditions of the recording equipment or the CD-R/RW (or DVD -R, DVD
+R, DVD -RW, DVD +RW) disc itself, some CD-R/RW (or DVD -R, DVD +R, DVD -RW, DVD
+RW) discs cannot be played on the unit.
3.
Do not attach any seal or label to either side (the labelled side or the recorded side) of a disc.
4.
Do not use irregularly shaped CDs (e.g., Heart shaped or octagonal) since they may result in
malfunctions.
5.
Some playback operations of DVDs and Video CDs may be intentionally programmed by
software manufacturers. This unit plays DVDS and Video CDs according to disc content
designed by the software manufacturer, therefore some playback features may not be
available or other functions may be added.
Recycling of electronic devices
This product is designed and manufactured with high quality materials and
components which can be recycled and reused.
This symbol means that electrical and electronic equipment, at their end-of-life, should
be disposed of separately from your household waste.
Please, dispose of this equipment at your local community waste collection/recycling
centre. In the European Union there are separate collection systems for used electrical
and electronic product. Please, help us to conserve the environment we live in!
Recycling of paper and carton
The material recycling symbol on the carton and user manual denotes that they are
recyclable. Dispose them not with the normal household waste.
Recycling of plastic parts
The material recycling symbol on the plastic parts denotes that they are recyclable.
Dispose them not with the normal household waste.
Green Dot
The “Grüne Punkt” denotes that the MAS Elektronik AG pays a duty to the
“Gesellschaft für Abfallvermeidung und Sekundärrohstoffgewinnung“.
Batteries
1.
The batteries can be returned free of charge after use in the shop or in
their immediate vicinity.
2.
The consumer is legally obliged to return of used batteries.
3.
The icons on batteries are with one of the two following characters,
consisting of a strikethrough trashcan and the chemical symbol of
heavy metals decisive for classification as contaminant-laden.
4.
Both symbols have the same meaning.
5.
Batteries that contain pollutants are characterised by chemical symbols: Pb = battery contains
lead, Cd = battery containing cadmium, Hg = battery contains mercury.
Every consumer is legally obliged to make these batteries with a collection of his church or in the
trade so that they can be conveyed to an environmentally sound disposal. We discard used batteries
for you free of charge and environmentally. Simply return them to us.
HTC 2232D
9
Notes
In the box
English
Following accessories should be in the box:
•
•
•
•
•
•
•
HTC 2232D LCD-TV
Remote Control with Battery
Manual
Video adapter cable phone jack to RCA for video components input
Main adapter
Wire for the main adapter
Warranty card
If any of the accessories are missing, then contact your dealer as soon as possible. Keep all the
original packaging in case you need to return the set to the dealer.
Features
•
•
•
•
•
•
•
•
•
•
•
•
•
•
•
•
10
LED Edge backlight for high picture quality and low power consumption.
Full-HD Resolution of 1920 x 1080 Pixel with 16:9 aspect ratio
Many Connections: VGA, RF, Y Pb Pr with progressive scan, Composite, SCART and 2x
HDMI
HDMI 1.3 with HDCP support
HDMI supports up to 1080p input resolutions
2x Stereo audio inputs for composite, video components and VGA
USB 2.0 High Speed port
PVR Ready - Records DVB-T broadcast on USB storage
Time Shift function when USB Stick is connected
HD Media-Player - Supports high definition videos in MPEG-2
Plays videos (MKV, AVI, MP4, MPG, TS), music (MP3, AAC, WMA) and pictures (JPEG,
BMP, PNG) from USB storage
Integrated analog TV Tuner with videotext
Integrated digital terrestrial TV Tuner (DVB-T) with EPG and videotext
Automatic or manual channel search
Auto-shutdown to save power when no signal input
DVD-Player inside with Slot-in technology
HTC 2232D
Mounting the Stand
The HTC 2232D is delivered with an un-mounted stand. Before you uses the TV set, please mount
the stand.
1.
2.
Unpack carefully the TV set from the gift
box. The bracket for the stand is premounted. On the bottom side you can find
two plugs.
Place the TV on a stable surface and
cover the piano black front panel with a
piece of cloth to avoid scratches.
English
3.
Place the stand in the correct position on
the leg retainer and insert them carefully
with the bracket (refer picture 2). Rotate
the stand in the bracket counterclockwise
(to left direction).
4.
The bracket click into the place with a
clack noise. Rotate the stand carefully to
control the correct fitting. Refer in picture 3
for details.
Set up at the TV again and lift them slightly. If the
wrong foot drops or sitting on the stand operator,
repeat the process again.
Notes:
•
Please mount the stand carefully.
•
Control the fitting of the stand after the mounting.
HTC 2232D
11
Quickstart Guide
1.
2.
3.
4.
5.
English
6.
7.
12
Mount the stand.
Connect the aerial or input source to the appropriate input socket at the rear of the set.
Connect the small round plug on the power adaptor cable to the power input socket at the
rear of the set.
Connect the main cable between the power adapter and the main supply. The LED will show
a red light.
Switch the power on by pressing the POWER button on the front panel or the remote control.
The LED will show a green light.
Use the INPUT button on the front panel or the remote control and a popup window with the
sources appears on the screen. You can select following sources: ATV, VGA, YUV, AV,
HDMI1, HDMI2, SCART, DTV, USB or DVD. You can use the front panel control to adjust the
volume or select a channel, as shown below, or you may use the remote control and confirm
by OK button.
A. Analog TV tuner (for example: cable system)
After switched on and press the INPUT button and choose “ATV” by pressing the navigation
button UP/DOWN and confirm by the OK button. Now the HTC 2232D is in analogue TV
Mode. By the first using of the TV set, the systems starts automatically the menu for
searching the TV channels (please refer page 21).
B. DVD-Player:
Switch on the unit and press the INPUT button and choose “DVD” by pressing the
navigation button UP/DOWN and confirm by the OK button. Now the HTC 2232D is in DVD
Mode.
C. DVB-T mode:
Switch on the unit and press the INPUT button and choose “DTV” by pressing the
navigation button UP/DOWN and confirm by the OK button. Now the HTC 2232D is in DVBT mode. By the first using of the TV set, the systems starts automatically the menu for
searching the TV channels (please refer page 21).
To switch the set off a short time, press the POWER button, the set will go into stand-by and
the LED will show red. lf you are not going to use the set for some time, switch the power off
completely by unplugging the mains cable.
HTC 2232D
Connectors
Rear Connection Panel
English
Name
POWER
USB
Function Description
Connect to Power Adapter
USB port for playback of audio, video and picture files
HDMI2
Second HDMI input
HDMI1
First HDMI input
SCART
Euro AV (Audio/Video) input
PC IN
Audio signal input for VGA (jack plug)
VGA
VGA signal of computer input
Coax
Headphone
Y Pb Pr
Video
L-in + R-in
RF
Digital Audio Output by coaxial (RCA)
Headphone (jack plug)
Video components signal input (jack plug)
CVBS video input (RCA)
Audio signal input for YPbPr and Video (RCA)
Connect to cable or air
HTC 2232D
13
Control Elements
Right Side
On the right side you can find the DVD-Player.
English
Notes:
1.
The DVD-Player has a Slot-In loader.
2.
Insert the disc into the loader so that the label side shows backwards and the
mirror side to the front.
3.
Do you uses on 12 cm disc.
Buttons on the top side
On the top side you can find
following buttons:
Button
Menu
CH+ / CHVOL+ / VOLINPUT
PLAY
EJECT
POWER
Function
LCD Settings
Change TV channel
Change volume
Select Source
Play button (DVD-Player)
Open/Close of the DVD loader
On / Off button
Front Side
LCD Panel
LED
The LED shows the status of the device. Red indicates
the Stand-By mode and Green indicates that the device is
ON.
IR
Infrared receiver
Speaker
Right and left speaker
IR = Receiver for the Remote Control
LED (Red = Stand-By / Green = On)
14
LCD Panel
LCD TFT Panel
HTC 2232D
Remote Control
Insert battery into the remote control
Insert the batteries in the remote control:
1.
Open the cover.
2.
Insert the batteries. Make sure to match - and +.
3.
Close the cover
Please follow the instructions below:
•
Do not insert the batteries in the wrong direction
•
•
•
•
•
English
Notes on batteries:
Improper use may cause battery leakage and corrosion.
Do not use different types of batteries together
If you do not use the remote control for a long time, remove the batteries
If the remote control operates not correctly, replace the batteries
lf battery leakage occurs, wipe the battery liquid from the battery compartment, then insert
new batteries
Make sure that the used batteries are disposed properly according to you local regulations.
Operation range
Point the remote control at the IR:
1. Within about 5 m
2. With an angle about 30 grade in both direction.
Notes:
•
•
•
•
•
Do not expose the IR of the device to a strong light source or direct sunlight.
Direct the remote control at the infrared receiver (IR) of the player
Do not drop the remote control.
Do not spill water or put anything wet on it.
Do not disassemble the remote control.
HTC 2232D
15
English
Remote Control
16
HTC 2232D
Remote Control
To display in a better view the picture of the
remote control is inverted.
Buttons of the remote control:
ATV: Analogue TV Tuner
DTV: Digital TV Tuner
DVD: DVD Player
REC: Recorder
USB: Media-Player
10.
11.
12.
13.
14.
15.
16.
17.
18.
19.
20.
POWER button
Exit button
MENU button for LCD settings
Picture mode button (PICTURE)
MUTE button
Numeric buttons (0 .. 9)
ATV + DTV: RECALL button
Increase Volume (VOL+)
Navigation cross (Up, Down, Left,
Right)
Decrease Volume (VOL-)
DVD + USB: Pause button (||); REC:
Time Shift button
DVD + USB: Play button (>)
ATV + DTV: Hide Videotext (CANCEL);
DVD + REC + USB: Fast Forward
button (>>)
ATV + DTV: Hold Videotext (HOLD):
DVD + REC + USB: Fast Rewind
button (<<)
REC: Recording list button (LIST);
DVD: Video-DVD Menu button
(D.MENU)
ATV + DTV: Channel list button (CH/
LIST); DVD: Setup setting button (SET)
ATV + DTV: Videotext button (TV
TEXT); DVD: Program Play button
(PROGRAM)
ATV + DTV: Videotext subpage button
(SUBPAGE); DVD + USB: Repetition
button (REPEAT)
Aspect Ratio button (RED) for sources;
ATV + DTV: Red function button for
Videotext; LCD: Function button; DVD:
Zoom function button
DTV: Schedule list button (GREEN);
ATV + DTV: Green function button for
Videotext; LCD: Function button; DVD:
Video DVD Title button (TITLE)
21.
22.
23.
24.
25.
26.
27.
28.
29.
30.
31.
32.
33.
34.
35.
36.
37.
38.
Information button (DISPLAY)
Audio button for DTV + USB + DVD
Sleep Timer button (SLEEP)
Sound mode button (SOUND)
Sources button (INPUT)
ATV + DTV: Channel up button (CH+)
Confirmation button (OK)
ATV + DTV: Channel down button
(CH-)
DVD + USB: Stop button; REC: Stops
recording
REC: Record button; DVD: Open/
Close the tray
ATV + DTV: Videotext Index Page
button (INDEX); DVD + USB: Previous
file or Chapter button (|<<)
ATV + DTV: Zoom of Videotext (SIZE);
DVD + USB: Next file or chapter button
(>>|)
DTV: EPG button
ATV + DTV: Favourite button (FAV)
DTV + DVD: Subtitle button
(SUBTITLE)
ATV + DTV: Shows hidden Videotext
pages (REVEAL); DVD + USB: Slow
motion button (SLOW)
ATV + DTV: Blue function button for
Videotext; LCD: Function button; USB:
Screen off button
ATV + DTV: Yellow function button for
Videotext; LCD: Function button; DVD:
Goto button (GOTO)
English
1.
2.
3.
4.
5.
6.
7.
8.
9.
Buttons of the remote control:
ATV: Analogue TV Tuner
DVB-T: Digital TV Tuner
DVD: DVD Player
REC: Recorder
USB: Media-Player
More button description on the next row.
HTC 2232D
17
Connection
English
Power connection
Connect the cable mounted female connector (IEC C13) of
the power cable to the male connector (IEC C14) of the power
adapter. Connect the female coaxial power connector to the
power plug of the TV set. Connect the CEE 7/7 plug with the
wall mounted power outlet.
On the front side you can see a red LED light. The TV set is
now in Stand-By mode. By pressing the POWER button on
the remote control or on the top side of the device the red
LED changes to a green light.
Antenna
The TV set has an analogue and a digital TV Tuner inside. For receiving analogue
TV signals please connect the antenna cable with the RF connector on the HTC TV
set and with the VHF/UHF roof antenna or with a CATV antenna plug.
For receiving digital terrestrial TV signals please connect the HTC TV set with the RF
plug and also with the roof antenna. If no roof antenna is available, please use indoor
aerial.
For activating the analogue TV Tuner, please switch with the INPUT button and
choose in the popup window „ATV“ or “DTV“ for digital terrestrial TV and confirm by
the OK button.
Note:
For getting the best DVB-T reception please uses the roof antenna. If not possible, than you can
connect the HTC TV set with an active indoor aerial.
SCART Input
Audio– and Video signals from a VCR or a setop box can
be transmitted by SCART. Please connect a SCART
cable with the SCART input on the HTC TV set and with
the SCART output on the VCR or setop box.
Press the INPUT button, choose „SCART“ in the popup
window and confirm by the OK button.
HDMI 1 and 2
If you want connect a multimedia device with HDMI like a
game console „PS3“ or a Setop box with the HTC TV set,
you can establish a HDMI connection. Please connect
the HDMI cable on the HDMI1 or HDMI2 interface on the
TV set and the HDMI output of the multimedia device.
Please press the INPUT button, choose „HDMI1“ or „HDMI2“ in the popup window and confirm by
the OK button.
18
HTC 2232D
Connection
With this kind of connection only video signals are transmitted. For listening sound on the TV you
should establish also a sound connection. Please connect the white and red wire of the 2-pin
component cable with the AUDIO OUT (source) and the RCA jack with the “L-in” and “R-in” of the TV
set.
English
Component Y Pb Pr Video– and Stereo Audio input
If you uses more than one multimedia terminals and the
SCART, HDMI and Video connection are used, than you
connect the next device by the audio/video component input
(Y Pb Pr). Please connect the video adapter cable with the
phone phone jack into YPbPr jack plug of the TV set.
Connect the 3-wire video component cable to the RCA jack
of the adapter cable and the other end to the multimedia
device. Please pay attention to the coloured coding of the
cable, inputs jacks (adapter cable) and the video output jacks (source):
•
“Y” with the green wire or RCA plug
•
“Pb” with the blue wire or RCA plug
•
“Pr” with the red wire or RCA plug
Please press the INPUT button, choose „YPbPr“ in the popup window and confirm by the OK button.
Video– and Stereo Audio input
If you uses more than one multimedia terminals and the SCART,
HDMI and YPbPr video connection are used, than you connect
the next device by composite. Please connect the CVBS cable
with the CVBS input of the TV set and with the CVBS output of
the multimedia device. With this kind of connection only video
signals are transmitted. For listening sound on the TV you should
establish also a sound connection.
Please connect the white and red wire of the 2-pin component
cable with the AUDIO OUT (source) and the RCA jacks “L-in”
and “R-in” of the TV set.
Please press the INPUT button, choose „AV“ in the popup window and confirm by the OK button.
USB Port
The USB port has different functions:
1.
2.
3.
4.
5.
PVR function
Time Shift Function
Playback of recorded TV programs
Playback of Video, Audio and Picture content from USB storage
Install new firmware version
Please press the INPUT button, choose „USB“ in the popup window and confirm by
the OK button.
HTC 2232D
19
Connection
English
VGA
You can use the TV set as a PC monitor by using the VGA interface. Please connect a VGA cable
with the VGA input of the TV set and with the PC.
With this kind of connection only video signals are transmitted. For listening sound on the TV you
should establish also a sound connection. Please connect the white and red wire of the 2-pin
component cable with the AUDIO OUT (source) and the stereo jack with the “PC IN” plug of the TV
set.
Please press the INPUT button and choose „VGA“ in the popup window. The VGA input is active.
Notes:
1.
Before you connect the HTC TV set with the PC, please change the graphic resolution of the
PC to: 640 x 480, 800 x 600 or 1024 x 768.
2.
Please establish the connection and switch to „PC-VGA“ input.
3.
For displaying the best results, please uses the native resolution of the TV LCD panel:
•
HTC 2232D —> 1920 x 1080 Pixel
Digital Coaxial Sound output
The specifications of DVB broadcast allows to transmit Stereo and/or Dolby Digital
sound. To output the Dolby Digital sound you can connect the TV set with a digital
amplifier and listen the sound by a connected speaker set.
Headphone
You can connect the a headphone on the TV set. Please insert the 3.5 phone
jack into the headphone connector.
20
HTC 2232D
First Time Installation
When you start the HTC 2232D TV set the first time and choose TV or DTV, than appears the
installation guide on the screen. With this guide you can search analogue and digital TV channels.
The search routine includes the frequencies of the analogue and digital broadcaster.
1.
2.
4.
5.
6.
English
3.
Please select the OSD language. You can
choose the pre-installed languages by
pressing the ◄ or ► buttons.
Press the ▼ button and navigate to the
option „Country“. Please choose the
suitable country by pressing the ◄ or ►
buttons.
Press the ▼ button and navigate to the
option “Search Mode”. Please choose by
pressing the ◄ or ► buttons the search
mode. The options are: ATV + DTV, DTV
or ATV. If you want to search only DVB-T
broadcast, than choose the option DTV.
Press the OK button and the search starts
immediately.
A new window opens on the screen, where
the status of the searching is documented.
The values of the found TV broadcast
stations of analogue, digital and Radio are
listed.
After finishing of the searching, all found
TV broadcast station will be saved into the
channel list. You can look at the TV
channel list by pressing the CH/LIST
button.
Note:
The complete searching needs a couple of minutes.
HTC 2232D
21
Sources
English
The single sources and inputs of the HTC2232D TV set can be choose by pressing the INPUT button
on the remote control or the INPUT on the top side of the TV set. A popup window appears on the
screen. The sources are:
DTV
ATV
SCART
YPBPR
DVD
PC
HDMI1
HDMI2
AV
USB
DVB-T TV Tuner
Analogue TV Tuner
SCART Video/Audio Input
Video component input
Internal DVD Player
VGA port
First HDMI input
Second HDMI input
CVBS Video Input
USB port
There you can choose the source by pressing the ▲/▼ button. Confirm the selected source with the
OK button.
22
HTC 2232D
DVB-T
Important buttons and there functions
Starts DVB-T Mode
If you want to uses the terrestrial digital TV (DVB-T), than you need to change the source into DTV.
Press the INPUT button and navigate to DTV with the ▲/▼ button. Confirm the selection DTV by
pressing the OK button.
Channel List
Press the CH/LIST button on the remote control and you gets the provided and
receives TV broadcast stations. By using the ▲/▼ buttons you can select the TV
station, which you like. To disappear thee channel list, press the EXIT button.
English
Change TV channel
To change to TV channel you can press the CH– or CH+ button.
Select TV Channel
You have also quick access to the different TV channels by using the numeric buttons.
Last TV channel
Press the RECALL button to go back to the last TV channel.
Change the Volume
By pressing the VOL– or VOL+ buttons you can adjust the volume of the speaker.
TV / Radio
Press the CH/LIST button to bring up the channel list. To switch between TV and radio, then press
the ► button repeatedly until the radio list appears. Select using the ▲ / ▼ keys to select the radio
transmitter and confirm the selection with the OK button.
Note:
Digital Radio will be not transmitted in every country.
EPG
Press EPG button to show the EPG information. For detailed information about the
EPG please refer the section about EPG.
Favourite list
If you had defined some TV or Radio into a favourite list, than you have a quick access
to the favourite list by pressing the FAV button.
HTC 2232D
23
DVB-T
Important buttons and there functions
Subtitle
Press SUBTITLE button to turn on or off the subtitle on the
screen. This function can be activated, if the service is
provide by the TV channel and program. In case that
subtitles are supported, than they will be listed into the
popup window. You can choose the subtitle and start them
with the OK button.
English
Note:
Subtitles are not supported in every country.
24
Tele- / Videotext
Press TV TEXT button to view the videotext information
of the current TV program.
1.
TV TEXT button starts and ends the Videotext
window
2.
CANCEL button fades out the Videotext window
and hidden them in the background.
3.
REVEAL button shows hidden Videotext pages
4.
HOLD button holds on the Videotext page during
the scan.
5.
SIZE button zooms the Videotext window.
6.
SUBPAGE button shows the subpages of
Videotext
7.
INDEX button makes a quick access to the index
page (normally page 100)
8.
RED button goes one page backward
9.
GREEN button goes on page forward
10.
YELLOW and BLUE button allows the quick
access to specific page
HTC 2232D
DVB-T
Important buttons and there functions
Language or another Audio
Press AUDIO button to change the audio language or the
audio track output. After pressing the AUDIO button a
popup window appears on the screen, where you can
select the preferred audio language or sound mode by
using the ▲/▼ buttons. Confirm the selection by pressing
the OK button.
Note:
Some broadcaster supports different languages or sound modes.
English
Quick-Information
Press the OK button during the live picture and a popup window appears on the screen. The
information in the window are TV program title, current date, current time, duration of the actual TV
program, resolution of the transmission (for example 576i) and if videotext is available.
On the right side you can find an arrow sign. By pressing the ► button you gets information about the
next TV program.
Information
Press the DISPLAY button during the live picture and detailed information are appears on the screen.
Beside the TV program title, time, date, duration time of the current program title, resolution of the
broadcast and if videotext is available, you can see the detailed EPG information of the current TV
program. With the ▲/▼ buttons you can browse all EPG information, if more than one page is
available. By pressing the ► button you gets information about the next TV program and there EPG
information.
HTC 2232D
25
DVB-T
EPG
English
The electronic program guide (EPG) can be activated by pressing the EPG button as well and the
EPG window appears on the screen.
The EPG window is organizes in three sections:
LEFT
Sort mode (current Time), Date with Time and Channel List
RIGHT
Detailed EPG information to on TV Program
BOTTOM
Buttons for operation
Sort Mode
The TV set sorts the EPG by Time or Channel.
Time
The EPG list is now sorted by time. To each TV broadcaster the actually TV programs is listed. With
the ▲/▼ buttons you can change to the TV channel. With the ◄ or ► buttons you can display the
previous or next page in this view.
TV channel
The EPG list is now sorted by TV channels. All
TV programs of the next 7 days are listed. If the
TV channel is marked with yellow, than you can
change them by using the ◄ or ► buttons.
With the ▲/▼ buttons you can browse into the
TV programs. If one TV program is marked
yellow bar, than you can goto the next or
previous page with the ◄ or ► buttons.
26
HTC 2232D
DVB-T
EPG
The operation buttons are listed in the bottom line.
INDEX
RECORD
GREEN
YELLOW
Switch the sort mode between Time and Channel
Starts the Timer programming on a marked TV program
Programs the starting of the TV set in the DVB-T mode
Shows the Timer Programming list on the screen
Would you like to schedule a recording, then press the RECORD button. On the TV set appears a
window in which are the parameters of the recording. Detailed information are on page 33.
English
The INDEX button to change the sorting sequence. The cursor is on the top box (left), so that is time
or station deposited yellow. Now go to the ◄ or ► keys to sort sequence.
Want to watch a particular program regularly, you can activate
the alarm. Press the GREEN button on a mail and then you
can set the parameters.
The figure shows the Options pop-up window. If necessary,
change the setting in which change with the ▲ or ▼ buttons
on the options. These are "Mode", "Minute", "Hour", "Date" and
"Month".
The options can be customized using the ◄ or ► keys to your
wishes.
The YELLOW button have access to the timer settings. There,
all scheduled events are listed. Within this list, you can also
delete events. Select an appropriate program and press the
RED button to delete from the list.
With the MENU button turn back a lever higher. Press the
EXIT button to exit the EPG window completely and you get to
the live image of the active channel.
HTC 2232D
27
TV Analog
Switch to ATV
If you want to uses the analogue TV Tuner (Cat TV), than you need to change the source into TV.
Press the INPUT button and navigate to TV with the ▲/▼ button. Confirm the selection TV by
pressing the OK button.
English
Channel List
Press the CH/LIST button on the remote control and you gets the provided and
receives TV broadcast stations. By using the ▲/▼ buttons you can select the TV
station, which you like. To disappear thee channel list, press the OK button.
Change TV channel
To change to TV channel you can press the CH+ or CH- button.
Select TV Channel
You have also quick access to the different TV channels by using the numeric buttons.
Last TV channel
Press the RECALL button to go back to the last TV channel.
Change the Volume
By pressing the VOL– or VOL+ buttons you can adjust the volume of the speaker.
Videotext
Please refer the description on page 24.
28
HTC 2232D
RECORDER
Preparing of the USB Storage
In DTV Mode Only
PVR function allows the unit to record live DTV program and make it available for reviewing at any
time.
NOTE:
• When PVR function is in progress, please don’t unplug the power and the external USB device at
will.
• When PVR function is active, the power indicator will blink with red and blue consecutively.
• Before start recording a program, please make sure the external USB device is connected.
• While recording, if the available storage space becomes low, the recording will be automatically
stopped.
English
Preparation of USB Storage for Recording
After connecting the memory, press the MENU
button on the remote control and select with the
arrow keys to select the menu Channel entry with
the arrow buttons ◄ / ►. Press DOWN arrow key
until you reach the sub PVR File System. Press
the ► button to open the menu. The menu PVR
File System appears on the screen.
The submenu PVR File System include the option for Select Disc,
Check PVR File System, USB Disc, Format, Time Shift Size and
Speed.
Select Disk
Select a disk to store the recorded file. Press the ▲▼ button
to select Select Disk and press the ► or OK button to prompt
a sub-menu.
Check PVR File System
Press the ▲▼ button to select Check PVR File System and
press the ► or OK button to start them.
After checking the file system, the item “USB Disk” will display
“Success” indicating the file system in the USB disk
connected has been checked and ready to use.
If the USB disk does not have a PVR File System, then unit
will prompt a message asking user to format it.
HTC 2232D
29
RECORDER
English
Format
Press the ▲▼ button to select Format and press the ► or OK
button to prompt a sub-menu which occurs only when the USB
device is plugged in for the first time, as shown.
WARNING
•
All data on the connected device will be lost if you
confirm to format.
•
It is strongly recommended that the USB device is
dedicated only for this unit. Various external data contain in the USB device might cause DVR
file system corrupt and requires formatting.
•
Once USB device is formatted, unit will create a unique file system on it. Therefore, it is not
advisable to connect USB device to a computer to export data.
PVR File System Type
The item PVR File System Type is highlighted and press the ◄► button to choose the File System to
be format and press the OK button.
FAT32
This file system is compatible with all computers, so that the disc be read after admission.
Hi Speed FS
This is a proprietary file system, which while browsing speed of the recording is optimized.
Once selected, you can define the partition size that is for the Hi Speed FS file system used. We
recommend a size of 50% of the disk in Hi Speed FS file system. The partition is formatted and
occupied.
After recording the file in the FAT32 partition will be stored so that they can also be read and edited
on a computer.
Time Shift Size
After the disk format is finished, the menu as shown on the right
will appear.
The item Time Shift Size is highlighted, press the ◄► button to
choose a size to be allocate for time shift. The maximum value
is 8 GB.
Press the ▼ button to highlight OK and press the OK button to
confirm and return.
Speed
Once USB device is checked, this item will display the USB
data transfer rate and the remaining space in it.
The last picture shows the ready USB storage.
30
HTC 2232D
RECORDER
Recording program
1.
Connect an USB storage to the USB port
2.
Make sure, that the USB storage is prepared for recording. Otherwise the storage will be not
accept.
3.
Only in DVB-T mode can be record a TV program.
4.
The system records a transport stream with the suffix TS.
Select the desired program then press the RECORD button on the remote control to
start recording and the progress bar will be displayed.
English
The operations are STOP for cancel the recording and PLAY for activates the trick modes. The trick
modes are similar than during Time Shift.
Press PLAY button to start the trick mode. The device start the playback of the recorded file from the
beginning. The recording continues in the background.
To change the operation please use the ◄► button to choose one option and confirm them with the
OK button.
PLAY
PAUSE
STOP
<<
>>
|<
>|
Starts the playback of the recording from the beginning
Pause of playback
Stops the playback (not the recording itself). Two times STOP ends the recording.
Fast Rewind with the speeds of x2, x4, x8 and x16 times
Fast Forward with the speeds of x2, x4, x8 and x16 times
Jumps 30 seconds backward
Jumps 30 seconds forward
Time Shift Function
This function allows you to pause and fast forward/rewind normal Live DTV viewing at
any time without missing any of the live broadcast, provide that a USB storage device is
connected. During viewing a DTV program, press the PAUSE button on the remote
control to pause live TV. A progress bar is displayed on the screen.
PLAY
PAUSE
STOP
<<
>>
|<
>|
Starts the playback of the recording from the beginning
Pause of playback
Stops the playback (not the recording itself). Two times STOP ends the recording.
Fast Rewind with the speeds of x2, x4, x8 and x16 times
Fast Forward with the speeds of x2, x4, x8 and x16 times
Jumps 30 seconds backward
Jumps 30 seconds forward
HTC 2232D
31
RECORDER
Playing recorded program
You can play the selected program in the recorded list.
Press the LIST button on the remote control to enter the Recorded List,
as shown:
Press the LIST button repeatedly to list the files by named Program,
Channel or Time.
English
Information about a recorded file
Press the ▲▼ button to select desired file and press the INFO or
►direction button to display the information of the file.
Playback
Press the ▲▼ button to select desired file and press the OK button to playback selected file.
While playing, you can see a playback progress bar as shown below.
Playback function
<< / >>
Fast Rewind or Forward
|<< / >>|
Jumps 30 seconds backwards or forwards
STOP
Stops the playback
PAUSE
Pause of the playback
32
HTC 2232D
Media-Player
This unit is designed with a USB port so that you can connect your USB device and playback the files
in the USB device.
•
•
•
•
•
•
English
•
The recognition speed of a USB storage device may depend on each device.
Please do not turn off the TV or unplug the USB device when the connected USB storage
device is working. When such device is suddenly separated or unplugged, the stored files or
the USB storage device may be damaged.
Please do not connect the USB storage device which was artificially manoeuvred on the PC.
The device may cause the product to malfunction or fail to be played. Never forget to use only
a USB storage device which has normal music files or image files.
Please use only a USB storage device which was formatted as a FAT32 file system provided
with the Windows operating system. In case of a storage device formatted as a different utility
program which is not supported by Windows, it may not be recognized.
Some USB storage devices may not be supported or operated smoothly.
If the name of a folder or file is too long, it will not be displayed or recognized.
Please backup the important file because a data of USB device may be damaged. Data
management is consumer's responsibility and in consequence the manufactures does not
cover the product bearing data damage.
Connecting the USB device
Enjoy the photo, music, movie and text stored in the USB device. In USB device, you
can not add a new folder or delete the existing folder.
1.
Connect the USB device to the USB PORT on the unit.
2.
Turn on the unit and press the INPUT button to enter the source menu.
3.
Press the ▲▼ button to select USB and press the OK button to enter the menu.
4.
Within this menu, press the ◄► button to select PHOTO, MUSIC, MOVIE or
TEXT and press the OK button to enter.
5.
Press the EXIT button to return to the previous menu.
HTC 2232D
33
Media-Player
Playing Photos
It’s available to playback the photo file( *.jpg, *.bmp, *.png ) in the USB device.
The On Screen Display may be different from your set. Images are an example to assist with the TV
operations. Optimal resolution of the pictures are resolutions of 1280x720 or 1920x1080 pixel. Other
resolutions are displayed according the they aspect ratio.
1.
2.
3.
English
4.
5.
6.
Press the ◄► button to select PHOTO and press the OK button to enter.
Press the ▲▼ button to select the desired folder and press the OK button to enter, as shown.
Press the ▲▼ button to navigate photo file and the photo selected can be previewed on the
right window, as shown below.
To create a playlist, press the OK button on each picture. All selected picture showing a tick
mark.
Press the Play (>) button to appear the picture in full screen mode. If you created a playlist,
than all files of them appears step by step on the screen.
Press the STOP button to end the full screen mode and the TV goes back to the file browser
view.
In full screen mode appears a navigation bar. Press the ◄► button to select on of the function in the
bar and execute them with the OK button. To fade out the navigation bar press the EXIT button on
the remote control.
If you press the ▲▼ button in full screen mode, than the playlist or the complete files list appears on
the screen. Here you can select a picture and display them by pressing the OK button.
34
HTC 2232D
Media-Player
Enjoying Music
It’s available to playback the music files in the formats MP3, WMA, WAVE and AAC from the USB
device.
1.
2.
3.
4.
6.
7.
8.
9.
English
5.
Press the ◄► button to select MUSIC and press the OK button to enter.
Press the ▲▼ button to select the desired folder and press the OK button to enter, as shown
below.
Press the ▲▼ button to select music file and the music selected can be played automatically,
as shown below.
You can create a playlist when you press the OK button on each selected music file. Press
the ► (PLAY) button to start displaying the music in full size.
When one or more music files are marked, the marked music will be played in sequence. For
example, if you want to listen to only one music repeatedly, just mark the music only and play
it.
If no music files are marked, all the music in the folder will be played in sequence.
During playing in full size, press the || button to pause playback and press the ► (PLAY)
button to resume. Press the |<< or >>| button to select previous/next file.
During playing in full size, press the << or >> button to activate fast backward or forward
playback and press the ► (PLAY) button to resume.
Press the STOP button to stop playback and go back to the music file list from the full sized
screen.
Overview after reading the folder of
the USB storage. If the cursor waits a
couple of seconds on one music file,
than the playback starts automatically.
Full screen view after pressing the
PLAY button on a selected music file.
On the right side of the window you
can see the playlist or the whole
folder.
Note:
During the music playback you can switch off the screen. Press the BLUE button (SCREEN) on the
remote control
HTC 2232D
35
Media-Player
Enjoying Movie
You can playback the movie files in the formats AVI, MPG, MP4, VOB, MOV, MKV, TS, M2T, and
TRP) in the USB device.
English
Limitations:
1.
The media player supports the playback of popular MPEG-2 codices (MPG, M2T) up to a
resolution of 1920 x 1080p.
2.
Please pay attention on the bit rate when you want to playback files, the bit rate is limited to
15,000 kbps. File with higher bit rates can be playback, but mostly with some troubles.
Operation:
1.
Press the ◄► button to select MOVIE and press the OK button to enter.
2.
Press the ▲▼ button to select the desired folder and press the OK button to enter.
3.
Press the ▲▼ button to select movie file and the movie selected is playing automatically on
the right window.
4.
When a movie is selected, use the OK button to mark or unmark the movie. Press the ►
(PLAY) button to start displaying the movie in full size.
5.
When one or more movie files are marked, the marked movie will be played in sequence.
6.
If no movie files are marked, all the movie in the folder will be played in sequence.
7.
During playing in full size, press the || button to pause playback and press the ► (PLAY)
button to resume. Press the |<< or >>| button to select previous/next file.
8.
During playing in full size, press the << or >> button to activate fast backward or forward
playback and press the ► (PLAY) button to resume.
9.
Press the STOP button to stop playback and go back to the movie file list from the full sized
screen.
During the playback of a video in full screen mode a navigation bar with many options appears on the
screen.
36
HTC 2232D
Media-Player
Navigation bar
Press the ◄► button to select one option in bar and execute the function with the OK button.
Activates the repetition mode
Segment repetition
Shows the playlist
Appears information of the current file on the screen
Slow motion playback
Stepwise playback
Go to a time index which you can insert
Increases the size of the video
Decrease the size of the video
Switches the aspect ratio
Displays all video files in the folder
English
REPEAT
A-B
Playlist
Info
Slow
Step
Goto Time
Zoom In
Zoom Out
Aspect Ratio
Display
Repeat mode
Here you can change the repetition mode. The options are Single, All or off.
Information
Shows information about the current video file on the right side of the screen.
A-B Segment
Start the segment playback in a loop function. Press OK button to set the first pint (A) and wait a
while to press again the OK button to mark the second point (B). The segment will be playback in a
loop function. To exit the segment playback press the OK button again.
Goto Time
Here you can insert a time index and than by execute the device jumps to this time index.
Aspect Ratio
If the video appears in full screen with a wrong aspect ration, than you can fix them with this option.
Text playback
The LCD Tv can playback text files. The navigation bar helps to navigate into the text files.
HTC 2232D
37
LCD Settings
Press the MENU button and you gets access to the different LCD settings. The beside picture shows
the different categories which characterizes with symbols.
Main Menu
English
Sub Menu
After starting the LCD settings you can change the category by using the ◄ or ► buttons. You can
enter in each category by pressing the ▼ button and this category is active. Each option or setting
can be change by ◄ or ► buttons. To exit the active category please press repeatedly the ▲ button.
The options are:
Time
Clock, On Time, Off Time, Sleep timer, Time zone and Auto Sleep
Sound
Sound mode, Treble, Bass, Balance, Auto Volume, Surround Mode and SPDIF
Picture
Picture Mode, Contrast, Brightness, Colour, Sharpness, Tint, Colour Temperature, Aspect Ratio,
Noise Reduction and Screen (only by VGA mode)
Channel
Auto Search, DTV manual search, TV manual search, Programme Edit, Signal Information, Software
Update, Start Record, Recorded List, Timer Programming, Timer List and PVR File System
Lock
Lock Channel, Password, Block Channel, Parental Control
Options
Language, Audio language, Subtitle language, Country, Default
To leave the TV settings, press the EXIT or MENU button.
38
HTC 2232D
LCD Settings
Channel setting
The channel settings includes the options for Auto Scan, DTV Manual Tuning, ATV Manual Tuning,
Programme Edit, Signal Information, Software Update, Start Record, Recorded List, Timer
Programming, Timer List and PVR File System
English
Auto Scan
With this setting you can search the TV broadcast station
for analogue and digital TV programs.
1.
Press the ▼ button and navigate to the option „Auto
Scan“.
2.
Please choose the suitable country by pressing the
◄ or ► buttons.
3.
Please choose the suitable Tune Type by pressing the ◄ or ► buttons.
4.
Press OK button to start the search run.
5.
A new window opens on the screen, where the status of the searching is documented. The
values of the found TV broadcast stations of analogue, digital and Radio are listed.
6.
After finishing of the searching, all found TV broadcast station will be saved into the channel
list. You can look at the TV channel list by pressing the CH/LIST button.
Note:
The complete searching needs a couple of minutes.
HTC 2232D
39
LCD Settings
Channel setting
DTV Manual Tuning
Press the ▼ button and navigate to the option “DTV manual
Tuning“. The search starts when you press the ► button.
1.
You can change the channel by using ◄ or ► buttons. So
you can define, on which channel shall be runs the search.
2.
Starts the searching by the OK button.
English
To leave the DTV manual tuning, press the EXIT or MENU button.
ATV Manual Search (ATV Manual Tuning)
Press the ▼ button and navigate to the option “ATV
manual Tuning“. The search starts when you press the
► button. The options are:
•
Storage To
•
System (B/G for West Europe, I for UK, D/K
for Eastern Europe and France, L or LL for
part of France)
•
Current TV channel
•
Search
•
Fine Tuning
1.
2.
3.
4.
With the ▲/▼ buttons you can browse to each
setting.
With the ◄ or ► buttons you can choose the position in the channel list, where the found TV
channel is stored.
Go to “Audio” and choose the Audio system by using the ◄ or ► buttons.
Go to “Search” and start them by the ► button.
Fine Tuning
By using the ◄ or ► buttons you can start the fine tuning of each TV channel, if the signal is too
weak or distorted.
With the RED button you can save the changes, if you for example has changes the Audio system.
To leave the ATV manual tuning, press the EXIT or MENU button.
40
HTC 2232D
LCD Settings
Channel setting
The option “Programme Edit” includes settings for Moving and sorting, Skip and define Favourites.
English
Move a TV channel
This option is responsible for sorting the TV channel, so that you can define your personal view of the
TV channel list.
1.
2.
3.
4.
5.
With the ▲/▼ buttons you can choose the TV channel, which shall be edit.
Press the YELLOW button and beside the chosen TV channel you can see now an arrow
symbol.
Move the TV channel with the ▲/▼ buttons on the position which you like.
Press the OK or YELLOW button to confirm and save the moving.
To leave the setting press the EXIT button.
Define TV Channels into Favourites
Here you can define your preferred TV channels into a favourite list. You can activate the list by
pressing the FAV button.
1.
With the ▲/▼ buttons you can choose the TV channel, which shall be edit.
2.
Press the FAV button and beside the chosen TV channel you can see now heart symbol.
3.
To leave the setting press the EXIT button.
Note:
If you want to delete a favourite TV channel from the favourite list, than browse the TV channel which
is marked by a heart symbol and press the FAV button. The heart symbol is deleted and this TV
channel can not seen anymore in the favourite list.
HTC 2232D
41
LCD Settings
Channel setting
Skip a TV Channel
With this option you can define single TV channel which can not dial anymore by using the numeric
buttons.
1.
With the ▲/▼ buttons you can choose the TV channel, which shall be skipped.
2.
Press the BLUE button and beside the chosen TV channel you can see now a vorbidden
symbol.
3.
To leave the setting press the EXIT button.
English
Rename a TV Channel (only by analogue TV channel possible)
With this option you can rename single analogue TV channel and define a new label.
1.
2.
3.
4.
5.
6.
With the ▲/▼ buttons you can choose the TV channel, which shall be skipped.
Press the GREEN button and beside the chosen TV channel you can see now green symbol.
With the ▲/▼ buttons you can browse the letters on each place.
With the ◄ or ► buttons you can go to the next position.
Save the new label of the TV channel by pressing the MENU button.
To leave the setting press the EXIT button.
Delete a TV Channel
With this option you can delete single TV channel from the TV list.
1.
2.
3.
With the ▲/▼ buttons you can choose the TV channel, which shall be skipped.
Press the RED button and the TV channel will deleted directly.
To leave the setting press the EXIT button.
Note:
The selected TV channel is now deleted from the TV channel list.
Signal Information
Displays some signal information of the current TV Channel
Software Update
Install with this option a new software.
Start Record
Starts immediately the recording of the current channel, when an USB storage is connected.
Recorded List
Shows the recordings in a list.
Recording Timer
Appears the timer programming on the screen.
Schedule List
Appears the timer programming list on the screen.
PVR File System
Prepares the USB storage for recording. The detailed description you can find on page 29.
42
HTC 2232D
LCD Settings
Picture setting
The picture settings includes option for “Picture Mode”, “Contrast”, “Brightness”, “Colour”,
“Sharpness”, “Tint”, “Colour Temperature”, “Aspect Ratio”, “Noise Reduction” and “Screen”.
English
Picture Mode
With the ◄ or ► buttons you can choose the picture mode. The live picture changes to the preset
settings. The presets are Dynamic, Standard, Mild and User. You can define you own settings if you
uses the USER options.
Brightness
With the ◄ or ► buttons you can select the level of brightness. This option is only than active, when
you uses the USER option by the picture mode.
Contrast
With the ◄ or ► buttons you can select the level of contrast. This option is only than active, when
you uses the USER option by the picture mode.
Colour
With the ◄ or ► buttons you can select the level of contrast. This option is only than active, when
you uses the USER option by the picture mode.
Sharpness
With the ◄ or ► buttons you can select the level of sharpness. This option is only than active, when
you uses the USER option by the picture mode.
Tint
With the ◄ or ► buttons you can select the level of hue. This option is only than active, when you
uses the USER option by the picture mode.
HTC 2232D
43
LCD Settings
Picture setting
Colour Temperature
With the ◄ or ► buttons you can select the level of colour temperature. The three preset options are
Cool, Warm, Medium and User.
You can define you own settings if you uses the USER options. Than you can get access to the three
colours “Red”, “Green” and “Blue”. Select the level of each colour by using the ◄ or ► buttons.
English
Aspect Ratio
With the ◄ or ► buttons you can select the aspect ratio and changes the view on the screen. The
options are:
•
•
•
•
•
•
16:9 - The picture is every time in full screen mode, independent from the supported aspect
ratio.
4:3 - The picture view is 4:3 and shows on the left and right side a black bar, independent
from the supported aspect ratio.
Auto - The view is defined by the supported aspect ratio and the adjustment is automatically.
By 16:9 is the picture in full screen and by 4:3 show the screen the black bars on the right
and left side.
Zoom 1 - This option can be used for an 4:3 aspect ratio. The picture is zoomed into full
screen by keeping the aspect ratio. Parts of the picture will be cut-off (specially on the top or
bottom side) and can not seen anymore.
Zoom 2 - This option can be used for an 16:9 widescreen or cinemascope picture. The
picture is zoomed into full screen by keeping the aspect ratio. Parts of the picture will be cutoff (specially on the right and left side) and can not seen anymore.
Panorama - Good option if film will be in CinemaScope format. The image is enlarged until
The black edges vanish above and below. However, on the right and left side are also image
information is lost.
By every source except the internal DVD-Player you can change the aspect ratio by pressing the
RED button on the remote control.
Note:
Do not uses the 4:3 aspect ratio every time, because you can damage the TFT LCD screen.
Noise Reduction
With the ◄ or ► buttons you can activate or deactivate the noise reduction. The option are:
•
•
•
•
•
Off
Low
Middle
High
Default
Noise reduction is off
The TV set produces a little noise reduction
Middle strength of noise reduction
Strong strength of noise reduction - often with too much sharpness
Standard option for noise reduction
Note:
Adjust the noise reduction in order your own impression.
44
HTC 2232D
LCD Settings
Picture setting
When you uses the VGA input, than you have several additional options for the adjustment of the
picture. These options are behind the setting SCREEN.
Press the ► button to get access to the SCREEN options. The sub-options are:
Auto Position
Horizontal Position
Vertical Position
Size
Phase
Auto Position
You can uses the Auto adjust option to synchronizes the picture from the PC VGA port in an optimal
way. Press the ► button to synchronizes the screen display.
English
•
•
•
•
•
Horizontal and Vertical Position
With these option you can adjust the VGA picture manually on the screen. Press the ◄ or ► buttons
and the picture shifts to high and width.
Size
Press the ◄ or ► buttons to change the size of the VGA picture on the screen, until a stable image is
obtained.
Phase
Use ◄ or ► buttons to adjust the phase of the ADC sampling clock relative to the H-sync signal, until
a stable image is obtained.
Save the new settings by pressing the MENU button.
To leave the setting press the EXIT button.
HTC 2232D
45
LCD Settings
Sound setting
English
The sound settings includes options for “Sound Mode”, “Treble”, “Bass”, “Balance”, “Auto Volume” ,
“Surround” and “SPDIF”.
Sound Mode
With the ◄ or ► buttons you can select the sound mode. The preset options are Music, Movie, Sport
and Standard. You can define you own settings if you uses the USER options. Than you have access
to the settings of treble and bass.
Treble and Bass
With the ◄ or ► buttons you can select the level treble and bass. These option are only than active,
when the USER option by sound mode is set.
Balance
With the ◄ or ► buttons you can select the balance.
Auto Volume
With this option you can activate an automatic damping of the volume, if very loud sound passage are
happened. This mode is like a Night Mode. With the ◄ or ► buttons you can activate or deactivate
the damping.
Surround Sound
This option activates the surround effects by the sound output. With the ◄ or ► buttons you can
activate or deactivate the surround sound.
SPDIF Mode
Here you can switch off and on the digital sound output. If on, than you can choose between AUTO
and PCM output.
46
HTC 2232D
LCD Settings
Time setting
The Time settings includes the options for “Clock”, “Off Time”, “On Time”, “Sleep Timer”, “Auto Sleep”
and “Time Zone”.
English
Clock
Choose the clock setting with the ▼ button and start to change the clock by pressing the OK button.
An additional popup window appears on the screen.
With the ▲/▼ buttons you can choose every sub-option. With the ◄ or ► buttons you can change
the options. The sub-options are Date, Month, Year, Hour and Minute.
Press the OK button for the saving the changes.
Off Time of the TV
With this option you can program the TV set for automatically
switch off. Start the option by pressing the ► button and a new
popup window appears on the screen. There you can define
each setting to program the off time. The settings are:
•
•
•
Repeat
Here you can define the cycle of the off time Once,
Every Day, Monday-Friday, Monday-Saturday, Saturday-Sunday, Sunday or Off.
Hour - Define the clock in hour (e.g. 18 o’clock)
Minute - Define the clock in minutes (e.g. 15 minutes)
HTC 2232D
47
LCD Settings
Time setting
On Time of the HTC TV set
With this option you can program the TV set for automatically
switch on. Start the option by pressing the ► button and a new
popup window appears on the screen. There you can define
each setting to program the on time. The settings are:
English
•
•
•
•
•
•
Activate
Here you can define the cycle of the on time Once,
Every Day, Monday-Friday, Monday-Saturday,
Saturday-Sunday, Sunday or Off
Hour - Define the clock in hour (e.g. 18 o’clock)
Minute - Define the clock in minutes (e.g. 15 minutes)
Volume - Here you can define the volume level by switch on the HTC TV set
Source - Here you can define the source, in which the HTC TV set starts by On Time. You
can choose DTV, ATV and Radio.
Channel - Here you can define the channel which shall be starts
For example, you define the settings to Monday-Friday, 8:05 o’clock, Volume 40 and DTV. Than the
HTC TV set starts between Monday and Friday at 8:05 o’clock with the second TV channel (DVB-T)
by a volume of 40.
Sleep Timer
With the option you can program the Sleep Timer to switch off the HTC TV set. The preset steps are
defined in minutes.
Note:
You can also start the Sleep Timer by pressing the SLEEP button on the remote control. By
repeatedly pressing the SLEEP button you can change the presets minutes.
Auto Sleep
With this option you can program the HTC TV set for automatically switch off, when after several
minutes no active signal provided by the source (HDMI, DVD, VGA, ect.).
Time Zone
With this option you can set the Time Zone. If you had chosen by the first time installation the country,
than the Time Zone is defined already.
48
HTC 2232D
LCD Settings
Option
The Option Settings includes the “Language”, “Audio language”, Subtitle language”, “Country” and the
“Factory Default”.
English
You can change each setting by using the ◄ or ► buttons.
OSD Language
Here you can select the language for the OSD.
Audio language
This option is important in DVB-T mode and you can select the audio language. Some broadcast TV
stations supports multi-lingual TV programs.
Subtitle language
This option is important in DVB-T mode and you can select the subtitle language. Some broadcast TV
stations supports subtitles in TV programs.
Country
Here you can define the country. The country setting has influence by other options, like Time Zone
or the searching of ATV and DTV channels.
Restore Factory Defaults
With this option you can load and reset the factory default settings. All personally settings are deleted.
HTC 2232D
49
LCD Settings
Lock setting
The LOCK settings includes
the option for “Lock Channel”,
“Set Password”, “Block
Program” and the “Parental
Guidance”.
English
Before you can change the
settings, you have to insert the
preset password if you enter
into the menu. The password
is “0 0 0 0”
Lock Channel
With this option you can lock a
channel.
Set Password
With this option you can change the preset password. Please insert the new password and confirm
the new password again.
Block Program
With this option you can block single TV
channels. After starting the option the channel
list appears on the screen. With the ▲/▼
buttons you can choose TV channel which you
want to block. To block a channel please press
the GREEN button on the remote control. On the
chosen TV channel appears a lock symbol.
Save the settings by pressing the MENU button.
The block TV channel can not choose anymore.
Parental Guidance
With this option you can define the level of the parental control. The parental control can be only than
active when the TV broadcaster supports this function.
50
HTC 2232D
LCD Troubleshooting
Check the following guide for the possible cause of a problem before contacting service.
Technical Support of Xoro/MAS:
•
Tel.: 040/77 11 09 17
•
Internet: www.xoro.de/support.htm
Solution
TV won’t switch on
•
•
•
No picture
Check the mains cable is connected properly to both the mains
supply and the mains adapter
Check the cable from the mains adapter is connected properly to the
set.
The electronic circuit may have reset. Pull the plug out, wait for 60
seconds, then plug back again.
•
•
•
Check the aerial or other input is connected properly.
•
•
Check that the VOLUME isn’t turned down, or the MUTE button
pressed.
Check that the audio cables are connected to the correct inputs.
Picture is wrong colour
•
Check that the correct input is selected, using the INPUT button.
The picture is unstable
when used with a PC
•
Check the Picture Setting and adjust the view by Auto Adjust match
the video output settings of the PC.
There are a few
coloured spots on the
screen
•
High resolution LCD screens often have a small number of faulty
pixels.
This is normal and within the bounds of our quality control checks.
Picture with wrong
scaling
•
No sound
•
English
Problem
Check that the correct input is selected, using the INPUT button.
Check the brightness and contrast settings in the Picture Setting.
The LCD has the wrong aspect ratio. Please press the RED button to
switch the aspect ratio from 16:9 to 4:3.
HTC 2232D
51
LCD Troubleshooting
Symptom
Correction
No DVB-T reception
•
•
•
•
•
English
Picture freezes
Strong
artefacts
mosaics
•
or
No searching possible
No Audio or no second
audio language
No subtitles
52
•
•
•
•
•
•
Switch the player into the DVB-T mode.
No DVB-T reception in your region.
Realign the antenna. Please pay attention to the direction of
the antenna tower.
Please use an active indoor aerial or a roof antenna.
Retry the Auto Scan.
Realign the antenna. Please pay attention to the direction of
the antenna tower.
Please use an active indoor aerial or a roof antenna.
Realign the antenna. Please pay attention to the direction of
the antenna tower.
Realign the antenna. Please pay attention to the direction of
the antenna tower.
Control the Country selection
Press the AUDIO button. Many TV broadcaster supports just
only one language.
Press the SUBTITLE button. Many TV boradcaster does not
support subtitles.
HTC 2232D
DVB-T
Picture Quality
Die picture quality by DVB-T depends on the different areas and the different conditions. Some
parameters are important for the picture quality, the bit rates, the resolution and the reception of the
transmitted DVB-T signals.
In Germany the values are very different by the bit rates:
ZDF
2700 until 4500 kbps
ARD
2000 until 4500 kbps
HR
1800 until 3500 kbps
Private TV Stations
1800 until 2700 kbps
English
Bit rate
The bit rates is fixed by the TV broadcaster and can be different between each TV program. Also the
different TV broadcaster define the bit rate different to each others. If you see by watching DVB-T
strong mosaics structures, artefacts or an un sharp picture, than you can try to increase the Signal
strength and Signal quality by searching a better position of the indoor aerial. Maybe you can try also
to change a passive indoor aerial to an active indoor aerial. But, if you can realizes optimal condition
by receiving the DVB-T signals and you have anymore the artefacts or mosaics structures, than is the
transmitted bit rates to low.
If the bit rate is higher, than the picture quality is mostly better and the picture is more than less by
artefacts or mosaic structures.
Resolution
The second influence by the picture quality is the transmitted resolution. If the resolution is higher
than you can see a more sharper picture. For example:
ARD / ZDF
Other
720x576 or 704x576 (that’s PAL Full D1 resolution)
544x576or 528x576
Receiving Condition
If you see by the information Signal strength and Signal quality some low values, you can try to find
another antenna position to increases the reception quality. Visible indicators for a worst reception of
the DVB-T signals is for example the a freeze picture or the message “No Signal”.
The reception quality depends for example on the kind of the antenna. Three different kind of antenna
are available, the passive and active indoor aerial and the roof antenna. Realign your indoor aerial in
this way, that you get the best reception as possible. Helpfully it to know in which direction are the
public antenna power and than you can adjust the antenna to this direction.
If a passive indoor aerial can not receive the DVB-T signal strong enough, please try an active indoor
aerial. The best reception results are by the roof antenna possible.
HTC 2232D
53
DVD-Player
Press the INPUT button on the remote control and choose DVD for using the internal DVD
Player.
English
The DVD Slot-In loader opens and produces now some noise. The Slot-In
loader is on the left side of the HTC 2232D. Place the disc with the printed
side to the rear into the loader and push very slightly to the right side. You can
see the silver side. The loader moves in the disc automatically and reads the
disc information.
Notes:
•
If the disc is inserts with the wrong side, than the loader tries to read
the disc. This procedure needs more time than in a normal way. The
loader can not read the disc content and displays the message “No
disc” and moves out the disc.
•
To be able to eject a CD or DVD it is necessary to enable the DVD
mode. Otherwise the pressing of the OPEN/CLOSE button (▲) will be
without function. Switch on the unit and press the SOURCE button and choose “DVD” in the
source menu. Now the HTC 2232D is in DVD mode.
Functions
An On Screen Display (OSD) indicator will be displayed at the upper part TV screen
when certain functions are executed, or when pressing the OSD button on the remote
control.
The OSD indicator is a user friendly interface designed to display the status of
playback type . When a different disc is loaded (DVD, CD, Music ready); the
OSD indicator bar will be different.
The OSD bar will appear automatically if it is
activated by pressing the DISPLAY button,
Press the DISPLAY again and a new status bar
will appear. Press DISPLAY a third time and the OSD bar will disappear. When OSD indicator bar
appears, press other button, the OSD indicator bar will disappear automatically.
By pressing the DISPLAY button again the
following picture is shown by Video –DVD:
1.
Active sound track
2.
Format of sound track DD 5.1 CH (channel)
3.
Subtitle (not included in this example) (OFF)
4.
More aspects (in this example there are no aspects activate at moment)
By MPEG-4 video files the information is a bit
different than with a video DVD.
Important information for a ISO Data disk with
MPEG-4 files are:
1.
2.
3.
4.
54
Disc Format (here CDROM)
Number of tracks and which one is just played
With or without sound
Running time
HTC 2232D
DVD-Player
Functions
Open/Close
To open and close the disc tray. Press OPEN/CLOSE button on the front panel or the
remote.
Notes:
•
•
•
•
Player will not skip forward or backward during “WARNING” section of a DVD disc.
Single chapter DVD or single track CD cannot skip
Please pay attention that the silver side of the disc is in front of you
Please insert only 12 cm disc into the DVD-Player
English
Play/Pause
Press PLAY button to play the disc.
Pause
Press PAUSE button again to pause (still picture). Press PLAY button to playback the
content.
Stop
Press STOP button to stop in two modes:
•
Press STOP button once. Stop memorizes the interrupt position and the OSD
shows PRESTOP. Resume play by pressing PLAY button.
•
Press STOP button twice completely stop disc. The OSD shows “STOP” and the PLAY
button will resume disc.
Next Chapter / Track
Press this button skip advance DVD chapter or CD track.
Previous Chapter / Track
Press this button skip backward DVD chapter or CD track.
Fast Backward/Fast Forward
Press this button to fast backward through the disc. Repeatedly press the button.
Press this button to fast forward through the disc. Repeatedly press the button will
increase the search speed.
Notes:
•
The changes in speed by fast backward or fast forward are from Normal —>
x2 —> x4 —> x8 —> 20 —> Normal
•
The player is muted in fast forward or fast backward this mode.
•
Player will not fast forward or fast backward during WARNING section of a DVD disc
HTC 2232D
55
DVD-Player
Function
Video-DVD Title
While playing a DVD, press the TITLE button return to the DVD disc title menu.
English
DVD Menu
While playing a DVD, press the D.MENU button return to the DVD disc menu.
Numeric Buttons
Numerical key pad (Random Program access)
1.
To direct access a DVD chapter or a CD track, input the desired DVD
chapter or CD track number using the numerical key pad.
2.
Input data for the DVD disc start menu or the player’s setup menu.
Audio Track
While playback a DVD disc, press AUDIO button repeatedly to select the desired audio
sound track. A DVD disc may contains up to 8 selectable audio sound tracks.
Subtitle
While play a DVD disc, press SUBTITLE button repeatedly to select the desired
subtitle, A DVD disc may contains up to 32 selectable subtitles.
Note:
DVD disc start menu may contains set up of angle, Subtitle and Audio soundtrack selection. You may
do the selection in the disc start menu.
Search / Goto
1.
Press the GOTO button (Yellow) and than you get access to the GOTO
function.
2.
Select with the Cursor buttons (◄ or ►) the desired menu point. You can
select Title, Chapter/Track or Time. Uses the numeric button to choose for example the time
index.
3.
Press the OK button to confirm them.
4.
The playback continues from the insert time index, chapter/track or title.
56
HTC 2232D
DVD-Player
Function
Repeat Mode
Press PEPEAT button repeatedly to select the repeat mode. Press more than one
times the REPEAT button and the repetition mode changes depding of the kind of
content.
In Video-DVD mode
REP. CHAPTER
REP. TITLE
REP. OFF
Repeat chapter
Repeat title
Repeat off
VCD, SVCD, AUUDIO CD
REP. 1
REP. ALL
REP. OFF
English
In Data mode (JPEG, MP3, WMA, Video files)
REP. Track
Repeat track
REP. FOLDER
Repeat folder
REP. ALL
Repeat disc
REP. OFF
Repeat off
Repeat track
Repeat disc
Repeat off
Note:
Some DVD discs do not allow repeat function.
Zoom
Press the ZOOM button repeatedly TV Screen display:
ZOOM x2 —> ZOOM x3 —> ZOOM x4 —>ZOOM x1/2 —> ZOOM x1/3 —> ZOOM
x1/4 —> ZOOM OFF
When playback the JPEG. Press the ZOOM button display the zoom x1/2, x1/3, x1/4, press direction
button to rotate picture. While display the zoom x2, x3, x4, press direction button to move picture
position.
Slow Motion
Press the SLOW button and the playback speed decreases. Pressing more than one
times the SLOW button and the DVD-Player reduces the speed in following kind:
Normal -> x1/2 -> x1/3 -> x1/4 -> x1/5 -> x1/6 -> x1/7 -> Normal
HTC 2232D
57
DVD-Player
Function
Program
Press PROG button to quit the program menu.
English
In DVD mode
When the program menu appears input the Title and Chapter Number
PLAY:
Press PLAY button to start program play.
CLEAR:
Navigate to the CLEAR button if you want to cancel the wrong information
you input. Press OK again to cancel all the tracks.
In CD mode
When the program menu appears, input the Track number, press OK, when the programming is
completed.
Mute
Press the MUTE button and the device switches off the sound. Press again the MUTE button to
activate the sound.
Volume
Press the VOL+ or VOL– buttons to change the volume.
58
HTC 2232D
DVD-Player
Data memory with Music, JPEG or Video files
Insert the a disc and the player will auto search the directories saved Video/Music/JPEG files. After
searching, it will auto go to the first directory saved Music files (to the disc containing both Music and
JPEG files. To the disc containing single type of files, it will go to the first directory) and play the first
song in the directory (File name is highlighted). The screen displays as the picture below:
English
The DVD-Player includes a install filter function, so that you get a better overview of the files by misc
disc. The device filters the content to Music, Pictures and Videos.
If music files on the disc, than the DVD-Player starts the playback with the first music file.
If picture files on the disc, the DVD-Player starts with the browser view and shows all pictures files.
If video files on the disc, the DVD-Player starts with the browser view and shows all video files.
By misc disc (Music, Pictures and Video) the player starts the
playback of the first music file. When you want to watch
pictures or videos from misc disc, than you shall change the
filter function. Navigate with the ► button three symbols on
the bottom of the screen. Choose on the symbol by the (◄ or
► button and confirm them with the OK button.
The symbols represents:
Music Files
Picture Files
Video Files
HTC 2232D
59
DVD-Player
Data memory with Music, JPEG or Video files
English
Data Disc with Pictures, Music or Videos
1.
The DVD Player supports pictures in JPEG format.
2.
The DVD-Player supports music files in MP3 and WMA formats.
3.
The DVD-Player supports video files in various formats.
Video files compatibility with this player is limited as follows:
1.
Available resolution size of the MPEG-1, MPEG-2 and MPEG-4 file is under 720x576 (W x H)
pixel.
2.
The file name of the MPEG-1, MPEG-2 and MPEG-4 file subtitle is available by 10
characters.
3.
If there is impossible code to express in the MPEG-1, MPEG-2 and MPEG-4 file, it may be
displayed as " _ "mark on the display.
4.
If the number of the screen frame is over 30 per second, this unit may not operate normally.
5.
If the video and audio structure of recorded file is not interleaved, either video or audio is
outputted.
6.
Playable MPEG-1, MPEG-2 and MPEG-4 file are ".avi ", ".mpg ", ".mpeg".
7.
Different MPEG-4 codices are supported. There must be encoded with are MPEG-4 part 2
(MPEG-4 SP/ASP) standard.
8.
No video files with a codec VC-1, H.264 or any container of MP4, MKV, 3GP or QT not
supported by the player.
9.
Supported Audio formats in MPEG-x files are:
•
MPEG-4:
AC3, MP3
•
•
•
60
MPEG-1/2:
MP2 / MPA
Sampling Frequency:
8 - 48 kHz (MP3)
Bit rate:
8 to 320 kbps (MP3)
HTC 2232D
DVD Player Setup
Press the SET button to enter the player's setup menu. Setup menu is a facility for
the owner to adjust the detail setting of the player. For the detail of Setup menu see
"SET UP MENU" of this instruction manual. Various features of the player can be
adjusted in the SETUP menu.
1.
2.
Press SET button SETUP menu appears.
Press the UP/DOWN button to highlight the desired menu.
In STOP mode, press SET button Highlight SYSTEM SETUP. Press UP/DOWN button to select the
subtitle. Press ENTER button, the screen displays submenu.
Press UP/DOWN button to highlight the desired time
Press the ► button to enter the language settings.
Press OK confirm your selected item.
English
•
•
•
System Setup:
TV System
There are NTSC / PAL / AUTO three modes, and
choose one mode according your TV mode.
If the TV mode is not suitable as the DVD player
screen will blink and become colorless.
The default setting: PAL
TV Type
1.
4 : 3 Pan Scan: It is suit to the common size TV. When playing,
the picture will be cut . so that the TV screen is filled with
the picture.
2.
4 : 3 Letter box: when the player connect to the commonly
size TV, please select the type. The top and bottom of TV
screen will display black frame.
3.
16 : 9 Wide Screen: When the player connects to the wide
screen TV.
The default setting: 4 : 3 Pan Scan.
Password
Move the cursor the PASSWORD item and press OK button to confirm and then input the secret
code “0 0 0 0” (if it is the first use). After confirmation, you are required to input new secret code and
then press OK button to confirm.
Warning:
Please remember the new secret code, otherwise you will not be able to change the parental control.
Please contact the agent or our company if you forget the secret code.
HTC 2232D
61
DVD Player Setup
English
System setup
RATING
There are total eight levels of this control. Eight levels as follow:
1.
KID-SAFE
2.
G
3.
PG
4.
PG13
5.
PG-R
6.
R
7.
NC-17
8.
ADULT
The first level discs are open to people of average and eight level only suitable for the adult . If you
want to change the Parental control setting, enter the user’s age control item and then enter four
digital secret code. The default secret code is 8357(if you are using this player for the first time, just
input this code ). If the input code has been confirmed, the level setting up menu will appear. Move
the cursor to choose the expected level and press ENTER button to confirm and store it.
Default
This is the factory default setting up . When choose “RESTORE”, the previous setting up, by the user
will be cancelled and the player will come to the factory setting up state.
Language Setup
In STOP mode, press SET button and Highlight
LANGUAGE.
Here you can choose the OSD language for the DVDPlayer, the preferred AUDIO, Subtitle and Menu
languages during the playback of Video-DVD.
•
•
•
•
•
62
Press UP/DOWN button
Press UP/DOWN button to highlight the
desired item in the LANGUAGE menu.
Press the ► button to enter the language
settings.
Press OK to confirm your selected item.
Press SETUP button SET to quit.
HTC 2232D
DVD Player Setup
Audio setup
The setting “KEY” adjust the bass audio output.
Positive values for decreasing the bass.
Negative values for increasing the bass.
•
•
•
English
In STOP mode, press SET button
•
Press UP/DOWN button
DIGITAL SETUP.
•
Press the ► button to enter .
and
Highlight
Press UP/DOWN button to highlight the
desired item in the DIGITAL SETUP menu.
Press OK to confirm your selected item.
Press SETUP button SET to quit.
Dynamic Range
Here you can change the audio compression. If you choose the setting “FULL” than the audio gets
the biggest limitation. A kind of “NIGHT MODE”. By using the setting “OFF”, the audio gets no
compression.
Dual Mono
The options here are Stereo, Mono L, Mono R and Mix Mono.
If you have Dolby digital output your amplifier/decoder, you may select stereo, left, right and mixed
sound accordingly.
HTC 2232D
63
Troubleshooting DVD
Our custom service will help you. Did you already read the Troubleshooting pages?
Technical custom service of Xoro/MAS:
•
Phone: +49 40 77 11 09 17
•
Internet: www.xoro.de/support.htm
Symptom
Check and Action
English
•
•
Does not play
•
•
•
•
•
Disc has been loaded upside down. Place the disc with the label side
up.
Disc’s region code does not match to the player.
Disc’s rating level is higher than the player’s rating level setting.
Disc is not correct type for the player.
Disc is damaged or power on for one or two hours.
Moisture may be condensed inside the player. Remove the disc and
leave the unit power on for one or two hours.
•
•
•
Check the system connection is proper and secure.
Picture
Noise /distorted
•
The disc is dirty or damaged. Clean the disc or try another disc.
Picture not full
screen
•
•
•
Select the screen format from the player’s SETUP MENU.
No Picture
Problem
message display
on screen
Cannot SKIP
or SEARCH
Remote control
des not function
Check if the connection cables are damaged.
Clean the disc.
See “SETUP MENU” of this manual.
Select the screen format from DVD disc menu.
Following message will display when there is a problem with the loaded disc”
1. “WRONG REGIONAL DISC”: Disc’s region code is not match to the
player.
2. “WRONG PASSWORD”: The player refuse to play a disc with rating level
higher than the player’s rating level setting.
3. “WRONG DISC”: The player is equipped with automatic disc quality
detection software. When the player detects a problem disc or a damaged
disc, the player may keep playing the disc at lower quality or stop playing,
depending on the damage level of the disc.
•
•
•
•
•
•
64
No disc, load a disc.
Some discs are programmed that do not allow users to SKIP or GOTO a
some sections, especially at the beginning WARNING section
Single Chapter disc cannot apply SKIP function.
Remove the obstacles between the remote control and the player.
Point the remote control towards the remote sensor on the player.
Check if the batteries of the remote control have been loaded with
correct polarities.
Replace the batteries of the remote control.
HTC 2232D
Specifications
General data
Power
Consumption
TV Norm
Audio System
Stereo Sound
Dimension
Weight
AC 100-240 V, 50/60 Hz
< 55 Watt / Stand-By < 1 Watt
PAL/SECAM, NTSC (only playback)
B/G, D/K, I, L/L’
NICAM/A2
535 x 165 x 396 mm (incl. stand)
4.8 kg (incl. stand)
DVB-T TV Tuner
Modulation
Video System
Audio System
COFDM,2k/8k, QPSK, 16QAM, 64QAM
MPEG-2 Video MP@ML
MPEG-1 Layer 2, AC-3
Connection
Video
Audio
TV Tuner
Others
2x HDMI 1.3 with HDCP, Video components, SCART, CVBS, VGA
Stereo IN, PC Audio IN, Coaxial digital out, Headphone
BVB-T, Analogue (CATV RF)
USB 2.0 High Speed, DVD-Player
Panel
Type
Panel Size:
Resolution
Backlight
Contrast Ratio
Brightness
Response Time
TFT LCD Panel
21.6 inch (54.8 cm)
1920 x 1080 with 16:9 aspect ratio
LED (Edge)
1000:1
250 cd/m2
5 ms (Tr + Tf)
Audio
Speaker
Audio System
Stereo Sound
2x 3 Watt
B/G, D/K, I
NICAM/A2
English
Operating conditions
Temperature
0 - 40° C
Humidity
5 - 90% (non condensing)
Pixel Error
The pixel errors (bright, dark pixel, line defects and brightness differences) defined in the
specifications describe the maximum allowed defects in type and number, which are excluded from
coverage.
Bright Dot
Dark Dot
Bright + Dark Dots
Line defects
Mura
≤2
≤5
≤5
No
No
HTC 2232D
65
CONTENU
CONSIGNES DE SÉCURITÉ IMPORTANTES ............................................................... 3
Notes ............................................................................................................................. 10
Recyclage ..................................................................................................................... 10
CARACTÉRISTIQUES .................................................................................................. 11
Caractéristiques du téléviseur........................................................................................ 11
MONTAGE DU PIED ..................................................................................................... 12
DEMARRAGE RAPIDE................................................................................................. 13
PANNEAU ..................................................................................................................... 14
Panneau arrière ............................................................................................................. 14
Face droite ..................................................................................................................... 15
TÉLÉCOMMANDE ........................................................................................................ 16
Préparation .................................................................................................................... 16
Utilisation ...................................................................................................................... 16
Touches et fonctions ..................................................................................................... 17
Français
CONNECTIQUE ............................................................................................................ 19
Alimentation ................................................................................................................... 19
Antenne.......................................................................................................................... 19
Péritel............................................................................................................................. 19
HDMI.............................................................................................................................. 19
Vidéo composants ......................................................................................................... 20
S-Vidéo .......................................................................................................................... 20
VGA ............................................................................................................................... 21
PREMIERE INSTALLATION......................................................................................... 22
SELECTION DES SOURCE.......................................................................................... 23
TNT ................................................................................................................................ 24
Les touche importantes ................................................................................................. 24
Télétexte ....................................................................................................................... 25
Guide Electronique des Programmes ........................................................................... .27
TUNER ANALOGIQUE ................................................................................................. 29
Les touche importantes.................................................................................................. 29
Télétexte ........................................................................................................................ 29
ENREGISTREMENT……………………………………………………………………...…...30
Préparation du support de stockage USB…………………………………………………...30
Enregistrement d’une émission……………………………………………………………….32
Fonction Time Shift……………………………………………………………………………..32
Lecture d’un enregistrement…………………………………………………………………...33
LECTURE MULTIMEDIA………………………………………………………………………34
Photos……………………………………………………………………………………………35
Musique…………………………………………………………………………………………..36
Film………………………………………………………………………...……………………..37
HTC 2232D
3
CONTENU
REGLAGES LCD........................................................................................................... 39
Générale ........................................................................................................................ 39
Chaînes.......................................................................................................................... 40
Image ............................................................................................................................. 44
Son................................................................................................................................. 47
Heure ............................................................................................................................. 48
Options........................................................................................................................... 50
Français
DÉPANNAGE LCD........................................................................................................ 52
DEPANNAGE TNT…………………………………………………………………………….53
NOTES SUR LA RECEPTION TNT………………………………………………….……...54
FONCTIONNEMENT DVD............................................................................................. 55
Présentation ................................................................................................................... 55
OSD .............................................................................................................................. 55
Ouvrir / Fermer............................................................................................................... 56
Lecture / Pause .............................................................................................................. 56
Stop................................................................................................................................ 56
Avance / Retour rapide .................................................................................................. 56
Titre DVD ....................................................................................................................... 57
Menu DVD...................................................................................................................... 57
Pavé numérique ............................................................................................................. 57
Langue audio ................................................................................................................. 57
Sous-titres……………………………………………………………………………………….57
Recherche……………………………………………………………………………………….57
Modes répétition............................................................................................................. 58
Zoom .............................................................................................................................. 58
Ralenti…………………………………………………………………………………………...58
Programme ................................................................................................................... 59
Sourdine…………………………………………………………………………………………59
Volume…………………………………………………………………………………………..59
Fichiers musicaux, photo et vidéo.................................................................................. 60
CONFIGURATION DVD ................................................................................................ 62
Configuration système ................................................................................................... 62
Configuration langue ...................................................................................................... 63
Configuration audio ........................................................................................................ 64
Configuration Dolby........................................................................................................ 64
DÉPANNAGE DVD........................................................................................................ 65
SPÉCIFICATIONS ......................................................................................................... 66
4
HTC 2232D
CONSIGNES DE SÉCURITÉ IMPORTANTES
Ce symbole indique la présence d'un courant électrique dans cet appareil, qui
présente un risque de décharge électrique et d'accident.
Ce symbole indique que des instructions importantes accompagnent cet appareil et
qu'il est important de consulter le mode d'emploi et d'entretien.
Cet appareil a été testé et il a été établi qu'il est conforme aux limites fixées pour les
appareils numériques de classe B, conformément aux normes du FCC, section 15.
Ces limites sont destinées à fournir une protection raisonnable contre les
interférences dommageables dans une installation résidentielle. Cet appareil génère,
utilise et peut émettre des fréquences radio qui, en cas de mauvaise installation ou
d'utilisation non conforme aux instructions, peut causer des interférences
dommageables à la réception des ondes radio et hertziennes, ce qui peut résulter en
des arrêts intempestifs
Précaution :
Pendant la lecture, le disque tourne très rapidement. Veuillez à ne pas déplacer le lecteur lors de
l'ouverture, afin de ne pas endommager le disque.
Français
Avertissement :
Afin de réduire les risques d'incendie ou de décharge électrique, ne pas exposer ce lecteur DVD à la
pluie ou à l'humidité. N'ouvrez pas l'appareil à cause de la tension présente à l'intérieur de l'appareil.
Cette opération est strictement réservée au personnel qualifié.
Cet appareil est muni d'un laser. Pour éviter une exposition directe au rayon laser, n'essayez pas de
l'ouvrir. L'utilisation de commandes, de réglages ou de procédures différentes de celles spécifiées ciaprès comporte des risques d'exposition à des radiations. Ne pas tenter d'ôter le couvercle ou
d'effectuer vous-même des réparations. Veuillez faire réviser ce matériel par un professionnel qualifié
Piles
Avec une utilisation inadéquate des piles, le liquide de la pile pourrait couler ou la pile pourrait
exploser. Prenez les précaution suivantes pour éviter de tels accidents :
1.
2.
3.
insérez la pile correctement + et - ( c'est-à-dire en tenant compte des différents pôles )
Si le lecteur ne doit pas être utilisé pendant une longue période enlevez la pile.
Si la pile ne fonctionne plus, enlevez là soigneusement avec un chiffon, ainsi que le liquide
s'il y en a, avant d'insérer de nouvelles piles.
HTC 2232D
5
CONSIGNES DE SÉCURITÉ IMPORTANTES
Manuel d’utilisation
1.
Toutes les instructions d’utilisation et les consignes de sécurité devraient être lues avant
l’utilisation de cet appareil.
2.
Les instructions d’utilisation et les consignes de sécurité devraient être conservées pour une
utilisation future.
3.
Tous les avertissements sur le produit et dans ce manuel devraient être pris en compte.
4.
Toutes les instructions d’utilisation devraient être suivies.
Français
Laser
Ce lecteur utilise un système Laser de classe 1.
1.
Assurez-vous que l’appareil soit éteint avant d’ouvrir le couvercle.
2.
Ne pas ouvrir l’appareil ou essayer de le démonter.
3.
Afin d’éviter tout danger, veuillez faire réviser et réparer ce lecteur uniquement par le
constructeur ou un service après-vente autorisé.
4.
Radiations laser visibles lorsque l’appareil est ouvert et le verrouillage des commandes
désactivé.
5.
Une utilisation autre que celle spécifiée dans ce manuel peut provoquer une exposition
dangereuse à des radiations.
Fonctionnement
1.
Réception de chaînes TV avec tuner TV analogique et/ou numérique et avec télétexte et
EPG (EPG uniquement en DVB-T).
2.
Veuillez n‘employer le lecteur DVD intégré que pour jouer des DVD vidéo, des CD vidéo et
des CD audio. La prise USB et le lecteur de cartes font partie du lecteur DVD intégré.
3.
Vous pouvez raccorder des terminaux aux prises indiquées (HDMI, PC-VGA, YUV, SCART
et Vidéo).
4.
Enregistre la TNT sur support de stockage USB.
5.
Fonction Time Shift sur support de stockage USB.
6.
Lecture des fichiers multimédia depuis le support de stockage USB, compatible avec la
résolution 720p
7.
Toute autre utilisation n‘est pas autorisée.
Antenne
Le tuner TV analogique et/ou numérique se raccorde à une antenne.
1.
Lorsque vous désirez brancher ou débrancher l‘antenne, veuillez tout d‘abord éteindre
l‘appareil et débrancher la prise de la fiche. En cas contraire, il pourrait se produire des
réactions électromagnétiques et l‘appareil raccordé pourrait être endommagé.
2.
Si votre appareil est relié à une antenne externe, veuillez vérifier qu‘elle ou le câble soit mis à
terre.
3.
Si vous prévoyez de ne plus utiliser l‘appareil pour une longue période de temps, veuillez
obligatoirement retirer le câble d‘antenne.
6
HTC 2232D
CONSIGNES DE SÉCURITÉ IMPORTANTES
Alimentation
1.
Ne jamais toucher la prise avec les mains mouillées
2.
Si vous voulez débrancher la prise, toujours tirer directement sur la fiche et jamais sur le
câble, qui pourrait être endommagé.
3.
Vérifier que le câble électrique n’est pas plié, coincé ou en contact avec une source de
chaleur.
4.
Vérifier que le câble électrique n’est pas enroulé autour de l’appareil lorsque celui-ci est
allumé.
5.
Ne jamais placer l’appareil en fonctionnement sur le câble électrique.
6.
Toujours utiliser des rallonges électriques conçues pour le niveau de consommation
électrique de l’appareil.
7.
Mettre l’appareil à l’abri de la pluie et de l’humidité.
8.
Utiliser l’appareil seulement si le voltage de votre habitation correspond à celui spécifié sur
l’étiquette de l’appareil. Un mauvais voltage pourrait endommager sérieusement l’appareil.
9.
Ne jamais poser de vases ou autre contenant sur l’appareil; de l’eau pourrait s’infiltrer
dedans.
10.
Ne jamais ouvrir l’appareil.
11.
Toujours débrancher toutes les prises de l’appareil si celui-ci n’est pas utiliser pendant une
longue période.
12.
Faire attention à ce que personne ne puisse tomber à cause des câbles.
HTC 2232D
Français
Compatibilité de la prise USB intégrée
1.
Ne raccorder à la prise USB que des mémoires flash USB (clés USB) en raison des
directives européennes.
2.
Le système accepte les mémoires USB ou les cartes mémoire jusqu‘à 8 GB. Il existe
malheureusement une multitude de différentes clés USB ou de cartes et toutes ne peuvent
pas être reconnues.
3.
Seuls les supports de stockage USB formatés dans le système de fichiers FAT 32 et NTFS
sont utilisables. Les autres systèmes de fichiers ne sont pas compatibles et ne seront pas
reconnus par le port USB.
4.
Les supports USB doivent être préparés pour l’enregistrement. Par conséquent, les supports
doivent être formatés. Toutes données présentes lors du formatage seront perdues. Utiliser
le même support pour l’enregistrement et le Time Shift.
5.
Sauvegarder toutes les données présentes dans le support avant de le connecter au
téléviseur.
7
Français
CONSIGNES DE SÉCURITÉ IMPORTANTES
Fonctionnement et position
1.
Pendant la lecture, le disque tourne très rapidement. Ne pas ouvrir ou déplacer le lecteur
pendant la lecture, autrement le disque pourrait être endommagé.
2.
Ne pas connecter d’accessoires qui ne soient pas fournis par le fabricant.
3.
Ne pas placer ce lecteur sur un support instable, car il pourrait tombé et blessé quelqu’un et/
ou être endommagé. Utiliser uniquement des supports recommandés par le fabricant. Si vous
souhaitez utiliser ce lecteur avec un support mural, merci d’utiliser les supports
recommandés par le fabricant et de suivre ses instructions de montage.
4.
Si vous placer le TV sur un chariot, veuillez le déplacer précautionneusement. Des arrêts
subits, une force excessive ou des surfaces non planes peuvent entraîner la chute du lecteur.
5.
Le télévision doit être placé à une distance d‘au moins 5 cm (2 pouces) du mûr.
6.
Le télévision doit être placé à une distance d‘au moins 10 cm des côtés et à au moins 20 cm
du plafond/d‘une étagère.
7.
Le lecteur peut afficher une image fixe sur un téléviseur ou un écran informatique pendant un
temps illimité. Ceci peut endommager l’écran. Il est donc conseillé d’activer l’économiseur
d’écran ou d’éteindre le lecteur s’il n’est pas utilisé.
8.
Ne pas utiliser en permanence le lecteur au format 4:3, ceci pourrait endommager l’écran.
9.
Ne pas augmenter le volume lorsque le lecteur lit une partie calme, car si un passage très
bruyant suit, ceci pourrait endommager les haut-parleurs.
10.
Ne placer que des CD / DVD dans le chargeur.
11.
Utiliser le bouton ON/OFF du lecteur pour l’éteindre si vous prévoyez de ne pas l’utiliser
pendant un certain temps.
12.
Débrancher la prise électrique pendant les orages.
13.
Les fentes et ouvertures servent à la ventilation, assurent un bon fonctionnement et évite une
surchauffe de l’appareil. Ces ouvertures ne doivent pas être obstruées.
14.
Ne jamais placer l’appareil sur un lit, un canapé, un tapis ou autre surface similaire qui
risquerait d’obstruer les ouvertures de l’appareil.
15.
Ce produit ne devrait pas être placé sur une étage ou dans une armoire, sauf si la ventilation
nécessaire est possible.
16.
Protéger l’appareil des intempéries.
17.
Ne jamais verser de liquide sur le produit.
18.
Ne pas exposer l’appareil ou la télécommande directement à la lumière du soleil.
19.
Si une antenne extérieure ou un système satellite est connecté à l'appareil, veillez à ce qu'ils
soient reliés à la terre, afin d'assurer une protection contre la surcharge et les décharges
d'électricité statique.
20.
Ne pas raccorder d‘appareils supplémentaires n‘étant pas recommandés par le fabricant.
Macrovision
Brevets US Nos. 4,631,603; 4,577,216; 4,819,098; 4,907,093; 5,315,448 et 6,516,132
"Ce produit incorpore la technologie de protection de copyright qui est protégée par des brevets des
États-Unis et d'autres droits de propriété intellectuels. L'utilisation de cette technologie de protection
de copyright doit être autorisée par Macrovision, et est prévue pour la maison et d'autres usages
limités de visionnement seulement à moins qu'autrement autorisé par Macrovision. Le désossage ou
le démontage est interdit.“
Dolby
Construit sous le permis des laboratoires dolby. Le « dolby » et le symbole double-D sont des
marques déposées des laboratoires dolby. Travaux non publiés confidentiels. 1992-1997 laboratoires
dolby, inc. Tous droits réservés.
8
HTC 2232D
CONSIGNES DE SÉCURITÉ IMPORTANTES
Français
Défaut
1.
N'essayez pas de réparer cet appareil vous-même, en l'ouvrant et en retirant le couvercle,
vous vous exposez à un courant important. La maintenance de votre lecteur est strictement
réservée aux techniciens de maintenance qualifiés.
2.
Dommages nécessitant une réparation - Débranchez l'appareil de la prise murale et
référez-vous au personnel de maintenance qualifié sous certaines conditions :
a.
Lorsque le cordon d'alimentation ou la prise électrique sont endommagés
b.
Si du liquide ou un objet est tombé dans l'appareil
c.
Si l'appareil a été exposé à l'eau ou à la pluie
d.
Si l'appareil ne fonctionne pas correctement en suivant les conseils d'utilisation.
Ajuster uniquement les commandes qui sont couvertes par les conseils d'utilisation. Tout
ajustement impropre des autres commandes pourra entraîner des dommages et nécessitera
un travail supplémentaire de la part d'un technicien qualifié pour
réparer l'appareil.
e.
Si l'appareil est tombé ou s'il a été endommagé de quelque façon que se soit et que
l'appareil montre une modification de ses performances, ceci indique qu'une
réparation ou un contrôle est nécessaire.
3.
Si votre lecteur montre un changement important de ses performances, ceci indique d’une
réparation ou vérification est nécessaire.
4.
Pièces de rechange Lorsque le remplacement de certaines pièces est nécessaire,
assurez-vous que le technicien de maintenance a utilisé des pièces de rechange
spécifiées par le constructeur ou des pièces qui ont les mêmes caractéristiques que
l e s
pièces d’origine. Le remplacement par des pièces non reconnues pouvant en traîner des
risques d'incendie, de décharge électrique et d'autres dommages.
5.
Merci de lire la section « Dépannage », vous y trouverez nos coordonnées pour le Service
Après-Vente.
6.
Une forte libération de nicotine dûe à la fumée de tabac endommage l‘électronique de
l‘appareil. Ceci constitue une mauvaise utilisation de l‘appareil ne permettant pas de faire
valoir la garantie en cas de réparation.
Pixels défectueux
Les pixels défectueux (pixels blancs, pixels noirs, pixels défectueux en ligne et écart de luminosité
des pixels) définis dans les spécifications déterminent le nombre maximal de pixels défectueux toléré
et exclus de la garantie.
HTC 2232D
9
Notes
Compatibilité des disques
1.
En fonctions des conditions d’enregistrement ou des disques CD-R/RW (ou DVD -R, DVD
+R, DVD -RW, DVD +RW) eux-mêmes, certains CD-R/RW (ou DVD -R, DVD +R, DVD -RW,
DVD +RW) peuvent ne pas être lus par le lecteur.
2.
Ne coller aucune étiquette sur l’une ou l’autre des face d’un disque (face avec l’étiquette ou
face enregistrée).
3.
Ne pas utilisé de CD ayant une forme irrégulière (ex. en forme de cœur) Ceci pourrait
entraîner un mauvais fonctionnement.
4.
Certaines opérations de lecture de DVD ou CD vidéo peuvent être intentionnellement
programmées par les fabricants. Cet appareil lira les DVD et CD vidéo en fonction du
contenu conçu par le fabricant logiciel. De plus, certaines options peuvent ne pas être
disponibles et d’autres ajoutées.
Français
Recyclage Information
Recyclage de équipements électriques
Ce produit est conçu et fabriqué avec des matériaux et composants de haute qualité
pouvant être recyclés et réutilisés.
Ce symbole signifie qu’en fin de vie, les équipements électriques et électroniques
doivent être rapportés dans des zones de recyclage et ne doivent pas être jetés avec
les ordures ménagères.
Merci de déposer cet équipement dans votre centre de recyclage ou chez votre
revendeur. En Europe, il existe des systèmes de recyclage différents pour les produits
électriques et électroniques usagés. Merci de nous aider à prendre soin de notre
environnement.
Recyclage de papier et carton
Le symbole de recyclage sur le carton et le manuel d’utilisation montre qu’ils sont
également recyclables. Merci de le déposer dans un point de collecte « papier », autre
que les ordures ménagères.
Recyclage de plastique
Le symbole de recyclage sur les parties plastiques montre qu’elles sont recyclables.
Merci de les déposer dans un point de collecte « plastique », autre que les ordures
ménagères.
Point Vert
Le logo “Point Vert” indique que MAS Elektronik est en accord avec les règles de
recyclage européenne et cotise auprès des organismes compétents.
Batteries
1.
Les batteries doivent être rapportées au magasin ou dans les points
de collecte prévus à cet effet.
2.
L’utilisateur est légalement responsables de ses batteries usagées.
3.
L’une des deux icônes ci-contre signifie que les batteries en cause
peuvent corroder les contenant d’ordures ménagères ou contiennent
des métaux lourds entrant dans la classification des produits dangereux.
4.
Les deux symboles ont la même signification.
5.
Les batteries contenant des polluants sont marquées par les symboles chimiques suivants:
Pb = contenant du plomb, Cd = contenant du cadmium, Hg = contenant du mercure.
L’utilisateur est tenu par la loi de rapporter les batteries usagées au magasin ou dans les points de
collecte prévus à cet effet afin de protéger l’environnement. Nous pouvons prendre en charge
gratuitement vos batteries usagées. Veuillez nous les retourner.
10
HTC 2232D
Notes
Contenu de l'emballage
Lorsque vous ouvrez l’emballage pour la première fois, vérifiez qu’il contient bien tous les éléments
suivants :
•
•
•
•
•
Téléviseur HTC 2232D
Télécommande
Piles pour la télécommande
Mode d‘emploi
Carte de garantie internationale
S’il manque un des accessoires mentionnés ci-dessus, contactez votre revendeur.
Conservez l’emballage original au cas où vous devriez retourner l’appareil au revendeur.
Caractéristiques du téléviseur
•
•
•
•
•
•
Rétro éclairage Edge LED pour une image de haute qualité et une faible consommation.
Résolution 1920 x 1080, 16:9
Connectique: VGA, RF, Y Pb Pr progressive scan, Composite, Péritel et 2x HDMI
Prises HDMI 1.3, HDCP
Prises HDMI compatibles avec la résolution 1080p
2 entrées audio stéréo pour les entrées vidéo composite, vidéo composante et VGA
Français
•
•
•
•
•
•
•
•
•
•
Port USB 2.0 High Speed
Fonction magnétoscope numérique - enregistre la TNT sur support de stockage USB
Fonction Time Shift sur support de stockage USB
Lecture des fichiers multimédia HD de MPEG-2 depuis le support de stockage USB - jusqu’à
la résolution 1080p
Vidéo (MKV, AVI, MP4, MPG, M2T, TS), musique (MP3, AAC, WMA) et photos (JPEG, BMP,
PNG)
Tuner analogique, Télétexte
Tuner TNT, Guide Electronique des Programmes et Télétexte
Recherche manuelle et automatique des chaînes
Mise en veille automatique pour l’économie d’énergie
Lecteur DVD intégré
HTC 2232D
11
Montage du pied
Le HTC 2232D est livré avec un pied non monté. Avant toute utilisation, le pied doit être monté.
1.
2.
Déballer soigneusement le téléviseur du
carton. Le socle du pied est pré monté. Il y
a deux clips en dessous.
Placer le téléviseur sur une surface plane
et stable en protégeant la face avant avec
un chiffon doux ou une couverture afin
d’éviter les rayures.
Placer le pied sur le socle suivant l’angle
illustré par la photo 2. Tourner le pied dans
le sens contraire des aiguilles d’une
montre (vers la gauche, comme illustré cicontre).
4.
Il est normal d’entendre un clic lorsque le
pied est en place. Tourner doucement le
pied pour vérifier qu’il est bien fixé, comme
illustré ci-contre.
Français
3.
Redresser le téléviseur et le soulever légèrement.
Si le pied se détache du socle, répéter les
opérations ci-dessus.
Notes:
•
Monter le pied avec soin.
•
Vérifier que le pied est bien fixé.
12
HTC 2232D
Démarrage rapide
1.
2.
3.
4.
5.
6.
HTC 2232D
Français
7.
Monter le pied.
Brancher l‘antenne ou la source d‘entrée à l‘entrée correspondante (par exemple HDMI,
Péritel, etc.) se trouvant à l‘arrière de l‘appareil.
Brancher la petite prise ronde du câble de l‘adaptateur électrique à l‘entrée de courant se
trouvant à l‘arrière de l‘appareil.
Relier le câble électrique à l‘adaptateur électrique et à la prise.
Mettre l‘appareil en marche en appuyant sur la touche POWER soit sur le panneau de
commande de l‘appareil, soit sur la télécommande. La lampe LED commence alors à briller
en vert.
Appuyer sur la touche INPUT de l‘appareil ou de la télécommande, s‘affiche alors un menu
de sélection des sources. Il existe les possibilités suivantes: TV, SCART, YUV, Vidéo, VGA,
HDMI1, HDMI2, TNT, USB et DVD. Vous pouvez naviguer vers l‘option désirée à l‘aide des
flèches HAUT ou BAS. Confirmer à l’aide la touche OK. Vous pouvez régler le volume ou
sélectionner une chaîne tant avec les éléments de commande se trouvant à l‘avant de
l‘appareil qu‘avec la télécommande.
A. Mode TNT:
Mettre l‘appareil en marche et appuyer sur la touche INPUT. Appuyer plusieurs fois sur la
flèche HAUT/BAS jusqu‘à ce que „DTV“ s‘affiche en haut à droite et confirmer la sélection
avec la touche OK. Le HTC 2232D se trouve alors en mode TNT. Lors de la première mise
en marche, le téléviseur vous guide vers la recherche des programmes. La recherche est
décrite à la page 22.
B. Lecteur DVD:
Mettre l‘appareil en marche et appuyer sur la touche INPUT. Appuyer plusieurs fois sur la
flèche HAUT/BAS jusqu‘à ce que „DVD“ s‘affiche en haut à droite et confirmer la sélection
avec la touche OK. Le HTC 2232D se trouve alors en mode DVD. Lors de la première mise
en marche, le téléviseur vous guide vers la recherche des programmes. La recherche est
décrite à la page 22.
C. Tuner TV analogique (par exemple réseau de câble):
Mettre l‘appareil en marche et appuyer sur la touche INPUT. Appuyer plusieurs fois sur la
flèche HAUT/BAS jusqu‘à ce que „ATV“ s‘affiche en haut à droite et confirmer la sélection
avec la touche OK. Le HTC 2232D se trouve alors en mode TV. Lors de la première mise en
marche, le téléviseur vous guide vers la recherche des programmes. La recherche est décrite
à la page 22.
Si vous désirez éteindre l‘appareil pour une courte période de temps, veuillez appuyer sur la
touche POWER. L‘appareil se met ensuite en mode veille (stand by) et la lampe LED
s‘allume en rouge. Dans le cas où vous prévoyez de ne plus utiliser l‘appareil pour une
longue période de temps, veuillez éteindre complètement l‘appareil en retirant le câble
d‘électricité.
13
Panneau
Français
Panneau arrière
Nom
POWER
USB
Pour brancher le câble d’alimentation
Prise USB
HDMI2
Seconde entrée des signaux vidéo et audio numérique HDMI
HDMI1
Première entrée des signaux vidéo et audio numérique HDMI
SCART
Péritel
PC-IN
Entrée des signaux audio VGA (prise jack)
VGA
Pour connecter la prise VGA depuis un PC
COAX
Headphone
Sortie audio numérique coaxiale (RCA)
Sortie casque (prise jack)
Y Pb Pr
Entrée des signaux video composante (prise jack)
VIDEO
Entrée des signaux vidéo composite (RCA)
L-in + R-in
RF
14
Description de la fonction
Entrée audio stéréo Y Pb Pr ou composite (RCA)
Pour brancher câble ou antenne
HTC 2232D
Panneau
Côté droit
Le lecteur DVD intégré se trouve sur le côté droit de l’appareil.
Notes:
1.
Le lecteur DVD est de type slot-in (mange-disque).
2.
Insérer le disque dans le lecteur étiquette vers l’arrière et le côté brillant vers
l’avant.
3.
N’utiliser que les disques de 12 cm de diamètre.
Sommet
Bouton
Menu
CH+ / CH-
Français
Sur le sommet du téléviseur, les
commandes suivantes sont
disponibles:
Fonction
Réglages LCD
Modifier chaîne TV
VOL+ / VOL- Modifier volume
INPUT
Sélectionner source
PLAY
Touche lecture (lecteur DVD)
EJECT
Activer/désactiver le chargeur DVD
Power
Marche / Veille
Face
Lampe LED
La lampe LED indique le statut de l‘appareil.
ROUGE signifie mode veille et VERT mode
marche.
LCD Panel
IR
Récepteur infrarouge
Haut-parleurs
Haut-parleurs de droite et de gauche.
IR = Récepteur infrarouge
LED (Rouge = Veille / Vert = Marche)
LCD Panel
Ecran LCD
HTC 2232D
15
TÉLÉCOMMANDE
Préparation
Français
Pour pouvoir utiliser la télécommande, mettre les piles dans le
compartiment prévu à cet effet.
1.
Ouvrir le compartiment à piles: Pousser et ouvrir le petit
couvercle.
2.
Y placer les piles livrées. En mettant les piles, bien faire attention
à leur polarité d’après les symboles + et - indiqués dans le
compartiment à piles.
3.
Refermer le couvercle
Remarques concernant les piles
Une mauvaise utilisation des piles peut conduire à ce que de l’acide coule
des piles. Ceci engendrera une corrosion pouvant endommager la
télécommande et pouvant provoquer son dysfonctionnement permanent.
Merci de respecter les règles suivantes:
• Toujours veiller à ce que les piles soit correctement placées selon les pôles respectifs. Les placer
seulement comme le montrent les symboles + et - du compartiment à piles.
• Ne jamais utiliser deux types différents de piles et ne jamais mélanger de vieilles piles avec des
neuves.
• Si vous prévoyez de ne pas utiliser la télécommande pendant une longue période,
veuillez retirer les piles. Vous éviterez ainsi d’éventuels dommages.
• Si la télécommande ne fonctionne pas correctement ou si elle n’agit plus sur les mêmes
distances, échanger les piles contre des neuves.
Utilisation de la télécommande
Diriger la télécommande en direction du capteur à infrarouges du lecteur et appuyez sur la touche
voulue.
Remarque:
Veillez à ce que le capteur à infrarouges ne soit pas exposé directement aux rayons du soleil ou
à une forte luminosité. Le lecteur pourrait à la longue ne plus réagir aux signaux de la
télécommande.
• Distance maximale: 7 mètres - Angle: pas plus de 30 degrés dans les deux directions
•
•
•
•
•
16
Diriger la télécommande en direction du capteur à infrarouges du lecteur de DVD.
Éviter d’endommager la télécommande en la faisant tomber.
Ne jamais placer la télécommande dans un endroit très chaud ou humide. Ne versez pas de
liquides sur la télécommande.
Ne jamais ouvrir le boîtier de la télécommande.
HTC 2232D
TÉLÉCOMMANDE
Touches et fonctions
Afin de mieux montrer les différentes touches,
l’image de la télécommande a été éclaircie.
Touche de la télécommande:
ATV: Tuner TV analogique
DTV: Tuner TNT
DVD: Lecteur DVD
REC: Enregistrement
USB: Lecture multimédia
1.
2.
3.
4.
5.
6.
7.
8.
9.
10.
11.
14.
15.
16.
17.
18.
19.
20.
Français
12.
13.
POWER: Marche/Arrêt
Exit: pour sortir des menus
MENU: configuration
PICTURE: réglage du mode d’image
MUTE: sourdine
Touches numériques (0 .. 9)
ATV + DTV: Retour
VOL+: pour augmenter le volume
Croix de navigation (Haut, Bas,
Gauche, Droite)
VOL-: pour diminuer le volume
DVD + USB: Pause (||); REC: Touche
Time Shift
DVD + USB: Touche lecture (>)
ATV + DTV: CANCEL cacher le
Télétexte; DVD + REC + USB: Touche
avance rapide (>>)
ATV + DTV: HOLD maintenir le
Télétexte: DVD + REC + USB: Touche
retour rapide(<<)
REC: LIST pour afficher la liste des
enregistrements; DVD: D.MENU pour
afficher le menu du DVD-Vidéo
ATV + DTV: CH/LIST touche liste des
chaînes; DVD: SET touche
configuration
ATV + DTV: Touche Télétexte (TV
TEXT); DVD: Touche lecture
programme (PROGRAM)
ATV + DTV: Touche sous-page
Télétexte (SUBPAGE); DVD + USB:
Touche répétition (REPEAT)
Touche format de l’image (ROUGE)
pour les sources; ATV + DTV: Touche
rouge dans le Télétexte; LCD: Touche
fonction; DVD: Touche zoom
DTV: Liste des programmations
(VERT); ATV + DTV: Touche verte
dans le Télétexte; LCD: Touche
fonction; DVD: Touche titre (TITLE)
Autres touches page suivantes.
HTC 2232D
17
TÉLÉCOMMANDE
Touches et fonctions
Touches de la télécommande:
ATV: Tuner TV analogique
DVB-T: Tuner TNT
DVD: Lecteur DVD
REC: Enregistrement
USB: Lecture multimédia
21.
22.
23.
24.
25.
26.
27.
28.
29.
30.
Français
31.
32.
33.
34.
35.
36.
37.
38.
18
HTC 2232D
Touche information (DISPLAY)
DTV + USB + DVD: Touche audio
Touche minuterie veille (SLEEP)
Touche mode son (SOUND)
Touche sources (INPUT)
ATV + DTV: Touche chaîne suivante
(CH+)
Touche de confirmation (OK)
ATV + DTV: Touche chaîne précédente
(CH-)
DVD + USB: Touche stop; REC: pour
arrêter l’enregistrement
REC: Touche enregistrement; DVD:
Ouvrir/fermer le tiroir
ATV + DTV: Touche page indexe Télétexte
(INDEX); DVD + USB: Touche fichier ou
chapitre précédent (|<<)
ATV + DTV: Touche zoom dans le
Télétexte (SIZE); DVD + USB: Touche
fichier ou chapitre suivant (>>|)
DTV: Touche Guide Electronique des
Programmes
ATV + DTV: Touche favoris (FAV)
DTV + DVD: Touche sous-titre
(SUBTITLE)
ATV + DTV: Afficher la page cachée du
Télétexte (REVEAL); DVD + USB: Touche
ralenti (SLOW)
ATV + DTV: Touche bleue dans le
Télétexte; LCD: Touche fonction; USB:
Touche de désactivation de l’écran
ATV + DTV: Touche jaune dans le
Télétexte; LCD: Touche fonction; DVD:
Touche aller à (GOTO)
CONNECTIQUE
Alimentation
Connecter la fiche femelle (IEC C13) du câble d’alimentation
à la fiche mâle (IEC C14) de l’adaptateur secteur. Connecter
la fiche femelle coaxiale à la fiche d’entrée alimentation du
téléviseur. Connecter la fiche CEE 7/7 à la prise secteur.
Vous aurez alors une diode rouge qui s’allumera sur l’avant
du téléviseur. Le HTC 2232D est maintenant en veille. En
appuyant sur la touche POWER de la télécommande ou du
TV, la diode s’allumera en vert.
Antenne
Le HTC 2232D possède un Tuner analogique et numérique intégré. Pour recevoir les
signaux analogique, connecter l’antenne au connecteur RF de l’appareil puis à une
antenne de toit VHF/UHF ou un système câblé (CATV ).
Pour recevoir les signaux de la TNT connecter le HTC 2232D à une antenne de toit
ou une antenne intérieure.
Pour activer le tuner analogique, veuillez mettre la source sur „ATV“. Et sur „DTV“
pour activer le tuner TNT.
Note :
Pour obtenir la meilleure réception TNT, nous vous conseillons d’utiliser une antenne de toit. Si cela
n’est pas possible, vous pouvez utiliser une antenne intérieure.
Français
Entrée péritel
Les signaux audio et vidéo d’un magnétoscope, par
exemple, peuvent être transmis par Péritel. Connecter le
câble Péritel à l’entrée Péritel du HTC et à la sortie Péritel
du magnétoscope. Appuyer sur la touche INPUT jusqu’à
ce que „SCART“ apparaisse à l’écran et confirmer à l’aide
de la touche OK. L’interface Péritel est alors activée.
HDMI
Vous pouvez utiliser cette interface pour connecter une
PS3 par exemple.
Connecter le câble HDMI à la prise HDMI1 ou HDMI2 du
téléviseur et de l’appareil source.
Appuyer sur la touche INPUT, sélectionner „HDMI1“ ou
„HDMI2“ dans la fenêtre des sources et confirmer à l’aide
de la touche OK.
HTC 2232D
19
CONNECTIQUE
Entrée vidéo composante et entrée audio stéréo
En cas de connexion de plusieurs appareils multimédia et
lorsque les prises péritel, HDMI et Vidéo sont déjà
occupées, il est possible d’utiliser l’entrée audio/vidéo
composante (Y Pb Pr). Connecter le câble adaptateur
disposant d’une prise jack à l’entrée YPbPr du téléviseur.
Connecter le câble vidéo composante à 3 brins aux prises
RCA de l’appareil multimédia en question. Faire attention au
des fiches:
•
“Y” avec le câble ou la fiche RCA vert
•
“Pb” avec le câble ou la fiche RCA bleu
•
“Pr” avec le câble ou la fiche RCA rouge.
code couleur
Avec cette connexion, seuls les signaux vidéo sont transmis. Pour obtenir le son sur le téléviseur, il
faut également établir la connexion audio. Connecter le câble à 2 brins blanc et rouge à la sortie
AUDIO OUT de l’appareil source et aux entrées “L-in” et “R-in” du téléviseur.
Français
Appuyer sur la touche INPUT et sélectionner „YPbPr“ dans la fenêtre des sources et confirmer à
l’aide de la touche OK.
Entrée vidéo et audio
En cas de connexion de plusieurs appareils multimédia et
lorsque les prises péritel, HDMI et YPbPr sont déjà occupées, il
est possible d’utiliser l’entrée vidéo composite. Connecter le
câble vidéo à l’entrée Video du téléviseur et à la sortie vidéo
composite de l’appareil multimédia. Avec cette connexion, seuls
les signaux vidéo sont transmis. Pour obtenir le son sur le
téléviseur, il faut également établir la connexion audio.
Connecter le câble à 2 brins blanc et rouge à la sortie AUDIO OUT de l’appareil source et aux
entrées “L-in” et “R-in” du téléviseur.
Appuyer sur la touche INPUT et sélectionner „AV“ dans la fenêtre des sources et confirmer à l’aide
de la touche OK.
Port USB
Le port USB a plusieurs fonctions:
1.
2.
3.
4.
5.
Fonction magnétoscope numérique
Fonction Time Shift
Lecture des enregistrements
Lecture des fichiers vidéo, audio et photo depuis le support de stockage USB
Mise à jour logicielle
Appuyer sur la touche INPUT et sélectionner „USB“ dans la fenêtre des sources et
confirmer à l’aide de la touche OK.
20
HTC 2232D
CONNECTIQUE
VGA
Il est possible d’utiliser le HTC 2232D comme écran informatique à l’aide de l’interface VGA.
Connecter un câble VGA à l’entrée VGA du HTC et au PC.
Appuyer sur la touche INPUT jusqu’à ce que „VGA“ apparaisse à l’écran et que l’entrée PC-VGA soit
activée.
Notes :
1.
Avant de connecter le HTC 2232D à un PC, veuillez changer la résolution du PC : 640 x 480,
800 x 600 ou 1024 x 768.
2.
Établir la connexion et mettre la source sur „VGA“
3.
Pour avoir de meilleurs résultats, merci d’utiliser la résolution native des dalles des HTC :
•
HTC 2232D —> 1920 x 1080 Pixel
Français
Sortie audio numérique coaxiale
Les caractéristiques de la TNT permet la transmission du son stéréo et/ou Dolby Digital.
Pour utiliser le son Dolby Digital sur un amplificateur numérique, il est possible de
connecter celui-ci au téléviseur via le câble audio numérique coaxial et écouter ainsi le
son sur la chaîne hi-fi.
Casque
Il est également possible de connecter un casque au téléviseur. Insérer le jack
3.5 à la sortie casque.
HTC 2232D
21
Première installation
Le guide d‘installation se lance lorsque vous utilisez le téléviseur HTC pour la première fois. Il vous
aide à rechercher toutes les chaînes, analogiques et numériques. Le processus de recherche
contient tant les fréquences analogiques que les fréquences des chaînes DVB-T numériques free to
air (FTA, chaînes en clair).
1.
2.
3.
4.
Français
5.
6.
Veuillez sélectionner la langue de
l‘affichage sur écran. Vous pouvez cliquer
sur les autres langues à l‘aide des flèches
◄ et ►. Lorsque vous avez trouvé la
bonne langue, confirmez la sélection avec
la touche OK.
Appuyer sur la touche ▼ et aller à l’option
„Pays“. Sélectionner le bon pays à l’aide
des touches ◄ / ►.
Appuyer sur la touche ▼ et aller à l’option
“Mode de Recherche”. Sélectionner le
mode de recherche à l’aide des touches
◄ / ►. Les options sont: ATV + DTV, DTV
ou ATV. Pour les régions où seule la TNT
est disponible, sélectionner l’option DTV.
Appuyer sur la touche OK pour lancer la
recherche.
Une nouvelle fenêtre apparaît à l’écran
montrant l’état de la recherche. Le nombre
des stations TV analogiques, numériques
et des stations de radio est affiché.
Toutes les chaînes TV et radio trouvées
sont enregistrées lorsque le processus de
recherche est terminé.
Note:
Le processus de recherche complet peut prendre quelques minutes.
22
HTC 2232D
Sélection des sources
Vous pouvez sélectionner les différentes sources du téléviseur HTC à l‘aide de la touche INPUT.
Veuillez appuyer sur la touche INPUT de la télécommande ou dans la zone de commande se
trouvant au sommet de l‘appareil. S‘ouvre ensuite une fenêtre à l‘écran affichant les différentes
sources. Il existe les options suivantes:
DTV
ATV
SCART
YPbPr
DVD
PC
HDMI1
HDMI2
AV
USB
Tuner TNT
Tuner TV analogique
Entrée péritel
Entrée vidéo composante
Lecteur DVD (intégré)
Entrée VGA
Entrée vidéo/audio numérique HDMI 1
Entrée vidéo/audio numérique HDMI 2
Entrée vidéo composite
Lecture multimédia
Français
Vous pouvez piloter les différentes sources à l‘aide des touches ▲/▼. Confirmez la sélection avec la
touche OK.
HTC 2232D
23
TNT
Les touches importantes et leurs fonctions
Démarrage du mode TNT
Pour regarder la télévision numérique terrestre (TNT), il faut mettre le téléviseur HTC en mode TNT.
Appuyer sur la touche INPUT et sélectionner „DTV“ à l‘aide des touches ▲/▼ et confirmer la
sélection avec la touche OK.
Liste des chaînes
Pour afficher la liste des chaînes, appuyer sur la touche CH/LIST. Pour quitter la liste
des chaînes, appuyer sur la touche EXIT.
Changement de chaîne
Il est possible de changer de chaîne TV au moyen des touches CH+ / CH-.
Français
Sélection des chaînes
Il est également possible d’accéder directement aux chaînes TV et de changer de chaîne au moyen
des touches numériques 1 à 9. La touche 10 permet de passer à l‘affichage à deux chiffres en
entrant, par exemple, 20. C‘est la 20ème chaîne télévisée (comme dans la liste des chaînes) qui
s‘affichera ensuite.
Dernière chaîne TV
Appuyer sur la touche RECALL de la télécommande pour retourner à la chaîne TV
précédente (active).
Volume
Les touches VOL+ / VOL– permettent de modifier le volume sonore du téléviseur.
TV / Radio
Appuyer sur la touche CH/LIST pour afficher la liste des chaînes. Pour passer de TV à radio, appuyer
sur la touche ► à plusieurs reprises. Sélectionner, à l’aide des touches ▲ / ▼, la station TV ou radio
souhaitée et confirmer à l’aide de la touche OK.
Note:
La radio numérique n’est disponible que dans certains pays.
EPG
La touche EPG permet d‘activer le guide électronique des chaînes. Se référer au
paragraphe EPG correspondant.
Liste des favoris
Si les chaînes favorites ont été définies au préalable, accéder directement aux favoris
en appuyant sur la touche FAV.
24
HTC 2232D
TNT
Les touches importantes et leurs fonctions
Sous-titrage
Pour afficher le sous-titrage d‘une chaîne TV, appuyer sur
la touche SUBTITLE. Si le sous-titrage est proposé, une
fenêtre de sélection apparaît et il est possible de
sélectionner, le cas échéant, le sous-titrage correspondant
à l‘aide de la touche OK.
Note:
L‘Allemagne ne diffuse pas de sous-titrage en TNT.
HTC 2232D
Français
Télétexte
La touche TV TEXT permet d‘activer le télétexte. Le
système télécharge donc le télétexte.
1.
La touche TV TEXT permet d’afficher ou de
fermer le Télétexte.
2.
La touche CANCEL permet de mettre le
Télétexte en arrière plan.
3.
La touche REVEAL affiche les pages cachées du
Télétexte.
4.
La touche HOLD garde la page Télétexte
pendant la recherche.
5.
La touche SIZE agrandit la page Télétexte.
6.
La touche SUBPAGE permet d’afficher la souspage du Télétexte
7.
La touche INDEX permet l’accès direct à la page
indexe (normalement la page 100)
8.
La touche ROUGE permet de reculer d’une page
9.
La touche VERT permet d’avancer d’une page
10.
Les touches JAUNE et BLEU l’accès direct à la page spécifique
25
TNT
Les touches importantes et leurs fonctions
Langue audio
Si vous désirez changer la langue audio ou passer à une
piste son multiple numérique, veuillez appuyer sur la touche
AUDIO. Apparaît alors une fenêtre popup où vous pouvez
sélectionner la langue ou la piste son multiple. Pour cela,
veuillez utiliser les touches ▲/▼ et confirmez la sélection
avec OK.
Note:
L‘Allemagne ne propose le son multiple qu‘avec certains programmes et
certaines chaînes TV.
Français
Affichage de brèves informations
Veuillez appuyer sur la touche OK pendant que l‘image passe en live, il apparaît ensuite une fenêtre
popup indiquant le titre des chaînes TV, la date, l‘heure actuelle, la durée du programme en cours, la
résolution du programme (par exemple 576i) et si le télétexte est disponible.
Sur la page de droite se trouve une indication à propos du programme suivant. Appuyer sur la touche
► permet d‘afficher le titre du prochain programme, sa durée etc.
Affichage d‘informations
Si vous appuyez sur la touche INFO pendant un programme, des informations détaillées s‘affichent.
En plus des informations comme le titre des chaînes TV, la date, l‘heure actuelle, la durée du
programme en cours, la résolution du programme (par exemple 576i) et la disponibilité du télétexte
s‘affichent les informations EPG du programme en cours. Vous pouvez feuilleter dans les
informations EPG à l‘aide des flèches ▲/▼. La touche ► vous permet de lire les informations EPG
du programme suivant.
26
HTC 2232D
TNT
Guide électronique des programmes (EPG)
Le Guide Electronique des Programmes (EPG) est activable à l’aide de la touche EPG. La fenêtre
EPG qui s’affiche à l’écran est organisée en trois sections (voir illustration ci-dessous):
Mode de tri (heure actuelle), Date et heure ainsi que liste des chaînes
Information détaillée sur l’émission en cours
Différentes opérations possibles
Français
GAUCHE
DROITE
EN BAS
Mode de tri
Le téléviseur classe le Guide par heure ou par chaîne.
Heure
La liste du Guide est classée par heure. Pour chacune des chaînes, l’émission en cours est affichée.
A l’aide des touches ▲/▼, passer au classement par chaînes. A l’aide des touches ◄ / ► , aller à la
page précédente ou suivante.
Chaîne TV
La liste du Guide est désormais classée par
chaîne. Toutes les émissions pour les 7
prochains jours sont affichées. Si la chaîne TV
est surlignée en jaune, il est possible de les
modifier à l’aide des touches ◄ / ►.
A l’aide des touches ▲/▼, entrer dans les
émissions TV. Si une émission TV est surlignée
en jaune, aller à la page suivante ou précédente
à l’aide des touche ◄ / ►.
HTC 2232D
27
TNT
Guide électronique des programmes (EPG)
Les opérations possibles sont affichées sur une ligne en bas de la page.
INDEX
RECORD
VERT
JAUNE
Changer le mode de tri entre Heure et Chaîne
Programmer l’enregistrement de l’émission marquée
Programmer le démarrage du téléviseur par la TNT
Afficher la liste de programmation d’enregistrement
La touche INDEX permet de changer le mode de tri. Le curseur est positionné en haut à gauche et
l’heure ou la station est marquée en jaune. A l’aide des touches ◄ / ►, aller à la séquence de tri.
Pour programmer un enregistrement, appuyer sur la touche RECORD. Une fenêtre s’affiche à l’écran
montrant les paramètres de la programmation. Se référer au détail page 33.
Français
Pour regarder une émission particulière régulièrement, il est
possible d’activer une alarme. Appuyer sur la touche VERT
puis régler les paramètres.
Ci-contre la fenêtre des Options. Si nécessaire, changer les
réglages en sélectionnant les options à l’aide des touches ▲ /
▼: "Mode", "Minute", "Heure", "Date" et "Mois".
Régler les options à l’aide des touches ◄ / ►.
La touche JAUNE permet d’accéder au réglage de la
minuterie. Dans cette fenêtre, toutes les programmations sont
affichées. Il est possible d’en supprimer une programmation.
Sélectionner le programme souhaité et appuyer sur la touche
ROUGE.
Retourner au menu précédent à l’aide de la touche MENU.
Appuyer sur la touche EXIT pour fermer la fenêtre EPG et
revenir à la chaîne en cours.
28
HTC 2232D
TV (Analogique)
Tuner TV analogique
Aller à la TV analogique
Pour regarder la télévision analogique (Cat TV), il faut sélectionner TV dans la liste des sources.
Appuyer sur la touche INPUT et aller à TV à l’aide des touches ▲/▼. Confirmer la sélection TV avec
la touche OK.
Liste des chaînes
Pour afficher la liste des chaînes, appuyer sur la touche CH/LIST, et la fermer en
appuyant sur la touche EXIT.
Changement de chaîne
Les touches CH+ / CH– permettent de changer de chaîne TV.
Sélection des chaînes
Il est possible d’accéder directement aux chaînes TV et de changer de chaîne au moyen des touches
numériques 1 à 9. La touche 10 permet de passer à l‘affichage à deux chiffres, entrer, par exemple,
20. C‘est la 20ème chaîne télévisée (comme dans la liste des chaînes) qui s‘affichera ensuite.
Volume
Les touches VOL+ / VOL– permettent de modifier le volume du téléviseur.
Français
Dernière chaîne TV
Appuyer sur la touche RECALL de la télécommande pour retourner à la chaîne TV
précédente (active).
Télétexte
La touche TV TEXT permet d‘activer le télétexte. Le système télécharge donc le télétexte.
Se référer à la description, page 25.
HTC 2232D
29
ENREGISTREMENT
Préparation du support de stockage USB
Uniquement en mode TNT
La fonction magnétoscope numérique permet au téléviseur d’enregistrer une émission TNT pour
pouvoir être regardée à tout moment.
NOTE:
• Lorsqu’un enregistrement est en cours, ne pas déconnecter la prise secteur et le support de
stockage USB.
• Lorsqu’un enregistrement est en cours, le LED clignote en rouge et vert.
• Avant de démarrer un enregistrement, s’assurer que le support de stockage USB est connecté.
• Pendant un enregistrement, si l’espace disponible devient trop faible, l’enregistrement s’arrête
automatiquement.
Français
Préparation du support de stockage USB
Après avoir connecté le support, appuyer sur la
touche MENU sur la télécommande et sélectionner
avec les flèches le menu Chaîne puis entrer à
l’aide des touches ◄ / ►. Appuyer la touche flèche
BAS jusqu’à atteindre le sous menu Système de
fichiers PVR. Appuyer sur la touche ► pour ouvrir
le menu. Le menu s’affiche.
Ce sous menu comprend l’option Sélectionner Disque, Vérifier le
système de fichiers PVR, Disque USB, Formatage Taille Time
Shift et Vitesse.
Sélectionner Disque
Sélectionner un disque pour stocker l’enregistrement. Appuyer
sur la touche ▲▼ pour atteindre Sélectionner Disque et
appuyer sur la touche ► ou OK pour afficher un sous menu.
Vérifier le système de fichiers PVR
Appuyer sur les touches ▲▼ pour sélectionner Vérifier le
système de fichiers PVR et appuyer sur la touche ► ou OK
pour démarrer la vérification.
Après avoir vérifier le système de fichiers, apparaît dans la
rubrique “Disque USB”, “Succès” signifiant que le système de
fichiers du disque USB a été vérifié et est prêt à l’usage.
Si le disque USB ne dispose pas de système de fichiers PVR,
un message apparaît demandant de formater le disque.
30
HTC 2232D
ENREGISTREMENT
Préparation du support de stockage USB
Formatage
Appuyer sur les touches ▲▼ pour sélectionner Formatage et
appuyer sur la touche ► ou OK afficher le sous menu,
uniquement si un support USB est connecté pour la première fois,
comme illustré ci-contre.
AVERTISSEMENT
•
A la confirmation du formatage, toutes données
présentes dans le support seront perdues.
•
Il est fortement recommandé de dédier un support de stockage USB pour ce téléviseur.
Diverses données contenues dans le support de stockage USB peut corrompre le système
de fichiers PVR, nécessitant un nouveau formatage et la perte des enregistrements.
•
Une fois le support USB est formaté, le téléviseur créera un système de fichiers unique sur
ce support. Il est donc déconseillé de connecter ce support sur un ordinateur.
Type de système de fichiers PVR
La rubrique Type de système de fichiers PVR est surlignée, appuyer sur les touches ◄► pour
sélectionner le Système de fichiers à formater et appuyer sur la touche OK.
FAT32
Ce système de fichiers est compatible avec tous les ordinateurs sur lesquels les fichiers peuvent être
lus.
Français
Hi Speed FS
Ceci est un système de fichiers propriétaire qui optimise la vitesse de l’enregistrement.
Une fois sélectionné, il est possible de définir la taille de partition utilisable dans le système de
fichiers Hi Speed FS. Nous recommandons la taille de 50% du disque en Hi Speed FS. La partition
est formatée et réservée.
Après un enregistrement dans la partition FAT32, les fichiers peuvent être lus et modifiés sur
l’ordinateur.
Taille Time Shift
Après l’achèvement du formatage, le menu ci-contre apparaît.
La rubrique Taille Time Shift est surlignée, appuyer sur les
touches ◄► pour choisir la taille allouée au time shift. La
valeur maximale est 8 Go.
Appuyer sur la touche ▼ pour surligner OK et appuyer sur la
touche OK pour confirmer et sortir.
Vitesse
Une fois le support USB vérifié, cette rubrique affiche le taux
de transfert USB et l’espace disponible.
Cette dernière photo montre le support USB prêt à l’usage.
HTC 2232D
31
ENREGISTREMENT
Enregistrement d’une émission
1.
Connecter un support de stockage USB au port USB du téléviseur.
2.
Vérifier que le support USB est préparé pour l’enregistrement. Sinon, le support ne
fonctionnera pas.
3.
L’enregistrement peut se faire uniquement en mode TNT.
4.
Le système enregistre le flux de transport avec un suffixe TS.
Sélectionner l’émission souhaitée puis appuyer sur la touche RECORD sur la
télécommande pour démarrer l’enregistrement et la barre ci-dessous s’affiche.
Français
Les opérations sont: STOP pour annuler l’enregistrement et PLAY pour activer les différents modes.
Les modes disponibles sont similaires aux opérations Time Shift.
Appuyer sur la touche PLAY pour entrer dans les modes. Le téléviseur démarre la lecture de
l’enregistrement depuis le début. L’enregistrement continue.
Pour choisir une opération, utiliser les touches ◄► puis confirmer à l’aide de la touche OK.
PLAY
PAUSE
STOP
<<
>>
|<
>|
Démarrer la lecture de l’enregistrement depuis le début
Suspendre la lecture
Arrêter la lecture (mais pas l’enregistrement). Appuyer deux fois sur STOP pour arrê
ter l’enregistrement.
Retour rapide x2, x4, x8 et x16
Avance rapide x2, x4, x8 et x16
Sauter 30 secondes en arrière
Sauter 30 secondes en avant
Fonction Time Shift
Cette fonction permet de suspendre l’émission, de revenir en arrière pendant une
émission, si un support USB est connecté. Au cours d’une émission TNT, appuyer sur la
touche PAUSE sur la télécommande pour suspendre l’émission. Une barre s’affiche.
PLAY
PAUSE
STOP
<<
>>
|<
>|
32
Démarre la lecture depuis le début de la séquence
Suspendre l’émission
Arrêter le différé (tout en conservant la séquence). Appuyer deux fois sur la touche
STOP pour arrêter la séquence Time Shift.
Retour rapide x2, x4, x8 et x16
Avance rapide x2, x4, x8 et x16
Sauter 30 secondes en arrière
Sauter 30 secondes en avant
HTC 2232D
ENREGISTREMENT
Lecture d’un enregistrement
Il est possible de choisir un enregistrement à lire depuis la Liste des
enregistrements.
Appuyer sur la touche LIST de la télécommande pour afficher la Liste
des enregistrements, voir ci-contre:
Appuyer de manière répétitive sur la touche LIST pour afficher les
fichiers par nom des émissions, de chaînes ou par heure.
Information sur un enregistrement
Appuyer sur les touches ▲▼ pour sélectionner le fichier souhaité et
appuyer sur la touche INFO ou ► pour afficher l’information sur le
fichier.
Français
Lecture
Appuyer sur les touches ▲▼ pour sélectionner le fichier souhaité puis sur la touche OK pour lire le
fichier.
Pendant la lecture, la barre ci-dessous s’affiche.
Fonction de lecture
<< / >>
Retour ou avance rapide
|<< / >>|
Saut de 30 secondes en arrière ou en avant
STOP
Arrêt de la lecture
PAUSE
Suspension de la lecture
HTC 2232D
33
Lecture multimédia
Le téléviseur est équipé d’un port USB permettant la connexion d’un support de stockage externe et
la lecture des fichiers se trouvant sur le support.
•
•
•
•
•
•
Français
•
34
La vitesse de montage d’un support de stockage USB peut varier d’un support à l’autre.
Ne pas débrancher le téléviseur ou déconnecter le support USB alors que le support est en
marche. Si le support est brutalement déconnecté, les fichiers ou le support lui-même peut
être endommagé.
Ne pas connecter un support USB largement utilisé sur un ordinateur. Le support peut causer
un mauvais fonctionnement du téléviseur. N’utiliser qu’un support de stockage USB ayant les
fichiers photo, musique ou vidéo normaux.
N’utiliser qu’un support de stockage USB formaté dans un système de fichiers FAT32 à partir
d’un système fonctionnant sous Windows. Si le support de stockage est formaté par un
utilitaire différent non compatible avec Windows, le support peut ne pas être reconnu.
Certains supports de stockage USB peuvent ne pas être reconnus ou ne pas fonctionner
correctement.
Si le nom d’un dossier ou d’un fichier est trop long, il peut ne pas s’afficher ou ne pas être
reconnu.
Sauvegarder régulièrement les fichiers importants car les fichiers peuvent être corrompus. La
gestion des fichiers est du ressort du consommateur et le fabricant ne peut être tenu
responsable d’un dommage causé aux données.
Connecter un support USB
Lire les fichiers photo, musique, film ou texte depuis un support de stockage USB. Il est
possible ni d’ajouter, ni de supprimer les fichiers sur le support depuis le téléviseur.
1.
Connecter le support USB au port USB du téléviseur.
2.
Mettre le téléviseur en marche et appuyer sur la touche INPUT.
3.
Dans le menu des sources, appuyer sur les touches ▲▼ pour sélectionner
USB et appuyer sur la touche OK.
4.
Dans le menu USB, appuyer sur les touces ◄► pour sélectionner PHOTO,
MUSIQUE, FILM ouTEXTE et appuyer sur la touche OK.
5.
Appuyer sur la touche EXIT pour revenir au menu précédent.
HTC 2232D
Lecture multimédia
Photos
Depuis le support de stockage USB, il est possible d’afficher les fichiers *.jpg, *.bmp, et *.png.
L’affichage sur l’écran peut être légèrement différent sur votre téléviseur. Les images ci-dessous ne
sont données qu’à titre d’illustration. Les résolutions optimales d’affichage des photos sont 1280x720
et 1920x1080. Les photos sont affichées dans leur format d’origine.
1.
2.
3.
4.
5.
6.
Appuyer sur les touches ◄► pour sélectionner PHOTO et sur la touche OK pour entrer.
Appuyer sur les touches ▲▼ pour sélectionner le dossier et sur la touche OK.
Appuyer sur les touches ▲▼ pour naviguer dans les fichiers, la photo sélectionnée s’affiche
dans la fenêtre de prévisualisation à droite, voir ci-dessous.
Pour créer une liste de lecture, appuyer sur la touche OK sur chaque photo. Toutes les
photos sélectionnées sont marquées.
Appuyer sur la touche Play (>) pour afficher la photo en mode plein écran. Si une liste de
lecture a été créée, les photos s’affichent les unes après les autres à l’écran.
Appuyer sur la touche STOP pour sortir du mode plein écran et le téléviseur revient à la page
de navigation.
Français
En mode plein écran, la barre ci-dessous apparaît.
Appuyer sur les touches ◄► pour sélectionner une fonction dans la barre et confirmer à l’aide de la
touche OK. Pour sortir de la page de navigation, appuyer sur la touche EXIT sur la télécommande.
En appuyant sur les touches ▲▼ en mode plein écran, la liste de lecture ou la liste complète des
fichiers apparaît à l’écran. Sélectionner une photo et l’afficher à l’aide de la touche OK.
HTC 2232D
35
Lecture multimédia
Musique
Depuis le support de stockage USB, les fichiers musicaux suivants sont pris en charges: MP3, WMA,
WAVE et AAC.
1.
2.
3.
4.
5.
6.
7.
8.
Français
9.
Appuyer sur les touches ◄► pour sélectionner MUSIQUE et sur la touche OK pour entrer.
Appuyer sur les touches ▲▼ pour sélectionner le dossier et sur la touche OK.
Appuyer sur les touches ▲▼ pour naviguer dans les fichiers, le morceau sélectionné est lu
automatiquement, voir ci-dessous.
Pour créer une liste de lecture, appuyer sur la touche OK sur chaque fichier musical
sélectionné. Appuyer sur la touche ► (PLAY) pour démarrer la lecture avec affichage plein
écran.
Lorsque plusieurs fichiers sont marqués, ils sont lus en séquence. Par exemple, pour lire un
seul morceau de manière répétitive, il suffit de le marquer et de démarrer la lecture.
Si aucun fichier musical n’est marqué, tous les morceaux dans un dossier sont lus en
séquence.
Pendant la lecture, appuyer sur la touche || pour suspendre la lecture et appuyer sur la
touche ► (PLAY) pour reprendre. Appuyer sur la touche |<< ou >>| pour aller au fichier
précédent ou suivant.
Pendant la lecture, appuyer sur la touche << ou >> pour activer le retour rapide ou l’avance
rapide et appuyer sur la touche ► (PLAY) pour reprendre la lecture.
Appuyer sur la touche STOP
pour arrêter la lecture et
retourner à la page de
navigation.
En entrant dans un dossier du
support de stockage USB. Si le
curseur est positionné sur un fichier
pendant quelques secondes, la
lecture de ce fichier démarre
automatiquement.
Visualisation plein écran après l’appui
sur la touche PLAY sur un fichier
musical sélectionné.
A droite de la fenêtre, la liste de
lecture ou la liste de tous les fichiers
dans le dossier sélectionné.
Note:
Pendant la lecture, il est possible de désactiver l’écran. Appuyer sur la touche BLEU (SCREEN) sur
la télécommande.
36
HTC 2232D
Lecture multimédia
Film
Depuis le support de stockage USB, les fichiers vidéo suivants sont pris en charge: AVI, MPG, MP4,
VOB, MOV, MKV, TS, M2T, et TRP.
Limitations:
1.
La fonction lecture multimédia est compatible avec les codecs MPEG-2 (MPG, M2T) jusqu’à
la résolution 1920 x 1080p.
2.
Vérifier le taux de transfert pour la lecture des fichiers, celui-ci est limité à 15000 kbps. Les
fichiers ayant un taux de transfert supérieur peuvent être lus mais peuvent montrer quelques
problèmes de fluidité.
Français
Opération:
1.
Appuyer sur les touches ◄► pour sélectionner FILM et sur la touche OK pour entrer.
2.
Appuyer sur les touches ▲▼ pour sélectionner le dossier et sur la touche OK.
3.
Appuyer sur les touches ▲▼ pour naviguer dans les fichiers, le fichier vidéo sélectionné est
lu automatiquement dans la fenêtre de prévisualisation en haut à droite de la page de
navigation, comme pour les photos (voir illustration, page 35).
4.
Lorsqu’un film est sélectionné, utiliser la touche OK pour le marquer. Appuyer sur la touche
► (PLAY) pour démarrer la lecture en mode plein écran.
5.
Lorsque plusieurs fichiers sont marqués, les films sont lus en séquence.
6.
Si aucun fichier n’est marqué, tous les films dans un même dossier sont lus en séquence.
7.
Durant la lecture, appuyer sur la touche || pour la suspendre et sur la touche ► (PLAY) pour
reprendre. Appuyer sur la touche |<< ou >>| pour aller au fichier précédent ou suivant.
8.
Durant la lecture, appuyer sur la touche << ou >> pour activer le retour rapide ou l’avance
rapide et sur la touche ► (PLAY) pour reprendre la lecture à la vitesse normale.
9.
Appuyer sur la touche STOP pour arrêter la lecture et retourner à la page de navigation.
Pendant la lecture d’un film en mode plein écran, une barre de navigation s’affiche à l’écran. Celle-ci
permet différentes options de lecture.
HTC 2232D
37
Lecture multimédia
Barre de navigation
Appuyer sur les touches ◄► pour sélectionner une option dans la barre puis sur la touche OK.
REPEAT
A-B
Playlist
Info
Slow
Step
Goto Time
Zoom In
Zoom Out
Aspect Ratio
Display
Active les modes de répétition
Répétition d’une séquence
Afficher la liste de lecture
Afficher les informations sur le fichier en cours
Lecture au ralenti
Avance image par image
Aller à l’indexe de temps à renseigner
Augmenter la taille de l’image
Diminuer la taille de l’image
Changer le format de l’image
Afficher tous les fichiers vidéo dans un dossier
Français
Mode de répétition
Sélectionner entre les modes de répétition suivants: Un seul, Tout or désactivé.
Information
Afficher les informations sur le fichier vidéo en cours à droite de l’écran.
Séquence A-B
Pour démarrer la lecture de la séquence en boucle, appuyer sur la touche OK pour marquer le point
de départ de la séquence (A) puis attendre le temps nécessaire et appuyer une nouvelle fois sur la
touche OK pour marquer le point de fin (B). La séquence sera lue en boucle. Pour désactiver la
lecture en boucle, appuyer sur la touche OK une nouvelle fois.
Indexe de temps
Renseigner le temps et la lecture démarre directement au moment sélectionné.
Format de l’image
Si la lecture en mode plein écran montre un film déformé, corriger le format de l’image à l’aide de
cette option.
Texte
Le téléviseur peut afficher les fichiers texte. La barre de navigation ci-dessous permet une utilisation
aisée de cette fonction.
38
HTC 2232D
Réglages LCD
Appuyer sur la touche MENU pour accéder aux différents réglages LCD.
Menu principal
Sous menu
Heure
Heure, horaire de connexion, horaire de déconnexion, minuterie, fuseau horaire et veille automatique
Français
Après avoir afficher le menu des réglages, changer la catégorie à l’aide des touches ◄ / ►. Entrer
dans la catégorie sélectionnée à l’aide de la touche ▼. Changer les options ou réglages à l’aide des
touches ◄ / ►. Pour sortir de la catégorie, appuyer à plusieurs reprises sur la touche ▲.
Son
Mode son, aigus, basses, balance, volume automatique, mode surround et SPDIF
Image
Mode image, contraste, luminosité, couleur, netteté, saturation, teinte, température de couleur, format
d‘image, réduction du bruit et écran (uniquement en VGA)
Chaîne
Recherche automatique, recherche manuelle DTV, recherche manuelle ATV, modification des
chaînes, Information sur le signal, Mise à jour logicielle, Démarrage de l’enregistrement, Liste des
enregistrements, Programmation, Liste des programmations et Système de fichiers PVR.
Verrouillage
Verrouiller une chaîne, mot de passe, bloquer des chaînes, sécurité enfants
Options
Langue, langue audio, langue de sous-titrage, pays, paramètres usine
Les touches EXIT et MENU vous permettent de quitter le réglages LCD.
HTC 2232D
39
Réglages LCD
Réglages des chaînes
Français
Les réglages des chaînes comprennent les options suivantes: Recherche automatique, Recherche
manuelle DTV, Recherche manuelle ATV, Modification des chaînes, Information sur le signal, Mise à
jour logicielle, Démarrage de l’enregistrement, Liste des enregistrements, Programmation, Liste des
programmations et Système de fichiers PVR.
Recherche automatique
Ce réglage permet de lancer la recherche des chaînes TNT
et analogique de manière automatique.
1.
Appuyer sur la touche ▼ et aller à l’option „Auto
Scan“.
2.
Sélectionner le bon pays à l’aide des touches ◄ /
►.
3.
Sélectionner le Type de Recherche à l’aide des touches ◄ / ►.
4.
Appuyer sur la touche OK pour démarrer la recherche.
5.
Une nouvelle fenêtre s’affiche à l’écran montrant l’état de la recherche. Le nombre des
stations TV analogique, TNT et radio trouvées y est énuméré.
6.
Après l’achèvement de la recherche, toutes les stations TV trouvées sont sauvegardées dans
la liste des chaînes. Pour y accéder, appuyer sur la touche CH/LIST.
Note:
Une recherche complète peut prendre quelques minutes.
40
HTC 2232D
Réglages LCD
Réglages des chaînes
Recherche manuelle DTV
Appuyer sur la touche ▼ et aller à l’option “Recherche manuelle
DTV“. Démarrer la recherche à l’aide de la touche ►.
1.
Changer de canal à l’aide des touches ◄ / ► afin de
déterminer sur quel canal doit démarrer la recherche.
2.
Lancer la recherche à l’aide de la touche OK.
Pour sortir de la Recherche manuelle DTV, appuyer sur la touche
EXIT ou MENU.
1.
2.
3.
4.
Les flèches ▲/▼ vous permettent de piloter
les sous-options.
A l‘aide des touches ◄/►, vous sélectionnez l‘endroit où la chaîne TV doit être enregistrée.
Avec les touches ◄/►, vous sélectionnez le système audio.
Naviguez vers l‘option Recherche et lancez le processus de recherche avec la touche ►.
Français
Recherche manuelle ATV
Vous pouvez lancer la recherche manuelle ATV avec
la flèche ►. Les sous-options suivantes sont
disponibles:
•
Enregistrement vers chaîne (Storage TO)
•
Système audio (B/G pour Europe de l‘Ouest, I
pour le Royaume Uni, D/K pour l‘Europe de
l‘Est, L ou LL pour certaines parties de la
France)
•
Chaîne en cours (Current CH)
•
Recherche (SEARCH)
•
Recherche précise (Fine-Tune)
Réglage précis (Fine Tune):
Les touches ◄/► vous permettent de régler la fréquence de manière précise si la chaîne en cours
ne présente qu‘un faible signal.
Vous pouvez sauvegarder les modifications des réglages (par exemple, du système audio ou autre) à
l‘aide de la touche ROUGE.
Les touches EXIT et MENU vous permettent de quitter la recherche manuelle.
HTC 2232D
41
Réglages LCD
Réglages des chaînes
Français
Le traitement des chaînes contient des options pour le tri et le saut de certaines chaînes TV et pour
classer des chaînes TV dans la liste des favoris.
Déplacement de chaînes TV (Move)
Cette option vous permet d‘affecter une nouvelle place à une chaîne TV dans la liste des chaînes.
Veuillez suivre la procédure suivante:
1.
Vous sélectionnez la chaîne TV en question avec les touches ▲/▼.
2.
Appuyez sur la touche JAUNE de la télécommande; il apparaît alors un symbole en flèche au
niveau de la chaîne TV sélectionnée.
3.
Sélectionnez la nouvelle place de la chaîne TV avec les touches ▲/▼.
4.
Veuillez appuyer sur la touche MENU ou JAUNE pour faire exécuter le déplacement.
5.
La touche EXIT vous permet de quitter le traitement des chaînes.
Classement en tant que favori
Cette option vous permet de classer certaines chaînes TV dans la liste des favoris. Vous pouvez
appeler plus tard cette liste à l‘aide de la touche FAV.
Veuillez suivre la procédure suivante:
1.
Vous sélectionnez la chaîne TV en question avec les touches ▲/▼.
2.
Appuyez sur la touche FAV de la télécommande; un symbole en forme de cœur apparaît
alors au niveau de la chaîne TV sélectionnée. Le système classe donc la chaîne TV dans la
liste des favoris.
3.
La touche EXIT permet de quitter l‘organisateur des chaînes et les nouveaux réglages sont
enregistrés. Un message apparaît indiquant la mise à jour du système.
Note:
Si vous désirez supprimer une chaîne TV de la liste des favoris, veuillez piloter la chaîne TV dans le
traitement des chaînes (marquée par un symbole en forme de cœur) et ré appuyez sur la touche
FAV. Le système supprime le symbole en cœur et la chaîne TV n‘apparaît plus dans la liste des
favoris.
42
HTC 2232D
Réglages LCD
Réglages des chaînes
Saut de chaîne (Skip)
Cette option vous permet de sélectionner certaines chaînes TV pour le saut de sorte que vous ne
pourrez plus les sélectionner directement avec les touches numériques. Veuillez suivre la procédure
suivante:
1.
Vous sélectionnez la chaîne TV en question avec les touches ▲/▼.
2.
Appuyez sur la touche BLEUE de la télécommande et il apparaît un symbole bleu au niveau
de la chaîne TV sélectionnée.
3.
La touche EXIT permet de quitter l‘organisateur des chaînes, les nouveaux réglages
s‘enregistrent.
Renommer une chaîne (Rename) —- Uniquement valable pour les chaînes TV analogiques
Cette option vous permet de renommer des chaînes TV analogiques et donc de leur affecter un
nouveau nom. Veuillez suivre la procédure suivante:
1.
Vous sélectionnez la chaîne TV en question avec les touches ▲/▼.
2.
Appuyez sur la touche VERTE de la télécommande et il apparaît un symbole vert au niveau
de la chaîne TV sélectionnée.
3.
Les touches ▲/▼ permettent de modifier le caractère de chaque position.
4.
Vous pouvez passer d‘une position à une autre à l‘aide des touches ◄/►.
5.
Vous sauvegardez la modification du nom en appuyant sur la touche MENU.
6.
La touche EXIT permet de quitter l‘organisateur des chaînes, les nouveaux réglages
s‘enregistrent.
Français
Supprimer une chaîne TV (Supprimer)
Cette option vous permet de supprimer des chaînes TV de la liste des chaînes. Veuillez suivre la
procédure suivante:
1.
Vous sélectionnez la chaîne TV en question avec les touches ▲/▼.
2.
Appuyez sur la touche ROUGE de la télécommande et la chaîne TV est immédiatement
supprimée.
3.
Appuyez aussi longtemps sur la touche EXIT de la télécommande jusqu‘à ce qu‘apparaisse
l‘image en live. Un message apparaît indiquant la mise à jour du système.
Information sur le signal
Afficher l’information sur le signal sur la chaîne TV en cours.
Mise à jour logicielle
Utiliser cette option pour installer un nouveau logiciel.
Démarrage de l’enregistrement
Démarrer immédiatement l’enregistrement de la chaîne en cours, lorsque qu’un support de stockage
USB est connecté.
Liste des enregistrements
Afficher les enregistrements dans une liste.
Programmation
Afficher le tableau de programmation.
Liste des programmations
Afficher la liste des programmations.
Système de fichiers PVR
Préparer le support de stockage USB pour l’enregistrement. Voir détail, page 30.
HTC 2232D
43
Réglages LCD
Réglages de l‘image
Français
Les réglages de l‘image contiennent les options mode d‘image, contraste, luminosité, couleur,
netteté, température d‘image, format d‘image et la réduction du bruit.
Mode d‘image
Les touches ◄/► vous permettent de régler le mode d‘image et donc la représentation de l‘image à
l‘écran. Les sous-options suivantes sont prédéfinies Dynamique, Standard et Moyen. Vous avez
également la possibilité de définir vos propres réglages. Pour le faire, veuillez utiliser la sous option
Utilisateur (user).
Luminosité (Brightness)
Vous pouvez régler la luminosité à l‘aide des touches ◄/►. Cette option ne s‘active que si vous avez
sélectionné le réglage utilisateur dans le mode d‘image.
Contraste (Contrast)
Vous pouvez régler le contraste à l‘aide des touches ◄/►. Cette option ne s‘active que si vous avez
sélectionné le réglage utilisateur dans le mode d‘image.
Couleur (Colour)
Vous pouvez régler la couleur de l‘image à l‘aide des touches ◄/►. Cette option ne s‘active que si
vous avez sélectionné le réglage utilisateur dans le mode d‘image.
Netteté (Sharpness)
Vous pouvez régler la netteté de l‘image à l‘aide des touches ◄/►. Cette option ne s‘active que si
vous avez sélectionné le réglage utilisateur dans le mode d‘image
Teinte (Tint)
Vous pouvez régler la teinte à l‘aide des touches ◄/►. Cette option ne s‘active que si vous avez
sélectionné le réglage utilisateur dans le mode d‘image.
44
HTC 2232D
Réglages LCD
Réglages de l‘image
Température de couleur (Color Temperature)
Les touches ◄/► vous permettent de régler la température de couleur et donc la représentation de
l‘image à l‘écran. Les sous-options suivantes sont prédéfinies:
•
•
•
froid
chaud
moyen
Vous avez également la possibilité de définir vos propres réglages. Pour cela, veuillez utiliser la sousoption Utilisateur (User). Vous aurez ensuite accès aux différentes couleurs Rouge (RED), Vert
(Green) et Bleu (Blue).
Format d‘image (Aspect Ratio)
Les touches ◄/► vous permettent de régler le format d‘image et donc la représentation de l‘image à
l‘écran. Les sous-options suivantes sont disponibles:
•
•
•
•
•
Français
•
16:9 — L‘image apparaît toujours en plein écran, indépendamment du format d‘image prévu.
4:3 — L‘image apparaît toujours en 4:3 avec des bandes noires à droite et à gauche,
indépendamment du format d‘image prévu.
Auto — Ajuste toujours automatiquement l‘image. S‘il s‘agit d‘une image en 16:9, c‘est un
plein écran qui apparaît. S‘il s‘agit d‘une image en 4:3, c‘est alors une image en 4:3 avec des
bandes lattérales qui apparaît.
Zoom 1 — Vous pouvez utiliser cette option avec les images en 4:3. L‘image s‘aggrandit en
plein écran tout en conservant le format d‘image. Toutefois, avec ce niveau de zoom, du
contenu de l‘image disparaît.
Zoom 2— Vous pouvez utiliser cette option avec une image en écran large 16:9. L‘image
s‘aggrandit en plein écran tout en conservant le format d‘image. Toutefois, avec ce niveau
de zoom, du contenu de l‘image disparaît.
Panorama - Option à sélectionner lorsque le film est au format CinemaScope. L’image
s’élargit et les bandes noires sur le dessus et en-dessous disparaissent. Toutefois, une partie
de l’image, à droite et à gauche, n’est pas visible.
Vous pouvez accéder à cette option également à l‘aide de la touche ROUGE, excepté dans le cas du
lecteur DVD intégré.
Réduction du bruit (Noise Reduction)
Les touches ◄/► permettent d‘activer le système de réduction du bruit:
•
Bas
Faible niveau de réduction du bruit
•
Moyen
Niveau de réduction du bruit moyen
•
Haut
Fort niveau de réduction du bruit - accompagné d’une netteté exagérée
•
Par défaut
Option standard de niveau de réduction de bruit
•
OFF (éteint)
la réduction du bruit n‘est pas active
HTC 2232D
45
Réglages LCD
Réglages de l‘image
En mode VGA, les réglages de l‘image contiennent davantage d‘options. Ils concernent l‘alignement
vertical et horizontal et la taille de l‘image. Cette sous-option supplémentaire se trouve dans le menu
SCREEN.
Vous pouvez faire apparaître d‘autres sous-options à l‘écran à l‘aide de la flèche ►.
Configuration automatique (Auto Position)
Vous pouvez configurer automatiquement les réglages suivants avec la touche ►.
Position horizontale et verticale
Vous pouvez régler la position de l‘image à l‘écran dans la hauteur mais aussi dans la largeur à l‘aide
des touches ◄/►.
Taille (Size)
Vous pouvez régler la taille de l‘image à l‘écran avec les touches ◄/►.
Français
Phase
Vous pouvez régler la phase de l‘horloge d‘échantillonnage ADC en rapport avec le signal H Sync
avec les touches ◄/► jusqu‘à ce qu‘apparaisse une image stable, claire et nette.
46
Vous sauvegardez la modification en appuyant sur la touche MENU. La touche EXIT vous permet de
quitter les réglages d‘image et le système enregistre les nouveaux réglages.
HTC 2232D
Réglages LCD
Réglages du son
Les réglages du son contiennent des options pour le mode son, les aigus, la basse, la balance, le
volume automatique, le surround et SPDIF.
Français
Mode son
Les touches ◄/► vous permettent de régler le mode son et donc la sortie du son. Les sous-options
suivantes sont prédéfinies musique, film, sport et standard.
Vous avez également la possibilité de définir vos propres réglages. Pour cela, veuillez utiliser la sousoption Utilisateur (User). Vous aurez ensuite accès aux réglages des aigus et de la basse.
Aigu (Treble) et basse
Vous pouvez changer le timbre avec les touches ◄/►. Cette option ne s‘active que si vous avez
sélectionné le réglage utilisateur dans le mode son.
Balance
Les touches ◄/► vous permettent de régler la balance du son de gauche et de droite.
Volume automatique (Auto Volume)
Cette option permet d‘amortir automatiquement le volume lorsque surviennent des passages
contenant un son très aigu. C‘est une sorte de mode sutural. Vous pouvez modifier cette option avec
les touches ◄/►.
Son surround
Cette option permet d‘activer la sortie du son avec des effets surround. Vous pouvez modifier cette
option avec les touches ◄/►.
Mode SPDIF
Pour désactiver ou activer la sortie audio numérique. Lorsque le mode SFDIF est activé, il est
possible de choisir entre le mode de sortie AUTO et PCM.
HTC 2232D
47
Réglages LCD
Réglages de l‘heure
Français
Les réglages de l‘heure contiennent des options pour l‘heure/la date, l‘heure automatique de coupure,
l‘heure automatique de mise en marche, la minuterie, la veille automatique et le fuseau horaire.
Heure/Date (Clock)
Veuillez sélectionner l‘option avec la flèche et appuyez sur la touche OK pour régler l‘heure et la
date. Une nouvelle fenêtre apparaît à l‘écran.
Les touches ◄/► vous permettent de modifier l‘option en cours. Vous pouvez naviguer vers la sousoption suivante avec les touches ▲/▼. Les sous-options suivantes sont disponibles Jour (Date),
Mois (Month), Année (Year), Heure (Hour) et Minute (Minute).
Appuyer sur la touche OK pour sauvegarder les modifications.
Heure automatique de coupure (Off Time)
Cette option vous permet de faire éteindre automatiquement
votre téléviseur HTC à un moment bien précis. Vous pouvez
activer cette option avec la touche ► et une nouvelle fenêtre
apparaît à l‘écran. Vous pouvez y définir le mode ainsi que
l‘horaire correspondant.
•
•
•
48
Répéter (Repeat)
Cette option contient les réglages possibles pour Une fois (Once), quotidiennement (every
day), lundi-vendredi (Mon.-Fri), lundi-samedi (Mon.-Sat.), samedi-dimanche (Sat.-Sun.),
dimanche (Sun) ou Eteint.
Heure (Hour)
Pour définir l‘horaire en heures.
Minutes (Minute)
Pour définir l‘horaire en minutes.
HTC 2232D
Réglages LCD
Réglages de l‘heure
Heure automatique de mise en marche (On Time)
Cette option vous permet de faire mettre automatiquement votre
téléviseur HTC en marche à un moment bien précis. Vous
pouvez activer cette option avec la touche ► et une nouvelle
fenêtre apparaît à l‘écran. Vous pouvez y définir le mode ainsi
que l‘horaire correspondant.
•
•
•
•
•
Vous pourriez par exemple effectuer les réglages suivants: Lundi-vendredi, 8:05 heure, volume 40 et
DTV avec Channel No 2.
Français
•
Répéter (Repeat)
Cette option contient les réglages possibles pour Une
fois (Once), quotidiennement (every day), lundivendredi (Mon.-Fri), lundi-samedi (Mon.-Sat.), samedidimanche
(Sat.-Sun.), dimanche (Sun) ou Eteint.
Heure (Hour)
Pour définir l‘horaire en heures.
Minutes (Minute)
Pour définir l‘horaire en minutes.
Volume (Volume)
Pour définir le niveau du volume.
Source (Mode)
Pour définir la source par laquelle le téléviseur HTC doit se mettre en marche. Vous pouvez
choisir entre DTV, ATV et radio.
Chaîne - Définir la chaîne sur laquelle s’effectue la mise en marche.
A ce moment bien précis, votre téléviseur HTC se mettrait toujours en marche automatiquement avec
la chaîne TV numérique activée à un niveau de volume de 40.
Minuterie (Sleeptimer)
Cette option vous permet de programmer la minuterie en minutes prédéfinies indiquant quand le
téléviseur HTC doit s‘éteindre automatiquement.
Note:
Vous pouvez également accéder à cette option au moyen de la touche SLEEP de la télécommande.
Veille automatique (Auto Sleep)
Cette option permet de toujours éteindre le téléviseur HTC automatiquement après quelques minutes
lorsqu‘il ne reçoit pas de signal actif des sources (DVD, HDMI, VGA etc.).
Fuseau horaire (Time Zone)
Cette option vous permet de définir le fuseau horaire dans lequel le téléviseur HTC se trouve. Si vous
avez déjà sélectionné le pays lors du processus de recherche, le réglage correspondant est juste en
règle générale.
HTC 2232D
49
Réglages LCD
Options
Français
Le menu options contient les réglages de la langue, du pays et du chargement des réglages usine.
OSD Langue (OSD Language)
Pour définir la langue de l‘affichage sur écran.
Langue audio (Audio Language)
Vous pouvez définir ici la langue active en DVB-T avec les chaînes ou les programmes TV diffusés
en plusieurs langues.
Langue de sous-titrage (Subtitle Language)
Vous pouvez définir ici la langue active de sous-titrage en DVB-T, dans le cas où il est diffusé.
Note:
En Allemagne, le sous-titrage n‘est pas disponible en DVB-T.
Pays (Country)
Lorsque le téléviseur HTC fonctionne en DVB-T, vous pouvez définir ici le pays dans lequel il se
trouve. Ce réglage influe directement sur le fuseau horaire des réglages de l‘heure.
Charger les réglages usine (Restore Factory Default)
Cette option vous permet de remettre les réglages d‘usine et de supprimer tous les réglages
personnels que vous devrez, au cas échéant, reparamétrer.
50
HTC 2232D
Réglages LCD
Options
Le menu LOCK contient divers
réglages pour limiter l‘accès à
des programmes TV ou pour
définir le niveau de la sécurité
enfants. Les sous-options
suivantes sont disponibles:
verrouiller une chaîne, modifier
le mot de passe, bloquer des
chaînes et la sécurité enfants.
Vous pouvez modifier les
options que si vous avez entré
le mode de passe prédéfini.
Après que l‘on vous ait
demandé le mot de passe,
veuillez entrer le mot de passe
à 4 chiffres 0 0 0 0.
Verrouiller une chaîne (Lock Channel)
Français
Modifier le mot de passe (Set Password)
Cette option vous permet de modifier le mot de passe prédéfini et de confirmer le nouveau mot de
passe.
Bloquer des chaînes (Block Program)
Cette option vous permet de bloquer des chaînes
TV. Après avoir activé cette option, la liste des
chaînes apparaît à l‘écran. Veuillez sélectionner
à l‘aide des touches ▲/▼ la chaîne que vous
désirez bloquer. Appuyez ensuite sur la touche
VERTE, il apparaît alors un symbole en forme de
verrou au niveau de la chaîne TV sélectionnée.
Vous sauvegardez le réglage en appuyant sur la
touche MENU.
Il n‘est plus possible d‘appeler la chaîne TV bloquée.
Sécurité enfants (Parental Guidance)
Cette option vous permet de définir le niveau de la sécurité enfants, si celle-ci est soutenue par la
chaîne TV concernée. Plus la valeur est grande, plus la protection de la sécurité enfants est élevée.
Note:
En Allemagne, il n‘est pas possible de régler le niveau de la sécurité enfants en DVB-T ou ATV.
HTC 2232D
51
DÉPANNAGE LCD
Veuillez consulter ce tableau pour détecter la cause probable d’un problème avant de contacter un
réparateur.
Support technique Xoro/MAS:
•
Tél.: +33 1 60 86 70 06
•
•
Internet: www.xoro.fr
Email : [email protected] ou [email protected]
Problème
Solution
Le téléviseur ne
s’allume pas
•
•
•
Pas d’image
•
•
Français
•
52
Pas de son
•
•
Vérifiez que le câble principal est bien branché à la prise d’alimentation
et à l’adaptateur.
Vérifiez que le câble de l’adaptateur est bien branché à l’appareil.
Il se peut que le circuit électronique se soit réinitialisé. Débranchez la
prise, attendez 60 secondes, puis rebranchez la.
Vérifiez si l’antenne ou les autres entrées sont bien branchées.
Vérifiez que vous avez sélectionné la bonne entrée, en utilisant la
touche INPUT.
Vérifiez les réglages de luminosité et de contraste dans le menu
VIDEO ou PC (ordinateur).
Vérifiez si le volume est mis au plus bas ou si la touche MUTE
(silencieux) est activée.
Vérifiez que les câbles audio soient bien branchés aux entrées
correspondantes.
L’image n’a pas les
bonnes couleurs
•
Vérifiez si vous avez sélectionné la bonne entrée, en utilisant la
touche INPUT.
L’image est instable
lorsqu’elle est gérée
par un ordinateur
•
Vérifiez si les réglages dans le menu PC (ordinateur) correspondent
aux réglages de sortie vidéo du PC.
Quelques points
colorés
apparaissent à
l’écran
•
Les écrans LCD à haute résolution n’ont généralement qu’un faible
taux de pixels défectueux.
Ceci est normal et dans les normes de nos contrôles de qualité.
Image déformée
•
•
Le LCD a un mauvais mode de réglage de l´image. Appuyez sur la
touche ROUGE pour changer le format de 16:9 en 4:3.
HTC 2232D
DÉPANNAGE TNT
Symptôme
Pas de réception TNT /
distorsion importante /
images se figent
Correction
•
•
•
•
•
•
Images se figent
•
•
Mosaïques ou
artéfacts
Mettre l’appareil en mode TNT
Pas de signal TNT dans votre région.
Réaligner l’antenne. Vérifier la direction de l’antenne
d’émission.
Utiliser une antenne intérieure active ou une antenne de toit.
Relancer la recherche automatique.
Réaligner l’antenne. Vérifier la direction de l’antenne
d’émission.
Utiliser une antenne intérieure active ou une antenne de toit.
Réaligner l’antenne.
d’émission.
Vérifier
la
direction
de
l’antenne
Pas d’alimentation
•
Brancher correctement le cordon d’alimentation et allumer le
lecteur
Impossible de
rechercher les chaînes
•
•
•
•
Ajuster l’antenne
•
•
•
•
•
•
•
•
•
Changer les piles
Pas d’image /
d’image colorée
pas
Pas de son
Audio et sous-titres ne
fonctionnent pas ou ne
peuvent être changés
•
•
Vérifier le bon raccordement au téléviseur
Vérifier le mode de sortie vidéo dans les réglages.
Utiliser selon la portée maximale (max. 5 mètres, 30 °)
Français
La télécommande ne
fonctionne pas
Lire le paragraphe de recherche des chaînes
Le capteur est orienté vers une lumière vive
Annuler la fonction « Silence »
Augmenter le volume
Vérifier la connexion à la TV ou à l’amplificateur.
Annuler le minuteur
Changer la piste audio (appuyer sur la touche AUDIO)
Changer la piste de sous-titres (appuyer sur la touche
SUBTITLE)
Les autres pistes audio ne sont pas compatibles
Les sous-titres ne sont pas compatibles
HTC 2232D
53
Notes sur la réception TNT
Qualité de l‘image
La qualité de l‘image en DVB-T diffère d‘un pays à l‘autre. Ce sont essentiellement le débit binaire
utilisé et l‘émission-réception qui influent sur la qualité de l‘image.
Le débit binaire est déterminé par les stations TV elles-mêmes et elles seules peuvent le modifier. Si
vous captez une image fortement mosaïquée, floue ou avec des artéfacts, vous pouvez, au cas
échéant, essayer de changer la position de l‘antenne afin d‘améliorer la réception. Il est toutefois
impossible d‘obtenir une meilleure qualité d‘image de certaines stations TV car le taux binaire émis
est trop faible.
Plus le taux binaire émis est élevé plus la qualité de l‘image est meilleure et moins l‘image contient
d‘artéfacts, de mosaïques et de brouillages.
En plus du taux binaire, la netteté de l‘image dépend également de la résolution émise et du matériau
de source. On peut dire en général que, plus la résolution est élevée, plus l‘image est nette.
Certaines stations émettent des résolutions plus faibles que d‘autres.
Français
Voici quelques exemples des différentes résolutions en Allemagne:
Chaînes TV publiques
720x576 ou 704x576 pixel
Chaînes TV privées
544x576 ou 528x576 pixel
Vous pouvez vous-même influer en partie sur les conditions de réception. Une mauvaise réception se
matérialise souvent, par exemple, par une image gelée ou par le message „Pas de signal“. Vous
pouvez améliorer la réception par plusieurs moyens. Il existe trois sortes d‘antennes, les antennes
passives, les actives et les antennes de toit. Les antennes passives ou actives sont des antennes
dites d‘intérieur. Veuillez toujours diriger l‘antenne de façon à garantir la meilleure des réceptions.
Veillez, au cas échéant, au positionnement des pilônes relais. Si possible, n‘utilisez que des
antennes de bonne qualité.
La meilleure des réceptions s‘obtient avec les antennes de toit, comme lorsqu‘elles servaient à capter
les chaînes analogiques terrestres. Ici aussi, vous pouvez obtenir une meilleure image en changeant
l‘orientation de l‘antenne de toit.
Vous pouvez recevoir des informatoins concernant la zone d‘émission et le positionnement des
pilônes relais dans l‘Internet sous: http://www.ueberallfernsehen.de. Vous y trouvez également une
vue d‘ensemble des chaînes TV émises.
54
HTC 2232D
FONCTIONNEMENT DVD
Présentation
Veuillez appuyer sur la touche INPUT de la télécommande et sélectionnez
DVD afin d’activer le lecteur DVD interne.
Le lecteur de DVD slot-in s’ouvre en faisant un peu de bruit. Le chargeur de
DVD se trouve sur le côté gauche du HTC xx26d.
Insérer le disque dans le chargeur slot-in de façon à voir la face argentée
(face gravée). La face imprimée du DVD ne doit pas être visible.
Le CD/DVD se placera ensuite automatiquement dans le lecteur et son
contenu sera affiché.
Notes :
•
•
Si le CD/DVD est introduit du mauvais côté, le lecteur essayera
quand même de le lire. Cette procédure prendra plus de temps que
la normale. Le lecteur affichera ensuite le message No Disc et
éjectera automatiquement le CD/DVD.
L’appareil doit être en mode DVD pour pouvoir éjecter un CD ou un DVD du lecteur. Pour
cela, appuyez sur la touche OPEN/CLOSE (▲) de la télécommande. Si l’appareil ne se
trouve pas en mode DVD, cette touche ne fonctionne pas. Appuyez sur la touche SOURCE
et sélectionnez „DVD“.
Fonction
Français
Un indicateur OSD (On Screen Display) sera affiché dans le coin supérieur gauche
de l’écran si certaines fonction sont exécutées et en appuyant sur la touche DISPLAY
de la télécommande.
L’indicateur OSD est une interface permettant d’afficher le statut de la lecture
en cours. En fonction du type de support chargé dans le lecteur, l’indicateur
OSD sera différent.
La barre d’état s’affichera automatiquement si
vous appuyez sur la touche DISPLAY. Appuyez
une nouvelle fois sur cette touche et une nouvelle barre sera affichée. Appuyez une 3ème fois sur la
touche DISPLAY et la barre d’état sera masquée. Lorsque la barre d’état est affichée, appuyez sur
une autre touche et elle sera masquée automatiquement.
En appuyant sur la touche DISPLAY une
nouvelle fois, l’image suivante sera affichée sur
l’écran.
(Bande son active / Format de la bande son DD
5.1 CH (canal) / Sous-titres (Non inclus dans cet exemple) (OFF) / Plus d’aspects (Dans cet exemple,
il n’y a pas d’aspects supplémentaires activés (OFF))
Pour les fichiers vidéo MPEG-4 les informations
sont un peu différentes de celles des DVD
vidéo.
Informations importantes pour les disques ISO
avec des fichiers MPEG-4 :
(Format du disque (ici CD-ROM) / Nombre de pistes ou de morceaux et celui actuellement lu / Avec
ou sans son / Durée de lecture).
HTC 2232D
55
FONCTIONNEMENT DVD
Fonction
Ouvrir / Fermer
Pour ouvrir et fermer le tiroir à disques.
Appuyez sur la touche OPEN sur la face avant de l’appareil ou sur la télécommande.
Note :
•
La lecture avance ou retour rapide ne fonctionnera pendant la partie avertissement d’un
DVD.
•
La fonction Skip n’est pas disponible sur les DVD avec un seul chapitre ou CD avec une
seule piste.
Lecture
Appuyez sur la touche PLAY pour lire le disque.
Français
Pause
Ré-appuyez sur la touche PAUSE pour mettre sur pause. Appuyez sur la touche
PLAY pour reprendre la lecture normale.
Stop
Appuyez sur la touche STOP pour arrêter de deux façons:
• Appuyez sur la touche STOP une fois. Le lecteur mémorise la position d’arrêt et
affiche PRESTOP. Reprenez la lecture du point d’arrêt en appuyant sur PLAY.
• Appuyez sur la touche STOP deux fois pour arrêter complètement le disque. L’OSD
affiche STOP. En appuyant sur PLAY vous reprendrez la lecture du disque depuis le début.
Avancer et reculer
Appuyez sur cette touche pour avancer d’un chapitre (DVD) ou d’une piste (CD).
Appuyez sur cette touche pour reculer d’un chapitre (DVD) ou d’une piste (CD).
Avance et Retour rapide
Appuyez sur cette touche pour utiliser la fonction Retour rapide. Appuyez à
plusieurs reprises sur cette touche.
Appuyez sur cette touche pour utiliser la fonction Avance rapide. Appuyez à
plusieurs reprises sur cette touche pour augmenter la vitesse d’avance.
Note:
•
•
•
56
En appuyant plusieurs fois sur les touches vous passez des vitesses Normal —> x2 —> x4
—> x8 —> 20 —> Normal
Le lecteur se met en silencieux lors de l’avance ou du retour rapide.
La lecture avance ou retour rapide ne fonctionnera pendant la partie avertissement d’un
DVD.
HTC 2232D
FONCTIONNEMENT DVD
Fonction
Titre DVD
Appuyez sur la touche TITLE pendant la lecture et 9 petites photos du répertoire en
cours s’afficheront en mode miniature. Neuf ou moins de photos s’affichent là où vous
regardez (selon le nombre de photos restantes).
Menu DVD
Si vous appuyez sur la touche D.MENU pendant la lecture d’un DVD vous retournerez
directement au menu de départ du DVD.
Pavé numérique
1.
Pour accéder directement à un chapitre DVD ou à une piste CD, entrez le
numéro du chapitre DVD ou de la piste du CD en utilisant les touches du
pavé numérique.
2.
Vous pouvez également utiliser le pavé numérique pour entrer les
données pour le menu du départ du DVD ou pour le menu de
configuration du lecteur.
Langue audio
Lors de la lecture d’un DVD, appuyez sur la touche LANG plusieurs fois pour choisir la
langue audio désirée. Un DVD peut contenir jusqu’à 8 langues audio différentes.
Français
Sous-titres
Durant la lecture d’un DVD, appuyez sur la touche SUBT plusieurs fois pour
sélectionner le sous-titre désiré. Un DVD peut contenir jusqu’à 32 sous-titres
différents.
Remarque:
Le menu général d’un DVD peut permettre de régler l’angle, les sous-titres et la langue audio. Vous
pouvez effectuer vos réglages depuis le menu général.
Recherche / Goto
1.
Appuyer sur la touche GOTO (Jaune) pour accéder à la fonction Recherche.
2.
A l’aide des touches ◄ / ►, sélectionner l’option souhaitée: Titre, Chapitre/
Piste ou Temps. Utiliser les touches numériques pour entrer, par exemple,
l’indexe de temps.
3.
Appuyer sur la touche OK pour confirmer.
4.
La lecture démarre à partir de l’indexe de temps, le chapitre, la piste ou le titre renseigné.
HTC 2232D
57
FONCTIONNEMENT DVD
Fonction
Modes répétition
Appuyez sur la touche REPEAT à plusieurs reprises pour sélectionner un mode
répétition. Appuyer à plusieurs reprises sur la touche REPEAT pour changer le
mode de répétition selon le type de contenu à lire.
En mode DVD-Vidéo
REP. CHAPTER
REP. TITLE
REP. OFF
Répéter le chapitre
Répéter le titre
Désactiver la répétition
En mode fichiers JPEG, MP3, WMA ou Vidéo
REP. Track
Répéter la piste
REP. FOLDER
Répéter le dossier entier
REP. ALL
Répéter tout
REP. OFF
Désactiver la répétition
Français
VCD, SVCD, AUUDIO CD
REP. 1
REP. ALL
REP. OFF
Répéter la piste
Répéter tout
Désactiver la répétition
Remarque :
Certains DVD ne permettent pas cette fonction
Zoom
Appuyez sur la touche ZOOM plusieurs fois pour choisir le zoom :
ZOOM x2 —> ZOOM x3 —> ZOOM x4 —> ZOOM x1/2 —> ZOOM x1/3 —>
ZOOM x1/4 —> ZOOM OFF
Lors de la lecture d’une photo JPEG. Appuyez sur la touche ZOOM pour afficher le zoom x1/2, x1/3,
x1/4. Appuyez sur les touches flèches pour retourner l’image. Lors de l’affichage en zoom x2, x3, x4,
appuyez sur les flèches pour déplacer l’image.
Ralenti
Appuyer sur la touche SLOW pour diminuer la vitesse de lecture. Appuyer à plusieurs
reprise sur la touche SLOW et la vitesse varie suivant le schéma ci-dessous:
Normal -> x1/2 -> x1/3 -> x1/4 -> x1/5 -> x1/7 -> Normal
58
HTC 2232D
FONCTIONNEMENT DVD
Fonction
Programme
Appuyez sur la touche PROGRAM pour quitter le menu programme.
En mode DVD
Lorsque le menu programme apparaît, entrez le numéro du titre et du chapitre.
LECTURE:
EFFACER:
Appuyer sur la touche PLAY pour démarrer la lecture.
Aller à l’option EFFACER pour effacer une information erronée renseignée préalable
ment. Appuyer sur la touche ENTER une nouvelle fois pour effacer toutes les pistes.
En mode CD
Lorsque le menu programme apparaît, entrez le numéro de la piste, appuyez sur OK, lorsque la
programmation est terminée.
Français
Sourdine
Appuyer sur la touche MUTE pour couper le son. Appuyer une nouvelle fois sur la touche MUTE pour
remettre le son.
Volume
Appuyer sur les touches VOL+ / VOL– pour modifier le volume sonore.
HTC 2232D
59
FONCTIONNEMENT DVD
Fichiers musicaux, photo et vidéo
Français
Insérer un disque et le lecteur déclenche automatiquement la recherche dans le répertoire des
fichiers Vidéo/Musique/Photo. Une fois la recherche achevée, il affiche le premier répertoire des
fichiers musicaux lorsque le disque contient aussi bien les fichiers musicaux que photo. Dans le cas
d’un disque contenant un seul type de fichiers, il affiche le premier répertoire et lit la première
chanson dans ce répertoire (le nom du fichier est surligné). Voir l’affichage sur l’écran ci-dessous:
Le lecteur DVD dispose d’un système de filtrage permettant un affichage différencié des divers types
de fichiers: Musique, Photos et Vidéos.
Pour les fichiers musicaux, le lecteur DVD démarre la lecture du premier fichier.
Pour les fichiers photo, le lecteur DVD affiche la page de navigation et montre tous les fichiers.
Pour les fichers vidéo, le lecteur DVD affiche la page de navigation et montre tous les fichiers.
Pour un disque mélangé (Musique, Photo et Vidéo), le lecteur
démarre la lecture du premier fichier musical. Pour regarder
les photos ou la vidéo dans ce genre de disques, il faut
modifier la fonction de filtrage. A l’aide de la touche ►, aller
vers les trois symboles en bas de l’écran. A l’aide des
touches ◄ / ► sélectionner un des symboles et confirmer avec la touche OK.
Les symboles représentent:
Fichiers musicaux
Fichiers photo
Fichiers vidéo
60
HTC 2232D
FONCTIONNEMENT DVD
Fichiers musicaux, photo et vidéo
Disque de données contenant les fichiers Photo, Musique ou Vidéo
1.
Le lecteur DVD peut lire les photos au format JPEG.
2.
Le lecteur DVD peut lire la musique au format MP3 et WMA.
3.
Le lecteur DVD peut lire plusieurs types de format vidéo.
La compatibilité avec les formats vidéo est la suivante:
1.
Résolution des fichiers MPEG-1, MPEG-2 et MPEG-4 = 720x576.
2.
Le nom de fichier MPEG-1, MPEG-2 et MPEG-4 = 10 caractères.
3.
Si l’un des noms de fichiers MPEG-1, MPEG-2 et MPEG-4 n’est pas affichable, le signe " _ "
apparaît.
4.
Le nombre maximal des images est de 30 par seconde.
5.
Si la structure vidéo ou audio du fichier n’est pas interfoliée, seul le signal vidéo ou audio
sera lu.
6.
Les fichiers compatibles sont MPEG-1, MPEG-2 et MPEG-4, ".avi ", ".mpg ", ".mpeg".
7.
Les différents codecs MPEG-4 sont pris en charge. Cependant, ils doivent être encodés dans
le standard MPEG-4 part 2 (MPEG-4 SP/ASP).
8.
Aucun fichier vidéo avec le codec VC-1, H.264 ou dans un container MP4, MKV, 3GP ou QT
n’est pris en charge.
9.
Les formats audio pris en charge dans un fichier MPEG-x sont:
•
MPEG-4:
AC3, MP3
MPEG-1/2:
MP2 / MPA
Fréquence d’échantillonnage:
8 - 48 kHz (MP3)
Taux de transfert:
8 à 320 kbps (MP3)
Français
•
•
•
HTC 2232D
61
CONFIGURATION DVD
Configuration Système
Appuyez sur la touche SET pour accéder au menu des réglages du lecteur. Le menu
des réglages permet à l’utilisateur d’ajuster facilement des réglages précis du
lecteur. Pour plus de détails concernant le menu des réglages, voir la partie "MENU
DES RÉGLAGES” de ce mode d’emploi.
De nombreuses caractéristiques peuvent être réglées dans le menu Configuration.
En mode STOP, appuyez sur la touche SET pour sélectionner le sous-menu
CONFIGURATION SYSTEME. Appuyez sur la touche HAUT/BAS pour sélectionner les sous-titre.
Appuyez sur la touche OK et le sous-menu sera affiché à l’écran.
•
•
Appuyez sur les touche HAUT / BAS pour sélectionner le temps voulu.
Appuyez sur OK pour confirmer le point que vous avez sélectionné.
Français
Système TV
Trois modes sont disponibles : NTSC / PAL / AUTO.
Choisissez un de ces modes en fonction de votre
téléviseur.
Si le mode TV ne correspond pas à celui du lecteur
DVD, l’écran clignotera et sera sans couleur.
Le réglage par défaut est : PAL
Type TV
1.
4:3 (Pan Scan): il convient aux téléviseurs de taille normale.
Lors de la lecture, l’image sera coupée de sorte que l’image
remplit l’écran du téléviseur.
2.
4:3 (LB): lorsque le lecteur est relié à un téléviseur de taille
normale, veuillez sélectionner ce type. Des bordures noires
apparaîtront alors en haut et bas de l’écran.
3.
16:9 (Écran large): Lorsque le lecteur est connecté à un écran
large, choisissez plutôt ce format.
Format par défaut : 4:3 (Pan Scan).
Mot de passe
Déplacez le curseur vers MOT DE PASSE et appuyez sur la touche OK pour confirmer. Entrez le
code secret “0 0 0 0” (uniquement la 1ère fois). Après avoir confirmé, vous devrez entrer un nouveau
mot de passe et appuyer sur OK pour confirmer.
Attention:
Prenez soin de retenir ce nouveau mot de passe ou vous ne pourrez plus changer les paramètres du
contrôle parental. Merci de contacter votre revendeur si vous avez oublié ce mot de passe.
62
HTC 2232D
CONFIGURATION DVD
Configuration système
Il existe 8 niveaux de contrôle parental :
1.
Enfants
2.
G
3.
PG
4.
PG13
5.
PG-R
6.
R
7.
NC-17
8.
Adultes
Les disques du premier niveau sont accessibles à tout le monde et les huit niveaux suivants sont
accessibles aux adultes. Si vous voulez modifier les paramètres du contrôle parental, entrer l’âge des
utilisateurs puis entrez le mot de passe à quatre chiffres. Le code secret par défaut est le 8357 (si
vous utilisez ce lecteur pour la 1ère fois, entrez simplement ce code). Si le code d’entrée a été
confirmé, le menu de réglage du niveau apparaîtra. Déplacez le curseur pour sélectionner le niveau
désiré et appuyez sur la touche OK pour confirmer et mémoriser.
Défaut
Ce sont les réglages d’usine par défaut. Si vous sélectionnez RESTAURER, les réglages effectués
au préalable par l’utilisateur seront supprimés et le lecteur sera réinitialisé.
En mode STOP, appuyez sur la touche DVD SETUP
pour sélectionner le menu LANGUE.
Il est possible de choisir la langue d’affichage sur
l’écran, la langue audio, la langue de sous-titre et la
langue du menu pendant la lecture d’un DVD-Vidéo.
•
•
•
•
•
Français
Configuration langue
Appuyer sur la touche BAS/HAUT
Appuyer sur la touche OK, Langue le sousmenu.
Appuyer sur la touche ► pour entrer dans la
configuration de langue.
Appuyer sur OK pour confirmer votre sélection.
Appuyer sur la touche SET pour quitter.
HTC 2232D
63
CONFIGURATION DVD
Configuration audio
Le réglage AUDIO ne contient qu’une option.
Les valeurs positives augmentent les aigus.
Les valeurs négatives augmentent les basses.
Configuration Dolby Digital
Français
Dual Mono
Pour choisir les réglages correspondants au nombre
de haut-parleurs connectés.
Stéréo:
Le son mono gauche passera par le
haut-parleur gauche et le son mono
droit
par le haut-parleur droit.
G-Mono:
Le son mono gauche passera par les
haut-parleurs droit et gauche.
D-Mono:
Le son mono droit passera par les
haut-parleurs droit et gauche.
Mix-Mono:
Les sons mono mélangés droit et gauche passeront par les haut-parleurs
et gauche.
droit
Dynamique
Pour optimiser la sortie son dynamique, les hauts volumes sonores sont adoucis, ce qui vous permet
de visionner votre film préféré sans gêner les autres.
Différents niveaux sonores sont disponibles : Entier, 6/8, 4/8, 2/8 et Off.
64
HTC 2232D
DÉPANNAGE DVD
Veuillez consulter ce tableau pour détecter la cause probable d’un problème avant de contacter un
réparateur. Support technique Xoro/MAS:
•
•
•
Tél.: +33 1 60 86 70 06
Internet: www.xoro.fr
Email : [email protected] ou [email protected]
Symptôme
Correction
•
•
Ne fonctionne
pas
•
•
•
•
•
Pas de disque > lancez un disque
Le disque a été placé du mauvais côté > Mettez le disque avec la face
étiquettée vers le haut.
La zone du disque ne correspond pas à celui du lecteur.
Le niveau de contrôle du disque est plus élevé que celui du contrôle
parental du lecteur
Le lecteur ne peut lire ce type de disque.
Le disque est abîmé
Il peut y avoir de l’humidité à l’intérieur du lecteur. Enlevez le disque et
attendez 1 ou 2 heures.
•
•
•
Activez la prise USB (Réglages systèmes —> Source —> USB)
Raccordez correctement la clé USB
Le contenu des données n’est pas conforme
Pas de lecture
du lecteur de
cartes
•
•
•
Activez le lecteur de cartes (Réglages système —> Source —> CARD)
Placez la carte SD, MMC ou MS avec les écritures vers l’arrière
Le contenu des données n’est pas conforme
Image ou bruit
déformé
•
Le disque est sale ou abîmé. Nettoyez le ou essayez un autre disque.
•
Sélectionnez le format de l’écran depuis le menu des réglages du
lecteur.
Consultez la partie « RÉGLAGES » de ce manuel
Sélectionnez le format d’écran depuis le menu du disque DVD.
L’image ne
remplit pas
l’écran
Impossible de
SAUTER des
pistes ou
RECHERCHER
La
télécommande
ne fonctionne
pas
•
•
•
•
•
•
•
•
Français
Pas de lecture
de l’USB
Certains disques sont programmés de sorte que l’utilisateur n’est pas
autorisé à SAUTER ou RECHERCHER certaines sections, et
notamment au début de la partie d’avertissement.
Les disques ne contenant qu’un chapitre ne sont pas compatible avec la
fonction SKIP
Enlevez les obstacles entre la télécommande et le lecteur.
Dirigez la télécommande vers le capteur du lecteur.
Vérifiez si les piles de la télécommande sont bien placées selon la
polarité indiquée.
Remplacez les piles de la télécommande.
HTC 2232D
65
SPÉCIFICATIONS
Information Générale
Alimentation
Consommation
Norme TV
Système audio
Son stéréo
Dimensions
Poids
AC 100-240 V, 50/60 Hz
< 55 Watts / Veille < 1 Watt
PAL/SECAM, NTSC (en lecture uniquement)
B/G, D/K, I, L/L’
NICAM/A2
535 x 165 x 396 mm (pied inclus)
4.8 kg (pied inclus)
Français
Conditions d’utilisation
Température
0 - 40° C
Humidité
5 - 90% (sans condensation)
Tuner TNT
Modulation
Système vidéo
Système audio
COFDM,2k/8k, QPSK, 16QAM, 64QAM
MPEG-2 Video MP@ML
MPEG-1 Layer 2, AC-3
Connectique
Vidéo
Audio
TV Tuner
Autres
2x HDMI 1.3, HDCP, Vidéo composante, Péritel, Vidéo composite, VGA
Stereo IN, PC Audio IN, Sortie numérique coaxiale, Casque
TNT, Analogique (CATV RF)
USB 2.0 High Speed, Lecteur DVD
Dalle
Type
Panel Size:
Résolution
Rétro éclairage
Contraste
Luminosité
Temps de réponse
TFT LCD
21.6" (54.8 cm)
1920 x 1080, 16:9
LED (Edge)
1000:1
250 cd/m2
5 ms (Tr + Tf)
Audio
Haut-parleurs
Système audio
Son stéréo
2x 3 Watts
B/G, D/K, I
NICAM/A2
Pixel défectueux
Les pixels défectueux définis ci-dessous (pixel brillant, noirs, défauts linéaires et différences de
luminosité) décrivent la tolérance du constructeur en type et en nombre. Ils sont exclus de la garantie.
Pixel brillant
Pixel noir
Pixel brillant + noir
Défaut linéaire
Différence de luminosité
66
≤2
≤5
≤5
Non
Non
HTC 2232D
XORO by MAS Elektronik AG
Pollhornbogen 19
21107 Hamburg
Deutschland
Tel: + 49(040) 77 11 09 17
Fax: + 49(040) 76 73 55 15
[email protected]
www.xoro.de