1
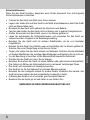
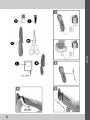
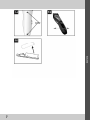
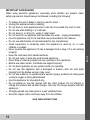
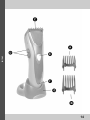
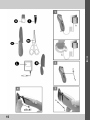
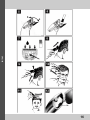
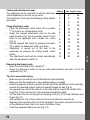
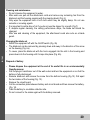
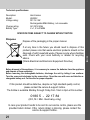
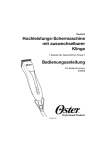
HS3002
Haarschneider
Hair Cutter
Bedienungsanleitung
User Manual
•
•
•
•
•
•
•
•
•
•
•
•
•
•
•
•
•
Trennen Sie das Gerät vom Netz bevor Sie es reinigen.
Lagern oder stellen Sie nicht das Gerät in die Nähe einer Badewanne, damit das Gerät
nicht ins Wasser fallen kann.
Benutzen Sie das Gerät nicht während des Duschens oder Badens.
Tauchen oder stellen Sie das Gerät nicht ins Wasser oder in andere Flüssigkeiten ein.
Greifen Sie niemals nach dem Gerät, wenn es ins Wasser gefallen ist
Lesen Sie aufmerksam die Sicherheitshinweise und verwenden Sie das Gerät nur
entsprechend den Angaben in der Bedienungsanleitung.
Benutzen Sie das Gerät nicht mit anderen Zubehörteilen, als die vom Hersteller
mitgelieferten.
Nehmen Sie das Gerät nie in Betrieb, wenn es beschädigt oder ins Wasser gefallen ist.
Schicken Sie es zur Überprüfung an das Service Center.
Tragen oder ziehen Sie das Gerät niemals am Netzkabel. Schützen Sie das Netzkabel
vor heißen Oberflächen oder sonstigen Beschädigungen und klemmen Sie es nicht ein.
Vor der Benutzung ist zu prüfen, ob die Messereinheit einwandfrei funktioniert.
Schalten Sie das Gerät aus, bevor Sie es ablegen.
Benutzen Sie niemals das Gerät mit einem defekten oder gebrochenen Kammaufsatz.
Das Fehlen von Zähnen am Kammaufsatz kann zu schweren Verletzungen führen.
Das Gerät nicht zusammen mit Haarspray benutzen
Das Gerät ist nur für den Gebrauch in trockenen Räumen geeignet.
Benutzen Sie das Ladegerät niemals für andere Geräte. Versuchen Sie niemals, das
Gerät mit einem anderen als dem mitgelieferten Ladegerät zu laden.
Aufladung des Gerätes nur in trockenen, geschlossenen Räumen.
Bewahren Sie das Gerät gut auf und halten es von Kindern fern
BEWAHREN SIE DIESE BEDIENUNGSANLEITUNG AUF
3
DEUTSCH
Sicherheitshinweise
Wenn Sie das Gerät benutzen, besonders wenn Kinder anwesend sind, sind folgende
Sicherheitshinweise zu beachten:
DEUTSCH
4
5
DEUTSCH
DEUTSCH
6
7
DEUTSCH
DEUTSCH
Beschreibung des Zubehörs
A. Kleiner Zubehörkamm, abnehmbar, einstellbar auf eine Haarlänge
zwischen 4 – 22 mm.
B. Großer Zubehörkamm, abnehmbar, einstellbar auf eine Haarlänge
von 24 – 42 mm.
C. Klingen-Set, abnehmbar.
D. Schneidelängen-Kontrollknopf mit Sperre für den Zubehörkamm beim
Umschalten.
E. Ein und Ausschalter
F. Ladestationanzeige
G. Ladestation
H. Öl für das Klingen-Set.
I. Säuberungsbürste
J. Hairstyling Kamm
K. Bartkamm
L. Adapter
M. Schere
Netzbetrieb
•
Stecken Sie den Niederspannungsstecker in die Anschlußbuchse des
Haarschneiders. (Abb.1a).
•
Stecken Sie das Steckernetzteil in die Netzsteckdose (Abb. 1b).
•
Schalten Sie das Gerät mit dem ON/OFF Schalter ein (Abb. 2a) und schalten
Sie es nach Gebrauch aus (Abb. 2b).
•
Hinweis: Wenn der Akku vollständig entladen ist, wird das Gerät nicht richtig
funktionieren. Schalten Sie das Gerät aus und laden Sie den Akku für 5 Minuten.
•
Schalten Sie wieder ein und verwenden Sie es mit dem Netzanschluß.
Akku aufladen
•
Stecken Sie den Adapter ein.
•
Stecken Sie das Steckernetzteil in die Netzsteckdose (Abb. 1b).
•
Schalten Sie das Gerät mit dem ON/OFF Schalter aus (Abb. 2b). Der Akku wird
nur im ausgeschalteten Zustand aufgeladen. Während des Ladens leuchtet die
Ladeanzeige auf.
•
Laden Sie nur dann wieder auf, wenn die Leistung des Gerätes deutlich
nachlässt.
•
Wenn der Akku vollständig geladen ist, kann das Gerät für ungefähr 60 Minuten
benutzt werden.
8
Den Zubehörkamm befestigen
•
Drücken Sie den Zubehörkontrollschalter (D) in die
Position „1“, um den Zubehörkamm einzurasten oder
zu lösen.
•
Fassen Sie den Zubehörkamm an den seitlich
liegenden Klammern (Abb. 3a) und setzen Sie ihn in
die Geräteöffnung ein, so dass er einrastet (Abb. 4).
•
Stellen Sie die gewünschte Haarlänge ein, indem Sie
den Knopf (D) hoch- oder runter drücken, um den
Zubehörbekamm zu justieren.
•
Der Zubehörkamm rastet automatisch ein, wenn das
Gerät eingeschaltet wird.
Hair length in mm
4
24
6
26
3
7
27
4
9
29
5
10
30
6
12
32
7
13
33
8
15
35
9
16
36
10
18
38
11
19
39
12
21
41
13
22
42
Den Zubehörkamm entfernen
•
Stellen Sie den Kontrollschalter ( D) in die Position „1“.
•
Fassen Sie den Zubehörkamm an den seitlich liegenden Klammern und ziehen ihn
aus dem Gerät heraus.
Tips für ein erfolgreiches Styling
Überzeugen Sie sich davon, dass Sie den richtigen Zubehörkamm und die richtige
Einstellung ausgewählt haben.
•
Überzeugen Sie sich davon, dass das Gerät sauber ist und der Akku geladen.
•
Halten Sie das Gerät so, dass die flache Seite des Zubehörkammes zum Kopf zeigt
und führen Sie ihn langsam aber beständig durch das Haar (Abb. 8).
•
Beginnen Sie generell an den Seiten oder im Nacken und schneiden Sie zur Mitte
des Kopfes hin (Abb. 9). Dann schneiden Sie das Haar am Vorderkopf in Richtung
Kopfmitte.
•
Schneiden Sie Haar, das länger als 40 mm ist, mit dem Haarstylingkamm (Abb. 10)
oder halten sie es zwischen Ihren Fingern (Abb. 11).
•
Hören Sie von Zeit zu Zeit mit dem schneiden auf , kämmen Sie das Haar und überprüfen Sie das Ergebnis.
•
Reinigen Sie das Gerät nach jedem Gebrauch (Abb. 6 / 7).
•
9
DEUTSCH
Mit dem Zubehörkamm schneiden
Setting
Das Gerät kann mit oder ohne den Zubehörkamm
1
benutzt werden, abhängig davon, welchen Haarschnitt
Sie wollen. Die Zubehörkämme geben die folgenden
2
Schnittlängen (siehe Tabelle):
Reinigung und Wartung
•
Tauchen Sie das Gerät nicht in Wasser.
•
Ziehen Sie den Zubehörkamm nach jedem Gebrauch ab und entfernen alle
noch vorhandenen Haare vom Schneideklingen-Set und vom Gehäuse mit einer Bürste
(Abb. 6).
•
Wischen Sie das Gerät nur mit einem weichen, leicht feuchten Tuch ab. Verwenden Sie
keine Lösungs- oder Scheuermittel.
•
Es ist wichtig, einen Tropfen Öl zu verwenden, wenn Sie das Haarschneidegerät länger
als 4 Wochen nicht benutzen (Abb. 7).
•
Wenn trotz regelmäßiger Reinigung die Schneideleistung nachläßt, sollte das
Klingen-Set gewechselt werden.
•
Nach Gebrauch und Reinigung des Gerätes dient der Zubehörkamm auch als
Klingenschutz.
Das Klingen-Set wechseln
Schalten Sie das Gerät mit dem ON/OFF Schalter aus (Abb. 2b).
•
Das Klingen-Set kann entfernt werden, indem es in Pfeilrichtung am Gehäuse herunter
und weggedrückt wird (Abb. 6b).
•
DEUTSCH
Entsorgung des Akkus
Entsorgen Sie bitte das Gerät in einer umweltfreundlichen Weise.
•
Ziehen Sie das Steckernetzteil aus der Steckdose und schalten das Gerät ein, so daß
der Akku vollständig entladen wird.
•
Entfernen Sie das Klingen-Set und entfernen Sie die Schraube unten am Gehäuse
(Abb. 12). Ziehen Sie die beiden Hälften des Gehäuses ab (Abb. 13).
•
Entfernen Sie die Platine. Trennen Sie die Verbindungsplatte zwischen Akku und
Platine und entfernen den Akku (Abb. 14).
•
Bringen Sie den Akku zu einer entsprechenden Sammelstelle.
•
Verbinden Sie das Gerät nicht mehr mit dem Netzanschluß, wenn der Akku entfernt ist.
•
10
Technische Daten:
Beschreibung:
Modell:
Stromversorgung:
Haarschneider
HS3002
DC 3V / 5W
Wiederaufladbare NiMH Batterie, nicht wechselbar
230V~, 50Hz (Ladegerät)
Batterie Type
2 x 1,2 Volt NiMH
TECHNISCHE ÄNDERUNGEN JEDERZEIT OHNE ANKÜNDIGUNG VORBEHALTEN
Hinweise zum Umweltschutz
Dieses Produkt darf am Ende seiner Lebensdauer nicht über den normalen
Haushaltsabfall entsorgt werden, sondern muss an einem Sammelpunkt für das
Recycling von elektrischen und elektronischen Geräten abgegeben werden. Das
Symbol auf dem Produkt, in der Gebrauchsanleitung oder auf der Verpackung weist
darauf hin. Die Werkstoffe sind gemäß ihrer Kennzeichnung wieder verwertbar.
Mit der Wiederverwendung, der stofflichen Verwertung oder anderen Formen der
Verwertung von Altgeräten, leisten Sie einen wichtigen Beitrag zum Schutze unserer
Umwelt. Bitte fragen Sie bei Ihrer Gemeindeverwaltung nach der zuständigen
Entsorgungsstelle.
Entsorgung der Batterien
Bevor das Gerät entsorgt werden darf, müssen die Batterien aus dem Gerät entfernt und getrennt
entsorgt werden:
Entladen Sie die Batterien, indem Sie das Gerät Einschalten und laufen lassen, bis die Batterien
leer sind. Öffnen Sie das Gehäuse des Gerätes mit einem Schraubendreher an des Schrauben.
Nehmen Sie die Batterie(n) heraus. Schneiden Sie die Anschlußdrähte dafür durch und entsorgen
Sie die Batterie(n).
Für den Fall, dass trotz unserer hohen Qualitätskontrollen Ihr Gerät einen Defekt
aufweisen sollte, wenden Sie sich bitte an unsere Servicehotline.
Diese erreichen Sie Montag bis Freitag in der Zeit von 10-18 Uhr unter:
0180 5 - 22 17 84
(€ 0,14/Min. aus dem deutschen Festnetz).
Falls das defekte Produkt in unser Servicecenter eingeschickt werden muß, so
verwenden Sie bitte den beigefügten Retourenaufkleber. Sollte dieser
Retourenaufkleber fehlen, wenden Sie sich bitte an unsere Servicehotline.
11
DEUTSCH
Entsorgen Sie die Verpackung sortenrein.
•
•
•
•
•
•
•
•
•
•
•
•
•
•
•
•
•
•
•
•
•
To reduce the risk of death or injury by electric shock :
Unplug this appliance before cleaning.
Do not place or store appliance when it can fall or be pulled into a tub or sink.
Do not use while bathing or in a shower.
Do not place in, or drop into, water or other liquid.
Do not reach for an appliance that has fallen into water. Unplug immediately.
Use this appliance only for its intended use as described in this manual.
Do not use attachments not recommended by the manufacturer.
Close supervision is necessary when this appliance is used by, on, or near
children or invalids.
Never operate this appliance if it has a damaged cord or plug, if it is not working
properly.
Keep the cord away from heated surfaces.
Do not pull, twist, or wrap line cord around appliance.
Never drop or insert any object into any opening on this appliance.
Before use make certain, the blades are aligned properly.
Do not place appliance on any surface while it is operating.
Do not use this appliance with a damaged or broken comb nor with teeth
missing from the blades as injury may occur.
Do not use outdoors or operate where aerosol (spray) products are being used
or where oxygen is being administered.
Use this appliance for Household only.
Do not attempt to use the charger with any other product. Do not attempt to
charge this product with another charger. Use only the charger supplier with this
appliance.
Charging should only take place in a well ventilated area.
Store the clipper indoor and keep away from the children.
SAVE THESE INSTRUCTIONS
13
ENGLISH
IMPORTANT SAFEGUARDS
When using electrical appliances, especially when children are present, basic
safety precautions should always be followed, including the following:
ENGLISH
14
15
ENGLISH
ENGLISH
16
17
ENGLISH
Description of parts
A. Small attachment comb, detachable, adjustable for hair lengths of 4 to 22mm
B. Large attachment comb, detachable, adjustable for hair lengths of 24 to 42mm
C. Blade set, detachable
D. Cutting length control button, with locking for attachment comb when switching
on
E. On/off switch
F. Charge indicator
G. Charging base
H. Oil for the blade set
I. Cleaning brush
J. Hairstyling comb
K. Moustache comb
L. Adaptor
M. Scissors
ENGLISH
Mains operation
• Plug the adaptor into the equipment socket. (Fig. 1a)
• Plug the adaptor transformer into the wall socket (Fig. 1b)
• Switch the equipment on with the On/Off switch (Fig. 2a) and switch off after use
(Fig. 2b)
• Note: If the equipment does not work in mains operation when the battery is fully
discharged, switch equipment off and change battery for 5 minutes. Switch on
again and use with mains connection.
Charging battery
• Plug the adaptor.
• Plug the plug-in transformer into the wall socket (Fig. 1b).
• Switch the equipment off with the On/Off switch (Fig. 2b). The equipment only
charges when it is switched off. During charging the charge indicator light up.
• Only recharge when performance of the machine noticeably drops.
• When the battery is fully charged the equipment can be used approx.60 minutes.
18
Fixing attachment comb
•
Press the attachment control button (D) to position
"1" for snap on or off attachment comb.
•
Grasp the required attachment comb by the side
guide brackets (Fig. 3a) and carefully place it in the
notch in the equipment until it snaps into place
(Fig. 4)
•
Set the required hair length by pressing the button
(D) to adjust the attachment comb up & down.
•
Adjustment is carried out at the side of the
equipment by pressing the cutting length control
button.
•
The attachment comb will be locked automatically
when the equipment is switch on.
Hair length in mm
4
24
6
26
3
7
27
4
9
29
5
10
30
6
12
32
7
13
33
8
15
35
9
16
36
10
18
38
11
19
39
12
21
41
13
22
42
Removing attachment comb
Move the control Button (D) to position"1"
•
Grasp the attachment comb by the two side guide brackets and pull it out of the
equipment (Fig. 3b).
•
Tips for a successful styling.
Make sure you choose the correct attachment comb and setting.
•
Make sure that the equipment is clean and the battery is charged.
•
Hold the equipment in such a way that the flat side of the attachment comb is pointing
towards the head and guide it slowly but steadily through the hair (Fig. 8).
•
As a general rule, start at the sides or on the neck and cut towards the middle of the
head (Fig. 9) Then cut the hair on the forehead towards the middle.
•
Cut hair more than 40 mm long with a hairstyling comb (Fig.10) or hold it between your
fingers (Fig.11).
•
Stop cutting from time to time, comb the hair out and check the result so far.
•
Regularly shake and blow bair out of the equipment. If you have collected a lot of hair
in the attachment comb, take it out clean it and blow it clear.
•
Clean the equipment after each use (Fig. 6/7).
•
19
ENGLISH
Cutting with attachment combs
Setting
The equipment can be used with or without attachment
1
combs depending on the hair cut you want.
The attachment combs give the following cutting lengths
2
(see table)
Cleaning and maintenance
•
Do not immerse the equipment in water.
•
After each use, pull out the attachment comb and remove any remaining hair from the
blade set and the housing opening with the cleaning brush (Fig. 6).
•
Only wipe the equipment with a soft cloth which may be slightly damp. Do not use
solvents or scouring agents.
•
It is important to add a drop of oil if you do not use the clipper for a month (Fig.7)
•
If, despite regular cleaning, the cutting performance drops, the blade set should be
changed.
•
After use and cleaning of the equipment, the attachment comb also acts as a blade
guard.
Changing the blade set
Switch the equipment off with the On/Off switch (Fig. 2b)
•
The blade set can be removed by pressing down and away in the direction of the arrow
on the housing (Fig. 6a)
•
To reuse, place the blade set with the hook engaged into the slot in the housing and
press down into the housing until it snaps into place (Fig. 6b).
•
ENGLISH
Disposal of battery
•
•
•
•
•
•
•
Please dispose the equipment at the end of its useful life in an environmentally
friendly manner.
Pull the plug-in transformer out of the wall socket and turn the equipment on so that the
battery is fully discharged.
Remove blade set and remove the screw from the bottom housing (Fig.12). Pull apart
the two halves of the housing (Fig. 13).
Remove the circuit board.
Cut the connection plate between battery and circuit board and then remove the battery.
(Fig. 14).
Take the battery to a suitable collection site.
Do not connect to the mains again with the battery removed.
20
Technical specifications:
Description:
Modell:
Voltage rating:
Charger rating:
Battery Type:
Hair trimmer
HS3002
DC 3V / 5W
Rechargeable NiMH Battery, not removable
AC 230V 50Hz
2 x 1,2 Volt NiMH
SPECIFICATIONS SUBJECT TO CHANGE WITHOUT NOTICE
Dispose
If at any time in the future you should need to dispose of this
product please note that waste electrical products should not be
disposed of with household waste. Please recycle where facilities
exist. Check with your Local Authority or retailer for recycling
advice.
(Waste Electrical and Electronic Equipment Directive)
Before disposal of the appliance, it is necessary to remove the batteries from the appliance
and dispose of them separately:
Before removing the rechargeable batteries, discharge the unit by letting it run continue.
Turn the screw anti-clockwise by the screw driver. Open the case with care and take the rechargeable battery out. Cut the wire for proper disposal.
If this product should be defective, despite our high standard quality control,
please contact the service & support hotline.
The hotline is available Monday through Friday from 10am to 6pm at this number:
0180 5 - 22 17 84
(€ 0,14 / Min. Germany only)
In case your product needs to be sent to our service centre, please use the
provided return sticker. If the return sticker is missing, please contact the
service & support hotline.
21
ENGLISH
Dispose of the packaging in the proper manner.
HOME ELECTRIC
HS3002
VERSION SW/FN01-2008 REV A01
HE-HS3002-DE-A5.PDF
(C) 2008
Hergestellt für:
JGC Company GmbH - Heckhofweg 146 - 50739 Köln- Germany