1
DE
EN
HANDBUCH / MANUAL
DataStation maxi z.ul
INHALTSVERZEICHNIS
DE
1) USB-Modus: Verbinden der TrekStor
DataStation maxi z.ul mit einem PC über USB
4
2) Netzwerk-Modus: Verbinden der TrekStor
DataStation maxi z.ul über das Netzwerk an
einem oder mehreren PCs
5
2.1) Die NDAS-Netzwerk-Technologie
2.2) Anschließen im Netzwerkmodus
2.3) Installation der Software für den Netzwerkmodus
5
6
6
3) Der NDAS-Geräte-Manager
8
3.1) Registrieren und Mounten einer neuen TrekStor
DataStation maxi z.ul über den Assistenten (Wizard) 8
3.2) Funktionen und Optionen des NDAS-Geräte-Managers
12
3.3) Modi des NDAS-Geräte-Managers
12
3.4) Modus der TrekStor DataStation maxi z.ul im
NDAS-Geräte-Manger ändern
13
3.5) Benutzen der TrekStor DataStation maxi z.ul
14
3.6) Datenaustausch mit der TrekStor
DataStation maxi z.ul
14
3.7) Unmounten der TrekStor DataStation maxi z.ul
14
4) Der NDAS-Kopplungsmanager
4.1)
4.2)
4.3)
4.4)
Einführung in die verschiedenen Kopplungsmodi
Voraussetzungen
Kopplungsmodus einrichten
Gekoppelte TrekStor DataStation maxi z.ul
mounten
4.5) Auflösen eines Verbundes gekoppelter
TrekStor DataStation maxi z.ul
4.6) Entkoppeln einer TrekStor DataStation maxi z.ul
aus einem Verbund
5) Allgemeine Dateisystemoperationen
5.1) Partitionieren der TrekStor DataStation maxi z.ul
5.2) Formatieren der TrekStor DataStation maxi z.ul
16
16
18
18
20
20
21
21
21
22
6) FAQ
23
7) Fehlersuche und -behebung
24
–2–
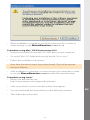
BEDIENUNGSANLEITUNG der TrekStor
DataStation maxi z.ul
Lieferumfang:
• TrekStor DataStation maxi z.ul
• Praktische Multifunktionshalterung
• Hochwertiges Netzwerkkabel
• Hi-Speed USB 2.0 Kabel
• Netzteil (100 V – 240 V)
• Software-CD
• Handbuch
System-Voraussetzungen:
• Windows® 98 SE / ME (nur im USB-Modus benutzbar)
• Windows® 2000 / XP, Mac® OS X ab 10.3, Linux®
• 233 MHz Pentium II oder höher (500 MHz Pentium III empfohlen)
• 64 MB RAM (256 MB RAM empfohlen)
• USB 1.1-Anschluss (Hi-Speed USB 2.0-Anschluss empfohlen)
• Freier 10/100 Base-T Netzwerkanschluss am PC, Switch oder Router
Hinweis: Die DataStation maxi z.ul kann entweder im USB-Modus
ODER im Netzwerk-Modus betrieben werden, jedoch nicht zeitgleich in beiden Modi.
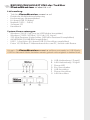
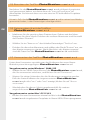
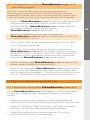
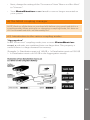
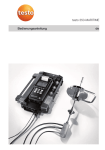
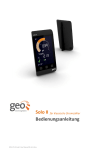
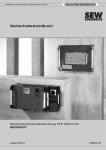
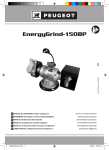
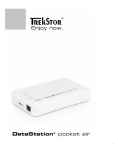
A
B
C
D
E
F
G
–3–
USB-Verbindung /-Zugriff
LAN-Verbindung /-Zugriff
Power-LED
Ein-/Ausschalter
USB-Anschluss
Power-Anschluss
LAN-Anschluss
DE
1) USB-Modus: Verbinden der TrekStor
DataStation maxi z.ul mit einem PC über USB
DE
Vorgehensweise unter Windows® ME / 2000 / XP und Mac® OS X ab 10.3
Hinweis für Benutzer von Windows® ME, 2000, XP, Mac® OS X 10.3: Für diese
Betriebssysteme sind keine Treiber nötig. Beachten Sie bitte, dass für Windows®
2000 mindestens Service-Pack 4 und für Windows® XP mindestens ServicePack 2 installiert sein muss.
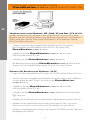
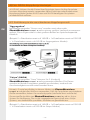
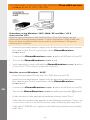
•
Stecken Sie zuerst das mitgelieferte Netzteil in eine Steckdose
und schließen Sie das Kabel an den "POWER"-Anschluss der
DataStation maxi z.ul an.
•
Schließen Sie die DataStation maxi z.ul an einen
USB-Anschluss Ihres PCs an.
•
Schalten Sie die DataStation maxi z.ul ein.
•
Ihr Betriebssystem fügt die DataStation maxi z.ul auf dem
"ARBEITSPLATZ" als lokalen Datenträger ("LOKALES LAUFWERK") hinzu.
Hinweise für Benutzer von Windows® 98 SE
• Legen Sie die mitgelieferte CD in das CD / DVD-Laufwerk Ihres PCs ein.
•
Stecken Sie das mitgelieferte Netzteil in eine Steckdose und schließen
Sie das Kabel an den "POWER"-Anschluss der DataStation
maxi z.ul an.
•
Schließen Sie die DataStation maxi z.ul an einen
USB-Anschluss Ihres PCs an.
•
Schalten Sie die DataStation maxi z.ul durch Drücken der
-Taste ein.
•
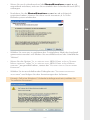
Wählen Sie im Fenster des erscheinenden Hardwareassistenten "WEITER".
•
Wählen Sie im folgenden Fenster die erste Option "NACH DEM BESTEN
TREIBER FÜR DAS GERÄT SUCHEN (EMPFOHLEN)". Bestätigen Sie mit "WEITER".
•
Wählen Sie im folgenden Fenster die Option "CD-ROM-LAUFWERK" aus und
bestätigen mit "WEITER".
–4–
DE
•
Nachdem Sie abschließend "FERTIG STELLEN" gewählt haben fügt Ihr
Betriebssystem die DataStation maxi z.ul auf dem
"ARBEITSPLATZ" als lokalen Datenträger ("LOKALES LAUFWERK") hinzu.
2) Netzwerk-Modus: Verbinden der TrekStor
DataStation maxi z.ul über das Netzwerk
mit einem oder mehreren PCs
2.1) Die NDAS-Netzwerk-Technologie
Die Netzwerkverbindung basiert auf der NDAS-Technologie. NDAS (Network Direct Attached Storage) ist eine von XIMETA patentierte Technologie,
die es erlaubt, digitale Medien direkt in ein Netzwerk einzubinden. Für diese
direkte Verbindung ist weder ein Server, noch eine IP-Adresse bzw. das
TCP/IP-Protokoll erforderlich, lediglich die NDAS-Geräte-Software muss
installiert sein.
Alle Benutzer, welche die NDAS-Geräte-Software installiert haben,
können gemountete (d. h. in das System eingebundene) Geräte direkt
kontrollieren und benutzten. Direkt bedeutet dabei, dass die installierten
NDAS-Geräte in den Arbeitsplatz eingebunden und dort als lokale Festplatte angezeigt werden.
–5–
2.2) Anschließen im Netzwerkmodus
Hinweis: Beim Betrieb mit nur einem PC wird die USB-Verbindung empfohlen.
DE
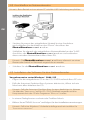
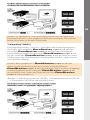
•
Stecken Sie zuerst das mitgelieferte Netzteil in eine Steckdose
und schließen Sie das Kabel an den "POWER"-Anschluss der
DataStation maxi z.ul an.
•
Schließen Sie danach das mitgelieferte Netzwerkkabel an den "LAN"Anschluss der DataStation maxi z.ul an und verbinden
dieses mit dem Netzwerkanschluss Ihres PCs.
Hinweis: Die DataStation maxi z.ul kann alternativ an einen
Router oder Switch im Netzwerk angeschlossen werden.
•
Schalten Sie die DataStation maxi z.ul ein.
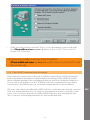
2.3) Installation der Software für den Netzwerkmodus
Vorgehensweise unter Windows® 2000 / XP
• Legen Sie die mitgelieferte CD in das CD / DVD-Laufwerk Ihres PCs ein.
•
Falls die Autostart-Funktion Ihres Systems aktiviert ist, öffnet sich ein
Menü mit allen Inhalten der CD.
Hinweis: Falls die Autostart-Funktion Ihres Systems deaktiviert ist, können
Sie über den "ARBEISTPLATZ" auf Ihr CD / DVD-Laufwerk zugreifen und im
Hauptverzeichnis der CD das Programm "MENU.EXE" starten.
•
In einem Dialogfenster erscheint das TrekStor-Menü.
•
Klicken Sie auf "NDAS-SOFTWARE" und folgen Sie den Installationsanweisungen.
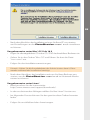
Hinweis: Falls eine Windows®-Sicherheitsabfrage erscheint wählen Sie
"INSTALLATION FORTSETZEN".
–6–
DE
•
Nach dem Abschluss der Installation müssen Sie Ihren PC neu starten,
um Einstellungen an der DataStation maxi z.ul vornehmen
zu können.
Vorgehensweise unter Mac® OS X ab 10.3
• Legen Sie die mitgelieferte CD in das CD / DVD-Laufwerk Ihres Rechners ein.
•
Gehen Sie in den Ordner "MAC-OS" und führen Sie dort die Datei
"INSTALL.MPKG" aus.
•
Folgen Sie den Installationsanweisungen.
Hinweis: Halten Sie die Anmeldedaten des Administrators bereit. Diese
werden während der Installation benötigt.
•
Nach dem Abschluss der Installation müssen Sie Ihren Rechner neu
starten, um die DataStation maxi z.ul im Netzwerk-Modus
nutzen zu können.
Vorgehensweise unter Linux®
• Bitte besuchen Sie die Internetseite:
http://www.ximeta.com/support/downloads/.
•
In den erscheinenden Abfragen wählen Sie Ihre Linux® Version aus.
•
Im folgenden Fenster können Sie den gewünschten Treiber herunter
laden.
•
Folgen Sie anschließend den Anweisungen.
–7–
3) Der NDAS-Geräte-Manager
3.1) Registrieren und Mounten einer neuen TrekStor
DataStation maxi z.ul über den Assistenten (Wizard)
Vorgehensweise unter Windows® 2000 / XP
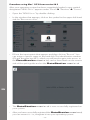
• Nach dem Neustart Ihres Betriebssystems, erscheint ein weiteres
Symbol im Infobereich der Taskleiste mit einem Ballontipp. Klicken
Sie zum Einrichten einer DataStation maxi z.ul mit Hilfe des
Assistenten auf diesen Ballontipp oder auf das Symbol .
DE
•
Alternativ klicken Sie mit der rechten Maustaste auf das Symbol und
wählen Sie aus dem erscheinenden Menü den Menüpunkt "ANMELDUNG
EINES NEUEN GERÄTS..." aus. Anschließend startet der Anmeldeassistent
(Wizard).
Hinweis: Falls der NDAS-Geräte-Manager nicht aktiviert ist, starten Sie
diesen unter "START" Ë "PROGRAMME" Ë "TrekStor NDAS-SOFTWARE" Ë
"TrekStor NDAS-GERÄTE-MANAGER".
•
Folgen Sie den Anweisungen der Installationssoftware zur Einrichtung
der DataStation maxi z.ul.
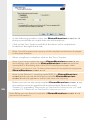
•
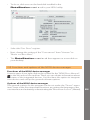
Sie werden aufgefordert, einen Namen für das neue Laufwerk
(die DataStation maxi z.ul) zu vergeben.
•
Im nächsten Fenster müssen Sie die Identifikationsnummer (ID)
eintragen.
Hinweis: Die Identifikationsnummer (ID) und den Schreibschlüssel (KEY)
finden Sie auf Ihrer DataStation maxi z.ul bzw. auf der
Rückseite der Schnellstart-Anleitung.
–8–
•
Wenn Sie auch schreibend auf die DataStation maxi z.ul
zugreifend möchten, müssen Sie zusätzlich den Schreibschlüssel (KEY)
eintragen.
•
Nachdem Sie die DataStation maxi z.ul erfolgreich
registriert haben, können Sie diese noch mounten, d. h. in Ihr
Betriebssystem einbinden.
DE
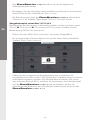
•
Wählen Sie nun aus, in welchem der 2 möglichen Modi das Laufwerk
gemountet werden soll. Klicken Sie anschließend auf die Schaltfläche
"Weiter".
•
Wenn Sie die Option "JA, ICH MÖCHTE DIESES NDAS-GERÄT IM LESE-/SCHREIBMODUS MOUNTEN." oder "JA, ICH MÖCHTE DIESES NDAS-GERÄT IM LESE-MODUS
MOUNTEN." ausgewählt haben, startet der "ASSISTENT FÜR DAS SUCHEN NEUER
HARDWARE".
•
Wählen Sie im anschließenden Dialogfenster "SOFTWARE AUTOMATISCH
INSTALLIEREN" und folgen Sie den Anweisungen der Software.
Hinweis: Falls eine Windows®-Sicherheitsabfrage erscheint, wählen Sie
"Installation fortsetzen".
–9–
DE
•
Ihre DataStation maxi z.ul ist nun als Festplatte im
Arbeitsplatz gemountet
•
Bestätigen Sie den Abschluss der Installation nochmals im Assistenten,
durch Drücken der Schaltfläche "FERTIG STELLEN".
•
Ihr Betriebssystem fügt die DataStation maxi z.ul auf dem
"ARBEITSPLATZ" als lokalen Datenträger ("LOKALES LAUFWERK") hinzu.
Vorgehensweise unter Mac® OS X 10.3
Nachdem Ihr Betriebssystem vollständig geladen wurde, erscheint unter
"FINDER" Ë "PROGRAMME" Ë "DIENSTPROGRAMME" ein neues Symbol mit der
Bezeichnung "NDAS DIENSTPROGRAMM".
•
Öffnen Sie das "NDAS DIENSTPROGRAMM" mit einem Doppelklick.
•
Im erscheinenden Fenster klicken Sie auf das oben links befindliche
Symbol "NEUES GERÄT ANMELDEN".
•
Füllen Sie die erscheinende Eingabematrix aus und klicken Sie
anschließend auf "REGISTRIEREN". Der Name der Festplatte kann von Ihnen
individuell vergeben werden. Die Identifikationsnummer (ID) sowie
den Schreibschlüssel (KEY), welchen Sie benötigen, um Schreibzugriff
auf die DataStation maxi z.ul zu erhalten, finden Sie
sowohl auf der Rückseite der Schnellstart-Anleitung als auch auf der
DataStation maxi z.ul.
– 10 –
DE
•
Die DataStation maxi z.ul ist nun erfolgreich in Ihrem
System registriert.
•
Nachdem Sie die DataStation maxi z.ul erfolgreich
registriert haben, können Sie diese noch mounten, d. h. in Ihr
Betriebssystem einbinden.
•
Klicken Sie dazu einmal auf die in der DataStation maxi z.ul
eingebauten Festplatte in Ihrem NDAS Dienstprogramm.
•
Wählen Sie das Register "UNIT DEVICE" aus.
•
Ändern Sie nun die Einstellung der "KONFIGURATION" von "DEAKTIVIEREN" auf
"AKTIVIEREN ALS LESEN/SCHREIBEN".
•
Anschließend erscheint die DataStation maxi z.ul als neuer
Datenträger auf Ihrem Desktop.
– 11 –
3.2) Funktionen und Optionen des NDAS-Geräte-Managers
Funktionen des NDAS-Geräte-Manager
Wenn Sie mit der rechten Maustaste im Infobereich der Taskleiste auf das
Symbol des "NDAS-GERÄTE-MANAGER"
klicken, öffnet sich ein Menü. Dort
erhalten Sie Informationen über den Status der eingebundenen Geräte.
Außerdem haben Sie die Möglichkeit, neue Geräte einzubinden und die
allgemeinen Optionen der Software aufzurufen.
DE
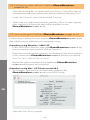
Optionen des NDAS-Geräte-Managers
Unter dem Menüpunkt "OPTIONEN" können Sie allgemeine Einstellungen
zum Programm treffen. Zu den wichtigsten Funktionen zählt die
Einstellung der Sprache der Benutzeroberfläche und das Aktivieren bzw.
Deaktivieren des "ANMELDUNGS-ASSISTENTEN" (Wizard).
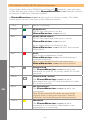
3.3) Modi des NDAS-Geräte-Managers
Wenn Sie mit der rechten Maustaste im Infobereich der Taskleiste auf
das Symbol des "NDAS-Geräte-Manager"
klicken, wird der Status der
DataStation maxi z.ul durch verschieden farbige Symbole
dargestellt.
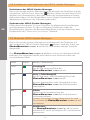
Eine DataStation maxi z.ul kann sich in verschiedenen Modi
befinden. Die folgende Tabelle liefert Ihnen eine Übersicht über die
verschiedenen Modi.
Farbe
Grün
Status
Modus / Bedeutung
Lesezugriff
Der PC hat Lesezugriff auf die
DataStation maxi z.ul.
Blau
Lese- / Schreibzugriff
Der PC hat Lese- und Schreibzugriff auf die
DataStation maxi z.ul.
In einer Aggregation oder Spiegelung ist die
DataStation maxi z.ul die primäre
DataStation.
Rot
Fehler
Fehler bei der Initialisierung der
DataStation maxi z.ul (Hardware-/
Softwareproblem).
Hinweis: Versuchen Sie den Fehler durch An- und
Ausschalten der DataStation maxi z.ul
zu beheben.
Grau
Deaktiviert
Die DataStation maxi z.ul ist weder
auf Ihrem PC noch auf anderen PCs im Netzwerk
gemountet.
– 12 –
Weiß
Deaktiviert / Aktiv
Die DataStation maxi z.ul ist auf
Ihrem PC deaktiviert, jedoch auf anderen PCs im
Netzwerk aktiviert.
Schwarz
Keine Verbindung
Die DataStation maxi z.ul ist nicht
angeschlossen.
Hinweis: Stellen Sie sicher, dass alle Kabel richtig
angeschlossen sind und/oder Ihre Antivirus- /
Firewall-Software die Verbindung nicht stört.
Gelb
Gemountet
Die DataStation maxi z.ul ist als
sekundäre DataStation in eine Aggregation oder
Spiegelung gemountet.
3.4) Modus der TrekStor DataStation maxi z.ul im
NDAS-Geräte-Manager ändern
Wenn Sie mit der rechten Maustaste im Infobereich der Taskleiste auf
das Symbol des "NDAS-GERÄTE-MANAGER"
klicken, öffnet sich ein Menü.
Um den Status einer DataStation maxi z.ul zu ändern,
markieren Sie diese im Menü und wählen den gewünschten Modus im
erscheinenden Kontextmenü aus.
Sie können 2 verschiedene Modi wählen:
a) Im Modus "MOUNTEN (NUR LESEN)" haben Sie ausschließlich Lesezugriff auf
die DataStation maxi z.ul .
b) Im Modus "MOUNTEN (LESEN/SCHREIBEN)" haben Sie sowohl Lese- als auch
Schreibzugriff auf die DataStation maxi z.ul.
Unter dem Eintrag "EIGENSCHAFTEN" erhalten Sie verschiedene Informationen
über die DataStation maxi z.ul. Dort können Sie gegebenenfalls unter dem Register "ALLGEMEIN" über die Schaltfläche "HINZUFÜGEN" den
Schreibschlüssel der DataStation maxi z.ul eintragen, um
Schreibzugriff auf diese zu erhalten.
Hinweis: Die Identifikationsnummer (ID) und den Schreibschlüssel (KEY) finden
Sie auf Ihrer DataStation maxi z.ul bzw. auf der Rückseite der
Schnellstart-Anleitung.
– 13 –
DE
3.5) Benutzen der TrekStor DataStation maxi z.ul
Nachdem Sie die DataStation maxi z.ul erfolgreich registriert
und gemountet haben, erscheint diese als "LOKALER DATENTRÄGER" im
Arbeitsplatz. Sie können diese nun wie eine im PC befindliche Festplatte
benutzen.
Hinweis: Falls Sie die DataStation maxi z.ul im reinen Lese-Modus
gemountet haben, ist der Datenträger schreibgeschützt.
DE
3.6) Datenaustausch mit der TrekStor
DataStation maxi z.ul
•
Markieren Sie die gewünschten Dateien bzw. Ordner mit der Maus.
Kopieren Sie diese durch Drücken der rechten Maustaste und Auswahl
des Punktes "KOPIEREN".
•
Wählen Sie im "ARBEITSPLATZ" den lokalen Datenträger "TREKSTOR" aus.
•
Drücken Sie die rechte Maustaste und wählen den Punkt "EINFÜGEN" aus, um
den Kopiervorgang zu starten. Nach Abschluss des Kopiervorgangs
sind die Daten auf der DataStation maxi z.ul vorhanden.
3.7) Unmounten der TrekStor DataStation maxi z.ul
Unter dem Unmouten versteht man das Entfernen der zuvor Ihrem
Betriebssystem hinzugefügten DataStation maxi z.ul.
Vorgehensweise unter Windows® 2000 / XP
• Wählen Sie im "NDAS-GERÄTE-MANAGER" die DataStation maxi z.ul,
die Sie unmounten möchten, und klicken Sie auf "UNMOUNTEN".
•
Warten Sie einige Sekunden, bis die Änderungen angezeigt werden.
Falls der Statusindikator der ungemounteten DataStation
maxi z.ul nicht "WEISS" oder "GRAU" anzeigt, klicken Sie auf "ANSICHT
AKTUALISIEREN".
•
Wiederholen Sie diesen Schritt gegebenenfalls für weitere
angeschlossene DataStation maxi z.ul.
Vorgehensweise unter Mac® OS X 10.3
• Klicken Sie zum Unmounten einmal auf die in der DataStation
maxi z.ul eingebauten Festplatte in Ihrem NDAS Dienstprogramm.
– 14 –
DE
•
Wählen Sie das Register "UNIT DEVICE" aus.
•
Ändern Sie nun die Einstellung der "KONFIGURATION" von "AKTIVIEREN ALS
LESEN/SCHREIBEN" auf "DEAKTIVIEREN".
•
Ihre DataStation maxi z.ul ist nun nicht mehr in Ihrem
System gemountet.
– 15 –
4) Der NDAS-Kopplungsmanager
ACHTUNG: Sichern Sie alle Daten Ihrer Festplatte, bevor Sie Ihre Festplatte
in einem Kopplungsmodus verwenden. Beim Einrichten oder Ändern eines
Kopplungsmodus gehen ALLE Daten auf ALLEN beteiligten Festplatten
unwiderruflich verloren.
4.1) Einführung in die verschiedenen Kopplungsmodi
DE
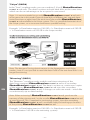
"Aggregation"
Im Kopplungsmodus "AGGREGATION" werden zwei oder mehr
DataStation maxi z.ul zu einem großen Laufwerk zusammengefasst. Diese Eigenschaft ist bei großem Bedarf an Speicherkapazität
nützlich.
(Beispiel: 1x DataStation maxi z.ul 160 GB + 1x DataStation maxi z.ul 250 GB
= 1x DataStation maxi z.ul 410 GB im Aggregations-Modus)
"Stripe" (RAID0)
Im Kopplungsmodus "STRIPE" können Sie 2 (4 oder 8)
DataStation maxi z.ul zusammenschließen. Die Daten
werden auf beide Festplatten parallel geschrieben, wodurch ein
Geschwindigkeitsvorteil erzielt werden kann.
Hinweis: Es wird empfohlen in diesem Modus nur DataStation
maxi z.ul gleicher Größe zu verwenden. Falls Sie Festplatten verschiedener
Größe verwenden, haben Sie nur die doppelte (vierfache bzw. achtfache)
Gesamtgröße der kleinsten DataStation maxi z.ul im StripeSystem zur Verfügung. Dies ist die vorgegebene Eigenschaft eines StripeSystems, um dauerhaftes paralleles Schreiben zu gewährleisten.
(Beispiel: 1x DataStation maxi z.ul 160 GB + 1x DataStation maxi z.ul 250 GB
= 1x DataStation maxi z.ul 320 GB im Stripe-Modus)
– 16 –
DE
Hinweis: Im Aggregation- und Stripe Modus erhöht sich die Gefahr eines
Datenverlustes, da es nicht möglich ist die Daten auszulesen, falls eine der
beiden Festplatten nicht mehr funktioniert.
"Spiegelung" (RAID1)
Der Kopplungsmodus "SPIEGELUNG" ermöglicht die Echtzeitspiegelung
der Daten einer primären DataStation maxi z.ul auf eine
sekundäre DataStation maxi z.ul. Die Daten werden als
kontinuierliche Kopien der primären DataStation maxi z.ul
auf die sekundäre DataStation maxi z.ul geschrieben, wenn
Änderungen oder Bearbeitungen durchgeführt werden – quasi wie ein
stets aktuelles Backup.
Hinweis: Beim Spiegeln von 2 DataStation maxi z.ul steht
Ihnen nur die Speicherkapazität der primären und/oder kleineren
DataStation maxi z.ul zur Verfügung. Dies ist in einem Spiegelungsystem erforderlich, da die sekundäre DataStation maxi z.ul
ausschließlich zum Sichern der Daten der primären DataStation
maxi z.ul vorhanden ist.
(Beispiel: 1x DataStation maxi z.ul 160 GB + 1x DataStation maxi z.ul 250 GB
= 1x DataStation 160 GB im Spiegelungsystem)
– 17 –
4.2) Voraussetzungen
Hinweis: Die Kopplungsmodi "Aggregation" und "Spiegelung" werden nur
unter Windows® 2000 / XP und Mac® OS X ab 10.3 unterstützt.
DE
•
Damit Sie bei den DataStation maxi z.ul einen der 3
Kopplungsmodi einrichten können, müssen Sie bei allen betreffenden
Laufwerken den Schreibschlüssel (KEY) eingetragen haben. Dies
können Sie im "NDAS-GERÄTE-MANAGER" beim Menüpunkt "EIGENSCHAFTEN"
des betreffenden Gerätes durchführen.
•
Laufwerke können nicht in 2 verschiedenen Modi gleichzeitig
betrieben werden.
•
Unmounten Sie alle DataStation maxi z.ul, die gekoppelt
werden sollen, auf allen PCs in Ihrem Netzwerk.
•
Andere Benutzer können die gekoppelten DataStation maxi
z.ul wieder mounten, nachdem die Kopplung eingerichtet und die
DataStation maxi z.ul partitioniert und formatiert wurde.
Hinweis: In den Kopplungsmodi "SPIEGELUNG" und "STRIPE" muss die Kapazität
der sekundären DataStation maxi z.ul mindestens gleich oder
größer als die der primären DataStation maxi z.ul sein.
4.3) Kopplungsmodus einrichten
ACHTUNG: Sichern Sie alle Daten Ihrer Festplatte, bevor Sie Ihre Festplatte in
einem Kopplungsmodus verwenden. Beim Einrichten eines Kopplungsmodus
gehen ALLE Daten auf ALLEN beteiligten Festplatten unwiderruflich verloren.
•
Klicken Sie auf "START" Ë "PROGRAMME" Ë "TrekStor NDAS-SOFTWARE" Ë
"TrekStor NDAS-KOPPLUNGSMANAGER".
•
Klicken Sie auf die Schaltfläche "KOPPELN", um den Assistenten zum Einrichten
eines Kopplungsmodus zu starten. Klicken Sie anschließend auf die
Schaltfläche "WEITER".
•
Wählen Sie zwischen den verschiedenen Kopplungsmodi und der
Anzahl der zu koppelnden Laufwerke aus.
– 18 –
DE
•
Im folgenden Fenster wählen Sie die DataStation maxi z.ul,
die Sie koppeln möchten, aus der linken Box aus.
•
Klicken Sie solange auf die Schaltfläche "HINZUFÜGEN", bis sich alle zu
koppelnden Laufwerke auf der rechten Seite befinden.
Hinweis: Die Gesamtkapazität des gekoppelten Verbundes bekommen Sie
im selben Fenster angezeigt.
•
Klicken Sie zum Abschluss der Kopplung auf die Schaltfläche "FERTIG STELLEN".
Hinweis: Falls Sie die falsche DataStation maxi z.ul zum
Koppeln markiert haben, klicken Sie mit der rechten Maustaste auf die
zu entkoppelnde DataStation maxi z.ul in der Dialogbox
des NDAS-Kopplungsmanagers. Wählen Sie dort im Kontxtmenü den
Punkt "IN UNABHÄNGIGES LAUFWERK UMWANDELN" aus, um diese entsprechende
DataStation maxi z.ul zu entkoppeln.
Hinweis: Im Kopplungsmodus "SPIEGELUNG" (RAID1) kann eine
DataStation maxi z.ul nur auf eine andere
DataStation maxi z.ul mit größerer oder zumindest gleich
großer Kapazität gespiegelt werden.
•
Bevor Sie die neuen gekoppelten DataStation maxi z.ul
benutzen können, muss der Speicherplatz partitioniert und formatiert
werden. Bitte lesen Sie dazu auch die Kapitel 5.1
"PARTITIONIEREN DER TREKSTOR DATASTATION MAXI Z.UL" und Kapitel 5.2
"FORMATIEREN DER TREKSTOR DATASTATION MAXI Z.UL".
Hinweis: Bevor Sie eine DataStation maxi z.ul formatieren /
partitionieren können, müssen Sie diese zuerst mounten.
– 19 –
4.4) Gekoppelte TrekStor DataStation maxi z.ul
mounten
•
Zum Mounten eines Verbundes gekoppelter DataStation
maxi z.ul muss die primäre DataStation maxi z.ul
gemountet werden.
•
Die sekundären DataStation maxi z.ul werden automatisch
gemountet, sobald die primäre gemountet wird.
Hinweis: Der NDAS-Geräte-Manager erkennt den Modus der primären und
sekundären DataStation maxi z.ul automatisch, wenn sie an
zusätzlichen PCs gemountet werden. Es muß nur die primäre
DataStation maxi z.ul gemountet werden.
DE
Hinweis: Sie können die primäre DataStation maxi z.ul - und
damit den Verbund - nur mounten, wenn Sie auch die sekundären
DataStation maxi z.ul an Ihrem PC registriert haben.
4.5) Auflösen eines Verbundes gekoppelter TrekStor
DataStation maxi z.ul
Hinweis: Um einen Verbund zu entkoppeln muss dieser auf allen PCs
ungemountet sein.
ACHTUNG: Sichern Sie alle Daten, bevor Sie eine Kopplung lösen. Beim
Entkoppeln gehen ALLE Daten auf ALLEN beteiligten Festplatten
unwiderruflich verloren.
•
Sekundäre DataStation maxi z.ul werden automatisch
ungemountet, sobald die primäre DataStation maxi z.ul
ungemountet wird.
Hinweis: Für weitere Informationen zum Unmounten der
DataStation maxi z.ul, lesen Sie bitte Kapitel 3.7 "UNMOUNTEN
DER TREKSTOR DATASTATION MAXI Z.UL".
•
Öffnen Sie den NDAS-Kopplungsmanager an einem PC, an dem alle
DataStation maxi z.ul des Verbunds registriert sind.
•
Markieren Sie den Verbund der gekoppelten DataStation
maxi z.ul und klicken Sie auf "ENTKOPPELN". Alle beteiligten
DataStation maxi z.ul werden in ungemountete
DataStation maxi z.ul entkoppelt. Die entkoppelten
DataStation maxi z.ul sind auch im NDAS-Geräte-Manager
sichtbar.
•
Bevor Sie die entkoppelten DataStation maxi z.ul wieder
benutzen können, müssen alle DataStation maxi z.ul einzeln
gemountet und formatiert werden. Bitte lesen Sie dazu auch die Kapitel
3.4 "MODUS DER TREKSTOR DATASTATION MAXI Z.UL IM NDAS-GERÄTE-MANAGER
ÄNDERN"und 5.2 "FORMATIEREN DER TREKSTOR DATASTATION MAXI Z.UL".
– 20 –
4.6) Entkoppeln einer TrekStor DataStation maxi z.ul
aus einem Verbund
ACHTUNG: Sichern Sie alle Daten, bevor Sie eine Kopplung lösen.
Beim Entkoppeln gehen ALLE Daten auf ALLEN beteiligten Festplatten
unwiderruflich verloren. Wenn Sie ein Laufwerk entkoppeln, können Sie die
Laufwerke, welche sich noch in der Kopplung befinden, nicht verwenden.
•
Bevor eine DataStation maxi z.ul in ein unabhängiges Laufwerk konvertiert werden kann, müssen sowohl die primäre als
auch die sekundäre DataStation maxi z.ul auf allen PCs
ungemountet werden, welche die gekoppelten
DataStation maxi z.ul benutzen.
Hinweis: Für weitere Informationen zum Unmounten der
DataStation maxi z.ul, lesen Sie bitte Kapitel 3.7 "UNMOUNTEN
DER TREKSTOR DATASTATION MAXI Z.UL" .
•
•
Öffnen Sie den NDAS-Kopplungsmanager an einem PC, der über
(Lese-/)Schreibrechte verfügt.
Klicken Sie mit der rechten Maustaste auf eine ungemountete
DataStation maxi z.ul und wählen Sie im Kontextmenü
den Punkt "IN EINFACHES LAUFWERK UMWANDELN" aus. Nach einer weiteren
Bestätigung wird das gekoppelte Laufwerk aus dem Verbund der
gekoppelten DataStation maxi z.ul entfernt.
Hinweis: Eine entkoppelte DataStation maxi z.ul kann nicht
benutzt werden, solange sie nicht gemountet ist.
•
Bevor Sie die entkoppelte DataStation maxi z.ul benutzen
können, muss auch diese partitioniert und formatiert werden. Bitte
lesen Sie dazu auch die Kapitel 5.1 "PARTITIONIEREN DER TREKSTOR DATASTATION
MAXI Z.UL" und Kapitel 5.2 "FORMATIEREN DER TREKSTOR DATASTATION MAXI Z.UL".
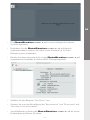
5) Allgemeine Dateisystemoperationen
5.1) Partitionieren der TrekStor DataStation maxi z.ul
Da die DataStation maxi z.ul direkt ins System eingebunden
ist, kann diese wie jede andere Festplatte in Windows® partitioniert
werden.
•
Klicken Sie mit der rechten Maustaste auf den Arbeitsplatz und
wählen Sie im erscheinenden Kontextmenü den Punkt "VERWALTEN" aus.
•
Wählen Sie unter dem Punkt "DATENSPEICHER" den Punkt "DATENTRÄGERVERWALTUNG" aus. Sie sehen alle eingebundenen Laufwerke.
•
Folgen Sie anschließend den Anweisungen des "ASSISTENT ZUM
INITIALISIEREN UND KONVERTIEREN VON DATENTRÄGERN".
– 21 –
DE
Hinweis für Benutzer von Windows® 2000: Folgen Sie anschließend den
Anweisungen des "ASSISTENT ZUM SCHREIBEN VON SIGNATUREN UND AKTUALISIEREN VON
FESTPLATTEN“.
•
Klicken Sie mit der rechten Maustaste auf das neu erstellte Laufwerk
und wählen Sie im erscheinenden Menü den Punkt "NEUE PARTITION...".
Hinweis für Benutzer von Windows® 2000: Klicken Sie mit der rechten
Maustaste auf das neu erstellte Laufwerk und wählen Sie im erscheinenden
Menü den Punkt "DATENTRÄGER ERSTELLEN…"
DE
•
Folgen Sie nun den Anweisungen des "ASSISTENT ZUM ERSTELLEN NEUER
PARTITIONEN".
Hinweis für Benutzer von Windows® 2000: Folgen Sie nun den
Anweisungen des "Assistent zum Erstellen von Datenträgern".
•
Im Anschluss daran wird Ihr neues Laufwerk automatisch formatiert.
5.2) Formatieren der TrekStor DataStation maxi z.ul
Da die DataStation maxi z.ul direkt ins System eingebunden
ist, kann diese wie jede andere Festplatte in Windows® formatiert werden.
Achtung: Sichern Sie alle Daten Ihrer Festplatte, bevor Sie Ihre Festplatte
formatieren. Beim Formatieren werden ALLE Daten auf dem Datenträger
gelöscht.
•
Klicken Sie unter "ARBEITPLATZ" mit der rechten Maustaste auf den
lokalen Datenträger "TREKSTOR".
•
Wählen Sie aus dem erscheinenden Kontextmenü den Punkt
"FORMATIEREN..." aus.
•
Klicken Sie mit der linken Maustaste auf die Schaltfläche "STARTEN" und
bestätigen Sie das Formatieren durch Drücken der Schaltfläche "OK".
Achtung: Eingriffe in die Festplattenstruktur (Partitionieren, Formatieren)
können nur durchgeführt werden, wenn alle anderen PCs, die Zugriff auf die
DataStation maxi z.ul haben, den Status der DataStation
maxi z.ul auf "UNGEMOUNTET" setzten. Lesen Sie dazu auch das Kapitel 3.7
"UNMOUNTEN DER TREKSTOR DATASTATION MAXI Z.UL".
– 22 –
6) FAQ
Welche Betriebssysteme werden von der DataStation maxi
z.ul unterstützt?
Die DataStation maxi z.ul unterstützt derzeit Windows® XP,
Windows® 2000, Mac® OS X und Linux® 9. (ab Kernel 2.6) 9. Windows® 98
SE und ME werden nur im USB-Modus unterstützt.
Können mehrere Benutzer gleichzeitig auf die DataStation
maxi z.ul zugreifen?
Ja, mehrere Benutzer können gleichzeitig auf die DataStation
maxi z.ul zugreifen.
Wie viele Benutzer können auf eine DataStation maxi z.ul
gleichzeitig zugreifen?
Theoretisch gibt es keine Begrenzung. Wir empfehlen einen
gleichzeitigen Zugriff von maximal 64 Benutzern.
Welche Dateisysteme werden von der DataStation maxi
z.ul unterstützt?
Die DataStation maxi z.ul ist nicht von einem Dateisystem
abhängig. Sie können die DataStation maxi z.ul je nach
eingesetztem Betriebssystem mit jedem Dateisystem formatieren.
Windows® 2000/XP unterstützen FAT32 und NTFS. Linux® und Mac® OS X
haben ihre eigenen Dateisysteme, unterstützen aber für die Kompatibilität
zu Windows® auch FAT32.
Ist die DataStation maxi z.ul vorformatiert?
Ja, sie ist mit dem FAT32-Dateisystem vorformatiert. Sie können Ihre
DataStation maxi z.ul mit den Mitteln Ihres Betriebssystems
nach Belieben neu formatieren und partitionieren.
Muss auf jedem PC, der auf die DataStation maxi z.ul
zugreifen will, die NDAS Software installiert sein?
Ja, die Software muss auf jedem PC installiert werden, der auf die
DataStation maxi z.ul über das Netzwerk zugreifen möchte.
Wird die NDAS-Software zum Einsatz der DataStation maxi z.ul
im USB-Modus benötigt?
Nein, die NDAS-Software wird dafür nicht benötigt.
– 23 –
DE
7) Fehlersuche und -behebung
Warum bleibt die Schaltfläche "WEITER" im Fenster "NDAS-GERÄTE IDENTIFIKATIONSNUMMER" der DataStation maxi z.ul grau?
Wahrscheinlich haben Sie nicht alle Zeichen korrekt eingegeben. Diese
enthalten niemals den Buchstaben "O". Überprüfen Sie, dass Sie die Ziffer
"0" (Null) verwendet haben.
DE
Ich habe eine DataStation maxi z.ul registriert. Warum
erscheint deren Status "ROT"?
Die DataStation maxi z.ul wurde im Netzwerk nicht gefunden.
• Entfernen Sie das Netzwerkkabel Ihrer DataStation maxi z.ul,
warten Sie ungefähr 10 Sekunden und stecken Sie es wieder ein.
•
Falls sich der Status Ihrer DataStation maxi z.ul dadurch
nicht ändert, starten Sie bitte Ihren PC neu.
Warum kann ich meinen PC nicht in den Ruhezustand oder
Standby-Modus versetzen?
Wenn Sie Ihren Computer in den Ruhezustand oder Standby-Modus
versetzen möchten, müssen Sie zuvor die DataStation maxi
z.ul unmounten. Klicken Sie dazu auf das NDAS-Geräte-Manager-Symbol
im Infobereich Ihrer Taskleiste und markieren Sie die zu deaktivierende
DataStation maxi z.ul. Wählen Sie im Menü "UNMOUNTEN".
Alternativ besteht die Möglichkeit, in den Optionen des NDAS-GeräteManagers die Unterstützung für den Ruhezustand bzw. den StandbyModus zu aktivieren.
Meine DataStation maxi z.ul erscheint mit einem
schwarzen Statusindikator.
Bitte überprüfen Sie folgende Punkte:
• Ist das Netzkabel richtig angeschlossen?
•
Blinkt die Statusanzeige (LED) am Switch bzw. am Netzwerkanschluss
Ihres PCs, an dem die DataStation maxi z.ul angeschlossen ist?
•
Vergewissern Sie sich, dass Ihre Firewall- / Antivirus-Software vor der
Installation deaktiviert wurde. Aktuelle Antivirus-Software hat ein neues
Feature, das Script Blocking genannt wird. Vergewissern Sie sich, dass
dieses Feature deaktiviert wird, bevor Sie fortfahren. Sie müssen auch
das NDAS-Software-Protokoll und die notwendige NDAS-Software
in Ihrer Firewall bzw. Ihrem Virenscanner zulassen.
•
Wenn Sie Wireless-LAN benutzen, vergewissern Sie sich, dass Sie eine
Verbindung mit dem Wireless-Router haben und dass die Signalstärke
gut ist. Gehen Sie auf die Website des Herstellers Ihres Wireless-Routers
und laden Sie die neuste Firmware und die neusten Treiber für Ihre
Wireless-LAN-Karte herunter. Versuchen Sie, die DataStation
maxi z.ul über das Netzwerkkabel direkt an Ihren Wireless-Router
anzuschließen und prüfen Sie, ob es dann funktioniert.
– 24 –
Ich erhalte die Fehlermeldung: "DATASTATION MAXI Z.UL NICHT
ANGESCHLOSSEN."
• Die DataStation maxi z.ul könnte nicht richtig angeschlossen
sein. Überprüfen Sie bitte alle Anschlüsse.
•
Versuchen Sie auch, Ihre DataStation maxi z.ul oder Ihren
PC an einem anderen Port Ihres Switches anzuschließen.
Obwohl ich die DataStation maxi z.ul erfolgreich
registriert habe, erscheint diese nicht im "ARBEITSPLATZ".
Was kann ich tun?
• Öffnen Sie die "COMPUTERVERWALTUNG", indem Sie mit der rechten
Maustaste auf "ARBEITSPLATZ" klicken.
•
Wählen Sie den Menüpunkt "VERWALTEN".
•
Klicken Sie dort unter "DATENSPEICHER" auf "DATENTRÄGERVERWALTUNG".
•
Überprüfen Sie, ob der Computer Ihre DataStation maxi z.ul
erkannt hat. Ihre DataStation maxi z.ul sollte als Datenträger 1 oder Datenträger 2 oder mit einer anderen Nummer, je nachdem wie viele Laufwerke Sie auf Ihrem Computer installiert haben,
erscheinen.
•
Klicken Sie mit der rechten Maustaste auf die richtige "DATENTRÄGER #"
und klicken Sie auf "INITIALISIEREN ...".
Ich habe das NDAS-Geräte-Manager-Symbol in meinem WindowsStartmenü angeklickt, aber es passiert nichts.
Das Symbol auf dem Desktop wird nur dazu verwendet, den NDASGeräte-Manager im Infobereich der Taskleiste zu starten. Das Symbol
im Infobereich der Taskleiste wird für die Funktionen Mounten bzw.
Unmounten, Hinzufügen bzw. Entfernen und zum Wechseln zwischen
den verschiedenen Zugriffsmodi der DataStation maxi z.ul
verwendet.
Wenn ich eine Datei öffnen oder kopieren möchte, erhalte ich
die Fehlermeldung: "(DATEINAME): ES KANN NICHT KOPIERT WERDEN. DER
DATENTRÄGER IST SCHREIBGESCHÜTZT. ENTFERNEN SIE DEN SCHREIBSCHUTZ ODER
VERWENDEN SIE EINEN ANDEREN DATENTRÄGER."
• Klicken Sie mit der linken Maustaste im Infobereich der Taskleiste auf
das Symbol des NDAS-Geräte-Managers. Wählen Sie bei der
betreffende DataStation maxi z.ul aus der Liste den Punkt
"MOUNTEN (LESEN/SCHREIBEN)".
•
Wenn Sie nur die Option "MOUNTEN (NUR LESEN)" zur Verfügung haben
müssen Sie den Schreibschlüssel (KEY) Ihrer DataStation
maxi z.ul eintragen. Den Schreibschlüssel (KEY) finden Sie auf
Ihrer DataStation maxi z.ul bzw. auf der Rückseite der
Schnellstartanleitung. Wenn Sie danach den Modus "MOUNTEN(LESEN/
SCHREIBEN)" der DataStation maxi z.ul aktivieren, können Sie
Daten auf die DataStation maxi z.ul kopieren.
– 25 –
DE
Ich erhalte die Fehlermeldung: "DAS GERÄT "STANDARDVOLUME" KANN
ZURZEIT NICHT BEENDET. WIEDERHOLEN SIE DEN VORGANG SPÄTER"
• Schließen Sie alle Programme und Fenster, die eventuell auf die
DataStation maxi z.ul zugreifen. Unter bestimmen Umständen, z. B. beim Kopieren großer Datenmengen, kann Windows®
z. B. den Kopiervorgang als beendet melden, obwohl im Hintergrund
noch Dateien vom Arbeitsspeicher kopiert werden.
•
DE
Versuchen Sie es noch einmal. Wenn Sie die Fehlermeldung immer
noch erhalten, starten Sie bitte Ihren PC neu.
Ich habe den Treiber für Windows® 98 SE installiert. Bei der Übertragung großer Dateien wird die Verbindung immer getrennt.
Windows® 98 SE kann nur FAT32-Dateisysteme lesen. FAT32 kann nur
Dateien bis zu einer Größe von 4 GB verwalten. Dies ist eine Begrenzung
des Dateisystems.
Ich habe meine DataStation maxi z.ul an den USB-Anschluss
meines Computers angeschlossen. Die DataStation maxi z.ul
wird aber nicht im Arbeitsplatz angezeigt.
• Stellen Sie sicher, dass die DataStation maxi z.ul
eingeschaltet ist.
•
Versuchen Sie die DataStation maxi z.ul an einen anderen
USB-Anschluss Ihres Computers anzuschließen. Überprüfen Sie, ob das
Problem so behoben wird.
•
Wenn Sie Windows® 98 SE, ME, Linux® oder Mac® OS X einsetzen,
stellen Sie sicher, dass die DataStation maxi z.ul mit einem
Dateisystem formatiert wird, das von dem jeweiligen Betriebssystem
unterstützt wird. Linux® und Mac® OS X haben ihre eigenen Dateisysteme, unterstützen aber auch FAT32.
Wenn ich meine DataStation maxi z.ul im USB-Modus
verwende, erscheint sie im NDAS-Geräte-Manager mit einem
schwarzen Statusindikator.
Im USB-Modus funktioniert die DataStation maxi z.ul ohne
den NDAS-Geräte-Manager. Im NDAS-Geräte-Manager im Infobereich
der Taskleiste wird sie deswegen mit einem schwarzen Statusindikator
angezeigt (nicht angeschlossen). Die Anzeige des Statusindikators bezieht
sich nur auf DataStation maxi z.ul, die im NDAS- Modus
angeschlossen sind.
– 26 –
DE
Hinweise:
• Von der Nutzung von USB-Kabeln mit Leitungslängen von mehr als 3 m sollte abgesehen werden.
Der Hersteller behält sich das Recht vor, das Produkt ständig weiter zu entwickeln. Diese
Änderungen können ohne direkte Beschreibung in dieser Bedienungsanleitung vorgenommen
werden. Informationen in dieser Bedienungsanleitung müssen somit nicht den Stand der
technischen Ausführung widerspiegeln.
Der Hersteller garantiert nur die Eignung für die eigentliche Bestimmung dieses Produktes. Weiter
ist der Hersteller nicht für Beschädigungen oder Verlust von Daten und deren Folgeschäden
verantwortlich.
Copyright © 2006 TrekStor GmbH & Co. KG. Alle Rechte vorbehalten. Bei weiteren erwähnten
Produkt- oder Firmenbezeichnungen handelt es sich möglicherweise um Warenzeichen oder
Markennamen der jeweiligen Inhaber.
– 27 –
INDEX
1) USB mode: Connecting the TrekStor DataStation
maxi z.ul to a PC via USB
30
2) Network mode: Connect the TrekStor DataStation
maxi z.ul to one or more PCs via the network.
31
2.1) The NDAS network technology
2.2) Connecting in network mode
2.3) Installation of software for the network mode
3) The NDAS device manager
34
3.1) Registering and mounting a new TrekStor DataStation
maxi z.ul using the assistant (Wizard)
3.2) Functions and options of the NDAS device manager
3.3) Modes of the NDAS device manager
3.4) Changing the mode of the TrekStor DataStation
maxi z.ul in the NDAS Device Manager.
3.5) Using the TrekStor DataStation maxi z.ul
3.6) Exchanging data with the TrekStor DataStation
maxi z.ul
3.7) Unmounting the TrekStor DataStation maxi z.ul
4) The NDAS coupling manager
4.1)
4.2)
4.3)
4.4)
4.5)
Introduction to the various coupling modes
Requirements
Setting up the coupling mode
Mounting a coupled TrekStor DataStation maxi z.ul
Canceling a TrekStor DataStation maxi z.ul
coupled to a combination.
4.6) Uncoupling a TrekStor DataStation maxi z.ul
from a combination
EN
31
32
32
5) General file system operations
5.1) Partitioning the TrekStor DataStation maxi z.ul
5.2) Formatting the TrekStor DataStation maxi z.ul
34
37
38
39
39
40
40
41
41
43
43
45
45
46
46
46
47
6) FAQ
48
7) Troubleshooting and correction
49
– 28 –
OPERATING INSTRUCTIONS for the TrekStor
DataStation maxi z.ul
Included in the delivery:
• TrekStor DataStation maxi z.ul
• Convenient multifunctional mount
• High-quality network cable
• Hi-Speed USB 2.0 cable
• Power supply (100 V – 240 V)
• Software CD
• Manual
System requirements:
• Windows® 98 SE / ME (usable only in USB mode)
• Windows® 2000 / XP, Mac® OS X from version 10.3, Linux®
• 233 MHz Pentium II or better (500 MHz Pentium III recommended)
• 64 MB RAM (256 MB RAM recommended)
• USB 1.1 port (Hi-Speed USB 2.0 port recommended)
• 10/100Base-T network connection available on your PC, switch or router
Note: The DataStation maxi z.ul can be operated either in USB
mode OR in network mode, but not in both modes at the same time.
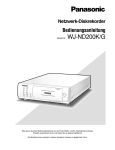
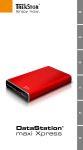
A
B
C
D
E
F
G
USB connection / access
LAN connection / access
Power LED
On / off switch
USB port
Power connection
LAN connection
EN
– 29 –
1) USB mode: Connecting the TrekStor DataStation
maxi z.ul to a PC via USB
Procedure using Windows® ME / 2000 / XP and Mac® OS X
from version 10.3
Note for users of Windows® ME, 2000, XP, Mac® OS X 10.3: Drivers are not
necessary for these operating systems. If you use Windows® 2000, make sure
that you have installed at least service pack 4, and Windows® XP requires
service pack 2 or above.
•
Insert the provided power supply into an electrical outlet, and connect
the cable to the "POWER" connection of the DataStation
maxi z.ul.
•
Connect the DataStation maxi z.ul to a USB port of your PC.
•
Turn on the DataStation maxi z.ul.
•
Your operating system will add the DataStation maxi z.ul as
a "LOCAL DISK" ("LOCAL DRIVE") under "MY COMPUTER".
Note for users of Windows® 98 SE
• Insert the provided CD into the CD / DVD drive of your PC.
EN
•
Insert the provided power supply into an electrical outlet, and connect
the cable to the "POWER" connection of the DataStation
maxi z.ul.
•
Connect the DataStation maxi z.ul to a USB port of your PC.
•
Turn on the DataStation maxi z.ul by pressing the button.
•
In the window of the appearing hardware wizard, select "NEXT".
•
Select the first option that appears in the following window: "SEARCH FOR
and confirm by pressing "NEXT".
THE BEST DRIVER FOR THE DEVICE (RECOMMENDED)"
•
Select the "CD ROM DRIVE" option in the following window and confirm
with "NEXT".
– 30 –
•
After you have then selected "FINISH", your operating system will add
the DataStation maxi z.ul as a "LOCAL DISK" ("LOCAL DRIVE")
under "MY COMPUTER".
2) Network mode: Connect the TrekStor
DataStation maxi z.ul to one or more PCs via
the network.
2.1) The NDAS network technology
The network connection is based on NDAS technology. NDAS (Network
Direct Attached Storage) is a patented technology from XIMETA, which
allows digital media to be integrated directly into the network. Neither a
server nor an IP address or the TCP/IP protocol is required for this direct
connection; the NDAS device software simply needs to be installed.
All users who have installed the NDAS device software can directly control
and use mounted devices (i.e. devices integrated into the system). In this
case, "DIRECT" means that the installed NDAS devices are integrated into
"MY COMPUTER" and displayed there as the local hard disk.
– 31 –
EN
2.2) Connecting in network mode
Note: When operating with only one PC, the USB connection is recommended.
•
Insert the provided power supply into an electrical outlet, and connect the
cable to the "POWER" connection of the DataStation maxi z.ul.
•
Then plug the provided network cable into the "LAN" connection of
the DataStation maxi z.ul and plug this into the network
connection of your PC.
Note: Alternatively, the DataStation maxi z.ul can be
connected to a router or switch in the network.
•
Turn the DataStation maxi z.ul on.
2.3) Installation of software for the network mode
Procedure using Windows® 2000 / XP
• Insert the provided CD into the CD / DVD drive of your PC.
•
If the startup function of your system is activated, a menu showing all
the contents of the CD will open.
Note: If the startup function of your system is deactivated, you can access
the CD / DVD drive via "MY COMPUTER" and start the program "MENU.EXE" in the
main directory of the CD.
EN
•
The TrekStor menu appears in a dialog window.
•
Click "NDAS SOFTWARE" and follow the installation instructions.
Note: If a Windows® security prompt appears, select "CONTINUE ANYWAY".
– 32 –
•
When installation is complete, you must restart your PC in order to
make settings on the DataStation maxi z.ul.
Procedure using Mac® OS X from version 10.3
• Insert the provided CD into the CD / DVD drive of your computer.
•
Go to the "MAC-OS" folder and execute the file "INSTALL.MPKG".
•
Follow the installation instructions.
Note: Keep the administrator log-on data handy. They will be required
during installation.
•
After installation is complete, you must restart your computer in order
to use the DataStation maxi z.ul in the network mode.
Procedure using Linux®
• Please visit the Internet site:
http://www.ximeta.com/support/downloads/.
•
Select your Linux® version from the queries that appear.
•
You can download the desired driver in the following window.
•
Then follow the instructions.
– 33 –
EN
3) The NDAS device manager
3.1) Registering and mounting a new TrekStor DataStation
maxi z.ul using the assistant (Wizard)
Procedure using Windows® 2000 / XP
• After restarting your operating system, another symbol appears in the
Info area of the task bar with a balloon tip. To set up a DataStation
maxi z.ul using the assistant, click on this balloon tip or on the symbol .
•
Alternatively, you can right-click on the symbol and select the
menu item "REGISTERING A NEW DEVICE..." from the menu that appears. The
registration wizard then starts.
Note: If the NDAS device manager is not activated, start it under "START" Ë
"PROGRAMS" Ë "TREKSTOR NDAS SOFTWARE" Ë "TREKSTOR NDAS DEVICE-MANAGER".
•
Follow the installation software instructions for setting up the
DataStation maxi z.ul.
•
You will be asked to assign a name for the new drive
(the DataStation maxi z.ul).
•
You must enter the identification number (ID) in the next window.
EN
Note: The identification number (ID) and the write key (KEY) can be found
on your DataStation maxi z.ul or on the reverse side of the
quick guide.
•
If you would like to gain write access to the DataStation
maxi z.ul, you must also enter the write key (KEY).
•
After you have successfully registered the DataStation maxi
z.ul, you can then mount it – i.e., integrate it into your operating system.
– 34 –
•
•
From the 2 possible modes, select the one in which the drive is to be
mounted. Then click on the "NEXT" button.
If you have selected the option "YES, I WOULD LIKE TO MOUNT THIS NDAS DEVICE
READ/WRITE MODE" or "YES, I WOULD LIKE TO MOUNT THIS NDAS DEVICE IN THE
READ MODE", the "ASSISTANT FOR SEARCHING FOR NEW HARDWARE" starts up.
IN THE
•
In the dialog window that appears next, select "AUTOMATICALLY INSTALL
and follow the software instructions.
SOFTWARE"
Note: If a Windows® security prompt appears, select "CONTINUE ANYWAY".
EN
•
Your DataStation maxi z.ul is now mounted as a hard disk
under "MY COMPUTER".
•
Reconfirm that the installation is complete in the Assistant by pressing
the "FINISH" button.
•
Your operating system will add the DataStation maxi z.ul as
a "LOCAL DISK" ("LOCAL DRIVE") under "MY COMPUTER".
– 35 –
Procedure using Mac® OS X from version10.3
After your operating system has been completely loaded, a new symbol
designated "NDAS UTILITY" appears under "FINDER" Ë "PROGRAMS" Ë "UTILITIES".
•
Open the "NDAS UTILITY" by double clicking.
•
In the window that appears, click on the symbol in the upper left-hand
side for "REGISTER NEW DEVICE".
•
Fill out the input matrix that appears and then click on "REGISTER". You
can assign a specific name to the hard disk. The identification number
(ID) and the write key (KEY), which you will need to gain write access to
the DataStation maxi z.ul, can be found both on the reverse
side of the quick guide and on the DataStation maxi z.ul.
•
The DataStation maxi z.ul is now successfully registered on
your system.
•
After you have successfully registered the DataStation maxi z.ul,
you can mount it – i.e., integrate it into your operating system.
EN
– 36 –
•
To do so, click once on the hard disk installed in the
DataStation maxi z.ul in your NDAS utility.
•
Select the "UNIT DEVICE" register.
•
Next, change the setting of the "CONFIGURATION" from "UNMOUNT" to
"MOUNT WITH READ-WRITE".
•
The DataStation maxi z.ul then appears as a new disk on
your desktop.
3.2) Functions and options of the NDAS device manager
Functions of the NDAS device manager
A menu opens if you right-click on the symbol for the "NDAS DEVICE MANAGER"in the Info area of the task bar. There you can obtain information about
the status of the integrated devices. You also have the option to integrate
new devices and call up the general software options.
Options of the NDAS device manager
The general settings for the program can be set under the "OPTIONS" menu
item. Some of the most important functions are setting the language of the
user interface and activating or deactivating the "REGISTRATION ASSISTANT" (Wizard).
– 37 –
EN
3.3) Modes of the NDAS device manager
If you right-click on the "NDAS DEVICE MANAGER"
symbol in the Info area
of the task bar, the status of the DataStation maxi z.ul is shown
by means of different colored symbols.
A DataStation maxi z.ul can be in various modes. The table
below gives you an overview of the different modes.
Color
Green
Status
Mode / meaning
Read access
The PC has read access to the
DataStation maxi z.ul.
Blue
Read / Write access
The PC has read and write access to the
DataStation maxi z.ul.
In an aggregation or mirroring, the
DataStation maxi z.ul is the primary
DataStation.
Red
Error
Error in the initialization of the
DataStation maxi z.ul (hardware/
software problem).
Note: Try to remedy the error by turning the
DataStation maxi z.ul on and off.
Gray
Deactivated
The DataStation maxi z.ul is not
mounted on your PC or on any other PCs in the
network.
White
Deactivated / active
The DataStation maxi z.ul is
deactivated on your PC, but activated on other
PCs in the network.
Black
No connection
The DataStation maxi z.ul is not
connected.
Note: Make sure that all cables are connected
properly and / or that your antivirus / firewall
software is not interfering with the connection.
Yellow
Mounted
The DataStation maxi z.ul is
mounted as a secondary DataStation in an
aggregation or mirroring.
EN
– 38 –
3.4) Change the mode of the TrekStor DataStation
maxi z.ul in the NDAS Device Manager.
A menu opens if you right-click on the symbol for the "NDAS DEVICE
MANAGER"in the Info area of the task bar. To change the status of a
DataStation maxi z.ul, mark it in the menu and select the
desired mode in the context menu that appears.
Two different modes can be selected:
a) In the "MOUNT (READ ONLY)" mode, you only have read access to the
DataStation maxi z.ul.
b) In the "MOUNT (READ / WRITE)" mode, you have both read and write
access to the DataStation maxi z.ul.
Under the "PROPERTIES" entry, you can obtain miscellaneous information
about the DataStation maxi z.ul. There, if applicable, you can
enter the write key of the DataStation maxi z.ul under the
"GENERAL" register using the "ADD" button, in order to obtain write access
to it.
Note: The identification number (ID) and the write key (KEY) can be found on
your DataStation maxi z.ul or on the reverse side of the quick guide.
3.5) Using the TrekStor DataStation maxi z.ul
After you have successfully registered and mounted the DataStation
maxi z.ul, it appears under "MY COMPUTER" as a "LOCAL DISK". You can now
use it as a hard disk located on the PC.
Note: If you have mounted the DataStation maxi z.ul in read
mode, the disk is write-protected.
– 39 –
EN
3.6) Exchanging data with the TrekStor DataStation
maxi z.ul
•
Select the desired files or folders with your mouse. Copy these files by
clicking them with your right mouse button and then selecting "COPY".
•
Under "MY COMPUTER", select the local disk "TREKSTOR".
•
Click it with your right mouse button, and select "PASTE" to start copying.
After copying is finished, the data will be available on the
DataStation maxi z.ul.
3.7) Unmounting the TrekStor DataStation maxi z.ul
Unmounting is defined as removing the DataStation maxi z.ul
that was previously added to your operating system.
Procedure using Windows® 2000 / XP
• In the "NDAS DEVICE MANAGER", select the DataStation maxi z.ul
that you want to unmount and click on "UNMOUNT".
•
•
Wait a few seconds until the changes are displayed. If the status indicator
of the unmounted DataStation maxi z.ul does not display
"WHITE" or "GRAY", click on "UPDATE STATUS".
Repeat this step as needed for any additional DataStation
maxi z.ul that may be connected.
Procedure using Mac® OS X from version10.3
• To unmount, click once on the hard disk installed in the
DataStation maxi z.ul in your NDAS utility.
EN
•
Select the "UNIT DEVICE" register.
– 40 –
•
Next, change the setting of the "CONFIGURATION" from "MOUNT WITH READ-WRITE"
to "UNMOUNT".
•
Your DataStation maxi z.ul is now no longer mounted on
your system.
4) The NDAS coupling manager
NOTE: Back up all the data on your hard disk before using your hard disk in a
coupling mode. When setting up or changing a coupling mode, ALL data on
ALL associated hard disks are irrevocably lost.
4.1) Introduction to the various coupling modes
"Aggregation"
In the "AGGREGATION" coupling mode, two or more DataStation
maxi z.ul units are combined into one large drive. This property is
useful if there is a large demand for memory.
(Example: 1x DataStation maxi z.ul 160 GB + 1x DataStation maxi z.ul 250 GB
= 1x DataStation maxi z.ul 410 GB in the Aggregation mode)
EN
– 41 –
"Stripe" (RAID0)
In the "STRIPE" coupling mode, you can combine 2 (4 or 8) DataStation
maxi z.ul units. The data is written to both hard disks at the same time,
which can be an advantage as far as speed is concerned.
Note: It is recommended to use only DataStation maxi z.ul units
of the same size in this mode. If you use hard disks of different sizes, you only have
twice (four times or eight times) the total size of the smallest DataStation
maxi z.ul available in the Stripe system. This is a specified characteristic of
the Stripe system, so as to ensure continuous parallel writing.
Example: 1x DataStation maxi z.ul 160 GB + 1x DataStation maxi z.ul 250 GB
= 1x DataStation maxi z.ul 320 GB in the Stripe mode)
Note: The danger of losing data increases in the Aggregation and Stripe
modes, since it is not possible to read the data if one of the two hard disks is no
longer functioning.
EN
"Mirroring" (RAID1)
The "MIRRORING" coupling mode enables real-time mirroring of the
data from a primary DataStation maxi z.ul to a secondary
DataStation maxi z.ul. The data is written as continuous copies
of the primary DataStation maxi z.ul onto the secondary
DataStation maxi z.ul, if changes or edits are made – much like
a continuously up-to-date backup.
Note: When mirroring 2 DataStation maxi z.ul, you have the
memory of the primary and / or the smaller DataStation maxi z.ul
at your disposal. This is required in a mirroring system, since the secondary
DataStation maxi z.ul is available solely for backing up the data
of the primary DataStation maxi z.ul.
Example: 1x DataStation maxi z.ul 160 GB + 1x DataStation maxi z.ul 250 GB
= 1x DataStation 160 GB in the mirroring system)
– 42 –
4.2) Requirements
Note: The "AGGREGATION" and "MIRRORING" coupling modes are only supported
under Windows® 2000 / XP and Mac® OS X from version 10.3.
•
In order to set up one of the 3 coupling modes for the
DataStation maxi z.ul, you must have entered the write key
(KEY) for all of the affected drives. You can do this in the "NDAS DEVICE
MANAGER" under the "PROPERTIES" menu item of the respective device.
•
The drives cannot be operated in 2 different modes at the same time.
•
Unmount all DataStation maxi z.ul, which are to be
coupled, on all of the PCs in your network.
•
Other users can re-mount the coupled DataStation maxi z.ul
after the coupling has been set up and the DataStation maxi z.ul
has been partitioned and formatted.
Note: In the "MIRRORING" and "STRIPE" coupling modes, the capacity of the
secondary DataStation maxi z.ul must be at least the same as
or greater than the primary DataStation maxi z.ul.
4.3) Setting up the coupling mode
NOTE: Back up all the data on your hard disk before using your hard disk
in a coupling mode. When setting up a coupling mode, ALL data on ALL
associated hard disks are irrevocably lost.
•
Click on "START" Ë "PROGRAMS" Ë "NDAS SOFTWARE" Ë "NDAS COUPLING MANAGER".
•
Click on the "COUPLE" button to start the Assistant for setting up a
coupling mode. Then click on the "NEXT" button.
•
Select from the different coupling modes and the number of drives to
be coupled.
– 43 –
EN
•
In the following window, select the DataStation maxi z.ul
that you would like to couple from the left-hand box.
•
Click on the "ADD" button until all of the drives to be coupled are
located on the right-hand side.
Note: You will see the total capacity of the coupled combination displayed
in the same window.
•
When coupling is complete, click on the "FINISH" button.
Note: If you have marked the wrong DataStation maxi z.ul
for coupling, right-click on the DataStation maxi z.ul to be
uncoupled in the dialog box of the NDAS coupling manager. Select
"CONVERT TO INDEPENDENT DRIVE" in the context menu to uncouple the respective
DataStation maxi z.ul.
Note: In the "MIRRORING" coupling mode (RAID1), a DataStation
maxi z.ul can only be mirrored on another DataStation
maxi z.ul with greater or at least the same size capacity.
•
EN
Before you can use the newly coupled DataStation maxi z.ul,
the memory must be partitioned and formatted. Please also read
Section 5.1 regarding: "PARTITIONING THE TREKSTOR DATASTATION MAXI Z.UL" and
section 5.2: "FORMATTING THE TREKSTOR DATASTATION MAXI Z.UL".
Note: Before you can format / partition a DataStation maxi z.ul,
you must first mount it.
– 44 –
4.4) Mounting a coupled TrekStor DataStation maxi z.ul
•
To mount a DataStation maxi z.ul coupled to a combination,
the primary DataStation maxi z.ul must be mounted.
•
The secondary DataStation maxi z.ul is automatically
mounted as soon as the primary one is mounted.
Note: The NDAS Device Manager automatically recognizes the mode of the
primary and secondary DataStation maxi z.ul if they are mounted
on additional PCs. Only the primary DataStation maxi z.ul needs
to be mounted.
Note: You can only mount the primary DataStation maxi z.ul –
and thus the combination – if you have also registered the secondary
DataStation maxi z.ul on your PC.
4.5) Canceling a TrekStor DataStation maxi z.ul coupled
to a combination.
Note: To uncouple a combination, it must be unmounted from all PCs.
NOTE: Back up all data before canceling a coupling. When uncoupling, ALL
data on ALL associated hard disks is irrevocably lost.
•
Secondary DataStation maxi z.ul are automatically
unmounted as soon as the primary DataStation maxi z.ul is
unmounted.
Note: For more information on unmounting the DataStation
maxi z.ul, please read section 3.7 "UNMOUNTING THE TREKSTOR DATASTATION MAXI Z.UL".
•
•
•
Open the NDAS coupling manager on a PC on which all
DataStation maxi z.ul of the combination are registered.
Select the combination of the coupled DataStation maxi z.ul
and click on "UNCOUPLE". All associated DataStation maxi z.ul
will be uncoupled into unmounted DataStation maxi z.ul.
The uncoupled DataStation maxi z.ul are also visible in the
NDAS Device Manager.
Before you can use the uncoupled DataStation maxi z.ul
again, all DataStation maxi z.ul must be individually
mounted and formatted. Please also read sections 3.4 "MOUNTING THE
TREKSTOR DATASTATION MAXI Z.UL" and 5.2 "FORMATTING THE TREKSTOR DATASTATION
MAXI Z.UL" on this topic.
– 45 –
EN
4.6) Uncoupling a TrekStor DataStation maxi z.ul
from a combination
NOTE: Back up all data before canceling a coupling. When uncoupling, ALL
data on ALL associated hard disks is irrevocably lost. When you uncouple a
drive, you cannot use the drives that are still in the coupling.
•
Before a DataStation maxi z.ul can be converted into an
independent drive, both the primary and all secondary DataStation
maxi z.ul must be unmounted from all PCs which use the coupled
DataStation maxi z.ul.
Note: For more information on unmounting the DataStation
maxi z.ul, please read section 3.7 "UNMOUNTING THE TREKSTOR DATASTATION
MAXI Z.UL".
•
Open the NDAS coupling manager on a PC which has (read /) write
rights for all hard disks on the combination.
•
Right-click on an unmounted DataStation maxi z.ul and
select "CONVERT TO A SIMPLE DRIVE" in the context menu. After confirming
again, the coupled drive will be removed from the combination of the
coupled DataStation maxi z.ul.
Note: An uncoupled DataStation maxi z.ul cannot be used
until it is mounted.
•
Before you can use the uncoupled DataStation maxi z.ul,
it must be partitioned and formatted. Please also read in Section 5.1
regarding: "PARTITIONING THE TREKSTOR DATASTATION MAXI Z.UL" and in Section
5.2: "FORMATTING THE TREKSTOR DATASTATION MAXI Z.UL".
5) General file system operations
5.1) Partitioning the TrekStor DataStation maxi z.ul
EN
Since the DataStation maxi z.ul is integrated directly into the
system, it can be partitioned just like every other hard disk in Windows®.
•
Right-click on My Computer and select "ADMINISTER" in the context menu
that appears.
•
Under the "DATA STORAGE DEVICE" menu item, select "DATA MEDIA ADMINISTRATION".
You will see all of the integrated drives.
•
Then follow the instructions of the "ASSISTANT FOR INITIALIZING AND CONVERTING DISKS".
Note for users of Windows® 2000: Then follow the instructions of the
"ASSISTANT FOR WRITING SIGNATURES AND UPDATING HARD DISKS".
– 46 –
•
Right-click on the newly created drive and select "NEW PARTITION" in the
menu that appears.
Note for users of Windows® 2000: Right-click on the newly created drive
and select "CREATE DISK..." in the menu that appears.
•
Then follow the instructions of the "ASSISTANT FOR CREATING NEW PARTITIONS".
Note for users of Windows® 2000: Next, follow the instructions of the
"ASSISTANT FOR CREATING DISKS".
•
Following this, your new drive will be formatted automatically.
5.2) Formatting the TrekStor DataStation maxi z.ul
Since the DataStation maxi z.ul is integrated directly into the
system, it can be formatted just as every other hard disk in Windows®.
Note: Back up all the data on your hard disk before formatting it. All the data
on the disk will be deleted when you format it.
•
Under "MY COMPUTER", right-click on the local disk "TREKSTOR".
•
Select "FORMAT..." from the context menu that appears.
•
Left click on the "START" button, and confirm that you want to format by
clicking the "OK" button.
Note: Changes to the hard disk structure (partitioning, formatting) can only be
carried out if all other PCs that have access to the DataStation
maxi z.ul set the status of the DataStation maxi z.ul to
"UNMOUNTED". Please read Section 3.7: "UNMOUNTING THE TREKSTOR DATASTATION MAXI Z.UL"
regarding this topic.
EN
– 47 –
6) FAQ
Which operating systems are supported by the DataStation
maxi z.ul?
The DataStation maxi z.ul currently supports Windows® XP,
Windows® 2000, Mac® OS X and Linux® (from kernel 2.6). Windows® 98 and
ME are only supported in the USB mode.
Can several users access the DataStation maxi z.ul at the
same time?
Yes, several users can access the DataStation maxi z.ul at the
same time.
How many users can access a DataStation maxi z.ul at the
same time?
Theoretically there are no limits. But we recommend simultaneous access
by a maximum of 64 users.
Which file systems are supported by the DataStation
maxi z.ul?
The DataStation maxi z.ul is not dependent on any file system.
Depending on the operating system being used, you can format the
DataStation maxi z.ul with any file system. Windows® 2000/XP
supports FAT32 and NTFS. Linux® and Mac® OS X have their own file
systems, but also support FAT32 for compatibility with Windows®.
Is the DataStation maxi z.ul pre-formatted?
Yes, it is pre-formatted with the FAT 32 file system. You can reformat and
partition your DataStation maxi z.ul as desired using the
resources of your operating system.
EN
Does the NDAS software need to be installed on every PC that the
DataStation maxi z.ul wishes to access?
Yes, the software must be installed on every PC that would like to access
the DataStation maxi z.ul via the network.
Is the NDAS software needed to use the DataStation maxi z.ul
in USB mode?
No, the NDAS software is not needed for that purpose.
– 48 –
7) Troubleshooting and correction
Why does the "NEXT" button in the "NDAS DEVICE IDENTIFICATION NUMBER"
window of the DataStation maxi z.ul remain gray?
It is likely that you have not entered all of the characters correctly. The letter
"O" is never included. Check to be sure you have used the "0" (zero) digit.
I registered a DataStation maxi z.ul. Why does the status
appear in "RED"?
The DataStation maxi z.ul could not be found in the network.
• Unplug the network cable from your DataStation maxi z.ul,
wait about 10 seconds, and plug it back in.
•
If the status of your DataStation maxi z.ul does not change
after this action, please reboot your PC.
Why can’t I put my PC in the idle state or standby mode?
If you want to put your computer in the idle state or standby mode, you
must first unmount the DataStation maxi z.ul. To do so, click
on the NDAS Device Manager symbol in the Info area of your task bar
and mark the DataStation maxi z.ul to be deactivated. Select
"UNMOUNT" in the menu.
Alternatively, in the options of the NDAS Device Manager, you can
activate the support for the idle state or the standby mode.
My DataStation maxi z.ul has a black status indicator.
Please check the following items:
• Is the power cable attached correctly?
•
Is the status display (LED) on the switch or on the network connection of
your PC, to which the DataStation maxi z.ul is connected,
flashing?
•
Make sure that your firewall /antivirus software has been deactivated
before installation. Current antivirus software has a new feature
called Script Blocking. Make sure that this feature is deactivated before
you continue. You must also allow the NDAS software protocol and the
necessary NDAS software to pass your firewall or virus scanner.
•
If you are using a wireless LAN, make sure that you are connected to
the wireless router and that the signal strength is good. Go to the
website of the wireless router manufacturer and load the latest
firmware and the latest drivers for your wireless LAN card. Try to
connect the DataStation maxi z.ul directly to your wireless
router via the network cable and check to see if it works.
– 49 –
EN
I am getting the following error message:
"DATASTATION MAXI Z.UL NOT CONNECTED."
• The DataStation maxi z.ul could be incorrectly connected.
Please check all connections.
•
Try also to connect your DataStation maxi z.ul or your PC
to another port of your switch.
Although I have successfully registered the DataStation
maxi z.ul, it does not appear under "MY COMPUTER". What can I do?
• Open "COMPUTER MANAGEMENT" by clicking with your right mouse button
on "MY COMPUTER".
•
Select the menu item "ADMINISTER".
•
Then click on "DISK MANAGEMENT" under "DATA STORAGE DEVICE".
•
Check to see whether the computer recognized your DataStation
maxi z.ul. Your DataStation maxi z.ul should appear as
Disk 1 or Disk 2 or with another number, depending on how many
drives you have installed on your computer.
•
Right-click on the correct "DISK #" and then click on "INITIALIZE..".
I clicked on the NDAS Device Manager symbol in my Windows start
menu, but nothing happens.
The symbol on the desktop is only used to start the NDAS Device Manager
in the Info area of the task bar. The symbol in the Info area of the task
bar is used for the functions Mount or Unmount, Add or Remove and
changing between the different access modes of the DataStation
maxi z.ul.
EN
When I want to open or copy a file, I receive the following error
message: "(FILE NAME): CANNOT BE COPIED. THE DISK IS WRITE-PROTECTED.
REMOVE THE WRITE PROTECTION OR USE A DIFFERENT DISK."
• Left-click on the symbol of the NDAS Device Manager in the Info area
of the task bar. Select from the list the item "MOUNT (READ / WRITE)" for
the respective DataStation maxi z.ul.
•
If you only have the "MOUNT (READ ONLY)" option available, you must
enter the write key (KEY) of your DataStation maxi z.ul.
The write key (KEY) can be found on your DataStation maxi z.ul
or on the reverse side of the quick guide. If you then activate the mode
"MOUNT (READ / WRITE)" of the DataStation maxi z.ul, you can
copy the data to the DataStation maxi z.ul.
– 50 –
I am getting the following error message: "THE DEVICE "STANDARD
VOLUME" CANNOT BE STOPPED AT THIS TIME. REPEAT THE PROCESS AGAIN LATER."
• Close all programs and windows that may access the DataStation
maxi z.ul. Under certain circumstances, e.g. when copying large
volumes of data, Windows® may, for example, report the copying
process as ended, even though files are still being copied in the
background from the main memory.
•
Try it again. If you continue to receive the error message, reboot your PC.
I have installed the driver for Windows® 98 SE. When transmitting
large files, the connection is always broken.
Windows® 98 SE can only read FAT32 file systems. FAT32 can only manage
files up to a size of 4 GB. That is a limitation of the file system.
I have connected my DataStation maxi z.ul to the USB
port of my computer. But the DataStation maxi z.ul is not
displayed under My Computer.
• Make sure that the DataStation maxi z.ul is turned on.
•
Try to connect the DataStation maxi z.ul to another USB
port of your computer. Check to see if this fixes the problem.
•
If you use Windows® 98 SE, ME, Linux® or Mac® OS X, make sure that
the DataStation maxi z.ul is formatted with a file system that
is supported by the respective operating system. Linux® and Mac® OS X
have their own file systems, but also support FAT32.
When I use my DataStation maxi z.ul in USB mode, it
appears in the NDAS Device Manager with a black status indicator.
In USB mode, the DataStation maxi z.ul functions without
the NDAS Device Manager. That is why it is displayed with a black status
indicator (not connected) in the NDAS Device Manager in the Info area of
the task bar. The status indicator display refers only to DataStation
maxi z.ul that are connected in the NDAS mode.
EN
Note:
• Do not use USB cables longer than 3 meters.
The manufacturer retains the right to continually improve the product. These changes may
be made without being directly described in this quick guide. For this reason, the information
provided in this quick guide may not reflect the current state of the art.
The manufacturer only guarantees suitability for the product’s intended purpose. In
addition, the manufacturer is not responsible for damages or loss of data and subsequent
consequences.
Copyright © 2006 TrekStor GmbH & Co. KG. All rights retained. Other cited product or company
names may be trademarks or brand names of the respective owner.
– 51 –
TrekStor GmbH & Co. KG
Kastanienallee 8-10 · D-64653 Lorsch · Germany · www.trekstor.de
HB-ZUL-V1.1-INT-060608