1
LED Backlit Flat TV
INSTRUCTION MANUAL
LE32A650CF
LE32F600C
Please read this manual carefully before operating the TV, and keep it for
future reference.
Contents
Safety Warnings . . . . . . . . . . . . . . . . . . . . 2
Other Features . . . . . . . . . . . . . . . . . . . 18
Welcome . . . . . . . . . . . . . . . . . . . . . . . . . . . . . . . . . 2
USB Media Player . . . . . . . . . . . . . . . . . . . . . . . . 18
Important Information . . . . . . . . . . . . . . . . . . . . 2
Thumbnail/List Mode . . . . . . . . . . . . . . . . . 18
About Your LED LCD TV . . . . . . . . . . . . . 5
Photo Mode . . . . . . . . . . . . . . . . . . . . . . . . . . 19
Installing the Stand . . . . . . . . . . . . . . . . . . . . . . . 5
Installing a Wall-Mount Bracket. . . . . . . . . . . . 5
Side Control . . . . . . . . . . . . . . . . . . . . . . . . . . . . . . 5
Rear Terminals . . . . . . . . . . . . . . . . . . . . . . . . . . . . 6
Making Connections . . . . . . . . . . . . . . . . . . . . . . 7
Connecting to Antenna/Cable . . . . . . . . . . 7
Connecting an External A/V Device . . . . . 7
Connecting a PC . . . . . . . . . . . . . . . . . . . . . . . 7
Connecting Headphones . . . . . . . . . . . . . . . 7
Music Mode . . . . . . . . . . . . . . . . . . . . . . . . . . 19
Video Mode . . . . . . . . . . . . . . . . . . . . . . . . . . 19
Button Function . . . . . . . . . . . . . . . . . . . . . . 20
USB Media Supported File Format . . . . . 21
Common Interface. . . . . . . . . . . . . . . . . . . . . . . 22
Teletext . . . . . . . . . . . . . . . . . . . . . . . . . . . . . . . . . 22
Using USB Device for Recording . . . . . . . . . . 23
Timeshift (DTV only) . . . . . . . . . . . . . . . . . . 23
Recording (DTV only) . . . . . . . . . . . . . . . . . 23
Connecting a Digital Audio System . . . . . 7
Using Your Remote Control . . . . . . . . . . . . . . . 8
Reference Section . . . . . . . . . . . . . . . . 24
Getting Started . . . . . . . . . . . . . . . . . . . . 9
Specification . . . . . . . . . . . . . . . . . . . . . . . . . . . . 25
Preparing Your Remote Control . . . . . . . . . . . 9
Installing the Batteries . . . . . . . . . . . . . . . . . 9
Remote Control and Battery Cautions. . . 9
Initial Setup. . . . . . . . . . . . . . . . . . . . . . . . . . . . . . . 9
Understanding the Basics . . . . . . . . . . . . . . . . 11
Troubleshooting. . . . . . . . . . . . . . . . . . . . . . . . . 24
Appendix. . . . . . . . . . . . . . . . . . . . . . . . . . . . . . . . 26
Turning the TV On or Off . . . . . . . . . . . . . . 11
Selecting the Input Source . . . . . . . . . . . . 11
Selecting a Channel . . . . . . . . . . . . . . . . . . . 11
Using Favourite List . . . . . . . . . . . . . . . . . . . 11
Adjusting the Volume . . . . . . . . . . . . . . . . . 11
Displaying Channel Information . . . . . . . 11
Navigating the On-Screen Menu. . . . . . . 11
Using Your TV . . . . . . . . . . . . . . . . . . . . .12
Adjusting the Video Settings . . . . . . . . . . . . . 12
Adjusting the Audio Settings . . . . . . . . . . . . . 13
Adjusting the Channel Settings. . . . . . . . . . . 14
Adjusting the TV Settings . . . . . . . . . . . . . . . . 15
Adjusting Lock Settings . . . . . . . . . . . . . . . . . . 17
LED Backlit Flat TV Instruction Manual EN-1
Safety Warnings
Safety Warnings
Welcome
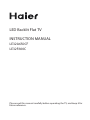
Thank you for choosing this 32” LED Backlit Flat TV. This manual will help you to set up and begin using your TV.
Firstly, check the package contents before installing your new TV.
• 32” LED Backlit Flat TV
• Remote control
• AAA battery x 2
• Instruction manual
• Quick start guide
• Warranty card
• TV stand and screws
• AC power cord (LE32F600C only)
!
When you open the box of LE32A650CF, take out the TV stand first to prevent it from falling off the top
cushion while unpacking the components.
Important Information
Read the following safety instructions before operating your TV. Keep these instructions for future reference.
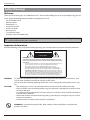
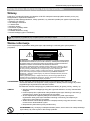
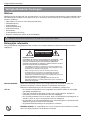
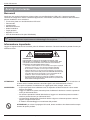
WARNING
RISK OF ELECTRIC SHOCK
DO NOT OPEN
WARNING
TO REDUCE THE RISK OF ELECTRIC SHOCK, DO NOT REMOVE COVER (OR
BACK). NO USER SERVICEABLE PARTS INSIDE. REFER TO QUALIFIED SERVICE
PERSONNEL.
• To avoid electric hazards, it is strongly suggested that the back cover
not be opened, as there is no any accessory inside the casing.
• If necessary, please contact authorized after-sales services.
• The lightning flash with arrowhead symbol within an equilateral
triangle is intended to alert the user to the presence of uninsulated
DANGEROUS VOLTAGE within the product’s enclosure that may be of
sufficient magnitude to constitute a risk of electrical shock to persons.
• The exclamation point within an equilateral triangle is intended to alert
the user to the presence of important operating and maintenance
(servicing) instructions in the literature accompanying the appliance.
WARNING:
CAUTION:
To avoid fires and electrical hazards, never place your television receiver in a humid area. Take
care to avoid accidental scratches or impacts on the screen.
Do not cover the ventilation openings with items such as newspaper, table cloth, curtains, and
etc.
• The main plug is used as a disconnection device and must remain readily accessible.
• Please read this manual carefully before using your television, and keep this manual to hand
for future reference.
• To achieve the best performance from your television, read this manual carefully and keep to
hand for future reference.
• Information in the Instruction Manual regarding screen displays and figures may vary due to
technical innovations.
• Unauthorised disassembly of this product is prohibited.
WARNING: To prevent the spread of fire, keep candles or other open flames away from this
product at all times.
EN-2 LED Backlit Flat TV Instruction Manual
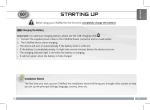
Safety Warnings
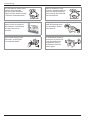
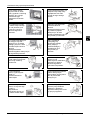
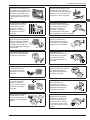
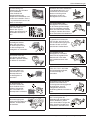
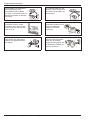
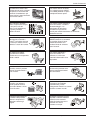
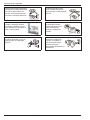
The product should be tightly
secured to table/wall in
accordance with the
installation instructions to
prevent injury or damage
caused by dropping.
To avoid fire hazards, do not
connect multiple sockets in
parallel and do not connect
multiple plugs to the same
socket.
Do not position the
product close to water or
oil (e.g. cooking oil or
lubricating oil), as this
may cause a fire hazard.
To avoid electric shocks or fire
hazards, unauthorised
disassembly of the television is
prohibited. Contact an
authorised after-sales service
provider if technical servicing is required.
Do not use damaged or
worn electrical plugs and
keep cables away from
heat sources to avoid
electric shocks and fire
hazards.
Disconnect the product
from the power supply and
contact an authorised
after-sales service provider
if the product starts to
make abnormal sounds.
To avoid collapsing, the
product must be placed on a
solid and stable surface.
To avoid explosions and
fire hazards, don't use or
store inflammable
materials near the product.
To avoid fire hazards,
keep the product away
from transformers or
heat sources.
To avoid electric shocks,
the antenna of the product
should be away from
electrical cables.
To avoid fire hazards, do
not use this product in
direct sunlight or close
to heat sources.
Always make sure that the
television is firmly plugged in,
as a poor electrical connection
might cause a fire.
Unplug the power
supply and antenna of
the product during a
rainstorm and
particularly during a
thunderstorm.
Before cleaning the
product, unplug the
television, and use soft
fabric, not chemicals. Make
sure that no water comes
into contact with the product.
LED Backlit Flat TV Instruction Manual EN-3
EN
Safety Warnings
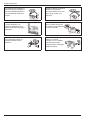
To avoid electric shocks or fire
hazards, disconnect the
television from the power
supply and the antenna during
a rainstorm or thunderstorm.
When an antenna is used,
measures should be taken to
prevent water from flowing
down through the cable and
into the television.
To reduce the risk of fire or
electric shock, do not place
the product in a humid area
or expose it to rain or
moisture.
The plug and electric
cable must be kept clean
to avoid electric shocks
or fire hazards.
Never touch the plug with
wet hands, as this might
cause electric shocks.
To avoid electric shocks or
fire hazards, if you are not
using the television for
long periods of time,
disconnect it from the
power supply.
EN-4 LED Backlit Flat TV Instruction Manual
About Your LED LCD TV
About Your LED LCD TV
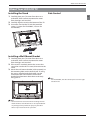
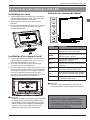
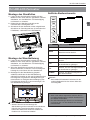
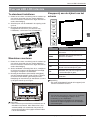
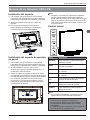
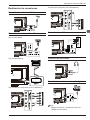
Installing the Stand
Side Control
EN
1. Carefully place your TV screen face-down on a
cushioned, clean surface to protect the screen
from damages and scratches.
2. Carefully align the stand to the bottom of the TV.
3. Secure the stand to the TV with the provided
screws. (3 screws for LE32F600C, 4 screws for
LE32A650CF)
Installing a Wall-Mount Bracket
1. Carefully place your TV screen face-down on a
cushioned, clean surface to protect the screen
from damages and scratches.
2. If the stand is attached, remove the screws that
secure the stand to the TV screen, then remove the
stand.
3. Attach the wall-mount bracket (sold separately) to
the mounting holes on the back of your TV using
the screws supplied with the bracket. See the
instructions that came with the wall-mount
bracket for information about how to correctly
hang your TV.
Note
• For LE32A650CF, the side control panel is on the right
side of the TV.
Note
• Contact technical assistance when installing the wall
mount bracket. Haier Electronics is not responsible for
any damage to the product or injury to yourself or
others if you install the TV on your own.
LED Backlit Flat TV Instruction Manual EN-5
About Your LED LCD TV
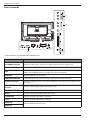
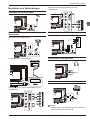
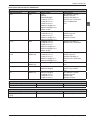
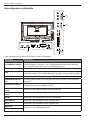
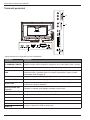
Rear Terminals
*
*
3
*
* These terminals are available for LE32A650CF only.
Connector
Descriptions
COMPONENT IN
(Y COMMON CVBS IN)
Connect the video cables for a component or composite device. When connecting a
composite video source, connect the yellow video wire to the Y (green) jack.
YPbPr/CVBS AUDIO
Connect the audio cables for a component or composite device.
USB
Insert a USB storage device to the USB port to view photos, listen to music or watch
videos. (See “USB Media Player” on page 18 for more information.)
HDMI 2 IN
Connect HDMI device to this jack.
COMMON INTERFACE
If you subscribe to a pay per view service, insert the CI module to this slot.
Headphone Output
Connect headphones to this jack. When headphones are inserted, the TV speakers will
be muted.
DIGITAL AUDIO OUT
(Coaxial)
Connect a coaxial digital audio system to this jack.
ANT IN (AIR/CABLE)
Connect an antenna or cable TV to this jack.
SCART
Connect a device using SCART cable to this jack.
PC AUDIO IN
Connect the audio cable from a computer.
PC IN
Connect the video cable from a computer.
HDMI 3 IN
Connect HDMI device to this jack.
HDMI 1 IN
EN-6 LED Backlit Flat TV Instruction Manual
About Your LED LCD TV
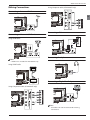
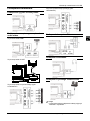
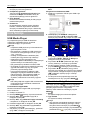
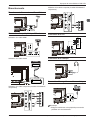
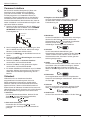
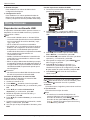
Using Composite cable (LE32A650CF only)
Making Connections
Connecting to Antenna/Cable
EN
L
R
COMPOSITE OUT
VIDEO
Connecting a PC
Connecting an External A/V Device
RGB
Using HDMI cable
PC
AUDIO
(L/R)
3
Connecting Headphones
Note
• HDMI 3 IN is available for LE32A650CF only.
Using SCART cable
SCART
Connecting a Digital Audio System
Using Component cable (LE32A650CF only)
Y
PB
PR
L
COMPONENT OUT
R
Note
• Turn off the TV and the device before making
connections.
LED Backlit Flat TV Instruction Manual EN-7
About Your LED LCD TV
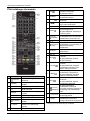
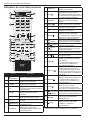
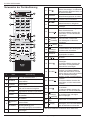
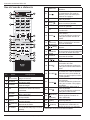
Using Your Remote Control
1
2
3
SOURCE
P.MODE
4
8
FAV/
Press to add a favourite channel.
In teletext mode, press to hold a
page.
9
SCREEN
Press to change the screen
display mode.
16
*
S.MODE
abc
def
ghi
jkl
mno
pqrs
tuv
wxyz
10 MENU/
11
STWX
Press to navigate the on-screen
menu.
OK
Press to confirm a selection.
SLEEP
Q.VIEW
12 BACK/
5
6
7
8
9
10
11
P
VOL
AUDIO
I/II
SUBTITLE
12
13
FAV /
GUIDE /
EXIT /
21
3D WORLD
INFO /
SCREEN
CH.LIST /
MENU /
Button
1
(Power)
14
15
BACK /
22
23
24
Descriptions
Press to return to the previous
menu.
In teletext mode, press to enter
mix mode.
(reverse) Press to fast forward or reverse
(forward) playback in multimedia mode.
13
(TEXT) Press to open the teletext.
(play/
pause)
OK
14
15
#
17
18
*
19
20
Press to open or close the onscreen menu.
Press to play/pause in multimedia
and timeshift mode.
16 SOURCE
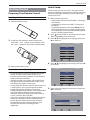
Press to open the input source
list.
17 P
Press to change the channel.
/
18 INFO/
Press to display the channel
information.
In teletext mode, press to reveal
the hidden information.
19 CH.LIST/
Press to open the channel list.
In teletext mode, press to switch
the image to top, bottom or full.
20 GUIDE/
Press to open the programme
guide (DTV only).
In teletext mode, press to enter a
secondary page.
21 EXIT/
Press to close the on-screen
menu.
In teletext mode, press to hide
the text.
Press to turn the TV on or off.
2
S.MODE
Press to select the sound mode.
3
P.MODE
Press to select the picture mode.
0-9
Press to enter a channel number
or password.
Q.VIEW
Press to switch to the last viewed
channel.
22
(prev)
(next)
Press to skip to next or previous
file in multimedia mode.
SLEEP
Press to set the sleep timer.
23
(REC)
Press to start/pause recording.
VOL+/-
Press to adjust the volume level.
24
(stop)
Press to stop multimedia
playback, timeshifting or
recording.
4
5
(Mute)
Press to turn the sound on or off.
I/II AUDIO
Press to select the DTV audio/
NICAM (depending on broadcast
signal).
SUBTITLE
Press to display the subtitle.
6
7
EN-8 LED Backlit Flat TV Instruction Manual
* This button does not work in these models.
Getting Started
Getting Started
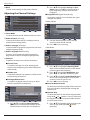
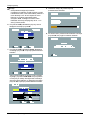
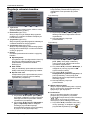
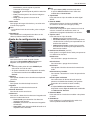
Initial Setup
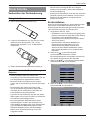
Preparing Your Remote Control
The first time you turn on your TV, the setup wizard
guides you through setting up basic settings including
the menu language, country, password, signal type
and channel scan.
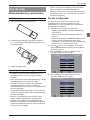
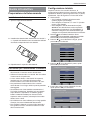
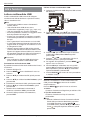
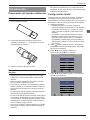
Installing the Batteries
1. Make sure that you have:
1. Open the battery cover.
• Installed the remote control batteries. (See page
9 for details)
• Connected an antenna or cable TV. (See page 7
for details)
• Connected the power cord to the AC IN jack on
the back of the TV and to a working power outlet.
For LE32A650CF, just connect the attached power
cord to a working power outlet.
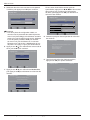
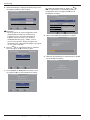
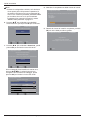
2. Press to turn on the TV. The setup wizard screen
opens. Press OK to start the wizard.
3. Press S/T to highlight your language, then press
X to continue.
2. Install two AAA batteries. Make sure that you
match the + and – symbols on the batteries with
the + and – symbols in the battery compartment.
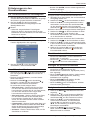
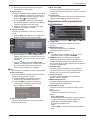
Initial Setup
Language
Please select your language:
English
Français
Italiano
Español
Deutsch
Back
Select
Next
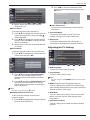
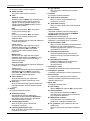
4. Press S/T to highlight your country, then press X
3. Replace the battery cover.
to continue.
Initial Setup
Remote Control and Battery Cautions
• Ensure that there is nothing between the remote
control and the remote sensor of the TV set.
• Use the remote control carefully. Do not drop the
remote control on the floor.
• Sunlight, or other strong light, will interfere with
the signal from the remote control. Avoid using
near fluorescent lights or neon signs.
• Do not place the remote control in direct heat or in
a damp place as you may damage the remote.
• Danger of explosion if battery is incorrectly
replaced. Replace only with the same or equivalent
type. The batteries (battery pack or batteries
installed) shall not be exposed to excessive heat
such as sunshine, fire or the like.
• If your TV is not to be used for a long period of time,
remove the batteries from the remote control.
• Do not dispose of the batteries with standard
household waste. Do not throw them in a fire.
Dispose of the battery according to local
regulations.
Country
Please select your country:
Austria
Belgium
Switzerland
Czech Republic
Germany
Back
Select
Next
5. Enter your new 4-digit password twice, then press
OK to continue.
Initial Setup
Please set password. “0000” is not a valid password
New Password
Confirm Password
Back
Select
Next
LED Backlit Flat TV Instruction Manual EN-9
EN
Getting Started
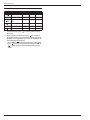
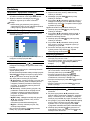
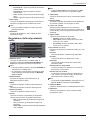
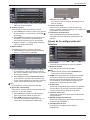
8. Wait a while for the channel scan to complete.
Note
• During the initial setup, if the TV is powered off before
a password is set, a new password must be set from the
Lock menu. Enter the default password-1234 to access
the Lock menu, then change the password. See
“Change Password” on page 17 for more information.
Initial Setup
The channel scan may take a while to complete.
Status: Scanning...
Analogue Channels: 0
Digital Channels: 0
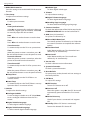
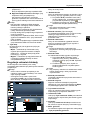
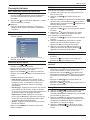
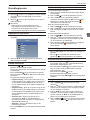
6. Press S/T to highlight your tuner mode, then
press X to continue.
Initial Setup
Channel Scan
21%
Tuner Mode
Please select your tuner mode:
Antenna
9. When the channel scan is completed, press OK to
Cable
exit the wizard.
Initial Setup
Back
Select
Complete
Congratulations!!
Next
Completed Initial Setup.
7. Press S/T to highlight Scan, then press X to start
Please press [OK] to exit the wizard.
the channel scan.
Initial Setup
Channel Scan
First, please connect antenna.
Back
Start channel scan now?
If you skip this step, the channel scan could be performed in Menu.
Note
• The initial setup process may vary depending on the
country you select. Follow the on-screen instructions
to complete the setup.
Scan
Skip Scan
Back
Select
Next
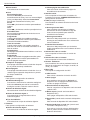
If the tuner mode is Cable, press S/T/W/X and
number buttons to configure the cable
information, then press OK to start the channel
scan.
Initial Setup
Please configure the cable info.
Scan Mode
Advance
Frequency (KHz)
306000
Modulation
Auto
Symbol Rate (Ksym/s)
Auto
Network ID
Auto
Select
Next
EN-10 LED Backlit Flat TV Instruction Manual
Getting Started
Understanding the Basics
Turning the TV On or Off
1. Press
to turn on the TV. It may take a few
seconds for an image to appear on the screen.
2. Press to turn off the TV. The TV enters standby
mode.
Note
• When the TV is off, power still flows into it. To
disconnect power, unplug the power cord.
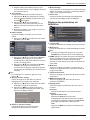
1. Tune to the channel that you want to add to the
favourite list.
2. Press FAV/ to open the favourite list.
3. Press S/T to highlight a desired position, then
press OK to add current channel to the favourite
list.
is displayed on the information banner.
To watch a favourite channel:
1. Press FAV/ to open the favourite list.
2. Press S/T to highlight a favourite channel, then
press OK to tune to the channel.
To remove a favourite channel:
Selecting the Input Source
1. Press SOURCE. The input source list opens.
Main
TV
SCART
VGA
HDMI 1
HDMI 2
USB
1. Press FAV/ to open the favourite list.
2. Press S/T to highlight the favourite channel that
you want to remove, then press OK to tune to the
channel.
3. Press OK again to remove the channel from the
favourite list.
will disappear from the
information banner.
Adjusting the Volume
• Press VOL+/VOL- to increase or decrease the
volume.
• Press
to turn off the sound. Press
press VOL+ to restore the sound.
2. Press S/T to highlight the input source, then
press OK.
Selecting a Channel
• Press P /P
to go to the next or previous
channel in the channel list.
• Press the number buttons to directly select a
channel.
• Press CH.LIST/ to open the channel list, then
press S/T and OK to select a channel.
To use the coloured buttons:
• Page up - Press red button to highlight the first
channel on the current page, then press red
button repeatedly to highlight the first channel on
the previous pages.
• Page down - Press green button to highlight the
last channel on the current page, then press green
button repeatedly to highlight the last channel on
the next pages.
• Select List - Press yellow button then S/T to
select the channel type that you want to display
on the list (All/Digital/Radio/Analogue).
• Exit - Press blue button to close the channel list.
• Press Q.VIEW to go to the last viewed channel.
again or
Displaying Channel Information
• Press INFO/ once to display basic channel
information such as channel number, channel
name, tuner mode, etc.
• Press INFO/ twice to display further information
such as programme title, resolution, audio
information, etc.
• Press INFO/ three times to display the
programme descriptions.
• Press INFO/ one more time to close the
information banner.
Navigating the On-Screen Menu
1. Press MENU/ . The on-screen menu opens.
2. Press S/T to highlight a main menu (Video/
Audio/TV/Setup/Lock), then press OK to access the
sub-menu.
3. Press S/T to highlight a sub-menu item, then
press OK to access the menu, or press W/X to
adjust the setting or select a setting option.
4. Press BACK/ to return to the previous menu, or
press EXIT/ to close the on-screen menu.
Using Favourite List
To add a favourite channel:
LED Backlit Flat TV Instruction Manual EN-11
EN
Using Your TV
DNR (Digital Noise Reduction)
Using Your TV
To reduce noise on screen and produce a clearer
video image.
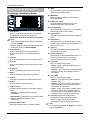
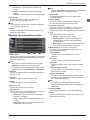
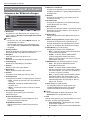
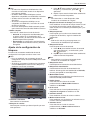
Adjusting the Video Settings
Eco
Picture Mode
Video
Audio
TV
Back Light
50
Brightness
31
Contrast
41
Saturation
37
0
HUE
Setup
MPEG NR
43
Sharpness
Lock
Enter
Select
Exit
Picture Mode
To select the picture mode. You can select User/
Vivid/Eco/Standard/Mild according to the
programme.
Note
• You can also press P.MODE button to select the picture
mode.
• Manually adjusting picture settings will automatically
change the Picture Mode to User.
Back Light
To adjust the backlight brightness to affect the
overall brilliance of the picture.
Brightness
To brighten or darken the picture.
Contrast
To adjust the intensity of the white level of the
picture.
Saturation
To adjust the colour saturation of the picture.
HUE
To adjust the colour hue of the picture.
Sharpness
To sharpen or soften the picture.
Gamma
To select the gamma type.
Colour Temperature
To select the colour temperature. You can select:
• Cool – Give the white colour a bluish tint.
• Standard – Give the white colour a neutral tint.
• Warm – Give the white colour a reddish tint.
Advanced Video
To adjust advanced video settings.
EN-12 LED Backlit Flat TV Instruction Manual
To reduce picture noise in MPEG-compressed
videos.
Adaptive Luma Control
To adjust the average brightness of the picture to
compensate for large areas of brightness.
Flesh Tone
To adjust skin colour based on skin tone
preference.
Dl Film Mode
To optimise the picture settings for watching
films.
Blue Stretch
To increase the blue component of white and
near white pixels without affecting flesh tone
colour.
Game Mode
To optimise the picture settings for playing
games.
Adaptive Back Light
To dynamically change the backlight of the
screen according to the amount of light and dark
in the signal.
VGA Mode (VGA source only)
To select the VGA mode.
• Video – In this mode, images look smoother
and text appears clearer.
• Graphic – In this mode, images look sharper.
Select this mode for watching videos from a
computer.
HDMI Mode (HDMI progressive timing only)
To select the HDMI mode.
• Auto – Choose Video/Graphic automatically.
• Graphic – In this mode, images look smoother
and text appears clear. Select this mode when
connecting a computer.
• Video – In this mode, images look sharper.
Select this mode when watching videos from a
computer or from video players, such as a DVD
player, Blu-ray player, etc.
Overscan (HDMI source only)
To extend part of the display past the visible area
of the screen. The resulting picture will “zoom in”
on the image centre.
Using Your TV
Note
• When Overscan is set to Off, Screen Mode cannot be
selected.
VGA
To adjust the computer image in VGA source. You
can adjust:
• Auto Adjust – Automatically adjust the image
settings.
• H. Position – Adjust picture’s horizontal
position.
• V. Position – Adjust picture’s vertical position.
• Phase – Adjust the focus of stable images.
• Clock – Adjust the sample frequency.
Audio Only
To turn off TV picture and listen to programme
audio only.
Note
• To exit audio only mode, press any button.
Reset
To reset the video settings to the factory defaults.
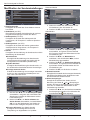
Adjusting the Audio Settings
Video
Audio Mode
Standard
Balance
Audio
0
Bass
50
Treble
TV
S
Setup
50
Sound Surround
Simulate
Speaker
On
SPDIF Type
Off
Lock
Enter
Select
Exit
Audio Mode
To select the audio mode. You can select User/
Standard/Music/Theatre to suit your personal
preference.
Note
• You can also press S.MODE button to select the audio
mode.
• Manually adjusting audio settings will automatically
change the Audio Mode to User.
Balance
To adjust the balance between the left and right
speakers.
Bass
To adjust the low frequency sound.
Treble
To adjust the high frequency sound.
Sound Surround
To simulate surround sound.
Speaker
To turn TV built-in speakers on or off. You can select:
EN
• Off – To turn TV built-in speakers off.
• On – To turn TV built-in speakers on.
• Auto (CEC) – To output audio from the
connected CEC device.
Note
• Auto (CEC) option will be disabled if CEC Function in
the CEC menu is set to Off.
SPDIF Type
To select the SPDIF digital audio output type.
SPDIF Delay
To adjust the SPDIF delay time to synchronise the
sound with the picture (0~250).
Auto Volume Control
Turn this setting on to keep the volume level
consistent when switching channels or when
switching from a TV show to a commercial.
Type
To select audio type.
• Normal – Provide normal audio.
• Hearing Impaired – Provide visual descriptions
of the scenes for hearing impaired viewers.
• Visually Impaired – Provide audio narration of
the scenes for visually impaired people.
Visually Impaired (DTV only)
To adjust the audio settings for visually impaired
people.
Speaker
To turn speakers on or off.
Headphone
To turn headphones on or off.
Volume
To adjust the volume level of the audio narration.
Pan and Fade
To turn the pan and fade control on or off.
Visually Impaired Audio
To select the language of the audio for visually
impaired people. (Options depend on broadcast
audio content)
Note
• Visually Impaired setting is only available when Type
is set to Visually Impaired.
Downmix Mode
To select audio downmix mode.
LED Backlit Flat TV Instruction Manual EN-13
Using Your TV
Reset
To reset audio settings to the factory defaults.
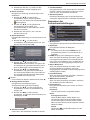
Adjusting the Channel Settings
Video
Stereo
Audio Channel
Audio
Channels
Time Shift Mode
TV
Down, then press OK to scan for higher or
lower frequency channels from the start
frequency.
Single RF Scan (Digital channel only)
Cable
Tuner Mode
2. Press S/T to highlight Scan up or Scan
Off
To perform single RF scan and check the signal
strength and quality.
Antenna Mode
Device Info
Scan single RF channel. (Digital Only)
Video
Setup
Antenna
Off
0%
Audio
Lock
Enter
Select
Exit
TV
Tuner Mode
To select the tuner mode: Antenna/Aerial or Cable.
Setup
41
RF Channel
Signal Level
0%
Signal Quality
0%
Lock
Audio Channel (ATV only)
To select the audio mode for a multiple audio or
stereo broadcast programme.
Audio Language (DTV only)
To select audio language for programmes that have
multiple language tracks.
Audio Language 2nd (DTV only)
To select second preferred audio language for
programmes that have multiple language tracks.
Channels
To perform channel scan and edit channel list.
Update Scan
To perform channel scan update to add channels
to the existing channel list.
Analogue Manual Scan
To perform analogue manual scan up or down
from the specified start frequency.
control to enter the RF channel.
2. Press OK to start scanning.
Cable Mode
Scan single RF channel. (Digital Only)
Video
Cable
Off
0%
Audio
Frequency (KHz)
TV
Setup
30600
Modulation
Auto
Symbol Rate (Ksym/s)
6875
Off
Scan up
Scan Down
Lock
Enter
Select
Exit
1. Press S/T to highlight Start Frequency
(MHz), then use the number buttons on the
remote control to enter the start frequency.
EN-14 LED Backlit Flat TV Instruction Manual
Exit
1. Press S/T to highlight Frequency (KHz),
then use the number buttons on the remote
control to enter the frequency.
2. Press S/T to highlight Modulation, then
press W/X to select the modulation type.
3. Press S/T to highlight Symbol Rate (Ksym/s),
then use the number buttons on the remote
control to enter the symbol rate.
4. Press OK to start scanning.
Favorite Network Select
Channel Skip
48.25
Start Frequency (MHz)
Select
To select the network you prefer if there are more
than two networks detected after running the
channel scan.
Search for analogue channels
Audio
Setup
Exit
1. Use the number buttons on the remote
Enter
To perform channel scan after selecting your
country and configuring your cable information
(cable mode).
TV
Select
Lock
Channel Scan
Video
Enter
To select the channels that will be skipped when
using the P /P
buttons. You can still tune to
the skipped channels using the number buttons
on the remote control.
1. Press S/T to highlight the channel that you
want to skip, then press OK.
displayed.
will be
Using Your TV
2. Press W/X to adjust the frequency while
Video
Audio
TV
Setup
909
Analogue
910
Analogue
911
Analogue
912
Analogue
913
Analogue
914
Analogue
915
Analogue
checking the background image, then press
OK to set.
Channel Number: 901
Channel Name: BBC
EN
Frequency: 85.25 MHz
Lock
Enter
Select
Set
Exit
2. Repeat above step until all the skipped
channels are set.
Clear Channel List
To clear all the channels that are stored in the
channel list.
Channel Sort
To change the order of the channel list.
1. Press S/T to highlight the channel that you
want to change position, then press OK.
will be displayed.
2. Press S/T to highlight the desired channel
position, then press OK to swap the position
of the two channels.
3. Repeat step 1 and 2 until all desired channels
are sorted.
Channel Edit
To edit the channel number and channel name.
1. Press S/T to highlight the channel that you
want to edit, then press OK.
Time Shift Mode
To turn time shift mode on or off. See “Time
Shifting” on page 23 for more information.
Device Info
To check the information of the device that is
connected to the USB jack on the back of the TV.
Adjusting the TV Settings
Video
Audio
Audio
Channel Number:
Channel Name:
TV
Setup
Network Name:
Frequency
915
16:9
DPMS
On
Blue Mute
Off
Interaction Channel
Off
MHEG PIN Protection
Off
Time Setup
Enter
503.3
Select
Exit
OSD Language
To select on-screen menu language.
Setup
Lock
Select
Exit
2. Press S/T to highlight Channel Number,
then press the number buttons on the
remote control to enter preferred channel
number.
3. Press S/T to highlight Channel Name, then
enter each character of the new name by
pressing the number buttons repeatedly to
select a character.
Note
• To delete a character, press W button.
Analogue Channel Fine Tune
To fine tune the analogue channel if the
reception is poor.
1. Press S/T to highlight the analogue channel
that you want to fine tune.
English
Lock
Sports
Enter
OSD Language
Screen Mode
TV
Video
Cancel
C
Screen Mode
To select screen display mode.
Note
• You can also press the SCREEN button to select screen
mode.
DPMS (Display Power Management Signals)
Turn this setting on to set the TV to automatically
enter standby mode if no PC input signal is detected
after 40 seconds in VGA mode.
Blue Mute
Turn this setting on to display a blue screen when
there is no input signal or when playing audio
programmes.
Interaction Channel
Turn this setting on to enable interaction channel
function.
LED Backlit Flat TV Instruction Manual EN-15
Using Your TV
MHEG PIN Protection
Turn this setting on to enable MHEG PIN Protection
function.
Time Setup
To adjust time and timer settings.
Time Zone
To select your time zone.
Time
Auto Synchronization
Select On to automatically synchronise date and
time with a digital signal (if available). Select Off
to manually adjust the date and time.
Date
Press W/X and number buttons to set the date.
Time
Press W/X and number buttons to set the time.
Timer Power On
To automatically turn the TV on at a preset time.
Timer
When the power on timer is turned on, press W/
X and number buttons to set the power on time.
Power On Channel
When the power on timer is turned on, select the
power on channel from the channel list.
Timer Power Off
To automatically turn the TV off at a preset time.
Timer
When the power off timer is turned on, press W/
X and number buttons to set the power off time.
Sleep Timer
To automatically turn the TV off after a set
amount of time.
Auto Sleep
To automatically turn the TV off if there is not any
operation after a set amount of time.
Subtitle
To adjust the subtitle settings.
Analogue Subtitle
To turn analogue subtitle on or off. Select Mute
to turn analogue subtitle on when the TV is
muted.
Digital Subtitle Language
To select digital subtitle language.
Digital Subtitle 2nd Language
To select second digital subtitle language.
EN-16 LED Backlit Flat TV Instruction Manual
Subtitle Type
To select digital subtitle type.
Teletext
To adjust teletext settings.
Digital Teletext Language
To select digital teletext language
Decoding Page Language
To select teletext decoding page language.
Common Interface
To check the information of the CAM inserted to the
COMMON INTERFACE slot on the back of the TV.
OAD (Over Air Download)
To update TV software by air.
Manual OAD Download
To manually update TV software by air. Follow the
on-screen instructions to complete the software
update.
Auto Download
Select Yes to enable your TV to download new
software by air automatically
Auto Install
Select Yes to enable your TV to install new
software by air automatically
Version Info
To check software version information.
System Information
To check system information.
Reset Default
To reset picture, audio, channel and user settings to
the factory defaults.
CEC Menu
To adjust CEC settings.
CEC function
To turn CEC function on or off.
Auto turn off
When this option is set to On, the CEC device will
automatically power off when the TV is turned
off.
Device Discovery
Check if your device is connected and supports
CEC.
Standby (When CEC device is connected)
To turn the selected CEC device off.
Using Your TV
Power On (When CEC device is connected)
To turn selected CEC device on.
Disable/Enable Sys. Aud. Ctrl. (When CEC
device is connected)
Toggle this setting to enable or disable audio
output from the connected CEC audio device and
its volume adjustment using the TV’s remote
control.
Note
• Not all HDMI devices support CEC. See your device’s
user manual for details.
• HDMI cables must be used to connect HDMI CECcompatible devices to your TV.
• The connected device’s HDMI CEC feature must be
turned on.
• If you connect an HDMI device that is not HDMI CECcompatible, the CEC control option does not work.
• Depending on the connected HDMI device, the CEC
HDMI control option may not work.
Shop Mode
To turn shop mode on or off.
• On – Settings are designed for maximum
impact in retail shop display and product
information banner will show on the screen.
• Off – Settings are optimised for normal home
viewing and energy efficiency.
Adjusting Lock Settings
Enter the password that was set during the initial
setup to access the Lock menu.
Note
• If a password is not set during the initial setup, enter
1234 to access the Lock menu.
• If your password is lost, enter the universal password
9443 to access the Lock menu, then set a new
password.
Video
Password
Change Password
To change the password.
Channel Lock
To lock channels that you want to prevent others
from watching.
1. Press S/T to highlight the channel that you
want to lock, then press OK. will be
displayed.
2. Repeat above step until all the locked
channels are set.
Note
• To tune to a locked channel, you must enter the 4-digit
password.
Time Interval Lock (Norway only)
To set the time interval during which the TV
channels will be locked. Password must be entered
to unlock and watch the channels.
Parental Lock
To prevent children from watching certain TV
programmes, according to the rating limit set.
Note
• This function only works for the programmes with Age
Rating information.
Source Lock
To lock input source.
1. Press S/T to highlight the input source that
you want to lock, then press OK. will be
displayed.
2. Repeat above step until all the locked sources
are set.
Note
• To switch to a locked source, you must enter the 4-digit
password.
Child Lock
To lock the control buttons on the side of the TV.
Tuning Lock
To disable TV tuning function. When this option is
set to On, the TV main menu will not be available.
Audio
TV
Setup
S
etup
Lock
Enter
Select
Exit
Source Set
To select the default input source, if Source Set
Mode is set to On.
Change Password
Video
Audio
OK
Channel Lock
Parental Lock
TV
Setup
S
etup
Lock
Source Set Mode
To set the TV to turn on with a default input source.
Source Lock
Child Lock
Off
Tuning Lock
Off
Source Set Mode
On
Enter
Select
Exit
Channel No.
To select the default channel, if Source Set is set to
TV.
Max Volume
To set the maximum volume limit.
LED Backlit Flat TV Instruction Manual EN-17
EN
Other Features
Initial Volume Mode
To set the TV to turn on with a default volume level.
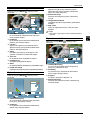
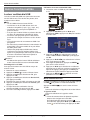
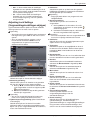
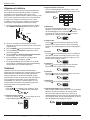
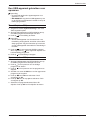
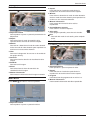
Using USB media player:
1. Connect your USB thumb drive to the USB port on
the back of the TV.
Initial Volume
To select the default volume level, if Initial Volume
Mode is set to On.
Clear Lock
To reset the lock settings to the factory defaults.
Initial Setup
To reset picture, audio, channel, user and lock
settings to the factory defaults. The Initial Setup
screen will open.
Other Features
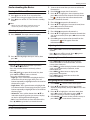
2. Press SOURCE, then S/T to highlight USB and
press OK to switch to USB mode.
USB Media Player
The USB Media Player allows you to connect a USB
thumb drive to your TV and play photos, music or
videos.
Video
Photo
Music
Note
• The USB thumb drive must be formatted as FAT32.
• Files on the USB thumb drive must end in a supported
file extension (*.mp3, *.jpg, *.mp4, etc).
• Files that are not supported will not be displayed.
• Some files may be unreadable due to individual file
setting.
• The player is not designed to play media from external
hard drives or mp3 players.
• Operation using USB hubs is not guaranteed.
• Due to the limited distance of USB signal transmission,
it is recommended not to use a USB patch cord.
• Use high-speed USB equipment that conforms to the
USB 2.0 full speed interface Standard. If the USB
equipment does not conform to USB full speed
interface standard, playback may be unsmooth.
Select
Enter
3. Press W/X to highlight the media type: Video,
4.
5.
6.
7.
Photo or Music, then press OK.
Press S/T/W/X to highlight the file that you
want to play, then press OK.
To adjust the settings, press MENU/ to open the
on-screen menu.
Press S/T to highlight an item, then press OK to
execute or to display setting options, then press
S/T to highlight desired option and press OK.
Press BACK/ to return to the previous menu or
close the menu.
Caution
• Do not disconnect the USB thumb drive from the TV
before exiting USB media player.
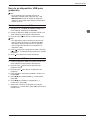
Formatting the USB thumb drive:
You can format your USB thumb drive using the onscreen menu.
1.
2.
3.
4.
5.
6.
7.
8.
Switch to TV source.
Press MENU/ . The on-screen menu opens.
Press S/T to highlight TV, then press OK.
Press S/T to highlight Device Info, then press
OK.
Highlight your USB thumb drive, then press OK.
Press S/T to highlight Format, then press OK.
When the confirmation screen opens, highlight
YES, then press OK.
When the formatting is completed. press EXIT.
EN-18 LED Backlit Flat TV Instruction Manual
Thumbnail/List Mode
When viewing contents of the USB thumb drive, press
FAV/ to toggle thumbnail/list mode.
Press MENU/
to open the on-screen menu.
Sort
To select the algorithm for sorting files.
Media Type
To select the media type.
Note
• When browsing contents of the USB thumb drive, to
return to the upper directory,
In thumbnail mode, press BACK/ .
In list mode, press S/T to highlight the
icon on
top of the list, then press OK.
[..]
Other Features
Repeat
To select the repeat mode of playing the files in the
same folder.
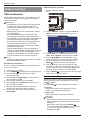
Photo Mode
Press MENU/
to open the on-screen menu.
Shuffle
To turn shuffle mode on or off. Turn shuffle mode on
to play the files in a random sequence.
Play
Repeat
Shuffle
Show Info
To show the information of the played music.
Rotate
Duration
Zoom
Photo
Repeat All
R
Short
3/14
Koala.JPG
Menu
Hide/Show Spectrum
To hide or show the spectrum.
Audio Only
To turn off screen display and listen to audio only.
Enter
Play/Pause
To play or pause the slide show.
Note
• To exit audio only mode, press any button.
Repeat
To select the repeat mode of playing the files in the
same folder.
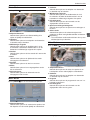
Video Mode
Press MENU/
to open the on-screen menu.
Shuffle
To turn shuffle mode on or off. Turn shuffle mode on
to play the files in a random sequence.
Pause
Repeat
Rotate
To rotate the photo 90° clockwise at a time.
Program
Show Info
Duration
To select the photo display time duration.
00:03:29
Video
00:04:50
3/14
Skyfall.MP4
Zoom
To zoom in the photo.
Menu
Enter
Effect
To select the photo display transition effect.
Play/Pause
To play or pause the video.
Show Info
To show the information of the displayed photo.
Repeat
To select the repeat mode of playing the files in the
same folder.
Music Mode
Program
To select the programmes of a *.ts file.
Press MENU/
to open the on-screen menu.
Show Info
To show the information of the played video.
Pause
Repeat
Shuffle
Show Info
Hide Spectrum
Audio Only
00:01:29
Music
00:04:50
3/14
Skyfall.mp3
Menu
Enter
Play/Pause
To play or pause the music.
LED Backlit Flat TV Instruction Manual EN-19
EN
Other Features
Button Function
Button
Function
Play/Pause
Play next file
Play previous
file
Fast forward
Fast reverse
Stop
*
In photo mode, press
duration.
Photo
Music
Video
9
9
9
9
9
9
9
9
9
9*
9
9
9
9
9
9**
to select photo display
** During video playback, pressing will suspend
playback at stop point with blue screen and “StopResume” message displayed. You can do either of
the following to continue:
- Press OK or
to resume playback at stop point.
- Press again to stop playback, then press OK or
to start playback from the beginning of the
video.
EN-20 LED Backlit Flat TV Instruction Manual
Other Features
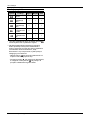
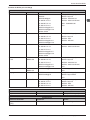
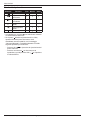
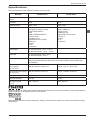
USB Media Supported File Format
File extension
*.avi
*.mp4
*.mov
Container
AVI
MP4
MP4
*.mkv
MKV
*.vob
MPEG PS
*.mpg
*.mpeg
MPEG PS
*.ts
File extension
*.mp3
MPEG TS
Container
MP3
Video file format
Video Codec
XviD
MPEG1
MPEG2 MP@HL
H.264 BP LV 4.0
H.264 MP LV 4.0
H.264 HP LV 4.0
MPEG-4 SP@HL 3.0
MPEG-4 ASP@HL 4.0
Motion JPEG
H.264 BP LV 4.0
H.264 MP LV 4.0
H.264 HP LV 4.0
MPEG-4 SP@HL 3.0
MPEG-4 ASP@HL 4.0
H.264 BP LV 4.0
H.264 MP LV 4.0
H.264 HP LV 4.0
MPEG-4 SP@HL 3.0
MPEG-4 ASP@HL 4.0
Motion JPEG
H.264 BP LV 4.0
H.264 MP LV 4.0
H.264 HP LV 4.0
MPEG-4 SP@HL 3.0
MPEG-4 ASP@HL 4.0
MPEG-2 MP@HL
MPEG-1
MPEG-2 MP@HL
MPEG-2 MP@HL
H.264 BP LV 4.0
H.264 MP LV 4.0
H.264 HP LV 4.0
Audio Codec
MP3(MPEG1 Layer3)
MPEG1 Layer1/2
MPEG2: AAC/AAC-LC
MPEG4: AAC-LC/HE-AAC
WAV: PCM/ADPCM
AC3
MP3(MPEG1 Layer3)
MPEG1 Layer1/2
MPEG2: AAC
MPEG4: HE-AAC
MPEG2: AAC/AAC-LC
MPEG4: AAC-LC/HE-AAC
MP3(MPEG1 Layer3)
MPEG1 Layer1/2
MPEG2: AAC/AAC-LC
MPEG4: AAC-LC/HE-AAC
AC3
MPEG1 Layer1/2
AC3
MP3(MPEG1 Layer3)
MPEG1 Layer1/2
AC3
MP3(MPEG1 Layer3)
MPEG1 Layer1/2
MPEG2: AAC
MPEG4: HE-AAC
Audio file format
Audio Codec
MP3 (MPEG1 Layer3)
Photo file format
File extension
*.jpg
*.jpeg
Container
Codec
JPEG
Baseline/Progressive
LED Backlit Flat TV Instruction Manual EN-21
EN
Other Features
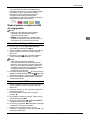
Common Interface
The common interface (CI) slot is designed to hold the
conditional access module (CAM) and smart card in
order to access pay-per-view TV programmes and
additional services. Contact your common interface
service provider to get more information about
modules and subscription. Please note that CAMs and
smart cards are neither supplied by nor optional
accessories from us.
1. Insert the smart card into the CAM, then insert the
CAM to the COMMON INTERFACE slot on the back
of the TV.
Page up/down
To display next or previous teletext page, press the
P /P buttons.
P
Page number entering
To select a teletext page, enter the page number
using the number buttons on the remote control.
abc
def
ghi
jkl
mno
pqrs
tuv
wxyz
CI slot
CAM
Smart card
2. The TV will display a message indicating that the
3.
4.
5.
6.
7.
CAM has been detected. Wait for a few minutes
until the card is activated.
Press MENU/ to open the on-screen menu.
Press S/T to highlight Setup, then press OK.
Press S/T to highlight Common Interface, then
press OK.
Press S/T to highlight the option you need, then
press OK.
Detailed information about the CAM is displayed.
Refer to the instruction manual of the CAM for
setting information.
Mix mode
To view the TV picture in teletext mode, press the
button. This will superimpose the teletext data
on top of the TV picture. Press
button again to
return to full text.
BACK /
Hold
To stop updating teletext page automatically, press
the button. This feature is very useful when there
are several teletext pages or lots of data on the
same page number.
FAV /
Teletext
Teletext is an information system broadcast by certain
channels, offering a range of text-based information,
typically including national, international and sporting
news, weather and TV schedules. It also provides
subtitles for people with hearing difficulties or those
who are unfamiliar with the language in which a
particular programme is being broadcast.
Teletext
To turn on teletext, press
button. To switch off
teletext, press
button again.
Size
To switch the teletext image to Top, Bottom or Full,
press the
button. This feature is very useful as it
magnifies the image and makes the characters
easier to read.
CH.LIST /
Reveal
To reveal hidden information such as an answer to a
quiz, press the
button.
INFO /
Subcode
To enter a secondary page, press
enter the 4-digit number.
GUIDE /
EN-22 LED Backlit Flat TV Instruction Manual
button and
Other Features
Hide
To hide the text, press the
button.
EXIT /
EN
Fast text coloured buttons
Fast text automatically displays the four most
commonly used pages that the broadcaster thinks
that you may want to choose next. Press the same
coloured button on the remote control as the
coloured link at the bottom of the teletext page to
go directly to that page.
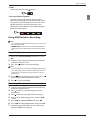
Using USB Device for Recording
Note
• It is recommended that the minimum device size used
for recording is 1 GB.
• IMPORTANT: The USB device should be formatted as
FAT32 by your PC before being inserted into the USB
jack.
Timeshift (DTV only)
1. Make sure Time Shift Mode in TV menu is set to
On.
2. Insert the FAT32 format USB device into the USB
jack on the back of the TV.
3. Press the button to start timeshifting.
Note
• If the USB device is inserted for timeshifting for the first
time, Disk Setup screen will open. Follow the on-screen
instructions to automatically or manually set up the
USB device.
4. Press
to pause the programme. If you press
again, the timeshift programme will play.
5. Press to stop timeshifting.
Recording (DTV only)
1. Insert the FAT32 format USB device into the USB
2.
3.
4.
5.
6.
7.
jack on the back of the TV.
Press button to start recording the current
programme.
Press button to stop programme recording.
To play the recorded programme, switch to USB
source.
Press W/X to highlight Video, then press OK.
Press W/X to highlight pvr folder, then press OK.
Select the programme file that you want to play,
then press OK to start playing.
LED Backlit Flat TV Instruction Manual EN-23
Reference Section
Reference Section
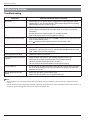
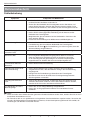
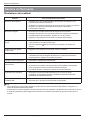
Troubleshooting
Symptoms
Items to Check and Actions to Follow
No power
• Check if the TV’s AC power cord is plugged into a working power outlet.
• Unplug the TV, and wait 60 seconds. Then reinsert plug into the working
power outlet and turn on the TV again.
No picture
• Make sure correct input source is selected.
• Check antenna connection on the back of the TV to see if it is properly
connected.
• Possible broadcast station trouble. Try another channel.
• Adjust the picture contrast and brightness settings.
Good picture but no sound
• Increase the volume level by pressing VOL+ button on the remote control
or on TV side control panel.
• Press
button on the remote control to ensure mute is off.
Good sound but poor colour
• Adjust the contrast, colour and brightness settings.
Poor picture
• Poor picture quality may occur when an activated S-VHS camera or
camcorder is connected to your TV and the other peripheral at the same
time. Switch off one of the peripherals.
Snowy picture and noise
• Check the antenna connection.
TV not responding to remote
control
•
•
•
•
TV not working
• Disconnect the TV from the power supply for 10 seconds, then reconnect
the TV. If the problem persists, contact authorised service personnel for
technical assistance.
No file displayed in USB
mode
• Make sure you select correct media type.
• Make sure the stored files are in supported format.
Check whether the batteries are working. Replace if necessary.
Make sure the remote control batteries are installed correctly.
Clean the remote control sensor lens on the TV.
You can still use the control buttons on the side of your TV.
Note
• If the problem is not solved by following these troubleshooting instructions, consult your local authorised service
centre.
• The TV set must only be repaired by qualified, registered service personnel. Never attempt to remove the back cover, as
the TV set contains dangerous voltage that may cause injury or fire.
EN-24 LED Backlit Flat TV Instruction Manual
Reference Section
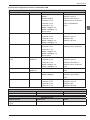
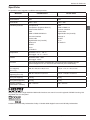
Specification
Specifications are subject to change without notice.
Model
LE32A650CF
LE32F600C
EN
Picture/sound system
PAL/SECAM-B/G, I, D/K, L
Power consumption
60W
45W
Audio output
10W + 10W
10W + 10W
Rear connectors
Component In
Composite In (Share Y input)
YPbPr/CVBS Audio In
USB
HDMI 1/HDMI 2/HDMI 3 In
Common Interface
Headphone Out
Digital Audio Out (Coaxial)
Antenna In
SCART
PC In
PC Audio In
USB
HDMI 1/HDMI 2 In
Common Interface
Headphone Out
Digital Audio Out (Coaxial)
Antenna In
SCART
PC In
PC Audio In
Temperature
Working: +5°C ~ +35°C
Storage: -15°C ~ +45°C
Humidity
Working: 20% ~ 80%
Storage: <
= 80%
Accessories
Remote control/AAA battery x 2/Instruction manual/Quick start guide/Warranty
card/TV stand with screws/Power cord (LE32F600C only)
Dimensions (with stand)
(W x H x D)
728.26 x 467.86 x 180.31 mm
731.87 x 477.17 x 207.15 mm
Dimensions (w/o stand)
(W x H x D)
728.26 x 434.26 x 77.07 mm
731.87 x 440.96 x 75.00 mm
Weight (with stand)
7.53 kg
5.8 kg
Weight (w/o stand)
7.13 kg
5.4 kg
Wall mounting (H x V)
100 x 100 mm
100 x 100 mm
HDMI, the HDMI logo, and High-Definition Multimedia Interface are trademarks or registered trademarks of
HDMI Licensing LCC in the United States and other countries.
Manufactured under license from Dolby Laboratories. Dolby and the double-D symbol are trademarks of Dolby
Laboratories.
LED Backlit Flat TV Instruction Manual EN-25
Reference Section
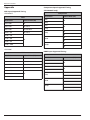
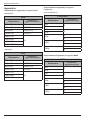
Appendix
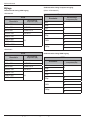
Component Input Supported Timing
VGA Input Supported Timing
(LE32A650CF only)
Component
LE32A650CF
VGA
Resolution
Refresh Rate (Hz)
720 x 400
70
640 x 480
60/70/72
800 x 600
56/60/70/72
1024 x 768
60/70/75
Resolution
Refresh Rate (Hz)
480i
60
480p
576i
50
576p
50
720p
60
1280 x 720
50
1280 x 960
60
1080i
60
1360 x 768
50
1920 x 1080
1080p
60
LE32F600C
HDMI Input Supported Timing
VGA
Resolution
Refresh Rate (Hz)
720 x 400
70
640 x 480
60/70/72
800 x 600
56/60/70/72
1024 x 768
60/70/75
Resolution
Refresh Rate (Hz)
480i
60
480p
576i
50
576p
1280 x 720
1280 x 960
HDMI
60
50
720p
60
1360 x 768
50
1080i
60
50
1080p
60
EN-26 LED Backlit Flat TV Instruction Manual
INSTRUKCJA OBSŁUGI
LE32A650CF
LE32F600C
Przed uruchomieniem urządzenia należy przeczytać niniejszą instrukcję i zachować
ją do wykorzystania w przyszłości.
Spis treści
Spis treści
Ostrzeżenia dotyczące
bezpieczeństwa ........................................... 2
Witamy...................................................................................... 2
Ważne informacje ............................................................... 2
Informacje o telewizorze LCD LED .......... 5
Instalacja podstawy ............................................................ 5
Instalacja uchwytu ściennego........................................ 5
Boczny panel sterowania ................................................ 5
Gniazda z tyłu odbiornika ................................................ 6
Podłączanie telewizora ..................................................... 7
Podłączenie sygnału z anteny/kabla ................... 7
Podłączenie zewnętrznego urządzenia
audio-wideo ..................................................................... 7
Podłączenie komputera PC ..................................... 7
Podłączenie słuchawek ............................................. 7
Podłączenie cyfrowego zestawu audio .............. 7
Pilot zdalnego sterowania ............................................... 8
Rozpoczynamy ............................................ 9
Przygotowanie pilota zdalnego sterowania ............ 9
Instalacja baterii ............................................................ 9
Ostrzeżenia dotyczące pilota zdalnego
sterowania i baterii ....................................................... 9
Ustawienia początkowe .................................................... 9
Podstawy .............................................................................. 11
Użytkowanie telewizora........................... 12
Regulacja ustawień obrazu ......................................... 12
Regulacja ustawień dźwięku ....................................... 13
Regulacja ustawień kanałów....................................... 14
Regulacja ustawień telewizora................................... 15
Regulacja ustawień blokady........................................ 17
Inne funkcje ............................................... 18
USB Media Player ............................................................ 18
Tryb miniatur/ listy plików....................................... 18
Tryb odtwarzania zdjęć ........................................... 19
Tryb odtwarzania muzyki ....................................... 19
Tryb odtwarzania filmów......................................... 19
Funkcje przycisków................................................... 20
Moduł CI................................................................................ 22
Teletekst ............................................................................... 22
Wykorzystanie urządzenia USB do
nagrywania .......................................................................... 23
Funkcja Time Shift (tylko DTV) ........................... 23
Nagrywanie (tylko DTV).......................................... 23
Część referencyjna .................................. 24
Rozwiązywanie problemów ......................................... 24
Dane techniczne ............................................................... 25
Informacje dodatkowe ...................................................... 26
Włączanie i wyłączanie telewizora .................... 11
Wybór źródła wejściowego ................................... 11
Wybór kanału............................................................... 11
Korzystanie z listy ulubionych kanałów............. 11
Regulacja głośności ................................................. 11
Wyświetlenie informacji o kanale ....................... 11
Poruszanie się w menu ekranowym ................. 11
Instrukcja obsługi telewizora LCD LED
PL-1
Ostrzeżenia dotyczące bezpieczeństwa
Ostrzeżenia dotyczące bezpieczeństwa
Witamy
Dziękujemy, że zakupili Państwo 32" telewizor LCD LED. Niniejsza instrukcja będzie stanowić pomoc przy
konfigurowaniu i użytkowaniu telewizora.
Najpierw, przed instalacją telewizora, należy sprawdzić, czy zawartość pudełka jest zgodna z poniższą listą:
• Telewizor LCD LED 32"
• Pilot zdalnego sterowania
• 2 x bateria AAA
• Instrukcja obsługi
• Przewodnik szybkiego startu
• Karta gwarancyjna
• Podstawa telewizora i wkręty
• Przewód zasilający (tylko LE32F600C)
Podczas rozpakowywania kartonu z modelem LE32A650CF najpierw należy wyjąć podstawę telewizora,
aby zapobiec jej upadkowi przy rozpakowywaniu pozostałych części.
Ważne informacje
Przed rozpoczęciem użytkowania należy przeczytać całą instrukcję i zachować ją do wykorzystania w
przyszłości.
OSTRZEŻENIE
NIEBEZPIECZEŃSTWO
PORAŻENIA PRĄDEM
ELEKTRYCZNYM
NIE OTWIERAĆ
OSTRZEŻENIE
ABY ZMNIEJSZYĆ NIEBEZPIECZEŃSTWO PORAŻENIA PRĄDEM ELEKTRYCZNYM,
NIE ZDEJMOWAĆ POKRYWY (ANI TYLNEJ OSŁONY). WEWNĄTRZ NIE ZNAJDUJĄ
SIĘ ŻADNE CZĘŚCI DO OBSŁUGI PRZEZ UŻYTKOWNIKA. WSZELKIE NAPRAWY
POWIERZAĆ WYKWALIFIKOWANYM PRACOWNIKOM SERWISU.
• Aby uniknąć niebezpieczeństwa porażenia prądem elektrycznym zalecamy, aby nie
otwierać obudowy. Wewnątrz nie ma żadnych części do obsługi przez użytkownika.
• W razie potrzeby kontaktować się z autoryzowanym centrum serwisowym.
• Znak błyskawicy z grotem, wpisany w trójkąt równoboczny, przestrzega użytkownika
przed obecnością wewnątrz urządzenia nieizolowanego NIEBEZPIECZNEGO
NAPIĘCIA, o wielkości wystarczającej, aby stanowić niebezpieczeństwo porażenia
prądem elektrycznym.
• Znak wykrzyknika wpisany w trójkąt równoboczny zwraca uwagę użytkownika na
istnienie ważnych wskazówek dotyczących obsługi i utrzymania (serwisowania)
zawartych w dokumentacji towarzyszącej urządzeniu.
OSTRZEŻENIE: W celu uniknięcia niebezpieczeństwa pożaru lub porażenia prądem elektrycznym nie
umieszczać telewizora w miejscach o dużej wilgotności. Należy zwracać uwagę, aby unikać
przypadkowego zarysowania lub uderzenia w ekran.
Nie blokować otworów wentylacyjnych przedmiotami takimi, jak gazety, obrusy, zasłony, itp.
UWAGA:
• Wtyczka przewodu zasilającego służy jako wyłącznik zasilania i musi być zawsze łatwo
dostępna.
• Przed rozpoczęciem użytkowania należy dokładnie przeczytać instrukcję i zachować ją
w bezpiecznym miejscu do wykorzystania w przyszłości.
• W celu zapewnienia najlepszej efektywności telewizora, przed rozpoczęciem
użytkowania należy przeczytać dokładnie instrukcję i zachować ją w bezpiecznym
miejscu do wykorzystania w przyszłości.
• Widoki ekranów oraz ilustracje zawarte w niniejszej instrukcji mogą ulec zmianie z uwagi
na techniczne udoskonalanie wyrobu.
• Nieuprawniony demontaż wyrobu jest zabroniony.
OSTRZEŻENIE: Aby zmniejszyć niebezpieczeństwo pożaru, świece oraz inne rodzaje otwartego
ognia należy cały czas trzymać z dala od tego produktu.
PL-2
Instrukcja obsługi telewizora LCD LED
Ostrzeżenia dotyczące bezpieczeństwa
Wyrób należy dobrze
przymocować do stołu/
ściany zgodnie z instrukcją
instalacji, aby uniknąć
zranienia lub jego
uszkodzenia na skutek
upadku.
W celu uniknięcia pożaru, nie
podłączać zbyt dużej liczby
rozgałęźników ani wielu
wtyczek do tego samego
gniazda.
Nie umieszczać wyrobu
w pobliżu wody lub oleju
(np. olej kuchenny lub
techniczny). Może to
stanowić zagrożenie
pożarowe.
Zabroniony jest demontaż
telewizora. Może to
stanowić
niebezpieczeństwo pożaru
lub porażenia prądem
elektrycznym. W razie
potrzeby kontaktować się z
autoryzowanym serwisem.
Nie używać uszkodzonych
ani zużytych wtyczek
elektrycznych. Przewód
zasilający trzymać z dala
od źródeł ciepła. Może to
stanowić
niebezpieczeństwo
porażenia prądem elektrycznym
lub zagrożenie pożarowe.
Jeśli z urządzenia
wydobywają się
nienormalne dźwięki,
należy odłączyć
przewód zasilający i
skontaktować się z
autoryzowanym
serwisem.
W celu uniknięcia upadku,
wyrób należy umieszczać
na mocnej i stabilnej
powierzchni.
W pobliżu urządzenia nie
używać ani nie
przechowywać materiałów
łatwopalnych. Może to
stanowić zagrożenie
wybuchem lub pożarem.
W celu uniknięcia
pożaru, wyrób trzymać
z dala od
transformatorów lub
źródeł ciepła.
W celu uniknięcia porażenia
prądem elektrycznym,
antenę należy utrzymywać z
dala od przewodów
elektrycznych.
W celu uniknięcia
pożaru, nie używać tego
wyrobu w
bezpośrednich
promieniach słońca ani
w pobliżu źródeł ciepła.
Zawsze należy się upewnić, że
telewizor jest prawidłowo
podłączony. Niepewne
połączenie elektryczne może
być przyczyną pożaru.
Instrukcja obsługi telewizora LCD LED
PL-3
Ostrzeżenia dotyczące bezpieczeństwa
W czasie burzy,
szczególnie burzy z
piorunami, odłączyć
źródło zasilania
i antenę.
Przed przystąpieniem do
czyszczenia telewizora
odłączyć go od zasilania.
Używać miękkiej, suchej
ściereczki. Nie stosować
żadnych środków
chemicznych. Upewnić się,
że do wnętrza wyrobu nie dostaje się woda.
W celu uniknięcia
niebezpieczeństwa porażenia
prądem elektrycznym lub
pożaru, w czasie burzy z
piorunami odłączyć źródło
zasilania i antenę.
Jeśli używana jest antena,
należy zadbać o to, aby po
przewodzie antenowym nie
spływała do wnętrza
telewizora woda.
W celu uniknięcia
niebezpieczeństwa porażenia
prądem elektrycznym lub
pożaru, nie umieszczać
wyrobu w miejscach
wilgotnych ani wystawiać go
na działanie deszczu lub
wilgoci.
W celu uniknięcia
niebezpieczeństwa
porażenia prądem
elektrycznym lub
pożaru, należy
utrzymywać w
czystości wtyczkę i
przewód elektryczny.
Nigdy nie wolno dotykać
wtyczki mokrymi rękoma.
Może to być przyczyną
porażenia prądem
elektrycznym.
W celu uniknięcia
niebezpieczeństwa
porażenia prądem
elektrycznym lub
pożaru, jeśli telewizor
nie będzie używany
przez dłuższy czas,
należy odłączyć go od zasilania.
PL-4
Instrukcja obsługi telewizora LCD LED
Informacje o telewizorze LCD LED
Informacje o telewizorze LCD LED
Instalacja podstawy
Boczny panel sterowania
1. Ostrożnie położyć telewizor na czystej
powierzchni ekranem zwróconym do dołu. W celu
ochrony ekranu przed uszkodzeniem i
zarysowaniem zastosować miękką podkładkę.
2. Dokładnie zestawić ze sobą podstawę i spód
telewizora.
3. Przykręcić podstawę do telewizora za pomocą
dołączonych wkrętów (3 wkręty dla modelu
LE32F600C, 4 wkręty dla modelu LE32A650CF).
Przycisk Opis
SOURCE Do wyboru źródła sygnału wejściowego.
Instalacja uchwytu ściennego
1. Ostrożnie położyć telewizor na czystej powierzchni ekranem zwróconym do dołu. W celu
ochrony ekranu przed uszkodzeniem
i zarysowaniem zastosować miękką podkładkę.
2. Jeśli zamontowana jest podstawa telewizora,
odkręcić trzy wkręty mocujące podstawę do
telewizora i odłączyć ją.
3. Za pomocą wkrętów dołączonych do uchwytu
ściennego (do nabycia oddzielnie) przymocować
uchwyt do otworów montażowych znajdujących
się z tyłu odbiornika.
MENU
Wejście lub wyjście z menu ekranowego.
VOL+
Zwiększenie głośności
VOL-
Zmniejszenie głośności
CH+
Wybór następnego kanału z listy kanałów
TV.
CH-
Wybór poprzedniego kanału z listy
kanałów TV.
POWER
Włączenie i wyłączenie odbiornika.
Uwaga
• W modelu LE32A650CF boczny panel
sterowania znajduje się po prawej stronie
telewizora.
UWAGA:
• Jeżeli inaczej nie zaznaczono, ilustracje telewizora i
menu ekranowego użyte w niniejszej instrukcji
bazują na modelu LE32F600C.
• Ilustracje menu ekranowego służą jedynie jako
odniesienie i mogą się różnić od ich rzeczywistego
wyglądu.
Uwaga
• W sprawie instalacji uchwytu ściennego należy
skorzystać z asysty technicznej. W przypadku
samodzielnej instalacji telewizora, Haier
Electronics nie odpowiada za jakiekolwiek
uszkodzenia wyrobu lub zranienia osób.
Instrukcja obsługi telewizora LCD LED
PL-5
Informacje o telewizorze LCD LED
Gniazda z tyłu odbiornika
* Te gniazda są dostępne tylko w modelu LE32A650CF.
Gniazdo
Opis
COMPONENT IN
(Y COMMON CVBS IN)
Podłączyć przewody sygnału wideo z urządzenia z wyjściem komponentowym lub
kompozytowym (sygnał zespolony). Podłączając źródło sygnału zespolonego,
podłączyć żółty przewód wideo do złącza Y (zielone).
YPbPr/CVBS AUDIO
Podłączyć przewody sygnału audio z urządzenia z wyjściem komponentowym lub
kompozytowym.
USB
Do portu USB można podłączyć urządzenie pamięci USB, aby przeglądać zdjęcia,
słuchać muzyki lub oglądać filmy. (Więcej szczegółów znajduje się na str. 18
niniejszej instrukcji w sekcji „USB Media Player”.)
HDMI 2 IN
Do tego złącza podłączyć urządzenie HDMI.
COMMON INTERFACE
Jeśli korzystamy z płatnych serwisów, do tego złącza należy wsunąć moduł CI.
Wyjście słuchawkowe
Do podłączenia słuchawek. Po podłączeniu słuchawek głośniki telewizora są
wyłączone.
DIGITAL AUDIO OUT
(Coaxial)
Do podłączenia koncentrycznego przewodu sygnału audio cyfrowego zestawu
muzycznego.
ANT IN (AIR/CABLE)
Do podłączenia anteny lub przewodu telewizji kablowej.
SCART
Podłączyć do urządzenia za pomocą przewodu SCART.
PC AUDIO
Wejście sygnału audio z komputera PC.
PC IN
HDMI 3 IN
HDMI 1 IN
Wejście sygnału wideo z komputera PC.
PL-6
Do tego złącza podłączyć urządzenie HDMI.
Instrukcja obsługi telewizora LCD LED
Informacje o telewizorze LCD LED
Podłączanie telewizora
Podłączenie sygnału z anteny/kabla
Podłączenie zewnętrznego urządzenia
audio-wideo
Za pomocą kabla kompozytowego (tylko
LE32A650CF)
Podłączenie komputera PC
Za pomocą kabla HDMI
Za pomocą kabla SCART
Podłączenie słuchawek
Podłączenie cyfrowego zestawu audio
Za pomocą kabla komponentowego (tylko
LE32A650CF)
Uwaga
• Przed wykonaniem podłączenia należy wyłączyć
telewizor i urządzenie.
Instrukcja obsługi telewizora LCD LED
PL-7
Informacje o telewizorze LCD LED
Pilot zdalnego sterowania
8
9
10
11
12
13
14
15
16
17
18
19
20
Nr Przycisk
1
(włączenie)
2
S.MODE
3
P.MODE
0-9
4
5
Q.VIEW
SLEEP
VOL+/(wyciszenie)
6
I/II AUDIO
7
SUBTITLE
PL-8
Opis
Włączenie lub wyłączenie
telewizora.
Naciśnięcie wybiera tryb
dźwięku.
Naciśnięcie wybiera tryb obrazu.
Do wprowadzenia numeru
kanału lub hasła.
Przełącza na ostatnio oglądany
program.
Włącza zegar wyłączenia.
Regulacja poziomu głośności.
Włączenie lub wyłączenie
dźwięku
Wybór dźwięku DTV / NICAM
(zależnie od nadawanego
sygnału).
Włączenie/ wyłączenie napisów
Instrukcja obsługi telewizora LCD LED
21
22
23
24
Dodaje ulubiony kanał. W trybie
teletekstu zatrzymuje
wyświetlanie strony.
Naciśnięcie zmienia tryb
SCREEN
wyświetlania ekranu.
Wyświetla lub ukrywa menu
MENU/
ekranowe.
Przyciski te służą do poruszania
się w menu ekranowym.
OK
Naciśnięcie zatwierdza wybór.
Naciśnięcie powoduje powrót do
poprzedniego menu.
BACK/
W trybie teletekstu wybiera tryb
mieszany (MIX).
W trybie odtwarzania
(w tył)
multimediów służy do szybkiego
(w przód)
odtwarzania w przód lub w tył.
(TEXT) Naciśnięcie włącza teletekst.
W trybie odtwarzania
(odtwarzanie/ multimediów i Timeshift służy do
pauza)
włączenia lub pauzy
odtwarzania.
Wyświetla listę źródeł sygnałów
SOURCE
wejściowych.
P /
Naciśnięcie zmienia kanał.
Naciśnięcie wyświetla informację
o kanale.
INFO/
W trybie teletekstu ujawnia
ukryte informacje.
Naciśnięcie wyświetla listę
kanałów.
CH.LIST/
W trybie teletekstu przełącza
wyświetlanie pomiędzy górą,
dołem i pełnym obrazem.
Naciśnięcie wyświetla
przewodnik po programach.
GUIDE/
W trybie teletekstu powoduje
wejście w podstronę tekstu.
Naciśnięcie wyłącza menu
ekranowe.
EXIT/
W trybie teletekstu wyłącza
wyświetlanie teletekstu.
W trybie odtwarzania
multimediów naciśnięcie
(poprzedni)
przycisku powoduje przejście do
(następny)
następnego lub poprzedniego
pliku.
Naciśnięcie rozpoczyna/ włącza
(nagrywanie)
pauzę nagrywania.
Naciśnięcie zatrzymuje
(stop)
odtwarzanie multimediów,
funkcję Timeshift lub nagrywanie.
FAV/
* Ten przycisk nie działa w tych modelach.
Rozpoczynamy
Rozpoczynamy
Przygotowanie pilota zdalnego
sterowania
Instalacja baterii
1. Otworzyć pokrywę baterii.
2. Włożyć dwie baterie AAA. Upewnić się, że
symbole + i – na bateriach odpowiadają takim
samym symbolom w zasobniku na baterie pilota.
Ustawienia początkowe
Po pierwszym włączeniu telewizora kreator ustawień
przeprowadzi nas przez podstawowe ustawienia, jak
język menu, kraj, hasło, rodzaj sygnału i
przeszukiwanie kanałów.
1. Upewnić się, że:
• W pilocie zdalnego sterowania zainstalowane są
baterie (patrz str. 9).
• Podłączona jest antena lub przewód telewizji
kablowej (patrz str. 7).
• Przewód zasilający jest podłączony do gniazda
AC IN z tyłu telewizora oraz do czynnego
gniazda zasilania. W przypadku modelu
LE32A650CF podłączyć istniejący przewód
zasilający do gniazda zasilania.
. Otwiera
2. Włączyć telewizor naciskając przycisk
się ekran kreatora ustawień. Nacisnąć przycisk
OK, aby uruchomić kreatora.
3. Przyciskami /podświetlić żądany język. Następnie
nacisnąć przycisk w celu kontynuowania.
3. Zamknąć pokrywę zasobnika na baterie.
Ostrzeżenia dotyczące pilota zdalnego
sterowania i baterii
• Upewnić się, że pomiędzy pilotem zdalnego
sterowania, a czujnikiem zdalnego sterowania na
odbiorniku telewizyjnym nie ma żadnych przeszkód.
• Pilota zdalnego sterowania używać ostrożnie. Nie
rzucać pilota na podłogę.
• Światło słoneczne lub inne silne światło może
zakłócać sygnał zdalnego sterowania wysyłany
przez pilota. Unikać używania w pobliżu lamp
fluoroscencyjnych lub neonów.
• Nie umieszczać pilota zdalnego sterowania w
miejscach gorących i wilgotnych. Może to być
przyczyną uszkodzenia pilota.
• Jeśli baterie wymieniono nieprawidłowo, istnieje
niebezpieczeństwo eksplozji. Baterie wymieniać
tylko na taki sam typ lub jego odpowiednik. Baterie
(nowe lub już zainstalowane) nie powinny być
wystawiane na nadmierne ciepło, jak promienie
słoneczne, ogień, itp.
• Jeśli telewizor nie będzie używany przez dłuższy
czas, należy wyjąć baterie z pilota zdalnego
sterowania.
• Nie wolno wyrzucać baterii razem z innymi
odpadami z gospodarstwa domowego. Nie wrzucać
baterii w ogień. Baterii należy pozbywać się zgodnie
z lokalnymi przepisami.
4. Przyciskami /podświetlić kraj. Następnie
nacisnąć przycisk .
5. Dwukrotnie wprowadzić 4-cyfrowe hasło,
następnie nacisnąć OK.
Instrukcja obsługi telewizora LCD LED
PL-9
Rozpoczynamy
Uwaga
• Jeśli podczas konfiguracji ustawień
początkowych telewizor został wyłączony przed
ustawieniem hasła, nowe hasło należy ustawić w
menu blokady Lock. W celu wejścia w menu
blokady Lock należy wprowadzić hasło
domyślne 1234, a następnie zmienić hasło.
Dokładne informacje znajdują się na str. 17 w
sekcji „Zmiana hasła”.
8. Odczekać chwilę, aby zakończyło się
przeszukiwanie kanałów.
6. Przyciskami /podświetlić tryb pracy tunera.
Następnie nacisnąć przycisk .
9. Po zakończeniu przeszukiwania kanałów nacisnąć
przycisk OK, aby wyjść z kreatora ustawień.
7. Przyciskami /podświetlić Szukaj. Następnie
naciskając przycisk rozpocząć przeszukiwanie
kanałów.
Jeśli wybrano kablowy tryb pracy tunera (Cable),
używając przycisków /// oraz przycisków
numerycznych należy skonfigurować informacje
dotyczące sieci kablowej, a następnie naciskając
przycisk OK rozpocząć przeszukiwanie kanałów.
PL-10
Instrukcja obsługi telewizora LCD LED
Rozpoczynamy
Podstawy
Włączanie i wyłączanie telewizora
1. Włączyć telewizor naciskając przycisk . Ukazanie
się obrazu na ekranie może zająć kilka sekund.
.
2. Wyłączyć telewizor naciskając przycisk
Telewizor wyłącza się do stanu czuwania.
Uwaga
• Nawet wtedy, gdy telewizor jest wyłączony,
ciągle pobiera prąd. W celu odłączenia zasilania
należy odłączyć przewód zasilający.
Wybór źródła wejściowego
1. Nacisnąć przycisk SOURCE. Wyświetla się lista
źródeł wejściowych.
Korzystanie z listy ulubionych kanałów
W celu dodania kanału do listy kanałów ulubionych:
1. Wybrać kanał, który chcemy dodać do listy
ulubionych kanałów.
otworzyć listę
2. Naciskając przycisk FAV/
ulubionych kanałów.
3. Przyciskami / podświetlić wybraną pozycję, a
następnie naciskając przycisk OK dodać bieżący
kanał do listy ulubionych. Na pasku informacyjnym
wyświetli się symbol .
Oglądanie kanału z listy kanałów ulubionych:
1. Nacisnąć przycisk FAV/ , aby otworzyć listę
ulubionych kanałów.
2. Przyciskami / podświetlić ulubiony kanał, a
następnie wybrać go naciskając przycisk OK.
Usuwanie ulubionego kanału:
1. Nacisnąć przycisk FAV/ , aby otworzyć listę
ulubionych kanałów.
2. Przyciskami / podświetlić ulubiony kanał,
który chcemy usunąć, a następnie wybrać go
naciskając przycisk OK.
3. Ponownie nacisnąć przycisk OK, aby usunąć
wybrany kanał z listy ulubionych. Z paska
informacyjnego znika symbol .
Regulacja głośności
2. Przyciskami / podświetlić źródło wejściowe, a
następnie nacisnąć przycisk OK.
Wybór kanału
• Za pomocą przycisków P / P
można
przełączać na następny lub poprzedni kanał z listy
kanałów.
• Przyciskami numerycznymi można bezpośrednio
wybrać żądany kanał.
• W celu otwarcia listy kanałów należy nacisnąć przycisk
CH.LIST/ , a następnie za pomocą przycisków
/ wybrać kanał i nacisnąć przycisk OK.
Aby skorzystać z kolorowych przycisków:
• W górę strony - Naciśnij czerwony przycisk, aby
podświetlić pierwszy kanał na bieżącej stronie,
następnie powtarzaj naciskanie czerwonego
przycisku, by podświetlić pierwszy kanał na
poprzednich stronach.
• W dół strony - Naciśnij zielony przycisk, aby
podświetlić ostatni kanał na bieżącej stronie,
następnie powtarzaj naciskanie zielonego
przycisku, by podświetlić ostatni kanał na
kolejnych stronach.
• Wybierz listę - Następnie naciśnij żółty przycisk
/, aby wybrać typ kanału, który chcesz
wyświetlić na liście
(wszystkie/cyfrowe/radiowe/analogowe).
• Wyjście - Naciśnij niebieski przycisk, aby
zamknąć listę kanałów.
• Aby powrócić do ostatnio oglądanego kanału,
należy użyć przycisku Q.VIEW.
• W celu zwiększenia lub zmniejszenia głośności
nacisnąć przycisk VOL+/VOL- .
• Aby wyłączyć dźwięk, użyć przycisku . Ponowne
powoduje włączenie
naciśnięcie przycisku
dźwięku.
Wyświetlenie informacji o kanale
• Aby wyświetlić podstawowe informacje o kanale,
jak numer kanału, nazwa kanału, tryb tunera, itp.,
nacisnąć jeden raz przycisk INFO/ .
• Powtórne naciśnięcie przycisku INFO/
wyświetli dalsze informacje, jak tytuł programu,
rozdzielczość, informacje o dźwięku, itp.
wyświetla
• Potrójne naciśnięcie przycisku INFO/
opis programu.
zamyka
• Kolejne naciśnięcie przycisku INFO/
pasek informacji.
Poruszanie się w menu ekranowym
1. Nacisnąć przycisk MENU/ . Otwiera się menu
ekranowe.
2. Za pomocą przycisków / podświetlić menu
główne (Video -obraz/Audio -dźwięk/TV -telewizja /
Setup - ustawienia) /Lock -blokada), a następnie
nacisnąć przycisk OK, aby wejść w kolejne menu.
3. Korzystając z przycisków / podświetlić żądaną
pozycję menu. Nacisnąć przycisk OK, wejść w
wybrane menu i za pomocą przycisków /
wyregulować ustawienia lub wybrać ustawienie opcji.
4. Nacisnąć przycisk BACK/ , aby powrócić do
poprzedniego menu lub przycisk EXIT/ , a aby
zamknąć menu ekranowe.
Instrukcja obsługi telewizora LCD LED
PL-11
Użytkowanie telewizora
Użytkowanie telewizora
Regulacja ustawień obrazu
DNR
Służy do redukcji cyfrowych zakłóceń obrazu,
wytwarza wyraźniejszy obraz.
MPEG NR
Służy do redukcji zakłóceń obrazu wideo z
kompresją MPEG.
Adapt. reg. lumin.
Reguluje średnią jasność ekranu w celu
kompensacji dużych obszarów bieli.
Tryb obrazu
Służy do ustawienia trybu obrazu. W zależności
od oglądanego programu można wybrać
Użytkownik/ Żywe/Eco/ Standardowe/Łagodna.
Uwaga
• Tryb obrazu można również wybrać naciskając
przycisk P.MODE.
• Ręczna regulacja ustawień obrazu automatycznie
zmieni tryb obrazu na UŻYTKOWNIK.
Podświetlenie
Służy do ustawienia jasności podświetlenia
ekranu. Ma to wpływ na całkowitą jaskrawość
obrazu.
Jasność
Służy do rozjaśnienia lub przyciemnienia obrazu.
Kontrast
Służy do ustawienia intensywności poziomu bieli
obrazu.
Nasycenie
Służy do ustawienia nasycenia koloru obrazu.
Barwa
Służy do ustawienia odcienia koloru obrazu.
Ostrość
Powoduje wyostrzenie lub zmiękczenie obrazu.
Gamma
Służy do wyboru wartości gamma.
Temp. kolorów
Umożliwia wybór temperatury barwowej. Można
wybrać:
• Chłodne – nadaje białej barwie odcień
niebieskawy.
• Standardowe –biała barwa ma odcień neutralny.
• Ciepłe – nadaje białej barwie odcień
czerwonawy.
Zaawansowane video
Regulacja zaawansowanych ustawień wideo.
PL-12
Instrukcja obsługi telewizora LCD LED
Karnacja skóry
Służy do regulacji koloru skóry w celu oddania
właściwego odcienia koloru skóry.
Tryb Filmu DI
Optymalizuje ustawienia obrazu dla oglądania
filmów.
Blue Stretch
Zwiększa zawartość niebieskiej barwy w bieli i
w pobliżu białych pikseli bez oddziaływania na
odcień koloru skóry.
Tryb gry
Służy do optymalizacji ustawień ekranu dla
korzystania z gier wideo.
Adapt. podświetl.
Dynamicznie zmienia podświetlenie ekranu w
zależności od ilości jasnych i ciemnych
obszarów obrazu zawartych w sygnale.
Tryb VGA
Służy do wybrania trybu VGA.
• Video – W tym trybie obraz jest miększy, a
tekst wyraźniejszy.
• Grafika – W tym trybie obraz wygląda ostrzej.
Należy go wybrać przy oglądaniu filmów z
komputera.
Tryb HDMI
Służy do wybrania trybu HDMI.
• Wyłącz – Automatyczny wybór ustawienia
Graphic/ Video.
• Grafika – W tym trybie obraz jest miększy, a
tekst wyraźniejszy. Należy go wybrać przy
podłączeniu do komputera.
• Video – W tym trybie obraz wygląda ostrzej.
Należy go wybrać przy oglądaniu filmów z
komputera lub ze źródeł sygnału wideo, jak
odtwarzacz DVD, odtwarzacz Blu-ray, itp.
Overscan (Wyłącznie źródło HDMI)
Rozszerzenie części wyświetlacza poza
widoczną część ekranu. W rezultacie
"powiększana" jest środkowa część obrazu.
Uwaga
• Po ustawieniu Overscan na Wyłącz, nie można
wybrać Tryb ekranu.
Użytkowanie telewizora
VGA (Tryb obrazu)
Umożliwia regulację obrazu ze źródła VGA.
Można wybrać:
• Auto regul. – Automatyczna regulacja ustawień
obrazu.
• Pozycja pozioma –Regulacja pozycji obrazu w
poziomie.
• Pozycja pionowa – Regulacja pozycji obrazu w
pionie.
• Faza – Regulacja ostrości stabilnego obrazu.
• Zegar – Regulacja częstości próbkowania.
Wył. audio
Służy do wyłączenia obrazu telewizyjnego, w celu
słuchania tylko programów dźwiękowych.
Uwaga
• Aby wyjść z tego trybu można nacisnąć dowolny
przycisk.
Resetuj
Umożliwia zresetowanie ustawień wideo do
domyślnych ustawień fabrycznych.
Regulacja ustawień dźwięku
Tryb audio
Służy do ustawienia trybu dźwięku. W zależności
od osobistych preferencji można wybrać
Użytkownik/Standardowe/Muzyka/Teatr.
Uwaga
• Tryb dźwięku można również wybrać naciskając
przycisk S.MODE.
• Ręczna regulacja ustawień dźwięku
automatycznie zmieni tryb dźwięku na
Użytkownik.
Balans
Służy do regulacji balansu pomiędzy lewym i
prawym głośnikiem.
Basy
Służy do regulacji dźwięku niskiej częstotliwości.
Tony wysokie
Służy do regulacji dźwięku wysokiej częstotliwości.
Dźwięk Surround
Symulacja dźwięku otaczającego.
Głośnik
Włącza lub wyłącza wbudowane głośniki. Można
wybrać:
• Wyłącz – wyłącza wbudowane głośniki.
• Włącz – włącza wbudowane głośniki.
• Automatyczny (CEC) – dźwięk jest odtwarzany
poprzez podłączone urządzenie CEC.
Uwaga
• Jeśli w menu CEC funkcja jest ustawiona na
Wyłącz, opcja Automatyczny (CEC) będzie
nieaktywna.
Typ SPDIF
Służy do wybrania typu wyjścia cyfrowego
dźwięku SPDIF.
Opóźnienie SPDIF
Regulacja czasu opóźnienia SPDIF w celu
synchronizacji dźwięku z obrazem (0 – 250).
Auto regul. głośn.
Funkcję tę należy ustawić na Włącz, jeśli chcemy,
aby podczas przełączania kanałów lub przy
przełączeniu z programu telewizyjnego na
reklamę utrzymywany był jednakowy poziom
dźwięku.
Typ audio
Umożliwia wybranie rodzaju dźwięku.
• Normalne – włącza normalny dźwięk.
• Niesłyszący – włącza opisy tekstowe scen
obrazu dla widzów niedosłyszących.
• Niedowidzący – włącza opisy słowne scen
obrazu dla widzów niedowidzących.
Niedowidzący (tylko DTV)
Służy do regulacji ustawień dźwięku dla osób
niedowidzących.
Głośnik
Włącza lub wyłącza głośnik.
Słuchawki
Włącza lub wyłącza słuchawki.
Głośność
Reguluje poziom głośności opisu słownego
(audiodeskrypcji).
Panoramowanie i wytłumienie
Włącza lub wyłącza sterowanie efektem Pan
and Fade.
Audio dla niedowidzących
Umożliwia wybór języka opisu słownego dla
widzów niedowidzących. (Opcja zależy od
nadawanych treści audio.)
Uwaga
• Ustawienie Niedowidzący jest dostępne tylko
wtedy, gdy funkcja rodzaju dźwięku Typ audio
jest ustawiona na Niedowidzący.
Downmix Mode (Tryb Downmix)
Wybór trybu przetwarzania dźwięku do
standardowych ustawień dźwięku 2-kanałowego.
Resetuj
Umożliwia zresetowanie ustawień audio do
domyślnych ustawień fabrycznych.
Instrukcja obsługi telewizora LCD LED
PL-13
Użytkowanie telewizora
Regulacja ustawień kanałów
Video
Audio
Tryb tunera
Antenaa
Kanał audio
Stereo
Kanały
Tryb Time Shifting
TV
Wysz. poj. RF (tylko kanały cyfrowe)
Przeprowadza przeszukiwanie pojedynczej
częstotliwości oraz sprawdza siłę i jakość
sygnału.
Tryb antenowy
Wyłącz
Device Info
Wyszukaj pojedynczy kanał RF. (Wyłącznie cyfrowy)
Video
Antena
Off
U
sta
Ustawienia
Zablokuj
Enter
Wybierz
Wyjście
Tryb tunera
Służy do wyboru rodzaju tunera: odbiór z anteny
(Antenna)/ kablowy (Cable ).
Kanał audio (tylko ATV)
Służy do wyboru trybu dźwięku dla programów
nadawanych z wieloma ścieżkami dźwiękowymi
lub stereofonicznie.
Język audio (tylko DTV)
Służy do wyboru języka dla programów nadawanych
z wieloma ścieżkami w różnych językach.
Język audio 2-gie (tylko DTV)
Służy do wyboru drugiego preferowanego języka
dla programów nadawanych z wieloma ścieżkami
w różnych językach.
Kanały
Umożliwia przeszukiwanie kanałów i edycję listy
kanałów.
Wyszukaj kanał
Po wybraniu kraju i skonfigurowaniu informacji
dotyczących telewizji kablowej (tryb Cable)
przeprowadza wyszukiwanie kanałów
telewizyjnych.
Szuk. aktual.
Służy do aktualizacji przeszukiwania kanałów i
dodaje nowe kanały do istniejącej listy kanałów.
Ręczne szuk. anal.
Przeprowadza ręczne przeszukiwanie pasma
analogowego w górę lub w dół od zadanej
częstotliwości początkowej.
Video
Wyszuk. kanały analogowe
Off
Audio
TV
Wuszukaj w dół
Zablokuj
Enter
Wybierz
Wyjście
1. Przyciskami S/T Częstotl. pocz. (MHz) i
korzystając z klawiatury numerycznej pilota
zdalnego sterowania wprowadzić wartość
częstotliwości początkowej.
2. Przyciskami S/T podświetlić Wyszukaj w
górę lub Wyszukaj w dół, a następnie
naciskając przycisk OK rozpocząć
przeszukiwanie kanałów w górę (Wyszukaj
w górę) lub w dół (Wyszukaj w dół).
PL-14
TV
U
sta
Ustawienia
41
Kanał RF
Poziom sygnału
0%
Jakość sygnału
0%
Zablokuj
Enter
Wybierz
Wyjście
1. Za pomocą klawiatury numerycznej pilota
zdalnego sterowania wprowadzić wartość
częstotliwości.
2. Nacisnąć OK, aby rozpocząć
przeszukiwanie.
Tryb kablowy
Wyszukaj pojedynczy kanał RF. (Wyłącznie cyfrowy)
Video
Kablowa
Off
0%
Audio
Częstotl. pocz. (MHz)
TV
U
st
Ustawienia
Modulacja
Przepływowość symbolowa (Ksyy
Zablokuj
Enter
Wybierz
Wyjście
1. Przyciskami S/T podświetlić Częstotl.
pocz. (KHz) i korzystając z klawiatury
numerycznej pilota zdalnego sterowania
wprowadzić częstotliwość.
2. Przyciskami S/T podświetlić Modulacja, a
następnie za pomocą przycisków W/X
wybrać rodzaj modulacji.
3. Przyciskami S/T podświetlić
Przepływowość symbolowa (Ksym/s) i za
pomocą klawiatury numerycznej pilota
zdalnego sterowania wprowadzić prędkość
transmisji sygnału.
4. Nacisnąć OK, aby rozpocząć
przeszukiwanie.
Wybór ulubionej stacji
Służy do wyboru preferowanej sieci w sytuacji,
gdy po uruchomieniu wyszukiwania kanałów
wykrywanych jest więcej sieci.
48.25
Częstotl. pocz. (MHz)
Wyszukaj w górę
U
st
Ustawienia
0%
Audio
Instrukcja obsługi telewizora LCD LED
Pomiń kanał
Służy do określenia kanałów, które będą
pomijane przy korzystaniu z przycisków
. Pominięte kanały można w dalszym
P /P
ciągu wybrać za pomocą przycisków
numerycznych pilota zdalnego sterowania.
1. Przyciskami S/T podświetlić kanał, który
ma być pominięty, a następnie nacisnąć
.
przycisk OK. Wyświetli się symbol
Użytkowanie telewizora
2. Za pomocą przycisków / zmieniać
częstotliwość jednocześnie obserwując obraz
w tle, a następnie nacisnąć przycisk OK.
2. Powtarzać powyższe kroki, dopóki nie
zostaną ustawione wszystkie kanały do
pominięcia.
Sort. kanał.
Służy do zmiany kolejności na liście kanałów.
1. Przyciskami / podświetlić kanał,
którego pozycję chcemy zmienić, a
następnie nacisnąć przycisk OK. Wyświetli
.
się symbol
2. Za pomocą przycisków / podświetlić
docelową pozycję kanału, a następnie
nacisnąć przycisk OK, aby zamienić
pozycje obu kanałów.
3. Powtarzać kroki 1 i 2, dopóki nie zostaną
posortowane wszystkie żądane kanały.
Wyczyść listę kanałów
Służy do skasowania wszystkich kanałów
zapamiętanych na liście kanałów.
Tryb Time Shifting
Włącza lub wyłącza tryb przesunięcia czasowego
odtwarzania Time Shift. Więcej informacji znajduje
się na str. 21 w sekcji „Funkcja Time Shift”.
Device Info (Informacja o urządzeniu)
Do sprawdzenia informacji dotyczących urządzenia
podłączonego do złącza USB z tyłu telewizora.
Regulacja ustawień telewizora
Edycja kanału
Służy do zmiany numeru i nazwy kanału.
1. Przyciskami / podświetlić kanał, który
chcemy edytować, a następnie nacisnąć
przycisk OK.
Język OSD
Służy do wyboru języka menu ekranowego.
Tryb ekranu
Służy do wyboru trybu wyświetlania ekranu.
2. Za pomocą przycisków / podświetlić
Numer kanału, a następnie korzystając z
przycisków numerycznych pilota zdalnego
sterowania wprowadzić żądany numer
kanału.
3. Za pomocą przycisków / podświetlić
Nazwa kanału, a następnie wprowadzać
pojedyncze znaki nowej nazwy naciskając
kilkakrotnie przyciski numeryczne, aby
wybrać żądaną literę.
Uwaga
• W celu skasowania znaku, nacisnąć przycisk .
Dokł. stroj. kan. anal.
W przypadku słabego odbioru służy do
precyzyjnego dostrojenia kanałów
analogowych.
1. Przyciskami / podświetlić kanał
analogowy, który chcemy precyzyjnie
dostroić.
Uwaga
• Tryb wyświetlania ekranu można również wybrać
naciskając przycisk SCREEN.
DPMS (Tryb zarządzania zasilaniem wyświetlacza)
Ustawienie tej opcji na On powoduje automatyczne
wyłączenie telewizora do stanu czuwania, gdy w
trybie VGA przez 40 sekund nie zostanie wykryty
sygnał wejściowy z komputera PC.
Wył nieb.
Ustawienie tej opcji na On powoduje wyświetlenie
niebieskiego ekranu przy braku sygnału
wejściowego lub podczas odtwarzania programów
dźwiękowych.
Kanał interakcyjny
Włączenie tej opcji uaktywnia interaktywne funkcje
danego kanału.
MHEG PIN Protection (Zabezpieczenie MHEG PIN)
Włączenie tej opcji uaktywnia funkcję
zabezpieczenia MHEG PIN.
Instrukcja obsługi telewizora LCD LED
PL-15
Użytkowanie telewizora
Ustawienia czasu
Do regulacji czasu i ustawień zegarów.
Strefa czasowa
Do wyboru własnej strefy czasowej.
Czas
Automat. synchr
Ustawić tę opcję na Włącz, aby automatycznie
synchronizować datę i godzinę za pomocą
sygnału cyfrowego (jeśli jest dostępny). Po
wybraniu ustawienia Wyłącz należy ręcznie
ustawić datę i godzinę.
Data
Za pomocą przycisków / i przycisków
numerycznych ustawić datę.
Czas
Za pomocą przycisków / i przycisków
numerycznych ustawić aktualny czas.
Timer wł. zasil
Służy do automatycznego włączenia telewizora
o ustawionej godzinie.
Timer (Zegar)
Gdy aktywny jest zegar włączenia (opcja
Timer wł. zasil ustawiona na Włącz), za
pomocą przycisków / i przycisków
numerycznych można ustawić godzinę
włączenia.
Włącz kanał
Gdy aktywny jest zegar włączenia (opcja
Timer wł. zasil ustawiona na Włącz), z listy
kanałów można wybrać kanał, na którym
telewizor się włączy.
Timer wył. zasil
Służy do automatycznego włączenia telewizora
o ustawionej godzinie.
Timer (Zegar)
Gdy aktywny jest zegar wyłączenia (opcja Timer
wył zasilustawiona na Włącz), za pomocą
przycisków / i przycisków numerycznych
można ustawić godzinę wyłączenia.
Timer uśpienia
Służy do automatycznego wyłączenia
telewizora po upływie ustawionego czasu.
Auto uśp.
Służy do automatycznego wyłączenia telewizora,
jeśli przez określony czas nie dokonano żadnej
operacji.
Napisy
Do regulacji ustawień napisów.
Analogowe napisy
Włącza (On) lub wyłącza (Off) napisy
analogowe. Wybrać ustawienie Wyciszenie,
aby włączać napisy analogowe, gdy dźwięk
telewizora zostanie wyciszony.
Cyfrowy język napisów
Służy do wyboru języka napisów dla
programów cyfrowych.
Cyfrowy język napisów 2-gie
Służy do wyboru drugiego języka napisów dla
programów cyfrowych.
PL-16
Instrukcja obsługi telewizora LCD LED
Typ napisów
Służy do wyboru rodzaju języka napisów
cyfrowych.
Teletekst
Do regulacji ustawień teletekstu.
Język cyfrow. teletekstu
Służy do wyboru języka teletekstu dla
programów cyfrowych.
Język dekod. strony
Służy do wyboru języka strony dekodowania
teletekstu.
Popul. interfejs
Umożliwia uzyskanie informacji dotyczących
modułu CI włożonego do gniazda COMMON
INTERFACE z tyłu telewizora.
OAD (Pobieranie aktualizacji)
Do pobierania aktualizacji oprogramowania
telewizora z przesyłanego wraz z sygnałem.
Ręczne pobier. OAD
Służy do ręcznej aktualizacji oprogramowania
telewizora. W celu przeprowadzenia
aktualizacji postępować zgodnie z instrukcjami
wyświetlanymi na ekranie.
Automatyczne pobieranie
Ustawienie Tak aktywuje automatyczne
pobieranie nowego oprogramowania przez
telewizor.
Automatyczna instalacja
Ustawienie Tak aktywuje automatyczną
instalację w telewizorze nowego
oprogramowania.
Informacje o wersji
Umożliwia sprawdzenie wersji oprogramowania.
Informacje o systemie
Umożliwia sprawdzenie informacji systemowych.
Reset. domyśl
Do zresetowania ustawień obrazu, dźwięku,
kanałów i ustawień użytkownika do domyślnych
ustawień fabrycznych.
Menu CEC
Do regulacji ustawień CEC.
CEC funkcji
Włącza (Włącz) lub wyłącza (Wył.) funkcję CEC.
Auto wyłączenie
Gdy opcja ta jest ustawiona na Włącz,
urządzenie CEC wyłącza się automatycznie
przy wyłączeniu telewizora.
Wykrywanie urządzeń
Do sprawdzenia, czy urządzenie jest
podłączone i obsługuje standard CEC.
St. gotowości (Gdy urządzenie CEC jest
podłączone)
Służy do wyłączenia wybranego urządzenia
CEC.
Użytkowanie telewizora
Włącz zasil. (Gdy urządzenie CEC jest
podłączone)
Służy do włączenia wybranego urządzenia CEC.
Wyłączanie/Włączanie Kont. Aud. Sys. (Gdy
urządzenie CEC jest podłączone)
Gdy funkcja ta jest aktywna, poziomem
głośności urządzenia CEC można sterować za
pomocą pilota zdalnego sterowania telewizora.
Uwaga
• Nie wszystkie urządzenia HDMI obsługują
standard CEC. Szczegóły można znaleźć w
instrukcji obsługi urządzenia.
• Do podłączenia urządzenia CEC do telewizora
należy zastosować przewody HDMI.
• Funkcja obsługi CEC podłączonego urządzenia
musi być włączona.
• Jeśli podłączono urządzenia HDMI, które nie jest
zgodne ze standardem CEC, opcja sterowania
CEC nie działa.
• W zależności od podłączonego urządzenia HDMI,
opcja sterowania HDMI CEC może nie działać.
Tryb sklep
Do włączenia (On) lub wyłączenia (Off) trybu
sklepowego.
• Włącz – Ustawienia są dostosowane, aby
wywrzeć jak największe wrażenie w sklepie
detalicznym , na ekranie ukazuje się pasek
informacyjny o wyrobie.
• Wyłącz – Ustawienia są zoptymalizowane dla
normalnego oglądania telewizji w domu i
oszczędzania energii.
Regulacja ustawień blokady
W celu wejścia w menu blokady Lock, należy
wprowadzić hasło ustawione przy dokonywaniu ustawień
początkowych.
Uwaga
• Jeśli w trakcie ustawień początkowych nie
ustawiono hasła, w menu blokady Lock można
wejść wpisując 12345.
• Jeśli zgubisz swoje hasło, wpisz hasło
uniwersalne (9443), aby uzyskać dostęp do
Menu blokady, a następnie ustaw nowe hasło.
Zmień hasło
Służy do zmiany hasła.
Blokada kanału
Służy do zablokowania dostępu do kanałów, które
nie chcemy, aby były oglądane przez inne osoby.
1. Przyciskami / podświetlić kanał, który
chcemy zablokować, a następnie nacisnąć
przycisk OK. Wyświetli się symbol .
2. Powtarzać powyższy krok, dopóki nie zostaną
zablokowane wszystkie żądane kanały.
Uwaga
• Aby wybrać zablokowany kanał, należy
wprowadzić 4-cyfrowe hasło.
Blokada czasowa (Tylko Norwegia)
Do ustawienia przedziału czasu, w którym kanały
telewizyjne będą zablokowane. W celu
odblokowania i oglądania kanałów należy w
prowadzić hasło.
Blokada rodzicielska
Służy do uniemożliwienia oglądania dzieciom
pewnych programów telewizyjnych zgodnie z
ograniczeniem wiekowym.
Uwaga
• Funkcja ta działa tylko w odniesieniu do
programów z informacją dotyczącą ograniczenia
wiekowego.
Blokada źródła
Do zablokowania źródła sygnału wejściowego.
1. Przyciskami / podświetlić źródło
wejściowe, który chcemy zablokować, a
następnie nacisnąć przycisk OK. Wyświetli
się symbol .
2. Powtarzać powyższy krok, dopóki nie
zostaną zablokowane wszystkie żądane
źródła sygnału.
Uwaga
• Aby przełączyć telewizor na zablokowane źródło
sygnału wejściowego, należy wprowadzić
4-cyfrowe hasło.
Blokada przed dziećmi
Umożliwia zablokowanie przycisków sterowania z
boku telewizora.
Blokada strojenia
Wyłącza możliwość dostrajania programów
telewizyjnych. Gdy opcja ta jest ustawiona na Włącz,
nie jest dostępne główne menu ustawień TV.
Tryb ustawienia źródła
Służy do ustawienia domyślnego źródła sygnału
wejściowego przy włączeniu telewizora.
Ustawienie źródła
Jeśli opcja Tryb ustawienia źródła jest ustawiona
na On, można tu wybrać domyślne źródło sygnału
wejściowego.
Nr kanału
Jeśli opcja Ustawienie źródła jest ustawiona na
TV, można tu wybrać domyślny kanał telewizyjny.
Maks. głośność
Do ustawienia ograniczenia głośności maksymalnej.
Tryb początkowej głośności
Instrukcja obsługi telewizora LCD LED
PL-17
Inne funkcje
Służy do ustawienia włączania telewizora z
domyślnym poziomem głośności.
Początkowa głośność
Jeśli opcja Tryb początkowej głośności jest
ustawiona na Włącz ustawienie to służy do
wybrania domyślnego poziomu głośności.
Usuń blokadę
Resetowanie ustawień blokady do fabrycznych
ustawień domyślnych.
8. Gdy formatowanie zostanie zakończone. Naciśnij
EXIT.
Korzystanie z odtwarzacza USB:
1. Podłączyć urządzenie USB do portu USB z tyłu
telewizora.
Ustawienia
Do zresetowania ustawień obrazu, dźwięku,
kanałów, ustawień użytkownika i blokad do
domyślnych ustawień fabrycznych. Otwiera się
ekran ustawień początkowych Initial Setup.
Inne funkcje
USB Media Player
Po podłączeniu pamięci USB do telewizora
odtwarzacz USB Media Player umożliwia
odtwarzanie zdjęć, muzyki i filmów.
Uwaga
• Urządzenie USB powinno być sformatowane w
systemie plików FAT32.
• Pliki zapisane w urządzeniu USB muszą mieć
rozszerzenie obsługiwanego formatu (*.mp3,
*.jpg, *.mp4, itp.).
• Z uwagi na indywidualne ustawienia pliku,
niektóre pliki mogą nie dać się odtworzyć.
• Odtwarzacz nie jest przeznaczony do
odtwarzania plików multimedialnych z zewnętrznych
dysków twardych ani odtwarzaczy mp3.
• Nie gwarantuje się działania z hubami USB.
• Ze względu na ograniczoną odległość transmisji
sygnału USB zaleca się, aby nie używać
przewodu połączeniowego USB.
• Użyj wysokiej szybkości urządzenie USB,
spełniające wymagania standardu USB 2.0
pełnej szybkości. Jeśli urządzenie USB nie
spełnia wymagań standardu USB pełnej
szybkości, odtwarzanie może nie być płynne.
Uwaga
• Nie należy odłączać napędu USB od telewizora,
przed zakończeniem działania odtwarzacza
multimediów USB.
Formatowanie napędu USB:
Możesz sformatować napęd USB, wykorzystując
menu ekranowe.
1. Przełącz na źródło TV.
2. Naciśnij MENU/ . Otworzy się menu ekranowe.
3. Naciśnij /, aby podświetlić opcję TV, a
następnie naciśnij OK.
4. Naciśnij /, aby podświetlić opcję Informacje
o urządzeniu, a następnie naciśnij OK.
5. Podświetl napęd USB, a następnie naciśnij OK.
6. Naciśnij /, aby podświetlić opcję Format, a
następnie naciśnij OK.
7. Gdy otworzy się ekran potwierdzający, podświetl
opcję TAK, a następnie naciśnij OK.
PL-18
Instrukcja obsługi telewizora LCD LED
2. Nacisnąć przycisk SOURCE. Następnie za
pomocą przycisków / podświetlić USB i
nacisnąć przycisk OK, aby przejść do trybu USB.
3. Korzystając z przycisków / podświetlić rodzaj
multimediów: Wideo, Zdjęcie lub Muzyka, a
następnie nacisnąć przycisk OK.
4. Przyciskami /// podświetlić plik, który
chcemy odtworzyć i nacisnąć przycisk OK.
5. W celu regulacji ustawień, należy nacisnąć
przycisk MENU/ otwierający menu ekranowe.
6. Przyciskami / podświetlić pozycję menu,
nacisnąć przycisk OK, aby wykonać lub wyświetlić
opcję ustawień, następnie za pomocą przycisków
/ podświetlić wybraną opcję i nacisnąć
przycisk OK.
7. W celu powrotu do poprzedniego menu lub
zamknięcia menu użyć przycisku BACK/ .
Tryb miniatur/ listy plików
Naciskając przycisk FAV/ podczas przeglądania
zawartości pamięci USB można przełączać widok
pomiędzy trybem miniatur i listą plików.
Otworzyć menu ekranowe naciskając przycisk
MENU/ .
Sortuj
Do wybrania algorytmu sortowania plików.
Typ medium
Do wybrania rodzaju multimediów.
Uwaga
• Aby podczas przeglądania zawartości pamięci
USB powrócić do katalogu głównego, należy:
W trybie miniatur nacisnąć przycisk BACK/ .
W trybie listy plików nacisnąć przycisk /, aby
podświetlić ikonę
u góry listy i nacisnąć OK.
Inne funkcje
Tryb odtwarzania zdjęć
Nacisnąć przycisk MENU/
ekranowe
i otworzyć menu
Losowo
Włącza lub wyłącza tryb mieszania plików.
Włączenie tego trybu powoduje odtwarzanie
plików w losowej kolejności.
Pokaż informacje
Pokazuje informacje dotyczące odtwarzanej
muzyki.
Ukryj/Pokaż spektrum
Umożliwia ukrycie lub wyświetlenie grafiki widma
dźwięku.
Wył. audio
Służy do wyłączenia obrazu i słuchania tylko
dźwięku.
Odtwórz/wstrzymaj
Do uruchomienia odtwarzania lub włączenia
pauzy pokazu slajdów.
Powtarzaj
Do wybrania trybu powtarzania odtwarzania
plików z tego samego folderu.
Losowo
Włącza lub wyłącza tryb mieszania plików.
Włączenie tego trybu powoduje odtwarzanie
plików w losowej kolejności.
Obróć
Umożliwia tymczasowy obrót zdjęcia o 90°
zgodnie z kierunkiem wskazówek zegara.
Czas trw.
Do wybrania czasu wyświetlania zdjęcia.
Uwaga
• Aby wyjść z tego trybu można nacisnąć dowolny
przycisk.
Tryb odtwarzania filmów
Nacisnąć przycisk MENU/
ekranowe
i otworzyć menu
Powiększenie
Umożliwia powiększenie zdjęcia.
Efekt
Do wybrania efektów przejścia przy wyświetlaniu zdjęć.
Pokaż informacje
Pokazuje informacje dotyczące wyświetlanego zdjęcia.
Odtwórz/Wstrzymaj
Do uruchomienia odtwarzania lub włączenia
pauzy przy odtwarzaniu filmu.
Tryb odtwarzania muzyki
Powtarzaj
Do wybrania trybu powtarzania odtwarzania
plików z tego samego folderu.
Nacisnąć przycisk MENU/
ekranowe
Program
Do wyboru programów dla pliku *.ts.
i otworzyć menu
Pokaż informacje
Pokazuje informacje dotyczące odtwarzanego
materiału wideo.
Odtwórz/Wstrzymaj
Do uruchomienia odtwarzania lub włączenia
pauzy przy odtwarzaniu muzyki.
Powtarzaj
Do wybrania trybu powtarzania odtwarzania
plików z tego samego folderu.
Instrukcja obsługi telewizora LCD LED
PL-19
Inne funkcje
Funkcje przycisków
Przycisk
Funkcja
Odtwarzanie/
Pauza
Odtwarzanie
następnego
pliku
Odtwarzanie
poprzedniego
pliku
Szybkie
przewijanie do
przodu
Szybkie
przewijanie do
tyłu
Stop
Zdjęcia Muzyka
Film
*
**
* W trybie przeglądania zdjęć naciskając przycisk
można wybrać czas wyświetlania zdjęcia.
** Naciśnięcie podczas odtwarzania nagrania
wideo spowoduje wstrzymanie odtwarzania w
miejscu oznaczonym przez stop oraz wyświetlenie
na niebieskim ekranie wiadomości „Stop –
Wznowienie". Aby kontynuować, wybierz jedną z
następujących możliwości:
- Naciśnij OK lub , aby wznowić odtwarzanie od
miejsca oznaczonego przez stop.
- Ponownie naciśnij , aby zatrzymać odtwarzanie,
a następnie naciśnij OK lub , aby zacząć od
początku odtwarzanie nagrania wideo.
PL-20
Instrukcja obsługi telewizora LCD LED
Inne funkcje
Format pliku obsługiwany przez USB Media
Format pliku wideo
Rozszerzenie pliku
*.avi
*.mp4
*.mov
Kontener multimedialny
Kodek wideo
Kodek audio
AVI
XviD
MPEG1
MPEG2 MP@HL
H.264 BP LV 4,0
H.264 MP LV 4.0
H.264 HP LV 4.0
MPEG-4 SP@HL 3.0
MPEG-4 ASP@HL 4.0
Motion JPEG
MP3(MPEG1 Layer3)
MPEG1 Layer1/2
MPEG2: AAC/AAC-LC
MPEG4: AAC-LC/HEAAC
WAV: PCM/ADPCM
AC3
MP4
H.264 BP LV 4,0
H.264 MP LV 4.0
H.264 HP LV 4.0
MPEG-4 SP@HL 3.0
MPEG-4 ASP@HL 4.0
MP3(MPEG1 Layer3)
MPEG1 Layer1/2
MPEG2: AAC
MPEG4: HE-AAC
MP4
H.264 BP LV 4,0
H.264 MP LV 4.0
H.264 HP LV 4.0
MPEG-4 SP@HL 3.0
MPEG-4 ASP@HL 4.0
Motion JPEG
MPEG2: AAC/AAC-LC
MPEG4: AAC-LC/HEAAC
H.264 BP LV 4,0
H.264 MP LV 4.0
H.264 HP LV 4.0
MPEG-4 SP@HL 3.0
MPEG-4 ASP@HL 4.0
MP3(MPEG1 Layer3)
MPEG1 Layer1/2
MPEG2: AAC/AAC-LC
MPEG4: AAC-LC/HEAAC
AC3
MPEG-2 MP@HL
MPEG1 Layer1/2
AC3
MPEG-1
MPEG-2 MP@HL
MP3(MPEG1 Layer3)
MPEG1 Layer1/2AC3
AC3
MPEG-2 MP@HL
H.264 BP LV 4,0
H.264 MP LV 4.0
H.264 HP LV 4.0
MP3(MPEG1 Layer3)
MPEG1 Layer1/2
MPEG2: AAC
MPEG4: HE-AAC
*.mkv
*.vob
MKV
MPEG PS
*.mpg
MKV
MPEG TS
*.mpeg
MPEG TS
*.ts
MPEG TS
Rozszerzenie pliku
Rozszerzenie pliku
Kontener multimedialny
Kodek audio
*.mp3
MP3
MP3(MPEG1 Layer3)
Format pliku zdjęcia
Rozszerzenie pliku
Kontener multimedialny
Kodek
*.jpg
*.jpeg
JPEG
Podstawowy/Progresywny
Instrukcja obsługi telewizora LCD LED
PL-21
Inne funkcje
Moduł CI
Gniazdo modułu CI jest przeznaczone do obsługi kart
dostępu warunkowego i elektronicznych kart
inteligentnych (Smart Card) w celu oglądania
płatnych kodowanych programów telewizyjnych i
korzystania z dodatkowych usług. Więcej informacji
dotyczących kart i abonamentów można uzyskać u
dostawców usług dostępu warunkowego. Producent
niniejszego telewizora nie dostarcza modułów CAM,
kart inteligentnych ani innego opcjonalnego
wyposażenia.
1. Kartę inteligentną Smart Card włożyć w moduł
dostępu warunkowego CAM, a następnie moduł
CAM wsunąć w gniazdo COMMON INTERFACE
znajdujące się z tyłu telewizora.
Wybieranie numeru strony
Stronę teletekstu można wybrać wprowadzając
numer strony za pomocą klawiatury numerycznej
na pilocie zdalnego sterowania.
Tryb mieszany
W trybie teletekstu można oglądać obraz
telewizyjny. W tym celu należy nacisnąć przycisk
. Strony teletekstu są teraz nałożone na obraz
telewizyjny. Aby powrócić do pełnego teletekstu,
nacisnąć ten przycisk ponownie.
2. Na telewizorze wyświetli się komunikat
potwierdzający wykrycie modułu CAM. Należy
odczekać kilka minut, aż karta się aktywuje.
3. Nacisnąć przycisk MENU/ , aby otworzyć menu
ekranowe.
4. Za pomocą przycisków / podświetlić
Ustawienia i nacisnąć przycisk OK.
5. Za pomocą przycisków / podświetlić Popul.
interfejs i nacisnąć przycisk OK.
6. Za pomocą przycisków / podświetlić żądaną
opcję i nacisnąć przycisk OK.
7. Wyświetlone zostają szczegółowe informacje
dotyczące karty CI. W celu zmiany ustawień
zapoznać się z instrukcją obsługi modułu CAM.
Zatrzymanie aktualizacji
Naciśnięcie przycisku
zatrzymuje
automatyczną aktualizację strony teletekstu.
Funkcja ta jest bardzo przydatna, gdy strona
teletekstu o tym danym numerze składa się
większej liczby stron tekstu lub pozycji danych.
Rozmiar tekstu
Naciśnięcie przycisku
przełącza sposób
wyświetlania strony teletekstu. Najpierw
wyświetlana jest jej część górna, następnie dolna,
a potem z powrotem pełna strona. Funkcja ta
powiększa wyświetlany obraz, co czyni tekst
łatwiejszym do odczytania.
Teletekst
Teletekst jest systemem informacyjnym nadawanym
na niektórych kanałach, oferującym szeroki zakres
informacji tekstowych, zwykle informacje krajowe,
zagraniczne i sportowe, prognozę pogody i programy
telewizyjne. Zawiera on również napisy przeznaczone
dla osób mających problemy ze słuchem lub dla tych,
którzy nie znają zbyt dobrze języka, w którym pogram
jest nadawany.
Teletekst
W celu włączenia funkcji teletekstu należy
. Aby go wyłączyć,
nacisnąć przycisk
nacisnąć ten przycisk powtórnie.
Strona następna/ poprzednia
można wybrać
Za pomocą przycisków P /P
następną lub poprzednią stronę teletekstu.
PL-22
Instrukcja obsługi telewizora LCD LED
Ujawnienie tekstu
Naciśnięcie przycisku
wyświetli ukrytą
informację, jak rozwiązania zagadek.
Kod podstrony
W celu wyświetlenia podstrony nacisnąć przycisk
i wprowadzić 4-cyfrowy kod.
Ukrycie tekstu
W celu ukrycia tekstu, nacisnąć przycisk
.
Inne funkcje
Kolorowe przyciski szybkiego dostępu
Tryb Fast Text automatycznie wyświetla cztery
najpopularniejsze strony, o których nadawca sądzi,
że możemy je chcieć wybrać jako następne.
Naciśnięcie na pilocie zdalnego sterowania
przycisku o takim kolorze, jak kolor łącza
wyświetlanego u dołu strony teletekstu spowoduje
bezpośrednie przejście do tej strony.
Wykorzystanie urządzenia USB
do nagrywania
Uwaga
• Zaleca się, aby minimalny rozmiar pamięci
urządzenia USB wykorzystywanego do
nagrywania wynosił 1 GB.
• WAŻNE: Przed włożeniem w gniazdo USB,
urządzenie USB powinno być sformatowane w
komputerze PC w systemie plików FAT32.
PL
Funkcja Time Shift (tylko DTV)
1. Upewnić się, że opcja Tryb Time Shifting w
menu TV jest ustawiona na Włącz.
2. Włożyć urządzenie pamięci USB sformatowane w
systemie plików FAT32 do gniazda USB z tyłu
telewizora.
3. Nacisnąć przycisk , aby rozpocząć działanie
funkcji przesunięcia czasowego Time Shift.
Uwaga
• Jeśli włożone urządzenie USB jest
wykorzystywane do funkcji Time Shift po raz
pierwszy, ukaże się ekran ustawień dysku Disk
Setup. W celu przeprowadzenia ręcznego lub
automatycznego ustawienia urządzenia, należy
postępować zgodnie ze wskazówkami
wyświetlanymi na ekranie.
4. Ponownie nacisnąć przycisk , aby włączyć pauzę
programu. Kolejne naciśnięcie przycisku spowoduje
odtwarzanie programu z przesunięciem czasowym.
5. W celu zakończenia działania funkcji Time Shift
nacisnąć przycisk .
Nagrywanie (tylko DTV)
1. Włożyć urządzenie pamięci USB sformatowane w
systemie plików FAT32 do gniazda USB z tyłu
telewizora.
2. Nacisnąć przycisk , aby rozpocząć nagrywanie
bieżącego programu.
3. W celu zakończenia nagrywania, nacisnąć
przycisk .
4. Aby odtworzyć zapisany program, należy wybrać
jako źródło sygnału USB.
5. Za pomocą przycisków W/X podświetlić Wideo, a
następnie nacisnąć przycisk OK.
6. Za pomocą przycisków W/X podświetlić folder pvr,
a następnie nacisnąć przycisk OK.
7. Wybrać plik z programem, który chcemy
odtworzyć, a następnie nacisnąć przycisk OK, aby
rozpocząć odtwarzanie.
Instrukcja obsługi telewizora LCD LED
PL-23
Część referencyjna
Część referencyjna
Rozwiązywanie problemów
W celu określenia przyczyny możliwych uszkodzeń proszę zapoznać się z poniższymi wskazówkami.
Elementy do sprawdzenia i działania do podjęcia
Objawy
Brak zasilania
Brak obrazu
Dobry obraz ale brak dźwięku
Dobry dźwięk ale słaby kolor
Słaba jakość obrazu
Obraz zaśnieżony i z zakłóceniami
Telewizor nie reaguje na pilota
zdalnego sterowania
Telewizor nie działa
W trybie USB nie można wyświetlić
żadnego pliku
• Sprawdzić, czy przewód zasilający telewizora jest podłączony do
czynnego gniazda zasilania.
• Odłączyć telewizor od zasilania i odczekać 60 sekund. Następnie
włożyć wtyczkę do czynnego gniazda zasilania i ponownie włączyć
telewizor.
• Upewnić się, że wybrane jest prawidłowe źródło sygnału wejściowego.
• Sprawdzić, czy antena jest prawidłowo podłączona z tyłu telewizora.
• Możliwe, że występują problemy z nadawaniem programu. Należy
sprawdzić na innym kanale.
• Wyregulować ustawienia kontrastu i jaskrawości obrazu.
• Zwiększyć poziom głośności naciskając przycisk VOL+ na pilocie
zdalnego sterowania lub na bocznym panelu telewizora.
• Nacisnąć przycisk
na pilocie zdalnego sterowania, aby upewnić się,
że funkcja wyciszenia jest wyłączona.
• Wyregulować ustawienia kontrastu, koloru i jaskrawości obrazu
• Słaba jakość obrazu może występować, gdy jednocześnie podłączone
są do telewizora czynna kamera S-VHS i inne urządzenie. Należy
wyłączyć jedno z urządzeń.
• Sprawdzić podłączenie anteny.
• Sprawdzić baterie. W razie potrzeby należy je wymienić.
• Upewnić się, że baterie pilota zdalnego sterowania są prawidłowo
zainstalowane.
• Wyczyścić czujnik zdalnego sterowania na telewizorze.
• Można korzystać z przycisków sterowania z boku telewizora.
• Odłączyć telewizor od zasilania na 10 sekund, a następnie ponownie go
podłączyć. Jeśli problem utrzymuje się w dalszym ciągu, należy
skontaktować się z autoryzowanym serwisem w celu zasięgnięcia
porady.
• Upewnić się, że prawidłowo wybrano rodzaj mediów.
• Upewnić się, że pliki są zapisane w obsługiwanym formacie.
Uwaga
• Jeśli korzystając z powyższych wskazówek nie można rozwiązać problemu, należy skontaktować się z
lokalnym autoryzowanym punktem serwisowym.
• Odbiornik telewizyjny może być naprawiany wyłącznie przez wykwalifikowaną osobę z uprawnieniami. Nie
próbować zdejmować tylnej pokrywy, ponieważ w telewizorze występuje niebezpieczne wysokie napięcie,
które może spowodować obrażenia osób lub pożar.
PL-24
Instrukcja obsługi telewizora LCD LED
Część referencyjna
Dane techniczne
Dane techniczne mogą ulec zmianie bez powiadomienia.
Model
System obrazu/ dźwięku
Zasilanie
Wyjście audio
Podłączenia z tyłu
odbiornika
Temperatura
Wilgotność
Wyposażenie
Wymiary z podstawą
(Szer. xWys. xGłęb.)
Wymiary bez podstawy
(Szer. xWys. xGłęb.)
Ciężar z podstawą
Ciężar bez podstawy
Rozstaw otworów uchwytu
ściennego (Szer. xWys..)
LE32A650CF
LE32F600C
PAL/SECAM-B/G, I, D/K, L
60 W
45 W
10W + 10W
10W + 10W
Wejście komponentowe
Port USB
Wejście zespolone (wspólne wejście Y) Wejście HDMI 1/HDMI 2
Wejście audio YPbPr/CVBS
Gniazdo modułu CI
Port USB
Wyjście słuchawkowe
Wejścia HDMI 1/HDMI 2/HDMI 3
Wyjście cyfrowe dźwięku
(koncentryczne)
Gniazdo modułu CI
Wejście antenowe
Wyjście słuchawkowe
Gniazdo SCART
Wyjście cyfrowe dźwięku
(koncentryczne)
Wejście PC
Wejście antenowe
Wejście PC Audio
Gniazdo SCART
Wejście PC
Wejście PC Audio
Praca: +5°C – +35°C
Przechowywanie: -15°C – +45°C
Praca: 20% – 80%
Przechowywanie: ≤ 80%
Pilot zdalnego sterowania/ 2 baterie AAA/ Instrukcja obsługi/ Przewodnik
szybkiego startu/ Karta gwarancyjna/ Podstawa telewizora z wkrętami/ Przewód
zasilający (tylko LE32F600C)
728,26 x 467,86 x 180,31 mm
731,87 x 477,17 x 207,15 mm
728,26 x 434,26 x 77,07 mm
731,87 x 440,96 x 75,00 mm
7,53 kg
7,13 kg
5,8 kg
5,4 kg
100 x 100 mm
100 x 100 mm
HDMI, logo HDMI i nazwa High-Definition Multimedia Interface są znakami towarowymi lub zarejestrowanymi
znakami towarowymi firmy HDMI Licensing LLC w USA i innych krajach.
Wyprodukowano na licencji firmy Dolby Laboratories. „Dolby” i symbol podwójnego D są znakami towarowymi
firmy Dolby Laboratories.
Instrukcja obsługi telewizora LCD LED
PL-25
Część referencyjna
Informacje dodatkowe
Obsługiwane taktowanie wejścia VGA
Obsługiwane taktowanie wejścia Component
(Wyłącznie LE32A650CF)
Component
LE32A650CF
Częstotliwość
odświeżania (Hz)
Rozdzielczość
480i
480p
720 x 400
70
576i
640 x 480
60/70/72
576p
800 x 600
56/60/70/72
1024 x 768
60/70/75
720p
1280 x 720
1280 x 960
1360 x 768
Częstotliwość
odświeżania (Hz)
Rozdzielczość
VGA
1080i
60
60
50
50
60
50
60
50
1920 x 1080
1080p
LE32F600C
Obsługiwane taktowanie wejścia HDMI
VGA
HDMI
Częstotliwość
odświeżania (Hz)
Rozdzielczość
70
480i
640 x 480
60/70/72
480p
800 x 600
56/60/70/72
576i
1024 x 768
60/70/75
576p
60
720p
1280 x 720
1360 x 768
1080i
1080p
PL-26
Instrukcja obsługi telewizora LCD LED
Częstotliwość
odświeżania (Hz)
Rozdzielczość
720 x 400
1280 x 960
60
60
50
50
60
50
60
50
60
MODE D'EMPLOI
LE32A650CF
LE32F600C
Veuillez lire attentivement le présent mode d'emploi avant d'utiliser
le téléviseur et gardez-le à portée de main pour vous y reporter
ultérieurement.
Table des matières
Avertissements de sécurité ............ 2
Utilisation de votre téléviseur ...... 12
Bienvenue .................................................2
Informations importantes ..........................2
Réglage des paramètres vidéo ...............12
Réglage des paramètres audio ..............13
Réglage des paramètres des chaînes ....14
Réglage des paramètres du
téléviseur ................................................15
Réglage des paramètres de
verrouillage .............................................17
A propos de votre téléviseur LCD
LED ................................................... 5
Installation du socle ..................................5
Installation d'un support mural ..................5
Panneau de commande latéral .................5
Prises arrière ............................................6
Branchements ..........................................7
Autres fonctionnalités................... 18
Lecteur multimédia USB .........................18
Branchement d'une antenne/d'un
câble .................................................... 7
Mode thumbnail/Liste ......................... 18
Connexion d'un périphérique A/V
externe ................................................. 7
Mode musique ................................... 19
Connexion d'un PC .............................. 7
Fonction du bouton ............................ 20
Formats de fichier pris en charge....... 21
Interface commune .................................22
Télétexte .................................................22
utilisation d'un périphérique USB pour
l'enregistrement ......................................23
Connexion d'un casque ....................... 7
Connexion d'un système audio
numérique ............................................ 7
Utilisation de votre télécommande ...........8
Mise en route ................................... 9
Préparation de votre télécommande ........9
Installation des piles ............................ 9
Avertissements relatifs à l'utilisation
de la télécommande et des piles ......... 9
.................................9
Concepts de base ...................................11
Mise sous/hors tension du
téléviseur ........................................... 11
Mode photo ........................................ 19
Mode vidéo ........................................ 19
Visionnage différé
(TV numérique uniquement) .............. 23
Enregistrer
(TV numérique uniquement) .............. 23
Section de référence ..................... 24
Dépannage .............................................24
.........................................25
Annexe ...................................................26
Sélection de la source d'entrée.......... 11
Sélection d'une chaîne....................... 11
Utilisation de la liste des favoris ......... 11
Réglage du volume ............................ 11
aux chaînes ....................................... 11
Navigation dans le menu à l'écran ..... 11
Mode d'emploi du téléviseur à écran plat et rétroéclairage par LED
FR-1
FR
Avertissements de sécurité
Avertissements de sécurité
Bienvenue
Merci d'avoir acheté ce téléviseur à écran plat et rétroéclairage par LED 32 pouces. Le présent mode d'emploi
d'installer votre nouveau téléviseur.
!"
"
###
$
%
&
*
&
&#+
,
!":;<<&=
>
!
#,
,
!"#;?<&:
d'éviter qu'il ne glisse de l'emballage lorsque vous déballez les autres composants.
Informations importantes
Veuillez prendre connaissance des règles de sécurité avant d'installer et d'utiliser votre téléviseur. Conservez ce mode
d'emploi pour pouvoir vous y reporter ultérieurement.
AVERTISSEMENT
@G*HJ&K#@%
ELECTRIQUE NE PAS
OUVRIR
AVERTISSEMENT
WXJ@@JG@@G*HJ&K#@%&@GHJY
RETIREZ PAS LE COUVERCLE (OU LE PANNEAU ARRIERE). NE
CONTIENT AUCUNE PIECE REPARABLE PAR L'UTILISATEUR.
FAITES APPEL A UN TECHNICIEN QUALIFIE.
Pour éviter tout risque d'origine électrique, il est fortement
recommandé de ne pas ouvrir le panneau arrière dans la mesure où
le boîtier ne contient aucun accessoire.
Si nécessaire, contactez un service après-vente agréé.
]
^,_
triangle équilatéral vise à sensibiliser l'utilisateur sur la présence
Y*GXY#Y%@J*
`
j
=
décharge électrique.
Le symbole d'un point d'exclamation encadré par un triangle
équilatéral vise à sensibiliser l'utilisateur sur la présence d'instructions
de manipulation et de maintenance (entretien) importantes dans la
documentation livrée avec l'appareil.
AVERTISSEMENT :
ATTENTION :
pour éviter tout risque d'incendie ou de décharge électrique, ne placez jamais votre
téléviseur dans une pièce humide. Prenez soin de ne pas rayer ni endommager
accidentellement l'écran.
w
{
=
{|
des nappes, des rideaux, etc.
_
=
j
j
accessible.
Veuillez lire attentivement le présent mode d'emploi avant d'utiliser votre téléviseur et
gardez-le à portée de main pour vous y reporter ultérieurement.
Pour une utilisation optimale de votre téléviseur, lisez attentivement ce mode d'emploi
et gardez-le à portée de main pour vous y reporter ultérieurement.
j
|
|_
}
j
_=
G
AVERTISSEMENT : pour éviter tout incendie, veillez à tenir ce produit éloigné des bougies
]
^
FR-2
Mode d'emploi du téléviseur à écran plat et rétroéclairage par LED
Avertissements de sécurité
Nous vous recommandons de
|
meuble/mur conformément aux
d'éviter tout risque de blessure
ou de dégât provoqué par une
chute.
N'utilisez pas plusieurs prises
électriques en parallèle et ne
branchez pas non plus plusieurs
_
}
d'éviter tout risque d'incendie.
Ne placez pas ce produit
à proximité d'une source
d'eau ou d'huile (huile
de cuisson ou huile
|
>
=
d'incendie.
Il est interdit de démonter
le téléviseur sans autorisation
=
décharge électrique ou
d'incendie. Contactez
le service après-vente agréé
si une réparation s'avère nécessaire.
Y
_
électriques endommagées ou
usées, et éloignez les câbles
électriques de toute source
_
risque de décharge électrique
ou d'incendie.
Débranchez le produit du
secteur et contactez le
service après-vente agréé
si le téléviseur commence à
émettre un son inhabituel.
Le produit doit être placé sur
une surface solide et stable
Ne stockez pas et
n'utilisez pas de matériaux
^
|
tout risque d'explosion et
d'incendie.
Eloignez le produit de
tout transformateur ou
toute source de chaleur
=
d'incendie.
L'antenne de ce produit doit
impérativement être éloignée
des câbles électriques
=
décharge électrique.
N'utilisez pas ce produit
à la lumière directe du
soleil ou à proximité
d'une source de chaleur
=
d'incendie.
Débranchez l'alimentation
et l'antenne du produit
en cas de fortes pluies et
notamment lors d'épisodes
orageux.
FR
Assurez-vous en permanence
que le téléviseur est
correctement raccordé :
un branchement électrique
inapproprié risquerait de
provoquer un incendie.
Pour nettoyer le produit,
débranchez au préalable
le téléviseur et utilisez un
chiffon doux sans aucun
produit chimique. Veillez à
ce qu'aucune goutte d'eau
ne rentre en contact avec le
produit.
Mode d'emploi du téléviseur à écran plat et rétroéclairage par LED
FR-3
Avertissements de sécurité
Débranchez le téléviseur du
secteur et de l'antenne en cas
de fortes pluies ou d'épisodes
|
=
décharge électrique ou d'incendie.
Lorsque vous utilisez une
antenne, prenez les précautions
nécessaires pour éviter que
l'eau ne s'écoule le long du
câble et ne s'introduise dans le
téléviseur.
Pour réduire les risques
d'incendie ou de décharge
électrique, n'installez pas le
produit dans une zone humide
ou exposée à la pluie ou à
l'humidité.
Nettoyez régulièrement la
_
=
d'alimentation pour éviter
tout risque de décharge
électrique ou d'incendie.
Ne touchez jamais la prise
électrique avec les mains
mouillées au risque de vous
électrocuter.
Débranchez le téléviseur
de la prise secteur en cas
de non-utilisation prolongée
=
décharge électrique ou
d'incendie.
FR-4
Mode d'emploi du téléviseur à écran plat et rétroéclairage par LED
A propos de votre téléviseur LCD LED
A propos de votre téléviseur LCD LED
Panneau de commande latéral
Installation du socle
1. Posez soigneusement le téléviseur sur une surface
à la fois stable et protégée, écran vers le bas, pour
éviter de l'endommager ou de le rayer.
2. Alignez soigneusement le socle sur le pied du
téléviseur.
3. Fixez le socle du téléviseur à l'aide des vis fournies.
(3 vis pour le modèle LE32F600C, 4 vis pour le
modèle LE32A650CF)
FR
Bouton
Description
SOURCE
Appuyez sur ce bouton pour
sélectionner la source d'entrée.
Appuyez sur ce bouton pour ouvrir ou
fermer le menu à l'écran.
Installation d'un support mural
MENU
1. Posez soigneusement le téléviseur sur une surface
à la fois stable et protégée, écran vers le bas, pour
éviter de l'endommager ou de le rayer.
2. *
{|
retirez les trois vis, puis détachez-le.
3. Vissez le support mural (vendu séparément) sur les
|,
à l'aide des vis fournies avec le support. Reportezvous aux instructions fournies avec le support
mural pour obtenir des informations sur la manière
d'accrocher correctement votre téléviseur.
VOL+
Appuyez sur ce bouton pour
augmenter le volume.
VOL-
Appuyez sur ce bouton pour diminuer
le volume.
CH+
Appuyez sur ce bouton pour accéder
à la chaîne suivante dans la liste.
CH-
Appuyez sur ce bouton pour accéder
à la chaîne précédente dans la liste.
POWER
Appuyez sur ce bouton pour allumer
ou éteindre le téléviseur.
Remarque
W
,
!"#;?<&:
commande latéral est situé à droite du téléviseur.
Remarque :
&
_=
du support mural. Haier Electronics décline toute
responsabilité quant aux dommages que pourrait
subir le produit ou aux blessures corporelles dont
vous, ou un tiers, pourriez être victime si vous
décidez d'installer vous-même le téléviseur.
REMARQUE :
*j
téléviseur et des écrans utilisées dans ce mode
d'emploi sont extraites du modèle LE32F600C.
j
indicatif uniquement et peuvent être différentes
des écrans de votre téléviseur.
Mode d'emploi du téléviseur à écran plat et rétroéclairage par LED
FR-5
A propos de votre téléviseur LCD LED
Prises arrière
*
*
3
*
* Ces prises ne sont disponibles que sur le modèle LE32A650CF.
Prise
Description
ENTREE COMPOSANT Prise permettant de brancher les câbles vidéo pour un périphérique composant
(ENTREE Y COMMON
ou composite. Lors de la connexion d'une source vidéo composite, branchez le
CVBS)
câble vidéo jaune sur la prise Y (verte).
AUDIO YPbPr/CVBS
Prise permettant de brancher les câbles audio pour un périphérique composant
ou composite.
USB
Port permettant d'insérer un périphérique de stockage USB pour consulter des
photos, écouter de la musique ou regarder des vidéos. (Reportez-vous à la
section « Lecteur multimédia USB », page 18 pour plus d'informations.)
ENTREE HDMI 2
Prise permettant de brancher un périphérique HDMI.
INTERFACE COMMUNE Si vous êtes abonné à un service de paiement à la séance, insérez le module CI
dans cette fente.
SORTIE CASQUE
Prise permettant de brancher un casque. Lorsqu'un casque est branché, les hautparleurs du téléviseur sont désactivés.
SORTIE AUDIO
NUMERIQUE (coaxial)
Prise permettant de brancher un système audio numérique coaxial.
ENTREE ANTENNE
(AIR/CABLE)
Prise permettant de brancher une antenne ou un câble TV.
PERITEL
Prise permettant de brancher un périphérique à l'aide d'un câble Péritel.
ENTREE AUDIO PC
Prise permettant de brancher le câble audio d'un ordinateur.
ENTREE PC
Prise permettant de brancher le câble vidéo d'un ordinateur.
ENTREE HDMI 3
ENTREE HDMI 1
FR-6
Prise permettant de brancher un périphérique HDMI.
Mode d'emploi du téléviseur à écran plat et rétroéclairage par LED
A propos de votre téléviseur LCD LED
Utilisation d'un câble composite (modèle LE32A650CF
uniquement)
Branchements
Branchement d'une antenne/d'un câble
L
R
COMPOSITE OUT
VIDEO
Connexion d'un périphérique A/V externe
FR
Connexion d'un PC
Utilisation d'un câble HDMI
RGB
PC
AUDIO
(L/R)
3
Connexion d'un casque
Utilisation d'un câble Péritel
SCART
Connexion d'un système audio numérique
Utilisation d'un câble composant (modèle LE32A650CF
uniquement)
Y
PB
PR
L
COMPONENT OUT
R
Remarque
_=
procéder aux raccordements.
Mode d'emploi du téléviseur à écran plat et rétroéclairage par LED
FR-7
A propos de votre téléviseur LCD LED
Utilisation de votre télécommande
1
2
3
SOURCE
P.MODE
4
abc
def
ghi
jkl
mno
pqrs
tuv
wxyz
P
AUDIO
6
7
8
9
10
11
9
10
11
SLEEP
VOL
8
*
S.MODE
Q.VIEW
5
16
7
17
12
I/II
SUBTITLE
12
13
FAV /
3D WORLD
INFO /
SCREEN
CH.LIST /
GUIDE /
MENU /
18
*
19
20
13
14
15
OK
BACK /
14
15
EXIT /
21
16
22
17
23
24
18
19
#
1
2
3
4
5
6
FR-8
Touche
(Alimentation)
Description
Appuyez sur cette touche pour
allumer ou éteindre le téléviseur.
Appuyez sur cette touche pour
sélectionner le mode audio.
Appuyez sur cette touche pour
P.MODE
sélectionner le mode vidéo.
Appuyez sur l'une de ces touches
0-9
pour accéder à une chaîne ou saisir
un mot de passe.
Appuyez sur cette touche pour
Q.VIEW
accéder à la dernière chaîne
consultée.
Appuyez sur cette touche pour
SLEEP
_
Appuyez sur cette touche pour régler
VOL+/le volume.
Appuyez sur cette touche pour activer
(Silencieux) ou désactiver le son.
Appuyez sur cette touche pour
sélectionner le mode audio
I/II (AUDIO)
numérique/NICAM (en fonction du
signal de diffusion).
20
S.MODE
21
22
23
24
Appuyez sur cette touche pour
j_
Appuyez sur cette touche pour
enregistrer une chaîne dans vos
favoris. En mode télétexte, appuyez
FAV/
sur cette touche pour garder à l'écran
j_
Appuyez sur cette touche pour
SCREEN
_
j_
l'écran.
Appuyez sur cette touche pour
MENU/
ouvrir ou fermer le menu à l'écran.
Appuyez sur cette touche pour
parcourir le menu à l'écran.
Appuyez sur cette touche pour
OK
Appuyez sur cette touche pour
retourner au menu précédent.
BACK/
En mode télétexte, appuyez sur cette
touche pour activer le mode mixte.
Appuyez sur cette touche pour
(retour)
activer la fonction avance rapide ou
(avance)
retour rapide en mode multimédia.
Appuyez sur cette touche pour
/ (TEXTE) activer le mode télétexte.
Appuyez sur cette touche pour lire
(lecture/
ou suspendre la lecture en mode
pause)
multimédia et différé.
Appuyez sur cette touche pour
SOURCE
j_
Appuyez sur cette touche pour
P/
changer de chaîne.
Appuyez sur cette touche pour
j_
j
aux chaînes.
INFO/
En mode télétexte, appuyez sur
_
j_
informations masquées.
Appuyez sur cette touche pour
j_
_`
mode télétexte, appuyez sur cette
CH.LIST/
touche pour placer l'image en haut
j_
plein écran.
Appuyez sur cette touche pour
activer le guide des programmes.
%JG
En mode télétexte, appuyez sur
cette touche pour accéder à une
page secondaire.
Appuyez sur cette touche pour
fermer le menu à l'écran.
EXIT/
En mode télétexte, appuyez sur
cette touche pour masquer le texte.
(précédent) Appuyez sur cette touche pour
_
(suivant)
ou précédent en mode multimédia.
Appuyez sur cette touche
pour commencer/suspendre
(ENR)
l'enregistrement.
Appuyez sur cette touche pour
arrêter la lecture multimédia,
(arrêt)
la diffusion en différé ou
l'enregistrement.
SUBTITLE
* Cette touche ne fonctionne pas sur ces modèles.
Mode d'emploi du téléviseur à écran plat et rétroéclairage par LED
Mise en route
*
une période prolongée, retirez les piles de la
télécommande.
Mise en route
Préparation de votre télécommande
Installation des piles
1. Ouvrez le couvercle des piles.
Y
{
_
classiques. Ne les jetez pas au feu non plus.
Mettez les piles au rebut conformément aux
réglementations locales.
La première fois que vous allumez votre téléviseur,
_
,
la langue du menu, le pays, le mot de passe, le type de
signal et la recherche des chaînes.
1. Assurez-vous d'avoir :
G
+
détails page 9)
2. Installez deux piles de type AAA. Veillez à introduire
correctement les piles de façon à respecter les
polarités + et – conformément aux symboles indiqués
dans leur compartiment.
&
w+
détails page 7)
_
ENTREE CA à l'arrière du téléviseur et à une prise
de courant en bon état de fonctionnement. Pour le
,
!"#;?<&:j
_
cordon d'alimentation fourni à une prise de courant
en bon état de fonctionnement.
2. Appuyez sur
pour allumer le téléviseur. L'écran
`#]
OK pour lancer l'assistant.
3. Appuyez sur / pour sélectionner votre langue,
puis sur pour continuer.
Initial Setup
3. Replacez le couvercle des piles.
Language
Please select your language:
English
Avertissements relatifs à l'utilisation de la
télécommande et des piles
Français
Italiano
#
={
trajectoire entre la télécommande et le capteur du
téléviseur.
W
:
ne pas la laisser tomber.
,
=
lumineuses de forte intensité interfèrent avec les
signaux émis par la télécommande. Evitez par
conséquent d'utiliser celle-ci à proximité d'enseignes
^
Español
Deutsch
Back
Next
4. Appuyez sur / pour sélectionner votre pays,
puis sur pour continuer.
Réglage initial
Pays
Veuillez choisir votre pays
Autriche
Y
directe de chaleur ou dans un endroit humide au
risque de l'endommager.
,
risque de provoquer une explosion. Lorsque vous
les remplacez, utilisez uniquement des piles de type
identique ou équivalent. Ne soumettez pas les piles
(le bloc batterie ou les batteries intégrées) à une
chaleur excessive, comme la lumière du soleil, des
^
Select
Belgique
Suisse
République Tchèque
Allemagne
Retour
Choisir
Suivant
Mode d'emploi du téléviseur à écran plat et rétroéclairage par LED
FR-9
FR
Mise en route
5. Saisissez deux fois votre nouveau mot de passe à
4 chiffres, puis appuyez sur OK pour continuer.
Réglage initial
Veuillez définir le mot de passe. “0000” n’est pas un mot de passe valide
Si vous avez choisi Cable comme mode de
syntonisation, appuyez sur /// et les touches
j
du câble, puis appuyez sur OK pour démarrer la
recherche des chaînes.
Réglage initial
Nouveau mot de passe
Configurez l’info câble
Mode Recherche
Confirmer mot de passe
Plein
Fréquence (KHz)
Retour
Choisir
Auto
Taux de symboles (Ksym/s))
Auto
ID réseau
Auto
Suivant
Remarque
_
}
menu Lock (Verrouillage) si le téléviseur est éteint
avant qu'un mot de passe ne soit choisi. Saisissez
le mot de passe par défaut 1234 pour accéder
au menu Lock, puis choisissez-en un nouveau.
@
$
de passe » à la page 17 pour plus d'informations.
6. Appuyez sur / pour sélectionner votre mode de
tuner, puis sur pour continuer.
Réglage initial
306000
Modulation
Choisir
Suivant
8. Patientez quelques minutes pendant la recherche
des chaînes.
Réglage initial
Recherche de chaînes
Le balayage des chaînes peut prendre un moment.
Statut : recherche en cours
Chaînes analogiques: 0
Chaînes numériques: 0
Recherche de chaînes
21%
Sélectionnez votre mode syntoniseur:
Antenna
Câble
9. Une fois la recherche des chaînes terminée,
appuyez sur OK pour quitter l'assistant.
Réglage initial
Retour
Choisir
Suivant
7. Appuyez sur / pour sélectionner Rechercher,
puis appuyez sur pour démarrer la recherche des
chaînes.
Réglage initial
Félicitations !!
Paramétrage initial terminé.
Veuillez appuyer sur [OK] pour quitter l’assistant.
Balayage chaînes
Commencez par brancher l’antenne.
Lancer le balayage chaînes?
Si vous passez cette étape, le balayage chaînes peut s’effect. depuis le Menu.
Rechercher
Omett. le balayage
Retour
FR-10
10
Choisir
Terminer
Suivant
Mode d'emploi du téléviseur à écran plat et rétroéclairage par LED
Retour
Mise en route
Concepts de base
Utilisation de la liste des favoris
Mise sous/hors tension du téléviseur
Pour ajouter une chaîne à vos favoris :
1. Appuyez sur
pour allumer le téléviseur. Il se
peut que l'image n'apparaisse pas immédiatement
à l'écran mais seulement au bout de quelques
secondes.
2. Appuyez sur
pour éteindre le téléviseur. Le mode
veille du téléviseur est activé.
Remarque
=
{
alimenté. Pour couper l'alimentation, débranchez
le cordon.
Sélection de la source d'entrée
1. Appuyez sur SOURCE. La liste des sources
d'entrée apparaît.
Principal
TV
SCART
VGA
HDMI 1
HDMI 2
USB
1. Accédez à la chaîne que vous voulez ajouter à la
liste de vos favoris.
2. Appuyez sur FAV/ j_
favoris.
3. Appuyez sur / pour sélectionner l'emplacement
de votre choix, puis sur OK pour ajouter la chaîne
sélectionnée à la liste des favoris. apparaît sur la
bannière d'informations.
Pour regarder une de vos chaînes favorites :
1. Appuyez sur FAV/ pour ouvrir la liste des chaînes
favorites.
2. Appuyez sur / pour sélectionner une chaîne
favorite, puis sur OK pour accéder à la chaîne.
Pour supprimer une chaîne favorite :
1. Appuyez sur FAV/ pour ouvrir la liste des chaînes
favorites.
2. Appuyez sur / pour sélectionner la chaîne
favorite que vous souhaitez supprimer, puis
appuyez sur OK pour accéder à la chaîne.
3. Appuyez à nouveau sur OK pour supprimer la
chaîne de votre liste des chaînes favorites.
disparaît de la bannière d'information.
2. Appuyez sur / pour sélectionner la source
d'entrée, puis sur OK.
Sélection d'une chaîne
Appuyez sur P
/P
pour accéder à la chaîne
suivante ou précédente de la liste.
#]
_
=
sélectionner directement une chaîne.
#]
CH.LIST/ j_
chaînes, puis sur / et OK pour sélectionner une
chaîne.
Utilisation des boutons de couleur :
- Appuyez sur le bouton rouge
une fois pour sélectionner la première chaîne sur
la page en cours, ou à plusieurs reprises pour
sélectionner la première chaîne sur les pages
précédentes.
- Appuyez sur le bouton vert une fois
pour sélectionner la dernière chaîne sur la page
en cours, ou à plusieurs reprises pour sélectionner
la dernière chaîne sur les pages suivantes.
Sélectionner la liste - Appuyez sur le bouton
jaune, puis sur / pour sélectionner le type de
_`
=
_
j_
(Tout/Numérique/Radio/Analogique).
Quitter - Appuyez sur le bouton bleu pour fermer
la liste des chaînes.
#]
Q.VIEW pour accéder à la dernière
chaîne consultée.
#]
VOL+/VOL- pour augmenter ou baisser
le volume.
#]
pour couper le son. Appuyez à
nouveau sur pour remettre le son.
chaînes
#]
INFO/ jj_
informations générales sur la chaîne, telles que le
numéro de la chaîne, le mode de tuner, etc.
#]
|jINFO/ j_
informations supplémentaires, telles que le titre des
programmes, la résolution, les informations audio,
etc.
#]
INFO/ jj_
description des programmes.
#]
INFO/ une fois de plus pour fermer la
bannière d'informations.
1. Appuyez sur MENU/ . Le menu à l'écran s'ouvre.
2. Appuyez sur / pour sélectionner un menu
principal (Video/Audio/TV/Setup/Lock), puis sur OK
pour accéder au sous-menu.
3. Appuyez sur / pour sélectionner un élément
du sous-menu, puis sur OK pour accéder au menu,
ou appuyez sur / pour ajuster le réglage ou
sélectionner une option de réglage.
4. Appuyez sur BACK/ pour retourner au menu
précédent, ou sur EXIT/ pour fermer le menu à
l'écran.
Mode d'emploi du téléviseur à écran plat et rétroéclairage par LED
FR-11
11
FR
Utilisation de votre téléviseur
Utilisation de votre téléviseur
!
Mode Image
Vidéo
Audio
TV
Réglages
ECO
Rétroéclairage
50
Luminosité
31
Contraste
41
Saturation
37
TEINTE
0
Netteté
43
Verrouiller
Ve
Entrée
Choisir
Quitter
"#
Permet de sélectionner le mode image. Suivant le
programme, vous pouvez choisir Utilisateur/Vif/
$%&*
&,.
Note
w
]
P.MODE pour sélectionner le mode image.
,
automatiquement en Utilisateur.
Permet de régler la luminosité du rétroéclairage qui
affecte la luminosité générale de l'image.
Luminosité
Permet d'éclaircir ou d'assombrir l'image.
Contraste
Permet de régler l'intensité du niveau de blanc de
l'image.
Saturation
Permet de régler la saturation des couleurs de
l'image.
TEINTE
Permet de régler la teinte des couleurs de l'image.
Netteté
Permet d'accentuer ou d'adoucir l'image.
Gamma
Permet de sélectionner le type de gamma.
Temp. couleur
Permet de sélectionner la température des couleurs.
Vous pouvez choisir entre :
Froid – Confère au blanc une teinte bleutée.
Standard – Confère au blanc une teinte neutre.
Chaud – Confère au blanc une teinte rougeâtre.
Vidéo avancé
Permet de régler les paramètres vidéo avancés.
DNR
Permet de réduire le bruit à l'écran et produit une
image vidéo plus propre.
NR MPEG
Permet de réduire le bruit à l'image des vidéos
$W%
FR-12
12
Cont. LUMA adaptatif
Permet de régler la luminosité moyenne de
importantes.
Ton chair
Permet de régler la couleur de la peau suivant les
préférences de teintes de peau.
Mode Film DI
Permet d'optimiser les réglages de l'image pour
Étirement bleu
Permet d'augmenter la composante bleue du blanc
et des pixels proches du blanc sans affecter les
couleurs des teintes carnées.
Mode Jeu
Permet d'optimiser les réglages de l'image pour
jouer aux jeux vidéo.
Rétroécl. adaptatif
W
]=
rétroéclairage de l'écran en fonction de la quantité
de lumière et d'ombre du signal.
Mode VGA+
w%#=
>
W
w%#
Vidéo&
j_
plus uniformes et du texte plus clair.
Graphique&
j_
images plus nettes. Sélectionnez ce mode pour
regarder des vidéos depuis votre ordinateur.
Mode HDMI (horloge progressive HDMI
uniquement)
Permet de sélectionner le mode HDMI.
Auto&_=
w
%_
Graphique&
j_
des images plus uniformes et du texte clair.
Sélectionnez ce mode lorsque vous connectez
un ordinateur.
Vidéo&
j_
plus nettes. Sélectionnez ce mode lorsque vous
regardez des vidéos depuis un ordinateur ou un
lecteur vidéo, par exemple un lecteur DVD, Bluray, etc.
*0;<(Source HDMI uniquement)
W
j_
de l’écran. L’image générée sera ‘recentrée’ au
milieu de l’image.
Note
=
*0;< est réglée
sur Désactivé, le Mode écran ne peut être
sélectionné.
VGA
Permet de régler l'image de l'ordinateur en source
w%#w
{
– Ajuste automatiquement les
réglages de l'image.
Position H. – Ajuste la position horizontale de
l'image.
Mode d'emploi du téléviseur à écran plat et rétroéclairage par LED
Utilisation de votre téléviseur
Position V. – Ajuste la position verticale de
l'image.
Phase – Ajuste la mise au point des images
stables.
– Ajuste la fréquence d'échantillonnage.
Audio seul
Permet d'éteindre l'image TV et d'écouter
uniquement le son du programme.
Note
W=
=
]
sur n'importe quel bouton.
Réinit.
Permet de réinitialiser les paramètres vidéo sur les
paramètres par défaut.
!
Vidéo
Mode audio
Standard
Balance son
Audio
0
Graves
50
Aigus
TV
é
Réglages
50
Son Surround
Simuler
Haut parleur
Arrêt
Type SPDIF
Désactivé
Verrouiller
Entrée
Choisir
Quitter
Mode audio
Permet de sélectionner le mode audio. Vous pouvez
sélectionner Utilisateur/Standard/Musique/Théâtre
selon vos préférences.
Note
w
]
S.MODE pour sélectionner le mode audio.
,
automatiquement le mode Audio en Utilisateur.
Balance
Permet de régler la balance entre les haut-parleurs
gauche et droit.
Graves
Permet de régler les basses fréquences.
Permet de régler les hautes fréquences.
Note
Auto (CEC) sera désactivée si la fonction
CEC du menu CEC est réglée sur Off.
Type SPDIF
Permet de sélectionner le type de sortie audio
numérique SPDIF.
Délais SPDIF
Permet de régler le délai d'attente SPDIF pour
synchroniser le son avec l'image (0~250).
Contrôle du vol.auto
Activez ce réglage pour garder un volume sonore
homogène lorsque vous changez de chaîne ou
lorsque vous passez d'un programme à une publicité.
Type
Permet de sélectionner le type audio.
Normal %
Malentendants – Fournit des descriptions
visuelles des scènes pour les spectateurs
malentendants.
Malvoyants – Fournit des narrations audio des
scènes pour les spectateurs malvoyants.
Malvoyants(TV numérique uniquement)
Permet de régler les paramètres audio pour les
personnes malvoyantes.
Haut parleur
Permet d'activer ou de désactiver les hautparleurs.
Casque
Permet d'activer ou de désactiver le casque.
Volume
Permet de régler le volume sonore de la narration
audio.
Panoramique et fondu
Permet d'activer ou de désactiver le contrôle
panoramique et fondu.
Audio malvoyants
Permet de sélectionner la langue audio pour les
personnes malvoyantes. (Les options dépendent
du contenu audio diffusé)
Note
$]
uniquement lorsque l'option Type est réglée sur
malvoyants.
Son Surround
Permet de simuler le son surround.
Haut parleur
Permet d'activer ou de désactiver les haut-parleurs
TV intégrés. Vous pouvez sélectionner :
= >
– Permet de désactiver les hautparleurs TV intégrés.
= ?
– Permet d'activer les haut-parleurs TV
intégrés.
Auto (CEC) – Permet de faire sortir le son d'un
périphérique CEC connecté.
Downmix Mode
Permet de sélectionner le mode audio downmix.
Réinit.
Permet de réinitialiser les paramètres audio sur les
paramètres par défaut.
Mode d'emploi du téléviseur à écran plat et rétroéclairage par LED
FR-13
13
FR
Utilisation de votre téléviseur
!
chaînes
Vidéo
Mode de reception TV
Antenne
Canal audio
Audio
Stéréo
Chaînes
Mode décalage
Désactivé
Device Info
TV
Recherche RF simple (chaîne numérique
uniquement)
Permet de procéder à la recherche simple RF et de
contrôler l'intensité et la qualité du signal.
Mode antenne
TV
Manquant
Entrée
Choisir
Quitter
Mode de reception TV
Permet de sélectionner le mode de tuner : Antenne/
Câble.
Canal audio (TV analogique uniquement)
Permet de sélectionner le mode audio pour un
programme de radiodiffusion audio ou stéréo
multiple.
, (TV numérique uniquement)
Permet de choisir la langue audio des programmes
disposant de pistes multilingues.
,@(TV numérique uniquement)
Permet de sélectionner la deuxième langue audio
des programmes disposant de pistes multilingues.
Chaînes
Permet de procéder à la recherche des chaînes et de
_`
Recherche de chaînes
Permet de procéder au balayage des chaînes
,
]
informations câble (mode câble).
Mise à jour recherche
Permet de procéder à la mise à jour du balayage
des chaînes pour ajouter des chaînes à la liste des
chaînes existantes.
Z
Permet de procéder à une recherche manuelle
analogique en-deçà ou au-delà d'une fréquence de
départ donnée.
Chercher chaînes analogiq.
Off
Audio
TV
48.25
Fréq. initiale (MHz)
Recherche amont
Réglages
Recherche avale
Verrouiller
Entrée
Choisir
Quitter
1. Appuyez sur / pour sélectionner Début
de fréquence (MHz), puis utilisez les touches
numériques de la télécommande pour entrer la
fréquence de départ.
2. Appuyez sur / pour sélectionner
Recherche amont ou Recherche avale,
puis sur OK pour parcourir les chaînes des
fréquences supérieures ou inférieures depuis la
fréquence de départ.
FR-14
14
Antenne
Off
0%
Audio
Réglages
R
Vidéo
Recherche chaîne RF simple (que numériq.)
Vidéo
Réglages
41
Chaîne RF
Niveau du signal
0%
Qualité du signal
0%
Verrouiller
Entrée
Choisir
Quitter
1. Utilisez les touches numériques de la
télécommande pour entrer la chaîne RF.
2. Appuyez sur OK pour démarrer la recherche.
Mode câble
Recherche chaîne RF simple (que numériq.)
Vidéo
Câble
Off
0%
Audio
TV
Réglages
Fréquence (KHz)
Modulation
Taux de symboles (Ksym/s)
s)
Verrouiller
Entrée
Choisir
Quitter
1. Appuyez sur / pour sélectionner Fréquence
(KHz), puis utilisez les touches numériques de
la télécommande pour entrer la fréquence.
2. Appuyez sur / pour sélectionner
Modulation, puis sur / pour sélectionner le
type de modulation.
3. Appuyez sur / pour sélectionner Taux de
symboles (Ksym/s), puis utilisez les touches
numériques de la télécommande pour entrer le
débit de symboles.
4. Appuyez sur OK pour démarrer la recherche.
Sélection d'un réseau favori
Permet de sélectionner le réseau de votre choix si
la recherche des chaînes a détecté plus de deux
réseaux.
Passer de chaîne
Permet de sélectionner les chaînes qui seront
ignorées en utilisant les boutons P /P
. Vous pouvez toujours accéder à la chaîne
ignorée en utilisant les touches numériques de la
télécommande.
1. Appuyez sur / pour sélectionner la chaîne
à ignorer, puis sur OK. j_
Vidéo
Audio
TV
Réglages
909
Analogique
910
Analogique
911
Analogique
912
Analogique
913
Analogique
914
Analogique
915
Analogique
Verrouiller
Mode d'emploi du téléviseur à écran plat et rétroéclairage par LED
Entrée
Choisir
Quitter
Utilisation de votre téléviseur
2. Répétez l'étape précédente jusqu'à ce que
vous en ayez terminé avec le réglage de toutes
les chaînes à ignorer.
Trier chaînes
W
_`
1. Appuyez sur / pour sélectionner la chaîne
sur OK. j_
2. Appuyez sur / pour sélectionner
_`
_
OK pour intervertir l'emplacement des deux
chaînes.
3. Répétez les étapes 1 et 2 jusqu'à ce que le tri
des chaînes soit terminé.
Editer chaînes
W
chaîne.
1. Appuyez sur / pour sélectionner la chaîne
OK.
Vidéo
Audio
Nom du réseau :
Numéro de chaîne
915
Nom de chaîne
Sports
TV
Fréquence
503.3
Réglages
Verrouiller
Entrée
Choisir
Quitter
2. Appuyez sur / pour sélectionner Numéro
de Chaîne]
_
numériques de la télécommande pour entrer le
numéro de chaîne désiré.
3. Appuyez sur / pour sélectionner Nommer
la chaîne
,
nouveau nom en appuyant à plusieurs reprises
sur les touches numériques pour sélectionner un
,
Note
W
,
]
bouton .
[\[
Permet de régler avec précision les chaînes
analogiques si la réception est mauvaise.
1. Appuyez sur / pour sélectionner la chaîne
analogique à régler avec précision.
2. Appuyez sur / pour régler la fréquence
,
appuyez sur OK
Numéro de chaîne: 901
Nom de chaîne: BBC
Fréquence: 85.25 MHz
Régler
A
Annuler
Effacer la liste des chaînes
Permet de supprimer toutes les chaînes
enregistrées dans la liste des chaînes.
Mode décalage
Permet d'activer ou de désactiver le mode visionnage
différé. Se reporter à la section « Visionnage différé »
page 21 pour plus d'informations.
Device Info
W
j_=
J*,
FR
Réglage des paramètres du
téléviseur
Vidéo
Audio
TV
Réglages
Français
Langue OSD
Mode écran
16:9
DPMS
Arrêt
Muet bleu
Désactivé
Chaîne d'intéraction
Désactivé
MHEG Protection PIN
Désactivé
Réglage heure
Verrouiller
Entrée
Choisir
Quitter
Langue OSD
Permet de sélectionner la langue des menus à l'écran.
Mode écran
W
j_
Note
w
]
SCREEN
j_
DPMS +*|
j_
>
Activez ce réglage pour que le téléviseur se mette
automatiquement en veille lorsqu'aucun signal
d'entrée PC n'est détecté au bout de 40 secondes en
mode VGA.
Muet bleu
#
j_
l'absence de signal d'entrée ou pendant l'écoute de
programmes audio.
Chaîne d'intéraction
Activez ce réglage pour permettre la fonction chaîne
d'interaction.
MHEG Protection PIN
Activez ce réglage pour permettre la fonction
protection PIN MHEG.
Réglage heure
W
,
_
minuteur.
Fuseau
Permet de sélectionner votre fuseau horaire.
Heure
Synchronisation auto
Sélectionnez Arrêt pour synchroniser
automatiquement la date et l'heure avec le signal
=
+
>*
Désactivé
pour régler manuellement la date et l'heure.
Date
Appuyez sur / et les touches numériques pour
régler la date.
Mode d'emploi du téléviseur à écran plat et rétroéclairage par LED
FR-15
15
Utilisation de votre téléviseur
Heure
Appuyez sur / et les touches numériques pour
régler l'heure.
Minuterie activée
Permet d'allumer automatiquement le téléviseur à
une heure précise.
Minuterie
Lorsque le minuteur de mise sous tension est activé,
appuyez sur / et les touches numériques pour
régler l'heure de démarrage.
Activer le canal
Lorsque le minuteur de mise sous tension est
activé, sélectionnez la chaîne à activer à la mise
sous tension dans la liste des chaînes.
Minuterie désact.
Permet d'éteindre automatiquement le téléviseur à
une heure précise.
Minuterie
Lorsque le minuteur de mise hors tension est activé,
appuyez sur / et les touches numériques pour
régler l'heure de mise hors tension.
Arrêt programmé
Permet d'éteindre automatiquement le téléviseur
après un certain temps écoulé.
Minuterie auto
Permet d'éteindre automatiquement le téléviseur
en l'absence d'opération au bout d'un certain
temps.
Sous-titres
Permet de régler les paramètres de sous-titrage.
Ss-titres analog.
Permet d'activer ou de désactiver les sous-titres
analogiques. Sélectionnez Muet pour activer les
sous-titres analogiques lorsque le téléviseur est en
mode silencieux.
Langue ss-titres numériq.
Permet de sélectionner la langue des sous-titres
numériques.
2nd Langue ss-titres numériq.
Permet de sélectionner la deuxième langue des
sous-titres numériques.
Type de ss-titres
Permet de sélectionner le type de sous-titres
numériques.
Télétexte
Permet de régler les paramètres du télétexte.
Langue Télétexte numériq.
Permet de sélectionner la langue du télétexte
numérique.
Décoder la langue de la page
Permet de sélectionner la langue de la page de
décodage.
Interface commune
Permet de contrôler les informations du CAM inséré
dans le logement INTERFACE COMMUNE à l'arrière
du téléviseur.
FR-16
16
OAD (téléchargement à distance)
Permet de mettre à jour le logiciel du téléviseur à
distance.
Téléchargement OAD
Permet de mettre à jour manuellement le logiciel
du téléviseur à distance. Suivez les instructions à
l'écran pour achever la mise à jour du logiciel.
Téléchargement auto
Sélectionnez Oui pour permettre à votre téléviseur
de télécharger automatiquement le nouveau
logiciel à distance
Installation auto
Sélectionnez Oui pour permettre à votre téléviseur
d'installer automatiquement le nouveau logiciel à
distance
Version en cours
Permet de contrôler les informations relatives à la
version du logiciel.
Système d'information
Permet de contrôler les informations relatives au
système.
Réini. par défaut
Permet de réinitialiser les réglages image, audio,
chaîne et utilisateur sur les paramètres par défaut.
Menu CEC
Permet de régler les paramètres CEC.
CEC fonction
Permet d'activer ou de désactiver la fonction CEC.
Arrêt auto
Lorsque cette option est réglée sur Arrêt, le
périphérique CEC s'éteint automatiquement en
même temps que le téléviseur.
Reconnaissance du périphérique
Permet de contrôler si votre périphérique est
branché et prend en charge le CEC.
Veille (lorsque le périphérique CEC est connecté)
Permet d'éteindre le périphérique CEC de votre
choix.
Mise sous tension (Quand le périphérique CEC
est connecté)
Permet d'allumer le périphérique CEC de votre
choix.
Désactiver/Activer Sys. Aud. Ctrl. (lorsque le
périphérique CEC est connecté)
lorsque cette option est activée, il est possible de
contrôler le volume du périphérique CEC avec la
télécommande du téléviseur.
Note
_=
K$G
compatibles CEC. Reportez-vous au manuel
d'utilisation livré par le fabricant de votre
périphérique pour plus de détails.
w
K$G
connecter des périphériques CEC compatibles
K$G
jK$G&&_=
doit être activée.
Mode d'emploi du téléviseur à écran plat et rétroéclairage par LED
Utilisation de votre téléviseur
*
_=
K$G=
K$G&&
&&
j
*
_=
K$G
K$G&&
j
Mode Boutique
W
Arrêt
,
|
j_
,
j
j_
Désactivé
,
j
=
Réglage des paramètres de
verrouillage
Note
*
1234
j9443
+w
>
Vidéo
Mot de passe
TV
Réglages
Verrouiller
Entrée
Choisir
Quitter
OK
Verrouillage des chaînes
Verrouillage parental
Réglages
Verrouiller
"
W
w=
j
*
W
j
si " est sur Arrêt
Modifier mot de passe
Vidéo
TV
Verrouillage parental
W
}_
j
w
j
Note
&
j
j
=
Gj
Verrouillage de la source
W
1. #]
/
OK sera
j_
2. @
{=
=
]
_`
Note
W
_jj
Verrouillage parental
W
Verrouillage du réglage
W
j
=
Arrêt
TV
Audio
Audio
Verrouillage de l'intervalle de temps +
Y,
=
>
W
=
_`
w
w
_`
Verrouillage de la source
Verrouillage parental
Désactivé
Verrouillage du réglage
Désactivé
Mode Définir la source
Arrêt
Entrée
Choisir
Quitter
"
W
Verrouillage des chaînes
W
_`
_
,
1. #]
/
_`
=
OK
j_
2. @
{=
=
]
_`
Note
W
_`
_jj
N° de chaîne
W
_`
j
>
TV
Volume maxi
W
|
Mode de Volume initial
W
w=
j
Volume initial
W
jMode de Volume initial est sur Arrêt
Effacer le verrouillage
W
,
j
Réglage initial
W
,
_`
,
j&
j_
Mode d'emploi du téléviseur à écran plat et rétroéclairage par LED
FR-17
17
FR
Autres fonctionnalités
Autres fonctionnalités
Utilisation du lecteur multimédia USB :
1. Connectez votre clé USB au port USB à l'arrière de
la TV.
Lecteur multimédia USB
Le lecteur multimédia USB vous permet de connecter
une clé USB à votre TV et de lire des photos, de la
musique ou des vidéos.
Note
J*}
j:#!"
_
J*
extension compatible (*.mp3, *.jpg, *.mp4, etc.).
_
=
pourront être lus.
G
=
_
}
_
_
provenant d'un disque dur externe ou d'un lecteur
mp3.
j
J*
pas garanti.
signal USB, il est recommandé de ne pas utiliser
de câble patch USB.
J
_=
J*_
conformes à la norme d’interface USB 2.0 full
speed. Si le périphérique USB n’est pas conforme
à la norme d’interface USB 2.0 full speed, la
lecture peut s’en trouver affectée.
Attention :
Y
_
J*
avant d’avoir arrêté le lecteur multimédia USB.
]
^*_
Vous pouvez formater votre clé USB au moyen du
menu à l›écran.
1. Basculez en source téléviseur.
2. Appuyez sur MENU/ . Le menu à l'écran s'ouvre.
3. Appuyez sur / pour sélectionner TV, puis
appuyez sur OK.
4. Appuyez sur / pour sélectionner Device Info,
puis appuyez sur OK.
5. Sélectionnez votre clé USB, puis appuyez sur OK.
6. Appuyez sur / pour sélectionner Format, puis
appuyez sur OK.
7. =
sélectionnez OUI, puis appuyez sur OK.
8. Une fois le formatage terminé, appuyez sur EXIT.
2. Appuyez sur SOURCE, puis sur / pour
sélectionner USB et appuyez sur OK pour basculer
en mode USB.
Vidéo
Choisir
Musique
Entrée
3. Appuyez sur / pour sélectionner le type de
média : Vidéo, Photo ou Musique, puis appuyez
sur OK.
4. Appuyez sur ///
_
à lire, puis appuyez sur OK.
5. Pour régler les paramètres, appuyez sur MENU/
pour ouvrir le menu à l'écran.
6. Appuyez sur / pour sélectionner un élément,
]
X¡
|
j_
options de réglage, puis appuyez sur / pour
sélectionner l'option désirée et appuyez sur OK.
7. Appuyez sur BACK/ pour retourner au menu
précédent ou fermer le menu.
Mode thumbnail/Liste
=
j_
J*]
sur FAV/ pour passer en mode thumbnail/liste.
Appuyez sur MENU/
pour ouvrir le menu à l'écran.
Trier
W
_
_
Type de média
Permet de sélectionner le type de média.
Note
W
lorsque vous naviguez sur la clé USB.
En mode thumbnail, appuyez sur BACK/ .
En mode liste, appuyez sur / pour sélectionner
en haut de la liste, puis appuyez sur OK.
l'icône
[..]
FR-18
18
Photo
Mode d'emploi du téléviseur à écran plat et rétroéclairage par LED
Autres fonctionnalités
Mode photo
Appuyez sur MENU/
pour ouvrir le menu à l'écran.
Lecture
Répéter
Aléatoire
Rotation
Durée
Zoom
Photo
Répéter tout
R
Court
3/14
Koala.JPG
Menu
Entrée
Lecture/Pause
Permet de lire ou de mettre en pause le diaporama.
Répéter
Permet de sélectionner le mode boucle pour lire les
_
}
Aléatoire
W
_j^
#
_j^
_
j¢
aléatoire.
Rotation
Permet de faire pivoter la photo de 90° dans le sens
des aiguilles d'une montre.
Durée
W
j_
photo.
Zoom
Permet de zoomer dans la photo.
Effet
Permet de sélectionner un effet de transition entre
deux photos.
W
j_
j
_
j_
Mode musique
Appuyez sur MENU/
pour ouvrir le menu à l'écran.
Répeter
Permet de sélectionner le mode boucle pour lire les
_
}
Aléatoire
W
_j^
#
_j^
_
j¢
aléatoire.
W
j_
j
=
"Z&
W
=
j_
Audio seul
W
j_
uniquement le son.
Note
W=
=
]
sur n'importe quel bouton.
Mode vidéo
Appuyez sur MENU/
pour ouvrir le menu à l'écran
Pause
Répéter
Program
Afficher info
00:03:29
Vidéo
00:04:50
3/14
Skyfall.MP4
Menu
Enter
Lecture/Pause
Permet de lire ou de mettre en pause la vidéo.
Répéter
Permet de sélectionner le mode boucle pour lire les
_
}
k
W
_
*.ts.
W
j_
j
Pause
Répéter
Aléatoire
Afficher info
Masquer spectre
Audio seul
00:01:29
Musique
00:04:50
3/14
Skyfall.mp3
Menu
Entrée
Lecture/Pause
Permet de lire ou de mettre en pause la musique.
Mode d'emploi du téléviseur à écran plat et rétroéclairage par LED
FR-19
19
FR
Autres fonctionnalités
Fonction du bouton
Bouton
Fonction
Lecture/Pause
_
suivant
_
précédent
Avance rapide
Retour rapide
Photo
Musique Vidéo
9
9
9
9
9
9
9
9
9
9*
9
9
9
9
9
9
9**
Arrêt
* En mode photo, appuyez sur
j_
_
pour sélectionner la
** Pendant la lecture de la vidéo, appuyer sur la touche
permet de mettre la lecture en pause ;
un écran bleu apparaît au moment où vous avez mis
pause, ainsi qu’un message « Arrêter - Reprendre ».
Pour continuer, vous pouvez :
- Appuyer sur OK ou sur la touche pour reprendre
la lecture là où vous l’avez arrêtée.
- Appuyer à nouveau sur la touche pour arrêter
la lecture, puis sur OK ou sur la touche pour
recommencer la lecture depuis le début de la vidéo.
FR-20
20
Mode d'emploi du téléviseur à écran plat et rétroéclairage par LED
Autres fonctionnalités
]
$
*.avi
Conteneur
AVI
Format vidéo
Codec vidéo
XviD
Codec audio
$W!+$W%¤]
!>
$W%¤
$W%¤]
¤"
$W%"$W¥K
$W%"##&##&&
H.264 BP LV 4.0
$W%##&&K##&
H.264 MP LV 4.0
WAV : PCM/ADPCM
H.264 HP LV 4.0
AC3
FR
$W%*W¥K!<
$W%#*W¥K<
*.mp4
*.mov
MP4
MP4
$¦W%
H.264 BP LV 4.0
$W!+$W%¤]
!>
H.264 MP LV 4.0
$W%¤]
¤"
H.264 HP LV 4.0
$W%"##&
$W%*W¥K!<
$W%K##&
$W%#*W¥K<
H.264 BP LV 4.0
$W%"##&##&&
H.264 MP LV 4.0
$W%##&&K##&
H.264 HP LV 4.0
$W%*W¥K!<
$W%#*W¥K<
*.mkv
MKV
$¦W%
H.264 BP LV 4.0
*.vob
$W%W*
H.264 MP LV 4.0
$W%¤]
¤"
H.264 HP LV 4.0
$W%"##&##&&
$W%*W¥K!<
$W%##&&K##&
$W%#*W¥K<
$W%"$W¥K
AC3
$W%¤]
¤"
$W%¤
AC3
$W!+$W%¤]
!>
$W%"$W¥K
$W%¤]
¤"#&!
$W%"$W¥K
AC3
$W!+$W%¤]
!>
H.264 BP LV 4.0
$W%¤]
¤"
H.264 MP LV 4.0
$W%"##&
H.264 HP LV 4.0
$W%K##&
*.mpg
MKV
*.mpeg
$W%*
$W%*
*.ts
$W%*
$W!+$W%¤]
!>
$
*.mp3
Format audio
Conteneur
MP3
Codec audio
$W!+$W%¤]
!>
$
*.jpg
Format photo
Conteneur
¦W%
Codec
Baseline/Progressive
*.jpeg
Mode d'emploi du téléviseur à écran plat et rétroéclairage par LED
FR-21
21
Autres fonctionnalités
Interface commune
Le logement de l'interface commune (CI) est conçu
pour recevoir le module d'accès conditionnel (CAM)
,
=
des programmes TV à la demande et des services
additionnels. Contactez votre fournisseur de services
d'interface commune pour plus d'informations au sujet
des modules et de la souscription. Veuillez notez
que nous ne fournissons ni ne proposons comme
accessoires optionnels le CAM ou la carte à puce.
1. Insérez la carte à puce dans le CAM, puis insérez le
CAM dans le logement INTERFACE COMMUNE à
l'arrière de la TV.
Logement CI
CAM
*
Pour sélectionner une page télétexte, entrez le
numéro de page à l'aide des touches numériques de
la télécommande.
abc
def
ghi
jkl
mno
pqrs
tuv
wxyz
Mode mix
Pour visualiser l'image TV en mode télétexte,
appuyez sur le bouton . Les informations télétexte
sont ainsi superposées en haut de l'image à l'écran.
Appuyez de nouveau sur le bouton
pour retourner
au texte entier.
Carte à puce
BACK /
2. j_
==
CAM a été détecté. Patientez quelques minutes
jusqu'à ce que la carte soit détectée.
3. Appuyez sur MENU/ pour ouvrir le menu à l'écran.
4. Appuyez sur / pour sélectionner ,
puis appuyez sur OK.
5. Appuyez sur / pour sélectionner Interface
commune, puis appuyez sur OK.
6. Appuyez sur / pour sélectionner les options dont
vous avez besoin, puis appuyez sur OK.
7. Des informations détaillées au sujet du CAM
j_
@
CAM pour obtenir les informations de réglage.
Télétexte
Stop
Pour ne plus mettre à jour automatiquement la
page télétexte, appuyez sur le bouton . Cette
option s'avère très utile lorsqu'il y a plusieurs pages
télétexte ou qu'un grand nombre d'informations sont
j_
}
FAV /
Taille
Pour déplacer l'image télétexte en haut, en bas ou
la mettre en plein écran, appuyez sur le bouton .
Cette option s'avère très utile dans la mesure où elle
grossit l'image et rend les lettres plus lisibles.
CH.LIST /
Révéler
Pour révéler les informations masquées, telles que les
réponses aux questions, appuyez sur le bouton .
INFO /
Le télétexte est un système d'informations diffusé
par certaines chaînes qui propose toute une gamme
d'informations sous forme de texte, comprenant
généralement des informations nationales, internationales
et sportives, la météo et le programme TV. Sont
également proposés des sous-titres pour les personnes
malentendantes ou qui connaissent mal la langue du
programme diffusé.
Télétexte
Pour activer le télétexte, appuyez sur le bouton /
. Pour désactiver le télétexte, appuyez de nouveau
sur le bouton / .
k
&;
Wj_
|
précédente, appuyez sur les boutons P /P
.
Sous-code
Pour entrer une page secondaire, appuyez sur le
et entrez le mot de passe à 4 chiffres.
bouton
GUIDE /
Masquer
Pour masquer le texte, appuyez sur le bouton
EXIT /
Boutons de couleur pour texte rapide
|
j_
=
=
pages que le diffuseur estime être celles que vous
souhaiteriez voir. Appuyez sur le même bouton
de couleur de la télécommande que le bouton
de couleur de la page télétexte pour accéder
directement à la page.
P
FR-22
22
.
Mode d'emploi du téléviseur à écran plat et rétroéclairage par LED
Autres fonctionnalités
utilisation d'un périphérique USB
pour l'enregistrement
Note
est de 1 Go.
IMPORTANT
j
_=
USB en FAT32 sur votre PC avant de le connecter
J*
FR
Visionnage différé +w=
=
>
1. #
=
Mode décalage
TV
Arrêt.
2. _
_=
J*j:#!"
,
w
3. #]
jj
Note
=
=
_
_=
J*
jj
,
j
*
=
_=
USB.
4. #]
*]
jj
5. #]
}
jj
Enregistrer+w=
=
>
1. _
_=
J*j:#!"
,
w
2. #]
3. #]
}
4. W
source USB.
5. #]
/
Vidéo
]
OK.
6. #]
/
pvr,
]
OK.
7. *
_
=
_
]
OK
Mode d'emploi du téléviseur à écran plat et rétroéclairage par LED
FR-23
23
Section de référence
Section de référence
>
Symptômes
Pas de courant
Eléments à contrôler et démarche à suivre
w
=
w
l'alimentation électrique.
_
w
;<
@
_
w
une prise électrique et rallumez-la.
Aucune image
#
w
=
,
w
jj]
_`
@
,
Bonne image mais pas de
son
#
]
VOL+ de la
télécommande ou sur le panneau de contrôle latéral de la TV.
#]
de la télécommande pour vous assurer que la
sourdine est bien désactivée.
Bon son mais image de faible
qualité
@
,
Image de faible qualité
G
=
j
=
|
simultanée d'une caméra ou d'un caméscope S-VHS et d'un autre
périphérique sur votre TV. Désactivez l'un des périphériques.
Neige et bruit
w
|
La TV ne répond pas à la
télécommande
w
=
j
@
#
=
correctement.
Y
]
w
w
{
w
La TV ne marche pas
_
w
¤<
reconnectez-la. Si le problème persiste, contactez le service après-vente
pour obtenir une assistance technique.
#_
j_
mode USB
#
_
]
#
=
_
Note
*
,
service après-vente local.
*
_
wY
]
{
le couvercle arrière : la tension du poste TV est dangereuse et pourrait provoquer des blessures ou un
incendie.
FR-24
24
Mode d'emploi du téléviseur à écran plat et rétroéclairage par LED
Section de référence
*
&
}
Modèle
LE32A650CF
LE32F600C
Système son et image
W#*&#$%G¡
Alimentation
60 W
45 W
Sortie audio
10 W + 10 W
10 W + 10 W
Connectique arrière
Composant Entrée
USB
Composite Entrée (entrée Y partagée)
HDMI 1/HDMI 2/HDMI 3 In
YPbPr/CVBS Audio In
Interface commune
USB
Sortie casque
HDMI 1/HDMI 2/HDMI 3 In
Sortie audio numérique (coaxiale)
Interface commune
Antenne Entrée
Sortie casque
SCART (Péritel)
Sortie audio numérique (coaxiale)
PC Entrée
Antenne Entrée
PC Entrée audio
FR
SCART (Péritel)
PC entrée
PC Entrée audio
Température
Sous tension : +5°C ~ +35°C
Entreposée : -15°C ~ +45°C
Humidité
Sous tension : 20% ~ 80%
§¨<©
Accessoires
###|"
%
*w
+!":;<<&
uniquement)
Dimensions (avec support)
(L x H x P)
728,26 x 467,86 x 180,31 mm
731,87 x 477,17 x 207,15 mm
Dimensions (sans
support) (L x H x P)
728,26 x 434,26 x 77,07 mm
731,87 x 440,96 x 75 mm
Poids (avec support)
7,53 kg
5,8 kg
Poids (sans support)
7,13 kg
5,4 kg
Fixation murale (H x V)
100 x 100 mm
100 x 100 mm
K$G
K$G
K_
$
G
j
=
HDMI Licensing LCC aux États-Unis et dans d'autres pays.
Fabriqués sous licence de Dolby Laboratories. Dolby et le symbole double-D sont des marques de
Dolby Laboratories.
Mode d'emploi du téléviseur à écran plat et rétroéclairage par LED
FR-25
25
Section de référence
Annexe
|
|
}~
(LE32A650CF uniquement)
LE32A650CF
Component
VGA
Résolution
Taux de
rafraîchissement (Hz)
Résolution
480i
720 x 400
70
480p
640 x 480
60/70/72
576i
800 x 600
56/60/70/72
576p
1024 x 768
60/70/75
1280 x 960
1360 x 768
60
50
50
720p
1280 x 720
60
60
1080i
1920 x 1080
1080p
LE32F600C
VGA
Résolution
70
640 x 480
60/70/72
800 x 600
56/60/70/72
1024 x 768
60/70/75
1280 x 960
1360 x 768
60
Résolution
480i
480p
576p
720p
1080i
1080p
FR-26
26
60
50
60
HDMI
576i
1280 x 720
50
|
>"#
Taux de
rafraîchissement (Hz)
720 x 400
Taux de
rafraîchissement (Hz)
Mode d'emploi du téléviseur à écran plat et rétroéclairage par LED
Taux de
rafraîchissement (Hz)
60
50
50
60
50
60
50
60
BEDIENUNGSANLEITUNG
LE32A650CF
LE32F600C
Lesen Sie diese Bedienungsanleitung vor Gebrauch des
Fernsehgeräts aufmerksam durch, und bewahren Sie sie zur
späteren Verwendung auf.
Inhalt
Sicherheitswarnungen .................... 2
Das Fernsehgerät im Einsatz ....... 12
Willkommen ..............................................2
Wichtige Informationen .............................2
Anpassen der Bildeinstellungen .............12
Anpassen der Toneinstellungen..............13
....14
Anpassen der Fernsehereinstellungen ...15
Fernseherfunktionen sperren .................17
Ihr LED-LCD-Fernseher................... 5
Montage des Standfußes .........................5
Montage der Wandhalterung ....................5
Seitliche Bedienelemente .........................5
Anschlüsse an der Rückseite ...................6
Herstellen von Verbindungen ...................7
Weitere Funktionen ....................... 18
Verbinden mit Antenne/Kabel .............. 7
Foto-Modus ........................................ 19
Anschließen eines externen Audio-/
Videogeräts .......................................... 7
Musik-Modus ..................................... 19
Anschließen eines PC ......................... 7
Tastenfunktion .................................... 20
Unterstützte Dateiformate für
USB-Medien ...................................... 21
Common Interface ..................................22
Videotext .................................................22
Aufnahmen mittels USB-Gerät ...............23
Anschließen von Kopfhörern ............... 7
Anschließen eines digitalen
Audiosystems ...................................... 7
Verwenden der Fernbedienung ................8
Erste Schritte ................................... 9
Vorbereiten der Fernbedienung ................9
Einlegen der Batterien ......................... 9
Vorsichtshinweise für Fernbedienung
und Batterien ....................................... 9
Erstinstallation ..........................................9
Erläuterungen zu den
Grundfunktionen .....................................11
Ein- und Ausschalten des
Fernsehgeräts .................................... 11
USB-Media-Player ..................................18
Miniaturansicht/Listenansicht ............. 18
Film-Modus ........................................ 19
Zeitversetztes Fernsehen
(nur DTV) ........................................... 23
Aufnahme (nur DTV) .......................... 23
USB Cloning: ..........................................23
Referenzabschnitt ......................... 24
Fehlerbehebung .....................................24
Technische Daten ...................................25
Anhang ...................................................26
Auswählen der Signalquelle .............. 11
Auswählen eines Senders ................. 11
Verwenden der Favoritenliste ............ 11
Einstellen der Lautstärke ................... 11
Anzeigen der Senderinformationen ... 11
Navigieren durch das
Bildschirmmenü ................................. 11
Flachbildfernseher mit LED-Hintergrundbeleuchtung – Bedienungsanleitung
DE-1
DE
Sicherheitswarnungen
Sicherheitswarnungen
Willkommen
Danke, dass Sie sich für diesen 32" (81 cm) Flachbildfernseher mit LED-Hintergrundbeleuchtung entschieden
haben. Diese Anleitung hilft Ihnen bei der Einrichtung und Verwendung Ihres Fernsehgeräts. Prüfen Sie vor der
Installation Ihres neuen Fernsehers den Inhalt des Pakets.
!!
!
!
###$%&
'
$!!
*!+!
;'
<=%!>!%
!
#?@+'!JOO?
!
Wenn Sie den Karton des LE32A650CF öffnen, sollten Sie zuerst den TV-Standfuß herausnehmen, damit er
beim Entpacken der Komponenten nicht vom oberen Kissen fallen kann.
Wichtige Informationen
Lesen Sie vor der Inbetriebnahme des Fernsehgeräts die folgenden Sicherheitshinweise. Bewahren Sie diese
Hinweise zur späteren Verwendung auf.
WARNUNG
NICHT ÖFFNEN –
STROMSCHLAGGEFAHR
WARNUNG
NEHMEN SIE DIE ABDECKUNG (ODER RÜCKSEITE) NICHT AB, UM
DIE STROMSCHLAGGEFAHR ZU REDUZIEREN. GERÄT ENTHÄLT
KEINE VOM BENUTZER REPARIERBAREN TEILE. WENDEN SIE
SICH AN EINEN QUALIFIZIERTEN SERVICEMITARBEITER.
Um Stromschläge zu vermeiden, sollten Sie die Rückwand niemals
Y[
'\!Y;]!^_
Wenden Sie sich bei Bedarf an einen autorisierten Kundendienst.
Der Blitz mit dem Pfeilspitzensymbol im gleichschenkligen Dreieck
soll den Benutzer auf das Vorhandensein GEFÄHRLICHER
SPANNUNG im Gehäuse des Produkts hinweisen. Diese Spannung
kann so hoch sein, dass die Gefahr eines Stromschlags besteht.
Das Ausrufezeichen innerhalb eines gleichschenkligen Dreiecks
weist den Benutzer auf wichtige Betriebs- und Wartungs- (Service-)
Anweisungen in der dem Produkt beiliegenden Beschreibung hin.
WARNUNG:
VORSICHT:
Um Brände und Stromschläge zu vermeiden, sollten Sie Ihr Fernsehgerät nie in feuchten
Bereichen aufstellen. Achten Sie darauf, Kratzer oder Stoßeinwirkung auf den Bildschirm zu
vermeiden.
Die Lüftungsöffnungen dürfen nicht durch Gegenstände wie Zeitungen, Tischtücher, Vorhänge usw.
abgedeckt werden.
@+
'<`j
!!!+!]
_
%#!`j={!|]!'!
[
und bewahren Sie sie zur späteren Verwendung an einem schnell zugänglichen Ort auf.
}j~!|]+!{][j%
Bedienungsanleitung sorgfältig lesen und zur späteren Verwendung aufbewahren.
|jj+!$
+!#!$!!'Y
sich aufgrund technischer Neuerungen ändern.
!jjj!'!_
WARNUNG: Halten Sie Kerzen und andere Flammen zu allen Zeiten von diesem Produkt fern, um
Brände zu vermeiden.
DE-2
Flachbildfernseher mit LED-Hintergrundbeleuchtung – Bedienungsanleitung
Sicherheitswarnungen
Zur Vermeidung von
Verletzungen oder Schäden
durch Herabfallen,
ist das Produkt den
Montageanweisungen
entsprechend aufzubauen und
fest auf einem stabilen Tisch o.
ä. zu positionieren bzw. an der
Wand zu befestigen.
Platzieren Sie das Produkt
nicht in der Nähe von
Wasser oder Öl (z. B.
Speise- oder Schmieröl), da
dies Brände verursachen
kann.
Verwenden Sie keine
beschädigten Stecker.
Halten Sie das Kabel
von Wärmequellen fern,
um Stromschläge und
Brandgefahr zu vermeiden.
Das Produkt muss auf
einer festen und stabilen
]
~+{[
um Stürze zu vermeiden.
Stellen Sie das Produkt
nicht in der Nähe von
Transformatoren oder
Wärmequellen auf,
um Brandgefahr zu
vermeiden.
Um Brandgefahr zu
vermeiden, sollten Sie
dieses Produkt nicht in
direktem Sonnenlicht
oder in der Nähe von
Wärmequellen verwenden.
Trennen Sie die
Stromversorgung und
Antenne des Produkts bei
Unwetter, insbesondere
bei Gewittern.
Schließen Sie keine Steckdosen
in Parallelschaltung an, und
verwenden Sie für mehrere
Stecker nicht die gleiche
Steckdose, da dies zu
Brandgefahr führen kann.
Um Stromschläge oder
Brandgefahr zu vermeiden,
ist die unbefugte Demontage
des Fernsehgeräts untersagt.
Wenn Sie technischen Service
benötigen, wenden Sie sich an
einen autorisierten Kundendienst.
DE
Wenn das Produkt
ungewöhnliche Geräusche
von sich gibt, trennen Sie es
von der Stromversorgung und
wenden Sie sich an einen
autorisierten Kundendienst.
Um Explosionen und
Brandgefahr zu vermeiden,
dürfen Sie feuergefährliches
Material nicht in der Nähe
des Produkts benutzen oder
lagern.
Die Antenne des Produkts
sollte sich nicht in der Nähe
%j'^[
um Stromschläge zu
vermeiden.
Vergewissern Sie sich immer,
dass das Stromkabel des
Fernsehgeräts ordnungsgemäß
eingesteckt ist, da eine
mangelhafte elektrische
Verbindung Brände verursachen
kann.
Ziehen Sie vor dem Reinigen
des Fernsehgeräts das
Netzkabel und verwenden Sie
weiche Stofftücher, jedoch
keine Chemikalien. Sorgen Sie
dafür, dass das Produkt nicht
mit Wasser in Kontakt kommt.
Flachbildfernseher mit LED-Hintergrundbeleuchtung – Bedienungsanleitung
DE-3
Sicherheitswarnungen
Trennen Sie bei Unwetter oder
Gewitter das Fernsehgerät von
der Stromversorgung und trennen
Sie die Antenne, um Stromschläge
oder Brandgefahr zu vermeiden.
Wenn eine Antenne verwendet
wird, sollten Maßnahmen
ergriffen werden, damit kein
Wasser am Kabel entlang in
den Fernseher gelangt.
Um die Gefahr von Bränden
und Stromschlägen zu
verringern, sollten Sie das
Produkt nie in feuchten
Bereichen aufstellen.
Halten Sie den Stecker
und das Stromkabel
sauber, um Stromschläge
oder Brandgefahr zu
vermeiden.
Berühren Sie den Stecker nie
mit nassen Händen, da dies zu
Stromschlägen führen kann.
Wenn das Fernsehgerät
über einen längeren
Zeitraum nicht benutzt
wird, sollte es vom
Stromnetz getrennt werden,
um Stromschläge oder
Brandgefahr zu vermeiden.
DE-4
Flachbildfernseher mit LED-Hintergrundbeleuchtung – Bedienungsanleitung
Ihr LED-LCD-Fernseher
Ihr LED-LCD-Fernseher
Seitliche Bedienelemente
Montage des Standfußes
1. Legen Sie das Fernsehgerät vorsichtig mit dem
Bildschirm nach unten auf eine gepolsterte, saubere
]
[!$
`j$
]!
und Kratzern zu schützen.
2. Richten Sie den Standfuß vorsichtig an der
Unterseite des Fernsehgeräts aus.
3. Schrauben Sie den Standfuß mit den mitgelieferten
Schrauben am Fernsehgerät fest. (3 Schrauben bei
LE32F600C, 4 Schrauben bei LE32A650CF)
Montage der Wandhalterung
1. Legen Sie das Fernsehgerät vorsichtig mit dem
Bildschirm nach unten auf eine gepolsterte, saubere
]
[!$
`j$
]!
und Kratzern zu schützen.
2. Wenn der Standfuß angeschraubt ist, lösen Sie
die drei Schrauben, mit denen er am Fernsehgerät
befestigt ist, und nehmen Sie den Standfuß ab.
3. Befestigen Sie die Wandhalterung (separat
erhältlich) mithilfe der mit der Wandhalterung
gelieferten Schrauben an den auf der Rückseite des
Fernsehgeräts vorgesehenen Montagebohrungen.
Informationen zur sachgerechten Aufhängung des
]^%#{![
der Wandhalterung beiliegen.
Hinweis
%
j
Wandhalterung an den technischen Kundendienst.
Falls Sie das Fernsehgerät selber montieren,
haftet Haier Electronics weder für Schäden am
Produkt noch für Personenschäden.
DE
Taste
Beschreibung
SOURCE
Zur Auswahl der Signalquelle drücken.
MENU
Zum Öffnen oder Schließen des
Bildschirmmenüs drücken.
VOL+
Zum Erhöhen der Lautstärke drücken.
VOL-
Zum Verringern der Lautstärke
drücken.
CH+
Drücken, um zum nächsten Sender in
der Senderliste zu gelangen.
CH-
Drücken, um zum vorherigen Sender in
der Senderliste zu gelangen.
POWER
Drücken, um das Fernsehgerät einoder auszuschalten.
Hinweis
$j#JO?^
seitliche Bedienfeld an der rechten Seite des
Fernsehgeräts.
HINWEIS:
'[<=
und OSD-Darstellungen in diesem Handbuch auf
dem Modell LE32F600C.
%!!+
und können sich von der tatsächlichen Anzeige
unterscheiden.
Flachbildfernseher mit LED-Hintergrundbeleuchtung – Bedienungsanleitung
DE-5
Ihr LED-LCD-Fernseher
Anschlüsse an der Rückseite
*
*
3
*
* Diese Anschlüsse sind nur beim Modell LE32A650CF verfügbar.
Anschluss
Beschreibung
COMPONENT IN
(Y COMMON CVBS IN)
Schließen Sie hier die Videokabel für ein Komponenten- oder Komposit-Gerät an.
Verbinden Sie beim Anschluss einer Komposit-Video-Quelle das gelbe Videokabel mit
der grünen Y-Buchse.
YPbPr/CVBS AUDIO
Schließen Sie hier die Audiokabel für ein Component- oder Composite-Gerät an.
USB
Schließen Sie zum Betrachten von Fotos, zur Wiedergabe von Musik oder zum
Abspielen eines Videos ein USB-Speichergerät an den USB-Anschluss an. (Weitere
|jj^%!}%$!%_
HDMI 2 IN
Schließen Sie an dieser Buchse ein HDMI-Gerät an.
COMMON INTERFACE
Wenn Sie Bezahlfernsehen nutzen und eine SmartCard mit CI-Modul haben, setzen
Sie das CI-Modul in diesen Steckplatz ein.
Kopfhörerausgang
Schließen Sie an dieser Buchse Ihre Kopfhörer an. Beim Einstecken der Kopfhörer
werden die Lautsprecher des Fernsehgeräts stummgeschaltet.
DIGITAL AUDIO OUT
(Koaxial)
Schließen Sie an dieser Buchse ein koaxiales, digitales Audiosystem an.
ANT IN (AIR/CABLE)
Schließen Sie an dieser Buchse eine Antenne oder Kabelfernsehen an.
SCART
Schließen Sie an diese Buchse ein Gerät mit SCART-Kabel an.
PC AUDIO IN
Schließen Sie hier das Audiokabel von einem Computer an.
PC IN
Schließen Sie hier das Videokabel von einem Computer an.
HDMI 3 IN
HDMI 1 IN
DE-6
Schließen Sie an dieser Buchse ein HDMI-Gerät an.
Flachbildfernseher mit LED-Hintergrundbeleuchtung – Bedienungsanleitung
Ihr LED-LCD-Fernseher
Verwenden eines Komposit-Kabels (nur bei
LE32A650CF)
Herstellen von Verbindungen
Verbinden mit Antenne/Kabel
L
R
COMPOSITE OUT
VIDEO
Anschließen eines externen Audio-/
Videogeräts
DE
Anschließen eines PC
RGB
Verwenden eines HDMI-Kabels
PC
AUDIO
(L/R)
3
Anschließen von Kopfhörern
Verwenden eines SCART-Kabels
SCART
Anschließen eines digitalen Audiosystems
Verwenden eines Komponenten-Kabels (nur bei
LE32A650CF)
Y
PB
PR
L
COMPONENT OUT
R
Hinweis
%
%`j!=!
den Fernseher und das Gerät ab.
Flachbildfernseher mit LED-Hintergrundbeleuchtung – Bedienungsanleitung
DE-7
Ihr LED-LCD-Fernseher
Verwenden der Fernbedienung
8
1
2
3
SOURCE
16
9
P.MODE
*
S.MODE
10
4
abc
def
ghi
jkl
mno
pqrs
tuv
wxyz
11
SLEEP
Q.VIEW
12
5
P
VOL
AUDIO
17
I/II
6
7
8
9
10
11
SUBTITLE
FAV /
3D WORLD
INFO /
SCREEN
CH.LIST /
GUIDE /
MENU /
18
*
19
20
BACK /
EXIT /
21
22
14
15
14
15
OK
12
13
13
23
24
16
17
18
19
#
1
2
3
4
5
6
7
DE-8
Taste
Beschreibung
Drücken, um das Fernsehgerät
(Ein/Aus) ein- oder auszuschalten.
Drücken, um den Tonmodus
S.MODE
auszuwählen.
Drücken, um den Bildmodus
P.MODE
auszuwählen.
Drücken, um eine Sendernummer
0-9
oder ein Kennwort einzugeben.
Drücken, um zum zuletzt
Q.VIEW
angesehenen Sender zu wechseln.
Drücken, um den Sleep-Timer
SLEEP
einzustellen.
Drücken, um die Laustärke
VOL+/einzustellen.
Drücken, um den Ton ein- oder
(Stumm) auszuschalten.
Drücken, um DTV-Audio/
I/II AUDIO
NICAM (abhängig vom
Übertragungssignal) auszuwählen.
Drücken, um den Untertitel
SUBTITLE
anzuzeigen.
20
21
22
23
24
Drücken, um einen bevorzugten
Sender hinzuzufügen. Im VideotextFAV/
Modus drücken Sie diese Taste, um
die Seite anzuhalten.
Drücken, um das
SCREEN
Bildschirmanzeigeformat zu ändern.
Drücken, um das Bildschirmmenü
MENU/
zu öffnen oder zu schließen.
Drücken, um durch das
Bildschirmmenü zu navigieren.
Drücken, um eine Auswahl zu
OK
bestätigen.
Drücken, um zum vorherigen
Menü zurückzukehren.
Im Videotext-Modus drücken Sie
BACK/
diese Taste, um zum Mix-Modus
zu gelangen.
Drücken, um im Multimedia-Modus
(zurück) einen schnellen Vorlauf oder
(vorwärts) eine Wiedergabe im Rücklauf
auszulösen.
Drücken, um den Videotext zu
/ (TEXT) öffnen.
Drücken, um im Multimedia- und
TimeShift-Modus die Wiedergabe
(Wiedergazu starten oder anzuhalten.
be/Pause)
Drücken, um die Liste der
SOURCE
Signalquellen zu öffnen.
Drücken, um den Sender zu
P
/
wechseln.
Drücken, um Senderinformation
anzuzeigen.
Im Videotext-Modus drücken Sie
INFO/
diese Taste, um ausgeblendete
Informationen anzuzeigen.
Drücken, um die Senderliste
zu öffnen. Im Videotext-Modus
drücken Sie diese Taste, um das
CH.LIST/
Bild am oberen oder unteren Rand
bzw. als Vollbild anzuzeigen.
Drücken, um den Programmführer
zu öffnen.
Im Videotext-Modus drücken Sie
GUIDE/
diese Taste, um eine zweite Seite
zu öffnen.
Drücken, um das Bildschirmmenü
zu verlassen.
EXIT/
Im Videotext-Modus drücken Sie
diese Taste, um Text auszublenden.
Drücken, um im Multimedia-Modus
zur nächsten oder vorherigen
(vorherige)
(nächste) Datei zu springen.
(AUFNAH- Drücken, um die Aufnahme zu
starten oder zu unterbrechen.
ME)
Drücken, um die MultimediaWiedergabe, den TimeShift-Modus
(Stopp)
oder die Aufnahme zu beenden.
* Bei diesen Modellen funktioniert diese Taste nicht.
Flachbildfernseher mit LED-Hintergrundbeleuchtung – Bedienungsanleitung
Erste Schritte
%]&]
Zeitraum nicht verwenden, nehmen Sie die Batterien
aus der Fernbedienung.
Erste Schritte
Vorbereiten der Fernbedienung
Einlegen der Batterien
j%$
&j
Hausmüll. Werfen Sie die Batterien nicht ins Feuer.
Entsorgen Sie die Batterien entsprechend den
lokalen Vorschriften.
1. Öffnen Sie die Batteriefachabdeckung.
Erstinstallation
2. Legen Sie zwei Batterien vom Typ AAA ein. Achten
Sie darauf, dass die Symbole + und - an den
Batterien den Symbolen + und - im Batteriefach
entsprechen.
Wenn Sie Ihr Fernsehgerät zum ersten Mal anschalten,
führt Sie der Erstinstallationsassistent durch die
Einrichtung der Grundeinstellungen wie Menüsprache,
Land, Kennwort, Signalart und Sendersuche.
1. Vergewissern Sie sich, dass:
$!
|jj^%!%_
#j*
j|jj^
Sie auf der Seite 7).
@+'$!
AC IN an der
Rückseite des Fernsehgeräts und in eine
funktionierende Steckdose eingesteckt ist.
Stecken Sie beim Modell LE32A650CF einfach
das montierte Netzkabel in eine funktionierende
Steckdose.
2. Drücken Sie , um das Fernsehgerät
einzuschalten. Der Bildschirm mit dem
Einrichtungsassistenten wird geöffnet. Drücken Sie
zum Starten des Assistenten die Taste OK.
3. Drücken Sie /, um Ihre Sprache auszuwählen
und anschließend , um fortzufahren.
Initial Setup
3. Setzen Sie die Batteriefachabdeckung wieder ein.
Language
Please select your language:
English
Vorsichtshinweise für Fernbedienung und
Batterien
Français
Italiano
Español
#
%![
+{
Fernbedienung und dem Fernbedienungssensor des
]';]^_
$!+%!=j
_
Lassen Sie die Fernbedienung nicht auf den Boden
fallen.
%j
j'
'Y
von der Fernbedienung gesendete Signal stören.
Vermeiden Sie die Verwendung in der Nähe von
Leuchtstoffröhren oder Neonleuchten.
Deutsch
Back
Next
4. Drücken Sie /, um Ihr Land auszuwählen und
anschließend , um fortzufahren.
Land
Erstmaliges Einrichten
Bitte wählen Sie lhr Land:
Österreich
Belgien
%!
!'
Wärmequelle oder an einen feuchten Ort, da dies die
Fernbedienung beschädigen könnte.
$!
]>${
Explosionsgefahr. Ersetzen Sie die Batterien nur
durch Batterien desselben bzw. eines gleichwertigen
Typs. Die Batterien (Batteriesatz oder im Gerät
^
$&
&]>
Wärme durch Sonneneinstrahlung, Feuer usw.
ausgesetzt werden.
Select
Schweiz
Tschechische Republik
Deutschland
Zurück
Auswählen
Zunächst
Flachbildfernseher mit LED-Hintergrundbeleuchtung – Bedienungsanleitung
DE-9
DE
Erste Schritte
5. Geben Sie Ihr neues, vierstelliges Kennwort
zweimal ein, und drücken Sie dann OK, um
fortzufahren.
Erstmaliges Einrichten
Falls im Empfangsmodus 'Kabel' eingestellt ist,
&
'%+!*j^!j*jj
/// und die Zifferntasten. Drücken Sie
anschließend OK, um die Sendersuche zu starten.
Erstmaliges Einrichten
Bitte Kennwort festlegen. “0000” ist kein gültiges Kennwort
Konfigurieren Sie die Kabeldaten
Suchmodus
Voll
Neues Passwort
Frequenz (kHz)
Passwort bestätigen
Zurück
Auswählen
306000
Modulation
Auto
Symbolrate (Ksym/s)
Auto
Netzwerk-ID
Auto
Zunächst
Auswählen
Hinweis
{]
!
Fernsehgerät von der Stromversorgung getrennt
oder ausgeschaltet wird, bevor ein Kennwort
eingerichtet wurde, muss über das SperreMenü (Lock) ein neues Kennwort eingerichtet
werden. Geben Sie für den Zugang zum SperreMenü (Lock) das Standard-Kennwort 1234 ein,
und ändern Sie dann das Kennwort. Weitere
|jj^%!%!
{j]_
Zunächst
8. Warten Sie, bis die Sendersuche abgeschlossen ist.
Erstmaliges Einrichten
Sendersuche
Die Kanalsuche braucht eine Weile.
Status: Suche läuft.
Analoge Kanäle: 0
Digitale Kanäle: 0
21%
6. Drücken Sie /, um Ihren Empfangs-Modus
(Tuner) auszuwählen, und anschließend , um
fortzufahren.
Tunermodus
Erstmaliges Einrichten
9. Drücken Sie nach Abschluss der Sendersuche OK,
um den Assistenten zu verlassen.
Wählen Sie den Tuner-Modus:
Erstmaliges Einrichten
Beendet
Antenne
Kabel
Glückwunsch!!
Das erstmalige Einrichten ist beendet.
Drücken Sie auf [OK], um den Assistenten zu verlassen.
Zurück
Auswählen
Zunächst
7. Drücken Sie /, um Suche starten
auszuwählen, und anschließend , um fortzufahren.
Erstmaliges Einrichten
Zurück
Sendersuche
Schließen Sie zuerst Antenne an.
Kanalsuche jetzt starten?
Wird der Schritt übersprungen, kann die Kanalsuche vom Menü aus durchgeführt werden.
Suche starten
Suche nicht durchführen
Zurück
DE-10
10
Auswählen
Zunächst
Flachbildfernseher mit LED-Hintergrundbeleuchtung – Bedienungsanleitung
Erste Schritte
&
'%Q.VIEW, um zum zuletzt angesehenen
Sender zu gelangen.
Erläuterungen zu den
Grundfunktionen
Ein- und Ausschalten des Fernsehgeräts
1. Drücken Sie , um das Fernsehgerät
einzuschalten. Bis das Bild am Bildschirm angezeigt
wird, können ein paar Sekunden verstreichen.
2. Drücken Sie , um das Fernsehgerät
auszuschalten. Das Fernsehgerät geht in den
Standby-Modus über.
Hinweis
%!
]
>j
%j;]_\%
Netzstecker aus der Steckdose, um das Gerät vom
Stromnetz zu trennen.
Auswählen der Signalquelle
1. Drücken Sie SOURCE auf der Fernbedienung. Die
Liste der Signalquellen wird angezeigt.
Haupt
TV
SCART
VGA
HDMI 1
HDMI 2
Verwenden der Favoritenliste
So fügen Sie der Favoritenliste einen Sender hinzu:
1. Wechseln Sie zu dem Sender, der zur Favoritenliste
hinzugefügt werden soll.
2. Drücken Sie FAV/ , um die Favoritenliste zu öffnen.
3. Drücken Sie /, um eine gewünschte Position
auszuwählen, und drücken Sie anschließend OK,
um den aktuellen Sender in die Favoritenliste
aufzunehmen. wird im Informationsfeld angezeigt.
So können Sie einen bevorzugten Sender wiedergeben:
1. Drücken Sie FAV/ , um die Favoritenliste zu öffnen.
2. Drücken Sie /, um den Sender in der
Favoritenliste auszuwählen, und anschließend OK,
um zu dem Sender zu wechseln.
So entfernen Sie einen Sender aus der Favoritenliste:
1. Drücken Sie FAV/ , um die Favoritenliste zu öffnen.
2. Drücken Sie /, um den zu entfernenden Sender
in der Favoritenliste auszuwählen, und anschließend
OK, um zu dem Sender zu wechseln.
3. Drücken Sie nochmals OK, um den Sender aus
der Favoritenliste zu entfernen. wird aus dem
Informationsfeld entfernt.
Einstellen der Lautstärke
&
'%VOL+/VOL-, um die Lautstärke zu
erhöhen oder zu verringern.
&
'% , um den Ton auszuschalten. Drücken
Sie , um den Ton erneut einzuschalten.
USB
2. Drücken Sie /, um die Signalquelle
auszuwählen, und anschließend OK.
Auswählen eines Senders
Wechseln Sie mit P /P auf der Fernbedienung
zum vorhergehenden oder nächsten Sender der
Senderliste.
&
'%\[!%
direkt auszuwählen.
&
'%CH.LIST/ , um die Senderliste
anzuzeigen, und drücken Sie anschließend /
und OK, um einen Sender auszuwählen.
So verwenden Sie die farbigen Tasten:
Seite nach oben – Drücken Sie die rote Taste,
um den ersten Sender auf der aktuellen Seite
hervorzuheben. Drücken Sie die rote Taste erneut,
um den ersten Sender auf der vorigen Seite
hervorzuheben und diese anzuzeigen.
Seite nach unten – Drücken Sie die grüne Taste,
um den letzten Sender auf der aktuellen Seite
hervorzuheben. Drücken Sie die grüne Taste
erneut, um den letzten Sender auf der nächsten
Seite hervorzuheben.
Listenauswahl – Drücken Sie die gelbe Taste, und
wählen Sie anschließend mithilfe der Tasten /
die Art der Sender aus, die in der Liste angezeigt
werden sollen (Alle/Digital/Radio/Analog).
Verlassen – Drücken Sie die blaue Taste, um die
Senderliste zu verlassen.
Anzeigen der Senderinformationen
%INFO/ einmal drücken, werden
wesentliche Senderinformationen wie
Sendernummer, Sendername, Signalquelle (Tuner)
usw. angezeigt.
%INFO/ zweimal drücken, werden weitere
|jj{j[#!Y![
Audiodaten usw. angezeigt.
%INFO/ dreimal drücken, wird die
Programmbeschreibung angezeigt.
%INFO/ noch einmal drücken, wird das
Informationsfeld geschlossen.
Navigieren durch das Bildschirmmenü
1. Drücken Sie MENU/ . Das Bildschirmmenü wird
angezeigt.
2. Drücken Sie /, um ein Hauptmenü (Bild/Ton/
Kanäle/Einstellungen/Sperre) auszuwählen, und
anschließend OK, um das Untermenü zu öffnen.
3. Drücken Sie /, um einen Menüpunkt im
Untermenü auszuwählen, und anschließend
entweder OK, um das Menü zu öffnen, oder
/, um die Einstellung zu ändern oder eine
Einstelloption auszuwählen.
4. Drücken Sie BACK/ , um zum vorherigen
Menü zurückzukehren, oder EXIT/ , um das
Bildschirmmenü zu schließen.
Flachbildfernseher mit LED-Hintergrundbeleuchtung – Bedienungsanleitung
DE-11
11
DE
Das Fernsehgerät im Einsatz
Das Fernsehgerät im Einsatz
Anpassen der Bildeinstellungen
Bildmodus
Bild
Ton
TV
ECO
Hintergrundbel.
50
Helligkeit
31
Kontrast
41
Farbsättigung
37
Farbton
Einstellungen
0
Bildschärfe
43
Sperren
Sp
Bestätigen
Auswählen
Verlassen
Bildmodus
So wählen Sie den Bildmodus aus: Sie können je
nach Programm Benutzer/Lebendig/Eco/Standard/
Mild auswählen.
Hinweis
%'Y!
<P.MODE drücken, um
den Bildmodus zu wählen.
$!#~!$!
wird der Bildmodus automatisch auf 'Benutzer'
eingestellt.
Hintergrundbel.
Regelt die Helligkeit der Hintergrundbeleuchtung, um
die Gesamtbrillanz des Bildes zu bestimmen.
Helligkeit
Stellt das Bild heller oder dunkler ein.
Kontrast
Bestimmt die Intensität des Weißpegels im Bild.
Farbsättigung
Bestimmt die Farbsättigung des Bildes.
Farbton
Bestimmt den Farbton des Bildes.
Bildschärfe
Macht das Bild schärfer oder weicher.
Gamma
Ermöglicht die Auswahl des Gamma-Typs.
Farbtemperatur
Ermöglicht die Auswahl der Farbtemperatur. Auswahl:
Kühl - Verleiht der weißen Farbe eine bläuliche
Tönung.
Standard – Verleiht der weißen Farbe einen
neutralen Ton..
Warm – Verleiht der weißen Farbe eine rötliche
Tönung.
Erweit. Bildeinstellungen
Ermöglicht die Anpassung der erweiterten
Bildeinstellungen.
Rauschreduzierung
Reduziert Störungen auf dem Bildschirm und
erzeugt ein klareres Videobild.
MPEG Rauschreduz.
Reduziert Störungen in MPEG-komprimierten
Videos.
DE-12
12
Adaptive Luma-Einst.
Ermöglicht die Einstellung der durchschnittlichen
Helligkeit des Bildes, um große Helligkeitsbereiche
auszugleichen.
Hautton
Ermöglicht die Einstellung des Hauttons auf die
bevorzugte Tönung.
DI-Filmmodus
Ermöglicht die Optimierung der Bildeinstellungen
für das Betrachten von Filmen.
Blue Stretch
Die blaue Komponente weißer und beinahe weißer
Bildpunkte kann erhöht werden, ohne dass sich
der Hautton ändert.
Spielmodus
Erlaubt die Optimierung der Bildeinstellungen für
Spiele.
Adapt. Hintergrundlicht (Adaptive Back Light)
Ermöglicht die dynamische Veränderung der
Hintergrundbeleuchtung des Bildschirms je nach
Niveau von Helligkeit oder Dunkelheit im Signal.
VGA-Modus (nur VGA-Quelle)
Ermöglicht die Auswahl des VGA-Modus.
Bild – In diesem Modus werden Bilder weicher
und Text klarer dargestellt.
– In diesem Modus werden Bilder
schärfer dargestellt. Wählen Sie diesen
Modus, wenn Sie Videos von einem Computer
wiedergeben möchten.
HDMI-Modus (nur HDMI Progressive Timing)
Auto~j$;^'{
automatisch ausgewählt.
– In diesem Modus werden Bilder
weicher dargestellt, Text erscheint klar. Wählen
Sie diesen Modus, wenn Sie eine Verbindung
zu einem Computer herstellen.
Bild – In diesem Modus werden Bilder schärfer
dargestellt. Wählen Sie diesen Modus, wenn
Sie sich Videos von einem Computer oder von
Videoabspielgeräten wie DVD-Player, Blu-rayPlayer usw. ansehen.
Overscan (Nur HDMI-Quelle)
Zur Vergrößerung der Anzeige jenseits des
sichtbaren Bildschirmbereichs. Das daraus
resultierende Bild wird zentral vergrößert.
Hinweis
Overscan auf Aus eingestellt ist, kann
Bildformat nicht ausgewählt werden.
VGA
Erlaubt die Anpassung des Computerbilds vom VGAEingang. Anpassungsmöglichkeiten:
Auto-Anpassung – Bildeinstellungen werden
automatisch angepasst.
H. Position – Passt die horizontale Bildposition
an.
Flachbildfernseher mit LED-Hintergrundbeleuchtung – Bedienungsanleitung
Das Fernsehgerät im Einsatz
V. Position – Passt die vertikale Bildposition an.
Phase – Passt die Fokussierung feststehender
Bilder an.
Clock – Passt die Abtastrate an.
Nur Tonsignal
Fernsehbild kann ausgeschaltet werden, wenn nur
der Programmton wiedergegeben werden soll.
Hinweis
&
'%+!=j!@!
<j<_
Zurücksetzen
Setzt die Bildeinstellungen auf die Werkseinstellungen
zurück.
Anpassen der Toneinstellungen
Bild
Standard
Tonmodus
Balance
Ton
0
Tiefen
50
Höhen
TV
Einstellungen
Einste
Eins
te
50
Raumklang
Simulierung
Lautsprecher
Ein
SPDIF-Typ
Aus
Sperren
Bestätigen
Auswählen
Verlassen
Tonmodus
Erlaubt die Auswahl des Tonmodus. Je nach
persönlichem Geschmack können Sie zwischen
Benutzer/Standard/Musik/Theater wählen.
Hinweis
%<jj!+
[
%
]
S.MODE auf der Fernbedienung.
$!#~!<j!
wird Tonmodus automatisch auf Benutzer
eingestellt.
Balance
Ermöglicht die Anpassung des
Lautstärkenverhältnisses zwischen linkem und
rechtem Lautsprecher.
Tiefen
Ermöglicht die Einstellung der tiefen Töne.
Höhen
Ermöglicht die Einstellung der hohen Töne.
Surround Sound
Ermöglicht die Simulation von Surround-Sound.
Lautsprecher
Ermöglicht das Ein- und Ausschalten der im
Fernsehgerät eingebauten Lautsprecher. Auswahl:
– Die eingebauten Lautsprecher werden
ausgeschaltet.
EIN – Die eingebauten Lautsprecher werden
eingeschaltet.
Auto (CEC) – Ermöglicht die Ausgabe von Audio
von einem angeschlossenen CEC-Gerät.
Hinweis
CEC-Funktion im Menü CEC auf Aus
eingestellt ist, wird die Option Auto deaktiviert
SPDIF Type
Ermöglicht die Auswahl des digitalen
Audioausgabetyps SPDIF.
SPDIF-Verzög.
Ermöglicht die Anpassung der SPDIFVerzögerungszeit zur Synchronisierung des Tons mit
dem Bild (0~250).
Autom. Lautstärkenanpassung
Wenn diese Einstellung eingeschaltet ist, bleibt die
Lautstärke beim Umschalten zu einem anderen
Sender oder von einer TV-Show zur Werbung
einheitlich.
Audiotyp
Erlaubt die Auswahl des Audiotyps.
Normal – Liefert normales Audio.
Hörbehindert – Liefert visuelle Beschreibungen
von Szenen für Hörbehinderte.
Sehbehindert – Liefert Audiobeschreibung von
Szenen für Sehbehinderte.
Sehbehindert (nur DTV)
Ermöglicht die Anpassung der Audioeinstellungen für
Sehbehinderte.
Lautsprecher
Ermöglicht das Ein- und Ausschalten der
Lautsprecher.
Kopfhörer
Ermöglicht das Ein- und Ausschalten der
Kopfhörer.
Lautstärke
Ermöglicht die Anpassung der Laustärke der
Audiobeschreibung.
Schwenk-/Ausblendoption
Ermöglich das Ein- und Ausschalten der Schwenkund Ausblendsteuerung.
Ton für Sehbehinderte
Ermöglicht die Auswahl der Audiosprache für
Sehbehinderte (die Optionen hängen vom
Audioinhalt der Sendung ab).
Hinweis
!Sehbehindert ist nur verfügbar,
wenn der Audiotyp auf Sehbehindert gesetzt ist.
Downmix-Modus
Ermöglicht die Auswahl des Downmix-Modus.
Zurücksetzen
Ermöglicht das Zurücksetzen der Toneinstellungen
auf die Werkseinstellungen.
Flachbildfernseher mit LED-Hintergrundbeleuchtung – Bedienungsanleitung
DE-13
13
DE
Das Fernsehgerät im Einsatz
Bild
Empfangsmodus
Antenne
Audiokanal
Ton
Suche eines einzelnen HF-Kanals. (Nur Digital)
Bild
0%
Ton
Kanäle
Aus
TV
Geräteinformation
Einstellungen
Einste
Eins
te
Antenne
Off
Stereo
TimeShift-Modus
TV
Antennen-Modus
41
HF Kanal
Signalpegel
0%
Signalqualität
0%
Einstellungen
Einste
Eins
te
Sperren
Sperren
Bestätigen
Bestätigen
Auswählen
Empfangsmodus
Ermöglicht die Auswahl des Tuner-Modus: Antenne
bzw. Kabel.
Audiokanal (nur ATV)
Ermöglicht die Auswahl des Audiomodus für mehrere
Programmübertragungen in Audio oder Stereo.
Audiosprache (nur DTV)
Ermöglicht die Auswahl der Audiosprache bei
Programmen, die Tonspuren in mehreren Sprachen
anbieten.
Audiosprache 2 (nur DTV)
Ermöglicht die Auswahl der zweiten gewünschten
Audiosprache bei Programmen, die Tonspuren in
mehreren Sprachen anbieten.
Kanäle
Ermöglicht die Durchführung der Sendersuche und die
Bearbeitung der Senderliste.
Sendersuche
Ermöglicht die Durchführung einer Sendersuche
im Anschluss an die Auswahl des Landes und der
*j^!j|**j!_
Update Suchlauf
Ermöglicht die Aktualisierung der Sendersuche, um
der bestehenden Senderliste Sender hinzuzufügen.
Analoge manuelle Suche
Erlaubt die Durchführung einer analogen manuellen
Suche von der angegebenen Startfrequenz aus
nach oben oder nach unten.
Bild
Nach analogen Kanälen suchen
Off
Ton
TV
48.25
Startfrequenz (MHz)
Suche aufwärts
Einstellungen
Eins
nste
Suche abwärts
Sperren
Bestätigen
Auswählen
Verlassen
1. Drücken Sie /, um die Startfrequenz (MHz)
auszuwählen, und geben Sie anschließend die
Startfrequenz mithilfe der Zifferntasten auf der
Fernbedienung ein.
2. Drücken Sie /, um Suche aufwärts oder
Suche abwärts auszuwählen, und anschließend
OK, um von der Startfrequenz aus Sender mit
höherer oder niedrigerer Frequenz zu suchen.
Einzelne HF-Suche (nur digitale Sender)
Ermöglicht eine einmalige HF-Suche und
Überprüfung von Signalstärke und -qualität.
DE-14
14
Auswählen
Verlassen
Verlassen
1. Geben Sie mithilfe der Zifferntasten auf der
Fernbedienung den HF-Sender ein.
2. Drücken Sie OK, um die Suche zu starten.
Kabel-Modus
Suche eines einzelnen HF-Kanals. (Nur Digital)
Bild
Kabel
Off
0%
Ton
Frequenz (kHz)
TV
Einstellungen
Einste
Eins
te
Modulation
Symbolrate (Ksym/s)
Sperren
Bestätigen
Auswählen
Verlassen
1. Drücken Sie /, um Frequenz (KHz)
auszuwählen, und geben Sie anschließend
die Frequenz mithilfe der Zifferntasten auf der
Fernbedienung ein.
2. Drücken Sie /, um Modulation zu
selektieren, und anschließend /, um den
Modulationstyp auszuwählen.
3. Drücken Sie /, um Symbolrate (Ksym/s)
auszuwählen, und geben Sie anschließend die
Symbolrate mithilfe der Zifferntasten auf der
Fernbedienung ein.
4. Drücken Sie OK, um die Suche zu starten.
Netzwerkauswahl
Ermöglicht die Auswahl des bevorzugten Netzwerks,
falls bei der Durchführung der Sendersuche mehr
als zwei Netzwerke erkannt wurden.
Kanal überspringen
Ermöglicht die Auswahl der Sender, die bei
Benutzung der Tasten P /P
übersprungen
werden. Sie können die übersprungenen Sender
nach wie vor mithilfe der Zifferntasten auf der
Fernbedienung einstellen.
1. Drücken Sie /, um den Sender auszuwählen,
der übersprungen werden soll, und drücken Sie
anschließend OK.
wird angezeigt.
Bild
Ton
TV
Einstellungen
909
Analog
910
Analog
911
Analog
912
Analog
913
Analog
914
Analog
915
Analog
Sperren
S
Flachbildfernseher mit LED-Hintergrundbeleuchtung – Bedienungsanleitung
Bestätigen
Auswählen
Verlassen
Das Fernsehgerät im Einsatz
2. Wiederholen Sie den o.a. Schritt, bis alle
übersprungenen Sender festgelegt sind.
Kanäle sortieren
Ermöglicht die Änderung der Reihenfolge in der
Senderliste.
1. Drücken Sie /, um den Sender
auszuwählen, dessen Position geändert
werden soll, und drücken Sie anschließend OK.
wird angezeigt.
2. Drücken Sie /, um die gewünschte
Senderposition auszuwählen, und
anschließend OK, um die Position der beiden
Sender zu tauschen.
3. Wiederholen Sie Schritt 1 und 2, bis alle
Sender sortiert sind.
Kanäle bearbeiten
Ermöglicht die Bearbeitung von Sendernummer und
-name.
1. Drücken Sie /, um den Sender
auszuwählen, der bearbeitet werden soll, und
drücken Sie anschließend OK.
Bild
Netzwerkname:
Ton
Sendernummer:
915
Sendername:
TV
Sports
Frequenz
503.3
Einstellungen
Sperren
S
Bestätigen
Auswählen
Verlassen
2. Drücken Sie /, um den Punkt
Sendernummer auszuwählen, und geben Sie
anschließend die gewünschte Sendernummer
über die Zifferntasten der Fernbedienung ein.
3. Drücken Sie /, um Sendername
auszuwählen, und geben Sie anschließend
die einzelnen Buchstaben des neuen Namens
durch wiederholtes Drücken der Zifferntasten
zur Auswahl eines Zeichens ein.
Hinweis
}\
+!Y
[&
'%<.
Analoge Kanal-Feinabst.
Ermöglicht die Feinabstimmung des
Analogsenders bei schlechtem Empfang.
1. Drücken Sie /, um den Analogsender
auszuwählen, bei dem die Feinabstimmung
erfolgen soll.
2. Drücken Sie /, um die Frequenz
anzupassen, und drücken Sie anschließend zur
Bestätigung auf OK.
Sendernummer: 901
Sendername: BBC
Frequenz: 85.25 MHz
Aktivieren
Abbrechen
A
Kanalliste löschen
Löscht alle in der Senderliste enthaltenen Sender.
TimeShift-Modus
Ermöglicht das Ein- oder Ausschalten der TimeShift!'j_|jj^%!
%!\`+_
Geräteinformation
Erlaubt die Überprüfung des an der Rückseite des
Fernsehers angeschlossenen USB-Speichermediums.
Anpassen der
Fernsehereinstellungen
Bild
Deutsch
Menüsprache
16:9
Bildformat
Ton
TV
Einstellungen
DE
DPMS
Ein
Blauer Bildschirm
Aus
Interaktionskanal
Aus
MHEG Kennwort-Schutz
Aus
Zeiteinstellung
Sperren
S
Bestätigen
Auswählen
Verlassen
Menüsprache
Ermöglicht die Sprachwahl für das Bildschirmmenü.
Bildformat
Ermöglicht das Ändern der Bildgröße.
Hinweis
%'Y!
<SCREEN auf der
Fernbedienung drücken, um das Bildformat zu
wechseln.
DPMS (Display Power Management Signals)
Wenn Sie diese Einstellung einschalten, geht das
Fernsehgerät automatisch in den Standby-Modus
über, wenn nicht spätestens nach 40 Sekunden im
VGA-Modus ein PC-Eingangssignal erkannt wird.
Blauer Bildschirm
Wenn Sie diese Einstellung einschalten, wird
ein blauer Bildschirm angezeigt, wenn kein
Eingangssignal vorhanden ist oder Audioprogramme
wiedergegeben werden.
Interaktionskanal
Wenn Sie diese Einstellung einschalten, aktivieren
%%!'j|'j_
MHEG Kennwort-Schutz
Wenn Sie diese Einstellung einschalten, aktivieren
Sie die MHEG PIN-Schutzfunktion.
Zeiteinstellung
Ermöglicht die Anpassung der Uhrzeit- und TimerEinstellung.
Zeitzone
Hier kann die Zeitzone ausgewählt werden.
Zeit
Auto-Synchronisation
Wenn Sie 'Ein' wählen, werden Datum und
Uhrzeit automatisch mit einem digitalen Signal
synchronisiert (falls vorhanden). Wenn Sie das
Datum und die Uhrzeit manuell anpassen möchten,
wählen Sie 'Aus'.
Datum
Drücken Sie / und die Zifferntasten, um das
Datum einzustellen.
Flachbildfernseher mit LED-Hintergrundbeleuchtung – Bedienungsanleitung
DE-15
15
Das Fernsehgerät im Einsatz
Zeit
Drücken Sie / und die Zifferntasten, um die Zeit
einzustellen.
Einschalt-Timer
Schaltet das Fernsehgerät zu einer voreingestellten
Zeit automatisch ein.
Timer
Wenn der Timer zum Einschalten des Geräts
eingeschaltet ist, drücken Sie zur Einstellung der
Einschaltzeit / und die Zifferntasten.
Einschalt-Kanal
Wenn der Timer zum Einschalten des Geräts
eingeschaltet ist, wählen Sie den Sender aus der
Senderliste, der eingeschaltet werden soll.
Ausschalt-Timer
Schaltet das Fernsehgerät zu einer voreingestellten
Zeit automatisch aus.
Timer
Wenn der Timer zum Ausschalten des Geräts
eingeschaltet ist, drücken Sie zur Einstellung der
Ausschaltzeit / und die Zifferntasten.
Sleep-Timer
Ermöglicht das automatische Ausschalten
des Fernsehgeräts nach Verstreichen eines
voreingestellten Zeitraums.
Auto-Abschaltung
Ermöglicht das automatische Ausschalten des
Fernsehgeräts, wenn während eines voreingestellten
Zeitraums kein Betrieb stattgefunden hat.
Untertitel
Ermöglicht die Anpassung der Untertiteleinstellungen.
Analoger Untertitel
Ermöglicht das Ein- und Ausschalten der analogen
Untertitel. Wählen Sie Stumm, um analoge Untertitel
bei stummgeschaltetem Fernsehgerät einzuschalten.
Digitale Untertitelsprache
Ermöglicht die Auswahl der Sprache für digitale
Untertitel.
Digitale Untertitelsprache 2
Ermöglicht die Auswahl der zweiten Sprache für
digitale Untertitel.
Untertitel-Typ
Ermöglicht die Auswahl des digitalen Untertiteltyps.
Videotext
Ermöglicht die Anpassung der
Videotexteinstellungen.
Digitale Videotextsprache
Ermöglicht die Auswahl der digitalen
Videotextsprache.
Dekodierseiten-Sprache
Ermöglicht die Sprachauswahl für die VideotextDecodierseite.
Common Interface
Erlaubt die Datenüberprüfung des auf der Rückseite
des Fernsehgeräts (COMMON INTERFACE)
eingesteckten CA-Moduls.
DE-16
16
OAD (Over Air Download)
Ermöglicht die funkgesteuerte Aktualisierung der
Fernsehersoftware.
Manueller OAD Download
Ermöglicht die manuelle, funkgesteuerte
Aktualisierung der Fernsehersoftware. Befolgen
Sie zur Durchführung der Softwareaktualisierung
die Anweisungen auf dem Bildschirm.
Auto-Download
Wählen Sie Ja, damit Ihr Fernsehgerät die
neueste Software funkgesteuert und automatisch
herunterladen kann.
Auto-Installation
Wählen Sie Ja, damit Ihr Fernsehgerät die
neueste Software funkgesteuert und automatisch
installieren kann.
Softwareversion
Prüft die Daten der Softwareversion.
Systeminformationen
Prüft die Systeminformationen.
Werte zurücksetzen
Ermöglicht das Zurücksetzen der Audio-,
Sender- und Benutzereinstellungen auf die
Werkseinstellungen.
CEC-Menü
Ermöglicht die Anpassung der CEC-Einstellungen.
CEC-Funktion
Ermöglicht das Ein- und Ausschalten der CECFunktion.
Auto-Abschaltung
Wenn diese Option auf 'Ein' gesetzt ist, schaltet
sich das CEC-Gerät automatisch aus, sobald das
Fernsehgerät ausgeschaltet wird.
Geräteüberprüfung
Prüft, ob Ihr Gerät angeschlossen ist und CEC
unterstützt.
Standby (wenn CEC-Gerät angeschlossen ist)
Schaltet das ausgewählte CEC-Gerät aus.
Power On (wenn CEC-Gerät angeschlossen ist)
Schaltet das ausgewählte CEC-Gerät ein.
Lautstärkenkontrolle Aud. Ctrl. (wenn CECGerät angeschlossen ist)
Wenn aktiviert, lässt sich der Lautstärkepegel
des CEC-Geräts über die Fernbedienung des
Fernsehgeräts steuern.
Hinweis
@
|;]!&+??_
|jj+!^%
Bedienungsanleitung Ihres HDMI-Geräts.
\!#
!`j|??'j~
Geräten an Ihr Fernsehgerät müssen HDMI-Kabel
verwendet werden.
|??!'j
j
Geräts muss eingeschaltet sein.
%;]
>[
HDMI CEC-kompatibel ist, funktioniert die CECSteuerungsoption nicht.
Flachbildfernseher mit LED-Hintergrundbeleuchtung – Bedienungsanleitung
Das Fernsehgerät im Einsatz
j|;]
möglich, dass die CEC HDMI-Steuerungsoption
nicht funktioniert.
Shop-Demo
Ermöglicht das Ein- oder Ausschalten des
Demonstrationsmodus für den Handel.
Ein – Die Einstellungen sind für eine maximale
Wirkung in Verkaufsräumen des Einzelhandels
ausgelegt; auf dem Bildschirm wird ein
Produktinfo-Banner angezeigt.
Aus – Die Einstellungen sind für den
Privatgebrauch und auf einen sparsamen
Energieverbrauch optimiert.
Fernseherfunktionen sperren
Geben Sie für den Zugriff auf das Sperre-Menü das bei
der Erstinstallation festgelegte Kennwort ein.
Hinweis
j'*{j
festgelegt wurde, geben Sie für den Zugriff auf das
Sperre-Menü das Kennwort 1234 ein.
%j|{j`j['Y%
dem Universalpasswort 9443 auf das Lock-Menü
zugreifen
und ein neues Passwort festlegen.
g
g
Bild
TV
Signalquellen-Voreinstellung
Hier kann das Fernsehgerät so eingestellt werden, dass
es sich mit einer Standard-Signalquelle einschaltet.
Einstellungen
Einstell
Eins
i tellunge
te ungen
n
Sperren
Spe
S
Sp
p rre
rren
n
Bestätigen
Auswählen
Verlassen
Passwort ändern
Bild
OK
Kanal-Sperre
Kindersicherung
TV
Einste
Einstellungen
Einstell
Eins
te ungen
tellunge
n
Sperren
Spe
Sp
S
p rre
rren
n
Kindersicherung
Basierend auf der Altersfreigabe werden Kinder
davon abgehalten, bestimmte Fernsehprogramme
anzusehen.
Hinweis
!'j!j
Altersfreigabeinformationen einsetzbar.
Signalquellen-Sperre
Sperrt eine Signalquelle.
1. Drücken Sie /, um die Signalquelle
auszuwählen, die gesperrt werden soll, und
drücken Sie dann auf OK.
wird angezeigt.
2. Wiederholen Sie den o.a. Schritt, bis alle
gesperrten Quellen festgelegt sind.
Hinweis
}!~ !!+!
[
müssen Sie das vierstellige Kennwort eingeben.
Bedienfeld-Sperre
Sperrt das seitliche Bedienfeld am Fernsehgerät.
Menü-Sperre
Sperrt die Menüfunktion des Fernsehgeräts.
Wenn diese Option auf Ein gesetzt ist,steht das
Hauptmenü des Fernsehgeräts nicht zur Verfügung.
Passwort
Ton
Ton
Zeitintervall-Sperre (nur Norwegen)
Ermöglicht die Einstellung eines Zeitintervalls, in
dessen Zeitraum die Fernsehsender gesperrt sind.
Zum Entsperren und Ansehen der Sender ist die
Eingabe des Kennworts erforderlich.
Signalquellen-Sperre
Bedienfeld-Sperre
Aus
Menü-Sperre
Aus
Signalquellen-Voreinstellung
Ein
Bestätigen
Auswählen
Verlassen
Passwort ändern
Hier können Sie das Kennwort ändern.
Kanal-Sperre
Hier können Sender gesperrt werden, die andere
Personen nicht sehen dürfen.
1. Drücken Sie /, um den Sender
auszuwählen, der gesperrt werden soll,
und drücken Sie anschließend OK.
wird
angezeigt.
2. Wiederholen Sie den o.a. Schritt, bis alle
gesperrten Sender festgelegt sind.
Hinweis
}+!~%+!{
[
müssen Sie das vierstellige Kennwort eingeben.
Signalquelle einstellen
Dient zur Auswahl der Standard-Eingangsquelle, wenn
Signalquellen-Voreinstellung auf Ein gesetzt ist.
Kanalnummer
Ermöglicht die Auswahl des Standard-Senders, wenn
Einstellen der Signalquelle auf TV gesetzt ist.
Max. Lautstärke
Ermöglicht die Einstellung der maximalen Lautstärke.
Lautstärken-Voreinstellung
Hier kann das Fernsehgerät so eingestellt werden,
dass es sich mit einer Standard-Lautstärke
einschaltet.
Lautstärke einstellen
Ermöglicht die Auswahl der Standard-Lautstärke,
wenn Lautstärken-Voreinstellung auf Ein gesetzt
ist.
Alle Einstellungen zurücksetzen
Zum Rücksetzen der Sperreinstellungen auf die
werkseitigen Standardwerte.
Erstmaliges Einrichten
Ermöglicht das Zurücksetzen der Bild-, Ton-,
Kanal-, Fernseher- und Sperreinstellungen auf
die Werkseinstellungen. Der Bildschirm für die
Erstinstallation wird angezeigt
Flachbildfernseher mit LED-Hintergrundbeleuchtung – Bedienungsanleitung
DE-17
17
DE
Weitere Funktionen
Weitere Funktionen
USB-Media-Player
Über den USB-Media-Player können Sie ein USBSpeichermedium an Ihr Fernsehgerät anschließen und
Fotos, Musik oder Videos wiedergeben.
Hinweis
}%$%~
!!j#<
formatiert sein.
!}%$%~
!&
mit einer unterstützten Dateierweiterung (*.mp3,
*.jpg, *.mp4 usw.) enden.
@
!&+{
+_
#!!`!!
manche Dateien unter Umständen nicht lesbar.
&`j
auf externen Festplatten oder MP3-Playern konzipiert.
$~}%$!
_
#!!
]'
{}%$
Signalübertragung sollten Sie kein USB-PatchKabel verwenden.
={%%~}%$;][
mit dem USB 2.0-Full-Speed-Schnittstellenstandard
übereinstimmt. Falls das USB-Gerät nicht mit
dem USB-Full-Speed-Schnittstellenstandard
übereinstimmt, stockt die Wiedergabe
möglicherweise.
Vorsicht
<%}%$%
'
`j=
des USB-Medienplayers vom Fernseher.
Formatieren des USB-Speichersticks:
Sie können den USB-Speicherstick mithilfe des
Bildschirmmenüs formatieren.
1. Wählen Sie die Quelle TV aus.
2. Drücken Sie MENU/ . Das Bildschirmmenü wird
angezeigt.
3. Verwenden Sie /, um TV auszuwählen, und
drücken Sie anschließend OK.
4. Verwenden Sie /, um Geräteinformation, und
drücken Sie anschließend OK.
5. Wählen Sie den USB-Speicherstick aus, und
drücken Sie anschließend OK.
6. Verwenden Sie /, um Formatieren auszuwählen,
und drücken Sie anschließend OK.
7. Wenn Sie dazu aufgefordert werden, wählen Sie JA
aus, und drücken Sie anschließend OK.
8. Wenn die Formatierung abgeschlossen wurde,
drücken Sie EXIT.
Verwenden des USB Media Players:
1. Verbinden Sie Ihren USB-Speichermedium
mit dem USB-Anschluss an der Rückseite des
Fernsehgeräts.
2. Drücken Sie SOURCE und anschließend /,
um USB auszuwählen, und drücken Sie dann OK,
um in den USB-Modus zu wechseln.
Bild
Auswählen
Musik
Bestätigen
3. Drücken Sie /, um den Medientyp auszuwählen:
Bild, Foto oder Musik, und anschließend OK.
4. Drücken Sie ///, um die Datei auszuwählen,
die wiedergegeben werden soll, und drücken Sie
anschließend OK.
5. Um das Bildschirmmenü zu öffnen und die
Einstellungen anzupassen, drücken Sie auf den
Knopf MENU/ ihrer Fernbedienung.
6. Drücken Sie /, um eine Position auszuwählen,
und anschließend OK, um die Einstellungsoptionen
auszuführen oder anzuzeigen. Drücken Sie dann
/, um die gewünschte Option auszuwählen, und
anschließend OK.
7. Drücken Sie BACK/ , um zum vorherigen Menü
zurückzukehren oder das Menü zu schließen.
Miniaturansicht/Listenansicht
Wenn Sie den Inhalt des USB-Speichermediums ansehen
möchten, drücken Sie FAV/ , um zwischen der Miniaturund der Listenansicht zu wechseln.
Drücken Sie MENU/ , um das Bildschirmmenü zu öffnen.
Sortieren
Ermöglicht die Auswahl des Algorithmus zum
Sortieren von Dateien.
Medientyp
Ermöglicht die Auswahl des Medientyps.
Hinweis
}!
|}%$
Speichermediums zum übergeordneten
Verzeichnis zurückzukehren,
drücken Sie in der Miniaturansicht BACK/ .
In der Listenansicht drücken Sie /, um das
Symbol
oben auf der Liste auszuwählen, und
anschließend OK.
[..]
DE-18
18
Foto
Flachbildfernseher mit LED-Hintergrundbeleuchtung – Bedienungsanleitung
Weitere Funktionen
Foto-Modus
Drücken Sie MENU/ , um das Bildschirmmenü zu öffnen.
Wiedergabe
Wiederholen
Mischen
Drehen
Dauer
Zoom
Foto
Alle wiederholen
A
Kurz
3/14
Koala.JPG
Menü
Bestätigen
Wiedergabe/Pause
Ermöglicht das Abspielen oder Anhalten der Diashow.
Wiederholen
Ermöglicht die Wiedergabe von Dateien eines
Ordners im Wiederholungsmodus.
Mischen
Y
j#!
%!
j!_%
%%!j![!
Dateien in zufälliger Reihenfolge wiederzugeben.
Drehen
Ermöglicht die Drehung des Fotos um jeweils 90° im
Uhrzeigersinn.
Dauer
Ermöglicht die Festlegung, wie lange ein Foto
gezeigt werden soll.
Zoom
Ermöglicht das Zoomen zur Vergrößerung der Ansicht.
Wirkung
Ermöglicht die Auswahl des Übergangseffekts beim
Anzeigen von Fotos.
Infos zeigen
Mit dieser Option werden die Informationen zum
dargestellten Foto angezeigt.
Musik-Modus
Drücken Sie MENU/ , um das Bildschirmmenü zu öffnen.
Pause
Wiederholen
Mischen
Infos zeigen
Spektrum ausblenden
Wiederholen
Ermöglicht die Wiedergabe von Dateien eines
Ordners im Wiederholungsmodus.
Mischen
Y
j#!
%!
j!_%
%%!j![!
Dateien in zufälliger Reihenfolge wiederzugeben.
Infos zeigen
Mit dieser Option werden die Informationen zur
abgespielten Musik angezeigt.
Spektrum ausblenden/Spektrum zeigen
Ermöglicht das Anzeigen oder Ausblenden des
Spektrums.
Nur Tonsignal
Ermöglicht das Ausschalten der Bildschirmanzeige,
wenn nur der Ton wiedergegeben werden soll.
Hinweis
&
'%+!=j!@!<j
eine beliebige Taste.
Film-Modus
Drücken Sie MENU/
öffnen.
, um das Bildschirmmenü zu
Pause
Wiederholen
Program
Infos zeigen
00:03:29
Video
00:04:50
3/14
Skyfall.MP4
Menü
Bestätigen
Wiedergabe/Pause
Ermöglicht das Wiedergeben oder Anhalten von
Videos.
Wiederholen
Ermöglicht die Wiedergabe von Dateien eines
Ordners im Wiederholungsmodus.
Programm
Ermöglicht die Auswahl der Programme einer Datei
im Format *.ts.
Infos zeigen
Mit dieser Option werden die Informationen zum
wiedergegebenen Video angezeigt.
Nur Tonsignal
00:01:29
Musik
00:04:50
3/14
Skyfall.mp3
Menü
Bestätigen
Wiedergabe/Pause
Ermöglicht das Abspielen oder Anhalten von Musik.
Flachbildfernseher mit LED-Hintergrundbeleuchtung – Bedienungsanleitung
DE-19
19
DE
Weitere Funktionen
Tastenfunktion
Taste
Funktion
Wiedergabe/
Pause
Nächste Datei
wiedergeben
Vorherige Datei
wiedergeben
Schnellvorlauf
Schnellrücklauf
Stopp
Foto
Musik
Film
9
9
9
9
9
9
9
9
9
9*
9
9
9
9
9
9
9**
* Drücken Sie im Foto-Modus , um die Dauer der
Fotoanzeige auszuwählen.
** Wenn Sie während der Wiedergabe des Videos
drücken, wird die Wiedergabe unterbrochen, und
es erscheint ein blauer Bildschirm mit der Nachricht
%j~!%j~~j+_%
folgenden zwei Möglichkeiten, um fortzufahren:
- &
'%*j , um die Wiedergabe ab
der angehaltenen Position fortzusetzen.
- Drücken Sie erneut , um die Wiedergabe zu
unterbrechen, und drücken Sie anschließend
*j , um die Wiedergabe vom Beginn des
Videos zu starten.
DE-20
20
Flachbildfernseher mit LED-Hintergrundbeleuchtung – Bedienungsanleitung
Weitere Funktionen
Unterstützte Dateiformate für USB-Medien
Video-Dateiformat
Dateierweiterung
*.avi
Container
AVI
*.mp4
MP4
*.mov
MP4
*.mkv
*.vob
MKV
MPEG PS
*.mpg
*.mpeg
MKV
MPEG TS
MPEG TS
*.ts
MPEG TS
Dateierweiterung
*.mp3
Dateierweiterung
*.jpg
*.jpeg
Video-Codec
XviD
MPEG1
MPEG2 MP@HL
H.264 BP LV 4.0
H.264 MP LV 4.0
H.264 HP LV 4.0
MPEG-4 SP@HL 3.0
MPEG-4 ASP@HL 4.0
Motion JPEG
H.264 BP LV 4.0
H.264 MP LV 4.0
H.264 HP LV 4.0
MPEG-4 SP@HL 3.0
MPEG-4 ASP@HL 4.0
H.264 BP LV 4.0
H.264 MP LV 4.0
H.264 HP LV 4.0
MPEG-4 SP@HL 3.0
MPEG-4 ASP@HL 4.0
Motion JPEG
H.264 BP LV 4.0
H.264 MP LV 4.0
H.264 HP LV 4.0
MPEG-4 SP@HL 3.0
MPEG-4 ASP@HL 4.0
MPEG-2 MP@HL
MPEG-1
MPEG-2 MP@HL
MPEG-2 MP@HL
H.264 BP LV 4.0
H.264 MP LV 4.0
H.264 HP LV 4.0
Audio-Codec
MP3 (MPEG1 Layer3)
MPEG1 Layer1/2
MPEG2: AAC/AAC-LC
MPEG4: AAC-LC/HE-AAC
WAV: PCM/ADPCM
AC3
DE
MP3 (MPEG1 Layer3)
MPEG1 Layer1/2
MPEG2: AAC
MPEG4: HE-AAC
MPEG2: AAC/AAC-LC
MPEG4: AAC-LC/HE-AAC
MP3 (MPEG1 Layer3)
MPEG1 Layer1/2
MPEG2: AAC/AAC-LC
MPEG4: AAC-LC/HE-AAC
AC3
MPEG1 Layer1/2
AC3
MP3 (MPEG1 Layer3)
MPEG1 Layer1/2AC3
AC3
MP3 (MPEG1 Layer3)
MPEG1 Layer1/2
MPEG2: AAC
MPEG4: HE-AAC
Audio-Dateiformat
Container
MP3
Audio-Codec
MP3 (MPEG1 Layer3)
Bild-Dateiformat
Container
JPEG
Codec
Baseline/Progressiv
Flachbildfernseher mit LED-Hintergrundbeleuchtung – Bedienungsanleitung
DE-21
21
Weitere Funktionen
Common Interface
Der Common Interface-Steckplatz (CI) dient zum
Anschluss eines Conditional-Access-Moduls
?#!%
[!'j~
Fernsehprogramme und zusätzliche Dienste zu
empfangen. Weitere Informationen zu den Modulen
und Abonnements erhalten Sie von Ihrem Common
Interface-Dienstanbieter. Bitte beachten Sie, dass wir
weder CA-Module noch Smartcards als Original- oder
optionales Zubehör anbieten.
1. Stecken Sie die Smartcard in das CA-Modul, und
führen Sie dann das CA-Modul in den COMMON
INTERFACE-Steckplatz an der Rückseite des
Fernsehgeräts ein.
P
Eingeben von Seitenzahlen
Um eine Videotextseite auszuwählen, geben Sie
die Seitenzahl mithilfe der Zifferntasten auf der
Fernbedienung ein.
abc
def
ghi
jkl
mno
pqrs
tuv
wxyz
CI-Steckplatz
CA-Modul
SmartCard
2. Das Fernsehgerät zeigt nun die Meldung an, dass
das CA-Modul erkannt wurde. Warten Sie einige
Minuten, bis die Karte aktiviert wurde.
3. Drücken Sie MENU/ , um das Bildschirmmenü zu
öffnen.
4. Drücken Sie /, um Einstellungen auszuwählen,
und anschließend OK.
5. Drücken Sie /, um Common Interface
auszuwählen, und anschließend OK.
6. Drücken Sie /, um die gewünschte Option
auszuwählen, und anschließend OK.
7. Es werden detaillierte Informationen zum CA-Modul
angezeigt. Weitere Informationen zur Einrichtung
^%$!!?#
Moduls.
Videotext
Videotext ist ein von bestimmten Sendern
ausgestrahltes Informationssystem, das eine
Reihe textbasierter Informationen enthält. Meist
sind dies nationale und internationale Nachrichten,
Sportnachrichten, Wetter und Sendeinformationen.
Zudem bietet der Videotext Untertitel für Personen mit
Hörbehinderung oder für Personen, die mit der Sprache
des ausgestrahlten Programms nicht vertraut sind.
Videotext
Um den Videotext einzuschalten, drücken Sie die
Taste / . Um den Videotext auszuschalten,
drücken Sie die Taste / erneut.
Mix-Modus
Um das Fernsehbild im Videotextmodus anzuzeigen,
drücken Sie die Taste . Dadurch werden die
Videotextdaten über das Fernsehbild eingeblendet.
Drücken Sie die Taste
erneut, um zur
vollständigen Textanzeige zurückzukehren.
BACK /
Anhalten
Um die automatische Aktualisierung der
Videotextseite anzuhalten, drücken Sie die Taste
. Diese Funktion ist sehr nützlich, wenn mehrere
Videotextseiten oder viele Daten auf der gleichen
Seite angezeigt werden.
FAV /
Größe
Um das Videotextbild nach oben bzw. nach unten zu
verschieben oder als Vollbild anzuzeigen, drücken
Sie die Taste . Diese Funktion ist nützlich, da
dadurch das Bild vergrößert und die Schrift lesbarer
wird.
CH.LIST /
Einblenden
Um ausgeblendete Informationen, beispielsweise
Antworten auf Quizfragen einzublenden, drücken Sie
die Taste .
INFO /
Subcode
Um eine zweite Seite einzugeben, drücken Sie die
Taste , und geben Sie die vierstellige Zahl ein.
GUIDE /
Ausblenden
Um den Text auszublenden, drücken Sie die Taste
.
EXIT /
Seite nach oben/unten
Verwenden Sie die Tasten P /P , um zur
vorherigen oder nachfolgenden Videotextseite zu
gelangen.
DE-22
22
Flachbildfernseher mit LED-Hintergrundbeleuchtung – Bedienungsanleitung
Weitere Funktionen
Farbige Schnelltexttasten
Der Schnelltext zeigt automatisch die vier am
]!^`{%[`j
Sendeanstalt empfohlen werden. Drücken Sie
die farbige Taste auf der Fernbedienung, die der
Farbe des Links entspricht. Sie werden sofort zur
entsprechenden Seite weitergeleitet.
Aufnahmen mittels USB-Gerät
Hinweis
&#!+
!{;]
Mindestgröße von 1 GB empfohlen.
WICHTIG: Sie sollten das USB-Gerät mithilfe des
PCs in das FAT32-Format umwandeln, bevor Sie
es an den USB-Anschluss anschließen.
Zeitversetztes Fernsehen (nur DTV)
1. Vergewissern Sie sich, dass der Menüpunkt
TimeShift-Modus des Fernsehgeräts auf Ein
gesetzt ist.
2. Schließen Sie das USB-Gerät im Format FAT32
am USB-Anschluss an der Rückseite des
Fernsehgeräts an.
3. Drücken Sie die Taste , um die TimeShift-Funktion
zu starten.
Hinweis
}%$;]+!+`+
Fernsehen angeschlossen wird, öffnet sich
$
'%!~_$j%+!
automatischen oder manuellen Einrichtung des
USB-Geräts die Anweisungen auf dem Bildschirm.
4. Drücken Sie , um das Programm zu unterbrechen.
Wenn Sie erneut drücken, wird das zeitversetzte
Programm wiedergegeben.
5. Drücken Sie , um die Zeitversetzung anzuhalten.
Aufnahme (nur DTV)
1. Schließen Sie das USB-Gerät im Format FAT32
am USB-Anschluss an der Rückseite des
Fernsehgeräts an.
2. Drücken Sie die Taste , um die Aufzeichnung des
aktuellen Programms zu starten.
3. Drücken Sie die Taste , um die Aufzeichnung des
Programms anzuhalten.
4. Um das aufgezeichnete Programm wiederzugeben,
wechseln Sie zur Quelle USB.
5. Drücken Sie /, um Film auszuwählen, und
anschließend OK.
6. Drücken Sie /, um den Ordner PVR
auszuwählen, und anschließend OK.
7. Wählen Sie die Programmdatei, die wiedergegeben
werden soll, und drücken Sie anschließend OK, um
die Wiedergabe zu starten.
USB Cloning:
USB Cloning ermöglicht das Kopieren Ihrer
gespeicherten Sender und Ihrer gespeicherten
Benutzeranwendungen.
1. Verbinden Sie einen USB Stick mit dem USB
Anschluss auf der Rückseite des TV Gerätes.
2. Um in die Fabrikeinstellungen zu gelangen, drücken
Sie Menü und danach 8893.
3. Drücken Sie / um zur Position Clone zu
gelangen und drücken OK.
Factory Setting
Feature & Adjust
>>
Color Temp
>>
Video Parameters
>>
Audio Parameters
>>
SSC Adjust
>>
Other Settings
>>
CLONE
>>
4. Drücken Sie / um auf die Positon Write
(schreiben) oder Read (lesen) zu gelangen.
CLONE
Back
Write
<<
<[
On
]>
Read
]%write (schreiben) um Daten von
Ihrem TV Gerät auf den USB Stick zu schreiben.
Ist der Kopiervorgang abgeschlossen, erscheint die
Nachricht Export complete.
]%read (lesen), um Daten von Ihrem
USB-Stick auf das TV Gerät zu kopieren. Ist der
Kopiervorgang abgeschlossen, erscheint die
Nachricht please reboot TV. Schalten Sie das
TV Gerät kurz ab und wieder an, Vorgang ist
abgeschlossen.
Flachbildfernseher mit LED-Hintergrundbeleuchtung – Bedienungsanleitung
DE-23
23
DE
Referenzabschnitt
Referenzabschnitt
Fehlerbehebung
Symptome
Prüfpunkte und Maßnahmen
Kein Strom
&%[j#?@+']
funktionierenden Steckdose verbunden ist.
\%@+']!%
'j[!
warten Sie 60 Sekunden. Stecken Sie dann den Stecker wieder in eine
funktionierende Steckdose, und schalten Sie das Fernsehgerät erneut an.
Kein Bild
&%[j
%¢!!{]_
&%j!]>=!#
Rückseite des Fernsehgeräts.
Y
{j%j_=!
%
einen anderen Sender.
%!&$'j!$'_
Bild in Ordnung, Ton fehlt
Y%!]'!
&
'<VOL+ auf der
Fernbedienung oder am seitlichen Bedienfeld des Fernsehgeräts.
&
'%< der Fernbedienung, um sicher zu gehen, dass die
Stummschaltung ausgeschaltet ist.
Ton in Ordnung, jedoch
schlechte Farbe
%!&$'j[!$'_
Schlechtes Bild
$¢!]{
!
`!
[
dass eine aktivierte S-VHS-Kamera oder ein aktivierter Camcorder
an Ihr Fernsehgerät und gleichzeitig an ein anderes Peripheriegerät
angeschlossen ist. Schalten Sie eines der Peripheriegeräte aus.
=
$!
Rauschen
&%#`!_
Fernsehgerät reagiert nicht
auf Fernbedienung
&%$!!'j_+%$_
={%
[$
!
eingelegt sind.
%!%j]_
%'Y
{`j
]j
Steuerungstasten verwenden.
Fernsehgerät funktioniert
nicht
<%]O%'!`j%j+[!
schließen Sie es dann erneut an. Wenn das Problem weiterhin besteht,
wenden Sie sich an einen autorisierten Kundendienst.
Im USB-Modus wird keine
Datei angezeigt
&%[j
~!{]_
&%[j~
!&+j
aufweisen.
Hinweis
j{j{'[{%
autorisierten Kundendienst vor Ort.
!`j¢!^+!%`
~{_=!
%
niemals, die Rückwand des Fernsehgeräts zu entfernen, da das Gerät spannungsführende Teile enthält, die
Verletzungen oder Brände verursachen können.
DE-24
24
Flachbildfernseher mit LED-Hintergrundbeleuchtung – Bedienungsanleitung
Referenzabschnitt
Technische Daten
Die technischen Daten können ohne Ankündigung geändert werden.
Modell
LE32A650CF
LE32F600C
Bild-/Tonsystem
PAL/SECAM-B/G, I, D/K, L
Stromversorgung
60 W
45 W
Audioausgang
10 W + 10 W
10 W + 10 W
Anschlüsse an der
Rückseite
Component In
Composite In (Share Y-Eingang)
YPbPr/CVBS Audioeingang
USB
Eingang HDMI 1/HDMI 2/HDMI 3
Common Interface
Kopfhörerausgang
Digital Audio Out (Koaxial)
Antenneneingang
SCART
PC-Eingang
PC AUDIO-Eingang
USB
Eingang HDMI 1/HDMI 2
Common Interface
Kopfhörerausgang
Digital Audio Out (Koaxial)
Antenneneingang
SCART
PC-Eingang
PC AUDIO-Eingang
Temperatur
Betriebstemp.: +5 °C ~ +35 °C
Lagerungstemp.: -15 °C ~ +45 °C
Luftfeuchtigkeit
im Betrieb: 20 % ~ 80 %
!£¤O¥
Zubehör
Fernbedienung/AAA-Batterie (2 Stück)/Bedienungsanleitung/Kurzanleitung/
Garantiekarte/Standfuß mit Schrauben/Netzkabel (nur bei LE32F600C)
Abmessungen
(inkl. Standfuß)
(B x H x T)
728,26 x 467,86 x 180,31 mm
731,87 x 477,17 x 207,15 mm
Abmessungen (ohne
Standfuß) (B x H x T)
728,26 x 434,26 x 77,07 mm
731,87 x 440,96 x 75,00 mm
Gewicht (inkl. Standfuß)
7,53 kg
5,8 kg
Gewicht (ohne Standfuß)
7,13 kg
5,4 kg
Wandhalterung (H x B)
100 x 100 mm
100 x 100 mm
DE
|[jj|j{^j!|
'j'
HDMI Licensing LCC in den USA und in anderen Ländern.
Hergestellt unter Lizenz der Dolby Laboratories. Dolby und das Symbol Doppel-D sind Marken der Dolby
Laboratories.
Flachbildfernseher mit LED-Hintergrundbeleuchtung – Bedienungsanleitung
DE-25
25
Referenzabschnitt
Anhang
Unterstützte Component-Eingangstaktung
Unterstützte VGA-Eingangstaktung
(Nur LE32A650CF)
LE32A650CF
Component
VGA
Bildwiederholfrequenz
(Hz)
480i
720 x 400
70
480p
640 x 480
60/70/72
576i
800 x 600
56/60/70/72
576p
1024 x 768
60/70/75
1280 x 960
1360 x 768
60
50
50
720p
1280 x 720
60
60
50
1080i
60
1920 x 1080
1080p
LE32F600C
VGA
Bildwiederholfrequenz
(Hz)
640 x 480
60/70/72
800 x 600
56/60/70/72
480i
60/70/75
480p
1280 x 960
1360 x 768
576i
60
576p
720p
1080i
1080p
DE-26
26
60
HDMI
70
1280 x 720
50
Unterstützte HDMI-Eingangstaktung
720 x 400
1024 x 768
Bildwiederholfrequenz
(Hz)
Flachbildfernseher mit LED-Hintergrundbeleuchtung – Bedienungsanleitung
Bildwiederholfrequenz
(Hz)
60
50
50
60
50
60
50
60
GEBRUIKERSHANDLEIDING
LE32A650CF
LE32F600C
Het is raadzaam de handleiding zorgvuldig lezen voordat u de tv
bedient, en hem te bewaren als naslag.
Inhoudsopgave
Veiligheidswaarschuwingen ........... 2
Welkom.........................................................2
Belangrijke informatie ...................................2
Over uw LED LCD-televisie ............ 5
Audio-instellingen aanpassen.....................13
Kanaalinstellingen aanpassen ....................14
De tv-instellingen aanpassen .....................15
Adjusting Lock Settings
(Vergrendelingsinstellingen wijzigen) .........17
Tv-standaard installeren ...............................5
Wandsteun monteren ...................................5
Knoppenrij aan de zijkant van het scherm....5
Aansluitpunten achterzijde ...........................6
Apparaten aansluiten....................................7
Andere functies ............................. 18
Tv aansluiten op antenne/kabel ........... 7
Music Mode ....................................... 19
Tv aansluiten op extern A/V-apparaat .. 7
Video Mode ........................................ 19
Pc aansluiten ....................................... 7
Toetsfuncties ...................................... 20
Ondersteunde bestandsindelingen
voor USB-media ................................. 21
Algemene interface.....................................22
Teletekst .....................................................22
Een USB-apparaat gebruiken voor
opnamen.....................................................23
Hoofdtelefoon aansluiten ..................... 7
Digitaal audiosysteem aansluiten ........ 7
De afstandsbediening gebruiken ..................8
Aan de slag ...................................... 9
Afstandsbediening voorbereiden ..................9
Batterijen plaatsen ............................... 9
Let op bij afstandsbediening en batterij 9
........................................9
Grondbeginselen ........................................11
Tv in- of uitschakelen ......................... 11
Ingangsbron selecteren ..................... 11
USB-mediaspeler .......................................18
Thumbnail/List Mode ......................... 18
Photo Mode ....................................... 19
Timeshift (alleen DTV) ....................... 23
Opnemen (alleen DTV) ...................... 23
Referentiesectie ............................. 24
Problemen oplossen ...................................24
.................................................25
Bijlage .........................................................26
Kanaal selecteren .............................. 11
De favorietenlijst gebruiken ............... 11
Volume wijzigen ................................. 11
Kanaalinformatie weergeven ............. 11
Navigeren in het schermmenu ........... 11
De tv gebruiken.............................. 12
Video-instellingen aanpassen.....................12
Gebruikershandleiding bij platte LED-tv met achtergrondverlichting
NL-1
NL
Veiligheidswaarschuwingen
Veiligheidswaarschuwingen
Welkom
Gefeliciteerd met de aanschaf van uw platte LED-tv van 32 inch met achtergrondverlichting. Deze handleiding dient
als leidraad bij de installatie en het gebruik van de tv. Controleer eerst de inhoud van de verpakking voordat u uw
nieuwe tv installeert.
!
!"#
!
$
%&"'
*+::;<
!
Wanneer u de doos van de LE32A650CF opent, neemt u eerst de tv-standaard eruit. Dit om te voorkomen
dat hij van het bovenste opvulkussen valt terwijl u de componenten uitpakt.
Belangrijke informatie
Lees onderstaande veiligheidsinstructies voordat u uw tv bedient. Bewaar de instructies om later te kunnen
raadplegen.
WAARSCHUWING
KANS OP ELEKTRISCHE
SCHOK – NIET OPENEN
WAARSCHUWING
VERMINDER HET RISICO VAN ELEKTRISCHE SCHOKKEN – OPEN
NOOIT DE KLEP (OF HET ACHTERPANEEL). ONDERDELEN
VAN HET APPARAAT MOGEN NIET DOOR DE GEBRUIKER
WORDEN VERVANGEN OF HERSTELD. NEEM CONTACT OP MET
GEKWALIFICEERD SERVICEPERSONEEL.
*Om elektrische schokken te voorkomen, is het niet toegestaan om
het achterpaneel te openen. Dit is ook niet nodig, aangezien er geen
accessoires in de behuizing aanwezig zijn.
%#>?@J
De bliksemschicht met pijl binnen de gelijkzijdige driehoek is
een waarschuwing dat binnen de behuizing niet-geïsoleerd
GEVAARLIJK VOLTAGE aanwezig is. Dit is mogelijk sterk genoeg om
mensen een elektrische schok te geven.
Het uitroepteken binnen een gelijkzijdige driehoek geeft aan dat
belangrijke bedienings- en onderhoudsinstructies worden verstrekt in de
literatuur bij het apparaat.
WAARSCHUWING:
LET OP:
plaats uw tv-ontvanger nooit in een vochtige ruimte. Dit om brand en elektrisch
gevaar te voorkomen. Voorkom krassen en schade aan het scherm.
Bedek de ventilatieopeningen niet met kranten, tafelkleden, gordijnen enz.
de netstekker wordt gebruikt om het apparaat stroomloos te maken en moet altijd
gemakkelijk bereikbaar zijn.
Lees deze handleiding zorgvuldig voordat u uw tv gaat gebruiken. Bewaar de
handleiding om deze in de toekomst te kunnen raadplegen.
Om de beste prestaties uit uw tv te halen, leest u de handleiding zorgvuldig door en
bewaart u deze om hem in de toekomst te kunnen raadplegen.
X">?!
afwijken als gevolg van technische innovaties.
Y>J
WAARSCHUWING: om verspreiding van vuur te voorkomen dient u kaarsen en ander
open vuur altijd uit de buurt van dit product te houden.
NL-2
Gebruikershandleiding bij platte LED-tv met achtergrondverlichting
Veiligheidswaarschuwingen
Zorg dat het product volgens de
installatie-instructies stevig is
bevestigd aan de tafel/wand. Zo
voorkomt u letsel of schade door
vallen.
Koppel niet meerdere
verlengsnoeren aan elkaar en
gebruik niet meerdere stekkers
in één stopcontact. Dit om
brand te voorkomen.
Plaats het apparaat niet
in de buurt van water of
olie (bijvoorbeeld bak- of
smeerolie), aangezien dit
brand kan veroorzaken.
Ongeoorloofde demontage van
de televisie is niet toegestaan.
Dit om elektrische schokken
of brand te voorkomen.
Neem contact op met een
geautoriseerde servicevertegenwoordiger als u
technische ondersteuning nodig hebt.
Gebruik geen beschadigde
of versleten stekkers en
houd kabels uit de buurt
van warmtebronnen om
elektrische schokken of brand
te voorkomen.
Trek de stekker van het
apparaat uit het stopcontact
en neem contact op
met een geautoriseerde
servicevertegenwoordiger
als het apparaat vreemde
geluiden maakt.
De tv moet op een stevige,
vlakke ondergrond worden
geplaatst zodat deze niet kan
omvallen.
Plaats of bewaar geen
ontvlambare stoffen in de
buurt van het product. Dit
om explosies en brand te
voorkomen.
Houd de tv uit de buurt
van transformatoren en
warmtebronnen. Dit om
brand te voorkomen.
Gebruik dit apparaat niet
in direct zonlicht of in de
buurt van warmtebronnen.
Dit om brand te
voorkomen.
Haal de stekker uit
het stopcontact en de
antennekabel uit de tv
tijdens regenbuien, in het
bijzonder bij onweer.
NL
De antenne van het apparaat
mag niet in de buurt zijn
van stroomkabels. Dit om
elektrische schokken te
voorkomen.
Zorg dat de stekker van de
televisie altijd goed in het
stopcontact zit, aangezien een
slechte aansluiting kan leiden tot
een brand.
Als u de televisie wilt
schoonmaken, moet u eerst
de stekker uit het stopcontact
halen. Gebruik voor het
schoonmaken een zachte
!@J
Zorg dat het product niet in
contact met water komt.
Gebruikershandleiding bij platte LED-tv met achtergrondverlichting
NL-3
Veiligheidswaarschuwingen
Trek de stekker van de televisie
uit het stopcontact en de
antennekabel uit de tv tijdens
een regen- of onweersbui. Dit om
elektrische schokken en brand te
voorkomen.
Als u gebruik maakt van een
antenne, moet u zorgen dat er
geen water via de kabel in de
televisie loopt.
Verminder het risico van brand
of elektrische schok – plaats
het product niet in een vochtige
ruimte en stel het niet bloot aan
regen of vocht.
De stekker en de
stroomkabel moeten schoon
blijven om elektrische
schokken of brand te
voorkomen.
Raak de stekker nooit met
natte handen aan, aangezien u
hierdoor een elektrische schok
kunt krijgen.
U moet de stekker van de
televisie uit het stopcontact
halen als u de televisie
langere tijd niet gebruikt. Dit
om elektrische schokken en
brand te voorkomen.
NL-4
Gebruikershandleiding bij platte LED-tv met achtergrondverlichting
Over uw LED LCD-televisie
Over uw LED LCD-televisie
Tv-standaard installeren
1. Plaats het tv-scherm voorzichtig met de voorkant op
een schoon oppervlak met een zachte afdekking.
Dit om het scherm te beschermen tegen krassen en
andere beschadiging.
2. Schuif de poot van de standaard in de opening onder
op de tv.
3. Bevestig de standaard aan de tv met de
meegeleverde schroeven. (3 schroeven voor
LE32F600C, 4 schroeven voor LE32A650CF)
Knoppenrij aan de zijkant van het
scherm
NL
Wandsteun monteren
1. Plaats het tv-scherm voorzichtig met de voorkant op
een schoon oppervlak met een zachte afdekking.
Dit om het scherm te beschermen tegen krassen en
andere beschadiging.
2. Als de standaard is bevestigd aan de tv, verwijdert u
de schroeven waarmee de standaard is bevestigd.
Vervolgens verwijdert u de standaard.
3. Bevestig de wandsteun (afzonderlijk verkrijgbaar)
aan de bevestigingsgaten achter op uw tv. Gebruik
de schroeven die worden geleverd bij de steun.
Raadpleeg de instructies bij de wandsteun om uw tv
op de juiste manier op te hangen.
Opmerking
%>
wandsteun te monteren. Haier Electronics is niet
verantwoordelijk voor schade aan het product of
persoonlijk letsel die zich mogelijk voordoen indien
u de tv zelf installeert.
Knop
Beschrijving
SOURCE
Indrukken om de ingangsbron te
selecteren.
MENU
Indrukken om het schermmenu te
openen of te sluiten.
VOL+
Indrukken om het volume te verhogen.
VOL-
Indrukken om het volume te verlagen.
CH+
Indrukken om naar het volgende
kanaal in de kanalenlijst te gaan.
CH-
Indrukken om naar het vorige kanaal
in de kanalenlijst te gaan.
POWER
Indrukken om de tv in of uit te
schakelen.
Opmerking
[
+\:;*!>>#
aan de rechterkant van de tv.
OPMERKING:
$#&
voor tv en schermweergave (OSD) in deze
handleiding op de LE32F600C.
"#
referentie en wijken mogelijk af van de werkelijke
schermweergave.
Gebruikershandleiding bij platte LED-tv met achtergrondverlichting
NL-5
Over uw LED LCD-televisie
Aansluitpunten achterzijde
*
*
3
*
* Deze aansluitpunten zijn alleen beschikbaar op model LE32A650CF.
Aansluiting
Beschrijving
COMPONENT IN
(Y COMMON CVBS IN)
Hierop sluit u de videokabels aan voor een component- of een
composietapparaat. Wanneer u een composietapparaat aansluit als videobron,
sluit u het gele videosnoer aan op de Y-aansluiting (groen).
YPbPr/CVBS AUDIO
Hierop sluit u de audiokabels aan voor een component- of een composietapparaat.
USB
Sluit een USB-opslagapparaat aan op de USB-poort om foto's of video's te bekijken
of muziek te luisteren. (Zie "USB-mediaspeler" op pagina 18 voor meer informatie.)
HDMI 2 IN
Hierop sluit u het HDMI-apparaat aan.
COMMON INTERFACE
(CI)
Als u bent geabonneerd op een pay-per-view service, plaatst u de CI-module in
deze sleuf.
Hoofdtelefoonuitgang
Hierop sluit u de hoofdtelefoon aan. Wanneer u de hoofdtelefoon aansluit, worden
de luidsprekers van de tv gedempt (mute).
DIGITAL AUDIO OUT
(coax)
Hierop sluit u een coaxiaal digitaal audiosysteem aan.
ANT IN (draadloos/
kabel)
Hierop sluit u een antenne of kabelvoorziening aan.
SCART
Hierop sluit u een apparaat aan via een SCART-kabel.
PC AUDIO IN
Hierop sluit u de audiokabel van de computer aan.
PC IN
Hierop sluit u de videokabel van de computer aan.
HDMI 3 IN
HDMI 1 IN
NL-6
Hierop sluit u het HDMI-apparaat aan.
Gebruikershandleiding bij platte LED-tv met achtergrondverlichting
Over uw LED LCD-televisie
Met composietkabel (alleen LE32A650CF)
Apparaten aansluiten
Tv aansluiten op antenne/kabel
L
R
COMPOSITE OUT
VIDEO
Pc aansluiten
Tv aansluiten op extern A/V-apparaat
NL
Met HDMI-kabel
RGB
PC
AUDIO
(L/R)
3
Hoofdtelefoon aansluiten
Met SCART-kabel
SCART
Digitaal audiosysteem aansluiten
Met SCART-kabel (alleen LE32A650CF)
Y
PB
PR
L
COMPONENT OUT
R
Opmerking
`!>>&
apparaten aansluit.
Gebruikershandleiding bij platte LED-tv met achtergrondverlichting
NL-7
Over uw LED LCD-televisie
De afstandsbediening gebruiken
1
2
3
SOURCE
P.MODE
4
16
SUBTITLE
8
FAV/
9
SCREEN
10
MENU/
*
S.MODE
abc
def
ghi
jkl
mno
pqrs
tuv
wxyz
SLEEP
Q.VIEW
7
11
OK
5
AUDIO
SUBTITLE
FAV /
3
4
5
6
NL-8
INFO /
SCREEN
CH.LIST /
GUIDE /
18
*
19
20
12
BACK/
13
(achteruit)
14
BACK /
EXIT /
21
/
(tekst)
15
(afspelen/
pauze)
16
SOURCE
17
P
18
INFO/
22
23
24
Knop
Beschrijving
Indrukken om de tv in of uit te
(aan/uit) schakelen.
Indrukken om de audiomodus te
S.MODE
selecteren.
Indrukken om de beeldmodus te
P.MODE
selecteren.
Indrukken om een kanaalnummer
0-9
of wachtwoord in te voeren.
Indrukken om te schakelen naar
Q.VIEW
het laatste kanaal dat u hebt
bekeken.
Indrukken om de slaaptimer in te
SLEEP
stellen.
Indrukken om het volume aan te
VOL+/passen.
Indrukken om het geluid in of uit te
(dempen) schakelen.
Indrukken om de DTV audio/
I/II AUDIO
NICAM te selecteren (naar gelang
het omroepsignaal).
In teletekstmodus: indrukken om
naar mixmodus te gaan.
Indrukken om vooruit of achteruit
te spoelen in multimediamodus.
(vooruit)
OK
14
15
2
3D WORLD
MENU /
12
13
1
17
I/II
6
7
8
9
10
11
Nr.
P
VOL
Indrukken om ondertiteling weer te
geven.
Indrukken om een favoriet kanaal
toe te voegen. In teletekstmodus:
indrukken om een pagina vast te
houden.
Indrukken om de
schermweergavemodus te wijzigen.
Indrukken om het schermmenu te
openen of te sluiten.
Indrukken om te navigeren in het
schermmenu.
Indrukken om een selectie te
bevestigen.
Indrukken om terug te keren naar
het vorige menu.
19
/
CH.LIST/
20
GUIDE/
21
EXIT/
(vorige)
22
(volgende)
23
(opnemen)
24
(stoppen)
Indrukken om teletekst te openen.
Indrukken om af te spelen/
te pauzeren in multimedia- en
timeshift-modus.
Indrukken om de lijst
ingangsbronnen te openen.
Indrukken om van kanaal te
veranderen.
Indrukken om de kanaalinformatie
weer te geven.
In teletekstmodus: indrukken om de
verborgen informatie weer te geven.
Indrukken om de kanalenlijst
te openen. In teletekstmodus:
indrukken om het beeld te schakelen
tussen boven, onder of volledig.
Indrukken om de programmagids
te openen.
In teletekstmodus: indrukken om
een secundaire pagina te openen.
Indrukken om het schermmenu te
sluiten.
In teletekstmodus: indrukken om
de tekst te verbergen.
Indrukken om naar het volgende
of vorige bestand te gaan in
multimediamodus.
Indrukken om opnemen te starten/
pauzeren.
Indrukken om multimedia-afspelen,
-timeshifting of -opnemen te
stoppen.
* Deze knop werkt niet bij deze modellen.
Gebruikershandleiding bij platte LED-tv met achtergrondverlichting
Aan de slag
X">!&
haalt u de batterijen uit de afstandsbediening.
Aan de slag
Afstandsbediening voorbereiden
[!J
de batterijen niet in vuur. Lever batterijen in volgens
de lokale regelgeving.
Batterijen plaatsen
1. Open het klepje van het batterijvakje.
De eerste keer dat u uw tv inschakelt, leidt de
"#?
basisinstellingen, zoals menutaal, land, wachtwoord,
type signaal en kanaalscan.
1. Controleer of het volgende is uitgevoerd:
[J
(zie pagina 9)
!#J'#
pagina 7)
2. Plaats twee AAA-batterijen. Zorg dat de symbolen +
en – op de batterijen aansluiten bij de symbolen + en –
in het batterijvakje.
%>AC IN-aansluiting achter
op de tv en een werkend stopcontact. Bij de
LE32A650CF hoeft u alleen het vaste netsnoer aan
te sluiten aan een werkend stopcontact.
2. Druk op
om te tv in te schakelen. Het scherm
van de installatiewizard verschijnt. Druk op OK om
de wizard te starten.
3. Druk op / om uw taal te markeren. Druk
vervolgens op om door te gaan.
Initial Setup
Language
Please select your language:
English
Français
Italiano
Español
3. Plaats het klepje terug.
Deutsch
Let op bij afstandsbediening en batterij
#
betreffende sensor van de tv-set geen objecten
bevinden.
#J
afstandsbediening niet op de vloer vallen.
Back
Next
4. Druk op / om uw land te markeren. Druk
vervolgens op om door te gaan.
Eerste instelling
Land
Kies het land:
!!
de afstandsbediening verstoren. Gebruik de
licht of neonlampen.
"
op een vochtige plek. Daar zou de afstandsbediening
kunnen beschadigen.
Select
Oostenrijk
België
Zwitserland
Tsjechië
Duitsland
Terug
Selecteren
Volgende
>
plaatst, ontstaat explosiegevaar. Gebruik alleen
batterijen van hetzelfde of een gelijkwaardig type.
Batterijen (in verpakking of geïnstalleerd) mogen niet
worden blootgesteld aan warmte of hitte, zoals direct
zonlicht, vuur en dergelijke.
Gebruikershandleiding bij platte LED-tv met achtergrondverlichting
NL-9
NL
Aan de slag
5. Geef tweemaal uw 4-cijferige wachtwoord op. Druk
vervolgens op OK om door te gaan.
Als Cable de afstemmodus is, drukt u op //
/ en cijfertoetsen om de kabelinformatie te
?J!>OK om de
kanaalscan te starten.
Eerste instelling
Stel het wachtwoord in. “0000” is geen geldig wachtwoord
Eerste instelling
Vorm de kabel informatie.
Nieuw wachtwoord
Scanmodus
Wachtwrd herhalen
Terug
Ga verder
Frequentie (KHz)
Selecteren
Volgende
Opmerking
?"
uitgeschakeld voordat een wachtwoord is
ingesteld, moet u een nieuw wachtwoord
instellen vanuit het menu Lock. Geef het
standaardwachtwoord op – 1234 – om het
menu Lock te openen. Wijzig vervolgens het
wachtwoord. Zie "Wachtwoord wijzigen" op pagina
17 voor meer informatie.
306000
Regeling
Auto
Symbol Cijfer (Ksym/s)
Auto
Netwerk ID
Auto
Selecteren
Volgende
8. Wacht even totdat de kanaalscan is voltooid.
Eerste instelling
Kanaal scannen
Het duurt even voordat de kanalen gescand zijn.
Toestand: Bezig met scannen...
Analoge kanalen: 0
Digitale kanalen: 0
6. Druk op / om uw afstemmodus te markeren.
Druk vervolgens op om door te gaan.
21%
Eerste instelling
Radiomodus
Selecteer je tuner modus:
Antenne
9. Wanneer de kanaalscan is voltooid, drukt u op OK
om de wizard af te sluiten.
Kable
Eerste instelling
Voltooid
Gefeliciteerd!!
Terug
Selecteren
Volgende
De instelling is voltooid.
Druk op [OK] om de wizard te voltooien.
7. Druk op / om Scannen te markeren. Druk
vervolgens op om de kanaalscan te starten.
Eerste instelling
Kanaal scannen
Sluit eerst de antenne aan.
Nu kanalen scannen?
Slaat u deze stap over dan kunt u de kanalen in het menu scannen.
Scannen
Scan overslaan
Terug
NL-10
10
Selecteren
Volgende
Gebruikershandleiding bij platte LED-tv met achtergrondverlichting
Terug
Aan de slag
De favorietenlijst gebruiken
Grondbeginselen
Tv in- of uitschakelen
1. Druk op
om te tv in te schakelen. Het kan enkele
seconden duren voordat beeld op het scherm
verschijnt.
2. Druk op
om te tv uit te schakelen. De tv gaat in
stand-bymodus.
Opmerking
!&!
nog steeds stroom het toestel binnen. Neem
het netsnoer uit het stopcontact om de
stroomvoorziening naar het toestel te onderbreken.
Ingangsbron selecteren
1. Druk op SOURCE. De lijst ingangsbronnen
verschijnt.
Hoofd
TV
SCART
VGA
HDMI 1
HDMI 2
USB
Een favoriet kanaal toevoegen:
1. Stem af op het kanaal dat u wilt toevoegen aan de
favorietenlijst.
2. Druk op FAV/ om de favorietenlijst te openen.
3. Druk op / om een gewenste positie te
markeren. Druk vervolgens op OK om het huidige
kanaal toe te voegen aan de favorietenlijst.
verschijnt in het informatievak.
Naar een favoriet kanaal kijken:
1. Druk op FAV/ om de favorietenlijst te openen.
2. Druk op / om een favoriet kanaal te markeren.
Druk vervolgens op OK om af te stemmen op het
kanaal.
Een favoriet kanaal verwijderen:
1. Druk op FAV/ om de favorietenlijst te openen.
2. Druk op / om het favoriete kanaal dat u wilt
verwijderen te markeren. Druk vervolgens op OK
om af te stemmen op het kanaal.
3. Druk opnieuw op OK om het kanaal te verwijderen
uit de favorietenlijst. verdwijnt uit het
informatievak.
Volume wijzigen
!>VOL+/VOL- om het volume te verhogen of
verlagen.
!> om het geluid uit te schakelen. Druk
opnieuw op om het geluid weer in te schakelen.
2. Druk op / om de ingangsbron te markeren.
Druk vervolgens op OK.
Kanaal selecteren
!>P
/P
om naar het volgende of vorige
kanaal in de kanalenlijst te gaan.
!>!!
te selecteren.
!>CH.LIST/ om de kanalenlijst te openen.
Druk vervolgens op / en OK om een kanaal te
selecteren.
De gekleurde knoppen gebruiken:
Pagina omhoog - Druk op de rode knop om het
eerste kanaal op de huidige pagina te selecteren
en druk daarna herhaaldelijk op de rode knop
om het eerste kanaal op voorgaande pagina’s te
selecteren.
Pagina omlaag - Druk op de groene knop om het
laatste kanaal op de huidige pagina te selecteren
en druk daarna herhaaldelijk op de groene knop
om het laatste kanaal op volgende pagina’s te
selecteren.
Selecteer lijst - Druk op de gele knop en
vervolgens op / om het kanaaltype te
selecteren dat u wilt weergeven in de lijst (Alles/
Digitaal/Radio/Analoog).
Afsluiten - Druk op de blauwe knop om de
kanalenlijst te sluiten.
!>Q.VIEW om naar het laatst bekeken kanaal
te gaan.
Kanaalinformatie weergeven
!>INFO/ om basisinformatie
over kanalen weer te geven, zoals kanaalnummer,
kanaalnaam, afstemmodus, enz.
!">INFO/ om verdere informatie
weer te geven, zoals programmatitel, resolutie,
audio-informatie, enz.
!>INFO/ om de
programmabeschrijvingen weer te geven.
!>INFO/ om het informatievak
te sluiten.
Navigeren in het schermmenu
1. Druk op MENU/ . Het schermmenu wordt
geopend.
2. Druk op / om een hoofdmenu (Video/Audio/TV/
Setup/Lock) te markeren. Druk vervolgens op OK
om het submenu te openen.
3. Druk op / om een optie van een submenu te
markeren. Druk vervolgens op OK om het menu te
openen. Of druk op / om de instelling aan te
passen of een insteloptie te selecteren.
4. Druk op BACK/ om terug te gaan naar het vorige
menu, of druk op EXIT/ om het schermmenu te
sluiten.
Gebruikershandleiding bij platte LED-tv met achtergrondverlichting
NL-11
11
NL
De tv gebruiken
De tv gebruiken
Video-instellingen aanpassen
ECO
Beeldmodus
Video
Audio
Televisie
Achtergrondlicht
50
Helderheid
31
Contrast
41
Verzadiging
37
0
TINT
Instellen
43
Scherpte
Vergrr
Verg
Vergrendelen
Enter
Selecteren
Afsluiten
Beeldmodus
De beeldmodus selecteren. Naargelang het
programma kunt u Gebruiker/Levendig/ECO/
Standaard/Zacht selecteren.
Opmerking
Y!!>P.MODE drukken om de
beeldmodus te selecteren.
aanpast, wordt de beeldmodus automatisch
gewijzigd in Gebruiker.
Achtergrondlicht
De achtergrondverlichting aanpassen om de
algemene helderheid van het beeld te wijzigen.
Helderheid
Beeld helderder of donkerder maken.
Contrast
Witintensiteit van het beeld aanpassen.
Verzadiging
Kleurverzadiging van het beeld aanpassen.
TINT
Kleurschakering van het beeld aanpassen.
Scherpte
Beeld scherper of zachter maken.
Gamma
Gammatype selecteren.
Kleurtemperatuur
Kleurtemperatuur selecteren. De opties zijn:
Koel – wit een blauwachtige tint geven.
Standaard – wit een neutrale tint geven.
Warm – wit een roodachtige tint geven.
Geavanceerde video
Geavanceerde video-instellingen aanpassen.
DNR
Ruis op het scherm verminderen om een helderder
videobeeld te krijgen.
NL-12
12
MPEG NR
Beeldruis verminderen in MPEG-gecomprimeerde
video's.
Aangepaste helderheid
Gemiddelde beeldhelderheid aanpassen om grote
heldere vlakken te compenseren.
Huidkleur
Huidkleur aanpassen aan voorkeur.
DI Film Modus
[>?!!J
Blauwe Strook
Blauwcomponent van witte en nagenoeg witte
pixels versterken zonder de vleeskleur te
beïnvloeden.
Spel Modus
De beeldinstellingen optimaliseren voor gamen.
Aangepast licht
De achtergrondverlichting van het scherm
dynamisch aanpassen naargelang de hoeveelheid
licht en donker in het signaal.
VGA-stand (alleen voor VGA-bron)
Beeldmodus selecteren.
Video – in deze modus worden afbeeldingen
vloeiender en tekst helderder weergegeven.
– in deze modus worden
afbeeldingen scherper weergegeven. Selecteer
deze modus om video's van een computer te
bekijken.
HDMI modus (alleen HDMI progressive timing)
HDMI-modus selecteren.
Auto – automatisch Video/Graphic kiezen.
– in deze modus worden
afbeeldingen vloeiender en tekst helder
weergegeven. Selecteer deze modus wanneer
u een computer aansluit.
Video – in deze modus worden afbeeldingen
scherper weergegeven. Selecteer deze modus
wanneer u video's bekijkt van een computer
of videospeler, zoals een dvd-speler, Blu-rayspeler, enz.
Overscan (alleen HDMI-bron)
Voor het uitbreiden van het deel van het display
voorbij het zichtbare gebied van het scherm. Het
resulterende beeld zal “inzoomen” op het midden
van de afbeelding.
Opmerking
Overscan is ingesteld op Uit, kan
Schermmodus niet worden geselecteerd.
VGA
Computerbeeld aanpassen in VGA-bron. U kunt de
volgende opties aanpassen:
Gebruikershandleiding bij platte LED-tv met achtergrondverlichting
De tv gebruiken
Auto instellen – beeldinstellingen automatisch
aanpassen.
H. Positie – horizontale beeldpositie
aanpassen.
V. Positie – verticale beeldpositie aanpassen.
Fase – focus van stabiele afbeeldingen
aanpassen.
Klok – sample-frequentie aanpassen.
Alleen audio
Tv-beeld uitschakelen en alleen de audio van het
programma beluisteren.
Opmerking
!>
willekeurige knop te drukken.
Reset
De fabrieksinstellingen van video-instellingen
herstellen.
Audio-instellingen aanpassen
Video
Standaard
Audiomodus
Balans
Audio
0
50
Laag
50
Hoog
Televisie
Instellen
Ins
Simuleren
Omgevingsgeluid
Luidspreker
Aan
SPDIF-type
Uit
Vergrendelen
Enter
Selecteren
Afsluiten
Audiomodus
Audiomodus selecteren. U kunt Gebruiker/
Standaard/Muziek/Bioscoop selecteren naargelang
uw persoonlijke voorkeur.
Opmerking
Y!!>S.MODE drukken om de
audiomodus te selecteren.
aanpast, wordt de Audiomodus automatisch
gewijzigd in Gebruiker.
Balans
Balans tussen linker- en rechterluidspreker
aanpassen.
Laag
Geluid van lage frequentie aanpassen.
Hoog
Geluid van hoge frequentie aanpassen.
– ingebouwde tv-luidsprekers uitschakelen.
ingebouwde tv-luidsprekers inschakelen.
Auto (CEC) – geluid uitvoeren van het
aangesloten CEC-apparaat.
Opmerking
Auto (CEC) – optie wordt uitgeschakeld als u de
CEC functie in het menu CEC instelt op Off.
SPDIF-type
SPDIF selecteren als type digitale audio-uitvoer.
SPDIF Vertraging
SPDIF-vertraging aanpassen om het geluid te
synchroniseren met het beeld (0~250).
Auto volume
Schakel deze instelling in om het volume consistent
te houden wanneer u wisselt van kanaal of van een
tv-programma naar reclame.
Audiotype
Audiotype selecteren.
Normaal – normale audio.
Gehoorgestoord – visuele beschrijvingen van
de scènes voor slechthorende kijkers.
Visueel gehandicapt – mondelinge
beschrijvingen van de scènes voor slechtziende
kijkers.
Visueel gehandicapt (alleen DTV)
Audio-instellingen aanpassen voor slechtzienden.
Luidspreker
Luidsprekers in- of uitschakelen.
Hoofdtelefoon
Hoofdtelefoon in- of uitschakelen.
Geluidssterkte
Geluidssterkte van mondelinge beschrijvingen
aanpassen.
Verplaatsen en in/uitfaden
Pan en fade-functie in- of uitschakelen.
Audio voor visueel gehandicapten
Taal selecteren voor het geluid voor slechtzienden.
(Opties afhankelijk van uitgezonden audiocontent)
Opmerking
XVisueel gehandicapt is alleen
beschikbaar wanneer Audiotype is ingesteld op
Visueel gehandicapt.
Downmix Mode
Audio-downmixmodus selecteren.
Omgevingsgeluid
Omgevingsgeluid simuleren.
Luidspreker
Ingebouwde tv-luidsprekers in- of uitschakelen. De
opties zijn:
Reset
Fabrieksinstellingen van audio-instellingen herstellen.
Gebruikershandleiding bij platte LED-tv met achtergrondverlichting
NL-13
13
NL
De tv gebruiken
Kanaalinstellingen aanpassen
Video
Radiomodus
Antenne
Audio Channel
Audio
Stereo
Scan single Eën RF-kanaal scannen (alleen digitaal)
Video
Antenne
Off
0%
Audio
Kanalen
Time Shifting Mode
Televisie
Antennemodus
Uit
Televisie
Device Info
In
Instellen
41
RF-kanaal
Signaalniveau
0%
Signaalkwaliteit
0%
In
Instellen
Vergrendelen
Enter
Vergrendelen
Enter
Selecteren
Radiomodus
Afstemmodus selecteren: Antenna/Cable.
Audiokanaal (alleen ATV)
Audiomodus selecteren voor een uitzending met
meerdere geluidssporen of stereo.
Audiotaal (alleen DTV)
Audiotaal selecteren voor programma's met
meerdere taalsporen.
Audiotaal 2e (alleen DTV)
Tweede voorkeur voor audiotaal selecteren voor
programma's met meerdere taalsporen.
Kanalen
Kanaalscan uitvoeren en kanalenlijst bewerken.
Kanaal scannen
Kanaalscan uitvoeren nadat u uw land hebt
geselecteerd en uw kabelinformatie hebt
?'!<J
Scan bijwerken
Kanaalscan bijwerken om kanalen toe te voegen
aan de bestaande kanalenlijst.
Analoog handm scan
Gebruik deze optie om vanuit de opgegeven
startfrequentie een handmatige scan naar analoge
kanalen met een hogere of lagere frequentie uit te
voeren.
Video
Analoge kanalen zoeken
Off
Audio
Televisie
48.25
Startfrequentie (MHz)
Omhoog scannen
In
Instellen
Omlaag scannen
Vergrendelen
Enter
Selecteren
Afsluiten
1. Druk op / om Startfrequentie (MHz) te
selecteren. Gebruik vervolgens de cijfertoetsen
op de afstandsbediening om de startfrequentie
op te geven.
2. Druk op / om Omhoog scannen of
Omlaag scannen te selecteren. Druk
vervolgens op OK om vanuit de startfrequentie
het scannen naar kanalen met een hogere of
lagere frequentie te starten.
Enkele RF-scan (alleen digitale kanalen)
Gebruik deze optie om een enkele RF-scan uit te
voeren en de sterkte en kwaliteit van het signaal te
controleren.
NL-14
14
Selecteren
Afsluiten
Afsluiten
1. Gebruik de cijfertoetsen op de
afstandsbediening om het RF-kanaal in te
voeren.
2. Druk op OK om het scannen te starten.
Kabelmodus
Scan single Eën RF-kanaal scannen (alleen digitaal)
Video
Kabel
Off
0%
Audio
Frequentie (KHz)
Televisie
In
Instellen
Regeling
Symbool Cijfer (Ksym/s)
s)
Vergrendelen
Enter
Selecteren
Afsluiten
1. Druk op / om Frequentie (KHz) te
selecteren. Gebruik vervolgens de cijfertoetsen
van de afstandsbediening om de frequentie in
te voeren.
2. Druk op / om Regeling te selecteren. Druk
vervolgens op / om het modulatietype te
selecteren.
3. Druk op / om Symbool Cijfer (Ksym/s)
te selecteren. Gebruik vervolgens de
cijfertoetsen van de afstandsbediening om de
symboolfrequentie in te voeren.
4. Druk op OK om het scannen te starten.
Favoriete netwerk selecteren
Gebruik deze optie om het gewenste te netwerk
selecteren als er tijdens het scannen naar kanalen
meer dan een netwerk is gedetecteerd.
Kanaal overslaan
Gebruik deze optie om de kanalen te selecteren
die bij gebruik van de toetsen P /P
moeten worden overgeslagen. Als u toch op de
overgeslagen kanalen wilt afstemmen, kunt u de
cijfertoetsen op de afstandsbediening gebruiken.
1. Druk op / om het kanaal dat u wilt
overslaan te selecteren en druk vervolgens op
OK.
wordt weergegeven.
g g
Video
Audio
Televisie
In
Instellen
909
Analoog
910
Analoog
911
Analoog
912
Analoog
913
Analoog
914
Analoog
915
Analoog
Vergrendelen
Gebruikershandleiding bij platte LED-tv met achtergrondverlichting
Enter
Selecteren
Afsluiten
De tv gebruiken
2. Herhaal bovenstaande stap tot alle kanalen die
moeten worden overgeslagen zijn ingesteld.
Kanaal sorteren
Gebruik deze optie om de volgorde van de kanalen
in de lijst met kanalen te wijzigen.
1. Druk op / om het kanaal te selecteren
dat u op een andere positie wilt plaatsen
wordt
en selecteer vervolgens OK.
weergegeven.
2. Druk op / om de gewenste positie voor het
kanaal te selecteren. Druk vervolgens op OK om
twee kanalen van positie te wisselen.
3. Herhaal stap 1 en 2 tot alle gewenste kanalen
in de gewenste volgorde zijn geplaatst.
Channel Labeling
Gebruik deze optie om het nummer en de naam van
een kanaal te bewerken.
1. Druk op / om het kanaal dat u wilt
bewerken te selecteren en druk op OK.
Video
Naam netwerk:
Audio
Kanaalnummer:
915
Kanaalnaam:
Televisie
Sports
Frequentie
503.3
In
Instellen
Vergrendelen
Enter
Selecteren
Afsluiten
2. Druk op / om Kanaalnummer te
selecteren. Druk vervolgens op de cijfertoetsen
van de afstandsbediening om het gewenste
kanaalnummer in te voeren.
3. Druk op / om Kanaalnaam te selecteren.
Voer de nieuwe naam in. De tekens waaruit
de naam bestaat selecteert u door per teken
herhaaldelijk op de cijfertoetsen te drukken.
Opmerking
!> om een teken te verwijderen.
Fijnafst van analoog kan
!#>!?
te stemmen bij een slechte ontvangst.
1. Druk op / om het analoge kanaal te
?"J
2. Druk op / om de frequentie aan te passen
terwijl u de kwaliteit van het beeld in de gaten
houdt. Klik op OK om de frequentie vast te zetten.
Kanaalnummer: 901
Kanaalnaam: BBC
Frequentie: 85.25 MHz
Instellen
Annuleren
A
Zenderoverzicht resetten
Gebruik deze optie om alle kanalen die in de lijst
met kanalen staan te wissen.
Tijdverschuiving
Gebruik deze optie om de modus Time Shifting in of
uit te schakelen. Zie "Timeshifting" op pagina 21 voor
meer informatie.
Device Info
Gebruik deze optie om de gegevens te bekijken van
het apparaat dat op de USB-aansluiting achter op de
tv is aangesloten.
De tv-instellingen aanpassen
Video
Audio
Te
Televisie
Instellen
Nederlands
OSD-taal
Schermmodus
16:9
DPMS
Aan
Blauw dempen
Uit
Interactie zender
Uit
MHEG PIN Protection
Uit
Tijd instellen
Vergrendelen
Enter
Selecteren
Afsluiten
OSD-taal
Gebruik deze optie om de taal te selecteren voor het
menu dat op het scherm wordt weergegeven.
Schermmodus
Gebruik deze optie om de schermweergavemodus te
selecteren.
Opmerking
!!>
toets SCREEN te drukken.
DPMS (energiebeheerfunctie)
Gebruik deze optie om de tv automatisch over te laten
schakelen naar de stand-bymodus als er binnen 40
seconden in VGA-modus geen invoersignaal vanuit de
pc wordt waargenomen.
Blauw dempen
Gebruik deze optie om de tv zo in te stellen dat er
een blauw scherm wordt weergegeven wanneer er
geen invoersignaal is of wanneer er audiobestanden
worden afgespeeld.
Interactie zender
Gebruik deze optie om het interactiekanaal in te
schakelen.
MHEG PIN Protection
Gebruik deze optie om de MHEG PIN-beveiliging in
te schakelen.
Tijd instellen
Gebruik deze optie om de tijd en de timer in te stellen.
Tijdzone
Gebruik deze optie om uw tijdzone in te stellen.
Tijd
Auto synchronisatie
Selecteer Aan om datum- en tijdgegevens
automatisch met een digitaal signaal te
synchroniseren (indien beschikbaar). Selecteer Uit
om de datum- en tijdgegevens handmatig aan te
passen.
Datum
Gebruik / en de cijfertoetsen om de datum in te
stellen.
Tijd
Gebruik / en de cijfertoetsen om de tijd in te
stellen.
Uitschakeltimer
Gebruik deze optie om de tv op een vooraf ingesteld
tijdstip in te schakelen.
Gebruikershandleiding bij platte LED-tv met achtergrondverlichting
NL-15
15
NL
De tv gebruiken
Timer
Wanneer de inschakeltimer is ingeschakeld, kunt u
met / en de cijfertoetsen de inschakeltijd instellen.
Zender aanzetten
Wanneer de inschakeltimer is ingeschakeld, kunt u
het inschakelkanaal in de lijst met kanalen selecteren.
Uitschakeltimer
Gebruik deze optie om de tv op een vooraf ingesteld
tijdstip uit te schakelen.
Timer
Wanneer de uitschakeltimer is ingeschakeld, kunt
u met / en de cijfertoetsen de uitschakeltijd
instellen.
Slaaptimer
Gebruik deze optie om de tv automatisch na een
vooraf ingestelde tijd uit te schakelen.
Automatisch slapen
Gebruik deze optie om ervoor te zorgen dat
de tv automatisch wordt uitgeschakeld als er
gedurende een bepaalde tijd geen activiteit heeft
plaatsgevonden.
Ondertitel
Gebruik deze optie om de instellingen voor
ondertiteling aan te passen.
Analoge ondertitel
Gebruik deze optie om de analoge ondertiteling in of
uit te schakelen. Selecteer Dempen om de analoge
ondertiteling in te schakelen wanneer het geluid van
de tv wordt gedempt.
Taal van digit ondertitels
Gebruik deze optie om een taal voor de digitale
ondertiteling te selecteren.
Taal van digit ondertitels 2e
Gebruik deze optie om een tweede taal voor de
digitale ondertiteling te selecteren.
Type v. ondertitel
Gebruik deze optie om een type digitale
ondertiteling te selecteren.
Teletekst
Gebruik deze optie om de instellingen van teletekst
aan te passen.
Taal van digit teletekst
Gebruik deze optie om de digitale teleteksttaal te
selecteren.
Taal v. decodeerpagina
Gebruik deze optie om de taal voor de
decodeerpagina voor teletekst te selecteren.
Gemeenschappelijke interface
Gebruik deze optie om de gegevens van de CAM die
in de sleuf COMMON INTERFACE op de achterkant
van de tv is geplaatst te controleren.
OAD (Over Air Download)
Gebruik deze optie om de software van de tv
draadloos bij te werken.
Handmatig OAD downloaden
Gebruik deze optie om de software van de tv
handmatig draadloos bij te werken. Volg de
instructies op het scherm voor het uitvoeren van de
software-update.
NL-16
16
Automatisch downloaden
Selecteer Yes om de tv zo in te stellen dat
nieuwe software automatisch draadloos wordt
gedownload.
Automatisch installeren
Selecteer Yes om de tv zo in te stellen dat
nieuwe software automatisch draadloos wordt
geïnstalleerd.
Versiegegevens
Gebruik deze optie om de gegevens van de
softwareversie te bekijken.
Systeeminformatie
Gebruik deze optie om de systeemgegevens te
bekijken.
Reset standaard
Gebruik deze optie om de beeldinstellingen,
geluidsinstellingen, kanaalinstellingen en
gebruikersinstellingen terug te zetten naar de
fabrieksinstellingen.
CEC (menu)
Gebruik dit menu om de CEC-instellingen aan te passen.
CEC functie
Gebruik deze optie om CEC in of uit te schakelen.
Auto uitschakelen
Wanneer deze optie is ingesteld op On, wordt het
CEC-apparaat automatisch uitgeschakeld wanneer
de tv wordt uitgeschakeld.
Onthulling apparaat
Controleer of uw apparaat is aangesloten en of
CEC wordt ondersteund.
Stand-by (wanneer CEC-apparaat is aangesloten)
Het geselecteerde CEC-apparaat uitschakelen.
Stroom inschakelen (wanneer CEC-apparaat is
aangesloten)
Het geselecteerde CEC-apparaat inschakelen.
Maak Sys. Aud. Ctrl. onmogelijk/mogelijk
(wanneer CEC-apparaat is aangesloten)
Wanneer deze optie is ingeschakeld, kan het
volumeniveau van het CEC-apparaat via de
afstandsbediening van de tv worden geregeld.
Opmerking
%X>>;
;J
de gebruikershandleiding van uw apparaat voor
informatie.
X;
;>
>>>"X!J
X;
;
apparaat moet zijn ingeschakeld.
X>>
X;
;>&"!;
;
bedieningsfunctie niet.
!!X>>&
"!;
;X!J
Winkelmodus
Gebruik deze optie om de winkelmodus in of uit te
schakelen.
Gebruikershandleiding bij platte LED-tv met achtergrondverlichting
De tv gebruiken
Aan – In deze modus staan de instellingen
ingesteld voor een optimale beeldweergave in de
winkel. Op het scherm wordt bovendien informatie
over het product weergegeven.
Uit – In deze modus staan de instellingen
ingesteld voor een normale beeldweergave
in de huiselijke omgeving, met een optimaal
energieverbruik.
Adjusting Lock Settings
(Vergrendelingsinstellingen wijzigen)
Typ het wachtwoord dat u tijdens de eerste installatie
hebt ingevoerd om het menu Lock te openen.
Opmerking
""
hebt ingevoerd, typt u 1234 om het menu Lock te
openen.
"""&
het universele wachtwoord 9443 in om het
vergrendelmenu te openen en een nieuw
wachtwoord in te stellen.
Video
Wachtwoord
Audio
T
Televisie
Instelle
Inst
In
Instellen
ellen
n
Vergrendelen
Enter
Selecteren
Afsluiten
Wachtwoord anders
Video
Audio
OK
Kanaalvergrendeling
Kinderslot
Te
Televisie
In ellen
Instellen
Instelle
Inst
n
Vergrendelen
Bronvergrendeling
Kinderslot
Uit
Kinderslot
Uit
Bronsetmodus
Aan
Enter
Selecteren
Afsluiten
Wachtwoord anders
Gebruik deze optie om het wachtwoord te wijzigen.
Kanaalvergrendeling
Gebruik deze optie om de kanalen te vergrendelen
die niet door anderen mogen worden bekeken.
1. Druk op / om het kanaal te selecteren dat
u wilt vergrendelen en druk vervolgens op OK.
wordt weergegeven.
2. Herhaal bovenstaande stap tot alle gewenste
kanalen zijn vergrendeld.
Opmerking
Y>!&
moet u het 4-cijferige wachtwoord invoeren.
Tijdtussenpoosvergrendeling (alleen beschikbaar
in Noorwegen)
Gebruik deze optie om het interval in te stellen
gedurende welke de tv-kanalen vergrendeld moeten
blijven. Om op een vergrendeld kanaal af te stemmen,
moet u het wachtwoord invoeren.
Kinderslot
Gebruik deze optie om op basis van de ingestelde
leeftijdsgrens bepaalde tv-programma's te blokkeren
die niet geschikt zijn voor kinderen.
Opmerking
#>"!>
leeftijdindicatie.
Bronvergrendeling
Gebruik deze optie om een invoerbron te
vergrendelen.
1. Druk op / om de invoerbron die u wilt
vergrendelen te selecteren en druk op OK.
wordt weergegeven.
2. Herhaal bovenstaande stap tot u alle bronnen
die u wilt vergrendelen hebt ingesteld.
Opmerking
Y!
moet u het 4-cijferige wachtwoord invoeren.
Kinderslot
Gebruik deze optie om de bedieningstoetsen op de
zijkant van de tv te vergrendelen.
Tuningslot
Gebruik deze optie om de mogelijkheid om de tv af
te stemmen uit te schakelen. Wanneer deze optie is
ingesteld op Aan, is het hoofdmenu van de tv niet
beschikbaar.
Bronsetmodus
Gebruik deze optie om de tv zo in te stellen dat deze
met een standaard invoerbron wordt ingeschakeld.
Bronset
Gebruik deze optie om de standaard invoerbron te
selecteren als Bronsetmodus is ingesteld op Aan.
Kanaalnr.
Gebruik deze optie om het standaard kanaal te
selecteren als Bronset is ingesteld op TV.
Max volume
Gebruik deze optie om het maximale volume in te
stellen.
Eerste volumemodus
Gebruik deze optie om de tv zo in te stellen dat
deze met een standaard volumeniveau wordt
ingeschakeld.
Eerste volume
Gebruik deze optie om het standaard volumeniveau
te selecteren als Eerste volumemodus is ingesteld
op Aan.
Vergrendeling opheffen
Voor het opnieuw instellen van de
vergrendelingsinstellingen naar de
standaardinstellingen.
Eerste instelling
Gebruik deze optie om de beeldinstellingen,
geluidsinstellingen, kanaalinstellingen,
gebruikersinstellingen en vergrendelingsinstellingen
terug te zetten naar de fabrieksinstellingen. Het
scherm voor de eerste installatie wordt geopend.
Gebruikershandleiding bij platte LED-tv met achtergrondverlichting
NL-17
17
NL
Andere functies
Andere functies
USB-mediaspeler gebruiken:
1. Sluit de USB-stick aan op de USB-poort achter op
uw tv.
USB-mediaspeler
Met de USB-mediaspeler kunt u een USB-stick op uw
tv aansluiten om foto's weer te geven en muziek en
video's af te spelen.
Opmerking
`[!*$#J
>`[!
ondersteunde bestandsindeling hebben (*.mp3,
*.jpg, *.mp4, etc.).
["&"
niet weergegeven.
`!#
">?!J
>
externe harde schijf of mp3-speler af te spelen.
"!`[J
">!`[
signaaltransmissie, is het af te raden een USBpatchkabel te gebruiken.
!`[>>
voldoet aan de standaard voor de USB 2.0-interface
met volle snelheid. Als de USB-apparatuur niet
voldoet aan de standaard voor de USB-interface
met volle snelheid, kan de weergave haperen.
Let op
>>`[
de USB-mediaspeler afsluit.
De USB-stick formatteren:
U kunt uw USB-stick formatteren met behulp van het
menu op het scherm.
1. Schakel over op TV-bron.
2. Druk op MENU/ . Het schermmenu wordt geopend.
3. Druk op / om TV te selecteren en druk
vervolgens op OK.
4. Druk op / om Apparaatinfo te selecteren en
druk vervolgens op OK.
5. Selecteer uw USB-stick en druk op OK.
6. Druk op / om Formatteren te selecteren en
druk vervolgens op OK.
7. Wanneer het bevestigingsscherm verschijnt,
selecteer dan JA en druk daarna op OK.
8. Wanneer het formatteren is voltooid, druk op
AFSLUITEN.
2. Druk op SOURCE. Gebruik vervolgens / om
USB te selecteren en druk op OK om over te
schakelen naar de USB-modus.
Video
Selecteren
Muziek
Enter
3. Gebruik / om het mediumtype te selecteren:
Video, Foto of Muziek. Druk vervolgens op OK.
4. Druk op /// om het bestand dat u wilt
afspelen te selecteren. Druk vervolgens op OK.
5. Om de instellingen aan te passen, drukt u op
MENU/ . Het schermmenu wordt geopend.
6. Druk op / om een item te selecteren. Druk
vervolgens op OK om de instelopties uit te voeren
of weer te geven. Druk vervolgens op / om de
gewenste optie te selecteren en druk op OK.
7. Druk op BACK/ om terug te keren naar het vorige
menu of om het menu te sluiten.
Thumbnail/List Mode
Tijdens het bekijken van de inhoud van de USB-stick,
kunt u schakelen tussen Thumbnail en List door op
FAV/ te drukken.
Druk op MENU/
om het schermmenu te openen.
Sorteren
Gebruik deze optie om het algoritme voor het
sorteren van bestanden te selecteren.
Type media
Gebruik deze optie om het type medium te
selecteren.
Opmerking
"!
USB-stick bladert en naar de bovenste map wilt
teruggaan:
Druk in de modus Thumbnail op BACK/ .
Druk in de modus List op / om het pictogram
boven aan de lijst te selecteren. Druk
vervolgens op OK.
[..]
NL-18
18
Foto
Gebruikershandleiding bij platte LED-tv met achtergrondverlichting
Andere functies
Photo Mode
Druk op MENU/
om het schermmenu te openen.
Afspelen
Herhalen
Willekeurige volgorde
Draaien
Duur
Zoomen
Foto
Alles herhalen
A
Kort
3/14
Koala.JPG
Menu
Enter
Afspelen/Pauzeren
Gebruik deze optie om een diavoorstelling af te
spelen of tijdelijk te onderbreken.
Herhalen
Gebruik deze optie om het afspelen van bestanden
in dezelfde map te herhalen.
Willekeurige volgorde
!#>
!J`!
bestanden in willekeurige volgorde af te spelen.
Draaien
Gebruik deze optie om de foto steeds 90° naar rechts
te draaien.
Duur
Gebruik deze optie om de tijd dat de foto wordt
weergegeven te selecteren.
Zoomen
Gebruik deze optie om de foto in te zoomen.
Effect
Gebruik deze optie om het overgangseffect van de
foto te selecteren.
Info weergeven
Gebruik deze optie om de informatie van de
weergegeven foto te tonen.
Music Mode
Druk op MENU/
om het schermmenu te openen.
Pauzeren
Herhalen
Herhalen
Gebruik deze optie om het afspelen van bestanden
in dezelfde map te herhalen.
Willekeurige volgorde
!#>
!J`!
bestanden in willekeurige volgorde af te spelen.
Info weergeven
Gebruik deze optie om de informatie over de
afgespeelde muziek te tonen.
Spectrum verbergen/weergeven
Gebruik deze optie om het spectrum te verbergen of
te tonen.
Alleen audio
Gebruik deze optie om de schermweergave uit te
schakelen en alleen naar geluidsbestanden te luisteren.
Opmerking
!>
willekeurige knop te drukken.
Video Mode
Druk op MENU/
om het schermmenu te openen.
Pauzeren
Herhalen
Program
Info weergeven
00:03:29
Video
00:04:50
3/14
Skyfall.MP4
Menu
Enter
Afspelen/Pauzeren
Gebruik deze optie om de video af te spelen of om
het afspelen van de video tijdelijk te onderbreken.
Herhalen
Gebruik deze optie om het afspelen van bestanden
in dezelfde map te herhalen.
Program
Gebruik deze optie om de programma's van een *.tsbestand te selecteren.
Info weergeven
Gebruik deze optie om de informatie over de
afgespeelde video weer te geven.
Willekeurige volgorde
Info weergeven
Spectrum verbergen
Alleen audio
00:01:29
Muziek
00:04:50
3/14
Skyfall.mp3
Menu
Enter
Afspelen/Pauzeren
Gebruik deze optie om de muziek af te spelen of om
het afspelen van de muziek tijdelijk te onderbreken.
Gebruikershandleiding bij platte LED-tv met achtergrondverlichting
NL-19
19
NL
Andere functies
Toetsfuncties
Knop
Functie
Afspelen/
Pauzeren
Volgend bestand
afspelen
Vorig bestand
afspelen
Vooruitspoelen
Snel achteruit
Stoppen
Foto
Muziek
Video
9
9
9
9
9
9
9
9
9
9*
9
9
9
9
9
9
9**
* Druk in de modus Photo op
om te selecteren hoe
lang de foto moet worden weergegeven.
** Tijdens afspelen op drukken resulteert in
onderbreking van het afspelen op het stoppunt,
waarbij een blauw scherm en een bericht “StoppenHervatten” wordt weergegeven. U kunt één van
de twee volgende handelingen uitvoeren om te
hervatten:
- Op OK of drukken om afspelen vanaf het
stoppunt te hervatten.
- Nogmaals op drukken om afspelen te stoppen
en vervolgens op OK of om de video vanaf het
begin af te spelen.
NL-20
20
Gebruikershandleiding bij platte LED-tv met achtergrondverlichting
Andere functies
Ondersteunde bestandsindelingen voor USB-media
Bestandsindeling
*.avi
Container
AVI
Video-bestandsindeling
Videocodec
XviD
Audiocodec
MP3 (MPEG1 Layer3)
MPEG1
MPEG1 Layer1/2
MPEG2 MP@HL
MPEG2: AAC/AAC-LC
H.264 BP LV 4.0
MPEG4: AAC-LC/HE-AAC
H.264 MP LV 4.0
WAV: PCM/ADPCM
H.264 HP LV 4.0
AC3
MPEG-4 SP@HL 3.0
MPEG-4 ASP@HL 4.0
*.mp4
*.mov
MP4
MP4
Motion JPEG
H.264 BP LV 4.0
MP3 (MPEG1 Layer3)
H.264 MP LV 4.0
MPEG1 Layer1/2
H.264 HP LV 4.0
MPEG2: AAC
MPEG-4 SP@HL 3.0
MPEG4: HE-AAC
MPEG-4 ASP@HL 4.0
H.264 BP LV 4.0
MPEG2: AAC/AAC-LC
H.264 MP LV 4.0
MPEG4: AAC-LC/HE-AAC
NL
H.264 HP LV 4.0
MPEG-4 SP@HL 3.0
MPEG-4 ASP@HL 4.0
*.mkv
MKV
Motion JPEG
H.264 BP LV 4.0
*.vob
MPEG PS
H.264 MP LV 4.0
MPEG1 Layer1/2
H.264 HP LV 4.0
MPEG2: AAC/AAC-LC
MPEG-4 SP@HL 3.0
MPEG4: AAC-LC/HE-AAC
MPEG-4 ASP@HL 4.0
MPEG-2 MP@HL
AC3
MPEG1 Layer1/2
MPEG-1
AC3
MP3 (MPEG1 Layer3)
MPEG-2 MP@HL
MPEG1 Layer1/2 AC3
MPEG-2 MP@HL
AC3
MP3 (MPEG1 Layer3)
H.264 BP LV 4.0
MPEG1 Layer1/2
H.264 MP LV 4.0
MPEG2: AAC
H.264 HP LV 4.0
MPEG4: HE-AAC
*.mpg
MKV
*.mpeg
MPEG TS
MPEG TS
*.ts
MPEG TS
MP3 (MPEG1 Layer3)
Bestandsindeling
*.mp3
Audio-bestandsindeling
Container
MP3
Audiocodec
MP3 (MPEG1 Layer3)
Bestandsindeling
*.jpg
Foto-bestandsindeling
Container
JPEG
Codec
Baseline/Progressive
*.jpeg
Gebruikershandleiding bij platte LED-tv met achtergrondverlichting
NL-21
21
Andere functies
Algemene interface
De Common Interface-sleuf (CI-sleuf) is bedoeld om
de Conditional Access Module (CAM) en smartcard
te plaatsen, voor de toegang van pay-per-view
programma's en andere diensten. Neem contact op met
uw Common Interface-leverancier om meer informatie
te krijgen over modules en abonnementen. Houd
er rekening mee dat wij geen CAM's en smartcards
meeleveren of als optionele accessoires leveren.
1. Plaats de smartcard in de CAM. Steek de CAM in
de COMMON INTERFACE-sleuf achter op de tv.
CI-sleuf
CAM
Smartkaart
Paginanummers invoeren
Om een teletekstpagina te selecteren, kunt u het
paginanummer invoeren met de cijfertoetsen op de
afstandsbediening.
abc
def
ghi
jkl
mno
pqrs
tuv
wxyz
Mixmodus
Als u het televisiebeeld wilt blijven zien terwijl
teletekst is ingeschakeld, drukt u op . Hierbij wordt
de teletekstpagina over het televisiebeeld heen
weergegeven. Druk nogmaals op
om terug te
gaan naar de volledige tekstweergave.
BACK /
2. Op de tv verschijnt het bericht dat de CAM is
gedetecteerd. Wacht een paar minuten tot de kaart
is geactiveerd.
3. Druk op MENU/ om het schermmenu te openen.
4. Druk op / om Instellen te selecteren. Druk
vervolgens op OK.
5. Druk op / om Gemeenschappelijke interface
te selecteren. Druk vervolgens op OK.
6. Druk op / om de optie die u nodig hebt te
selecteren. Druk vervolgens op OK.
7. Er wordt gedetailleerde informatie over de CAM
weergegeven. Raadpleeg de instructiehandleiding
van de CAM voor de juiste instellingen.
Teletekst
Teletekst is een door een aantal televisiekanalen
uitgezonden informatieservice. Via deze service zenden
televisiekanalen verschillende op tekst gebaseerde
soorten informatie uit, waaronder nationaal nieuws,
internationaal nieuws en sportnieuws, het weerbericht
en tv-programmaoverzichten. De service biedt ook
ondertiteling voor doven en slechthorenden en voor
mensen die de taal waarin een bepaald programma
wordt uitgezonden niet goed beheersen.
Teletekst
Druk op / om teletekst in te schakelen. Druk
nogmaals op / om teletekst uit te schakelen.
Pagina omhoog/omlaag
Druk op de toetsen P /P om de volgende of de
vorige teletekstpagina weer te geven.
Vasthouden
om het automatisch bijwerken van de
Druk op
pagina stop te zetten. Deze functie is erg handig
wanneer een teletekstpagina meerdere subpagina's
heeft.
FAV /
Grootte
om het teletekstbeeld over te schakelen
Druk op
naar Boven, Onder of Volledig. Deze functie is erg
handig omdat u hiermee het beeld vergroot en de
tekens beter leesbaar worden.
CH.LIST /
Onthullen
Druk op
om verborgen gegevens te onthullen,
bijvoorbeeld het antwoord op een quizvraag.
INFO /
Subcode
om een secundaire pagina in te voeren.
Druk op
Typ vervolgens de 4-cijferige code.
GUIDE /
Verbergen
Druk op
om de tekst te verbergen.
EXIT /
Gekleurde knoppen voor sneltekst
Met sneltekst worden automatisch de vier populairste
pagina's weergeven waarvan de omroep denkt
dat u deze als volgende wilt kiezen. Druk op de
afstandsbediening op de knop met dezelfde kleur als
de koppeling onder aan de teletekstpagina om direct
naar de desbetreffende pagina te gaan.
P
NL-22
22
Gebruikershandleiding bij platte LED-tv met achtergrondverlichting
Andere functies
Een USB-apparaat gebruiken voor
opnamen
Opmerking
>>
opnamen is 1 GB.
BELANGRIJK: zorg dat het USB-apparaat op uw
pc als FAT32 is geformatteerd voordat u het op de
USB-ingang aansluit.
Timeshift (alleen DTV)
1. Zorg dat de modus Tijdverschuiving in het menu
TV is ingesteld op On.
2. Sluit het USB-apparaat met FAT32-indeling aan op
de USB-ingang aan de achterzijde van de tv.
3. Druk op om timeshifting te starten.
NL
Opmerking
`[>>!
timeshifting wordt gebruikt, wordt het scherm Disc
Setup geopend. Volg de instructies op het scherm
om het USB-apparaat automatisch of handmatig in
te stellen.
4. Druk op om het programma tijdelijk te stoppen.
Als u nogmaals op drukt, begint het afspelen van
het timeshifting-programma.
5. Druk op om timeshifting te stoppen.
Opnemen (alleen DTV)
1. Sluit het USB-apparaat met FAT32-indeling aan op
de USB-ingang aan de achterzijde van de tv.
2. Druk op om het opnemen van het huidige
programma te starten.
3. Druk op om het opnemen van het programma te
stoppen.
4. Schakel over naar de USB-bron om het opgenomen
programma af te spelen.
5. Druk op / om Video te selecteren. Druk
vervolgens op OK.
6. Druk op / om de map pvr te selecteren. Druk
vervolgens op OK.
7. Selecteer het programmabestand dat u wilt
afspelen. Druk op OK om het afspelen te starten.
Gebruikershandleiding bij platte LED-tv met achtergrondverlichting
NL-23
23
Referentiesectie
Referentiesectie
Problemen oplossen
Symptomen
Geen stroom
Items die moeten worden gecontroleerd en acties die moeten worden
ondernomen
;!!>
gestoken.
$!!!>J+:J`!
stekker terug in het functionerende stopcontact en zet de tv weer aan.
Geen beeld
;J
;>J
#!>#J
ander kanaal.
J
Goed beeld, maar geen
geluid
>VOL+ op de
afstandsbediening of op de zijkant van de tv te drukken.
!> op de afstandsbediening, zodat u zeker weet dat het geluid niet
wordt gedempt.
Goed geluid, maar slechte
kleuren
&!J
Slecht beeld
!"!``
camcorder zowel op uw tv als op een van de randapparaten is aangesloten.
Schakel een van de randapparaten uit.
Beeld met sneeuw en ruis
;J
Tv reageert niet op
afstandsbediening
;"!J##J
#>J
>J
!!>#!!J
Tv werkt niet
!!:>
weer aan. Als het probleem aanhoudt, neemt u contact op met een erkend
servicecentrum waar technische medewerkers klaarstaan om u verder te
helpen.
Er worden geen bestanden
weergegeven in USB-modus
>J
>J
Opmerking
>">#>&!>
plaatselijke erkende servicecentrum.
">!"?>J"
nooit de achterkant. De hoge spanning in de tv kan letsel of brand veroorzaken.
NL-24
24
Gebruikershandleiding bij platte LED-tv met achtergrondverlichting
Referentiesectie
`>?!#!""#J
Model
LE32A650CF
LE32F600C
Beeld- en geluidssysteem
PAL/SECAM-B/G, I, D/K, L
Stroomvoorziening
60W
45W
Audio-ingang
10 W + 10 W
10 W + 10 W
Aansluitingen op de
achterkant
Componentingang
USB
Composietingang (gedeelde Y-ingang)
HDMI 1/HDMI 2-ingang
YPbPr/CVBS-audio-ingang
Algemene interface
USB
Hoofdtelefoonuitgang
HDMI 1/HDMI 2/HDMI 3-ingang
Digitale audio-uitgang (coaxiaal)
Algemene interface
Antenne-ingang
Hoofdtelefoonuitgang
SCART
Digitale audio-uitgang (coaxiaal)
PC-ingang
Antenne-ingang
PC-audio-ingang
NL
SCART
PC-ingang
PC-audio-ingang
Temperatuur
Bedrijf: +5°C ~ +35°C
Opslag: -15 °C ~ +45 °C
Vochtigheid
Bedrijf: 20% ~ 80%
Y>:
Accessoires
Afstandsbediening/AAA-batterij x 2/instructiehandleiding/snelstartgids/garantiekaart/tvstandaard met schroeven/stroomsnoer (uitsluitend LE32F600C)
Afmetingen
(met standaard)
(b x h x d)
728.26 x 467.86 x 180.31 mm
731,87 x 477,17 x 207,15 mm
Afmetingen (zonder
standaard) (b x h x d)
728.26 x 434.26 x 77.07 mm
731,87 x 440,96 x 75,00 mm
Gewicht (met standaard)
7,53 kg
5,8 kg
Gewicht (zonder
standaard)
7,13 kg
5,4 kg
Wandmontage (l x b)
100 x 100 mm
100 x 100 mm
X&X?X#!>!
van HDMI Licensing LCC in de Verenigde Staten en andere landen.
Geproduceerd onder licentie van Dolby Laboratories. Dolby en het symbool met de dubbele D zijn handelsmerken
van Dolby Laboratories.
Gebruikershandleiding bij platte LED-tv met achtergrondverlichting
NL-25
25
Referentiesectie
Bijlage
Ondersteunde timing Component-ingang
Ondersteunde timing VGA-ingang
(Alleen LE32A650CF)
LE32A650CF
Component
VGA
Vernieuwings
frequentie (Hz)
Resolutie
480i
720 x 400
70
480p
640 x 480
60/70/72
576i
800 x 600
56/60/70/72
576p
1024 x 768
60/70/75
1360 x 768
60
50
50
720p
1280 x 720
1280 x 960
60
60
50
1080i
60
1920 x 1080
1080p
LE32F600C
VGA
720 x 400
70
640 x 480
60/70/72
800 x 600
56/60/70/72
1024 x 768
60/70/75
1280 x 960
1360 x 768
60
Vernieuwings
frequentie (Hz)
Resolutie
480i
480p
576p
720p
1080i
1080p
NL-26
26
60
HDMI
576i
1280 x 720
50
Ondersteunde timing HDMI-ingang
Vernieuwings
frequentie (Hz)
Resolutie
Vernieuwings
frequentie (Hz)
Resolutie
Gebruikershandleiding bij platte LED-tv met achtergrondverlichting
60
50
50
60
50
60
50
60
MANUALE DI ISTRUZIONI
LE32A650CF
LE32F600C
Leggere con attenzione questo manuale prima di utilizzare il
televisore e tenerlo a portata di mano per riferimento futuro.
Sommario
Avvisi di sicurezza ........................... 2
Benvenuti ..................................................2
Informazione importante ...........................2
Informazioni sul televisore LCD
LED ................................................... 5
Uso del televisore .......................... 12
Regolazione delle impostazioni video ....12
Regolazione delle impostazioni audio ....13
Regolazione delle impostazioni dei
canali ......................................................14 IT
Regolazione delle impostazioni del
televisore ................................................15
Regolazione delle impostazioni di blocco17
Installazione del supporto .........................5
Installazione di una staffa per il
montaggio a parete ...................................5
Controlli laterali .........................................5
Terminali posteriori....................................6
Collegamenti .............................................7
Altre funzioni.................................. 18
Collegamento ad antenna o cavo ........ 7
Modalità foto ...................................... 19
Collegamento di un dispositivo A/V
esterno ................................................. 7
Modalità musica ................................. 19
Collegamento di un PC ........................ 7
Funzioni dei pulsanti .......................... 20
Formato di file supportato dal lettore
multimediale USB ............................... 21
.................... 7
Collegamento di un sistema audio
digitale ................................................. 7
Uso del telecomando ................................8
Lettore multimediale USB .......................18
Modalità anteprima/elenco ................. 18
Modalità video .................................... 19
Guida introduttiva............................ 9
Common Interface ..................................22
Teletext ...................................................22
Uso di dispositivi USB per la
registrazione ...........................................23
Preparazione del telecomando .................9
Timeshift (solo DTV) .......................... 23
Installazione delle batterie ................... 9
Registrazione (solo DTV) ................... 23
Precauzioni per il telecomando e la
batteria ................................................. 9
.............................9
Descrizione delle procedure
fondamentali ...........................................11
Sezione di riferimento ................... 24
Risoluzione dei problemi ........................24
...............................................25
Appendice ...............................................26
Accensione e spegnimento del
televisore ........................................... 11
Selezione dell'origine di input ............ 11
Selezione di un canale ....................... 11
Uso dell'elenco dei preferiti ................ 11
Regolazione del volume .................... 11
Visualizzazione delle informazioni
sui canali ............................................ 11
Navigazione nel menu su schermo .... 11
Manuale di istruzioni del televisore a schermo piatto con retroilluminazione LED
IT-1
Avvisi di sicurezza
Avvisi di sicurezza
Benvenuti
Grazie per aver scelto il televisore a schermo piatto con retroilluminazione LED a 32". Il presente manuale
prima di installare il nuovo televisore.
!#$
#%
&&&
*
+
,
-
:,
;,
;&<!#-=>>;?
!
&
!#&=@>;-
,
stacchi dal cuscinetto superiore durante il disimballaggio dei componenti.
Informazione importante
Leggere le seguenti istruzioni di sicurezza prima di utilizzare il televisore. Tenere le istruzioni a portata di mano per
riferimento futuro.
ATTENZIONE
NON APRIRE. RISCHIO DI
SCOSSE ELETTRICHE.
ATTENZIONE
JKKQKKK:;WX:;X::K;WYXY
RIMUOVERE IL COPERCHIO (O PANNELLO POSTERIORE). NON
CONTIENE PARTI RIPARABILI DALL'UTENTE. RIVOLGERSI AL
PERSONALE DI ASSISTENZA QUALIFICATO.
J,
posteriore in quanto non vi sono accessori all'interno dell'unità.
:
,
\,
Il simbolo del fulmine con la punta di freccia all'interno di un triangolo
equilatero avvisa l'utente della presenza di TENSIONE PERICOLOSA
non isolata nell'enclosure del prodotto con una magnitudine tale da
costituire un rischio di scosse elettriche per le persone.
Il punto esclamativo all'interno di un triangolo equilatero avvisa l'utente
della presenza di importanti istruzioni di manutenzione e operative nella
documentazione dell'apparecchiatura.
ATTENZIONE
AVVERTENZA
,
,
,
J
J
,
Y
,
]
,
,
,
,
,
sempre accessibile.
]
,
mano per riferimento futuro.
J
,
]
tenerlo a portata di mano per riferimento futuro.
*
,,
seguito di miglioramenti tecnici.
^,
%
ATTENZIONE: ,
,
lontane da questo prodotto.
IT-2
Manuale di istruzioni del televisore a schermo piatto con retroilluminazione LED
Avvisi di sicurezza
Il prodotto deve essere ben
,
alla parete in conformità alle
istruzioni di installazione per
evitare lesioni o danni derivanti
da eventuali cadute.
J,
non collegare prese multiple
in modalità parallela né spine
multiple alla stessa presa.
Non collocare il prodotto
vicino a liquidi come acqua
o olio (ad es. olio da
%
?
in quanto potrebbe
causare incendi.
Per evitare scosse elettriche o
_,
disassemblaggio non
autorizzato del televisore.
Contattare un provider di
,
\,
assistenza tecnica.
Non utilizzare spine elettriche
danneggiate o usurate e
tenere i cavi lontano da fonti
di calore per evitare scosse
elettriche e rischi di incendio.
Scollegare il prodotto
dall'alimentazione e contattare
,
,
\
vendita autorizzato se il
prodotto inizia ad emettere
suoni anomali.
J,
il prodotto deve essere
solida e stabile.
Per evitare esplosioni e
utilizzare o conservare
%
,
al prodotto.
Per evitare rischi di
lontano da trasformatori o
fonti di calore.
J,
l'antenna del prodotto deve
essere posizionata lontano
dai cavi elettrici.
Per evitare rischi di
questo prodotto sotto la
luce solare diretta o vicino
a fonti di calore.
Assicurarsi sempre che
il televisore sia collegato
`
collegamenti elettrici non corretti
possono causare incendi.
Scollegare l'alimentazione
e l'antenna del prodotto
durante i temporali e in
particolare durante gli
uragani.
Scollegare il televisore prima
di pulirlo e utilizzare materiali
%
chimiche. Assicurarsi che il
prodotto non entri in
contatto con acqua.
Manuale di istruzioni del televisore a schermo piatto con retroilluminazione LED
IT
IT-3
Avvisi di sicurezza
Per evitare scosse elettriche o
televisore dall'alimentazione e
l'antenna durante temporali o
uragani.
j
adottare le precauzioni
`
acqua lungo il cavo e nel
televisore.
Per ridurre il rischio di incendi
collocare il prodotto in aree
umide né esporlo alla pioggia o
all'umidità.
La spina e il cavo elettrico
devono essere tenuti puliti
per evitare scosse elettriche
o rischi di incendio.
Non toccare mai la spina con
le mani bagnate poiché ciò
potrebbe causare scosse
elettriche.
Per evitare scosse
elettriche o rischi di
il televisore per lunghi
dall'alimentazione.
IT-4
Manuale di istruzioni del televisore a schermo piatto con retroilluminazione LED
Informazioni sul televisore LCD LED
Informazioni sul televisore LCD LED
Installazione del supporto
1. Collocare con cautela lo schermo del televisore
,,
%
morbida per proteggere lo schermo da eventuali
2. Allineare con attenzione il supporto alla parte
inferiore del televisore.
3. Fissare il supporto al televisore con le viti in
<!,
!#-=>>;k,
LE32A650CF)
Installazione di una staffa per il
montaggio a parete
1. Collocare con cautela lo schermo del televisore
,,
%
morbida per proteggere lo schermo da eventuali
2. :
_
,,
,
quindi rimuovere il supporto.
3. Collegare la staffa per il montaggio a parete (in
vendita separatamente) ai fori di montaggio sul
retro del televisore utilizzando le viti fornite con la
staffa. Consultare le istruzioni fornite con la staffa
per il montaggio a parete per informazioni su come
,
Nota
;
della staffa per il montaggio a parete. Haier
_%
,
prodotto o lesioni all'operatore o ad altri utenti in caso
di installazione autonoma del televisore.
Controlli laterali
IT
Pulsante
Descrizione
SOURCE
Premere per selezionare l'origine di
input.
MENU
Premere per aprire o chiudere il
menu su schermo.
VOL+
Premere per aumentare il livello del
volume.
VOL-
Premere per ridurre il livello del
volume.
CH+
Premere per andare al canale
successivo nell'elenco dei canali.
CH-
Premere per andare al canale
precedente nell'elenco dei canali.
POWER
Premere per accendere o spegnere il
televisore.
Nota
J!#&=@>;-
trova sul lato destro del televisore.
NOTA
:,
,
,
X:<X\:
w?
utilizzate in questo manuale si riferiscono al
prodotto LE32F600C.
X:
,
w
,
Manuale di istruzioni del televisore a schermo piatto con retroilluminazione LED
IT-5
Informazioni sul televisore LCD LED
Terminali posteriori
*
*
3
*
* Questi terminali sono disponibili solo per LE32A650CF.
Connettore
Descrizioni
COMPONENT IN
(Y COMMON CVBS IN)
Collegare i cavi video per un componente o dispositivo composito. Quando si
,
,,
{|}<,?
YPbPr/CVBS AUDIO
Collegare i cavi audio per un componente o dispositivo composito.
USB
,
Q:~Q:~,
,
J
,$
multimediale USB" a pagina 18.
HDMI 2 IN
;
,W*]{|
COMMON INTERFACE
:
%%,
w,
;
]
;]{|j
del televisore vengono disattivati.
DIGITAL AUDIO OUT
(Coaxial)
;
]{|
ANT IN (AIR/CABLE)
;,]{|
SCART
;
,
,:;&K]{|
PC AUDIO IN
Collegare il cavo audio da un computer.
PC IN
Collegare il cavo video da un computer.
HDMI 3 IN
HDMI 1 IN
IT-6
;
,W*]{|
Manuale di istruzioni del televisore a schermo piatto con retroilluminazione LED
Informazioni sul televisore LCD LED
Uso del cavo Composite (solo LE32A650CF)
Collegamenti
Collegamento ad antenna o cavo
L
R
COMPOSITE OUT
VIDEO
IT
Collegamento di un dispositivo A/V esterno
Collegamento di un PC
Uso del cavo HDMI
RGB
PC
AUDIO
(L/R)
3
Uso del cavo SCART
SCART
Collegamento di un sistema audio digitale
Uso del cavo Component (solo LE32A650CF)
Y
PB
PR
L
COMPONENT OUT
R
Nota
:
,
,
effettuare il collegamento.
Manuale di istruzioni del televisore a schermo piatto con retroilluminazione LED
IT-7
Informazioni sul televisore LCD LED
Uso del telecomando
1
2
3
SOURCE
P.MODE
4
ghi
SUBTITLE
Premere per visualizzare i
sottotitoli.
8
FAV/
Premere per aggiungere un
canale preferito. In modalità
su una pagina.
9
SCREEN
Premere per cambiare la
modalità di visualizzazione
dello schermo.
7
16
*
S.MODE
abc
def
jkl
mno
10 MENU/
pqrs
tuv
wxyz
SLEEP
Q.VIEW
Premere per navigare nel
menu su schermo.
OK
Premere per confermare una
selezione.
BACK/
Premere per tornare al menu
precedente.
accedere alla modalità mista.
11
5
17
P
VOL
AUDIO
12
I/II
6
7
8
9
10
11
SUBTITLE
FAV /
3D WORLD
INFO /
SCREEN
CH.LIST /
GUIDE /
MENU /
18
*
19
20
BACK /
EXIT /
21
22
14
15
Premere per far avanzare
o riavvolgere rapidamente
13 (riavvolgimento)
la riproduzione in modalità
(avanzamento) multimediale.
14
OK
12
13
23
24
1
Pulsante
(Alimentazione)
Premere per accendere o
spegnere il televisore.
S.MODE
Premere per selezionare la
modalità audio.
3
P.MODE
Premere per selezionare la
modalità immagine.
>\
Premere per inserire il numero
Q.VIEW
Premere per passare all'ultimo
canale visualizzato.
SLEEP
Premere per impostare il timer
di sospensione.
5
X\
(Muto)
6
I/II AUDIO
IT-8
(TEXT)
Premere per regolare il livello
del volume.
Premere per aprire il teletext.
Premere per riprodurre/
sospendere la riproduzione
in modalità multimediale e
timeshift.
16 SOURCE
Premere per aprire l'elenco
delle origini di input.
17 P
Premere per cambiare canale.
/
INFO/
Premere per visualizzare le
informazioni sul canale.
per visualizzare le informazioni
nascoste.
19 CH.LIST/
Premere per aprire l'elenco
premere per visualizzare
%
schermo intero.
20 GUIDE/
Premere per aprire la guida dei
programmi.
per accedere a una pagina
secondaria.
21 EXIT/
Premere per chiudere il menu
su schermo.
per nascondere il testo.
Descrizioni
2
4
/
(riproduci/
15
pausa)
18
#
Premere per aprire o chiudere
il menu su schermo.
22
(prec.)
(succ.)
J
precedente o successivo in
modalità multimediale.
Premere per attivare o
disattivare l'audio.
23
(REC)
Premere per avviare/
sospendere la registrazione.
Premere per selezionare
l'audio DTV/NICAM (in base al
segnale di trasmissione).
24
(interrompi)
Premere per interrompere la
registrazione multimediale.
* Il pulsante non funziona in questi modelli.
Manuale di istruzioni del televisore a schermo piatto con retroilluminazione LED
Guida introduttiva
Guida introduttiva
Preparazione del telecomando
Installazione delle batterie
1. Aprire il coperchio della batteria.
2. Installare due batterie AAA. Assicurarsi che i simboli +
e – riportati sulle batterie siano correttamente allineati
ai simboli corrispondenti sul vano batterie.
,
,
,
%]
1. Assicurarsi di:
&,
%
(Vedere pagina 9 per dettagli)
&,,<
pagina 7 per dettagli)
&,
,
{|
AC IN sul retro del televisore e ad una presa di
J!#&=@>;-_
,
collegato a una presa di alimentazione funzionante.
2. Premere
per accendere il televisore. Viene
,
Premere OK per avviare la procedura guidata.
3. Premere /,
]
premere per continuare.
Initial Setup
Language
Please select your language:
English
Français
Italiano
Español
Deutsch
Back
3. Riposizionare il coperchio della batteria.
Precauzioni per il telecomando e la batteria
Select
Next
4. Premere /,
]
premere per continuare.
Configurazione iniziale
Paese
Selezionare il paese:
&
,
telecomando e il sensore remoto del televisore.
Q
Y
il telecomando sul pavimento.
interferiscono con il segnale del telecomando.
,
,
Y
,
calore dirette o in un luogo umido in quando potrebbe
danneggiarsi.
:%
,
,
_
:
%
di tipo identico o equivalente. Le batterie (gruppo
batterie o batterie installate) non devono essere
,
:
,
,
,%
Y
%
Non gettarle nel fuoco. Smaltire le batterie in base
alle normative locali.
Austria
Belgio
Svizzera
Repubblica Ceca
Germania
Indietro
Selezione
Dopo
5. ,,
k
quindi premere OK per continuare.
Configurazione iniziale
Impostare la password. “0000” non è una password valida
Nuova password
Conferma password
Indietro
Selezione
Dopo
Manuale di istruzioni del televisore a schermo piatto con retroilluminazione LED
IT-9
IT
Guida introduttiva
Nota
,
,
_
,
|
1234
|]
%
J
,
$*
$
8. Attendere il completamento della ricerca dei canali.
Configurazione iniziale
Ricerca canali
Per completare la ricerca dei canali potrebbe essere necessario del tempo.
Stato: ricerca...
Canali analogici: 0
Canali digitali: 0
6. Premere / per evidenziare la modalità di
]
per continuare.
Configurazione iniziale
21%
Modalità Sintonizzatore
Selezionare la modalità del sintonizzatore:
9. j
_
OK per uscire dalla procedura guidata.
Antenna
Configurazione iniziale
Cavo
Completato
Congratulazioni !!
Configurazione iniziale completata.
Premere [OK] per uscire dalla procedura guidata.
Indietro
Selezione
Dopo
7. Premere / per evidenziare Scansione]
premere per avviare la ricerca dei canali.
Indietro
Configurazione iniziale
Ricerca canali
Per prima cosa collegare l’antenna.
Avviare ora lla ricerca canali?
Se si salta questo punto, la ricerca canali può essere effettuata da Menu
Scansione
Ignora ricerca
Indietro
Selezione
Dopo
:
_
,
premere /// e i pulsanti numerici per
%
]
premere OK per iniziare la ricerca dei canali.
Configurazione iniziale
Configurare le info sul cavo.
Modalità di Ricerca
Intero
Frequenza (KHz)
306000
Modulazione
Auto
Velocità di modulazione (Ksym/s))
Auto
ID rete
Auto
Selezione
IT-10
10
Dopo
Manuale di istruzioni del televisore a schermo piatto con retroilluminazione LED
Guida introduttiva
Descrizione delle procedure
fondamentali
Uso dell'elenco dei preferiti
Accensione e spegnimento del televisore
1. Sintonizzarsi sul canale che si desidera aggiungere
all'elenco dei preferiti.
2. Premere FAV/ per aprire l'elenco dei preferiti.
3. Premere / per evidenziare una posizione
]
OK per aggiungere
il canale corrente all'elenco dei preferiti. viene
visualizzato sull'intestazione delle informazioni.
Per guardare un canale preferito:
1. Premere FAV/ per aprire l'elenco dei preferiti.
2. Premere /,
quindi premere OK per sintonizzarsi sul canale.
Per rimuovere un canale preferito:
1. Premere FAV/ per aprire l'elenco dei preferiti.
2. Premere / per evidenziare il canale preferito
,]
OK per
sintonizzarsi sul canale.
3. Premere di nuovo OK per rimuovere il
canale dall'elenco dei preferiti. scompare
dall'intestazione delle informazioni.
1. Premere
per accendere il televisore. La
visualizzazione di un'immagine sullo schermo può
richiedere alcuni secondi.
2. Premere
per spegnere il televisore. Il televisore
%w
Nota
j
,
_
_
J
disconnettere il cavo di alimentazione.
Selezione dell'origine di input
1. Premere SOURCE. Viene visualizzato l'elenco delle
origini di input.
Principale
TV
SCART
VGA
HDMI 1
Per aggiungere un canale preferito:
Regolazione del volume
JVOL+/VOL- per aumentare o ridurre il
volume.
J per disattivare l'audio. Premere di nuovo
per ripristinare l'audio.
HDMI 2
USB
2. Premere /,
quindi premere OK.
Selezione di un canale
JP
/P
per andare al canale successivo
o precedente nell'elenco dei canali.
J
direttamente un canale.
JCH.LIST/ quindi premere / e OK per selezionare un
canale.
Utilizzo dei pulsanti colorati:
Pagina su: premere il pulsante rosso per evidenziare
il primo canale della pagina corrente e premerlo
ripetutamente per evidenziare il primo canale delle
pagine precedenti.
Pagina giù: premere il pulsante verde per
evidenziare l'ultimo canale della pagina corrente
e premerlo ripetutamente per evidenziare l'ultimo
canale delle pagine successive.
Seleziona elenco: quindi / per selezionare il tipo di canale che
si desidera visualizzare in elenco (Tutto/Digitale/
Radio/Analogico).
Esci: premere il pulsante blu per chiudere l'elenco
dei canali.
JQ.VIEW per andare all'ultimo canale
visualizzato.
Visualizzazione delle informazioni sui canali
JINFO/ una volta per visualizzare le
%
]
JINFO/ due volte per visualizzare ulteriori
]
JINFO/ tre volte per visualizzare le
descrizioni dei programmi.
JINFO/ ancora una volta per chiudere
l'intestazione delle informazioni.
Navigazione nel menu su schermo
1. Premere MENU/ . Viene visualizzato il menu su
schermo.
2. Premere / per evidenziare un menu principale
<
&
:|?]
OK
per accedere al sottomenu.
3. Premere / per evidenziare una voce di
]
OK per accedere
al menu oppure premere / per regolare
l'impostazione o selezionare un'opzione di
impostazione.
4. Premere BACK/ per tornare al menu precedente
oppure premere EXIT/ per chiudere il menu su
schermo.
Manuale di istruzioni del televisore a schermo piatto con retroilluminazione LED
IT-11
11
IT
Uso del televisore
Uso del televisore
Regolazione delle impostazioni
video
ECO
Modalità Immagine
Video
Audio
TV
Illuminazione
50
Luminosità
31
Contrasto
41
Saturazione
37
0
TONALITÀ
Impostazione
43
Nitidezza
Bl
Blocca
Invio
Selezione
Esci
Modalità Immagine
;
^
possibile selezionare Utente/Vivido/ECO/Standard/
Media in base al programma.
Nota
^
%
P.MODE per
selezionare la modalità immagine.
immagini ,
Modalità Immagine a Utente.
Illuminazione
Consente di regolare la retroilluminazione che
,
Luminosità
Consente di schiarire o scurire l'immagine.
Contrasto
Consente di regolare l'intensità del livello del bianco
nell'immagine.
Saturazione
Consente di regolare la saturazione del colore
dell'immagine.
TONALITÀ
Consente di regolare la tonalità del colore
dell'immagine.
Nitidezza
Consente di aumentare o ridurre la nitidezza
dell'immagine.
Gamma
Consente di selezionare il tipo di gamma.
Temperatura colore
;
^
possibile selezionare:
Freddo: conferisce al bianco una tonalità
bluastra.
Standard: conferisce al bianco una tonalità
neutra.
Caldo: conferisce al bianco una tonalità
rossastra.
Video avanzato
Consente di regolare le impostazioni video avanzate.
Riduzione Rumore Digitale
Consente di ridurre i disturbi sullo schermo e
produrre un'immagine video più nitida.
IT-12
12
MPEG NR
Consente di ridurre i disturbi sulle immagini nei
video con compressione MPEG.
Auto Luminosità
Consente di regolare la luminosità media
dell'immagine per compensare grandi aree di
luminosità.
Tonalità pelle
Consente di regolare il colore della pelle in base
alle preferenze corrispondenti.
Consente di ottimizzare le impostazioni delle
,
Blue Stretch
Consente di aumentare il componente blu nei pixel
%
,
%
del tono color carne.
Modalità gioco
Consente di ottimizzare le impostazioni per la
riproduzione dei giochi.
Retroilluminazione adattiva
;
retroilluminazione dello schermo in base alla
quantità di toni chiari e toni scuri del segnale.
Mod. VGA (solo origine VGA)
Consente di selezionare la modalità VGA.
Video
]
più uniformi e il testo più chiaro.
]
appaiono più nitide. Selezionare questa modalità
per guardare video da un computer.
Modalità HDMI (solo per timing progressivo HDMI)
Consente di selezionare la modalità HDMI.
Auto: seleziona in modo automatico la modalità
Video/Graphic.
]
appaiono più uniformi e il testo più chiaro.
Selezionare questa modalità quando si collega
un computer.
Video
]
più nitide. Selezionare questa modalità quando
si guardano video da un computer o da lettori
,
~\w
ecc.
Sovrascansione (Solo sorgente HDMI)
J
w,
%
dello schermo. L'immagine risultante "ingrandisce" il
centro dell'immagine.
Nota
jSovrascansione_
Off
_
%
Modalità Schermo.
VGA
Consente di regolare l'immagine del computer
+&^
%
Regolazione automatica: regola
automaticamente le impostazioni delle
immagini.
Manuale di istruzioni del televisore a schermo piatto con retroilluminazione LED
Uso del televisore
Posizione O.: regola la posizione orizzontale
dell'immagine.
Posizione V.: regola la posizione verticale
dell'immagine.
Fase: regola la messa a fuoco delle immagini
Clock: regola la frequenza di campionamento.
Solo audio
Consente di disattivare l'immagine del televisore e
ascoltare il programma in modalità solo audio.
Nota
J
qualsiasi pulsante.
Ripristino
Consente di ripristinare i valori di fabbrica delle
impostazioni video.
Regolazione delle impostazioni
audio
V
Video
Standard
Modalità audio
Bilanciamento
Audio
0
50
Bassi
50
Alti
TV
Impostazione
mposs
mpo
Simulazione
Audio surround
Casse
On
Tipo SPDIF
Off
Blocca
Invio
Selezione
Esci
Modalità audio
;
^
possibile selezionare Utente/ Standard/Musica/
Teatro per impostare la preferenza personale.
Nota
^
%
S.MODE per
selezionare la modalità audio.
,
Modalità
audio a Utente.
Bilanciamento
Consente di regolare il bilanciamento tra gli
altoparlanti sinistro e destro.
Bassi
Consente di regolare l'audio a bassa frequenza.
Alti
Consente di regolare l'audio ad alta frequenza.
Audio surround
Consente di simulare l'audio surround.
Casse
Consente di attivare o disattivare gli altoparlanti
,
^
%
per disattivare gli altoparlanti integrati nel
televisore.
On: per attivare gli altoparlanti integrati nel
televisore.
Auto (CEC): imposta l'uscita audio dal dispositivo
CEC collegato.
Nota
Auto (CEC) verrà disattivata se CEC
funzione;;_
Off.
Tipo SPDIF
Consente di selezionare il tipo di uscita audio digitale
SPDIF.
Ritardo SPDIF
Consente di regolare l'intervallo di ritardo SPDIF per
sincronizzare l'audio con l'immagine (0~250).
Contr. aut. volume
Attivare questa impostazione per mantenere
uniforme il livello del volume quando si passa da un
canale all'altro o da un programma televisivo a una
pubblicità.
Tipo di audio
Consente di selezionare il tipo audio.
Normale: fornisce l'audio normale.
Non udenti: fornisce descrizioni visive delle
scene per i non udenti.
Ipo-vedenti: fornisce narrazioni audio delle
scene per i non vedenti.
Ipo-vedenti (solo DTV)
Consente di regolare le impostazioni audio per i non
vedenti.
Casse
Consente di attivare o disattivare gli altoparlanti.
;
,
,
Volume
Consente di regolare il livello del volume della
narrazione audio.
Panoramica e dissolvenza
Consente di attivare o disattivare il controllo di
panoramica e dissolvenza.
Audio per non vedenti
Consente di selezionare la lingua dell'audio per
i non vedenti. (Le opzioni variano in base alla
trasmissione del contenuto audio)
Nota
Ipo-vedenti_
%
Tipo di audio_
Ipo-vedenti.
Downmix Mode
;
Ripristino
Consente di ripristinare i valori di fabbrica delle
impostazioni audio.
Manuale di istruzioni del televisore a schermo piatto con retroilluminazione LED
IT-13
13
IT
Uso del televisore
Regolazione delle impostazioni
dei canali
Video
Modalità Sintonizzatore
Antenna
Canale audio
Audio
Stereo
Ricerca singolo Ch (Digitale)
Video
Antenna
Off
Canali
Mod. Time Shift
TV
Ricerca RF singola (solo canali digitali)
Consente di eseguire ricerche RF singole e
controllare la potenza e la qualità del segnale.
Antenna Mode
Off
0%
Audio
Info Prodotto
TV
Impostazione
mpo
p
Impostazione
41
Canale RF
Livello del segnale
0%
Qualità di segnale
0%
Blocca
Invio
Selezione
Esci
Blocca
Invio
Modalità Sintonizzatore
Consente di selezionare la modalità di
sintonizzazione: antenna/cavo.
Canale audio (solo ATV)
Consente di selezionare la modalità audio per un
programma di trasmissione stereo o audio multiplo.
Lingua audio (solo DTV)
Consente di selezionare la lingua audio per i
programmi con più lingue.
Lingua audio 2° (solo DTV)
Consente di selezionare la seconda lingua audio
preferita per i programmi con più lingue.
Canali
Consente di eseguire la ricerca dei canali e
Ricerca canali
Consente di eseguire la ricerca dei canali
,
informazioni di cablaggio (modalità cavo).
Aggiorna ricerca
Consente di eseguire l'aggiornamento della
ricerca dei canali per aggiungere canali all'elenco
esistente.
Ricerca manuale analogica
Consente di eseguire una ricerca analogica
manuale verso l'alto o il basso a partire dalla
]
Video
Ricerca di canali analogici
Off
Audio
TV
48.25
Frequenza iniziale (MHz)
Scansione su
Impostazione
Scansione giù
Blocca
Invio
Selezione
Esci
1. Premere / per evidenziare Frequenza
iniziale (MHz)]
numerici del telecomando per inserire la
frequenza di avvio.
2. Premere / per evidenziare Scansione
su o Scansione giù]
OK per
cercare canali a frequenze più alte o più basse
a partire dalla frequenza iniziale.
Selezione
Esci
1. Utilizzare i pulsanti numerici del telecomando
per inserire il canale RF.
2. Premere OK per avviare la ricerca.
Cable Mode
Ricerca singolo Ch (Digitale)
Video
Cavo
Off
0%
Audio
Frequenza (KHz)
TV
Impostazione
Modulazione
Velocità di modulazione (Ksym/s)
s))
Blocca
Invio
Selezione
Esci
1. Premere / per evidenziare Frequenza
(KHz)]
telecomando per inserire la frequenza iniziale.
2. Premere / per evidenziare Modulazione
quindi premere / per selezionare il tipo di
modulazione.
3. Premere / per evidenziare Velocità di
modulazione (Ksym/s)]
pulsanti numerici del telecomando per inserire
la velocità di segnalazione.
4. Premere OK per avviare la ricerca.
Selezione rete preferita
;
vengono rilevate più di due reti dopo aver eseguito
la ricerca dei canali.
Ignora canale
Consente di selezionare i canali che verranno
saltati quando si utilizzano i pulsanti P /P ^
comunque possibile sintonizzarsi sui canali saltati
utilizzando i pulsanti numerici del telecomando.
1. Premere / per evidenziare il canale che si
verrà
]
OK.
visualizzato.
Video
Audio
TV
Impostazione
909
Analogico
910
Analogico
911
Analogico
912
Analogico
913
Analogico
914
Analogico
915
Analogico
Blocca
Invio
IT-14
14
Manuale di istruzioni del televisore a schermo piatto con retroilluminazione LED
Selezione
Esci
Uso del televisore
2. K
`,
impostati tutti i canali saltati.
Ordina canali
Consente di cambiare l'ordine dell'elenco dei canali.
1. Premere / per evidenziare il canale per il
]
%
]
verrà visualizzato.
premere OK.
2. Premere / per evidenziare la posizione
]
OK per
cambiare la posizione dei due canali.
3. K
#`
desiderati non vengono ordinati.
Channel Labeling
;
canale.
1. Premere / per evidenziare il canale che si
]
OK.
Mod. Time Shift
Consente di attivare o disattivare la modalità
J
,$
$
a pagina 21.
Info Prodotto
Consente di controllare le informazioni del dispositivo
{|Q:~,
Regolazione delle impostazioni
del televisore
Video
Italiano
Lingua OSD
Audio
TV
Impostazione
DPMS
On
Schermata blu
Off
Canale interattivo
Off
MHEG PIN Protezione
Off
Impostazione orario
Blocca
Invio
Video
Nome rete:
Audio
Numero del canale::
915
Nome del canale:
TV
Sports
Frequenza
503.3
Impostazione
Blocca
Invio
Selezione
Esci
2. Premere / per evidenziare Numero del
canale]
telecomando per inserire il numero del canale
preferito.
3. Premere / per evidenziare Nome del
canale]
,
nome premendo ripetutamente i pulsanti
numerici per selezionare un carattere.
Nota
J
.
Sint. canali anal.
Consente di effettuare l'ottimizzazione del canale
_
1. Premere / per evidenziare il canale
analogico che si desidera ottimizzare.
2. Premere / per regolare la frequenza
]
premere OK per impostarla.
Numero del canale: 901
Nome del canale: BBC
Frequenza: 85.25 MHz
Imposta
A
Annulla
Azzera elenco canali
Consente di eliminare tutti i canali memorizzati
nell'elenco dei canali.
IT
16:9
Modalità Schermo
Selezione
Esci
Lingua OSD
Consente di selezionare la lingua del menu su
schermo.
Modalità Schermo
Consente di selezionare la modalità di
visualizzazione dello schermo.
Nota
J
_
possibile premere il pulsante SCREEN.
DPMS<
wJ*:
?
Scegliere questa impostazione per impostare la
%w
,
viene rilevato alcun segnale di input di un PC dopo 40
secondi in modalità VGA.
Schermata blu
Scegliere questa impostazione per visualizzare
una schermata blu in assenza di segnali di input o
quando sono in esecuzione programmi audio.
Canale interattivo
Scegliere questa impostazione per attivare la
funzione canale interattivo.
MHEG PIN Protezione
Scegliere questa impostazione per attivare la
funzione protezione PIN MHEG.
Impostazione orario
Consente di regolare le impostazioni dell'ora e del
timer.
Fuso orario
Consente di selezionare il fuso orario.
Ora
Sincr. Automatica
Selezionare On per sincronizzare automaticamente
la data e l'ora tramite un segnale digitale (se
disponibile). Selezionare Off per regolare
manualmente la data e l'ora.
Data
Premere / e i pulsanti numerici per impostare la
data.
Manuale di istruzioni del televisore a schermo piatto con retroilluminazione LED
IT-15
15
Uso del televisore
Ora
Premere / e i pulsanti numerici per impostare
l'ora.
Orario accensione
Imposta l'accensione automatica del televisore a
un'ora prestabilita.
Timer
j
_
,
/ e i pulsanti numerici per impostare l'ora di
accensione.
Accensione canale
j
_
,
il canale di accensione dall'elenco dei canali.
Orario spegnimento
Imposta lo spegnimento automatico del televisore a
un'ora prestabilita.
Timer
j
_
,
/ e i pulsanti numerici per impostare l'ora di
spegnimento.
Timer di disattivazione
Imposta lo spegnimento automatico del televisore
dopo un determinato periodo di tempo.
Disatt. autom.
Imposta lo spegnimento automatico del televisore
dopo un determinato periodo di inattività.
Sottotitolo
Consente di regolare le impostazioni dei sottotitoli.
Sottotitoli analogici
Consente di attivare o disattivare i sottotitoli
analogici. Selezionare Mute per attivare i sottotitoli
]
,
_
disattivazione audio.
lingua dei sottotitoli
Consente di selezionare la lingua dei sottotitoli
digitali.
lingua dei sottotitoli 2°
Consente di selezionare la seconda lingua dei
sottotitoli digitali.
Tipo di sottotitoli
Consente di selezionare il tipo di sottotitoli digitali.
Televideo
Consente di regolare le impostazioni del teletext.
Lingua Televideo digitale
Consente di selezionare la lingua del teletext
digitale.
Consente di selezionare la lingua della pagina di
Interfaccia comune
Consente di controllare le informazioni del modulo
CAM inserito nello slot COMMON INTERFACE sul
retro del televisore.
OAD<X,&
?
;
,
,
etere.
IT-16
16
Download OAD manuale
;
del televisore via etere. Seguire le istruzioni
visualizzate sullo schermo per completare
Download automatico
Selezionare Yes
,
,,
,
etere
Installazione automatica
Selezionare Yes per attivare l'installazione
,,
,
etere
Informazioni versione
Consente di controllare le informazioni della versione
Informazioni di sistema
Consente di controllare le informazioni di sistema.
!
Consente di ripristinare i valori di fabbrica per le
Menu CEC
Consente di regolare le impostazioni CEC.
CEC funzione
Consente di attivare o disattivare la funzione CEC.
Auto Spegne
Se impostata su On
,;;
automaticamente allo spegnimento del televisore.
Scoperta disp.
,_
CEC.
Standby (con dispositivo CEC collegato)
Consente di spegnere il dispositivo CEC
selezionato.
Accensione (con dispositivo CEC collegato)
Consente di accendere il dispositivo CEC
selezionato.
Disattiva/Attiva Controllo audio sistema (con
dispositivo CEC collegato)
:
,
,,
,
CEC può essere controllato dal telecomando del
televisore.
Nota
Y
,
W*
;;J
dell'utente del dispositivo.
J
,
W*\;;
%
,
_
,
W*
W*\;;
,,
essere attivata.
:
,W*W*\
;;
%
;;
funziona.
%
,W*
W*\;;%%
Modalità negozio
Consente di attivare o disattivare la modalità
negozio.
Manuale di istruzioni del televisore a schermo piatto con retroilluminazione LED
Uso del televisore
On: tali impostazioni sono concepite per
ottenere la massima visibilità nel punto vendita
e l'intestazione con le informazioni sul prodotto
viene visualizzata sullo schermo.
Off: tali impostazioni sono ottimizzate per la
visualizzazione domestica standard e il risparmio
energetico.
Regolazione delle impostazioni di
blocco
Inserire la password impostata durante la
|
Nota
:_
1234 per accedere
|
password universale 9443 per accedere al menu
|]
,
Video
Password
Audio
TV
Impostazione
Blocca
Invio
Selezione
Esci
Cambia password
Video
Audio
OK
Blocco canali
Blocco genitori
TV
Impostazione
Blocca
Blocco sorgente
Blocco per minori
Off
Blocco sintonizzazione
Off
Modalità di impostazione sorgente
Invio
On
Selezione
Esci
Cambia password
;
Blocco canali
Consente di bloccare tutti i canali che non si desidera
far vedere a terzi.
1. Premere / per evidenziare il canale che si
verrà
%]
OK.
visualizzato.
2. K
`,
impostati tutti i canali bloccati.
Nota
J
%_
inserire la password di 4 cifre.
Blocco intervallo di tempo (solo per la Norvegia)
Consente di impostare l'intervallo di tempo durante il
]
,
%
J
%
_
password.
Blocco genitori
Consente di impedire ai bambini di guardare
%
Nota
j
_
%
programmi che presentano informazioni sulla
dell'età.
Blocco sorgente
Consente di bloccare l'origine di input.
1. Premere / per evidenziare l'origine di input
%]
OK.
verrà visualizzato.
2. K
`,
impostate tutte le origini bloccate.
Nota
J
%_
inserire la password di 4 cifre.
Blocco per minori
Consente di bloccare i pulsanti di controllo sul lato
del televisore.
Blocco sintonizzazione
Consente di disattivare la funzione di sintonizzazione
,
:]
_
On
il menu principale TV_
%
Modalità di impostazione sorgente
Consente di impostare il televisore in modo che si
Impostazione sorgente
;
se Modalità di impostazione sorgente_
su On.
N. canale
;
Impostazione sorgente_
TV.
Volume max
Consente di impostare il limite massimo del volume.
Modalità volume iniziale
Consente di impostare il televisore in modo che si
,,
Volume iniziale
Consente di selezionare il livello del volume
Modalità volume iniziale_
su On.
Cancella blocco
J
%
Consente di ripristinare i valori di fabbrica per le
e blocco. Viene visualizzata la schermata di
Manuale di istruzioni del televisore a schermo piatto con retroilluminazione LED
IT-17
17
IT
Altre funzioni
Altre funzioni
Utilizzo del lettore multimediale USB:
1. Collegare l'unità thumb USB alla porta USB sul retro
del televisore.
Lettore multimediale USB
Il lettore multimediale USB consente di collegare
%Q:~,
video o visualizzare foto.
Nota
%Q:~,
formato FAT32.
%Q:~,,
<!{k?
,,
&
%%
%
_
multimediale proveniente da unità disco esterne o
da mp3.
Y
%Q:~
&
Q:~
,
di collegamento USB.
Q
Q:~,
conforme allo standard di interfaccia USB 2.0 Full
::
Q:~_
Q:~#>-:
riproduzione potrebbe non essere uniforme.
Avvertenza
Y
,Q:~,
prima di uscire dal lettore multimediale USB.
Formattazione dell'unità thumb USB:
^
%
%Q:~
su schermo.
1. Passare all'origine TV.
2. Premere MENU/ . Viene visualizzato il menu su
schermo.
3. Premere / per evidenziare TV]
OK.
4. Premere / per evidenziare Info Prodotto]
premere OK.
5. ,
%Q:~]
OK.
6. Premere / per evidenziare Formatta]
premere OK.
7. Quando viene visualizzata la schermata di
,
YES e premere OK.
8. &
premere EXIT.
2. Premere SOURCE]
/ per evidenziare
USB e premere OK per passare alla modalità USB.
Video
Selezione
Musica
Invio
3. Premere / per evidenziare il tipo di contenuto
VideoFoto o Musica]
premere OK.
4. Premere ///,
]
OK.
5. J
MENU/ per
aprire il menu su schermo.
6. Premere /,
,]
premere OK per eseguire o visualizzare le opzioni
/ per evidenziare
l'opzione desiderata e premere OK.
7. Premere BACK/ per tornare al menu precedente
o chiudere il menu.
Modalità anteprima/elenco
Quando si visualizzano i contenuti dell'unità thumb
Q:~FAV/ per alternare le modalità
anteprima/elenco.
Premere MENU/
per aprire il menu su schermo.
Ordina
;
"
Consente di selezionare il tipo di contenuto
multimediale.
Nota
j
%Q:~
w
BACK/ .
/ per evidenziare
l'icona
]
premere OK.
[..]
IT-18
18
Foto
Manuale di istruzioni del televisore a schermo piatto con retroilluminazione LED
Altre funzioni
Modalità foto
Premere MENU/
per aprire il menu su schermo.
Riproduci
Ripeti
Modalità casuale
Ruota
Durata
Zoom
Foto
Ripeti tutto
R
Corta
3/14
Koala.JPG
Menu
Invio
Riproduci/Metti in pausa
Consente di riprodurre o sospendere una
presentazione.
Ripeti
Consente di selezionare la modalità di ripetizione per
Modalità casuale
Consente di attivare o disattivare la modalità di
riproduzione casuale. Attivare la modalità di riproduzione
]
Ruota
Consente di ruotare la foto di 90° in senso orario con
una singola operazione.
Durata
Consente di selezionare la durata di visualizzazione
delle foto.
Zoom
Consente di ingrandire la foto.
Effetto
Consente di selezionare l'effetto di transizione per la
visualizzazione della foto.
Mostra informazioni
Consente di mostrare le informazioni della foto
visualizzata.
Modalità musica
Premere MENU/
per aprire il menu su schermo.
Modalità casuale
Consente di attivare o disattivare la modalità
di riproduzione casuale. Attivare la modalità di
]
casuale.
Mostra informazioni
Consente di visualizzare le informazioni della musica
in riproduzione.
Nascondi/Mostra gamma
Consente di mostrare o nascondere lo spettro.
Solo audio
Consente di interrompere la visualizzazione sullo
schermo e ascoltare solo l'audio.
Nota
J
qualsiasi pulsante.
Modalità video
Premere MENU/
per aprire il menu su schermo
Metti in pausa
Ripeti
Program
Mostra informazioni
00:03:29
Video
00:04:50
3/14
Skyfall.MP4
Menu
Invio
Riproduci/Metti in pausa
Consente di riprodurre o sospendere il video.
Ripeti
Consente di selezionare la modalità di ripetizione per
Program
;
formato *.ts.
Mostra informazioni
Consente di visualizzare le informazioni del video in
riproduzione.
Pause
Ripeti
Modalità casuale
Mostra informazioni
Nascondi gamma
Solo audio
00:01:29
Musica
00:04:50
3/14
Skyfall.mp3
Menu
Invio
Riproduci/Metti in pausa
Consente di riprodurre o sospendere la musica.
Ripeti
Consente di selezionare la modalità di ripetizione per
Manuale di istruzioni del televisore a schermo piatto con retroilluminazione LED
IT-19
19
IT
Altre funzioni
Funzioni dei pulsanti
Pulsante
Funzione
Riproduci/Pausa
K
successivo
K
precedente
Avanzamento
rapido
Riavvolgimento
rapido
Interrompi
Foto Musica
Video
9
9
9
9
9
9
9
9
9
9*
9
9
9
9
9
9
9**
* per selezionare la durata
di visualizzazione delle foto.
* Se si preme ,
questa si fermerà al punto di arresto e verrà
visualizzata una schermata blu con il messaggio
¡
\K
¢^
%
seguenti operazioni per continuare:
\Premere OK o per riprendere la riproduzione dal
punto di arresto.
\Premere nuovamente per interrompere la
]
X£ per riprodurre
il video dall’inizio.
IT-20
20
Manuale di istruzioni del televisore a schermo piatto con retroilluminazione LED
Altre funzioni
#$%
*
*.avi
Contenitore
AVI
#&
Codec video
XviD
Codec audio
*J!<*J+w!?
MPEG1
*J+w#
MPEG2 MP@HL
*J+#&&;&&;\;
H.264 BP LV 4.0
*J+k&&;\;W\&&;
H.264 MP LV 4.0
WAV: PCM/ADPCM
H.264 HP LV 4.0
AC3
IT
*J+\k:J¥W!>
*J+\k&:J¥Wk>
*.mp4
*.mov
MP4
MP4
Motion JPEG
H.264 BP LV 4.0
*J!<*J+w!?
H.264 MP LV 4.0
*J+w#
H.264 HP LV 4.0
MPEG2: AAC
*J+\k:J¥W!>
*J+kW\&&;
*J+\k&:J¥Wk>
H.264 BP LV 4.0
*J+#&&;&&;\;
H.264 MP LV 4.0
*J+k&&;\;W\&&;
H.264 HP LV 4.0
*J+\k:J¥W!>
*J+\k&:J¥Wk>
|,
MKV
Motion JPEG
H.264 BP LV 4.0
*.vob
MPEG PS
H.264 MP LV 4.0
*J+w#
H.264 HP LV 4.0
*J+#&&;&&;\;
*J+\k:J¥W!>
*J+k&&;\;W\&&;
*J+\k&:J¥Wk>
*J+\#*J¥W
AC3
*J+w#
*J+\
AC3
*J!<*J+w!?
*J+\#*J¥W
*J+w#&;!
*J+\#*J¥W
AC3
*J!<*J+w!?
H.264 BP LV 4.0
*J+w#
H.264 MP LV 4.0
MPEG2: AAC
H.264 HP LV 4.0
*J+kW\&&;
*.mpg
MKV
*.mpeg
MPEG TS
MPEG TS
*.ts
MPEG TS
*J!<*J+w!?
*
*.mp3
#
Contenitore
MP3
Codec audio
*J!<*J+w!?
*
{
#
Contenitore
JPEG
Codec
Di base/Progressivo
{
Manuale di istruzioni del televisore a schermo piatto con retroilluminazione LED
IT-21
21
Altre funzioni
Common Interface
;<;
?
_
;&*<;
&*?
w,
,
;
provider dei servizi IC per ottenere maggiori informazioni
sui moduli e sull'abbonamento. Tenere presente che
i moduli CAM e le smart card non vengono forniti in
dotazione né sono accessori opzionali Haier.
1. ;&*]
inserire il modulo CAM nello slot COMMON
INTERFACE sul retro del televisore.
Slot IC
CAM
Smart card
Page number entering
J
numero di pagina utilizzando i pulsanti numerici del
telecomando.
abc
def
ghi
jkl
mno
pqrs
tuv
wxyz
Mix mode
J,
premere il pulsante . Questa impostazione
consente di visualizzare i dati teletext in
sovraimpressione nella parte superiore dello
schermo. Premere nuovamente il pulsante per
tornare alla modalità schermo intero.
BACK /
2. Sul televisore verrà visualizzato un messaggio
;&*_
,
Attendere alcuni minuti per l'attivazione della scheda.
3. Premere MENU/ per aprire il menu sullo schermo.
4. Premere / per evidenziare Impostazione
quindi premere OK.
5. Premere / per evidenziare Interfaccia comune
quindi premere OK.
6. Premere / ,
quindi premere OK.
7. Vengono visualizzate informazioni dettagliate sul
;&*J
consultare il manuale di istruzioni del modulo CAM.
Teletext
_
canali. Trasmette una serie di informazioni basate
,
Fornisce inoltre sottotitoli per non udenti o per coloro
che non conoscono bene la lingua di trasmissione di un
determinato programma.
Teletext
J
,
/ . Per
,
/ .
Page up/down
Per visualizzare la pagina teletext precedente o
,
P /P .
P
IT-22
22
Hold
Per interrompere automaticamente l'aggiornamento
. Questa
_
¦
teletext o di molti dati per lo stesso numero di pagina.
FAV /
Size
J
%
,
pulsante j
_
]
ingrandisce l'immagine e rende più agevole la lettura.
CH.LIST /
Reveal
J
]
.
INFO /
Subcode
J
pulsante
e inserire il numero a 4 cifre.
GUIDE /
Hide
J
.
EXIT /
Pulsanti colorati testo rapido
Il testo rapido consente di visualizzare
automaticamente le quattro pagine utilizzate
più di frequente che l'emittente seleziona come
probabili scelte successive. Premere il pulsante del
telecomando dello stesso colore del collegamento
visualizzato nella parte inferiore della pagina teletext
per andare direttamente alla pagina indicata.
Manuale di istruzioni del televisore a schermo piatto con retroilluminazione LED
Altre funzioni
Uso di dispositivi USB per la
registrazione
Nota
:
,+~
IMPORTANTE:
,Q:~,
-&!#
J;
{|Q:~
Timeshift <?
IT
1. &
Mod. Time Shift TV
On
2. ;
,Q:~
-&!#
{|Q:~
3. J
,,
Nota
:
,Q:~,
,,,
|::
,Q:~
4. J :
,
,
5. J Registrazione <?
1. ,Q:~
-&!#{|
Q:~
2. J
,,
3. J
4. J
USB
5. J/,
Video]
OK
6. J/,
pvr]
OK
7. :
]
OK,,
Manuale di istruzioni del televisore a schermo piatto con retroilluminazione LED
IT-23
23
Sezione di riferimento
Sezione di riferimento
Risoluzione dei problemi
Sintomi
Nessuna alimentazione
Voci da controllare e procedure
,
,
presa di alimentazione funzionante.
:
,
=>
j
,
la spina in una presa di alimentazione funzionante e accendere
nuovamente il televisore.
Nessuna immagine
&
,
J
%
%
J,
K
Immagine buona ma nessun
suono
&
,,
VOL+ del telecomando
o sul pannello di controllo del televisore.
J
attivato.
del telecomando per accertarsi che l'audio sia
Audio buono ma qualità
colore bassa
K
Qualità immagine bassa
Q]
§,
],
:\W:_,
un'altra periferica. Spegnere una delle periferiche.
Immagine bianca e disturbo
;
Il televisore non risponde al
telecomando
;%
:
&
%
J
,
^
%
,
Il televisore non funziona
:
,
>
]
:
%
,
autorizzato per assistenza tecnica.
Y,
modalità USB
&
,
&
,
Nota
:
%,
]
%
,
centro di assistenza autorizzato locale.
,
,
,
]
Y
,
il coperchio posteriore poiché l'apparecchio presenta una tensione pericolosa che può provocare lesioni o
incendi.
IT-24
24
Manuale di istruzioni del televisore a schermo piatto con retroilluminazione LED
Sezione di riferimento
$,
,,
Modello
LE32A650CF
LE32F600C
Sistema immagine/audio
J&:;&*\~+£
Alimentazione
60W
45W
Uscita audio
10W + 10W
10W + 10W
Connettori posteriori
Component In
USB
;
<
:}?
HDMI 1/HDMI 2 In
}J%J;~:&
Common Interface
USB
Q
HDMI 1/HDMI 2/HDMI 3 In
Digital Audio Out (Coaxial)
Common Interface
Antenna In
Q
SCART
Digital Audio Out (Coaxial)
PC In
Antenna In
PC Audio In
IT
SCART
PC In
PC Audio In
Temperatura
Operativa: +5 °C ~ +35 °C
:
\@¨;©k@¨;
Umidità
Operativa: 20% ~ 80%
:
ª«>¬
Accessori
Telecomando/2 batterie AAA/Manuale di istruzioni/Guida introduttiva/Foglio
garanzia/supporto TV con viti/cavo di alimentazione (solo LE32F600C)
Dimensioni
(con supporto)
(A x L x P)
#«#=k=«=«>!
!«k#>@
Dimensioni (senza
supporto) (A x L x P)
#«#=k!k#=>
!«kk>=@>>
Peso (con supporto)
@!|
@«|
Peso (senza supporto)
!|
@k|
Supporto a parete
(orizzontale x verticale)
100 x 100 mm
100 x 100 mm
W*
W*W
\
*
W*
;;
negli Stati Uniti e in altri paesi.
J
%w%
%w
%
%w%
Manuale di istruzioni del televisore a schermo piatto con retroilluminazione LED
IT-25
25
Sezione di riferimento
Appendice
Temporizzazione supportata per ingresso VGA
LE32A650CF
Temporizzazione supportata per ingresso
component
(Solo LE32A650CF)
Component
VGA
Frequenza di
aggiornamento (Hz)
Risoluzione
70
480i
640 x 480
60/70/72
480p
800 x 600
56/60/70/72
576i
60/70/75
576p
720 x 400
1024 x 768
1280 x 720
1280 x 960
1360 x 768
720p
60
1080i
1920 x 1080
1080p
LE32F600C
Frequenza di
aggiornamento (Hz)
Risoluzione
60
50
50
60
50
60
50
60
VGA
Risoluzione
Frequenza di
aggiornamento (Hz)
Temporizzazione supportata per ingresso HDMI
HDMI
720 x 400
70
640 x 480
60/70/72
800 x 600
56/60/70/72
480i
1024 x 768
60/70/75
480p
1280 x 720
1280 x 960
Risoluzione
576i
60
576p
1360 x 768
720p
1080i
1080p
IT-26
26
Manuale di istruzioni del televisore a schermo piatto con retroilluminazione LED
Frequenza di
aggiornamento (Hz)
60
50
50
60
50
60
50
60
(LE32A650CF only)
(LE32A650CF only)
Sezione di riferimento
IT
(LE32A650CF only)
Manuale di istruzioni del televisore a schermo piatto con retroilluminazione LED
IT-27
27
MANUAL DE INSTRUCCIONES
LE32A650CF
LE32F600C
Lea este manual detenidamente antes de utilizar el televisor y
guárdelo para futuras consultas.
Índice
Advertencias de seguridad............. 2
Uso del televisor ............................ 12
Bienvenido ................................................2
Información importante .............................2
........12
........13
Acerca de su televisor LED LCD .... 5
Instalación del soporte ..............................5
Instalación del soporte de montaje en
pared ........................................................5
Control lateral ...........................................5
Terminales de la parte posterior ...............6
Realización de conexiones .......................7
Conexión a una Antenna/Cable ........... 7
canales ...................................................14
televisor ..................................................15
bloqueo ...................................................17
Otras funciones ............................. 18
Reproductor multimedia USB .................18
Conexión de un dispositivo A/V
externo ................................................. 7
Modo de miniatura/lista ...................... 18
Conexión de un PC .............................. 7
Modo Music ....................................... 19
Conexión de auriculares ...................... 7
Modo Video ........................................ 19
Conexión de un sistema de audio
digital ................................................... 7
Uso del mando a distancia .......................8
Función de los botones ...................... 20
Formato de archivo admitido de
multimedia USB ................................. 21
Interfaz común ........................................22
Teletexto .................................................22
Uso de un dispositivo USB para
grabación ................................................23
Introducción ..................................... 9
Preparación del mando a distancia ..........9
Colocación de las pilas ........................ 9
Precauciones con el mando a
distancia y las pilas .............................. 9
.................................9
Conceptos básicos .................................11
Encendido y apagado del televisor .... 11
Selección de la fuente de entrada ..... 11
Modo Photo ....................................... 19
Cambio de tiempo (solo DTV) ........... 23
Grabación (solo DTV) ........................ 23
Sección de referencia ................... 24
Solución de problemas ...........................24
.....................................25
Apéndice .................................................26
Selección de un canal ........................ 11
Uso de la lista de favoritos ................. 11
Ajuste del volumen ............................ 11
Visualización de información del
canal .................................................. 11
Navegación por el menú en
pantalla .............................................. 11
Manual de instrucciones del televisor de pantalla plana con retroiluminación LED
ES-1
ES
Advertencias de seguridad
Advertencias de seguridad
Bienvenido
Gracias por elegir este televisor de pantalla plana con retroiluminación LED de 32”. Este manual le ayudará a
nuevo televisor.
!"#
$
"
%%%
$
&'
*
+
'
,
-
-%
:
!";<==->
!
%
+
!"%<?=-;
la almohadilla superior mientras se desembalan los componentes.
Información importante
Lea las siguientes instrucciones de seguridad antes de utilizar el televisor. Guarde estas instrucciones para futuras
consultas.
ADVERTENCIA
RIESGO DE DESCARGA
ELÉCTRICA. NO ABRIR.
ADVERTENCIA
@%H%
HJ-KH
HK,&Q
,-%H&%
W-HK-%
XQ
YJK
LA CUBIERTA (O PARTE POSTERIOR). DENTRO NO HAY PIEZAS
YJ
@J%
H@%H%H
J,J%HKQ
@]X&%,
X
-QX%-Q
CON PERSONAL DE ASISTENCIA TÉCNICA CUALIFICADO.
@
^
_
`
accesorio dentro.
,
autorizado.
'
*
k_
un triángulo equilátero está destinado a alertar al usuario de la
presencia de VOLTAJE PELIGROSO no aislado en la estructura del
riesgo de descarga eléctrica para las personas.
El signo de admiración dentro de un triángulo equilátero está destinado
a alertar al usuario de la existencia de instrucciones importantes de uso
y mantenimiento en los documentos que se incluyen con el aparato.
ADVERTENCIA:
PRECAUCIÓN: ^
`
zona húmeda. Tenga cuidado para evitar arañazos o golpes accidentales en la pantalla.
X
+
_{
|
accesible.
para poder consultarlo en el futuro.
@
^
a mano para consultarlo en el futuro.
{
pueden variar debido a innovaciones técnicas.
*
_
+
ADVERTENCIA: +
expuestas cerca de este producto en ningún momento.
ES-2
Manual de instrucciones del televisor de pantalla plana con retroiluminación LED
Advertencias de seguridad
+
}
según las instrucciones de
instalación para evitar lesiones o
~
'
@
no conecte varios enchufes en
paralelo y no conecte varios
enchufes en la misma toma.
No coloque el producto
cerca de agua ni aceite
(como aceite de cocina o
>
existe peligro de incendio.
Para evitar descargas eléctricas
permite el desensamblaje no
autorizado del televisor.
Póngase en contacto con
un proveedor de servicio posventa autorizado si
necesita asistencia técnica.
No utilice enchufes eléctricos
~
mantenga los cables alejados
de fuentes de calor para
evitar descargas eléctricas y
el peligro de incendio.
Desenchufe la fuente de
alimentación del producto
y póngase en contacto con
un proveedor de servicio
posventa autorizado si el
producto empieza a hacer
ruidos anómalos.
@
el producto debe colocarse
estable.
Para evitar el peligro de
|
utilice ni almacene materiales
k
producto.
Para evitar el peligro
el producto lejos de
transformadores o fuentes
de calor.
Para evitar una descarga
^
producto debe estar lejos de
cables de alimentación.
Para evitar el peligro de
producto bajo la luz directa
del sol ni cerca de fuentes
de calor.
^
_{
mala conexión eléctrica puede
provocar un incendio.
Desenchufe la fuente de
alimentación y la antena
del producto durante las
si ésta es eléctrica.
%
desenchufe el televisor y utilice
~
'
%`
producto no entre en contacto
con agua.
Manual de instrucciones del televisor de pantalla plana con retroiluminación LED
ES
ES-3
Advertencias de seguridad
Para evitar descargas eléctricas o
_{
la fuente de alimentación del
televisor y la antena durante las
tormentas o tormentas eléctricas.
,
tomar medidas para que no
entre agua por el cable hasta el
televisor.
Para reducir el riesgo de
^
no coloque el producto en una
zona húmeda ni lo exponga a la
lluvia o a la humedad.
El enchufe y el cable
de alimentación deben
mantenerse limpios para
evitar una descarga
eléctrica o el peligro de
incendio.
No toque nunca el enchufe con
_`
puede producir una descarga
eléctrica.
Para evitar descargas
eléctricas o el peligro de
televisor durante largos
desenchúfelo de la fuente de
alimentación.
ES-4
Manual de instrucciones del televisor de pantalla plana con retroiluminación LED
Acerca de su televisor LED LCD
Acerca de su televisor LED LCD
Instalación del soporte
1. -
_
+
_
para proteger la pantalla frente a daños y arañazos.
2. Alinee con cuidado el soporte con la base del
televisor.
3. Fije el soporte al televisor con los tornillos
:!
!";<==-
4 tornillos para el modelo LE32A650CF)
Nota
@
técnica cuando instale el soporte de montaje en
pared. Haier Electronics no es responsable de ningún
daño en el producto ni de ninguna lesión que pueda
sufrir usted u otras personas si instala el televisor por
su propia cuenta.
Control lateral
ES
Instalación del soporte de montaje
en pared
1. -
_
+
_
para proteger la pantalla frente a daños y arañazos.
2. ,
*
+
3. Acople el soporte de montaje en pared (se vende
>
+
posterior del televisor con los tornillos suministrados
con el soporte. Consulte las instrucciones que
se incluyen con el soporte de montaje en pared
para obtener más información sobre cómo colgar
correctamente el televisor.
Botón
Descripción
SOURCE
Pulse este botón para seleccionar la
fuente de entrada.
MENU
Pulse este botón para abrir o cerrar
el menú en pantalla.
VOL+
Pulse este botón para subir el nivel
de volumen.
VOL-
Pulse este botón para bajar el nivel
de volumen.
CH+
Pulse este botón para ir al siguiente
canal de la lista de canales.
CH-
Pulse este botón para ir al canal
anterior de la lista de canales.
POWER
Pulse este botón para encender o
apagar el televisor.
Nota
!"%<?=-;
lateral está en la parte derecha del televisor.
NOTA:
%
ilustraciones del televisor y la OSD utilizadas
en este manual están basadas en el modelo
LE32F600C.
Q,
{
y pueden diferir de su aspecto real.
Manual de instrucciones del televisor de pantalla plana con retroiluminación LED
ES-5
Acerca de su televisor LED LCD
Terminales de la parte posterior
*
*
3
*
* Estos terminales están disponibles solo en el modelo LE32A650CF.
Conector
Descripciones
COMPONENT IN
(Y COMMON CVBS IN)
-
'
%
{
'
'
toma Y (verde).
YPbPr/CVBS AUDIO
Conecte los cables de audio de un componente o dispositivo compuesto.
USB
K
J,
J,
{
_
`
'
:-
H
J,#
página 18 para obtener más información.)
HDMI 2 IN
Conecte un dispositivo HDMI a esta toma.
COMMON INTERFACE
,
-K
ranura.
Salida de auriculares
-
%
*
los altavoces del televisor.
DIGITAL AUDIO OUT
(Coaxial)
Conecte un sistema de audio digital coaxial en esta toma.
ANT IN (AIR/CABLE)
Conecte una antena o un terminal de TV por cable en esta toma.
SCART
Conecte un dispositivo mediante el cable SCART en esta toma.
PC AUDIO IN
Conecte el cable de audio de un ordenador.
PC IN
-
'
HDMI 3 IN
HDMI 1 IN
ES-6
Conecte un dispositivo HDMI en esta toma.
Manual de instrucciones del televisor de pantalla plana con retroiluminación LED
Acerca de su televisor LED LCD
Uso del cable compuesto (solo LE32A650CF)
Realización de conexiones
Conexión a una Antenna/Cable
L
R
COMPOSITE OUT
VIDEO
ES
Conexión de un dispositivo A/V externo
Conexión de un PC
Uso del cable HDMI
RGB
PC
AUDIO
(L/R)
3
Conexión de auriculares
Uso del cable SCART
SCART
Conexión de un sistema de audio digital
Uso del cable de componente (solo LE32A650CF)
Y
PB
PR
L
COMPONENT OUT
R
Nota
%
realizar las conexiones.
Manual de instrucciones del televisor de pantalla plana con retroiluminación LED
ES-7
Acerca de su televisor LED LCD
Uso del mando a distancia
1
2
3
SOURCE
P.MODE
4
SUBTITLE
8
FAV/
9
SCREEN
10
MENU/
*
S.MODE
abc
def
ghi
jkl
mno
pqrs
tuv
wxyz
11
OK
SLEEP
Q.VIEW
5
16
7
P
VOL
AUDIO
17
12
BACK/
13
(retroceso)
(avance)
I/II
6
7
8
9
10
11
SUBTITLE
FAV /
3D WORLD
INFO /
SCREEN
CH.LIST /
GUIDE /
MENU /
18
*
19
20
14
OK
12
13
BACK /
EXIT /
21
22
14
15
23
24
15
16
17
18
N.º
1
Botón
Descripciones
(Encendido)
Pulse este botón para encender o
apagar el televisor.
2
S.MODE
3
P.MODE
0-9
4
YK
SLEEP
5
VOL+/(Silencio)
6
I/II AUDIO
ES-8
Pulse este botón para seleccionar
el modo de audio.
Pulse este botón para seleccionar el
modo de imagen.
Pulse estos botones para
introducir un número de canal o
contraseña.
Pulse este botón para cambiar al
último canal visto.
Pulse este botón para establecer
el temporizador.
Pulse este botón para ajustar el
nivel de volumen.
Pulse este botón para conectar o
desconectar el sonido.
Pulse este botón para seleccionar
DTV Audio/NICAM (según la señal
emitida).
19
20
21
22
23
24
Pulse este botón para mostrar
'
Pulse este botón para añadir
un canal favorito. En modo de
|
mantener una página.
Pulse este botón para cambiar el
modo de pantalla.
Pulse este botón para abrir o
cerrar el menú en pantalla.
Pulse este botón para navegar por
el menú en pantalla.
@
una selección.
Pulse este botón para volver al
menú anterior.
|
botón para acceder al modo de
mezcla.
Pulse este botón para avanzar
rápido o reproducir en retroceso
en modo multimedia.
Pulse este botón para abrir el
(TEXT) teletexto.
Pulse este botón para reproducir/
poner en pausa en modo multimedia
(reproducir/
y en modo de cambio de tiempo.
pausa)
/
Pulse este botón para abrir la lista
de fuentes de entrada.
Pulse este botón para cambiar de
P
/
canal.
Pulse este botón para visualizar la
información del canal.
|
INFO/
botón para mostrar la información
oculta.
Pulse este botón para abrir la lista
|
pulse este botón para cambiar la
CH.LIST/
{
o a toda pantalla.
@
'
de programas.
|
GUIDE/
botón para acceder a una página
secundaria.
Pulse este botón para cerrar el
menú en pantalla.
EXIT/
|
botón para ocultar el texto.
(anterior) Pulse este botón para saltar al
archivo siguiente o anterior en
modo multimedia.
(siguiente)
Pulse el botón iniciar/poner en
(REC)
pausa la grabación.
Pulse este botón para detener
(detener)
cambio de tiempo o la grabación.
SOURCE
* Este botón no funciona en estos modelos.
Manual de instrucciones del televisor de pantalla plana con retroiluminación LED
Introducción
X
_
+
doméstica. No las arroje al fuego. Deséchelas según
indique la normativa local.
Introducción
Preparación del mando a distancia Colocación de las pilas
1. Abra la tapa de las pilas.
2. Inserte dos pilas AAA. Asegúrese de que hace
'
compartimento de las pilas.
*
+
*
`
'
~
~
`
1. Asegúrese de haber:
K
(Consulte la página 9 para obtener más detalles)
-
cable. (Consulte la página 7 para obtener más
detalles)
-
AC IN de la parte trasera del televisor y a una
toma de corriente que funcione. En el modelo
!"%<?=-;
alimentación instalado en una toma de corriente
que funcione.
2. Pulse
para encender el televisor. Se abrirá la
@
OK
para iniciar el asistente.
3. Pulse /
para continuar.
Initial Setup
Language
Please select your language:
English
Français
Italiano
Español
3. Vuelva a colocar la tapa de las pilas.
Precauciones con el mando a distancia y
las pilas
%`
_
a distancia y el sensor del mando a distancia del
televisor.
J
X
+
caer el mando a distancia al suelo.
{
pueden interferir en la señal del mando a distancia.
k
televisor.
X
|
_
~
,
{
|
de explosión. Sustitúyalas solo por el mismo tipo o
uno equivalente. Las pilas (paquete de pilas o pilas
>
|
|
{
,
'
distancia.
Deutsch
Back
Select
Next
4. Pulse /
'
pulse para continuar.
Configuración inicial
País
Por favor, seleccione su País:
Austria
Bélgica
Suiza
República Checa
Alemania
Atrás
Seleccionar
Después
Manual de instrucciones del televisor de pantalla plana con retroiluminación LED
ES-9
ES
Introducción
5. K
~
'
OK para continuar.
Configuración inicial
Configurar info. de cable
Configuración inicial
Modo de búsqueda
Avanzar
Configure una contraseña. “0000” no está admitido como contraseña.
Frecuencia (KHz)
306000
Modulación
Automático
Tasa de símbolo (Ksym/s))
Automático
Network ID
Automático
Nueva Contraseña
Confirmar Contraseña
Seleccionar
Atrás
Seleccionar
Después
Nota
~
debe establecer una nueva contraseña en el menú
Lock. Introduzca la contraseña predeterminada
1234
`
~
-
-
Contraseña” en la página 17 para obtener más
información.
6. Pulse /
para continuar.
Configuración inicial
Modo sintonizador
Por favor, seleccione su modo del sintonizador:
Después
8. Espere a que termine la búsqueda de canales.
Configuración inicial
Búsqueda de canales
La búsqueda de canales puede tardar un poco en completarse.
Estado: Buscando...
Canales analógicos: 0
Canales digitales: 0
21%
9. J
`
OK para salir del asistente.
Configuración inicial
Completa
Antena
Cable
¡Enhorabuena !!
Configuración inicial completada.
Por favor, pulse [OK] para salir del asistente.
Atrás
Seleccionar
Después
7. Pulse / para resaltar Explorar
para iniciar la búsqueda de
canales.
Configuración inicial
Atrás
Búsqueda de canales
Primero conecte antena.
¿Iniciar la búsqueda de canales ahora?
Si salta este paso, podrá realizarla después en el Menú.
Explorar
Saltar búsqueda
Atrás
Seleccionar
Después
,
-
//
/
^
{
OK
para iniciar la búsqueda de canales.
ES-10
10
Manual de instrucciones del televisor de pantalla plana con retroiluminación LED
Introducción
Conceptos básicos
Uso de la lista de favoritos
Encendido y apagado del televisor
Para añadir un canal favorito:
1. Sintonice el canal que desea añadir a la lista de
favoritos.
2. Pulse FAV/ para abrir la lista de favoritos.
3. Pulse /
OK para añadir el canal actual a
la lista de favoritos. aparecerá en la cabecera de
información.
Para ver un canal favorito:
1. Pulse FAV/ para abrir la lista de favoritos.
2. Pulse /
{
OK para sintonizar dicho canal.
Para eliminar un canal favorito:
1. Pulse FAV/ para abrir la lista de favoritos.
2. Pulse / para resaltar el canal favorito que
OK para
sintonizar dicho canal.
3. Vuelva a pulsar OK para eliminar el canal
sintonizado de la lista de favoritos. desaparecerá
de la cabecera de información.
1. Pulse
para encender el televisor. Puede que
tarde unos segundos en aparecer una imagen en
pantalla.
2. Pulse
para apagar el televisor. El televisor pasa
a modo en espera.
Nota
,
@
desenchufe el cable de alimentación.
Selección de la fuente de entrada
1. Pulse SOURCE. Se abrirá la lista de fuentes de
entrada.
Principal
TV
SCART
VGA
HDMI 1
HDMI 2
USB
Ajuste del volumen
@
VOL+/VOL- para subir o bajar el volumen.
@
para desconectar el sonido. Vuelva a pulsar
para recuperar el sonido.
2. Pulse /
{
OK.
Selección de un canal
Pulse P
/P
para ir al canal siguiente o anterior
en la lista de canales.
@
^
directamente un canal.
@
CH.LIST/ / y OK para seleccionar un
canal.
Para utilizar los botones de colores:
Página ant.: pulse el botón rojo para resaltar el
*
pulse el botón rojo varias veces para resaltar el
primer canal de las páginas anteriores.
Página sig.: pulse el botón verde para resaltar el
`
*
pulse el botón verde varias veces para resaltar el
último canal de las páginas siguientes.
Seleccionar lista:
/ para seleccionar el tipo de
canal que desea mostrar en la lista (Todos/Digital/
Radio/Analógico).
Salir: pulse el botón azul para cerrar la lista de
canales.
@
Q.VIEW para ir al último canal visto.
Visualización de información del canal
@
INFO/ una vez para ver la información
*
`
@
INFO/ dos veces para ver más información
'
{
@
INFO/ tres veces para ver las descripciones
de los programas.
@
INFO/ una vez más para cerrar la cabecera
de información.
Navegación por el menú en pantalla
1. Pulse MENU/ . Se abrirá el menú en pantalla.
2. Pulse / para resaltar un menú principal (Video/
%}},}>
OK
para acceder al submenú.
3. Pulse / para resaltar un elemento del submenú
OK
`
o bien pulse /
+
4. Pulse BACK/ para volver al menú anterior o pulse
EXIT/ para cerrar el menú en pantalla.
Manual de instrucciones del televisor de pantalla plana con retroiluminación LED
ES-11
11
ES
Uso del televisor
!=*
@
+
Modo de imagen
Vídeo
Audio
TV
ECO
Luz de fondo
50
Brillo
31
Contraste
41
Saturación
37
Matiz
Configur
0
Nitidez
43
Bloquear
Bl
Entrar
Seleccionar
Salir
Para seleccionar el modo de imagen. Puede
seleccionar según el programa.
Nota
^
!" para
seleccionar el modo de imagen.
%
+
imagen, *
*
Modo de
a .
Luz de fondo
@
+
{
#
Para aclarar u oscurecer la imagen.
@
+
imagen.
@
+
$
@
+
%$
Para dar nitidez o suavizar la imagen.
&
Para seleccionar el tipo de gamma.
'*
Para seleccionar la temperatura de color. Puede
seleccionar:
,
0
+
;$
@
+
'
"%<
Para reducir el ruido de la pantalla y producir una
'
*
&%<
@
'
$@&
ES-12
12
'*
@
+
`
{
de tono de piel.
*
"
@
'
*
$
@
'|
{
del tono de la piel.
@
+
<!*
@
*
de la pantalla según la cantidad de luz y oscuridad
de la señal.
Modo VGA :
{
&%>
@
&%
;
*
*
|
*
'
&0
*
*
'
,
'
>":
$K>
@
$K
0
}&_
*
&0
*
*
|
'
,
este modo al conectar un ordenador.
;
*
*
'
,
'
'
Blu-ray, etc.
?@*
:,
{
$K>
@
|
*
*
*
*
Nota
-
?@*
en "
* no
se puede seleccionar.
VGA
@
+
{
&%
@
+
0
+
*
Manual de instrucciones del televisor de pantalla plana con retroiluminación LED
Uso del televisor
Posición H.: permite ajustar la posición
horizontal de la imagen.
Posición V.: permite ajustar la posición vertical de
la imagen.
Fase: permite ajustar el foco de las imágenes
estables.
Reloj: permite ajustar la frecuencia de
muestreo.
Sólo audio
Para apagar la imagen del televisor y escuchar solo
el audio del programa.
Nota
@
botón.
Restablecer
@
'
valores predeterminados de fábrica.
Vídeo
Audio
Modo audio
Medio
Balance
0
Graves
50
Agudos
TV
50
Sonido Surround
Simular
Altavoces
Configur
C
Activado
Tipo SPDIF
Desactivado
Bloquear
Entrar
Seleccionar
Salir
Modo audio
Para seleccionar el modo de audio. Puede
seleccionar Usuario/Medio/Música/Cine para
adaptarlo a sus preferencias personales.
Nota
^
S.MODE para
seleccionar el modo de audio.
%
+
se cambiará automáticamente Modo audio a
Usuario.
Balance
Para ajustar el balance entre los altavoces izquierdo
y derecho.
Graves
Para ajustar el sonido de baja frecuencia.
Agudos
Para ajustar el sonido de alta frecuencia.
Sonido Surround
Para simular sonido envolvente.
Altavoces
Para activar o desactivar los altavoces integrados del
televisor. Puede seleccionar:
J "
: para desactivar los altavoces
integrados del televisor.
Activado: para activar los altavoces integrados
del televisor.
Auto (CEC): para generar la salida del audio en el
dispositivo CEC conectado.
Nota
Auto (CEC) estará desactivada si
la opción CEC función del menú CEC está
establecida en Desactivado.
Tipo SPDIF
Para seleccionar el tipo de salida de audio digital
SPDIF.
Retardo SPDIF
Para ajustar el tiempo de demora de SPDIF para
sincronizar el sonido con la imagen (0~250).
Contr.Volumen Auto
%
volumen constante al cambiar de canal o al
cambiar de un programa de televisión a un anuncio.
Tipo de audio
Para seleccionar el tipo de audio.
Normal: proporcionar audio normal.
Personas Sordas: proporcionar descripciones
visuales de las escenas para espectadores con
"
;: proporcionar narración
de audio de las escenas para espectadores con
"
;(solo DTV)
@
+
Altavoces
Para encender o apagar los altavoces.
Auriculares
Para encender o apagar los auriculares.
Volumen
Para ajustar el nivel de volumen de la narración de
audio.
Panorámico y fundido
Para activar o desactivar el control de panorámica
y fundido.
Audio para invidentes
Para seleccionar el idioma del audio para las
:
dependen del contenido de audio emitido)
Nota
+
"
; solo está
disponible cuando Tipo de audio está establecido
en "
;.
Downmix Mode
Para seleccionar el modo de mezclador a dos pistas
de audio.
Restablecer
@
valores predeterminados de fábrica.
Manual de instrucciones del televisor de pantalla plana con retroiluminación LED
ES-13
13
ES
Uso del televisor
Búsqueda RF único (solo canales digitales)
canales
Vídeo
Audio
Modo sintonizador
Antena
Canal de audio
Estéreo
Para realizar una búsqueda de un único canal RF
y comprobar la intensidad y calidad de la señal.
Modo Antenna
Buscar un único canal RF. (Sólo digital)
Vídeo
Canales
Desactivado
0%
Audio
Información de dispositivo
TV
Configur
C
TV
Bloquear
Configur
C
Entrar
Seleccionar
Búsqueda de canales
Para realizar una búsqueda de canales después
'
{
de cable (modo de cable).
Actualizar búsq.
Para realizar la actualización de la búsqueda de
canales para añadir canales a la lista existente.
Búsqueda manual analógica
Para realizar una búsqueda manual analógica
hacia arriba o hacia abajo a partir de la frecuencia
Vídeo
Buscar canales analógicos
Off
48.25
Frecuencia de inicio (MHz)
Buscar hacia arriba
Configur
C
Nivel de señal
0%
Calidad de señal
0%
Bloquear
Entrar
Seleccionar
Salir
1. Utilice los botones numéricos del mando a
distancia para introducir el canal RF.
2. Pulse OK para iniciar la búsqueda.
Modo Cable
Buscar un único canal RF. (Sólo digital)
Vídeo
Cable
Off
0%
Audio
Frecuencia (KHZ)
TV
Configur
C
Modulación
Tasa de símbolo (Ksym/s)
s))
Bloquear
Entrar
Seleccionar
Salir
1. Pulse / para resaltar Frecuencia (KHZ)
^
del mando a distancia para introducir la
frecuencia.
2. Pulse / para resaltar Modulación
/ para seleccionar el
tipo de modulación.
3. Pulse / para resaltar '?
(Ksym/s)
numéricos del mando a distancia para
'
4. Pulse OK para iniciar la búsqueda.
Seleccionar red favorita
@
más de dos después de ejecutar la búsqueda de
canales.
Saltar canal
Audio
TV
41
Canal RF
Salir
Modo sintonizador
Para seleccionar el modo de sintonizador: Antenna/
Cable.
Canal de audio (solo ATV)
Para seleccionar el modo de audio para varios
audios o un programa emitido en estéreo.
Idioma Audio (solo DTV)
Para seleccionar el idioma del audio para programas
que tienen varias pistas de idioma.
Idioma Audio 2 (solo DTV)
Para seleccionar el segundo idioma del audio
preferido para programas que tienen varias pistas de
idioma.
Canales
Para realizar una búsqueda de canales y editar la
lista de canales.
Buscar hacia abajo
Bloquear
Entrar
Seleccionar
Salir
1. Pulse / para resaltar Frecuencia de
inicio (MHz)
botones numéricos del mando a distancia para
introducir la frecuencia de inicio.
Para seleccionar los canales que se omitirán
al utilizar los botones P /P . Aún puede
sintonizar los canales omitidos con los botones
numéricos del mando a distancia.
1. Pulse / para resaltar el canal que
OK.
aparecerá.
2. Pulse / para resaltar Buscar hacia arriba
o Buscar hacia abajo
OK para buscar canales de frecuencia mayor o
menor desde la frecuencia de inicio.
ES-14
14
Antena
Off
Modo de cambio tiempo
Manual de instrucciones del televisor de pantalla plana con retroiluminación LED
Uso del televisor
Vídeo
Audio
TV
C
Configur
909
Analógico
910
Analógico
911
Analógico
912
Analógico
913
Analógico
914
Analógico
915
Analógico
Número de canal: 901
Nombre de canal: BBC
Frecuencia: 85.25 MHz
Fijar
Bloquear
Entrar
Seleccionar
Salir
2. Repita el paso anterior hasta haber establecido
todos los canales omitidos.
Ordenar canales
Para cambiar el orden de la lista de canales.
1. Pulse / para resaltar el canal cuya posición
OK.
aparecerá.
2. Pulse / para resaltar la posición de canal
OK para
intercambiar la posición de los dos canales.
3. Repita los pasos 1 y 2 hasta haber ordenado
todos los canales deseados.
Editar canales
Para editar el número y el nombre del canal.
1. Pulse / para resaltar el canal que desea
OK.
Vídeo
Audio
TV
Borrar lista de canales
Para borrar todos los canales almacenados en la
lista de canales.
Función Time shift
Para activar o desactivar el modo de cambio de
-
-
#
*
"
para obtener más información.
Información de dispositivo
Para comprobar la información del dispositivo
conectado a la toma USB de la parte posterior del
televisor.
televisor
Vídeo
Número de canal:
915
Nombre de canal:
Sports
Español
Idioma OSD
16:9
Modo de pantalla
Audio
TV
Configur
Nombre de red:
Cancelar
Activado
DPMS
Silencio azul
Desactivado
Canal de interacción
Desactivado
(MHEG) Codigo de proteccion
Desactivado
Configuración de hora
Bloquear
Frecuencia
Entrar
503.3
Configur
C
Bloquear
Entrar
Seleccionar
Salir
2. Pulse / para resaltar Número de canal
^
del mando a distancia para introducir el número
3. Pulse / para resaltar Nombre de canal
nuevo nombre pulsando los botones numéricos
varias veces para seleccionar un carácter.
Nota
@
*
.
!
@
+
recepción es de mala calidad.
1. Pulse / para resaltar el canal analógico
+
2. Pulse / para ajustar la frecuencia
{
OK para establecerla.
Seleccionar
Salir
Idioma OSD
Para seleccionar el idioma del menú en pantalla.
Modo de pantalla
Para seleccionar el modo de pantalla.
Nota
^
SCREEN para
seleccionar el modo de pantalla.
DPMS
:~
'
>
%
televisor pase automáticamente a modo en espera
si no se detecta ninguna señal de entrada de PC
después de 40 segundos en modo VGA.
Silencio azul
%
azul cuando no haya ninguna señal de entrada o
cuando se reproduzcan programas de audio.
Canal de interacción
%
{
canal interactivo.
(MHEG) Codigo de proteccion
%
{
protección por PIN MHEG.
[
@
+
temporizador.
Manual de instrucciones del televisor de pantalla plana con retroiluminación LED
ES-15
15
ES
Uso del televisor
Zona Horaria
Para seleccionar la zona horaria.
Hora
Sincronización Auto
Seleccione Activado para sincronizar
automáticamente la fecha y hora con una señal digital
(si hay una disponible). Seleccione Desactivado
para ajustar manualmente la fecha y hora.
Fecha
Pulse / y los botones numéricos para establecer
la fecha.
Hora
Pulse / ^
+
_
Encendido Auto.
Para encender automáticamente el televisor a una
hora preestablecida.
Programador
Cuando esté activado el encendido automático,
pulse / y los botones numéricos para establecer
la hora de encendido automático.
Canal al encender
Cuando esté activado el encendido automático,
seleccione el canal de encendido automático en la
lista de canales.
Apagado Auto.
Para apagar automáticamente el televisor a una hora
preestablecida.
Programador
Cuando esté activado el apagado automático, pulse
/ y los botones numéricos para establecer la
hora de apagado automático.
Temporiz. de apagado
Para apagar automáticamente el televisor después
de un periodo de tiempo establecido.
Auto Apagado
Para apagar automáticamente el televisor si no se
realiza ninguna operación después de un periodo
de tiempo establecido.
Subtítulo
@
+
'
Subtítulos Analógicos
@
'
Seleccione Silencio
'
analógicos cuando el televisor esté en silencio.
Idioma de Subtítulo digital
@
'
Idioma de Subtítulo digital 2
Para seleccionar el segundo idioma de los
'
Tipo de subtítulos
@
'
Teletexto
@
+
|
Idioma del teletexto digital
@
|
ES-16
16
*0
Para seleccionar el idioma de la página de
|
Interfaz común
Para comprobar la información del módulo CA
insertado en la ranura COMMON INTERFACE de la
parte posterior del televisor.
OAD (descarga inalámbrica)
Para actualizar el software del televisor de forma
inalámbrica.
Descarga manual OAD
Para actualizar manualmente el software
del televisor de forma inalámbrica. Siga las
instrucciones en pantalla para realizar la
actualización de software.
Descarga automática
Seleccione Yes para permitir que el televisor
descargue automáticamente nuevo software de
forma inalámbrica.
Instalación automática
Seleccione Yes para permitir que el televisor
instale automáticamente nuevo software de forma
inalámbrica.
Información sobre la versión
Para comprobar la información de versión de
software.
Información sobre el sistema
Para comprobar la información del sistema.
Restaur. Predeterm.
Para restablecer los valores predeterminados de
{*
canal y de usuario.
Menú CEC
@
+
--
CEC función
@
{
--
Auto apagar
Si se establece esta opción en Activado, el
--
*
*
cuando se apague el televisor.
Descubrimiento de dispositivo
Permite comprobar si el dispositivo está conectado
--
Modo espera (cuando está conectado el
-->
@
--
Encendido (cuando está conectado el dispositivo
-->
@
--
Desactivar/Activar ctr. aud. sis. (cuando está
-->
Si se activa, el nivel de volumen del dispositivo
--
distancia del televisor.
Manual de instrucciones del televisor de pantalla plana con retroiluminación LED
Uso del televisor
Nota
X
$K
--
Consulte el manual del usuario de su dispositivo
para obtener detalles.
,
$K
dispositivos compatibles con HDMI CEC al televisor.
,
{
$K
--
dispositivo.
,
$K
$K
--
{
de CEC no funciona.
{
$K
que la función de control de CEC HDMI no funcione.
Modo compras
Para activar o desactivar el modo de tienda.
Activado
*
~
un efecto máximo en la visualización de la
tienda minorista y la cabecera de información del
producto aparecerá en pantalla.
Desactivado
*
^
energética.
bloqueo
Introduzca la contraseña establecida durante la
`
Nota
,
~
1234 para acceder
al menú Lock.
,
~
~
universal 9443 para acceder al menú Bloqueo y
establecer una nueva contraseña.
Vídeo
Contraseña
Audio
TV
Configu
Configur
Configu
Bloquear
Entrar
Seleccionar
Salir
Cambiar Contraseña
Vídeo
Audio
OK
Bloqueo de canales
Bloqueo parental
TV
C igu
Configur
Configu
Conf
Bloquear
Bloqueo de fuente
Bloqueo de niños
Desactivado
Bloqueo de sintonización
Desactivado
Modo definir fuente
Des
Entrar
Seleccionar
Salir
Cambiar Contraseña
Para cambiar la contraseña.
Bloqueo de canales
Para bloquear canales que desee impedir que vean
otras personas.
1. Pulse / para resaltar el canal que desea
OK.
aparecerá.
2. Repita el paso anterior hasta haber establecido
todos los canales bloqueados.
Nota
@
~
'
Bloqueo de intervalo de tiempo (solo Noruega)
Para establecer el intervalo de tiempo durante el cual
los canales de televisión estarán bloqueados. Se
debe introducir la contraseña para desbloquear y ver
los canales.
Bloqueo parental
Para impedir que los niños vean determinados
`
establecida.
Nota
{
información de Bloqueo de fuente
Para bloquear la fuente de entrada.
1. Pulse / para resaltar la fuente de entrada
OK.
aparecerá.
2. Repita el paso anterior hasta haber establecido
todas las fuentes bloqueadas.
Nota
@
{
~
'
Bloqueo de niños
Para bloquear los botones de control del televisor.
Bloqueo de sintonización
Para desactivar la función de sintonización del
televisor. Si esta opción está establecida en Activado
el menú principal TV no estará disponible.
\
Para establecer que el televisor se encienda con una
fuente de entrada predeterminada.
"\
Para seleccionar la fuente de entrada
\ se
establece en Activado.
Nº de canal
@
se establece en TV.
Volumen máximo
@
'
*|
Modo volumen inicial
Para establecer que el televisor se encienda con un
nivel de volumen predeterminado.
Volumen inicial
Para seleccionar el nivel de volumen
Modo volumen inicial se
establece en Activado.
Manual de instrucciones del televisor de pantalla plana con retroiluminación LED
ES-17
17
ES
Otras funciones
Eliminar bloqueo
Para restablecer los valores de fábrica de la
Para restablecer los valores predeterminados de
{*
usuario y bloqueo. Se abrirá la pantalla Initial Setup.
Uso del reproductor multimedia USB:
1. Conecte la memoria USB al puerto USB de la parte
posterior del televisor.
Otras funciones
Reproductor multimedia USB
El reproductor multimedia USB le permite conectar un
dispositivo de memoria USB al televisor y reproducir
{
`
'
Nota
J,
{
;%!"
_
J,
|
_
:!
+
>
X
*
_
_
_
*
~
multimedia de discos duros ni reproductores de MP3.
X
{
concentradores USB.
~
J,
de refuerzo USB.
J
J,
el estándar de interfaz de velocidad total USB 2.0. Si
el equipo USB no cumple el estándar de interfaz de
J,
sea homogénea.
Precaución
X
J,
de salir del reproductor multimedia USB.
Formateo del dispositivo de memoria USB:
Puede formatear el dispositivo de memoria USB
mediante el menú en pantalla.
1. Cambie a la fuente de TV.
2. Pulse MENU/ . Se abrirá el menú en pantalla.
3. Pulse / para resaltar TV
OK.
4. Pulse / para resaltar Información de
dispositivo
OK.
5. H
J,
OK.
6. Pulse / para resaltar Formato
pulse OK.
7. -
YES
OK.
8. J
_
{
EXIT.
ES-18
18
2. Pulse SOURCE
/ para
resaltar USB y pulse OK para cambiar al modo
USB.
Vídeo
Seleccionar
Foto
Música
Entrar
3. Pulse / para resaltar el tipo de medio: ;
Foto o Música
OK.
4. Pulse /// para resaltar el archivo que desea
OK.
5. @
+
MENU/ para
abrir el menú en pantalla.
6. Pulse /
OK para ejecutar o para
/
para resaltar la opción deseada y después OK.
7. Pulse BACK/ para volver al menú anterior o
cerrar el menú.
Modo de miniatura/lista
%
J,
FAV/ para alternar entre el modo de miniatura y lista.
Pulse MENU/ para abrir el menú en pantalla.
Ordenar
Para seleccionar el algoritmo para ordenar archivos.
Tipo de medio
Para seleccionar el tipo de medio.
Nota
%
|
J,
BACK/ .
/ para resaltar el
icono
OK.
[..]
Manual de instrucciones del televisor de pantalla plana con retroiluminación LED
Otras funciones
Modo Photo
Pulse MENU/
para abrir el menú en pantalla.
Reproducir
Repetir
Mezclar
Girar
Duración
Zumbido
Foto
Repetir todo
R
Corto
3/14
Koala.JPG
Menú
Entrar
Reproducir/Pausa
Para reproducir o poner en pausa la presentación de
diapositivas.
Repetir
Para seleccionar el modo de repetición de la
reproducción de archivos de la misma carpeta.
Mezclar
Para activar o desactivar el modo de orden aleatorio.
Active el modo de orden aleatorio para reproducir los
archivos en una secuencia aleatoria.
Girar
Para rotar la imagen 90° de una vez en el sentido de
las agujas del reloj.
Duración
Para seleccionar la duración de visualización de la
imagen.
Zumbido
Para acercar la imagen.
Efecto
Para seleccionar el efecto de transición de
visualización de la imagen.
Mostrar información
Para mostrar la información de la imagen mostrada.
Modo Music
Pulse MENU/
para abrir el menú en pantalla.
Repetir
Para seleccionar el modo de repetición de la
reproducción de archivos de la misma carpeta.
Mezclar
Para activar o desactivar el modo de orden aleatorio.
Active el modo de orden aleatorio para reproducir los
archivos en una secuencia aleatoria.
Mostrar información
Para mostrar la información de la música
reproducida.
Ocultar/Mostrar espectro
Para ocultar o mostrar el espectro.
Sólo audio
Para apagar la pantalla y escuchar solo el audio.
Nota
@
botón.
Modo Video
Pulse MENU/
para abrir el menú en pantalla.
Pausa
Repetir
Program
Mostrar información
00:03:29
Vídeo
00:04:50
3/14
Skyfall.MP4
Menú
Entrar
Reproducir/Pausa
@
'
Repetir
Para seleccionar el modo de repetición de la
reproducción de archivos de la misma carpeta.
Program
Para seleccionar los programas de un archivo *.ts.
Mostrar información
@
{
'
Pausa
Repetir
Mezclar
Mostrar información
Ocultar espectro
Sólo audio
00:01:29
Música
00:04:50
3/14
Skyfall.mp3
Menú
Entrar
Reproducir/Pausa
Para reproducir o poner en pausa la música.
Manual de instrucciones del televisor de pantalla plana con retroiluminación LED
ES-19
19
ES
Otras funciones
Función de los botones
Botón
Función
Reproducir/
Pausa
Reproducir
archivo
siguiente
Reproducir
archivo anterior
Avance rápido
Retroceso
rápido
Detener
Imagen
Música
;
9
9
9
9
9
9
9
9
9
9*
9
9
9
9
9
9
9**
* para seleccionar la
duración de visualización de la imagen.
** '
se
suspenderá la reproducción en el punto de detención
+
,
Resume”. Puede realizar una de las siguientes
acciones para continuar:
- Pulse OK o para reanudar la reproducción en el
punto de detención.
- Pulse de nuevo para detener la reproducción
Q para iniciar la
'
ES-20
20
Manual de instrucciones del televisor de pantalla plana con retroiluminación LED
Otras funciones
Formato de archivo admitido de multimedia USB
,
[
Extensión de archivo
Contenedor
*.avi
AVI
XviD
MPEG1
MPEG2 MP@HL
H.264 BP LV 4.0
H.264 MP LV 4.0
H.264 HP LV 4.0
MPEG-4 SP@HL 3.0
MPEG-4 ASP@HL 4.0
Motion JPEG
*.mp4
MP4
H.264 BP LV 4.0
H.264 MP LV 4.0
H.264 HP LV 4.0
MPEG-4 SP@HL 3.0
MPEG-4 ASP@HL 4.0
*.mov
MP4
H.264 BP LV 4.0
H.264 MP LV 4.0
H.264 HP LV 4.0
MPEG-4 SP@HL 3.0
MPEG-4 ASP@HL 4.0
Motion JPEG
*.mkv
MKV
H.264 BP LV 4.0
*.vob
MPEG PS
H.264 MP LV 4.0
H.264 HP LV 4.0
MPEG-4 SP@HL 3.0
MPEG-4 ASP@HL 4.0
*.mpg
MKV
MPEG-2 MP@HL
MPEG TS
*.mpeg
MPEG TS
MPEG-1
MPEG-2 MP@HL
*.ts
Extensión de archivo
*.mp3
Extensión de archivo
*.jpg
*.jpeg
MPEG TS
MPEG-2 MP@HL
H.264 BP LV 4.0
H.264 MP LV 4.0
H.264 HP LV 4.0
Códec de audio
MP3 (MPEG1 Layer3)
MPEG1 Layer1/2
MPEG2: AAC/AAC-LC
MPEG4: AAC-LC/HE-AAC
%
@-$}%@-$
AC3
MP3 (MPEG1 Layer3)
MPEG1 Layer1/2
MPEG2: AAC
MPEG4: HE-AAC
ES
MPEG2: AAC/AAC-LC
MPEG4: AAC-LC/HE-AAC
MP3 (MPEG1 Layer3)
MPEG1 Layer1/2
MPEG2: AAC/AAC-LC
MPEG4: AAC-LC/HE-AAC
AC3
MPEG1 Layer1/2
AC3
MP3 (MPEG1 Layer3)
MPEG1 Layer1/2AC3
AC3
MP3 (MPEG1 Layer3)
MPEG1 Layer1/2
MPEG2: AAC
MPEG4: HE-AAC
Formato de archivo de audio
Contenedor
MP3
Códec de audio
MP3 (MPEG1 Layer3)
Formato de archivo de imagen
Contenedor
JPEG
Códec
'
}@
Manual de instrucciones del televisor de pantalla plana con retroiluminación LED
ES-21
21
Otras funciones
Interfaz común
La ranura Common Interface (CI) está diseñada para
alojar módulos de acceso condicional (CA) y tarjetas
otros servicios de pago por visión. Póngase en contacto
con su proveedor de servicios de interfaz común para
obtener más información acerca de los módulos y la
suscripción. Tenga en cuenta que no suministramos
-%
+
{
como accesorios opcionales.
1. K
+
-%
continuación inserte el módulo CA correctamente en
la ranura COMMON INTERFACE situada en la parte
posterior del televisor.
Ranura CI
CAM
Introducción del número de página
@
*
|
el número de página con los botones numéricos del
mando a distancia.
abc
def
ghi
jkl
mno
pqrs
tuv
wxyz
Modo de mezcla
Para ver la imagen de televisión en modo de
|
{
superpondrá la información del teletexto sobre la
imagen de televisión. Pulse el botón
de nuevo
para volver al texto completo.
BACK /
Tarjeta inteligente
2. El televisor mostrará un mensaje que indica que se
ha detectado el módulo CA. Espere unos minutos
hasta que se active la tarjeta.
3. Pulse MENU/ para abrir el menú en pantalla.
4. Pulse / para resaltar OK.
5. Pulse / para resaltar Interfaz común
OK.
6. Pulse / OK.
7. Se muestra información detallada sobre el módulo
CA. Consulte el manual de instrucciones del módulo
-%
{
Teletexto
El teletexto es un sistema de información emitido por
{
{
|
'
la programación de televisión. También proporciona
'
aquellas no familiarizadas con el idioma en el que se
emite un programa concreto.
Teletexto
@
|
/ . Para
|
/ .
Página anterior/Página siguiente
Para mostrar la página siguiente o anterior de
|
P /P .
Retener
Para que deje de actualizarse automáticamente la
*
|
. Esta función
es muy útil cuando hay varias páginas de teletexto o
muchos datos en el mismo número de página.
FAV /
Tamaño
Para cambiar la imagen de teletexto a la parte
{
.
{
`
'
facilita la lectura de los caracteres.
CH.LIST /
Revelar
Para revelar información oculta como la respuesta de
.
INFO /
Subcódigo
@
*
`
'
GUIDE /
Ocultar
@
|
.
EXIT /
Botones de colores de texto rápido
La función de texto rápido muestra automáticamente
las cuatro páginas más utilizadas que el emisor
considera que puede elegir para verlas a
continuación. Pulse el botón del mando a distancia
con el mismo color que el enlace de color que
aparece en la parte inferior de la página de teletexto
para ir directamente a esa página.
P
ES-22
22
Manual de instrucciones del televisor de pantalla plana con retroiluminación LED
Otras funciones
Uso de un dispositivo USB para
grabación
Nota
,
~
'
&
IMPORTANTE:
J,
J,
_
{
;%!"
@-
Cambio de tiempo :
>
1. %`
Modo de cambio tiempo
` TV
*
Activado
2. K
J,
{
;%!"
J,
3. @
ES
Nota
,
J,
*
,
,
*
J,
4. @
,
*
5. @
Grabación :
>
1. K
J,
{
;%!"
J,
2. @
3. @
4. @
fuente USB
5. @
/
Vídeo
OK
6. @
/
pvr
OK
7. ,
_
OK
Manual de instrucciones del televisor de pantalla plana con retroiluminación LED
ES-23
23
Sección de referencia
Sección de referencia
Solución de problemas
Elementos que comprobar y acciones que realizar
Sin alimentación
-
-%
*
a una toma de corriente que funcione.
_{
<=
%
a insertar el enchufe en una toma de corriente que funcione y vuelva a
encender el televisor.
Sin imagen
%`
_
{
-
|
ver si está conectada correctamente.
@
@
%+
Buena imagen pero sin
sonido
%
VOL+ en el mando a
distancia o en el panel de control del televisor.
@
en el mando a distancia para asegurarse de que no está
activado el silencio.
Buen sonido pero color de
mala calidad
%+
Imagen de mala calidad
@
_
_
*
,,
o videocámara activada conectada al televisor y otro periférico al mismo
tiempo. Apague uno de los periféricos.
Imagen con nieve y ruido
-
|
El televisor no responde al
mando a distancia
-
{
-*
%`
*
correctamente.
,
El televisor no funciona
^
{
=
^
,
`
contacto con el personal del servicio autorizado para obtener asistencia
técnica.
No se muestra ningún
archivo en modo USB
%`
%`
_
{
Nota
,
técnico autorizado local.
,
^
X
+
ES-24
24
Manual de instrucciones del televisor de pantalla plana con retroiluminación LED
Sección de referencia
*
*
+
=]^_`k,
LE32F600C
,
}
@%},-%$}&
K
} -
60 W
45 W
,
10W + 10W
10W + 10W
-
-
K
-
K
:,_
£
>
£@@}-,
%
K
J,
$K
}$K
"}$K
!
K
K{
`
_
Q
%
Q
:-|>
%
K
,-%H
@-
K
@-
%
K
J,
$K
}$K
"
K
K{
`
_
Q
%
Q
:-|>
%
K
,-%H
@-
K
@-
%
K
ES
{
?
¤-
¥
!?
¤
?
¤-
¥
?
¤-
{
"=
¦
¥
§=
¦
¨
§=
¦
%
$
}"
%%%}$
}&'
*}
+
'},
}-
:
!";<==->
:
>
:%
|
%
|
@>
©"§"<
|
<©§<
|
§=!
©!§©
|
©©©
|
"=©?
:
>
©"§"<
|
!"<
|
©©=©
:%
|
%
|
@>
©!§©
|
=ª<
|
©?==
@
:
>
©?!
?§
@
:
>
©!
?
$+
:
|
>
==
|
==
==
|
==
$K
$K
_
$
K{
$K
--
J
'
;
+
'
Manual de instrucciones del televisor de pantalla plana con retroiluminación LED
ES-25
25
Sección de referencia
Apéndice
Frecuencias admitidas en la entrada VGA
LE32A650CF
Frecuencias admitidas en la entrada de
componentes
(Solo LE32A650CF)
Component
VGA
Resolución
Tasa de actualización
(Hz)
Resolución
70
480i
640 x 480
60/70/72
480p
800 x 600
56/60/70/72
576i
60/70/75
576p
720 x 400
1024 x 768
1280 x 720
1280 x 960
1360 x 768
60
50
50
720p
60
60
1080i
1920 x 1080
1080p
LE32F600C
Tasa de actualización
(Hz)
50
60
50
60
VGA
Resolución
Tasa de actualización
(Hz)
Frecuencias admitidas en la entrada HDMII
HDMI
720 x 400
70
640 x 480
60/70/72
800 x 600
56/60/70/72
480i
1024 x 768
60/70/75
480p
1280 x 720
1280 x 960
Resolución
576i
60
576p
1360 x 768
720p
1080i
1080p
ES-26
26
Manual de instrucciones del televisor de pantalla plana con retroiluminación LED
Tasa de actualización
(Hz)
60
50
50
60
50
60
50
60