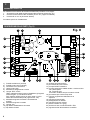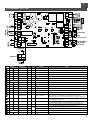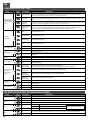
1
ISTSNAP4
V. 06.2013
SNAP 4
I
BARRIERA ELETTROMECCANICA
Istruzioni d’uso e di programmazione
F
BARRIERE ELECTROMECANIQUE
Instructions pour l'utilisation et la programmation
pag. 14
E
BARRERA ELECTROMECÁNICA
Instrucciones de uso y de programación
pag. 22
GB
ELECTROMECHANICAL BARRIER
Operation and programming instructions
pag. 30
ELEKTROMECHANISCHE SCHRANKE
Gebrauchs- und Programmierungsanleitung
pag. 38
ELEKTROMECHANISCHE SLAGBOOM
Gebruiks- en programmeeraanwijzingen
pag. 46
D
NL
pag. 6
I
F
E
GB
D
NL
230
955
1180
I - luce passaggio utile 4000 mm
F - largeur de passage utile 4000 mm
E - ancho de paso libre 4000 mm
GB - usable opening 4000 mm
D - Nutzbarer lichter Durchgang 4000 mm
NL - nuttige breedte doorgang 4000 mm
305
I - Misure espresse in mm
E - Medidas expresadas en mm
F - Dimensions exprimées en mm
GB - Measurements in mm
D - Maße in mm
NL - Afmetingen in mm
SNAP4
Fig. A
Fig. B
2
F
I
E
GB
D
NL
3
4
2
5
6
1
7
8
9
1
I
QUADRO D’ASSIEME
10
F
TABLEAU D’ENSEMBLE
11
E
CUADRO DEL CONJUNTO
12
GB
GENERAL ASSEMBLY
D
GESAMTANSICHT
NL
OVERZICHTSTEKENING
Fig. C
3
I
F
E
GB
D
NL
270°
Fig. D
Fig. E1
227
min
4
min. 200 mm
160
310
240
. 35
0
0
. 40
min
Fig. E2
I
F
E
GB
D
NL
4
Fig. F
Fig. G
5
I
AVVERTENZE IMPORTANTI SULL’INSTALLAZIONE
- L'installazione dell'automazione deve essere eseguita a regola d'arte da personale qualificato avente i requisiti di legge e
fatta in conformità della direttiva macchine 2006/42/CE.
- Verificare lo stato di eventuali cavi già presenti nell'impianto.
- Fare un'analisi dei rischi dell'automazione e di conseguenza adottare le sicurezze e le segnalazioni necessarie.
- Installare i comandi (ad esempio il selettore a chiave) in modo che l'utilizzatore non si trovi in una zona pericolosa.
- Terminata l'installazione provare più volte i dispositivi di sicurezza, segnalazione e di sblocco dell'automazione.
- Applicare sull'automazione l'etichetta o la targhetta CE contenenti le informazioni di pericolo e i dati di identificazione.
- Consegnare all'utilizzatore finale le istruzioni d'uso, le avvertenze per la sicurezza e la dichiarazione CE di conformità.
- Accertarsi che l'utilizzatore abbia compreso il corretto funzionamento automatico, manuale e di emergenza
dell'automazione.
- Informare l'utilizzatore per iscritto (ad esempio nelle istruzioni d'uso):
* dell'eventuale presenza di rischi residui non protetti e dell'uso improprio prevedibile.
* Di scollegare l'alimentazione quando viene eseguita la pulizia nell'area dell'automazione o viene fatta piccola
manutenzione (es: ridipingere).
* Di controllare frequentemente che non vi siano danni visibili all'automazione e nel caso ve ne siano, avvertire
immediatamente l'installatore
* Di non far giocare i bambini nelle immediate vicinanze dell'automazione
- Predisporre un piano di manutenzione dell'impianto (almeno ogni 6 mesi per le sicurezze) riportando su di un apposito
registro gli interventi eseguiti.
SCELTA DELLA MOLLA
Tipo asta
Lunghezza asta
3m
4m
RAPPER4TL
MSNYELLOW
MSNYELLOW
SNAPPER4
MSNYELLOW
MSNGREEN
SNAPPER4 + PSR
MSNGREEN
MSNGREEN
SNAPPER4 + SRS
MSNGREEN
MSNGREEN / MSNRED
SNAPPER4 + SRS + PSR
MSNGREEN
MSNRED
CARATTERISTICHE
SNAP4 è una barriera elettromeccanica che trova impiego negli accessi a: parcheggi, stabilimenti, enti pubblici, ospedali,
edifici condominiali, ecc.
E' costituita da un armadio, all'interno del quale sono alloggiati il motoriduttore e la centrale elettronica di comando.
Il movimento è irreversibile con possibilità di sblocco manuale.
Accessori a richiesta
SNAPPER4
PAF
PSR
SRS
SNR
FIX SNAP4
ADEK
STICKERS
LEDSNAPPER
CB24
SPB24
SUN POWER
H230T
6
Asta rigida a sezione circolare di lunghezza totale L4250 mm.
Piedino di appoggio fisso.
Piedino d'appoggio mobile.
Rastrelliera in plastica L2000 mm.
Snodo.
Accessori di fissaggio.
Adesivo catarifrangente per SNAPPER4 L4000 mm.
12 stickers riflettenti.
Luci led per SNAPPER4
Carica batterie 24V, da utilizzare con centrali a 24V.
Scatola da esterno con 2 batterie da 12V 7Ah.
Kit alimentazione a pannelli solari applicabile a tutte le automazioni a 24Vdc.
Riscaldatore per garantire il funzionamento dei motoriduttori anche a basse
temperature. Alimentazione a 230V assorbimento 10W completo di termostato.
I
QUADRO D’INSIEME (fig. C)
1.
2.
3.
4.
5.
6.
Fotocellule
Appoggio fisso
Asta in alluminio
Adesivo catarinfrangente
Selettore a chiave
Siepe
7.
8.
9.
10.
11.
12.
SNAP4
Lampeggiante
Antenna
Interruttore differenziale
Interruttore generale
Linea di alimentazione
APERTURA ARMADIO (Fig. B)
Per aprire il vano centrale della SNAP4 girare la serratura 1 (Fig. B) in senso orario, alzare quindi il coperchio ruotandolo
come da Fig. B punto 2.
Una volta tolto il coperchio è possibile togliere la porta sfilandola dall’alto.
VERIFICHE PRELIMINARI ED INSTALLAZIONE A TERRA
Prima di passare all’installazione vera e propria, si consiglia di verificare che la sede di posizionamento della barriera sia
solida ed appropriata e permetta alla barriera un esercizio corretto.
Se la SNAP4 poggia su un solido basamento in cemento, può essere fissata direttamente al suolo con 4 tasselli ad
espansione D.12 (fig. E1), oppure il fissaggio può essere fatto con l’ausilio della contropiastra (FIXSNAP4), completa di
zanche di ancoraggio (fig. E2); in questo caso agire nel seguente modo:
1. Eseguire uno scavo di fondazione, tenendo conto delle misure della contropiastra di fondazione.
2. Alloggiare nello scavo le canaline di adduzione dei cavi di alimentazione e di collegamento
3. Eseguire il montaggio contropiastra-zanche come fig. E2.
4. Annegare nel calcestruzzo le canaline e la contropiastra di fondazione e controllarne l’orizzontalità.
5. Svitare i dadi dalle 4 zanche, dopo che il calcestruzzo si sia solidificato.
6. Alloggiare sulla contropiastra la SNAP4, fissandola con le 4 rondelle ed i 4 dadi in dotazione.
SBLOCCO DELLA BARRIERA
Per sbloccare la barriera, agire come in figura D:
1. Inserire la chiave di sblocco e lasciarla inserita.
2. Ruotare la chiave esagonale di 270 gradi in senso anti-orario fino al fermo meccanico
L’asta è ora svincolata dal motoriduttore.
Per ribloccare l’asta:
1. Inserire la chiave di sblocco (1) e lasciarla inserita.
2. Ruotare in senso orario la chiave esagonale di 270 gradi.
INSTALLAZIONE DELLA BARRIERA
NOTA: tutte le informazioni seguenti sono riferite ad una installazione destra della barriera come in figura C.
Per il collegamento elettrico si consiglia di usare un cavo di alimentazione 3x1.5.
1. Interrare una guaina per il passaggio dei cavi di alimentazione elettrica e di sicurezza.
2. Installare la barriera a terra nei modi precedentemente descritti.
3. Portare la barriera in posizione di asta abbassata sbloccando l’asta. Il lato del bilancino su cui è fissata la molla deve
essere in alto. Vedi fig. G2 (barriera DESTRA).
4. Fissare la piastra di ancoraggio del supporto asta con le quattro viti con il lato lungo in orizzontale (Fig. F1). La
coppia di serraggio delle viti deve essere superiore a 70 Nm.
5. Montare il supporto asta posizionando le quattro viti. Il lato del supporto dove c’è una vite di battuta deve essere
dalla parte opposta all’area di passaggio (vedi freccia di fig. F2).
6. Inserire l’asta nel supporto (lato con rinforzo) fino al fermo (vite di battuta).
7. Serrare fino in fondo le viti del supporto asta, inserire il tappo (Fig.F3).
8. Portare l’asta a 90 gradi e agganciare la molla.
9. Tirare quindi la molla in modo che l’asta (sbloccata) resti in equilibrio a 45 gradi. Ulteriore regolazione può avvenire
spostando il fulcro della molla sul bilancino (fig. G): avvicinando il fulcro diminuisce il momento complessivo,
allontanandolo viceversa aumenta.
10. Verificare che a 20 e 70 gradi l’asta rimanga pressoché ferma.
11. Bloccare il motoriduttore.
12. Effettuare i necessari collegamenti elettrici collegando la linea di alimentazione ai morsetti situati dentro la scatola
posta dentro l’armadio.
13. Procedere con l’installazione e configurazione della centrale (vedi capitoli successivi).
7
I
BARRIERA SINISTRA
Per trasformare la barriera da DESTRA a SINISTRA procedere come segue:
1. Spostare la molla dalla posizione destra alla posizione sinistra (fig. G1)
2. Invertire i fili del motore nella centralina (35 con 36 , pagina successiva)
3. Invertire fili 14 con 16 (finecorsa elettrici)
Procedere quindi con l’installazione.
DESCRIZIONE DELLE PARTI (Fig. H)
1
Fig. H
3
2
-
M
+
M
23
4
D
TPR
5
+
+
22
-
Slave
D
+
+
24V
+
+
-
LDA
PROG.
-
STOP
P3
P/P
+
TEST
24FT
FCS
US1
21
TR1
COM
ON
LD1
1
2
3
4
5
6
7
8
9
10
11
12
NA
20
Reset
C1
FC1
19
C2
FC2
ANT.
18
P/P
PA
RS
ON
NC
1
FT
STP
CC
TPR
CSB
6
7
FCS
FT
P/P
STP
REG.VEL.
PRELAMP.
RIC.AUT.
CC
JCC
C
SLAVE
JOLLY
PC
TPR.OPEN
FotoRIC.
PA
8
P/P
SCHEDA RADIO OC
17
1)
2)
3)
4)
5)
6)
7)
8)
9)
10)
11)
8
16
15 14
Fusibile ausiliari 24V (2A fast)
Fusibile motore 24V (10A fast)
Connettore luci LED interne
Uscita motore 24V
Morsettiera collegamento encoder
Jumper TEST e FCS
TEST: togliendo questo jumper si disabilitano gli ingressi
sicurezze (part. 7) con barriera chiusa.
FCS: togliere questo jumper se viene usato un microswitch di sicurezza sulla porta (ingresso 26 - NC)
Morsettiera ingressi sicurezze e alimentazione
ausiliari
Morsettiera ingressi comando
Jumper JCC
Dip-Switch disabilitazione sicurezze
Dip-Switch funzioni
13
12)
13)
14)
15)
16)
17)
18)
19)
20)
21)
22)
23)
12 11
10 9
Pulsanti programmazione
Connettore luci LED interne
Jumper RESET centralina
Jumper selezione modalità canale 1 ricevitore OC2:
P/P: passo/passo
PA: comando apre
Il secondo canale è sempre comando chiude.
Connettore per ricevitore tipo OC2
Trimmer regolazione rallentamento in
apertura
Ingresso antenna radio
Collegamento di TERRA
Ingresso finecorsa motore
Uscita contatto US1 (jolly)
Uscita luci asta, comandi SLAVE e TPR
Ingresso 24Vdc alimentazione centralina
I
COLLEGAMENTI ELETTRICI
+
+
+
P/P
TEST
US1
LD1
Reset
FC1
15 17 18
12
14 16
13
C1
C2
P/P
PA
FC2
ANT.
Antenna
RS
ON
1
2
3
4
5
6
7
8
9
10
11
12
ON
NA
TR1
FT
STP
CC
TPR
1
COM
9 10 11
uscita US1
8A 230V
NC
P/P
REG.VEL.
PRELAMP.
RIC.AUT.
JCC
SLAVE
JOLLY
TPR
FotoRIC.
SCHEDA RADIO OC
+
+
24FT
+
Alimentazione
fotocellule
-
FCS
24V
-
-
1A max.
P3
+
ENCODER
PROG.
STOP
D filo BIANCO
+ filo VERDE
- filo BLU
-
-
31 30 29 28 27 26 25 24 23 22 21 20 19
LDA
34 33 32
led
asta
+
3 4 5 6 7 8
D
MOTORE
2
-
Slave
M
1
TPR
36 35
-
24Vdc
+
CSB
FCS
FT
STP
CC
Contatto porta
FT
STOP
Costa in chiusura
C
PC
PA
P/P
Pulsante CHIUDE
Pulsante APRE
Pulsante P/P
apertura
FC1
14 16
C2
15
finecorsa
13
C1
FC2
chiusura
Morsetto n.
Dispositivo
V
I max
24Vdc
10 A
Funzione
Note
1
2
3
4
TPR
5
6
comando SLAVE
7
8
Luci ASTA
9
10
Uscita US1
Uscita jolly NC
Dati di contatto: 8A 230V
10
11
Uscita US1
Uscita jolly NA
Dati di contatto: 8A 230V
12
24Vac
24V
Alimentazione Centralina Collegare all’uscita alimentazione dalla scatola alimentatore
Assenza linea
Collegare al secondario del trasformatore
uscita comandi SLAVE
collegare alla centralina della seconda barriera (SLAVE)
100 mA Illuminazione ASTA
Collegare alle luci LED dell’asta, se presenti
TERRA
Contatto di TERRA
13
14
Contatto NC
Finecorsa APRE
Finecorsa nei pressi dell’apertura
15
16
Contatto NC
Finecorsa CHIUDE
Finecorsa nei pressi della chiusura
17
18
Antenna Radio
17 Calza, 18 Centrale
Collegare un’antenna per 433 MHz (50 Ohm)
19
22
Pulsante NA
Comando Passo/Passo
Vedi tabella di configurazione dip-switch
20
22
Pulsante NA
Comando Apre
Avvia l’apertura della barriera
21
22
Pulsate NA
Comando Chiude
Avvia la chiusura della barriera
23
27
Costa 8K2 / N.C.
Costa in Chiusura
24
27
Pulsante NC
Comando Stop
25
27
Contatto NC
Fotocellula in chiusura
26
27
Contatto N.C.
Contatto porta
28
29
Ausiliari
24Vdc
30
31
Ausiliari
24Vdc
32, 33, 34
35
36
1A max
Ingresso abilitato in chiusura. Possibilità di collegare coste 8K2 (JCC
chiuso) oppure un contatto N.C. (JCC aperto). Se non viene
utilizzato, aprire JCC e portare in ON dip-switch CC (dip 3 di part. 10)
Blocco di tutte le funzioni. Se non utilizzato, portare in ON il dipswitch STP (dip 2 di part. 10)
Durante la chiusura inverte la marcia.
Se non utilizzata, portare in on il dip-switch FT (dip 1 di part. 10)
Collegare questo ingresso al micro-switch di sicurezza della porta.
Se non utilizzato, ponticellare l’ingresso (filo tra 26 e 27)
Alimentazione fotocellule Tensione presente solo quando la barriera non è chiusa
Alimentazione
Tensione permanente
Encoder
32 - / 33 + / 34 D
32 BLU, 33 VERDE, 34 BIANCO
Motore
Uscita Motore 24V
Connessione al Motore
9
I
CONFIGURAZIONE DIP-SWITCH
Funzione
n.
Off On
tempo di apertura circa 4 sec.
medio-bassa
tempo di apertura circa 6 sec.
bassa
tempo di apertura circa 8 sec.
Escluso
Il lampeggiante viene alimentato contemporaneamente al motore.
Inserito
Il lampeggiante viene alimentato 5 secondi prima di ogni manovra.
Escluso
Dopo una apertura completa la centrale richiude solo con un comando manuale.
Inserito
Dopo una apertura completa la centrale richiude dopo il tempo pausa programmato.
Escluso
Funzione esclusa
Inserito
La centrale esegue i comandi ricevuti da una centrale MASTER
9 10
Contatto per
Luce di cortesia
Con questa modalità possiamo comandare una luce di cortesia.
Accesa da inizio ciclo a un tempo programmabile dopo la chiusura.
9 10
Contatto per
Lampeggiante
Contatto per comandare un lampeggiante, frequenza 2 Hz.
9 10
Contatto per
elettroblocco
Uscita attiva in apertura, pausa e chiusura.
ON
medio-alta
3 4
ON
Non utilizzato
7
Funzionamento
SLAVE
8
Modo Uscita
US1 (jolly).
Contatto pulito
ON
tempo di apertura circa 3 sec.
3 4
6
9
10
9 10
Apertura per
black out
11
Fotorichiusura
12
Durante l’apertura premendo il pulsante P/P la barriera si blocca e poi chiude.
Durante la chiusura premendo il pulsante P/P la barriera si blocca e poi apre.
alta
5
Timer
Richiusura
Apre-Chiude
3 4
4
Durante l’apertura premendo il pulsante P/P la barriera si blocca, premendo nuovamente chiude.
Durante la chiusura premendo il pulsante P/P la barriera si blocca, premendo nuovamente apre.
3 4
Prelampeggio
3
Apre-StopChiude
Apre-Chiude con
inversione esclusa
durante l’apertura
1 2
Velocità
barriera
Note
Durante l’apertura premendo il pulsante P/P non abbiamo alcun effetto. Durante la pausa premendo il
pulsante P/P non abbiamo alcun effetto.
Durante la chiusura premendo il pulsante P/P la barriera si blocca per pochi secondi e poi apre.
Durante l’apertura premendo il pulsante P/Pnon abbiamo alcun effetto. Durante la pausa premendo il
pulsante P/P la barriera chiude. Durante la chiusura premendo il pulsante P/P la barriera si blocca per
pochi secondi e poi apre.
1 2
2
1 2
1
ON
1 2
Modo Ingresso
Passo/Passo
e
Canale Radio
(CH1)
Descrizione
Apre sempre
“Condominiale”
Contatto di
segnalezione
stato barriera
Esclusa
Uscita attiva con barriera non chiusa.
Funzione esclusa
Inserita
Con assenza di rete, la barriera resta aperta. Al ritorno della rete la barriera chiude se dip 6 in ON
Esclusa
Funzione esclusa.
Inserita
L’intervento della fotocellula riduce il tempo di pausa, qualunque sia stato il suo valore, a 2 secondi.
DIP-SWITCH ESCLUSIONE SICUREZZE
Funzione
n.
FT
1
STP
2
CC
3
TPR
10
4
Off On
Descrizione
Note
OFF
Con fotocellula installata
ON
Esclude ingresso fotocellula
OFF
Con ingresso di STOP utilizzato
ON
Esclude ingresso STOP
OFF
JCC in ON
Con ingresso Costa Chiude (tipo 8K2) utilizzato
JCC in OFF Con ingresso Costa Chiude (tipo NC) utilizzato
JCC: part 9 di fig. H
ON
JCC in OFF
OFF
Collegare secondario trasformatore ai morsetti 3 e 4.
Se manca tensione di rete, la barriera apre (con dip 11 ON e con utilizzo batterie tampone)
ON
Funzione esclusa
Esclude ingresso Costa Chiude
I
PROGRAMMAZIONE POSIZIONE DI APERTURA E CHIUSURA
La barriera SNAP4 è già programmata da fabbrica per l’utilizzo con apertura a 90 gradi e chiusura a 0 gradi.
Se per motivi particolari d’installazione c’è bisogno di ritoccare il punto di apertura o/e il punto di chiusura, procedere
come segue:
Per il punto di apertura:
1. Togliere alimentazione alla centralina
2. Portare in OFF il dip 6 di richiusura automatica
3. Allentare il controdado e alzare provvisoriamente il gommino antivibrante di apertura
4. Dare alimentazione alla centralina
5. Premere il pulsante P/P, l’asta apre
6. Premere e tenere premuto il pulsante PROG/STOP per circa 3 sec. finché il Led LD1 si accende
7. Premere più volte P/P per spostare il punto in apertura oppure P3 per spostarlo verso la chiusura
8. Premere PROG/STOP per memorizzare il punto prescelto
9. Portare il gommino antivibrante in appoggio al bilancino.
10. Sbloccare l’asta e portarla al punto di equilibrio (circa 45 gradi)
11. Abbassare ancora il gommino antivibrante di circa 2 millimetri e bloccarlo con il controdado
12. Riportare il dip 6 in ON per riabilitare la richiusura automatica
13. Ridare alimentazione alla centrale
Per il punto di chiusura
1. Premere P/P per aprire la barriera
2. Togliere alimentazione alla centralina
3. Portare in OFF il dip 6 di richiusura automatica
4. Allentare il controdado e alzare provvisoriamente il gommino antivibrante di chiusura
5. Dare alimentazione alla centralina
6. Premere il pulsante P/P, l’asta chiude
7. Premere e tenere premuto il pulsante PROG/STOP per circa 3 sec. finché il Led LD1 si accende
8. Premere più volte P/P per spostare il punto verso l’apertura oppure P3 per spostarlo verso la chiusura
9. Premere PROG/STOP per memorizzare il punto prescelto
10. Portare il gommino antivibrante in appoggio al bilancino.
11. Sbloccare l’asta e portarla al punto di equilibrio (circa 45 gradi)
12. Abbassare ancora il gommino antivibrante di circa 2 millimetri e bloccarlo con il controdado
13. Riportare il dip 6 in ON per riabilitare la richiusura automatica
14. Ridare alimentazione alla centrale
PROGRAMMAZIONE TEMPO DI PAUSA
Questa operazione va fatta a barriera chiusa:
1.
2.
3.
Premere P3 e tenerlo premuto finché si accende il Led LD1 (lampeggio una volta per secondo)
Premere P/P per far partire il conteggio del tempo di pausa. Il Led LD1 cambia tipo di lampeggio.
Trascorso il tempo di pausa desiderato, premere di nuovo P/P per memorizzarlo. Il Led LD1 rimarrà acceso fisso per
un paio di secondi, poi si spegne.
PROGRAMMAZIONE TEMPO LUCE DI CORTESIA (uscita US1 con dip 9 e 10 in OFF)
Questa operazione va fatta a barriera chiusa:
1.
2.
3.
4.
Premere P3 e tenerlo premuto finché si accende il Led LD1 (lampeggio una volta per secondo)
Premere nuovamente P3, il Led LD1 ora lampeggerà due volte per secondo.2)
Premere P/P per far partire il conteggio del tempo della luce di cortesia. Il Led LD1 cambia tipo di lampeggio.
Dopo che è passato il tempo desiderato, premere di nuovo P/P per memorizzarlo. Il Led LD1 rimarrà acceso fisso
per un paio di secondi, poi si spegne.
VISUALIZZAZIONE NUMERO DI MANOVRE COMPLESSIVE DELLA BARRIERA
Questa operazione va fatta a barriera chiusa:
1.
2.
Tenendo premuto P3 fare un reset alla centralina cortocircuitando per un attimo il jumper di RESET (part. 14 di fig.
H).
I led gialli interni lampeggeranno per 6 volte, dopodiché inizierà la visualizzazione del numero delle manovre.
11
I
3.
La visualizzazione avviene come segue:
- Prima cifra: numero di lampeggi dei led rossi e gialli assieme (centinaia di migliaia)
- Seconda cifra: numero di lampeggi dei led gialli (decine di migliaia)
- Terza cifra: numero di lampeggi dei led rossi (migliaia)
Esempio: visualizzazione di 210.000 cicli di lavoro.
- Led rossi e gialli lampeggiano 2 volte
- Pausa
- Led gialli lampeggiano una volta
- Pausa
- Led rossi non lampeggiano
- Fine
PROGRAMMAZIONE DELL’ALLARME MANUTENZIONE
La centrale SN24 segnala l’allarme manutenzione tramite 6 lampeggi dei Led rossi interni.
Il numero dei cicli, dopo i quali viene segnalato l’allarme, è programmato da fabbrica a 100.000.
Per modificare questo parametro procedere come segue:
1.
2.
3.
4.
Ad asta chiusa premere Prog/Stop per circa 10 secondi (dopo tre secondi LD1 si accende, tenere premuto finché
LD1 si spegne di nuovo)
Ora l’allarme manutenzione è stato cancellato, quindi bisogna reimpostarlo.
Il numero viene impostato a multipli di 10.000, premere P/P per aumentare i lampeggi del Led LD1 (il numero
massimo di lampeggi è 10 che corrisponde a 100.000 manovre)
Premere il tasto P3 per memorizzare il numero impostato.
BARRIERE CONTRAPPOSTE, FUNZIONE MASTER-SLAVE
Con questo modo d’installazione è possibile avere due barriere contrapposte che si muovono in sincronia tra loro.
1. Installare le due barriere eseguendo, se necessario, le regolazioni delle posizioni di apertura e di chiusura.
2. Scegliere la barriera principale (MASTER) per collegare in essa tutte le funzioni dell’impianto (comandi, ricevitori radio,
sicurezze, fotocellule...).
3. Sulla barriera secondaria (SLAVE) lasciare tutto come da fabbrica. Collegare solamente la costa, se presente. Mettere il
dip 8 in posizione ON. Fare un reset.
4. Collegare l’uscita Slave della barriera MASTER all’ingresso “P/P” della barriera SLAVE. Il morsetto “-” (5) della MASTER
al “C” (22) della SLAVE e il morsetto “D” (6) della MASTER al P/P (19) della SLAVE. Se il collegamento è corretto, il led
corrispondente all’ingresso “P/P” della barriera SLAVE inizia a lampeggiare.
5. Collegare l’uscita Slave morsetto “D” (6) della barriera SLAVE al morsetto “PA” (20) della barriera MASTER.
6. Testare l’impianto provando i vari comandi e le sicurezze delle due barriere.
SEGNALAZIONE DI ERRORI
La barriera SNAP4 segnala eventuali anomalie attraverso il lampeggio dei led rossi presenti nei due lati dell’armadio:
n° Lampeggi
14
Significato
Descrizione
1
costa interrotta
con costa premuta o guasto ai collegamenti elettrici
2
asta forzata
con asta chiusa, segnala la forzatura manuale
3
intervento encoder
rivelazione ostacolo
4
encoder assente
encoder guasto o collegamento errato
5
anomalia mosfet
guasto driver del controllo motore
6
allarme manutenzione
superamento del numero manovre impostato
7
errore finecorsa
guasto dei finecorsa elettrici o collegamento errato
PROGRAMMAZIONE INIZIALE DOPO SOSTITUZIONE CENTRALINA
Questa procedura è necessaria solamente se viene sostituita la centrale SN24 alla barriera SNAP4.
Dopo questa operazione proseguire con la regolazione dei punti di apertura e di chiusura, se necessario.
1.
2.
3.
12
Effettuare un reset tenendo premuto i pulsanti P3 e PROG/STOP. Rilasciare i pulsanti all’accensione del Led LD1.
Premere il pulsante “P/P”. la barriera effettuerà una serie di movimenti fino a fermarsi in chiusura.
Lo spegnimento del led LD1 significherà la fine della procedura.
I
SMALTIMENTO
Questo prodotto è formato da vari componenti che potrebbero a loro volta contenere sostanze
inquinanti. Non disperdere nell'ambiente!
Informarsi sul sistema di riciclaggio o smaltimento del prodotto attenendosi alle norme di legge
vigenti a livello locale.
DATI TECNICI
MOTORE
U.M.
Tensione motore
Vdc
24
Corrente max. motore
A
12
Potenza motore massima
W
300
Coppia massima
Nm
600
Lunghezza max. asta
mm
4250
°
100
sec.
3-6
Angolo max di manovra
Tempo di manovra
Intensità cicli di lavoro
intensivo
Encoder
SI
Finecorsa elettrici
SI
Lubrificante grasso
CENTRALE DI COMANDO
TS10
U.M.
Modello
Tensione di alimentazione
Corrente max.
SN24
Vac
230
A
1,5
Rallentamento elettronico
SI
Compatibile con Sun Power
SI
CARATTERISTICHE GENERALI
U.M.
Temperatura di funzionamento
°C
-20 +55
Grado di protezione
IP
54
Peso
Kg
50
DICHIARAZIONE DI CONFORMITA’ CE
Il fabbricante: Telcoma srl
via L. Manzoni, 11 - 31015 - Z.I. Campidui Conegliano (TV) - ITALY
DICHIARA che il prodotto: SNAP4
è conforme alle seguenti direttive CEE:
-Direttiva EMC 2004/108/CE
-Direttiva bassa tensione (LVD) 2006/95/CE
Conegliano, 17/02/2012
Il Legale rappresentante
Ennio Ambroso
13
F
RECOMMANDATIONS IMPORTANTES SUR L'INSTALLATION
- L'installation de l'automatisme doit être effectuée dans les règles de l'art par du personnel qualifié ayant les conditions
requises par la loi et conformément à la directive machines 2006/42/CE.
- Vérifier l'état des éventuels câbles déjà présents dans l'installation.
- Faire une analyse des risques de l'automatisme et adopter les dispositifs de sécurité et de signalisation nécessaires.
- Installer les commandes (par exemple le sélecteur à clé) de manière que l'utilisateur ne se trouve pas dans une zone
dangereuse.
- Quand l'installation est terminée, essayer plusieurs fois les dispositifs de sécurité, signalisation et débrayage de
l'automatisme.
- Appliquer sur l'automatisme l'étiquette ou la plaquette CE contenant les informations de danger et les données
d'identification.
- Remettre à l'utilisateur final la notice d'instructions, les consignes de sécurité et la déclaration CE de conformité.
- Contrôler que l'utilisateur a bien compris le fonctionnement automatique, manuel et d'urgence de l'automatisme.
- Informer l'utilisateur par écrit (par exemple dans la notice d'instructions) :
* de l'éventuelle présence de risques résiduels non protégés et de l'utilisation impropre prévisible.
* de déconnecter l'alimentation quand on nettoie la zone où est installé l'automatisme ou en cas de petits travaux d'entretien
(par ex. : repeindre).
* de contrôler fréquemment qu'il n'y a pas de dommages visibles à l'automatisme et s'il y en a, avertir immédiatement
l'installateur
* de ne pas laisser les enfants jouer à proximité immédiate de l'automatisme.
- Préparer un plan de maintenance de l'installation (au moins tous les 6 mois pour les dispositifs de sécurité) en reportant sur
un registre les interventions effectuées.
CHOIX DU RESSORT
Type lisse
Longueur lisse
3m
4m
RAPPER4TL
MSNYELLOW
MSNYELLOW
SNAPPER4
MSNGREEN
MSNGREEN
SNAPPER4 + PSR
MSNGREEN
MSNGREEN
SNAPPER4 + SRS
MSNGREEN
MSNGREEN / MSNRED
SNAPPER4 + SRS + PSR
MSNGREEN
MSNRED
CARACTÉRISTIQUES
SNAP4 est une barrière électromécanique utilisée pour les accès aux : parkings, usines, organismes publics, hôpitaux,
immeubles, etc.
Elle est constituée d'un fût contenant l'opérateur et la logique électronique de commande. Le mouvement est irréversible avec
possibilité de débrayage manuel.
Accessoires sur demande
SNAPPER4
PSR
SRS
SNR
FIX SNAP4
ADEK
STICKERS
LEDSNAPPER
CB24
SPB24
SUN POWER
H230T
14
Lisse rigide de section ronde, longueur totale L4250 mm. PAF
Lyre de repos fixe.
Appui mobile
Crémaillère en plastique L2000 mm.
Articulation.
Accessoires de fixation.
Bande réfléchissante autocollante pour SNAPPER4 L4000 mm.
12 autocollants réfléchissants.
Lumières led pour SNAPPER4
Chargeur de batteries 24 V, à utiliser avec des logiques de commande à 24 V.
Caisson pour l'extérieur avec 2 batteries de 12 V 7 Ah.
Kit d'alimentation à panneaux solaires, applicable à tous les automatismes à 24 Vcc.
Réchauffeur pour garantir le fonctionnement des opérateurs même aux basses températures.
Alimentation à 230 V absorption 10 W livré avec thermostat.
F
VUE D'ENSEMBLE (fig. C)
1.
2.
3.
4.
5.
6.
Photocellules
Lyre de repos fixe
Lisse en aluminium
Autocollant réfléchissant
Sélecteur à clé
Haie
7.
8.
9.
10.
11.
12.
SNAP4
Clignotant
Antenne
Interrupteur différentiel
Interrupteur général
Ligne d'alimentation
OUVERTURE FÛT (Fig. B)
Pour ouvrir le logement de la logique de la SNAP4 tourner la serrure 1 (Fig. B) dans le sens des aiguilles d'une montre,
soulever le couvercle en le tournant comme l'indique la Fig. B. point 2.
Après avoir enlevé le couvercle, on peut retirer la porte en l'extrayant par le haut.
CONTRÔLES PRÉLIMINAIRES ET INSTALLATION AU SOL
Avant de passer à l'installation proprement dite, il est conseillé de vérifier que l'emplacement où sera positionnée la barrière
est solide et approprié et permet un fonctionnement correct.
Si la SNAP4 repose sur une solide base en ciment, elle peut être fixée directement au sol avec 4 chevilles à expansion D.12
(fig. E1), ou bien la fixation peut être faite avec la contreplaque (FIXSNAP4), équipée d'agrafes (fig. E2) ; dans ce cas,
procéder de la façon suivante :
1. Creuser un trou en tenant compte des dimensions de la contreplaque de fondation.
2. Placer dans le trou les goulottes pour les câbles d'alimentation et de connexion.
3. Effectuer le montage contreplaque-agrafes comme sur la fig. E2.
4. Noyer dans le ciment les goulottes et la contreplaque de fondation et contrôler l'horizontalité.
5. Une fois que le ciment a pris, dévisser les écrous des 4 agrafes.
6. Monter la SNAP4 sur la contreplaque, en la fixant avec les 4 rondelles et les 4 écrous fournis.
DÉBRAYAGE DE LA BARRIÈRE
Pour débrayer la barrière, agir comme sur la figure D :
1. Introduire la clé de débrayage et la laisser en place.
2. Tourner la clé à six pans de 270 degrés dans le sens contraire des aiguilles d'une montre jusqu'à la butée
mécanique
La lisse est maintenant libérée de l'opérateur.
Pour rembrayer la lisse :
1. Introduire la clé de débrayage (1) et la laisser en place.
2. Tourner la clé à six pans de 270 degrés dans le sens des aiguilles d'une montre
INSTALLATION DE LA BARRIÈRE
NOTE : toutes les informations qui suivent se réfèrent à une installation de la barrière à droite, comme dans la figure C.
Pour le raccordement électrique, il est conseillé d'utiliser un câble d'alimentation 3x1.5.
1. Enterrer une gaine pour le passage des câbles d'alimentation électrique et de sécurité.
2. Installer la barrière au sol suivant les indications qui précèdent.
3. Mettre la barrière dans la position lisse abaissée et bloquer la lisse. Le côté du balancier sur lequel est fixé le ressort
doit se trouver en haut. Voir fig. G2 (barrière DROITE).
4. Fixer la plaque d'ancrage du support de la lisse à l'aide des quatre vis avec le côté long à l'horizontale (Fig. F1). Le
couple de serrage des vis doit être supérieur à 70 Nm.
5. Monte support de la lisse en positionnant les quatre vis. Le côté du support où il y a une vis de butée doit se trouver
du côté opposé à la zone de passage (voir flèche fig. F2).
6. Introduire la lisse dans le support (côté avec renfort) jusqu'à la butée (vis de butée).
7. Serrer à fond les vis du support de la lisse, mettre le bouchon (fig. F3).
8. Porter la lisse dans la position à 90 degrés et accrocher le ressort.
9. Tirer ensuite le ressort de manière que la lisse (débloquée) reste en équilibre à 45 degrés. On peut faire un réglage
supplémentaire en déplaçant le point de fixation sur le balancier (fig. G) : en rapprochant le point le moment total
diminue, tandis qu'il augmente quand on l'éloigne.
10. Vérifier qu'à 20 et 70 degrés la lisse reste plus ou moins à l'arrêt.
11. Bloquer l'opérateur.
12. Effectuer les branchements électriques nécessaires en connectant la ligne d'alimentation aux bornes situées dans la
boîte qui se trouve dans le fût.
13. Procéder avec l'installation et la configuration de la logique (voir chapitres ci-après).
15
F
BARRIÈRE GAUCHE
Pour transformer la barrière de DROITE à GAUCHE, procéder de la façon suivante :
1. Déplacer le ressort de la position droite à la position gauche (fig. G1)
2. Inverser les fils du moteur dans la logique (35 avec 36 , page suivante)
3. Inverser les fils 14 avec 16 (fins de course électriques)
Continuer avec l'installation.
DESCRIPTION DES PARTIES (Fig. H)
1
Fig. H
3
2
-
M
+
M
23
4
D
TPR
5
+
+
22
-
Slave
D
+
+
24V
+
+
-
LDA
PROG.
-
STOP
P3
P/P
+
TEST
24FT
FCS
US1
21
TR1
COM
ON
LD1
1
2
3
4
5
6
7
8
9
10
11
12
NA
20
Reset
C1
FC1
19
C2
FC2
ANT.
18
P/P
PA
RS
ON
NC
1
FT
STP
CC
TPR
CSB
6
7
FCS
FT
P/P
STP
REG.VEL.
PRELAMP.
RIC.AUT.
CC
JCC
C
SLAVE
JOLLY
PC
TPR.OPEN
FotoRIC.
PA
8
P/P
SCHEDA RADIO OC
17
1)
2)
3)
4)
5)
6)
16
15 14
Fusible auxiliaires 24V (2A fast)
Fusible moteur 24V (10A fast)
Connecteur lumières LED internes
Sortie moteur 24V
Bornier connexion encodeur
Cavalier TEST et FCS
TEST : en enlevant ce cavalier on désactive les entrées
sécurité (part. 7) avec barrière fermée.
FCS : enlever ce cavalier si un micro-interrupteur de
sécurité est utilisé sur la porte (entrée 26 - NF)
7) Bornier entrées sécurité et alimentation auxiliaires
8) Bornier entrées commande
9) Cavalier JCC
10) Dip-switch désactivation sécurités
11) Dip-switch fonctions
16
13
12 11
10 9
12) Touches de programmation
13) Connecteur lumières LED internes
14) Cavalier réinitialisation logique de commande
15) Cavalier sélection modalité canal 1 récepteur OC2 :
P/P : pas à pas
PA : commande ouverture
Le deuxième canal est toujours commande
fermeture.
16) Connecteur pour récepteur type OC2
17) Trimmer réglage ralentissement en ouverture
18) Entrée antenne radio
19) Connexion de terre
20) Entrée fin de course moteur
21) Sortie contact US1 (jolly)
22) Sortie lumières lisse, commandes SLAVE et TPR
23) Entrée 24 Vcc alimentation logique de commande
F
COLLEGAMENTI ELETTRICI
+
+
+
P/P
TEST
US1
LD1
Reset
FC1
15 17 18
12
14 16
13
C1
C2
P/P
PA
FC2
ANT.
Antenna
RS
ON
1
2
3
4
5
6
7
8
9
10
11
12
ON
NA
TR1
FT
STP
CC
TPR
1
COM
9 10 11
NC
P/P
REG.VEL.
PRELAMP.
RIC.AUT.
JCC
SLAVE
JOLLY
TPR
FotoRIC.
SCHEDA RADIO OC
+
24FT
+
Alimentation
photocellules
-
FCS
24V
-
-
1A max.
P3
+
+
ENCODEUR
PROG.
STOP
D fil BLANC
+ fil VERT
- fil BLEU
-
-
31 30 29 28 27 26 25 24 23 22 21 20 19
LDA
34 33 32
led
lisse sortie US1
8A 230V
+
3 4 5 6 7 8
D
MOTEUR
2
-
Slave
M
1
TPR
36 35
-
24Vdc
+
CSB
FCS
FT
STP
CC
Contact porte
FT
STOP
Bord sensible
en fermeture
C
PC
PA
P/P
Touche ferm.
Touche ouv.
Touche P/P
ouverture
FC1
14 16
C2
15
fin de course
13
C1
FC2
fermeture
Borne n.
Dispositif
V
I max
Fonction
Note
24Vdc
10 A
Alim. logique de comm.
Connecter à la sortie alimentation du boîtier d'alimentation
Absence ligne
Connecter au secondaire du transformateur
1
2
3
4
TPR
5
6
commande SLAVE
7
8
Lumières LISSE
9
10
Sortie US1
Sortie jolly NF
Données de contact : 8 A 230 V
10
11
Sortie US1
Sortie jolly NO
Données de contact : 8 A 230 V
12
24Vac
sortie commandes SLAVE connecter à la logique de la deuxième barrière (SLAVE)
24V
100 mA Éclairage LISSE
Connecter aux lumières LED de la lisse, si présentes
TERRE
Contact de TERRE
13
14
Contact NF
Fin de course OUVERTURE Fin de course près de l'ouverture
15
16
Contact NF
Fin de course FERMETURE Fin de course près de de la fermeture
17
18
Antenne Radio
17 Conducteur ext., 18 Âme
Connecter une antenne pour 433 MHz (50 Ohm)
19
22
Touche NO
Commande Pas à Pas
Voir tableau de configuration dip-switch
20
22
Touche NO
Commande Ouverture
Démarrer l'ouverture de la barrière
21
22
Touche NO
Commande Fermeture
Démarre la fermeture de la barrière
23
27
Bord sensible 8 K2 / N.F.
Bord sensible en fermeture (JCC fermé) ou un contact N.F. (JCC ouvert). S'il n'est pas utilisé, ouvrir JCC et
Entrée activée en fermeture. Possibilité de connecter des bords sensibles 8K2
mettre sur ON les dip-switchs CC (dip 3 du détail 10)
24
27
Touche NF
Commande Stop
25
27
Contact NF
Photocellule en fermeture
26
27
Contact NF
Contact porte
28
29
Auxiliaires
24Vdc
30
31
Auxiliaires
24Vdc
32, 33, 34
35
36
Blocage de toutes les fonctions.
S'il n'est pas utilisé, mettre sur ON le dip-switch STP (dip 2 du détail 10)
Durante la chiusura inverte la marcia.
Se non utilizzata, portare in on il dip-switch FT (dip 1 di part. 10)
Collegare questo ingresso al micro-switch di sicurezza della porta.
Se non utilizzato, ponticellare l’ingresso (filo tra 26 e 27)
Alim. photocellules
Tension présente uniquement quand la barrière n'est pas fermée
Alimentation
Tension permanente
Encodeur
32 - / 33 + / 34 D
32 BLEU, 33 VERT, 34 BLANC
Moteur
Sortie Moteur 24 V
Connexion au Moteur
1A max
17
F
CONFIGURATION DIP-SWITCHS
Fonction
n.
Off On
ON
moy.-haute
temps d'ouverture env. 4 s
moy.-basse
temps d'ouverture env. 6 s
basse
temps d'ouverture env. 8 s
Exclu
Le clignotant est alimenté en même temps que le moteur.
Activé
Le clignotant est alimenté 5 secondes avant chaque manœuvre.
Exclu
Après une ouverture complète la logique de commande referme uniquement avec une commande manuelle.
Activé
Après une ouverture complète la logique de commande referme après le temps de pause programmé.
Exclu
Fonction exclue.
Activé
La logique exécute les commandes envoyées par une logique MASTER
9 10
Contact pour
Écl. automatique
Avec cette modalité nous pouvons commander un éclairage automatique.
Allumé depuis le début d'un cycle jusqu'à un temps programmable après la fermeture.
9 10
Contact pour
Clignotant
Contact pour commander un clignotant, fréquence 2 Hz.
9 10
Contact pour
verrou élec.
Sortie activée en ouverture, pause et fermeture.
9 10
7
Fonctionnement
SLAVE
8
Mode Sortie
US1 (jolly).
Contact sans
potentiel
temps d'ouverture env. 3 s
3 4
Non utilisé
9
10
Ouv.pour panne
de courant
11
Photocellule
refermeture
12
Durant l'ouverture, la pression de la touche P/P n'a aucun effet. Durant la pause, la pression de la
Ouvre toujours
touche P/P n'a aucun effet.
« Fonct. collectif »
Durant la fermeture, en pressant la touche P/P la barrière se bloque pendant quelques instants puis
Ouv.-Ferm. avec
Durant l'ouverture, la pression de la touche P/P n'a aucun effet. Durant la pause, en pressant la touche P/P
inversion exclue
la barrière se ferme. Durant la fermeture, en pressant la touche P/P la barrière se bloque pendant
durant l'ouverture
quelques instants puis s'ouvre.
3 4
6
Durant l'ouverture en pressant la touche P/P la barrière se bloque puis se ferme. Durant la
fermeture, en pressant la touche P/P la barrière se bloque puis s'ouvre.
haute
Contact de
signalisation état
barrière
Sortie activée avec barrière non fermée
Exclue
Fonction exclue.
Activée
En l'absence de courant, la barrière reste ouverte. Au retour du courant la barrière se ferme si le dip 6
est sur ON
Exclue
Fonction exclue.
Activée
L'intervention de la photocellule réduit le temps de pause, quelle que soit sa valeur, à 2 secondes.
5
Tempori.
Refermeture
Ouv.-Ferm.
3 4
4
Ouv.-Stop-Ferm.
3 4
Préclignot.
3
ON
1 2
Vitesse
barrière
ON
1 2
2
1 2
1
Notes
Durant l'ouverture en pressant la touche P/P la barrière se bloque, en pressant de nouveau la barrière
se ferme. Durant la fermeture en pressant la touche P/P la barrière se bloque, en pressant de nouveau
la barrière s'ouvre.
ON
1 2
Mode entrée
Pas à pas et
Canal Radio
(CH1)
Description
DIP-SWITCH EXCLUSION DES SÉCURITÉS
Fonction
n.
FT
1
STP
2
CC
3
Off On
Description
Notes
OFF
Avec photocellule installée
ON
Exclut entrée photocellule
OFF
Avec entrée STOP utilisée
ON
Exclut entrée STOP
JCC sur ON
TPR
18
4
OFF
Avec entrée Bord sensible ferme (type 8K2) utilisée
JCC sur OFF Avec entrée Bord sensible ferme (type NF) utilisée
JCC: détail 9 de fig. H
ON
JCC sur OFF
OFF
Connecter (secondaire) transformateur aux bornes 3 et 4.
En cas de panne de courant, la barrière s'ouvre (avec dip 11 ON et en utilisant les batteries tampon)
ON
Fonction exclue
Exclut entrée bord sensible fermeture
F
PROGRAMMATION POSITION D'OUVERTURE ET FERMETURE
La barrière SNAP4 est déjà programmée en usine pour l'utilisation avec ouverture à 90 degrés et fermeture à 0 degré.
Si pour des raisons particulières d'installation il faut retoucher le point d'ouverture ou/et le point de fermeture, procéder de
la façon suivante :
Pour le point d'ouverture :
1. Couper l'alimentation de la logique
2. Mettre le dip 6 de refermeture automatique sur OFF
3. Desserrer le contre-écrou et soulever provisoirement le joint antivibratoire d'ouverture
4. Alimenter électriquement la logique de commande
5. Presser la touche P/P, la lisse s'ouvre
6. Presser et maintenir la touche PROG/STOP enfoncée pendant environ 3 s jusqu'à ce que la Led LD1 s'allume
7. Presser plusieurs fois P/P pour déplacer le point vers l'ouverture ou P3 pour le déplacer vers la fermeture
8. Presser PROG/STOP pour mémoriser le point choisi
9. Mettre le joint antivibratoire en appui sur le balancier.
10. Débloquer la lisse et la porter au point d'équilibre (environ 45 degrés)
11. Abaisser de nouveau le joint antivibratoire d'environ 2 millimètres et le bloquer avec le contre-écrou
12. Reporter le dip 6 sur ON pour réactiver la refermeture automatique
13. Couper l'alimentation de la logique
Pour le point de fermeture
1. Presser P/P pour ouvrir la barrière
2. Couper l'alimentation de la logique
3. Mettre le dip 6 de refermeture automatique sur OFF
4. Desserrer le contre-écrou et soulever provisoirement le joint antivibratoire de fermeture
5. Alimenter électriquement la logique de commande
6. Presser la touche P/P, la lisse se ferme
7. Presser et maintenir la touche PROG/STOP enfoncée pendant environ 3 s jusqu'à ce que la Led LD1 s'allume
8. Presser plusieurs fois P/P pour déplacer le point vers l'ouverture ou P3 pour le déplacer vers la fermeture
9. Presser PROG/STOP pour mémoriser le point choisi
10. Mettre le joint antivibratoire en appui sur le balancier.
11. Débloquer la lisse et la porter au point d'équilibre (environ 45 degrés)
12. Abaisser de nouveau le joint antivibratoire d'environ 2 millimètres et le bloquer avec le contre-écrou
13. Reporter le dip 6 sur ON pour réactiver la refermeture automatique
14. Couper l'alimentation de la logique
PROGRAMMATION TEMPS DE PAUSE
Cette opération doit être faite avec la barrière fermée :
1.
2.
3.
Presser P3 et garder la touche enfoncée jusqu'à ce que la Led LD1 s'allume(elle clignote une fois par seconde)
Presser P/P pour lancer le comptage du temps de pause. La led LD1 change de type de clignotement.
Quand le temps de pause désiré s'est écoulé, presser de nouveau P/P pour le mémoriser. La Led LD1 reste allumée
fixe pendant environ 2 secondes puis s'éteint.
PROGRAMMATION TEMPS ÉCLAIRAGE AUTOMATIQUE (sortie US1 avec dip 9 et 10 sur OFF)
Cette opération doit être faite avec la barrière fermée :
1.
2.
3.
4.
Presser P3 et garder la touche enfoncée jusqu'à ce que la Led LD1 s'allume (elle clignote une fois par seconde)
Presser de nouveau P3, la led LD1 clignotera maintenant deux fois par seconde.
Presser P/P pour lancer le comptage du temps d'éclairage automatique. La led LD1 change de type de
clignotement.
Quand le temps désiré s'est écoulé, presser de nouveau P/P pour le mémoriser. La Led LD1 reste allumée fixe
pendant environ 2 secondes puis s'éteint.
AFFICHAGE NOMBRE DE MANŒUVRES TOTALES DE LA BARRIÈRE
1.
2.
3.
En maintenant P3 enfoncée, réinitialiser la logique en court-circuitant un instant le cavalier RESET (pos. 14 - fig. H).
Les leds jaunes internes clignoteront 6 fois puis on aura l'affichage du nombre de manœuvres.
L'affichage s'effectue comme suit :
- Premier chiffre : nombre de clignotements des led rouges et jaunes ensemble (centaines de milliers)
- Deuxième chiffre : nombre de clignotements des leds jaunes(dizaines de milliers)
- Troisième chiffre : nombre de clignotements des leds rouges (milliers)
19
F
Exemple : Affichage de 210 000 cycles de travail.
- Les led rouges et jaunes clignotent 2 fois
- Pause
- Les led jaunes clignotent une fois
- Pause
- Les led rouges ne clignotent pas
- FIN
PROGRAMMATION DE L'ALLARME MAINTENANCE
La logique SN24 signale l'alarme maintenance à travers 6 clignotements des leds rouges internes.
Le nombre de cycles après lesquels l'alarme est donnée est programmé en usine à 100 000. Pour modifier ce paramètre,
procéder comme suit :
1.
2.
3.
4.
Avec la lisse fermée, presser Prog/Stop pendant environ 10 secondes (au bout de trois secondes LD1 s'allume,
maintenir la touche enfoncée jusqu'à ce que LD1 se réteigne)
L'alarme maintenance a été annulée, il faut donc la reprogrammer.
Le numéro est réglé sur des multiples de 10 000, presser P/P pour augmenter les clignotements de la led LD1 (le
nombre maximum de clignotements est 10 qui correspond à 100 000 manœuvres)
Presser la touche P3 pour mémoriser la valeur programmée.
BARRIÈRES OPPOSÉES, FONCTION MASTER-SLAVE
Avec ce mode d'installation, on peut avoir deux barrières opposées qui sont manœuvrées de manière synchronisée entre
elles.
1. Installer les deux barrières en exécutant, si nécessaire les réglages des positions d'ouverture et de fermeture.
2. Choisir la barrière principale (MASTER) pour y connecter toutes les fonctions de l'installation (commandes, récepteurs
radio, sécurité, photocellules...).
3. Sur la barrière secondaire (SLAVE) laisser la configuration d'usine. Connecter uniquement le bord sensible s'il est
présent. Mettre le dip 8 dans la position ON. Faire une réinitialisation.
4. Connecter la sortie Slave de la barrière MASTER à l'entrée « P/P » de la barrière SLAVE. La borne « - » (5) de la
MASTER à l'entrée« C » (22) de la SLAVE et la borne « D » (6) de la MASTER à l'entrée P/P (19) de la SLAVE. Si la
connexion est correcte, la led correspondant à l'entrée « P/P » de la barrière SLAVE commence à clignoter.
5. Connecter la sortie Slave borne « D » (6) de la barrière SLAVE à la borne « PA » (20) de la barrière MASTER.
6. Tester l'installation en essayant les différentes commandes et les sécurités des deux barrières.
SIGNALISATION D'ERREURS
La barrière SNAP4 signale d'éventuelles anomalies à travers le clignotement des leds rouges présentes des deux côtés
du fût :
14
nb de clignotem.
Signification
Description
1
bord sensible interrompu
avec bord sensible pressé ou panne dans les
2
lisse forcée
avec lisse fermée, signale le forçage manuel
3
intervention encodeur
détection obstacle
4
encodeur absent
encodeur en panne ou connexion erronée
5
anomalie mosfet
panne du pilote du contrôle moteur
6
alarme maintenance
dépassement du nombre de manœuvres programmé
7
erreur fin de course
panne des fins de course électriques ou connexion erronée
PROGRAMMATION INITIALE APRÈS REMPLACEMENT DE LA LOGIQUE
Cette procédure n'est nécessaire que quand on remplace la logique SN24 dans la barrière SNAP4.
Après cette opération, continuer avec le réglage des points d'ouverture et de fermeture, si nécessaire.
1.
2.
3.
20
Effectuer une réinitialisation en maintenant la pression sur les touches P3 et PROG/STOP. Relâcher les touches à l'allumage de la led
LD1.
Presser la touche « P/P ». La barrière effectuera une série de mouvement jusqu'à s'arrêter en fermeture.
L'extinction de la led LD1 signifiera la fin de la procédure.
F
ELIMINATION
Ce produit est constitué de divers composants qui pourraient à leur tour contenir des substances
polluantes. Ne pas laisser ce produit gagner l’environnement.
S’informer sur le système de recyclage ou d’élimination du produit conformément aux dispositions
légales en vigueur à un niveau local.
DONNÉES TECHNIQUES
MOTEUR
U.M.
Tension moteur
Vdc
24
Courant maximum moteur
A
12
Puissance maximum moteur
W
300
Couple maximum
Nm
600
Longueur maximum lisse
mm
4250
Angle maximum de manœuvre
°
100
Temps de manœuvre
s
3-6
Intensité cycles de travail
intensif
Encodeur
OUI
Fins de course électriques
OUI
Lubrifiant graisse
LOGIQUE DE COMMANDE
TS10
U.M.
Modèle
Tension d'alimentation
SN24
Vca
230
A
1,5
Courant maximum
Ralentissement électronique
OUI
Compatible avec SUN POWER
OUI
Caractéristiques Générales
U.M.
Température de fonctionnement
°C
-20 +55
Indice de protection
IP
54
Poids
Kg
50
DÉCLARATION DI CONFORMITÉ CE
Le fabricant : Telcoma srl
via L. Manzoni, 11 - 31015 - Z.I. Campidui Conegliano (TV) - ITALIE
déclare que le produit : SNAP4
est conforme aux directives CEE suivantes :
-Directive CEM 2004/108/CE
-Directive Basse Tension (LVD) 2006/95/CE
Conegliano, 17/02/2012
Le Représentant légal
Ennio Ambroso
21
E
ADVERTENCIAS IMPORTANTES SOBRE LA INSTALACIÓN
- La instalación de la automatización tiene que efectuarla con todas las de la ley personal cualificado que disponga de los
requisitos legales y de acuerdo con la directiva máquinas 2006/42/CE.
- Comprobar el estado de eventuales cables ya presentes en el equipo.
- Efectuar un análisis de los riesgos de la automatización y adoptar por consiguiente los dispositivos de seguridad y de
señalización necesarios.
- Instalar los comandos (por ejemplo el interruptor de llave) de forma que el usuario no se encuentre en una zona peligrosa.
- Al final de la instalación, probar varias veces los dispositivos de seguridad, de señalización y de desbloqueo de la
automatización.
- Aplicar en la automatización la etiqueta o la placa de características CE que contiene las informaciones de peligro y los
datos de identificación.
- Entregar al usuario final las instrucciones de uso, las advertencias para la seguridad y la declaración CE de conformidad.
- Verificar que el usuario haya entendido el correcto funcionamiento automático, manual y de emergencia de la
automatización.
- Informar al usuario por escrito (por ejemplo en las instrucciones para el uso):
* de la eventual presencia de riesgos secundarios no protegidos y del mal uso previsible.
* de desconectar la alimentación cuando se lleva a cabo la limpieza en el área de la automatización o se efectúan
pequeñas intervenciones de mantenimiento (ej: repintar).
* de controlar con frecuencia que no existan desperfectos visibles en la automatización y si se encuentran, de advertir de
forma inmediata al instalador
* de no permitir que los niños jueguen en los alrededores de la automatización
- Preparar previamente un programa de mantenimiento del equipo (por lo menos cada 6 meses para los dispositivos de
seguridad) anotando en un registro específico las intervenciones efectuadas.
ELECCIÓN DEL MUELLE
Tipo mástil
Longitud mástil
3m
4m
RAPPER4TL
MSNYELLOW
MSNYELLOW
SNAPPER4
MSNGREEN
MSNGREEN
SNAPPER4 + PSR
MSNGREEN
MSNGREEN
SNAPPER4 + SRS
MSNGREEN
MSNGREEN / MSNRED
SNAPPER4 + SRS + PSR
MSNGREEN
MSNRED
CARACTERÍSTICAS
SNAP4 es una barrera electromecánica que se utiliza en los accesos a: aparcamientos, fábricas, entes públicos, hospitales,
edificios de apartamentos, etc.
Está formada por un armario en cuyo interior se encuentra el motorreductor y la unidad central electrónica de comando. El
movimiento es irreversible con posibilidad de desbloqueo manual.
Accesorios disponibles
SNAPPER4
PAF
PSR
SRS
SNR
FIX SNAP4
ADEK
STICKERS
LEDSNAPPER
CB24
SPB24
SUN POWER
H230T
22
Mástil rígido de sección circular de 4250 mm de longitud total.
Base de apoyo fija.
Base de apoyo móvil.
Faldilla de plástico de 2000 mm de longitud.
Articulación.
Accesorios de fijación.
Adhesivo catadióptrico para SNAPPER4 de 4000 mm de longitud.
12 stickers reflectantes.
Luces led para SNAPPER4
Cargador de baterías 24V, a utilizar con unidades centrales de 24V.
Caja de exterior con 2 baterías de 12V 7Ah.
Kit de alimentación con paneles solares aplicables en todas las automatizaciones de 24Vdc.
Calentador para garantizar el funcionamiento de los motorreductores incluso a bajas temperaturas.
Alimentación de 230V con absorción 10W equipado con termostato.
E
VISIÓN DE CONJUNTO (fig. C)
1.
2.
3.
4.
5.
6.
Fotocélulas
Soporte fijo
Mástil en aluminio
Adhesivo catadióptrico
Interruptor de llave
Faldilla
7.
8.
9.
10.
11.
12.
SNAP4
Luz intermitente
Antena
Interruptor diferencial
Interruptor general
Línea de alimentación
APERTURA ARMARIO (Fig. B)
Para abrir el compartimiento de la centralita de la SNAP4, gire la cerradura 1 (Fig. B) en el sentido de las agujas del reloj
y levante luego la tapa girándola tal como se muestra en la Fig. B punto 2.
Después de sacar la tapa le será posible sacar la puerta estirándola hacia arriba.
COMPROBACIONES PRELIMINARES E INSTALACIÓN DE TIERRA
Antes de pasar a la instalación propiamente dicha, le aconsejamos que compruebe que la sede de emplazamiento de la
barrera sea sólida y apropiada y permita que la barrera se mueva de forma correcta.
Si la SNAP4 se apoya sobre una base de cemento sólida, se puede fijar directamente en el suelo con 4 tacos de expansión
D.12 (Fig. E1), o ayudándose con la contraplaca (FIXSNAP4), equipada con pernos de anclaje (Fig. E2); en ese caso efectúe
lo siguiente:
1. Realice un agujero de cimentación, teniendo en cuenta las medidas de la contraplaca de cimentación .
2. Coloque los canales de toma de los cables de alimentación y de conexión en el agujero.
3. Efectúe el montaje contraplaca-pernos tal como se muestra en la Fig. E2.
4. Cubra con hormigón los canales y la contraplaca de cimentación y controle su horizontalidad.
5. Desatornille las tuercas de los 4 pernos cuando el hormigón se haya solidificado.
6. Coloque sobre la contraplaca la SNAP4, fijándola con las 4 arandelas y las 4 tuercas que se entregan de serie.
DESBLOQUEO DE LA BARRERA
Para desbloquear la barrera, siga las imágenes de la figura D:
1. Introduzca la llave de desbloqueo y déjela en su sede.
2. Gire la llave hexagonal 270 grados en el sentido contrario de las agujas del reloj hasta el tope mecánico
El mástil se encuentra ahora separado del motorreductor.
Para bloquear de nuevo el mástil:
1. Introduzca la llave de desbloqueo (1) y déjela en su sede.
2. Gire en el sentido de las agujas del reloj la llave hexagonal 270 grados.
INSTALACIÓN DE LA BARRERA
NOTA: las informaciones siguientes se refieren a una instalación a la derecha de la barrera, tal como se muestra en la
figura C.
Para la conexión eléctrica se aconseja utilizar un cable de alimentación 3x1.5.
1. Entierre una vaina para pasar los cables de alimentación eléctrica y los de los dispositivos de seguridad.
2. Instale la barrera a tierra con las modalidades descritas anteriormente.
3. Coloque la barrera en la posición de mástil bajado desbloqueando el mástil. El lado del balancín sobre el que se ha
fijado el muelle tiene que encontrarse arriba. Véase Fig. G2 (barrera DERECHA).
4. Fije la placa de anclaje del soporte del mástil con los cuatro tornillos con el lado largo en horizontal (Fig. F1). El par
de apriete de los tornillos tiene que superar los 70 Nm.
5. Monte el soporte del mástil colocando los cuatro tornillos. El lado del soporte donde se encuentra un tornillo de tope
tiene que encontrarse en la parte opuesta del área de paso (véase flecha de la fig. F2).
6. Introduzca el mástil en el soporte (lado con refuerzo) hasta la parada (tornillo de tope).
7. Apriete hasta el final los tornillos del soporte del mástil, introduzca el tapón (Fig.F3).
8. Coloque el mástil a 90 grados y acople el muelle.
9. Estire luego el muelle de forma que el mástil (desbloqueado) permanezca en equilibrio a 45 grados. Es posible
efectuar una ulterior regulación desplazando el eje del muelle sobre el balancín (Fig. G): acercando el eje disminuye
el tiempo total, viceversa, alejándolo aumenta.
10. Compruebe que a 20 y 70 grados el mástil permanezca prácticamente parado.
11. Bloquee el motorreductor.
12. Efectúe las conexiones eléctricas necesarios conectando la línea de alimentación a los bornes situados dentro de la
caja situada dentro del armario.
13. Continúe con la instalación y la configuración de la unidad central (véanse capítulos sucesivos).
23
E
BARRERA IZQUIERDA
Para transformar la barrera de DERECHA a IZQUIERDA efectúe lo siguiente:
1. Desplace el muelle de la posición derecha a la posición izquierda (Fig. G1)
2. Invierta los cables del motor en la centralita (35 con 36, página sucesiva)
3. Invierta los cables 14 con 16 (finales de carrera eléctricos)
Efectuar luego la instalación.
DESCRIPCIÓN DE LAS PARTES (Fig. H)
1
Fig. H
3
2
-
M
+
M
23
4
D
TPR
5
+
+
22
-
Slave
D
+
+
24V
+
+
-
LDA
PROG.
-
STOP
P3
P/P
+
TEST
24FT
FCS
US1
21
TR1
COM
ON
LD1
1
2
3
4
5
6
7
8
9
10
11
12
NA
20
Reset
C1
FC1
19
C2
FC2
ANT.
18
P/P
PA
RS
ON
NC
1
FT
STP
CC
TPR
CSB
6
7
FCS
FT
P/P
STP
REG.VEL.
PRELAMP.
RIC.AUT.
CC
JCC
C
SLAVE
JOLLY
PC
TPR.OPEN
FotoRIC.
PA
8
P/P
SCHEDA RADIO OC
17
1)
2)
3)
4)
5)
6)
16
15 14
Fusible dispositivos auxiliares 24V (2A fast)
Fusible motor 24V (10A fast)
Conector luces LED internas
Salida motor 24V
Terminal de conexiones conexión codificador
Jumper TEST y FCS
TEST: sacando este jumper se desactivan las entradas
de los dispositivos de seguridad (part. 7) con barrera
cerrada.
FCS: saque este jumper si utiliza un micro- switch de
seguridad en la puerta (entrada 26 - NC)
7) Terminal de conexiones entradas dispositivos de
seguridad y alimentación dispositivos auxiliares
8) Terminal de conexiones entradas comando
9) Jumper JCC
10) Dip-switch desactivación dispositivos de seguridad
11) Dip-switch funciones
24
13
12 11
10 9
12) Botones programación
13) Conector luces LED internas
14) Jumper RESET centralita
15) Jumper selección modalidad canal 1 receptor OC2:
P/P: paso/paso
PA: comando abrir
El segundo canal es siempre comando cerrar.
16) Conector para receptor tipo OC2
17) Trimmer regulación deceleración durante la apertura
18) Entrada antena radio
19) Conexión de TIERRA
20) Entrada fin de carrera motor
21) Salida contacto US1 (jolly)
22) Salida luces mástil, comandos SLAVE y TPR
23) Entrada 24Vdc alimentación centralita
E
COLLEGAMENTI ELETTRICI
+
+
+
P/P
TEST
US1
LD1
Reset
FC1
15 17 18
12
14 16
13
C1
C2
P/P
PA
FC2
ANT.
Antena
RS
ON
1
2
3
4
5
6
7
8
9
10
11
12
ON
NA
TR1
FT
STP
CC
TPR
1
COM
9 10 11
NC
P/P
REG.VEL.
PRELAMP.
RIC.AUT.
JCC
SLAVE
JOLLY
TPR
FotoRIC.
SCHEDA RADIO OC
+
+
24FT
+
Alimentazione
fotocellule
-
FCS
24V
-
-
1A max.
P3
+
ENCODER
PROG.
STOP
D cable BLANCO
+ cable VERDE
- cable AZUL
-
-
31 30 29 28 27 26 25 24 23 22 21 20 19
LDA
34 33 32
led
mástil salida US1
8A 230V
+
3 4 5 6 7 8
D
MOTORE
2
-
Slave
M
1
TPR
36 35
-
24Vdc
+
CSB
FCS
FT
STP
CC
Contacto puerta
FT
STOP
Banda en cierre
C
PC
PA
P/P
Botón CERRAR
Botón ABRIR
Botón P/P
apertura
15
C2
14 16
C1
13
Fin de
carrera
FC1
FC2
cierre
Borne n.
Dispositivo
1
2
3
4
TPR
5
6
comando SLAVE
7
8
Luces MÁSTIL
9
10
Salida US1
10
11
12
V
I máx
Función
24Vdc
10 A
Alimentación Centralita
Conectar en la salida alimentación desde la caja alimentador
Ausencia línea
Conectar al secundario del transformador
24Vac
Notas
salida comandos SLAVE conectar a la centralita de la segunda barrera (SLAVE)
24V
100 mA Iluminación MÁSTIL
Conectar a las luces LED del mástil, si disponibles
Salida jolly NC
Datos de contacto: 8A 230V
Salida US1
Salida jolly NA
Datos de contacto: 8A 230V
TIERRA
Contatto di TERRA
13
14
Contacto NC
Finecorsa APRE
Fin de carrera cerca de la apertura
15
16
Contacto NC
Finecorsa CHIUDE
Fin de carrera cerca del cierre
Conectar una antena para 433 MHz (50 ohm)
17
18
Antena Radio
17 Cable de masa,
18 Unidad central
19
22
Botón NA
Comando Paso/Paso
Véase tabla de configuración dip-switch
20
22
Botón NA
Comando Abrir
Pone en marcha la apertura de la barrera
21
22
Botón NA
Comando Cerrar.
Pone en marcha el cierre de la barrera
23
27
Banda 8K2 / N.C.
Banda en Cierre
24
27
Botón NC
Comando Stop
25
27
Contacto NC
Fotocélula en cierre
26
27
Contacto NC
Contacto puerta
Conecte esta entrada al micro-switch de seguridad de la puerta.
Si no se utiliza, efectúe un puente de conexión en la entrada (cable entre 26 y 27)
28
29
Dispositivos auxiliares
24Vdc
Alimentación fotocélulas
Tensión presente sólo cuando la barrera no está cerrada
Dispositivos auxiliares
24Vdc
30
31
32, 33, 34
35
36
1A max
Entrada activa en cierre. Posibilidad de conectar bandas 8K2 (JCC
cerrado) o un contacto N.C. (JCC abierto). Si no se utiliza, abra JCC
y sitúe en ON dip-switch CC (dip 3 de part. 10)
Bloqueo de todas las funciones.
Se non utilizzato, portare in ON il dip-switch STP (dip 2 di part. 10)
Durante el cierre invierte el funcionamiento.
Si no se utiliza, sitúe a on el dip-switch FT (dip 1 de part. 10)
Alimentación
Tensión permanente
Encoder
32 - / 33 + / 34 D
32 AZUL, 33 VERDE, 34 BLANCO
Motor
Salida Motor 24V
Conexión al Motor
25
E
CONFIGURACIÓN DIP-SWITCH
Función
n.
Off On
ON
medio-alta
tiempo de apertura de aproximadamente 4 seg.
medio-baja
tiempo de apertura de aproximadamente 6 seg.
baja
tiempo de apertura de aproximadamente 8 seg.
Excluido
La luz intermitente se alimenta de forma contemporánea con el motor.
Activado
La luz intermitente se alimenta 5 segundos antes de cada maniobra.
Excluido
Tras una apertura completa la unidad central cierra de nuevo sólo con un comando manual.
Activado
Tras una apertura completa la unidad central cierra de nuevo después del tiempo de pausa programado.
Excluido
Función excluida
Activado
La unidad central ejecuta los comandos recibidos desde una unidad central MASTER
Contacto para
Luz de cortesía
Con esta modalidad se puede controlar una luz de cortesía.
Encendida desde el inicio del ciclo hasta un tiempo programable después del cierre.
Contacto para
Luz intermitente
Contacto para controlar una luz intermitente, frecuencia 2 Hz.
9 10
Contacto para
electrobloqueo
Salida activa en apertura, pausa y cierre.
9 10
8
Modalidad
Salida US1
(jolly). Contacto
limpio
tiempo de apertura de aproximadamente 3 seg.
9 10
Funcionamiento
SLAVE
9
10
Apertura para
blackout
11
Foto nuevo
cierre
12
Durante la apertura, pulsando el botón P/P no se produce ningún efecto. Durante la pausa, pulsando el
botón P/P no se produce ningún efecto.
Durante el cierre, pulsando el botón P/P la barrera se bloquea durante pocos segundos y luego se abre.
Abrir-Cerrar con
Durante la apertura, pulsando el botón P/P no se produce ningún efecto. Durante la pausa, pulsando el
inversión menos
botón P/P la barrera se cierra. Durante el cierre, pulsando el botón P/P la barrera se bloquea durante
durante la apertura pocos segundos y luego se abre.
Abrir siempre
“Comunitaria”
9 10
7
Durante la apertura, pulsando el botón P/P la barrera se bloquea y luego se cierra.
Durante el cierre, pulsando el botón P/P la barrera se bloquea y luego se abre.
3 4
No se utiliza
Abrir-Cerra
3 4
6
Durante la apertura, pulsando el botón P/P la barrera se bloquea, pulsando de nuevo se cierra. Durante
el cierre, pulsando el botón P/P la barrera se bloquea, pulsando de nuevo se abre.
alta
Contacto de
señalización
estado barrera
Salida activa con barrera no cerrada.
Excluido
Función excluida
Activado
Con ausencia de red, la barrera permanece abierta. Cuando la red vuelve la barrera se cierra si el
dip 6 se encuentra en ON
Excluido
Función excluida.
Activado
La intervención de la fotocélula reduce el tiempo de pausa, sea cual sea su valor, a 2 segundos.
5
Temporizador
Nuevo cierre
Abrir-Stop-Cerrar
3 4
4
Notas
3 4
Preintermitencia
3
ON
1 2
Velocidad
barrera
ON
1 2
2
1 2
1
ON
1 2
Modalidad
Entrada
Paso/Paso y
Canal Radio
(CH1)
Descripción
DIP-SWITCH EXCLUSIÓN DISPOSITIVOS DE SEGURIDAD
Función
n.
FT
1
STP
2
CC
3
TPR
26
4
Off On
Descripción
Notas
OFF
Con fotocélula instalada
ON
Excluye entrada fotocélula
OFF
Con entrada de STOP utilizada
ON
Excluye entrada STOP
JCC en ON
Con entrada Banda Cerrar (tipo 8K2) utilizada
JCC en OFF
Con entrada Banda Cerrar (tipo NC) utilizada
ON
JCC en OFF
Excluye entrada Banda Cierra
OFF
Conecte el transformador secundario a los bornes 3 y 4.
Si falta tensión de red, la barrera abre (con dip 11 ON y con utilización de baterías tampón)
ON
Función excluida
OFF
JCC: part 9 de la fig. H
E
PROGRAMACIÓN POSICIÓN DE APERTURA Y CIERRE
La barrera SNAP4 ya está programada de fábrica para la utilización con apertura a 90 grados y cierre a 0 grados.
Si por motivos particulares de instalación fuera necesario retocar el punto de apertura y/o el punto de cierre, efectúe lo
siguiente:
Para el punto de apertura:
1. Saque la alimentación a la centralita
2. Lleve a OFF el dip 6 de nuevo cierre automático
3. Afloje la contratuerca y levante de forma provisional el tapón de goma antivibración de apertura
4. Dé alimentación a la centralita
5. Pulse el botón P/P, el mástil se abrirá.
6. Pulse y mantenga pulsado el botón PROG/STOP durante aproximadamente 3 seg. hasta que el Led LD1 se
encienda
7. Pulse varias veces P/P para desplazar el punto en apertura o P3 para desplazarlo hacia el cierre
8. Pulse PROG/STOP para memorizar el punto escogido
9. Coloque el tapón de goma antivibración en apoyo al balancín.
10. Desbloquee el mástil y colóquelo en el punto de equilibrio (aproximadamente 45 grados)
11. Baje de nuevo el tapón de goma antivibración aproximadamente 2 milímetros y bloquéelo con la contratuerca
12. Coloque de nuevo el dip 6 en ON para rehabilitar el nuevo cierre automático
13. Devuelva la alimentación a la unidad central
Para el punto de cierre
1. Pulse P/P para abrir la barrera
2. Saque la alimentación a la centralita
3. Lleve a OFF el dip 6 de nuevo cierre automático
4. Afloje la contratuerca y levante de forma provisional el tapón de goma antivibración de cierre
5. Dé alimentación a la centralita
6. Pulse el botón P/P, el mástil se cerrará
7. Pulse y mantenga pulsado el botón PROG/STOP durante aproximadamente 3 seg. hasta que el Led LD1 se
encienda
8. Pulse varias veces P/P para desplazar el punto hacia la apertura o P3 para desplazarlo hacia el cierre
9. Pulse PROG/STOP para memorizar el punto escogido
10. Coloque el tapón de goma antivibración en apoyo al balancín.
11. Desbloquee el mástil y colóquelo en el punto de equilibrio (aproximadamente 45 grados)
12. Baje de nuevo el tapón de goma antivibración aproximadamente 2 milímetros y bloquéelo con la contratuerca
13. Coloque de nuevo el dip 6 en ON para rehabilitar el nuevo cierre automático
14. Devuelva la alimentación a la unidad central
PROGRAMACIÓN TIEMPO DE PAUSA
Esta operación tiene que realizarse con la barrera cerrada:
1.
2.
3.
Pulse P3 y manténgalo pulsado hasta que se encienda el Led LD1 (luz intermitente una vez por segundo)
Pulse P/P para hacer iniciar el cómputo del tiempo de pausa. El Led LD1 cambia el tipo de intermitencia.
Tras el tiempo de pausa deseado, pulse de nuevo P/P para memorizarlo. El Led LD1 permanecerá encendido fijo
durante un par de segundos, luego se apagará.
PROGRAMACIÓN TIEMPO LUZ DE CORTESÍA (salida US1 con dip 9 y 10 en OFF)
Esta operación tiene que realizarse con la barrera cerrada:
1.
2.
3.
4.
Pulse P3 y manténgalo pulsado hasta que se encienda el Led LD1 (parpadeo una vez por segundo)
Pulse de nuevo P3, el Led LD1 ahora parpadeará dos veces por segundo.
Pulse P/P para hacer iniciar el cómputo del tiempo de la luz de cortesía. El Led LD1 cambia el tipo de intermitencia.
Transcurrido el tiempo deseado, pulse de nuevo P/P para memorizarlo. El Led LD1 permanecerá encendido fijo
durante un par de segundos, luego se apagará.
VISUALIZACIÓN NÚMERO DE MANIOBRAS TOTALES DE LA BARRERA
1.
2.
3.
Manteniendo pulsado P3 efectúe un reset en la centralita cortocircuitando durante poco tiempo el jumper de RESET
(part. 14 de la fig. H).
Los led amarillos internos parpadearán 6 veces y luego empezará la visualización del número de las maniobras.
La visualización se produce de la forma siguiente:
- Primer dígito: número de parpadeos de los leds rojos y amarillos juntos (cientos de miles)
27
E
- Segundo dígito: número de parpadeos de los leds amarillos (decenas de miles)
- Tercer dígito: número de parpadeos de los leds rojos (miles)
Ejemplo: visualización de 210.000 ciclos de trabajo.
- Leds rojos y amarillos parpadean 2 veces
- Pausa
- Leds amarillos parpadean una vez
- Pausa
- Leds rojos no parpadean
- Final
PROGRAMACIÓN DE LA ALARMA MANTENIMIENTO
La unidad central SN24 señala la alarma mantenimiento mediante 6 parpadeos de los Leds rojos internos.
El número de los ciclos, tras los cuales se señala la alarma, está programado de fábrica en 100.000. Para modificar este
parámetro efectúe lo siguiente:
1.
2.
3.
4.
Pulse, con el mástil cerrado, PROG/Stop durante aproximadamente 10 segundos (después de tres segundos se
encenderá el LD1, mantenga pulsado hasta que el LD1 se apague de nuevo)
Ahora la alarma mantenimiento se ha eliminado y será necesario configurarla de nuevo.
El número se configura en múltiplos de 10.000, pulse P/P para aumentar los parpadeos del Led LD1 (el número
máximo de parpadeos es 10 que corresponde a 100.000 maniobras)
Pulse la tecla P3 para memorizar el número configurado.
BARRERAS OPUESTAS, FUNCIÓN MASTER-SLAVE
Con esta forma de instalación es posible disponer de dos barreras opuestas que se mueven en sincronía entre ellas.
1. Instale las dos barreras efectuando, en caso necesario, las regulaciones de las posiciones de apertura y de cierre.
2. Escoja la barrera principal (MASTER) para conectar a ella todas las funciones del equipo (comandos, radiorreceptores,
dispositivos de seguridad, fotocélulas...).
3. En la barrera secundaria (SLAVE) deje todo tal como estaba de fábrica. Conecte sólo la banda, si se encuentra
disponible.
Coloque el dip 8 en posición ON. Efectúe un reset.
4. Conecte la salida Slave de la barrera MASTER a la entrada “P/P” de la barrera SLAVE. El borne “-” (5) de la MASTER en
el “C” (22) de la SLAVE y el borne “D” (6) de la MASTER en el P/P (19) de la SLAVE. Si la conexión es correcta, el led
correspondiente a la entrada “P/P” de la barrera SLAVE empezará a parpadear.
5. Conecte la salida Slave borne “D” (6) de la barrera SLAVE al borne “PA” (20) de la barrera MASTER.
6. Pruebe el equipo verificando los diversos comandos y los dispositivos de seguridad de las dos barreras.
INDICACIÓN DE ERRORES
La barrera SNAP4 señala eventuales anomalías a través del parpadeo de los leds rojos presentes en los dos lados del
armario:
n° Parpadeos
14
Significado
Descripción
1
banda interrumpida
con banda pulsada o avería en las conexiones eléctricas
2
mástil forzado
con mástil cerrado, señala el forzado manual
3
intervención codificador
detección obstáculo
4
codificador ausente
codificador averiado o conexión errónea
5
anomalía mosfet
avería driver del control motor
6
alarma mantenimiento
superación del número de maniobras configurado
7
error fin de carrera
avería de los finales de carrera eléctricos o conexión errónea
PROGRAMACIÓN INICIAL DESPUÉS DE LA SUSTITUCIÓN DE LA CENTRALITA
Este procedimiento es necesario sólo si se sustituye la unidad central SN24 en la barrera SNAP4.
Después de esta operación, continúe con la regulación de los puntos de apertura y de cierre, en caso necesario.
1.
2.
3.
28
Efectúe un reset manteniendo pulsados los botones P3 y PROG/STOP. Suelte los botones cuando se encienda el Led LD1.
Pulse el botón “P/P”. La barrera efectuará una serie de movimientos hasta detenerse en posición de cierre.
El apagado del led LD1 significará el final del procedimiento.
E
ELIMINACION
Este producto está constituido por varios componentes que podrían, a su vez, contener sustancias
contaminantes.
¡No los vierta en el medio ambiente! Infórmese sobre el sistema de reciclaje o eliminación del
producto con arreglo a las leyes vigentes en ámbito local.
DATOS TÉCNICOS
MOTOR
U.M.
Tensión motor
Vdc
24
Corriente máx. motor
A
12
Potencia motor máxima
W
300
Par máximo
Nm
600
Longitud máx. mástil
mm
4250
°
100
seg.
3-6
Ángulo máx de maniobra
Tiempo de maniobra
Intensidad ciclos de trabajo
intensivo
Encoder
SÍ
Finales de carrera eléctricos
SÍ
Lubrificante grasa
UNIDAD CENTRAL DE CONTROL
TS10
U.M.
Modelo
Tensión de alimentación
Corriente máx.
SN24
Vac
230
A
1,5
Deceleración electrónica
SÍ
Compatible con Sun Power
SÍ
CARACTERÍSTICAS GENERALES
U.M.
Temperatura de funcionamiento
°C
-20 +55
Grado de protección
IP
54
Peso
Kg
50
DECLARACIÓN DE CONFORMIDAD CE
El fabricante: Telcoma srl
via L. Manzoni, 11 - 31015 - Z.I. Campidui Conegliano (TV) - ITALY
DECLARA que el producto: SNAP4
cumple con las siguientes directivas CEE:
-Directiva EMC 2004/108/CE
-Directiva baja tensión (LVD) 2006/95/CE
Conegliano, 17/02/2012
El representante legal
Ennio Ambroso
29
GB
IMPORTANT INSTALLATION ADVICE
- The automation system must be installed to good workmanship standards by qualified staff meeting the legal
prerequisites, in accordance with machinery directive 2006/42/EC.
- Check the condition of any wiring already installed in the system.
- Analyse the risks of the automation system and adopt any appropriate safety and warning measures.
- Install cont rols such as the key -swi tch in such a way that the user is not in a hazard zone.
- After installation, try out the automation safety, signalling and release devices several times.
- Apply the CE lab l or nameplate containing the hazard information and ID information to the automation. .
- Consign the instructions for use, safety information and EC declaration of conformity to the final user.
- Ensure that the user has understood how to operate the automation correctly in automatic, manual and emergency
modes.
- Inform the user in writing (for example, in the operating instructions):
* of any residual risks for which no protection is provided, and foreseeable misuse .
* That the power supply must be disconnected in the event of cleaning in the area of the automation, or minor maintenance
work (e.g. repainting).
* That the automation must be inspected frequently for visible damage, informing the installer immediately if any damage is
found.
* That children must not be allowed to play in the immediate vicinity of the automation.
- That a maintenance schedule must be drawn up for the plant (at least every six months for the safety devices), recording
work done in a specific log.
SPRING SELECTION
Bar type
Bar length
3m
4m
RAPPER4TL
MSNYELLOW
MSNYELLOW
SNAPPER4
MSNGREEN
MSNGREEN
SNAPPER4 + PSR
MSNGREEN
MSNGREEN
SNAPPER4 + SRS
MSNGREEN
MSNGREEN / MSNRED
SNAPPER4 + SRS + PSR
MSNGREEN
MSNRED
CHARACTERISTICS
The SNAP4 is an electromechanical barrier suitable for use on the accesses to car parks, factories, public buildings, hospitals,
apartment buildings, etc.
It consists of a cabinet containing the gear motor and control unit. The drive system is irreversible with a manual release
facility.
Optional accessories
SNAPPER4
PAF
PSR
SRS
SNR
FIX SNAP4
ADEK
STICKERS
LEDSNAPPER
CB24
SPB24
SUN POWER
H230T
30
Circular section rigid bar, total length L4250 mm.
Fixed supporting foot.
Movable sporting foot.
Plastic skirt L2000 mm.
Articulated joint.
Fixing accessories.
Reflective adhesive for SNAPPER4 L4000 mm.
12 reflective stickers.
LED lights for SNAPPER4
24V battery charger, for use with 24V control unit.
Outdoor installation box with 2 12V 7Ah batteries.
Solar panel power supply kit suitable for installation on all 24 Vdc automation systems.
Heater to ensure gear motor operation even at low temperatures.
Power supply 230V power absorption 10W complete with thermostat.
GB
GENERAL OVERVIEW (fig. C)
1.
2.
3.
4.
5.
6.
Photocells
Fixed rest
Aluminium bar
Reflective sticker
Key-switch
Skirt
7.
8.
9.
10.
11.
12.
SNAP4
Flashing light
Antenna
Differential safety breaker
Master switch
Power supply line
OPENING THE CABINET (Fig. B)
To open the SNAP4 control unit cabinet, turn the lock 1 (Fig. B) clockwise and lift the lid, turning it as shown in Fig. B
point 2.
Once the lid has been removed, the door can be lifted off.
PRELIMINARY CHECKS AND INSTALLATION ON THE GROUND
Before proceeding with installation as such, check that the point where the barrier is to be installed is solid and suitable,
allowing the barrier to operate correctly.
If the SNAP4 is installed on a solid concrete base, it can be fixed directly to the ground with 4 expansion plugs D.12 (fig. E1), or
it can be secured with the aid of the counterplate (FIXSNAP4), complete with anchor bolts (fig. E2); in this case, proceed as
follows:
1. Dig out the foundation, bearing in mind the size of the foundation counterplate.
2. Place raceways in the hole for the power supply and connection wires
3. Fit the counterplate and anchor bolt as shown in fig. E2.
4. Sink the raceways and foundation plate in concrete and check that they are horizontal.
5. Unscrew the nuts of the 4 anchor bolts once the concrete has set..
6. Place the SNAP4 on the counterplate, fixing it with the 4 washers and 4 nuts provided.
RELEASING THE BARRIER
To release the barrier, proceed as shown in figure D:
1. Insert the release key and leave it in place.
2. Turn the hexagonal key 270 degrees anti-clockwise until it reaches the mechanical limit stop.
The bar has now been released from the gear motor.
To re-engage the bar:
1. Insert the release key (1) and leave it in place.
2. Turn the hexagonal key 270 degrees clockwise.
INSTALLING THE BARRIER
N.B.: all the information which follows refers to a right-handed barrier installation as shown in figure C.
The electrical connection should be made with a 3x1.5 power supply cable.
1. Lay an underground duct to take the electrical power supply and safety cables.
2. Install the barrier on the ground as already described.
3. Release the rod, bringing the barrier to the rod lowered position. The side of the swing arm on which the spring is
fixed should be upward. See fig. G2 (RIGHT-HAND barrier).
4. Fix the bar support anchor plate with the four screws, with the long side horizontal (Fig. F1). The screws must be
tightened to a torque of more than 70 Nm.
5. Mount the bar support, fitting the four screws. The side of the support with the stop screw must be the side opposite
the passage area (see arrow in fig. F2).
6. Insert the bar in the support (side with brace) until it reaches the stop (the stop screw).
7. Fully tighten the bar support screws and fit the cap (Fig.F3).
8. Move the bar to 90 degrees and connect the spring.
9. Then pull the spring so that the bar (released) remains in equilibrium at 45 degrees. Further adjustments can be
made by shifting the fulcrum of the spring on the swing arm (fig. G): move the fulcrum nearer to reduce the overall
moment or move it away to increase.
10. Check that the bar remains virtually still at 20 and 70 degrees.
11. Lock the gear motor.
12. Make the necessary electrical connections by connecting the power supply line to the terminals in the box inside the
cabinet.
13. Proceed with the installation and configuration of the control unit (see following points).
31
GB
LEFT-HAND BARRIER
To convert the barrier from RIGHT-HAND to LEFT-HAND, proceed as follows:
1. Move the spring from the right-hand to the left-hand position (fig. G1)
2. Swap the motor wires on the control unit (35 with 36, next page)
3. Swap wires 14 and 16 (electric limit switch)
Then proceed with installation.
DESCRIPTION OF PARTS (Fig. H)
1
Fig. H
3
2
-
M
+
M
23
4
D
TPR
5
+
+
22
-
Slave
D
+
+
24V
+
+
-
LDA
PROG.
-
STOP
P3
P/P
+
TEST
24FT
FCS
US1
21
TR1
COM
ON
LD1
1
2
3
4
5
6
7
8
9
10
11
12
NA
20
Reset
C1
FC1
19
C2
FC2
ANT.
18
P/P
PA
RS
ON
NC
1
FT
STP
CC
TPR
CSB
FT
P/P
STP
REG.VEL.
PRELAMP.
RIC.AUT.
CC
JCC
C
SLAVE
JOLLY
PC
TPR.OPEN
FotoRIC.
PA
P/P
1)
2)
3)
4)
5)
6)
16
15 14
Auxiliary circuit fuse 24V (2A fast)
Motor fuse 24V (10A fast)
Internal LED light connector
Motor output 24V
Encoder connection terminal board
TEST and FCS jumpers
TEST: removing this jumper disables the safety inputs
(item 7) with barrier closed.
FCS: remove this jumper if a safety microswitch is used
on the door (input 26 - NC)
7) Safety device and control system power supply terminal
board
8) Control input terminal board
9) Jumper JCC
10) Safety device disabling dip-switches
11) Functions dip-switches
32
13
12 11
7
FCS
SCHEDA RADIO OC
17
6
10 9
12) Programming buttons
13) Internal LED light connector
14) Control unit RESET jumper
15) OC2 receiver channel 1 model selection jumper:
P/P: stepping
PA: open command
The second channel is always close command.
16) OC2 receiver connector
17) Opening deceleration regulator trimmer
18) Radio antenna input
19) GROUND connection
20) Motor limit switch input
21) US1 (multi-purpose) output contact
22) Bar lights output, SLAVE and TPR controls
23) Control unit power supply input 24Vdc
8
GB
ELECTRICAL CONNECTIONS
+
+
+
P/P
TEST
US1
LD1
Reset
FC1
15 17 18
12
14 16
13
C1
C2
P/P
PA
FC2
ANT.
Antenna
RS
ON
1
2
3
4
5
6
7
8
9
10
11
12
ON
NA
TR1
FT
STP
CC
TPR
1
COM
9 10 11
NC
P/P
REG.VEL.
PRELAMP.
RIC.AUT.
JCC
SLAVE
JOLLY
TPR
FotoRIC.
SCHEDA RADIO OC
+
24FT
Alimentazione
fotocellule
+
-
FCS
24V
-
-
1A max.
P3
+
+
ENCODER
PROG.
STOP
D WHITE wire
+ GREEN wire
- BLUE wire
-
-
31 30 29 28 27 26 25 24 23 22 21 20 19
LDA
34 33 32
+
3 4 5 6 7 8
Bar light
output output US1
8A 230V
D
MOTOR
2
-
Slave
M
1
TPR
36 35
-
24Vdc
+
CSB
FCS
FT
STP
CC
Door contact
FT
STOP
Closing edge
C
PC
PA
P/P
CLOSE button
OPEN button
P/P button
Opening key
FC1
14 16
C2
15
Limit switch
13
C1
FC2
closure
Morsetto n.
Dispositivo
1
2
3
4
TPR
5
6
comando SLAVE
7
8
Luci ASTA
9
10
Uscita US1
10
11
12
V
I max
24Vdc
10 A
24Vac
24V
Funzione
Note
control unit power supply Connect to power supply output of power supply box
Power failure
Connect to transformer secondary
SLAVEC control output
Connect to control unit of second (SLAVE) barrier
100 mA BAR lighting
Connect to bar LED lights, if installed
NC multifunction output
Contact data: 8A 230V
Uscita US1
NO multifunction output
Contact data: 8A 230V
TERRA
GROUND contact
13
14
Contatto NC
OPEN limit switch
Limit switch near open position
15
16
Contatto NC
CLOSE limit switch
Limit switch near closed position
17
18
Antenna Radio
19
22
NO button
20
22
21
22
23
Connect to an antenna for 433 MHz (50 Ohm)
Stepping control
See dip-switch configuration table
NO button
Open command
Starts of opening of the barrier
NO button
Close command
Starts closure of the barrier
27
Edge 8K2 / N.C.
Closing edge
24
27
NC button
Stop command
25
27
NC contact
Closing photocell
26
27
N.C. contact
Door contact
28
29
Auxiliary devices
24Vdc
Auxiliary devices
24Vdc
30
31
32, 33, 34
35
36
1A max
Input enabled for closur. Option of connecting 8K2 edges (JCC closed) or
an N.C. contact (JCC open). If not used, open JCC and set dip-switch CC
(dip-switch 3 of item 10) ON
Cuts out all functions
If not used, set dip-switch STP (dip-switch 2 of item 10) ON
Reverses direction during closure.
If not used, set dip-switch FT (dip-switch 1 of item 10) ON
Connect this input to the door safety microswitch
If not used, place a jumper across the input (wire between 26 and 27)
Photocell power supply
Power only present when barrier is not closed
Power supply
Permanent voltage
Encoder
32 - / 33 + / 34 D
32 BLUE, 33 GREEN, 34 WHITE
Motor
Motor output 24V
Connection to motor
33
GB
DIP-SWITCH CONFIGURATION
Function
n.
Off On
If the P/P button is pressed during opening, the barrier stops then closes.
If it is pressed during closure, the barrier stops then opens.
Always opens
“Condominium”
Pressing the P/P button during opening has no effect. Pressing the P/P button during a pause has no
effect.
If the P/P button is pressed during closure, the barrier stops for a few seconds then opens.
Opens-Closes
with no reversal
during opening
Pressing the P/P button during opening has no effect. If the P/P button is pressed during a pause,
the barrier closes. if the P/P button is pressed during closure, the barrier stops for a few seconds
then opens.
3 4
high
opening time 3 sec. approx.
3 4
medium-high
opening time 4 sec. approx.
3 4
medium-low
opening time 6 sec. approx.
3 4
low
opening time 8 sec. approx.
Off
The flashing light operates together with the motor.
On
The flashing light operates 5 seconds before any operation.
Off
After complete opening, the barrier can only be closed by a manual command.
On
After complete opening, the barrier closes after a programmed pause time.
Off
Function disabled
On
The control unit performs the commands received from a MASTER control unit
9 10
Courtesy light
contact
This mode can be used to operate a courtesy light.
Access from cycle start a programmable time after closure.
9 10
Flashing light
contact
Contact for controlling a flashing light, frequency 2 Hz.
4
5
Re-closure
Timer
6
Not used
7
SLAVE
Operation
8
9
10
9 10
Output US1
(multipurpose)
mode). Clean
contact
ON
Preflash
3
ON
1 2
Barrier speed
ON
Opens-Closes
1 2
2
ON
During opening, press the P/P button to stop the barrier; press again to close.
During closure, press the P/P button to stop the barrier; press again to open.
1 2
1
9 10
Black out
opening
11
Closure
photocell
12
Notes
Opens-StopsCloses
1 2
Input mode
Stepping and
Radio Channel
(CH1)
Description
Electric
interlock
contact
Barrier status
signalling
contact
Off
Output active during opening, closing and pause.
Output active with barrier not closed.
Function disabled
On
The barrier remains open in the event of a blackout. When the power returns the barrier closes if
dip 6 is ON.
Off
Function disabled.
On
Tripping of the photocell reduces the pause time to 2 seconds, regardless of the setting.
SAFETY DEVICE DISABLING DIP-SWITCHES
Function
n.
FT
1
STP
2
CC
3
TPR
34
4
Off On
Description
Notes
OFF
With photocell installed
ON
Disables photocell input
OFF
With STOP input used
ON
Disables STOP input
OFF
JCC in ON
With Close Edge (type 8K2) input used
JCC in OFF With Close Edge (type NC) input used
JCC: item 9 di fig. H
ON
JCC in OFF Disables Close Edge input
OFF
Connect transformer secondary to terminals 3 and 4.
If mains power fails, the barrier opens (with dip 11 ON and with use of buffer battery).
ON
Function disabled
GB
PROGRAMMING THE OPEN AND CLOSED POSITIONS
The SNAP4 barrier is programmed by default for use with opening at 90 degrees and closure at 0 degrees.
If the opening and/or closing point has to be adjusted due to special installation requirements, proceed as follows:
For the opening point:
1. Disconnect the power supply to the control unit
2. Set the automatic re-closure dip-switch 6 on OFF
3. Loosen the locknut and temporarily lift the rubber opening vibration damper
4. Power up the control unit
5. Press the P/P button; the bar opens
6. Hold down the PROG/STOP button for about 3 sec. until LED LD1 illuminates
7. Press P/P repeatedly to move the point in the opening direction or P3 for the closing direction
8. Press PROG/STOP to save the point selected
9. Put the rubber vibration damper against the rod.
10. Release the rod and move it to its point of equilibrium (about 45 degrees)
11. Lower the rubber vibration damper by about another 2 millimetres and lock in place with the locknut
12. Return dip-switch 6 to ON to re-enable automatic re-closure
13. Restore power to the control unit
For the closure point:
1. Press P/P to open the barrier
2. Disconnect the power supply to the control unit
3. Set the automatic re-closure dip-switch 6 on OFF
4. Undo the locknut and temporarily lift the rubber opening vibration damper
5. Power up the control unit
6. Press the P/P button; the bar closes
7. Hold down the PROG/STOP button for about 3 sec. until LED LD1 illuminates
8. Press P/P repeatedly to move the point in the opening direction or P3 for the closing direction
9. Press PROG/STOP to save the point selected
10. Put the rubber vibration damper against the rod.
11. Release the rod and move it to its point of equilibrium (about 45 degrees)
12. Lower the rubber vibration damper by about another 2 millimetres and lock in place with the locknut
13. Return dip-switch 6 to ON to re-enable automatic re-closure
14. Restore power to the control unit
PROGRAMMING THE PAUSE TIME
This operation must be carried out with the barrier closed:
1.
2.
3.
Press P3 and hold it down until LED LD1 illuminates (it flashes once a second)
Press P/P to start counting of the pause time. LED LD1 changes its flashing mode.
After the pause time required, press P/P again to memorise it. LED LD1 will remain on steadily for a couple of
seconds and then go out.
PROGRAMMING THE COURTESY LIGHT TIME (output US1 with dip-switches 9 and 10 OFF)
This operation must be carried out with the barrier closed:
1.
2.
3.
4.
Press P3 and hold it down until LED LD1 illuminates (it flashes once a second)
Press P3 again; LED LD1 will now flash twice every second. 2)
Press P/P to start counting of the courtesy light time. LED LD1 changes its flashing mode.
After the time required has passed, press P/P again to memorise it. LED LD1 will remain on steadily for a couple of
seconds and then go out.
DISPLAYING THE TOTAL COUNT OF BARRIER OPERATIONS
This operation must be carried out with the barrier closed:
1)
2)
Hold down P3 to reset the control unit by short-circuiting the RESET jumper (14, fig. H) for a moment.
The yellow LEDs will flash 6 times, after which the number of operations will be displayed.
35
GB
3)
The number is displayed as follows:
- First figure: number of flashes of the red and yellow LEDs together (hundreds of thousands)
- Second figure: number of flashes of the yellow LEDs added together (tens of thousands)
- Third figure: number of flashes of the red LEDs added together (thousands)
Example: display of 210,000 duty cycles.
- Red and yellow LEDs flash twice
- Pause
- Yellow LEDs flash once
- Pause
- Red LEDs do not flash
- End
PROGRAMMING THE MAINTENANCE ALARM
The SN24 control unit signals a maintenance alarm by means of 6 flashes of the internal red LEDs.
The number of cycles after which the alarm is signalled is set by default at 100,000. To modify this parameter, proceed as
follows:
1.
2.
3.
4.
With the barrier down, press Prog/Stop for about 10 seconds (after three seconds LD1 illuminates; keep pressing
until LD1 goes out again)
The maintenance alarm has now been deleted so it has to be reprogrammed.
The number is set in multiples of 10,000. Press P/P to increase the flashes of LED LD1 (the maximum number of
flashes is 10, corresponding to 100,000 manoeuvres).
Press key P3 to save the number set.
PAIR OF OPPOSITE BARRIERS, MASTER-SLAVE FUNCTION
This installation mode allows a pair of opposite barriers to be operated in synchrony.
1. Install the two barriers, adjusting the open and closed positions if necessary.
2. Select the main (MASTER) barrier and connect all the system functions (controls, radio receivers, safety devices,
photocells, etc.) to it.
3. Leave all the default settings unchanged on the secondary (SLAVE) barrier. Only connect the edge, if installed.
Set the 8 dip-switches ON. Perform a reset.
4. Connect the Slave output of the MASTER barrier to the “P/P” input of the SLAVE barrier, terminal “-” (5) of the MASTER to
“C” (22) of the SLAVE and terminal “D” (6) of the MASTER to P/P (19) of the SLAVE. If the connection is correct, the LED
of the “P/P” output of the SLAVE barrier will start to flash.
5. Connect the Slave output, terminal “D” (6), of the SLAVE barrier to “PA” (20) of the MASTER barrier.
6. Test the system, trying out the various commands and the safety devices of the two barriers.
ERROR SIGNALLING
The SNAP4 barrier signals any malfunctions by flashing the red LEDs on each side of the control cabinet:
14
No. of flashes
Meaning
Description
1
edge contact broken
with the edge pressed or an electrical connection failure
2
rod forced
signals manual forcing with bar closed
3
encoder tripped
obstacle detected
4
encoder failure
encoder malfunction or connection error
5
mofset malfunction
motor control driver failure
6
maintenance alarm
set number of manoeuvres exceeded
7
limit switch error
electric limit switch failure or connection error
INITIAL PROGRAMMING AFTER control unit REPLACEMENT
This procedure is only necessary if the SN24 control unit of the SNAP4 barrier is replaced. After this operation, continue with adjustment of
the open and closed points, if necessary.
1.
2.
3.
36
Perform a reset by holding down the P3 and PROG/STOP buttons. Release the buttons when LED LD1 illuminates.
Press the “P/P” button. The barrier will perform a series of movements and stop in the closed position.
When LED LD1 goes out, the procedure has been completed.
GB
DISPOSAL
This product is made up of various components that could contain pollutants. Dispose of properly!
Make enquiries concerning the recycling or disposal of the product, complying with the local laws in
force.
TECHNICAL DATA
MOTOR
U.M.
Motor voltage
Vdc
24
Max. motor current
A
12
Maximum motor power
W
300
Maximum torque
Nm
600
Max. rod length
mm
4250
°
100
sec.
3-6
Max. operating angle
Operating time
Duty cycle intensity
intensive
Encoder
Y
Electric limit switches
Y
Lubricating grease
CONTROL UNIT
TS10
U.M.
Model
Power supply voltage
Max. current
SN24
Vac
230
A
1,5
Electronic deceleration
Y
Compatible with Sun Power
Y
GENERAL DATA
U.M.
Operating temperature
°C
-20 +55
Degree of protection
IP
54
Weight
Kg
50
EC DECLARATION OF CONFORMITY
The manufacturer: Telcoma srl
via L. Manzoni, 11 - 31015 - Z.I. Campidui Conegliano (TV) - ITALY
DECLARES that the product: SNAP4
complies with the following EEC directives:
-EMC Directive 2004/108/EC
-Low Voltage Directive (LVD) 2006/95/EC
Conegliano, 17/02/2012
The Legal Representative
Ennio Ambroso
37
D
WICHTIGE HINWEISE ZUR INSTALLATION
- Die Installation des Automationssystems muss nach allen Regeln der Kunst von Fachpersonal gemäß den gesetzlichen
Anforderungen und in Übereinstimmung mit der Maschinenrichtlinie 2006/42/EG vorgenommen werden.
- Den Zustand eventuell bereits in der Anlage vorhandener Kabel überprüfen.
- Eine Risikoanalyse des Automationssystems durchführen und dementsprechend erforderliche Sicherheitsvorrichtungen
und Warnhinweise einsetzen.
- Steuerungen installieren (beispielsweise Schlüsseltaster), so dass sich der Nutzer nicht in einen gefährlichen Bereich
begibt.
- Nach beendeter Installation mehrere Male die Sicherheits-, Warn- und Entriegelungsvorrichtungen des Automatiksystems
testen.
- Das EG-Typenschild oder Etikett mit den Risikoinformationen und Kenndaten am Automationssystem anbringen.
- Dem Endnutzer die Bedienungsanleitung, die Sicherheitshinweise und die EG-Konformitätserklärung übergeben.
- Sicherstellen, dass der Nutzer den korrekten automatischen und manuellen Betrieb und den Notfallbetrieb des
Automationssystems verstanden hat.
- Den Benutzer schriftlich (z.B. in der Bedienungsanleitung) über Folgendes informieren:
* Eventuelles Vorhandensein nicht geschützter Restrisiken und vorhersehbarer unsachgemäßer Gebrauch
* Vorschrift, die Stromversorgung zu trennen, wenn im Bereich des Automationssystems gereinigt wird oder
Instandhaltungen ausgeführt werden (z. B. neuer Anstrich)
* Vorschrift, das Automationssystem häufig auf sichtbare Schäden zu überprüfen und ggf. unverzüglich den Installateur zu
benachrichtigen
* Vorschrift, Kinder nicht in der unmittelbaren Nähe des Automationssystems spielen zu lassen
- Einen Wartungsplan für die Anlage bereitstellen (mindestens alle 6 Monate für die Sicherheitsvorrichtungen) und alle
ausgeführten Maßnahmen in einem speziellen Wartungsbuch eintragen.
WAHL DER FEDER
Art der Stange
Länge der Stange
3m
4m
RAPPER4TL
MSNYELLOW
MSNYELLOW
SNAPPER4
MSNGREEN
MSNGREEN
SNAPPER4 + PSR
MSNGREEN
MSNGREEN
SNAPPER4 + SRS
MSNGREEN
MSNGREEN / MSNRED
SNAPPER4 + SRS + PSR
MSNGREEN
MSNRED
MERKMALE
SNAP4 ist eine elektromechanische Schranke, die für die Zugangskontrolle zu Parkplätzen, Firmen, öffentlichen
Einrichtungen, Krankenhäusern, Wohnblocks etc. eingesetzt wird.
Sie besteht aus einem Schrank, in dem sich der Motorantrieb und die elektronische Steuerung befinden. Die Bewegung ist
nicht umkehrbar, es besteht die Möglichkeit zur manuellen Entriegelung.
Zubehör auf Wunsch
SNAPPER4
PSR
SRS
FIX SNAP4
ADEK
STICKERS
LEDSNAPPER
CB24
SPB24
SUN POWER
H230T
38
Starre Rundstange mit einer Gesamtlänge von 4250 mm. PAF
Starrer Stützfuß
Beweglicher Stützfuß.
Ständer aus Kunststoff L 2000 mm. SNR Gelenk.
Befestigungszubehör.
Reflektierendes Klebeband für SNAPPER4 L 4000 mm.
12 reflektierende Sticker.
LED-Leuchten für SNAPPER4
Batterieladegerät 24V zur Verwendung mit 24 V Steuerungen
Gehäuse für Außenbereiche mit 2 Batterien 12V 7Ah.
Bausatz Stromversorgung über Solarzellen, für alle 24 Vdc Automationssysteme verwendbar
Heizgerät, sichert die Funktionstüchtigkeit der Motorantriebe auch bei niedrigen Temperaturen.
Versorgung mit 230 V, Leistungsaufnahme 10 W, komplett mit Thermostat.
D
GESAMTANSICHT (fig. C)
1.
2.
3.
4.
5.
6.
Fotozellen
Unbewegliche Auflage
Aluminiumstange
Reflektierendes Klebeband
Schlüsseltaster
Gitter
7.
8.
9.
10.
11.
12.
SNAP4
Blinklicht
Antenne
Differenzialschalter
Hauptschalter
Versorgungsleitung
ÖFFNEN DES SCHRANKS (Abb. B)
Um das Fach mit der Steuerung des SNAP4 zu öffnen, das Schloss 1 (Abb. B) im Uhrzeigersinn drehen, anschließend
die Abdeckung wie auf Abb. B Punkt 2 gezeigt drehen und abheben.
Sobald die Abdeckung entfernt wurde, kann die Tür nach oben herausgezogen werden.
VORKONTROLLEN UND BODENINSTALLATION
Vor der eigentlichen Installation empfiehlt es sich zu überprüfen, dass der Ort, an dem die Schranke aufgestellt werden soll,
fest und solide ist und sich für den einwandfreien Betrieb der Schranke eignet.
Wenn SNAP4 auf einem soliden Betonsockel steht, kann sie auch direkt mit vier Spreizdübeln D.12 (Abb. E1) befestigt
werden, die Befestigung ist aber auch mithilfe einer Gegenplatte (FIXSNAP4) und Verankerungselementen (Abb. E2)
möglich; in diesem Fall wie folgt vorgehen:
1. Unter Berücksichtigung der Abmessungen der Fundament-Gegenplatte eine Baugrube ausheben.
2. In der Grube die Zuführungskanäle für die Strom- und Anschlusskabel platzieren.
3. Die Montage der Gegenplatte-Verankerungselemente wie auf Abb. E2 vornehmen.
4. Die Kanäle und die Fundament-Gegenplatte im Beton eingießen und überprüfen, dass sie horizontal ausgerichtet sind.
5. Die Muttern der 4 Verankerungselemente lösen, wenn der Beton fest ist.
6. SNAP4 auf der Gegenplatte aufsetzen und mit den 4 Unterlegscheiben und den 4 Muttern, die im Lieferumfang
enthalten sind, fixieren.
ENTSPERREN DER SCHRANKE
Zum Entsperren der Schranke wie auf Abbildung D gezeigt vorgehen:
1. Den Schlüssel zum Entsperren einstecken und stecken lassen.
2. Den Sechskantschlüssel um 270 Grad bis zum mechanischen Anschlag gegen den Uhrzeigersinn drehen.
Die Stange ist jetzt vom Motorantrieb abgekoppelt.
Um die Stange wieder zu sperren:
1. Den Schlüssel zum Entsperren (1) einstecken und stecken lassen.
2. Den Sechskantschlüssel um 270 Grad im Uhrzeigersinn drehen.
INSTALLATION DER SCHRANKE
ANMERKUNG: Alle folgenden Informationen beziehen sich auf eine Installation der Schranke auf der rechten Seite wie
auf Abbildung C gezeigt.
Für den elektrischen Anschluss wird ein Versorgungskabel 3x1,5 empfohlen.
1. Ein Schutzrohr für den Durchgang der Sicherheits- und Stromversorgungskabel eingraben.
2. Die Schranke wie oben beschrieben auf dem Boden installieren.
3. Die Stange der Schranke absenken, dazu die Stange entsperren. Die Seite der Traverse, auf der die Feder befestigt
ist, muss oben liegen. Siehe Abb. G2 (Schranke RECHTS).
4. Die Ankerplatte der Stangenhalterung mit den vier Schrauben mit der langen Seite horizontal befestigen (Abb. F1).
Das Anzugsmoment der Schrauben muss mehr als 70 Nm betragen.
5. Die Halterung der Stange mit den vier Schrauben montieren. Die Seite der Halterung, auf der sich eine
Anschlagschraube befindet, muss dem Durchgangsbereich gegenüberliegen (siehe Pfeil auf Abb. F2).
6. Die Stange bis zum Anschlag (Anschlagschraube) in der Halterung (Seite mit Verstärkung) einsetzen.
7. Die Schrauben der Stangenhalterung fest anziehen und die Kappe anbringen (Abb. F3).
8. Die Stange auf 90 Grad bringen und die Feder einhaken.
9. Die Feder so ziehen, dass die (entsperrte) Stange bei 45 Grad im Gleichgewicht bleibt. Eine weitere Justierung ist
durch Verschieben des Angelpunkts der Feder auf der Traverse möglich (Abb. G): Wird der Angelpunkt näher gelegt,
vermindert sich das Gesamtmoment, wird er weiter weg geschoben, erhöht es sich.
10. Überprüfen, dass sich die Stange bei 20 und 70 Grad praktisch nicht bewegt.
11. Den Motorantrieb sperren.
12. Die Versorgungsleitung für die notwendigen elektrischen Anschlüsse an die Klemmen in der Anschlussdose im
Schrank anschließen.
13. Die Installation und die Konfiguration der Steuerung fortsetzen (siehe nachfolgende Kapitel).
39
D
SCHRANKE LINKS
Um die Schranke von RECHTS nach LINKS zu ändern, wie folgt vorgehen:
1. Die Feder von rechts nach links verschieben (Abb. G1)
2. Die Position der Drähte des Motors in der Steuerung vertauschen (35 mit 36, nächste Seite)
3. Drähte 14 mit 16 (elektrische Endschalter) vertauschen
Anschließend die Installation fortsetzen.
BESCHREIBUNG DER TEILE (Abb. H)
1
Abb. H
3
2
-
M
+
M
23
4
D
TPR
5
+
+
22
-
Slave
D
+
+
24V
+
+
-
LDA
PROG.
-
STOP
P3
P/P
+
TEST
24FT
FCS
US1
21
TR1
COM
ON
LD1
1
2
3
4
5
6
7
8
9
10
11
12
NA
20
Reset
C1
FC1
19
C2
FC2
ANT.
18
P/P
PA
RS
ON
NC
1
FT
STP
CC
TPR
CSB
FT
P/P
STP
REG.VEL.
PRELAMP.
RIC.AUT.
CC
JCC
C
SLAVE
JOLLY
PC
TPR.OPEN
FotoRIC.
PA
P/P
1)
2)
3)
4)
5)
6)
16
15 14
Hilfssicherungen 24 V (2A fast)
Motorsicherungen 24 V (10A fast)
Steckverbinder interne LED-Leuchten
Ausgang für 24V Motor
Klemmleiste für den Encoderanschluss
Jumper TEST und FCS
TEST: Wird dieser Jumper entfernt, werden die
Sicherheitseingänge (Det. 7) bei geschlossener
Schranke gesperrt.
FCS: Diesen Jumper entfernen, wenn ein MikroSicherheitsswitch auf dem Port verwendet wird (Eingang
26 – NC)
7) Klemmleiste Sicherheitseingänge und Hilfsversorgung
8) Klemmleiste Steuereingänge
9) Jumper JCC
10) Dip-Switch Sperren der Sicherheitsvorrichtungen
11) Dip-Switch für die verschiedenen Funktionen
40
13
12 11
7
FCS
SCHEDA RADIO OC
17
6
10 9
12) Tasten zur Programmierung
13) Steckverbinder interne LED-Leuchten
14) Jumper für RESET der Steuerung
15) Jumper für die Auswahl des Modus Kanal 1
Empfänger OC2:
P/P: Schrittbetrieb
PA: Steuerung öffnet
Der zweite Kanal ist immer Steuerung schließt.
16) Steckverbinder für Empfänger vom Typ OC2
17) Trimmer zur Regulierung der Verlangsamung beim
Öffnen
18) Eingang Funkantenne
19) Anschluss an ERDUNG
20) Eingang Motorendschalter
21) Ausgang Kontakt US1 (Jolly)
22) Ausgang Beleuchtung der Stange, Steuerungen
SLAVE und TPR
23) Eingang 24 Vdc Versorgung der Steuerung
8
D
ELEKTRISCHE ANSCHLÜSSE
+
+
+
P/P
TEST
US1
LD1
Reset
FC1
15 17 18
12
14 16
13
C1
C2
P/P
PA
FC2
ANT.
Antenna
RS
ON
1
2
3
4
5
6
7
8
9
10
11
12
ON
NA
TR1
FT
STP
CC
TPR
1
COM
9 10 11
NC
P/P
REG.VEL.
PRELAMP.
RIC.AUT.
JCC
SLAVE
JOLLY
TPR
FotoRIC.
SCHEDA RADIO OC
+
+
24FT
Alimentazione
fotocellule
+
-
FCS
24V
-
-
1A max.
P3
+
ENCODER
PROG.
STOP
D WEISS. Dr.
+ GRÜN. Dr.
- BL. Dr.
-
-
31 30 29 28 27 26 25 24 23 22 21 20 19
LDA
34 33 32
+
3 4 5 6 7 8
led
Schrankeaster Ausgang US1
8A 230V
D
MOTOR
2
-
Slave
M
1
TPR
36 35
-
24Vdc
+
CSB
FCS
FT
STP
CC
Kontakt Port
FT
STOP
Schaltleiste
in Schließung
C
PC
PA
P/P
Taster SCHLIESST
Taster ÖFFNET
Taster P/P
Öffnung
FC1
14 16
C2
15
Enschalter
13
C1
FC2
Schließung
Klemme Nr.
Vorrichtung
V
I max
24Vdc
10 A
Funktion
Anmerkungen
1
2
3
4
TPR
5
6
Befehl SLAVE
7
8
Lichter STANGE
9
10
Ausgang US1
Ausgang Jolly NC
Daten für Kontakt: 8A 230V
10
11
Ausgang US1
Ausgang Jolly NA
Daten für Kontakt: 8A 230V
12
Versorgung der Steuerung An den Versorgungsausgang aus dem Netzteilgehäuse anschließen
24Vac
Leitung fehlt
An den Sekundärkreis des Netzteils anschließen
Ausgang Befehl SLAVE
An die Steuerung der zweiten Schranke (SLAVE) anschließen
24V
100 mA Beleuchtung STANGE
An die LED-Leuchten der Stange anschließen, wo vorhanden
ERDUNG
Kontakt ERDUNG
13
14
Kontakt NC
Endschalter ÖFFNET
15
16
Kontakt NC
Endschalter SCHLIESST Endschalter in der Nähe der Schließung
17
18
Funkantenne
17 Geflecht, 18 Steuerung Eine Antenne für 433 MHz (50 Ohm) installieren
Endschalter in der Nähe der Öffnung
19
22
Taster NO
Befehl Schrittbetrieb
Siehe Konfigurationstabelle Dip-switch
20
22
Taster NO
Befehl Öffnen
Start der Öffnung der Schranke
21
22
Taster NO
Befehl Schließen
Start der Schließung der Schranke
23
27
Schaltleiste
8K2 / N.C.
Schaltleiste in
Schließung
Eingang in Schließung freigegeben. Es können Schaltleisten 8K2 (JCC
geschlossen) oder ein NC-Kontakt (JCC geöffnet) angeschlossen
werden. Wenn nicht verwendet, JCC öffnen und Dip-Switch CC auf ON
bringen (Dip 3 von Det. 10)
24
27
Taster NC
Befehl Stop
25
27
Kontakt NC
Fotozelle in Schließung
26
27
Kontakt NC
Kontakt Port
28
29
Hilfskreise
24Vdc
Hilfskreise
24Vdc
30
31
32, 33, 34
35
36
1A max
Sperren aller Funktionen
Wenn nicht verwendet, Dip-Switch STP auf ON bringen (Dip 2 von
Kehrt beim Schließen die Laufrichtung um.
Wenn nicht verwendet, Dip-Switch FT auf ON bringen (Dip 1 von Det
Diesen Eingang an den Mikro-Sicherheitsswitch des Ports
anschließen
Versorgung Fotozellen
Spannung liegt nur an, wenn die Schranke nicht geschlossen ist
Versorgung
Spannung liegt dauerhaft an
Encoder
32 - / 33 + / 34 D
32 BLAU, 33 GRÜN, 34 WEISS
Antrieb
Ausgang für 24V Motor
Anschluss an Motor
41
D
KONFIGURATION DIP-SWITCH
Funktion
n.
Off On
SLAVE-Betrieb
8
Modus des
Ausgangs US1 9
(Jolly)
Potentialfreier 10
Kontakt
ON
7
hoch
Öffnungszeit ca. 3 Sek.
mittel-hoch
Öffnungszeit ca. 4 Sek. tempo
mittel-niedrig
Öffnungszeit ca. 6 Sek.
niedrig
Öffnungszeit ca. 8 Sek.
Gesperrt
Das Blinklicht wird gleichzeitig mit dem Antrieb gespeist.
Eingeschaltet
Das Blinklicht wird 5 Sekunden vor jeder Bewegung gespeist.
Gesperrt
Nach einer vollständigen Öffnung schließt die Steuerung nur durch manuellen Befehl.
Eingeschaltet
Nach einer vollständigen Öffnung schließt die Steuerung nach der programmierten Pause.
Gesperrt
Funktion ausgeschlossen
Eingeschaltet
Die Steuerung führt die von der MASTER-Steuerung empfangenen Befehle aus
Kont. für
Zusatzlicht
In diesem Modus kann ein Zusatzlicht angesteuert werden.
Eingeschaltet bei Zyklusbeginn für einen programmierten Zeitraum nach der Schließung.
Kontakt für
Blinklicht
Kontakt zur Steuerung eines Blinklichts mit Frequenz 2 Hz.
9 10
Nicht benutzt
Kontakt für
Elektrosperre
Aktiver Ausgang bei Öffnung, Pause und Schließung.
9 10
Öffnung
wegen
Stromausfall
11
Erneute
Schließung
hinter den
Fotozelle
12
Öffnen-Schließen
Keine Wirkung, wenn man während der Öffnung auf die Taste P/P drückt. Die Schranke schließt sich,
mit gesperrter
wenn man während der Pause auf die Taste P/P drückt. Die Schranke blockiert wenige Sekunden lang,
Umkehrfunktion
wenn man während der Schließung auf die Taste P/P drückt, und öffnet sich dann.
beim Öffnen
9 10
6
Öffnet immer
Keine Wirkung, wenn man während der Öffnung auf die Taste P/P drückt. Keine Wirkung, wenn man
„Mehrfamilienha während der Pause auf die Taste P/P drückt. Die Schranke blockiert wenige Sekunden lang, wenn man
während der Schließung auf die Taste P/P drückt, und öffnet sich dann.
us“
9 10
Timer
Zulauf
Die Schranke blockiert, wenn man während der Öffnung auf die Taste P/P drückt, und schließt dann. Die
Schranke blockiert, wenn man während der Schließung auf die Taste P/P drückt, und öffnet sich dann.
3 4
5
Öffnet -Schließt
3 4
Vorwarnung
Öffnet - Stopp Schließt
3 4
4
Anmerkungen
Die Schranke blockiert, wenn man während der Öffnung auf die Taste P/P drückt, und sie schließt sich
durch ein erneutes Drücken. Die Schranke blockiert, wenn man während der Schließung auf die Taste
P/P drückt, und sie öffnet sich durch ein erneutes Drücken.
3 4
3
ON
1 2
Geschwindigk
eit
der Schranke
ON
1 2
2
1 2
1
ON
1 2
Eingangsmodu
s
Schrittbetrieb
und
Funkkanal
(CH1)
Beschreibung
Kontakt zur
Meldung des
Schrankenstatu
Gesperrt
Aktiver Ausgang bei nicht geschlossener Schranke.
Funktion ausgeschlossen
Eingeschaltet
Bei fehlendem Netz bleibt die Schranke geöffnet Kehrt das Netz zurück, schließt sich die Schranke,
wenn Dip 6 auf ON
Gesperrt
Funktion ausgeschlossen.
Eingeschaltet
Die Auslösung der Fotozelle verkürzt die Pause unabhängig von ihrem Wert auf 2 Sekunden.
DIP-SWITCH SPERRUNG DER SICHERHEITSVORRICHTUNGEN
Funktion
FT
STP
CC
TPR
42
n.
1
2
3
4
Off On
Beschreibun
Anmerkungen
OFF
Mit installierter Fotozelle
ON
Ausschluss Eingang der Fotozelle
OFF
Mit STOP-Eingnang in Verwendung
ON
Ausschluss STOP-Eingang
OFF
JCC in ON
Mit Eingang Schaltleiste schließt (Typ 8K2) in Verwendung
JCC in OFF Mit Eingang Schaltleiste schließt (Typ NC) in Verwendung
ON
JCC in OFF
OFF
An den Sekundärkreis des Netzteils Klemmleiste 3 und 4 anschließen.
ON
Funktion ausgeschlossen
Ausschluss Eingang Schaltleiste
JCC: part 9 di fig. H
D
PROGRAMMIERUNG DER ÖFFNUNGS- UND SCHLIESSUNGSPOSITIONEN
Die Schranke SNAP4 ist bereits werkseitig für den Einsatz mit einer Öffnung von 90 Grad und einer Schließung von 0
Grad programmiert.
Falls aus besonderen Installationsgründen der Öffnung- oder der Schließungspunkt geändert werden muss, wie folgt
vorgehen:
Für den Öffnungspunkt:
1. Die Spannungsversorgung zur Steuerung abschalten.
2. Dip 6 für die automatische Wiederschließung auf OFF stellen.
3. Die Gegenmutter lockern und den Schwingungsdämpfer aus Gummi für die Öffnung provisorisch anheben
4. Die Steuerung wieder mit Strom versorgen.
5. Den Taster P/P drücken, die Stange öffnet sich
6. Den Taster PROG/STOP ca. 3 Sek. Lang gedrückt halten, bis sich die LED-Leuchte 1 einschaltet
7. Mehrmals P/P drücken, um den Punkt zur Öffnung zu verschieben oder P3, um ihn in Richtung Schließung zu
verschieben
8. PROG/STOP drücken, um den gewählten Punkt zu speichern
9. Den Schwingungsdämpfer aus Gummi wieder auf die Traverse auflegen
10. Die Stange entsperren und auf den Gleichgewichtspunkt bringen (ca. 45 Grad)
11. Den Schwingungsdämpfer aus Gummi um ca. 2 mm weiter absenken und mit der Gegenmutter fixieren
12. Dip 6 wieder auf ON stellen, um die automatische Schließung freizugeben
13. Die Steuerung wieder mit Strom versorgen
Für den Schließungspunkt:
1. P/P drücken, um die Schranke zu öffnen
2. Die Spannungsversorgung zur Steuerung abschalten.
3. Dip 6 für die automatische Wiederschließung auf OFF stellen.
4. Die Gegenmutter lockern und den Schwingungsdämpfer aus Gummi für die Schließung provisorisch anheben
5. Die Steuerung wieder mit Strom versorgen.
6. Den Taster P/P drücken, die Stange schließt sich
7. Den Taster PROG/STOP ca. 3 Sek. lang gedrückt halten, bis sich die LED-Leuchte 1 einschaltet
8. Mehrmals P/P drücken, um den Punkt zur Öffnung zu verschieben, oder P3, um ihn in Richtung Schließung zu
verschieben
9. PROG/STOP drücken, um den gewählten Punkt zu speichern
10. Den Schwingungsdämpfer aus Gummi wieder auf die Traverse auflegen
11. Die Stange entsperren und auf den Gleichgewichtspunkt bringen (ca. 45 Grad)
12. Den Schwingungsdämpfer aus Gummi um ca. 2 mm weiter absenken und mit der Gegenmutter fixieren
13. Dip 6 wieder auf ON stellen, um die automatische Schließung freizugeben
14. Die Steuerung wieder mit Strom versorgen
PROGRAMMIERUNG DER PAUSE
Die Programmierung muss bei geschlossener Schranke erfolgen:
1.
2.
3.
P3 drücken und gedrückt halten, bis die LED-Leuchte LD1 aufleuchtet (blinkt einmal pro Sekunde)
P/P drücken, um den Zähler für die Pausezeit zu starten. Die LED LD1 ändert die Art des Blinkens.
Nach Ablauf der gewünschten Pausezeit, erneut P/P drücken, um sie zu speichern. Die LED-Leuchte LD1 leuchtet
einige Sekunden ununterbrochen und erlischt dann.
PROGRAMMIERUNG DER ZEIT FÜR DAS ZUSATZLICHT (Ausgang US1 mit Dip 9 und 10 auf OFF)
Die Programmierung muss bei geschlossener Schranke erfolgen:
1.
2.
3.
4.
P3 drücken und gedrückt halten, bis die LED-Leuchte LD1 aufleuchtet (blinkt einmal pro Sekunde)
Erneut P3 drücken, die LED-Leuchte LD1 blinkt zweimal pro Sekunde auf. 2)
P/P drücken, um den Zähler für die Zeit für das Zusatzlicht zu starten. Die LED LD1 ändert die Art des Blinkens.
Nach Ablauf der gewünschten Zeit, erneut P/P drücken, um sie zu speichern. Die LED-Leuchte LD1 leuchtet einige
Sekunden ununterbrochen und erlischt dann.
ANZEIGE DER ZAHL ALLER BEWEGUNGEN DER SCHRANKE
1.
2.
3.
P3 gedrückt halten, um ein Reset der Steuerung durchzuführen, dazu kurzfristig den RESET-Jumper kurzschließen
(Det. 14 auf Abb. H).
Die gelben LED-Innenleuchten blinken 6-mal auf, anschließend startet die Anzeige der Zahl der Bewegungen.
Die Anzeige erfolgt wie folgt:
- Erste Ziffer: Zahl der Blinksignale der roten und gelben LED-Leuchten (Hunderttausende)
- Zweite Ziffer: Zahl der Blinksignale der gelben LED-Leuchten (Hunderttausende)
43
D
- Dritte Ziffer: Zahl der Blinksignale der roten LED-Leuchten (Tausende)
Beispiel: Anzeige von 210.000 Arbeitszyklen
- Rote und gelbe LED-Leuchten blinken 2-mal
- Pause
- Gelbe LED-Leuchten blinken einmal
- Pause
- Rote LED-Leuchten blinken nicht
- Ende
PROGRAMMIERUNG DES WARTUNGSALARMS
Die Steuerung SN24 meldet einen Wartungsalarm über 6-malige Blinksignale der internen roten LED-Leuchten.
Die Zahl der Zyklen, nach denen der Alarm ausgelöst wird, ist werkseitig auf 100.000 programmiert. Um nur diesen
Parameter zu ändern, wie folgt vorgehen:
1.
2.
3.
4.
Bei geschlossenem Stange ca. 10 Sekunden lang Prog/Stop drücken (nach drei Sekunden leuchtet LD1 auf,
gedrückt halten, bis LD1 erneut erlischt)
Jetzt wurde der Wartungsalarm gelöscht, er muss daher neu eingestellt werden.
Die Zahl wird mit einem Vielfachen von 10.000 eingestellt, P/P drücken, um die Blinksignale der LED-Leuchte LD1
zu erhöhen (die maximale Blinkzahl ist 10 und entspricht 100.000 Bewegungen)
Die Taste P3 drücken, um die eingestellte Zahl zu speichern.
GEGENÜBERLIEGENDE SCHRANKEN, FUNKTION MASTER-SLAVE
Mit dieser Installationsart können zwei Schranken einander gegenüberliegen und sich synchron bewegen.
1.
Die zwei Schranken installieren, gegebenenfalls die Einstellungen für die Öffnungs- und Schließungspositionen vornehmen.
2.
Die Hauptschranke (MASTER) auswählen, um bei ihr alle Funktionen der Anlage anzuschließen (Steuerungen,
Funkempfänger, Sicherheitsvorrichtungen, Fotozellen ...).
3.
An der zweiten Schranke (SLAVE) alles wie vom Werk geliefert lassen. Nur die Schaltleiste anschließen, wo vorhanden.
Dip 8 auf ON stellen. Ein Reset durchführen.
4.
Den Slave-Ausgang der MASTER-Schranke an den Eingang „P/P“ der Slave-Schranke anschließen. Die Klemme “-” (5) der
MASTER-Schranke an “C” (22) der SLAVE-Schranke und die Klemme “D” (6) der MASTER-Schranke an P/P (19) der SLAVESchranke anschließen. Ist der Anschluss korrekt, beginnt die LED-Leuchte, die dem Eingang „P/P“ der SLAVE-Schranke
entspricht, zu blinken.
5.
Den Slave-Ausgang Klemme „D“ (6) der SLAVE-Schranke an die Klemme „PA“ (20) der MASTER-Schranke anschließen.
6.
Die Anlage testen, dazu die diversen Steuerungen und Sicherheitsvorrichtungen der beiden Schranken ausprobieren.
FEHLERMELDUNGEN
Die Schranke SNAP4 meldet eventuelle Störungen durch das Aufblinken der roten LED-Leuchten auf beiden Seiten des
Schranks:
14
Bedeutung
Beschreibung
1
Schaltleiste unterbrochen
mit gedrückter Schaltl. oder Defekt an den elektr. Anschl.
2
Stange gewaltsam bewegt
bei geschl. Stange zeigt sie von Hand erzw. Beweg. an
3
Eingriff des Encoders
Erkennen von Hindernissen
4
Encoder fehlt
Encoder defekt oder falscher Anschluss
5
Störung Mosfet
Defekt des Treibers der Motorsteuerung
6
Wartungsalarm
Überschreiten der eingestellten Zahl an Bewegungen
7
Fehler Endschalter
Defekt der elektr. Endschalter oder falscher Anschluss
Zahl des Aufblinkens
ANFANGSPROGRAMMIERUNG NACH AUSTAUSCH DER STEUERUNG
Dieses Verfahren ist nur erforderlich, wenn die Steuerung SN24 der Schranke SNAP4 ausgewechselt wird.
Danach mit der Einstellung der Öffnungs- und Schließungspunkte weitermachen, falls nötig.
1.
2.
3.
44
Ein Reset durchführen, dazu die Tasten P3 und PROG/STOP drücken. Bei Aufleuchten der LED-Leuchte LD1 die Tasten loslassen.
Die Taste „P/P“ drücken. Die Schranke führt eine Reihe von Bewegungen aus und stoppt anschließend in der Schließposition.
Das Erlöschen der LED-Leuchte LD1 zeigt das Ende des Verfahrens an.
D
ENTSORGUNG
Dieses Produkt besteht aus verschiedenen Bauteilen, die ihrerseits die Umwelt verschmutzende
Stoffe enthalten können. Sachgerecht entsorgen!
Informieren Sie sich, nach welchem Recycling- oder Entsorgungssystem das Produkt entsprechend
der örtlich geltenden Bestimmungen zu entsorgen ist.
TECHNISCHE DATEN
MOTOR
M.E.
Motorspannung
Vdc
24
Höchststrom Motor
A
12
Max. Motorleistung
W
300
Max. Drehmmoment
Nm
600
Max. Stangenlänge
mm
4250
°
100
Sek.
3-6
Max. Bewegungswinkel
Bewegungszeit
Intensität Arbeitszyklen
intensiv
Encoder
JA
Elektrische Endschalter
JA
Schmierfett
STEUERUNG
TS10
M.E.
Modell
Versorgungsspannung
Höchststrom
SN24
Vac
230
A
1,5
Elektronischer Soft-Stop
JA
Kompatibel mit Sun Power
JA
ALLGEMEINE EIGENSCHAFTEN
M.E.
Betriebstemperatur
°C
-20 +55
Schutzgrad
IP
54
Gewicht
Kg
50
EG- KONFORMITÄTSERKLÄRUNG
Der Hersteller: Telcoma srl
via L. Manzoni, 11 - 31015 - Z.I. Campidui Conegliano (TV) - ITALY
ERKLÄRT, dass das Produkt: SNAP4
den folgenden EWG-Richtlinien entspricht:
-EMC Richtlinie 2004/108/EG
-Niederspannungsrichtlinie (LVD) 2006/95/EG
Conegliano, den 17/02/2012
Der gesetzliche Vertreter
Ennio Ambroso
45
NL
BELANGRIJKE AANWIJZINGEN DE INSTALLATIE
- De installatie van de automatisering moet volgens de regels der kunst worden uitgevoerd door gekwalificeerd personeel,
dat aan de wettelijke vereisten voldoet, en dient in overeenstemming met de Machinerichtlijn 2006/42/EG te geschieden.
- Controleer de toestand van eventuele reeds in de installatie aanwezige kabels.
- Maak een risicoanalyse van de automatisering en bepaal op grond hiervan welke veiligheidsinrichtingen en signaleringen
gebruikt moeten worden.
- Installeer de bedieningsinrichtingen (bijvoorbeeld de sleutelschakelaar) op een dusdanige plaats dat de gebruiker zich niet
in een gevarenzone bevindt.
- Test na afloop van de installatie meerdere malen de veiligheidsinrichtingen, signaleringsinrichtingen en het
ontgrendelingssysteem van de automatisering.
- Voorzie de automatisering van het etiket of het bordje met CE-markering, dat informatie m.b.t. de gevaren en de
identificatiegegevens bevat.
- Geef de gebruiksaanwijzingen, de veiligheidsvoorschriften en de EG-verklaring van overeenstemming aan de
eindgebruiker.
- Verzeker u ervan dat de gebruiker goed begrepen heeft wat de correcte manier is om de automatisering in automatische
modus, handbediende modus en noodmodus te gebruiken.
- Informeer de gebruiker schriftelijk (bijvoorbeeld in de gebruiksaanwijzing):
* over de eventuele aanwezigheid van restrisico's waar geen beveiliging tegen bestaat en van voorzienbaar oneigenlijk
gebruik;
* over de noodzaak de stroomtoevoer af te sluiten bij reinigingswerkzaamheden in de zone rond de automatisering of bij
klein onderhoud (bijv.: schilderwerk);
* over de noodzaak vaak te controleren of de automatisering geen zichtbare schade vertoont, in het geval van zichtbare
schade dient de gebruiker de installateur hiervan onmiddellijk op te hoogte te stellen;
* dat het verboden is kinderen in de onmiddellijke nabijheid van de automatisering te laten spelen;
- Stel een onderhoudsschema voor de installatie op (minstens eens per 6 maanden voor de veiligheidsinrichtingen) en
noteer de uitgevoerde werkzaamheden in een hiervoor bestemd register.
KEUZE VAN DE VEER
Slagboomtype
Lengte slagboom
3m
4m
RAPPER4TL
MSNYELLOW
MSNYELLOW
SNAPPER4
MSNGREEN
MSNGREEN
SNAPPER4 + PSR
MSNGREEN
MSNGREEN
SNAPPER4 + SRS
MSNGREEN
MSNGREEN / MSNRED
SNAPPER4 + SRS + PSR
MSNGREEN
MSNRED
KENMERKEN
SNAP4 is een elektromechanische slagboom die wordt gebruikt voor het beveiligen van de toegang tot: parkeerplaatsen,
gebouwen, openbare instellingen, ziekenhuizen, woonflats etc.
Het product bestaat uit een kast waarin de reductiemotor en de elektronische besturingseenheid gehuisvest zijn. De
beweging is onomkeerbaar, met mogelijkheid tot handmatige ontgrendeling.
Accessoires op aanvraag
SNAPPER4
PSR
SRS
SNR
FIX SNAP4
ADEK
STICKERS
LEDSNAPPER
CB24
SPB24
SUN POWER
H230T
46
Starre slagboom met cirkelvormige diameter, totale lengte L4250 mm. PAF Vaste steunpoot.
Mobiele steunpoot.
Kunststof rooster L2000 mm.
Geleding.
Bevestigingsaccessoires.
Reflecterende sticker voor SNAPPER4 L4000 mm.
12 reflecterende stickers.
Ledlampjes voor SNAPPER4
Batterijlader 24V, te gebruiken met 24V besturingseenheden.
Kast voor buitenshuis met 2 batterijen van 12V 7Ah.
Set voor voeding via zonnepanelen die geschikt is voor alle 24Vdc automatiseringen.
Verwarmingselement om de werking van de reductiemotoren ook bij lage temperaturen te garanderen. 230V
voeding, opname 10W compleet met thermostaat.
NL
OVERZICHTSTEKENING (Afb. C)
1.
2.
3.
4.
5.
6.
Fotocellen
Vaste steun
Slagboom van aluminium
Reflecterende sticker
Sleutelschakelaar
Heg
7.
8.
9.
10.
11.
12.
SNAP4
Knipperlicht
Antenne
Aardlekschakelaar
Hoofdschakelaar
Voedingslijn
OPENING KAST (Afb. B)
Om het compartiment van de besturingseenheid van de SNAP4 te openen, draait u het slot 1 (Afb. B) met de klok mee en
licht u vervolgens het deksel op door het te draaien, zoals te zien is op Afb. B punt 2.
Nadat u het deksel hebt verwijderd, is het mogelijk om de deur te verwijderen, door deze van boven af naar buiten te
trekken.
CONTROLES VOORAF EN INSTALLATIE OP DE GROND
Alvorens tot de feitelijke installatie over te gaan, wordt aangeraden te controleren of de plaats, die gekozen is voor de
plaatsing van de slagboom, solide en geschikt is en een correcte werking van de slagboom toelaat.
Als de SNAP4 op een solide onderlaag van cement rust, kan hij rechtstreeks aan de grond worden verankerd met 4
expansiepluggen D.12 (afb. E1), of kan de montage worden gerealiseerd met behulp van de tegenplaat (FIXSNAP4),
compleet met ankers (afb. E2); in dit geval gaat u als volgt te werk:
1. Maak een funderingsput, en houd hierbij rekening met de afmetingen van de funderingsplaat.
2. Plaats de kanalen voor de voedings- en verbindingskabels in de put
3. Monteer de tegenplaat-ankers zoals is aangegeven op fb. E2.
4. Stort beton op de kanalen en de funderingsplaat en controleer of het beton recht is.
5. Draai, nadat het beton is uitgehard, de moeren van de 4 ankers los.
6. Plaats de SNAP4 op de tegenplaat, en zet hem vast met de bijgeleverde 4 onderlegschijven en 4 moeren.
ONTGRENDELING VAN DE SLAGBOOM
Om de slagboom te ontgrendelen, te werk gaan zoals is aangegeven op afbeelding D:
1. Steek de ontgrendelsleutel in het slot en laat hem daar zitten.
2. Draai de zeskantsleutel 270 graden tegen de klok in tot aan de mechanische stop
De slagboom is nu van de reductiemotor afgekoppeld.
Om de slagboom weer te vergrendelen:
1. Steek de ontgrendelsleutel (1) in het slot en laat hem zitten.
2. Draai de zeskantsleutel 270 graden met de klok mee.
INSTALLATIE VAN DE SLAGBOOM
OPMERKING: alle hieronder gegeven aanwijzingen hebben betrekking op een rechtse installatie van de slagboom, zoals
op afbeelding C.
Voor de elektrische aansluiting wordt aangeraden een voedingskabel van 3x1.5 te gebruiken.
1. Graaf een huls in voor de doorvoer van de elektrische voedings- en veiligheidskabels.
2. Installeer de slagboom zoals hiervoor beschreven.
3. Zet de slagboom in de stand met neergelaten slagboom, door de slagboom te ontgrendelen. De kant van het
balanselement waarop de veer bevestigd is, moet omhoog staan. Zie afb. G2 (naar RECHTS openende slagboom).
4. Bevestig de verankeringsplaat van de steun van de slagboom met de vier schroeven, met de lange zijde horizontaal
(Afb. F1). De schroeven moeten worden aangehaald met een koppel van meer dan 70 Nm.
5. Monteer de steun van de slagboom door de vier schroeven aan te brengen. De kant van de steun met
aanslagschroef moet zich tegenover de doorgangszone bevinden (zie pijl. afb. F2).
6. Plaats de slagboom in de steun (kant met versteviging) tot hij tegen de stop (aanslagschroef) aan zit.
7. Haal de schroeven van de slagboomsteun volledig aan, installeer de dop (Afb. F3).
8. Zet de slagboom op 90 graden en haak de veer vast.
9. Trek vervolgens zodanig aan de veer dat de slagboom (ontgrendeld) op 45 graden in evenwicht blijft. Verdere
afstelling kan geschieden door het draaipunt van de veer op het balanselement te verplaatsen (afb. G): door het
draaipunt dichterbij te brengen neemt het totale moment af, door het verder af te plaatsen neemt het daarentegen
toe.
10. Controleer of de slagboom op 20 en 70 vrijwel stil blijft staan.
11. Blokkeer de reductiemotor.
12. Breng de noodzakelijke elektrische aansluitingen tot stand door de voedingslijn te verbinden met de klemmen in de
door die zich in de kast bevindt.
47
NL
NAAR LINKS OPENENDE SLAGBOOM
Om de slagboom van naar RECHTS openend in naar LINKS openend te veranderen, als volgt te werk gaan:
1. Verplaats de veer van de rechter naar de linker positie (afb. G1)
2. Draai de draden van de motor in de besturingseenheid om (35 en 36 worden omgewisseld, zie volgende pagina)
3. Draai de draden 14 en 16 om (elektrische eindaanslagen)
Voer vervolgens de installatie uit.
BESCHRIJVING ONDERDELEN (Afb. H)
1
Afb. H
3
2
-
M
+
M
23
4
D
TPR
5
+
+
22
-
Slave
D
+
+
24V
+
+
-
LDA
PROG.
-
STOP
P3
P/P
+
TEST
24FT
FCS
US1
21
TR1
COM
ON
LD1
1
2
3
4
5
6
7
8
9
10
11
12
NA
20
Reset
C1
FC1
19
C2
FC2
ANT.
18
P/P
PA
RS
ON
NC
1
FT
STP
CC
TPR
CSB
FT
P/P
STP
REG.VEL.
PRELAMP.
RIC.AUT.
CC
JCC
C
SLAVE
JOLLY
PC
TPR.OPEN
FotoRIC.
PA
P/P
1)
2)
3)
4)
5)
6)
16
15 14
Hulpzekeringen 24V (2A fast)
Motorzekering 24V (10A fast)
Connector interne LED lampen
Uitgang motor 24V
Klemmenbord aansluiting encoder
Jumper TEST en FCS
TEST: door deze jumper te verwijderen, worden de
ingangen van de veiligheidsinrichtingen gedeactiveerd
(det. 7) wanneer de slagboom dicht is.
FCS: verwijder deze jumper als een microveiligheidsschakelaar op de poort wordt gebruikt
(ingang26 - NC)
7) Klemmenbord ingangen veiligheidsinrichtingen en
voeding hulpcircuits
8) Klemmenbord bedieningsingangen
9) Jumper JCC
10) Dip-Switch deactivering veiligheidsinrichtingen
11) Dip-Switch functies
48
13
12 11
7
FCS
SCHEDA RADIO OC
17
6
10 9
12) Programmeerknoppen
13) Connector interne LED lampen
14) Jumper RESET besturingseenheid
15) Jumper selectie modus kanaal 1 ontvanger OC2:
P/P: stap-voor-stap
PA: bedieningsinstructie openen
Het tweede kanaal is altijd bedieningsinstructie
sluiten.
16) Connector voor ontvanger type OC2
17) Trimmer voor regeling vertraging in
openingsbeweging
18) Ingang radioantenne
19) MASSA-aansluiting
20) Ingang eindaanslag motor
21) Uitgang contact US1 (jolly)
22) Uitgang lichten slagboom, bedieningsinstructies
SLAVE en TPR
23) Ingang 24Vdc voeding besturingseenheid
8
NL
ELEKTRISCHE AANSLUITINGEN
+
+
+
P/P
TEST
US1
LD1
Reset
FC1
15 17 18
12
14 16
13
C1
C2
P/P
PA
FC2
ANT.
Antenna
RS
ON
1
2
3
4
5
6
7
8
9
10
11
12
ON
NA
TR1
FT
STP
CC
TPR
1
COM
9 10 11
NC
P/P
REG.VEL.
PRELAMP.
RIC.AUT.
JCC
SLAVE
JOLLY
TPR
FotoRIC.
SCHEDA RADIO OC
+
24FT
-
Voeding
fotocellen
+
-
FCS
24V
-
1A max.
P3
+
+
ENCODER
PROG.
STOP
D WITTE draad
+ GROENE draad
- BLAUWE draad
-
-
31 30 29 28 27 26 25 24 23 22 21 20 19
LDA
34 33 32
led
sla uitgang US1
8A 230V
+
3 4 5 6 7 8
D
MOTOR
2
-
Slave
M
1
TPR
36 35
-
24Vdc
+
CSB
FCS
FT
STP
CC
Contact poort
FT
STOP
Contactlijst in
sluitbeweging
C
PC
PA
P/P
Knop SLUITEN
Knop OPENEN
Knop P/P
openen
14 16
C2
15
eindaanslag
13
C1
FC1
FC2
sluiten
Klem nr.
1
2
3
4
Inrichting
TPR
V
I max
Functie
24Vdc
10 A
Voeding besturingseenheid
Verbind de voeding vanuit de voedingskast met de uitgang
Geen lijn
Verbind met secundair transformator
uitgang
bedieningsinstructies
SLAVE
collegare alla centralina della seconda barriera (SLAVE)
24Vac
Opm.
5
6
bediening SLAVE
7
8
Lichten SLAGBOOM
9
10
Uitgang US1
Uitgang jolly NC
Contactgegevens: 8A 230V
10
11
Uitgang US1
Uitgang jolly NA
Contactgegevens: 8A 230V
12
24V
100 mA Verlichting SLAGBOOM
Verbind met de LED lampen van de slagboom, indien aanwezig
TERRA
MASSA contact
13
14
NC contact
Eindaanslag OPENEN
Eindaanslag openingsbeweging
15
16
NC contact
Eindaanslag SLUITEN
Eindaanslag sluitbeweging
17
18
Antenne radio
19
22
NA drukknop
20
22
NA drukknop
Bedieningsinstructie Open
21
22
NA drukknop
Bedieningsinstructie Sluit Start sluitbeweging slagboom
23
27
Contactlijst
8K2 / NC
Contactlijst in sluitbeweging
24
27
NC drukknop
25
27
NC contact
26
27
NC contact
28
29
Hulpcircuits
24Vdc
30
31
Hulpcircuits
24Vdc
32, 33, 34
35
36
Sluit een antenne voor 433 MHz (50 Ohm) aan
Stap-voor-stap bedieningsinstructie Zie configuratietabel dip-switches
Start openingsbeweging slagboom
Ingang geactiveerd in sluitbeweging. Mogelijkheid tot aansluiting
contactlijsten 8K2 (JCC gesloten) of een NC contact (JCC open). Als hij
niet gebruikt wordt, JCC openen en de dip-switch CC (dip 3 van det. 10)
Blokkering van alle functies.
Bedieningsinstructie Stop
Indien niet gebruikt, de dip-switch STP (dip 2 van det. 10) op ON zetten
Draait gedurende de sluitbeweging de beweging om.
Fotocel in sluitbeweging
Indien niet gebruikt, de dip-switch FT (dip 1 van det. 10) op ON zetten
1A max
Contact poort
Verbind deze ingang met de micro-veiligheidsschakelaar van de poort.
Indien niet gebruikt, de ingang (draad tussen 26 en 27) van een geleidingsbrug
voorzien
Voeding fotocellen
Spanning alleen aanwezig wanneer de slagboom niet gesloten is
Voeding
Permanente spanning
Encoder
32 - / 33 + / 34 D
32 BLAUW, 33 GROEN, 34 WIT
Motor
Uitgang motor 24V
Aansluiting op de motor
49
NL
CONFIGURATIE DIP-SWITCHES
Functie
n.
Off On
ON
1 2
Open altijd
“Woonflat”
Open-Sluit met
Wanneer gedurende de opening op de knop P/P wordt gedrukt, gebeurt er niets. Wanneer gedurende de
omkeer uitgesloten
pauze op de knop P/P wordt gedrukt, gaat de slagboom dicht. Door gedurende de sluitbeweging op de
gedurende de
knop P/P te drukken, blokkeert de slagboom voor enkele seconden en gaat dan open.
opening
hoog
openingstijd circa 3 sec.
3 4
midden-hoog
openingstijd circa 4 sec.
3 4
midden-laag
openingstijd circa 6 sec.
3 4
laag
openingstijd circa 8 sec.
Uit
Het knipperlicht wordt tegelijkertijd met de motor gevoed.
Aan
Het knipperlicht wordt 5 seconden voor iedere manoeuvre gevoed.
5
Uit
6
Aan
Modus Uitgang
US1 (jolly).
Spanningsvrij
contact
9
10
Opening door
black-out
11
Hersluiting foto
12
Uit
Functie uitgesloten
Aan
De besturingseenheid voert de bedieningsinstructies uit die ontvangen werden van een MASTER
besturingseenheid
Contact voor
Gebruikerslicht
Met deze modus kunnen we een gebruikerslicht bedienen.
Brandt vanaf het begin van de cyclus tot een programmeerbare tijd na de sluiting.
Contact voor
knipperlicht
Contact voor het bedienen van een knipperlicht, frequentie 2 Hz.
Contact voor
elektrische
vergrendeling
Uitgang actief in openingsbeweging, pauze en sluitbeweging.
9 10
8
9 10
SLAVE-Betrieb
9 10
7
Na een complete openingsbeweging, zal de besturingseenheid alleen hersluiten met een handmatige
bedieningsinstructie.
Na een complete openingsbeweging, zal de besturingseenheid hersluiten na de geprogrammeerde
pauzetijd.
9 10
Werking
SLAVE
Opmerkingen
Door gedurende de openingsbeweging op de knop P/P te drukken, blokkeert de slagboom, door hem
opnieuw in te drukken gaat hij dicht. Door gedurende de sluitbeweging op de knop P/P te drukken.
blokkeert de slagboom, door hem opnieuw in te drukken gaat hij open.
Door gedurende de openingsbeweging op de knop P/P te drukken, blokkeert de slagboom en gaat dan
dicht. Door gedurende de sluitbeweging op de knop P/P te drukken, blokkeert de slagboom en gaat dan
open.
Wanneer gedurende de opening op de knop P/P wordt gedrukt, gebeurt er niets. Wanneer gedurende de
pauze op de knop P/P wordt gedrukt, gebeurt er niets. Door gedurende de sluitbeweging op de knop P/P
te drukken, blokkeert de slagboom voor enkele seconden en gaat dan open.
3 4
Niet gebruikt
4
Open-Sluit
ON
1 2
Voorwaarschuwing
3
Open-Stop-Sluit
ON
1 2
Snelheid
slagboom
ON
1 2
Modus Ingang 1
Stap-voor-stap
en Radiokanaal 2
(CH1)
Beschrijving
Contact voor
signalering
status slagboom
Uitgang actief met niet gesloten slagboom.
Uit
Functie uitgesloten
Aan
Als er geen netspanning is, blijft de slagboom open. Als de spanning terugkomt, gaat de slagboom dicht
als dip 6 ON is
Uit
Functie uitgesloten.
Aan
De activering van de fotocel reduceert de pauzetijd, wat de waarde hiervan ook was, tot 2 seconden.
DIP-SWITCH UITSLUITING VEILIGHEIDSINRICHTINGEN
Functie
nr.
FT
1
STP
2
CC
3
TPR
50
4
Off On
Beschrijving
Opmerkingen
Uit
Met geïnstalleerde fotocel
Aan
Uitsluiting ingang fotocel
Uit
Met ingang STOP in gebruik
Aan
Uitsluiting ingang STOP
Uit
JCC in ON
Met ingang Contactlijst Sluiten (type 8K2) in gebruik
JCC in OFF Met ingang Contactlijst Sluiten (type NC) in gebruik
JCC: detail 9 van afb. H
Aan
JCC in OFF Uitsluiting ingang Contactlijst Sluiten
Uit
Verbind secundair transformator met de klemmen 3 en 4.
Als er geen netspanning is, gaat de slagboom open (met dip 11 ON en met gebruik bufferbatterij)
Aan
Functie uitgesloten
NL
PROGRAMMERING OPENINGS- EN SLUITPOSITIE
De slagboom SNAP4 is in de fabriek geprogrammeerd voor gebruik met opening op 90 graden en sluiting op 0 graden.
Als het om bijzondere installatieredenen nodig is het openingspunt en/of het sluitpunt te veranderen, dient u als volgt te
werk te gaan:
Voor het openingspunt:
1. Koppel de stroomtoevoer naar de besturingseenheid af
2. Zet de dip 6 voor automatisch hersluiten op OFF
3. Draai de contramoer los en licht het trillingdempende sluitrubber provisorisch op
4. Geef stroom aan de besturingseenheid
5. Druk op de knop P/P, de slagboom gaat open
6. Druk op de knop PROG/STOP en houd hem circa 3 sec. ingedrukt, tot de Led LD1 gaat branden
7. Druk meerdere malen op P/P om het punt in openingsrichting te verplaatsen of op P3 om het in sluitrichting te
verplaatsen
8. Druk op PROG/STOP om het gekozen punt op te slaan in het geheugen
9. Breng het trillingdempende rubber weer in de oorspronkelijke positie tegen het balanselement aan.
10. Ontgrendel de slagboom en zet hem op het balanspunt (circa 45 graden)
11. Breng het trillingdempende rubber nog circa 2 millimeter verder omlaag en blokkeer het met de contramoer
12. Zet de dip 6 weer op ON om de automatische hersluiting weer te activeren
13. Geef weer stroom aan de besturingseenheid
Voor het sluitpunt
1. Druk op P/P om de slagboom te openen
2. Koppel de stroomtoevoer naar de besturingseenheid af
3. Zet de dip 6 voor automatisch hersluiten op OFF
4. Draai de contramoer los en licht het trillingdempende sluitrubber provisorisch op
5. Geef stroom aan de besturingseenheid
6. Druk op de knop P/P, de slagboom gaat dicht
7. Druk op de knop PROG/STOP en houd hem circa 3 sec. ingedrukt, tot de Led LD1 gaat branden
8. Druk meerdere malen op P/P om het punt in openingsrichting te verplaatsen of op P3 om het in sluitrichting te
verplaatsen
9. Druk op PROG/STOP om het gekozen punt op te slaan in het geheugen
10. Breng het trillingdempende rubber weer in de oorspronkelijke positie tegen het balanselement aan.
11. Ontgrendel de slagboom en zet hem op het balanspunt (circa 45 graden)
12. Breng het trillingdempende rubber nog circa 2 millimeter verder omlaag en blokkeer het met de contramoer
13. Zet de dip 6 weer op ON om de automatische hersluiting weer te activeren
14. Geef weer stroom aan de besturingseenheid
PROGRAMMERING PAUZETIJD
Dit moet bij gesloten slagboom gebeuren:
1.
2.
3.
Druk op P3 en houd ingedrukt totdat de Led LD1 gaat branden (knippert eenmaal per seconde)
Druk op P/P om het tellen van de pauzetijd te starten. De Led LD1 gaat op een andere manier knipperen.
Nadat de gewenste pauzetijd is verstreken, opnieuw op P/P drukken om de tijd op te slaan. De Led LD1 zal een
aantal seconden vast blijven branden en vervolgens uitgaan.
PROGRAMMERING TIJD GEBRUIKERSLICHT (uitgang US1 met dip 9 en 10 op OFF)
Dit moet bij gesloten slagboom gebeuren:
1.
2.
3.
4.
Druk op P3 en houd ingedrukt totdat de Led LD1 gaat branden (knippert eenmaal per seconde)
Druk nogmaals op P3, de Led LD1 knippert nu tweemaal per seconde
Druk op P/P om het tellen van de tijd van het gebruikerslicht te starten. De Led LD1 gaat op een andere manier
knipperen.
Nadat de gewenste tijd is verstreken, opnieuw op P/P drukken om de tijd op te slaan. De Led LD1 zal een aantal
seconden vast blijven branden en vervolgens uitgaan.
WEERGAVE TOTAAL AANTAL MANOEUVRES VAN DE SLAGBOOM
Dit moet bij gesloten slagboom gebeuren:
1.
2.
Terwijl u P3 ingedrukt houdt, een reset van de besturingseenheid uitvoeren door voor een moment de jumper
RESET (det. 14 van afb. H) kort te sluiten.
De interne gele led's zullen 6 maal knipperen, waarna de weergave van het aantal manoeuvres begint.
51
NL
3.
De weergave is als volgt:
- Eerste cijfer: aantal knipperingen van de rode en gele led's samen (honderdtallen van duizendtallen)
- Tweede cijfer: aantal knipperingen van de gele led's (tientallen van duizendtallen)
- Derde cijfer: aantal knipperingen van de rode led's (duizendtallen)
Voorbeeld: weergave van 210.000 bedrijfscycli.
- Rode en gele led's knipperen 2 keer
- Pauze
- Gele led's knipperen één keer
- Pauze
- Rode led's knipperen niet
- Eind
PROGRAMMERING VAN HET ONDERHOUDALARM
De besturingseenheid SN24 signaleert het onderhoudalarm met 6 knipperingen van de interne rode led's.
Het aantal cycli, waarna het alarm gesignaleerd wordt, is in de fabriek ingesteld op 100.000. Om deze parameter te
veranderen, gaat u als volgt te werk:
1.
2.
3.
4.
Druk met gesloten slagboom circa 10 seconden op Prog/Stop (na drie seconden gaat LD1 branden, ingedrukt
houden tot LD1 weer uitgaat)
Nu is het onderhoudalarm gewist en moet het dus opnieuw worden ingesteld.
Het aantal wordt ingesteld op meervouden van 10.000, druk op P/P om het aantal knipperingen van de Led LD1 te
verhogen (het maximumaantal is 10, wat overeenkomt met 100.000 manoeuvres)
Druk op de toets P3 om het ingestelde aantal op te slaan.
TEGEN OVER ELKAAR GEPLAATSTE SLAGBOMEN, MASTER-SLAVE FUNCTIE
Met deze installatiemodus is het mogelijk om twee tegen over elkaar geplaatste slagbomen synchroon te laten bewegen.
1. Installeer de twee slagbomen en stel, indien nodig, de openings- en sluitposities in.
2. Kies de hoofdslagboom (MASTER) om hierop alle functies van de installatie aan te sluiten (bedieningsinstructies, radioontvangers, veiligheidsinrichtingen, fotocellen...).
3. Op de secundaire slagboom (SLAVE) laat u alles zoals in de fabriek ingesteld. Sluit alleen de contactlijst aan, indien
aanwezig.
Zet de dip 8 op ON. Voer een reset uit.
4. Verbind de uitgang Slave van de slagboom MASTER met de ingang “P/P” van de slagboom SLAVE. De klem “-” (5) van
de MASTER met “C” (22) van de SLAVE en de klem “D” (6) van de MASTER met P/P (19) van de SLAVE. Als de
aansluiting correct is uitgevoerd, begint de led die hoort bij de ingang “P/P” van de slagboom SLAVE te knipperen.
5. Verbind de uitgang Slave klem “D” (6) van de slagboom SLAVE,met de klem “PA” (20) van de slagboom MASTER.
6. Test de installatie door de verschillende bedieningsinstructies en veiligheidsinrichtingen van de twee slagbomen uit te
proberen.
SIGNALERING VAN FOUTEN
De slagboom SNAP4 signaleert eventuele storingen aan de hand van het knipperen van de rode led's aan weerszijden van de
kast:
14
Betekenis
Beschrijving
1
contactlijst onderbroken
met ingedrukte lijst of probleem elektrische aansluitingen
2
slagboom geforceerd
met dichte slagboom, signaleert handmatige forcering
3
activering encoder
detectie obstakel
4
encoder afwezig
encoder defect of verkeerde aansluiting
5
afwijking mosfet
defect driver van de motorbesturing
6
onderhoudalarm
overschrijding van het ingestelde aantal manoeuvres
7
fout eindaanslag
defect elektrische eindaanslagen of verkeerde aansluiting
Aantal knipperingen
EERSTE PROGRAMMERING NA VERVANGING BESTURINGSEENHEID
Deze procedure is alleen nodig wanneer de besturingseenheid SN24 van de slagboom SNAP4 wordt vervangen.
Na deze handeling dienen zo nodig de openings- en sluitpunten te worden ingesteld.
1.
52
Voer een reset uit door de drukknoppen P3 en PROG/STOP ingedrukt te houden. Laat de drukknoppen los wanneer de Led LD1 gaat
branden.
NL
2.
3.
Druk op de drukknop “P/P”. De slagboom voert een reeks bewegingen uit en komt tot slot tot stilstand in gesloten stand.
Het uitgaan van de led LD1 duidt op het einde van de procedure.
VERWIJDERING
Dit product bestaat uit diverse onderdelen die ook weer verontreinigende stoffen kunnen bevatten.
Het product mag niet zomaar weggegooid worden!
Informeer over de wijze van hergebruik of verwijdering van het product en neem daarbij de wettelijke
voorschriften die ter plaatse gelden in acht.
TECHNISCHE GEGEVENS
MOTOR
M.e.
Spanning motor
Vdc
24
Max. stroom motor
A
12
Maximumvermogen motor
W
300
Maximumkoppel
Nm
600
Max. lengte slagboom
mm
4250
Max manoeuvreerhoek
°
100
sec.
3-6
Manoeuvretijd
Intensiteit werkcycli
intensief
Encoder
SI
Elektrische eindaanslagen
SI
Smeervet
BESTURINGSEENHEID
TS10
M.e.
Model
Voedingsspanning
Max. stroom
SN24
Vac
230
A
1,5
Elektronische vertraging
SI
Compatibel met Sun Power
SI
ALGEMENE KENMERKEN
U.M.
Bedrijfstemperatuur
°C
-20 +55
Beschermingsklasse
IP
54
Gewicht
Kg
50
EG-VERKLARING VAN OVEREENSTEMMING
De fabrikant: Telcoma srl
via L. Manzoni, 11 - 31015 - Z.I. Campidui Conegliano (TV) - ITALY
VERKLAART dat het product: SNAP4
aan de volgende EEG-richtlijnen voldoet:
-Richtlijn EMC 2004/108/CE
-Laagspanningsrichtlijn (LVD) 2006/95/CE
Conegliano, 17/02/2012
De wettelijke vertegenwoordiger
Ennio Ambroso
53
NOTE
CERTIFICATO DI GARANZIA
PRODOTTO
TIMBRO E/O FIRMA DELL’INSTALLATORE
DATA D’INSTALLAZIONE
%
I
F
E
GARANZIA
GARANTIE
GARANTÍA
La presente garanzia copre gli eventuali guasti e/o anomalie
dovuti a difetti e/o vizi di fabbricazione. La garanzia decade
automaticamente in caso di manomissione o errato utilizzo
del prodotto.
Durante il periodo di garanzia la ditta Telcoma srl si impegna
a riparare e/o sostituire le parti difettate e non manomesse.
Restano a intero ed esclusivo carico del cliente il diritto di
chiamata, nonché le spese di rimozione, imballo e trasporto
del prodotto per la riparazione e sostituzione.
Cette garantie couvre les éventuelles pannes et/ou
anomalies imputables à des défauts eou vis de fabrication.
La garantie s'annule automatiquement si le produit a été
modifié ou utilisé de maniére impropre. L'entreprise Telcoma
srl s'engange, durant la periode de garantie du produit, à
reparer et/ou remplacer les piéces defectueuses n'ayant
pas subi de modifications. Restent entièrement et
exclusivament à la charge du client, le droit d'appel ainsi que
les frais d'enleévement, d'emballage et de transport du
produit pour sa réparation ou substitution.
La presente garantía es válida en el caso cie averias y/o
anomaliás causadas por defectos y/o desperfectos de
fabricación. La garantía automáticamente pierde valor en el
caso de arreglos improprios o utilizactión equivocada del
producto. Durante el periodo de garantía, la empresa
Telcoma srl se compromete a reparar y/o cambiar la partes
defectuosas que no hayan sido dañadas. Quedan a total y
exclusivo cargo del cliente el derecho de llamada, como asi
también los gastos de desmontaje, embalaje y transporte
del producto para la raparación o cambio.
GB
D
NL
WARRANTY
GARANTIE
GARANTIE
This warranty covers any failure and/or malfunctioning due
to manifacturing faults and/or bad workmanship.
The warranty is automatically invalidated if the product is
tempered with or used incorrectly.
During the warranty period, Telcoma srl undertakes to repair
and/or replace faulty parts provided they have not been
tampered with.
The call-out charge as well as the expenses for disassembly
removal packing and transport of the product for repair or
replacement shall be charged entirely to the customer.
Die vorliegende Garantie deckt eventuelle Defekte und/oder
Betriebsstörungen ab, die auf Fabricationsfehler
und/oder mängel zurück-zuführen sin. Die Garantie
verfällt automatisch im Falle von Manipulationen oder
fehlerhaftem Gebrauch des Produktes. Während der
Garantiezeit verpflichtet sich die Firma Telcoma srl, die
defekten und nicht manipulierten Teile zu reparieren
und/oder auszutauschen. Die Auforderung des
Kundendienstes als auch die Kosten für die Abholung, die
Verpackung und den Transport des Produkten für die
Reparatur bzw den Austausch gehen zu vollen und
ausschliefßlichen Lasten des Kunden.
Deze garantie dekt eventuele storingen en/of defecten die te
wijten aan fabrieksfouten en/of gebreken. De garantie
vervalt automatisch indien de gebruiker zelf aan het produkt
gesleuteld heeft of veranderingen aangebracht heeft of
indien het produkt op verkeerde wijze gebruikt is. Tijdens de
garantietermijn neemt de Firma Telcoma srl de verplichting
op te defecte onderdelen te repareren en/of te vervangen
mits de gebruiker deze onderdelen niet zelf geprobeerd
heeft te repareren. De voorrijkosten alsmede de onkosten
voor het demonteren, het verpakken en verzenden van het
produkt te repareren of te vervangen zijn en blijven
uitsluitend voor rekening van de klant.
Telcoma srl - Via L. Manzoni, 11 - Z.I. Campidui
31015 Conegliano - (TV) Italy - Tel. ++39 0438-451099
Fax ++39 0438-451102 - Part. IVA 00809520265
http://www.telcoma.it
E-mail: info@telcoma .it