1
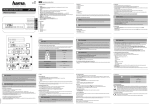
00
123189
World Travel Alarm Clock
Weltreisewecker
„RC 150”
GB
D
Operating Instructions
Bedienungsanleitung
Consignes de sécurité
Instrucciones de seguridad
Техника безопасности
Veiligheidsinstructies
Υποδείξεις ασφαλείας
Wskazówki bezpieczeństwa
A
8
F
ES
RUS
NL
GR
PL
G Operating instruction
Controls and Displays
A Controls
1. Display
2.
button = sets the time
3.
button = displays alarm time (approx. 5 seconds); used for setting alarm
4. ALARM ON/OFF slide switch = activates/deactivates the alarm
5.
button = reduces the current set value
button = increases the current set value
6.
7. SNOOZE/LIGHT button = activates the backlight (approx. 5 seconds)/postpones the alarm for 5 minutes
8. Twilight sensor
9.
ON/OFF slide switch = activates/deactivates the twilight sensor
10. WAVE button = activates/deactivates manual radio signal reception; switches between °C and °F (UK/DE/US); switches
between 40 kHz and 60 kHz frequencies (JP)
11. RESET button = restores factory settings
12. OFF/US/UK/DE/JP slide switch = activates/deactivates the radio signal; activates summer time and deactivates radio signal
13. Battery compartment
14. Cover flap
6
5
2
3
11
10
9
Radio icon
12
WAVE
14
Fair
Excellent
US
2
7
1
5
Signal strength
Poor
13
UK / DE
9
2
7
1
6
4 3
JP
5
8
6
Radio icon appearance
radio signal search
Flashing
Active
Displayed continuously
Successful – signal is being received
No display
Inactive
Note
This symbol is used to indicate additional information or important notes.
6
• If, during initial setup of the device, a radio signal is not received within the first few minutes, the search is aborted. The
radio icon disappears.
• If there are reception problems, we recommend leaving the clock to sit overnight, since interference is generally less at
night.
• In the meantime, you can start a manual search for the radio signal at another location or you can manually set the time
and date.
• The clock automatically continues to search for the radio signal on a daily basis. If the signal is received successfully, the
manually set time and date are overwritten.
• Press the WAVE button (10) to start the manual search for the radio signal.
Note – Manual search
• The manual search function using the WAVE button (10) is only possible if the radio signal is activated (US/UK/DE/JP) –
see 5.2. Activating/deactivating the radio signal.
• The manual search is automatically aborted after 6-16 minutes.
• Using the WAVE button (10) frequently will drain the battery. We recommend only using this function to seek out an
optimal location for the device.
• Move the OFF/US/UK/DE/JP slide switch (12) to the OFF position to deactivate continuous synchronisation with the radio
signal.
Use these settings when you are in a region where you cannot or are not permitted to receive a radio signal.
You must then manually carry out the settings described in 5.3. Manually setting the date/time.
13
11
5
Note – Time settings
5.2. Activating/deactivating the radio signal
You can either completely deactivate radio signal reception or adapt it to one of four different regions.
12
7
1
10
Note – Time zone
• The radio signal can be received over long distances, but it always corresponds to the time zone from which the signal is
sent. Please note that you must set the time difference accordingly for countries with a different time zone.
• If you are in Moscow, the time is 3 hours later than in Germany. This means that you should set +3 for the time zone.
The clock then automatically sets itself 3 hours ahead after receiving the DCF signal or according to the manually set time.
• Move the ALARM ON/OFF slide switch (4) to the OFF position to the right until the surface underneath the slide switch is
black.
• The alarm is deactivated and the alarm clock icon (B – 12) disappears from the display (1).
Stopping the alarm/snooze function
• If the alarm is activated, it is triggered at the set time and an alarm signal sounds for one minute. The alarm automatically
stops after this time and is then triggered again the next day at the set alarm time.
• To stop the alarm early, move the ALARM ON/OFF slide switch (4) to the OFF position to the right until the surface
underneath the slide switch is black. The alarm is now deactivated.
• Move the ALARM ON/OFF slide switch (4) back to the ON position on the left again to activate the alarm for the next day.
Note – Day of the week
• You can choose from English (GB), French (FR), German (DE), Spanish (ES) and Italian (IT) for the display of the day of
the week.
5.4. Alarm
Setting the alarm time
• Press and hold the button (3) for approx. 2 seconds until the hours display (B – 10) begins to flash.
• Set the following information in the order listed:
• Hours
• Minutes
• To select the individual values, press the button (5) or the button (6) and confirm your selection by pressing the
button (3).
• If you do not make an entry for 30 seconds, the device automatically exits the settings mode and the settings you made are
saved.
• Press the button (3) to display the set alarm time for approx. 5 seconds.
00123189/08.14
This symbol is used to indicate safety instructions or to draw your attention to specific hazards and risks.
• Press the up WAVE button (10) again to end the manual search.
ALARM
2
4 3
WARNING – Batteries
Warning
3. Safety Notes
• The product is intended for private, non-commercial use only.
• Protect the product from dirt, moisture and overheating, and only use it in a dry environment.
• Do not use the product in areas where the use of electronic devices is not permitted.
• Only connect the product to a socket that has been approved for the device. The socket must be installed close to the product and
easily accessible.
• Do not drop the product and do not expose it to any major shocks.
• Do not attempt to service or repair the product yourself. Leave any and all service work to qualified experts.
• Do not modify the product in any way. Doing so voids the warranty.
No reception
4
3
• Remove the batteries from the product if you will not be using it for an extended period, unless it is being kept ready for
emergencies.
• Keep the packaging material out of the reach of children due to the risk of suffocation.
• Dispose of packaging material immediately according to locally applicable regulations.
•
•
•
•
Immediately remove and dispose of dead batteries from the product.
Only use batteries (or rechargeable batteries) that match the specified type.
Do not mix old and new batteries or batteries of a different type or make.
When inserting batteries, note the correct polarity (+ and - markings) and insert the batteries accordingly. Failure to do so
could result in the batteries leaking or exploding.
• Do not overcharge batteries.
• Keep batteries out of the reach of children.
• Do not short circuit the batteries/rechargeable batteries and keep them away from uncoated metal objects.
4. Getting Started
• If necessary, flip the cover flap (14) forwards over the buttons.
• Open the battery compartment (13), insert two AAA batteries with the correct polarity and close the battery
compartment (13).
• If nothing is shown on the LCD display after new batteries have been inserted, press the RESET button (11) with a pointed
object to restart the device.
• Flip the cover flap (14) back to use it as a base for the alarm clock.
5. Operation
Note – Input
• Hold down the
button (5) or the
button (6) to select the values faster.
7
1
4
1. Explanation of Warning Symbols and Notes
2. Package Contents
• RC 150 global travel alarm clock
• 2 AAA batteries
• These operating instructions
B Display icons
1. Time
2. AM/PM (12-hour format)
3. Day
4. Month
5. Day of the week
6. Temperature
7. Signal strength
8. Summer time
9. Time zone map (US)
10. Alarm time
11. AM/PM (12-hour format)
12. Alarm clock icon
13. Alarm clock display icon
5.1. Automatic date/time setting using the radio signal
• Once you have inserted the batteries, the display is switched on, an acoustic signal sounds and the alarm clock automatically
starts searching for a radio signal. During the search, the radio icon will flash. This process can take 3 to 5 minutes.
• When the radio signal is received, the date and time are automatically set.
B
Thank you for choosing a Hama product.
Take your time and read the following instructions and information completely. Please keep these instructions in a safe place for
future reference. If you sell the device, please pass these operating instructions on to the new owner.
Activating/deactivating the alarm
• Move the ALARM ON/OFF slide switch (4) to the left to the ON position. A red surface will be visible underneath the slide
switch.
• The alarm is activated and the alarm clock icon (B – 12) is shown on the display (1).
Note – Snooze function
• While the alarm signal is sounding, press the SNOOZE/LIGHT button (7) to activate the snooze function. Zz begins to
flash on the display (1). The alarm signal will be stopped for 5 minutes, after which it will sound again.
• The snooze function can be activated four consecutive times.
5.5. Temperature display
• Press and hold the WAVE button (10) for approx. 2 seconds to switch the temperature display (B – 6) between °C and °F.
• This is only possible if the OFF/US/UK/DE/JP slide switch (12) is set to the US, UK or DE position.
• If the measured values are outside the measurement range, the temperature display (B – 6) will show Lo (< -40 °C/-40 °F) or
HI (> 70 °C/158 °F).
5.6. Backlight
• If you press the SNOOZE/LIGHT button (7), the display (1) will light up for approx. 5 seconds.
• The alarm clock is equipped with a twilight sensor (8) that automatically switches on the backlight of the display (1) to a
dimmed setting as soon as it gets dark.
• During the day or if there is enough light, the twilight sensor (8) automatically switches off the dimmed backlight on the
display (1).
• Move the ON/OFF slide switch (9) to the ON or OFF position to activate or deactivate the twilight sensor (8).
• Move the OFF/US/UK/DE/JP slide switch (12) to the US, UK, DE or JP position to activate continuous synchronisation with
the radio signal for North America (WWVB), Great Britain (MSF), Germany/Europe (DCF-77) or Japan (JJY40/JJY60).
If you select the US position, the time zone map (B – 9) appears.
Press the button (5) or the button (6) within approx. 5 seconds to select the appropriate time zone for your location.
The currently selected time zone flashes. Select P for the Pacific Standard Time Zone (PST), M for the Mountain Standard Time
Zone (MST), C for the Central Standard Time Zone (CST) or E for the Eastern Standard Time Zone (EST).
To save the selected time zone, do not press anything for approx. 5 seconds.
• If you have selected the JP position, press and hold the WAVE button (10) for approx. 3 seconds to switch between the JJY40
and JJY60 radio signals.
Note – Summer time
• Select DST AUTO as described in 5.3 Manually setting the date/time.
• The clock automatically switches to summer time. (B – 8)
appears on the display as long as summer time is
activated.
5.3. Manually setting the date/time
• Press and hold the button (2) for approx. 2 seconds until the year display begins to flash.
• Set the following information in the order listed:
• Year
• Month (B – 4)
• Day (B – 3)
• 12/24 hour format
• Hours
• Minutes
• Seconds (only zeros possible)
• Time zone
• Day of the week language (B – 5)
• DST AUTO/OFF
• To select the individual values, press the button (5) or the button (6) and confirm your selection by pressing the
button (2).
• Press the button (2) immediately to adopt the set value displayed and skip ahead.
• If you do not make an entry for 30 seconds, the device automatically exits the settings mode and the settings you made are
saved.
9. Technical Data
Note – Backlight
• We recommend deactivating the twilight sensor while the clock is not in use, while it is packed during travel, etc.
• Continuous use of the twilight sensor will drain the battery.
5.7. Replacing the batteries
• Once the elements on the display (1) begin to dim, replace the batteries as described in 4. Getting Started.
6. Care and Maintenance
Only clean this product with a slightly moist, lint-free cloth, and do not use aggressive cleaning agents. Make sure that water
does not get into the product.
7. Warranty Disclaimer
Hama GmbH & Co. KG assumes no liability and provides no warranty for damage resulting from improper installation/mounting,
improper use of the product or from failure to observe the operating instructions and/or safety notes.
8. Service and Support
Please contact Hama Product Consulting if you have any questions about this product.
Hotline: +49 9091 502-115 (German/English)
Further support information can be found here:
www.hama.com
RC 150 global travel alarm clock
Power supply
3.0 V
2 x AAA batteries
Measuring range
Temperature
-40 °C – +70 °C
-40 °F – +158 °F
10. Recycling Information
Note on environmental protection:
After the implementation of the European Directive 2002/96/EU and 2006/66/EU in the national legal system, the
following applies: Electric and electronic devices as well as batteries must not be disposed of with household waste.
Consumers are obliged by law to return electrical and electronic devices as well as batteries at the end of their service
lives to the public collecting points set up for this purpose or point of sale. Details to this are defined by the national
law of the respective country. This symbol on the product, the instruction manual or the package indicates that a
product is subject to these regulations. By recycling, reusing the materials or other forms of utilising old devices/Batteries, you are
making an important contribution to protecting our environment.
11. Declaration of Conformity
Hama GmbH & Co. KG hereby declares that this device is in compliance with the basic requirements and other relevant
regulations of the 1999/5/EC guideline. You will find the declaration of conformity with R&TTE directive 99/5/EC on the
internet at www.hama.com.
00
123189
World Travel Alarm Clock
Weltreisewecker
„RC 150”
GB
D
Operating Instructions
Bedienungsanleitung
Consignes de sécurité
Instrucciones de seguridad
Техника безопасности
Veiligheidsinstructies
Υποδείξεις ασφαλείας
Wskazówki bezpieczeństwa
F
ES
RUS
NL
GR
PL
5.1. Automatische Einstellung Datum/ Uhrzeit nach Funksignal
• Nach dem Einlegen der Batterie wird das Display eingeschaltet, es ertönt ein akustisches Signal und der Wecker beginnt
automatisch die Suche nach einem Funksignal. Während des Suchvorgangs blinkt das Funksymbol . Dieser Vorgang kann
3 bis 5 Minuten dauern.
• Bei Empfang des Funksignals werden Datum und Uhrzeit automatisch eingestellt.
Funksymbol
Signalstärke
Kein Empfang
Schlecht
Annehmbar
Hervorragend
Anzeige Funksymbol
Suche nach Funksignal
Blinkende Anzeige
Aktiv
Dauerhafte Anzeige
Erfolgreich – Signal wird empfangen
Keine Anzeige
Inaktiv
D Bedienungsanleitung
Bedienungselemente und Anzeigen
A Bedienungselemente
1. Display
- Taste = Einstellung Uhrzeit
2.
3.
- Taste = Anzeige Weckzeit (ca. 5 Sekunden) / Einstellung Wecker
4. ALARM ON/OFF-Schiebeschalter = Aktivierung/ Deaktivierung Wecker
5.
-Taste = Verringerung des aktuellen Einstellungswerts
6.
-Taste = Erhöhung des aktuellen Einstellungswerts
7. SNOOZE / LIGHT-Taste = Aktivierung Hintergrundbeleuchtung (ca. 5 Sekunden) / Unterbrechung des Wecksignals für 5
Minuten
8. Dämmerungssensor
9.
ON/ OFF-Schiebeschalter = Aktivierung/ Deaktivierung Dämmerungssensor
10. WAVE-Taste = Aktivierung/ Deaktivierung manueller Funksignal-Empfang / Wechsel zwischen °C und °F (UK/DE/US) /
Wechsel zwischen Frequenzen 40 kHz und 60 kHz (JP)
11. RESET-Knopf = Zurücksetzung auf Werkseinstellung
12. OFF/US/UK/DE/JP-Schiebeschalter = Aktivierung / Deaktivierung Funksignal / Aktivierung Sommerzeit und Deaktivierung
Funksignal
13. Batteriefach
14. Abdeckklappe
B Displaysymbole
1. Uhrzeit
2. AM/PM (12-Stunden-Format)
3. Tag
4. Monat
5. Wochentag
6. Temperatur
7. Signalstärke
8. Sommerzeit
9. Zeitzonenkarte (US)
10. Weckzeit
11. AM/PM (12-Stunden-Format)
12. Weckersymbol
13. Anzeigesymbol Wecker
Hinweis – Uhrzeiteinstellung
• Wird innerhalb der ersten Minuten während der Ersteinrichtung kein Funksignal empfangen, wird die Suche beendet. Das
Funksymbol erlischt.
• Bei Empfangsstörungen wird empfohlen, die Uhr über Nacht stehen zu lassen, da hier die Störsignale in der Regel
geringer sind.
• Sie können währenddessen eine manuelle Suche nach dem Funksignal an einem anderen Aufstellungsort starten oder die
manuelle Einstellung von Uhrzeit und Datum vornehmen.
• Die Uhr sucht automatisch weiterhin täglich nach dem Funksignal. Bei erfolgreichem Signalempfang werden die manuell
eingestellte Uhrzeit und das Datum überschrieben.
• Drücken Sie die WAVE-Taste (10), um die manuelle Suche nach dem Funksignal zu starten.
Hinweis – manueller Suchvorgang
• Der manuelle Suchvorgang über die WAVE-Taste (10) ist nur bei aktiviertem Funksignal (US/UK/DE/JP) – siehe 5.2.
Aktivierung/ Deaktivierung Funksignal – möglich.
• Der manuelle Suchvorgang schaltet sich automatisch nach 6 – 16 Minuten ab.
• Eine häufige Nutzung der WAVE-Taste (10) geht zu Lasten der Batteriekapazität. Es wird empfohlen, diese Funktion nur
zur Ausmachung eines optimalen Aufstellungsorts zu nutzen.
• Drücken Sie die WAVE-Taste (10) erneut, um den manuellen Suchvorgang zu beenden.
5.2. Aktivierung/ Deaktivierung Funksignal
Sie können den Empfang des Funksignals entweder komplett deaktivieren oder für vier verschiedene Regionen anpassen.
• Schieben Sie den OFF/US/UK/DE/JP-Schiebeschalter (12) auf die Position OFF, um die dauerhafte Synchronisation mit dem
Funksignal zu deaktivieren.
Nutzen Sie diese Einstellungen, wenn Sie sich in einer Region befinden, in der kein Funksignal empfangen werden kann und/
oder darf.
Nehmen Sie anschließend die Einstellungen – wie in 5.3. Manuelle Einstellung Datum/ Uhrzeit beschrieben – manuell
vor.
Aktivierung/ Deaktivierung Wecker
• Schieben Sie den ALARM ON/OFF-Schiebeschalter (4) nach links auf die Position ON. Unter dem Schiebeschalter wird eine
rote Fläche sichtbar.
• Der Wecker ist aktiviert und auf dem Display (1) wird das Weckersymbol (B – 12) angezeigt.
• Schieben Sie den ALARM ON/OFF-Schiebeschalter (4) nach rechts auf die Position OFF, bis die Fläche hinter dem
Schiebeschalter schwarz ist.
• Der Wecker ist deaktiviert und das Weckersymbol (B – 12) auf dem Display (1) erlischt.
Wecker beenden/ Schlummerfunktion
• Ist der Wecker aktiviert, wird dieser zur entsprechenden Uhrzeit ausgelöst und es ertönt für eine Minute ein Wecksignal.
Danach wird der Wecker automatisch beendet und am nächsten Tag zur eingestellten Weckzeit wieder ausgelöst.
• Um den Wecker vorzeitig zu beenden, schieben Sie den ALARM ON/OFF-Schiebeschalter (4) nach rechts auf die Position
OFF, bis die Fläche hinter dem Schiebeschalter schwarz ist. Der Wecker ist nun deaktiviert.
• Schieben Sie den ALARM ON/OFF-Schiebeschalter (4) wieder nach links auf die Position ON, um den Wecker für den
nächsten Tag zu aktivieren.
Hinweis – Schlummerfunktion
00123189/08.14
• Drücken Sie während des Wecksignals die SNOOZE / LIGHT-Taste (7), um die Schlummerfunktion zu aktiveren. Auf dem
Display (1) beginnt Zz zu blinken. Das Wecksignal wird für 5 Minuten unterbrochen und dann erneut ausgelöst.
• Die Schlummerfunktion kann viermal hintereinander ausgelöst werden.
5.5. Anzeige Temperatur
• Drücken und halten Sie die WAVE-Taste (10) für ca. 2 Sekunden, um bei der Temperaturanzeige (B – 6) zwischen °C und °F
zu wechseln.
• Dies ist nur möglich, wenn Sie den OFF/US/UK/DE/JP-Schiebeschalter (12) auf die Position US, UK oder DE eingestellt
haben.
• Liegen die Messwerte außerhalb des Messbereichs, wird in der Temperaturanzeige (B – 6) Lo (< -40°C/ -40°F) bzw. HI (>
70°C/ 158°C) angezeigt.
5.6. Hintergrundbeleuchtung
• Drücken Sie die SNOOZE / LIGHT-Taste (7), wird das Display (1) für ca. 5 Sekunden beleuchtet.
• Der Wecker ist mit einem Dämmerungssensor (8) ausgestattet, der automatisch bei dunkleren Lichtverhältnissen eine
gedämmte Hintergrundbeleuchtung des Displays (1) einschaltet.
• Bei Tageslicht bzw. ausreichend hellen Lichtverhältnissen schaltet der Dämmerungssensor (8) die gedämmte
Hintergrundbeleuchtung des Displays (1) automatisch aus.
• Schieben Sie den ON/ OFF-Schiebeschalter (9) auf die Position ON bzw. OFF, um den Dämmerungssensor (8) zu aktivieren
bzw. deaktivieren.
Hinweis – Hintergrundbeleuchtung
• Es wird empfohlen, den Dämmerungssensor während der Nichtbenutzung, auf Reisen im Gepäck, usw. zu deaktivieren.
• Eine dauerhafte Nutzung des Dämmerungssensors geht zu Lasten der Batteriekapazität.
5.7. Batteriewechsel
• Sobald die Anzeige auf dem Display (1) schwächer wird, wechseln Sie die Batterien – wie in 4. Inbetriebnahme beschrieben
– aus.
6. Wartung und Pflege
• Reinigen Sie dieses Produkt nur mit einem fusselfreien, leicht feuchten Tuch und verwenden Sie keine aggressiven Reiniger.
Achten Sie darauf, dass kein Wasser in das Produkt eindringt.
7. Haftungsausschluss
Die Hama GmbH & Co. KG übernimmt keinerlei Haftung oder Gewährleistung für Schäden, die aus unsachgemäßer Installation,
Montage und unsachgemäßem Gebrauch des Produktes oder einer Nichtbeachtung der Bedienungsanleitung und/oder der
Sicherheitshinweise resultieren.
8. Service und Support
Bitte wenden Sie sich bei Fragen zum Produkt gerne an die Hama-Produktberatung.
Hotline: +49 9091 502-115 (Deu/Eng)
Weitere Supportinformationen finden sie hier:
www.hama.com
Vielen Dank, dass Sie sich für ein Hama Produkt entschieden haben!
Nehmen Sie sich Zeit und lesen Sie die folgenden Anweisungen und Hinweise zunächst ganz durch. Bewahren Sie diese
Bedienungsanleitung anschließend an einem sicheren Ort auf, um bei Bedarf darin nachschlagen zu können. Sollten Sie das
Gerät veräußern, geben Sie diese Bedienungsanleitung an den neuen Eigentümer weiter.
1. Erklärung von Warnsymbolen und Hinweisen
Fachpersonal.
• Nehmen Sie keine Veränderungen am Produkt vor. Dadurch verlieren sie jegliche Gewährleistungsansprüche.
• Entnehmen Sie Batterien aus dem Produkt, wenn dieses für längere Zeit nicht genutzt wird, außer das Produkt wird für
Notfälle bereitgehalten.
• Halten Sie Kinder unbedingt von dem Verpackungsmaterial fern, es besteht Erstickungsgefahr.
• Entsorgen Sie das Verpackungsmaterial sofort gemäß den örtlich gültigen Entsorgungsvorschriften.
Warnung
Warnung
Wird verwendet, um Sicherheitshinweise zu kennzeichnen oder um Aufmerksamkeit auf besondere Gefahren und
Risiken zu lenken.
Hinweis
Wird verwendet, um zusätzlich Informationen oder wichtige Hinweise zu kennzeichnen.
2. Packungsinhalt
• Weltreisewecker RC 150
• 2 AAA Batterien
• diese Bedienungsanleitung
3. Sicherheitshinweise
• Das Produkt ist für den privaten, nicht-gewerblichen Haushaltsgebrauch vorgesehen.
• Schützen Sie das Produkt vor Schmutz, Feuchtigkeit und Überhitzung und verwenden Sie es nur in trockenen Umgebungen.
• Benutzen Sie das Produkt nicht in Bereichen, in denen elektronische Produkte nicht erlaubt sind.
• Positionieren Sie das Produkt nicht in der Nähe von Störfeldern, Metallrahmen, Computern und Fernsehern etc. Elektronische
Geräte sowie Fensterrahmen beeinträchtigen die Funktion des Produktes negativ.
• Lassen Sie das Produkt nicht fallen und setzen Sie es keinen heftigen Erschütterungen aus.
• Versuchen Sie nicht, das Produkt selbst zu warten oder zu reparieren. Überlassen Sie jegliche Wartungsarbeit dem zuständigen
• Schieben Sie den OFF/US/UK/DE/JP-Schiebeschalter (12) auf die Position US, UK, DE oder JP, um die dauerhafte
Synchronisation mit dem Funksignal für Nordamerika (WWVB), Großbritannien (MSF), Deutschland/ Europa (DCF-77) oder
Japan (JJY40/ JJY60) zu aktivieren.
• Haben Sie die Position US ausgewählt, erscheint die Zeitzonenkarte (B – 9).
Drücken Sie innerhalb ca. 5 Sekunden die -Taste (5) oder die -Taste (6), um die entsprechende Zeitzone Ihres
Aufenthaltsorts auszuwählen.
Die aktuell ausgewählte Zeitzone blinkt auf. Wählen Sie P für die Pacific Standard Time Zone (PST), M für die Mountain
Standard Time Zone (MST), C für die Central Standard Time Zone (CST) oder E für die Eastern Standard Time Zone (EST).
Drücken Sie ca. 5 Sekunden keine Taste, um die ausgewählte Zeitzone zu speichern.
• Haben Sie die Position JP ausgewählt, drücken und halten Sie die WAVE-Taste (10) für ca. 3 Sekunden, um zwischen den
Funksignalen JJY40 und JJY60 zu wechseln.
•
•
•
•
Entfernen und entsorgen Sie verbrauchte Batterien unverzüglich aus dem Produkt.
Verwenden Sie ausschließlich Akkus (oder Batterien), die dem angegebenen Typ entsprechen.
Mischen Sie alte und neue Batterien nicht, sowie Batterien unterschiedlichen Typs oder Herstellers.
Beachten Sie unbedingt die korrekte Polarität (Beschriftung + und -) der Batterien und legen Sie diese entsprechend ein.
Bei Nichtbeachtung besteht die Gefahr des Auslaufens oder einer Explosion der Batterien.
• Laden Sie Batterien nicht.
• Bewahren Sie Batterien außerhalb der Reichweite von Kindern auf.
• Schließen Sie Akkus/Batterien nicht kurz und halten Sie sie von blanken Metallgegenständen fern.
4. Inbetriebnahme
• Klappen Sie gegebenenfalls die Abdeckklappe (14) nach vorne über die Tasten.
• Öffnen Sie das Batteriefach (13), legen Sie zwei AAA Batterien polrichtig ein und schließen Sie das Batteriefach (13)
wieder.
• Wird nach dem Einsetzen einer neuen Batterie nichts auf dem LCD-Display angezeigt, drücken Sie mit einem spitzen
Gegenstand den RESET-Knopf (11), um einen Neustart zu generieren.
• Klappen Sie die Abdeckklappe (14) nach hinten, um diese als Standfuß zum Aufstellen des Weckers zu nutzen.
5. Betrieb
Hinweis – Eingabe
• Halten Sie die -Taste (5) oder die -Taste (6) gedrückt, um die Werte schneller auswählen zu können.
• Drücken Sie direkt die -Taste (2), um den angezeigten Einstellungswert zu übernehmen und zu überspringen.
• Erfolgt 30 Sekunden keine Eingabe, wird der Einstellungsmodus automatisch verlassen und die vorgenommenen Einstellungen
gespeichert.
Hinweis – Zeitzone
• Das Funksignal kann weitläufig empfangen werden, entspricht jedoch immer der Zeitzone, von der das Signal gesendet
wird. Beachten Sie daher, dass Sie in Ländern mit anderer Zeitzone die Zeitverschiebung entsprechend einstellen müssen.
• Befinden Sie sich in Moskau, ist es dort bereits 3 Stunden später als in Deutschland. Stellen Sie daher bei der Zeitzone
+3 ein. Die Uhr stellt sich dann immer nach Empfang des Signals bzw. in Bezug auf die manuell eingestellte Uhrzeit
automatisch 3 Stunden weiter.
Hinweis – Sommerzeit
• Wählen Sie – wie in 5.3. Manuelle Einstellung Datum/ Uhrzeit beschrieben – DST AUTO aus.
• Die Uhrzeit stellt sich automatisch auf die Sommerzeit um. Solange die Sommerzeit aktiv ist, wird auf dem Display
(B – 8) angezeigt.
5.3. Manuelle Einstellung Datum/ Uhrzeit
• Drücken und halten Sie die -Taste (2) für ca. 2 Sekunden, bis die Jahresanzeige zu blinken beginnt.
• Stellen Sie die folgenden Informationen nacheinander ein:
• Jahr
• Monat (B – 4)
• Tag (B – 3)
• 12/24-Stunden-Format
• Stunden
• Minuten
• Sekunden (nur Nullen möglich)
• Zeitzone
• Sprache Wochentag (B – 5)
• DST AUTO/OFF
• Drücken Sie zum Auswählen der einzelnen Werte die -Taste (5) oder die -Taste (6) und bestätigen Sie die jeweilige
Auswahl durch Drücken der -Taste (2).
Hinweis – Wochentag
• Sie können für die Wochentaganzeige die Sprachen Englisch (GB), Französisch (FR), Deutsch (DE), Spanisch (ES) oder
Italienisch (IT) wählen.
5.4. Wecker
Einstellung Weckzeit
• Drücken und halten Sie die -Taste (3) für ca. 2 Sekunden, bis die Stundenanzeige (B – 10) zu blinken beginnt.
• Stellen Sie die folgenden Informationen nacheinander ein:
• Stunden
• Minuten
• Drücken Sie zum Auswählen der einzelnen Werte die -Taste (5) oder die -Taste (6) und bestätigen Sie die jeweilige
Auswahl durch Drücken der -Taste (3).
• Erfolgt 30 Sekunden keine Eingabe, wird der Einstellungsmodus automatisch verlassen und die vorgenommenen Einstellungen
gespeichert.
• Drücken Sie die -Taste (3), um die eingestellte Weckzeit für ca. 5 Sekunden anzuzeigen.
9. Technische Daten
Weltreisewecker RC 150
Stromversorgung
3,0 V
2 x AAA Batterie
Messbereich
Temperatur
-40°C – +70°C
-40°F – +158°F
10. Entsorgungshinweise
Hinweis zum Umweltschutz:
Ab dem Zeitpunkt der Umsetzung der europäischen Richtlinien 2002/96/EG und 2006/66/EG in nationales Recht gilt
folgendes: Elektrische und elektronische Geräte sowie Batterien dürfen nicht mit dem Hausmüll entsorgt werden. Der
Verbraucher ist gesetzlich verpflichtet, elektrische und elektronische Geräte sowie Batterien am Ende ihrer
Lebensdauer an den dafür eingerichteten, öffentlichen Sammelstellen oder an die Verkaufsstelle zurückzugeben.
Einzelheiten dazu regelt das jeweilige Landesrecht. Das Symbol auf dem Produkt, der Gebrauchsanleitung oder der
Verpackung weist auf diese Bestimmungen hin. Mit der Wiederverwertung, der stofflichen Verwertung oder anderen Formen der
Verwertung von Altgeräten/Batterien leisten Sie einen wichtigen Beitrag zum Schutz unserer Umwelt.
Hama GmbH & Co KG
86652 Monheim / Germany
www.hama.com
11. Konformitätserklärung
Hiermit erklärt Hama GmbH & Co. KG, dass sich dieses Gerät in Übereinstimmung mit den grundlegenden
Anforderungen und den übrigen einschlägigen Bestimmungen der Richtlinie 1999/5/EG befindet. Die
Konformitäts-erklärung nach der R&TTE Richtlinie 99/5/EG finden Sie unter www.hama.com.
All listed brands are trademarks of the corresponding companies. Errors and omissions excepted,
and subject to technical changes. Our general terms of delivery and payment are applied.
00
123189
F Consignes de sécurité
Remarque
World Travel Alarm Clock
Weltreisewecker
Vous pouvez télécharger le mode d’emploi complet dans
votre langue en saisissant la référence sur www.hama.com.
„RC 150”
Avertissement concernant les piles
Operating Instructions
Bedienungsanleitung
Consignes de sécurité
Instrucciones de seguridad
Техника безопасности
Veiligheidsinstructies
Υποδείξεις ασφαλείας
Wskazówki bezpieczeństwa
GB
D
F
ES
RUS
NL
GR
PL
• Retirez les piles usagées immédiatement du produit pour
les recycler.
• Utilisez exclusivement des batteries (ou des piles) du
type indiqué.
• N’utilisez pas simultanément des piles usagées et des
piles neuves ou des piles de différents types.
• Respectez impérativement la polarité de la pile
(marquage + et -) lors de l‘insertion dans le boîtier ;
risques d‘écoulement et d‘explosion des piles si tel n‘est
pas le cas.
• Ne surchargez pas les piles.
• Conservez les piles hors de portée des enfants.
• Ne court-circuitez pas les batteries/piles et éloignez-les
des objets métalliques.
c Instrucciones de seguridad
Consignes de recyclage
Remarques concernant la protection de
l’environnement:
Conformément à la directive européenne 2002/96/
CE et 2006/66/CE, et afin d‘atteindre un certain
nombre d‘objectifs en matière de protection de
l‘environnement, les règles suivantes doivent être
appliquées: Les appareils électriques et
électroniques ainsi que les batteries ne doivent pas être éliminés
avec les déchets ménagers. Le pictogramme “picto” présent sur
le produit, son manuel d‘utilisation ou son emballage indique
que le produit est soumis à cette réglementation. Le
consommateur doit retourner le produit/la batterie usager aux
points de collecte prévus à cet effet. Il peut aussi le remettre à
un revendeur. En permettant enfin le recyclage des produits
ainsi que les batteries, le consommateur contribuera à la
protection de notre environnement. C‘est un acte écologique.
Exclusion de garantie
La société Hama GmbH & Co. KG décline toute responsabilité
en cas de dommages provoqués par une installation, un
montage ou une utilisation non conformes du produit ou encore
provoqués par un non respect des consignes du mode d‘emploi
et/ou des consignes de sécurité.
Service et assistance
En cas de question concernant le produit, veuillez vous adresser
au service de conseil produits de Hama.
Ligne téléphonique directe : +49 9091 502-115 (allemand/
anglais)
Vous trouverez ici de plus amples informations concernant
l‘assistance : www.hama.com
N Veiligheidsinstructies
Aanwijzing
De volledige BDI in uw landstaal vindt u onder invoer van
het artikelnummer op www.hama.com als download.
Waarschuwing - batterijen
00123189/08.14
• Lege batterijen direct uit het product verwijderen en
afvoeren.
• Gebruik uitsluitend accu’s (of batterijen), welke met het
vermelde type
• overeenstemmen.
• Gebruik geen oude en nieuwe batterijen tegelijkertijd
alsmede geen batterijen van een verschillende soort
of fabrikaat.
• Let absoluut op de correcte polariteit (opschrift + en -)
van de batterijen en plaats deze dienovereenkomstig in
het batterijvakje. Indien de batterijen verkeerd worden
geplaatst kunnen deze gaan lekken of zelfs exploderen.
• De batterijen niet overontladen.
• Batterijen buiten het bereik van kinderen opbergen.
• De accu‘s/batterijen niet kortsluiten en uit de buurt van
blanke metalen voorwerpen houden.
Nota
Puede descargar las instrucciones de manejo en el idioma
correspondiente a su país introduciendo el número de
artículo en www.hama.com.
Aviso – Pilas
• Retire y deseche de inmediato las pilas gastadas del
producto.
• Utilice exclusivamente pilas recargables (o pilas) que
sean del mismo tipo.
• No mezcle pilas viejas y nuevas, ni tampoco pilas de
tipos o fabricantes diferentes.
• Observe siempre la correcta polaridad (inscripciones + y
-) de las pilas y coloque éstas de forma correspondiente.
La no observación de lo anterior conlleva el riesgo de
derrame o explosión de las pilas.
• No sobrecargue las pilas.
• Mantenga las pilas fuera del alcance de los niños.
• No cortocircuite las pilas recargables/baterías y
manténgalas alejadas de objetos metálicos.
R Техника безопасности
Instrucciones para desecho y reciclaje
Nota sobre la protección medioambiental:
Después de la puesta en marcha de la directiva
Europea 2002/96/EU y 2006/66/EU en el sistema
legislativo nacional, se aplicara lo siguiente: Los
aparatos eléctricos y electrónicos, así como las
baterías, no se deben evacuar en la basura
doméstica. El usuario está legalmente obligado a llevar los
aparatos eléctricos y electrónicos, así como pilas y pilas
recargables, al final de su vida útil a los puntos de recogida
comunales o a devolverlos al lugar donde los adquirió. Los
detalles quedaran definidos por la ley de cada país. El símbolo
en el producto, en las instrucciones de uso o en el embalaje
hace referencia a ello. Gracias al reciclaje, al reciclaje del
material o a otras formas de reciclaje de aparatos/pilas usados,
contribuye Usted de forma importante a la protección de
nuestro medio ambiente.
Exclusión de responsabilidad
Hama GmbH & Co KG no se responsabiliza ni concede garantía
por los daños que surjan por una instalación, montaje o
manejo incorrectos del producto o por la no observación de las
instrucciones de manejo y/o de las instrucciones de seguridad.
Servicio y soporte
Si tiene que hacer alguna consulta sobre el producto, diríjase al
asesoramiento de productos Hama.
Línea directa: +49 9091 502-115 (Alemán/Inglés)
Encontrar más información de soporte aquí:
www.hama.com
J Υποδείξεις ασφαλείας
Aanwijzingen over de afvalverwerking
Notitie aangaande de bescherming van het milieu:
Ten gevolge van de invoering van de Europese
Richtlijn 2002/96/EU en 2006/66/EU in het
nationaal juridisch system, is het volgende van
toepassing: Elektrische en elektronische apparatuur,
zoals batterijen mag niet met het huisvuil
weggegooid worden. Consumenten zijn wettelijk verplicht om
electrische en elctronische apparaten zoals batterijen op het
einde van gebruik in te dienen bij openbare verzamelplaatsen
speciaal opgezet voor dit doeleinde of bij een verkooppunt.
Verdere specificaties aangaande dit onderwerp zijn omschreven
door de nationale wet van het betreffende land. Dit symbool op
het product, de gebruiksaanwijzing of de verpakking duidt erop
dat het product onderworpen is aan deze richtlijnen. Door te
recycleren, hergebruiken van materialen of andere vormen van
hergebruiken van oude toestellen/batterijen, levert u een grote
bijdrage aan de bescherming van het mileu.
Uitsluiting van garantie en aansprakelijkheid
Hama GmbH & Co. KG aanvaardt geen enkele aansprakelijkheid
of garantieclaims voor schade of gevolgschade, welke door
ondeskundige installatie, montage en ondeskundig gebruik van
het product ontstaan of het resultaat zijn van het niet in acht
nemen van de bedieningsinstructies en/of veiligheidsinstructies.
Service en support
Neem bij vragen over het product contact op met de afdeling
Productadvies van HAMA.
Hotline: +49 9091 502-115 (Duits/Engels)
Meer support-informatie vindt u hier: www.hama.com
Υπόδειξη
Μπορείτε να κατεβάσετε το πλήρες εγχειρίδιο χειρισμού στη
γλώσσας σας πληκτρολογώντας τον κωδικό προϊόντος στη
σελίδα www.hama.com.
Προειδοποίηση - Μπαταρίες
• Αφαιρέστε και απορρίψτε τις χρησιμοποιημένες
μπαταρίες αμέσως από το προϊόν
• Χρησιμοποιείτε αποκλειστικά απλές ή επαναφορτιζόμενες
μπαταρίες του προβλεπόμενου τύπου.
• Μην μπερδεύετε παλιές και καινούριες μπαταρίες, καθώς
και μπαταρίες διαφορετικού τύπου και κατασκευαστή.
• Προσέξτε οπωσδήποτε τη σωστή πολικότητα (επιγραφή
+ και -) των μπαταριών και τοποθετήστε τις ανάλογα. Η
μη τήρηση μπορεί να οδηγήσει σε διαρροή του υγρού ή
σε έκρηξη των μπαταριών.
• Μην αποφορτίζετε υπερβολικά τις μπαταρίες.
• Φυλάτε τις μπαταρίες μακριά από παιδιά.
• Μην βραχυκυκλώνετε τις απλές/επαναφορτιζόμενες
μπαταρίες και μην τις φέρνετε σε επαφή με γυμνά
μεταλλικά αντικείμενα.
Примечание
Полное руководство по эксплуатации на
соответствующем языке можно загрузить через www.
hama.com.
Батареи. Техника безопасности
• Израсходованные батареи немедленно удалять из
прибора и утилизировать.
• Разрешается применять аккумуляторы только
указанного типа.
• Не применять различные типы или новые и старые
батареи вместе.
• Соблюдать полярность батарей (+ и -).
Несоблюдение полярности может стать причиной
взрыва батарей.
• Не подвергать аккумуляторы чрезмерной зарядке.
• Батареи хранить в безопасном месте и не давать
детям.
• Не закорачивать контакты батарей. Не хранить
рядом с металлическими объектами.
Инструкции по утилизации
Охрана окружающей среды:
С момента перехода национального
законодательства на европейские нормативы
2002/96/EU и 2006/66/EU действительно
следующее: Электрические и электронные
приборы, а также батареи запрещается
утилизировать с обычным мусором. Потребитель, согласно
закону, обязан утилизировать электрические и электронные
приборы, а также батареи и аккумуляторы после их
использования в специально предназначенных для этого
пунктах сбора, либо в пунктах продажи. Детальная
регламентация этих требований осуществляется
соответствующим местным законодательством. Необходимость
соблюдения данных предписаний обозначается особым
значком на изделии, инструкции по эксплуатации или упаковке.
При переработке, повторном использовании материалов или
при другой форме утилизации бывших в употреблении
приборов Вы помогаете охране окружающей среды. В
соответствии с предписаниями по обращению с батареями, в
Германии вышеназванные нормативы действуют для
утилизации батарей и аккумуляторов.
Отказ от гарантийных обязательств
Компания Hama GmbH & Co. KG не несет ответственность
за ущерб, возникший вследствие неправильного монтажа,
подключения и использования изделия не по назначению, а
также вследствие несоблюдения инструкции по эксплуатации и
техники безопасности.
Отдел техобслуживания
По вопросам ремонта или замены неисправных изделий
обращайтесь к продавцу или в сервисную службу компании
Hama.
Горячая линия отдела техобслуживания:
+49 9091 502-115 (немецкий, английский)
Подробнее смотрите здесь: www.hama.com
P Wskazówki bezpieczeństwa
Υποδείξεις απόρριψης
Υπόδειξη σχετικά με την προστασία περιβάλλοντος:
Από τη στιγμή που η Ευρωπαϊκή Οδηγία 2002/96/
EΕ και 2006/66/EE ενσωματώνεται στο εθνικό
δίκαιο ισχύουν τα εξής: Οι ηλεκτρικές και οι
ηλεκτρονικές συσκευές καθώς και οι μπαταρίες δεν
επιτρέπεται να πετιούνται στα οικιακά απορρίμματα.
Οι καταναλωτές υποχρεούνται από τον νόμο να επιστρέφουν τις
ηλεκτρικές και ηλεκτρονικές συσκευές καθώς και τις μπαταρίες
στο τέλος της ζωής τους στα δημόσια σημεία περισυλλογής που
έχουν δημιουργηθεί γι’ αυτό το σκοπό ή στα σημεία πώλησης.
Οι λεπτομέρειες ρυθμίζονται στη σχετική νομοθεσία. Το σύμβολο
πάνω στο προϊόν, στο εγχειρίδιο χρήσης ή στη συσκευασία
παραπέμπει σε αυτές τις διατάξεις. Με την ανακύκλωση,
επαναχρησιμοποίηση των υλικών ή με άλλες μορφές
χρησιμοποίησης παλιών συσκευών / Μπαταριών συνεισφέρετε
σημαντικά στην προστασία του περιβάλλοντος. Στη Γερμανία
ισχύουν αντίστοιχα οι παραπάνω κανόνες απόρριψης σύμφωνα
με τον κανονισμό για μπαταρίες και συσσωρευτές.
Απώλεια εγγύησης
Η εταιρεία Hama GmbH & Co KG δεν αναλαμβάνει καμία ευθύνη
ή εγγύηση για ζημιές, οι οποίες προκύπτουν από λανθασμένη
εγκατάσταση και συναρμολόγηση ή λανθασμένη χρήση του
προϊόντος ή μη τήρηση των οδηγιών λειτουργίας και/ή των
υποδείξεων ασφαλείας.
Σέρβις και υποστήριξη
Για ερωτήσεις σχετικά με το προϊόν απευθυνθείτε στην υπηρεσία
εξυπηρέτησης πελατών της Hama.
Γραμμή υποστήριξης: +49 9091 502-115 (Γερμανικά/Αγγλικά)
Περισσότερες πληροφορίες υποστήριξης θα βρείτε στη
διεύθυνση: www.hama.com
Wskazówki
Kompletna instrukcja obsługi w Twoim języku jest
dostępna do pobrania na stronie www.hama.com po
podaniu numeru artykułu.
Ostrzeżenie - baterie
• Natychmiast usunąć z produktu zużyte baterie i poddać
je utylizacji.
• Używać wyłącznie akumulatorów (lub baterii)
odpowiadających podanemu typowi.
• Nie mieszać starych i nowych baterii ani baterii różnych
typów lub producentów.
• Wkładając baterie, zwrócić koniecznie uwagę
na właściwe podłączenie biegunów (znak + i -).
Nieprzestrzeganie grozi wyciekiem lub wybuchem
baterii.
• Nie przeciążać baterii.
• Przechowywać baterie poza zasięgiem dzieci.
• Nie zwierać akumulatorów / baterii oraz trzymać je z
dala od odkrytych przedmiotów metalowych.
Informacje dotycząca recyklingu
Wskazówki dotyczące ochrony środowiska:
Od czasu wprowadzenia europejskiej dyrektywy
2002/96/EU i 2006/66/EU do prawa narodowego
obowiązują następujące ustalenia: Urządzeń
elektrycznych, elektronicznych oraz baterii
jednorazowych nie należy wyrzucać razem z
codziennymi odpadami domowymi! Użytkownik zobowiązany
prawnie do odniesienia zepsutych, zniszczonych lub
niepotrzebnych urządzeń elektrycznych i elektronicznych do
punktu zbiórki lub do sprzedawcy. Szczegółowe kwestie
regulują przepisy prawne danego kraju. Informuje o tym
symbol przekreślonego kosza umieszczony na opakowaniu.
Segregując odpady pomagasz chronić środowisko!
Wyłączenie odpowiedzialności
Hama GmbH & Co. KG nie udziela gwarancji ani nie
odpowiada za szkody wskutek niewłaściwej instalacji,
montażu oraz nieprawidłowego stosowania produktu
lub nieprzestrzegania instrukcji obsługi i/lub wskazówek
bezpieczeństwa.
Serwis i pomoc techniczna
W razie pytań dotyczących produktu prosimy zwrócić się do
infolinii Hama.
Gorąca linia: +49 9091 502-115 (niem./ang.)
Dodatkowe informacje są dostępne na stronie: www.hama.
com