1
BEDIENUNGSANLEITUNG
REVOX 8225. COMPACT DISC PLAYER
WICHTIGE HINWEISE
Schützen Sie lhr Gerät vor übermässiger Hitze
und Feuchtigkeit. Stellen Sie es so auf, dass die
Lüftungssch itze nicht verdeckt werden,
Vor Anschliessen des Gerätes ans Netz sind unbedingt die Hinweise in Kapitel 1.12u beachten.
Der Laser-Abtaster strahlt kein gefährliches Licht
aus, ausserdem wird er nur bei geschlossener
Schublade aktiviert.
I
GARANTIE
Den Geräten, welche in der Bundesrepublik
Deutschland verkauft werden, liegt eine spezielle Garantieanforderungskarte bei. Entweder befindet sich die Karte in der Verpackung oder in
einer Plastiktasche an der Verpackungsaussenseite. Sollte diese Karte fehlen, wenden Sie sich
an lhr REVOX-Fachgeschäft oder an lhre REVOXLandesvertretung.
Für in der Schweiz und Osterreich gekaufte Geräte gibt der Fachhändler die Garantiebescheinigung ab.
Bei den in Frankreich gekauften Geräten finden
Sie die Garantiekarte in der Verpackung. Diese
Karte muss von lhrem autorisierten REVOXFachhändler vollständig ausgefüllt und unter-
schrieben werden.
Bitte beachten Sie, dass die Garantie nur im Verkaufsland gültig ist. Ausserdem machen wir Sie
darauf aufmerksam, dass die Garantie erlischt,
wenn am Gerät unsachgemässe Eingriffe oder
nicht fachmännische Reparaturen vorgenommen worden sind.
VERPACKUNG
Bewahren Sie die Originalverpackung auf. Beieinem Transport ist diese Spezialverpackung der
beste Schutz für lhr wertvolles Gerät.
Subject to change.
Printed in Switzerland
by WILLI STUDER AG 10.30 0081 (Ed.1084)
copyrighr by wlLLl STUDER AG
CH-81
05 Regensdorf
-Zü rich
INHALTSVERZEICHN IS
1.
1.1
1.1.1
ALLGEMEINES
lnbetriebnahme
Kontrollen vor Anschliessen des Gerätes an das Netz
1.1.2 Tonsignal- (NF-) Kabel anschliessen
1.1.3 Den GD-Player B.225 an das Netz anschliessen
1.2
Ubersicht der Bedienungselemente
1.2.1 Al lgemeine Bedienungselemente
1.2.2 Speziel le Bedienungselemente
1.2.3 Anschlüsse an der Rückseite.
Die Compact Disc
1.3
1.3.1 Wissenswertes über die Compact Disc
1.3.2 Handhabung und Pflege der Compact Disc
1.3.3 Struktur der Compact Disc
.
2
2.1
2.2
BEDIENUNGSANLEITUNG
CD-Player 8225 einschalten
Compact Disc abspielen
2.2.1 Compact Disc einlegen
2.22 Abspielen einer Compact Disc (Play CD-Mode)
2.3 Display l7l
2.3.1 Display bei normalem Abspielmodus (PLAY CD-Mode)
2.3.2 Display bei Programm-Betrieb (PROGRAM MODE)
2.4 Kopfhörerbetrieb
3 PROGRAMMIEREN DES COMPACT DISC PLAYERS REVOX 8225
3 1 Allgemeines
3.1.1 Wozu sich selbst ein Programm zusammenstellen
3.2 Programmieren Schritt für Schritt
3.2.1
3.2.2
3.2.3
3.2.4
5
3.3
3.3 1
3.4
3.2
3.2.6
3.4.1
3.4.2
3.4.3
3.4.4
4.
Allgemeine Hinweise zur Programmierung
CD-Player auf Programm-Eingabe schalten
Reihenfolge umprogrammieren
Abschnitte programmieren
Eingabe-Arten vermischt eingeben
lm Programm <blättern)
Programm editieren
Programm löschen
SpezielleProgramm-Schritte
Repetierbetrieb (LOOP) programmieren
Pause programmieren
Alarmfunktion programmieren (Taste CAL. TONE l12l)
Ausschalten am Ende des Programmes
.
BEDIENUNG DES COMPACT DISC PLAYERS 8225 MIT DER
N FRAROT-FERNBEDI EN U NG REVOX B2O1
I
4.1
4.2
5.
5.1
5.2
2
Allgemeines..
Bedienung
.
TECHNISCHER ANHANG
Technische Daten
Abmessungen
Seite
3
3
3
3
3
4
4
4
6
6
6
7
7
B
B
B
B
I
10
10
10
11
12
12
12
12
12
12
13
13
14
14
14
15
15
15
16
16
16
17
17
17
1B
1B
1B
1ALLGEMEINES
1.1
lnbetriebnahme
Kontrollen vor Anschliessen des Gerätes an das Netz
1.1.1
Damit das Laufwerk während dem Transport
nicht beschädigt werden kann, wurde es mit
zwei Schrauben von unten fixiert. Vor lnbetriebnahme müssen diese Schrauben vollständig herausgedreht werden. Die Schrauben sind unterhalb des Laufwerkes von der
Unterseite des Gerätes her zugänglich.
Bevor das Gerät an das Netz angeschlossen
wird, sollte der Spannungswähler an der Geräte-Rückseite kontrolliert werden. Die durch
die Aussparung sichtbare Spannungsangabe
muss mit der des Ortsnetzes übereinstimmen.
lst dies nicht der Fall, so muss der Spannungs-
wähler umgestellt und die Netzsicherung gegebenenfalls ausgewechselt werden.
Vorgehen:
- Die Befestigungsschrauben des oberen Gehäuseblechs lösen und das Blech abheben.
- Den Spannungswähler auf den richtigen
Spannungswert ei nstel len.
- Netzsicherung kontrollieren:
100.., 140V T 500 mA slow
200 ...240V T 250 mA slow
Eine falsche Sicherung muss ersetzt werden.
- Gehäuseblech wieder montieren.
:
:
1.1.2 Tonsignal- (NF-) Kabel anschliessen
Der CD-Player 8225 wird über ein zweifaches
Cinch-Kabel (C2C) mit dem Verstärker verbunden. Dazu sind am 8225 zwei Ausgänge
(AUDIO OUTPUT) vorhanden.
FIXED
Dieser Ausgang ist für den Anschluss an einen Verstärker wie z.B. der REVOX 8251 gedacht, Erwird mitdem Eingang DISC (8251)
oder AUX (8750187 B0/B739) angeschlossen. Dieser Ausgang liefert einen fixen Pegel
p
" ilillllllllllllllll
&
ä
F.
lllllllllllllllll6ryg
sg
&
ä
tillllililllilllllll
x
$
ä
ä
:&
:B
tl#lxlffilllßlllllllll
.ä
T$
:$
itü
IIIffililtlilIßilil11l'
wt:g:=rcg
llliltNIIIilll
, ),
Ilf
J.
a ) t ),
l.
a r r rt
lf lllllrlllr-rlrrti
--
)..
:ä
ä
!*
1,,
1&
;iär"
ll', T&i
e
)ffi
;t
.1f,
:{t'
:*ä
-']tr
l,
re
M
VARIABLE
Mit diesem Anschluss können z.B. REVOXAktivboxen oder ein Endverstärker ohne
Eingangsregler direkt betrieben werden.
Der Pegel dieses Ausganges kann an der
Frontplatte mit den Tasten VOLUME + [10]
oder - [11] verändert werden. Wird auf maximale Lautstärke geschaltet, so ist es möglich, dass Schaltknackse der Volumensteuerung hörbar werden.
CD-Player8.225 an das Netz anschliessen
Bevor das Gerät an das Ne? angeschlossen
wird, müssen unbedingt die Hinweise unter
1.1.3 Den
Kapitel <1.1.1 Kontrollen vor Anschliessen des
Gerätes an das Netz> beachtet werden. Danach kann der CD-PIayer 8225 mit dem beigelegten Netzkabel an das Netz angeschlossen werden.
t51 t41 t3t t2I
l21l l2ol
IleI
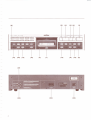
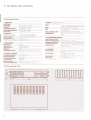
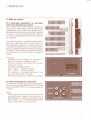
1.2 Übersicht der Bedienungselemente
1.2.1
Allgemeine Bedienungselemente
11l
POWER". mit dieser Taste kann das
Gerät ein- und ausgeschaltet werden.
Gewisse Teile (Bsp. der lR-Empfänger)
bleiben allerdings immer eingeschaltet
(sog. Stand-By Betrieb).
LOAD, durch Betätigen dieser Taste
fährt das Laufwerk 16l aus resp. ein
(siehe 2.2.1) Compact Disc einlegen
STOP-, mit dieser Taste kann der Abspielvorgang unterbrochen werden.
Dadurch wird der Laser-Abtaster wieder in die Anfangsposition gesteuert
und, falls das Gerät im Program-Mode
war. das Programm abgebrochen. Die
Position des Laser-Abtasters kann nach
Drücken der Taste STOP nicht mehr
reproduziert werden. Falls dies gewünscht wird, siehe Taste VA [15].
PLAY/NEXI Abspieltaste mit folgenden
Funktionen:
Betätigen nach LOAD l2l, die CD beginnt zu drehen, das lnhaltsverzeichnis
wird ausgelesen und die Platte wird ab
dem ersten Stück (TRACK) abgespielt
Nochmaliges Drücken, das nächste
Stück (TRACK) wird angewählt.
Betätigen nach Drücken einer der Tasten l8l, direkte Anwahl des (X-ten)
Stückes.
Betätigen nach Drücken der Taste PROGRAM [26], der Program-Mode wird
aktiviert.
l2l
t3l
14)
1.2.2 Spezielle Bedienungselemente
Die Bedienungselemente im unteren Frontplattenteil können grob in zwei Funktionsgruppen unterteilt werden: Bedienungselemente
für zusätzliche Laufwerk-Funktionen und Bedienungselemente für die Programmierung.
A Bedienungselemente für zusätzliche
Laufwerkfunktionen
tgl
PHONES, Klinken-Buchse für Kopfhörer
200 ...600 Ohm
[10] VOLUME +, mit dieser Taste kann der
Kopfhörer-Pegel wie auch der Pegel des
Ausgangs VARIABLE OUTPUT erhöht
werden.
Drücken während einem aktiven Programm, der nächste Programm-Schritt
wird angewählt.
t5l REPEAT, Drücken dieser Taste bewirkt
sofortiges Repetieren des gerade laufenden Stückes. lst das Gerät auf Stopp.
so wird das erste Stück der CD abgespielt. lst das Gerät im Program-Mode,
wird der laufende Programm-Schritt
wiederholt.
t6l (Laufwerk), Laufwerkeinschub mit CDLaufwerk und Flüssigkristall-Anzeige,
welcher durch Drücken derTaste LOAD
12) aus-leingefahren werden kann.
(Anzeige), multifunktioneller LC-Display.
Diese Anzeige informiert über sämtliche Betriebszustände des Gerätes und
über den lnhalt der eingelegten CD.
t8l (Tasten 0 - 9), Zahlen-Eingabetasten.
Sie können für die direkte Anwahl eines
Stückes (TRACK) in Verbindung mit der
Taste PLAY/NEXT [4] oder zur Programm ierung verwendet werden.
1
[2 ] R-SEN SOR, nfrarot-Empfängerfenster.
l7l
I
I
Mit den Tasten der oberen Reihe (t1l bis t8l,
mitAusnahme derTasten REPEAT t5l und der
Zahlentaste 0) kann das Gerät eingeschaltet
werden. Dabei startet es im dadurch vorgewä hlten Betriebsmodus.
-, mit dieser Taste kann der
Kopfhörer-Pegel wie auch der Pegel des
Ausgangs VARIABLE OUTPUT abgeschwächt werden.
[12] CAL TONE., Kalibrierton-Taste. mit dieser Taste kann ein 1000 Hz-Kalibrierton
auf die Ausgänge geschaltet werden.
Ein angeschlossenes Tonbandgerät
kann damit präzise gepegelt werden.
Der 1000 Hz CAL TONE entspricht dem
maximal möglichen Ausgangspegel.
Dieser Maximalpegel ist systembedingt
und wird auch von kurzen lmpulsen
nicht überschritten.
l1 1l VOLUME
l13l AUTOSTOP Drücken dieser Taste bewirkt, dass der Abspielvorgang am
Schluss des gerade laufenden Stückes
oder Prog ramm-Sch rittes unterbrochen
wird. Dabei wird der Laser-Abtaster
automatisch an den Anfang des nächsten Stückes positionierl Unwillkürlich
nach Drücken der Taste PAUSE VA
[15] wird das nächste Stück abgespielt.
Danach wird wieder automatisch auf
Pause geschaltet.
[14] Taste tr, mit dieser Taste kann in einem
Stuck jede Stelle gegen das Ende hin
angefahren werden. (Gedrückt halten
a utomatischer Vorlauf).
:
B Tasten
V^
(Pause)", mit dieser Taste kann der
Abspielvorgang jederzeit unterbrochen
werden.
[16] Taste {, mit dieser Taste kann in einem
Stück jede Stelle gegen den Anfang hin
angefahren werden. (Gedrückt halten
automatischer Rücklauf).
[17] DISPLAY mit dieser Taste kann die Anzeige umgeschaltet werden. lm normalen Abspielmodus wird bei jedem
Stuck die Zeit ab Anfang des Stücks
angezeigt. Durch Drücken dieser Taste
wird die gesamte Spielzeit von Anfang
bis zum gerade gespielten Stück angezeigt
[15]
:
für die Programmierung
[18] LOOP*, mit dieser Taste kann der Befehl gegeben werden, die CD oder das
Programm immer wieder abzuspielen,
bis die Taste STOP [3] gedrückt wird.
+,
diese Taste erlaubt während dem
[19]
Prog rammieren das <Aufwä rts-Blättern>
im Programm. Sie ist eine nützliche
Hilfe wenn ein bestehendes Programm
abgeändert werden solL
l20l -, gleiche Funktion wie [19], jedoch abwärts.
l22l STORE. Speicherladetaste, welche
nach jeder Programmschritt-Eingabe
gedrückt werden muss. Dadurch wird
automatisch der nächste Programmschritt auf der Anzeige angezeigt, und
die entsprechenden Angaben können
eingegeben werden.
t23l MARK,.mit dieser Taste kann im Programmiervorgang, während ein Stück
abgehört wird, eine Start- und Stoppmarke gesetzt werden. Dadurch kann
auch im Program-Mode jede beliebige
Stel le programmiert werden.
l24l TRACK/TIME, mit dieser Taste kann die
Anzeige während dem Programmiervorgang von Stück-(Track-)Eingabe auf
Zeiteingabe (Min. und Sec.) geschaltet
werden.
[25] CURSOR. mit dem Cursor kann jede
Stelle in der Anzeige angefahren und
danach nach Bedarf editiert werden.
Achtung: lst die Eingabe auf ZeiI
(TIME) geschaltet, so muss um die Sekunden zu programmieren nach der
Minuten-Eingabe mit dem Cursor weitergeschaltet werden.
[26] PROGRAM, mit dieser Taste kann der
Eingabemodus eingestel lt werden.
Wird nach erfolgter Program-Eingabe
die Taste PLAY/NEXT [4] gedrückt, so
starlet das Gerät im Program-Mode.
Falls nach dem Programmiervorgang
der CD-Player in der normalen Betriebsart gestartet wird, so muss vorgängig
zur Taste PLAY/NEXT die Taste PROGRAM 126l nochmals gedrückt werden.
*
Diese Funktionen können auch in Programmen verwendet werden.
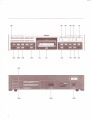
1.2.3 Anschlüsse an der Rückseite
[30] AUDIO OUTPUT FIXED, Ausgang für
einen Verstärker bei welchem der Eingang an den Pegel des CD-Players angepasst werden kann (der Verstärker
REVOX 8251 ist ab Werk optimal angepasst)
AUDIO
OUTPUT VARIABLE, an diesen
[31]
Ausgang können Aktivboxen oder eine
Endstufe etc. direkt angeschlossen
werden. Die Lautstärke kann mit den
beiden Tasten VOLUME * und - an der
Frontplatte des CD-Players eingestellt
werden.
t32l AC POWER, Ne?anschluss (daneben
ist die Spannungseinstellung kontrollierbar)
[33] REMOTE, über diesen Anschluss kann
a) der lR-Empfänger unterdrückt und
b) eine Kabelfernbedienung angeschlossen werden.
1.3 Die Compact Disc
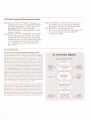
1.3.1 Wissenswertes über die Compact Disc
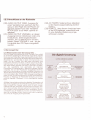
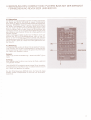
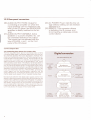
Die 5 km lange <lnformationsrille> einer Compact Disc enthält
Die digitole Umsetzung
ein komplexes Digitalsignal: alternierend angeordnete, digrtale
Werte aus zwei Tonkanälen tragen die Musikinformation. Untergeordnete lnformationen für die Anzeige der Stücke (TRACK's),
Abspielzeit etc. sind ebenfalls in dieser <lnformationsrille> ent-
von PkittC ie{lektierter. Läeistralil
halten. Auf der Compact Disc trägt diese lnformation eine
hauchdünne Aluminium-Schicht. In dieser Schicht ist die drgrtale lnformation in Form von Vertiefungen enthalten. Das Abtasten dieser Daten geschieht mit einem Laserstrahl. Die Reflexion des Laserstrahls wird gleichzeitig von mehreren
Photodioden (Lichtempfänger) in elektrische (digitale) Signale
umgesetzt. Das von den Photodioden abgegebene Gesamtsignal wird in verschiedenen Schritten verarbeitet. Erkennen und
Trennen der Synchronisier-lnformation, Trennen der Musik- und
lnformationsdaten (Bsp. TRACK TIN/E), Erzeugen eines Regelsignals aus der Synchronisierfrequenz und der Ouarz-Referenzfrequenz zur Regelung der Plattenteller-Drehzahl und Umsetzung der digitalen Tonsignale in ihre ursprüngliche analoge
.Se.rvosystem
I
llr
'Rillen-
Photodetektoren
Licht > elektrisches Signal
nachführung
(radial)
iili
-.Fqkuqsierung
(yertikal)
Sqrvosygtern.
Servosystem
für Drehzahl
Anzeige
Form.
Allfällrge Unterschiede zwischen den digitalen Tonsignalen und
den Slcherungsdaten bei der Dekodierung deuten auf eine defekte Compact Disc. Signale, welche noch im leicht unregelmässigen Takt der rotierenden Compact Disc erscheinen, werden in einen perfekten Zeitraster gebracht. Einzelne Fehler werden korrigiert, nicht korrigierbare durch lnterpolation (Durchschnittswert aus der Abtastung vor bzw. nach dem Fehler) ersetzt. Bei zu häufigen Fehlern, welche nicht mehr korrigierbar
sind, wird der Ausgang stummgeschaltet.
Fehlerkorrektur
eventuell verfälschte
Daten > fehlerfreies
digitales Signal
Zur
HiFi
Anlage
Linker Kanal
D/A Umsetzung
fehlerfreies digitales
Signal > zwei analoge
Audio (-Ton) Signale
Zur
HiFi
Anlage
Rechter. Kanal
1.3.2 Handhabung und Pflege der Compact Disc
Die Handhabung der Compact Disc ist bedeutend einfacher
und problemloser als man es von der Langspielplatte her gewohnt ist. Trotzdem müssen einige Punkte unbedingt beachtet
werden. Dazu ist es notwendig. dass man die mechanische
Konstruktion der Compact Disc kennt
Die Compact Disc ist dreischichtig aufgebaut. Auf der relativ
starken Schutzschicht wird die hauchdünne Aluminiumschicht,
welche die lnformation trägt, aufgetragen. Auf diese schwache
Schicht wird später das Label (lnhalt, lnterpret und Disc-Marke)
aufgedruckt. Der Lack und die Farbe. welche beim Bedrucken
aufgebracht wird, sind der einzige Schutz der empfindlichen
Schicht Wohl <liest> der Laser-Abtaster ab der anderen, viel
besser geschutzten Seite, doch kann ein Kratzer in der MetallSchicht (auf der bedruckten Seite) ein Abspielen der Compact
Disc stören oder gar verunmöglichen. Der Abstand der <lnformationsrillen> auf der Compact Disc beträgt nur 1,6 pm und die
mittlere Bitlänge ca. 1 pm (ein Tausendstel Millimeter). Wenn
man sich diese Grössenordnung vorstellt wird klar dass ein
Kratzer auf der bedruckten Rückseite der Compact Disc verheerende Folgen haben kann.
Auf der Lese-Seite (spiegelnde Fläche) wirkt sich ein Kratzer
oder ein Fingerabdruck kaum oder gar nicht aus. Diese Seite ist
durch die starke Trägerschicht weitgehend geschutzt. Kratzer
und Verschmutzungen irritieren den Laser-Abtaster nicht so
leicht. Durch die starke Fokussierung stören Schmutzpartikel
auf der CD-Oberfläche kaum.
Trotzdem sollte die Compact Disc gleich sorgfältig und sauber
behandelt werden, wie man sich dies bei den Langspielplatten
gewohnt ist.
Eine Reinigung der Compact Disc erubrigt sich, wenn sie nur am
Rand angefasst wird und nach jedem Abspielvorgang sofort in
die Originalverpackung gelegt wird.
Verschmutzte Compact Disc's können mit einem fusselfreien,
weichen und trockenen Tuch abgewischt werden. Auf keinen
Fall darf irgendein Lösungs- oder Scheuermittel verwendet
werden.
1.3.3 Stuktur der Compact Disc
Auf der Compact Disc ist eine Fülle von lnformationen enthalten. Um die Möglichkeiten, welche das CD-System bietet, voll
auszunutzen, ist es notwendig, die Struktur der Compact Disc zu
kennen. Auf einer Compact Disc kann ungefähr maximal eine
Spielzeit von 70 Minuten gespeichert werden, Dies eröff net natürlich Möglichkeiten wie die ununterbrochene Wiedergabe
grosser Konzerte. Da allerdings auch einzelne Passagen eines
solchen Konzertes direkt gesucht und abgespielt werden sollen.
muss eine entsprechende Information in derTonspur mitaufgezeichnet sein. Dies wurde bei der Compact Disc auf folgende
Weise gelöst:
- lst eine Unterteilung in einzelne Stucke möglich, so werden
diese durch kurze Pausen voneinander getrennt. Diese Stucke
werden auf der Compact Disc mit TRACK bezeichnet
- Eine andere Vlöglichkeit der Unterteilung sind die sogenannten lndices (INDEX). Klassische Aufnahmen, bei welchen ein
Stück meist in einzelne Sätze unterteilt ist. werden bei einigen
Herstellern mit lndices versehen.
Hinweis:
Die Unterteilung der Compact Disc wird vom CD-Hersteller de-
finiert. Sollte eine Aufnahme welche aus mehreren Teilen besteht, nicht mit lndices versehen sein, so ist im lnhaltsverzeichnis auf der Hülle meist die Anfangszeit (CD-TIME) angegeben.
-
Jede Compact Disc ist zudem in Minuten und Sekunden unterteilt. Eine beliebige Stelle kann sekundengenau angefahren
werden und bleibt jederzeit reproduzierbar. Die in der Anzeige
des REVOX 8225 ausgelesene Zeit wird immer ab Compact
Disc gelesen und entspricht nicht der effektiven Betriebszeit
des Gerätes. Selbstverständlich kann eine Stelle in TRACK
TIME wie auch in CD TIME angefahren werden (man beachte
Kapitel 2.3, Abschnitt <Achtung:>).
2 BEDIENUNGSANLEITUNG
Hinweis:
Die nachfolgende Bedlenungsanleitung sollte Schritt f ur Schritt
durchgearbeitet werden. Nur durch wiederholtes <Spielenr mit
dem CD-Player 8225 wird man mit der Bedienung vertraut und
kann die vielfältigen Programmiermöglichkeiten nutzen. Fehlbedienungen am Gerät können keine Schäden verursachen. es ist
ausgeschlossen. dass durch einen falschen Tastendruck eine
Beschädigung des CD-Players erfolgt. Selbst die Compact Disc
<ist nirgends so sicher aufgehoben> wie im Gerät selbst.
2.1 CD-PIayer
8225 einschalten
Nachdem das Gerät ordnungsgemäss eingerichtet und angeschlossen ist, kann es durch Drücken der Taste POWER [1]
eingeschaltet werden. ln der Anzeige (Drsplay) [7] erscheint
folgendes Bild:
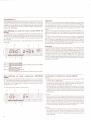
TRACK
r-l r-f
t-t t-t
10
1
5
rrrtrrrrllrlllrrrrllrrlllrltll
TIME
l-l .. l-l l-l
t-l
15
,-l t-l
20
25
30
2.2 Compact Disc abspielen
2.2.1 Compact Disc einlegen
Bevor die erste Compact Disc eingelegt und abgespielt wird,
sollte der Abschnitt <Die Compact Disc>, Kapitel 1.3. durchgelesen werden.
- Taste LOAD [2] drücken, das Laufwerk [6] wird ausgefahren.
- Die Compact Disc vorsichtig mit der bedruckten Seite nach
oben einlegen.
-
Durch nochmaliges Drücken der Taste LOAD [2] wird das
Laufwerk [6] wreder eingefahren. Danach ist das Gerät im
Stopp-Modus. das alte lnhaltsverzeichnis ist gelöscht.
Das Laufwerk wird auch eingefahren, wenn die Taste PLAY/
NEXT [4] gedruckt wird. Danach wird das lnhaltsverzeichnis
eingelesen und der Abspielvorgang beginnt sofort.
Während dem Ein- resp. Ausfahren des Laufwerkes sollte der
Weg der Laufwerk-Schublade nicht behindert werden. Stösst
die Schublade während dem Ein- resp. Ausfahren auf Widerstand, so ändert sie ihre Laufrichtung. Dies geschieht auch,
wenn ein unvorsichtiger Anwender seine Finger nicht rechtzeitig aus dem Schubladenbereich zieht.
Das Gerät kann allerdings auch durch direkte Anwahl einer
Funktion eingeschaltet werden. Hinweise dazu werden in dem
entsprechenden Abschitt gegeben.
2.2.2 Abspielen einer Compact Disc (Play GD-Mode)
-
Compact Disc einlegen (siehe Kapitel22.1l.
Durch Drücken derTaste PLAY/NEXT [4]wird derAbspielvorgang gestartet. Es werden dadurch folgende Vorgänge ausgelöst:
1. Die Compact Disc beginnt zu drehen.
-
2. Das lnhaltsverzeichnis wird ab Compact Disc gelesen und
in den Speicher geladen.
3. Das lnhaltsverzeichnis wird im Display [7] angezeigt (Feld
E, schwarzer Balken. max. 30 Stücke können angezeigt
werden)
ABCD
Erneutes Drücken dieser Taste hebt die Funktion wieder auf,
derAbspielvorgang wird an der gleichen Stelleweitergeführt,
an welcher er unterbrochen wurde.
Mit den Tasten { [16] und tr [14] kann jede beliebige Stelle auf
der Compact Disc angefahren werden. Als Positionierungshilfe dient auch hier der Display [7]. lm Feld B wird das StÜck
(TRACK), in Feld C die zeitliche Position (TlN/E) innerhalb des
Stückes angezeigt. Diese Position ist sekundengenau reproduzierbar. Kurzes. mehrfaches Antippen der Taste [14] oder
['16] bewirkt eine kleine Veränderung der Position, längeres
Drücken bewirkt schnelle Veränderung der Position. Nach
Loslassen der Taste wird automatisch wieder auf den normalen Abspielbetrieb geschaltet. Möchte man den Laser-Abtaster positionieren, ohne dass danach der Abspielmodus
eingeschaltet wird. so muss vorgängig die Taste VA (Pause)
gedrückt werden.
Danach kann eine bekannte Stelle mit den Tasten [14] und [16]
4. Das erste Stück (TRACK) auf der Compact Disc wird abgespielt.
-
-
Erneutes Betätigen der Taste PLAY/NEXT [4] lässt den LaserAbtaster auf den Anfang des nächsten Stückes springen und
das zweite Stuck wird abgespielt. lm lnhaltsverzeichnis (Display [7]) wird dies selbstverständlich angezeigt. Der Balken
(Feld E) ist nun links um ein Segment kurzer (Bedeutung; ein
Stück wurde bereits abgespielt) und unter dem Schriftzug
TRACK (Feld B) stehen die Zahlen 02 (: zweites Stuck).
Erneutes Drucken der Taste PLAY/NEXT [4] lässt den LaserAbtaster auf das nächste Stück springen usw.
Drücken einer Zahlen-Eingabetaste [B] und danach derTaste
PLAYi NEXT [4] lässt den Laser-Abtaster direkt auf das angewählre stück (TRACK) springen
Beispiel:
-
Jemand will das 14. Stück (TRACK) der eingelegten Compact
Disc abspielen, Vorgehen:
- Taste 1 und 4 (der Tasten [B]) drucken.
- Taste PLAY/NEXT [4] drücken, der Laser-Abtaster springt
auf das vierzehnte Stück.
Drucken der Taste STOP [3] bewirkt sofortigen Abbruch des
Abspiel-Vorganges. und die Anzeige im Display [7] wird auf
Null gestellt. der Balken zeigt wieder das ganze lnhaltsverzeichnis.
Durch Drücken der Taste REPEAT [5] wrrd das laufende Stück
sofort wieder ab Anfang gespielt.
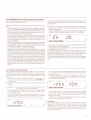
Drücken derTasteVA [15] (Pausentaste) unterbrichtden Abspielvorgang. der Laser-Abtaster bleibt in der erreichten Position stehen,
lm Display erscheint der Schriftzug PAUSE.
TRACK
1
,
5
PAUSE
TIIIIE
t ,_t
-f
:r. :r
,:.:l
10
.lj,
20
E
'A
30
angefahren und bei Bedarf durch Drücken der Taste VA [15]
abgespielt werden. Auch die Tasten PLAY/NEXT [4] und REPEAT [5] behalten ihre Funktion. heben die Pause allerdings
nicht auf.
Wird die Taste AUTOSTOP [13] gedrückt, so schaltet das
Gerät am Ende elnes Stückes (TRACK) auf Pause. Gleichzeitig
wird der Laser-Abtaster an den Anfang des nächsten Stückes
gesetzt. Durch Drücken der Taste VA [15] wird dieses unverzüglich abgespielt (die Pause von einigen Sekunden zwischen
zwei Stücken wurde übersprungen). Diese Funktion wird
nach jedem Stück wiederholt, bis die Taste AUTOSTOP [13]
ein zweites Mal gedrückt wird. Am Ende der CD wird diese
Funktion selbsttätig ausgeschaltet. Diese Funktion wird
-
selbstverständlich im Display [7] angezeigt.
Wird dieTaste LOOP [18]gedrückt, so beginntderAbspielvorgang nach dem letzten Stück (TRACK) von vorne. Solange
diese Funktion eingeschaltet ist, wird die eingelegte Oompact
Disc wiederholt (Endlosbetrieb). Auch diese Funktion wird im
Display [7] angezeigt. Nochmaliges Drücken dieser Taste
hebt die Funktion wieder auf.
2.3 Display [7]
Das Display (Anzeige l7l) ist das lnformationszentrum des
Compact Disc Players REVOX 8225. Darin können sämtliche
Betriebszustände des Gerätes angezeigt resp. ausgelesen werden. lm weiteren wird durch das Display auch uber den lnhalt
der Compact Disc wie auch uber die aktuelle Spielzeit innerhalb
des Stückes (TRACK-TIME) oder seit Anfang CD (CD-TIME) informiert.
2.3.1 Display bei normalem Abspielmodus (PLAY CDMODE)
Wird nach dem Einlegen einer neuen CD die Taste STOP [3] Sedrückt, zeigt der Balken IE] 30 Stücke an. Dies ist normal und
bedeutet. dass das lnhaltsverzeichnis der CD noch nicht gelesen wurde. Sobald die Taste PLAY/NEXT [4] gedrucktwlrd, wird
das lnhal tsverzeichnis korrigiert
lm normalen Abspielmodus informiert der Display über folgende Zustände:
ABCD
.Th'ACK
INDEX
151015202530
.- -r.lrrrr.ra.:lrtl.
B
C
Feld D
Feld
Feld
E
.
.PAUSE
TIME
.
üI,55,ouÄH*
Wenn am Anfang einer Compact Disc durch Drücken derTaste
die effektive Zeit ab Anfang des Stückes ausgelesen. bei der CD
TIME wrrd die Pause am Anfang der Compact Disc (ca. 2 Sekun-
den bevor das erste Stuck beginnt) noch dazu gerechnet. Diese
lnformationen sind auf der Compact Disc programmiert und
nicht vom Abspielgerät abhängig
Stücknummer TRACK
Teil eines Stückes INDEX
Position des Laser-Abtasters entweder aul Stück-Antang (TRACK-TIME)
oder auf CD-Anfang (CD TIME) bezogen
Pause
Pause am Ende eines Stückes
Endlosbetrieb
[a] 2 Stücke bereits abgespielt
lbl verbleibende Stücke
tal + Ibl: Gesamtstückzahl aul der eingelegten Compact Disc.
2.3.2 Display bei Programm-Betrieb (PROGRAM MODE)
Wird das Gerät auf Programm-Betrieb (Kapitel 3) geschaltet, so
kann das Display als Programmierungshilfe zur Eingabekontrolle und f ür Korrekturen verwendet werden. Auch während einem
Programm-Ablauf informiert es ständig über den aktuellen Pro-
gramm-Schritt.
Folgende lnformationen werden ausgelesen.
STFP TRACK. .
,il-l
.'b
. rlrlrlrrrltlr
A Information Stück (TRACK) bezogen
Feld A
-
-
ABCD
1
Achtung:
DISPLAY [17] von TRACKTIME auf CD TIME umgeschaltetwird,
fällt auf, dass sich die beiden Zeiten um ca.2 Sekunden unterscheiden. Dies hat folgenden Grund, Bei der TRACK TIME wird
: 'll 3ll t
Feld
Hinweis:
TRACK : Titel. Stück oder Abschnitt in welche die Compact
Disc unterteilt ist. Bei Unterhaltungsmusik gilt meist ein Stück/
Titel : eine ganze <TRACK>. Bei klassischen Werken kann es vorkommen, dass die CD noch besser unterteilt ist, vor allem bei
Werken mit tliessenden Übergängen.
Diese <Feineinteilung> wird mit den Indices (INDEX) gemacht,
Die INDEX Anzeige im Display erfolgt automatisch, sobald der
Laser-Abtaster eine INDEX-lnformation auf der CD liest.
Feld C des Displays informiert uber die momentane Position des
Laser-Abtasters innerhalb des Stückes (TRACK TIME). Anstelle
dieser Anzeige kann auch die aktuelle Position des Laser-Abtasters bezogen auf Disc-Anfang ausgelesen werden (CD TIME)
Dies geschieht durch Drucken der Taste DIS PLAY [1 7] N ochmaliges Drücken dieser Taste schaltet wieder auf TRACK TIME.
Falls der Schriftzug STEP weder sichtbar ist noch im Display
blinkt, rst das Gerät im normalen Play CD-Mode.
Blinkt der Schriftzug STEP so ist das Gerät auf Programm-Eingabe geschaltet. die Zahl darunter zeigt den ausgelesenen
Programm-Schritt an.
Läuft das Gerät und der Schriftzug STEP steht in der Anzeige,
so bedeutet dies, dass ein aktiviertes Programm läuft, das Gerät ist im PIay Program-Mode. Die Zahl unterhalb des Schriftzuges STEP gibt den laufenden Programm-Schritt an.
TRACK
10
LlLi
15
Feld B
2a
25
30
ln diesem Feld wird das Stück (TRACK) angezeigt, welches
am Beginn des Programm-Schrittes steht (im Beispiel TRACK
03) Falls in Feld C keine Eingabe gemacht wurde, wird das
ganze Stück gespielt und danach der nächste ProgrammSchritt ausgeführt. Feld B bezeichnet immer die Anfangsposi
tion eines Programm-Schrittes, auch wenn in Feld C keine Eingabe gemacht wurde.
Feld C
-
Wurde in diesem Feld eine Eingabe gemacht, so ist diese die
Endposition des Programm-Schrittes. lm obenstehenden Beispiel heisst dies: Schritt 01. spiele Stück 3 bis (und mit) Stück
4. Danach wird der nächste Schritt ausgeführt.
10
B Zeitangabe (TIME) anstelle von
Stück (TRACK)
ABCD
Feld A
-
gleiche Funktion wie vorgängig beschrieben.
Feld B
-
Der Anfang des Programm-Schrittes wurde in Minuten und
Sekunden eingegeben. Dabei bezieht sich die Zeit auf CDTIME (für TRACK-TIME-Eingabe würde die entsprechende
TRACK-Angabe fehlen. (lm Beispiel beginnt der ProgrammSchritt auf der Position 28 Minuten und 30 Sekunden.
Feld C
-
Der Programm-Schritt endet nach der letzten im Display angegebenen Sekunde (im Beispiel nach Position 32 Minuten
und 00 Sekunden).
Hinweis:
Selbstverständlich können Stück und Zeit vermischt eingege-
ben werden (als Anfangsposition eine Zeit, Endposition ein
Stück oder umgekehrt).
2.4 Kopfhörerbetrieb
An der Buchse l9l kann ein Kopfhörer (200 bis 600 Ohm) mit
einem 6,3 mm Klinkenstecker angeschlossen werden. Die Lautstärke wird über die Taste * [10] erhöht und mit der Taste - [11]
abgesenkt.
AchtLrng: Dadurch wird auch der Ausgang VARIABLE auf der
Rückseite beeinflusst.
Kurzes Antippen dieser Tasten verändert die Lautstärke in klein-
sten Schritten, längeres Drücken dieser Tasten verändert sie
schnell.
Bei voll aufgedrehter Lautstärke können die Schaltknackse der
Volumensteuerung hörbar werden.
3 PROGRAMMIEREN
DES COMPACT DISC PLAYERS REVOX8225
3.l Allgemeines
Der REVOX 8225 lässt sich sehr vielfältig programmieren. Auf
den ersten Blick wird die Fülle an Programmiermöglichkeiten
manchen Anwender verunsichern, ob er überhaupt in der Lage
sei. die dafür notwendigen Prozeduren zu erlernen. Der Programmiervorgang istfür jedermann erlernbar. Wichtig dabei ist,
jeder Schritt muss bewusst durchgeführt und wiederholt wer3.1.1
Wozu sich selbst ein Programm zusammenstellen
Es gibt viele gute Gründe, vor dem Abspielen einer Compact
Disc, ein Programm zusammenzustellen.
Man möchte beispielsweise:
-
die Stücke nicht in der Reihenfolge abspielen, wie sie auf der
Compact Disc angeordnet sind (siehe Kapitel 3.2.3\
eines oder mehrere Stücke gar nicht abspielen (quasi eine
Compact Disc selektiv abspielen) (siehe Kapitel3.23l
einzelne Takte oder Teile eines oder mehrerer Stücke miteinander vergleichen (siehe Kapitel 3.2.4)
3.2 Programmieren Schritt für Schritt
3.2.1 Allgemeine Hinweise zur Programmierung
Die Tasten, welche für den Programmiermodus gebraucht wer-
den, sind bis auf wenige Ausnahmen in der linken FrontplattenHälfte zu finden. Die Tasten PROGRAM 126l und STORE [22]
sind durch die Rotfärbung hervorgehoben. Dies unterstreicht ihre spezielle Bedeutung. Um irgend ein Programm zu erstellen,
muss zuerst die rote Taste PROGRAM [26] gedrückt werden.
Danach erscheint im Display [7] der blinkende Schriftzug STEP
Damitwird angezeigt, dass das Gerätfur eine Programm-Eingabe bereit ist. Nun können einzelne Schritte eingegeben werden.
CD -Player auf Pro g ra m m-Ei ngabe sch alte n
Grundsätzlich kann ein Programm bei zwei Betriebszuständen
eingegeben werden:
- Programmeingabe ohne dass eine Compact Disc abgespielt
wird.
- Programmeingabe während gleichzeitig eine Compact Disc
abgespielt wird.
den, bis er beherrscht wird. Die Reihenfolge. wie sie in derAnleitung beschrieben wird, muss eingehalten werden. Sonst schleichen sich immer wieder Fehler ein, welche meist von der Ursache her nicht mehr rekonstruiert werden können. d.h. man
merkt nicht. was man falsch macht.
-
eine Phrase in einem Stück genau analysieren, ohne mit dön
Tasten [14] und [16] jedesmal den Anfang zu suchen (siehe Ka-
pitel 3.4.1)
sich ein Programm fur das Uberspielen auf Tonband zusammenstellen (siehe Kapitel 3 2.3)
Es könnten noch viele Beispiele angeführt werden. doch wird
sich beijedem mit genug Ubung auch die Phantasie, eigene Anwendungsgebiete mit dem geeigneten Programm abzudecken,
-
einstellen.
Wichtig:
Nach Eingabe jedes Schrittes (STEP) muss dieser durch Abspeichern gesichert werden (nach jedem Schritt: Taste STORE
[22] drucken). Wird dies vergessen, so kann kein weiterer Programm-schritt eingegeben werden, man verändert höchstens
die bereits gemachte Eingabe. Durch dieses Vorgehen besteht
die Möglichkeit, auch nachträglich in einem bestehenden Programm innerhalb einzelner Schritte Korrekturen oder Veränderungen anzubringen. Während ein Programm eingegeben wird,
kann gleichzeitig der CD-Player normal abgespieltwerden, oder
das eingegebene Programm ablaufen (siehe 3 3 Programm editieren).
3.2.2
Vorgehen bei <nur Programm-Eingabe>:
- Gerät einschalten (Taste POWER [1] drücken).
- Nach kurzer ZeiI erscheint im Display die normale Anzeige.
dass noch kein lnhaltsverzeichnis eingelesen ist. Dies ist jedoch fur den Programmiervorgang nicht von Bedeutung.
- Programmiermodus einschalten (Taste PROGRAM 126)\
d rü c ken.
- Der Schriftzug STEP blinkt nun im Display [7], das Gerät wartet auf die Programm-Eingabe.
Vorgehen während gleichzeitig eine Compact Disc abgespielt
wird:
- Gewünschte Compact Disc einlegen und Abspielvorgang
sta rten.
-
12
Taste PROGRAM [26] drücken, der Schriftzug STEP blinkt im
Display [7], das Programm kann eingegeben werden.
Der Abspielvorgang wird durch die Programm-Eingabe nicht
beeinflusst. Während der ganzen Eingabe darf allerdings keine
Laufwerkfunktion gedrückt werden, da sonst der ProgrammAblauf gestartet wird (Ausnahmen werden in den spezifischen
Kapiteln erklärt)
ABCD
s"l.FFi, TRAeK..r.....: :':i..
r.', .r.
.
,[.t Lf.'-..,:,'.,,',,,.
151015202530
I.l.ll,I,ll:rlti.ll']r:.
.. :: :.:.
...
:.. :::: -....'::.:
:
3.2.3 Reihenfolge umprogrammieren
Die Reihenfolge der Stücke auf der Compact Disc kann beliebig
verändert werden.
Vorgehen (die entsprechende Reihenfolge ist als Beispiel gedacht):
- Gerät auf Programm Eingabe schalten (Taste PROGRAM [26]
drücken), der Schriftzug STEP blinkt im Display [7] in Feld A
und darunter steht die Ziff er 1.
Die Zahlen unterhalb des SchriftzugesTRACK in Feld B stehen
auf 00.
- Das gewunschte Anfangsstück eingeben (2.8. StÜck 4). Taste
4 (Tastenfeld [B]) drücken, die TRACK-Anzeige wechselt auf
04. Diese Eingabe bedeutet: Programmschritt'1 (STEP 1), spiele Stuck 4 (TRACK 4).
- Die Eingabe muss noch abgespeichert werden (Taste STORE
[22] drucken) Die STEP-Anzeige springr auI 2, dte TRACKAnzeige wieder auf 00. Dies bedeutet, der zweite Programmschritt kann eingegeben werden.
- Als nächstes wird Stück 9 gewünscht:
Taste 9 (Tastenfeld [B]) und danach die Taste STORE l22l
drücken, die Eingabe ist abgespeichert. Die STEP-Anzeige
steht nun auf 3, die TRACK-Anzeige wieder auf 00.
- Am Schluss des Programms (auch der letzte Schritt muss
durch Drücken der Taste STORE [22] gespeichert werden),
kann entweder durch nochmaliges Drücken der Taste PROGRAM [26] wieder auf den normalen Absplelmodus geschaltet (das Programm bleibt selbstverständlich gespeichert),
oder durch Drücken der Taste PLAY/NEXT [4] der Programm-
Selbstverständlich können innerhalb eines Schrittes auch mehrere Stücke hintereinander (nur in der auf der Compact Disc definierten Reihenfolge) eingegeben werden.
Beispiel (als ein Schritt werden die Stücke 3 bis 12 eingegeben):
- Taste 3 (Tastenfeld [B]) drucken, die TRACK-Anzeige springt
auf 03.
- Nun muss die Taste CURSOR gedruckt werden. dadurch erscheint in Feld C (Display) eine zweite TRACK-Anzeige
STEP TRA6K
L! l:l
I
TRACK
,:, l:l
151015202530
trlllltrllll
2 (Tastenfeld l8l) drücken..die zweite TRACKAnzeige springt auI 12.
- Taste STORE [22] drücken, dieser Programmschritt ist damit
eingespeichert.
Auf diese Weise kann Schrittf ür Schritt ein Programm mit bis zu
"19 Schritten eingegeben werden. Ein Stück kann beliebig oft im
Programm vorkommen, wie auch nicht alle Stücke der Compact Disc berucksichtigt werden müssen.
Will man sich für eine Uberspielung auf Band nur einzelne Titel
der jeweiligen Compact Disc aussuchen. so bietet sich diese
Programmierart ideal an.
-
Tasten 1 und
-
Durch Drücken der Tasten 2 und 5 werden nun die Sekunden
eingegeben. Die Anfangszeit ist eingeschrieben (noch nicht
abspeichern),
Erneut Taste CURSOR [25] drücken, in der Anzeige erscheint
Ablauf gestartet werden. Nochmaliges Drücken der Taste
PLAY/NEXT schaltet sofort auf den nächsten ProgrammSchritt. Angezeigt wird der PLAY PROGRAM MODE indem
der Schiiftzug STEP in Feld A nicht mehr blinkt
3.2.4 Abschnitte programmieren
Es können auch Abschnitte definiert werden. Diese Abschnitte
können ein Stück betreffen, aber auch über mehrere Stucke hin-
aus programmiert werden. Dazu müssen allerdings die Anfangs- und Endpositionen bekannt sein. Diese können auf zwei
Arten ermittelt werden
1. lm normalen Abspielmodus die Anfangs- und Endposition
notieren (in Minuten und Sekunden bezogen auf CD-TIME.
siehe Kapitel 2.3)
2. Während dem Abspielvorgang im Programmiermodus Marken setzen.
:
Vorgehen
zu 1.: (im Beispiel Anfang :
Ende
-
-
STEP
TII\,1E
,;'; 5
TII\1E
l:, ,:, ,-,
151015202530
12 Minuten 25 Sekunden,
15
nun eine zweite TIME-Anzeige (falls TRACK erscheint,
TRACK/TIME [24] drucken)
lrttrlttrttr
Minuten 34 Sekunden)
Gerät auf Programmiermodus schalten und mit der Taste
TRACK/TIME Zal die Anzeige TRACK im Display auf TIME
umschalten.
Zuerst dürfen nur die Minuten eingegeben werden; Tasten 'l
und 2 drücken.furdie Sekunden-Eingabe muss nunzuerstdie
CURSOR-Taste [25] gedrückt werden. in der Anzeige erscheint nun dieses Bild:
-
-
Auch jetzt können zuerst nur die Minuten eingegeben werden.
Eingabe:Taste 1 und 5. Durch erneutes Drücken der CURSOR-
Taste [25] können noch die Sekunden eingegeben werden
(im Beispiel Tasten 3 und 4).
Die Eingabe ist beendet und muss jetztabgespeichertwerden
(Taste STORE [22] drücken).
Hinweis:
STEP
t
t
TIIViE
| -t.r-l f-,
t r:'ü ,_l
151015202530
rrrrtlrrtlll
Während dem Programm-Ablauf wird im Display nicht die eingegebene Zeit, sondern das Stuck (TRACK) und an zweiter Stelle die aktuelle Position des Laser-Abtasters (TRACK-TIME) angezeigt. Durch Drucken der Taste DISPLAY [17] kann selbstverständlich an zweiter Stelle auf CD-Tll\/E umgeschaltet werden.
13
Vorgehen zu 2.:
- Eingelegte CD mir Taste PLAY/NEXT [4] starten.
- Taste PROGRAM [26] drucken.
- Mit den Tasten { ['16] und V l14l kurz vor den vorgesehenen
Startpunkt fahren, danach an diesem Punkt durch Drücken
der Taste MARK [23] die Startmarke setzen. Die entsprechende Zeitmarke (im CD-TIME) wird nun an erster Stelle im Display angezeigt. Gleichzeitig erscheint das zweite Feld Wird
nun an der Stelle, an welcher der Abspielvorgang unterbrochen werden soll, die Taste Mark [23] ein zweites Mal gedrückt, so wird auch diese ZeiIim Display (Feld C) angezeigt.
TIME
STEP
I
I
1
{
U,f' i
TIT
10
E
rtlrtrrl
rr 'Ji:l E 25
20
15
-
Taste STORE [22] drücken, der durch Marken definierte Ab-
schnitt ist eingespeichert.
Während dem Programm-Ablauf wird im Display nicht die CDTIIVE angezeigt, sondern das Stück und die Position des LaserAbtasters innerhalb desselben.
30
3.2.5 Eingabe-Arten vermischt eingeben
Selbstverständlich können die einzelnen Eingaben auch vermischt eingegeben werden, d.h. beispielsweise als Anfangspunkt ein Stück (TRACK-Eingabe) als Endpunkt eine Zeit (über
Tastenfeld [B] eingegeben oder mit Taste N/ARK [23] gesetzt)
oder umgekehrt. Falls als Anfangspunkt ein Stück (TRACK) eingegeben wird, muss der Endpunkt bei Zeitangabe bezogen auf
TRACK TIME eingegeben werden (Ausnahme).
3.2.6 lm Programm <blätternr
ln einem fertigen, wie auch in einem angefangenen Programm
kann jeder Schritt einzeln im Display [7] ausgelesen werden
Dies geschieht mit den Tasten PROGRAM STEP + [19] und -
[20]. So kann lederzeit ein einzelner Schritt nochmals uberprüft
und gegebenenfalls abgeändert werden (siehe Kapitel 3 3).
3.3 Programm editieren
Selbstverständlich kann ein bestehendes Programm auch
Durch Drücken derTaste CURSOR [25] können die Minuten in
Feld B verändert werden. dies wird angezeigt, indem die <:>
verschwinden.
nachträglich auf einfache Weise abgeändert werden. Jede Eingabe innerhalb der Programmschritte lässt sich individuell verändern.
Vorgehen:
- Mit den Tasten PROGRAM STEP [i9] und [20] zu dem zu edi
tierenden Schritt blättern.
- Bevor eine Zifferverändertwird, muss die CURSOR-Taste [25]
einmal gedrückt werden. Danach kann in Feld B die TRACKAnzeige oder bei TIME-Anzeige das Minutenfeld editiert werden.
Wird die CURSOR-Taste ein zweitesmal gedruckt. so kann bei
TRACK-Anzeige Feld C oder beiTlME-Anzeige das Sekundenfeld (Feld B) editiert werden. Eine weitere CURSOR-Betätigung ermöglicht die Minuten in der zweiten TIME-Anzeige zu
TI ME
STEP
l,:'
I
I
1
5
trrrtlltttlttr
-
E5
10
1
5
ITIIIIITIIIITT
-
Funktion des CURSOR's <Schritt für Schrittr:
Taste PROGRAM drucken und bis zu dem zu korrigierenden
Schritt blättern.
tt iE'5 l:l
1
5
IITTIIIITI
t4
10
,:' -i; , i:,
15
20
-
lll
30
20
t5
rrl
25
5E
10
,:::,
30
15
rTI
, l-f
-l
I tt-t
20
25
Mit Taste CURSOR auf Sekundeneingabe schalten (der
scheint wieder): (Eingabe 38).
15
IIIITI
-l
,:'
i ,:,
E
-1
30
<:r
er-
Til!18
STEP
25
-fI I r-l
tt-l
Die Anfangsposition soll auf 17 Min. 38 Sek. gestellt werden:
(Einqabe 17)
tl l-i
editieren usw
,::1
I
-1,
10
TITTI'IITTT
15
20
25
30
-
Mit Taste CURSOR auf Minuteneingabe der Stopp-Marke
schalten. der Schriftzug TIME im zweiten Feld erscheint wieder: (Eingabe 25).
tt
I
-lt
-f E
151015202530
,:,
!,
",
f-,
,_l
ITIIITTTITTIIIIII
*
Mit Cursor-Taste auf Sekunden-Eingabe schalten. auch der
im zweiten Feld erscheint wieder: (Eingabe 27).
t;: I -lt Jl E
1
5
10
trll
,:f
r;:='
15
rrl
<:r
-l
I
25
30
Der in dieser Art abgeänderte Programmschritt kann nun abgespeichert werden. lm obigen Beispielwurden alle Stellen verändert. N/it dem Cursor ist es natürlich möglich an jeder Stelle in einem Programm-Schritt selektiv etwas zu ändern.
3.3.1 Programm löschen
Das Programm wird auf zwei Arten
gelöscht:
ken). Dabei muss allerdings der Programm-Modus einge(Um ein neues Programm einzugeben, braucht das alte nicht geschaltet sein.
löschtzu werden. Es kann einfach überschrieben werden.) 2. Durch einen Netzunterbruch ()50ms, bei Stromausfall.
1. Durch gleichzeitiges Drücken der Tasten STORE und PRO- Ausschalten des Gerätes löscht den Speicher nicht).
GRAM (Taste STORE gedrückt halten und PROGRAM drük-
3.4 Spezielle Programm-Schritte
ln den folgenden Abschnitten werden einige spezielle Programm-Schritte wie Repetierbetrieb, automatisches Abschalten etc. behandelt.
3.4.1 Repetierbetrieb (LOOP) programmieren
An jeder beliebigen Stelle im Programm (am sinnvollsten allerdings am Schluss) kann der Repetierbetrieb als ProgrammSchritt eingegeben werden. Wird als letzter Schritt eines Programmes ein LOOP eingegeben, so wird das ganze Programm
laufend wiederholt, bis es mit Taste STOP unterbrochen wird.
Beispiel (ein Programm mit
-
-
14
Wird nun das Programm normaldurch Drucken derTaste PLAY/
NEXT [4] gestartet. so wird das ganze Programm, sobald das
Ende erreicht ist. von Anfang an wiederholt. Dieser Vorgang
wiederholt sich endlos, bis das Programm mit Taste STOP [3]
abgebrochen wird
Schritten soll repetiertwerden):
Schritrl5 blättern (mit
Taste PROGRAM [26] drücken und auf
Taste [']91).
Schritt 15 eingeben: Taste LOOP [18] drücken, in der Anzeige
wird anstelle der TRACK-Zahl ein L angezeigt. Die Eingabe mit
Taste STORE [22] abspeichern.
STEP
TRACK
I
It ,-
151015202530
ITITIITTIITIITIT
'15
3.4.2 Pause programmieren
Falls am Ende eines Stückes eine Pause einprogrammiert werden soll, so ist dies auf ähnliche Art wie unter 3.4.1 erklärt mÖg-
lich. Stattwie im Beispiel eine Repetier-Funktion am Schluss des
Programmes, soll nun nach Schritt 9 eine Pause eingegeben
werden.
- lm Programm auf Schritt 10 blättern, danach die Taste VA [15]
(PAUSE) drücken, in der Anzeige erscheint ein <Pr, danach die
Eingabe abspeichern.
oder auf der Fernbedienung gedrückt zu werden. Das Programm läuft nun bis zur nächsten Pause durch, oderfalls keine mehr programmiert ist. bis an den Schluss
Bemerkung: Falls nach jedem Schritt eine Pause gewÜnscht
wird, kann für diesen Fall vor Starten des Programmes (auch
während dem PLAY PROGRAM MODE) die Taste AUTOSTOP
[13] gedruckt werden. Dadurch wird nach jedem Schritt auf die
Funktion PAUSE geschaltet. Sie kann durch DrÜcken derTaste
STE
T
P
t t-l
r,^t
RACK
F
151015202530
ITTTITTIITIITIITT
-
Nach Abspielen des neunten Programm-Schrittes schaltet
das Gerät auf Pause. Dabei wird allerdings berelts der Anfang
des nächsten Schrittes gesucht. Soll das Programm fortgesetzt werden, so braucht nur die Pausentaste [15] am Gerät
3.4.3 Alarmfunktion programmieren (Taste CAL TONE [12])
VA t15l am Gerät oder auf der Fernbedienung gelöst werden.
Hinweis:
Anstelle der Funktion PAUSE kann auch das Ausschalten der
Programme eingegeben werden (Funktion STOP). Dies geschieht auf die gleiche Weise wie vorgängig beschrieben. nur
wird anstelle der Taste va [15] die Taste sToP [3] gedrÜckt und
abgespeichert. Wird das Programm gestartet und erreicht den
mit der STOP-Funktion definierten Schritt, so wird der CDPlayer auf STOP geschaltet.
-
Fur spezielle Anwendungen kann es sinnvoll sein, das Ende ei-
nes Programmes oder einer Sequenz innerhalb des Programmes mit einem <Alarmton) zu kennzeichnen. Für diese Anwendung wird folgender Schritt eingegeben:
- Anstelle eines Stückes oder einer Zeit, wird die Taste CAL
TONE [12] gedrückt. ln der Anzeige erscheint ein <Ci.
STEP
Eingabe abspeichern (die Anzeige springt auf den nächsten
Schritt).
Dieser Alarm wird an der Stelle innerhalb des Programmes solange ertönen, bis er durch Drücken der Taste CAL TONE [12]
abgestellt (dabei wird automatisch auf den nächsten Schritt geschaltet). oder das Programm durch Drucken der Stopp-Taste
abgebrochen wird.
TRACK
fl-l ,151015202530
rllrrrrlllllrrrrr
3.4.4 Ausschalten am Ende des Programmes
Bei Bedarf kann auch mit einem Programm-Schritt der Befehl,
das Gerät auszuschalten, gegeben werden.
Programm-Eingabemodus wählen und mit der Taste [19] auf
den letzten Programmschritt (+'1) blättern (falls 15 der letzte
ist, auf 16).
STEP
TRACK
itrt
151015202530
rrrrrrrtltrllllrr
16
Taste POWER [1] drucken. in der Anzeige erscheint <-r. Das
Gerät wird auf d iese Art nicht ausgeschaltet (erst zweima liges
Drücken der POWER-Taste schaltet das Gerät während dem
-
Taste STORE drücken. Das Programm mit Taste PLAY/NEXT
[4] starten, als letzter Schritt wird sich das Gerät selbst ausschalten,
Programm-Eingabemodus aus.
Vorgehen:
-
-
4 BEDIENUNG
DES COMPACT DISC PLAYERS 8.225 MIT DER INFRAROT
FERNBEDIENUNG REVOX B2O1 UND B2O1 CD
4.l Allgemeines
Die REVOX lnfrarot FernbedienungB2Ol lst dafür eingerichtet,
alle Geräte der REVOX HiFi-Kette zu steuern (Vollverstärker
8251, FM-TunerP261, Kassettengerät B710 N/K ll lR und die Plattenspieler 879118795. Dadurch wurde eine Doppelbelegung
der Tasten unumgänglich. Der CD-Player 8225 wird mit den
gleichen Tasten wie der FM-Tuner REVOX 8261 bedient. Diese
sind im mittleren Feld zu finden. Damit der lR-Empfänger des
CD-Players erkennt, ob ein ausgesendeter Befehl ihm gilt, muss
gleichzeitig zu einer Funktion immer die "-Taste gedrückt und
gehalten werden.
Jeden empfangenen Befehl quittiert der CD-Player durch Aufleuchten der LED im lR-Empfängerfenster. Falls nur der CDPlayer mit der Fernbedienung gesteuert werden soll, kann dle
Fernbedienung in einer REVOX-Servicestelle entsprechend modifiziert werden. damit die x-Taste nicht mehr gedrückt zu werden braucht.
4.2 Bedienung
lm folgenden Bild werden die Tasten mit der gleichen Numerierung versehen, wie auf dem Ausklappblatt am Anfang der Bedienungsanleitung. Tasten, welche die gleiche Nummer besitzen, haben auch dieselbe Funktion
Beispiel:
Taste
Gerät.
)
[4] (auf der Fernbedienung
:
Taste PLAY/NEXT
-ü6J:[!S]rft4l.
l4l am
Achtung:
Beim Wählen einer Funktion muss immer die Taste x gedruckt
und gehalten werden.
Taste POWER OFF schaltet die ganze Anlage (Tuner Verstärker,
Kassettengerät und CD-Player) aus. Für diese Funktion braucht
die x-Taste nicht gedrückt zu werden.
Bei der lR-Fernsteuerung 8201 CD kann die Taste [3] dtrekt
bedient werden. Fntsprechend ist sie auch mtt PLAY/NEXT
bezeichnet.
17
5
5.1
A
TECHNISCHER ANHANG
Technische Daten
D AI{ZEIGE
AUDIO.DATEN
+0,/
Frequenzgang:
2012..20k1z,
Klirrfaktor:
<0,006% (.2ANz 2Aklz)
Fremdspannungsabstand:
>
Geräuschspannungsabstand:
Ubersprechen:
>
90dB (20N2. 2AkNzl
V, Ri < 500 Ohm, kurzsch uss{est
.2 V R
500 Ohm, kurzschlussfest
2
l(opfhörerausgang:
4,5V, R
Xanalgleichheit lL,zRl :
pho.oe 1"or r-d..
dg,."-t"
<02d8
ABLT
<50
Ohm, kurzsch uss{est
t8 0..,.
p
PAUSE, AUT0STOP, L00P:
spez
PROGRAM MODE:
jeder Programm Schritt
44Lkllz
Quantisierung:
Optischer Abtaster:
16
w
rd sekundengenau
an
19
lnhaltderProgramm-Schritte:
TRACK T
Genauigkeit der
Schrittel
Mf
oder auch verm scht
ngabe über Keyboard oder durch Setzen von N4arken
lecier Schr
ii
kann sek,rndengena! def n ert werden.
Sonderlunktionen wle LOOP, PAUSI etc. können
programm ert werden
A GaAs-Fla b e ter aser
Wellenlänge:
0,78
:
pm
F
C RC (Cross nter eave Reed So omon Code)
ATLGEMEINES
Stromversorgung:
Gleichlaulschwankungen:
:
:
2AA/224./240V
I2.. L4 n/s
Stromverbrauch:
max 40 Watt
quarzgena!
Abmessungen:
450 x 109 x 332 cm (BxFl xT)
500
200 lJ,/m
max. Spieldauer:
74 M nuten
(06s
(
n
. + 10 oro e nste
ba
T 500 mA (s ow)
T 250 mA (s owl
100 ... 140 V
200 ... 240 V
Startzeit aus Pause:
Suchzeit für beliebige Stelle:
tz
Netzsicherungen:
LAUFWERK,/STEUERUNG
GD-Drehgeschwindigkeit:
V
100,/120./140
50,'60
C
ebsarten werden ausge esen
PROGRAMMIERMOGLICHKEITEN
AnzahlProgramm-Schritte:
Sonderlunktionen:
Brt inear/Kana
e e Betr
geze gt.
Programmiermöglichkeiten: f
ABTAST-SYSTEM
dt ge e g'
a
lede mögl che Ze t kann ausge esen werden: TRACK
T VIE und CD T t\4t
E
g
Or-
TIME:
(
0
Abtastfrequenz:
Fehlerkorrektur-System
rd ö ,\ö d0. o.
INDEX:
Ausgangspegel:
AUDIO OUTPUT FIXTD
AUD 0 OUTPUT VAR
der aktuel e Stand kann entweder n der TRACK
Anzeige oder rm 30-Segment Ba ken geiesen werden
TRAGKI
0,6 dB
96dB(20Hz.20kllz)
> 100 d B (20 lz . 2a kNz)
B
Mu t f unktrone les LC D sp ay
inform ert uber folgende Zustände
Anzahl Xanäle:
Anderungen vorbeha ien
4 s (uber 12000 Spuren pro Se<unde)
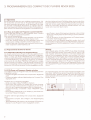
5.2 Abmessungen (mm)
EEEEEf
Er (f E) ul
lT-Tntl
EIHE:EIEI
E:] Cf El O
o
13321
o
I
t
1B
r
OPERATI NG I NSTRUCTIONS
REVOX
8225. COMPACT DISC PLAYER
IMPORTANT
Protect your CD player from excessive heat and
humidity. lnstallthe CD player in a location where
the ventilating louvers are not obstructed.
Please read the instructions in Section 1.1 carefully before connecting the CD player to an AC
power source.
The laser pick-up does not emit dangerous light
and it is only activated when the drawer is
closed.
GUARANTEE
A special guarantee request card is bypacked to
all CD players sold within the Federal Republic of
Germanv. This card is either located inside the
packing or in a plastic pouch on the outside of the
packing. Should this card be missing, please
consult your REVOX dealer or your national
REVOX distributor.
Guarantee cards for CD players sold in Swiuerland and Austria are issued directly bythe authorized dealer.
Guarantee cards for CD players sold in France
are located inside the packing This card must be
completely filled out and signed by your authorized REVOX dealer.
Please note thatthe guarantee is onlyvalid within
the country in which the equipment has been
sold. The guarantee becomes null and void if
unauthorized modifications or unprofessional
repairs are made.
PACKING
Please save the original packing material because its special construction provides optimum
protection for your valuable equipment.
TABLE OF CONTENTS
1.
11
1.1.1
1.1.2
1.1.3
1.2
1.2.1
1.2.2
1.2.3
13
13.1
1.3.2
1.3.3
2
2.1
GENERAL
Putting the CD player into operation
irrä cp pläver to irte ÄC
checks before
"ännä"iinö
(AF)
cable
Connecting the audio
Gonnecting the B.225 CD player to the AC supply
;"ppit
4
4
4
OPERATING I NSTRUCTIONS
B
B
B
B
6
b
b
7
7
2.2.2
2.3
2.3.1
2.3.2
2.4
Loading the compact disc
Playing a compact disc (PLAY CD MODE)
Display l7l
(PLAV Co
oiipn'v'iri no'-äl pt;t
Display in PROGRAM MODE
Headphones
3.
3.1
PROGRAMMING THE REVOXP225 COMPACT DISC PLAYER
General
2.2.1
3.1
1
3.2
3.21
322
3 2.3
3.2,4
325
326
33
3 3.1
34
3.4.1
3.4.2
3.4.3
3.4.4
4.
3
3
lndex of CD player controls
General controls
Special controls
Rear-panel connectors
The compact disc .. ..
lnteresting facts about the compact disc
Handling and care of the compact disc
Structure of the compact disc
Switching on the 8.225 CD player
Playback of compact discs
2.2
Page
3
3
J
ilä;
I
MooE)
.
Why compile your own program?
Step-by-step prog ramm ing
General programming hints
Switching the CD player to program entry mode
Reprogramming the play sequence
Programming of CD segments
Mixed step boundaries
"Paging" through the program
Modifying the program
Cancelling a program.
Special program steps
Programming the loop function
Programming a pause
Programming the alarm function (CAL TONE 112))
Power-off function at the end of the program
.
4.1
OPERATING THE 8225 COMPACT DISC PLAYER WITH THE
REVOX B2O1 INFRARED REMOTE CONTROL
General
4,2
Operating
5.
51
TECHNICAL APPENDIX
Technical data
5.2
Dimensions
.
10
10
10
11
12
12
12
12
12
12
13
13
14
14
14
'15
15
15
16
16
16
17
17
17
1B
1B
1B
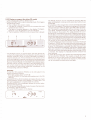
1 GENERAL
1.1
Putting the CD player into operation
Checks before connecting the CD
player to the AC supply
The player mechanism has been blocked
1.1.1
from below with two screws in order to prevent damage in transit. These screws must be
completely removed before the CD player is
put into service. They are accessible below
the CD drive from the underside of the CD
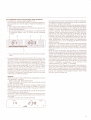
' ilillllllllllllllll
iiilliiiiiiiiiiii,*,r,,7
tilllililllllllllllf'
player
Before the CD player is connected to the AC
supply for the first time, check the setting of
the line voltage selector on the back of the
unit The voltage indication visible through the
cutout must match the voltage of the local
supply system lf this is not the case, the line
voltage selector setting has to be changed
and the power fuse replaced, if necessary.
Procedure:
- Unfasten the fixing screws of the upper cover and remove the cover.
- Set the line voltage selector to the correct
AC voltage.
- Check power fuse:
100.. 140V T 500 mA (slow)
200 ...240V T 250 mA (slow)
Replace the fuse if the rating is incorrect.
- Reinstall the cover.
:
:
1.1,2 Connecting the audio (AF) cable
The CD player 8225 is connected to the amplifier through a double Cinch cable (CzC).
Two AUDIO OUTPUTS are available on the
8225.
FIXED
This output is intended for connecting to an
amplifier such as the REVOX 8251. Connect
this socket to the DISC input (8251) or AUX
input (8750187 80/8739) This output supplies a fixed level.
it#räililllllillililtl1
lllIliltililllilßßtß
'i
llillftIIlllli"",
ttsrrarrrar)t.)
Itf
lrt:rtllrltlrlilirt
VARIABLE
This output can be connected directly to
REVOX active speakers or a power amplifier without level controls. The level of this
output can be adjusted on the front panel
with the keys VOLUME + [10] or - 1111.
Switching clicks of the volume control may
possibly become audible if the maximum
volume is selected.
Connecting the B.225 CD player to
the AC supply
1.1.3
Carefully read the instructions in Section 1.1.1
"Checks before connecting the CD player to
the AC supply" before connecting the CD
player 8225 with the bypacked power cord to
the AC supply.
tst
t21l l2ol
tlel
t4I
l11l
I1O1 tel
1.2
lndex of CD player controls
1.2.1 General
controls
t1l
POWER., key for switching the CD
player on and off. However. certain elements (such as the lR receiver) are always switched on (in so-called standby
mode).
LOAD, the drawer [6] opens or closes
when this key is pressed (refer to Seclion 2.2.1, Loading the compact disc).
t3l STOP", this key interrupts the play
function. The optical laser head is retracted to the starting position and the
program is interrupted if the CD player
was in program mode. The position in
which the laser pick-up was operating
before the STOP key was pressed cannot be reproduced. lf this is desired,
please refer to VA [15] key.
14) PLAY/NEXT, play key with the following
functions:
Pressed after LOAD l2l. CD starts to
rotate, the table of contents is read, and
the disc is played starting with the first
selection (TRACK). The next selection
(TRACK) is accessed if this key is pressed again.
Pressed after one of the digit keys [B]:
direct addressing of selection n.
Pressed after program mode has been
selected with PROGRAM [26]: play
program mode is activated.
Pressed in an active program: the next
program step is addressed.
l2l
1.2,2 Special controls
The controls in the lower front-panel sections
can be roughly divided into two function
groups: controls for additional player functions and programming controls.
A Controls for add itional player fu nctions
l9l
PHONES, headphones jack 200... 600
ohms.
+, increases the level of the
VOLUME
l10l
headphones and the VARIABLE OUTPUT
REPEAT. the selection currently being
tsl played
is repeated as soon as this key
pressed.
lf the CD player is in stop
is
mode. the first selection of the compact
disc will be played. lf the CD player is
in program mode, the current program
step will be repeated.
t6l (CD drive), drawer module with CD
drive and liquid crystal display. The
drawer can be opend or closed with
LOAD [2]
(Display), multifunction LC display. This
display provides information on all operating modes of the CD player and the
content of the loaded compact disc.
(Keys 0 - 9), digit keys for direct addressing of a selection (TRACK) in conjunction with PLAY NEXT [4], or for
programmrng.
[21] lR-SENSOR, infrared receiver window.
l7l
l8l
The CD player can be switched on by pressing
any of the keys [1] through [B] in the upper row
(exeptfor REPEAT [5] and the digit key 0). The
CD player starts in the selected operating
mode.
-, decreases the level of the
headphones and the VARIABLE OUT-
l1 1l VOLUME
PUI
[12] CAL TONE., this calibration key connects a 1000 Hz calibrating tone to the
outputs so that the recording level of a
connected tape deck can be accurately
adjusted The 1000 Hz CAL TONE corresponds to the maximum output level.
This maximum level is system-dependent and will not be exceeded even by
short peak pulses.
[13] AUTOSTOP interrupts the playing sequence at the end of the current selection or program step. The laser pickup
is automatically positioned at the beginning of the next selection. The next
selection is started immediately after
PAUSE VA [15] is pressed. Upon conclusion of this selection, the CD player
switches again to pause mode.
[14] Key tr, during the playback of a selection, certain passages can be skipped
by pressing this key (continuosly pressed automatic fast forward).
:
t15l VA (Pause)", the playing sequence can
be interrupted at any time with this key.
l16l Key {, during the playback of a selection, passages can be repeated by
pressing this key (continuously pressed : automatic fast backward).
[17] DISPLAY, change-over of display mode.
ln normal play mode, the elapsed time
since the starl of the current selection
is displayed. When this key is pressed,
the total play time from the start of the
disc to the current selection is displayed.
B Programming buttons
[18] LOOP*, repeats the CD or the program
until STOP [3] is pressed.
+,
l19l "paging" forward in program mode.
Particularly useful for modifying an
existing program.
l20l -, same function as [19] but "paging"
backward.
memory load key to be presSTORE,
[22]
sed after each program step entry. The
next program step will subsequently be
indicated on the display so that the
corresponding entries can be made.
[23] MARK, allows a start and a stop mark
to be set in programming mode while
a selection is being played. Any CD
location can thus be programmed.
[24] TRACK/TIME, switches the display in
programming mode from selection
(TRACK) input to time input (minutes
and seconds).
[25] CURSOR, any display position can be
approached with the cursor and then
edited. Note: if the display is in TIME
mode, the cursor must be advanced
with this key in order to enter the seconds after the minutes.
[26] PROGRAM, sets the program entry
mode. When PLAY/NEXT [4] is pressed
after the program entries have been
completed, the CD player starts in play
program mode.
lf the CD player is to be started in
normal mode after the programming
entries have been completed, press
PROGRAM [26] key again before PLAY/
NEXr [4]
"These functions can also be programmed.
1.2.3 Rear-panel connectors
[30] AUDIO OUTPUT FIXED Output for
connecting an amplifier on which the
input sensitivity can be matched to the
level of the CD player (the REVOX8251
amplifier is ideally matched at the factory).
[31] AUDIO OUTPUT VARIABLE Active
speakers or a power amplifier, etc. can
be connected directly to this output.
The volume can be adjusted with the
and - on the front
keys VOLUME
panel of the CD player
t32l AC POWER Power inlet (the line voltage selector setting can be checked
adjacent to it).
[33] REMOTE This connector allows:
a) defeating the lR receivet and
b) connecting a cable-type remote
control device.
*
1.3 The
compact disc
1.3.1 lnteresting facts about the compact disc
The 5 km long information "groove" of a compact disc contains
a complex digital signal: interleaved digital values from two au
Pigit6l, eonvCision
dio channels represent the music information. Auxiiiary information for indicating the selections (TRACKs), playing time. etc.
is also stored in this information "grove". The information on the
compact disc is encoded on an ultrathin aluminized layer. The
digital information on this layer is represented by "pits" which
are scanned by a laser beam. The reflection of the laser beam is
converted simultaneously by several photo diodes (light receivers) into electrical (digital) signals The aggregate signal output
by the photo diodes is processed in several steps. detection and
separation of the synchronization information, separation of the
music and information data (e,9. TRACK TIME), generating a
Laser beam refldcted by,.disc
Servo system
foi
track
.
Photodetectors
Light > electrical signal'
alignment
{radial)
Serro syslgm
,lai',
.
.iq.quisli'rg
, ,(vditical)'
.
l
control signal from the synchronization frequency and the
quartz reference for controlling the platter speed, and converting the digital audio signals to their originally analog shape.
Display
Discrepancies between the digital audio signals and the error
detection data d iscovered du ring the decoding indicate that the
compact disc is defective. Signals that still appear in a slighly ir
regular cycle of the compact disc are brought into a perfecttime
slot pattern. Single errors can be corrected, uncorrectable errors are replaced by interpolation (mean values from the scanning f unction before or after the error. lf uncorrecta ble errors occur in long bursts. the output will be muted softly
Demodulator
Electrical signal > data
Servo system.
Error correction
Possible error
bursts > error-free
digital signal
To HiFiequlpment
[.eft channel
D/A conversion
Error-free digital
signal
> two analog
audio (sound) signal
-
..for '
rotational speed
To HiFiequipment
Right channel
1.3.2 Handling and care of the compact disc
Handling of the compact disc is more convenient and troublefree than is the case with LP records. However, it is still essential
to observe certain precautions which can be better followed if
the mechanical design of the compact disc is understood.
The compact disc consists of three layers. A relatively strong
transparent substrate is coated with an ultrathin aluminized layer on which the information is encoded. The label (content, artists, disc brand) is printed on this sensitive layer. Thevarnish and
the ink applied during the printing process are the only protection of the aluminized layer. Although the laser pickup "reads"
from the opposite side. which is the much better protected side,
a scratch on the printed side of the aluminized layer can interfere
with or even prevent playback of the compact disc. The pitch of
the information "grooves" on the compact disc is only 1.6pm
and the average bit length is approximately'1 pm (:'111000th of a
millimeter). ln view of these microdimensions it becomes clear
that a scratch on the printed side of the compact disc can have
disasterous consequences.
,l:
s
*
On the read side (scintillating surface), a scratch or fingerprint
has little or no effect. This side is largely protected by the strong
substrate. The laser pickup is not easily confused by scratches
and contaminations. Because of the strong focussing, dirt par-
ticles on the CD surface cause little interference.
Despite this. compact discs should be handled carefully and
kept clean in the same way the hi-f i enthusiast is accustomed to
from LP records.
Cleaning of the compact disc is not necessary if the CD is only
touched along the edges and if it is immediately returned to the
origina I jacket after it has been used. Dirty compact discs can be
cleaned with a lint-free, soft piece of cloth. Never use any solvent or abrasive cleaning agents.
1.3.3 Structure of the compact disc
A great abundance of information is stored on a compact disc
The user gains full advantage of the possibilities offered by the
CD system only if he knows the structure of the compact disc.
The maximum playing time of a compact disc is approximately
70 minutes. This makes it possible, for example, to play Iong
concerts without interruption. However, because it is frequently
desired to search and play individual passages, corresponding
information must also be encoded on the audio track. The following methods are used on the compact disc.
- lf the content can be subdivided into individual selections.
these are separated by short silent grooves. On the compact
disc these selections are identified as TRACK
- A different method of subdividing is the use of indices (lNDEX). Classrcal recordings in which most works consist of
movements are provided with indices by some of the disc ma
n
ufactu rers.
Note:
The subdivision of compact discs is def ined bythe CD manufacturer. On recordings comprising severai sections for which no
indices have been created. the starting time (CD-TIME) is usual-
ly specified on the jacket.
-
Each compact disc is also subdivlded into minutes and seconds of play time. Any location can, therefore, be accurately
and reproducibly accessed The time indicated on the display
of the REVOX 8225 ts always read f rom the compact disc and
does not correspond to the actual playing time of the unit. Of
course, any location can be searched in TRACK TIME as well
as in CD TIME mode (refer to Section 2.3 "Caution").
2 OPERATING INSTRUCTIONS
Note:
The following operating instructions should be exercised step
by step. Only after repetitive use of the 8225 CD player will the
owner become familiar with its f unction and be able to take ad-
vantage of its versatile programming features.
Operating errors such as pressing the wrong key cannot damage the CD player. Even the compact disc is "nowhere better
protected" than in the drawer.
Switching on the 8225 CD player
After the unit has been properly placed and hooked up, it can be
switched on with the POWER [1] key. The following information
appears on the display [7]:
2.1
However. the CD player can also be powered on by selecting
a
function. More information can be found in the corresponding
Sections.
TRACK
t-, t-t
,_t
t_t
TIME
t-l . t-f f-f
,-t . ,-l ,J
151015202530
llrrllrllrllllllrrlllrlllrlrll
2.2 Playback of compact discs
2.21Loading the compact disc
Carefully study Section 1.3 2 "Handling and care of the compact
disc" before you load the first CD.
- Press LOAD [2]. the drive drawer [6] opens
- Carefully load the compact disc with the printed side facing
up.
-
Press LOAD [2] again and the drawer 16l closes. The CD player is now in stop mode, the table of contents of a previous disc
has been cleared.
The drawer can also be closed by pressing PLAY/NEXT [4]. ln
this case the table of contents is read and playback starts immediatly.
Do not obstruct the drawer during its opening or closing movement. The direction of travel is reversed immediately if resistance is detected during the opening or closing movement. This
is also the case if the user does not remove his fingers in time
from the drawer area.
2.2.2 Playing a compact disc (play CD mode)
- Load compact disc (refer to Section 2.2.1).
-
the following events:
1. The compact disc starts to rotate.
2. The table of contents is read from the compact disc and
transferred into memory.
3. The table of contents appears in the display [7] (field E.
black bar up to 30 selections can be indicated).
4. The first selection (TRACK) on the compact disc is played.
:i,i:rIIr':
,tt'i
-
",'..t'.
Ll',i:',,
.'
.,,t,,,',t.
,i,r'i :ri.,.,ir.ri,1, i.:,,:r,..i.r.,r,i,r,ri.,.'
lf PLAY/NEXT [4] key is pressed again, the laser pickup ad-
vances to the beginning of the next selection and the second
selection is played. This is, of course, indicated in the table of
contents (display [7]). The bar (field E) is now shorter on the
left by one segment (meaning: one selection has already been
played) and the digits 02 (: second selection) appear below
the work TRACK (field B). lf PLAY/NEXT [4] is pressed again,
the laser scanner moves to the start of the next selection. etc.
lf a numeric input key [B] and subsequently PLAY/NEXT [4]
are pressed, the laser pickup advances immediately to the
corresponding selection (TRACK).
Example:
-
selection.
Pressing STOP key [3] immediately terminates the play mode
and the selector number in the display [7] is set to zero. The
bar again indicates the complete table of contents.
Pressing REPEAT [5] immediately replays the current selection from the beginning.
VA [15] (pause) suspends play mode, however, the laser pickup remains in the last position.
The word PAUSE appears in the display.
TII\4E
TRACK
1
t tJ
I I
5
suspended.
-
t,','.',i
To play the 14th selection (TRACK) on the CD loaded in the
player proceed as follows:
- Press the numeric keys 1 and 4 [B].
- Press PLAY/NEXT [4]:the laser pickup advances to the 14th
-
again and playback continues at the same spot where it was
-
rr.il.:1ri,..,rr.rl.i,'lri,.r:,:.,.1.:i,l
':li,l.il I.l':l:,I,,I:,Iil'I:lr:1.'I'li,I.Ii
-
The PAUSE function can be cancelled by pressing this key
Press PLAY/NEXT [4] in order to start play mode. This triggers
10
.lj.
:f
t.-.-l'-l
=r.
20
PAUSE
t=f
25
30
-
Any location on the compact disc can be searched with { [16]
and tr [14]. The display [7] serves as a locating aid. Field B indicates the selection (TRACK), f ield C the TIME within the selection. This search is reproducible with an accuracy of one second. Brief, repeated touching of key [14] or [16] causes a
small change in the position. For rapid searches the corresponding key is pressed continuously. Playback resumes automatically as soon as the search key is released. For repositioning the laser pickup without automatic activating of play
mode. press the VA key [15] (pause) f irst The functions PLAY/
NEXT [4] and REPEAT [5] are neither cancelled by the search
nor do they in turn cancel the PAUSE function.
AUTOSTOP [13]switchesthe CD playertopauseattheend of
a selection (TRACK) and the laser pickup is positioned at the
start of the next selection. This selection is played immediately when VA [15] (pause) is pressed (the silent "grooves" between two selections are skipped). This function repeats itself
after each selection until AUTOSTOP [13] is pressed again.
This f unction is also reset automatically when the end of a CD
is reached. The display [7] indicates that this function has
been selected.
lf LOOP [18] is pressed, play restarts from the beginning after
the last selection (TRACK). The loaded compact disc is repeated for as long as this function is active (endless mode).
This function is also indicated in the display [7]. The function
can be cancelled by pressing this key again.
2.3 Display [7]
The display [7] is the information center of the REVOX 8225
compact disc player. All operating states of the unit can be indicated or read out. The content of a compact disc as well as the
momentary playing timewithin a selection (TRACKTIME) orthe
time f rom the beginning of the CD (CD TIME) can be read on the
display.
2.3.1 Display in normal play mode (PLAY CD MODE)
lf STOP [3] is pressed after a new CD has been loaded, the bar
IE] indicates 30 selections This is normal and means that the
CD's table of contents has not been read in yet. The table of contents is updated as soon as PLAY/NEXT [4] is pressed.
The display provides the following status information in normal
play CD mode:
Note:
TRACK : title, selection or segment into which the compact
disc has been subdivided. On CDs with popular music one selection/title corresponds usuallyto onefull "TRACK". Some CDs
with classical music are better subdivided, especially in works
with pauseless transitions.
This fine subdivision is made with indices. The INDEX is auto
matically indicated on the display as soon as the laser pickup
reads an INDEX information on the CD.
Freld C of the display indicates the momentary position of the
laser pickup within a selection (TRACK TIME) By pressing the
DISPLAY key [17] the display can be switched over to indicate
the momentary position of the laser pickup relative to the start of
the CD (CD TIME) Press this key again to switch back to TRACK
TIN/IE,
Caution:
ir. :::.,,.
..-
:,,,iriär\CK.,,.,.: ,.:,,r..iNDFX
i.,
Field
B
C
D
Field
E
Field
ri:.TI.ME.i-.,
ri.
i, :.
.
,.,PA_USE.
.,,
$ *.-l *, 55 ",1:9""
i,i,.ir.lri:I,:It.Iilr,l,l..,l..'I.,!.l.il.rl,
Field
.,. . i,
r.-.:,'..,rriri,.iri
, :,r .,
i,.r.rrr,....:
the pause atthe beginning of the compact disc (approximately 2
seconds before the first selection starts). This information is encoded on the compact disc, i.e. it does not depend on the type of
CD player.
i
Selection number (TRACK)
Portion of a selection (INDEX)
Positionof thelaserpickupeitherrelativetothebeginningof
(TRACK TIME) or the beginning of the CD (CD TIME)
When the display is switched over with push button DISPLAY
[17] from TRACK TIME to CD TIN/E at the beginning of a compact disc. the two times differ by approximately 2 seconds. The
reason for this is the following: the TRACK TIME is the actual
time f rom the start of the selection. the CD TIME also includes
aselection
Pause
Pause at the end ol a selection
Loop mode
[a] 2 selections already played
[b] remaining selection
tal + tbl : total selections on
CD in
the player
2.3.2 Display in PROGRAM MODE
When the CD player is switched to program mode (Section 3), A TRACK related information
the display serves as a programming aid for verifying the inputs Freld A
and for corrections. During the programming sequence it conti- - lf the word STEP is neither visible nor flashing on the display
nuously supplies information on the current program step
the unit operates in normal play CD mode.
- lf the word STEP f lashes, the unit is switched to program entry
The {ollowing information is displayed:
mode, the number below refers to the program step being ac
CCSSCd,
-
ABC
STFp,..,':TAAC'K.,:..r,.:,,...,.:.,.r,,,TBACK,:,.,ri..i.i,..'
'l.ii
äiä,'.:' .,tti.,...',["$..t,.,i,tl.,',.
..i :r','rl.rliIr.I:,I,il::l-lrl:lr'l:I:1
..:'.
ii.i :',,i
.,:.:...:.'.:-::
lf the CD player is running and the word STEP is visible in the
display, this means that a program is being executed. i.e. the
CD player is operating in play program mode. The number be
low the word STEP refers to the program step currently being
executed.
Field
-
B
Thrs freld indicates the selection (TRACK) accessed in this
program step (in our example TRACK 03) If no entry was
made in f ield C. the entire selection will be played after which
the next program step is initiated. Field B always refers to the
start position of a program step. even if no entry was made in
field
Field
-
10
C.
C
An entry (optional) in this f ield indicates the end position of the
program step. ln the foregoing example this means: step 01.
play selections 3 through 4, then execute next program step.
B TIME
display in place of TRACK
AB
Field A
-
Same function as described above.
Field
-
B
The starting point of the program step was entered in minutes
and seconds. This time refers to CD TIME (for TRACK TIME
entries the corresponding TRACK information would be missing). ln our example the program step starts in the position 28
minutes and 30 seconds.
2.4 Headphones
Headphones (200 to 600 Ohms) can be connected with a
6.3mm (114") lack plug to socket [9]. The volume can be increased with the + key [10] and decreased with the - key [11].
Caution: These keys also influence the level of the VARIABLE
OUTPUT on the rear panel.
Field C
-
The program step terminates after the last second specified
on the display (in our example afler 32 minutes and 00 seconds).
Note:
Of course, selection numbers and the time can be entered in
combination. e.g. time for the starting position and selection
number for the ending position, or vice versa.
Brief touching of these keys varies the volume in very small in-
crements. Rapid changes are possible by pressing the corresponding key continuously.
Switching clicks of the volume control may possibly become
audible if the volume is set to its maximum.
3 PROGRAMMING THE REVOX 8225 COMPACT DISC PLAYER
3.l General
The REVOX P225 features highly flexible programming facilities. Atf irst glance the user may have doubts whether he will ever be able to master the procedures. He can rest assured: programming is so easy that it can be grasped by anyone. lmportant is, that every step be performed and rehearsed (consciously) until it is fully understood. lt is essentialto progress in the se
3.1-1
Why compile your own program?
There are many reasons why a program should be compiled before a compact disc is played.
For example if you want to:
- play the selections not in the same sequence as they are arranged on the compact disc (refer to Section 3.2.3)
- skip one or several selections, i.e. selective playback of a compact disc (refer to Section 3.2.3)
- cornpare individual beats or passages of one or several selections (refer to Section 3.2.4)
quence described in this manual. otherwise errors may creep in
which usually cannot be traced back, i.e. the operator is not
aware of what he is doing wrong.
-
exactly analyze a phrase of a selection without having to
search the starting point each time with keys [14] and ['16] (refer to Section 3.4.1)
assemble a program for copying on tape (refer to Section
3.2.3)
Many other examples could be cited, however, once the user
has become proficient, he will soon think of other requirements
that can be satisfied with suitable programs.
3.2 Step-by-Step programming
3.2.1 General programming hints
Save for a few exceptions, all programming keys are arranged
on the left-hand side of the f ront panel. The keys PROGRAM t26l
and STORE 122) are particularly conspicuous because of their
red tops. This underscores their special significance. At the beginning of each program. the red PROGRAN/ [26] key must be
pressed. This is acknowledged on the display [7] with the f lashing word STEP This signals that the unit is ready to accept the
entries for the individual program steps.
3.2.2 Switching the CD player to program entry mode
A program can basically be entered in two operating modes.
-
Program entry without a compact disc being played.
Program entry concurrently with the playback of a compact
disc.
Procedure for "Program entry only":
- Switch CD player on (press POWER [1]).
- The normal indication that no table of contents has been read
-
gram).
Playback is not influenced by the program entries, However, no
player functions should be pressed during the program input
session, otherwise the program will be started (exceptions are
explained in specific Sections).
ABCD
:
appears on the display after a brief delay. Howevel this has no
STFP
significance for the programming operation.
Activate the programming mode (press PROGRAN/ [26])
The word STEP now flashes in the display [7], the CD player
awaits your program entries.
.t.:.. g .,,....10 ..,., ...18. .,.,,..2A, .... 2.5
l.lll.lI:.ttr'll''ll.r.I,.'.
Procedure for programming while a CD is being played:
- Load desired compact disc and start play mode.
- Activate program mode with PROGRAN/ [26]. the word STEP
flashes in the display [7] and the program can be entered,
12
lmportant:
After the entries for each STEP have been completed. the program step must be saved in memory by pressing STORE l22l.lf
this is forgotten. no further step can be entered, however this
can possibly overwrite the previous entry. lt is possible to correct or modify individual steps in an existing program. A CD can
be played while a program is being compiled, or the entered
program can be executed (refer to Section 3.3 Editing a pro-
TRIICK,
r r-i '-i
30
3.2.3 Reprogramming the play sequence
The play sequence of the selections on the compact disc can be
modified as desired.
Procedure (the following sequence should be regarded as an
example):
-
Activate program mode (press PROGRAM [26]). the word
STEP f lashes in f ield A of the
Example: selections 3 through 12 are lo be entered in a single
ste p:
- Press digit 3 (key field [B]). the track indication advances to
03.
- Now press the CURSOR key. A second TRACK indication now
appears in field C of the display.
display [7] and the digit 1 appears
STEP TRACK
below.
The digits below TRACK in field B are at 00.
- Enter the first selection desired (example: selection 4). Press
digit 4 (on key field [B], the TRACK indication changes to 04
This entry means: program STEP 1 plays selection (TRACK) 4.
- Save the entry by pressing STORE l22l.f he STEP indication
changes to 2, the TRACK indication back to 00. The second
program step can now be entered.
- The next selection to be played ls number 9:
Press 9 (on keyfield [B])followed by store [22]; program step
2 is now saved. The STEP indication changes to 3, the TRACK
indication to 00.
- At the end of the program (the last step must also be saved by
pressing STORE 122)\,normal play mode can be activated by
pressing PROGRAM [26] (the program remains in memory),
or the program can be started by pressing PLAY/NEXT [4].
Pressing PLAY/NEXT a second time immediatly advances the
program to the next step. PLAY PROGRAM MODE is indicated
by discontinuing the flashing of the word STEP in field A.
Of course. consecutive selections can be included in one program step (but only in the sequence as they are stored on the
Lr
,:,
TRACK
I
l:,
151015202530
tlrttttlllll
':l
- Press digits 1 and 2 (of keyfield [B]).the secondTRACK indication advances to 12.
- Press STORE l2/.fhis program step is now saved.
Following the above procedure, a program with up to 19 steps
can be created step by step. A selection can be included as
often as desired in a program and not all selections of the compact disc have to be accessed. This programming method is
ideal for copying individual CD selections to a tape.
compact disc).
3.2.4 Programming of CD segments
Segments (passages) can also be defined in a program. Segments can relate to one or several selections. However. the
starting and ending locations must be known. These can be determined in two ways:
1 . Note the starting and ending time in normal play mode (in
minutes and seconds. relative to CD TIME, refer to Section
Press digits 2 and 5 to enterthe seconds. The starting time has
-
Procedures for method '1 . (in our example a starting time of 12
minutes and25 seconds and an ending time of 15 minutes and 34 seconds is assumed)
-
Activate program mode and change over the display from
TRACK indication to TIME indication by pressing TRACK/
TrME [24].
First, enter only the minutes: press 1 and 2. Before the seconds
can be entered press the CURSOR [25] key The following information is subsequently displayed:
STEP
TII\IE
, I ;'i:l i:l
in the display (press TRACK/TIME [24] if TRACK appears).
TII!1E
r l ,J"J 5
a
compact disc.
-
Press CURSOR [25] again. A second TIN/E indication appears
STEP
23)
2. Set marks in program entry mode during the playback of
now been entered (do not store yet).
TIME
l:f l-, ,:,
151015202530
TITIIIITITII
-
First, enter only the minutes by pressing the digits 1 and 5.
Press CURSOR [25] again so that the seconds can be entered
(in our examples digits 3 and 4).
The entrles for this step are now complete and must be saved
by pressing STORE [22].
Note:
During program execution. the selection (TRACK) and in the second position the current location of the laser pickup (TRACK
TIME) are indicated rather than the time entered with the keys.
The CD time can be read out in the second position by pressing
the DISPLAY [17] changeover key.
151015202530
trrllrrlllll
13
Procedure for method 2:
Start loaded CD by pressing PLAYiNEXT
-
-
[4].
Press PROGRAM [26].
With keys { [16] and tr [14] search a location immediately
in
Press STORE 1221,Ihe segment between the marks is now
stored.
During the execution of the program, the selection number and
front of the desired starting point and set the start mark by the location of the laser pickup within the selection are dispressing MARK [23]. The corresponding time mark (in CD played rather than the CD TIME.
TIME) will be indicated in the first position of the display and
the second f ield is also initialized. When MARK [23] is pressed
a second time at the point where playback should stop. this
time is also indicated in the displav (field C).
STEP
TIN4E
TII\4E
L';
I
':A
151015202530
':f
'E
rrllrlrlttr
5;J
E
3.2.5 Mixed step boundaries
Of course, program step entries can contain mixed boundaries, the MARK [23] key, or vice versa. lf a selection (TRACK) is used
i.e. the starting point can be a selection number (TRACK entry) as the starting point, an ending point def ined by time must relate
and the ending point a time (entered via key field [B] or set with to the TRACK TIME (exception).
3.2.6 "Paging" through the program
Each step of a complete or incomplete program can be indivi- thus be rechecked and modified if necessary (refer to Section
dually read out on the display [7]. The keys PROGRAM STEP + 3 3)
[19] and - l2O) are used for this purpose. Each program step can
3.3 Modifying the program
An existing program can be modified in a simple manner. Each
entry within the program steps can be altered individually.
Procedure:
- With PROGRAM STEP 119l and [20]. page to the desired program step.
- Press the CURSOR [25] key once before changing any value.
The TRACK indication can be modified in field B, or in TIME indicating mode the minutes field.
When the CURSOR key is pressed a second time, field C (in
TRACK indication mode) or the seconds field B (in TIME indication mode) can be modified. By pressing the CURSOR key
again, the minutes in the second TIME field can be modified,
etc.
-
STEP
TIME
IT ,E 5E
1
5
Ittttlllttlttl
-
tl
I
I
15
rected.
lrrrlr
STEP
TII\,IE
tl iEr5 E'
5
llttrrttlllrrt
-
Tlr!1E
10
,:f
15
trl
I r-f
-1.
f ' t r-l
20
25
30
15
rtt
I r-,
-fI tr-l
20
25
30
,:r -l i ,-t
E,
10
15
20
-l E,
Ittltltrllt
25
30
Advance to the seconds by pressing the CURSOR key (the ":"
reappears): (entry 38).
STEP
TIN]E
r,r l-l;1,:l
1
5
tlllrlllllltrllrr
14
10
,:f
The start position is to be set to 17 minutes and 38 seconds
(entry 17).
STEP
Step-by-step function of the CURSOR:
- Press PROGRAM key and page forward to the step to be cor-
1
The minutes in field B can be corrected by pressing the CURSOR [25] key. This is acknowledged by blanking out the ":".
10
E1 ,,:,
15
20
25
30
-
-
The stop mark is to be changed Io 25.27.
By pressing the CURSOR key, advance to the minutes input
field of the stop mark, the word TIME reappears in the second
field: (entry 25).
tl I -l'l
STEP
TII\i]E
151015202530
ITITTIIIIIITTIITT
-
TII\,IE
t-l
E ,:f 5 I, t-l
With the CURSOR key. advance to the seconds input field;the
":" in the seconds field reappears. (entry 27\.
STEP
TII\4E
tl l-l'lE
1
5
rrltrrlllrllllltr
10
;: 5tr15
20
-l
I
25
30
This modif ied program step can now be stored. ln the foregoing
example, allfields were modified. However, with it is possible to
make selective changes in a program step with the aid of the
cursor.
3.3.1 Cancelling a program
The program is cancelled in two
2.Byapowerfailure()50ms).Switchingoff theCDplayerwith
ways:
newone the POWER keys does not erase the memory content, because the memory remains powered in the standby mode.
is entered. The old one can be simply overwritten.)
(ltis notnecessarytocanceltheold program beforea
1. By simultaneously pressing the STORE and PROGRAM keys
in which case the program mode must be active.
3.4 Special program steps
The following Section describes certain special program steps
such as repeat mode. automatic switch-off, etc.
3.4.1 Programming the LOOP function
The loop function can be programmed in any step of the program (only as the last one makes sense), lf a LOOP command is
entered in the last step of a program, the entire program will be
continuously repeated until it is interrupted with the STOP key
lf the program is started normally by pressing PLAYiNEXT [4],
the entire program is repeated when the end is reached. Looping continues untilthe program is interrupted with the STOP [3]
key
Example (a program comprising
-
14 steps is to be repeated):
Press PROGRAM [26] key and page forward to step 15 with
key
1191.
Enter step 15: press LOOP [18] key. An "lJ'appears in place of
the TRACK number. Save the entry with STORE [22]
STEP
TRACK
I
It,-
151015202530
rrrtttrttlllllrl
15
3.4.2 Programming a pause
A pause can be programmed at the end of a selection in the
same manner as described in Section 3.4 1. ln our example a
pause ls to be entered after step 9 instead ofthe repeatfunction
at the end of the program.
- Page forward"P"in the program to step 10, then press the PAUSE
appears in the display. Store the entry.
key [15]. A
STEP
t-Ä
TRACK
F
1
5
rltlllrrlllrllltr
10
15
20
25
30
the CD player or on the remote control. The program continues to run until the next stop is reached or if none is programmed, until the end is reached.
Note: lf a pause
is desired after each step, the AUTOSTOP [13]
key can be pressed before the start of the program (or in PLAY
PROGRAN/ N/ODE). This activates the PAUSE function after
each step. The pause can be cancelled by pressing the pause
key 115l on the CD player or on the remote control.
Note:
However. the beginning of the next step will not yet be accessed. To continue the program. press the PAUSE [15] key on
lnstead of PAUSE. an interrupt command can be programmed
(STOP function) by following the above procedure. ln this case
the sToP [3] key must be pressed rather than the PAUSE [15]
key. When the program is started and reaches the step with the
STOP command, the program is interrupted and the CD player
switches to STOP mode.
3.4.3 Programming the alarm function (CAL. TONE [12] key)
This alarm tone remains active until it is muted by pressing CAL.
- The CD player switches to pause afterthe ninth program step.
ln certain applications it may be usefulto signalthe end of a program or of a sequence within the program with an'Alarm tone"
fONE [12] (causing the program to advance automatically to
the next step), or by interrupting the program with the STOP key.
by programming the following step:
or a
- Program CAL. TONE [12] instead of a selection number
time, This is acknowledged on the display by a "C".
- Store the entry (the display advances to the next step).
STEP
TRACK
fl-l t1
5
rrrrrrrlllttrrtrl
10
15
20
25
30
3.4.4 Power off function at the end of the program
A command for switching off the CD player can be entered in a
program step:
-
-
-
Activate program mode and page forward with key [']91 to the
last program step *1, e.g. step 16 if the last program step was
'1tr
STEP
TRACK
tr:
I r^l
151015202530
rrttlttrlrtrrrlll
16
Press POWER [1] A "-" is displayed. This does not power off
the CD player (unless the POWER key is pressed twice in pro-
gram mode).
Press STORE key. Start the program with PLAY/NEXT
[4] The
CD player switches itself off in the last program step.
4
OPERATING THE 8225 COMPACT DISC PLAYER WITH THE
REVOX B2O1 OR B2O1CD INFRARED REMOTE CONTROL
4.1 General
The REVOX 8201 infrared remote control is designed for controlling all components of the REVOX hi-fi system (integrated
amplifier 8251, FM tuner 8261, cassette recorder 8710 MK ll lR,
and the turntables 8791/8795 Thrs made it necessary, however.
to assign more than one f unction to the remote control keys. The
CD player is controlled by the same keys as the REVOX 8261 Fl\/
tuner. These keys are located in the center field The lR receiver
of the CD player recognizes only those commands, for which
the *-key has been pressed concurrently with the corresponding function. The CD player acknowledges each command by
turning on the LED in the lR window. lf only the CD player is to be
operated from the remote control. the latter can be modified by
a REVOX service agency so that the *-key does not have to be
pressed.
4.2 Operating
ln the following illustration the controls are identified with the
same numbers as on the fold out page at the beginning of these
operating instructions. Keys with the same number consequently have the same funclion.
Example:
4l on the remote control
)
f
:
R6ttrsl{141
PLAY/NEXT l4l on the CD player
Caution:
Always press and hold down the "-key when selecting
a
func-
tion.
POWER OFF switches the entire REVOX hi-f i system (tuner, amplif ier, cassette recorder and CD player) off . lt is not necessary to
press the * key {or this function.
On the infrared remote control 8201 CD button [3] can be ope
rated directly. For this reason it is marked with PLAY/NEXT
17
5
5.1
TECHNICAL APPENDIX
Technical data
A AUDIO
D DISPLAY Multfunction LC d sp ay
pp " -h" [o or I g.LoL.c r[O r o Or
DATA
Number of channelsr
Harmonic distorsion:
2ANz 2AkFlz.*0/-06dB
<0 006 % (20 Hz 20 kFlz)
S/N ratio, linear:
>
96dB
(.20ft
24k,ft)
S,/N ratio, weighted:
>
100 d B
(.20lz .
2A k!,z)
Channel separation:
>
Frequency response:
0utput level:
d
B t.ZA Nz .. 2A kNz)
0 0UTPUIVAR.IABLE 0.. 2V.
Rt
Phones output:
4.5 V. Ri
Ghannel balance (L,/Rl:
<02d8
Phase inearity through drgta
B
f
(500
proof
PAUSE, AUT0STOP, LO0P:
:pec al operatlng modes are nd cated
PROGRAM MODE:
each program step
Sampling frequency:
44Il.lz
Quantization;
16btinear/channe
Pickup:
AlGaAs sem conductor laser
Wave length:
078pm
Error correcting system:
CIRC (Cross Lnterleave Reed Solomon Code)
E
500 .200
reso
l2.. L4 rn/s
quartz crysta prec s on
Maximüm playing time:
/4
Start delay lrom pause:
Search time for any location:
(06s
TRACK. T ME or mixed
Programming methods:
kevboard entrv or sett ng of marks
each step can be def ned with a reso ut on of one
a funct ons such as L00P, PAUSt, etc can be
programmed
F
spec
GENERAT
V, 20A/ 22A/2+A\1, + 10'r,, 50160
adlustab e on vo tage se ector
100./120,/140
mrnutes
100
140V:
T 500 mA (siow)
T 250 mA (slow)
Power fuses:
200 .240 V :
Power consumption:
40 W max
Dimensions:
450x109x332mm (wxhxd)
..
Sub ect to change
(over 12C00 tracks per second)
5.2 Dimensions (mm)
1B
of
Step resolution:
Special functions:
rpm
Scanning velocity:
t: E: Et l'-r t3
äc:r} EI
uton
secon d
Wow and flutter:
(4s
wth a
19
DISC DRIVE,/ CONTROL
GD rotation speed:
nd cated
PROGRAMMING FACILITIES
Power requirements:
C
s
CD
ONC SCCONd
steps:
OPTICAL SYSTEM
a al.
Ether t me can be read out: TRACK TIME and
T I/E
Number of program steps:
Content of program
ng)
o.öc.pl.,"dot-a
TIME:
ohms, short-circu jt proof
< 50 ohn, S, short c rcu t
ter ng (oversampl
-0..
II{DEX:
.P<'000r...-o['.lpoo
AUDOOUTPUTFXED
AUD
90
the current posit on can be determined e ther from
the d splayed TRACK nrmber or the 30 segment bar.
TRACK:
rr-Tnn
EITfE=E
E] EE} O
"ll
o
Flz
MODE D'EMPLOI
REVOX 8225 . LECTEUR DE COMPACT DISC
AVIS IMPORTANTS
Prot6gez votre appareil de I'humidit6 et de la
chaleur excessive. Placez-le de telle fagon que la
grille d'a6ration ne soit pas obstru6e. ll est imp6-
ratif d'obseryer les indications du chapitre 1,1
avant de raccorder I'appareil au secteur.
Le lecteur laser n'6met aucune lumiÖre dangereuse; il n'est de plus activ6 qu'une fois le tiroir
ferm6.
GARANTIE
Une carte de garantie sp6ciale est jointe aux appareils vendus en Allemagne F6d6rale. Cette
carte se trouve, soit dans I'emballage de I'appareil, soit dans une enveloppe en plastique plac6e
sur un cöt6 de cet emballage. En I'absence d'une
telle carte, veuillez vous adresser ä votre revendeur REVOX ou ä votre agence 169ionale
REVOX.
Le bon de garantie des appareils vendus en Suisse ou en Autriche est d6livr6 par le revendeur.
Le bon de garantie des appareils vendus en France se trouve dans leur emballage. ll doit Ötre convena blement rempl i et si g n6 pa r votre revendeur
agr6e REVOX.
Veuillez observer que les garanties ne sont valables que dans le pays d'achat. Nous attirons en
outre votre attention sur la perte de validit6 de la
garantie qu'entraine toute manipulation ou r6paration effectu6e par un personnel non qualifi6.
EMBALLAGE
Conservez l'emballage d'origine. En cas de
transporl, cet emballage sp6cial constitue la
meilleure protection de votre pr6cieux appareil.
REPERTO
I
RE
1. CrNrnnlrTES
1.1
Mise en
service
1.1.1 Contröles pr6c6dant le raccordement de I'appareil au secteur
1.1.2 Branchemänt de cordon BF
1.1.3 Raccordement du lecteur de CD B225 au secteur
1.2 Vue d'ensemble des organes de commande . ..
1.2.1 Commandes g6n6rales
1.2.2 Commandes sp6ciales
1.2.3 Raccordements du panneau arriÖre
1.3
Le Compact
Disc
1.3.1 Principe du fonctionnement du Compact Disc
1.3.2 Manipulation et entretien du Compact Disc
..
...
Disc
2 MODE D'EMPLOI
2.1 Mise sous tension du lecteur de CD 8.225
2.2 Lecture du Compact Disc
2.2.1 Mise en place du Compact Disc
2.2.2 Lecture du Compact Disc (PLAY CD MODE)
2.3 Affichage 17)
2.3.1 Affichage-en mode de lecture normal (PLAY CD MODE)
2.3.2 Nffichage en mode (programme> (PROGRAM MODE)
2.4 Ecouteärcasqr"
1.3
3
a
3.1
3.1.1
3.2
3.2.1
3.2.2
3.2.3
3.2.4
3.2.5
3.2.6
3.3
3.3.1
3.4
3.4.1
3.4.2
3.43
3.4.4
4
Page
3
3
3
3
3
. ....
.. .. ...
Structure du Compact
PROGRAMMATION DU LECTEUR DE COMPACT DISC REVOX 8225
G6n6ralit6s
Pourquoi r6aliser ses propres programmes?
Programmation pas ä pas
Rögles g6n6rales de programmation
Mise du lecteur de Compact Disc en mode de programmation
Modification de I'ordre de lecture des morceaux.
Programmation d'extraits
M6lange des types de donn6es
<Parcourin le programme
Edition des programmes
Effacement d'un programme. ..
Pas de programme sp6ciaux. .
Programmation d'une boucle (LOOP)
Programmation d'une pause
Programmation de la fonction alarme (touche CAL. TONE112))
Mise hors tension ä la fin du programme
.
UTILISATION DU LECTEUR DE COMPACT DISC 8225 AVEC LA
TTITCOVMANDE INFRA-ROUGE REVOX 8201
4
4
4
6
6
6
7
7
B
B
B
B
I
.....
10
10
10
11
12
12
12
12
12
12
13
13
14
14
14
15
15
15
16
16
16
4.1
G6n6ralit6s
4.2
Utilisation
17
17
17
5
5.1
ANNEXE TECHNIOUE
Ca ract6ristiques techniq ues
Dimensions
1B
1B
1B
5.2
2
1 GENrnnltEs
1.1
Mise en service
Contröles pr6c6dant le raccordement de l'appareil au secteur
1.1.1
Afin d'6viter toute d6t6rioration pendant
le
transpor-t, le m6canisme a 6t6 fix6 par le bas ä
I'aide de deux vis. Celles-ci doivent ötre complötement extraites avant de mettre I'appareil
en service. Ces vis, plac6es sous le m6canisme, sont accessibles par le panneau inf6rieur
de l'appareil.
Contröler la position du s6lecteur de tension,
plac6 sur le panneau arriöre, avant de raccorder l'appareil au secteur. La valeur de tension
lisible dans l'6videment doit correspondre ä la
valeur locale de la tension secteur. Das le cas
contraire, il faut modifier la position de s6lecteur de tension et, le cas 6ch6ant. changer le
fusible
Processus:
D6visser les vis de fixation du panneau sup6rieur du boitier et d6poser celui-ci.
Placer le s6lecteur de tension sur la valeur
exacte du secteur.
Contröler le fusible secteur:
1 00 ... 1 40 V
T 500 mA (slow)
200 ...240V T 250 mA (slow)
Tout fusible ne correspondant pas ä ces
donn6es devra ötre remplac6.
Remonter le panneau sup6rieur du boitier.
-
:
:
-
1,1.2 Branchement du cordon BF
Le lecteur de CD 8225 se raccorde ä l'amplificateur par un double cäble Cinch (C2Cl. Deux
sorties (AUDIO OUTPUT) sontdisponibles sur
le 8225.
FIXED
Cette sortie est destin6e au raccordement ä
un amplificateur int6g16, comme par ex. le
REVOX 8251. On utilisera ä cet effet I'entr6e
DISC (8251) ou AUX (F75018780/8739)
Cette sortie d6livre un niveau fixe.
' ililfiillllllllllll
ffilllllllllllll ffiffiß
I'ilililllllt
llffi
.' .' ..:. .',
.t
, ,.
ti*lfiit1ill1ßii l|llrr
tilI[Iiilliililtffi
llllillillllil,ffiffil
EllllIlltEftE!!ffttt!t
..
VARIABLE
Cette sortie permet un raccordement direct
ä un amplificateur de puissance ou encore
aux enceintes actives REVOX. Le niveau de
cette sortie peut ötre command6 par les
touchesVOLUME + [10] ou - [11] situ6es sur
lä face avant. Les bruits de commutation de
la commande de volume peuvent devenir
audibles si celle-ci est pouss6e au maximum.
1.1.3 Raccordement du lecteur de CD
8.225 au secteur
ll est imp6ratif d'observer les directives d6crites dans le chapitre <1.1.1 Contröles pr6c6dant
le raccordement de I'appareil au secteur>. Le
lecteur de CD peut ensuite Ötre raccord6 au
secteur par le cäble joint ä cet effet.
qSC PUreR
' COMPACA
23
tlll tlol
tel
d'ensemble des organes de commande
1.2 Vue
1.2.1
Commandes g6n6rales
t1l
POWER., cette touche commande la
mise sous/hors tension de I'appareil.
Certains circuits (comme par ex. le 16cepteur lR) restent cependant toujours
sous tension (fonctionnement en
Stand-By)
LOAD, une pression sur cette touche
provoque la sortie, resp. la rentr6e du
m6canisme (voir <Chargement du
Compact Disc>, chap. 2.2.1).
STOP", lorsque cette touche est activ6e. la lecture est interrompue. Le capteur laser revient alors ä sa position de
d6part et, si l'appareil 6tait en mode
(programme>, le programme est 6galement interrompu. La position du laser
ne peut ötre retrouv6e aprös une pression sur la touche STOP Si cela est
cependant souhait6, il faut utiliser la
touche VA 1151.
PLAY/NEXT, touche de lecture poss6dant les fonctions suivantes:
Si elle est activ6e aprös LOAD l2l,le
CD commence ä tourner, son r6pertoire est d6chiffr6 et le disque est lu en
commengant par le premier morceau
(TRACK). Une nouvelle pression sur
cette touche provoque la s6lection du
morceau (TRACK) suivant.
S6lection du n-iöme morceau si elle
est press6e aprös une des touches [B].
l2l
t3l
l4l
Mise en mode (programme> si elle est
activ6e aprös la touche PROGRAM [26].
Press6e pendant l'ex6cution d'un programme, elle provoque un saut au pas
de programme suivant.
t5l REPEAT. une pression sur cette touche
provoque une r6p6tition imm6diate du
morceau dont la lecture est en cours.
Si le lecteur 6tait sur STOP le premier
morceau de CD est lu. Si le lecteur est
en mode (programme>, le pas de programme effectu6 est r6p6t6.
t6l (m6canisme), tiroir contenant le m6canisme du CD et l'afficheur ä cristaux liquides. ll est rentr6 ou sorti par action
sur la touche LOAD [2].
17l (afficheur), afficheur LCD multi-fonctions. ll affiche toutes les donn6s concernant le fonctionnement de I'appareil
et informe sur le r6pertoire du CD plac6
dans le lecteur.
tBl (touches 0 - 9), touches d'entr6e num6rique Elles sont utilis6es pour la s6lection directe d'un morceau (TRACK),
conjointement ä la touche PLAY/NEXT
[4], ou encore pour la programmation.
[21] IR-SENSOR, fenötre du r6cepteur ä
infra-rouge.
llappareil peut ötre mis en service par simple
pression sur I'une des touches de la rang6e
sup6rieure (t1l ä i8l, ä I'exception des touches
REPEAT [5] et de la touche d'entr6e du chiffre
0)
1.2.2 Commandes sp6ciales
Les organes de commande de la partie inf6rieure de la face avant peuvent Ötre, sch6matiquement, r6partis en deux groupes: d'une
part, les fonctions compl6mentaires du m6canisme, d'autre part les commandes destin6es
ä la programmation.
A Gommandes des fonctions
compl6-
mentaires du m6canisme
l9l
PHONES, prise pour casque 200 ..600
ohms.
[10] VOLUME +, cette touche permet
d'augmenter le niveau de l'6coute au
casque ainsi que le niveau de modulation de la sortie VARIABLE OUTPUT
[1 1] VOLUME -, cette touche permet de diminuer le niveau de l'6coute au casque
ainsi que le niveau de modulation de la
sortie VARIABLE OUTPUT
t12l CAL TONE". Commande la commutation de I'oscillateur de calibration
(1000 Hz) sur les sorties. Un magn6tophone raccord6 ä la sortie peut alors
ötre calibr6 pr6cis6ment. Le signal
1000 Hz correspond au niveau maximal
de sortie; il est d6termin6 par le systöme et ne saurait ötre d6pass6, möme
par de courtes pointes de modulation.
[13] AUTOSTOP une pression sur cette
touche commande l'interruption de la
lecture ä la fin du morceau en cours ou
du programme aprös le pas effectu6.
Le capteur laser est alors automatiquement positionn6 sur le d6but du morceau suivant. Celui-ci est lu si la touche
PAUSE VA 115l est activ6e Aprös cette
lecture, I'appareil se commute automatiquement sur Pause.
B
[14] Touche F, recherche d'un passage
situ6 vers la fin du morceau (pression
continue avance rapide automatique).
l15l VA (Pause)", cette touche permet d'interrompre le processus de lecture.
[16] Touche {, recherche d'un passage situ6
vers le d6but du morceau (pression
retour rapide automatique).
continue
[17] DISPLAY commutation de l'afficheur.
En mode normal de lecture, la dur6e
est affich6e du d6but de chaque morceau. Une pression sur cette touche
provoque I'affichage de la dur6e totale:
du d6but de la lecture jusqu'ä la position actuelle.
:
:
Touches destin6es ä la programmation
[18] LOOP", cette touche commande la 16p6tion de la lecture du CD ou de I'ex6cution du programme jusqu'ä ce que la
touche STOP [3] soit activ6e.
[19] +, lors de la programmation, cette touche permet d'effectuer un <scrolling>,
c'est-ä-dire de faire d6filer les pas de
programme successifs. C'est une aide
pr6cieuse lorsqu'un programme doit
ötre modifi6.
l20l -, m6me fonction que [19], mais avec
d6filement en sens inverse.
[22] STORE, touche de mise en m6moire.
Elle doit ötre press6e aprös chaque
entr6e d'un pas de programme. Le pas
de programme suivant est ensuite affich6 automatiquement et les donn6es
correspondantes peuvent ötre alors
entr6es.
[23] MARK, cette touche permet d'ins6rer
des points de d6part et d'arröt pendant
la lecture d'un morceau. ll est alors
6galement possible de programmer un
morceau quelconque en mode (programme).
[24] TRACK/TIME, permet de commuter
l'afficheur, pendant le d6roulement d'un
programme, entre I'entr6e du morceau
(TRACK) ou du temps (mn. et s.).
[25] CURSOR, le curseur permet d'acc6der
ä chaque position de I'afficheur et de
l'6diter selon le besoin. Attention: si
I'afficheur est commut6 sur I'entr6e du
temps (TIME), il faut. pour programmer
les secondes, de nouveau utiliser le
curseur aprös avoir programm6 les minutes.
[26] PROGRAM, commutation sur le mode
d'entr6e de donn6es. Aprös avoir effectu6 une programmation complöte,
presser la touche PLAY/NEXT [4] et
I'appareil s'enclenche en mode (programme).
Si, aprös avoir effectu6 une programmation, on d6sire replacer le lecteur
de CD en mode normal de fonctionnement, il faut, pr6alablement ä la touche
PLAY/NEXT, appuyer de nouveau sur Ia
touche PROGRAM 1261.
" Ces fonctions peuvent 6galement ötre rap-
pel6es par un programme.
1.2.3 Raccordement du panneau arriöre
[30] AUDIO OUTPUT FIXED, sortie pour un
amplificateur dont la sensibilite d'entr6e
peut ötre adapt6e au niveau de sortie
du lecteur de CD (l'amplificateur
REVOX 8251 est calibr6 de fagon optimale en usine).
[31] AUDIO OUTPUT VARIABLE, un amplificateur de puissance ou des enceintes
actives REVOX peuvent ötre raccord6s
ä cette sortie. Le volume peut alors Ötre
command6 par les touches VOLUME +
ou - situ6es sur la face avant du lecteur de CD.
l32l AC POWER, raccordement au secteur
(la fenötre de contröle de la s6lection
de tension secteur est placee ä cöt6).
[33] REMOTE, cette prise permet:
a) la mrse hors fonction du r6cepteur lR,
b) le raccordement d'une t6l6commande par cäble.
1.3 Le Compact Disc
1.3.1 Principe du fonctionnement du Compact Disc
Le <sillon> du Compact Disc. long de 5 km. renferme un signal digital complexe: des valeurs numeriques, dispos6es en alternance pour les deux canaux, contiennent l'information musicale.
Des donn6es de second plan comme le num6ro du morceau
(TRACK), la du16e de lecture. etc. sont 69alement contenues
dans le <sillon> Dans le cas du Compact Disc, l'information est
contenue dans une couche d'aluminium excessivement mince.
Les valeurs num6riques sont cod6es sous forme de creux dans
cette couche. La lecture de ces donn6es est effectuee par un rayon laser dont le signal r6fl6chi esttransformö en un signal 6lectrique (digital) par plusieurs photodiodes (recepteurs de lumiöre) travaillant simultan6ment. [ensemble du signal d6livr6 par
les photodiodes est trait6 en plusieur 6tapes: reconnaissance et
s6paration des signaux de synchronisation. söparation des in
formations musicales et des donn6es annexes (par ex. TRACK
TIME), production d'un signal de 169ulation ä partir de la fr6quence de synchronisation et de la fr6quence de r6förence
issue de quartz pour 16aliser la 16gulation de la vitesse de rotation du disque et, enfin. conversion de l'information musicale de
sa forme num6rique au signal analogique original.
D'6ventuelles diff6rences entre le signal musical num6rique et
les donn6es de contröle lors du d6codage ne peuvent ötre cau
s6es que par un Compact Disc d6fectueux. Les signaux qui apparaissent avec un l6ger d6calage, par rapport ä la rotatlon du
Compact Disc, sont automatiquement synchronis6es. Les fautes simples sont corrig6es, les valeurs qui ne peuvent ötre corrig6es sont remplacöes par une interpolation (moyenne entre les
6chantillons avant et resp. aprös la faute) Lorsque trop de fautes
non corrigibles se produisent, le signal de sortie est annul6.
Ls conversion digitole
Faisce*u laser r6ll€chi par le disque
Asservissemenl du
centrage du
sillon
D6tection photo6lectrique
Lumiöre
)
signal
6lectrique
Asservissement de la
localisation
(sers vertical)
{sens radial)
Affichage
D6modulation
Signal 6lectrique
) donn6es
Asselvisse-
ment du
nombre de
tüurs
Restauration du signal
Donn6es perturb6es )
signal num6rique sans
erreur
Vers le
canal gauche
de la chaine
Conversion digit./analog
Signal digital sans
erreur > deux signaux
analogiques (audio)
rVerS le
can*l droit
de 1a chaine
1.3.2 Manipulation et entretien du Compact Disc
La manipulation du Compact Disc est sensiblement plus simple
et moins problematique que celle du disque microsillon analogique. Certains polnts doivent cependant Ötre imp6rativement
observ6s. A cet effet. il est n6cessaire de connaitre la structure
m6canique du Compact Disc.
Trois couches constituent le Compact Disc, Une couche d'alu
minium, extrÖmement mince et contenant l'information, est rapport6e sur une couche protectrice relativement 6paisse. Le label
(16pertoire. interpröte et marque du disque) est ensuite imprim6
sur la couche mince. La Iaque et la couleur provenant de cette
impression constituent la seule protection de la couche sensible. Certes, le capteur laser lit par l'autre face qui est bien mieux
prot6g6e. Cependant, une rayure de la couche m6tallique (sur la
face imprim6e) peut perturber, voire interdire la lecture du Compact Disc. Le pas des <sillons> du Compact Disce n'est que d'env.
1.6 pm et Ia longeur moyenne par bit est env. 1 pm (un milliöme
de millimötre). Une fois que l'on a pris conscience de ces ordres
de grandeul il devient clair qu'une rayure sur la face imprim6e
lr;r
ü
d'un Compact Disc puisse avoir des cons6quences irr6m6diables.
Une rayure ou une empreinte de doigt sur la face lue (surface 16löchissante) n'a, par contre, quasiment aucune inf luence. Cette
face est amplement proteg6e par la couche porteuse. Les rayures et les täches n'affolent pas si facilement le capteur laser: la
forte convergence du faisceau le rend pratiquement insensible
ä la pr6sence de particules de poussiöre sur la surface du CD.
Le Compact Disc doit malg16 tout recevoir les mömes soins que
les disques microsillon analoglques.
Le nettoyage du Compact Disc est superflu si celui-ci est toujours tenu par la tranche et si, aprös chaque lecture, il est immediatement replac6 dans son emballage original.
Un Compact Disc sale peut ötre nettoy6 avec un chiffon sec,
doux et non effiloch6. N'employer en aucun cas une solution ou
une lessive abrasive.
f
1.3.3 Structure du Compact Disc
Un Compact Disc contient une trÖs grande quantit6 d'informations. ll est n6cessaire, afin de profiter au mieux des possibilit6s
qu'offre le systöme CD, de connaitre la structure du Compact
Disc. ll est possible de m6moriser environ 70 minutes de musique sur un Compact Disc. Ceci ouvre de nouvelle perspectives
comme la reproduction ininterrompue de longs concerts. ll doit
ötre en outre possible de chercher et de lire directement des
passages isol6s de tels concerts. f information correspondante
doit ötre enregistr6e conjointement ä la musique, ce qui, pour le
Compact Disc, a 6t6 r6solu de la fagon suivante:
- Si une r6partition en plusieurs morceaux est possible, ceux-ci
sont s6par6s par de courtes pauses. Sur le Compact Disc, ces
morceaux sont nomm6s TRACKs
- La 16partition peut 69alement ötre organisee autour d'indices
(INDEX). Les enregistrements classiques sont pour la plupart
diviSes en mouvements qui. chez quelquesfabricants, sont rep6r6s par des indices.
Avis:
lorganisation du Compact Disc est d6fine par le fabricant du
CD. Si un enregistrement comprend plusieurs morceaux sans
indices, leur place est fr6quemment rep6r6e par leur position
dans le temps, laquelle est indiqu6e dans le 16pertoire du coffret.
-
Chaque Compact Disc est donc divis6 en minutes et secondes. Un positionnement ä la seconde prös sur un passage est
r6alisable et reproductible ä tout instant. Iindication du temps
lisible sur l'affichage du REVOX 8225 esttoujours d6termin6e
ä partir du Compact Disc et ne correspond pas au temps
effectif de fonctionnement du lecteur. Le positionnement sur
un passage peut bien sür ötre effectu6 par TRACK TIME comme par CD TIME (observer les indications du chapitre 23,pa
ragraphe <AtLenlion:,).
2. MODE D'EMPLOI
Avis:
ll est conseill6 d'6tudier ce mode d'emploi pas ä pas. Seul un
<jeu> 16p6te avec les commandes du lecteur de CD 8225 permet
de se familiariser avec son utilisation et d'en exploiter toutes les
possibili t6s de programmation.
Une utilisation erron6e ne peut causer aucun dommage; il est
absolument exclu que l'activation non appropri6e d'une touche
puisse provoquer une d6t6rioration du lecteur de CD. Le Compact Disc lui-möme n'est jamais autant en s6curit6 que dans son
lecteur.
du lecteur de CD 8225
Une fois I'appareil install6 et raccord6 comme indiqu6 pr6c6demment, il peut ötre mis sous tension par action sur la touche
POWER [1]. timage suivante apparait alors sur l'afficheur (Display) [7]:
2.1 Mise sous tension
TRACK
f-r t-f
t-t ,-t
TII\4E
rl.rl r-l
t-l , ,-l ,-l
151015202530
ttlttttrlrlrlllllrllltlllrllll
2.2 Lecture du Compact Disc
2.2.1 Mise en place du Compact Disc
ll est conseill6 de lire le paragraphe <Manipulation et entretien
du Compact Disc> du chapitre 1.3. avant de placer et d'6couter le
premier Compact Disc.
- Appuyer sur la touche LOAD [2], le m6canisme [6] s'ouvre,
- Placer avec soin le Compact Disc dans l'appareil, la face imprimee 6tant dirig6e vers le haut.
-
Une deuxiöme pression sur la touche LOAD [2] et le m6canisme [6] se referme. [appareil est alors en mode Stop, I'ancien
16pertoire est efface.
Le m6canisme se referme 6galement aprös activation de la
touche PLAY/NEXT [4]. Le r6pertoire est ensuite lu et le processus de lecture d6bute aussitöt.
Veiller ä'ce que le tiroir du m6canisme puisse se d6placer librement entre ses deux positions. Si le tiroir rencontre une r6sistance pendant son ouverture, resp. sa fermeture, il repart en sens
inverse. Ceci se produit 6galement quand un utilisateur peu
averti ne retire pas ä temps ses doigts du tiroir.
[appareil peut en outre
Ötre mis sous tension par la selection directe de l'une des fonctions. Les indications concernant ce sys-
töme sont donnees dans le paragraphe correspondant.
2.2.2 Lecture du Compact Disc (PLAY CD MODE)
-
lvlettre le Compact Disc en place (voir chapitre 2.2.1).
Le processus de lecture est initialis6 lorsque la touche PLAY/
NEXT [4] est activ6e. ll comprend les 6tapes suivantes:
'1
. Le Compact Disc commence ä tourner.
2. Le r6pertoire du Compact Disc est lu et stock6 en m6moire.
3. Le 16pertoire est affich6 par l'affichage [7] (au plus 30 morceaux peuvent ötre indiqu6s sur les segments de la section
-
E).
4. Le premier morceau (TRACK) du Compact Disc est lu.
-
Une nouvelle pression sur la touche PLAY/NEXT [4] provoque
le posltionnement du capteur laser au d6but du deuxiÖme
morceau qui est lu ensuite. Tout ceci est bien sür indiqu6 dans
le repertoire (aff ichage [7]). La colonne (section E) est mainte-
nant raccourcie d'un segment ä gauche (signification: un
morceau a d6jä öt6 lu) et les chiffres 02 (: deuxiöme morceau) apparaissent sous l'inscription TRACK (section B). En
appuyant une fois encore sur la touche PLAY/NEXT [4]. on
provoque le saut du capteur laser au morceau suivant. etc. .
La pression d'une touche d'entr6e num6rique [8] suivie de la
touche PLAY/NEXT [4] positionne directement le capteur laser sur le morceau s6lectionn6.
.
-
Exemple:
On souhaite lire le 14öme morceau (TRACK) du Compact Disc
-
-
mis en place. Processus:
- Appuyer sur les touches 1 et 4 (des touches [B]).
- Appuyer sur la touche PLAY/NEXT [4], le capteur laser se
positionne sur le 14öme morceau.
Une pression sur la touche STOP [3] provoque I'arröt imm6diat de la lecture et l'indication de l'affichage [7] est ramen6e
ä z6ro. La colonne indique ä nouveau le r6pertoire complet.
Le morceau en cours de lecture est aussitöt relu depuis le d6but si on appuye sur la touche REPEAT [5].
La touche VA [15] (pause) interrompt la lecture; le capteur laser reste en place. llaffichage indique PAUSE.
TRACK
1
ru
tt
5
TII\1E
10
ra:
.lit
PAUSE
JE
20
30
-
Une nouvelle pression sur cette touche annule la fonction; la
lecture reprend ä partir de l'endroit oü elle avait 6t6 interrompue
Les touches < [16] et> ['14] permettent d'acc6der ä un passage quelconque du Compact Disc. Le passage s6lectionn6 est
rep616 par sa position dans le temps (TIME) ä I'int6rieur du
morceau dont le num6ro (TRACK) est indiqu6 dans la partie B
de l'afficheur. Cette position peut ötre retrouv6e ä la seconde
prös. De courtes et multiples pressions sur les touches tr [14]
ou { [16] ne provoquent que de courts d6placements du capteur laser; une pression continue d6clenche une modification
rapide de sa position. Lorsque la touche est reläch6e, l'appa-
reil revient en mode normal de lecture. Si on souhaite positionner le capteur laser sans pour autant d6clencher ensuite la
lecture, il faut appuyer auparavant sur la touche VA (pause).
On peut alors se placer sur un passage connu gräce aux touches tr [14] ou { [16] et en d6clencher la lecture par action sur
la touche VA [15]. Les touches PLAY/NEXT [4] et REPEAT [5]
conservent 69alement leurs fonctions, ceci bien sür sans annuler Ia Pause.
[appareil se commute sur Pause ä la f in du morceau (TRACK)
si, en cours de lecture, on appuye sur la touche AUTOSTOP
[13]. Le capteur laser est, dans le möme temps, positionn6 au
d6but du morceau suivant. Celui-ci est imm6dlatement lu si
on appuye sur la touche VA [15] (le lecteur ne marque alors
pas la pause de quelques secondes entre les deux morceaux).
Cette fonction, qui est automatiquement annul6e ä la fin du
Compact Disc, se r6pöte pour chaque morceau. jusqu'ä ce
que la touche AUTOSTOP 113l soit press6e une deuxiöme
fois. Elle est bien sür indiqu6e sur le Dlsplay [7].
Lorsque la touche LOOP [18] est press6e. le Compact Disc est
relu dös le d6but aprös lecture du dernier morceau (TRACK).
Le Compact Disc est lu tant que cette fonction est enclench6e
(boucle sans fin). Cette fonction est 6galement rappel6e par
l'affichage [7]. Une nouvelle pression sur cette touche annule
la fonction.
2.3 Affichage [7]
[affichage [7] visualise les informations du Compact Disc Player REVOX 8225 ll affiche et permet de s6lectionner tous les
modes de fonctionnement de l'appareil. ll d6livre en outre des
indications sur le r6pertoire du Compact Disc et la position dans
le temps ä l'int6rieur du morceau (TRACK-Tll\/E) ou depuis le d6but du CD (CD-TlN/E)
de lecture normal (PLAY
CD
Si, aprös avoir mis un nouveau CD en place, on appuie sur la
tou-
2.3.1 Affichage en mode
MODE)
che STOP [3].la colonne IE] affiche 30 morceaux. Ceci esttoutä
fait normal et signifie que le repertoire du CD n'a pas encore 6t6
lu. Dös que la touche PLAY/NEXT [4] est press6e. le r6pertolre
est corrig6.
En mode normal de lecture. l'affichage d6livre les informations
suivantes:
lndication:
fRACK : Titre, morceau ou passage constituant une subdivlsion du Compact Disc. Dans le cas de la musique l6gÖre, on a
pour la plupart du temps un morceau par titre, soit un (TRACK)
complet. Pour les ceuvres classiques. le CD est parfois divis6
plus finement. en particulier si les transitions sont peu marqu6es.
Cette division plus fine est realis6e par des indices (INDEX). L-in
dication des INDEX sur l'affichage s'effectue automatiquement
dös que le capteur laser reconnait une telle information sur le
CD
La partie C de l'affichage informe sur la position momentan6e
du capteur laser par rapport au d6but du morceau (TRACKTIME). On peut. en appuyant sur la touche DISPLAY [17], substituer ä cet affichage celui de la position du capteur laser par rapport au d6but du CD (CD TIME). Une nouvelle pression sur cette
touche ramöne l'indication de TRACK TIME.
Attention:
rT.Ri{c(. :.'
;:l
. rN'D'Ex.
[,,{:E
J,ü:.'1
2A
' .r.15'
.5. :.. .'rto
i'ri - r,t.ll-rlr
B
C
Partie D
Partie
Partie
Partie
E
. TIMF
. PAUSE
^1'fo'I"'
.
5
r
25
30
Si, au d6but de la lecture d'un Compact Disc, on commute l'affichage de TRACK TIN/E ä CD TIME en agissant sur la touche DISPLAY [17], on s'6tonne de voir les deuxtemps diff6rer d'env. 2 seconds En effet, TRACK TIME indique le temps ä partir du com
mencement effectif du morceau tandis que CD TIME tient
compte en plus du <blanc> plac6 au debut du Compact Disc
(env. 2 secondes avant le d6but du premier morceau). Ces informations sont programm6es sur le Compact Disc et sont ind6
pendantes du lecteur.
Numero de morceau TRACK
Partie d'un morceau INDEX
Position du capteur laser par rapport au d6but, soit du morceau (TRACKTIME), soit du cD (CD-TIME)
Pause
Pause ä la fin d'un morceau
R6p6tition continuelle
[a] 2 morceaux ont ddjä 6t6 lus
[b] morceaux restants
tal + Ibl : Nombre total de morceaux du Compact Disc mis en place.
2.3.2 Affichage en mode (programmer
(PROGRAM
MODE)
Une fois l'appareil plac6 en mode <programme> (voir le chapitre
3). l'affichage sert d'aide ä la programmation en permettant le
contröle des donn6es et 6ventuellement leur correction. Lors de
l'execution d'un programme, il indique constamment le pas de
programme en cours.
A Information se r6f6rant au morceau TRACK)
Partie A
- [appareil est en mode normal de lecture si l'inscription STEP
n'est ni fixe ni clignotante
- Si l'inscription STEP clignote. l'appareil est commut6 sur son
-
On distingue deux types d'information:
ABCD
STFP TRACK
r[^.1
:1
5,
. lt.rrll.lrrlllr
Partie B
TRACK
1Q :
[i t{
T5.
mode de programmation. Le nombre indiqu6 en-dessous indique le pas de programme s6lectronn6.
Si I'appareil est en fonctionnement et l'inscription STEP est
fixe, cela signif ie que le lecteur exöcute un programme donn6.
[appareil est alors en mode Play Program. Le nombre indiqu6
sous I'inscription STEP indique le pas de programme en cours
d'ex6cution.
ZÜ
25
morceau (TRACK) par lequel d6bute le pas de programme
(TRACK 03 dans cet exemple) est indiqu6 sur cette partie de
l'aff ichage. Si la partie C de I'affichage ne pr6sente aucune in
dication. le pas de programme suivant est execut6 aprÖs lecture complöte du morceau indiqu6 en B. La partie B indique
toulours la position de d6part d'un pas de programme, möme
si aucune donn6e n'a 6t6 entr6e dans la partie C.
Le
Partie C
-
Si cette partie de l'affichage comporte une indication, il s'agit
de la position finale du pas de programme. Dans le cas de
l'exemple ci-dessus: pas de programme 01, lecture du morceau 3 jusqu'au morceau 4 (compris). Le pas suivant est ensuite ex6cut6.
10
B Donn6e du temps (TIME)au lieu du morceau (TRACK)
ABCD
Partie A
-
Möme fonctlon que celle d6crite pr6c6demment.
Partie B
-
Le d6but du pas de programme a 6t6 donn6 en minutes et secondes. Le temps se r6fÖre alors au CD-TIME (la donn6e correspondante TRACK manquerait pour une entr6e en TRACKTIME). Dans notre exemple, le pas de programme d6bute au
point 28 minutes et 30 secondes.
2.4 Ecoute au casque
Un casque d'6coute (200 ä 600 Ohm), muni d'un connecteur
Jack 6,3mm, peut ötre raccord6 ä la prise [9]. Le volume est
augment6 par action sur la touche + [10] et abaiss6 par la touche - [11].
Attention: la tension de la sortle VARIABLE, situ6e sur le panneau arriöre de I'appareil. est 6galement inf luenc6e par ces touches.
Partie C
- Le pas de programme se termine aprÖs la derniÖre seconde
indiqu6e par le Display (dans notre exemple, aprös le point 32
minutes et 00 secondes).
Avis:
ll est bien entendu possible de möler des donn6es en num6ro de
morceau et en temps (un temps comme point de d6part et un
morceau comme position finale ou inversement).
De courtes pressions sur ces touches provoquent de l6gÖres
variations du niveau de sortie; une action prolong6e suscite une
variation rapide.
Des bruits de commutation peuvent devenir audibles lorsque
cette commande de niveau est ä son maximum.
3 PROGRAMMATION DU LECTEUR DE COMPACT DISC REVOX 8225
3.1 G6n6ralit6s
ll existe de nombreuses fagons de programmer le REVOX 8225
Certains utilisateurs, bien que parfaitement en mesure d'assimiler les diverses proc6dures n6cessaires, seront quelque peu d6rout6s par les nombreuses possibilit6s de programmation offertes. La programmation de cet appareil est accessible ä tout un
chacun. ll est cependant important d'en 6tudier chaque 6tape et
3.1.1 Pourquoi r6aliser ses propres programmes?
Les raisons de r6diger un programme avant la lecture d'un Com-
pact Disc sont nombreuses.
On souhaite peut-ötre:
- 6couter les morceaux dans un ordre diff6rent de celui qui est
propos6 ä I'origine (voir le chap. 3.2 3),
- ne pas 6couter un ou plusieurs morceaux (c'est-ä-dire effectuer une 6coute s6lective d'un Compact Disc) (voir le chap.
-
de la reprendre jusqu'ä ce qu'elle soit maitris6e. Lordre indiqu6
dans ce mode d'emploi doit ötre suivi dans la pratique. Des fautes. dont on ne peut d6terminer l'origine et dont on n'a pas conscience, apparaissent souvent dans le cas contraire.
-
-
analyser pr6cis6ment une phrase musicale sans avoir ä utiliser ä chaque fois les touches de positionnement F [14] et {
[16] (vorr le chap 3.4.1).
r6aliser un programme pour l'enregistrer ensuite sur magn6-
tophone (voir le chap 3.2.3)
On pourrait encore citer de nombreux exemples. AprÖs avoir acquis quelque pratique, chacun souhaitera sÜrement couvrir ses
3.2.31,
propres domalnes d'applications gräce
effectuer des comparaisons entre des mouvements ou des
passages d'un ou de plusieurs morceaux (voir le chap.3.2 4\,
appropri6s,
ä des
programmes
3.2 Programmation pas ä pas
3.2.1 Rögles g6n6rales de programmation
Les touches utilis6es en mode programmation se trouvent, ä
quatre exceptions prös. sur la moiti6 gauche de la face avant.
Les touches PROGRAN/ [26] et STORE [22] sont mises en relief
par leur couleur rouge. Ceci souligne leur signification particuliöre. ll faut appuyer sur la touche rouge PROGRAM [26] avant
de commencer ä r6diger un programme. f inscription STEP de
l'affichage [7] apparait alors en clignotant. Lappareil indique
ainsi qu'il est pröt ä recevoir les donn6es d'un programme; les
divers pas peuvent donc maintenant Ötre programm6s.
lmpottant:
Aprös avoir 6t6 entr6es, les donn6es de chaque pas de programme (STEP) doivent ötre sauvegard6es (appuyer sur la touche STORE [22] aprös chaque pas). ll est impossible de programmer le pas suivant si ceci n'est pas effectu6; on peut au plus
modlfier les donn6es fraichement entr6es. Ce proc6d6 permet
en outre d'introduire des modifications ou des corrections dans
un programme d6ja existant. Lors de sa programmation, le lecteur de CD peut fonctionner normalement ou ex6cuter le programme en cours d'entr6e (voir 3.3, Edition des programmes).
3.2.2 Mise du lecteur de Compact Disc en mode de programmation
ment de I'appareil:
- entr6e d'un programme sans lecture simultan6e d'un Com-
pact Disc,
d6roulement de la lecture n'est aucunement influenc6 par la
donn6e du programme. ll ne faut cependant activer aucune des
fonctions du m6canisme pendant toute la dur6e de l'entr6e du
programme, sinon le programme commence ä ötre ex6cut6 (les
-
programmation pendant la lecture simultan6e d'un Compact
exceptions seront d6taill6es dans des chapitres sp6cifiques).
Un programme peut ötre entrtl sous deux modes de fonctionne-
Le
Disc.
Proc6d6 pour (programmation seule>:
- Mettre l'appareil sous tension (appuyer sur la touche POWER
-
t1t)
lJaffichage normal. indiquant que le r6pertoire n'a pas encore
6t6 lu, apparait au bout de peu de temps sur l'affichage. Ceci
est sans cons6quence pour la programmation.
Mettre en mode de programmation (appuyer sur la touche
PROGRAM [26]).
[inscription STEP de l'affichage [7] se met ä clignoter; l'appareil attend la donn6e d'un programme.
Programmation pendant la lecture simultan6e d'un Compact
Disc:
-
Mettre le Compact Disc en place et commencer sa lecture,
Appuyer sur la touche PROGRAN/ [26], l'inscription STEP de
l'aff ichage [7] se met ä clignoter et le programme peut 6tre ent16.
12
r[t 'J
I'Ir.l
I.I
l.I
:.1
lil]l:l.i.r'.ir''r'..r:.
rr.i.'i ::r..r',r .. :. rr'..i'rrrririrl
3.2.3 Modification de l'ordre de lecture des morceaux
[ordre dans lequel sont lus les diff6rents morceaux du Compact
Disc peut ötre chang6 ä volont6.
ll est bien entendu 6galement possible d'entrer plusieurs morceaux (dans l'ordre d6fini par le Compact Disc) dans un seul pas
de programme.
Proc6d6 (la suite de morceaux qui suit est cit6e comme exemple):
-
-
-
Placer l'appareil en mode d'entr6e de programme (appuyer
sur la touche PROGRAN/ [26]), l'inscription STEP se met ä clignoter dans Ia partie A de l'affichage [7] et le chiffre 1 est affich6 en-dessous. Les chiffres plac6s en-dessous de l'inscription TRACK de la partie B indiquent 00.
lndiquer le morceau par lequel on souhaite commencer (par
ex. le morceau 4). Appuyer sur la touche 4 (pavö num6rique
l8l). l'affichage TRACK indique 04. Cette donn6e signifie que
le pas de programme 1 (STEP 1) provoque la lecture du morceau 4 (TRACK 4).
Cette donn6e doit maintenant ötre mise en m6moire (appuyer
sur la touche STORE 1221.faffichage STEP passe ä 2,1'affi'
chage TRACK indique ä nouveau 00. Cecl signifie que le second pas de programme peut ötre donn6.
Le prochain morceau souhait6 est le 9öme:
Appuyer sur la touche 9 (pav6 num6rique [B]) puis sur la touche STORE 1221,la donn6e est alors m6moris6e. lJaffichage
STEP passe maintenant ä 3, l'affichage TRACK revient ä 00.
A la fin du programme (le dernier pas de programme doit lui
aussi ötre mis en m6moire par action sur la touche STORE
l22ll, on peut se replacer en mode normal de lecture (le programme reste bien sür m6moris6) en appuyant ä nouveau sur
la touche PROGRAM f26l ou bien d6clencher l'ex6cution du
programme en agissant sur la touche PLAY/NEXT [4]. Le fonctionnement en PLAY PROGRAM MODE est indiqu6 par I'inscription STEP de la partie A de l'affichage: elle cesse de cli-
Exemple (les morceaux3 ä12 sont entr6s dans un seul pas):
- Appuyer sur la touche 3 (pav6 num6rique [B]), l'affichage
TRACK indique 03.
- Appuyer maintenant sur la touche CURSOR, une deuxiöme indication TRACK apparait alors sur la partie C du Display.
STEP TRACK
L!
TRACK
[, -1
l:f
151015202530
rltrlrllltll
'-l
-
Appuyer sur les touches 1 et 2 (pav6 num6rique [B]); le deuxiöme affichage TRACK indique 12.
- Appuyer sur la touche STORE l22l Ce pas de programme est
maintenant mis en m6moire.
On peut. de cette fagon, entrer pas ä pas un programme comprenant jusqu'ä 19 pas. Un möme morceau peut Ötre repris ä volont6 dans un programme, de möme qu'il n'est pas n6cessaire
de tenir compte de tous les morceaux du Compact disc.
Ce type de programmation est en outre id6al si on souhaite enregistrer des titres isol6s du Compact Disc sur bande magn6tique.
gnoter.
3.2.4 Programmation d'extraits
Des extraits peuvent ötre 6galement d6finis. lls peuvent ötre
contenus dans un seul morceau ou bien en couvrir plusieurs.
Dans tous les cas. seule la donn6e des positions initiale et finale
est n6cessaire. Celles-ci peuvent ötre d6termin6es de deux
fagons:
1. En notant les positions initiale et finale en mode normal de
lecture (en minutes et secondes, r6f6r6es au CD-TIME, voir
le chap. 2.3).
2. En plagant des marques lors de la lecture en mode program-
Les secondes peuvent maintenant ötre donn6es en appuyant
sur touches 2 et 5. Le temps initial est alors affich6 (ne m6mo-
-
r
mation.
Proc6d6 pour'1.: (exemple: d6but ä 12 minutes et 25 secondes,
fin ä 15 minutes et 34 secondes)
- Placer I'appareil en mode programmation et, en agissant sur
la touche TRACK/TIME [24], commuter de l'aff ichage TRACK
sur l'affichage TIME.
- Les minutes doivent d'abord ötre entr6es: appuyer sur les touches 1 et 2. Avant d'entrer les secondes. appuyer sur la touche
CURSOR [25]; l'affichage pr6sente alors l'aspect suivant.
STE
P
I
I
I
I
1
5
tllttlrrrlrl
;;i: uf-l
',rO
risez pas encorel)
Appuyer ä nouveau sur la touche CURSOR [25], une deuxiöme indication TIME apparait alors (siTRACK est aff ich6, appuyer sur TRACK/TIME [24]).
-
5
LJ:,:r
1
5
ITTITIIIII
10
,:l tl
15
20
t:f
25
30
ll
Les minutes doivent, de nouveau. ötre donn6es en premier:
touches 1 et 5. Une nouvelle pression sur la touche CURSOR
[25] permet d'entrer ensuite les secondes (touches 3 et 4
dans cet exemple).
[entr6e est achev6e et doit maintenant ötre mise en m6moire
(appuyer sur la touche STORE [22]).
lndication:
15
20
25
30
Lors du d6roulement du programme. le temps donn6 n'est pas
indiqu6 par l'affichage; celui-ci indique le num6ro du morceau
(TRACK)
en cours de lecture et la position momentan6e
(TRACK-TlN/E) du capteur laser. ll est bien entendu possible de
commuter la deuxiöme position sur CD-TIME en appuyant sur la
touche DISPLAY [17].
13
Proc6d6 pour 2.:
Commencer la lecture du CD en appuyant sur
-
-
la
touche PLAY/
NEXT [4].
Appuyer sur la touche PROGRAM [26].
Se positionner un peu avant le point de d6part pr6vu ä l'aide
des touches { [16] et tr [14] et placer ensuite une marque sur
ce point en appuyant sur la touche MARK [23]. La position
correspondante (en CD-TlN/E) est indiqu6e dans la premiöre
partie de l'affichage tandis que la deuxiöme apparait. Si la touche MARK [23] est press6e une deuxiöme fois au moment oü
le point f inal pr6vu est atteint, cette position est 6galement indiqu6e sur Ie Display (partie C).
Appuyer sur la touche STORE l22l,l'extrait d6fini par les marques est mis en m6moire.
Lors du d6roulement du programme. I'aff ichage n'indique pas le
CD-TIME mais le num6ro du morceau (TRACK) en cours de lecture et la position momentan6e du capteur laser ä l'int6rieur de
ce morceau.
-
STEP
t
I
,::1
'ii'l E
'10
1
ttlrtrll
,:,
5;r1
25
15
30
tlt
3.2.5 M6lange des types de donn6es
Les d iff6rents types de donn6es peuvent bien entendu Ötre
com-
bin6s: par ex. un morceau (donn6e du TRACK) comme point de
d6part et un temps comme pointf inal (donn6 par les touches du
3.2.6 <Parcourirr le programme
Chaque pas d'un programme, qu'il soit d6jä achev6 ou en cours
de programmation. peut ötre visualis6 par l'afflchage [7] gräce
auxtouches PROGRAN/ STEP + [19] et - [20]. Ainsi. chaque pas
3.3 Edition des programmes
Un programme peut trös facilement ötre corrig6. möme aprös
avoir 6t6 entr6. Chacune des donn6es d'un pas de programme
peut ötre modifi6e.
pav6 num6rique [B] ou par la touche MARK [23]) ou inversement. Si le point de d6part est donn6 par un morceau. le point final doit ötre r6f6r6 au TRACK TIME (exception).
de programme peut
6ch6ant. corrig6 (volr
-
-
Fonctionnement du CURSOR en <pas ä pasr.
Appuyer sur Ia touche PROGRAN/ et <feuilleter> jusqu'au prochain pas ä corriger.
STEP
ir
TIME
lE'5
151015202530
IITIIIIIII'IIIITI
14
E
TIME
E -f: ,,:,
tout instant ötre examin6 et, le cas
chap 3.3).
Une pression sur la touche CURSOR [25] permet de modifier
I'indication des minutes de la partie B. Les <:> disparaissent.
STEP
Proc6d6
- <Feuilleten le programme avec les touches PROGRAN/ STEP
[19] et [20]jusqu'ä ce que le pas ä 6diter soit atteint.
- Appuyer une fois sur la touche CURSOR [25] avant de corriger un chiffre. ll est alors possible de corriger l'indication du
TRACK dans la partie B ou, dans le cas d'un aff ichage TIME. le
nombre des minutes.
Une fois la touche CURSOR [25] ä nouveau press6e, on peut
modifier l'indication du TRACK dans la partie C ou, dans le cas
d'un affichage TIN/E, le nombre des secondes (partie B). Une
nouvelle pression de CURSOR permet de corriger les minutes
du deuxiöme affichage de temps, etc.
ä
le
TIME
r iE5,:l ,:a-i ,,:i
151015202530
TIIITITIIIITITIII
-
Le point de d6part doit ötre amen6 ä 17 min. et 36 s: (entr6e
de 17).
STEP
tt
TII\,IE
i -i 5 ,!l
,:a
-i
t ,:,
151015202530
IITTIIIIIITIITTII
-
Commuter sur la deuxiöme donn6e ä I'aide de la touche CUR<:> apparait de nouveau): (entr6e de 38)
SOR (le
STEP
tEf
15
rrltll
TII\1E
I
-l'
rrtt
JE
10
lrll
,:f
15
trt
-lttt
20
f-l
t_l
za
30
-
Le point d'arröt doit ötre amen6 ä 25 min. el 27 s.
Commuter sur la donn6e en minutes de la marque ä l'aide de
la touche CURSOR, l'inscription TIME apparait ä nouveau
dans la deuxiöme partie: (entr6e de 25).
STEP
tt I -lt:, ,5
1
5
rrrtlrtllllrll
-
TIME
TII\IE
10
r:f
15
r=
-t
lrl
r r-l
I t-l
20
25
30
Commuter sur la deuxiöme donn6e ä l'aide de la touche CURSOR (le <:r de la deuxiöme partie apparait de nouveau): (entr6e
de 27\.
TII\4E
STEP
tE l-l'-1 E
1...1.t..1i....1i..
TIME
1
;5:1
20 25
30
Le pas de programme modifi6 de cette fagon peut maintenant
ötre m6moris6. Dans I'exemple pr6c6dent, toutes les donn6es
ont 6t6 modifi6es. Tout point d'un pas de programme peut bien
sür ötre s6lectivement modifi6 gräce au curseur.
3.3.1 Effacement d'un programme
ll existe deux facons d'effacer un programme:
(il n'est pas n6cessaire d'effacer l'ancien programme pour en
entrer un nouveau. ll suffit d'6crire <par dessus>.)
1 . En appuyant en möme temps sur les touches STORE et PROGRAM. Pour cela, le mode programme doit d6jä ötre enclen-
2. Par une interruption du secteur () 50 ms, lors d'une coupure
de tension secteur; la mise hors tension (STAND BY) de I'appareil n'efface pas sa m6moire).
ch6
3.4 Pas de programme sp6ciaux
Les paragraphes suivants traitent de la programmation de fonctions sp6ciales comme la r6p6tition sans fin. la mise hors tension automatique, etc.
3.4.1 Programmation d'une boucle (LOOP)
Un pas de programme commandant une r6p6tition (boucle)
peut ötre plac6 ä tout endroit du programme (le plus sens6 est
6videmment de le placer ä la f in). Si le dernier pas d'un programme est une boucle LOOP le programme reprend continuellement jusqu'ä ce qu'une pression sur la touche STOP l'interrom-
Si le programme est de nouveau lanc6 en appuyant sur la tou-
che PLAYiNEXT [4]. il est automatiquement repris ä partir du
d6but ä chaque fois qu'il atteint sa fin. Cette boucle se 16pöte ä
l'infini jusqu'ä ce qu'elle soit interrompue par une action sur la
touche STOP [3].
pe.
Exemple (un programme de14 pas doit ötre r6p6t6):
-
-
Appuyer sur la touche PROGRAM [26] et rfeuilleter> jusqu'au
pas 15 (avec la touche [19]).
Entrer le pas 15: appuyer sur la touche LOOP [18], un <Li remplace alors I'indication du num6ro de TRACK M6moriser cette donn6e avec la touche STORE [22].
STEP
tr:
l_l
TRACK
I
I
15i015202530
lrtrlrlllllllllr
15
3.4.2 Programmation d'u ne pause
processus de programmation d'une pause est similaire ä celui d6crit en 3.4.1. Au lieu, comme dans l'exemple donn6, de pla-
Remarque: Si on souhaite effectuer une pause aprös chaque
cer une boucle ä la fin d'un programme, on veut ici introduire
[13] avant de lancer le programme (6galement pendant le PLAY
PROGRAN/I N/ODE). Le lecteur se commute alors sur la fonction
PAUSE aprös l'ex6cution de chaque pas de programme. Cette
Le
une pause aprös le pas de programme 9.
: <Feuilleter> le programme jusqu'au pas 10 puis appuyer sur la
touche VA [15] (PAUSE). finscription <Pr apparait alors sur
I'affichage. M6morlser cette donn6e.
STEP
151015202530
ITITIIITITITIIIII
fappareil se commute sur Pause aprös avoir lu le 9Öme morceau. De plus, le d6but du morceau suivant est automatique
ment recherch6. Si on souhaite poursuivre le programme, il
suffit d'appuyer sur la touche PAUSE [15] du lecteur ou de la
t6l6commande. Le programme se d6roule alors jusqu'ä
prochaine pause ou, s'il n'y en a plus, jusqu'ä sa fin.
Outre la fonction PAUSE. il est 69alement possible de programmer l'interruption du programme (fonction STOP). Le processus
est semblable ä celui d6crit pr6c6demment; il suffit d'appuyer
sur la touche STOP [3] ä la place de la touche VA [15]. Lorsque,
lors de son d6roulement, le programme atteint le pas d6fini par
la fonction STOP il s'interrompt et I'appareil se commute sur
STOP
la
3.4.3 Programmation de la fonction alarme (Touche CAL.
TONE [12])
ll peut ötre utile, pour des
applications sp6ciales, de rep6rer la f in
d'un programme ou de l'une de ses s6quences en produisant un
<signal d'alarme>. Dans un tel cas, il faut entrer le pas de programmation selon le processus suivant:
- Appuyer sur la touche CAL. TONE l12l au lieu d'entrer un num6ro de morceau ou un temps. taffichage indique alors <C>.
STEP
fonction peut Ötre annul6e par une pression sur la touche VA
[15] du lecteur ou par la t6l6commande.
Avis:
TRACK
t,-, l=t
a|^r t
-
pas de programme, il suffit de presser la touche AUTOSTOP
-
Ouand le pas de programme d6fini par la fonction CAL. TONE
[12] est atteint, le signal d'alarme r6sonnera jusqu'ä ce qu'il soit
d6clench6 par pression sur la touche CAL. TONE [12] (le programme avance automatiquement au prochain pas). ou le programme soit interrompu par pression sur la touche STOP [3].
TRACK
ttl-f
'1
5
rttrtltrlrrllrlll
10
15
20
25
30
3.4.4 Mise hors tension ä la fin du programme
Lordre de mise hors tension de l'appareil peut 6galement etre
m6moris6 dans un pas de programme.
-
Processus:
-
S6lectionner le mode de programmation et. ä l'aide de la touche [19], se positionnner sur le dernier *1 pas de programme
(si c'est 15, aller ä 16).
STEP
TRACK
li=
151015202530
ttlatlttlttrttrlt
16
Mettre cette donn6e en m6moire (l'affichage passe au pas
suivant).
-
Appuyer sur la touche POWER [1]; l'affichage indique alors
<-i. De cette facon, l'appareil n'est pas mis hors tension (seule
une deuxiöme pression sur la touche POWER peut mettre
l'appareil hors tension lorsqu'il est en mode programmation).
Appuyer sur la touche STORE. Lancer le programme en pressant la touche PLAY/NEXT f4l; l'appareilse d6clenchera avec
l'arriv6e du dernier pas.
4 UTILISATION DU LECTEUR DE COMPACT DISC 8225 AVEC LA
TTUCOMMANDE INFRA-ROUGE REVOX B2O1OU B2O1 CD
4.1 G6n6ralit6s
La t6l6commande ä infra-rouge REVOX 8201 est prevue pour
contröler tous les maillons de la chatne haute-fid6lit6 REVOX
(amplificateur int6g16 8251. tuner FN/ 8261, magn6tophone ä
cassettes 8710 MK ll lR et platines tourne-disques 8791/8795).
Ceci a rendu inevitable l'emploi de touches ä double fonction. Le
lecteur de CD 8225 est command6 par les mömes touches que
le tuner FM REVOX 8261. Ces touches sont plac6es sur la partie
centrale du clavier. Pour que le r6cepteur lR du lecteur de CD
considöre que I'ordre envoy6 s'adresse ä lui, il faut, au möme
temps. presser la touche de l'ordre d6si16 et la touche x.
Le lecteur de CD confirme chaque ordre recu en illuminant la
LED plac6e dans Iafenötre du r6cepteur lR. Si seul le lecteurde
CD est contrö16 par la t6l6commande, il est possible de la faire
modifier par un atelier de service REVOX pour qu'il ne soit plus
n6cessaire de presser la touche x.
4.2 Utilisation
touches repr6sent6es sur l'image suivante possÖdent la mÖme num6rotation que celle du volet d6pliant plac6 au d6but du
mode d'emploi. Les touches portant le möme num6ro ont69ale
ment la möme fonction.
Les
14l
1161.{15:,114}
Exemple:
Touche ) l4l (sur la tel6commande) :
touche PLAY/NEXT [4]
sur l'appareil
Attention:
llfaut toujours presser et maintenir
la touche x avant de s6lec-
tionner une fonction.
La touche POWER OFF d6connecte toute la chaine (tuner, amplificateur magn6tophone ä cassettes et lecteur de CD). ll n'est
pas n6cessaire de presser la touche * avant de commander cet-
te fonction
Pour la t6l6commande infra-rouge 8201 CD la touche [3] peut
ötre directement utilis6e. C'est pourquoi elle comporte l'indica
tion PLAY/NEXT
17
5
5.1
A
ANNEXE TECHNIOUE
Caract6ristiques techniques
Recherche d'un passage
quelconque:
DOI{NEES AUDIO
l{ombre de canaux:
R6ponse en fr6quence:
24ft
Distorsion:
<
2a
[Hz
D
*0'-0,6d8
ft ..24 klz)
> 96dB \20ft 2AIlz)
de ivre
TRACK:
II{DEX:
Att6nüation de diaphonie:
>100d8 (2012 2Ak.lz't
> 90 d B (20lz .. 2A klz)
Niveau de sortie:
AUDOOUTPUTFXID
2
Recul du bruit de fond:
Rapport signal/bruit:
AUDI0
0,006 % QA
< 500
V, R
0UTPUTVARIABLE 0.. 2V,
Sortie pour casque:
Equilibragedescanaux
4,5 V,
Rt
es
ohms, courl-c rcu tab e
ohms, court circu table
Ri < 50 ohms, courl-c rcu tab
e
a situat on momentanöe peut ötre ue dans l'aff cha
ge TRACK ou dans a colonne ä 30 segments
nd cat on automat que des rnd ces
ind que es deux types de temps
IRACK TlN4t et CD TlMt
nd cation des modes sp€c aux de fonct onnement
PAUSE, AUTOSTOP, [OOP:
chaque pas de programme est def nr
PROGRAM MODE:
E POSSIBITITES
SYSTEME DE LECTURE
a seconde
DE PROGRAMMATION
Nombre de pas de programme:
B
ä
pres.
lGlDl: .'oo
Phase inearis6e par filtrage dig tal (Oversamp ing)
ii fonctions
nd catrons su vantes
TIME:
(500
.11000p L" pa " ord.
<,1
AFFICHAGE Aff cheur LCD mu
19
TlMt ou comb na son des deux.
Possibilit6sdeprogrammation: en-lröeapar e caver ou par a m se en place de
Contenudespasdeprogrammei
Fr6quenced'ächantillonnager 44,It.lz
TRACK,
inöa re, 16 b ts/cana
Quantilication:
Capteur optique:
Longueur d'onde:
Code de correction
d'erreurs:
Laser AlGaAs ä sem conducteur
Exactidude des pas:
0,78
Fonctions sp6ciales:
um
F
Vitesse de rotation du GD:
500. 200trs/m
Vitesse de lecture:
1,2
n
o o dooö
les {onctons spöcia es comme LOOP, PAUSL etc
peuvent ötre programmöes.
C RC (Cross lnterleave Reed So omon Code)
C MECANISME,/COMMANDE
pe. ö,od" t .l"
'dq..pä
GENERATITES
100/120/140V, 2AA/22A/24AV. +10% se eciible,
Raccordement secteur:
50,'60
Hz.
Pleurage et scintillement:
'.7,4 rn/ s
prec s on du
Düree max, de lecture:
74 m nutes
Gonsommation:
40 Watt max
Temps de d6marrage aprös
une paüse:
(0,6s
Dimensions:
150
Fusibles secteur:
100.. 140V: T 500 mA (s ow)
qL"rartz
200.240V:T250mA(sow)
r
109
^
ll2
mm rLr H r
P)
Sous reserve de modif caiions
5.2 Dimensions (mm)
EEEEE
EE]E]
mrnn
EEIEEII:1
T=
o
El cf El o
l-3321
l-l
,18
o
!
-:-
r'?'-
ffi
:=..t
ffi
ffi
t
'-
EEEEE
:i
;ffi
SP t&
-lW
S!
:::::.--
,1
-e..:c.
-;;ffi
.:#'
I
I
I
i
l
G
I
I - -'-{
I
SPEAKE RS
A/B
flffiIffiF
8791/8795
I
ANTENNA INPUT