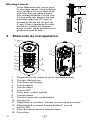
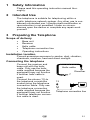
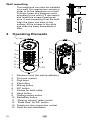
1
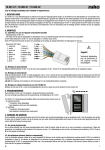
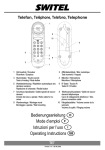
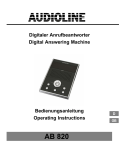
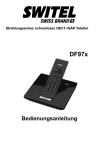
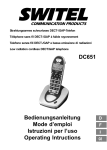
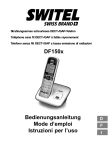
Schnurgebundenes Telefon
Téléphone à fil
Telefono con filo
Conventional telephone
TE9
Bedienungsanleitung
Mode d’emploi
Istruzioni per l’uso
Operating Instructions
2
Bedienungsanleitung . . . . . . 3
Mode d’emploi . . . . . . . . . . 9
Istruzioni per l’uso . . . . . . . 15
Operating Instructions . . . . 21
1 Sicherheitshinweise
Lesen Sie diese Bedienungsanleitung sorgfältig durch.
2 Bestimmungsgemäße Verwendung
Dieses Telefon ist geeignet für das Telefonieren innerhalb eines Telefonnetzes. Jede andere Verwendung gilt
als nicht bestimmungsgemäß. Eigenmächtige Veränderungen oder Umbauten sind nicht zulässig. Öffnen Sie
das Gerät in keinem Fall selbst und führen Sie keine eigenen Reparaturversuche durch.
3 Telefon in Betrieb nehmen
Lieferumfang
S
S
S
S
S
Basisgerät
Hörer
Spiralkabel
Telefonanschlusskabel
Bedienungsanleitung
Aufstellungsort
Vermeiden Sie Belastungen durch Rauch, Staub, Erschütterungen, Chemikalien, Feuchtigkeit, Hitze oder
direkte Sonneneinstrahlung.
Telefon anschließen
Verbinden Sie den Hörer
und das Basisgerät mit dem
Spiralkabel. Verwenden Sie
nur das mitgelieferte Spiralkabel, da das Gerät mit einem anderen Spiralkabel
eventuell nicht funktioniert.
Verbinden Sie das Telefon (13) und die Telefonanschlussdose mithilfe des Telefonanschlusskabels.
Verwenden Sie nur das mitgelieferte Telefonanschlusskabel, da das Gerät mit einem anderen
Telefonanschlusskabel
eventuell nicht funktioniert.
D
Spiralkabel
Hörer
7
13
Telefonanschlusskabel
3
Ihr Telefon ist zur Wandmontage
geeignet. Für die Befestigung
des Telefons benötigen Sie zwei
Schrauben. Bohren Sie zwei Löcher im Abstand der vorgesehenen Aufhängungen (75 mm) und
lassen Sie die Schrauben 5 mm
aus der Wand herausstehen.
Setzen Sie das Telefon an den
Aufhängungen auf die Schrauben und schieben Sie es etwas
nach unten.
75 mm
Wandmontage
4 Bedienelemente
1
2
13
11
1
12
3
4
5
6
7
1
2
3
4
5
6
7
8
9
10
11
12
13
14
4
14
8
9
14
10
Höreraufhängungen (bei Wandmontage)
Auflegekontakt
Zifferntasten
Stern−Taste
Stummschalt−Taste
R/F−Taste
Buchse für Spiralkabel
Raute−Taste
Wahlpause−Taste
Wahlwiederholung−Taste
Schieberegler Klingellautstärke"
Schieberegler Flash−Zeit" für R/F−Taste
Telefonanschlussbuchse
Aufhängungen
D
5 Bedienung
Anruf annehmen
Wenn das Telefon klingelt, heben Sie den Hörer ab und
führen Sie das Gespräch.
Gespräch beenden
Um ein Gespräch zu beenden, legen Sie den Hörer
auf.
Anrufen
Heben Sie den Hörer ab. Warten Sie, bis Sie das Freizeichen hören. Wählen Sie die gewünschte Telefonnummer mit den Zifferntasten (3).
Wahlwiederholung
Ihr Telefon speichert die zuletzt gewählte Rufnummer.
Um die zuletzt gewählte Rufnummer erneut anzurufen,
heben Sie den Hörer ab und warten Sie, bis Sie das
Freizeichen hören. Drücken Sie die Wahlwiederholung−
Taste (10). Die zuletzt gewählte Nummer wird automatisch gewählt.
Mikrofon stummschalten
Halten Sie während eines Telefonats die Stummschalt−
Taste (5) gedrückt, um das Mikrofon stummzuschalten.
Lassen Sie die Stummschalt−Taste (5) los, um die
Stummschaltung aufzuheben und das Telefonat fortzusetzen.
Flash−Taste an Nebenstellenanlagen 1
Ist Ihr Telefon an einer Nebenstellenanlage angeschlossen, können Sie über die R/F−Taste (6) Funktionen, wie z. B. Anrufe weiterleiten und automatischen
Rückruf, nutzen. Lesen Sie bitte die Bedienungsanleitung Ihrer Nebenstellenanlage. Ob Ihr Telefon an Ihrer
Nebenstellenanlage einwandfrei funktioniert, erfahren
Sie bei dem Händler, bei dem die Anlage gekauft
wurde.
Flash−Zeit einstellen
Werkseitig ist eine Flash−Zeit von 100 ms eingestellt.
Sie sollten die Standardeinstellung für die Flash−Zeit in
der Regel nicht ändern, da dies die Standard Flash−
Zeit im Telefonnetz ist. Sie können sie jedoch ändern,
wenn Ihr Telefon mit einer Telefonanlage verbunden ist,
die eine andere Flash−Zeit erfordert.
Die Flash−Zeit wird mit einem Schieberegler (12) auf
der Geräteunterseite eingestellt. Es gibt 2 Einstellungen: 100 ms und 300 ms. Schieben Sie den Schieberegler (12) in die gewünschte Position.
D
5
Wahlpause
Bei Nebenstellenanlagen ist es erforderlich, eine Amtskennzahl vorzuwählen, um ein Freizeichen zu bekommen. Bei wenigen älteren Nebenstellenanlagen dauert
es einige Zeit, bis das Freizeichen zu hören ist. Für
diese Nebenstellenanlagen kann nach der Amtskennzahl eine Wahlpause eingefügt werden, um direkt weiterwählen zu können, ohne das Freizeichen abzuwarten. Drücken Sie die Wahlpause−Taste (9), um eine
Wahlpause von ca. 3 Sekunden einzufügen.
Klingellautstärke einstellen
Die Klingellautstärke wird mit einem Schieberegler (11)
auf der Geräteunterseite eingestellt. Es gibt 2 Einstellungen: laut (großes Symbol) und leise (kleines Symbol). Schieben Sie den Schieberegler (11) in die gewünschte Position.
6 Falls es Probleme gibt
Fragen und Antworten
Fragen
Antworten
Kein Telefongespräch möglich
− Die Telefonleitung ist nicht korrekt angeschlossen oder gestört. Schließen Sie das Telefon erneut an. Verwenden Sie
nur die mitgelieferten Anschlusskabel.
− Schließen Sie ein anderes Telefon an. Ist immer noch kein
Telefongespräch möglich, ist
vermutlich der Telefonanschluss defekt.
Telefonnummer
wird nicht gewählt
− Drücken Sie die Tasten ausreichend fest, so dass Sie bei jedem Tastendruck einen Signalton hören.
Service−Hotline
Bei technischen Problemen können Sie sich an unsere
Service−Hotline unter Tel. 0900 00 1675 innerhalb der
Schweiz (Kosten Swisscom bei Drucklegung:
CHF 2.60/min) wenden. Bei Garantieansprüchen wenden Sie sich an Ihren Fachhändler. Die Garantiezeit
beträgt 2 Jahre.
6
D
7 Pflegehinweise / Entsorgung
Pflegehinweise
S
S
Reinigen Sie die Gehäuseoberflächen mit einem
weichen und fusselfreien Tuch.
Verwenden Sie keine Reinigungs− oder
Lösungsmittel.
Entsorgung
Sie sind gesetzlich zur sachgerechten
Entsorgung von Gebrauchsgütern verpflichtet. Das nebenstehende Symbol auf
Ihrem Telefon bedeutet, dass elektrische
und elektronische Altgeräte und Batterien
getrennt vom Hausmüll zu entsorgen sind.
Elektrische oder elektronische Geräte
entsorgen Sie bei einer Sammelstelle eines geeigneten Entsorgungsträgers.
Verpackungsmaterialien entsorgen Sie entsprechend den lokalen Vorschriften.
8 Garantie
SWITEL − Geräte werden nach den modernsten
Produktionsverfahren hergestellt und geprüft.
Ausgesuchte Materialien und hoch entwickelte
Technologien sorgen für einwandfreie Funktion und
lange Lebensdauer. Ein Garantiefall liegt nicht vor,
wenn die Ursache einer Fehlfunktion des Geräts bei
dem Telefonnetzbetreiber oder einer eventuell
zwischengeschalteten Nebenstellenanlage liegt. Die
Garantie gilt nicht für die in den Produkten
verwendeten Batterien, Akkus oder Akkupacks. Die
Garantiezeit beträgt 24 Monate, gerechnet vom Tage
des Kaufs.
Innerhalb der Garantiezeit werden alle Mängel, die auf
Material− oder Herstellungsfehler zurückzuführen sind,
kostenlos beseitigt. Der Garantieanspruch erlischt bei
Eingriffen durch den Käufer oder durch Dritte. Schäden,
die durch unsachgemäße Behandlung oder
Bedienung, natürliche Abnutzung, durch falsches
Aufstellen oder Aufbewahren, durch unsachgemäßen
Anschluss oder Installation sowie durch höhere Gewalt
oder sonstige äußere Einflüsse entstehen, fallen nicht
unter die Garantieleistung. Wir behalten uns vor, bei
Reklamationen die defekten Teile auszubessern, zu
ersetzen oder das Gerät auszutauschen.
Ausgetauschte Teile oder ausgetauschte Geräte gehen
in unser Eigentum über. Schadenersatzansprüche sind
ausgeschlossen, soweit sie nicht auf Vorsatz oder
grober Fahrlässigkeit des Herstellers beruhen.
D
7
Sollte Ihr Gerät dennoch einen Defekt innerhalb der
Garantiezeit aufweisen, wenden Sie sich bitte unter
Vorlage Ihrer Kaufquittung ausschließlich an das
Geschäft, in dem Sie Ihr SWITEL−Gerät gekauft haben.
Alle Gewährleistungsansprüche nach diesen
Bestimmungen sind ausschließlich gegenüber Ihrem
Fachhändler geltend zu machen. Nach Ablauf von zwei
Jahren nach Kauf und Übergabe unserer Produkte
können Gewährleistungsrechte nicht mehr geltend
gemacht werden.
Konformitätserklärung
Dieses Gerät erfüllt die Anforderungen der EU−Richtlinie:
1999/5/EG Richtlinie über Funkanlagen und Telekommunikationsendeinrichtungen und die gegenseitige Anerkennung ihrer Konformität. Die Konformität mit der o.
a. Richtlinie wird durch das CE−Zeichen auf dem Gerät
bestätigt. Für die komplette Konformitätserklärung nutzen Sie bitte den kostenlosen Download von unserer
Website www.switel.com.
8
D
1 Consignes de sécurité
Lisez très attentivement ce mode d’emploi.
2 Utilisation conforme à son usage
Ce téléphone est prévu pour téléphoner à l’intérieur
d’un réseau téléphonique. Toute autre utilisation est
considérée comme non conforme à son usage. Des
modifications ou transformations effectuées de façon
arbitraire sont interdites. N’ouvrez en aucun cas l’appareil et n’essayez pas de le réparer vous−même.
3 Mettre le téléphone en service
Contenu du coffret
S
S
S
S
S
Appareil de base
Combiné
Cordon spiralé
Câble de raccordement téléphonique
Mode d’emploi
Lieu d’installation
Évitez les nuisances causées par la fumée, la poussière, les vibrations, les produits chimiques, l’humidité,
la grande chaleur ou un ensoleillement direct.
Raccorder le téléphone
Raccordez le combiné et
l’appareil de base à l’aide du
cordon spiralé. N’utilisez que
le cordon fourni avec l’appareil, l’appareil ne fonctionnant éventuellement pas
avec un autre cordon.
Raccordez le téléphone (13)
et la prise téléphonique à
l’aide du câble de raccordement. N’utilisez que le câble
de raccordement fourni avec
l’appareil, l’appareil ne fonctionnant éventuellement pas
avec un autre câble.
F
Cordon spiralé
Combiné
7
13
Câble de raccordement
téléphonique
9
Votre téléphone est conçu pour
le montage mural. Vous avez besoin de deux vis pour fixer le téléphone. Percez deux trous à
une même distance l’un de l’autre que celle qui sépare les suspensions prévues (75 mm) et
laissez sortir les vis du mur de
5 mm. Fixez maintenant le téléphone en posant les suspensions sur les vis et poussez−le légèrement vers le bas.
75 mm
Montage mural
4 Éléments de manipulation
1
2
13
11
1
12
3
4
5
6
7
14
8
9
14
10
1
2
3
4
5
6
7
8
9
10
11
12
Suspensions du combiné (pour montage mural)
Contact Raccrocher
Touches numériques
Touche étoile
Touche Muet
Touche R/F
Prise pour cordon spiralé
Touche dièse
Touche pause de numérotation
Touche bis
Régulateur à coulisse volume sonore de la sonnerie"
Régulateur à coulisse temps de flash" pour la
touche R/F
13 Prise de raccordement téléphonique
14 Encoches
10
F
5 Utilisation du téléphone
Prendre un appel
Quand le téléphone sonne, décrochez le combiné et téléphonez.
Terminer la communication
Raccrochez le combiné pour terminer la communication.
Appeler
Décrochez le combiné. Attendez la tonalité. Composez
le numéro avec les touches numériques (3).
Touche bis
Votre téléphone enregistre le dernier numéro d’appel
composé. Pour rappeler ce numéro, décrochez le combiné et attendez la tonalité. Appuyez sur la touche
bis (10). Le numéro est automatiquement composé.
Mettre le micro en mode Muet
Appuyez sur la touche Muet (5) pendant une communication pour mettre le micro en mode Muet. Relâchez−la (5) pour supprimer le mode Muet et continuez
la conversation.
Touche flash sur les installations PABX 2
Si votre téléphone est raccordé à une installation
PABX, la touche R/F (6) vous fait bénéficier des fonctions telles que le transfert d’appels et le rappel automatique. Nous vous invitons à lire le mode d’emploi de
votre installation PABX. Le revendeur auprès duquel
vous avez acheté l’installation vous informera si votre
téléphone fonctionne parfaitement sur celle−ci.
Régler le temps de flash
En usine le temps de flash est réglé sur 100 ms. Il est
conseillé de ne pas modifier le réglage par défaut du
temps de flash, celui−ci étant le temps de flash par défaut dans le réseau téléphonique. Vous pouvez toutefois le modifier si votre téléphone est relié à une installation PABX nécessitant un temps de flash différent.
Celui−ci se règle avec un régulateur à coulisse (12) situé sous l’appareil. Il existe 2 réglages : 100 ms et
300 ms. Poussez le régulateur (12) à la position voulue.
F
11
Pause de numérotation
Dans le cas d’installations PABX, il faut composer auparavant un code réseau pour obtenir la tonalité. Sur
quelques installations plus anciennes, vous devez attendre quelques instants avant de pouvoir entendre la
tonalité. Pour ces installations PABX, une pause de numérotation peut être insérée après le code réseau afin
de pouvoir continuer à composer le numéro directement sans attendre la tonalité. Appuyez sur la touche
de pause de numérotation (9) pour insérer une pause
de 3 secondes.
Régler le volume sonore de la sonnerie
Le volume de la sonnerie se règle avec le régulateur à
coulisse (11) situé sous l’appareil. Il existe 2 réglages :
fort (grande icône) et faible (petite icône). Poussez le
régulateur (11) à la position voulue.
6 En cas de problèmes
Questions et réponses
Questions
Réponses
Pas de commu- − Le téléphone n’est pas correcnication téléphotement raccordé ou est pernique possible
turbé. Raccordez une nouvelle
fois le téléphone. N’utilisez
que le câble de raccordement
fourni avec l’appareil.
− Raccordez un autre téléphone.
Si vous ne pouvez toujours
pas téléphoner, votre raccordement téléphonique est sans
doute défectueux.
Vous ne pouvez
pas composer
votre numéro
− Appuyez suffisamment sur les
touches pour que vous puissiez entendre un bip sonore à
chaque fois que vous appuyez.
Ligne d’assistance directe
S’il s’agit de problèmes techniques, vous pouvez vous
adresser à notre hotline de service en Suisse au numéro de tél. 0900 00 1675 (frais Swisscom à la date
d’impression de ce manuel : CHF 2.60/min). Si vous
jouissez de droits de garantie, adressez−vous à votre
revendeur. La durée de la garantie est de 2 ans.
12
F
7 Remarques concernant l’entretien /
élimination du téléphone
Remarques d’entretien
S
S
Nettoyez les surfaces du boîtier avec un chiffon
doux et non pelucheux.
N’utilisez pas de produits d’entretien ou de
solvants.
Élimination
La loi vous oblige à éliminer de manière
appropriée les biens de consommation.
L’icône ci−contre sur votre téléphone signifie que les appareils électriques et
électroniques usagés ainsi que les piles
doivent être éliminés séparément des ordures ménagères.
Éliminez les appareils électriques ou
électroniques dans le centre de collecte
d’un organisme approprié d’élimination
des déchets.
Éliminez les fournitures d’emballage conformément au règlement local.
8 Garantie
Les appareils SWITEL sont fabriqués et contrôlés
selon des procédés les plus modernes qui soient. Des
matériaux sélectionnés et des technologies de pointe
garantissent un fonctionnement irréprochable et une
longue durée de vie. La garantie ne rentre pas en jeu si
l’exploitant du réseau téléphonique ou une installation
PABX éventuellement intercalée est responsable du
dysfonctionnement de l’appareil. La garantie ne
s’applique pas aux batteries, batteries rechargeables
ou packs de batteries rechargeables utilisés dans les
produits. La durée de la garantie est de 24 mois à partir
de la date d’achat.
Pendant la période de garantie, tous les défauts dus à
des vices de matériel ou de fabrication seront éliminés
gratuitement. Le droit à la garantie expire en cas
d’intervention de l’acheteur ou de tiers. Les dommages
provenant d’un mauvais traitement ou d’une
manipulation incorrecte, d’une usure naturelle, d’une
mauvaise mise en place ou conservation, d’un
raccordement ou d’une installation incorrects ainsi que
d’un cas de force majeure ou autres influences
extérieures, sont exclus de la garantie. En cas de
réclamations, nous nous réservons le droit de réparer,
de remplacer les pièces défectueuses ou d’échanger
l’appareil. Les composants remplacés ou les appareils
F
13
échangés deviennent notre propriété. Les demandes
de dommages et intérêts sont exclues tant qu’elles ne
reposent pas sur l’intention ou une négligence
grossière du fabricant.
Si votre appareil devait malgré tout présenter une
défectuosité pendant la période de garantie, veuillez
vous adressez, muni de la quittance d’achat,
exclusivement au magasin où vous avez acheté votre
appareil SWITEL. Vous ne pouvez faire valoir vos
droits à la garantie selon ces dispositions
qu’exclusivement auprès de votre revendeur. Deux ans
après l’achat et la remise de nos produits, il n’est plus
possible de faire valoir les droits en matière de
garantie.
Déclaration de conformité
Cet appareil répond aux exigences des
directives de l’union européenne (UE) :
1999/5/CE : Directive sur les installations de radio et de
télécommunication et la reconnaissance réciproque de
leur conformité. La conformité à la directive ci−dessus
est confirmée sur l’appareil par le symbole CE. Pour
obtenir la déclaration de conformité intégrale, utilisez le
téléchargement gratuit depuis notre site Internet
www.switel.com.
14
F
1 Indicazioni di sicurezza
Leggere attentamente le presenti istruzioni per l’uso.
2 Destinazione d’uso
Il presente telefono consente di svolgere telefonate
all’interno di una rete telefonica. Qualsiasi altro impiego
è considerato come non conforme agli usi previsti. Non
sono consentite modifiche o trasformazioni non autorizzate. Non aprire per nessuna ragione l’apparecchio autonomamente, né compiere riparazioni di propria iniziativa.
3 Messa in funzione del telefono
Oggetto di fornitura
S
S
S
S
S
Unità base
Ricevitore
Cavo a spirale
Cavo di collegamento telefonico
Istruzioni per l’uso
Luogo di installazione
Evitare un’esposizione a fumo, polvere, vibrazioni, sostanze chimiche, umidità, calore e raggi solari diretti.
Collegare il telefono
Collegare mediante il cavo a
spirale il ricevitore all’unità
base. Utilizzare soltanto il
cavo a spirale fornito in dotazione visto che l’apparecchio
potrebbe non funzionare utilizzando un altro cavo a spirale.
Collegare il telefono (13) e la
presa telefonica con l’ausilio
del cavo di collegamento telefonico. Utilizzare soltanto il
cavo di collegamento telefonico fornito in dotazione visto che l’apparecchio potrebbe non funzionare
utilizzando un altro cavo di
collegamento telefonico.
I
Cavo a spirale
Ricevitore
7
13
Cavo di collegamento
telefonico
15
Il telefono è concepito per il montaggio a parete. Il fissaggio del
telefono richiede due viti. Prevedere due fori con una distanza richiesta dai dispositivi di aggancio (75 mm) e lasciare sporgere
le viti di 5 mm dal muro. Introdurre quindi il telefono sui dispositivi di aggancio e spingere l’apparecchio verso sotto.
75 mm
Montaggio a parete
4 Elementi di comando
1
2
13
11
1
12
3
4
5
6
7
1
2
3
4
5
6
7
8
9
10
11
12
13
14
16
14
8
9
14
10
Dispositivi di aggancio ricevitore
(per montaggio a parete)
Contatto di riaggancio
Tasti numerici
Tasto asterisco
Tasto di muting
Tasto R/F
Innesto per cavo a spirale
Tasto cancelletto
Tasto pausa di selezione
Tasto ripetizione di chiamata
Cursore scorrevole Volume di squillo"
Cursore scorrevole Durata flash" per tasto R/F
Presa telefonica
Dispositivi di aggancio
I
5 Esercizio
Ricevere una chiamata
Quando il telefono squilla, sollevare il ricevitore per
condurre la telefonata.
Concludere una chiamata
Per concludere la chiamata, agganciare il ricevitore.
Telefonare
Sollevare il ricevitore. Attendere l’ascolto del segnale di
libero. Selezionare il numero telefonico desiderato tramite i tasti numerici (3).
Ripetizione di chiamata
Il telefono memorizza l’ultimo numero di chiamata selezionato. Per richiamare il numero telefonico selezionato
per ultimo, sollevare il ricevitore e attendere, fino a
quando si avverte il segnale di libero. Premere il tasto
ripetizione di chiamata (10). L’apparecchio seleziona
automaticamente il numero selezionato per ultimo.
Silenziamento del microfono
Con chiamata in corso, tenere premuto il tasto di muting (5) per disabilitare il microfono del dispositivo. Rilasciare il tasto di muting (5) per interrompere il silenziamento e proseguire la telefonata.
Tasto flash in impianti telefonici interni 3
Con telefono collegato ad un impianto telefonico interno, il tasto R/F (6) consente l’uso di altre funzioni disponibili, come per es. le funzioni di inoltro di chiamata
e richiamata automatica. Si prega di leggere le istruzioni per l’uso del proprio impianto telefonico interno. Il
rivenditore autorizzato è in grado di indicare se il telefono acquistato funzionerà senza alcun problema nel
proprio impianto telefonico interno.
Impostare la durata flash
La configurazione iniziale prevede una durata flash
di 100 ms. Si consiglia di non modificare, in linea generale, le impostazioni standard per la durata flash visto
che si tratta della durata flash standard applicata nella
rete telefonica. È comunque possibile modificare la durata flash qualora il telefono risulti collegato ad un impianto telefonico che richiede una durata flash diversa.
La durata flash è impostata tramite cursore scorrevole (12) presente sul lato inferiore del dispositivo. È
possibile scegliere tra 2 opzioni: 100 ms e 300 ms. Portare il cursore scorrevole (12) nella posizione richiesta.
I
17
Pausa di selezione
In presenza di impianti telefonici interni è necessario
preselezionare un numero di accesso alla rete esterna
per ottenere un segnale di linea libera prima di poter
compiere una telefonata. Alcuni impianti telefonici interni di vecchia data richiedono del tempo prima di trasmettere il segnale di linea libera. Per questi impianti
telefonici interni è possibile inserire una pausa di selezione dopo il numero di accesso alla linea esterna in
modo da poter proseguire con la selezione del numero
senza dover attendere il segnale di libero. Premere il
tasto pausa di selezione (9) per aggiungere una pausa
di selezione di ca. 3 secondi.
Impostare il volume di squillo
Il volume di squillo è impostato tramite cursore scorrevole (11) presente sul lato inferiore del dispositivo. È
possibile scegliere tra 2 opzioni: volume alto (simbolo
grande) e volume basso (simbolo piccolo). Portare il
cursore scorrevole (11) nella posizione richiesta.
6 In presenza di problemi
Domande e risposte
Domande
Risposte
Non è possibile
condurre una
chiamata telefonica
− La linea telefonica non è collegata correttamente oppure
presenta un guasto. Ricollegare il telefono. Utilizzare allo
scopo il cavo di allacciamento
fornito in dotazione.
− Collegare quindi un altro telefono. Se ciò nonostante non
fosse possibile condurre una
telefonata, probabilmente il
guasto riguarda l’allacciamento telefonico.
Il dispositivo non − Premere i tasti con sufficiente
seleziona il nupressione in modo da avvertire
mero telefonico
un segnale acustico ogni volta
che si preme un tasto.
Linea di assistenza
In caso di problemi tecnici è possibile rivolgersi alla nostra linea di assistenza tecnica chiamando al numero
0900 00 1675 valido per la Svizzera (spese da rete
Swisscom alla data di stampa: CHF 2,60/min). In caso
di reclami entro il periodo di garanzia, rivolgersi al rivenditore autorizzato. Il periodo di garanzia ricopre
2 anni.
18
I
7 Consigli per la cura / Smaltimento
Consigli per la cura
S
S
Pulire le superfici degli apparecchi con un panno
morbido che non lascia pelucchi.
Non utilizzate mai detergenti o solventi.
Smaltimento
Sussiste l’obbligo legislativo al corretto
smaltimento di beni di consumo. Il simbolo riportato sul telefono e raffigurato qui
a lato indica che apparecchi usati elettrici
ed elettronici e batterie esauste non sono
da smaltire assieme ai normali rifiuti domestici.
Procedere allo smaltimento di apparecchi elettrici o elettronici presso un centro di raccolta incaricato con lo smaltimento conforme.
Smaltire confezioni ed imballaggi secondo
quanto indicato dalle norme in vigore a livello
locale.
8 Garanzia
Gli apparecchi SWITEL sono costruiti e collaudati in
osservanza dei processi di produzione più moderni.
L’impiego di materiali selezionati e tecnologie
altamente sviluppate sono garanti di una perfetta
funzionalità e lunga durata in vita. La garanzia non
viene considerata esecutiva qualora la causa del
malfunzionamento dell’apparecchio sia riconducibile al
gestore della rete telefonica oppure se questa è da
attribuirsi ad un impianto telefonico interno interposto.
La garanzia non si estende a batterie, accumulatori o
pacchi batteria utilizzati all’interno degli apparecchi. Il
periodo di garanzia ricopre 24 mesi a partire dalla data
di acquisto.
Entro il periodo di garanzia si procederà
all’eliminazione gratuita di tutti i guasti dovuti a difetti di
materiale o produzione. Il diritto di garanzia cessa in
caso di interventi da parte dell’acquirente o di terzi.
Danni derivanti da un impiego o esercizio non
conforme agli usi previsti, da naturale usura, da errato
montaggio o errata conservazione, da collegamento o
installazione impropri, da forza maggiore o altri influssi
esterni non sono coperti da garanzia. In qualità di
produttore ci riserviamo il diritto, in caso di reclami, di
riparare o sostituire le parti difettose o di rimpiazzare
l’apparecchio. Parti o apparecchi sostituiti passano di
nostra proprietà. Sono esclusi diritti di risarcimento per
I
19
danni qualora non siano dovuti a intenzione o colpa
grave del costruttore.
Nel caso in cui il presente apparecchio dovesse ciò
nonostante presentare un difetto durante il periodo di
garanzia, si prega di rivolgersi esclusivamente al
negozio di rivendita dell’apparecchio SWITEL assieme
al relativo scontrino di acquisto. In base alle presenti
disposizioni, tutti i diritti di garanzia dovranno essere
fatti valere esclusivamente nei confronti del rivenditore
autorizzato. Decorso il termine di due anni dalla data di
acquisto e consegna dei nostri prodotti non sarà più
possibile fare valere alcun diritto di garanzia.
Dichiarazione di conformità
Questo apparecchio risponde a
quanto disposto dalla Direttiva UE
1999/5/CE concernente le apparecchiature radio, le apparecchiature terminali di telecomunicazioni e il reciproco riconoscimento della loro conformità. La conformità con la direttiva di cui sopra viene confermata dal
marchio CE applicato sull’apparecchio. Per la dichiarazione di conformità completa si prega di voler usufruire
del servizio gratuito di download dal nostro sito Internet
www.switel.com.
20
I
1 Safety Information
Please read this operating instruction manual thoroughly.
2 Intended Use
The telephone is suitable for telephoning within a
public telephone network system. Any other use is considered unintended use. Unauthorised modification or
reconstruction is not permitted. Under no circumstances open the device or complete any repair work
yourself.
3 Preparing the Telephone
Scope of delivery
S
S
S
S
S
Base unit
Receiver
Helix cable
Telephone connection line
Operating instructions
Installation location
Prevent excessive exposure to smoke, dust, vibration,
chemicals, moisture, heat and direct sunlight.
Connecting the telephone
Connect the receiver and
base unit with the helix
cable. Only use the helix
cable supplied because the
equipment may not function
if another helix cable is
used.
Connect the phone (13) to
the telephone connection
socket using the telephone
connection cable. Only use
the telephone connection
cable supplied because the
equipment may not function
if another telephone connection cable is used.
G
Helix cable
Receiver
7
13
Telephone connection line
21
The telephone can also be installed
on a wall. You require two screws in
order to fix the telephone on a wall.
Drill two holes at a distance corresponding to the slots (75 mm apart)
and insert the screws leaving approx. 5 mm projecting from the wall.
Align the base unit slots to the
screws, fit the screws in the slots
and slide the base downwards a
little.
75 mm
Wall mounting
4 Operating Elements
1
2
13
11
1
12
3
4
5
6
7
1
2
3
4
5
6
7
8
9
10
11
12
13
14
22
14
8
9
14
10
Receiver hook (for wall installation)
On−hook contact
Digit keys
Star button
Muting button
R/F button
Socket for helix cable
Hash button
Dialling pause button
Redialling button
Ringing volume" slide control
Flash time" for R/F button
Telephone line connection socket
Slots for wall installation
G
5 Operation
Taking a call
When the phone rings, lift the receiver and take the
call.
Ending a call
Replace the receiver to end the call.
Making a call
Lift the receiver. Wait until you hear the dialling tone.
Dial the required telephone number using the digit
keys (3).
Redialling
Your telephone stores the last phone number dialled.
To redial the last number dialled, lift the receiver and
wait until you hear the dialling tone. Press the Redialling button (10). The last number dialled is automatically redialled.
Muting button (microphone off/on)
Press the Muting button (5) and keep it pressed during
a call to switch the microphone off. Release the Muting
button (5) to deactivate the muting function and continue the call.
Flash button on private branch exchanges 4
If the telephone is connected to a private branch exchange, functions such as transferring calls and automatic call back can be used via the R/F button (6).
Please refer to the manual supplied with your private
branch exchange. The sales outlet where you purchased the exchange can provide information as to
whether the telephone will work properly with the exchange.
Setting the Flash (Recall) time
At the factory, the flash time is set to 100 ms. In most
cases, you should not alter the standard flash time setting because this is the standard flash time in telephone
networks. However, you can alter the flash time if your
phone is connected to a telephone system which uses
a different flash time.
The flash time is changed using the slide control (12)
on the underside of the unit. There are 2 settings:
100 ms and 300 ms. Move the slide control (12) to the
required position.
G
23
Dialling pause
When using private branch exchanges, it is necessary
to dial an access code to obtain the dialling tone for an
outside line. When using some older private branch exchanges, it takes a little time before the dialling tone
becomes audible. In the case of such private branch
exchanges, a dialling pause can be inserted after the
number for an outside line in order to continue dialling
directly without having to wait for the dialling tone.
Press the Dialling Pause button (9) to insert a dialling
pause of approx. 3 seconds.
Setting the ringing volume
The ringing volume is changed using the slide control (11) on the underside of the unit. There are 2 settings: loud (large symbol) and quiet (small symbol).
Move the slide control (11) to the required position.
6 In Case of Problems
Problems and solutions
Problems
Solutions
No telephone
calls possible
− The telephone line is not connected properly or is defective.
Connect the phone again.
Only use the connection cable
supplied.
− Connect a different phone. If
telephoning is still not possible, the telephone connection
is probably defective.
Telephone
number is not
dialled
− Press the buttons sufficiently
hard so that you hear an
acoustic signal each time a
button is pressed.
Service hotline
In the case of technical problems, you can contact our
hotline service, Tel. 0900 00 1675 within Switzerland
(Swisscom fees at time of going to print:
CHF 2.60/min). In the case of claims under the terms of
guarantee, please contact your sales outlet. There is a
2 year period of guarantee.
24
G
7 Maintenance / Disposal
Maintenance
S
S
Clean the housing surfaces with a soft, fluff−free
cloth.
Do not use any cleaning agents or solvents.
Disposal
You are legally obliged to dispose of consumable goods according to the applicable regulations. The adjacent symbol
on the telephone indicates that electrical
and electronic apparatus and batteries no
longer required must be disposed of separate from domestic waste.
Electrical and electronic devices must
be disposed of at a suitable collection
point provided by the public waste authorities.
Packaging materials must be disposed of according to local regulations.
8 Guarantee
SWITEL equipment is produced and tested according
to the latest production methods. The implementation
of carefully chosen materials and highly developed
technologies ensure trouble−free functioning and a long
service life. The terms of guarantee do not apply where
the cause of equipment malfunction is the fault of the
telephone network operator or any interposed private
branch extension system. The terms of guarantee do
not apply to the batteries or power packs used in the
products. The period of guarantee is 24 months from
the date of purchase.
All deficiencies related to material or manufacturing
errors within the period of guarantee will be redressed
free of charge. Rights to claims under the terms of
guarantee are annulled following tampering by the
purchaser or third parties. Damage caused as a result
of improper handling or operation, normal wear and
tear, incorrect positioning or storage, improper
connection or installation or Acts of Gods and other
external influences are excluded from the terms of
guarantee. In the case of complaints, we reserve the
right to repair defective parts, replace them or replace
the entire device. Replaced parts or devices become
our property. Rights to compensation in the case of
damage are excluded where there is no evidence of
intent or gross negligence by the manufacturer.
If your device does show signs of a defect within the
G
25
period of guarantee, please contact the sales outlet
where you purchased the SWITEL device, producing
the purchase receipt as evidence. All claims under the
terms of guarantee in accordance with this agreement
can only be asserted at the sales outlet. No claims
under the terms of guarantee can be asserted after a
period of two years from the date of purchase and
hand−over of the product.
Declaration of Conformity
This device fulfils the requirements
stipulated in the EU directive:
1999/5/EC directive on radio equipment and telecommunications terminal equipment and the mutual recognition of their conformity. Conformity with the above
mentioned directive is confirmed by the CE mark on the
device. To view the complete Declaration of Conformity,
please refer to the free download available on our web
site at www.switel.com.
26
G
Notes
G
27
Declaration of Conformity 5
Diese Anlage entspricht der europäischen R&TTE Richtlinie.
Für die komplette Konformitätserklärung nutzen Sie bitte den
kostenlosen Download von unserer Website www.switel.com.
Cet équipement est conforme à la directive européenne
R&TTE. Pour obtenir la déclaration de conformité intégrale,
veuillez vous servir du téléchargement gratuit de notre site
Internet www.switel.com.
Quest’apparecchiatura è conforme alla direttiva europea
R&TTE. Per la dichiarazione di conformità completa si prega
di voler usufruire del servizio gratuito di download dal nostro
sito Internet www.switel.com.
This equipment complies with the European R&TTE directive.
To view the complete Declaration of Conformity, please refer
to the free download available at our web site:
www.switel.com.
Service Hotline
Bei technischen Problemen können Sie sich an unsere Service−Hotline unter Tel. 0900 00 1675 innerhalb der Schweiz
(Kosten Swisscom bei Drucklegung: CHF 2.60/min) wenden.
S’il s’agit de problèmes techniques, vous pouvez vous
adresser à notre hotline de service en Suisse en appelant le
numéro 0900 00 1675 (frais Swisscom à la date d’impression
de ce manuel : CHF 2.60/min).
In caso di problemi tecnici è possibile rivolgersi alla nostra
hotline di assistenza tecnica chiamando al numero 0900 00
1675 valido per la Svizzera (spese da rete Swisscom alla
data di stampa: CHF 2.60 / min).
In the event of technical problems, you can contact our hotline
service, Tel. 0900 00 1675 within Switzerland (cost via Swisscom at time of going to print: CHF 2.60/min).
Version 1.0 − 15.11.2011