1
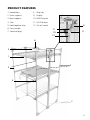
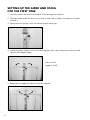
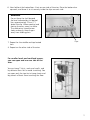
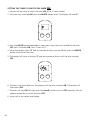
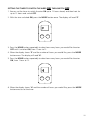
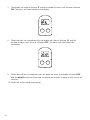
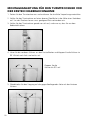
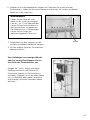
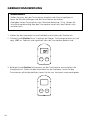
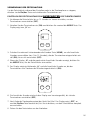
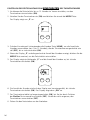
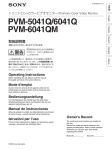
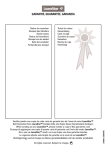
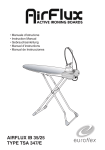
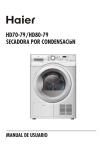
INSTRUCTION BOOKLET
DRY:SOON DELUXE
3 TIER HEATED AIRER
Model: 24909
DRY:SOON DELUXE 3 TIER HEATED AIRER
Thank you for choosing the Dry:Soon Deluxe 3 Tier Heated Airer.
Please take a little time to read this booklet before you use your machine and keep it in a
safe place for future reference.
You can dry your washing quickly and easily no matter what the weather with the Deluxe
Heated Airer – it costs just pennies to run and is kinder to clothes than tumble drying.
The timer allows you to set your airer to switch on and off up to 12 hours ahead.
The open shelves are really easy to fill and so versatile, just position them to suit your
needs: as well as drying T-shirts, socks and smalls over the rungs, you can lay delicate
items flat to avoid stretching or hang big sheets and towels without them touching the
floor. With hold-together clips and a cord tidy, it stores away neatly when not in use.
Here at Lakeland, our award-winning family-owned business still offers the same excellent
quality, value for money and exceptional customer service as when we founded the
company back in the 1960s.
Our products are hand-picked and thoroughly tested so you can be sure that everything
you purchase will be a pleasure to use for many years to come.
CONTENTS
Product features...............................................................................................................3
Safety cautions..............................................................................................................4-5
Setting up the Airer and using for the first time.............................................................6-7
Instructions for use..........................................................................................................8
Using the timer...........................................................................................................9-12
Storing your Airer...........................................................................................................13
Frequently asked questions.............................................................................................13
Electrical connections.....................................................................................................14
Recycling your electricals................................................................................................14
2
PRODUCT FEATURES
1. Heated bars
8. Plug tidy
2. Front supports
9. Display
3. Back supports
10. MODE button
4. Clips
11. HOUR button
5. Hold-together clips
12. On/ off switch
6. Carry handle
8
9
10
7. Cord and plug
11
12
6
5
1
2
3
4
7
3
SAFETY CAUTIONS
Carefully read all the instructions before using the appliance and keep in a safe place
for future reference. Always follow these safety cautions when using the appliance to
avoid personal injury or damage to the appliance. This appliance should be used only as
described in this instruction book.
• This appliance can be used by children aged from 8 years and above and persons with reduced physical, sensory or mental
capabilities or lack of experience and knowledge if they have
been given supervision or instruction concerning use of the
appliance in a safe way and understand the hazards involved.
Children shall not play with the appliance. Cleaning and user
maintenance shall not be done by children unless they are older
than 8 and supervised.
•Make sure your electricity supply matches the voltage shown on the appliance.
•Ensure all packaging materials and any promotional labels or stickers are removed from the appliance before the first use.
•Always inspect the appliance before use for noticeable signs of damage. Do not use if
damaged or has been dropped. In the event of damage, or if the appliance develops a
fault contact the Lakeland customer care team on 015394 88100.
•Do not use this appliance if the lead is damaged. If the lead is damaged it must be
replaced with a special lead. Contact the Lakeland customer care team on
015394 88100.
•Always use the appliance on a dry, level, heat resistant surface.
•Unplug from the mains when not in use. To disconnect, turn the socket to “off “and
remove the plug from the mains socket.
•Do not use any accessories or attachments with this appliance other than those
recommended by Lakeland.
•To protect against fire, electric shock or personal injury, do not immerse cord, plug or lid
in water or other liquids.
•Avoid contact between the lead and hot surfaces. Keep the airer plug and lead away
from ovens, electric and gas burners, flames and water sources.
•For indoor use only.
•For domestic use only.
•This appliance should be used for airing clothes as described within the instructions
for use that accompany it.
•Always ensure that your hands are dry before removing the plug from the mains socket.
Never pull the plug out of the mains socket by its lead or carry the airer by its lead.
4
•Do not allow the lead to be compressed or curled, or touch sharp edges.
•Do not connect this appliance to an external timer or remote control system.
•An extension cable may be used with care. The electrical rating of the cable should be at
least as great as the appliance.
•This appliance complies with the basic requirements of Directives 04/108/EC
(Electromagnetic Compatibility) and 06/95/EC (Safety of Domestic Electrical Appliances).
•WARNING: A cut off plug inserted into a socket is a serious safety (shock) hazard.
Ensure the cut off plug is disposed of safely.
•
CAUTION: The plastic bags used to wrap this appliance or the packaging may be
dangerous. To avoid risk of suffocation, keep these bags out of reach of babies
and children. These bags are not toys.
•Always switch off and unplug the Deluxe 3 Tier Heated Airer after use, leaving it to
cool down completely before closing it to store. Do not wind the power cord around
the Airer.
•Ensure the airer is folded out securely before loading it with laundry and switching it on.
•When opening and closing the airer, never use force. The mechanisms should move
freely and easily. Keep fingers away from the folding parts.
•Do not overload the airer, the maximum load of the airer is 15kg. Load evenly across the
surface to avoid the airer tipping over.
5
SETTING UP THE AIRER AND USING
FOR THE FIRST TIME
1. Carefully unpack the airer and remove all the packaging materials.
2. The airer needs to be set up on a dry level surface near a socket, with plenty of space
around it.
3. Stand the airer upright, with the control panel facing you.
3
4. Unclip the front supports from the hold-together clips, open them out to the left and
right at a 90 degree angle.
4
Open out the
supports to 90º.
5. Repeat on the opposite side for the back supports.
5
6
6. Now fold out the heated bars. Start on one side of the airer. Raise the bottom bar
upwards, and lower it to sit securely inside the clips on each side.
WARNING
6
Do not force the shelf beyond
the level indicated by this dotted
line, approximately 2.5cm (1”)
above the clip. When opening and
closing the airer, never use force.
The mechanism should move
freely and easily. Keep fingers
away from folding parts.
7. Repeat for the middle and top heated bars.
Clips
8. Repeat on the other side of the airer.
For smaller loads and confined spaces,
you can open and use one side of the
airer.
You can hang T-shirts, socks and smalls, and
lay delicate items flat to avoid stretching. You
can open only the top tier to hang sheets and
big towels without them touching the floor.
7
INSTRUCTIONS FOR USE
WARNING
Ensure the airer is folded out securely before loading it with laundry and
switching it on.
Do not overload the airer, the maximum load of the airer is 15kg. Load evenly
across the surface to avoid the airer tipping over.
1.Plug the airer into the socket and switch on.
2 Press the on/off switch. The airer will beep, the screen will illuminate and display ‘ON’
to show the airer is heating.
MODE
HOUR
3. Press the on/off switch again to turn off, the screen will go blank. Switch off at the
socket and unplug. Leave the airer to cool down completely before closing it to store.
MODE
8
HOUR
USING THE TIMER
To cancel the timer while you are setting it or mid-cycle, press the on/off switch to turn
the airer off.
SETTING THE TIMER TO SWITCH THE AIRER OFF
1.You can set the timer to switch the airer OFF, up to 12 hours ahead.
2. With the airer switched ON, press the MODE button twice. The display will read ‘H’.
MODE
HOUR
3.Press the HOUR button repeatedly to select how many hours you would like the airer
ON until it switches OFF, from 1 hour to 12.
4. When the display shows ‘H’ and the number of hours you would like, press the MODE
button to set the timer.
5. The display will show a flashing ‘H’ and the number of hours the airer will be ON and
heating for.
MODE
HOUR
6. The hours will count down on the display until the airer switches OFF.
7. When the cycle has finished the timer will beep five times, the display will read ‘OFF’
and the on/off switch will illuminate until you press it again to fully switch off the airer.
8. Switch off the socket and unplug.
9
SETTING THE TIMER TO SWITCH THE AIRER ON
1.You can set the timer to switch the airer ON up to 12 hours ahead.
2.With the airer switched ON, press the MODE button once. The display will read ‘P’.
MODE
HOUR
3.Press the HOUR button repeatedly to select how many hours you would like the airer
OFF until it switches ON, from 1 hour to 12.
4. When the display shows ‘P’ and the number of hours you would like, press the MODE
button twice to set the timer.
5. The display will show a flashing ‘P’ and the number of hours until the airer switches
ON.
MODE
HOUR
6. The hours will count down on the display until the airer switches ON. The display will
then show ‘ON’.
7. The airer will stay ON until you press the on/off switch to turn it OFF manually. You will
need to remember to switch the airer OFF.
8.Switch off at the socket and unplug.
10
SETTING THE TIMER TO SWITCH THE AIRER ON, THEN SWITCH OFF
1.You can set the timer to switch the airer ON up to 12 hours ahead, and then heat for
up to 12 hours and switch OFF.
2.With the airer switched ON, press the MODE button once. The display will read ‘P’.
MODE
HOUR
3.Press the HOUR button repeatedly to select how many hours you would like the airer
OFF until it switches ON, from 1 hour to 12.
4.When the display shows ‘P’ and the number of hours you would like, press the MODE
button once. The display will read ‘H’.
5.Press the HOUR button repeatedly to select how many hours you would like the airer
ON, from 1 hour to 12.
MODE
HOUR
6.When the display shows ‘H’ and the number of hours you would like, press the MODE
button once to set the timer.
11
7. The display will show a flashing ‘P’ and the number of hours until the airer switches ON. The hours will count down on the display.
MODE
HOUR
8. When the airer has started heating, the display will show a flashing ‘H’ and the number of hours until the airer switches OFF. The hours will count down on
the display.
MODE
HOUR
9. When the cycle has finished the timer will beep five times, the display will read ‘OFF’ and the on/off switch will illuminate to remind you to press it again to fully switch off the airer.
10. Switch off at the socket and unplug.
12
STORING YOUR AIRER
1. Leave the airer to cool down completely before closing it to store.
2. Close the airer by folding down the heated bars on each side, top to bottom. Then fold
in the back and front supports, clipping them into the hold-together clips to store it
flat until your next use.
3. Store the plug inside the plug tidy.
4. Move the airer using the carry handle.
5. Do not wind the power cord around the airer.
6. Check the parts for wear or damage after every few uses.
FREQUENTLY ASKED QUESTIONS
Question: Why is my 3 Tier Heated Airer is not heating up?
Answer: It may not be switched on. Check the airer is plugged in, switched on at the socket and the on/ off switch is pressed and illuminated.
13
ELECTRICAL CONNECTIONS
THIS APPLIANCE MUST BE EARTHED
This appliance is fitted with a fused three-pin plug to BS1363 which is suitable for use
in all homes fitted with sockets to current specifications. If the fitted plug is not suitable
for your socket outlets, it should be cut off and carefully disposed of. To avoid an electric
shock, do not insert the discarded plug into a socket.
FITTING A NEW PLUG
If for any reason you need to fit a new plug, the flexible mains lead must be connected
as shown here. The wires in the mains lead fitted to this appliance are coloured in
accordance with the following code:
3 amp
fuse
Connect BLUE to Neutral (N)
Connect GREEN/YELLOW to Earth (E)
Connect BROWN to Live (L)
3 amp fuse to be used
3 amp FUSE
If the colours of the wires in the mains lead of this appliance do not correspond with the
coloured markings identifying the terminals in your plug, proceed as follows. The wire
which is coloured green and yellow MUST be connected to the terminal which is marked
with the letter E (Earth) or coloured green. The wire which is coloured blue MUST be
connected to the terminal which is marked with the letter N (Neutral) or coloured black.
The wire which is coloured brown MUST be connected to the terminal which is marked
with the letter L (Live) or coloured red.
Before refitting the plug cover, check that there are no cut or stray strands of wire inside
the plug. Use a 3 amp BS1362 fuse. Only BSI or ASTA approved fuses should be used. If
you are at all unsure which plug or fuse to use, always refer to a qualified electrician.
Note: After replacing or changing a fuse on a moulded plug which has a fuse cover, the
cover must be refitted to the plug; the appliance must not be used without a fuse cover.
If lost, replacement fuse covers can be obtained from an electrical shop. This appliance
complies with the following EU Directives: 2006/95/EC (Low Voltage Directive) and
2004/108/EC (EMC Directive).
RECYCLING YOUR ELECTRICALS
Along with many other high street retailers, Lakeland has joined a
scheme whereby customers can take their unwanted electricals to
recycling points set up around the country.
Visit www.recycle-more.co.uk to find your nearest recycling point.
14
15
16
GEBRAUCHSANWEISUNG
DRY:SOON BEHEIZTER
LUXUS-TURMTROCKNER
MIT 3 EBENEN
Modell: 24909
17
DRY:SOON BEHEIZTER LUXUS-TURMTROCKNER
MIT 3 EBENEN
Vielen Dank, dass Sie sich für den Kauf des Dry:Soon beheizten Luxus-Turmtrockners mit 3
Ebenen entschieden haben.
Bitte lesen Sie sich diese Anleitung vor dem Gebrauch Ihres neuen Produkts aufmerksam
durch und bewahren Sie sie gut auf, falls Sie später auf die hier enthaltenen Informationen
zurückgreifen möchten.
Mit dem beheizten Luxus-Turmtrockner trocknen Sie Ihre Wäsche leicht und schnell,
egal bei welchem Wetter - extrem günstig im Verbrauch und viel schonender als ein
Kondenstrockner.
Mit der Zeitschaltuhr können Sie den Turmtrockner bis zu 12 Stunden vorher einstellen.
Die ausklappbaren Ebenen sind leicht zugänglich und so vielseitig, dass Sie sie ganz nach
Ihrem Bedarf einsetzen können: Hängen Sie T-Shirts, Socken und kleine Kleidungsstücke
an den Stangen auf und Trocknen Sie Feinwäsche liegend, um Knitterfalten zu vermeiden.
Oder hängen Sie Bettlaken und große Handtücher auf, ohne dass diese den Boden
berühren. Dank der Feststellhaken und der Stecker-/Kabelhalterung lässt sich der
Turmtrockner leicht zusammenklappen und platzsparend verstauen.
Unser mehrfach ausgezeichneter Familienbetrieb legt heute genauso viel Wert auf ein
Höchstmaß an Qualität, ein gutes Preis-Leistungsverhältnis und einen hervorragenden
Kundenservice wie damals in den 60er Jahren, als Lakeland gegründet wurde.
Unsere Artikel werden mit größter Sorgfalt ausgewählt und gründlich geprüft. So haben
Sie die Gewähr, dass Ihnen jeder Artikel, den Sie bei uns kaufen, jahrelang Freude bereiten
wird.
INHALT
Ausstattungsmerkmale...................................................................................................19
Sicherheitshinweise...................................................................................................20-21
Montageanleitung für den Turmtrockner vor der ersten Ingebrauchnahme.................22-23
Gebrauchsanweisung.....................................................................................................24
Verwendung der Zeitschaltuhr...................................................................................25-28
Aufbewahrung des Turmtrockners..................................................................................29
Häufig gestellte Fragen...................................................................................................29
18
AUSSTATTUNGSMERKMALE
1. Beheizte Stangen
8. Steckerhalterung
2. Vordere Stützen
9. Display
3. Hintere Stützen
10. MODE-Taste
4. Haken
11. STUNDEN-Taste
5. Feststellhaken
12. Ein/Aus-Taste
6. Tragegriff
8
9
10
7. Netzkabel und Netzstecker
11
12
6
5
1
2
3
4
7
19
SICHERHEITSHINWEISE
Lesen Sie sich diese Bedienungsanleitung vor der ersten Inbetriebnahme Ihres Geräts
sorgfältig durch und bewahren Sie sie für den weiteren Gebrauch sicher auf. Befolgen Sie
beim Gebrauch des Produkts stets diese Sicherheitshinweise, um Körperverletzungen oder
Schäden am Produkt zu vermeiden. Dieses Produkt ist nur für den vorgesehenen Zweck
gemäß der Beschreibung in dieser Gebrauchsanweisung bestimmt.
• Dieses Gerät darf von Kindern ab 8 Jahren und Personen mit
verminderter körperlicher, sensorischer oder geistiger Fähigkeit
oder mit fehlenden Erfahrungen und Kenntnissen nur dann
verwendet werden, wenn sie von einer Person, die für ihre
Sicherheit verantwortlich ist, beaufsichtigt werden und sie im
Gebrauch und hinsichtlich der potentiellen Gefahren des Geräts
unterwiesen wurden. Dieses Gerät ist kein Spielzeug. Das Gerät
darf nicht von Kindern unter 8 Jahren benutzt werden. Kinder
ab 8 Jahren dürfen das Gerät nur unter Aufsicht benutzen und
reinigen.
•Stellen Sie sicher, dass Ihre Stromversorgung mit der auf dem Gerät angegebenen
Spannung übereinstimmt.
•Entfernen Sie vor der ersten Ingebrauchnahme alle Verpackungsmaterialien sowie
Werbeetiketten vom Gerät.
•Vergewissern Sie sich stets vor Gebrauch des Geräts, dass es keine erkennbaren Schäden
aufweist. Verwenden Sie das Produkt nicht, falls es Schäden aufweist oder versehentlich
fallen gelassen wurde. Wenden Sie sich im Falle von Schäden oder Defekten am Gerät
an den Kundenservice von Lakeland unter der Rufnummer 0800 444 1500.
•Verwenden Sie das Produkt nicht, falls das Netzkabel beschädigt ist. Falls das Netzkabel
beschädigt ist, muss es durch ein Spezialkabel ersetzt werden. Kontaktieren Sie den
Kundenservice von Lakeland unter der Rufnummer 0800 444 1500.
•Stellen Sie das Gerät zum Gebrauch stets auf einer trockenen, ebenen und
hitzebeständigen Fläche auf.
•Ziehen Sie den Netzstecker bei Nichtgebrauch des Geräts aus der Netzsteckdose. Um
das Gerät abzuschalten, ziehen Sie den Netzstecker aus der Netzsteckdose.
•Verwenden Sie nur die von Lakeland empfohlenen Zubehörteile oder Einsätze.
•Tauchen Sie Netzkabel, Netzstecker, Deckel oder Gerät nicht in Wasser oder andere
Flüssigkeiten ein. Es besteht Brand-, Stromschlag- und Verletzungsgefahr!
•Sorgen Sie dafür, dass das Netzkabel nicht mit heißen Oberflächen in Berührung kommt.
Halten Sie den Turmtrockner, den Netzstecker und das Netzkabel von heißen Geräten
wie Öfen, Elektro- und Gasherden sowie von offenen Flammen, heißen Oberflächen und
Wasserquellen fern.
20
•Nur für Innenräume.
•Nur für den häuslichen Gebrauch.
•Dieses Produkt ist nur zum Trocknen/Lüften von Wäsche gemäß der Beschreibung in der
mitgelieferten Gebrauchsanweisung vorgesehen.
•Ziehen Sie den Netzstecker ausschließlich mit trockenen Händen aus der Netzsteckdose.
Ziehen Sie den Netzstecker nie am Netzkabel aus der Netzsteckdose heraus und
transportieren den Turmtrockner nie am Netzkabel.
•Achten Sie darauf, dass das Netzkabel nicht gedrückt oder geknickt wird oder mit
scharfen Kanten in Berührung kommt.
•Schließen Sie das Gerät nicht an eine externe Zeitschaltuhr oder an ein System mit
Fernbedienung an.
•Lassen Sie bei der Verwendung von Verlängerungskabeln Vorsicht walten. Die
elektrischen Anschlussdaten des Kabels müssen mindestens so hoch wie die des Geräts
sein.
•Dieses Produkt entspricht den Grundanforderungen der EMV-Richtlinie 2004/108/EG
(elektromagnetische Verträglichkeit) und der Niederspannungsrichtlinie 2006/95/EG
(Sicherheit elektrischer Betriebsmittel).
•WARNHINWEIS: Bei einem abgeschnittenen Stecker in einer Netzsteckdose besteht
schwere Verletzungsgefahr durch Schock! Sorgen Sie dafür, dass der abgeschnittene
Stecker ordnungsgemäß entsorgt wird.
•
VORSICHT: Die Kunststoff-Verpackungsmaterialien stellen eine Gefahr dar. Sie
dürfen nicht in die Hände von Babys und Kindern gelangen, da Erstickungsgefahr
besteht. Diese Verpackungsmaterialien sind kein Spielzeug.
•Schalten Sie den beheizten Luxus-Turmtrockner nach Gebrauch immer aus und ziehen
Sie den Netzstecker aus der Steckdose. Lassen Sie den Turmtrockner vollständig
abkühlen, bevor Sie ihn verstauen. Wickeln Sie das Netzkabel nicht um den
Turmtrockner.
•Stellen Sie sicher, dass der Turmtrockner komplett und sicher ausgeklappt ist, bevor Sie
Wäsche aufhängen und den Turmtrockner einschalten.
•Öffnen und schließen Sie den Turmtrockner nie gewaltsam. Die Mechanismen sind
leichtgängig. Halten Sie Ihre Finger von jeglichen klappbaren Teilen fern.
•Überladen Sie den Turmtrockner nicht. Maximale Belastung: 15 kg. Hängen Sie Wäsche
gleichmäßig über den Turmtrockner verteilt auf, damit dieser nicht umfallen kann.
21
MONTAGEANLEITUNG FÜR DEN TURMTROCKNER VOR
DER ERSTEN INGEBRAUCHNAHME
1. Packen Sie den Turmtrockner aus und entfernen Sie sämtliche Verpackungsmaterialien.
2. Stellen Sie den Turmtrockner auf einer ebenen Oberfläche in der Nähe einer Steckdose
auf. Um den Trockner herum muss genügend Platz vorhanden sein.
3. Stellen Sie den Turmtrockner gerade vor sich auf, und zwar so, dass Sie vor dem
Bedienfeld stehen.
3
4. Lösen Sie die vorderen Stützen aus den Feststellhaken und klappen Sie die Stützen im
90° Winkel nach links und rechts auf.
4
Klappen Sie die
Stützen bis 90° auf.
5. Wiederholen Sie den Vorgang auf der gegenüberliegenden Seite mit den hinteren
Stützen.
5
22
6. Klappen Sie nun die beheizbaren Stangen aus. Beginnen Sie an der Seite des
Turmtrockners. Heben Sie die untere Stange an und setzen Sie sie dann auf beiden
Seiten fest in die Haken ein.
WARNHINWEIS
6
Heben Sie das Seitenteil nicht
weiter als bis zu der gestrichelten
Linie an – ca. 2,5 cm oberhalb des
Hakens Öffnen und schließen Sie
den Turmtrockner nie gewaltsam.
Der Mechanismus ist leichtgängig.
Halten Sie Ihre Finger von
jeglichen klappbaren Teilen fern.
7. Wiederholen Sie den Vorgang mit den
mittleren und oberen beheizten Stangen.
Haken
8. Mit der anderen Seite des Turmtrockners
ebenso verfahren.
Zum Aufhängen von weniger Wäsche
oder bei wenig Platz klappen Sie nur
eine Seite des Turmtrockners aus.
Hängen Sie T-Shirts, Socken und kleine
Kleidungsstücke auf und Trocknen Sie
Feinwäsche liegend, um Knitterfalten zu
vermeiden. Klappen Sie nur die obere Ebene
aus, um Bettlaken oder große Handtücher
aufzuhängen, ohne dass diese den Boden
berühren.
23
GEBRAUCHSANWEISUNG
WARNHINWEIS
Stellen Sie sicher, dass der Turmtrockner komplett und sicher ausgeklappt ist,
bevor Sie Wäsche aufhängen und den Turmtrockner einschalten.
Überladen Sie den Turmtrockner nicht. Maximale Belastung: 15 kg. Hängen Sie
Ihre Wäsche gleichmäßig über den Turmtrockner verteilt auf, damit dieser nicht
umfallen kann.
1. Stecken Sie den Netzstecker in eine Steckdose und schalten den Trockner ein.
2. Drücken Sie die Ein/Aus-Taste. Es erklingt ein Piepton. Die Anzeige leuchtet auf und
zeigt „ON“ an. Dadurch wird signalisiert, dass der Turmtrockner beheizt wird.
MODE
HOUR
3. Betätigen Sie die Ein/Aus-Taste erneut, um den Turmtrockner auszuschalten; die
Anzeige erlischt. Ziehen Sie den Netzstecker aus der Steckdose. Lassen Sie den
Turmtrockner vollständig abkühlen, bevor Sie ihn zum Verstauen zusammenklappen.
MODE
24
HOUR
VERWENDUNG DER ZEITSCHALTUHR
Um die Zeitschaltuhr während des Einstellens oder in der Trockenphase zu stoppen,
drücken sie die Ein/Aus-Taste und schalten den Turmtrockner aus.
EINSTELLEN DER ZEITSCHALTUHR ZUM AUSSCHALTEN DES TURMTROCKNERS
1. Sie können die Zeitschaltuhr bis zu 12 Stunden im Voraus einstellen, um den
Turmtrockner auszuschalten (OFF).
2. Schalten Sie den Turmtrockner ein (ON) und drücken Sie zweimal die MODE-Taste. Das
Display zeigt nun „H“ an.
MODE
HOUR
3. Drücken Sie mehrmals hintereinander die Stunden-Taste (HOUR), um die Anzahl der
Stunden auszuwählen (von 1 bis 12 Stunden), die der Turmtrockner eingeschaltet sein
soll (ON), bis er sich ausschaltet (OFF).
4. Wenn das Display „H“ und die gewünschte Anzahl der Stunden anzeigt, drücken Sie
die MODE-Taste, um die Zeitschaltuhr einzustellen.
5. Das Display zeigt ein blinkendes „H“ und die Anzahl der Stunden an, die der
Turmtrockner zum Trocknen der Wäsche eingeschaltet ist (ON).
MODE
HOUR
6. Die Anzahl der Stunden wird auf dem Display nun heruntergezählt, bis sich der
Turmtrockner ausschaltet (OFF).
7. Nach Ende der Trockenphase piept das Gerät fünf Mal. Das Display zeigt „OFF“ an
und die Ein/Aus-Taste leuchtet auf, bis Sie sie drücken, um den Turmtrockner komplett
auszuschalten.
8. Ziehen Sie den Netzstecker aus der Steckdose.
25
EINSTELLEN DER ZEITSCHALTUHR ZUM EINSCHALTEN DES TURMTROCKNERS
1. Sie können die Zeitschaltuhr bis zu 12 Stunden im Voraus einstellen, um den
Turmtrockner einzuschalten (ON).
2. Schalten Sie den Turmtrockner ein (ON) und drücken Sie einmal die MODE-Taste.
Das Display zeigt nun „P“ an.
MODE
HOUR
3. Drücken Sie mehrmals hintereinander die Stunden-Taste (HOUR), um die Anzahl der
Stunden auszuwählen (von 1 bis 12 Stunden), die der Turmtrockner ausgeschaltet sein
soll (OFF), bis er sich einschaltet (ON).
4. Wenn das Display „P“ und die gewünschte Anzahl der Stunden anzeigt, drücken Sie die
MODE-Taste zweimal, um die Zeitschaltuhr einzustellen.
5. Das Display zeigt ein blinkendes „P“ und die Anzahl der Stunden an, bis sich der
Turmtrockner einschaltet (ON).
MODE
HOUR
6. Die Anzahl der Stunden wird auf dem Display nun heruntergezählt, bis sich der
Turmtrockner einschaltet (ON). Das Display zeigt dann „ON“ an.
7. Der Turmtrockner bleibt so lange eingeschaltet (ON), bis Sie ihn durch Drücken
der Ein/Aus-Taste manuell ausschalten (OFF). Sie dürfen nicht vergessen, den
Turmtrockner auszuschalten (OFF).
8. Ziehen Sie den Netzstecker aus der Steckdose.
26
EINSTELLEN DER ZEITSCHALTUHR ZUM EINSCHALTEN UND DARAUF
FOLGENDEM AUSSCHALTEN DES TURMTROCKNERS
1. Sie können die Zeitschaltuhr bis zu 12 Stunden im Voraus einstellen, um den
Turmtrockner einzuschalten (ON), bis zu 12 Stunden zu trocknen und sich dann
auszuschalten (OFF).
2. Schalten Sie den Turmtrockner ein (ON) und drücken Sie einmal die MODE-Taste.
Das Display zeigt nun „P“ an.
MODE
HOUR
3. Drücken Sie mehrmals hintereinander die Stunden-Taste (HOUR), um die Anzahl der
Stunden auszuwählen (von 1 bis 12 Stunden), die der Turmtrockner ausgeschaltet sein
soll (OFF), bis er sich einschaltet (ON).
4. Wenn das Display „P“ und die gewünschte Anzahl der Stunden anzeigt, drücken Sie die
MODE-Taste einmal. Das Display zeigt nun „H“ an.
5. Drücken Sie mehrmals hintereinander die Stunden-Taste (HOUR), um die Anzahl der
Stunden auszuwählen (von 1 bis 12 Stunden), die der Turmtrockner eingeschaltet sein
soll (ON).
MODE
HOUR
6. Wenn das Display „H“ und die gewünschte Anzahl der Stunden anzeigt, drücken Sie
die MODE-Taste einmal, um die Zeitschaltuhr einzustellen.
27
7. Das Display zeigt ein blinkendes „P“ und die Anzahl der Stunden an, bis sich der
Turmtrockner einschaltet (ON). Die Stunden werden auf dem Display heruntergezählt.
MODE
HOUR
8. Wenn der Turmtrockner mit dem Trocknen begonnen hat, zeigt das Display ein
blinkendes „H“ und die Anzahl der Stunden an, bis sich der Turmtrockner ausschaltet
(OFF). Die Stunden werden auf dem Display heruntergezählt.
MODE
HOUR
9. Nach Ende der Trockenphase piept das Gerät fünf Mal. Das Display zeigt „OFF“ an
und die Ein/Aus-Taste leuchtet auf. Drücken Sie die Ein/Aus-Taste erneut, um den
Turmtrockner komplett auszuschalten.
10.Ziehen Sie den Netzstecker aus der Steckdose.
28
AUFBEWAHREN IHRES TUMRTROCKNERS
1. Lassen Sie den Turmtrockner vollständig abkühlen, bevor Sie ihn zum Verstauen
zusammenklappen.
2. Klappen Sie den Trockner zusammen, indem Sie die beheizbaren Stangen auf jeder
Seite von oben nach unten einklappen. Klappen Sie dann die hinteren und vorderen
Stützen ein und klemmen Sie diese in den Feststellhaken fest. Nun können Sie den
flach zusammengeklappten Turmtrockner bis zum nächsten Gebrauch platzsparend
verstauen.
3. Geben Sie den Stecker in die Steckerhalterung.
4. Tragen Sie den zusammengeklappten Turmtrockner am Tragegriff.
5. Wickeln Sie das Netzkabel nicht um den Turmtrockner.
6. Überprüfen Sie die einzelnen Teile regelmäßig auf Verschleiß oder Schäden.
HÄUFIG GESTELLTE FRAGEN
Frage:
Warum heizt sich der Turmtrockner mit 3 Ebenen nicht auf?
Antwort: Er ist möglicherweise nicht eingeschaltet. Überprüfen Sie, ob der Turmtrockner mit dem Stromnetz verbunden ist und ob die Ein/Aus-Taste aufleuchtet.
29
30
31
Lakeland
Alexandra Buildings, Windermere, Cumbria, UK LA23 1BQ
Tel: +44(0)15394 88100 www.lakeland.co.uk
D Tel: 0800 444 1500 www.lakeland.de
32