1
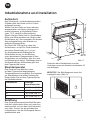
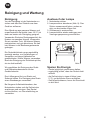
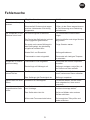
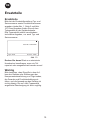
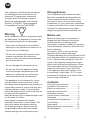
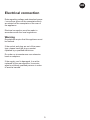
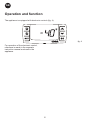
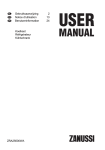
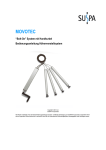
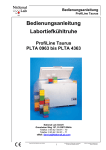
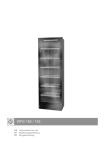
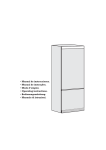
Bedienungsanleitung
Labortiefkühltruhe
L86TK200
Stand 08/2014
DE
Die Bedienungsanleitung muss den
Mitarbeitern jederzeit zugänglich sein.
Dieses Gerät entspricht den Regelungen
zur CE Kennzeichnung sowie den
einschlägigen Richtlinien und Normen.
Niederspannungsrichtlinie 73/23/EWG.
EMV Richtlinie 89/336/EWG.
Alte Geräte
Warnung
Vor dem Gebrauch
Alte Kühl- und Gefriergeräte sind häufig mit
komplizierten Schnappschlössern versehen,
die von innen nicht geöffnet werden
können. Falls bei Ihnen ein solches Gerät
steht, oder wenn Sie ein solches Gerät
ausrangieren, machen Sie bitte zuerst das
Schloss unbrauchbar. So verhindern Sie,
dass spielende Kinder eingesperrt werden
und in Lebensgefahr kommen können.
Da das Gerät ein brennbares Kältemittel
enthält, dürfen die Kältemittelleitungen
niemals beschädigt sein!
Vor dem Gebrauch Ihres neuen Geräts
sollten Sie diese Bedienungsanleitung
gründlich lesen. Sie enthält wichtige
Informationen zu Sicherheit, Installation,
Betrieb und Wartung. Bewahren Sie die
Bedienungsanleitung auf. Sie könnten
Sie zu einem späteren Zeitpunkt evtl.
benötigen. Kontrollieren Sie das Gerät
sofort bei Lieferung auf eventuelle
Beschädigungen. Transportschäden sind
dem Händler zu melden, bevor das Gerät in
Gebrauch genommen wird.
Verpackung entfernen. Reinigen Sie das
Gerät innen mit warmem Wasser, dem Sie
etwas unparfümiertes Spülmittel zugeben.
Mit sauberem Wasser nachwischen und
gründlich trocknen (siehe “Reinigung”).
Verwenden Sie ein weiches Tuch.
Wurde das Gefriergerät bei Temperaturen
unter +5 °C gelagert, muss vor dem ersten
Einschalten mindestens eine Stunde zur
Akklimatisierung vergehen.
- Das Verstopfen von Belüftungsöffnungen
im Gerätegehäuse oder der
Einbauumgebung ist zu vermeiden.
- Keine mechanischen Geräte oder
andere Mittel zur Beschleunigung des
Abtauvorgangs einsetzen, wenn diese
nicht ausdrücklich vom Hersteller
empfohlen sind.
- Den Kältemittelkreislauf nicht
beschädigen.
- In den Lebensmittellagerabteilen keine
elektrischen Geräte verwenden, sofern
diese nicht vom Hersteller empfohlen
sind.
Dieses Gerät ist nicht für die Bedienung
durch Kinder oder gebrechliche
Personen bestimmt, sofern sie nicht von
verantwortlichen Personen beaufsichtigt
werden, um sicherzustellen, dass sie das
Gerät sicher bedienen können. Kleine
Kinder dürfen nicht mit dem Gerät spielen.
Die Schlüssel stets separat und außerhalb
der Reichweite von Kindern aufbewahren.
Niemals Behälter mit Flüssigkeiten,
insbesondere kohlensäurehaltige Getränke,
in dem Gefriergerät aufbewahren. Die
Flüssigkeit kann beim Gefrieren eine
Explosion verursachen. Die kühlenden
Oberflächen nie mit bloßer Haut
berühren. Stets Handschuhe tragen, um
Verbrennungen zu vermeiden.
Inhalt
Lernen Sie Ihr Gefriergerät kennen....3
Inbetriebnahme und Installation..........4
Elektrischer Anschluss.......................5
Bedienung und Funktion.....................6
Parametereinstellungen......................7
Bedienungsbefehle.............................. 8
Abtauen.............................................. 9
Reinigung und Wartung................... 10
Fehlersuche...................................... 11
Ersatzteile..........................................12
Entsorgung.................................... 13
Elektroschaltplan............................... 14
2
DE
Lernen Sie Ihr Gefriergerät kennen
Handgriff
Dichtleiste
Typenschild
Trennwand/Tauwasserschale
Korb
Ventilationsrost
Elektronisches Bedienungsfeld
Tauwasserabfluss
Rollen
Abb. 1
3
DE
Inbetriebnahme und Installation
Aufstellort
800 mm
Aus Sicherheits- und betriebstechnischen
Gründen darf das Gerät nicht im Freien
aufgestellt werden.
Stellen Sie das Gerät auf einen ebenen,
waagerechten und festen Untergrund in
einem trockenen, gut belüfteten Raum
(max. 75 % relative Luftfeuchtigkeit).
Stellen Sie das Gerät nicht in unmittelbarer
Nähe von Wärmequellen wie Herden oder
Heizkörpern auf, und vermeiden Sie direkte
Sonneneinstrahlung oder Wärme von
anderen Wärmequellen.
Die Norm EN 378 legt fest, dass der
Aufstellraum, in dem Ihr Gerät installiert
wird einen Rauminhalt von 1 m³ pro
8 g Kohlenwasserstoffkältemittel im
Gerät haben muss, um die Bildung
eines brennbaren Gasgemischs in dem
Aufstellraum zu verhindern, falls ein Leck
im Kältekreislauf auftritt. Die Menge des im
Gerät befindlichen Kältemittels geht aus
dem Typenschild hervor.
10
0
SN
+10 ºC bis +32 ºC
N
+16 ºC bis +32 ºC
ST
+18 ºC bis +38 ºC
T
+18 ºC bis +43 ºC
m
100 m
Abb. 2
Zwischen dem Geräteboden und der
Unterlage muss der Abstand mindestens 35
mm betragen.
Das Gerät ist zum Betrieb in dem
auf dem Typenschild angegebenen
Temperaturbereich ausgelegt. Die Angaben
zur Klimaklasse und andere technische
Daten finden Sie auf dem Typenschild an
der Geräterückseite.
Zulässige
Raumtemperatur
m
20 mm
Raumtemperatur
Klimaklasse
m
WICHTIG! Der Belüftungsrost muss frei
zugänglich sein (Abb. 3).
Belüftung
Abb. 3
Das Gerät muss ausreichend belüftet sein,
und die Luftzirkulation über und unter ihm
sowie seitlich von ihm darf nicht behindert
sein. Abb. 2 zeigt, wie die erforderliche
Luftzirkulation um das Gefriergerät herum
gewährleistet wird.
4
DE
Elektrischer Anschluss
Das Gerät ist zum Anschluss an das
Wechselstromnetz bestimmt. Die Werte für
Spannung (V) und Frequenz (Hz) sind auf
dem Typenschild an der Geräterückseite
angegeben. Das Gerät ist allein an eine
eigene Steckdose anzuschließen.
Das Netzkabel ist direkt mit der Steckdose
zu verbinden. Keine Verlängerungskabel
verwenden!
Bei Beschädigung des Netzkabels
ist es durch ein gleichwertiges Teil
zu ersetzen, das vom Hersteller oder
dessen Kundendienst geliefert wird.
5
DE
Bedienung und Funktion
Das Gerät ist mit einer elektronischen Steuerung ausgerüstet (Abb. 4)
Abb. 4
Für die Bedienung der elektronischen
Steuerung verweisen wir auf die separate
Bedienungsanleitung im Gerät.
6
DE
Abtauen
Das Gefriergut und die Luftfeuchtigkeit
verursachen mit der Zeit Reif und Eis im
Innern der Gefriertruhe. Eine dünne Reifoder Eisschicht setzt die Leistung des
Geräts nicht herab, aber mit zunehmender
Stärke des Belags erhöht sich der
Energieverbrauch. Etwas loser Reif lässt
sich mit einem Kunststoffschaber entfernen.
Nicht vergessen, den Tauwasserablauf
wieder mit dem Stopfen zu verschließen.
Niemals elektrische Geräte oder scharfe
Werkzeuge zum Entfernen von Reif/Eis
verwenden, da sie das Truheninnere
beschädigen können.
Abb. 8
Erreicht die Reif- oder Eisschicht 4-5 mm
Stärke, muss das Gerät abgetaut werden.
Wir empfehlen, das Gefriergerät abzutauen,
wenn nur wenige Waren darin gelagert sind.
Gehen Sie folgendermaßen vor:
1. Deckel offen lassen.
2. Trennwand unter Tauwasserablauf
legen.
3. Eine Schüssel mit warmem (nicht
kochendem) Wasser in das Gerät stellen
und den Deckel schließen. Ca. 30
Minuten warten und die Reifschicht dann
mit dem Kunststoffschaber entfernen.
4. Um während des Abtauvorgangs
Wasser auf dem Fußboden zu
vermeiden, ist die Tauwasserschale
regelmäßig zu kontrollieren. Der Boden
um den Tauwasserablauf herum sollte
abgedeckt werden, um ihn gegen Eis
und Wasserspritzer zu schützen.
Nachdem das Eis getaut ist, das
Gefriergerät mit einer schwachen Lösung
aus Wasser und unparfümiertem
Spülmittel reinigen. Mit einem trockenen
Tuch nachwischen.
5. Versorgungsspannung anschließen.
6. Das Lagergut kann wieder ins Gerät
gelegt werden, wenn die Temperatur
korrekt ist.
7
DE
Reinigung und Wartung
Reinigung
Austausch der Lampe
Vor der Reinigung ist der Netzstecker zu
ziehen und das lose Zubehör aus dem
Gerät zu entfernen.
1. Netzstecker ziehen.
2. Lampenschirm abnehmen (Abb. 9). Den
Schirm zusammendrücken, sodass er
sich von den beiden Klipps löst.
3. Glühlampe(n) austauschen.
4. Lampenschirm wieder anbringen und
Versorgungsspannung anschließen.
Eine Mischung aus warmem Wasser und
unparfümiertem Spülmittel (max. 85 ºC) ist
dazu am besten zur Reinigung geeignet.
Verwenden Sie keine Reinigungsmittel, die
Kratzer verursachen können. Verwenden
Sie ein weiches Tuch. Mit klarem Wasser
nachwischen und gut abtrocknen. Es darf
kein Wasser in die Bedienungselemente
gelangen.
max.
15 W
Die Deckeldichtleiste muss regelmäßig
gereinigt werden, um Verfärbungen zu
vermeiden und lange Haltbarkeit zu
gewährleisten. Klares Wasser verwenden.
Nach der Reinigung der Dichtleiste prüfen,
ob sie dicht schließt.
Abb. 9
Sparen Sie Energie
Wir empfehlen die Reinigung der Drahtund Röhrenkondensatoren an der
Geräterückseite.
- Deckel möglichst geschlossen halten.
- regelmäßig prüfen, dass der Deckel dicht
schließt
- die Gefriertruhe in einem kühlen (max.
5 °C), gut belüfteten Raum aufstellen.
- Gefriergerät abtauen, bevor die Eisschicht
zu dick wird.
Den Lüftungsrost frei von Staub und
Schmutz halten. Zur Reinigung des Rosts
einen Staubsauger verwenden.
Bei längerer Außerbetriebnahme, den
Netzstecker ziehen und die Gefriertruhe
ausräumen und reinigen. Den Deckel
nicht schließen, um Geruchsbildung zu
vermeiden.
8
DE
Fehlersuche
Fehler
Mögliche Ursache
Abhilfe
Keine Kontrolllampe
leuchtet.
Das Gerät ist ausgeschaltet.
Stecker und Schalter prüfen.
Stromausfall; Sicherung hat angesprochen; Netzstecker nicht richtig
eingesteckt.
Prüfen, ob der Strom angeschlossen
ist. Die Sicherung muss intakt/eingeschaltet sein.
Der Belüftungsrost ist blockiert.
Für unbehinderte Luftzirkulation
sorgen.
Der Deckel der Gefriertruhe ist nicht
ordnungsgemäß geschlossen.
Deckel schließen und einige Stunden
lang warten.
Es wurde mehr neues Gefriergut in
das Gerät gelegt, als gleichzeitig
eingefroren werden kann.
Einige Stunden warten.
Starke Reif- und Eisschicht.
Gefriergerät abtauen.
Thermostat zu warm eingestellt.
Thermostat auf niedrigere Temperatur einstellen.
Thermostat zu kalt eingestellt.
Thermostat auf höhere Temperatur
einstellen.
Deckel liegt auf Gefriergut auf.
Gefriergut umlagern und prüfen, ob
der Deckel nun dicht schließt.
Der Raum ist sehr feucht.
Häufig lüften oder Gerät in einem anderen, trockeneren Raum aufstellen.
Die Temperatur im Gefrierraum ist zu hoch.
Temperatur im Gefriergerät zu niedrig.
Gefriergerät setzt
schnell Reif an.
Das Gefriergut gibt Feuchtigkeit ab.
Gefriergut umpacken.
Deckel lässt sich nicht
öffnen.
Unterdruck im Gefriergerät.
2-3 Minuten warten, bis der Unterdruck abgebaut ist, dann erneut
versuchen.
Vibrationen und
ungewöhnliche Geräusche.
Das Gerät steht nicht auf einer ebenen Unterlage.
Gerät auf eine ebene, waagerechte
und feste Unterlage stellen.
Das Gerät steht nicht frei.
Gerät von Möbeln oder anderen
Geräten abrücken.
Körbe oder Trennwand sind locker.
Die beweglichen Teile prüfen und
wieder einsetzen.
9
DE
Ersatzteile
Ersatzteile
Bitte bei der Ersatzteilbestellung Typ- und
Seriennummer sowie Produktionsnummer
angeben (siehe Abb. 1, Seite 3 und Abb.
10). Diese Angaben finden Sie auf dem
Typenschild an der Geräterückseite.
Das Typenschild enthält verschiedene
technische Angaben, u.a. auch Typ- und
Seriennummer.
Serial No.: XXXXXXXX
Type: XXXX
Prod. No.: XXXX
Abb. 10
Denken Sie daran! Stets nur autorisierte
Handwerker beauftragen, wenn ein Teil
repariert oder ausgewechselt werden muss!
Wichtig
Bitte beachten, dass Eingriffe in dem Aufbau des Gerätes oder Änderungen der
Komponentenbestückung zur Folge haben,
die Garantie und Produktenhaftung entfallen, und die Anwendung des Gerätes ist
nicht zulässig. Die auf dem Typenschild
angeführte Genehmigung ist auch ungültig.
10
DE
Umweltschutz
Verpackung
Entsorgung
Das Verpackungsmaterial ist vollständig
recyclebar und mit Recyclingsymbolen
gekennzeichnet. Beachten Sie bitte die bei
Ihnen gültigen Entsorgungsvorschriften.
Beachten Sie in jedem Fall die jeweils
geltenden Umweltschutzbestimmungen.
Bei Ihrem zuständigen Stadtreinigungsamt
können Sie erfahren, wie Abtransport und
Wiederverwertung dieser Geräte in Ihrer
Gemeinde gehandhabt werden.
Gerät
Das Gerät besteht aus recyclingfähigem
Material. Das Gerät enthält brennbare
Gase, und die Entsorgung hat gemäß den
jeweils geltenden Umweltbestimmungen zu
erfolgen. Bitte machen Sie das Gerät durch
Abschneiden des Netzkabels unbrauchbar,
und liefern Sie es bei einer autorisierten
Kühlgerätesammelstelle ab.
Dieses Produkt ist gemäß der EURichtlinie 2002/96/EG über ausrangierte
elektrische und elektronische Ausrüstung
(WEEE) gekennzeichnet. Durch eine
ordnungsgemäße Entsorgung dieses
Produkts helfen Sie mit, potentiell negative
Folgen für die Umwelt und die Gesundheit
der Bevölkerung zu vermeiden, die durch
eine unsachgemäße Entsorgung verursacht
werden könnten.
Das Symbol
am Produkt oder auf
schriftlichem Begleitmaterial bedeutet,
dass das Produkt nicht zusammen mit
Haushaltsabfall entsorgt werden darf. Es
muss vielmehr bei einer Sammelstelle für
elektrische und elektronische Ausrüstung
abgeliefert werden.
Die Entsorgung hat gemäß den jeweils vor
Ort geltenden Umweltbestimmungen für
die Abfallentsorgung zu erfolgen. Weitere
Informationen zu Behandlung, Recycling
und Wiederverwertung dieses Produkts
bekommen Sie bei Ihren zuständigen
Behörden, der Müllabfuhr oder dem
Händler, bei dem Sie das Gerät erworben
haben.
11
GB
Old appliances
The operating instructions should always
be available to and accessible for the
personnel! The appliance concerned
complies with CE marking regulation,
Directives and standards. Low Voltage
Directive 73/23/EEC. Electromagnetic
Compatibility Directive 89/336/EEC.
Old refrigerators and freezers are often
fitted with complicated latches that can
only be opened from the outside. If you
have one of these old units stored away
somewhere, or if you scrap one, remember
to destroy the latch first in order to prevent
children from being exposed to great
danger by getting locked inside the unit.
Warning
Before use
As the appliance contain a refrigerant which
are flammable it is essential to ensure that
the refrigerant pipes are not damaged.
Before operating your new appliance,
please read the following instructions
carefully as they contain important
information on safety, installation, operation
and maintenance. Keep the instructions for
future reference.
On receipt, check to ensure that the
appliance has not been damaged.
Transport damage should be reported to the
local distributor before the appliance is put
to use. Remove the packaging. Clean the
inside of the appliance using warm water
with a mild, perfume-free detergent. Rinse
with clean water and dry thoroughly (see
cleaning instructions). Use a soft cloth.
If the appliance has been stored in cold
surroundings (colder than +5°C), it must
be allowed to stabilise for at least an hour
before being switched on.
- Keep clear of obstruction all ventilation
openings in the appliance enclosure or in
the structure for building-in.
- Do not use mechanical devices or other
means to accelerate the defrosting
process, other than those recommended
by the manufacturer.
- Do not damage the refrigerant circuit.
- Do not use electrical appliance inside
the food storage compartments of the
appliance, unless they are of the type
recommended by the manufacturer.
This appliance is not intended for use by
young children or infirm persons unless
they have been adequately supervised by a
responsible person to ensure that they can
use the appliance safely. Young children
should be supervised to ensure that they do
not play wiht the appliance.
Keep always the keys in seperate place and
out of reach of children.
Never place containers with liquids,
especially fizzy drinks, in the freezer. The
liquid may cause an explosion during
the freezing process. Never touch the
refrigerating surfaces with bare hands.
Always wear gloves to prevent burning.
Contents
Get to know your freezer................. 3
Installation and start-up.................... 4
Electrical connection........................ 5
Operation and function..................... 6
Parameter settings........................... 7
Control panel commands................. 8
Defrosting.........................................9
Cleaning and maintenance............ 10
Fault finding................................... 11
Spare parts..................................... 12
Safeguarding the environment.......13
Wiring diagram............................... 14
2
GB
Get to know your chest freezer
Handle
Sealing strip
Nameplate
Partition/defrost
water tray
Basket
Ventilation grille
Electronic control
panel
Defrost water drain
Wheel
fig. 1
3
GB
Installation and start-up
Placement
800 mm
For safety and operational reasons, the
appliance must not be installed outdoors.
The appliance should be placed on a
stable, level surface in a dry, well-ventilated
room (max. 75% relative air humidity).
Never place the appliance close to sources
of heat such as cookers or radiators, and
avoid placing it in direct sunlight. Standard
EN378 specifies that the room in which you
install your appliance must have a volume
of 1m³ per 8 g of hydrocarbon refrigerant
used in the appliances , so as to avoid the
formation of inflammeable gas/air mixtures
in the room where the appliance is located
in the event of a leak in the refrigerant
circuit. The quantity of the refrigerant used
in your appliances is indicated on the
nameplate.
10
0
SN
+10 ºC to +32 ºC
N
+16 ºC to +32 ºC
ST
+18 ºC to +38 ºC
T
+18 ºC to +43 ºC
fig. 2
IMPORTANT! There must be free access
to the ventilation grille (fig. 3).
Ventilation
It is important that the appliance be well
ventilated and that air can circulate unhindered above, below and around it. Figure 2
illustrates how the necessary air circulation
can be ensured.
Keep ventilation openings, in the appliance
enclosure or in the built-in structure, clear of
obstruction.
m
100 m
There must be at least 35 mm clearance
between the base of the appliance and the
floor.
The appliance is designed to operate at
limited ambient temperatures according to
the appliance climatic category specified
on the nameplate. Data regarding climate
Class and other technical information are
given on the nameplate on the rear of the
appliance.
Optimum room
temperature
m
20 mm
Room temperature
Climate class
m
fig. 3
4
GB
Electrical connection
Data regarding voltage and absorbed power
/ current are given on the nameplate which
are stated on the nameplate on the rear of
the appliance.
Electrical connection must be made in
accordance with the local regulations.
Warning
Regulations require that this appliance must
be earthed.
If the socket and plug are not of the same
type, please have the plug or socket
replaced by a qualified electrician.
Do under no circumstances use extension
leads or adaptors.
If the supply cord is damaged, it must be
replaced by the manufacturer, its service
agent or similarly qualified persons in order
to avoid a harzard.
5
GB
Operation and function
The appliance is equipped with electronic controls (fig. 4).
fig. 4
For operation of the electronic control,
reference is made to the separate
instruction manual enclosed in the
appliance.
6
GB
Defrosting
The items stored in the freezer and the
humidity of the surrounding air gradually
cause frost and ice to form inside the
freezer. A thin layer of frost or ice does
not affect freezer performance, but the
thicker the layer, the higher the energy
consumption. Small amounts of loose frost
can be removed using a plastic scraper.
Never use electrical apparatus or sharp
implements as these may damage the
inside of the appliance.
fig. 8
When the layer of frost and ice exceeds
4-5 mm the freezer should be completely
defrosted. It is recommended that defrosting
be performed when there are no or only a
few items stored in the freezer.
Proceed as follows:
1. Leave the freezer lid open.
2. Position the partition under the defrost water drain.
3. Place a bowl of hot (but not boiling) water in the freezer, close the lid and wait approx. 30 minutes before removing loose frost with the plastic scraper.
4. To prevent water from damaging the floor during defrosting, it is advisable to check
the defrost water tray from time to time
and to cover the floor around the defrost
water drain to protect against ice and
splashes. When all the frost and ice have
melted, clean the inside of the appliance
using water with a mild, perfume-free
detergent. Dry the freezer with a soft
cloth.
5. Reconnect the power supply.
6. Return items to the freezer when the
required temperature has been reached.
Remember to reinsert the stopper in the
defrost water drain.
7
GB
Cleaning and maintenance
Cleaning
Replacing the bulb
Before cleaning, disconnect the power
supply and remove all loose fittings.
1. Disconnect the power supply by
removing the plug from the socket.
2. Remove the lamp cover by pressing it together to release it from the two clips (fig. 9).
3. Replace the bulb(s).
4. Refit the cover and reconnect the power supply.
The appliance is best cleaned using
warm water (max. 85°C) with a little mild,
perfume-free detergent. Never use cleaning
agents that scour. Use a soft cloth. Rinse
with clean water and dry thoroughly. It is
important to prevent water from entering the
control panel.
The sealing strip around the lid must be
cleaned regularly to prevent discolouration
and prolong service life. Use clean water.
After cleaning the sealing strip, check that it
continues to provide a tight seal.
max.
15 W
It is recommended that the wire and tubular
condensers on the rear of the appliance be
cleaned.
fig. 9
Save energy
The ventilation grille must also be kept free
of dust and dirt. Clean it with a vacuum
cleaner.
- Keep the lid closed as much as possible.
- Check regularly that the lid closes tightly.
- Position the freezer in a cool (min. 5°C),
well-ventilated room.
- Defrost the freezer before the layer of ice
becomes excessively thick.
If the appliance is not to be used for any
length of time, switch it off, disconnect the
power supply, empty it, clean the inside and
leave the lid open to allow air circulation
and prevent smells.
8
GB
Fault finding
Fault
Possible cause
Remedy
No control lamps are
lit.
The appliance is switched off.
Check the plug and socket.
Power failure; the fuse is blown; the
appliance is not plugged in correctly.
Check that power is connected.
Reset the fuse.
Temperature in freezer
too high.
The ventilation grille is blocked.
Ensure unhindered air circulation.
The lid is not closed properly.
Close the lid and wait a few hours.
The quantity of items placed in the
freezer at a time is greater than the
capacity of the appliance.
Wait a few hours.
Thick layer of frost and ice.
Defrost the freezer.
The thermostat is set too high.
Set the thermostat to a lower temperature.
The thermostat is set too low.
Set the thermostat to a higher temperature.
The lid is prevented from closing
tightly by items stored in the freezer.
Reposition items inside the freezer
and check that the lid closes tightly.
Air humidity in the room is high.
Ventilate the room more often or
move the freezer to a room with lower
humidity.
Items placed in the freezer are giving
off moisture.
Repack items stored in the freezer.
The lid cannot be
opened.
Underpressure in freezer.
Wait 2-3 minutes until the underpressure has been equalised and try
again.
Vibration and unusual
noise.
The appliance is not on a level
surface.
Position the freezer on a flat, level
and stable surface.
The appliance is not free standing.
Move the appliance away from other
appliances or pieces of furniture.
Baskets or partition are loose.
Check movable fittings and reposition
them.
Temperature in freezer
too low.
The freezer produces
large quantities of
frost.
9
GB
Spare parts
Spare parts
When ordering spare parts, please state the
type, serial and production numbers of your
appliance (see fig. 1 on page 3 and fig. 10).
This information is given on the nameplate
on the rear of the appliance. The nameplate
contains various technical information,
including type and serial numbers.
Serial No.: XXXXXXXX
Type: XXXX
Prod. No.: XXXX
fig. 10
Note: Always use approved service
technicians when your appliance is to be
repaired or replaced!
Important
Please note that changes to the
construction of the appliance or changes to
the component equipment of the appliance
will invalidate the warranty and product
liability, and the appliance cannot be used
lawfully. The approval stated on the rating
plate will also be invalidated.
10
GB
Safeguarding the environment
Packing
Disposal
The packing material is entirely recyclable,
and marked with recycling symbol. Please
follow the local regulations for scrapping.
Environmental regulations on disposal must
always be observed. When disposing of
the appliance you should contact your local
authority technical department who will
inform you of how collection and recycling
of such units take place in your area.
Appliance
The appliance is made of recyclable
material. The cabinet contain flammable
blowing gases and dispose of the
appliance should be according with the
local environmental regulations. Make the
appliance unusable by cutting of the power
supply cord and please, the appliance must
be delivered to an authorised centre for
recovery of refrigerant.
This product is marked in accordance
with EU Directive 2002/96/EC on waste
electrical and electronic equipment (WEEE).
Ensuring that the product is disposed of
correctly helps prevent potential negative
impacts on the environment and human
health. Such impacts may occur if the
product is disposed of inappropriately.
The
symbol on the product or its
accompanying documents means that the
product must not be disposed of together
with household refuse. Instead, it must be
delivered to a recycling station for electrical
and electronic equipment.
The product must be disposed of in
accordance with current environmental
regulations for the disposal of waste.
For further information on the handling,
recycling and reuse of this product, please
contact your local authorities or waste
collection company, or the dealer from
whom you purchased the product.
11