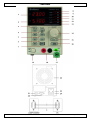
1
LABPS3005D EN NL FR ES DE PT PL PROGRAMMABLE DC LAB POWER SUPPLY 0-30V/ USB 2.0 PROGRAMMEERBARE LABORATORIUMVOEDING 0-30 V / USB 2.0 ALIMENTATION LABORATOIRE PROGRAMMABLE - 0-30 V / USB 2.0 FUENTE DE ALIMENTACIÓN DE LABORATORIO PROGRAMABLE 0-30V DC / USB 2.0 PROGRAMMIERBARES LABORNETZGERÄT 0-30V DC / USB 2.0 FONTE DE ALIMENTAÇÃO DC LAB PROGRAMÁVEL 0-30V/ USB 2.0 PROGRAMOWALNY ZASILACZ WARSZTATOWY DC 0-30V/ USB 2.0 USER MANUAL GEBRUIKERSHANDLEIDING MODE D’EMPLOI MANUAL DEL USUARIO BEDIENUNGSANLEITUNG MANUAL DO UTILIZADOR INSTRUKCJA OBSŁUGI 3 10 17 24 31 38 45 LA BPS3005D V . 04 – 03 /02 /2015 2 ©V elleman nv LA BPS3005D USER MANUAL 1. Introduction To all residents of the European Union Important environmental inf ormation about this product T his s ymbol on the devic e or the pac kage indicates that disposal of the devic e after its lifecycle c ould harm the environment. D o not dis pos e of the unit (or batteries) as uns orted municipal was te; it s hould be taken to a s pec ialized c ompany for rec ycling. T his device s hould be returned to your dis tributor or to a loc al rec ycling s ervice. Res pect the loc al environmental rules . If in doubt, contact your local waste disposal authorities. T hank you for c hoos ing V elleman! P lease read the manual thoroughly befor e bringing this device into s ervice. I f the devic e was damaged in trans it, don't ins tall or us e it and c ontac t your dealer. 2. Safety Instructions Keep this device away from c hildren and unauthorized us ers. Indoor use only. Keep this device away from rain, mois ture, s plashing and dripping liquids . N ever put objec ts filled with liquids on top of or c los e to the device. DO NOT dis as semble or open the c over under any c ircumstances. T ouching live wires c an c aus e life-threatening electroshocks. T here are no us er- serviceable parts inside the devic e. Refer to an authorized dealer for s ervice and/or s pare parts. A lways c onnect the device to an earthed power s oc ket. Caution: devic e heats up during us e. M ake s ure the ventilation openings are c lear at all times . For s uffic ient air c irculation, leave at least 1 ” (±2 .5 c m) in front of the openings . P lac e the device on a flat, heat res is tant s urface, do not plac e the device on c arpets, fabric s … A lways disconnect mains power when devic e not in us e or when s erv icing or maintenance ac tivities are performed. H andle the power c ord by the plug only. Keep this device away from dus t and extreme temperatures. P rotect this device from s hocks and abus e. A void brute forc e when operating the device. D o not us e the devic e when damage to hous ing or c ables is noticed. D o not attempt to s ervice the device yourself but c ontact an authorised dealer. 3. General Guidelines Refer to the Velleman® Service and Quality Warranty on the las t pages of this manual. Familiarise yourself with the func tions of the devic e before actually us ing it. A ll modific ations of the devic e are forbidden for s afety reasons. D amage caused by us er modific ations to the devic e is not c overed by the warranty. O nly us e the device for its intended purpos e. U s ing the device in an unauthorised way will void the warranty. D amage c aused by dis regard of c ertain guidelines in this manual is not c overed by the warranty and the dealer will not ac c ept responsibility for any ens uing defects or problems. Keep this manual for future referenc e. V . 04 – 03 /02 /2015 3 ©V elleman nv LA BPS3005D 4. Features dual L E D dis play for voltage and c urrent c oars e and fine adjus tments of voltage and c urrent protec tion mode: voltage or c urrent limiting output c onnec tors: ins ulated s afety plugs organic glass front panel / other panels made of s teel memory: 5 programmable memories c omputer c onnectivity: pc remote c ontrol via U SB or RS2 32 s oftware V 2 .5 included for Windows XP , V ista and W7 , W8 , W8 .1 (3 2 bits + 6 4 bits ) 5. Description T he L A BPS3005D is a highly ac curate, D C - regulated power s upply with an adjus table output. T his output c an be us ed for c ons tant voltage (C .V.) and c ons tant c urren t (C .C.). T he output voltage c an be adjus ted between 0 V and 3 0V when the devic e is in the c onstant voltage mode. T he c urrent-limiting point c an be s et arbitrarily in this mode. T he output c urrent c an be adjus ted c ontinuously between 0A and 5 A in the c onsta nt current mode. T he output c urrent and voltage are indicated on the L E D displays. Refer to the illus trations on page 2 of this manual. 1 2 Of f /On: output on/off OVP: overvoltage protection on/off 13 14 3 OCP/Beep: overc urrent protection / key tones on/off 15 4 Lock/Unlock: loc k/unlock panel keys 16 5 M1-M4: memory s ave / rec all 17 6 C urrent dis play (ampere) 18 Voltage/Current : s elect between voltage or c urrent for adjus tment E arth (ground) terminal, c onnec ted to the c has sis and earth pin of the power s upply s oc ket O utput terminals 7 8 V oltage display (v olt) OVP indic ator: overvoltage protection is ac tive 19 20 Power: on/off button RS2 3 2 port for remote c ontrol via pc 9 21 U SB port (type B) for remote c ontrol via pc 10 OCP indic ator: overc urrent protection is ac tive CC indic ator: c onstant c urrent mode 22 Fan 11 12 CV indic ator: c onstant voltage mode OUT indic ator: output is on 23 24 P ower s upply s ocket Fus e holder 6. M1-M5 indic ator: ac tive memory A djust : adjus tment knob for voltage and c urrent; s election of memory 5 < >: digit s election buttons for c oarse/fine tuning of voltage and c urrent Operation Switching the Power Supply On or Of f 1. C onnect the inc luded power c ord to the bac k of the devic e [23] and plug the other end into a s uitable, earthed power s ocket. A lways c onnect the device to an earthed power s oc ket. 2. 3. P res s the Power button [19] to s witc h the power s upply on. T he power s upply automatically rec alls the s ettings from memory 1 . (See Set ting Voltage and Current for more information.) T he dis play s hows the existing s ettings, the M 1 indicator [13] lights . A t this moment, there is no output voltage or c urrent on the output termina ls . P res s the Power button [19] to s witc h the power s upply off. V . 04 – 03 /02 /2015 4 ©V elleman nv LA BPS3005D Using the Power Supply in Constant Voltage Mode I f you want to us e the power s upply in c onstant voltage mode, you s et up the des ired output voltage between 0 V and 3 0V. Y ou als o s et up the des i red c urrent limit. I f the output c urrent exc eeds the limit, the power s upply automatically goes into c onstant c urrent mode. Using the Power Supply in Constant Current Mode I f you want to us e the power s upply in c onstant c urrent mode: you s et up the des ired output c urrent between 0 A and 5 A . Y ou also s et up the des ired voltage limit. Set ting Voltage and Current Y ou c an s ave 4 different voltage/current s ettings us ing the memory keys M 1~M4. 1. P res s the memory key [5] of the memory for whic h you want to define the s ettings. T he c orres ponding indicator M 1~M 4 [13] lights and the exis ting s ettings for voltage and c urrent are dis played. 2. P res s the Voltage/Current key [16] to s et the voltage. T he voltage readout flashes. o For us e in c ons tant voltage mode: this is the desired c onstant voltage. o For us e in c ons tant c urrent mode: this is the des ired voltage limit. o I f you enable overvoltage protection, the output s witc hes off automatic ally if the voltage exc eeds this value. 3. T urn the adjus tment knob [14] until you reac h approximately the desired voltage. P ress < or > [15] to s elec t a digit in the voltage readout [7] and turn the adjus tment knob to fine - tune. 4. P res s the Voltage/Current key [16] again to s et the c urrent. T he c urrent readout flashes. o For us e in c ons tant voltage mode: this is the desired c urrent limit. o For us e in c ons tant c urrent mode: this is the des ired c onstant c urrent. o I f you enable overc urrent protection, the output s witches off automatically if the c urrent exc eeds this value. 5. T urn the adjus tment knob [14] until you reac h approximately the desired c urrent. P ress < or > [15] to s elec t a digit in the c urrent readout [6] and turn the adjus tment knob to fine - tune. 6. P res s the memory key again (or wait until the dis play s tops flashing). T he s ettings are s aved in the s elected memory. Recalling Set tings T o rec all one of the s aved s ettings, pres s the c orresponding memory key M 1~M4 [5]. T he c orres ponding indic ator M 1~M4 [13] lights and the c orres ponding voltage/current s ettings appear on the dis play. Note: the output is s witc hed off automatic ally when you pres s a memory key to rec all a s etup. Using Memory 5 T o us e memory 5 , proc eed as follows : 1. P res s memory key 4 and turn the adjus tment knob until indic ator M 5 lights. 2. Set the voltage and c urrent as des ired. Wait until the dis play s tops flas hing. T he s ettings are automatic ally s tored in memory 5 . 3. T o rec all the s ettings, press memory key 4 and turn the adjus tment knob again until indictor M 5 lights . Connecting a Load 1. C onnect the load’s positive terminal to the red + terminal [18] of the power s upply. 2. C onnect the load’s negative terminal to the blac k – terminal [18] of the power s upply. 3. Y ou c an c onnect the + or – terminal to the green earth terminal [17] of the power s upply to pin the voltage to 0 V (earth potential) at that terminal. I f you leave the earth terminal unc onnected, the output floats with res pect to the ground. A pplying Voltage to the Load 1. P res s the Of f/On key [1] to apply the voltage to the load. T he OUT [12] and C.V. indic ators [11] light. T he power s upply works in c ons tant voltage (CV) mode; the dis play now s hows the ac tual output voltage and c urrent. I f the c urrent exc eeds the s et c urrent limit, the power s upply automatically goes into c onstant c urrent (C C) mode. T he C.V. indic ator goes out and the C.C. indic ator [10] lights . 2. P res s the Of f/On key [1] to s witc h the output off. V . 04 – 03 /02 /2015 5 ©V elleman nv LA BPS3005D 7. Panel Keys Locking the Panel T o prevent unwanted operation of the panel keys , you c an loc k the front panel. 1. P res s and hold the Lock/Unlock key [4] for about 2 s ec onds. Y ou hear a s hort tone. T he keys are now loc ked. 2. T o unloc k the panel, pres s and hold the button again. Y ou hear a s hort tone. Key Tones E ac h time you pres s a key on the front panel, you hear a ton e. 1. T o s witc h off the tone, pres s and hold the OCP/Beep key [3] for about 2 s ec onds. 2. T o s witc h the tone on again, pres s and hold the OCP/Beep key [3] for about 2 s ec onds. 8. Protection Using Overvoltage Protection 1. T o protec t against overvoltage, s et up the maximum voltage and then pres s the OVP button. T he OVP indic ator lights. 2. P res s Of f/On to apply the output to the load. I f the output voltage bec omes higher than the s et value, the power s upply c uts off the output and the OVP indic ator flas hes. 3. D is connect the load. 4. T o rec over, pres s the OVP key. Using Overcurrent Protection 1. T o protec t against overcurrent, s et up the maximum c urrent and then pres s the OCP button. T he OCP indic ator lights. 2. P res s Of f/On to apply the output to the load. I f the output c urrent bec omes higher than the s et value, the power s upply c uts off the output and the OCP indic ator flas hes. 3. D is connect the load. 4. T o rec over, pres s the OCP key. 9. Troubleshooting N othing happens when you pres s the panel keys. T he keys are loc ked. P ress and hold the Lock/Unlock key [4] about 2 s ec onds. Y ou hear a tone when they keys are unloc ked. P ower is on and output is s witc hed on, but there is no output. T he load is not properly c onnected, or the c urrent s etup is 0 . T he output voltage ris es s lowly when the output is s witc hed on. T he c urrent s etup is too s mall. 10. Remote Control via PC T o operate the power s upply via the inc luded pc s oftware, proc eed as follows: 1. I ns tall the s oftware on your pc and launc h the s oftware . 2. C onnect the power s upply to the pc via the U SB [21] or RS2 32 [20] port and s witc h it on. T he power s upply c onnects automatically to the s oftware . When c onnec tion is successful, you hear a tone. O n the pc , the c ommunic ation s tatus [K] is indic ated. Note: the keys on the front panel are loc ked when the power s upply is c onnected to a pc . Y ou c an only operate the power s upply via the pc . T he L E D display and indic ators work normally. V . 04 – 03 /02 /2015 6 ©V elleman nv LA BPS3005D Main Screen T he main s c reen of the remote c ontrol s oftware: A B C urrent adjus tment C urrent dis play (ampere) G H C urrent graph: s hows the c urrent over time L og C D E V oltage adjustment V oltage display (volt) O vercurrent protection I J K O utput off O utput on C ommunic ation s tatus F V oltage graph: s hows the voltage over time Set ting Voltage and Current T o s et the voltage and c urrent [A ,C] you c an: s elect a value from the lis t drag the s liders. T ip: you c an c lick on the s lider and us e the s c roll wheel of your mous e. T he s et value appears in the box to the right of the s lider. A pplying Voltage to the Load P res s the ON key [J] to apply voltage to the load. P res s the OFF key [I] to s witc h the output off. Using Overcurrent Protection T o protec t against overcurrent, s et up the maximum c urrent and then s elect Output switch of f in the Current protection set up box [E]. T o s witc h overcurrent protection off, s elect Overcurrent protection of f . V . 04 – 03 /02 /2015 7 ©V elleman nv LA BPS3005D Running a Predef ined Voltage/Current Programme T he s oftware allows you to define a s eries of voltage/current s ettings for the output, and let them run automatic ally. T o s et up the programme: 1. 2. 3. 4. 5. 6. C lic k the ProgramForm tab. I n the table, enter the des ired voltages, c urrents, and time (in s ec onds). I n the loop box, s elect how many times the programme has to run: o Selec t inf inite to let the programme run infinitely until you s top it manually. o Selec t a number from the s election lis t. o O r c lick in the loop box and type the required number. C lic k the Run button to s tart the programme. C lic k the Stop button to paus e the programme. C lic k Run again and the programme c ontinues where it was s topped. C lic k the MainScreen tab to s ee the evolution of voltage and c urrent in the graphs while the programme runs . Exiting f rom PC Remote Control Mode 1. C los e the remote c ontrol s oftware. 2. D is connect the U SB/RS232 cable from the bac k of the power s upply. Y ou hear a tone from the power s upply to indic ate that remote c ontrol mode is no longer ac tive. The keys on the front panel are unloc ked automatically (this may take a few s ec onds). Troubleshooting I f you are experienc ing problems, c heck if the pc ’s C O M port is s et up c orrectly: bits per s ec ond: 9 600 parity bit: none data bits : 8 s top bits : 1 data flow c ontrol: none. T o c hec k the func tionality, run this query c ommand via a terminal application s uch as M TTTY: * ldn? T his s hould return the identification information (model name, s erial number) of the power s upply. 11. Cleaning and Maintenance D is connect the device from the mains prior to maintenanc e ac tivities. T he power s upply c ables mus t not s how any damage. H ave a qualified technician maintain the devic e. Wipe the devic e regularly with a mois t, lint- free c loth. D o not us e alc ohol or s olvents. T here are no us er- s erviceable parts, apart from the fus e. C ontac t your dealer for s pare parts if nec es sary. Store the devic e in a dry, well- ventilated, dus t-free room. Replacing the Fuse O nly replace the fus e by a fus e of the s ame type and rating. 1. Before replac ing the fus e, unplug the mains lead. 2. Wedge the fus e holder out of its hous ing with a flat - head s c rewdriver. 3. Remove the damaged fus e from its holder and replac e with the exac t s ame type of fus e. 4. I ns ert the fus e holder bac k in its place and rec onnect power. V . 04 – 03 /02 /2015 8 ©V elleman nv LA BPS3005D 12. Technical Specifications input voltage fus e output voltage 220 V 3 A /250V / 50 Hz 0 -3 0 V output c urrent 0 - 5A s ourc e effec t C .V . ≤ 0 .0 1 % + 3 mV C .C . ≤ 0 .1 % + 3 mA load effec t C .V . ≤ 0 .0 1 % + 2 mV C .C . ≤ 0 .1 % + 1 0 mA s etup res olution 1 0 mV 1 mA s etup ac curacy (2 5°C ± 5 °C ) ≤ 0 .5 % + 2 0 mV ≤ 0 .5 % + 1 0 mA ripple (2 0 H z-20MHz) ≤ 2 mV rms ≤ 3 mA rms temperature c oefficient ≤ 1 0 0 ppm + 1 0 mV ≤ 1 0 0 ppm + 5 mA read bac k ac c uracy 1 0 mV 1 mA read bac k temp. c oeffic ient ≤ 1 0 0 ppm + 1 0 mV ≤ 1 0 0 ppm + 5 mA reac tion time (1 0% rated load) voltage ris e: ≤ 1 0 0 ms voltage drop: ≤ 1 0 0 ms dimens ions weight autonomy 1 1 0 (W) x 1 5 6 (H ) x 2 6 0 (D ) mm 4 .3 kg 8 hours of c ontinuous us e at maximum load Use this device with original accessories only. Velleman nv cannot be held responsible in the event of damage or injury resulting f rom (incorrect) use of this device. For more inf o concerning this product and the latest version of this manual, please visit our website www.velleman.eu. The inf ormation in this manual is subject to change without prior notice. © COPYRIGHT NOTICE The copyright to this manual is owned by Velleman nv. A ll worldwide rights reserved. N o part of this manual may be c opied, reproduced, translated or reduc ed to any elec tronic medium or otherwis e without the prior written c ons ent of the c opyright holder. V . 04 – 03 /02 /2015 9 ©V elleman nv LA BPS3005D GEBRUIKERSHANDLEIDING 1. Inleiding A an alle ingezet enen van de Europese Unie Belangrijke milieu-inf ormatie bet ref f ende dit product D it s ymbool op het toes tel of de verpakking geeft aan dat, als het na zijn levens cyclus wordt weggeworpen, dit toes tel s chade kan toebrengen aan het milieu. G ooi dit to estel (en eventuele batterijen) niet bij het gewone huis houdelijke afval; het moet bij een ges pecialiseerd bedrijf terec htkomen voor rec yclage. U moet dit toes tel naar uw verdeler of naar een lokaal rec yc lagepunt brengen. Respecteer de plaatselijke milieuwetgeving. Hebt u vragen, contacteer dan de plaatselijke autoriteiten bet ref f end de verwijdering. D ank u voor uw aankoop! L ees deze handleiding grondig voor u het toes tel in gebruik neemt. Werd het toes tel beschadigd tijdens het transport, ins talleer het da n niet en raadpleeg uw dealer. 2. Veiligheidsinstructies H oud buiten het bereik van kinderen en onbevoegden. G ebruik het toes tel enkel binnenshuis. Bes c herm tegen regen, voc htigheid en ops pattende vloeistoffen. P laats geen objec ten gevuld met vloeistof op of naas t het toes tel. D emonteer of open dit toes tel NOOIT. Raak geen kabels aan die onder s troom s taan om dodelijke elektroshocks te vermijden. E r zijn geen door de gebruiker vervangbare onderdelen in dit toes tel. V oor onderhoud of res erveonderdelen, c ontacteer uw dealer. Sluit het toes tel altijd aan op een geaard s topcontact. Bij gebruik kan de behuizing opwarmen. Zorg dat de verluc htingsopeningen niet verstopt geraken. V oorzie een ruimte van mins tens 2 ,5 c m tussen het toestel en elk ander objec t . P laats het toestel op een effen en hittebes tendig oppervlak. P laats het toestel nooit op (kamerbreed) tapijt, textiel… T rek de s tekker uit het s topc ontact (trek niet aan de kabel!) voordat u het toes tel reinigt en als u het niet gebruikt. Bes c herm tegen s tof en extreme temperaturen. Bes c herm tegen s chokken. V ermijd brute krac ht tijdens de bediening. G ebruik het toes tel niet indien de behuizing of de kabels beschadigd is. Repareer het toes tel niet zelf; neem c ontact op met een erkende dealer. 3. Algemene richtlijnen Raadpleeg de Velleman® service- en kwaliteitsgarantie ac hteraan deze handleiding. L eer eers t de func ties van het toes tel kennen voor u het gaat gebruiken. O m veiligheidsredenen mag u geen wijzigingen aanbrengen. Sc hade door wijzigingen die de gebruiker heeft aangebracht valt niet onder de garantie. G ebruik het toes tel enkel waarvoor het gemaakt is . Bij onoordeelkundig gebruik vervalt de garantie. D e garantie geldt niet voor s c hade door het negeren van bepaalde ric htlijnen in deze handleiding en uw dealer zal de verantwoordelijkheid afwijzen voor defec ten of problemen die hier rec htstreeks verband mee houden. Bewaar deze handleiding voor verdere raadpleging. V . 04 – 03 /02 /2015 10 ©V elleman nv LA BPS3005D 4. Eigenschappen L E D -scherm met dubbele weergave van s panning en s troom fijnregeling van s panning en s troom beveiligingsmode: s panning- of s troombegrenzing uitgangs connectoren: geïsoleerde veiligheidspluggen voorpaneel van organisch glas / andere panelen uit s taal geheugen: 5 programmeerbare geheugens c onnec tiviteit: PC - bediening op afs tand via U SB of RS2 32 s oftware V 2 .5 meegeleverd voor Windows XP , V ista en W7 , W8 , W8 .1 (3 2 bits + 6 4 bits ) bes c hermd d.m.v. zekering kleur: wit. 5. Omschrijving D e L A BPS3005D is een zeer prec ieze, D C -gestuurde voeding met een regelbare uitgang. U kunt deze uitgang gebruiken voor c onstante s panning (C .V.) of c ons tante s troom (C .C.). D e uitgangs spanning kan willekeurig worden ingesteld tus sen 0 V en 3 0V wanneer het toes tel zich in de "c ons tante s panning"-mode bevindt. I n deze mode kunt u het s troombegrenzingspunt willekeurig ins tellen. D e uitgangs stroom kan willekeurig worden inges teld op 0 tot 5 A in de "c onstante s troom" -mode. D e uitgangs stroom en de uitgangs spanning worden aangegeven d.m.v. L C D displays. Raadpleeg de afbeeldingen op pagina 2 van deze handleiding. 1 Of f /On: uitgang aan/uit 13 M1-M5-indic ator: ac tief geheugen 2 OVP: overs panningsbeveiliging aan/uit 14 3 OCP/Beep: overs troombeveiliging / toets tonen aan/uit Lock/Unlock: paneeltoetsen vergrendelen/ontgrendelen 15 A djust : ins telknop voor s panning en s trooms terkte; s electie geheugen 5 < >: s electieknoppen voor grof- /fijnregeling s panning en s troomsterkte Voltage/Current : s electie s panning- of s troomregeling 5 M1-M4: geheugen ops laan / oproepen 17 A ardingsaansluiting, aangesloten op het c has sis en aardpen van de voedings aansluiting 6 7 8 D is play weergave uitgangsstroom (ampère) D is play weergave uitgangsspanning (volt) OVP-indic ator: overspanningsbeveiliging is ac tief OCP indic ator: overs troombeveiliging is ac tief 18 19 20 U itgangsconnectoren Power: aan/uit- knop RS2 3 2-poort voor PC - bediening op afs tand 21 U SB- poort (type B) voor P C - bediening op afs tand CC-indic ator: c ons tante s troommodus CV-indic ator: c ons tante spanningsmodus OUT-indic ator: uitgang is ac tief 22 23 24 V entilator V oedingsaansluiting Zekeringhouder 4 9 10 11 12 6. 16 Gebruik De voeding in- of uitschakelen 1. Sluit de meegeleverde voedingskabel aan op de aans luiting aan de ac hterkant van het toes tel [23] en s teek het andere uiteinde in een ges chikt, geaard s topcontact. Sluit het toes tel altijd aan op een geaard s topcontact. V . 04 – 03 /02 /2015 11 ©V elleman nv LA BPS3005D 2. 3. D ruk op Power [19] om de voeding in te s c hakelen. D e voeding roept automatisch de ins tellingen van geheugen 1 op. (Zie Set ting Voltage and Current voor meer informatie.) H et dis play toont de bes taande ins tellingen, de M 1 -indicator [13] lic ht op. O p dit ogenblik is er geen uitgangsspanning of – s troom op de uitgangs connectoren. D ruk op Power [19] om de voeding uit te s c hakelen. De voeding gebruiken in constante spanningsmodus I ndien u de voeding wens t te gebruiken in c onstante s panningsmodus, s tel de gewens te uitgangs spanning in tus sen 0 V en 3 0V. U kunt eveneens het gewens te s troombegrenzingspunt instellen. I ndien de uitgangs spanning de inges telde waarde overschrijdt, gaat het toes tel automatisch over in c ons tante s troommodus. De voeding gebruiken in constante stroommodus I ndien u de voeding wens t te gebruiken in c onstante s troommodus: s tel de gewens te uitgangsstroom in tus s en 0A en 5 A. U kunt eveneens de gewens te s panningsbegrenzing ins tellen. Spanning en stroom instellen U kunt tot 4 vers c hillende s panning-/stroominstellingen opslaan met de geheugentoetsen M 1~M4. 1. D ruk op de geheugentoets [5] van het geheugen waarvan u de ins tellingen wens t te definiëren. D e overeenkomstige M 1~M4-indicator [13] lic ht op en de bes taande s panning- en s troominstellingen worden weergegeven. 2. D ruk op de s elec tieknop Voltage/Current [16] om de s panning in te s tellen. D e s panningsuitlezing knippert. o V oor gebruik in c ons tante s panningsmodus: dit is de gewens te c onstante s panning. o V oor gebruik in c ons tant s troommodus: dit is het gewens te s panningsbegrenzingspunt. o Bij het deac tiveren van de overspanningsbeveiliging, wordt de uitgang automatis ch uitges chakeld indien de s panning de inges telde waarde overschrijdt. 3. D raai aan de ins telknop [14] totdat u ongeveer de gewens te s panningswaarde hebt bereikt. D ruk op < of > [15] om een digit te s electeren in de s panningsuitlezing [7] en draai aan de ins telknop om te fijnregelen. 4. D ruk nogmaals op de s electieknop Voltage/Current [16] om de s troom in te s tellen. D e s troomuitlezing knippert. o V oor gebruik in c ons tante s panningsmodus: dit is het gewens te s troombegrenzingspunt. o V oor gebruik in c ons tants stroommodus: dit is de gewens te c onstante s troom. o Bij het deac tiveren van de overstroombeveiliging, wordt d e uitgang automatisch uitgeschakeld indien de s troom de inges telde waarde overschrijdt. 5. D raai aan de ins telknop [14] totdat u ongeveer de gewens te s troomwaarde hebt bereikt. D ruk op < of > [15] om een digit te s electeren in de s troomuitlezing [6] en draai aan de ins telknop om te fijnregelen. 6. D ruk nogmaals op de geheugentoets (of wac ht totdat de dis play niet meer knippert). D e ins tellingen zijn opgeslagen in het ges electeerde geheugen. Oproepinstellinge n O m één van de opges lagen ins tellingen op te roepen, druk op de overeenkomstige M 1~M 4geheugentoetsen [5]. D e overeenkomstige M1~M 4-indicator [13] lic ht op en de overeenkomstige s panning- en s troominstellingen worden weergegeven op de dis play. Opmerking: de uitgang wordt automatisch uitgeschakeld wan neer u een geheugentoets indrukt om een ins telling op te roepen. Geheugen 5 gebruiken O m geheugen 5 te gebruiken, gaat u als volgt te werk: 1. D ruk op de geheugentoets 4 en draai aan de ins telknop totdat de M 5 -indicator oplicht. 2. Stel de gewens te s panning en s troom in. Wac ht totdat de dis play niet meer knippert. D e ins tellingen worden automatisch opgeslagen in geheugen 5 . 3. O m de ins tellingen op te roepen, druk de op de geheugentoets 4 en draai nogmaals aan de ins telknop totdat de M 5-indicator oplicht. V . 04 – 03 /02 /2015 12 ©V elleman nv LA BPS3005D Een belast ing aansluiten 1. Sluit de pos itieve uitgangsconnector van de belas ting aan op de rode + uitgangs connector [18] van de voeding. 2. Sluit de negatieve aansluitconnector van de belas ting aan op de zwarte – aans luitconnector [18] van de voeding. 3. U kunt de + of – c onnec toren aansluiten op de groene aardingsaansluiting [17] van de voeding om de s panning in te s tellen op 0 V (aardingspotentiaal) bij die aans luiting. A ls de aardingsaansluiting niet aangesloten wordt, "zweeft" de uitgang t.o.v. de aarde. Spanning aanleggen op de belasting 1. D ruk op de Of f /on- knop [1] om s panning te zetten op de belas ting. D e OUT- [12] en C.V.-indic atoren [11] lic hten op. D e voeding werkt in c ons tante spanningsmodus (C V ); de dis play geeft nu de huidige uitgangsspanning en – stroom weer. I ndien de uitgangs stroom de ingestelde waarde overschrijdt, gaat het toes tel automatisch over in c ons tante s troommodus (CC). D e C.V.-indic ator gaat uit en de C.C.-indic ator [10] lic ht op. 2. D ruk op de Of f /on- knop [1] om de uitgang uit te s c hakelen. 7. Paneeltoetsen Het paneel vergrendelen O m ongewens te bediening van de paneeltoetsen te voorkomen, kunt u het frontpaneel vergrendelen. 1. H oud de Lock/Unlock- toets [4] ingedrukt gedurende een 2 -tal s econden. U hoort een korte pieptoon. D e toets en zijn nu vergrendeld. 2. O m het paneel te ontgrendelen, houd de toets opnieuw ingedrukt. U hoort een korte pieptoon. Toet stonen T elkens u een toets indrukt op het frontpaneel, hoort u een pieptoon. 1. O m de toets toon uit te s c hakelen, houd de OCP/Beep- toets [3] ingedrukt gedurende een 2 - tal s ec onden. 2. O m de toets toon opnieuw in te s c hakelen, houd de OCP/Beep- toets [3] ingedrukt gedurende een 2 - tal s econden. 8. Beveiliging De overspanningsbeveil igi ng gebruiken 1. O m te beveiligen tegen overspanning, s tel de maximumspanning in en druk daarna o p de OVPtoets . D e OVP-indic ator licht op. 2. D ruk op Of f /On om de uitgang aan te leggen op de belas ting. Wanneer de uitgangs spanning de inges telde waarde overschrijdt, s chakelt de voeding de uitgang uit en de OVP- indic ator knippert. 3. O ntkoppel de belasting. 4. O m te hers tellen, druk op de OVP- toets . De overstroombeveili gi ng gebruiken 1. O m te beveiligen tegen overstroom, s tel de maximumstroom in en druk daarna op de OCP- toets . D e OCP-indic ator lic ht op. 2. D ruk op Of f /On om de uitgang aan te leggen op de belas ting. Wanneer de uitgangs stroom de ingestelde waarde overschrijdt, s c hakelt de voeding de uitgang uit en de OCP- indic ator knippert. 3. O ntkoppel de belasting. 4. O m te hers tellen, druk op de OCP- toets . 9. Problemen en oplossingen E r gebeurt niets bij het indrukken van de paneeltoetsen. D e toets en zijn vergrendeld. H oud de Lock/Unlock- toets [4] ingedrukt gedurende een 2 - tal s ec onden. U hoort en pieptoon wanneer de toets en ontgrendeld zijn. Stroom en uitgang zijn inges c hakeld, maar er is geen uitgang. D e belas ting is niet c orrect aangesloten, of de s troominstelling is 0 . V . 04 – 03 /02 /2015 13 ©V elleman nv LA BPS3005D D e uitgangs panning s tijgt lichtjes wanneer de uitgang is ingeschakeld. D e s troominstelling is te klein. 10. PC-besturing op afstand O m de voeding te bedienen via de meegeleverde PC -software, gaat u als volgt te werk: 1. I ns talleer de s oftware op uw P C en s tart de s oftware. 2. Sluit de voeding aan op de P C via de U SB [21] of RS2 3 2 [20] poort en s c hakel in. D e voeding maakt automatisch een verbinding met de s oftware. Bij een ges laagde verbinding, hoort u een pieptoon. O p de P C, wordt de c ommunicatiestatus [K] weergegeven. Opmerking: de toets en op het frontpaneel zijn vergrendeld wanneer de voeding aangesloten is op een P C . U kunt de voeding enkel bedienen via de P C. D e L E D- display en indicatoren we rken normaal. Hoof dscherm H et hoofds c herm van de s oftware voor P C - bediening op afs tand: A Regelknop s troom G B C U itlezing s troom (ampère) Regelknop s panning H I Stroomdiagram: visualiseert de s troom gedurende een bepaalde tijd L og U itgang is uitgeschakeld D E F U itlezing s panning (volt) O verstroombeveiliging Spannings diagram: vis ualiseert de s panning gedurende een bepaalde tijd J K U itgang is ingeschakeld C ommunic atiestatus Spanning en stroom instellen O m de s panning en s troom [A ,C] in te s tellen, kunt u: een waarde s electeren uit de lijs t s leep de s c huifknoppen. T ip: klik op de s c huifknop en gebruik het s crollwieltje van uw muis . D e inges telde waarde vers chijnt in het veld rec hts van de s c huifknop. V . 04 – 03 /02 /2015 14 ©V elleman nv LA BPS3005D Spanning aanleggen op de belasting D ruk op ON [J] om s panning aan te leggen op de belas ting. D ruk op OFF [I] om de uitgang uit te s c hakelen. De overstroombeveili gi ng gebruiken O m te beveiligen tegen overstroom, s tel de maximumstroom in en s elec teer vervolgens Output switch of f in het veld Current protection set up [E]. O m de overs troombeveiliging te deactiveren, s electeer Overcurrent protection of f . Een vooraf ingesteld programma voor spanning/stroom af spelen M et de s oftware kunt u een reeks s panning -/stroominstellingen definiëren, en deze automatisch laten uitvoeren. O m het programma in te s tellen: 1. 2. 3. 4. 5. 6. Klik op de tab ProgramForm. I n de tabel, geef de gewens te s panning, s troom, en duur in (weergave in s ec onden). I n het veld loop, s electeer het aantal keren dat het programma moet afges peeld worden: o Selec teer inf inite om het programma onbepaald door te laten lopen totdat u het manueel doet s toppen. o Kies een aantal uit de ges electeerde lijst. o O f klik in het veld loop en geef het gevraagde aantal in. Klik op Run om het programma af te s pelen. Klik op Stop om het programma te onderbreken. Klik nogmaals op Run en het programma gaat verder waar het ges topt is. Klik op de tab MainScreen om de s panning- /stroomevolutie in de diagrammen te vis ualiseren terwijl het programma loopt. De af standsbedieningmodus verlaten 1. Sluit de s oftware voor P C -bediening op afs tand. 2. Koppel de U SB/RS232- kabel los van de ac hterkant van de voeding. U hoort een pieptoon om aan te geven dat de afs tands bedieningmodus niet langer actief is . D e toets en op het frontpaneel worden automatisch vergrendeld (dit kan enkele s econden duren). Problemen en oplossingen M oc hten er zic h problemen voordoen, c ontroleer of de C O M -poort van de P C c orrect is ingesteld: bits per s ec onde: 9 600 pariteitsbit: geen databits : 8 s topbits: 1 c ontrole dataflow: geen. O m de func ties te verifiëren, laat deze c ontrolequery lopen via een terminalapplicatie zoals MTTTY: * ldn? H ierdoor zouden de identificatiegegevens (modelnaam, s erienummer) van de voeding teruggestuurd worden. 11. Reiniging en onderhoud O ntkoppel het toestel van het lic htnet voor u aan onderhouds werkzaamheden begint. D e voedings kabels mogen niet beschadigd zijn. L aat het toes tel onderhouden door een ges choolde tec hnicus. M aak het toes tel geregeld s choon met een voc htige, niet pluizende doek. G ebruik geen alc ohol of s olventen. V . 04 – 03 /02 /2015 15 ©V elleman nv LA BPS3005D D e gebruiker mag geen onderdelen vervangen, behalve de zekering. Bes tel eventuele res erveonderdelen bij uw plaats elijke verdeler. Bewaar het toes tel op een droge, goed geventileerde, s tofvrije ruimte. De zekering vervangen V ervang een ges prongen zekering enkel door een zekering van hetzelfde type. 1. O ntkoppel het toestel van de nets panning voor u de zekering vervangt. 2. M aak de zekeringhouder los met behulp van een s c hroevendraaier met platte kop. 3. V erwijder de oude zekering en vervang door een zekering van hetzelfde type. 4. P laats de zekeringhouder terug in het toes tel en s c hakel de s troom weer in. 12. Technische specificaties ingangs spanning zekering uitgangs spanning 220 V 3 A /250V / 50 Hz 0 -3 0 V uitgangs stroom 0 - 5A regeling van de bron C .V . ≤ 0 .0 1 % + 3 mV C .C . ≤ 0 .1 % + 3 mA regeling van de belas ting C .V . ≤ 0 .0 1 % + 2 mV C .C . ≤ 0 .1 % + 1 0 mA res olutie instelling 1 0 mV 1 mA nauwkeurigheid ins telling (2 5 °C ± 5 °C ) ≤ 0 .5 % + 2 0 mV ≤ 0 .5 % + 1 0 mA rimpel (2 0 H z-20MHz) ≤ 2 mV rms ≤ 3 mA rms temperatuurs coëfficiënt afmetingen gewic ht ≤ 1 0 0 ppm + 1 0 mV ≤ 1 0 0 ppm + 5 mA 1 0 mV 1 mA ≤ 1 0 0 ppm + 1 0 mV ≤ 1 0 0 ppm + 5 mA s panningsstijging: ≤ 1 0 0 ms s panningsdaling: ≤ 1 0 0 ms 1 1 0 (B) x 1 5 6 (H ) x 2 6 0 (D ) mm 4 .3 kg autonomie 8 u doorlopend gebruik bij max. belas ting nauwkeurigheid uitlezing temperatuurs coëfficiënt uitlezing reac tietijd (1 0% nominale belas ting) Gebruik dit toestel enkel met originele accessoires. Velleman nv is niet aansprakelijk voor schade of kwet suren bij (verkeerd) gebruik van dit toestel. Voor meer inf ormatie over dit product en de laatste versie van deze handleiding, zie www.velleman.eu. De inf ormatie in deze handleiding kan te allen tijde worden gewijzigd zonder vooraf gaande kennisgeving. © A UTEURSRECHT Velleman nv heef t het aut eursrecht voor deze handleiding. A lle wereldwijde rechten voorbehouden. H et is niet toegestaan om deze handleiding of gedeelten ervan over te nemen, te kopiëren, te vertalen, te bewerken en op te s laan op een elektronisch medium zonder voorafgaande s c hriftelijke toestemming van de rec hthebbende. V . 04 – 03 /02 /2015 16 ©V elleman nv LA BPS3005D MODE D’EMPLOI 1. Introduction A ux résidents de l'Union européenne Des inf ormations environnementale s importantes concernant ce produit C e s ymbole s ur l'appareil ou l'emballage indique que l’élimination d’un appareil en fin de vie peut polluer l'environnement. N e pas jeter un appareil électrique ou élec tronique (et des piles éventuelles) parmi les déc hets municipaux non s ujets au tri s électif ; une déc hèterie traitera l’appareil en ques tion. Renvoyer les équipements us agés à votre fournisseur ou à un s ervice de rec yc lage local. I l c onvient de res pecter la réglementation locale relative à la protec tion de l’environnement. En cas de questions, contacter les autorités locales pour élimination. N ous vous remercions de votre ac hat ! L ire la prés ente notice attentivement avant la mis e en s ervice de l’appareil. Si l’appareil a été endommagé pendant le trans port, ne pas l’ins taller et c onsulter votre revendeur. 2. Consignes de sécurité G arder hors de la portée des enfants et des pers onnes non autorisées. U tiliser c et appareil uniquement à l'intérieur. P rotéger de la pluie, de l’humidité et des projec tions d’eau. N e jamais placer d’objet c ontenant un liquide s ur l’appareil. NE JA MA IS dés as sembler ou ouvrir le boîtier. T oucher un c âble s ous tens ion peut c auser des élec trochocs mortels. I l n’y a auc une pièc e maintenable par l’utilisateur. C ommander des pièc es de rec hange éventuelles c hez votre revendeur. T oujours brancher l'appareil s ur une pris e de c ourant avec mise à la terre. L e boîtier c hauffe pendant l’us age. V eiller à c e que les fentes de ventilation ne s oient pas bloquées . L aisser une dis tance de minimum 2 ,5 c m entre l’appareil et tout autre objet. P lac er l’appareil s ur une s urfac e plate et rés istante à la c haleur. É viter de placer l’appareil s ur une moquette, un tapis , du textile… D ébranc her l’appareil s’il n’es t pas utilisé ou pour le nettoyer. T irer la fic he pour débranc her l'appareil ; non pas le c âble. P rotéger c ontre la pous sière. P rotéger c ontre la c haleur extrême. P rotéger c ontre les c hocs et le traiter avec c irconspection pendant l’opération. N e pas utilis er c et appareil en c as d’endommagement visible au boîtier ou au c âble. C onfier toute réparation à votre revendeur agrée. 3. Directives générales Se référer à la garantie de service et de qualité Velleman® en fin de notic e. Se familiaris er avec le fonc tionnement avant l’emploi. T oute modific ation es t interdite pour des rais ons de s écurité. L es dommages oc casi onnés par des modific ations par le c lient ne tombent pas s ous la garantie. N ’utilis er qu’à s a fonc tion prévue. U n us age impropre annule d'office la garantie. L a garantie ne s ’applique pas aux dommages s urvenus en négligeant c ertaines directives de c ette notic e et votre revendeur déclinera toute res ponsabilité pour les problèmes et les défauts qui en rés ultent. G arder c ette notice pour toute référence ultérieure. V . 04 – 03 /02 /2015 17 ©V elleman nv LA BPS3005D 4. Caractéristiques éc ran L E D avec double affic hage de tens ion et de c ourant réglage fin de la tens ion et du c ourant mode de protec tion : limitation de tens ion ou de c ourant c onnec teurs de s ortie : fic hes de s écurité is olées panneau frontal en verre organique / autres panneaux en ac ier mémoire : 5 mémoires programmables c onnec tivité : c ontrôle à dis tance de P C par U SB ou RS2 32 logic iel V 2.5 inc lus pour Windows XP , V ista e t W7 , W8 , W8 .1 (3 2 bits + 6 4 bits ) protégées par un fus ible c ouleur : blanc - gris. 5. Description L a L A BPS3005D es t une alimentation à pilotage C C à haute préc ision, équipée d'une s ortie réglable. V ous pouvez utilis er c ette s ortie pour une tens ion c onstante (C.V.) ou un c ourant c onstant (C .C.). L a tens ion de s ortie peut être réglée arbitrairement de 0 V à 3 0V lorsque l'appareil se trouve dans le mode de tens ion c onstante. L e point de limitation de c ourant es t réglable dans c e mode. L e c ourant de s ortie peut être réglé entre 0 et 5 A dans le mode de c ourant c onstant. L e c ourant de s ortie et la tens ion de s ortie s ont affic hés au moyen d'afficheurs à L CDs. Se référer aux illus trations en page 2 de c ette notice. 1 2 Of f /On : s ortie ac tivée/désactivée OVP : protec tion c ontre la s urtension ac tivée/désactivée OCP/Beep : protec tion c ontre le s urc ourant/ tonalité des touches ac tivée/désactivée Lock/Unlock : verrouiller/déverrouilles les touc hes du panneau 13 14 16 Voltage/Current : s électionnez entre ajus tement de la tens ion ou de c ourant 5 M1-M4 : s auvegarder / rappeler mémoire 17 Borne de mis e à la terre (mas s e), c onnectée au c hâs sis et à la broc he de terre du c onnec teur d'alimentation 6 7 8 A ffic heur de c ourant (ampère) A ffic heur de tens ion (volt) I ndic ateur OVP : protec tion c ontre la s urtens ion es t activée I ndic ateur OCP : protec tion c ontre le s urc ourant est ac tivée 18 19 20 C onnecteurs de s ortie Power : bouton marc he/arrêt P ort RS2 32 pour c ontrôler le P C à dis tance 21 P ort U SB (type B) pour c ontrôler le P C à dis tance I ndic ateur CC : mode de c ourant c onstant I ndic ateur CV : mode de tens ion c onstante I ndic ateur OUT : s ortie es t activée 22 23 24 V entilateur C onnecteur d'alimentation P orte- fusible 3 4 9 10 11 12 6. 15 I ndic ateur M1-M5 : mémoire ac tive A djust : molette de réglage pour c ourant et tens ion; s élection de mémoire 5 < > : bouton de s élection pour le réglage fin/gros de la tens ion et du c ourant Emploi A llumer ou ét eindre l'alimentation 1. C onnecter le c ordon d'alimentation à l'arrière de l'appareil [23] et enfic her l'autre extrémité dans une pris e de c ourant avec mis e à la terre appropriée. T oujours brancher l'appareil s ur une pris e de c ourant avec mise à la terre. V . 04 – 03 /02 /2015 18 ©V elleman nv LA BPS3005D 2. 3. A ppuyer s ur le bouton Power [19] pour allumer l'alimentation. L 'alimentation rappelle automatiquement les réglages de mémoire 1 . (V oir Set ting Voltage and Current pour plus d'informations.) L 'affic heur visualise les réglages existants, l'indicateur M 1 [13] s 'allume. A c e moment, il n'y a pas de tens ion ou du c ourant de s o rtie s ur les connecteurs de s ortie. A ppuyer s ur le bouton Power [19] pour éteindre l'alimentation. Utiliser l'alimentation en mode de tension constante Si vous s ouhaitez utiliser l'alimentation en mode de tens ion c onstante, il faut régler la tens ion de s or tie s ouhaitée entre 0V et 3 0V. L e point de limitation de c ourant est également réglable dans c e mode. Si le c ourant de s ortie dépasse la valeur limite instaurée, l'alimentation s e met automatiquement en mode de c ourant c onstant. Utiliser l'alimentation en mode de courant constant Si vous s ouhaitez utiliser l'alimentation en mode de c ourant c onstant : régler le c ourant de s ortie s ouhaité entre 0A et 5A. Régler également le point de limitation de tens ion. Régler la tension et le courant I l es t pos sible de mé moris er 4 modes de réglages différents de tens ion/courant en utilisant les touches de mémoire M 1 ~M 4. 1. A ppuyer s ur la touc he de mémoire [5] de la mémoire dont vous s ouhaitez définir les réglages. L 'indicateur c orrespondant M 1~M4 [13] s 'allume et les réglages existants de la tens ion et du c ourant s 'affichent. 2. A ppuyer s ur la touc he Voltage/Current [16] pour régler la tens ion. L 'affichage de la tens ion c lignote. o P our utilis er en mode de tens ion c onstante : c ec i es t la tension c onstante s ouhaitée. o P our utilis er en mode de c ourant c onstant : c eci es t le point de limitation de tens ion s ouhaité. o E n dés ac tivant la protection c ontre la s urtension, la s ortie s 'éteint automatiquement s i la tens ion dépasse c ette valeur. 3. T ourner la molette de réglage [14] jus qu'à c e que la tens ion s ouhaitée s oit atteinte approximativement. A ppuyer s ur < ou > [15] pour s élec tionner un digit dans l'affichage de tens ion [7] et tourner la molette de réglage pour ajus ter. 4. A ppuyer de nouveau s ur la touc he Voltage/Current [16] pour régler le c ourant. L 'afficheur de c ourant c lignote. o P our utilis er en mode de tens ion c onstante : c ec i es t le point de limitation de c ourant souhaité. o P our utilis er en mode de c ourant c onstant : c eci es t le c ourant c onstant s ouhaité. o E n dés ac tivant la protection c ontre le s urcourant, la s ortie s 'éteint automatiquement s i le c ourant dépasse c ette valeur. 5. T ourner la molette de réglage [14] jus qu'c e que le c ourant s ouhaité s oit atteint approximativement. A ppuyer s ur < ou > [15] pour s élec tionner un digit dans l'affichage de c ourant [6] et tourner la molette de réglage pour ajus ter. 6. A ppuyer de nouveau s ur la touc he de mémoire (ou patienter jus qu'à c e que l'afficheur s 'arrête de c lignoter). L es réglages s ont s auvegardés dans la mémoire s élec tionnée. Rappel de réglages P our rappeler un des réglages s auvegardés, appuyer s ur la touc he de mémoire M 1~M 4 [5]. L 'indic ateur c orres pondant M1~M 4 [13] s 'allume et les réglages c orrespondants de tens ion/courant s 'affichent. Remarque : la s ortie s 'éteint automatiquement en appuyant s ur une touc he de mémoire pour rappeler un réglage s auvegardé. Utiliser mémoire 5 P our utilis er mémoire 5 , proc éder c omme s uit : 1. A ppuyer s ur la touc he de mémoire 4 et tournez la molette de réglage jus qu'à c e que l'indicateur M 5 s 'allume. 2. Régler la tens ion et le c ourant c omme vous le s ouhaitez. P atienter jus qu'à c e que l'afficheur s 'arrête de c lignoter. L es réglages s ont s auvegardés automatiquement dans mémoire 5 . 3. P our rappeler les réglages, appuyer s ur la touc he de mémoire 4 et to urner à nouveau la molette de réglage jus qu'à c e que l'indicateur M 5 s'allume. V . 04 – 03 /02 /2015 19 ©V elleman nv LA BPS3005D Connecter une charge 1. C onnecter le c onnecteur pos itif de la c harge au c onnecteur + rouge [18] de l'alimentation. 2. C onnecter le c onnecteur négatif de la c harge au c onnecteur – noir [18] de l'alimentation. 3. I l es t pos sible de rac corder le c onnecteur + ou – à la borne de mis e à la terre verte [17] de l'alimentation pour fixer la tens ion s ur 0 V (potentiel de terre) à c ette borne. E n lais s ant la borne de mis e à la terre déc onnectée, la s ortie flotte à l'égard de la terre. A ppliquer tension à la charge 1. A ppuyer s ur la touc he Off/On [1] pour appliquer la tens ion à la c harge. L es indic ateurs OUT [12] et C.V. [11] s 'allument. L 'alimentation fonc tionne en mode de tens ion c ons tante (CV); en c e moment l'affic heur visualise la tens ion et le c ourant de s ortie ac tuels. Si le c ourant dépasse la valeur limite instaurée, l'alimentation s e met automatiquement en mode de c ourant c onstant. L 'indicateur C.V. s 'éteint et l'indicateur C.C. [10] s 'allume. 2. A ppuyer s ur la touc he Off/On [1] pour éteindre la s ortie. 7. Touches du panneau Verrouiller le panneau P our éviter tout ac tionnement involontaire des touches du panneau, il es t pos sible de verrouiller le panneau frontal. 1. A ppuyer et maintenir enfoncé la touc he Lock/Unlock [4] pendant environ 2 s econdes. V ous entendez un bip s onore c ourt. L es touc hes s ont maintenant verrouillées. 2. P our déverrouiller le panneau, appuyer et maintenir enfonc é de nouveau la touc he. V ous entendez un bip s onore c ourt. Tonalité de touches A c haque fois que vous appuyez s ur une touc he du panneau frontal, vous entendez un bip s onore. 1. P our éteindre la tonalité, appuyer et maintenir enfoncé la touc he [3] pendant environ 2 s ec ondes. 2. P our rallumer la tonalité, appuyer et maintenir enfonc é la touche OCP/Beep [3] pendant environ 2 s ec ondes. 8. Protection Utiliser la protection contre la surtension 1. P our une protec tion c ontre la s urtension, régler la tens ion maximum et puis appuyer s ur la touc he OVP. L 'indicateur OVP s 'allume. 2. A ppuyer s ur Of f/On pour appliquer la s ortie à la c harge. Si la tens ion de s ortie dépasse la valeur ins taurée, l'alimentation c oupe la s ortie et l'indicateur OVP c lignote. 3. D éc onnecter la c harge. 4. P our rétablir, appuyer s ur la touc he OVP. Utiliser la protection contre le surcourant 1. P our une protec tion c ontre le s urcourant, régler le c ourant maximum et puis appuyer s ur la touc he OCP. L 'indic ateur OCP s 'allume. 2. A ppuyer s ur la touc he Off/On pour appliquer la s ortie à la c harge. Si le c ourant de s ortie s urpasse la valeur ins taurée, l'alimentation c oupe la s ortie et l'indicateur OCP c lignote. 3. D éc onnecter la c harge. 4. P our rétablir, appuyer s ur la touc he OCP. 9. Problèmes et solutions Rien ne s e pas se en appuyant s ur les touches du panneau. L es touc hes s ont verrouillées. A ppuyer et maintenir enfoncé la touc he Lock/Unlock [4] pendant environ 2 s ec ondes. V ous entendez un bip s onore lorsque les touches s ont déverrouillées. L 'appareil est mis s ous tension et la s ortie es t activée, mais il n'y a p as de s ortie. L a c harge n'es t pas connectée c orrectement, ou le réglage du c ourant es t mis s ur 0 . V . 04 – 03 /02 /2015 20 ©V elleman nv LA BPS3005D L a tens ion de s ortie s 'accroît lentement lors que la s ortie es t allumée. L e réglage du c ourant es t trop petit. 10. Contrôle à distance de PC P our piloter l'alimentation depuis le logiciel PC livré, proc éder c omme s uit : 1. I ns taller le logiciel s ur votre PC et lancer le logiciel. 2. C onnecter l'alimentation au P C par le port U SB [21] ou RS2 3 2 [20] et allumer- la. L 'alimentation s e c onnecte automatiquement au logiciel. L orsque la c onnexion es t réussie, vous entendez un bip s onore. Sur le P C , l'état de c ommunication [K] es t vis ualisé. Remarque : les touc hes s ur le panneau frontal s ont verrouillées lorsque l'alimentat ion es t c onnectée à un P C . L 'alimentation ne peut qu'être pilotée depuis le P C. L 'afficheur L ED et les indicateurs fonc tionnent normalement. Ecran principal L 'éc ran principal du logiciel de c ontrôle à dis tance : A A jus tement de c ourant G B A ffic hage de c ourant (ampère) H D iagramme de c ourant : vis ualise le c ourant au c ours du temps J ournal des évènements (log) C D E A jus tement de tens ion A ffic hage de tension (volt) P rotection c ontre le s urcourant I J K Sortie es t dés activée Sortie es t ac tive É tat de c ommunic ation F D iagramme de tens ion : vis ualise la tension au c ours du temps Régler la tension et le courant P our régler la tens ion et le c ourant [A ,C] vous pouvez : s électionner une valeur depuis la liste déplac er les glissières. C onseil : c liquer s ur la glissière et utiliser la molette de votre s ouris. L e réglage s 'affiche dans la c ase s ituée à droite de la glis sière. V . 04 – 03 /02 /2015 21 ©V elleman nv LA BPS3005D A ppliquer tension à la charge A ppuyer s ur la touc he ON [J] pour appliquer tens ion à la c harge. A ppuyer s ur la touc he OFF [I] pour dés ac tiver la s ortie. Utiliser la protection contre le surcourant P our une protec tion c ontre le s urcourant, régler le c ourant maximum et puis s électionner Output switch of f dans la c as e Current protection set up [E]. P our dés activer la protection c ontre le s urcourant, s électionner Overcurrent protection of f . Lancer un programme prédéf inie de tension/coura nt L e logic iel vous permet de définir une s érie de réglages de tension/courant pour la s ortie, et de les faire exéc uter automatiquement. P our c onfigurer le programme : 1. 2. 3. 4. 5. 6. C liquer s ur l'onglet ProgramForm. D ans la table, s aisir les tensions, c ourants et la durée (affic hage en s ec ondes) que vous s ouhaitez. D ans la c as e loop, s électionner le nombre de fois que le programme doit s 'exécuter : o Sélec tionner inf inite pour faire exéc uter le programme en c ontinu jus qu'à c e qu'il s oit arrêté manuellement. o C hois issez un nombre parmi la lis te de s élection. o O u c liquer dans la c ase loop et s aisir le nombre requis . C liquer s ur la touc he Run pour lanc er le programme. C liquer s ur la touc he Stop pour interrompre le programme. C liquer de nouveau s ur Run et le programme c ontinue là où il a été interrompu. C liquer s ur l'onglet MainScreen pour vis ualiser l'évolution de la tens ion et du c ourant dans les diagramme s pendant que le programme es t exécuté. Quitter le mode de contrôle de PC à distance 1. Fermer le logic iel de c ontrôle à dis tance. 2. D éc onnecter le c âble U SB/RS232 c onnecté à l'arrière de l'alimentation. V ous entendez un bip s onore émis par l'alimentation pour indiquer que le mode de c ontrôle de P C à dis tance n'est plus ac tivé. L es touches du panneau frontal s ont déverrouillées automatiquement (c ela peut prendre quelques secondes). Problèmes et solutions E n c as de problèmes, vérifier s i le port C O M du P C a été c onfiguré c orrectement : bits par s ec onde : 9 6 0 0 bit de parité : auc un bits de données : 8 bits d'arrêt : 1 c ontrôle des flux de données : auc un. P our vérifier la fonc tionnalité, exécuter c ette c ommande de requête depuis un terminal d'application c omme M T TTY : * ldn? C ela devrait faire retourner les données d'identification (nom de modèle, numéro de s érie) de l'alimentation. 11. Nettoyage et entretien D ébranc her l’appareil avant de le nettoyer. L es c âbles d'alimentation ne peuvent pas être endommagés. U n tec hnicien qualifié doit entretenir l’appareil. E s s uyer l’appareil régulièrement avec un c hiffon humide non peluc heux. É viter l’us age d’alc ool et de s olvants. V . 04 – 03 /02 /2015 22 ©V elleman nv LA BPS3005D I l n’y a auc une pièc e maintenable par l’utilisateur s auf le fus ible. C ommander des pièces de rec hange éventuelles chez votre revendeur. C ons erver dans un endroit s ec, bien ventilé et s ans poussière. Remplacement du f usible Remplac ez le fus ible défectueux par un exemplaire identique. 1. D ébranc hez l’appareil du rés eau avant de remplacer le fus ible. 2. Retirez le porte- fusible de s on emplacement à l’aide d’un tournevis à lame plate. 3. Retirez le fus ible défectueux et remplacez -le par un fus ible du même type. 4. Réins érez le porte -fusible dans s on emplacement et rec onnectez l’alimentation. 12. Spécifications techniques tens ion d'entrée fus ible tens ion de s ortie 220 V 3 A /250V / 50 Hz 0 -3 0 V c ourant de s ortie 0 - 5A réglage de la s ourc e C .V . ≤ 0 .0 1 % + 3 mV C .C . ≤ 0 .1 % + 3 mA réglage de la c harge C .V . ≤ 0 .0 1 % + 2 mV C .C . ≤ 0 .1 % + 1 0 mA rés olution de réglage 1 0 mV 1 mA préc is ion de réglage (2 5°C ± 5 °C ) ≤ 0 .5 % + 2 0 mV ≤ 0 .5 % + 1 0 mA ondulation (2 0 Hz-20MHz) ≤ 2 mV rms ≤ 3 mA rms c oeffic ient de température dimens ions poids ≤ 1 0 0 ppm + 1 0 mV ≤ 1 0 0 ppm + 5 mA 1 0 mV 1 mA ≤ 1 0 0 ppm + 1 0 mV ≤ 1 0 0 ppm + 5 mA haute de tens ion : ≤ 1 0 0ms bais s e de tension : ≤ 1 0 0 ms 1 1 0 (L ) x 1 5 6 (H ) x 2 6 0 (P ) mm 4 .3 kg autonomie 8 h à c harge max. préc is ion de l'affichage affic hage du c oeffic ient de température temps de réac tion (1 0% c harge nominale) N’employer cet appareil qu’avec des accessoires d’origine. La SA Velleman ne peut, dans la mesure conf orme au droit applicable êt re tenue responsable des dommages ou lésions (directs ou indirects) pouvant résulter de l’utilisation de cet appareil. Pour plus d’inf ormation concernant cet article et la dernière version de cet te notice, prière de visiter notre site web www.velleman.eu. Toutes les inf ormations présentées dans cet te notice peuvent êt re modif iées sans notif ication préalable. © DROITS D’A UTEUR SA Velleman est l’ayant droit des droits d’auteur pour cet te notice. Tous droits mondiaux réservés. T oute reproduction, traduction, c opie ou diffus ion, intégrale ou partielle, du c ontenu de c ette notic e par quelque proc édé ou s ur tout s upport électronique q ue s e s oit est interdite sans l’ac cord préalable éc rit de l’ayant droit. V . 04 – 03 /02 /2015 23 ©V elleman nv LA BPS3005D MANUAL DEL USUARIO 1. Introducción A los ciudadanos de la Unión Europea Importantes inf ormaciones sobre el medio ambiente concerniente a este producto E s te s ímbolo en es te aparato o el embalaje indica que, s i tira las mues tras inservibles, podrían dañar el medio ambiente. N o tire es te aparato (ni las pilas, s i las hubiera) en la bas ura domés tica; debe ir a una empres a es pecializada en rec iclaje. D evuelva este aparato a s u dis tribuidor o a la unidad de rec ic laje local. Res pete las leyes locales en relac ión c on el medio ambiente. Si tiene dudas, contacte con las autoridades locales para residuos. ¡ G racias por haber c omprado la LA BPS3005D! L ea atentamente las instrucciones del manual antes de us arla. Si el aparato ha s ufrido algún daño en el trans porte no lo ins tale y póngas e en c ontacto con s u dis tribuidor. 2. Instrucciones de seguridad M antenga el aparato lejos del alcance de personas no c apacitadas y niños . U tilice el aparato sólo en interiores. N o exponga es te equipo a lluvia, humedad ni a ningún tipo de s alpicadura o goteo. N unc a ponga un objeto c on líquido en el aparato. NUNCA des monte ni abra la c aja. P uede s ufrir una peligrosa descarga eléctrica al tocar un c able c onectado a la red eléc trica. E l us uario no habrá de efec tuar el mantenimiento de ninguna pieza. C ontacte c on s u dis tribuidor s i necesita piezas de rec ambio. C onec te el aparato s iempre a un enc hufe pues to a tierra. L a c aja s e c alienta durante el us o. A segúrese de que los orific ios de ventilación no es tén bloqueados. D eje una dis tancia de mín. 2 ,5 c m entre el aparato y c ualquier otro objeto. I ns tale el aparato en una s uperficie plana y res istente al c alor. N o ponga el aparato en una alfombra, tejido, etc . D es conecte s iempre el aparato s i no va a us arlo durante un largo período de tiempo o antes de limpiarlo. T ire s iempre del enchufe para desconectar el c able de red, nunc a del propio c able. N o exponga es te equipo a polvo. N o exponga este equipo a temperaturas extremas. N o agite el aparato. E vite us ar exc esiva fuerza durante el manejo y la ins talación. N o utilic e este aparato en c as si la c aja o el c able es tá dañado. L a reparación debe s er realizada por pers onal especializado. 3. Normas generales V éase la Garantía de servicio y calidad Velleman ® al final de es te manual del us uario. Familiarícese c on el func ionamiento del aparato antes de utilizarlo. P or razones de s eguridad, las modificaciones no autorizadas del aparato están prohibidas. L os daños c aus ados por modific aciones no autorizadas, no es tán c ubiertos por la garantía. U tilice s ólo el aparato para las aplicaciones descritas en es te manual. Su us o inc orrecto anula la garantía c ompletamente. D años c ausados por des cuido de las instrucciones de s eguridad de es te manual invalidarán s u garantía y s u dis tribuidor no s erá res ponsable de ningún daño u otros problemas resultantes. G uarde es te manual del us ua rio para c uando necesite consultarlo. V . 04 – 03 /02 /2015 24 ©V elleman nv LA BPS3005D 4. Características dis play L ED para tensión y c orriente ajus te fino de tens ión y c orriente modo de protec c ión: límite de tensión o c orriente c onec tores de s alida: c onectores de s eguridad aislados panel frontal de vidrio orgánic o/ / los otros paneles de ac ero memoria: 5 memorias programables c onec tividad: c ontrol remoto de PCs por U SB o RS2 32 inc luye s oftware V2.5 para Windows XP, V ista y W7 , W8 , W8 .1 (3 2 bits + 6 4 bits ) protegidas por fus ible c olor: blanc o. 5. Descripción E s una alimentación muy prec isa, c ontrolada por C C y equipada c on una s alida regulable. P uede utilizar es ta s alida para una tens ión c onstante (C .V.) o una c orriente c onstante (C .C.). E s pos ible ajus tar la tens ión de s alida arbitrari amente de 0 V a 3 0V s i el aparato s e enc uentra en el modo de tens ión c onstante. E n es te modo, es pos ible programar la limitación de c orriente arbitrariamente. E s pos ible ajus tar la c orriente de s alida entre 0 y 5 A en el modo de c orriente c onstante. L a c orriente de s alida y la tens ión de s alida s e visualizan c on pantallas L CD. V éase las figuras en la página 2 de es te manual del us uario . 1 2 OFF/ON: s alida O N/O FF OVP: protec c ión c ontra s obretensiones O N /O FF OCP/Beep: protec ción c ontra s obrec orrientes / tono de tec la O N/O FF 13 14 Lock/Unlock: bloquear/desbloquear las tec las M1-M4: Memory save / recall memoria guardar / rec ordar vis ualización de la c orriente (amperio) 16 18 c onec tores de s alida 7 8 vis ualización de la tens ión (voltio) indic ador OVP: la protec ción c ontra s obretensiones está activada 19 20 Power: botón O N /O FF puerto RS2 3 2 para el c ontrol a dis tancia por PC 9 21 10 indic ador OCP: la protec ción c ontra s obrec orrientes está activada indic ador CC: modo de c orriente c ontinua 22 puerto U SB (tipo B) para el c ontrol a dis tancia por P C ventilador 11 12 indic ador CV: modo de tens ión c ontinua indic ador OUT: la s alida es tá ac tivada 23 24 entrada del enc hufe portafus ibles 3 4 5 6 6. 15 17 indic ador M1-M5: memoria ac tiva A djust : botón de ajus te para la tens ión y la c orriente. Selección de memoria 5 < >: botones de s elección para el ajus te grues o/fino de la tens ión y la c orriente Voltage/Current : s eleccione entre el ajus te de tens ión o el ajus te de c orriente c onexión a tierra, c onectada al c hasis y la tierra del enc hufe Uso A ctivar/desactivar el aparato 1. C onec te el c able de alimentación (inc l.) a la entrada [23] de la parte tras era del aparato y c onecte a la red eléc trica. C onec te s iempre el aparato a una toma puesta a tierra. 2. 3. P uls e el botón Power [19] para ac tivar el aparato. Se vis ualizan automáticamente los ajus tes de memoria 1 . (P ara más informac ión, c onsulte Set ting Voltage and Current ). L a pantalla visualiza los ajus tes introducidos. E l indicador M 1 [13] s e ilumina. E n es te momento no hay tens ión ni c orriente en los c onectores de s alida. P uls e el botón Power [19] para des ac tivar el aparato. V . 04 – 03 /02 /2015 25 ©V elleman nv LA BPS3005D Utilizar el modo de tensión continua Si quiere utilizar la fuente de alimentac ión en el modo de tens ión c ontinua, introduzca una tens ión de s alida entre 0 V y 3 0V. T ambién es posible ajus tar el límite de c orriente deseado. L a fuente de alimentación c onmuta automáticamente al modo de c orriente c ontinua s i la c orriente de s alida s obrepasa el límite. Utilizar el modo de Corriente Continua Si quiere utilizar la fuente de alimentac ión en el modo de c orriente c ontinua, introduzca una c orriente de s alida entre 0 A and 5 A. T ambién es posible ajus tar el límite de tensión deseado. A justar la tensión y la corriente E s pos ible guardar 4 ajus tes de tens ión/corriente diferentes con los botones de memoria M 1~M 4. 1. P uls e el botón de memoria [5] c orres pondiente para determinar s us ajustes. E l indic ador M 1~M4 [13] c orres pondiente s e ilumina y los ajustes introducidos para la tens ión y la c orriente s e vis ualizan. 2. P uls e el botón Voltage/Current [16] para ajus tar la tens ión. L os dígitos de la tens ión parpadean. o P ara el us o en el modo de tens ión c ontinua: es to es la tens ión c ontinua deseada. o P ara el us o en el modo de c orriente c ontinua: es to es el límite de tensión deseado. o A l ac tivar la protección c ontra s obretensiones: la s alida s e desactiva automáticamente s i la tens ión s obrepasa este valor. 3. G ire el botón de ajus te [14] has ta que alc ance aproximadamente la tensión des eada. P ulse < o > [15] para s eleccionar un dígito en la parte de vis ualización de la tens ión [7]. G ire el botón de ajus te para un ajus te fino. 4. V uelva a puls ar el botón Voltage/Current [16] para ajus tar la c orriente. L a parte de vis ualización de la c orriente parpadea. o P ara el us o en el modo de tens ión c ontinua: es to es el límite de c orrien te deseado. o P ara el us o en el modo de c orriente c ontinua: es to es la c orriente continua deseada. o Si ac tiva la protección c ontra s obrecorrientes, la s alida s e des activa automáticamente s i la c orriente s obrepasa es te valor. 5. G ire el botón de ajus te [14] has ta que alc ance aproximadamente la c orriente deseada. P ulse < o > [15] para s eleccionar un dígito en la parte de vis ualización de la c orriente [6]. G ire el botón de ajus te para un ajus te fino. 6. V uelva a puls ar el botón de memoria (o es pere has ta que la pantall a deje de parpadear). L os ajus tes s e guardan en la memoria s eleccionada. Recordar ajustes P ara rec ordar uno de los ajus tes guardados, puls e el botón M 1 ~M4 [5] adec uado. E l indicador M 1~M4 [13] c orres pondiente s e ilumina y los ajustes de tensión/corriente s e visualizan en la pantalla. Observación: la s alida s e desactiva automáticamente al pulsar un botón de memoria para rec ordar un ajus te. Utilizar la memoria 5 P ara utilizar la memoria 5 , haga lo s iguiente: 1. P uls e el botón de memoria 4 y gire el botón de aju s te has ta que el indic ador M 5 s e ilumine. 2. I ntroduzc a la tensión y la c orriente deseadas. E s pere has ta que la pantalla deje de parpadear. L os ajus tes s e guardan automáticamente en la memoria 5 . 3. P ara rec ordar los ajus tes, puls e el botón de memoria 4 y gire e l botón de ajus te has ta que el indic ador M 5 s e ilumine. Conectar una carga 1. C onec te la c onexión pos itiva (+) de la c arga al c onector de s alida positivo rojo [18] de la fuente de alimentación. 2. C onec te la c onexión negativa (- ) de la c arga al c onec tor de s alida negativo negro [18] de la fuente de alimentación. 3. Conecte la carga a tierra utilizando la c onexión a tierra verde [17] de la fuente de alimentación para ajus tar la tens ión del c onector en 0 V (potencial de tierra). L as s alidas flotan c on respecto a la tierra s i no c onec te la c onexión a tierra. V . 04 – 03 /02 /2015 26 ©V elleman nv LA BPS3005D A plicar una tensión a la carga 1. P uls e el botón Of f/On [1] para aplic ar la tens ión a la c arga. E l indic ador OUT [12] y el indic ador C.V. [11] s e iluminan. L a alimentación func i ona en el modo de tens ión c ontinua (CV). A hora, la pantalla visualiza la tensión y la c orriente de s alida actuales. L a fuente de alimentación c onmuta automáticamente al modo de c orriente c ontinua (C C) s i la c orriente s obrepasa el límite de c orriente estab lecido. E l indicador C.V. s e apaga y el indic ador C.C. [10] s e ilumina. 2. P uls e el botón Of f/On [1] para des activar la s alida. 7. Botones de panel Bloquear los botones E s pos ible bloquear las teclas para evitar un func ionamiento no des eado. 1. M antenga pulsado el botón Lock/Unlock [4] unos 2 s egundos. E l aparato emite un tono c orto. A hora, los botones están bloqueados. 2. P ara des bloquear los botones, vuelva a puls ar y mantenga puls ado el botón. Se emite un tono c orto. Los tonos de tecla C ada vez que puls a un botón del panel frontal, oye un tono. 1. P ara des activar el tono, puls e y mantenga puls ado el botón OCP/Beep [3] unos 2 s egundos. 2. P ara volver a ac tivar el tono, puls e y mantenga puls ado el botón OCP/Beep [3] unos 2 s egundos. 8. Protección Utilizar la protección contra sobret ensiones 1. P ara una protec ción c ontra s obretensiones, introduzca la tens ión máxima y luego pulse el botón OVP. E l indic ador OVP s e ilumina. 2. P uls e Of f/On para aplic ar la s alida a la c arga. L a fuente de alimentac ión desactiva la s alida y el indic ador OVP parpadea s i la tens ión de s alida es s uperior al valor introducido. 3. D es conecte la c arga. 4. P ara un res tablecimiento, puls e el botón OVP. Utilizar la protección contra sobrecorrie ntes 1. P ara una protec ción c ontra s obrecorrientes, introduzca la c orriente máxima y luego puls e el botón OCP. E l indic ador OCP s e ilumina. 2. P uls e Of f/On para aplic ar la s alida a la c arga. L a fuente de alimentación desactivar la s alida y el indic ador OCP parpadea s i la c orriente de s alida es s uperior al valor introducido. 3. D es conecte la c arga. 4. P ara un res tablecimiento, puls e el botón OCP. 9. Solución de problemas N o pas a nada al puls are los botones de panel. L os botones es tán bloqueados. P ulse y mantenga puls ado el botón Lock/Unlock [4] unos 2 s egundos . O irá un tono s i los botones están desbloqueados. L a alimentac ión y la s alida están ac tivadas pero no hay s alida. L a c arga no ha s ido c onectada c orrectamente o el ajus te de la c orriente es 0 . L a tens ión de s alida aumenta lentamente si la s alida está activada. E l ajus te de c orriente actual es demasiado bajo. 10. Control remoto por PC P ara manejar la fuente de alimentación c on el s oftware inc luido, s iga los s iguientes pasos: 1. I ns tale el s oftware en s u P C e inícielo. 2. C onec te la alimentación al P C por el puerto U SB [21] o RS2 3 2 [20] y ac tívela. L a fuente de alimentación s e conecte automáticamente al s oftware. O ye un tono s i la c onexión es c orrec ta. E l es tado de c omunicación [K] es tá indic ado en el P C . V . 04 – 03 /02 /2015 27 ©V elleman nv LA BPS3005D Observación: los botones del panel frontal es tán bloqueados s i el aparato está c onectado al P C. P uede c ontrolar el aparato s ólo a través del P C. L a pantalla L ED y los indicadores L ED func ionan de manera normal. Pantalla principal L a pantalla princ ipal del s oftwa re de c ontrol remoto: A ajus te de la c orriente G gráfic o de c orriente: visualiza la c orriente c on el tiempo B C D vis ualización de la c orriente (amperio) ajus te de la tens ión vis ualización de la tens ión(voltio) H I J his toria la s alida es tá desactivada la s alida es tá activada E F protec ción c ontra s obrecorrientes gráfic o de tens ión: visualiza la tensión c on el tiempo K es tado de la c omunicación A justar la tensión y la corriente P ara ajus tar la tens ión y la c orriente [A ,C]: s eleccione un valor de la lis ta des lice los c onmutadores des lizantes. C onsejo: es pos ible hacer c lic en el c onmutador des lizante y utilizar la rueda de des plazamiento del ratón. E l valor s eleccionado aparece en la c as illa de la derec ha del c onmutador deslizante. A plicar tensión a la carga P uls e el botón ON [J] para aplic ar tens ión a la c arga. P uls e el botón OFF [I] para des ac tivar la s alida. Utilizar la protección contra sobrecorrie ntes P ara ac tivar la protección c ontra sobrecorrientes, introduzca la c orriente máxima y s eleccione Output switch of f (des ac tivar la s alida) en la c as illa Current protection set up [E]. P ara des activar la protección c ontra s obrecorrientes, s eleccione Overcurrent protection of f . V . 04 – 03 /02 /2015 28 ©V elleman nv LA BPS3005D Iniciar un programa de tensión/corrie nte preprograma do E l s oftware le permite determinar diferentes ajus tes de tens ión/corriente para la s alida y dejarlos func ionar automáticamente. P ara ajustar el programa: 1. 2. 3. 4. 5. 6. H aga c lic en ProgramForm. E n la lis ta, introduzca las tensiones, las corrientes y el tiempo des eados (en s egundos). E n la c as illa loop, s eleccione c uántas veces el programa debe ejec utarse: o Selec cione inf inite s i quiere que el programa s e ejec ute infinitamente has ta que lo des ac tive de manera manual. o Selec cione un número de la lis ta de s elección. o O haga c lic en loop e introduzc a el número des eado. H aga c lic en el botón Run para ac tivar el programa. H aga c lic en el botón Stop para hac er una paus a. V uelva a hac er c lic en Run y el programa c ontinúa des de el punto en que s e detuvo. H aga c lic en MainScreen para ver la evoluc ión de la tens ión y la c orriente en los gráfic os mientras que el programa es tá ac tivado. Salir del modo de control a distancia por PC 1. C ierre el s oftware de c ontrol a dis tancia. 2. D es conecte el c able U SB/RS232 de la parte tras era de la alimentación. E l aparato emite un tono para indic ar que el modo de c ontrol a dis tancia ya no es tá ac tivado. L os botones del panel frontal es tán des bloqueados automáticamente (es to puede durar unos s egundos). Solución de problemas E n c as o de problemas, c ontrole s i el puerto CO M del PC ha s ido ajustado c orrectamente: bits por s egundo: 9 6 00 bit de paridad: bits de datos : 8 bits de parada: 1 c ontrol de flujo de datos : - . P ara c ontrolar la func ionalidad, ejec ute es te c omando query c on una aplicación c omo p.ej. M T TTY: * ldn? N ormalmente, la informac ión de identificación (nombre del modelo, número de s erie) de la alimentación s e res tables. 11. Limpieza y mantenimiento D es conecte el aparato de toda fuente antes de limpiarlo. N o dañe los c ables de alimentación. C ontacte c on un téc nico e specializado para ins talar el aparato. L impie el aparato y el depós ito c on un paño húmedo s in pelus as. E vite el us o de alc ohol y de dis olventes. E l us uario no habrá de efec tuar el mantenimiento de ninguna pieza s alvo el fus ible. C ontacte c on s u dis tribuidor s i nec esita piezas de rec ambio. G uarde el aparato en un lugar s ec o, bien aireado y s in polvo. Reemplazar el f usible Reemplac e un fus ible fundido por otro del mis mo tipo. 1. D es conecte el aparato de la red antes de reemplazar el fus ible. 2. D es atornille el portafusibles c on un des tornillador c on punta plana. 3. Saque el fus ible fundido y reemplác elo. 4. V uelva a poner el portafus ibles en s u lugar. V . 04 – 03 /02 /2015 29 ©V elleman nv LA BPS3005D 12. Especificaciones tens ión de entrada fus ible tens ión de s alida 220 V 3 A /250V / 50 Hz 0 - 3 0V c orriente de s alida 0 - 5A ajus te de la fuente C .V . ≤ 0 .0 1 % + 3 mV C .C . ≤ 0 .1 % + 3 mA ajus te de la c arga C .V . ≤ 0 .0 1 % + 2 mV C .C . ≤ 0 .1 % + 1 0 mA res olución de ajus te 1 0 mV 1 mA prec is ión de ajus te (2 5°C ± 5 °C ) ≤ 0 .5 % + 2 0 mV ≤ 0 .5 % + 1 0 mA rizado (2 0 H z-20MHz) ≤ 2 mV rms ≤ 3 mA rms c oefic iente de temperatura ≤ 1 0 0 ppm + 1 0 mV ≤ 1 0 0 ppm + 5 mA prec is ión de la vis ualización 1 0 mV 1 mA c oefic iente de temperatura ≤ 1 0 0 ppm + 1 0 mV ≤ 1 0 0 ppm + 5 mA tiempo de reac c ión (1 0 % c arga nominal) s ubida de tens ión: ≤ 1 0 0 ms c aída de tens ión: ≤ 1 0 0 ms dimens iones pes o autonomía 1 1 0 (A n) x 1 5 6 (A l) x 2 6 0 (P ) mm 4 .3 kg 8 horas a c arga máx. Utilice este aparato sólo con los accesorios originales. Velleman NV no será responsable de daños ni lesiones causados por un uso (indebido) de este aparato. Para más inf ormación sobre este producto y la versión más reciente de este manual del usuario, visite nuestra página www.velleman.eu. Se pueden modif icar las especif icaciones y el contenido de este manual sin previo aviso. © DERECHOS DE A UTOR Velleman NV dispone de los derechos de autor para este manual del usuario. Todos los derechos mundiales reservados. E s tá estrictamente prohibido reproducir, traduc ir, c opiar, editar y guardar es te manual del us uario o partes de ello s in previo permiso escrito del derecho habiente. V . 04 – 03 /02 /2015 30 ©V elleman nv LA BPS3005D BEDIENUNGSANLEITUNG 1. Einführung A n alle Einwohner der Europäischen Union Wichtige Umweltinf ormationen über dieses Produkt D ies es Symbol auf dem P rodukt oder der V erpackung zeigt an, das s die E ntsorgung dieses P roduktes nach s einem L ebenszyklus der U mwelt Schaden zufügen kann. E nts orgen Sie die E inheit (oder verwendeten Batterien) nic ht als uns ortiertes H ausmüll; die E inheit oder verwendeten Batterien müs sen von einer s pezialisierten Firma zwec ks Recycling entsorgt werden. D ies e E inheit muss an den H ändler oder ein örtlic hes Recycling-Unternehmen retourniert werden. Res pektieren Sie die örtlichen U mweltvorschriften. Falls Zweif el bestehen, wenden Sie sich f ür Entsorgungsrichtlinie n an Ihre örtliche Behörde. Wir bedanken uns für den Ka uf des LA BPS3005D! L es en Sie diese Bedienungsanleitung vor I nbetriebnahme s orgfältig durc h. Ü berprüfen Sie, ob T rans portschäden vorliegen. Sollte dies der Fall s ein, verwenden Sie das G erät nicht und wenden Sie s ic h an I hren H ändler. 2. Sicherheitshinweise H alten Sie Kinder und U nbefugte vom G erät fern. V erwenden Sie das G erät nur im Innenbereich. Sc hützen Sie das G erät vor Regen und Feuc hte. Stellen Sie keine mit Flüssigkeit befüllten G egenstände auf das G erät. D emontieren oder öffnen Sie das G erät NIE. D as Berühren von unter Spannung s tehenden L eitungen könnte zu lebensgefährlichen elektrischen Schlägen führen. E s gibt keine zu wartenden T eile. Bes tellen Sie eventuelle Ersatzteile bei I hrem Fac hhändler. Sc hließen Sie das G erät immer an eine geerdet e Stec kdose an. Bei A nwendung kann das G ehäuse aufheizen. Beachten Sie, das s die L üftungsschlitze nicht bloc kiert werden. Beachten Sie eine minimale E ntfernung von 2 .5 cm zwis chen dem G erät und jedem anderen G egens tand. I nstallieren Sie das G erät auf einer ebenen, hitzebes tändigen O berfläche. I nstallieren Sie das G erät nie auf T eppich(boden), T extilien, us w. T rennen Sie das G erät bei N ichtbenutzung und vor jeder Reinigung vom N etz. Fas sen Sie dazu den N etzs tecker an der G rifffläc he an und ziehen Sie nie an der N etzleitung. Sc hützen Sie das G erät vor Staub. Sc hützen Sie das G erät vor extremen T emperaturen. V ermeiden Sie Erschütterungen. V ermeiden Sie rohe G ewalt während der I ns tallation und Bedienung des G erätes. V erwenden Sie das G erät nic ht wenn das G ehäuse oder das Kabel beschädigt s ind. L assen Sie dies es G erät von einem Fachmann reparieren. 3. Allgemeine Richtlinien Siehe Velleman® Service- und Qualitätsgarantie am E nde dies er Bedienungsanleitung. N ehmen Sie das G erät erst in Betrieb, nac hdem Sie s ich mit s einen Funktionen vertraut gemacht haben. E igenmächtige V eränderungen s ind aus Sicherheitsgründen verboten. Bei Sc häden verursacht durc h eigenmäc htige Änderungen erlischt der G arantieanspruch. V erwenden Sie das G erät nur für A nwendungen bes chrieben in dies er Bedienungsanleitung s onst kann dies zu Sc häden am P rodukt führen und erlis cht der G arantieanspruch. Bei Sc häden, die durc h N ichtbeachtung der Bedienungsanleitung verursacht werden, erlischt der G arantieanspruch. Für daraus res ultierende Folgeschäden übernimmt der H ersteller keine H aftung. Bewahren Sie dies e Bedienungsanleitung für künftige E ins ichtnahme auf. V . 04 – 03 /02 /2015 31 ©V elleman nv LA BPS3005D 4. Eigenschaften L E D -Anzeige für Spannung und Strom Feinreglung von Spannung und Strom Sic herungsmodus: Spannungs- oder Strombegrenzung A us gangsbuchsen: is olierte Sicherheitsbuchsen Frontplatte aus organischem G lass / andere P latten aus Stahl Speic her: 5 programmierbare Speicher V erbindung: PC - Fernsteuerung über U SB oder RS232 Software V 2 .5 mitgeliefert für Windows XP , V ista und W7 , W8 , W8 .1 (3 2 Bits + 6 4 Bits ) durc h Sic herung geschützt Farbe: Weiß- G rau 5. Umschreibung D as L A BPS3005D is t ein s ehr genaues L abornetzgerät mit einem regelbaren A usgang. D ieser A usgang kann s owohl für kons tante Spannung (C .V.) als auc h für kons tanten Strom (C .C.) verwendet werden. D ie A us gangsspannung kann zwis chen 0 V und 3 0V geregelt werden wenn s ic h das G erät im Kons tantspannungs- Modus befindet. D ie Strombegrenzung kann in dies em M odus beliebig eingestellt werden. D er A us gangsstrom kann s tändig zwis chen 0 und 5 A im Kons tantstrom -Modus angepasst werden. D er A us gangsstrom und die A us gangsspannung werden auf den L C D- Displays gezeigt. Siehe A bbildungen, Seite 2 dies er Bedienungsanleitung. 1 Of f /On: A us gang E IN/AUS 13 M1-M5- A nzeige: aktiver Speicher 2 OVP: Ü bers pannungsschutz E IN/AUS 14 3 OCP/Beep: Ü bers tromschutz / T as tentöne E I N /AUS Lock/Unlock: T as ten bloc kieren/deblockieren 15 A djust : E ins tellknopf für Spannung und Strom. A us wahl Speicher 5 < >: Wähls c halter für c oars e/ Feineinstellung von Spannung und Strom Spannung/Strom: A us wahl zwis chen Spannungs - oder Stromeinstellung 5 M1-M4: Memory save / recall Speic her s peichern / abrufen 17 E rdungs anschluss, verbunden mit C hassis und E rdungs stift der Stec kdose 6 7 8 18 19 20 9 Stromanzeige (A mpere) Spannungs anzeige (V olt) OVP- A nzeige: Ü berspannungsschutz is t aktiv OCP- A nzeige: Ü berstromschutz ist aktiv A us gangsbuchsen Power: E I N /AUS-Taste RS2 3 2-Anschluss für fernges teuerte Bedienung über P C U SB-Anschluss (T yp B) für fernges teuerte Bedienung über P C 10 11 12 CC- A nzeige: Kons tantstrom-Modus CV- A nzeige: Konstantspannungs-Modus OUT- A nzeige: A usgang ist eingeschaltet 22 23 24 4 6. 16 21 L üfter N etzeingangsbuchse Sic herungshalter Anwendung Das Gerät ein- oder ausschalten 1. V erbinden Sie das mitgelieferte Stromkabel mit der N etzeingangsbuchse [23] auf der Rüc ks eite des G erätes und s tecken Sie den N etzstecker in eine geeignete, geerdete Steckdose. Sc hließen Sie das G erät immer an eine geerdet e Stec kdose an. 2. D rüc ken Sie die Power- T aste [19] um das G erät einzus chalten. D as G erät zeigt automatisch die E instellungen von Speicher 1 an. (Siehe Set ting Voltage and Current für mehr I nformationen). D as D isplay zeigt die ein gestellten E instellungen an. D ie M 1A nzeige [13] leuc htet. M omentan gibt es keine Spannung oder - Strom an den A us gangsbuchsen. V . 04 – 03 /02 /2015 32 ©V elleman nv LA BPS3005D 3. D rüc ken Sie die Power- T aste [19] um das G erät aus zuschalten. Konstantspannungs-Modus M öc hten Sie das N etzgerät im Kons tantspannun gs-Modus betreiben, dann s tellen Sie die gewünschte A us gangsspannung zwis chen 0V und 3 0V ein. Sie können auch die gewüns chte Strombegrenzung eins tellen. Ü bers chreitet der A usgangsstrom die Begrenzung, s o s chaltet das G erät automatisch auf Kons tantstrom M odus um. Konstantstrom-Modus M öc hten Sie das N etzgerät im Kons tantstrom-Modus betreiben, dann s tellen Sie den gewüns chten A us gangsstrom zwis c hen 0 A und 5 A ein. Sie können auc h die gewüns chte Spannungsbegrenzung eins tellen. Die Spannung und den Strom einstellen Sie können 4 vers c hiedene Spannungs-/Stromeinstellungen mit den Speichertaste M 1~M 4 einstellen. 1. D rüc ken Sie die Speichertaste [5] des Speichers für den Sie die E ins tellungen bestimmen möc hten. D ie ents prechende M 1~M4-Anzeige [13] leuc htet und die momentan eingestellten Werte für Spannung und Strom werden angezeigt. 2. D rüc ken Sie die Spannung/Strom- T as te [16] um die Spannung einzus tellen. D ie Spannungs A nzeige blinkt. o Für die A nwendung im Kons tantspannungs -Modus: dies is t die gewünschte Konstantspannung. o Für die A nwendung im Kons tantstrom-Modus: dies ist die gewüns chte Spannungsbegrenzung. o A ktivieren Sie den Ü berspannungsschutz, dann wird der A us gang automatisch aus geschaltet wenn die Spannung dies en Wert übers chreitet. 3. D rehen Sie den E ins tellknopf [14] bis Sie die gewüns c hte Spannung ungefähr erreichen. D rücken Sie < oder > [15] um eine Ziffer in der Spannungs -Anzeige [7] aus zuwählen und drehen Sie den E ins tellknopf zum Feineinstellen. 4. D rüc ken Sie die Spannung/Strom- T as te [16] wieder, um den Strom einzus tellen. D ie StromA nzeige blinkt. o Für die A nwendung im Kons tantspannungs -Modus: dies is t die gewünschte Strombegrenzung. o Für die A nwendung im Kons tantstrom-Modus: dies ist der gewüns c hte Konstantstrom. o A ktivieren Sie den Ü berstromschutz dann wird der A us gang automatisch aus geschaltet wenn der Strom dies en Wert übers chreitet. 5. D rehen Sie den E ins tellknopf [14] bis Sie den gewüns c hten Strom ungefähr erreichen. D rücken Sie < oder > [15] um eine Ziffer in der Strom- Anzeige [7] aus zuwählen und drehen Sie den E ins tellknopf zum Feineinstellen. 6. D rüc ken Sie die Speichertaste wieder (oder warten Sie bis das D isplay nicht mehr blinkt). D ie E ins tellungen werden im aus gewählten Speicher gespeichert. Einstellungen abruf en U m eine der ges peicherten E inst ellungen abzurufen, drüc ken Sie die entsprechende M 1~M 4 Speic hertaste [5]. D ie ents prechende M1~M 4-Anzeige [13] leuc htet und die Spannungs-/StromE ins tellungen werden im D is play angezeigt. Bemerkung: der A us gang wird automatisch ausgeschaltet wenn Sie eine Speichertaste drüc ken, um eine E ins tellung abzurufen. Speicher 5 verwenden U m Speic her 5 zu verwenden: 1. D rüc ken Sie Speichertaste 4 und drehen Sie den E ins tellknopf bis die M 5 -Anzeige leuchtet. 2. Stellen Sie die gewüns chte Spannung und den gewüns c hten Strom ein. Warten Sie bis das D isplay nic ht mehr blinkt. D ie E ins tellungen werden automatisch in Speicher 5 ges peichert. 3. U m die E ins tellungen abzurufen, drüc ken Sie Speichertaste 4 und drehen Sie den E ins tellknopf wieder bis die M 5 - Anzeige leuchtet. Verbraucher anschließen 1. V erbinden Sie den P lus-Anschluss (+) des V erbrauchers mit der rote P lus -Ausgangsbuchse [18] des L abor- N etzgerätes. 2. V erbinden Sie den M inus-Anschluss (- ) des V erbrauchers mit der s c hwarzen Minus-Ausgangsbuchse [18] des L abor- Netzgerätes. V . 04 – 03 /02 /2015 33 ©V elleman nv LA BPS3005D 3. E rden Sie den V erbraucher an dem dafür vorges ehenen E rdungsanschluss [17] des L aborN etzgerätes, um die Spannung an der Buc hs e auf 0 V (E rdpotential) einzustellen. V erbinden Sie den E rdungsanschluss nicht, dann s c hweben die A usgänge hinsichtlich der E rde. Spannung auf einen Verbraucher anwenden 1. D rüc ken Sie die Of f/On- Taste [1] um die Spannung auf den V erbraucher anzuwenden. D ie OUT- [12] und C.V.- A nzeige [11] leuc htet. D as L abor-Netztgerät funktioniert im Kons tantspannungs- Modus (CV). D as D isplay zeigt nun die a ktuelle Ausgangsspannung den aktuellen Strom an. Ü bers chreitet der Strom die eingestellte Strombegrenzung, s o s c haltet das G erät automatisch auf Kons tantstrom-Modus (CC) um. D ie C.V.- A nzeige wird erlis cht und die C.C.- A nzeige [10] leuc htet. 2. D rüc ken Sie die Of f/On- Taste [1] um den A us gang auszuschalten. 7. Die Tasten des Bedienfelds Die Tasten blockieren U m einen ungewüns c hten Betrieb der T asten zu vermeiden, kann diese blockiert werden. 1. D rüc ken Sie und halten Sie die Lock/Unlock- T as te [4] etwa 2 Sekunden gedrüc kt. E s ertönt einen kurzen Beep. D ie T as ten s ind jetzt blockiert. 2. U m die T as ten zu deblockieren, drüc ken Sie und halten Sie die T aste wieder gedrückt. E s ertönt einen kurzen Beep. Tastentöne E s ertönt einen Beep jedes Mal wenn Sie e ine T aste auf der Frontplatte drüc ken. 1. U m das Signal aus zuschalten, drüc ken Sie und halten Sie die OCP/Beep- T as te [3] etwa 2 Sekunden gedrüc kt. 2. U m das Signal wieder einzus chalten, drüc ken Sie und halten Sie die OCP/Beep- T as te [3] etwa 2 Sekunden gedrüc kt. 8. Schutz Überspannungsschutz 1. U m den Ü bers pannungsschutz einzuschalten, s tellen Sie die H öchstspannung ein und drüc ken Sie die OVP- T as te. D ie OVP- A nzeige leuchtet. 2. D rüc ken Sie Of f/On um den A us gang auf den V erbraucher anzuwenden. Wird die A us gangsspannung höher als der eingestellte Wert, s o s chaltet das L abor -Netzgerät den A us gang aus und blinkt die OVP- Anzeige. 3. T rennen Sie den V erbraucher. 4. Zur Wiederhers tellung, drüc ken Sie die OVP- Taste. Using Überstromschutz 1. U m den Ü bers tromschutz einzuschalten, s tellen Sie den H öchststrom ein und drüc ken Sie die OCPT as te. D ie OCP- A nzeige leuchtet. 2. D rüc ken Sie Of f/On um den A us gang auf den V erbraucher anzuwenden. Wird der A us gangsstrom höher als der eingestellte Wert, s o s chaltet das L abor -Netzgerät den A us gang aus und blinkt die OCP- A nzeige. 3. T rennen Sie den V erbraucher. 4. Zur Wiederhers tellung, drüc ken Sie die OCP- T aste. 9. Problemlösung D a pas s iert nic hts wenn Sie die T as ten drüc ken. D ie T as ten s ind blockiert. D rüc ken Sie und halten Sie die Lock/Unlock- T as te [4] etwa 2 Sekunden gedrüc kt. E s ertönt ein Signal wenn die T as ten deblockiert s ind. Stromvers orgung und A usgang s ind eingeschaltet, aber es gibt keinen A usgang. D er V erbraucher wurde nic ht korrekt angeschlossen oder die Stromeinstellung is t 0 . D ie A us gangsspannung erhöht allmählich wenn der A us gang eingeschaltet is t. D er aktuelle Stromeinstellung is t zu niedrig. V . 04 – 03 /02 /2015 34 ©V elleman nv LA BPS3005D 10. Ferngesteuerte Bedienung über PC U m das L abor- Netzgerät über die mitgelieferte PC -Software zu bedienen, gehen Sie vor wie folgt: 1. I ns tallieren Sie die Software auf dem P C und s tarten Sie die Software. 2. V erbinden Sie das L abor- Netzgerät über den U SB - [21] oder den RS2 3 2-Anschluss [20] mit dem P C und s c halten Sie ein. D as L abor-Netzgerät verbindet automatisch mit der Software. I s t der A nschluss gelungen, s o ertönt ein Signal. A uf dem P C , der Kommunikationsstatus [K] is t angezeigt. Bemerkung: D ie T asten der Frontplatte s ind blockiert wenn das G erät mit einem P C verbunden ist. Sie können das L abor- Netzgerät nur über den P C bedienen. D as L ED-D isplay und die L E D-Anzeigen funktionieren normal. Hauptbildschirm D as H auptbildschirm der fernges teuerten Software: A Stromeins tellung G B Stromdis play (Ampere) H Balkenanzeige für Strom: zeigt den Strom in der Zeit an G es c hichte C D E Spannungs einstellung Spannungs display (V olt) Ü bers tromschutz I J K A us gang aus geschaltet A us gang eingeschaltet Kommunikationsstatus F Balkenanzeige der Spannung: zeigt die Spannung in der Zeit an Die Spannung und den Strom einstellen U m die Spannung und den Strom [A ,C] einzus tellen: Wählen Sie einen Wert aus der L is te Sc hieben Sie die Schiebeschalter. H inweis: Sie können den Sc hiebeschalter klicken und das Sc rollrad der M aus verwenden. D er einges tellte Wert ers cheint im Käs tchen rec hts vom Sc hiebeschalter. V . 04 – 03 /02 /2015 35 ©V elleman nv LA BPS3005D Spannung auf den Verbraucher anwenden D rüc ken Sie die ON- T aste [J] um Spannung auf den V erbraucher anzuwenden. D rüc ken Sie die OFF- Taste [I] um den A us gang aus zuschalten. Überstromschutz U m den Ü bers tromschutz einzuschalten, s tellen Sie den H öchststrom ein und wählen Sie Output switch of f im Strom protection set up- Käs tc hen [E] aus . U m den Ü bers tromschutz aus zuschalten, wählen Sie Überstromschutz of f aus . Ein vorprogrammi ertes Spannungs-/Stromprogra mm abspielen M it der Software können Sie einige Spannungs -/Stromeinstellungen für den A us gang bestimmen und dann automatisch abs pielen. U m das P rogramm einzustellen: 1. 2. 3. 4. 5. 6. Klic ken Sie auf ProgramForm. I n der L is te, geben Sie die gewüns chte Spannung, Strom und Zeit (in Sekunden) ein. I m loop- Käs tc hen, wählen Sie wie viel M al das P rogramm laufen mus s: o Wählen Sie inf inite um das P rogramm s tufenlos laufen zu las sen, bis Sie es manuell s toppen. o Wählen Sie eine N ummer der L is te. o O der klic ken Sie das loop- Käs tchen an und gben Sie die gewüns c hte N ummer ein. Klic ken Sie auf Run um das P rogramm zu s tarten. Klic ken Sie auf Stop um das P rogramm zu paus ieren. Klicken Sie wieder auf Run und das P rogramm s tartet wieder, wo es ges toppt war. Klic ken Sie auf MainScreen um die E volution von Spannung und Strom in der Balkenanzeige zu s ehen wenn das P rogramm läuft. Den f erngesteuerter Modus über PC verlassen 1. Sc hließen Sie die Software. 2. T rennen Sie das U SB/RS232-Kabel von der Rüc kseite des L abor- Netzgerätes. E s ertönt ein Signal, um anzuzeigen, das s der ferngesteuerte Modus nicht mehr aktiviert ist. D ie T as ten der Frontplatte werden automatisch deblockiert (dies kann einige Sekunden dauern). Problemlösung I m P roblemfall, überprüfen Sie, ob d er C O M-Anschluss des PC korrekt eingestellt is t: bits pro Sekunde: 9 6 00 P aritätsbit: D atenbits: 8 Stoppbits: 1 D atenflusskontrolle: - . U m die Funktionalität zu tes ten, las sen Sie diesen Q uery- Befehl über eine A pplikation wie M TTTY laufen: * ldn? N ormalerweise wird die I dentifizierungsinformation des L abor-Netzgerätes dann zurüc kgesetzt (M odellname, Seriennummer). 11. Reinigung und Wartung T rennen Sie das G erät vom N etz ehe Sie mit den Servic earbeiten anfangen. Sorgen Sie dafür, das s die N etzkabel nicht beschädigt werden. L as sen Sie das G erät von einer Fac hkraft installieren. V erwenden Sie zur Reinigung ein feuc htes, fus s elfreies T uch. V erwenden Sie auf keinen Fall A lkohol oder irgendwelc he L ösungsmittel. V . 04 – 03 /02 /2015 36 ©V elleman nv LA BPS3005D A ußer Sic herung gibt es keine zu wartenden T eile. Bes tellen Sie eventuelle Ersatzunterteile bei I hrem Fac hhändler. L agern Sie das G erät an einem troc kenen, gut gelüfteten, s taubfreien O rt. Die Sicherung erset zen E rs etzen Sie eine Sicherung durc h eine Sicherung desselben T yps und ders elben L eistung. 1. T rennen Sie das G erät vom N etz ehe Sie die Sic herung ers etzen. 2. L oc kern Sie den Sicherungshalter mit einem Sc hlitz -Schraubendreher. 3. E ntfernen Sie die defekte Sicherung und s etzen Sie eine neue Sicherung gleichen T yps ein. 4. Bringen Sie den Sic herungshalter wieder in das G ehäuse ein und verbinden Sie das G erät mit dem N etz. 12. Technische Daten E ingangsspannung Sic herung 220 V 3 A /250V A us gangsspannung 0 -3 0 V A us gangsstrom Regelung Q uelle A bmes sungen 0 - 5A C .V . ≤ 0 .0 1 % + 3 mV C .C . ≤ 0 .1 % + 3 mA C .V . ≤ 0 .0 1 % + 2 mV C .C . ≤ 0 .1 % + 1 0 mA 1 0 mV 1 mA ≤ 0 .5 % + 2 0 mV ≤ 0 .5 % + 1 0 mA ≤ 2 mV rms ≤ 3 mA rms ≤ 1 0 0 ppm + 1 0 mV ≤ 1 0 0 ppm + 5 mA 1 0 mV 1 mA ≤ 1 0 0 ppm + 1 0 mV ≤ 1 0 0 ppm + 5 mA Spannungs anstieg: ≤ 1 0 0ms Spannungs verlust: ≤ 1 0 0ms 1 1 0 (B) x 1 5 6 (H ) x 2 6 0 (T ) mm G ewic ht A utonomie 4 .3 kg 8 Std. s tändiger Betrieb bei maximaler Belastung Regelung L as t A uflös ung E instellung P räzis ion E instellung (2 5 °C ± 5 °C ) Res twelligkeit (2 0Hz-20MHz) T emperaturkoeffizient A nzeige-Genauigkeit T emperaturkoeffizient A ns prechzeit (1 0% N ennlast) / 50 Hz Verwenden Sie dieses Gerät nur mit originellen Zubehörteilen. Velleman NV übernimmt keine Haf tung f ür Schaden oder Verlet zungen bei (f alscher) A nwendung dieses Gerätes. Für mehr Inf ormationen zu diesem Produkt und die neueste Version dieser Bedienungsanl eitung, siehe www.velleman.eu. A lle Ä nderungen ohne vorherige A nkündigung vorbehalten. © URHEBERRECHT Velleman NV besitzt das Urheberrecht f ür diese Bedienungsanleitung. A lle weltweiten Rechte vorbehalten. O hne vorherige s chriftliche G enehmigung des U rheb ers is t es nic ht gestattet, diese Bedienungsanleitung ganz oder in T eilen zu reproduzieren, zu kopieren, zu übers etzen, zu bearbeiten oder zu s peic hern. V . 04 – 03 /02 /2015 37 ©V elleman nv LA BPS3005D MANUAL DO UTILIZADOR 1. Introdução A os cidadãos da União Europeia Importantes inf ormações sobre o meio ambiente no que respeita a este produto E s te s ímbolo no aparelho ou na embalagem indica que, enquanto desperdícios, poderão c ausar danos no meio ambiente. N ão deite o aparelho (nem as pilhas , s e as houver) no lixo domés tico; dirija-se a uma empres a es pecializada em rec iclagem. D evolva o aparelho ao s eu dis tribuidor ou ao pos to de rec iclagem local. Respeite a legislação local relativa ao meio ambiente. Em caso de dúvidas, contacte com as autoridades locais para os resíduos. A gradecemos o fac to de ter adquirido este aparelho. L eia atentamente as ins truções do manual antes de us ar o aparelho. C aso o aparelho tenha s ofrido algum dano durante o trans porte não o ins tale e entre em c ontac to c om o s eu dis tribuidor. 2. Instruções de segurança M antenha o aparelho fora do alc ance de c rianças e pes soas não qualificadas. Usar apenas em interiores. P roteger o aparelho c ontra a c huva e humidade ou qualquer tipo de s alpicos ou gotas. N unc a coloque recipientes c om líquidos em c ima do aparelho. NUNCA des monte ou abra a tampa do dis pos itivo em quaisquer c ircunstâncias. T ocar em c abos ligados à c orrente pode provocar c hoques elétricos mortais. O utilizador não terá de fazer a manutenç ão das peças. C ontacte o s eu dis tribuidor c aso necessite de peç as de s ubs tituição. L igue s empre o aparelho a uma tomada c om ligaç ão terra. A tenção: o exterior do aparelho aquec e durante o func ionamento. C ertifique -se s empre que os orifíc ios de ventilação não s e enc ontram bloqueados. P ara que exista s uficiente c irc ulação de ar deixe pelo menos 1 ” (±2 .5 c m) de es paç o à frente das aberturas. C oloque o aparelho numa s uperfíc ie plana, res istente ao c alor, nunc a c oloque o aparelho em c ima de tapetes, tec idos... D es ligue s empre a fic ha da tomada quando o aparelho não es tiver a s er us ado ou qu ando es tiverem a dec orrer quaisquer operações de manutenç ão. Segure s empre na fic ha para des ligar o c abo da rede, nunc a no próprio c abo. N ão exponha o equipamento ao pó nem a temperaturas extremas. P roteja o aparelho de quedas e má utilizaç ão. E vite us ar forç a excessiva ao utilizar o aparelho. N ão utilizar o aparelho s e verificar que o exterior ou os c abos estão danificados. N ão tente proc eder à reparaç ão do aparelho. C ontacte um dis tribuidor autorizado. 3. Normas gerais C ons ulte a Garantia de serviço e qualidade Velleman® na parte final des te manual do utilizador. Familiarize-se c om o func ionamento do aparelho antes de o utilizar. P or razões de s egurança, es tão proibidas quaisquer modificações do aparelho des de que não autorizadas. O s danos provocados por modific ações não autorizadas, não es tão c obertos pela garantia. U tilize o aparelho apenas para as aplicações descritas neste manual. U ma utilização inc orreta anula a garantia c ompletamente. D anos c ausados pelo não c umprimento das normas de s egurança referidas nes te manual anulam a garantia e o s eu dis tribuidor não s erá responsável por quaisquer danos ou outros problemas daí res ultantes. V . 04 – 03 /02 /2015 38 ©V elleman nv LA BPS3005D G uarde es te manual para que o pos s a c onsultar s empre que nec essário. 4. Características duplo vis or L E D para voltagem e c orrente ajus te fino e gros s eiro da voltagem e da c orrente modo protec ção: limite para voltagem ou c orrente c onec tores de s aída: fic has c om is olamento de s egurança painel frontal em vidro orgânic o / outros painéis em aç o memória: 5 memórias programáveis ligaç ão ao c omputador: C ontrolo removo através do P C via U SB ou RS2 32 s oftware V 2 .5 incluído para Windows XP, V ista e W7 , W8 , W8 .1 (3 2 bits + 6 4 bits ) 5. Descrição A L A BPS3005D é uma fonte de alimentação de elevada precisão, D C -regulada com s aída regulável. E s ta s aída pode s er us ada para voltagem c onstante (C .V.) e c orrente c onstante (C.C.). A voltagem de s aída pode s er ajus tada entre 0 V e 3 0V s empre que o aparelho es tá no modo de voltagem c ons tante. O ponto limite de c orrente pode s er definido arbitrariamente nes te modo. A c orrente de s aída pode s er ajus tada c ontinuamente entre 0 A e 5 A no modo c orrente c onstante. A voltagem e c orrente de s aída s ão indicadas nos visores LCD. V er as figuras da página 2 des te manual do utilizador. 1 2 Desligado/Ligado: s aída ligada/desligada OVP: protec ç ão c ontra s obrevoltagem ligada/desligada OCP/Beep: protec ção contra sobrecorrente / tec la de s inal sonoro ligada/desligada 13 14 16 5 Bloquear/Desbloque ar: tec las para bloquear/desbloquear M1-M4: memória s alvar / rec uperar 6 7 I ndic ação da c orrente (amperes) I ndic ação da voltagem (volts) 18 19 8 OVP : protec ção contra sobrevoltagem ativa 20 9 OCP : protec ç ão c ontra s obrecorrente ativa 21 10 11 CC : modo c orrente c onstante CV : modo voltagem c onstante 22 23 porta RS2 3 2 para c ontrolo remoto a partir do pc porta U SB (tipo B) para c ontrolo remoto a partir do pc V entilador T omada de alimentação 12 OUT : s aída ativa 24 P orta- fusível 3 4 6. 15 17 M1-M5 indic ador: memória ativa A justar: botão regulador para a voltagem e a c orrente; s elecção da memória 5 < >: botões de s elecção para a s intonia gros s eira/fina da voltagem e da c orrente Voltagem/Corre nte: s elecionar entre voltagem e c orrente para ajus te T erminal terra, ligado ao c hassis e pino terra da tomada de alimentaç ão T erminais de s aída A limentação: botão on/off Utilização Ligar ou Desligar a A limentação 1. L igue o c abo de alimentaç ão fornecido à parte tras eira do aparelho [23] e ligue a outra extremidade a uma tomada c om ligaç ão terra. L igue s empre o aparelho a uma tomada c om ligaç ão terra. 2. 3. P res sione o botão Power [19] para ligar a fonte alimentaç ão. A fonte de alimentação assume automaticamente as definições da memória 1 . (V er Set ting Voltage and Current para mais informaç ão.) N o vis or aparecem as definições existentes, o indic ador M 1 [13] ac ende. N es te momento não existe tensão ou c orrente de s aída nos terminais de s aída. P res sione o botão Power [19] para des ligar a fonte de alimentação. V . 04 – 03 /02 /2015 39 ©V elleman nv LA BPS3005D Usar a Fonte de A limentação no Modo Voltagem Constante Se pretende us ar a fonte de alimentação no modo voltagem c onstante, ajus te a voltagem de s aída entre 0 V e 3 0 V. D eve definir também o limite de c orrente pretendido. Se a c orrente de s aída exceder o limite definido, a fonte de alimentaç ão passa automaticamente para o modo de c orrente c onstante. Usar a Fonte de A limentação no Modo Corrente Constante Se pretende us ar a fonte de alimentação no modo de c orrente c onstante: defina a c orrente de s aída prentendida entre 0 A e 5 A. D eve definir também o limite de voltagem pretendido. Def inir a Voltagem e a Corrente P ode s alvar 4 c onfigurações de volta gem/corrente us ando as teclas de memória M 1~M4. 1. P res sione a tec la de memória [5] da memória para a qual pretende fazer as c onfigurações. O indic ador c orrespondente M 1~M4 [13] ac ende e aparec em as definições atuais para a voltagem e a c orrente. 2. P res sione a tec la Voltage/Current [16] para definir a voltagem. O valor referente à voltagem fic a intermitente. o P ara us ar no modo de voltagem c onstante: es ta é a voltagem c onstante pretendida. o P ara us ar no modo c orrente c onstante: es te é o limite de voltag em des ejado. o Se ativar a proteç ão c ontra sobrevoltagem, a s aída é des ligada automaticamente c aso a voltagem exc eda esse valor. 3. Rode o botão de ajus te [14] até atingir aproximadamente a voltagem des ejada. P ressione < ou > [15] para s elecionar um dos dígitos da leitura da voltagem[7] e rode o botão de ajus te para a s intonia-fina. 4. P res sione a tec laVoltage/Current [16] novamente para definir a c orrente. A leitura da c orrente fic a intermitente. o P ara us ar no modo voltagem c onstante: es te é o limite de c orrente de s ejado. o P ara us ar no modo c orrente c onstante: es ta é a c orrente c onstante desejada. o Se ativar a proteç ão c ontra sobrecorrente, a s aída é des ligada automaticamente c aso a c orrente exceda esse valor. 5. Rode o botão de ajus te [14] até atingir aproximadamente a c orrrente desejada. P ressione < ou > [15] para s elecionar um dígito da leitura da c orrente [6] e rode o botão de ajus te para a s intoniafina. 6. P res sione novamente a tec la de memória (ou aguarde até o vis or parar de pis c ar). A s c onfigurações es tão gravadas na memória s elecionada. Recuperar Conf igurações P ara rec uperar uma das c onfigurações gravadas, pres sione a tec la de memória c orrespondente M1~M 4 [5]. O indic ador c orrespondente M 1~M 4 [13] ac ende e as res petivas c onfigurações da voltagem/c orrente aparecem no v is or. Nota: a s aída é des ligada automaticamente s empre que pressiona uma tec la de memória para rec uperar uma c onfiguração. Usar a Memória 5 P ara us ar a memória 5 , proc eda da s eguinte forma: 1. P res sione a tec la de memória 4 e rode o botão de ajus te até o indi c ador M 5 acender. 2. D efina a voltagem e a c orrente pretendidas. A guarde até o vis or parar de pis c ar. A s c onfigurações s ão automaticamente gravadas na memória 5 . 3. P ara rec uperar as c onfigurações, pres sione a tec la de memória 4 e rode o botão de ajus te até o indic ador M 5 ac ender. Conectar uma Carga 1. L igue o terminal pos itivo da c arga ao terminal + vermelho [18] da fonte de alimentaç ão. 2. L igue o terminal negativo da c arga ao terminal - preto [18] da fonte de alimentação. 3. P ode ligar o terminal + ou – ao terminal terra verde [17] da fonte de alimentação para fixar a voltagem em 0 V (potencial terra) no terminal. Se deixar o terminal terra des ligado, a s aída flutua em relaç ão ao s olo. V . 04 – 03 /02 /2015 40 ©V elleman nv LA BPS3005D A plicar Voltagem à Carga 1. P res sione a tec la Of f/On [1] para aplic ar a voltagem à c arga. O s indicadores OUT [12] e C.V. ac endem [11] . A fonte de alimentaç ão func iona no modo voltagem c onstante (CV); no vis or aparece agora e s aída atual de voltagem e de c orrente. Se a c orrente exc eder o limite de finido, a fonte de alimentação passa automaticamente para o modo de c orrente c onstante (CC). O indic ador C.V. des liga e o indic ador C.C. ac ende [10] . 2. P res sione a tec la Of f/On [1] para des ligar a s aída. 7. Teclas do Painel Bloquear o Painel P ara evitar o func ionamento indesejado das teclas do painel, pode bloquear o painel frontal. 1. M antenha pressionada a tec la Lock/Unlock [4] durante c erc a de 2 s egundos. O uvirá um s inal s onoro breve. A s teclas es tão agora bloqueadas. 2. P ara des bloquear o painel, pres sione o botão novamente. O uvirá um s inal s onoro breve. Som das Teclas Sempre que pres s ionar uma tec la do painel frontal, ouve um s inal s onoro. 1. P ara des ligar o s inal s onoro, mantenha pressionada a tec la OCP/Beep [3] durante c erc a de 2 s egundos. 2. P ara voltar a ligar o s inal s onoro, mantenha pressionada a tec la OCP/Beep [3] durante c erc a de 2 s egundos. 8. Proteção Usar a Proteção contra Sobrevoltagem 1. P ara proteç ão c ontra s obrevoltagem, defina a voltagem máxima e em s eguida pressione o botão OVP . O indic ador OVP ac ende. 2. P res sione Of f/On para aplic ar a s aída à c arga. Se a voltagem de s aída for s uperior ao valor definido, a fonte de alimentaç ão c orta a s aída e o indic ador OVP fic a intermitente. 3. D es ligar a c arga. 4. P ara rec uperar, pres sione a tec la OVP . Usar a Proteção contra Sobrecorre nte 1. P ara proteç ão c ontra s obrecorrente, defina a c orrente máxima e em s eguida pres sione o botão OCP . O indic ador OCP ac ende. 2. P res sione Of f/On para aplic ar a s aída à c arga. Se a c orrente de s aída for s uperior ao valor definido, a fonte de alimentação c orta a s aída e o indic ador OCP fic a intermitente. 3. D es ligue a c arga. 4. P ara rec uperar, pres sione a tec la OCP . 9. Resolução de problemas N ada ac ontece quando pressione as teclas do pa inel. A s tec las estão bloqueadas. M antenha pressionada a tec la Lock/Unlock [4] durante c erc a de 2 s egundos . O uvirá um s inal sonoro assim que as teclas estiverem des bloqueadas. A alimentação está ligada e a s aída es tá ligada, mas não exis te s aída. A c arga não es tá devidamente c onectada, ou a c orrente es tá c onfigurada para 0 . A voltagem de s aída aumenta lentamente quando a s aída está ligada. A c orrente c onfigurada é demas iado baixa. 10. Controlo Remoto via PC P ara operar a fonte de alimentação através do s oftware para pc inc luído, proc eda da s eguinte forma: 1. I ns tale o s oftware no s eu pc e inic ie o s oftware. V . 04 – 03 /02 /2015 41 ©V elleman nv LA BPS3005D 2. C onec te a fonte de alimentação ao pc através da porta U SB [21] ou RS2 32 [20] e ligue- a. A fonte de alimentação é c onectada automaticamente c om o s oftware. Q uand o a ligação é bem s uc edida, ouve-se um s inal s onoro. N o pc , aparec e o es tado [K] da c omunic ação. Nota: as tec las do painel frontal estão bloqueadas enquanto a fonte de alimentação estiver ligada ao pc . Só pode fazer func ionar a fonte de alimentação através do pc . O vis or L ED e os indic adores func ionam normalmente. Ecrã Principal O ec rã princ ipal do s oftware de c ontrolo remoto: A Regulaç ão da c orrente G B C I ndic ação da c orrente (amperes) Regulaç ão da voltagem H I G ráfic o da c orrente mostra a c orrente ao longo do tempo H is tórico D es ligar s aída D E F I ndic ação da voltagem (volts) P roteção c ontra s obrecorrente G ráfic o da voltagem mos tra a voltagem ao longo do tempo J K L igar s aída E s tado da c omunicação Def inir a Voltagem e a Corrente P ara definir a voltagem e a c orrente [A ,C] pode: s elecione um valor a partir da lis ta arras tar os s eletores. Sugestão: pode c licar no s eletor e us ar a roda des lizante do rato. O valor definido aparece na c aixa à direita do s eletor. A plicar Voltagem à Carga P res sione a tec la ON [J] para aplic ar voltagem à c arga. P res sione a tec la OFF [I] para des ligar a s aída. Usar a Proteção contra Sobrecorre nte P ara proteç ão c ontra s obrecorrente, defina a c orrente máxima e s elecioneDesligar saída na c aixa Conf igurar proteção de corrente[E]. V . 04 – 03 /02 /2015 42 ©V elleman nv LA BPS3005D P ara des ligar a proteç ão c ontra s obrecorrente, s elecione Desligar proteção sobrecorre nte. Executar um Programa de Voltage/Corrente Pré-def inida. O s oftware permite - lhe deinir uma s érie de c onfigurações de voltagem/corrente de s aída e deixá -las a s erem exec utadas automaticamente. P ara iniciar o programa: 1. 2. 3. 4. 5. 6. C lique na barra ProgramForm . N a tabela, introduza as voltagens, c orrentes e tempo (em s egundos) pretendidas. N a c aixa loop s elecione o número de vezes que o programa deve c orrer: o Selec ione inf inite para deixar o programa a c orrer por tempo indeterminado até que o interrompa manualmente. o Selec ione um número a partir da lis ta. o O u c lique na c aixa loop e digite o número pretendido. C lique no botão Run para inic iar o programa. C lique no botão Stop para interromper o programa. C lique em Run novamente e o programa c ontinua a partir do ponto em que foi interrompido. C lique na barra MainScreen para ver a evoluç ão da voltagem e da c orrente através dos gráficos enquanto o programa es tá a c orrer. Sair do Modo Controlo Remoto via PC 1. Fec he o s oftware de c ontrolo remoto. 2. D es ligue o c abo U SB/RS232 na parte tras eira da fonte de alimentação. O uvirá um s inal s onoro da fonte de alimentaç ão para indicar que o modo de c ontrolo remoto já não es tá ativo. A s teclas do painel frontal s ão desbloqueadas automaticamente (is to pode demorar alguns s egundos). Resolução de problemas Se s urgirem problemas, verifique s e a porta CO M do pc es tá c onfigurada c orretamente. bits por s egundo: 9 6 00 bit de paridade: nenhum bits de dados : 8 bits de paragem: 1 c ontrolo de fluxo de dados : nenhum. P ara tes tar esta func ionalidade, exec ute este c omando de tes te via um terminal de aplic ação tal c omo o M T TTY: * ldn? I s to deverá apresentar a informaç ão identificativa (nome do modelo, número de s érie) da fonte de alimentação. 11. Limpeza e manutenção D es ligue o aparelho da c orrente antes de qualquer ac tividade de manutenç ão. O s c abos de alimentação não devem apresentar quaisquer danos . C ontacte um téc nico especializado para ins talar o aparelho. L impe o aparelho regularmente c om um pano húmido s em pêlo. E vite o us o de álc ool ou dis s olventes. N ão exis tem peç as para s erem reparadas pelo utilizador, à exc epção do fus ível. C o ntacte o s eu dis tribuidor no c as o de nec essitar de peç as de s ubstituição. G uarde o aparelho num loc al s eco, bem ventilado, e livre de poeiras . Substituir o Fusível Subs titua o fus ível apenas por outro fus ível do mes mo tipo. 1. A ntes de s ubstituir o fus ível, des ligue a c orrente. 2. T ire o porta- fus íveis do s eu lugar us ando uma c have de fendas. 3. Retire o fus ível danificado do porta -fusíveis e s ubstitua-o por um fus ível exatamente do mes mo tipo. 4. C oloque o porta- fusíveis novamente no lugar e volte a ligar a c orrente. V . 04 – 03 /02 /2015 43 ©V elleman nv LA BPS3005D 12. Especificações voltagem de entrada fus ível tens ão de s aída 220 V 3 A /250V / 50 Hz 0 -3 0 V c orrente de s aída 0 - 5A efeito da fonte C .V . ≤ 0 .0 1 % + 3 mV C .C . ≤ 0 .1 % + 3 mA efeito da c arga C .V . ≤ 0 .0 1 % + 2 mV C .C . ≤ 0 .1 % + 1 0 mA res olução da c onfiguração 1 0 % + 3 mV 1 mA prec is ão da c onfiguração (2 5 °C ± 5 °C ) ≤ 0 .5 % + 2 0 mV ≤ 0 .5 % + 1 0 mA ondulaç ão (2 0Hz-20MHz) ≤ 2 mV rms ≤ 3 mA rms c oefic iente de temperatura ≤ 1 0 0 ppm + 1 0 mV ≤ 1 0 0 ppm + 5 mA prec is ão da leitura bidirecional 1 0 % + 3 mV 1 mA c oefic iente de temperatura da leitura bidirecional ≤ 1 0 0 ppm + 1 0 mV ≤ 1 0 0 ppm + 5 mA tempo de reaaç ão (1 0% de c arga) aumento de tens ão: ≤ 1 0 0 ms queda de tens ão: ≤ 1 0 0 ms dimens ões pes o autonomia 1 1 0 (W) x 1 5 6 (H ) x 2 6 0 (D ) mm 4 .3 kg 8 horas de func ionamento c ontínuo com a c arga máxima Utilize este aparelho apenas com acessórios originais. A Velleman NV não será responsável por quaisquer danos ou lesões causados pelo uso (indevido) do aparelho. Para mais inf ormação sobre este produto e para aceder à versão mais recente deste manual do utilizador, visite a nossa página www.velleman.eu. Podem alterar-se as especif icações e o conteúdo deste manual sem aviso prévio. © DIREITOS DE A UTOR A Velleman NV det ém os direitos de autor deste manual do utilizador. Todos os direitos mundiais reservados. É es tritamente proibido reproduzir, traduzir, c opiar, editar e gravar es te manual do utilizador ou partes deste s em prévia autorização es crita por parte da detentora dos direitos. V . 04 – 03 /02 /2015 44 ©V elleman nv LA BPS3005D INSTRUKCJA OBSŁUGI 1. Wstęp Przeznaczona dla mieszkańców Unii Europejskiej. Ważne inf ormacje dotyczące środowiska. N iniejs zy s ymbol umieszczony na urządzeniu bądź opakowaniu ws kazuje, że us uwanie produktu może być s zkodliwe dla ś rodowiska. N ie należy us uwać urządzenia lub bate rii do zbiorc zego pojemnika na odpady komunalne, należy je przekazać specjalistycznej firmie zajmując ej s ię rec yklingiem. U rządzenie można zwróc ić dystrybutorowi lub lokalnej firmie zajmując ej s ię rec yklingiem. N ależy pos tępować zgodnie z zas adami bezpiecz eństwa dotyc zącymi ś rodowiska. W razie wątpliwości należy skontaktować się z f irmą zajmującą się utylizacją odpadów. D ziękujemy za zakup produktu V elleman! P rosimy o dokładne zapoznanie s ię z ins trukcją obsługi przed użyc iem. Jeś li urządzenie zos tało uszkodzone podczas transportu, pros imy o nie korzys tanie z niego i s kontaktowanie s ię ze s przedawc ą. 2. Instrukcje bezpieczeństwa C hronić urządzenie przed dziećmi i nieupoważnionymi użytkownikami. Wyłącznie do użytku wewnątrz pomieszcze ń. C hronić urządzenie przed des zczem, wilgoc ią, rozprys kami i ś ciekającymi c ieczami. N igdy nie s tawiać przedmiotów wypełnionyc h c ieczą na urządzeniu. NIE WOLNOdemontować ani otwierać pokrywy oc hronnej. P odczas instalacji należy zac hować s zczególną os trożność: dotknięcie przewodów pod napięc iem może prowadzić do zagrażając ego życ iu porażenia prądem elektrycznym. W urządzeniu nie wys tępują c zęści, które mogą być s erwis owane przez użytkownika. W c elu uzys kania c zęści s erwisowych lub zamiennyc h należy s kontaktować s ię z autoryzowanym s przedawc ą. U rządzenie należy każdorazowo podłączać do uziemionego gniazda s ieciowego. Uwaga: urządzenie nagrzewa s ię podczas pracy. O twory we ntylacyjne nie mogą nigdy być zablokowane. A by zapewnić odpowiednią c yrkulację powietrza należy pozostawić przynajmniej 2 ,5 c m wolnej przes trzeni przed otworami. U mieścić urządzenie na płaskiej, termoodpornej powierzc hni, nie us tawiać urządzenia na dywanac h tkaninach, itp. Kiedy urządzenie nie jes t używane, albo gdy przeprowadzane s ą prace s erwisowe lub kons erwac yjne, należy odłączyć urządzenie od zas ilania s ieciowego. Kabel zasilający należy trzymać tylko za wtyc zkę. C hronić urządzenie przed zbyt wys oką temperaturą i pyłem. C hronić urządzenie przed ws trząsami i użytkować wyłącznie zgodnie z przeznaczeniem. P odc zas obsługi urządzenia unikać s tosowania s iły. N ie używać urządzenia, jeś li zaobserwowano us zkodzenie obudowy lub kabli. N ie podejmować próby naprawy urządzenia. W tym c elu należy s kontaktować s ię z autoryzowanym s przedawcą. 3. Informacje ogólne P ros zę zapoznać s ię z informac jami w c zęś ci Usługi i gwarancja jakości Velleman® niniejs zej ins trukcji. na końc u P rzed rozpoc zęciem pracy z urządzeniem należy zapoznać s ię z jego funkc jami. Wprowadzanie zmian w urządzeniu jes t zabronione ze względów bezpieczeństwa. N ależy pamiętać, że us zkodzenia s powodowane przez zmiany wprowadzone przez użytkownika nie s ą objęte gwaranc ją. U rządzenie należy używać wyłącznie zgodnie z przeznac zeniem. U żywanie urządzenia niezgodnie z przeznac zeniem s powoduje unieważnienie gwaranc ji. V . 04 – 03 /02 /2015 45 ©V elleman nv LA BPS3005D G waranc ja nie obejmuje us zkodzeń s powodowanych w wyniku nieprzes trzegania niniejszej ins trukcji, a s przedawc a nie ponosi odpowiedzialności za wynikłe us zkodzenia lub problemy. N ależy zac hować niniejszą ins trukcję na przys złość. 4. Właściwości podwójny wyś wietlacz L ED do ws kazywania napięcia i prądu zgrubna i prec yzyjna nas tawa napięcia i prądu tryb oc hrony: ogranic znik napięcia i prądu złąc za wyjś c iowe: izolowany wtyk z zes tykiem oc hronnym panel przedni ze s zkła organic znego/ pozos tałe panele wykonane ze s tali pamięć : 5 programowalnych pamięci możliwoś ć połączenia z komputerem: zdalne s terowanie z P C za poś rednictwem U SB lub RS232 dołąc zone oprogramowanie ws półpracujące z Windows XP , V ista i W7 , W8 , W8 .1 5. Opis L A BPS3005D to prec yzyjny zasilacz D C o regulowanym wyjś c iu. Wyjś c ie to może być s tosowane do napięc ia s tałego (C .V.) oraz prądu s tałego (C .C.). N apięcie wyjś ciowe można regulować w zakres ie 0V - 3 0V, gdy urządzenie znajduje s ię w trybie napięc ia s tałego. W trybie ty m można dowolnie us tawić wartoś ć graniczną prądu. P rąd wyjś c iowy można regulować w s pos ób c iągły od 0 A do 5 A w trybie prądu s tałego. P rąd i napięc ie wyjś ciowe ws kazują wyś wietlacze L ED. P atrz rys unki na s tronie 2 niniejs zej ins trukcji. 1 Of f /On: wyjś c ie wł/wył 13 M1-M5: pamięć aktywna 2 OVP: zabezpiec zenie nadnapięciowe wł/wył 14 3 OCP/Beep: zabezpieczenie nadprądowe / dźwięki przyc isków wł/wył Lock/Unlock: blokowanie/odblokowywanie przyc is ków na panelu 15 A djust : pokrętło regulacyjne napięcia i prądu; wybór pamięc i 5 < >: przyc is k wyboru pozyc ji do zgrubnej i prec yzyjnej nas tawy napięcia i prądu Voltage/Current : wybór napięc ie/prąd do regulac ji 5 M1-M4: zapis /wywołanie pamięci 17 6 Wyś wietlacz prądu (ampery) 18 7 8 Wyś wietlacz napięcia (volt) OVP : zabezpieczenie nadnapięciowe jes t aktywne 19 20 Power: przyc isk wł/wył (O N /O FF) P ort RS2 32 zdalnego s terowania za poś rednictwem PC 9 21 10 OCP : zabezpiec zenie nadprądowe jes t aktywne CC : tryb prądu s tałego 22 P ort U SB (typ B) zdalnego s terowania za poś rednictwem PC Wentylator 11 12 CV : tryb napięc ia s tałego OUT : wyjś c ie jes t włączone 23 24 G niazdo zas ilania U c hwyt bezpiecznika 4 6. 16 U ziemiony zacisk podłączony do obudowy oraz wtyk gniazda zas ilania Zac iski wyjś ciowe Obsługa Włączanie/wyłączanie zasilacza 1. P odłączyć dołączony kabel zasilający z tyłu urządzenia [23] , a drugi koniec do odpowiedniego, uziemionego gniazda s ieciowego. U rządzenie należy każdorazowo podłączać do uziemionego gniazda s ieciowego. V . 04 – 03 /02 /2015 46 ©V elleman nv LA BPS3005D 2. 3. N ac isnąć przycisk Power[19], aby włąc zyć zas ilacz. Zas ilacz automatycznie wywołuje us tawienia z pamięci 1 . (Szc zegółowe informacje przedstawiono w c zęś ci Set ting Voltage and Current ), Wyś wietlacz pokazuje bieżące us tawienia, kontrolka M 1 [13] ś wiec i s ię. W tym momenc ie na zac iskach wyjś c iowych nie wys tępuje napięcie wyjś ciowe ani prąd wyjś c iowy. N ac isnąć przycisk Power[19], aby wyłąc zyć zasilacz. Użytkowanie zasilacza w trybie napięcia stałego J eś li zasilacz ma być używany w trybie napięc ia s tałego, należy us tawić wymagane napięcie wyjś ciowe w zakres ie 0V - 3 0V. N ależy us tawić również wymaganą wartoś ć ograniczenia prądu. J eś li prąd wyjś c iowy przekracza wartoś ć graniczną, za s ilacz automatycznie przechodzi w tryb prądu s tałego. Użytkowanie zasilacza w trybie prądu stałego J eś li zasilacz ma być użytkowany w trybie prądu s tałego: należy us tawić wymaganą wartość prądu wyjś c iowego w zakres ie 0A - 5 A. N ależy ustawić również wymaganą wartoś ć ograniczenia napięcia. Ustawianie napięcia i prądu I s tnieje możliwość zapisania 4 różnych us tawień napięcia/prądu przy użyc iu przycisków pamięci M 1~M 4. 1. N ac isnąć przycisk pamięci [5] , dla której mają zos tać zdefiniowane us tawienia. Świec i s ię odpowiednia kontrolka M 1~M 4 [13] i wyś wietlają s ię zapisane us tawienia napięcia i prądu. 2. N ac isnąć przycisk Voltage/Current [16] , aby us tawić napięcie. M iga odc zyt napięcia. o W przypadku użytkowania w trybie napięcia s tałego jest to wymagane napięcie s tałe. o W przypadku użytkowania w trybie prądu s tałego jes t to wymagana wartoś ć graniczna napięc ia. o W przypadku wyłąc zenia zabezpieczenia nadnapięciowego, wyjś c ie automatycznie wyłącza s ię, gdy wartoś ć ta jes t przekroc zona. 3. P rzekręcać pokrętło regulacji [14] do momentu us tawienia wymaganego napięcia (w przybliżeniu). N ac isnąć < lub > [15] , aby wybrać pozyc ję odc zytu napięcia [7] i przekręc ić pokrętło regulacyjne, aby dos troić. 4. N ac isnąć ponownie przycisk Voltage/Current [16] , aby us tawić wartoś ć prądu. M iga odczyt prądu. o W przypadku użytkowania w trybie napięcia s tałego jest to wymagana wartoś ć graniczna prądu. o W przypadku użytkowania w trybie prądu s tałego jes t to wymagana wartoś ć prądu s tałego. o W przypadku wyłąc zenia zabezpieczenia nadprądowego, wyjś c ie aut omatycznie wyłąc za s ię, gdy wartoś ć ta jes t przekroc zona. 5. P rzekręcać pokrętło regulacji [14] do momentu us tawienia wymaganej wartoś ci prądu (w przybliżeniu). N acisnąć < lub > [15] , aby wybrać pozyc ję odc zytu prądu[6] i przekręc ić pokrętło regulac yjne, aby dos troić. 6. N ac isnąć ponownie przycisk pamięci (lub odc zekać aż wyś wietlacz przes tanie migać). U s tawienia zapisywane s ą w wybranej pamięc i. Wywoływanie ustawień A by wywołać dowolne z zapis anych us tawień, należy nacisnąć odpowiedni przycisk pamięci M 1~M 4 [5]. Świec i s ię odpowiednia kontrolka M 1~M 4 [13] i wyś wietlają s ię odnośne us tawienia napięcia/prądu. Uwaga: po wc iś nięciu przyc isku pamięci w c elu wywołania us tawienia, wyjś c ie jest automatycznie wyłąc zane. Użytkowanie pamięci 5 W c elu użyc ia pamięci 5 , należy postępować nas tępująco: 1. N ac isnąć przycisk pamięci 4 i przekręc ać pokrętło regulacji dopóki kontrolka M 5 nie zapali s ię. 2. U s tawić wartoś ć napięcia i prądu zgodnie z wymaganiami. Zac zekać, aż wyś wietlacz przestanie migać . U s tawienia s ą automatycznie zap isywane w pamięc i 5 . 3. A by wywołać us tawienia, nac isnąć przycisk pamięci 4 i przekręcić ponownie pokrętło regulacji dopóki kontrolka M 5 nie zapali s ię. Podłączenie obciążenia 1. P odłączyć końcówkę dodatnią do c zerwonego zacisku + [18] zas ilacza. 2. P odłączyć końcówkę ujemną do c zarnego zac isku – [18] zas ilacza. V . 04 – 03 /02 /2015 47 ©V elleman nv LA BPS3005D 3. Końc ówkę + lub – można podłąc zyć do zielonego zacisku uziemienia [17] zas ilacza, aby us talić wartoś ć napięcia na końc ówce równą 0 V (potencjał uziemienia). Jeś li zacisk uziemienia jes t wolny, wyjś c ie pozo staje bez uziemienia. Przyłożenie napięcia do obciążenia 1. N ac isnąć przycisk Of f/On [1] , aby przyłożyć napięcie do obc iążenia. OUT [12] i C.V. [11] ś wiec ą s ię. Zasilacz pracuje w trybie napięc ia s tałego (C V); wyś wietlacz ws kazuje rzec zywistą wartość napięcia i prądu wyjś c iowego. Jeś li wartość prądu przekracza us tawioną wartość graniczną, zas ilacz automatycznie przechodzi w tryb prądu s tałego (CC). Kontrolka C.V. wyłąc za s ię, a kontrolka C.C. [10] ś wiec i s ię. 2. N ac isnąć przycisk Of f/On [1] , aby wyłąc zyć wyjś cie. 7. Przyciski na panelu Blokowanie panelu A by zapobiec użyciu przycisków na panelu przez os oby niepowołane, panel przedni można zablokować . 1. N ac isnąć i przytrzymać przycisk Lock/Unlock [4] przez ok. 2 s ekundy. Zos tanie wyemitowany krótki s ygnał dźwiękowy. Wówc zas przyc iski s ą zablokowane. 2. A by odblokować panel, przycisk należy ponownie nacisnąć i przytrzymać. Zos tanie wyemitowany krótki s ygnał dźwiękowy. Dźwięki przycisków P rzy każdym nac iśnięciu przyc isku na panelu przednim emitowany jest s ygnał dźwiękowy. 1. A by wyłąc zyć dźwięk, należy nacisnąć i przytrzymać przyc isk OCP/Beep [3] przez ok. 2 s ekundy. 2. A by ponownie włąc zyć dźwięk, należy nac isnąć i przytrzymać przycisk OCP/Beep [3] przez ok. 2 s ekundy. 8. Zabezpieczenie Użytkowanie zabezpieczenia nadnapięciowe go 1. A by zapewnić oc hronę przed przepięciem, należy ustawić maksymalną wartość napięcia i nac isnąć przyc is k OVP . OVP ś wiec i s ię. 2. N ac isnąć przycisk Of f/On , aby przyłożyć napięcie wyjś ciowe do obc iążenia. Jeś li napięcie wyjś ciowe przekroczy ustawioną wartoś ć, zas ilacz odc ina wyjś cie, a kontrolka OVP zac zyna migać . 3. O dłączenie obciążenia. 4. A by powróc ić do s tanu poprzedniego, nac isnąć przycisk OVP . Użytkowanie zabezpieczenia nadprądowego 1. A by zapewnić oc hronę przed przetężeniem, należy us tawić maksymalną wartość prądu i nac isnąć przyc is k OCP . Kontrolka OCP ś wiec i s ię. 2. N ac isnąć przycisk Of f/On , aby przyłożyć napięcie do obc iążenia. Jeś li prąd wyjś c iowy przekroczy us tawioną wartość, zas ilacz odc ina wyjś cie, a kontrolka OCP zac zyna migać . 3. O dłączenie obciążenia. 4. A by powróc ić do s tanu poprzedniego, nac isnąć przycisk OCP . 9. Wykrywanie i usuwanie usterek P o nac iśnięciu przycisków na panelu nic s ię nie dzieje. P rzyc iski s ą zablokowane. N acisnąć i przytrzymać przycisk Lock/Unlock [4] przez ok. 2 s ekundy. P o odblokowaniu przycisków zos tanie wyemitowany sygnał dźwiękowy. U rządzenie i wyjś c ie s ą włąc zone, ale nie ma napięc ia. N ieprawidłowo podłączone obc iążenie lub wartość prądu jes t ustawiona na 0 . G dy wyjś c ie jes t włąc zone, napięcie wyjś ciowe powoli roś nie. U s tawiona wartość prądu jes t zbyt nis ka. V . 04 – 03 /02 /2015 48 ©V elleman nv LA BPS3005D 10. Zdalne sterowanie za pośrednictwem PC A by obs ługiwać zasilacz za poś rednictwem dołąc zonego oprogramowania dla P C, należy postępować nas tępująco: 1. Zains talować oprogramowanie na komputerze i uruc homić. 2. P odłączyć zasilacz do komputera za poś rednictwem portu U SB [21] lub RS2 3 2 [20] , a nas tępnie włąc zyć . Zas ilacz automatycznie łączy s ię z oprogramowaniem. J eś li połączenie powiedzie s ię, wyemitowany zos tanie s ygnał dźwiękowy. N a komputerze ws kazywany jes t s tan komunikacji [K] . Uwaga: gdy zas ilacz jes t podłączony do komputera, przyc iski na panelu przednim s ą zablokowane. Zas ilacz można obs ługiwać wyłącznie z poziomu komputera. Wyś wietlacz L ED i kontrolki działają normalnie. Ekran główny E kran główny oprogramowania zdalnego s terowania: A Regulac ja prądu G Wykres prądu: ws kazuje wartoś ć prądu w zależnoś ci od c zasu B C D Wyś wietlacz prądu (amper) Regulac ja napięcia Wyś wietlacz napięcia (volt) H I J Rejes tr Wyjś c ie wył (off) Wyjś c ie wł (on) E F Zabezpieczenie nadprądowe Wykres napięcia: ws kazuje wartoś ć napięcia w zależnoś ci od c zasu K Stan komunikac ji Ustawienia napięcia i prądu A by us tawić wartoś ć napięcia i prądu [A ,C] , można: wybrać wartoś ć z lis ty.= przes unąć s uwaki. Ws kazówka: można kliknąć na s uwak i użyć kółka przewijania myszy. U s tawiona wartość pojawia s ię w okienku, z prawej s trony s uwaka. V . 04 – 03 /02 /2015 49 ©V elleman nv LA BPS3005D Przyłożenie napięcia do obciążenia N ac isnąć przycisk ON [J] , aby przyłożyć napięcie do obc iążenia. N ac isnąć przyciskOFF [I] , aby wyłąc zyć wyjś c ie. Użytkowanie zabezpieczenia nadprądowego A by zapewnić oc hronę przed przetężeniem, należy us tawić maksymalną wartość prądu i wybrać pozyc ję Output switch of f w okienku Current protection set up [E]. A by wyłąc zyć zabezpieczenie nadprądowe, wybrać pozycję Overcurrent protection of f . Uruchamiani e wstępnie zdef iniowanego programu napięcia/prą du O programowanie umożliwia zdefiniowanie s erii us tawień napięcie/prąd dla wyjś c ia i pozwala na ic h automatyc zną zmianę. A by ustawić program: 1. 2. 3. 4. 5. 6. Kliknąć zakładkę ProgramForm . W tabeli wpis ać wymagane wartoś ci napięcia, prądu oraz c zas (w s ekundach). W okienku loop , wybrać ile razy program ma być powtarzany: o Wybrać inf inite , aby program prac ował w s pos ób c iągły, do momentu wyłąc zenia ręc znego. o Wybrać lic zbę z lis ty. o M ożna też kliknąć w okienko loop i wpis ać wymaganą lic zbę. N ac isnąć przycisk Run , aby uruc homić program. N ac isnąć przycisk Stop , aby zatrzymać program. N acisnąć ponownie przyc is k Run i program będzie kontynuować pracę od miejs ca zatrzymania. Kliknąć zakładkę MainScreen, aby zobac zyć zmiany napięcia i prądu na wykres ac h podczas pracy programu. Wyjście z trybu zdalnego sterowania PC 1. Zamknąć oprogramowanie zdalnego s terowania. 2. O dłączyć kabel U SB/RS232, znajdując y s ię z tylu zas ilacza. Zas ilacz wyemituje s ygnał dźwiękowy, ws kazując, że tryb zdalnego s terowania jes t nieaktywny. P rzyc iski na panelu przednim s ą automatycznie odblokowywane (może to zająć kilka s ekund). Wykrywanie i usuwanie usterek W razie wys tąpienia problemów należy s prawdzić, c zy port CO M komputera jes t us tawiony prawidłowo. bity na s ekundę: 9 600 bit parzys tości: brak bity danyc h: 8 bity s topu: 1 kontrola przepływu danyc h: brak. A by s prawdzić funkc jonalność, należy uruc homić niniejsze polecenie za poś rednic twem aplikacji terminalowej, np. M T TTY: * ldn? W odpowiedzi powinny pojawić s ię informacje identyfikacyjne (nazwa modelu, numer s eryjny) zas ilacza. 11. Czyszczenie i konserwacja P rzed rozpoc zęciem konserwac ji należy odłączyć urządzenie od zas ilania s ieciowego. Kable zas ilacza nie mogą być us zkodzone. Kons erwację urządzenia winien przeprowadzić wykwalifikowany tec hnik. C o jakiś c zas przetrzeć urządzenie wilgotną niestrzępiącą s ię ś ciereczką. N ie s tosować alkoholu ani rozpus zc zalników. V . 04 – 03 /02 /2015 50 ©V elleman nv LA BPS3005D Wewnątrz urządzenia opróc z bezpiecznika nie ma c zęści, które użytkownik mógłby s erwisować s amodzielnie. W c elu uzys kania c zęści zamiennych należy s kontaktować s ię ze s przedawc ą. U rządzenie należy przechowywać w pomies zczeniu s uchym, dobrze wentylowanym i wolnym od pyłu. Wymiana bezpiecznika D opus zczalna jes t jedynie wymiana bezpiecznika na model o jednakowym typie i parametrac h znamionowyc h. 1. P rzed wymianą bezpiec znika odłączyć zas ilanie s ieciowe. 2. Wymontować uc hwyt bezpiecznika z obudowy za pomoc ą płas kiego śrubokręta. 3. U s unąć us zkodzony bezpiecznik z uc hwytu i wymienić na bezpiecznik tego s amego typu. 4. U mieś cić uc hwyt bezpiecznika z powrotem na miejs c u i ponownie podłączyć zasilanie. 12. Specyfikacja techniczna napięc ie wejś ciowe bezpiec znik 220 V 3 A /250V napięc ie wyjś ciowe 0 -3 0 V prąd wyjś c iowy efekt źródła wymiary 0 - 5A C .V . ≤ 0 ,0 1 % + 3 mV C .C . ≤ 0 ,1 % + 3 mA C .V . ≤ 0 ,0 1 % + 2 mV C .C . ≤ 0 ,1 % + 1 0 mA 1 0 mV 1 mA ≤ 0 ,5 % + 2 0 mV ≤ 0 ,5 % + 1 0 mA ≤ 2 mV rms ≤ 3 mA rms ≤ 1 0 0 ppm + 1 0 mV ≤ 1 0 0 ppm + 5 mA 1 0 mV 1 mA ≤ 1 0 0 ppm + 1 0 mV ≤ 1 0 0 ppm + 5 mA wzros t napięc ia: ≤ 1 0 0 ms s padek napięcia: ≤ 1 0 0 ms 1 1 0 (s zer.) x 1 5 6 (wys .) x 2 6 0 (gł.) mm mas a autonomia 4 ,3 kg 8 godzin c iągłego użytkowania przy maksymalnym obciążeniu efekt obc iążenia rozdzielc zość us tawień dokładność ustawień (2 5°C ± 5 °C ) tętnienie (2 0Hz-20MHz) ws półc zynnik temperaturowy dokładność odczytu ws półc zynnik temperaturowy odc zytu c zas reakcji (1 0% obciążenia znamionowego) / 50 Hz Należy używać tylko oryginalnych akcesoriów. Firma Velleman NV nie może być pociągnięt a do odpowiedzialności w przypadku uszkodzeń lub obrażeń wynikających z (błędnego) korzystania z niniejszego urządzenia. A by uzyskać więcej inf ormacji dotyczących produktu oraz najnowszą wersję niniejszej instrukcji, należy odwiedzić naszą stronę internet ową www.velleman.eu. Inf ormacje zawarte w niniejszej instrukcji obsługi mogą ulec zmianie bez wcześniejszego powiadomienia. © INFORMA CJA O PRA WA CH A UTORSKICH Niniejsza instrukcja jest własnością f irmy Velleman nv i jest chroniona prawami autorskimi. Wszystkie prawa są zastrzeżone na całym świecie. Żadna c zęś ć tej ins trukcji nie może być kopiowana, przedrukowywana, tłumac zona lub konwertowana na ws zelkie noś niki elektroniczne lub w inny s pos ób, bez uprzedniej pis emnej zgody właś c iciela praw autors kich. V . 04 – 03 /02 /2015 51 ©V elleman nv Velleman® Service and Quality Warranty Since its foundation in 1972, Velleman® acquired extensive experience in the electronics world and currently distributes its products in over 85 countries. All our products fulfil strict quality requirements and legal stipulations in the EU. In order to ensure the quality, our products regularly go through an extra quality check, both by an internal quality department and by specialized external organisations. If, all precautionary measures notwithstanding, problems should occur, please make appeal to our warranty (see guarantee conditions). General Warranty Conditions Concerning Consumer Products (for EU): • All consumer products are subject to a 24-month warranty on production flaws and defective material as from the original date of purchase. • Velleman® can decide to replace an article with an equivalent article, or to refund the retail value totally or partially when the complaint is valid and a free repair or replacement of the article is impossible, or if the expenses are out of proportion. You will be delivered a replacing article or a refund at the value of 100% of the purchase price in case of a flaw occurred in the first year after the date of purchase and delivery, or a replacing article at 50% of the purchase price or a refund at the value of 50% of the retail value in case of a flaw occurred in the second year after the date of purchase and delivery. • Not covered by warranty: - all direct or indirect damage caused after delivery to the article (e.g. by oxidation, shocks, falls, dust, dirt, humidity...), and by the article, as well as its contents (e.g. data loss), compensation for loss of profits; - consumable goods, parts or accessories that are subject to an aging process during normal use, such as batteries (rechargeable, nonrechargeable, built-in or replaceable), lamps, rubber parts, drive belts... (unlimited list); - flaws resulting from fire, water damage, lightning, accident, natural disaster, etc.…; - flaws caused deliberately, negligently or resulting from improper handling, negligent maintenance, abusive use or use contrary to the manufacturer’s instructions; - damage caused by a commercial, professional or collective use of the article (the warranty validity will be reduced to six (6) months when the article is used professionally); - damage resulting from an inappropriate packing and shipping of the article; - all damage caused by modification, repair or alteration performed by a third party without written permission by Velleman®. • Articles to be repaired must be delivered to your Velleman® dealer, solidly packed (preferably in the original packaging), and be completed with the original receipt of purchase and a clear flaw description. • Hint: In order to save on cost and time, please reread the manual and check if the flaw is caused by obvious causes prior to presenting the article for repair. Note that returning a non-defective article can also involve handling costs. • Repairs occurring after warranty expiration are subject to shipping costs. • The above conditions are without prejudice to all commercial warranties. The above enumeration is subject to modification according to the article (see article’s manual). Velleman® service- en kwaliteitsgarantie Velleman® heeft sinds zijn oprichting in 1972 een ruime ervaring opgebouwd in de elektronicawereld en verdeelt op dit moment producten in meer dan 85 landen. Al onze producten beantwoorden aan strikte kwaliteitseisen en aan de wettelijke bepalingen geldig in de EU. Om de kwaliteit te waarborgen, ondergaan onze producten op regelmatige tijdstippen een extra kwaliteitscontrole, zowel door onze eigen kwaliteitsafdeling als door externe gespecialiseerde organisaties. Mocht er ondanks deze voorzorgen toch een probleem optreden, dan kunt u steeds een beroep doen op onze waarborg (zie waarborgvoorwaarden). Algemene waarborgvoorwaarden consumentengoederen (voor Europese Unie): • Op alle consumentengoederen geldt een garantieperiode van 24 maanden op productie- en materiaalfouten en dit vanaf de oorspronkelijke aankoopdatum. • Indien de klacht gegrond is en een gratis reparatie of vervanging van een artikel onmogelijk is of indien de kosten hiervoor buiten verhouding zijn, kan Velleman® beslissen het desbetreffende artikel te vervangen door een gelijkwaardig artikel of de aankoopsom van het artikel gedeeltelijk of volledig terug te betalen. In dat geval krijgt u een vervangend product of terugbetaling ter waarde van 100% van de aankoopsom bij ontdekking van een gebrek tot één jaar na aankoop en levering, of een vervangend product tegen 50% van de kostprijs of terugbetaling van 50 % bij ontdekking na één jaar tot 2 jaar. • Valt niet onder waarborg: - alle rechtstreekse of onrechtstreekse schade na de levering veroorzaakt aan het toestel (bv. door oxidatie, schokken, val, stof, vuil, vocht...), en door het toestel, alsook zijn inhoud (bv. verlies van data), vergoeding voor eventuele winstderving. - verbruiksgoederen, onderdelen of hulpstukken die onderhevig zijn aan veroudering door normaal gebruik zoals bv. batterijen (zowel oplaadbare als niet-oplaadbare, ingebouwd of vervangbaar), lampen, rubberen onderdelen, aandrijfriemen... (onbeperkte lijst). - defecten ten gevolge van brand, waterschade, bliksem, ongevallen, natuurrampen, enz. - defecten veroorzaakt door opzet, nalatigheid of door een onoordeelkundige behandeling, slecht onderhoud of abnormaal gebruik of gebruik van het toestel strijdig met de voorschriften van de fabrikant. - schade ten gevolge van een commercieel, professioneel of collectief gebruik van het apparaat (bij professioneel gebruik wordt de garantieperiode herleid tot 6 maand). - schade veroorzaakt door onvoldoende bescherming bij transport van het apparaat. - alle schade door wijzigingen, reparaties of modificaties uitgevoerd door derden zonder toestemming van Velleman®. • Toestellen dienen ter reparatie aangeboden te worden bij uw Velleman®-verdeler. Het toestel dient vergezeld te zijn van het oorspronkelijke aankoopbewijs. Zorg voor een degelijke verpakking (bij voorkeur de originele verpakking) en voeg een duidelijke foutomschrijving bij. • Tip: alvorens het toestel voor reparatie aan te bieden, kijk nog eens na of er geen voor de hand liggende reden is waarom het toestel niet naar behoren werkt (zie handleiding). Op deze wijze kunt u kosten en tijd besparen. Denk eraan dat er ook voor niet-defecte toestellen een kost voor controle aangerekend kan worden. • Bij reparaties buiten de waarborgperiode zullen transportkosten aangerekend worden. • Elke commerciële garantie laat deze rechten onverminderd. Bovenstaande opsomming kan eventueel aangepast worden naargelang de aard van het product (zie handleiding van het betreffende product). Garantie de service et de qualité Velleman® Depuis 1972, Velleman® a gagné une vaste expérience dans le secteur de l’électronique et est actuellement distributeur dans plus de 85 pays. Tous nos produits répondent à des exigences de qualité rigoureuses et à des dispositions légales en vigueur dans l’UE. Afin de garantir la qualité, nous soumettons régulièrement nos produits à des contrôles de qualité supplémentaires, tant par notre propre service qualité que par un service qualité externe. Dans le cas improbable d’un défaut malgré toutes les précautions, il est possible d’invoquer notre garantie (voir les conditions de garantie). Conditions générales concernant la garantie sur les produits grand public (pour l’UE) : • tout produit grand public est garanti 24 mois contre tout vice de production ou de matériaux à dater du jour d’acquisition effective ; • si la plainte est justifiée et que la réparation ou le remplacement d’un article est jugé impossible, ou lorsque les coûts s’avèrent disproportionnés, Velleman® s’autorise à remplacer ledit article par un article équivalent ou à rembourser la totalité ou une partie du prix d’achat. Le cas échéant, il vous sera consenti un article de remplacement ou le remboursement complet du prix d’achat lors d’un défaut dans un délai de 1 an après l’achat et la livraison, ou un article de remplacement moyennant 50% du prix d’achat ou le remboursement de 50% du prix d’achat lors d’un défaut après 1 à 2 ans. • sont par conséquent exclus : - tout dommage direct ou indirect survenu à l’article après livraison (p.ex. dommage lié à l’oxydation, choc, chute, poussière, sable, impureté…) et provoqué par l’appareil, ainsi que son contenu (p.ex. perte de données) et une indemnisation éventuelle pour perte de revenus ; - toute pièce ou accessoire nécessitant un remplacement causé par un usage normal comme p.ex. piles (rechargeables comme non rechargeables, intégrées ou remplaçables), ampoules, pièces en caoutchouc, courroies… (liste illimitée) ; - tout dommage qui résulte d’un incendie, de la foudre, d’un accident, d’une catastrophe naturelle, etc. ; - out dommage provoqué par une négligence, volontaire ou non, une utilisation ou un entretien incorrect, ou une utilisation de l’appareil contraire aux prescriptions du fabricant ; - tout dommage à cause d’une utilisation commerciale, professionnelle ou collective de l’appareil (la période de garantie sera réduite à 6 mois lors d’une utilisation professionnelle) ; - tout dommage à l’appareil qui résulte d’une utilisation incorrecte ou différente que celle pour laquelle il a été initialement prévu comme décrit dans la notice ; - tout dommage engendré par un retour de l’appareil emballé dans un conditionnement non ou insuffisamment protégé. - toute réparation ou modification effectuée par une tierce personne sans l’autorisation explicite de SA Velleman® ; - frais de transport de et vers Velleman® si l’appareil n’est plus couvert sous la garantie. • toute réparation sera fournie par l’endroit de l’achat. L’appareil doit nécessairement être accompagné du bon d’achat d’origine et être dûment conditionné (de préférence dans l’emballage d’origine avec mention du défaut) ; • tuyau : il est conseillé de consulter la notice et de contrôler câbles, piles, etc. avant de retourner l’appareil. Un appareil retourné jugé défectueux qui s’avère en bon état de marche pourra faire l’objet d’une note de frais à charge du consommateur ; • une réparation effectuée en-dehors de la période de garantie fera l’objet de frais de transport ; • toute garantie commerciale ne porte pas atteinte aux conditions susmentionnées. La liste susmentionnée peut être sujette à une complémentation selon le type de l’article et être mentionnée dans la notice d’emploi. Garantía de servicio y calidad Velleman® Desde su fundación en 1972 Velleman® ha adquirido una amplia experiencia como distribuidor en el sector de la electrónica en más de 85 países. Todos nuestros productos responden a normas de calidad rigurosas y disposiciones legales vigentes en la UE. Para garantizar la calidad, sometemos nuestros productos regularmente a controles de calidad adicionales, tanto a través de nuestro propio servicio de calidad como de un servicio de calidad externo. En el caso improbable de que surgieran problemas a pesar de todas las precauciones, es posible recurrir a nuestra garantía (véase las condiciones de garantía). Condiciones generales referentes a la garantía sobre productos de venta al público (para la Unión Europea): • Todos los productos de venta al público tienen un perìodo de garantìa de 24 meses contra errores de producción o errores en materiales desde la adquisición original; • Si la queja está fundada y si la reparación o sustitución de un artìculo no es posible, o si los gastos son desproporcionados, Velleman® autoriza reemplazar el artículo por un artículo equivalente o reembolsar la totalidad o una parte del precio de compra. En este caso, usted recibirá un artículo de recambio o el reembolso completo del precio de compra si encuentra algún fallo hasta un año después de la compra y entrega, o un artículo de recambio al 50% del precio de compra o el reembolso del 50% del precio de compra si encuentra un fallo después de 1 año y hasta los 2 años después de la compra y entrega. Por consiguiente, están excluidos entre otras cosas: - todos los daños causados directa o indirectamente al aparato (p.ej. por oxidación, choques, caída,...) y a su contenido (p.ej. pérdida de datos) después de la entrega y causados por el aparato, y cualquier indemnización por posible pérdida de ganancias; - partes o accesorios, que estén expuestos al desgaste causado por un uso normal, como por ejemplo baterías (tanto recargables como no recargables, incorporadas o reemplazables), bombillas, partes de goma, etc. (lista ilimitada); - defectos causados por un incendio, daños causados por el agua, rayos, accidentes, catástrofes naturales, etc.; - defectos causados a conciencia, descuido o por malos tratos, un mantenimiento inapropiado o un uso anormal del aparato contrario a las instrucciones del fabricante; - daños causados por un uso comercial, profesional o colectivo del aparato (el período de garantía se reducirá a 6 meses con uso profesional); - daños causados por un uso incorrecto o un uso ajeno al que está previsto el producto inicialmente como está descrito en el manual del usuario; - daños causados por una protección insuficiente al transportar el aparato. - daños causados por reparaciones o modificaciones efectuadas por una tercera persona sin la autorización explícita de Velleman®; - se calcula gastos de transporte de y a Velleman® si el aparato ya no está cubierto por la garantía. • Cualquier artìculo que tenga que ser reparado tendrá que ser devuelto a su distribuidor Velleman®. Devuelva el aparato con la factura de compra original y transpórtelo en un embalaje sólido (preferentemente el embalaje original). Incluya también una buena descripción del fallo; • Consejo: Lea el manual del usuario y controle los cables, las pilas, etc. antes de devolver el aparato. Si no se encuentra un defecto en el artículo los gastos podrían correr a cargo del cliente; • Los gastos de transporte correrán a carga del cliente para una reparación efectuada fuera del período de garantía. • Cualquier gesto comercial no disminuye estos derechos. La lista previamente mencionada puede ser adaptada según el tipo de artículo (véase el manual del usuario del artículo en cuestión). Velleman® Service- und Qualitätsgarantie Seit der Gründung in 1972 hat Velleman® sehr viel Erfahrung als Verteiler in der Elektronikwelt in über 85 Ländern aufgebaut. Alle Produkte entsprechen den strengen Qualitätsforderungen und gesetzlichen Anforderungen in der EU. Um die Qualität zu gewährleisten werden unsere Produkte regelmäßig einer zusätzlichen Qualitätskontrolle unterworfen, sowohl von unserer eigenen Qualitätsabteilung als auch von externen spezialisierten Organisationen. Sollten, trotz aller Vorsichtsmaßnahmen, Probleme auftreten, nehmen Sie bitte die Garantie in Anspruch (siehe Garantiebedingungen). Allgemeine Garantiebedingungen in Bezug auf Konsumgüter (für die Europäische Union): • Alle Produkte haben für Material- oder Herstellungsfehler eine Garantieperiode von 24 Monaten ab Verkaufsdatum. • Wenn die Klage berechtigt ist und falls eine kostenlose Reparatur oder ein Austausch des Gerätes unmöglich ist, oder wenn die Kosten dafür unverhältnismäßig sind, kann Velleman® sich darüber entscheiden, dieses Produkt durch ein gleiches Produkt zu ersetzen oder die Kaufsumme ganz oder teilweise zurückzuzahlen. In diesem Fall erhalten Sie ein Ersatzprodukt oder eine Rückzahlung im Werte von 100% der Kaufsumme im Falle eines Defektes bis zu 1 Jahr nach Kauf oder Lieferung, oder Sie bekommen ein Ersatzprodukt im Werte von 50% der Kaufsumme oder eine Rückzahlung im Werte von 50 % im Falle eines Defektes im zweiten Jahr. • Von der Garantie ausgeschlossen sind: - alle direkten oder indirekten Schäden, die nach Lieferung am Gerät und durch das Gerät verursacht werden (z.B. Oxidation, Stöße, Fall, Staub, Schmutz, Feuchtigkeit, ...), sowie auch der Inhalt (z.B. Datenverlust), Entschädigung für eventuellen Gewinnausfall. - Verbrauchsgüter, Teile oder Zubehörteile, die durch normalen Gebrauch dem Verschleiß ausgesetzt sind, wie z.B. Batterien (nicht nur aufladbare, sondern auch nicht aufladbare, eingebaute oder ersetzbare), Lampen, Gummiteile, Treibriemen, usw. (unbeschränkte Liste). - Schäden verursacht durch Brandschaden, Wasserschaden, Blitz, Unfälle, Naturkatastrophen, usw. - Schäden verursacht durch absichtliche, nachlässige oder unsachgemäße Anwendung, schlechte Wartung, zweckentfremdete Anwendung oder Nichtbeachtung von Benutzerhinweisen in der Bedienungsanleitung. - Schäden infolge einer kommerziellen, professionellen oder kollektiven Anwendung des Gerätes (bei gewerblicher Anwendung wird die Garantieperiode auf 6 Monate zurückgeführt). - Schäden verursacht durch eine unsachgemäße Verpackung und unsachgemäßen Transport des Gerätes. - alle Schäden verursacht durch unautorisierte Änderungen, Reparaturen oder Modifikationen, die von einem Dritten ohne Erlaubnis von Velleman® vorgenommen werden. • Im Fall einer Reparatur, wenden Sie sich an Ihren Velleman®-Verteiler. Legen Sie das Produkt ordnungsgemäß verpackt (vorzugsweise die Originalverpackung) und mit dem Original-Kaufbeleg vor. Fügen Sie eine deutliche Fehlerbeschreibung hinzu. • Hinweis: Um Kosten und Zeit zu sparen, lesen Sie die Bedienungsanleitung nochmals und überprüfen Sie, ob es keinen auf de Hand liegenden Grund gibt, ehe Sie das Gerät zur Reparatur zurückschicken. Stellt sich bei der Überprüfung des Gerätes heraus, dass kein Geräteschaden vorliegt, könnte dem Kunden eine Untersuchungspauschale berechnet. • Für Reparaturen nach Ablauf der Garantiefrist werden Transportkosten berechnet. • Jede kommerzielle Garantie lässt diese Rechte unberührt. Die oben stehende Aufzählung kann eventuell angepasst werden gemäß der Art des Produktes (siehe Bedienungsanleitung des Gerätes). Velleman ® usługi i gwarancja jakości Od czasu założenia w 1972, Velleman® zdobył bogate doświadczenie w dziedzinie światowej elektroniki. Obecnie firma dystrybuuje swoje produkty w ponad 85 krajach. Wszystkie nasze produkty spełniają surowe wymagania jakościowe oraz wypełniają normy i dyrektywy obowiązujące w krajach UE. W celu zapewnienia najwyższej jakości naszych produktów, przechodzą one regularne oraz dodatkowo wyrywkowe badania kontroli jakości, zarówno naszego wewnętrznego działu jakości jak również wyspecjalizowanych firm zewnętrznych. Pomimo dołożenia wszelkich starań czasem mogą pojawić się problemy techniczne, prosimy odwołać się do gwarancji (patrz warunki gwarancji). Ogólne Warunki dotyczące gwarancji: • Wszystkie produkty konsumenckie podlegają 24-miesięcznej gwarancji na wady produkcyjne i materiałowe od daty zakupu. • W przypadku, gdy usterka jest niemożliwa do usunięcia lub koszt usunięcia jest nadmiernie wysoki Velleman ® może zdecydować o wymianie artykułu na nowy, wolny od wad lub zwrócić zapłaconą kwotę. Zwrot gotówki może jednak nastąpić z uwzględnieniem poniższych warunków: - zwrot 100% ceny zakupu w przypadku, gdy wada wystąpiła w ciągu pierwszego roku od daty zakupu i dostawy - wymiana wadliwego artykułu na nowy, wolny od wad z odpłatnością 50% ceny detalicznej lub zwrot 50% kwoty ceny nabycia w przypadku gdy wada wystąpiła w drugim roku od daty zakupu i dostawy. • Produkt nie podlega naprawie gwarancyjnej: - gdy wszystkie bezpośrednie lub pośrednie szkody spowodowane są działaniem czynników środowiskowych lub losowych (np. przez utlenianie, wstrząsy, upadki, kurz, brud, ...), wilgotności; - gwarant nie ponosi odpowiedzialności za szkody wynikających z utraty danych; - produkty konsumenckie, części zamienne lub akcesoria podatne na process starzenia, wynikającego z normalnego użytkowania, np: baterie (ładowalne, nieładowalne, wbudowane lub wymienne), żarówki, paski napędowe, gumowe elementy napędowe... (nieograniczona lista); - usterka wynika z działania pożaru, zalania wszelkimi cieczami, uderzenia pioruna, upadku lub klęski żywiołowej, itp.; - usterka wynika z zaniedbań eksploatacyjnych tj. umyślne bądź nieumyślne zaniechanie czyszczenia, konserwacji, wymiany materiałów ekspolatacyjnych, niedbalstwa lub z niewłaściwego obchodzenia się lub niezgodnego użytkowania z instrukcją producenta; - szkody wynikające z nadmiernego użytkowania gdy nie jest do tego celu przeznaczony tj. działalność komerycjna, zawodowa lub wspólne użytkowanie przez wiele osób - okres obowiązywania gwarancji zostanie obniżony do 6 (sześć) miesięcy; - Szkody wynikające ze źle zabezpieczonej wysyłki produktu; - Wszelkie szkody spowodowane przez nieautoryzowaną naprawę, modyfikację, przeróbkę produktu przez osoby trzecie jak również bez pisemnej zgody firmy Velleman ®. • Uszkodzony produkt musi zostać dostarczony do sprzedawcy ® Velleman, solidnie zapakowany (najlepiej w oryginalnym opakowaniu), wraz z wyposażeniem z jakim produkt został sprzedany. W przypadku wysyłki towaru w opakowaniu innym niż oryginalnym ryzyko usterki produktu oraz tego skutki przechodzą na właściciela produktu. Wraz z niesprawnym produktem należy dołączyć jasny i szczegółowy opis jego usterki, wady; • Wskazówka: Aby zaoszczędzić na kosztach i czasie, proszę szczegółowo zapoznać się z instrukcja obsługi; czy przyczyną wady są okoliczności techniczne czy też wynikaja wyłącznie z nieznajomości obsługi produktu. W przypadku wysyłki sprawnego produktu do serwisu nabywca może zostać obciążony kosztmi obsługi oraz transportu. • W przypadku napraw pogwarancyjnych lub odpłatnych klient ponosi dodatkowo koszt wysyłki produktu do i z serwisu. wymienione wyżej warunki są bez uszczerbku dla wszystkich komercyjnych gwarancji. Powyższe postanowienia mogą podlegać modyfikacji w zależności od wyrobu (patrz art obsługi). Garantia de serviço e de qualidade Velleman® Desde a sua fundação em 1972 Velleman® tem adquirido uma amplia experiencia no sector da eletrónica com uma distribuição em mais de 85 países. Todos os nossos produtos respondem a exigências rigorosas e a disposições legais em vigor na UE. Para garantir a qualidade, submetemos regularmente os nossos produtos a controles de qualidade suplementares, com o nosso próprio serviço qualidade como um serviço de qualidade externo. No caso improvável de um defeito mesmo com as nossas precauções, é possível invocar a nossa garantia. (ver as condições de garantia). Condições gerais com respeito a garantia sobre os produtos grande público (para a UE): • qualquer produto grande público é garantido 24 mês contra qualquer vício de produção ou materiais a partir da data de aquisição efectiva; • no caso da reclamação ser justificada e que a reparação ou substituição de um artigo é impossível, ou quando os custo são desproporcionados, Velleman® autoriza-se a substituir o dito artigo por um artigo equivalente ou a devolver a totalidade ou parte do preço de compra. Em outro caso, será consentido um artigo de substituição ou devolução completa do preço de compra no caso de um defeito no prazo de 1 ano depois da data de compra e entrega, ou um artigo de substituição pagando o valor de 50% do preço de compra ou devolução de 50% do preço de compra para defeitos depois de 1 a 2 anos. • estão por consequência excluídos: - todos os danos directos ou indirectos depois da entrega do artigo (p.ex. danos ligados a oxidação, choques, quedas, poeiras, areias, impurezas…) e provocado pelo aparelho, como o seu conteúdo (p.ex. perca de dados) e uma indemnização eventual por perca de receitas; - consumíveis, peças ou acessórios sujeitos a desgaste causado por um uso normal, como p.ex. pilhas (recarregáveis, não recarregáveis, incorporadas ou substituìveis), lâmpadas, peças em borracha correias… (lista ilimitada); - todos os danos que resultem de um incêndio, raios, de um acidente, de una catastrophe natural, etc.; - danos provocados por negligencia, voluntária ou não, uma utilização ou manutenção incorrecta, ou uma utilização do aparelho contrária as prescrições do fabricante ; - todos os danos por causa de uma utilização comercial, profissional ou colectiva do aparelho ( o período de garantia será reduzido a 6 meses para uma utilização profissional); - todos os danos no aparelho resultando de uma utilização incorrecta ou diferente daquela inicialmente prevista e descrita no manual de utilização; - todos os danos depois de uma devolução não embalada ou mal protegida ao nível do acondicionamento. - todas as reparações ou modificações efectuadas por terceiros sem a autorização de SA Velleman®; - despesas de transporte de e para Velleman® se o aparelho não estiver coberto pela garantia. • qualquer reparação será fornecida pelo local de compra. O aparelho será obrigatoriamente acompanhado do talão ou factura de origem e bem acondicionado (de preferência dentro da embalagem de origem com indicação do defeito ou avaria); • dica: aconselha-mos a consulta do manual e controlar cabos, pilhas, etc. antes de devolver o aparelho. Um aparelho devolvido que estiver em bom estado será cobrado despesas a cargo do consumidor; • uma reparação efectuada fora da garantia, será cobrado despesas de transporte; • qualquer garantia comercial não prevalece as condições aqui mencionadas. A lista pode ser sujeita a um complemento conforme o tipo de artigo e estar mencionada no manual de utilização. Made in PRC Imported by Velleman nv Legen Heirweg 33, 9890 Gavere, Belgium www.velleman.eu