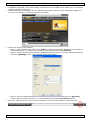
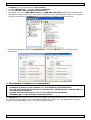
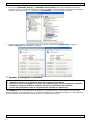
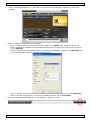
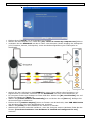
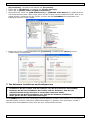
1
P PCUS SBVC C2 US SB VIDEO + STEREO SOU UND CAP PTURE UNIT VI IDEO + STEREOG S GELUID CAPTUR C LUITING G E STICK MET USB-AANSL CO ONVERTI ISSEUR VIDÉO + SON ST TÉRÉO SUR PORT T USB UN NIDAD DE D CAPTU URA VÍD DEO + SO ONIDO ESTÉREO CON CO ONEXIÓN N USB USER MANU U UAL G GEBRUIKER RSHANDLEIIDING N NOTICE D’E EMPLOI M MANUAL DE EL USUARIO B BEDIENUNG GSANLEITU UNG 2 11 20 29 38 REV 02 REV. VI IDEO + SOUND S C CAPTURE E STICK MIT USB B-ANSCH HLUSS PCUSBVC2 Rev. 02 Use er man nual 1.. Introdu uction To o all reside ents of the e European Union Im mportant environme e ental inforrmation ab bout this product p This symbol on the device e or the pac ckage indicates that disposal of tthe device after a its ycle could harm h the environment. Do not dispose of th he unit (or batteries) as unsorted lifecy municipal waste e; it should d be taken to a specialized company for rec cycling. This s device uld be returrned to you ur distributo or or to a lo ocal recyclin ng service. Respect th he local shou environmental rules. If in doubt, contact yo our local waste w disp posal auth horities. Th hank you fo or choosing Velleman! Please read the manu ual thoroug ghly before bringing th his device intto service. If the devic ce was dam maged in tra ansit, do no ot install orr use it and d contact yo our dealer. pa ackage conttents: USB 2.0 2 video ad dapter USB 2.0 2 cable, le ength ± 70cm Printed quick installation gu uide; full us ser manual on CD-ROM w Ulead® ® Video Stu udio 10.0 software DVD with DVD with w drivers s, Arcsoft ShowBiz S DV VD2 and Bla azeVideo Ma agic 3.0 (Trial version n) 2.. Safety Instruct I ions ep the deviice away frrom children n and unau uthorised us sers. Kee O NOT disassemble orr open the cover. c Therre are no user-service eable parts inside the DO dev vice. Refer to an authorized dealler for service and/or spare parts s. 3.. General Guideliines Re efer to the Velleman® V ® Service and Quality Warran nty on the last pages of this man nual. Indoor use u only. Keep K this de evice away form rain, moisture, splashing and a drippin ng liquids. Keep this s device away from du ust and extrreme heat. Protect th his device from shocks s and abuse e. Avoid brrute force w when operating the device. • Familiarise e yourself with w the fun nctions of the device before b actually using it. cations of th he device are a forbidde en for safetty reasons. Damage caused by user u • All modific modificatio ons to the device d is no ot covered by the warrranty. • Only use the t device for f its inten nded purpose. Using the device in an unautthorised wa ay will void the warran nty. • Damage caused by disregard d off certain gu uidelines in this manua al is not cov vered by th he warranty y ealer will no ot accept re esponsibilitty for any ensuing e deffects or pro oblems. and the de • Do not us se the dev vice to perform illegal activitie es. 4.. Feature es • easy-to-us se software e included Ulead® ® Video Studio 10.0 Arcsoft ShowBiz DVD2 D Blazevid deo Magic 3.0 3 (trial) • powered by b USB 2.0 port, no ad dditional po ower supply y needed • brightness s, contrast, hue and sa aturation control • very smalll size, easy y to carry • snapshot button b • plug-and-p play • supports writing w usin ng most pop pular DVD formats f (DV VD+/-R/RW W, DVD+/-V VR, DVD-Video...) • full screen n for preview wing video programs • transfer viideo files to o iPod, iPod d touch, Apple TV, PSP P, PS3, XBO OX, Mobile phone • support HD D video file e input • supports almost a all audio and im mage file fo ormats • upload vid deo to YouT Tube 23.08.2011 2 ©Velleman n nv PCUSBVC2 Rev. 02 5. System requirements CPU Pentium 4 CPU or higher Operating System Microsoft® Windows®2000/XP/Vista/Windows 7 or higher memory RAM 512 MB or higher hard disk 1Gb for software, minimum 4Gb for recording display resolution 1024 x 768 or higher sound card Windows® compatible sound card (used for playback) graphics card DirectX 9.0C compatible USB USB 2.0 compliant port 6. Driver installation IMPORTANT NOTES: • Install the drivers and software prior to making any hardware connections! • Make sure you have administrator rights on your computer system when installing drivers and software. • Disable all antivirus software during software installation. • Refer to §5 for the minimum system requirements. • Insert the VELLEMAN© CD-ROM into your CD-ROM drive. A window will appear: • Click [Install driver]. 23.08.2011 3 ©Velleman nv PCUSBVC2 Rev. 02 • Click [Next >]. • Click [Finish] to finalize driver installation. • The system will now ask to restart the computer. Select [Yes, I want to restart my computer now]. • Connect the PCUSBVC2 to your video source (not incl., e.g. TV, camera, DVD...). Note that you must connect the device to an S-video or Composite/audio output! Refer to the user manual of your video source to locate signal output connectors. [1] not included. • Connect the USB-connector of the PCUSBVC2 to a free USB port on your computer. Note: for signal integrity, it is not recommended to connect through a HUB. • The system detects the new hardware on the USB port and a message box pops up. Select [No, not this time] and click [Next >]. • Select [Install software automatically] and click [Next >]. Follow the instructions on the screen. • A window might pop up stating that the USB 2861 Device did not pass Windows logo testing; select [continue anyway]. • Click [Finish] to complete driver installation. • If any other components are found, please repeat the above procedure until the [Found new hardware: Your hardware is installed and configured for use]-window appears. 23.08.2011 4 ©Velleman nv PCUSBVC2 Rev. 02 • Verify whether the drivers are installed correctly. Right click on [My computer] and click left to select [Properties]. • Go to the [Hardware] tab and select [Device manager]. • Go to the [Sound, video and game controllers]. • Locate the [USB 2861 Device] and the [USB EMP audio Device]. If no exclamation marks (yellow triangles) are shown in front of the device names, the installation was successful. Otherwise, remove the driver, disconnect and reconnect the PCUSBVC2 to re-install the driver. • If you want to see the version of the driver, right click on it and select [properties]. Select the [Driver] tab. 23.08.2011 5 ©Velleman nv PCUSBVC2 Rev. 02 7. Software installation and configuration IMPORTANT NOTES: • Install the drivers and software prior to making any hardware connections! • Make sure you have administrator rights on your computer system when installing drivers and software. • Disable all antivirus software during software installation. • Refer to §5 for the minimum system requirements. This PCUSBVC2 comes with two full version software packages (Ulead® Video Studio 10.0 and Arcsoft ShowBiz DVD2) and one trial package (Blazevideo Magic 3.0) which will expire after 3 months unless a licence key is purchased. a) ShowBiz DVD 2 • Insert the VELLEMAN© CD-ROM into your CD-ROM drive. A window will appear: • Click [Install ShowBiz DVD 2] and follow the instructions on the screen. Select your preferred installation language. The licence key is printed on the CD-ROM sleeve. Make sure to keep the keys for future reference. • When installation is finished, start the software by double-clicking on the “Showbiz DVD2” icon on your desktop. The following screen is shown: • Make sure the PCUSBVC2 device is properly connected and select [Capture, create, or edit videos]. • Configure the video and audio settings in the bottom part of the screen. 23.08.2011 6 ©Velleman nv PCUSBVC2 Rev. 02 • On the [Video] tab, click on [Input] next to Video Device to set the video input to Composite Video or S-Video. • Click on [Advance] to set the applicable video standard. • Set options for audio on the [Audio] tab. • Press the [Record] button to set file name, location and format. • For more information on how to use the software, click on the [help] button in the menu bar. b) BlazeVideo Magic 3.0 (Trial) • Insert the VELLEMAN© CD-ROM into your CD-ROM drive. A window will appear: 23.08.2011 7 ©Velleman nv PCUSBVC2 Rev. 02 • Click [Install Magic 3.0] and follow the instructions on the screen. Select your preferred installation language. The serial number is printed on the CD-ROM sleeve. Make sure to keep this number for future reference. • When installation is finished, start the software by double-clicking on the “BlazeVideo Magic 3.0” icon on your desktop. The following screen is shown: • Follow the steps on the window: o Step 1: add or delete video files. Press [Add] to locate and add files. Added files are shown in the window above. To delete a file, select it in the window and press [Delete]. o Step 2: set the desired output format using the drop down menu. For more advanced settings, press the [Setting] button (see example screenshot below). o Step 3: set the output directory where the converted files will be stored via the [Browse] button. Open the store directory in a new window by clicking the [Location] button. • For more information on how to use this software, click on the [?] button in the menu bar. 23.08.2011 8 ©Velleman nv PCUSBVC2 Rev. 02 c) ShowBiz DVD 2 • Insert the CD-ROM into your CD-ROM drive. • Click [Next] and select your language. Click [Install VideoStudio 10.0] > [Next] and follow the instructions in the window until the installation is complete. • Restart your computer. • To start the application, click on the Ulead VideoStudio icon on your computer’s desktop. Explanation on how to use your Ulead VideoStudio software can be found on the included CDROM (under directory \Document\Manual). 8. Troubleshooting Hardware connection issues. The PCUSBVC2 comes with and female S-video and 3 female RCA connectors. Most video sources will also have female connectors. Male-male RCA cables or a male-male S-Video cable is not included and must be purchased separately. Note however that these cables often are included when buying a new video source (e.g. TV, Video...). In case your video source only comes with a SCART output, you must purchase an adaptor with a SCART connector on one end and three RCA connectors on the other. Device did not pass Windows logo testing This message can safely be ignored as it will not cause problems with other software. Basically it means that Microsoft did not test the software itself. Duration of recording The PCUSBVC2 is a real-time capture device. This means that e.g. it will take 3 hours to capture or transfer a 3-hour recording. Size of recording Recording size depends on the chosen format and image size. To decrease overall file size, select a different format or reduce the image size. Note that this will also decrease image quality. E.g. in AVI format (no compression) 10 minutes of recording uses about 1GB. In MPEG format this is about 200MB; in WMV about 30MB. Transferring audio only to PC This is not possible with the PCUSBVC2. 23.08.2011 9 ©Velleman nv PCUSBVC2 Rev. 02 9. Technical specifications complies with USB 2.0 supports NTSC, PAL video input 1 x RCA composite, 1 x S-Video audio input stereo RCA resolution NTSC 720 x 480 @ 30fps PAL 720 x 576 @ 25fps system requirements USB 2.0 compliant port operating system Microsoft® Windows®2000/XP/Vista/Windows 7 CPU Pentium 4 or higher hard disk space 1Gb for software, minimum 4Gb for recording DVD standard DVD player or recorder memory 512Mb minimum display resolution 1024 x 768 or higher sound card Windows® compatible sound card (used for playback) graphics card DirectX 9.0C compatible Use this device with original accessories only. Velleman nv cannot be held responsible in the event of damage or injury resulted from (incorrect) use of this device. For more info concerning this product and the latest version of this user manual, please visit our website www.velleman.eu. The information in this manual is subject to change without prior notice. © COPYRIGHT NOTICE The copyright to this manual is owned by Velleman nv. All worldwide rights reserved. No part of this manual or may be copied, reproduced, translated or reduced to any electronic medium or otherwise without the prior written consent of the copyright holder. The included software is copyright protected by the respective owners. 23.08.2011 10 ©Velleman nv PCUSBVC2 Rev. 02 GEB BRUIKE ERSHAN NDLEIDI ING 1.. Inleidin ng Aa an alle ing gezetenen van de Eu uropese Un nie Be elangrijke milieu-infformatie betreffend b de dit prod duct s op het toestel of de verp pakking gee eft aan datt, als het na a zijn leven nscyclus Dit symbool word dt weggewo orpen, dit toestel scha ade kan toe ebrengen aa an het milie eu. Gooi ditt toestel (e en even ntuele batte erijen) niet bij het gew wone huishoudelijke afval; het m moet bij een n gesp pecialiseerd bedrijf terrechtkomen n voor recyc clage. U mo oet dit toes stel naar uw w verdeler of naarr een lokaall recyclagep punt brengen. Respec cteer de pla aatselijke m milieuwetge eving. He ebt u vragen, contac cteer dan de plaatse elijke auto oriteiten betreffend b de de verw wijdering. Da ank u voor uw aankoo op! Lees dez ze handleid ding grondig voor u he et toestel in n gebruik neemt. n Werrd he et toestel be eschadigd tijdens t het transport, installeer het h dan niet en raadplleeg uw dea aler. Inhoud: 2 dapter USB 2.0-videoad USB 2.0-kabel, 2 le engte ± 70 0 cm gebruikershandle eiding m Ulead® Video Stud dio 10.0 sofftware dvd met dvd met m driver, Arcsoft A Sho owBiz DVD2 2 en BlazeV Video Magic c 3.0 (proeffversie) 2.. Veilighe eidsinstrructies d buiten he et bereik va an kinderen n en onbevo oegden. Houd oor de gebruiker verva angbare onderdelen in n dit toestel. Voor onderhoud of Er ziijn geen do reserveonderde elen, contacteer uw de ealer. 3.. Algeme ene richttlijnen Ra aadpleeg de e Velleman n® service e- en kwaliteitsgarantie achterraan deze h handleiding g. Gebruiik het toesttel enkel binnenshui b is. Bescherrm tegen re egen, vochttigheid en opspatttende vloeistoffen. erm tegen stof s en extreme hitte. Besche Besche erm tegen schokken s e vermijd brute krach en ht tijdens d de bediening g. • Leer eerst de functies s van het toestel kenn nen voor u het gaat gebruiken. heidsredene en mag u geen g wijzigiingen aanbrengen. Sc chade door wijzigingen n die de • Om veiligh gebruiker heeft aangebracht valt niet onde er de garan ntie. • Gebruik he et toestel enkel e waarv voor het gemaakt is. Bij B onoorde eelkundig ge ebruik verv valt de garantie. • De garantie geldt nie et voor scha ade door he et negeren van bepaalde richtlijn nen in deze e handleidin ng aler zal de verantwoor v rdelijkheid afwijzen a vo oor defecten n of problemen die hie er en uw dea rechtstreeks verband d mee houd den. • Gebruik dit d toestel niet voor illegale opnames. o 4.. Eigensc chappen • gebruikers svriendelijk ke software Ulead® Video Stud dio 10.0 Arcsoft ShowBiz DVD2 D Blazevid deo Magic 3.0 3 (proefv versie) • voeding viia USB 2.0--poort, geen extra voe eding vereist • regelbare helderheid, contrast, kleurschak kering en in ntensiteit • zeer klein,, overal me eeneembaar • snapshotk knop • plug-and-p play • ondersteunt schrijffunctie (DVD D+/-R/RW, DVD+/-VR, DVD-Vide eo...) • scherm me et voorverttoon van videoprogram mma's • overdrachtt videobesttanden naar iPod, iPod d touch, Ap pple TV, PSP, PS3, XBO OX, GSM • ondersteunt input HD D video bes stand • ondersteunt praktisch alle versc cheidene au udio- en be eeldformate en • opladen viideo naar YouTube Y 23.08.2011 11 ©Velleman n nv PCUSBVC2 Rev. 02 5. Systeemvereisten CPU Pentium 4 of hoger besturingssysteem Microsoft® Windows® 2000/XP/Vista/Windows 7 of hoger geheugen 512 MB RAM of hoger harddisk 1 GB voor software, minimaal 4 GB voor opnames resolutie display 1024 x 768 of hoger geluidskaart Windows®-compatibele geluidskaart (enkel voor weergave) grafische kaart compatibel DirectX 9.0C USB USB 2.0 compliant port 6. De driver installeren BELANGRIJKE OPMERKINGEN • Installeer de drivers en de software voor u de hardware gaat aansluiten! • Zorg bij het installeren van drivers en software dat u administratieve rechten hebt op de te gebruiken computer. • Schakel alle antivirussoftware uit voor de software gaat installeren. • Raadpleeg §5 voor de minimale systeemvereisten. • Plaats de VELLEMAN© cd-rom in de cd-romdrive. Het volgende venster verschijnt: • Klik op [Install driver]. 23.08.2011 12 ©Velleman nv PCUSBVC2 Rev. 02 • Klik op [Next >]. • Klik op [Finish] om de installatie te voltooien. • Herstart uw computer door op [Yes, I want to restart my computer now] te klikken. • Sluit de PCUSBVC2 aan op de S-video- of composiet-/audio-uitgang van de videobron (bv. tvtoestel, camera, dvd-speler). Raadpleeg bij twijfel de handleiding van de videobron. [1] niet meegeleverd • Steek de USB-stekker van de PCUSBVC2 in een vrije USB-poort van uw computer. Om signaalverlies te vermijden, is het niet aan te raden de PCUSBVC2 via een hub aan te sluiten. • Uw computer vindt nieuwe hardware op de USB-poort. Selecteer [No, not this time] en klik vervolgens op [Next >]. • Selecteer [Install software automatically] en klik op [Next >]. Volg de instructies op het scherm. • Klik op [continue anyway] wanneer een venster verschijnt met het bericht dat USB 2861 Device de Windows Logo-test niet heeft doorstaan. • Selecteer [Finish] om de installatie van de driver te voltooien. • Herhaal de bovenstaande procedure indien de computer verdere hardware vindt tot het venster [Found new hardware: Your hardware is installed and configured for use] verschijnt. 23.08.2011 13 ©Velleman nv PCUSBVC2 Rev. 02 • Ga na of alle drivers correct werden geïnstalleerd. Klik met de rechtermuisknop op [My computer] en klik vervolgens op [Properties]. • Ga naar [Hardware] en selecteer [Device manager]. • Ga naar [Sound, video and game controllers]. • Controleer of er voor [USB 2861 Device] en [USB EMP audio Device] een gele driehoek met uitroepteken staat. Indien niet, dan werden de drivers correct geïnstalleerd. Indien wel, verwijder de driver, ontkoppel de PCUSBVC2 van de computer en installeer de driver opnieuw. • Klik met de rechtermuisknop op [properties] en selecteer [Driver] om de driverversie te controleren. 7. De software installeren en configureren BELANGRIJKE OPMERKINGEN • Installeer de drivers en de software voor u de hardware gaat aansluiten! • Zorg bij het installeren van drivers en software dat u administratieve rechten hebt op de te gebruiken computer. • Schakel alle antivirussoftware uit voor de software gaat installeren. • Raadpleeg §5 voor de minimale systeemvereisten. De PCUSBVC2 wordt geleverd met twee volwaardige softwarepakketten (Ulead® Video Studio 10.0 en Arcsoft ShowBiz DVD2) en een proefpakket (Blazevideo Magic 3.0). Het proefpakket vervalt 3 maanden na de installatie tenzij u een licentienummer koopt. 23.08.2011 14 ©Velleman nv PCUSBVC2 Rev. 02 a) ShowBiz DVD 2 • Plaats de VELLEMAN© cd-rom in de cd-romdrive. Het volgende venster verschijnt: • Klik op [Install ShowBiz DVD 2] en volg de instructies op het scherm. Selecteer de gewenste taal. Het licentienummer staat vermeld op de hoes van de cd-rom. Bewaar deze nummers op een veilige plaats. • Start de software na de voltooiing van de installatie door te dubbelklikken op ‘Showbiz DVD2’ op het bureaublad. Het volgende venster verschijnt: • Sluit de PCUSBVC2 correct aan op de computer en selecteer [Capture, create, or edit videos]. • Configureer de video- en audio-instellingen onderaan het scherm. • Klik in de video-instellingen op [Input] naast [Video Device] en selecteer de video-ingang (Composite Video of S-Video). • Klik vervolgens op [Advance] om de videostandaard te selecteren. • Kies de audio-opties onder [Audio]. 23.08.2011 15 ©Velleman nv PCUSBVC2 Rev. 02 • Klik op [Record] om bestandsnaam, -locatie en -formaat te bepalen. • Klik op [help] in de menubalk voor meer informatie over het gebruik van de software. b) BlazeVideo Magic 3.0 • Plaats de VELLEMAN© cd-rom in de cd-romdrive. Het volgende venster verschijnt: • Klik op [Install Magic 3.0] en volg de instructies op het scherm. Selecteer de gewenste taal. Het licentienummer staat vermeld op de hoes van de cd-rom. Bewaar deze nummers op een veilige plaats. 23.08.2011 16 ©Velleman nv PCUSBVC2 Rev. 02 • Start de software na de voltooiing van de installatie door te dubbelklikken op ‘BlazeVideo Magic 3.0’ op het bureaublad. Het volgende venster verschijnt: • Volg de stappen beschreven in het venster: o Stap 1: videobestand toevoegen of verwijderen. Klik op [Add] om een bestand toe te voegen. De toegevoegde bestanden worden in het venster weergegeven. Verwijder een bestand door het bestand te selecteren en op [Delete] te klikken. o Stap 2: selecteer het formaat via het uitrolmenu. Druk op [Setting] voor meer instelmogelijkheden (zie screenshot hieronder). o Stap 3: selecteer de doeldirectory waar de bestanden bewaard zullen worden via [Browse]. Open die doeldirectory in een nieuw venster via [Location]. • Klik op [?] in de menubalk voor meer informatie over het gebruik van de software. 23.08.2011 17 ©Velleman nv PCUSBVC2 Rev. 02 c) ShowBiz DVD 2 • Plaats de cd-rom in de cd-romdrive. • Klik op [Next] en selecteer de gewenste taal. Klik vervolgens op [Install VideoStudio 10.0] > [Next] en volg de instructies op het scherm om de installatie te voltooiien. • Herstart uw computer. • Start de toepassing op door op ‘Ulead VideoStudio’ op het bureaublad te klikken. Raadpleeg de meegeleverde cd-rom (onder \Document\Manual) voor meer uitleg over het gebruik van de software. 8. Problemen en oplossingen Probleem bij het aansluiten van de hardware De PCUSBVC2 is uitgerust met een vrouwelijke S-video-stekker en drie vrouwelijke RCAstekkers. De meeste videoapparaten zijn ook uitgerust met vrouwelijke stekkers. Mannelijke naar mannelijke adapterstekkers zijn niet meegeleverd maar afzonderlijk verkrijgbaar. Nieuwe apparatuur wordt ook geleverd met dergelijke adapterstekkers (bv. tv-toestel, videorecorder). Voor een apparaat dat enkel uitgerust is met een scartaansluiting heeft u een adapter nodig met een scartstekker en 3 x RCA-stekkers. De hardware heeft de Windows Logo-test niet doorstaan U mag dit bericht gerust negeren. Dit bericht geeft enkel aan dat Microsoft® de software niet zelf heeft getest. Opnameduur De PCUSBVC2 is een real-time opnameapparaat. Het kopiëren van een opname van 3 uur zal dus 3 uur in beslag nemen. Grootte van het opnamebestand De grootte van het bestand hangt af van het geselecteerde formaat en de beeldgrootte. U kunt de grootte van het bestand beperken door een ander formaat te kiezen of de beeldgrootte te verkleinen. Merk op dat dit de kwaliteit van het beeld zal beïnvloeden. Voorbeeld: Een opname van 10 minuten in AVI-formaat (geen compressie) neemt 1 GB in beslag, dezelfde opname in MPEG-formaat neemt ongeveer 200 MB in beslag, in WMVformaat ongeveer 30 MB. Kopiëren van audio naar uw pc U kunt met de PCUSBVC2 geen afzonderlijke audiosignalen kopiëren. 23.08.2011 18 ©Velleman nv PCUSBVC2 Rev. 02 9. Technische specificaties ondersteunt USB 2.0 ondersteunt NTSC, PAL video-ingang 1 x RCA composiet, 1 x S-Video audio-ingang stereo RCA resolutie NTSC 720 x 480 @ 30 fps PAL 720 x 576 @ 25 fps systeemvereisten USB 2.0-poort besturingssysteem Microsoft® Windows® 2000/XP/Vista/Windows 7 CPU Pentium 4 of hoger vrije hardeschijfruimte 1 GB voor software, minimaal 4 GB voor opname dvd standaard dvd-speler of -recorder geheugen minimaal 512 MB schermresolutie 1024 x 768 of hoger geluidskaart Windows®-compatibele geluidskaart (enkel voor weergave) compatibel DirectX 9.0C grafische kaart Gebruik dit toestel enkel met originele accessoires. Velleman nv is niet aansprakelijk voor schade of kwetsuren bij (verkeerd) gebruik van dit toestel. Voor meer informatie omtrent dit product en de meest recente versie van deze handleiding, zie www.velleman.eu. De informatie in deze handleiding kan te allen tijde worden gewijzigd zonder voorafgaande kennisgeving. © AUTEURSRECHT Velleman nv heeft het auteursrecht voor deze handleiding. Alle wereldwijde rechten voorbehouden. Het is niet toegestaan om deze handleiding of gedeelten ervan over te nemen, te kopiëren, te vertalen, te bewerken en op te slaan op een elektronisch medium zonder voorafgaande schriftelijke toestemming van de rechthebbende. De meegeleverde software is auteursrechterlijk beschermd door de respectievelijke eigenaars. 23.08.2011 19 ©Velleman nv PCUSBVC2 Rev. 02 NOTIC CE D’EM MPLOI 1.. Introdu uction Au ux résiden nts de l'Un nion europ péenne De es informa ations env vironneme entales imp portantes concernant ce prod duit Ce symbole s sur l'appareil ou l'emballage indiqu ue que l’élim mination d’un appareil en fin de vie v peutt polluer l'e environnem ment. Ne pas jeter un appareil a éle ectrique ou électroniqu ue (et des piles s éventuelle es) parmi le es déchets municipaux non sujetts au tri sélectif ; une déchèterie e traittera l’apparreil en ques stion. Renvo oyer les équipements usagés à v votre fournisseur ou à un service s de recyclage r lo ocal. Il conv vient de res specter la réglementa r ation locale relative à la l prottection de l’’environnem ment. En n cas de qu uestions, contacter c les autoriités locale es pour élimination. No ous vous re emercions de d votre ach hat ! Lire la a présente notice attentivement avant la mise en service de l’a appareil. Si l’appareil a été endom mmagé pen ndant le tra ansport, ne pas l’installer et eur. consulter vottre revende ontenu: Co ateur vidéo o USB 2.0 adapta câble USB 2.0, lo ongueur ± 70 cm e d'emploi notice DVD avec a logicie el Ulead® Viideo Studio o 10.0 DVD avec a pilotes s, Arcsoft ShowBiz S DV VD2 et Blaze eVideo Mag gic 3.0 (verrsion démo)) 2.. Consign nes de sé écurité er hors de la portée de es enfants et des pers sonnes non autorisées s. Garde p mainttenable parr l’utilisateu ur. Comman nder des pièces de rec change Il n’y a aucune pièce z votre reve endeur. éventuelles chez 3.. Directiv ves géné érales Se e référer à lla garantie e de servic ce et de qualité Vellleman® à la l fin de cette notice. Utiliser ce et appareil uniqueme ent à l'inté érieur. Prottéger de la pluie, de l’’humidité et e des projections d’eau. Protéger contre la poussière. Protéger P con ntre la challeur extrêm me. Protéger contre les chocs c et le traiter ave ec circonspe ection pend dant l’opéra ation. • Se familiarriser avec le fonctionn nement ava ant l’emploii. dification es st interdite pour des raisons r de sécurité. s Le es dommag ges occasion nnés par de es • Toute mod modificatio ons par le client c ne tombent pas sous la garantie. q sa fonc ction prévu ue. Un usag ge impropre e annule d'o office la garantie. • N’utiliser qu’à ux dommag ges survenus en négligeant certa aines directtives de cettte • La garantie ne s’applique pas au v revendeur déclin nera toute responsabil r lité pour les s problème es et les déffauts qui en n notice et votre résultent. c eur pour des d enregistrements illégaux. • Ne pas uttiliser ce convertiss 4.. Caracté éristique es • livré avec logiciel con nvivial Ulead® Video Stud dio 10.0 Arcsoft ShowBiz DVD2 D Blazevid deo Magic 3.0 3 (version démo) • alimenté par p port 2.0 0, ne néces ssite aucune e alimentattion supplémentaire • clarté, con ntraste, nua ance et inte ensité régla ables • dimensions très rédu uites, haute e portabilité é • bouton de capture d’’écran • plug-and-p play • fonction d'écriture (D DVD+/-R/RW W, DVD+/--VR, DVD-V Video...) • écran pour programm mes vidéo préparatoire p es • transfert des d enregistrements vidéo v vers iPod, iPod touch, Apple e TV, PSP, PS3, XBOX X, GSM • supporte l'entrée des s enregistre ements HD vidéo • supporte quasiment q t toute lecture de plusie eurs formatts audio et image • télécharge ement vidéo o sur YouTu ube 23.08.2011 20 ©Velleman n nv PCUSBVC2 Rev. 02 5. Système requis microprocesseur Pentium 4 ou plus système d’exploitation Microsoft® Windows® 2000/XP/Vista/Windows 7 ou plus mémoire 512 Mo RAM ou plus disque dur 1 Go pour le logiciel, minimum 4 Go pour l’enregistrement résolution de l’écran 1024 x 768 ou plus carte son carte son compatible Windows® (pour lecture uniquement) carte graphique carte graphique compatible DirectX 9.0C USB port compatible USB 2.0 6. Installation des pilotes REMARQUE IMPORTANTE : • Installer les pilotes et le logiciel avant d’effectuer les connexions du périphérique ! • Veiller à obtenir des droits d’administrateur sur l’ordinateur d’installation. • Désactiver tout antivirus pendant l’installation du logiciel. • Lire les informations concernant le système requis sous le chapitre §5. • Insérer le cédérom VELLEMAN© dans le lecteur cédérom de l’ordinateur. La fenêtre suivante apparaît : • Cliquer sur [Install driver]. • Cliquer sur [Next >]. 23.08.2011 21 ©Velleman nv PCUSBVC2 Rev. 02 • Cliquer sur [Finish] pour compléter l’installation. • Redémarrer votre ordinateur en sélectionnant [Yes, I want to restart my computer now]. • Connecter le PCUSBVC2 à la source vidéo (p.ex. téléviseur, caméscope, lecteur DVD...). Toujours connecter le convertisseur à la sortie S-vidéo ou composite/audio ! Consulter la notice de l’appareil audio en question en cas de doute. [1] non inclus • Insérer la fiche USB du PCUSBVC2 dans un port USB libre de votre ordinateur. Il n’est cependant conseillé de connecter le convertisseur à un hub. • Le système trouve automatiquement le nouveau périphérique connecté au port USB. Un message apparaît. Sélectionner [No, not this time] et cliquer sur [Next >]. • Sélectionner [Install software automatically] et cliquer ensuite sur [Next >]. Suivre les instructions à l’écran. • Cliquer sur [continue anyway] lorsqu’un message surgit expliquant que l’USB 2861 Device n’a pas passé le test Windows Logo. • Cliquer sur [Finish] pour compléter l’installation du pilote. • Répéter cette procédure pour tout autre composant à installer jusqu’à ce le message [Found new hardware: Your hardware is installed and configured for use] apparaît. • Vérifier l’installation des pilotes en cliquant avec le bouton droit de la souris sur [My computer] et en sélectionnant ensuite [Properties]. • Ouvrir l’onglet [Hardware] et sélectionner [Device manager]. 23.08.2011 ©Velleman nv 22 PCUSBVC2 Rev. 02 • Cliquer sur [Sound, video and game controllers]. • Les pilotes [USB 2861 Device] et [USB EMP audio Device] sont dûment installés lorsqu’ils n’affichent pas de triangle jaune. Dans le cas contraire, désinstaller le pilote concerné, déconnecter et ensuite reconnecter le PCUSBVC2 pour réinstaller le pilote. • Cliquer avec le bouton droit de la souris sur le pilote et sélectionner [properties] et ensuite l’onglet [Driver] pour vérifier la version. 7. Installation et configuration du logiciel REMARQUE IMPORTANTE : • Installer les pilotes et le logiciel avant d’effectuer les connexions du périphérique ! • Veiller à obtenir des droits d’administrateur sur l’ordinateur d’installation. • Désactiver tout antivirus pendant l’installation du logiciel. • Lire les informations concernant le système requis sous le chapitre §5. Le PCUSBVC2 inclut deux packs de logiciel complet (Ulead® Video Studio 10.0 et Arcsoft ShowBiz DVD2) et un pack démo (Blazevideo Magic 3.0) qui expire 3 mois après installation sauf lors de l’activation d’un numéro de licence. 23.08.2011 23 ©Velleman nv PCUSBVC2 Rev. 02 a) ShowBiz DVD 2 • Insérer le cédérom VELLEMAN© dans le lecteur cédérom de l’ordinateur. La fenêtre suivante apparaît : • Cliquer sur [Install ShowBiz DVD 2] et suivre les instructions à l’écran. Sélectionner la langue. Le numéro de licence est mentionné sur la jaquette du cédérom. Conserver ce numéro pour toute référence ultérieure. • Une fois l’installation complétée, lancer le logiciel en double cliquant sur l’icône « Showbiz DVD2 » qui se trouve sur le bureau de l’ordinateur. La fenêtre suivante apparaît : • Veiller à ce que le PCUSBVC2 soit proprement connecté et sélectionner [Capture, create, or edit videos]. • Régler les paramètres vidéo et audio au bas de l’écran. • Ouvrir l’onglet [Video] et cliquer sur [Input] sous [Video Device] pour sélectionner l’entrée vidéo, en l’occurrence Composite Video ou S-Video. • Cliquer sur [Advance] pour sélectionner le standard vidéo. 23.08.2011 24 ©Velleman nv PCUSBVC2 • Sélectionner les options audio sous [Audio]. Rev. 02 • Cliquer sur [Record] et donner un nom, un emplacement et un format au ficher. • Ouvrir le menu d’aide [help] dans la barre menu pour plus d’informations concernant l’utilisation du logiciel. b) BlazeVideo Magic 3.0 • Insérer le cédérom VELLEMAN© dans le lecteur cédérom de l’ordinateur. La fenêtre suivante apparaît : • Cliquer sur [Install Magic 3.0] et suivre les instructions à l’écran. Sélectionner la langue. Le numéro de licence est mentionné sur la jaquette du cédérom. Conserver ce numéro pour toute référence ultérieure. 23.08.2011 25 ©Velleman nv PCUSBVC2 Rev. 02 • Une fois l’installation complétée, lancer le logiciel en double cliquant sur l’icône « BlazeVideo Magic 3.0 » qui se trouve sur le bureau de l’ordinateur. La fenêtre suivante apparaît : • Suivre les étapes mentionnées à l’écran : o Étape 1 : ajout ou suppression d’un fichier vidéo. Cliquer sur [Add] pour ajouter un fichier. Le fichier ajouté s’affiche dans la fenêtre principale. Supprimer le fichier en le sélectionnant et en cliquant sur [Delete]. o Étape 2: sélection du format du fichier dans le menu déroulant. Cliquer sur [Setting] pour un paramétrage en détail (voir exemple ci-dessous). o Étape 3: attribution d’un répertoire de stockage des fichiers convertis via la fonction [Browse]. Ouvrir le répertoire de stockage dans une nouvelle fenêtre en cliquant sur [Location]. • Ouvrir le menu d’aide [?] dans la barre menu pour plus d’informations concernant l’utilisation du logiciel. 23.08.2011 26 ©Velleman nv PCUSBVC2 Rev. 02 c) ShowBiz DVD 2 • Insérer le cédérom dans le lecteur cédérom de l’ordinateur. • Cliquer sur [Next] et sélectionner la langue. Ensuite, cliquer sur [Install VideoStudio 10.0] > [Next] et suivre les instructions à l’écran jusqu’à ce que le logiciel soit installé. • Redémarrer votre l’ordinateur. • Lancer l’application en double cliquant sur l’icône « Ulead VideoStudio » qui se trouve sur le bureau de l’ordinateur. Consulter le fichier sous le répertoire \Document\Manual sur le cédérom pour plus d’informations concernant l’utilisation du logiciel. 8. Problèmes et solutions Problème de connexion du périphérique Le PCUSBVC2 est équipé d’une fiche S-vidéo femelle et de trois fiches RCA femelles. La plupart des appareils vidéo sont également équipés de fiches femelles. L’adaptateur RCA mâle-mâle ou S-Vidéo mâle-mâle requis à l’interconnexion n’est pas inclus mais doit être acheté séparément. Toutefois, beaucoup d’appareils vidéo (p.ex. téléviseur, enregistreur) incluent un câble adaptateur. Utiliser un câble adaptateur à fiche péritel pour un appareil équipé d’une connexion péritel uniquement. Le périphérique n’a pas passé le test Windows Logo Ignorer ce message puisqu’il n’influence en aucun cas le bon fonctionnement du logiciel. Ce message indique uniquement que le logiciel n’a pas été testé par Microsoft®-même. Durée d’enregistrement Le PCUSBVC2 est un convertisseur à temps réel. Exemple : un enregistrement de 3 heures aura une durée de transfert de 3 heures. Taille de l’enregistrement La taille du fichier dépend du format et de la taille de l’image sélectionnés. Pour réduire la taille générale du fichier, sélectionner un format moindre ou une taille de l’image inférieure. Ceci réduira également la qualité de l’image. Exemple : un enregistrement de 10 minutes occupe environ 1 Go au format AVI (aucune compression), environ 200 Mo au format MPEG et environ 30 Mo au format WMV. Transfert audio Le PCUSBVC2 ne permet pas l’enregistrement de signaux audio séparés. 23.08.2011 27 ©Velleman nv PCUSBVC2 Rev. 02 9. Technical specifications supporte USB 2.0 supporte NTSC, PAL entrée vidéo 1 x RCA composite, 1 x S-Vidéo entrée audio RCA stéréo résolution NTSC 720 x 480 @ 30 images/s PAL 720 x 576 @ 25 images/s système requis port USB 2.0 système d'exploitation Microsoft® Windows® 2000/XP/Vista/Windows 7 microprocesseur Pentium 4 ou plus espace disque libre DVD 1 Go pour le logiciel, minimum 4 Go pour l'enregistrement lecteur ou enregistreur DVD standard mémoire minimum 512 Mo résolution de l'image 1024 x 768 ou plus carte son carte son compatible Windows® (uniquement pour lecture) carte graphique compatible DirectX 9.0C carte graphique N’employer cet appareil qu’avec des accessoires d’origine. SA Velleman ne sera aucunement responsable de dommages ou lésions survenus à un usage (incorrect) de cet appareil. Pour plus d’information concernant cet article et la version la plus récente de cette notice, visitez notre site web www.velleman.eu. Toutes les informations présentées dans cette notice peuvent être modifiées sans notification préalable. © DROITS D’AUTEUR SA Velleman est l’ayant droit des droits d’auteur pour cette notice. Tous droits mondiaux réservés. Toute reproduction, traduction, copie ou diffusion, intégrale ou partielle, du contenu de cette notice par quelque procédé ou sur tout support électronique que se soit est interdite sans l’accord préalable écrit de l’ayant droit. Les logiciels inclus sont protégés par le droit d’auteur de la part des possesseurs respectifs. 23.08.2011 28 ©Velleman nv PCUSBVC2 Rev. 02 M MANUAL L DEL USUARI U O 1.. Introdu ucción A los ciudad danos de la Unión Eu uropea mportantes s informac ciones sob bre el med dio ambien nte concerrniente a e este produ ucto Im Estte símbolo en este apa arato o el embalaje e in ndica que, si s tira las m muestras ins servibles, pod drían dañarr el medio ambiente. a No tire este e aparato (ni las pilas, si las hub biera) en la bas sura domés stica; debe ir a una em mpresa esp pecializada en reciclaje e. Devuelva a este apa arato a su distribuidor d r o a la unid dad de reciiclaje local. Respete la as leyes loc cales en rela ación con el e medio am mbiente. Si tiene dud das, contac cte con las s autorida ades locale es para residuos. CUSBVC2! Lea atenta amente las instruccion nes del man nual antes de ¡Gracias por haber comprado la PC sarla. Si el aparato a ha sufrido alg gún daño en n el transpo orte no lo in nstale y pó óngase en contacto c con us su distribuido or. cluye: Inc ador de víd deo USB 2.0 0 adapta cable USB 2.0, lo ongitud ± 70cm 7 al del usuario manua DVD con c softwarre Ulead® Video V Studio 10.0 DVD mit m Treibern n, Arcsoft ShowBiz S DV VD2 und Bla azeVideo Magic M 3.0 (T Testversion) 2.. Instruc cciones de d seguridad parato lejos s del alcanc ce de perso onas no cap pacitadas y niños. Mantenga el ap suario no habrá de efe ectuar el mantenimien m nto de ninguna pieza. Contacte con c su El us distrribuidor si necesita n pie ezas de rec cambio. 3.. Normas s genera ales Vé éase la Garrantía de servicio s y calidad c Ve elleman ® al a final de este e manua al del usuarrio. Utilice el aparato só ólo en interiores. No exponga este e equipo a lluvia, humedad ni a po de salpic cadura o go oteo. ningún tip No expon nga este equipo a polv vo. No expo onga este equipo e a tem mperaturas s extremas.. No agite el e aparato. Evite usar excesiva fuerza durante el manejo y la ins stalación. • Familiaríce ese con el funcionamie f ento del ap parato antes de utilizarlo. es de segurridad, las modificacion m nes no auto orizadas del aparato están prohib bidas. Los • Por razone daños causados por modificacio m ones no auttorizadas, no n están cubiertos porr la garantía a. • Utilice sólo o el aparato o para las aplicaciones a s descritas en este ma anual. Su u uso incorrec cto anula la a garantía completame ente. • Los daños causados por descuid do de las in nstrucciones s de seguridad de este e manual in nvalidarán su uidor no serrá responsa able de ningún daño u otros prob blemas resultantes. garantía y su distribu • No utilice e este conv vertidor para p graba aciones ilegales. 4.. Caracte erísticas • se entrega a con softw ware fácil de e utilizar Ulead® Video Stud dio 10.0 Arcsoft ShowBiz DVD2 D Blazevid deo Magic 3.0 3 (versión de demostración) • alimentada a por puertto 2.0, no necesita n una alimentación adicion nal • brillo, conttraste, mattiz e intensiidad ajusta ables • pequeña, fácil f a lleva ar consigo • botón de captura c de la pantalla • plug-and-p play • función de e escritura (DVD+/-R/ ( /RW, DVD+ +/-VR, DVD-Video...) • pantalla co ompleta para una vistta previa de e programa as de vídeo • transmisió ón de ficherros de vídeo o a iPod, iP Pod touch, Apple A TV, PSP, P PS3, X XBOX, móviil • soporta la entrada de e ficheros de d vídeo de e alta definición • soporta ca asi cualquie er formato de d audio e imagen • es posible subir el víd deo a YouT Tube 23.08.2011 29 ©Velleman n nv PCUSBVC2 Rev. 02 5. Exigencias del sistema CPU (unidad central de proceso) Pentium 4 o más reciente sistema operativo Microsoft® Windows® 2000/XP/Vista/Windows 7 o más reciente memoria 512 MB RAM o más reciente disco duro 1 GB para el software, mín. 4 GB para la grabación resolución de la imagen 1024 x 768 o más reciente tarjeta de sonido tarjeta de sonido compatible Windows® (sólo para lectura) tarjeta gráfica tarjeta gráfica compatible DirectX 9.0C USB puerto compatible USB 2.0 6. Instalar los drivers OBSERVACIÓN IMPORTANTE: • ¡Instale los drivers y el software antes de conectar el hardware! • Asegúrese de que obtenga los derechos de administrador para el ordenador utilizado. • Desactive cualquier antivirus software durante la instalación del software. • Lea las informaciones sobre la exigencias del sistema en capítulo §5. • Introduzca el CD VELLEMAN© en el reproductor de CD del ordenador. Aparece la siguiente pantalla: • Haga clic en [Install driver]. • Haga clic en [Next >]. 23.08.2011 30 ©Velleman nv PCUSBVC2 Rev. 02 • Haga clic en [Finish] para completar la instalación. • Reinicie el ordenador al seleccionar [Yes, I want to restart my computer now]. • Conecte el PCUSBVC2 a la fuente de vídeo (p.ej. televisor, videocámara reproductor DVD...). ¡Conecte siempre el convertidor a la salida S-vídeo o compuesto/audio! Véase el manual del usuario del aparato de audio en cuestión en caso de duda. [1] non inclus • Introduzca el conector USB de la PCUSBVC2 en un puerto USB libre del ordenador. Sin embargo, no conecte el convertidor a un hub para evitar una pérdida de señal. • El sistema encuentra automáticamente el nuevo aparato conectado al puerto USB. Aparece un mensaje. Seleccione [No, not this time] y haga clic en [Next >]. • Seleccione [Install software automatically] y haga clic en [Next >]. Siga las instrucciones en la pantalla. • Haga clic en [continue anyway] si aparece una pantalla con el mensaje USB 2861 Device no ha pasado el test Windows Logo. • Haga clic en [Finish] para completar la instalación del driver. • Repita este procedimiento para instalar otro hardware hasta que aparezca el mensaje [Found new hardware: Your hardware is installed and configured for use]. • Controle la instalación de los drivers al hacer clic en [My computer] con el botón derecho del ratón y al seleccionar luego [Properties]. • Abra la pestaña [Hardware] y seleccione [Device manager]. 23.08.2011 31 ©Velleman nv PCUSBVC2 Rev. 02 • Haga clic en [Sound, video and game controllers]. • Los drivers [USB 2861 Device] y [USB EMP audio Device] han sido instalados de manera correcta si no se visualiza un triángulo amarillo con signo de exclamación. Si aparece un triángulo amarillo, desinstale el driver, desconecte la PCUSBVC2 y vuelva a instalar el driver. • Haga clic con el botón derecho del ratón en el driver y seleccione [properties] y luego la pestaña [Driver] para controlar la versión. 7. Instalar y configurar el software OBSERVACIÓN IMPORTANTE: • ¡Instale los drivers y el software antes de conectar el hardware! • Asegúrese de que obtenga los derechos de administrador para el ordenador utilizado. • Desactive cualquier antivirus software durante la instalación del software. • Lea las informaciones sobre la exigencias del sistema en capítulo §5. La PCUSBVC2 incluye dos paquetes de software completos (Ulead® Video Studio 10.0 y Arcsoft ShowBiz DVD2) y un paquete con una versión de demostración (Blazevideo Magic 3.0) que caduca 3 meses después de la instalación salvo si activa un número de licencia. 23.08.2011 32 ©Velleman nv PCUSBVC2 Rev. 02 a) ShowBiz DVD 2 • Introduzca el CD VELLEMAN© en el reproductor de CD del ordenador. Aparece la siguiente pantalla: • Haga clic en [Install ShowBiz DVD 2] y siga las instrucciones en la pantalla. Seleccione el idioma. El número de licencia está en el embalaje del CD-ROM. Guarde este número para cuando necesite consultarlo. • Después de haber completado la instalación, ejecute el software al hacer clic dos veces en el icono « Showbiz DVD2 » que está en el escritorio del ordenador. Aparece la siguiente pantalla: • Asegúrese de que la PCUSBVC2 esté conectado correctamente y seleccione [Capture, create, or edit videos]. • Ajuste los parámetros de vídeo y audio en la parte inferior de la pantalla. • Abra la pestaña [Video] y haga clic en [Input] bajo [Video Device] para seleccionar la entrada de vídeo, en este caso, Composite Video o S-Vídeo. • Haga clic en [Advance] para seleccionar el estándar de vídeo. 23.08.2011 33 ©Velleman nv PCUSBVC2 • Seleccione las opciones de audio bajo [Audio]. Rev. 02 • Haga clic en [Record] para determinar el nombre, el lugar y el formato del fichero. • Para más informaciones sobre el uso del software, haga clic en [help] de la barra de menú. b) BlazeVideo Magic 3.0 • Introduzca el CD VELLEMAN© en el reproductor de CD del ordenador. Aparece la siguiente pantalla: • Haga clic en [Install Magic 3.0] y siga las instrucciones en la pantalla. Seleccione el idioma. El número de licencia está en el embalaje del CD-ROM. Guarde este número para cuando necesite consultarlo. 23.08.2011 34 ©Velleman nv PCUSBVC2 Rev. 02 • Después de haber completado la instalación, ejecute el software al hacer clic dos veces en el icono « BlazeVideo Magic 3.0 » que está en el escritorio del ordenador. Aparece la siguiente pantalla: • Siga los pasos mencionados en la pantalla: o Paso 1: añadir o borrar un fichero de vídeo. Haga clic en [Add] para añadir un fichero. El fichero añadido se visualiza en la pantalla principal. Borre un fichero al seleccionar y al hacer clic en [Delete]. o Paso 2: selección del formato del fichero en el menú desplegable. Haga clic en [Setting] para un ajuste detallado (véase el ejemplo a continuación). o Paso 3: atribuir un directorio de destino de los ficheros convertidos con la función [Browse]. Abra el directorio de destino en una nueva pantalla al hacer clic en [Location]. • Para más informaciones sobre el uso del software, haga clic en [?]. 23.08.2011 35 ©Velleman nv PCUSBVC2 Rev. 02 c) ShowBiz DVD 2 • Introduzca el CD en el reproductor de CD del ordenador. • Haga clic en [Next] y seleccione el idioma. Luego, haga clic en [Install VideoStudio 10.0] > [Next] y siga las instrucciones en la pantalla hasta que esté instalado el software. • Reinicie el ordenador. • Ejecute la aplicación al hacer clic dos veces en el icono « Ulead VideoStudio » que esetá en el escritorio. Para más informaciones sobre el uso del software, haga clic en el fichero bajo el directorio \Document\Manual del CD-ROM. 8. Solución de problemas Problema de conexión del software La PCUSBVC2 está equipada con un conector S-vídeo hembra y tres conectores RCA hembras. La mayoría de los aparatos de vídeo también están equipados con conectores hembra. El adaptador RCA macho-macho o S-Vídeo macho-macho no está incluido pero está disponible por separado. Sin embargo, muchos aparatos de vídeo (p.ej. televisor, videograbadora) incluyen un cable de adaptador. Para un aparato que sólo está equipado con una conexión SCART necesita un cable adaptador a 3 x conector SCART. El hardware no ha pasado el test Windows Logo Ignore este mensaje porque no influye en ningún caso el buen funcionamiento del software. Este mensaje indica sólo que el software no ha sido probado por Microsoft® mismo. Duración de la grabación La PCUSBVC2 es un convertidor en tiempo real. Ejemplo: copiar una grabación de 3 horas durará 3 horas. Tamaño de la grabación El tamaño del fichero depende del formato y el tamaño de la imagen seleccionados. Para disminuir el tamaño general del fichero, seleccione un formato más pequeño o un tamaño de la imagen inferior. Esto disminuirá también la calidad de la imagen. Ejemplo: una grabación de 10 minutos ocupa aproximadamente 1 GB en el formato AVI (ninguna compresión), aproximadamente 200 MB en el formato MPEG y aproximadamente 30 MB en el formato WMV. Copiar audio al PC La PCUSBVC2 no permite la grabación de señales de audio separadas. 23.08.2011 36 ©Velleman nv PCUSBVC2 Rev. 02 9. Especificaciones soporta USB 2.0 soporta NTSC, PAL entrada de vídeo 1 x RCA compuesto, 1 x S-Vídeo entrada de audio RCA estéreo resolución NTSC 720 x 480 @ 30 imágenes/s PAL 720 x 576 @ 25 imágenes /s exigencias del sistema puerto USB 2.0 sistema operativo Microsoft® Windows® 2000/XP/Vista/Windows 7 CPU (unidad central de proceso) espacio libre en el disco duro DVD Pentium 4 o más reciente memoria mín. 512 MB resolución de la imagen tarjeta de sonido 1024 x 768 o más reciente tarjeta gráfica 1Gb para el software, mín. 4Gb para la grabación lector o grabadora DVD estándar tarjeta de sonido compatible Windows® (sólo para lectura) tarjeta gráfica compatible DirectX 9.0C Utilice este aparato sólo con los accesorios originales. Velleman NV no será responsable de daños ni lesiones causados por un uso (indebido) de este aparato. Para más información sobre este producto y la versión más reciente de este manual del usuario, visite nuestra página www.velleman.eu. Se pueden modificar las especificaciones y el contenido de este manual sin previo aviso. © DERECHOS DE AUTOR Velleman NV dispone de los derechos de autor para este manual del usuario. Todos los derechos mundiales reservados. Está estrictamente prohibido reproducir, traducir, copiar, editar y guardar este manual del usuario o partes de ello sin previo permiso escrito del derecho habiente. El software incluido está protegido por el derecho de autor de los propietarios respectivos. 23.08.2011 37 ©Velleman nv PCUSBVC2 Rev. 02 BE EDIENU UNGSAN NLEITUN NG 1.. Einführrung An n alle Einw wohner der Europäis schen Unio on Wichtige Um mweltinforrmationen n über dies ses Produkt Dieses Symbol auf dem Prrodukt oder der Verpa ackung zeig gt an, dass die Entsorg gung dieses h seinem Le ebenszyklus s der Umwe elt Schaden n zufügen k kann. Entso orgen Sie die Produktes nach erwendeten n Batterien) nicht als unsortierte es Hausmüll; die Einhe eit oder Einheit (oder ve wendeten Batterien mü üssen von einer e spezia alisierten Firma F zweck ks Recycling entsorgt verw werd den. Diese Einheit muss an den Händler H ode er ein örtlic ches Recyclling-Untern nehmen retou urniert werrden. Respe ektieren Sie e die örtlich hen Umwelttvorschrifte en. Fa alls Zweife el bestehen n, wenden n Sie sich für f Entsorg gungsrichttlinien an Ihre örtlic che Behörd de. Wiir bedanken n uns für de en Kauf des PCUSBVC2! Lesen Sie diese Bedienungs B anleitung vor v Inbetriebnahme sorgfälttig durch. Überprüfen Ü ansportschäden vorlie egen. Sie, ob Tra eferumfang g: Lie USB 2.0 2 Videoad dapter USB 2.0-Kabel, 2 L Länge ± 70 0 cm Bedien nungsanleittung DVD mit m Ulead® Video Stud dio 10.0 Sofftware DVD mit m Treibern n, Arcsoft ShowBiz S DV VD2 und Bla azeVideo Magic M 3.0 (T Testversion) 2.. Sicherh heitshinw weise n Sie Kinde er und Unbe efugte vom m Gerät fern n. Halten bt keine zu wartenden Teile. Besttellen Sie eventuelle e E Ersatzteile bei Ihrem Fachhändle F er. Es gib 3.. Allgeme eine Rich htlinien Sie ehe Vellem man® Serv vice- und Qualitätsg Q garantie am m Ende die eser Bedienungsanleitu ung. Verwend den Sie das s Gerät nurr im Innen nbereich. Schützen S S Sie das Gerä ät vor Rege en und Feu uchte. Setze en Sie das Gerät keine er Flüssigke eit wie z.B. Tropf- ode er Spritzwa asser, aus. en Sie das Gerät G vor Staub. S Schü ützen Sie da as Gerät vo or extremen n Schütze Tempera aturen. Vermeid den Sie Ersc chütterungen. Vermeiiden Sie rohe Gewalt w während de er Installation und Bed dienung des s Gerätes. • Nehmen Sie S das Gerä ät erst in Betrieb, B nac chdem Sie sich s mit seiinen Funktionen vertra aut gemach ht haben. • Eigenmäch htige Verän nderungen sind aus Sicherheitsgrründen verrboten. Bei Schäden verursacht durch eige enmächtige e Änderunge en erlischt der Garanttieanspruch h. n Sie das Gerät G nur fü ür Anwendu ungen besc chrieben in dieser Bedienungsanleitung sons st • Verwenden kann dies zu Schäden n am Produ ukt führen und u erlischt der Garan ntieanspruc ch. • Bei Schäde en, die durc ch Nichtbea achtung derr Bedienung gsanleitung verursachtt werden, erlischt e der Garantiean nspruch. Fü ür daraus re esultierende e Folgeschä äden übernimmt der Hersteller ke eine Haftung g. • Verwende en Sie das s Gerät nic cht für ille egale Aufnahmen. 4.. Eigensc chaften • Lieferung mit benutzerfreundlicher Software Ulead® Video Stud dio 10.0 Arcsoft ShowBiz DVD2 D Blazevid deo Magic 3.0 3 (Testve ersion) • Stromvers sorgung übe er USB 2.0-Port, brau ucht keine zusätzliche z Stromversorgung • Helligkeit, Kontrast, Farbton und Intensität regelbar • sehr klein,, einfach mitzunehme m n • Schnappsc chusstaste • Plug-and-P Play • unterstütz zt Schreibfu unktion (DV VD+/-R/RW W, DVD+/-V VR, DVD-Vid deo...) • Vollbild fürr eine Vorschau der Videoprogra V mme • Übertragung von Videodateien auf a iPod, iP Pod touch, Apple A TV, PSP, P PS3, X XBOX, Mobiltelefon • unterstütz zt die Eingabe von HD-Videodateien 23.08.2011 38 ©Velleman n nv PCUSBVC2 • unterstützt fast alle Audio- und Bildformate • das Video kann auf YouTube hochgeladen werden Rev. 02 5. Systemanforderungen CPU (Zentraleinheit) Pentium 4 oder höher Betriebssystem Microsoft® Windows® 2000/XP/Vista/Windows 7 oder höher Speicher 512 MB RAM oder höher freier Speicherplatz 1GB für Software, min. 4GB für Aufnahme Auflösung display 1024 x 768 oder höher Soundkarte Windows®-kompatible Soundkarte (nur für Wiedergabe) Grafikkarte kompatibel DirectX 9.0C USB USB 2.0 kompatibler Port 6. Die Treiber installieren WICHTIGE BEMERKUNGEN • Installieren Sie die Treiber und die Software, ehe Sie die Hardware anschließen! • Beachten Sie bei der Installation der Treiber und der Software, dass Sie die Administrativen Rechte auf dem zu verwenden Computer haben. • Schalten Sie alle Antivirussoftware aus, ehe Sie die Software installieren. • Siehe §5 für die min. Systemanforderungen. • Legen Sie das VELLEMAN© CD-ROM in das CD-ROM-Laufwerk. Nachfolgendes Fenster erscheint im Display: • Klicken Sie auf [Install driver]. 23.08.2011 39 ©Velleman nv PCUSBVC2 Rev. 02 • Klicken Sie auf [Next >]. • Klicken Sie auf [Finish] um die Installation zu beenden. • Starten Sie den Computer neu, indem Sie [Yes, I want to restart my computer now] klicken. • Verbinden Sie den PCUSBVC2 mit dem S-video- oder Komposit-/Audio-Ausgang der Videoquelle (z.B. Fernseher, Kamera, DVD-Spieler). Siehe die Bedienungsanleitung der Videoquelle im Zweifelsfall. [1] niet meegeleverd • Stecken Sie den USB-Stecker des PCUSBVC2 in einen freien USB-Port des Computers. Um Signalverlust zu vermeiden, schließen Sie den PCUSBVC2 nicht über einen Netzknoten an. • Ihr Computer findet neue Hardware auf dem USB-Port. Wählen Sie [No, not this time] aus und klicken Sie danach auf [Next >]. • Wählen Sie [Install software automatically] aus und klicken Sie auf [Next >]. Befolgen Sie die Anweisungen im Bildschirm. • Klicken Sie auf [continue anyway] wenn ein Fenster mit der Nachricht, dass USB 2861 Device den Windows Logo-Test nicht überstanden hat, erscheint. • Wählen Sie [Finish] um die Installation des Treibers zu beenden. • Wiederholen Sie oben stehendes Verfahren, wenn der Computer weitere Hardware findet bis das Fenster [Found new hardware: Your hardware is installed and configured for use] erscheint. 23.08.2011 40 ©Velleman nv PCUSBVC2 Rev. 02 • Überprüfen Sie, ob alle Treiber korrekt installiert sind. Klicken Sie mit der rechten Maustaste auf [My computer] und klicken Sie danach auf [Properties]. • Gehen Sie zu [Hardware] und wählen Sie [Device manager]. • Gehen Sie zu [Sound, video and game controllers]. • Überprüfen Sie, ob da vor [USB 2861 Device] en [USB EMP audio Device] ein gelbes Dreieck mit Ausrufezeichen steht. Wenn nicht, dann sind die Treiber korrekt installiert worden. Gibt es ein gelbes Dreieck, entfernen Sie den Treiber, trennen Sie dien PCUSBVC2 des Computers und installieren Sie den Treiber wieder. • Klicken Sie mit der rechten Maustaste auf [properties] und wählen Sie [Driver] um die Treiberversion zu überprüfen. 7. Die Software installieren und konfigurieren WICHTIGE BEMERKUNGEN • Installieren Sie die Treiber und die Software, ehe Sie die Hardware anschließen! • Beachten Sie bei der Installation der Treiber und der Software, dass Sie die Administrativen Rechte auf dem zu verwenden Computer haben. • Schalten Sie alle Antivirussoftware aus, ehe Sie die Software installieren. • Siehe §5 für die min. Systemanforderungen. Der PCUSBVC2 wird mit zwei vollwertigen Softwarepaketen (Ulead® Video Studio 10.0 und Arcsoft ShowBiz DVD2) und eine Testversion (Blazevideo Magic 3.0) geliefert. Die Testversion verfällt 3 Monate nach der Installation außer wenn Sie eine Lizenznummer kaufen. 23.08.2011 41 ©Velleman nv PCUSBVC2 Rev. 02 a) ShowBiz DVD 2 • Legen Sie das VELLEMAN© CD-ROM in das CD-ROM-Laufwerk. Nachfolgendes Fenster erscheint im Display: • Klicken Sie auf [Install ShowBiz DVD 2] und befolgen Sie die Anweisungen im Bildschirm. Wählen Sie die gewünschte Sprache aus. Die Lizenznummer steht auf der Hülle des CD-Roms. Bewahren Sie diese Nummer für künftige Einsichtnahme auf. • Starten Sie die Software nach der Beendung der Installation, indem Sie ‘Showbiz DVD2’ auf der Arbeitsoberfläche zwei Mal klicken. Nachfolgendes Fenster erscheint im Display: • Verbinden Sie den PCUSBVC2 korrekt mit dem Computer und wählen Sie [Capture, create, or edit videos]. • Konfigurieren Sie die Video- und Audio-Einstellungen unten im Bildschirm. • Klicken Sie in den Video-Einstellungen auf [Input] neben [Video Device] und wählen Sie den Video-Eingang (Composite Video oder S-Video). • Klicken Sie danach auf [Advance] um den Videostandard auszuwählen. 23.08.2011 42 ©Velleman nv PCUSBVC2 • Wählen Sie die Audio-Optionen unter [Audio] aus. Rev. 02 • Klicken Sie auf [Record] um den Dateinamen, den -Ort und das -Format zu bestimmen. • Für mehr Information über die Anwendung der Software, klicken Sie auf [help] in der Menüleiste. b) BlazeVideo Magic 3.0 • Legen Sie das VELLEMAN© CD-ROM in das CD-ROM-Laufwerk. Nachfolgendes Fenster erscheint im Display: • Klicken Sie auf [Install Magic 3.0] und befolgen Sie die Anweisungen im Bildschirm. Wählen Sie die gewünschte Sprache aus. Die Lizenznummer steht auf der Hülle des CD-Roms. Bewahren Sie diese Nummer für künftige Einsichtnahme auf. 23.08.2011 43 ©Velleman nv PCUSBVC2 Rev. 02 • Starten Sie die Software nach der Beendung der Installation, indem Sie ‘BlazeVideo Magic 3.0’ auf der Arbeitsoberfläche zwei Mal klicken. Nachfolgendes Fenster erscheint im Display: • Befolgen Sie die Schritte, beschrieben im Fenster: o Schritt 1: Videodatei hinzufügen oder löschen. Klicken Sie auf [Add] um eine Datei hinzuzufügen. Die hinzugefügten Dateien werden im Fenster angezeigt. Entfernen Sie eine Datei, indem Sie eine Datei auswählen und danach auf [Delete] klicken. o Schritt 2: Wählen Sie das Format über das Aufklappmenü. Klicken Sie auf [Setting] für mehr Einstellungsmöglichkeiten (Siehe Screenshot unten). o Schritt 3: wählen Sie das Zielverzeichnis, wo Sie die Dateien über [Browse] speichern werden. Öffnen Sie das Zielverzeichnis über [Location] in einem neuen Fenster. • Für mehr Information über die Anwendung der Software, klicken Sie auf [?] in der Menüleiste. 23.08.2011 44 ©Velleman nv PCUSBVC2 Rev. 02 c) ShowBiz DVD 2 • Legen Sie das CD-ROM in das CD-ROM-Laufwerk. • Klicken Sie auf [Next] und wählen Sie die gewünschte Sprache aus. Klicken Sie danach auf [Install VideoStudio 10.0] > [Next] und befolgen Sie die Anweisungen im Bildschirm, um die Installation zu beenden. • Starten Sie den Computer neu. • Starten Sie die Applikation, indem Sie ‘Ulead VideoStudio’ auf der Arbeitsoberfläche zwei Mal klicken. Siehe das mitgelieferte CD-ROM (unter \Document\Manual) für mehr Information über die Anwendung der Software. 8. Problemlösung Problem beim Anschließen der Hardware Der PCUSBVC2 verfügt über eine S-video-Buchse und drei RCA-Buchsen. Die meisten Videogeräte verfügt auch über Buchsen. Stecker-Stecker RCA-Kabel oder Stecker-Stecker SVideo Kabel sind nicht mitgeliefert, sondern diese sind separat erhältlich. Neue Geräte werden meistens mit diesen Kabeln geliefert (z.B. Fernseher, Videorecorder). Verfügt ein Gerät nur über einen SCART-Anschluss, so brauchen Sie einen Adapter mit SCART-Stecker und 3 x RCA-Stecker. Die Hardware hat den Windows Logo-test nicht überstanden Ignorieren Sie diese Nachricht. Diese Nachrricht zeigt nur an, das Microsoft® die Software nicht selber getestet hat. Aufnahmedauer Der PCUSBVC2 ist ein Echtzeit-Aufnahmegerät. Das Kopieren einer Aufnahme von 3 Stunden dauert also 3 Stunden. Größe der Aufnahmedatei Die Dateigröße hängt vom gewählten Format und der Bildgröße ab. Sie können die Dateigröße beschränken, indem Sie ein anderes Format auszuwählen oder die Bildgröße zu verkleinern. Bemerken Sie, dass die Bildqualität beeinflussen wird. Beispiel: eine Aufnahme von 10 Minuten in AVI-Format (keine Kompression) nimmt 1 GB ein, dieselbe Aufnahme in MPEG-Format nimmt etwa 200 MB ein, im WMV-Format etwa 30 MB. Audio auf PC kopieren Sie können mit dem PCUSBVC2 keine separate Audiosignale kopieren. 23.08.2011 45 ©Velleman nv PCUSBVC2 Rev. 02 9. Technische Daten unterstützt USB 2.0 unterstützt NTSC, PAL Video-Eingang 1 x RCA komposit, 1 x S-Video Audio-Eingang Stereo RCA Auflösung NTSC 720 x 480 @ 30 fps PAL 720 x 576 @ 25 fps Systemanforderun gen USB 2.0-Port Betriebssystem Microsoft® Windows® 2000/XP/Vista/Windows 7 CPU (Zentraleinheit) Pentium 4 oder höher freier Speicherplatz 1GB für Software, min. 4GB für Aufnahme DVD Standard DVD-Spieler oder -Rekorder Speicher min. 512 MB Bildschirmauflösung 1024 x 768 oder höher Soundkarte Windows®-kompatible Soundkarte (nur für Wiedergabe) compatibel DirectX 9.0C Grafikkarte Verwenden Sie dieses Gerät nur mit originellen Zubehörteilen. Velleman NV übernimmt keine Haftung für Schaden oder Verletzungen bei (falscher) Anwendung dieses Gerätes. Für mehr Informationen zu diesem Produkt und die neueste Version dieser Bedienungsanleitung, siehe www.velleman.eu. Alle Änderungen ohne vorherige Ankündigung vorbehalten. © URHEBERRECHT Velleman NV besitzt das Urheberrecht für diese Bedienungsanleitung. Alle weltweiten Rechte vorbehalten. ohne vorherige schriftliche Genehmigung des Urhebers ist es nicht gestattet, diese Bedienungsanleitung ganz oder in Teilen zu reproduzieren, zu kopieren, zu übersetzen, zu bearbeiten oder zu speichern. Die mitgelieferte Software ist von den entsprechenden Eigentümern urheberrechtlich geschützt. 23.08.2011 46 ©Velleman nv Velleman® Service and Quality Warranty Velleman® has over 35 years of experience in the electronics world and distributes its products in more than 85 countries. All our products fulfil strict quality requirements and legal stipulations in the EU. In order to ensure the quality, our products regularly go through an extra quality check, both by an internal quality department and by specialized external organisations. If, all precautionary measures notwithstanding, problems should occur, please make appeal to our warranty (see guarantee conditions). General Warranty Conditions Concerning Consumer Products (for EU): • All consumer products are subject to a 24-month warranty on production flaws and defective material as from the original date of purchase. • Velleman® can decide to replace an article with an equivalent article, or to refund the retail value totally or partially when the complaint is valid and a free repair or replacement of the article is impossible, or if the expenses are out of proportion. You will be delivered a replacing article or a refund at the value of 100% of the purchase price in case of a flaw occurred in the first year after the date of purchase and delivery, or a replacing article at 50% of the purchase price or a refund at the value of 50% of the retail value in case of a flaw occurred in the second year after the date of purchase and delivery. • Not covered by warranty: - all direct or indirect damage caused after delivery to the article (e.g. by oxidation, shocks, falls, dust, dirt, humidity...), and by the article, as well as its contents (e.g. data loss), compensation for loss of profits; - frequently replaced consumable goods, parts or accessories such as batteries, lamps, rubber parts, drive belts... (unlimited list); - flaws resulting from fire, water damage, lightning, accident, natural disaster, etc. …; - flaws caused deliberately, negligently or resulting from improper handling, negligent maintenance, abusive use or use contrary to the manufacturer’s instructions; - damage caused by a commercial, professional or collective use of the article (the warranty validity will be reduced to six (6) months when the article is used professionally); - damage resulting from an inappropriate packing and shipping of the article; - all damage caused by modification, repair or alteration performed by a third party without written permission by Velleman®. • Articles to be repaired must be delivered to your Velleman® dealer, solidly packed (preferably in the original packaging), and be completed with the original receipt of purchase and a clear flaw description. • Hint: In order to save on cost and time, please reread the manual and check if the flaw is caused by obvious causes prior to presenting the article for repair. Note that returning a non-defective article can also involve handling costs. • Repairs occurring after warranty expiration are subject to shipping costs. • The above conditions are without prejudice to all commercial warranties. The above enumeration is subject to modification according to the article (see article’s manual). Velleman® service- en kwaliteitsgarantie Velleman® heeft ruim 35 jaar ervaring in de elektronicawereld en verdeelt in meer dan 85 landen. Al onze producten beantwoorden aan strikte kwaliteitseisen en aan de wettelijke bepalingen geldig in de EU. Om de kwaliteit te waarborgen, ondergaan onze producten op regelmatige tijdstippen een extra kwaliteitscontrole, zowel door onze eigen kwaliteitsafdeling als door externe gespecialiseerde organisaties. Mocht er ondanks deze voorzorgen toch een probleem optreden, dan kunt u steeds een beroep doen op onze waarborg (zie waarborgvoorwaarden). Algemene waarborgvoorwaarden consumentengoederen (voor Europese Unie): • Op alle consumentengoederen geldt een garantieperiode van 24 maanden op productie- en materiaalfouten en dit vanaf de oorspronkelijke aankoopdatum. • Indien de klacht gegrond is en een gratis reparatie of vervanging van een artikel onmogelijk is of indien de kosten hiervoor buiten verhouding zijn, kan Velleman® beslissen het desbetreffende artikel te vervangen door een gelijkwaardig artikel of de aankoopsom van het artikel gedeeltelijk of volledig terug te betalen. In dat geval krijgt u een vervangend product of terugbetaling ter waarde van 100% van de aankoopsom bij ontdekking van een gebrek tot één jaar na aankoop en levering, of een vervangend product tegen 50% van de kostprijs of terugbetaling van 50 % bij ontdekking na één jaar tot 2 jaar. • Valt niet onder waarborg: - alle rechtstreekse of onrechtstreekse schade na de levering veroorzaakt aan het toestel (bv. door oxidatie, schokken, val, stof, vuil, vocht...), en door het toestel, alsook zijn inhoud (bv. verlies van data), vergoeding voor eventuele winstderving. - verbruiksgoederen, onderdelen of hulpstukken die regelmatig dienen te worden vervangen, zoals bv. batterijen, lampen, rubberen onderdelen, aandrijfriemen... (onbeperkte lijst). - defecten ten gevolge van brand, waterschade, bliksem, ongevallen, natuurrampen, enz. - defecten veroorzaakt door opzet, nalatigheid of door een onoordeelkundige behandeling, slecht onderhoud of abnormaal gebruik of gebruik van het toestel strijdig met de voorschriften van de fabrikant. - schade ten gevolge van een commercieel, professioneel of collectief gebruik van het apparaat (bij professioneel gebruik wordt de garantieperiode herleid tot 6 maand). - schade veroorzaakt door onvoldoende bescherming bij transport van het apparaat. - alle schade door wijzigingen, reparaties of modificaties uitgevoerd door derden zonder toestemming van Velleman®. • Toestellen dienen ter reparatie aangeboden te worden bij uw Velleman®-verdeler. Het toestel dient vergezeld te zijn van het oorspronkelijke aankoopbewijs. Zorg voor een degelijke verpakking (bij voorkeur de originele verpakking) en voeg een duidelijke foutomschrijving bij. • Tip: alvorens het toestel voor reparatie aan te bieden, kijk nog eens na of er geen voor de hand liggende reden is waarom het toestel niet naar behoren werkt (zie handleiding). Op deze wijze kunt u kosten en tijd besparen. Denk eraan dat er ook voor niet-defecte toestellen een kost voor controle aangerekend kan worden. • Bij reparaties buiten de waarborgperiode zullen transportkosten aangerekend worden. • Elke commerciële garantie laat deze rechten onverminderd. Bovenstaande opsomming kan eventueel aangepast worden naargelang de aard van het product (zie handleiding van het betreffende product). Garantie de service et de qualité Velleman® Velleman® jouit d’une expérience de plus de 35 ans dans le monde de l’électronique avec une distribution dans plus de 85 pays. Tous nos produits répondent à des exigences de qualité rigoureuses et à des dispositions légales en vigueur dans l’UE. Afin de garantir la qualité, nous soumettons régulièrement nos produits à des contrôles de qualité supplémentaires, tant par notre propre service qualité que par un service qualité externe. Dans le cas improbable d’un défaut malgré toutes les précautions, il est possible d’invoquer notre garantie (voir les conditions de garantie). Conditions générales concernant la garantie sur les produits grand public (pour l’UE) : • tout produit grand public est garanti 24 mois contre tout vice de production ou de matériaux à dater du jour d’acquisition effective ; • si la plainte est justifiée et que la réparation ou le remplacement d’un article est jugé impossible, ou lorsque les coûts s’avèrent disproportionnés, Velleman® s’autorise à remplacer ledit article par un article équivalent ou à rembourser la totalité ou une partie du prix d’achat. Le cas échéant, il vous sera consenti un article de remplacement ou le remboursement complet du prix d’achat lors d’un défaut dans un délai de 1 an après l’achat et la livraison, ou un article de remplacement moyennant 50% du prix d’achat ou le remboursement de 50% du prix d’achat lors d’un défaut après 1 à 2 ans. • sont par conséquent exclus : - tout dommage direct ou indirect survenu à l’article après livraison (p.ex. dommage lié à l’oxydation, choc, chute, poussière, sable, impureté…) et provoqué par l’appareil, ainsi que son contenu (p.ex. perte de données) et une indemnisation éventuelle pour perte de revenus ; - tout bien de consommation ou accessoire, ou pièce qui nécessite un remplacement régulier comme p.ex. piles, ampoules, pièces en caoutchouc, courroies… (liste illimitée) ; - tout dommage qui résulte d’un incendie, de la foudre, d’un accident, d’une catastrophe naturelle, etc. ; - out dommage provoqué par une négligence, volontaire ou non, une utilisation ou un entretien incorrects, ou une utilisation de l’appareil contraire aux prescriptions du fabricant ; - tout dommage à cause d’une utilisation commerciale, professionnelle ou collective de l’appareil (la période de garantie sera réduite à 6 mois lors d’une utilisation professionnelle) ; - tout dommage à l’appareil qui résulte d’une utilisation incorrecte ou différente que celle pour laquelle il a été initialement prévu comme décrit dans la notice ; - tout dommage engendré par un retour de l’appareil emballé dans un conditionnement non ou insuffisamment protégé. - toute réparation ou modification effectuée par une tierce personne sans l’autorisation explicite de SA Velleman® ; - frais de transport de et vers Velleman® si l’appareil n’est plus couvert sous la garantie. • toute réparation sera fournie par l’endroit de l’achat. L’appareil doit nécessairement être accompagné du bon d’achat d’origine et être dûment conditionné (de préférence dans l’emballage d’origine avec mention du défaut) ; • tuyau : il est conseillé de consulter la notice et de contrôler câbles, piles, etc. avant de retourner l’appareil. Un appareil retourné jugé défectueux qui s’avère en bon état de marche pourra faire l’objet d’une note de frais à charge du consommateur ; • une réparation effectuée en-dehors de la période de garantie fera l’objet de frais de transport ; • toute garantie commerciale ne porte pas atteinte aux conditions susmentionnées. La liste susmentionnée peut être sujette à une complémentation selon le type de l’article et être mentionnée dans la notice d’emploi. Garantía de servicio y calidad Velleman® Velleman® disfruta de una experiencia de más de 35 años en el mundo de la electrónica con una distribución en más de 85 países. Todos nuestros productos responden a normas de calidad rigurosas y disposiciones legales vigentes en la UE. Para garantizar la calidad, sometimos nuestros productos regularmente a controles de calidad adicionales, tanto por nuestro propio servicio de calidad como por un servicio de calidad externo. En el caso improbable de que surgieran problemas a pesar de todas las precauciones, es posible apelar a nuestra garantía (véase las condiciones de garantía). Condiciones generales referentes a la garantía sobre productos de venta al público (para la Unión Europea): • Todos los productos de venta al público tienen un período de garantía de 24 meses contra errores de producción o errores en materiales desde la adquisición original; • Si la queja está fundada y si la reparación o la sustitución de un artículo es imposible, o si los gastos son desproporcionados, Velleman® autoriza reemplazar el artículo por un artículo equivalente o reembolsar la totalidad o una parte del precio de compra. En este caso, recibirá un artículo de recambio o el reembolso completo del precio de compra al descubrir un defecto hasta un año después de la compra y la entrega, o un artículo de recambio al 50% del precio de compra o la sustitución de un 50% del precio de compra al descubrir un defecto después de 1 a 2 años. • Por consiguiente, están excluidos entre otras cosas: - todos los daños causados directamente o indirectamente al aparato y su contenido después de la entrega (p.ej. por oxidación, choques, caída,...) y causados por el aparato, al igual que el contenido (p.ej. pérdida de datos) y una indemnización eventual para falta de ganancias; - partes o accesorios que deban ser reemplazados regularmente, como por ejemplo baterías, lámparas, partes de goma, ... (lista ilimitada) - defectos causados por un incendio, daños causados por el agua, rayos, accidentes, catástrofes naturales, etc. ; - defectos causados a conciencia , descuido o por malos tratos, un mantenimiento inapropiado o un uso anormal del aparato contrario a las instrucciones del fabricante; - daños causados por un uso comercial, profesional o colectivo del aparato (el período de garantía se reducirá a 6 meses con uso profesional) ; - daños causados por un uso incorrecto o un uso ajeno al que est está previsto el producto inicialmente como está descrito en el manual del usuario ; - daños causados por una protección insuficiente al transportar el aparato. - daños causados por reparaciones o modificaciones efectuadas por una tercera persona sin la autorización explicita de SA Velleman® ; - se calcula gastos de transporte de y a Velleman® si el aparato ya no está cubierto por la garantía. • Cualquier reparación se efectuará por el lugar de compra. Devuelva el aparato con la factura de compra original y transpórtelo en un embalaje sólido (preferentemente el embalaje original). Incluya también una buena descripción del defecto ; • Consejo: Lea el manual del usuario y controle los cables, las pilas, etc. antes de devolver el aparato. Si no se encuentra un defecto en el artículo los gastos podrían correr a cargo del cliente; • Los gastos de transporte correrán a carga del cliente para una reparación efectuada fuera del periode de garantía. • Cualquier gesto comercial no disminuye estos derechos. La lista previamente mencionada puede ser adaptada según el tipo de artículo (véase el manual del usuario del artículo en cuestión) Velleman® Service- und Qualitätsgarantie Velleman® hat gut 35 Jahre Erfahrung in der Elektronikwelt und vertreibt seine Produkte in über 85 Ländern. Alle Produkte entsprechen den strengen Qualitätsforderungen und gesetzlichen Anforderungen in der EU. Um die Qualität zu gewährleisten werden unsere Produkte regelmäßig einer zusätzlichen Qualitätskontrolle unterworfen, sowohl von unserer eigenen Qualitätsabteilung als auch von externen spezialisierten Organisationen. Sollten, trotz aller Vorsichtsmaßnahmen, Probleme auftreten, nehmen Sie bitte die Garantie in Anspruch (siehe Garantiebedingungen). Allgemeine Garantiebedingungen in Bezug auf Konsumgüter (für die Europäische Union): • Alle Produkte haben für Material- oder Herstellungsfehler eine Garantieperiode von 24 Monaten ab Verkaufsdatum. • Wenn die Klage berechtigt ist und falls eine kostenlose Reparatur oder ein Austausch des Gerätes unmöglicht ist, oder wenn die Kosten dafür unverhältnismäßig sind, kann Velleman® sich darüber entscheiden, dieses Produkt durch ein gleiches Produkt zu ersetzen oder die Kaufsumme ganz oder teilweise zurückzuzahlen. In diesem Fall erhalten Sie ein Ersatzprodukt oder eine Rückzahlung im Werte von 100% der Kaufsumme im Falle eines Defektes bis zu 1 Jahr nach Kauf oder Lieferung, oder Sie bekommen ein Ersatzprodukt im Werte von 50% der Kaufsumme oder eine Rückzahlung im Werte von 50 % im Falle eines Defektes im zweiten Jahr. • Von der Garantie ausgeschlossen sind: - alle direkten oder indirekten Schäden, die nach Lieferung am Gerät und durch das Gerät verursacht werden (z.B. Oxidation, Stöße, Fall, Staub, Schmutz, Feuchtigkeit, ...), sowie auch der Inhalt (z.B. Datenverlust), Entschädigung für eventuellen Gewinnausfall. - Verbrauchsgüter, Teile oder Zubehörteile, die regelmäßig ausgewechselt werden, wie z.B. Batterien, Lampen, Gummiteile, Treibriemen, usw. (unbeschränkte Liste). - Schäden verursacht durch Brandschaden, Wasserschaden, Blitz, Unfälle, Naturkatastrophen, usw. - Schäden verursacht durch absichtliche, nachlässige oder unsachgemäße Anwendung, schlechte Wartung, zweckentfremdete Anwendung oder Nichtbeachtung von Benutzerhinweisen in der Bedienungsanleitung. - Schäden infolge einer kommerziellen, professionellen oder kollektiven Anwendung des Gerätes (bei gewerblicher Anwendung wird die Garantieperiode auf 6 Monate zurückgeführt). - Schäden verursacht durch eine unsachgemäße Verpackung und unsachgemäßen Transport des Gerätes. - alle Schäden verursacht durch unautorisierte Änderungen, Reparaturen oder Modifikationen, die von einem Dritten ohne Erlaubnis von Velleman® vorgenommen werden. • Im Fall einer Reparatur, wenden Sie sich an Ihren Velleman®Verteiler. Legen Sie das Produkt ordnungsgemäß verpackt (vorzugsweise die Originalverpackung) und mit dem OriginalKaufbeleg vor. Fügen Sie eine deutliche Fehlerumschreibung hinzu. • Hinweis: Um Kosten und Zeit zu sparen, lesen Sie die Bedienungsanleitung nochmals und überprüfen Sie, ob es keinen auf de Hand liegenden Grund gibt, ehe Sie das Gerät zur Reparatur zurückschicken. Stellt sich bei der Überprüfung des Geräts heraus, dass kein Geräteschaden vorliegt, könnte dem Kunden eine Untersuchungspauschale berechnet. • Für Reparaturen nach Ablauf der Garantiefrist werden Transportkosten berechnet. • Jede kommerzielle Garantie lässt diese Rechte unberührt. Die oben stehende Aufzählung kann eventuell angepasst werden gemäß der Art des Produktes (siehe Bedienungsanleitung des Gerätes).