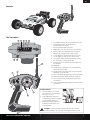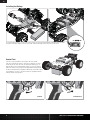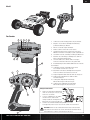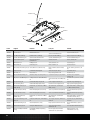
1
®
INSTRUCTION MANUAL
BEDIENUNGSANLEITUNG
MANUEL D’UTILISATION
MANUALE DI ISTRUZIONI
Before operating this vehicle, please read all printed materials thoroughly.
Horizon Hobby is not responsible for inadvertent errors in this manual.
EN
NOTICE
All instructions, warranties and other collateral documents are subject to change at the sole discretion of Horizon Hobby, Inc. For up-to-date
product literature, visit horizonhobby.com and click on the support tab for this product.
Meaning of Special Language
The following terms are used throughout the product literature to indicate various levels of potential harm when operating this product:
NOTICE: Procedures, which if not properly followed, create a possibility of physical property damage AND a little or no possibility of injury.
CAUTION: Procedures, which if not properly followed, create the probability of physical property damage AND a possibility of serious injury.
WARNING: Procedures, which if not properly followed, create the probability of property damage, collateral damage, and serious injury OR
create a high probability of superficial injury.
WARNING: Read the ENTIRE instruction manual to become familiar with the features of the product before operating. Failure to operate the product
correctly can result in damage to the product, personal property and cause serious injury.
This is a sophisticated hobby product. It must be operated with caution and common sense and requires some basic mechanical ability. Failure to operate
this Product in a safe and responsible manner could result in injury or damage to the product or other property. This product is not intended for use by
children without direct adult supervision. Do not attempt disassembly, use with incompatible components or augment product in any way without the
approval of Horizon Hobby, Inc. This manual contains instructions for safety, operation and maintenance. It is essential to read and follow all the
instructions and warnings in the manual, prior to assembly, setup or use, in order to operate correctly and avoid damage or serious injury.
Additional Safety Precautions and Warnings
Age Recommendation: Not for children under 14 years. This is not a toy.
• Always keep a safe distance in all directions around your model to avoid collisions or injury. This model is controlled by a radio signal subject
to interference from many sources outside your control. Interference can cause momentary loss of control.
• Always operate your model in open spaces away from full-size vehicles, traffic and people.
• Always carefully follow the directions and warnings for this and any optional support equipment (chargers, rechargeable battery packs, etc.).
• Always keep all chemicals, small parts and anything electrical out of the reach of children.
• Always avoid water exposure to all equipment not specifically designed and protected for this purpose. Moisture causes damage to electronics.
• Never place any portion of the model in your mouth as it could cause serious injury or even death.
• Never operate your model with low transmitter batteries.
To register your product online, visit www.losi.com
Thank you for purchasing the Losi® 22T™ RTR. We are confident you
will be satisfied with the performance of this durable and resilient vehicle.
Please read the entire manual before setting up and using your vehicle.
Table of Contents
Register your Losi Product Online............................................................2
Components ..........................................................................................2
Tools Needed .........................................................................................2
Tools Included........................................................................................2
Needed to Complete...............................................................................2
Contents................................................................................................3
The Transmitter ......................................................................................3
Installing the Battery ..............................................................................4
Control Test ...........................................................................................4
Driving Your Vehicle ................................................................................5
Recalibrating and Adjusting the MSC540BL-S ESC...................................6
Troubleshooting Guide ............................................................................7
Transmitter and Receiver Binding ............................................................7
Limited Warranty ....................................................................................8
FCC Information .....................................................................................8
Warranty and Service Contact Information ...............................................9
Parts Contact Information .......................................................................9
Compliance Information for the European Union .......................................9
Parts List/Exploded Views .....................................................................34
Optional Parts List ................................................................................39
Setup Sheet.........................................................................................42
2
Components
• 1/10-Scale 22T RTR
• Spektrum™ DX3E 2.4GHz DSM® Radio System
• MSC540BL-S Sensored Brushless ESC, 13.5T Limit
• 13.5T Sensored Motor, ROAR Legal
• LOSB0812 Extra High-Torque Servo
• 4 AA batteries (for transmitter)
Tools Needed
• Hobby grade knife
• Needle nose pliers
• Side cutting pliers
• Safety goggles
• Soldering iron
• Double-sided tape (LOSA4004)
• CA glue (LOSA7880 or LOSA7881)
Tools Included
• 4-Way wrench
• Transmitter/Receiver BIND Plug
• 3 Hex Wrench “L” shaped—1.5mm, 2.0mm and 2.5mm
• Flat Turnbuckle Wrench
• Shock Tools
Needed to Complete
• A 6-cell Ni-MH battery pack or 2S Li-Po battery pack
• Ni-MH battery charger with automatic peak detection
or Li-Po battery charger
LOSI 1/10 22T 2WD ELECTRIC
LOSI TRUCK
1/10 22T
RTR
2WD
• INSTRUCTION
ELECTRIC TRUCK
MANUAL
RTR
EN
Contents
ST. TRIM
POWER
ST. RATE
TH. TRIM
The Transmitter
10
11
12
ST
BIND
N
ST-L
15
ST-R
13
TH
R
N
TH-F
14
AUX
R
N
TH-B
1. Steering Wheel: Controls direction (left/right) of the model.
2. Throttle Trigger: Controls speed and direction
(forward/reverse) of the model.
3. Antenna: Transmits signal to the model.
4. On/Off Switch: Turns the power on/off for the transmitter.
5. Indicator Lights: Green (right) light indicates adequate
battery power. Red (left) indicates signal strength.
6. ST. Trim: Adjusts the “hands off” direction of the model.
7. TH. Trim: Adjusts the motor speed to stop at neutral.
8. Steering Rate: Adjusts amount front wheels move when
the steering wheel is turned left and right.
9. Bottom Cover: Covers and holds the batteries that power
the transmitter.
10. BIND Button
11. ST. REV: Reverses the function of the steering when the
wheel is turned left or right.
12. TH. REV: Reverses the function of the speed control when
pulled back or pushed forward.
13. TH-F: Forward Endpoint. Adjusts the amount of full throttle.
14. TH-B: Brake Endpoint. Adjusts the amount of full brake.
15. ST-L: Steering Left Endpoint. Adjusts the amount of left
steering travel.
16. ST-R: Steering Right Endpoint. Adjusts the amount of right
steering travel.
AUX
R
2P 3P LIN
AUX-H
AUX-L
16
3
6
5
8
ST. TRIM
ON
POWER
ST. RATE
OFF
TH. TRIM
4
7
Installing Batteries
1
2
1. Push in the battery cover a small
amount to release the retaining tab,
then remove the cover.
2. Install 4 AA batteries, taking care
to align battery polarity to the diagram
in the transmitter’s battery case.
3. Carefully re-install the battery cover
by aligning the tabs with the slots
on the transmitter.
CAUTION: Do not remove transmitter batteries while the model is powered
on or while operating, as a loss of model control, damage or injury can result.
9
LOSI 1/10 22T 2WD ELECTRIC TRUCK RTR • INSTRUCTION MANUAL
3
EN
Installing the Battery
ON
OFF
To install the battery pack, loosen the hook and loop straps. Insert the fully charged battery and tighten the hook straps.
Connect the blue EC3™ battery connector to the ESC. Turn the transmitter on first. Then turn on the vehicle.
Control Test
Perform a control test with the vehicle wheels off of the ground.
If the tires rotate after the vehicle is powered-on, adjust the “TH. Trim”
knob located to the lower left of the steering wheel until they stop. To
make the wheels move forward, pull the trigger. To reverse the wheels,
wait for the model to stop, then push the trigger. When moving forward,
the wheels should track in a straight line without any steering wheel input.
If not, adjust the “ST. Trim” so the wheels track in a straight line without
having to turn the steering wheel.
TH. TRIM
TH. TRIM
Forward
4
Brake/Reverse
LOSI 1/10 22T 2WD ELECTRIC TRUCK RTR
EN
Driving Precautions
• Avoid driving the vehicle in or through standing water, wet grass,
mud or snow. The electronics in the vehicle are not waterproof.
• Maintain sight of the vehicle at all times.
• Inspect the vehicle for loose wheel hardware.
• Inspect the steering assembly for any loose hardware. Driving the vehicle
off-road can cause fasteners to loosen over time.
• Do not drive the vehicle in tall grass. Doing so can damage the vehicle or
electronics.
• Stop driving the vehicle when you notice a lack of power. Driving the
vehicle when the battery is discharged can cause the receiver to power
off. You may lose control of the vehicle.
CAUTION: Do not discharge a LiPo battery below 3V per cell.
Batteries discharged to a voltage lower than the lowest approved
voltage may become damaged, resulting in loss of performance
and potential fire when batteries are charged.
• Do not apply the throttle in forward or reverse if the vehicle is stuck.
Applying throttle in this instance can damage the motor or ESC.
• After driving the vehicle, allow the electronics to cool to ambient
temperature before using the next battery pack.
RUN TIME
The largest factor in run time is the capacity of the battery pack.
A larger mAh rating increases the amount of run time experienced.
The condition of a battery pack is also an important factor in both run time
and speed. The battery connectors may become hot during driving. Batteries
will lose performance and capacity over time.
Driving the vehicle from a stop to full speed repeatedly will damage the
batteries and electronics over time. Sudden acceleration will also lead
to shorter run times.
To Improve Run Times
• Keep your vehicle clean and maintained.
• Allow more airflow to the ESC and Motor.
• Change the gearing to a lower ratio. A lower ratio lowers the operating
temperature of the electronics. Use a smaller pinion gear or larger spur
gear to lower the gear ratio.
• Use a battery pack with a higher mAh rating.
• Use the optimum charger to charge battery packs
(Visit your local hobby dealer for more information).
LOSI 1/10 22T 2WD ELECTRIC TRUCK RTR
TUNING, ADJUSTING & MAINTAINING YOUR VEHICLE
•
•
•
•
•
•
•
•
•
•
•
•
Examine your vehicle on a regular basis.
Use a brush to remove dirt and dust.
Look for damage to the suspension arms and other molded parts.
Re-glue the tires to the wheels, if necessary.
Use suitable tools to tighten fasteners.
Make sure the camber and steering linkages are not bent.
Replace any bent linkages.
Adjust the Toe and Camber settings, if necessary.
Remove the shocks and inspect them for damage. Rebuild the
shocks if oil is leaking.
Inspect electronics and batteries for exposed wires. Repair exposed
wires with shrink-wrap, or replace the wire.
Make sure the ESC and receiver are secure on the chassis. Replace
the double-sided tape, if necessary.
Power on the transmitter. If the green LED is dim or off, replace
the AA batteries in your transmitter.
Check the spur gear for wear.
SERVICE/REPAIR
Radio/Speed Control & Motor
If any problems other than those covered in the troubleshooting section
arise, please call the appropriate electronics service department. They
will be able to give the problem additional specific attention and provide
instructions for the solution.
Maintenance
If any questions other than those covered in the troubleshooting or
maintenance sections arise, please call the appropriate Horizon product
support department.
Cleaning
Performance can be hindered if dirt gets in any of the moving suspension
parts. Use compressed air, a soft paintbrush, or a toothbrush to remove dust
or dirt. Avoid using solvents or chemicals as they can actually wash dirt into
the bearings or moving parts, as well as cause damage to the electronics.
5
EN
Recalibrating and Adjusting the MSC540BL-S ESC
ON
OFF
Preparing the Transmitter
1. Make sure the transmitter batteries are fully charged.
2. Power the transmitter on.
3. Set the Travel Adjust to the maximum value in the forward and reverse
directions. If your transmitter has an adjustable throttle trigger, please
select 70/30.
4. Make sure the throttle channel reversing is set to NORMAL.
5. Center the throttle trim and make sure any sub-trims are set to 0.
Connecting the Battery to the ESC
1. Make sure the ESC power switch is in the OFF position.
2. Connect the blue EC3 battery connector to the ESC.
3. Power the transmitter on.
4. Power the ESC on.
Using Reverse
1. Apply brake.
2. Return the throttle to neutral when the vehicle comes to a stop.
3. Apply brake again. Reverse is now active.
NOTICE: There is no delay when changing from Reverse to Forward.
Not allowing the vehicle to stop before changing from Reverse to
Forward may cause damage to the vehicle gearing, motor or both.
One-Touch Calibration
The motor does not receive power when the ESC is in programming
or calibration mode.
1. Power the transmitter on.
2. Press and hold the Setup button while powering the ESC on.
3. Release the Setup Button when the Green LED is on.
4. Move the throttle to the full throttle position. Hold full throttle until
the Green LED glows solid, confirming the forward endpoint position.
5. Move the throttle to the full brake position. Hold full brake until the
Red LED glows solid, confirming the brake/reverse endpoint position.
6. Return the throttle to the center/neutral position. The calibration
is complete when both Green and Red LEDs glow solid.
ESC Programming
The motor does not receive power when the ESC is in programming
or calibration mode.
1. Power the transmitter on.
2. Power the ESC on. The Green and Red LEDs glow solid.
3. Press and hold the Setup button. The Green LED flashes for each Menu.
4. Release the Setup button to enter a Menu. A pause after each menu
option allows you to make a selection.
5. The Red LED flashes when you enter a menu. The number of Red
flashes corresponds to the current selection.
6. Quickly press the setup button to change the Setting selection.
7. After you select a menu option, press and hold the Setup button
to confirm the selection.
*The black-shaded setting is the factory default.
Main Menu
Number of
Green Flashes
Menu
1
Battery Type
2
Drive Type
3
Beginner Mode
4
Drag Brake
Menu 1—Battery Type
Number of
Red LED Flashes
Battery Type Setting
1
Ni-MH/Ni-Cd (no cutoff)
2
2S Li-Po (6.2V cutoff)
Menu 2—Forward/Reverse
Number of
Red LED Flashes
Forward/Reverse Setting
1
Forward/Brake
2
Forward/Brake/Reverse
Menu 3—Beginner Mode
Number of
Red LED Flashes
Beginner Mode Setting
1
Off (no throttle limit)
2
On (50% throttle limit)
Menu 4—Drag Brake
Drag Brake is the amount of brake percentage applied when the
throttle returns to neutral.
6
Number of
Red LED Flashes
Drag Brake Setting
1
0% (drag brake off)
2
10%
3
20%
4
30%
LOSI 1/10 22T 2WD ELECTRIC TRUCK RTR
EN
Troubleshooting Guide
Problem
Possible Cause
Solution
Vehicle does not operate
Battery not charged or plugged in
Charge battery/plug in
ESC switch not “On”
Turn on ESC switch
Transmitter not “On” or low battery
Turn on/replace batteries
Pinion not meshing with spur gear
Adjust pinion/spur mesh
Pinion spinning on motor shaft
Tighten pinion gear setscrew on motor shaft flat spot
Slipper too loose
Check and adjust slipper
Transmission gears stripped
Replace transmission gears
Motor runs but rear wheels
do not rotate
Steering does not work
Drive pin broken
Check and replace drive pin
Servo plug not in receiver properly
Make sure the steering servo plug is connected to
the receiver steering channel, noting proper polarity
Servo gears or motor damaged
Replace or repair servo
Will not turn one direction
Servo gears damaged
Replace or repair servo
Motor does not run
Motor wire solder joint is damaged
Resolder the motor wire with the proper equipment
Motor wire broken
Repair or replace as needed
ESC gets hot
ESC damaged
Contact Horizon Hobby Product Support
Sensor wire damaged or loose
Replace or reinstall sensor wire
Motor over-geared
Use smaller pinion or larger spur gear
Driveline bound up
Check wheels and transmission for binding
Poor run time and/or sluggish Battery pack not fully charged
acceleration
Charger not allowing full charge
Poor range and/or glitching
Slipper will not adjust
Recharge battery
Try another charger
Slipper slipping too much
Check/adjust slipper
Driveline bound up
Check wheels, transmission for binding
Transmitter batteries low
Check and replace
Vehicle battery low
Recharge battery
Loose plugs or wires
Check all wire connections and plugs
Drive pin missing in shaft
Replace drive pin
Slipper plates worn out
Replace slipper plates and adjust slipper
Transmitter and Receiver Binding
Binding Procedure
1. Make sure the transmitter and vehicle are both powered off.
2. Install a bind plug in the receiver battery/bind port. You do not need to remove any of the other plugs to re-bind.
3. With the Bind plug installed, turn on the vehicle. Notice a blinking Orange LED within the receiver.
4. With the steering and throttle in the desired preset failsafe positions (neutral), press and hold the bind button and turn on the transmitter.
The red LED on the front of the transmitter will flash within a couple seconds, indicating the transmitter is in bind mode. Once the red LED
begins flashing, release the bind button.
5. When the receiver binds to the transmitter, the receiver light will turn solid.
6. Power off the vehicle and the transmitter.
7. Disconnect the battery from the ESC. Remove the bind plug from the receiver.
8. Safely store the bind plug (some owners attach the bind plug to their transmitter using two-part loops and clips).
9. The receiver will keep the binding to the transmitter until another binding is done.
If you encounter problems, obey binding instructions and refer to the transmitter troubleshooting guide for other instructions. If needed, contact the
appropriate Horizon Product Support office.
LOSI 1/10 22T 2WD ELECTRIC TRUCK RTR
7
EN
Limited Warranty
What this Warranty Covers
Horizon Hobby, Inc. (“Horizon”) warrants to the original purchaser
that the product purchased (the “Product”) will be free from defects
in materials and workmanship at the date of purchase.
What is Not Covered
This warranty is not transferable and does not cover (i) cosmetic damage,
(ii) damage due to acts of God, accident, misuse, abuse, negligence,
commercial use, or due to improper use, installation, operation or
maintenance, (iii) modification of or to any part of the Product, (iv) attempted
service by anyone other than a Horizon Hobby authorized service center,
or (v) Products not purchased from an authorized Horizon dealer.
OTHER THAN THE EXPRESS WARRANTY ABOVE, HORIZON MAKES NO
OTHER WARRANTY OR REPRESENTATION, AND HEREBY DISCLAIMS ANY
AND ALL IMPLIED WARRANTIES, INCLUDING, WITHOUT LIMITATION, THE
IMPLIED WARRANTIES OF NON-INFRINGEMENT, MERCHANTABILITY AND
FITNESS FOR A PARTICULAR PURPOSE. THE PURCHASER ACKNOWLEDGES
THAT THEY ALONE HAVE DETERMINED THAT THE PRODUCT WILL SUITABLY
MEET THE REQUIREMENTS OF THE PURCHASERS INTENDED USE.
Purchaser’s Remedy
Horizon’s sole obligation and purchaser’s sole and exclusive remedy shall be
that Horizon will, at its option, either (i) service, or (ii) replace, any Product
determined by Horizon to be defective. Horizon reserves the right to inspect
any and all Product(s) involved in a warranty claim. Service or replacement
decisions are at the sole discretion of Horizon. Proof of purchase is required
for all warranty claims. SERVICE OR REPLACEMENT AS PROVIDED UNDER
THIS WARRANTY IS THE PURCHASER’S SOLE AND EXCLUSIVE REMEDY.
Limitation of Liability
HORIZON SHALL NOT BE LIABLE FOR SPECIAL, INDIRECT, INCIDENTAL
OR CONSEQUENTIAL DAMAGES, LOSS OF PROFITS OR PRODUCTION OR
COMMERCIAL LOSS IN ANY WAY, REGARDLESS OF WHETHER SUCH CLAIM
IS BASED IN CONTRACT, WARRANTY, TORT, NEGLIGENCE, STRICT LIABILITY
OR ANY OTHER THEORY OF LIABILITY, EVEN IF HORIZON HAS BEEN
ADVISED OF THE POSSIBILITY OF SUCH DAMAGES. Further, in no event shall
the liability of Horizon exceed the individual price of the Product on which
liability is asserted. As Horizon has no control over use, setup, final assembly,
modification or misuse, no liability shall be assumed nor accepted for any
resulting damage or injury. By the act of use, setup or assembly, the user
accepts all resulting liability. If you as the purchaser or user are not prepared
to accept the liability associated with the use of the Product, purchaser is
advised to return the Product immediately in new and unused condition to
the place of purchase.
Law
These terms are governed by Illinois law (without regard to conflict of law
principals). This warranty gives you specific legal rights, and you may also
have other rights which vary from state to state. Horizon reserves the right to
change or modify this warranty at any time without notice.
WARRANTY SERVICES
Questions, Assistance, and Services
Your local hobby store and/or place of purchase cannot provide warranty
support or service. Once assembly, setup or use of the Product has been
started, you must contact your local distributor or Horizon directly. This will
enable Horizon to better answer your questions and service you in the event
that you may need any assistance. For questions or assistance, please direct
your email to [email protected], or call 877.504.0233
toll free to speak to a Product Support representative. You may also find
information on our website at www.horizonhobby.com.
merchandise until it arrives and is accepted at our facility. An Online Service
Request is available at http://www.horizonhobby.com under the Support tab.
If you do not have internet access, please contact Horizon Product Support
to obtain a RMA number along with instructions for submitting your product
for service. When calling Horizon, you will be asked to provide your complete
name, street address, email address and phone number where you can be
reached during business hours. When sending product into Horizon, please
include your RMA number, a list of the included items, and a brief summary
of the problem. A copy of your original sales receipt must be included for
warranty consideration. Be sure your name, address, and RMA number are
clearly written on the outside of the shipping carton.
NOTICE: Do not ship Li-Po batteries to Horizon. If you have any issue
with a Li-Po battery, please contact the appropriate Horizon Product
Support office.
Warranty Requirements
For Warranty consideration, you must include your original sales
receipt verifying the proof-of-purchase date. Provided warranty
conditions have been met, your Product will be serviced or replaced free
of charge. Service or replacement decisions are at the sole discretion
of Horizon.
Non-Warranty Service
Should your service not be covered by warranty service will be
completed and payment will be required without notification
or estimate of the expense unless the expense exceeds 50% of
the retail purchase cost. By submitting the item for service you are
agreeing to payment of the service without notification. Service estimates
are available upon request. You must include this request with your item
submitted for service. Non-warranty service estimates will be billed a
minimum of ½ hour of labor. In addition you will be billed for return freight.
Horizon accepts money orders and cashiers checks, as well as Visa,
MasterCard, American Express, and Discover cards. By submitting any item
to Horizon for service, you are agreeing to Horizon’s Terms and Conditions
found on our website http://www.horizonhobby.com/Service/Request/.
FCC Information
This device complies with part 15 of the FCC rules. Operation is subject
to the following two conditions: (1) This device may not cause harmful
interference, and (2) this device must accept any interference received,
including interference that may cause unde-sired operation.
CAUTION: Changes or modifications not expressly
approved by the party responsible for compliance could void the
user’s authority to operate the equipment.
This product contains a radio transmitter with wireless technology
which has been tested and found to be compliant with the applicable
regulations governing a radio transmitter in the 2.400 GHz to 2.4835 GHz
frequency range.
Antenna Separation Distance
When operating your Spektrum transmitter, please be sure to maintain a
separation distance of at least 5 cm between your body (excluding fingers,
hands, wrists, ankles and feet) and the antenna to meet RF exposure safety
requirements as determined by FCC regulations.
The following illustrations show the approximate 5 cm RF exposure area
and typical hand placement when operating your Spektrum transmitter.
Inspection or Services
If this Product needs to be inspected or serviced, please use the Horizon
Online Service Request submission process found on our website or call
Horizon to obtain a Return Merchandise Authorization (RMA) number. Pack
the Product securely using a shipping carton. Please note that original boxes
may be included, but are not designed to withstand the rigors of shipping
without additional protection. Ship via a carrier that provides tracking and
insurance for lost or damaged parcels, as Horizon is not responsible for
8
LOSI 1/10 22T 2WD ELECTRIC TRUCK RTR
EN
Warranty and Service Contact Information
Country
of Purchase
Horizon Hobby
Address
Phone Number / Email Address
United States of
America
Horizon Service Center
(Electronics and engines)
4105 Fieldstone Rd
Champaign, Illinois, 61822 USA
877-504-0233
Online Repair Request:
visit www.horizonhobby.com/service
Horizon Product Support
(All other products)
4105 Fieldstone Rd
Champaign, Illinois, 61822 USA
877-504-0233
[email protected]
United Kingdom
Horizon Hobby Limited
Units 1-4 Ployters Rd
Staple Tye
Harlow, Essex
CM18 7NS, United Kingdom
+44 (0) 1279 641 097
[email protected]
Germany
Horizon Technischer
Service
France
Horizon Hobby SAS
+49 (0) 4121 2655 100
[email protected]
+33 (0) 1 60 47 44 70
[email protected]
China
Horizon Hobby-China
Christian-Junge-Straße 1
25337 Elmshorn, Germany
14 Rue Gustave Eiffel
Zone d’Activité du Réveil Matin
91230 Montgeron
Room 506, No. 97 Changshou Rd.
Shanghai, China 200060
+86 (021) 5180 9868
[email protected]
Parts Contact Information
Country
of Purchase
Horizon Hobby
Address
Phone Number / Email Address
United States
Sales
4105 Fieldstone Rd
Champaign, Illinois, 61822 USA
800-338-4639
[email protected]
United Kingdom
Horizon Hobby Limited
Units 1-4 Ployters Rd
Staple Tye
Harlow, Essex
CM18 7NS, United Kingdom
+44 (0) 1279 641 097
[email protected]
Germany
Horizon Hobby GmbH
Christian-Junge-Straße 1
25337 Elmshorn, Germany
+49 4121 46199 60
[email protected]
France
Horizon Hobby SAS
14 Rue Gustave Eiffel
Zone d’Activité du Réveil Matin
91230 Montgeron
+33 (0) 1 60 47 44 70
[email protected]
China
Horizon Hobby-China
Room 506, No. 97 Changshou Rd.
Shanghai, China 200060
+86 (021) 5180 9868
[email protected]
Compliance Information for the European Union
AT
DE
GR
LU
PT
UK
BE
DK
HU
LV
RO
BG
ES
IE
MT
SE
CZ
FI
IT
NL
SI
CY
FR
LT
PL
SK
Declaration of Conformity
(in accordance with ISO/IEC 17050-1)
Product(s):
LOS 1/10 22T 2WD Electric Truck RTR
(DX3E Transmitter/SR300 Receiver Included)
Item Number(s):
LOSB0123
Equipment class:
2
The object of declaration described above is in conformity with the
requirements of the specifications listed below, following the provisions
of the European R&TTE directive 1999/5/EC:
Instructions for disposal of WEEE
by users in the European Union
This product must not be disposed of with other waste.
Instead, it is the user’s responsibility to dispose of their
waste equipment by handing it over to a designated
collections point for the recycling of waste electrical and electronic
equipment. The separate collection and recycling of your waste equipment
at the time of disposal will help to conserve natural resources and
ensure that it is recycled in a manner that protects human health and the
environment. For more information about where you can drop off your waste
equipment for recycling, please contact your local city office, your household
waste disposal service or where you purchased the product.
EN 300-328 V1.7.1
EN 301 489-1 V1.7.1: 2006
EN 301 489-17 V1.3.2: 2008
EN 60950-1:2006+A11
Signed for and on behalf of:
Steven A. Hall
Horizon Hobby, Inc.
Vice President
Champaign, IL USA
International Operations and Risk Management
November 27, 2011
Horizon Hobby, Inc.
LOSI 1/10 22T 2WD ELECTRIC TRUCK RTR
9
DE
HINWEIS
Alle Anweisungen, Garantien und anderen zugehörigen Dokumente können im eigenen Ermessen von Horizon Hobby, Inc. jederzeit geändert werden.
Die aktuelle Produktliteratur finden Sie auf horizonhobby.com unter der Registerkarte „Support“ für das betreffende Produkt.
Spezielle Bedeutungen
Die folgenden Begriffe werden in der gesamten Produktliteratur verwendet, um auf unterschiedlich hohe Gefahrenrisiken beim Betrieb dieses Produkts
hinzuweisen:
HINWEIS: Wenn diese Verfahren nicht korrekt befolgt werden, können sich möglicherweise Sachschäden UND geringe oder keine Gefahr von Verletzungen ergeben.
ACHTUNG: Wenn diese Verfahren nicht korrekt befolgt werden, ergeben sich wahrscheinlich Sachschäden UND die Gefahr von schweren Verletzungen.
WARNUNG: Wenn diese Verfahren nicht korrekt befolgt werden, ergeben sich wahrscheinlich Sachschäden, Kollateralschäden und schwere
Verletzungen ODER mit hoher Wahrscheinlichkeit oberflächliche Verletzungen.
WARNUNG: Lesen Sie die GESAMTE Bedienungsanleitung, um sich vor dem Betrieb mit den Produktfunktionen vertraut zu machen. Wird das
Produkt nicht korrekt betrieben, kann dies zu Schäden am Produkt oder persönlichem Eigentum führen oder schwere Verletzungen verursachen.
Dies ist ein hochentwickeltes Hobby-Produkt. Es muss mit Vorsicht und gesundem Menschenverstand betrieben werden und benötigt gewisse mechanische Grundfähigkeiten. Wird dieses Produkt nicht auf eine sichere und verantwortungsvolle Weise betrieben, kann dies zu Verletzungen oder Schäden am Produkt oder anderen
Sachwerten führen. Dieses Produkt eignet sich nicht für die Verwendung durch Kinder ohne direkte Überwachung eines Erwachsenen. Versuchen Sie nicht ohne
Genehmigung durch Horizon Hobby, Inc., das Produkt zu zerlegen, es mit inkompatiblen Komponenten zu verwenden oder auf jegliche Weise zu erweitern. Diese
Bedienungsanleitung enthält Anweisungen für Sicherheit, Betrieb und Wartung. Es ist unbedingt notwendig, vor Zusammenbau, Einrichtung oder Verwendung alle
Anweisungen und Warnhinweise im Handbuch zu lesen und zu befolgen, damit es bestimmungsgemäß betrieben werden kann und Schäden oder schwere Verletzungen vermieden werden.
Zusätzliche Sicherheitsvorkehrungen und Warnhinweise
Nicht geeignet für Kinder unter 14 Jahren. Dies ist kein Spielzeug.
• Halten Sie stets in allen Richtungen einen Sicherheitsabstand um Ihr Modell, um Zusammenstöße oder Verletzungen zu vermeiden. Dieses Modell wird
von einem Funksignal gesteuert, das Interferenzen von vielen Quellen außerhalb Ihres Einflussbereiches unterliegt. Diese Interferenzen können einen
augenblicklichen Steuerungsverlust verursachen.
• Betreiben Sie Ihr Modell immer auf einer Freifläche ohne Fahrzeuge in voller Größe, Verkehr oder Menschen.
• Befolgen Sie stets sorgfältig die Anweisungen und Warnhinweise für das Modell und jegliche optionalen Hilfsgeräte (Ladegeräte, Akkupacks usw.).
• Bewahren Sie alle Chemikalien, Klein- und Elektroteile stets außerhalb der Reichweite von Kindern auf.
• Setzen Sie Geräte, die für diesen Zweck nicht speziell ausgelegt und geschützt sind, niemals Wasser aus. Feuchtigkeit kann die Elektronik beschädigen.
• Stecken Sie keinen Teil des Modells in den Mund, da dies zu schweren Verletzungen oder sogar zum Tod führen kann.
• Betreiben Sie Ihr Modell nie mit fast leeren Senderakkus.
Registrieren Sie Ihr Fahrzeug jetzt und erfahren Sie als erstes alles über optionale Teile, neue Produkte und vieles mehr.
Wählen Sie www.Losi.com und folgen den Anweisungen des Registrierungs Links.
Vielen Dank, dass Sie sich für das Losi® 22T™ RTR entschieden haben.
Wir sind überzeugt, dass Sie mit der Performance dieses stabilen und
robusten Fahrzeugs vollauf zufrieden sein werden. Lesen Sie bitte die
Bedienungsanleitung aufmerksam und vollständig durch, bevor Sie Ihr
Fahrzeug einrichten und verwenden.
Inhaltsverzeichnis
Onlineregistrierung...............................................................................10
Komponenten ......................................................................................10
Benötigte Werkzeuge............................................................................10
Enthaltene Werkzeuge ..........................................................................10
Noch benötigt ......................................................................................10
Inhalt...................................................................................................11
Der Sender ..........................................................................................11
Einlegen des Akkus ..............................................................................12
Steuertest............................................................................................12
Sicherheitshinweise beim Fahren .........................................................13
Neukalibrierung und Anpassung des MSC540BL-S ESC .........................14
Fehlersuchanleitung .............................................................................15
Bindung von Sender und Empfänger .....................................................15
Garantie und Service Informationen .....................................................16
Garantie und Service Kontaktinformationen ..........................................17
Kundendienstinformationen .................................................................17
Rechtliche Informationen für die Europäische Union .............................17
Ersatzteilliste/Explosionszeichnungen ....................................................34
Liste der optionalen Bauteile .................................................................39
Einrichtblatt .........................................................................................42
10
Komponenten
• 22T RTR Maßstab 1:10
• Spektrum™-DX3E-2,4GHz-DSM-Funkanlage
• Bürstenloser MSC540BL-S-ESC mit Sensoren, 13,5T-Limit
• 13,5T-Motor mit Sensoren, mit ROAR-Zulassung
• LOSB0812 Servo mit besonders hohem Drehmoment
• 4 AA-Batterien (für Sender)
Benötigte Werkzeuge
• Hobbymesser
• Flachrundzange
• Seitenschneider
• Schutzbrille
• Lötkolben
• Doppelseitiges Klebeband (LOSA4004)
• Sekundenkleber (LOSA7880 oder LOSA7881)
Enthaltene Werkzeuge
• 4fach-Inbusschlüssel
• Sender/Empfänger-Bindestecker
• 3 L-förmige Inbusschlüssel: 1,5 mm, 2,0 mm und 2,5 mm
• Flacher Spannschlüssel
• Stoßdämpferwerkzeuge
Noch benötigt
• Ein 6-Zellen-Ni-MH-Akkupack oder 2S-Li-Po-Akkupack
• Ni-MH-Akkuladegerät mit automatischer Spitzenerkennung oder
Li-Po-Akkuladegerät
LOSI 1/10 22T 2WD ELECTRIC TRUCK RTR
DE
Inhalt
ST. TRIM
POWER
ST. RATE
TH. TRIM
Der Sender
10
11
12
ST
BIND
N
ST-L
15
ST-R
13
TH
R
N
TH-F
14
AUX
R
N
TH-B
AUX
R
2P 3P LIN
AUX-H
AUX-L
16
3
6
5
8
ST. TRIM
POWER
ST. RATE
EIN
AUS
TH. TRIM
4
7
1. Lenkrad: Steuert die Richtung (links/rechts) des Modells.
2. Gasgeber: Steuert die Geschwindigkeit und Richtung
(vorwärts/rückwärts) des Modells.
3. Antenne: Sendet das Signal zum Modell.
4. Ein/Aus-Schalter: Schaltet den Sender ein/aus.
5. Signalleuchten: Grün (rechts) zeigt an, das ausreichend
Akkustrom vorhanden ist. Rot (links) zeigt die Signalstärke an.
6. Steuertrimm: Passt die „freihändige“ Richtung des Modells an.
7. Gastrimm: Passt die Motorgeschwindigkeit an, damit der
Motor in der Neutralstellung anhält.
8. Steuerrate: Gibt an, wie stark die Räder einschlagen,
wenn das Lenkrad nach links und rechts gedreht wird.
9. Bodenabdeckung: Deckt die Batterien/Akkus für den Sender ab.
10. Bindetaste
11. Lenkumkehr: Kehrt die Lenkfunktion beim Drehen
des Lenkrads nach links oder rechts um.
12. Gasumkehr: Kehrt die Geschwindigkeitssteuerung beim
Ziehen nach hinten oder Drücken nach vorn um.
13. Vollgas: Endpunkt vorwärts. Gibt die Stärke des Vollgas an.
14. Vollbremsung: Endpunkt Bremse. Gibt die Stärke
der Vollbremsung an.
15. Lenkung links: Endpunkt bei Linkslenkung.
Gibt den Ausschlag bei Linkssteuerung an.
16. Lenkung rechts: Endpunkt bei Rechtslenkung.
Gibt den Ausschlag bei Rechtssteuerung an.
Einlegen der Batterien
1
2
1. Drücken Sie die Batteriefachabdeckung
etwas ein, um die Sperre zu lösen, und
nehmen Sie sie dann ab.
2. Legen Sie 4 AA-Batterien oder -Akkus
ein und achten Sie dabei auf die
richtige Polarität, die im Diagramm im
Batteriefach des Senders angegeben ist.
3. Schließen Sie die Batteriefachabdeckung
vorsichtig wieder, indem Sie die Laschen in die Schlitze im Sender führen.
ACHTUNG: Nehmen Sie die Senderbatterien nicht heraus, wenn das Modell
eingeschaltet ist oder fährt, da Sie sonst die Kontrolle über das Modell verlieren
und möglicherweise Schäden oder Verletzungen verursachen.
9
LOSI 1/10 22T 2WD ELECTRIC TRUCK RTR
11
DE
Einlegen des Akkus
EIN
AUS
Um das Akkupack einzulegen, lösen Sie die Klettriemen. Legen Sie den vollständig aufgeladenen Akku ein und schließen
Sie die Klettriemen. Schließen Sie den blauen EC3™-Akkuanschluss an den ESC an. Schalten Sie zuerst den Sender ein.
Schalten Sie dann das Fahrzeug ein.
Steuertest
Nehmen Sie die Fahrzeugräder vom Boden, um den Steuertest
durchzuführen. Wenn sich die Räder drehen, wenn das Fahrzeug
eingeschaltet wird, passen Sie den Knopf „TH. Trim“ links unter dem
Lenkrad an, bis dies nicht mehr auftritt. Geben Sie Gas, um die Räder
vorwärts zu bewegen. Warten Sie, bis das Modell stoppt, und drücken
Sie dann den Gasgeber nach vorn, um rückwärts zu fahren. Bei der
Vorwärtsfahrt sollten die Räder geradeaus fahren, ohne dass Sie lenken
müssen. Wenn das nicht der Fall ist, passen Sie „ST. Trim“ so an, das
die Räder ohne Betätigung des Lenkrads geradeaus fahren.
TH. TRIM
TH. TRIM
Vorwärts
12
Bremsen/Rückwärts
LOSI 1/10 22T 2WD ELECTRIC TRUCK RTR
DE
Sicherheitshinweise beim Fahren
• Fahren Sie das Fahrzeug nach Möglichkeit nicht durch stehendes
Wasser, nasses Gras, Matsch oder Schnee. Die Elektronik im Fahrzeug
ist nicht wasserfest.
• Halten Sie stets Blickkontakt zum Fahrzeug.
• Prüfen Sie das Fahrzeug auf lose Radteile.
• Prüfen Sie die Lenkbaugruppe auf lose Teile. Wenn Sie das Fahrzeug
im Gelände fahren, können sich Befestigungen mit der Zeit lockern.
• Fahren Sie das Fahrzeug nicht in hohem Gras. Dadurch können das
Fahrzeug oder die Elektronik beschädigt werden.
• Halten Sie das Fahrzeug an, wenn Sie bemerken, dass der Antrieb
nachlässt. Wenn Sie das Fahrzeug mit schwachem Akku oder schwachen
Batterien fahren, kann sich der Empfänger ausschalten. Dann können
Sie die Kontrolle über das Fahrzeug verlieren.
ACHTUNG: Entladen Sie einen Li-Po-Akku nicht unter 3 V pro
Zelle. Akkus, die unter die angegebene Mindestspannung tiefentladen
werden, können beschädigt werden, was die Leistung beeinträchtigen
und möglicherweise beim Laden einen Brand verursachen kann.
• Drücken Sie den Gasgeber nicht nach vorn oder hinten, wenn das
Fahrzeug feststeckt. Wenn Sie in dieser Situation Gas geben, können
der Motor oder der ESC beschädigt werden.
• Lassen Sie nach jeder Fahrt die Elektronik auf Umgebungstemperatur
abkühlen, bevor Sie das nächste Akkupack verwenden.
LAUFZEIT
Der größte Faktor bei der Laufzeit ist die Kapazität des Akkupacks.
Ein höherer mAh-Wert bedeutet eine längere Laufzeit.
Der Zustand des Akkupacks ist ebenfalls ein wichtiger Faktor für Laufzeit
und Geschwindigkeit. Die Akkuanschlüsse können sich beim Fahren
erhitzen. Akkus verlieren mit der Zeit an Leistung und Kapazität.
Wenn Sie das Fahrzeug wiederholt aus dem Stand auf die
Höchstgeschwindigkeit beschleunigen, werden die Akkus und die Elektronik
mit der Zeit beschädigt. Plötzliche Beschleunigung verkürzt außerdem
die Laufzeit.
So verlängern Sie die Laufzeit
• Halten Sie Ihr Fahrzeug sauber und in gutem Wartungszustand.
• Erlauben Sie einen besseren Luftstrom zum ESC und zum Motor.
• Wechseln Sie das Getriebe zu einem niedrigeren Übersetzungsverhältnis.
Ein niedrigeres Übersetzungsverhältnis senkt die Betriebstemperatur der
Elektronik. Verwenden Sie ein kleineres Ritzel oder ein größeres Stirnrad,
um das Übersetzungsverhältnis zu senken.
• Verwenden Sie ein Akkupack mit einem höheren mAh-Wert.
• Verwenden Sie das optimale Ladegerät zum Aufladen der Akkupacks
(Beratung bei Ihrem Hobbyhändler).
LOSI 1/10 22T 2WD ELECTRIC TRUCK RTR
TUNEN, ANPASSEN UND WARTEN DES FAHRZEUGS
•
•
•
•
•
•
•
•
•
•
•
•
Untersuchen Sie das Fahrzeug regelmäßig.
Entfernen Sie Dreck und Staub mit einem Pinsel.
Prüfen Sie es auf Schäden an den Querlenkern und anderen Formteilen.
Kleben Sie bei Bedarf die Reifen wieder an den Rädern fest.
Ziehen Sie Befestigungen mit geeigneten Werkzeugen fest.
Kontrollieren Sie die Sturz- und Spurstangen auf Verbiegungen. Wechseln
Sie verbogene Stangen aus.
Passen Sie die Spur- und Sturzeinstellungen bei Bedarf an.
Entfernen Sie die Stoßdämpfer und prüfen Sie sie auf Schäden. Bauen
Sie neue Stoßdämpfer ein, wenn Öl austritt.
Prüfen Sie Elektronik und Akkus auf freiliegende Drähte. Reparieren Sie
freiliegende Drähte mit Isolierung oder wechseln Sie die Kabel aus.
Prüfen Sie, ob der ESC und der Empfänger sicher im Fahrwerk befestigt
sind. Ersetzen Sie bei Bedarf das doppelseitige Klebeband.
Schalten Sie den Sender ein. Wenn die grüne LED nur schwach oder gar
nicht leuchtet, wechseln Sie die AA-Batterien im Sender aus.
Prüfen Sie das Stirnrad auf Abnutzung.
KUNDENDIENST/REPARATUR
Funkanlage/ESC und Motor
Wenn Probleme auftreten, die nicht in der Fehlersuchanleitung abgedeckt
sind, wenden Sie sich bitte an den betreffenden Elektronikkundendienst.
Die Kundendienstmitarbeiter können Sie speziell zu Ihrem Problem beraten
und Anweisungen zur Lösung geben.
Wartung
Wenn Fragen auftreten, die nicht in der Fehlersuchanleitung oder im
Abschnitt zur Wartung abgedeckt sind, wenden Sie sich bitte an die
betreffende Horizon-Produktsupportabteilung.
Reinigung
Die Leistung kann beeinträchtigt werden, wenn Schmutz in Teile der
Aufhängung gerät. Entfernen Sie Staub oder Schmutz mit Druckluft, einem
weichen Pinsel oder einer Zahnbürste. Meiden Sie Lösungsmittel oder
Chemikalien, da diese den Schmutz in die Lager oder bewegliche Teile
spülen und die Elektronik beschädigen können.
13
DE
Neukalibrierung und Anpassung des MSC540BL-S ESC
EIN
AUS
Vorbereitung des Senders
1. Stellen Sie sicher, dass die Senderbatterien oder -akkus vollständig
geladen sind.
2. Schalten Sie den Sender ein.
3. Stellen Sie die Wegeinstellung für vorwärts und rückwärts auf den
Höchstwert ein. Wenn Ihr Sender einen anpassbaren Gasgeber hat,
wählen Sie bitte 70/30.
4. Die Gaskanalumkehr muss auf NORMAL eingestellt sein.
5. Zentrieren Sie den Gastrimm und prüfen Sie, ob alle Subtrimms auf 0
eingestellt sind.
Anschluss des Akkus an den ESC
1. Stellen Sie sicher, dass der ESC-Schalter ausgeschaltet ist (OFF).
2. Schließen Sie den blauen EC3-Akkuanschluss an den ESC an.
3. Schalten Sie den Sender ein.
4. Schalten Sie den ESC ein.
Rückwärtsgang
1. Bremsen Sie.
2. Lassen Sie den Gasgeber zur Neutralstellung zurückkehren, wenn das
Fahrzeug anhält.
3. Bremsen Sie erneut. Jetzt ist der Rückwärtsgang aktiviert.
HINWEIS: Beim Wechsel vom Rückwärts- zum Vorwärtsgang gibt es
keine Verzögerung. Wenn Sie dem Fahrzeug nicht erlauben anzuhalten,
bevor Sie vom Rückwärtsgang zum Vorwärtsgang wechseln, können
das Fahrzeuggetriebe, der Motor oder beides beschädigt werden.
Schnellkalibrierung
Die Stromzufuhr zum Motor ist unterbrochen, wenn sich der ESC im
Programmier- oder Kalibrierungsmodus befindet.
1. Schalten Sie den Sender ein.
2. Halten Sie die Setup-Taste gedrückt, während Sie den ESC einschalten.
3. Lassen Sie die Setup-Taste los, wenn die grüne LED leuchten.
4. Bewegen Sie den Gasgeber auf die Vollgasposition. Halten Sie Vollgas,
bis die grüne LED kontinuierlich leuchtet, wodurch die Endpunktposition
für den Vorwärtsgang bestätigt wird.
5. Bewegen Sie den Gasgeber auf die Vollbremsungsposition. Halten Sie
die Vollbremsung, bis die rote LED kontinuierlich leuchtet, wodurch
die Endpunktposition für Bremsen/Rückwärtsgang bestätigt wird.
6. Lassen Sie den Gasgeber zur Mittel-/Neutralstellung zurückkehren.
Die Kalibrierung ist abgeschlossen, wenn sowohl die grüne als auch
die rote LED kontinuierlich leuchtet.
14
ESC-Programmierung
Die Stromzufuhr zum Motor ist unterbrochen, wenn sich der ESC im
Programmier- oder Kalibrierungsmodus befindet.
1. Schalten Sie den Sender ein.
2. Schalten Sie den ESC ein. Die grüne und rote LED leuchten kontinuierlich.
3. Halten Sie die Setup-Taste gedrückt. Die grüne LED blinkt für die
einzelnen Menüs.
4. Lassen Sie die Setup-Taste los, um ein Menü aufzurufen. Eine Pause
nach den einzelnen Menüoptionen erlaubt Ihnen die Auswahl.
5. Die rote LED blinkt, wenn Sie ein Menü aufrufen. Die Blinkanzahl
entspricht der aktuellen Menüoption.
6. Drücken Sie die Setup-Taste kurz, um die Einstellungsauswahl zu ändern.
7. Wenn Sie eine Menüoption ausgewählt haben, halten Sie die SetupTaste gedrückt, um die Auswahl zu bestätigen.
*Die Werkeinstellung ist schwarz schattiert.
Hauptmenü
Blinkanzahl grüne LED
Menü
1
Akkutyp
2
Antriebstyp
3
Anfängermodus
4
Schleppbremse
Menü 1: Akkutyp
Blinkanzahl rote LED
Akkutypeinstellung
1
Ni-MH/Ni-Cd (keine Abschaltung)
2
2S Li-Po (Abschaltung bei 6,2 V)
Menü 2: Vorwärts/Rückwärts
Blinkanzahl rote LED
Vorwärts-/RückwärtsEinstellung
1
Vorwärts/Bremse
2
Vorwärts/Bremse/Rückwärts
Menü 3: Anfängermodus
Blinkanzahl rote LED
Anfängermodus-Einstellung
1
Aus (Kein Gaslimit)
2
Ein (Gaslimit 50 %)
Menü 4: Schleppbremse
Die Schleppbremse gibt an, wie viel Bremskraft in Prozent angewendet
wird, wenn der Gasgeber zur Neutralstellung zurückkehrt.
Blinkanzahl rote LED
Schleppbremsen-Einstellung
1
0 % (Schleppbremse aus)
2
10 %
3
20 %
4
30 %
LOSI 1/10 22T 2WD ELECTRIC TRUCK RTR
DE
Fehlersuchanleitung
Problem
Mögliche Ursache
Fahrzeug reagiert nicht
Akku nicht aufgeladen oder nicht angeschlossen Laden Sie den Akku auf oder schließen Sie ihn an
Motor läuft, aber Räder
drehen sich nicht
Lenkung funktioniert nicht
Lösung
ESC nicht eingeschaltet
Schalten Sie den ESC ein
Sender nicht eingeschaltet oder Akku/Batterie
schwach
Schalten Sie den Sender ein oder wechseln Sie die Batterien aus
Ritzel greift nicht in das Stirnrad ein
Passen Sie den Eingriff zwischen Ritzel und Stirnrad an
Ritzel dreht sich auf der Motorwelle
Ziehen Sie die Ritzelstellschraube an der flachen Stelle der
Motorwelle fest
Rutschkupplung zu locker
Prüfen Sie die Rutschkupplung und passen Sie sie an
Getriebezahnräder abgeschert
Wechseln Sie die Getriebezahnräder aus
Mitnehmerstift abgebrochen
Prüfen Sie den Mitnehmerstift und wechseln Sie ihn aus
Servostecker nicht fest im Empfänger
Stellen Sie sicher, dass der Lenkservostecker unter Beachtung
der Polarität an den Empfängerlenkkanal angeschlossen ist
Servogetriebe oder Motor beschädigt
Wechseln Sie den Servo aus oder reparieren Sie ihn
Lenkt in eine Richtung nicht Servogetriebe beschädigt
Wechseln Sie den Servo aus oder reparieren Sie ihn
Motor läuft nicht
Lötverbindung des Motorkabels ist beschädigt
Löten Sie das Motorkabel mit den richtigen Geräten wieder an
Motorkabel durchgetrennt
Reparieren Sie es oder wechseln Sie es aus
ESC beschädigt
Wenden Sie sich an den Kundendienst von Horizon Hobby
Sensorkabel beschädigt oder lose
Wechseln Sie das Sensorkabel aus oder bauen Sie es neu ein
Zu hohes Übersetzungsverhältnis im Motor
Verwenden Sie ein kleineres Ritzel oder ein größeres Stirnrad
ESC wird heiß
Kraftübertragung behindert
Schlechte Laufzeit und/oder Akkupack nicht vollständig aufgeladen
träge Beschleunigung
Ladegerät lässt keine vollständige Aufladung zu
Schlechte Reichweite und/
oder Aussetzer
Rutschkupplung lässt sich
nicht anpassen
Prüfen Sie Räder und Getriebe auf festhängende Teile
Laden Sie den Akku auf
Probieren Sie ein anderes Ladegerät
Rutschkupplung rutscht zu sehr
Prüfen Sie die Rutschkupplung und passen Sie sie an
Kraftübertragung behindert
Prüfen Sie Räder und Getriebe auf festhängende Teile
Senderbatterien/-akkus schwach
Prüfen Sie sie und wechseln Sie sie aus
Fahrzeugakku schwach
Laden Sie den Akku auf
Lose Stecker oder Kabel
Prüfen Sie alle Kabelanschlüsse und Stecker
Mitnehmerstift in der Welle fehlt
Bauen Sie den Mitnehmerstift ein
Kupplungsplatten abgenutzt
Wechseln Sie die Kupplungsplatten aus und passen Sie die
Rutschkupplung an
Bindung von Sender und Empfänger
Bindungsvorgang
1. Stellen Sie sicher, dass der Sender und das Fahrzeug beide ausgeschaltet sind.
2. Stecken Sie den Bindestecker in den Senderakku-/-bindeanschluss. Sie müssen keine der anderen Stecker entfernen, um eine erneute
Bindung durchzuführen.
3. Wenn der Bindestecker eingesteckt ist, schalten Sie das Fahrzeug ein. Nun sollte eine orangefarbene LED im Empfänger blinken.
4. Bewegen Sie Lenkrad und Gasgeber an die gewünschten voreingestellten Failsafe-Positionen (Neutralstellung), halten Sie die Bindetaste
gedrückt, und schalten Sie den Sender ein. Die rote LED vorn am Empfänger blinkt nach einigen Sekunden auf, was anzeigt, dass sich der
Empfänger im Bindemodus befindet. Wenn die rote LED blinkt, lassen Sie die Bindetaste los.
5. Wenn sich der Empfänger an den Sender bindet, leuchtet das Licht am Empfänger kontinuierlich.
6. Schalten Sie das Fahrzeug und den Sender aus.
7. Trennen Sie den Akku vom ESC. Ziehen Sie den Bindestecker aus dem Empfänger.
8. Bewahren Sie den Bindestecker sicher auf (manche Besitzer befestigen den Bindestecker mit zweiteiligen Schlaufen und Clips am Sender).
9. Der Empfänger behält die Bindung an den Sender bei, bis eine andere Bindung durchgeführt wird.
Wenn Probleme auftreten, folgen Sie den Anweisungen zur Bindung und lesen Sie die weiteren Anweisungen im Abschnitt zur Fehlersuche für den Sender.
Falls erforderlich, wenden Sie sich an das zuständige Horizon-Kundendienstbüro.
LOSI 1/10 22T 2WD ELECTRIC TRUCK RTR
15
DE
Garantie und Service Informationen
Warnung
Sicherheitshinweise
Ein ferngesteuertes Modell ist kein Spielzeug. Es kann, wenn es falsch
eingesetzt wird,zu erheblichen Verletzungen bei Lebewesen und
Beschädigungen an Sachgütern führen. Betreiben Sie Ihr RC-Modell nur auf
freien Plätzen und beachten Sie alle Hinweise derBedienungsanleitung des
Modells wie auch der Fernsteuerung.
Dieses ist ein hochwertiges Hobby Produkt und kein Spielzeug. Es
muss mit Vorsicht und Umsicht eingesetzt werden und erfordert
einige mechanische wie auch mentale Fähigkeiten. Ein Versagen, das
Produkt sicher und umsichtig zu betreiben kann zu Verletzungen von
Lebewesen und Sachbeschädigungen erheblichen Ausmaßes führen.
Dieses Produkt ist nicht für den Gebrauch durch Kinder ohne die
Aufsicht eines Erziehungsberechtigten vorgesehen. Die Anleitung enthält
Sicherheitshinweise und Vorschriften sowie Hinweise für die Wartung und
den Betrieb des Produktes. Es ist unabdingbar, diese Hinweise vor der
ersten Inbetriebnahme zu lesen und zu verstehen. Nur so kann der falsche
Umgang verhindert und Unfälle mit Verletzungen und Beschädigungen
vermieden werden.
Garantiezeitraum
Exklusive Garantie - Horizon Hobby Inc (Horizon) garantiert, dass
dasgekaufte Produkt (Produkt) frei von Material- und Montagefehlern
ist. Der Garantiezeitraum entspricht den gesetzlichen Bestimmung des
Landes, in dem das Produkt erworben wurde. In Deutschland beträgt der
Garantiezeitraum 6 Monate und der Gewährleistungszeitraum 18 Monate
nach dem Garantiezeitraum.
Einschränkungen der Garantie
Fragen, Hilfe und Reparaturen
(a) Die Garantie wird nur dem Erstkäufer (Käufer) gewährt und kann nicht
übertragen werden. Der Anspruch des Käufers besteht in der Reparatur
oder dem Tausch im Rahmen dieser Garantie. Die Garantie erstreckt sich
ausschließlich auf Produkte, die bei einem autorisierten Horizon Händler
erworben wurden. Verkäufe an dritte werden von dieser Garantie nicht
gedeckt. Garantieansprüche werden nur angenommen, wenn ein gültiger
Kaufnachweis erbracht wird. Horizon behält sich das Recht vor, diese
Garantiebestimmungen ohne Ankündigung zu ändern oder modifizieren und
widerruft dann bestehende Garantiebestimmungen.
(b) Horizon übernimmt keine Garantie für die Verkaufbarkeit des Produktes,
die Fähigkeiten und die Fitness des Verbrauchers für einen bestimmten
Einsatzzweck des Produktes. Der Käufer allein ist dafür verantwortlich,
zu prüfen, ob das Produkt seinen Fähigkeiten und dem vorgesehenen
Einsatzzweck entspricht.
(c) Ansprüche des Käufers ¬ Es liegt ausschließlich im Ermessen von
Horizon, ob das Produkt, bei dem ein Garantiefall festgestellt wurde,
repariert oder ausgetauscht wird. Dies sind die exklusiven Ansprüche des
Käufers, wenn ein Defekt festgestellt wird.
Horizon behält sich vor, alle eingesetzten Komponenten zu prüfen, die in den
Garantiefall einbezogen werden können. Die Entscheidung zur Reparatur
oder zum Austausch liegt nur bei Horizon. Die Garantie schließt kosmetische
Defekte oder Defekte, hervorgerufen durch höhere Gewalt, falsche
Behandlung des Produktes, falscher Einsatz des Produktes, kommerziellen
Einsatz oder Modifikationen irgendwelcher Art aus.
Die Garantie deckt Schäden, die durch falschen Einbau, falsche
Handhabung, Unfälle, Betrieb, Service oder Reparaturversuche, die nicht von
Horizon ausgeführt wurden, aus. Rücksendungen durch den Käufer direkt an
Horizon oder eine seiner Landesvertretung bedürfen der schriftlichen.
Ihr lokaler Fachhändler und die Verkaufstelle können eine
Garantiebeurteilung ohne Rücksprache mit Horizon nicht durchführen.
Dies gilt auch für Garantiereparaturen. Deshalb kontaktieren Sie in einem
solchen Fall den Händler, der sich mit Horizon kurz schließen wird, um eine
sachgerechte Entscheidung zu fällen, die Ihnen schnellst möglich hilft.
Schadensbeschränkung
Horizon ist nicht für direkte oder indirekte Folgeschäden,
Einkommensausfälle oder kommerzielle Verluste, die in irgendeinem
Zusammenhang mit dem Produkt stehen nicht verantwortlich, unabhängig
ab ein Anspruch im Zusammenhang miteinem Vertrag, der Garantie oder
der Gewährleistung erhoben werden. Horizon wird darüber hinaus keine
Ansprüche aus einem Garantiefall akzeptieren, die über den individuellen
Wert des Produktes hinaus gehen. Horizon hat keine Einfluss auf den
Einbau, die Verwendung oder die Wartung des Produktes oder etwaiger
Produktkombinationen, die vom Käufer gewählt werden. Horizon übernimmt
keine Garantie und akzeptiert keine Ansprüche für in der folge auftretende
Verletzungen oder Beschädigungen. Mit der Verwendung und
dem Einbau des Produktes akzeptiert der Käufer alle aufgeführten
Garantiebestimmungen ohne Einschränkungen und Vorbehalte.
Wenn Sie als Käufer nicht bereit sind, diese Bestimmungen im
Zusammenhang mit der Benutzung des Produktes zu akzeptieren,
werden Sie gebeten, dass Produkt in unbenutztem Zustand in der
Originalverpackung vollständig bei dem Verkäufer zurückzugeben.
16
Wartung und Reparatur
Muss Ihr Produkt gewartet oder repariert werden, wenden Sie sich entweder
an Ihren Fachhändler oder direkt an Horizon. Packen Sie das Produkt
sorgfältig ein. Beachten Sie, dass der Originalkarton in der Regel nicht
ausreicht, um beim Versand nicht beschädigt zu werden. Verwenden Sie
einen Paketdienstleister mit einer Tracking Funktion und Versicherung,
da Horizon bis zur Annahme keine Verantwortung für den Versand des
Produktes übernimmt.
Bitte legen Sie dem Produkt einen Kaufbeleg bei, sowie eine ausführliche
Fehlerbeschreibung und eine Liste aller eingesendeten Einzelkomponenten.
Weiterhin benötigen wir die vollständige Adresse, eine Telefonnummer für
Rückfragen, sowie eine Email Adresse.
Garantie und Reparaturen
Garantieanfragen werden nur bearbeitet, wenn ein Originalkaufbeleg von
einem autorisierten Fachhändler beiliegt, aus dem der Käufer und das
Kaufdatum hervorgeht. Sollte sich ein Garantiefall bestätigen wird das
Produkt repariert oder ersetzt. Diese Entscheidung obliegt einzig
Horizon Hobby.
Kostenpflichtige Reparaturen
Liegt eine kostenpflichtige Reparatur vor, erstellen wir einen
Kostenvoranschlag, den wir Ihrem Händler übermitteln. Die Reparatur wird
erst vorgenommen, wenn wir die Freigabe des Händlers erhalten. Der Preis
für die Reparatur ist bei Ihrem Händler zu entrichten. Bei kostenpflichtigen
Reparaturen werden mindestens 30 Minuten Werkstattzeit und die
Rückversandkosten in Rechnung gestellt. Sollten wir nach 90 Tagen keine
Einverständniserklärung zur Reparatur vorliegen haben, behalten wir uns
vor, das Produkt zu vernichten oder anderweitig zu verwerten.
Achtung: Kostenpflichtige Reparaturen nehmen wir nur für Elektronik und
Motoren vor. Mechanische Reparaturen, besonders bei Hubschraubern und
RC-Cars sind extrem aufwendig und müssen deshalb vom Käufer selbst
vorgenommen werden.
Sicherheit und Warnungen
Als Anwender des Produktes sind Sie verantwortlich für den sicheren
Betrieb aus dem eine Gefährdung für Leib und Leben sowie Sachgüter
nicht hervorgehen soll. Befolgen Sie sorgfältig alle Hinweise und
Warnungen für dieses Produkt und für alle Komponenten und Produkte,
die Sie im Zusammenhang mit diesem Produkt einsetzen. Ihr Modell
empfängt Funksignale und wird dadurch gesteuert. Funksignale können
gestört werden, was zu einem Signalverlust im Modell führen würde.
Stellen Sie deshalb sicher, dass Sie um Ihr Modell einen ausreichenden
Sicherheitsabstand einhalten, um einem solchen Vorfall vorzubeugen.
LOSI 1/10 22T 2WD ELECTRIC TRUCK RTR
DE
Garantie und Service Kontaktinformationen
Land des Kauf
Horizon Hobby
Adresse
Telefon / Email Adresse
Deutschland
Horizon Technischer
Service
Christian-Junge-Straße 1
25337 Elmshorn, Deutschland
+49 (0) 4121 2655 100
[email protected]
Kundendienstinformationen
Land des Kauf
Horizon Hobby
Adresse
Telefon / Email Adresse
Deutschland
Horizon Hobby GmbH
Christian-Junge-Straße 1
25337 Elmshorn, Deutschland
+49 4121 46199 60
[email protected]
Rechtliche Informationen für die Europäische Union
AT
DE
GR
LU
PT
UK
BE
DK
HU
LV
RO
BG
ES
IE
MT
SE
CZ
FI
IT
NL
SI
CY
FR
LT
PL
SK
Konformitätserklärung laut Allgemeine Anforderungen (ISO/IEC 17050-1:2004, korrigierte Fassung 2007-06-15); Deutsche und Englische Fassung EN ISO/
IEC 17050-1:2010
Declaration of conformity (in accordance with ISO/IEC 17050-1)
Horizon Hobby GmbH
Christian-Junge-Straße 1
D-25337 Elmshorn
erklärt das Produkt:
22T-RTR 1/10 2wd Electric Truck RTR-LOSB0123 (mit Spektrum DX3E Sender und SR300 Empfänger enthalten)
declares the product:
22T-RTR 1/10 2wd Electric Truck RTR-LOSB0123 (DX3E Transmitter/SR300 Receiver Included)
Geräteklasse:
2
equipment class:
den grundlegenden Anforderungen des §3 und den übrigen einschlägigen Bestimmungen des FTEG (Artikel 3 der R&TTE)
complies with the essential requirements of §3 and other relevant provisions of the FTEG (Article 3 of the R&TTE directive)
Angewendete harmonisierte Normen:
Harmonised standards applied:
EN 300-328 V1.7.1
EN 301 489-1 V1.7.1: 2006
EN 301 489-17 V1.3.2: 2008
EN 60950-1:2006+A11
Elmshorn, 11.27.2011
Steven A. Hall
Geschäftsfuhrer
Managing Director
Birgit Schamuhn
Geschäftsfuhrerin
Managing Director
Horizon Hobby GmbH; Hamburger Str. 10; D-25337 Elmshorn
HR Pi: HRB 1909; UStIDNr.:DE812678792; Str.Nr.: 1829812324
Geschäftsführer Birgit Schamuhn, Steven A. Hall
Tel.: +49 4121 4619960 • Fax: +49 4121 4619970 eMail: [email protected]; Internet: www.horizonhobby.de
Es gelten unsere allgemeinen Geschäftsbedingungen, die in unseren Geschäftsräumen eingesehen werden können. Ware bleibt bis zur vollständigen
Bezahlung Eigentum der Horizon Hobby GmbH
Entsorgung in der Europäischen Union
Dieses Produkt darf nicht über den Hausmüll entsorgt werden. Es ist die Verantwortung des Benutzers, dass Produkt an einer registrierten
Sammelstelle für Elektroschrott abzugeben diese Verfahren stellt sicher, dass die Umwelt geschont wird und natürliche Ressourcen nicht über
die Gebühr beansprucht werden. Dadurch wird das Wohlergehen der menschlichen Gemeinschaft geschützt. Für weitere Informationen, wo
der Elektromüll entsorgt werden kann, können Sie Ihr Stadtbüro oder Ihren lokalen Entsorger kontaktieren.
LOSI 1/10 22T 2WD ELECTRIC TRUCK RTR
17
FR
REMARQUE
La totalité des instructions, garanties et autres documents est sujette à modification à la seule discrétion d’Horizon Hobby, Inc.
Pour obtenir la documentation à jour, rendez-vous sur le site horizonhobby.com et cliquez sur l’onglet de support de ce produit.
Signification de certains termes spécifiques
Les termes suivants sont utilisés dans l’ensemble du manuel pour indiquer différents niveaux de danger lors de l’utilisation de ce produit :
REMARQUE:
ATTENTION:
AVERTISSEMENT:
Procédures qui, si elles ne sont pas suivies correctement, peuvent entraîner des dégâts matériels ET éventuellement
un faible risque de blessures.
Procédures qui, si elles ne sont pas suivies correctement, peuvent entraîner des dégâts matériels ET des blessures graves.
Procédures qui, si elles ne sont pas suivies correctement, peuvent entraîner des dégâts matériels et des blessures graves
OU engendrer une probabilité élevée de blessure superficielle.
AVERTISSEMENT: Lisez la TOTALITÉ du manuel d’utilisation afin de vous familiariser avec les caractéristiques du produit avant de le faire
fonctionner. Une utilisation incorrecte du produit peut entraîner sa détérioration, ainsi que des risques de dégâts matériels, voire de blessures graves.
Ceci est un produit de loisirs sophistiqué. Il doit être manipulé avec prudence et bon sens et requiert des aptitudes de base en mécanique. Toute utilisation irresponsable de ce produit ne respectant pas les principes de sécurité peut provoquer des blessures, entraîner des dégâts matériels et endommager
le produit. Ce produit n’est pas destiné à être utilisé par des enfants sans la surveillance directe d’un adulte. N’essayez pas de démonter le produit, de
l’utiliser avec des composants incompatibles ou d’en améliorer les performances sans l’accord d’Horizon Hobby, Inc. Ce manuel comporte des instructions
relatives à la sécurité, au fonctionnement et à l’entretien. Il est capital de lire et de respecter la totalité des instructions et avertissements du manuel avant
l’assemblage, le réglage et l’utilisation, ceci afin de manipuler correctement l’appareil et d’éviter tout dégât matériel ou toute blessure grave.
Précautions et avertissements supplémentaires liés à la sécurité
14 ans et plus. Ceci nest pas un jouet.
• Maintenez toujours une distance de sécurité adéquate dans toutes les directions autour de votre modèle afin d’éviter les collisions et blessures. Ce
modèle est contrôlé par un signal radio, qui peut être soumis à des interférences provenant de nombreuses sources que vous ne maîtrisez pas. Les interférences sont susceptibles d’entraîner une perte de contrôle momentanée.
• Faites toujours fonctionner votre modèle dans des espaces dégagés, à l’écart des véhicules, de la circulation et des personnes.
• Respectez toujours scrupuleusement les instructions et avertissements relatifs à votre modèle et à tous les équipements complémentaires optionnels
utilisés (chargeurs, packs de batteries rechargeables, etc.).
• Tenez toujours tous les produits chimiques, les petites pièces et les composants électriques hors de portée des enfants.
• Évitez toujours d’exposer à l’eau tout équipement non conçu et protégé à cet effet. L’humidité endommage les composants électroniques.
• Ne mettez jamais aucune partie du modèle dans votre bouche. Vous vous exposeriez à un risque de blessure grave, voire mortelle.
• Ne faites jamais fonctionner votre modèle lorsque les batteries de l’émetteur sont faibles.
Enregistrez votre produit maintenant et soyez le premier à découvrir des dernières pièces en option, les mises à jour du produit et bien d‘autres
choses encore. Connectez-vous sur WWW.LOSI.COM et suivez le lien d‘enregistrement du produit pour rester en contact.
Nous vous remercions d’avoir acheté le Losi® 22T™ RTR. Nous sommes
convaincus que vous serez satisfait des performances de ce véhicule durable
et résistant. Veuillez lire la totalité du manuel avant de régler votre véhicule
et de l’utiliser.
Table des matières
Enregistrez votre produit Losi en ligne ...................................................18
Composants ........................................................................................18
Outils nécessaires ................................................................................18
Outils inclus.........................................................................................18
Matériel nécessaire ..............................................................................18
Contenu ..............................................................................................19
L’émetteur ...........................................................................................19
Installation de la batterie.......................................................................20
Test des commandes ...........................................................................20
Précautions pour la conduite ...............................................................21
Réétalonnage et réglage du contrôleur électronique
de vitesse MSC540BL-S (ESC) ..............................................................22
Guide de dépannage ............................................................................23
Affectation de l’émetteur et du récepteur ...............................................23
Garantie et réparations ........................................................................24
Coordonnées de Garantie et réparations ..............................................25
Informations de contact pour les pièces ...............................................25
Informations de conformité pour l’Union européenne ............................25
Liste des pièces/Vues éclatées .............................................................34
Liste des pièces optionnelles ................................................................39
Feuille de réglage ................................................................................42
18
Composants
• 22T RTR à l’échelle 1/10
• Système radio Spektrum™ DX3E 2,4 GHz DSM
• Contrôleur électronique de vitesse sans balais à capteur
MSC540BL-S, limite de 13,5 T
• Moteur à capteur 13,5 T agréé ROAR
• Servo à couple extra élevé LOSB0812
• 4 piles AA (pour l’émetteur)
Outils nécessaires
• Cutter de modélisme
• Pince à becs fins
• Pince coupante
• Lunettes de sécurité
• Fer à souder
• Ruban adhésif double face (LOSA4004)
• Colle cyanoacrylate (LOSA7880 ou LOSA7881)
Outils inclus
• Clé en croix
• Prise pour l’affectation émetteur/récepteur
• 3 clés hexagonales en L : 1,5 mm, 2 mm et 2,5 mm
• Clé plate pour tendeur
• Outils pour amortisseurs
Matériel nécessaire
• Un pack de batterie 6 cellules Ni-MH ou Li-Po 2S
• Un chargeur de batterie Ni-MH avec détection automatique
de crête ou un chargeur de batterie Li-Po
TRUCK ÉLECTRIQUE RTR LOSI 1/10 22T 2WD
FR
Contenu
ST. TRIM
POWER
ST. RATE
TH. TRIM
L’émetteur
10
11
12
ST
BIND
N
ST-L
15
ST-R
13
TH
R
N
TH-F
14
AUX
R
N
TH-B
AUX
R
2P 3P LIN
AUX-H
AUX-L
16
3
6
5
8
ST. TRIM
POWER
ST. RATE
MARCHE
ARRÊT
TH. TRIM
4
7
1. Volant : il contrôle la direction (gauche/droite) du modèle.
2. Gâchette des gaz : elle contrôle la vitesse et la direction
(avant/arrière) du modèle.
3. Antenne : elle transmet le signal au modèle.
4. Interrupteur Marche/Arrêt : il permet d’allumer et
d’éteindre l’émetteur.
5. Voyants lumineux : le voyant vert (à droite) indique une
charge de batterie adéquate. Le voyant rouge (à gauche)
indique la force du signal.
6. ST. TRIM (trim de direction) : il ajuste la direction « volant
libre » du modèle.
7. TH. TRIM (Trim des gaz) : il ajuste la vitesse du moteur,
qui s’arrête au point neutre.
8. ST. RATE (taux de direction) : il règle l’ampleur du
mouvement des roues avant lorsque le volant est
tourné à gauche et à droite.
9. Cache inférieur : il protège les piles qui alimentent
l’émetteur et les maintient en place.
10. Bouton d’affectation (BIND)
11. ST. REV : pour inverser la fonction de direction lorsque
le volant est tourné à gauche ou à droite.
12. TH. REV : pour inverser la fonction de contrôle de la vitesse
lorsque la gâchette est tirée ou poussée.
13. TH-F : fin de course des gaz. Pour régler le plein gaz.
14. TH-B : fin de course de freinage. Pour régler le freinage
complet.
15. ST-L : fin de course à gauche. Pour régler la course
de direction à gauche.
16. ST-R : fin de course à droite. Pour régler la course
de direction à droite.
Installation des piles
1
2
1. Appuyez légèrement sur le cache des
piles pour dégager la languette de
retenue, puis retirez-le.
2. Installez 4 piles AA, en prenant bien soin
d’aligner les polarités conformément au
schéma présent dans le compartiment
de l’émetteur prévu pour les piles.
3. Remettez le cache des piles en place en
alignant avec soin la languette avec la fente sur l’émetteur.
ATTENTION : ne retirez pas les piles de l’émetteur alors que le modèle est sous
tension ou en fonctionnement, sous peine d’en perdre le contrôle et d’entraîner
des dommages ou des blessures.
9
TRUCK ÉLECTRIQUE RTR LOSI 1/10 22T 2WD
19
FR
Installation de la batterie
MARCHE
ARRÊT
Pour installer le pack de batterie, desserrez les bandes auto-agrippantes. Insérez la batterie chargée et serrez les bandes
auto-agrippantes. Branchez le connecteur de batterie EC3™ bleu au contrôleur électronique de vitesse. Allumez d’abord
l’émetteur. Allumez ensuite le véhicule.
Test des commandes
Effectuez un test des commandes avec les roues du véhicule qui
ne touchent pas le sol.
Si les pneus tournent une fois le véhicule sous tension, réglez le
bouton TH. TRIM situé en bas à gauche du volant jusqu’à ce qu’ils
s’arrêtent. Pour faire avancer les roues, tirez la gâchette. Pour faire
marche arrière, attendez que le modèle s’arrête, puis poussez la
gâchette. Lorsque le véhicule avance, les roues devraient tracer une
ligne droite si vous ne touchez pas du tout le volant. Si ce n’est pas
le cas, réglez le bouton ST. TRIM de telle sorte que les roues tracent
une ligne droite sans qu’il soit nécessaire de tourner le volant.
TH. TRIM
TH. TRIM
Marche avant
20
Frein/Marche arrière
TRUCK ÉLECTRIQUE RTR LOSI 1/10 22T 2WD
FR
Précautions pour la conduite
• Évitez d’utiliser le véhicule dans des flaques d’eau, de l’herbe humide,
de la boue ou de la neige. L’électronique embarquée n’est pas étanche.
• Gardez le véhicule bien en vue à tout moment.
• Inspectez le véhicule pour vérifier que les pièces des roues sont
bien fixées.
• Inspectez la direction pour vérifier que les pièces sont bien fixées.
La conduite du véhicule ailleurs que sur une route peut en effet entraîner
le desserrage des fixations au fil du temps.
• N’utilisez pas le véhicule dans des herbes hautes. Vous risqueriez
d’endommager celui-ci ou son électronique.
• Arrêtez d’utiliser le véhicule quand vous remarquez un manque de
puissance. Le fait de piloter un véhicule lorsque la batterie est déchargée
peut entraîner la mise hors tension du récepteur. Vous pourriez perdre
le contrôle du modèle.
ATTENTION : ne déchargez pas une batterie Li-Po au-dessous
du seuil de 3 V par cellule. Les batteries déchargées à une tension
inférieure à la tension minimale approuvée peuvent se détériorer, ce qui
entraîne des pertes de performances et un risque d’incendie potentiel
lorsque les batteries sont chargées.
• Ne mettez pas les gaz en marche avant ou arrière si le véhicule est
coincé. Dans ce cas, le fait d’accélérer peut en effet endommager
le moteur ou le contrôleur électronique de vitesse.
• Après avoir piloté le véhicule, laissez les composants électroniques
refroidir et revenir à température ambiante avant d’utiliser un autre
pack de batterie.
TEMPS DE FONCTIONNEMENT
Le facteur qui joue le rôle le plus important dans le temps de
fonctionnement est la capacité du pack de batterie. Plus la valeur
en mAh est élevée, plus le temps de fonctionnement sera long.
L’état du pack de batterie est également déterminant pour le temps de
fonctionnement comme pour la vitesse. Les connecteurs de la batterie
peuvent chauffer en cours d’utilisation du véhicule. Les performances
et la capacité des batteries diminuent avec le temps.
Faire passer le véhicule de l’arrêt à la pleine vitesse de façon répétée
détériore les batteries et l’électronique au fil du temps. Les accélérations
soudaines entraînent également des temps de fonctionnement plus courts.
Pour améliorer les temps de fonctionnement
• Gardez votre véhicule bien propre et entretenez-le.
• Améliorez la circulation d’air sur le contrôleur électronique de vitesse
et le moteur.
• Abaissez la démultiplication. Un taux plus faible réduit la température
de fonctionnement des composants électroniques. Utilisez un pignon
plus petit ou une couronne plus grande pour abaisser le rapport de
démultiplication.
• Utilisez un pack de batterie dont la valeur en mAh est plus élevée.
• Utilisez le chargeur le plus adapté pour charger vos packs de batterie
(rendez-vous chez votre revendeur local pour plus d’informations).
TRUCK ÉLECTRIQUE RTR LOSI 1/10 22T 2WD
OPTIMISATION, RÉGLAGE ET ENTRETIEN DE VOTRE
VÉHICULE
• Examinez régulièrement votre véhicule.
• Utilisez une brosse pour enlever saletés et poussières.
• Vérifiez si les bras de suspension et les autres parties moulées
sont en bon état.
• Recollez les pneus aux roues, si nécessaire.
• Utilisez des outils appropriés pour effectuer les serrages.
• Vérifiez que les liaisons de cambrure et de direction ne sont pas faussées.
Remplacez les liaisons endommagées.
• Modifiez les réglages de pincement et de cambrure si nécessaire.
• Retirez les amortisseurs et vérifiez s’ils sont abîmés. Remontez-les
s’ils perdent de l’huile.
• Inspectez l’électronique et les batteries pour vérifier si des câblages
sont à nu. Réparez les câbles endommagés avec du film plastique,
ou remplacez-les.
• Assurez-vous que le contrôleur électronique de vitesse et le récepteur
sont bien fixés au châssis. Remplacez l’adhésif double face si nécessaire.
• Allumez l’émetteur. Si le voyant lumineux vert est de faible intensité
ou éteint, changez les piles AA de votre émetteur.
• Vérifiez si la couronne est usée.
MAINTENANCE/RÉPARATION
Radio/Contrôleur de vitesse et moteur
Si des problèmes autres que ceux répertoriés dans la section de dépannage
surviennent, veuillez appeler le service chargé de la maintenance des
composants électroniques. Celui-ci pourra se pencher sur le problème
que vous rencontrez et vous donner des instructions pour le résoudre.
Maintenance
Si des questions autres que celles répertoriées dans les sections de
dépannage et de maintenance surviennent, veuillez appeler le service
d’assistance produit Horizon.
Nettoyage
Les performances peuvent s’en ressentir si des saletés pénètrent dans
les pièces de suspension mobiles. Utilisez de l’air comprimé, un pinceau
doux ou une brosse à dents pour enlever la poussière et les saletés. Évitez
d’utiliser des solvants ou des produits chimiques car ils peuvent pousser
la saleté dans les roulements et les pièces mobiles, et endommager les
composants électroniques.
21
FR
Réétalonnage et réglage du contrôleur électronique
de vitesse MSC540BL-S (ESC)
Programmation du contrôleur électronique de vitesse
MARCHE
ARRÊT
Préparation de l’émetteur
1. Vérifiez que les piles de l’émetteur sont entièrement chargées.
2. Allumez l’émetteur.
3. Définissez le réglage de la course sur la valeur maximale dans les
directions avant et arrière. Si votre émetteur est doté d’une gâchette
des gaz réglable, veuillez sélectionner 70/30.
4. Vérifiez que l’inversion de la voie des gaz est réglée sur le paramètre
NORMAL.
5. Centrez le trim des gaz et assurez-vous que les sous-trims sont
réglés sur 0.
Connexion de la batterie au contrôleur électronique de vitesse
1. Vérifiez que l’interrupteur du contrôleur électronique de vitesse
est en position Arrêt (OFF).
2. Branchez le connecteur de batterie EC3 bleu au contrôleur
électronique de vitesse.
3. Allumez l’émetteur.
4. Allumez le contrôleur électronique de vitesse.
Utilisation de la marche arrière
1. Freinez.
2. Ramenez la gâchette au point neutre lorsque le véhicule s’arrête.
3. Freinez de nouveau. La marche arrière est maintenant active.
REMARQUE : le passage de la marche arrière à la marche avant
s’effectue sans délai. Le fait de ne pas laisser le véhicule s’arrêter
avant de passer de l’une à l’autre peut endommager l’embrayage,
le moteur ou les deux.
Étalonnage rapide
Le moteur n’est pas alimenté quand le contrôleur électronique
de vitesse est en mode programmation ou étalonnage.
1. Allumez l’émetteur.
2. Appuyez sur le bouton de réglage tout en allumant le contrôleur
électronique de vitesse.
3. Relâchez le bouton de réglage lorsque le voyant lumineux vert s’allume.
4. Déplacez la gâchette vers la position plein gaz. Maintenez-la ainsi
jusqu’à ce que le voyant lumineux vert devienne fixe, ce qui confirme
la position de fin de course des gaz.
5. Déplacez la gâchette vers la position de freinage maximal. Maintenezla ainsi jusqu’à ce que le voyant lumineux rouge devienne fixe, ce qui
confirme la position de fin de course des freins/de la marche arrière.
6. Ramenez la gâchette en position centrale/neutre. L’étalonnage est
terminé quand les témoins lumineux vert et rouge sont tous les
deux fixes.
22
Le moteur n’est pas alimenté quand le contrôleur électronique de vitesse
est en mode programmation ou étalonnage.
1. Allumez l’émetteur.
2. Allumez le contrôleur électronique de vitesse. Les témoins lumineux
vert et rouge s’allument et restent fixes.
3. Maintenez le bouton de réglage enfoncé. Le témoin lumineux vert
clignote pour chaque menu.
4. Relâchez le bouton de réglage pour entrer dans un menu. Une pause
après chaque option de menu vous permet d’effectuer une sélection.
5. Le témoin lumineux rouge clignote quand vous entrez dans un menu.
Le nombre de clignotements correspond à la sélection actuelle.
6. Appuyez rapidement sur le bouton de réglage pour modifier la sélection.
7. Une fois une option de menu sélectionnée, appuyez sur le bouton
de réglage et maintenez-le enfoncé pour confirmer la sélection.
*Le paramètre sur fond noir est celui qui est défini en usine
par défaut.
Menu principal
Nombre de clignotements
verts
Menu
1
Type de batterie
2
Type de conduite
3
Mode Débutant
4
Freinage par traînée
Menu 1—Type de batterie
Nombre de clignotements
rouges
Paramétrage du type
de batterie
1
Ni-MH/Ni-Cd (pas de coupure)
2
Li-Po 2S (coupure à 6,2 V)
Menu 2—Marche avant/Marche arrière
Nombre de clignotements
rouges
Paramétrage de la marche
avant/marche arrière
1
Marche avant/Frein
2
Marche avant/Frein/Marche
arrière
Menu 3—Mode Débutant
Nombre de clignotements
rouges
Paramétrage du mode
Débutant
1
Désactivé (gaz non limités)
2
Activé (gaz limités à 50 %)
Menu 4—Freinage par traînée
Le freinage par traînée est le taux de freinage appliqué lorsque la gâchette
revient en position neutre.
Nombre de clignotements
rouges
Paramétrage du freinage par
traînée
1
0 % (freinage par traînée
désactivé)
2
10 %
3
20 %
4
30 %
TRUCK ÉLECTRIQUE RTR LOSI 1/10 22T 2WD
FR
Guide de dépannage
Problème
Cause possible
Le véhicule ne fonctionne pas. La batterie n’est pas chargée ou n’est pas
branchée.
L’interrupteur de l’ESC n’est pas en position
Marche.
L’émetteur n’est pas allumé ou la batterie est
trop faible.
Le moteur fonctionne mais les Le pignon n’est pas entraîné avec la couronne.
roues arrière ne tournent pas. Le pignon tourne sur l’arbre du moteur.
Le patin est trop lâche.
Les engrenages de transmission sont
endommagés.
L’axe d’entraînement est cassé.
La direction ne fonctionne pas. Le servo n’est pas branché correctement sur
le récepteur.
Il est impossible de tourner
dans une direction.
Le moteur ne fonctionne pas.
L’ESC chauffe.
Le temps de fonctionnement
est faible et/ou l’accélération
est poussive.
Portée faible et/ou parasites.
Il est impossible de régler
le patin.
Les engrenages du servo ou le moteur sont
endommagés.
Les engrenages du servo sont endommagés.
Le joint de soudure du câble du moteur
est abîmé.
Le câble du moteur est cassé.
L’ESC est endommagé.
Le câble du capteur est endommagé ou mal
connecté.
Le rapport est trop élevé.
La ligne de transmission est enrayée.
Le pack de batterie n’est pas complètement
chargé.
Le chargeur n’assure pas une charge
complète.
Le patin patine trop.
La ligne de transmission est enrayée.
Les piles de l’émetteur sont faibles.
La batterie du véhicule est faible.
Des fiches ou des câbles sont lâches.
L’axe d’entraînement manque dans l’arbre.
Les disques du patin sont usés.
Solution
Chargez la batterie/branchez-la.
Allumez l’interrupteur de l’ESC.
Allumez l’émetteur/remplacez les piles.
Réglez l’engrenage du pignon et de la couronne.
Resserrez la vis de fixation du pignon sur la surface
plane de l’arbre du moteur.
Vérifiez le patin et réglez-le.
Remplacez les engrenages de transmission.
Vérifiez l’axe d’entraînement et remplacez-le.
Vérifiez le raccordement du servo de direction à la
voie de direction du récepteur en prenant garde à la
polarité.
Réparez ou remplacez le servo.
Réparez ou remplacez le servo.
Ressoudez le câble du moteur avec le matériel
approprié.
Réparez-le ou remplacez-le si nécessaire.
Contactez l’assistance produit Horizon Hobby.
Remplacez ou réinstallez le câble du capteur.
Utilisez un pignon plus petit ou une couronne
plus grande.
Vérifiez si les roues et la transmission sont grippées.
Rechargez la batterie.
Essayez un autre chargeur.
Vérifiez le patin et réglez-le.
Vérifiez si les roues et la transmission sont grippées.
Vérifiez-les et remplacez-les.
Rechargez la batterie.
Contrôlez la totalité des câbles et connexions.
Remplacez l’axe d’entraînement.
Remplacez les disques et réglez le patin.
Affectation de l’émetteur et du récepteur
Procédure d’affectation
1. Vérifiez que l’émetteur et le véhicule sont tous deux éteints.
2. Insérez une prise d’affectation dans le port batterie du récepteur prévu à cet effet. Il est inutile de retirer les autres prises
pour réaliser une réaffectation.
3. La prise d’affectation étant branchée, allumez le véhicule. Un témoin lumineux clignotant orange s’allume sur le récepteur.
4. La direction et les gaz se trouvant dans les positions préréglées de sécurité désirées (réglage neutre), appuyez sur le bouton d’affectation
et, tout en le maintenant enfoncé, allumez l’émetteur. Le témoin lumineux rouge sur la face avant de l’émetteur se met à clignoter dans
les quelques secondes qui suivent, ce qui indique que l’émetteur se trouve en mode d’affectation. Une fois que le témoin lumineux rouge
se met à clignoter, relâchez le bouton d’affectation.
5. Quand le récepteur est affecté à l’émetteur, le témoin lumineux du récepteur devient fixe.
6. Éteignez le véhicule et l’émetteur.
7. Déconnectez la batterie du contrôleur électronique de vitesse. Retirez la prise d’affectation du récepteur.
8. Rangez la prise d’affectation dans un endroit sûr (certains utilisateurs la fixent à leur émetteur à l’aide de clips
et d’attaches en deux parties).
9. Le récepteur reste affecté à l’émetteur jusqu’à une nouvelle affectation.
Si vous rencontrez des problèmes, suivez les instructions d’affectation et reportez-vous au guide de dépannage de l’émetteur pour plus d’informations.
Le cas échéant, contactez le bureau d’assistance produit Horizon approprié.
TRUCK ÉLECTRIQUE RTR LOSI 1/10 22T 2WD
23
FR
Garantie et réparations
Durée de la garantie
Indications relatives à la sécurité
Garantie exclusive - Horizon Hobby, Inc. (Horizon) garantit que le Produit
acheté (le « Produit ») sera exempt de défauts matériels et de fabrication
à sa date d’achat par l’Acheteur. La durée de garantie correspond aux
dispositions légales du pays dans lequel le produit a été acquis. La durée
de garantie est de 6 mois et la durée d’obligation de garantie de 18
mois à l’expiration de la période de garantie.
Ceci est un produit de loisirs perfectionné et non un jouet. Il doit être utilisé
avec précaution et bon sens et nécessite quelques aptitudes mécaniques
ainsi que mentales. L’incapacité à utiliser le produit de manière sûre
et raisonnable peut provoquer des blessures et des dégâts matériels
conséquents. Ce produit n’est pas destiné à être utilisé par des enfants sans
la surveillance par un tuteur. La notice d’utilisation contient des indications
relatives à la sécurité ainsi que des indications concernant la maintenance
et le fonctionnement du produit. Il est absolument indispensable de lire et
de comprendre ces indications avant la première mise en service. C’est
uniquement ainsi qu’il sera possible d’éviter une manipulation erronée et
des accidents entraînant des blessures et des dégâts.
Limitations de la garantie
(a) La garantie est donnée à l’acheteur initial (« Acheteur ») et n’est
pas transférable. Le recours de l’acheteur consiste en la réparation ou
en l‘échange dans le cadre de cette garantie. La garantie s’applique
uniquement aux produits achetés chez un revendeur Horizon agréé. Les
ventes faites à des tiers ne sont pas couvertes par cette garantie. Les
revendications en garantie seront acceptées sur fourniture d’une preuve
d’achat valide uniquement. Horizon se réserve le droit de modifier les
dispositions de la présente garantie sans avis préalable et révoque alors
les dispositions de garantie existantes.
(b) Horizon n’endosse aucune garantie quant à la vendabilité du produit
ou aux capacités et à la forme physique de l’utilisateur pour une utilisation
donnée du produit. Il est de la seule responsabilité de l’acheteur de vérifier
si le produit correspond à ses capacités et à l’utilisation prévue.
(c) Recours de l’acheteur – Il est de la seule discrétion d‘Horizon de
déterminer si un produit présentant un cas de garantie sera réparé
ou échangé. Ce sont là les recours exclusifs de l’acheteur lorsqu’
un défaut est constaté.
Horizon se réserve la possibilité de vérifier tous les éléments utilisés et
susceptibles d’être intégrés dans le cas de garantie. La décision de réparer
ou de remplacer le produit est du seul ressort d’Horizon. La garantie exclut
les défauts esthétiques ou les défauts provoqués par des cas de force
majeure, une manipulation incorrecte du produit, une utilisation incorrecte
ou commerciale de ce dernier ou encore des modifications de quelque
nature qu’elles soient.
La garantie ne couvre pas les dégâts résultant d’un montage ou d’une
manipulation erronés, d’accidents ou encore du fonctionnement ainsi que
des tentatives d’entretien ou de réparation non effectuées par Horizon. Les
retours effectués par le fait de l’acheteur directement à Horizon ou à l’une
de ses représentations nationales requièrent une confirmation écrite.
Limitation des dégâts
Horizon ne saurait être tenu pour responsable de dommages conséquents
directs ou indirects, de pertes de revenus ou de pertes commerciales, liés
de quelque manière que ce soit au produit et ce, indépendamment du fait
qu’un recours puisse être formulé en relation avec un contrat, la garantie
ou l’obligation de garantie. Par ailleurs, Horizon n’acceptera pas de recours
issus d’un cas de garantie lorsque ces recours dépassent la valeur unitaire
du produit. Horizon n’exerce aucune influence sur le montage, l’utilisation
ou la maintenance du produit ou sur d’éventuelles combinaisons de produits
choisies par l’acheteur. Horizon ne prend en compte aucune garantie et
n‘accepte aucun recours pour les blessures ou les dommages pouvant
en résulter. En utilisant et en montant le produit, l’acheteur accepte sans
restriction ni réserve toutes les dispositions relatives à la garantie figurant
dans le présent document.
Si vous n’êtes pas prêt, en tant qu’acheteur, à accepter ces dispositions en
relation avec l’utilisation du produit, nous vous demandons de restituer au
vendeur le produit complet, non utilisé et dans son emballage d’origine.
24
Questions, assistance et réparations
Votre revendeur spécialisé local et le point de vente ne peuvent effectuer
une estimation d’éligibilité à l’application de la garantie sans avoir consulté
Horizon. Cela vaut également pour les réparations sous garantie. Vous
voudrez bien, dans un tel cas, contacter le revendeur qui conviendra avec
Horizon d’une décision appropriée, destinée à vous aider le plus rapidement
possible.
Maintenance et réparation
Si votre produit doit faire l’objet d’une maintenance ou d‘une réparation,
adressez-vous soit à votre revendeur spécialisé, soit directement à
Horizon. Emballez le produit soigneusement. Veuillez noter que le carton
d‘emballage d’origine ne suffit pas, en règle générale, à protéger le produit
des dégâts pouvant survenir pendant le transport. Faites appel à un service
de messagerie proposant une fonction de suivi et une assurance, puisque
Horizon ne prend aucune responsabilité pour l’expédition du produit jusqu’à
sa réception acceptée. Veuillez joindre une preuve d’achat, une description
détaillée des défauts ainsi qu’une liste de tous les éléments distincts
envoyés. Nous avons de plus besoin d’une adresse complète, d’un numéro
de téléphone (pour demander des renseignements) et d’une adresse de
courriel.
Garantie et réparations
Les demandes en garantie seront uniquement traitées en présence d’une
preuve d’achat originale émanant d’un revendeur spécialisé agréé, sur
laquelle figurent le nom de l’acheteur ainsi que la date d’achat. Si le cas
de garantie est confirmé, le produit sera réparé Cette décision relève
uniquement de Horizon Hobby.
Réparations payantes
En cas de réparation payante, nous établissons un devis que nous
transmettons à votre revendeur. La réparation sera seulement effectuée
après que nous ayons reçu la confirmation du revendeur. Le prix de la
réparation devra être acquitté au revendeur. Pour les réparations payantes,
nous facturons au minimum 30 minutes de travail en atelier ainsi que les
frais de réexpédition. En l’absence d’un accord pour la réparation dans un
délai de 90 jours, nous nous réservons la possibilité de détruire le produit ou
de l’utiliser autrement.
ATTENTION: nous n’effectuons de réparations payantes que pour
les composants électroniques et les moteurs. Les réparations touchant
à la mécanique, en particulier celles des hélicoptères et des voitures
radiocommandées, sont extrêmement coûteuses et doivent par
conséquent être effectuées par l’acheteur lui-même.
TRUCK ÉLECTRIQUE RTR LOSI 1/10 22T 2WD
FR
Coordonnées de Garantie et réparations
Pays d'achat
France
Horizon Hobby
Horizon Hobby SAS
Adress
14 Rue Gustave Eiffel
Zone d’Activité du Réveil Matin
91230 Montgeron
Numéro de téléphone/Courriel
+33 (0) 1 60 47 44 70
[email protected]
Informations de contact pour les pièces
Pays d'achat
Horizon Hobby
Address
Numéro de téléphone/Courriel
France
Horizon Hobby SAS
14 Rue Gustave Eiffel
Zone d’Activité du Réveil Matin
91230 Montgeron
+33 (0) 1 60 47 44 70
[email protected]
Informations de conformité pour l’Union européenne
AT
DE
GR
LU
PT
UK
BE
DK
HU
LV
RO
BG
ES
IE
MT
SE
CZ
FI
IT
NL
SI
CY
FR
LT
PL
SK
Déclaration de conformité
(conformément à la norme ISO/IEC 17050-1)
Produit(s):
LOS 1/10 22T 2WD Electric Truck RTR
(DX3E Emetteur/SR300 récepteur inclus)
Numéro(s) d’article:
LOSB0123
Catégorie d’équipement: 2
L’objet de la déclaration décrit ci-dessus est en conformité avec les
exigences des spécifications énumérées ci-après, suivant les conditions
de la directive ETRT 1999/5/CE:
Elimination dans l’Union Européenne
Ce produit ne doit pas être éliminé avec les ordures
ménagères. Il est de la responsabilité de l‘utilisateur
de remettre le produit à un point de collecte officiel des
déchets d’équipements électriques. Cette procédure
permet de garantir le respect de l’environnement et l’absence de
sollicitation excessive des ressources naturelles. Elle protège de plus
le bien-être de la communauté humaine. Pour plus d’informations quant
aux lieux d’éliminations des déchets d‘équipements électriques, vous
pouvez contacter votre mairie ou le service local de traitement des
ordures ménagères.
EN 300-328 V1.7.1
EN 301 489-1 V1.7.1: 2006
EN 301 489-17 V1.3.2: 2008
EN 60950-1:2006+A11
Signé en nom et pour le compte de:
Horizon Hobby, Inc.
Champaign, IL USA
27 novembre 2011
Steven A. Hall
Vice-président
Gestion Internationale des Activités et des Risques
Horizon Hobby, Inc.
TRUCK ÉLECTRIQUE RTR LOSI 1/10 22T 2WD
25
IT
AVVISO
Tutte le istruzioni, le garanzie e gli altri documenti pertinenti sono soggetti a cambiamenti a totale discrezione di Horizon Hobby, Inc.
Per una documentazione aggiornata sul prodotto, visitare il sito horizonhobby.com e fare clic sulla sezione Support del prodotto.
Convenzioni terminologiche
Nella documentazione relativa al prodotto vengono utilizzati i seguenti termini per indicare i vari livelli di pericolo potenziale durante
l’uso del prodotto:
AVVISO:
Indica procedure che, se non debitamente seguite, possono determinare il rischio di danni alle cose E il rischio minimo
o nullo di lesioni alle persone.
ATTENZIONE: Indica procedure che, se non debitamente seguite, determinano il rischio di danni alle cose E di gravi lesioni alle persone.
AVVERTENZA: Indica procedure che, se non debitamente seguite, determinano il rischio di danni alle cose, danni collaterali e gravi lesioni
alle persone O il rischio elevato di lesioni superficiali alle persone.
AVVERTENZA: leggere TUTTO il manuale di istruzioni e familiarizzare con le caratteristiche del prodotto prima di farlo funzionare.
Un uso improprio del prodotto può causare danni al prodotto stesso e alle altre cose e gravi lesioni alle persone.
Questo aeromodello è un prodotto sofisticato per appassionati di modellismo. Deve essere azionato in maniera attenta e responsabile e richiede alcune
conoscenze basilari di meccanica. L’uso improprio o irresponsabile di questo prodotto può causare lesioni alle persone e danni al prodotto stesso o alle
altre cose. Questo prodotto non deve essere utilizzato dai bambini senza la diretta supervisione di un adulto. Non tentare di smontare, utilizzare componenti
incompatibili o modificare il prodotto in nessun caso senza previa approvazione di Horizon Hobby, Inc. Questo manuale
contiene le istruzioni per la sicurezza, l’uso e la manutenzione del prodotto. È fondamentale leggere e seguire tutte le istruzioni e le avvertenze
del manuale prima di montare, impostare o utilizzare il prodotto, al fine di utilizzarlo correttamente e di evitare di causare danni alle cose
o gravi lesioni alle persone.
Ulteriori precauzioni per la sicurezza e avvertenze
Almeno 14 anni. Non è un giocattolo
• Mantenere sempre un perimetro di sicurezza intorno al modello per evitare collisioni o ferite. Questo modello funziona con comandi radio soggetti
all’interferenza di altri dispositivi non controllabili dall’utente. Qualsiasi interferenza può provocare una momentanea perdita di controllo.
• Utilizzare sempre l’aeromodello in spazi aperti liberi da veicoli, traffico o persone.
• Seguire sempre scrupolosamente le istruzioni e le avvertenze relative all’aeromodello e a tutti gli accessori (caricabatteria, pacchi batterie ricaricabili ecc.).
• Tenere sempre le sostanze chimiche, i componenti di piccole dimensioni e i componenti elettrici fuori dalla portata dei bambini.
• Evitare sempre il contatto con l’acqua di tutti i dispositivi che non sono stati specificatamente progettati per funzionare in acqua. L’umidità danneggia
le parti elettroniche.
• Non mettere in bocca alcun componente del modello poiché potrebbe causare lesioni gravi o persino morte.
• Non far volare il modello se le batterie della trasmittente sono poco cariche.
Registrate il vostro prodotto adesso e sarete i primi a scoprire le ultime novità sui componenti, sui prodotti e tanto altro ancora.
Andare su WWW.LOSI.COM e seguire il link di registrazione del prodotto per essere sempre aggiornati
Grazie per aver acquistato Losi® 22T™ RTR, un veicolo solido e resistente
dalle ottime prestazioni. Leggere l’intero manuale prima di procedere al
settaggio e all’utilizzo del veicolo.
Indice
Registrazione del prodotto Losi online....................................................26
Componenti .........................................................................................26
Utensili necessari .................................................................................26
Utensili in dotazione .............................................................................26
Altri componenti necessari....................................................................26
Indice ..................................................................................................27
Trasmettitore .......................................................................................27
Installazione delle batterie.....................................................................28
Test di prova ........................................................................................28
Precauzioni per la guida ......................................................................29
Taratura e regolazione dell’ESC MSC540BL-S........................................30
Guida alla risoluzione dei problemi ........................................................31
Collegamento di trasmettitore e ricevitore ..............................................31
Durata della Garanzia ..........................................................................41
Garanzia e Revisiona informazioni per i contatti ....................................42
Informazioni di Servizio clienti ..............................................................42
Informazioni sulla conformità per l’Unione Europea...............................42
Elenco pezzi / Viste esplose ..................................................................34
Elenco pezzi opzionali ...........................................................................39
Foglio impostazioni...............................................................................42
26
Componenti
• 22T RTR in scala 1/10
• Sistema radio Spektrum™ DX3E 2,4 GHz DSM
• ESC brushless con sensore MSC540BL-S, limite 13,5T
• Motore con sensore 13,5T, conforme ROAR
• Servo LOSB0812 a coppia elevatissima
• 4 pile AA per il trasmettitore
Utensili necessari
• Taglierino
• Pinza con becchi ad ago
• Tronchese laterale
• Occhiali di protezione
• Saldatoio
• Nastro biadesivo (LOSA4004)
• Colla CA (LOSA7880 o LOSA7881)
Utensili in dotazione
• Tetrachiave
• Spinotto di collegamento trasmettitore/ricevitore
• 3 chiavi esagonali a L da 1,5 mm, 2,0 mm e 2,5 mm
• Chiave piatta per tenditore
• Utensili per ammortizzatori
Altri componenti necessari
• Un pacco batteria Li-Po 2S o Ni-MH a 6 celle
• Caricabatterie Ni-MH con rilevamento automatico del picco
o caricabatterie Li-Po
TRUCK ELETTRICA LOSI 1/10 22T 2WD RTR
IT
Indice
ST. TRIM
POWER
ST. RATE
TH. TRIM
Trasmettitore
10
11
12
ST
BIND
N
ST-L
15
ST-R
13
TH
R
N
TH-F
14
AUX
R
N
TH-B
AUX
R
2P 3P LIN
AUX-H
AUX-L
16
3
6
5
8
ST. TRIM
ON
POWER
ST. RATE
OFF
TH. TRIM
4
1. Volante: controlla la direzione (sinistra/destra) del modellino.
2. Trigger del throttle: controlla la velocità e il senso di marcia
(avanti/indietro) del modellino.
3. Antenna: trasmette il segnale al modellino.
4. Interruttore On/Off: accende/spegne il trasmettitore.
5. Spie luminose: la spia verde (destra) indica che la carica
della batteria è sufficiente. La spia rossa (sinistra) indica la
potenza del segnale.
6. Trim dello sterzo: regola la direzione “senza mani”
del modellino.
7. Trim del throttle: regola la velocità del motore per l’arresto in
posizione neutra.
8. Tasso di sterzata: regola l’entità dello spostamento delle ruote
anteriori quando il volante viene girato verso sinistra o destra.
9. Copertura inferiore: protegge e tiene ferme le batterie che
alimentano il trasmettitore.
10. Pulsante di collegamento.
11. Inversione delle sterzo: inverte la funzione dello sterzo
quando il volante viene girato verso sinistra o destra.
12. Inversione del throttle: inverte la funzione del controllo della
velocità quando viene tirato indietro o spinto in avanti.
13. TH-F (estremità marcia avanti): regola la quantità di
throttle massimo.
14. TH-B (estremità freno): regola la quantità di frenata massima.
15. ST-L (estremità sterzo a sinistra): regola la quantità di corsa
dello sterzo a sinistra.
16. ST-R (estremità sterzo a destra): regola la quantità di corsa
dello sterzo a destra.
7
Installazione delle batterie
1
2
9
TRUCK ELETTRICA LOSI 1/10 22T 2WD RTR
1. Premere leggermente sulla copertura
delle batterie per rilasciare la linguetta di
ritenuta, quindi rimuovere la copertura.
2. Installare 4 batterie AA, rispettando
la polarità indicata nel disegno
posto nell’alloggiamento batterie
del trasmettitore.
3. Riposizionare la copertura delle batterie
avendo cura di allineare le linguette alle scanalature sul trasmettitore.
ATTENZIONE: Non rimuovere le batterie del trasmettitore mentre il modellino
è acceso o durante il funzionamento. Ciò può causare la perdita del controllo del
modellino, danni o lesioni.
27
IT
Installazione delle batterie
ON
OFF
Per installare il pacco batteria, allentare le cinghie di nastro ad asola e uncino. Inserire la batteria completamente carica
e stringere nuovamente le cinghie di nastro ad asola e uncino. Collegare il connettore EC3™ blu della batteria all’ ESC.
Accendere prima il trasmettitore, poi il veicolo.
Test di prova
Eseguire un test di prova con le ruote del veicolo staccate da terra.
Se le ruote girano all’accensione del veicolo, utilizzare la manopola
“TH. Trim” posta in basso a sinistra del volante per regolare il trim del
throttle fino all’arresto delle ruote. Per far muovere le ruote in avanti,
tirare il trigger. Per la marcia indietro, attendere l’arresto del modellino,
quindi spingere il trigger. Durante la marcia avanti, le ruote devono tracciare
una linea retta senza alcun intervento sul volante. In caso contrario, utilizzare
la manopola “ST. Trim” per regolare il trim dello sterzo in modo tale che le
ruote possano tracciare una linea retta senza dover intervenire con il volante.
TH. TRIM
TH. TRIM
Avanti
28
Freno/Retromarcia
TRUCK ELETTRICA LOSI 1/10 22T 2WD RTR
IT
Precauzioni per la guida
• Evitare di far passare il veicolo su acqua stagnante, erba umida, fango
o neve. Le parti elettroniche del veicolo non sono a tenuta stagna.
• Non perdere mai di vista il veicolo.
• Assicurarsi che le parti meccaniche delle ruote non siano allentate.
• Assicurarsi che le parti dell’assieme dello sterzo non siano allentate.
L’utilizzo del veicolo fuori strada può causare a lungo andare
l’allentamento degli elementi di fissaggio.
• Non utilizzare il veicolo nell’erba alta. Ciò può causare danni al veicolo
o alle parti elettroniche.
• Se si nota un calo di potenza, smettere di utilizzare il veicolo. L’uso del
veicolo con la batteria scarica può causare lo spegnimento del ricevitore
e la perdita del controllo del veicolo.
ATTENZIONE: Non scaricare la batteria Li-Po al di sotto dei
3 V per cella. La scarica della batteria a una tensione inferiore alla
minima approvata può causare danni alla batteria e, di conseguenza,
una riduzione delle prestazioni, nonché il rischio di incendio durante la
carica della batteria.
• Non applicare il throttle in marcia avanti o indietro se il veicolo è bloccato.
Ciò può causare danni al motore e all’ESC.
• Lasciar raffreddare le parti elettroniche fino a temperatura ambiente dopo
l’utilizzo del veicolo prima di installare un nuovo pacco batteria.
AUTONOMIA
Il fattore determinante per l’autonomia del veicolo è la capacità del pacco
batteria. A una maggiore potenza nominale in mAh corrisponde una
maggiore autonomia.
Altro fattore importante tanto per l’autonomia quanto per la velocità del
veicolo sono le condizioni del pacco batteria. Durante l’utilizzo, i connettori
delle batterie potrebbero surriscaldarsi. Con il tempo le prestazioni e la
capacità delle batterie si riducono.
Non portare ripetutamente il veicolo dalla posizione di arresto alla
velocità massima. A lungo andare ciò può causare danni alle batterie
e alle parti elettroniche. Anche le accelerazioni improvvise contribuiscono
a ridurre l’autonomia.
Per migliorare l’autonomia
• Eseguire periodicamente la pulizia e la manutenzione del veicolo.
• Aumentare il flusso dell’aria all’ESC e al motore.
• Utilizzare un rapporto di trasmissione più basso per abbassare la
temperatura di esercizio delle parti elettroniche. Per ridurre il rapporto
di trasmissione, utilizzare una ruota conica più piccola o un ingranaggio
cilindrico più grande.
• Utilizzare un pacco batteria con una potenza nominale superiore in mAh.
• Utilizzare il caricabatterie più adatto al pacco batteria in uso. Per ulteriori
informazioni, rivolgersi al negozio di modellismo più vicino.
TRUCK ELETTRICA LOSI 1/10 22T 2WD RTR
MESSA A PUNTO, REGOLAZIONE E MANUTENZIONE
DEL VEICOLO
•
•
•
•
•
•
•
•
•
•
•
•
Controllare regolarmente le condizioni del veicolo.
Rimuovere lo sporco e la polvere con uno spazzolino.
Verificare l’assenza di danni ai bracci di sospensione e ad altri pezzi saldati.
Incollare nuovamente gli pneumatici alle ruote, se necessario.
Stringere gli elementi di fissaggio con gli utensili opportuni.
Assicurarsi che i leveraggi dello sterzo e del camber non siano piegati.
Sostituire le eventuali parti piegate.
Regolare campanatura e convergenza, se necessario.
Rimuovere gli ammortizzatori e verificare l’assenza di danni. Ricostruire gli
ammortizzatori in caso di perdita d’olio.
Verificare l’assenza di cavi scoperti nella parti elettroniche e nelle batterie.
Riparare i cavi scoperti con guaina retrattile o sostituirli.
Assicurarsi che l’ESC e il ricevitore siano fissati saldamente allo chassis.
Sostituire il nastro biadesivo, se necessario.
Accendere il trasmettitore. Se il LED verde ha un luce fioca o è spento,
sostituire le batterie AA del trasmettitore.
Verificare che l’ingranaggio cilindrico non sia usurato.
ASSISTENZA E RIPARAZIONE
Controllo radio, controllo velocità e motore
In caso di problemi non trattati nella sezione relativa alla risoluzione dei
problemi, contattare il reparto di assistenza elettronica di competenza,
che potrà analizzare il problema con maggiore attenzione e fornire istruzioni
per la risoluzione.
Manutenzione
In caso di domande non trattate nelle sezioni relative alla risoluzione dei
problemi e alla manutenzione, contattare il reparto di assistenza ai prodotti
Horizon di competenza.
Pulizia
La presenza di sporco sulle parti in movimento delle sospensioni può
comportare un peggioramento delle prestazioni. Per rimuovere lo sporco e la
polvere, utilizzare aria compressa, un pennello morbido o uno spazzolino
da denti. Evitare l’uso di solventi o detergenti chimici, che possono portare
lo sporco all’interno dei cuscinetti e delle parti in movimento, nonché
danneggiare le parti elettroniche.
29
IT
Taratura e regolazione dell’ESC MSC540BL-S
ON
OFF
Preparazione del trasmettitore
1. Assicurarsi che le batterie del trasmettitore siano completamente cariche.
2. Accendere il trasmettitore.
3. Impostare la regolazione della corsa sul valore massimo nelle direzioni
avanti e indietro. Se il trasmettitore è dotato di un trigger del throttle
regolabile, selezionare il valore 70/30.
4. Assicurarsi che l’inversione di canale del throttle sia impostata
su normale.
5. Centrare il trim del throttle e assicurarsi che gli eventuali sub-trim siano
impostati su 0.
Connessione della batteria all’ESC
1. Assicurarsi che l’interruttore di accensione dell’ESC sia posizionato
su OFF.
2. Collegare il connettore EC3 blu della batteria all’ESC.
3. Accendere il trasmettitore.
4. Accendere l’ESC.
Utilizzo della retromarcia
1. Applicare il freno.
2. Attendere l’arresto del veicolo, quindi riportare il throttle in
posizione neutra.
3. Applicare nuovamente il freno. Ora la retromarcia è attiva.
ATTENZIONE: Quando si passa dalla marcia avanti alla retromarcia non
c’è alcun ritardo. Se non si attende l’arresto del veicolo, il passaggio
brusco dalla marcia avanti alla retromarcia può causare danni alla
trasmissione, al motore o a entrambi.
Taratura rapida
Quando l’ESC è in modalità di programmazione o taratura, il motore non
è alimentato.
1. Accendere il trasmettitore.
2. Tenere premuto il pulsante di impostazione durante
l’accensione dell’ESC.
3. Quando il LED verde si illumina, rilasciare il pulsante di impostazione.
4. Portare il throttle in posizione di accelerazione massima. Tenere il
throttle al massimo finché la luce del LED verde non diventa fissa,
a conferma della posizione estrema di marcia avanti.
5. Portare il throttle in posizione di frenata massima. Tenere il freno al
massimo finché la luce del LED rosso non diventa fissa, a conferma
della posizione estrema di frenata/marcia indietro.
6. Riportare il throttle in posizione centrale/neutra. L’operazione di taratura
sarà completata quando entrambi i LED, rosso e verde, si illuminano di
luce fissa.
30
Programmazione dell’ESC
Quando l’ESC è in modalità di programmazione o taratura, il motore non
è alimentato.
1. Accendere il trasmettitore.
2. Accendere l’ESC. Il LED rosso e quello verde si illuminano di luce fissa.
3. Tenere premuto il pulsante di impostazione. Il LED verde lampeggia per
ciascun menu.
4. Rilasciare il pulsante di impostazione per accedere a un menu.
Una pausa dopo ciascuna opzione di menu permette di effettuare
la selezione.
5. Quando si accede a un menu, il LED rosso lampeggia per un numero di
volte corrispondente alla selezione corrente.
6. Premere brevemente il pulsante di impostazione per modificare
l’impostazione selezionata.
7. Dopo aver selezionato una opzione di menu, tenere premuto il pulsante
di impostazione per confermare la selezione.
* I valori su fondo nero rappresentano l’impostazione di fabbrica.
Menu principale
Numero di lampeggiamenti
del LED verde
Menu
1
Tipo di batteria
2
Tipo di trasmissione
3
Modalità principiante
4
Freno trascinamento
Menu 1: Tipo di batteria
Numero di lampeggiamenti
del LED rosso
Impostazione tipo di batteria
1
Ni-MH/Ni-Cd (senza interruzione)
2
Li-Po 2S (interruzione a 6,2 V)
Menu 2: Avanti/Indietro
Numero di lampeggiamenti
del LED rosso
Impostazione marcia avanti/
indietro
1
Avanti/Freno
2
Avanti/Freno/Indietro
Menu 3: Modalità principiante
Numero di lampeggiamenti
del LED rosso
Impostazione modalità
principiante
1
Off (nessuna limitazione del throttle)
2
On (limitazione del throttle al 50%)
Menu 4: Freno trascinamento
Il freno trascinamento è l’intensità di frenata, espressa in percentuale,
applicata quando il throttle torna in posizione neutra.
Numero di lampeggiamenti
del LED rosso
Impostazione freno
trascinamento
1
0% (freno trascinamento disattivato)
2
10%
3
20%
4
30%
TRUCK ELETTRICA LOSI 1/10 22T 2WD RTR
IT
Guida alla risoluzione dei problemi
Problema
Possibile causa
Soluzione
Il veicolo non funziona
Batteria scarica o non collegata
Caricare o collegare la batteria
Interruttore dell’ESC non in posizione “On”
Posizionare l’interruttore dell’ESC su “On”
Trasmettitore spento o con batteria quasi scarica Accendere il trasmettitore o sostituire le batterie
Il motore è in funzione ma le
ruote posteriori non girano
Il pignone non si innesta con l’ingranaggio
cilindrico
Regolare l’innesto pignone/ingranaggio cilindrico
Il pignone gira sull’albero motore
Serrare la vite di fermo della ruota conica sul punto
piano dell’albero motore
Pattino allentato
Controllare e regolare il pattino
Ingranaggi della trasmissione spanati
Sostituire gli ingranaggi della trasmissione
Perno della trasmissione rotto
Controllare e sostituire il perno della trasmissione
Spinotto del servo non inserito correttamente
nel ricevitore
Assicurarsi che lo spinotto del servo dello sterzo sia
collegato al canale di sterzata del ricevitore, con la
polarità corretta
Motore o ingranaggi del servo danneggiati
Riparare o sostituire il servo
Il modellino non gira in
una direzione
Ingranaggi del servo danneggiati
Riparare o sostituire il servo
Il motore non funziona
Giunto di saldatura del cavo del motore
danneggiato
Saldare nuovamente il cavo del motore utilizzando
l’attrezzatura appropriata
Cavo del motore rotto
Riparare o sostituire secondo necessità
ESC danneggiato
Contattare il servizio di assistenza Horizon Hobby
Cavo del sensore danneggiato o allentato
Sostituire o reinstallare il cavo del sensore
Eccessiva velocità del motore
Utilizzare un pignone più piccolo o un ingranaggio
cilindrico più grande
Trasmissione legata
Verificare il collegamento di ruote e trasmissione
Pacco batteria non completamente carico
Ricaricare la batteria
Il caricabatterie non permette di raggiungere la
carica completa
Provare a utilizzare un altro caricabatterie
Il pattino slitta troppo
Controllare e regolare il pattino
Lo sterzo non funziona
L’ESC si surriscalda
L’autonomia è scarsa e/o
l’accelerazione è lenta
Trasmissione legata
Verificare il collegamento di ruote e trasmissione
Raggio d’azione limitato
e/o presenza di impulsi
di disturbo
Batteria del trasmettitore quasi scarica
Controllare e sostituire la batteria
Batteria del veicolo quasi scarica
Ricaricare la batteria
Spinotti o cavi allentati
Verificare spinotti e collegamento di tutti i fili
Impossibile regolare il pattino
Perno della trasmissione mancante nell’albero
Sostituire il perno della trasmissione
Piastre del pattino usurate
Sostituire le piastre del pattino e regolare il pattino
Collegamento di trasmettitore e ricevitore
Procedura di collegamento
1. Assicurarsi che il trasmettitore e il veicolo siano spenti.
2. Inserire uno spinotto di collegamento nella porta della batteria/di collegamento del ricevitore. Non è necessario rimuovere altri spinotti per
eseguire il collegamento.
3. Con lo spinotto di collegamento inserito, accendere il veicolo. Un LED arancione lampeggia all’interno del ricevitore.
4. Con il volante e il throttle nelle posizioni failsafe preimpostate desiderate, tenere premuto il pulsante di collegamento e accendere il
trasmettitore. Il LED rosso nella parte anteriore del trasmettitore lampeggia dopo pochi secondi, a indicare che il trasmettitore è in
modalità di collegamento. Quando il LED rosso inizia a lampeggiare, rilasciare il pulsante di collegamento.
5. Quando viene stabilito il collegamento tra ricevitore e trasmettitore, la spia del ricevitore si accende di luce fissa.
6. Spegnere il veicolo e il trasmettitore.
7. Scollegare la batteria dall’ESC. Rimuovere lo spinotto di collegamento dal ricevitore.
8. Conservare lo spinotto di collegamento in un luogo sicuro; ad esempio fissandolo al trasmettitore con bandelle doppie e clip.
9. Il ricevitore manterrà il collegamento al trasmettitore fino a quando non verrà eseguito un altro collegamento.
In caso di problemi, seguire le istruzioni per il collegamento. Per ulteriori istruzioni, fare riferimento alla sezione Guida alla risoluzione dei problemi del
trasmettitore. Se necessario, rivolgersi al servizio di assistenza Horizon di competenza.
TRUCK ELETTRICA LOSI 1/10 22T 2WD RTR
31
IT
Durata della Garanzia
Periodo di garanzia
Indicazioni di sicurezza
Garanzia esclusiva - Horizon Hobby, Inc., (Horizon) garantisce che i prodotti
acquistati (il “Prodotto”) sono privi di difetti relativi ai materiali e di eventuali
errori di montaggio. Il periodo di garanzia è conforme alle disposizioni legali
del paese nel quale il prodotto è stato acquistato. Tale periodo di garanzia
ammonta a 6 mesi e si estende ad altri 18 mesi dopo tale termine.
Questo è un prodotto sofisticato di hobbistica e non è un giocattolo.
Esso deve essere manipolato con cautela, con giudizio e richiede delle
conoscenze basilari di meccanica e delle facoltà mentali di base. Se il
prodotto non verrà manipolato in maniera sicura e responsabile potrebbero
risultare delle lesioni, dei gravi danni a persone, al prodotto o all’ambiente
circostante. Questo prodotto non è concepito per essere usato dai bambini
senza una diretta supervisione di un adulto. Il manuale del prodotto contiene
le istruzioni di sicurezza, di funzionamento e di manutenzione del prodotto
stesso. È fondamentale leggere e seguire tutte le istruzioni e le avvertenze
nel manuale prima di mettere in funzione il prodotto. Solo così si eviterà
un utilizzo errato e di preverranno incidenti, lesioni o danni.
Limiti della garanzia
(a) La garanzia è limitata all’acquirente originale (Acquirente) e non è
cedibile a terzi. L’acquirente ha il diritto a far riparare o a far sostituire la
merce durante il periodo di questa garanzia. La garanzia copre solo quei
prodotti acquistati presso un rivenditore autorizzato Horizon. Altre transazioni
di terze parti non sono coperte da questa garanzia. La prova di acquisto
è necessaria per far valere il diritto di garanzia. Inoltre, Horizon si riserva
il diritto di cambiare o modificare i termini di questa garanzia senza alcun
preavviso e di escludere tutte le altre garanzie già esistenti.
(b) Horizon non si assume alcuna garanzia per la disponibilità del prodotto,
per l’adeguatezza o l’idoneità del prodotto a particolari previsti dall’utente. è
sola responsabilità dell’acquirente il fatto di verificare se il prodotto è adatto
agli scopi da lui previsti.
(c) Richiesta dell’acquirente – spetta soltanto a Horizon, a propria
discrezione riparare o sostituire qualsiasi prodotto considerato difettoso
e che rientra nei termini di garanzia. queste sono le uniche rivalse a cui
l’acquirente si può appellare, se un prodotto è difettoso.
Horizon si riserva il diritto di controllare qualsiasi componente utilizzato che
viene coinvolto nella rivalsa di garanzia. Le decisioni relative alla sostituzione
o alla riparazione avvengono solo in base alla discrezione di Horizon.
Questa garanzia non copre dei danni superficiali o danni per cause di forza
maggiore, uso errato del prodotto, negligenza, uso ai fini commerciali, o una
qualsiasi modifica a qualsiasi parte del prodotto.
Questa garanzia non copre danni dovuti ad una installazione errata, ad un
funzionamento errato, ad una manutenzione o un tentativo di riparazione non
idonei a cura di soggetti diversi da Horizon. La restituzione del prodotto a
cura dell’acquirente, o da un suo rappresentante, deve essere approvata
per iscritto dalla Horizon.
Limiti di danno
Horizon non si riterrà responsabile per danni speciali, diretti, indiretti o
consequenziali; perdita di profitto o di produzione; perdita commerciale
connessa al prodotto, indipendentemente dal fatto che la richiesta si basa su
un contratto o sulla garanzia. Inoltre la responsabilità di Horizon non supera
mai in nessun caso il prezzo di acquisto del prodotto per il quale si chiede
la responsabilità. Horizon non ha alcun controllo sul montaggio, sull’utilizzo
o sulla manutenzione del prodotto o di combinazioni di vari prodotti. Quindi
Horizon non accetta nessuna responsabilità per danni o lesioni derivanti da
tali circostanze. Con l’utilizzo e il montaggio del prodotto l’utente acconsente
a tutte le condizioni, limitazioni e riserve di garanzia citate in questa sede.
Qualora l’utente non fosse pronto ad assumersi tale responsabilità associata
all’uso del prodotto, si suggerisce di di restituire il prodotto intatto, mai usato
e immediatamente presso il venditore.
32
Domande, assistenza e riparazioni
Il vostro negozio locale e/o luogo di acquisto non possono fornire garanzie
di assistenza o riparazione senza previo colloquio con Horizon. questo vale
anche per le riparazioni in garanzia. Quindi in tale casi bisogna interpellare
un rivenditore, che si metterà in contatto subito con Horizon per prendere
una decisione che vi possa aiutare nel più breve tempo possibile.
Manutenzione e riparazione
Se il prodotto deve essere ispezionato o riparato, si prega di rivolgersi ad
un rivenditore specializzato o direttamente ad Horizon. il prodotto deve
essere Imballato con cura. Bisogna far notare che i box originali solitamente
non sono adatti per effettuare una spedizione senza subire alcun danno.
Bisogna effettuare una spedizione via corriere che fornisce una tracciabilità
e un’assicurazione, in quanto Horizon non si assume alcuna responsabilità
in relazione alla spedizione del prodotto. Inserire il prodotto in una busta
assieme ad una descrizione dettagliata degli errori e ad una lista di tutti
i singoli componenti spediti. Inoltre abbiasmo bisogno di un indirizzo
completo, di un numnero di telefono per chiedere ulteriori domande
e di un indirizzo e-mail.
Garanzia a riparazione
Le richieste in garanzia verranno elaborate solo se è presente una
prova d’acquisto in originale proveniente da un rivenditore specializzato
autorizzato, nella quale è ben visibile la data di acquisto. Se la garanzia viene
confermata, allora il prodotto verrà riparato o sostituito. Questa decisione
spetta esclusivamente a Horizon Hobby.
Riparazioni a pagamento
Se bisogna effettuare una riparazione a pagamento, effettueremo un
preventivo che verrà inoltrato al vostro rivenditore. La riparazione verrà
effettuata dopo l’autorizzazione da parte del vostro rivenditore. La somma
per la riparazione dovrà essere pagata al vostro rivenditore. Le riparazioni
a pagamento avranno un costo minimo di 30 minuti di lavoro e in fattura
includeranno le spese di restituzione. Qualsiasi riparazione non pagata
e non richiesta entro 90 giorni verrà considerata abbandonata e verrà
gestita di conseguenza.
ATTENZIONE: Le riparazioni a pagamento sono disponibili solo
sull’elettronica e sui motori. Le riparazioni a livello meccanico, soprattutto
per gli elicotteri e le vetture RC sono molto costose e devono essere
effettuate autonomamente dall’acquirente.
BUGGY ELETTRICA LOSI 1/10
TRUCK
22 2WD
ELETTRICA
RTR • MANUALE
LOSI 1/10DI
22T
ISTRUZIONI
2WD RTR
IT
Garanzia e Revisiona informazioni per i contatti
Stato in cui il prodotto
è stato acquistato
Germania
Horizon Hobby
Indirizzo
Telefono/Indirizzo e-mail
Horizon Technischer
Service
Christian-Junge-Straße 1
25337 Elmshorn, Germania
+49 (0) 4121 2655 100
[email protected]
Informazioni di Servizio clienti
Stato in cui il prodotto
è stato acquistato
Horizon Hobby
Indirizzo
Telefono/Indirizzo e-mail
Germania
Horizon Hobby GmbH
Christian-Junge-Straße 1
25337 Elmshorn, Germania
+49 (0) 4121 2655 100
[email protected]
Informazioni sulla conformità per l’Unione Europea
AT
DE
GR
LU
PT
UK
BE
DK
HU
LV
RO
BG
ES
IE
MT
SE
CZ
FI
IT
NL
SI
CY
FR
LT
PL
SK
Dichiarazione di conformità
(in conformità con ISO/IEC 17050-1)
Prodotto(i):
LOS 1/10 22T 2WD Electric Truck RTR
(DX3E trasmettitore/SR300 ricevitore incluso)
Numero(i) articolo:
LOSB0123
Classe dei dispositivi: 2
Gli oggetti presentati nella dichiarazione sopra citata sono conformi ai
requisiti delle specifi che elencate qui di seguito, seguendo le disposizioni
della direttiva europea ARTT 1999/5/EC:
Istruzioni del RAEE per lo smaltimento
da parte di utenti dell’Unione Europea
Questo prodotto non deve essere smaltito assieme ai rifiuti
domestici. Al contrario, l’utente è responsabile dello smaltimento
di tali rifiuti che devono essere portati in un centro di raccolta designato
per il riciclaggio di rifiuti elettrici e apparecchiature elettroniche. La raccolta
differenziata e il riciclaggio di tali rifiuti provenienti da apparecchiature nel
momento dello smaltimento aiuteranno a preservare le risorse naturali
e garantiranno un riciclaggio adatto a proteggere il benessere dell’uomo
e dell’ambiente. Per maggiori informazioni sui centri di raccolta, contattare
il proprio ufficio locale, il servizio di smaltimento rifiuti o il negozio presso
il quale è stato acquistato il prodotto.
EN 300-328 V1.7.1
EN 301 489-1 V1.7.1: 2006
EN 301 489-17 V1.3.2: 2008
EN 60950-1:2006+A11
Firmato per conto di:
Steven A. Hall
Horizon Hobby, Inc.
Vice Presidente
Champaign, IL USA
Operazioni internazionali e Gestione dei rischi
27 novembre 2011
Horizon Hobby, Inc.
BUGGY
TRUCK ELETTRICA LOSI 1/10 22T
22 2WD
2WDRTR
RTR• MANUALE DI ISTRUZIONI
33
Parts List
Part #
LOS4123
LOSA2953
LOSA2954
English
48 Pitch Pinion Gear, 23T
51T Differential Gear, 22 RTR
Gear Differential, Complete, 22 RTR
Deutsch
Français
Italiano
48-Pitch-Ritzel, 23T
Pignon conique 48 pas, 23 T
Ruota conica passo 48, 23T
51T Differenzialgetriebe, 22 RTR
Différentiel 51 T, 22 RTR
Differenziale 51T, 22 RTR
Differenzialgetriebe, komplett, 22 RTR
Différentiel complet, 22 RTR
Differenziale completo, 22 RTR
Knochenaufnahme, Differenzialgetriebe,
22 RTR
Cardans, différentiel, 22 RTR
Bicchierini differenziale, 22 RTR
Differenziale e set albero, 22 RTR
LOSA2955
Outdrives, Gear Differential, 22 RTR
LOSA2956
Differential Gear & Shaft Set, 22 RTR Differenzialgetriebe und Wellensatz, 22
RTR
Jeu de différentiels et d’arbres, 22 RTR
LOSA3123
Slipper Friction Pad
Gleitbremsbelag
Patin d’embrayage à friction
Pastiglia pattino
LOSA3983
82T 48 Pitch Kevlar Spur Gear
82T 48 Zahn Kevlar Zahnrad
Couronne en Kevlar 82T 48dp
82T 48 Ingranaggio Pitch Kevlar
LOSA4002
Antenna Kit
Antennenbausatz
Kit d’antenne
Kit dell’antenna
LOSA5006
Upper & Lower Shock Caps, 22 RTR
Obere und untere Stoßdämpferkappen,
22 RTR
Obturateurs d’amortisseurs supérieurs et
inférieurs, 22 RTR
Cappucci ammortizzatori superiori e
inferiori, 22 RTR
LOSA6306
4-40 Aluminum Mini-Nuts (10)
4-40 Mnimuttern, Aluminium (10)
Ecrous freins 4-40 Aluminum (10)
4-40 Mini dai in alluminio (10)
LOSA6937
5 x 10 mm Ball Bearings (2)
Kugellager 5 x 10 mm (2)
Roulements à billes 5x10 mm (2)
5 x 10 mm Cuscinetti a sfera (2)
LOSA6943
10 x 15 mm Ball Bearings (2)
Kugellager 10 x 15 mm (2)
Roulements à billes 10x15 mm (2)
10 x 15 mm Cuscinetti a sfera (2)
LOSA6955
5 x 13 mm Ball Bearings (2)
Kugellager 5 x 13 mm (2)
Roulements à billes 5 x 13 mm (2)
5 x 13 mm Cuscinetti a sfera (2)
LOSA8309
Sticker Sheet, 22T RTR
Dekorbogen, 22T RTR
Planche de decalcomanias, 22T RTR
Foglio con decalcomania, 22T RTR
LOSA8411
Painted Body, White, 22T RTR
Lackierte Karosserie, weiß, 22T RTR
Carrosserie peinte, blanche, 22T RTR
Corpo verniciato, bianco, 22T RTR
Lackierte Karosserie, Schwarz, 22T RTR
Carrosserie peinte, noire, 22T RTR
Corpo verniciato, nero, 22T RTR
Pneumatici BK-Bar camion, bianchi,
montati (2)
LOSA8412
Painted Body, Black, 22T RTR
LOSA17643W
Truck BK Bar Premount, White (2)
Lastwagen ,BK-Bar-Reifen, Weiß, montiert
(2)
Pneu camion BK-Bar, blanc, monté (2)
LOSA17643B
Truck BK Bar Premount, Blue (2)
Lastwagen ,BK-Bar-Reifen, Blau, montiert
(2)
Pneu camion BK-Bar, bleue, monté (2)
Pneumatici BK-Bar camion, blu, montati
(2)
LOSB0812
Extra-High-Torque Servo
Servo mit besonders hohem Drehmoment
Servo à couple extra élevé
Servo a coppia elevatissima
LOSB9411
13.5T Sensored Motor ROAR Legal
13,5T-Motor mit Sensoren,
mit ROAR-Zulassung
Moteur à capteur 13,5 T agréé ROAR
Motore con sensore 13,5T,
conforme ROAR
LOSB9503
MSC540BL-S Sensored ESC,
13.5T Limit
MSC540BL-S-ESC mit Sensoren,
13,5T-Limit
Contrôleur électronique de vitesse à
capteur MSC540BL-S, limite de 13,5 T
ESC con sensore MSC540BL-S,
limite 13,5T
SPM3160
DX3E 3-Channel DSM Surface Radio DX3E-3-Kanal-DSM-Bodenfunkanlage
Radio de surface DSM 3 voies DX3E
Radio di superficie DSM DX3E a 3 canali
SPMSR300
SR300 3CH DSM Sport Surface RX
SR300-3-Kanal-DSMSportbodenfunkanlage RX
Récepteur de surface sport DSM 3 voies
SR300
Ricevitore Sport di superficie DSM
SR300 a 3 canali
TLR1052
Front Bulkhead, 22
Vordere Spritzwand, 22
Cloison AV, 22
Paratia anteriore, 22
Montaggio anteriore / staffa chassis, 22
Paraurti anteriore, 22
TLR1053
Front Servo Mount/Chassis Brace,
22
Vordere Hilfsbefestigung/
Fahrgestellklammer, 22
Support de servo/renfort de châssis AV,
22
TLR1054
Front Bumper, 22
Frontstoßstange, 22
Pare-choc AV, 22
TLR1056
Steering Rack/Rack Housing &
Spacers, 22
Zahnstange/Lenkgehäuse
u. Abstandhalter, 22
Paliers de direction/logement de paliers & Rack di sterzata /Rack alloggiamento &
rondelles, 22
distanziatori, 22
TLR1059
Caster Block, 3 Degree: 22
Lenkrollensperre, 3 Grad: 22
Blocks de chasse, 3 degrés, 22
Blocco ruote, 3 gradi: 22
Set alberino / Distanziatore
blocco ruote
TLR1063
Spindle/Caster Block Shim set
Achsschenkel-/LenkrollensperrenScheibensatz
Jeu de cales de fusée/blocks de chasse
TLR1064
Plastic Ball Cup, Short, 30 Degree
Kunststoffkugelpfanne, kurz, 30 Grad
Coupelle de rotule plastique, courte, 30
degrés
Copertura in plastica, corta, 30 gradi
TLR1065
Front and Rear Hinge Pin Brace, 22
Gelenkbolzenanker, vorne und hinten, 22
Renfort de fusée AV et AR, 22
Staffe del cardine anteriori e posteriori,
22
TLR1066
Ball stud/Hub Spacer Set, 22
Kugelgelenkbolzen-/
Nabenabstandhaltersatz, 22
Jeu de goujon à rotule/rondelle de
fusée, 22
Perno della sfera / Set distanziatore, 22
TLR1067
King Pin Screw, 22 (8)
Achsschenkelbolzenschraube, 22 (8)
Vis de broche de fusée, 22 (8)
Vite King pin, 22 (8)
TLR1100
Front Arm Set, 22T
Querlenker vorne, 22T
Jeu de bras AV, 22T
Set braccio anteriore, 22T
TLR1101
Front Pivot & Brace, 30 Degree,
22T & 22
Querlenkerhalter vorne 30° 22T & 22
Axe avant et renfort, 30°,22T, 22
Perno e supporto anteriore, 30 gradi,
22T & 22
TLR1102
Shock Tower & Body Mounts, Front, Dämpferbrücke & Karosseriehalter
22T
Support d’amortisseur et de carrosserie
avant, 22T
Supporti per ammortizzatore anteriore,
22T
TLR1103
Spindle Set, Inline, 22T
Radträger, Inline: 22T
Set de fusées, en ligne, 22T
Set perni, in linea, 22T
TLR1104
Front Axle, 22T (2)
Vorderachse, 22T (2)
Axe AV, 22T (2)
Assale anteriore, 22T (2)
TLR1554
Servo Horn Set, Steering, 22
Servohupensatz, Lenkung, 22
Jeu de bras de servo , direction, 22
Set Servo Horn, sterzo, 22
34
TLR8202
TLR1102
LOSA5006
TLR1066 TLR5092
TLR6313
TLR5097
TLR5959
TLR1102
TLR6314
TLR5902
TLR6028
TLR1554
TLR6313
TLR5090
TLR1064
TLR5900
TLR5088
TLR5904
TLR6028
TLR5903
TLR1101
TLR6306
TLR1056
TLR6018
TLR6023
TLR5084
TLR1056
TLR6067
TLR6066
TLR5903
TLR6289
TLR1063
TLR1067
TLR6025
TLR5093
TLR5086
LOSA6937
TLR2974
TLR1104
TLR1067
TLR5903
TLR6352
TLR5963
TLR1053
TLR5094
TLR1103
TLR1100
TLR5182
LOSA17643B
TLR1104
TLR1066
TLR1067
TLR5965
TLR5090
TLR6352
TLR6025
TLR1059
TLR6079
TLR5964
TLR6018
TLR5903
TLR1066
TLR1054
TLR5096
TLR6025
TLR1052
TLR6313
TLR2051
TLR6105
TLR2929
TLR5095
TLR2975
Part #
English
Deutsch
Français
Italiano
TLR2044
Anti-Squat Tuning Set, LRC, 22
Anti-Squat-Tuningsatz, LRC, 22
Jeu d’optimisation d’anticabrage, LRC,
22
Set impostazione anti-squat, LRC, 22
TLR2046
Plastic Nut, Rear Inner Hinge Pin
Brace, 22
Kunststoffmutter, Gelenkbolzenanker
hinten innen, 22
Écrou plastique, pivot AR intérieur, 22
Dado in plastica, staffa del cardine
interna posteriore, 22
TLR2048
Pivot Ball, Rear Inner Hinge Pin, 22
Kugelfassung, Gelenkbolzen hinten
innen, 22
Bille pivot, pivot AR intérieur, 22
Sfera del perno, perno del cardine
interno posteriore, 22
TLR2051
Front & Rear Camber Block Kit, 22
Spurklotzsatz vorne u. hinten, 22
Kit de blocage de cambrure AV & AR, 22
Kit bloccaggio camber anteriore &
posteriore, 22
TLR2052
Rear Hub & Hex, 22 (2)
Hintere Nabe u. Sechskant, 22 (2)
Fusée & vis hex AR, 22 (2)
Mozzo posteriore & dado, 22 (2)
TLR2054
Rear Outer Hinge pin, 22 (2)
Gelenkbolzen hinten außen, 22 (2)
Broche d’axe extérieur AR, 22 (2)
Perno esterno per cardini, 22 (2)
TLR2055
Rear Inner Hinge pin, 22 (2)
Gelenkbolzen hinten innen, 22 (2)
Broche d’axe intérieur AR, 22 (2)
Perno interno per cardini, 22 (2)
TLR2100
Rear Arm Set, 22T
Querlenker hinten, 22T
Jeu de bras AR, 22T
Set braccio posteriore, 22T
TLR2101
Rear Shock Tower, Rear Motor, 22T
Hinterer Dämpferdom, Heckmotor, 22T
Support d’amortisseur AR, moteur AR,
22T
Torre ammortizzatore posteriore,
motore posteriore, 22T
TLR2926
Driveshaft Set, Complete (2) 22T
Antriebswellen Set, Komplett: 22T
Set de cardans, complet (2) 22T
Set semiasse, completo
(2) 22T
TLR2927
Driveshaft Set, (2) 22T
Antriebswellen Set (2): 22T
Set de cardans, (2) 22T
Set semiassi, (2) 22T
TLR2928
Rear Axles, (2) 22T
Radachse Hinten (2): 22T
Axes de roues, arrière (2) 22T
Assali posteriori, (2) 22T
TLR2929
Front and Rear Wheel Hex, 22T
Mitnehmer Vorne/Hinten: 22T
Hexagone de roues av/arr, 22T
Ruota anteriore e posteriore Hex, 22T
TLR2963
Layshaft & Spacer, 22
Zwischenwelle u. Abstandhalter, 22
Arbre secondaire & entretoise, 22
Supporto & distanziatore, 22
TLR2964
Slipper Spring, 22
Gleitfeder, 22
Ressort d’ensemble patinant, 22
Anello di scorrimento, 22
TLR2965
Slipper Plates, 22, all XXX (2)
Gleitbleche, 22, alle XXX (2)
Plateaux d’embrayage patinant, 22,
tous XXX (2)
Piastre di scorrimento, 22,
tutte XXX (2)
TLR2966
Idler Gear & Shaft, 22 (2)
Zwischenrad u. -welle, 22 (2)
Pignon « fou » & arbre, 22 (2)
Ingranaggi & albero, 22 (2)
TLR2967
Gear Case, Rear Motor, 22
Getriebegehäuse, Heckmotor, 22
Carter de pignons, moteur AR, 22
Alloggiamento ingranaggi, motore
posteriore, 22
TLR2972
Driveshaft Rebuild Kit, 22
Antriebswellen-Umbausatz, 22
Kit de reconstitution d’arbre de
transmission, 22
Kit ricostruzione trasmissione, 22
35
LOSA4002
TLR6276
TLR4155
TLR4153
TLR5960
TLR4153
TLR4154
TLR4140
TLR5961
TLR5962
Part #
English
Deutsch
Français
Italiano
TLR2973
Rear Axle Spacer Set, 22
Abstandhaltersatz, Hinterachse, 22
Jeu de rondelles d’axe AR, 22
Set distanziatore assale posteriore, 22
TLR2974
Drive Pin Set, 22
Mitnehmerstiftsatz, 22
Jeu d’axes d’entraînement, 22
Set perno trasmissione, 22
TLR2975
Rear Wheel Nut, 22, M4 (6)
Radmutter hinten, 22, M4 (6)
Écrou de roue AR, 22 M4 (6)
Dado ruota posteriore 22, M4 (6)
TLR2986
Toe Plate, Aluminum 4 deg, 22
Querlenkeraufnahme 4 Grand 22
Toe Plate, Aluminum 4 deg, 22
Toe Plate, Aluminum 4 deg, 22
TLR4140
Chassis, Machined, 22T
Fahrgestell, maschinell
bearbeitet, 22T
Châssis, usiné, 22T
Chassis, lavorato, 22T
TLR4153
Mud Guard Set, 22
Kotflügelsatz, 22
Jeu de garde-boue, 22
Set parafango, 22
TLR4154
Battery Trays, 22
Batterieträger, 22
Brides de batterie, 22
Vassoio batteria, 22
TLR4155
Battery Straps, Hook & Loop, 22 (2) Gurte, Haken u. Öse, Batterie, 22 (2)
Brides de batterie, brides de fixation,
22 (2)
Fascette batteria, ganci & fasce, 22
(2):
TLR4156
Chassis Foam Set
Schaumstoffsatz, Fahrgestell
Jeu de mousse pour châssis
Set schiuma chassis
TLR4157
Motor Plate, 22
Motorschild, 22
Plaque de support moteur, 22
Piastra motore, 22
TLR4158
Motor Guard & Rear Bumper, 22
Motorabdeckung u. Stoßstange hinten, 22
Protection moteur & pare-chocs AR, 22
Protezione motore & paraurti
posteriore, 22
TLR4161
Wing Stay Set, Rear/Mid Engine, 22
Kotflügelstützensatz, Heck-/Mittelmotor,
22
Jeu de fixation d’aile, moteur AR/Centre,
22
Set alette, motore posteriore / centrale,
22
TLR4163
Gear Cover & Plug, 22
Getriebeabdeckung u. Stopfen, 22
Carter de pignon et bouchon, 22
Coperchio e tappo ingranaggi, 22
TLR4164
Gear Cover Plug, 22 (2)
Getriebeabdeckungsstopfen, 22 (2)
Bouchon de carter de pignon, 22 (2)
Tappo copertura ingranaggi, 22 (2)
TLR5075
Shock Shaft, 3.5mm, Rear, Ti
Nitride, 22T (2)
Dämpferwelle, 3,5 mm, hinten, Ti-Nitrid,
22T (2)
Tige d’amortisseur, 3,5 mm, AR, Ti
Nitride, 22T (2)
Albero ammortizzatore, 3.5mm, posteriore, Nitruro di titanio, 22T (2)
TLR5076
Rear Shock Body Set, 22T (2)
Hinterer Dämpfergehäusesatz, 22T (2)
Jeu de corps d’amortisseur AR, 22T (2)
Set corpo ammortizzatore posteriore,
22T (2)
TLR5084
Rear Shock Body set, 22 (2)
Hinterer Dämpfergehäusesatz, 22 (2)
Jeu de corps d’amortisseur AR, 22 (2)
Set corpo ammortizzatore posteriore,
22 (2)
TLR5088
Shock Shaft, 3.5 mm, Rear,
Ti Nitride, 22 (2)
Dämpferwelle, 3,5 mm, hinten, Ti-Nitrid,
22 (2)
Tige d’amortisseur, 3,5 mm, AR, Ti
Nitride, 22 (2)
Albero ammortizzatore, 3,5 mm, posteriore, Nitruro di titanio, 22 (2)
TLR5090
Piston Set and Bushings, 12 mm
Shock, 22
Kolbensatz und Buchsen, 12-mm-Dämpfer,
22
Jeu et bagues de pistons, amortisseurs
12 mm, 22
Set pistone boccola, ammortizzatori
12 mm, 22
TLR5092
Upper Shock Bushing, 22 (4)
Obere Dämpferbuchse, 22 (4)
Bague supérieure d’amortisseur, 22 (4)
Boccola ammortizzatore superiore,
22 (4)
TLR5093
Shock Shaft O-ring Set, 22
O-Ringsatz, Dämpferwelle, 22
Jeu de joints toriques de tige
d’amortisseur, 22
Set o-ring albero ammortizzatore, 22
TLR5094
Shock Preload Adjuster Nut with
O-rings
Einstellmutter, Dämpfervorspannung,
mit O-Ringen
Écrou de réglage de précontrainte
d’amortisseur avec joints toriques
Dado di regolazione carica
ammortizzatore con O-ring
36
LOSA2953
LOSA2955
LOSA2955
LOSA2954
LOSA2955
LOSA2955
LOSA2953
LOSA2956
LOSA2955
LOSA2955
Part #
English
Deutsch
Français
Italiano
TLR5095
Shock End Set with Spring Cups,
12 mm Shock, 22
Dämpferendstücksatz mit Federtellern,
12-mm-Dämpfer, 22
Jeu d’extrémités d’amortisseurs avec
coupelles de ressort, amortisseur 12
mm, 22
Set finecorsa ammortizzatore con
coppe della molla, ammortizzatore da
12 mm, 22
TLR5096
Shock Limiter Set, 3.5 mm Shaft, 22
Dämpferbegrenzungssatz, 3,5 mm, Welle,
22
Jeu de limiteurs d’amortisseur, tige de
3,5 mm, 22
Set limitatore ammortizzatore,
3,5 mm albero, 22
TLR5097
Shock Standoff, 22
Dämpferabstandsbolzen, 22
Entretoise d’amortisseur, 22
Stallo ammortizzatore, 22
TLR5168
Shock Spring, Rear, 2.3 Rate, Pink,
Rear, 22
Dämpferfeder hinten, Federkonstante 2,0,
rosa, 22
Ressort d’amortisseur, AR, Taux 2.0
Rose, 22
Molla ammortizzatore,
posteriore, 2,0 rosa, 22
TLR5182
Shock Spring, Front, 3.5 Rate,
Green, 22T
Dämpferfeder vorne, Federkonstante 3.5,
grün, 22T
Ressort d’amortisseur, AV, Taux 3.5
Vert, 22T
Molla ammortizzatore, anteriore, 3,5
verde, 22T
TLR5900
Button Head Screws, M3 x 5 mm
(10)
Halbrundkopfschrauben, M3 x 5 mm (10)
Vis à tête bouton, M3 x 5 mm (10)
Viti a testa bombata, M3 x 5 mm (10)
TLR5901
Button Head Screws, M3 x 6 mm
(10)
Halbrundkopfschrauben, M3 x 6 mm (10)
Vis à tête bouton, M3 x 6 mm (10)
Viti a testa bombata, M3 x 6 mm (10)
TLR5902
Button Head Screws, M3 x 8 mm
(10)
Halbrundkopfschrauben, M3 x 8 mm (10)
Vis à tête bouton, M3 x 8 mm (10)
Viti a testa bombata, M3 x 8 mm (10)
TLR5903
Button Head Screws, M3 x 10 mm
(10)
Halbrundkopfschrauben, M3 x 10 mm (10)
Vis à tête bouton, M3 x 10 mm (10)
Viti a testa bombata, M3 x 10 mm (10)
TLR5904
Button Head Screws, M3 x 12 mm
(10)
Halbrundkopfschrauben, M3 x 12 mm (10)
Vis à tête bouton, M3 x 12 mm (10)
Viti a testa bombata, M3 x 12 mm (10)
TLR5905
Button Head Screws, M3 x 18 mm
(10)
Halbrundkopfschrauben, M3 x 18 mm (10)
Vis à tête bouton, M3 x 18 mm (10)
Viti a testa bombata, M3 x 18 mm (10)
TLR5906
Button Head Screws, M3 x 35 mm
(10)
Halbrundkopfschrauben, M3 x 35 mm (10)
Vis à tête bouton, M3 x 35 mm (10)
Viti a testa bombata, M3 x 35 mm (10)
TLR5907
Button Head Screws, M3 x 40 mm
(4)
Halbrundkopfschrauben, M3 x 40 mm (4)
Vis à tête bouton, M3 x 40 mm (4)
Viti a testa bombata, M3 x 40 mm (4)
TLR5908
Button Head Screws, M3 x 44 mm
(4)
Halbrundkopfschrauben, M3 x 44 mm (4)
Vis à tête bouton, M3 x 44 mm (4)
Viti a testa bombata, M3 x 44 mm (4)
TLR5909
Button Head Screws, M3 x 16 mm
(10)
Halbrundkopfschrauben, M3 x 16 mm (4)
Vis à tête bouton, M3 x 16 mm (4)
Viti a testa bombata, M3 x 16 mm (4)
TLR5930
Cap Head Screws,
M3 x 8mm (10)
Innensechskantschrauben,
M3 x 8 mm (10)
Vis à tête creuse,
M3 x 8 mm (10)
Viti a testa bombata,
M3 x 8mm (10)
TLR5931
Cap Head Screws, M3 x 5 mm (10)
Innensechskantschrauben, M3 x 5 mm
(10)
Vis à tête creuse, M3 x 5 mm (10)
Viti a testa bombata, M3 x 5 mm (10)
TLR5935
Cap Head Screws, M3 x 20 mm (4)
Innensechskantschrauben,
M3 x 20 mm (4)
Vis à tête creuse, M3 x 20 mm (4)
Viti a testa bombata, M3 x 20 mm (4)
TLR5959
Flathead Screw, M2.5 x 16mm, (10)
Flachkopfschrauben,
M2.5 x 16 mm (10)
Vis à tête plate ,
M2.5 x 16 mm (10)
Viti a testa piatta,
M2.5 x 16mm (10)
37
TLR4161
LOSA5006
TLR5903
TLR6312
TLR5090
TLR6105
TLR2964
TLR2965
LOSA3123
TLR5931
TLR4158
TLR3979
TLR5075
TLR5096
TLR4164
TLR4163
TLR5076
TLR2963
LOSA6397
TLR4157
TLR5093
TLR5090
TLR2967
TLR2965
LOSA6937
TLR5086
TLR5906
TLR5094
TLR4161
TLR5935
LOSA2954
TLR5168
TLR2966
TLR5908
LOSA6943
TLR5907
TLR2967
TLR5095
TLR6352
TLR5905
Part #
English
Deutsch
Français
Italiano
TLR5960
Flathead Screws, M2 x 6 mm (10)
Flachkopfschrauben, M2 x 6 mm (10)
Vis à tête plate, M2 x 6 mm (10)
Viti a testa piatta, M2 x 6 mm (10)
TLR5961
Flathead Screws, M3 x 8 mm (10)
Flachkopfschrauben, M3 x 8 mm (10)
Vis à tête plate, M3 x 8 mm (10)
Viti a testa piatta, M3 x 8 mm (10)
TLR5962
Flathead Screws, M3 x 10 mm (10)
Flachkopfschrauben, M3 x 10 mm (10)
Vis à tête plate, M3 x 10 mm (10)
Viti a testa piatta, M3 x 10 mm (10)
TLR5963
Flathead Screw, M3 x 12 mm (10
Flachkopfschraube, M3 x 12 mm (10)
Vis à tête plate, M3 x 12 mm (10)
Viti a testa piatta, M3 x 12 mm (10)
TLR5964
Flathead Screw, M3 x 16 mm (10)
Flachkopfschraube, M3 x 16 mm (10)
Vis à tête plate, M3 x 16 mm (10)
Viti a testa piatta, M3 x 16 mm (10)
TLR5965
Flathead Screw, M3 x 20 mm (10)
Flachkopfschraube, M3 x 20 mm (10)
Vis à tête plate, M3 x 20mm (10)
Viti a testa piatta, M3 x 20 mm (10)
TLR6018
Rod End, 4.8 mm, 22
Gelenkkopf, 4,8 mm, 22
Extrémités de tige, 4,8 mm, 22
Estremità barra, 4,8 mm, (22)
TLR6023
Ball Stud, 4.8 mm, 10 mm, 22 (4)
Kugelgelenkbolzen, 4,8 mm, 10 mm,
22 (4)
Goujon à rotule, 4,8 mm, 10 mm, 22 (4)
Perno della sfera, 4,8 mm, 10 mm, 22
(4)
TLR6024
Ball Stud, 4.8 mm, 8 mm, 22 (4)
Kugelgelenkbolzen, 4,8 mm, 8 mm, 22 (4)
Goujon à rotule, 4,8 mm, 8mm, 22 (4)
Perno della sfera, 4,8 mm, 8 mm, 22 (4)
TLR6025
Ball Stud, 4.8 mm, 6 mm, 22 (4)
Kugelgelenkbolzen, 4,8 mm, 6 mm, 22 (4)
Goujon à rotule, 4,8 mm, 6mm, 22 (4)
Perno della sfera, 4,8 mm, 6 mm, 22 (4)
TLR6028
Ball Stud, Short Neck, 5 mm (2)
Kugelgelenkbolzen, kurzer Hals, 5 mm (2)
Goujon à rotule, cou court, 5 mm (2)
Perno della sfera, collo corto,
5 mm (2)
TLR6066
Turnbuckle, 75mm, 22T (2)
Spannschloss, 75 mm, 22T (2
Tendeur, 75 mm, 22T (2)
Tenditore, 75mm, 22T (2)
TLR6067
Turnbuckle, 70mm, 22T (2)
Spannschloss, 70 mm, 22T (2)
Tendeur, 70 mm, 22T (2)
Tenditore, 70mm, 22T (2)
TLR6079
Hinge Pin Set, Front, Inner, 22 (2)
Gelenkbolzensatz vorne innen, 22 (2)
Jeu de broche d’axe, AV, intérieur, 22 (2)
Set perno cardine, anteriore, interno,
22 (2)
TLR6105
E-Clips, 3 mm Shaft (12)
E-Clips, 3-mm-Welle (12)
E-Clips, axe 3 mm (12)
E-Clips, 3 mm albero (12)
TLR6288
Setscrew, M3 x 2.5 mm (10)
Gewindestift, M3 x 2,5 mm (10)
Vis de réglage, M3 x 2,5 mm (10)
Vite di regolazione, M3 x 2,5 mm (10)
TLR6289
Setscrew, M3 x 5 mm (10)
Gewindestift, M3 x 5 mm (10)
Vis de réglage, M3 x 5 mm (10)
Vite di regolazione, M3 x 5 mm (10)
TLR6291
Setscrew, M5 x 4 mm, Flat Point
(10)
Gewindestift, M5 x 4 mm, Kegelkuppe (10)
Vis de réglage, M2.5 x 4mm, bout plat
(10)
Vite di regolazione, M2,5 x 4 mm, piatta
Punto (10)
TLR6312
Locknut, M2.5 x .45 x 5 mm (6)
Sicherungsmutter, M2,5 x 0,45 x 5 mm (6)
Écrou de blocage M2.5 x .45 x 5 mm (6)
Dado di fermo, M2,5 x 45 x 5 mm (6)
TLR6313
Locknut, M3 x .5 x 5.5 mm (10)
Sicherungsmutter, M3 x 0,5 x 5,5 mm (10)
Écrou de blocage M3 x .5 x 5,5 mm (10)
Dado di fermo, M2,5 x 5 x 5,5 mm (10)
TLR6314
Nut Insert, M3 x 14.5, 22 (2)
Gewindebuchse, M3 x 14,5, 22 (2)
Insert d’écrou, M3 x 14.5, 22 (2)
Inserto dado, M3 x 14,5, 22 (2)
TLR6352
Washers, M3 (10)
Unterlegscheiben, M3 (10)
Rondelles, M3 (10)
Rondelle, M3 (10)
TLR6933
Bearing Kit, 22
Lagersatz, 22
Kit de roulements, 22
Kit cuscinetto, 22
TLR8201
Wing Washers, (4), 22
Wing Washers, (4), 22
Wing Washers, (4), 22
Wing Washers, (4), 22
38
TLR2101
TLR5092
TLR5097
TLR1066
TLR6313
TLR6018
TLR6066
TLR6313
TLR5904
TLR5905
TLR5904
TLR5903
TLR6024
TLR2051
TLR2984
TLR5964
TLR2046
TLR1065
TLR2055
TLR4154
TLR6018
TLR2927
TLR2972
TLR6024
TLR1066
LOSA6937
TLR5096
TLR2100
TLR2973
LOSA17643W
TLR2929
TLR2052
TLR1066
TLR5094
TLR6105
TLR5963
TLR2928
TLR2048
TLR2044
TLR5963
TLR2974
TLR2972
TLR6288
TLR5963
TLR6105
TLR1066
TLR2054
TLR2975
LOSA6955
Part #
English
Deutsch
Français
Italiano
TLR8202
Body Clips
Gehäuseclips
Clips carrosserie
Clips del corpo
Optional Parts\Optionale Bauteile\Piéces optionnelles\Pezzi opzionali\Piezas Opcionales
Part #
English
Deutsch
Français
Italiano
LOSA99172
Camber Gauge
Sturzlehre
Jauge de carrossage
Misuratore di camber
LOSA99173
Ride Height Gauge
Höhenmesser
Jauge de garde au sol
Misuratore di altezza
TLR1043
Threaded Front King Pin, TiNitride,
(2), 22
Achsschenkelgewindebolzen vorne,
Ti-Nitrid, (2), 22
Axe de fusée AV filetée, TiNitride, 22
(2)
Perno King filettato anteriore, Nitruro
di titanio, (2), 22
TLR1044
Aluminum Carrier, 0°, 22
Aluminumträger, 0°, 22
Porte-fusée aluminium, 0°, 22
Supporto in alluminio, 0°, 22
TLR1045
Aluminum Carrier, 3°, 22
Aluminumträger, 3°, 22
Porte-fusée aluminium, 3°, 22
Supporto in alluminio, 3°, 22
TLR1046
Aluminum Carrier, 5°, 22
Aluminumträger, 5°, 22
Porte-fusée aluminium, 5°, 22
Supporto in alluminio, 5°, 22
TLR1047
Aluminum Carrier, 10°, 22
Aluminumträger, 10°, 22
Porte-fusée aluminium, 10°, 22
Supporto in alluminio, 10°, 22
TLR1048
Brass Kick Angle Shim, 20°, 22
Rückstoßwinkelscheibe, Messing,
20°, 22
Cale d’angle de battement laiton,
20°, 22
Distanziatore angolare in ottone,
20°, 22
TLR1049
Brass Kick Angle Shim, 25°, 22
Rückstoßwinkelscheibe, Messing,
25°, 22
Cale d’angle de battement laiton,
25°, 22
Distanziatore angolare in ottone,
25°, 22
TLR1058
Caster Block, 5˚, 22
Lenkrollensperre, 5˚, 22
Block de chasse, 5˚, 22
Blocco ruote, 5˚, 22
TLR1059
Caster Block, 3˚, 22
Lenkrollensperre, 3˚, 22
Block de chasse, 3˚, 22
Blocco ruote, 3˚, 22
TLR1060
Caster Block, 0˚, 22
Lenkrollensperre, 0˚, 22
Block de chasse, 0˚, 22
Blocco ruote, 0˚, 22
TLR1072
Aluminum Front Pivot, 22
Vordere Aluminumdrehachse, 22
Pivot AV aluminium, 22
Alluminio Front Pivot, 22
TLR1105
Aluminum Front Pivot, 30˚, 22T
Vordere Aluminumdrehachse, 30˚, 22T
Pivot AV aluminium, 30˚, 22T
Alluminio Front Pivot, 30˚, 22T
TLR1550
Servo Mounts, Aluminum, 22
Servohalterungen, Aluminium, 22
Supports de servo en aluminium, 22
Attacchi servo, alluminio, 22
TLR1555
Aluminum Servo Horn 23 Spline
Aluminumservohupe 23 Schiebekeil
Bras de servo aluminium, cannelure
23,
Servo Horn alluminio linguetta da 23
TLR2045
Anti-Squat Tuning Set, HRC, 22
Anti-Squat-Tuningsatz, HRC, 22
Jeu d’optimisation d’anticabrage,
HRC, 22
Set impostazione anti-squat, HRC, 22
TLR2056
Ti Nitride Hinge Pin, Rear Outer,
Threaded (2), 22
Gelenkbolzen hinten außen, Ti-Nitrid,
mit Gewinde (2), 22
Broche d’axe Ti Nitride, extérieur AR,
filetée, 22 (2)
Nitruro di titanio perno cardine, posteriore esterno filettato (2), 22
TLR2057
Aluminum Rear Hubs, 0 degree, 22
Hintere Aluminumnaben, 0 Grad, 22
Moyeux AR aluminium, 0 degré, 22
Mozzi posteriori in alluminio, 0 gradi,
22
TLR2059
Front Camber Block, Aluminum, 22
Sturzblock vorn, Aluminium, 22
Blocage de cambrure avant en aluminium, 22
Blocco camber anteriore, alluminio, 22
TLR2060
Rear Camber Block, Aluminum, 22
Sturzblock hinten, Aluminium, 22
Blocage de cambrure arrière en
aluminium, 22
Blocco camber posteriore, alluminio, 22
39
Part #
English
Deutsch
Français
Italiano
TLR2061
Rear Camber Block, Mid Motor,
Aluminum, 22
Sturzblock hinten, Mittelmotor,
Aluminium, 22
Blocage de cambrure arrière en aluminium, moteur central, 22
Blocco camber posteriore, centro
motore, alluminio, 22
TLR2102
Rear Shock Tower, Mid Motor, 22T
Hinterer Dämpferdom, Mittelmotor,
22T
Support d’amortisseur AR, moteur
Centre, 22T
Torre ammortizzatore posteriore,
motore mediano, 22T
TLR2947
Tungsten Carbide Thrust Balls, 2mm
(6)
Wolfram Carbid Differentialkugeln
2mm (6)
Billes de butée en Carbure de Tungstène, 2mm (6)
Sfere di spinta Tungsten Carbide,
2mm (6)
TLR2948
Diff Nut Holder, Aluminum, 22
Differenzialmutterhalter, Aluminum, 22 Support d’écrou de différentiel,
aluminium, 22
TLR2951
Tungsten Carbide Diff Balls, 3/32 (14)
Wolfram Carbid Differentialkugeln
3/32 (14)
Billes de différentiel en Carbure de
Tungstène, 3/32 (14)
Sfere Diff Tungsten Carbide, 3/32 (14)
TLR2952
Silicone Diff Grease, 8cc, 22
Silikon Differenzial Schmierfett,
8cc, 22
Graisse de différentiel silicone, 8cc, 22
Grasso silicone differenziale, 8cc, 22
TLR2953
Differential Gear, 51T, 22
Differenzial, 51T, 22
Couronne de différentiel, 51 dents, 22
Ingranaggio differenziale, 51T, 22
TLR2954
Drive Rings, 22 (2)
Antriebsringe, 22 (2)
Couronne de transmission, 22 (2)
Anelli della trasmissione, 22 (2)
TLR2955
Outdrive Set, 22
Abtriebssatz, 22
Jeu de cardan, (22)
Set bicchierini, 22
TLR2956
Differential Ball Set, Hard (14)
Differenzial-Kugelsatz, hart (14)
Jeu de billes de différentiel, dur (14)
Set sfera differenziale, rigida (14)
TLR2957
Differential Thrust Assembly, 22
Differenzialschub-Baugruppe, 22
Ensemble billes et rondelles différentiel, Montaggio diff., 22
22
TLR2958
Differential Through Screw and Nut, 22
Durchgangsschraube u. -mutter,
Differenzial, 22
Vis et écrou traversant de différentiel,
22
Vite passante e dado diff., 22
TLR2959
Differential Spring, 22 (1)
Differenzialfeder, 22 (1)
Ressort de différentiel, 22 (1)
Molla differenziale, 22 (1)
Wartungssatz, Differenzial, 22
Kit d’entretien de différentiel, 22
Kit servizio diff., 22
Alloggiamento ingranaggi, motore
centrale, 22
TLR2962
Differential Service Kit, 22
Supporto dado differenziale, alluminio,
22
TLR2968
Gear Case, Mid Motor, 22
Getriebegehäuse, Mittelmotor, 22
Carter de pignons, moteur Centre, 22
TLR2979
Aluminum, Toe Plate, 3.5˚, HRC, 22
Aluminumtrittleiste, 3,5˚, HRC, 22
Plaque de pincement aluminium, 3,5˚,
HRC, 22
Alluminio, piastra convergenza, 3,5˚,
HRC, 22
TLR2981
Aluminum, Toe Plate, 4.5˚, HRC, 22
Aluminumtrittleiste, 4,5˚, HRC, 22
Plaque de pincement aluminium, 4,5˚,
HRC, 22
Alluminio, piastra convergenza, 4,5˚,
HRC, 22
TLR2982
Aluminum, Toe Plate, 5˚, HRC, 22
Aluminumtrittleiste, 5˚, HRC, 22
Plaque de pincement aluminium, 5˚,
HRC, 22
Alluminio, piastra convergenza, 5˚,
HRC, 22
TLR2983
Aluminum, Toe Plate, 3°, HRC, 22
Aluminumtrittleiste, 3˚, HRC, 22
Plaque de pincement aluminium, 3˚,
HRC, 22
Alluminio, piastra convergenza, 3.˚,
HRC, 22
TLR2984
Aluminum, Toe Plate, 3°, LRC, 22
Aluminumtrittleiste, 3˚, LRC, 22
Plaque de pincement aluminium, 3˚,
LRC, 22
Alluminio, piastra convergenza, 3.˚,
LRC, 22
TLR2985
Aluminum, Toe Plate, 3.5°, LRC, 22
Aluminumtrittleiste, 3,5°, LRC, 22
Plaque de pincement aluminium, 3,5˚,
LRC, 22
Alluminio, piastra convergenza, 3,5°,
LRC, 22
TLR2987
Aluminum Toe Plate, 4.5°, LRC, 22
Aluminumtrittleiste, 4,5°, LRC, 22
Plaque de pincement aluminium,, 4,5°,
LRC, 22
Alluminio, piastra convergenza, 4,5°.
LRC, 22
TLR2988
Aluminum Toe Plate, 5°, LRC, 22
Aluminumtrittleiste, 5°, LRC, 22
Plaque de pincement aluminium, 5˚,
LRC, 22
Alluminio, piastra convergenza, 5°,
LRC, 22
TLR3980
78T 48P Kevlar Spur Gear
78T 48P Kevlar-Stirnrad
Couronne en Kevlar 78 T 48P
Ingranaggio cilindrico in kevlar, 48P
78T
TLR4151
Brass Weight System, Mid Motor, 22
Messinggewichtsschema,
Mittelmotor, 22
Système de poids laiton, moteur centre, Sistema di pesatura in ottone, motore
22
centrale, 22
TLR4162
Rear Chassis Brace, Mid Motor, 22
Hintere Fahrgestellklammer,
Mittelmotor, 22
Renfort de châssis AR, moteur Centre,
22
Staffa chassis posteriore, motore
mediano, 22
TLR4166
Titanium Shock Mounts, 22 (4)
Titandämpferbefestigungen, 22 (4)
Supports d’amortisseur titane, 22 (4)
Supporti in titanio ammortizzatore,
22 (4)
TLR5074
Low Friction Shock O-Rings, (8), 22
Stoßdämpfer-O-Ringe, geringe
Reibung, (8), 22
Joints toriques d’amortisseur faible
friction, (8), 22
Guarnizioni circolari ammortizzatore a
basso attrito, (8), 22
TLR5085
Shock Cap Set, 22 (2)
Dämpferdeckelsatz, 22 (2)
Jeu de obturateur d’amortisseur, 22
(2)
Set cappuccio ammortizzatore
TLR5086
Shock Cap, Bottom, 22 (2)
Dämpferdeckel unten, 22 (2)
Obturateur d’amortisseur, bas, 22 (2)
Cappuccio ammortizzatore, inferiore
22 (2)
TLR5089
Bladder Set, 12 mm Shocks, 22 (4)
Blasensatz, 12-mm-Dämpfer, 22 (4)
Jeu de soufflets, amortisseurs 12 mm,
22 (4)
Set camera d’aria, ammortizzatori
12 mm , 22 (4)
TLR5099
Aluminum, Shock Tool Kit, 12 mm
Shock
Aluminiumdämpferwerkzeugsatz,
12-mm-Dämpfer
Kit d’outils pour amortisseur aluminium, amortisseur 12 mm
Kit utensili ammortizzatori, ammortizzatore da 12 mm, Alluminio
TLR5162
Shock Spring, Rear, 1.6 Rate, Grey,
22T
Dämpferfeder hinten, Federkonstante
1,6, grau, 22T
Ressort d’amortisseur, AR, Taux 1.6
Gris, 22T
Molla ammortizzatore, posteriore, 1.6
grigio, 22T
TLR5163
Shock Spring, Rear, 1.8 Rate, White,
22T
Dämpferfeder hinten, Federkonstante
1,8, weiß, 22T
Ressort d’amortisseur, AR, Taux 1.8
Blanc, 22T
Molla ammortizzatore, posteriore, 1.8
bianca, 22T
40
Part #
English
Deutsch
Français
Italiano
TLR5164
Shock Spring, Rear, 2.0 Rate, Yellow,
22T
Dämpferfeder hinten, Federkonstante
2,0, gelb, 22T
Ressort d’amortisseur, AR, Taux 2.0
Jaune, 22T
Molla ammortizzatore,
posteriore, 2,0 gialla, 22T
TLR5179
Shock Spring, Front, 2.5
Rate Red, 22T
Dämpferfeder vorne, Federkonstante
2,5, Röte, 22T
Ressort d’amortisseur, AV, Taux 2.5
rouge, 22T
Molla ammortizzatore, anteriore, 2,5
rosso, 22T
TLR5180
Shock Spring, Front, 2.9 Rate, Orange,
22T
Dämpferfeder vorne, Federkonstante
2,9, orange, 22T
Ressort d’amortisseur, AV, Taux 2.9
Orange, 22T
Molla ammortizzatore, anteriore, 2.9
arancione, 22T
TLR5181
Shock Spring, Front, 3.2 Rate, Silver,
22T
Dämpferfeder vorne, Federkonstante
3,2, silber, 22T
Ressort d’amortisseur, AV, Taux 3.2
Argent, 22T
Molla ammortizzatore, anteriore, 3,2
argentata, 22T
TLR5932
Cap Head screws, M3 x 10 mm (10)
Innensechskantschrauben,
M3 x 10 mm (10)
Vis à tête creuse, M3 x 10 mm (10)
Viti a testa bombata, M3 x 10 mm (10)
TLR5933
Cap Head Screws, M3 x 12 mm (10)
Innensechskantschrauben,
M3 x 12 mm (10)
Vis à tête creuse, M3 x 12mm (10)
Viti a testa bombata, M3 x 12 mm (10)
TLR5934
Cap Head Screws, M3 x 16 mm (10)
Innensechskantschrauben,
M3 x 16 mm (10)
Vis à tête creuse, M3 x 16mm (10)
Viti a testa bombata, M3 x 16 mm (10)
TLR6019
Ballstud/Hub Spacer Set, Aluminum,
22
Kugelgelenkbolzen-/
Nabenabstandhaltersatz, Aluminum,
22
Jeu de goujons à rotule/rondelles de
fusée aluminium, 22
Perno della sfera / Set distanziatore
mozzo, alluminio, 22
TLR6030
Titanium Ball Stud, 4.8 x 6 mm (2)
Kugelgelenkbolzen, Titan,
4,8 x 6 mm (2)
Goujon à rotule titane 4,8 x 6 mm (2)
Perno della sfera, titanio 4,8 x 6 mm
(2)
TLR6031
Titanium Ball Stud, 4.8 x 8 mm (2)
Kugelgelenkbolzen, Titan,
4,8 x 8 mm (2)
Goujon à rotule titane 4,8 x 8 mm (2)
Perno della sfera, titanio 4,8 x 8 mm
(2)
TLR6032
Titanium Ball Stud, 4.8 x 10 mm (2)
Kugelgelenkbolzen, Titan,
4,8 x 10 mm (2)
Goujon à rotule titane 4,8 x 10 mm (2)
Perno della sfera, titanio
4,8 x 10 mm (2)
TLR6068
Titanium Turnbuckle Kit (6): 22T
Titan Gewindestangen Kit (6):22T
Kit de biellettes titane (6) : 22T
Kit tenditore titanio (6): 22T
TLR6072
Titanium Turnbuckle, 70mm (2): 22T
Spannschloss, Titan, 70mm (2): 22T
Tendeur titane, 70mm (2): 22T
Titanio tenditore, 70mm (2): 22T
TLR6073
Titanium Turnbuckle, 75mm (2): 22T
Spannschloss, Titan, 75mm (2): 22T
Tendeur titane, 75mm (2): 22T
Titanio tenditore, 75mm (2): 22T
TLR7002
Wheel, Front & Rear, Yellow, 22T
Felge Vorne/Hinten, Gelb: 22T
Jantes av et arr, jaune, 22T
Ruota anteriore e posteriore gialla, 22T
TLR7003
Front and Rear Wheel, White: 22T
Felge Vorne/Hinten, Weiß: 22T
Jantes av et arr, blanc : 22T
Ruota anteriore e posteriore, bianca:
22T
TLR8300
TLR Decal Sheet
TLR-Dekorbogen
Planche de décalcomanies TLR
TLR Foglio con decalcomanie
TLR99101
Shock Shaft Pliers
Dämpfer Kolbenstange Zange
Pince à tige d‘amortisseur
Pinze albero ammortizzatore
TLR99102
Turnbuckle Wrench, 22, 8B, 8T
Stellschlüssel für Gewindestift, 22,
8B, 8T
Clé à biellettes ,22, 8B, 8T
Chiave tenditore, 22, 8B, 8T
41
Name:
22T RTR Base Setup
City:
Track
Conditions
Track:
State:
Indoor
Outdoor
Tight
Open
Event:
Date:
Smooth
Rough
Blue Groove
Dry
Hard Packed
Loose/Loamy
Wet
Dusty
Grass
AstroTurf
High Bite
Other
Low Bite
Med Bite
Front Suspension
Toe: 0 degree
Ride Height: 31mm
Camber: -1 degree
Caster:
0º
3º
Kick Angle:
20º
25º
Sway Bar: No
1
2
3
5º
10º
30º
4mm
0mm
2mm
SPACER
SPACER
1
SPACER
Shock Type: Bladder Emulsion Oil: 27.5wt
Piston: 56
Spring: Green (Truck Front Spring-TLR5182)
Shock Limiters: 4mm
Shock Location: #1 on tower/inside on arm
Bump Steer: 0mm
Camber Link: #1
2
INSIDE
OUTSIDE
0mm
SPACER
Notes:
Rear Suspension
Chassis Configuration:
Rear Motor
Mid Motor
1000wt
Toe: 4 degrees
Anti-Squat: 2.5 degrees
C BA
2mm
SPACERS
C B A
Roll Center: Low Roll Center (LRC) High Roll Center (HRC)
E D
C B A
Ride Height: 29mm
ED
Camber: -1 degrees
Rear Hub Spacing: Middle
Hex Width: Stock
Sway Bar: No
Shock Type: Bladder
Emulsion Oil: 27.5wt
55
Piston:
Electronics
Spring: Pink (Buggy Rear Spring- TLR5168)
Radio:
Shock Limiters: 2mm
Servo:
Camber Link: 2/B
ESC:
Shock Locations: #2 on tower/inside on arm
Initial Brake:
Drag Brake:
Stock
Spoiler:
Throttle Profile:
Battery Position: Forward
Weight Placement
(Mark with “X”)
Tires
Front: BK Bar
Rear:
Weight of
each piece
42
Notes:
oz./g
BK Bar
Compound
Blue
White
0mm
4
3
2
1
SPACERS
1
2
OUTSIDE
INSIDE
Timing Advance:
Throttle/Brake Expo:
Servo Expo:
Throttle/Brake EPA:
Motor: Losi 13.5
Pinion: 23
Spur: 82
Battery:
Insert
Additive
City:
Track
Conditions
Event:
Date:
Name:
Track:
State:
Indoor
Outdoor
Tight
Open
Smooth
Rough
Hard Packed
Loose/Loamy
Blue Groove
Dry
Wet
Dusty
Grass
AstroTurf
High Bite
Other
Low Bite
Med Bite
Front Suspension
1
2
Toe:
Ride Height:
Camber:
Caster:
0º
3º
5º
10º
Kick Angle:
20º
25º
30º
Sway Bar:
Shock Type: Bladder Emulsion Oil:
Piston:
Spring:
Shock Limiters:
3
SPACER
SPACER
1
SPACER
2
INSIDE
OUTSIDE
Shock Location:
Bump Steer:
Camber Link:
SPACER
Notes:
Rear Suspension
Chassis Configuration:
Rear Motor
Mid Motor
Toe:
Anti-Squat:
Roll Center: Low Roll Center (LRC) High Roll Center (HRC)
Ride Height:
Camber:
Rear Hub Spacing:
Hex Width:
Sway Bar:
Shock Type: Bladder
Emulsion Oil:
Piston:
Spring:
Shock Limiters:
Camber Link:
Shock Locations:
Spoiler:
Battery Position:
Weight Placement
(Mark with “X”)
Tires
Front:
4
3
2
1
C BA
SPACERS
B A
E D
C B A
C
SPACERS
1
2
ED
OUTSIDE
INSIDE
Electronics
Radio:
Servo:
ESC:
Initial Brake:
Drag Brake:
Throttle Profile:
Timing Advance:
Throttle/Brake Expo:
Servo Expo:
Throttle/Brake EPA:
Motor:
Pinion:
Spur:
Battery:
Compound
Insert
Additive
Rear:
Weight of
each piece
Notes:
oz./g
43
®
WWW.LOSI.COM
©2011 Horizon Hobby Inc.
Losi, 22T, DSM, EC3 and the Horizon Hobby logo are trademarks or registered trademarks of Horizon Hobby, Inc.
The Spektrum trademark is used with permission of Bachmann Industries, Inc.
US 7,391,320. Patents Pending.
Created 10/11 33042
LOSB0123 800-0474