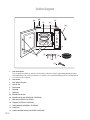
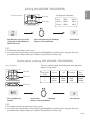
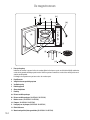
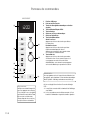
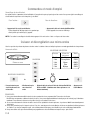
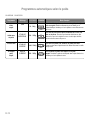
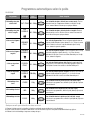
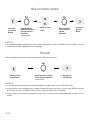
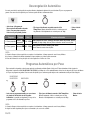
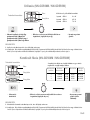
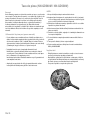
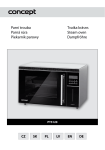
1
English
Deutsch
Gebruiksaanwijzing
Mode dʼemploi
Français
Bedienungsanleitung
Nederland
s
Operating Instructions
Manuale di istruzioni
Manual de instruções
Italiano
Instrucciones de funcionamiento
Instrukcja obsługi
Instrucţiuni de operare
Español
Kezelési útmutató
Microwave/Grill Oven
Magnetron/Grill Oven
Polski
Mikrowellengerät mit Grill
Four à Micro-ondes-Gril
Forno a microonde e grill
Forno Micro-ondas/Grelhador
Česky
Horno Microondas/Grill
Kuchenka mikrofalowa z grillem
Cuptor cu microunde
Românã
NN-GD560M / NN-GD550W / NN-SD450W
Magyar
Grillezös/mikrohullámú sütö
IMPORTANT SAFETY INSTRUCTIONS: Before operating this oven, please read these instructions carefully and keep for future
reference.
BELANGRIJKE VEILIGHEIDSINSTRUCTIES. Lees ze a.u.b. zorgvuldig door en bewaar ze zodat u ze opnieuw kunt raadplegen wanneer nodig.
WICHTIGE SICHERHEITSANWEISUNGEN. Bitte sorgfältig durchlesen und zur weiteren Bezugnahme aufbewahren.
INSTRUCTIONS DE SÛRETÉ IMPORTANTES. Avant dʼutiliser le four à micro-ondes, lisez attentivement les recommandations dʼutilisation et conservez-les soigneusement.
ISTRUZIONI IMPORTANTI PER LA SICUREZZA. Leggere attentamente queste note e conservarle per riferimento futuro.
INSTRUCCIONES SOBRE SEGURIDAD IMPORTANTES. Léalas detenidamente y guárdelas para futura referencia.
WAŻNE INSTRUKCJE BEZPIECZEŃSTWA. Prosimy o dokładne zapoznanie się z instrukcją i zachowanie jej.
DÒLEÎITÉ BEZPEâNOSTNÍ POKYNY. Pfied uvedením trouby do provozu si laskavû peãlivû pfieãtûte tyto pokyny a uschovejte je
pro budoucí pouÏití.
FONTOS BIZTONSÁGI TUDNIVALÓK Kérjük, olvassa el gondosan, és örizze meg a késöbbiekben.
INSTRUCŢIUNI DE SIGURANŢĂ IMPORTANTE: Înainte de utilizarea a acestui cuptor, vă rugăm să citiţi cu atenţie aceste instrucţiuni şi
să le păstraţi pentru referinţe ulterioare.
Installation and Connection
Unpack the oven, remove all packing material, and examine the oven for
any damage such as dents, broken door latches or cracks in the door. If
you find any damage, notify your dealer immediately. Do not install a
damaged microwave oven.
Earthing instructions
IMPORTANT: THIS UNIT HAS TO BE PROPERLY EARTHED FOR
PERSONAL SAFETY.
If your AC outlet is not grounded, it is the personal responsibility of the
customer to have it replaced with a properly grounded wall socket.
Operation voltage
The voltage has to be the same as specified on the label on the oven. If a
higher voltage than specified is used, it may cause a fire or other
damages.
Placement of the Oven
This oven is intended for Counter-Top and Built-In use only. It is not
intended for use inside a cupboard.
Do not place this oven near an electric or gas cooker range.
The feet should not be removed.
This oven is only for household usage. Do not use outdoors.
Avoid using the microwave oven in high humidity.
The power cord should not touch the outside of the oven.
Keep the cord away from hot surfaces. Do not let the cord hang over
the edge of a table or work top. Do not immerse the cord, plug or
oven in water.
9. Do not block the air vents on the top and back of the oven. If these
openings are blocked during operation the oven may overheat. In
this case the oven is protected by a thermal safety device and
resumes operation only after cooling down.
10.This appliance is not intended to be operated by means of an
external timer or separate remote-control system.
4.
5.
6.
7.
8.
Attention: Hot Surfaces
(NN-GD560M / NN-GD550W)
Built-in
WARNING
This oven may be built into a wall cabinet by using the proper trim kit,
white NN-TKT59WFP/ silver NN-TKT59MFP, which may be purchased
from a local Panasonic dealer.
1. The door seals and door seal areas should be cleaned with a damp
cloth.
The appliance should be inspected for damage to the door seals and
door seal areas and if these areas are damaged the appliance
should not be operated until it has been repaired by a service
technician trained by the manufacturer.
2. Do not attempt to tamper with or make any adjustments or repairs to
the door, control panel housing, safety interlock switches or any other
part of the oven. Do not remove the outer panel from the oven which
gives protection against exposure to microwave energy.
Repairs should only be done by a qualified service person.
1. Place the oven on a flat and stable surface, more than 85 cm above
the floor.
2. When this oven is installed, it should be easy to isolate the appliance
from the electricity supply by pulling out the plug or operating a circuit
breaker.
3. For proper operation, ensure a sufficient air circulation for the oven.
Counter-top use:
a. Allow 15 cm of space on the top of the oven, 10 cm at the back,
5 cm on one side, and the other side must be opened more than
40 cm.
b. If one side of the oven is placed flush to a wall, the other side or top
must not be blocked.
5cm
15cm
10cm
Open
Counter-top
3. Do not operate this appliance if it has a damaged CORD OR PLUG,
if it is not working properly, or if it has been damaged or dropped. It is
dangerous for anyone other than a service technician trained by the
manufacturer to perform repair service.
4. If the supply cord of this appliance is damaged, it must be replaced
with the special cord available from the manufacturer.
5. Only allow children to use the oven without supervision when
adequate instructions have been given so that the child is able to use
the oven in a safe way and understands the hazards of improper
use.
6. Liquids and other foods must not be heated in sealed containers
since they are liable to explode.
7. This appliance is not intended for use by persons (including childen)
with reduced sensory or mental capabilities, or lack of experience
and knowledge unless they have been given supervision or
instruction concerning use of the appliance by a person responsible
for their safety. Children should be supervised to ensure that they do
not play with the appliance.
En-1
English
Examine your microwave oven
Safety Instructions
Use of your oven
Fan motor operation
1. Do not use the oven for any reason other than the preparation of food.
This oven is specifically designed to heat or cook food. Do not use this
oven to heat chemicals or other non-food products.
If the oven gets hot after use, the fan may rotate for a few minutes to
cool the electric components. This is perfectly normal, and you can take
out the food from the oven while the fan is still in operation.
2. Before use, check that utensils/containers are suitable for use in
microwave ovens.
Oven light
3. Do not attempt to use this microwave oven to dry newspaper, clothing
or any other materials. They may catch on fire.
4. When the oven is not being used, do not store any objects other than
oven accessories inside the oven in case it is accidentally turned on.
5. The appliance shall not be operated by MICROWAVE or
COMBINATION (NN-GD560M / NN-GD550W) WITHOUT FOOD IN
THE OVEN. Operation in this manner may damage the appliance.
Exception to this is point 1 under heater operation and pre-heating the
pizza pan.
6. If smoke or a fire occurs in the oven, press Stop/Cancel Pad and leave
the door closed in order to stifle any flames. Disconnect the power
cord, or shut off power at the fuse or the circuit breaker panel.
Heater operation (NN-GD560M / NN-GD550W)
1. Before using COMBINATION or GRILL function for the first time, wipe
excessive oil off in the oven cavity and operate the oven without food
and accessories on Grill, for 10 minutes. This will allow the oil that is
used for rust protection to be burned off. This is the only time the oven
is used empty.
2. Exterior oven surfaces, including air vents on the cabinet and the oven
door will get hot during COMBINATION and GRILLING, take care when
opening or closing the door and when inserting or removing food and
accessories.
3. The oven has two heaters situated in the top of the oven. After using
the COMBINATION and GRILL function, these surfaces will be very
hot.
N.B. After cooking by these modes, the oven accessories will be
very hot.
4. The accessible parts may become hot when the grill and combination
are in use. Children should be kept away.
5. When the appliance is operated in the combination mode, children
should only use the oven under supervision due to the temperatures
generated.
En-2
When it becomes necessary to replace the oven light, please consult
your dealer.
Accessories
The oven comes equipped with a variety of accessories. Always follow
the directions given for use of the accessories.
Glass tray
1. Do not operate the oven without the roller ring and the glass tray in
place.
2. Never use another type of glass tray than the one specially designed
for this oven.
3. If the glass tray is hot, let it cool before cleaning or placing in water.
4. The glass tray can turn in either direction.
5. If the food or cooking vessel on the glass tray touches the oven walls
and stops the tray rotating, the tray will automatically rotate in the
opposite direction. This is normal.
6. Do not cook foods directly on the glass tray.
Roller ring
1. The roller ring and the oven floor should be cleaned frequently to
prevent noise and build-up of remaining food.
2. The roller ring must always be used for cooking together with the
glass tray.
Wire rack (NN-GD560M / NN-GD550W)
1. The Wire Rack is used to facilitate browning of small dishes and help
with the good circulation of the heat.
2. Do not use any metal container directly on the Wire Rack in
COMBINATION with MICROWAVE.
3. Do not use the Wire Rack in MICROWAVE mode only.
Pizza pan (NN-GD560M / NN-GD550W) - See page En-14
Important Information
6. Liquids
• Cooking times given in the cookbook are approximate. The cooking
time depends on the condition, temperature, amount of food and on the
type of cookware.
• When heating liquids, e.g. soup, sauces and beverages in your
microwave oven, overheating the liquid beyond boiling point can occur
without evidence of bubbling. This could result in a sudden boil over of
the hot liquid. To prevent this possibility the following steps should be
taken:
• Begin with the minimum cooking time to help prevent overcooking. If
the food is not sufficiently cooked you can always cook it for a little
longer.
N.B.: If the recommended cooking times are exceeded the food
will be spoiled and in extreme circumstances could catch fire and
possibly damage the interior of the oven.
2. Small quantities of foods
• Small quantities of food or foods with low moisture content can burn,
dry out or catch on fire if cooked too long. If materials inside the oven
should ignite, keep the oven door closed, turn the oven off and remove
the plug from the socket.
3. Eggs
• Do not cook eggs in their shells and whole hard-boiled eggs by
MICROWAVE. Pressure may build up and the eggs will explode, even
after microwave heating has ended.
4. Piercing skin
• Food with non porous skins, such as potatoes, egg yolks and sausages
must be pierced before cooking by MICROWAVE to prevent bursting.
5. Meat thermometer
• Use a meat thermometer to check the degree of cooking of roasts and
poultry only when the meat has been removed from the oven. Do not
use a conventional meat thermometer when using MICROWAVE or
COMBINATION because it may cause sparking.
a) Avoid using straight-sided containers with narrow necks.
b) Do not overheat.
c) Stir the liquid before placing the container in the oven and again
halfway through the cooking time.
d) After heating, allow it to stand in the oven for a short time, stir
again before carefully removing the container.
7. Paper/Plastic
• When heating food in plastic or paper containers, check the oven
frequently as these types of containers ignite if overheated.
• Do not use recycled paper products (e.g. Kitchen Roll) unless the
paper product is labelled as safe for microwave oven use. Recycled
paper products may contain impurities which may cause sparks and/or
fires during use.
• Remove wire twist-ties from roasting bags before placing the bags in
the oven.
8. Utensils/foil
• Do not heat any closed cans or bottles because they might explode.
• Metal containers or dishes with metallic trim should not be used during
Microwave cooking. Sparking will occur.
• If you use any aluminium foil, meat spikes or metalware the distance
between them and the oven walls and door should be at least 2 cm to
prevent sparking.
9. Feeding bottles/baby food jars
• The top and teat or lid must be removed from feeding bottles or baby
food jars before placing in the oven.
• The contents of feeding bottles and baby food jars are to be stirred or
shaken.
• The temperature has to be checked before consumption to avoid
burns.
En-3
English
1. Cooking times
Outline Diagram
[8b]
[13]
[8a]
[6]
[4]
[12]
[5]
[2]
[1]
[7]
[3]
[9]
[10]
[11]
1.
Door release button
Press to open the door. When you open the oven door during cooking, the cooking is stopped temporarily without clearing
earlier made settings. The cooking is resumed as soon as the door is closed and Start Pad pressed. The oven lamp lights as
soon as the oven door is opened.
2.
Oven window
3.
Door safety lock system
4.
Oven air vent
5.
Control panel
6.
Glass tray
7.
Roller ring
8a.
External oven air vents
8b.
External oven air vents (NN-GD560M / NN-GD550W)
9.
Wire rack (NN-GD560M / NN-GD550W)
10.
Pizza pan (NN-GD560M / NN-GD550W)
11.
Pizza Pan Handle (NN-GD560M / NN-GD550W)
12.
Power Cord
13.
Caution Label (Hot surfaces) (NN-GD560M / NN-GD550W)
En-4
Control Panel
English
NN-GD560M / NN-GD550W *
(1)
(2)
(3)
1.
Display Window
2.
Microwave Power Pad
3.
Grill Power Pad
4.
Combination Power
5.
Auto Weight Turbo Defrost Pad
6.
Delay/Stand Pad
7.
Clock Pad
8.
Auto Program Selector Dial
9.
Time/Weight Dial
10.
Stop/Cancel Pad:
Before cooking: one press clears your
instructions.
(8)
During cooking: one press temporarily stops the
cooking program. Another press cancels all your
instructions and the time of day will appear in the
display.
(4)
(5)
11.
(9)
(6)
Start Pad:
Press to start operating the oven. If during cooking the
door is opened or Stop/ Cancel Pad is pressed once,
Start Button has to be pressed again to continue
cooking.
(7)
* N.B. The design of your control panel may vary from the
panel displayed (depending on colour), but the functionality
will remain the same.
(10)
(11)
NOTE: If an operation is set and Start Pad is not pressed,
after 6 minutes, the oven will automatically cancel the
operation. The display will revert back to clock mode.
Beep Sound:
A beep sounds when a pad is
pressed. If this beep does not
sound, the setting is incorrect.
When the oven changes from
one function to another, two
beeps sound. After completion of
cooking, five beeps sound.
This oven is equipped with an energy saving function.
Please Note:
1. When in stand-by mode the brightness of the display will
be reduced.
2. The oven will enter stand-by mode, when first plugged in
and immediately after the last operation has completed.
En-5
Control panel
NN-SD450W
(1)
(2)
(3)
(4)
(5)
(6)
(7)
(8)
(1)
(6)
(2)
(9)
(7)
(3)
(4)
Display window
Microwave Power Pads
Auto Weight Turbo Defrost Pad
Delay/stand Pad
Clock Pad
Auto program selector Dial
Time/Weight Dial
Stop/Cancel Pad:
Before cooking: one press clears your
instructions.
During cooking: one press temporarily stops the
cooking program.
Another press cancels all your instructions and the
time of day will appear in the display.
Start Pad:
Press to start operating the oven. If during
cooking the door is opened or Stop/ Cancel Pad is
pressed once, Start Pad has to be pressed again to
continue cooking.
NOTE: If an operation is set and Start Pad is not pressed,
after 6 minutes, the oven will automatically cancel the
operation. The display will revert back to clock mode.
(5)
(8)
(9)
This oven is equipped with an energy saving function.
Please Note:
Beep Sound:
A beep sounds when a pad is
pressed. If this beep does not
sound, the setting is incorrect.
When the oven changes from
one function to another, two
beeps sound. After completion of
cooking, five beeps sound.
En-6
1. When in stand-by mode the brightness of the display will
be reduced.
2. The oven will enter stand-by mode, when first plugged in
and immediately after the last operation has completed.
Controls and operation procedure
“88:88”
English
Plug In
Word Prompting
Press
“FRANCAIS”
In French
Press
“ITALIANO”
In Italian
Press
“DEUTSCH”
In German
Press
“NEDERLANDS”
In Dutch
Press
ESPANOL
In Spanish
Press
“POLSKI”
In Polish
Press
“CESKY”
In Czech
Press
“ENGLISH”
In English
Press
“DANSK”
In Danish
Press
“SUOMI”
In Finnish
Press
“SVENSKA”
In Swedish
Press
“NORSK”
In Norwegian
These models have a unique function “Word Prompting”
which guides you through the operation of your
microwave. After plugging in the oven press the Start
Pad until you locate your language. As you press the
Pads, the display will scroll the next instruction eliminating the opportunities for mistakes. If for any reason you
wish to change the language displayed, unplug the oven
and repeat this procedure.
If the Delay/Stand Pad is pressed 4 times, this will turn
off the operation guide. To turn the operation guide back
on, press the Delay/Stand Pad 4 times.
For model NN-SD450W only.
Clock setting: Example: To set 12:00
• Press Clock Pad once.
The colon starts to blink.
• Enter the time by turning the Time/Weight Dial.
The time appears in the display and the colon blinks.
• Press Clock Pad.
The colon stops blinking and the time
of day is entered.
NOTE:
1. To reset the time of day repeat all the above steps.
2. The time of day is displayed, unless the power supply is interrupted.
3. This clock has a 24 hour display.
En-7
Controls and operation procedure
Child safety lock:
Using this system will make the oven controls inoperable; however, the door can be opened. Child Lock can be set when the display shows a colon
or the time.
To cancel:
To set:
• Press Stop/Cancel Pad three times.
• Press Start Pad three times.
The time of day will reappear in the display.
The time of day will disappear. Actual time will not be lost.
*
A ʻ ʼ is indicated in the display.
NOTE: To activate child lock, start pad must be pressed 3 times within a 10 second period.
Microwave cooking and defrost
There are 5 different microwave power levels available. The chart below shows the approximate wattage for each power level.
Use of accessory:
NN-GD560M / NN-GD550W
NN- SD450W
Glass Tray
Press
Power Level
Wattage
Once
Twice
3 Times
4 Times
5 Times
Max (High)
Defrost
Medium
Low
Simmer
1000 W
270 W
600 W
440 W
250 W
NN-GD560M / NN-GD550W
or
• Press this pad until the
power you require
appears in the display
window.
• Select the desired
microwave power level.
• Set the cooking time using the Time/Weight Dial
(HIGH power: up to 30 minutes
Other powers: up to 1 hour and 30 minutes).
• Press Start Pad.
NOTE:
1. For 2 or 3 stage cooking, before pressing Start Pad, repeat setting the Microwave power level and cooking time.
e.g. Casserole –– High 10 minutes to bring the casserole to boil. Simmer 60 minutes to cook.
Simmer 10 minutes to allow flavours to develop.
2. Stand time can be programmed after the Microwave power and time setting.
3. You can change the cooking time during cooking, if required. Turn Time/Weight Dial to increase or decrease the cooking time. Time can be
increased/decreased in 1 minute increments, up to 10 minutes. Turning the dial to zero will end cooking.
4. The oven will automatically work on High microwave power if a cooking time is entered without the power level previously being selected.
En-8
Grilling (NN-GD560M / NN-GD550W)
The Grill provides 3 Grill settings.
Wire rack
1 Press
Glass tray
GRILL 1
1300 W
2 Presses
GRILL 2
950 W
3 Presses
GRILL 3
700 W
• Press Start Pad.
• Set the cooking time using the Time/Weight
Dial (up to 1 hour and 30 minutes).
• Select Grill Power. Press once for Grill
1 (High), twice for Grill 2 (Medium) or 3
times for Grill 3 (Low).
English
Use of accessory:
NOTE:
1. The Grill will only operate with the oven door closed.
2. You can change the cooking time during cooking, if required. Turn Time/Weight Dial to increase/decrease the cooking time. Time can be
increased/decreased in 1 minute increments, up to 10 minutes. Turning the dial to zero will end cooking.
Combination cooking (NN-GD560M / NN-GD550W)
Use of accessory:
There are 3 combination settings. The following chart shows the approximate
wattage for each power level.
Wire rack
Glass tray
Combination
Setting
Presses
Grill
Microwave
Word
Prompt
1
2
3
1 press
2 presses
3 presses
1300 W
1300 W
1300 W
600 W
440 W
250 W
G1-600 W
G1-440 W
G1-250 W
Glass tray
• Select combination level
(see table).
• Set the cooking time using the Time/Weight
Dial (up to 1 hour and 30 minutes).
• Press Start Pad.
NOTE:
1. The Combination mode will only operate with the oven door closed.
2. You can change the cooking time during cooking, if required. Turn Time/Weight Dial to increase/decrease the cooking time. Time can be
increased/decreased in 1 minute increments, up to 10 minutes. Turning the dial to zero will end cooking.
En-9
Auto Defrost
With this feature you can defrost frozen foods according to the weight. Select the category and set the weight of the food. The weight is programmed
in grams. For quick selection, the weight starts from the most commonly used weight for each category.
• Select the desired Auto Defrost
Program.
1 press for small pieces
2 presses for big pieces
Word Prompt
Program
1 Small pieces
2 Big pieces
• Set the weight of the frozen food by using the Time/Weight Dial.
Turning the dial slowly will count up in 10g steps. Turning the dial quickly
will count up in 100g steps.
Recommended
Weight
• Press Start
Pad.
Suitable Foods
SMALL
PIECES
150 - 1600g (each 100g to 400g). Turn at beeps.
BIG
PIECE
400 - 2400g Big pieces of meat, roast, whole chicken. Turn at beeps.
Small pieces of meat, escallop, sausages, fish fillets, steaks, chops
NOTE:
1. When defrosting time is over 60 minutes the time will appear as Hours and Minutes.
2. The shape and size of the food will determine the maximum weight the oven can accommodate.
3. For further information see defrosting guidelines in cook book.
Auto weight programs
This feature allows you to cook most of your favourite foods by setting the weight only. The oven determines Microwave power level, Grill power
(GD569M /GD559W) and cooking time automatically. Select the category and set the weight of the food. The weight is programmed in grams. For
quick selection, the weight starts from the most commonly used weight for each category.
NN-GD560M/
NN-GD550W
NN- SD450W
e.g.
or
• Select the desired Auto weight program by
turning the Auto Program Selector Dial. The
display will scroll through the Auto Weight Cook
programs.
• Set the weight of the food by using the Time/Weight Dial.
Turning the dial slowly will count up in 10g steps. Turning the dial
quickly will count up in 100g steps.
NOTE:
1. When cooking time is over 60 minutes, the time will appear as Hours and Minutes.
2. Follow the charts overleaf for the recommended weight and accessories to be used.
En-10
• Press Start
Pad.
Auto weight programs
English
NN-GD560M / NN-GD550W
Program
Word
Prompt
Recommended
Weight
1 Reheat Cup
1 CUP
150g
For reheating a cup of hot drink (e.g. tea, coffee, milk and soup).
Select reheat cup, enter weight (150ml), press Start Pad.
2 Reheat Bowl
1 BOWL
300g
For reheating a bowl of hot drink.
Select reheat bowl, enter weight (300ml), press Start Pad.
3 Reheat Fresh Meal
FRESH
MEAL
200 - 1500g
4 Reheat Frozen Meal
5 Cook Fresh Vegetables
FROZEN
MEAL
FRESH
VEGETABLES
6 Cook Frozen Vegetables
FROZEN
VEGETABLES
7 Cook Fresh Fish
FRESH
FISH
8 Cook Frozen Fish
FROZEN
FISH
Accessories
Instructions
For reheating plated meal, or casserole.
All foods should be at room or refrigerated temperatures. Stir at beep.
Allow a few minutes standing time.
200 - 1200g
For reheating frozen plated meal, or casserole.
All food must be pre-cooked and frozen.
Stir at beep. At the completion of cooking, stir the foods and allow 2 to
3 minutes standing time.
250 - 1500g
For cooking fresh vegetables. Place the prepared
vegetables in a suitable sized container. Sprinkle with
6 tbsp (90ml) of water. Cover them lightly with pierced cling film or a
lid. Large quantities will require stirring at beep.
300 - 1000g
For cooking frozen vegetables.
Place them in a suitable sized container, add 2 tbsp (30ml) water.
Cover them lightly with pierced cling film or a lid.
Large quantities will require stirring at beep.
150 - 1000g
For cooking fresh fish (whole, fillets, steaks). Shield the thinner
portions, place it in a suitable sized container. Add 2 tbsp (30ml) liquid.
Cover it with pierced cling film or a lid.
200 - 900g
For cooking frozen fish steaks and fillets. Place it in a suitable sized
container, add 2 tbsp (30ml) water, cover it lightly with pierced cling film
or a lid.
Hints for reheating cup and bowl.
1. Stir the liquid before heating (Heated liquids can erupt if not mixed with air).
2. Do not cover hot drinks such as tea or coffee. Cover soup with a saucer to avoid any risk of eruption.
3. After heating, stir again and allow to stand for a short time.
En-11
Auto weight programs
NN-GD560M / NN-GD550W
Program
9 Frozen Bread
10 Fresh Chicken Pieces
11 Whole Chicken
12 Frozen Gratin/Lasagne
En-12
Word
Prompt
Recommended
Weight
FROZEN
BREAD
50 - 500g
CHICKEN
PIECES
200 - 1200g
WHOLE
1000 - 2200g
CHICKEN
FROZEN
GRATIN
300 - 1000g
Accessories
Instructions
For reheating frozen bread, rolls and croissants.
Remove all packaging and place on Wire Rack on Glass Tray. Turn at
beep.
For cooking chicken pieces eg. chicken legs, thighs or
drumsticks. Place the chicken in a heatproof dish on Wire Rack on
Glass Tray. For even cooking spread out the chicken and turn it at
beep.
For cooking whole fresh unstuffed chicken. Cook the stuffing
separately. Place the chicken in a heatproof dish on Glass Tray. Start
cooking the breast side down and turn it at beep.
For reheating and browning frozen gratin/lasagne.
Remove all packaging and place the gratin/lasagne in a heatproof dish
on Glass Tray.
Auto weight panacrunch programs
English
Panacrunch programs (NN-GD560M / NN-GD550W)
1. Select the desired program and
place the pizza pan in the oven
directly on the glass tray.
2. Press the start Pad to pre-heat
the pizza pan.
Program
Word
Prompt
Recommended
Weight
13 Fresh Pizza
CHILLED
PIZZA
150 - 600g
14 Frozen Pizza
15 Fresh Quiche
16 Frozen Quiche
FROZEN
PIZZA
CHILLED
QUICHE
FROZEN
QUICHE
150 - 600g
4. Press Start Pad.
Instructions
For reheating, crisping the base and browning the top of fresh
purchased pizza.
Remove all packaging and place the pizza in the preheated pizza pan.
For reheating, crisping the base and browning the top of frozen
purchased pizza.
Remove all packaging and place the pizza in the preheated pizza pan.
150 - 700g
For reheating, crisping the pastry base and browning the top of
fresh purchased quiche.
Remove all packaging and place the quiche in the preheated pizza pan.
150 - 500g
For reheating, crisping the pastry base and browning the top of
frozen purchased quiche.
Remove all packaging and place the quiche in the preheated pizza pan.
200 - 500g
For reheating, crisping and browning frozen potato products.
After pre-heating the pan, spread out potato products in the pan. For
best results cook in a single layer and turn at beep.
CHIPS
17 Frozen Potato Products
Accessories
3. After pre-heating beeps sound.
Place the food in the pan, set
weight.
En-13
Pizza pan (NN-GD560M / NN-GD550W)
The ʻconceptʼ
NOTES:
Some foods cooked by microwave can have soft and soggy crusts. Your
pizza pan accessory will brown and crisp pizzas, quiches, pies, breaded
products just as a conventional oven. Your Panasonic pizza pan works in
three ways: heating the pan by absorbing microwaves, heating the food
directly by microwaves and heating the food by the grill. The base of the
pan absorbs the microwaves and transfers them into heat. Then the heat
is conducted through the pan to the food. The heating effect is maximised
by the non-stick surface.
1. Do not pre-heat the pan more than 8 minutes.
Using the pizza pan (Manual operation)
• For best results, pre-heat the pan before using. Place directly on the
glass turntable and pre-heat on Combination 1 (Grill 1 + 600 Watt) for 3
minutes. To assist browning, brush the pan with oil before preheating for
items such as sausages and beefburgers.
• Remove the pan from the oven and place the food in the pan.
Use the pizza pan handle or oven gloves as the pan will be very hot.
For best results, it is important that the food is placed on the pan
immediately after pre-heating. Performance cannot be guaranteed with a
time delay.
• Place the pan on the glass turntable and cook according to the
guidelines shown in the cooking chart in the cookbook.
2. Always place the pan in the centre of the glass tray and ensure it
does not touch the wall of the oven cavity. Failure to do so, may
cause sparking which would damage the cavity.
3. Always use the pan on the glass turntable. Do not use with the wire
rack.
4. Always use the pizza pan handle or oven gloves when handling the
hot pan.
5. Ensure all food packaging is removed before cooking.
6. Do not place any heat-sensitive materials on the hot pan as this
may cause burning.
7. The pan can be used in a conventional oven.
8. For best results, use the pan in COMBINATION GRILL and
MICROWAVE.
Care of the pan
• Never use any sharp utensils on the pan as this will damage the nonstick surface.
• After use, wash the pan in hot soapy water and rinse in hot water. Do
not use any abrasive cleaning substances or scouring pads as this
will damage the surface of the pan.
• The pan is dishwasher safe.
En-14
Auto Weight Programs
English
NN-SD450W
Program
Word
Prompt
Recommended
Weight
1 Reheat Meal
FRESH
MEAL
200 - 1500g
For reheating plated meal, or casserole.
All foods should be at room or refrigerated temperatures. Stir at beep.
Allow a few minutes standing time.
200 - 1200g
For reheating frozen plated meal, or casserole.
All food must be pre-cooked and frozen. Stir at beep. At the
completion of cooking, stir the foods and allow 2 to 3 minutes standing
time.
250 - 1500g
For cooking fresh vegetables. Place the prepared vegetables in a
suitable sized container. Sprinkle with 6 tbsp (90ml) of water. Cover
them lightly with pierced cling film or a lid. Large quantities will require
stirring at beep.
4 Cook Frozen Vegetables
FROZEN
VEGETABLES
300 - 1000g
For cooking frozen vegetables.
Place them in a suitable sized container, add 2 tbsp (30ml) water.
Cover them lightly with pierced cling film or a lid. Stir the vegetables at
beep.
5 Cook Fresh Fish
FRESH
FISH
150 - 1000g
For cooking fresh fish (whole, fillets, steaks). Shield the thinner
portions, place it in a suitable sized container. Add 2 tbsp (30ml) liquid.
Cover it with pierced cling film or a lid.
6 Cook Frozen Fish
FROZEN
FISH
200 - 900g
For cooking frozen fish steaks and fillets.
Place it in a suitable sized container, add 2 tbsp (30ml) water, cover it
lightly with pierced cling film or a lid.
1 CUP
150g
For reheating a cup of hot drink (e.g. tea, coffee, milk and soup).
Select reheat cup, enter weight (150ml), press Start Pad.
1 BOWL
300g
For reheating one bowl of hot drink.
Select reheat bowl, enter weight (300ml), press Start Pad.
2 BOWL
600g
For reheating two bowls of hot drink.
Select reheat 2 bowls, enter weight (600ml), press Start Pad.
2 Reheat Frozen Meal
3 Cook Fresh Vegetables
7 Reheat Cup
8 Reheat 1 Bowl
9 Reheat 2 Bowls
FROZEN
MEAL
FRESH
VEGETABLES
Accessories
Instructions
Hints for reheating cup and bowl.
1. Stir the liquid before heating (Heated liquids can erupt if not mixed with air).
2. Do not cover hot drinks such as tea or coffee.
Cover soup with a saucer to avoid any risk of eruption.
3. After heating, stir again and allow to stand for a short time.
En-15
Delay start cooking
By using Delay/Stand Pad, you are able to program Delay Start cooking.
e.g.
• Press
Delay/Stand
Pad.
• Set the delay time by turning the • Set the desired cooking program and
Time/Weight Dial (up to 9 hours).
cooking time.
• Press Start Pad.
NOTE:
1. Three stage cooking can be programmed including Delay Start cooking.
e.g.
Delay Start: 1 hour
High Power: 10 min.
or
Simmer Power: 20 min.
or
5 times
Once
2. If the programmed delay time exceeds one hour, the time will count down in units of minutes. If less than one hour, the time will count down in units
of seconds.
3. Delay Start cannot be programmed before any Auto Programs.
4. If the Delay/Stand Pad is pressed 4 times, this will turn off the operation guide. To turn the operation guide back on, press the Delay/Stand Pad 4 times.
Stand time
By using Delay/Stand pad, you can program Stand Time after cooking is completed or use to program the oven as a minute timer.
e.g.
or
• Set the desired cooking program and
cooking time.
• Press
Delay/Stand Pad.
NOTE:
• Set desired amount of time by
turning the Time/Weight Dial (up
to 9 hours).
• Press Start Pad.
1. Three stage cooking can be programmed including Stand Time.
e.g.
High Power: 4 min.
or
Stand Time: 5 min.
High Power: 2 min.
or
Once
Once
2. If the oven door is opened during the Stand Time or Minute Timer, the time in the display window will continue to count down.
3. This feature may also be used as a timer. In this case press Delay/Stand Pad, set time and press Start Pad.
En-16
Questions and answers
A: When the oven does not turn on, check the following:
1. Is the oven plugged in securely? Remove the plug from the outlet, wait 10 seconds
and reinsert.
2. Check the circuit breaker and the fuse. Reset the circuit breaker or replace the fuse if it
is tripped or blown.
3. If the circuit breaker or fuse is all right, plug another appliance into the outlet. If the
other appliance works, there probably is a problem with the oven. If the other appliance
does not work, there probably is a problem with the outlet.
If it seems that there is a problem with the oven, contact an authorized Service Centre.
Q: My microwave oven causes interference with my
TV. Is this normal?
A: Some radio and TV interference might occur when you cook with the microwave oven.
This interference is similar to the interference caused by small appliances such as mixers,
vacuums, blow dryers, etc. It does not indicate a problem with your oven.
Q: The oven wonʼt accept my program. Why?
A: The oven is designed not to accept an incorrect program. For example, the oven will not
accept a fourth stage, and will not accept an Auto Weight Program after Delay Start.
Q: Sometimes warm air comes from the oven vents.
Why?
A: The heat given off from the cooking food warms the air in the oven cavity. This warmed air
is carried out of the oven by the air flow pattern in the oven. There are no microwaves in the
air. The oven vents should never be blocked during cooking.
Q: “D” appears in the display and the oven does not
cook. Why?
A: The oven has programmed DEMO MODE. This mode is designed for retail store display.
Deactivate this mode by pressing Microwave Power once and Stop/Cancel Pad 4 times
(NN-GD560M / NN-GD550W) or Max Microwave Power Pad once and Stop/Cancel Pad 4
times (NN-SD450W).
Q: Can I use a conventional oven thermometer in
the oven?
A: Only when you are using GRILL cooking mode (NN-GD560M / NN-GD550W). The metal in
some thermometers may cause arcing in your oven and should not be used on
MICROWAVE and COMBINATION cooking modes.
Q: My oven stops cooking by microwave and “H97”
and “H98” appears in the display window.
A: The display indicates a problem with the microwave generation system. Please
contact an authorised Service Center.
Q: The wordprompt has disappeared on my display,
I can only see numbers ?
A : There may have been a power failure, and the wordprompt is disabled. Unplug the oven for
a few seconds, then plug it again. When "88:88" is displayed, press the start pad until your
language is displayed. Then set the clock. Refer to page En-7.
NN-GD560M / NN-GD550W
Q: There are humming and clicking noises from my
oven when I cook by COMBINATION. What is
causing these noises?
A: The noises occur as the oven automatically switches from MICROWAVE power to GRILL to
create the combination setting. This is normal.
Q: My oven has an odour and generates smoke
when using the COMBINATION and GRILL
function. Why?
A: After repeated use, it is recommended to clean the oven and then run the oven without
food, glass tray, and roller ring on Grill for 5 minutes. This will burn off any food, residue or
oil which may cause an odour and/or smoking.
En-17
English
Q: Why wonʼt my oven turn on?
Care of your oven
1. Turn the oven off before cleaning.
2. Keep the inside of the oven, door seals and door seal areas clean.
When food splatters or spilled liquids adhere to the oven walls, door
seals and door seal areas wipe off with a damp cloth. Mild detergent
may be used if they get very dirty. The use of harsh detergent or
abrasive is not recommended.
DO NOT USE COMMERCIAL OVEN CLEANERS. Do not use harsh,
abrasive cleaners or sharp metal scrapers to clean the oven door
glass since they can scratch the surface, which may result in
shattering the glass.
3. The outside oven surface should be cleaned with a damp cloth. To
prevent damage to the operating parts inside the oven, water should
not be allowed to seep into the ventilation openings.
4. If the Control Panel becomes dirty, clean it with a soft, dry cloth. Do
not use harsh detergents or abrasives on the Control Panel. When
cleaning the Control Panel, leave the oven door open to prevent the
oven from accidentally turning on. After cleaning touch
STOP/CANCEL Pad to clear the display window.
5. If steam accumulates inside or around the outside of the oven door,
wipe with a soft cloth. This may occur when the microwave oven is
operated under high humidity conditions and in no way indicates a
malfunction of the unit.
6. It is occasionally necessary to remove the glass tray for cleaning.
Wash the tray in warm soapy water or in a dishwasher.
En-18
7. The roller ring and oven cavity floor should be cleaned regularly to
avoid excessive noise. Simply wipe the bottom surface of the oven
with mild detergent and hot water then dry with a clean cloth. The
roller ring may be washed in mild soapy water. Cooking vapours
collect during repeated use but in no way affects the bottom surface
or roller ring wheels. After removing the roller ring from the cavity
floor for cleaning, be sure to replace it in the proper position.
8. When using the GRILL or COMBINATION mode, (NN-GD560M /
NN-GD550W) some foods may inevitably splatter grease on to the
oven walls. If the oven is not cleaned occasionally, it may start to
“smoke” during use.
9. A steam cleaner is not to be used for cleaning.
10. This oven should only be serviced by qualified personnel.
For maintenance and repair of the oven contact the nearest
authorized dealer.
11. Keep air vents clear at all times. Check that no dust or other material
is blocking any of the air vents on the top, bottom or rear of the oven.
If air vents become blocked this could cause overheating which
would affect the operation of the oven and possibly result in a
hazardous situation.
12. Failure to maintain the oven in a clean condition could lead to
deterioration of surfaces that could affect the life of the appliance and
possibly result in a hazardous situation.
Technical specifications
Output:
Outside Dimensions:
Oven Cavity Dimensions:
Uncrated Weight:
Noise:
NN-GD560M / NN-GD550W
NN-SD450W
230 V, 50 Hz
Maximum;
Microwave;
Grill;
230 V, 50 HZ
2300 W
1100 W
1350 W
Microwave;
1000 W (IEC-60705)
Grill Heater;
1300 W
510 (W) x 380 (D) x 304 (H) mm
359 (W) x 352 (D) x 217 (H) mm
12.5 kg
50 dB
English
Power Source:
Power Consumption:
Microwave;
1100 W
Microwave;
1000 W (IEC-60705)
510 (W) x 380 (D) x 304 (H) mm
359 (W) x 352 (D) x 217 (H) mm
11.5 Kg
50 dB
Specifications subject to change without notice.
This product is an equipment that fulfills the European standard for EMC disturbances (EMC = Electromagnetic Compatibility) EN 55011. According to
this standard this product is an equipment of group 2, class B and is within required limits. Group 2 means that radio-frequency energy is intentionally
generated in the form of electromagnetic radiation for warming up of foods. Class B means that this product may be used in normal household areas.
Information on Disposal for Users of Waste Electrical & Electronic Equipment (private households)
This symbol on the products and/or accompanying documents means that used electrical and electronic products should not be
mixed with general household waste.
For proper treatment, recovery and recycling, please take these products to designated collection points, where they will be accepted
on a free of charge basis. Alternatively, in some countries you may be able to return your products to your local retailer upon the
purchase of an equivalent new product.
Disposing of this product correctly will help to save valuable resources and prevent any potential negative effects on human health
and the environment which could otherwise arise from inappropriate waste handling. Please contact your local authority for further
details of your nearest designated collection point.
Penalties may be applicable for incorrect disposal of this waste, in accordance with national legislation.
For business users in the European Union
If you wish to discard electrical and electronic equipment, please contact your dealer or supplier for further information.
Information on Disposal in other Countries outside the European Union
This symbol is only valid in the European Union.
If you wish to discard this product, please contact your local authorities or dealer and ask for the correct method of disposal.
Pursuant to the directive 2004/108/EC, article 9(2)
Panasonic Testing Centre
Panasonic Service Europe, a division of Panasonic Marketing Europe GmbH
Winsbergring 15,22525 Hamburg, F.R.Germany
Manufactured by Panasonic Home Appliances Microwave Oven (Shanghai) Co.,Ltd, 898
Longdong Road, Pudong, Shanghai, 201203, China.
En-19
Aufstellen und Anschließen
Überprüfung Ihres Mikrowellengerätes
Erdungsvorschriften
WICHTIG: ZUR SICHERHEIT VON PERSONEN MUSS DIESES GERÄT
GEERDET SEIN!
Ist die Steckdose nicht geerdet, muß der Kunde die Steckdose durch eine
ordnungsgemäße Schutzkontaktsteckdose ersetzen lassen.
Betriebsspannung
Die Netzspannung muß der auf dem Typenschild des Gerätes angegebenen
Spannung entsprechen. Wird eine höhere Spannung als angegeben verwendet, so kann ein Brand entstehen oder sonst ein Unfall die Folge sein.
Aufstellen des Gerätes
Dieses Dampf-Mikrowellengerät ist nur zur Benutzung auf der Tischplatte
oder Arbeitsfläche gedacht. Es ist nicht als Einbaugerät zur Benutzung in
einem Schrank gedacht.
Einbaurahmen
Dieses Mikrowellengerät kann mit dem als Sonderzubehör erhältlichen
Einbaurahmen Weiß NN-TKT59WFP/ Silber NN-TKT59MFP in eine
Einbauküche integriert werden. Erhältlich vom örtlichen PanasonicKundendienst.
1. Stellen Sie das Mikrowellengerät auf eine feste, ebene Stellfläche.
2. Achten Sie beim Aufstellen des Gerätes darauf, daß bei Gefahr jed
erzeit der Stecker gezogen oder die Sicherung am Sicherungskasten
ausgeschaltet werden kann.
3. Das Gerät arbeitet ordnungsgemäß, wenn eine ausreichende
Luftzirkulation stattfinden kann.
Aufstellen auf der Arbeitsfläche:
a.
Sicherheitsrichtlinien empfehlen einen Mindestabstand von 15
cm über dem Gerät, 10 cm zur Rückwand sowie 5 cm zur einen
und freistehend zur anderen Seite.
b.
Sollte das Gerät an einer Seite direkt an der Wand
stehen, müssen die anderen Seiten frei bleiben.
5cm
15cm
10cm
Frei
stehend
Arbeitsfläche
Achtung: Heiße Oberflächen
(NN-GD560M / NN-GD550W)
Warnung
1. Das Gerät ist vom Benutzer auf mögliche Beschädigungen an den
Türdichtungsflächen zu prüfen, und falls ein solcher Schaden aufge
treten ist, darf das Gerät nicht betrieben werden, bevor es vom
Panasonic Kundendienst repariert worden ist.
2. Führen Sie weder eine Manipulation noch eine Reparatur an der Tür,
an den Kontrolleinrichtungen oder
Sicherheitsvorrichtungen sowie an irgendeinem anderen Teil des
Gerätes durch. In keinem Fall das Gehäuse, das den Schutz gegen
Strahlenbelastung durch Mikrowellenenergie sicherstellt, abbauen.
Das Gerät darf nur von einem geschulten Panasonic KundendienstTechniker geprüft oder repariert werden.
3. Das Gerät nicht in Betrieb setzen, wenn das Netzanschlußkabel oder
der Netzstecker beschädigt ist, bzw. wenn es nicht ordnungsgemäß
arbeitet oder eine sichtbare Beschädigung aufweist.
4. Die zum Anschluß dieses Gerätes verwendete Spezial
Anschlußleitung ist nur über einen Panasonic Kundendienst
erhältlich und darf nur durch einen qualifizierten Panasonic
Kundendienst ersetzt werden. Ebenso darf die eingebaute
Garraumlampe nur vom Panasonic Kundendienst ausgetauscht
werden.
5. Kindern darf die Benutzung des Gerätes ohne Aufsicht nur erlaubt
werden, wenn eine ausreichende Anweisung gegeben wurde, die
das Kind in die Lage versetzt, das Gerät in sicherer Weise bedienen
und die Gefahr einer falschen Bedienung verstehen zu können.
6. Keine Flüssigkeiten und Nahrungsmittel in versiegelten Behältern
(z.B. Konserven) erhitzen, da diese platzen können.
7. Dieses Gerät darf nicht von Personen (einschließlich Kinder) mit
eingeschränkten körperlichen, sensorischen oder mentalen
Fähigkeiten benutzt werden. Gleiches gilt für Personen, denen es an
der nötigen Erfahrung und dem nötigen Wissen mangelt, außer sie
werden durch eine für sie verantwortliche Person beaufsichtigt oder
im sicheren Gebrauch des Gerätes unterwiesen. Kinder müssen
beaufsichtigt werden, damit sichergestellt ist, dass sie nicht mit dem
Gerät spielen.
D-1
Deutsch
Das Gerät auspacken, Verpackungsmaterial entfernen und auf
Beschädigungen wie z.B. Stoßstellen, gebrochene Türverriegelungen oder
Risse in der Tür überprüfen. Sofort den Händler benachrichtigen, wenn das
Gerät beschädigt ist. Kein beschädigtes Mikrowellengerät installieren.
4. Das Gerät nicht in unmittelbarer Nähe eines Gas- oder Elektroherdes
aufstellen.
5. Die Stellfüße dürfen nicht entfernt werden.
6. Das Mikrowellengerät nicht bei zu hoher Luftfeuchtigkeit benutzen.
7. Das Netzanschlußkabel darf die Gerätegehäuseoberfläche nicht
berühren, da diese während des Betriebes heiß wird.
Das Kabel auch nicht mit anderen heißen Oberflächen in
Berührung bringen. Das Netzanschlußkabel nicht über Tisch-oder
Thekenkanten hängen lassen. Das Kabel oder den Netzstecker nicht
in Wasser tauchen.
8. Dieses Gerät ist nicht zur Bedienung mit einer externen
Zeitschaltuhr oder separaten Fernbedienung gedacht.
Wichtige Hinweise
Inbetriebnahme des Gerätes
Automatischer Entlüftungsbetrieb
Vor der ersten Benutzung bitte den Garraum mit einem Tuch
auswischen und Ölflecke entfernen sowie das Gerät unbedingt ohne
Zubehör und Lebensmittel für 10 Minuten nur mit dem Grill in Betrieb setzen. Damit ist sichergestellt, daß konservierende
Ölreste im Garraum vollständig verbrennen und das Lebensmittel
geschmacklich nicht beeinträchtigen.
Ist das Mikrowellengerät nach dem Betrieb heiß, setzt automatisch der
Entlüftungsbetrieb für eine Minute ein. Dies ist keine Fehlfunktion, sondern dient zum Abkühlen der elektronischen Bauteile. Sie können
währenddessen die Gerätetür öffnen und das Lebensmittel herausnehmen. Der Entlüftungsbetrieb schaltet sich automatisch ab.
Gebrauch und Ausstattung des Gerätes
Zum Wechseln der Garraumbeleuchtung wenden Sie sich bitte an Ihren
Händler.
1. Dieses Gerät ist nur für den Hausgebrauch konzipiert. Nicht im Freien
benutzen.
2. Das Mikrowellengerät nur zur Nahrungsmittelzubereitung benutzen.
Dieses Gerät ist speziell zum Auftauen, Erwärmen und Garen von
Lebensmitteln entsprechend der Bedienungs- und Kochanleitung
konzipiert. Erhitzen Sie in keinem Fall Chemikalien oder andere
Produkte.
3. Nehmen Sie das Mikrowellengerät nie ohne Lebensmittel in Betrieb.
Dies kann zu Beschädigungen des Gerätes führen. Eine Ausnahme gilt
für die erste Inbetriebnahme und Reinigung (Ausbrennen) des Gerätes.
4. Das Gerät ist mit zwei Heizelementen an der Garraumdecke ausgestat
tet. Während des Grill- oder Kombinationsbetriebes werden die
Gehäuseoberflächen, die Tür und ebenso das benutzte Zubehör und
Geschirr heiß. Bitte seien Sie vorsichtig beim Öffnen bzw. Schließen
der Tür sowie beim Hineinstellen bzw. Herausnehmen von
Lebensmitteln und Geschirr. Bei Benutzung ist somit Vorsicht geboten
und Kinder müssen ferngehalten werden.
5. Prüfen Sie vor der ersten Benutzung Ihres Geschirrs, ob es für den
Gebrauch im Mikrowellengerät geeignet ist.
6. Nicht versuchen, Kleidungsstücke, Zeitungen oder andere Materialien
im Mikrowellengerät zu trocknen. Diese Gegenstände können sich
entzünden.
7. Im Garraum des Mikrowellengerätes dürfen keine Gegenstände aufbe
wahrt werden, die bei unbeabsichtigtem Einschalten des Gerätes eine
Gefahr für die Umgebung darstellen.
8. Kommt es zu einem Brand oder tritt während des Mikrowellenbetriebes
Rauch aus dem Gerät, ist die Gerätetür geschlossen zu halten und das
Gerät abzuschalten sowie der Netzstecker zu ziehen.
9. Bei Verwendung des Geräts im Kombinationsmodus entstehen sehr
hohe Temperaturen. Kinder sind bei der Verwendung des Gerätes
immer zu beaufsichtigen.
Garraumbeleuchtung
Zubehör
Das Mikrowellengerät ist mit unterschiedlichem Zubehör ausgestattet.
Verwenden Sie dieses bitte laut Anweisung.
Glasdrehteller
1. Das Mikrowellengerät nicht ohne den dazugehörigen Glasdrehteller
und Rollenring in Betrieb setzen.
2. Benutzen Sie in keinem Fall einen anderen Glasdrehteller als den
speziell dafür konzipierten Drehteller.
3. Den evtl. heißen Glasdrehteller abkühlen lassen, bevor Sie diesen
reinigen bzw. mit Wasser abspülen.
4. Der Drehteller kann rechts- oder linksherum laufen. Dies stellt keine
Fehlfunktion dar.
5. Berührt das Lebensmittel bzw. Kochgeschirr die Garraumwände, läuft
der Drehteller nicht weiter, sondern stoppt und beginnt, sich in die
entgegengesetzte Richtung zu drehen.
6. Das Lebensmittel nicht direkt auf dem Glasdrehteller auftauen, erwär
men oder garen.
Rollenring
1. Der Rollenring und die Vertiefung im Garraumboden müssen
regelmäßig gereinigt werden, um zu verhindern, daß Geräusche
entstehen und sich Nahrungsmittelreste ansammeln.
2. Den Rollenring immer zusammen mit dem Glasdrehteller benutzen.
Runder Rost (NN-GD560M / NN-GD550W)
1. Der runde Rost wird zum Bräunen von kleineren Portionen benutzt
und unterstützt die gleichmäßige Hitzeverteilung.
2. Beim Kombinationsbetrieb mit Mikrowelle weder Alu- oder
Metallspieße noch irgendein Metallgeschirr direkt auf dem Rost
plazieren.
Bräunungsteller (NN-GD560M / NN-GD550W) Siehe Seite D-14.
D-2
Wichtige Informationen
1. Kochzeiten
Wird die empfohlene Kochzeit überschritten, kann das
Lebensmittel leicht verbrennen und ggf. einen Brand auslösen
und somit den Garraum zerstören.
2. Geringe Lebensmittelmengen
• Sehr kleine Lebensmittelmengen oder Speisen mit geringem
Feuchtigkeitsgehalt können schnell austrocknen und verbrennen,
wenn sie zu lange gegart werden. Kommt es zu einem Brand, die Tür
des Mikrowellengerätes geschlossen halten, das Gerät abschalten und
den Netzstecker aus der Steckdose ziehen.
b) Überhitzen Sie die Flüssigkeit nicht.
c) Rühren Sie die Flüssigkeit einmal um, bevor Sie das Gefäß ins
Gerät stellen sowie nochmals nach der halben Kochzeit.
d) Lassen Sie nach Ablauf der Kochzeit das Gefäß kurze Zeit
im Gerät stehen, bevor Sie es herausnehmen. Rühren Sie
die Flüssigkeit anschließend noch einmal um.
8. Papier und Plastik
• Weder rohe oder gekochte Eier in der Schale noch gepellte hart
gekochte Eier mit Mikrowellen erhitzen oder kochen. Nach Ende des
Mikrowellen-Kochvorgangs kann sich noch weiterhin Druck bilden und
die Eier können explodieren.
• Wenn Behälter aus Papier, Kunststoff oder anderen leicht
entflammbaren Materialien zum Erwärmen
benutzt werden, darf das Mikrowellengerät nicht unbeaufsichtigt
betrieben werden! Diese Behälter können sich entzünden.
• Verwenden Sie keine recycelten Papierprodukte (z.B. Küchenrollen),
die nicht ausschließlich für die Benutzung im Mikrowellengerät
geeignet sind. Im Recycling-Papier können Bestandteile sein, die
Funkenbildung oder einen Brand verursachen.
• Entfernen Sie Metallverschlüsse von Bratfolien, bevor Sie
diese ins Gerät stellen.
4. Lebensmittel mit Schale oder Haut
9. Hilfsmittel und Folien
• Bei Lebensmitteln wie z.B. Kartoffeln und Würstchen empfiehlt es sich,
sie vorher anzustechen, um ein evtl. Platzen zu vermeiden.
• Erhitzen Sie keine geschlossenen Flaschen oder Konserven im
Mikrowellengerät, da diese durch den Druck explodieren können.
• Verwenden Sie während des Mikrowellenbetriebes weder
Geschirr aus Metall noch Geschirr mit Metallrand.
• Falls Sie Aluminiumfolie oder evtl. Fleischspieße aus Metall
im Mikrowellengerät benutzen, halten Sie einen Abstand von
mindestens 2 cm zu den Garraumwänden bzw. zu der Garraumtür
ein, um Funkenbildung zu vermeiden.
3. Eier
5. Speisethermometer
• Falls Sie den Garzustand mit einem Speisethermometer überprüfen
wollen, verwenden Sie bitte keine herkömmlichen Thermometer im
Mikrowellengerät. Diese können Funken verursachen. Benutzen Sie
diese Speisethermometer nur außerhalb des Mikrowellengerätes.
6. Tiere
• Keine Lebewesen im Mikrowellengerät erwärmen oder trocken.
7. Flüssigkeiten
• Beim Erhitzen von Flüssigkeiten im Mikrowellengerät kann durch
kurzfristiges Aufkochen (Siedeverzug) die Flüssigkeit im Gerät oder bei
der Entnahme schlagartig verdampfen und explosionsartig aus dem
Gefäß geschleudert werden. Dies kann zu Verbrennungen führen.
10. Babynahrung
• Benutzen Sie nur Fläschchen oder Glasformen aus hochwertigen
hitzebeständigen Materialien und plazieren Sie diese ohne Deckel in
der Mitte des Drehtellers.
• Nach dem Erhitzen sollte die Babynahrung in Fläschchen oder
Gläsern gut geschüttelt bzw. durchgerührt werden, damit ein
Temperaturausgleich stattfinden kann.
• Gläser mit Babynahrung dürfen auf keinen Fall verschlossen sein.
• Überprüfen Sie die Temperatur vor dem Verzehr, um
Verbrennungen zu vermeiden.
D-3
Deutsch
• Die im Kochbuch angegebenen Kochzeiten sind Richtzeiten.
Die Kochzeit ist abhängig von Beschaffenheit, Ausgangstemperatur
und Menge des Lebensmittels sowie von der Art des verwendeten
Geschirrs.
• Gehen Sie zunächst von den kürzeren Kochzeiten aus, um ein
Übergaren der Speisen zu vermeiden. Hat das Lebensmittel noch nicht
den gewünschten Auftau-, Erwärm- oder Garzustand erreicht, haben
Sie immer noch die Möglichkeit, die Garzeit zu verlängern.
Sie vermeiden einen Siedeverzug, indem Sie beim Erhitzen
von Flüssigkeiten in Gläsern oder Tassen immer ein hitzebeständi
ges Glasstäbchen mit hineinstellen oder größere Gefäße mit einem
Deckel bzw. Teller abdecken. Zusätzlich sollten Sie folgende
Punkte beachten:
a) Vermeiden Sie die Verwendung von geraden Gefäßen mit engem
Ausguß.
Schematische Ansicht
[8b]
[13]
[8a]
[6]
[4]
[12]
[5]
[2]
[1]
[7]
[3]
[9]
[10]
[11]
1.
Tür-Freigabetaste
Drücken Sie diese Taste, um die Tür zu öffnen. Wird während des Garvorganges die Tür geöffnet, ist der Gerätebetrieb unterbrochen, das Programm bleibt aber erhalten. Wird die Tür wieder geschlossen und die Starttaste gedrückt, läuft der
Garvorgang weiter ab. Die Garraumbeleuchtung schaltet sich ein, wenn die Tür geöffnet wird.
Sichtfenster
Türsicherheitsverriegelungen
Garraumbeleuchtung
Bedienfeld
Glasdrehteller
Rollenring
Äußere Entlüftungsschlitze
Äußere Entlüftungsschlitze (NN-GD560M / NN-GD550W)
Runder Grillrost (NN-GD560M / NN-GD550W)
Bräunungstelle (NN-GD560M / NN-GD550W)
Pizza-Pfannengriff / NN-GD550W)
2.
3.
4.
5.
6.
7.
8a.
8b.
9.
10.
11.
12. Stromkabel
13. Warnschild (Heiße Oberfläche) (NN-GD560M / NN-GD550W)
D-4
Bedienfeld
NN-GD560M / NN-GD550W*
(1)
(2)
(3)
(8)
(4)
(5)
(9)
(6)
(7)
(10)
(11)
Akustisches Signal:
Wird auf eine Funktionstaste gedrückt,
ertönt ein Signal. Ist dies nicht der Fall,
hat das Gerät die Eingabe nicht
angenommen bzw. die Eingabe war
inkorrekt. Beim Zwei-/Drei-PhasenBetrieb ertönt beim Wechsel der
Phasen der Signalton 2mal. Nach
Ablauf eines Kochvorganges ist das
Signal 5mal zu hören.
Digitalanzeige/ Anzeigenfeld
Mikrowellenbetrieb
Grillbetrieb
Grillkombinationsbetrieb
Taste für Gewichtsautomatik zum
Auftauen
6. Verzögern/Stehen
7. Uhr
8. Auto-Programmregler
9. Drehregler für die Zeit oder
Gewichtseingabe
10. Stopp-/Löschtaste:
Eine Betätigung der Stopp-/ Löschtaste vor
dem Betrieb löscht alle eingegebenen Daten.
Durch einmaliges Drücken der Stopp-/
Löschtaste während des Kochvorganges wird
der Betrieb unterbrochen, durch zweimaliges
Drücken werden alle Eingaben gelöscht und
in der Digitalanzeige erscheint wieder die
Uhrzeit.
11. Starttaste: Durch Drücken der Starttaste
beginnt das Mikrowellengerät zu arbeiten.
Wird die Tür geöffnet bzw. die Stopp-/
Löschtaste während des Betriebs einmal
betätigt, muß die Starttaste erneut gedrückt
werden, damit das Gerät wieder arbeitet.
Deutsch
1.
2.
3.
4.
5.
*Das Bedienfeld Ihres Mikrowellengerätes kann sich von
dem hier gezeigten unterscheiden (abhängig von der
Farbe); die Funktion der Tasten ist jedoch gleich.
Anmerkungen: Wird ein Betriebsvorgang gewählt und
die Start-Taste nicht gedrückt, wird der Vorgang nach 6
Minuten automatisch vom Gerät rückgängig gemacht.
Das Display kehrt zurück zum Zeitanzeige-Modus.
Dieses Gerät verfügt über eine Energiesparfunktion.
Bitte beachten:
1. Im Bereitschaftsmodus ist die Helligkeit des Displays
reduziert.
2. Das Mikrowellengerät geht beim ersten Einschalten und
sofort nach Abschluss des letzten Betriebsvorgangs in
den Bereitschaftsmodus über.
D-5
Bedienfeld
NN-SD450W*
1.
2.
3.
4.
5.
6.
7.
8.
(1)
(6)
(2)
(7)
(3)
Digitalanzeige/ Anzeigenfeld
Mikrowellenbetrieb
Taste für die Gewichtsautomatik zum Auftauen
Verzögern/Stehen
Uhr
Auto-Programmregler
Drehregler für die Zeit oder Gewichtseingabe
Stop-/Löschtaste:
Eine Betätigung der Stop-/ Löschtaste vor dem
Betrieb löscht alle eingegebenen Daten. Durch
einmaliges Drücken der Stop-/ Löschtaste
während des Kochvorganges wird der Betrieb
unterbrochen, durch zweimaliges Drücken werden
alle Eingaben gelöscht und in der Digitalanzeige
erscheint wieder die Uhrzeit.
9. Starttaste:
Durch Drücken der Starttaste beginnt das
Mikrowellengerät zu arbeiten.
Wird die Tür geöffnet bzw. die Stop-/Löschtaste
während des Betriebs einmal betätigt, muß die
Starttaste erneut gedrückt werden, damit das
Gerät wieder arbeitet.
(4)
(5)
(8)
(9)
Akustisches Signal:
Wird auf eine Funktionstaste
gedrückt, ertönt ein akustisches
Signal. Ist dies nicht der Fall, hat das
Gerät die Eingabe nicht
angenommen bzw. die Eingabe war
inkorrekt. Beim Zwei-/Drei-PhasenBetrieb ertönt beim Wechsel der
Phasen der Signalton 2mal. Nach
Ablauf eines Kochvorganges ist das
akustische Signal 5mal zu hören.
D-6
Anmerkungen: Wird ein Betriebsvorgang gewählt und
die Start-Taste nicht gedrückt, wird der Vorgang nach 6
Minuten automatisch vom Gerät rückgängig gemacht. Das
Display kehrt zurück zum Zeitanzeige-Modus.
Dieses Gerät verfügt über eine Energiesparfunktion.
Bitte beachten:
1. Im Bereitschaftsmodus ist die Helligkeit des Displays
reduziert.
2. Das Mikrowellengerät geht beim ersten Einschalten und
sofort nach Abschluss des letzten Betriebsvorgangs in
den Bereitschaftsmodus über.
Tastatur und Bedienung
Wird der Netzstecker angeschlossen, erscheint “88:88” in der Digitalanzeige.
Digitale Laufschrift
“FRANCAIS”
In Französisch
Starttaste drücken
“ITALIANO”
In Italienisch
Starttaste drücken
“DEUTSCH”
In Deutsch
Starttaste drücken
“NEDERLANDS”
In Holländisch
Starttaste drücken
ESPANOL
In Spanisch
Starttaste drücken
“POLSKI”
Starttaste drücken
“CESKY”
Auf Tschechisch
Starttaste drücken
“ENGLISH”
In Englisch
Starttaste drücken
“DANSK”
In Dänisch
Starttaste drücken
“SUOMI”
In Finnisch
Starttaste drücken
“SVENSKA”
In Schwedisch
Starttaste drücken
“NORSK”
In Norwegisch
Einstellen der Uhr:
• Drücken Sie einmal auf die
Uhr-Taste
Der Doppelpunkt blinkt.
Diese Modelle haben eine einzigartige LaufschriftFunktion, die Sie durch den Betrieb Ihrer
Mikrowelle führt. Nach Anschluss des
Mikrowellengeräts an die Steckdose drücken Sie
die Start-Taste, bis Sie Ihre Sprache gefunden
haben. Während Sie die Tasten drücken, läuft das
Display zur nächsten Anweisung und eliminiert
damit die Möglichkeit, Fehler zu machen. Wenn
Sie aus irgendeinem Grund die Sprache ändern
möchten, ziehen Sie den Stecker aus der
Steckdose und wiederholen Sie dieses Verfahren.
Bei viermaligem Drücken der
Vorwahlzeit/Standzeit-Taste wird die LaufschriftFunktion ausgeschaltet. Zum erneuten Einschalten
drücken Sie viermal die Vorwahlzeit/StandzeitTaste.
In Polnisch
NUR FÜR MODELL SD450W
Beispiel: Wenn Sie 12:00 Uhr einstellen wollen, verfahren Sie wie folgt:
• Stellen Sie durch Drehen des Drehreglers
für die Zeit-/Gewichtseingabe die korrekte
Uhrzeit/Tageszeit ein.
Die Uhrzeit erscheint im Anzeigenfeld und der
Doppelpunkt blinkt.
• Drücken Sie auf die Uhr-Taste
Der Doppelpunkt hört auf
zu blinken und die Uhrzeit
ist eingestellt.
Anmerkungen:
1. Um die Uhrzeit zu verändern, wiederholen Sie die oben beschriebenen Schritte.
2. Die eingestellte Uhrzeit bleibt solange erhalten, bis die Stromzufuhr unterbrochen wird.
3. Diese Anzeige ist eine 24-Stunden Uhr.
D-7
Deutsch
Starttaste drücken
Digitale Laufschrift
Tastatur und Bedienung
Kindersicherung:
Die Kindersicherung kann aktiviert werden, wenn ein Doppelpunkt bzw. die Uhrzeit im Anzeigenfeld steht. Nach Aktivierung der Kindersicherung kann
keine Eingabe über das Bedienfeld erfolgen. Die Funktionen des Gerätes sind blockiert, die Tür kann wie gewohnt geöffnet werden.
Eingabe:
Löschen:
• Drücken Sie 3mal die Starttaste.
• Die Uhrzeit erscheint nicht mehr im Anzeigenfeld, ist
aber nicht gelöscht. Im Anzeigenfeld erscheint und
die Kindersicherung ist aktiviert.
• Drücken Sie 3mal die Stopp-/Löschtaste.
• Die Uhrzeit erscheint wieder im Anzeigenfeld, die
Kindersicherung ist gelöscht.
HINWEIS: Zum Aktivieren der Kindersicherung muss die Start-Taste dreimal innerhalb von 10 Sekunden gedrückt werden.
Mikrowellenbetrieb
Es stehen 5 verschiedene Mikrowellen-Leistungsstufen zur Verfügung. Die Wattleistungen der einzelnen Leistungsstufen entnehmen
Sie bitte der nachfolgenden Tabelle.
NN-GD560M / NN-GD550W
Zubehör:
NN-SD450W
Glasdrehteller
Drücken Sie
Power Level
Wattage
Einmal
Zweimal
3-mal
4-mal
5-mal
Max (Hoch)
Auftauen
Mittel
Niedrig
1000 W
270 W
600W
440 W
250 W
auf kleiner Flamme kochen
NN-GD560M / NN-GD550W
oder
• Stellen Sie den
Drehregler zur Wahl der
Betriebsarten auf die gewünschte
Mikrowellenleistungsstufe.
• Stellen Sie mit dem Drehregler für die Zeit-/ Gewichtseingabe die
gewünschte Zeit ein (Maximale Leistung: maximal 30 Minuten, alle
anderen Leistungsstufen: maximal 90 Minuten).
Der nächste durchzuführende Eingabeschritt “START” sowie die
eingegebene Leistung und Zeit erscheinen abwechselnd im
Anzeigenfeld. Ebenso wird das Mikrowellensymbol angezeigt.
• Drücken Sie die
Starttaste.
Anmerkungen:
1. Wiederholen Sie die Einstellung der Mikrowellen-Leistungsstufe und Kochzeit für 2- und 3-Stufen-Kochvorgänge, bevor Sie das
Start-Pad drücken.
z. B. Schmortopf - 10 Minuten auf „Hoch“ stellen, um den Schmortopf zum Kochen zu bringen. Dann 60 Minuten langsam kochen.
10 Minuten köcheln lassen, damit sich der Geschmack entwickeln kann.
2. Die Standzeit kann nach Einstellung der Mikrowellenleistung und der Zeit programmiert werden.
3. Sie können die Kochzeit während des Gerätebetriebs verändern. Betätigen Sie den Drehregler für die Zeiteingabe und verlängern bzw. verkürzen
Sie die Zeit. Die Verlängerung bzw. Verkürzung erfolgt in 1-Minuten-Schritten bis zu 10 Minuten. Wird der Drehregler für die Zeiteingabe auf Null
gestellt, ist der Kochvorgang beendet.
4. Das Mikrowellengerät läuft automatisch auf Leistungsstufe Hoch, wenn die Kochzeit eingegeben wird, ohne dass vorher eine Leistungsstufe gewählt wurde.
D-8
Grillbetrieb (NN-GD560M / NN-GD550W)
Zubehör:
Rost
• Wählen Sie die
Grilleinstellung.
Drücken Sie einmal für
Grill 1 (Hoch), zweimal
für Grill 2 (Mittel) oder
3-mal für Grill 3 (Niedrig).
Deutsch
Glasdrehteller
Der Grill verfügt über 3
Grilleinstellungen.
1-mal drücken - GRILL 1 1300 W
2-mal drücken - GRILL 2 950 W
3-mal drücken - GRILL 3 700 W
• Betätigen Sie die
Starttaste.
• Stellen Sie mit dem Drehregler für die Zeit/Gewichtseingabe die gewünschte Zeit ein
(maximal 90 Minuten).
Anmerkungen:
1. Der Grillbetrieb startet nur, wenn die Gerätetür geschlossen ist.
2. Sie können die Kochzeit während des Gerätebetriebs verändern. Betätigen Sie den Drehregler für die Zeiteingabe und verlängern bzw.
verkürzen Sie die Zeit. Die Verlängerung bzw. Verkürzung erfolgt in 1-Minuten-Schritten bis zu 10 Minuten. Wird der Drehschalter für die
Zeiteingabe auf Null gestellt, ist der Kochvorgang beendet.
Grillkombinationsbetrieb (NN-GD560M / NN-GD550W)
Es stehen Ihnen 3 feste Grillkombinationsprogramme mit folgenden
Leistungsstufen zur Verfügung:
Zubehör:
Rost
Glasdrehteller
Kombination
sprogramm
Drücken
Grilleistung
1
2
3
1-mal drücken
2-mal drücken
3-mal drücken
1300W
1300W
1300W
Mikrowellenl Digitale
Laufschrift
eistung
600W
440W
250W
G1-600W
G1-440W
G1-250W
Glasdrehteller
• Wählen Sie die
Kombinationsstufe
(siehe Tabelle).
• Stellen Sie mit dem Drehregler für die Zeit-/Gewichtseingabe
die gewünschte Zeit ein (maximal 90 Minuten).
• Betätigen Sie die
Starttaste.
Anmerkungen:
1. Der Grillkombinationsbetrieb startet nur, wenn die Gerätetür geschlossen ist.
2. Sie können die Kochzeit während des Gerätebetriebs verändern. Betätigen Sie den Drehregler für die Zeiteingabe und
verlängern bzw. verkürzen Sie die Zeit. Die Verlängerung bzw. Verkürzung erfolgt in 1-Minuten-Schritten bis zu 10 Minuten. Wird der Drehregler
für die Zeiteingabe auf Null gestellt, ist der Kochvorgang beendet.
D-9
Gewichtsautomatik zum Auftauen
Mit dieser Ausstattung können Sie Lebensmittel nach Gewicht auftauen. Wählen Sie das gewünschte Programm und geben Sie das Gewicht des
Lebensmittels auf 10g genau ein. Bei jedem Programm wird nach Betätigen der Gewichtsautomatiktaste zum Auftauen zuerst ein Gewicht angezeigt,
das aufgrund haushalts- oder handelsüblicher Lebensmittelmengen festgelegt wurde (Erstgewicht).
• Wählen Sie das gewünschte
Programm durch ein- oder
zweimaliges Drücken der
Gewichtsautomatiktaste zum
Auftauen.
Programm
Digitale Laufschrift
1 Kleine Teile
1mal drücken
KLEINE
TEILE
2 Große Stücke
2mal drücken
GROSSE
TEILE
• Geben Sie mit dem Drehregler für die Zeit- und Gewichtseingabe
das Gewicht des Lebensmittels ein. Langsames Drehen des
Reglers wird in Schritten von 10g gerechnet. Schnelles Drehen des
Reglers wird in Schritten von 100g gerechnet.
Mindest-/Höchstgewicht
150 - 1600g
400 - 2400g
• Betätigen Sie die
Starttaste.
Lebensmittel
Flache, kleine Fleischstücke, z.B. Steaks, Schnitzel, Gulasch, Würstchen,
Hähnchenschenkel, Fischfilet (jedes Stück 100g bis 400g). Wenden Sie die Lebensmittel
während des Auftauens, wenn das Signal ertönt.
Große Fleischstücke, z.B. Braten, ganze Hähnchen. Wenden Sie die Lebensmittel während
des Auftauens, wenn das Signal ertönt.
Anmerkungen:
1. Ist die Auftauzeit länger als 60 Minuten, wird die Zeit im Anzeigenfeld in Stunden und Minuten angezeigt.
2. Die maximale Gewichtsbegrenzung wird durch die Größe und Form des Lebensmittels bedingt.
3. Zubereitungshinweise für Lebensmittel, die nicht für diese Gewichtsautomatik geeignet sind, entnehmen Sie bitte den Angaben im Kochbuch.
Gewichtsautomatik zum Erwärmen, Garen oder Kombinationsgaren
Diese Ausstattung ermöglicht Ihnen die Zubereitung vieler Lebensmittel. Für jedes Programm wurden unterschiedliche Mikrowellenleistungen und/oder
Grilleistungen (NN-GD560M/NN-GD550W) sowie Zeiten in Abhängigkeit vom Lebensmittelgewicht ermittelt. Wählen Sie das gewünschte Programm
und geben Sie das Gewicht des Lebensmittels auf 10g genau ein. Bei jedem Programm wird nach Betätigen der entsprechenden
Gewichtsautomatiktaste zuerst ein Gewicht angezeigt, das aufgrund haushalts- oder handelsüblicher Lebensmittelmengen festgelegt wurde.
Beispiel:
NN-GD560M/
NN-GD550W NN-SD450W
• Wählen Sie das gewünschte
Autogewichtprogramm, indem Sie die AutoProgrammregler drehen. Das Display blättert
dabei durch die AutogewichtKochprogramme.
• Geben Sie mit dem Drehregler für die Gewichtseingabe
das Gewicht des Lebensmittels ein. Langsames Drehen des
Reglers wird in Schritten von 10g gerechnet. Schnelles Drehen des
Reglers wird in Schritten von 100g gerechnet.
• Betätigen Sie
die Starttaste.
Anmerkungen:
1. Ist die Erwärm- oder Garzeit länger als 60 Minuten, wird die Zeit im Anzeigenfeld in Stunden und Minuten angezeigt.
2. Auf den Seiten D-11 bis D-17 finden Sie die zur Verfügung stehenden Gewichtsautomatikprogramme. Halten Sie sich unbedingt an die angegebe
nen Gewichtsbegrenzungen und Zubehörangaben.
D-10
Gewichtsautomatikprogramme
NN-GD560M / NN-GD550W
1 Tasse
2 Suppentasse
3 Eintöpfe und
Tellergerichte
4 Tiefgefrorene
Eintöpfe und
Tellergerichte
5 Gemüse, Frisch
6 TK-Gemüse
7 Fisch, Frisch
Digitale
Laufschrift
1 TASSE
1 SCHUESSEL
Mindest-/
Höchstgewicht
150g
300g
Zum Erhitzen von Getränken und Suppen. Geben Sie das
Lebensmittel in eine mikrowellengeeignete Suppentasse oder schüssel und decken Sie diese mit einer Untertasse oder einem
Deckel ab, um einen Siedeverzug zu vermeiden. Rühren Sie die
Flüssigkeit vor und nach dem Erwärmen um. Beachten Sie eine
Standzeit von 1-2 Minuten.
200 - 1200g
FRISCHES 250 - 1500g
GEMUESE
TK
GEMUESE 300 - 1000g
FRISCHER 150 - 1000g
FISCH
TK FISCH
8 TK-Fisch
Hinweise/Tips
Zum Erhitzen von Getränken (z.B. Kaffee, Tee, Milch oder
Suppe) in einer Tasse. Geben Sie die Flüssigkeit in eine mikrowellengeeignete Tasse und stellen Sie ein hitzebeständiges
Glasstäbchen hinein, um einen Siedeverzug zu vermeiden. Rühren
Sie die Flüssigkeit vor und nach dem Erwärmen um. Beachten Sie
eine Standzeit von ca. 1 Minute.
FRISCHE
MAHLZEIT 200 - 1500g
TK
GERICHT
Zubehör
200 - 900g
Zum Erhitzen von Tellergerichten und Eintöpfen mit Zimmeroder Kühlschranktemperatur. Decken Sie die Lebensmittel zum
Erwärmen grundsätzlich ab. Rühren Sie die Speisen während der
Erwärmzeit (Signalton) und vor der Stehzeit um. Beachten Sie eine
Standzeit von 2-3 Minuten.
Zum Erhitzen von vorgegarten tiefgekühlten Tellergerichten und
Eintöpfen. Decken Sie die Lebensmittel zum Erwärmen grundsätzlich ab. Rühren Sie die Speisen während der Erwärmzeit (100 ml)
und vor der Stehzeit um. Beachten Sie eine Standzeit von 2 - 3
Minuten.
Zum Garen von frischem Gemüse. Geben Sie das vorbereitete
Gemüse mit 90 ml Wasser in eine mikro-wellengeeignete Form mit
Deckel. Größere Gewichte sollten während der Garzeit einmal
umgerührt werden (Signalton beachten). Beachten Sie eine
Standzeit von 5 Minuten.
Zum Garen von tiefgekühltem Gemüse. Geben Sie das Gemüse
mit 40 ml Wasser in eine mikrowellengeeignete Form mit Deckel.
Das Gemüse während der Garzeit einmal umrühren (Signalton
beachten). Beachten Sie eine Standzeit von 5 Minuten.
Zum Garen von frischen Fischfilets oder -koteletts. Dünnere
Bereiche abdecken, Fische in eine geeignete Form legen. Fügen
Sie 1-2 Eßlöffel Flüssigkeit zu. Mit einem Deckel oder eingestochener Folie abdecken.
Zum Garen von tiefgekühlten Fischfilets oder -koteletts. Geben
Sie den Fisch mit 30 ml Flüssigkeit (Wasser, Zitrone, Wein) in eine
mikrowellengeeignete Form mit Deckel. Beachten Sie eine Standzeit
von 5-10 Minuten.
D-11
Deutsch
Programm
Gewichtsautomatikprogramme
NN-GD560M / NN-GD550W
Programm
Digitale
Laufschrift
Mindest-/
Höchstgewicht
BROT
50 - 500g
9 TK-Brot
10 Hähnchenstücke
11 Hähnchen
12 TK-Gratin / TK-Lasagne
D-12
HUEHNER200 - 1200g
TEILE
HUHN
GANZ
GEFRORE
NES
GRATIN
Zubehör
Hinweise/Tips
Zum Erhitzen von tiefgefrorenen Broten, Brötchen und
Croissants. Nehmen Sie das Lebensmittel aus der Verpackung
und legen Sie dieses auf das Rost. Wenden Sie das Lebensmittel
beim Ertönen des Signals.
Zum Garen und Bräunen von frischen Hähnchenteilen wie z.B.
Hähnchenschenkel oder -flügel. Legen Sie die Hähnchenteile mit
der Hautseite nach unten in eine mikrowellengeeignete,
hitzebeständige Form und stellen Sie diese auf den Rost. Wenden
Sie das Geflügel während der Garzeit beim Ertönen des Signals.
1000 - 2200g
Zum Garen und Bräunen von ganzen frischen Hähnchen ohne
Füllung. Kochen Sie die Füllung separat. Legen Sie das Hähnchen
mit der Brustseite nach unten in eine mikrowellengeeignete,
hitzebeständige Form auf den Glasdrehteller. Wenden Sie das
Geflügel während der Garzeit beim Ertönen des Signals.
300 - 1000g
Zum Erhitzen und Bräunen von tiefgekühlten Gratins und
Lasagne, industriell vorgefertigt.
Nehmen Sie den Auflauf aus der Verpackung und geben Sie ihn in
eine portionsgerechte mikrowellengeeignete und hitzebeständige
Form, die auf den Glasdrehteller gestellt wird.
Gewichtsautomatikprogramme
Panacrunch-Programme (NN-GD560M / NN-GD550W)
Deutsch
1. Wählen Sie das gewünschte
Programm und stellen Sie den
Bräunungsteller direkt auf den
Glasdrehteller.
Programm
13 Frisch-Pizza
14 TK-Pizza
15 Frisch-Quiche
2. Drücken Sie die Starttaste, um
den Bräunungsteller
vorzuheizen.
Digitale
Laufschrift
Mindest-/
Höchstgewicht
4. Drücken Sie die Starttaste.
Hinweise/Tips
GEKUEHL150 - 600g
TE PIZZA
Zum Erhitzen und Bräunen von frischer Pizza,
industriell vorgefertigt. Entfernen Sie die Verpackung und legen Sie
die Pizza in den vorgeheizten Bräunungsteller.
GEFRORENE PIZZA
Zum Erhitzen und Bräunen von tiefgekühlter Pizza,
industriell vorgefertigt. Entfernen Sie die Verpackung und legen Sie
die Pizza in den vorgeheizten Bräunungsteller.
150 - 600g
GEKUEHLTE
150 - 700g
QUICHE
Zum Erhitzen und Bräunen von frischer Quiche,
industriell vorgefertigt.
Entfernen Sie die Verpackung und legen Sie die Quiche in den
vorgeheizten Bräunungsteller.
TK QUICHE
150 - 500g
Zum Erhitzen und Bräunen von tiefgekühlter Quiche, industriell vorgefertigt.
Entfernen Sie die Verpackung und legen Sie die Quiche in den
vorgeheizten Bräunungsteller.
200 - 500g
Zum Erhitzen und Bräunen von tiefgekühlten
Kartoffelprodukten, industriell vorgefertigt. Entfernen Sie die
Verpackung und verteilen Sie die Kartoffelprodukte gleichmäßig auf
dem vorgeheizten Bräunungsteller. Wenden Sie die Lebensmittel
während der Garzeit beim Ertönen des Signals.
16 TK-Quiche
POMMES
17 TK-Pommes
Zubehör
3. Ist das Vorheizen beendet, ertönt
ein Signal. Legen Sie
anschließend das Lebensmittel
in den Bräunungsteller und
geben Sie das Gewicht ein.
D-13
Bräunungsteller (nur für NN-GD560M / NN-GD550W)
Das Konzept
Wichtige Hinweise
Werden bestimmte Lebensmittel wie z.B. Pizza oder Quiche im
Mikrowellengerät zubereitet, ist das Ergebnis oft nicht mit dem Backofen
zu vergleichen: Der Teig ist meistens weicher und der Boden nicht so
knusprig.
Mit dem Panasonic Bräunungsteller als Zubehör ist das kein Problem
mehr. Pizza, Quiches oder auch andere Produkte können knusprig
gebräunt werden. Das Prinzip ist folgendermaßen: Der Boden des
Bräunungstellers absorbiert Mikrowellen und wandelt diese in Hitze um.
Diese Hitze wird von unten an das Lebensmittel abgegeben. Eine
Bräunung der Lebensmittel-Oberfläche wird durch den Grill erreicht.
Außerdem unterstützt die Anti-Haft-Beschichtung des Bräunungstellers
den Hitze-Effekt.
1. Heizen Sie den Bräunungsteller maximal 8 Minuten vor.
2. Plazieren Sie den Bräunungsteller in der Mitte des Glasdrehtellers.
Versichern Sie sich, daß der Bräunungsteller die Garraumwände
nicht berührt. Fehlerhaftes Plazieren könnte Funkenbildung und
damit eine Beschädigung des Garraums verursachen.
3. Setzen Sie den Bräunungsteller immer direkt auf den
Glasdrehteller. Benutzen Sie in keinem Fall zusätzlich das Rost.
4. Wenn Sie mit dem heißen Bräunungsteller arbeiten, benutzen Sie
bitte immer den dazugehörigen Griff oder Topfhandschuhe, um
Verbrennungen zu vermeiden.
5. Entfernen Sie sämtliches Verpackungsmaterial des Lebensmittels,
bevor Sie dieses zubereiten.
6. Plazieren Sie niemals hitzeempfindliches Material auf dem
heißen Bräunungsteller. Diese könnten sich entzünden.
7. Der Bräunungsteller kann auch im Backofen benutzt werden.
8. Benutzen Sie den Bräunungsteller in Kombination mit Mikrowelle
und Grill, um beste Ergebnisse zu erzielen.
Anwendung des Bräunungstellers
• Um die besten Ergebnisse zu erzielen, ist es notwendig, dieses
Zubehör vorzuheizen: Setzen Sie den Bräunungsteller direkt
auf den Glasdrehteller und heizen ihn 3 Minuten mit der
Grillkombination 1(Grill 1 + 600W) vor. Sollen Lebensmittel wie
z.B. Würstchen oder Frikadellen zubereitet werden, dann fetten
Sie den Bräunungsteller vor dem Vorheizen ein, um die
Bräunung zu optimieren.
• Nehmen Sie nach dem Vorheizen den Bräunungsteller mit dem
dazugehörigen Griff oder Topfhandschuhen aus dem Gerät.
Legen Sie das Lebensmittel unverzüglich auf den
Bräunungsteller und stellen Sie den Teller sofort wieder in das
Mikrowellengerät. Jede Zeitverzögerung kann das Garergebnis
beeinflussen.
• Geben Sie die laut Tabelle vorgegebene Leistung und Zeit ein.
D-14
Pflege des Bräunungstellers
• Benutzen Sie auf dem Bräunungsteller keine scharfkantigen
Gegenstände bzw. Messer, da sonst die Beschichtung beschädigt
wird.
• Reinigen Sie den benutzten Bräunungsteller in heißem Seifenwasser
und spülen Sie mit klarem, heißen Wasser nach. Verwenden Sie
weder Scheuermittel noch Kratz-schwämme, da die Oberfläche sonst
beschädigt werden könnte.
• Der Bräunungsteller ist für die Geschirrspülmaschine geeignet.
Gewichtsautomatikprogramme - NN-SD450W
Programm
FRISCHE
MAHLZEIT
Mindest-/ Höchstgewicht
200 - 1500g
2 Tiefgefrorene Eintöpfe
und Tellergerichte
TK
GERICHT
200 - 1200g
3 Gemüse,
Frisch
FRISCHES
GEMUESE
250 - 1500g
TK GEMUESE
300 - 1000g
4 TK-Gemüse
5 Fisch, Frisch
FRISCHER
FISCH
150 - 1000g
TK FISCH
200 - 900g
6 TK-Fisch
7 Tasse
1 TASSE
150g
8 Suppentasse
1SCHUESSEL
300g
9 2 Suppentassen
2SCHUESSEL
600g
Zubehör
Hinweise/Tips
Zum Erhitzen von vorgegarten Tellergerichten und Eintöpfen
mit Zimmer- oder Kühlschranktemperatur.
Geben Sie das Lebensmittel auf einen mikrowellengeeigneten Teller
bzw. in eine mikrowellengeeignete Schüssel. Decken Sie die
Lebensmittel mit einer Abdeckhaube bzw. einem Deckel ab. Rühren
Sie die Speisen nach der Hälfte der Erwärmzeit und vor der
Stehzeit um. Beachten Sie eine Standzeit von 2-3 Minuten.
Zum Erhitzen von vorgegarten, tiefgekühlten Tellergerichten
und Eintöpfen. Geben Sie das Lebensmittel auf einen mikrowellengeeigneten Teller bzw. in eine mikro-wellengeeignete Schüssel.
Decken Sie die Lebensmittel mit einer Abdeckhaube bzw. einem
Deckel ab. Rühren Sie die Speisen nach der Hälfte der Erwärmzeit
und vor der Stehzeit um. Beachten Sie eine Standzeit von 2 - 3
Minuten.
Zum Garen von frischem Gemüse (z.B. Blumenkohl, Brokkoli,
Möhren, Zucchini oder kleine Salzkartoffeln).
Geben Sie das vorbereitete Gemüse mit 90 ml Wasser in eine
passende, mikrowellengeeignete Form mit Deckel. Rühren Sie
größere Gewichte nach der Hälfte der Garzeit einmal um. Beachten
Sie eine Standzeit von 5 Minuten.
Zum Garen von tiefgekühltem Gemüse (z.B. Bohnen, Erbsen
oder Möhren). Geben Sie das Gemüse mit 30 ml Wasser in eine
passende, mikrowellengeeignete Form mit Deckel. Rühren Sie
größere Gewichte nach der Hälfte der Garzeit einmal um. Beachten
Sie eine Standzeit von 5 Minuten.
Zum Garen von frischem Fisch (z.B. ganze Fische, Fischfilets
oder -koteletts). Dünnere Bereiche abdecken, Fisch in eine geeignete
Form legen. Fügen Sie 2 Eßlöfel (30ml) Flüssigkeit zu. Mit einem
Deckel oder eingestochener Folie abdecken. Beachten Sie eine
Standzeit von 5-10 Minuten.
Zum Garen von tiefgefrorenem Fisch (z.B. ganze Fische,
Fischfilets oder -koteletts). Geben Sie den Fisch mit 30 ml
Flüssigkeit (Wasser, Zitrone, Wein) in eine mikrowellengeeignete
Form mit Deckel. Beachten Sie eine Standzeit von 5-10 Minuten.
Zum Erhitzen von Getränken (z.B. Kaffee, Tee, Milch oder Suppe)
in einer Tasse. Geben Sie die Flüssigkeit in eine mikrowellengeeignete Tasse und stellen Sie ein hitzebeständiges
Glasstäbchen hinein, um einen Siedeverzug zu vermeiden. Rühren
Sie die Flüssigkeit vor und nach dem Erwärmen um. Beachten Sie
eine Standzeit von ca. 1 Minute.
Zum Erhitzen von Getränken und Suppen. Geben Sie das
Lebensmittel in eine mikrowellengeeignete Suppentasse oder -schüssel und
decken Sie diese mit einer Untertasse oder einem Deckel ab, um einen
Siedeverzug zu vermeiden. Rühren Sie die Flüssigkeit vor und nach dem
Erwärmen um. Beachten Sie eine Standzeit von 1-2 Minuten.
D-15
Deutsch
1 Eintöpfe und
Tellergerichte
Digitale
Laufschrift
Gebrauch des Gerätes mit Zeitvorwahl
Indem Sie die Verzögern/Stehen-Taste benutzen, können Sie den verzögerten Beginn des Kochvorgangs programmieren.
Beispiel:
• Drücken Sie die
Verzögern/Stehen
Taste
• Stellen Sie die Verzögerungszeit ein,
indem Sie den Zeit/Gewicht Drehregler
drehen (bis zu 9 Stunden).
• Stellen Sie das gewünschte
Kochprogramm und die Kochzeit ein.
• Drücken Sie die
Start Taste
HINWEIS:
1. Es können drei Kochstufen programmiert werden, einschließlich verzögertem Kochbeginn.
Zum Beispiel:
Start verzögern: 1 Stunde
Hohe Kochleistung: 10 Min.
oder
Kochen auf kleiner Flamme: 20 Min.
oder
5-mal
Einmal
2. Beträgt die programmierte Verzögerungszeit mehr als ein Stunde, erfolgt der Countdown in Minuteneinheiten. Beträgt die programmierte
Verzögerungszeit weniger als eine Stunde, erfolgt der Countdown in Sekundeneinheiten.
3. Startverzögerung kann nicht vor den automatischen Programmen programmiert werden.
4. Bei viermaligem Drücken der Vorwahlzeit/Standzeit-Taste wird die Laufschrift-Funktion ausgeschaltet. Zum erneuten Einschalten drücken Sie
viermal die Vorwahlzeit/Standzeit-Taste.
Standzeit
Die Verzögern/Stehen Taste können Sie dazu benutzen, die Standzeit nach Ablauf des Kochvorgangs zu programmieren oder um das Gerät als
Minuten-Schaltuhr zu programmieren.
Beispiel:
oder
• Stellen Sie das gewünschte
Kochprogramm und die Kochzeit ein.
• Drücken Sie auf das
Verzögern/Stehen-Pad.
• Stellen Sie die gewünschte
• Drücken Sie die Start
Zeitspanne ein, indem Sie die
Taste.
Zeit/Gewicht-Drehregler drehen (bis
zu 9 Stunden).
HINWEIS:
1. Es können drei Kochstufen programmiert werden, einschließlich Standzeit.
Hohe Kochleistung: 4 Min.
Standzeit: 5 Min.
Hohe Kochleistung: 2 min.
oder
oder
Einmal
Einmal
2. Wird die Tür des Geräts während der Standzeit oder der Minutenschaltuhr geöffnet, wird der Countdown im Display-Fenster fortgesetzt.
3. Diese Funktion kann auch als Zeit-Schaltuhr benutzt werden. In diesem Fall drücken Sie die Verzögern/Stehen-Taste, stellen die Zeit ein und drücken die Start-Taste.
D-16
Fragen und Antworten
A: Läßt sich das Mikrowellengerät nicht einschalten, überprüfen Sie bitte
folgendes:
1. Steckt der Netzstecker fest in der Steckdose? Ziehen Sie den Stecker aus der
Steckdose und warten Sie 10 Sekunden, bevor Sie diesen wieder hineinstecken.
2. Überprüfen Sie die Netzsicherung und ersetzen Sie diese gegebenenfalls.
3. Ist die Netzsicherung in Ordnung? Stecken Sie den Netzstecker eines anderen
Elektrogerätes in die gleiche Steckdose. Arbeitet dieses Elektrogerät auch nicht, ist die
Steckdose defekt. Arbeitet das Gerät jedoch ordnungsgemäß, ist Ihr Mikrowellengerät
defekt. Wenden Sie sich in diesem Fall bitte unbedingt an einen Panasonic
Kundendienst.
F: Das Mikrowellengerät verursacht
Fernsehstörungen. Ist das normal?
A: Beim Betrieb des Mikrowellengerätes können Fernseh- und Radiostörungen
auftreten. Es handelt sich um ähnliche Störungen, wie sie durch kleine Elektrogeräte wie
Mixer, Staubsauger, Haartrockner usw. verursacht werden können. Dies bedeutet nicht, daß
Ihr Mikrowellengerät defekt ist.
F: Warum nimmt das Mikrowellengerät das
gewünschte Programm nicht an?
A: Der Herd ist so ausgelegt, dass er kein falsches Programm akzeptiert. Zum Beispiel akzeptiert
der Herd keine vierte Stufe oder ein Autogewicht-Programm nach einem verzögerten Start.
F: Warum strömt manchmal warme Luft aus dem
Mikrowellengerät?
A: Die erhitzten Lebensmittel erwärmen den Garraum. Diese warme Luft wird durch die
zirkulierende Luftströmung aus dem Gerät nach außen befördert. In dieser erwärmten Luft sind
keine Mikrowellen enthalten. Die Lüftungsöffnungen dürfen während des Kochens in keinem
Fall abgedeckt werden.
F: “D” erscheint im Anzeigenfeld, was bedeutet
das?
A: Das Gerät ist für den Fachhandel mit einem Demonstrationsprogramm ausgestattet. Betätigen
Sie 4mal die Taste für die Uhrzeit, um diese Funktion zu löschen. Das Gerät ist wieder betriebsbereit.
F: Kann im Mikrowellengerät ein
herkömmliches Fleischthermometer
verwendet werden?
A: Nur für den reinen Grillbetrieb können Sie ein Fleischthermometer verwenden (NN-GD560M /
NN-GD550W). Benutzen Sie für den Mikrowellenbetrieb bzw. für den Kombinationsbetrieb
niemals ein herkömmliches Fleischthermometer, denn das Metall des Thermometers könnte
Funkenbildung verursachen.
F: Das Gerät stoppt den Mikrowellen-Garvorgang
und die Meldung „H97“ oder „H98“ erscheint
auf dem Display.
A: Die Fehlermeldung weist auf ein Problem bei der Mikrowellenerzeugung hin. Bitte wenden Sie
sich an einen autorisierten Kundendienstvertreter.
F: Die Laufschrift im Display ist verschwunden.
Warum kann ich nur Zahlen sehen?
A: Möglicherweise gab es einen Stromausfall und die Laufschrift wurde deaktiviert. Trennen Sie
das Gerät einige Sekunden vom Netzstrom und schließen Sie es wieder an. Wenn „88:88“
angezeigt wird, drücken Sie die Start-Taste, bis Ihre Sprache erscheint. Stellen Sie dann die
Uhrzeit ein. Siehe Seite De-7.
NN-GD560M / NN-GD550W
F: Warum sind während des Kombinationsgarens
brummende und klickende Geräusche zu
hören?
A: Diese Geräusche sind bedingt durch das automatische Umschalten von Mikrowellenleistung
auf Grilleistung während des Kombinationsbetriebes, dies ist normal.
F: Warum riecht das Mikrowellengerät
unangenehm und erzeugt Rauch nach dem
Grill- bzw. Kombinationsbetrieb?
A: Nach mehrfachem Gebrauch des Gerätes ist es notwendig, das Gerät gründlich zu reinigen.
Sie können zusätzlich das Gerät ohne Lebensmittel, Glasdrehteller und Rollenring für 5
Minuten mit dem Grill in Betrieb setzen. Damit ist sichergestellt, daß Lebensmittelrückstände
und konservierende Ölreste verbrennen, die den Geruch und Rauch verursachen.
D-17
Deutsch
F: Warum läßt sich das Mikrowellengerät nicht
einschalten?
Pflege des Mikrowellengerätes
1. Vor dem Reinigen den Netzstecker aus der Steckdose ziehen.
2. Halten Sie stets den Garraum, die Tür und den Türrahmen sauber.
Entfernen Sie Spritzer von Speisen und Flüssigkeiten, die an den
Garraumwänden und der Tür haften, mit einem feuchten Tuch und
ggf. mildem Reinigungsmittel. Scharfe Reinigungs- und Scheuermittel
sind nicht empfehlenswert.
VERWENDEN SIE IN KEINEM FALL BACKOFENREINI
GUNGSMITTEL. Verwenden Sie zur Reinigung der gläsernen
Mikrowellentür keine Scheuermittel oder scharfe Metallschaber,
da diese eine Beschädigung der Oberfläche zur Folge haben und
zum Zerspringen des Glases führen könnte.
3. Das Gehäuse des Gerätes sollte feucht abgewischt und mit
einem weichen Tuch getrocknet werden. Achten Sie darauf, daß
kein Wasser durch die Entlüftungsschlitze ins Geräteinnere
gelangt, da das Gerät sonst Schaden nehmen könnte.
4. Ist das Bedienfeld verschmutzt, säubern Sie dieses mit einem
feuchten, weichen Tuch. Verwenden Sie in keinem Fall scharfe
Reinigungs- bzw. Scheuermittel. Damit es nicht zu einem
unvorhergesehen Betrieb des Gerätes kommt, lassen Sie die Tür
des Gerätes beim Säubern geöffnet.
5. Während des Betriebes kann sich durch Verdampfen von
Feuchtigkeit innen oder außen auf dem Sichtfenster des Gerätes
Kondenswasser niederschlagen und evtl. unter der Tür abtropfen.
Dieser Vorgang ist normal und kann verstärkt bei niedrigen
Raumtemperaturen und hoher Luftfeuchtigkeit auftreten. Die
Sicherheit des Gerätes ist dadurch nicht beeinträchtigt. Bitte nach
dem Betrieb das Kondenswasser mit einem weichen Tuch abwischen.
6. Bitte den Glasdrehteller herausnehmen und abkühlen lassen, bevor
Sie diesen in warmem Seifenwasser oder in der Spülmaschine reinigen.
D-18
7. Der Rollenring und die Vertiefung im Geräteboden sollten
regelmäßig gereinigt werden. Damit werden unnötige
Betriebsgeräusche vermieden und die Ansammlung von
Lebensmittelresten verhindert. Einfach den Boden mit einem
feuchten Tuch auswischen und anschließend trocknen. Der
Rollenring kann mit mildem Seifenwasser gereinigt werden.
Achten Sie darauf, daß Sie den Rollenring und Drehteller nach
dem Reinigen wieder richtig einsetzen.
8. Während des Grill- und Kombinationsbetriebes (NN-GD560M / NNGD550W) können Spritzer von Speisen und Getränken an den
Garraumwände haften bleiben. Wird das Gerät nicht regelmäßig
gereinigt, kann es während des Betriebes zur Rauchentwicklung
kommen.
9. Ein Dampfreiniger darf nicht zur Reinigung benutzt werden.
10. Das Mikrowellengerät darf ausschließlich vom qualifizierten
Panasonic Kundendienst geprüft oder repariert werden.
11. Die Belüftungsöffnungen sind jederzeit frei zu halten. Vergewissern
Sie sich, dass die Belüftungsöffnungen oben, unten und hinten am
Gerät nicht durch Staub oder andere Materialien vestopft sind.
Verstopfte Belüftungsöffnungen können zu Überhitzung des Geräts
führen, was den Betrieb des Geräts beeinträchtigen und eine
Gefahrensituation hervorrufen kann.
12. Die Luftabzüge immer freihalten. Überprüfen Sie, dass die
Luftabzüge an der Ober-, Unter- und Rückseite des Gerätes nicht
durch Staub oder anderes Material verstopft werden. Wenn die
Luftabzüge verstopft sind, kann dies zu Überhitzung führen und
die Funktionsfähigkeit des Gerätes beeinträchtigen.
Technische Daten
NN-SD450W
230 V, 50 Hz
230 V, 50 Hz
Leistungsaufnahme:
Maximum:
2300 W
Mikrowelle:
1100 W
Grill:
1350 W
Mikrowelle:
1000 W (IEC-60705)
Grill:
1300 W
Ausgangsleistung:
Mikrowelle:
1100 W
Mikrowelle:
1000 W (IEC-60705)
Äußere Abmessungen:
510 (B) x 380 (T) x 304 (H) mm
510 (B) x 380 (T) x 304 (H) mm
Garraumabmessungen:
359 (B) x 352 (T) x 217 (H) mm
359 (B) x 352 (T) x 217 (H) mm
Gewicht:
ca. 12.5 Kg
ca. 11.5 Kg
Geräuschpegel:
Bereitschaftsleistung:
Ausschalt-Leistung:
50 dB
50 dB
Deutsch
NN-GD560M / NN-GD550W
Netzspannung:
Die Angaben sind Annäherungswerte; Änderungen sind vorbehalten.
Pflege des Mikrowellengerätes
Bei diesem Produkt handelt es sich um ein Gerät, das die europäische Norm für EMV-Funkstörungen (EMV = Elektromagnetische Verträglichkeit), EN
55011, erfüllt. Gemäß dieser Norm ist dieses Produkt ein Gerät der Gruppe 2, Klasse B und hält alle Grenzwerte ein. Gruppe 2 bedeutet, dass in
diesem Gerät Hochfrequenz-Energie für das Erwärmen oder Garen von Lebensmitteln absichtlich als elektromagnetische Strahlung erzeugt wird.
Klasse B sagt aus, dass dieses Produkt in einem normalen Wohnbereich betrieben werden darf.
Benutzerinformationen zur Entsorgung von elektrischen und elektronischen Geräten (private Haushalte)
Entsprechend der grundlegenden Firmengrundsätze der Panasonic-Gruppe wurde ihr Produkt aus hochwertigen Materialien und
Komponenten entwickelt und hergestellt, die recycelbar und wieder verwendbar sind.
Dieses Symbol auf Produkten und/oder begleitenden Dokumenten bedeutet, dass elektrische und elektronische Produkte am Ende
ihrer Lebensdauer vom Hausmüll getrennt entsorgt werden müssen.
Bringen Sie bitte diese Produkte für die Behandlung, Rohstoffrückgewinnung und Recycling zu den eingerichteten kommunalen
Sammelstellen bzw. Wertstoffsammelhöfen, die diese Geräte kostenlos entgegennehmen.
Die ordnungsgemäße Entsorgung dieses Produktes dient dem Umweltschutz und verhindert mögliche schädliche Auswirkungen auf
Mensch und Umwelt, die sich aus einer unsachgemäßen Handhabung der Geräte am Ende Ihrer Lebensdauer ergeben könnten.
Genauere Informationen zur nächstgelegenen Sammelstelle bzw. Recyclinghof erhalten Sie bei Ihrer Gemeindeverwaltung.
Für Geschäftskunden in der Europäischen Union
Bitte treten Sie mit Ihrem Händler oder Lieferanten in Kontakt, wenn Sie elektrische und
elektronische Geräte entsorgen möchten. Er hält weitere Informationen für sie bereit.
Informationen zur Entsorgung in Ländern außerhalb der Europäischen Union
Dieses Symbol ist nur in der Europäischen Union gültig.
Gemäß der Richtlinie 2004/108/EC, Artikel 9(2)
Panasonic Testing Centre
Panasonic Deutschland, eine Division der Panasonic Marketing Europe GmbH
Winsbergring 15,22525 Hamburg, Deutschland
Hergestellt von Panasonic Home Appliances Microwave Oven (Shanghai) Co., Ltd, 898 Longdong Road, Pudong, Shanghai, 201203, China.
D-19
Installatie en aansluiting
Uw magnetronoven controleren
Verpakkingsmateriaal en controleer de magnetron op schade, zoals
deuken, beschadigde deurvergrendelingen of barsten in de deur.
Waarschuw uw dealer onmiddellijk als u beschadigingen aantreft. Een
beschadigde magnetronoven mag niet geïnstalleerd worden.
Aardaansluiting
s
Bedrijfsspanning
Het voltage dient in overeenstemming te zijn met de op het label van de
oven opgegeven spanning. Wanneer een hogere spanning gebruikt wordt,
kan dit brand of andere beschadigingen tot gevolg hebben.
Plaatsen van de oven
Deze oven is uitsluitend bestemd voor gebruik op een werkblad. Hij is niet
bedoeld als inbouwoven of voor gebruik in een kast.
Let op: Hete oppervlakken
(NN-GD560M / NN-GD550W)
Inbouwen
WAARSCHUWING
De oven kan, indien gebruik wordt gemaakt van een inbouwraam (wit, NNTKT59WFP/ zilver NN-TKT59MFP) ingebouwd worden in een muurkast. Dit
inbouwraam kunt u verkrijgen bij een Panasonic voortverkoper (dealer).
1. De deurafdichtingen en de plaatsen hieromheen moeten worden
schoongemaakt met een vochtige doek. Het apparaat moet gecon
troleerd worden op beschadigingen aan de deurafdichtingen en de
plaatsen rondom deze afdichtingen; indien er sprake van beschadig
ing is, mag het apparaat niet gebruikt worden totdat het door gekwali
ficeerd servicepersoneel gerepareerd is.
2. Probeer niet zelf reparaties uit te voeren aan de ovendeur, het
bedieningspaneel, de veiligheids-vergrendelingsschakelaars of welk
ander deel van de magnetronoven dan ook. Verwijder de behuizing
van de magnetronoven niet; deze biedt bescherming tegen bloot
stelling aan magnetron-energie. Reparaties mogen uitsluitend door
gekwalificeerd servicepersoneel worden uitgevoerd.
3. Gebruik dit apparaat niet, indien het NETSNOER en/of de STEKKER
beschadigd zijn. Indien het apparaat niet goed functioneert,
beschadigd of gevallen is, mogen in verband met de veiligheid
reparaties uitsluitend uitgevoerd worden door gekwalificeerd servi
cepersoneel.
4. Indien het netsnoer defect mocht raken, dient het altijd door en origi
neel netsnoer vervangen te worden.
5. Kinderen mogen de magnetronoven uitsluitend zonder toezicht
gebruiken wanneer ze goed geïnstrueerd zijn, zodat ze de oven op
veilige wijze kunnen bedienen en zich bewust zijn van de gevaren
van onjuist gebruik.
6. Ontploffingsgevaar bestaat indien voedsel of dranken in een gesloten
blik of fles worden verwarmd.
1. Plaats de magnetronoven op een vlak en stabiel oppervlak, minimaal
85 cm boven de vloer.
2. Wanneer deze oven geïnstalleerd is, moet het toestel gemakkelijk los
gekoppeld kunnen worden van de stroomtoevoer door de stekker los te
nemen of door een schakelaar te gebruiken.
3. De magnetronoven kan alleen op de juiste wijze functioneren, indien er
voldoende ventilatie is.
Plaatsing op een meubel:
a. Boven de magnetronoven moet een ruimte vrij gelaten worden van
15 cm, aan de achterzijde 10 cm, aan de zijkant 5 cm, en aan de
andere zijkant een ruimte van meer dan 40 cm.
b. Wanneer één van de zijden van de magnetronoven tegen een wand
staat, mag de andere zijde of de bovenkant niet geblokkeerd zijn.
4. Plaats de magnetronoven niet vlak naast andere elektrische
apparatuur of een gasfornuis.
5. Verwijder de voetjes van de magnetronoven niet.
5cm
15cm
10cm
VRIJE
RUIMTE
Plaatsing op een meubel
7. Dit apparaat is niet bedoeld voor gebruik door personen (met inbegrip
van kinderen) met beperkte zintuiglijke of mentale instelling of met
een gebrek aan ervaring of kennis, tenzij ze onder toezicht staan van
of richtlijnen hebben gekregen over het gebruik van het apparaat
door een persoon die verantwoordelijk is voor hun veiligheid.
Kinderen moeten onder toezicht staan om te verhinderen dat ze spelen met het apparaat.
Nl-1
Nederland
BELANGRIJK: DIT APPARAAT DIENT VOOR PERSOONLIJKE VEILIGHEID JUIST GEAARD TE WORDEN.
Indien uw stopcontact niet is geaard, is het de persoonlijke verantwoording
van de klant om het te laten vervangen door een juist geaarde wandcontactdoos.
6. Deze magnetronoven is uitsluitend bestemd voor huishoudelijk
gebruik. Niet buitenshuis gebruiken.
7. Wij raden u af om de magnetronoven in een vochtige omgeving te
gebruiken.
8. Het stroomsnoer mag niet in aanraking komen met de buitenzijde van
de oven. Houd het snoer uit de buurt van warme of hete opper
vlakken. Laat het snoer niet over de rand van een tafel of aanrecht
hangen. Dompel het snoer, de stekker of de oven niet onder in water.
9. De ventilatie-openingen bovenop en achterop de
magnetronoven mogen niet geblokkeerd worden. Indien deze
openingen geblokkeerd zijn terwijl de magnetronoven in gebruik is,
kan hij oververhit raken. Een thermische beveiliging zal in dit geval
de magnetronoven buiten werking stellen en de oven weer
inschakelen zodra hij is afgekoeld.
10. Dit apparaat is niet geschikt voor gebruik met een externe timer
of met een afzonderlijk systeem voor afstandsbediening.
Veiligheidsinstructies
Gebruik van uw magnetronoven
Werking van de ventilatormotor
1. Gebruik de oven uitsluitend voor het bereiden van voedsel.
Deze magnetronoven is speciaal ontworpen voor het opwarmen en
bereiden van voedsel.
Gebruik de magnetronoven niet om chemische of andere niet eetbare
producten te verwarmen.
Als de oven na het gebruik heet wordt dan kan de ventilator enkele
minuten werken om de elektrische componenten af te koelen. Dit is normaal en u kunt het voedsel gerust uit de magnetronoven nemen, ook al
draait de ventilator nog steeds.
2. Voor gebruik dient u er zich van te verzekeren dat alle te gebruiken
hulpmiddelen (schalen/bakvormen enz.) geschikt zijn voor gebruik in de
magnetronoven.
3. Gebruik de magnetronoven niet om krantenpapier, kleding of andere
materialen te drogen. Ze kunnen vlam vatten.
4. Gebruik de magnetronoven niet om voorwerpen (anders dan de
accessoires) in op te bergen, indien de oven per ongeluk wordt
ingeschakeld.
5. Gebruik het apparaat niet met de functie MAGNETRON of
COMBINATIE (NN-GD550W/NN-GD560M) ZONDER DAT ZICH
HIERIN VOEDSEL BEVINDT. Het apparaat kan hierdoor beschadigd
raken. Een uitzondering hierop is punt 1onder Werking van Oven en
Grill en Voorverwarmen van de pizzapan.
6. Als er rook of vuur in uw magnetronoven ontstaat, druk dan op de
STOP/WIS-toets en laat de ovendeur gesloten om de vlammen te
doven.
Trek de stekker uit het stopcontact of verbreek de stroomtoevoer bij de
zekering of de schakelaar.
Werking van oven en grill (NN-GD569M / NN-GD559W)
1. Voordat u voor de eerste keer gebruik gaat maken van de
COMBINATIE- of GRILL-functie, moet aanwezige olie verwijderd wor
den uit de binnenkant van de oven en moet de oven gedurende 10
minuten zonder accessoires of voedsel ingeschakeld worden in de grillstand. Op deze manier wordt de olie, die gebruikt is als bescher
mingslaag tegen roesten, weggebrand. Dit is de enige keer dat de oven
leeg gebruikt mag worden.
2. De buitenwanden van de magnetronoven, inclusief de ventilatie-openin
gen en de ovendeur worden tijdens gebruik van de COMBINATIE- en
GRILL-functies heet; pas dus op bij het openen of sluiten van de oven
deur en bij het inbrengen of verwijderen van voedsel en accessoires.
3. De magnetronoven is uitgerust met twee verwarmingselementen die
zich bovenin de magnetronoven bevinden. Na gebruik van de COMBI
NATIE- of GRILL-functie zullen deze oppervlakken zeer heet zijn.
OPMERKING: Na gebruik van deze functies zullen ook de
oventoebehoren zeer heet zijn.
4. De makkelijk bereikbare onderdelen kunnen heet worden bij het in
gebruik zijn van grill en combinatie. Laat kinderen niet in de buurt
komen.
5. Wanneer het apparaat gebruikt wordt in de combinatiemodus, mogen
kinderen de oven slechts gebruiken onder toezicht omdat de tempera
turen dan zeer hoog zijn.
Nl-2
Ovenlicht
Voor vervanging van de lamp van de oven moet u contact opnemen met
uw dealer.
Accessoires
Er wordt een aantal toebehoren bij deze magnetronoven geleverd. Volg
altijd de instructies op van de betreffende toebehoren.
Glazen draaiplateau
1. Gebruik de magnetronoven niet zonder de draairing en het glazen
draaiplateau.
2. Gebruik uitsluitend een glazen draaiplateau dat speciaal voor deze
magnetronoven ontworpen is.
3. Als het glazen draaiplateau heet is, moet het eerst afkoelen
voordat u het schoonmaakt of in water onderdompelt.
4. Het glazen draaiplateau kan in beide richtingen draaien.
5. Indien het voedsel of de schaal op het plateau de wanden van de
oven raakt, waardoor het draaien stopt, gaat het draaiplateau
automatisch in de tegengestelde richting draaien. Dit is normaal.
6. Bereid geen voedsel direct op het glazen draaiplateau.
Draairing
1. De draairing en de ovenbodem moeten regelmatig worden gereinigd
om ongewenste geluiden en het ophopen van voedselresten te
voorkomen.
2. Tijdens het koken moet de draairing altijd samen met het glazen
draaiplateau worden gebruikt.
Metalen rooster (NN-GD560M / NN-GD550W)
1. Het metalen rooster wordt gebruikt voor het bruiningsproces van
kleine hoeveelheden en zorgt bovendien voor een goede circulatie
van de warmte.
2. Plaats geen metalen voorwerpen direct op het metalen rooster in
COMBINATIE met de MAGNETRONFUNCTIE.
3. Gebruik het rooster niet in de magnetron stand.
Pizzapan (NN-GD560M / NN-GD550W) - Zie pagina Nl-14
Belangrijke informatie
1. Kooktijden
6. Vloeistoffen
• De in het kookboek vermelde kooktijden zijn bij benadering.
Factoren, die invloed hebben op de kookduur, zijn:
de begintemperatuur, de hoeveelheid voedsel en de materialen die
voor het koken worden gebruikt.
• Indien vloeistoffen, zoals soep, sauzen en dranken opgewarmd wor
den in uw magnetronoven, kunnen deze zonder te gaan borrelen
heter worden dan het kookpunt. Hierdoor kan de hete vloeistof plot
seling gaan overkoken. Om dit te voorkomen, kunnen de volgende
stappen opgevolgd worden:
• Begin met de minimale kooktijd om te voorkomen dat het voedsel te
gaar wordt. Als het voedsel niet gaar genoeg geworden is, kunt u het
altijd nog wat langer bereiden.
• Kleine hoeveelheden voedsel met een gering vochtgehalte kunnen uit
drogen, aanbranden of zelfs verbranden als ze te lang worden
doorgekookt. Indien het voedsel in de oven vlam vat, moet de oven
deur gesloten blijven, de magnetronoven uitgezet worden en moet de
stekker uit het stopcontact worden genomen.
3. Eieren
• Kook met de magnetron geen ongepelde eieren en verwarm geen
hardgekookte eieren. Eieren kunnen ten gevolge van de druk ontplof
fen, zelfs na hun opwarming in de magnetron.
4. Niet-poreuze schil
• Voedsel zonder poreuze schil, zoals aardappelen, eierdooiers en
worstjes, moet ingeprikt worden alvorens ze met de MAGNETRONfunctie te bereiden. Zo voorkomt u dat ze exploderen.
5. Vleesthermometer
• Indien u gebruik maakt van een vleesthermometer voor vlees en gevo
gelte, gebruik deze dan alleen wanneer het voedsel buiten de mag
netronoven is. Gebruik geen conventionele vleesthermometer tijdens
de MAGNETRON- of COMBINATIE-functie, omdat hierbij vonken kun
nen optreden.
c) Roer de vloeistof om alvorens deze in de oven te plaatsen en roer
halverwege de opwarmtijd nogmaals.
d) Laat de vloeistof na het verwarmen nog even in de oven staan en
roer goed om voordat u de vloeistof uit de oven haalt.
7. Papier/kunststof
• Als u voedsel gaat verwarmen in kunststof of papieren bakjes, dient
u de oven regelmatig te controleren, omdat deze bakjes bij overver
hitting vlam kunnen vatten.
• Gebruik geen gerecycled papier (b.v. keukenrol), tenzij het
papierproduct gekenmerkt is als zijnde veilig voor gebruik in een
magnetronoven. Vervuilingen in recycled papier kunnen in de mag
netron vonken en/of brand veroorzaken.
• Verwijder metalen sluitingen van braadzakken voordat u deze in de
oven plaatst.
8. Keukengerei/folie
• Verwarm nooit gesloten potjes of flessen omdat deze kunnen
exploderen.
• Gebruik geen metalen bakjes of schotels met metalen randen tijdens
de magnetron-functie. Hierdoor kunnen er vonken ontstaan
• Bij gebruik van aluminiumfolie, vleesspiesen of andere metalen voor
werpen, moet de afstand tot de ovenwanden minimaal 2 cm bedra
gen om vonkoverslag te voorkomen.
9. Zuigflessen/potjes babyvoeding
• De speen of deksel moeten verwijderd worden van zuigflessen of
potjes babyvoedsel alvorens ze in de magnetronoven te plaatsen.
• Schud zuigflessen goed en roer de inhoud van de potjes met
babyvoeding een paar maal om.
• Controleer de temperatuur van het voedsel voor het nuttigen
zorgvuldig, om verbranden te voorkomen.
Nl-3
Nederland
2. Kleine hoeveelheden voedsel
b) Niet te lang verwarmen.
s
OPMERKING: Als u het voedsel langer kookt dan de aanbevolen
kooktijden, kan het bederven, en in extreme gevallen zelfs vlam
vatten en de magnetronoven beschadigen.
a) Gebruik geen rechte glazen of bekers met smalle of toelopende
bovenkant.
De magnetronoven
[8b]
[13]
[8a]
[6]
[4]
[12]
[5]
[2]
[1]
[7]
[3]
[9]
[10]
[11]
1.
Deur openingsknop
Indrukken om ovendeur te openen. Indien u de ovendeur tijdens het kookproces opent, wordt het koken tijdelijk onderbroken,
zonder dat de gemaakte instellingen gewist worden. Het koken gaat weer normaal door, zodra de deur wordt gesloten en de
starttoets wordt ingedrukt.
Het lampje in de magnetronoven gaat aan, zodra u de ovendeur opent.
2.
Doorkijkvenster
3.
Veiligheids-deurvergrendelingssysteem
4.
Ventilatie-opening
5.
Bedieningspaneel
6.
Glazen draaiplateau
7.
Draairing
8a. Externe ventilatie-openingen
8b. Externe ventilatie-openingen (NN-GD560M / NN-GD550W)
9.
Metalen rooster (NN-GD560M / NN-GD550W)
10. Pizzapan (NN-GD560M / NN-GD550W)
11.
Handgreep van de pizzapan (NN-GD560M / NN-GD550W)
12. Elektriciteitssnoer
13. Waarschuwingsetiket (Hete oppervlakken) (NN-GD560M / NN-GD550W)
Nl-4
Bedieningspaneel
NN-GD560M / NN-GD550W*
1.
2.
3.
4.
5.
(1)
(3)
(8)
(4)
(5)
12.
(9)
(6)
(7)
*
(10)
De uitvoering van het bedieningspaneel kan afwijken van de
afbeelding (afhankelijk van de kleur). De functies zijn echter
dezelfde.
(11)
Piepgeluid:
Er weerklinkt een piepgeluid wanneer een toets wordt ingedrukt.
Indien er geen piepgeluid te horen
is, is de instelling niet correct.
Wanneer de oven overgaat op een
andere functie, weerklinken twee
piepjes. Wanneer een programma
klaar is, weerklinken 5 piepjes.
OPMERKING: Als u een programma heeft ingesteld, maar
niet op de startknop drukt, dan annuleert de oven het programma automatisch na zes minuten. Op het display wordt
dan weer de tijd van de dag weergegeven.
Deze oven is voorzien van een functie voor energiebesparing.
Let op:
1. De helderheid van de display vermindert als de stand-by
mode is ingeschakeld.
2. De oven zal op de stand-by mode overgaan als deze voor
het eerst wordt ingeplugd en direct nadat de laatste handeling ermee is verricht.
Nl-5
Nederland
(2)
s
6.
7.
8.
9.
10.
Uitleesvenster
Magnetronvermogen
Knop voor het zeer snel ontdooien met
gewichtautomaat
Combinatievermogen
Knop voor het zeer snel ontdooien met
gewichtautomaat
Startvertraging/Standtijd
Kloktoets
Automatische programma keuzeschakelaar
Tijd-/gewichtselector
Stop/wistoets:
Voor het koken: Een druk op de toets en het
gehele ingestelde programma wordt gewist.
Tijdens het koken: Met één druk op de toets
wordt het kookproces tijdelijk onderbroken.
Indien u de toets nogmaals indrukt, wordt
het ingestelde programma gewist en verschijnt de
tijd in het uitleesvenster.
Starttoets:
Indrukken om de magnetronoven in werking te
stellen.
Indien tijdens het koken de deur geopend wordt,
of de Stop/wistoets eenmaal wordt ingedrukt,
moet de Starttoets weer ingedrukt worden om
door te gaan met koken.
Bedieningspaneel
NN-SD450W
1.
2.
3.
4.
5.
6.
7.
8.
(1)
(6)
(2)
9.
(7)
(3)
Uitleesvenster
Magnetronvermogen
Knop voor het zeer snel ontdooien met gewichtautomaat
Startvertraging/Standtijd
Kloktoets
Automatische program-ma keuzeschakelaar
Tijd-/gewichtselector
Stop/wistoets:
Voor het koken: Een druk op de toets en het gehele
ingestelde programma wordt gewist.
Tijdens het koken: Met één druk op de toets
wordt het kookproces tijdelijk onderbroken.
Indien u de toets nogmaals indrukt, wordt
het ingestelde programma gewist en verschijnt de
tijd in het uitleesvenster.
Starttoets:
Indrukken om de magnetronoven in werking te stellen.
Indien tijdens het koken de deur geopend wordt,
of de Stop/wistoets eenmaal wordt ingedrukt,
moet de Starttoets weer ingedrukt worden om door
te gaan met koken.
(4)
(5)
(8)
(9)
Piepgeluid:
Er weerklinkt een piepgeluid wanneer een toets wordt
ingedrukt. Indien er geen
piepgeluid te horen is, is de
instelling niet correct. Wanneer de
oven overgaat op een andere
functie, weerklinken twee piepjes.
Wanneer een programma klaar is,
weerklinken 5 piepjes.
Nl-6
OPMERKING: Als u een programma heeft ingesteld, maar
niet op de startknop drukt, dan annuleert de oven het programma automatisch na zes minuten. Op het display wordt
dan weer de tijd van de dag weergegeven.
Deze oven is voorzien van een functie voor energiebesparing.
Let op:
1. De helderheid van de display vermindert als de stand-by
mode is ingeschakeld.
2. De oven zal op de stand-by mode overgaan als deze
voor het eerst wordt ingeplugd en direct nadat de laatste
handeling ermee is verricht.
Bedieningstoetsen en gebruiksprocedure
Stap-voor-stap-display:
Aansluiten
“88:88”
Word Prompting
In het Frans
Druk op
“ITALIANO”
In het Italiaans
Druk op
“DEUTSCH”
In German
Druk op
“NEDERLANDS”
In het Nederlands
Druk op
ESPANOL
In het Spaans
Druk op
“POLSKI”
In het Pools
Druk op
“CESKY”
In het Tsjechisch'
Druk op
“ENGLISH”
In het Engels
Druk op
“DANSK”
In het Deens
Druk op
“SUOMI”
In het Fins
Druk op
“SVENSKA”
In het Zweeds
Druk op
“NORSK”
In het Noors
De klok instellen:
• Druk één keer op de kloktoets.
De dubbele punt gaat knipperen
Deze modellen hebben de unieke functie “Hulptekst
op display” die u begeleidt bij de bediening van uw
magnetronoven. Nadat u de stekker in het stopcontact heeft gestoken, drukt u net zo lang op de knop
Start totdat uw taal in de display verschijnt. Als u op
een knop drukt, dan verschijnt de volgende instructie
op de display zodat vergissingen zijn uitgesloten. Als
u om welke reden dan ook de weergegeven taal wilt
wijzigen, verwijder de stekker dan uit het stopcontact
en herhaal de bovenstaande procedure.
Als u de Delay/Stand knop 4 keer indrukt zal
hulptekst worden uitgeschakeld. Om de hulptekst
weer te laten verschijnen drukt u de Delay/Stand
knop 4 keer in.
UITSLUITEND VOOR
MODEL NN-SD450W
Voorbeeld: 14:25 uur instellen
• Voer de tijd in door de Tijd/gewichtschakelaar te draaien.
De tijd verschijnt in het uitleesvenster en de
dubbele punt knippert
• Druk op de kloktoets.
De dubbele punt houdt op met knipperen en
de tijd is in het geheugen opgenomen.
OPMERKING:
1. Als u de tijd opnieuw wilt instellen, moeten alle bovenstaande stappen herhaald worden.
2. De tijd van de dag wordt weergegeven, tenzij de stroom onderbroken is.
3. Dit is een 24-uurs klok.
Nl-7
Nederland
“FRANCAIS”
s
Druk op
Bedieningstoetsen en gebruiksprocedure
Kinderslot:
Met dit systeem worden de bedieningselementen buiten werking gesteld. De ovendeur kan echter wel geopend worden. Het kinderslot kan ingesteld
worden wanneer het uitleesvenster een dubbele punt of de tijd weergeeft.
Instellen:
Opheffen:
• Druk driemaal op de Starttoets
De tijdsaanduiding verdwijnt. De tijd
blijft aanwezig in het geheugen.
• Druk driemaal op de Stop/wistoets.
De tijd verschijnt weer in het uitleesvenster.
OPMERKING: Om het kinderslot te activeren moet u de startknop 3 keer binnen 10 seconden indrukken.
Koken met de magnetronfunctie en ontdooien
Er zijn 5 verschillende magnetron vermogensstanden beschikbaar. In onderstaand schema wordt bij benadering het wattage voor elk van de vermogensniveauʼs weergegeven.
NN-GD560M / NN-GD550W
Gebruik van de accessoires:
Druk op
NN-SD450W
Glazen draaiplateau
1
2
3
4
5
Keer
Keer
Keer
Keer
Keer
Vermogensstand
Wattage
Max. (Hoog)
Ontdooien
Medium
Laag
Sudderen
1000 W
270 W
600 W
440 W
250 W
NN-GD560M / NN-GD550W
Of
• Druk op deze toets totdat het
vereiste vermogen in het displayvenster verschijnt.
• Selecteerde gewenste
vermogensstand
voor de magnetron.
• Stel de bereidingstijd in met de
Tijd-/gewichtschakelaar
(HOOG vermogen: tot 30 minuten
ander vermogen: tot 90 minuten).
• Druk op de
Starttoets.
OPMERKING:
1. Stel de vermogensstand van de magnetron en de kooktijd opnieuw in voordat u op Start drukt voor 2- of 3-fase koken.
bv. Stoofschotel –– 10 minuten hoog om de stoofschotel aan de kook te brengen. 60 minuten sudderen.
10 minuten sudderen om de smaak tot zijn recht te laten komen
2. De standtijd kan na het instellen van de vermogensstand en de kooktijd geprogrammeerd worden.
3. U kunt desgewenst de kooktijd tijdens de bereiding wijzigen. Verdraai de Tijd-/gewichtsschakelaar om de kooktijd te verlengen of te verkorten. De
tijd kan in stappen van 1 minuut tot een maximum van 10 minuten verlengd/verkort worden. Door de schakelaar op nul te zetten wordt het koken
beëindigd.
4. De oven werkt automatisch op Hoog magnetronvermogen als de kooktijd zonder het vooraf instellen van de vermogensstand wordt ingevoerd.
Nl-8
Grillen (NN-GD560M / NN-GD550W)
Gebruik van de accessoires:
De grill voorziet in 3 grillinstellingen.
1 keer drukken voor
GRILL 1
1300 W
Glazen
draaiplateau
2 keer drukken voor
GRILL 2
950 W
3 keer drukken voor
GRILL 3
700 W
• Druk op de
Starttoets.
• Stel de bereidingstijd in met de Tijd/gewichtschakelaar
(tot 90 minuten).
OPMERKING:
1. De grill functioneert uitsluitend wanneer de ovendeur gesloten is.
2. U kunt desgewenst de kooktijd tijdens de bereiding wijzigen. Verdraai de Tijd-/gewichtschakelaar om de kooktijd te verlengen of te verkorten. De tijd
kan in stappen van 1 minuut tot een maximum van 10 minuten verlengd/verkort worden. Door de schakelaar op nul te zetten wordt het koken
beëindigd.
Combinatiekoken (NN-GD560M / NN-GD550W)
Gebruik van de accessoires:
Er zijn 3 combinaties voorgeprogrammeerd. In onderstaand schema wordt bij
benadering het wattage voor elk van de vermogensniveauʼs weergegeven.
Metalen
rooster
Glazen
draaiplateau
Glazen
draaiplateau
• Selecteer combinatie
(zie tabel).
Combinatieinstelling
1
2
3
• Stel de bereidingstijd in met de Tijd/gewichtschakelaar (tot 90 minuten).
Aantal keren
drukken.
Grill
1 keer drukken
2 keer drukken
3 keer drukken
1300W
1300W
1300W
Magnetron Stap-voorstap
G1-600W
600W
G1-440W
440W
250W
G1-250W
• Druk op de Starttoets.
OPMERKING:
1. De grill functioneert uitsluitend wanneer de ovendeur gesloten is.
2. U kunt desgewenst de kooktijd tijdens de bereiding wijzigen. Verdraai de Tijd-/gewichtschakelaar om de kooktijd te verlengen of te verkorten. De
tijd kan in stappen van 1 minuut tot een maximum van 10 minuten verlengd/verkort worden. Door de schakelaar op nul te zetten wordt het koken
beëindigd.
Nl-9
Nederland
s
• Selecteer grillvermogen. Druk
1 keer voor Grill 1 (Hoog), twee
keer voor Grill 2 (Medium) of 3
keer voor Grill 3 (Laag).
Metalen
rooster
Automatisch ontdooien
Met deze functie kunt u bevroren voedsel ontdooien op basis van het gewicht. Selecteer de categorie en stel het gewicht van het voedsel in. Het
gewicht is geprogrammeerd in grammen. Voor snelle selectie, is van elke categorie het meest voor de hand liggende gewicht geprogrammeerd.
• Selecteer het gewenste Autoontdooiprogramma.
1 keer indrukken voor kleine stukken
2 keer indrukken voor grote stukken
Programma
StapVoor-Stap
KLEINE
1 Kleine stukken STUKKEN
2 Grote stukken
GROTE
STUKKEN
• Druk op de
• Stel het gewicht van het bevroren voedsel in met de TijdStarttoets.
/gewichtschakelaar. Het gewicht wordt bepaald in stappen van 10
gram als u langzaam aan de knop draait. Het gewicht wordt bepaald in
stappen van 100 gram als u snel aan de knop draait.
Geschikt voedsel
Gewicht
Kleine stukken vlees, kalfsoesters, worstjes, vis filet, steaks, koteletten
150 - 1600g (van 100g tot 400g). Draaien bij pieptoon.
400 - 2400g
Grote stukken vlees, braadstukken, hele kip.
Draaien bij pieptoon.
OPMERKING:
1. Indien de ontdooitijd meer dan 60 minuten bedraagt, wordt de tijd weergegeven in uren en minuten.
2. De vorm en het formaat van het voedsel bepalen het maximale gewicht dat in de oven geplaatst kan worden.
3. Raadpleeg voor meer informatie de ontdooirichtlijnen in het kookboek.
Auto-gewicht programmaʼs
Met deze functie kunt u het merendeel van uw favoriete gerechten bereiden door alleen het gewicht in te stellen. De oven bepaalt automatisch het
magnetronvermogen, het grillvermogen (GD560M / GD550W) en de bereidingstijd. Selecteer de categorie en stel het gewicht van het voedsel in. Het
gewicht wordt geprogrammeerd in grammen. Voor snelle selectie, is van elke categorie het meest voor de hand liggende gewicht geprogrammeerd.
NN-GD560M /
NN-GD550W
NN-SD450W
b.v.
•
Selecteer het gewenste automatische gewichtprogramma door aan de automatische programma
keuzeschakelaar te draaien. Het display bladert door
de automatische gewicht kookprogramma's.
• Stel het gewicht van het voedsel in met
de Tijd-/gewichtschakelaar. Het gewicht
wordt bepaald in stappen van 10 gram als u
langzaam aan de knop draait. Het gewicht
wordt bepaald in stappen van 100 gram als
u snel aan de knop draait.
OPMERKING:
1. Indien de bereidingstijd meer dan 60 minuten bedraagt, wordt de tijd weergegeven in uren en minuten.
2. Raadpleeg de tabellen op de volgende bladzijde voor het aanbevolen gewicht en de te gebruiken accessoires.
Nl-10
• Druk op de
Starttoets.
Auto-gewicht programmaʼs
NN-GD560M / NN-GD550W
Programma
StapVoor-Stap
Aanbevolen
Accessoires
gewicht
Instructies
2 Schaal
opwarmen
1 KOM
300g
Voor het opwarmen van een schaal met een warme drank.
Selecteer Schaal opwarmen, voer het gewicht in (300ml) en druk op
de startknop.
3 Verse
opwarmen
VERSE
MAALTIJD
200 - 1500g
Voor het opwarmen van kant-en-klaarmaaltijd of ovenschotel
maaltijd. Al het voedsel dient op kamer- of koelkasttemperatuur te
zijn. Bij pieptoon omscheppen. Na afloop enkele minuten laten
nagaren.
4 Bevroren
opwarmen
BEVROREN
MAALTIJD
200 - 1200g
Al het voedsel moet reeds bereid en ingevroren zijn.
Bij pieptoon omroeren. Na bereidingstijd voedsel omscheppen en 2
tot 3 minuten laten nagaren.
250 - 1500g
Voor het bereiden van verse groente. Doe de groente in een
daarvoor geschikte schaal. Besprenkel met 9 theelepels (100ml)
water. Afdekken met magnetronfolie of een deksel. Bij grote
hoeveelheden omscheppen als de pieptoon weerklinkt.
300 - 1000g
Voor het bereiden van bevroren groente. Doe de groente in een
daarvoor geschikte schaal. Voeg 3-4 theelepels (40ml) water toe.
Afdekken met magnetronfolie of een deksel. Bij grote hoeveelheden
omscheppen als de pieptoon weerklinkt.
5 Verse groente
bereiden
6 Bevroren groente
bereiden
VERSE
GROENTEN
BEVROREN
GROENTEN
7 Verse vis
bereiden
VERSE VIS
150 - 1000g
Voor het bereiden van verse vis (hele vis, filets, moten).
Dek dunnere gedeelten af. Plaats de vis in een daarvoor geschikte
schaal. Voeg 1-2 theelepels water toe. Afdekken met magnetronfolie
of een deksel.
8 Bevroren vis
bereiden
BEVRORE
VIS
200 - 900g
Voor het bereiden van bevroren vismoten en filets.
Doe de vis in een daarvoor geschikte schaal. Voeg
2 theelepels (30ml) water toe. Afdekken met magnetronfolie of een
deksel. Vis draaien bij pieptoon.
Tips voor het opwarmen van kopjes en kommen
1. Roer de vloeistof goed door voordat u deze opwarmt. (Vloeistoffen die niet zijn vermengd met lucht, kunnen opspatten als ze worden verhit.)
2. Dranken zoals thee of koffie mogen niet worden bedekt. Bedek soep met een schotel om opspatten te voorkomen.
3. Na het opwarmen goed roeren en even laten nagaren.
Nl-11
Nederland
150g
s
1 KOP
Voor het opwarmen van een warme drank in een kopje (zoals
koffie, thee, melk en soep).
Selecteer Kop opwarmen, voer het gewicht in (150ml) en druk op de
startknop.
1 Kop opwarmen
Auto-gewicht programmaʼs
NN-GD560M / NN-GD550W
Programma
StapVoor-Stap
9 Bevroren
brood
BROOD
10 Stukken
kip
11 Hele
kip
12 Bevroren
gegratineerd voedsel/Lasagne
Nl-12
Aanbevolen
Accessoires
gewicht
Instructies
50 - 500g
Voor het opwarmen van bevroren brood, broodjes en croissants. Verwijder alle verpakking en leg het bevroren brood op het
rooster op het glazen draaiplateau. Draaien bij pieptoon.
VERSE
STUKKEN
KIP
200 - 1200g
Voor het bereiden van stukken kip, b.v. vleugeltjes,
pootjes of drumsticks. Leg de kip op een vuurvast bord op het
metalen rooster. Spreid de stukken kip voor gelijkmatige bereiding
uit en draai ze om bij de pieptoon.
HELE KIP
1000 - 2200g
Voor het bereiden van hele kip zonder vulling. Bereid de vulling
afzonderlijk. Plaats de kip op een vuurvaste platte
omgekeerde schaal op het glazen draaiplateau. Begin het bereiden met
de borst naar beneden en draai de kip bij de pieptoon.
DIEPGEVROREN GRATIN 300 - 1000g
Voor het opwarmen en bruinen van bevroren
gegratineerd voedsel/lasagne. Verwijder alle verpakking en leg het
gegratineerde voedsel/lasagne op een vuurvast bord op het glazen
draaiplateau.
Auto-gewicht programmaʼs
Panacrunch Programma (NN-GD560M / NN-GD550W)
StapVoor-Stap
4. Druk op de Starttoets.
Instructies
150 - 600g
Bodem knapperig maken en bovenkant bruin van verse gekochte
pizza.
Verwijder alle verpakking en leg de pizza in de voorverwarmde pizzapan.
DIEPGEVR
OREN
PIZZA
150 - 600g
Bodem knapperig maken en bovenkant bruin van ingevroren
gekochte pizza.
Verwijder alle verpakking en leg de pizza in de voorverwarmde pizzapan.
VERSE
QUICHE
150 - 700g
Voor het opwarmen en knapperig maken van de bodem en het
bruinen van de bovenkant van verse gekochte quiche. Verwijder
alle verpakking en leg de quiche in de voorverwarmde pizzapan.
13 Verse
pizza
VERSE
PIZZA
14 Bevroren
pizza
15 Verse
quiche
Aanbevolen
Accessoires
gewicht
3. Bij het einde van de voorverwarmingstijd weerklinkt een
pieptoon. Doe het voedsel in de
pan.
16 Bevroren
quiche
BEVROREN
QUICHE
150 - 500g
Voor het opwarmen en knapperig maken van de bodem en het
bruinen van de bovenkant van ingevroren gekochte quiche.
Verwijder alle verpakking en leg de quiche in de voorverwarmde pizzapan.
17 Bevroren
aardappelproducten
DIEPGEVROREN AARDAPPELPRO- 200 - 500g
DUCTEN
Voor het opwarmen en bruinen van bevroren
aardappelproducten. Verdeel na het opwarmen van de pan de aardappelproducten over de pan. Voor de beste resultaten moeten de
aardappelproducten in een enkele laag gelegd worden en bij de pieptoon worden gedraaid.
Nl-13
Nederland
Programma
2. Druk op de Starttoets om de
pizzapan voor te
verwarmen.
s
1. Kies het gewenste
programma en plaats de pizzapan direct op het glazen
draaiplateau.
Pizzapan (NN-GD560M / NN-GD550W)
Het ʻconceptʼ
Opmerkingen:
Bepaalde in de magnetron bereide eetwaar kunnen een zachte en kleffe
korst krijgen. In uw pizzapan worden pizzaʼs, quiches, pasteitjes, gepaneerde producten net zo bruin en knapperig als in een conventionele
oven.
Uw Panasonic-pizzapan functioneert op drie manieren: opwarmen van de
pan door absorptie van magnetronstralen, direct opwarmen van het voedsel door magnetronstralen en opwarmen van het voedsel via de grill. De
onderkant van de pan absorbeert de magnetronstralen en zet deze om in
hitte. Vervolgens wordt de hitte via de pan doorgegeven aan het voedsel.
Het verwarmingseffect wordt geoptimaliseerd door het anti-aanbak oppervlak.
1. Verwarm de pan niet langer dan 8 minuten voor.
Gebruik van de pizzapan (Handmatige bediening)
• Voor de beste resultaten moet de pan voor gebruik voorver-warmd
worden. Plaats hem direct op het glazen draaiplateau en verwarm in de
Combinatiestand gedurende 1 tot 3 minuten voor. Voor een beter bruiningseffect moet de pan ingesmeerd worden met olie alvorens hem voor
te verwarmen voor producten als worstjes en beefburgers.
• Verwijder de pan uit de oven en doe het voedsel in de pan.
Gebruik altijd het handvat van de pan of ovenwanten, omdat de pan
zeer heet zal zijn. Voor de beste resultaten is het van elang dat het
voedsel onmiddellijk na het voorverwarmen op de pan geplaatst wordt.
De prestaties kunnen anders niet gegarandeerd worden.
• Zet de pan op het glazen draaiplateau en bereid het voedsel volgens de
richtlijnen in de bereidingstabel van het kookboek.
2. Zet de pan altijd in het midden van het glazen draaiplateau en zorg
ervoor dat hij de wanden van de oven niet raakt. Bij aanraking van
de ovenwanden kunnen er vonken ontstaan waardoor de oven
beschadigd kan raken.
3. Zet de pan altijd op het glazen draaiplateau. Gebruik hem niet met
het metalen rooster.
4. Gebruik altijd het handvat van de pan of ovenwanten. De pan is
heet!
5. Controleer of alle voedselverpakking verwijderd is voordat u met de
bereiding begint.
6. Zet nooit warmtegevoelige materialen op de hete pan; deze kunnen
hierdoor ontbranden.
7. De pan kan gebruikt worden in conventionele ovens.
8. Voor de beste resultaten moet de pan gebruik worden in COMBI
NATIE GRILL en MAGNETRON.
Verzorging van de pan
• Gebruik nooit scherp keukengerei op de pan, omdat hierdoor het
anti-aanbak oppervlak beschadigt.
• Na gebruik afwassen in een heet sopje en afspoelen met heet water.
Geen schurende reinigingsmiddelen of schuursponsjes gebruiken;
hierdoor beschadigt het oppervlak van de pan.
• De pan kan veilig in de vaatwasser gereinigd worden.
Nl-14
Auto-gewicht programmaʼs
NN-SD450W
Programma
StapVoor-Stap
1 Vers
opwarmen
VERSE
MAALTIJD
200 - 1500g
DIEPGEVROREN MAALTIJD 200 - 1200g
4 Bevroren groente
bereiden
DIEPGEVROREN
GROENTEN
5 Verse vis bereiden
VERSE VIS
6 Bevroren vis bereiden
DIEPGEVROREN VIS
Voor het opwarmen van kant-en-klaarmaaltijd of
ovenschotel maaltijd. Al het voedsel dient op kamer- of koelkasttemperatuur te zijn. Bij pieptoon omscheppen. Na afloop enkele minuten
laten nagaren.
Al het voedsel moet reeds bereid en ingevroren zijn.
Bij pieptoon omroeren. Na bereidingstijd voedsel omscheppen en 2
tot 3 minuten laten nagaren.
s
VERSE
3 Verse groente bereiden GROENTEN 250 - 1500g
Instructies
Voor het bereiden van verse groente. Doe de groente in een daarvoor geschikte schaal. Besprenkel met 6 theelepels (90ml) water.
Afdekken met magnetronfolie of een deksel. Bij grote hoeveelheden
omscheppen als de pieptoon weerklinkt.
300 - 1000g
Voor het bereiden van bevroren groente. Doe de groente in een
daarvoor geschikte schaal. Voeg 2 theelepels (30ml) water toe.
Afdekken met magnetronfolie of een deksel. Schep de groenten om
wanneer de pieptoon weerklinkt.
150 -1000g
Voor het bereiden van verse vis (hele vis, filets, moten).
Dek dunnere gedeelten af. Plaats de vis in een daarvoor geschikte
schaal. Voeg 2 theelepels (30ml) water toe. Afdekken met magnetronfolie of een deksel.
200 - 900g
Voor het bereiden van bevroren vismoten en filets.
Doe de vis in een daarvoor geschikte schaal. Voeg 2
theelepels (30ml) water toe. Afdekken met magnetronfolie of een
deksel.
7 Kopje
opwarmen
1 KOP
150g
Voor het opwarmen van een warme drank in een kopje (zoals
koffie, thee, melk en soep).
Selecteer Kop opwarmen, voer het gewicht in (150ml) en druk op de
startknop.
8 Kom
opwarmen
1 KOM
300g
Voor het opwarmen van een kom met een warme drank.
Selecteer Kom opwarmen, voer het gewicht in (300ml) en druk op de
startknop.
9 2 Kom
opwarmen
2 KOMMEN
600g
Voor het opwarmen van 2 kommen met een warme drank.
Selecteer 2 Kom opwarmen, voer het gewicht in (600ml) en druk op
de startknop.
Tips voor het opwarmen van kopjes en kommen.
1. Roer de vloeistof goed door voordat u deze opwarmt. (Vloeistoffen die niet zijn vermengd met lucht, kunnen opspatten als ze worden verhit.)
2. Dranken zoals thee of koffie mogen niet worden bedekt. Bedek soep met een schotel om opspatten te voorkomen.
3. Na het opwarmen goed roeren en even laten nagaren.
Nl-15
Nederland
2 Bevroren opwarmen
Aanbevolen
Accessoires
gewicht
Koken met startvertraging
Door gebruik van de Startvertraging/Standtijd knop kunt u het vertraagd starten van het koken programmeren.
b.v.
• Stel de vertragingstijd in door aan de
• Druk op
Tijd/Gewicht knop te draaien (tot 9 uur).
Startvertraging/Stan-dtijd.
• Stel het gewenste kookprogramma
en de kooktijd in.
• Druk op de startknop.
OPMERKING:
1. 3-fase koken kan samen met het koken met startvertraging worden geprogrammeerd.
bijvoorbeeld
Startvertraging: 1 uur
Hoog vermogen: 10 min.
Of
Sudderen: 20 min.
Of
5 keer
1 keer
2. Als de ingestelde vertragingstijd langer is dan 1 uur, dan wordt de tijd in minuten afgeteld. Als de tijd minder is dan 1 uur dan wordt de tijd in seconden afgeteld.
3. De startvertraging kan niet voor automatische programma's worden geprogrammeerd.
4. Als u de Delay/Stand knop 4 keer indrukt zal hulptekst worden uitgeschakeld. Om de hulptekst weer te laten verschijnen drukt u de Delay/Stand knop 4 keer in.
Standtijd
Met behulp van de Startvertraging/Standtijd knop kunt u de standtijd programmeren na het koken of gebruiken om de oven als een minuut timer te
programmeren.
b.v.
Of
• Stel het gewenste kookprogramma
en de kooktijd in.
• Druk op
Startvertraging/
Standtijd.
• Stel de vertragingstijd in door aan
de Tijd/Gewicht knop te draaien
(tot 9 uur).
• Druk op de startknop.
OPMERKING:
1. 3-fase koken kan samen met de standtijd worden geprogrammeerd.
bijvoorbeeld
Hoog vermogen: 4 min.
Hoog vermogen: 2 min.
Standtijd: 5 min.
Of
Of
1 keer
1 keer
2. Als de ovendeur tijdens de standtijd of minuut timer wordt geopend, dan wordt het aftellen van de tijd in het displayvenster voortgezet.
3. Deze functie kan ook als timer worden gebruikt. Druk in dit geval op Startvertraging/Standtijd, stel de tijd in en druk op Start.
Nl-16
Vragen en antwoorden
V: Waarom kan de oven niet worden
ingeschakeld?
V: Mijn magnetronoven stoort mijn TV-toestel. Is dit A: Er kan een bepaalde mate van storing op de radio en TV optreden wanneer de
magnetronoven wordt gebruikt. Deze storing is gelijk aan het soort interferentie dat
normaal?
veroorzaakt wordt door kleine huishoudelijke apparaten zoals mixers, stofzuigers,
haardrogers e.d. Dit duidt niet op een storing in uw magnetronoven.
V: De oven accepteert mijn programma niet.
Waarom?
A: De oven is zodanig ontworpen dat er geen verkeerd programma in werking wordt gesteld.
De oven accepteert bijvoorbeeld geen vierde fase of een automatisch gewichtprogramma
na het drukken op Startvertraging.
V: Soms komt er warme lucht uit de ventilatieopeningen van de oven. Waarom?
A: De warmte afkomstig van het bereiden van het voedsel verwarmt de lucht in de oven.
Deze warme lucht wordt de oven uitgeleid via het luchtstroompatroon in de oven. Deze
lucht bevat geen magnetronstraling. De ventilatie-openingen van de oven mogen nooit
geblokkeerd worden.
V: Er verschijnt een “D” in het uitlees-venster en de A: De oven heeft een geprogrammeerde DEMO-MODUS. Deze modus is ontwikkeld voor
weergave in winkels. Annuleer deze modus door drie keer op de kloktoets te drukken.
oven functioneert niet. Waarom?
V: Kan ik in de oven gebruik maken van een
gewone thermometer?
A: In de oven is de DEMO MODE functie geprogrammeerd. Deze functie is bedoeld voor
demonstratie in de winkel. Om deze functie te deactiveren drukt u de Microwave Power
knop een keer in en de Stop/Cancelknop 4 keer (NN-GD560M / NN-GD550W) of de Max
Microwave Power knop een keer en de Stop/Cancel knop 4 keer (NN-SD450W).
V: De magnetronfunctie van mijn oven werkt niet
meer en de melding 'H97' en 'H98' verschijnt in
de display.
A: Dit betekent dat er een probleem is met het systeem dat de microgolven opwekt. Neem
contact op met een erkend onderhoudscentrum.
V: De hulptekst staat niet meer op de display en ik
zie alleen nog cijfers.
A: Er kan sprake zijn van een stroomstoring waardoor de hulptekst is verdwenen. Trek de
stekker van de oven uit het stopcontact gedurende een paar seconden en plug de stekker
dan weer in. Als u “88:88” op de display ziet druk dan op de startknop totdat uw taal naar
keuze op de display verschijnt. Stel vervolgens de klok in. Zie pagina NI-7.
NN-GD560M / NN-GD550W
V: Tijdens het COMBINATIE koken hoor ik zoe
mende en klikkende geluiden in de oven. Wat is
de oorzaak van deze geluiden?
A: Deze geluiden worden veroorzaakt door het automatisch overschakelen van de oven van
MAGNETRONOVEN op GRILL voor het realiseren van de juiste combinatie-afstellingen.
Dit is normaal.
V: Tijdens het COMBINATIE koken of GRILLEN
komt er een onaangenaam luchtje uit mijn oven.
Waarom?
A: Na herhaaldelijk gebruik bevelen wij u aan om de magnetronoven te reinigen en zonder
voedsel, glazen plateau of draairing gedurende 5 minuten de grill aan te zetten. Op deze
manier worden alle voedselrestjes, vetaanslag etc., die de uchtjes en/of rook veroorzaken,
weggebrand.
Nl-17
Nederland
s
A: Controleer het volgende wanneer de oven niet kan worden ingeschakeld:
1. Is de stekker goed aangesloten? Neem de stekker uit het stopcontact, wacht tien
seconden en steek de stekker weer in het stopcontact.
2. Controleer de zekering en de stroomonderbreker. Reset stroomonderbreker of ver
vang de zekering als hij uitgeschakeld resp. doorgeslagen is.
3. Indien de stroomonderbreker of de zekering in orde zijn, probeer dan een ander
apparaat op het stopcontact aan te sluiten. Indien het andere apparaat werkt, is er
waarschijnlijk een probleem met de oven. Indien het andere apparaat niet werkt, is er
waarschijnlijk een probleem met het stopcontact. Indien het er naar uitziet dat er een
probleem met de oven is, moet contact opgenomen worden met een erkend service
centrum.
Verzorging van uw magnetronoven
1. Zet de oven uit alvorens hem te reinigen.
2. Houd de deurafdichtingen en de plaatsen hieromheen schoon. Als er
spatten en gemorste vloeistoffen vast zijn gaan zitten op de ovenwanden, deurafdichtingen en de plaatsen hieromheen, moeten deze
worden schoongemaakt met een vochtige doek. Als zij zeer vuil zijn
geworden mag gebruik gemaakt worden van een mild reinigingsmiddel. Het gebruik van agressieve reinigingsmiddelen of schuursponsjes wordt niet aanbevolen.
GEBRUIK GEEN COMMERCIËLE OVENREINIGERS. Gebruik geen
ruwe, schurende reinigingsmiddelen of scherpe metalen schrapers
om de ruit van de ovendeur te reinigen, aangezien deze het oppervlak kunnen krassen en het glas kunnen doen barsten.
3. De buitenzijde van de oven moet worden schoongemaakt met een
vochtige doek. Ter voorkoming van schade aan de onderdelen binnen in de oven, mag er geen water via de ventilatie-openingen naar
binnen sijpelen.
4. Indien het bedieningspaneel vuil wordt, moet dit met een zachte,
droge doek gereinigd worden. Gebruik geen agressieve reinigingsmiddelen of schuursponsjes op het bedieningspaneel. Bij het
reinigen van het bedieningspaneel moet de ovendeur open blijven
om te voorkomen dat de oven per ongeluk wordt ingeschakeld. Na
het schoonmaken moet de STOP/WIS-toets worden ingedrukt om
het uitleesvenster weer op de kloktijd te stellen.
5. Indien er aan de binnenkant van de ovendeur of rondom de
buitenkant hiervan stoomvorming plaatsvindt, veeg deze dan weg
met een zachte doek. Dit kan het geval kunnen zijn, wanneer de
magnetronoven wordt gebruikt in een ruimte met een hoge
vochtigheidsgraad; dit duidt niet op foutief functioneren van het
apparaat.
Nl-18
6. Van tijd tot tijd moet het glazen draaiplateau verwijderd worden om
het schoon te maken. Reinig het plateau in warm water met een
afwasmiddel of in een vaatwasmachine.
7. De draairing en de ovenbodem moeten regelmatig worden
gereinigd om ongewenste geluiden te voorkomen. Verwijder
het vuil op de bodem van de magnetronoven met een mild
schoonmaakmiddel en heet water, en maak hem daarna
droog met een schone doek. De draairing moet worden
afgewassen in een mild sopje. Bij een regelmatig gebruik
zetten zich kookdampen vast op de bodem en/of de wielen
van de draairing, maar tasten deze op geen enkele wijze
aan. Wanneer u de draairing uit de uitsparing in de grondplaat haalt
om hem schoon te maken, let er dan goed op dat de draairing weer
in de juiste positie terug geplaatst wordt.
8. Bij het GRILLEN of COMBINATIE (NN-GD560M/NN-GD550W)
koken zullen sommige voedsel soorten vetspatten op de ovenwanden veroorzaken. Indien de oven niet van tijd tot tijd gereinigd wordt,
kan hij tijdens het gebruik gaan “roken”.
9. Gebruik geen stoomreiniger voor het reinigen.
10. De magnetronoven mag uitsluitend door gekwalificeerd servicepersoneel worden gerepareerd. Neem voor onderhoud en reparaties
van de oven contact op met de dichtstbijzijnde erkende dealer.
11. Zorg ervoor dat de luchtuitlaten altijd vrij zijn. Controleer of alle luch
tuitlaten op de boven-, onder- of achterkant van de oven vrij zijn van
stof of ander materiaal. Een blokkering van de luchtuitlaten kan
oververhitting veroorzaken die een invloed kan hebben op de werking van de oven en mogelijk een gevaarlijke situatie kan opleveren.
12. Als u de oven niet schoon houdt, is het mogelijk dat de kwaliteit van
de oppervlakken vermindert waardoor de levensduur van het toestel verkort en er mogelijk gevaarlijke situaties ontstaan.
Technische specificaties
NN-SD450W
230 V, 50 Hz
Maximum;
Magnetron;
230 V, 50 Hz
2300 W
1100 W
Grill;
1350 W
Capaciteit:
Magnetron;
Grill-element;
1000 W (IEC-60705)
1300 W
Buitenafmetingen:
Binnenafmetingen:
Gewicht:
Geluidsniveau:
510 (B) x 380 (D) x 304 (H) mm
359 (B) x 352 (D) x 217 (H) mm
12.5Kg
50 dB
Netvoeding
Stroomverbruik:
Magnetron;
1100 W
Magnetron;
1000 W (IEC-60705)
s
510 (B) x 380 (D) x 304 (H) mm
359 (B) x 352 (D) x 217 (H) mm
11.5Kg
50 dB
De specificaties kunnen zonder nadere aankondiging worden gewijzigd.
Dit produkt voldoet aan de Europese standaard (EN 55011) voor EMC interferentie's (EMC = Elektromagnetische Compabiliteit).
Overeenkomstig deze standaard behoort dit produkt tot de groep 2 apparatuur, klasse B en voldoet deze aan alle normeringseisen.
Groep 2 houdt in dat de Frequentie energie wordt opgewekt in de vorm van elektromagnetische straling bedoeld voor het verwarmen en koken van
voedsel. Groep B informeert dat dit produkt toegepast kan worden voor normaal huishoudelijk gebruik.
Informatie over het weggooien van elektrische en elektronische apparatuur (particulieren)
Dit symbool betekent in Europa dat gebruikte elektrische en elektronische
producten niet bij het normale huishoudelijke afval mogen.
Lever deze producten in bij de aangewezen inzamelingspunten, waar ze gratis worden geaccepteerd en op de juiste manier worden
verwerkt, teruggewonnen en hergebruikt. In Nederland kunt u uw producten bij uw winkelier inleveren bij de aanschaf van een
vergelijkbaar nieuw product.
Wanneer u dit product op de juiste manier als afval inlevert, spaart u waardevolle hulpbronnen en voorkomt u potentiële negatieve
gevolgen voor de volksgezondheid en het milieu, die anders kunnen ontstaan door een onjuiste verwerking van afval. Neem contact
op met uw gemeente voor meer informatie over het dichtstbijzijnde
inzamelingspunt of raadpleeg www.nvmp.nl, www.ictoffice.nl of www.stibat.nl.
Voor zakelijke gebruikers in de Europese Unie
Neem voor het weggooien van elektrische en elektronische apparatuur contact op met uw leverancier voor verdere informatie.
Informatie over verwijdering van afval in landen buiten de Europese Unie
Dit symbool is alleen geldig in de Europese Unie.
Neem wanneer u dit product wilt weggooien, contact op met de lokale overheid of uw leverancier en vraag wat de juiste verwijderingsmethode is.
Uit hoofde van richtlijn 2004/108/EC, artikel 9(2)
Panasonic testcentrum
Panasonic Service Europe, een afdeling van Panasonic Marketing Europe GmbH
Winsbergring 15,22525 Hamburg, F.R. Duitsland
Geproduceerd door Panasonic Home Appliances Microwave Oven (Shanghai) Co., Ltd., 898 Longdong Road, Pudong, Shanghai, 201203, China.
Nl-19
Nederland
NN-GD560M / NN-GD550W
Installation et raccordement
Vérifiez lʼétat du four à micro-ondes
4.
Déballez le four et débarrassez-le de lʼensemble du matériel
dʼemballage. Examinez soigneusement lʼappareil afin de détecter toute
déformation, défectuosité du système de fermeture de la porte ou défaut
au niveau de la porte elle-même. Prévenez immédiatement votre revendeur si lʼappareil est endommagé. Nʼinstallez pas un four à micro-ondes
abîmé.
5.
6.
7.
8.
Instructions pour la mise à la terre
IMPORTANT : POUR VOTRE SECURITE, IL EST TRES IMPORTANT
QUE CET APPAREIL SOIT CORRECTEMENT MIS A LA TERRE.
Si la prise murale nʼest pas mise à la terre, le client se doit de la faire
remplacer par une prise murale correctement mise à la terre.
9.
Précaution concernant la tension dʼalimentation
Attention : Surfaces brûlantes
Emplacement du four
Ce modèle est conçu pour être placé sur un plan de travail ou encastré
dans une colonne. Il ne doit pas être installé dans un placard.
Si vous encastrez lʼappareil
Si vous souhaitez encastrer le four dans le mur, utilisez le kit dʼencastrement (blanc) NN-TKT59WFP/ (argenté) NN-TKT59MFP, disponible
auprès de votre revendeur Panasonic local.
1. Placez le four sur une surface plane et stable à plus de 85 cm audessus du sol.
2. Une fois le four installé, il suffit, pour isoler lʼappareil de la
source électrique, de retirer la fiche ou dʼutiliser un disjoncteur.
3. Afin de garantir une utilisation optimale du four, veillez à ce quʼil soit
suffisamment ventilé.
Si vous placez lʼappareil sur un plan de travail :
a. Laissez un espace de 15 cm en haut du four, de 10 cm à lʼarrière, de
5 cm dʼun côté du four et dʼau moins 40 cm de lʼautre côté.
b. Si vous placez le four à ras du mur, veillez à ce que lʼautre
côté ou le dessus du four soit totalement libre.
5cm
15cm
10cm
Côté libre
Plan de travail
10.
AVERTISSEMENT
1. Nettoyez les joints dʼétanchéité de la porte à lʼaide d'une éponge
humide. Vérifiez si lʼappareil ne présente pas de défauts au niveau
des joints dʼétanchéité. Si cʼest le cas, ne lʼutilisez plus avant
que ceux-ci aient été réparés par un technicien agréé par le
fabricant.
2. Ne tentez jamais de modifier, dʼajuster ou de réparer la porte,
le boîtier du panneau de commandes, les commutateurs de
verrouillage de sécurité ou tout autre élément du four. Ne retirez pas
le panneau arrière du four, car il sert de protection contre les microondes émises par le four.
Confiez exclusivement les réparations à du personnel qualifié.
3. Nʼutilisez pas lʼappareil si la PRISE ou le CORDON DʼALIMENTA
TION est endommagé, sʼil ne fonctionne pas correctement, sʼil est
abîmé ou sʼil est tombé. Il est dangereux de confier la réparation de
lʼappareil à une personne autre quʼun technicien formé par le
fabricant.
4. Si le câble dʼalimentation de cet appareil est endommagé,
remplacez-le par le câble spécial fourni exclusivement par le
fabricant.
5. Nʼautorisez pas les enfants à se servir du four sans surveillance, sauf
si vous leur avez donné au préalable les instructions adéquates leur
permettant de lʼutiliser dans des conditions de sécurité optimales et
sʼils sont parfaitement conscients des dangers qu'entraînerait une
mauvaise utilisation de celui-ci.
6. Les aliments et les liquides ne doivent pas être chauffés dans des
récipients fermés hermétiquement car ceux-ci risquent dʼexploser.
7. Ce four ne sera pas utilisé par des personnes (y compris des
enfants) dont les capacités sensorielles ou mentales sont réduites,
ou bien qui nʼont pas lʼexpérience ni les connaissances requises, à moins dʼêtre surveillées par une personne chargée de leur
sécurité ou dʼavoir reçu de cette personne les instructions nécessaires pour lʼutilisation de lʼappareil.
Fr-1
Français
Utilisez la tension indiquée sur le four à micro-ondes. Si on utilise une
tension supérieure à la tension spécifiée, lʼappareil risque de provoquer un
incendie ou dʼautres dégâts.
Ne placez pas le four à proximité dʼune cuisinière au gaz ou
électrique.
Ne retirez pas les pieds du four.
Ce four est destiné uniquement à usage domestique. Ne lʼutilisez
pas à lʼextérieur.
Nʼutilisez pas le four dans une pièce dont le taux dʼhumidité est très
élevé.
Evitez tout contact entre le cordon dʼalimentation et lʼextérieur de
lʼappareil et éloignez-le de toute surface chaude. Ne le laissez pas
pendre sur le bord dʼune table ou dʼun plan de travail. Evitez de
mouiller le cordon dʼalimentation, la prise ou le four.
Nʼobstruez pas les ouvertures dʼaération situées en haut et à
lʼarrière du four de manière à éviter toute surchauffe du four.
Un dispositif thermique de sécurité protège le four en cas de
surchauffe. Sʼil sʼenclenche, le four ne pourra fonctionner à
nouveau quʼaprès refroidissement.
Ce four ne doit pas être commandé par un minuteur externe ni par
un système de télécommande distinct.
Consignes de sécurité
Utilisation du four
Fonctionnement du ventilateur
1. Utilisez le four exclusivement à des fins culinaires. Ce four est
spécialement conçu pour réchauffer ou cuire des aliments. Ne
lʼutilisez pas pour réchauffer des produits chimiques ou tout
autre produit non alimentaire.
Le moteur du ventilateur s'enclenche pendant quelques minutes après
le fonctionnement du four, afin de refroidir les composants électriques.
Cela est parfaitement normal et vous pouvez retirer les mets cuisinés
pendant que le ventilateur tourne.
2. Vérifiez si les ustensiles et les plats utilisés conviennent aux fours à
micro-ondes.
Lampe du four
3. Ne tentez pas de sécher des journaux, des vêtements ou tout autre
matériau dans votre four à micro-ondes, car ceux-ci pourraient sʼenflammer.
4. Ne placez dans le four aucun objet autre que ses accessoires et ce
même si vous ne lʼutilisez pas, car celui-ci pourrait être fortuitement mis
en route.
5. Nʼutilisez jamais le four en mode MICRO-ONDES ou COMBINE
(NN-GD560/NN-GD550) SANS Y PLACER PREALABLEMENT DES
ALIMENTS. Cette interdiction ne sʼapplique pas au point 1 de la section
Utilisation des résistances ni au préchauffage du Panacrunch.
6. Si vous constatez la présence de fumée ou de flammes dans le four,
appuyez sur la touche Arrêt/Annulation et laissez la porte fermée de
manière à étouffer les flammes.
Débranchez le cordon dʼalimentation ou coupez le courant au niveau du
fusible ou du disjoncteur.
Utilisation du gril (NN-GD560M / NN-GD550W)
1. Avant dʼutiliser les modes COMBINE ou GRIL pour la première fois,
essuyez lʼhuile présente dans le four, puis faites chauffer lʼappareil en
mode Gril pendant 10 minutes, et ce sans aliment ni accessoire. Cette
opération permet de brûler lʼhuile de protection. Il sʼagit là du seul cas
où le four peut être utilisé à vide.
2. Les parois extérieures du four, les ouvertures dʼaération présentes sur
le capot et la porte du four sʼéchauffent lorsque vous utilisez les modes
COMBINE et GRIL. Prenez garde de ne pas vous brûler en ouvrant et
en refermant la porte ou en manipulant les aliments et les accessoires.
3. En cas dʼutilisation des modes COMBINE et GRIL, les deux résistances
présentes dans la partie supérieure du four sont brûlantes.
N.B. : Les différents accessoires du four sont également très
chauds.
4. Les parties accessibles pourront devenir incandescentes en mode grill
et combiné. Tenir les enfants éloignés de lʼappareil.
5. Lorsque le four est utilisé en mode de cuisson combinée, les enfants ne
devront sʼen servir que sous surveillance en raison des hautes températures qui sont produites.
Fr-2
Si vous devez remplacer la lampe du four, adressez-vous à votre revendeur.
Accessoires
Le four est fourni avec toute une série dʼaccessoires. Utilisez-les toujours conformément aux instructions.
Plateau tournant en verre
1. Utilisez le four uniquement si lʼanneau à roulettes et le plateau tournant en verre sont en place.
2. Nʼutilisez jamais un autre plateau tournant en verre que celui
spécialement conçu pour votre four.
3. Si le plateau tournant en verre est chaud, attendez quʼil
refroidisse pour le nettoyer ou le plonger dans lʼeau.
4. Le plateau tournant en verre peut pivoter dans les deux sens.
5. Si les aliments ou le plat disposés sur le plateau tournant en verre
touchent les parois du four et lʼempêchent de tourner, celui-ci pivote
automatiquement dans la direction inverse. Cʼest normal.
6. Ne cuisez pas dʼaliments à même le plateau tournant en verre.
Anneau à roulettes
1. Nettoyez régulièrement lʼanneau à roulettes et la sole du four afin de
réduire les nuisances dues aux bruits ainsi que lʼaccumulation de
particules de nourriture.
2. Utilisez toujours lʼanneau à roulettes avec le plateau tournant en
verre pour la cuisson des aliments.
Trépied métallique (NN-GD560M / NN-GD550W)
1. Le trépied métallique facilite la coloration des aliments et favorise la
circulation de la chaleur.
2. En mode COMBINE, ne mettez jamais de récipient métallique en
contact direct avec le trépied métallique.
3. N'utilisez pas le trépied en mode MICRO-ONDES uniquement.
Panacrunch (NN-GD560M / NN-GD550W) - Voir page Fr-14
Informations importantes
1) Temps de cuisson
a) Evitez dʼutiliser des récipients à bords droits et goulots étroits.
• Les temps de cuisson indiqués dans le livre de recettes sont
approximatifs. Ils dépendent des conditions, de la température, de la
quantité de nourriture ainsi que du type de récipient utilisé.
b) Ne surchauffez pas les liquides.
• Commencez toujours par le temps de cuisson minimum : si un
plat nʼest pas assez cuit, vous pourrez toujours le remettre dans le four
pour terminer la cuisson.
d) Une fois le liquide réchauffé, laissez-le reposer un court instant dans
le four, puis remuez-le de nouveau avant de retirer précautionneusement le récipient du four.
N.B. : Tout dépassement du temps de cuisson recommandé
risque d'abîmer les aliments. Dans des cas extrêmes, ceux-ci peuvent même sʼenflammer et endommager lʼintérieur du four.
c) Remuez le liquide avant de le verser dans le récipient et à
mi-cuisson.
7) Papier/plastique
Si vous réchauffez des aliments dans des barquettes en plastique
ou en papier, surveillez régulièrement la cuisson, car ces matériaux ont tendance à sʼenflammer en cas de surchauffe.
•
Nʼutilisez aucun papier recyclé (par exemple du papier essuie-tout),
sauf sʼil est stipulé quʼil convient aux fours à micro-ondes. En effet,
les papiers recyclés contiennent des impuretés qui peuvent provoquer des étincelles ou sʼenflammer en cours de cuisson.
•
Avant de placer un sac dans le four, retirez les liens métalliques de
fermeture.
2) Petites quantités de nourriture
• Si vous cuisez trop longtemps de petites quantités de nourriture ou des
aliments peu riches en eau, ceux-ci peuvent se dessécher, se consumer, voire s'enflammer. Si les aliments s'enflamment dans le four,
maintenez la porte fermée, mettez le four en position Arrêt et
débranchez le cordon dʼalimentation.
3) Œufs
• Ne préparez pas des oeufs à la coque ou des oeufs durs en mode
MICRO-ONDES. Ils risquent dʼexploser sous lʼeffet de la pression,
même lorsque la cuisson est terminée.
4) Aliments à peau
• Les aliments à peau ou enveloppe imperméable tels que les pommes
de terre, les jaunes dʼœufs et les saucisses doivent être piqués avant
dʼêtre cuits dans le FOUR A MICRO-ONDES afin dʼéviter quʼils
nʼéclatent.
8) Ustensiles/Papier aluminium
•
Ne réchauffez pas des canettes ou des bouteilles fermées, car
celles-ci pourraient exploser.
•
Evitez dʼutiliser des récipients et des plats métalliques dans votre
four à micro-ondes, car ceux-ci provoqueraient des étincelles.
•
Si vous utilisez du papier aluminium, des brochettes ou des
barquettes métalliques, la distance entre ces matériaux et les
parois du four doit être de 2 cm minimum afin dʼéviter les
étincelles.
5) Thermomètre à viande
• Utilisez un thermomètre à viande pour vérifier le degré de cuisson des
rôtis et des volailles uniquement lorsque ceux-ci ont été retirés du four.
Il est déconseillé dʼutiliser un thermomètre à viande conventionnel si
vous utilisez les modes MICRO-ONDES et COMBINE afin dʼéviter les
étincelles.
9) Biberons et aliments pour bébés
•
Enlevez toujours la partie supérieure, la tétine ou le couvercle des
biberons ou des petits pots pour bébés avant de les placer dans le
étincelles.
6) Liquides
•
Mélangez ou agitez le contenu des biberons et des petits pots.
• Lorsque vous réchauffez des liquides, notamment de la soupe, des
sauces et des boissons dans votre four à micro-ondes, ils peuvent
dépasser le point dʼébullition sans que vous remarquiez lʼapparition de
bulles. Cela peut entraîner un débordement soudain du liquide chaud.
Pour éviter cet inconvénient, respecter les règles suivantes. :
•
Vérifiez toujours la température des aliments avant de les
proposer à lʼenfant afin dʼéviter quʼil se brûle.
Fr-3
Français
•
Schéma descriptif
[8b]
[13]
[8a]
[6]
[4]
[12]
[5]
[2]
[1]
[7]
[3]
[9]
[10]
[11]
1.
Touche d'ouverture de la porte
Si on ouvre la porte du four pendant quʼil est en marche, il sʼarrête de fonctionner sans toutefois que les instructions de
programmation soient annulées. Pour poursuivre la cuisson, refermez la porte, puis appuyez sur la touche Marche.
Lʼintérieur du four sʼéclaire dès que vous ouvrez la porte. Pressez pour ouvrir la porte.
2.
Fenêtre du four
3.
Système de verrouillage de sécurité de la porte
4.
Ouverture dʼaération du four
5.
Panneau de commandes
6.
Plateau tournant en verre
7.
Anneau à roulettes
8a
Ouvertures dʼaération externes du four
8b. Ouvertures dʼaération externes du four (NN-GD560M / NN-GD550W)
9.
Trépied métallique (NN-GD560M / NN-GD550W)
10. Panacrunch (NN-GD560M / NN-GD550W)
11. Manche amovible pour Panacrunch (NN-GD560M / NN-GD550W)
12. Câble électrique
13. Sticker dʼavertissement (surfaces chaudes) (NN-GD560M / NN-GD550W)
Fr-4
Panneau de commandes
NN-GD560M / NN-GD550W*
1.
2.
3.
4.
5.
(1)
(2)
(8)
(4)
(5)
(9)
(6)
(7)
Français
(3)
Fenêtre dʼaffichage
Puissances Micro-ondes
Puissances Gril
Modes combinés
Touche de décongélation automatique en fonction
du poids.
6. Touche Minuteur/Départ différé
7. Touche Horloge
8. Sélecteur de cuisson Automatique
9. Sélecteur Durée/Poids
10. Touche Arrêt/Annulation:
Avant la cuisson: Appuyez une fois sur cette
touche pour effacer les instructions.
Pendant la cuisson:
Appuyez une fois sur cette touche pour interrompre
momentanément la cuisson. Appuyez une nouvelle
fois pour annuler toutes vos instructions et afficher
lʼheure.
11. Touche Marche:
Appuyez une fois sur cette touche pour mettre en
marche le four. Si vous ouvrez la porte ou si vous
appuyez une seule fois sur la touche
Arrêt/Annulation, vous devez à nouveau appuyer sur la
touche Marche pour poursuivre la cuisson.
design du panneau de commandes de votre four peut dif* Le
férer légèrement de celui illustré. Les fonctions sont néan(10)
(11)
Bips sonores
Un bip sonore retentit chaque fois
que vous appuyez sur un bouton.
Si ce nʼest pas le cas, cela signifie que lʼinstruction est refusée.
Deux signaux sonores sont émis
entre chaque étape de cuisson et
cinq lorsque la cuisson est terminée.
moins identiques.
REMARQUES :
Si un programme est choisi et que le bouton Marche n'est
pas appuyé, après 6 minutes, le four annulera automatiquement l'opération. L'affichage reviendra en mode horloge.
Ce four est équipé dʼune fonction dʼéconomie dʼénergie.
N.B. :
1. Lorsquʼil est en mode veille, la luminosité de lʼaffichage
sera réduite.
2. Le four se mettra en mode veille au moment où il est
branché à lʼalimentation et après la dernière opération.
Fr-5
Panneau de commandes
NN-SD450W*
1.
2.
3.
(1)
4.
5.
6.
7.
8.
(6)
(2)
9.
(7)
(3)
Fenêtre dʼaffichage
Puissances Micro-ondes
Touche de décongélation automatique en fonction
du poids.
Touche Minuteur/Départ différé
Touche Horloge
Sélecteur de cuisson Automatique
Sélecteur Durée/Poids
Touche Arrêt/Annulation:
Avant la cuisson:
Appuyez une fois sur cette touche pour effacer
les instructions.
Pendant la cuisson:
Appuyez une fois sur cette touche pour interrompre momentanément la cuisson.
Appuyez une nouvelle fois pour annuler toutes
vos instructions et afficher lʼheure.
Touche Marche:
Appuyez une fois sur cette touche pour mettre
en marche le four. Si vous ouvrez la porte ou si
vous appuyez une seule fois sur la touche
Arrêt/Annulation, vous devez à nouveau appuyer
sur la touche Marche pour poursuivre la cuisson.
(4)
(5)
(8)
(9)
Bips sonores
Un bip sonore retentit chaque fois
que vous appuyez sur un bouton.
Si ce nʼest pas le cas, cela signifie
que lʼinstruction est refusée. Deux
bips sonores sont émis entre
chaque étape de cuisson et cinq
lorsque la cuisson est terminée.
Fr-6
REMARQUES :
Si un programme est choisi et que le bouton Marche n'est
pas appuyé, après 6 minutes, le four annulera automatiquement l'opération. L'affichage reviendra en mode horloge.
Ce four est équipé dʼune fonction dʼéconomie dʼénergie.
N.B. :
1. Lorsquʼil est en mode veille, la luminosité de lʼaffichage
sera réduite.
2. Le four se mettra en mode veille au moment où il est
branché à lʼalimentation et après la dernière opération.
Affichage du mode d'emploi
Commandes et mode d'emploi
branchez le four
88:88
mode d'emploi
“FRANCAIS”
En français
Appuyez sur la touche
“ITALIANO”
En italien
Appuyez sur la touche
“DEUTSCH”
En allemand
Appuyez sur la touche
“NEDERLANDS”
En néerlandais
Appuyez sur la touche
ESPANOL
En espagnol
“POLSKI”
En polonais
Appuyez sur la touche
“CESKY”
En tchèque
Appuyez sur la touche
“ENGLISH”
En Anglais
Appuyez sur la touche
“DANSK”
En Danois
Appuyez sur la touche
“SUOMI”
En Finnois
Appuyez sur la touche
“SVENSKA”
En Suédois
Appuyez sur la touche
“NORSK”
En Norvégien
Appuyez sur la touche
Réglage de lʼhorloge :
• Pressez une fois la touche Horloge.
Le deux-points (:) commence à clignoter.
Cet appareil est équipé d'un mode d'emploi
défilant unique qui vous aide à l'utiliser.
Après avoir branché le four, appuyez sur la
touche « Start » (Démarrage) jusquʼà ce que
votre langue sʼaffiche. Lorsque vous
appuyez sur les touches, lʼaffichage fera
apparaître lʼinstruction suivante, éliminant
ainsi le risque dʼerreurs. Si, pour une raison
ou une autre, vous souhaitez changer la
langue qui est affichée, débranchez le four et
répétez cette procédure.
Si vous appuyez 4 fois sur la touche «
Minuteur/Départ différé, le mode d'emploi
défilant sera désactivé. Pour le réactiver,
pressez 4 fois la touche Minuteur/Départ différé.
Français
Appuyez sur la touche
UNIQUEMENT SUR
MODELE NN-SD450W
Exemple : Pour régler lʼheure sur 12:00
• Affichez lʼheure en tournant le
sélecteur Durée/Poids.
Lʼheure apparaît sur lʼaffichage tandis que le
deux-points (:) clignote.
• Pressez la touche Horloge.
Le deux-points (:) cesse de clignoter et l'heure est mémorisée.
REMARQUES :
1. Pour remettre lʼhorloge à lʼheure, répétez la procédure ci-dessus.
2. Lʼheure est affichée en permanence, sauf en cas de coupure de courant.
3. Cette horloge s'affiche sur 24 heures.
Fr-7
Commandes et mode d'emploi
Verrouillage de sécurité enfant
Ce système rend les commandes du four inutilisables, à lʼexception de la porte qui peut toujours être ouverte. Vous pouvez régler le verrouillage de
sécurité enfant lorsque lʼheure ou le deux-points (:) est affiché.
Pour le désactiver :
Pour lʼactiver :
•
Appuyez trois fois sur la touche Marche.
Lʼheure disparaît de lʼaffichage (mais nʼest cependant pas
effacée) tandis quʼun astérisque (E) apparaît.
•
Appuyez trois fois sur la touche Arrêt/Annulation.
Lʼheure apparaît de nouveau sur lʼaffichage.
NOTE : Pour activer le verrouillage de sécurité enfant, appuyez 3 fois sur la touche « Start » en lʼespace de 10 secondes.
Cuisson et décongélation aux micro-ondes
Votre four possède cinq niveaux de puissance de micro-ondes. Le tableau ci-dessous indique la puissance en watts approximative de chaque niveau.
Accessoire utilisé :
NN-GD560M / NN-GD550W
Pressez
NN-SD450W
Plateau en verre
Une fois
2 fois
3 fois
4 fois
5 fois
Niveau de
puissance
Max
Décongélation
Moyen
Doux
Mijotage
Watts
1000 W
270 W
600 W
440 W
250 W
NN-GD560M / NN-GD550W
Ou
• Pressez la touche pour
choisir la puissance des
micro-ondes.
• Sélectionnez la puissance des microondes.
• Réglez la durée de cuisson à lʼaide du sélecteur Durée/Poids
(Durée sur MAX : 30 minutes max. Autres puissances : 99
minutes maximum).
• Appuyez sur la
touche Marche.
REMARQUES :
1. Vous pouvez éventuellement modifier la durée de cuisson pendant la cuisson proprement dite. Tournez alors le sélecteur
Durée/Poids pour augmenter ou diminuer la durée de cuisson. Vous pouvez augmenter/diminuer la durée par pas de 1 minute, jusquʼà 10 minutes
maximum. Si vous ramenez le sélecteur sur la position zéro (0), vous mettez fin à la cuisson.
2. Si vous tounez directement le sélecteur de durée sans choisir au préalable le niveau de puissance , la puissance 1000 W sera automatiquement
sélectionnée.
3. Vous pouvez enchaîner jusqu'à 3 étapes de cuisson. Pour cela , avant de presser la touche Marche, choisissez une deuxième (troisième) puissance
et sa durée. Pour cuire par exemple un ragoût, cuire sur Max pendant 10 min pour porter à ébullition, puis cuire sur Mijotage pendant 60 min.
4. Vous pouvez utiliser cette option d'enchaînement pour programmer avec la touche Minuteur un temps de repos après cuisson.
Fr-8
Cuisson au gril (NN-GD560M / NN-GD550W)
Accessoires utilisés :
Trépied métallique
Plateau en verre
• Choisissez la puissance de
Gril désirée. Pressez 1 fois
pour Gril Fort (1), 2 fois pour
Gril moyen (2) ou 3 fois pour
Gril faible (3).
Vous pouvez choisir 3 puissances de Gril.
1 pression
Gril 1
1300 W
2 pressions
Gril 2
950 W
3 pressions
Gril 3
700 W
• Réglez la durée de cuisson à lʼaide du sélecteur
Durée/Poids (99 minutes maximum).
• Appuyez sur la touche
Marche.
1. Le gril ne fonctionne que lorsque la porte du four est fermée.
2. Vous pouvez éventuellement modifier la durée de cuisson pendant la cuisson proprement dite. Tournez alors le sélecteur
Durée/Poids pour augmenter ou diminuer la durée de cuisson. Vous pouvez augmenter/diminuer la durée par pas de 1 minute, jusquʼà 10 minutes
maximum. Si vous ramenez le sélecteur sur la position zéro (0), vous mettez fin à la cuisson.
Cuisson combinée (NN-GD560M / NN-GD550W)
Accessoires utilisés :
Le mode de cuisson combinée comprend trois réglages. Le tableau cidessous indique la puissance en watts approximative de chaque réglage.
Trépied
métallique
Plateau en
verre
Plateau en
verre
• Choisir la cuisson
combinée désirée. (voir
tableau).
Cuisson
combinée
Pressez
Puissance
gril
Micro-ondes
Affichage
1
2
3
1 fois
2 fois
3 fois
1300 W
1300 W
1300 W
600W
440W
250W
G1-600W
G1-440W
G1-250W
• Réglez la durée de cuisson à lʼaide du sélecteur
Durée/Poids (99 minutes maximum).
• Appuyez sur la
touche Marche.
REMARQUES :
1. Le gril ne fonctionne que lorsque la porte du four est fermée.
2. Vous pouvez éventuellement modifier la durée de cuisson pendant la cuisson proprement dite. Tournez alors le sélecteur
Durée/Poids pour augmenter ou diminuer la durée de cuisson. Vous pouvez augmenter/diminuer la durée par pas de 1 minute, jusquʼà 10 minutes
maximum. Si vous ramenez le sélecteur sur la position zéro (0), vous mettez fin à la cuisson.
Fr-9
Français
REMARQUES :
Décongélation automatique
Cette fonction vous permet de décongeler des aliments congelés selon leur poids. Sélectionnez la catégorie dʼaliment et affichez le poids. Le poids
s'affiche en grammes. Pour accélérer la sélection, lʼaffichage indique dʼabord le poids le plus fréquemment utilisé avec chaque catégorie dʼaliment.
• Sélectionnez le programme de décongélation automatique désiré. Appuyez
une fois pour les petites pièces et deux
fois pour les grosses pièces et les rôtis.
Programme
Affichage
• Affichez le poids de l'aliment à décongeler à l'aide du sélecteur
Durée/Poids. Une rotation lente du sélecteur fera défiler le poids par pas
de 10 g. Une rotation rapide le fera défiler par pas de 100 g.
Poids min-max recommandé
Aliments convenant à ces programmes
• Appuyez sur la
touche Marche.
1Petites pièces
PETITES
PIECES
150 - 1600g
Petits morceaux de viande, escalopes, saucisses, filets de poisson, steaks, côtelettes
(de 100 à 400 grammes chacun).Au bip sonore, retournez lʼaliment.
2 Rôtis
GROSSE
PIECE
400 - 2400g
Grosse pièce de viande, rôti, poulet entier, poisson entier.
Au bip sonore, retournez lʼaliment.
REMARQUES :
1. Quand la durée de décongélation est supérieure à 60 minutes, elle est affichée en heures et minutes.
2. La forme et la taille de lʼaliment déterminent le poids maximal que le four peut décongeler.
3. Pour plus dʼinformations, consultez les instructions de décongélation du manuel de cuisson.
Programmes automatiques selon le poids
Cette fonction vous permet de cuire ou réchauffer la plupart des aliments courants simplement en affichant le poids. Le four détermine automatiquement le niveau de puissance des micro-ondes, la puissance du gril (NN-GD560M / NN-GD550W) et la durée de cuisson. Sélectionnez la catégorie et
le poids de lʼaliment. Le poids s'affiche en grammes. Pour accélérer la sélection, lʼaffichage indique dʼabord le poids le plus fréquemment utilisé avec
chaque catégorie dʼaliment.
NN-GD560M/
NN-GD550W
NN-SD450W
ex.
• Sélectionnez la cuisson de l'aliment désiré en
tournant le sélecteur de cuissons Auto. Les
cuissons automatiques s'affichent successivement
dans la fenêtre.
• Affichez le poids de l'aliment à l'aide du sélecteur
Durée/Poids. Une rotation lente du sélecteur fera défiler le
poids par pas de 10 g. Une rotation rapide le fera défiler par
pas de 100 g.
REMARQUES :
1. Quand la durée de cuisson est supérieure à 60 minutes, elle est affichée en heures et minutes.
2. Pour plus dʼinformations sur le poids et les accessoires à utiliser, consultez les tableaux des pages suivantes.
Fr-10
• Appuyez sur
la touche
Marche.
Programmes automatiques selon le poids
NN-GD560M / NN-GD550W
Poids recom- Accessoire
mandé
Programme
Affichage
1 Réchauffage dʼune
tasse
1 TASSE
150g
Pour réchauffer une tasse de boisson (thé, café, lait et soupe).
Sélectionnez ce programme Tasse, affichez le poids (150 ml) et
pressez la touche Marche.
2 Réchauffage dʼun bol
1BOL
300g
Pour réchauffer un bol de boisson (thé, café, lait, soupe).
Sélectionnez ce programme Bol, affichez le poids (300 ml) et pressez
la touche Marche.
PLAT
FRAIS
4 Réchauffage dʼun plat
surgelé
PLAT
SURGELE
5 Cuisson des légumes
frais
6 Cuisson des légumes
surgelés
LEGUMES
FRAIS
200 - 1500g
Pour réchauffer un plat cuisiné (avec ou sans sauce).
Tous les aliments doivent être précuits et doivent être à température
ambiante ou réfrigérée.
Remuez au bip sonore et respectez quelques minutes de temps de
repos en fin de réchauffage.
200 - 1200g
Pour réchauffer un plat cuisiné surgelé. Tous les aliments doivent
être précuits et surgelés. Remuez aux bip sonores. Remuez encore
une fois à la fin de cuisson et respectez quelques minutes de temps de
repos.
250 - 1500g
Pour cuire des légumes frais. Placez les légumes préparés dans un
récipient de taille adéquate. Ajoutez 100 ml (9 c. à s.) dʼeau et couvrez
le tout à lʼaide dʼun couvercle ou de film alimentaire percé. Mélangez
au bip sonore.
LEGUMES
SURGELES 300 - 1000g
7 Cuisson du poisson
frais
POISSON
FRAIS
8 Cuisson du
poisson
surgelé
POISSON
SURGELE
150 - 1000g
200 - 900g
Pour cuire des légumes surgelés.Placez les légumes dans un récipient de taille adéquate et ajoutez 40 ml (3 c. à s.) dʼeau. Couvrez à
lʼaide dʼun couvercle ou de film alimentaire percé. Au bip sonore,
mélangez.
Pour cuire des filets de poisson frais. Repliez les parties plus fines
ou disposez-les vers le milieu d'un plat de taille appropriée. Ajoutez 1 à
2 c. à s. de liquide. Couvrez d'une assiette ou d'un film étirable percé.
Pour cuire des filets de poisson surgelés. Placez le poisson dans un
récipient de taille adéquate et ajoutez 30 ml dʼeau. Couvrez à lʼaide
dʼun couvercle ou de film alimentaire percé.
Quelques conseils pour réchauffer une tasse ou un bol.
1. Remuez le liquide avant de le réchauffer (un liquide non-mélangé avant peut déborder lors du réchauffage).
2. Ne pas couvrir des boissons chaudes comme le thé ou le café. Couvrir la soupe avec une soucoupe afin dʼéviter les projections.
3. Remuez à la fin du réchauffage et respectez un temps de repos.
Fr-11
Français
3 Réchauffage dʼun plat
frais
Mode d'emploi
Programmes automatiques selon le poids
NN-GD560M / NN-GD550W
Programme
Affichage
9 Pain
surgelé
PAIN
10 Morceaux
de poulet
VOLAILLE
MORCEAUX
200 - 1200g
11 Poulet entier
VOLAILLE
ENTIERE
1000 - 2200g
Pour cuire une pintade, une canette ou un poulet frais entier.
Placez le poulet dans un plat résistant à la chaleur. Retournez la volaille
au bip sonore.
12 Lasagne/
gratin
surgelé
GRATIN
SURGELE
300 - 1000g
Pour réchauffer et gratiner des lasagnes ou un gratin
surgelé. Transférez le gratin de sa barquette dans un plat allant au four,
lui-même posé sur le plateau de verre.
Fr-12
Poids recommandé
50 - 500g
Accessoire
Mode d'emploi
Pour réchauffer du pain, des croissants et des petits pains déjà
cuits et surgelés. Déballez entièrement et placez lʼaliment sur le
trépied métallique, lui-même posé sur le plateau en verre. Retournez au
bip sonore.
Pour cuire des morceaux de poulet, notamment des cuisses, des
ailes ou des pilons. Placez les morceaux bien étalés dans un plat
allant au four posé sur le trépied. Pour une coloration plus uniforme,
retournez les morceaux au bip sonore.
Programmes automatiques selon le poids en Panacrunch
Les programmes Panacrunch (NN-GD560M / NN-GD550W)
1. Sélectionnez le programme
désiré et placez le Panacrunch
dans le four, directement sur le
plateau en verre.
2. Appuyez sur la touche Marche
pour préchauffer le Panacrunch.
Affichage
13 Pizza
fraîche
PIZZA
FRAICHE
14 Pizza
surgelée
Poids recommandé
4. Appuyez sur la touche Marche.
Français
Programme
3. Une fois le préchauffage terminé, le signal sonore retentit.
Posez les aliments sur le plat,
affichez le poids.
Accessoire
Mode d'emploi
150 - 600g
Pour réchauffer des pizzas du commerce, déjà cuites et
réfrigérées.
Déballez entièrement et posez la pizza sur le Panacrunch préchauffé. Ne convient pas aux Flammekuche.
PIZZA
SURGELEE
150 - 600g
Pour réchauffer des pizzas du commerce, déjà cuites et
surgelées.
Déballez entièrement et posez la pizza sur le Panacrunch préchauffé.
Ne convient pas aux Flammekuche ni aux pizzas de type "cuit et lève".
QUICHE
FRAICHE
150 - 700g
Pour réchauffer les quiches du commerce, cuites et réfrigérées.
Déballez entièrement et posez la quiche sur le Panacrunch préchauffé.
16 Quiche
surgelée
QUICHE
SURGELEE
150 - 500g
Pour réchauffer les quiches du commerce, cuites et surgelées.
Déballez entièrement et posez la quiche sur le Panacrunch préchauffé.
17 Frites à four
surgelées
FRITES A
FOUR
200 - 500g
Pour réchauffer les frites à four surgelées.
Répartissez les frites sur le Panacrunch préchauffé. Pour un résultat
optimal, étalez les frites en une seule couche et remuez au bip
sonore.
15 Quiche
fraîche
Fr-13
Le Panacrunch (NN-GD560M / NN-GD550W)
A quoi sert un Panacrunch Panasonic ?
Remarques :
Certains aliments tels que les pizzas, les tartes ou les quiches ne se
réchauffent pas aussi bien dans un four micro-ondes que dans un four
conventionnel. Trop souvent le dessous des aliments reste humide et la
pâte molle. L'accessoire "Panacrunch" remédie à cet inconvénient en rendant plus croustillants et dorés les fonds de pâte de ces aliments. En effet,
la base du plat absorbe les micro-ondes et les restitue sous forme de
chaleur. Ainsi l'aliment bénéficie d'un triple mode de cuisson : direct par
les micro-ondes, par conduction du plat vers la base de l'aliment et le gril
colore le dessus. Le revêtement anti-adhésif optimise cette accumulation
de chaleur.
1. Ne préchauffez pas le Panacrunch pendant plus de 8 minutes.
Pour réchauffer de façon satisfaisante des Flammekueche ou des
pizzas à pâte très fine, il est souhaitable de préchauffer le
Panacrunch 4 à 5 minutes.
2. Placez toujours le Panacrunch au centre du plateau tournant en
verre et assurez-vous quʼil ne touche pas la paroi de la cavité du
four, car cela risquerait de provoquer des étincelles susceptibles
dʼendommager la cavité.
3. Utilisez toujours le Panacrunch avec le plateau tournant en verre, et
non avec le trépied métallique.
4. Utilisez toujours des gants de protection ou la poignée amovible
lorsque vous manipulez le plat quand il est chaud.
5. Avant de commencer la cuisson, assurez-vous que vous avez bien
retiré tous les emballages de lʼaliment.
6. Ne posez jamais dʼustensile sensible à la chaleur sur le
Panacrunch, car il risquerait de brûler.
7. Vous pouvez utiliser le Panacrunch dans un four traditionnel.
8. Pour un résultat optimal, n'utilisez le Panacrunch qu'en mode combiné Micro-ondes + gril.
Utilisation du Panacrunch (utilisation manuelle)
• Pour un résultat optimal, préchauffez le Panacrunch avant de lʼutiliser.
Posez-le directement sur le Panacrunch tournant en verre et préchauf
fez-le en mode combiné N°= 1 (G1- 600W) pendant 3 minutes. Pour
faciliter la coloration des aliments tels que les saucisses et les steacks
hachés,huilez légèrement le plat avant de le préchauffer.
• Retirez le Panacrunch du four et posez les aliments dessus. Comme le
Panacrunch est extrêmement chaud, utilisez la poignée amovible ou des
gants de protection. Pour un résultat optimal, il est important de poser
les aliments sur le Panacrunch immédiatement après lʼavoir préchauffé.
Un délai nuirait immanquablement aux performances.
• Posez le Panacrunch sur le plateau tournant en verre et cuisez lʼaliment
conformément aux instructions du tableau de cuisson qui figure dans le
manuel de cuisson.
Fr-14
Entretien du Panacrunch
• Ne pas utiliser d'ustensile tranchant, car cela endommagerait le
revêtement antiadhésif du Panacrunch. Ne pas faire tomber le
Croustiplat au risque de le déformer.
• Après utilisation, nettoyez le Panacrunch avec de lʼeau chaude et du
savon, puis rincez-le à lʼeau chaude. Nʼutilisez pas d'éponge abrasive ou de tampon à récurer, car cela endommagerait la surface du
Panacrunch.
• Le Panacrunch peut être lavé dans un lave-vaisselle.
Programmes automatiques selon le poids
NN-SD450W
Programme
1 Réchauffage des plats
cuisinés frais
2 Réchauffage des plats
cuisinés surgelés
Poids
recommandé Accessoire
PLAT FRAIS 200 - 1500g
PLAT
SURGELE
LEGUMES
FRAIS
Mode d'emploi
Pour réchauffer des plats cuisinés (avec ou sans sauce). Tous les
aliments doivent être à température ambiante ou réfrigérée. Au bip
sonore, remuez l'aliment. Laissez reposer quelques minutes.
200 - 1200g
Pour réchauffer des plats cuisinés précuits et surgelés. Remuez
lʼaliment aux bips sonores. En fin de cuisson, remuez à nouveau lʼaliment et laissez-le reposer quelques minutes.
250 - 1500g
Pour cuire des légumes frais. Placez les légumes préparés dans un
récipient de taille adéquate. Ajoutez 100 ml (9 c. à s.) dʼeau et couvrez
le tout à lʼaide dʼun couvercle ou de film alimentaire percé. Au bip
sonore, remuez les grandes quantités.
300 - 1000g
Pour cuire des légumes surgelés. Placez les légumes dans un récipient de taille adéquate et ajoutez 40 ml (3 c. à s.) dʼeau. Couvrez
légèrement à lʼaide dʼun couvercle ou de film alimentaire percé. Au bip
sonore, remuez les légumes.
150 - 1000g
Pour cuire des filets de poisson frais. Repliez les parties plus fines
ou disposez-les vers le milieu d'un plat de taille appropriée. Ajoutez 30
ml de liquide. Couvrez d'une assiette ou d'un film étirable percé.
4 Cuisson des légumes
surgelés
LEGUMES
SURGELES
5 Cuisson du poisson
frais
POISSON
FRAIS
6 Cuisson du poisson
surgelé
POISSON
SURGELE
200-900g
Pour cuire des filets de poisson surgelés. Placez le poisson dans un
récipient de taille adéquate et ajoutez 1 à 2 c. à s. dʼeau. Couvrez
légèrement à lʼaide dʼun couvercle ou de film alimentaire percé.
7 Réchauffage dʼune
tasse
1 TASSE
150g
Pour réchauffer une tasse de boisson (thé, café, lait et soupe).
Seléctionnez le programme Tasse, affichez le poids (150 ml) et pressez
la touche Marche.
8 Réchauffage dʼun bol
1 BOL
300g
Pour réchauffer un bol de boisson (thé, café, lait, soupe).
Seléctionnez le programme Bol, affichez le poids (300 ml) et pressez la
touche Marche.
2 BOLS
600g
Pour réchauffer deux bols de boisson (thé, café, lait, soupe).
Seléctionnez le programme 2 Bols, affichez le poids (600 ml) et pressez
la touche Marche.
9 Réchauffage de 2 bols
Quelques conseils pour réchauffer une tasse ou un bol.
1. Remuez le liquide avant de le réchauffer (un liquide non-mélangé avant peut déborder lors du réchauffage).
2. Ne pas couvrir des boissons chaudes comme le thé ou le café. Couvrir la soupe avec une petite assiette afin dʼéviter les projections.
3. Remuez à la fin du réchauffage et respectez un temps de repos.
Fr-15
Français
3 Cuisson des légumes
frais
Affichage
Mise en marche retardée
Ou
• Pressez une
fois la touche
Minuteur.
• Réglez le temps de
retardement souhaité en
tournant le sélecteur
Durée/Poids.
(jusqu'à 9 heures)
• Choisir la cuisson
désirée.
• Affichez la durée de
cuisson à l'aide du
sélecteur
Durée/Poids.
• Appuyez sur
la touche
Marche.
REMARQUE :
1. Si le retardement programmé est supérieur à une heure, le compte à rebours s'affiche en minutes. Sʼil est inférieur à une heure, il s'affiche en secondes.
2. Il est impossible de retarder le démarrage d'une cuisson automatique.
Minuteur
Cette touche Minuteur peut fonctionner comme un simple minuteur de cuisine sans activer le four.
• Pressez une fois la
touche Minuteur.
• Choisissez la durée souhaitée à
lʼaide du sélecteur Durée/Poids
(jusquʼà 9 heures).
• Appuyez sur la
touche Marche.
REMARQUE :
1. Si vous ouvrez la porte du four pendant le fonctionnement du minuteur, le compte à rebours continue à défiler dans la fenêtre.
2. Vous pouvez utiliser cette fonction Minuteur pour programmer un temps de repos après cuisson. Dans ce cas, il vous faut, APRES avoir programmé une cuisson, presser la touche Minuteur et choisir une durée de repos, puis enfin, presser la touche Marche.
3. Jusqu'à 3 étapes de cuisson peuvent être programmées, le temps de repos ou la mise en marche retardée comptant pour une étape. Voir note 3
page Fr-8
Fr-16
Questions et réponses
R.: Si le four ne fonctionne pas, vérifiez les points suivants :
1. Le four est-il correctement branché ? Débranchez le cordon dʼalimentation du four,
attendez 10 secondes, puis rebranchez-le.
2. Vérifiez le disjoncteur et le fusible. Réglez le disjoncteur ou remplacez le fusible sʼil est
déclenché ou sʼil a sauté.
3. Si tout est normal au niveau du disjoncteur ou du fusible, vérifiez le bon fonctionnement de la prise murale en y branchant un autre appareil électrique. Si cet appareil
fonctionne, cela signifie que le problème se situe au niveau du four à micro-ondes. Sʼil
ne fonctionne pas, cela signifie que la prise murale est défectueuse.
Si le four à micro-ondes est défectueux, contactez un service dʼentretien et
de réparation agréé.
Q.: Est-il normal que mon four à micro-ondes pro
duise des interférences sur mon récepteur de
télévision ?
R.: Des interférences radio ou TV peuvent se produire si un four à micro-ondes fonctionne à
proximité. Ce même type dʼinterférence se produit lorsquʼon utilise de petits appareils
électriques tels quʼun mixeur, un aspirateur, un sèche-cheveux, etc. La présence dʼinterférences ne signifie donc pas que le four à micro-ondes est défectueux.
Q.: Pourquoi le four refuse-t-il mes instructions de
programmation ?
R.: Le four à micro-ondes est conçu pour refuser toute instruction de programmation incorrecte. Par exemple, il refuse une programmation automatique selon le poids après une
mise en marche retardée.
Q.: Il arrive parfois que de lʼair chaud se dégage
R.: La chaleur dégagée par la cuisson des aliments réchauffe lʼair contenu dans la cavité du
four. Cet air chaud est évacué du four par ventilation. Il nʼy a pas de micro-ondes dans ce
par les ouvertures dʼaération du four. Pourquoi ?
dégagement dʼair. Nʼobstruez jamais ces aérations en cours de cuisson.
Q.: La lettre <D> apparaît sur lʼaffichage et
le four ne fonctionne pas. Pour quelle raison ?
Q: Mon four arrête de cuire par micro-ondes et « H97
» et « H98 » sʼaffichent sur lʼécran dʼaffichage.
Q: Le mode d'emploi défilant a disparu de l'affichage, je ne vois que des numéros.
R:
Le four sʼest programmé en MODE DEMO (Démonstration). Ce mode est prévu pour les
démonstrations en magasin. Désactivez ce mode pressant une fois la touche Micro-ondes
puis 4 fois la touche Arrêt/Annulation.
R.: Lʼaffichage indique un problème avec le système de génération de micro-ondes. Veuillez
contacter un centre de service après-vente autorisé.
R : Une panne dʼalimentation sʼest peut-être produite, ete mode d'emploi défilant a été désactivé. Débranchez le four pendant quelques secondes puis branchez-le de nouveau.
Lorsque « 88:88 » sʼaffiche à lʼécran, appuyez sur la touche Marche jusquʼà ce que votre
langue sʼaffiche. Réglez ensuite lʼhorloge. Référez-vous à la page Fr-7.
NN-GD560M / NN-GD550W
Q.: Des ronflements et des cliquetis sont
émis par le four lorsque je cuisine en
mode combiné. Dʼoù cela provient-il ?
R.: Ces bruits, qui surviennent lors du passage du mode MICRO-ONDES au mode GRIL,
sont tout à fait normaux.
Q.: Pour quelle raison mon four dégage-t-il une
odeur et de la fumée lorsque je cuisine en
modes COMBINE et GRIL ?
R.: Après plusieurs utilisations, il est recommandé de nettoyer le four et de le faire fonctionner
sans nourriture pendant 5 minutes en mode GRIL, et ce après avoir retiré le plateau tournant en verre et lʼanneau à roulettes. Cette opération brûlera tout résidu de nourriture ou
graisse susceptible de dégager des odeurs et/ou de la fumée.
Fr-17
Français
Q.: Pourquoi mon four ne fonctionne-t-il
pas ?
Entretien de lʼappareil
1. Débranchez lʼappareil avant de le nettoyer.
2. Veillez à ce que lʼintérieur du four et les joints de la porte
soient toujours propres. Nettoyez les projections dʼaliments ou les
taches sur les parois intérieures du four et sur les joints de la porte à
lʼaide dʼun linge humide. Si le four est très sale, nettoyez-le à lʼaide
dʼun produit de nettoyage non abrasif. Lʼutilisation de détergents à
base de soude caustique est vivement déconseillée.
NʼUTILISEZ PAS LES PRODUITS DESTINES AUX FOURS
DISPONIBLES DANS LE COMMERCE. Ne pas utiliser de produits
de nettoyage abrasifs ou durs ni de racloirs métalliques pointus pour
nettoyer la vitre de la porte du four afin de ne pas rayer la surface et
de ne pas briser la vitre.
3. Nettoyez les surfaces extérieures du four à lʼaide dʼun linge humide.
Veillez à ce que lʼeau ne pénètre pas par les ouvertures dʼaération
présentes à lʼintérieur du four afin de ne pas endommager ses différentes pièces.
4. Nettoyez le panneau de commandes à lʼaide dʼun linge doux et sec.
Nʼutilisez pas de tampons abrasifs ou de détergents puissants.
Lorsque vous nettoyez le panneau de commandes, laissez la porte
du four ouverte afin dʼéviter tout déclenchement inopiné. Une fois
lʼopération de nettoyage terminée, appuyez sur la touche
ARRET/ANNULATION de manière à effacer lʼaffichage.
5. Si de la condensation se forme à lʼintérieur ou à lʼextérieur de la
porte du four, essuyez-la au moyen dʼun linge doux. De la condensation peut se former lorsque le four fonctionne dans une pièce très
humide. Cela nʼest en aucun cas dû à un mauvais fonctionnement de
lʼappareil.
Fr-18
6. Il est parfois nécessaire de retirer le plateau tournant en verre afin de
le nettoyer. Lavez-le à lʼeau savonneuse chaude ou dans un lavevaisselle.
7. Nettoyez régulièrement lʼanneau à roulettes et la sole du four pour
éviter que celui-ci produise trop de bruit. A cette fin, il suffit d'essuyer
la sole du four avec de lʼeau chaude additionnée dʼun détergent
doux, puis de la sécher à lʼaide dʼun linge sec. Lavez lʼanneau à
roulettes dans de lʼeau savonneuse. Les vapeurs de cuisine susceptibles de sʼaccumuler après plusieurs utilisations n'abîment ni la sole ni
les roulettes de lʼanneau. Assurez-vous de placer correctement lʼanneau à roulettes après lʼavoir enlevé.
8. Lorsque vous cuisinez en mode GRIL ou COMBINE (NN-GD560M /
NN-GD550W), il est inévitable que des projections de graisse salissent les parois du four. Nettoyez régulièrement le four afin dʼéviter
quʼil dégage de la fumée en cours dʼutilisation.
9. Ne pas utiliser de nettoyeur-vapeur pour le nettoyage de
votre four.
10. La maintenance du four ne peut être executée que par du
personnel qualifié. Pour toute opération de maintenance ou de réparation, adressez-vous à votre revendeur agréé.
11. Gardez toujours les orifices dʼaération sont dégagés. Vérifiez quʼil nʼy
a pas de poussière ou autre matière qui puisse boucher un
quelconque orifice dʼaération au haut, au bas ou à lʼarrière du four.
Si les orifices dʼaération se bouchent, ceci pourra entraîner le
surchauffage, ce qui affecterait le fonctionnement du four et
conduirait peut-être à une situation dangereuses.
12. Les ouvertures d'aération ne doivent jamais être obturées. Vérifiez
régulièrement qu'elles ne sont pas bouchées par des poussières ou
d'autres objets. Si cela se produisait, la surchauffe du four affecterait
son fonctionnement.
Fiche technique
Alimentation
Puissance dʼentrée
Puissance de sortie
Dimensions extérieures
Dimensions intérieures
Poids (hors emballage)
Niveau sonore
NN-GD560M / NN-GD550W
230 V, 50 Hz
Maximale;
2300 W
Micro-ondes;
1100 W
Gril;
1350 W
Micro-ondes;
1000 W (IEC-60705)
Résistance;
1300 W
510 (L) x 380 (P) x 304 (H) mm
359 (L) x 352 (P) x 217 (H) mm
12.5 Kg
50 dB
NN-SD450W
230 V, 50 Hz
Micro-ondes;
1100 W
Micro-ondes;
1000 W (IEC-60705)
510 (L) x 380 (P) x 304 (H) mm
359 (L) x 352 (P) x 217 (H) mm
11.5 Kg
50 dB
Cet appareil répond aux normes européennes sur les perturbations éléctromagnétiques EMC (compatibilité électromagnétique) EN 55011. Selon cette
norme, cet appareil appartient au groupe 2, de classe B et dans le périmètre requis. L'appartenance au groupe 2 signifie que l'énergie de fréquence
radio est intentionnellemet émise sous forme d'onde électromagnétique afin de chauffer des aliments. Classe B signifie que ce produit est conforme à
une utilisation domestique.
Informations relatives à l'évacuation des déchets, destinées aux utilisateurs d'appareils électriques et électroniques (usage domestique)
Lorsque ce symbole figure sur les produits et/ou les documents qui les accompagnent, cela signifie que les appareils électriques et
électroniques ne doivent pas être jetés avec les ordures ménagères.
Pour que ces produits subissent un traitement, une récupération et un recyclage appropriés, envoyez-les dans les points de collecte
désignés, où ils peuvent être déposés gratuitement. Dans certains pays, il est possible de renvoyer les produits au revendeur local
en cas d'achat d'un produit équivalent.
En éliminant correctement ce produit, vous contribuerez à la conservation des ressources vitales et à la prévention des éventuels
effets négatifs sur l'environnement et la santé humaine qui pourraient survenir dans le cas contraire.
Afin de connaître le point de collecte le plus proche, veuillez contacter vos autorités locales. Des sanctions peuvent être appliquées en cas d'élimination incorrecte de ces déchets, conformément à la législation en vigueur.
Utilisateurs professionnels de l'Union européenne
Pour en savoir plus sur l'élimination des appareils électriques et électroniques, contactez votre revendeur ou fournisseur.
Informations sur l'évacuation des déchets dans les pays ne faisant pas partie de l'Union européenne
Ce symbole n'est reconnu que dans l'Union européenne.
Pour vous débarrasser de ce produit, veuillez contacter les autorités locales ou votre revendeur afin de connaître la procédure d'élimination à suivre.
Conformément à lʼarticle 9(2) de la directive 2004/108/CE
Panasonic Testing Centre
Panasonic Service Europe, une division de Panasonic Marketing Europe GmbH,
Winsbergring 15, 22525 Hambourg, Allemagne
Fabriqué par Panasonic Home Appliances Microwave Oven (Shanghai) Co., Ltd, 898 Longdong Road, Pudong, Shanghai 201203, Chine.
Fr-19
Français
Caractéristiques techniques susceptibles dʼêtre modifiées sans avis préalable.
Installazione e connessione del forno alla rete elettrica
Esaminate il vostro forno
Togliere il forno dallʼimballo avendo cura di togliere tutto il materiale da
imballaggio, ed esaminarlo per accertare che non vi siano danni come ad
esempio ammaccature, rotture delle chiusure o incrinature del portello.
Non installare un forno se danneggiato: avvertite subito il vostro rivenditore.
Istruzioni per la messa a terra
IMPORTANTE: PER LA SICUREZZA PERSONALE QUESTO ELETTRODOMESTICO NECESSITA DI UNA CORRETTA MESSA A TERRA.
Se una presa di corrente non ha la messa a terra, è responsabilità e obbligo dellʼacquirente sostituirla con una che ne sia fornita.
Avvertenze su voltaggio e alimentazione
Il voltaggio usato deve essere quello specificato sul forno. Lʼuso di un voltaggio più alto di quello indicato è pericoloso e può causare incendi o altri
tipi di danno.
Sistemazione del forno
Il forno è progettato per essere utilizzato esclusivamente su un ripiano.
Non deve essere incorporato o incassato in altri elementi.
Questo forno può essere incassato utilizzando lʼapposito kit da incasso
Panasonic mod. NN-TKT59WFP se bianco, mod., NN-TKT59MFP se
argento, che si può acquistare presso i rivenditori Panasonic.
1. Sistemare il forno su una superficie stabile e piana, a più di 85 cm. da
terra.
2. Sistemare il forno in modo che sia facile scollegare lʼapparecchio dalla
rete elettrica estraendo la spina o agendo su un interruttore generale.
3. Per un funzionamento corretto, assicurarsi che il forno possa disporre
di una sufficiente circolazione dellʼaria.
Sistemazione su un piano:
a. Lasciate 15 cm. di spazio dalla superficie superiore del forno,
10 cm. da quella posteriore e 5 cm. da una delle pareti laterali; una
delle superfici laterali deve essere lasciata libera per almeno 40 cm.
b. Se un lato del forno è posto rasente ad una parete, lʼaltro lato o la
superficie superiore non deve essere bloccata o aderire ad unʼaltra
superficie.
5cm
15cm
10cm
SPAZIO
VUOTO
Superficie
del ripiano.
Attenzione: superfici molto calde
(NN-GD560M/NN-GD550W)
AVVERTENZE:
1. Le guarnizioni del portello e le zone circostanti devono essere
pulite con un panno umido.
Nel caso in cui esse vengano danneggiate, non bisogna mettere in
funzione il forno fino a quando un tecnico autorizzato non le abbia
riparate.
2. Non cercare in alcun modo di modificare o riparare il forno in nessuna delle sue parti.
Non rimuovere il pannello esterno dal forno per nessun motivo,
poiché esso protegge dallʼesposizione allʼenergia delle microonde.
Le eventuali riparazioni devono essere eseguite esclusivamente da
un servizio di assistenza tecnica qualificato.
3. Non utilizzare lʼapparecchio se ha il cavo elettrico o la spina
danneggiati, se non funziona in modo corretto o se è stato
danneggiato o fatto cadere. Tentare di riparare il forno è pericoloso
per chiunque non sia un tecnico dellʼassistenza appositamente
istruito dal produttore.
4. Se viene danneggiato il cavo dellʼapparecchio, deve essere
sostituito da un cavo speciale fornito dal fabbricante.
5. Non permettere che i bambini usino il forno da soli, senza la supervisione di un adulto. Fatelo SOLO nel caso in cui al bambino siano
state date adeguate istruzioni e che, quindi, sia in grado di usare il
forno in modo sicuro e di capire il pericolo che può derivare da un
uso improprio.
6. Liquidi o altri cibi non devono essere riscaldati in contenitori sigillati
poicheʼ questi potrebbero esplodere.
7. Questo apparecchio non è previsto per essere impiegato da persone (bambini inclusi) che abbiano ridotte capacità sensoriali o
mentali, o manchino di esperienza o conoscenze, a meno che non
siano sorvegliate o abbiano ricevuto istruzioni sullʼuso dell'apparecchio da una persona responsabile per la loro sicurezza. I bambini
devono essere sorvegliati per assicurarsi che non giochino con l'apparecchio.
It-1
Italiano
Incasso
4. Non posizionare questo forno vicino ad una cucina a gas o elettrica.
5. Non rimuovere i piedini dʼappoggio del forno.
6. Questo forno è da utilizzare esclusivamente per uso domestico: non
utilizzare allʼaperto.
7. Non usare il forno in ambienti molto umidi.
8. Il cavo di alimentazione non deve toccare le pareti esterne del forno.
Esso non deve venire in contatto con superfici calde. Non lasciare il
cavo sospeso sopra un tavolo o un piano di lavoro.
Non immergere il cavo di alimentazione, la spina o il forno
stesso nellʼacqua.
9. Non ostruire le prese dellʼaria sulla parte superiore e posteriore del
forno. Se queste aperture vengono ostruite mentre lʼapparecchio è in
funzione, il forno si può surriscaldare. In questo caso lʼelettrodomestico è protetto da un dispositivo termico di sicurezza che lo spegne e
lo disattiva totalmente, fino a che il forno non si sia raffreddato.
10. Questo apparecchio non è progettato per essere impiegato tramite
un timer esterno o un sistema telecomandato acquistato separatamente.
Istruzioni per la sicurezza
Utilizzazione del vostro forno
Funzionamento della ventola di raffreddamento
1. Non utilizzare il forno per nessun altro motivo che non sia la
preparazione di cibo. Questo forno è stato progettato per riscaldare o
cuocere il cibo. Non usare questo forno per riscaldare prodotti chimici
o qualsiasi altra cosa al di fuori del cibo.
2. Prima di usare il forno, accertarsi che gli utensili siano adatti per la
cottura a microonde.
3. Non cercare di asciugare giornali, abiti o altri materiali poiché potrebbero prendere fuoco.
4. Quando il forno non è in funzione, non riporre allʼinterno alcun oggetto
al di fuori degli accessori del forno stesso, per evitare danni in caso di
accensione accidentale del forno.
5. Le funzioni di cottura a microonde o combinazione (NN-GD550M / NNGD550W) non devono essere utilizzate con il forno vuoto per evitare
di danneggiare lʼelettrodomestico, ad eccezione del caso descritto al
punto 1, pag. (2) , paragrafo “RISCALDAMENTO”, ed il caso dellʼoperazione di preriscaldamento della teglia per la pizza.
6. Se si dovessero sviluppare fumo o fiamme allʼinterno della cavità del
forno, premere il tasto interruzione/cancellazione e lasciare la porta
chiusa allo scopo di estinguere eventuali incendi.
Togliere la spina dalla presa o spegnere lʼinterruttore generale.
Se il forno si surriscalda dopo l'uso, la ventola potrebbe ruotare
per alcuni minuti per raffreddare i componenti elettrici.
Tutto ciò è perfettamente normale. Per togliere il cibo
dal forno non è necessario aspettare che la ventola si fermi: si
può fare mentre la ventola è in funzione.
Riscaldamento (NN-GD560M / NN-GD550W)
1. Prima di usare le funzioni di cottura a COMBINAZIONE o cottura con il
GRILL per la prima volta, asciugare lʼolio in eccesso che potrebbe
trovarsi allʼinterno della cavità del forno, farlo funzionare sulla
posizione GRILL per 10 minuti, senza cibo e accessori. Questa operazione deve essere fatta allo scopo di bruciare e quindi far dissolvere
lʼolio usato per la protezione antiruggine.
Questo è lʼunico caso in cui il forno deve essere usato vuoto.
2. Le superfici esterne del forno, inclusa la ventola di raffreddamento ed
il portello dʼapertura, si scaldano durante la cottura a combinazione o
con grill. Fate attenzione quando aprite o chiudete il portello del forno
e quando inserite od estraete il cibo o gli accessori.
3. Il forno ha due resistenze poste nella parte superiore del forno. Dopo
lʼutilizzo delle funzioni COMBINAZIONE e GRILL, queste superfici
saranno molto calde.
ATTENZIONE: dopo la cottura con queste funzioni, anche
gli accessori del forno eventualmente utilizzati saranno
molto caldi.
4. Le parti accessibili del forno possono diventare incandescenti durante
lʼuso delle funzioni grill e combinazione. Tenere i bambini lontano dal
forno.
5. Quando lʼapparecchio è utilizzato nella modalità combinata, i bambini
possono utilizzare il forno solamente sotto supervisione a causa delle
temperature generate.
It-2
Luce della cavità del forno
Consultare un centro assistenza autorizzato nel caso in cui si rendesse
necessario riparare o cambiare la lampadina che illumina la cavità del
forno.
Accessori
Il forno contiene alcuni accessori: seguire sempre le istruzioni per il loro
uso.
Vassoio di vetro
1. Non adoperare mai il forno senza lʼanello rotante ed il vassoio di
vetro inseriti correttamente al loro posto allʼinterno del forno.
2. Non adoperare un vassoio di vetro diverso da quello originale
Panasonic, che è stato studiato appositamente per questo forno.
3. Se il vassoio di vetro diventa caldo, lasciarlo raffreddare prima di
pulirlo o di metterlo nellʼacqua.
4. Il vassoio di vetro può girare in entrambi i sensi.
5. Se il cibo o il recipiente posti sul vassoio di vetro toccano le pareti
del forno e fermano la rotazione del vassoio, questʼultimo riprenderà
automaticamente a girare nella direzione opposta: ciò è perfettamente normale.
6. Non cuocere il cibo direttamente sul vassoio di vetro.
Anello rotante
1. Lʼanello rotante e la parte inferiore del forno devono essere puliti frequentemente per evitare il prodursi di unʼeccessiva rumorosità ed un
accumulo di residui di cibo e schizzi.
2. Lʼanello rotante deve essere sempre usato insieme al vassoio di vetro.
Griglia di metallo (NN-GD560M / NN-GD550W)
1. Usare la griglia di metallo per facilitare la doratura di piccole porzioni
ed ottenere una buona circolazione del calore.
2. Non mettere nessun contenitore metallico direttamente a contatto
con la griglia di metallo quando si usa la funzione COMBINAZIONE
con le MICROONDE.
3. Non usare la griglia di metallo nella modalità solo microonde.
Teglia per la pizza: (NN-GD560M / NN-GD550W) vedere pag.
It-14.
Informazioni importanti
1) Tempi di cottura
6) Liquidi
•
I tempi di cottura indicati nel ricettario sono approssimativi. Il tempo di
cottura dipende dalle condizioni, dalla temperatura, dalla quantità di
cibo e dal tipo di stoviglie impiegate.
•
•
Cominciare a cuocere inserendo il tempo di cottura più breve per
evitare una cottura eccessiva. Se il cibo non risulta cotto a sufficienza,
si può sempre farlo cuocere ancora un pò.
N.B. Se i tempi di cottura consigliati dovessero risultare eccessivi, il cibo si rovinerà e, in casi estremi, potrebbe addirittura
prendere fuoco, danneggiando anche lʼinterno del forno.
2) Piccole quantità di cibo
•
Piccole quantità di cibo o cibi con un basso contenuto di umidità pos
sono bruciarsi, sec-carsi eccessivamente o incendiarsi se cotti troppo
a lungo. Se lʼalimento introdotto nel forno dovesse incendiarsi, lascia
re chiuso il portello, spegnete il forno e togliete la spina dalla presa.
3) Uova
•
a)
b)
c)
d)
Per evitare lʼeventualità devono essere prese le seguenti
precauzioni:
evitare lʼuso di contenitori con pareti alte ed a collo stretto;
non surriscaldare;
mescolare i liquidi prima di mettere il contenitore nel forno, ed anche
a metà del tempo di cottura;
dopo aver riscaldato, lasciare riposare nel forno per un pò e poi,
prima di tirare fuori il contenitore (facendo attenzione a non scottarsi), mescolare nuovamente.
7) Carta, plastica
•
Se si riscalda il cibo in contenitori di carta e/o di plastica, controllare
spesso il forno poiché questo tipo di contenitori possono incendiarsi
se surriscaldati.
Non usare prodotti di carta riciclata (per es. rotoli di carta da cucina)
a meno che sul prodotto sia espressamente indicato “adatto per
lʼuso nel forno a microonde”. Infatti alcuni prodotti in carta riciclata
possono contenere impurità che possono causare scintille e/o incendi durante lʼuso.
Togliere eventuali legature di filo o nastro prima di inserire nel forno
involucri e cartocci da rosticceria.
I cibi che non hanno un superficie porosa, come ad esempio, patate,
tuorli dʼuovo e salsicce, devono essere bucherellate prima della
cottura a microonde per evitare che scoppino.
5) Termometro per carni
8) Utensili/pellicole
•
•
Usare un termometro per carni per controllare il grado di cottura di
arrosti e pollame, solo quando la carne è stata tolta dal forno. Non
usare un comune termometro per carni durante la cottura a microonde
o combinata, per evitare lʼemissione di scintille.
Non riscaldare lattine o bottiglie chiuse perché potrebbero
esplodere.
Non utilizzare contenitori in metallo o stoviglie con inserti in metallo
(es. decori dorati o manici) per la cottura a microonde perché
potrebbero causare lʼemissione di scintille.
Se vengono impiegati fogli di alluminio, aghi per spiedini o utensili in
genere in metallo, la distanza tra essi e le pareti del forno ed il
portello deve essere di almeno 2 cm. per evitare lʼemissione di scintille.
9) Biberon/brocche
•
Agitare o mescolare bene il contenuto di biberon e brocche.
Controllare la temperatura prima di consumare il contenuto per
evitare di scottarsi.
La parte superiore e la tettarella dei biberon, e il coperchio dei
vasetti di cibi per neonati devono essere rimossi prima di mettere
biberon e vasetti in forno.
It-3
Italiano
Non cuocere le uova nel loro guscio e le uova sode intere nel forno a
MICROONDE. La pressione all'inte no del forno può aumentare fino a
provocare l'esplosione delle uova, anche dopo che la fase di riscalda
mento del forno a MICROONDE è terminata.
4) Bucherellare le superfici non porose
•
Quando si riscaldano dei liquidi (come ad es. zuppe, salse o
bevande) nel forno a microonde, può capitare che arrivino al punto
di ebollizione senza che in superficie si evidenzi la formazione di
bolle: ques-ta situazione può manifestarsi, anche allʼimprovviso,
con la formazione di grumi o la fuoriuscita del liquido dal recipiente.
Il vostro forno
[8b]
[13]
[8a]
[6]
[4]
[12]
[5]
[2]
[1]
[7]
[3]
[9]
[10]
[11]
1.
Pulsante di sblocco dello sportello
Se si apre la porta del forno durante il funzionamento, la cottura viene temporaneamente interrotta ma le impostazioni selezionate
in precedenza non vengono cancellate. La cottura riprende non appena si richiude la porta e si preme nuovamente il tasto Avvio.
La luce del forno si accende non appena si apre la porta del forno.
2.
Finestra del forno
3.
Sistema di bloccaggio di sicurezza della porta
4.
Presa di ventilazione del forno
5.
Pannello di controllo
6.
Vassoio di vetro
7.
Anello rotante
8a. Prese di ventilazione del forno esterne
8b. Prese di ventilazione del forno esterne (NN-GD560M / NN-GD550W)
9.
Struttura di metallo(NN-GD560M / NN-GD550W)
10. Piatto grigliante (NN-GD560M / NN-GD550W)
11. Manico teglia da pizza (NN-GD560M / NN-GD550W)
12. Cavo di alimentazione
13. Etichetta di avvertenza (Superficie calda) (NN-GD560M / NN-GD550W)
It-4
Pannello di controllo
NN-GD560M / NN-GD550W*
1.
2.
3.
4.
5.
(1)
(2)
(3)
(8)
(4)
(9)
(6)
(7)
*
(10)
(11)
Italiano
(5)
Finestrella del display
Modalità microonde
Modalità grill
Modalità programma combinato
Tasto programma automatico turbo di scongelamento a peso
6. Ritardo/attesa
7. Pulsante dell'orologio
8. Manopola del selettore del programma
automatico
9. Manopola Tempo/Peso
10. Tasto Arresto/Cancella:
Prima della cottura: se si preme una volta si
cancellano le istruzioni selezionate. Durante la
cottura: se si preme una volta si arresta
temporaneamente il programma di cottura.
Premendo di nuovo si cancellano tutte le
istruzioni inserite e lʼora appare nel display.
11. Tasto Avvio:
Premere per avviare il funzionamento del forno.
Se durante la cottura la porta viene aperta o il
tasto Arresto/Cancella viene premuto una volta, è
necessario premere di nuovo il tasto Avvio per
riprendere la cottura.
La configurazione del pannello comandi del vostro microonde
potrebbe differire da quella qui indicata, a seconda della
diversa colorazione. In ogni caso, le funzioni dei comandi
(tasti e manopole), rimangono identiche.
Nota
Segnale acustico
Un segnale acustico viene emesso
quando si preme un tasto. Se tale
segnale non viene emesso significa
che lʼimpostazione non è corretta.
Quando il forno passa da una
funzione a unʼaltra, vengono emessi
due segnali acustici. A cottura
ultimata vengono emessi cinque
segnali acustici.
Se viene impostata un'operazione ma il pannello di avvio
non viene toccato, dopo 6 minuti, l'operazione viene automaticamente annullata. Il display torna alla modalità di visualizzazione dell'ora.
Il forno è fornito di una funzione di risparmio energetico.
Da notare:
1. In modalità stand-by la luminosità del display è ridotta.
2. Il forno entra in modalità stand-by quando la spina è
inserita e immediatamente al termine dellʼultima
operazione.
It-5
Pannello di controllo
NN-SD450W
1.
2.
3.
(1)
Finestrella del display
Modalità microonde
Tasto programma automatico turbo di
scongelamento a peso
Ritardo/attesa
Pulsante dell'orologio
Manopola del selettore del programma
automatico
Manopola Tempo/Peso
Tasto Arresto/Cancella:
Prima della cottura: se si preme una volta si
cancellano le istruzioni selezionate.
Durante la cottura: se si preme una volta si
arresta temporaneamente il programma di cottura. Premendo di nuovo si cancellano tutte le
istruzioni inserite e lʼora appare nel display.
Tasto Avvio:
Premere per avviare il funzionamento del forno.
Se durante la cottura la porta viene aperta o il
tasto Arresto/Cancella viene premuto una volta,
è necessario premere di nuovo il tasto Avvio per
riprendere la cottura.
4.
5.
6.
7.
8.
(6)
(2)
9.
(7)
(3)
(4)
(5)
(8)
(9)
Nota
Segnale acustico
Un segnale acustico viene emesso quando si preme un tasto. Se
tale segnale non viene emesso
significa che lʼimpostazione non è
corretta. Quando il forno passa da
una funzione a unʼaltra, vengono
emessi due segnali acustici. A
cottura ultimata vengono emessi
cinque segnali acustici.
It-6
Se viene impostata un'operazione ma il pannello di avvio
non viene toccato, dopo 6 minuti, l'operazione viene automaticamente annullata. Il display torna alla modalità di visualizzazione dell'ora.
Il forno è fornito di una funzione di risparmio energetico.
Da notare:
1. In modalità stand-by la luminosità del display è ridotta.
2. Il forno entra in modalità stand-by quando la spina è
inserita e immediatamente al termine dellʼultima
operazione.
Uso dei comandi e funzionamento del forno
Collegare alla presa di corrente “88:88”
Visualizzazione della lingua:
“FRANCAIS”
IN FRANCESE
Premere
“ITALIANO”
IN ITALIANO
Premere
“DEUTSCH”
IN TEDESCO
Premere
“NEDERLANDS”
IN OLANDESE
Premere
ESPANOL
IN SPAGNOLO
Premere
“POLSKI”
IN POLACCO
Premere
“CESKY”
IN CECO
Premere
“ENGLISH”
IN INGLESE
Premere
“DANSK”
IN DANESE
Premere
“SUOMI”
IN FINLANDESE
Premere
“SVENSKA”
IN SVEDESE
Premere
“NORSK”
IN NORVEGESE
Questi modelli sono muniti di una funzione unica
chiamata “Word Prompting” (Suggerimento) che
vi guida nellʼutilizzo del vostro forno a
microonde. Dopo avere inserito la presa elettrica
premere il tasto di avvio fino a che non appaia la
lingua desiderata. Mano a mano che i tasti sono
premuti, sul display scorreranno le istruzioni
eliminando la possibilità di commettere errori.
Se, per qualsiasi motivo, si desideri cambiare la
lingua selezionata, sfilare e rinfilare la spina del
forno dalla presa elettrica e ripetere questa procedura.
Se il tasto Delay/Stand (Attesa/Riposo) è premuto 4 volte, la guida dʼutilizzo sarà spenta.Per
riaccendere la guida dʼutilizzo, premere il tasto
Delay/Stand (Attesa/Riposo) 4 volte.
Italiano
Premere
SOLO PER IL MODELLO
NN-SD450W
Impostazione dellʼorologio
Esempio: Impostazione delle ore 14:25
• Premere una volta il pulsante dell'orologio.
I due punti cominciano a
lampeggiare.
• Inserire lʼora mediante la manopola
Ora/Peso.
Lʼora viene visualizzata nel display e i
due punti cominciano a lampeggiare.
• Premere il pulsante dell'orologio.
I due punti smettono di lampeggiare e lʼora
è così impostata.
NOTA:
1. Per impostare nuovamente lʼora, ripetere tutti i passi di cui sopra.
2. Lʼora è sempre visualizzata a meno che lʼalimentazione non venga interrotta.
3. Questo orologio funziona sul sistema delle 24 ore.
It-7
Uso dei comandi e funzionamento del forno
Sistema di bloccaggio per la sicurezza dei bambini:
Questo sistema disattiva i comandi del forno, tuttavia la porta può essere aperta. È possibile impostare il sistema di bloccaggio quando il display visualizza i due punti o lʼora.
Per impostare:
•
Per cancellare:
Premere il tasto Avvio tre volte.
Lʼora scompare dal display.
Tuttavia lʼimpostazione dellʼora non viene
cancellata.
Il simboloʻ*ʼappare nel display.
• Premere il tasto Arresto/Cancella tre volte.
Lʼora riappare nel display.
NOTA: Per attivare la sicura bambini, il tasto di avvio deve essere premuto 3 volte nellʼarco di 10 secondi.
Cottura e scongelamento con il forno a microonde
Si possono selezionare 5 diversi livelli di potenza per il forno a microonde. La tabella seguente indica approssimativamente il wattaggio di ogni livello
di potenza.
NN-GD550W/NN-GD560M
Uso degli accessori:
NN-SD450W
Vassoio di vetro
NN-GD550W/
NN-GD560M
Premere
Livello di potenza
Voltaggio
Una volta
Due volte
3 volte
4 volte
5 volte
Massima (Alta)
Scongelamento
Media
Bassa
Cottura a fuoco lento
1000 W
270 W
600 W
440 W
250 W
Oppure
• Premere questo pulsante finché
la potenza richiesta non viene
visualizzata nella finestra del
display.
• Selezionare il livello di
potenza richiesto per il
forno a microonde.
• Impostare il tempo di cottura usando la
manopola. Ora/Peso (Potenza ALTA: fino a
30 minuti, Altre Potenze: fino a 90 minuti).
• Premere il tasto
Avvio.
NOTA:
1. Per una cottura in 2 o 3 fasi, prima di premere il pulsante di avvio, reimpostare il livello di potenza e il tempo di cottura del forno a microonde.
Esempio: Stufato – Potenza elevata per 10 minuti, per portare lo stufato a ebollizione. Potenza bassa per 60 minuti per far cuocere lentamente.
Potenza bassa per 10 minuti per permettere agli aromi di svilupparsi.
2. Il tempo di attesa può essere programmato dopo aver impostato il tempo di cottura e il livello di potenza del forno a microonde.
3. Il tempo di cottura può essere modificato durante la cottura, se necessario. Girare la manopola Ora/Peso per aumentare o diminuire il tempo di cottura. Il tempo può essere aumentato o diminuito in unità di 1 minuto fino a un massimo di 10 minuti. Se si porta la manopola sulla posizione zero la
cottura viene interrotta.
4. Il forno funzionerà automaticamente alla potenza massima se si imposta il tempo di cottura senza aver prima selezionato il livello di potenza.
It-8
Uso del grill (NN-GD560M / NN-GD550W)
Uso degli accessori:
• Selezione della potenza del grill. Premere una
volta per Grill 1 (Alta), due volte per Grill 2
(Media) o 3 volte per Grill 3 (Bassa).
Supporto di
metallo
Per il grill sono disponibili 3 impostazioni.
Vassoio di
vetro
2 pressioni per GRILL 2 a
950 W
3 pressioni per GRILL 3 a
700 W
1 pressione per GRILL 1 a 1300 W
• Premere il tasto
Avvio.
• Impostare il tempo di cottura usando la
manopola Ora/Peso (fino a 90 minuti).
NOTA:
Combinazione di cottura (NN-GD560M / NN-GD550W)
Uso degli accessori:
Esistono tre diverse impostazioni per la cottura combinata. La tabella seguente
indica approssimativamente il wattaggio di ciascun livello di potenza.
Supporto di
metallo
Vassoio di
vetro
Impostazione
cottura combinata
Pressioni
Grill
Microonde
Visualizzazione
della lingua
1
2
3
1 pressione
1300W
1300W
1300W
600W
440W
250W
G1-600W
G1-440W
G1-250W
2 pressioni
3 pressioni
Vassoio di vetro
• Selezione del livello di
combinazione (vedere
tabella).
• Impostare il tempo di cottura usando la manopola
Ora/Peso (fino a 90 minuti).
• Premere il tasto
Avvio.
NOTA:
1. La cottura combinata funziona solo se la porta del forno a microonde è chiusa.
2. Il tempo di cottura può essere modificato durante la cottura, se necessario. Girare la manopola Ora/Peso per aumentare o
diminuire il tempo di cottura. Il tempo può essere aumentato o diminuito in unità di 1 minuto fino a un massimo di 10 minuti. Se si porta la manopola sulla posizione zero la cottura viene interrotta.
It-9
Italiano
1. Il grill funziona solo se la porta del forno a microonde è chiusa.
2. Il tempo di cottura può essere modificato durante la cottura, se necessario. Girare la manopola Ora/Peso per aumentare o diminuire il tempo di
cottura. Il tempo può essere aumentato o diminuito in unità di 1 minuto fino a un massimo di 10 minuti. Se si porta la manopola sulla posizione
zero la cottura viene interrotta.
Scongelamento automatico
Questa caratteristica permette di scongelare automaticamente i cibi congelati in funzione del loro peso. Selezionare la categoria e impostare il peso del
cibo. Il peso deve essere programmato in grammi. Per una selezione rapida, il peso inizia da quello utilizzato più frequentemente per ogni categoria.
• Selezionare il programma di
scongelamento automatico desiderato.
Premere una volta per cibi di piccole
dimensioni e premere due volte per cibi di
grosse dimensioni.
Programma
Visualizzazione
della lingua
• Impostare il peso del cibo congelato usando la manopola
Ora/Peso.
Se si gira la manopola lentamente, la regolazione viene effettuata
con incrementi da 10g. Se si gira la manopola velocemente,
la regolazione viene effettuata con incrementi da 100g.
• Premere il tasto
Avvio.
Cibi adatti
Peso
Piccole porzioni di carne, scaloppine, salsicce, filetti di pesce, bistecche, costolette di
1 Piccole porzioni
PEZZI
PICCOLI
150 - 1600g maiale (ognuna da 100g a 400g). Girare al segnale acustico.
2 Grosse porzioni
PEZZI
GRANDI
400 - 2400g Grosse porzioni di carne, arrosto, polli interi. Girare al segnale acustico.
NOTA:
1. Quando il tempo di scongelamento supera i 60 minuti, il tempo viene visualizzato in ore e minuti.
2. La forma e la dimensione del cibo determina il peso massimo che il forno può gestire.
3. Per ulteriori informazioni, consultare le direttive sullo scongelamento nel ricettario.
Programmi automatici a peso
Questa funzione permette di cucinare la maggior parte dei vostri cibi preferiti impostandone unicamente il peso. Il forno determina automaticamente il
necessario livello di potenza delle microonde, la potenza del grill (NN-GD560M / NN-GD550W) e il tempo di cottura. Selezionare la categoria e impostare
il peso del cibo. Il peso è programmato in grammi. Per una selezione rapida, il peso inizia da quello utilizzato più frequentemente per ogni categoria.
NN-GD560M /
NN-GD550W
NN-SD450W
es.
• Selezionare il programma di pesatura automatico
ruotando la manopola del selettore del programma
automatico. Sul display verranno visualizzati i programmi di cottura automatica in base al peso.
• Impostare il peso del cibo usando la manopola Ora/Peso.
Se si gira la manopola lentamente, la regolazione
viene effettuata con incrementi da 10g. Se si gira la
manopola velocemente, la regolazione viene effettuata con
incrementi da 100g.
NOTA:
1. Quando il tempo di cottura supera i 60 minuti, il tempo viene visualizzato in ore e minuti.
2. Seguire la tabella a tergo per il peso raccomandato e gli accessori da usare.
It-10
• Premere il
tasto Avvio.
Programmi automatici a peso
NN-GD560M / NN-GD550W
Programma
Visualizzazione
della lingua
Peso
raccomandato
Accessori
Istruzioni
1 Riscaldare
tazza
1 TAZZA
150g
Per riscaldare una tazza di liquido caldo (es. tè, caffè, latte,
minestra).
Selezionare Riscaldare tazza, selezionare il peso (150ml) e premere il
tasto di Avvio.
2 Riscaldare
scodella/terrina
1 SCODELLA
300g
Per riscaldare una terrina di liquido caldo.
Selezionare Riscaldare terrina, selezionare il peso (300ml) e premere
il tasto di Avvio.
3 Riscaldare
PASTO
FRESCO
4 Riscaldare cibi
congelati
6 Cottura
verdure
congelate
7 Cottura
pesce
fresco
8 Cottura pesce
congelato
VERDURE
FRESCHE
VERDURE
SURGELATE
PESCE
FRESCO
PESCE
SURGELATO
200 - 1200g
Per riscaldare una pietanza congelata su un piatto o in casseruola.
Tutti i cibi devono sempre essere precotti e congelati. Al segnale acustico mescolare. A cottura ultimata, mescolare il cibo e lasciare riposare
per 2 o 3 minuti.
250 - 1500g
Per cucinare verdure fresche. Porre le verdure preparate in un contenitore di dimensioni adatte. Versare sopra 9 cucchiai di acqua
(100ml). Coprire leggermente con pellicola trasparente da cucina perforata o con un coperchio. Grosse quantità dovranno essere rigirate al
segnale acustico.
300 - 1000g
Per cucinare verdure congelate.
Porre in un contenitore di dimensioni adatte ed aggiungere 3-4 cucchiai di acqua (40ml). Coprire leggermente con pellicola trasparente da
cucina perforata o con un coperchio. Al segnale acustico mescolare le
verdure.
150 - 1000g
Per cucinare pesce fresco (intero, filetti, tranci).
Proteggere le porzioni più sottili e disporre in un contenitore di dimensioni adatte. Aggiungere 1-2 cucchiai di liquido. Coprire leggermente
con pellicola trasparente da cucina perforata o con un coperchio.
200 - 900g
Per cucinare tranci e filetti di pesce congelato.
Porre in un contenitore di dimensioni adatte ed aggiungere 2 cucchiai
di acqua (30ml). Coprire leggermente con pellicola trasparente da
cucina perforata o con un coperchio.
Suggerimenti per riscaldare tazze, terrine e scodelle.
1. Mescolare il liquido prima di riscaldarlo. (I liquidi riscaldati possono fuoriscire dal recipiente se non vengono mescolati con aria).
2. Non coprire bevande calde quali tè e caffè. Coprire le minestre con un coperchio per evitarne lʼeventuale fuoriuscita dal contenitore.
3. Dopo avere riscaldato lʼalimento, mescolare nuovamente e lasciare riposare per breve tempo.
It-11
Italiano
5 Cottura
verdure
fresche
PASTO
SURGELATO
200 - 1500g
Per riscaldare una pietanza su un piatto o una casseruola.
Il cibo deve sempre essere a temperatura ambiente o refrigerato (a
temperatura di frigorifero). Al segnale acustico mescolare. Lasciare
riposare per alcuni minuti.
Programmi automatici a peso
NN-GD560M / NN-GD550W
Programma
Visualizzazione
della lingua
Peso
consigliato
PANE
Accessori
Istruzioni
50 - 500g
Per riscaldare pane, panini e croissant congelati.
Rimuovere completamente la confezione e porre sul supporto di metallo. Mettere la griglia sul vassoio di vetro. Rigirare al segnale acustico.
10 Pezzi di pollo
PEZZI DI
POLLO
200 - 1200g
Per cuocere pezzi di pollo, ad esempio ali, petti o cosce.
Disporre il pollo in un piatto resistente al calore, sul supporto di metallo. Mettere la griglia sul vassoio di vetro. Per una cottura omogenea,
allargare bene i pezzi nel piatto e girarli al segnale acustico.
11 Pollo intero
POLLO
INTERO
1000 -2200g
Per cucinare polli interi freschi e non ripieni. Cuocere il
ripieno separatamente. Disporre il pollo in un piatto resistente al
calore e metterlo sul vassoio di vetro. Iniziare la cottura del pollo con
il petto rivolto verso il basso e rigirarlo al segnale acustico.
300 - 1000g
Per riscaldare e dorare lasagne e piatti gratinati congelati.
Rimuovere completamente la confezione e porre il gratin o le lasagne
in un piatto resistente al calore e metterlo sul vassoio di vetro.
9 Pane
congelato
12 Gratin/ lasagne
congelate
It-12
GRATIN
SURGELATO
Programmi automatici a peso
Programmi Panacrunch (NN-GD560M / NN-GD550W)
1. Selezionare il programma
desiderato e porre il piatto
grigliante direttamente sul
vassoio di vetro nel forno.
Programma
14 Pizza
congelata
15 Quiche
fresche
16 Quiche
congelata
17 Prodotti
congelati a base di patate
Visualizzazione
Peso
della lingua
consigliato
PIZZA
FRESCA
150 - 600g
PIZZA
SURGELATA 150 - 600g
QUICHE
FRESCA
150 - 700g
Accessori
3. Quando la fase di preriscaldamento è ultimata viene
emesso il segnale acustico.
Porre il cibo nel piatto grigliante,
impostare il peso.
4. Premere il tasto di Avvio.
Istruzioni
Per riscaldare, rendere croccante la base e dorare la parte superiore di pizza acquistata fresca.
Rimuovere completamente la confezione e porre la pizza nel piatto
grigliante preriscaldato.
Per riscaldare, rendere croccante la base e dorare la parte superiore di pizza acquistata congelata.
Rimuovere completamente la confezione e porre la pizza nel piatto
grigliante preriscaldato.
Per riscaldare, rendere croccante la base e dorare la crosta di
quiche (torte salate) acquistate e fresche.
Rimuovere completamente la confezione e porre la quiche nel piatto
grigliante preriscaldato.
QUICHE
SURGELATA 150 - 500g
Per riscaldare, rendere croccante la base e dorare la
crosta di quiche (torte salate) acquistate e congelate.
Rimuovere completamente la confezione e porre la quiche nel piatto
grigliante preriscaldato.
PATATE
SURGELATE
Per riscaldare, rendere croccante e dorare alimenti congelati a
base di patate.
Dopo avere preriscaldato il piatto grigliante disporvi gli alimenti
allargandoli bene. Per ottenere i migliori risultati non sovrapporre gli
alimenti e girarli al segnale acustico.
200 - 500g
It-13
Italiano
13 Pizza
fresca
2. Premere il tasto di avvio per
preriscaldare il piatto grigliante.
Istruzioni per lʼuso del piatto grigliante (NN-GD560M / NN-GD550W)
Il ʻconcettoʼ
Note:
Alcuni cibi cotti nel forno a microonde possono avere una crosta morbida
e umida. Il vostro accessorio piatto grigliante renderà pizze, quiche (torte
salate), focacce e pane croccanti e dorati proprio come se cotti in un forno
tradizionale.
Il piatto grigliante Panasonic lavora in 3 modi diversi: riscaldando il piatto
(che assorbe le microonde), riscaldando il cibo direttamente tramite le
microonde e riscaldando il cibo con il grill. La base del piatto
assorbe le microonde e le trasforma in calore. Quindi il calore viene condotto attraverso il piatto grigliante al cibo. Lʼeffetto riscaldante è ottimizzato
dalla superficie antiaderente dello stesso.
1. Non preriscaldare il piatto grigliante per più di 8 minuti.
Uso del piatto grigliante (Funzionamento manuale)
• Per ottenere i risultati migliori, preriscaldare il piatto prima dellʼuso.
Porre direttamente sul piatto rotante e preriscaldare usando il programma combinato 1 (Grill 1 + 600 Watt) per tre minuti. Per ottenere una
grigliatura migliore, ungere il piatto grigliante con olio prima di preriscaldarlo, per cibi quali salsicce e hamburger.
• Togliere il piatto dal forno e metterci dentro il cibo. Usare il manico in
dotazione oppure dei guanti da forno dato che il piatto può scottare. Per
ottenere i migliori risultati è importante sistemare SUBITO il cibo sul
piatto dopo il preriscaldamento: qualsiasi ritardo potrebbe non garantire
il risultato finale.
• Porre il piatto grigliante sul vassoio di vetro rotante e cuocere
secondo le istruzioni contenute nella tabella di cottura del
ricettario.
2. Porre sempre il piatto grigliante al centro del vassoio di vetro e assicurarsi che non tocchi le pareti interne del forno in quanto ciò
potrebbe causare delle scintille che danneggerebbero la cavità del
forno.
3. Usare sempre il piatto grigliante sul vassoio di vetro rotante.
Non usare mai con il supporto di metallo.
4. Usare sempre il manico o i guanti da forno quando si maneggia il
piatto caldo.
5. Assicurarsi di rimuovere completamente la confezione dei
cibi prima della cottura.
6. Non porre alcun prodotto sensibile al calore sul piatto caldo perché
potrebbe bruciarsi.
7. Il piatto grigliante può essere utilizzato in un forno tradizionale.
8. Per ottenere i risultati migliori usare il piatto con il programma di
combinazione GRILL e MICROONDE.
Cura del piatto grigliante
• Non utilizzare utensili appuntiti sul piatto poiché potrebbero
danneggiarne la superficie.
• Dopo lʼuso, lavare il piatto in acqua calda e detersivo adatto e risciaquare in acqua calda. Non usare prodotti o spugnette abrasivi che
potrebbero danneggiarne la superficie.
• È possibile lavare il piatto grigliante in lavastoviglie.
It-14
Programmi automatici a peso
NN-SD450W
Programma
Visualizzazione
della lingua
1 Riscaldare
cibi freschi
PASTO
FRESCO
2 Riscaldare
cibi congelati
3 Verdure
fresche
Accessori
200 - 1500g
PASTO
SURGELATO 200 - 1200g
VERDURE
FRESCHE
VERDURE
SURGELATE
Istruzioni
Per riscaldare una pietanza in un piatto o in una casseruola.
Tutti i cibi devono essere a temperatura ambiente o refrigerati (a temperatura da frigorifero). Mescolare al segnale acustico. Lasciare
riposare alcuni minuti.
Per riscaldare una pietanza congelata in un piatto o una casseruola. Tutti i cibi devono essere precotti e congelati. Mescolare al segnale
acustico. A cottura ultimata, mescolare il cibo e lasciare riposare alcuni
minuti.
250 - 1500g
Per cuocere verdure fresche (es. carote, zucchine,
broccoli, cavolfiori e piccoli pezzi di patata). Porre le
verdure preparate in un contenitore di dimensioni adatte. Versare
sopra 6 cucchiai di acqua (90ml). Coprire con pellicola trasparente da
cucina perforata o con un coperchio. Grosse quantità dovranno essere
rigirate al segnale acustico.
300 - 1000g
Per cuocere verdure congelate (es. piselli, fagioli e
carote). Porre le verdure in un contenitore di dimensioni adatte.
Aggiungere 2 cucchiai di acqua (30ml). Coprire con pellicola trasparente da cucina perforata o con un coperchio. Grosse quantità dovranno essere rigirate al segnale acustico.
150 - 1000g
Per cuocere pesce fresco (es. del pesce intero, filetti o tranci).
Proteggere le porzioni più sottili e disporre in un contenitore di dimensioni adatte. Aggiungere 2 cucchiai di acqua (30ml). Coprire con pellicola trasparente da cucina perforata o con un coperchio.
5 Pesce
fresco
PESCE
FRESCO
6 Pesce
congelato
PESCE
SURGELATO
200-900g
Per cuocere pesce congelato (es. filetti di pesce o tranci). Disporre
in un contenitore di dimensioni adatte. Aggiungere 2 cucchiai di acqua
(30ml). Coprire con pellicola trasparente da cucina perforata o con un
coperchio.
7 Riscaldare
tazza/scodella
1 TAZZA
150g
Per riscaldare una tazza di liquido caldo (es. tè, caffè, latte,
minestra).
Selezionare Riscaldare tazza, selezionare il peso (150ml) e premere il
tasto di Avvio.
8 Riscaldare
1 scodella
1 SCODELLA
300g
Per riscaldare una terrina di liquido caldo.
Selezionare Riscaldare 1 scodella, selezionare il peso (300ml) e premere il tasto di Avvio.
9 Riscaldare
2 scodelle
2 SCODELLA
600g
Per riscaldare una terrina di liquido caldo.
Selezionare Riscaldare 2 scodelle, selezionare il peso (600ml) e premere il tasto di Avvio.
Suggerimenti per riscaldare tazze, terrine e scodelle.
1. Mescolare il liquido prima di riscaldarlo. (I liquidi riscaldati possono fuoriscire dal recipiente se non vengono mescolati con aria).
2. Non coprire bevande calde quali tè e caffè. Coprire le minestre con un coperchio per evitarne lʼeventuale fuoriuscita dal contenitore.
3. Dopo avere riscaldato lʼalimento, mescolare nuovamente e lasciare riposare per breve tempo.
It-15
Italiano
4 Verdure
congelate
Peso
consigliato
Cottura con avvio ritardato
Utilizzando il pulsante di ritardo/attesa, è possibile programmare una cottura con avvio ritardato.
es.
• Premere Pulsante di
ritardo/attesa.
NOTA:
• Impostare l'intervallo di differimento ruotando la
manopola dell'ora/del peso (per un tempo massimo di 9 ore).
• Impostare il programma e il
tempo di cottura richiesti.
• Premere il pulsante
di avvio.
1. È possibile programmare una cottura in tre fasi che includa la modalità di cottura con avvio ritardato.
ad esempio:
Avvio differito: 1 ora
Alta potenza: 10 min.
Oppure
Potenza per cottura a fuoco lento: 20 min.
Oppure
Una volta
5 volte
2. Se l'intervallo di tempo programmato è superiore a un'ora, il tempo di cottura viene conteggiato in minuti. Se l'intervallo programmato è inferiore a
un'ora, il tempo di cottura viene conteggiato in secondi.
3. L'avvio ritardato non può essere programmato prima dei programmi automatici.
4. Se il tasto ritardato (Attesa/Riposo) è premuto 4 volte, la guida dʼutilizzo sarà spenta.Per riaccendere la guida dʼutilizzo, premere il tasto
Delay/Stand (Attesa/Riposo) 4 volte.
Tempo di attesa
Il pulsante di ritardo/attesa può essere utilizzato per programmare il tempo di attesa dopo che la cottura è stata completata oppure per
programmare il forno come un timer a minuti.
es.
Oppure
• Impostare il programma e il tempo
di cottura richiesti.
NOTA:
• Premere il pulsante di
ritardo/attesa.
• Impostare l'intervallo di ritardo ruotando
la manopola dell'ora/del peso (per un
tempo massimo di 9 ore).
• Premere il pulsante
di avvio.
1. È possibile programmare una cottura in tre fasi che includa la modalità di cottura con avvio ritardato.
ad esempio:
Oppure
Una volta
Alta potenza: 4 min.
Tempo di attesa: 5 min.
Alta potenza: 2 min.
Oppure
Una volta
2. Se si apre lo sportello del forno durante l'intervallo di attesa o mentre è in funzione il timer a minuti, il tempo di cottura visualizzato nella finestra del
display continuerà a essere conteggiato.
3. Questa funzione può essere usata anche come un timer. In tal caso, premere il pulsante di ritardo/attesa, impostare il tempo di cottura e premere il
pulsante di avvio.
It-16
Domande e risposte
R: Quando il forno non si accende, verificare i punti seguenti:
1. Il forno è stato collegato saldamente alla presa di corrente? Estrarre la spina dalla
presa, attendere 10 secondi e reinserirla.
2. Verificare lʼinterruttore e il fusibile. Riaccendere lʼinterruttore o sostituire il fusibile
qualora fosse saltato o bruciato.
3. Se lʼinterruttore e il fusibile sono a posto, collegare un altro apparecchio alla presa di
corrente. Se questo apparecchio funziona, il problema risiede probabilmente nel forno
stesso. Se questo secondo apparecchio collegato non funziona, il problema risiede
probabilmente nella presa di corrente. Se il problema dovesse essere nel forno stesso,
contattare un centro di assistenza qualificato.
D: Il mio forno a microonde causa delle
interferenze allʼapparecchio TV. È normale?
R: È possibile che si verifichino delle interferenze durante la cottura con il forno a microonde.
Questa interferenza è simile a quella causata da piccoli elettrodomestici quali frullatori,
aspirapolvere, asciugacapelli, ecc. Questo non vuol dire che il forno a microonde sia difettoso.
D: Il forno non accetta il programma. Perché?
R: Il forno è progettato per non accettare programmi errati. Ad esempio, dopo l'avvio differito,
il forno non consente di impostare né una quarta fase né un programma di pesatura automatico.
D: Talvolta proviene dellʼaria calda dalle
prese di ventilazione del forno. Perché?
R: Il calore emanato dal cibo che viene cotto riscalda lʼaria nella cavità del forno.
Questa aria calda viene portata fuori dal forno dal movimento dellʼaria allʼinterno del forno.
Non ci sono microonde nellʼaria. Le prese di ventilazione del forno non devono mai essere
bloccate durante la cottura.
D: La lettera “D” appare nel display e il forno non R: Il forno ha programmato il modo di cottura di dimostrazione. Questa modalità è stata concepita per lʼesposizione nei negozi dellʼapparecchio.
cuoce. Perché?
Disattivare, quindi, questa modalità premendo tre volte il pulsante dell'orologio.
D: Posso usare un termometro convenzionale da R: Il forno ha una modalità dimostrativa preimpostata (DEMO MODE). Questa modalità è prevista per le dimostrazioni per clienti allʼinterno dei punti vendita. Disattivare questa modalità
forno nel forno a microonde?
premendo il tasto di Potenza Microonde una volta e, in seguito, il tasto Stop/Cancel
(Arresto/Annullamento) 4 volte (NN-GD560M / NN-GD550W ) o il tasto di Potenza
Microonde Massima una volta e, in seguito, il tasto Stop/Cancel (Arresto/Annullamento) 4
volte (NN-SD450W).
D: Il mio forno smette di cucinare a microonde e
sul display appaiono “H97” e “H98”.
R: Il display indica un problema con il sistema di generazione a microonde. Si prega di contattare un centro assistenza autorizzato.
D: Il sistema di suggerimento “Word Prompting”
non appare più sul mio display e vedo solamente dei numeri.
R: Potrebbe essersi verificata unʼinterruzione dellʼalimentazione elettrica e il sistema “Word
Prompting” è stato disabilitato. Sfilare la spina del forno e dopo pochi secondi reinserirla.
Quando appare 88:88, premere il tasto di avvio fino a quando apparirà la lingua desiderata. Quindi impostare lʼora. Fare riferimento alla pagina It-7.
NN-GD560M / NN-GD550W
D: Quando cucino con il programma combinato,
si sentono ronzii e clicchettii provenienti dal
forno. Che cosa provoca questi rumori?
R: I rumori sono dovuti al fatto che il forno passa automaticamente dalla potenza
MICROONDE alla potenza GRILL per eseguire il programma combinato impostato. Questo
è normale.
D: Il forno sprigiona un odore e genera del
fumo quando utilizzo le funzioni di programma combinato e GRILL. Perché?
R: Dopo un certo utilizzo del forno, è raccomandabile pulire questʼultimo e farlo funzionare
immediatamente senza alimenti e privo vassoio di vetro e anello rotante, impostandolo
sulla posizione Grill per 5 minuti. Questa operazione brucerà tutti i residui di cibo e di grasso che possono causare odori e/o fumo.
It-17
Italiano
D: Perché il forno non si accende?
Cura del forno a microonde
1. Prima di procedere alla pulizia del forno, scollegarlo dalla
presa di corrente.
2. Mantenere puliti lʼinterno del forno, le giunture della porta e le superfici vicine a queste. Pulire gli schizzi di cibo e i liquidi versati che
aderiscono alle pareti del forno passando un panno umido sulle giunture della porta e sulle superfici vicine. È possibile utilizzare un detergente neutro nel caso in cui le giunture fossero molto sporche. Non è
raccomandato lʼuso di detergenti concentrati o abrasivi.
NON UTILIZZARE I PRODOTTI PER LA PULIZIA DEI FORNI
DISPONIBILI IN COMMERCIO. Non utilizzare detergenti abrasivi o
raschietti di metallo appuntiti per pulire il vetro del forno in quanto
possono graffiare la superficie e, di conseguenza, danneggiare il
vetro.
3. La superficie esterna del forno deve essere pulita con un panno
umido. Per evitare di danneggiare le parti operative allʼinterno del
forno, evitare di far penetrare dellʼacqua nelle prese di ventilazione.
4. Se il pannello di controllo si sporca, pulirlo con un panno morbido e
asciutto. Non usare detergenti concentrati né spugnette abrasive sul
pannello di controllo. Quando si pulisce il pannello di controllo lasciare la porta aperta per evitare lʼaccensione accidentale del forno.
Dopo la pulizia, toccare il tasto Arresto/Cancella per eliminare quanto
visualizzato nel display.
5. Se si accumula del vapore allʼinterno o intorno alla parte esterna
della porta del forno, passarvi sopra un panno morbido. Questo può
accadere quando il forno a microonde viene usato in condizioni di
forte umidità e non indica assolutamente un cattivo funzionamento
dellʼapparecchio.
6. Occasionalmente è necessario rimuovere il vassoio di vetro per pulirlo. Lavare il vassoio in acqua calda e detersivo o, in lavastoviglie.
7. Lʼanello rotante e la base della cavità del forno devono essere puliti
regolarmente per evitare rumore eccessivo. Passare semplicemente
un panno inumidito con detergente neutro e acqua calda sulla base
interna del forno, quindi asciugare con un panno asciutto. Lavare
lʼanello rotante in acqua e detersivo neutro. I vapori di cottura si condensano con lʼuso ripetuto del forno, ma non danneggiano in nessun
caso la base del forno né le rotelle dellʼanello rotante. Dopo aver
rimosso lʼanello rotante dalla base del forno per la pulizia, assicurarsi
di riposizionarlo correttamente.
8. Quando si usano le modalità di cottura GRILL o di programma combinato (NN-GD560M / NN-GD550W), alcuni cibi inevitabilmente produrranno schizzi di grasso sulle pareti del forno. Se il forno non viene
pulito regolarmente, potrebbe cominciare a esalare del fumo quando
viene utilizzato.
9. Non utilizzare pulitori a vapore.
10. La manutenzione di questo forno deve essere eseguita unicamente
da personale qualificato. Per la manutenzione e le riparazioni al
forno, contattare il più vicino centro di assistenza autorizzato
Panasonic.
11. Mantenere sempre libere da ostacoli le aperture di ventilazione.
Verificare che le aperture collocate sulla parte superiore, inferiore o
posteriore del forno non siano ostruite da polvere o altri materiali. In
caso contrario, il forno potrebbe surriscaldarsi provocando un funzionamento anomalo del forno e causando eventualmente situazioni
pericolose.
12. La mancanza di attenzione alla pulizia del forno può portare al
deteri oramento delle superfici, riducendo la vita operativa dell'apparecchio e creando situazioni a rischio.
Caratteristiche tecniche
Alimentazione:
Consumo energetico:
NN-GD560M /NN-GD550W
NN-SD450W
230 V, 50 Hz
Massimo;
Microonde;
230 V, 50 Hz
Grill;
2300 W
1100 W
1350 W
Uscita:
Microonde;
Potenza grill;
1000 W (IEC - 60705)
1300 W
Dimensioni esterne
Dimensioni della cavità del forno
Peso senza imballaggio
Rumorosità
Standby Power:
Off Power:
510 (L) x 380 (P) x 304 (A) mm
359 (L) x 352 (P) x 217 (A) mm
12.5 Kg
50 dB
Microonde;
1100 W
Microonde;
1000 W (IEC-60705)
510 (L) x 380 (P) x 304 (A) mm
359 (L) x 352 (P) x 217 (A) mm
11.5Kg
50 dB
Le caratteristiche tecniche sono soggette a modifiche senza preavviso.
It-18
Cura del forno a microonde
Questo prodotto è conforme agli attuali standard Europei per la Compatibilità Elettromagnetica, in ottemperanza alle norme EN 55011.Secondo gli
standard menzionati questo prodotto rientra nel gruppo 2, classe B, all'interno dei limiti richiesti. Gruppo 2; significa che la radio frequenza è generata
sotto forma di emissione elettromagnetica adatta allo scopo di riscaldare o cuocere i cibi. Classe B: significa che questo prodotto può essere utilizzato
nel normale ambito casalingo.
Informazioni per gli utenti sullo smaltimento di apparecchiature elettriche ed elettroniche obsolete (per i
nuclei familiari privati)
Questo simbolo sui prodotti e/o sulla documentazione di accompagnamento
significa che i prodotti elettrici ed elettronici usati non devono essere mescolati con i rifiuti domestici generici.
Per un corretto trattamento, recupero e riciclaggio, portare questi prodotti ai punti di raccolta designati, dove verranno accettati gratuitamente. In alternativa, in alcune nazioni potrebbe essere possibile restituire i prodotti al rivenditore locale, al momento dell'acquisto di un nuovo prodotto equivalente.
Uno smaltimento corretto di questo prodotto contribuirà a far risparmiare preziose risorse ed evitare potenziali effetti negativi sulla
salute umana e sull'ambiente, che potrebbero derivare, altrimenti, da uno smaltimento inappropriato. Per ulteriori dettagli, contattare
la propria autorità locale o il punto di raccolta designato più vicino.
In caso di smaltimento errato di questo materiale di scarto, potrebbero venire applicate delle penali, in base alle leggi nazionali.
Per gli utenti aziendali nell'Unione Europea
Informazioni sullo smaltimento in nazioni al di fuori dell'Unione Europea
Questo simbolo è valido solo nell'Unione Europea.
Qualora si desideri smaltire questo prodotto, contattare le autorità locali o il rivenditore e chiedere informazioni sul metodo corretto di smaltimento.
Ai sensi della direttiva 2004/108/CE, articolo 9(2)
Panasonic Testing Centre
Panasonic Service Europe, una divisione di Panasonic Marketing Europe GmbH
Winsbergring 15, 22525 Amburgo, Germania
Prodotto da Panasonic Home Appliances Microwave Oven (Shanghai) Co.,Ltd, 898 Longdong Road, Pudong, Shanghai, 201203, Cina.
It-19
Italiano
Qualora si desideri smaltire apparecchiature elettriche ed elettroniche, contattare il rivenditore o il fornitore per ulteriori informazioni.
Instalación y Conexión
Examine su horno microondas
Desembale el horno, saque todo el material de embalaje y
examine que el horno no tenga ningún daño como abolladuras, pestillos
de la puerta rotos o grietas en la puerta. Si encuentra cualquier daño,
notifíquelo a su distribuidor inmediatamente. No instale un horno microondas dañado.
Instrucciones para conexión a tierra
IMPORTANTE: ESTA UNIDAD TIENE QUE ESTAR DEBIDAMENTE
CONECTADA A TIERRA, POR SU SEGURIDAD PERSONAL.
Si su salida de CA no está conectada a tierra, es responsabilidad personal
del cliente reemplazarla por un enchufe de pared con conexión a tierra.
Voltaje de funcionamiento
El voltaje tiene que ser el mismo que está especificado en la
etiqueta que está sobre el horno. Si se usa un voltaje más alto que el
especificado, puede causar un incendio u otros daños.
No coloque este horno cerca de una cocina eléctrica o de gas.
No deben sacarse los apoyos inferiores.
Este horno es sólo para uso doméstico. No usarlo al aire libre.
Evitar el uso del horno microondas en ambiente de humedad alta.
El cable de la corriente no debe tocar el exterior del horno.
Mantener el cable alejado de superficies calientes. No deje el
cable colgando del borde de una mesa o de un mostrador. No
sumerja en agua el cable, ni la clavija ni el horno.
9. No bloquee las rejillas de ventilación situadas en la parte superior
y trasera del horno. Si estas rejillas están bloqueadas durante la
operación, el horno puede sobrecalentarse. En este caso el horno
está protegido por un dispositivo de seguridad térmico y reanude
la operación únicamente tras haberse enfriado.
10. Este aparato no está diseñado para funcionar con un sistema de
control remoto independiente ni con un temporizador externo.
4.
5.
6.
7.
8.
Atención: Superficies calientes
(NN-GD560M / NN-GD550W)
Colocación del horno
Este horno está diseñado únicamente para su uso en encimeras. No está
diseñado para utilizarlo empotrado dentro de alacenas.
Empotrado
Este horno puede empotrarse en una cabina de pared usando el conjunto
de montaje, NN-TKT59WFP blanco /NN-TKT59MFP plata, que puede comprarse en un distribuidor local de Panasonic.
Uso sobre una superficie:
a.
b.
Hay que dejar 15 cm de espacio libre por encima del
horno, 10 cm por detrás y 5 cm por un lado, mientras que
el otro lado debe estar despejado más de 40 cm.
Si un lado del horno está colocado a nivel de una pared, el
otro lado o la parte superior no debe estar bloqueado.
5cm
15cm
10cm
ABIERTO
Sobre una superficie
1. Los cierres de la puerta y las áreas de cerrado de la puerta deben
limpiarse con un paño húmedo.
El aparato debe inspeccionarse para ver si tiene daños en los
cierres de la puerta y en las áreas de cierre de la puerta y si estas
áreas están dañadas, no debe hacerse funcionar el aparato hasta
que haya sido reparado por personal del servicio técnico oficial.
2. No intente forzar o hacer cualquier ajuste o reparación a la puerta,
panel de control, o cualquier otra parte del horno. No saque el
panel exterior del horno que proporciona protección contra la
exposición a la energía del microondas.
Las reparaciones deben ser realizadas por una persona de servicio
cualificada.
3. No haga funcionar este aparato si tiene un CABLE o CLAVIJA
estropeados. Si no trabaja apropiadamente o está estropeado o se
ha caído, es peligroso realizar cualquier reparación para alguien
que no sea del servicio técnico oficial.
4. Si el cable de suministro de este aparato está estropeado, deberá
reemplazarlo. Le recordamos que cualquier reparación deberá
realizarse a través del servicio técnico oficial.
5. Solo deberá permitir a los niños el uso del horno cuando se les
hayan dado las instrucciones adecuadas para que éstos sean
capaces de usar el horno de forma segura y entiendan los riesgos
que pueden derivarse de un uso inapropiado.
6. Nunca deberá calentar líquidos o cualquier otro tipo de alimento en
recipientes herméticos, ya que existe el riesgo de que estallen por
culpa de la presión.
7. Este aparato no está diseñado para que lo utilicen personas (niños
incluidos) con capacidades sensoriales o mentales reducidas, o sin
experiencia y conocimientos, a menos que una persona respons
able de su seguridad les supervise o les haya dado instrucciones
acerca del uso del aparato. Es preciso controlar a los niños para
cerciorarse de que no jueguen con el aparato.
Es-1
Español
1. Coloque el horno sobre una superficie plana y estable, a más de 85
cm por encima del suelo.
2. Cuando se instale este horno, debe ser fácil aislar el aparato del sum
inistro de electricidad, tirando de la clavija o accionando el disyuntor.
3. Para que el funcionamiento sea el apropiado, hay que asegurar una
circulación suficiente de aire para el horno.
AVISO
Instrucciones de Seguridad
Utilización de su horno
1.
2.
3.
4.
5.
6.
No use el horno para ningún otro fin que no sea la preparación de
comida. Este horno está diseñado específicamente para calentar,
descongelar o cocinar alimentos. No use este horno para calentar
productos químicos u otros productos no-alimenticios.
Antes de utilizarlo, verifique que los utensilios/recipientes son
adecuados para su uso en hornos microondas.
No intente usar este horno microondas para secar periódicos, ropa o
cualquier otro material. Podrían incendiarse.
Cuando no vaya a usar el horno, no guarde en el interior otros obje
tos que no sean los accesorios del horno, para que no se ponga en
marcha accidentalmente.
No se hará funcionar el aparato mediante las funciones MICROON
DAS o COMBINADO (NN-GD560M / NN-GD550W), SI NO HAY
COMIDA EN EL HORNO ya que se podría estropear. La excepción a
esta norma es el punto 1 en los casos de operación de calentamiento
y en pre calentamiento de la bandeja para pizza.
Si hubiera humo o fuego en el horno, pulse el botón Paro/Cancelar y
deje la puerta cerrada, con objeto de sofocar cualquier llama.
Desenchufe el cable eléctrico o corte la corriente en el panel de inter
ruptor o fusible.
Funcionamiento de la Resistencia (NN-GD560M / NN-GD550W)
1.
2.
3.
4.
5.
Antes de usar la función COMBINADO o GRILL por primera vez,
limpie el exceso de aceite que haya en la cavidad del horno y haga
funcionar el horno sin comida ni accesorios en el Grill durante 10
minutos. Esto permitirá que se queme el aceite que se usa para la
protección contra la corrosión. Esta es la única ocasión en que el
horno se utiliza vacío.
Las superficies exteriores del horno, incluidos los ventiladores de aire
en la cabina y la puerta del horno, se calentarán durante el COMBI
NADO y el GRILLING; tener cuidado al abrir o cerrar la puerta y al
introducir o sacar comida y accesorios.
El horno tiene dos resistencias situadas en la parte superior del
horno. Después de usar la función COMBINADO y GRILL, estas
superficies estarán muy calientes.
Nota: Después de cocinar mediante estas formas, los
accesorios del horno estarán muy calientes.
Las partes accesibles pueden calentarse cuando se utilizan el grill y
el modo combinado. Debe mantener a los niños alejados del aparato.
Cuando el aparato se acciona en modo combinación, los niños sólo
deben utilizar el horno bajo supervisión debido a las temperaturas
generadas.
Es-2
Funcionamiento del Ventilador
Si el horno se calienta después de la utilización, el ventilador puede
girar durante unos minutos para enfriar los componentes eléctricos.
Esto es perfectamente normal y usted puede sacar la comida del horno
mientras el ventilador esté todavía en funcionamiento.
Lámpara del Horno
Cuando sea necesario reemplazar la lámpara del horno, póngase en
contacto con el servicio técnico.
Accesorios
El horno está equipado con una variedad de accesorios. Síganse siempre las indicaciones dadas para el uso de los accesorios.
Bandeja de cristal
1. No haga funcionar el horno sin haber colocado el aro giratorio y la
bandeja de cristal.
2. Nunca usar otro tipo de bandeja de cristal que no sea la diseñada
especialmente para este horno.
3. Si la bandeja de cristal está caliente, deberá dejarla enfriar antes de
limpiarla o sumergirla en agua.
4. La bandeja de cristal puede girar en cualquier dirección.
5. Si el recipiente de comida que está sobre la bandeja de cristal toca
las paredes del horno, se detendrá momentáneamente y ésta girará
automáticamente en la dirección contraria. Esto es normal.
6. No cocine alimentos directamente sobre la bandeja de cristal.
Aro giratorio
1. El aro giratorio y la parte inferior del horno deben limpiarse
frecuentemente.
2. El aro giratorio debe usarse siempre para cocinar, junto con la ban
deja de cristal.
Parrilla NN-GD560M / NN-GD550W)
1. La Parrilla se utiliza para gratinar y dorar los platos pequeños y para
ayudar a la buena circulación del calor.
2. No use ningún recipiente metálico sobre la Parrilla en COMBINADO
con MICROONDAS.
3. No use la parrila, en función de MICROONDAS solo.
Bandeja para pizza (NN-GD560M / NN-GD550W) Ver página Es-14
Información Importante
1. Tiempos de Cocción
6. Líquidos
•
•
•
Los tiempos de cocción dados en el libro de cocina son aproximados.
El tiempo de cocción depende de la condición, temperatura, cantidad
de comida y tipo de recipiente.
Comience con el tiempo de cocción mínimo para evitar una sobrecoc
ción. Si la comida no está suficientemente cocida, siempre podrá
añadir un poco más de tiempo.
Nota :
Si se sobrepasan los tiempos de cocción recomendados, la comi
da puede estropearse y en circunstancias extremas podría incen
diarse y dañar posiblemente el interior del horno.
2. Pequeñas Cantidades de Alimentos
•
Pequeñas cantidades de comida o alimentos con bajo contenido de
humedad pueden quemarse, secarse o incendiarse si se cuecen
demasiado tiempo. Si los materiales dentro del horno se incendiaran,
mantenga cerrada la puerta del horno, apague el horno y desenchufe
el cable eléctrico.
a)
b)
c)
d)
7. Papel/Plástico
•
•
3. Huevos
•
No cocine huevos con la cáscara ni cueza huevos duros en la modalidad de MICROONDAS. Puede aumentar la presión y los huevos
pueden explotar, incluso después de que el microondas haya dejado
de emitir calor.
Cuando se calienten líquidos, por ejemplo, sopa, salsas y bebidas
en su horno microondas, puede ocurrir un sobrecalentamiento
del líquido por encima de su punto de ebullición sin que se aprecie
borboteo.
Para prevenir esta posibilidad deben tomarse las siguientes medas:
Evitar el uso de recipientes de lados
rectos con cuellos estrechos.
No sobrecalentar.
Remover el líquido antes de colocar el recipiente en el
horno y otra vez en el intermedio del tiempo de cocción.
Después del calentamiento deje reposar el alimento.
•
Cuando caliente comida en recipientes de papel o de plástico,
vigílelo ya que estos tipos de recipientes o envoltorios se encienden
si se sobrecalientan.
No use productos de papel reciclado (por ej.: Rollo de Cocina), a
menos que el producto de papel esté etiquetado como seguro para
uso en horno microondas. Los productos de papel reciclado pueden
contener impurezas que pueden causar chispas y/ó fuego durant
su uso.
Saque las tiras de cierre de las bolsas, en el caso que las llevara,
antes de colocar las bolsas en el horno.
8. Utensilios/Papel de aluminio
•
•
•
Los alimentos con pieles no porosas, tales como las patatas, yemas
de huevo y salchichas deben pincharse antes de la cocción en
microondas. La presión puede aumentar y hacerlos estallar.
5. Termómetro para la Carne
•
Use un termómetro para la carne para verificar el grado de
cocción de los asados y las aves, una vez haya sacado el alimentodel
horno. No use un termómetro convencional para la carne, cuandoesté
utilizando el programa de Microondas o Combinado, ya que puede
producir chispas.
•
No calentar latas ni botellas cerradas porque pueden explotar.
Los recipientes metálicos o los platos con ribetes metálicos no
deben usarse durante la cocción Microondas ya que pueden pro
ducir chispas.
Si Vd. utiliza papel de aluminio, pinchos para carne o utensilios de
metal, la distancia entre ellos y las paredes y la puerta del horno
debe ser de como mínimo 2 cm.
9. Biberones/Tarritos para bebés
•
•
•
El tapón y la tetina o tapa deben sacarse de los biberones y de los
tarritos antes de colocarlos en el horno.
El contenido de los biberones y de los tarritos tiene que removerse
o agitarse.
La temperatura tiene que verificarse antes de su consumo, para evi
tar quemaduras.
Es-3
Español
4. Perforar la Piel
Esquema general
[8b]
[13]
[8a]
[6]
[4]
[12]
[5]
[2]
[1]
[7]
[3]
[9]
[10]
[11]
1.
Botón de Liberación de la Puerta
Púlselo para abrir la puerta. Cuando abra la puerta del horno durante la cocción, la cocción se detiene temporalmente sin que
desaparezcan los ajustes hechos anteriormente. La cocción se reanuda tan pronto como se cierra la puerta y se pulsa el botón
Marcha. La lámpara del horno se enciende tan pronto como se abra la puerta del horno.
2.
Ventana del Horno
3.
Sistema de Cierre de Seguridad de la Puerta
4.
Rejillas de ventilación del horno
5.
Panel de Control
6.
Bandeja de cristal
7.
Aro Giratorio
8a. Orificios de ventilación
8b. Orificios de ventilación (NN-GD560M / NN-GD550W)
9.
Parrilla (NN-GD560M / NN-GD550W)
10. Bandeja para pizza (NN-GD560M / NN-GD550W)
11.
9.
10.
Es-4
Mango del recipiente para la pizza (NN-GD560M / NN-GD550W)
Cable de alimentación
Advertencia (superficie caliente) (NN-GD560M / NN-GD550W)
Panel de Control
NN-GD560M / NN-GD550W*
1.
2.
3.
4.
5.
(1)
(2)
(3)
(8)
(4)
(5)
(9)
(6)
Español
(7)
Ventanilla visualizadora
Potencia de microondas
Potencia de grill
Potencia de combinado
Botón de descongelación turbo con peso
automático
6. Retraso/Parada
7. Botón del reloj
8. Dial selector de programa automático
9. Dial Tiempo/Peso
10. Botón Paro/ Cancelación:
Antes de la cocción : pulsando una vez
desaparecen sus instrucciones.
Durante la cocción : pulsando una vez, se
detiene temporalmente el programa de cocción.
Pulsando otra vez más, se cancelan todas sus
instrucciones y aparece la hora en la pantalla.
11. Botón de Marcha: Pulsarlo para que
comience a funcionar el horno. Si durante la
cocción se abre la puerta o se pulsa una vez el
botón Paro/Cancelación
tendrá que pulsar el botón de Marcha otra vez
para que continúe la cocción.
diseño del panel de control del microondas puede ser
* El
de diferente color, pero las funciones de este no varían.
(10)
(11)
Nota
Si se establece una operación y no se pulsa el botón de inicio, el horno cancelará la operación automáticamente después de 6 minutos. La pantalla volverá al modo de reloj.
Avisador acústico:
Cuando se pulsa un botón suena
un pitido. Si este pitido no suena,
el ajuste es incorrecto. Cuando el
horno cambia de una a otra
función suenan dos pitidos. Una
vez se ha completado la cocción,
suenan cinco pitidos.
Este horno está equipado con una función de ahorro de energía.
Nota:
1. Durante el modo de espera, el brillo de la pantalla se reducirá.
2. El horno entrará en modo de espera la primera vez que se
enchufe e inmediatamente después de completar el último
funcionamiento.
Es-5
Panel de Control
NN-SD450W
1.
2
3.
4.
5.
6.
7.
8.
(1)
(6)
(2)
9.
(7)
(3)
(4)
Ventanilla visualizadora
Potencia de microondas
Descongelación Automática por Peso
Retraso/Parada
Botón del reloj
Dial selector de programa automático
Dial Tiempo/Peso
Botón Paro/ Cancelación:
Antes de la cocción : Pulsando una vez
desaparecen sus instrucciones.
Durante la cocción : pulsando una vez,
se detiene temporalmente el programa de
cocción. Pulsando otra vez más, se cancelan todas sus instrucciones y aparece la
hora en la pantalla.
Botón de Marcha: Pulsarlo para que
comience a funcionar el horno. Si durante
la cocción se abre la puerta o se pulsa una
vez el botón Paro/Cancelación tendrá que
pulsar el botón de Marcha otra vez para
que continúe la cocción.
Nota
(5)
(8)
(9)
Si se establece una operación y no se pulsa el botón de
inicio, el horno cancelará la operación automáticamente
después de 6 minutos. La pantalla volverá al modo de
reloj.
Este horno está equipado con una función de ahorro de energía.
Nota:
Avisador acústico:
Cuando se pulsa un botón suena
un pitido. Si este pitido no suena,
el ajuste es incorrecto. Cuando el
horno cambia de una a otra función suenan dos pitidos. Una vez
se ha completado la cocción, suenan cinco pitidos.
Es-6
1. Durante el modo de espera, el brillo de la pantalla se reducirá.
2. El horno entrará en modo de espera la primera vez que se
enchufe e inmediatamente después de completar el último
funcionamiento.
Mandos y Modo de funcionamiento
Conecte “88:88”
Función Chivato
“FRANCAIS”
En Francés
Pulse
“ITALIANO”
En Italiano
Pulse
“DEUTSCH”
En Alemán
Pulse
“NEDERLANDS”
In Dutch
Pulse
ESPANOL
En Español
Pulse
“POLSKI”
En Polaco
Pulse
“CESKY”
En checo
Pulse
“ENGLISH”
En Inglés
Pulse
“DANSK”
En Danés
Pulse
“SUOMI”
En Finlandés
Pulse
“SVENSKA”
En Sueco
Pulse
“NORSK”
En Noruego
Ajuste del Reloj :
• Pulse el botón del reloj una vez.
Los : comienzan a parpadear
Estos modelos disponen de la función exclsiva de “Información en pantalla”, que sirve de
guía para utilizar el microondas. Tras haber
enchufado el horno, pulse el botón de inicio
tantas veces como sea necesario hasta
encontrar el idioma que desee. Cada vez que
pulse un botón, la pantalla mostrará el siguiente paso a seguir, eliminando la posibilidad
de cometer errores. Si por cualquier motivo
quisiera cambiar el idioma de la información
en pantalla, desconecte el horno y repita este
procedimiento.
Si se pulsa el botón Retraso/Reposo 4 veces,
se apagará la guía de funcionamiento. Para
volver a encender la guía de funcionamiento,
pulse el botón Retraso/Reposo 4 veces
SÓLO PARA EL MODELO
NN-SD450W
Español
Pulse
Ejemplo : Ajustar a las 12:00
• Ponga la hora girando el dial Tiempo/Peso
La hora aparece en la pantalla y los :
parpadean
• Pulse el botón del reloj.
Los : paran de parpadear y la hora está entrada
NOTA :
1. Para reajustar la hora del día repetir todos los pasos anteriores.
2. La hora del día se visualiza a menos que se interrumpa el suministro eléctrico.
3. Este reloj tiene una visualización de 24 horas.
Es-7
Mandos y Modo de funcionamiento
Bloqueo de Seguridad para Niños:
Usando este sistema hará que los mandos del horno sean inoperables; sin embargo, la puerta podrá abrirse. El Bloqueo para Niños puede activars
ecuando el visualizador muestra los dos puntos o la hora.
Para
Activarlo:
Para
Cancelarlo:
• Pulsar el Botón de Marcha tres veces.
• Pulsar el botón Paro/Cancelar tres veces.
La hora del día desaparecerá.
La hora actual no se perderá. Un * aparecerá en el visualizador.
La hora del día reaparecerá en el visualizador.
NOTA: Para activar el bloqueo de seguridad para niños, se debe pulsar el botón de inicio 3 veces en un período de 10 segundos.
Cocción y Descongelación del microondas
Hay disponibles 5 niveles diferentes de potencia de microondas. La tabla de debajo muestra el número de vatios aproximado para cada nivel de potencia.
NN-GD560M / NN-GD550W
Uso del accesorio:
NN-SD450W
Bandeja de cristal
Pulsar
Nivel de
potencia
Potencia en vatios
Una vez
Máx. (Alto)
1000 W
Dos veces
Descongelación
270 W
3 veces
Medio
600 W
4 veces
Bajo
440 W
5 veces
Ebullición suave
250 W
NN-GD560M / NN-GD550W
O
• Seleccione el nivel deseado
• Pulse este botón hasta que la
de potencia del microondas.
potencia que usted precise
aparezca en la ventana de visualización.
• Ajustar el tiempo de cocción usando el
Dial (Potencia ALTA: hasta 30 min.
Potencia otros: hasta 90 min.) Tiempo/Peso.
• Pulsar el botón
Marcha.
NOTA:
Para la cocción en 2 ó 3 etapas, antes de pulsar el botón de Arranque, repita el ajuste del nivel de potencia de microondas y el tiempo de cocción.
p.ej. Guiso –– Alto (HIGH) 10 minutos para levantar un hervor al guiso. Hervir a fuego lento (SIMMER) 60 minutos para cocinarlo.
Hervir a fuego lento (Simmer) 10 minutos para que se desarrollen los sabores.
2. El tiempo de parada puede programarse después del ajuste de potencia y tiempo del microondas.
3. Puede cambiar el tiempo de cocción durante la cocción si es necesario. Gire el Dial Tiempo/Peso para aumentar o disminuir el tiempo de cocción.
El tiempo puede aumentarse/disminuirse en incrementos de un minuto y hasta diez minutos. Girando el dial a cero finalizará la cocción.
Asegúrese de que utiliza los recipientes y accesorios adecuados cuando cambie el modo de preparación.
4. El horno funcionará automáticamente en Alta potencia de microondas si se introduce un tiempo de cocción sin que se haya selec
cionado previamente el nivel de potencia.
1.
Es-8
Grill (NN-GD560M / NN-GD550W)
Parrilla
Uso del accesorio:
Bandeja de cristal
• Seleccionar Potencia de Grill. Pulse una vez para
Grill 1 (Alto), dos veces para Grill 2 (Medio) o 3
veces para Grill 3 (Bajo).
El Grill ofrece 3 ajustes para el Grill.
1 Pulsación
GRILL 1 1300 W
2 Pulsaciones
GRILL 2 950 W
3 Pulsaciones
GRILL 3 700 W
• Pulsar botón Marcha.
• Ajustar el tiempo de cocción usando el Dial
Tiempo/Peso (hasta 90 min.).
NOTA:
1.
2.
El aparato sólo funcionará con la puerta del horno cerrada.
Puede cambiar el tiempo de cocción durante la misma, si esto fuera necesario. Gire el Dial Tiempo/Peso para aumentar o disminuir el tiempo de
cocción. El tiempo puede aumentar / disminuir en incrementos de un minuto / diez minutos. Girando el dial a cero finalizará la cocción.
Cocción Combinado (NN-GD560M / NN-GD550W)
Español
Uso del accesorio:
Hay tres ajustes de combinado. La tabla siguiente muestra el
número de vatios aproximado para cada nivel de potencia.
Parrilla
Ajuste
Pulsaciones
combinado
Bandeja de
Cristal
1
2
3
Grill
1 Pulsación 1300W
2 Pulsaciones 1300W
3 Pulsaciones 1300W
Microondas
Chivato
600W
440W
250W
G1-600W
G1-440W
G1-250W
Bandeja de Cristal
• Seleccionar nivel de
combinación (ver tabla).
• Ajustar el tiempo de cocción usando el
Dial Tiempo/Peso (hasta 90 min.).
• Pulsar botón Marcha.
NOTA:
1.
2.
El aparato sólo funcionará con la puerta del horno cerrada.
Puede cambiar el tiempo de cocción durante la misma, si esto fuera necesario. Gire el Dial Tiempo/Peso para aumentar o disminuir el tiempo de
cocción. El tiempo puede aumentarse / disminuirse en incrementos de un minuto y hasta diez minutos. Girando el dial a cero finalizará la cocción.
Es-9
Descongelación Automática
Con esta característica usted podrá descongelar alimentos simplemente ajustando el peso del mismo. El peso se programa en
gramos. Para una selección rápida el peso comienza a partir del más comúnmente usado.
• Seleccionar el Programa de
Descongelación Automática deseado.
Pulse 1 vez para piezas pequeñas.
Pulse 2 veces para piezas grandes.
Programa
Chivato
• Fije el peso del alimento congelado usando el dial
Tiempo/Peso. Girando lentamente el dial se contarán pasos de
10g. Girando el dial rápidamente se contarán pasos de 100g.
• Pulsar el botón
Marcha
Alimentos adecuados
Peso
Piezas pequeñas de carne, escalopa, salchichas, filetes de pescado, bistecs,
1 Piezas pequeñas
PIEZAS
PEQUEÑOS
150 - 1600g chuletas (de 100g a 400g cada una). Girar el alimento cuando suene el pitido.
2 Piezas grandes
PIEZAS
GRANDES
400 - 2400g
Piezas grandes de carne, asados, pollo entero.
Girar el alimento cuando suene el pitido.
NOTA :
1. Cuando el tiempo de descongelación sea superior a los 60 minutos, el tiempo aparecerá como Horas y Minutos.
2. La forma y el tamaño del alimento determinará el peso máximo que el horno puede acomodar.
3. Para más información ver los principios de la descongelación en el libro de cocina.
Programas Automáticos por Peso
Esta característica le permite cocinar la mayor parte de sus alimentos preferidos fijando sólo el peso. El horno determina el nivel de potencia
Microondas, la potencia de Grill (NN-GD560M / NN-GD550W) y el tiempo de cocción automáticamente. Seleccione la categoría y fije el peso del alimento. El peso se programa en gramos. Para una selección rápida, el peso comienza a partir del peso más comúnmente usado para cada categoría.
NN-GD560M/
NN-GD550W
NN-SD450W
e.g.
• Seleccione el programa automático por peso deseado girando el dial del Selector de Programa
Automático. La pantalla se desplazará a lo largo de los
programas de Cocción Automática por Peso.
• Fije el peso del alimento usando el dial Tiempo/Peso
Girando lentamente el dial se contarán pasos de 10g.
Girando el dial rápidamente se contarán pasos de 100g.
NOTA:
1. Cuando el tiempo de descongelación sea superior a los 60 minutos, el tiempo aparecerá como Horas y Minutos.
2. Seguir las tablas siguientes para el peso recomendado y los accesorios a utilizar.
Es-10
• Pulsar el botón
Marcha
Programas Automáticos por Peso
NN-GD560M / NN-GD550W
Programa
Chivato
Peso
Recomendado
1 Recalentar
Taza
CALENTAR
1 TAZA
150g
Para recalentar una taza de bebida caliente (por ej. té, café, leche
y sopa). Seleccionar la taza a recalentar, registrar el peso (150ml) y
pulsar el botón marcha.
2 Recalentar
Tazón
CALENTAR
1TAZON
300g
Para recalentar un tazón de bebida caliente.
Seleccionar el tazón a recalentar, registrar el peso (300ml) y pulsar el
botón marcha.
3 Recalentar
Fresco
CALENTAR
COMIDA 200 - 1500g
FRESCA
4 Recalentar
Congelada
6 Cocción de
Verdura
Congelada
7 Cocción de
Pescado
Fresco
8 Cocción de
Pescado
Congelado
COCINAR
VERDURA
FRESCA
250 - 1500g
COCINAR
VERDURA
CONGELADA 300 - 1000g
COCINAR
PESCADO
FRESCO
COCINAR
PESCADO
CONGELADO
150 - 1000g
200 - 900g
Instrucciones
Para recalentar platos preparados, o cazuelas.
Todos los alimentos deben estar a la temperatura ambiente o de
refrigeración. Remover al sonar el pitido. Dejarlos unos pocos minutos en reposo antes de servir.
Todos los alimentos deben estar precocinados y congelados.
Remover cuando suene el pitido. Al término de la cocción, remover los
alimentos y dejarlos en reposo de 2 a 3 minutos.
Para cocinar verduras frescas. Colocar las verduras preparadas en
un recipiente de tamaño adecuado. Rociarlas con 9 cucharadas
(100ml) de agua. Cubrirlas ligeramente con film perforado o con una
tapadera. Grandes cantidades requerirán removerlas cuando suene
el pitido.
Para cocinar verduras congeladas. Colocarlas en un recipiente de
tamaño adecuado, añadir 3-4 cucharadas (40ml) de agua. Cubrirlas
ligeramente con un film perforado o con una tapadera. Remover las
verduras cuando suene el pitido.
Para cocinar piezas o filetes de pescado fresco. Tape las porciones más finas, sitúelas en un recipiente adecuado. Añadir 1-2
cucharadas de líquido. Cubrirlo ligeramente con un film
perforado o con una tapadera.
Para cocinar piezas o filetes de pescado congelado. Colocarlos en
un recipiente del tamaño adecuado, añadir 2 cucharadas (30ml) de
agua, cubrirlo ligeramente con un film perforado o con una tapadera.
Indicaciones para recalentar taza y tazón.
1. Agitar el líquido antes de calentarlo
2. No tapar las bebidas calientes como el té o el café.
Cubrir la sopa con un plato para evitar que se derrame.
3. Después del calentamiento, agitar otra vez y dejarlo en reposo unos minutos.
Es-11
Español
5 Cocción de
Verdura Fresca
CALENTAR
COMIDA
CONGELADA 200 - 1200g
Accesorios
Programas Automáticos por Peso
NN-GD560M / NN-GD550W
Programa
9 Pan
Congelado
Chivato
PAN
50 - 500g
10 Piezas de
Pollo
PIEZAS DE
POLLO
11 Pollo
Entero
POLLO
ENTERO
12 Gratinados
congelados/
Lasaña
Congelada
Es-12
Peso
Recomendado
GRATINADO
CONGELADO
Accesorios
Instrucciones
Para recalentar pan congelado, bollos y croissants. Quitar todo el
envoltorio y colocarlo en la Parrilla sobre la Bandeja de Cristal.
Girarlo cuando suene el pitido.
200 - 1200g
Para cocinar piezas de pollo, por ej. patas de pollo,
muslos. Colocar el pollo en un plato resistente al calor en la Parrilla,
sobre la bandeja de cristal. Para una cocción uniforme, separar el
pollo y darle la vuelta cuando suene el pitido.
1000 - 2200g
Para cocinar un pollo entero fresco no relleno. Cocinar el relleno
aparte. Colocar el pollo dentro de un plato resistente al calor sobre la
Bandeja de Cristal. Comenzar a cocinar el lado de la pechuga hacia
abajo y girarlo al sonar el pitido.
300 - 1000g
Para recalentar y dorar el gratinado/lasaña congelado. Quitar
todo el envoltorio y colocar el gratinado/lasaña en un plato resistente
al calor sobre la Bandeja de Cristal.
Programas Automáticos por Peso
Programas Panacrunch (NN-GD560M / NN-GD550W)
1. Seleccionar el programa deseado y colocar la bandeja para
pizza en el horno directamente
sobre la bandeja de cristal.
Programa
13 Pizza
Fresca
15 Quiche
Fresca
16 Quiche
Congelada
17 Productos
de Patata
congelados
Chivato
PIZZA
FRESCA
Peso
Recomendado
150 - 600g
PIZZA
CONGELADA 150 - 600g
QUICHE
FRESCA
150 - 700g
QUICHE
CONGELADA 150 - 500g
PATATAS
FRITAS
200 - 500g
3. Tras el precalentamiento suenan pitidos. Colocar el alimento
en la bandeja, fijar el peso.
Accesorios
4. Pulsar el botón Marcha.
Instrucciones
Para recalentar, dejar crujiente la base y dorar la parte superior
de la pizza fresca.
Quitar todo el envoltorio y colocar la pizza en la bandeja previamente
precalentada.
Para recalentar, dejar crujiente la base y dorar la parte superior
de la pizza congelada comprada. Quitar todo el envoltorio y colocar
la pizza en la bandeja previamente precalentada.
Para recalentar, dejar crujiente la base de pasta y dorar la parte
superior de la quiche fresca.
Quitar todo el envoltorio y colocar la quiche en la bandeja
previamente precalentada.
Para recalentar, dejar crujiente la base de pasta y dorar la parte
superior de la quiche congelada comprada.
Quitar todo el envoltorio y colocar la quiche en la bandeja
previamente precalentada.
Para recalentar, dejar crujientes y dorar los productos de patata
congelados. Después de precalentar la bandeja, esparcir los productos de patata en la bandeja. Para obtener mejores resultados, cocinar
en una sola capa y girar al sonar el pitido.
Es-13
Español
14 Pizza
Congelada
2. Pulsar el botón de marcha para
precalentar la bandeja para
pizza.
Bandeja para Pizza (NN-GD560M / NN-GD550W)
El “concepto”
Notas :
Algunos alimentos cocinados con microondas pueden quedar poco
crujientes. Su accesorio Panacrunch dorará y hará crujientes las pizzas,
quiches, tartas, productos de bollería, igual que lo haría un horno
convencional. Su bandeja Panacrunch trabaja de tres maneras : calentando la bandeja por absorción de las microondas, calentando el alimento
directamente por microondas y calentando el alimento mediante el grill. La
base de la bandeja absorbe las microondas y las transmite en forma de
calor. Entonces el calor es conducido a través de la bandeja al alimento.
El efecto de calentamiento es maximizado por la superficie anti-adherente.
1. No precalentar la bandeja más de 8 minutos.
Usando la bandeja para pizza
(funcionamiento manual)
• Para obtener mejores resultados, precalentar la bandeja antes
de usarla. Colocarla directamente sobre la bandeja de cristal y
precalentar en Combinado 1(Grill 1 + 600 W) unos 3 minutos.
Para ayudar a que se doren alimentos como salchichas y
hamburguesas, untar la bandeja con aceite antes de precalentarla.
• Sacar la bandeja del horno y colocar el alimento en la bandeja.
Usar el mango de la bandeja para pizza o unas manoplas ya
que la bandeja estará muy caliente. Para obtener mejores resultados,
es importante que el alimento esté colocado sobre la bandeja
inmediatamente después del precalentamiento. Si se retrasa, no
puede garantizarse un buen resultado.
• Colocar la bandeja sobre la bandeja de cristal y cocinar según las
instrucciones mostradas en la tabla de cocción del libro de cocina.
Es-14
2. Colocar la bandeja siempre en el centro de la bandeja de cristal y
asegurarse de que no toque la pared de la cavidad del horno. No
hacer esto puede causar chispas que dañarían la cavidad.
3. Usar siempre la bandeja sobre la bandeja de cristal. No usarla con
la parrilla.
4. Usar siempre el mango para la bandeja o unas manoplas cuando
manipule la bandeja caliente.
5. Asegurarse de que se ha sacado todo el envoltorio del alimento
antes de la cocción.
6. No colocar ningún material sensible al calor sobre la bandeja
caliente, ya que puede quemarse.
7. La bandeja puede usarse en un horno convencional.
8. Para obtener mejores resultados, usar la bandeja en COMBINADO
GRILL y MICROONDAS.
Conservación de la bandeja
• Nunca utilice ningún tipo de utensilio punzante sobre la bandeja
pues puede dañar la superficie anti-adherente.
• Después de usarla, lavar la bandeja en agua caliente con jabón y
aclarar en agua caliente. No use ninguna clase de sustancia
limpiadora abrasiva o estropajos, ya que esto dañaría la superficie
de la bandeja.
• La bandeja puede lavarse en el lavavajillas.
Programas Automáticos por Peso
NN-SD450W
Programa
Chivato
1 Recalentar
Fresco
CALENTAR
COMIDA
2 Recalentar
Congelado
3 Cocción de
Verdura Fresca
4 Cocción de
Verdura
Congelada
Peso
Recomendado
200 - 1500g
CALENTAR COMIDA CONGELADA 200 - 1200g
COCINAR
VERDURA
FRESCA
COCINAR VERDURA CONGELADA
Accesorios
Instrucciones
Para recalentar platos preparados, o cazuelas.
Todos los alimentos deben estar a la temperatura ambiente o de
refrigeración. Remover al sonar el pitido. Dejarlos unos pocos
minutos en reposo.
Todos los alimentos deben estar precocinados y congelados. Remover cuando suene el pitido. Al término de la cocción,
remover los alimentos y dejarlos en reposo de 2 a 3 minutos.
300 - 1000g
Para cocinar verduras congeladas. Colocarlas en un recipiente
del tamaño adecuado, añadir 2 cucharadas (30ml) de agua.
Cubrirlas ligeramente con un film perforado o con una tapadera.
Remover las verduras cuando suene el pitido.
150 - 1000g
Para cocinar piezas o filetes de pescado fresco. Tape las porciones más finas, sitúelas en un recipiente adecuado. Añadir 2
cucharadas (30ml) de líquido. Cubrirlo ligeramente con un film
perforado o con una tapadera.
5 Cocción de
Pescado
Fresco
COCINAR
PESCADO
FRESCO
6 Cocción de
Pescado
Congelado
COCINAR PESCADO CONGELADO
200-900g
7 Recalentar
Taza
CALENTAR 1TAZA
150g
Para recalentar una taza de bebida caliente (por ej. té, café,
leche y sopa). Seleccionar la taza a recalentar, registrar el peso
(150ml) y pulsar el botón marcha.
8 Recalentar
Tazón
CALENTAR
1TAZON
300g
Para recalentar un tazón de bebida caliente.
Seleccionar el tazón a recalentar, registrar el peso (300ml) y
pulsar el botón marcha.
9 Recalentar
2 Tazón
CALENTAR
2TAZONES
600g
Para recalentar 2 tazón de bebida caliente.
Seleccionar el tazón a recalentar, registrar el peso (600ml) y
pulsar el botón marcha.
Para cocinar piezas o filetes de pescado congelado.
Colocarlos en un recipiente de tamaño adecuado, añadir 2
cucharadas (30ml) de agua, cubrirlo ligeramente con un film
perforado o con una tapadera.
Indicaciones para recalentar taza y tazón.
1. Agitar el líquido antes de calentarlo
2. No tapar las bebidas calientes como el té o el café. Cubrir la sopa con un plato para evitar que se derrame.
3. Después del calentamiento, agitar otra vez y dejarlo un corto tiempo en reposo.
Es-15
Español
250 - 1500g
Para cocinar verduras frescas. Colocar las verduras en un
recipiente. Rociarlas con 6 cucharadas (90ml) de agua. Cubrirlas
ligeramente con film perforado o con una tapa. Deberá removerlas en cuanto suene el pitido.
Cocción con Arranque Retrasado
Utilizando el botón Retraso/Parada, puede programarse la cocción con Arranque Retrasado.
e.j.
• Pulse el botón
Retraso/Parada.
• Ajuste el tiempo de retraso girando el dial
Tiempo/Peso (hasta 9 horas).
• Ajuste el programa de cocción y el
tiempo de cocción deseados.
• Pulse el botón de
Arranque.
NOTA:
1. Puede programarse una cocción en tres etapas incluyendo la cocción de Arranque Retrasado.
p. ej.
Arranque Retrasado: 1 hora
Alta Potencia: 10 min.
Potencia de Ebullición Lenta: 20 min.
O
O
5 veces
Una vez
2. Si el tiempo de retraso programado es de más de una hora, el tiempo contará hacia atrás en unidades de minuto. Si es de menos de una hora, el
tiempo contará hacia atrás en unidades de segundo.
3. El Arranque Retrasado no puede programarse antes de cualquier Programa Automático.
4. Si se pulsa el botón Retraso/Reposo 4 veces, se apagará la guía de funcionamiento. Para volver a encender la guía de funcionamiento, pulse el
botón Retraso/Reposo 4 veces.
Tiempo de Parada
Utilizando el botón Retraso/Parada, puede usted programar el Tiempo de Parada después de que la cocción haya finalizado o utilizarse para
programar el horno como temporizador en minutos.
e.j.
O
• Ajuste el programa de cocción y el
tiempo de cocción deseados.
NOTA:
• Pulse el botón
Retraso/Parada.
• Ajuste la cantidad de tiempo deseada
girando el dial Tiempo/Peso (hasta 9
horas).
• Pulse el botón de
arranque.
1. Puede programarse una cocción en tres etapas incluyendo el Tiempo de Parada.
p. ej.
Alta Potencia: 4 min.
O
Tiempo de Parada: 5 min.
Alta Potencia: 2 min.
O
Una vez
Una vez
2. Si se abre la puerta del horno durante el Tiempo de Parada o la Temporización en Minutos, el tiempo de la ventana de visualización continuará
contando hacia atrás.
3. Esta función puede también utilizarse como temporizador. En este caso pulse el botón Retraso/Parada, ajuste el tiempo y pulse el botón de
Arranque.
Es-16
Preguntas y Respuestas
P: ¿Por qué no se pone en marcha mi horno?
R: Cuando el horno no se pone en marcha verifique los siguientes puntos:
1. ¿Está el horno correctamente enchufado? Desenchufe el cable, espere 10 minutos y vuél
valo a enchufar.
2. Verifique el interruptor y el fusible. Rearme el interruptor o cambie el fusible si se ha solta
do o se ha fundido.
3. Si el interruptor o el fusible están bien, pruebe a conectar otro aparato en ese enchufe. Si
el otro aparato funciona, es probablemente un problema del horno. Pero si el otro aparato
no funciona, probablemente es un problema del enchufe. Si le parece que hay un proble
ma con el horno, contacte con un Centro de Servicio autorizado.
P: Mi horno microondas causa interferencias
en mi televisor. ¿Es normal?
R: Pueden ocurrir algunas interferencias en la radio y el televisor cuando usted cocina con el
horno microondas. Esta interferencia es similar a la interferencia causada por pequeños
aparatos electrodomésticos, tales como batidoras, aspiradoras, secadores, etc. Ello no
significa que su horno tenga algún problema.
P: El horno no acepta mi programa.
¿Por qué?
R: El horno está diseñado para no aceptar un programa incorrecto. Por ejemplo, el horno no
aceptará una cuarta etapa, y no aceptará un Programa Automático por Peso después del
Arranque Retrasado.
R: El calor que despiden los alimentos que se cocinan, calientan el aire en la cavidad del
horno. Este aire caliente es transportado fuera del horno por el flujo de aire que hay en el
horno. No hay aire en el microondas. Las rejillas de ventilación nunca deben estar obstru
idas durante la cocción.
P: Aparece una “D” en el visualizador pero
el horno no cocina. ¿Por qué?
R: El horno ha programado el MODO DEMO. Este modo está diseñado para retener el visu
alizador de reserva.
Desactive este modo pulsando el botón del reloj tres veces.
P: ¿Puedo usar un termómetro para horno
convencional en mi horno microondas?
R: El horno está programado en el modo de exhibición. Este modo está diseñado para la
exposición del producto en el establecimiento de venta al público. Desactive este modo
pulsando Potencia de microondas y el botón Parada/Cancelar 4 veces (NN-GD560M /
NN-GD550W) o el botón Máxima potencia de microondas una vez y el botón
Parada/Cancelar 4 veces (NN-SD450W).
P: El horno deja de funcionar en microondas y
aparece en pantalla “H97” y “H98”.
R: El mensaje en pantalla indica que hay un problema con el sistema de generación de
microondas. Póngase en contacto con el centro de reparaciones autorizado.
P: La información en la pantalla ha desaparecido, sólo se ven números.
R: Es posible que haya habido un corte de energía y la información en la pantalla se haya
deshabilitado. Desenchufe el horno por unos segundos y vuélvalo a enchufar. Cuando se
muestre "88:88", pulse el botón de inicio hasta que aparezca su idioma. A continuación,
ajuste el reloj. Consulte la Pág Es-7.
NN-GD560M / NN-GD550W
P: Se oyen ruidos de zumbidos y
chasqueos en mi horno cuando cocino
mediante COMBINADO. ¿Qué causa
estos ruidos?
R: Los ruidos se producen mientras el horno cambia automáticamente de la potencia
MICROONDAS a GRILL para crear el ajuste combinado. Esto es normal.
P: Mi horno hace olor y produce humo
cuando usa las funciones
COMBINADO y GRILL. ¿Por qué?
R: Tras un uso frecuente, se recomienda limpiar el horno y hacerlo luego funcionar sin ali
mento, ni bandeja de cristal, ni aro giratorio en Grill durante 5 minutos.
Ello quemará cualquier alimento, residuo o aceite que pueda causar olor y/o humo.
Es-17
Español
P: Algunas veces sale aire caliente por las
rejillas de ventilación. ¿Por qué?
Cuidado de su Horno
1. Desconecte el horno antes de limpiarlo.
2. Mantenga limpios el interior del horno, cierres de la puerta y áreas
de cierre de la puerta. Si se le adhieren restos de alimentos o de
líquidos, límpielos con un trapo húmedo. Si estuviera muy sucio,
puede usar un detergente suave. No es recomendable el uso de
detergentes severos o abrasivos.
NO USE LIMPIADORES DE HORNOS CONVENCIONALES.
3. La superficie exterior del horno debe limpiarse con un trapo húmedo.
Para prevenir que sufran algún daño las partes operativas del interior
del horno, no debe permitirse que el agua rezume y se cuele por las
aberturas de ventilación.
4. Si el Panel de Control llega a ensuciarse, límpielo con un trapo seco,
suave. No use detergentes severos o abrasivos en el Panel de
Control. Cuando limpie el Panel de Control, deje abierta la puerta del
horno para prevenir que el horno se pusiera en marcha accidentalmente. Después de la limpieza pulse el Botón PARO/CANCELAR
para borrar lo que aparezca en el visualizador.
5. Si se forman condensaciones en el interior o en el exterior de la
puerta del horno, límpielas con un trapo suave. Esto puede ocurrir
cuando el horno microondas funciona bajo condiciones de humedad
alta y de ninguna manera supone un mal funcionamiento del aparato.
6. De cuando en cuando es necesario sacar la bandeja de
cristal para limpiarla. Lave la bandeja con agua caliente y jabón o en
el lavavajillas.
7. Deben limpiarse regularmente el aro giratorio y la base
interior del horno para evitar un ruido excesivo. Simplemente limpie
la superficie inferior del horno con un detergente suave en agua
caliente, después seque con un trapo limpio. El aro giratorio puede
lavarlo en una solución de agua y jabón suave. Los vapores del cocinado recogidos durante un uso repetido del horno no afectan para
nada a la parte inferior del mismo ni a las ruedecillas del aro giratorio. Después de sacar el aro giratorio del suelo de la cavidad del
horno para limpiarlo, asegúrese de volverlo a colocar en la posición
correcta.
8. Cuando use el modo GRILL o COMBINADO (NN-GD560M / NNGD550W), algunos alimentos pueden salpicar de grasa inevitablemente las paredes del horno. Si el horno no se limpia regularmente,
puede comenzar a producir humo durante su utilización.
9. No debe utilizarse una limpiadora a vapor para limpiar el aparato.
10. Este horno solamente puede ser revisado por personal
cualificado. Para el mantenimiento y reparación del horno, póngase
en contacto con el distribuidor autorizado más próximo.
11. No obstruya los respiraderos en ningún momento. Compruebe que
no hay polvo ni otros materiales obstruyendo los respiraderos de la
parte superior, inferior y trasera del horno.
Si los respiraderos quedan obstruidos, podría producirse un sobreca
lentamiento que afectaría al funcionamiento del horno y podría
provocar una situación peligrosa.
12. Debe mantener el horno limpio, puesto que no hacerlo así podría
llevar al deterioro de las superficies, lo cual podría afectar la vida del
electrodoméstico y probablemente resultaría en una situación de
riesgo.
Especificaciones Técnicas
Alimentación Eléctrica:
Potencia de entrada:
Potencia de salida:
Dimensiones exteriores:
Dimensiones cavidad del horno:
Peso sin embalar:
Ruido:
NN-GD560M / NN-GD550W
NN-SD450W
230 V, 50 Hz
Máximo;
Microondas;
Grill;1350 W
Microondas;
Resistencia Grill;
230 V, 50 Hz
2300 W
1100 W
1000 W (IEC-60705)
1300 W
510 (ancho) x 380 (fondo) x 304 (alto) mm
359 (ancho) x 352 (fondo) x 217 (alto) mm
12.5 Kg
50 dB
Microondas;
1100 W
Microondas;
1000 W (IEC-60705)
510 (ancho) x 380 (fondo) x 304 (alto) mm
359 (ancho) x 352 (fondo) x 217 (alto) mm
11.5 Kg
50 dB
Especificaciones sujetas a variación sin previo aviso
Es-18
Cuidado de su Horno
Este producto es un equipo que cumple con el standard EMC (EMC=Compatibilidad Electromagnética) EN 55011. De acuerdo con este standard este
producto es un equipo del grupo 2 clase B y se encuentra dentro de los límites exigidos. Grupo 2 significa que la energía de radio frecuencia es generada en forma de radiación electromagnética para calentar o cocinar alimentos. Clase B significa que este producto debe de ser usado en áreas
domésticas.
Información sobre la eliminación para los usuarios de equipos eléctricos y
electrónicos usados (particulares)
La aparición de este símbolo en un producto y/o en la documentación adjunta indica que los productos eléctricos y electrónicos usados no deben mezclarse con la basura doméstica general.
Para que estos productos se sometan a un proceso adecuado de tratamiento, recuperación y reciclaje, llévelos a los puntos de
recogida designados, donde los admitirán sin coste alguno. En algunos países existe también la posibilidad de devolver los productos
a su minorista local al comprar un producto nuevo equivalente.
Si desecha el producto correctamente, estará contribuyendo a preservar valiosos recursos y a evitar cualquier posible efecto negativo
en la salud de las personas y en el medio ambiente que pudiera producirse debido al tratamiento inadecuado de desechos. Póngase en contacto con
su autoridad local para que le informen detalladamente sobre el punto de recogida designado más cercano.
De acuerdo con la legislación nacional, podrían aplicarse multas por la eliminación incorrecta de estos desechos.
Para empresas de la Unión Europea
Si desea desechar equipos eléctricos y electrónicos, póngase en contacto con su distribuidor o proveedor para que le informe detalladamente.
Información sobre la eliminación en otros países no pertenecientes a la Unión Europea
Este símbolo sólo es válido en la Unión Europea.
Si desea desechar este producto, póngase en contacto con las autoridades locales o con su
distribuidor para que le informen sobre el método correcto de eliminación.
Español
Según la directiva 2004/108/CE, artículo 9(2)
Centro de Ensayos de Panasonic
Panasonic Service Europe, una división de Panasonic Marketing Europe GmbH
Winsbergring 15,22525 Hamburg, República Federal de Alemania
Fabricado por Panasonic Home Appliances Microwave Oven (Shanghai) Co.,Ltd, 898 Longdong Road, Pudong, Shanghai, 201203, China.
Es-19
Ustawianie i podłączanie kuchenki mikrofalowej
Sprawdź kuchenkę mikrofalową
Rozpakuj urządzenie i sprawdź czy nie ma widocznych uszkodzeń, jak na
przykład wgnieceń, wyłamanych rygli drzwiczek albo zarysowań drzwiczek.
Jeśli urządzenie jest uszkodzone, skontaktuj się natychmiast z punktem
sprzedaży. Nie instaluj uszkodzonego urządzenia.
Przepisy dotyczące uziemienia
WAŻNE: DLA OSOBISTEGO BEZPIECZEŃSTWA, URZĄDZENIE TO MUSI
BYĆ PRAWIDŁOWO UZIEMIONE.
Jeśli gniazdko sieciowe nie posiada uziemienia, klient musi, we własnym
zakresie, wymienić je na gniazdko prawidłowo uziemione.
Napięcie zasilające
Napięcie sieciowe musi odpowiadać napięciu zasilania podanemu na
tabliczce znamionowej kuchenki mikrofalowej. Podłączenie urządzenia do
sieci o wyższym napięciu może spowodować pożar lub inne uszkodzenie.
7. Unikaj używania kuchenki mikrofalowej w pomieszczeniach, w
których panuje duża wilgotność.
8. Kabel sieciowy nie powinien dotykać powierzchni obudowy
urządzenia. Kabel powinien przebiegać z dala od rozgrzewających
się powierzchni. Nie dopuszczaj do tego, aby kabel zwisał ze stołu
lub z blatu. Nie zanurzaj kabla, wtyczki, ani kuchenki w wodzie.
9. Nie zasłaniaj otworów wentylacyjnych znajdujących się na górze i z
tyłu kuchenki. Jeśli podczas pracy kuchenki otwory te zostaną
zakryte, kuchenka może się przegrzać. W tym przypadku, kuchenka
jest chroniona przez układ zabezpieczający przed nadmierną
temperaturą, który wznowi pracę kuchenki dopiero po jej ostygnięciu.
10.Kuchenka nie jest wyposażona w zdalne sterowanie ani czasomierz
zewnętrzny.
Uwaga: gorące powierzchnie
NN-GD560M / NN-GD550W
Ustawianie kuchenki
Kuchenka jest przeznaczona do użytkowania na blacie kuchennym. Nie jest
przystosowana do użytkowania w obudowie lub wewnątrz kredensu.
Zabudowa
Kuchenka ta może być także wbudowana w meble kuchenne, przy użyciu
odpowiedniego zestawu uchwytów montażowych, białego NNTKT59WFP/NN-TKT59MFP, który można zakupić u lokalnego
przedstawiciela firmy Panasonic.
1. Ustaw kuchenkę na równej i stabilnej powierzchni, ponad 85 cm nad
podłogą.
2. Kuchenka powinna być ustawiona tak, aby można ją było łatwo odłączyć
od zasilania, poprzez wyciągnięcie wtyczki lub wyłączenie bezpiecznika.
3. Do prawidłowego działania, kuchenka musi mieć zapewnioną dobrą
wentylację.
Ustawienie między szafkami:
4. Nie ustawiaj kuchenki w pobliżu kuchni gazowej ani kuchni elektrycznej.
5. Nie wolno demontować nóżek kuchenki.
6. Kuchenka przeznaczona jest wyłącznie do użytku domowego. Nie
używaj jej na zewnątrz.
5cm
15cm
10cm
OTWARTA
Blat szafek
1. Uszczelki drzwi i miejsca przyległe do uszczelek należy czyścić
zwilżoną ściereczką. Kuchenka mikrofalowa winna być sprawdzana
pod kątem uszkodzeń uszczelek drzwi oraz powierzchni
przylegających do nich i jeśli te powierzchnie są uszkodzone,
urządzenie nie powinno być używane do czasu naprawy, wyłącznie,
przez wykwalifikowany personel autoryzowanego punktu
serwisowego firmy Panasonic.
2. Nie próbuj regulować lub naprawiać drzwiczek, obudowy panelu
sterowania, przełączników zabezpieczeń wyłączających lub
jakiejkolwiek innej części kuchenki. Nie usuwaj zewnętrznej pokrywy
z kuchenki, gdyż daje ona zabezpieczenie przed przenikaniem
energii mikrofal.
Naprawy powinny być wykonywane wyłącznie przez wykwalifikowany
personel punktu serwisowego.
3. Nie używaj tego urządzenia, gdy ma uszkodzony kabel sieciowy lub
wtyczkę, jeśli nie pracuje prawidłowo, lub gdy zostało uszkodzone
lub upuszczone.
W takich przypadkach, urządzenie powinno być naprawiane
wyłącznie przez wykwalifikowany personel punktu serwisowego.
4. Jeśli kabel sieciowy tego urządzenia zostanie uszkodzony, powinien
być wymieniony na specjalny kabel dostarczany wyłącznie przez
producenta.
5. Samodzielne i bezpieczne korzystanie z kuchenki przez dzieci jest
możliwe tylko wtedy, gdy zostały one nauczone jak ją obsługiwać,
oraz gdy są świadome jak niebezpieczne może być nieprawidłowe
korzystanie z kuchenki.
6. Płynów lub innego rodzaju żywności nie wolno podgrzewać w
zamkniętych pojemnikach, gdyż grozi to wybuchem.
7. To urządzenie nie jest przeznaczone do użytku przez osoby (w tym
dzieci) o ograniczonych możliwościach fizycznych lub umysłowych,
przez osoby niedoświadczone lub o niewystarczającej wiedzy, chyba
że zostały poinstruowane w zakresie obsługi urządzenia przez osobę
odpowiedzialną za ich bezpieczeństwo, bądź korzystają z urządzenia
pod jej nadzorem. Należy uniemożliwić dzieciom zabawę kuchenką.
Pl-1
Polski
a. Pozostaw 15 cm wolnej przestrzeni nad kuchenką, 10 cm z tyłu i 5
cm z jednego boku, a strona przeciwna musi być otwarta na ponad
40 cm.
b. Jeśli kuchenka jest przysunięta jednym bokiem do ściany, wtedy
druga strona musi być całkowicie otwarta.
OSTRZEŻENIE
Zalecenia dotyczące bezpieczeństwa
Korzystanie z kuchenki
Działanie wentylatora chłodzącego
1. Nie używaj kuchenki do jakiegokolwiek innego celu niż
przygotowywania posiłków. Kuchenka ta została specjalnie
zaprojektowana do podgrzewania lub gotowania żywności. Nie używaj
jej do podgrzewania chemikaliów lub innych produktów
nieżywnościowych.
Jeśli kuchenka po użyciu staje się gorąca, przez kilka minut może
działać wentylator chłodzący podzespoły elektryczne. Jest to normalne i
dlatego, gdy wentylator jeszcze pracuje, możesz wyjąć potrawy z
kuchenki.
2. Przed użyciem, sprawdź czy naczynia/ pojemniki są odpowiednie do
używania w kuchence mikrofalowej.
Kiedy zajdzie konieczność wymiany oświetlenia kuchenki, skontaktuj się
z autoryzowanym punktem serwisowym.
3. Nie próbuj używać kuchenki mikrofalowej do suszenia gazet, ubrań ani
innych materiałów, gdyż mogłyby się zapalić.
Akcesoria
4. Gdy kuchenka nie jest używana, nie przechowuj w jej wnętrzu
jakichkolwiek przedmiotów, innych niż akcesoria, gdyż w przypadku
włączenia urządzenia, mogłyby spowodować zagrożenie.
5. Nie należy włączać kuchenki mikrofalowej w trybie MIKROFAL LUB
KOMBINACYJNYM (NN-GD550W/NN-GD560M) BEZ ŻYWNOŚCI W
KUCHENCE. Ten sposób użytkowania może doprowadzić do
uszkodzenia urządzenia.
Wyjątek stanowi punkt 1 pracy grzejnika oraz wstępnego podgrzewania
talerza do pizzy.
6. Jeśli w kuchence pojawi się dym lub ogień, naciśnij przycisk
stop/kasowanie i pozostaw zamknięte drzwiczki, aby zdusić płomienie.
Odłącz kabel zasilający lub odetnij dopływ prądu, wyłączając
bezpiecznik.
Praca grzejnika (NN-GD560M/ NN-GD550W)
1. Przed pierwszym użyciem funkcji KOMBINACYJNEJ lub GRILLA,
wytrzyj nadmiar smaru z wnętrza kuchenki i uruchom kuchenkę, bez
żywności i akcesoriów, w trybie grilla przez około 10 minut. Pozwoli to
na całkowite wypalenie się pozostałości oleju zabezpieczającego przed
korozją. Jest to jedyny przypadek użycia pustej kuchenki.
2. W trybie KOMBINACYJNYM oraz GRILLA, zewnętrzne ścianki
kuchenki, włączając otwory wentylacyjne w obudowie oraz drzwiczki,
rozgrzeją się, dlatego należy zachować ostrożność podczas otwierania
lub zamykania drzwiczek oraz podczas wkładania i wyjmowania
żywności oraz akcesoriów.
3. Kuchenka wyposażona jest w dwa grzejniki usytuowane w górnej
części wnętrza kuchenki. Po gotowaniu w trybie KOMBINACYJNYM i
GRILLA, wnętrze i ścianki kuchenki oraz użyte akcesoria będą bardzo
gorące.
4. Elementy łatwo dostępne mogą się nagrzać, gdy kuchenka pracuje na
ustawieniach grilla i mieszanych. Należy uniemożliwić dzieciom dostęp
do kuchenki.
5. Podczas użytkowania kuchenki w trybie mieszanym, należy
szczególnie nadzorować dzieci ze względu na wysokie temperatury
wytwarzane przez kuchenkę.
Pl-2
Oświetlenie kuchenki
Kuchenka wyposażona jest w szereg akcesoriów. Zawsze postępuj
zgodnie ze wskazówkami dotyczącymi użycia tych akcesoriów.
Szklany talerz obrotowy
1. Nie włączaj kuchenki bez włożonego na miejsce talerza szklanego i
pierścienia z rolkami.
2. Nigdy nie używaj innego talerza szklanego niż dostarczony i
specjalnie zaprojektowany do tej kuchenki.
3. Jeśli talerz jest gorący, pozwól mu ostygnąć przed czyszczeniem lub
włożeniem do wody.
4. Talerz szklany może obracać się zarówno w prawo jak i w lewo.
5. Jeśli żywność lub naczynie, w którym gotujesz żywność, dotknie
ścianki kuchenki i zatrzyma obracanie się talerza, wtedy talerz
zacznie automatycznie obracać się w stronę przeciwną. Jest to
normalny objaw pracy.
6. Nie gotuj żywności bezpośrednio na szklanym talerzu.
Pierścień z rolkami
1. Pierścień z rolkami oraz dno kuchenki winny być często czyszczone,
aby zapobiec szmerom oraz nagromadzeniu się resztek żywności.
2. Podczas gotowania, pierścień z rolkami musi być zawsze używany
razem ze szklanym talerzem.
Ruszt (NN-GD560M / NN-GD550W)
1. Rusztu używamy do przyrumienienia niewielkich porcji żywności oraz
ułatwienia cyrkulacji gorącego powietrza.
2. Nie używaj pojemników metalowych postawionych bezpośrednio na
ruszcie w trybie KOMBINACYJNYM z MIKROFALAMI.
3. Nie używaj metalowgo rusztu w trybie samych MIKROFAL.
Talerz na pizzę (NN-GD560M / NN-GD550W) patrz strona PL-14.
Informacje ważne
1) Czasy gotowania
7) Papier/plastik
• Czasy gotowania podane w książce kucharskiej są wartościami
przybliżonymi. Czas gotowania zależy od rodzaju żywności, temperatury
i ilości żywności oraz rodzaju naczynia.
• Gotując żywność w plastikowych lub papierowych pojemnikach,
sprawdzaj często kuchenkę, gdyż tego typu pojemniki mogą zapalić
się, o ile zostaną nadmiernie rozgrzane.
• Nie używaj wyrobów papierniczych z wtórnego przerobu (np.
ręczników kuchennych), chyba że na takim wyrobie jest naklejka
informująca, że produkt można bezpiecznie używać w kuchence
mikrofalowej. Wyroby papiernicze z wtórnego przerobu mogą
zawierać zanieczyszczenia, które mogą być przyczyną zaiskrzenia lub
ognia podczas korzystania z kuchenki.
• Przed włożeniem do kuchenki torebek do prażenia, usuń z nich
wykonane z drutu zapinki.
• Rozpocznij od minimalnego czasu gotowania, aby uniknąć rozgotowania
potrawy. Jeśli potrawa będzie niedogotowana, zawsze możesz
dogotować ją, ponownie ustawiając parametry.
UWAGA: Jeżeli przekroczysz zalecany czas gotowania, żywność
zostanie zniszczona (spieczona), a w ekstremalnym przypadku
może się zapalić i spowodować uszkodzenie wnętrza kuchenki.
2) Małe ilości żywności
• Małe porcje żywności lub potraw zawierające mało wody mogą się
przypalić, wyschnąć lub nawet zapalić się, jeśli będą gotowane zbyt
długo. Jeśli żywność w kuchence zapali się, pozostaw drzwiczki
kuchenki zamknięte, wyłącz kuchenkę i wyjmij wtyczkę z gniazdka.
3) Jajka
• Nie gotuj jajek w skorupkach w trybie MIKROFAL. Nawet Jeśli
podgrzewanie przy pomocy mikrofal jest zakończone, wytwarzone
ciśnienie może powodować, że jajka eksplodują.
4) Przebijanie skórki
• Produkty z pozbawioną porów skórką, takie jak ziemniaki, żółtka jajek i
kiełbaski muszą być przekłute przed gotowaniem w trybie MIKROFAL,
aby nie uległy rozerwaniu.
5) Termometr do mięsa
• Nie ogrzewaj w kuchence żadnych zamkniętych puszek, ani butelek,
ponieważ mogłyby eksplodować.
• Metalowe pojemniki oraz naczynia z metalowymi ozdobami nie
powinny być używane podczas gotowania w trybie MIKROFAL.
Mogłoby to spowodować iskrzenie.
• Jeśli użyjesz folii aluminiowej, szpilek do mięsa lub innych
metalowych elementów, odległość między nimi, a ściankami i
drzwiczkami kuchenki powinna wynosić przynajmniej 2 cm, aby nie
doszło do iskrzenia.
9) Butelki do karmienia/słoiczki z żywnością dla niemowląt
• Nakrętka lub smoczek muszą być zdjęte z butelek do karmienia lub
słoiczków z żywnością dla niemowląt przed włożeniem ich do
kuchenki.
• Zawartość butelek i słoiczków z żywnością dla niemowląt po ogrzaniu
musi być wymieszana lub wstrząśnięta.
• Przed podaniem żywności należy sprawdzić jej temperaturę, aby
uniknąć poparzenia.
6) Płyny
• Podczas podgrzewania płynów, np. zup, sosów i napojów, w kuchence
mikrofalowej może dojść do przegrzania cieczy, to znaczy do
przekroczenia temperatury wrzenia bez powstawania pęcherzyków
pary. Może to doprowadzić do nagłego wyrzucenia gorącej cieczy. Aby
uniknąć tego niebezpieczeństwa, należy przedsięwziąć następujące
środki ostrożności:
a) Unikaj stosowania naczyń o płaskich ściankach z wąską szyjką.
b) Nie przegrzewaj płynów.
c) Wymieszaj ciecz przed włożeniem naczynia do kuchenki i ponownie
po upływie połowy czasu gotowania.
d) Po podgrzaniu, pozostaw naczynie z płynem w kuchence na krótki
czas, a następnie wymieszaj jeszcze raz, zanim ostrożnie wyjmiesz
naczynie.
Pl-3
Polski
• Używaj termometru do mięsa, aby sprawdzić stopień ugotowania
pieczeni lub drobiu dopiero po wyjęciu mięsa z kuchenki. Nie używaj do
mięsa zwykłego termometru, w trybie MIKROFAL lub
KOMBINACYJNYM, gdyż mogłoby to spowodować iskrzenie.
8) Naczynia/folie
Wygląd zewnętrzny
[8b]
[13]
[8a]
[6]
[4]
[12]
[5]
[2]
[1]
[7]
[3]
[9]
[10]
[11]
1.
Przycisk otwierania drzwiczek
Naciśnij przycisk aby otworzyć drzwiczki. Gdy otworzysz drzwiczki podczas gotowania, gotowanie zostanie chwilowo
przerwane, bez kasowania wcześniejszych ustawień.
Gotowanie zostanie wznowione, gdy tylko drzwiczki zostaną ponownie zamknięte i naciśniesz przycisk start. Oświetlenie
wnętrza kuchenki włącza się, jak tylko drzwiczki kuchenki zostaną otwarte.
2.
Okienko kuchenki
3.
System blokady zabezpieczającej drzwi
4.
Otwór wentylacyjny kuchenki
5.
Panel sterowania
6.
Szklany talerz
7.
Pierścień z rolkami
8a. Zewnętrzne otwory wentylacyjne
8b. Zewnętrzne otwory wentylacyjne (NN-GD550W/NN-GD560M)
9.
Ruszt (NN-GD550W/NN-GD560M)
10. Talerz do pizzy (NN-GD550W/NN-GD560M)
11. Uchwyt do patelni na pizzę (NN-GD550W/NN-GD560M)
12. Kabel zasilający
13. Etykieta ostrzegawcza (Gorąca powierzchnia) (NN-GD550W/NN-GD560M)
Pl-4
Panel sterowania
NN-GD560M / NN-GD550W *
1.
2.
3.
4.
5.
(1)
(2)
(3)
(8)
(4)
(5)
(9)
(6)
(7)
Polski
(10)
Wyświetlacz
Moc mikrofal
Moc Grilla
Moc w trybie kombinacyjnym
Przycisk automatycznego rozmrażania
zależnie od wagi produktu w trybie Turbo
6. Timer/Zatrzymanie
7. Zegar
8. Pokrętło wyboru programów
automatycznych
9. Pokrętło czasu/wagi
10. Przycisk stop/kasowanie
Przed rozpoczęciem gotowania:
jedno naciśnięcie przycisku kasuje
wprowadzone ustawienia.
Podczas gotowania: jedno naciśnięcie
przycisku chwilowo wstrzymuje wykonywanie
programu gotowania. Po powtórnym
naciśnięciu, wszystkie wprowadzone
ustawienia zostaną skasowane, a na
wyświetlaczu pojawi się czas.
11. Przycisk start
Naciśnij ten przycisk, aby uruchomić pracę
kuchenki.
Jeśli podczas gotowania drzwiczki kuchenki
zostaną otwarte, lub zostanie jednokrotnie
naciśnięty przycisk stop/kasowanie, musisz
ponownie nacisnąć przycisk start, aby
kontynuować gotowanie.
(11)
* Wygląd panelu może się różnić od prezentowanego (zależnie
od koloru) ale funkcje przycisków pozostają takie same.
Uwaga:
Sygnał dźwiękowy:
Po naciśnięciu jednego z przycisków
rozlega się sygnał dźwiękowy. Jeśli
sygnału nie słychać, oznacza to, że
ustawienia są niepoprawne. Gdy
kuchenka zmienia funkcję z jednej
na inną, rozlegają się dwa sygnały
dźwiękowe. Po zakończeniu
gotowania, sygnał dźwiękowy
rozlega się pięciokrotnie.
Jeżeli dana operacja została nastawiona ale przycisk startu
nie został naciśnięty, to po upływie 6 minut kuchenka
automatycznie anuluje nastawę. Wyświetlacz zaś powróci do
trybu wyświetlania aktualnego czasu.
Kuchenka jest wyposażona w funkcję oszczędzania energii.
Uwaga:
1. W trybie czuwania jasność wyświetlacza zostanie
zredukowana.
2. Kuchenka przejdzie do trybu czuwania po podłączeniu do
źródła zasilania oraz po zakończeniu danej pracy.
Pl-5
Panel sterowania
NN-SD450W
1.
2.
5.
(1)
4.
5.
6.
7.
8.
(6)
(2)
(7)
9.
(3)
(4)
(5)
(8)
Wyświetlacz
Moc mikrofal
Przycisk automatycznego rozmrażania
zależnie od wagi produktu w trybie Turbo
Opóźnienie / Odstawienie
Zegar
Pokrętło wyboru programów
automatycznych
Pokrętło czasu/wagi
Przycisk stop/kasowanie
Przed rozpoczęciem gotowania: jedno
naciśnięcie przycisku kasuje wprowadzone
ustawienia.
Podczas gotowania: jedno naciśnięcie
przycisku chwilowo wstrzymuje wykonywanie
programu gotowania. Po powtórnym
naciśnięciu, wszystkie wprowadzone
ustawienia zostaną skasowane, a na
wyświetlaczu pojawi się czas.
Przycisk start
Naciśnij ten przycisk, aby uruchomić pracę
kuchenki.
Jeśli podczas gotowania drzwiczki kuchenki
zostaną otwarte, lub zostanie jednokrotnie
naciśnięty przycisk stop/kasowanie, musisz
ponownie nacisnąć przycisk start, aby
kontynuować gotowanie.
(9)
Uwaga:
Sygnał dźwiękowy:
Po naciśnięciu jednego z przycisków
rozlega się sygnał dźwiękowy. Jeśli
sygnału nie słychać, oznacza to,że
ustawienia są niepoprawne. Gdy
kuchenka zmienia funkcję z jednej na
inną, rozlegają się dwa sygnały
dźwiękowe. Po zakończeniu
gotowania, sygnał dźwiękowy
rozlega się pięciokrotnie.
Pl-6
Jeżeli dana operacja została nastawiona ale przycisk startu
nie został naciśnięty, to po upływie 6 minut kuchenka
automatycznie anuluje nastawę. Wyświetlacz zaś powróci
do trybu wyświetlania aktualnego czasu.
Kuchenka jest wyposażona w funkcję oszczędzania energii.
Uwaga:
1. W trybie czuwania jasność wyświetlacza zostanie
zredukowana.
2. Kuchenka przejdzie do trybu czuwania po pierwszym
podłączeniu zasilania oraz po zakończeniu danej pracy.
Regulatory oraz procedura obsługi
Funkcja podpowiedzi (wyświetlanie podpowiedzi następnego kroku):
Podłącz do sieci “88:88” (Stan wyświetlacza)
Naciśnij
(Wyświetlanie kolejnego języka)
Naciśnij
“FRANCAIS”
Język francuski
Naciśnij
“ITALIANO”
Język włoski
Naciśnij
“DEUTSCH”
Język niemiecki
Naciśnij
“NEDERLANDS”
Język holenderski
Naciśnij
ESPANOL
Język hiszpański
“POLSKI”
Język polski
Naciśnij
“CESKY”
Po czesku
Naciśnij
“ENGLISH”
Język angielski
Naciśnij
“DANSK”
Po Duński
Naciśnij
“SUOMI”
Po Fiński
Naciśnij
“SVENSKA”
Po szwedzku
Naciśnij
“NORSK”
Po norwesku
Naciśnij
Modele te mają unikalną funkcję „monitowania
słów”, oprowadzającą użytkownika po funkcjach
kuchenki mikrofalowej. Po podłączeniu kuchenki
należy naciskać przycisk Start do momentu
odnalezienia swojego języka. W miarę naciskania
przycisków na wyświetlaczu będą przewijane
kolejne instrukcje, co eliminuje ryzyko pomyłki.
Jeśli z jakiejś przyczyny zajdzie potrzeba zmiany
wyświetlanego języka, należy wyłączyć kuchenkę
z kontaktu i powtórzyć procedurę.
Czterokrotne przyciśnięcie przycisku Opóźnienie /
Odstawienie spowoduje wyłączenie przewodnika
po funkcjach kuchenki. Aby ponownie uruchomić
przewodnik, naciśnij czterokrotnie przycisk
Opóźnienie / Odstawienie.
TYLKO DLA MODELU
NN-SD450W
Polski
Ustawianie zegara: Przykład: Aby ustawić godzinę 14:25
• Naciśnij Zegar raz.
Dwukropek zacznie migać.
• Wprowadź czas, obracając pokrętło
czasu/wagi.
Czas pojawi się na wyświetlaczu, a
dwukropek będzie migać.
• Naciśnij Zegar.
Dwukropek przestanie migać Czas jest ustawiony.
UWAGA:
1. Aby na nowo ustawić zegar, wykonaj ponownie powyższe kroki.
2. Aktualny czas będzie wyświetlany, dopóki nie wystąpi przerwa w zasilaniu kuchenki.
3. Urządzenie jest wyposażone w 24-godzinny tryb wyświetlania zegara.
Pl-7
Regulatory oraz procedura obsługi
Funkcja zabezpieczenia przed dziećmi:
Użycie tej funkcji zablokuje regulatory kuchenki, jednakże, drzwiczki nadal będzie można otworzyć. Funkcję zabezpieczenia przed dziećmi można
włączyć, gdy na wyświetlaczu widoczny jest dwukropek lub czas.
Aby włączyć
zabezpieczenie:
Aby wyłączyć
zabezpieczenie:
• Naciśnij trzykrotnie przycisk start.
Czas przestanie być wyświetlany.
Informacja o czasie nie zostanie jednak utracona.
Taki symbol * będzie widoczny na wyświetlaczu.
• Naciśnij trzykrotnie przycisk stop/kasowanie.
Na wyświetlaczu ponownie ukaże się czas.
UWAGA: Aby włączyć blokadę, należy w czasie 10 sekund trzykrotnie nacisnąć przycisk startu.
Gotowanie oraz rozmrażanie mikrofalowe
W kuchence mikro falo wej zasto so wano 5 różnych p o zio mów mo cy. W tabelce poniżej, podana jest przybliżona moc w Watach dla każdego poziomu
gotowania.
NN-GD560M / NN-GD550W
Użycie akcesoriów:
NN-SD450W
Szklany talerz
Wciśnij
Poziom mocy
Ilość watów
Raz
Dwa razy
3 razy
4 razy
5 razy
Maks. (Wysoki)
1000 W
270 W
600 W
440 W
250 W
Rozmrażanie
Sredni
Niski
Utrzymanie ciepła
NN-GD560M / NN-GD550W
Lub
• Naciśnij po to, aby
• Wybierz żądany
na monitorze pojawił się
poziom mocy
wybierany poziom mocy.
kuchenki.
• Ustaw czas gotowania, używając pokrętła czasu/wagi
(MAX- DUŻA: do 30 minut Poziom: do 90 minut).
• Naciśnij przycisk
start.
UWAGA:
1. Przy gotowaniu w 2 lub 3 etapach przed naciśnięciem przycisku Start należy powtórzyć ustawienia poziomu mocy kuchenki i czasu gotowania.
np. Potrawka - na ustawieniach o najwyższej mocy 10 minut do zagotowania potrawki. Gotowanie na ustawieniach o niższej mocy, aby ugotować:
60 minut.
Gotowanie na ustawieniach o niższej mocy, aby uzyskać pełniejszy smak potrawy: 10 minut.
2. Czas zatrzymania jest programowalny po ustawieniu poziomu mocy i czasu gotowania kuchenki.
3. Podczas gotowania możesz zmienić ustawienie czasu, o ile zachodzi taka potrzeba. Obróć pokrętło czasu/wagi, aby wydłużyć lub skrócić czas
gotowania. Czas można zwiększać/zmniejszać o 1 min., aż do 10 min. Ustawienie pokrętła w pozycji zero zakończy gotowanie.
4. Kuchenka rozpocznie automatycznie pracę na wysokim poziomie mocy,jeśli zostanie wprowadzony czas gotowania bez uprzedniego wyboru
poziomu mocy.
Pl-8
Opiekanie (NN-GD560M / NN-GD550W)
Grill posiada 3 ustawienia.
Ruszt
Użycie akcesoriów:
Szklany talerz
• Wybierz moc grilla. Wciśnij raz,
aby wybrać Grill 1 (Wysoki), dwa
razy Grill 2 (Średni) lub 3 razy
Grill 3 (Niski).
1 wciśnięcie GRILL 1
1300 W
2 wciśnięcia GRILL 2
950 W
3 wciśnięcia GRILL 3
700 W
• Ustaw czas opiekania przy pomocy pokrętła czasu/wagi
(do 90 minut).
• Naciśnij przycisk start.
UWAGA:
1. Grill może opiekać wyłącznie przy zamkniętych drzwiczkach kuchenki.
2. Podczas opiekania możesz zmienić ustawienie czasu, o ile zachodzi taka potrzeba. Obróć pokrętło czasu/wagi, aby wydłużyć lub skrócić czas
gotowania. Czas można zwiększać/zmniejszać o 1 min., aż do 10 min. Ustawienie pokrętła w pozycji zero zakończy gotowanie.
Gotowanie kombinacyjne (NN-GD560M / NN-GD550W)
Użycie akcesoriów:
Dostępne są 3 ustawienia trybu kombinacyjnego. Poniższa
tabelka pokazuje moc w Watach dla każdego ustawienia.
Ruszt
1
2
3
Grill
1 wciśnięcie 1300 W
2 wciśnięcia 1300 W
3 wciśnięcia 1300 W
Mikrofale
Funkcja
podpowiedzi
600 W
440 W
250 W
G1-600W
G1-440W
G1-250W
Szklany talerz
• Wybierz poziom kombinacji
(patrz tabela).
• Ustaw czas gotowania przy pomocy pokrętła
czasu/wagi (do 90 minut).
• Naciśnij przycisk start.
UWAGA:
1. Grill może opiekać wyłącznie przy zamkniętych drzwiczkach kuchenki.
2. W trakcie gotowania możesz zmienić ustawienie czasu, o ile zachodzi taka potrzeba. Obróć pokrętło czasu/wagi, aby wydłużyć lub skrócić czas
gotowania. Czas można zwiększać/zmniejszać o 1 min., aż do 10 min. Ustawienie pokrętła w pozycji zero, zakończy gotowanie.
Pl-9
Polski
Ustawienie Wciśnięcia
kombinacji
Szklany
talerz
Rozmrażanie automatyczne
Dzięki tej funkcji możesz rozmrażać żywność na podstawie jej wagi. Wybierz rodzaj produktu i ustaw jego wagę. Waga jest wprowadzana w gramach.
W celu przyspieszenia wyboru, waga rozpoczyna się od wielkości najczęściej używanych dla danego rodzaju produktu.
• Wybierz żądany program rozmrażania
automatycznego.
1 (jedno) naciśnięcie dla małych porcji
2 (dwa) naciśnięcia dla dużych porcji
Funkcja
podpowiedzi
Program
1 Małych porcji
2 Dużych porcji
• Ustaw wagę zamrożonego produktu przy pomocy pokrętła czasu/wagi.
Przekręcając pokrętło powoli przeliczamy co 10g. Przekręcając pokrętło
szybko przeliczamy co 100g.
Waga
• Naciśnij przycisk
start.
Odpowiednie rodzaje żywności
Małe kawałki mięsa, eskalopki, kiełbaski, zmielone lub posiekane mięso, filety rybne,
MALE
KAWALKI
150 - 1600g steki, kotlety (od 100g do 400g każdy). Obróć po usłyszeniu sygnału dźwiękowego.
DUZE
KAWALKI
400 - 2400g
Duże porcje mięsa, pieczeni, cały kurczak, duże porcje ryb.
Obróć po usłyszeniu sygnału dźwiękowego.
UWAGA:
1. Gdy czas rozmrażania wynosi ponad 60 minut, będzie wyświetlany jako godziny i minuty.
2. Aby uzyskać dodatkowe wyjaśnienia, zapoznaj się z informacjami na temat rozmrażania zamieszczonymi w książce kucharskiej.
Programy automatyczne uwzględniające wagę produktu
Funkcja ta umożliwia gotowanie Twoich ulubionych potraw tylko na podstawie ustawionej wagi. Kuchenka automatycznie ustawia poziom mocy
mikrofal, moc grilla (NN-GD560M / NN-GD550W) oraz czas gotowania. Wybierz żądany rodzaj programu i ustaw wagę produktu. Waga jest
wprowadzana w gramach. W celu przyspieszenia wyboru, waga rozpoczyna się od wielkości najczęściej używanych dla każdego rodzaju produktu.
NN-GD560M/
Np. NN-GD550W
NN-SD450W
• Wyboru programu uwzględniające wagę
produktu dokonujemy kręcąc pokrętłem
automatycznego wyboru programów. Na
monitorze będą wyswietlane te programy.
• Ustaw wagę produktu przy pomocy pokrętła czasu/wagi.
Przekręcając pokrętło powoli przeliczamy co 10g.
Przekręcając pokrętło szybko przeliczamy co 100g.
UWAGA:
1. Gdy czas gotowania wynosi ponad 60 minut, czas będzie wyświetlany jako godziny i minuty.
2. Postępuj zgodnie z treścią tabel na następnych stronach, korzystając z zalecanych wag oraz akcesoriów.
Pl-10
• Naciśnij
przycisk start.
Programy automatyczne uwzględniające wagę produktu
NN-GD560M / NN-GD550W
Program
Funkcja
podpowiedzi
Zalecana
waga
1 Podgrzewanie
płynów w
kubku
1 KUBEK
150g
Do podgrzania kubka gorącego płynu (np. herbaty, kawy, mleka i
zupy).
Wybierz program podgrzewanie kubka,wprowadź wagę (150ml),
naciśnij przycisk start.
2 Podgrzewanie
płynów na talerzu
1 MISKA
300g
Do podgrzania talerza gorącego płynu.
Wybierz program podgrzewanie talerza, wprowadź wagę (300ml),
naciśnij przycisk start.
3 Podgrzewanie
świeżych potraw
SWIEZE
POTRAWY
200 - 1500g
Do podgrzewania potraw na talerzach lub w garnkach.
Wszystkie potrawy powinny mieć temperaturę pokojową, lub być
wyjęte z lodówki. Odczekaj kilka minut w trybie pauzy, w celu
wyrównania ich temperatury.
4 Podgrzewanie
zamrożonych
potraw
MROZONE
POTRAWY
200 - 1200g
Cała potrawa musi być wcześniej ugotowana i zamrożona.
Po ugotowaniu wymieszaj potrawę odczekaj 2-3 minuty w trybie pauzy,
w celu wyrównania temperatury.
5 Gotowanie świeżych
warzyw
SWIEZE
250 - 1500g
Do gotowania świeżych warzyw. Włóż przygotowane warzywa do
odpowiedniej wielkości pojemnika. Polej je 9 łyżkami stołowymi
(100 ml) wody. Przykryj lekko ponakłuwaną folią lub pokrywką. Duże
ilości warzyw będą wymagały wymieszania po usłyszeniu sygnału
dźwiękowego.
300 - 1000g
Do gotowania zamrożonych warzyw. Umieść je w odpowiednim
naczyniu i dodaj 3-4 łyżki stołowe wody (40 ml). Przykryj je delikatnie
ponakłuwaną folią obkurczliwą lub pokrywką. Wymieszaj warzywa po
usłyszeniu sygnału dźwiękowego.
150 - 1000g
Do gotowania świeżych ryb (dzwonki i filety).
Przykryć cieńsze kawałki, umieścić w odpowiednim pojemniku. Dodaj
1-2 łyżki stołowe płynu. Przykryj lekko ponakłuwaną folią lub
pokrywką.
200 - 900g
Do gotowania zamrożonych ryb (dzwonki i filety).
Umieść je w naczyniu odpowiedniej wielkości i dodaj 2 łyżki stołowe
wody (30 ml). Przykryj je delikatnie ponakłuwaną folią obkurczliwą lub
pokrywką.
WARZYWA
MROZONE
7 Gotowanie świeżych ryb
SWIEZE
RYBY
MROZONE
8 Gotowanie zamrożonych
ryb
RYBY
Wskazówki
Uwagi odnośnie podgrzewania kubka oraz talerza.
1. Wymieszaj płyn przed podgrzewaniem. Podgrzewany płyn może się wylać, jeśli nie będzie wymieszany.
2. Nie nakrywaj gorących napojów takich jak herbata czy kawa. Zupę nakryj salaterką, aby zapobiec wylaniu się jej.
3. Po podgrzaniu, dokładnie zamieszaj i pozostaw na chwilę w celu wyrównania temperatury.
Pl-11
Polski
6 Gotowanie zamrożonych WARZYWA
warzyw
Akcesoria
Programy automatyczne uwzględniające wagę produktu
NN-GD560M / NN-GD550W
Program
Funkcja
podpowiedzi
9 Zamrożone pieczywo
MROZONYC
HLEB
10 Kawałki kurczaka
Zalecana
waga
50 - 500g
KAWALKI 200 - 1200g
KURCZAKA
11 Cały kurczak
CALY
1000 - 2200g
KURCZAK
12 Zapiekanki zamrożone
MROZONE
ZAPIEKANKI 300 - 1000g
Pl-12
Akcesoria
Wskazówki
Do podgrzewania zamrożonego chleba, bułek oraz rogalików.
Usuń opakowanie i umieść na ruszcie na szklanym talerzu. Obróć po
usłyszeniu sygnału dźwiękowego.
Do pieczenia części kurczaka jak nóżki, uda lub skrzydełka. Umieść
kawałki kurczaka w naczyniu żaroodpornym na ruszcie. W celu równego
upieczenia, rozłóż części kurczaka w jednej warstwie i po usłyszeniu
sygnału dźwiękowego, obróć je na drugą stronę.
Do pieczenia całego, świeżego, niefaszerowanego kurczaka. Farsz
przygotuj oddzielnie. Umieść kurczaka w żaroodpornym naczyniu, a całość
ustaw na szklanym talerzu. Pieczenie rozpocznij, układając kurczaka
piersiami do dołu, a po usłyszeniu sygnału dźwiękowego, obróć go na
druga stronę.
Do podgrzewania i przyrumieniania zamrożonych zapiekanek lub
łazanek (lasagne).
Usuń opakowanie i umieść zapiekankę w żaroodpornym naczyniu, a
całość ustaw na szklanym talerzu.
Programy automatyczne uwzględniające wagę produktu
Programów Panacrunch (NN-GD560M / NN-GD550W)
1. Wybierz żądany program i
umieść talerz do pizzy w
kuchence bezpośrednio na
talerzu szklanym.
Program
13 Pizza świeża
14 Pizza zamrożona
Funkcja
podpowiedzi
Zalecana
waga
SCHLODZONA
150 - 600g
PIZZA
MROZONA
PIZZA
150 - 600g
SCHLODZONE
150 - 700g
QUICHE
16 Zamrożone ciasto z
owocami / Quiche
MROZONE
QUICHE
17 Zamrożone produkty
ziemniaczane
MROZONE
FRYTKI
Akcesoria
3. Po wstępnym podgrzaniu,
rozlegnie się sygnał dźwiękowy.
Włóż produkty do talerza do
pizzy, ustaw wagę.
4. Naciśnij przycisk start.
Wskazówki
Do podgrzewania, nadawania kruchości na spodzie i
przyrumieniania wierzchu świeżej, kupionej pizzy.
Usuń opakowanie i włóż pizzę do wcześniej podgrzanego talerza do
pizzy.
Do podgrzewania, nadawania kruchości na spodzie i
przyrumieniania wierzchu zamrożonej, kupionej pizzy.
Usuń opakowanie i włóż pizzę do wcześniej podgrzanego talerza do
pizzy.
Do podgrzewania, nadawania ciastu kruchości na spodzie i
przyrumieniania wierzchu kupionego, świeżego ciasta z owocami.
Usuń opakowanie i włóż ciasto do wcześniej podgrzanego talerza do
pizzy.
150 - 500g
Do podgrzewania, nadawania ciastu kruchości na spodzie i
przyrumieniania wierzchu kupionego, zamrożonego ciasta z
owocami. Usuń opakowanie i włóż ciasto do wcześniej podgrzanego
talerza do pizzy.
200 - 500g
Do podgrzewania, nadawania kruchości i przyrumieniania
zamrożonych produktów ziemniaczanych. Po wcześniejszym
podgrzaniu talerza, rozłóż produkty ziemniaczane w talerzu do pizzy.
Aby uzyskać jak najlepszy efekt, podgrzewaj je w jednej warstwie i
obróć na sygnał.
Pl-13
Polski
15 świeże ciasto z
owocami / Quiche
2. Naciśnij przycisk start, aby
wstępnie podgrzać talerz do
pizzy.
Talerz do pizzy (NN-GD560M / NN-GD550W)
Idea
Uwagi:
Niektóre produkty żywnościowe przygotowywane w kuchence mikrofalowej
mogą mieć miękkie i wilgotne skórki lub spody. Twój, należący do
wyposażenia, talerz do pizzy przyrumieni i doda kruchości pizzy, ciastom,
sękaczom, pieczywu, uzyskując taki efekt jak w zwykłej kuchni. Twój talerz
do pizzy firmy Panasonic działa na trzy sposoby: podgrzewa talerz,
absorbując mikrofale, podgrzewa żywność bezpośrednio przez mikrofale
oraz opieka żywność grillem. Dno talerza do pizzy pochłania mikrofale i
zamienia je w ciepło. Następnie, ciepło to jest przekazywane przez talerz
do żywności. Efekt podgrzewania jest maksymalizowany przez powłokę
antyadhezyjną.
1. Nie podgrzewaj talerza do pizzy dłużej niż 8 minut.
2. Talerz do pizzy stawiaj zawsze na środku szklanego talerza
obrotowego i upewnij się, że nie dotyka żadnej ścianki wnętrza
kuchenki. W przeciwnym razie, może nastąpić iskrzenie, które może
uszkodzić wnętrze kuchenki.
3. Talerz do pizzy używaj zawsze na szklanym talerzu obrotowym. Nie
używaj go z rusztem.
4. Używaj zawsze uchwytu do talerza do pizzy lub kuchennych
rękawiczek, gdy będziesz operował gorącym talerzem.
5. Przed przyrządzaniem potraw należy usunąć wszelkie opakowania.
Korzystanie z talerza do pizzy (Obsługa ręczna)
• Aby uzyskać jak najlepszy efekt, podgrzej talerz przed używaniem go.
Umieść go bezpośrednio na szklanym talerzu obrotowym i podgrzewaj
w trybie kombinacynym 1 przez 3 minuty. Aby wzmocnić
przyrumienianie, w przypadku takich dań jak kiełbaski czy hamburgery,
talerz do pizzy posmaruj oliwą, przed wstępnym podgrzewaniem.
• Wyjmij talerz do pizzy z kuchenki i umieść na talerzu żywność. Użyj
uchwytu do talerza do pizzy lub kuchennych rękawiczek, gdyż talerz
będzie bardzo gorący. Aby uzyskać jak najlepszy efekt, żywność należy
umieścić na talerzu natychmiast po jego wstępnym podgrzaniu.
Działanie funkcji “gorącego talerza” nie może być gwarantowane w
trybie opóźnionego rozpoczęcia podgrzewania/gotowania.
• Ustaw talerz do pizzy na szkalnym talerzu obrotowym i gotuj zgodnie
ze wskazówkami zawartymi w tabelach gotowania w książce
kucharskiej.
Pl-14
6. Nie umieszczaj żadnych materiałów łatwopalnych na gorącym
talerzu do pizzy, gdyż mogą się zapalić.
7. Talerz do pizzy może być używany w zwykłej kuchni.
8. W celu uzyskania jak najlepszego efektu, talerz do pizzy powinien
być używany w trybie kombinacynym GRILLA i MIKROFAL.
Obchodzenie się z talerzem do pizzy
• Nigdy nie dotykaj talerza ostrymi przedmiotami, gdyż zniszczyłoby to
powierzchnię antyadhezyjną.
• Po użyciu, myj talerz w wodzie z dodatkiem płynu do mycia naczyń i
spłucz gorącą wodą. Nie używaj żadnych proszków czyszczących
ani ostrych ścierek, gdyż zniszczą powierzchnię talerza.
• Talerz można bezpiecznie myć w zmywarce do naczyń.
Programy automatyczne uwzględniające wagę produktu
NN-SD450W
Program
1 Podgrzewanie świeżych
potraw
2 Podgrzewanie
zamrożonych produktów
3 Świeże warzywa
Funkcja
podpowiedzi
Zalecana
waga
Akcesoria
SWIEZE
200 - 1500g
POTRAWY
MROZONE
POTRAWY 200 - 1200g
SWIEZE
WARZYWA
250 - 1500g
MROZONE
4 Warzywa zamrożone
5 Świeże ryby
WARZYWA 300 - 1000g
SWIEZE
RYBY
Wskazówki
Do podgrzewania potraw na talerzach lub w garnkach.
Wszystkie potrawy powinny mieć temperaturę pokojową lub być wyjęte z
lodówki. Zamieszaj w połowie czasu gotowania i pozostaw kilka minut, w
celu wyrównania temperatury.
Do podgrzewania zamrożonych potraw na talerzach lub w garnkach.
Wszystkie potrawy powinny być wcześniej ugotowane i zamrożone.
Zamieszaj w połowie czasu gotowania. Po ugotowaniu wymieszaj
potrawę i pozostaw na kilka minut, w celu wyrównania temperatury.
Do gotowania świeżych warzyw (np. marchewki, brokuł,kalafiora i
drobno pokrojonych ziemniaków. Włóż warzywa do odpowiedniego
pojemnika. Polej je 6 łyżkami stołowymi (90 ml) wody. Przykryj lekko
ponakłuwaną folią lub pokrywką. Duże ilości warzyw będą wymagały
wymieszania w połowie czasu gotowania.
Do gotowania zamrożonych warzyw (np. grochu, fasoli i marchewki).
Umieść je w odpowiednim naczyniu i dodaj 2 łyżki stołowe wody (30 ml).
Przykryj je ponakłuwaną folią obkurczliwą lub pokrywką. Duże ilości
warzyw wymagają wymieszania w połowie czasu gotowania.
Do gotowania świeżych ryb (np. całych, filety i dzwonka).
Przykryć cieńsze kawałki, umieścić w odpowiednim pojemniku. Dodaj 2
łyżki stołowe (30 ml) płynu. Przykryj lekko ponakłuwaną folią lub pokrywką.
Do gotowania zamrożonych ryb (np. filety i dzwonka).
Umieść je w naczyniu odpowiedniej wielkości i dodaj 2 łyżki stołowe wody
(30 ml). Przykryj je delikatnie ponakłuwaną folią obkurczliwą lub
pokrywką.
MROZONE
6 Ryby mrożone
RYBY
200 - 900g
7 Podgrzewanie
napojów w
kubku
1 KUBEK
150g
Do podgrzania kubka gorącego napoju (np. herbaty, kawy, mleka i
zupy). Wybierz program podgrzewanie kubka, wprowadź wagę (150ml),
naciśnij przycisk start.
8 Podgrzewanie
napojów w
talerzu
1 MISKA
300g
Do podgrzania talerza gorącego napoju.
Wybierz program podgrzewanie talerza, wprowadź wagę (300ml), naciśnij
przycisk start.
9 Podgrzewanie
napojów w
2 talerzach
2 MISKA
600g
Do podgrzania 2 talerzy gorącego napoju.
Wybierz program podgrzewanie talerza, wprowadź wagę (600ml), naciśnij
przycisk start.
Uwagi odnośnie podgrzewania kubka oraz miseczki.
1. Wymieszaj płyn przed podgrzewaniem. Podgrzewany płyn może się wylać, jeśli nie będzie wymieszany.
2. Nie nakrywaj gorących napojów takich jak herbata czy kawa. Zupę nakryj salaterką, aby zapobiec jej wylaniu się.
3. Po podgrzaniu, dokładnie zamieszaj i pozostaw na chwilę w celu wyrównania temperatury.
Pl-15
Polski
150 - 1000g
Opóznienie rozpoczęcia gotowania (Timer)
Korzystając z przycisku Timer/Zatrzymanie możemy zaprogramować moment rozpoczęcia gotowania.
n.p.
• Nacisnij
Opóżnienie / Odstawienie
UWAGA:
• Ustaw żądany
program gotowania i czas
gotowania.
• Ustaw czas opóźnienia timera
przekręcając pokrętło Czas/Waga
(do 9 godzin).
• Naciśnij
przycisk Start
1. Gotowanie w trzech etapach można zaprogramowac przy pomocy gotowania z timerem.
np.
Timer: 1 godzina
Poziom mocy Utrzymania ciepła: 20 min
Poziom mocy Wysoki: 10 min.
Lub
Lub
Raz
5 razy
2. Jeśli zaprogramowany czas timera przekracza 1 godzinę, odliczanie następuje w minutach. Jeśli czas nie przekracza godziny, odliczanie następuje
w sekundach.
3. Opóźnienie Startu nie może być ustawione przed wyborem programu automatycznego (Auto Program).
4. Czterokrotne przyciśnięcie przycisku opóźnienia/czuwania spowoduje wyłączenie przewodnika po funkcjach kuchenki. Aby ponownie uruchomić
przewodnik, naciśnij czterokrotnie przycisk opóźnienia/odstawienia
Funkcja Odstawienia
Korzystając z przycisku Opóżnienie / Odstawienie ustawiamy czas zatrzymania po gotowaniu lub też programujemy kuchenkę z timerem minutowym.
n.p.
Lub
• Można wprowadzić żądany program • Nacisnij
• Wprowadź chcianą wartość czasu
gotowania i czas gotowania.
Opóżnienie / Odstawienie
obracając pokrętłem Czasu/Waga (do 9
godzin).
UWAGA:
• Naciśnij
Start.
1. Gotowanie w trzech etapach można zaprogramować przy pomocy funkcji Odstawienia.
np.
Poziom mocy Wysoki: 4 min.
Lub
Czas Zatrzymania: 5 min.
Poziom mocy Wysoki: 2 min.
Lub
Raz
Raz
2. Jeśli drzwiczki kuchenki zostaną otwarte przy uruchomionej funkcji czas Odstawienie lub Timer minutowy, czas na monitorze będzie nadal odliczany.
3. Funkcję tę można stosowac jako timer. W tym przypadku należy nacisnąć Opóżnienie / Odstawienie, ustawić czas i nacisnąć Start.
Pl-16
Pytania (P) i odpowiedzi (O)
O: Jeśli kuchenka nie włącza się, sprawdź następujące punkty:
1. Czy wtyczka jest dokładnie włożona? Wyjmij wtyczkę z gniazdka, zaczekaj 10 sekund i włóż
ją ponownie.
2. Sprawdź zainstalowane bezpiecznik: zwykły i automatyczny. Włącz bezpiecznik
automatyczny lub wymień zwykły bezpiecznik (jeśli jest spalony).
3. Jeśli bezpiecznik jest dobry, podłącz do gniazdka inne urządzenie. Jeśli podłączone
urządzenie działa, prawdopodobnie niesprawna jest kuchenka. Jeśli nie działa także inne
podłączone urządzenie, to znaczy, że uszkodzone jest gniazdko.
Jeśli okaże się, że niesprawna jest kuchenka, skontaktuj się z autoryzowanym punktem
serwisowym.
P: Kuchenka powoduje zakłócenia odbioru
telewizyjnego. Czy jest to normalne?
O: Podczas gotowania w kuchence mikrofalowej mogą wystąpić zakłócenia odbioru radiowego i
telewizyjnego. Są to zakłócenia podobne do powodowanych przez drobny sprzęt taki jak
miksery, odkurzacze, suszarki itp. Nie oznaczają one niesprawności kuchenki
P: Kuchenka nie przyjmuje mojego programu.
Dlaczego?
O: Kuchenkę zaprojektowano w taki sposób, aby nie akceptowała wadliwie wprowadzonych
programów. Na przykład kuchenka nie przyjmje czwartego etapu i nie zgodzi się na program
automatycznie uwzględniający wagę produktu po uruchomieniu opóźnienia rozpoczęcia
gotowania (timera).
P: Czasami z otworów wentylacyjnych wypływa
ciepłe powietrze. Dlaczego?
O: Ciepło wydobywające się z gotowanej potrawy ogrzewa powietrze we wnętrzu kuchenki.
Ogrzane powietrze wyprowadzane jest na zewnątrz kuchenki za pomocą systemu przepływu
powietrza w kuchence. W wydobywającym się powietrzu nie ma mikrofal. Podczas gotowania
nie wolno zakrywać otworów wentylacyjnych.
P: Na wyświetlaczu widoczny jest wskaźnik "D" i
kuchenka nie gotuje. Dlaczego?
O: Kuchenka ma zaprogramowany TRYB DEMONSTRACYJNY. Tryb ten jest przeznaczony dla
wystaw sklepowych Należy go wyłączyć, naciskając jeden raz przycisk wyboru mocy, a
następnie naciskając czterokrotnie przycisk zatrzymania/anulowania lub naciskając jeden raz
przycisk maksymalnej mocy kuchenki, a następnie naciskając czterokrotnie przycisk
zatrzymania/anulowania (NN-SD450W).
P: Czy mogę używać w kuchence mikrofalowej
termometru do zwykłych kuchenek?
O: Tylko wtedy, gdy korzystasz z trybu opiekania na GRILLU. W niektórych termometrach, metal
może powodowac iskrzenie w kuchence i dlatego nie mozna ich używać w trybach gotowania
MIKROFALOWEGO i KOMBINACYJNEGO.
P: Moja kuchenka przerywa gotowanie z
użyciem mikrofal, a na wyświetlaczu
pojawiają się napisy „H97” i „H98”.
O: Oznacza to, że wystąpił problem z systemem emisji mikrofal. Należy skontaktować się z
autoryzowanym centrum serwisowym.
P: Funkcja „monitowania słów” zniknęła z
mojego wyświetlacza, na wyświetlaczu są
tylko cyfry.
O: Przyczyną mogła być awaria zasilania W takim wypadku funkcja została wyłączona. Odłącz
kuchenkę od źródła zasilania na ilka sekund, a następnie podłącz ponownie. Jeśli na
wyświetlaczu pojawi się "88:88", naciśnij i przytrzymaj przycisk startu dopóki nie pojawi się
Twój język. Następnie ustaw zegar. Wskazówki na str. Pl-7.
NN-GD560M / NN-GD550W
P: Gdy gotuję w trybie KOMBINACYJNYM,
z kuchenki mikrofalowej dobiegają trzaski i
kliknięcia. Co jest przyczyną tych dźwięków?
O: Dźwięki te pojawiają się, gdy kuchenka automatycznie przestawia się z MIKROFAL na GRILL,
aby przejść w kombinacyjny tryb gotowania. Jest to normalny objaw pracy.
P: Z kuchenki wydobywa się niemiły zapach i
dym podczas korzystania z funkcji GRILLA
oraz trybu KOMBINACYJNEGO. Dlaczego?
O: Po wielokrotnym użyciu, zalecane jest oczyszczenie kuchenki i wtedy włącz ją na 5 minut w
trybie GRILLA bez żywności, szklanego talerza i pierścienia z rolkami. Spowoduje to wypalenie
wszystkich resztek żywności, które mogą być przyczyną wydzielania się dymu i niemiłego
zapachu.
Pl-17
Polski
P: Dlaczego kuchenka nie włącza się?
Konserwacja kuchenki mikrofalowej
1. Przed czyszczeniem kuchenki, wyłącz ją.
2. Utrzymuj w czystości wnętrze kuchenki, uszczelki drzwiczek oraz
powierzchnie wokół uszczelek. Rozpryskaną żywność lub płyny należy
ścierać ze ścian wnętrza kuchenki, uszczelek drzwiczek oraz
powierzchni wokół uszczelek, wilgotną ściereczką. Jeśli kuchenka jest
silnie zabrudzona, użyj łagodnego środka czyszczącego. Korzystanie z
silnych środków do czyszczenia i szorowania nie jest zalecane.
Nie używaj dostępnych w handlu środków czyszczących do zwykłych
kuchenek. Nie należy używać środków z dodatkami ściernymi lub
metalowych skrobaczek do czyszczenia szklanej pokrywy kuchenki,
ponieważ mogą one spowodować porysowanie jej powierzchni, co
może prowadzić do pęknięcie szyby.
3. Obudowa zewnętrzna kuchenki powinna być czyszczona wilgotną
ściereczką, a następnie osuszona miękką ściereczką. Zwróć uwagę,
aby woda nie przedostała się przez otwory wentylacyjne do wnętrza
urządzenia, ponieważ mogłoby to doprowadzić do jego uszkodzenia.
4. Jeśli panel sterowania jest zabrudzony, oczyść go miękką, suchą
ściereczką. Nie używaj silnych środków do czyszczenia i szorowania.
Aby uniknąć przypadkowego włączenia urządzenia, podczas
czyszczenia panelu sterowania, pozostaw otwarte drzwiczki kuchenki.
Po oczyszczeniu, naciśnij przycisk STOP/KASOWANIE, aby wyłączyć
wyświetlacz.
5. Jeśli wewnątrz lub na zewnątrz drzwiczek osadzi się rosa, zetrzyj ją
miękką ściereczką. Może to wystąpić, gdy kuchenka mikrofalowa
pracuje w warunkach dużej wilgotności, jednakże nie jest to objawem
złej pracy urządzenia.
6. Od czasu do czasu wyjmij szklany talerz i umyj go w wodzie ze
środkiem czyszczącym lub w zmywarce do naczyń.
7. Pierścień z rolkami oraz zagłębienie w dolnej ściance kuchenki
powinny być regularnie czyszczone, aby uniknąć nadmiernych
szmerów. Wystarczy przetrzeć dno wilgotną ściereczką i
dodatkowo wysuszyć suchą tkaniną. Pierścień z rolkami można
myć w wodzie z łagodnym środkiem myjącym.
Po wielokrotnym użyciu kuchenki, zbierają się opary po
gotowaniu, ale w żaden sposób nie wpływają na stan dna, ani
pierścienia z rolkami.
Pamiętaj aby po umyciu założyć na miejsce pierścień z rolkami.
8. Podczas korzystania z GRILLA lub trybu KOMBINACYJNEGO
(NN-GD560M / NN-GD550W) z niektórych produktów może
pryskać tłuszcz na ścianki kuchenki. Jeśli kuchenka nie jest
czyszczona, mogą wydobywać się z niej nieprzyjemne zapachy.
9. Nie wolno używać do mycia urządzenia parowego.
10. Kuchenka winna być konserwowana i naprawiana wyłącznie przez
wykwalifikowany personel autoryzowanego punktu serwisowego.
11. Należy zawsze pilnować, aby otwory wentylacyjne pozostawały
czyste. Należy sprawdzać, czy we wlotach powietrza po bokach
i z tyłu urządzenia nie gromadzi się kurz lub nie ma innych
materiałów, które mogłyby je zatkać.
Jeśli wloty powietrza się zatkają, może dojść do przegrzania
kuchenki, co może mieć wpływ na jej pracę, a nawet
spowodować niebezpieczeństwo.
12. Jeżeli kuchenka nie jest utrzymywana w należytej czystości, może
to prowadzić do nisżczenia jej ścianek, a w efekcie do skrócenia
czasu prawidłowego funkcjonowania urządzenia i
niebezpiecznych sytuacji.
Dane techniczne
Napięcie sieciowe:
Pobór mocy:
Moc wyjściowa:
NN-GD560M / NN-GD550W
NN-SD450W
230 V, 50 Hz
Maksymalnie:
2300 W
Mikrofale:
1100 W
Grill:
1350 W
Mikrofale:
1000 W (IEC-60705)
Grill:
1300 W
510 (Szer.) x 380 (Dług.) x 304 (Wys.) mm
359 (Szer.) x 352 (Dług.) x 217 (Wys.) mm
12.5 Kg
50 dB
230 V, 50 Hz
Wymiary zewnętrzne:
Wymiary wnętrza kuchenki:
Waga:
Hałas:
Pobór mocy w trybie czuwania:
Pobór mocy w trybie wyłączonym:
Mikrofale:
1100 W
Mikrofale:
1000 W (IEC-60705)
510 (Szer.) x 380 (Dług.) x 304 (Wys.) mm
359 (Szer.) x 352 (Dług.) x 217 (Wys.) mm
11.5 Kg
50 dB
Dane techniczne mogą ulec zmianie bez powiadomienia.
Pl-18
Konserwacja kuchenki mikrofalowej
Produkt ten jest wyrobem, który spełnia wymagania norm europejskich dotyczących kompatybilności elektromagnetycznej (EMC). Stosownie do tych
wymagań urządzenie zaliczone jest do grupy „2" i posiada klasę bezpieczeństwa „B". Grupa „2" oznacza, że energia o częstotliwości radiowej jest z
założenia generowana w formie fal elektromagnetycznych, przeznaczonych do podgrzewania produktów żywnościowych. Klasa „B" oznacza, że
urządzenie może być użytkowane w typowych warunkach domowych.
Informacja dla użytkowników o pozbywaniu si´ urzàdzeƒ elektrycznych i elektronicznych (dotyczy gospodarstw
domowych)
Przedstawiony symbol umieszczony na produktach lub dołączonej do nich d okumentacji informuje, że niesprawnych urządzeń
elektrycznych lub elektronicznych nie można wyrzucać razem z odpadami gospodarczymi.
Prawidłowe postępowanie w razie konieczności pozbycia się urządzeń
elektrycznych lub elektronicznych, utylizacji, powtórnego użycia lub odzysku podzespołów polega na przekazaniu urządzenia do
wyspecjalizowanego punktu zbiórki, gdzie będzie przyjęte bezpłatnie. W niektórych krajach produkt można oddać lokalnemu
dystrybutorowi podczas zakupu innego urządzenia. Prawidłowa utylizacja urządzenia umożliwia zachowanie cennych zasobów i
uniknięcie negatywnego wpływu na zdrowie i środowisko, które może być zagrożone przez nieodpowiednie postępowanie z odpadami.
Szczegółowe informacje o najbliższym punkcie zbiórki można uzyska u władz lokalnych.
Nieprawidłowa utylizacja odpadów zagrożona jest karami przewidzianymi w odpowiednich przepisach lokalnych.
Użytkownicy biznesowi w krajach Unii Europejskiej
W razie konieczności pozbycia się urządzeń elektrycznych lub elektronicznych, prosimy skontaktować się z najbliższym punktem sprzedaży lub z
dostawcą, którzy udzielą dodatkowych informacji.
Pozbywanie si´ odpadów w krajach poza Unià Europejskà
Taki symbol jest ważny tylko w Unii Europejskej.
W razie potrzeby pozbycia się niniejszego produktu prosimy skontaktować się z lokalnymi władzami lub ze sprzedawcą celem uzyskania informacji o
prawidłowym sposobie postępowania.
Zgodnie z dyrektywą 2004/108/WE, artykuł 9 ust. (2)
Centrum Testowania Panasonic
Panasonic Service Europe, oddział Panasonic Marketing Europe GmbH
Winsbergring 15, 22525 Hamburg, Niemcy
Producent: Panasonic Home Appliances Microwave Oven (Shanghai) Co., Ltd, 898 Longdong Road, Pudong, Shanghai, 201203, Chiny.
Polski
Pl-19
Instalace a připojení
Kontrola mikrovlnné trouby
Troubu vybalte, odstraňte veškerý balicí materiál a troubu zkontrolujte, zda
nedošlo k poškození jako promáčknutí povrchu, ke zlomení dveřních
západek nebo popraskaní dvířek. Zjistíte-li jakékoli poškození, informujte o
tom neprodleně svého prodejce. Poškozenou mikrovlnou troubu
neinstalujte.
Instrukce týkající se uzemnění
DŮLEŽITÉ: Z DŮVODŮ ZAJIŠTĚNÍ BEZPEČNOSTI OSOB MUSÍ BÝT
TATO JEDNOTKA SPRÁVNĚNA UZEMNĚNA.
Není-li výstup střídavého proudu (AC) uzemněn, je zákazník osobně
odpovědný za jeho nahrazení správně uzemněnou nástěnnou zásuvkou.
Provozní napětí
Toto napětí musí být stejné, jako je hodnota uvedená na štítku na troubě.
Používá-li se vyšší než stanovené napětí, může to způsobit vznik ohně
nebo jiné škody.
4. Tuto troubu neumísťujte v blízkosti elektrického nebo plynového
vařiče.
5. Patky se nemají odstraňovat.
6. Tato trouba je určena pouze pro použití v domácnosti. Nepoužívejte ji
ve venkovním prostoru.
7. Mikrovlnou troubu nepoužívejte při vysoké vlhkosti vzduchu.
8. Přívodní šňůra se nemá dotýkat vnějšího povrchu trouby. šňůra musí
vést mimo horké povrchy. Nenechávejte šňůru viset přes okraj stolu
nebo pracovního pultu. šňůru, vidlici ani troubu neponořujte do vody.
9. Vzduchové otvory v horní a zadní části trouby nesmí být blokovány.
Dojde-li k zablokování těchto otvorů během provozu, může to
způsobit přehřátí trouby. Pro takový případ je trouba chráněna
tepelným pojistným zařízením, takže k obnovení provozu dojde až po
ochlazení trouby.
10. Toto zařízení nelze ovládat externím časovačem ani samostatným
systémem dálkového ovládání.
Umístění trouby
Troubu lze umístit na pracovní plochu nebo vestavět do nábytku. Není
určena k provozu uvnitř skříně.
Vestavěná trouba
Tato trouba se může zabudovat do nástěnné skříňky za použití správného
montážního rámečku, tj. bílého rámečku NN-TKT59WFP nebo stříbrného
NN-TKT59MFP které lze zakoupit u místního prodejce Panasonic.
1. Troubu umístěte na rovný a stabilní povrch, ve vzdálenosti více než 85
cm nad podlahou.
2. Po umístění trouby má být možné provést snadné odpojení spotřebiče
od sítě vytažením vidlice nebo uvedením jističe do provozu.
3. Pro správný provoz trouby zajistěte dostatečnou cirkulaci vzduchu.
Umístění trouby na kuchyňském pultu:
5cm
15cm
10cm
Volný
prostor
Kuchyňský pult
(NN-GD560M / NN-GD550W)
VÝSTRAŽNÉ UPOZORNĚNÍ
1. Čištění těsnění dvířek a prostoru kolem těsnění dvířek se má
provádět vlhkým hadříkem.
Spotřebič se má kontrolovat za účelem zjištění poškození těsnění
dvířek a prostoru kolem těsnění dvířek; je-li tento prostor poškozen,
nemá se spotřebič používat, dokud jej neopraví servisní technik
vyškolený výrobcem.
2. Neprovádějte úpravy, seřizování či opravy dvířek, krytu ovládacího
panelu, bezpečnostních blokovacích spínačů nebo jakékoli jiné části
trouby. Neodstraňujte z trouby vnější kryt, který zajišťuje ochranu
proti účinkům mikrovlnné energie.
Opravy má provádět pouze kvalifikovaný servisní technik.
3. Tento spotřebič nepoužívejte, je-li poškozená ŠŇŮRA NEBO
VIDLICE, pokud spotřebič správně nefunguje, nebo je poškozen či
spadl na zem. Je nebezpečné, aby opravy prováděl někdo jiný než
servisní technik vyškolený výrobcem.
4. Je-li přívodní šňůra tohoto spotřebiče poškozena, musí být
nahrazena speciální šňůrou, která je k dostání u výrobce.
5. Děti mohou používat troubu bez dozoru pouze tehdy, pokud byly
odpovídajícím způsobem poučeny tak, že jsou schopny používat
troubu bezpečným způsobem a chápou nebezpečí nesprávného
použití.
6. Tekutiny a jiné potraviny nesmějí být ohřívány v uzavřených nádobách,
protože by mohly explodovat.
7. Toto zařízení nemohou používat osoby (včetně dětí) se sníženými
smyslovými nebo mentálními schopnostmi nebo s nedostatkem
zkušeností a znalostí, pokud nejsou pod dohledem nebo nebyly
instruovány ohledně používání tohoto zařízení osobou zodpovědnou
za jejich bezpečnost. Děti musí být pod dohledem, aby si se
zařízením nehrály.
Cz-1
Česky
a. Nad horní částí trouby musí být zůstat 15 cm volného prostoru, v
zadní části 10 cm, na jedné straně 5 cm a na druhé straně více než
40 cm.
b. Je-li jedna strana trouby umístěna v jedné rovině se stěnou, nesmí
být druhá nebo horní strana blokována.
Pozor: Horké povrchy
Bezpečnostní instrukce
Používání trouby
Provoz motorku ventilátoru
1. Troubu nepoužívejte pro jiné účely, než je příprava pokrmů. Tato trouba
je speciálně navržena pro ohřev nebo přípravu pokrmů. Tuto troubu
nepoužívejte k ohřevu chemických látek nebo jiných produktů, které
nejsou potravinami.
Je-li trouba po použití horká, může se ventilátor několik minut otáčet,
aby došlo k ochlazení elektrických součástí. To je naprosto normální, a
pokud je ventilátor ještě v provozu, můžete vyjmout jídlo z trouby.
2. Před použitím zkontrolujte, zda jsou příslušenství/nádoby vhodné pro
použití v mikrovlnných troubách.
Bude-li třeba vyměnit žárovku vnitřního osvětlení trouby, obraťte se na
svého prodejce.
3. Nepoužívejte tuto mikrovlnnou troubu k sušení novin, oděvů nebo
jakýchkoli jiných materiálů. Mohly by se vznítit.
Příslušenství
4. Pokud se trouba nepoužívá, neskladujte z důvodů nebezpečí
náhodného zapnutí uvnitř trouby žádné jiné předměty vyjma
příslušenství.
5. Spotřebič nesmí být provozován v režimu MIKROVLNNÉHO OHŘEVU
nebo KOMBINOVANÉ PŘÍPRAVY (NN-GD550W/ NN-GD560M) BEZ
JÍDLA UMÍSTĚNÉHO V TROUBĚ. Provozování takovým způsobem
může spotřebič poškodit. Výjimkou je bod 1 kapitoly, která se týká
provozu žhavicích spirál a předehřátí pánve na pizzu.
6. Dojde-li v troubě ke vzniku kouře nebo ohně, stiskněte tlačítko
zastavení/zrušení a dvířka nechte zavřená, aby došlo k uhašení
plamenů.
Odpojte přívodní šňůru nebo vypněte elektrický proud na panelu
pojistky nebo jističe.
Provoz se žhavicími spirálami (NN-GD560M / NN-GD550W)
1. Před prvním použitím funkce KOMBINOVANÉHO OHŘEVU nebo
GRILOVÁNÍ vytřete z trouby nadbytečný olej a po dobu 10 min nechte
troubu v provozu bez jídla a příslušenství v režimu grilování. Tím dojde
k vypálení oleje, který se používá jako ochrana proti korozi. Toto je
jediný okamžik, kdy se trouba používá prázdná.
2. Vnější povrch trouby včetně vzduchových otvorů na skříňce a dvířkách
trouby se v režimu KOMBINOVANÉHO OHŘEVU a GRILOVÁNÍ
zahřívá, takže otevírání nebo zavírání dvířek a vkládání nebo vyjímání
pokrmů a příslušenství věnujte pozornost.
3. Trouba má dvě žhavicí spirály, které se nacházejí v horní části trouby.
Po použití funkce KOMBINOVANÉHO OHŘEVU a GRILOVÁNÍ budou
tyto povrchy velmi horké.
Pozor: Po provozu v těchto režimech bude příslušenství trouby
velmi horké.
4. Když je používán gril a režim combination, mohou být přístupné části
velmi horké. Děti musí být v bezpečné vzdálenosti.
5. Pokud je zařízení používáno v režimu combination, kvůli vznikající
teplotě by děti měly troubu používat pouze pod dohledem.
Cz-2
Osvětlení vnitřního prostoru trouby
Společně s troubou se dodává různé příslušenství. Vždy dodržujte
uvedené pokyny, které se týkají používání příslušenství.
Skleněný talíř
1. Troubu neprovozujte, pokud není kruhová podložka a skleněný talíř
na svém místě.
2. Nikdy nepoužívejte jiný typ skleněného talíře, než je skleněný talíř
speciálně navržený pro tuto troubu.
3. Je-li skleněný talíř horký, nechte jej před čištěním nebo ponořením
do vody ochladit.
4. Skleněný talíř se může otáčet v obou směrech.
5. Jestliže se nádoba s jídlem nebo varná nádoba na skleněném talíři
dotknou stěn trouby a dojde k zastavení otáčení talíře, začne se talíř
automaticky otáčet v opačném směru. To je normální.
6. Nepřipravujte pokrmy přímo na skleněném talíři.
Kruhová podložka
1. Kruhová podložka a dno trouby se mají často čistit, aby se zabránilo
hlučnému provozu a hromadění zbytků jídla.
2. Kruhová podložka se musí při přípravě pokrmů používat vždy
společně se skleněným talířem.
Drátěný rošt (NN-GD560M / NN-GD550W)
1. Drátěný rošt usnadňuje zapékání malých množství pokrmů dozlatova
a napomáhá dobré cirkulaci tepla.
2. V režimu KOMBINOVANÉ přípravy s MIKROVLNNÝM OHŘEVEM
neumísťujte kovovou nádobu přímo na drátěný rošt.
3. Nepoužívejte drátěný rošt v režimu využívajícím pouze mikrovlnný
ohřev.
Pánev na pizzu (NN-GD560M / NN-GD550W) – viz str. Cz-14
Důležité informace
1. Doba přípravy pokrmů
6. Tekuté pokrmy
• Délky doby přípravy pokrmů uvedené v kuchařce jsou přibližné. Doba
závisí na stavu, teplotě, množství jídla a typu kuchyňského nádobí.
• Při ohřevu tekutých pokrmů, např. polévek, omáček a nápojů v
mikrovlnné troubě může dojít k přehřátí tekutiny nad bod varu, aniž
by se to projevilo tvorbou bublinek. To může být důsledkem náhlého
převaření horkého tekutého pokrmu. Abyste zabránili této možnosti,
dodržujte tyto kroky:
• Abyste zabránili převaření, začněte s minimální dobou přípravy. Není-li
jídlo dostatečně uvařené, můžete je vždy ještě dodatečně trochu
povařit.
Pozor: Dojde-li k překročení doporučené délky doby přípravy, jídlo
se znehodnotí, a v extrémních případech může dojít k jeho
vznícení a případnému poškození vnitřního prostoru trouby.
2. Malá množství jídla
• Malá množství jídel nebo jídla s nízkým obsahem vlhkosti se mohou
spálit, vysušit, nebo vznítit, pokud jsou připravována příliš dlouho.
Pokud dojde ke vznícení pokrmů v troubě, nechte dvířka trouby
zavřená, troubu vypněte a vytáhněte vidlici přívodní šňůry ze zásuvky.
3. Vajíčka
a) Nepoužívejte nádoby s rovnými stěnami a úzkými hrdly.
b) Zabraňte přehřátí.
c) Před umístěním nádoby do trouby tekutý pokrm promíchejte, a
pak opět po uplynutí poloviny doby ohřevu.
d) Po ohřátí nechte pokrm krátkou dobu odstát v troubě, poté obsah
opět promíchejte a nádobu opatrně vyjměte z trouby.
7. Papír/plasty
• Při ohřívání jídla v plastových nebo papírových nádobách provádějte
častou kontrolu trouby, protože tyto typy nádob se při přehřátí vznítí.
• V režimu MIKROVLNNÉHO OHŘEVU nevařte vajíčka ve skořápce ani
celá, natvrdo uvařená vajíčka. Může se vytvořit tlak, což způsobí
puknutí vajíček, a to i po ukončení mikrovlnného ohřevu.
• Nepoužívejte výrobky z recyklovaného papíru (např. kuchyňské role),
pokud není výrobek z papíru označen jako bezpečný při použití v
mikrovlnné troubě. Výrobky z recyklovaného papíru mohou obsahovat
nečistoty, které mohou při použití způsobit vznik jisker a/nebo ohně.
4. Propíchnutí neporézní vrstvy potravin
• Před umístěním sáčků do trouby odstraňte stahovací drátky.
• Potraviny s neporézní vrstvou jako brambory, žloutky a párky se musí
před vařením v režimu MIKROVLNNÉHO OHŘEVU propíchnout, aby
se zabránilo prasknutí.
8. Náčiní/fólie
5. Teploměr určený pro měření teploty masa
• Ke kontrole stupně přípravy pečeného masa a drůbeže použijte
teploměr určený pro měření teploty masa až po vyjmutí masa z trouby.
V režimu MIKROVLNNÉHO OHŘEVU nebo KOMBINOVANÉ
PŘÍPRAVY nepoužívejte běžné teploměry určené pro měření teploty
masa, protože by mohlo dojít ke vzniku jisker.
• Neohřívejte uzavřené plechovky nebo láhve, protože mohou
explodovat.
• Při přípravě pokrmu v režimu mikrovlnného vaření se nemají používat
kovové nádoby nebo misky s kovovou úpravou. Dochází ke vzniku
jisker.
• Používáte-li jakékoli hliníkové fólie, jehly na maso nebo kovové
nádobí, má vzdálenosti mezi nimi a stěnami trouby a dvířky činit
alespoň 2 cm, aby se zabránilo vzniku jisker.
9. Kojenecké láhve/nádobky s dětskou výživou
• Obsah kojenecké láhve a nádobky s dětskou výživou se má
promíchat nebo protřepat.
• Abyste zabránili popáleninám, zkontrolujte před podáním pokrmu jeho
teplotu.
Cz-3
Česky
• Před umístěním kojenecké láhve nebo nádobky s dětskou výživou do
trouby se musí odstranit horní část a dudlík láhve nebo víčko
nádobky.
Schématické zobrazení
[8b]
[8a]
[13]
[6]
[4]
[12]
[5]
[2]
[1]
[7]
[3]
[9]
[10]
[11]
1.
Tlačítko otevření dvířek
Stisknutím tlačítka dvířka otevřete. Pokud otevřete dvířka během přípravy pokrmu, proces přípravy se dočasně přeruší, aniž
by došlo k vymazání dříve provedených nastavení. Příprava pokrmu se obnoví, jakmile dojde k zavření dvířek a stisknutí
tlačítka spuštění. Po otevření dvířek se rozsvítí světlo v troubě.
Cz-4
2.
Skleněná výplň dvířek trouby
3.
Systém bezpečnostního zámku dvířek
4.
Vzduchový otvor trouby
5.
Ovládací panel
6.
Skleněný talíř
7.
Kruhová podložka
8a.
Vnější vzduchové otvory trouby
8b.
Vnější vzduchové otvory trouby (NN-GD560M / NN-GD550W)
9.
Drátěný rošt (NN-GD560M / NN-GD550W)
10.
Pánev na pizzu (NN-GD560M / NN-GD550W)
11.
Rukojeť pánve na pizzu (NN-GD560M / NN-GD550W)
12.
Síťový kabel
13.
Výstražný štítek (Horké povrchy) (NN-GD560M / NN-GD550W)
Ovládací panel
NN-GD560M / NN-GD550W*
(1)
(2)
(3)
(8)
1.
Displej
2.
Mikrovlnný ohřev
3.
Grilování
4.
Kombinovaná příprava
5.
Tlačítko automatického zrychleného
rozmrazování s vážením
6.
Oddálení spuštění přípravy
pokrmu/prodleva
7.
Hodiny
8.
Volič automatických programů
9.
Nastavení času/hmotnosti
10.
Tlačítko zastavení/zrušení:
Před vařením: jedním stisknutím vymažete
Vámi zadané nastavení.
(4)
Během vaření: jedním stisknutím dočasně
zastavíte program přípravy pokrmu. Dalším
stisknutím zrušíte všechna Vámi zadaná
nastavení a na displeji se zobrazí aktuální čas.
(5)
(9)
(6)
11.
Tlačítko spuštění:
Stisknutím tlačítka spustíte provoz trouby.
Jestliže dojde během přípravy pokrmu k
otevření dvířek nebo k jednomu stisknutí
tlačítka zastavení/zrušení, musí se pro další
obnovení procesu přípravy pokrmu stisknout
tlačítko spuštění.
(7)
(10)
(11)
* Vzhled panelu se může měnit (v závislosti na barevném
provedení trouby), ale funkce ovládacích prvků je stejná.
Česky
napfi.:
Pípnutí:
Po stisknutí libovolného tlačítka
se ozve pípnutí. Pokud se toto
pípnutí neozve, není nastavení
správné. Pokud se změní jedna
funkce trouby na druhou, je to
signalizováno dvěma pípnutími.
Dokončení přípravy pokrmu je
signalizováno pěti pípnutími.
Jestliže je některá činnost nastavena a nestiskne se příslušný
knoflík pro spuštění, trouba automaticky po šesti minutách tuto
činnost zruší. Displej se vrátí zpět na režim hodin.
Tato trouba je vybavená funkcí úspory energie.
Poznámka:
1. Pokud bude trouba v pohotovostním režimu, jas
obrazovky bude snížen.
2. Při prvním zapojení a okamžitě po dokončení poslední
operace se trouba přepne do pohotovostního režimu.
Cz-5
Ovládací panel
NN-SD450W
1.
2.
3.
(1)
4.
5.
6.
7.
8.
(6)
(2)
9.
(7)
(3)
(4)
(5)
Displej
Mikrovlnný ohřev
Tlačítko automatického zrychleného
rozmrazování s vážením
Oddálení spuštění přípravy
pokrmu/prodleva
Hodiny
Volič automatických programů
Nastavení času/hmotnosti
Tlačítko zastavení/zrušení:
Před vařením: jedním stisknutím vymažete
Vámi zadaná nastavení.
Během vaření: jedním stisknutím dočasně
zastavíte program přípravy pokrmů. Dalším
stisknutím zrušíte všechna Vámi zadaná
nastavení a na displeji se zobrazí aktuální čas.
Tlačítko spuštění:
Stisknutím tlačítka spustíte provoz trouby.
Jestliže dojde během přípravy pokrmu k
otevření dvířek nebo k jednomu stisknutí
tlačítka zastavení/zrušení, musí se pro další
obnovení procesu přípravy pokrmu stisknout
tlačítko spuštění.
napfi.:
(8)
(9)
Jestliže je některá činnost nastavena a nestiskne se příslušný
knoflík pro spuštění, trouba automaticky po šesti minutách tuto
činnost zruší. Displej se vrátí zpět na režim hodin.
Tato trouba je vybavená funkcí úspory energie.
Pípnutí:
Po stisknutí libovolného tlačítka
se ozve pípnutí. Pokud se toto
pípnutí neozve, není nastavení
správné. Pokud se změní jedna
funkce trouby na druhou, je to
signalizováno dvěma pípnutími.
Dokončení přípravy pokrmu je
signalizováno pěti pípnutími.
Cz-6
Poznámka:
1. Pokud bude trouba v pohotovostním režimu, jas
obrazovky bude snížen.
2. Při prvním zapojení a okamžitě po dokončení poslední
operace se trouba přepne do pohotovostního režimu.
Ovládací prvky a provoz
Nastaveno
“88:88”
Text na displeji
Stiskněte
“FRANCAIS”
Ve francouzštině
Stiskněte
“ITALIANO”
V italštině
Stiskněte
“DEUTSCH”
V němčině
Stiskněte
“NEDERLANDS”
V holandštině
Stiskněte
ESPANOL
Ve španělštině
“POLSKI”
V polštině
Stiskněte
“CESKY”
V češtině
Stiskněte
“ENGLISH”
V angličtině
Stiskněte
“DANSK”
V dánštině
Stiskněte
“SUOMI”
Ve finštině
Stiskněte
“SVENSKA”
Ve švédštině
Stiskněte
“NORSK”
V norštině
Stiskněte
Tyto modely mají jedinečnou funkci „Word Prompting”
(svítící hesla), která vás bude provázet činností vaší
mikrovlnné trouby. Po zapnutí trouby mačkejte tlačítko
Start, dokud nenastavíte svůj jazyk. Jak budete
mačkat tlačítka, bude displej ukazovat následující
pokyn, čímž vyloučí možnost chyby. Pokud budete
chtít z jakéhokoli důvodu změnit zobrazený jazyk,
troubu vypněte ze zásuvky a celý postup zopakujte.
Pokud 4krát stisknete tlačítko Prodleva/Odstavení,
průvodce činností trouby se vypne. Pokud jej budete
chtít znovu zapnout, 4krát stiskněte tlačítko
Prodleva/Odstavení.
Platí pouze pro model SD450W
Nastavení hodin:
Příklad: Nastavení na 12:00
Česky
• Jednou stiskněte tlačítko
nastavení hodin.
Začne blikat dvojtečka.
• Otáčením voliče času/hmotnosti zadejte čas.
Na displeji se zobrazí čas, přičemž bude
blikat dvojtečka.
• Stiskněte tlačítko nastavení hodin.
Dvojtečka přestane blikat, displej
zobrazuje aktuální čas.
POZNÁMKA:
1. Chcete-li provést resetování času, opakujte výše uvedené kroky.
2. Displej bude zobrazovat čas tak dlouho, dokud nedojde k přerušení přívodu elektrického proudu.
3. Tyto hodiny využívají 24-hodinový formát času.
Cz-7
Ovládací prvky a provoz
Dětská pojistka:
Použitím tohoto systému dojde k vyřazení ovládacích prvků z provozu, avšak lze otevírat dvířka. Dětskou pojistku lze nastavit, pokud je na displeji
zobrazena dvojtečka nebo čas.
Zrušení:
Nastavení:
• Třikrát stiskněte tlačítko spuštění.
Displej přestane zobrazovat čas, ale nedojde ke ztrátě
aktuálního času. Na displeji se zobrazí A \.
• Třikrát stiskněte tlačítko zastavení/zrušení.
Na displeji se opět zobrazí aktuální čas.
POZNÁMKA: Dětskou pojistku aktivujete trojím stisknutím tlačítka Start během 10 sekund.
Mikrovlnný ohřev a rozmrazování
K dispozici je 5 různých úrovní mikrovlnného výkonu. Následující tabulka uvádí přibližné hodnoty výkonu pro každou úroveň.
Použití příslušenství:
NN-GD560M / NN-GD550W
NN-SD450W
Skleněný talíř
Stiskněte
Úroveň výkonu
W
1x
Max. (vysoká)
1000 W
2x
Rozmrazování
270 W
3x
Střední
600 W
4x
Nízká
440 W
5x
Dušení
250 W
NN-GD560M / NN-GD550W
nebo
• Tiskněte toto tlačítko
tak dlouho, dokud se na
displeji nezobrazí
požadovaný výkon.
• Zvolte požadovanou
úroveň mikrovlnného
výkonu.
• Pomocí voliče času/hmotnosti nastavte délku
doby přípravy (vysoký výkon:
do 30 minut, ostatní výkony: do 90 minut).
• Stiskněte tlačítko
spuštění.
POZNÁMKA:
1. V případě dvou nebo třífázové přípravy znovu nastavte, před stisknutím tlačítka spuštění, úroveň mikrovlnného výkonu a délku doby přípravy např.
zapékané pokrmy – Max. úroveň výkonu na 10 minut, aby se začal pokrm vařit. Mírný var na 60 minut, aby se uvařil.
Mírný var na 10 minut, aby se rozvinuly chutě a vůně.
2. Po nastavení mikrovlnného výkonu a času lze naprogramovat dobu prodlevy.
3. Je-li třeba, můžete během přípravy pokrmu změnit délku doby přípravy. Snížení nebo zvýšení doby vaření se provádí voličem času/hmotnosti. Čas
lze zvyšovat nebo snižovat s přesností 1 min, a to až do 10 min. Otočením voliče na nulu dojde k ukončení přípravy pokrmu.
4. Trouba bude automaticky pracovat při vysokém mikrovlnném výkonu, pokud se zadá délka doby přípravy pokrmu, aniž by byla předem nastavena
úroveň výkonu.
Cz-8
Grilování (NN-GD560M/NN-GD550W)
Použití příslušenství:
Drátěný rošt
K dispozici jsou 3 úrovně nastavení grilování.
Skleněný talíř
1 stisknutí
2 stisknutí
3 stisknutí
GRILL 1
GRILL 2
GRILL 3
• Zvolte grilovací výkon. Stisknete-li
• Pomocí voliče času/hmotnosti nastavte délku
tlačítko 1x, zvolíte grilování 1 (vysoký
doby přípravy pokrmu (do 90 minut).
výkon), stisknete-li je 2x, zvolíte grilování
2 (střední výkon), stisknete-li je 3x,
zvolíte grilovaní
3 (nízký výkon).
1300 W
950 W
700 W
• Stiskněte tlačítko
spuštění.
POZNÁMKA:
1. Gril bude nyní fungovat pouze tehdy, pokud budou dvířka zavřená.
2. Je-li třeba, můžete během přípravy změnit délku doby přípravy pokrmu. Snížení nebo zvýšení délky doby přípravy pokrmu se provádí otočením
voliče času/hmotnosti. Čas lze zvyšovat nebo snižovat s přesností 1 min, a to až do 10 min. Otočením voliče na nulu dojde k ukončení přípravy
pokrmu.
Kombinovaná příprava (NN-GD560M/NN-GD550W)
Použití příslušenství:
Drátěný rošt
Skleněný talíř
Skleněný talíř
K dispozici jsou 3 možnosti nastavení kombinované přípravy.
Následující tabulka uvádí přibližné hodnoty ve W pro každou úroveň
výkonu.
Nastavení
kombinované
přípravy
Stisknutí
Grilování
Mikrovlnný
ohřev
Text
na displeji
1
2
3
1
2
3
1300W
1300W
1300W
600W
440W
250W
G1-600W
G1-440W
G1-250W
Česky
• Zvolte úroveň výkonu pro
kombinovanou přípravu
(viz tabulku).
• Pomocí voliče času/hmotnosti nastavte délku
doby přípravy pokrmu (do 90 minut).
• Stiskněte tlačítko
spuštění.
POZNÁMKA:
1. Režim kombinované přípravy bude aktivní pouze tehdy, pokud budou dvířka trouby zavřená.
2. Je-li třeba, můžete během přípravy pokrmu změnit délku doby přípravy. Snížení nebo zvýšení délky doby přípravy se provádí otočením voliče
času/hmotnosti. Čas lze zvyšovat nebo snižovat s přesností 1 min, a to až do 10 min. Otočením voliče na nulu dojde k ukončení přípravy pokrmu.
Cz-9
Automatické rozmrazování
Pomocí této funkce můžete rozmrazovat mražená jídla podle hmotnosti. Zvolte příslušnou kategorii a nastavte hmotnost jídla. Hmotnost se
programuje v gramech. Pro rychlou volbu začíná hmotnost nejběžněji používanou hodnotou v rámci každé kategorie.
• Zvolte požadovaný program
• Pomocí voliče času/hmotnosti nastavte hmotnost mraženého jídla.
automatického rozmrazování.
Pomalým otáčením voliče nastavíte hmotnost s přesností 10 g.
V případě malých kousků stiskněte 1x.
Rychlým otáčením voliče nastavíte hmotnost s přesností 100 g.
V případě velkých kusů stiskněte 2x.
Program
1 Malé kousky
2 Velké kusy
Text na
displeji
Hmotnost
• Stiskněte tlačítko
spuštění.
Vhodná jídla
150 - 1600g Malé kousky masa, škeble, párky, vykostěné rybí plátky, stejky, kotlety
MALE
(porce o hmotnosti 100 až 400 g). Po pípnutí otočit.
KOUSKY
VETSI KUSY
400 - 2400g Velké kusy masa, pečeně, celé kuře. Po pípnutí otočit.
MASA
POZNÁMKA:
1. Pokud je doba rozmrazování delší než 60 min, zobrazí se čas v hodinách a minutách.
2. Tvar a velikost jídla budou určovat maximální hmotnost, které se trouba může přizpůsobit.3. Další informace – viz pokyny týkající se rozmrazování,
které jsou uvedeny v kuchařce.
Automatické programy podle hmotnosti Auto Weight
Tato funkce umožňuje připravovat většinu Vašich oblíbených jídel na základě pouhého nastavení hmotnosti. Trouba automaticky určí úroveň
mikrovlnného výkonu, grilovacího výkonu (NN-GD550W/NN-GD560M) a délku přípravy pokrmu. Zvolte příslušnou kategorii a nastavte hmotnost jídla.
Hmotnost se programuje v gramech. Pro rychlou volbu začíná hmotnost nejběžněji používanou hodnotou v rámci každé kategorie.
NN-GD560M /
NN-GD550W
NN-SD450W
např.
• Otočením voliče automatických programů
zvolte požadovaný program podle hmotnosti
Auto Weight. Na displeji se budou postupně
přetáčet automatické programy Auto Weight.
• Pomocí voliče času/hmotnosti nastavte hmotnost jídla.
Pomalým otáčením voliče nastavíte hmotnost s přesností 10 g.
Rychlým otáčením voliče nastavíte hmotnost s přesností 100 g.
POZNÁMKA:
1. Pokud je doba přípravy delší než 60 minut, zobrazí se čas v hodinách a minutách.
2. Doporučené hodnoty hmotnosti a příslušenství, které je třeba používat, jsou uvedeny na následující stránce.
Cz-10
• Stiskněte tlačítko
spuštění.
Automatické programy podle hmotnosti Auto Weight
NN-GD560M / NN-GD550W
Doporučená
Příslušenství
hmotnost
Program
Text na
displeji
1 Přihřívání šálku
1 SALEK
150g
Pro přihřívání šálku s horkým nápojem (např. čajem, kávou,
mlékem a polévkou). Zvolte přihřívání šálku, zadejte hmotnost (150
ml), stiskněte tlačítko spuštění.
2 Přihřívání misky
1 MISKA
300g
Pro přihřívání misky s horkým nápojem. Zvolte přihřívání misky,
zadejte hmotnost (300 ml), stiskněte tlačítko spuštění.
3 Ohřev čerstvého jídla
CERSTVYCH
200 - 1500g
POKRMU
ZMRAZENYCH
4 Ohřev zmrazeného jídla
POKRMU 200 - 1200g
5 Vaření čerstvé zeleniny
CERSTVE
250 - 1500g
ZELENINY
ZMRAZENE
300 - 1000g
6 Vaření mražené zeleniny ZELENINY
7 Vaření čerstvých ryb
ZMRAZENE
200 - 900g
RYBY
Pro ohřev jídla na talíři nebo v nádobě, ve které se jídlo podává.
Všechny pokrmy mají mít pokojovou teplotu nebo být chlazené. Po
pípnutí promíchejte. Nechte několik minut odstát.
Pro ohřev zmrazeného jídla na talíři nebo v nádobě, ve které se
jídlo podává. Veškeré pokrmy musí být předvařené a zmrazené. Po
pípnutí zamíchejte. Po dokončení ohřevu jídlo zamíchejte a nechte 2 až
3 minuty odstát.
Pro vaření čerstvé zeleniny. Připravenou zeleninu umístěte do
nádoby vhodné velikosti. Jemně ji postříkejte 9lžícemi (100 ml) vody.
Lehce ji překryjte přilnavou perforovanou fólií nebo pokličkou (víčkem).
V případě velkých množství je třeba po pípnutí zeleninu zamíchat.
Pro vaření mražené zeleniny. Zeleninu umístěte do nádoby vhodné
velikosti, přidejte 3-4 lžíce (40 ml) vody. Lehce ji překryjte přilnavou
perforovanou fólií nebo pokličkou (víčkem). V případě velkých
množství je třeba po pípnutí zeleninu zamíchat.
Pro vaření čerstvých ryb (celých, vykostěných plátků, stejků).
Tenčí části překryjte, umístěte do nádoby vhodné velikosti. Přidejte 1-2
lžíce tekutiny. Zakryjte přilnavou perforovanou fólií nebo pokličkou
(víčkem).
Pro vaření mražených rybích stejků a vykostěných plátků.
Umístěte do nádoby vhodné velikosti, přidejte 2 lžíce (30 ml) vody,
lehce zakryjte přilnavou perforovanou fólií nebo pokličkou (víčkem).
Pokyny týkající se ohřevu šálků a misek.
1. Před ohřevem tekutinu promíchejte (Pokud nejsou ohřívané tekutiny promíchány se vzduchem, může dojít k jejich vyprsknutí).
2. Horké nápoje jako čaj nebo kávu nezakrývejte.
Abyste zabránili nebezpečí vyprsknutí, zakryjte polévku talířkem.
3. Po ohřátí obsah opět promíchejte a nápoj nechte krátkou dobu odstát.
Cz-11
Česky
8 Vaření mražených ryb
CERSTVYCH
150 - 1000g
RYB
Instrukce
Automatické programy podle hmotnosti Auto Weight
NN-GD560M / NN-GD550W
Program
Text na
displeji
Doporučená
hmotnost
CHLEB
50 - 500g
9 Zmrazený chléb
10 Kousky čerstvého
kuřete
11 Celé kuře
12 Zmrazená obalovaná
jídla/lasagne
Cz-12
Příslušenství
Instrukce
Pro ohřev zmrazeného chleba, rohlíků a krosantů. Odstraňte
veškerý obal a chléb nebo pečivo umístěte na drátěný rošt nebo
skleněný talíř. Po pípnutí otočte.
CERSTVYCH
KURECICH 200 - 1200g
KOUSKU
Pro vaření kuřecích kousků, např. kuřecích horních nebo dolních
stehen či pečených stehen. Vložte kuře do žáruvzdorné nádoby a
nádobu umístěte na drátěný rošt nebo skleněný talíř. Z důvodů
správné přípravy části kuřete rovnoměrně rozprostřete a po pípnutí
otočte.
CELE KURE 1000 - 2200g
Pro vaření celého čerstvého kuřete bez nádivky. Nádivku připravte
zvlášť. Vložte kuře do žáruvzdorné nádoby a nádobu umístěte na
skleněný talíř. Začněte tak, že prsa kuřete jsou otočena směrem dolů.
Po pípnutí kuře otočte.
ZMRAZENEHO
ZAPEKANEHO
POKRMU
300 - 1000g
Pro ohřev a osmažení zmrazených obalovaných jídel/lasagne.
Odstraňte veškerý obal a vložte obalované jídlo/lasagne do
žáruvzdorné nádoby a nádobu umístěte na skleněný talíř.
Speciální programy podle hmotnosti
Auto Weight pro zapékání seshora i zespoda
Speciální programy pro zapékání seshora i zespoda (NN-GD560M / NN-GD550W)
1. Zvolte požadovaný program a
umístěte pánev na pizzu do
trouby, přímo na skleněný talíř.
Program
13 Čerstvá pizza
14 Mražená pizza
15 Čerstvé slané koláče
17 Mražené výrobky
z brambor
Text na
displeji
Doporučená
hmotnost
3. Po pípnutích signalizujících
provedení předehřevu
umístěte do pánve pokrm a
nastavte hmotnost.
Příslušenství
4. Stiskněte tlačítko spuštění.
Instrukce
CHLAZENE
150 - 600g
PIZZY
Pro ohřev, zapékání čerstvé koupené pizzy tak, aby dole byla
křupavá a nahoře dozlatova upečená. Odstraňte veškerý obal a
pizzu umístěte do předehřáté pánve na pizzu.
ZMRAZENE
PIZZY
150 - 600g
Pro ohřev, zapékání mražené koupené pizzy tak, aby dole byla
křupavá a nahoře dozlatova upečená. Odstraňte veškerý obal a
pizzu umístěte do předehřáté pánve na pizzu.
CHLAZENEHO
KOLACE
150 - 700g
Pro ohřev, zapékání koupených čerstvých slaných koláčů tak, aby
dole bylo těsto křupavé a nahoře dozlatova upečené. Odstraňte
veškerý obal a umístěte slaný koláč do předehřáté pánve na pizzu.
150 - 500g
Pro ohřev, zapékání koupených mražených slaných koláčů tak,
aby dole bylo těsto křupavé a nahoře dozlatova upečené.
Odstraňte veškerý obal a umístěte slaný koláč do předehřáté pánve na
pizzu.
200 - 500g
Pro ohřev, opékání zmražených výrobků z brambor, aby byly
křupavé a dozlatova upečené. Po předehřátí pánve na ni umístěte
bramborové hranolky, lupínky atd. K docílení optimálních výsledků
připravujte vždy jen jednu vrstvu, po pípnutí otočte.
ZMRAZENEHO KOLACE
ZMRAZENYCH
BRAMBOROVYCH
POKRMU
Cz-13
Česky
16 Mražené slané koláče
2. Pro předehřátí pánve na pizzu
stiskněte tlačítko spuštění.
Pánev na pizzu (NN-GD560M / NN-GD550W)
Princip
Poznámky:
Některá jídla připravovaná v mikrovlnné troubě mohou mít měkkou a
nepropečenou kůrčičku. Vaše pánev na pizzu umožní přípravu dozlatova
upečené a křupavé pizzy, slaných i sladkých koláčů, chlebových výrobků
stejně dobře jako tradiční trouba.
Vaše pánev na pizzu Panasonic funguje třemi způsoby, tj. dochází k
ohřevu pánve na základě absorpce mikrovln, dále k přímému ohřevu jídla
mikrovlnami a ohřevu jídla grilováním. Spodní část pánve absorbuje
mikrovlny a převádí je na teplo. Poté je teplo přenášeno pánví do jídla.
Účinek ohřevu maximalizuje nepřilnavý povrch.
1. Pánev nepředehřívejte déle než 8 min.
Používání pánve na pizzu (Ruční provoz)
• K docílení nejlepších výsledků pánev před použitím předehřejte. Pánev
umístěte přímo na skleněný otočný talíř, zvolte program kombinované
přípravy 1 (grilování 1 + 600 W) a nechte ji po dobu 3 minut
předehřívat. Abyste v případě takových pokrmů, jako jsou párky a
hovězí hamburgery, napomohli jejich zhnědnutí, potřete pánev před
předehříváním olejem.
• Pánev vyjměte z trouby a vložte do ní jídlo. Použijte rukojeť, která je
určená pro pánev na pizzu, nebo rukavice, protože pánev bude velmi
horká. K docílení nejlepších výsledků je důležité, abyste jídlo umístili do
pánve ihned po jejím předehřátí. V případě zpoždění nelze zaručit
výsledek.
• Pánev umístěte na otočný skleněný talíř a pokrm zapékejte podle
pokynů uvedených v kuchařce.
Cz-14
2. Pánev vždy umístěte do středu skleněného talíře a zajistěte, aby se
nedotýkala stěn vnitřního prostoru trouby. Nedodržení tohoto
požadavku může způsobit vznik jisker, které mohou poškodit vnitřní
prostor trouby.
3. Pánev musí být vždy umístěna na skleněném otočném talíři.
Nepoužívejte drátěný rošt.
4. Při manipulaci s horkou pánví vždy používejte rukojeť nebo
rukavice, které jsou určeny pro manipulaci s pánví.
5. Před vařením odstraňte z jídla veškerý obal.
6. Na horkou pánev nepokládejte žádné materiály, které jsou citlivé na
teplo, mohlo by dojít k jejich vznícení.
7. Pánev lze používat v běžné troubě.
8. K docílení nejlepších výsledků využívejte při přípravě jídel s
použitím pánve KOMBINOVANÝ PROGRAM GRILOVÁNÍ a
MIKROVLNNÉHO OHŘEVU.
Údržba pánve
• V případě pánve nikdy nepoužívejte ostré náčiní, protože poškozuje
nepřilnavý povrch.
• Po použití pánev umyjte v horké saponátové vodě a opláchněte ji
horkou vodou. Nepoužívejte žádné brusné čisticí prostředky nebo
drátěnky, protože poškozují povrch pánve.
• Pánev lze bezpečně umývat v myčce na nádobí.
Automatické programy podle hmotnosti Auto Weight
NN-SD450W
Program
1 Přihřívání jídla
Text na
displeji
Doporučená
Příslušenství
hmotnost
CERSTVYCH
200 - 1500g
POKRMU
ZMRAZENYCH
POKRMU
200 - 1200g
2 Ohřev zmrazeného jídla
3 Vaření čerstvé zeleniny
CERSTVE
ZELENINY
250 - 1500g
ZMRAZENE
ELENINY 300 - 1000g
4 Vaření mražené zeleniny
5 Vaření čerstvých ryb
CERSTVYCH
150 - 1000g
RYB
Instrukce
Pro přihřívání jídla na talíři nebo v nádobě, ve které se jídlo
podává. Všechny pokrmy mají mít pokojovou teplotu nebo být
chlazené. Po pípnutí promíchejte. Nechte několik minut odstát.
Pro ohřev zmrazeného jídla na talíři nebo v nádobě, ve které se
jídlo podává. Veškeré jídlo musí být předvařené a zmrazené. Po
pípnutí zamíchejte. Po dokončení vaření jídlo zamíchejte a nechte 2
až 3 minuty odstát.
Pro vaření čerstvé zeleniny. Připravenou zeleninu umístěte do
nádoby vhodné velikosti. Postříkejte ji 6 lžícemi (90 ml) vody. Lehce ji
překryjte přilnavou perforovanou fólií nebo pokličkou (víčkem). V
případě velkých množství je třeba po pípnutí zeleninu zamíchat.
Pro vaření mražené zeleniny. Zeleninu umístěte do nádoby vhodné
velikosti, přidejte 2 lžíce (30 ml) vody. Lehce ji překryjte přilnavou
perforovanou fólií nebo pokličkou (víčkem). Po pípnutí zeleninu
zamíchejte.
Pro vaření čerstvých ryb (celých, vykostěných plátků, stejků).
Tenčí části překryjte, umístěte do nádoby vhodné velikosti. Přidejte 2
lžíce (30 ml) tekutiny. Zakryjte přilnavou perforovanou fólií nebo
pokličkou (víčkem).
200 - 900g
Pro vaření mražených rybích stejků a vykostěných plátků.
Umístěte do nádoby vhodné velikosti, přidejte 2 lžíce (30 ml) vody,
lehce zakryjte přilnavou perforovanou fólií nebo pokličkou (víčkem).
7 Přihřívání šálku
1 SALEK
150g
Pro přihřívání šálku s horkým nápojem (např. čajem, kávou,
mlékem a polévkou). Zvolte přihřívání šálku, zadejte hmotnost (150
ml), stiskněte tlačítko spuštění.
8 Přihřívání 1 misky
1 MISKA
300g
Pro přihřívání jedné misky s horkým nápojem. Zvolte přihřívání
misky, zadejte hmotnost (300 ml), stiskněte tlačítko spuštění.
9 Přihřátí 2 misek
2 MISKY
600g
Pro přihřátí dvou misek s horkým nápojem. Zvolte přihřátí 2 misek,
zadejte hmotnost (600 ml), stiskněte tlačítko spuštění.
Pokyny týkající se přihřátí šálků a misek.
1. Před ohřevem tekutinu promíchejte (Pokud nejsou ohřívané tekutiny smíchány se vzduchem, může dojít k jejich vyprsknutí).
2. Horké nápoje jako čaj nebo kávu nezakrývejte.
Abyste zabránili nebezpečí vyprsknutí, zakryjte polévku talířkem.
3. Po ohřátí obsah opět promíchejte a nápoj nechte krátkou dobu odstát.
Cz-15
Česky
ZMRAZENE
RYBY
6 Vaření mražených ryb
Oddálení spuštění přípravy pokrmu
Pomocí tlačítka oddálení spuštění přípravy pokrmu/prodleva můžete naprogramovat oddálení přípravy pokrmů.
např.
• Stiskněte tlačítko oddálení
spuštění přípravy
pokrmu/prodleva.
• Voličem času/hmotnosti
nastavte dobu oddálení
(až 9 hod).
• Nastavte požadovaný program a dobu
přípravy pokrmu.
• Stiskněte tlačítko
spuštění.
POZNÁMKA:
1. Lze naprogramovat třífázovou přípravu pokrmů, včetně oddálení spuštění přípravy.
např.
Vysoký výkon: 10 min
Slabý výkon (dušení): 20 min
Doba oddálení spouštění: 1 hod
nebo
nebo
5x
1x
2. Je-li naprogramována doba oddálení delší než 1 hodina, čas se bude odpočítávat v minutách. Je-li kratší než jedna hodina, bude se čas
odpočítávat v sekundách.
3. Oddálení spuštění přípravy pokrmu nelze naprogramovat před automatickými programy.
4. Pokud 4krát stisknete tlačítko Prodleva/Odstavení, průvodce činností trouby se vypne. Pokud jej budete chtít znovu zapnout, 4krát stiskněte tlačítko
Prodleva/Odstavení.
Prodleva
Pomocí tlačítka oddálení spuštění přípravy pokrmu/prodleva můžete naprogramovat dobu prodlevy po ukončení přípravy pokrmu, nebo použít toto
tlačítko k naprogramování trouby jako minutového časovače.
např.
nebo
• Nastavte požadovaný program
a dobu přípravy pokrmu.
POZNÁMKA:
• Stiskněte tlačítko oddálení
spuštění přípravy pokrmu/
prodleva.
• Voličem času/hmotnosti nastavte
požadovanou dobu trvání (až 9
hod).
1. Lze naprogramovat fázovou přípravu pokrmu včetně doby prodlevy.
např.
Vysoký výkon: 4 min
Prodleva: 5 min
• Stiskněte tlačítko
spuštění.
Vysoký výkon: 2 min
nebo
nebo
1x
1x
2. Dojde-li během doby prodlevy nebo při naprogramování trouby jako minutového časovače k otevření dvířek trouby, bude se čas na displeji i
nadále odpočítávat.
3. Tuto funkci lze rovněž využít jako časovač. V takovém případě stiskněte tlačítko oddálení spuštění přípravy pokrmu/prodleva, nastavte čas a
stiskněte tlačítko spuštění.
Cz-16
Otázky a odpovědi
Ot: Proč se moje trouba nezapne?
Od: Pokud nedojde k zapnutí trouby, zkontrolujte:
1. Je-li trouba správně připojena k síti? Vytáhněte vidlici ze zásuvky, počkejte 10
sekund a znovu vidlici zasuňte.
2. Zkontrolujte jistič a pojistku. Znovu zapněte jistič, pokud je vypnut, nebo vyměňte
spálenou pojistku.
3. Jsou-li jistič i pojistka v pořádku, připojte do zásuvky jiný spotřebič. Jestliže tento jiný
spotřebič funguje, potom problém spočívá pravděpodobně v troubě. Pokud jiný
spotřebič nefunguje, problémem je pravděpodobně zásuvka.
Pokud se domníváte, že se problém týká trouby, obraťte se na autorizované servisní
středisko.
Od: Při používání mikrovlnné trouby může u některých rozhlasových a televizních přijímačů
docházet k rušení. Toto rušení se podobá rušení, které způsobují malé spotřebiče, jako
jsou mixéry, vysavače, vysoušeče vlasů atd. Neznamená to problém, jež by se týkal Vaší
trouby.
Ot: Trouba nechce akceptovat mnou zvolený
program. Proč?
Od: Trouba je navržena tak, že neakceptuje nesprávný program. Např. neakceptuje čtvrtou
fázi a po spuštění prodlevy neakceptuje žádný automatický program podle hmotnosti Auto
Weight.
Ot: Někdy vychází ze vzduchových otvorů trouby
teplý vzduch. Proč?
Od: Teplo uvolňované připravovaným pokrmem ohřívá vzduch ve vnitřním prostoru trouby.
Tento ohřátý vzduch vystupuje z trouby ven vzduchovými otvory. Tento vzduch neobsahuje
žádné mikrovlny. Během přípravy jídla nemají být vzduchové otvory trouby nikdy
zablokovány.
Ot: Na displeji je zobrazeno “D“ a trouba nepracuje.
Proč?
Od: Je naprogramován demonstrační režim (DEMO MODE). Tento režim je určen pro
předvedení v maloobchodní síti.
Deaktivujte tento režim trojím stisknutím tlačítka hodin.
Ot: Mohu v mikrovlnné troubě používat teploměr
určený pro tradiční trouby?
Od: Pouze v režimu GRIL.V mikrovlném režimu,by mohlo dojít k jiskření, při použití kovového
teploněru.
Ot: Trouba přestane mikrovlnně vařit a na displeji
se objeví „H97" a „H98".
Od: Displej upozorňuje na problém vytváření mikrovln. Obraťte se na autorizované servisní
centrum.
Ot: Funkce „Word Prompting" z displeje zmizela,
vidím pouze čísla.
Od: Mohlo dojít k přerušení dodávky elektřiny a funkce „Word Prompting" byla deaktivována.
Troubu na několik sekund odpojte ze zásuvky, pak ji znovu zapojte. Jakmile se objeví
„88:88", mačkejte tlačítko start, dokud se nezobrazí váš jazyk. Pak nastavte hodiny. Viz
strana En-7.
(NN-GD560M / NN-GD550W)
Ot: Když připravuji pokrmy v KOMBINOVANÉM
REŽIMU ozývá se z trouby bzučení a cvakání?
Co způsobuje tyto zvuky?
Od: Tyto zvuky se ozývají, když se trouba automaticky přepíná z MIKROVLNNÉHO REŽIMU
na režim GRILOVÁNÍ za účelem nastavení kombinované funkce. Je to normální.
Ot: V KOMBINOVANÉM REŽIMU a při GRILOVÁNÍ
moje trouba zapáchá a vychází z ní kouř?
Proč?
Od: Po opakovaném používání doporučujeme troubu vyčistit a poté ji po dobu
5 minut nechat v provozu bez jídla, skleněného talíře a kruhové podložky v režimu
grilování. Tím dojde k vypálení veškerého jídla, zbytků nebo oleje, které mohly způsobit
zápach a/nebo kouř.
Cz-17
Česky
Ot: Moje trouba ruší televizor. Je to normální?
Péče o troubu
1. Před čištěním troubu vypněte.
2. Vnitřní prostor trouby, těsnění dvířek a prostor kolem těsnění dvířek
udržujte v čistotě. Pokud jídlo nebo rozstříknuté tekutiny ulpí na
stěnách trouby, těsnění dvířek nebo v prostoru kolem těsnění
dvířek, otřete tyto plochy vlhkým hadříkem. Jsou-li tyto plochy velmi
znečistěné, lze použít jemný saponát. Nedoporučujeme používat
agresivní saponáty nebo brusné prostředky.
NEPOUŽÍVEJTE ČISTICÍ PROSTŘEDKY URČENÉ PRO
PRŮMYSLOVÉ TROUBY. Při čištění skleněné výplně dvířek trouby
nepoužívejte agresivní či brusné čisticí prostředky nebo ostré kovové
stěrky, neboť mohou poškrábat povrch a způsobit vysypání skla.
3. Čištění vnějšího povrchu trouby se má provádět vlhkým hadříkem.
Abyste zabránili poškození provozních částí uvnitř trouby, zabraňte
proniknutí vody do ventilačních otvorů.
4. Dojde-li k znečištění ovládacího panelu, vyčistěte panel měkkým,
suchým hadříkem. K čištění ovládacího panelu nepoužívejte
agresivní saponáty nebo brusné prostředky. Při čištění ovládacího
panelu nechte dvířka trouby otevřená, abyste zabránili náhodnému
zapnutí trouby. Po čištění stiskněte k vymazání displeje tlačítko
zastavení/zrušení.
5. Dojde-li ve vnitřním prostoru nebo kolem vnějšího prostoru dvířek
trouby k nahromadění páry, otřete povrch měkkým hadříkem. K
tomuto může dojít tehdy, pokud je mikrovlnná trouba provozována v
podmínkách vyznačujících se vysokou vlhkosti, a v žádném případě
to neznamená poruchu spotřebiče.
6. Občas bude nutné z důvodů čištění vyjmout skleněný talíř. Talíř
umyjte teplou mýdlovou vodou nebo v myčce na nádobí.
7. Kruhová podložka a dno vnitřního prostoru trouby se mají pravidelně
čistit, aby se zabránilo nadměrné hlučnosti. Jednoduše vyčistěte
povrch dna trouby jemným saponátem a horkou vodou, poté jej
vysušte čistým hadříkem. Kruhovou podložku lze opláchnout jemnou
mýdlovou vodou. Během opakovaného používání trouby dochází k
hromadění výparů v důsledku přípravy pokrmů, avšak tyto výpary v
žádném případě neovlivňují povrch dna nebo součásti kruhové
podložky. Po vyjmutí kruhové podložky z vnitřního prostoru trouby za
účelem čištění musí být tato podložka opět umístěna do správné
polohy v troubě.
8. Při používání režimu GRILOVÁNÍ a KOMBINOVANÉ PŘÍPRAVY
(NN-GD560M / NN-GD550W) mohou některé pokrmy nevyhnutelně
způsobovat rozstřikování tuku po stěnách trouby. Pokud se
neprovede občasné čištění trouby, může během používání docházet
k tvorbě kouře.
9. Při čištění se nepoužívá parní čistič.
10. Servis této trouby může provádět pouze kvalifikovaný servisní
technik. Z důvodů údržby a opravy trouby se obraťte na nejbližšího
autorizovaného prodejce.
11. Vždy nechávejte větrací otvory odkryté. Zkontrolujte, zda nejsou
větrací otvory na horní, spodní nebo zadní straně mikrovlnné trouby
ucpané prachem nebo jiným materiálem. Pokud se ucpou, mohlo by
dojít k přehřátí, což by mohlo ovlivnit provoz mikrovlnné trouby a
případně vést ke vzniku nebezpečné situace.
12. Nebude-li trouba udržována v čistém stavu, může to zhoršit stav
povrchu, a tím dojít ke snížení životnosti spotřebiče a případnému
vzniku nebezpečné situace.
Technické specifikace
NN-GD560M / NN-GD550W
SD450W
Napájení:
230 V, 50 Hz
230V, 50 HZ
Příkon:
maximum;
Výkon:
2300 W
mikrovl. ohřev;
1100 W
grilování;
1350 W
mikrovl. ohřev;
1000 W (IEC-60705)
žhavicí spirála grilu;
1300 W
mikrovl. ohřev;
1100 W
mikrovl. ohřev;
1000 W (IEC-60705)
Vnější rozměry:
510 (W) x 380 (D) x 304 (H) mm
Rozměry vnitř. prostoru:
359 (W) x 352 (D) x 217 (H) mm
510 (W) x 380 (D) x 304 (H) mm
359 (W) x 352 (D) x 217 (H) mm
Hmotnost netto:
12.5 kg
11.5 Kg
Hlučnost:
50 dB
50 dB
Specifikace jsou předmětem změn bez předchozího vyrozumění.
Cz-18
Technické specifikace
Tento výrobek je zařízením, které splňuje požadavky evropské normy EN 55011 na elektromagnetickou kompatibilitu (EMC). Podle této normy je
tento výrobek zařízením skupiny 2, tř. B a pohybuje se v rozsahu požadovaných mezí. Skupina 2 znamená, že se radiofrekvenční energie
záměrně vytváří ve formě elektromagnetického záření za účelem ohřevu pokrmů. Třída B znamená, že se tento výrobek může používat v běžných
domácnostech.
Informace o likvidaci, které se týkají uživatelů odpadního elektrického a elektronického zařízení
(domácnosti)
Tento symbol vyznačený na výrobcích a/nebo v průvodní dokumentaci značí, že se použité elektrické a elektronické výrobky
nemají míchat s běžným odpadem z domácností.
Za účelem provedení správné úpravy, obnovy a recyklace dopravte tyto výrobky do určených sběren, kde budou přijaty zdarma.
Popř. v některých zemích můžete vrátit výrobky místnímu maloobchodníkovi při nákupu nového ekvivalentního výrobku.
Správná likvidace tohoto výrobku pomůže ušetřit cenné zdroje a zabrání případným negativním účinkům na lidské zdraví a
prostředí, které by jinak mohly vzniknout v důsledku neodpovídajícího nakládání s odpadem. Další podrobnosti o nejbližší sběrně
Vám sdělí Váš místní (městský) úřad.
V souladu s národní legislativou se mohou v souvislosti s nesprávnou likvidací tohoto odpadu vymáhat pokuty.
Informace pro podnikatelské subjekty v Evropské unii
Jestliže chcete likvidovat elektrické nebo elektronické zařízení, obraťte se na svého prodejce nebo dodavatele, kteří Vám poskytnou další
informace.
Informace týkající se likvidace v zemích mimo Evropskou unii
Tento symbol platí pouze pro Evropskou unii.
Jestliže chcete provést likvidaci tohoto výrobku, obraťte se na místní úřad nebo prodejce a vyžádejte si informace týkající se správného způsobu
likvidace.
Podle nařízení 2004/108/EC, článku 9(2)
Panasonic Testing Centre
Panasonic Service Europe, společnosti Panasonic Marketing Europe GmbH
Winsbergring 15, 22525 Hamburg, SRN
Výrobce: Panasonic Home Appliances Microwave Oven (Shanghai) Co.,Ltd, 898 Longdong Road, Pudong, Shanghai, 201203, Čína.
Česky
Cz-19
Telepítés és csatlakoztatás
Ellenőrizze mikrohullámú sütőjét.
Csomagolja ki a sütőt, távolítsa el a csomagolást, és ellenőrizze, hogy
nem láthatók-e sérülések a sütőn, például bemélyedések, törött ajtó
fogantyúk, vagy repedések az ajtón. Ha bármilyen sérülést észlel, azonnal
értesítse a kereskedőt. Ne helyezzen működésbe sérült mikrohullámú
sütőt.
Földelési utasítások
FONTOS: EZT A KÉSZÜLÉKET MEGFELELŐ MÓDON FÖLDELNI KELL
A SZEMÉLYES BIZTONSÁG ÉRDEKÉBEN.
Ha a hálózati konnektor nincs földelve, a vásárló személyes felelőssége,
hogy megfelelően földelt fali konnektorra cseréltesse azt.
Működtetési feszültség
A feszültségnek meg kell felelnie a sütőn található címkén feltüntetett
értéknek. Ha a megadottnál magasabb feszültséget használ, az tűzhöz és
más károkhoz vezethet.
A sütő elhelyezése
Ezt a sütőt csak pult felső részére, beépí - tett használatra tervezték.
Szekrény bel - sejében nem használható.
4. Ne helyezze ezt a sütőt egy elektromos- vagy gázsütő közelébe.
5. A lábakat nem szabad eltávolítani.
6. Ez a sütő csak háztartási célokra használható. Ne használja
szabadtéren.
7. Ne használja a mikrohullámú sütőt nedves környezetben.
8. A tápkábel nem érhet hozzá a sütő külső burkolatához. Tartsa távol a
tápkábelt forró felületektől. Ne hagyja a vezetéket az asztal vagy pult
széléről lelógni. Ne merítse a vezetéket, a csatlakozódugót vagy a
sütőt vízbe.
9. Ne zárja el a sütő tetején és hátlapján lévő szellőzőnyílásokat. Ha
ezek a nyílások működés közben elzáródnak, a sütő túlmelegedhet.
Ez esetben a sütőt biztonsági hőkapcsoló védi, és a készülék csak
lehűlés után kapcsolható be újra.
10. A készülék nem arra készült, hogy külső időzítővel, vagy különálló
távirányító rendszerrel működtessék.
Figyelem: Forró felületek
(NN-GD560M / NN-GD550W)
FIGYELMEZTETÉS
Ez a sütő beépíthető egy fali szekrénybe a megfelelő készlet, a fehér
hvit NN-TKT59WFP/sølv NN-TKT59MFP segítségével, amely
beszerezhető a helyi Panasonic márkakereskedőtől.
1. Az ajtó szigetelését és az ajtó szigetelés körülötti területet nedves
ruhával meg kell tisztítani. A készüléken ellenőrizni kell az ajtó
szigetelés és a szigetelés környékének épségét, és ha ezek a
terültek megsérültek, a készüléket nem szabad addig használni,
amíg azt egy, a gyártó által képzett szakember ki nem javította.
2. Ne próbálkozzon az ajtónak, a vezérlőpanel burkolatának, a
biztonsági zárszerkezet kapcsolójának, vagy a sütő más részeinek
javításával vagy átalakításával. Ne távolítsa el a külső panelt a
sütőről, mivel az védelmet biztosít a mikrohullámú energia ellen. A
javításokat szakképzett szerelővel kell végeztetni.
3. Ne működtesse ezt a készüléket, ha a VEZETÉK VAGY
CSATLAKOZÓDUGÓ megsérült, ha nem működik megfelelően, vagy
ha az megsérült, vagy leejtették. A gyártó által képzett
szakembereken kívül más személyek számára a javítás elvégzése
veszélyes.
4. Ha a vezeték tápkábele megsérült, azt a gyártótól beszerezhető
speciális tápkábelre kell kicserélni.
5. Gyermekek számára csak akkor engedélyezze a sütő önálló
használatát, ha azok megfelelő utasításokat kaptak, és a gyermek
képes a sütő biztonságos használatára, és tisztában van a helytelen
használat kockázataival.
6. Nem szabad folyadékot és más ételt lezárt tartóedényben melegíteni,
mert felrobbanhat!
7. Ezt a készüléket csökkent fizikai, érzékszervi, vagy szellemi
képességû személyek (beleértve a gyermekeket), illetve
tapasztalattal és hozzáértéssel nem rendelkezõ személyek nem
használhatják, kivéve, ha a biztonságukért felelõs személy
felügyelete és irányítása alatt használják a készüléket. Felügyelje a
gyermekeket, hogy ne játszhassanak a készülékkel.
1. A sütőt egyenletes és stabil felületen, a padlótól legalább 85 cm-re
helyezze el.
2. A sütőt úgy kell elhelyezni, hogy a készülék könnyen kikapcsolható
legyen az elektromos hálózatból a csatlakozódugó kihúzásával, vagy
egy megszakító segítségével.
3. A megfelelő működés érdekében biztosítson elégséges légáramlást a
sütő körül.
Használat pultokon:
a. Biztosítson legalább 15 cm szabad helyet a sütő felett,
10 cm-t mögötte, 5 cm-t egyik oldalon, és a másik oldalon hagyjon
szabadon legalább 40 cm-t.
b. Ha a sütő egyik oldala közvetlenül a fal mellett helyezkedik el, a
másik oldalt és sütő tetejét nem szabad elzárni.
5cm
15cm
10cm
Hagyja
szabadon
Pult
Hu-1
Magyar
Beépítve
Biztonsági utasítások
A sütő használata
Ventillátor motor működése
1. Ne használja a sütőt semmilyen más célra, csak étel készítésére. Ezt a
sütőt speciálisan étel melegítésére vagy főzésére tervezték. Ne
használja a sütőt vegyi anyagok, vagy más termékek melegítésére.
Ha a sütő használat közben felforrósodik, a ventillátor pár percig még
működhet, hogy lehűtse az elektromos alkatrészeket. Ez teljesen
normális, és kiveheti az ételt a sütőből, miközben a ventillátor még
működik.
2. Használatuk előtt ellenőrizze, hogy az eszközök/edények alkalmasak-e
mikrohullámú sütőben történő használatra.
Sütő világítás
3. Ne használja ezt a mikrohullámú sütőt újságpapír, ruhák, vagy más
anyagok szárítására, mert ezek meggyulladhatnak.
Ha szükségessé válik a sütő világításának cseréje, kérjük forduljon a
kereskedőhöz, ill. a szakszervizhez.
4. Amikor a sütő használaton kívül van, ne tároljon benne semmit, a
tartozékokat kivéve, mivel a sütőt véletlenül bekapcsolhatja.
5. Ez a készülék nem működtethető a MIKROHULLÁM vagy
KOMBINÁCIÓ üzemmódban (NN-GD550W/NN-GD560M) HA NINCS
ÉTEL A SÜTŐBEN. Az ilyen működtetés károsíthatja a készüléket. Ez
alól kivétel az melegítő funkciónál leírt 1. pont, és a pizza tál
előmelegítése.
6. Ha a sütőben füst vagy tűz keletkezik, nyomja meg a Stop/Törlés
gombot, és hagyja becsukva az ajtót, hogy elfojtsa a lángokat. Húzza
ki a tápkábelt, vagy kapcsolja ki az áramot a biztosítéknál vagy a
megszakítónál.
Tartozékok
A sütő különböző tartozékokkal kerül szállításra. Mindig tartsa be a
tartozékok használatára vonatkozó utasításokat.
Üveg tálca
1. Ne működtesse a sütőt, ha a görgőgyűrű és az üveg tálca nincs a
helyén.
2. Soha ne használjon más típusú üveg tálcát, mint a kifejezetten
ehhez a sütőhöz tervezett típus.
3. Ha az üveg tálca felforrósodott, hagyja lehűlni, mielőtt tisztítaná, vagy
vízbe merítené.
4. Az üveg tálca mindkét irányba foroghat.
Melegítő funkció (NN-GD560M / NN-GD550W)
1. Mielőtt először használná a KOMBINÁCIÓ vagy a GRILL funkciót,
törölje le a felesleges olajat a sütő belsejében, és működtesse a sütőt
Grill funkcióban, étel és tartozékok nélkül, 10 percig. Ennek
segítségével a rozsdavédelemre használt olaj elégethető. Ez az
egyetlen alkalom, amikor a sütő üresen használható.
2. A sütő külső felületei, beleértve a szellőző nyílásokat, és a sütő ajtaját,
felforrósodnak a KOMBINÁCIÓ és a GRILL üzemmódban, ezért legyen
óvatos az ajtó nyitása és csukása, illetve az étel és tartozékok be- és
kihelyezése során.
3. A sütőben két fűtőelem található a sütő felső részében. A KOMBINÁCIÓ
és a GRILL funkciók használatát követően ezek a felületek nagyon
forróak lesznek.
MEGJEGYZÉS: Ezen funkciók használatát követően a sütő
tartozékai is nagyon forróak lesznek.
5. Ha az üveg tálcára helyezett étel vagy edény hozzáér a sütő falához,
és akadályozza a tálca forgását, a tálca automatikusan az ellenkező
irányba forog. Ez normális.
6. Ne főzzön ételeket közvetlenül az üveg tálcán.
Görgőgyűrű
1. A görgőgyűrűt és a sütő alsó felszínét rendszeresen tisztítani kell a
zajos működés és az ételmaradványok lerakódásának megelőzése
érdekében.
2. A görgőgyűrűt az üvegtálcával együtt mindig használni kell
a főzés során.
Rács (NN-GD560M / NN-GD550W)
1. A rács segít a kisebb tálak megpirításában és elősegíti a meleg
levegő megfelelő áramlását.
4. Amennyiben a grill vagy az összetett funkciót használja, az elérhető
részek forróvá válhatnak. A gyerekeket távol kell tartani.
2. Ne használjon fém tálakat közvetlenül a rácson a KOMBINÁCIÓ vagy
MIKROHULLÁMÚ üzemmódban.
5. Amikor a készüléket kombinált üzemmódban használja, gyermekek
csak felügyelet mellett használhatják a sütőt a létrejövő magas
hőmérséklete miatt.
3. Ne használja a rácsot csak MIKROHULLÁMÚ üzemmódban.
Hu-2
Pizza tál (NN-GD560M / NN-GD550W) - Lásd Hu-14. oldal
Fontos információ
1. Főzési idők
6. Folyadékok
• A szakácskönyvben megadott főzési idők közelítő értékek. A főzési idő
az étel állapotától, hőmérsékletétől, mennyiségétől és az edény
típusától függ.
• Folyadékok, pl. leves, szószok, vagy italok melegítése során a
mikrohullámú sütőben, a folyadékok felmelegedhetnek a forráspontra,
anélkül, hogy ezt buborék képződés jelezné. Ez a forró folyadék
hirtelen kifutásához vezethet. Ennek megelőzése érdekében tartsa be
az alábbi lépéseket:
• A minimális főzési idővel kezdje, hogy megelőzze a túlfőzést. Ha az étel
nem főtt meg kellőképpen, mindig főzheti egy kicsit tovább.
MEGJEGYZÉS: Ha a javasolt főzési időt túllépi, az étel tönkremegy,
és rendkívüli esetekben meggyulladhat, és károsíthatja a sütő
belsejét.
2. Kis mennyiségű étel
• Ha kis mennyiségű, vagy alacsony nedvességtartalmú ételt főz, és túl
sokáig főzi, az kiszáradhat vagy meggyulladhat. Ha a sütőben lévő
anyagok meggyulladnak, tartsa zárva a sütő ajtaját, kapcsolja ki a sütőt,
és húzza ki a konnektorból.
3. Tojás
• Ne főzzön tojást héjában, és ne főzzön egész keménytojást a
MIKROHULLÁMÚ üzemmódban. A nyomás megnőhet, és a tojások
felrobbanhatnak, még a mikrohullámú melegítés vége után is.
4. Felület átszúrása
• A nem porózus felületű ételek, például a burgonya, tojássárgája vagy a
virsli esetén azok felületét ki kell szúrni a MIKROHULLÁMÚ főzés előtt,
hogy megelőzze azok felrobbanását.
5. Hús hőmérő
• Csak akkor használjon hús hőmérőt a sültek és szárnyasok sütési
fokának ellenőrzésére, ha a húst kivette a sütőből. Ne használjon
hagyományos hús hőmérőt a MIKROHULLÁMÚ vagy a KOMBINÁCIÓ
funkciókkal, mivel az szikrázást okozhat.
a) Kerülje az egyenes falú, szűk nyakú edények használatát.
b) Ne melegítse túl a folyadékokat.
c) Keverje meg a folyadékot, mielőtt a sütőbe helyezné majd keverje
meg ismét a főzési idő felénél.
d) Melegítés után, hagyja az edényt rövid ideig állni a sütőben, majd
keverje meg ismét, mielőtt óvatosan kivenné a sütőből.
7. Papír/műanyag
• Ha műanyag vagy papír edényben lévő ételt melegít, ellenőrizze
gyakran, mivel ezek a csomagolások meggyulladnak, ha túlmelegíti
őket.
• Ne használjon újrahasznosított papírból készült termékeket, csak ha a
papír terméken fel van tüntetve, hogy biztonságosan használható
mikrohullámú sütőben. Az újrahasznosított papír termékek
tartalmazhatnak olyan szennyeződéseket, amelyek használat közben
szikrákat és/vagy tüzet okozhatnak.
• A sütő zacskókról távolítsa el a záró drótokat, mielőtt a sütőbe
helyezné a zacskókat.
8. Csomagolás/fólia
• Ne melegítsen zárt konzervdobozokat vagy üvegeket, mert
felrobbanhatnak.
• A fém edényeket és a fém szegélyt tartalmazó csomagolásokat nem
szabad a mikrohullámú üzemmóddal használni.
Ez szikrázáshoz vezet.
• Ha alufóliát, fém tűket vagy más fém eszközöket használ, a távolság
köztük és a sütő falai és ajtaja között legalább 2 cm kell, hogy legyen,
a szikrázás megelőzése érdekében.
9. Etető üvegek/Bébi étel üvegek
• A kupakot vagy fedőt el kell távolítani az etető üvegekről és bébi
ételes üvegekről, mielőtt behelyezné azokat a sütőbe.
• Fogyasztás előtt ellenőrizni kell a hőmérsékletet az égési sérülések
elkerülése érdekében.
Hu-3
Magyar
• Az etető üvegek és bébi ételes üvegek tartalmát fel kell rázni, vagy
meg kell keverni.
Áttekintő ábra
[8b]
[13]
[8a]
[6]
[4]
[12]
[5]
[2]
[1]
[7]
[3]
[9]
[10]
[11]
1.
Hu-4
2.
3.
4.
5.
6.
7.
8a.
8b.
9.
10.
11.
Ajtó nyitó gomb
Nyomja meg az ajtó nyitásához. Ha kinyitja a sütő ajtaját főzés közben, a főzés ideiglenesen leáll a korábbi beállítások
törlődése nélkül. A főzés újrakezdődik, amint becsukja az ajtót és megnyomja a Start gombot. A sütő világítása bekapcsol,
amikor kinyitja az ajtót.
Sütő ablak
Ajtó biztonsági záró rendszere
Sütő szellőzőnyílása
Vezérlő panel
Üveg tálca
Görgőgyűrű
Külső szellőzőnyílások
Külső szellőzőnyílások (NN-GD560M / NN-GD550W)
Rács (NN-GD560M / NN-GD550W)
Pizza tál (NN-GD560M / NN-GD550W)
Pizza sütőedény fogója(NN-GD560M / NN-GD550W)
12.
Tápkábel
13.
Figyelmeztető címke (Forró felületek)(NN-GD560M / NN-GD550W)
Vezérlő panel
NN-GD560M / NN-GD550W*
(1)
(2)
(3)
1.
Kijelző
2.
Mikrohullámú üzemmód
3.
Grill üzemmód
4.
Kombináció üzemmód
5.
Automatikusan mérlegelő turbó kiolvasztás
gomb
6.
Késleltetés/Várakozás
7.
Óra gomb
8.
Autom. program választó tárcsa
9.
Idő/súly beállító tárcsa
10.
Stop/Törlés gomb:
Főzés előtt: egy gombnyomással törli a
beprogramozott utasításokat.
(8)
Főzés közben: egy gombnyomás ideiglenesen
megállítja a főzési programot. Még egy nyomás törli
az összes utasítást és az idő jelenik meg a kijelzőn.
(4)
11.
(5)
Start gomb:
Nyomja meg a sütő elindításához. Ha sütés közben
kinyitja az ajtót, vagy ha egyszer megnyomja a
Stop/Törlés gombot, a Start gombot újra meg kell
nyomni a sütés folytatásához.
(9)
(6)
(7)
*
(10)
(11)
Hangjelzés:
Megjegyzés:
Amennyiben egy művelet be van állítva, és a Start gomb
nincs lenyomva, akkor 6 perc múlva a sütő automatikusan
törli az adott műveletet. A kijelző pedig visszaáll óra
üzemmódba.
A sütő energiatakarékos funkcióval van ellátva.
Megjegyzés:
Magyar
Amikor egy gombot megnyom,
rövid hangjelzés hallatszik. Ha
nem hall hangjelzést, a beállítás
helytelen. Amikor a sütő egy
funkcióról egy másikra vált,
kettős hangjelzés hallatszik.
A főzés befejezésekor öt
hangjelzés hallható.
A kezelőpult eltérhet az itt megjelenítettől (a színtől
függően), azonban a gombok felirata azonos.
1. Készenléti módban a kijelző fényereje lecsökken.
2. A sütő készenléti módba kerül az első konnektorba
csatlakoztatáskor, illetve közvetlenül az utolsó művelet
elvégzése után.
Hu-5
Vezérlő panel
NN-SD450W
1.
2.
3.
(1)
4.
5.
6.
7.
8.
(6)
(2)
9.
(7)
(3)
Kijelző
Mikrohullámú üzemmód
Automatikusan mérlegelő turbó kiolvasztás
gomb
Késleletetés/Várakozás
Óra gomb
Autom. program választó tárcsa
Idő/súly tárcsa
Stop/Törlés gomb:
Főzés előtt: egy gombnyomás törli a
beprogramozott utasításokat.
Főzés közben: egy gombnyomás
ideiglenesen megállítja a főzési programot.
Még egy nyomás törli az összes utasítást és
az idő jelenik meg a kijelzőn.
Start gomb:
Nyomja meg a sütő elindításához. Ha főzés
közben kinyitja az ajtót, vagy megnyomja a
Stop/Törlés gombot, a Start gombot újra
meg kell nyomni a főzés folytatásához.
Megjegyzés:
Amennyiben egy művelet be van állítva, és a Start gomb
nincs lenyomva, akkor 6 perc múlva a sütő automatikusan
törli az adott műveletet. A kijelző pedig visszaáll óra
üzemmódba.
(4)
(5)
(8)
(9)
A sütő energiatakarékos funkcióval van ellátva.
Megjegyzés:
Hangjelzés:
Amikor egy gombot megnyom,
rövid hangjelzés hallatszik. Ha
nem hall hangjelzést, a beállítás
helytelen. Amikor a sütő egy
funkcióról egy másikra vált,
kettős hangjelzés hallatszik.
A főzés befejezésekor öt
hangjelzés hallható.
Hu-6
1. Készenléti módban a kijelző fényereje lecsökken.
2. A sütő készenléti módba kerül az első konnektorba
csatlakoztatáskor, illetve közvetlenül az utolsó művelet
elvégzése után.
Vezérlés és működtetés
Csatlakoztatás
“88:88”
Szöveges utasítás
Nyomja meg
“FRANCAIS”
Francia
Nyomja meg
“ITALIANO”
Olasz
Nyomja meg
“DEUTSCH”
Német
Nyomja meg
“NEDERLANDS”
Holland
Nyomja meg
ESPANOL
Spanyol
“POLSKI”
Lengyel
Nyomja meg
“CESKY”
Csehül
Nyomja meg
“ENGLISH”
Angol
Nyomja meg
“DANSK”
Dán
Nyomja meg
“SUOMI”
Finn
Nyomja meg
Nyomja meg
“SVENSKA”
Svéd
Nyomja meg
“NORSK”
Norvég
Óra beállítás:
CSAK AZ SD450W TÍPUSNÁL
Példa: A 12:00 beállításához
• Állítsa be az időt az Idő/Súly beállító tárcsa
forgatásával.
Az idő megjelenik a kijelzőn és a kettőspont villog.
• Nyomja meg az Óra gombot.
A kettőspont villogása megszűnik és a
megadott idő tárolódik.
MEGJEGYZÉS:
1. Az idő átállításához ismételje meg a fenti lépéseket.
2. Az idő mindig látható, kivéve ha megszakad az áramellátás.
3. Ez az óra 24-órás kijelzővel rendelkezik.
Hu-7
Magyar
• Nyomja meg egyszer az Óra
gombot.
A kettőspont villogni kezd.
Ezek a típusok egy egyedülálló funkcióval, a
"szöveges utasítással" rendelkeznek, amely
segít a mikrohullámú sütő irányításában.
Bekapcsolás után tartsa nyomva a Start
gombot a megfelelő nyelv kiválasztásáig.
Amint megnyomja a gombokat, a kijelző a
következő utasításra vált, kizárva a hibázás
kockázatát. Ha valamilyen okból meg kívánja
változtatni a kijelző nyelvét, húzza ki a sütőt
a konnektorból és ismételje meg az eljárást.
A Késleltetés/Várakozás gomb négyszeri
megnyomásával kikapcsolhatja a kezelési
útmutatót. A kezelési útmutató
visszakapcsolásához nyomja meg négyszer
a Késleltetés/Várakozás gombot.
Vezérlés és működtetés
Biztonsági gyermekzár:
Ennek a rendszernek a használata működésen kívül helyezi a vezérlőket, de az ajtó kinyitható. A gyermekzár akkor állítható be, ha a kijelzőn
kettőspont, vagy az idő látható.
A törléshez:
A beállításhoz:
• Nyomja meg háromszor a Start gombot.
Az idő eltűnik a kijelzőről. A beállított idő nem törlődik. A
"*" jelzés látható a kijelzőn. a kijelzőn.
• Nyomja meg háromszor a Stop/Törlés gombot.
Az idő újra megjelenik a kijelzőn.
MEGJEGYZÉS: A gyermekzár aktiválásához 10 másodpercen belül háromszor kell megnyomni a Start gombot.
Mikrohullámú főzés és kiolvasztás
5 különböző mikrohullám teljesítményszint szint használható. Az alábbi táblázat az egyes szintek megközelítő energiáját mutatja, Wattban.
Tartozékok használata:
NN-GD560M / NN-GD550W
NN-SD450W
Üveg tálca
Nyomja meg
Energia szint
Teljesítmény
Egyszer
Kétszer
3-szor
4-szer
5-ször
Max. (Magas)
Kiolvasztás
Közepes
Alacsony
Párolás
1000 W
270 W
600 W
440 W
250 W
NN-GD560M / NN-GD550W
vagy
• Nyomja meg annyiszor a
gombot, hogy a
szükséges energiaszint
jelenjen meg a kijelzőn.
• Válassza ki a kívánt
mikrohullám
erősségi szintet.
• Állítsa be a főzési időt az Idő/Súly beállító tárcsa
forgatásával. (MAGAS energia szint: legfeljebb 30
perc, Más szintek: legfeljebb 90 perc).
• Nyomja meg a
Start gombot.
MEGJEGYZÉS:
1. 2 vagy 3 részletben történő főzés esetén, a Start gomb megnyomása előtt ismételje meg a mikrohullám energiaszint és a főzési idő beállítását. pl.
Pl. Ragu –– 10 perc, magas fokozaton a ragu felforralásához. Főzéshez 60 percen át párolja.
Az ízek kibontakozásáért 10 percig párolja.
2. A várakozási idő a mikrohullám szint és az időbeállítás után állítható be.
3. Ha szükséges, főzés közben megváltoztathatja a főzési időt. Forgassa az Idő/Súly tárcsát a főzési idő növeléséhez vagy csökkentéséhez. Az idő 1
perces lépésekben növelhető/csökkenthető, legfeljebb 10 percig. Ha a nullára állítja a tárcsát, a főzés véget ér.
4. A sütő automatikusan a Magas energia szinten működik, ha úgy adja meg a főzési időt, hogy nem állítja be előtte az energia szintet.
Hu-8
Grillezés (NN-GD560M / NN-GD550W)
Rács
A Grillezéssel 3 grill beállítást használhat.
Tartozékok használata:
Üveg tálca
• Válassza ki a grillezés erősségét. Egy
gombnyomás a Grill 1 (Magas), két
gombnyomás a Grill 2 (Közepes) vagy 3
gombnyomás a Grill 3 (Alacsony) szinthez.
1 nyomás
GRILL 1
1300 W
2 nyomás
GRILL 2
950 W
3 nyomás
GRILL 3
700 W
• Állítsa be a főzési időt az Idő/Súly beállító tárcsa
forgatásával. (legfeljebb 90 percig).
• Nyomja meg a Start
gombot.
MEGJEGYZÉS:
1. A grillezés csak akkor kapcsol be, ha a sütő ajtaja csukva van.
2. Ha szükséges, főzés közben megváltoztathatja a főzési időt. Forgassa az Idő/Súly beállító tárcsát főzési idő növeléséhez vagy csökkentéséhez.
Az idő 1 perces lépésekben növelhető/csökkenthető, legfeljebb 10 percig. Ha a nullára állítja a tárcsát, a főzés véget ér.
Kombinált főzés (NN-GD560M / NN-GD550W)
Tartozékok használata:
3 kombinációs beállítás van. Az alábbi táblázat az egyes szintek
megközelítő energiáját mutatja, Wattban.
Rács
Kombinációs
beállítás
Gombnyomások száma
Grill
Mikrohullám
Szöveges
utasítás
1
2
3
1 nyomás
2 nyomás
3 nyomás
1300W
1300W
1300W
600W
440W
250W
G1-600W
G1-440W
G1-250W
Üveg tálca
Üveg tálca
• Állítsa be a főzési időt az Idő/Súly beállító tárcsa tárcsa
forgatásával (legfeljebb 90 perc).
• Nyomja meg a Start
gombot (lásd a
táblázatot).
MEGJEGYZÉS:
1. A kombinációs üzemmód csak akkor kapcsol be, ha a sütő ajtaja csukva van.
2. Ha szükséges, főzés közben megváltoztathatja a főzési időt. Forgassa az Idő/Súly beállító tárcsát főzési idő növeléséhez vagy csökkentéséhez.
Az idő 1 perces lépésekben növelhető/csökkenthető, legfeljebb 10 percig. Ha a nullára állítja a tárcsát, a főzés véget ér.
Hu-9
Magyar
• Válassza ki a
kombinációt.
Automatikus kiolvasztás
E funkció segítségével kiolvaszthat fagyasztott ételeket, azok súlyának megfelelően. Válassza ki a kategóriát és állítsa be az étel súlyát.
A súlyt grammban kell megadni. A gyorsabb kiválasztás érdekében, a súly az adott kategóriában leggyakrabban használt súly értéken áll.
• Válassza ki a kívánt automatikus
kiolvasztó programot.
1 gombnyomás kis darabokhoz
2 gombnyomás nagy darabokhoz
Program
1 Kis darabok
2 Nagy darabok
Szókövetés
SMALL
PIECES
BIG
PIECE
• Állítsa be a fagyasztott étel súlyát az Idő/Súly beállító tárcsa
forgatásával.
Ha lassan forgatja a tárcsát, 10 g-os lépésekben állítható.
Ha gyorsan forgatja a tárcsát, 100 g-os lépésekben állítható.
Súly
• Nyomja meg a Start
gombot.
Példa az ételekre
Kisebb húsdarabok, csiga, hal filé, steak, sertés szeletek
150 - 1600 g (mindegyik 100 g és 400 g között). Hangjelzéskor fordítsa meg.
400 - 2400 g Nagy hús darabok, pecsenyék, egész csirke. Hangjelzéskor fordítsa meg.
MEGJEGYZÉS:
1. Ha a kiolvasztási idő több mint 60 perc, az idő órában és percben jelenik meg.
2. Az étel mérete és alakja határozza meg, hogy maximum mekkora súly fér be a sütőbe.
3. További információért tájékozódjon szakácskönyvekben a kiolvasztási tanácsokról.
Automatikus súly programok
E funkció segítségével legtöbb kedvenc ételét elkészítheti úgy, hogy csak a súlyt kell beállítania. A sütő automatikusan meghatározza a mikrohullám
energiaszintjét, a grillezés erősségét (NN-GD550W/NN-GD560M) és a főzési időt. Válassza ki a kategóriát és állítsa be az étel súlyát. A súlyt
grammban kell megadni. A gyorsabb kiválasztás érdekében, a súly az adott kategóriában leggyakrabban használt súly értéken áll.
NN-GD560M/
NN-GD550W
NN-SD450W
pl.:
• Válassza ki a kívánt Automatikus súly
programot az Automatikus program választó
tárcsa forgatásával. A kijelzőn az automatikus
súly főzési programok láthatók.
• Állítsa be az étel súlyát az Idő/Súly beállító tárcsa forgatásával.
Ha lassan forgatja a tárcsát, 10 g-os lépésekben állítható. Ha gyorsan
forgatja a tárcsát, 100 g-os lépésekben állítható.
MEGJEGYZÉS:
1. Ha a főzési idő több mint 60 perc, az idő órában és percben jelenik meg.
2. Használja a túloldalon lévő táblázatot az ajánlott súly és tartozékok kiválasztásához.
Hu-10
• Nyomja meg a
Start gombot.
Automatikus súly programok
NN-GD560M / NN-GD550W
Program
1 csésze felmelegítés
2 bögre felmelegítés
Szöveges
utasítás
Ajánlott súly Tartozékok
Utasítások
1 CUP
150 g
Egy csésze forró ital (pl. tea, kávé, tej vagy leves)
felmelegítéséhez.
Válassza ki a csésze felmelegítést, adja meg a súlyt (150 ml), nyomja
meg a Start gombot.
1 BOWL
300 g
Egy bögre forró ital felmelegítéséhez.
Válassza ki a bögre felmelegítést, adja meg a súlyt (300 ml), nyomja
meg a Start gombot.
3 friss étel felmelegítése
1 FRESH
MEAL
200 - 1500 g
Készételek, egytálételek felmelegítéséhez.
Minden ételnek szobahőmérsékleten, vagy a hűtőszekrény
hőmérsékletén kell lennie. Hangjelzéskor keverje meg. Hagyja pár
percig állni.
4 mélyhűtött étel
felmelegítése
FROZEN
MEAL
200 - 1200 g
Mélyhűtött készételek, egytálételek felmelegítéséhez.
Minden ételnek főttnek és mélyhűtöttnek kell lennie.
Hangjelzéskor keverje meg. A főzési idő végén keverje meg az ételt, és
hagyja 2-3 percig állni.
5 friss zöldség főzése
FRESH
250 - 1500 g
VEGETABLES
Friss zöldségek főzéséhez. Helyezze az előkészített zöldségeket egy
megfelelő méretű edénybe. Öntsön rájuk 9 ek (100 ml) vizet.
Részlegesen fedje be őket fedéllel, vagy perforált fóliával. Nagy
mennyiségek esetén hangjelzéskor keverje meg.
6 mélyhűtött zöldség
FROZEN
VEGETABLES 300 - 1000 g
Mélyhűtött zöldségek főzéséhez.
Helyezze megfelelő méretű edénybe, öntsön rá 3-4 ek (40 ml) vizet.
Részlegesen fedje be őket fedéllel, vagy perforált fóliával. Nagy
mennyiségek esetén hangjelzéskor keverje meg.
FRESH FISH 150 - 1000 g
Friss hal főzéséhez (egész, filé, szeletek). Takarja be a vékonyabb
részeket, helyezze egy megfelelő méretű edénybe. Öntsön rájuk 1-2 ek
folyadékot. Fedje be fedéllel, vagy perforált fóliával.
főzése
7 friss hal főzése
FROZEN
FISH
200 - 900 g
Mélyhűtött hal filé és szeletek főzéséhez. Helyezze megfelelő méretű
edénybe, öntsön rá 2 ek (30 ml) vizet, és fedje be részlegesen fedéllel
vagy perforált fóliával.
Tippek a csésze és bögre felmelegítéséhez.
1. Melegítés előtt keverje el a folyadékot (A folyadékok melegítéskor kifuthatnak, ha nincsenek elkeverve a levegővel).
2. Ne fedje le a forró italokat, pl. a teát vagy kávét. Fedje le a levest egy kistányérral, hogy elkerülje a kifutás veszélyét.
3. Melegítés után keverje meg ismét, és hagyja rövid ideig állni.
Hu-11
Magyar
8 mélyhűtött
hal főzése
Automatikus súly programok
NN-GD560M / NN-GD550W
Program
9 mélyhűtött kenyér
10 friss csirke darabok
11 Egész csirke
12 mélyhűtött rakott
étel/lasagne
Hu-12
Szókö
vetés
FROZEN
BREAD
Ajánlott súly Tartozékok
Utasítások
50 - 500 g
Mélyhűtött kenyér, tekercsek és croissant felmelegítéséhez.
Távolítsa el a csomagolást és helyezze a rácsra vagy az üveg tálcára.
A csipogáskor fordítsa meg.
CHICKEN
PIECES
200 - 1200 g
Csirke darabok főzéséhez, pl. csirke comb, szárny, stb. Helyezze a
csirkét egy hőálló tálba, vagy a rácsra vagy az üveg tálcára. Az
egyenletes főzés érdekében oszlassa el a húst, és forgassa meg a
csipogáskor.
WHOLE
CHICKEN
1000 2200 g
Friss, egész, töltetlen csirke főzéséhez. A tölteléket külön főzze
meg. Helyezze a csirkét egy hőálló tálba, vagy az üveg tálcára. A
mellel lefelé kezdje a főzést, és a csipogáskor fordítsa át.
FROZEN
GRATIN
300 - 1000 g
Mélyhűtött rakott étel/lasagne felmelegítéséhez és pirításához.
Távolítsa el a csomagolást és helyezze a rakott ételt/lasagne-t egy
hőálló tálra vagy az üveg tálcára.
Automatikus súly programok
Panacrunch programok (NN-GD560M / NN-GD550W)
1. Válassza ki a kívánt
programot, és helyezze a
pizza tálat közvetlenül az üveg
tálcára.
Program
13 friss pizza
2. Nyomja meg a Start gombot a
pizza tál előmelegítéséhez.
Szöveges Ajánlott súly Tartozékok
utasítás
CHILLED
PIZZA
14 mélyhűtött pizza
FROZEN
PIZZA
15 friss lepény
CHILLED
QUICHE
16 mélyhűtött lepény
FROZEN
QUICHE
150 - 600 g
150 - 600 g
4. Nyomja meg a Start
gombot.
Utasítások
A frissen vásárolt pizza felmelegítéséhez, aljának megpirításához
és tetejének megbarnításához.
Távolítsa el a csomagolást és helyezze a pizzát az előmelegített pizza
tálba.
Mélyhűtött pizza felmelegítéséhez, aljának megpirításához és
tetejének megbarnításához. Távolítsa el a csomagolást és helyezze
a pizzát az előmelegített pizza tálba.
150 - 700 g
A frissen vásárolt lepény felmelegítéséhez, aljának
megpirításához és tetejének megbarnításához.
Távolítsa el a csomagolást és helyezze a quiche-t az előmelegített
pizza tálba.
150 - 500 g
A mélyhűtötten vásárolt lepény felmelegítéséhez, aljának
megpirításához és tetejének megbarnításához. Távolítsa el a
csomagolást és helyezze a lepényt az előmelegített pizza tálba.
200 - 500 g
Mélyhűtött burgonya termékek felmelegítéséhez, megpirításához
és megbarnításához. A tál előmelegítése után helyezze a burgonyát
a tálba. A legjobb eredmény érdekében oszlassa el egy rétegben, és
forgassa meg hangjelzéskor.
CHIPS
Hu-13
Magyar
17 mélyhűtött burgonya
termékek
3. Az előmelegítés után
hangjelzés hallatszik.
Helyezze az ételt a tálba és
állítsa be a súlyt.
Pizza tál (NN-GD560M / NN-GD550W típushoz)
A „mùködési elv”
Megjegyzés:
Egyes mikrohullámú sütőben készült ételek kérge puha és nedves. A
pizza tál tartozék segítségével pizzát, lepényeket, péksüteményeket
barníthat és piríthat meg, mint egy hagyományos sütőben. A Panasonic
pizza tál három módon működik: a tál felmelegedik a mikrohullám
elnyelése következtében, az ételt közvetlenül melegíti a mikrohullám és a
grill. A tál alapja elnyeli a mikrohullámokat és hővé alja. A hőt ezután a
tálon keresztül az étel veszi fel. A melegítő hatást maximalizálja a
tapadásgátló felület.
1. A ne melegítse elő a tálat 8 percnél tovább.
A Pizza tál használata (Kézi használat)
5. Az étel csomagolását teljesen távolítsa el főzés előtt.
• A legjobb eredmény érdekében melegítse elő a tálat a használat előtt.
Helyezze közvetlenül az üveg tálra és melegítse elő a Kombináció 1
(Grill 1 + 600 Watt) programmal 3 percig. A barnítás elősegítése
érdekében, kenje meg olajjal a tálat az előmelegítés előtt, mielőtt olyan
ételeket készít, mint a virsli vagy a hamburger.
6. Ne helyezzen semmilyen hőérzékeny anyagot a forró tálba, mert ez
égéshez vezethet.
• Vegye ki a pizza tálat a sütőből és helyezze az ételt a tálba. Használja a
pizza tál nyelét vagy fogókesztyűt, mert a tál nagyon forró. A legjobb
eredmény érdekében az ételt közvetlenül az előmelegítés után helyezze
a tálba. Ha késlekedik a tökéletes eredmény nem garantált.
• Helyezze a tálat az üveg tálcára és készítse el az ételt a szakácskönyv
főző táblázatának utasításai alapján.
2. Mindig az üveg tálca közepére helyezze a tálat, hogy az ne érjen
hozzá a sütő belsejének falához. Ha nem így helyezi be, az
szikrázáshoz vezethet, ami a sütő károsodásához vezethet.
3. A tálat mindig az üveg tálcára helyezve használja. Ne használja a
ráccsal.
4. Mindig használja a pizza tál nyelét vagy fogókesztyűt a tál kezelése
során.
7. A tál használható hagyományos sütőben.
8. A legjobb eredmény érdekében a tálat a KOMBINÁCIÓ GRILL és a
MIKROHULLÁM üzemmódokban használja.
A sütő karbantartása
• Soha ne használjon éles eszközöket a tállal, mert ez károsíthatja a
tapadásgátló felületet.
• Használat után mossa el a tálat meleg mosószeres vízben, és
öblítse el forró vízzel. Ne használjon súrolószereket vagy
súrolószivacsot, mert ez károsíthatja a tál felületét.
• A tál mosható mosogatógéppel.
Hu-14
Automatikus súly programok
NN-SD450W
Program
Szöveges
utasítás
1 étel felmelegítés
FRESH
MEAL
2 mélyhűtött étel
felmelegítése
FROZEN
MEAL
Ajánlott súly Tartozékok
Utasítások
200 - 1500 g
Készételek, egytálételek felmelegítéséhez. Minden ételnek
szobahőmérsékleten, vagy a hűtőszekrény hőmérsékletén kell lennie.
Hangjelzéskor keverje meg. Hagyja pár percig állni.
200 - 1200 g
Mélyhűtött kész ételek, egytálételek felmelegítéséhez.
Minden ételnek főttnek és mélyhűtöttnek kell lennie. A csipogáskor
keverje meg. A főzési idő végén keverje meg az ételt, és hagyja 2-3
percig állni.
3 friss zöldség főzése
FRESH
250 - 1500 g
VEGETABLES
4 mélyhűtött zöldség
főzése
FROZEN
VEGETABLES 300 - 1000 g
5 friss hal főzése
FRESH FISH 150 - 1000 g
Friss zöldségek főzéséhez. Helyezze az előkészített zöldségeket egy
megfelelő méretű edénybe. Öntsön rájuk 6 ek (90 ml) vizet.
Részlegesen fedje be őket fedéllel, vagy perforált fóliával. Nagy
mennyiségek esetén a csipogáskor keverje meg.
Mélyhűtött zöldségek főzéséhez. Helyezze megfelelő méretű
edénybe, öntsön rá 2 ek (30 ml) vizet. Részlegesen fedje be őket
fedéllel, vagy perforált fóliával. A csipogáskor keverje meg.
Friss hal főzéséhez (egész, filé, szeletek). Takarja be a vékonyabb
részeket, helyezze egy megfelelő méretű edénybe. Öntsön rájuk 2 ek
(30 ml) folyadékot. Fedje be fedéllel, vagy perforált fóliával.
FROZEN
FISH
200 - 900 g
1 CUP
150 g
Egy csésze forró ital (pl. tea, kávé, tej vagy leves)
felmelegítéséhez. Válassza ki a csésze felmelegítést, adja meg a
súlyt (150 ml), nyomja meg a Start gombot.
8 1 bögre felmelegítése
1 BOWL
300 g
Egy bögre forró ital felmelegítéséhez. Válassza ki a bögre
felmelegítést, adja meg a súlyt (300 ml), nyomja meg a Start gombot.
9 2 bögre felmelegítése
2 BOWL
600 g
Két bögre forró ital felmelegítéséhez. Válassza ki a 2 bögre
felmelegítését, adja meg a súlyt (600 ml), nyomja meg a Start gombot.
6 mélyhűtött hal főzése
7 csésze felmelegítés
Mélyhűtött hal filé és szeletek főzéséhez. Helyezze megfelelő
méretű edénybe, öntsön rá 2 ek (30 ml) vizet, és fedje be részlegesen
fedéllel vagy perforált fóliával.
1. Melegítés előtt keverje meg a folyadékot (A folyadékok melegítéskor kifuthatnak, ha nincsenek elkeverve a levegővel).
2. Ne fedje le a forró italokat, pl. a teát vagy kávét. Fedje le a levest egy kistányérral, hogy elkerülje a kifutás veszélyét.
3. Melegítés után keverje meg ismét, és hagyja rövid ideig állni.
Hu-15
Magyar
Tippek a csésze és bögre felmelegítéséhez.
A főzés kezdetének késleltetése
A Késleltetés/Várakozás gomb segítségével, beprogramozhatja a főzés késleltetett kezdését.
pl.
• Nyomja meg a
Késleltetés/Várakozás gombot.
• Állítsa be a késleltetési időt az
Idő/Súly beállító tárcsa
forgatásával (legfeljebb 9 óra).
• Válassza ki a kívánt főzési
programot és főzési időt.
• Nyomja meg a
Start gombot.
MEGJEGYZÉS:
1. Három szakaszú főzés is programozható a késleltetett kezdéssel.
pl.
A késleltetett kezdés: 1 óra
Magas energia szint: 10 perc
vagy
Párolás energia szint: 20 perc
vagy
5-ször
Egyszer
2. Ha a beprogramozott késleltetési idő meghaladja az egy órát, a visszaszámlálás percben történik. Ha a kevesebb mint egy óra, a visszaszámlálás
másodpercben történik.
3. A késleltetett kezdés nem használható az automatikus programok előtt.
4. A Késleltetés/Várakozás gomb négyszeri megnyomásával kikapcsolhatja a kezelési útmutatót. A kezelési útmutató visszakapcsolásához nyomja
meg négyszer a Késleltetés/Várakozás gombot.
Várakozási idő
A Késleltetés/Várakozás gomb segítségével, beprogramozhatja a várakozási időt főzés után, vagy időzítésként használhatja.
pl.
vagy
• Válassza ki a kívánt főzési
programot és főzési időt.
• Nyomja meg a Késleltetés/
Várakozás gombot.
MEGJEGYZÉS:
• Állítsa be a kívánt időtartamot az
Idő/Súly tárcsa forgatásával
(legfeljebb 9 óra).
• Nyomja meg a
Start gombot.
1. Három szakaszú főzés is programozható a várakozási idővel.
pl.
Magas energia szint: 4 perc
vagy
Várakozási idő: 5 perc
Magas energia szint: 2 perc
vagy
Egyszer
Egyszer
2. Ha várakozási idő vagy időzítés közben kinyitja az ajtót, a visszaszámlálás folytatódik a kijelzőn.
3. Ez a funkció időzítőként is használható. Ez esetben nyomja meg a Késleltetés/Várakozás gombot és nyomja meg a Start gombot.
Hu-16
Kérdések és válaszok
K: Miért nem kapcsol be a sütőm?
V: Ha a sütő nem kapcsol be, ellenőrizze az alábbiakat:
1. Megfelelően csatlakoztatva van a sütő? Húzza ki a csatlakozót a konnektorból, várjon
10 másodpercet, és dugja be újra.
2. Ellenőrizze a megszakítót és a biztosítékot. Állítsa vissza a megszakítót, vagy cserélje
ki a biztosítékot, ha bekapcsolt, vagy kiégett.
3. Ha a megszakító és a biztosíték rendben van, csatlakoztasson egy másik készüléket a
konnektorhoz. Ha a készülék működik, a probléma a sütővel van. Ha a készülék nem
működik, a probléma a fali konnektorral van.
Ha úgy tűnik, hogy a probléma a sütővel van, értesítsen egy megbízott szerviz
központot.
K: A mikrohullámú sütő gyakran interferenciát
okoz a TV-mel. Normális ez?
V: Bizonyos fokú rádió és TV interferencia előfordulhat, amikor a mikrohullámú sütővel főz. Ez az
interferencia hasonló a kis berendezések, például mixerek, porszívók, hajszárítók, stb. okozta
interferenciához. Nem jelenti azt, hogy bármilyen probléma lenne a sütővel.
K: A sütő nem fogadja el a programot.
Miért nem?
V: Ezt a sütőt úgy tervezték, hogy ne fogadjon el hibás programot. Például a sütő nem fogad el
negyedik szakaszt, és nem fogad el automatikus súly programokat késleltetett indítást követően.
K: Időnként meleg levegő jön a sütő
szellőzőnyílásaiból. Miért?
V: Az étel készítése során felszabaduló meleg felmelegíti a sütőben lévő levegőt. Ez a meleg
levegő a szellőzés következtében távozik a sütőben. A levegőben nincsenek mikrohullámok. A
sütő szellőző nyílásait sosem szabad elzárni sütés közben.
K: „D” betű jelenik meg a kijelzőn és sütő nem
használható. Miért?
V: A sütő DEMO üzemmódban van. Ez az üzemmód bolti kiállításra szolgál. Ezen üzemmód
kikapcsolásához nyomja meg a Mikrohullám teljesítmény gombot egyszer, majd a Stop/Törlés
gombot négyszer (NN-GD560M / NN-GD550W) vagy a Maximális Mikrohullám teljesítmény
gombot egyszer, majd a Stop/Törlés gombot négyszer (NN-SD450W).
K: Használhatok e hagyományos sütő-hőmérőt
ebben a sütőben?
V: Csak akkor, ha a GRILL főzési módot használja (NN-GD560M / NN-GD550W). Az egyes
hőmérőkben lévő fém szikrázást okozhat a sütőben, és nem szabad azt a MIKROHULLÁM és
KOMBINÁCIÓ üzemmódokkal használni.
K: A sütő nem süt mikrohullámmal és a kijelzőn
„H97” és „H98” jelenik meg.
V: A kijelző a mikrohullámot előállító rendszer problémáját jelzi. Kérjük, forduljon egy hivatalos
szervizközponthoz.
K: A Súgó eltűnt a kijelzőről, csak számokat látok.
V: Hálózati probléma lehet, ezért a Súgó nem elérhető. Húzza ki a sütőt a konnektorból
néhány másodpercre, majd dugja vissza. Ha „88:88”-at mutat, nyomja addig a start gombot,
amíg a kívánt nyelv meg nem jelenik. Ezután állítsa be az órát. Lásd a 7. oldalon.
K: Zümmögő és kattogó hangok jönnek a sütőből a
KOMBINÁCIÓ üzemmód használata során. Mi
okozza ezt a zajt?
V: Zaj akkor keletkezik, amikor a sütő automatikusan átvált MIKROHULLÁMRÓL GRILLRE, a
kombinációs beállítás következtében. Ez normális.
K: A sütőben szagok és füst keletkeznek, amikor a
KOMBINÁCIÓ és a GRILL funkciót használom.
Miért?
V: Az ismételt használatot követően ajánlatos kitisztítani a sütőt és ezután Grill módban, a
görgőgyűrűt és az üvegtálat behelyezve, étel nélkül 5 percig működtetni. Ez eléget minden ételt,
maradékot, vagy olajat, ami szagokat és/vagy füstöt kelthet.
Hu-17
Magyar
(NN-GD560M / NN-GD550W)
Karbantartás
1. Tisztítás előtt kapcsolja ki a sütőt.
2. Tartsa tisztán a sütő belsejét, az ajtó szigetelését, és ajtó
szigetelésének környékét. Ha a sütő falára, az ajtó szigetelésére és
az ajtó szigetelés körülötti területekre étel vagy folyadék kerül, törölje
le nedves ruhával. Ha nagyon koszos, használjon enyhe
mosogatószert. Erős mosogatószer vagy súrolószer használata nem
ajánlott. NE HASZNÁLJON KERESKEDELMI SÜTŐTISZTÍTÓ
SZEREKET. Ne használjon erős, súroló hatású tisztítóeszközöket,
vagy fém kaparókat a sütő ajtóüvegének tisztítására, mert
megkarcolhatják a felszínt, ami az üveg töréséhez vezethet.
3. Az sütő külső felszínét nedves ruhával kell tisztítani. A sütő
belsejében lévő alkatrészek sérülésének elkerülése érdekében, a
víznek nem szabad a szellőzőnyílásokon keresztül beszivárognia.
4. Ha a vezérlőpanel szennyeződik, tisztítsa meg egy puha, száraz
ruhával. Ne használjon erős mosogatószert vagy súrolószert a
vezérlőpanelen. A vezérlőpanel tisztítása során hagyja nyitva a sütő
ajtaját, hogy megelőzze a sütő véletlen bekapcsolását. A tisztítást
követően nyomja meg a STOP/TÖRLÉS gombot, a kijelző ablak
tartalmának törléséhez.
5. Ha pára gyülemlik fel belül, vagy a sütő ajtajának külsején, törölje le
egy puha ruhával. Ez akkor fordul elő, ha a mikrohullámú sütőt
magas páratartalom mellett működtetik, és nem jelenti a készülék
meghibásodását.
6. Időnként szükséges az üveg tálca eltávolítása tisztítás céljából.
Mossa el a tálcát meleg szappanos vízben vagy mosogatógépben.
7. A görgőgyűrűt és a sütő alsó felszínét rendszeresen tisztítani kell a
zajos működés megelőzése érdekében. Egyszerűen törölje tisztára a
sütő alsó felszínét enyhe mosószerrel és meleg vízzel, majd törölje
szárazra egy tiszta ruhával. A görgőgyűrű enyhe mosószeres vízben
elmosható. Az ismételt használat során felgyülemlenek a főzés
gőzei, de ez nem befolyásolja az alsó felszín vagy a görgőgyűrű
működését. Miután levette a görgőgyűrűt az alsó felszínről, ügyeljen
rá, hogy a megfelelő helyzetben tegye azt vissza.
8. Amikor a GRILL vagy KOMBINÁCIÓ üzemmódot használja (NNGD560M / NN-GD550W), egyes ételek elkerülhetetlenül zsírt
fröcskölnek a sütő falaira. Ha nem tisztítja rendszeresen a sütőt, ez a
lerakódás használat közben „füstölni” kezdhet.
9. Tisztításra nem szabad gőztisztítót használni.
10. A javításokat csak szakképzett szerelővel szabad végeztetni. A sütő
karbantartása és javítása érdekében forduljon a legközelebbi
megbízott márkaszervizhez.
11. Mindig tartsa tisztán a szellõzõnyílásokat. Ellenőrizze, hogy por, vagy
más anyagok nem zárják-e el a sütõ tetején, alján vagy hátoldalán
található szellőzőnyílásokat. Ha a szellõzõnyílások elzáródnak, az
túlmelegedést okozhat, ami károsítja a sütő működését, és esetleg
veszélyes helyzetet eredményezhet.
12. A sütő tisztán tartásának elmulasztása a felületek károsodásához
vezethet, ami csökkentheti a készülék élettartamát és esetleg
kockázatos helyzethez is vezethet.
Minőségtanúsítás, műszaki adatok
A 2/1984. (III.10) BkM-IpM számú együttes rendelet alapján - mint forgalmazó - tanúsítjuk, hogy a Panasonic mikrohullámú sütők megfelelnek a
következő műszaki jellemzőknek:
Tápfeszültség:
Teljesítmény felvétel:
Teljesítmény:
Külső méretek:
Belső méretek:
Súly csomagolás nélkül:
Zajkib o csátás:
NN-GD560M / NN-GD550W
~ 230 V, 50 Hz
Maximum;
2300 W
Mikrohullám;
1100 W
Grill;
1350 W
NN-SD450W
~ 230 V, 50 HZ
Mikrohullám;
1000 W (IEC-60705)
Grill fűtőelem;
1300 W
510 (szél.) x 380 (mélys.) x 304 (mag.) mm
359 (szél.) x 352 (mélys.) x 217 (mag.) mm
12.5 kg
50 dB
Mikrohullám;
1100 W
Mikrohullám;
1000 W (IEC-60705)
510 (szél.) x 380 (mélys.) x 304 (mag.) mm
359 (szél.) x 352 (mélys.) x 217 (mag.) mm
11.5 Kg
50 dB
A műszaki jellemzők bejelentés nélküli megváltoztatásának jogát fenntartjuk.
Hu-18
Műszaki jellemzők
Ez a termék megfelel az Elektromágneses összeférhetőségre vonatkozó, (EMC) EN 55011 Európai szabványnak. E szabvány alapján ez a
berendezés a 2. csoport, B osztályába tartozik, és a megadott határértékeken belül van. A 2. csoport azt jelenti, hogy szándékosan keletkezik rádiófrekvenciájú elektromágneses sugárzás az étel felmelegítése céljából. A B osztály azt jelenti, hogy a termék a normál háztartási területeken
használható.
Információ az elektromos és elektronikus berendezések kidobásról a felhasználók számára (magánszemélyek
háztartásai)
Ez a szimbólum a termékeken és/vagy a csatolt dokumentumokon azt jelenti, hogy a használt elektromos és elektronikus termékeket
nem szabad az általános háztartási szeméttel keverni.
A megfelelő kezelés, feldolgozás és újrahasznosítás érdekében, kérjük vigye el az ilyen termékeket a kijelölt begyűjtő pontokra, ahol
azokat ingyen átveszik. Egyes országokban visszaviheti a terméket a helyi értékesítőnek is, ha hasonló, új terméket vásárol.
E termék megfelelő elhelyezése segít az értékes erőforrások megőrzésében és megelőzi az esetleges helytelen hulladékkezelés
emberi szervezetre, illetve a környezetre gyakorolt negatív hatásait. Kérjük tájékozódjon a helyi hatóságoknál a további részletekről és
a legközelebbi begyűjtő pontról.
A nemzeti szabályozástól függően az ilyen hulladék helytelen elhelyezéséért akár bírságok is kiszabhatók.
Üzleti felhasználók számára az Európai Unióban
Ha elektromos vagy elektronikus berendezéseket kíván kidobni, kérjük tájékozódjon helyi szakkereskedőjénél vagy ellátójánál a további részletekről.
Információ a kidobásról az Európai Unión kívüli országok számára
Ez a szimbólum csak az Európai Unión belül érvényes.
Ha ki kívánja dobni ezt a terméket, kérjük tájékozódjon a helyi hatóságoknál vagy szakkereskedőjénél az elhelyezés megfelelő módjáról.
A készülék megfelel a 2004/108/EC direktíva 9(2) szakaszának.
Panasonic Testing Centre
Panasonic Service Europe, a Panasonic Marketing Europe GmbH divíziója
Winsbergring 15, 22525 Hamburg, F. R. Germany
Gyártotta a Panasonic Home Appliances Microwave Oven (Shanghai) Co. Ltd., Longdong Road, Pudong, Sanghaj, 201203, Kína.
Magyar
Hu-19
Instalare şi conectare
Verificaţi cuptorul cu microunde
Despachetaţi cuptorul, îndepărtaţi în întregime ambalajul şi verificaţi dacă
aparatul prezintă vreun defect, cum ar fi urme de lovituri, defecţiuni ale
dispozitivelor de blocare a uşii sau fisuri ale uşii. Dacă constataţi existenţa
vreunui defect, anunţaţi imediat vânzătorul de la care aţi cumpărat cuptorul. Nu instalaţi un cuptor cu microunde defect.
Instrucţiuni privind legarea la pământ
IMPORTANT: ACEST APARAT TREBUIE SĂ FIE LEGAT LA PĂMÂNT
ASTFEL ÎNCÂT PROTECŢIA PERSONALĂ SĂ FIE ASIGURATĂ ÎN MOD
CORESPUNZĂTOR.
Dacă priza dumneavoastră de curent alternativ nu dispune de
împământare, aveţi responsabilitatea de a o înlocui cu o priză legată la
pământ în mod corespunzător.
Tensiunea de lucru
Tensiunea trebuie să corespundă celei specificate pe eticheta existentă pe
cuptorul cu microunde. Utilizarea cuptorului la o tensiune mai mare decât
cea specificată poate cauza incendii sau alte pagube.
Amplasarea cuptorului
Atenţie: Suprafeţe Fierbinţi
Acest cuptor este destinat utilizării doar pe blatul mobilierului de bucătărie sau
integrat în mobilier. Nu este adecvat pentru folosirea încastrată în mobilier.
Integrarea cuptorului
Acest cuptor cu microunde poate fi amplasat în interiorul unui dulap suspendat utilizând trusa de reglare corespunzătoare, de culoare albă
TKT59WFP, de culoare argintie NN-TKT59MFP, care poate fi achiziţionată
de la un distribuitor Panasonic local.
1. Amplasaţi cuptorul pe o suprafaţă plană şi stabilă, la o înălţime mai
mare de 85 cm faţă de sol.
2. După instalarea cuptorului aveţi grijă ca acesta să poată fi uşor separat
de sursa de curent, prin scoaterea din priză a fişei sau acţionarea unui
întrerupător.
3. Pentru o bună funcţionare a cuptorului, asiguraţi o circulaţie corespunzătoare a aerului.
Utilizarea pe blatul mobilierului de bucătărie:
a. Alocaţi un spaţiu de 15 cm deasupra cuptorului, 10 cm în spate,
5 cm pe una din laterale şi de cel puţin 40 cm pe cealaltă laterală.
b. Dacă una din lateralele cuptorului este în acelaşi plan cu un perete,
cealaltă laterală sau partea superioară trebuie să fie liberă.
5cm
4. Nu amplasaţi cuptorul în vecinătatea unei maşini de gătit electrice
sau a aragazului.
5. Suporturile cuptorului nu trebuie îndepărtate.
6. Acest cuptor este destinat exclusiv uzului casnic. A nu se utiliza în
aer liber.
7. Evitaţi utilizarea cuptorului cu microunde în condiţii de umiditate
excesivă.
8. Cablul de alimentare nu trebuie să intre în contact cu corpul cuptorului. Se interzice contactul cablului cu suprafeţele fierbinţi. Nu lăsaţi
cablul să atârne peste marginea mesei sau a blatului. Nu introduceţi
cablul, ştecherul sau cuptorul în apă.
9. Nu blocaţi orificiile de aerisire din partea superioară şi spatele cuptorului. Dacă aceste orificii sunt blocate în timpul funcţionării, cuptorul
se poate supraîncălzi. În acest caz, cuptorul este protejat de un dispozitiv termic de siguranţă, reluând funcţionarea numai după ce s-a
răcit.
10.Acest aparat nu a fost proiectat pentru a funcţiona prin intermediul
unui temporizator extern sau al unui sistem separat de telecomandă.
15cm
10cm
Blatul mobilierului de bucătărie
AVERTISMENT
1. Elementele şi zonele de etanşare ale uşii trebuie curăţate cu o cârpă
umedă.
Verificaţi dacă aparatul prezintă defecţiuni ale elementelor şi zonelor
de etanşare ale uşii, iar în cazul în care observaţi defecţiuni nu utilizaţi aparatul decât după ce a fost reparat de un tehnician instruit de
fabricant.
2. Nu încercaţi să modificaţi, să reglaţi sau să reparaţi uşa, carcasa
panoului de control, dispozitivul de blocare, şi nici orice altă componentă a cuptorului. Nu îndepărtaţi panoul exterior al cuptorului,
deoarece acesta vă protejează împotriva expunerii la microunde.
Reparaţiile trebuie efectuate numai de o persoană calificată.
3. Nu utilizaţi aparatul în cazul în care CABLUL SAU ªŞTECHERUL
prezintă defecţiuni, dacă nu funcţionează corespunzător sau dacă a
fost deteriorat ori a căzut pe jos. Efectuarea reparaţiilor de o persoană care nu a fost instruită de fabricant este periculoasă.
4. În cazul în care cablul de alimentare al aparatului este defect, acesta
trebuie înlocuit cu un cablu special furnizat de fabricant.
5. Permiteţi copiilor să folosească cuptorul fără supraveghere numai
după ce au primit instrucţiuni de utilizare adecvate, astfel încât să-l
poată utiliza în siguranţă şi să înţeleagă primejdiile unei utilizări
incorecte.
6. Lichidele şi ale alimente nu trebuie încălzite în recipiente închise,
întrucât pot exploda.
7. Acest aparat nu a fost conceput pentru utilizare de către persoane
(inclusiv copii) cu capacităţi senzoriale sau mentale reduse, ori care
nu dispun de experienţa şi cunoştinţele necesare în acest sens,
decât sub supraveghere sau dacă au primit instrucţiuni privind
utilizarea aparatului, din partea unei persoane responsabile pentru
siguranţa acestora. Copiii trebuie supravegheaţi pentru vă asigura că
nu se joacă cu aparatul.
Ro-1
Românã
Liber
(NN-GD560M / NN-GD550W)
Instrucţiuni de siguranţă
Modul de utilizare a cuptorului
Funcţionarea ventilatorului
1. Nu utilizaţi cuptorul în nici-un alt scop în afara preparării alimentelor.
Acest cuptor a fost proiectat special pentru încălzirea sau prepararea
alimentelor. Nu utilizaţi acest cuptor în vederea încălzirii unor produse
chimice sau nealimentare.
Dacă în timpul utilizării cuptorul se încinge, este posibil ca ventilatorul să
pornească şi să funcţioneze pentru câteva minute pentru a răci componentele electrice. Acesta este un lucru perfect normal şi puteţi scoate
alimentele din cuptor în timp ce ventilatorul se află în funcţiune.
2. Înaintea utilizării, verificaţi dacă vasele/recipientele pot fi utilizate în
cuptoarele cu microunde.
Lumina din interiorul cuptorului
3. Nu utilizaţi cuptorul pentru uscarea ziarelor, hainelor sau a altor
materiale. Acestea se pot aprinde.
4. Pentru a evita orice fel de neplăceri în cazul în care cuptorul este pornit
în mod întâmplător, când nu este folosit nu păstraţi în acesta nici un fel
de obiecte, cu excepţia accesoriilor.
5. Aparatul nu trebuie utilizat în modul MICROUNDE sau COMBINAT
(NN-GD560M / NN-GD550W) FĂRĂ ALIMENTE ÎN INTERIOR. O astfel
de utilizare poate conduce la defectarea aparatului. Excepţie o
constituie punctul 1 în timpul încălzirii şi preîncălzirii tăvii de pizza.
6. În cazul în care cuptorul scoate fum sau ia foc, apăsaţi butonul
Stop/Cancel (Oprire/Anulare) şi lăsaţi uşa închisă pentru a înăbuşi
flăcările. Scoateţi ştecherul din priză sau întrerupeţi alimentarea
electrică cu ajutorul siguranţelor fuzibile ori de la întrerupător.
Funcţionarea dispozitivului de încălzire
(NN-GD560M / NN-GD550W)
1. Înainte de a utiliza pentru prima dată funcţia COMBINATĂ sau GRIL,
ştergeţi uleiul în exces aflat în cuptor apoi puneţi-l în funcţiune fără
alimente şi accesorii, folosind funcţia Gril timp de 10 minute. Aceasta
va permite arderea uleiului folosit în vederea asigurării protecţiei
anticorosive. Aceasta este singura ocazie în care cuptorul poate fi
utilizat fără alimente.
2. Suprafeţele exterioare ale cuptorului, inclusiv orificiile de ventilaţie şi
uşa cuptorului, se vor încinge în timpul utilizării funcţiilor COMBINAT şi
GRIL, motiv pentru care trebuie să aveţi grijă la deschiderea sau
închiderea uşii şi la introducerea sau scoaterea alimentelor şi
accesoriilor.
3. Cuptorul are două elemente de încălzire, situate în partea sa
superioară. După utilizarea funcţiilor COMBINAT şi GRIL, aceste
suprafeţe vor fi foarte fierbinţi.
N.B. După folosirea acestor moduri, accesoriile cuptorului vor fi
foarte fierbinţi.
4. Părţile accesibile pot deveni fierbinţi când se utilizează modurile gril şi
combinat. Nu permiteţi copiilor să se apropie de cuptor.
5. Când cuptorul este utilizat în modul combinat, copiii îl pot folosi numai
sub supraveghere, datorită temperaturilor ridicate generate.
Ro-2
Când devine necesară înlocuirea becul din interiorul cuptorului, vă
rugăm să luaţi legătura cu furnizorul dumneavoastră.
Accesorii
Cuptorul este livrat împreună cu o largă varietate de accesorii. În vederea utilizării acestora urmaţi întotdeauna instrucţiunile date.
Platoul din sticlă
1. Nu utilizaţi cuptorul fără ca inelul cu role şi platoul din sticlă să se
afle în poziţia corespunzătoare.
2. Nu utilizaţi niciodată un alt tip de platou din sticlă în afara celui destinat special acestui cuptor.
3. Dacă platoul din sticlă este încins, lăsaţi-l să se răcească înainte de
a-l curăţa sau introduce în apă.
4. Platoul din sticlă se poate roti în orice direcţie.
5. Dacă alimentele sau vasul aflat pe platoul din sticlă atinge pereţii
cuptorului şi împiedică rotirea platoului, acesta se va roti automat în
direcţia opusă. Acest lucru este normal.
6. Nu amplasaţi alimentele direct pe platoul din sticlă.
Inelul cu role
1. Inelul cu role şi baza cuptorului trebuie curăţate frecvent pentru a
evita apariţia zgomotului în timpul funcţionării şi acumularea resturilor
de alimente.
2. În timpul gătirii inelul cu role trebuie utilizat întotdeauna împreună cu
platoul din sticlă.
Suport din sârmă (NN-GD560M / NN-GD550W)
1. Suportul din sârmă are rolul de a facilita circularea căldurii şi
rumenirea alimentelor aflate în vase mici.
2. Nu amplasaţi nici-un vas metalic direct pe suportul din sârmă în
COMBINAŢIE cu MICROUNDE.
3. Nu utilizaţi suportul din sârmă numai în modul cu MICROUNDE.
Tava de pizza (NN-GD560M / NN-GD550W) - A se vedea pagina
Ro-14
Informaţii importante
1. Timpii de gătit
6. Lichide
• Timpii de preparare indicaţi în cartea de bucate sunt aproximativi.
Aceştia depind de starea, temperatura, cantitatea alimentelor şi de tipul
de vase de bucătărie utilizate.
• Când încălziţi lichide, cum ar fi supa, sosurile şi băuturile, în cuptorul
dumneavoastră cu microunde, încălzirea lichidului peste temperatura
de fierbere poate avea loc şi fără ca acest lucru să fie pus în evidenţă
prin prezenţa bulelor. Acest lucru poate avea ca urmare erupţia bruscă
a lichidului fierbinte. Pentru a evita acest lucru, trebuie luate următoarele măsuri:
• Începeţi cu timpii minimi, pentru a evita prepararea excesivă. Dacă
mâncarea nu este gătită suficient, puteţi oricând continua pentru încă o
perioadă de timp.
N.B.: Dacă timpul de gătit recomandat este depăşit, mâncarea va fi
compromisă şi, în cazuri extreme, poate lua foc şi eventual deteriora interiorul cuptorului.
2. Cantităţi reduse de alimente
• Cantităţile mici de alimente, sau alimentele cu un conţinut redus de
umiditate se pot arde, usca sau aprinde, dacă sunt încălzite prea mult
timp. Dacă materialele aflate în interiorul cuptorului se aprind, lăsaţi
închisă uşa cuptorului, opriţi-l şi scoateţi ştecherul din priză.
3. Ouă
• Nu încălziţi ouă în coajă şi ouă tari, fierte întregi, prin modul
MICROUNDE. Se poate forma o presiune care să conducă la explozia
ouălelor, chiar şi după încheierea fazei de încălzire cu microunde.
4. Înţeparea alimentelor cu coajă
a) Evitaţi utilizarea recipientelor cu pereţi drepţi şi gât îngust.
b) Nu încălziţi excesiv.
c) Amestecaţi lichidul înainte de a introduce recipientul în cuptor şi
repetaţi această operaţiune la jumătatea timpului de gătire.
d) După încălzire, lăsaţi recipientul în cuptor timp de câteva minute,
apoi amestecaţi din nou înainte de a-l scoate cu atenţie.
7. Hârtie/Plastic
• În timpul încălzirii alimentelor aflate în ambalaje din hârtie sau material
plastic verificaţi frecvent cuptorul, deoarece aceste tipuri de ambalaje
se pot aprinde dacă sunt supraîncălzite.
• Nu utilizaţi produse din hârtie reciclată (cum ar fi rolele de bucătărie)
dacă acestea nu poartă menţiunea că pot fi folosite în cuptorul cu
microunde. Produsele din hârtie reciclată pot conţine impurităţi care
pot provoca scântei şi/sau se pot aprinde în timpul utilizării.
• Alimentele cu un înveliş lipsit de pori, cum sunt cartofii, gălbenuşurile
de ou şi cârnaţii trebuie înţepate înainte de a fi preparate în modul
MICROUNDE, pentru a nu se crăpa sau exploda.
• Îndepărtaţi legăturile pungilor produselor de încălzit înainte de a le
introduce în cuptor.
5. Termometru pentru carne
• Nu încălziţi recipiente sau sticle închise, deoarece pot exploda.
• Verificarea măsurii în care sunt rumenite fripturile şi carnea de pasăre,
cu ajutorul termometrului pentru carne, trebuie efectuată numai după
ce acestea au fost scoase din cuptor. Când folosiţi modul
MICROUNDE, la măsurarea temperaturii cărnii nu utilizaţi un termometru convenţional, deoarece acesta poate produce scântei.
• Vasele metalice sau cu ornamente metalice nu pot fi utilizate în timpul
încălzirii cu microunde. Se pot produce scântei.
8. Vase/folii
• Pentru a preveni apariţia scânteilor în cazul în care utilizaţi folii de aluminiu, ţepuşe pentru carne sau alte articole metalice, distanţa dintre
acestea şi pereţii şi uşa cuptorului trebuie să fie de cel puţin 2 cm.
9. Biberoane/recipiente cu alimente pentru copii mici
• Capacul de protecţie şi tetina sau capacul de fixare a tetinei trebuie
îndepărtate de pe biberoane sau recipientele cu alimente pentru copiii
mici, înainte de a fi introduse în cuptor.
• Conţinutul biberoanelor şi al recipientelor cu alimente pentru copiii mici
trebuie amestecat sau agitat.
• Verificaţi temperatura alimentelor înainte de a le consuma, pentru a
evita arsurile.
Românã
Ro-3
Schiţă de prezentare
[8b]
[13]
[8a]
[6]
[4]
[12]
[5]
[2]
[1]
[7]
[3]
[9]
[10]
[11]
1.
Butonul de deschidere a uşii
Uşa se deschide prin apăsarea acestui buton. Dacă deschideţi uşa cuptorului în timpul preparării alimentelor, prepararea este
întreruptă temporar fără ca setările anterioare să fie anulate. Gătitul este reluat imediat ce uşa a fost închisă şi apăsat butonul
Pornire. Lampa din interiorul cuptorului se aprinde imediat ce este deschisă uşa.
2.
Uşa cu geam a cuptorului
3.
Sistem de siguranţă pentru blocarea uşii
4.
Fante de ventilare
5
Panou de control
6.
Platou din sticlă
7.
Inel cu role
8a.
Orificii exterioare de ventilare
8b.
Orificii exterioare de ventilare (NN-GD560M / NN-GD550W)
9.
Suport din sârmă (NN-GD560M / NN-GD550W)
10.
Tava de pizza (NN-GD560M / NN-GD550W)
11.
Mânerul tăvii de pizza (NN-GD560M / NN-GD550W)
12.
Cablu de alimentare
13.
Etichetă de avertizare (Suprafeţe Fierbinţi) (NN-GD560M / NN-GD550W)
Ro-4
Panoul de Control
NN-GD560M / NN-GD550W *
(1)
(2)
(3)
(8)
1.
Afişaj
2.
Butonul de pornire a modului de încălzire cu
microunde
3.
Butonul de pornire a modului gril
4.
Butonul de pornire a modului combinat de încălzire
5.
Butonul de pornire a decongelării automate în
funcţie de greutate
6.
Buton de temporizare/întârziere
7.
Butonul de reglare a timpului
8.
Selector rotativ de programe automate
9.
Selector rotativ pentru timp/greutate
10.
Butonul Stop/Anulare:
Înainte de a găti: o singură apăsare de buton anulează
setările efectuate anterior.
(4)
În timpul gătitului: o singură apăsare va opri temporar
programul de gătit. O nouă apăsare va anula toate
setările pe care le-aţi efectuat anterior şi ora curentă va
fi afişată pe ecran.
(5)
(9)
(6)
(7)
11.
Butonul Pornire:
Cuptorul porneşte prin apăsarea acestui buton. Dacă în
timpul procesului de preparare a alimentelor este
deschisă uşa sau apăsat butonul Oprire/Anulare, va trebui să apăsaţi din nou butonul Pornire pentru a continua gătitul.
*N.B. Designul panoului de control poate diferi faţă de cel
prezentat aici (în funcţie de culoare), dar funcţionalitatea este
aceeaşi.
(10)
(11)
NOTĂ: Dacă programaţi o operaţiune şi nu apăsaţi butonul
Pornire, în decurs de 6 minute cuptorul va anula în mod
automat operaţiunea respectivă. Afişajul va reveni la indicarea orei curente.
Semnal sonor:
Acest cuptor cu microunde dispune de o funcţie de
economisire a energiei.
Vă rugăm să reţineţi:
1. Când cuptorul este în stand-by, luminozitatea afişajului
va fi redusă.
2. Cuptorul intră în mod stand-by după prima conectare la
reţea şi imediat după ce s-a terminat ultima operaţiune
programată.
Românã
La apăsarea unui buton se aude
un semnal sonor. Dacă semnalul
sonor nu se aude, înseamnă că
setarea nu este corectă. Când
cuptorul trece de la o funcţie la
alta, sunt emise două semnale
sonore. După încheierea procesului de preparare, sunt emise
cinci semnale sonore.
Ro-5
Panoul de control
NN- SD450W
(1)
(2)
(1)
(3)
(4)
(5)
(6)
(7)
(8)
(6)
(2)
(7)
(9)
(3)
(4)
(5)
(8)
Afişaj
Butoane de pornire a modului de încălzire cu
microunde
Butonul de dezgheţare rapidă, prin calcularea
automată a greutăţii
Buton de temporizare/întârziere
Butonul de reglare a timpului
Selector rotativ de programe automate
Selector rotativ pentru timp/greutate
Butonul Stop/Anulare:
Înainte de a găti: o singură apăsare a acestui buton
anulează comenzile dumneavoastră.
În timpul gătitului: o singură apăsare a acestui buton
întrerupe temporar programul de preparare a alimentelor.
O nouă apăsare a acestui buton anulează toate
comenzile dumneavoastră şi ora curentă va fi afişată
pe ecran.
Butonul Pornire:
Cuptorul porneşte prin apăsarea acestui buton. Dacă în
timpul procesului de preparare a alimentelor este
deschisă uşa sau apăsat butonul Stop/Anulare, va trebui să apăsaţi din nou butonul Pornire pentru a continua gătitul.
(9)
NOTĂ: Dacă programaţi o operaţiune şi nu apăsaţi butonul
Pornire, în decurs de 6 minute cuptorul va anula în mod
automat operaţiunea respectivă. Afişajul va reveni la indicarea
orei curente.
Semnal sonor:
La apăsarea unui buton se aude
un semnal sonor. Dacă semnalul
sonor nu se aude, înseamnă că
setarea nu este corectă. Când
cuptorul trece de la o funcţie la
alta, sunt emise două semnale
sonore. După încheierea procesului de preparare, sunt emise
cinci semnale sonore.
Ro-6
Acest cuptor cu microunde dispune de o funcţie de
economisire a energiei.
Vă rugăm să reţineţi:
1. Când cuptorul este în stand-by, luminozitatea afişajului
va fi redusă.
2. Cuptorul intră în mod stand-by după prima conectare la
reţea şi imediat după ce s-a terminat ultima operaţiune
programată.
Butoanele de comandă şi procedura de operare
Conectare
“88:88”
Selectare opţiune
Apăsaţi
“FRANCAIS”
Franceză
Apăsaţi
“ITALIANO”
Italiană
Apăsaţi
“DEUTSCH”
Germană
Apăsaţi
“NEDERLANDS”
Olandeză
Apăsaţi
ESPANOL
Spaniolă
Apăsaţi
“POLSKI”
Poloneză
Apăsaţi
“CESKY”
Cehă
Apăsaţi
“ENGLISH”
Engleză
Apăsaţi
“DANSK”
Daneză
Apăsaţi
“SUOMI”
Finlandeză
Apăsaţi
“SVENSKA”
Suedeză
Apăsaţi
“NORSK”
Norvegiană
Aceste modele dispun de o funcţie unică denumită
“Selectare opţiune” care vă ghidează în privinţa utilizării
cuptorului cu microunde. După conectarea cuptorului la
reţeaua de curent, apăsaţi butonul Pornire până găsiţi
limba dorită. Pe măsură ce apăsaţi butoanele, afişajul
va prezenta următoarea opţiune, eliminând posibilitatea
de eroare. Dacă, din vreun motiv oarecare, doriţi să
schimbaţi limba afişajului, deconectaţi cuptorul de la
priza de de alimentare şi repetaţi procedura.
Dacă butonul de Temporizare/Întârziere este apăsat de
4 ori, ghidul de operare va fi dezactivat. Pentru a reactiva ghidul de operare, apăsaţi butonul
Temporizare/Întârziere de 4 ori.
Numai pentru modelul NN-SD450W.
Reglarea orei: Exemplu: Pentru a regla ora 12:00
• Apăsaţi o dată butonul de
reglare a timpului.
Cele două puncte separatoare
încep să clipească.
• Reglaţi ora rotind selectorul Timp/Greutate.
Ora apare pe afişaj şi cele două puncte de separare
clipesc.
• Apăsaţi butonul de reglare a timpului
Cele două puncte separatoare nu mai
clipesc şi este memorată ora curentă.
Românã
NOTĂ:
1. Pentru reglarea din nou a orei curente, repetaţi paşii de mai sus.
2. Este afişată ora curentă, cu excepţia cazului în care este întreruptă alimentarea cu curent.
3. Afişajul este capabil să prezinte toate cele 24 de ore ale zilei.
Ro-7
Butoanele de comandă şi procedura de operare
Blocare de siguranţă pentru copii:
Prin utilizarea acestui sistem butoanele de comandă ale cuptorului devin nefuncţionale; totuşi, uşa acestuia poate fi deschisă. Funcţia de blocare de
siguranţă pentru copii poate fi reglată atunci când sunt afişate două puncte sau ora.
Pentru anulare:
Pentru reglare:
• Apăsaţi de trei ori butonul Oprire/Anulare.
• Apăsaţi de trei ori butonul Pornire.
Ora curentă va fi afişată din nou pe ecran.
Ora curentă va dispare. Ora curentă nu va fi însă ştearsă.
*
Afişajul indică ʻ ʼ.
NOTĂ: Pentru a activa sistemul de blocare de siguranţă pentru copii, butonul Pornire va trebui apăsat de trei ori într-un interval de 10 secunde.
Gătirea şi decongelarea alimentelor cu ajutorul microundelor
Există 5 nivele utilizabile de putere a microundelor. Tabelul de mai jos indică puterea electrică aproximativă (în waţi) pentru
fiecare nivel de putere.
NN-GD560M / NN-GD550W
Utilizarea accesoriilor:
Apăsaţi
NN- SD450W
Platou din sticlă
O dată
De două ori
De 3 ori
De 4 ori
De 5 ori
Nivelul de
putere
Max (Mare)
Decongelare
Mediu
Redus
Fierbere înceată
Putere
1000 W
270 W
600 W
440 W
250 W
NN-GD560M / NN-GD550W
sau
• Apăsaţi acest buton
până la afişarea puterii
dorite.
• Alegeţi nivelul dorit de
putere a microundelor.
• Reglaţi timpul de gătire utilizând selectorul
Timp/Greutate (putere MARE: până la 30 de minute
Alte puteri: până la 1 oră şi 30 de minute).
• Apăsaţi butonul
Pornire.
NOTĂ:
1. Pentru gătitul în 2 sau 3 etape, înainte de a apăsa butonul Pornire, repetaţi reglarea nivelului de putere a microundelor şi timpul de gătit.
De ex.: Cratiţă –– Nivelul de putere Mare, timp de 10 minute, pentru a face apa din cratiţă să fiarbă. Pentru gătit, utilizaţi timp de 60 de minute
nivelul Fierbere înceată. Pentru permite aromelor să se amplifice, utilizaţi timp de 10 minute nivelul Fierbere înceată.
2. Timpul de aşteptare poate fi programat după reglarea puterii microundelor şi a orei.
3. Dacă este necesar, timpul de gătit poate fi modificat pe parcurs. Rotiţi selectorul Timp/Greutate pentru a mări sau a reduce timpul de gătire necesar. Timpul poate fi mărit sau redus în etape succesive a câte 1 minut fiecare, până la 10 minute. Rotirea selectorului în poziţia zero va opri gătitul.
4. Dacă timpul de gătit este reglat fără a fi fost în prealabil ales nivelul de putere, cuptorul va funcţiona automat la puterea maximă a microundelor.
Ro-8
UTILIZAREA Grătarului (NN-GD560M / NN-GD550W)
Utilizarea accesoriilor:
Suport din sârmă
Platou din sticlă
• Selecţionaţi puterea grătarului. Apăsaţi
o dată pentru Gril 1 (Mare), de două ori
pentru Gril 2 (Medie) sau de 3 ori pentru Gril 3 (Redusă).
Funcţia Gril permite 3 reglări.
1 Apăsare
GRIL 1
1300 W
2 Apăsări
GRIL 2
950 W
3 Apăsări
GRIL 3
700 W
• Apăsaţi butonul
Pornire.
• Reglaţi timpul de gătit cu ajutorul selectorului
Timp/Greutate (până la cel mult 1 oră şi 30 de
minute).
NOTĂ:
1. Modul Gril va funcţiona numai dacă uşa cuptorului este închisă.
2. Dacă este necesar, timpul de gătit poate fi modificat pe parcurs. Rotiţi selectorul Timp/Greutate pentru a mări sau reduce timpul de gătit necesar.
Timpul poate fi mărit sau redus în etape succesive a câte 1 minut fiecare, până la 10 minute. Rotirea selectorului în poziţia zero va opri gătitul.
Gătitul combinat (NN-GD560M / NN-GD550W)
Utilizarea accesoriilor:
Există 3 setări ale modului combinat. Tabelul de mai jos indică numărul aproximativ de waţi pentru fiecare nivel de putere în parte.
Suport din sârmă
Platou din sticlă
Setările modului
combinat
1
2
3
Apăsări
1 apăsare
2 apăsări
3 apăsări
Gril
1300 W
1300 W
1300 W
Microunde
Selectare
opţiune
600 W
440 W
250 W
G1-600 W
G1-440 W
G1-250 W
Platou din sticlă
• Selectaţi nivelul modului
combinat (a se vedea tabelul).
• Reglaţi timpul de gătit cu ajutorul selectorului
Timp/Greutate (până la cel mult 1 oră şi 30 de minute).
• Apăsaţi butonul Pornire.
1. Modul Combinat va funcţiona numai dacă uşa cuptorului este închisă.
2. Dacă este necesar, timpul de gătit poate fi modificat pe parcurs. Rotiţi selectorul Timp/Greutate pentru a mări sau reduce timpul de gătit necesar.
Timpul poate fi mărit sau redus în etape succesive a câte 1 minut fiecare, până la 10 minute. Rotirea selectorului în poziţia zero va opri gătitul.
Ro-9
Românã
NOTĂ:
Decongelare Automată
Utilizând această funcţie, puteţi decongela alimentele în funcţie de greutatea lor. Selectaţi categoria şi greutatea alimentelor. Greutatea este programată în grame. Pentru o selectare rapidă, greutatea începe de la valoarea cea mai des utilizată pentru fiecare categorie în parte.
• Selectaţi programul dorit de
decongelare automată.
1 apăsare pentru cantităţi mici
2 apăsări pentru cantităţi mari
• Cu ajutorul selectorului Timp/Greutate reglaţi greutatea alimentelor
congelate.
Rotiţi încet selectorul pentru a regla greutatea în trepte de câte 10g.
Răsuciţi selectorul repede pentru a regla greutatea în trepte de câte 100g.
Greutatea
Selectare opţi- recomandată
une
Program
1 cantităţi mici
2 Cantităţi mari
• Apăsaţi butonul
Pornire.
Alimente care pot fi decongelate
SMALL
PIECES
150 - 1600g (fiecare de la 100 g până la 400g). Întoarceţi alimentele la semnalele sonore.
BIG
PIECE
400 - 2400g
Cantităţi mici de carne, escalop, cârnaţi, file de peşte, fripturi, cotlet
Cantităţi mari de carne, friptură, pui întregi.
Întoarceţi alimentele la semnalele sonore.
NOTĂ:
1. Atunci când timpul de decongelare depăşeşte 60 de minute, acesta va fi exprimat în ore şi minute.
2. Forma şi dimensiunea alimentelor va determina greutatea maximă pe care o poate prepara cuptorul.
3. Pentru informaţii suplimentare citiţi indicaţiile din cartea de bucate referitoare la decongelare.
Programe automate în funcţie de greutate
Această funcţie permite prepararea majorităţii mâncărurilor preferate, numai prin setarea greutăţii. Cuptorul stabileşte în mod automat nivelul de putere al microundelor şi grătarului, (GD560M /GD550W) precum şi timpul necesar preparării alimentelor. Selectaţi categoria şi greutatea alimentelor.
Greutatea este programată în grame. Pentru o selectare rapidă, greutatea începe de la valoarea cea mai des utilizată pentru fiecare categorie în
parte.
NN-GD560M /
NN-GD550W
NN- SD450W
ex.:
sau
• Selectaţi programul automat prin rotirea
selectorului pentru programe automate în
funcţie de greutate. Afişajul va prezenta programele automate de preparare a alimentelor în
funcţie de greutate.
• Selectaţi greutatea alimentelor cu ajutorul selectorului
Timp/Greutate.
Rotind încet selectorul valoarea greutăţii va fi modificată cu câte
10g. Răsuciţi selectorul repede pentru a regla greutatea în trepte de
câte 100g.
NOTĂ:
1. Atunci când timpul necesar preparării alimentelor depăşeşte 60 de minute, timpul va fi exprimat în ore şi minute.
2. Consultaţi tabelele de mai jos pentru a găsi greutatea recomandată şi accesoriile de utilizat.
Ro-10
• Apăsaţi butonul
Pornire.
Programe automate în funcţie de greutate
NN-GD560M / NN-GD550W
Program
Selectare Greutatea recomandată
opţiune
Accesorii
Instrucţiuni
1 Reîncălzire cană
1 CUP
150g
Pentru a reîncălzi o cană de lichid fierbinte (de exemplu, ceai,
cafea, lapte şi supă).
Selectaţi programul de reîncălzire a cănii, reglaţi greutatea (150ml) şi
apăsaţi butonul Pornire.
2. Reîncălzire bol
1 BOWL
300g
Pentru a reîncălzi un bol cu lichid.
Selectaţi programul de reîncălzire a bolului, reglaţi greutatea (300ml) şi
apăsaţi butonul Pornire.
3 Preîncălzire alimente
proaspete
FRESH
MEAL
200 - 1500g
Pentru a reîncălzi o farfurie sau o caserolă cu alimente.
Toate alimentele trebuie să fie la temperatura camerei sau refrigerate.
Amestecaţi la semnalul sonor. A se lăsa să aştepte câteva minute în
cuptor.
200 - 1200g
Pentru a reîncălzi alimente congelate, în farfurie sau caserolă.
Toate alimentele trebuie să fie în prealabil preparate şi congelate.
Amestecaţi la semnalul sonor. La finalul gătitului, amestecaţi alimentele
şi lăsaţi-le să stea liniştite timp de 2 - 3 minute.
250 - 1500g
Pentru prepararea legumelor proaspete. Introduceţi legumele
pregătite într-un vas cu dimensiuni corespunzătoare. Stropiţi-le cu 6
linguri (90ml) de apă. Acoperiţi-le uşor cu o folie sau un capac găurite.
Cantităţile mari trebuie amestecate când este emis semnalul sonor.
300 - 1000g
Pentru prepararea legumelor congelate.
Introduceţi legumele într-un vas de dimensiuni corespunzătoare şi
adăugaţi 2 linguri (30 ml) de apă. Acoperiţi-le uşor cu o folie sau un
capac găurite. Cantităţile mari trebuie amestecate când este emis
semnalul sonor.
150 - 1000g
Pentru prepararea peştelui proaspăt (întreg, filé, bucăţi) Protejaţi
porţiile mai subţiri, puneţi-le într-un vas de dimensiuni corespunzătoare.
Adăugaţi 2 linguri (30ml) de lichid. Acoperiţi-le cu o folie sau un capac
găurite.
200 - 900g
Pentru prepararea peştelui congelat, filé sau bucăţi. Puneţi peştele
într-un vas de dimensiuni corespunzătoare, adăugaţi 2 linguri (30 ml) de
apă şi acoperiţi cu o folie sau un capac găurite.
4 Reîncălzire alimente
congelate
5 Preparare legume
proaspete
6 Preparare legume
congelate
7 Preparare peşte
proaspăt
8 Preparare peşte
congelat
FROZEN
MEAL
FRESH
VEGETABLES
FROZEN
VEGETABLES
FRESH
FISH
FROZEN
FISH
Recomandări pentru reîncălzirea unei căni sau a unui bol.
Românã
1. Înainte de a-l încălzi, lichidul trebuie amestecat (lichidele încălzite pot erupe dacă nu sunt amestecate cu aer).
2. Nu acoperiţi băuturile calde, cum sunt ceaiul sau cafeaua. Acoperiţi supa cu o farfurioară, pentru a evita orice risc de erupţie.
3. După încălzire, amestecaţi din nou şi lăsaţi alimentul să stea în cuptor pentru scurt timp.
Ro-11
Programe automate în funcţie de greutate
NN-GD560M / NN-GD550W
Program
Selectare Greutatea recomandată
opţiune
9 Pâine congelată
FROZEN
BREAD
10 Carne proaspătă de pui
în piese
CHICKEN
PIECES
11 Pui întreg
12 Prepararea graténului/lazanei congelate
Ro-12
50 - 500g
200 - 1200g
Accesorii
Instrucţiuni
Pentru reîncălzirea pâinii, ruladelor şi croasantelor
Îndepărtaţi complet ambalajul şi puneţi alimentele pe grătarul din
sârmă amplasat pe platoul din sticlă. Întoarceţi la semnalul sonor.
Pentru prepararea cărnii de pasăre în piese, cum ar fi pulpele,
aripile sau picioarele de pui. Puneţi carnea de pasăre într-un vas
termorezistent pe grătarul din sârmă amplasat pe platoul din sticlă.
Pentru o preparare uniformă separaţi piesele de carne de pasăre şi
întoarceţi la semnalul sonor.
WHOLE
1000 - 2200g
CHICKEN
Pentru prepararea puilor întregi, fără umplutură. Preparaţi
umplutura separat. Puneţi puiul într-un vas termorezistent pe grătarul
din sârmă amplasat pe platoul din sticlă. Începeţi gătitul cu pieptul în
jos şi întoarceţi la semnalul sonor.
300 - 1000g
Pentru reîncălzirea şi rumenirea gratén-ului/lazanei îngheţate.
Eliminaţi complet ambalajul şi amplasaţi gratén-ul/lazania pe o farfurie
termorezistentă, pe platoul din sticlă.
FROZEN
GRATIN
Programe automate în funcţie de greutate pentru panacrunch
Programe panacrunch (NN-GD560M / NN-GD550W)
1. Selectaţi programul dorit şi
amplasaţi tava de pizza în cuptor, direct pe platoul de sticlă.
Program
13 Pizza proaspătă
14 Pizza congelată
15 Plăcintă proaspătă
16 Plăcintă congelată
2. Apăsaţi butonul Pornire pentru a
preîncălzi tava de pizza.
Selectare Greutatea recomandată
opţiune
CHILLED
PIZZA
FROZEN
PIZZA
CHILLED
QUICHE
FROZEN
QUICHE
4. Apăsaţi butonul Pornire.
Instrucţiuni
150 - 600g
Pentru reîncălzirea, coacerea bazei şi rumenirea părţii superioare
a pizzei proaspete.
Îndepărtaţi complet ambalajul şi amplasaţi pizza în tava de pizza
preîncălzită.
150 - 600g
Pentru reîncălzirea, coacerea bazei şi rumenirea părţii superioare
a pizzei congelate.
Îndepărtaţi complet ambalajul şi amplasaţi pizza în tava de pizza
preîncălzită.
150 - 700g
Pentru reîncălzirea, coacerea bazei aluatului şi rumenirea părţii
superioare a plăcintei proaspete.
Îndepărtaţi complet ambalajul şi amplasaţi plăcinta în tava de pizza
preîncălzită.
150 - 500g
Pentru reîncălzirea, coacerea bazei aluatului şi rumenirea părţii
superioare a plăcintei congelate.
Îndepărtaţi complet ambalajul şi amplasaţi plăcinta în tava de pizza
preîncălzită.
200 - 500g
Pentru reîncălzirea, rumenirea şi prăjirea produselor din cartofi
până devin crocante. După preîncălzirea tăvii, împrăştiaţi produsele
din cartofi în tavă. Pentru cele mai bune rezultate, gătiţi într-un singur
strat şi întoarceţi la semnalul sonor.
CHIPS
17 Produse congelate din
cartofi
Accesorii
3. După ce se aude semnalul
sonor, amplasaţi alimentele în
tavă şi reglaţi greutatea.
Românã
Ro-13
Tava de pizza (NN-GD560M / NN-GD550W)
Concept
NOTE:
Unele alimente preparate cu ajutorul microundelor pot avea o crustă moale
sau necoaptă. Tava de pizza va rumeni şi coace pizza, lipii, plăcinte şi alte
produse de patiserie, întocmai ca în cazul unui cuptor obişnuit. Tava de
pizza Panasonic acţionează în trei feluri: se încălzeşte prin absorbţia
microundelor, încălzeşte alimentele direct cu ajutorul microundelor şi
încălzeşte alimentele cu ajutorul funcţiei gril. Baza tăvii absoarbe
microundele şi le transformă în căldură. Apoi căldura este transferată prin
tavă către alimente. Efectul de încălzire este sporit de suprafaţa sa antiaderentă.
1. Nu preîncălziţi tava timp de mai mult de 8 minute.
Utilizarea tăvii de pizza pan (operare manuală)
• Pentru obţinerea unor rezultate mai bune, încălziţi tava înainte de a o
utiliza. Aceasta trebuie amplasată direct pe platoul din sticlă şi preîncălzită în modul combinat 1 (Gril 1 + 600 W) timp de 3 minute. Pentru a
ajuta rumenirea, înaintea preîncălzirii pentru alimente cum sunt cârnaţii
şi hamburgerii, ungeţi cu ulei tava, cu ajutorul unei perii.
• Îndepărtaţi tava din cuptor şi amplasaţi alimentele în tavă.
Mânuiţi tava cu ajutorul mânerului aferent sau a mănuşilor, întrucât
aceasta poate fi foarte fierbinte. Pentru rezultate mai bune, este important ca alimentele să fie amplasate pe tavă
imediat după preîncălzire. Rezultatele maxime nu pot fi garantate dacă
sunt amplasate mai târziu.
• Amplasaţi tava pe platoul din sticlă şi preparaţi alimentele conform
instrucţiunilor din tabelul pentru gătit din cartea de bucate.
Ro-14
2. Amplasaţi tava întotdeauna în centrul platoului de sticlă şi asiguraţivă că nu atinge pereţii cuptorului. Nerespectarea acestui lucru poate
provoca scântei şi deteriora interiorului cuptorului.
3. Utilizaţi tava întotdeauna numai pe platanul de sticlă. A nu se utiliza
împreună cu grătarul din sârmă.
4. Când manevraţi tava fierbinte utilizaţi întotdeauna mânerul tăvii de
pizza sau mănuşi.
5. Înainte de a începe gătitul, asiguraţi-vă că ambalajele alimentelor au
fost complet îndepărtate.
6. Pe tava fierbinte nu amplasaţi materiale termosensibile, fiindcă se
pot arde.
7. Tava poate fi utilizată şi într-un cuptor tradiţional.
8. Pentru rezultate mai bune, utilizaţi tava în modul combinat dintre
GRIL şi MICROUNDE.
Îngrijirea tăvii
• Evitaţi întotdeauna contactul ustensilelor ascuţite cu tava, deoarece
acestea îi pot deteriora suprafaţa anti-aderentă.
• După utilizare, spălaţi tava în apă fierbinte cu detergent şi clătiţi tot
cu apă fierbinte. Nu utilizaţi substanţe de curăţat abrazive sau bureţi
din sârmă, deoarece acestea deteriorează suprafaţa tăvii.
• Tava poate fi spălată cu maşina de spălat vase.
Programe automate în funcţie de greutate
NN- SD450W
Program
1 Reîncălzire alimente
2 Reîncălzire alimente congelate
Selectare Greutatea recomandată
opţiune
FRESH
MEAL
FROZEN
MEAL
Accesorii
Instrucţiuni
200 - 1500g
Pentru a reîncălzi o farfurie sau o caserolă cu alimente.
Toate alimentele trebuie să fie la temperatura camerei sau refrigerate.
Amestecaţi la semnalul sonor. A se lăsa să aştepte câteva minute în
cuptor.
200 - 1200g
Pentru a reîncălzi alimente congelate, în farfurie sau caserolă.
Toate alimentele trebuie să fie în prealabil preparate şi congelate.
Amestecaţi la semnalul sonor. La finalul preparării, amestecaţi alimentele şi lăsaţi-le să se răcească timp de 2 - 3 minute.
250 - 1500g
Pentru prepararea legumelor proaspete. Introduceţi legumele
pregătite, într-un vas cu dimensiuni corespunzătoare. Stropiţi-le cu 6
linguri (90ml) de apă. Acoperiţi-le uşor cu o folie sau un capac găurite.
Cantităţile mari trebuie amestecate când este emis semnalul sonor.
300 - 1000g
Pentru prepararea legumelor congelate.
Introduceţi legumele într-un vas de dimensiuni corespunzătoare şi
adăugaţi 2 linguri (30 ml) de apă. Acoperiţi-le uşor cu o folie sau un
capac găurite. Amestecaţi legumele la semnalul sonor.
150 - 1000g
Pentru prepararea peştelui proaspăt (întreg, filé, bucăţi) Protejaţi
porţiile mai subţiri şi puneţi-le într-un vas de dimensiuni corespunzătoare. Adăugaţi 2 linguri (30ml) de lichid. Acoperiţi-le cu o folie sau un
capac găurite.
3 Preparare legume
proaspete
FRESH
VEGETABLES
4 Preparare legume congelate
FROZEN
VEGETABLES
5 Preparare peşte proaspăt
FRESH
FISH
6 Preparare peşte congelat
FROZEN
FISH
200 - 900g
Pentru prepararea peştelui congelat, filé sau bucăţi.
Puneţi peştele într-un vas de dimensiuni corespunzătoare, adăugaţi 2
linguri (30 ml) de apă şi acoperiţi cu o folie sau un capac găurite.
7 Reîncălzire cană
1 CUP
150g
Pentru a reîncălzi o cană de lichid fierbinte (de exemplu, ceai,
cafea, lapte şi supă).
Selectaţi programul de reîncălzire a cănii, reglaţi greutatea (150ml) şi
apăsaţi butonul Pornire.
8 Reîncălzire 1 bol
1 BOWL
300g
Pentru a reîncălzi un bol cu lichid cald.
Selectaţi reîncălzirea bolului, introduceţi greutatea (300ml), apăsaţi
butonul Pornire.
9 Reîncălzire 2 boluri
2 BOWL
600g
Pentru a reîncălzi două boluri cu lichid.
Selectaţi reîncălzirea a 2 boluri, introduceţi greutatea (600ml), apăsaţi
butonul Pornire.
Recomandări pentru reîncălzirea unei căni sau a unui bol.
Românã
1. Înainte de a-l încălzi, lichidul trebuie amestecat (lichidele încălzite pot erupe dacă nu sunt amestecate cu aer).
2. Băuturile calde, cum sunt ceaiul sau cafeaua, nu trebuie acoperite.
Acoperiţi supa cu o farfurioară, pentru a evita orice risc de erupţie.
3. După încălzire, amestecaţi din nou şi lăsaţi alimentul să stea în cuptor pentru scurt timp.
Ro-15
Temporizarea gătitului
Utilizând butonul Temporizare/Aşteptare, puteţi programa opţiunea de pornire temporizată a preparării.
ex.:
• Apăsaţi butonul
Temporizare/Aşt
eptare.
• Reglaţi durata temporizării prin
rotirea selectorului
Timp/Greutate(maximum 9 ore).
• Reglaţi programul dorit şi timpul de
gătit.
• Apăsaţi butonul
Pornire.
NOTĂ:
1. Pot fi programate trei faze de gătit, inclusiv temporizarea gătitului.
ex.: Pornirea cu întârziere: 1 oră
Putere mare: 10 min.
sau
Fierbere lentă: 20 min.
sau
O dată
De 5 ori
2. Dacă temporizarea programată este mai lungă de o oră, numărătoarea inversă a timpului va fi afişată în minute. Dacă este mai scurtă de o oră,
numărătoarea inversă va fi afişată în secunde.
3. Temporizarea nu poate fi programată înaintea programelor automate în funcţie de greutate.
4. Dacă butonul de Temporizare/Aşteptare este apăsat de 4 ori, atunci ghidul de operare va fi dezactivat. Pentru a reactiva ghidul de operare, apăsaţi
butonul Temporizare/Întârziere de 4 ori.
Timp de aşteptare
Utilizând butonul Temporizare/Aşteptare, puteţi programa timpul de aşteptare ulterior finalizării preparării, ori puteţi programa cuptorul să intre pe
funcţia de cronometru.
ex.:
sau
• Reglaţi programul dorit şi timpul de
gătit.
NOTĂ:
• Apăsaţi butonul
Temporizare/Aşteptare.
• Cu ajutorul selectorului rotativ
Timp/Greutate introduceţi durata
de timp dorită (până la 9 ore).
• Apăsaţi butonul
Pornire.
1. Pot fi programate trei etape de gătit, inclusiv timpul de aşteptare.
ex.:
sau
Putere mare: 4 min.
Putere mare: 2 min.
Timp de aşteptare: 5 min.
sau
O dată
O dată
2. Dacă pe durata timpului de aşteptare sau a cronometrului este deschisă uşa cuptorului, numărătoarea inversă de pe afişaj nu se va opri.
3. Această funcţie poate fi de asemenea folosită drept cronometru. În acest caz apăsaţi butonul Amânare/Aşteptare, setaţi ora şi apăsaţi butonul
Pornire.
Ro-16
Întrebări şi răspunsuri
Î: De ce nu porneşte cuptorul?
R: Când cuptorul nu porneşte, verificaţi:
1. Este conectat corect la priza de curent? Scoateţi ştecherul din priză, aşteptaţi 10
secunde şi introduceţi-l din nou în priză.
2. Verificaţi întrerupătorul şi siguranţa fuzibilă. Anclanşaţi înapoi întrerupătorul dacă a
decuplat, ori înlocuiţi siguranţa dacă s-a ars.
3. Dacă întrerupătorul sau siguranţa sunt în regulă, conectaţi la priză un alt aparat. Dacă
respectivul aparat funcţionează, atunci probabil cuptorul are o problemă. Dacă respectivul aparat nu funcţionează, atunci probabil că priza are o problemă.
Dacă se pare că există o problemă la cuptor, contactaţi un centru de service autorizat.
Î: Cuptorul meu cu microunde interferă cu televizorul. Este normal?
R: În timpul utilizării cuptorului cu microunde pot apărea anumite interferenţe cu undele radio
sau TV.
Acest tip de interferenţă este similar celui provocat de alte aparate mici, cum ar fi mixerele,
aspiratoarele, uscătoarele de păr, etc. Acest lucru nu indică prezenţa unei probleme a cuptorului.
Î: Cuptorul nu acceptă programul pe care l-am
reglat. De ce?
R: Cuptorul este conceput astfel încât să nu accepte un program greşit. De exemplu, cuptorul
nu va accepta o a patra etapă şi nu va accepta nici un program automat în funcţie de greutate după pornirea temporizată.
Î: Uneori iese aer cald din orificiile de ventilaţie. De
ce?
R: Căldura degajată de alimentele preparate încălzeşte aerul din incinta cuptorului. Acest aer
încălzit este evacuat din cuptor cu ajutorul ventilatorului. Nu există emisii de microunde în
aer. Orificiile de ventilaţie ale cuptorului nu trebuie blocate niciodată în timpul gătitului.
Î: Litera “D” apare pe afişaj iar cuptorul nu
funcţionează. De ce?
A: Cuptorul derulează programul DEMONSTRATIV. Acest mod a fost conceput numai pentru a
fi derulat în cadrul punctului de comercializare. Dezactivaţi acest mod prin apăsarea o singură dată a butonului de încălzire cu microunde şi de 4 ori a butonului Stop/Anulare (NNGD560M / NN-GD550W) sau o singură dată a butonului de putere maximă a microundelor
şi de 4 ori a butonului Stop/Anulare (NN-SD450W).
Î: Pot utiliza în cuptor un termometru convenţional?
A: Numai când utilizaţi modul GRIL (NN-GD560M / NN-GD550W). Metalul din interiorul anumitor termometre poate produce scântei când sunt introduse în cuptor, motiv pentru care nu
trebuie utilizat în modul de gătit GRIL şi COMBINAT.
Î: Cuptorul meu întrerupe gătitul cu microunde şi
este afişat mesajul "H97" sau "H98".
R: Afişajul indică o problemă a sistemului de generare a microundelor. Vă rugăm
să contactaţi un centru de service autorizat.
Î: Ghidul de operare a dispărut de pe afişaj. Nu pot
vedea decât numere?
R: Poate a existat o cădere de tensiune şi ghidul de operare este dezactivat. Scoateţi cuptorul
din priză pentru câteva secunde, apoi conectaţi-l din nou. Când se afişează “88:88”, apăsaţi
butonul de pornire până când apare limba de afişare dorită. Apoi reglaţi ora exactă.
Consultaţi pagina Ro-7.
NN-GD560M / NN-GD550W
Î: Se aud zgomote şi pocnete din cuptorul când
R: Zgomotul apare când cuptorul comută automat de la MICROUNDE la GRIL în vederea
gătesc în modul COMBINAT. Ce cauzează aceste
realizării setării combinate. Acest lucru este normal.
zgomote?
R: După utilizări repetate, se recomandă curăţarea cuptorului şi apoi pornirea acestuia fără alimente, platou din sticlă şi inel cu role, pe Gril, timp de 5 minute. Astfel vor fi arse orice resturi de alimente sau urme de ulei care pot provoca un miros neplăcut şi/sau fum.
Ro-17
Românã
Î: Cuptorul emană un miros neplăcut şi scoate fum
atunci când sunt utilizate funcţiile COMBINAT şi
GRIL. De ce?
Modul de întreţinere a cuptorului
1. Opriţi cuptorul înainte de curăţare.
2. Păstraţi curat interiorul cuptorului, garniturile şi zonele de etanşare
ale uşii. Dacă există resturi de mâncare sau de lichide pe pereţii cuptorului, pe garniturile şi zonele de etanşare ale uşii, acestea trebuie
şterse cu o cârpă umedă. Dacă sunt greu de de îndepărtat, puteţi
folosi un detergent cu acţiune moderată. Utilizarea unor detergenţi
puternici sau a materialelor abrazive nu este recomandată.
NU UTILIZAŢI PRODUSE COMERCIALE DE CURĂŢAT MAŞINI DE
GĂTIT. Pentru a curăţa uşa cuptorului nu utilizaţi agenţi de curăţire
puternici sau abrazivi, ori instrumente ascuţite din metal, întrucât
aceştia îi pot zgâria suprafaţa, fapt ce poate conduce chiar şi la
spargerea sticlei.
3. Suprafaţa exterioară a cuptorului trebuie curăţată cu o cârpă umedă.
Pentru a evita defectarea componentelor funcţionale din interiorul
cuptorului, nu permiteţi pătrunderea apei în orificiile de ventilaţie.
4. În cazul în care panoul de control se murdăreşte, acesta trebuie
curăţat cu o cârpă moale şi uscată. Nu utilizaţi detergenţi puternici ori
materiale abrazive pentru curăţarea panoului de control. Lăsaţi uşa
deschisă când curăţaţi panoul de control, pentru a evita pornirea
accidentală a cuptorului. După curăţare, apăsaţi butonul
OPRIRE/ANULARE pentru a şterge ecranul de afişare.
5. Dacă se condensează vapori în interiorul cuptorului sau în jurul uşii
acestuia, ştergeţi suprafeţele aburite cu o cârpă moale. Acest lucru
poate apărea când cuptorul cu microunde este utilizat în condiţii de
umiditate excesivă şi acest lucru nu înseamnă ca aparatul s-a defectat.
6. Periodic, este necesară scoaterea platoului din sticlă pentru a fi
curăţat. Spălaţi platoul cu apă caldă şi săpun, sau în maşina de
spălat vase.
Ro-18
7. Inelul cu role şi suprafaţa de bază a incintei cuptorului trebuie
curăţate periodic pentru a evita producerea unor zgomote excesive
în timpul funcţionării. Curăţaţi partea inferioară a cuptorului cu un
detergent cu acţiune moderată şi apă fierbinte, apoi ştergeţi-l cu o
cârpă curată. Inelul cu role poate fi spălat cu apă şi detergent cu
acţiune moderată. Vaporii rezultaţi în urma gătitului se acumulează în
urma utilizării repetate, însă aceştia nu afectează în nici-un fel partea
inferioară a cuptorului sau rolele inelului cu role. După scoaterea şi
curăţirea inelului cu role din incinta cuptorului, asiguraţi-vă că îl poziţionaţi înapoi în mod corespunzător.
8. În timpul utilizării modurilor GRIL sau COMBINAT, (NN-GD560M /
NN-GD550W) unele alimente pot stropi cu grăsime pereţii cuptorului. În cazul în care cuptorul nu este curăţat periodic, acesta va
începe să “afume” în timpul utilizării.
9. A nu se folosi o metodă de curăţare cu abur.
10. Acest cuptor trebuie reparat numai de un personal calificat.
Pentru întreţinerea şi repararea cuptorului, contactaţi cel mai apropiat dealer autorizat.
11. Păstraţi în permanenţă orificiile de ventilaţie curate. Asiguraţi-vă că
orificiile de ventilaţie aflate în partea superioară, inferioară sau în
spatele cuptorului nu sunt blocate de praf sau alte materiale.
Blocarea orificiilor de ventilare poate conduce la o încălzire excesivă,
fapt care poate afecta funcţionarea cuptorului şi eventual crea o
situaţie periculoasă.
12. În cazul în care cuptorul nu este păstrat în condiţii corespunzătoare
de curăţenie, este posibilă deteriorarea suprafeţelor, fapt care ar
putea afecta durata de viată a aparatului şi ar putea da naştere unor
situaţii periculoase.
Specificaţii tehnice
Sursă de alimentare:
Consum de putere:
NN-GD560M / NN-GD550W
NN- SD450W
230 V, 50 Hz
Maxim;
Microunde;
Gril;
230V, 50 HZ
2300 W
1100 W
1350 W
Putere de ieşire:
Microunde;
1000 W (IEC-60705)
Încălzitor Gril;
1300 W
Dimensiuni externe:
510 (W) x 380 (D) x 304 (H) mm
Dimensiunile incintei cuptorului: 359 (W) x 352 (D) x 217 (H) mm
Greutate netă:
12,5 kg
Nivel de zgomot:
50 dB
Microunde;
1100 W
Microunde;
1000 W (IEC-60705)
510 (W) x 380 (D) x 304 (H) mm
359 (W) x 352 (D) x 217 (H) mm
11.5 Kg
50 dB
Specificaţiile pot fi modificate fără aviz prealabil.
Acest produs este un echipament care corespunde standardului european referitor la perturbaţiile radioelectrice EMC (EMC = Compatibilitate
Electromagnetică) EN 55011. Conform acestui standard, acest produs face parte din grupa 2, clasa B, şi se încadrează în limitele impuse. Grupa 2 se
referă la faptul că energia de radiofrecvenţă este generată în mod intenţionat sub forma unei radiaţii electromagnetice destinate încălzirii alimentelor.
Clasa B se referă la faptul că produsul poate fi folosit ca aparatură casnică normală.
Informaţii referitoare la eliminarea de către utilizatori a deşeurilor echipamentelor electrice şi electronice
(gospodării particulare)
Prezenţa acestui simbol pe produse şi/sau documentele de însoţire înseamnă că produsele electrice şi electronice folosite nu trebuie
împreunate cu deşeurile casnice obişnuite.
Pentru o tratare, regenerare şi reciclare corespunzătoare, vă rugăm să transportaţi aceste produse la punctele de colectare desemnate, unde vor fi acceptate fără plată. Alternativ, în unele ţări puteţi trimite produsul înapoi detailistului dumneavoastră, atunci când
cumpăraţi un produs echivalent nou.
Eliminarea corectă a acestui produs va ajuta la salvarea unor resurse valoroase şi va preveni potenţialele efecte negative asupra
sănătăţii umane şi asupra mediului, care altfel ar putea proveni din mânuirea neadecvată a deşeurilor. Pentru detalii suplimentare
referitoare la punctul de colectare cel mai apropiat de dumneavoastră, vă rugăm să contactaţi autorităţile locale.
Pentru eliminarea incorectă a acestui produs se pot aplica amenzi, în conformitate cu legislaţia naţională.
Pentru utilizatorii comerciali din Uniunea Europeană
Dacă doriţi să eliminaţi un echipament electric sau electronic, pentru informaţii suplimentare vă rugăm să contactaţi dealerul sau furnizorul dumneavoastră.
Informaţii referitoare la eliminare valabile în ţări din afara Uniunii Europene
Acest simbol este valabil numai în Uniunea Europeană.
Dacă doriţi să eliminaţi acest produs, vă rugăm să contactaţi autorităţile locale sau furnizorul şi să întrebaţi care este metoda corectă de eliminare.
Românã
Conform directivei directivei EMC 2004/108/EC, articolul 9(2)
Panasonic Testing Centre
Panasonic Service Europe, o divizie a Panasonic Marketing Europe GmbH
Winsbergring 15, 22525 Hamburg, F.R.Germany
Produs de Panasonic Home Appliances Microwave Oven (Shanghai) Co.,Ltd, 898
Longdong Road, Pudong, Shanghai, 201203, China.
Ro-19
Panasonic Manufacturing U.K Ltd (PMUK)
Wyncliffe Road
Pentwyn Industrial Estate
Cardiff
CF23 7XB
UK
F00039G01EP