1
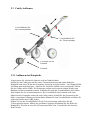
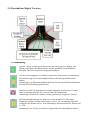
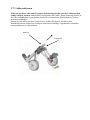
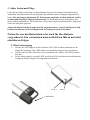
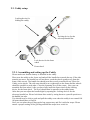
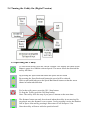
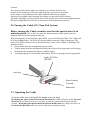
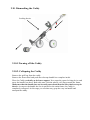
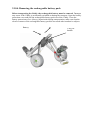
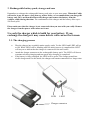
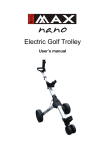
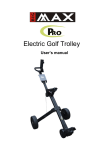
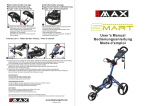
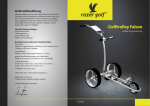
Electric Golf Trolley User’s manual Herzlichen Glückwunsch zum Kauf Ihres neuen Caddies! Dies ist der erste motorbetriebene Caddy, den Sie nicht mehr von einem normalen handgezogenen Cart unterscheiden können. Er sieht nicht nur so aus - er wird auch genauso genutzt. Der Auf- und Abbau erfolgt so, wie Sie es von einem handgezogenen Cart her kennen. Seine Antriebstechnik unterscheidet ihn jedoch völlig von diesen Carts. Sie werden die Leichtigkeit, mit dem Sie diesen Caddy handhaben, nicht mehr missen wollen. Er unterstützt Sie in Ihrem gesamten Spiel; bergauf und bergab, im ebenen und unebenen Gelände, bei Wind und Wetter. Nehmen Sie den Griff locker in die Hand und machen Sie alles wie gewohnt. Die intelligente Steuerung des Caddy sorgt dafür, daß Sie stets die volle Kontrolle haben. Die Geschwindigkeit wird mittles dugital Display eingestellt; Richtungsänderungen sind genau so mühelos wie vorher. Diese fortschrittliche Antriebstechnik ist darüberhinaus auf den ersten Blick nicht einmal zu erkennen! Bevor Sie nun aber mit Ihrem Caddy die erste Runde spielen, noch eine Bitte: Nehmen Sie sich ein wenig Zeit für die Bedienungsanleitung und beachten Sie die Sicherheitshinweise! Congratulations on your new Caddy! Your Caddy maintains all the benefits of a standard, manual cart. It is lightweight and collapsible, but provides incredible mobility on the golf course. The setup and dismantling is very similar to an average push/pull cart. You may use the Caddy like manually cart, however, the drive technology will amaze you! You will never want to be without the easy feeling of this new technology. The Caddy supports you throughout your game. Whether you are going uphill or downhill, in even or uneven terrain, or playing in a storm - this Caddy weathers it all. Take the handle loosely into your hand, proceed as you would with a manual cart, and you will have full control. The Speed is adjusted via the turn ring. Direction changes are effortless. The silent gearless motors offer top efficiency. They are invisibly located in the enclosed wheels, together with high quality ball bearings. Before you take the Caddy out on its first course, please read the operation instructions and security notes. 1. Sicherheitshinweise Während der Reise oder dem Transport in Fahrzeugen muß der Akku aus dem Caddy entfernt werden. Andernfalls sind Schäden möglich durch ein versehentliches Einschalten des Caddies. Das Steckernetzteil ist nur zur Verwendung in geschlossenen Räumen geeignet (vor Feuchtigkeit schützen). Die auf dem Steckernetzteil angegebene Netzspannung darf nicht überschritten werden. Das Steckernetzteil darf nur zum Laden der Akkus dieses Caddies verwendet werden. Bitte verwenden Sie nur Orginal-Akkus und Ladevorrichtungen. Andernfalls sind erhebliche Gesundheits- und Sachschäden nicht auszuschließen. Der Akku enthält 7 Lithium Ionen Batteriezellen mit einer Kapazität von bis zu 6800mAh bei 24 Volt. Der Akku darf in keinem Fall geöffnet werden. Batteriezellen, die Quecksilber, Cadmium oder Blei enthalten sind entsorgungspflichtig. Unbrauchbare Akkus sind den gesetzlichen Bestimmungen entsprechend zu entsorgen. Jede weitere Änderung am Gerät ist unzulässig und führt zum Verlust der Betriebserlaubnis sowie der Garantie. Unsachgemäßer Gebrauch schließt jegliche Gewährleistung aus! 2. Inbetriebnahme 2.1 Der erste Ladevorgang Der Akku ist im Lieferzustand nicht komplett geladen, daher laden Sie den Akku bitte vorher entsprechend der in Kap. 3 beschriebenen Vorgehensweise. 2.2 Akku einbauen Im Auslieferungszustand ist der Akku im Caddy eingebaut. Damit kein Strom während des Transportes zu Ihnen fließen kann ist eine Schutzfolie zwischen den Batteriekontakten und der Caddy-Elektronic. Bitte entfernen Sie diese vor Gebrauch. Im zusammen gefalteten Zustand können Sie den Akku in den Caddy schieben oder auch entfernene. Bitte schieben Sie den Akku in die Öffnung, bis dieser vollständig im Caddy verschwunden ist. Ein falsches Einbauen des Akkus ist nicht möglich. Batterie Bewegungsrichtung der Batterie Verschlußhebel zum öffnen des Caddies 2.3 Caddy Aufbauen Verschlußhebel für das zusammenfalten Verschlußhebel für die Telesscopstange Verschluß für das Frontrad Frontrad 2.3.1 Aufbauen der Hauptteile Vergewissern Sie sich das die Batterie sich im Caddy befindet. Stellen Sie den Caddy nun auf die untere Taschenarretierung und ziehen dann den Handgriff nach oben. Wenn die Seitenarme sich nicht bewegen wollen – der Handgriff läßt sich dann auch nicht bewegen - schieben Sie die Räder einfach etwas auseinander. Stellen Sie den Caddy auf die Räder. Die Seitenarme sollten nun in einem rechten Winkel zum Rahmen und auch zueinander stehen. Schließen Sie nun den Verschlußhebel in der Mitte. Nun können Sie das Frontrad montieren. Der Verschluß für das Frontrad sollte zum Montieren des Frontrades senkrecht zum Caddy stehen. Sobald Sie das Frontrad ein die dafür vorgesehene Öffnung geschoben haben können Sie den Verschlußheble schließen Er sollte nun paralle zum Caddy stehen. Öffnen Sie nun die Verschlußhebel für die Telesscopestange und ziehen Sie die Telesscopstange heraus. Mittles des gewählten Auszuges bestimmen Sie die Höhe des Handgriffes. Er sollte in einer für Sie bequemen Höhe sein. Verschließen Sie dann die Hebel wieder. Der Caddy sollte sich nun schon im ausgeschalteten Zustand fahren lassen, ohne daß dessen Teile einen losen Eindruck machen. Nun legen Sie den Golfbag in die vorgesehene Position und befestigen Sie ihn mit den Gurten. Achten Sie auf eine sichere Positionierung des Golfbags und einen festen Sitz der Gurte. 2.4 Einschalten (Digital Version) 2.5 Bedienung Um den Trolley zu aktivieren drücken Sie bitte den ON/OFF Button. Das Display wird dann den Batteriestatus und die gewählte Geschwindigkeit anzeigen. Der Pfeil zeigt die Bewegungsrichtung an Um die Geschwindigkeit zu erhöhen, drücken Sie den Speed Forward Button Zur Reduzierung der Geschwindigkeit drücken Sie den Speed Backward Button Anmerkung: Um Rückwärtszufahren drücken Sie den Speed Backward Button bis sich die Pfeilrichtung geändert hat Drücken Sie den Go/Stop Button um den Fahrmodus zu aktivieren. Um den Fahrt zu beenden drücken Sie erneut auf den GO/Stop Button Anmerkung: Drücken Sie mehrere Tasten gleichzeitig stoppet der Trolley! Die Distanzfunktion kann nur aktiviert werden wenn der Trolley steht! Einmaliges drücken erlaubt eine Distanze von ca. 5m, zweimaliges Drücken verdoppelt die Distanz auf ca. 10m, dreimaliges drücken erhöht die Distanz auf ca. 15m Anmerkung: Der Trolley wird mit der eingestellten Geschwindigkeit fahren ! Vorsicht: Aus Sicherheitsgründen stellen Sie bitte sicher, daß sich keinerlei Hindernisse oder Personen in der groben Laufrichtung befinden, und bleiben Sie immer in der Nähe Ihres Caddies, um rechtzeitig eingreifen zu können. Die Bewegungsrichtung kann sich z.B. durch Bodenunebenheiten oder verborgene Hindernisse wie Golfbälle plötzlich und gänzlich ändern auch ist eine gewisse Abweichung von der idealen Geraden durch Fertigungstoleranzen nicht aus zu schließen! 2.6 Reinigung Ist der Caddy verschmutzt, reinigen Sie ihn mit einem milden Reinigungsmittel und warmem Wasser. Benutzen Sie niemals einen konzentrierten Luft oder Wasserstrahl oder Hochdruckreiniger in der Nähe der Motoren. Die Benutzung eines HOCHDRUCKREINIGERS ist nicht zulässig Ist der Caddy nach dem Spiel oder der Reinigung naß, sollten Sie ihn trockenwischen. Da sich die Motoren in den Rädern befinden, sollten Sie tiefe Wasserbereiche (Tauchbecken) meiden. Die maximale Wasserhöhe darf die Motoren nicht erreichen, da sonst Wasser in die Motoren eindringt, welches diese zerstören würde! 2.7 Caddy abbauen / zusammenlegen Öffner 2.7.1 Ausschalten Um den Trolley zu deaktivieren drücken Sie bitte den ON/OFF Button. Die LED auf dem Display werden nun verschwinden und der Caddy ist ausgeschaltet. 2.7.2 Zusammenfalten Lösen Sie die Gurte und entfernen Sie die Golftasch vom Caddy. Nun entfernen Sie das Frontrad und schieben Sie die Telesscopstange vollständig ein. Stellen Sie den Caddy senkrecht auf seine untere Taschenarretierung und öffnen Sie den mittleren Öffner. Halten Sie nun den Caddy am Handgriff und bewegen Sie diesen nach unten. Die beiden Seitenarme mit den Rädern klappen nun in Richtung des Rahmens. Achten Sie darauf das sich der Handgriff leicht bewegen läßt und die Seitenräder sich in der Luft befinden. Sobald der Handgriff parallel zum unterem Rahmen liegt, ist der Caddy vollständig zusammengefaltet. Nun können Sie den Caddy am Tragegriff sicher tragen. 2.7.3 Akku entfernen Während der Reise oder dem Transport in Fahrzeugen sollte stets der Akku aus dem Caddy entfernt werden. Anderenfalls sind Schäden am Caddy, Ihrem Fahrzeug oder an in der Nähe befindlichen Gegenständen durch ein versehentliches Einschalten des Gerätes nicht auszuschließen! Ziehen Sie den Akku aus dem Caddy heraus. Achten Sie darauf, daß die beiden Kontaktflächen am Akku beim Transport nicht durch leitfähige Gegenstände verbunden (kurzgeschlossen) werden können. Batterie Tragegriff 3. Akku, Laden und Pflege Laden Sie den Akku rechtzeitig vor dem nächsten Spiel auf. Sie können ihn natürlich auch unmittelbar nach Spielende oder am folgende Tag aufladen und am Ladegerät angeschlossen lassen. Bei sehr langen Spielpausen zB. Winterpause empfehlen wir den Akku nur zu 50% zu laden und dann das Ladegerät abzutrennen. Die Kombination diese Ladegerätes und dieses Akkus ermöglicht ca. 500 Ladezyklen. (Mit jedem erneute Anschließen des Ladegerätes wird ein Ladezyklus gestartet) Achten Sie darauf, daß das Ladegerät nicht angeschlossen ist, wenn Sie mit Ihrem Caddy losfahren! Entfernen Sie bei Nichtgebrauch das Ladegerät aus der Steckdose! Nutzen Sie nur den Batterielader der auch für Ihre Batterie vorgesehen ist. Ein vertauschen kann zu Defekten führen mit nicht absehbaren Folgen. 3.1 Der Ladevorgang Stecken Sie ihr Ladegerät in die Steckdose. Die LED1 leuchtet permanent rot als Signal für Spannung. Die LED2 blinkt rot wärend des Startprocesses des Laders. Stecken Sie nun den Ladestecker in die Ladebuchse des Akkus. Die LED2 leuchtet nun Rot. Ist der Akku geladen, wechselt LED2 von Rot auf Grün. In diesem Zustand kann das Ladegerät auch für längere Zeit angeschlossen bleiben. LED 1 Ladebuchse LED 2 Bemerkung: Blinkt die LED2 des Ladegerätes Rot ist ein Fehler aufgetreten. Überprüfen Sie die Steckverbindungen. Entfernen Sie das Kabel zur Batterie und stecken Sie es dann erneut ein. Sollte die LED2 weiterhin Blinken hat entweder die Batterie oder das Ladegerät einen Fehler erzeugt. Dieses kann auch eine minimale höhere Spannung der Batterie sein. Dieses können Sie selbst prüfen. Stecken Sie die Batterie in den Caddy. Sollte die LED nun grün aufleuchten ist die Batterie Ok hat aber für den Ladevorgang die zulässige Spannung erreicht. Dieses führt zum blinken der LED2. Die Caddyelektronik ist gegen zu hohe Spannung ebenfalls geschützt so dass durch diese Überprüfung kein Schaden am Caddy entstehen kann. Sie können nun ganz beruhigt Ihr Golfspiel starten. Die Batterie ist OK und vollständig geladen. Sollte die LED im Caddy aber nicht Grün zeigen ist die Batterie defekt. Ziehen Sie ihr Ladegerät ebenfalls aus der Steckdose und schicken Sie dieses zusammen mit Ihrem Akku an einen autorisierten Vertragshändler zurück. Sollte ein Herstellungsdefekt innerhalb der zwei jährigen Garantiezeit vorliegen, werden die defekten Teile natürlich für Sie kostenlos instandgesetzt oder ausgetauscht. Eine fehlerhafte Batterie kann zu Schäden am Caddy führen. Bitte achten Sie darauf und entfernen Sie die schadhafte Batterie sofort aus dem Caddy. Eine beschädigte Batterie zB. Gehäuseverformungen/Risse darf nicht versandt werden. Bitte halten Sie in diesem Falle Rücksprache mit ihrem Händler. 3.2 Akkupflege Der Akku verfügt über eine selbstrückstellende Sicherung gegen Kurzschluß (z.B. Verbindung zwischen den beiden Kontakten). Dadurch ist die Elektronik des Caddies und die Batteriezellen geschützt. Sobald der Kurzschluß beseitigt ist, repariert sich die Sicherung gewissermaßen von selbst. Das Ladegerät ist optimal auf diesen Akku abgestimmt. Es überwacht die maximale Spannung und die gesamte Ladezeit. Die Elektronik des Caddies enthält eine Temperatur- und Spannungsüberwachung, um Elektronik, Motoren und Akku während des Betriebes nur unter optimalen Bedingungen zu betreiben. Wird der Caddy im Betrieb plötzlich „schwach“, kann dies zwei Ursachen haben. Entweder ist die Batterie leer (dann dürfte die Lampe/LED ständig rot leuchten), oder die Elektronik ist durch große Belastungen stark erhitzt (dies dürfte dann der Fall sein, wenn die LED im Ruhezustand gelb oder grün leuchtet). Darüber hinaus können Sie noch selbst zu einer langen Lebensdauer des Akkus beitragen: Nicht schweren Stößen aussetzen oder fallenlassen. Bei niedrigen Temperaturen lagern. ZB. 5° bis 10°C 4. Problemlösungen und Tips 4.1 Generelle Probleme und Tips In seltenen Fällen treten Produktionsfehler auf, die sich aber meist in den ersten zwei bis drei Monaten des Gebrauches bemerkbar machen. Ihr Caddy Vertragshändler kann Ihnen sicherlich schnell mit einer Lösung weiter helfen. Um Ihnen aber längere Wartezeiten zu ersparen, haben wir eine Tabelle mit möglichen Fehlerquellen erstellt. Der Caddy läßt sich nur schwer bewegen Sie stehen an einem zu großen Hindernis für die Motoren. Versetzen Sie den Caddy oder suchen Sie sich einen anderen Weg. Der Caddy kann sich auch nach stärkerer Belastung vor interner Überhitzung schützen. Eine geringere Belastung läßt ihn dann nach einiger Zeit wieder abkühlen und stärker werden. Der Caddy hat sich selber ausgeschaltet Die Batterie schützt sich gegen zu hohe Belastung und schaltet sich bei Überstrom selbständig aus. Sie können den Caddy aber sofort wieder Einschalten. Um diesen Vorgang zuvermeiden sollten Sie sich nicht den Berg hinauf ziehen lassen. Diese kann zu einer Überlastung der Batterie führen Der Caddy reagiert nicht auf Eingabe am Display Schalten Sie den Caddy AUS und wieder EIN. Sollte Sie keine Veränderung des Zustandes erhalten, schalten Sie den Cadddy AUS Er läßt sich nun wie ein normales Cart ziehen oder schieben. Sie haben aber keinerlei Unterstützung durch die Motoren mehr. Anbauteile oder andere Teile des Caddies sind lose Anbauteile oder andere Teile des Caddies sind gebrochen Ziehen Sie die Schrauben nach, so daß eine sichere Funktion gewährleistet ist. Lassen Sie die Teile durch Originalteile ersetzen. Congratulations on your new Caddy! Your Caddy maintains all the benefits of a standard, manual cart. It is lightweight and collapsible, but provides incredible mobility on the golf course. The setup and dismantling is very similar to an average push/pull cart. You may use the Caddy like manually cart, however, the drive technology will amaze you! You will never want to be without the easy feeling of this new technology. The Caddy supports you throughout your game. Whether you are going uphill or downhill, in even or uneven terrain, or playing in a storm - this Caddy weathers it all. Take the handle loosely into your hand, proceed as you would with a manual cart, and you will have full control. The intelligent microprocessor control will adapt automatically to your walking speed. Direction changes are effortless. If you take your hand off the sensor, the Caddy will stop immediately. The silent gearless motors offer top efficiency. They are invisibly located in the enclosed wheels, together with high quality ball bearings. Before you take the Caddy out on its first course, please read the operation instructions and security notes. 1. Security notes Before traveling or transporting the Caddy, the rechargeable battery should be removed. Damages are possible should the system be accidentally turned on. The charger should only to be used indoors and should be protected against moisture. The indicated main input voltage on the charger must not be exceeded. The charger is solely designed for use with the rechargeable battery pack. We recommend using only original rechargeable batteries and charger devices. Otherwise, health and property damages may occur. The rechargeable battery contains 7 Lithium Ionen battery cells which equals to a capacity up to 6800 mAh at 24 Volts. Never tamper with the rechargeable battery. Battery cells are subject to special waste disposal. Useless rechargeable batteries should be disposed of properly. Do not tamper with the Caddy. This may lead to a malfunction which will cause a problem in the operation of the Caddy. Improper use will render the warranty null and void! 2. Prior to Operation of the Caddy 2.1. The first charging process The rechargeable battery pack is in the delivery stage not completly charged. Therefore, charge the battery pack according to the instructions in section 3. 2.2. Inserting the rechargeable battery pack While in deleavery stage the battery is installed in the caddy. To prevent any current flow there is a protection layer over the battery contacts. Please remove this before use. When the caddy is in its folded stage you can insert ore remove the battery. Please push the rechargeable battery pack into the opening until it is completely inserted. You will find that it is not possible to place the rechargeable battery pack the wrong way into the caddy. Batterie Direction for the battery movements Locking device for opening the caddy 2.3. Caddy setup Locking device for folding the caddy Locking device for the telescope handel bar Lock device for the front wheel Front wheel 2.3.1. Assembling and setting up the Caddy Please make sure that the battery is installed in the caddy. Place now the caddy on the lower end and pull the handle bar towards the top. If the side arms do not move, the handle bar will not move; push the wheels gently away from the frame if this occurs. The handle bar should now move easily towards the top. Place the Caddy on its wheels. The side arms should be at a right angle to the frame and the wheels should be parallel to each other. Close the fastening lever at the center. Now you can assemble the front wheel. After you have fully insert the front wheel tilt the locking device for the front wheel . The level should now be parralle to the caddy frame. After that you can adjust the handle hight by opening the locking devices for the telescope handle bar. Please lock them after wards by turing them to a parralle position to the handle bar tube. You should now be able to push and pull the caddy even when the caddy is not turned ON. All parts should have a firm fit. Now you can place the golf bag on the bag support tray and fix it with the straps. Please ensure a proper seating of the golf bag and that the straps have a tied sit. 2.4 Turning the Caddy On (Digital Version) 2.5 Operating the Caddy To activate the trolley press the ON/OFF button. The display will show up the Batterie gauge level and the selected speed. The arrow shows the dirction the trolley will move By pressing the Speed forward button the speed will be raised By pressing the Speed backward button the speed will be reduced. Note to run backwards press the Speed Backwards button so that the arrow shows in backwards direction For let the trolley move press the GO / Stop button. To Stop the Trolley press the GO/Stop button. Note: The trolley will also stop if you press 2 buttons at the same time. The distance button can only be activated when the trolley in not moving. By pressing it once the distance is set to aprox. 5m by pressing it twice the distance will be aprox 10m and by pressing it three times it will be aprox. 15m. Note the trolley will move with the speed selected! Caution: For safety reasons, please make sure that there are neither obstacles nor persons in the rough travel direction and do always stay in close proximity to the caddy. It is possible that the caddy suddenly and entirely changes direction, for example when running over bumps or concealed objects such as golf balls! Although we but the most effort in the quality there can be misalignments from the ideal straight direction line due to tolerances in the manufacture process 2.6.Turning the Caddy ON (Turn Poti System) Before turning the Caddy on make sure that the speed control is in neutral postion. This is the case when the neutral postion of the speed control is angaged with the internal spring loaded pin. By pressing gently on the indicator light (LED), you switch ON the Caddy. The Caddy will be in the standby mode. The LED will always indicate that the Caddy is turned on. The color of the LED will also tell you about the battery status of the Caddy. A flashing LED indicates a fault. Green means that the rechargeable battery is full. Yellow means that the rechargeable battery has delivered its largest part of the energy. Red means the rechargeable battery is almost empty. A blinking light gives you further information. See error messages in the supplement. Light / LED for: ON/OFF Start/Stop Speed control Forward Backward 2.7. Operating the Caddy Grasp the rubber part of the handle bar loosely with your hand. By turning the speed control in forward direction the Caddy will move in the forward direction. If you want to stop you, you have to turn the speed control into its neutral postion. By turning the speed control in backwards direction the Caddy will move in the backward direction until you turn it back into its neutral postion Avoid jeopardizing or hindering maneuvers. Be aware that the Caddy has more power than you actually sense. When stopping on uneven terrain, place the Caddy so that it cannot tip or roll. Park it with its side oriented to the slope. Like a manual cart, it has no parking brake! Do not leave the Caddy unattended in the ON position (you would not leave your car with the motor running, would you?). 2.8. Cruise control / automatic travel mode By pressing the Start/Stop switch, the caddy will activate an automatic travel mode. The caddy will slowly speed up intill its reach the speed you have selected with the speed control. It will move into the selected direction! By turning the speed control the speed can be continuously accelerated or deacclerated. If reaching the neutral postion the caddy will stop. After turning again the speed control the caddy will start moving agin into the selected direction. If you wish to keep the selected speed and direction but need to stop, press the Stop/Stop switch and the caddy will stop. When you can continoue your game just press the Stop/Stop switch again and the caddy will resume the selected speed slowly. Caution: For safety reasons, please make sure that there are neither obstacles nor persons in the rough travel direction and do always stay in close proximity to the caddy. It is possible that the caddy suddenly and entirely changes direction, for example when running over bumps or concealed objects such as golf balls! Although we but the most effort in the quality there can be misalignments from the ideal straight direction line due to tolerances in the manufacture process 2.9. Cleaning the Caddy If the Caddy is dirty, clean it with a mild cleaner and warm water. Never use a concentrated air or water jet or high pressure water cleaner. If the Caddy is damp after the game or after the cleaning, dry it with a towel. Do not use a HIGHPRESSURE water hose. It will damage the caddy Because the motor is located in the wheels, deep water areas should be avoided under all circumstances. Water levels must not reach the wheel’s center. This will cause damage to the motor! 2.10. Dismantling the Caddy Locking device 2.10.1.Turning off the Caddy 2.10.2. Collapsing the Caddy Remove the golf bag from the caddy Remove the front wheel and push the telescope handle bar complete inside. Place the Caddy vertically on its lower support. Now open the center locking device and move the handle bar down. Both side arms, with the wheels, will flap towards the frame. Make sure that the handle bar can be easily moved and that the side wheels are up in the air. As soon as the handle bar lies in parallel to the main frame, the Caddy is completely collapsed. At this stage you can than easy grap the carry on handle and transport the caddy. 2.10.4. Removing the rechargeable battery pack Before transporting the Caddy, the rechargeable battery must be removed. Damages may occur if the Caddy is accidentally switched on during the transport. Open the battery protection cover and pull the rechargeable battery pack out of the Caddy. Close the battery protection cover. Always, in particular during transportation, make sure that the electric contacts of the rechargeable battery pack do not touch other conductive objects. Battery Carry on handle 3. Rechargeable battery pack, storage and care Remember to recharge the rechargeable battery pack prior to your next game. When the Caddy will not be in use for more a long time e.g winter brake, we recommend that you charge the battery only 50% and than disconnect the charger and remove the battery from the caddyhe caddy during that time. The combination of the charger and the battery allow up to 500 load cycles. Please make sure that the charger is not connected when you start with you caddy. Remove the charger from the power outlet when not in use. Use only the charger which is build for your battery. If you exchange the charger it may cause defects with can not be forseen. 3.1. The charging process Plug the charger into a suitable mains supply outlet. Yet the LED1 and LED2 will go to red. While LED2 will be blinking after the initial process is completed the LED1 will stay on to indicat that the charger is connected to the wall outlet. Attach the charger connector to the rechargeable battery pack. The LED2 will show a constant red when charging and turn green after charging is completed If the battery is fully recharged, the LED2 will be green. The charger turned into trickle charge mode. In this mode, the charger can remain connected for a longer time. LED1 LED2 Charger connector Comment: If the LED2 on the charger blinks quickly after connected to the battery, an error during the startup process has occurred. Disconnect the charger from the battery and try to connect it again. If the LED2 still blinks it could be due to the fact that the battery has reached its upper charge limits. You can check for your self if this it the case. Simply place the battery to the caddy and switch on the trolley. If the LED of the trolley is green the battery is fully charged and has reached it upper limit. You can now start with your golf play. (The Caddy electronic is protected agains over voltage from the battery and will show at the Caddy LED its status). If the tolley LED does not show green than the battery and charger are damaged. Please send the charger and battery to a authorized contract dealer. Should a defect be found which is covered by the warranty, a cost-free repair or exchange of the defective part will be issued. Remove damaged battery packs immediately because they can damage the caddy. 3.2. Rechargeable battery pack care The rechargeable battery pack has a self resetting semiconductor fuse which protects against short circuits (e.g. accidental connection between both contacts). The Caddy’s electronics and battery cells are, therefore, protected. As soon as the short circuit is removed, the fuse resets and the rechargeable battery pack is functional again. Our charger is designed specifically for use with this rechargeable battery pack. Again, do not ever use a different charger! The charger supervises the maximum input power and the total charging time. You can contribute to a long life of the rechargeable battery pack: Avoid any type of shock. For example, do not drop the Caddy, nor the battery pack. Store at room temperature. 4. Problem solving and tips 4.1. General Problem solving and tips If the Caddy suddenly becomes “weak” during operation, there can be two causes. The battery is either empty (and the light/LED may be permanently red), or the electronics of the caddy are over heated (this might then be the case, if the light/LED is in the yellow or green stage.) In rare cases, production failures can occur. These will be noticeable usually in the first two to three months of use. Your Caddytec contract dealer can certainly help you quickly with a solution. However, in order to save you time, see the table below for possible errors and solutions. The Caddy can only be moved heavily You are facing difficult terrain eg. the caddy Motor or front wheel is inside a hole. Remove the caddy manual and try a different way. The Caddy can protect itself against internal overheating. Switch OFF the caddy and wait until it cooled down. A slighter load condition will also cool off the Caddy. The Caddy has switched it self off The battery has a self protection against overload. You can switch On the caddy immediately. To avoid this please to not let the caddy pull you uphill. This might cause a overload for the battery The Caddy does not react on the input at the display Switch OFF and On the caddy If you still have not a reaction than please switch Off the caddy The caddy can then be maneuvered and still be used like a manual cart. However, you have no electric support. Parts or sub components of the Caddy are loose Parts or sub components of the Caddy are broken Fasten all screws so a secure function is guaranteed. Replace the parts or sub components with original parts.