1
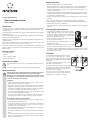
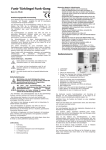
•Das Produkt darf keinen extremen Temperaturen, starken Vibrationen
oder starken mechanischen Beanspruchungen ausgesetzt werden.
•Betreiben Sie das Produkt nur in gemäßigtem Klima, aber nicht in tropischem Klima.
•Das Produkt gibt bei Aktivierung einen lauten Alarmton ab. In verschiedenen Ländern gibt es hierfür Einschränkungen für die Lautstärke oder die
Alarmdauer. Beachten Sie ggf. örtliche Vorschriften.
Batterie-Hinweise
D Bedienungsanleitung
Tür- und Fensteralarm
Best.-Nr. 1227482
Bestimmungsgemäße Verwendung
Das Produkt dient als Überwachungsgerät für Türen oder Fenster. Beim Öffnen der Tür
oder des Fensters löst ein Magnetkontakt einen Alarm aus und das Gerät gibt einen
lauten Alarmton ab.
Der Zeitraum zwischen Auslösung des Magnetkontakts und Alarmton ist einstellbar
(0, 10 oder 20 Sekunden).
Der Alarmton kann durch Eingabe eines 4stelligen Passworts (veränderbar) vorzeitig
beendet werden.
Die Stromversorgung des Produkts erfolgt über Batterien.
Die Sicherheitshinweise und alle anderen Informationen dieser Bedienungsanleitung
sind unbedingt zu beachten.
Eine andere Verwendung als zuvor beschrieben, führt zur Beschädigung dieses Produktes, darüber hinaus ist dies mit Gefahren, wie z.B. Kurzschluss, Brand, elektrischer
Schlag etc., verbunden.
Dieses Produkt erfüllt die gesetzlichen, nationalen und europäischen Anforderungen.
Alle enthaltenen Firmennamen und Produktbezeichnungen sind Warenzeichen der jeweiligen Inhaber. Alle Rechte vorbehalten.
Lieferumfang
• Tür-/Fensteralarm
• Magnet
• 3 Knopfzellen (Typ „LR44“)
• Bedienungsanleitung
Symbol-Erklärungen
Dieses Symbol weist Sie auf besondere Gefahren bei Handhabung, Betrieb
oder Bedienung hin.
Das „Pfeil“-Symbol steht für spezielle Tipps und Bedienhinweise.
Sicherheitshinweise
Bei Schäden, die durch Nichtbeachten dieser Bedienungsanleitung verursacht werden, erlischt die Gewährleistung/Garantie! Für Folgeschäden
übernehmen wir keine Haftung!
ei Sach- oder Personenschäden, die durch unsachgemäße Handhabung
B
oder Nichtbeachten der Sicherheitshinweise verursacht werden, übernehmen wir keine Haftung. In solchen Fällen erlischt die Gewährleistung/Garantie.
a) Allgemein
•Aus Sicherheits- und Zulassungsgründen (CE) ist das eigenmächtige Umbauen und/oder Verändern des Produkts nicht zulässig.
•Das Produkt ist kein Spielzeug, es gehört nicht in Kinderhände! Kinder
können die Gefahren, die im falschen Umgang mit elektrischen Geräten
auftreten können, nicht einschätzen. Außerdem enthält das Produkt Kleinteile und Batterien. Lassen Sie deshalb in Anwesenheit von Kindern besondere Vorsicht walten!
•Lassen Sie das Verpackungsmaterial nicht achtlos liegen, dieses könnte
für Kinder zu einem gefährlichen Spielzeug werden.
• Sollten Sie noch Fragen haben, die in dieser Bedienungsanleitung nicht
beantwortet werden, so wenden Sie sich bitte an uns oder an einen anderen Fachmann.
b) Montage, Anschluss und Betrieb
•Das Produkt darf nur in trockenen, geschlossenen Innenräumen montiert
und betrieben werden. Das Produkt darf nicht feucht oder nass werden.
•Verwenden Sie das Produkt nicht in Räumen oder bei widrigen Umgebungsbedingungen, wo brennbare Gase, Dämpfe oder Stäube vorhanden
sind oder vorhanden sein können! Es besteht Explosionsgefahr!
• Batterien gehören nicht in Kinderhände.
• Lassen Sie Batterien nicht offen herumliegen, es besteht die Gefahr, dass diese von
Kindern oder Haustieren verschluckt werden. Suchen Sie im Falle eines Verschluckens sofort einen Arzt auf.
• Ausgelaufene oder beschädigte Batterien können bei Berührung mit der Haut Verätzungen verursachen, benutzen Sie deshalb in diesem Fall geeignete Schutzhandschuhe.
• Aus Batterien auslaufende Flüssigkeiten sind chemisch sehr aggressiv. Gegenstände oder Oberflächen, die damit in Berührung kommen, können teils massiv beschädigt werden. Bewahren Sie Batterien deshalb an einer geeigneten Stelle auf.
• Batterien dürfen nicht kurzgeschlossen, zerlegt oder ins Feuer geworfen werden. Es
besteht Explosionsgefahr!
• Herkömmliche nicht wiederaufladbare Batterien dürfen nicht aufgeladen werden,
Explosionsgefahr!
• Mischen Sie keine Batterien mit unterschiedlichem Zustand (z.B. volle und halbvolle
Batterien).
• Wechseln Sie immer den ganzen Satz Batterien aus.
• Achten Sie beim Einlegen der Batterien auf die richtige Polung (Plus/+ und Minus/beachten).
Batterien einlegen, Batteriewechsel
• Öffnen Sie das Batteriefach auf der Vorderseite des
Tür-/Fensteralarms, indem Sie die einzelne Befestigungsschraube des Batteriefachdeckels herausdrehen.
Anschließend kann der Batteriefachdeckel nach unten
in Pfeilrichtung geschoben werden.
• Legen Sie drei Batterien vom Typ „LR44“ polungsrichtig
ein (Plus/+ und Minus/- beachten).
Der Pluspol der Batterien muss nach außen zu Ihnen hin
zeigen, siehe Bild rechts.
• Schieben Sie den Batteriefachdeckel auf und drehen
Sie die zu Beginn entfernte Schraube wieder ein.
• Ein Batteriewechsel ist erforderlich, wenn der Tür-/Fensteralarm nur noch sehr leise ist oder nicht mehr funktioniert. Bei schwachen Batterien blinkt außerdem die
LED alle 3 Sekunden kurz auf.
Montage
Der Tür-/Fensteralarm und der Magnet können auf
eine glatte, saubere, fett- und staubfreie Oberfläche geklebt werden. Ziehen Sie dazu die Schutzfolie auf der Rückseite ab und drücken Sie den Tür-/
Fensteralarm bzw. den Magnet fest an.
Der Magnet kann entweder links oder rechts vom
Tür-/Fensteralarm montiert werden.
Der Abstand zwischen dem Magnetkontakt im
Tür-/Fensteralarm und dem Magnet sollte nicht
größer sein als 5 mm, um eine sichere Funktion zu
gewährleisten. Ein Höhenversatz ist nicht zulässig.
Einer der Pfeile des Magnets muss direkt auf den
Pfeil links oder rechts am Tür-/Fensteralarm zeigen, siehe Bild rechts.
<5 mm
<5 mm
Bedienung
f) Panik-Funktion
a) Tür-/Fensteralarm scharfschalten
• Um den Alarmton sofort auszulösen (z.B. bei einem Überfall), halten Sie die Taste
„P“ für 2 Sekunden gedrückt. Der Alarm wird für die Dauer von 30 Sekunden aktiviert.
• Drücken Sie kurz die Taste „P“. Die rote LED leuchtet 3x kurz auf und es werden
zeitgleich 3 Pieptöne ausgegeben.
• Nach 5 Sekunden leuchtet die LED 1x kurz auf und es wird ein einzelner Piepton
ausgegeben.
Der Tür-/Fensteralarm ist nun scharfgeschaltet.
Wird die Tür oder das Fenster geöffnet und entfernt sich der Magnet zu weit vom
Magnetkontakt, so wird ein Alarmton ausgegeben.
Der Zeitraum zwischen Auslösung des Magnetkontakts und Alarmton ist
einstellbar (0, 10 oder 20 Sekunden), siehe unten. In der Grundeinstellung ab
Werk ist eine Zeit von 0 Sekunden eingestellt.
b) Tür-/Fensteralarm deaktivieren
• Geben Sie das Passwort ein und drücken Sie die Taste „P“. In der Grundeinstellung
ist das Passwort „1234“.
• Die LED leuchtet auf und ein langer Piepton wird ausgegeben. Danach ist der Tür-/
Fensteralarm deaktiviert.
Wenn ein falsches Passwort eingegeben wird (etwa „4321“ anstatt „1234“,
so gibt der Tür-/Fensteralarm ein kurzes Tonsignal aus.
Wird 3x nacheinander das falsche Passwort eingegeben, so erfolgt die Auslösung des Alarmtons.
c) Passwort ändern
Eine Änderung des Passworts der Grundeinstellung („1234“) ist nur dann
möglich, wenn der Tür-/Fensteralarm deaktiviert ist, siehe b).
• Halten Sie die Taste „1“ für etwa 2 Sekunden gedrückt. Anschließend wird ein einzelner Piepton ausgegeben. Lassen Sie die Taste wieder los.
• Geben Sie das alte Passwort ein (in der Grundeinstellung „1234“), es werden 2 Pieptöne ausgegeben.
• Geben Sie nun das neue Passwort ein, z.B. „4321“, es werden 3 Pieptöne ausgegeben.
Das Passwort ist nun geändert.
Werden die Batterien entfernt oder gewechselt, geht die Einstellung verloren und das Passwort wird auf die Grundeinstellung „1234“ zurückgesetzt.
Wenn Sie das Passwort vergessen, so entnehmen Sie einfach die Batterien
für ein paar Sekunden und legen Sie sie wieder ein.
Beachten Sie dass das Passwort immer vierstellig sein muss, also z.B.
„4321“ oder „2222“.
d) Zeitverzögerung einstellen
• Um den Alarm zu beenden, geben Sie das richtige Passwort ein und drücken Sie die
Taste „P“.
Wartung und Reinigung
• Das Produkt ist für Sie bis auf einen gelegentlichen Batteriewechsel wartungsfrei.
• Äußerlich sollte das Produkt nur mit einem sauberen, weichen, trockenen Tuch abgewischt werden.
Verwenden Sie auf keinen Fall aggressive Reinigungsmittel oder chemische
Lösungen, da dadurch das Gehäuse angegriffen (Verfärbungen) oder die
Funktion beeinträchtigt werden könnte.
Entsorgung
a) Allgemein
Entsorgen Sie das Produkt am Ende seiner Lebensdauer gemäß den gelten-
den gesetzlichen Bestimmungen.
Entnehmen Sie evtl. eingelegte Batterien und entsorgen Sie diese getrennt
vom Produkt.
b) Batterien und Akkus
Als Endverbraucher sind Sie gesetzlich (Batterieverordnung) zur Rückgabe aller gebrauchten Batterien und Akkus verpflichtet; eine Entsorgung über den Hausmüll ist
untersagt.
Schadstoffhaltige Batterien, Akkus sind mit nebenstehendem Symbol gekennzeichnet, das auf das Verbot der Entsorgung über den Hausmüll hinweist. Die Bezeichnungen für das ausschlaggebende Schwermetall sind Cd
= Cadmium, Hg = Quecksilber, Pb = Blei.
Verbrauchte Batterien, Akkus sowie Knopfzellen können Sie unentgeltlich bei den
Sammelstellen Ihrer Gemeinde, unseren Filialen oder überall dort abgeben, wo Batterien/Akkus/Knopfzellen verkauft werden.
Sie erfüllen damit die gesetzlichen Verpflichtungen und leisten Ihren Beitrag zum Umweltschutz.
Technische Daten
Stromversorgung................................ 3 Batterien vom Typ „LR44“
Lautstärke des Alarmtons................. 100 dB
Zeitverzögerung.................................. Einstellbar (0, 10 oder 20 Sekunden; Grundeinstellung 0 Sekunden)
Nach dem Auslösen des Magnetkontakts (wenn sich beim Öffnen der Tür oder des
Fensters der Magnet vom Magnetkontakt im Tür-/Fensteralarm weit genug entfernt)
wird in der Grundeinstellung sofort Alarm ausgelöst.
Passwort.............................................. 4stellig (Grundeinstellung „1234“)
Möchten Sie jedoch z.B. eine Wohnungstür absichern, können Sie eine Zeitverzögerung von 10 oder 20 Sekunden einstellen. So haben Sie genug Zeit, das Passwort einzugeben, ohne dass Alarm ausgelöst wird.
Abmessungen...................................... 85 x 46 x 9 mm (B x H x T)
Umgebungsbedingungen.................. Temperatur 0 °C bis +40 °C, Luftfeuchte 10% bis
90% relativ, nicht kondensierend
Gewicht................................................ 30 g
Die Einstellung der Zeitverzögerung ist nur dann möglich, wenn der Tür-/
Fensteralarm deaktiviert ist, siehe b).
• Zeitverzögerung 0 Sekunden:
Halten Sie die Taste „3“ und „4“ gleichzeitig für 5 Sekunden gedrückt, bis die LED
aufleuchtet und ein langes Tonsignal ausgegeben wird.
• Zeitverzögerung 10 Sekunden:
Halten Sie die Taste „3“ für 5 Sekunden gedrückt, bis die LED aufleuchtet und ein
langes Tonsignal ausgegeben wird.
• Zeitverzögerung 20 Sekunden:
Halten Sie die Taste „4“ für 5 Sekunden gedrückt, bis die LED aufleuchtet und ein
langes Tonsignal ausgegeben wird.
Werden die Batterien entfernt oder gewechselt, geht die Einstellung verloren und die Zeitverzögerung wird auf die Grundeinstellung „0 Sekunden“
zurückgesetzt.
e) Alarmauslösung
Ist der Tür-/Fensteralarm scharfgeschaltet und wird die Tür oder das Fenster geöffnet,
so startet nach Ablauf der Zeitverzögerung der Alarmton.
Ist die Tür oder das Fenster nach 30 Sekunden immer noch nicht geschlossen, so
startet der Alarm nach Ablauf der Zeitverzögerung erneut.
Ist als Zeitverzögerung „0 Sekunden“ eingestellt (Grundeinstellung), wird
sofort Alarm ausgelöst.
Haben Sie als Zeitverzögerung „10 Sekunden“ oder „20 Sekunden“ eingestellt, so blinkt in dieser Zeit die rote LED schnell und erst danach wird der
Alarm ausgelöst. Geben Sie während dieser Zeitverzögerung das richtige
Passwort ein (anschließend mit der Taste „P“ bestätigen), so ist der Tür-/
Fensteralarm deaktiviert.
Dies ist eine Publikation der Conrad Electronic SE, Klaus-Conrad-Str. 1, D-92240 Hirschau (www.conrad.com).
Alle Rechte einschließlich Übersetzung vorbehalten. Reproduktionen jeder Art, z. B. Fotokopie, Mikroverfilmung, oder die Erfassung in
elektronischen Datenverarbeitungsanlagen, bedürfen der schriftlichen Genehmigung des Herausgebers. Nachdruck, auch auszugsweise, verboten. Die Publikation entspricht dem technischen Stand bei Drucklegung.
© Copyright 2014 by Conrad Electronic SE.
Battery instructions
• Batteries should be kept out of the reach of children.
• Do not leave batteries lying around in the open; there is a risk of them being swallowed by children or pets. If they are swallowed, consult a doctor immediately.
• Leaking or damaged batteries can lead to caustic burning of the skin. Therefore, use
suitable protective gloves.
• Liquids leaking from batteries are very chemically aggressive. Objects or surfaces
coming into contact with these liquids might be considerably damaged. Therefore,
store batteries in a suitable location.
G Operating Instructions
Door and window alarm
Item no. 1227482
• Batteries must not be short-circuited, opened or thrown into a fire. There is a risk of
explosion!
• Do not recharge standard, non-rechargeable batteries, danger of explosion!
• Do not mix batteries with different charges (e.g. flat and half-discharged batteries).
• Always replace the entire set of batteries.
Intended use
• Please pay attention to the correct polarity (plus/+ and minus/-) when inserting the
batteries.
The product is used as a surveillance device for doors and windows. When the door
or the window is opened, a magnetic contact triggers the alarm, and the device emits
an audible alarm.
Inserting/replacing the batteries
The time between the activation of the magnetic contact and the alarm can adjusted
(0, 10 or 20 seconds).
The alarm can be stopped at an early stage by entering a 4-digit password (changeable).
The product is powered by batteries.
Always observe the safety instructions and all other information included in these operating instructions.
Any use other than that described above could lead to damage to this product and
involves the risk of short circuits, fire, electric shock, etc.
This product complies with the applicable national and European requirements. All
names of companies and products are the trademarks of the respective owners. All
rights reserved.
Package contents
• Door/window alarm
• Magnet
• 3 coin cells (type “LR44”)
• Operating instructions
Explanation of symbols
This symbol indicates specific risks associated with handling, function and
use.
The “arrow” symbol indicates special tips and operating information.
Safety Instructions
amages due to failure to follow these operating instructions will void the
D
warranty! We do not assume any liability for any resulting damage!
e do not assume any liability for material and personal damage caused
W
by improper use or non-compliance with the safety instructions. In such
cases, the warranty will be null and void.
a) General
•Unauthorised conversion and/or modification of the product is not allowed for safety and approval reasons (CE).
•The product is not a toy and does not belong in the hands of children!
Children do not realise the danger arising from the incorrect use of electrical devices. In addition, the product contains small parts and batteries.
Therefore, be especially careful when children are around!
•Do not leave packaging material carelessly lying around, since it could
become a dangerous plaything for children.
•If you have any questions that are not answered in these operating instructions, please contact our technical service or another specialist.
b) Installation, connection and operation
•This product must be installed and used only in dry conditions indoors.
The product must not get damp or wet.
•Do not use the product in rooms that are under adverse environmental
conditions, where combustible gases, vapours or dust are or may be
present! There is a risk of explosion!
•The product must not be exposed to extreme temperatures, strong vibrations or heavy mechanical stress.
•The product is suitable for use only in moderate climates, not tropical climates.
•The product emits a loud alarm sound when activated. In many countries,
there are restrictions with regard to volume and alarm duration. Please
follow any local regulations.
• Open the battery compartment on the front of the door/
window alarm by unscrewing the single attachment
screw of the battery compartment cover. Afterwards,
the battery compartment cover can be pushed downwards, in the direction of the arrow.
• Insert three batteries of type “LR44” with correct polarity (observe plus/+ and minus/-).
The plus pole has to point outward, towards you; see the
illustration to the right.
• Slide the battery compartment cover back on and reattach the screw that you removed in the first step.
• The batteries require changing when the volume of door/window alarm is very low
or no longer functions at all. Furthermore, the LED briefly lights up every 3 seconds
when the batteries are weak.
Installation
The door/window alarm and the magnet can be stuck
onto an even, clean surface that is free of grease
and dust. Remove the protective film on the back
and press the door/window alarm and the magnet
firmly down.
The magnet can be mounted either to the left or
right of the door/window alarm.
The distance between the magnetic contact in the
door/window alarm and the magnet should not be
more than 5 mm in order to ensure a safe function.
A height offset is not permitted.
One of the arrows of the magnet has to point directly at the arrow to the left or right of the door/
window alarm. See illustration on the right.
<5 mm
<5 mm
Operation
f) Panic function
a) Arming the door/window alarm
• In order to trigger the alarm sound immediately (e.g. in the event of an assault),
press and hold down the “P” button for 2 seconds. The alarm is activated for the
time period of 30 seconds.
• Briefly press the “P” button. The red LED briefly lights up 3x and 3 beeps are emitted
simultaneously.
• After 5 seconds, the LED briefly lights up 1x and an individual beep can be heard.
The door/window alarm is now armed.
• Enter the correct password and press the key “P” to stop the alarm.
Maintenance and Cleaning
If the door or window is opened, and the distance between the magnet and the
magnetic contact gets too big, you will hear an alarm sound.
• Apart from the occasional battery change, the product is maintenance-free for you.
The time between the activation of the magnetic contact and the alarm can
adjusted (0, 10 or 20 seconds), see below. In the factory default settings the
time is set to 0 seconds.
Do not use aggressive cleaning agents or chemical solutions for this could
damage the housing (discolouring) or impair the operation.
• The outside of the product should only be cleaned with a clean, soft, dry cloth.
b) Disarming the door/window alarm
Disposal
• Enter the password and press the key “P”. The default setting for the password is
“1234”.
a) General instructions
• The LED lights up and a long beep is emitted. Afterwards, the door/window alarm is
disarmed.
If you enter a wrong password (for example, “4321” instead of “1234”), the
door/window alarm emits a brief acoustic signal.
If the wrong password is entered 3x consecutively, the alarm sound is triggered.
c) Changing the password
Changing the password of the default setting (“1234”) is possible only when
the door/window alarm is disarmed; see b).
• Press and hold down the “1” button for approx. 2 seconds. Afterwards, an individual
beep is emitted. Release the button again.
• Enter the old password (in the default setting “1234”), 2 beeps will be emitted.
• Now enter the new password, e.g. “4321”, 3 beeps will be emitted.
The password has been changed.
If you remove or replace the batteries, the setting will be lost and the password will be reset to the default setting “1234”.
If you forget the password, simply remove the batteries for a few seconds
and reinsert them.
Please keep in mind that the password always needs to consist of four digits, e.g. “4321” or “2222”.
d) Setting the time delay
After triggering the magnetic contact (when distance between the magnet and the
magnetic contact in the door/window alarm becomes wide enough while opening the
door or the window), the alarm is activated immediately in the default setting.
However, if you wish to secure, e.g. an apartment entrance door, you can set a time
delay of 10 or 20 seconds. This will give you enough time to enter the password without
triggering the alarm.
Please dispose of the unserviceable product according to the relevant statutory requirements.
Remove any inserted battery and dispose of it separately from the product.
b) Batteries and rechargeable batteries
As the end user, you are required by law (Battery Ordinance) to return all used batteries/rechargeable batteries; disposal of them in the household waste is prohibited.
Contaminated batteries and rechargeable batteries are labelled with this
symbol to indicate that disposal in the domestic waste is forbidden. The designations for the heavy metals involved are: Cd = Cadmium, Hg = Mercury,
Pb = Lead.
Used batteries, rechargeable batteries as well as coin cells can be returned to collection points in your municipality, our stores or wherever batteries/rechargeable batteries/coin cells are sold.
You therefore fulfil your statutory obligations and contribute to the protection of the
environment.
Technical data
Power supply....................................... 3 batteries of type “LR44”
Volume of the alarm sound................ 100 dB
Time delay............................................ Adjustable (0, 10 or 20 seconds; default setting 0
seconds)
Password............................................. 4 digits (default setting “1234”)
Ambient conditions............................. Temperature 0 °C to +40 °C, air humidity 10% to
90% relative, not condensing
Dimensions.......................................... 85 x 46 x 9 mm (W x H x D)
Weight................................................... 30 g
Setting the time delay is possible only when the door/window alarm is disarmed; see b).
• Time delay of 0 seconds:
Press and hold down the keys “3” and “4” simultaneously for 5 seconds until the
LED lights up and a long acoustic signal is can be heard.
• Time delay of of 10 seconds:
Hold down the button “3” for 5 seconds until the LED lights up and a long acoustic
signal can be heard.
• Time delay of of 20 seconds:
Hold down the button “4” for 5 seconds until the LED lights up and a long acoustic
signal can be heard.
If you remove or replace the batteries, the setting will be lost and the time
delay will be reset to the default setting “0 seconds”.
e) Triggering the alarm
If the door/window alarm is armed and the door or window is opened, the alarm sound
will start after the time delay.
If the door or window is still not closed after 30 seconds, the alarm starts again after
the preset delay time.
If “0 seconds” is set as time delay (default setting), the alarm is triggered
immediately.
If you have set the time delay to “10 seconds” or “20 seconds”, the red LED
flashes quickly during this time, and the alarm is triggered only after this
time has lapsed. If you enter the correct password during this time delay
(afterwards, confirm with the “P” button), the door/window alarm will be
disarmed.
This is a publication by Conrad Electronic SE, Klaus-Conrad-Str. 1, D-92240 Hirschau (www.conrad.com).
All rights including translation reserved. Reproduction by any method, e.g. photocopy, microfilming, or the capture in electronic data
processing systems require the prior written approval by the editor. Reprinting, also in part, is prohibited. This publication represent
the technical status at the time of printing.
© Copyright 2014 by Conrad Electronic SE.
V2_0914_02/VTP