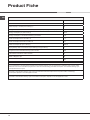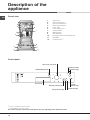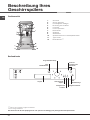
1
Istruzioni per l’uso LAVASTOVIGLIE IT Italiano, 1 EN English,13 FR Français, 25 Sommario Scheda prodotto, 2 Precauzioni e consigli, 3 DE Deutsch, 37 PL Polski, 49 HU Magyar, 61 Sicurezza generale Smaltimento Risparmiare e rispettare l’ambiente Installazione e Assistenza, 4-5 Posizionamento e livellamento Collegamenti idraulici ed elettrici Dati tecnici Avvertenze per il primo lavaggio Ecodesign Regulation Assistenza Descrizione dell’apparecchio, 6 Vista d’insieme Pannello comandi Caricare i cesti, 7 LSPA+ 720A.1 Cesto inferiore Cesto superiore Regolazione cesto superiore Avvio e utilizzo, 8 Avviare la lavastoviglie Caricare il detersivo Programmi, 9 Tabella dei programmi Brillantante e sale rigenerante, 10 Caricare il brillantante Caricare il sale rigenerante Manutenzione e cura, 11 Escludere acqua e corrente elettrica Pulire la lavastoviglie Evitare i cattivi odori Pulire gli irroratori Pulizia filtro entrata acqua Pulire i filtri Se ci si assenta per lunghi periodi Anomalie e rimedi, 12 Scheda prodotto IT Scheda prodotto Marchio HOTPOINT ARISTON Modello LSPA+ 720A.1 Capacità nominale in numero di coperti standard (1) 10 Classe di efficienza energetica su una scala da A+++ (bassi consumi) a D (alti consumi) A+ Consumo energetico annuo in kWh (2) 237.0 Consumo energetico del ciclo di lavaggio standard in kWh 0.81 Consumo di potenza nel modo spento in W 1.3 Consumo di potenza nel modo lasciato acceso in W 3.0 Consumo di acqua annuo in litri (3) 2800.0 Classe di efficacia di asciugatura su una scala da G (efficacia minima) ad A (efficacia massima) A Durata del programma per il ciclo di lavaggio standard in minuti 10’ Durata del modo lasciato acceso in minuti 10 Rumore in dB(A) re 1 pW 49 Prodotto da incasso Si NOTE 1) L’informazione sull’etichetta e sulla scheda fanno riferimento al programma standard di lavaggio, questo programma è adatto per lavare stoviglie che presentano un grado di sporco normale ed è il programma più efficiente in termini di consumo combinato di energia ed acqua. Il ciclo standard corrisponde al ciclo ECO. 2) Consumo di energia basato su 280 cicli annui standard con acqua caricata fredda e sui consumi in modo di spento o di lasciato acceso dopo la fine ciclo. Il consumo effettivo dipende da come viene usato l’elettrodomestico. 3) Basato su 280 cicli di lavaggio standard. Il consumo effettivo dipende dalle modalità di utilizzo dell’apparecchio. 2 Precauzioni e consigli L’apparecchio è stato progettato e costruito in conformità alle norme internazionali di sicurezza. Queste avvertenze sono fornite per ragioni di sicurezza e devono essere lette attentamente. È importante conservare questo libretto per poterlo consultare in ogni momento. In caso di vendita, di cessione o di trasloco, assicurarsi che resti insieme all’apparecchio. Leggere attentamente le istruzioni: ci sono importanti informazioni sull’installazione, sull’uso e sulla sicurezza. Questo apparecchio è progettato per l’uso domestico o per applicazioni simili, ad esempio: - aree adibite a cucina per il personale in negozi, uffici ed altri ambienti di lavoro; - case coloniche; - utilizzo da parte di clienti in hotel, motel ed altri ambienti di tipo residenziale; - bed and breakfast. Sicurezza generale • Questo elettrodomestico non può venire usato da persone (bambini compresi) con ridotte capacità fisiche, sensoriali o mentali, o mancanza di esperienza e conoscenza, a meno che non venga loro fornita supervisione o istruzioni riguardanti l’uso da una persona responsabile della loro sicurezza. • È necessaria la supervisione di un adulto per evitare che i bambini giochino con l’elettrodomestico. • L’apparecchio è stato concepito per un uso di tipo non professionale all’interno dell’abitazione. • L’apparecchio deve essere usato per il lavaggio delle stoviglie a uso domestico, solo da persone adulte e secondo le istruzioni riportate in questo libretto. • L’apparecchio non va installato all’aperto, nemmeno se lo spazio è riparato, perché è molto pericoloso lasciarlo esposto a pioggia e temporali. • Non toccare la lavastoviglie a piedi nudi. • Non staccare la spina dalla presa della corrente tirando il cavo, bensì afferrando la spina. • È necessario chiudere il rubinetto dell’acqua e staccare la spina dalla presa della corrente prima di effettuare operazioni di pulizia e manutenzione. • In caso di guasto, in nessun caso accedere ai meccanismi interni per tentare una riparazione. • Non appoggiarsi o sedersi sulla porta aperta: l’apparecchio potrebbe ribaltarsi. • La porta non deve essere tenuta nella posizione aperta perchè può rappresentare il pericolo di inciampare. • Tenere il detersivo e il brillantante fuori dalla portata dei bambini. • Gli imballaggi non sono giocattoli per bambini. Smaltimento • Smaltimento del materiale di imballaggio: attenersi alle norme locali, così gli imballaggi potranno essere riutilizzati. • La direttiva Europea 2012/19/EU sui rifiuti di apparecchiature elettriche ed elettroniche (RAEE), prevede che gli elettrodomestici non debbano essere smaltiti nel normale flusso dei rifiuti solidi urbani. Gli apparecchi dismessi devono essere raccolti separatamente per ottimizzare il tasso di recupero e riciclaggio dei materiali che li compongono e impedire potenziali danni per la salute e l’ambiente. Il simbolo del cestino barrato è riportato su tutti i prodotti per ricordare gli obblighi di raccolta separata. Per ulteriori informazioni, sulla corretta dismissione degli elettrodomestici, i detentori potranno rivolgersi al servizio pubblico preposto o ai rivenditori. Risparmiare e rispettare l’ambiente Risparmiare acqua ed energia • Avviare la lavastoviglie solo a pieno carico. In attesa che la macchina sia piena, prevenire i cattivi odori con il ciclo Ammollo (vedi Programmi). • Selezionare un programma adatto al tipo di stoviglie e al grado di sporco consultando la Tabella dei programmi: - per stoviglie normalmente sporche utilizzare il programma Eco, che garantisce bassi consumi energetici e di acqua. - se il carico è ridotto attivare l’opzione Mezzo carico* (vedi Avvio e utilizzo). • Se il proprio contratto di erogazione dell’energia elettrica prevede fasce orarie di risparmio energetico, effettuare i lavaggi negli orari a tariffa ridotta. L’opzione Partenza Ritardata* (vedi Avvio e utilizzo) può aiutare a organizzare i lavaggi in tal senso. Detersivi senza fosfati, senza cloro e contenenti enzimi • Si consiglia vivamente di usare i detersivi senza fosfati e senza cloro che sono i più indicati per la tutela dell’ambiente. • Gli enzimi sviluppano un’azione particolarmente efficace con temperature prossime ai 50°C, per cui con i detersivi con enzimi si possono impostare lavaggi a basse temperature e ottenere gli stessi risultati che si avrebbero a 65°C. • Dosare bene il detersivo in base alle indicazioni del produttore, alla durezza dell’acqua, al grado di sporco e alla quantità di stoviglie per evitare sprechi. Pur biodegradabili, i detersivi contengono elementi che alterano l’equilibrio della natura. 3 IT Installazione e Assistenza IT In caso di trasloco tenere l’apparecchio in posizione verticale; se fosse necessario, inclinarlo sul lato posteriore. Posizionamento e livellamento 1. Disimballare l’apparecchio e controllare che non abbia subìto danni durante il trasporto. Se fosse danneggiato non collegarlo e contattare il rivenditore. 2. Sistemare la lavastoviglie facendo aderire i fianchi o lo schienale ai mobili adiacenti o alla parete. L’apparecchio può anche essere incassato sotto a un piano di lavoro continuo* (vedi foglio di Montaggio). Fare attenzione che nel tubo non ci siano né pieghe né strozzature. Collegamento del tubo di scarico dell’acqua Collegare il tubo di scarico, senza piegarlo, a una conduttura di scarico con diametro minimo di 4 cm. Il tubo di scarico deve essere ad un’altezza compresa tra 40 e 80 cm. dal pavimento o piano d’appoggio della lavastoviglie (A). 3. Posizionare la lavastoviglie su un pavimento piano e rigido. Compensare le irregolarità svitando o avvitando i piedini anteriori finché l’apparecchio non sia orizzontale. Un accurato livellamento dà stabilità ed evita vibrazioni, rumori e spostamenti. 4*. Per regolare l’altezza del piedino posteriore, agire sulla boccola esagonale di colore rosso presente nella parte inferiore, frontale, centrale della lavastoviglie, con una chiave a bocca esagonale apertura 8 mm., girando in senso orario per aumentare l’altezza e in senso antiorario per diminuirla. (vedere foglio istruzioni incasso allegato alla documentazione) Collegamenti idraulici ed elettrici L’adattamento degli impianti elettrici e idraulici per l’installazione deve essere eseguito solo da personale qualificato. La lavastoviglie non deve appoggiare sui tubi o sul cavo di alimentazione elettrica. L’apparecchio deve essere collegato alla rete di distribuzione dell’acqua utilizzando tubi nuovi. Non riutilizzare i vecchi tubi. I tubi di carico e di scarico dell’acqua e il cavo di alimentazione elettrica possono essere orientati verso destra o sinistra per consentire la migliore installazione. Collegamento del tubo di carico dell’acqua • A una presa d’acqua fredda: avvitare bene il tubo di carico a un rubinetto con bocca filettata da 3/4 gas; prima di avvitare, far scorrere l’acqua finché non sia limpida affinché le eventuali impurità non intasino l’apparecchio. • A una presa d’acqua calda: nel caso di impianto centralizzato di termosifoni, la lavastoviglie può essere alimentata con acqua calda di rete purché non superi la temperatura di 60°C. Avvitare il tubo al rubinetto come descritto per la presa d’acqua fredda. Se la lunghezza del tubo di carico non è sufficiente, rivolgersi a un negozio specializzato o a un tecnico autorizzato (vedi Assistenza). La pressione dell’acqua deve essere compresa nei valori riportati dalla tabella Dati tecnici (vedi a lato). 4 Prima di collegare il tubo di scarico dell’acqua al sifone del lavandino, rimuovere il tappo di plastica (B). Sicurezza antiallagamento Per garantire che non si generino allagamenti, la lavastoviglie: - è dotata di un sistema che interrompe l’ingresso dell’acqua nel caso di anomalie o di perdite dall’interno. Alcuni modelli sono dotati di un dispositivo supplementare di sicurezza New Acqua Stop*, che garantisce l’antiallagamento anche in caso di rottura del tubo di alimentazione. ATTENZIONE: TENSIONE PERICOLOSA! Il tubo di carico dell’acqua, non deve in nessun caso, essere tagliato in quanto contiene parti sotto tensione. Collegamento elettrico Prima di inserire la spina nella presa della corrente, accertarsi che: • la presa abbia la messa a terra e sia a norma di legge; • la presa sia in grado di sopportare il carico massimo di potenza della macchina, indicato nella targhetta caratteristiche sulla controporta (vedi capitolo Descrizione della lavastoviglie); • la tensione di alimentazione sia compresa nei valori indicati nella targhetta caratteristiche sulla controporta; • la presa sia compatibile con la spina dell’apparecchio. In caso contrario richiedere la sostituzione della spina a un tecnico autorizzato (vedi Assistenza); non usare prolunghe o prese multiple. Ad apparecchio installato, il cavo di alimentazione elettrica e la presa della corrente devono essere facilmente raggiungibili. Il cavo non deve subire piegature o compressioni. Se il cavo di alimentazione è danneggiato, deve essere sostituito dal costruttore o dal suo Servizio di Assistenza Tecnica, in modo da prevenire ogni rischio. (Vedi Assistenza) L’Azienda declina ogni responsabilità qualora queste norme non vengano rispettate. Assistenza Striscia anticondensa* Prima di contattare l’Assistenza: Dopo aver incassato la lavastoviglie aprire la porta e incollare la striscia adesiva trasparente sotto al ripiano in legno per proteggerlo dalla eventuale condensa. Dati Tecnici Capacità Larghezza cm. 44,5 Altezza cm. 82 Profondità cm. 57 10 coperti standard Pressione acqua alimentazione 0,05 ÷ 1MPa (0.5 ÷ 10 bar) 7,25 – 145 psi Tensione di alimentazione vedi targhetta caratteristiche Potenza totale assorbita vedi targhetta caratteristiche Fusibile vedi targhetta caratteristiche Dimensioni Questa apparecchiatura è conforme alle seguenti Direttive Comunitarie: -2006/95/EC (Bassa Tensione) -2004/108/EC (Compatibilità Elettromagnetica) -2009/125/EC (Comm. Reg. 1016/2010) (Ecodesign) -97/17/EC (Etichettatura) -2012/19/EU (RAEE) Avvertenze per il primo lavaggio Dopo l’installazione, rimuovere i tamponi posizionati sui cesti e gli elastici di trattenimento sul cesto superiore (dove presenti). Immediatamente prima del primo lavaggio, riempire completamente d’acqua il serbatoio del sale e solo dopo aggiungere circa 1 Kg di sale (vedi capitolo Brillantante e sale rigenerante): è normale che l’acqua trabocchi. Selezionare il livello di durezza dell’acqua (vedi tabella capitolo Brillantante e sale rigenerante). Dopo il caricamento del sale la spia MANCANZA SALE* si spegne. Il mancato riempimento del contenitore del sale, può provocare il danneggiamento del dolcificatore dell’acqua e dell’elemento riscaldante. La macchina, è dotata di segnali acustici/toni (secondo il modello d lavastoviglie) che avvisano dell’avvenuto comando: accensione, fine ciclo ecc.. I simboli/spie/led luminosi presenti sul pannello comandi/ display, possono variare di colore, pulsare o essere a luce fissa. (secondo il modello di lavastoviglie). Il display*, visualizza informazioni utili relative al tipo di ciclo impostato, alla fase di lavaggio/asciugatura, al tempo residuo, alla temperatura ecc... ecc... IT • Verificare se l’anomalia può essere risolta da soli (vedi Anomalie e Rimedi). • Riavviare il programma per controllare se l’inconveniente è stato ovviato. • In caso negativo, contattare il Servizio Assistenza Tecnica Autorizzato. Non ricorrere mai a tecnici non autorizzati. Comunicare: • il tipo di anomalia; • il modello della macchina (Mod.); • il numero di serie (S/N). Queste informazioni si trovano sulla targhetta caratteristiche posta sull’apparecchio (vedi Descrizione dell’apparecchio). Assistenza Attiva 7 giorni su 7 Se nasce il bisogno di intervento chiamare il Numero Unico Nazionale 199.199.199*. Un operatore sarà a completa disposizione per fissare un appuntamento con Centro Assistenza Tecnico autorizzato più vicino al luogo da cui si chiama. È attivo 7 giorni su 7, sabato e domenica compresi, e non lascia mai inascoltata una richiesta. * Al costo di 14,25 centesimi di Euro al minuto (iva inclusa) dal Lun. al Ven. dalle 08:00 alle 18:30, il Sab. dalle 08:00 alle 13:00 e di 5,58 centesimi di Euro al minuto (iva inclusa) dal Lun. al Ven. dalle 18:30 alle 08:00, il Sab. dalle 13:00 alle 08:00 e i giorni festivi, per chi chiama dal telefono fisso. Per chi chiama da radiomobile le tariffe sono legate al piano tariffario dell’operatore telefonico utilizzato. Le suddette tariffe potrebbero essere soggette a variazione da parte dell’operatore telefonico; per maggiori informazioni consultare il sito www.aristonchannel.com. * Presente solo su alcuni modelli. 5 Descrizione dell’apparecchio IT Vista d’insieme 1. Cestello superiore 2. Irroratore superiore 3.Ribaltine 4. Regolatore altezza cestello 5. Cestello inferiore 6. Irroratore inferiore 7. Cestello posate 8. Filtro lavaggio 9. Serbatoio sale 10. Vaschette detersivo e serbatoio brillantante 11. Targhetta caratteristiche 12. Pannello comandi*** Pannello comandi Manopola Selezione Programmi Tasto e spia Avvio/Pausa Tasto On-Off/Reset Maniglia apertura porta Spia Lavaggio Spia Asciugatura *** Solo sui modelli ad incasso totale * Presente solo su alcuni modelli. Il numero e il tipo di programmi ed opzioni variano in base al modello di lavastoviglie. 6 Spia Mancanza Sale Spia Fine programma Caricare i cestelli Prima di caricare i cesti, eliminare dalle stoviglie i residui di cibo e vuotare bicchieri e coppe dei liquidi rimasti. Sistemare le stoviglie in modo che siano ben ferme e non si ribaltino. Dopo aver caricato, controllare che gli irroratori ruotino liberamente. Inclinazione A Cesto inferiore - Sollevare la ribaltina, farla scorrere leggermente e posizionarla nell’ inclinazione desiderata. Il cesto inferiore può contenere pentole, coperchi, piatti, insalatiere, posate ecc..secondo gli Esempi di caricamento. Piatti e coperchi grandi vanno sistemati di preferenza ai lati del cesto, facendo attenzione a non bloccare la rotazione dell’irroratore superiore. Alcuni modelli di lavastoviglie, dispongono di settori reclinabili*, gli stessi si possono usare in posizione verticale per la sistemazione dei piatti oppure in posizione orizzontale per sistemare pentole e insalatiere. Cestino delle posate Il cestino delle posate può essere di tipo diverso a seconda dei modelli di lavastoviglie. Il cestino delle posate deve essere posizionato frontalmente sul cesto inferiore, facendolo scorrere tra gli inserti fissi, o sul cesto superiore, soluzione indicata quando si esegue un lavaggio a mezzo carico (sui mod. provvisti di tale opzione). - E’ munito di ribaltine scorrevoli che consentono una sistemazione ottimale delle posate. Inclinazione B Inclinazione C IT Regolare l’altezza del cesto superiore Per agevolare la sistemazione delle stoviglie, è possibile sistemare il cesto superiore in posizione alta o bassa. E’ preferibile regolare l’altezza del cesto superiore a CESTO VUOTO. Non sollevare o abbassare MAI il cesto su un solo lato. Aprire i fermi delle guide del cesto a destra e a sinistra ed estrarre il cesto; sistemarlo in alto o in basso, farlo scivolare lungo le guide fino a far entrare anche le rotelle anteriori e chiudere i fermi (vedi figura). Se il cesto è dotato di maniglie Dual Space* (vedi figura), estrarre il cesto superiore a fine corsa, impugnare le maniglie ai lati del cesto e muovere verso l’alto o verso il basso; lasciare ricadere il cesto accompagnandolo. Esempi di caricamento cesto superiore I coltelli e gli utensili con punte taglienti devono essere sistemati nel cestino delle posate con le punte rivolte verso il basso o sistemati sulle ribaltine del cesto superiore in posizione orizzontale. Esempi di posizionamento dei cestini posate Cesto superiore Caricarvi le stoviglie delicate e leggere: bicchieri, tazze da tè e caffè, piattini, insalatiere basse, padelle, pentole basse poco sporche, secondo gli Esempi di caricamento. • Tazze e tazzine, coltelli lunghi e acuminati, posate di servizio: posizionarli sulle ribaltine**. Ribaltine ad inclinazione variabile* - L’inclinazione consente di acquistare maggiore spazio nel cesto superiore, di posizionare calici con steli di lunghezza diversa e di migliorare le prestazioni di asciugatura. Esempi di caricamento cesto inferiore Stoviglie non adatte al lavaggio in lavastoviglie • • • • • Oggetti di legno, con impugnatura in legno o in corno o con parti incollate. Oggetti di alluminio, rame, ottone, peltro o stagno. Stoviglie di plastica non termoresistente. Porcellane antiche o dipinte a mano. Argenteria antica. L’argenteria non antica può invece essere lavata con un programma delicato e accertandosi che non sia a contatto con altri metalli. Si consiglia l’utilizzo di stoviglie idonee al lavaggio in lavastoviglie. * Presente solo in alcuni modelli. ** Variabili per numero e posizione. 7 Avvio e utilizzo IT Avviare la lavastoviglie 1. Aprire il rubinetto dell’acqua. 2. Premere il tasto ON-OFF: tutte le spie presenti sul pannello comandi si illuminano per alcuni secondi. 3. Aprire la porta e dosare il detersivo (vedi sotto). 4. Caricare i cestelli (vedi Caricare i cestelli) e chiudere la porta. 5. Selezionare il programma ruotando la manopola SELEZIONE PROGRAMMA in senso orario: far coincidere la tacca sulla manopola con il numero o il simbolo del programma. La spia relativa al tasto AVVIO/PAUSA pulsa. 6. Selezionare le opzioni di lavaggio* (vedi pagina opzioni). 7. Avviare premendo il tasto AVVIO, la spia smette di pulsare e diventa a luce fissa. L’accensione della spia relativa al lavaggio avvisa dell’inizio del programma. 8. Alla fine del programma si illumina la spia FINE (luce fissa). Spegnere l’apparecchio premendo il tasto ON-OFF, chiudere il rubinetto dell’acqua e staccare la spina dalla presa di corrente. 9. Aspettare alcuni minuti prima di togliere le stoviglie, per evitare di scottarsi. Scaricare i cestelli iniziando da quello inferiore. - Per ridurre il consumo di energia elettrica, in alcune condizioni di NON utilizzo, la macchina si spegne automaticamente. Modificare un programma in corso Se si è selezionato un programma sbagliato è possibile modificarlo, purché appena iniziato: a lavaggio avviato, per cambiare ciclo di lavaggio spegnere la macchina con una pressione prolungata del tasto ON/OFF/Reset, riaccenderla con lo stesso tasto e selezionare nuovamente programma e opzioni desiderati. Caricare il detersivo Il buon risultato del lavaggio dipende anche dal corretto dosaggio del detersivo, eccedendo non si lava in modo più efficace e si inquina l’ambiente. Utilizzare solo detersivo per lavastoviglie. NON UTILIZZARE detersivi per lavaggio a mano. Un utilizzo eccessivo di detersivo può lasciare residui di schiuma a fine ciclo. L’utilizzo delle pastiglie è consigliato solo nei modelli dove è presente l’opzione PASTIGLIE MULTIFUNZIONE. Le migliori prestazioni di lavaggio ed asciugatura, si ottengono solo con l’utilizzo di detersivo in polvere, brillantante liquido e sale. vaschetta A: Detersivo per lavaggio vaschetta B: Detersivo per prelavaggio 1. Aprire il coperchio C premendo il pulsante D. B 2. Dosare il detersivo consultando la Tabella dei programmi: • in polvere: vaschette A e B. • p a s t i g l i e : q u a n d o i l programma ne richiede 1, metterla nella vaschetta A e C chiudere il coperchio; quando ne richiede 2, mettere la seconda sul fondo della vasca. 3. Eliminare i residui di detersivo dai bordi della vaschetta e chiudere il coperchio fino allo scatto. D A Aggiungere altre stoviglie Premere il tasto Avvio/Pausa, (la luce del tasto pulsa) Aprire la porta facendo attenzione alla fuoriuscita di vapore e inserire le stoviglie. Premere il tasto Avvio/Pausa (luce fissa): il ciclo riprende. Premendo il tasto Avvio/Pausa per mettere in pausa la macchina, si interrompe sia il programma sia l’Avvio Ritardato se impostato. In questa fase non si può cambiare il programma. Interruzioni accidentali Se durante il lavaggio si apre la porta o si verifica un’interruzione di corrente, il programma si interrompe. Riprende dal punto in cui si era interrotto quando si chiude la porta o torna la luce. * Presente solo su alcuni modelli. 8 Programmi Se le stoviglie sono poco sporche o sono state sciacquate precedentemente sotto l’acqua, ridurre sensibilmente la dose del detersivo. IT Il numero e il tipo di programmi ed opzioni variano in base al modello di lavastoviglie. Indicazioni per la scelta dei programmi Stoviglie e pentole molto sporche (da non usare per pezzi delicati). Stoviglie e pentole normalmente sporche. Programma standard giornaliero. Sporco quotidiano in quantità limitata. (4 coperti + 1 pentola + 1 padella). Lavaggio preliminare in attesa di completare il carico al pasto successivo. Lavaggio ecologico a bassi consumi energetici, adatto a stoviglie e pentole. Ciclo economico e veloce da utilizzare per stoviglie poco sporche, subito dopo l’uso. (2 piatti +2 bicchieri +4 posate+1 pentola + 1 padellino) Ciclo economico e veloce per stoviglie delicate, più sensibili alle alte temperature, subito dopo l’uso. (calici nel cesto sueperiore + piatti delicati, nel cesto inferiore). Detersivo (A) = vaschetta A (B) = vaschetta B polvere liquido pastiglie Programmi che prevedono l’asciugatura 25 g (A) 25 ml (A) 1 (A) Si No 2:25’ 21 g (A) 4 g (B) 21 ml (A) 4 ml (B) 1 (A) Si No 1:50’ 25 g (A) 25 ml (A) 1 (A) No No 1:00’ No No No No No 0:08’ 21 g (A) 4 g (B) 21 ml (A) 4 ml (B) 1 (A) Si No 3:00’ 21 g (A) 21 ml (A) 1 (A) No No 0:35’ 25 g (A) 25 ml (A) 1 (A) Si No 1:35’ Programma 1. Intensivo 2. Normale 3. Quotidiano 4. Ammollo 5. Eco* Opzioni Durata del programma (tolleranza ±10%) Hrs. Min. 6. Rapido 7. Cristalli Note: le migliori prestazioni dei programmi “Quotidiano e Rapido/Speed”, si ottengono preferibilmente rispettando il numero di coperti specificati. Nota per i laboratori di Prove: per informazioni sulle condizioni della prova comparativa EN, farne richiesta all’indirizzo: ASSISTENZA_ [email protected] * Il programma Eco, rispetta la norma EN-50242, dura più a lungo rispetto ad altri programmi ma presenta un minor consumo di energia ed in più è rispettoso con l’ambiente. Per facilitare il dosaggio del detersivo è bene sapere che: 1 cucchiaio da cucina = 15 g. di polvere = 15 ml di liquido circa. - 1 cucchiaino da cucina = 5 g.di polvere = 5 ml di liquido circa 9 Brillantante e sale rigenerante IT Usare solo prodotti specifici per lavastoviglie. Non usare sale alimentare o industriale nè detersivi per il lavaggio a mano. Seguire le indicazioni riportate sulla confezione. (Il decalcificatore è impostato dalla fabbrica sul livello 3). - Per uscire dalla funzione attendere alcuni secondi o premere un tasto delle opzioni* o spegnere la macchina con il tasto ON/OFF. Se si usa un prodotto multifunzione, non è necessario aggiungere brillantante, si consiglia invece di aggiungere sale, specie se l’acqua è dura o molto dura. Seguire le indicazioni riportate sulla confezione. Se si utilizzano le pastiglie multifunzione, riempire comunque il serbatoio del sale. Non aggiungendo né sale né brillantante è normale che le spie MANCANZA SALE * e MANCANZA BRILLANTANTE* rimangano accese. Caricare il brillantante Il brillantante facilita l’asciugatura delle stoviglie facendo scivolare l’acqua dalla superficie, così che non rimangano striature o macchie. Il serbatoio del brillantante va riempito: • quando sul pannello si accende la spia MANCANZA BRILLANTANTE*; 1. Aprire il serbatoio ruotando il tappo (G) in senso antiorario. 2. Versare il brillantante evitando che fuoriesca. Se accade, pulire subito con un panno asciutto. F 3. Riavvitare il tappo. Non versare MAI il brillantante G direttamente all’interno della vasca. Regolare la dose di brillantante Se non si è soddisfatti del risultato dell’asciugatura, è possibile regolare la dose di brillantante. Con un cacciavite girare il regolatore (F) scegliendo tra 6 posizioni (la regolazione di fabbrica è sul 4): • se sulle stoviglie ci sono striature, girare verso i numeri bassi (1-3). • se ci sono gocce d’acqua o macchie di calcare girare verso i numeri alti (4-6). Impostazione durezza dell’acqua Ogni lavastoviglie è corredata di un dolcificatore dell’acqua che, utilizzando del sale rigenerante specifico per lavastoviglie, fornisce acqua priva di calcare per il lavaggio delle stoviglie. Questa lavastoviglie, consente una regolazione che riduce l’inquinamento ed ottimizza le prestazioni di lavaggio in funzione della durezza dell’acqua. Il dato è reperibile presso l’Ente erogatore dell’acqua potabile. - Spegnere la macchina con il tasto ON/OFF e aprire la porta. -Posizionare la manopola SELEZIONE PROGRAMMA prima sul 5° programma ed in succesione sul 1° programma e nuovamente sul 5°. -Premere il tasto ON/OFF, le spie delle fasi ciclo lampeggiano; ora è possibile selezionare il livello di durezza. Ad ogni programma corrisponde un livello di durezza: Es: 1° programma, livello durezza 1 2° programma, livello durezza 2 ecc..ecc... fino ad un massimo di cinque* livelli. 10 Tabella Durezze Acqua livello 1 2 3 4 °dH 0-6 6 - 11 12 - 17 17 - 34 °fH 0 - 10 11 - 20 21 - 30 31 - 60 mmol/l 0-1 1,1 - 2 2,1 - 3 3,1 - 6 5* 34 - 50 61 - 90 6,1 - 9 Autonomia media** contenitore sale mesi 7 mesi 5 mesi 3 mesi 2 mesi 2/3 settimane Da 0°f a 10°f si consiglia di non utilizzare sale. * con impostazione 5 la durata può prolungarsi. ** con 1 lavaggio al giorno (°dH = durezza in gradi tedeschi - °fH = durezza in gradi francesi - mmol/l = millimol/litro) Caricare il sale rigenerante Per avere buoni risultati di lavaggio è indispensabile verificare che il serbatoio del sale non sia mai vuoto. Il sale rigenerante elimina il calcare dall’acqua, evitando che si depositi sulle stoviglie. Il serbatoio del sale è posto nella parte inferiore della lavastoviglie (vedi Descrizione) e va riempito: • quando il galleggiante verde* non è visibile osservando il tappo del sale; • quando sul pannello si accende la spia MANCANZA SALE*; 1. Estrarre il cesto inferiore e svitare il tappo del serbatoio in senso antiorario. 2. Solo per il primo utilizzo: riempire il serbatoio di acqua fino al bordo. 3. Posizionare l’imbuto * (vedi figura) e riempire il serbatoio di sale fino al bordo (circa 1 kg); è normale che trabocchi un po’ d’acqua. 4. Togliere l’imbuto*, eliminare i residui di sale dall’imbocco; sciacquare il tappo sotto l’acqua corrente prima di avvitarlo, disponendolo a testa in giù e facendo defluire l’acqua dalle quattro fessure disposte a stella nella parte inferiore del tappo. (tappo con galleggiante verde*) E’ consigliabile effettuare questa operazione ad ogni caricamento del sale. Chiudere bene il tappo, affinché nel serbatoio non entri detersivo durante il lavaggio (potrebbe danneggiarsi irrimediabilmente il dolcificatore). Quando si rende necessario, caricare il sale prima di un ciclo di lavaggio in modo da eliminare la soluzione salina traboccata dal contenitore del sale. * Presente solo su alcuni modelli. Manutenzione e cura Escludere acqua e corrente elettrica • Chiudere il rubinetto dell’acqua dopo ogni lavaggio per eliminare il pericolo di perdite. • Staccare la spina dalla presa di corrente quando si pulisce la macchina e durante i lavori di manutenzione. Pulire la lavastoviglie • La superficie esterna e il pannello di controllo possono essere puliti con un panno inumidito con acqua non abrasivo. Non usare solventi o abrasivi. • La vasca interna può essere pulita da eventuali macchie con un panno imbevuto di acqua e poco aceto. Evitare i cattivi odori • Lasciare sempre socchiusa la porta per evitare il ristagno di umidità. • Pulire regolarmente le guarnizioni perimetrali di tenuta della porta e delle vaschette detersivo con una spugnetta umida. Si eviteranno così ristagni di cibo, principali responsabili del cattivo odore. Pulire gli irroratori Può succedere che residui di cibo si attacchino agli irroratori e ostruiscano i fori da cui esce l’acqua: di tanto in tanto è bene controllarli e pulirli con uno spazzolino non metallico. I due irroratori, sono entrambi smontabili. Per smontare l’irroratore superiore, occorre svitare girando in senso antiorario la ghiera di plastica.L’irroratore superiore, va rimontato con la parte con il maggior numero di fori rivolta verso l’alto. Periodicamente, pulire il filtro entrata acqua posizionato all’uscita del rubinetto. - Chiudere il rubinetto dell’acqua. - Svitare l’estremità del tubo di carico acqua, togliere il filtro e pulirlo delicatamente sotto un getto di acqua corrente. - Inserire nuovamente il filtro e avvitare il tubo. Pulire i filtri Il gruppo filtrante è formato da tre filtri che puliscono l’acqua di lavaggio dai residui di cibo e la rimettono in circolo: per avere buoni risultati di lavaggio è necessario pulirli. Pulire i filtri con regolarità. La lavastoviglie non deve essere usata senza filtri o con filtro sganciato. • Dopo alcuni lavaggi, controllare il gruppo filtrante e se necessario pulirlo accuratamente sotto acqua corrente, aiutandosi con uno spazzolino non metallico, seguendo le istruzioni sotto riportate: 1. ruotare in senso antiorario il filtro cilindrico C ed estrarlo (fig. 1). 2. Estrarre il bicchiere filtro B facendo una leggera pressione sulle alette laterali (Fig. 2); 3. Sfilare il piatto filtro inox A. (fig. 3). 4. Ispezionare il pozzetto ed eliminare eventuali residui di cibo. NON RIMUOVERE MAI la protezione della pompa di lavaggio (particolare di colore nero) (fig.4). C 1 L’irroratore inferiore si smonta tirandolo verso l’alto. A 3 Pulizia del filtro entrata acqua* Se i tubi dell’acqua sono nuovi o sono rimasti per lungo tempo inattivi, prima di fare l’allacciamento, far scorrere l’acqua fino a che diventi limpida e sia priva di impurità. Senza questa precauzione, c’è il rischio che il punto dove entra l’acqua si intasi, danneggiando la lavastoviglie. Dopo la pulizia dei filtri, rimontare il gruppo filtrante e ricollocarlo correttamente nella sua sede; è fondamentale per un buon funzionamento della lavastoviglie. Se ci si assenta per lunghi periodi • Staccare i collegamenti elettrici e chiudere il rubinetto dell’acqua. • Lasciare socchiusa la porta. • Al rientro, fare un lavaggio a vuoto. * Presente solo su alcuni modelli. 11 IT Anomalie e rimedi IT Qualora l’apparecchio presenti delle anomalie di funzionamento, controllare i seguenti punti prima di rivolgersi all’Assistenza. Anomalie: Possibili cause / Soluzione: La lavastoviglie non parte o non risponde ai comandi • Spegnere la macchina con il tasto ON/OFF, riaccendere dopo un minuto circa e reimpostare il programma. • La spina non è ben inserita nella presa di corrente. • La porta della lavastoviglie non è ben chiusa. La porta non si chiude • La serratura è scattata; spingere energicamente la porta fino a sentire il “clack”. La lavastoviglie non scarica acqua. • • • • La lavastoviglie fa rumore. • Le stoviglie sbattono tra loro o contro gli irroratori. Il programma non è ancora terminato. Il tubo di scarico dell’acqua è piegato (vedi Installazione). Lo scarico del lavello è ostruito. Il filtro è intasato da residui di cibo. • Eccessiva presenza di schiuma: il detersivo non è dosato adeguatamente o non è idoneo al lavaggio in lavastoviglie. (vedi Avvio e utilizzo). Su stoviglie e bicchieri ci sono depositi calcarei o una patina biancastra. • Manca il sale rigenerante o la sua regolazione non è adeguata alla durezza dell’acqua (vedi Brillantante e sale). • Il tappo del serbatoio del sale non è chiuso bene. • Il brillantante è esaurito o il dosaggio è insufficiente. Su stoviglie e bicchieri ci sono striature o sfumature bluastre. • Il dosaggio del brillantante è eccessivo. Le stoviglie sono poco asciutte. • È stato selezionato un programma senza asciugatura. • Il brillantante è esaurito o il dosaggio è insufficiente (vedi Brillantante e sale). • La regolazione del brillantante non è adeguata. • Le stoviglie sono in materiale antiaderente o in plastica. Le stoviglie non sono pulite. • I cestelli sono troppo carichi (vedi Caricare i cestelli). • Le stoviglie non sono sistemate bene. • Gli irroratori non sono liberi di ruotare. • Il programma di lavaggio è troppo blando (vedi Programmi). • Eccessiva presenza di schiuma: il detersivo non è dosato adeguatamente o non è idoneo al lavaggio in lavastoviglie. (vedi Avvio e utilizzo). • Il tappo del brillantante non è stato chiuso correttamente. • Il filtro è sporco o intasato (vedi Manutenzione e cura). • Manca il sale rigenerante (vedi Brillantante e sale). La lavastoviglie non carica acqua – Allarme rubinetto chiuso. (si sentono dei brevi bip)* (lampeggiano velocemente le spie Asciugatura e Fine). • • • • Allarme al tubo di carico dell’acqua/Filtrino entrata acqua intasato. (lampeggiano velocemente le spie: Lavaggio, Asciugatura e Fine) • Spegnere la macchina premendo il tasto ON/OFF. Chiudere il rubinetto dell’acqua per evitare allagamenti, staccare la spina della corrente. Controllare che il filtro entrata acqua non sia intasato da impurità. (vedere capitolo “Manutenzione e Cura”) * Presente solo su alcuni modelli. 12 Manca l’acqua nella rete idrica. Il tubo di carico dell’acqua è piegato (vedi Installazione). Aprire il rubinetto e l’apparecchio si avvia dopo pochi minuti. L’apparecchio si è bloccato perché non si è intervenuti al suono dei bip * . Spegnere la macchina con il tasto ON/OFF, aprire il rubinetto e dopo 20 secondi riaccendere premendo lo stesso tasto. Riprogrammare la macchina e riavviare. Operating instructions DISHWASHER EN English,13 Contents Product Fiche, 14 Precautions and advice,15 General safety Disposal Saving energy and respecting the environment Installation and Assistance, 16-17 Positioning and levelling Connecting the water and electricity supplies Advice regarding the first wash cycle Technical data Assistance Ecodesign Regulation Description of the appliance, 18 LSPA+ 720A.1 Overall view Control panel Loading the racks, 19 Lower rack Upper rack Adjusting upper rack Start-up and use, 20 Starting the dishwasher Measuring out the detergent Wash cycles, 21 Table of wash cycles Rinse aid and refined salt, 22 Measuring out the rinse aid Measuring out the refined salt Care and maintenance, 23 Shutting off the water and electricity supplies Cleaning the dishwasher Preventing unpleasant odours Cleaning the sprayer arms Cleaning the water inlet filter Cleaning the filters Leaving the machine unused for extended periods Troubleshooting, 24 Product Fiche EN Product Fiche Brand HOTPOINT/ARISTON Model LSPA+ 720A.1 Rated capacity in standard place settings (1) 10 Energy efficiency class on a scale from A+++ (low consumption) to D (high consumption) A+ Energy consumption per year in kWh (2) 237.0 Energy consumption of the standard cleaning cycle in kWh 0.81 Power consumption of the off-mode in W 1.3 Power consumption of the left-on mode in W 3.0 Water consumption per year in litres (3) 2800.0 Drying efficacy class on a scale from G (low efficacy) to A (high efficacy) A Programme time for standard cleaning cycle in minutes 180’ The duration of the left-on mode in minutes 10 Noise in dB(A) Re 1pW 49 Built-in model Yes NOTES 1) The information on the label and fiche relates to the standard cleaning cycle, this programme is suitable to clean normally soiled tableware and it is the most efficient programme in terms of combined energy and water consumption. The standard cleaning cycle corresponds to the Eco cycle. 2) Based on 280 standard cleaning cycles using cold water fill and the consumption of the low power modes. Actual energy consumption depends on how the appliance is used. 3) Based on 280 standard cleaning cycles. Actual water consumption depends on how the appliance is used. 14 Precautions and advice This appliance was designed and manufactured in compliance with international safety standards The following information has been provided for safety reasons and should therefore be read carefully. Keep this instruction manual in a safe place for future reference. If the appliance is sold, given away or moved, please ensure the manual is kept with the machine. Please read these instructions carefully: they contain important information on installation, use and safety. This appliance is designed for domestic use or similar applications, for example: - staff kitchen areas in shops, offices and other work environments; - farmhouses; - use by guests in hotels, motels and other residential settings; - bed & breakfasts. General safety • The appliance should not be operated by people (including children) with reduced physical, sensory or mental capacities, or by inexperienced people who are not familiar with the product, unless supervision or instructions on how to use it are provided by someone who assumes responsibility for their safety. • An adult must supervise children at all times to prevent them from playing with the appliance. • The appliance was designed for domestic use inside the home and is not intended for commercial or industrial use. • The appliance must be used by adults only to wash domestic crockery in accordance with the instructions in this manual. • The appliance must not be installed outdoors, even in covered areas. It is extremely dangerous to leave the machine exposed to rain and storms. • Do not touch the appliance when barefoot. • When unplugging the appliance always pull the plug from the mains socket. Do not pull on the cable. • The water supply tap must be shut off and the plug should be removed from the electrical socket before cleaning or maintaining the appliance. • If the appliance breaks down, do not under any circumstances touch the internal parts in an attempt to perform the repair work yourself. • Do not lean or sit on the open door of the appliance: this may cause the appliance to overturn. • The door should not be left open as it may create a dangerous obstacle. • Keep detergent and rinse aid out of reach of children. • The packaging material should not be used as a toy for children. Disposal • Disposal of packaging material: observe local legislation so that the packaging may be reused. • The European Directive 2012/19/EU relating to Waste Electrical and Electronic Equipment (WEEE) states that household appliances should not be disposed of using the normal solid urban waste cycle. Exhausted appliances should be collected separately in order to optimise the re-using and recycling rate of the materials inside the machine, while preventing potential damage to the environment and public health. The crossed-out dustbin symbol is marked on all products to remind the owners of their obligations regarding separated waste collection. For further information relating to the correct disposal of household appliances, owners may contact the relevant public authority or the local appliance dealer. Saving energy and respecting the environment Saving water and energy • Only begin a wash cycle when the dishwasher is full. While waiting for the dishwasher to be filled, prevent unpleasant odours using the Soak cycle (see Wash cycles). • Select a wash cycle that is suited to the type of crockery and to the soil level of the crockery using the Table of wash cycles: - for dishes with a normal soil level use the Eco wash cycle, which ensures low energy/water consumption levels. - If the load is smaller than usual activate the Half Load option* (see Start-up and use). • If your electricity supply contract gives details of electricity-saving time bands, run wash cycles when electricity prices are lower. The Delayed Start button * (see Start-up and use) helps you organise the wash cycles accordingly. Phosphate-free and chlorine-free detergents containing enzymes • We strongly recommend that you use detergents that do not contain phosphates or chlorine, as these products are harmful to the environment. • Enzymes provide a particularly effective action at temperatures around 50°C. As a result detergents containing enzymes can be used in conjunction with low-temperature wash cycles in order to achieve the same results as a normal 65°C wash cycle. • To avoid wasting detergent, use the product in appropriate quantities based on the manufacturer’s recommendations, the hardness of the water, the soil level and the quantity of crockery to be washed. Even if they are biodegradable, detergents contain substances which may alter the balance of nature. 15 EN Installation and Assistance EN If the appliance must be moved at any time, keep it in an upright position; if absolutely necessary, it may be tilted onto its back. Positioning and levelling Connecting the water outlet hose Connect the outlet hose (without bending it) to a drain duct with a minimum diameter of 4 cm. The outlet hose must be at a height ranging from 40 to 80 cm from the floor / surface where the dishwasher rests (A). 1. Remove the appliance from all packaging and check that it has not been damaged during transportation. If it has been damaged, contact the retailer and do not proceed any further with the installation process. 2. Arrange the dishwasher so that its sides or back panel are in contact with the adjacent cabinets or the wall. This appliance can also be recessed under a single worktop* (see the Assembly Instruction sheet.) 3. Position the dishwasher on a level sturdy floor. If the floor is uneven, the front feet of the appliance should be adjusted until it reaches a horizontal position. If the appliance is levelled correctly, it will be more stable and much less likely to move or cause vibrations and noise while it is operating. 4*. To adjust the height of the rear foot, turn the red hexagonal bushing on the lower central part at the front of the dishwasher using a hexagonal spanner with an opening of 8 mm. Turn the spanner in a clockwise direction to increase the height and in an anticlockwise direction to decrease it (see Building-in Instruction sheet attached to the documentation.) Connecting the water and electricity supplies Connection to the water and electricity supplies should only be performed by a qualified technician. The dishwasher should not stand on the water hoses or electricity supply cable. The appliance must be connected to the water supply network using new hoses. Do not use old piping. The water inlet and outlet hoses and the electricity supply cable may be positioned towards the right or the left in order to achieve the best possible installation. Connecting the water inlet hose • To a suitable cold water connection point: before attaching the hose, run the water until it is perfectly clear so that any impurities that may be present in the water do not clog the appliance; after performing this operation, screw the inlet hose tightly onto a tap with a ¾ gas threaded connection. • To a suitable hot water connection point: your dishwasher may be supplied with hot water from the mains supply (if you have a central heating system with radiators) provided that it does not exceed a temperature of 60°C. Screw the hose to the tap as described for connection to a cold water supply. If the inlet hose is not long enough, contact a specialist store or an authorised technician (see Assistance.) Before connecting the water outlet hose to the sink drain, remove the plastic plug (B). Anti-flooding protection To ensure floods do not occur, the dishwasher: - is provided with a special system which blocks the water supply in the event of anomalies or leaks from inside the appliance. Some models are also equipped with the supplementary safety device New Acqua Stop*, which guarantees anti-flooding protection even in the event of a supply hose rupture. WARNING: HAZARDOUS VOLTAGE! Under no circumstances should the water inlet hose be cut, as it contains live electrical parts. Electrical connection Before inserting the plug into the electrical socket, make sure that: • The socket is earthed and complies with current regulations. • the socket can withstand the maximum load of the appliance, which is indicated on the data plate located on the inside of the door (see Description of the appliance); • The power supply voltage falls within the values indicated on the data plate on the inside of the door. • The socket is compatible with the plug of the appliance. If this is not the case, ask an authorised technician to replace the plug (see Assistance); do not use extension cables or multiple sockets. Once the appliance has been installed, the power supply cable and the electrical socket should be easily accessible. The cable should not be bent or compressed. If the power supply cable is damaged, it must be replaced by the manufacturer or its Technical Assistance Service in order to prevent all potential hazards (see Assistance.) The water pressure must be within the values indicated in the Technical Data table (see adjacent information.) The hose should not be bent or compressed. 16 * Only available in selected models. Anti-condensation strip* After installing the dishwasher, open the door and stick the adhesive transparent strip under the wooden shelf in order to protect it from any condensation which may form. Advice regarding the first wash cycle After the installation, remove the stoppers from the racks and the retaining elastic elements from the upper rack, if any. Immediately before the first washing, completely fill the salt dispenser with water and add only then approximately 1 kg of salt (see chapter entitled Rinse aid and refined salt). The water may overflow: this is normal and is not a cause for concern. Select the water hardness value (see chapter entitled Rinse aid and refined salt). - After the salt has been poured into the machine, the LOW SALT indicator light* switches off. If the salt container is not filled, the water softener and the heating element may be damaged as a result. Assistance Before contacting Assistance: • Check whether the problem can be resolved using the Troubleshooting guide (see Troubleshooting). • Restart the programme to check whether the problem has ceased to exist. • If the problem persists, contact the Authorised Technical Assistance Service. The machine has a buzzer/set of tones (depending on the dishwasher model) to inform the user that a command has been implemented: power on, cycle end etc. The symbols/indicator lights/LEDs on the control panel/ display may vary in colour and may have a flashing or fixed light (depending on the dishwasher model). The display* provides useful information concerning the type of wash cycle, drying/wash-cycle phase, remaining time, temperature etc etc. Technical data Capacity Water supply pressure width 44.5 cm height 82 cm depth 57 cm 10 standard place-settings 0,05 ÷ 1MPa (0.5 ÷ 10 bar) 7,25 – 145 psi Power supply voltage See appliance data plate Total absorbed power See appliance data plate Fuse See appliance data plate Dimensions This dishwasher conforms to the following European Community Directives: -2006/95/EC (Low Voltage) -2004/108/EC (Electromagnetic Compatibility) -2009/125/EC (Comm. Reg. 1016/2010) (Ecodesign) -97/17/EC (Labelling) -2012/19/EC (WEEE) Never use the services of unauthorised technicians. Please have the following information to hand: • The type of malfunction. • The appliance model (Mod.). • The serial number (S/N). This information can be found on the appliance data plate (see Description of the appliance). ECODESIGN REGULATION ECO wash cycle is the standard cycle to which the energy label data refers; this cycle can be used to wash crockery with a normal soil level and is the most efficient in terms of energy and water consumption for this type of crockery. To reduce consumption even further, only run the dishwasher when it is full. Standby consumption: Left-on mode consumption: 3 W – Off mode consumption: 1,3 W Consumption data table for the main cycles Standard conditions* INTENSIVE NORMAL User conditions** Energy consumption (kWh/cycle) Water consumption (l/cycle) Duration (min/ cycle) Energy consumption (kWh/cycle) Water consumption (l/cycle) Duration (min/cycle) 1,30 1,05 14 14 150 115 1,15 0,95 14 13 140 110 * Cycle data refers to the values recorded in a laboratory, in accordance with European standard EN 50242. ** Data is obtained by recording values when the appliance is operational and loaded with user crockery. 17 EN Description of the appliance EN Overall view 1. 2. 3. 4. 5. 6. 7. 8. 9. 10. 11. 12. Upper rack Upper sprayer arm Tip-up compartments Rack height adjuster Lower rack Lower sprayer arm Cutlery basket Washing filter Salt dispenser Detergent and rinse aid dispensers Data plate Control Panel*** Control panel Select wash cycle knob Start/Pause button and indicator light ON/OFF/RESET button Door handle Washing indicator light Drying indicator light ***Only in completely built-in models. * Only available in selected models. The number and type of wash cycles and options may vary depending on the dishwasher model. 18 Low Salt indicator light End indicator light Loading the racks Before loading the racks, remove all food residues from the crockery and empty liquids from glasses and cups. Arrange the crockery so that it is held in place firmly and does not tip over. After loading the appliance, check that the sprayer arms can rotate freely. Lower rack The lower rack can hold pans, lids, plates, salad bowls, cutlery, etc. as seen in the Loading examples. Plates and large covers should be placed at the sides of the rack, ensuring that they do not block the rotation of the upper sprayer arm. Some dishwasher models are fitted with tip-up sections * , which can be used in a vertical position when arranging plates or in a horizontal position when arranging pans and salad bowls. Cutlery basket The type of cutlery basket may vary according to the dishwasher model: The cutlery basket should be positioned at the front of the lower rack, by sliding it between the fixed inserts, or on the upper rack when the half load option has been selected (in models featuring this option). - It has a collapsible sliding system which means the cutlery can be arranged in the best possible way. Knives and other utensils with sharp edges must be placed in the cutlery basket with the points facing downwards, or they must be positioned horizontally in the tip-up compartments on the upper rack. Tilt A Tilt B Tilt C EN -Lift the tip-up compartment, slide it gently and position it in the desired tilt angle. Adjusting the height of the upper rack In order to make it easier to arrange the crockery, the upper rack may be moved to a higher or lower level. The height of the upper rack should ideally be adjusted WHEN THE RACK IS EMPTY. Never lift or lower the rack on one side only. Open the left and right guide rail stops and pull out the rack; position it higher or lower as required, slide it along the guide rails until the front wheels are in place and close the stops (see figure). If the rack is fitted with “Dual Space” handles* (see figure), pull out the upper rack until it reaches its stop point, grip the handles at the sides of the rack and move it upwards or downwards, then slowly let it fall back into place. Loading examples for the upper rack Loading examples for the lower rack Cutlery basket positioning examples Upper rack Load this rack with delicate and lightweight crockery: glasses, tea and coffee cups, saucers, small salad bowls, saucepans and small saucepans which are not too soiled, using the Loading examples as a guide. • Mugs and cups, long sharp knives and serving utensils: place these on the tip-up compartments**. Tip-up compartments with adjustable tilt* - The tilt feature can be used to increase the space in the upper rack, to position wine glasses with different stem lengths safely and to improve drying performance. Items which should not be washed in the dishwasher • Wooden items, objects with wooden or horn handles or gluedon parts. • Items made from aluminium, copper, brass, pewter or tin. • Items made from plastic material which is not heat-resistant. • Antique or hand-painted porcelain. • Antique silver. Silver which is not antique may, however, be washed in the dishwasher using a delicate wash cycle, provided that it does not come into contact with other metals. We recommend the use of crockery which is dishwasher safe. *Only available in selected models. ** The number and position may vary. 19 Start-up and use EN Starting the dishwasher 1. Turn the water tap on. 2. Press the ON/OFF button: all the indicator lights on the control panel will light up for a few seconds. 3. Open the door and pour in a suitable amount of detergent (see below). 4. Load the racks (see Loading the racks) and shut the door. 5. Select the wash cycle by turning the WASH CYCLE SELECT knob in a clockwise direction: align the notch on the knob with the number or symbol representing the desired wash cycle. The START/PAUSE indicator light will flash. 6. Select the wash options* (see adjacent information). 7. Start the cycle by pressing the START button; the indicator light will light up and remain lit in a fixed manner. The indicator light corresponding to the wash phase will switch on, signalling that the wash cycle has begun. 8. At the end of the wash cycle the END indicator light will switch on (fixed light). Switch off the appliance by pressing the ON/OFF button, shut off the water valve and unplug the appliance from the electricity socket. 9. Wait for a few minutes before removing the crockery, in order to avoid burns. Unload the racks, beginning with the lower level. - The machine will switch off automatically during certain periods of inactivity, in order to minimise electricity consumption. Modifying a wash cycle in progress If a mistake was made during the wash cycle selection process it is possible to change the cycle, provided that it has only just begun: once the wash cycle has started, switch off the machine by pressing and holding the ON/OFF/Reset button. Switch it back on using the same button and select the desired wash cycle and options. Adding extra crockery Measuring out the detergent A good wash result also depends on the correct amount of detergent being used; exceeding the stated amount does not result in a more effective wash and increases environmental pollution. Only use detergent which has been specifically designed for dishwashers. DO NOT USE washing up liquid. Using excessive detergent may result in foam residue remaining in the machine after the cycle has ended. The use of tablets is only recommended for models which offer the MULTI-FUNCTIONAL TABLETS option. To achieve the best results from each washing and drying cycle, powder detergent, rinse aid liquid and salt should be used. Compartment A: Washing detergent Compartment B: Pre-wash detergent 1. Open cover C by pressing button D. 2. Pour in the detergent after consulting the Table of wash cycles: • For powder detergent use compartments A and B. C • For detergent in tablet form: when the cycle requires 1 tablet, place it in compartment A and close the cover; when it requires 2, place the second tablet at the bottom of the appliance. 3. Remove detergent residues from the edges of the compartment and close the cover until it clicks. D A B Press the Start/Pause button (the corresponding indicator light will flash). Open the door, taking care to avoid the escaping steam, and place the crockery inside the appliance. Press the Start/Pause button (fixed light): the cycle starts from the point at which it was interrupted. If the Start/Pause button is pressed so as to pause the machine, the wash cycle or the Delayed Start* function (if selected) is interrupted. At this stage it is not possible to change the wash cycle. Accidental interruptions If the door is opened during the wash cycle, or if there is a power cut, the cycle stops. It starts again from the point at which it was interrupted once the door has been shut or once the electricity supply is restored. * Only available in selected models. 20 Wash cycles If the crockery is only lightly soiled or if it has been rinsed with water before being placed in the dishwasher, reduce the amount of detergent used accordingly. EN The number and type of wash cycles and options may vary depending on the dishwasher model. Wash cycle selection instructions Heavily soiled dishes and pans (not to be used for delicate items). Normally soiled pans and dishes. Standard daily wash cycle. Limited quantity of daily soiling. (4 place settings + 1 saucepan +1 frying pan). Pre-wash for dishes while awaiting completion of the load with the dishes from the next meal. Environmentally-friendly wash cycle with low energy consumption levels, suitable for pans and dishes. Economic and fast wash to be used for lightly soiled dishes. (Run cycle immediately after use) (2 plates + 2 glasses + 4 pieces of cutlery + 1 saucepan + 1 small frying pan). Economic and fast wash for delicate items which are sensitive to high temperatures. (Run cycle immediately after use) (glasses upper rack + delicate plates, lower rack). Detergent (A) = compartment A (B) = compartment B Wash cycle Wash cycles which include drying Options Wash cycle duration (tolerance ±10%) Hrs. Min. Powder Liquid Tablets 25 g (A) 25 ml (A) 1 (A) Yes No 2:25’ 21 g (A) 4 g (B) 21 ml (A) 4 ml (B) 1 (A) Yes No 1:50’ 25 g (A) 25 ml (A) 1 (A) No No 1:00’ No No No No No 0:08’ 21 g (A) 4 g (B) 21 ml (A) 4 ml (B) 1 (A) Yes No 3:00’ 21 g (A) 21 ml (A) 1 (A) No No 0:35’ 25 g (A) 25 ml (A) 1 (A) Yes No 1:35’ 1. Intensive 2. Normal 3. Daily A 60 4. Soak 5. Eco* 6. Rapid 7. Crystal Notes: Optimum performance levels when using the “Daily 60’ - Rapidwash/Speed” amounts of crockery specified. achieved To make it easier to measure out the detergent, it is worth remembering that: 1 tablespoon = 15 gr. of powder = approximately 15 ml of liquid - 1 teaspoon = 5 gr. of powder = approximately 5 ml of liquid * The Eco wash cycle adheres to the regulation EN-50242. Although it has a longer duration than other wash cycles it uses less energy and is les harmful to the environment. Note for Test Laboratories: for information relating to comparative EN testing conditions, please send an email to the following address: [email protected] 21 Rinse aid and refined salt EN Only use products which have been specifically designed for dishwashers. Do not use table salt or industrial salt, or washing up liquid. Follow the instructions given on the packaging. If using a multi-functional product it is not necessary to add rinse aid; however, we recommend that you add salt, especially if you live in an area where the water is hard or very hard. Follow the instructions given on the packaging. If you do not add salt or rinse aid, the LOW SALT* and LOW RINSE AID* indicator lights remain lit. Measuring out the rinse aid Rinse aid makes it easier for the crockery to dry, as water runs off surfaces more readily and therefore does not leave streaks or marks. The rinse aid dispenser should be filled: • When the LOW RINSE AID* indicator light on the control panel/dislay is illuminated; 1. Open the dispenser by turning the lid (G) in an anticlockwise direction. 2. Pour in the rinse aid, making sure it does not overflow from the F dispenser. If this happens, clean the spill immediately with a dry G cloth. 3. Screw the lid back on. NEVER pour the rinse aid directly into the appliance tub. Adjusting the amount of rinse aid If you are not completely satisfied with the drying results, you may adjust the quantity of rinse aid used. Use a screwdriver to turn the dosage adjuster (F) to one of the 6 pre-set positions (the default position is set to 4): • If there are streaks on the crockery, set the adjustment device to a lower number (1-3). • If drops of water remain on the crockery or if there are limescale marks present after the cycle has finished, set the adjuster to a higher number (4-6). Setting the water hardness Every dishwasher is equipped with a water softener which, by using refined salt designed especially for this type of appliance, supplies water without limescale which is then used to wash the crockery. This dishwasher offers a setting which helps to reduce pollution and optimises washing performance in accordance with the water hardness level in your area. This information can be obtained from your local water supplier. - Switch the machine off using the ON/OFF button and open the door. - Set the SELECT WASH CYCLE knob first to wash cycle 5, then to wash cycle 1, then to wash cycle 5 again. - Press the ON/OFF button; the wash cycle phase (washing, drying, end) indicator lights will flash. It is now possible to select the water hardness level. There is a water hardness level for 22 every wash cycle: E.g.: wash cycle 1, water hardness level 1 wash cycle 2, water hardness level 2, etc. etc., up to a maximum of 5* levels. (The default water softener setting is level 3). - To exit the function, wait a few seconds or press one of the option buttons*, or switch off the machine using the ON/OFF button. Even if using multi-functional tablets, the salt dispenser should still be filled. Average salt container capacity duration** Level °dH °fH mmol/l months 1 0-6 0 - 10 0-1 7 months 2 6 - 11 11 - 20 1,1 - 2 5 months 3 12 - 17 21 - 30 2,1 - 3 3 months 4 17 - 34 31 - 60 3,1 - 6 2 months 6,1 - 9 2/3 weeks 5* 34 - 50 61 - 90 For values between 0°f and 10°f, we do not recommend the use of salt. * this setting may cause a slight increase in the Water Hardness Table duration of the cycles. ** for 1 wash cycle per day. (°dH = hardness measured in German degrees - °f = hardness measured in French degrees - mmol/l = millimoles per litre) Measuring out the refined salt In order to achieve the best possible results using a wash cycle, make sure that the dispenser is never empty. Refined salt removes limescale from the water, thus avoiding the formation of deposits on crockery. The salt dispenser is located in the lower part of the dishwasher (see Description) and should be filled: •When the green float* cannot be seen by simply looking at the cap of the salt dispenser. • When the LOW SALT* indicator light on the control panel/ display is illuminated; 1. Remove the lower rack and unscrew the container cap (anticlockwise). 2. The first time you do this: fill the water tank right up to its edge. 3. Position the funnel* (see figure) and fill the salt container right up to its edge (this should hold approximately 1 kg); it is not unusual for a little water to leak out. 4. Remove the funnel* and wipe any salt residue away from the opening; rinse the cap under running water and then screw it on, the head facing downwards so as to let the water flow out of the four cracks which are arranged in a star shape on the lower part of the cap. (Salt cap with green float*) It is advisable to perform this procedure every time you add salt to the container. Make sure the cap is screwed on tightly, so that no detergent can get into the container during the wash cycle (this could damage the water softener beyond repair). When necessary, measure out the salt before a wash cycle so that any saline solution which has leaked out of the salt dispenser is removed. * Only available in selected models. Care and maintenance Shutting off the water and electricity supplies • Turn off the water tap after every wash cycle to avoid leaks. • Always unplug the appliance when cleaning it and when performing maintenance work. Cleaning the dishwasher • The external surfaces of the machine and the control panel may be cleaned using a non-abrasive cloth which has been dampened with water. Do not use solvents or abrasive products. • Any marks on the inside of the appliance may be removed using a cloth dampened with water and a little vinegar. Preventing unpleasant odours • Always keep the door of the appliance ajar in order to avoid moisture from forming and being trapped inside the machine. • Clean the seals around the door and detergent dispensers regularly using a damp sponge. This will avoid food becoming trapped in the seals, which is the main cause behind the formation of unpleasant odours. Cleaning the sprayer arms Food residue may become encrusted onto the sprayer arms and block the holes used to spray the water. It is therefore recommended that the arms are checked from time to time and cleaned with a small non-metallic brush. The two sprayer arms may both be removed. To remove the upper sprayer arm, rotate the locking ring in an anti-clockwise direction. The upper sprayer arm should be replaced with the holes facing upwards. The lower sprayer arm can be removed by pulling it upwards. Clean the water inlet filter at the tap outlet regularly. - Turn off the water tap. - Unscrew the end of the water inlet hose, remove the filter and clean it carefully under running water. - Replace the filter and screw the water hose back into position. Cleaning the filters The filter assembly consists of three filters which remove food residues from the washing water and then recirculate the water. They should be cleaned if you wish to achieve the best results in every wash. Clean the filters regularly. The dishwasher should not be used without filters, or if the filter is loose. • After several washes, check the filter assembly and if necessary clean it thoroughly under running water, using a non-metallic brush and following the instructions below: 1. Turn the cylindrical filter C in an anti-clockwise direction and pull it out (fig. 1). 2. Remove the cup filter B by exerting a slight pressure on the side flaps (fig. 2). 3. Slide out the stainless steel plate filter A (fig. 3). 4. Inspect the trap and remove any food residue. NEVER REMOVE the wash cycle pump (black detail) (fig. 4). C 1 A 3 After cleaning the filters, replace the filter assembly and fix it in position correctly; this is essential for maintaining the efficient operation of the dishwasher. Cleaning the water inlet filter* If the water hoses are new or have not been used for an extended period of time, let the water run to make sure it is clear and free of impurities before performing the necessary connections. If this precaution is not taken, the water inlet could become blocked and damage the dishwasher. Leaving the machine unused for extended periods • Disconnect the appliance from the electricity supply and shut off the water tap. • Leave the door of the appliance ajar. • When you return, run a wash cycle when the dishwasher is empty. * Only available in selected models. 23 EN Troubleshooting EN Whenever the appliance fails to work, check for a solution from the following list before calling for Assistance. Problem: Possible causes / Solutions: The dishwasher does not start or cannot be controlled • Switch off the appliance by pressing the ON/OFF button, switch it back on after approximately one minute and reset the program. • The appliance has not been plugged in properly. • The dishwasher door has not been shut properly. The door won’t close • The lock was released. Strongly push the door until a “clacking” noise is heard. No water drains out from the dishwasher. • • • • The dishwasher makes excessive noise. • The dishes are rattling against each other or against the sprayer arms. • An excessive amount of foam has been produced: the detergent has not been measured out correctly or it is not suitable for use in dishwashers (see Start-up and use). The dishes and glasses are covered in a white film or limescale deposits. • The level of the refined salt is low or the dosage setting is not suited to the hardness of the water (see Rinse aid and salt). • The lid on the salt dispenser is not closed properly. • The rinse aid has been used up or the dosage is too low. The dishes and glasses are streaked or have a bluish tinge. • The rinse aid dosage is too high. The crockery has not been dried properly. • • • • The dishes are not clean. • • • • • The dishwasher does not take any water in - Tap shut-off alarm (several short beeps are emitted*) (the Drying and End indicator lights flash). • • • • Water inlet hose alarm / Water inlet filter blocked (the Washing, Drying and End indicator lights flashes). • Switch off the appliance by pressing the ON/OFF button. Shut off the water tap to eliminate the risk of flooding and remove the plug from the electrical socket. Make sure the water inlet filter has not become blocked by impurities (see “Care and maintenance” chapter). * Only available in selected models. 24 The dishwasher cycle has not yet finished. The water inlet hose is bent (see Installation). The drain duct is blocked. The filter is clogged up with food residues. A wash cycle without a drying program has been selected. The rinse aid has been used up or the dosage is too low (see Rinse aid and salt). The rinse aid dispenser setting is not suitable. The crockery is made from non-stick material or plastic. The racks are overloaded (see Loading the racks). The crockery has not been arranged well. The sprayer arms cannot move freely. The wash cycle is too gentle (see Wash cycles). An excessive amount of foam has been produced: the detergent has not been measured out correctly or it is not suitable for use in dishwashers (see Start-up and use). • The lid on the rinse aid compartment has not been shut correctly. • The filter is dirty or blocked (see Care and maintenance). • The refined salt level is low (see Rinse aid and salt). There is no water in the mains supply. The water inlet hose is bent (see Installation). Turn on the tap and the appliance will start after a few minutes. The appliance lock has been activated because no action was taken when the beeps* sounded. Switch off the appliance using the ON/OFF button, turn on the tap and switch the appliance back on after 20 seconds by pressing the same button. Reprogram the appliance and restart the wash cycle. Mode d’emploi LAVE-VAISSELLE FR Sommaire FR Fiche de produit, 26 Français, 25 Précautions et conseils, 27 Sécurité générale Mise au rebut Economies et respect de l’environnement Installation et Service, 28-29 Mise en place et mise à niveau Raccordements eau et électricité Caractéristiques techniques Conseils pour le premier lavage Service Ecodesign Regulation Description de l’appareil, 30 LSPA+ 720A.1 Vue d’ensemble Tableau de bord Charger les paniers, 31 Panier inférieur Panier supérieur Panier à couverts Réglage du panier supérieur Mise en marche et utilisation, 32 Mettre en marche le lave-vaisselle Charger le produit de lavage Programmes, 33 Tableau des programmes Produit de rinçage et sel régénérant, 34 Charger le produit de rinçage Charger le sel régénérant Entretien et soin, 35 Coupure de l’arrivée d’eau et du courant Nettoyer le lave-vaisselle Eviter les mauvaises odeurs Nettoyer les bras de lavage Nettoyage du filtre d’entrée d’eau Nettoyer les filtres En cas d’absence pendant de longues périodes Anomalies et remèdes, 36 25 Fiche de produit Fiche de produit FR Marque HOTPOINT/ARISTON Modèle LSPA+ 720A.1 Capacité nominale dans un environnement standard (1) 10 Classe énergétique sur une échelle de A+++ (faible consommation) à D (consommation élevée) A+ Consommation d''énergie par année en kWh (2) 237.0 Consommation d''énergie du cycle de lavage standard en kWh 0.81 Consommation d''energie en mode "off" en W 1.3 Consommation d''energie en mode "on" en W 3.0 Consommation d''eau par an en litres (3) 2800.0 Classe d’efficacité du séchage sur une échelle de G (efficacité minimum) à A (efficacité maximum) A Durée du programme pour un cycle de lavage standard en minutes 180 Durée du mode "on" en minutes 10 Émissions acoustiques dans l’air, exprimées en dB(A) re 1 pW 49 Encastrable Oui NOTES 1) Les informations sur l’étiquette et sur la fiche se rapportent au cycle de lavage standard. Ce programme convient pour laver une vaisselle normalement sale, et il s’agit des programmes les plus efficaces en termes de consommation combinée d’eau et d’énergie. Le cycle de lavage standard correspond au cycle éco. 2) Sur la base de 280 cycles de lavage standard avec une alimentation en eau froide et une consommation en modes à faible puissance. La consommation réelle d’énergie dépend des conditions d’utilisation de l’appareil 3) Sur la base de 280 cycles de lavage standard. La consommation réelle d’énergie dépend des conditions d’utilisation de l’appareil. 26 Précautions et conseils Cet appareil a été conçu et fabriqué conformément aux normes internationales de sécurité. Ces consignes sont fournies pour des raisons de sécurité, il faut les lire attentivement. Conserver ce mode d’emploi pour pouvoir le consulter à tout moment. En cas de vente, de cession ou de déménagement, s’assurer qu’il accompagne bien l’appareil. Lire attentivement les instructions : elles fournissent des conseils importants sur l’installation, l’utilisation et la sécurité de l’appareil. Cet appareil est conçu pour un usage domestique ou autres applications similaires, telles que : - lieux aménagés en espace cuisine pour le personnel de magasins, bureaux et autres lieux de travail ; - fermes ; - utilisation par les clients d’hôtels, de motels ou autres locaux de type résidentiel ; - chambres d’hôtes. Sécurité générale • Cet électroménager n'est pas destiné à être utilisé par des personnes (enfants compris) dont les capacités physiques, sensorielles ou mentales sont réduites ou qui ne disposent pas des connaissances ou de l'expérience nécessaires, à moins qu'elles n'aient été formées et encadrées pour l'utilisation de cet appareil par une personne responsable de leur sécurité. • Les enfants doivent être surveillés par un adulte pour éviter qu’ils ne jouent avec l’appareil. • Cet appareil est conçu pour un usage de type non professionnel à l'intérieur d'une habitation. • Cet appareil est destiné au lavage de vaisselle à usage domestique, il ne doit être utilisé que par des adultes et selon les instructions reportées dans cette notice. • Ne pas installer l’appareil à l’extérieur, même dans un endroit protégé, car il est extrêmement dangereux de l’exposer à la pluie et aux orages. • Ne pas toucher au lave-vaisselle pieds nus. • Ne jamais tirer sur le câble pour débrancher la fiche de la prise de courant. • Fermer le robinet de l’eau et débrancher la fiche de la prise de courant avant d’effectuer tous travaux de nettoyage et d’entretien. • En cas de panne, éviter à tout prix d’accéder aux mécanismes internes pour tenter une réparation. • Ne pas s’appuyer à la porte ouverte ou s’y asseoir : l’appareil pourrait basculer. • Ne pas garder la porte ouverte pour éviter de buter contre elle en risquant de se faire mal. • Garder les produits de lavage et de rinçage hors de la portée des enfants. • Les emballages ne sont pas des jouets pour enfants. Mise au rebut • Mise au rebut du matériel d’emballage : se conformer aux réglementations locales de manière à ce que les emballages puissent être recyclés. • La directive européenne 2012/19/EU sur les déchets d’équipements électriques et électroniques (DEEE), prévoit que les électroménagers ne peuvent pas être traités comme des déchets solides urbains normaux. Les appareils usagés doivent être collectés séparément afin d’optimiser le taux de récupération et le recyclage des matériaux qui les composent et réduire l’impact sur la santé humaine et l’environnement Le symbole de la poubelle barrée est appliqué sur tous les produits pour rappeler qu’ils font l’objet d’une collecte sélective. Pour tout autre renseignement sur la collecte des électroménagers usés, prière de s’adresser au service public préposé ou au vendeur. Economies et respect de l’environnement Faire des économies d’eau et d’électricité • Ne faire fonctionner le lave-vaisselle que quand il est rempli au maximum de sa capacité. Dans l’attente de remplir l’appareil, lancer le cycle de Trempage pour éviter la formation de mauvaises odeurs (voir Programmes). • Sélectionner un programme adapté au type de vaisselle et à son degré de salissure, consulter pour cela le Tableau des programmes : - pour de la vaisselle normalement sale, choisir le programme Eco (économique), il limite la quantité d’eau et d’électricité utilisée. - pour une quantité réduite de vaisselle, choisir l’option Demi-charge* (voir Mise en marche et utilisation). • Si le contrat de fourniture d’électricité prévoit des tranches horaires à prix réduit, effectuer les lavages pendant ces heures creuses. L’option Départ différé* (voir Mise en marche et utilisation) peut vous aider à organiser vos lavages dans ce sens Produits de lavage sans phosphates, sans chlore et aux enzymes • Il est vivement conseillé d’utiliser des produits de lavage sans phosphates et sans chlore, plus indiqués pour la protection de l’environnement. • Les enzymes développent une action particulièrement efficace à des températures avoisinant 50°C, les produits de lavage aux enzymes permettent donc de sélectionner des lavages à de basses températures et d’obtenir les mêmes résultats qu’à une température de 65°C. • Pour bien doser le produit de lavage, il faut tenir compte des indications du fabricant, de la dureté de l’eau, de la quantité de vaisselle et de son degré de salissure pour éviter tout gaspillage. Bien que biodégradables, les produits de lavage contiennent des éléments qui altèrent l’équilibre de la nature. * Présent uniquement sur certains modèles. 27 FR Installation et Service FR En cas de déménagement, transporter l’appareil verticalement; si besoin est, l’incliner sur le dos. Mise en place et mise à niveau 1. Déballer l’appareil et s’assurer qu’il n’a pas été endommagé pendant le transport. S’il est abîmé, ne pas le raccorder et contacter le revendeur. Raccordement du tuyau d’évacuation de l’eau Raccorder le tuyau d’évacuation, sans le plier, à une conduite d’évacuation ayant au moins 4 cm de diamètre. Le tuyau d’évacuation doit être placé entre 40 et 80 cm audessus du sol ou du plan d’appui du lave-vaisselle (A). 2. Installer le lave-vaisselle de manière à ce que les côtés et la paroi arrière touchent aux meubles adjacents ou au mur. L’appareil peut être encastré sous un plan de travail continu* (voir feuille de montage). 3. Installer le lave-vaisselle sur un sol plat et rigide. Compenser les irrégularités en vissant ou en dévissant les pieds avant jusqu'à ce que l'horizontalité de l’appareil soit parfaite. Une bonne horizontalité garantit la stabilité de l’appareil et supprime tout risque de vibrations, bruits et déplacements. 4*. Pour régler la hauteur du pied arrière, agir sur la douille rouge à six pans située dans la partie avant du lave-vaisselle, en bas et au milieu, à l’aide d’une clé mâle à six pans, ouverture 8 mm. Tourner dans le sens des aiguilles d’une montre pour augmenter la hauteur et dans le sens inverse pour la diminuer. (voir feuille d’instructions jointe à la documentation) Raccordements eau et électricité L’adaptation des installations électriques et les travaux de plomberie de l’installation doivent être effectués par du personnel qualifié. Le lave-vaisselle ne doit pas écraser les tuyaux ou le câble d’alimentation électrique. Utiliser des tuyaux neufs pour effectuer le raccordement de l’appareil au réseau de distribution de l’eau. Ne pas réutiliser les anciens tuyaux. Les tuyaux d’amenée et d’évacuation de l’eau et le câble d’alimentation électrique peuvent être orientés vers la droite ou vers la gauche pour simplifier l’installation. Raccord du tuyau d’amenée de l’eau • A une prise d'eau froide : bien visser le tuyau d’amenée à un robinet à embout fileté 3/4 gaz ; avant de visser, faire couler l’eau jusqu’à ce quelle devienne limpide et dépourvue d’impuretés qui pourraient engorger l’appareil. • A une prise d'eau chaude : en cas d’installation de chauffage centralisé (radiateurs), le lave-vaisselle peut être alimenté avec de l’eau chaude de réseau ne dépassant pas 60°C. Visser le tuyau au robinet en procédant comme pour la prise d'eau froide. Si la longueur du tuyau d’amenée ne suffit pas, s’adresser à un magasin spécialisé ou à un technicien agréé (voir Assistance). La pression de l’eau doit être comprise entre les valeurs reportées dans le tableau des Caractéristiques techniques (voir ci-contre). Attention à ce que le tuyau ne soit pas plié ou écrasé. Avant de raccorder le tuyau d’évacuation de l’eau au siphon de l’évier, retirer le bouchon en plastique (B). Sécurité anti-fuite Pour éviter tout risque d’inondation, le lave-vaisselle : - est équipé d’un dispositif qui coupe l’arrivée de l’eau en cas d’anomalie ou de fuite à l’intérieur de l’appareil. Quelques modèles sont équipés d’un dispositif de sécurité supplémentaire New Acqua Stop*, qui garantit contre tout risque d'inondation même en cas de rupture du tuyau d’amenée de l’eau. ATTENTION : TENSION DANGEREUSE ! Il ne faut en aucun cas couper le tuyau d’amenée de l’eau car il contient des parties sous tension. Raccordement électrique Avant de brancher la fiche dans la prise de courant, s'assurer que : • la prise est bien reliée à la terre et est conforme aux réglementations en vigueur ; • la prise est bien apte à supporter la puissance maximale de la machine reportée sur la plaquette signalétique fixée à la contre-porte (voir chapitre Description du lave-vaisselle) ; • a tension d’alimentation est bien comprise entre les valeurs figurant sur la plaque signalétique de la contre-porte ; • la prise est bien compatible avec la fiche de l’appareil. Autrement, faire remplacer la fiche par un technicien agréé (voir Assistance) ; n’utiliser ni rallonges ni prises multiples. Après installation de l’appareil, le câble d’alimentation électrique et la prise de courant doivent être facilement accessibles. Le câble ne doit être ni plié ni trop écrasé. Afin d’éviter tout danger, faire changer le cordon d’alimentation abîmé, par le fabricant ou par son service aprèsvente. (Voir Assistance) * Présent uniquement sur certains modèles. 28 Ruban anti-condensation* Après avoir encastré le lave-vaisselle, ouvrir la porte et coller le ruban adhésif transparent sous le plan en bois pour le protéger contre la formation de condensation. Conseils pour le premier lavage Après l’installation, enlever les chevilles placées sur les paniers et les élastiques de blocage sur le panier supérieur (le cas échéant). Juste avant le premier lavage, remplir complètement d’eau le réservoir à sel et ajouter environ 1 kg de sel (voir Produit de rinçage et sel régénérant) : il est tout à fait normal que de l’eau déborde. Sélectionner le degré de dureté de l’eau (voir Produit de rinçage et sel régénérant). - Après remplissage du réservoir à sel, le voyant SEL* s’éteint. Cet électroménager dispose de signaux sonores/bips (selon le modèle de lave-vaisselle) qui signalent que la commande a été activée: allumage, fin de cycle etc.. Tous les symboles/voyants/led lumineux du bandeau de commande/afficheur peuvent avoir des couleurs différentes, flasher ou être en fixe. (selon le modèle de lave-vaisselle). Affichage* (display-LCD) d'informations utiles concernant le type de cycle sélectionné, la phase de lavage/séchage, le temps résiduel, la température etc.... etc... Le manque de remplissage du réservoir à sel, peut endommager l’adoucisseur d’eau et l’élément chauffant. Service Avant d’appeler le service d’assistance technique: Caractéristiques techniques Dimensions largeur 44,5 cm hauteur 82 cm profondeur 57 cm Capacité 10 couverts standard Pression eau d’alimentation 0,05 ÷ 1 MPa (0,5 ÷ 10 bar) 7,25 – 145 psi Tension d’alimentation Voir étiquette des caractéristiques Puissance totale absorbée Voir étiquette des caractéristiques Fusible Voir étiquette des caractéristiques Cet appareil est conforme aux Directives Communautaires suivantes: - 2006/95/EC (Basse Tension) - 2004/108/EC (Compatibilité Electromagnétique) -2009/125/EC (Comm. Reg. 1016/2010) (Ecodesign) -97/17/EC (Etiquetage) -2012/19/EU (DEEE) • Vérifier s’il est possible de résoudre l’anomalie soimême (voir Anomalies et remèdes). • Faire repartir le programme pour s’assurer que l’inconvénient a été résolu. • Si ce n’est pas le cas, contacter un Service d’Assistance Technique agréé. Ne jamais faire appel à des techniciens non agréés. Communiquer: • le type d’anomalie; • le modèle de l’appareil (Mod.); • le numéro de série (S/N). Ces informations figurent sur la plaque signalétique apposée sur l’appareil (voir Description de l’appareil). ECODESIGN REGULATION Le cycle de lavage ECO c’est le programme standard auquel se référent les données de l’étiquette-énergie. Ce cycle est prévu pour le lavage de la vaisselle normalement sale et est le programme le plus efficace en termes de consommation d’énergie et d’eau pour ce type de vaisselle. Pour consommer moins, utiliser le lave-vaisselle à pleine charge. Consommations en stand-by: Consommation en left-on mode: 3 W - Consommation en off-mode: 1,3 W Tableau des consommations pour les cycles principaux INTENSIF NORMAL Conditions standard* Consommation d’énergie (KWh/cycle) Consommation d’eau (litre/cycle) 1,30 1,05 14 14 Durée (min/cycle) Conditions usager** Consommation d’énergie (KWh/cycle) Consommation d’eau (litre/cycle) Durée (min/cycle) 150 115 1,15 0,95 14 13 140 110 * Les données du programme sont des valeurs de mesure de laboratoire obtenues selon la norme européenne EN 50242. ** Les données sont obtenues en effectuant des mesures dans les conditions d’utilisation et de charge de la vaisselle de l’usager. 29 FR Description de l’appareil FR Vue d’ensemble 1. 2. 3. 4. 5. 6. 7. 8. 9. 10. 11. 12. Panier supérieur Bras de lavage supérieur Clayettes rabattables Réglage hauteur du panier Panier inférieur Bras de lavage inférieur Panier à couverts Filtre lavage Réservoir à sel Bacs produit de lavage et réservoir à produit de rinçage Plaque signalétique Tableau de bord*** Tableau de bord Bouton Sélection programme Touche et voyant Marche/Pause Touche ON-OFF/RESET Poignée ouverture porte Voyant Lavage Voyant Séchage *** Uniquement pour modèles tout intégrables. * Présent uniquement sur certains modèles. Le nombre et les types de programmes et des options, varient selon le modele de lave-vaisselle. 30 Voyant Manque de sel Voyant Fin Charger les paniers Avant de charger les paniers, débarrasser la vaisselle des déchets plus importants et vider les verres et les coupes. Ranger la vaisselle de manière à ce qu’elle ne bouge pas pour éviter tout risque de renversement. Après avoir chargé le lave-vaisselle, s’assurer que les bras de lavage tournent librement. Panier du bas Le panier du bas peut contenir des casseroles, des couvercles, des assiettes, des saladiers, des couverts etc.selon les Exemples de chargement. Ranger de préférence sur les côtés du panier les plats de service et les grands couvercles sans toutefois bloquer la rotation du bras de lavage supérieur. Certains modèles de lave-vaisselle sont pourvus de secteurs rabattables* qui peuvent être placés à la verticale pour ranger des assiettes ou à l’horizontale pour ranger des casseroles et des saladiers. Panier à couverts Le panier à couverts peut varier selon le modèle de lavevaisselle. Le panier à couvert doit être placé à l’avant dans le panier du bas où il peut coulisser parmi les accessoires fixes, ou sur le panier du haut dans le cas d’un lavage à demi-charge (sur les appareils dotés de cette fonction). - Il est équipé de rabats coulissants qui permettent de mieux ranger les couverts. Inclinaison A Inclinaison B Inclinaison C FR - Soulever l’étagère rabattable, la faire glisser légèrement et la placer selon l’inclinaison désirée. Régler la hauteur du panier supérieur Pour optimiser le rangement de la vaisselle, possibilité de régler le panier supérieur en position haute ou basse. Régler de préférence la hauteur du panier quand ce dernier est VIDE. Ne jamais soulever ou abaisser le panier d’un seul côté. Ouvrir les butées des glissières du panier à droite et à gauche et sortir le panier. Positionner le panier en position haute ou basse, le faire glisser le long des glissières jusqu’à ce que les roues avant entrent elles aussi et refermer les butées (voir figure). Si le panier est équipé de poignées Espace double* (voir figure), sortir le panier du haut en fin de corse, saisir les poignées sur les côtés du panier et déplacer vers le haut ou vers le bas; laisser retomber le panier sans le lâcher. Exemples de chargement du panier supérieur Ranger les couteaux et les ustensiles de cuisine pointus et coupants dans le panier à couverts, pointes tournées vers le bas, ou, à plat, sur les clayettes rabattables du panier supérieur. Exemples de rangement de le panier à couverts Panier du haut Y ranger la vaisselle fragile et légère: verres, tasses à thé et à café, soucoupes, saladiers bas, casseroles basses peu sales, en suivant les Exemples de chargement. • Tasses et tasses à café, couteaux longs et pointus, couverts de service: les placer sur les étagères rabattables**. Etagères rabattables à inclinaison variable* - L’inclinaison permet de gagner de la place dans le panier supérieur, de ranger des verres à pied de longueur différente et d’améliorer les performances de séchage. Exemples de chargement du panier inférieur Vaisselle n’allant pas au lave-vaisselle • Objets en bois, avec des manches en bois ou en corne ou ayant des parties collées. • Objets en aluminium, cuivre, laiton ou étain. • Vaisselle en plastique thermorésistant. • Porcelaines anciennes ou peintes à la main. • Argenterie ancienne. Les pièces d’argenterie non ancienne peuvent par contre être lavées avec un programme délicat après s’être assuré qu’elles ne touchent pas à d’autres métaux. Nous conseillons d’utiliser de la vaisselle lavable au lavevaisselle. * Présent uniquement sur certains modèles. ** Leur nombre et leur position varient. 31 Mise en marche et utilisation FR Mettre en marche le lave-vaisselle 1. Ouvrir l’arrivée d’eau. 2. Appuyer sur la touche ON-OFF: tous les voyants du bandeau de commande s’allument pendant quelques secondes. 3. Ouvrir la porte et doser le produit de lavage (voir plus bas). 4. Charger les paniers (voir Charger les paniers) et fermer la porte. 5. Pour sélectionner le programme souhaité, tourner le bouton de SÉLECTION PROGRAMME dans le sens des aiguilles d’une montre: amener le repère en face du symbole ou du numéro du programme. Le voyant de la touche MARCHE/Pause flashe. 6. Sélectionner les options de lavage* (voir ci-contre). 7. Appuyer sur la touche MARCHE pour démarrer, le voyant cesse de flasher (lumière fixe). Le voyant correspondant au lavage s’allume pour signaler le démarrage du programme. 8. A la fin du programme, la touche FIN s’allume (lumière fixe). Eteindre l’appareil par pression sur la touche ON-OFF, fermer le robinet de l’eau et débrancher la fiche de la prise de courant. 9. Attendre quelques minutes avant de sortir la vaisselle pour éviter de se brûler. Décharger les paniers en commençant par celui du bas. - Pour réduire sa consommation d’énergie, la machine s’éteint automatiquement dans certaines conditions de non-utilisation. Modifier un programme en cours En cas d’erreur de sélection d’un programme, il est possible de le modifier, à condition qu’il vienne tout juste de démarrer: pour changer un cycle de lavage en cours, éteindre puis rallumer l’appareil par une pression prolongée sur la touche ON/OFF, sélectionner ensuite le nouveau programme et les options désirées. Charger le produit de lavage Un bon résultat de lavage dépend aussi d’un bon dosage du produit de lavage. Un excès de produit de lavage ne lave pas mieux et pollue l’environnement. N’utiliser que du produit de lavage spécial lavevaisselle. NE PAS UTILISER de produits pour laver la vaisselle à la main. Une utilisation excessive de produit de lavage peut laisser des résidus de mousse en fin de cycle. L’utilisation de pastilles n’est conseillée que pour les modèles qui prévoient l’option PASTILLES MULTIFONCTION. Pour obtenir des performances de lavage et de séchage optimales, utiliser des produits de lavage en poudre, du liquide de rinçage et du sel. bac A: Produit de lavage bac B: Produit de prélavage 1. Appuyer sur la touche D pour ouvrir le couvercle C. A B 2. Pour doser le produit de lavage se reporter au Tableau des programmes: • en poudre: bacs A et B. • pastilles: si le programme en prévoit 1, placer cette dernière dans le bac A et fermer le C couvercle; s’il en prévoit 2, mettre la deuxième dans le fond de la cuve. 3. Eliminer les résidus de produit de lavage sur les bords du bac et fermer le couvercle jusqu’au déclic. D Introduire de la vaisselle en cours de lavage Appuyer sur la touche Marche/Pause, (la touche se met à flasher). ouvrir la porte en faisant attention à la vapeur chaude qui s’échappe et introduire la vaisselle. Appuyer sur la touche Marche/Pause (lumière fixe): le cycle redémarre. Appuyer sur la touche Marche/Pause pour mettre l’appareil en pause, le programme et le départ différé éventuellement sélectionné sont stoppés. Pendant cette phase, aucun changement de programme n’est possible. Interruptions accidentelles En cas d’ouverture de la porte en cours de lavage ou de coupure de courant, le programme s’arrête. Il redémarre du point où il a été interrompu dès que le courant revient ou que la porte est refermée. * Présent uniquement sur certains modèles. 32 Programmes En cas de vaisselle peu sale ou précédemment rincée à l’eau, réduire considérablement la quantité de produit de lavage. FR Le nombre et les types de programmes et des options, varient selon le modele de lave-vaisselle. Indications sur le choix des programmes Vaisselle et casseroles très sales (déconseillé pour la vaisselle fragile) Programme 2. Normal Vaisselle du jour en quantité réduite. (4 couverts + 1 casserole + 1 poêle). 3. Quotidien Lavage préalable dans l’attente de compléter le chargement au repas suivant 4. Trempage Cycle économique et rapide pour vaisselle peu sale, tout de suite après l’usage. (2 assiettes +2 verres + 4 couverts +1 casserole + 1 petite poêle) Cycle économique et rapide pour vaisselle fragile ne supportant pas les hautes températures, tout de suite après l’usage. (verres à pied dans le panier supérieur+ assiettes fragiles, dans le panier inférieur). Programmes prévoyant le séchage Options Durée du programme (tolérance ±10% Hrs. Min 25 g (A) 25 ml (A) 1 (A) Oui Non 2:25’ 21 g (A) 4 g (B) 21 ml (A) 4 ml (B) 1 (A) Oui Non 1:50’ 25 g (A) 25 ml (A) 1 (A) Non Non 1:00’ Non Non Non Non Non 0:08’ 21 g (A) 4 g (B) 21 ml (A) 4 ml (B) 1 (A) Oui Non 3:00’ 21 g (A) 21 ml (A) 1 (A) Non Non 0:35’ 25 g (A) 25 ml (A) 1 (A) Oui Non 1:35’ 1.Intensif Vaisselle et casseroles normalement sales. Programme standard quotidien. Lavage écologique à faible consommation d’électricité pour vaisselle et casseroles. Produit de lavage (A) = bac A (B) = bac B Poudre Liquide Pastilles 5. Eco* 6. Rapide 7. Cristal Remarques: Pour obtenir des performances optimales avec les programmes “Quotidien et Rapide/Speed’” il est conseillé de respecter le nombre de couverts indiqué. * Le programme Eco est conforme à la norme EN-50242. Il a une durée de lavage plus longue que les autres programmes mais c’est aussi celui qui consomme le moins d’énergie et qui respecte le plus l’environnement. Note pour les laboratoires d’essai: pour toutes informations détaillées sur les conditions d’essai comparatif EN, s’adresser à: [email protected] Pour simplifier le dosage du produit de lavage, prendre note que: 1 cuillère à soupe = 15 gr. de poudre = 15 ml de liquide environ - 1 cuillère à café = 5 gr. de poudre = 5 ml de liquide environ 33 Produit de rinçage et sel régénérant FR N’utiliser que des produits de lavage spéciaux lave-vaisselle. Ne pas utiliser de sel alimentaire ou industriel ni de produits pour lavage de la vaisselle à la main. Se conformer aux instructions reportées sur l’emballage. En cas d’utilisation d’un produit multifonction, pas besoin d’ajouter de produit de rinçage mais nous conseillons par contre d’ajouter du sel, surtout en cas d’eau dure ou très dure. Se conformer aux instructions reportées sur l’emballage. S’il n’y a pas de rajout de sel ni de produit de rinçage, il est normal que les voyants SEL* et produit DE RINÇAGE* restent allumés. Charger le produit de rinçage Le produit de rinçage aide au séchage de la vaisselle car il fait glisser l’eau de la surface et évite ainsi la formation de traces ou de taches. Il faut remplir le réservoir à produit de rinçage: • quand le voyant PRODUIT DE RINÇAGE* du bandeau / display s’allume; 1. Ouvrir le réservoir en tournant le couvercle (G) dans le sens inverse des aiguilles d’une montre. 2. Verser le produit de rinçage F sans le faire déborder. Si cela se produit, nettoyer aussitôt avec un G chiffon sec. 3. Revisser le couvercle. Ne JAMAIS verser le liquide de rinçage directement à l’intérieur de la cuve. Régler la dose de produit de rinçage Si le résultat du séchage n’est pas satisfaisant, le dosage du produit de rinçage peut être réglé. A l’aide d’un tournevis agir sur le dispositif de réglage (F) et l’amener sur une des 6 positions au choix (il est réglé en usine sur 4): • si la vaisselle présente des traces, l’amener sur des chiffres plus bas (1-3). • s’il y a des gouttes d’eau ou des taches de calcaire, le régler sur des chiffres plus élevés (4-6). Réglage dureté de l’eau Chaque lave-vaisselle est équipé d’un adoucisseur d’eau qui, grâce à du sel régénérant spécial lave-vaisselle, fournit de l’eau de lavage sans calcaire. Ce lave-vaisselle permet d’opérer un réglage pour réduire la pollution et optimiser les performances de lavage selon la dureté de l’eau. Se renseigner auprès de l’organisme distributeur de l’eau. - Eteindre l’appareil à l’aide de la touche ON/OFF et ouvrir la porte. - Placer le bouton SÉLECTION PROGRAMME d’abord sur le 5ème programme puis successivement sur le 1er et à nouveau sur le 5ème. - Appuyer sur la touche ON/OFF, les voyants des phases du cycle se mettent à clignoter, la sélection du degré de dureté est 34 à présent possible. A chaque programme son degré de dureté: Par ex. : 1er programme, degré de dureté 1 2ème programme, degré de dureté 2 etc..etc... jusqu’à 5* niveaux maximum. (L’adoucisseur d’eau est réglé en usine sur le niveau 3) - Pour quitter cette fonction, attendre quelques secondes ou appuyer sur une touche des options* ou éteindre l’appareil à l’aide de la touche ON/OFF. En cas d’utilisation de pastilles de lavage multifonction, remplir tout de même le réservoir à sel. Autonomie moyenne** réservoir à sel niveau °dH °fH mmol/l mois 1 0-6 0 - 10 0-1 7 mois 2 6 - 11 11 - 20 1,1 - 2 5 mois 3 12 - 17 21 - 30 2,1 - 3 3 mois 4 17 - 34 31 - 60 3,1 - 6 2 mois 6,1 - 9 2/3 semaines 5* 34 - 50 61 - 90 De 0°f à 10°f nous vous conseillons de ne pas utiliser de sel. Tableau de dureté de l’eau * la sélection 5 peut prolonger la durée. ** avec 1 cycle de lavage par jour. (°dH = dureté en degrés allemands - °fH = dureté en degrés français - mmol/l = millimol/litre) Charger le sel régénérant Pour obtenir de bons résultats de lavage, s’assurer que le réservoir à sel n’est jamais vide. Le sel régénérant élimine le calcaire présent dans l’eau et évite ainsi qu’il ne se dépose sur la vaisselle. Le réservoir à sel qui se trouve dans la partie inférieure du lavevaisselle (voir Description) doit être rempli: • quand le flotteur vert* n’est plus visible à travers le couvercle du sel; • quand le voyant SEL* du bandeau/display s’allume; 1. Sortir le panier inférieur et dévisser le couvercle du réservoir dans le sens inverse des aiguilles d’une montre. 2. Lors de la première mise en service : remplir le réservoir d’eau à ras bord. 3. Utiliser l’entonnoir* (voir figure) pour remplir le réservoir de sel à ras bord (1 kg environ). Il est tout à fait normal qu’il y ait un peu d’eau qui déborde. 4. Enlever l’entonnoir*, éliminer les résidus de sel sur le filetage. Avant de revisser le couvercle, il faut le rincer à l’eau courante en le plaçant tête en bas et en faisant couler l’eau à travers les quatre fentes en étoile situées dans la partie inférieure du couvercle. (Bouchon réservoir à sel avec flotteur vert*) Nous conseillons d’effectuer cette opération à chaque chargement de sel. Fermer soigneusement le couvercle pour éviter que du produit de lavage pénètre à l’intérieur du réservoir pendant le lavage (cela pourrait endommager irrémédiablement l’adoucisseur). En cas de rajout de sel, effectuer cette opération juste avant un cycle de lavage pour éliminer aussitôt la solution saline qui a débordé. * Présent uniquement sur certains modèles. Entretien et soin Coupure de l’arrivée d’eau et de courant • Fermer le robinet de l’eau après chaque lavage pour éviter tout risque de fuites. • Débrancher la fiche de la prise de courant lors du nettoyage de l’appareil et pendant tous travaux d’entretien. Nettoyer le lave-vaisselle • Pour nettoyer l’extérieur et le bandeau de commande, utiliser un chiffon humide non abrasif. N’utiliser ni solvants ni abrasifs. • Pour nettoyer la cuve intérieure et enlever toute tache, utiliser un chiffon imbibé d’eau additionnée d’un peu de vinaigre. Eviter les mauvaises odeurs • Laisser toujours la porte entrouverte pour éviter toute stagnation d’humidité. • Nettoyer régulièrement les joints d’étanchéité de la porte et des bacs à produits de lavage avec une éponge humide. On évitera ainsi les incrustations de déchets d’aliment qui sont les principaux responsables de la formation de mauvaises odeurs. Nettoyer les bras de lavage Il peut arriver que des déchets restent collés aux bras de lavage et bouchent les orifices de sortie de l’eau : mieux vaut les contrôler de temps en temps et les nettoyer avec une petite brosse non métallique. Les deux bras de lavage sont tous deux démontables. Pour démonter le bras supérieur, il faut dévisser la bague de fixation en plastique (tourner dans le sens inverse des aiguilles d’une montre). Il faut remonter le bras gicleur supérieur, orifices orientés vers le haut. Pour démonter le bras de lavage inférieur, tirer vers le haut. Nettoyer, périodiquement le filtre d’entrée de l’eau situé à la sortie du robinet. - Fermer le robinet de l’eau. - Dévisser l’extrémité du tuyau d’arrivée de l’eau, retirer le filtre et le laver soigneusement à l’eau courante. - Remettre le filtre en place et visser le tuyau. Nettoyer les filtres Les trois filtres qui composent le groupe filtrant débarrassent l’eau de lavage des résidus d’aliments avant de la remettre en circulation : pour obtenir de bons résultats de lavage, il faut les nettoyer. Nettoyer les filtres régulièrement. Ne pas utiliser le lave-vaisselle sans filtres ou avec filtre mal fixé. • Après quelques lavages, contrôler le groupe filtrant et, si nécessaire, le laver soigneusement à l’eau courante avec une petite brosse non métallique en procédant comme suit : 1. tourner le filtre cylindrique C dans le sens inverse des aiguilles d’une montre pour le sortir de son emplacement (fig. 1). 2. Exercer une légère pression sur les ailettes latérales du gobelet filtre B pour le faire sortir (Fig. 2); 3. Dégager le filtre inox A. (fig. 3). 4. Examiner la cavité et éliminer tout résidu de nourriture. NE JAMAIS RETIRER la protection de la pompe de lavage (pièce noire) (fig.4). C 1 A 3 Nettoyage du filtre d’entrée d’eau* Si les tuyaux de l’eau sont neufs ou s’ils sont restés longtemps inutilisés, avant d’effectuer le raccordement, faire couler l’eau jusqu’à ce qu’elle devienne limpide et dépourvue d’impuretés. Faute de quoi, un engorgement pourrait se produire au point d’arrivée de l’eau et endommager le lave-vaisselle . Après avoir nettoyé les filtres, remettre soigneusement le groupe filtrant à sa place, cette opération est fondamentale pour un bon fonctionnement du lave-vaisselle. En cas d’absence pendant de longues périodes • Débrancher les raccordements électriques et fermer le robinet de l’eau. • Laisser la porte entrouverte. • Au retour, effectuer un lavage à vide. * Présent uniquement sur certains modèles. 35 FR Anomalies et remèdes FR Si l’appareil présente des anomalies de fonctionnement, procéder aux contrôles suivants avant de prendre contact avec le service d’assistance technique. Anomalies: Causes / Solutions possibles: Le lave-vaisselle ne démarre pas ou n’obéit pas aux commandes • Eteindre l’appareil à l’aide de la touche ON-OFF, rallumer au bout d’une minute environ et présélectionner le programme. • La fiche n’est pas bien branchée dans la prise de courant. • La porte du lave-vaisselle n’est pas bien fermée. La porte ne ferme pas • La serrure est enclenchée; pousser énergiquement sur la porte jusqu’au “clic”. Le lave-vaisselle ne vidange pas. • • • • Le lave-vaisselle est bruyant. • La vaisselle s’entrechoque ou butte contre les bras de lavage. • Excédent de mousse: le produit de lavage n’est pas bien dosé ou n’est pas approprié (voir Mise en marche et utilisation). (voir Mise en marche et utilisation). La vaisselle et les verres présentent des dépôts de calcaire ou une couche blanchâtre. • Il manque du sel régénérant ou son réglage n’est pas adapté à la dureté de l’eau (voir Produit de rinçage et sel). • Le couvercle du réservoir à sel n’est pas bien fermé. • Il n’y a plus de produit de rinçage ou son dosage est insuffisant. La vaisselle et les verres présentent des traces blanches ou des reflets bleuâtres. • Le dosage du produit de rinçage est excessif. La vaisselle n’est pas sèche. • Un programme sans séchage a été sélectionné. • Il n’y a plus de produit de rinçage ou son dosage est insuffisant (voir Produit de rinçage et sel). • Le réglage du produit de rinçage n’est pas approprié. • La vaisselle est en matériau antiadhésif ou en plastique. La vaisselle n’est pas propre. • • • • • Il n’y a pas d’arrivée d’eau - Alarme robinet fermé. (des bips* courts retentissent) (clignotement des voyants , Séchage et Fin) • • • • Alarme sur le tuyau d’arrivée de l’eau/Filtre arrivée eau bouché. (clignotement des voyants Lavage, Séchage et Fin) • Appuyer sur la touche ON/OFF pour éteindre l’appareil. Fermer le robinet de l’eau pour éviter tout risque d’inondation, débrancher la fiche de la prise de courant. S’assurer que le filtre d’arrivée de l’eau n’est pas bouché par des impuretés. (voir chapitre “Entretien et Soin”) Le programme n’est pas encore terminé. Le tuyau d’évacuation de l’eau est plié (voir Installation). L’évacuation de l’évier est bouchée. Le filtre est bouché par des déchets de nourriture. Les paniers sont trop chargés (voir Charger les paniers). La vaisselle n’est pas bien rangée. Les bras de lavage ne tournent pas librement. Le programme de lavage n’est pas assez puissant (voir Programmes). Excédent de mousse: le produit de lavage n’est pas bien dosé ou n’est pas approprié (voir Mise en marche et utilisation). (voir Mise en marche et utilisation). • Le couvercle du réservoir à produit de rinçage n’est pas bien fermé. • Le filtre est sale ou bouché (voir Entretien et soin). • Il manque du sel régénérant (voir Produit de rinçage et sel). Il y a une coupure d’eau. Le tuyau d’arrivée de l’eau est plié (voir Installation). Ouvrir le robinet, l’appareil se met en marche au bout de quelques minutes. L’appareil s’est bloqué car vous n’avez pas donné suite aux bips* d’avertissement. Eteindre l’appareil à l’aide de la touche ON/OFF, ouvrir le robinet et au bout de 20 secondes rallumer en appuyant à nouveau sur la même touche. Reprogrammer l’appareil et le remettre en marche. * Présent uniquement sur certains modèles. 36 Bedienungsanleitung GESCHIRRSPÜLER DE Deutsch, 37 Inhaltsverzeichnis DE Datenblatt, 38 Vorsichtsmaßregeln und Hinweise, 39 Allgemeine Sicherheit Entsorgung Energie sparen und Umwelt schonen Installation und Kundendienst, 40-41 Positionierung und Nivellierung Wasser- und Elektroanschlüsse Technische Daten Hinweise zur ersten Inbetriebnahme Kundendienst Ecodesign Regulation LSPA+ 720A.1 Beschreibung Ihres Geschirrspülers, 42 Geräteansicht Schalterblende Körbe beladen, 43 Geschirrspüler-Unterkorb Geschirrspüler-Oberkorb Besteckkorb Starten und Gebrauch, 44 Starten des Geschirrspülers Einfüllen des Spülmittels Spülprogramme, 45 Spülprogrammtabelle Klarspüler und Regeneriersalz, 46 Einfüllen des Klarspülers Einfüllen des Regeneriersalzes Reinigung und Pflege, 47 Abstellen der Wasser- und Stromversorgung Reinigung des Geschirrspülers Vermeidung von Geruchsbildung Reinigung der Sprüharme Reinigung des Wasserfilters Die Filter reinigen Was tun, bevor Sie für längere Zeit verreisen Störungen und Abhilfe, 48 37 Datenblatt DE Datenblatt Marke HOTPOINT ARISTON Modell LSPA+ 720A.1 Nennkapazität in Standardgedecken für den Standardreinigungszyklus (1) 10 Energieeffizienzklasse (A+++ niedriger Verbrauch) bis D (hoher Verbrauch) A+ Energieverbrauch pro Jahr in kWh (2) 237.0 Energieverbrauch Standardreinigungszyklus in kWh 0.81 Gewichtete Leistungsaufnahme im Aus-Zustand in W 1.3 Gewichtete Leistungsaufnahme im unausgeschalteten Zustand in W 3.0 Wasserverbrauch pro Jahr in Liter (3) 2800.0 Trocknungseffizienzklasse (A höchste Effizienz) bis G (geringste Effizienz) A Programmdauer des Standardreinigungszyklus in Minuten 180’ Dauer des unausgeschalteten Zustands nach Programmende 10 Luftschallemissionen dB(A) re 1pW 49 Einbaugerät Ja HINWEIS 1) Angabe auf Grundlage von 280 Standardreingungszyklen bei Kaltwasserbefüllung und dem Verbrauch der Betriebsarten mit geringer Leistungsaufnahme. Der tatsächliche Energieverbrauch hängt von der Art der Nutzung des Geräts ab. 2) Die Angaben beziehen sich auf den Standardreinigungszyklus. Dieses Programm eignet sich zur Reingung von normal verschmutztem Geschirr und ist am effizientesten in Bezug auf den kombinierten Energie- und Wasserverbrauch. Der Standardreingungszyklus entspricht dem Eco Zyklus. 3) Angabe auf Grundlage von 280 Standardreingungszyklen. Der tatsächliche Energieverbrauch hängt von der Art der Nutzung des Geräts ab. 38 Vorsichtsmaßregeln und Hinweise Das Gerät wurde nach den strengsten internationalen Sicherheitsvorschriften entworfen und gebaut. Nachstehende Hinweise werden aus Sicherheitsgründen geliefert und sollten aufmerksam gelesen werden Bewahren Sie diese Bedienungsanleitung bitte sorgfältig auf, damit Sie sie jederzeit zu Rate ziehen können. Im Falle eines Verkaufs, einer Übergabe oder eines Umzugs muss sie das Gerät stets begleiten. Lesen Sie bitte folgende Hinweise aufmerksam durch, sie liefern wichtige Informationen hinsichtlich der Installation, des Gebrauchs und der Sicherheit. Dieses Gerät ist für den Hausgebrauch oder ähnliche Anwendungen, zum Beispiel: - Küchenbereiche für das Personal von Geschäften, Büros und andere Arbeitsumgebungen; - Bauernhäuser; - Nutzung durch Kunden in Hotels, Motels und anderen Wohnbereichen; - Bed and Breakfast. Allgemeine Sicherheit • Dieses Gerät ist nicht zur Verwendung durch Personen (einschließlich Kinder) mit eingeschränkten körperlichen, geistigen oder sensorialen Fähigkeiten oder ohne ausreichende Erfahrung und Kenntnis geeignet, es sei denn, sie werden durch eine für ihre Sicherheit verantwortliche Person beaufsichtigt und eingewiesen. • Es ist die Aufsicht eines Erwachsenen erforderlich, um zu vermeiden, dass Kinder mit dem Gerät spielen. • Dieses Gerät ist für den nicht professionellen Einsatz in privaten Haushalten bestimmt. • Das Gerät darf nur zum Spülen von Haushaltsgeschirr verwendet werden und nur durch Erwachsene sowie gemäß den Anleitungen dieses Handbuchs bedient werden. • Das Gerät darf nicht im Freien aufgestellt werden, auch nicht, wenn es sich um einen geschützten Platz handelt. Es ist äußerst gefährlich, das Gerät Regen und Gewittern auszusetzen. • Berühren Sie den Geschirrspüler nicht, wenn Sie Barfuß sind. • Ziehen Sie den Netzstecker nicht am Netzkabel aus der Steckdose, sondern nur am Netzstecker selbst. • Vor Reinigungs- und Wartungsmaßnahmen muss der Wasserhahn zugedreht und der Netzstecker aus der Steckdose gezogen werden. • Versuchen Sie bei etwaigen Störungen bitte keinesfalls, Innenteile selbst zu reparieren. • Stützen Sie sich und setzen Sie sich bitte nicht auf die offen stehende Gerätetür, das Gerät könnte umkippen. • Die Gerätetür sollte nicht offen gelassen bleiben, da man darüber stolpern könnte. • Bewahren Sie das Spülmittel und den Klarspüler außerhalb der Reichweite von Kindern auf. • Verpackungsmaterial ist kein Spielzeug für Kinder. Entsorgung • B e f o l g e n S i e d i e l o k a l e n V o r s c h r i f t e n ; Verpackungsmaterial kann wiederverwertet werden. • Die europäische Richtlinie 2012/19/EG über Elektround Elektronik-Altgeräte (WEEE) sieht vor, dass Haushaltsgeräte nicht mit dem normalen Hausmüll entsorgt werden dürfen. Die Altgeräte müssen getrennt gesammelt werden, um die Rückführung und das Recycling der Materialien zu optimieren, aus denen die Geräte hergestellt sind, und um mögliche Belastungen der Gesundheit und der Umwelt zu verhindern. Das Mülleimersymbol ist auf allen Produkten dargestellt, um an die Verpflichtung zur getrennten Abfallsammlung zu erinnern. Für weitere Informationen hinsichtlich der ordnungsgemäßen Entsorgung von Haushaltsgeräten wenden Sie sich bitte an Ihren Händler oder an die zuständige kommunale Stelle. Energie sparen und Umwelt schonen Wasser und Strom sparen • Setzen Sie den Geschirrspüler nur bei voller Ladung in Betrieb. Um in der Zwischenzeit, d.h. bis das Gerät ganz gefüllt ist, die Bildung unangenehmer Gerüche zu vermeiden, setzen Sie den Einweichzyklus in Gang (siehe Spülprogramme). • Wählen Sie ein für das zu spülende Geschirr und den Verschmutzungsgrad geeignetes Programm. Ziehen Sie hierzu die Programmtabelle zu Rate: - Verwenden Sie für normal verschmutztes Geschirr das umweltfreundliche Sparprogramm Eco, das einen niedrigen Wasser- und Stromverbrauch gewährleistet. - Bei nur geringfügiger Befüllung aktivieren Sie die Option Halbe Füllung * (siehe Start und Inbetriebnahme). • Sieht Ihr Stromliefervertrag Billigstromzeiten vor, empfiehlt sich, das Gerät in diesen Niedrigtarifzeiten in Betrieb zu setzen. Die Option Startzeitvorwahl* (siehe Start und Inbetriebnahme) ist Ihnen in diesem Fall eine wertvolle Stütze. Phosphat- und chlorfreie, enzymhaltige Reinigungsmittel • Wir empfehlen dringend den Einsatz von phosphatund chlorfreien Spülmitteln, da diese die Umwelt nicht zu sehr belasten. • Die optimale Wirkung der Enzyme ist bei einer Temperatur von ca. 50°C gegeben, demnach können bei enzymhaltigen Spülmitteln Spülgänge bei Niedrigtemperaturen eingestellt und dennoch dieselben Ergebnisse erzielt werden, wie bei 65°C-Programmen. • Dosieren Sie Spülmittel sparsam je nach Angabe des Herstellers, Wasserhärte, Verschmutzungsgrad und Menge des Geschirrs, um Verschwendungen zu vermeiden. Obwohl sie biologisch abbaubar sind, beinhalten sie dennoch Stoffe, die die Umwelt belasten. * Nur bei einigen Modellen. 39 DE Installation - Kundendienst DE Im Falle eines Umzugs sollte das Gerät möglichst in vertikaler Position transportiert werden, falls erforderlich, neigen Sie das Gerät zur Rückseite hin. Positionierung und Nivellierung 1. Nehmen Sie das Verpackungsmaterial ab und prüfen Sie Ihr Gerät auf eventuelle Transportschäden. Schließen Sie das Gerät im Falle einer Beschädigung bitte nicht an, sondern fordern Sie den Kundendienst an. Anschluss des Ablaufschlauchs Schließen Sie den Ablaufschlauch, ohne ihn zu krümmen, an eine Ablaufleitung mit Mindestdurchmesser von 4 cm an. Der Ablaufschlauch muss sich in einer Höhe von 40 bis 80 cm vom Boden oder von der Standfläche der Spülmaschine (A) befinden. 2. Stellen Sie das Gerät so auf, dass es mit den Seitenteilen oder mit der Rückwand an den anliegenden Möbeln oder an der Wand anlehnt. Das Gerät kann auch unter einer durchlaufenden Arbeitsplatte eingebaut werden* (siehe Montageanleitung). 3. Stellen Sie den Geschirrspüler auf einem ebenen und festen Boden auf. Gleichen Sie eventuelle Unregelmäßigkeiten durch Anziehen oder Losschrauben der vorderen Stellfüße aus, bis das Gerät eben ausgerichtet ist. Eine präzise Nivellierung verleiht dem Gerät die erforderliche Stabilität, durch die Vibrationen, Betriebsgeräusche und ein Verrücken des Gerätes vermieden werden. 4*. Regulieren Sie den hinteren Stellfuß durch Einwirken mittels eines 8 mm-Sechskantschlüssels auf die rote Sechskantbuchse (befindlich unter der Frontseitenmitte des Geschirrspülers). Durch Drehen nach rechts wird die Höhe erhöht, durch Drehen nach links wird sie herabgesetzt. (Siehe der Dokumentation beiliegendes Anleitungsblatt) Wasser- und Elektroanschlüsse Vor dem Anschließen des Ablaufschlauchs an den Siphon des Spülbeckens den Plastikdeckel (B) abnehmen. Schutz vor Überschwemmungen Um Überschwemmungen auszuschließen, wurde der Geschirrspüler: - mit einem System versehen, dank dessen der Wasserzulauf bei Anomalien oder internem Wasserverlust unterbrochen wird. Einige Modelle sind mit einem zusätzlichen New Acqua Stop* Sicherheitssystem ausgestattet, das auch bei Schlauchdefekten vor Überschwemmung schützt. ACHTUNG: GEFÄHRLICHE SPANNUNG! Die Anpassung der Elektro- und Wasseranlagen zur Installation des Gerätes darf nur von Fachpersonal durchgeführt werden.. Der Versorgungsschlauch darf auf keinen Fall abgeschnitten werden: er enthält nämlich Strom führende Teile. Der Geschirrspüler darf nicht auf Rohrleitungen oder auf dem Netzkabel aufstützen. Elektroanschluss Für den Anschluss des Gerätes an die Wasserversorgung müssen neue Schläuche verwendet werden. Die alten Schläuche sollten niemals erneut verwendet werden. Der Wasserzulaufschlauch (A), der Wasserablaufschlauch (B) und das Netzkabel können sowohl nach rechts als auch nach links ausgerichtet werden, wodurch eine optimale Installation gewährleistet wird. Anschluss des Zulaufschlauchs • An einen Kaltwasseranschluss: Schrauben Sie den Wasserzulaufschlauch fest an einen mit ¾-Gewindeanschluss versehenen Hahn; bevor Sie ihn jedoch anschrauben, lassen Sie Wasser auslaufen, bis klares Wasser austritt, um das Gerät vor Verstopfen durch Unreinheiten zu bewahren. • A n e i n e n W a r m w a s s e r a n s c h l u s s : I m F a l l e e i n e r Zentralheizungsanlage kann der Geschirrspüler auch durch heißes Leitungswasser gespeist werden, vorausgesetzt, die Temperatur übersteigt 60 °C nicht. Schrauben Sie den Schlauch an den Wasserhahn, so wie für den Anschluss an den Kaltwasserhahn beschrieben. Sollte der Zulaufschlauch nicht lang genug sein, dann wenden Sie sich bitte an einen Fachhändler oder an einen autorisierten Techniker (siehe Kundendienst). Der Wasserleitungsdruck muss innerhalb der in der Tabelle der technischen Daten (siehe seitlich) angegebenen Werte liegen. Der Schlauch darf nicht eingeklemmt oder abgeknickt werden. 40 Vor Einfügen des Netzsteckers in die Steckdose ist sicherzustellen, dass: • die Netzsteckdose geerdet ist und den gesetzlichen Bestimmungen entspricht; • die Netzsteckdose die auf dem Typenschild (befindlich auf der Innentür) angegebene max. Leistungsaufnahme des Gerätes trägt (siehe Beschreibung Ihres Geschirrspülers); • die Versorgungsspannung den auf dem Typenschild (auf der Innentür) vermerkten Werten entspricht; • die Steckdose mit dem Netzstecker kompatibel ist. Andernfalls muss der Netzstecker von einem autorisierten Techniker ausgetauscht werden (siehe Kundendienst); verwenden Sie bitte keine Verlängerungen oder Vielfachstecker. Der Netzstecker, das Netzkabel und die Steckdose sollten bei installiertem Gerät leicht zugänglich sein. Das Netzkabel darf nicht gebogen oder eingeklemmt werden. Sollte das Speisekabel beschädigt sein, muss es vom Hersteller oder seiner technischen Kundendienststelle ausgetauscht werden, um Unfallrisiken vorzubeugen. (Siehe Kundendienst) Kundendienst Technische Daten Abmessungen Breite 44,5 cm Höhe 82 cm Tiefe 57 cm Fassungsvermögen 10 Maßgedecke Wasserversorgungsdruck 0,05 ÷ 1MPa (0,5 ÷10 bar) 7,25 – 145 psi Versorgungsspannung Siehe Typenschild Maximale Leistungsaufnahme Siehe Typenschild Schmelzsicherung Siehe Typenschild DE Bevor Sie den Kundendienst anfordern: • sollten einige Kontrollen vorab selbst durchgeführt werden (siehe Störungen und Abhilfe). • Starten Sie das Programm erneut, um sicherzustellen, dass die Störung behoben wurde. • Ist dies nicht der Fall, wenden Sie sich bitte an den autorisierten Kundendienst. Beauftragen Sie bitte niemals unbefugtes Personal. Dieses Gerät entspricht folgenden EG-Richtlinien: - 2006/95/EWG (Niederspannung); - 2004/108/EWG (elektromagnetische Verträglichkeit) -2009/125/EG (Comm. Reg. 1016/2010) (Ecodesign) -97/17/EC (Etikettierung) -2012/19/EU Kondensationsschutzstreifen* Öffnen Sie nach dem Einbau des Geschirrspülers die Gerätetür und bringen Sie den transparenten Klebestreifen unter dem Holzbord an, um es vor eventuellem Kondenswasser zu schützen. Geben Sie bitte Folgendes an: • die Art der Störung • das Gerätemodell (Mod.) Das Gerät ist mit akustischen Signalen/Tönen ausgestattet (je nach Geschirrspülermodell), die den eingegebenen Befehl anzeigen: Start, Zyklusende, etc.. Die Leuchtsymbole/Kontrollanzeigen/LED-Anzeigen auf dem Bedienfeld/Display, können unterschiedliche Farben aufweisen, blinken oder Dauerlicht anzeigen. (je nach Geschirrspülermodell). Das Display* zeigt nützliche Informationen zum eingestellten Zyklus, Spül-/Trockenphase, Restzeit, Temperatur, etc. an. (je nach Geschirrspülermodell) Hinweise zur ersten Inbetriebnahme Nach Abschluss der Installation die Puffer an den Körben und die Rückhaltegummis vom oberen Korb (wenn vorhanden) entfernen. Sofort vor dem ersten Spülgang, den Salzbehälter ganz mit Wasser und fügen Sie ca. 1 kg Salz hinzu (siehe Klarspüler und Regeneriersalz): Es ist völlig normal, dass Wasser austritt. Stellen Sie den Härtegrad des Wassers ein (siehe Abschnitt Klarspüler und Regeneriersalz). - Nach dem Einfüllen des Salzes erlischt die SALZNACHFÜLLANZEIGE*. Das Nichtfüllen des Salzbehälters kann eine Beschädigung des Wasserenthärters und des Heizwiderstandes bewirken ECODESIGN REGULATION Spülzyklus ECO ist das Standardprogramm, auf das sich die Daten des Energie-Labels beziehen; diese Zyklus eignet sich zum Spülen von normal verschmutzem Geschirr und ist das effizienteste Programm im Hinblick auf Energie- und Wasserverbrauch für diese Art von Geschirr. Für einen geringeren Verbrauch sollte die Maschine voll beladen werden. Standby-Verbrauch: Verbrauch im Left-On-Modus: 3 W - Verbrauch im Off-Modus: 1,3 W Tabelle der Verbrauche der wichtigsten Spülzyklen Standardbedingungen* INTENSIV NORMAL Benutzerspezifische Bedingungen** Energie-verbrauch (KWh/Zyklus) Wasserverbrauch (l/Zyklus) Programmdauer (Min/Zyklus) Energie-verbrauch (KWh/Zyklus) Wasserverbrauch (l/Zyklus) Programmdauer (Min/Zyklus) 1,30 1,05 14 14 150 115 1,15 0,95 14 13 140 110 * Die Programmdaten sind Labormessdaten, die gemäß der europäischen Vorschrift EN 50242 erfasst wurden. ** Die Datenerfassung erfolgt mit Messungen unter Nutzungs- und Beladebedingungen des Anwenders. 41 Beschreibung Ihres Geschirrspülers DE Geräteansicht 1.Oberkorb 2. Oberer Sprüharm 3. Hochklappbare Ablagen 4. Einstellung der Korbhöhe 5.Unterkorb 6. Unterer Sprüharm 7.Besteckkorb 8.Spülsiebe 9.Salzbehälter 10. Spülmittelkammern und Klaspülerbehälter 11.Typenschild 12.Bedienblende*** Bedienblende Programmwählerknopf Taste und Kontrollleuchte Start/Pause Taste EIN/AUS/Reset Türgriff Anzeigeleuchte Spülen Anzeigeleuchte Trocknen SalzNachfüllanzeige Anzeigeleuchte Ende ***Nur bei den komplett integrierten Modellen. *Nur an einigen Modellen Die Anzahl und die Art der Spülprogramme und -optionen ist abhängig vom jeweiligen Geschirrspülermodell. 42 Beschickung der Körbe Bevor Sie das Geschirr in den Geschirrspüler einräumen, befreien Sie es von Speiserückständen und entleeren Sie Gläser und Schalen von Getränkeresten. Ordnen Sie das Geschirr so ein, dass es fest steht und nicht kippen kann. Stellen Sie nach Einräumen des Geschirrs sicher, dass sich die Sprüharme frei bewegen können. Unterer Geschirrkorb Der Unterkorb kann für Töpfe, Deckel, Teller, Saltschüsseln, Besteck usw. eingesetzt werden. Siehe Beschickungsbeispiele. Große Teller und große Deckel sollten am Korbrand einsortiert werden, und zwar so, dass der obere Sprüharm nicht behindert wird. Einige Geschirrspülermodelle verfügen über klappbare Bereiche * , die in senkrechter Stellung zum Einsortieren von Tellern, oder in waagerechter Stellung zum Einsortieren von Töpfen und Salatschüsseln verwendet werden können. Besteckkorb Der Besteckkorb kann je nach Geschirrspülermodell unterschiedlich ausgeführt sein. Der Besteckkorb wird frontal im Unterkorb zwischen die festen Bereiche geschoben, oder aber in den Oberkorb, was etwa bei halber Füllmenge geeignet ist (bei Modellen, die diese Funktion vorsehen). - Er ist mit verschiebbaren Klappen ausgerüstet, die eine optimale Anordnung des Geschirrs ermöglichen. Neigung A Neigung B Neigung C DE - Heben Sie die hochklappbare Ablage an, verschieben Sie sie etwas und stellen Sie sie auf den gewnschten Neigungswinkel. Höheneinstellung des Oberkorbes Um das Einordnen des Geschirrs zu vereinfachen, kann der Oberkorb je nach Bedarf in Hoch- oder Niedrigstellung eingeschoben werden. Es empfiehlt sich, die Höhe des Oberkorbes bei LEEREM KORB zu regulieren. -Heben oder senken Sie den Korb niemals nur an einer Seite. Öffnen Sie den rechten und linken Arretierstift der Korbführungen und ziehen Sie den Korb heraus; schieben Sie ihn in Hoch- oder Niedrigstellung ein; lassen Sie ihn über die Führungen nach hinten gleiten und schieben Sie hierbei auch die Vorderräder ein; schließen Sie die Arretierstifte (siehe Abbildung). Ist der Korb mit “Dual Space*”-Griffen ausgestattet (siehe Abbildung), ziehen Sie den Oberkorb bis zum Anschlag heraus, fassen die an den Korbseiten befindlichen Griffe mit den Händen, ziehen diese nach oben bzw. drücken sie nach unten, und lassen Sie den Korb daraufhin herab (hierbei begleiten). Beschickungsbeispiele für den Oberkorb Messer und andere Küchenutensilien mit scharfen Spitzen sind mit nach unten gerichteten Spitzen in den Besteckkorb einzuordnen, oder waagerecht auf die Ablagen des oberen Geschirrkorbs zu legen. Beispiele zur Einordnung des Besteckkorbes Beschickungsbeispiele für den Unterkorb Oberer Geschirrkorb In den oberen Geschirrkorb sortieren Sie empfindliches und leichtes Geschirr ein: Gläser, Tee- und Mokkatassen, Untertassen, flache Schüsseln, Pfannen, flache, nur leicht verschmutzte Töpfe gemäß den Beschickungsbeispielen. • Tassen und Mokkatassen, Lange und spitze Messer, Servierbesteck: auf den hochklappbaren Ablagen**. Hochklappbare Ablagen mit unterschiedlicher Neigungseinstellung* - Die Neigung schafft mehr Platz im Oberkorb, sie ermglicht das Einstellen von Stielglsern unterschiedlicher Hhe und verbessert die Trockenleistung. * Nur an einigen Modellen. ** In unterschiedlicher Anzahl und Platzierung. Nicht spülmaschinenfestes Geschirr • Gegenstände aus Holz, mit Holzgriffen, aus Horn, oder mit geleimten Teilen. • Gegenstände aus Aluminium, Kupfer, Messing, Zinn. • Nicht hitzefestes Geschirr aus Kunststoff. • Antikes, oder handbemaltes Porzellan. • Antike Silberwaren. Nicht antike Silberwaren dagegen können im Geschirrspüler gespült werden. Stellen Sie ein sanftes Programm ein, und vermeiden Sie den Kontakt mit anderem Metall. Es empfiehlt sich, spülmaschinenfestes Geschirr zu verwenden. 43 Start und Inbetriebnahme DE Starten des Geschirrspülers 1. Öffnen Sie den Wasserhahn. 2. Drücken Sie die ON/OFF-Taste: alle Kontrollleuchten auf der Bedienblende leuchten für einige Sekunden auf. 3. Öffnen Sie die Geschirrspülertür und füllen Sie das Spülmittel ein (siehe unten). 4. Befüllen Sie die Geschirrkörbe (siehe Beschickungsbeispiele) und schließen Sie die Gerätetür. 5. Wählen Sie ein Programm aus, indem Sie den Reglerknopf PROGRAMMWAHL im Uhrzeigersinn drehen: Stellen Sie die sich auf dem Knopf befindliche Bezugskerbe auf die Programmnummer bzw. das Programmsymbol. Die Kontrollleuchte der Taste Start/Pause blinkt. 6. Wählen Sie die Spüloptionen* (siehe nebenstehende Spalte). 7. Mit der Taste START den Spülvorgang starten, die Kontrollleuchte hört auf zu blinken (Dauerlicht). Das Einschalten der zum Spülgang gehörenden Kontrollleuchte zeigt den Start des Programms an. 8. Am Ende des Spülprogramms leuchtet die Anzeigeleuchte ENDE auf (Dauerlicht). Schalten Sie das Gerät mittels der ON/OFF-Taste aus, schließen Sie den Wasserhahn und ziehen Sie den Netzstecker aus der Steckdose. 9. Warten Sie einige Minuten, bevor Sie das Geschirr herausnehmen. Sie könnten sich daran verbrennen. Räumen Sie die Geschirrspülerkörbe aus, beginnen Sie dabei mit dem Unterkorb. - Zur Senkung des Stromverbrauchs bei Stillstand des Geräts schaltet sich das Gerät unter gewissen Bedingungen automatisch aus. Unbeabsichtigtes Unterbrechen des Spülprogramms Wird während des Spülgangs die Gerätetür geöffnet, oder sollte ein Stromausfall stattfinden, wird der Spülgang unterbrochen. Wird die Gerätetür wieder geschlossen, oder kehrt der Strom zurück, läuft das Programm an der Stelle weiter, an der es unterbrochen wurde. Einfüllen des Spülmittels Ein gutes Spülergebnis hängt auch von einer korrekten Spülmitteldosierung ab. Eine zu hohe Dosierung ist nicht gleichzusetzen mit einem besseren Spülergebnis, man belastet dadurch nur die Umwelt. Verwenden Sie bitte ausschließlich Spülmittel für Geschirrspüler. VERWENDEN SIE BITTE KEIN HANDSPÜLMITTEL. Bei übermäßiger Spülmittelverwendung können Schaumreste am Ende des Spülgangs zurückbleiben. Zum Einsatz von Tabs wird nur dann geraten, wenn das Modell die Zusatzfunktion MULTIFUNKTIONSTABS vorsieht. Die besten Spül- und Trockenergebnisse erhalten Sie nur durch Einsatz von Spülmitteln in Pulverform, flüssigen Klarspülern und Salz. Kammer A: Spülmittel für den Hauptspülgang Kammer B: Spülmittel für den Vorspülgang 1. Öffnen Sie den Deckel C und drücken Sie die Taste D. 2. Hinsichtlich der Dosierung verweisen wir auf die Programmtabelle: • Spülpulver: Kammern A und B. • Spültabs: Erfordert das Spülprogramm 1 Tab, geben C Sie diesen in Kammer A und schließen den Deckel. Erfordert es 2 Tabs, geben Sie den zweiten Tab auf den Geräteboden. 3. Entfernen Sie eventuelle Spülmittelrückstände von den Kanten der Kammern und schließen Sie den Deckel so, dass er einrastet. D Änderung eines laufenden Programms Sollten Sie irrtümlich ein falsches Programm gewählt haben, kann es noch geändert werden, vorausgesetzt es wurde gerade erst in Gang gesetzt: Möchten Sie bei laufendem Spülgang das Spülprogramm ändern, schalten Sie das Gerät durch längeres Drücken der EIN/AUS/Reset-Taste aus. Schalten Sie es darauf über dieselbe Taste wieder ein, und wählen Sie erneut ein Programm und die gewünschten Spüloptionen an. Hinzufügen von weiterem Geschirr Drücken Sie die Start/Pause-Taste (die Taste blinkt), öffnen Sie die Gerätetür (Vorsicht, es kann heißer Dampf austreten!) und räumen Sie das zusätzliche Geschirr ein. Drücken Sie die Taste Start/Pause (Dauerlicht): das Spülprogramm startet daraufhin erneut. A B Durch Druck auf die Taste Start/Pause wird sowohl das Spülprogramm als auch die Startzeitvorwahl (sollte eine solche programmiert worden sein) unterbrochen. Während dieser Phase kann das Spülprogramm nicht geändert werden. * Nur an einigen Modellen 44 Spülprogramme Für nur leicht verschmutztes Geschirr, oder für Geschirr, das vorher unter laufendem Wasser abgespült wurde, kann die Spülmittelmenge erheblich reduziert werden. Die Anzahl und die Art der Spülprogramme und -optionen ist abhängig vom jeweiligen Geschirrspülermodell. Hinweise zur Programmwahl Stark verschmutztes Geschirr, Töpfe und Pfannen (nicht geeignet für empfindliches Geschirr). Normal verschmutztes Geschirr und Töpfe. Normaler täglicher Abwasch. Tägl. Abwasch geringfügiger Mengen (4 Maßgedecke + 1 Topf + 1 Pfanne) Abspülen des Geschirrs, das erst später, zusammen mit weiterem Geschirr, gespült werden soll. Öko-Programm mit niedrigem Energieverbrauch, geeignet für Geschirr und Töpfe. Kurzes Sparprogramm für nur leicht verschmutztes, sofort nach dem Gebrauch gespültes Geschirr (2 Teller + 2 Gläser + 4 Bestecke + 1 Topf + 1 kleine Pfanne). Kurzes Sparprogramm für temperaturempfindliches, sofort nach dem Gebrauch zu reinigendes Geschirr. (Kelchgläser Oberkorb + empfindliche Teller, unterkorb). Spülprogramm Spülmittel (A) = Dosierkammer A (B) = Dosierkammer B Trocknen Spüloptionen Programmdauer (Toleranz ±10%) Hrs. Min. 1 (A) Ja Nein 2:25’ 21 ml (A) 4 ml (B) 1 (A) Ja Nein 1:50’ 25 gr (A) 25 ml (A) 1 (A) Nein Nein 1:00’ Nein Nein Nein Nein Nein 0:08’ 21 gr (A) 4 gr (B) 21 ml (A) 4 ml (B) 1 (A) Ja Nein 3.00’ 21 g (A) 21 ml (A) 1 (A) Nein Nein 0:35’ 25 g (A) 25 ml (A) 1 (A) Ja Nein 1:35’ in pulverform flüssig 25 gr (A) 25 ml (A) 21 gr (A) 4 gr (B) Tabs 1. Intensiv 2. Normal 3. Tägliche Anwendung 4. Einweichen 5. Eko* 6. Kurz 7.Kristallgläser Anmerkung: Die optimale Leistung der Programme “Tägliche Anwendung - Kurz/Speed” ist dann gewährleistet, wenn die Anzahl der angegebenen Maßgedecke eingehalten wird. Zur Vereinfachung der Spülmitteldosierung berücksichtigen Sie bitte Folgendes: 1 Esslöffel = ca. 15 gr Spülpulver = ca. 15 ml Flüssigspülmittel - 1 Teelöffel = ca. 5 gr Spülpulver = ca. 5 ml Flüssigspülmittel * Das Sparprogramm “Eco” (Öko), das den Anforderungen der Norm EN 50242 entspricht, hat eine längere Dauer im Vergleich zu den übrigen Programmen. Trotzdem handelt es sich um das Programm mit dem niedrigsten Energieverbrauch, das die Umwelt nicht belastet. Hinweis für die Prüflabors: Detaillierte Informationen hinsichtlich der Bedingungen des EN-Vergleichstests sind an nachfolgender Adresse anzufordern: [email protected] 45 DE Klarspüler und Regeneriersalz DE Verwenden Sie bitte nur Spezialspülmittel für Geschirrspüler. Verwenden Sie bitte kein Koch- oder Industriesalz, und auch keine Handspülmittel. Bitte befolgen Sie die auf der jeweiligen Verpackung befindlichen Anweisungen. Sollten Sie ein Multifunktionsprodukt verwenden, ist ein Hinzufügen von weiterem Klarspüler nicht erforderlich. Der Zusatz von Regeneriersalz ist jedoch ratsam, besonders bei hartem oder sehr hartem Wasser. Bitte befolgen Sie die auf der jeweiligen Verpackung befindlichen Anweisungen. Da weder Salz noch Klarspüler eingefüllt wird, ist es ganz normal, dass die SALZNACHFÜLLANZEIGE* und die KLARSPÜLERNACHFÜllANZEIGE* bleiben eingeschaltet. Einfüllen des Klarspülers Der Klarspüler fördert das Trocknen des Geschirrs, da das Wasser von der Geschirroberfläche abläuft; es verbleiben weder Streifen noch Flecken. Der Klarspülerbehälter muss aufgefüllt werden: • w e n n auf der Bedienblende die KLARSPÜLERNACHFÜLLANZEIGE* aufleuchtet; 1. Behälter durch Drehen des Stöpsels (G) gegen den Uhrzeigersinn öffnen. 2. Klarspüler einfüllen, er darf nicht überlaufen. Andernfalls sofort mit F einem trockenen Tuch abwischen. G 3. Stöpsel wieder aufschrauben. Füllen Sie den Klarspüler NIEMALS direkt ins Innere des Geschirrspülers. Klarspülerdosierung Sollte das Trockenergebnis unzufrieden stellend sein, kann die Klarspülerdosierung neu eingestellt werden. Drehen Sie den Regler (F) mit Hilfe eines Schraubenziehers auf eine der 6 Einstellungen (werkseitig eingestellt auf 4): • wenn das Geschirr Streifen aufweist, drehen Sie den Regler auf eine niedrige Einstellung (1-3). • Befinden sich Wassertropfen oder Kalkflecken darauf, drehen Sie den Regler auf höhere Einstellungen (4-6). Einstellen der Wasserhärte Jeder Geschirrspüler ist mit einem Wasserenthärter ausgestattet, der durch Verwendung von speziell für Geschirrspüler vorgesehenem Regeneriersalz den Geschirrspüler mit kalkfreiem Wasser versorgt. Dieser Geschirrspüler kann so eingestellt werden, dass die Umweltbelastung reduziert und die Spülleistungen entsprechend der Wasserhärte optimiert werden. Angaben zur Wasserhärte erhalten Sie bei Ihrem Wasserwerk. - Schalten Sie die Maschine mit der Taste ON/OFF (Ein/AusTaste) ab und öffnen Sie die Tür. - Stellen Sie den Schalter PROGRAMMWAHL erst auf das 5. Programm, dann auf das 1. Programm und dann erneut auf das 5. - Drücken Sie die ON/OFF-Taste:, die Kontrollleuchten der Zyklusphasen blinken; jetzt kann die Wasserhärte eingestellt werden. Jedem Spülprogramm entspricht eine Härtestufe: Beispiel: 1. Spülprogramm, Härtestufe 1 46 2. Spülprogramm, Härtestufe 2... etc., etc. bis maximal fünf* Stufen. (Der Entkalker ist ab Werk auf den Wert 3 eingestellt). - Zum Verlassen der Funktion warten Sie bitte einige Sekunden, oder drücken Sie eine Taste der Optionen*, oder schalten Sie das Gerät über die EIN/AUS-Taste aus. Wenn Multifunktionstabs verwendet werden, ist trotzdem der Salzbehälter zu füllen. Salzbehälter reicht Tabelle zur Wasserhärte Stufe 1 2 3 4 5* °dH 0-6 6 - 11 12 - 17 17 - 34 34 - 50 °fH 0 - 10 11 - 20 21 - 30 31 - 60 61 - 90 mmol/l 0-1 1,1 - 2 2,1 - 3 3,1 - 6 6,1 - 9 durchschnittlich für** Monate 7 Monate 5 Monate 3 Monate 2 Monate 2-3 Wochen Von 0 °f bis 10 °f wird empfohlen, kein Salz zu verwenden. * mit der Einstellung 5 kann sich die Haltbarkeit verlängern. ** bei einem Spülzyklus pro Tag. (°dH = Grad deutsche Härte - °fH = Grad französische Härte - mmol/l = Millimol/Liter) Einfüllen des Regeneriersalzes Um ein optimales Spülergebnis zu gewährleisten, sollte der Salzbehälter niemals leer sein. Durch das Regeneriersalz wird das Wasser entkalkt; demnach setzt sich kein Kalk auf Ihrem Geschirr ab. Der Salzbehälter befindet sich im Geschirrspülerboden (siehe Beschreibung) und muss aufgefüllt werden: • Wenn der grüne Schwimmer* durch den Salzstöpsel hindurch nicht sichtbar ist; • wenn auf der Bedienblende die SALZNACHFÜLLANZEIGE* aufleuchtet. 1. Ziehen Sie den Unterkorb heraus und schrauben Sie den Salzbehälterdeckel gegen den Uhrzeigersinn ab. 2. Nur für die erstmalige Inbetriebnahme: Füllen Sie den Behälter bis zum Rand mit Wasser. 3. Setzen Sie den mitgelieferten Trichter* auf (siehe Abbildung) und füllen Sie den Behälter bis zum Rand mit Salz (ca. 1 kg); es ist ganz normal, wenn etwas Wasser austritt. 4. Nehmen Sie den Trichter* heraus und entfernen Sie die Salzreste vom Öffnungsrand; Spülen Sie den Deckel unter fließendem Wasser ab, bevor Sie ihn wieder aufschrauben. Halten Sie ihn hierzu kopfüber unter den Wasserstrahl und lassen Sie das Wasser aus den vier Schlitzen im unteren Bereich des Deckels abfließen. (Salzdeckel mit grünem Schwimmer*) Es wird empfohlen, diesen Vorgang bei jedem Nachfüllen von Salz zu wiederholen. Schrauben Sie den Deckel fest auf, damit während des Spülgangs keine Spüllauge eintreten kann. (Diese könnte den Enthärter dauerhaft beschädigen). Sollte das Nachfüllen von Salz erforderlich sein, sollte dies sofort vor der Durchführung eines Spülgangs erfolgen, damit die übergelaufene Salzlösung sofort entfernt wird. * Nur an einigen Modellen Reinigung und Pflege Abstellen der Wasser- und Stromversorgung • Drehen Sie den Wasserhahn nach jedem Spülgang zu, um Schäden durch eventuelles Austreten von Wasser auszuschließen. • Ziehen Sie den Netzstecker aus der Steckdose, bevor Sie Ihren Geschirrspüler reinigen oder Wartungsmaßnahmen getroffen werden. Reinigung des Geschirrspülers • Die Gehäuseteile und die Bedienblende können mit einem mit Wasser angefeuchteten, weichen Tuch gereinigt werden. Vermeiden Sie Löse- und Scheuermittel. • Zur Beseitigung von evtl. Flecken im Innenraum des Gerätes verwenden Sie ein feuchtes Tuch, auf das Sie etwas weißen Essig träufeln. Vermeidung von Geruchsbildung • Lassen Sie die Gerätetür stets nur angelehnt; auf diese Weise kann sich keine Feuchtigkeit ansammeln. • Die Dichtungen der Tür und der Reinigerkammern sollten regelmäßig mit einem feuchten Tuch gereinigt werden. Sie vermeiden so die Ansammlung von Speiseresten, hauptsächliche Ursache von Geruchsbildung im Geschirrspüler. Reinigung der Sprüharme An den Sprüharmen könnten Speiserückstände festkleben, und die Wasserdüsen verstopfen. Ab und zu sollten diese demnach kontrolliert und mit einem Bürstchen, das nicht aus Metall sein darf, gereinigt werden. Beide Sprüharme konnen abgenommen werden. Zur Abnahme des oberen Sprüharmes drehen Sie den Kunststoffring gegen den Uhrzeigersinn ab. Der obere Sprüharm ist mit nach oben gerichteten Löchern wieder einzusetzen. Der untere Sprüharm wird nach oben abgezogen. - Schließen Sie den Wasserhahn. - Schrauben Sie den Wasserschlauch ab, nehmen Sie den Filter heraus und reinigen Sie ihn vorsichtig unter fließendem Wasser. - Setzen Sie den Filter wieder ein und verschrauben Sie den Schlauch. Reinigung der Filtersiebe Die Siebgruppe setzt sich aus drei Filtern zusammen, die Spülwasser reinigen, von Speiseresten befreien und wieder in Umlauf bringen. Um optimale Spülergebnisse zu gewährleisten, müssen diese gereinigt werden. Reinigen Sie die Filtersiebe regelmäßig. Der Geschirrspüler darf nie ohne Filtersiebe oder mit ausgehängten Filtern arbeiten. • Kontrollieren Sie nach einigen Spülgängen die Filtersiebgruppe. Ggf. ist diese sorgfältig unter laufendem Wasser auszuspülen. Nehmen Sie hierzu ein kleines Bürstchen (das nicht aus Metall sein darf) zu Hilfe. Verfahren Sie wie folgt: 1. Drehen Sie das zylinderförmige Filtersieb C gegen den Uhrzeigersinn heraus (Abb. 1). 2. Ziehen Sie den Siebbecher B durch leichten Druck auf die seitlichen Flügel heraus (Abb. 2). 3. Nehmen Sie den Stahl-Siebteller A ab (Abb. 3). 4. Kontrollieren Sie den Hohlraum und befreien Sie diesen von eventuellen Speiseresten. Das Spülpumpenschutzteil (schwarzes Teil) DARF NICHT ABGENOMMEN WERDEN. (Abb.4) C 1 A 3 Reinigen des Wasserzufuhr-Filtersiebes* Falls es sich um neue, oder für einen längeren Zeitraum nicht benutzte Wasserschläuche handeln sollte, ist sicherzustellen, dass das Wasser auch klar und frei von Verunreinigungen ist. Lassen Sie es hierzu einige Zeit lang fließen. Es kann nämlich ansonsten passieren, dass die Anschlussstelle verstopft wird und Ihr Geschirrspüler dadurch Schaden nimmt. Reinigen Sie regelmäßig den Wasserzulauffilter am Zufuhrhahn. Setzen Sie die Siebgruppe nach der Reinigung der Filtersiebe wieder korrekt in ihren Sitz ein, dies ist äußerst wichtig, um eine ordnungsgemäße Betriebsweise des Geschirrspülers zu gewährleisten. Was tun, bevor Sie für längere Zeit verreisen • Schalten Sie sämtliche Elektroanschlüsse ab und schließen Sie den Wasserhahn. • Lassen Sie die Gerätetür leicht aufstehen. • Lassen Sie nach Ihrer Rückkehr einen Spülgang ohne Geschirr durchlaufen. * Nur an einigen Modellen 47 DE Störungen und Abhilfe DE Sollten Betriebsstörungen auftreten, kontrollieren Sie bitte folgende Punkte, bevor Sie sich an den Kundendienst wenden. Störungen: Mögliche Ursachen / Lösungen: Die Spülmaschine startet nicht oder reagiert nicht auf die Bedienungseingaben • Schalten Sie das Gerät durch Drücken der ON/OFF-Taste aus und nach etwa einer Minute wieder ein und wiederholen Sie die Programmeinstellung. • Der Stecker ist nicht richtig in der Steckdose. • Die Gerätetür ist nicht ganz geschlossen. Die Gerätetür schließt nicht. • Das Schloss ist bereits eingerastet; drücken Sie die Tür energisch, bis ein “Clacklaut” zu hören ist. Der Geschirrspüler pumpt das Wasser nicht ab. • • • • Der Geschirrspüler ist zu laut. • Das Geschirr schlägt aneinander oder gegen die Sprüharme. • Es hat sich zu viel Schaum gebildet: Das Spülmittel wurde unkorrekt dosiert oder es ist ungeeignet für Geschirrspüler. (siehe Start und Inbetriebnahme). Auf dem Geschirr und auf den Gläsern befinden sich Kalkablagerungen oder ein weißer Belag. • Es fehlt Regeneriersalz bzw. die Dosierung entspricht nicht der Wasserhärte ( siehe Klarspüler und Regeneriersalz ). • Der Deckel des Salzbehälters ist nicht ordnungsgemäß geschlossen. • Es fehlt Klarspülmittel oder es wird unzureichend dosiert. Das Geschirr und die Gläser weisen weiße Streifen bzw. bläuliche Schattierungen auf. • Der Klarspüler wurde zu hoch dosiert. Das Geschirr ist nicht ganz trocken. • Es wurde ein Spülprogramm, das keinen Trockengang vorsieht, eingestellt. • Es fehlt Klarspülmittel oder es wird unzureichend dosiert ( siehe Klarspüler und Regeneriersalz ). • Die Klarspüler-Dosiereinstellung ist nicht angemessen. • Das Geschirr besteht aus Antihaftmaterial oder aus Plastik. Das Spülprogramm ist noch nicht ganz abgelaufen. Der Ablaufschlauch ist geknickt ( siehe Installation ). Der Ablauf des Spülbeckens ist verstopft. Im Filtersieb haben sich Speisereste angesammelt. Das Geschirr ist nicht sauber geworden • • • • • Die Körbe wurden zu voll geladen ( siehe Beschickung der Körbe ). Das Geschirr wurde nicht korrekt eingeräumt. Die Sprüharme können sich nicht frei bewegen. Das Spülprogramm ist zu schwach ( siehe Spülprogramme ). Es hat sich zu viel Schaum gebildet: Das Spülmittel wurde unkorrekt dosiert oder es ist ungeeignet für Geschirrspüler. (siehe Start und Inbetriebnahme). • Der Stöpsel des Klarspülerbehälters wurde nicht korrekt geschlossen. • Das Filtersieb ist schmutzig oder verstopft ( siehe Wartung und Pflege ). • Es fehlt Regeneriersalz ( siehe Klarspüler und Regeneriersalz ). Der Geschirrspüler lädt kein Wasser Alarm Wasserhahn geschlossen. (Sie vernehmen kurze Signaltöne*) (die Trocknen und Ende-Anzeigeleuchte blinkt). Alarm am Wasser-Zulaufschlauch. Wasserzulauffilter verstopft. (die Spülen, Trocknen und EndeAnzeigeleuchte blinkt). *Nur an einigen Modellen. 48 • • • • Es besteht eine Unterbrechung der Wasserzufuhr. Der Zufuhrschlauch ist geknickt ( siehe Installation ). Öffnen Sie den Wasserhahn; das Gerät setzt sich nach wenigen Minuten in Gang. Das Gerät hat auf Sperre geschaltet, weil nach Erklingen der Bip-Töne* kein Eingriff erfolgte. Schalten Sie das Gerät über die ON/OFF-Taste aus, öffnen Sie den Wasserhahn und schalten Sie das Gerät nach 20 Sekunden über dieselbe Taste wieder ein. Wiederholen Sie die Geräteeinstellung und starten Sie das Spülprogramm erneut. • Schalten Sie das Gerät über die ON/OFF-Taste aus. Drehen Sie den Wasserhahn zu, um Überschwemmungen zu vermeiden, ziehen Sie den Netzstecker aus der Steckdose. Prüfen Sie den Wasserzulauffilter (siehe Kapitel “Reinigung und Pflege”). Instrukcja obsługi PL Polski, 49 ZMYWARKA Spis treści PL Karta produktu, 50 Środki ostrożności i zalecenia, 51 Ogólne zasady bezpieczeństwa Usuwanie odpadów Oszczędność i ochrona środowiska Instalacja - Serwis Techniczny 52-53 Ustawianie i poziomowanie Podłączenie do sieci wodnej i elektrycznej Ostrzeżenia dotyczące pierwszego mycia Dane techniczne Serwis Techniczny Ecodesign Regulation Opis urządzenia, 54 Widok ogólny Panel sterowania LSPA+ 720A.1 Napełnianie koszy, 55 Kosz dolny Kosz na sztućce Kosz górny Uruchomienie i użytkowanie, 56 Uruchomienie zmywarki Dozowanie środka myjącego Programy, 57 Tabela programów Nabłyszczacz i sól regeneracyjna, 58 Dozowanie środka nabłyszczającego Dozowanie soli regeneracyjnej Konserwacja i utrzymanie, 59 Wyłączanie wody i prądu elektrycznego Czyszczenie zmywarki Unikanie powstawania brzydkich zapachów Czyszczenie spryskiwaczy Czyszczenie filtra dopływu wody Czyszczenie filtrów W przypadku dłuższej nieobecności Anomalie i środki zaradcze, 60 49 Karta produktu PL Karta produktu Marka HOTPOINT ARISTON Nazwa modelu LSPA+ 720A.1 Pojemność znamionowa, wyrażona liczbą standardowych kompletów naczyń (1) 10 Klasa efektywności energetycznej, skla od A+++ (niskie zużycie) do D (wysokie zużycie) A+ Zużycie energii w kWh rocznie (2) 237.0 Zużycie energii w standardowym cyklu zmywania w kWh 0.81 Zużycie energii w trybie wyłączenia i trybie czuwania w W 1.3 Zużycie energii w trybie włączenia i trybie czuwania w W 3.0 Roczne zużycie wody w litrach rocznie (3) 2800.0 Klasa efektywności suszenia, skala od G (minimalna efektywność) do A (maksymalna efektywność) A Czas programu dla standardowego cyklu zmywania w minutach 180’ Czas trwania trybu czuwania w minutach 10 Poziom emitowanego hałasu w dB(A) re1 pW 49 Model do zabudowy Tak Uwagi 1) Informacja, że cykl jest odpowiedni do zmywania normalnie zabrudzonych zastaw stołowych oraz że jest najbardziej efektywnym programem pod względem łącznego zużycia energii i wody dla tego rodzaju zastawy stołowej; Standardowy cykl zmywania odpowiada cyklowi Eco. 2) Na podstawie 280 standardowych cykli zmywania, przy użyciu zimnej wody, oraz w trybie niskiego zużycia energii. Rzeczywiste zużycie energii zależy od sposobu użycia urządzenia. 3) Na podstawie 280 standardowych cykli zmywania. Rzeczywiste zużycie energii zależy od sposobu użycia urządzenia. 50 Zalecenia i środki ostrożności Niniejsze urządzenie zostało zaprojektowane i wyprodukowane zgodnie z międzynarodowymi normami bezpieczeństwa. Poniższe ostrzeżenia podane zostały ze względów bezpieczeństwa i należy je uważnie przeczytać. Należy zachować niniejszą książeczkę instrukcji dla przyszłych konsultacji. W przypadku sprzedaży, odstąpienia lub przeprowadzki należy dopilnować, aby została przekazana wraz z urządzeniem nowemu właścicielowi. Uważnie przeczytać instrukcję: zawiera ona ważne informacje dotyczące instalacji, użytkowania i bezpieczeństwa. To urządzenie zostało zaprojektowane do użytku domowego lub podobnych zastosowań, na przykład: - w pomieszczeniach przystosowanych do użytku kuchennego przez personel w sklepach, biurach i innych miejscach pracy; - w domach kolonijnych; - do użytku przez klientów w hotelach, motelach i innych obiektach typu mieszkaniowego; - w pensjonatach bed and breakfast. Bezpieczeństwo ogólne • To urządzenie nie może być używane przez osoby (w tym dzieci) niepełnosprawne fizycznie, zmysłowo lub umysłowo oraz osoby bez doświadczenia lub znajomości obsługi urządzenia, chyba że będzie to miało miejsce pod nadzorem osoby odpowiedzialnej za ich bezpieczeństwo lub po uprzednim otrzymaniu instrukcji na temat obsługi urządzenia. • Niezbędny jest nadzór osoby dorosłej pilnującej, aby dzieci nie bawiły się tym urządzeniem. • U r z ą d z e n i e j e s t p r z e z n a c z o n e d o u ż y t k u nieprofesjonalnego wewnątrz pomieszczeń mieszkalnych. • Urządzenie powinno być używane do mycia naczyń w warunkach domowych wyłącznie przez osoby dorosłe i zgodnie z niniejszymi instrukcjami. • Urządzenia nie należy instalować na świeżym powietrzu, nawet w miejscu zadaszonym, gdyż wystawienie go na działanie deszczu i burz jest bardzo niebezpieczne. • Nie dotykać zmywarki, stojąc boso na podłodze. • Przy wyjmowaniu wtyczki z gniazdka nie ciągnąć za kabel, lecz trzymać za wtyczkę. • Przed przystąpieniem do czyszczenia i konserwacji urządzenia należy zamknąć zawór wody i wyjąć wtyczkę z gniazdka. • W razie uszkodzenia w żadnym wypadku nie ingerować w wewnętrzne mechanizmy urządzenia i nie próbować go samodzielnie naprawiać. • Nie opierać się ani nie siadać na otwartych drzwiach: urządzenie mogłoby się przewrócić. • Nie należy pozostawiać otwartych drzwi zmywarki, gdyż można o nie zawadzić. • Trzymać detergenty i płyn nabłyszczający z dala od dzieci. • Opakowania nie są zabawkami dla dzieci. Utylizacja • Utylizacja materiałów opakowaniowych: dostosować się do lokalnych przepisów; w ten sposób opakowanie będzie mogło zostać ponownie wykorzystane. • Dyrektywa wspólnotowa 2012/19/EU w sprawie zużytego sprzętu elektrycznego i elektronicznego (WEEE) przewiduje, że sprzęt gospodarstwa domowego nie powinien być usuwany jako nieposortowane odpady komunalne. Zużyte urządzenia powinny podlegać selektywnej zbiórce w celu uzyskania maksymalnego wskaźnika odzysku i recyklingu ich materiałów składowych oraz uniknięcia ewentualnych zagrożeń dla zdrowia i środowiska. Symbol przekreślonego kosza umieszczany jest na wszystkich produktach w celu przypominania o obowiązku segregacji odpadów. W celu uzyskania bliższych informacji na temat prawidłowego złomowania urządzeń gospodarstwa domowego ich właściciele mogą się zwrócić do właściwych służb publicznych lub do sprzedawców tych urządzeń. Oszczędność i ochrona środowiska Oszczędność wody i energii • Uruchamiać zmywarkę tylko z pełnym ładunkiem. • W oczekiwaniu na napełnienie maszyny zapobiegać przykrym zapachom przy pomocy cyklu namaczania (patrz programy). • Wybierać programy odpowiednie do rodzaju naczyń i stopnia zabrudzenia, stosując się do Tabeli programów: - dla naczyń normalnie zabrudzonych stosować program Eco, który zapewnia niskie zużycie energii i wody. - przy ograniczonym ładunku włączyć opcję Połowa ładunku* (zob. Uruchomienie i użytkowanie). • Jeśli zawarta umowa na dostawę energii elektrycznej przewiduje strefy czasowe oszczędności energetycznej, uruchamiać zmywarkę w godzinach obowiązywania niższej taryfy. Opcja Opóźnienia startu* (zob. Uruchomienie i użytkowanie) może pomóc zorganizować zmywanie pod tym kątem. Detergenty bez fosforanów, bez chloru i zawierające enzymy • Zdecydowanie zaleca się stosowanie detergentów niezawierających fosforanów i chloru, gdyż są one najbardziej wskazane dla ochrony środowiska. • Enzymy wykazują szczególną skuteczność w temperaturach zbliżonych do 50°C, przez co enzymatyczne środki myjące mogą być stosowane do zmywania w niższych temperaturach uzyskując takie samy wyniki jakie osiągnięto by bez nich w przypadku temperatury 65°C. • Odpowiednio dozować detergenty w oparciu o zalecenia producenta, zależnie od twardości wody, stopnia zabrudzenia i ilości naczyń, unikając tym samym niepotrzebnych strat. Choć środki myjące są biodegradalne, zawsze zawierają one składniki zakłócające równowagę środowiska. * Tylko w niektórych modelach. 51 PL Instalacja Serwis Techniczny W przypadku przenoszenia należy trzymać urządzenie w pozycji pionowej; w razie konieczności przechylić je do tyłu. PL Ustawienie i wypoziomowanie 1. Rozpakować urządzenie i sprawdzić, czy nie zostało uszkodzone podczas transportu. Jeśli okazałoby się uszkodzone, nie podłączać go, lecz skontaktować się ze sprzedawcą. Podłączenie węża odprowadzającego wodę Podłączyć przewód odprowadzający, nie zginając go, do przewodu kanalizacyjnego o średnicy minimum 4 cm. Przewód odprowadzający musi znajdować się na wysokości od 40 do 80 cm od podłogi lub podłoża, na którym umieszczono zmywarkę (A). 2. Ustawić zmywarkę, przysuwając jej boki lub tył do sąsiadujących mebli lub do ściany. Urządzenie można również wbudować pod blatem kuchennym* (zob. Karta montażu). 3. Postawić zmywarkę na równym i twardym podłożu. Skompensować nierówności odkręcając lub dokręcając przednie nóżki, aż urządzenie znajdzie się w pozycji poziomej. Dokładne wypoziomowanie zapewnia stabilność i zapobiega drganiom, hałasom i zmianom pozycji urządzenia. 4*. Aby wyregulować wysokość tylnej nóżki, należy przekręcić sześciokątną tuleję w kolorze czerwonym, znajdującą się w dolnej, przedniej, środkowej części zmywarki za pomocą klucza sześciokątnego 8 mm, obracając ją w kierunku zgodnym z ruchem wskazówek zegara, aby zwiększyć wysokość, a w kierunku przeciwnym do ruchu wskazówek zegara, aby ją zmniejszyć. (patrz ulotka z instrukcjami dotyczącymi zabudowy załączona do dokumentacji) Połączenie hydrauliczne i elektryczne Przystosowanie instalacji elektrycznej oraz hydraulicznej powinno być dokonywane wyłącznie przez wykwalifikowany personel. Zmywarka nie może być ustawiona na przewodach rurowych ani na kablu zasilania elektrycznego. Zmywarkę należy podłączyć do sieci wodociągowej za pomocą nowych węży doprowadzających. Nie używać starych węży. Wąż doprowadzający i odprowadzający wodę, jak również kabel zasilający można skierować na prawo lub na lewo, aby umożliwić optymalną instalację. Podłączenie węża doprowadzającego wodę • Do zaworu wody zimnej: dokładnie przykręcić wąż doprowadzający do zaworu z gwintem 3/4 GAZ; przed przykręceniem węża odkręcić wodę i poczekać, aż będzie całkiem czysta, tak aby ewentualne nieczystości nie zapchały urządzenia. • Do zaworu wody ciepłej: w przypadku instalacji centralnego ogrzewania zmywarka może być zasilana ciepłą wodą wodociągową, pod warunkiem że jej temperatura nie przekracza 60°C. Przykręcić wąż do zaworu w taki sam sposób jak w przypadku wody zimnej. Jeśli wąż doprowadzający okaże się za krótki, zwrócić się do specjalistycznego sklepu lub wykwalifikowanego technika (zob. Serwis). Ciśnienie wody powinno mieścić się w zakresie wartości podanych w tabeli danych technicznych (patrz obok). Przed podłączeniem przewodu odprowadzającego wodę do syfonu zlewozmywaka, należy usunąć plastikową zatyczkę (B). Zabezpieczenie przed zalaniem Aby zagwarantować, że nie dojdzie do zalania, zmywarka: - posiada system przerywający dopływ wody w przypadku wystąpienia anomalii lub wydostawania się wody ze środka. Niektóre modele wyposażone są w dodatkowe urządzenie zabezpieczające New Acqua Stop*, które gwarantuje ochronę przed zalaniem również w przypadku pęknięcia przewodu doprowadzającego wodę. UWAGA: NIEBEZPIECZNE NAPIĘCIE! Węża doprowadzającego wodę nie można w żadnym wypadku przecinać, gdyż zawiera części pod napięciem. Podłączenie do sieci elektrycznej Przed włożeniem wtyczki do gniazdka należy się upewnić, czy: • gniazdko ma uziemienie i jest zgodne z obowiązującymi przepisami; • gniazdko jest w stanie wytrzymać obciążenie maksymalnej mocy urządzenia wskazane na tabliczce znamionowej umieszczonej na drzwiach wewnętrznych (zob. Opis zmywarki); • napięcie zasilania zawiera się w przedziale wartości podanych na tabliczce znamionowej umieszczonej na drzwiach wewnętrznych; • gniazdko jest kompatybilne z wtyczką urządzenia. W przeciwnym wypadku zwrócić się do wykwalifikowanego technika o wymianę wtyczki (zob. Serwis) ; nie używać przedłużaczy ani rozgałęziaczy. Po zainstalowaniu urządzenia przewód zasilana elektrycznego oraz gniazdko elektryczne powinny być łatwo dostępne. Kabel nie powinien być powyginany ani przygnieciony. Jeśli przewód zasilający jest uszkodzony, powinien zostać wymieniony przez producenta lub jego serwis techniczny, aby uniknąć wszelkiego ryzyka. (zob. Serwis) Dopilnować, aby nie zgiąć ani nie skręcić węża. * Tylko w niektórych modelach. 52 Pasek antykondensacyjny* Po zabudowaniu zmywarki otworzyć drzwi i przykleić przezroczysty pasek samoprzylepny pod drewnianym blatem, aby zabezpieczyć go przed ewentualnymi skroplinami. Ostrzeżenia dotyczące pierwszego mycia Po zainstalowaniu, należy zdjąć elementy ochronne z koszy oraz gumki przytrzymujące kosz górny (jeśli je zastosowano). Bezpośrednio przed pierwszym zmywaniem, napełnić do końca wodą pojemnik na sól, a następnie dodać około 1 kg soli (patrz rozdział Środek nabłyszczający i sól regeneracyjna): to normalne, że woda przelewa się. Wybrać stopień twardości wody (patrz rozdział Środek nabłyszczający i sól regeneracyjna). - Po wsypaniu lampka kontr. BRAK SOLI* zgaśnie. Nie napełnienie pojemnika na sól może spowodować uszkodzenie zmiękczacza wody i elementu grzewczego. Dane tecniczne Pojemność Ciśnienie wody zasilania 0,05 ÷ 1 MPa (0,5 ÷ 10 bar) 7,25 – 145 psi Napięcie zasilania elektrycznego Patrz tabliczka danych technicznych Całkowita moc pochłaniania Patrz tabliczka danych technicznych Bezpiecznik topikowy PL Przed zwróceniem się do Serwisu Technicznego: • Sprawdzić, czy problemu nie można rozwiązać samodzielnie (patrz Nieprawidłowości w działaniu i sposoby ich usuwania). • Ponownie uruchomić program, aby przekonać się, czy usterka nie ustąpiła. • W przeciwnym wypadku skontaktować się z autoryzowanym Serwisem Technicznym. Zwracać się wyłącznie do autoryzowanych techników. Podać: • rodzaj nieprawidłowości; • model urządzenia (Mod.); • numer seryjny (S/N). Informacje te znajdują się na tabliczce znamionowej umieszczonej na urządzeniu (patrz Opis urządzenia). Maszyna jest wyposażona w systemy akustyczne/ tonowe (zależnie od modelu zmywarki), które informują o wykonanym poleceniu: włączeniu, końcu cyklu, itd. szerokość 44,5 cm. wysokość 82 cm. głębokość 57 cm. 10 nakryć standardowych Wymiary Serwis Techniczny Symbole/lampki kontrolne/diody świetlne obecne na panelu sterowniczym/wyświetlaczu mogą posiadać różne kolory, świecić światłem pulsującym lub stałym. (zależnie od modelu zmywarki) Wyświetlacz* wyświetla użyteczne informacje odnoszące się do rodzaju ustawionego cyklu, fazy mycia/suszenia, pozostałego czasu, temperatury, itd. Patrz tabliczka danych technicznych Niniejsze urządzenie zostało wyprodukowane zgodnie z natępującymi dyrektywami unijnymi: -2006/95/EC (o Niskim Napięciu) -2004/108/EC (o Zgodności Elektromagnetycznej) -2009/125/EC (Comm. Reg. 1016/2010) (Ecodesign) -97/17/EC (Nakładanie etykietek) -2012/19/CE (WEEE) ECODESIGN REGULATION Cykl zmywania EKO to program standardowy, do którego odnoszą się dane etykiety energetycznej; cykl ten jest odpowiedni do mycia średnio zabrudzonych naczyń i jest najbardziej wydajnym programem pod względem zużycia energii elektrycznej i wody dla tego rodzaju naczyń. Aby zmniejszyć zużycie wody i energii, staraj się uruchamiać zmywarkę, gdy jest całkowicie wypełniona. Zużycie w trybie stand-by: Zużycie w trybie left-on: 3 W - zużycie w trybie off: 1,3 W Tabela zużycia dla głównych cykli Warunki standardowe* Warunki u¿ytkownika** Zu¿ycie energii (KWh/cykl) Zu¿ycie wody (KWh/cykl) Czas trwania (min/cykl) Zu¿ycie energii (KWh/cykl) Zu¿ycie wody (KWh/cykl) Czas trwania (min/cykl) INTENSYWNY 1,30 14 150 1,15 14 140 NORMALNY 1,05 14 115 0,95 13 110 * Dane programu są laboratoryjnymi wartościami zmierzonymi zgodnie z europejską normą EN 50242. ** Dane określono na podstawie pomiarów w warunkach użytkowania i zapełniania zmywarki przez użytkownika. 53 Opis urządzenia Widok ogólny PL 1. 2. 3. 4. 5. 6. 7. 8. 9. 10. 11. 12. Kosz górny Spryskiwacz górny Półeczki Regulacja wysokości kosza Kosz dolny Spryskiwacz dolny Kosz na sztućce Filtr zmywania Pojemnik na sól Pojemniki na środek myjący i nabłyszczający Tabliczka znamionowa Panel sterowania*** Panel sterowania Pokrętło Wybór programów Przycisk On-Off/Reset Rączka do otwierania drzwi Kontrolka Mycie Kontrolka Suszenie ***Tylko dla modeli do całkowitej zabudowy. * Tylko w niektórych modelach. Numery i rodzaje programów zmieniają się w zależności od modelu zmywarki. 54 Przycisk i kontrolka Start/Pauza Kontrolka Brak soli Kontrolka Zakończenie zmywania Napełnianie koszy Przed napełnieniem koszy usunąć z naczyń resztki żywności i opróżnić szklanki oraz kieliszki z pozostałych w nich płynów.Ustawić naczynia w taki sposób, aby nie poruszały się i i nie przewracały się. Po napełnieniu koszy sprawdzić czy spryskiwacze obracają się swobodnie. Kosz dolny W dolnym koszu można umieszczać garnki, pokrywki, talerze, salaterki, sztućce itp.według Przykładów napełniania. Duże garnki oraz pokrywki najlepiej ustawiać po bokach kosza, uważając, aby nie zablokować obrotów górnego spryskiwacza. Niektóre modele zmywarek wyposażone są w pochylne półki*, można je ustawiać w pozycji pionowej do wkładania talerzy lub w pozycji poziomej do wkładania garnków i salaterek. Kosz na sztućce Kosz na sztućce może być różnego rodzaju w zależności od modelu zmywarki. Kosz na sztućce ma być ustawiony w pozycji przedniej w dolnym koszu, wsunięty pomiędzy stałe prowadnice, lub w koszu górnym w przypadku, kiedy wykonuje się mycie z połową ładunku ( w sposób przewidziany dla takiej opcji). - Wyposażony jest w przesuwne pałeczki, które umożliwiają optymalne ułożenie sztućców. Noże i ostro zakończone narzędzia należy układać w koszu na sztućce tak, aby ich ostre końce były skierowane w dół, lub też umieszczać je na wysuwanych półeczkach górnego kosza w pozycji poziomej. Nachylenie A Nachylenie B Nachylenie C PL - Podnieść półeczkę, przesunąć lekko i ustawić w dowolnym nachyleniu. Regulowanie wysokości górnego kosza Aby ułatwić układanie naczyń, górny kosz można ustawić na górze albo na dole. Lepiej wyregulować wysokość górnego kosza gdy KOSZ JEST PUSTY. Nigdy nie podnosić ani nie opuszczać kosza tylko z jednej strony. otworzyć blokady prowadnic kosza po prawej i lewej stornie i wyjąć kosz; umieścić go wyżej lub niżej, przesunąć go po prowadnicach aż do zaskoczenia przednich kółeczek i zamknąć blokady (patrz rysunek). Jeśli kosz wyposażony jest w uchwyty Dual Space* (patrz rysunek), wysunąć górny kosz aż do ogranicznika, po czym przesunąć w górę lub w dół uchwyty znajdujące się po bokach kosza; podczas opuszczania kosza należy go przytrzymać. Przyklady napelniania górnego kosza Przykłady rozmieszczenia kosza na sztućce Przyklady napelniania dolnego kosza Kosz górny Umieszczać w nim naczynia delikatne i lekkie: szklanki, filiżanki do herbaty i kawy, talerzyki, płaskie salaterki, patelnie, niskie lekko zabrudzone garnki, według Przykładów napełniania. • Filiżanki i kubeczki, Długie i ostre noże, sztućce codzienne: układać je na półeczkach**. Półeczki o różnym nachyleniu* - Nachylenie pozwala na uzyskanie jak największej przestrzenia w koszu górnym, aby ustawić lamki o rónej długości nóżek i aby polepszyć wyniki suszenia. * Tylko w niektórych modelach. ** Zmienne co do ilości i położenia. Sztuce nieodpowiednie do mycia w zmywarce • Przedmioty drewniane, z uchwytami drewnianymi lub rogowymi albo z częściami klejonymi. • Przedmioty z aluminium, miedzi, mosiądzu, cyny lub stopów cyny. • Naczynia z tworzyw sztucznych nieodporne na działanie temperatury. • Porcelana antyczna lub ręcznie malowana. • Srebra antyczne. Natomiast srebra nieantyczne można myć przy pomocy programu delikatnego, upewniwszy się wcześniej, że nie stykają się one z innymi metalami. Zaleca się używanie naczyń nadających się do mycia w zmywarce. 55 Uruchomienie i użytkowanie PL Uruchomienie zmywarki Dozowanie środka myjącego 1. Otworzyć zawór dopływu wody. 2. Nacisnąć przycisk ON-OFF: wszystkie kontrolki znajdujące się na panelu sterowaniawłącząsię na kilka sekund. 3. Otworzyć drzwiczki i umieścić we właściwym pojemniku odpowiednią ilość środka myjącego (patrz poniżej). 4. Napełnić kosze (patrz Napełnianie koszy) i zamknąć drzwiczki. 5. Wybrać program, obracając pokrętło WYBÓR PROGRAMU w kierunku zgodnym z ruchem wskazówek zegara: ustawić wskaźnik znajdujący się na pokrętle na numerze lub na symbolu żądanego programu. Kontrolka odpowiadająca przyciskowi START/PAUZA zacznie pulsować. 6. Wybrać opcje zmywania* (patrz obok). 7. Włączyć naciskając przycisk START, kontrolka przestanie pulsować i będzie świecić stałym światłem. Włączenie się kontrolki zmywania informuje o rozpoczęciu programu. 8. Pod zakończeniu programu włącza się kontrolka KONIEC (stałe, światło). Wyłączyć urządzenie naciskając przycisk ON-OFF, zamknąć zawór wody i wyjąć wtyczkę z gniazdka. 9. Przed wyjęciem naczyń odczekać kilka minut, aby uniknąć poparzenia się. Rozładować kosze, zaczynając od dolnego. Dobry rezultat mycia zależy również od właściwego dozowania środka myjącego, jego nadmierna ilość nie zwiększa skuteczności mycia, powoduje natomiast zanieczyszczenie środowiska. - Aby obniżyć zużycie energii elektrycznej, w niektórych warunkach NIE użytkowania, maszyna automatycznie wyłączy się. Należy używać wyłącznie środka myjącego do zmywarek. NIE UŻYWAĆ środków do mycia ręcznego. Nadmiar środka myjącego może być powodem pozostania piany po zakończeniu cyklu. Używanie tabletek dozwolone jest tylko w tych maszynach gdzie jest opcja TABLETKI WIELOFUNKCYJNE. Najlepsze efekty mycia i suszenia można osiągnąć używając środków myjących w proszku, środków nabłyszczających w płynie oraz soli. pojemnik A: Środek do mycia pojemnik B: Środek do mycia wstępnego D A B Zmiana programu w trakcie jego trwania W przypadku wyboru niewłaściwego programu możliwa jest jego zmiana, pod warunkiem, że został on uruchomiony przed chwilą: aby po włączeniu zmywania zmienić wybrany cykl, należy wyłączyć urządzenie naciskając dłużej przycisk ON/ OFF/Reset, ponownie je włączyć tym samym przyciskiem i dokonać wyboru nowego programu oraz opcji. C 1. Otworzyć pokrywę C, naciskając przycisk D. 2. Dodać odpowiednią ilość środka myjącego podaną w Tabeli programów: • w proszku: pojemniki A i B. • tabletki: kiedy program wymaga 1 tabletki, umieścić ją w pojemniku A i zamknąć pokrywę; kiedy wymaga 2, umieścić drugą na dnie komory. 3. Usunąć pozostałości środka myjącego z krawędzi pojemnika i zamknąć pokrywę tak, aby się zatrzasnęła. Dokładanie dodatkowych naczyń Nacisnąć przycisk Start/Pauza, (światło przycisku pulsuje). Otworzyć drzwi, uważając na wydobywającą się parę, i włożyć naczynia. Zamknąć drzwi i nacisnąć przycisk Start/Pauza (światło stałe): cykl zostanie wznowiony. Po naciśnięciu przycisku Start/Pauza w celu zatrzymania urządzenia następuje przerwanie zarówno programu, jak i opóźnionego Startu*, jeśli jest on ustawiony. W tej fazie zmiana programu nie jest możliwa. Przypadkowe zatrzymanie Jeśli podczas zmywania drzwi zostaną otwarte lub wystąpi przerwa w dopływie prądu, program zostanie przerwany. Z chwilą zamknięcia drzwi lub przywrócenia dopływu prądu program jest kontynuowany od momentu, w którym został przerwany. * Tylko w niektórych modelach. 56 Programy Jeśli naczynia są mało zabrudzone lub zostały uprzednio spłukane wodą, należy znacznie zmniejszyć ilość środka myjącego. PL Numery i rodzaje programów zmieniają się w zależności od modelu zmywarki. Wskazówki ułatwiające wybór programu Bardzo brudne naczynia i garnki (nie stosować do mycia delikatnych naczyń). Program 1. Intensywny Normalnie zabrudzone naczynia i garnki. Program standardowy codzienny. 2. Normalny Zwykłe codzienne zabrudzenia w niewielkiej ilości. (4 nakrycia + 1 garnek + 1 patelnia) 3. Codzienny Mycie wstępne w oczekiwaniu na uzupełnienie wsadu zmywarki po następnym posiłku. 4. Namaczanie Mycie ekologiczne przy niskim zużyciu energii, odpowiednie dla naczyń i garnków. 5. Eco* Szybki i oszczędny cykl do mycia mało zabrudzonych naczyń, zaraz po ich użyciu. (2 talerze + 2 szklan ki + 4 sztućce + 1garnek + 1 mała patelnia) Szybki i oszczędny cykl do mycia d elikatnych naczyń, mniej odpornych na wysokie temperatury, zaraz po ich użyciu. (kieliszków Kosz górny + delikatne talerze Kosz dolny). Środek myjący (A) = pojemnik A (B) = pojemnik B Programy z suszeniem Opcje Czas trwania programu (tolerancja ±10%) Godz. Min. proszek płyn tabletki 25 g (A) 25 ml (A) 1 (A) Tak Nie 2:25’ 21 g (A) 4 g (B) 21 ml (A) 4 ml (B) 1 (A) Tak Nie 1:50’ 25 g (A) 25 ml (A) 1 (A) Nie Nie 1:00’ Nie Nie Nie Nie Nie 0:08’ 21 g (A) 4 g (B) 21 ml (A) 4 ml (B) 1 (A) Tak Nie 3:00’ 21 g (A) 21 ml (A) 1 (A) Nie Nie 0:35’ 25 g (A) 25 ml (A) 1 (A) Tak Nie 1:35’ 6. Szybki 7. Kryształy Uwaga: Aby ułatwić dozowanie środka myjącego, warto wiedzieć, że: 1 łyżka kuchenna = 15 gramów proszku = około 15 ml płynu - 1 łyżeczka kuchenna = 5 gramów proszku = około 5 ml płynu Najlepsza skuteczność zmywania i suszenia programu „Codzienny - Błyskawiczny/Speed’” otrzymuje się zwykle jeśli wkłada się właściwą ilość naczyń. * Program Eko, zgodny z normą EN-50242, trwa dłużej niż inne programy, jednak to on zapewnia najmniejsze zużycie energii, a ponadto jest przyjazny dla środowiska. Uwaga dla Laboratoriów Testowych: Żądania o szczegółowe informacje dotycząc warunków testów komparacyjnych EN należy kierować na adres: [email protected] 57 Środek nabłyszczający i sól regeneracyjna Stosować wyłącznie produkty przeznaczone do zmywarek. Nie używać soli spożywczej lub przemysłowej ani środków do mycia ręcznego. Należy przestrzegać wskazówek znajdujących się na opakowaniu. PL W przypadku stosowania produktu wielofunkcyjnego nie jest konieczne dodawanie środka nabłyszczającego, zaleca się natomiast dodać sól, zwłaszcza gdy woda jest twarda lub bardzo twarda. Należy przestrzegać wskazówek znajdujących się na opakowaniu. Gdy nie dodaje się ani soli, ani środka nabłyszczającego jest rzeczą normalną, że lampki kontrolne BRAK SOLI* i BRAK SRODKA NABŁYSZCZAJACEGO* będą nadal świeciły się. Dozowanie środka nabłyszczającego Środek nabłyszczający ułatwia suszenie naczyń, usuwając wodę z ich powierzchni, dzięki czemu nie powstają na nich zacieki ani plamy. Zbiornik na środek nabłyszczający powinien być napełniony: • gdy na panelu kontrolnym pulsuje lampka kontrolna BRAK ŚRODKA NABŁYSZCZAJĄCEGO*; 1. Otworzyć pojemnik obracając korek (G) w kierunku przeciwnym do ruchu wskazówek zegara. 2. Wlać środek nabłyszczający uważając, aby się nie przelał. F Jeśli jednak tak się zdarzy, szybko wytrzeć plamę suchą G szmatką. 3. Zakręcić korek. Nie należy NIGDY wlewać środka nabłyszczającego bezpośrednio do wnętrza komory zmywania. Regulacja dozowania środka nabłyszczającego W przypadku niezadowalających wyników zmywania lub suszenia można wyregulować dozowanie środka nabłyszczającego. Przy pomocy śrubokręta obracać regulatorem (F), wybierając jedno spośród 6 położeń (regulacja fabryczna to 4): • jeśli na naczyniach pozostają smugi, należy ustawić regulator na niższą wartość (1-3). • jeśli pozostają krople wody lub plamy wapiennego osadu, należy ustawić regulator na wyższą wartość (4-6). Ustawianie twardości wody Każda zmywarka wyposażona jest w zmiękczacz wody, który przy wykorzystaniu soli regeneracyjnej, właściwej dla danego rodzaju zmywarki, zapewnia odwapnioną wodę do mycia naczyń. Ta zmywarka posiada regulację, dzięki której można ograniczyć zanieczyszczenie środowiska i zoptymalizować wyniki mycia, dostosowując program zmywania do stopnia twardości wody. Wartość ta dostępna jest w przedsiębiorstwie, które dostarcza wodę pitną. - Wyłączyć urządzenie za pomocą przycisku ON/OFF i otworzyć drzwiczki. - Ustawić pokrętło WYBÓR PROGRAMU najpierw na programie 5, następnie na 1 i ponownie na 5. - Nacisnąć przycisk ON/OFF, kontrolki faz cyklu pulsują.; teraz można wybrać poziom twardości wody. Każdemu programowi odpowiada poziom twardości: Np.: Program 1, poziom twardości 1 Program 2, poziom twardości 2, itd.... maksymalnie do 5*poziomów. (Odkamieniacz jest fabrycznie nastawiony na poziomie 3). - Aby wyjść z funkcji odczekać kilka sekund, nacisnąć przycisk opcji* lub włączyć urządzenie za pomocą przycisku ON/OFF. Również w przypadku stosowania tabletek wielofunkcyjnych pojemnik z solą musi być napełniony. (°dH = twardość w stopniach niemieckich - °fH = twardość w stopniach francuskich - mmol/l = millimol/litr) Dozowanie soli regeneracyjnej W celu uzyskania dobrych wyników zmywania należy dbać o to, aby pojemnik na sól nigdy nie był pusty. Sól regenerująca eliminuje wapń z wody, nie dopuszczając do powstawania osadów na naczyniach. Pojemnik na sól znajduje się w dolnej części zmywarki (patrz Opis) i powinien być napełniany: • gdy zielony pływak* jest niewidoczny podczas obserwacji korka soli; • gdy na panelu kontrolnym pulsuje lampka kontrolna BRAK ŚRODKA NABŁYSZCZAJĄCEGO*; 1. Wyjąć dolny i odkręcić korek zbiornika w kierunku przeciwnym do ruchu wskazówek zegara. 2. Tylko za pierwszym razem: Napełnić do pełna zbiornik wodą. 3. Ustawić lejek* (patrz rysunek) i napełnić zbiornik solą po samą krawędź (około 1 kg); wyciek wody jest normalnym zjawiskiem. 4. Wyciągnąć lejek*, usunąć sól z zewnętrznej części otworu zbiornika; przed zakręceniem należy korek wypłukać pod bieżącą wodą, ustawić główką w dół po to, aby wyciekła woda z czterech szpar znajdujących się w formie gwiazdy pod korkiem. Zaleca się wykonania tej czynności po każdorazowym dosypywaniu soli. Zamknąć dokładnie korek tak, aby podczas mycia detergent nie dostał się do zbiornika ( mogłoby to zniszczyć nieodwracalnie odwapniacz). W razie konieczności wsypać sól przed cyklem mycia, aby usunąć roztwór soli, który wypłynął z pojemnika. * Tylko w niektórych modelach. 58 Konserwacja i utrzymanie Wyłączanie wody i prądu elektrycznego • Zakręcać zawór wody po każdym zmywaniu, aby uniknąć niebezpieczeństwa wycieków. • Wyjmować wtyczkę z kontaktu przed przystąpieniem do czyszczenia urządzenia oraz podczas czynności konserwacyjnych. Czyszczenie zmywarki • Obudowa zewnętrzna i panel sterowania mogą być czyszczone miękką ściereczką zwilżoną wodą. Nie należy stosować rozpuszczalników ani środków ściernych. • Ewentualne plamy w komorze wewnętrznej można czyścić przy pomocy szmatki zmoczonej w roztworze wody i niewielkiej ilości octu. Unikanie powstawania brzydkich zapachów • Pozostawiać drzwi zmywarki zawsze przymknięte, aby uniknąć osadzania się wilgoci. • Regularnie czyścić obwodowe uszczelki drzwi oraz pojemniki na środek myjący przy pomocy wilgotnej gąbki. Pozwoli to uniknąć osadzania się resztek żywności, które są główną przyczyną powstawania przykrych zapachów. Czyszczenie spryskiwaczy Może się zdarzyć, że resztki żywności pozostaną na spryskiwaczach, zatykając otwory, przez które wydostaje się woda: od czasu do czasu dobrze jest je sprawdzać i czyścić przy pomocy niemetalowej szczoteczki. Obydwa spryskiwacze są demontowalne. Aby zdemontować górny spryskiwacz, należy odkręcić plastikowy pierścień, obracając go w kierunku przeciwnym do ruchu wskazówek zegara. Górny zraszacz należy zamontować z otworami skierowanymi do góry. Od czasu do czasu czyścić filtr dopływu wody znajdujący się na wyjściu zaworu. - Zamknąć zawór wody. - Po zamknięciu zaworu należy odkręcić końcówkę przewodu doprowadzającego wodę do zmywarki, wyjąć filtr i delikatnie umyć go pod bieżącą wodą. - Następnie ponownie włożyć filtr i zakręcić przewód. PL Czyszczenie filtrów Zespół filtrujący składa się z trzech filtrów, które oczyszczają wodę wykorzystywaną do mycia z resztek żywności i ponownie wprowadzają ją do obiegu: w celu zapewnienia dobrych rezultatów mycia konieczne jest ich czyszczenie. Czyścić filtry regularnie. Nie należy używać zmywarki bez filtrów lub z odłączonym filtrem. • Po kilku zmywaniach sprawdzić zespół filtrujący i, w razie konieczności, dokładnie go wyczyścić pod bieżącą wodą, wykorzystując w tym celu niemetalową szczoteczkę, zgodnie z poniższymi instrukcjami: 1. obrócić w kierunku przeciwnym do ruchu wskazówek zegara filtr cylindryczny C i wyjąć go (rys. 1). 2. Wyjąć obsadę filtra B lekko naciskając na boczne skrzydełka (Rys. 2); 3. Wysunąć płytę filtra ze stali nierdzewnej A. (rys. 3). 4. Skontrolować studzienkę i usunąć ewentualne resztki potraw. NIGDY NIE USUWAC ochrony pompy mycia (szczegół w kolorze czarnym) (rys.4). C 1 Dolny zraszacz wyciąga się pociągając go w kierunku do góry. A 3 Czyszczenie filtra dopływu wody* „Jeśli rury sieci wodociągowej są nowe lub nie były używane przez dłuższy czas, przed podłączeniem zmywarki należy odkręcić wodę i odczekać, aż będzie ona przejrzysta i wolna od zanieczyszczeń. Ostrożność ta zapobiega zbieraniu się nieczystości w punkcie, w którym zmywarka pobiera wodę i w następstwie tego, uszkodzeniu zmywarki.” Po wyczyszczeniu filtrów należy ponownie zamontować zespół filtrujący i prawidłowo go umiejscowić; ma to zasadnicze znaczenie dla prawidłowego działania zmywarki. W przypadku dłuższej nieobecności • Odłączyć połączenia elektryczne i zamknąć zawór wody. • Pozostawić drzwi uchylone. • Po powrocie wykonać jedno zmywanie bez wsadu. * Tylko w niektórych modelach. 59 Anomalie i środki zaradcze Jeśli w pracy urządzenia pojawiają się anomalie w pracy, należy skontrolować następujące punkty przed zwróceniem się do Obsługi technicznej (patrz Obsługa techniczna). Niektóre z usterek są sygnalizowane za pomocą lampek zapalających się na panelu sterowania. Przed wezwaniem pomocy technicznej należy zanotować, które z lampek świecą. PL Problemy: Możliwe przyczyny / Rozwiązanie: Zmywarka nie rozpoczyna pracy lub nie odpowiada na polecenia • W yłączyć urzą dzenie n aciskając przycisk ON/OFF, uruchom ić je pono wnie po upł ywi e jedn ej m inuty i pono wnie usta wić p rog ram . • W tyczka nie jest dobrze wł ożo na do g nia zdka. • Dr zwi zm ywarki nie są do b rze zam knięte. Drzwi się nie zamykają • Zaskoczył zam ek drzwi; po pchnąć ene rgicznie d rzwi, aż do usłys zeni a dźwi ęku „clack”. Zm yw ar ka nie odprow adza w od y. • • • • Zm yw ar ka jes t głośna. • Naczyni a ude rzają o siebi e lub o spryski wacze. • Nadm iar pi any: ni e wł aściwa ilość deterge ntu lub d eterg ent nieo dpo wied ni do zm ywan ia w zm ywa rce. (zob. Uruchom ienie i u żytko wanie ). Na nacz yniach i szklank ac h osadza się kamień lub tw orz y się biaław y nalot. • Brakuje soli rege neracyjn e j lub jej ilość nie jest odpo wi ednia d la stopnia tward ości wo dy (patrz Środe k nabłyszczający i sól). • Korek poj em nika na sól nie jest dobrze zam knięty. • Środ ek nabł yszczaj ący skończył się lub j ego ilość jest nie wystarczaj ąca. Na nacz yniach i szklank ac h tw orzą się zacieki lub niebieskaw e smugi. • W lano za dużo płynu na błyszczająceg o. Nacz ynia nie są c ałkiem su che. • W ybrany został pro gram bez suszen ia. • Środ ek nabł yszczaj ący skończył się lub j ego ilość jest nie wystarczaj ąca (patr z Śro dek nabł yszczając y i sól). • Reg ulacja śro dka nabł yszc zające go jest nie wł aściwa. • Naczyni a są wykon ane z ni eprzywie rające go t wo rzywa l ub z pl astiku. Nacz ynia nie są cz ys te. • • • • • Zm yw ar ka nie pobiera w ody – Al a rm “zamknięt y zaw ór” • • • • (słychać krótkie sygnały dźwiękowe)* (migają szybko kontrolki Suszenie i Zakończenie) Al a rm na przew odzie doprow adzając ym w odę / Zatkan y filtr dopł yw u w od y. (migają szybko kontrolki: Mycie, Suszenie i Zakończenie) 60 Prog ram się jeszcze nie skończył. Prze wó d odp ro wad zając y wodę j est zgięty (patrz Insta lacja). Odpł yw zle wozm ywaka jest zatkany. Filtr jest zapcha ny resztka m i jedzenia. Kosze są przeła do wan e (zob. Ład o wa nie koszy). Naczyni a nie są właści wie ułożone. Spryski wac ze nie m ogą się swob odni e ob racać. Prog ram zm ywa nia jest zb yt delikatn y (zob. Prog ram y). Nadm iar pi any: ni e wł aściwa ilość deterge ntu lub d eterg ent nieo dpo wied ni do zm ywan ia w zm ywa rce. (zob. Uruchom ienie i u żytko wanie ). • Korek pł ynu n abł yszczaj ącego nie został od po wi edn io zakręco ny. • Filtr jest brud ny l ub zapch any (zo b. Konserwacja i utrzym anie). • Brak soli ochron nej (zo b. Płyn na błys zczając y i sól). Brak wod y w sieci wod ocią go wej. Prze wó d dop ro wad zając y wodę j est zgięty (patrz Insta lacja). Ot wor zyć za wór, a urzą dze nie ruszy po paru m inutach. Ur ząd ze nie zostało zablok o wan e z p o wo du braku re akcji na sygnał y dźwi ęko we *. W yłączyć urząd zeni e za p om ocą przycisku ON/OFF, otworzyć za wór i po 2 0 sekundach p o no wni e włąc zyć zm ywa rkę, naciskając ten sam przycisk. Ponownie zap rog ra m ować i uruchom ić urzą dze nie. • W yłączyć urzą dzenie n aciskając przycisk ON/OFF. Zamknąć za wó r wo dy, aby u niknąć zal ania, wyjąć wt yczkę z g nia zdka. Spra wdzić, czy filtr do pływu wod y nie jest zatkan y p rze z zani eczys zczeni a. (patr z ro zd ział "Ko nserwacja i utrzym anie ”) Használati útmutató HU Magyar, 61 MOSOGATÓGÉP Tartalom HU Termékismertető adatlap, 62 Óvintézkedés és tanácsok, 63 Általános biztonság Hulladékelhelyezés Környezetvédelem Üzembe helyezés - Szerviz, 64-65 Elhelyezés és vízszintezés Vízbekötés és elektromos csatlakoztatás Tanácsok az első mosáshoz Műszaki adatok Ecodesign Regulation Készülékleírás, 66 LSPA+ 720A.1 Áttekintő nézet Kezelőpanel Berámolás a kosarakba, 67 Alsó kosár Evőeszköztartó kosár Felső kosár Indítás és használat, 68 A mosogatógép elindítása A mosogatószer betöltése Programok, 69 Programtáblázat Öblítőszer és regeneráló só, 70 Az öblítőszer betöltése A regeneráló só betöltése Karbantartás és ápolás, 71 A víz elzárása, és a készülék áramtalanítása A mosogatógép kitiszítása A kellemetlen szagok elkerülése A permetezőkarok tisztítása A bemenővíz-szűrő tisztítása A szűrők tisztítása Amennyiben hosszú ideje nem használta Rendellenességek és elhárításuk, 72 61 Termékismertető adatlap HU Termékismertető adatlap Márka HOTPOINT ARISTON Típusazonosító LSPA+ 720A.1 Előírt kapacitás szabványos terítékben kifejezve. (1) 10 Energiahatékonysági osztály A+++ (alacsony fogyasztás) osztálytól G (magas fogyasztás) osztályig. A+ Éves energiafogyasztás kWh/év-ben kifejezve. (2) 237.0 A szabványos tisztítási ciklus energiafogyasztása kWh-ban. 0.81 Energiafogyasztás kikapcsolt üzemmódban W-ban. 1.3 Energiafogyasztás bekapcsoéva hagyott üzemmódban W-ban. 3.0 Éves vízfogyasztás liter/évben kifejezve. (3) 2800.0 Szárítóhatékonysági osztály G osztálytól (alacsony hatékonyság) A osztályig (magas hatékonyság). A Programidő normál tisztítási ciklus esetén percben kifejezve. 180’ A bekapcsolva hagyott üzemmód időtartama. 10 Zajkibocsátás dB(A)-ben kifejezve 1 pW hangteljesítményre vonatkoztatva. 49 Beépíthető modell. Igen Megjegyzés: 1) A címkén és az adatlapon található tájékoztatás a normál tisztítási ciklusra vonatkozik, amely program átlagosan szennyezett konyhai edények tisztítására alkalmas, valamint az energia- és a vízfogyasztás együttes figyelembevétele esetén ez a leghatékonyabb program. A normál tisztítási ciklus megfelel az Eco ciklusnak. 2) 280 hideg víztöltésű, normál tisztítási cikluson és az alacsony villamosenergia-fogyasztású üzemmódokon alapul. A tényleges energiafogyasztás a készülék üzemeltetési módjától függ. 3) 280 normál tisztítási cikluson alapul. A tényleges vízfogyasztás a készülék üzemeltetési módjától függ. 62 Óvintézkedés és tanácsok Őrizze meg a kézikönyvet, hogy bármikor használhassa! A mosogatógép értékesítése, átadása, és/vagy áthelyezése esetén biztosítsa, hogy a kézikönyv a készülékkel együtt maradjon! Figyelmesen olvassa el az utasításokat: fontos információkat tartalmaznak az üzembe helyezésről, a használatról és a biztonságról. Költözködés esetén a készüléket tartsa függőleges helyzetben; ha ez nem lehetséges, a hátsó oldalára döntse! Ezt a készüléket háztartási használatra, illetve ahhoz hasonló alkalmazásokra tervezték, pl.: - konyhaként kialakított területek bolti, irodai és egyéb munkakörnyezetben dolgozó személyzet számára; - vidéki házak; - szállodai, moteli és egyéb lakókörnyezetben lakó ügyfelek által való használat; - bed and breakfast. Általános biztonság • Ezt a háztartási gépet működtetésre alkalmatlan személyek (a gyerekeket is beleértve) nem használhatják, kivéve, amennyiben ezeket a személyeket egy, a biztonságukért felelős személy felügyeli, illetve a készülék használatát nekik elmagyarázza. • Felnőttnek kell vigyáznia arra, hogy a gyerekek ne játsszanak a háztartási géppel. • A készüléket otthoni, nem üzemszerű használatra tervezték. • A készüléket csak felnőtt használhatja edények háztartási mosogatására, kizárólag az útmutatóban leírt utasítások szerint. • A készülék nem állítható föl a szabadban – még akkor sem, ha a hely védett – mert nagyon veszélyes kitenni esőnek és viharoknak. • Ne érjen a mosogatógéphez mezítláb! • A d u g ó t n e a t á p k á b e l n é l , h a n e m a csatlakozódugónál fogva húzza ki az aljzatból! • Ha a készüléken tisztítást vagy karbantartást végez, mindig zárja el a vízcsapot, és húzza ki a dugót a konnektorból! • Meghibásodás esetén semmiképp ne próbálja megjavítani a belső szerkezeteket! • Soha ne érintse meg az ellenállást! • Ne támaszkodjon és ne üljön a nyitott ajtóra: a készülék felbillenhet! • Ne hagyja nyitva az ajtót, mert a készülék felbillenhet! • A mosogatószert és az öblítőszert tartsa távol a gyerekektől! • A csomagolóanyag nem gyerekjáték! * Csak néhány modellnél tartozék. Hulladékelhelyezés • A csomagolóanyagok megsemmisítése: tartsa be a helyi előírásokat, így a csomagolóanyagok újrahasznosíthatók! • Az Európai Parlament és Tanács, elektromos és elektronikus berendezések hulladékairól (WEEE) szóló 2012/19/EK irányelve előírja, hogy ezen hulladékok nem kezelhetők háztartási hulladékként. A forgalomból kivont berendezéseket, az azokat alkotó anyagok hatékonyabb visszanyerése, illetve újrahasznosítása, valamint az emberi egészség és a környezet védelme érdekében szelektíven kell gyűjteni! Az összes terméken megtalálható áthúzott szemetes szimbólum a szelektív gyűjtési kötelezettségre emlékeztet. A tulajdonosok, háztartási készülékük forgalomból történő helyes kivonásával kapcsolatban, további információért a megfelelő közszolgálathoz, illetve a forgalmazóhoz is fordulhatnak. Környezetvédelem Takarítson meg vizet és energiát! • A mosogatógépet csak tele indítsa el! Amíg arra vár, hogy megteljen a mosogatógép, a kellemetlen szagok keletkezését megelőzheti az Áztatás program lefuttatásával (lásd Programok). • A Programtáblázat alapján válasszon az edényeknek és szennyezettségük mértékének megfelelő programot: - Normál szennyezettségű edényekhez használja a Gazdaságos programot, mely alacsony energiafogyasztást és vízfogyasztást biztosít! - Kis mennyiségű mosandó esetén kapcsolja be a Fél adag* opciót (lásd Indítás és használat)! • Amennyiben az ön áramszolgáltatói szerződése idősávokhoz köti a fogyasztói árat, mosson az alacsony tarifájú időszakban! Ebben az esetben a Késleltetett indítás* opcióval (lásd Indítás és használat) beállíthatja a mosás kívánt idejét! Foszfátmentes, klórmentes, enzimes mosogatószerek • Erősen ajánljuk a foszfátmentes és klórmentes mosogatószereket, melyek kevésbé károsítják a környezetet. • Az enzimek 50 °C körüli hőmérsékleten különösen hatékonyak, ami miatt az enzimes mosogatószereknél a mosogatás hőmérsékletét alacsonyabbra lehet állítani, ennek ellenére ugyanazt az eredményt adja, mint egy 65 °C-os mosogatás. • Amennyiben a mosogatószert a gyártói előírásoknak, a vízkeménységnek, és a szennyezettség mértékének megfelelően helyesen adagolja, elkerüli a pazarlást. Még a biológiailag lebomló fajtájú mosogatószerek is tartalmaznak olyan összetevőket, melyek megbontják a természet egyensúlyát. 63 HU Üzembe helyezés - Szerviz HU Költözködés esetén a készüléket tartsa függőleges helyzetben; ha ez nem lehetséges, a hátsó oldalára döntse! Elhelyezés és vízszintezés 1. Csomagolja ki a készüléket, és ellenőrizze, hogy nem sérült-e meg a szállítás során. Amennyiben megsérült, ne kösse be, hanem forduljon a viszonteladóhoz. A leeresztőcső bekötése A leeresztőcsövet – a cső megtörése nélkül – kösse legalább 4 cm átmérőjű lefolyóba. A leeresztőcsőnek a padlótól vagy a mosogatógép alátámasztási felületétől számítva 40 és 80 cm között kell lennie (A). 2. Helyezze el a mosogatógépet úgy, hogy oldalai, illetve hátlapja nekifeküdjenek a szomszédos bútoroknak, falaknak. A készülék egybefüggő munkalap alá is beszerelhető* (lásd beszerelési útmutató). 3. A mosogatógépet sík és kemény padlóra állítsa. A készülék vízszintbe állításakor a padló egyenetlenségeit az elülső lábak ki-, illetve becsavarásával kompenzálhatja. A pontos vízszintezéssel biztosítható a készülék stabilitása, megelőzhetők a rezonanciák és zajok, illetve a készülék nem fog elmozdulni. 4*. A hátsó lábak magasságának beállításához a mosogatógép alsó, elülső, középső részén található piros színű hatszögletű csavarjait állítsa be egy 8 mm-es hatszögletű csavarkulccsal – a magasság növeléséhez csavarja órairányban, a magasság csökkentéséhez pedig órairánnyal ellentétesen (lásd a dokumentációhoz mellékelt beépítési útmutatót). Vízbekötés és elektromos csatlakoztatás A vízbekötéshez és elektromos csatlakoztatáshoz szükséges átalakításokat csak szakember végezheti. Vigyázzon, hogy a mosogatógép nehogy rátegye a csövekre, vagy a tápkábelre! A készüléket új csövekkel kell a vízhálózatba bekötni. Ne használjon régi csöveket! A vízbevezetőcső, a leeresztőcső, valamint az elektromos tápkábel a kényelmes bekötés érdekében mind jobbra, mind balra elvezethető. A vízbevezetőcső bekötése • B e k ö t é s h i d e g v í z - v e z e t é k b e : C s a v a r o z z a f ö l a vízbevezetőcsövet egy 3/4 hüvelykes menettel rendelkező vízcsapra; de előtte, a készülék eltömődésének megelőzése érdekében jól eressze ki a vizet, míg a vízsugár áttetszővé nem válik! • Bekötés melegvíz-vezetékbe: Amennyiben Önöknél központi fűtőberendezés szolgáltatja a melegvizet, a mosogatógép a hálózati melegvízre is ráköthető, feltéve, hogy annak hőmérséklete nem haladja meg a 60 °C-ot. A hidegvíz-vezetéknél leírtak szerint csavarozza föl a csövet a csapra. Ha a vízbevezetőcső nem elég hosszú, forduljon szaküzlethez vagy meghatalmazott szakemberhez (lásd "Szerviz"). A víznyomásnak a Műszaki adatok táblázatában szereplő határértékek között kell lennie (lásd oldalt). Ügyeljen arra, hogy a csövön ne legyen se törés, se szűkület. 64 Mielőtt a leeresztőcsövet a mosogatószifonba becsatlakoztatja, távolítsa el a műanyag dugót (B). A vízkiömlés megakadályozása A víz kiömlésének megakadályozása érdekében a mosogatógép: - egy olyan rendszerrel van ellátva, mely rendellenességek esetén meggátolja a vízbetáplálást, illetve a készülékben rekedt víz kiengedését. Bizonyos modellek a New Acqua Stop * nevű kiegészítő biztonsági berendezéssel is rendelkeznek, mely a vízbevezetőcső megrongálódása esetén is megakadályozza a vízkiömlést. FIGYELEM! NAGYFESZÜLTSÉG! A vízbevezetőcsövet semmilyen körülmények között sem szabad elvágni, mivel nyomás alatt álló részeket tartalmaz. Elektromos csatlakoztatás Mielőtt bedugná a dugót a konnektorba, győződjön meg az alábbiakról: • Az aljzatnak van földelése, és megfelel a törvény által előírtaknak. • az aljzat képes elviselni a készülék ajtajának belső oldalán elhelyezett adattáblán feltüntetett maximális teljesítményfelvételt (lásd "A mosogatógép leírása"); • A tápfeszültség értéke a készülék ajtajának belső oldalán elhelyezett adattáblán feltüntetett értékek közé esik. • Az aljzat kompatíbilis a készülék villásdugójával. Ellenkező esetben a hivatalos szakszervizzel cseréltesse le a villásdugót (lásd "Szerviz"). Ne használjon hosszabbítót vagy elosztót. Az elektromos tápkábelnek és a hálózati aljzatnak a készülék bekötése után is könnyen hozzáférhetőnek kell maradnia. A kábel ne legyen megtörve vagy összenyomva! Ha a tápkábel megsérül, a kockázatok megszüntetése végett a kábelt a gyártóval, illetve a legközelebbi szakszervizzel ki kell cseréltetni. (Lásd "Szerviz") * Csak néhány modellnél tartozék. Vízlecsapódásgátló csík* A mosogatógép beszerelése után nyissa ki az ajtót, és ragassza az átlátszó öntapadó csíkot a fapolc alsó oldalára, hogy megvédje azt a kondenzvíztől. Tanácsok az első mosáshoz A beszerelés után távolítsa el a kosarakra helyezett betéteket és a felső kosáron lévő elasztikus tartóelemeket (ahol van). Az üzembe helyezés után, közvetlenül az első mosás előtt, a sótartályt töltse meg színültig vízzel, és csak ezután adjon hozzá nagyjából 1 kg sót (lásd Öblítőszer és regeneráló só): a víz túl fog csordulni. Válassza ki a vízkeménységet (lásd Öblítőszer és regeneráló só)! - A só betöltése után a SÓHIÁNYJELZO* lámpa kialszik. Amennyiben a sótartályba nem tölt sót, a vízlágyító berendezés és a fűtőszál tönkremehet. Szerviz HU Mielőtt a szervizhez fordul: • Győződjön meg arról, hogy a rendellenességet nem tudja maga elhárítani (lásd Rendellenességek és elhárításuk)! • Ellenőrizze a hiba elhárításának sikerességét a program újraindításával! • Amennyiben nem sikerült elhárítani, forduljon a hivatalos szakszervizhez! Soha ne forduljon nem hivatalos szerelőhöz! Közölje: • a rendellenesség jellegét; • a készülék modelljét (Mod.); • a gyártási számot (S/N)! Ezen információkat a készüléken elhelyezett adattáblán találhatja (lásd Készülékleírás). Műszaki adatok Dimensões Szélesség 44,5 cm. Magasság 82 cm. Mélység 57 cm. Méretek 10 normál teríték Hálózati víznyomás 0,05 ÷ 1 MPa (0,5 ÷ 10 bar) 7,25 – 145 psi Tápfeszültség Lásd adattábla Teljes felvett teljesítmény Lásd adattábla Olvadó biztosíték Lásd adattábla A készülék hangjelzésekkel/dallamokkal (mosogatógépmodellenként eltérő lehet ) jelzi vissza a parancsok végrehajtását: bekapcsolás, ciklus vége stb. A kezelőpanel/kijelző szimbólumai/jelzőlámpái/világító LED-jei több színnel is tudnak villogni vagy világítani. (mosogatógép-modellenként eltérő lehet). A kijelző* hasznos információkkal szolgál a beállított ciklus fajtájáról, a mosogatási/szárítási ciklusról, a maradékidőről, a hőmérsékletről stb. A készülék megfelel az alábbiuniós irányelveknek: -2006/95/EC (kisfeszültségi) -2004/108/EC (Az elektromágneses összeférhetõségrõl szóló) -2009/125/EC (Comm. Reg. 1016/2010) (Ecodesign) -97/17/EC (Címkézés) -2012/19/CE ECODESIGN REGULATION ECO mosási ciklus ez az a normál program, melyre az energiafogyasztást jelölő címke vonatkozik; ez a ciklus normál szennyezettségű edények mosására szolgál, egyúttal ez az a program, mely az energia- és vízfogyasztás vonatkozásában ennél az edénytípusnál a leghatékonyabb. Ha kevesebbet szeretne fogyasztani, a mosogatógépet tele töltettel használja. Készenléti fogyasztás: Bekapcsolva hagyott mód fogyasztása 3,0 [W] – Kikapcsolt mód fogyasztása 1,3 [W] A főbb ciklusok fogyasztási táblázata Normál körülmények* Felhasználói körülmények** Energiafogyasztás [kWh/ciklus] Vízfogyasztás [l/ciklus] Idõtartam [perc/ciklus] Energiafogyasztás kWh/ciklus] Vízfogyasztás [l/ciklus] Idõtartam [perc/ciklus] INTENZÍV 1,30 14 150 1,15 14 140 NORMÁL 1,05 14 115 0,95 13 110 * A program adatai az EN 50242 európai szabvány szerint számított laboratóriumilag mért értékek. ** Az adatok használati körülmények és felhasználói edénytöltet mellett lettek megállapítva. 65 Készülékleírás HU Áttekintő nézet 1. Felső kosár 2. Felső permetezőkar 3. Billenőpolc 4. Kosármagasság szabályozó 5. Alsó kosár 6. Alsó permetezőkar 7. Evőeszköztartó kosár 8. Mosogatószűrő 9.Sótartály 10. Mosogatószeres és öblítőszeres rekesz 11. Adattábla 12. Kezelőpanel*** Kezelőpanel PROGRAMVÁLASZTÓ tárcsa ON/OFF-Reset gomb Ajtónyitó fogantyú MOSOGATÁS lámpa SZÁRÍTÁS lámpa ***Csak teljes beépítésű modelleknél. *Csak néhány modellnél tartozék. A programok és opciók száma és típusa a mosogatógép típusától függően változhat. 66 Indítás/ szüneteltetés gomb és lámpa Sóhiányjelző lámpa PROGRAM VÉGE lámpa Berámolás a kosarakba Mielőtt berámolna a kosarakba, távolítsa el az ételmaradékokat az edényekről, és öntse ki a poharakból és tálkákból a bennük maradt folyadékot. Az edényeket úgy helyezze el, hogy stabilan álljanak, és ne borulhassanak le. A berámolás után ellenőrizze, hogy a permetezőkarok szabadon el tudnak-e forogni! Alsó kosár Az alsó kosárba fazekakat, fedőket, tányérokat, salátástálakat, evőeszközöket stb.lehet berámolni a Berámolási minták szerint. A nagyobb tányérokat és fedőket a kosár szélein tanácsos elhelyezni, ügyelve arra, hogy ne akadályozzák a felső permetezőkart a forgásban. Bizonyos mosogatógép-modellek lehajtható részekkel * rendelkeznek, melyeket függőleges helyzetben tányérok, vízszintes helyzetben pedig fazekak és salátástálak elrendezésére lehet használni. Evőeszköztartó kosár Az evőeszköztartó kosár a mosogatógép típusától függően eltérő lehet. Az evőeszköztartó kosarat az alsó kosár elülső részén kell elhelyezni, becsúsztatva a fix betétekbe, vagy a felső kosárban kell elhelyezni (fél adagos mosogatás esetén ennek megoldási módjait a következő ábra mutatja). - A kosár eltolható billenőpolcokkal rendelkezik, melyek segítségével az evőeszközöket megfelelően el lehet rendezni. A lejtés B lejtés C lejtés HU - Emelje fel a billenőpolcot, enyhén csúsztassa el, majd állítsa a kívánt lejtési szögre. A felső kosár magasságának beállítása Az edények elhelyezésének megkönnyítése érdekében a felső kosár magasabb, illetve alacsonyabb pozícióba állítható: A felső kosár magasságát lehetőleg ÜRES ÁLLAPOTBAN állítsa be! A kosarat sohase emelje vagy süllyessze csak egyik oldalánál fogva. Nyissa ki a kosár jobb- és baloldali sínjein az ütközőket, és húzza ki a kosarat; rakja a síneket feljebb vagy lejjebb, helyezze vissza a kosarat úgy, hogy az első görgők is a sínen legyenek, és zárja vissza az ütközőket (lásd ábra)! Amennyiben a kosár Dual Space fogantyúval* van ellátva (lásd ábra), húzza ki teljesen a felső kosarat, fogja meg a kosár oldalain lévő fogantyúkat, és mozgassa azokat feljebb vagy lejjebb – hagyja a helyére kattanni a kosarat. Berámolási minták a felső kosárra A késeket és a vágóeszközöket élükkel lefele kell behelyezni az evőeszköztartó kosárba, vagy vízszintesen a felső kosár billenőpolcaira. Az evőeszköztartó kosár elrendezési mintái Berámolási minták az alsó kosárra Felső kosár Rámolja be a kényes és könnyű edényeket: a poharakat, a teás- és kávéscsészéket, a tányérokat, a mély salátástálakat, a serpenyőket és az enyhén szennyezett mély fazekakat a Berámolási minták szerint! • A csészéket és csészealjakat helyezze a billenőpolcra**! • A hosszú és hegyes késeket, merőkanalakat helyezze a billenőpolcra**! Változtatható lejtésű billenőpolc* - A lejtés beállításával nagyobb teret nyerhet a felső kosárban, különféle szárhosszú talpas poharakat helyezhet el, és javíthatja a szárítás hatásfokát. * Csak bizonyos modelleknél tartozék. ** Számuk és helyzetük változtatható. Mosogatógépes mosásra nem alkalmas edények • Fa-, fanyelű vagy csontmarkolatú, illetve ragasztott tárgyak. • Alumíniumból, vörös- vagy sárgarézből, cinből, illetve ónból készült tárgyak. • Nem hőálló műanyag edények. • Antik vagy kézzel festett porcelánok. • Antik ezüstkészlet. Ellenben a nem antik ezüstkészlet a kíméletes programmal mosható, de ez esetben győződjön meg arról, hogy az ne érintkezzen más fémekkel! Tanácsos mosogatógépben mosható edényeket használni. 67 Indítás és használat HU A mosogatógép elindítása A mosogatószer betöltése 1. Nyissa ki a vízcsapot. 2. Nyomja meg a BE/KI gombot: néhány másodpercig a kezelőpanel valamennyi lámpája kigyullad. 3. Nyissa ki az ajtót, és adagolja be a mosogatószert (lásd alább). 4. Rámoljon be a kosarakba (lásd Berámolás a kosarakba fejezetet), és csukja be az ajtót. 5. A PROGRAMVÁLASZTÓ tekerőgomb órairányban történő elforgatásával válassza ki a megfelelő programot: a tekerőgomb rovátkájának pontosan a program számán vagy szimbólumán kell állnia. Az INDÍTÁS/SZÜNETELTETÉS gomb lámpája villog. 6. Válassza ki a mosogatási opciókat* (lásd oldalt). 7. Indítsa el az INDÍTÁS gomb megnyomásával. A lámpa abbahagyja a villogást és folytonos fénnyel világít. A mosás lámpájának kigyulladása a program kezdetére figyelmeztet. 8. A program végén kigyullad a VÉGE lámpa (folyamatos fénnyel világít). A BE/KI gomb megnyomásával kapcsolja ki a készüléket, zárja el a vízcsapot, és húzza ki a dugót a konnektorból. 9. Az edények kiszedése előtt várjon néhány percet, hogy nehogy megégesse magát. Az alsó kosárral kezdve rámolja ki a kosarakat. A mosogatás eredményessége a mosogatószer helyes adagolásán is múlik – túlzott használatával a mosás nem lesz hatékonyabb, csak a környezetszennyezés lesz nagyobb. - Az energiafogyasztás csökkentése érdekében a használat SZÜNETELÉSÉNEK bizonyos eseteiben a készülék automatikusan kikapcsol. Folyamatban lévő program módosítása Ha véletlenül rossz programot indított volna el, az indításkor még visszavonhatja: a mosogatás elindítása után a mosogatási ciklus módosításához a BE/KI/NULLÁZÁS gomb nyomva tartásával kapcsolja ki a készüléket, kapcsolja be ugyanezzel a gombbal, és válassza ki újból a kívánt programot és beállítást. Csak mosogatógépbe való mosogatószert használjon! NE HASZNÁLJON kézi mosogatószert! Tabletták használata csak azoknál a modelleknél javasolt, melyek rendelkeznek a MULTIFUNKCIÓS TABLETTÁK opcióval. Amennyiben túl sok mosogatószert használ, a ciklus végén a mosandón hab maradhat. A mosogatás és szárítás maximális hatásfokát csak úgy érheti el, ha por alakú mosogatószert, folyékony öblítőszert és sót használ. A rekesz: mosogatószer a mosáshoz B rekesz: mosogatószer az előmosáshoz 1. A D gomb megnyomásával nyissa ki a C fedelet! 2. Adagolja be a mosogatószert a Programtáblázat szerint: • por: A és B rekesz. • tabletta: amikor a programhoz 1 szükséges, helyezze be azt az A rekeszbe, és csukja le a fedelét; ha 2 kell, a másodikat a C rekesz mélyére kell tenni. 3. Távolítsa el a mosogatószermaradványokat a rekesz pereméről, és kattanásig csukja le a fedelét! D A B Edények menet közbeni berámolása Nyomja meg az Indítás/szüneteltetés gombot (a gomb lámpája villogni kezd). Nyissa ki az ajtót, vigyázva a kiáramló gőzre, és rakja be az edényeket. Nyomja meg az INDÍTÁS/ SZÜNETELTETÉS gombot: a ciklus folytatódik. Az INDÍTÁS/SZÜNETELTETÉS gombnak a készülék szüneteltetése érdekében való megnyomásával a programot, vagy – ha be van állítva – a késleltetett indítást lehet megszakítani. Ebben a fázisban nem lehet módosítani a programot. Véletlen leállások Ha a mosogatás során kinyílik az ajtó vagy elmegy az áram, a program félbeszakad. Ha az ajtót becsukja, illetve visszatér az áram, a mosogatás onnan folytatódik, ahol korábban félbeszakadt. * Csak néhány modellnél tartozék. 68 Programok Amennyiben az edények nem túl koszosak vagy korábban vízzel el lettek öblítve, csökkentse jelentősen a mosogatószer-adagot! A programok és opciók száma és típusa a mosogatógép típusától függően változhat. Javaslatok a program kiválasztásához Erősen szennyezett edények és fazekak (sérülékeny edényekhez nem használható). Normál szennyezettségű edények és fazekak. Standard mindennapi program Hétköznapi szennyezettség korlát ozott mennyiségben. (4 teríték + 1 fazék + 1 serpenyő) A következő fogásra előkészítő m osogatás Alacsony energiafogyasztású gaz daságos mosás edények és fazek ak számára. Gazdaságos és gyors ciklus kevé ssé szennyezett edények használ at utáni azonnali elmosogatásáho z. (2 tányér + 2 pohár + 4 evőesz köz+1 fazék+1 kis serpenyő) Gazdaságos és gyors ciklus közv etlen használat után a magas hő mérsékletre érzékenyebb, kényes edények számára. (talpas pohár felső kosár + kényes tányérok, alsó kosár ) Mosogatószer (A) = A rekesz (B) = B rekesz Program Szárítást tartalmazó Opciók programok Program időtartama (±10% eltérés) óra:perc’ por folyadék tabletta 25 g (A) 25 ml (A) 1 (A) Igen Nem 2:25’ 21 g (A) 4 g (B) 21 ml (A) 4 ml (B) 1 (A) Igen Nem 1:50’ 25 g (A) 25 ml (A) 1 (A) Nem Nem 1:00’ Nem Nem Nem Nem Nem 0:08’ 21 g (A) 4 g (B) 21 ml (A) 4 ml (B) 1 (A) Igen Nem 3:00’ 21 g (A) 21 ml (A) 1 (A) Nem Nem 0:35' 25 g (A) 25 ml (A) 1 (A) Igen Nem 1:35’ 1. Intenzív 2. Normál 3. Hétköznapi 4. Áztatás 5. Gazdaságos* 6. Gyorsmosás 7. Kristályok Megjegyzés: A Hétköznapi - Gyorsmosás/Speed program maximális hatékonyságát úgy érheti el, ha betartja a terítékek meghatározott számát. A mosogatószer adagolásának megkönnyítéséhez jó tudni, hogy: 1 evőkanál = nagyjából 15 gr. por = nagyjából 15 ml folyadék 1 teáskanál = nagyjából 5 gr. por = nagyjából 5 ml folyadék * Az EN-50242 szabványnak megfelelő Gazdaságos program a többi programhoz képest hosszabb programidővel rendelkezik, mindenesetre ennek a legkisebb az energiafogyasztása, és még környezetkímélő is. Megjegyzés a vizsgáló laboratóriumok számára: az EN összehasonlító vizsgálatok körülményeivel kapcsolatos részletes információkért forduljon a következő címhez: [email protected] 69 HU Öblítőszer és regeneráló só HU Kizárólag mosogatógépekhez használatos termékeket használjon! Ne használjon se étkezési, se ipari sót, se kézi mosogatószert! Tartsa be a termék csomagolásán található utasításokat! Pl. az 1. program 1. keménységi szintet jelent. A 2. program 2. keménységi szintet stb... max. 5. szintig. (A vízlágyító berendezés gyárilag a 3. szintre van állítva). - A funkcióból való kilépéshez várjon nagyjából néhány másodpercet, vagy nyomjon meg egy opciógombot*, illetve a BE/KI gombbal kapcsolja ki a készüléket. Multifunkciós termék használata esetén nem szükséges öblítőszert használni, helyette tanácsos sót betölteni, különösen, ha a víz kemény vagy nagyon kemény. Tartsa be a termék csomagolásán található utasításokat! Multifunkciós tabletták használata esetén mindenképpen töltse meg a sótartályt. Ha nem tölt be se sót, se öblítőszert, a SÓHIÁNYJELZŐ LÁMPA* és ÖBLÍTŐSZERHIÁNYJELZŐ LÁMPA* égve marad. Az öblítőszer betöltése Az öblítőszerrel az edények könnyebben száradnak, mivel a felületükről a víz lepereg, és nem maradnak csíkok, illetve foltok. A öblítőszeres rekeszt akkor kell feltölteni, • ha a kezelőpanelen kigyullad az ÖBLÍTŐSZERHIÁNY-JELZŐ lámpa*; 1. A kupak (G) órairánnyal ellentétesen történő kicsavarásával nyissa ki a rekeszt! 2. Töltse be az öblítőszert, F vigyázva, nehogy mellé menjen! Ha mégis, száraz ronggyal G azonnal törölje le! 3. Csavarja vissza a kupakot! SOHA ne öntse az öblítőszert közvetlenül a mosogatótérbe! Állítsa be az öblítőszer adagolását! Ha nem elégedett a szárítás eredményével, módosítson az öblítőszer adagolásán! Egy csavarhúzóval forgassa el a szabályozót (F) a 6 pozíció egyikébe (gyárilag a 4-esre van beállítva): • Amennyiben az edényeken fehér csíkok láthatók, csavarja kisebb értékre (1–3)! • Ha az edényeken vízcseppek vagy vízkőfoltok találhatók, csavarja magasabb értékre (4–6)! A vízkeménység beállítása Minden egyes mosogatógép vízlágyító berendezéssel van ellátva, mely kifejezetten mosogatógépbe való regeneráló só használatával vízkőmentes vizet szolgáltat az edények mosogatásához. Ez a mosogatógép olyan szabályozással rendelkezik, mely csökkenti a környezetterhelést és a vízkeménységnek megfelelően optimalizálja a mosási teljesítményt. A víz keménységéről a hálózati ivóvíz szolgáltatójától kaphat felvilágosítást. - Az ON/OFF gombbal kapcsolja ki a készüléket, és nyissa ki az ajtót. - Forgassa a PROGRAMVÁLASZTÓ tekerőgombot az 5. programra, majd az 1. programra, végül ismét az 5. programra. - Nyomja meg az ON/OFF gombot, mire a ciklusjelző lámpák villogni kezdenek. A keménységi szintet immár ki lehet választani. Minden programhoz tartozik egy keménységi szint: 70 Vízkeménység-táblázat Szint 1 2 3 4 °dH 0-6 6 - 11 12 - 17 17 - 34 °fH 0 - 10 11 - 20 21 - 30 31 - 60 mmol/l 0-1 1,1 - 2 2,1 - 3 3,1 - 6 Egy sótartály-töltet átlagos élettartama** Hónapok 7 hónap 5 hónap 3 hónap 2 hónap 5* 34 - 50 61 - 90 6,1 - 9 2/3 hét 0 °fH és 10 °fH között tanácsos nem használni sót. * az 5-ös program esetén az időtartam hosszabb lehet. ** napi 1 mosogatási ciklussal. (°dH = német keménységi fok – °fH = francia keménységi fok – mmol/l = millimol/liter) A regeneráló só betöltése A mosogatás eredményességéhez nélkülözhetetlen, hogy a sótartály sose ürüljön ki. A regeneráló só eltávolítja a vízből a vízkövet, így az nem rakódhat az edényekre. A sótartály a mosogatógép alsó részén található (lásd Készülékleírás), és fel kell tölteni: • ha a sótartály kupakján a zöld szintjelző* nem látható; • ha a kezelőpanelen kigyullad az ÖBLÍTŐSZERHIÁNY-JELZŐ lámpa*; 1. Húzza ki az alsó kosarat, és órairánnyal ellentétesen csavarja le a tartály kupakját. 2. Csak az első használatbavétel alkalmával: a tartályt a pereméig töltse fel vízzel. 3. Helyezze be a tölcsért* (lásd ábra), és a tartályt töltse fel a pereméig sóval (kb. 1 kg) – nem baj, ha a víz kicsit túlcsordul. 4. Vegye ki a tölcsért*, törölje le a sót a tartály szájáról, becsavarás előtt folyó csapvíz alatt, fejjel lefelé tartva öblítse el a kupakot úgy, hogy a víz átfolyjon a kupak alsó részén csillag alakban kiképzett négy résen. (Zöld szintjelzős sótartálykupak*) Javasoljuk, hogy ezt a műveletet minden egyes sóbetöltésnél hajtsa végre. Jól zárja vissza a kupakot, hogy a mosogatás során a mosogatószer nehogy behatolhasson a tartályba (ez helyrehozhatatlanul tönkreteheti a vízlágyítót). Ha szükséges, a mosási ciklus előtt töltse be a sót, és távolítsa el a sótartályból kicsordult sóoldatot! * Csak néhány modellnél tartozék. Karbantartás és tisztítás A víz elzárása, és a készülék áramtalanítása • A vízveszteségek elkerülése érdekében minden mosogatás után zárja el a vízcsapot! • Ha a készüléken tisztítást vagy karbantartást végez, húzza ki a dugót a konnektorból! A mosogatógép kitiszítása • A kezelőpanel külső felülete súrolószert nem tartalmazó vízzel átitatott ronggyal tisztítható. Ne használjon oldó- vagy súrolószereket! • A belső mosogatótér faláról az esetleges foltokat ecetes vízzel átitatott ronggyal lehet lemosni. A kellemetlen szagok elkerülése • Az ajtót mindig csak félig csukja be, hogy a pára nehogy beposhadjon! • Rendszeresen tisztítsa meg egy nedves szivaccsal az ajtó, illetve a mosogatószeres rekeszek megfelelő zárását biztosító kerületi tömítéseket! Így eltávolíthatók az ételmaradékok, melyek elsődlegesen felelősek a kellemetlen szagokért. A permetezőkarok tisztítása Előfordulhat, hogy ételmaradékok tapadnak a permetezőkarokra, és eltömeszelik a permetezőnyílásokat: időnként ajánlatos ellenőrizni, és egy nem fémes szivaccsal megtisztítani. Mind a két permetezőkar leszerelhető. A felső permetezőkar leszereléséhez csavarozza ki órairánnyal ellentétesen a műanyag szorítócsavart! A felso permetezokart a furatokkal fölfelé kell felszerelni. Rendszeresen tisztítsa meg a csap kimeneténél elhelyezett bemenővíz-szűrőt. - Zárja el a vízcsapot. - Csavarja le teljesen a vízbevezetőcső végét, vegye ki a szűrőt, és óvatosan tisztítsa meg folyó vízsugár alatt. - Helyezze vissza a szűrőt, és csavarja vissza a csövet. A szűrők tisztítása A szűrőblokkot három szűrő alkotja, melyek a víz visszaforgatása mellett kiszűrik az ételmaradékokat a mosogatóvízből: a mosogatás eredményességéhez a szűrőket meg kell tisztítani. Rendszeresen tisztítsa meg a szűrőket! A mosogatógépet ne használja szűrők nélkül, illetve kikötött szűrőberendezéssel! • Néhány mosás után ellenőrizze a szűrőblokkot, és szükség esetén az alábbi utasítások betartásával, folyó csapvíz alatt, nem fémes kefével tisztítsa meg alaposan: 1. A C köralakú szűrőt forgassa órairánnyal ellentétesen, és vegye ki (1. ábra)! 2. Az oldalsó szárnyak könnyed benyomásával vegye ki a B szűrőpoharat (2. ábra)! 3. Csavarozza ki az A inox szűrőtányért (3. ábra)! 4. Ellenőrizze a lefolyónyílást, és távolítsa el az esetleges ételmaradékokat! SOHA NE TÁVOLÍTSA EL a mosószivattyú védelmét (különösen a feketét ne) (4. ábra)! C 1 Az alsó permetezőkart lefele húzva lehet kiszedni. A 3 A bemenővíz-szűrő tisztítása* Ha a vízcsövek újak vagy sokáig nem használták őket, a csatlakoztatás előtt folyassa a csapot mindaddig, míg a víz tiszta és szennyeződésmentes nem lesz. Enélkül az óvintézkedés nélkül fennáll a veszélye, hogy a víz belépésének helye eltömődik és a mosogatógép megrongálódik. A szűrők megtisztítása után szerelje össze ismét a szűrőblokkot, és megfelelően illessze vissza a helyére – az egység a mosogatógép megfelelő működéséhez nélkülözhetetlen. Hosszú távollét esetén • Áramtalanítsa a készüléket, és zárja el a vízcsapot! • Hagyja résnyire nyitva az ajtót! • Megérkezéskor indítson el egy üres mosogatást! * Csak néhány modellnél tartozék. 71 HU Rendellenességek és elhárításuk HU 195118061.00 10/2013 pb - Xerox Fabriano Amennyiben a készülék működésében rendellenességet észlel, mielőtt a szervizhez fordulna, ellenőrizze a következő pontokat! Hiba: Lehetséges okok / elhárításuk: A mosogatógép nem indul vagy nem reagál a parancsokra. • A BE/KI gombbal kapcsolja ki a készüléket, és kb. egy perc elteltével indítsa újra, majd állítsa be újra a programot. • A dugó nincs jól bedugva a konnektorba. • A mosogatógép ajtaja nincs rendesen becsukva. Az ajtó nem csukódik. • A retesz kioldott; határozott mozdulattal húzza meg az ajtót kattanásig. A mosogatógép nem ereszti le a vizet. • • • • A mosogatógép zajos. • Az edények egymásnak vagy a permetezőkaroknak ütődnek. • Túlzott habzás: A mosogatószer adagolása nem megfelelő, vagy nem mosogatógéphez való. (lásd Indítás és használat). Az edényeken és poharakon vízkő, vagy fehéres réteg található. • Elfogyott a regeneráló só, vagy az adagolása nincs megfelelően beállítva a vízkeménys égre (lásd Öblítőszer és regeneráló só). • A sótartály kupakja nincs rendesen bezárva. • Elfogyott az öblítőszer, vagy az adagolása nem elégséges. Az edények és poharak csíkosak, vagy felületükön kékes bevonat látható. • Az öblítőszer adagolása el van túlozva. Az edények nincsenek rendesen megszárítva. • A kiválasztott programban nincs szárítás. • Elfogyott az öblítőszer, vagy az adagolása nem elégséges (lásd Öblítőszer és regenerá ló só). • Az öblítőszer-beállítások nem megfelelőek. • Az edények teflon- vagy műanyag edények. Az edények nem tiszták. • • • • • Túl sok edény van a kosarakban (lásd Berámolás a kosarakba). Az edények rosszul lettek behelyezve. A permetezőkarok akadályozva vannak a szabad forgásban. A mosogatási program nem elég intenzív (lásd Programok). Túlzott habzás: A mosogatószer adagolása nem megfelelő, vagy nem mosogatógéphe z való. (lásd Indítás és használat). • Az öblítőszer kupakja nem lett jól bezárva. • A szűrő koszos vagy el van tömődve (lásd Karbantartás és ápolás). • Elfogyott a regeneráló só (lásd Öblítőszer és regeneráló só). A mosogatógép nem kap vizet – Figyelmeztetés zárt vízcsapra. • • • • (rövid sípolások hallhatók*) (a Szárítás lámpa és a Vége lámpa gyorsan villog) Figyelmeztetés eltömődött vízbeve zetőcsőre/bemenővíz-szűrőre (a Mosogatás lámpa, a Szárítás lámpa és a Vége lámpa gyorsan villog) * Csak néhány modellnél tartozék. 72 A program még nem ért véget. A leeresztőcső meg van törve (lásd Üzembe helyezés). A mosogató lefolyója el van dugulva. A szűrő az ételmaradékoktól eltömődött. Nincs víz a hálózatban. A vízbevezetőcső meg van törve (lásd Üzembe helyezés). Nyissa ki a vízcsapot, és a készülék néhány perc elteltével elindul. A készülék amiatt állt meg, mert a sípolás után nem történt beavatkozás. A BE/KI gombbal kapcsolja ki a készüléket, nyissa ki a vízcsapot, és 20 másodperc elte ltével ugyanezen gomb megnyomásával indítsa újra a készüléket. Programozza be újra a készüléket, és indítsa el. • Az BE/KI gomb megnyomásával kapcsolja ki a készüléket. A víz kiömlésének elkerülés e érdekében zárja el a vízcsapot, húzza ki a dugót a konnektorból. Ellenőrizze, hogy a bemenővíz-szűrő szennyeződéstől nem tömődött-e el. (lásd „Karba ntartás és ápolás”)