1
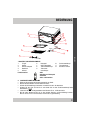
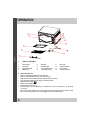
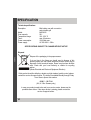
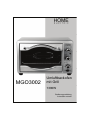
MGO3002
Umluftbackofen
mit Grill
1300W
Bedienungsanleitung
Instruction manual
ZU IHRER SICHERHEIT
Vor dem Gebrauch dieses Gerätes sollten folgende Sicherheitshinweise
beachtet werden:
!
!
!
!
!
!
!
DEUTSCH
!
!
!
!
!
!
!
!
!
!
2
Lesen Sie diese Bedienungsanleitung sorgfältig durch.
Die Netzspannung muß mit den Angaben auf dem Typenschild (auf der
Unterseite der Produkts) übereinstimmen.
Lassen Sie das Gerät nicht unbeaufsichtigt, während es benutzt wird.
Stecken Sie das Gerät aus, wenn es nicht verwendet wird oder gereinigt
werden soll. Lassen Sie das Gerät vor der Reinigung erst abkühlen.
Lassen Sie die Netzleitung nicht vom Tisch herunterhängen, nicht einklemmen
oder mit heißen Flächen in Berührung kommen.
Stellen Sie das Gerät auf einer ebenen Oberfläche auf. Stellen Sie das Gerät
nicht auf erhitzte Flächen.
Tauchen Sie das Gerät, Netzleitung oder Netzstecker nicht ins Wasser oder in
andere Flüssigkeiten. Dadurch besteht die Gefahr eines elektrischen Schlages.
Lassen Sie Kinder nicht unbeaufsichtigt mit diesem Gerät umgehen.
Ihr Gerät, insbesondere die Glastür, wird während des Betriebes heiß. Fassen
Sie das Gerät daher nur an dem dafür vorgesehenen Türgriff an.
Berühren Sie nie die Glastür, da diese auch von außen heiß wird.
Spritzen Sie kein Wasser auf das Glasfenster, wenn es noch heiß ist. Dies kann
zu Rissen im Glas führen.
Der Ofen sollte mindestens 10cm von der Wand entfernt stehen.
Wenn die Anschlussleitung dieses Gerätes beschädigt wird, muss sie durch
den Hersteller oder seinen Kundendienst ersetzt werden, um Gefährdungen zu
vermeiden.
Benutzen Sie das Gerät nie mit einer defekten Netzleitung oder Netzstecker.
Lassen Sie das Gerät von Ihrem Service Center reparieren und überprüfen.
Dieses Gerät ist ausschließlich für den Haushaltsgebrauch bestimmt.
Dieses Gerät ist nicht für den Gebrauch im Freien bestimmt, verwenden Sie es
nur im Haus.
Bewahren Sie diese Bedienungsanleitung sorgfältig auf.
BEDIENUNG
1. BAUTEILE UND BEDIENELEMENTE
1.
Türgriff
6.
2.
Glastür
7.
3.
Griff für Grillspieß
8.
4.
Backblech
9.
5.
Grillrost
Funktionsstufen:
0
DEUTSCH
Drehspieß
Griff für Backblech
Thermostatdrehknopf
Thermostatkontrolllampe
10.
11.
12.
Funktionswahlknopf
Timerdrehknopf
Schalter für Umluft
- AUS
- Oberhitze und Drehspieß
- Unterhitze
- Ober- und Unterhitze
2. VOR ERSTER INBETRIEBNAHME
! Entfernen Sie das gesamte Verpackungsmaterial vom Gerät.
! Nehmen Sie alles Zubehör aus dem Garraum heraus.
! Wickeln Sie die Netzleitung auseinander und stecken Sie sie in die Steckdose.
! Schalten Sie den Ofen auf 250°C ein und wählen Sie mit dem Funktionswahlknopf beide
Heizelemente (
).
! Lassen Sie den Ofen mit eingeschalteter Umluftfunktion für ca. 15 Minuten laufen.
! Bei der ersten Benutzung kann es zu einer leichten Geruchs- und Rauchbildung kommen.
Dies ist normal und nur von kurzer Dauer. Achten Sie auf gute Belüftung.
3
BEDIENUNG
3. Benutzung des Ofens
3.1.
!
!
!
3.2
!
!
!
!
!
Allgemeiner Rat
Wenn Sie backen oder grillen, empfiehlt es sich den Ofen vorzuheizen, um ein besseres
Ergebnis zu erzielen
Die Kochzeit hängt von dem Lebensmittel, der Temperatur und dem individuellen Geschmack
ab. Die in Kochrezepten angegebenen Zeiten sind reine Garzeiten. Eventuelle Vorheizzeiten
sind zu berücksichtigen.
Wenn Sie gefrorene Lebensmittel zubereiten, überprüfen Sie die angegebenen Garzeiten.
Essen warmhalten
Stellen Sie den Funktionknopf auf die Position
Stellen Sie die Umluftfunktion an.
Stellen Sie die Temperatur auf 100°C ein.
Schieben Sie das Grillrost in den Ofen und stellen das Essen darauf.
Wenn Sie das Essen länger als 20 bis 30 Minuten warm halten wollen, empfielt es sich, es mit
Alufolie abzudecken, damit es nicht zu trocken wird.
Lassen Sie das Essen nicht solange im Ofen, da es sonst zu trocken werden kann.
DEUTSCH
3.3
Backen (mit Umluft)
Diese Funktion ist ideal für Obstkuchen, Quiche, Pasteten usw. geeignet.
! Schieben Sie das Gitter auf die unterste Schiene.
! Stellen Sie den Funktionsknopf auf die Position
! Stellen Sie die Umluftfunktion an.
! Stellen Sie das Thermostat auf die gewünschte Temperatur ein.
! Stellen Sie die Zeituhr auf die gewünschte Zeit ein.
! Warten Sie, bis der Ofen die gewünschte Temperatur erreicht hat (die Anzeigelampe erlischt
dann). Stellen Sie erst danach die Speisen in den Ofen.
! Wenn das Essen vorher fertig sein sollte, stellen Sie bitte manuell die Zeitschaltuhr auf “O”
3.4
Backen (ohne Umluft)
Diese Funktion eignet sich ideal für Pizzen, Lasagne, Aufläufe, kleines Geflügel, alle Arten von
Fisch, überbackenes Gemüse und unterschiedliche Arten von Kuchen.
! Schieben Sie das Gitterrost auf die unterste Schiene.
! Stellen Sie den Funktionsknopf auf die Position
! Stellen Sie das Thermostat auf die gewünschte Temperatur ein.
! Stellen Sie die Zeituhr auf die gewünschte Zeit ein.
! Warten Sie, bis der Ofen die gewünschte Temeratur erreicht hat (die Anzeigelampe erlischt
dann). Stellen Sie erst danach die Speisen in den Ofen.
! Wenn das Essen vorher fertig sein sollte, stellen Sie bitte manuell die Zeitschaltuhr auf “O”
4
BEDIENUNG
3.6
Garen mit Umluft
Diese Funktion ist ideal, um schmackhafte Torten zu backen, Fleischgerichte zuzubereiten
(ausgenommen Geflügel). Sie eignet sich zur Zubereitung von Röstkartoffeln und dem Backen von
Kuchen. Ebenfalls eignet sich diese Funktion für die gleichzeitige Zubereitung unterschiedlicher
Speisen.
! Schieben Sie das Gitterrost in den Ofen.
! Stellen Sie den Funktionsknopf auf die Position
! Stellen Sie die Umluftfunktion an.
! Stellen Sie das Thermostat auf die gewünschte Temperatur ein.
! Stellen Sie die Zeituhr auf die gewünschte Zeit ein.
! Warten Sie, bis der Ofen die gewünschte Temperatur erreicht hat (die Anzeigelampe erlischt
dann). Stellen Sie erst danach die Speisen in den Ofen.
! Wenn das Essen vorher fertig sein sollte, stellen Sie bitte manuell die Zeitschaltuhr auf “O”
3.7
Braten und Grillen mit dem Spieß
Diese Funktion eignet sich ideal für Hähnchen auf dem Spieß, Geflügel, Braten, Schweinefleisch
und Kalbfleisch.
! Stecken Sie das Grillgut auf den Spieß und fixieren es mit den beigefügten Gabeln.
! Setzen Sie das Kuchenblech auf die unterste Schiene. Danach setzen Sie den Spieß in die
Halterung ein.
! Schließen Sie die Türe so, daß sie einen Spalt geöffnet bleibt.
! Der Ofen muss für diese Funktion nicht vorgeheizt werden.
! Stellen Sie den Funktionsknopf auf die Position
! Stellen Sie das Thermostat auf die gewünschte Temperatur ein.
! Stellen Sie die Zeituhr auf die gewünschte Zeit ein.
! Wenn das Essen vorher fertig sein sollte, stellen Sie bitte manuell die Zeitschaltuhr auf “O”
Der Garvorgang kann jederzeit vor Ablauf der eingestellten Zeit beendet werden, stellen Sie
dazu bitte die Zeitschaltuhr auf "O" zurück .
5
DEUTSCH
3.5
Grillen
Diese Funktion ist ideal für Hamburger, Würstchen, Kotelett, Würste usw. Außerdem kann diese
Funktion zum Anbraten der Gerichte verwendet werden
! Schieben Sie das Grillrost auf die obere Position und das Backblech auf die unterste Schiene.
Tipp: Gießen Sie 2 Gläser Wasser ins Backblech, um Rauch zu vermeiden, und um es leichter zu
reinigen
! Stellen Sie den Funktionsknopf auf die Position
! Stellen Sie das Thermostat auf die gewünschte Temperatur ein.
! Stellen Sie die Zeituhr auf die gewünschte Zeit ein.
! Heizen Sie den Ofen 5 Minuten mit leicht geöffneter Türe vor.
! Platzieren Sie das Essen auf dem Grillrost und lassen die Tür leicht geöffnet. Das Grillgut sollte
ab und zu gewendet werden.
! Wenn das Essen vorher fertig sein sollte, stellen Sie bitte manuell die Zeitschaltuhr auf “O”
REINIGUNG UND PFLEGE
4. REINIGUNG
!
!
!
!
!
!
!
!
Stellen Sie den Timer nach der Benutzung wieder auf „0“, indem Sie den Drehknopf gegen den
Uhrzeigersinn drehen.
Ziehen Sie den Stecker aus der Steckdose. Lassen Sie den Ofen wieder abkühlen.
Nehmen Sie das Backblech, den Bratrost oder den Spiess zum Reinigen heraus.
Grillrost und Kuchenblech können von Hand oder in der Spülmaschiene gereinigt werden.
Wischen Sie die Innenflächen mit einem feuchten Tuch oder Schwamm ab.
Sie können einen feuchten Schwamm benutzen, um die äußeren Oberflächen zu reinigen.
Verwenden Sie keine Scheuermittel oder scharfe Reiniger. Diese können die Oberfläche
beschädigen.
Benutze Sie niemals aluminiumkorrosive Produkte (Sprayreinigungsmittel), um den Innenraum
zu reinigen
Warnung: UNTER KEINEN UMSTÄNDEN darf Wasser in das Gerät gelangen.
DEUTSCH
6
TECHNISCHE DATEN
Technische Daten
Beschreibung:
Modell:
Garraum Kapazität:
Temperaturbereich:
Timer:
Leistungsaufnahme:
Stromversorgung:
Minibackofen mit Umluft und Grill
MGO3002
20 L
100 - 250 °C
max. 60 Minuten
1300 Watt max.
220-240V~ 50Hz
Hinweise zum Umweltschutz
Entsorgen Sie die Verpackung sortenrein.
Dieses Produkt darf am Ende seiner Lebensdauer nicht über den normalen
Haushaltsabfall entsorgt werden, sondern muss an einem Sammelpunkt für
das Recycling von elektrischen und elektronischen Geräten abgegeben
werden. Das Symbol auf dem Produkt, in der Gebrauchsanleitung oder auf
der Verpackung weist darauf hin.
Die Werkstoffe sind gemäß ihrer Kennzeichnung wieder verwertbar. Mit der
Wiederverwendung, der stofflichen Verwertung oder anderen Formen der
Verwertung von Altgeräten leisten Sie einen wichtigen Beitrag zum Schutze
unserer Umwelt. Bitte fragen Sie bei Ihrer Gemeindeverwaltung nach der
zuständigen Entsorgungsstelle.
Für den Fall, dass trotz unserer hohen Qualitätskontrollen
Ihr Gerät einen Defekt aufweisen sollte, wenden Sie sich bitte an
unsere Servicehotline. Diese erreichen Sie Montag bis Freitag
in der Zeit von 10-18 Uhr unter:
0180 5 - 22 17 84
(€ 0,14/Min. aus dem deutschen Festnetz)
Falls das defekte Produkt in unser Servicecenter eingeschickt werden muß, so
verwenden Sie bitte den beigefügten Retourenaufkleber. Sollte dieser
Retourenaufkleber fehlen, wenden Sie sich bitte an unsere Servicehotline
7
DEUTSCH
TECHNISCHE ÄNDERUNGEN JEDERZEIT OHNE ANKÜNDIGUNG
VORBEHALTEN
8
SAFETY PRECAUTIONS
!
!
!
!
!
!
!
!
!
!
!
!
!
!
Read all instructions.
Before use check that the voltage power corresponds to the one shown on
the appliance nameplate.
Unplug from outlet when not in use and before cleaning. Allow to cool before
cleaning the appliance.
Do not let cord hang over edge of the table or counter, or touch hot surface.
Place the appliance on a flat surface. Do not place on a heated surface.
Close supervision is necessary when any appliance is used by or near
children.
Do not touch hot surface. Use handle or knobs only.
When in use, the oven is hot! Never touch the oven and the glass door.
Don’t sprinkle water on the glass window whilst it is still very hot, this could
cause the glass to crack.
A distance of at least 10cm should be maintained between the oven and the
wall.
Do not operate any appliance with a damaged cord or plug or after the
appliance malfunctions. Return the appliance to the nearest authorized
service center for examination, repair or adjustment.
If the supply cord is damaged, it must be replaced by the manufacturer or its
service agent in order to avoid a hazard.
Do not use outdoors.
Save these instructions.
9
ENGLISH
When using electrical appliance, the following basic safety precautions
should always be followed:
OPERATION
ENGLISH
1.
GUIDE TO THE PARTS
1.
2.
3.
4.
Door Handle
Glass Door
Rotisserie Handle
Baking Tray
5.
6.
7.
8.
Grill Rack
Rotisserie Spit
Tray & Rack Handle
Thermostat Control
9.
10.
11.
12.
Pilot Light
Function Selector
Timer Control
Convection Switch
2. Before first time use:
! Remove all packaging material from the appliance
! Remove all accessories (rack, tray, etc.) from the oven.
! Wipe the oven and the accessories with a damp cloth and dry them.
! Fully unwind the power cord and plug it in the power socket.
! Set the function control to
! Switch on the CONVECTION.
! Set the temperature to 250°C.
! Use the timer to let the appliance run (without any food or accessories in it) for about
15 minutes.
! If the unit is used for the first time, it may slightly emit smell and smoke. This is normal and only
lasts for a short time. Make sure to use the appliance in a well ventilated area.
10
OPERATION
3.
3.1
!
!
!
3.2
!
!
!
!
!
Using The Ovens:
General Advice
When baking or grilling, it is advisable to always pre-heat the oven to the desired temperature,
to get the best possible cooking results.
Cooking time depends on the food quality, the food temperature and individual taste. The time
shown in cooking recipes and tables is only indicative and doesn’t consider the time needed to
pre-heat the oven.
When cooking freeze-dry foods, check the time suggested in the products’ packaging.
Keeping food warm
Set the function selector knob to position
Turn on the convection fan.
Set the temperature to 100°C.
Insert the wire rack, and place the food on top of it.
If the food needs to be kept warm for longer than 20-30 minutes, it should be covered with
tinfoil, to prevent it from becoming too dry.
3.3
Baking
This function is ideal for flans, fruit puddings, quiche, pies, etc.
! Insert the wire rack to the bottom position.
! Turn the function selector knob to position
! Turn on the convection fan.
! Set the thermostat at required temperature.
! Set the timer knob to the required cooking time.
! Wait for the oven to reach the set temperature (the pilot light goes off), then put the food in.
! If cooking is completed before the end of the set time, please manually turn the timer knob to
position “O”.
3.4
Traditional oven cooking
This function is ideal for cooking great pizzas, lasagne, first courses au gratin, small fowl, all kinds
of fish, stuffed vegetables au gratin and different kinds of cakes.
! Insert the wire rack to the bottom position.
! Turn the function selector knob to position
! Set the thermostat at required temperature.
! Set the timer knob to the required cooking time.
! Wait for the oven to reach the set temperature (the pilot light goes off), then put the food in.
! If cooking is completed before the end of the set time, please manually turn the timer knob to
position “O”.
11
ENGLISH
Do not leave the food in the oven for a long time as it may become too dry!
OPERATION
3.5
Grilling
This function is ideal for grilling hamburgers, chops, frankfurters, sausages, etc. In addition, this
function may be used for browning foods: coquilles saint-jacques, etc.
! Insert the wire rack to the top position and the baking tray onto the bottom heating element.
Hint: We suggest pouring two glasses of water into the baking tray so as to avoid smoke and bad
stains resulting from burning fat, and for easy cleaning.
! Set the function selector knob to position
! Set the thermostat at required temperature.
! Set the timer knob to the required cooking time.
! Preheat the oven for about 5 minutes with slight ajar of the door.
! Place the food on the wire rack, and close the door, leaving it ajar, and remember to turn the
food half way during cooking.
! If cooking is completed before the end of the set time, please manually turn the timer knob to
position “O”.
ENGLISH
3.6
Convection oven cooking
This function is ideal for cooking great savoury pies, all kinds of meat-based main dishes (except
small fowl), roast potatoes and cakes in general. It is also good for simultaneously cooking on two
different levels.
! Insert the wire rack to the bottom position.
! Turn the function selector knob to position
! Turn on the convection fan.
! Set the thermostat at required temperature.
! Set the timer knob to the required cooking time.
! Wait for the oven to reach the set temperature (the pilot light goes off), then put the food in.
! If cooking is completed before the end of the set time, please manually turn the timer knob to
position “O”.
3.7
Rotisserie with the spit
The function is ideal for cooking chicken on the spit, fowl in general, roast pork and veal.
! Place the food on the spit and hold it firm by using the forks (for best results, tie down the meat
using kitchen string).
! Place the baking tray onto the bottom heating element, then insert the spit on the spit mount
inside the oven.
! Close the door, leaving it slightly ajar (half-open).
! Then oven does not need to be preheated for this function.
! Turn the function selector knob to position
! Set the thermostat at required temperature.
! Set the timer knob to the required time.
Once cooking is completed, please manually turn the timer knob to position “O”.
12
CLEANING
4. CLEANING
!
!
!
!
!
!
!
!
!
After use, set timer knob counter counterclockwise to “0” position.
Allow the appliance to cool completely before cleaning. Unplug cord from the socket.
Remove the plug from the power socket.
Cool the oven down to the room temperature.
Remove all accessories from inside the oven.
The wire rack, baking tray and diet grill may be washed as other kitchenware, either by hand or
by dishwasher.
You can always use a moist sponge to clean the outside surfaces. Avoid using abrasive
products that could damage the finish. Ensure water or soap does not penetrate the oven
inside through the vents of the oven.
Clean the oven surface and interior with a damp cloth or a sponge and take the tray, broil rack
out to wash.
Never use aluminum-corrosive products (spray detergents) to clean the inside aluminum walls
and never scrape the walls with sharp or pointed objects.
ENGLISH
Warning: ON NO ACCOUNT should water be allowed to get inside the oven.
13
SPECIFICATION
Technical specifications
Description:
Model:
Oven capacity:
Temperature range:
Timer:
Power consumption:
Power supply:
Mini baking oven with convection
and rotisserie grill
MGO3002
20 L
100 - 250 °C
max. 60 minutes
1300 Watt max.
AC 220-240V ~ 50Hz
SPECIFICATIONS SUBJECT TO CHANGE WITHOUT NOTICE
Disposal
Dispose of the packaging in the proper manner.
ENGLISH
If at any time in the future you should need to dispose of this
product please note that Waste electrical products should not be
disposed of with household waste. Please recycle where facilities
exist. Check with your Local Authority or retailer for recycling
advise.
(Waste Electrical and Electronic Equipment Directive)
If this product should be defective, despite our high standard quality control, please
contact the service & support hotline. The hotline is available Monday through Friday
from 10am to 6pm at this number:
0180 5 - 22 17 84
(€ 0,14 / Min. Germany only)
In case your product needs to be sent to our service centre, please use the
provided return sticker. If the return sticker is missing, please contact the
service & support hotline.
14
15
HOME ELECTRIC
MGO3002
VERSION FN/ER05-2008 REV A01
HE-MGO3002-D-E-A5.PDF
Hergestellt für:
JGC Company GmbH, Köln - Germany
(C) 2008