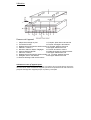
1
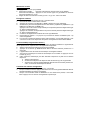
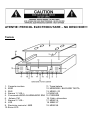
UR - 2010
Bedienungsanleitung
Instruction manual
Mode d´emploi
Das Öffnen i s t N U R F a c h p e r s o n a l
gestattet !
Sicherheits-/Umwelt-/Aufstell-/Montagehinweise
•
•
•
•
•
•
•
•
•
•
•
•
Gerät niemals mit Flüssigkeiten in Verbindung bringen oder in Feuchträumen (z.B. Bad)
betreiben. LEBENSGEFAHR !!
Gerät NICHT in der Nähe von Spühlbecken oder Herden in der Küche montieren.
Gerät bei Unterbaumontage sicher gegen herunterfallen montieren.
Kinder sollten das Gerät nur unter Aufsicht Erwachsener betreiben.
Keiner Verschmutzung, Sonnenbestrahlung oder anderen Hitzequellen aussetzen.
Möglichst weit entfernt von Mikrowellengeräten, TV oder PC Monitoren betreiben um
Empfangsstörungen (Radio & RDS-Signal) zu vermeiden.
Nur Alkaline Batterien als Gangreserve verwenden, die zu 100% frei von Cadmium und
Quecksilber sind.
Immer kompletten Batteriesatz wechseln. Nie ALT & NEU vermischen !
Verbrauchte Batterien sind Sonderabfall und gehören NICHT in den Hausmüll. Geben Sie
diese an geeigneten Sammelstellen oder bei Ihrem Händler ab.
Batterien NIEMALS ins Feuer werfen. EXPLOSIONSGEFAHR !!
Bei längerem Nichtgebrauch (z.B. Urlaub) oder Gewitter, Gerät vom Stromnetz nehmen.
Netzkabel nicht einklemmen. Bei Beschädigung dieses, Gerät umgehend in eine
authorisierte Fachwerkstatt bringen.
Bedienung
1. Montageplatte bzw. Standfuss
2. Funktionstaste
3. Zeiteinstellung / Sendersuche vorwärts
4. Alarm 1 / Lautstärke +
5. Timer / Alarm / Modus / Einstellungen
6. UKW-FM Wurfantenne
7. Alarm 2 / Lautstärke 8. Zeiteinstellung / Sendersuche rückw.
9. Autom. Senderspeicher
10. LCD-Multifunktionsanzeige
11. Batteriefach Gangreserve
12. Senderspeichertaste
13. Festsenderspeicher 5/10
14. Festsenderspeicher 4/9
15. Betriebstaste
16. Netzkabel mit Netzstecker
17. Festsenderspeicher 1/6
18. Festsenderspeicher 2/7
19. Festsenderspeicher 3/8
Einsatz als Standgerät
Nehmen Sie die Montageplatte (1) und führen zuerst die 2 Nasen an den beiden quatratischen
Löchern hinten auf der Unterseite des Gerätes ein und dann drücken Sie vorsichtig
die Vorderseite der Montageplatte in das Gerät bis diese einrasten.
Unterbaumontage des Gerätes
1. Suchen Sie eine geeignete und sichere (weit entfernt von Spühle & Herd) Anbaustelle.
2. Drücken Sie die 2 Befestigungsarretierungen auf der Rückseite des Gerätes nach unten
und schieben die Montageplatte (1) nach hinten um diese vom Gerät zu nehmen.
3. Beiliegende Bohrschablone an die gewünschte Montagestelle halten und markieren die 4
Befestigungslöcher mit einem Stift. Halten Sie ca. 3-3,5cm Abstand zu der vorderen Kante,
denn so schliesst das Radio dann bündig mit Ihrem Hängeschrank ab.
4. Je nach Stärke bzw. Beschaffenheit des Unterbauschrankes, sollten entweder passende
Löcher gebohrt werden (min. 1,5mm kleiner im Durchmesser als Schrauben) oder mit
einem Dorn Ansetzpunkte für die Schrauben geschaffen werden.
5. Falls Sie eine Blende am Unterbauschrank haben, können Sie die beiliegenden
Distanzhalter verwenden.
6. Befestigen Sie nun die Montageplatte (mit/ohne Distanzhalter) mit Schrauben am
Hängeschrank.
7. Jetzt das Gerät schräg mit den beiden vorderen auf der Oberseite befindlichen
Aussparungen in die Haltenasen der Montageplatte setzten und das Gerät auf der hinteren
Seite nach oben drücken, bis dieses einrastet. KEINE GEWALT anwenden.
8. Die Wurfantenne (6) MUSS für einen guten Empfang voll ausgezogen werden und kann mit
einem Klebeband an der Schrankunterseite befestigt werden.
Haftungsausschluss für Montage
Wir weisen ausdrücklich darauf hin, das die beiliegenden Schrauben nicht für alle auf dem
Markt befindlichen Unterbauschrankmaterialien/-stärken geeignet sind und schliessen somit
jegliche Haftungsansprüche uns gegenüber bei Beschädigung des Unterbauschrankes aus.
Sollten Sie andere Schrauben für die Montage benötigen, sind diese im einschlägigen
Fachhandel erhältlich.
Inbetriebnahme
1. Stellen Sie sicher, das Ihr Stromnetz 230V 50Hz hat, dann Netzstecker anschliessen
2. Falls der Strom mal ausfällt, sollten Sie 2 Stück Batterien (nicht inkl.) 1,5V UM-4/AAA
polrichtig in das Batteriefach (11) einlegen. Bei Stromausfall leuchtet die Anzeige nicht auf
und das Radio funktioniert nicht. Die Gangreserve-Batterie unterstützt nur den internen
Weiterlauf der Uhr und die Speicherung Ihres Alarms. Wenn das Stromnetz wieder
verfügbar ist, leuchtet die korrekte Uhrzeit wieder auf und das Gerät ist wieder voll
funktionsfähig. Diese Batterien sollten ca. alle 12 Monate gewechselt werden.
Einstellen der Uhrzeit
1.
2.
Taste (2) MODE 1x drücken
Mit Tasten (3) UP & (8) DOWN Zeit einstellen
Kurzes drücken:
Zeit springt im Minutenrythmus
Drücken & halten: Zeit springt im 10-Minuten Rythmus
Einstellen von Datum
1.
2.
Taste (2) MODE 2x drücken
Mit Tasten (3) UP & (8) DOWN Datum einstellen
Kurzes drücken:
Datum springt im Tagesrythmus
Drücken & halten
Datum springt im 10-Tages Rhythmus
Bitte beachten Sie bei Zeit & Datumeinstellung, wenn Sie binnen ca. 10 Sekunden keine
Tasten drücken, das Gerät in den normalen Zeitmodus zurückgeht.
Einstellen der Terminerinnerungsfunktion
Mit dieser Funktion können Sie bis zu 5 Termine (z.B. Geburtstage) speichern und das Gerät
erinnert Sie dann am jeweiligen Tag morgens um Uhr 8.00.
1. Taste (2) MODE 3x drücken (SDA1 & Datum blinkt abwechselnd)
2. Mit Tasten (3) UP & (8) DOWN Erinnerunstermin einstellen. (siehe Einstellung Datum)
3. Mit Taste (5) TIMER kann die Jahreszahl deaktiviert werden und Sie werden dann jedes
Jahr am gleichen Tag erinnert.
4. Termin ist jetzt gespeichert automatisch auf Taste (17) MEM 1/6
5. Für weitere Termineinstellungen, Tasten (18) MEM 2/7 bis (13) MEM 5/10 drücken und
Datum wie zuvor beschrieben einstellen.
Zum eingestellten Termin ertönt um Uhr 8.00 morgens 10 Minuten lang ein Alarmton & SDA
blinkt in der Anzeige. Zu jeder vollen Stunde bis Uhr 23.00 wiederholt sich der Alarmton.
Um den Erinnerungsalarm zu stoppen, drücken Sie eine beliebige Taste.
RDS Funktion (automatische Aktualisierung Zeit/Datum)
Über das RDS-Signal werden div. Funktionen wie z.B. Sendername, Uhrzeit, Titel etc. ( wenn
vom Sender unterstützt !) an das Radio übermittelt und wenn die Update-Funktion am Gerät
aktiviert ist, wird im Radiobetrieb & Empfang eines RDS-Senders immer die Uhrzeit und das
Datum aktualisiert, was ca. alle 1-2 Minuten geschieht.
1. Im Uhrzeitmodus die Taste (2) MODE 4x drücken. Anzeige „UPDATE“
2. Taste (3) UP drücken. Über dem Wort UPDATE blinkt nun das Uhrensymbol und die
Uhrzeit/Datum wird nun automatisch beim Empfang eines RDS-Signales aktualisiert.
3. Um die autom. Aktualisierungfunktion zu deaktivieren, drücken Sie die Taste (8) DOWN
und das Uhrsymbol erlischt.
Küchentimer
1.
2.
3.
4.
5.
6.
7.
Taste (5) TIMER drücken und mit Tasten (3)UP bzw. (8) DOWN Zeit einstellen. Möglich
einstellbarer Zeitraum 00:01 – 23:39
Taste (5) TIMER erneut drücken, um den Timer zu starten.
Ein Timer-Symbol (Kochtopf) erscheint sowie eine rückwärts laufende Analoguhr.
30 Sekunden vor Ablauf der Zeit ertönt ca. alle 5 Sekunden ein Signal, das in immer
kürzeren Intervallen ertönt und bei Ablauf der Zeit fortlaufend ist.
Um Signalton zu beenden, Taste (5) TIMER drücken.
Der Timer kann auch zwischendurch kurz unterbrochen werden, indem Sie kurz die Taste
(5) TIMER drücken und die Zeit wird angehalten. Nochmaliges Drücken der Taste (5)
startet den Timer wieder an der zuvor gestoppten Zeit.
Um den Timer ganz zu deaktivieren, drücken & halten Sie die Taste (5) TIMER, bis die
Anzeige in den normalen Uhrmodus zurückgeht.
Küchentimer programmieren
Mit den Tasten (17) MEM 1/6 bis (13) MEM 5/10 können verschiedene Zeiten programmiert
werden (bis zu 5 Timerzeiten)
1. Taste (5) TIMER drücken.
2. Mit Tasten (3) UP / (8) DOWN Zeit einstellen.
3. Taste (12) MEM.SET drücken. „T“ blinkt in der Anzeige
4. Taste für den gewünschten Speicherplatz drücken MEM 1/6) – MEM 5/10 und in der
Anzeige erscheint die Speicherplatznummer.
5. Taste (12) MEM.SET erneut drücken, um zu speichern.
6. Um die jeweilige Timerzeit abzurufen, drücken Sie im Uhrmodus die Taste (5) TIMER und
die Taste des entsprechenden Speicherplatzes (MEM 1/6 – MEM 5/10).
7. Um Timer zu starten, Taste (5) TIMER erneut drücken.
8. Um Timer zu stoppen, Taste (5) TIMER drücken & halten, bis normale Uhr erscheint.
Weckfunktion Alarm 1 / Alarm 2
Es können 2 unterschiedliche Weckzeiten programmiert werden
Weckfunktion
Mit Radio
Symbol in der Anzeige
Mit Signalton
Ausgestellt
1.
2.
3.
4.
5.
6.
kein Symbol
Taste (4) AL1 oder (7) AL2 drücken und in der Anzeige erscheint die zuletzt eingestellte
Weckzeit und das Symbol für den Alarmtyp für Alarm 1 oder Alarm 2.
Mit den Tasten (3) UP & (8) DOWN gewünschte Weckzeit einstellen.
Tasten (4) AL1 oder (7) AL2 drücken, bis gewünschte Weckart (Smybol in Anzeige)
angezeigt wird.
Mit Taste (5) ALARM MODE die Wochentage einstellen, an denen der Alarm aktiviert sein
soll.
Werktags (Mo-Fr.) / Wochenende (Sa-So)
Taste (5) so oft drücken, bis gewünschte Tage eingestellt sind.
Ein bestimmter Wochentag
Taste (5) drücken & halten bis gewünschter Wochentag eingestellt ist.
Taste (2) MODE drücken für Speicherung und um in den Uhrmodus zurück zu gelangen.
Bei Wecken mit Radio, läuft das Radio ca. 1 Stunde. Für Beendigung, Taste (4) AL1 oder
Taste (7)AL2 drücken
Bei Wecken mit Alarmton, ertönt dieser für ca. 10 Minuten. Vorzeitige Beendigung mit
Tasten (4) AL1 oder (7) AL2.
Radiobetrieb
Sender einstellen
1. Taste (15) POWER drücken
2. Manuelle Suche:
Tasten (3)UP oder (8) DOWN kurz drücken
Automatische Suche:
„
„
„
„
drücken & ca. 2 Sek. halten
3. Lautstärke mit Tasten (4) VOL+ bzw. (7) VOL- nach Wunsch einstellen
Sender speichern
Es können max. 10 Festsender gespeichert werden.
1. Sender suchen wie zuvor beschrieben.
2. Taste (12) MEM.SET drücken. Anzeige „MEM“ blinkt.
3. Speicherplatz wählen (17)MEM1/6 (18)MEM 2/7 (19) MEM 3/8 (14) MEM 4/9 (13) MEM
5/10
Jeweilige Taste 1x drücken für ersten Speicherplatz (z.B. Speicherplatz 4)
Jeweilige Taste 2x drücken für zweiten Speicherplatz (z.B. Speicherplatz 9)
4. Mit Taste (12) MEM.SET Speicherung bestätigen
5. Schritte 1-4 wiederholen bis alle gewünschten Sender (max. 10) gespeichert sind.
6. Um im Radiobetrieb die Sender abzurufen, jeweils die Speicherplatztaste 1x bzw. 2x
drücken.
AMS Funktion (autom. Speicherung)
Mit dieser Funktion werden Sender mit RDS Signal automatisch gesucht und auf die
Speicherplätze verteilt.
1. Gerät mit Taste (15) POWER einschalten
2. Taste (9) MEM-REVIEW AMS drücken und ca. 2 Sekunden halten.
3. Das Gerät startet den Suchlauf und speichert Sender ab.
4. Der Suchlauf kann durch Drücken der Tasten (4) oder (7) gestoppt werden.
5. Der Suchlauf kann auch nur ab einer bestimmten Frequenz erfolgen.
a. Gerät einschalten.
b. Mit Taste (3) UP oder (8) DOWN Startfrequenz anwählen.
c. Taste (9) MEM-REVIEW AMS drücken & ca. 2 Sek. halten, Suchlauf startet.
Abruf der gespeicherten Sender
Jeder gespeicherter Sender wird für ca. 5 Sekunden angespielt.
1. Im Radiobetrieb, Taste (9) MEM-REVIEW AMS kurz drücken und Gerät startet.
2. Wenn Sie an einem Sender stoppen möchten, drücken Sie irgendeine Speichertaste.
Sperrfunktion für Tasten
Sie können die Tasten sprerren, so das z.B. Kinder keine Änderungen vornehmen können.
1. Taste (12) MEM.SET drücken, bis ein Schlüsselsymbol in der Anzeige erscheint.
2. Um Sperre zu entfernen wiederum Taste (12) drücken, bis Schlüsselsymbol erlischt.
Dimmer (de-)aktivieren
Wenn Sie den Dimmer aktivieren, wird die Display-Helligkeit sich im Standby-Modus
verdunkeln.
Gehen Sie hierbei wie folgt vor: (Gerät muss sich im Standby-Modus befinden)
1. Drücken Sie Taste (2) MODE 1x. Æ Uhrzeit blinkt
2. Taste (2) MODE so oft drücken bis „DIM OFF“ in der Anzeige erscheint
3. Mit Tasten (3) UP oder (8) DOWN Dimmer aktivieren (ON) oder deaktivieren (OFF)
4. Eingabe mit Taste (2) MODE bestätigen
Hinweis:
Sie müssen innerhalb 10 Sekunden eine Taste drücken, ansonsten wechselt das Gerät
automatisch in den Standby-Modus und der Vorgang muss wiederholt werden.
Technische Daten
UKW – FM Frequenz
Netzbetrieb
Gangreserve Batterie (Uhr)
Musikleistung:
Leistungsaufnahme
Betriebstemperatur
87,5 – 108MHz
AC 230V 50Hz
3V (2 x 1,5V UM-4/AAA)
1W RMS
5 Watt
5°C – 40°C
Technische Änderungen und Druckfehler vorbehalten
Copyrights by Wörlein GmbH, 90556 Cadolzburg, Germany.
Vervielfälltigung oder Kopie dieser Anleitung nur mit ausdrücklicher Genehmigung durch Wörlein GmbH
SEUL le personnel c o m p é t e n t est a u t o r i s é à ouvrir le
boîtier !
Indications concernant la sécurité /la protection de l’environnement /le
positionnement /le montage
•
•
•
•
•
•
•
•
•
•
•
•
Evitez tout contact de cet appareil avec des liquides et ne l’utilisez jamais dans des pièces
humides (telles qu’une salle de bain par ex.). DANGER DE MORT !!
N’INSTALLEZ PAS cet appareil à proximité d’un évier ou d’une cuisinière dans votre
cuisine.
Si vous installez cet appareil en sous-plan, veillez à ce qu’il ne puisse pas tomber.
Les enfants devront utiliser cet appareil uniquement sous la surveillance d’adultes.
Placez cet appareil dans un endroit à l’abri de la saleté, des rayons du soleil ou de toute
autre source de chaleur.
Utilisez votre appareil si possible loin d’appareils à micro-ondes, de télévisions ou
d’ordinateurs, afin d’éviter des troubles de réception (radio & signal RDS).
Utilisez uniquement des piles alcalines en réserve de marche, qui doivent être exemptes à
100% de cadmium et de mercure.
Changez toujours toutes les piles en même temps. Ne mélangez jamais des piles
ANCIENNES & des piles NEUVES !
Les piles usagées constituent un déchet particulier et NE doivent PAS être jetées avec vos
ordures ménagères habituelles. Veuillez les déposer dans un centre de récupération
adapté ou les remettre à votre commerçant compétent.
Ne jetez JAMAIS les piles dans le feu. RISQUE D’EXPLOSION !!
En cas d’une longue non-utilisation de l’appareil (par ex. pendant vos vacances) ou en cas
d’orage, débranchez l’appareil du secteur.
Ne coincez pas le câble de réseau. En cas de détérioration de ce dernier, veuillez apporter
immédiatement l’appareil dans un magasin spécialisé et compétent en la matière.
Utilisation
Dessous de l’appareil
1. Plaque de montage ou pied
11. Compart. piles réserve de marche
2. Touche de fonction
12. Touche d’enregistr. des stations
3. Réglage heure /Recherche stations avant 13. Enregist. stations fixes 5/10
4. Alarme 1 / Volume +
14. Enregist. stations fixes 4/9
5. Minuteur / Alarme / Mode / Réglages
15. Touche de mise en marche
6. Antenne flexible OM-FM
16. Câble de réseau et prise au secteur
7. Alarme 2 / Volume 17. Enregist. stations fixes 1/6
8. Réglage heure /Recherche stations arrière 18. Enregist. stations fixes 2/7
9. Enregistr. autom. des stations
19. Enregist. stations fixes 3/8
10. Ecran d’affichage LCD multi-fonctions
Utilisation en tant qu’appareil posé
Prenez la plaque de montage (1) et introduisez, tout d’abord, les 2 crochets dans les deux trous
de forme carrée, situés à l’arrière de l’appareil, puis enfoncez prudemment le côté avant de la
plaque de montage dans l’appareil jusqu’à ce qu’elle s’y encliquète.
Montage sous-plan de l’appareil
9. Cherchez tout d’abord un endroit adapté à ce type de montage, qui soit sûr (éloigné de
l’évier et de la cuisinière).
10. Enfoncez les 2 dispositifs d’arrêt situés sur le dos de l’appareil vers le bas et faîtes glisser la
plaque de montage (1) vers l’arrière afin de la retirer de l’appareil.
11. Placez le gabarit de perçage, que vous trouverez ci-joint, à l’emplacement de montage
désiré et marquez les 4 trous de fixation à l’aide d’un crayon. Respectez une marge d’env.
3-3,5cm de distance avec l’arête avant, ainsi votre radio se situera exactement au bord de
votre placard suspendu.
12. Selon l’épaisseur voire la qualité du placard suspendu, il est nécessaire soit de percer des
trous adaptés (diamètres d’au min. 1,5mm plus petits que les vis), soit d’ajuster les points
de fixation des vis à l’aide d’un mandrin.
13. Dans le cas où votre placard suspendu serait équipé d’un écran, vous pouvez alors utiliser
les pièces intercalaires jointes.
14. Vous pouvez désormais fixer la plaque de montage (avec / sans pièce intercalaire) à l’aide
des vis sur votre placard suspendu.
15. Maintenant, placez votre appareil en biais, avec les deux encoches situées sur l’avant de
l’appareil dans les crochets de fixation de la plaque de montage et enfoncez l’appareil sur
le côté arrière vers le haut jusqu’à ce qu’il s’encliquète. Surtout NE PAS utiliser la FORCE.
16. Pour obtenir une bonne réception, l’antenne flexible (6) DOIT être sortie entièrement et
peut être fixée sur le dessous du placard à l’aide d’un ruban adhésif.
Exclusion de la responsabilité pour le montage
Nous attirons particulièrement votre attention sur le fait que les vis jointes ne sont pas adaptées
à tous les types de matériaux ou d’épaisseurs de placards suspendus existants sur le marché
et nous excluons ainsi toute revendication concernant une responsabilité de notre part en cas
d’endommagement du placard suspendu.
Dans le cas où vous auriez besoin d’autres vis pour effectuer le montage, veuillez vous les
procurer chez un commerçant spécialisé.
Mise en marche
3. Vérifiez tout d’abord que le courant électrique de votre secteur est bien de 230V 50Hz, puis
branchez la prise.
4. Au cas où il y aurait une panne de courant, nous vous conseillons de mettre 2 piles (non
incluses dans la livraison) de 1,5V UM-4/AAA dans le compartiment de piles (11), en
respectant bien le sens des bornes polaires (11). En cas de panne de courant, l’écran
d’affichage ne s’allumera pas et la radio ne fonctionnera pas. La pile de réserve de marche
servira uniquement à ce que l’heure réglée continue à marcher et à conserver
l’enregistrement de l’alarme. Lorsque le courant électrique est rétabli, l’heure réglée
correctement se rallume et l’appareil pourra fonctionner de nouveau. Il est recommandé de
changer ces piles env. tous les 12 mois.
Réglage de l’heure
3.
4.
Appuyez une fois sur la touche (2) MODE
Réglez l’heure à l’aide des touches (3) UP & (8) DOWN
Vous appuyez brièvement :
Heure défile minute par minute
Vous tenez la touche enfoncée :
Heure défile par tranche de 10 minutes
Réglage de la date
3.
4.
Appuyez 2 fois sur la touche (2) MODE
Réglez la date à l’aide des touches (3) UP & (8) DOWN
Vous appuyez brièvement :
La date défile jour par jour
Vous tenez la touche enfoncée :
La date défile par tranche de 10 jours
Attention, lorsque vous réglez l’heure et la date, si vous n’appuyez sur aucune touche pendant
un espace d’env. 10 secondes, l’appareil revient en mode horaire normal.
Réglage de la fonction de rappel de dates
A l’aide de cette fonction, vous avez la possibilité d’enregistrer jusqu’à 5 dates différentes (par
ex. anniversaires) et votre appareil vous rappellera la date enregistrée le matin de cette date à
8.00 heures.
6. Appuyez 3 fois sur la touche (2) MODE (SDA1 & Date clignote en alternance)
7. Réglez la date à enregistrer à l’aide des touches (3) UP & (8) DOWN. (voire également
Réglage de la date)
8. Vous pouvez désactiver le chiffre de l’année à l’aide de la touche (5) TIMER et ainsi,
l’appareil vous rappellera cette date chaque année.
9. La date est désormais enregistrée automatiquement sur la touche (17) MEM 1/6.
10. Pour enregistrer d’autres dates, appuyez sur les touches (18) MEM 2/7 jusqu’à (13) MEM
5/10 et réglez la date en question comme décrit ci-dessus.
Le jour de la date enregistrée, un signal d’alarme se déclenchera le matin à 8.00 heures,
sonnera pendant 10 minutes et le symbole SDA clignotera sur l’écran d’affichage. Ce signal
d’alarme se répètera à chaque heure jusqu’à 23.00 heures.
Afin d’arrêter l’alarme de rappel, il vous suffira d’appuyer sur une touche quelconque.
Fonction RDS (actualisation automatique heure /date)
Le signal RDS permet de transmettre à votre radio diverses fonctions, telles que, par ex., le
nom de la station, l’heure, le titre écouté, etc. ( lorsque ces fonctions sont prévues par la
station !) et lorsque la fonction d’actualisation est activée sur votre appareil, l’heure et la date
seront toujours actualisées lorsque vous écoutez la radio et que vous recevez une station RDS,
ce qui se produit env. toutes les 1-2 minutes.
4. Appuyez 4 fois sur la touche (2) MODE en mode horaire. Affichage «UPDATE».
5. Appuyez sur la touche (3) UP. Au-dessus du mot UPDATE, vous voyez désormais le
symbole heure qui clignote et l’heure / la date vont désormais être actualisées
automatiquement, dès que vous recevrez un signal RDS.
6. Pour désactiver la fonction d’actualisation automatique, appuyez alors sur la touche (8)
DOWN et le symbole heure va disparaître.
Minuteur (Timer) de cuisine
8.
9.
10.
11.
12.
13.
14.
Appuyez sur la touche (5) TIMER et réglez le temps voulu à l’aide des touches (3) UP ou (8)
DOWN. Intervalle de temps possible de 00:01 – 23:39
Appuyez de nouveau sur la touche (5) TIMER afin de lancer le minuteur.
Le symbole du minuteur (marmite) apparaît alors, ainsi qu’une pendule analogique défilant
à rebours.
30 secondes avant la fin du temps programmé se déclenche un signal sonore env. toutes
les 5 secondes ; ce signal retentira à intervalles de plus en plus courts et lorsque le temps
sera écoulé, il sonnera sans interruption.
Pour arrêter le signal sonore, appuyez sur la touche (5) TIMER.
Le minuteur peut également être interrompu brièvement entre-temps; pour cela, appuyez
brièvement sur la touche (5) TIMER et le compte à rebours sera interrompu. En appuyant
de nouveau sur la touche (5), vous relancez alors le minuteur qui reprend le compte à
rebours interrompu auparavant.
Si vous souhaitez désactiver complètement le minuteur, il vous suffit d’appuyer sur la
touche (5) TIMER et de la tenir enfoncée jusqu’à ce que l’écran d’affichage revienne en
mode horaire normal.
Programmer minuteur de cuisine
Vous avez la possibilité de programmer différents temps à l’aide des touches (17) MEM 1/6
jusqu’à (13) MEM 5/10 (jusqu’à 5 temps de minuteur différents)
9. Appuyez sur la touche (5) TIMER.
10. Réglez le temps voulu à l’aide des touches (3) UP / (8) DOWN.
11. Appuyez sur la touche (12) MEM.SET. «T» clignote sur l’écran d’affichage.
12. Appuyez sur la touche MEM 1/6) – MEM 5/10 pour enregistrer la place correspondante et
le numéro de la place d’enregistrement s’affiche sur l’écran.
13. Appuyez de nouveau sur la touche (12) MEM.SET pour effectuer l’enregistrement.
14. Pour pouvoir consulter le temps de minuteur souhaité, appuyez, une fois dans le mode
horaire normal, sur la touche (5) TIMER et sur la touche de l’emplacement de
l’enregistrement désiré (MEM 1/6 – MEM 5/10).
15. Pour lancer le minuteur, appuyez de nouveau sur la touche (5) TIMER.
16. Pour arrêter le minuteur, appuyez de nouveau sur la touche (5) TIMER et maintenez-la
enfoncée jusqu’à ce que l’heure normale apparaisse de nouveau.
Fonction réveil Alarme 1 / Alarme 2
Vous avez la possibilité de programmer 2 heures différentes de réveil.
Fonction réveil
Avec radio
Symbole sur écran d’affichage
Avec signal sonore
Eteinte
7.
pas de symbole affiché
Enfoncez la touche (4) AL1 ou (7) AL2; sur l’écran d’affichage s’inscrit la dernière heure de
réveil réglée, ainsi que le symbole caractérisant le type d’alarme Alarme 1 ou Alarme 2.
8. Réglez l’heure de réveil désirée à l’aide des touches (3) UP & (8) DOWN.
9. Enfoncez les touches (4) AL1 ou (7) AL2, jusqu’à ce que le mode de réveil souhaité
(symbole s’affiche sur l’écran) soit affiché.
10. A l’aide de la touche (5) ALARM MODE, vous pouvez alors régler les jours de la semaine
où l’alarme devra être activée.
Jours ouvrables (Lu-Ve.) / Week-end (Sa-Di.)
Appuyez autant de fois sur la touche (5) jusqu’à ce que les jours souhaités soient affichés.
Un jour de semaine bien particulier
Appuyez sur la touche (5) et la tenir enfoncée jusqu’à ce que le jour souhaité s’affiche.
11. Appuyez sur la touche (2) MODE pour effectuer l’enregistrement et pour retourner dans le
mode horaire.
12. Lorsque le réveil s’effectue en mode Radio, la radio fonctionnera pendant env. 1 heure.
Pour l’arrêter, appuyez sur la touche (4) AL1 ou sur la touche (7)AL2
Lorsque le réveil s’effectue par le signal sonore, ce dernier fonctionnera alors pendant env.
10 minutes. Vous pouvez l’arrêter à tout moment en appuyant sur les touches (4) AL1 ou (7)
AL2.
Marche de la radio
Régler la station
4. Appuyer sur la touche (15) POWER.
5. Recherche manuelle :
Enfoncez brièvement les touches (3)UP ou (8) DOWN
Recherche automatique : Appuyez sur les touches (3)UP ou (8) DOWN et tenez-les
enfoncées pendant env. 2 sec.
6. Réglez le volume à l’aide des touches (4) VOL+ ou (7) VOL- selon votre désir.
Enregistrer stations
Vous avez la possibilité d’enregistrer au max. 10 stations fixes.
7. Cherchez la station comme décrit ci-dessus.
8. Appuyez sur la touche (12) MEM.SET. «MEM» clignote sur écran d’affichage.
9. Choisissez la place de l’enregistrement de cette station (17)MEM1/6 (18)MEM 2/7 (19)
MEM 3/8 (14) MEM 4/9 (13) MEM 5/10.
Appuyez 1 fois sur la touche correspondante pour la première place d’enregistrement (par
ex. place d’enregistrement 4)
Appuyez sur la touche correspondante 2 fois pour la seconde place d’enregistrement (par
ex. place d’enregistrement 9)
10. Confirmez l’enregistrement à l’aide de la touche (12) MEM.SET.
11. Renouvelez les étapes 1 à 4 jusqu’à ce que toutes les stations souhaitées (max. 10)
soient enregistrées.
12. Pour pouvoir consulter les stations lorsque radio fonctionne, il vous suffit d’appuyer 1 fois
voire 2 fois sur la touche respective de la place d’enregistrement de la station désirée.
Fonction AMS (enregistrement autom.)
Cette fonction permet de rechercher automatiquement les stations émettant un signal RDS et
de les répartir sur les emplacements d’enregistrement disponibles.
6. Allumez votre appareil à l’aide de la touche (15) POWER.
7. Appuyez sur la touche (9) MEM-REVIEW AMS et tenez-la enfoncée pendant env. 2
secondes.
8. L’appareil lance alors la recherche automatique et enregistre la station.
9. Vous pouvez interrompre la recherche automatique à tout instant en appuyant sur les
touches (4) ou (7).
10. Cette recherche automatique peut être effectuée uniquement à partir d’une certaine
fréquence.
a. Allumez votre appareil.
b. Choisissez la fréquence de départ à l’aide des touches (3) UP ou (8) DOWN.
c. Appuyez sur la touche (9) MEM-REVIEW AMS et tenez-la enfoncée pendant env.
2 sec., la recherche automatique est lancée.
Consulter les stations enregistrées
Chaque station enregistrée passera pendant env. 5 secondes.
3. Lorsque la radio fonctionne, appuyez brièvement sur la touche (9) MEM-REVIEW AMS et
l’appareil fait défiler les stations enregistrées.
4. Lorsque vous souhaitez arrêter le défilement sur une station bien précise, il vous suffit
alors d’appuyer sur une touche d’enregistrement quelconque.
Fonction de blocage des touches
Vous avez la possibilité de bloquer les touches de sorte que les enfants par exemple ne
puissent pas modifier les réglages déjà effectués.
3. Appuyez sur la touche (12) MEM.SET jusqu’à ce qu’une clé apparaisse sur l’écran
d’affichage.
4. Pour supprimer le blocage, il vous suffit d’appuyer de nouveau sur la touche (12) jusqu’à
ce que la clé disparaisse.
Données techniques
Fréquence OM – FM
Alimentation secteur
Pile réserve de marche (heure)
Puissance efficace musicale
Puissance absorbée
Température de service
87,5 – 108MHz
AC 230V 50Hz
3V (2 x 1,5V UM-4/AAA)
1W RMS
5 Watt
5°C – 40°C
Sous réserves de modifications techniques et d’erreurs d’impression
Copyrights auprès de Wörlein GmbH (SARL), 90556 Cadolzburg, Allemagne.
Reproduction ou photocopie de ce mode d’emploi uniquement avec autorisation explicite de la société Wörlein
GmbH (SARL).
WARNING: SHOCK HAZARD – DO NOT OPEN!!!
Key List
1. Mounting bracket
2. MODE
3. UP
4. Alarm 1 / VOL +
5. TIMER/ALARM MODE/SDA MODE
6. FM antenna
7. Alarm 2 / VOL 8. DOWN
9. MEMORY Review / AMS
10. LCD display
11. Battery Hatch
12. MEMORY / KEY LOCK
13. MEM 5 /10
14. MEM 4/9
15. POWER
16. Power Cord
17. MEM 1/6
18. MEM 2/7
19. MEM 3/8
How to used
•
•
•
•
As the unit is powered up, the date and clock are defaulted to Monday, 1st Jan
2007, 0:00 or 12:00AM.
The two alarms are defaulted to 0:00 or 12:00AM, daily type but disabled.
The radio is switched off.
It then switches to auto-run mode.
Auto-run Mode (Radio OFF)
•
•
•
•
•
•
•
•
•
•
Press <MODE> once to go to different mode sequentially.
Auto-run Mode
Set the Clock
Set the Date
(with Clock display)
Dimmer ON/OFF
Automatic update ON/OFF
Set the SDA
In radio mode, If RDS information is transmitted by the station, the station name
appears in place of the frequency; the frequency is displayed when there is no
RDS information had been received.
Press <Alarm-1> to review/set the alarm-1.
Press <Alarm-2> to review/set the alarm-2.
Only when the radio is ON, press <M1/M6>, <M2/M7>, <M3/M8> and <M4/M9>,
<M5/10> to recall the preset memories.
Only when the radio is ON, press <MEM>,<M1-M10>and then <MEM> again to
store the current station into memory.
Only when the radio is ON, press <Vol. +> and <Vol. -> to adjust speaker
volume.
When the radio is ON, press <M / SCAN> to preview those preset memory.
Press and hold for 2 seconds to activated the AMS (Automatic Memory Storage).
At every minute boundary, the real time clock is compared with the alarm setting
if it has been enabled. For details, please refer to the section of ‘When alarm is
active’.
Set the clock (manually)
•
•
•
•
•
•
•
•
•
Press <MODE> once when the unit stays in clock display mode.
The clock goes flashing the LCD with day-flag cleared.
The second keeps counting up once per second.
Press <UP> to advance the clock by 1 minute.
Press <DOWN> to move the clock back by 1 minute
Press and hold <UP> or <DOWN> to set the clock in fast mode of 10 minutes per
step.
Press <MODE> once to set the date.
Press other key to start its corresponding function.
When no key has been pressed for 10 seconds, the current setting is confirmed
and it switches to auto-run mode.
Set the date
•
•
•
Press <MODE> once in clock setting mode.
The current date goes flashing in the format of dd.mm.yyyy in the LCD.
Press <UP> or <DOWN> to change the current setting by 1 day per step. Press
and hold <UP> or <DOWN> to change the setting in fast mode of 10 days per
step. The day flag will be updated automatically when the date has become
•
•
•
steady.
Press <MODE> once to confirm the current setting and it switches to set the
SDA.
Press other key to start its corresponding function.
When no key has been pressed for 10 seconds, the current setting is confirmed
and it switches to auto-run mode automatically.
Set the SDA
•
•
•
•
•
•
•
•
Press <MODE> once in date setting mode.
The date & ‘SDA’ goes flashing alternative.
Press <UP> or <DOWN> to set the Special Date.
Press < SDA MODE > to ignore the year.
Press <MODE> once to confirm the current setting and go to set the automatic
update ON/OFF.
Press <M1-M5> to select the number of SDA
Press other key to start its corresponding function.
When no key has been pressed for 10 seconds, the current setting is confirmed
and it switches to auto-run mode automatically.
In case of ignore the year the SDA will be active ever year at same date
Switching automatic update ON/OFF
•
•
•
•
•
•
•
Press <MODE> once in SDA setting mode.
The display show ‘UPDATE’ press <UP> or <DOWN> to switch update ON or
OFF.
The indicator “
” disappears, the update function is switch OFF.
” flashes. The time will be updated the next RDS time signal is
The indicator “
received.
Press <MODE> once to confirm the current setting and go to set the dimmer
ON/OFF.
Press other key to start its corresponding function.
When no key has been pressed for 10 seconds, the current setting is confirmed
and it switches to auto-run mode automatically.
Switching dimmer ON/OFF
•
•
•
•
•
•
•
•
Press <MODE> once in the automatic update setting mode.
The display show ‘DIM ON’ or ‘DIM OFF’.
Press <UP> or <DOWN> to switch dimmer ON or OFF.
Display show ‘DIM ON’ the display is illuminated for 10 seconds, when any key
had been pressed.
Display show ‘DIM OFF’ the display is illuminated for all time.
Press <MODE> once to confirm the current setting and it switches to auto-run
mode.
Press other key to start its corresponding function.
When no key has been pressed for 10 seconds, the current setting is confirmed
and it switches to auto-run mode automatically.
The Cooking Timer (Radio Off)
•
•
Press <TIMER> to enter the timer mode.
Press <M1> once, display shows ‘00:00 T1’ goes solid or the previous value of
the memory-1 goes solid in the LCD.
•
•
•
•
•
•
•
Similar to <M1>, press <M2>, <M3>, <M4> or <M5> to select the desired preset
memory value.
Press <UP> or <DOWN> to adjust the value (from 1 minute to 23hours and
59minute), press <TIMER> to start the cooking timer and the current value will
store in to memory automatically.
Press < TIMER > again to pause the timer. To restart the timer press <TIMER>
again.
Press and hold <TIMER> for 2 seconds to terminate the timer and leave, when
the timer is running.
When the clock before 30 second reach to 00.00, the voice
“be…be…be…be…be” will be heard until 00.00
When the clock reach to 00:00, the voice “be------” will be heard for 1 hour until
user terminate.
Press the < TIMER > to terminate the timer and leave.
As the alarm becomes active, the cooking timer, if exists, is terminated immediately.
ALARM1 and ALARM2 setting
•
•
•
•
•
•
•
•
•
•
Press <ALARM1> or <ALARM2> once, ‘ALARM1’ or ‘ALARM2’ goes solid in the
alphanumeric section.
The current setting of HH:MM and the type of alarm goes flashing by the
corresponding day-flags.
Press <UP> to advance the setting by 1 minute.
Press <DOWN> to move the setting back by 1 minute.
Press and hold <UP> or <DOWN> to change the setting in fast mode of 10
minutes per step.
Press <ALARM MODE> to change the type of alarm between daily, weekday,
weekend and daily independently, which are reflected by the 7 day-flags.
Press and hold <ALARM MODE> to enter daily independently mode. Press
<ALARM MODE> again to select the day and it will reflect by the day-flags.
Press and hold <ALARM MODE> to leave the daily independently mode and
return select daily, weekday and weekend.
Press same alarm key, which is <ALARM1> or <ALARM2>, once to select the
output format of the alarm
Output format
LCD display
Beep sound
‘Bell’ symbol goes solid
Radio output
‘Radio’ symbol goes solid
Disable
All the ‘Bell’ and ‘Radio’ are cleared
Press other key to start its corresponding function.
When no key has been pressed for 10 seconds, the system goes back to
auto-run mode.
When SDA is active
•
•
•
•
When the date/month/(year) matches with the SDA which has been enable, alert
becomes active at 8:00AM.
As the SDA active, Sound of beep toggles at the Speaker for 10 minutes, Muted
Radio even radio ON & The “SDA” goes flash on LCD display.
The 10 minutes beep music per every hour until 23:00.
Press any key to start its corresponding function and the SDA at the day will be
terminate.
When alarm is active
•
•
•
•
•
When the real time clock matches with the alarm which has been enabled, alarm
becomes active.
As the alarm becomes active, the Cooking timer, if exists, is terminated
immediately.
If Beep sound alarm is selected,
1)
Sound of beep toggles at the Speaker
2)
Muted Radio even radio ON
3)
The duration of alarm is 10 minutes
If Radio alarm is selected,
1)
RADIO ON
2)
the duration of the alarm is 60 minutes
To terminate the currently active alarm, press the corresponding key <ALARM1>
or <ALARM2>.
Radio reception
•
•
Press <POWER> once, the station frequency or the station name show on LCD.
”
If RDS information is transmitted by the station current set, “
appears in the display and after short time the station name appears in place of
the frequency.
Recall radio preset memory
•
•
•
•
•
There are 10 preset memory stations for the radio.
When the radio is ON, press <M1/M6> once. ‘MEM’ goes solid; the frequency of
the memory-1 goes solid in the LCD. Press again <M1/M6> to select the preset
memory-6.
Similar to <M1/M6>, press <M2/M7>, <M3/M8>, <M4/M9> or <M5/M10> to
select the desired preset memory station.
When new preset memory key is pressed, MUTE is active. When keying the
preset memory has been released for 1 second, the selection of preset memory
is considered as valid and the radio will be tuned to that frequency immediately
with MUTE idle.
At any time, press other key to start its corresponding function.
Store into memory
•
•
•
•
•
To store the tuning frequency of radio station being received into any of the
preset memory, press <MEM> once. The ‘MEM’ goes flashing.
Select the desired memory station by pressing the corresponding key until its
number goes solid above ‘MEM’.
Press <MEM> again to confirm the process of storing. Then, ‘MEM’ goes solid.
When ‘MEM’ is flashing, pressing <UP>, <DOWN> or <M/ SCAN> will search up,
search down and memory scan with the ‘MEM’ cleared.
Press other key to start its corresponding function.
Search Up/Down
•
•
•
When the radio is ON, press <UP> once to change the receiving frequency up by
1 step (50kHz).
Press <DOWN> once to change the receiving frequency down by 1 step
(50kHz).
Press and hold <UP> to search the next radio station by moving the receiving
frequency up.
•
Press and hold <DOWN> to search the next radio station by moving the
receiving frequency down.
Memory review
•
•
•
•
When the radio is ON, press <M/SCAN> once to scan the 10 preset memory
stations.
The review starts from the next memory station or MEM-1 if no memory station is
being selected.
Review will stop at each station for 5 seconds.
During review, press other key will start its corresponding function and the review
process will be terminated.
AMS Using
•
Press and hold <M/SCAN> 2 seconds to active AMS mode. In this mode, the
radio will automatically store the station that had been scanned.
Electronic Volume Control
•
•
•
Only when radio is on,
Press <VOL +> once, to increase speaker volume by one step. Hold for
continually.
Press <VOL -> once, to decrease speaker volume by one step. Hold for
continually.
Key-lock
•
Press and hold the <MEM> for 2 seconds, key-lock has been switched ON, the
“KEY” goes solid.
Technical Data
UKW-FM Frequency
Rated Voltage
Backup Battery
Output
Temperature display
87,5 – 108MHz
AC 230V 50Hz
3V (2 x 1,5V UM-4/AAA)
500mW
5°C – 40°C
Technische Änderungen und Druckfehler vorbehalten
Copyrights by Wörlein GmbH, 90556 Cadolzburg, Germany.
Vervielfälltigung oder Kopie dieser Anleitung nur mit ausdrücklicher Genehmigung durch Wörlein GmbH
ATENTIE: PERICOL ELECTROCUTARE – NU DESCHIDE!!!
Tastele
1. Consola montare
2. MOD
3. SUS
4. Alarma 1 / VOL +
5. Cronometru/MOD ALARMA/MOD SDA
6. Antena FM
7. Alarma 2 / VOL 8. JOS
9. Revizuire memorie / AMS
10. Ecran LCD
11. Trapa baterie
12. MEMORIE / BLOCARE TASTA
13. MEM 5 /10
14. MEM 4/9
15. PORNIRE
16. Cablu alimentare
17. MEM 1/6
18. MEM 2/7
19. MEM 3/8
Mod de folosire
•
La pornirea aparatului, data si ora suunt presetate la luni, 1 ianuarie 2007,
•
•
•
0:00 sau12:00AM.
Cele doua alare sunt presetate la 0:00 sau 12:00AM, zilnic, dar dezactivate.
Radioul este oprit.
Apoi trece in modul auto-functionare.
Modul auto-functionare (Radio oprit)
•
•
Apasati <MOD> o data pentru a trece in diferte moduri pe rand.
Mod auto-functionare
Potrivire ceas
(cu afisa ceas)
Potrivire data
Pornire/oprire graduator
Pornire/oprire actualizare automata
S etare SDA
In modul radio, daca informatia RDS se transmite prin post, denumirea postului
apare in locul frecventei; frecventa este afisata cand nu s-au receptionat informatiile
RDS.
Apasati <Alarma-1> pentru revizuire/potrivire alarma-1.
Apasati <Alarma-2> pentru revizuire/potrivire alarma-2
Doar cand aparatul este pornit, apasati <M1/M6>, <M2/M7>, <M3/M8> si
<M4/M9>, <M5/10> pentru a rapela memoria presetata.
Doar cand aparatul este pornit, apasati <MEM>,<M1-M10> si apoi <MEM> din nou
pentru a stoca postul curent in memorie.
Doar cand radioul este pornit, apasati <Vol. +> si <Vol. -> pentru a ajusta
volumul difuzorului.
Cand radioul este pornit, apasati <M / SCAN> pentru a vizualiza memoria presetata.
Apasati si tineti 2 secunde pentru a activa AMS (Automatic Memory
Storage - Stocare automata a memoriei).
In fiecare moment, ceasul real este comparat cu setarea alarmei daca s-a activat
setarea alarmei. Pentru detalii, va rugam sa cautati la capitolul ‘Cand alarma este
activata’.
•
•
•
•
•
•
•
•
Potriviti ceasul (manual)
•
•
•
•
•
•
•
•
•
Apasati <MOD> o data cand aparatul este in modul de afisare a ceasului.
Ceasul clipeste pe LCD cu semnul zilei sters.
Al doilea continua sa inumere o data la fiecare secunda.
Apasati <SUS> pentru a mari ora cu 1 minut.
Apasati <JOS> pentru a micsora ora cu 1 minut.
Apasati si tineti <SUS> sau <JOS> pentru a potrivi ceasul in modul rapid de 10
minute per actiune.
Apasati <MOD> o data pentru a potrivi data.
Apasati alta tasta pentru a porni functia corespunzatoare ei.
Cand nu se mai apasa nici o tasta timp de 10 secunde, setarea curenta este
confirmata si trece in modul auto-functionare.
Potriviti data
•
•
•
Apasati <MOD> o data in modul de setare a ceasului.
Data curenta incepe sa clipeasca in format dd.mm.yyyy pe LCD.
Apasti <SUS> sau <JOS> pentru a modifica setarea curenta cu 1 zi per actiune.
Apasati si tineti <SUS> sau <JOS> pentru a modifica setarea in mod rapid de 10
•
•
•
zile per actiune. Semnul zilei va fi actualizat automat cand data se stabilizeaza.
become steady.
Apasati <MOD> o data pentru a confirma setarea curenta si trece la setarea
SDA.
Apasati alta tasta pentru a porni functia corespunzatoare.
Cand nu se apasa nici o tasta timp de 10 secunde, setarea curenta este
confirmata si trece automat in modul auto-functionare.
Potriviti SDA
•
•
•
•
•
•
•
•
Apasati <MOD> o data in modul de setare a datei.
Data & ‘SDA’ incep sa clipeasca alternativ.
Apasati <SUS> sau <JOS> pentru potrivirea Datei speciale.
Apasati < SDA MOD > pentru a ignora anul.
Apasati <MOD> o data pentru a confirma setarea curenta si a trece la setarea
actualizarii automate la PORNIT/OPRIT.
Apasati <M1-M5> pentru a alege numarul SDA
Apasati alta tasta pentru a porni functia corespunzatoare ei.
Cand nu se apasa nici o tasta timp de 10 secunde, se confirma setarea curenta
si trece in mod auto-functionare automat.
In cazul ignorarii anului, SDA va fi activa in fiecare an la aceeasi data.
PORNIREA/OPRIREA actualizarii automate
•
•
•
•
•
•
•
Apasati <MOD> o data in modul de setare a SDA.
Ecranul afiseaza ‘UPDATE’, apasati <SUS> sau <JOS> pentru a porni sau opri
actualizarea automata.
Indicatorul “
” dispare, functia de actualizare se OPRESTE.
Indicatorul “
“ clipeste. Ora va fi actualizata cand se primeste urmatorul
semnal de ora RDS.
Apasati <MOD> o data pentru a confirma setarea curenta si a trece la setarea
PORNIT/OPRIT a graduatorului.
Apasati alta tasta pentru a porni functia corespunzatoare ei.
Cand nu se apasa nici o tasta timp de 10 secunde, se confirma setarea curenta
si trece in mod auto-functionare automat.
PORNIREA/OPRIREA graduatorului
•
•
•
•
•
•
•
•
Apasati <MOD> o data in modul de setare a actualizarii automate.
Ecranul afiseaza ‘DIM ON’ sau ‘DIM OFF’.
Apasati <SUS> sau <JOS> pentru a PORNI sau OPRI graduatorul.
Ecranul afiseaza ‘DIM ON’ si este luminat 10 secunde, cand s-a apasat
orice tasta.
Ecranul afiseaza ‘DIM OFF’ si este luminat tot timpul.
Apasati <MODE> o data pentru a confirma setarea curenta si trece la modul
auto-functionare.
Apasati orice alta tasta pentru a porni functia corespunzatoare.
Cand nu se apasa nici o tasta timp de 10 secunde, se confirma setarea curenta
si trece in mod auto-functionare automat.
Cronometrul pentru gatit (Radio oprit)
•
•
Apasati <TIMER> pentru a intra in modul cronometru.
Apasati <M1> o data, ecranul afiseaza ‘00:00 T1’ si se stabilizeaza sau valoarea
•
•
•
•
•
•
•
anterioara a memoriei-1 se stabilizeaza pe LCD.
La fel ca la <M1>, apasati <M2>, <M3>, <M4> sau <M5> pentru a alege
valoarea memoriei presetate dorite.
Apasati <SUS> sau <JOS> pentru a ajusta valoarea (de la 1 minut la 23 ore
si 59 minute), apasati <CRONOMETRU> pentru a porni cronometrul pentru gatit
iar valoarea curenta va fi stocata in memorie automat.
Apasati < CRONOMETRU > din nou pentru a face o pauza. Pentru a reporni, apasati
din nou <CRONOMETRU>.
Apasati si tineti <CRONOMETRU> timp de 2 secunde pentru a termina cronometrul
si lasati-l cand cronometrul merge.
Cu 30 de secunde inainte ca ceasul sa ajunga la 00.00, se va auzi
“bi…bi…bi…bi…bi” pana la 00.00
Cand ceasul ajunge la 00:00, sunetul “bi------” se va auzi timp de 1 ora pana
cand utilizatorul opreste.
Apasati < CRONOMETRU > pentru a opri cronometrul si terminati.
Cand alarma se activeaza, cronometrul pentru gatiti, daca e cazul, se opreste
imediat.
Setarea ALARMA1 si ALARMA2
•
•
•
•
•
•
•
•
•
•
Apasati <ALARMA1> sau <ALARMA2> o data, ‘ALARMA1’ sau ‘ALARMA2’ se
stabilizeaza in partea alfanumerica.
Setarea curenta a HH:MM si tipul de alarma clipeste langa semnalele
zilelor corespunzatoare.
Apasati <SUS> pentru a mari setarea cu un 1 minut.
Apasati <JOS> pentru a micsora setarea cu 1 minut.
Apasati si tineti <SUS> sau <JOS> pentru a modifica setarea in mod rapid cu 10
minute per actiune.
Apasati <MOD ALARMA> pentru a modifica tipul de alarma de la zilnic la zi din
saptamana, sfarsit de saptamana sau zi independenta, constand in semnele celor 7 zile.
Apasati si tineti <MOD ALARMA> pentru a introduce in mod zi indepenta. Apasati
<MOD ALARMA> din nou pentru a alege ziua si vor aparea semnalizarile zilelor.
Apasati si tineti <MOD ALARMA> pentru a iesi din modul zi independenta si
reveniti pentru a alege zilnic, zi din saptaman si sfarsit de saptamana.
Apasati aceeasi tasta de alarma, <ALARMA1> sau <ALARMA2>, o data pentru a
alege forma prezentarii alarmei
Forma prezentare
Ecran LCD
Sunet sonerie
Simbolul 'Clopotel' se stabilizeaza
Semnal radio
Simbolul 'Radio' se stabilizeaza
Dezactivare
Toate simbolurile se sterg
Apasati orice alta cheie pentru a porni functia corespunzatoare.
Cand nu se apasa nici o tasta timp de 10 secunde, sistemul se intoarce in
modul de auto-functionare.
Cand SDA e activat
•
•
•
•
Cand data/luna/(anul) se potrivesc celor activate in SDA, alerta devine activa
la ora 8:00AM.
Cand SDA e activ, sunetul soneriei trece pe difuzor timp de 10 minute,
radioul redus la mut devine radio pornit & “SDA” clipeste pe ecranul LCD.
La fiecare ora de muzica, 10 minute de sonerie pana la ora 23:00.
Apasat orice tasta pentru a porni functia corespunzatoare si SDA zilei va fi
terminat.
Cand alarma este activa
•
•
•
•
•
Cand ceasul real ajunge la ora alarmei care a fost activata, alarma devine
activa.
Cand alarma devine activa, cronometrul pentru gatit, daca exista, se termina
imediat.
Daca se alege alarma cu sonerie,
1)
Soneria trece la difuzor
2)
Radioul redus la mut devine radio pornit
3)
Durata alarmei este de 10 minute
Daca se alege alarma radio,
1)
RADIO este pornit
2)
durata alarmei este de 60 de minute
Pentru a inceta alarma activa, apasati tasta corespunzatoare
<ALARMA1> or <ALARMA2>.
Receptia radio
•
•
Apasati <PORNIRE> o data, frecventa postului sau numele postului se afiseaza pe
LCD.
Daca informatia RDS se transmite prin postul setat curent, "
'"
apare pe ecran si dupa o perioada scurta apare numele postului in locul
frecventei.
Rapelul memoriei radio presetate
•
•
•
•
•
Exista 10 posturi radio memorate presetate.
Cand radioul este pornit, apasati <M1/M6> o data. ‘MEM’ se stabilizeaza; frecventa
memoriei -1 se stabilizeaza pe LCD. Apasati din nou <M1/M6> pentru a alege
memoria presetata-6.
In mod asemanator cu <M1/M6>, apasati <M2/M7>, <M3/M8>, <M4/M9> sau
<M5/M10> pentru a alege postul din memoria presetata dorit.
Cand este apasata tasta memoriei noi presetate, MUT este activat. Cand tasta
memoriei presetate a fost eliberata 1 secunda, selectarea memoriei presetate
e considerata valida si radioul va fi reglat pe acea frecventa imediat cand
MUT nu este activ.
In orice moment, apasati alta tasta pentru a porni functia corespunzatoare ei.
Stocarea in memorie
•
•
•
•
•
Pentru a stoca frecventa reglata a unui post radio receptionat in oricare dintre
memoriile presetate, apasati <MEM> o data. ‘MEM’ incepe sa clipeasca.
Alegeti postul din memorie dorit apasand tasta corespunzatoare pana numarul lui
se stabilizeaza deasupra ‘MEM’.
Apasati <MEM> din nou pentru a confirma stocarea. Apoi, ‘MEM’ se stabilizeaza.
Cand ‘MEM’ clipeste, daca apasati <SUS>, <JOS> sau <M/ SCAN> va cauta in
sus, in jos sau va scana memoria cu ‘MEM’ sters.
Apasati orice alta tasta pentru a porni functia corespunzatoare acesteia.
Cautare in sus/jos
•
•
Cand radioul este pornit, apasato <SUS> o data pentru a modifica frecventa crescator
cu un 1 interval (50kHz).
Apasati <JOS> o data pentru a modifica frecventa descrescator cu 1 interval
•
•
(50kHz).
Apasati si tineti <SUS> pentru a cauta urmatorul post radio modificand frecventa de
receptie crescator.
Press and hold <DOWN> to search the next radio station by moving the
receiving frequency down.
Revizuirea memoriei
•
•
•
•
Cand radioul este pornit, apasati <M/SCAN> o data pentru a scana cele 10 posturi
presetate in memorie.
Revizuirea incepe cu urmatorul post din memorie sau cu MEM-1 daca nu este
selectat nici un post memorat.
Revizuirea se va opri la fiecare post 5 secunde.
In timpul revizuirii, apasati orice alta tasta pentru a porni functia corespunzatoare
acesteia, ceea cei incheie procesul de revizuire.
Folosirea AMS
•
Apasati si tineti <M/SCAN> 2 secunde pentru a activa modul AMS. In acest mod,
radioul va stoca automat postul care a fost scanat.
Controlul electronic al volumului
•
•
•
Numai cand radioul este pornit,
Apasati <VOL +> o data, pentru a ridica volumul difuzorului cu o treapta.
Mentineti in mod continuu.
Apasati <VOL -> o data, pentru a scadea volumul difuzorului cu o treapta.
Mentineti in mod continuu.
Blocarea tastelor
•
Apasati si tineti <MEM> timp de 2 secunde, ceea ce porneste blocarea tastelor,
se stabilizeaza “KEY” pe ecran.
Date tehnice