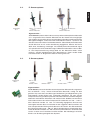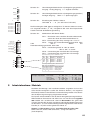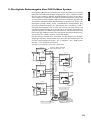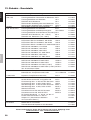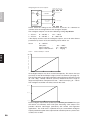
1
Messumformer / Transmitter / Convertisseur
Novasina
HygroDat 100
1117612 / 200323.066.03
Bedienungsanleitung
Operating instructions
© Novasina AG 2010
Switzerland
Technische Änderungen vorbehalten
Technical data subject to modification
Sous réserve de modifications techniques
3
4
1.2. Wichtige Hinweise
4
1.3. Hinweise zur Feuchtemessung/Kalibrierung
6
6
2.1. HygroDat 100 Transmitter
6
2.2. E-Sensorsysteme
7
2.3. C-Sensorsysteme
7
Montagearbeiten / Installation
8
3.1. Wahl des Montagestandortes
8
3.2. Montage / Installation
9
3.3. Klimadaten Ermittlung im Aussenbereich
10
3.4. Elektrische Anschlüsse
11
3.5. Installation der elektrischen Verdrahtung des Transmitter
13
4.1. Konfiguration mittels DIP Schalter
14
14
Inbetriebnahme / Betrieb
15
6.1. Die Anzeigeformate
16
6.2. Die Menüstruktur
16
6.3. Passwort Einstellung
17
6.4. Anzeige und Setzen der Justier-Alarmierung
18
6.5. Neujustierung von bis zu 5 Feuchte Messpunkten
18
6.6. Menü Justierung der analogen Ausgänge
20
6.7. Menü Skalierung der analogen Ausgänge
21
Die Bedienung des Systems
16
6.8. Menü "Passwort Aktivierung"
21
6.9. Menü "About" (Systeminformationen)
22
Die analoge Datenausgabe
23
7.
Handhabung der SC Salz Check - Feuchte Standards
9.
Die digitale Datenausgabe über CAN Feldbus System
8.
5
Produktebeschreibung
4. Konfiguration des Transmitters
5
4
Deutsch
2
Einleitung
1.1. Ganz zu Beginn
10. Digitale Kommunikation via RS 232 Datenschnittstelle
11. Unterhalt und Wartung
11.1. Austausch der Messzellen
English
1
Inhaltsverzeichnis
22
25
26
27
28
12. Geräte Spezifikationen
29
13. Zubehör - Ersatzteile
30
14. Anhänge
32
14.1. Werksdiagramme für analoge Ausgänge
32
14.2. Fehlermeldungen
32
14.3. Tabelle CAN Adressen
33
14.4. Menü Struktur
34
Dokument Versionen :
Version
1.0
1.1
1.2
1.3
1.4
Beschreibung Modifikation
Original Ausgabe Englisch
Vollständige Überarbeitung Deutsch
Vollständige Überarbeitung Deutsch / Englisch
Anpassungen für default setting und Anzeige
Anpassungen fneue Adresse Novasina AG, Lachen
Datum / Kürzel
01.06.2002 / HM
21.07.2004 / HM
15.08.2004 / HM
22.08.2005 / HM
01.11.2007 / HM
3
1
Einleitung
Deutsch
1.1. Ganz zu Beginn
Wir möchten uns bei Ihnen bedanken, dass Sie sich für das hochpräzisions
Feuchte- und Temperatur Transmitter-System HygroDat 100 entschieden
haben. Sie haben damit ein äusserst leistungsfähiges Multifunktions
Klimamessgerät erworben. Hohe Präzision, grosse Zuverlässigkeit und eine
einzigartige Funktionalität sowie Flexibilität sind die Markenzeichen für das
HygroDat 100 System. Es bietet als einziges System überhaupt die Möglichkeit
der Verwendung von zwei völlig unabhängigen Feuchte Messprinzipien. Das
seit Jahrzehnten bewährte resistiv elektrolytische Messprinzip, eine Erfindung
und Weiterentwicklung der Novasina, oder die neuste Technologie vom
Silizium basierenden miniaturisierten kapazitiven Messsystem in CMOS
Sens Technologie mit digitaler Datenübermittlung. Dabei ist ein MikroProzessor im Sensor integriert. Sie entscheiden damit für Ihre Applikation
selbst, welche Technologie die richtige ist.
Bitte lesen Sie diese Bedienungsanleitung in Ruhe vollständig durch, damit
Sie optimal von allen Möglichkeiten Ihres Novasina HygroDat 100 Systems
profitieren können.
1.2. Wichtige Hinweise
English
Lieferung
Überprüfen Sie bei Erhalt der Lieferung:
-– das Gerät auf Transportschäden. Allfällige Schäden melden Sie bitte
umgehend dem Transportunternehmen und Ihrem NovasinaLieferanten.
– die Vollständigkeit des Lieferumfangs (gemäss Lieferschein).
Unvollständige Lieferungen werden von Ihrem Novasina-Lieferanten
umgehend ergänzt.
Sicherheit
– Dieses Gerät hat das Werk in sicherheitstechnisch einwandfreiem Zustand verlassen. Um diesen Zustand zu erhalten, beachten
und befolgen Sie bitte alle Hinweise und Warnvermerke in dieser
Bedienungsanleitung.
– Die Transmitter und Sensoren des HygroDat 100 sind ausschliesslich
zur Feuchtigkeits- und Temperaturmessung in atemluftfähiger
Umgebung bestimmt. Messungen in Flüssigkeiten oder in aggressiven
Gasgemischen können den Sensor sowie die Armatur unwiderruflich
zerstören. Verwenden Sie den Transmitter ausschliesslich
für Messungen von Atemluft. Eine andere oder darüber
hinausgehende Benutzung gilt als nicht bestimmungsgemäss. Für
daraus resultierende Schäden wird seites des Herstellers/Lieferanten
keine Haftung übernommen. Das Risiko trägt allein der Anwender.
– Die Montage- und Installationsarbeiten dürfen nur durch
ausgewiesenes Fachpersonal (Elektriker oder Fachkraft mit
gleichwertiger Ausbildung) ausgeführt werden.
4
– Das Novasina HygroDat 100 System darf nur unter den spezifizierten
Betriebsbedingungen betrieben werden (siehe Kapitel 8 „Technische
Daten“).
– Insbesondere
ist
es
verboten,
den
explosionsgefährdeten Räumen einzusetzen.
Transmitter
in
Deutsch
– Dasselbe gilt auch für alle Sensoren sofern diese nicht speziell und
explizit dafür als geeignet erklärt werden.
– Beachten und befolgen Sie bitte die lokalen Vorschriften zum Umgang
mit netzgespeisten Geräten.
– Schalten Sie vor jeder mechanischen oder elektrischen Manipulation
alle spannungsführenden Teile wie Speisegeräte usw. unbedingt ab.
– Das Novasina HygroDat 100 System enthält ESD - empfindliche
Bauteile. Beachten Sie die entsprechenden Sicherheitsmassnahmen.
(ESD = Elektrostatische Entladung)
– Verwenden Sie ausschliesslich Original
Ersatzteile von Ihrem Novasina Lieferanten.
Zubehör
und
– Ohne schriftliche Genehmigung der Novasina, dürfen an Transmitter
und Sensoren keine An- und Umbauten vorgenommen werden. Eine
allfällige Gewährleistung erlischt damit sofort.
Bedienungsanleitung
Bitte bewahren Sie die Bedienungsanleitung an einem sicheren und leicht
zugänglichen Ort auf. Bei Verlust der Anleitung wenden Sie sich bitte für einen
umgehenden Ersatz an Ihre Novasina Vertretung.
English
Kundendienst
Novasina hat weltweit ein gut ausgebautes Vertreternetz, das mit
versierten Technikern einen jederzeit präsenten Service anbietet. Melden
Sie allfällige Störungen Ihrem Novasina-Vertreter. Entsprechende Adressen
können jederzeit unter www.novasina.com abgerufen werden.
1.3. Hinweise zur Feuchtemessung/Kalibrierung
Für eine korrekte Feuchtemessung bzw. Kalibrierung muss sich die Messzelle
mit dem zu messenden Medium/Feuchtestandard im Temperaturgleichgewicht befinden. Bereits eine minimale Temperaturdifferenz zwischen
dem zu messenden Medium und der Messzelle führt zu einem falschen
Messresultat. Je höher die Luftfeuchtigkeit, desto stärker wirkt sich diese
Temperaturdifferenz auf das Messresultat aus.
Beispiel: Bei 20°C (68°F) und einer relativen Feuchte von 50% ergibt eine
Temperaturdifferenz von ±1°C zwischen dem Medium und der Messzelle
einen Fehler von ±3%rF. Bei einer relativen Feuchte von 90% beträgt der
Fehler bereits ca. ±6%rF.
5
Produktebeschreibung
Beim Transmittersystem HygroDat 100 von Novasina, handelt es sich um ein
hochpräzises, robustes und äusserst variables technisches Spitzenprodukt.
Herausragende Merkmale sind höchste Präzision, grosse Zuverlässigkeit,
einfachste Nachjustierbarkeit und Bedienbarkeit, sowie dessen vielseitiges
Einsatzgebiet dank seinen verschiedenen anschliessbaren Sensoren. Ein
Mikrokontroller der neuesten Generation, gepaart mit äusserst betriebsicheren
Software, garantieren einen optimalen Betrieb. Das Novasina HygroDat 100
System setzt sich aus verschiedenen Teilen zusammen :
Deutsch
2.
– HygroDat 100
Transmitter in 24V oder 90...230 V in zwei verschiedenen Gehäuse
(Poly/Alu)
– E- Sensorsysteme
Präzisions Sensoren auf der Basis der elektrolytischen Feuchte
Messtechnik ( Novasina Eigenentwicklung seit 40 J )
– C- Sensorsysteme
Besonders robuste Sensoren auf der Basis der neusten kapazitiven
Feuchte Messtechnik ( CMOS Sens, digitale Sensorik )
English
– Diverses Zubehör
Filtersysteme für alle Sensoren, Interface Schnittstellen RS-232,
CAN, Analyse- und Treiber Software für PC, diverse Feuchte
Standards für die Überprüfung und Nachjustierung.
2.1.
HygroDat 100 Transmitter
HygroDat 100 POLY
6
HygroDat 100 Alu
Die Transmitter beider Modellreihen können mit Betriebsspannung von
15…40 VDC / 16.....30VAC oder Wechselspannung (90…260 VAC) betrieben
werden.
E- Sensorsysteme
Deutsch
2.2.
E-Messzelle
CC-1
HIA 11....13, 1x Sensor
( 13mm )
mit CC-1 Messzelle
HIS 11...13, 1x, 23, 2x Sensor
( 20 mm )
mit CC-1 Messzelle
2.3.
C-Messzelle
DCC-1
English
Eigenschaften :
Alle E-Sensorsysteme sind mit der äusserst präzisen elektrolytischen Messzelle
CC-1 ausgerüstet. Diese Feuchte Messzelle hat den Vorteil einer einzigartigen
Genauigkeit, der schnellen Anpassungsfähigkeit an das Messmediumund hohen
Messgeschwindigkeit, sowie einer nicht vorhandenen Feuchte - Hysterese. All
dies über einen sehr weiten Feuchte Messbereich. Jede elektrolytische Messzelle
wird im Werk auf ±2%rF vor der Auslieferung abgeglichen. Ebenso wird sie im
Werk einer Voralterung unterzogen. Die elektrolytische Messmethode eignet
sich speziell auch für Feuchte Messungen in Bereichen über 85 bis nahe zu 100%
rF. Die Temperaturmessung erfolgt direkt auf der Messzelle mittels einem
präzisen, speziell abgeglichenem NTC Messelements. Damit werden beide
Parameter exakt an der gleichen Stelle im Raum gemessen.
C- Sensorsysteme
HIC 1x Sensor
( 13 mm )
mit DCC-1 Zelle
HICS 1x Sensor
( 20 mm )
mit DCC-1 Zelle
HICH 1x Hochtemp. Sensor
( 20mm )
mit DCC-1 Zelle
Eigenschaften :
Alle C-Sensorsysteme sind mit der neusten kapazitiven Messtechnik ausgerüstet.
Die auf Silizium - Chip - Niveau miniaturisierte Messzelle, verfügt auf dem
gleichen Chip auch über eine Messsignal Aufbereitung und Digitalisierung. Der
Informationen werden digital zum Transmitter übermittelt. Für eine genaue
Temperaturmessung wurde ein präzisions NTC Messelement zusätzlich integriert.
Neben der besonderen Robustheit und mechanischer Stabilität, besticht diese
Technik durch einen sehr weiten Temperatur Einsatzbereich von -40.....+120° C.
Alle C-Sensoren werden auf ±3.5 %rF werkseitig abgeglichen. Eine bessere
Genauigkeit erhalten diese im Verbund mit den HygroDat 100 Transmitter und
einer entsprechenden Eichung mittels Novasina SC Checks. Der Einsatzbereich
der C-Sensoren geht von 0....100% rF. Dabei spielt der Sensor seine Stärken eher
unterhalb der 85%rF Marke aus. Alle C-Sensorsysteme können in einem Abstand
von bis zu 30 m vom Transmitter installiert werden. Die Kabellänge hat keinen
Einfluss auf die Messgenauigkeit des Systems.
7
3
Montagearbeiten / Installation
3.1. Wahl des Montagestandortes
Deutsch
Deutsch
Achtung : Die Sensoren des Novasina HygroDat 100 System (E- und CSensor) darf nicht in aggressiven, korrodierenden Umgebungen (verursacht
durch chemische Gase, Dämpfe oder Flüssigkeiten, die säure- oder basenhaltig
sind usw.) eingesetzt werden.
Zur Montage muss das Gehäuse des Transmitters geöffnet werden. Die darin
enthaltenen Elektronikbauteile sind grundsätzlich ESD empfindlich. Treffen
Sie deshalb vor Beginn der Montagearbeiten die entsprechenden Sicherheitsmassnahmen (ESD-Schutz).
Transmitter :
Der Transmitter selbst sollte an einen gut zugänglichen Standort möglichst auf
Augenhöhe mittels 4 Schrauben sicher befestigt werden. Wählen Sie den
Standort nach folgenden Kriterien aus :
– Ablesbarkeit der Anzeige und Bedienbarkeit des Transmitter
– Gute Zugänglichkeit bei Installation und Bedienung
– Verfügbarkeit der Speisung und Verbindung zu
Steuerung und Regelung
– Sauberkeit und Sicherheit (Beschädigung des Transmitters)
English
Beide Gehäusetypen weisen einen IP 65 Schutzgrad auf, sind also entsprechend im Inneren
wasser- und staubgeschützt. Der Schutz ist jedoch nur bei der Verwendung der richtigen
Installationskabel, der Überprüfung der Dichtungen und dem Festziehen aller Schrauben und
Muttern gewährleistet.
E- und C- Sensoren :
Um korrekte Messresultate zu gewährleisten, sollten Sie den Sensor möglichst
an dem Standort installieren, wo die Messung auch tatsächlich eine
entsprechende Aussagekraft ergibt. („Messpunkt am Ort des Geschehens“).
Wählen Sie den Montagestandort so, dass :
8
–
der Sensor nicht durch Lichtquellen, Heizkörper, sich erwärmende
Elektronik, direkte Sonnenbestrahlung usw. erwärmt wird.
–
der Sensor an mindestens 3 Seiten von der Luft umströmt wird.
–
der Sensor bei Raumüberwachung nicht einem direkten Luftzug
(offene Fenster oder Türen) ausgesetzt wird.
–
die zulässigen Betriebsbedingungen in jedem Fall eingehalten
werden.
–
eine ausreichende Luftzirkulation um den Sensor gewährleistet ist
(nicht in Nischen platzieren).
–
keine mechanischen Vibrationen oder gar schockartige Stösse auf den
Sensor einwirken können (gilt vor allem für E-Sensoren HIA und HIS).
–
dass die "MAK Werte" der zu messenden Umgebung nicht überschritten
werden. Dies könnte einen erhöhten Drift und raschen Ausfall der
Sensoren bewirken
Montieren Sie den Transmitter nicht an Orten, an denen sich Kälte- oder
Wärmebrücken bilden können. Der daraus resultierende Luftstrom kann das
Messresultat verfälschen oder zur Kondensation am Messelement und an der
Elektronik führen. Kontaktieren Sie vor der Montage der Sensoren den
Verantwortlichen für die Messung bzw. Steuerung und Regelung oder den
entsprechenden Projektleiter. Bestimmen Sie zusammen den optimalen
Standort. Jedem Sensor sind 3 Stk beschriftete Klebeschilder mit der Serie
Nr. des Sensors beigelegt. Befestigen Sie jeweils 1 Stk am Sensorschaft und
am Transmitter Gehäuse. Damit können Sie jederzeit die Zugehörigkeit des
Sensors zum Transmitter erkennen.
3.2. Montage / Installation
English
Deutsch
Allgemeines :
Das HygroDat 100 System wird bereits vormontiert mit den entsprechenden
Sensortypen je nach Bestellung ausgeliefert. Das heisst, dass bei der
Verwendung eines C-Sensors auf der Deckelelektronik bereits ein zusätzlicher
Print für den Anschluss des C-Sensors montiert worden ist. Ein System mit
einem E-Sensor verfügt nicht über diese zweite Elektronik, es sei den, dass das
System mit der Option inkl. einer RS-232 bestellt worden ist. Darauf befinden
sich die Stecker für den E-Sensor sowie für die RS-232 Schnittstelle. Der
ursprüngliche Stecker für den E-Sensor wird mit der Zusatzelektronik verdeckt.
Transmitter :
Die Installation des Transmitters erfolgt mittels 4 Schrauben für dessen
spezielle Löcher bereits am Umfang des Gehäuse angebracht sind. Der
Zugang zu den Befestigungslöchern erfolgt nachdem der Deckel mit der
Elektronik abgenommen worden ist. Montieren Sie zuerst das hintere Gehäuseteil
(Gehäuseboden) an einer Wand und lassen Sie den Deckel mit der integrierten
Elektronik solange in der Verpackung, bis die Installation des Sensors
abgeschlossen ist. Verwenden Sie für das Bohren der Löcher in die Wand die
beigelegte Papierschablone. Im Inneren des Gehäuse erläutern entsprechende
Hinweisschilder die korrekte Verkabelung des Transmitters. Weitere
Informationen entnehmen Sie bitte der beigelegten Installationsanweisung.
E- und C- Sensoren : ( -20.....+80°C )
Für alle HygroDat 100 Sensoren stehen zwei Montage Set's zur Verfügung :
- Klassische Wandmontage mittels Kunststoff Clip oder Kunststoffschelle.
- Kanalmontage mittels dichtendem Kanal Montageflansch aus Kunststoff
Wandmontage Clips sind jedem Sensor beigelegt und können auch als
Ersatzteil nachbestellt werden. Vergewissern Sie sich vor der Montage der
Sensoren, dass das gewählte System für Ihre Applikation entspricht damit sich
der Sensor nicht unerwünscht verschieben kann.
Für die Kanalmontage werden zwei Flansche für die 13mm und 20mm
Sensoren angeboten. Weitere Informationen entnehmen Sie bitte der beigelegten
Sensor-Installationsanweisung.
9
HICH- Sensor : ( -40.....+120°C ) Hochtemperatur Anwendungen
Deutsch
Deutsch
Für Hochtemperatur-Anwendungen besitzt dieser Sensor ein spezielles Silikon
Kabel sowie weitere temperaturbeständige Kunststoffteile, die den gesamten
Temperaturbereich abdecken. Dieser Sensor sollte auf jeden Fall mit dem
mitgelieferten speziellen Wandhalter vollständig im Raum installiert werden.
Danach kann das Kabel aus dieser Hochtemperatur-Zone über eine „bauseits“
zu beschaffende Kabelverschraubung in eine kühlere Zone < +60°C auf die
beigelegte Installationsdose geführt werden. Die Verbindung zwischen der
Installation Box und dem Transmitter erfolgt dann mit einem spezifizierten
abgeschirmten 5-Pol Kabel. Weitere Informationen entnehmen Sie bitte der
beigelegten Sensor-Installationsanweisung.
HygroDat 100
5 Pol Kabel
ohne Schrim
HIA oder HIC sensor
5 x 0.5 mm2
novasina
100 m
Max Kabellänge für HIA, HIS Sensor
( E- Sensoren )
HygroDat 100
6 Pol Kabel
mit Schrim
HIC, HICS oder HICH sensor
6 x 0.25 mm2
English
novasina
30 m
Max. Kabellänge für HIC,
HICS und HICH Sensor
( C- Sensoren )
Allgemeine Hinweise :
Jedes HygroDat 100 System wird vom Werk aus komplett (Transmitter und
Sensor) zusammen in einer Verpackung ausgeliefert. Das komplette System
ist im Werk einer 5 Punkte Eichung unterzogen worden. Der Sensor gehört
deshalb zwingend zum zugehörigen Transmitter. Bitte vertauschen Sie NIE
die jeweiligen Sensoren und Transmitter !!
Für die Installation des Sensors gehen Sie sinnvollerweise folgendermassen
vor :
Installieren Sie vorgängig die entsprechende Halterung.
Befestigen Sie den eigentlichen Sensor mit dem losen Kabel in der Halterung.
Verlegen Sie das Kabel des Sensors entsprechend Ihren Bedürfnissen und
Applikation.
Verkürzen Sie das Sensorkabel nach Wunsch bevor sie dieses über die dafür
geeignete Stopfbuchse in den Transmitter einführen.
Entfernen Sie fachgerecht die nötigen Isolationen und bringen auf allen Adern
sogenannte Adern Endhülsen an bevor diese am Stecker festscrhauben.
Auch eine Verlängerung ist nachträglich in entsprechenden Grenzen möglich.
Kleben Sie im Gehäuseboden das beigelegte Sensor Label ( Serie Nr ) ein,
dadurch können sie die Zugehörigkeit des Sensor zum Transmitter jederzeit
bestimmen.
3.3. Klimadaten Ermittlung im Aussenbereich
Falls das Transmittersystem für die Klimadaten Ermittlung im Aussenbereich
eingesetzt wird, bietet Novasina ein entsprechendes Wetterschutzschild
gegen direkten Lichteinfall, als Spritzwasser- und Wind- sowie Schneeschutz
an. Das Wetterschutzschild kann mit allen Sensortypen verwendet werden.
Die Installation erfolgt an einem Mast mit Durchmesser 25.....50mm.
Achten Sie bei der Montage auf die maximal zur Verfügung stehenden Kabellänge zwischen Sensor und Transmitter.
Aussenwand
Wetter- und Strahlenschutz
Schild aus Metall oder Kunststoff
weiss
E- oder C- Sensor
Armatur mit Befestigung
Wetterschutzschild Novasina
mit zusätzlichem spez. Flansch 13, 20mm
10
Befestigungs
Flansch
Kundenspezifische Lösungsvariante
eines bauseitig erstellten Wetterschutzes
3.4. Elektrische Anschlüsse
- Stecker 1 :
- Stecker 2 :
- Stecker 3 :
- Stecker 4 :
Deutsch
Deutsch
Jeder HygroDat 100 Transmitter verfügt über 3 bzw. 4 Anschluss Stecker,
welche auf der Leiterplatte, die im Deckel integriert ist, angebracht sind.
Speisung des gesamten Systems 24V AC/DC
oder 90...230V AC
2 analoge Ausgänge
oder digitaler CAN Feldbus Anschluss
E- oder C- Sensor Anschluss
RS-232 Anschluss (optional bei E-Sensorsystem)
Standardmässig beim C-Sensorsystem
Achtung : Teile des HygroDat 100 können gefährliche elektrische
Spannungen erzeugen. Vor dem Öffnen des Gehäuses muss das Instrument
spannungslos sein! Entsprechende Arbeiten dürfen nur von geschultem
und ausgebildetem Personal ausgeführt werden.
HygroDat 100 mit E-Sensor 24V AC/DC:
T e m p .
S e n s o r
8
9 1 0 1 1 1 2
4
5
2 4 V
A C /D C
1
2
H u m i.
6
7
E-Sensor Anschluss ohne
RS-232 Option
8
S e n s o r
T e m p .
9 1 0 1 1 1 2
4
5
9 0 ....2 6 0 V A C
1
2
3
H u m i.
6
English
HygroDat 100 mit E-Sensor 90.....230V AC/DC:
7
HygroDat 100 mit E-Sensor 24V AC/DC mit RS-232:
T e m p .
S e n s o r
E-Sensor Anschluss mit
RS-232 Option
9 1 0 1 1 1 2
5
6
7
2 1 2 2 2 3
8
4
2 4 V
A C /D C
1
2
H u m i.
Z u s a tz p r in t fü r R S - 2 3 2
HygroDat 100 mit E-Sensor 90...230V AC/DC mit RS-232:
T e m p .
S e n s o r
9 1 0 1 1 1 2
5
6
7
2 1 2 2 2 3
8
4
9 0 ....2 6 0 V A C
1
2
3
H u m i.
Z u s a tz p r in t fü r R S - 2 3 2
11
Anschlusstabelle für E-Sensoren :
S te c k e r b e le g u n g H y g r o D a t 1 0 0 m it E - S e n s o r s y s te m
S te c k e r
1
P in N u m m e r
S p e is u n g : 9 0 ...2 3 0 V A C
S p e is u n g : 9 0 ...2 3 0 V A C
S p e is u n g : 9 0 ...2 3 0 V A C
1
2
Deutsch
Deutsch
3
S p e is u n g : 2 4 V A C / D C
S p e is u n g : 2 4 V A C / D C
1
2
4
A n a
A n a
A n a
A n a
5
2
6
7
4
D ig
D ig
D ig
D ig
5
6
7
3
S e
S e
S e
S e
S e
8
9
1 0
1 1
1 2
(4 )
:
B e s c h r e ib u n g / F u n k tio n
lo g
lo g
lo g
lo g
ita
ita
ita
ita
le
le
le
le
n s
n s
n s
n s
n s
e s A
e s A
e s A
e s A
C A
C A
C A
C A
o r
o r
o r
o r
o r
A n
A n
A n
A n
A n
u s g
u s g
u s g
u s g
N S
N S
N S
N S
s c
s c
s c
s c
s c
h lu
h lu
h lu
h lu
h lu
a n g
a n g
a n g
a n g
s s ig
s s ig
s s ig
s s ig
s s
s s
s s
s s
s s
- K
- K
- K
- K
- K
c h
c h
c h
c h
n itts
n itts
n itts
n itts
->
a b
a b
a b
a b
a b
fü r
fü r
fü r
fü r
lle
lle
lle
lle
e lfa
e lfa
e lfa
e lfa
e lfa
D ig ita le R S - 2 3 2 S c h n itts te lle
D ig ita le R S - 2 3 2 S c h n itts te lle
D ig ita le R S - 2 3 2 S c h n itts te lle
2 1
2 2
2 3
N
->
n a l
n a l
n a l
n a l
te
te
te
te
L
->
T e m
T e m
F e u
F e u
rb
rb
rb
rb
rb
e
+
->
T -
->
p .
p .
c h te
c h te
->
->
->
e
e
e
-
T +
H H +
n ic
C A
C A
C A
h t
N
N
N
->
->
->
G N D
R x
T x
->
->
->
->
->
e
P E
->
b e n u tz t
L
G N D
H
B ra u n
G ra u
G rü n
G e lb
W e is s
HygroDat 100 mit C-Sensoren 24V AC/DC mit RS-232:
T e m p .
English
5
6
7
C - S e n s o r
2 1 2 2 2 3
4
2 4 V
A C /D C
1
2
H u m i.
1 3 1 4 1 5 1 6 1 7 1 8
Z u s a tz p r in t fü r C - S e n s o r in k l. R S - 2 3 2
HygroDat 100 mit C-Sensoren 90...230V AC/DC mit RS-232:
T e m p .
5
6
7
2 1 2 2 2 3
4
9 0 ....2 6 0 V A C
1
2
3
H u m i.
C - S e n s o r
1 3 1 4 1 5 1 6 1 7 1 8
Z u s a tz p r in t fü r C - S e n s o r in k l. R S - 2 3 2
Anschlusstabelle für C-Sensoren :
S te c k e r b e le g u n g H y g r o D a t 1 0 0 m it C - S e n s o r s y s te m
S te c k e r
1
P in N u m m e r
1
2
3
1
5
2
3
12
(4 )
2
4
6
4
7
5
6
7
1 3
1 4
1 5
1 6
1 7
1 8
2 1
2 2
2 3
:
B e s c h r e ib u n g / F u n k tio n
S p e is u n g : 9 0 ...2 3 0 V A C
S p e is u n g : 9 0 ...2 3 0 V A C
S p e is u n g : 9 0 ...2 3 0 V A C
S p e is u n g : 2 4 V A C / D C
S p e is u n g : 2 4 V A C / D C
A n a
A n a
A n a
A n a
D ig
D ig
D ig
D ig
S e
S e
S e
S e
S e
S e
lo g
lo g
lo g
lo g
ita
ita
ita
ita
n s
n s
n s
n s
n s
n s
e s A
e s A
e s A
e s A
le C
le C
le C
le C
o r
o r
o r
o r
o r
o r
A n
A n
A n
A n
A n
A n
u s g
u s g
u s g
u s g
A N S
A N S
A N S
A N S
s c
s c
s c
s c
s c
s c
h lu
h lu
h lu
h lu
h lu
h lu
a n g
a n g
a n g
a n g
c h n
c h n
c h n
c h n
s s
s s
s s
s s
s s
s s
s s ig
s s ig
s s ig
s s ig
itts
itts
itts
itts
- K
- K
- K
- K
- K
- K
->
N
->
n a l
n a l
n a l
n a l
te lle
te lle
te lle
te lle
a b
a b
a b
a b
a b
a b
L
->
e lfa
e lfa
e lfa
e lfa
e lfa
e lfa
fü r
fü r
fü r
fü r
D ig ita le R S - 2 3 2 S c h n itts te lle
D ig ita le R S - 2 3 2 S c h n itts te lle
D ig ita le R S - 2 3 2 S c h n itts te lle
rb
rb
rb
rb
rb
rb
T e m
T e m
F e u
F e u
e
e
e
e
e
e
p .
p .
c h te
c h te
P E
->
+
->
T -
->
->
->
->
-
T +
H H +
n ic
C A
C A
C A
h t
N
N
N
->
->
->
G N D
R x
T x
->
->
->
->
->
->
b e n u tz t
L
G N D
H
G e /G n
W e is s
S c h ir m
S c h w a rz
B la u
B ra u n
Kabel Typen für E- und C Sensorverbindungen :
Kabeltyp
E
Li YY
C
Li YYS
Beschreibung / Funktion
5 x 0.5 mm2 oder 5 x 0.75mm2 ohne Schirm
Adernfarbe braun,grau,grün,gelb,weiss
Deutsch
Deutsch
Sensor
6 x 0.25 mm2 mit Schirm, Adernfarbe grün/
gelb, weiss, SchrimAnschluss schwarz,
blau,braun
Empfohlene Kabel Typen für HygroDat 100 Stromversorgung :
Sensor
Kabeltyp
Beschreibung / Funktion
24V
TT (Tdc)
2 x 1.0 mm2 oder 2 x 1.50mm2 Litzenkabel
Adernfarbe blau, braun
230V
TT (Tdc)
3 x 1.0 mm2 oder 3 x 1.5mm2 Litzenkabel
Adernfarbe grün/gelb, blau, braun
Empfohlene Kabel Typen für HygroDat 100 Analog Ausgänge :
AOut
I
U
Kabeltyp
TWIST-CY
Beschreibung / Funktion
2 x 2 x 0.75 mm2 oder 2 x 2 x 1.0mm2
paarweise verdrillt mit gemeinsamen
Geflechtschrim
Empfohlene Kabel Typen für HygroDat 100 CAN Feldbus Interface:
CAN
Bus
Kabeltyp
TLi2YcY
Beschreibung / Funktion
2 x 2 x 0.22 mm2 oder 2 x 2 x 0.5mm2
paarweise verdrillt mit gemeinsamen
Geflechtschrim
English
DIO
Empfohlene Kabel Typen für HygroDat 100 RS-232 Interface :
Kabeltypen für die RS-232 Schnittstelle des HygroDat 100 Transmitter :
DIO
Kabeltyp
RS232
TWIST-CY
Beschreibung / Funktion
2 x 0.5 mm2 oder 2 x 0.75mm2 paarweise
verdrillt mit gemeinsamen Geflechtschrim
Um eine einwandfreie Funktion aller Baugruppen zu gewährleisten, müssen die
empfohlenen Kabeltypen für das HygroDat 100 Messsystem verwendet werden.
Verlängern Sie die Verkabelung zwischen Sensor und Transmitter nicht unnötig.
Kürzen Sie diese so weit wie möglich. Bei einer allfälligen Verlängerung empfehlen wir
eine Elektro - Installationsbox mit entsprechend hochwertigen Klemmenverbindungen
zu verwenden. Andernfalls ist es möglich, dass die Messwertübertragung nicht
einwandfrei gewährleistet ist.
3.5. Installation der elektrischen Verdrahtung des Transmitter
Für die Installation aller nötigen Anschlüsse dürfen nur die oben beschriebenen
Kabeltypen verwendet werden. Verwenden Sie nur die vorgesehenen
Kabeldurchführungen am Transmitter zur Kabeleinbringung. Diese dichten bei
richtiger Verwendung sehr gut ab und ermöglichen auch gleich eine
Zugentlastung. Verwenden Sie nur Kabel mit zwei Isolationsschichten, die für
die Kabeldurchführung auch geeignet sind. Bohren Sie auf keinen Fall weitere
Löcher in das Gehäuse. Damit würden sie den IP Schutzgrad zunichte machen.
Ioslieren sie die Doppelisolation fachmännisch ab und verwenden sie stehts
Kabelendhülsen zum Schutz der Adern!
Anschliessend können die Stecker (befinden sich bei der Auslieferung auf dem
Deckel des Transmitters) mit einem geeigneten 0-er Schraubenzieher an die
Kabel angebracht werden. Hilfe dazu bieten die im Transmittergehäuse
angebrachten Labels und schematische Stromlaufpläne des Planers. Nach
vorsichtigem Festziehen der Mutter an den Kabelverschraubungen, kann dann
13
Deutsch
Deutsch
der Deckel aus der Verpackungseinheit genommen werden. Bitte überprüfen
Sie noch einmal alle Verbindungen gemäss dem beigelegten Anschlussbild.
Die drei bzw. vier Steckverbindungen können nun an die im Deckel befindliche
Elektronik angeschlossen werden. Die Installation wird danach mit dem dichten
Verschliessen des Deckels mittels den 4 Schrauben abgeschlossen.
Achtung : Verwenden Sie auf keinem Fall ein Messinstrument (Ohmmeter) zur
Überprüfung der Verbindungen zum Sensor hin, da dies zur Messung ein
Gleichstrom Signal abgibt und den Sensor rsp. dessen Elektronik damit
unwiderruflich beschädigt werden kann. Überprüfen Sie die Sensorvertrahtung
visuell und anhand des Stromlaufplanes.
English
Für die Aluminium Gehäuseversion ist das Anbringen der
beigelegten elektrischen Verbindung vom Gehäuse Boden zum
Deckel zwingend notwendig (Erdung!)
4. Konfiguration des Transmitters
Der HygroDat 100 Transmitter bietet eine grosse Vielfalt an Konfigruationsmöglichkeiten. Alle hardwarenahen Funktionen können mittels zwei DIPSwitch Schalterreihen (S3 / S4) sowie zusätzlich 2 Einzelschaltern (S1 / S2)
eingestellt werden. Weitere Konfigurationen sind auch über die Menüsteuerung
zugänglich und können dort eingestellt werden.
Nachfolgend werden zuerst die DIP-Schalterstellungen beschrieben und
anschliessend die Menüfunktionen dargestellt :
4.1. Hardware Konfiguration mittels DIP-Schalter
Für die hardwaremässige Konfiguration des Transmitters stehen 2 DIP
Schalterreihen zur Verfügung. Sie befinden sich auf der rechten Seite des
Elektronik Prints der sich im Deckel befindet. Nachfolgend werden diese
Schalterreihen S1, S2, S3 und S4 genannt!
14
A n a lo g
C u rre n t
S 1
Schalter S1 :
Umschaltung der Steckerleiste 2 (analoger Ausgangsstecker)
Ausgang : Analog Ausgang <—> digitaler CAN Bus
S 2
Schalter S2 :
Umschaltung der Steckerleiste 2 (analoger Ausgangsstecker)
Analoger Ausgang : Strom <—> Spannungssignal
Schalter S3 :
Einstellung der CAN Bus Adresse
CAN Addr 0 ...... 6 (nur aktiv wenn CAN aktiv)
V o lta g e
0
1
C A N A d d re s s
2
3
1
Die Einstellung der CAN Adresse erfolgt binär. Es können Adressen von 01127 eingestellt werden ( 26 Bit ). Vergleichen Sie auch die entsprechende
Tabelle am Ende der Bedienungsanleitung.
4
C A N A d d re s s
3
5
C A N A d d re s s
4
6
5
C A N A d d re s s
O N
2
C A N A d d re s s
C A N A d d re s s
S 3
7
6
Schalter S4 :
C A N P u ll- u p
1 2 0 O h m
O F F
W id .
1
A n z e ig e F o r m a t
O F F = °C
/ O N = °F
A n a lo g S ig n a l
L C D A n z e ig e
3
4
B 0
O F F = 0 ..1 0 V /0 ..2 0 m A
O N = 2 ..1 0 V /4 ..2 0 m A
X 1
X 0
5
6
7
O F F
1
S 4
DIP 1 : Einschalten eines 120 Ohm Abschlusswiderstands
sofern das Gerät der letzte Busteilnehmer ist.
DIP 2 : Umschaltung der Temp. Anzeige von °C auf °F
DIP 3 : Setzen der Datenübermittlungsgeschwind. beim
CAN
DIP 4 :
Setzen
der
Datenübermittlungsgeschwind. beim CAN
DIP 5 : Umschaltung AOUT 0..10V / 0...20mA
oder 2..10V / 4...20 mA
DIP 6 : Umschaltung der 2ten Zeile der LCD Anzeige
DIP 7 : Umschaltung der 2ten Zeile der LCD Anzeige
B a u d r a te E in s te llu n g ü b e r S 4
B 0
O N
O F F
O N
O F F
O N
2
3
B0
B1
X0
X1
O N
2
B 1
C A N B a u tra te
S 4
Multifunktions DIP-Switch Reihe :
4
5
B 1
O F F
O F F
O N
O N
D IP S w itc h 3 u n d 4
Ü b e r m ittlu n g s g e s c h w in d ig k e it
B a
B a
B a
B a
u d
u d
u d
u d
ra
ra
ra
ra
te
te
te
te
=
=
L C D A n z e ig e n - E in s te llu n g ü b e r S 4
6
X 0
7
O F F
O N
O F F
O N
X 1
O F F
O F F
O N
O N
L C D A n z e ig e
Z e
Z e
Z e
Z e
ile
ile
ile
ile
2
2
2
2
->
->
->
->
=
=
2 0
5 0
1 2 5
5 0 0
k B
k B
k B
k B
a u
a u
a u
a u
d
d
d
d
D IP S w itc h 6 u n d 7
r e la tiv e
T a u p u n
S p e z . E
W a s s e r
L u ftfe u c h te
k t T e m p .
n th a lp ie
g e h a lt
Analogue output Aout 1der
: Temperature
: -20.....: +80 °C
Grundeinstellungen
Analogen Ausgänge
Analogue output Aout 2 :
5
Rel. humidity
Dev point
spec. enthalpy
spec.water cont.
English
C A N A d d re s s
O F F
Deutsch
Deutsch
C A N B u s
:
:
:
:
0..... 100 % rF
-60..... +80 °C
0..... 1’600 KJ/kg
0..... 600 g/kg
¦
¦
¦
¦
¦
-4.....176 °F
0.....100 % RH
-76.....176 °F
0..... 666 btu/lb
0.....4’000 grm/lb
Inbetriebnahme / Betrieb
Nachdem alle Montage- und Installationsarbeiten ausgeführt sind und das
Gerät korrekt konfiguriert ist,sollte der Gehäuse Deckel ( mit inegrierter
ELektronik) wieder auf dem Gehäuse Unterteil befestigt werden. Erst danach
darf die Spannungsversorgung eingeschaltet werden.
Das System wird unmittelbar nach der Aufschaltung der Speisung initialisiert.
Während dieser Zeit leuchten alle LED's kurz auf. Der Novasina HygroDat
100 befindet sich anschliessend sofort im Messmodus. Die grüne LED
(„Power“) leuchtet. Die Anzeige schaltet um und zeigt die aktuelle Temperatur
auf der Zeile 1. Je nach hardware Konfiguratione zeigt die Zeile 2 die relative
Feuchte (in %rF) oder andere gerechnete Werte an.
Hinweis: Im Messmodus leuchtet ausschliesslich die grüne LED!
Sollte noch eine andere LED aufleuchten , so liegt ein Fehler vor
(siehe Kapitel 8).
15
6
Die Bedienung des Systems
6.1. Die Anzeigeformate
Deutsch
Deutsch
Die Anzeigeformate werden mittels DIP Schalter S4/2 sowie S4/6 und S4/7
auf dem Elektronik Print im Deckel des Transmitters eingestellt (siehe Seite
16). Diese Grundeinstellung kann nicht über die Menustruktur eingestellt
werden. Mit der Umstellung der Einheiten von ISO- oder US-Einheiten
wechseln auch die Einheiten von Temperatur, Taupunkt, Enthalpie, und
Wassergehalt! Die jeweiligen analogen Ausgänge korrespondieren immer
mit der entsprechend eingestellten Anzeige.
IS O
Bsp. :
E in h e ite n :
2 1 . 2 ° C
5 2 . 8 % R H
T e m p e ra tu r
r e la tiv e L u ftfe u c h te
7 0 . 2 ° F
5 2 . 8 % R H
2 1 . 2
1 0 . 5
° C
° C
T e m p e ra tu r
T a u p u n k t T e m p .
7 0 . 2
5 0 . 6
° F
° F
2 1 . 2
4 1 . 6
° C
k J / k g
T e m p e ra tu r
s p e z ifis c h e E n th a lp ie
7 0 . 2
2 5 . 2
° F
b t u / l b
2 1 . 2
8 . 3
° C
g / k g
T e m p e ra tu re
W a s s e r g e h a lt d e r L u ft
7 0 . 2
5 4 . 4
° F
g r n / l b
Anzeige in US-Einheiten von Temperatur und Taupunkt
S4/2 :
S4/6 :
S4/7 :
ON
ON
OFF
7 0 . 2
5 0 . 6
° F
° F
Aout 1 :
Temp. in °F
Aout 2 :
Taupunkt in °F
English
( Einstellung des Bereiches der analogen Ausgänge siehe „Set An.Out RANGE“ )
6.2. Die Menüstruktur
Das modulare und sehr flexible HygroDat 100 Feuchte- und Temperatur
Transmitter System kann neben der Hardware abhängigen Konfiguration
(DIP-Schalter), zusätzlich auch mit Hilfe einer Menüsteuerung konfiguriert
und bedient werden. Die dazu benötigten Bedienungselemente (2 Tasten)
sind im Deckel des HygroDat 100 unterhalb der Anzeige integriert. Nachfolgend
werden diese Tasten „Select“ und „Set“ genannt.
Taste „Select“ oder „wählen“ :
Taste „ Set“ oder „bestätigen“:
Innerhalb der Menüstruktur können damit verschiedene Informationen über
Zustände, Laufzeiten und Justierung abgerufen werden. Erstmals für einen
Feuchte- und Temperatur Transmitter, kann das System mittels Passwort vor
unautorisierten Veränderungen sicher und einfach geschützt werden.
Bei jedem Start zeigt der HygroDat 100 während rund 5 Sekunden die aktuell
gespeicherte Software Version auf der LC-Display an. Danach schaltet er
automatisch auf den Messmodus um und ist somit betriebsbereit. Alle
analogen Ausgänge werden aktiviert und geben ein entsprechendes Signal
ab. Die digitalen Schnittstellen sind je nach hardware Konfiguration ebenfalls
aktiv und können angesteuert werden.
Nachfolgend werden die einzelnen Menüpunkte erläutert :
16
NOVASI NA
SW V1 . 2 0
Informations Anzeige
und aktulle interne Software Version
time
5 sec.
ACCESS CODE?
00000
Passwort abfrage : Erfolgt nur wenn ein
Passwort >00000 eingestellt worden ist
>OPERATI NG
HOURS
Betriebstundenzähler des Transmitters
seit der letzten Neujustierung, Werkskalibierung
>CALI BRATI ON
Menü für die Neujustierung der Feuchtemessung
mittels Novasina SC-Check's (Feuchte Standard
>ADJ UST
ANALOG OUT
Menü für die Anpassung der analogen Ausgangs
an SPS oder DDC Steuerungs- und Regelsystem
>SET
AN. OUT RANGE
Menü für die Skalierung der Ausgangsbereiche j
einzelnen analogen Ausgangs. ( skalierbar )
>SET
ACCESS CODE
Setzen eines persönlichen 5 stelligen
Zugangs. Deaktivierung mit Code 00000!
>ABOUT
Informationen über Instrumentenstatus
SW / HW Version-Level, sowie Sensortyp
Deutsch
Deutsch
Normale Messwert Anzeige abhängig
von den Hardware Schalter Einstellungen
Durch drücken der „Select“ Taste gelangt man von einem zum anderen
Menüpunkt. Erscheint auf der Anzeige das gewünschte Menü, kann durch
drücken der „Set“ Taste der jeweiligen Menüpunkt aktiviert und verändert
werden.
Die Anzeige wird automatisch zurückgesetzt wenn längere Zeit keine Taste
bedient wird. Wenn dabei ein Passwort (Zahlencode) gesetzt worden ist, wird
dieser ebenfalls aktiviert.
6.3. Passwort Einstellung
A C C E S S C O D E
x x x x x
A C C E S S C O D E
1 2 3 4 5
W ro n g
> O P E R A T I N G
H O U R S
Das System wird ohne Passwortschutz ausgeliefert. Damit kann der
Anwender sofort in die verschiedenen Menüpunkte navigieren. Das
Passwortschutzsystem wird aktiviert, indem beim Menüpunkt „SET ACCESS
CODE“ ein 5-stelliges Nummernpasswort eingegeben wird. Eine Deaktivierung
erfolgt automatisch indem das Zugangswort auf 00000 gesetzt wird
(Grundeinstellung bei Auslieferung).
Die Einstellung geschieht mittels der „Set“ Taste nachdem der Menüpunkt
angewählt worden ist. Durch drücken dieser Taste ändert sich die Ziffer 0...9
jeweils um eine Stelle. Hält man diese Taste längere Zeit gedrückt, so wird ein
Schnellvorlauf der Ziffern aktiviert. Nach Erreichen eines "10er" Durchlaufes
wird auf die nächste Zifferposition umgeschaltet. Der Schnellvorlauf wirkt
dann auch die gleiche Art und Weise bei der neuen Position. Die Zahl wird am
einfachsten durch die Einstellung der höchstwertigen Ziffer zur niederwertigsten
Ziffer eingegeben. Ist die höchstwertigste Ziffer einmal eingestellt, so kann
durch kurzes Abwarten und anschliessend erneutes drücken der „Set“ Taste
wieder von hinten begonnen werden.
17
English
HAUPT MENÜ
24. 8 ° C
4 5 . 8 % RH
ACCESS CODE
xxxxx
Deutsch
Deutsch
XXXXX
1 1
2 2
3 3
A C C E S S
C O D E
x x x x x
X
1
5
X
1
2
X
2
3
3
X
1
2
3
4
X
1
3
5 4 3 2 1
1
2
3
2
P o s .
1
P a s s w o r t 1 2 3 4 5
3
Pos.
1
Beispiel : Passwort 12345 :
1 2 3 4 5
B e is p ie l :
Einmalig kurzes drücken der Taste schaltet
den Wert um 1 Ziffer weiter
2
2
3
1 1 1
2 2 2
3 3 3
4
5
:
Permanentes drücken der Taste
bewirkt einen Schnellvorlauf der Ziffern bis die gleiche Ziffer wieder erreicht
ist. Danach wechselt die Stelle um 1 Ziffer nach links.
Wird während ca. 2 Sek. keine Taste gedrückt, so beginnt
die Einstellung bei der ersten Ziffer rechts von vorne.
Schritt 1: Drücken Sie die "Set" Taste solange permanent
bis an der Position 5 die Nr. 1 eingestellt ist.
--> Warten sie ca. 2 Sek. (Rückstellung des Zeigers)
Schritt 2: Drücken Sie die "Set" Taste solange permanent
bis an der Position 4 die Nr. 2 eingestellt ist.
--> Warten sie ca. 2 Sek. (Rückstellung des Zeigers)
Schritt 3: Drücken Sie die "Set" Taste solange permanent
bis an der Position 3 die Nr. 3 eingestellt ist.
--> Warten sie ca. 2 Sek. (Rückstellung des Zeigers)
Schritt 4: Drücken Sie die "Set" Taste solange permanent
bis an der Position 2 die Nr. 4 eingestellt ist.
--> Warten sie ca. 2 Sek. (Rückstellung des Zeigers)
Schritt 5: Drücken Sie die "Set" Taste solange permanent
bis an der Position 1 die Nr. 5 eingestellt ist.
Schritt 6: Beendigung der Einstellung mittels der Taste "Sele
6.4. Anzeige und Setzen der Justier-Alarmierung
S e n s o r n e e d
c a l i b r a t i o n ! !
> O P E R A T I N G
H O U R S
!! L C D D is p la y
B L IN K T !!
> O P E R A T I N G
H O U R S
L a s t C a l i b r :
0 0 0 0 1 h
English
S e t
a t :
a l a r m
0 8 7 6 0
h
Dieser Menüpunkt dient zur Überwachung der periodischen Neujustierung
des gesamten Feuchte - Mess Systems. Zuerst wird die bereits abgelaufene
Zeit seit der letzten Neujustierung angezeigt. Durch drücken der „Select“
Taste, kann die Alarmzeit bis zur Neujustierung individuell neu eingestellt
werden. Werkseitig ist der Alarm auf 8760h eingestellt (1 Jahr). Dieser lässt
sich durch das Setzen auf 00000 deaktivieren. Die Einstellung der Alarmzeit
geschieht auf die gleiche Art und Weise wie beim Setzen des Passwortes.
Sobald mind. 1 Feuchtepunkt neu justiert worden ist, setzt sich das System
wieder selbständig zurück und startet den Alarmtimer von Neuem. Der
Alarmtimer wird durch die Veränderung des Wertes ebenfalls neu gesetzt !
6.5. Neujustierung von bis zu 5 Feuchte Messpunkten
Die Gewähr für die Richtigkeit einer Messung ist nur gegeben, wenn ein
Messgerät gelegentlich geprüft und nötigenfalls an einem, oder mehreren
Punkten neu justiert wird.
Feuchte-Sensoren können im Laufe der Zeit von ihrem ursprünglichen
Feuchtewerten abweichen. Der Grund liegt meist in der "chemischen"
Verschmutzung der Luft. Deshalb müssen sie von Zeit zu Zeit kontrolliert bzw.
neu justiert werden. Nur dadurch lässt sich die ursprüngliche Genauigkeit des
Mess Systems wieder herstellen. (Drift der Feuchte Sensoren)
Das Novasina HygroDat 100 System kann an bis zu 5 Punkten neu justiert
werden. Novasina hat dafür sogenannte SC- Checks entwickelt. Diese auf
einer Salzlösung basierenden zylinderförmigen Feuchte-Generatoren
ermöglichen jedem Kunden sein System jederzeit zu überprüfen und
nötigenfalls neu zu justieren. Dazu ist die Menüfunktion „Calibration“
vorgesehen.
Die SC-Checks auch Feuchte Standards genannt, können bei entsprechend
sorgfältiger Handhabung jahrelang verwendet werden. Bei Bedarf sind diese
auch mit einem international anerkannten Zertifikat erhältlich. Feuchte
Standards können in einem Temperaturbereich von 15......30°C angewendet
werden und sollten auch bei diesen Temperaturen gelagert sein.
Folgende Tabelle gibt einen Überblick über die 5 Referenzpunkte, die zu
verwendenden Feuchte Standards und den entsprechenden Kalibrierbereich:
18
> CALI BRATI ON
Di s pl a y
c a l i b. - st at us
Ca l i b. s e ns or
t o 52. 9%
Del e t e al l
ca l . - poi nt s
Eingang durch
drücken der
Taste
Referenzpunkt
Poi nt 11 . 3 %
ca l i br at ed
De l . si ngl e
ca l . - poi nt s
Kurzes drücken der
Taste
ermöglicht die Auswahl des
zu löschenden Punktes
in % rF bei 25 °C
11.3
32.8
52.9
75.3
90.1
11.3 %
32.8 %
52.9 %
75.3 %
90.1 %
De l et e poi nt
at . 3 2. 8 % ?
Feuchte Standard
(Sensor Check)
SC-11
SC-33
SC-53
SC-75
SC-90
Justierbereich um den
Referenzpunkt in %rF
von –7.0 bis +7.0
von –8.0 bis +8.0
von –8.0 bis +8.0
von –7.0 bis +6.0
von –6.0 bis +3.0
Deutsch
Deutsch
>CALI BRAT I ON
Der Justierbereich gibt an, in welchem Bereich um den Feuchte-Referenzpunkt
eine Justierung des Systems noch möglich ist. Liegt der Messwert ausserhalb
dieses Bereiches, kann der Sensor nicht mehr kalibriert werden (der Sensor
ist zu weit weggedriftet und damit defekt).
Über die Häufigkeit einer Kontrolle bzw. einer Kalibrierung lassen sich keine
generellen Aussagen machen. Dies ist allein abhängig vonverschiedenen
Faktoren der Umgebungsbedingungen und der geforderten Messgenauigkeit,
sowie das Messmedium und der Installation.
Hinweis:
Die relative Feuchte des SensorChecks ist von der Umgebungstemperatur abhängig (siehe Aufdruck
auf Feuchtestandard). Der Novasina
Hygrodat kompensiert diese Abhängigkeit bei der Kalibrierung automatisch.
Wir empfehlen nach der ersten Inbetriebnahme eines Systems alle paar
Monate eine Überprüfung vorzunehmen. Die Auswertung der Resultate
erlaubt Rückschlüsse auf die erforderlichen Justierintervalle.
Falls Sie Probleme bei der Kalibrierung Ihres HygroDat haben, nehmen Sie
bitte Kontakt mit Ihrer Novasina-Vertretung auf oder wenden Sie sich direkt
an das Herstellerwerk in der Schweiz.
English
6.5.1. Vorgehen bei der Neujustierung
Vor der Justierung eines Feuchtepunktes sollte der SC Feuchte Standard
visuell überprüft werden. Im Schauglas muss entmineralisiertes Wasser,
Sensor
Salzkristalle und etwas Luft sichtbar sein. Das Salz sollte geschüttelt werden
ev.
können (Ausnahme ist das 11er Salz, das sehr trocken ausgeliefert wird).
Adapter “ch”
Nach dem Öffnen des grauen Verschlussdeckels auf der Stirnseite des SCStandards, kann die weisse Membrane im Innern des SC, visuell auf
Dichtheit überprüft werden (keine Wasserrückstände im Innern). Bevor der
SC Check auf den eigentlichen Sensor aufgesteckt werden kann, sollte dieser
muss dieser kurz geschüttelt werden. Die entsprechende Funktion des SCChecks ist nur gewährleistet, wenn der SC Check luftdicht über dem Sensor
Sensor-Check
abschliesst. Achten Sie unbedingt darauf und benutzen Sie je nach Sensor
entsprechende Reduktionsstücke die bei Novasina erhältlich sind.
Bitte beachten Sie zusätzlich folgende Punkte :
– Sensor-Check und Messzelle müssen zum Zeitpunkt der Kalibrierung im
Temperatur- und Feuchte Gleichgewicht sein.
– Die Temperatur muss zum Zeitpunkt der Kalibrierung zwischen 15 °C und 30
°C liegen. Die Temperatur soll dabei möglichst konstant und stabil sein.
– Während dem Kalibrieren sind thermische Beeinflussungen durch Luftzug,
direkte Sonnenbestrahlung, Ventilation, Heizungswärme usw. zu vermeiden
6.5.2. Kalibrierung durchführen
Um einen der 5 Referenzpunkte zu kalibrieren, gehen Sie bitte wie folgt vor:
•
Gewünschten Sensor-Check mit/ohne Adapter „ch“ (Art.Nr.1107345)
vorsichtig auf den Sensor aufstecken und nötigenfalls das System
mittels Styropor-Schutzhülle thermisch zusätzlich schützen.
•
Warten bis Messzelle und Feuchte Standard im Temperaturund Feuchte- Gleichgewicht sind (Richtzeit: ca. 30 Minuten.).
Der Transmitter darf während der Wartezeit
nicht ausgeschaltet werden.
•
Anwählen des Menüpunktes „Calibration“ („Select“ Taste).
19
Deutsch
Deutsch
•
Mittels der „Set“ und „Select“ Taste zum Untermenü „Calib. sensor“
wechseln. Der Transmitter sollte nun selbständig erkennen welches SCCheck auf den Sensor aufgesteckt ist. Folgende Meldung wird angezeigt:
„Calib.Sensor to xx.x%“, wobei "xx.x" den SC Wert darstellt (überprüfen
Sie ob das HygroDat 100 System das SC Check richtig erkennt!).
• Durch drücken der „Set“ Taste während 3 Sek. wird die Justierung
ausgeführt. Der Transmitter speichert die Abweichungen und quittiert
dies durch eine kurze Anzeige „done“. Damit ist dieser Feuchtepunkt
bereits neu justiert.
•
Danach können weitere SC Checks auf den Sensor gesteckt und jeweils
einen weitere Feuchte Referenzpunkte neu justiert werden.
Hinweis: Falls die „SET“ Taste nicht innerhalb von 60 Sekunden erneut
gedrückt wird, wird der Referenzpunkt nicht justiert und das Gerät kehrt in
den Messmodus zurück.
Sollte die Anzeige „No Calibration“ erscheinen, so konnte der Feuchte
Referenzpunkt nicht justiert werden. Folgende Fehlermöglichkeiten sind
dabei zu erwähnen :
1. Der Messwert nicht genügend stabil (Temperatur oder Feuchtewert) .
2. Die gemessene Temperatur liegt ausserhalb der Limiten.
3. Der Referenzwert liegt ausserhalb des Fangbereiches (siehe Seite 19 ).
English
4. Das SC Check erzeugt nicht mehr die gewünschte Feuchtegleichgewicht rsp. kann dieses nicht mehr richtig generieren (mehr dazu
siehe Beipackzettel für die SC Standards ).
6.6. Menü Justierung der analogen Ausgänge
20
Dieser Menüpunkt wurde speziell für die Anpassung des Systems an
Prozessleitsysteme, wie sie in der Industrie an vielen Orten eingesetzt
werden, entwickelt. Dieses Tool löst das immer wieder auftretende Problem,
der leicht abweichenden Anzeigen zwischen dem Transmitter ( Messgerät
Vorort) und einer Anzeige auf der Prozessleitstation. Beim HygroDat 100 kann
dies auf eine sehr elegante Art und Weise gelöst werden . Der Grund liegt meist
in der analogen Informationsübertragung und getrennten Digitalisierung der
Signale an verschiedenen Orten (Toleranzprobleme). Diese Funktion ermöglicht
es dem Kunden die analogen Ausgänge bis zu einem maximalen Offset von +/
-5% des Anzeigewertes zu schieben. Der Anzeigewert auf dem Transmitter wird
dabei nicht verändert. Zusätzlich kann dieser Menüpunkt auch noch für die
Signalerkennung auf einer Prozessleitstation genutzt werden. Nach der
Aktivierung dieses Menüpunktes sendet der Transmitter ein analoges
Ausgangssignal, das genau 30% des Maximalwertes entspricht. Durch drücken
der „Select“ Taste kann es auf einen Signalwert von 70% umgeschaltet werden.
Natürlich ist an beiden Punkten eine Justierung möglich. Beide analogen
Ausgänge können so optimal auf ein Leitsystem eingestellt werden.
Justierung der analogen Ausgänge : (Abgleich)
Analoger Ausgangswert !
>ADJ UST
ANAL OGE OUT
Beeinflusst nicht den Anzeigewert
+ 5.0%
+ 5.0%
30.0%
Ausgabewert
Schritt = 0.1%
- 5.0%
Zeit
3 sec.
Justierung der analogen Ausgänge für
DDC / SPS system synchronisierung !!
Adj us t out put 1
10. 0° C
Veränderung des Ausgangssignals in Schritten
bis auf +/- 5% der Limite ( Sägezahn )
Adj us t out put 1
50. 0° C
Veränderung des Ausgangssignals in Schritten
bis auf +/- 5% der Limite ( Sägezahn )
Adj us t out put 2
3 0 . 0 % RH
Veränderung des Ausgangssignals in Schritten
bis auf +/- 5% der Limite ( Sägezahn )
Adj us t out put 2
7 0 . 0 % RH
Veränderung des Ausgangssignals in Schritten
bis auf +/- 5% der Limite ( Sägezahn )
Deutsch
Deutsch
Hinweis : Die Justierung bezieht sich ausschliesslich auf die analogen Aus
gänge und nicht auf die Anzeige des HygroDat 100 Systems !
Veränderungen sind nur mittels eines geeignetem Messinstrument das auf die analogen Ausgänge geschaltet wird,
sichtbar !
- 5.0%
6.7. Menü Skalierung der analogen Ausgänge
Das HygroDat 100 System verfügt über eine sehr leistungsfähige
Skalierfunktion zwischen den angezeigten Messwerten und den analogen
Ausgängen. Damit können Sie Ihre analogen Ausgänge an den gewünschten
Messbereich anpassen (wählbar über die Menüsteuerung).
OUT 1 :
OUT 2 :
4.....20 mA
4.....20 mA
->
->
0......55°C
0......75,5 % RH
Die analogen Ausgänge selbst weisen eine sehr hohe Linearität und Genauigkeit
aus. Die Messungen vom Sensor werden mehr als 10 mal pro Sekunde an
die analogen Ausgänge gesendet. Dies ermöglicht eine sehr schnelle Reaktion
der angeschlossenen Regelung oder Überwachung.
Das System selbst, misst die beiden analogen Ausgänge und regelt diese sehr
genau aus. Beide analogen Ausgänge sind Kurzschluss geschützt!
Mit dieser Funktion ist es Ihnen möglich die Leistungsfähigkeit aller anderen
angeschlossenen Regelsysteme oder Überwachungen vollständig in Ihrem
gewünschten Bereich auszuschöpfen.
Skalierbare Ausgänge :
>SET
AN: OUT RANGE
Skalierung der analogen Ausgänge
Re s e t t o
f a c t or y s e t ?
Zeit
3 sec.
Zeit
3 sec.
Bereich innerhalb der Instumentenlimiten frei einstellbar
55°C
Set this value
d one
Se t . o ut . 1 f r om
- 2 0. 0° C
Untere Bereichseinstellung des analogen
Ausgangs 1 beginnend bei -20.0°C !
Se t . out . 1 t o
80. 0° C
Obere Bereichseinstellung des analogen
Ausgangs 1 beginnend bei + 80.0°C !
Se t . out . 1 f r om
0 . 0 % RH
Untere Bereichseinstellung des analogen
Ausgangs 2 beginnend bei 0.0% RH !
(oder je nach Anzeige auf LCD)
Se t . out . 2 t o
1 0 0 . 0 % RH
Obere Bereichseinstellung des analogen
Ausgangs 2 beginnend bei 100.0% RH !
(oder je nach Anzeige auf LCD)
0°C
4mA
20mA
Rückstellung auf Grundeinstellungen erfolgt !
6.8. Menü „Passwort –Aktivierung“
Das Transmitter System kann bei Bedarf mittels eines Passwortcodes vor
unberechtigtem Zugriff geschützt werden. Die Auslieferung geschieht jedoch
mit einem deaktiviertem Passwortschutz („00000“). Das Passwort
Schutzsystem ist aktiviert indem in diesem Menupunkt einen Code <>
„00000“ eingegeben und bestätigt wird.
21
English
Beispiel :
Achtung :
Vergessen sie NIE den eingestellten Passwortcode des
Systems. Eine Deaktivierung ist nur im Werk der Novasina
möglich und zieht immer eine Neujustierung mit sich !
Deutsch
Deutsch
Setzen eines Passwortcode :
<SET
ACCESS CODE
Zeit
3 Sec.
ACCESS CODE
1 2345
Eingabe eines neuen Codes für das
Passwortschutzsystem <>"00000"
(vergessen sie den Code NIE!)
Gewünschten Code durch drücken
der
Taste eingeben !
Ac t i v a t e
a c c e s s c ode
NEIN
JA
Durch das drücken der Taste
bestätigen sie
den neuen Code und verlassen das Menü
Durch das drücken der Taste
ignorieren sie
den neuen Code und aktivieren den alten Code
Die Aktivierung des Passwortschutzsystem geschieht automatisch wenn
keine Taste innerhalb den nächsten 5 Minuten mehr gedrückt worden ist !
6.9. Menü „About“ (Systeminformationen)
Beim letzten Menüpunkt können Sie aktuelle Informationen Ihr Feuchte- und
Temperatur Messinstrument erfahren. Folgende Informationen stellt das
System zur Verfügung :
•
•
•
Aktuelle SW Version
Aktueller Hardware Level
Art des angeschlossenen Sensorsystems
: SW V04.03
: Level 0
: C-Sensor / E-Sensor
English
Es können keine Änderungen in diesem Menupunkt ausgeführt werden. Die
Angaben dienen lediglich zur Information. Zukünftig ist es möglich, dass
weitere Menupunkte seitens Novasina eingebaut werden können.
>Ab ou t
7.
> Sof t war e
SW V 04 . 0 3
Information über integrierte Programmsoftware Version des HygroDat 100
Ha r dwa r e
Le ve l 0
Information über die Hardware-Elektronik
Version des HygroDat 100
Se ns or
C
Information über den aktuell
angeschlossenen Sensortyp ( C / E )
Handhabung der SC Salz Check - Feuchte Standards
Novasina empfiehlt zur Überprüfung und Neujustierung aller Feuchte- und
Temperatur Mess-Systeme die Verwendung von Novasina SC Feuchte
Standards. Diese haben sich seit Jahrzehnten bewährt, sind äusserst einfach
in der Anwendung und können über einen langen Zeitraum mehrmalig
verwendet werden. Bitte beachten Sie, dass die SC Checks nach Gebrauch
sofort verschlossen und diese umgehend im vorgesehenen zylindrischen
Behälter zur Aufbewahrung gelagert werden.
Für die vollständige Überprüfung und nötigenfalls Neujustierung eines
Transmittersystems wurde ein 5er SC Set inkl. Koffer entwickelt. Es ist jedoch
auch möglich eine Justierung der Transmitter an einzelnen Feuchtepunkten
zu bewerkstelligen.
Empfehlungen für eine einwandfreie Justierung des HygroDat 100 Systems in
Verbindung mit den Novasina SC-Standards :
22
•
Die Raumtemperatur während der Justierung muss im Bereich von
15...30°C liegen und sollte während der Justierung nicht mehr als +/0,2°C schwanken.
•
Alle verwendeten SC Checks müssen vor der Verwendung visuell
überprüft werden (siehe Packungsbeilage).
•
Damit die SC-Standards eine genaue relative Luftfeuchtigkeit im
Inneren erzeugen können, muss der Sensor vom SC dicht
•
Alle verwendeten SC-Checks müssen min. 1h vor dessen Verwendung auf die gleiche Umgebungstemperatur wie der zu
überprüfende Sensor gebracht werden.
•
Das Transmittersystem muss während des ganzen Tests bzw.
Justierung eingeschaltet sein.
•
Starten Sie eine Mehrpunkt-Justierung wenn möglich immer beim
53% rF SC-Check. Gehen Sie dann über zum SC-75% und dann
zum SC-90%. Danach kann der SC-33% und letztes der SC-11%
verwendet werden.
•
Da ein kapazitiver C-Sensor physikalisch bedingt eine Hysterese
hat, sollten Sie bei seiner Justierung immer den gleiche Ablauf bzw.
Reihenfolge befolgen.
•
Jedes HygroDat 100 System wird werkseitig an 5 Punkten justiert.
Sollte eine Neujustierung einzelner Punkte nötig sein, so werden
diese Parameterwerte in der Software des HygroDat 100
Transmitters überschrieben. Diese müssen vorgängig nicht gelöscht
werden.
•
Sobald ein Sensor (C- oder E- Messzelle) einmal getauscht wird, ist
es unumgänglich, alle Justierwerte die sich in der Software des
Transmitters befinden zu löschen (das Löschen der Parameter erfolgt im
Menü „Calibration“). Danach solle an 5 Punkten neu justiert werden.
Deutsch
Deutsch
umschlossen sein und fest auf dem Sensor sitzen. Verwenden Sie
allenfalls das entsprechende Reduktionsstück um den Durchmesser
der Öffnung des SC Checks anzupassen.
English
• Die Novasina Messzellen werden mit einer Grundgenauigkeit von +/
- 2.0% rF (E-Sensor) bzw. +/-3.5% rF (C-Sensor) ausgeliefert.
Die SC-Standards erzeugen bei richtiger Handhabung eine äusserst stabile relative Luftfeuchte und
können somit als eigentliche Feuchte Generatoren bzw. Feuchte Standards bezeichnet werden.
8. Die analoge Datenausgabe
Jeder Transmitter verfügt über 2 analoge Ausgänge. Diese können
verschiedenartig konfiguriert und per Software auch entsprechend skaliert
werden (siehe Installation und Konfiguration Seite 11/14). Auf dem analogen
Ausgang Nr.1 wird immer die aktuelle Temperatur in °C oder je nach Anzeigekonfiguration auch °F ausgegeben. Der analoge Ausgang Nr. 1 korrespondiert
mit der Anzeige der Zeile 1 auf dem LCD.
Der zweite analoge Ausgang gibt immer ein Signal, korrespondierend mit der
zweiten Zeile der Anzeige, aus. Dies ist normalerweise der entsprechende
Wert für die relative Luftfeuchte in % rF. Je nach Konfiguration der zweiten
Zeile (siehe Seite 15) können aber auch Taupunkt, Enthalpie oder der
gerechnete Wassergehalt auf den analogen Ausgang ausgegeben werden.
Bitte beachten Sie die entsprechende Verdrahtung für Spannung bzw.
Stromausgang zwischen dem HygroDat 100 Transmitter und dem Regleroder PLC- ( SPS/DDC) Eingang.
Schaltschema bei Spannungsausgängen :
Regler- DDC, SPS oder PLC
Eingang mit 0..10V Konfiguration
H+ 7
Aout 1
Temperartur
U
I = max. 10 mA
0 (2).......10V DC
H- 6
max. 20 mA
I = max. 10 mA
T+ 7
Aout 2
rel. Feuchte
0 (2).......10V DC
U
max. 20 mA
T- 6
Andere Aout 2 sind mittels
DIP-Switch S4 einzustellen !
23
Schaltschema bei Stromsausgängen :
Regler- DDC, SPS oder PLC
Eingang mit 0(4)..20mA Konfiguration
H+ 7
I
U = max. 10 V DC
0 (4).......20mA
Deutsch
Deutsch
Aout 1
Temperartur
max. 10V DC
H- 6
T+ 7
Aout 2
rel. Feuchte
U = max. 10 V DC
0 (4).......20mA
I
max. 10V DC
T- 6
Andere Aout 2 sind mittels
DIP-Switch S4 einzustellen !
Bitte kontrollieren Sie nach der Konfiguration der analogen Ausgänge mittels
Volt- bzw. Ampèremeter die Einstellungen des Transmitters.
Bei der Auslieferung sind folgende Skalierungen der analogen Ausgänge
eingestellt:
1. Aout 1 :
2. Aout 2 :
0....10V DC ->
0....10V DC ->
-20......+80°C
0......100% RH
wenn die Anzeige und somit auch der analoge Ausgang 2 auf andere Klimaparameter mittels S4 umgeschaltet wird, so sind die folgenden Werte eingestellt:
Aout 2
:
0.... 10V DC
Taupunkt
:
Spez. Enthalpie :
Spez. Wassergehalt :
-40......+60°C
0..... 166 KJ/kg
0..... 49 g/kg
Aout 2 : relative Luftfeuchte 4....20 mA
English
100.0 % R H
50.0% R H
0.0 % R H
0 1 2 3 4
5
6
7
8
9
10
11
12
13
14
15
16
17
18
19
20 m A
Alle analogen Ausgänge können nachträglich neu skaliert werden. Dies
bedeutet, dass Sie den gewünschten Ausgabebereich frei per Software
einstellen können ( siehe Seite 21 ) Dabei bleibt der Arbeitsbereich des
analogen Ausgangs immer gleich (0....10V / 0(4).....20mA). Sie können
jedoch bestimmen, dass dieser Bereich nicht mehr einer Temperatur von 20.....+80°C entspricht, sondern nur noch z.B. 0....+50°C ! Dabei bleibt die
analoge Auflösung der Ausgänge immer gleich.
5 0 .0 ° C
2 5 .0 ° C
0 .0 ° C
0
24
1
2
3
4
5
6
7
8
9
10 V D C
Jeder der analogen Ausgänge wird bis zu 10 mal pro Sekunde aktualisiert.
Dadurch erhalten Sie einen äusserst genaue und schnelle Messwertausgabe.
Die bringt massgebende Vorteile vorallem bei Steuerungs- und Regel
Applikationen. Die LCD Anzeige selbst wird 1 Mal pro Sekunde erneuert.
Beide analogen Ausgänge besitzen die Möglichkeit der Justierung und
Skalierung für entsprechende Partner wie SPS, PLC oder DDC Systeme.
Ihr HygroDat 100 Feuchte- und Temperatur Präzsisions-Messsystem verfügt
neben den standardisierten analogen Ausgängen (0...10V / 4...20mA) zusätzlich
über ein sehr modernes digitales Datenübermittlungssystem auf der Basis
eines Feldbuses. Anstelle der analogen Datenübertragung kann das System
an eine 2-Draht Leitung (Feldbus CAN) zusammen mit anderen HygroDat 100
Transmittern oder kompatiblen Busteilnehmern angeschlossen werden. Die
Übermittlung erfolgt mittels einem standardisierten Datenprotokoll. Das
gewählte Protokoll entspricht der Spezifikation des CAN Buses (CAN =
Controller Area Network). Dies ist eine sehr einfache, äusserst sichere und
schnelle Datenschnittstelle, die es erlaubt, bis zu 127 solcher Transmitter an
eine Leitung von bis zu 1’000m Länge anzuschliessen. Für die Datenauslesung
können gängige CAN Bus Karten inkl. Software für PC basierende Systeme,
wie auch für PLC- (SPS-) Systeme, verwendet werden.
Die Busleitungen werden beim Transmitter auf die Klemme der analogen
Ausgänge verdrahtet. Entsprechend muss dann aber der DIP-Switch S1, S3
und S4 richtig konfiguriert werden (S1 = CANopen / S3 = CAN Knoten
Nummer / S4 = Baudrate und Pullup)
Deutsch
Deutsch
9. Die digitale Datenausgabe über CAN Feldbus System
Prinzipielles Verdrahtungsschema bei Feldbus CAN :
CAN Nr : 97
Physikalisches ENDE des CAN Kabels!!
( der Bus muss zwingend am ANFANG und ENDE
mit 120 Ohm abgeshlossen werden )
120 Ohm
CAN Bus Teilnehmer
HygroDat 100 / 97
S4
ON OFF
1
CAN Nr : 96
2
S1 : CANopen
S3 : CAN Nr. xx
S4 : Baude Rate
S4
120 Ohm
ON OFF
Max Länge ist abhängig von der
Übertragungsrate : 1'000m
E- oder C- Sensor
CAN Nr : 03
CAN Bus Teilnehmer
HygroDat 100 / 03
S4
ON OFF
120 Ohm
1
2
English
CAN Bus Teilnehmer
HygroDat 100 / 96
1
2
S1 : CANopen
S3 : CAN Nr. xx
S4 : Baude Rate
E- oder C- Sensor
CAN Nr.: 02
CAN Bus Teilnehmer
HygroDat 100 / 02
S1 : CANopen
S3 : CAN Nr. xx
S4 : Baude Rate
Transmitte
Speisung
S4
120 Ohm
ON OFF
E- oder C- Sensor
1
2
S1 : CANopen
S3 : CAN Nr. xx
S4 : Baude Rate
CAN Nr : 01
CAN Bus Teilnehmer
HygroDat 100 / 01
E- oder C- Sensor
S4
ON OFF
2
Personal Computer System für die
Prozess Visualisierung oder
PLC / SPS / DDC Systeme
120 Ohm
1
120 Ohm
S1 : CANopen
S3 : CAN Nr. xx
S4 : Baude Rate
E- oder C- Sensor
CAN
USB
RS-232
CAN MASTER
"Addr : 00"
ANFANG des CAN Feldbusses !!
( der Bus muss zwingend am ANFANG und ENDE
mit 120 Ohm abgeshlossen werden )
25
Deutsch
Deutsch
Über den CAN Feldbus werden alle vom HygroDat 100 gemessenen und
gerechneten Informationen in einem normierten Datenformat gemäss CAN
Spezifikation
übermittelt.
Die
eingehende
Behandlung
der
Protokollspezifikation würde den Rahmen dieser Bedienungsanleitung
sprengen. Deshalb verweisen wir auf die bei Novasina zusätzlich erhältliche
CAN Spezifikation.
Für eine einwandfreie Kommunikation mit den verschiedenen Transmittern
über CAN, müssen folgende Schalter auf der Transmitter Leiterplatte eingestellt
sein :
1.
2.
3.
4.
S1
S2
S3
S4
:
:
:
:
Umschaltung CAN / Aout auf CAN
Keine Funktion wenn S1 auf CAN !
Einstellung der binären CAN Adresse 01....127
S4/1 Pullup Widerstand bei Bedarf S4/3-4 Baudrate
English
Novasina arbeitet im Bereich der Feldbus Kommunikation auf der Besis von
CAN seit Jahren mit der deutschen Firma IXXAT zusammen. Sollten Sie solch
eine Applikation planen, so empfiehlt es sich uns vorgängig zu kontaktieren.
Gerne händigen wir Ihnen Informationen wie Protokoll, Entwicklungssoftware
sowie Informationen über die Verwendung von USB zu CAN Hardware für PC
basierende Systeme aus.
10. Digitale Kommunikation via RS 232 Datenschnittstelle
Der HygroDat 100 Transmitter verfügt standardmässig beim C-Sensor
(Option beim E-Sensor) über eine digitale RS-232 Schnittstelle, welche auf
dem Zusatzprint der Elektronik angebracht ist. Diese kann für den Datentransfer
zu einem PC benutzt werden. Novasina bietet ebenfalls die einfache, leicht
zu bedienende NOVALOG 32 Software an, welche auf Windows basiert.
Damit können die Daten angezeigt und zeitabhängig entsprechend gespeichert
werden. Zusätzliche Analyse- und Trendfunktionen, einzelne
Rechenfunktionen, sowie einfache Ausdruck- und Export-Möglichkeiten
ergänzen dieses bedienerfreundliche Software Paket.
Bei der RS-232 Verbindung handelt es sich stets um eine Punkt zu Punkt
Verbindung. Es kann jeweils nur 1 HygroDat 100 mit 1 PC kommunizieren.
Die Datenkabellänge ist gemäss der Spezifikation für eine RS 232 auf max.
15m begrenzt. Dazu wird ein zweiadriges geschirmtes Datenkabel verwendet,
welches folgendermassen verdrahtet wird :
RS-232
Stecker
Windows basierendes PC
System mit RS 232 COM Schnittstelle
Stecker 4
auf Zusatzprint
TxD
RxD
23 TxD
22 RxD
21
GND
HygroDat 100
RS-232 Interface
26
11. Unterhalt und Wartung
11.1. Austausch der Messzellen
Deutsch
Deutsch
Die eigentliche Messzelle jedes HygroDat 100 Sensors kann sehr einfach
ausgetauscht werden. Ganz gleich ob es sich dabei um einen E- oder CSensor handelt. Beide sind steckbar unter dem Filterschutzsystem auf dem
entsprechenden Sensor angebracht. Um an die Messzelle zu kommen, muss
zuerst die Filterschutzkappe, abgeschraubt werden. Danach ist die Messzelle
frei zugänglich.
Achtung! Die Feuchtemesszellen des Novasina HygroDat ist mit
einer integrierten Heizung (Betauungsschutz) ausgerüstet, um sie vor Sättigung
bei hoher Luftfeuchtigkeit und damit vor Defekt zu schützen. Damit dieser
Betauungsschutz jederzeit gewährleistet ist, sollte die Spannungsversorgung bei hoher relativer Luftfeuchtigkeit (>95 %rF), immer
eingeschaltet sein.
Keine der Messzellen darf in irgend einer Form gereinigt werden. Für einen
optimalen Messzellenschutz werden verschiedene Filterschutz Systeme je
nach Applikation angeboten. Verschmutzte Messzellen müssen auf jeden Fall
ersetzt bzw. ausgetauscht werden. Eine Reinigung jeglicher Art zersteurt das
Messelement sofort. Auch die Berührung der Filterflächen (dunkle rechteckige
Fensterchen bei E-Messzelle) oder des Sensor Chips (C-Messzelle), verursacht
einen erhöhten Drift bzw. eine Beschädigung der Messzellen!
HIA-1x
HIS-1x
HIS-2x
HIC-1x
HICS-1x
HICH-1x
:
:
:
:
:
:
E-Sensor
E-Sensor
E-Sensor
C-Sensor
C-Sensor
C-Sensor
CC-1
CC-1
CC-1
DCC-1
DCC-1
DCC-1
English
Die E-Messzelle besitzt an seiner Unterseite einen 6-Pol Stecker (männchen)
während die C-Messzelle eine 5-Pol Buchse (weiblich) besitzt. Es ist nicht
möglich auf einen C-Sensor eine E- Messzelle zu stecken und umgekehrt.
Best.Nr : 111 3828
Best.Nr : 111 3828
Best.Nr : 111 3828
Best.Nr : 111 9590
Best.Nr : 111 9590
Best.Nr : 111 9590
Filterflächen
BITTE NIE BERÜHREN
E-Sensor
CC-1 Messzelle
C-Sensor
DCC-1 Messzelle
Austausch der E-Messzelle :
Der Austausch der Messzelle ist sehr einfach.
1. Entfernen Sie des Filtersystems indem Sie dieses abschrauben.
2. Danach kommen Sie direkt zur Messzelle.
3. Ziehen sie vorsichtig die Messzelle aus ihrem Sockel. Bitte beachten Sie
dabei, dass die oben bezeichneten Flächen auf keinen Fall berührt werden
dürfen.
4. Ersetzen Sie die defekte Messzelle durch eine neue des gleichen Typs.
Diese sind bei Ihrem Vertreter meist am Lager. Die Messzelle funktioniert
in beiden möglichen Steckpositionen (180°gedreht).
Die CC-1 Feuchte- und Temperatur Messzelle besitzt herstellerseitig eine
Grundgenauigkeit von +/-2.0 % rF. Benötigt Ihre Applikation keine genauere
Messung, so müssen nur noch die alten Kalibrationswerte im System gelöscht
werden (siehe Seite 19).
Danach sollte der Filter sofort wieder aufgeschraubt werden. Nur so ist ein
optimaler Schutz gewährleistet und die neue Messzelle ideal positioniert.
27
Deutsch
Austausch der C-Messzelle :
Der Austausch der C-Messzelle ist genau so einfach wie bei der E-Messzelle.
Es kann in der gleichen Reihenfolge vorgegangen werden. Die C-Messzelle
weist jedoch einen Verdrehschutz auf und kann damit nur in einer Position
gesteckt werden. Der sich am Kopf befindliche schwarze Teil (C-Messelement)
sollte ebenfalls auf keinen Fall berührt werden.
Die DCC-1 Feuchte- und Temperatur Messzelle besitzt herstellerseitig eine
Grundgenauigkeit von +/-3.5 % rF. Benötigt Ihre Applikation keine genauere
Messung, so müssen nur noch die alten Kalibrationswerte im System gelöscht
werden (siehe Seite 19).
Danach sollte der Filter sofort wieder aufgeschraubt werden. Nur so ist ein
optimaler Schutz gewährleistet und die neue Messzelle ideal positioniert.
Nach einem Messelemente Wechsel sollten Sie das System immer neu
justieren, da sonst die Grundgenauigkeit der Sensoren das Massgebende
Element des Mess System ist (+/-2%rF :E-Sensor bzw. +/-3.5%rF :C-Sensor).
Dazu müssen die alten gespeicherten Messwerte nicht zwingend gelöscht
werden. Der Transmitter überschreibt einfach bei der Neujustierung die alten
Werte (siehe Seite 19).
Filterwechsel :
English
Das HygroDat 100 System verfügt über verschiedene Möglichkeiten, den
Sensor aktiv (chemisch) oder passiv (mechanisch) vor unerwünschten
Fremdeinwirkungen von zu schützen. Gerne beraten Sie unsere Vertretungen
bei Bedarf. Alle Filter müssen von Zeit zu Zeit getauscht werden, da
chemische Beeinflussungen den Filter angreifen und deaktivieren können.
Auch starke Verschmutzung macht einen Filterwechsel nötig.
Kontrollieren Sie periodisch jeden Filter genau und wechseln Sie diesen
frühzeitig aus. Dies verlängert die Lebensdauer der Messzellen. Eine
Verminderung der chemischen Wirksamkeit kann teilweise an der erhöhten
Drift der Messzellen festgestellt werden.
Nur passive Filftersysteme können sehr vorsichtig gereinigt werden. Verwenden
Sie auf keinen Fall Reinigungsmittel oder andere chemische Stoffe. Auch
Druckluft kann die teilweise feinen Membran filter zerstören. Reiben Sie den
Filter allenfalls vorsichtig mit einem weichen, trockenen Tuch ab.
Reinigung des Transmitters und des Sensors :
! NUR ÄUSSERE REINIGUNG WENN NÖTIG !
Der Transmitter kann mit einem trockenen weichen Tuch abgerieben werden.
Prüfen Sie dabei auch den Sitz der 4 Schrauben am Deckel, die Deckeldichtung
sowie die Kabelverschraubungen am Gehäuse. Nur so kann dauernd der
entsprechende IP Schutzgrad gewährleistet werden.
Kontrollieren Sie das HygroDat 100 System periodisch mittels SC-Standards
und justieren Sie, falls nötig, einzelne Feuchtepunkte. Somit können Sie den
ausgegebenen Messwerten jederzeit vertrauen. Machen Sie auch
Vergleichmessungen mit einem mobilen Feuchte Messinstrument wie z.B.
dem Novasina HygroMate Handmessgerät (Art.Nr.111 8903).
28
Versorgungsspannung :
Anschlussleistung :
Frequenzbereich :
El. Schutz
:
Minimum
230VAC
24VAC
24VDC
230VAC
24VAC
24VDC
230VAC/24VAC-DC
230VAC / 24VAC-DC
24VDC
Messbereich ISO : Temperatur
relative Luftfeuchte (Messbereich)
relative Luftfeuchte (Arbeitsbereich)
Taupunkt Temperatur
Spezifische Enthalpie
Spezifischer Wassergehalt
Messbereich US.: Temperatur
relative Luftfeuchte (Messbereich)
relative Luftfeuchte (Arbeitsbereich)
Taupunkt Temperatur
Spezifische Enthalpie
Spezifischer Wassergehalt
E - Sensorsysteme :
Genauigkeit :
Temperatur
rF bei 25°C und 5-Pkt. Justierung
C - Sensorsysteme :
Genauigkeit :
Temperatur
rF bei 25°C und 5-Pkt. Justierung
Ausgangsspannung Aout 1 / Aout 2 (Spannung )
Lastwiderstand
Aout 1 / Aout 2 (Spannung)
Ausgangsstrom
Aout 1 / Aout 2 (Strom )
Lastwiderstand
Aout 1 / Aout 2 (Strom)
Drift bei Standard Bedingungen
Gehäuse Schutzgrad
Sensor Schutzgrad (Abhängig von Sensorfilter)
Typisch
Maximum
90
16
15
Einheit
230
260
24
30
24
40
3
3
3
50/60
Galvanisch getrennt !
Schutz gegen falsches anschliessen !
AC
VAC
VDC
VA
VA
W
Hz
-40
0
0 (6)
-40
0
0
-40
0
0 (6)
-40
8
0
°C
%RH
%RH
°C
KJ/kg
g/kg
°F
%RH
%RH
°F
btu/lb
grn/lb
120
100
100
60
166
49
248
100
100
140
79
343
English
Spezifikationen
Deutsch
12. Geräte Spezifikationen
+/-0.2
+/-0.5
K
%
+/-0.2
+/-2.0
K
%
V
kOhm
mA
Ohm
%/Jahr
IP
IP
0/2
10
> 10
0/4
Lagertemperatur für Transmitter und Sensor
Betriebstemperatur des Transmitters
Betriebstemperatur des Sensors alle E-Messzellen!
Betriebstemperatur des Sensors alle C-Messzellen!
Betriebstemperatur des Sensors nur HICH-1x Sensor
Luftfeuchte bei Betrieb Transmitter
Luftfeuchte bei Betrieb Sensor
Geprüfte CE Normen :
Schlagfestigkeit, Vibrationen,
elektrische Sicherheitsbestimmungen
Gewicht Transmitter
Gewicht Sensor HIA, HIC ohne Kabel
Gewicht Sensor HIS, HICS und HICH ohne Kabel
Dimensionen Transmitter ( B x H x D )
Dimensionen Sensor HIA, HIC (D x L )
20
< 500
<1.0 (typisch)
65
65
Sensor HIA mit Filter : 111 1018
Sensor HIS mit Filter : 111 7524
-10
60
0
50
-20
80
-20
80
-40
120
5
95
0
100
IEC 68-2-6
EC 61010 –1 : ( ed. 2 )
IEC 68-2-6
Poly : 550
/ Alu : 750
ca. 80
ca. 240
Poly : 130x180x66 / Alu : 140x180x71
Durchmesser : 13 x 165
g
g
g
mm
mm
Dimensionen Sensor HIS, HICS,HICH (D x L )
Durchmesser : 20 x 180
mm
°C
°C
°C
°C
°C
%RH
%RH
29
Deutsch
English
13. Zubehör - Ersatzteile
Typ
Bezeichnung / Beschreibung
Artikel Nr.
Vorfilter
HIA / HIC
Standardfilter Kunststoff mit Membrane
CF-1
Tressengewebefilter nichtrostend mit Membrane MF-1
Tressengewebefilter mit Aktivkohle
AF-1
Sinterfilter ohne Membrane
SF-1
Nichtrostender Stahlkäfig filter ohne Membrane CP-1
Nichtrostender Stahlkäfig filter mit Membrane
STCF-1
Standardfilter rostfrei mit Tressengewebe
TS-1
Tressengewebefilter mit Aktivkohle
AS-1
Tressengewebefilter mit Silberpermanganat
AS-1 Redox
Tressengewebefilter ohne Membrane(-40..120°C) TS-2
Sinterfilter ohne Membrane (-40....+120°C)
SS-2
Sinterfilter mit Membrane (-20....+80°C)
SS-1
110 7335
111 1018
111 3675
110 7330
111 4745
111 7505
111 7524
111 7525
111 8965
111 9597
111 9600
111 7183
Polycarbonat
Polycarbonat
Polycarbonat
Polycarbonat
Sensor 13x100mm, 1.5m Kabel
HIA-11
Sensor 13x100mm, 10m Kabel
HIA-12
Sensor 13x100mm, 20m Kabel
HIA-13
Sensor 13x100mm, bis 100m Kabel HIA-1x
111 7245
111 7247
111 6934
111 6935
Stahl-Sensor
Stahl-Sensor
Stahl-Sensor
Stahl-Sensor
Stahl-Sensor
Stahl-Sensor
20x160mm, 1.5m Kabel
20x160mm, 10m Kabel
20x160mm, 20m Kabel
20x160mm, bis 100m Kabel
20x310mm, 20m Kabel
20x310mm, bis 100m Kabel
HIS-11
HIS-12
HIS-13
HIS-1x
HIS-23
HIS-2X
111 7532
111 7533
111 7534
111 7535
111 7751
111 7752
Polycarbonat Sensor 13x100mm, bis 30m Kabel HIC-1x
111 9678
Stahl-Sensor 20x160mm bis 30m Kabel
HICS-1x
Stahl-Sensor 20x310mm bis 30m Kabel
HICS-2x
Stahl-Sensor 20x160mm 2m Kabel (+120°C)
HICH-11
Stahl-Sensor 20x160mm bis 30m Kabel (+120°C) HICH-21
Inkl. Anschlussbox HTBox
111 9575
111 9558
111 9580
111 9585
E-Messzelle
Elektrolytische Temp/Feuchte Messzelle
Elektrolytische Temp/Feuchte Messzelle
CC-1
CC-1 Silikonfrei
111 3828
111 6260
C-Messzelle
Kapazitive Temp/Feuchte Messzelle
DCC-1
111 9590
Zubehör
Anschlussbox zu Hochtemperatur HICH Sensor
Serielle Datenschnittstelle zu HygroDat 100
Kanalmontage-Kit 1 zu HIA und HIC Sensoren
Kanalmontage-Kit 2 zu HIS, HICS & HICH
Wandmontage-Kit 1 zu HIA und HIC Sensoren
Wandmontage-Kit 2 zu HIS, HICS & HICH
Wetterschutzschild
Zusatzflansche für HIA und HIC Sensoren
Zusatzflansche für HIS, HICS & HICH
SC-Feuchte Standards 11, 33, 53, 75, 90% rF
5er-Set Feuchtestandard 11...90% rF
Adapter CH ( Durchmesser Reduktion
zu Polycarbonat Sensor )
HTBox
INT-2
KKIT-1
KKIT-2
WKIT-1
WKIT-2
WETT
WETF-1
WETF-2
1119586
111 9621
111 5343
111 7538
111 7588
111 7992
111 6812
111 6813
111 8963
111 xxxx
111 7847
1107345
Vorfilter
HIS, HICS, HICH
E-Sensoren
C-Sensoren
Ersatzteile
Stecker-Set zu Transmitter
Thermoisolierende Styrobox zu SC-Standards
CH
111 8973
111 1302
Weitere Informationen finden Sie im Internet auf unserer Homepage unter
www.novasina.ch oder www.novasina.com !
30
Werksdiagramme für
analoge Ausgänge Aout 1 & 2
Deutsch
14.1.
T e m p e ra tu r A u s g a n g A o u t 1
°C
( E in s te llu n g w e r k s e itig ! )
% R H
8 0
1 0 0
1 5 8
7 0
9 0
1 4 0
6 0
8 0
1 2 2
5 0
7 0
1 0 4
4 0
6 0
8 6
3 0
5 0
6 8
2 0
4 0
5 0
1 0
3 0
3 2
0
2 0
1 4
- 1 0
1 0
- 4
- 2 0
0
1
2
3
4
5
6
7
8
9
1 0
1 1
R e c h e n b e is p ie l in ° C : T = 2 7 .0 ° C
1 6 m A x (2 7 + 2 0 ) + 4 = 1 1 .5 2 m A
1 0 0
1 2
1 3
1 4
1 5
1 6
1 7
1 8
1 9
R e c h e n b e is p ie l in ° F : T = 8 0 .6 ° F
1 6 m A x (8 0 .6 + 4 ) + 4 = 1 1 .5 2 m A
1 8 0
T a u p u n k t T e m p e ra tu r A u s g a n g A o u t 2
2 0
m
0
b tu /lb
k J /k g
6 0
7 9 .0
1 6 6 .0
1 2 2
5 0
7 1 .1
1 4 9 .4
1 0 4
4 0
6 3 .2
1 3 2 .8
8 6
3 0
5 5 .3
1 1 6 .2
6 8
2 0
4 7 .4
9 9 .6
5 0
1 0
3 9 .5
8 3 .0
3 2
0
3 1 .6
6 6 .4
1 4
- 1 0
2 3 .7
4 9 .8
- 4
- 2 0
1 5 .8
3 3 .2
- 2 2
- 3 0
7 .9
1 6 .6
- 4 0
- 4 0
0
°C
0
1
2
3
4
5
6
7
8
9
1 0
1 1
R e c h e n b e is p ie l in ° C : T = 1 3 .5 ° C
1 6 m A x (1 3 .5 + 4 0 )
+ 4 = 1 2 .5 6 m A
1 0 0
1 2
1 3
1 4
1 5
1 6
1 7
1 8
1 9
R e c h e n b e is p ie l in ° F : T = 5 5 .4 ° F
1 6 m A x (5 5 .4 + 4 0 )
+ 4 = 1 2 .4 8 m A
1 8 0
2 0
m
A
1
2
3
4
5
6
R e c h e n b e is p ie l in %
1 6 m A x (5 8 )
1 0 0
1 4 0
°F
R e la tiv e L u ftfe u c h te A u s g a n g A o u t 2
rF
0
A
( E in s te llu n g w e r k s e itig ! )
%
0
7
8
9
1 0
( E in s te llu n g w e r k s e itig ! )
1 1
1 2
rF / R H : T = 5 8 .0 % R H
+ 4
1 3
1 4
1 5
1 6
1 7
1 8
1 9
2 0
1 9
2 0
m
A
= 1 3 .2 8 m A
S p e z ifis c h e E n th a lp ie A u s g a n g A o u t 2
( E in s te llu n g w e r k s e itig ! )
English
°F
1 7 6
0
1
2
3
4
5
6
7
8
9
1 0
1 1
1 2
R e c h e n b e is p ie l in k J /k g : E n th = 8 3 k J /k g
1 6 m A x (8 3 )
+ 4 = 1 2 .0 0 m A
1 6 6
1 3
1 4
1 5
1 6
1 7
1 8
m
A
R e c h e n b e is p ie l in b tu /lb : E n th = 3 9 .5 b tu /lt
1 6 m A x (3 9 .5 )
+ 4 = 1 2 .0 0 m A
7 9
Beispiel einer Kunden Skalierung
auf Aout 2 ( relative Luftfeuchte )
g r n /lb
S p e z ifis c h e r W a s s e r g e h a lt d e r L u ft A u s g a n g A o u t 2
g /k g
3 4 3 .0
4 9 .0
3 0 8 .7
4 4 .1
2 7 4 .4
3 9 .2
2 4 0 .1
3 4 .3
2 0 5 .8
2 9 .4
1 7 1 .5
2 4 .5
1 3 7 .2
1 9 .6
1 0 2 .9
1 4 .7
6 8 .6
9 .8
3 4 .3
4 .9
0
0
( E in s te llu n g w e r k s e itig ! ) % R H
%
6 5 .0
S c a lie r te r A u s g a n g %
rF
rF
A o u t 2
( B e is p ie l : K u n d e n e in s te llu n g )
6 0 .0
5 5 .0
5 0 .0
4 5 .0
4 0 .0
3 5 .0
3 0 .0
2 5 .0
2 0 .0
0
1
2
3
4
5
6
7
8
9
1 0
R e c h e n b e is p ie l in g /k g : W C = 2 8 .5 g /k g
1 6 m A x (2 8 .5 )
+ 4 = 1 3 .3 1 m A
4 9
1 1
1 2
1 3
1 4
1 5
1 6
1 7
1 8
1 9
2 0
m
R e c h e n b e is p ie l in g r n /lb : W C = 2 0 3 .4 g r n /lb
1 6 m A x (2 0 3 .4 )
+ 4 = 1 3 .4 9 m A
3 4 3
A
1 5 .0
0
1
2
3
4
5
6
7
8
9
1 0
1 1
1 2
1 3
1 4
1 5
1 6
1 7
1 8
1 9
2 0
m
R e c h e n b e is p ie l in % r F : H u m = 5 5 .4 % r F
1 6 m A x (5 5 .4 -1 5 )
+ 4 = 1 6 .9 3 m A
5 0
31
A
English
Deutsch
14.2. Fehlermeldungen
ERROR LED blinkt ROT !!
Nr.
Anzeige
Fehlerbeschreibung
01
SENSOR
SENSOR
Transmitter erhält kein
auswertbares Sensorsignal
Sensor richtig einstecken
Sensorwechsel da defekt
02
NEED
CALIBRATION
Justieralarm des Transmitters
eingest. Betriebszeit abgelaufen
System mind. an einem
Feuchtepunkt justieren
03
Unstable cal
TRY AGAIN
Unzulässiger Feuchtesprung
während der Justierung
Längere Zeit warten bis erneut
Justierung versucht wird
04
CAN
ERROR
Kommunikationsfehler auf
Feldbussystem CAN
Kabel falsch angeschlossen
oder falsche CAN Einstellungen
05
INT.FAILURE
EERPOM UDATA
Schreib/Lesefehler auf internes
nicht flüchtiges Memory
Interne Elektronik defekt
Kompl. Instrument einsenden
06
INT.FAILURE
UDATA Bank
Lesefehler internes
Memory
Interne Elektronik defekt
Kompl. Instrument einsenden
07
INT.FAILURE
EEPROM FDATA
Lesefehler internes
Memory
Interne Elektronik defekt
Kompl. Instrument einsenden
08
SOFTW.ERROR
# XXXXX
Interner Programmfehler
Bitte Nr. merken
Restart des Instrumentes
bei Wiederholung Instr. einsenden
09
INT.FAILURE
ROM Checksum
Lesefehler internes
Memory
Interne Elektronik defekt
Kompl. Instrument einsenden
10
keine Anzeige
des Transmitters
Probleme mit der Speisung
Überprüfen Sie die Speisung
mittels Volt/Ampère Meter
11
SENSOR
FAILURE
Probleme mit der Sensor
Verdrahtung
Überprüfen Sie die Verdrahtung
anhand der Bedienungsanleitung
12
24.5° C
53.2% RH
Kein Ausgangssignal auf
Aout 1 oder Aout 2
Falsche Skalierung der Ausgänge
Falsche Konfiguration der Ausg.
Kurzschluss an einem der Ausg.
oder Überlast !
Prüfung der Konfiguration mittels
DIP - Switches
13
24.5° C
53.2% RH
Kommunikation auf CAN
Bus System nicht möglich!
Kurzschluss an CAN Bus
Falsche Verdrahtung
Falsche Konfiguration des Busses
Kein Leitungsabschluss !!
14
24.5° C
53.2% RH
Kommunikation auf RS-232
nicht möglich !
Kurzschluss an RS-232
Falsche Verdrahtung
Falsche "Peer to Peer" Konfig. der
COM Schnittstelle (Empfänger
ist falsch konfiguriert)
Zu lange Kabellängen für COM
32
Fehlerbehebung
C A N
ID
0
1
2
3
4
5
6
7
8
9
1 0
1 1
1 2
1 3
1 4
1 5
1 6
1 7
1 8
1 9
2 0
2 1
2 2
2 3
2 4
2 5
2 6
2 7
2 8
2 9
3 0
3 1
3 2
3 3
3 4
3 5
3 6
3 7
3 8
3 9
4 0
4 1
4 2
--O F
O F
O F
O F
O F
O F
O F
O F
O F
O F
O F
O F
O F
O F
O F
O F
O F
O F
O F
O F
O F
O F
O F
O F
O F
O F
O F
O F
O F
O F
O F
O F
O F
O F
O F
O F
O F
O F
O F
O F
O F
O F
F
C A N A d d re s s
C A N A d d re s s
C A N A d d re s s
C A N A d d re s s
C A N A d d re s s
C A N A d d re s s
C A N A d d re s s
1
0
1
2
4
3
5
6
O F F
S 3
F
F
F
F
F
F
F
F
F
F
F
F
F
F
F
F
F
F
F
F
F
F
F
F
F
F
F
F
F
F
F
F
F
F
F
F
F
F
F
F
F
C A N 6
O
O
O
O
O
O
O
O
O
O
O
O
O
O
O
O
O
O
O
O
O
O
O
O
O
O
O
O
O
O
O
O N
O N
O N
O N
O N
O N
O N
O N
O N
O N
O N
-F
F
F
F
F
F
F
F
F
F
F
F
F
F
F
F
F
F
F
F
F
F
F
F
F
F
F
F
F
F
F
F
F
F
F
F
F
F
F
F
F
F
F
F
F
F
F
F
F
F
F
F
F
F
F
F
F
F
F
F
F
F
C A N 5
O
O
O
O
O
O
O
O
O
O
O
O N
O N
O N
O N
O N
O N
O N
O N
O N
O N
O N
O N
O N
O N
O N
O N
O F
O F
O F
O F
O F
O F
O F
O F
O F
O F
O F
O
O
O
O
-F
F
F
F
F
F
F
F
F
F
F
F
F
F
F
F
F
F
F
F
F
F
F
F
F
F
F
F
F
F
F
F
F
F
F
F
F
F
F
F
F
C A N 4
O
O
O
O
O N
O N
O N
O N
O N
O N
O N
O N
O F
O F
O F
O F
O F
O F
O F
O F
O N
O N
O N
O N
O N
O N
O N
O N
O F
O F
O F
O F
O F
O F
O F
O F
O N
O N
O N
O
O
O
-F
F
F
F
F
F
F
F
F
F
F
F
F
F
F
F
F
F
F
F
F
F
F
F
F
F
F
F
F
F
C A N 3
-O F F
O F F
O F F
O N
O N
O N
O N
O F F
O F F
O F F
O F F
O N
O N
O N
O N
O F F
O F F
O F F
O F F
O N
O N
O N
O N
O F F
O F F
O F F
O F F
O N
O N
O N
O N
O F F
O F F
O F F
O F F
O N
O N
O N
O N
O F F
O F F
O F F
C A N 2
-O F F
O N
O N
O F F
O F F
O N
O N
O F F
O F F
O N
O N
O F F
O F F
O N
O N
O F F
O F F
O N
O N
O F F
O F F
O N
O N
O F F
O F F
O N
O N
O F F
O F F
O N
O N
O F F
O F F
O N
O N
O F F
O F F
O N
O N
O F F
O F F
O N
C A N 1
O N
O F
O N
O F
O N
O F
O N
O F
O N
O F
O N
O F
O N
O F
O N
O F
O N
O F
O N
O F
O N
O F
O N
O F
O N
O F
O N
O F
O N
O F
O N
O F
O N
O F
O N
O F
O N
O F
O N
O F
O N
O F
--
F
F
F
F
F
F
F
F
F
F
F
F
F
F
F
F
F
F
F
F
F
C A N 0
C A N
ID
4 3
4 4
4 5
4 6
4 7
4 8
4 9
5 0
5 1
5 2
5 3
5 4
5 5
5 6
5 7
5 8
5 9
6 0
6 1
6 2
6 3
6 4
6 5
6 6
6 7
6 8
6 9
7 0
7 1
7 2
7 3
7 4
7 5
7 6
7 7
7 8
7 9
8 0
8 1
8 2
8 3
8 4
8 5
F
F
F
F
F
F
F
F
F
F
F
F
F
F
F
F
F
F
F
F
F
O N
O N
O N
O N
O N
O N
O N
O N
O N
O N
O N
O N
O N
O N
O N
O N
O N
O N
O N
O N
O N
O F
O F
O F
O F
O F
O F
O F
O F
O F
O F
O F
O F
O F
O F
O F
O F
O F
O F
O F
O F
O F
O F
F
F
F
F
F
F
F
F
F
F
F
F
F
F
F
F
F
F
F
F
F
F
C A N 5
English
O F
O F
O F
O F
O F
O F
O F
O F
O F
O F
O F
O F
O F
O F
O F
O F
O F
O F
O F
O F
O F
O N
O N
O N
O N
O N
O N
O N
O N
O N
O N
O N
O N
O N
O N
O N
O N
O N
O N
O N
O N
O N
O N
C A N 6
O F
O F
O F
O F
O F
O N
O N
O N
O N
O N
O N
O N
O N
O N
O N
O N
O N
O N
O N
O N
O N
O F
O F
O F
O F
O F
O F
O F
O F
O F
O F
O F
O F
O F
O F
O F
O F
O N
O N
O N
O N
O N
O N
F
F
F
F
F
F
F
F
F
F
F
F
F
F
F
F
F
F
F
F
F
C A N 4
O N
O N
O N
O N
O N
O F
O F
O F
O F
O F
O F
O F
O F
O N
O N
O N
O N
O N
O N
O N
O N
O F
O F
O F
O F
O F
O F
O F
O F
O N
O N
O N
O N
O N
O N
O N
O N
O F
O F
O F
O F
O F
O F
F
F
F
F
F
F
F
F
F
F
F
F
F
F
F
F
F
F
F
F
F
F
C A N 3
O F
O N
O N
O N
O N
O F
O F
O F
O F
O N
O N
O N
O N
O F
O F
O F
O F
O N
O N
O N
O N
O F
O F
O F
O F
O N
O N
O N
O N
O F
O F
O F
O F
O N
O N
O N
O N
O F
O F
O F
O F
O N
O N
F
F
F
F
F
F
F
F
F
F
F
F
F
F
F
F
F
F
F
F
F
C A N 2
O N
O F
O F
O N
O N
O F
O F
O N
O N
O F
O F
O N
O N
O F
O F
O N
O N
O F
O F
O N
O N
O F
O F
O N
O N
O F
O F
O N
O N
O F
O F
O N
O N
O F
O F
O N
O N
O F
O F
O N
O N
O F
O F
F
F
F
F
F
F
F
F
F
F
F
F
F
F
F
F
F
F
F
F
F
F
C A N 1
O N
O F
O N
O F
O N
O F
O N
O F
O N
O F
O N
O F
O N
O F
O N
O F
O N
O F
O N
O F
O N
O F
O N
O F
O N
O F
O N
O F
O N
O F
O N
O F
O N
O F
O N
O F
O N
O F
O N
O F
O N
O F
O N
F
F
F
F
F
F
F
F
F
F
F
F
F
F
F
F
F
F
F
F
F
C A N 0
C A N
ID
8 6
8 7
8 8
8 9
9 0
9 1
9 2
9 3
9 4
9 5
9 6
9 7
9 8
9 9
1 0 0
1 0 1
1 0 2
1 0 3
1 0 4
1 0 5
1 0 6
1 0 7
1 0 8
1 0 9
1 1 0
1 1 1
1 1 2
1 1 3
1 1 4
1 1 5
1 1 6
1 1 7
1 1 8
1 1 9
1 2 0
1 2 1
1 2 2
1 2 3
1 2 4
1 2 5
1 2 6
1 2 7
O N
O N
O N
O N
O N
O N
O N
O N
O N
O N
O N
O N
O N
O N
O N
O N
O N
O N
O N
O N
O N
O N
O N
O N
O N
O N
O N
O N
O N
O N
O N
O N
O N
O N
O N
O N
O N
O N
O N
O N
O N
O N
C A N 6
O F
O F
O F
O F
O F
O F
O F
O F
O F
O F
O N
O N
O N
O N
O N
O N
O N
O N
O N
O N
O N
O N
O N
O N
O N
O N
O N
O N
O N
O N
O N
O N
O N
O N
O N
O N
O N
O N
O N
O N
O N
O N
F
F
F
F
F
F
F
F
F
F
C A N 5
O N
O N
O N
O N
O N
O N
O N
O N
O N
O N
O F
O F
O F
O F
O F
O F
O F
O F
O F
O F
O F
O F
O F
O F
O F
O F
O N
O N
O N
O N
O N
O N
O N
O N
O N
O N
O N
O N
O N
O N
O N
O N
F
F
F
F
F
F
F
F
F
F
F
F
F
F
F
F
C A N 4
O F
O F
O N
O N
O N
O N
O N
O N
O N
O N
O F
O F
O F
O F
O F
O F
O F
O F
O N
O N
O N
O N
O N
O N
O N
O N
O F
O F
O F
O F
O F
O F
O F
O F
O N
O N
O N
O N
O N
O N
O N
O N
F
F
F
F
F
F
F
F
F
F
F
F
F
F
F
F
F
F
C A N 3
O N
O N
O F
O F
O F
O F
O N
O N
O N
O N
O F
O F
O F
O F
O N
O N
O N
O N
O F
O F
O F
O F
O N
O N
O N
O N
O F
O F
O F
O F
O N
O N
O N
O N
O F
O F
O F
O F
O N
O N
O N
O N
F
F
F
F
F
F
F
F
F
F
F
F
F
F
F
F
F
F
F
F
C A N 2
F
F
F
F
F
F
F
F
F
F
F
F
F
F
F
F
F
F
F
F
O F
O N
O F
O N
O F
O N
O F
O N
O F
O N
O F
O N
O F
O N
O F
O N
O F
O N
O F
O N
O F
O N
O F
O N
O F
O N
O F
O N
O F
O N
O F
O N
O F
O N
O F
O N
O F
O N
O F
O N
O F
O N
F
F
F
F
F
F
F
F
F
F
F
F
F
F
F
F
F
F
F
F
F
C A N 0
Deutsch
O N
O N
O F
O F
O N
O N
O F
O F
O N
O N
O F
O F
O N
O N
O F
O F
O N
O N
O F
O F
O N
O N
O F
O F
O N
O N
O F
O F
O N
O N
O F
O F
O N
O N
O F
O F
O N
O N
O F
O F
O N
O N
C A N 1
14.3. CAN Bus Adressen
CAN Adressen (Einstellbar auf S3)
O N
2
3
4
5
6
7
33
14.4. Menü Struktur
Haupt MENÜ :
NOVASI NA
SW V1. 20
Informations Bildschirm
und aktulle interne Software Version
time
5 Sec.
Normale Messwert Anzeige abhängig
von den Hardware Schalter einstellungen
English
HA UPT M ENÜ
24. 8 ° C
45. 8% RH
Taste "SET"
Taste "SELECT"
ACCESS CODE?
00000
Passwort abfrage : Erfolgt nur wenn ein
Passwort >00000 eingestellt worden ist
Passwortschutz
>OPERATI NG
HOURS
Betriebstundenzähler des Transmitter
seit der letzten Neujustierung, Werkskalibierung
Betr. / Kal.-Alarm
>CALI BRATI ON
Menü für die Neujustierung der Feuchtemessung
mittels Novasina SC-Check's (Feuchte Referenzen)
>ADJUST
ANALOG OUT
Menü für die Anpassung der analogen Ausgangssignale
an SPS oder DDC Steuerungs- und Regelsysteme
>SET
AN. OUT RANGE
Menü für die Anpassung der Bereiche für jeden
einzelnen analogen Ausgang. ( Skalierung )
>SET
ACCESS CODE
Setzen eines persönlichen 5 stelligen
Passwortes. Deaktivierung mit 00000!
>ABOUT
Informationen über Instrumentenstatus
SW / HW Version-Level, Sensortyp
Werte Einstellung mit einer Taste : (Bsp. Passwort)
Justierung der relativen Feuchte
Synchronisation Aout 1/2
Skalierung Aout 1/2
Passwort setzen
Info Menü
Messwert Anzeige Formate
XXXXX
1 1
2 2
3 3
1 1 1
2 2 2
3 3 3
5 4 3 2 1
Einmal kurz die Taste drücken schaltet
den Wert um 1 Ziffer weiter
Pos.
Beispiel : Passwort 12345 :
1 2 3 4 5
Permanentes drücken der Taste
bewirkt schnellen
Vorlauf der Ziffern bis die gleiche Ziffer wieder erreicht
ist. Danach wechselt die Stelle um 1 Position nach links.
Wird während 2 Sek. keine Taste gedrückt, so beginnt die
Einstellung bei der ersten Ziffer rechts von vorne.
Schritt 1: Drücken Sie die "Set" Taste solange bis
an der Position 5 die Nr. 1 eingestellt ist.
--> Warten sie ca. 2 Sek. (Rückstellung des Zeigers)
Schritt 2: Drücken Sie die "Set" Taste solange bis
an der Position 4 die Nr. 2 eingestellt ist.
--> Warten sie ca. 2 Sek. (Rückstellung des Zeigers)
Schritt 3: Drücken Sie die "Set" Taste solange bis
an der Position 3 die Nr. 3 eingestellt ist.
--> Warten sie ca. 2 Sek. (Rückstellung des Zeigers)
Schritt 4: Drücken Sie die "Set" Taste solange bis
an der Position 2 die Nr. 4 eingestellt ist.
--> Warten sie ca. 2 Sek. (Rückstellung des Zeigers)
Schritt 5: Drücken Sie die "Set" Taste solange bis
an der Position 1 die Nr. 5 eingestellt ist.
Schritt 6: Beendigung der Einstellung mittels der Taste "Select"
ACCESS CODE
xxx xx
ACCESS CODE
123 45
21. 2 ° C
52. 8% RH
Temperatur
relative Luftfeuchte
70. 2 ° F
52. 8% RH
21. 2 ° C
10. 5 ° C
Temperatur
Taupunkt Temp.
70. 2 ° F
50. 6 ° F
21. 2 ° C
41. 6 kJ/ kg
Temperatur
spezifische Enthalpie
70. 2 ° F
25. 2 bt u/ l b
21. 2 ° C
8. 3 g/ k g
Temperatur
Wassergehalt der Luft
70. 2 ° F
54. 4 gr n/ l b
Betr. / Cal. Alarm :
Passwortschutz :
Falsch
US Einheiten :
ISO Einheiten :
ACCESS CODE
x xx x x
Durch drücken der "Set" Taste gelangt
man in das Werte- Einstell Menü.
>OPERATI NG
HOURS
La s t Ca l i br :
00001h
Nach der Einstellung des Passwortes muss
dies durch drücken der "Select" Taste
abgeschlossen werden.
> OPERATI NG
HOURS
Se t
at :
Nur wenn Passwort OK erscheinen
nachfolgend die weiteren Menüs !
OK
34
Deutsch
Deutsch
Menu Funktionen
al ar m
08760 h
Menü Anzeige der Zeit seit der letzten Neujustierung und setzen der Wiederholzeit
Anzeige der Zeit seit der letzten Neujustierung
mind. eines Feuchte Messpunktes.
Setzen der Alarmzeit wann das System wieder
neu justiert werden sollte ( 1 Jahr = 8760 h ).
>CALI BRATI ON
Eingang durch
drücken der
Taste
Poi nt 1 1 . 3 %
c a l i br a t e d
Di s pl ay
c a l i b. - s t a t us
Ca l i b. sensor
t o 5 2. 9 %
Drücken der
Taste für
mind. 3 Sek. justiert diesen
Feuchtepunkt automatisch.
Voraussetzung :
- Wert stabil
- Fangbereich eines
Feuchtepunktes.
Anzeige für erfolgreiches
ausführen der Justierung
"done" für ca.1 sek.
Deutsch
Justierung der relativen Feuchte :
11.3 %
32.8 %
52.9 %
75.3 %
90.1 %
De l . s i ngl e
c a l . - poi nt s
De l et e a l l
c a l . - poi nt s
Kurzes drücken der
Drücken der
Taste für
mind. 3 Sek. löscht gleich- Taste ermöglicht die Auswahl
zeitig alle Justierwerte der des zu löschenden Punktes
Feuchtepunkte automatisch.
De l e t e poi nt
Anzeige für erfolgreiches
a t . 32 . 8 % ?
Löschen der Justierung
"done" für ca.1 Sek.
Drücken der
Taste für
mind. 3 Sek. löscht denJustierWert des Feuchtepunktes.
Anzeige für erfolgreiches
Löschen der Justierung
"done" für ca.1 Sek.
Synchronisation Aout 1/2 :
> ADJ UST
ANALOGE OUT
Analoger Ausgangswert !
Beeinflusst nicht den Anzeigewert
30.0%
A usgabew ert
Justierung der analogen Ausgänge für
DDC / SPS System Synchronisierung !!
Veränderung des Ausgangssignal in Schritten
bis auf +/- 5% der Limite ( Sägezahn )
Adj us t ou t put 1
1 0. 0° C
+ 5.0%
+ 5.0%
Zeit
3 Sec.
Adj us t ou t put 1
5 0. 0° C
Veränderung des Ausgangssignal in Schritten
bis auf +/- 5% der Limite ( Sägezahn )
Adj us t ou t put 2
3 0 . 0 % RH
Veränderung des Ausgangssignal in Schritten
bis auf +/- 5% der Limite ( Sägezahn )
Adj us t out p ut 2
7 0 . 0 % RH
Veränderung des Ausgangssignal in Schritten
bis auf +/- 5% der Limite ( Sägezahn )
- 5.0%
- 5.0%
Skalierung Aout 1/2 :
Skalierung der analogen Ausgänge
> SET
AN: OUT RANGE
Zeit
3 sec.
Re s e t t o
f a c t or y s e t ?
Bereich innerhalb der Instumentenlimiten frei einstellbar
55°C
Zeit
3 sec.
Set this value
done
0°C
4mA
Rückstellung auf Grundeinstellungen erfolgt !
Se t . out . 1 f r om
- 2 0. 0° C
Untere Bereichseinstellung des analogen
Ausgangs 1 beginnend bei -20.0°C !
Se t . out . 1 t o
80. 0° C
Obere Bereichseinstellung des analogen
Ausgangs 1 beginnend bei + 80.0°C !
Se t . out . 1 f r om
0 . 0 % RH
Untere Bereichseinstellung des analogen
Ausgangs 2 beginnend bei -0.0% RH !
(oder je nach Anzeige auf LCD)
Se t . o ut . 2 t o
1 0 0 . 0 % RH
Obere Bereichseinstellung des analogen
Ausgangs 2 beginnend bei 100.0% RH !
(oder je nach Anzeige auf LCD)
20mA
Passwort setzen :
<SET
ACCESS CODE
ACCESS CODE
12345
Info Menü :
Zeit
3 Sec.
Eingabe eines neuen Codes für das
Passwortschutzsystem <>"00000"
(vergessen sie den Code NIE!)
Gewünschten Code durch drücken
der
Taste eingeben !
Ac t i v at e
a c c e s s c ode
NEIN
JA
>Sof t war e
SW V 04 . 0 3
Har dwar e
Lev el 0
Information über integrierte Programmsoftware Version des HygroDat 100
Information über die Hardware-Elektronik
Version des HygroDat 100
Information über den aktuell
angeschlossenen Sensortyp ( C / E )
Durch das drücken der Taste
bestätigen sie
den neuen Code und verlassen das Menü
Durch das drücken der Taste
ignorieren sie
den neuen Code und aktivieren den alten Code
Sensor
C
Verlassen des Menüpunktes !
35
English
Schritt = 0.1%
© Novasina AG 2008
Printed in Switzerland
Technische Änderungen vorbehalten
Technical data subject to modification
Sous réserve de modifications techniques
Table of contents
1.1.
1.2.
1.3.
For a start .................................................................................................................................................... 38
Important notes ........................................................................................................................................... 38
Notes on humidity measuring/calibration ................................................................................................... 39
Product description ........................................................................................ 40
2.1.
2.2.
2.3.
HygroDat 100 Transmitter .......................................................................................................................... 40
E-sensor systems ....................................................................................................................................... 41
C-sensor systems ....................................................................................................................................... 41
3
Assembly works / installation ........................................................................ 42
4.
Configuration of the transmitter4. Configurationof the transmitter ............ 48
4.1.
Hardware configuration via DIP switch ................................................................................................ 48
5
6
7.
Deutsch
2.
Introduction .................................................................................................... 38
3.1.
3.2.
3.3.
3.4.
3.5.
Selection of the assembly site ....................................................................................................................
Assembly / installation ................................................................................................................................
Outdoor-determination of climate data .......................................................................................................
Electrical connections .................................................................................................................................
Installation of the electric wiring of the transmitter .....................................................................................
42
43
44
45
47
Commissioning / operation ............................................................................. 49
Operating the system ..................................................................................... 50
6.1. The display formats ....................................................................................................................................
6.2. The menu structure ........................................................................................................................................
6.3. Password setting .........................................................................................................................................
6.4. Display and setting of the adjustment alarm ..............................................................................................
6.5. Re-adjustment of up to 5 humidity measuring points .................................................................................
6.5.1. Procedure for re-adjustment ........................................................................................................
6.5.2. Implementing calibrations ............................................................................................................
6.6. Menu for adjusting the analogous outputs ......................................................................................
6.7. Menu for scaling the analogous outputs .....................................................................................................
6.8. Menu for „password activation“ ..................................................................................................................
6.9. „About“ menu (system information) ............................................................................................................
50
50
51
52
52
53
53
54
55
55
56
English
1
Handling of the SC Salt Check – humidity standards .................................. 56
8. The analogous data output ................................................................................ 57
9. The digital data output via CAN field bus system ........................................... 59
10. Digital communication via
RS 232 data interface ...................................... 60
11. Servicing and maintenance ............................................................................ 61
11.1. Replacement of measuring cells ................................................................................................................... 61
12. Device specifications ....................................................................................... 63
13. Accessories / spare parts ................................................................................ 64
14. Annexes ............................................................................................................ 65
14.1. Default graphs for analogue outputs ............................................................................................................
14.2. Error messages .............................................................................................................................................
14.3. CAN addresses .............................................................................................................................................
14.4. Menu structure ..............................................................................................................................................
65
66
67
68
Document version :
Version
1.0
1.1
1.2
1.3
1.4
Description / Modification
Original in English
Re-design in German
Complete re-design in German and English
Adjustement of default setting and display
New company address of Novasina AG, Lachen
date / visa
01.06.2002 / HM
21.07.2004 / HM
30.08.2004 / HM
22.08.2005 / HM
01.11.2007 / HM
37
Introduction
1.1.
For a start
Deutsch
1
Thank you very much for purchasing the high-precision humidity and
temperature HygroDat 100 Transmitter System. You have thus obtained an
extremely efficient multifunctional climate meter. The features of the HygroDat
100 System include high precision, great reliability and both a unique
functionality and flexibility. It is in fact the only system that allows for the use
of two completely independent humidity measuring principles. The resistive
electrolytic principle invented and developed by Novasina, which has proved
its effectiveness for decades, or the latest technology of the silicon-based
miniaturised capacitive measuring system in the CMOS Sens technology with
digital data transfer. This also includes a microprocessor in the sensor. You
can thus decide yourself which technology is the best for your application.
Please completely read these operating instructions carefully in order to
obtain optimum benefit from all features of your Novasina HygroDat 100
System.
1.2.
Important notes
Delivery
Check upon delivery if:
English
– the device has been damaged during transport. Please immediately
notify any damage to the transport company and your Novasina
supplier.
– the shipment is complete (in accordance with delivery note). Any
incomplete shipments will immediately be supplemented by your
Novasina supplier.
Safety
– This device was in a flawless safety condition when it left the works. In
order to maintain this condition, please pay attention to and observe
any and all notes and warnings in these operating instructions.
– The transmitters and sensors of the HygroDat 100 are exclusively
designed for humidity and temperature measuring in respiratory-air
environments. Measurements in liquids or aggressive gas mixtures
might irrevocably destroy both the sensor and the instrument. Only use
the transmitter for respiratory-air measurements. Any other or exceeding
use will be considered as improper. In such event, the manufacturer/
supplier will take no liability for any resulting damage. The user bears
the sole risk.
– The assembly and installation works may only be carried out by
qualified personnel (electrician or specialist with equivalent
qualification).
– The Novasina HygroDat 100 System may only be operated under the
specified operating conditions (see chapter 8 „Technical data“).
– It is particularly prohibited to use the transmitter in explosionendangered rooms.
– The same applies to all sensors unless they are specially and explicitly
marked as suitable for such purpose.
– Please pay attention to and observe any local regulations on handling
mains-supplied devices.
38
– The Novasina HygroDat 100 System contains ESD-sensitive
components. Observe the relating safety precautions.
(ESD = electrostatic discharge)
Deutsch
– Ensure to disconnect any live components such as power devices
etc. before implementing any mechanical or electrical manipulations.
– Only use original accessories and spare parts from your Novasina
supplier.
– Unless approved in writing by Novasina, the transmitters and sensors
may not be extended or modified. In such event, any warranty will
immediately become extinct.
Customer service
Novasina has a worldwide well-developed network of agents that provides
services by experienced technicians at any time. In case of any troubles,
please contact your Novasina agent. You can find a list of addresses under
www.novasina.com.
1.3.
Notes on humidity measuring/calibration
For a correct humidity measuring or calibration, the measuring cell must be
in a temperature balance with the medium/humidity standard to be
measured. Even minimum temperature differences between the medium to be
measured and the measuring cell may cause incorrect measuring results. The
higher the air humidity, the greater the influence of such temperature difference
on the measuring result.
Example: Given a temperature of 20°C (68°F) and a relative humidity of 50%,
a temperature difference of ±1°C between the medium and the measuring cell
would lead to an error of ±3%RH. Given a relative humidity of 90%, the error
would already be approx. ±6%RH.
39
English
Operating instructions
Please keep the operating instructions in a safe and easily accessible place.
In case of loss of the instructions, please contact your Novasina agent for
immediate substitution.
2.
Product description
Deutsch
The HygroDat 100 transmitter system by Novasina is a highly precise, robust
and extremely variable technical top product. Its outstanding features include
highest precision, great reliability, most easy adjustability and operability and
a versatile scope of application thanks to its various connectible sensors. A
microcontroller of the latest generation, combined with an extremely fail-safe
software, guarantees optimum operation. The Novasina HygroDat 100 System
consists of the following components:
– HygroDat 100
Transmitter in 24V or 90...230 V in two different casings (poly/alu)
–
E-sensor systems
Precision sensors based on the electrolytic humidity measuring
technique (self-developed by Novasina 40 years ago)
– C-sensor systems
Particularly robust sensors based on the latest capacitive humidity
measuring technique (CMOS Sens, digital sensor technology)
– Diverse accessories
Filter systems for all sensors, RS-232 interfaces, CAN, analysis and
driver software for PC, diverse humidity standards for verification
and adjustments.
HygroDat 100
Capacitive
sensor system
English
Electrolytic
sensor system
HIA 1x HIS 1x
HIC 1x HICS 1x
HICH 1x
-20......+80°C
-40..+120°C
novasina
-20......+80°C
- Installation kits & spare
- Special filter for protection
- Outdoor weather protection
- General spare parts
- electrolytic meas. cell
CC-1
Case
:
Power
Supply
:
- aluminium
- polycarbonate
- 24V AC /DC
-90...230V AC
(50 / 60 Hz)
! Multiple use !
- Installation kits & spare parts
- Special filter for protection
- Outdoor weather protection
- general spare parts
- capacitive measurement cell
DCC-1
NOVASINA
Longtherme availability humidity standards "SC-Checks"
for test and calibration of all humidity sensors !
2.1.
HygroDat 100 Transmitter
HygroDat 100 POLY
HygroDat 100 Alu
The transmitters of both model series may be operated under operating
voltage of 15…40 VDC / 16.....30VAC or alternating voltage (90…260
VAC).
40
E-sensor systems
Deutsch
2.2.
E-measurement cell
CC-1
HIA 11....13, 1x sensor
(diameter = 13mm)
with CC-1 cell
HIS 11...13, 1x, 23, 2x sensor
(diameter = 20 mm)
with CC-1 cell
2.3.
English
Properties:
All E-sensor systems are equipped with the highly precise electrolytic CC-1
measuring cell. The advantages of this humidity measuring cell include unique
accuracy, quick adaptation to the medium to be measured, high measuring speed
and lacking humidity hysteresis. All this over a very broad humidity measuring
range. Before delivery, each electrolytic measuring cell is calibrated to ±2%RH by
default. Furthermore, it is submitted to a preageing. The electrolytic measuring
technique is also particularly suitable for humidity measurements in environments
above 85 up to almost 100% RH. The temperature is measured directly on the
measuring cell by means of a precise, specially calibrated NTC measuring
element. Thus, both parameters are measured in exactly the same place within
the room.
C-sensor systems
C-measurement
element
DCC-1
HIC 1x sensor
(diameter = 13 mm)
with DCC-1 cell
HICS 1x sensor
(diameter = 20 mm)
with DCC-1 cell
HICH 1x High temp. sensor
(diameter = 20mm)
with DCC-1 cell
Properties:
All C-sensor systems are equipped with the latest capacitive measuring technology.
The measuring cell, which has been miniaturised to silicon-chip level, also
provides measuring signal processing and digitisation on the same chip. The
information is digitally transferred to the transmitter. Additionally, a precision NTC
measuring element has been integrated for accurate temperature measurements.
Apart from its special robustness and mechanical stability, this technology
features a very broad temperature range of -40.....+120°C. All C-sensors are
calibrated to ±3.5 %RH by default. Higher accuracy can be achieved in combination
with the HygroDat 100 transmitter and a calibration by Novasina SC Checks. The
application range of the C-sensors covers 0....100% RH. However, the sensor
tends to provide its best results below the mark of 85%RH. All C-sensor systems
can be installed within a distance of up to 30m from the transmitter. The cable
length has no influence on the measuring accuracy of the system.
41
3
Assembly works / installation
Deutsch
Deutsch
3.1.
Selection of the assembly site
Note: The sensors of the Novasina HygroDat 100 System (E- and C-sensor)
may not be used in aggressive, corrosive environments (caused by chemical
gases, vapours or liquids that contain acids or alkalines, etc.).
For the assembly, the casing of the transmitters must be opened. The contained
electronic components are generally ESD-sensitive. Therefore, take the
appropriate safety precautions (ESD protection) before starting with the assembly
works.
Transmitter:
The Transmitter itself should be safely attached in an easily accessible place
by means of 4 screws, if possible at eye level. Choose the site according to the
following criteria:
– Readability of the display and operatibility of the transmitter
– Easy access for installation and operation
– Availability of the power supply and connection to
control and regulation
– Cleanliness and safety (damage to the transmitter)
English
Both casing types have an IP 65 protection degree, i.e. they are water- and dust-protected in their
interior. However, this protection can only be guaranteed if the correct installation cables are
used, the seals are checked and all screws and nuts are tightened.
E- and C-sensors:
In order to ensure correct measuring results, the sensor should be installed in
a place where the measurement certainly provides meaningful data.
(„Measuring point on the spot“). Choose the assembly site in a way that:
–
the sensor is not heated by any light sources, radiators, heat-absorbing
electronics, direct sunlight, etc.
–
the sensor is circumflowed by air on at least 3 sides.
–
the sensor is not exposed to direct air draught (open windows or doors)
during room protection.
–
the admissible operating conditions are observed at any case.
–
sufficient air circulation around the sensor is guaranteed (no positioning
in recesses).
–
the sensor is not exposed to mechanical vibrations or even shock-like
impacts (this particularly applies to the HIA and HIS E-sensors).
–
the „MAC values“ of the environment to be measured are not exceeded.
This might cause an increased drift and a quick failure of the sensors.
Do not assemble the transmitter in places where thermal bridges might
develop. The resulting air draught could distort the measuring result or cause
condensations on the measuring element and the electronics. Contact the
person responsible for the measurement or the control and regulation or the
competent project manager before installing the sensors. Agree on the
optimal position. 3 adhesive labels indicating the serial no. of the sensor are
enclosed to each sensor. Attach 1 of them each to the sensor shaft and the
transmitter casing. Thus you will always be able to identify which sensor
belongs to which transmitter.
42
General:
The HygroDat 100 System is already delivered pre-assembled with the sensor
types as ordered. This means that an additional print for connecting the Csensor has already been assembled on the cover electronics when a C-sensor
is used. A system with an E-sensor will not be equipped with this second
electronics unless the system has been ordered including the RS-232 option.
This provides the sockets for the E-sensor and the RS-232 interface. The
original socket for the E-sensor will then be covered by the additional electronics.
Deutsch
Assembly / installation
E-sensor interface
C-sensor / RS-232
adapter PCB
RS-232 interface
C-sensor interface
analogue output / CAN interface
Power supply
English
3.2.
Transmitter:
The transmitter is installed by means of 4 screws, for which special holes are
already provided on the exterior of the casing. The attachment holes can be
accessed after the electronics cover has been removed. First assemble the rear
casing part (bottom) on a wall and leave the cover with the integrated electronics
in the packaging until the installation of the sensor has been completed. Use the
enclosed paper template for drilling the holes into the wall. In the interior of the
casing, you will find special notes that explain the correct wiring of the
transmitter. For further information, please see the enclosed installation
instructions.
E- and C-sensors: (-20.....+80°C)
Two assembly sets are available for all HygroDat 100 sensors:
- Classic wall assembly by means of plastic clip or plastic clamp.
- Canal assembly by means of sealing canal assembly flange from plastic
Wall assembly clips are enclosed to each sensor and may also be reordered as
spare parts. Before assembling the sensors, ensure that the selected system is
suitable for your application so that the sensor cannot move unintentionally.
For the canal assembly, two flanges for the 13mm and 20mm sensors are
offered. For further information, see the enclosed sensor installation instructions.
43
HICH sensor: (-40.....+120°C) High-temperature applications
Deutsch
Deutsch
For high-temperature applications, this sensor provides a special silicone
cable as well as other temperature-resistant plastic components covering the
whole temperature range. This sensor should at any case completely be
installed in the room with the supplied special wall holders. Then the cable may
be led from this high-temperature zone into a cooler zone < +60°C to the
enclosed installation socket via a cable gland to be provided by the purchaser.
The installation socket and the transmitter are then connected by means of a
specified shielded 5-pole cable. For further information, see the enclosed
sensor installation instructions.
HygroDat 100
5 pole cable
without any shield
HIA or HIS sensor
5 x 0.5 mm2
novasina
100 m
Max cable length for HIA, HIS sensors
( E- sensors )
HygroDat 100
6 pole cable
with shild
HIC, HICS or HICH sensor
6 x 0.25 mm2
English
novasina
30 m
Max. cablelength for HIC,HICS
and HICH sensors
( C- sensors )
3.3.
General notes:
Each HygroDat 100 System is completely (transmitter and sensor) delivered
in one packaging from the factory. The entire system has been submitted to
a 5 point calibration in the factory. It is thus crucial that the sensor is always
used together with the accompanying transmitter. Please do NOT exchange
the sensors and transmitters!!
For installing the sensors, it will be most reasonable to proceed as follows:
First install the required holder.
Then attach the sensor itself together with the loose cable to the holder.
Lay the cable of the sensor according to your requirements and application.
Shorten the sensor cable as required before inserting it into the transmitter via
the appropriate compression gland.
Properly remove any necessary insulations and attach so-called wire end
sleeves to all wires before tightening it to the plug.
Subsequent extensions will be possible up to a certain limit.
Attach the enclosed sensor label (serial no.) to the bottom of the casing so that
you will be able to identify at any time to which transmitter a sensor has been
assigned.
Outdoor-determination of climate data
If the transmitter system is used for outdoor-determination of climate data,
Novasina offers a special weather protection shield against direct light
incidence and as shower water, wind and snow protection. The weather
protection shield can be used with all sensor types. It is installed on a post with
a diameter of 25.....50mm.
When assembling it, observe the maximum cable length available between
the sensor and the transmitter.
Outside wall
Weather- and radiation protection
shield is in steel or polycarbonate
and white painted!
E- or C- sensor
incl. installation kit
Novasina weather protection shield with additional
special flanges 13 / 20mm for outdoor applications
44
sensor
holder
Customer specific weather
protection shield solutions
Electrical connections
Each HygroDat 100 Transmitter provides 3 or 4 connecting plugs, which
are attached to the circuit board integrated in the cover.
- Plug 1 :
- Plug 2 :
- Plug 3 :
- Plug 4 :
Supply of the whole system 24V AC/DC
or 90...230V AC
2 analogous outputs
or digital CAN field bus connection
E- or C-sensor connection
RS-232 connection (optional with E-sensor system)
default with C-sensor system
Deutsch
Deutsch
3.4.
Warning: Some compounds of the HygroDat 100 might produce dangerous
voltages. Ensure that the instrument is dead before opening the casing!
Any related works may only be carried out by trained and qualified
personnel.
HygroDat 100 with E-sensor 24V AC/DC:
T e m p .
S e n s o r
8
9 1 0 1 1 1 2
4
5
e
2 4 V
A C /D C
1
2
H u m i.
6
7
d
c
E-sensor connectors without
any RS-232 option !
8
S e n s o r
T e m p .
9 1 0 1 1 1 2
4
5
e
9 0 ....2 6 0 V A C
1
2
3
H u m i.
6
English
HygroDat 100 with E-sensor 90.....230V AC/DC:
7
d
c
HygroDat 100 with E-sensor 24V AC/DC incl. RS-232:
24 V
AC/DC
1
2
Temp. Hum.
Sensor
e
5
6
7
d
21 22 23
8 9 10 11 12
4
f
c
additional PCB for RS-232
E-sensor connectors with
RS-232 option
HygroDat 100 with E-sensor 90...230V AC/DC incl. RS-232:
90....260 V AC
1
2
3
Temp. Hum.
Sensor
e
5
d
f
6
7
21 22 23
8 9 10 11 12
4
c
additional PCB for RS-232
45
Table of connections for E-sensors :
No. of pin connection for HygroDat 100 system with E-sensors :
Deutsch
Deutsch
Con
Pin No.
Description / function
1
2
3
Power supply : 90...230VAC
Power supply : 90...230VAC
Power supply : 90...230VAC
->
->
->
L
N
PE
1
Power supply : 24VAC / DC
Power supply : 24VAC / DC
->
->
+
4
5
6
7
Analogue output signal for Temp.
Analogue output signal for Temp.
Analogue output signal for humidity
Analogue output signal for humidity
->
->
->
->
TT+
HH+
4
5
6
7
Digital CAN interface
Digital CAN interface
Digital CAN interface
Digital CAN interface
not used
CAN Low
CAN GND
CAN High
3
8
9
10
11
12
Sensor connection - cable color
Sensor connection - cable color
Sensor connection - cable color
Sensor connection - cable color
Sensor connection - cable color
->
->
->
->
->
(4)
21
22
23
Digital RS-232 interface
Digital RS-232 interface
Digital RS-232 interface
-> GND
-> RxD
-> TxD
1
2
-
brown
gray
geen
yellow
white
HygroDat 100 with C-sensors 24V AC/DC incl. RS-232:
24 V
AC/DC
1
2
Temp. Hum.
PCB interface
for c-sensor
d
4
5
6
7
21 22 23
English
C- sensor
e
c
f
13 14 15 16 17 18
Additional PCB with RS-232 interface
HygroDat 100 with C-sensors 90...230V AC/DC incl. RS-232:
Temp. Hum.
PCB interface
for c-sensor
d
5
6
7
21 22 23
e
4
90....260 V AC
1
2
3
C- sensor
f
c
13 14 15 16 17 18
Additional PCB with RS-232 interface
Table of connections for C-sensors:
Pin connection for HygroDat 100 with C-sensor system :
Con.
1
2
3
(4)
46
Pin Number
Description / function
1
2
3
Power supply : 90...230VAC
Power supply : 90...230VAC
Power supply : 90...230VAC
->
->
->
L
N
PE
1
Power supply : 24VAC / DC
Power supply : 24VAC / DC
->
->
+
4
5
6
7
Analogous output signal for temp.
Analogous output signal for temp.
Analogous output signal for humidity
Analogous output signal for humidity
->
->
->
->
TT+
HH+
4
5
6
7
Digital CAN interface
Digital CAN interface
Digital CAN interface
Digital CAN interface
not used
CAN Low
CAN GND
CAN High
13
14
15
16
17
18
Sensor connector - cable color
Sensor connector - cable color
Sensor connector - cable color
Sensor connector - cable color
Sensor connector - cable color
Sensor connector - cable color
->
->
->
->
->
->
21
22
23
Digital RS-232 interface
Digital RS-232 interface
Digital RS-232 interface
-> GND
-> Rx
-> Tx
-
yell/green
white
shield
black
blue
brown
Cable types for E- and C-sensor connections:
cable typ
E
Li YY
5 x 0.5 mm2 or 5 x 0.75 mm2 without shield
wire color brown, grey, green, yellow, white
Description / function
C
Li YYS
6 x 0.25 mm2 with shield
wire color yellow/green, white, shield connection,
black, blue, brown
Deutsch
Deutsch
Sensor
Recommended cable types for HygroDat 100 power supply:
Sensor
cable typ
Description / function
24V
TT (Tdc)
2 x 1.0 mm2 or 2 x 1.5 mm2 flexible wire
wire color : blue, brown
230V
TT (Tdc)
3 x 1.0 mm2 oder 3 x 1.5 mm2 flexible wire
wire color : blue, brown, yellow/green
Recommended cable types for HygroDat 100 analogous outputs:
AOUT
I
U
cable type
Description / function
TWIST-CY
2 x 2 x 0.75 mm2 or 2 x 2 x 1.0 mm2 twisted drill
with a complete shield around all
Recommended cable types for HygroDat 100 CAN field bus interface:
cable type
TLi2YcY
Description / function
2 x 2 x 0.22 mm2 or 2 x 2 x 0.5 mm2 twisted drill
with a complete shield around all
English
DIO
CAN
Bus
Recommended cable types for HygroDat 100 RS-232 interface :
AOUT
cable type
Description / function
RS232
TWIST-CY
2 x 0.5 mm2 or 2 x 0.75 mm2 twisted
with a complete shield around all
In order to ensure a trouble-free functioning of all assemblies, the recommended cable
types for the HygroDat 100 measuring system must be used. Do not unnecessarily
extend the cabling between the sensor and the transmitter. Make it as short as possible.
In case of any extensions, we recommend to use an electric installation socket with
appropriate quality clamp connections. Otherwise a trouble-free transmission of the
measuring data might not be guaranteed.
3.5.
Installation of the electric wiring of the transmitter
For the installation of all necessary connections, only the above mentioned
cable types may be used. Only use the provided cable openings on the
transmitter for inserting the cables. If used properly, these provide very good
sealing and at the same time ensure traction relief. Only use cables with two
insulation layers that are suitable for the cable openings. Do not drill any further
holes into the casing. This would destroy the IP protection degree.Properly strip
the double insulation and always use cable end sleeves in order to protect the
wires!
Then the plugs (to be found on the cover of the transmitter upon delivery) can
be attached to the cable by means of an appropriate type-0 screwdriver.
Assistance on this can be found on the labels attached within the transmitter
casing and the schematic circuit diagrams by the planner. After carefully
tightening the nut on the cable fittings, the cover may be removed from the
packaging unit. Please check again all connections by means of the enclosed
connection figure.
47
Deutsch
Deutsch
The three or four cable connectors may now be connected to the electronics on
the cover. The installation may then be completed by closely fastening the cover
by means of the 4 screws.
Warning: Avoid at any case to use a measuring instrument (ohmmeter) for
checking the connections to the sensor since such emits a direct current signal
when measuring, which might irrevocably damage the sensor or its electronics.
Check the sensor wiring visually and by means of the circuit diagram.
For the HygroDat 100 aluminium transmitter housing, it is
indispensible that you installct the ground wire ( yellow/green )
between the housing cover and bottom before you close the
transmitter.
English
4.
Configuration of the transmitter
The HygroDat 100 transmitter provides a large variety of configuration options.
All hardware-related functions can be set by means of two DIP switch rows (S3
/ S4) and 2 additional single switches (S1 / S2). Further configurations are
accessible and can be set via the menu control.
In the following section, first the DIP switch positions will be described and
then the menu functions will be explained:
4.1.
Hardware configuration via DIP switch
2 pieces of DIP switch rows are available for the hardware-related configuration
of the transmitter. They can be found on the right side of the electronic print on
the cover. During the rest of this document, these will be referred to as S1, S2,
S3 and S4!
48
Switch S1 :
Switching of switch row 2 (analogous output plug)
Output : analogous output <—> digital CAN bus
A n a lo g
C u rre n t
S 2
Switch S2 :
Switching of switch row 2 (analogous output plug)
Analogous output : current <—> voltage signal
Switch S3 :
Setting of CAN bus address
CAN addr 0 ...... 6 (only active when CAN is active)
V o lta g e
S3
OFF
CAN Address 0
CAN Address 1
CAN Address 2
CAN Address 3
CAN Address 4
CAN Address 5
CAN Address 6
Deutsch
Deutsch
S 1
C A N B u s
ON
The setting of the CAN address is made binarily. Addresses from 01- 127 may
be set (26 bit). Also compare the corresponding table at the end of these
operating instructions.
1
2
3
4
5
6
7
Switch S4 :
Multi-functional DIP switch row :
DIP 1 : Setting of a 120 Ohm connection resistance
S4
OFF
CAN Pull-up
120 Ohm Resistor
Display format
OFF = °C / ON = °F
B1
CAN Baudrate B0
Analogue signal
OFF = 0..10V/0..20mA
ON = 2..10V/4..20mA
X1
1
2
3
4
5
6
7
DIP 2 : Switching of the temp. display from °C to °F
DIP 3 : Setting of the data transmission speed with CAN
DIP 4 : Setting of the data transmission speed with CAN
DIP 5 : Switching of AOUT 0..10V / 0...20mA
or 2..10V / 4...20 mA
DIP 6 : Switching of the 2nd line of the LCD
DIP 7 : Switching of the 2nd line of the LCD
1
O F F
2
3
B0
B1
X0
X1
4
5
6
S 4
Baude rate adjustment with S4 DIP Switch 3 and 4
O N
B0
OFF
ON
OFF
ON
B1
OFF
OFF
ON
ON
English
LCD display
if the device is the last bus user.
ON
Data transmition speed
Baude rate = 20 kBaud
Baude rate = 50 kBaud
Baude rate = 125 kBaud
Baude rate = 500 kBaud
LCD display adjustment with S4 DIP Switch 6 and 7
7
X0
OFF
ON
OFF
ON
X1
OFF
OFF
ON
ON
LCD display
Line 2
Line 2
Line 2
Line 2
->
->
->
->
relative humidity
dew point temp.
spec. enthalpy
spec. mixing ratio
Default setting analgoue outputs :
Analogue output Aout 1 : Temperature
Analogue output Aout 2 : Rel. humidity
Dew point
spec. enthalpy
spec.water cont.
5.
:
:
:
:
:
-20..... +80 °C
0..... 100 % rF
-40..... +60 °C
0..... 166 KJ/kg
0..... 49 g/kg
¦
¦
¦
¦
¦
-4.....176 °F
0.....100 % RH
-40.....140 °F
0..... 79
btu/lb
0.....343 grm/lb
Commissioning / operation
After all assembly and installation works have been completed and the device
has been configurated correctly, the cover of the casing (with integrated
electronics) should be re-attached to the body of the casing. Then the voltage
supply may be switched on.
The system will be initialised immediately upon activation of the supply. During
this, all LEDs will flash up for a short moment. Afterwards, the Novasina
HygroDat 100 will already be in the measuring mode. The green LED
(„Power“) lights up. The display will switch over and indicate the current
temperature in line 1. Depending on the hardware configuration, line 2 will
show the relative humidity (in %RH) or any other calculated values.
Note: In the measuring mode, only the green LED will light up!
If any other LED also flashes, there will be a failure (see chapter 8).
49
6. Operating the system
Deutsch
Deutsch
6.1. The display formats
The display formats are set by means of the S4/2, S4/6 and S4/7 DIP switch
on the electronic print on the cover of the transmitter (see page 16). This
default setting cannot be set via the menu structure. Any switchover between
ISO and US units will also change the temperature, dew point, enthalpy and
water content units! The analogous outputs will always correspond to the
setting of the display.
US units :
ISO units :
21. 2 ° C
52. 8% RH
Temperature
relative humidity
70. 2 ° F
52. 8% RH
Temperature
relative humidity
21. 2 ° C
10. 5 ° C
Temperature
Dew point temp.
70. 2 ° F
50. 6 ° F
Temperature
Dew point temp.
21. 2 ° C
41. 6 kJ/ kg
Temperature
Spec. enthalpy
70. 2 ° F
25. 2 bt u/ l b
Temperature
Spec. enthalpy
21. 2 ° C
8. 3 g/ kg
Temperature
spec. water content
70. 2 ° F
54. 4 gr n/ l b
Temperature
spec. water cont
Example: Display of temperature and dew point in US units
S4/2 :
S4/6 :
S4/7 :
ON
ON
OFF
7 0 . 2
5 0 . 6
° F
° F
Aout 1 :
Temp. in °F
Aout 2 :
Dew point in °F
English
(For setting the range of the analogous outputs see „Set An.Out RANGE“ )
6.2. The menu structure
Apart from the hardware-related configuration (DIP switches), the modular
and very flexible HygroDat 100 humidity and temperature transmitter system
can additionally be configurated and operated by means of a menu control.
The required operating elements (2 buttons) are integrated into the cover of
the HygroDat 100 below the display. For the rest of this document, these keys
will be referred to as „Select“ and „Set“.
„Select“ button
:
„Set“ button
:
Within the menu structure, they can be used for retrieving various information
on conditions, running periods and adjustment. For the first time with a
humidity and temperature transmitter, the system can safely and easily be
protected against unauthorised changes by means of a password.
Upon each start, the HygroDat 100 displays the currently stored software
version on the LCD for about 5 seconds. Then it automatically switches over
to the measuring mode and is thus ready for operation. All analogous outputs
are activated and emit a corresponding signal. Depending on the hardware
configuration, the digital interfaces are also active and can be triggered.
In the following section, the different menu items will be explained:
50
NOVASI NA
SW V1 . 2 0
MAIN MENU
24. 8 ° C
4 5 . 8 % RH
Display of measurement units depending
on actual HW setting parameters
ACCESS CODE?
0 0000
Password request occurs only if
password activated >"00000"
>OPERATI NG
HOURS
Operating hours counter, since the
last calibrations of minimum one point
>CALI BRATI ON
Calibration menu for rel. hum. calibration
of the system with Novasina SC checks.
>ADJ UST
ANALOG OUT
Adjusting menu for synchronizing the
analoguw outputs to a DDC or PLC system
>SET
AN. OUT RANGE
Menu for scaling analogue outputs
A-Out 1 and A-Out 2
>SET
ACCESS CODE
Menu for setting the access code. Inactive when access code = "00000"
>ABOUT
Instrument status information about
hard- and software level and sensor type
By pressing the „Select“ button, you can enter the different menu items.
When the desired menu is indicated on the display, press the „Set“ button in
order to activate or change the menu item.
The display will automatically be set back if no button is pressed during a
longer period of time. If a password (numeric code) has been set, this will also
be activated.
6.3.
Password setting
ACCESS CODE
x xxxx
ACCESS CODE
12345
Wrong
> OPERATI NG
HOURS
The system is delivered without password protection. Thus the user will
immediately be able to navigate through the different menu items. The
password protection system can be activated by entering a 5-digit numeric
password under the menu item „SET ACCESS CODE“. It can automatically
be disabled by setting the password to 00000 (default setting upon delivery).
The setting is carried out by means of the „Set“ button after having selected
the menu item. By pressing this button, the digits 0...9 will change by one digit
each. If the button is pressed for a longer period of time, a fast forward of the
digits is activated. After having passed 10 digits, the system switches to the
next digit position. The fast forward will then work in the same way with the new
position. The number can most easily be entered by setting the highest-value
digit to the lowest-value digit. Once the highest-value digit has been set, you
can start again from the end by waiting for a short moment and then pressing
the „Set“ button again.
51
English
time
5 sec.
Deutsch
Deutsch
Start up sequence "Welcome monitor"
and software version information.
ACCESS CODE
x xx x x
Deutsch
Deutsch
ACCESS CODE
x xxxx
XXXXX
1 1
2 2
3 3
XXXXX
1 1
2 2
3 3
1 1 1
2 2 2
3 3 3
1 1 1
2 2 2
3 3 3
5 4 3 2 1
Pos.
5 4 3 2 1
By pressing once the value advances
by one step.
Pressing permanently the
button allows
Pos. a fast forward and changing digits. Jump back to
the fist position by waiting approx. 2 sec.
Example : Access code 12345 :
1 2 3 4 5
Example : Code 12345 :
1 2 3 4 5
6.4.
Sensor need
cal i br at i on ! !
>OPERATI NG
HOURS
Display and setting of the adjustment alarm
LC display FLASHES!
> OPERATI NG
HOURS
La st Cal i br :
000 0 1h
English
Se t a l ar m
a t : 0 8 76 0 h
6.5.
Step 1: Set the pos. 5 number "1" by pressing
for a long time. Wait 2 sec. !
Step 2: Set the pos. 4 number "2" by pressing
for a long time. Wait 2 sec. !
Step 3: Set the pos. 3 number "3" by pressing
for a long time. Wait 2 sec. !
Step 4: Set the pos. 2 number "4" by pressing
for a long time. Wait 2 sec. !
Step 5: Set the pos. 1 number "5" by pressing
for a long time. Wait 2 sec. !
Step 6: Quit the setting by pressing the
"Select" button !
This menu item serves for the control of the periodic re-adjustment of the entire
humidity measuring system. First the time passed since the last re-adjustment
will be displayed. By pressing the „Select“ button, the alarm time until the next
re-adjustment can individually be reset. The alarm is set to 8760h by default
(1 year). It can be disabled by setting it to 00000. The alarm time can be set
in the same way as the password.
As soon as at least 1 humidity point has been re-adjusted, the system
automatically sets back and starts the alarm timer again. The alarm time will
also be reset if the value is changed!
Re-adjustment of up to 5 humidity measuring points
The accuracy of a measurement can only be guaranteed if the measuring
device is checked and re-adjusted, if required, with respect to one or several
points from time to time.
Humidity sensors might deviate from their original humidity values during the
course of time. This is usually due to the „chemical“ contamination of the air.
Therefore, they must be checked or re-adjusted from time to time. This is the
only way to restore the original accuracy of the measuring system (drift of the
humidity sensors).
The Novasina HygroDat 100 system can be re-adjusted with respect to up to
5 points. For this purpose, Novasina has developed so-called SC Checks.
These cylindrical humidity generators based on a saline solution enable the
customers to check and re-adjust their systems at any time, if required. For this
they can use the „Calibration“ menu function.
The SC Checks – also called humidity standards – can be used for years if
they are handled carefully. If required, they can also be delivered together with
an internationally recognised certificate. Humidity standards can be applied
within a temperature range of 15......30°C and should also be stored under
these temperatures.
The following table provides an overview of the 5 reference points, the
humidity standards to be applied and the corresponding calibration ranges:
52
> CALI BRATI ON
Go in thie menue by pressing
the
button
Di s pl a y
c al i b. - s t a t us
Del e t e al l
ca l . - poi nt s
Ca l i b. s e ns or
t o 52. 9%
Press
button for min.
3 sec. to calib. the displayed
humidity point. After calibr.
"done" display is highlighted
for 1 sec.
Poi nt @1 1 . 3 %
ca l i br at ed
De l . si ngl e
ca l . - poi nt s
Press
button for min.
Press
button one time.
3 sec. to delete al calibr.
points at standard. After del.
De l et e poi nt
"done" display is highlighted
at . 1 1. 3 % ?
for 1 sec.
Press
button for min.
3 sec. to delete the calibr.
point at standard. After del.
"done" display is highlighted
for 1 sec.
11.3 %
32.8 %
52.9 %
75.3 %
90.1 %
Reference point
in % RH
at 25 °C
Humidity standard
( sensor
check)
Adjustment range
around the ref
point at %RH
11.3
32.8
52.9
75.3
90.1
SC-11
SC-33
SC-53
SC-75
SC-90
from –7.0 to +7.0
from –8.0 to +8.0
from –8.0 to +8.0
from –7.0 to +6.0
from –6.0 to +3.0
Deutsch
Deutsch
>CALI BRAT I ON
The adjustment range indicates in which area around the humidity reference
point the system can still be adjusted. If the measured value is outside this
range, the sensor cannot be calibrated anymore (the sensor has drifted off too
far and is thus defect).
Notes:
No general statements can be made on the frequency of a check or calibration.
This depends on various factors of the ambient conditions and the required
measuring accuracy as well as the measured medium and the installation.
The relative hum. of the SC checks
depends on the environment temp.
(see label on SC Check) and is compensated automatically by the the
HygroDat 100 during the calibration
procedure
in
the
range
of 15....30°C!
We recommend to carry out checks every few months after the first
commissioning of the system. The interpretation of the results will allow for
conclusions on the required adjustment intervals.
If you have any problems with the calibration of your HygroDat, please contact
your Novasina agency or the manufacturer’s works in Switzerland.
Procedure for re-adjustment
Sensor
ev.
Adapter “ch”
Before adjusting a humidity point, the SC humidity standard should be visually
checked. De-mineralised water, salt crystals and some air should be
visible in the inspection glass. It should be possible to shake the salt (except
for the type-11 salt, which is supplied very dry). After opening the grey closing
cover on the front side of the SC standard, the white membrane in the interior
of the SC can be visually checked for leakproofness (no water residues in the
interior). Before the SC Check can be placed on the actual sensor, this should
be shaken for a while. The correct functioning of the SC Checks is only
guaranteed if the SC Check provides an airtight seal to the sensor. Ensure that
this is the case and use appropriate reduction pieces for each sensor, which
are available with Novasina.
Please also observe the following notes:
Sensor-Check
– The Sensor Check and the measuring cell must be in a temperature and
humidity balance at the point of time of calibration.
– The temperature must be between 15°C and 30°C at the point of time of
calibration. Furthermore, the temperature should be as constant and stable as
possible.
– During the calibration, thermic influences through air draught, direct sunlight,
ventilation, radiator heat etc. must be avoided.
6.5.2.
Implementing calibrations
In order to calibrate any of the 5 reference points, proceed as follows:
•
Carefully place the desired Sensor Check on the sensor with/without
„ch“ adapter (item no.1107345) and provide additional thermic protection
to the system by means of a styrofoam protection cover, if necessary.
•
Wait until the measuring cell and the humidity standard are in a
temperature and humidity balance (guide value: approx. 30 minutes).
The transmitter may not be switched off
during the waiting period.
•
Selection of the „Calibration“ menu item („Select“ button).
53
English
6.5.1.
Deutsch
Deutsch
•
Switch to the „Calib. sensor“ sub-menu by means of the „Set“ and
„Select“ buttons. Now the transmitter should automatically identify which
SC Check has been attached to the sensor. The following message will
be displayed: „Calib.Sensor to xx.x%“, where „xx.x“ corresponds to the
SC value (check if the HygroDat 100 System identifies the SC Check
correctly!).
• By pressing the „Set“ button for 3 sec., the adjustment will be carried out.
The transmitter will save the deviations and indicates this by displaying
„done“. Then this humidity point has already been re-adjusted.
•
Afterwards, other SC Checks can be attached to the sensor and further
humidity reference points can be re-adjusted.
Note: If the „SET“ button is not pressed again within 60 seconds, the reference
point will not be adjusted and the device returns to the measuring mode.
If the message „No Calibration“ is displayed, the humidity reference point
could not be adjusted. This can be due to the following errors:
1. The measured value is not stable enough (temperature or humidity value) .
2. The measured temperature is outside the limits.
3. The reference value is outside the capture range (see page 19 ).
4. The SC Check no longer produces the desired humidity balance
or can no longer generate it correctly.
English
(for more information see package insert on the SC standards )
>CALI BRAT I ON
> CALI BRATI ON
Acces to the menu by pressing
the
button
Poi nt @1 1. 3%
ca l i br at ed
Di s pl a y
c al i b. - st a t us
Ca l i b. s e ns or
t o 52. 9%
Press
button for min.
3 sec. to calib. the displayed
humidity point.
After calibr."done" is
displayed for approx 1 sec.
Del e t e al l
ca l . - poi nt s
Press
button for min.
3 sec. to delete all calibr.
points (11..90%).
After del."done" is
displayed for approx 1 sec.
De l . si ngl e
ca l . - poi nt s
Press
button one time.
De l et e poi nt
at . 1 1. 3 % ?
11.3 %
32.8 %
52.9 %
75.3 %
90.1 %
Press
button for min.
3 sec. to delete this calibr.
point (11 / 33 / 53 / 75 / 90%).
After del."done" is displayed
for approx 1 sec.
6.6. Menu for adjusting the analogous outputs
This menu item has particularly been developed for adapting the system to
process control systems, such as they are employed in many places in
industry. This tool solves the recurrent problem of the slightly differing displays
between the transmitter (on-site measuring device) and the process control
station. With the HygroDat 100, this can be solved in a very elegant way. The
problem is usually caused by the analogous information transmission and
separate digitalisation of the signals at different locations (tolerance problems).
This function enables the customers to shift the analogous outputs up to a
maximum offset of +/-5% of the displayed value. The value displayed on the
transmitter is not changed. This menu item can additionally be used for signal
detection at a process control station. After the menu item has been activated,
the transmitter emits an analogous output signal equivalent to exactly 30% of the
maximum value. By pressing the „Select“ button, it can be switched over to a
signal value of 70%. Adjustments will of course be possible with both places.
Thus both analogous outputs can be ideally adjusted to a control system.
54
This adjustment exclusively refers to the analogous outputs and not
to the display of the HygroDat 100 system! Any changes will only
be visible by means of an appropriate measuring instrument that has
been switched to the analogous outputs!
Deutsch
Deutsch
Note:
Adjustment of the analogue oututs :
> ADJ UST
ANALOGE OUT
Analogue output singal !
This has no influence on the display value!
+ 5.0%
30.0%
utput value
+ 5.0%
Step = 0.1%
- 5.0%
6.7.
- 5.0%
time
3 sec.
Adjustment of the two analogue
outputs for DDC/PLC system
synchronizsation !
Adj us t out put 1
1 0. 0° C
Changes the value in steps up
to +/-5% of displayed value !
Adj us t out put 1
5 0. 0° C
Changes the value in steps up
to +/-5% of displayed value !
Adj us t out put 2
3 0 . 0 % RH
Changes the value in steps up
to +/-5% of displayed value !
Adj us t out put 2
7 0 . 0 % RH
Changes the value in steps up
to +/-5% of displayed value !
Menu for scaling the analogous outputs
The HygroDat 100 system provides a highly efficient scaling function between
the displayed measured values and the analogous outputs. Thus you can
adjust your analogous outputs to the desired measuring range (selectable via
the menu control).
OUT 1 :
OUT 2 :
4.....20 mA
4.....20 mA
->
->
0......55°C
0......75.5 % RH
The analogous outputs themselves provide very high linearity and accuracy.
The measurements by the sensor are sent to the analogous outputs more than
10 times per second. This allows for very quick reactions by the connected
regulation or control.
The system itself measures both analogous outputs and regulates them very
exactly. Both analogous outputs are short-circuit protected!
With this function, you will be able to take complete advantage of the efficiency
of all other connected regulation systems or controls in the desired field.
Scalable outputs :
>SET
AN: OUT RANGE
time
3 sec.
Re s e t t o
f a c t or y s e t ?
time
3 sec.
Adjust all analogue outputs !
done
Reset to factory
setting is done !!
Set this value
Adjustable range within the
instrument limitations
55°C
0°C
20mA
4mA
6.8.
Se t . out . 1 f r om
- 20. 0° C
Lower range limit of analogue output 1
starting at -20.0°C
Se t . out . 1 f r om
+8 0 . 0 ° C
Upper range limit of analogue output 1
starting at +80.0°C
Se t . out . 2 f r om
0 . 0 % RH
Lower range limit of analogue output 2
starting at 0.0% rH
Se t . out . 2 t o
1 0 0 . 0 % RH
Upper range limit of analogue output 2
starting at 100.% rH
Menu for „password activation“
If required, the transmitter system can be protected against unauthorised
access by means of a password code. However, upon delivery the password
protection will be disabled („00000“). The password system can be activated
by entering and confirming a code <> „00000“ under this menu item.
55
English
Example :
Deutsch
Deutsch
Warning:
Do NOT forget the set password code of the system. A
deactivation will only be possible in the works of Novasina and
will always involve are adjustment!
Set Access code :
<SET
ACCESS CODE
time
3 sec.
ACCESS CODE
1 2345
Input of the new acces code
Attention : Don't forget this code !!
Set the access code by pressing the
button.
Ac t i v a t e
a c c e s s c ode
NO
YES
By pressing the
button you confirm the new
access code and quit the menu.
By pressing the
button you ignore the new
access code and quit the menu.
The password protection system will be activated automatically
if no button is pressed within the following 5 minutes!
6.9.
„About“ menu (system information)
Under the last menu item, you can find the latest information on your humidity
and temperature measuring instrument. The system provides the following
information:
•
•
•
Current SW version
Current hardware level
Type of the connected sensor system
: SW V04.03
: Level 0
: C-sensor / E-sensor
English
No changes can be made to this menu item. The data are only for your
information. It might be possible that further menu points will be included by
Novasina in future.
>Ab ou t
7.
> Sof t wa r e
SW V 0 4 . 0 3
Information about the firmware software version of the HygroDat 100
Ha r dwar e
Le v e l 0
Information about the hardwareelectronic version of the HygroDat 100
Se ns or
C
Information about the connected
sensor type ( C / E sensor )!
Handling of the SC Salt
Check – humidity standards
For checking and re-adjusting any humidity and temperature measuring
systems, Novasina recommends to use Novasina SC humidity standards.
These have proved successful for decades, are extremely easy to use and can
be applied several times during a long period of time. Please ensure to
immediately close the SC Checks after use and to put them in the provided
cylindrical containers for storage.
A 5-SC set incl. suitcase has been developed for the complete checking and
possible re-adjustment of a transmitter system. However, a re-adjustment of
the transmitter can also be carried out on the individual humidity points.
Recommendations for a trouble-free adjustment of the HygroDat 100 systems
in combination with the Novasina SC standards:
56
•
The room temperature must be within a range of 15...30°C and
should not vary by more than +/- 0,2°C during the adjustment.
•
All applied SC Checks must be visually checked before use (see
package insert).
•
All applied SC Checks must be brought to the same ambient
temperature as the sensor to be checked at least 1h before use.
•
The transmitter system must be switched on during the whole test or
adjustment.
•
If possible, always start a multiple-point adjustment with a 53% RH
SC Check. Then switch to the SC-75% and then to the SC-90%.
Then the SC-33% and finally the SC-11% can be used.
•
Since due to physical reasons a capacitive C-sensor always has a
hysteresis, you should always follow the same procedure or
sequence during its adjustment.
•
Each HygroDat 100 System is adjusted at 5 points by default. If any
re-adjustment of individual points becomes necessary, these
parameter values will be overwritten in the software of the HygroDat
100 transmitters. They do not need to be deleted before.
•
If any sensor (C- or E-measuring cell) is replaced, it will be
indispensable to delete all adjustment values that are stored in the
software of the transmitter (the parameters can be deleted in the „Calibration“
menu). Afterwards, re-adjustments should be carried out on all 5
points.
• The Novasina measuring cells are supplied with a basic accuracy of
+/- 2.0% RH (E-sensor) or +/-3.5% RH (C-sensor).
If handled properly, the SC standards produce an extremely stable relative air humidity and can
thus be designated as actual humidity generators or humidity standard
8. The analogoues data output
Each transmitter has 2 analogous outputs. These can be configurated
differently and also scaled by means of software (see installation and
configuration page 11/14). The analogous output no. 1 always indicates the
current temperature in °C or °F, according to the display configuration. The
analogous output no. 1 corresponds to line 1 on the LCD.
The second analogous output always emits a signal, corresponding to the
second line of the display. This will usually be the value for the relative humidity
in % RH. However, depending on the configuration of the second line (see
page 15), the dew point, enthalpy or the calculated water content can also be
transmitted to the analogous output.
Please observe the wiring for the voltage or current output between the
HygroDat 100 transmitter and the control or PLC ( SPS/DDC) input.
Wiring diagram with voltage outputs:
H+ 7
A-Out 1
temperature
U
I = max. 10 mA
0 (2).......10V DC
H- 6
max. 20 mA
I = max. 10 mA
T+ 7
A-Out 2
rel. humidity
Controller- DDC, SPS or PLC
input configuration for 0..10V
0 (2).......10V DC
U
max. 20 mA
T- 6
The value of the A-Out 2 depends
on the switch S4 position !
57
Deutsch
Deutsch
In order for the SC standards to achieve an exact relative air
humidity in the interior, the sensor must be closely encircled by the
SC, which must be tightly attached to the sensor. If required, use the
appropriate reduction piece in order to adjust the diameter of the
opening of the SC Check.
English
•
Wiring diagram with current outputs:
Controller- DDC, SPS or PLC
Input 0 (4)..20mA configuration
Deutsch
Deutsch
H+ 7
Aout 1
temperarture
I
U = max. 10 V DC
0 (4).......20mA
max. 10V DC
H- 6
T+ 7
U = max. 10 V DC
0 (4).......20mA
I
Aout 2
rel. humidity
max. 10V DC
T- 6
Other outputs for Aout 2
see DIP-Switch S4 !
Please check the settings of the transmitter by means of a voltmeter or
ammeter after the configuration of the analogous outputs.
The analogous outputs are set to the following scalings by default:
1. A-Out 1 :
2. A-Out 2 :
0....10V DC ->
0....10V DC ->
-20......+80°C
0......100% RH
If the display and thus also the analogous output 2 are set to other climate
parameters by means of S4, the following values will be set:
Aout 2
:
0.... 10V DC
Dew point
:
Spec. enthalpy
:
Spec. water content :
-40......+60°C
0..... 166 KJ/kg
0..... 49 g/kg
Aout 2 : relative humidity 4....20 mA
English
%RH
100
90
80
70
60
50
40
30
20
10
0
0 1 2 3 4
5
6
7
8
9 10 11 12 13 14 15 16 17 18 19 20 m A
All analogous outputs may be re-scaled subsequently. This means that you
can freely set the desired output range by means of software (see page 21).
Thus the operating range of the analogous output will always remain the same
(0....10V / 0(4).....20mA). However, you may determine that this range no
longer corresponds to a temperature of -20.....+80°C but only e.g. 0....+50°C!
The analogous resolution will always remain the same.
5 0 .0 ° C
2 5 .0 ° C
0 .0 ° C
0
1
2
3
4
5
6
7
8
9
10 V DC
Each analogous output will be updated up to 10 times per second. Thus you
will receive an extremely exact and quick measuring value output. This
provides decisive advantages particularly with control and regulation
applications. The LCD itself is updated once per second.Both analogous
outputs provide the option to be adjusted and scaled for partner systems such
as SPS, PLC or DDC.
58
Apart from the standardised analogous outputs (0...10V / 4...20mA), your
HygroDat 100 humidity and temperature precision measuring system
additionally provides a very modern digital data transmission system based on
a field bus. Instead of the analogous data transmission, the system can be
connected to a 2-wire line (CAN field bus) together with other HygroDat 100
transmitters or compatible bus participants. The transmission is done via a
standardised data protocol. The selected protocol corresponds to the
specification of the CAN bus (CAN = Controller Area Network). This is a very
simple, extremely safe and quick data interface that allows for the connection
of up to 127 of such transmitters to a line with a length of up to 1’000m.
Common CAN bus cards incl. software for both PC-based systems and PLC
(SPS) systems can be used for the data read-out.
The bus lines are wired to the clamps of the analogous outputs with the
transmitter. Accordingly, the S1, S3 and S4 DIP switches must then be
configurated correctly (S1 = CAN open / S3 = CAN node number / S4 = baud
rate and pull-up).
Deutsch
Deutsch
9. The digital data output via
CAN field bus system
Basic wiring diagram with the CAN field bus:
( each CAN bus line must be terminated at the
beginning and end by a 120 ohm resistor )
120 Ohm
S4
ON OFF
1
Physical END of the CAN bus line (cable) !
CAN No : 96
2
English
CAN No : 97
CAN bus participant
HygroDat 100 / 97
CAN bus participant
HygroDat 100 / 96
S1 : CANopen
S3 : CAN No. xx
S4 : Baude rate
S4
120 Ohm
ON OFF
Max length of the CAN bus line is
1'000 m and depends on the
data transmission speed (baude rate)
E- or C- sensor
CAN No : 03
CAN bus participant
HygroDat 100 / 03
S4
ON OFF
120 Ohm
1
2
S1 : CANopen
S3 : CAN No. xx
S4 : Baude rate
1
2
S1 : CANopen
S3 : CAN No. xx
S4 : Baude rate
E- or C- sensor
CAN No.: 02
CAN bus participant
HygroDat 100 / 02
Power
supply
S4
120 Ohm
ON OFF
E- or C- sensor
1
2
S1 : CANopen
S3 : CAN No. xx
S4 : Baude rate
CAN No : 01
CAN bus participant
HygroDat 100 / 01
E- or C- sensor
S4
ON OFF
2
Personal computer system for
prozess visualisation or
PLC / SPS / DDC systems
120 Ohm
1
120 Ohm
S1 : CANopen
S3 : CAN No. xx
S4 : Baude rate
E- or C- sensor
CAN
USB
RS-232
CAN MASTER
"Addr : 00"
Beginning of the CAN fieldbus line !!
( each CAN bus line must be terminate at the
beginning and end by a 120 ohm resistor )
59
Deutsch
Deutsch
All information measured and calculated by the HygroDat 100 is transmitted
via the CAN field bus in a standardised data format in accordance with the CAN
specification. A detailed description of the protocol specification would go
beyond the scope of these operating instructions. We therefore refer to the
additional CAN specification, which is available with Novasina.
In order to ensure a trouble-free communication with the various transmitters
via CAN, the following switches must be set on the transmitter circuit board:
1.
2.
3.
4.
S1
S2
S3
S4
:
:
:
:
Switching of CAN / Aout to CAN
No function if S1 switched to CAN !
Setting of the binary CAN address 01....127
S4/1 pull-up resistance if required S4/3-4 baud rate
In the area of field bus communication based on CAN, Novasina has cooperated
with the German company IXXAT for several years. If you are planning such
an application, it is recommended to contact us in advance. We will be pleased
to provide you with information such as protocols and development software
as well as information on using USB with CAN hardware for PC-based
systems.
Digital communication via
RS 232 data interface
English
10.
The HygroDat 100 transmitter is equipped with a digital RS-232 interface by
default in case of the C-sensor (optional with E-sensor), which is attached to
the additional print of the electronics. It can be used for transmitting data to a
PC. Novasina also offers the easy, user-friendly NOVALOG 32 software,
which is based on Windows. It can display the data and store it in a timedependent way. This user-friendly software package is supplemented by
additional analysis and trend functions, individual calculating functions as well
as easy printout and export options. The RS-232 connection is always a pointto-point connection. Only 1 HygroDat 100 can communicate with 1 PC at the
same time.
The data cable length is limited to a maximum of 15m in accordance with the
specification for a RS 232. A two-wire shielded data cable must be used, which
is wired as follows:
RS-232
connector
Windows based PC system
with RS 232 COM interface
CON 4
on
additional
PCB
HygroDat 100
RS-232 interface
60
TxD
RxD
23 TxD
22 RxD
21
GND
11. Service and maintenance
The central measuring cell of each HygroDat 100 sensor can be replaced
very easily. Indifferent of whether you have an E- or a C-sensor. Both are just
plugged in under the filter protection system on the sensor. In order to reach
the measuring cell, first the filter protection cap must be removed. The
measuring cell can then be freely accessed.
Deutsch
Deutsch
11.1. Replacement of measuring cells
Warning! The humidity measuring cells of the Novasina HygroDat are
equipped with an integrated heating (moisture protection) in order to protect
them against saturation and thus against defects in case of high air humidity.
In order to ensure that this moisture protection is guaranteed at any time, the
current supply should always be switched on in case
of high relative air humidity (>95 %RH).
None of the measuring cells must be cleaned in any way. Various filter
protection systems for different applications are available for an optimum
measuring cell protection. Contaminated measuring cells must be replaced at
any case. Any kind of cleaning will immediately destroy the measuring
element. If the filter surfaces (dark rectangular windows with E-measuring cell)
or the sensor chips (C-measuring cell) are touched, this will also cause an
increased drift or damage to the measuring cells!
HIA-1x
HIS-1x
HIS-2x
HIC-1x
HICS-1x
HICH-1x
:
:
:
:
:
:
E-sensor
E-sensor
E-sensor
C-sensor
C-sensor
C-sensor
CC-1
CC-1
CC-1
DCC-1
DCC-1
DCC-1
P.O.No: 111 3828
P.O.No: 111 3828
P.O.No: 111 3828
P.O.No: 111 9590
P.O.No: 111 9590
P.O.No: 111 9590
English
The E-measuring cell is equipped with a 6-pole plug (male) on its bottom,
while the C-measuring cell has a 5-pole socket (female). A C-sensor cannot
be plugged on an E-measuring cell or vice versa.
! DO NEVER TOUCH !
the filter surfaces
E-sensor
CC-1 measurement cell
C-sensor
DCC-1 measurement cell
Replacing the E-measuring cell:
The measuring cell can be replaced very easily.
1. Remove the filter system by unscrewing it.
2. You can then access the measuring cell directly.
3. Carefully remove the measuring cell from the socket.
Please ensure not to touch the above mentioned surfaces.
4. Replace the defect measuring cell with another one of the same type.
These will usually be on stock with your agent. The measuring
cell works in both possible plug positions (inverted by180°).
The CC-1 humidity and temperature measuring cell provides a basic accuracy
of +/-2.0 % RH by default. If your application does not require more exact
measurements, you will only need to delete the old calibration values in the
system (see page 19).
Afterwards, the filter should immediately be screwed on again. Only this way
will an optimum protection be guaranteed and the new measuring cell be
ideally positioned.
61
Replacing the C-measuring cell:
Deutsch
Replacing the C-measuring cell is as easy a with the E-measuring cell. You
can proceed in the same order. However, the C-measuring cell has a twisting
protection and can thus only be plugged in one position. The black part on the
head (C-measuring element) should not be touched either.
The DCC-1 humidity and temperature measuring cell provides a basic
accuracy of +/-3.5 % RH by default. If your application does not require more
exact measurements, you will only need to delete the old calibration values in
the system (see page 19).
Afterwards, the filter should immediately be screwed on again. Only this way
will an optimum protection be guaranteed and the new measuring cell be
ideally positioned.
After having replaced a measuring element, you should always re-adjust the
system since otherwise the basic accuracy of the sensors would be the
decisive element of the measuring system (+/-2%RH: E-sensor or +/-3.5%RH:
C-sensor). For doing so, it will not be necessary to delete the previously saved
measuring values. The transmitter will simply overwrite the old values when
being re-adjusted (see page 19).
Replacing the filter:
English
The HygroDat 100 system provides various options for actively (chemically)
or passively (mechanically) protecting the sensor against undesired external
influences. If necessary, our agencies will be happy to advise you. All filters
must be replaced from time to time since chemical influences might affect and
disable the filter. Filter replacements will also become necessary in case of
heavy contamination.
Regularly check all filters thoroughly and replace them in time. This will
prolong the durability of the measuring cells. Reductions in the chemical
effectiveness are partly indicated by an increased drift of the measuring cells.
Only passive filfter systems can be cleaned very carefully. Do not at any case
use detergents or other chemical substances. Compressed air might also
destroy the partly fine membrane filters. If necessary, carefully polish the filter
with a soft, dry cloth.
Cleaning the transmitter and the sensor:
! EXTERNAL CLEANING ONLY, IF REQUIRED !
The transmitter may be polished with a dry, soft cloth. Also check the position
of the 4 screws on the cover, the cover sealing and the cable fittings on the
casing. Only this way can the corresponding IP protection degree permanently
be guaranteed.
Regularly check the HygroDat 100 System by means of SC standards and
adjust individual humidity points, if necessary. Thus you can always rely on the
displayed measuring values. Furthermore, carry out comparison measurements
with a mobile humidity measuring instrument such as the Novasina HygroMate
manual measuring device (item no. 111 8903).
62
Specifications
minimum
Power supply :
90
16
15
E - sensor system :
Accuracy :
temperature
rh at 25°C and 5-point. calibration
C - Sensor system :
Accuracy :
temperature
rh at 25°C and 5-point. calibration
Output A-Out 1 / A-Out 2 (voltage )
Load resistance
A-Out 1 / A-Out 2 (voltage)
Output current
A-Out 1 / A-Out 2 (current )
Load resistance
A-Out 1 / A-Out 2 (current)
Drift at active standard conditions
Case protection against dust and water
Sensor protection against dust and water
( depending on the selected filter system )
Storage temp. for transmitter and sensor
Operation temp. of the transmitter
Operation temp. of the E-sensors with CC-1 cell !
Operation temp. of the C-sensors with DCC-1 cell !
Operation temp. of the HICH-1x sensor with DCC-1 cell !
Operation humidity of the transmitter
Operation humidity of the sensor
Tested CE standard :
Shock, vibration, electrical safety standards
Weight of the transmitter
Weight of the sensor HIA, HIC without cable
Weight of the sensor HIS, HICS and HICH without cable
Dimension of the transmitter ( B x H x D )
Dimension of the sensor HIA, HIC (D x L )
Dimension of the sensor HIS, HICS,HICH (D x L )
maximum
unit
230
260
AC
24
30
VAC
24
40
VDC
3
VA
3
VA
3
W
50/60
Hz
Galvanic isolation between power and output!
Protection against wrong power supply connection!
-20 (-40)
+80 (+120)
°C
0
100
%RH
0 (6)
100
%RH
-60
80
°C
0
1'600
KJ/kg
0
600
g/kg
-4 (-40)
+176 (+248)
°F
0
100
%RH
0 (6)
100
%RH
-76
+176
°F
8
+660
btu/lb
0
+4'000
grn/lb
1
+/-0.2
+/-0.5
K
%
+/-0.2
+/-2.0
K
%
V
kOhm
mA
Ohm
%/Jahr
IP
IP
0/2
10
> 10
0/4
20
< 500
<1.0 (typical)
65
65
Filter SF-1, MF-1, STCF-1, SS-1, TS-1
-10
0
-20
-20
-40
5
0
English
230VAC
24VAC
24VDC
Power consumption :
230VAC
24VAC
24VDC
Power frequency :
230VAC/24VAC-DC
Power protection :
230VAC / 24VAC-DC
24VDC
Meas. range ISO : temperature
relative humidity (meas. range)
relative humidity (working range)
dewpoint temperature
specific enthalpy
specific water content
Meas. range US: temperature
relative humidity (meas. range)
relative humidity (working range)
dewpoint temperature
specific enthalpy
specific water content
typical
Deutsch
12. Device applications
60
50
80
80
120
95
100
IEC 68-2-6
EC 61010 –1 : ( ed. 2 )
IEC 68-2-6
Poly : 550
/ Alu : 750
ca. 80
ca. 240
Poly : 130x180x66 / Alu : 140x180x71
diameter = 13 x 165
diameter = 20 x 180
°C
°C
°C
°C
°C
%RH
%RH
g
g
g
mm
mm
mm
63
Deutsch
13.
1 . Accessories - spare parts
Type
Description
Filter system
HIA / HIC
Standard filter in polycarbonate with membrane
Stainless steel metal web filter with membrane
Stainless steel metal web filter with active carbon
Sintered micro filter without membrane
Stainless steel protective cap without membrane
Stainless steel protective cap with membrane
Standard filter in stainless steel
with metal web and membrane
Stainless steel metal web with activated carbon
Stainless steel metal web with silver permanganat
Stainless steel metal web filter (-40..120°C)
Sintered filter without membrane (-40....+120°C)
Sintered filter without membrane (-20....+80°C)
CF-1
MF-1
AF-1
SF-1
CP-1
STCF-1
TS-1
110
111
111
110
111
111
111
7335
1018
3675
7330
4745
7505
7524
AS-1
AS-1 Redox
TS-2
SS-2
SS-1
111
111
111
111
111
7525
8965
9597
9600
7183
Polycarbonate
Polycarbonate
Polycarbonate
Polycarbonate
HIA-11
HIA-12
HIA-13
HIA-1x
111
111
111
111
7245
7247
6934
6935
HIS-11
HIS-12
HIS-13
HIS-1x
HIS-23
HIS-2X
111
111
111
111
111
111
7532
7533
7534
7535
7751
7752
Polycarbonate sensor 13x100mm, up to 30m
HIC-1x
111 9678
Stainless steel-sensor 20x160mm up to 30m
Stainless steel-sensor 20x310mm up to 30m
Stainless steel-sensor 20x160mm 2m cable
(-40...+120°C)
Stainless steel-sensor 20x160mm up to 30m
(-40...+120°C) incl. installation box
HICS-1x
HICS-2x
HICH-11
111 9575
111 9558
111 9580
HICH-21
111 9585
Filter system
HIS, HICS, HICH
English
E-sensors
Stainless
Stainless
Stainless
Stainless
Stainless
Stainless
C-sensors
article no.
sensor 13x100mm, 1.5m cable
sensor 13x100mm, 10m cable
sensor 13x100mm, 20m cable
sensor 13x100mm, up to 100m
steel-sensor
steel-sensor
steel-sensor
steel-sensor
steel-sensor
steel-sensor
20x160mm, 1.5m cable
20x160mm, 10m cable
20x160mm, 20m cable
20x160mm up to100m
20x310mm, 20m cable
20x310mm up to100m
E-meas. cell
Electrolytic temp./humidity meas. cell
CC-1
111 3828
Electrolytic temp./humidity meas. cell silicone free CC-1 silicone free 111 6260
C-meas. cell
Capacitive temp./humidity meas. cell
Accessoirs
Installation box to high temp. HICH-1x sensor
HTBox
Serial data interface to HygroDat 100 transmitter INT-2
Duct installation-kit 1 to HIA and HIC sensors
KKIT-1
Duct installation-kit 2 to HIS, HICS & HICH
KKIT-2
Wall installation-kit 1 to HIA and HIC sensors
WKIT-1
Wall installation-kit 2 to HIS, HICS & HICH
WKIT-2
Weather and radiation protection shield
WETT
Special flanges to weather shield for HIA & HIC WETF-1
Special flanges to weather shield for
WETF-2
HIS, HICS & HICH sensors
SC-humidity standards 11, 33, 53, 75, 90% rF
Set with 5 humidity standards 11...90% rF
Adapter CH (for diameter reduction HIA & HIC sensor) CH
1119586
111 9621
111 5343
111 7538
111 7588
111 7992
111 6812
111 6813
111 8963
Connector-set to transmitter for E-Sensors
Thermal insulation styrofoam box to SC-checks
111 8973
111 1302
Spare parts
DCC-1
Further information can be found on our home page
www.novasina.ch
or www.novasina.com !
64
111 9590
111 xxxx
111 7847
110 7345
14. Annexes
14.1. Default diagramms for analogues outputs
°F
°C
176
80
100
158
70
90
140
60
80
122
50
70
104
40
60
86
30
50
68
20
40
50
10
30
32
0
20
14
-1 0
10
-4
-2 0
Temperature output A-Out 1 ( Factory settings ! )
%RH % rF
Deutsch
Factory charts for analogue
outputs A-Out 1 & 2
Relative humidity output A-Out 2 ( Factory setting ! )
0
0
1
2
3
4
5
6
7
8
9
10
11
12
13
14
15
16
17
18
19
20 m A
0
Calculation example at °F : T = 80.6°F
16mA x (80.6 +4) + 4 = 11.52 mA
180
Calculation example at °C : T = 27.0°C
16mA x (27 +20) + 4 = 11.52 mA
100
60
7 9 .0
1 6 6 .0
122
50
7 1 .1
1 4 9 .4
104
40
6 3 .2
1 3 2 .8
86
30
5 5 .3
1 1 6 .2
68
20
4 7 .4
9 9 .6
50
10
3 9 .5
8 3 .0
32
0
3 1 .6
6 6 .4
14
-1 0
2 3 .7
4 9 .8
-4
-2 0
1 5 .8
3 3 .2
-2 2
-3 0
7 .9
1 6 .6
-4 0
-4 0
0
Dewpoint temperature output A-Out 2 ( Factory setting ! )
2
3
4
5
6
7
8
9
10
11
12
13
14
15
16
17
18
19
4
5
6
7
8
9
10
11
12
13
14
15
16
17
18
19
20 m A
16
17
18
19
20 m A
Specific enthalpy output A-Out 2 ( Factory setting ! )
0
0
20 m A
Calcluation example at °F : T = 55.4°F
16mA x (55.4 +40)
+ 4 = 12.48 mA
180
Calcluation example at °C : T = 13.5°C
16mA x (13.5 +40)
+ 4 = 12.56 mA
100
3
English
°C
1
2
btu/lb kJ/kg
°F
140
0
1
Calculation example at % rF / RH : T = 58.0 %RH
16mA x (58)
+ 4 = 13.28 mA
100
1
2
3
4
5
6
7
8
9
10
11
Calculation example at kJ/kg : Enth = 83kJ/kg
16mA x (83)
+ 4 = 12.00 mA
166
12
13
14
15
Calculation example at btu/lb : Enth = 39.5 btu/lt
16mA x (39.5)
+ 4 = 12.00 mA
79
Example of a customised scaled
ouputA-Out 2 ( rel. humidity )
grn/lb
g/kg
3 4 3 .0
4 9 .0
3 0 8 .7
4 4 .1
2 7 4 .4
3 9 .2
2 4 0 .1
3 4 .3
2 0 5 .8
2 9 .4
1 7 1 .5
2 4 .5
1 3 7 .2
1 9 .6
1 0 2 .9
1 4 .7
6 8 .6
9 .8
3 4 .3
4 .9
0
0
Specific Water content in air at output A-Out 2 ( Factory setting ! )
Scaled output % RH A-Out 2 ( example : customer settings )
%RH % rF
6 5 .0
6 0 .0
5 5 .0
5 0 .0
4 5 .0
4 0 .0
3 5 .0
3 0 .0
2 5 .0
2 0 .0
0
1
2
3
4
5
6
7
8
9
10
11
Calculation example at g/kg : WC = 28.5 g/kg
16mA x (28.5)
+ 4 = 13.31 mA
49
12
13
14
15
16
17
18
19
20 m A
1 5 .0
0
1
2
3
4
5
6
7
8
9
10
11
12
13
14
15
16
17
18
19
20 m A
Calculation example at % rF : Hum = 55.4%rF
16mA x (55.4-15)
+ 4 = 16.93 mA
50
Calculation example at grn/lb : WC = 203.4 grn/lb
16mA x (203.4)
+ 4 = 13.49 mA
343
Grundeinstellungen der analogen Ausgänge :
Analogue output Aout 1 : Temperature
Analogue output Aout 2 : Rel. humidity
Dev point
spec. enthalpy
spec.water cont.
:
:
:
:
:
-20..... +80 °C
0..... 100 % rF
-40..... +60 °C
0..... 166KJ/kg
0..... 49 g/kg
¦
-4.....176 °F
¦
0.....100 % RH
¦ -40.....140 °F
¦
0..... 79
btu/lb
¦
0.....343 grm/lb
65
English
Deutsch
14.2. Error messages
ERROR LED flashing red !!
No.
LC-Display
Failure description
Failure cause and repair
01
SENSOR
SENSOR
Transmitter does not receive any
signal from the transmitter
Sensor not well connected
Replace damaged sensor
02
NEED
CALIBRATION
Calibration alarm of the transmitter, Calibrate the system at minimum
calibration time out of limit
one point of rel. humidity with SC
03
Unstable cal
TRY AGAIN
Unstable rel. humidity during
calibration process
Wait a while and retry to calibrate
the same point
04
CAN
ERROR
Communication failure on
CAN fieldbus system
Cable wiring incorrect or wrong
CAN addresses
05
INT.FAILURE
EERPOM UDATA
Write/reading failure on internal
system memory
Electronic is out of order
Factory check on the whole system
06
INT.FAILURE
UDATA Bank
Reading failure on internal data
memory
Electronic is out of order
Factory check on the whole system
07
INT.FAILURE
EEPROM FDATA
Reading failure on internal data
memory
Electronic is out of order
Factory check on the whole system
08
SOFTW.ERROR
# XXXXX
Internal program failure
Please note the failure code no.
Restart the instrument, if the failure
occurs again --> factory check
09
INT.FAILURE
ROM Checksum
Reading failure internal
memory in the program area
Electronic is out of order
Factory check of the whole system
10
No display
at the transmitter
Power supply problems or
electronic PCB problems
Verify the power supply by an
ameter
11
SENSOR
FAILURE
Problems with the sensor CC-1,
DCC-1 cell or the wiring
Check wiring between sensor and
transm. according to op. manual
12
24.5° C
53.2% RH
No output signal on A-Out 1 or 2
Short circuit on A-Out or overload
Incorrect scaling of A-outputs
on one or both outputs
Incorrect configuration of A-output Check the configuration by the
DIP switches (hard-, software)
13
24.5° C
53.2% RH
Communication with CAN bus
not possible. No device response
Wrong wiring of bus system. No
bus termination res., short circuit
or wrong HW configruation, check
operation manual for CAN
14
24.5° C
53.2% RH
Communication with RS-232
interface not possible
No signals through RS-232
interace
Short circuit of the wiring
Wrong peer to peer config. (HW)
Too long RS-232 cable length
Wrong COM interface on the
master or incorrect configuration
C A N
ID
0
1
2
3
4
5
6
7
8
9
1 0
1 1
1 2
1 3
1 4
1 5
1 6
1 7
1 8
1 9
2 0
2 1
2 2
2 3
2 4
2 5
2 6
2 7
2 8
2 9
3 0
3 1
3 2
3 3
3 4
3 5
3 6
3 7
3 8
3 9
4 0
4 1
4 2
--O F
O F
O F
O F
O F
O F
O F
O F
O F
O F
O F
O F
O F
O F
O F
O F
O F
O F
O F
O F
O F
O F
O F
O F
O F
O F
O F
O F
O F
O F
O F
O F
O F
O F
O F
O F
O F
O F
O F
O F
O F
O F
F
C A N A d d re s s
C A N A d d re s s
0
1
C A N A d d re s s
2
C A N A d d re s s
3
C A N A d d re s s
C A N A d d re s s
C A N A d d re s s
6
5
1
3
4
O F F
S 3
F
F
F
F
F
F
F
F
F
F
F
F
F
F
F
F
F
F
F
F
F
F
F
F
F
F
F
F
F
F
F
F
F
F
F
F
F
F
F
F
F
C A N 6
O
O
O
O
O
O
O
O
O
O
O
O
O
O
O
O
O
O
O
O
O
O
O
O
O
O
O
O
O
O
O
O N
O N
O N
O N
O N
O N
O N
O N
O N
O N
O N
-F
F
F
F
F
F
F
F
F
F
F
F
F
F
F
F
F
F
F
F
F
F
F
F
F
F
F
F
F
F
F
F
F
F
F
F
F
F
F
F
F
F
F
F
F
F
F
F
F
F
F
F
F
F
F
F
F
F
F
F
F
F
C A N 5
O
O
O
O
O
O
O
O
O
O
O
O N
O N
O N
O N
O N
O N
O N
O N
O N
O N
O N
O N
O N
O N
O N
O N
O F
O F
O F
O F
O F
O F
O F
O F
O F
O F
O F
O
O
O
O
-F
F
F
F
F
F
F
F
F
F
F
F
F
F
F
F
F
F
F
F
F
F
F
F
F
F
F
F
F
F
F
F
F
F
F
F
F
F
F
F
F
C A N 4
O
O
O
O
O N
O N
O N
O N
O N
O N
O N
O N
O F
O F
O F
O F
O F
O F
O F
O F
O N
O N
O N
O N
O N
O N
O N
O N
O F
O F
O F
O F
O F
O F
O F
O F
O N
O N
O N
O
O
O
-F
F
F
F
F
F
F
F
F
F
F
F
F
F
F
F
F
F
F
F
F
F
F
F
F
F
F
F
F
F
C A N 3
-O F F
O F F
O F F
O N
O N
O N
O N
O F F
O F F
O F F
O F F
O N
O N
O N
O N
O F F
O F F
O F F
O F F
O N
O N
O N
O N
O F F
O F F
O F F
O F F
O N
O N
O N
O N
O F F
O F F
O F F
O F F
O N
O N
O N
O N
O F F
O F F
O F F
C A N 2
-O F F
O N
O N
O F F
O F F
O N
O N
O F F
O F F
O N
O N
O F F
O F F
O N
O N
O F F
O F F
O N
O N
O F F
O F F
O N
O N
O F F
O F F
O N
O N
O F F
O F F
O N
O N
O F F
O F F
O N
O N
O F F
O F F
O N
O N
O F F
O F F
O N
C A N 1
O N
O F
O N
O F
O N
O F
O N
O F
O N
O F
O N
O F
O N
O F
O N
O F
O N
O F
O N
O F
O N
O F
O N
O F
O N
O F
O N
O F
O N
O F
O N
O F
O N
O F
O N
O F
O N
O F
O N
O F
O N
O F
--
F
F
F
F
F
F
F
F
F
F
F
F
F
F
F
F
F
F
F
F
F
C A N 0
C A N
ID
4 3
4 4
4 5
4 6
4 7
4 8
4 9
5 0
5 1
5 2
5 3
5 4
5 5
5 6
5 7
5 8
5 9
6 0
6 1
6 2
6 3
6 4
6 5
6 6
6 7
6 8
6 9
7 0
7 1
7 2
7 3
7 4
7 5
7 6
7 7
7 8
7 9
8 0
8 1
8 2
8 3
8 4
8 5
F
F
F
F
F
F
F
F
F
F
F
F
F
F
F
F
F
F
F
F
F
O N
O N
O N
O N
O N
O N
O N
O N
O N
O N
O N
O N
O N
O N
O N
O N
O N
O N
O N
O N
O N
O F
O F
O F
O F
O F
O F
O F
O F
O F
O F
O F
O F
O F
O F
O F
O F
O F
O F
O F
O F
O F
O F
F
F
F
F
F
F
F
F
F
F
F
F
F
F
F
F
F
F
F
F
F
F
C A N 5
English
O F
O F
O F
O F
O F
O F
O F
O F
O F
O F
O F
O F
O F
O F
O F
O F
O F
O F
O F
O F
O F
O N
O N
O N
O N
O N
O N
O N
O N
O N
O N
O N
O N
O N
O N
O N
O N
O N
O N
O N
O N
O N
O N
C A N 6
O F
O F
O F
O F
O F
O N
O N
O N
O N
O N
O N
O N
O N
O N
O N
O N
O N
O N
O N
O N
O N
O F
O F
O F
O F
O F
O F
O F
O F
O F
O F
O F
O F
O F
O F
O F
O F
O N
O N
O N
O N
O N
O N
F
F
F
F
F
F
F
F
F
F
F
F
F
F
F
F
F
F
F
F
F
C A N 4
O N
O N
O N
O N
O N
O F
O F
O F
O F
O F
O F
O F
O F
O N
O N
O N
O N
O N
O N
O N
O N
O F
O F
O F
O F
O F
O F
O F
O F
O N
O N
O N
O N
O N
O N
O N
O N
O F
O F
O F
O F
O F
O F
F
F
F
F
F
F
F
F
F
F
F
F
F
F
F
F
F
F
F
F
F
F
C A N 3
O F
O N
O N
O N
O N
O F
O F
O F
O F
O N
O N
O N
O N
O F
O F
O F
O F
O N
O N
O N
O N
O F
O F
O F
O F
O N
O N
O N
O N
O F
O F
O F
O F
O N
O N
O N
O N
O F
O F
O F
O F
O N
O N
F
F
F
F
F
F
F
F
F
F
F
F
F
F
F
F
F
F
F
F
F
C A N 2
O N
O F
O F
O N
O N
O F
O F
O N
O N
O F
O F
O N
O N
O F
O F
O N
O N
O F
O F
O N
O N
O F
O F
O N
O N
O F
O F
O N
O N
O F
O F
O N
O N
O F
O F
O N
O N
O F
O F
O N
O N
O F
O F
F
F
F
F
F
F
F
F
F
F
F
F
F
F
F
F
F
F
F
F
F
F
C A N 1
O N
O F
O N
O F
O N
O F
O N
O F
O N
O F
O N
O F
O N
O F
O N
O F
O N
O F
O N
O F
O N
O F
O N
O F
O N
O F
O N
O F
O N
O F
O N
O F
O N
O F
O N
O F
O N
O F
O N
O F
O N
O F
O N
F
F
F
F
F
F
F
F
F
F
F
F
F
F
F
F
F
F
F
F
F
C A N 0
C A N
ID
8 6
8 7
8 8
8 9
9 0
9 1
9 2
9 3
9 4
9 5
9 6
9 7
9 8
9 9
1 0 0
1 0 1
1 0 2
1 0 3
1 0 4
1 0 5
1 0 6
1 0 7
1 0 8
1 0 9
1 1 0
1 1 1
1 1 2
1 1 3
1 1 4
1 1 5
1 1 6
1 1 7
1 1 8
1 1 9
1 2 0
1 2 1
1 2 2
1 2 3
1 2 4
1 2 5
1 2 6
1 2 7
O N
O N
O N
O N
O N
O N
O N
O N
O N
O N
O N
O N
O N
O N
O N
O N
O N
O N
O N
O N
O N
O N
O N
O N
O N
O N
O N
O N
O N
O N
O N
O N
O N
O N
O N
O N
O N
O N
O N
O N
O N
O N
C A N 6
O F
O F
O F
O F
O F
O F
O F
O F
O F
O F
O N
O N
O N
O N
O N
O N
O N
O N
O N
O N
O N
O N
O N
O N
O N
O N
O N
O N
O N
O N
O N
O N
O N
O N
O N
O N
O N
O N
O N
O N
O N
O N
F
F
F
F
F
F
F
F
F
F
C A N 5
O N
O N
O N
O N
O N
O N
O N
O N
O N
O N
O F
O F
O F
O F
O F
O F
O F
O F
O F
O F
O F
O F
O F
O F
O F
O F
O N
O N
O N
O N
O N
O N
O N
O N
O N
O N
O N
O N
O N
O N
O N
O N
F
F
F
F
F
F
F
F
F
F
F
F
F
F
F
F
C A N 4
O F
O F
O N
O N
O N
O N
O N
O N
O N
O N
O F
O F
O F
O F
O F
O F
O F
O F
O N
O N
O N
O N
O N
O N
O N
O N
O F
O F
O F
O F
O F
O F
O F
O F
O N
O N
O N
O N
O N
O N
O N
O N
F
F
F
F
F
F
F
F
F
F
F
F
F
F
F
F
F
F
C A N 3
O N
O N
O F
O F
O F
O F
O N
O N
O N
O N
O F
O F
O F
O F
O N
O N
O N
O N
O F
O F
O F
O F
O N
O N
O N
O N
O F
O F
O F
O F
O N
O N
O N
O N
O F
O F
O F
O F
O N
O N
O N
O N
F
F
F
F
F
F
F
F
F
F
F
F
F
F
F
F
F
F
F
F
C A N 2
F
F
F
F
F
F
F
F
F
F
F
F
F
F
F
F
F
F
F
F
O F
O N
O F
O N
O F
O N
O F
O N
O F
O N
O F
O N
O F
O N
O F
O N
O F
O N
O F
O N
O F
O N
O F
O N
O F
O N
O F
O N
O F
O N
O F
O N
O F
O N
O F
O N
O F
O N
O F
O N
O F
O N
F
F
F
F
F
F
F
F
F
F
F
F
F
F
F
F
F
F
F
F
F
C A N 0
Deutsch
O N
O N
O F
O F
O N
O N
O F
O F
O N
O N
O F
O F
O N
O N
O F
O F
O N
O N
O F
O F
O N
O N
O F
O F
O N
O N
O F
O F
O N
O N
O F
O F
O N
O N
O F
O F
O N
O N
O F
O F
O N
O N
C A N 1
14.3. CAN addresses
(to be configured on S3)
O N
2
4
5
6
7
67
Menu functions
Main MENUE :
NOVASI NA
SW V1. 20
Information display
and actuall software/firmware version
time
5 Sec.
Standard measurement value display depends
on the HW configruation by DIP switches
English
M AIN M ENU
24. 8 ° C
45. 8% RH
Deutsch
Deutsch
14.4. Menu structure
Button "SET"
Button "SELECT"
ACCESS CODE?
00000
Password inquiry : Active when the access
code is set >00000
Password protection
>OPERATI NG
HOURS
Opertation hour counter of the transmitter
since the last calibration of min. one point
Operation. / calibration alarm
>CALI BRATI ON
Menu point for new calibration of a humidity point
with the Novasina SC-Check's (humidity standards)
>ADJUST
ANALOG OUT
Menu point for synchronizing the analogue outputs
for PLC or DDC control system
>SET
AN. OUT RANGE
Menu point for scaling and adjusting each analogue
output in current or voltage( scaling )
>SET
ACCESS CODE
Menu point for setting a new access code in 5 digits
Deactivation by set "00000"!
>ABOUT
Menu point for system information and instrument
status, SW and HW version-level and sensortype
Value setting by one button :
Adjustment of relative humidity
Synchronizing the A-Out 1/2
Scaling the A-Out 1/2
Set access code
Info Menu
Value display units :
ACCESS CODE
x xx x x
XXXXX
1 1
2 2
3 3
1 1 1
2 2 2
3 3 3
5 4 3 2 1
Pos.
Example : Access code 12345 :
1 2 3 4 5
By pressing once the value advances
by one step.
Pressing permanently the
button allows
a fast forward and changing digits. Jump back to
the fist position by waiting approx. 2 sec.
Step 1: Set the pos. 5 number "1" by pressing
for a long time. Wait 2 sec. !
Step 2: Set the pos. 4 number "2" by pressing
for a long time. Wait 2 sec. !
Step 3: Set the pos. 3 number "3" by pressing
for a long time. Wait 2 sec. !
Step 4: Set the pos. 2 number "4" by pressing
for a long time. Wait 2 sec. !
Step 5: Set the pos. 1 number "5" by pressing
for a long time. Wait 2 sec. !
Step 6: Quit the setting by pressing the
"Select" button !
Access code :
ACCESS CODE
x xx xx
ACCESS CODE
1 2 345
21. 2 ° C
52. 8% RH
Temperature
relative humidity
70 . 2 ° F
52 . 8% RH
Temperature
relativ humidity
21 . 2 ° C
10 . 5 ° C
Temperature
Dew point temp.
7 0. 2 ° F
5 0. 6 ° F
Temperature
Dew point temp.
21. 2 ° C
41. 6 kJ/ k g
Temperature
Spec. enthalpy
70 . 2 ° F
25 . 2 bt u/ l b
Temperature
Spec. enthalpy
21 . 2 ° C
8 . 3 g/ k g
Temperature
Spec. water content
7 0. 2 ° F
5 4. 4 gr n/ l b
Temperature
Spec. water content
Operation / calibration alarm :
Set the right personal code for
access to the main menu !
>OPERATI NG
HOURS
La s t Ca l i br :
00001h
Confirm your access code by
pressing the "SELECT" button !
Wrong
Se t
at :
> OPERATI NG
HOURS
Only if the code is correct
you can access to the
main menu !!
68
US units :
ISO units :
OK
al ar m
08760 h
Menu point to display the time since the last
calibration of min. one humidity point
Display of the time since the last calibration of
min. one humidity point or reset.
Set a new calibration alarm time when the
system is being recalibrated( 1 year = 8760 h ).
Adjusting the relative humidity :
Access to the menu by pressing
the
button
> CALI BRATI ON
Poi nt 1 1 . 3 %
c a l i br a t e d
Di s pl a y
c a l i b. - s t at us
De l . s i ngl e
c a l . - poi nt s
De l e t e al l
c a l . - poi nt s
Ca l i b. s e nsor
t o 52. 9%
Press
button for min.
3 sec. to calib. the displayed
humidity point.
After calibr."done" is
displayed for approx 1 sec.
Deutsch
> CALI BRAT I ON
Press
button for min.
3 sec. to delete al calibr.
points at standard.
After calibr."done" is
displayed for approx 1 sec.
Press
11.3 %
32.8 %
52.9 %
75.3 %
90.1 %
button one time.
De l e t e poi nt
at . 1 1. 3 % ?
Press
button for min.
3 sec. to delete the calibr.
point at standard.
After calibr."done" is
displayed for approx 1 sec.
Synchronize A-Out 1 or 2 :
>ADJUST
ANALOGE OUT
Analogue output singal !
This has no influence on the display value!
+ 5.0%
30.0%
Output value
+ 5.0%
Step = 0.1%
time
3 sec.
Adjustment of the two
analogue outputs for DDC/PLC
system synchronisation !!
Adj us t out put 1
10. 0° C
Changes the value steps
up to +/-5%
Adj us t out put 1
50. 0° C
Changes the value steps
up to +/-5%
Adj us t out put 2
3 0 . 0 % RH
Changes the value steps
up to +/-5%
Adj us t out put 2
7 0 . 0 % RH
Changes the value steps
up to +/-5%
English
- 5.0%
- 5.0%
Scaling A-Out 1 or 2 :
> SET
AN: OUT RANGE
Res e t t o
f ac t or y s et ?
Adjust all analogue outputs !
55°C
time
3 sec.
time
3 sec.
Set this value
Adjustable range within the
instrument limitations
done
0°C
4mA
20mA
Set access code :
time
3 sec.
Entrance for the new accessl code !
Attention : Don't forget this newer !!
Set the new access code by pressing
the
"SELECT" button.
Ac t i v a t e
a c c e s s c od e
NO
YES
Se t . out . 1 f r om
- 20. 0° C
Lower range limit of analogue output 1
starting at -20.0°C
Se t . out . 1 t o
80 . 0 ° C
Upper range limit of analogue output 1
starting at +80.0°C
Se t . out . 1 f r om
0 . 0 % RH
Lower range limit of analogue output 2
starting at 0.0% rH
Se t . out . 2 t o
1 00 . 0 % RH
Upper range limit of analogue output 2
starting at 100.% rH
Information Menu :
<SET
ACCESS CODE
ACCESS CODE
1234 5
Reset to factory
setting is done !!
>Sof t wa r e
SW V 0 4 . 0 3
Information about the firmware software version of the HygroDat 100
Ha r dwa r e
Le v e l 0
Information about the hardwareelectronic version of the HygroDat 100
Se ns or
C
Information about the connected
sensor type ( C / E - sensor )!
Set new access code by pressing the "SELECT"
button !! Don't foget this code, otherwise you
have no access of the main menue in future !!
69
English
Deutsch
Bemerkungen / Notizen :
70
English
Deutsch
Notes :
71
Now we would like to thank you for your confidence in us and hope you will
enjoy and obtain successful measurements with the HygroDat 100 quality
product and its manifold options.
In case of any further questions, Novasina and its agencies will be happy
to advise you at any time.
Your Novasina Team
Hersteller / Manufacturer :
Novasina AG
Neuheimstrasse 12
CH-88 53 Lachen SZ
Switzerland
www.novasina.com
Technische Änderungen vorbehalten / Technical changes possible
Copyright by
Novasina 200 8