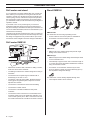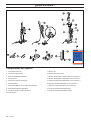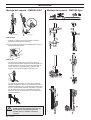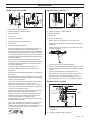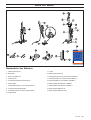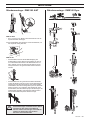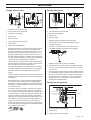
1
manual
GB Operator’s
Please read the operator’s manual carefully and make sure
you understand the instructions before using the machine.
de
ES Manual
instrucciones
Lea detenidamente el manual de instrucciones y asegúrese
de entender su contenido antes de utilizar la máquina.
DE Bedienungsanweisung
Lesen Sie die Bedienungsanweisung sorgfältig durch und
machen Sie sich mit dem Inhalt vertraut, bevor Sie das
DMS 160
A/AT/Gyro
Gerät benutzen.
FR
Manuel d’utilisation
GB ES DE FR
Lire attentivement et bien assimiler le manuel d’utilisation
avant d’utiliser la machine.
HUSQVARNA CONSTRUCTION PRODUCTS
KEY TO SYMBOLS
Symbols on the machine:
Make sure that the fork grips in the inner ear.
Tighten using a suitable spanner.
WARNING! The machine can be a
dangerous tool if used incorrectly or
carelessly, which can cause serious or fatal
injury to the operator or others.
Lock the nut using a 30 mm spanner. Check
the lock nut on the L-handle. Make sure that it
is tightened.
Please read the operator’s manual carefully
and make sure you understand the
instructions before using the machine.
WARNING! Dust forms when drilling,
which can cause injuries if inhaled. Use
an approved breathing mask. Always
provide for good ventilation.
Always wear:
•
Approved protective helmet
•
Approved hearing protection
•
Protective goggles or a visor
•
Breathing mask
Other symbols/decals on the machine
refer to special certification
requirements for certain markets.
Symbols in the operator’s manual:
This product is in accordance with
applicable EC directives.
Inspection and/or maintenance should
be carried out with the motor switched
off and the plug disconnected.
Environmental marking. Symbols on the
product or its packaging indicate that this
product cannot be handled as domestic
waste. It must instead be submitted to an
appropriate recycling station for the recovery
of electrical and electronic equipment.
Always wear approved protective
gloves.
By ensuring that this product is taken care of
correctly, you can help to counteract the
potential negative impact on the environment and people that
can otherwise result through the incorrect waste
management of this product.
Regular cleaning is required.
For more detailed information about recycling this product,
contact your municipality, your domestic waste service or the
shop from where you purchased the product.
Visual check.
Ensure that water cannot leak into the
machine when drilling in the ceiling. Use an
appropriate water collector and cover the
machine in plastic, but do not cover the air
intakes and air outlets.
Protective goggles or a visor must be
worn.
The drilling machine must be suitable and
designed for the size of drill bit. The max drill bit
diameter is stated on the machine.
Use a drill suitable for the work.
Ø
Load/power indication (LCS-Load
control system).
Check that the ceiling is strong enough. The
ceiling should be solid.
2 – English
CONTENTS
Contents
KEY TO SYMBOLS
Symbols on the machine: .............................................
Symbols in the operator’s manual: ...............................
CONTENTS
Contents ......................................................................
WHAT IS WHAT?
What is what on the drilling machine? .........................
WHAT IS WHAT?
What is what on the stand? .........................................
SAFETY INSTRUCTIONS
Steps before using a new drilling machine ..................
Personal protective equipment .....................................
Machine′s safety equipment ........................................
Checking, maintaining and servicing the machine′s
safety equipment ..........................................................
General safety precautions ..........................................
PRESENTATION
Drill motor and stand ....................................................
Drill motor DMS160 .....................................................
Stand DMS160 ...........................................................
ASSEMBLY
Assembling the stand - DMS160 A/AT .........................
Assembling the stand - DMS160 Gyro .........................
STARTING AND STOPPING
Before starting .............................................................
Starting ........................................................................
Stopping .......................................................................
WORKING TECHNIQUES
General working instructions .......................................
Using the machine .......................................................
MAINTENANCE
Maintenance of the drill motor .....................................
Stand maintenance ......................................................
TECHNICAL DATA
Drill motor DMS160 .....................................................
Stand DMS160 ...........................................................
EC-declaration of conformity ........................................
2
2
3
4
5
6
6
7
7
7
8
8
8
9
9
12
12
12
13
14
15
16
17
18
18
English
–3
WHAT IS WHAT?
What is what on the drilling machine?
1
Drill spindle
8
Locking knob
2
Water connector
9
Screws (4) for feeder rear section and gearbox
3
Screws holding together the gearbox and the motor.
10 Feeder handle
4
Switch
11 Feeder rear section
5
Cover for slip clutch (SMC)
12 PRCD Earth-fault breaker
6
Carbon brush cover
13 Spanners
7
Load/power indication (LCS-Load control system).
14 Operator′s manual
4 – English
WHAT IS WHAT?
What is what on the stand?
1
Telescopic support column 40
11 L-handle
2
Drill column
12 Operator′s manual
3
Drill motor DMS160
13 Extension module U (Available as an accessory.)
4
Wall rail
14 Extension module l (Available as an accessory.)
5
Support column/locking mechanism
15 Expansion attachment (Available as an accessory.)
6
Ceiling plate
16 Water collector (Available as an accessory.)
7
Base plate (GB 40 T) with transport wheels
17 Vacuum plate (Available as an accessory.)
8
Expander angle base plate
18 Tool kit DMS160 AT
9
Column screw and lock screw
19 Tool kit DMS160 Gyro
10 Locking nut
English
–5
SAFETY INSTRUCTIONS
Steps before using a new drilling
machine
•
Read through the operating instructions carefully before
you begin using the machine.
•
This machine is designed for and intended for drilling
concrete, brick and different stone materials. All other use
is improper.
•
The machine is intended for use in industrial applications
by experienced operators.
•
Check the assembly of the drill, see the section changing
the drill bit.
•
Check that the cord and extension cord are intact and in
good condition.
•
Keep the workplace tidy. Disorder leads to accident risks.
Always use common sense
It is not possible to cover every conceivable situation you can
face when using a drilling machine. Always exercise care and
use your common sense. Avoid all situations which you
consider to be beyond your capability. If you still feel uncertain
about operating procedures after reading these instructions,
you should consult an expert before continuing. Do not
hesitate to contact your dealer or us if you have any more
questions about the use of the drilling machine. We will
willingly be of service and provide you with advice as well as
help you to use your drilling machine both efficiently and
safely.
Personal protective equipment
!
WARNING! You must use approved personal
protective equipment whenever you use the
machine. Personal protective equipment
cannot eliminate the risk of injury but it will
reduce the degree of injury if an accident
does happen. Ask your dealer for help in
choosing the right equipment.
•
Protective helmet
•
Hearing protection
•
Protective goggles or a visor
•
Breathing mask
•
Heavy-duty, firm grip gloves.
•
Tight-fitting, heavy-duty and comfortable clothing that
permits full freedom of movement.
•
Boots with steel toe-caps and non-slip sole.
•
Always have a first aid kit nearby.
Let your Husqvarna dealer check the drilling machine
regularly and make essential adjustments and repairs.
All information and all data in the Operator’s Manual were
applicable at the time the Operator’s Manual was sent to print.
!
!
6 – English
WARNING! Under no circumstances may the
design of the machine be modified without
the permission of the manufacturer. Always
use genuine accessories. Non-authorized
modifications and/or accessories can result
in serious personal injury or the death of the
operator or others.
WARNING! The use of products such as
cutters, grinders, drills, that sand or form
material can generate dust and vapours
which may contain hazardous chemicals.
Check the nature of the material you intend
to process and use an appropriate breathing
mask.
SAFETY INSTRUCTIONS
Machine′′s safety equipment
This section describes the machine′s safety equipment, its
purpose, and how checks and maintenance should be carried
out to ensure that it operates correctly. See the ”What is
what?” section to locate where this equipment is positioned
on your machine.
!
WARNING! Never use a machine that has
faulty safety equipment! Safety equipment
must be inspected and maintained. See
instructions under the heading Checking,
maintaining and servicing the machine’s
safety equipment. If your machine does not
pass all the checks, take it to a service
workshop for repair.
Checking, maintaining and servicing
the machine′′s safety equipment
IMPORTANT! All servicing and repair work on the machine
requires special training. This is especially true of the
machine′s safety equipment. If your machine fails any of the
checks described below you must contact your service
agent. When you buy any of our products we guarantee the
availability of professional repairs and service. If the retailer
who sells your machine is not a servicing dealer, ask him for
the address of your nearest service agent.
General safety precautions
•
Do not use the drilling machine without first reading and
understanding the contents of this Operator’s Manual.
!
!
WARNING! There is always a risk of shocks
from electrically powered machines. Avoid
unfavourable weather conditions and body
contact with lightning conductors and metal
objects. Always follow the instructions in the
Operator’s manual to avoid damage.
WARNING! There is always a risk of crush
injuries when working with products
containing moving parts. Wear protective
gloves to avoid body injuries.
•
Never use the machine if you are tired, if you have drunk
alcohol, or if you are taking medication that could affect
your vision, your judgement or your co-ordination.
•
Wear personal protective equipment. See instructions
under the heading Personal protective equipment.
•
Never carry the machine by means of the cord and never
pull out the plug by pulling the cord. Keep all cords and
extension cords away from water, oil and sharp edges.
Make sure the cord is not pinched in doors, fences or the
like. Otherwise it can cause the object to become live.
•
Check that the cord and extension cord are intact and in
good condition. Use an extension cord intended for
outdoor use. Never use the machine if the cord is
damaged, hand it in to an authorized service workshop for
repair.
•
Do not use an extension cord while it is rolled up to avoid
overheating.
•
The machine should be connected to an earthed outlet
socket.
•
Check that the mains voltage corresponds with that stated
on the rating plate on the machine.
•
Never use a machine that is faulty. Carry out the checks,
maintenance and service instructions described in this
manual. Some maintenance and service measures must
be carried out by trained and qualified specialists. See
instructions under the heading Maintenance.
•
Never allow anyone else to use the machine without first
ensuring that they have understood the contents of the
operator’s manual.
•
People and animals can distract you causing you to lose
control of the machine. For this reason, always remain
concentrated and focused on the task.
•
Be careful as clothing, long hair, and jewellery can get
caught in moving parts.
Switch
The power switch should be used to start and stop the
machine.
Checking the power switch
•
Start the machine by pressing the power switch.
•
Shut down the machine by pressing the power switch.
•
A defective power switch should be replaced by an
authorized service workshop.
Transport and storage
Do not store or transport the drilling machine with the drill bit
fitted in order to protect your drilling machine and drill bits
from damage.
Store the drilling machine in a lockable area so that it is out of
reach of children and unauthorised persons.
Store the drilling machine and stand in dry and frost free
conditions.
English
–7
PRESENTATION
Drill motor and stand
Stand DMS160
It is our wish that you will be satisfied with your product and
that it will be your companion for a long time. Think of this
operator′s manual as a valuable document. By following its′
content (using, service, maintenance etc) the life span and
the second-hand value of the machine can be extended. If
you will sell this machine, make sure that the buyer will get the
operator′s manual.
A purchase of one of our products gives you access to
professional help with repairs and services whenever this
may be necessary. If the retailer who sells your machine is not
one of our authorised dealers, ask him for the address of your
nearest service workshop.
Husqvarna Construction Products has a policy of continuous
product development. Husqvarna reserves the right to modify
the design and appearance of products without prior notice
and without further obligation introduce design modifications.
DMS160 A
DMS160 AT
DMS160 Gyro
DMS160 A/AT
The stands are secured using expanding screws.
•
A water collector and vacuum plate are available as
accessories to suck the stand into place.
Drill motor DMS160
DMS160 AT
•
DMS160 AT has a modular design that permits angle
drilling and a rotation function.
DMS160 Gyro
•
DMS160 is an electric drill, intended for drilling concrete,
brick and various stone materials.
•
The drilling machine has a modular design and is easy to
assemble.
•
The machine has a speed range for drill bits with a
diameter(ø) of 120 mm / 4.75 In.
•
The design of the slip clutch (SMC- Slide Mechanical
Clutch) gives the greatest power output and it can be
adjusted from outside.
•
The machine is intended for stand mounted drilling.
•
The machine is water cooled.
•
The machine is double insulated and has power
indicators.
•
The machine works at its best if not overloaded, let the
maximum yellow LED on the load/power indicator (LCSLoad Control System) be on. Max. 10 minutes max. load
the machine must then be run without a load for 2 minutes.
8 – English
•
DMS160 Gyro has a modular design with telescopic stand
to secure the drill motor.
•
The telescopic support column has a maximum length of
3.1 metres, but can be extended an additional 0.75 metres
using an extension module.
•
A maximum of one extension module may be used.
•
Only one spanner (24/30 mm) and an allen key (8 mm)
are required to change the settings.
The drill column can be variably adjusted through 360°.
•
The transport wheels can be removed.
ASSEMBLY
Assembling the stand - DMS160 A/
AT
Assembling the stand - DMS160
Gyro
DMS 160 Gyro
2
3
DMS160 A/AT
•
Drill holes (15 mm) in the floor or in the wall and knock in
the expander bolts.
4
20 Bolt down the base plate. Check carefully that the
expander is secured correctly.
1
DMS160 AT
•
The drill column is mounted on the base plate’s angle
bracket. Tighten the lock screw with an 8 mm allen key.
The drill column can be turned through 360° and locked
variably in each position using a locking screw (8 mm allen
key)
7
5
6
•
The drill column is set at the required angle by tightening
the nut using a 24 mm spanner. If the vacuum plate is
used, make sure the support surface is not porous and
can loosen from the floor or the wall. Make sure that the
vacuum pump has sufficient power to secure the vacuum
plate. A suitable vacuum motor is Husqvarna VP200.
8
9
!
WARNING! The vacuum plate must never be
used for ceiling drilling. Careless or
incorrect use can result in serious or fatal
injury to the operator or others.
10
11
English
–9
ASSEMBLY
Drilling in walls
6
5
Drilling in the floor
2
3
6
7
2
5
4
3
7
4
1
1
Base plate with locking screw.
1
Locking screw
2
Column screw and lock screw
2
Column screw and lock screw
3
Locking knob
3
Locking knob
4
L-handle
4
L-handle
5
Drill column
5
Locking screw
6
Column screw and lock screw
•
Fold down the drill column using the L-handle.
7
Locking nut
•
Make sure that the support column enters the lock sleeve.
8
Drill motor DMS160
•
Tighten the locking nut with a 30 mm key and lock the
locking handle.
•
Place the base plate at a drill column’s length from the
wall. The support column screw should be screwed in.
When drilling is to be performed at a height greater than
1.5 metres, the heavier outer tube should be turned
upwards and vice versa when drilling below 1.5 metres.
Check that the support column is clamped in the base
plate with the locking screw.
•
Clamp the telescopic column support against the ceiling.
Choose the closest hole in the holed inner tube. Clamp
using the support column handle and screw the last bit
using a 24 mm spanner. Do not clamp too tight.
•
Place the stand in the required position.
6
Lock the support column in the lock sleeve with the locking
screw and the nut. Tighten using the 24 and 30 mm
spanners.
•
Clamp the telescopic support column against the ceiling
with the support column mechanism. Tighten the last bit
using a 24 mm spanner, do not tighten too tight. The
telescopic support column has a maximum length of 3.1
metres, but can be extended an additional 0.75 metres
using an extension module.
•
Loosen the locking handle and rotate the drill column.
Fold down the drill column using the L-handle.
•
Fit the drill motor DMS160 on the drill column.
•
Then turn back the drill column with the drill motor to the
desired position against the wall. Lock the locking handle.
•
Angle back and fold up the drill column, secure with the Lhandle and nut. When angle drilling, loosen the L-handle
and set the drill column at the required angle by tightening
the nut using a 30 mm spanner.
•
Check the position of the drill bit. Screw in the support
column screw against the wall to secure the drill column.
Secure with a locking nut, 30 mm. Use a wooden batten
as packing. The drill column can be turned through 360°
and locked variably in each position using a locking screw
(8 mm allen key)
•
The expander attachment can be used to provide
additional anchorage of the drill column. The attachment
is adjusted against the support column screw and is
secured on the wall with an expansion bolt. Secure with a
locking nut, 30 mm.
10 – English
ASSEMBLY
Drilling in the ceiling
1
Column screw and lock screw
2
Locking nut
3
Column screw and lock screw
•
Place the stand in the required position.
•
Check that the support column screw in the drill column is
screwed in. Fold up and lock the drill column in the vertical
position with the locking nut.
•
Check that the drill bit is in the right position. Clamp the
telescopic support column against the ceiling with the
support column mechanism.
•
Screw in the support column screw against the ceiling to
secure the drill column. Secure with a locking nut, 30 mm.
Use a wooden batten as packing.
•
The expander attachment can be used to provide
additional anchorage of the drill column. (Available as an
accessory.) The attachment is adjusted against the
support column screw and is secured on the wall with an
expansion bolt. Secure with a locking nut, 30 mm.
!
WARNING! The vacuum plate must never be
used for ceiling drilling. Careless or
incorrect use can result in serious or fatal
injury to the operator or others.
English
– 11
STARTING AND STOPPING
Before starting
Drilling in the ceiling
!
!
WARNING! The vacuum plate must never be
used for ceiling drilling.
Use a water collector to avoid water
penetrating into the machine. The machine
must be covered with plastic or the like in
order to prevent water penetrating into the
machine, but do not cover the air intakes
and air outlets.
WARNING! Note the following before
starting:
The machine should be connected to an
earthed outlet socket.
Check that the mains voltage corresponds
with that stated on the rating plate on the
machine. Keep people and animals well
away from the working area.
!
WARNING! Before drilling, check that all
locking screws are tightened well.
Serious accidents can occur if the concrete
core remains in the drill when backing out
the drill motor/drill from the floor, wall or
ceiling.
!
WARNING! A maximum of one extension
module may be used.
Check that no one on the floor below can be
injured by falling concrete cores.
Make sure that:
•
The switch is undamaged. If not, the switch must be
replaced by an authorised repairman.
Starting
•
Turn on the water cooling.
•
Press in the switch fully.
•
Start to feed the drill bit with the help of the feed handle.
Stopping
•
The machine and its equipment are correctly installed:
- The drill is secured properly.
- The stand is firmly attached.
!
WARNING! The drill bit continues to rotate
for a while after the motor has been switched
off. Do not stop the drill bit with your hands.
Personal injuries can occur.
- Secure the machine on the stand using a suitable method.
•
Wear personal protective equipment. See instructions
under the heading Personal protective equipment.
•
Water cooling is connected to the machine.
Shut down the machine by pressing the power switch.
Cooling
Run the machine unloaded for a minute or two to cool the
motor.
12 – English
WORKING TECHNIQUES
General working instructions
!
!
•
Never work alone, always ensure there is another person
close at hand. Apart from being able to receive help to
assemble the machine, you can also get help if an
accident should occur.
•
Keep all parts in good working order and ensure that all
fixtures are properly tightened.
WARNING! This section takes up the basic
safety precautions for working with the
drilling machine. This information is never a
substitute for professional skills and
experience. If you encounter a situation
where you are uncertain how to proceed you
should ask an expert. Contact your dealer,
service agent or an experienced drilling
machine user. Do not attempt any task that
you feel unsure of!
WARNING! Overexposure to vibration can
lead to circulatory damage or nerve damage
in people who have impaired circulation.
Contact your doctor if you experience
symptoms of overexposure to vibration.
Such symptoms include numbness, loss of
feeling, tingling, pricking, pain, loss of
strength, changes in skin colour or
condition. These symptoms normally appear
in the fingers, hands or wrists. These
symptoms may be increased in cold
temperatures.
•
Do not use the machine in bad weather, such as dense
fog, rain, strong wind, intense cold, etc. Working in bad
weather is tiring and can lead to dangerous conditions,
e.g. slippery surfaces.
•
Never start to work with the power cutter before the
working area is clear and you have a firm foothold. Look
out for any obstacles with unexpected movement. Ensure
when cutting that no material can become loose and fall,
causing operating injury.
•
Remain at a distance from the drill bit when the motor is
running.
•
Ensure that the working area is sufficiently illuminated to
create a safe working environment.
•
Make sure that no pipes or electrical cables are routed in
the area to be drilled.
•
Ensure the cord is behind you when you start to use the
machine so that the cord will not be damaged.
•
Never leave the machine unsupervised with the motor
running. A rotating drill bit can entail a risk of serious
injury.
•
Always unplug the machine during longer work breaks.
•
Do not overload the machine. Overloading can damage
the machine.
•
Keep tools sharp and clean in order to enable safer work.
•
Always check the rear side of the surface where the drill
bit will emerge when drilling right through. Secure and
cordon off the area and make sure that no one can be
injured or material damaged.
•
Always switch off the machine before you move it.
English
– 13
WORKING TECHNIQUES
Using the machine
•
•
Keep your hands at a safe distance from the drill spindle
and drill bit when the machine is running.
Keep an eye open for oil or water leakage.
Drilling outdoors
Always use extension cables that are approved for outdoor
use.
Changing the drill bit
1
Pull out the plug.
2
Get:
- The new drill bit.
- The supplied open-ended spanners, size 24 mm and 32
mm.
- Water-resistant grease.
3
Remove the old drill bit using the open-ended spanners.
4
Apply water-resistant grease to the thread of the new drill
bit.
5
Attach the drill bit using the open-ended spanners.
Slip clutch (SMC)
The machine is equipped with a mechanical slip clutch
(SMC).
Tension the slip clutch as follows:
•
Loosen the cover for the slip clutch.
2
1
3
•
Carefully lock the hook nut using a flat wide screwdriver in
one of the hook nut’s four notches.
•
Turn the drill spindle with a 27 mm open-ended spanner
15 degrees.
Remove the screwdriver and refit the cover on the slip clutch.
14 – English
Load/power indication (LCS-Load control
system).
The machine works at its best if not overloaded, let the
maximum yellow LED on the load/power indicator (LCS- Load
Control System) be on. Max. 10 minutes max. load the
machine must then be run without a load for 2 minutes.
MAINTENANCE
Maintenance of the drill motor
IMPORTANT! Inspection and/or maintenance should be
carried out with the motor switched off and the plug
disconnected.
4
Unscrew the four screws holding together the motor and
gearbox.
5
Loosen the ground cable from the gearbox cover (only
applies to 230V).
6
Carefully disassemble the machine.
7
Replace the module that needs to be replaced. Use
Castrol MS3 Molybdenum grease in the gearbox.
8
Assemble the motor with the gearbox.
9
Replace the screws.
The lifetime of your machine can be extended considerably if
it is used, cared for and maintained in the proper manner.
Cleaning
•
Keep the machine and drill bit clean in order for drilling to
be carried out safely.
10 Screw on the brush cover.
Changing the rear section
•
In order for the machine to always be cooled sufficiently
the cooling air openings must be kept clear and clean.
Blow down the machine regularly with compressed air.
1
Loosen the four screws and the locking knob on the rear
of the drill.
2
Replace the two slide plates when the rear section is to be
replaced.
3
Bolt together the rear section using the four screws. Screw
in the locking knob.
Electrical Feed
!
WARNING! Never use damaged cables that
can cause serious, even fatal, personal
injuries.
Check that the cord and extension cord are intact and in good
condition. Never use the machine if the cord is damaged,
hand it in to an authorized service workshop for repair.
Repairs
IMPORTANT! All types of repairs may only be carried out by
authorised repairmen. This is so that the operators are not
exposed to great risks.
Replacing the motor and the gearbox
1
Secure the machine with drill spindle downwards in a vice
or the like.
2
Remove the cover for the carbon brushes using a flat wide
screwdriver.
3
Carefully remove the carbon brushes.
English
– 15
MAINTENANCE
Replacing the carbon brushes
The carbon brushes must be removed and checked regularly.
Weekly if the machine is used daily or at longer intervals if the
machine is used more seldom. The area of wear should be
even and undamaged.
Repairs
IMPORTANT! All types of repairs may only be carried out by
authorised repairmen. This is so that the operators are not
exposed to great risks.
Both carbon brushes must always be replaced as a pair, but
one at a time. Do as follows:
Daily maintenance
1
1
Check that nuts and screws are tight.
2
Clean the outside of the machine.
Remove the cover for the carbon brushes using a flat wide
screwdriver.
2
Carefully remove the carbon brushes. The carbon
brushes must be replaced if there is less than 6 mm
remaining on the brushes.
3
Fit new carbon brushes.
4
Screw on the brush cover.
5
Let the machine idle for 10 minutes to run in the new
carbon brushes.
Daily maintenance
1
Check that nuts and screws are tight.
2
Check that the power switch unit works smoothly.
3
Clean the outside of the machine.
4
Check and clean the cooling air openings.
5
Check that the cord and extension cord are intact and in
good condition.
Stand maintenance
Cleaning and lubrication
IMPORTANT! Remove the drill motor. For maintenance of
the drill motor see maintenance of the drill motor.
•
It is important that the drill stand is kept clean for
functionality to be maintained.
•
Clean the stand using a high pressure washer and then
wipe dry.
•
Lubricate the moving parts on the stand. Apply standard
grease to counteract corrosion on the contact surfaces.
16 – English
TECHNICAL DATA
Drill motor DMS 160
Electric motor
Single-phase
Rated voltage, V
230/100-120
Rated output, W
1560
Rated current, A
230 V
6A
100-120 V
13A
Weight, kg
5,9
Diameter drill bit, mm
Max. diameter of the drill bit, with stand
120 mm (4.7”)
Spindle thread
Int. 1/2” R
Water connector
G 1/4”
Spindle speed, idle, rpm
Green 1
1100
Green 2
980
Green 3
840
Spindle speed, rpm
Yellow
700
Red
640
Noise emissions (see note 1)
Sound power level, measured dB(A)
102
Sound power level, guaranteed LWA dB(A)
103
Sound levels (see note 2)
Sound pressure level at the operators ear, dB(A)
89
Vibration levels (see note 3)
Handle, m/s2
<2,5
Note 1: Noise emissions in the environment measured as sound power (LWA) in conformity with EN 12348.
Note 2: Noise pressure level according to EN 12348. Reported data for noise pressure level has a typical statistical dispersion
(standard deviation) of 1.0 dB(A).
Note 3: Vibration level according to EN 12348. Reported data for vibration level has a typical statistical dispersion (standard
deviation) of 1 m/s2.
English
– 17
TECHNICAL DATA
Stand DMS 160
Height, mm
DMS 160 A height, mm
840
DMS 160 AT height, mm
900
DMS 160 Gyro height, mm
1900-3100
Stroke, mm
600
Max. drill bit diameter (mm)
120
Weight, kg
DMS 160 A
10,5
DMS 160 AT
12
DMS 160 Gyro
31,4
Tool kit DMS 160 AT
0,3
Tool kit DMS 160 Gyro
0,8
Weight, kg (extra accessory)
Vacuum plate
2,5
Water collector
0,7
Extension module l
2,9
Extension module U
2,9
Expansion attachment
0,8
EC-declaration of conformity
(Applies to Europe only)
Husqvarna AB, SE-433 81 Göteborg, Sweden, tel: +46-31-949000, declares under sole responsibility that drilling machine and
stand Husqvarna DMS 160 drill motor, DMS 160 A/AT/Gyro from 2010’s serial number and onward (the year is stated in plain
text on the type plate plus a subsequent serial number) conform with the regulations in the COUNCIL’S DIRECTIVE:
•
of May 17, 2006 "relating to machinery" 2006/42/EC
•
of December 15, 2004 ”relating to electromagnetic compatibility” 2004/108/EC.
•
of December 12, 2006 ”relating to electrical equipment” 2006/95/EC.
The following standards have been applied: EN ISO 12100:2003, EN 55014-1:2006, EN 55014-2/A1:2001, EN 61000-3-2:2006,
EN 61000-3-3/A1/A2:2005, EN 12348/A1:2009.
Göteborg December 29, 2009
Henric Andersson
Vice President, Head of Power Cutters and Construction Equipment
Husqvarna AB
(Authorized representative for Husqvarna AB and responsible for technical documentation.)
18 – English
ACLARACIÓN DE LOS SÍMBOLOS
Símbolos en la máquina:
Comprobar que la horquilla agarra en la orejeta
interior. Apretar con una llave adecuada.
¡ATENCIÓN! La máquina, si se utiliza de
forma errónea o descuidada, puede ser una
herramienta peligrosa que puede causar
daños graves e incluso la muerte al usuario
y a otras personas.
Fijar la tuerca con una llave de 30 mm.
Controlar la tuerca de seguridad del mango en
L. Comprobar que está apretada.
Lea detenidamente el manual de
instrucciones y asegúrese de entender su
contenido antes de utilizar la máquina.
¡ATENCIÓN! Al taladrar se genera polvo
que puede causar daños por inhalación.
Utilizar una máscara respiratoria
homologada. Procurar que haya buena
ventilación.
Utilice siempre:
•
Casco protector homologado
•
Protectores auriculares homologados
•
Gafas protectoras o visor
•
Máscara respiratoria
Los demás símbolos/etiquetas que
aparecen en la máquina corresponden a requisitos de
homologación específicos en determinados mercados.
Símbolos en el manual de
instrucciones:
Este producto cumple con la directiva CE
vigente.
El control y/o mantenimiento de la
máquina debe hacerse con el motor
parado y el enchufe desenchufado.
Etiquetado ecológico. El símbolo en el
producto o en su envase indica que no se
puede tratar este producto como desperdicio
doméstico. Deberá por lo tanto depositarse
en un centro de recogida adecuado para el
reciclado de equipos eléctricos y
electrónicos.
Utilice siempre guantes protectores
homologados.
Haciendo que este producto sea manipulado
adecuadamente, se ayuda a evitar consecuencias negativas
potenciales para el medio ambiente y las personas, lo que
puede ocurrir con la manipulación inadecuada como residuos
del producto.
La máquina debe limpiarse
regularmente.
Para obtener información más detallada sobre el reciclado de
este producto, contacte con la oficina municipal local, con el
servicio de eliminación de desperdicios domésticos o con la
tienda donde compró el producto.
Control visual.
Al perforar en techo, comprobar que no
puede entrar agua en la máquina. Utilizar
un colector de agua adecuado y cubrir la
máquina con un plástico, pero sin tapar las
bocas de entrada y salida de aire.
Debe utilizarse gafas protectoras o
visor.
La taladradora debe ser adecuada y estar
adaptada para el tamaño de la broca. El
diámetro máximo de broca está indicado en la
máquina.
Utilizar una broca adecuada para el trabajo a
realizar.
Ø
Indicación de carga/corriente
(sistema de control de carga LCS).
Comprobar que el techo es adecuado. El
techo debe ser macizo.
Spanish
– 19
ÍNDICE
Índice
ACLARACIÓN DE LOS SÍMBOLOS
Símbolos en la máquina: .............................................
Símbolos en el manual de instrucciones: ....................
ÍNDICE
Índice ...........................................................................
¿QUÉ ES QUÉ?
Componentes de la taladradora ...................................
¿QUÉ ES QUÉ?
Componentes del soporte ............................................
INSTRUCCIONES DE SEGURIDAD
Medidas a tomar antes de utilizar una taladradora
nueva ...........................................................................
Equipo de protección personal ....................................
Equipo de seguridad de la máquina ............................
Control, mantenimiento y servicio del equipo de
seguridad de la máquina .............................................
Instrucciones generales de seguridad .........................
PRESENTACIÓN
Motor de taladradora y soporte ....................................
Motor de taladradora DMS160 .....................................
Soporte DMS160 ........................................................
MONTAJE
Montaje del soporte - DMS160 A/AT ...........................
Montaje del soporte - DMS160 Gyro ...........................
ARRANQUE Y PARADA
Antes de arrancar ........................................................
Arranque ......................................................................
Parada .........................................................................
TÉCNICA DE TRABAJO
Instrucciones generales de trabajo ..............................
Empleo de la máquina .................................................
MANTENIMIENTO
Mantenimiento del motor de taladradora .....................
Mantenimiento del soporte ..........................................
DATOS TECNICOS
Motor de taladradora DMS160 .....................................
Soporte DMS160 ........................................................
Declaración CE de conformidad ..................................
20 – Spanish
19
19
20
21
22
23
23
24
24
24
25
25
25
26
26
29
29
29
30
31
32
33
34
35
35
¿QUÉ ES QUÉ?
Componentes de la taladradora
1
Husillo de taladradora
8
Manija de fijación
2
Conexión de agua
9
3
Tornillos que fijan el motor en la caja de cambios.
Tornillos (4 unidades) para pieza trasera de alimentador y
caja de cambios
4
Interruptor
5
Tapa del acoplamiento deslizante (SMC)
6
Tapa de escobillas
7
Indicación de carga/corriente (sistema de control de
carga LCS).
10 Empuñadura de alimentador
11 Pieza trasera de alimentador
12 Ruptor de falla de tierra PRCD
13 Llaves
14 Manual de instrucciones
Spanish
– 21
¿QUÉ ES QUÉ?
Componentes del soporte
1
Puntal telescópico 40
11 Mango en L
2
Columna de perforación
12 Manual de instrucciones
3
Motor de taladradora DMS160
13 Módulo prolongador U (Disponible como accesorio.)
4
Riel de pared
14 Módulo prolongador I (Disponible como accesorio.)
5
Puntal / mecanismo de bloqueo
15 Fijación de expansión (Disponible como accesorio.)
6
Placa de techo
16 Colector de agua (Disponible como accesorio.)
7
Placa base (GB 40 T) con ruedas de transporte
17 Placa de vacío (Disponible como accesorio.)
8
Placa base inclinada expansible
18 Juego de herramientas DMS160 AT
9
Tornillo de puntal y tornillo de fijación
19 Juego de herramientas DMS160 Gyro
10 Contratuerca
22 – Spanish
INSTRUCCIONES DE SEGURIDAD
Medidas a tomar antes de utilizar
una taladradora nueva
•
Leer detenidamente el manual antes de empezar a
utilizar la máquina.
•
Esta máquina está diseñada para y destinada a la
perforación de hormigón, ladrillo y diferentes materiales
pedregosos. Cualquier otra aplicación es errónea.
•
La máquina está destinada al uso por operadores
experimentados, en aplicaciones industriales.
•
Controlar el montaje de la broca; ver el capítulo relativo al
cambio de broca.
•
Compruebe que el cable y el cable de empalme está
intacto.
•
Mantener bien ordenado el lugar de trabajo. El desorden
comporta riesgo de accidentes.
Emplee siempre el sentido común.
Es imposible abarcar todas las situaciones imaginables que
se pueden producir al utilizar una taladradora. Proceder
siempre con cuidado y emplear el sentido común. El usuario
debe evitar usar la máquina en aplicaciones para las que no
se considere suficientemente calificado. Si después de leer
estas instrucciones todavía hay inseguridad en cuanto al
procedimiento de uso, consultar con un experto antes de
proseguir. No dudar en ponerse en contacto con el
distribuidor o con el fabricante si hay alguna duda en cuanto
al empleo de la taladradora. Estamos a su disposición para
dar consejos que ayuden a emplear la taladradora de forma
mejor y más segura.
Encarcar al distribuidor de Husqvarna la revisión regular de
la taladradora y la realización de los ajustes y reparaciones
necesarios.
Equipo de protección personal
!
¡ATENCIÓN! Para trabajar con la máquina
debe utilizarse un equipo de protección
personal homologado. El equipo de
protección personal no elimina el riesgo de
lesiones, pero reduce su efecto en caso de
accidente. Pida a su distribuidor que le
asesore en la elección del equipo.
•
Casco protector
•
Protectores auriculares
•
Gafas protectoras o visor
•
Máscara respiratoria
•
Guantes resistentes de agarre seguro.
•
Prendas de vestir ceñidas, resistentes y cómodas que
permitan una libertad de movimientos total.
•
Botas con puntera de acero y suela antideslizante.
•
Tenga siempre a mano el equipo de primeros auxilios.
Toda la información y todos los datos contenidos en este
manual de instrucciones son vigentes en la fecha de
impresión del manual.
!
!
¡ATENCIÓN! Bajo ninguna circunstancia
debe modificarse la configuración original
de la máquina sin autorización del
fabricante. Utilizar siempre recambios
originales. Las modificaciones y/o la
utilización de accesorios no autorizadas
pueden ocasionar accidentes graves o
incluso la muerte del operador o de terceros.
¡ATENCIÓN! El uso de productos que cortan,
pulen, taladran, alisan o forman materiales
puede generar polvo y vapores que pueden
contener sustancias químicas dañinas.
Averiguar la composición del material con
que se trabaja y usar una máscara
respiratoria adecuada.
Spanish
– 23
INSTRUCCIONES DE SEGURIDAD
Equipo de seguridad de la máquina
En este capítulo se describen los componentes de seguridad
de la máquina, su función y el modo de efectuar el control y
el mantenimiento para garantizar un funcionamiento óptimo.
En cuanto a la ubicación de estos componentes en su
máquina, vea el capítulo Qué es qué.
!
¡ATENCIÓN! Nunca utilice una máquina con
componentes de seguridad defectuosos. El
equipo de seguridad se debe controlar y
mantener. Ver las instrucciones del capítulo
Control, mantenimiento y servicio del
equipo de seguridad de la máquina. Si el
control de la máquina no da resultado
satisfactorio, hay que acudir a un taller de
servicio para la reparación.
Control, mantenimiento y servicio
del equipo de seguridad de la
máquina
¡IMPORTANTE! Todos los trabajos de servicio y reparación
de la máquina requieren una formación especial. Esto es
especialmente importante para el equipo de seguridad de
la máquina. Si la máquina no pasa alguno de los controles
indicados a continuación, acuda a su taller de servicio
local. La compra de alguno de nuestros productos le
garantiza que puede recibir un mantenimiento y servicio
profesional. Si no ha adquirido la máquina en una de
nuestras tiendas especializadas con servicio, solicite
información sobre el taller de servicio más cercano.
!
•
Nunca utilice la máquina si está cansado, si ha ingerido
alcohol o si toma medicamentos que puedan afectarle la
vista, su capacidad de discernimiento o el control del
cuerpo.
•
Utilice el equipo de protección personal. Vea las
instrucciones bajo el título Equipo de protección personal.
•
No lleve nunca la máquina agarrando el cable y no tire del
cable para desenchufarla. Mantenga todos los cables y
cables de empalme apartados de agua, aceite y cantos
agudos. Proceda con cuidado para evitar que el cable se
apriete en puertas, vallas o similares. Hay riesgo de
cargar objetos con electricidad.
•
Compruebe que el cable y el cable de empalme está
intacto. Utilizar un cable de alargue para uso a la
intemperie. Si se daña el cable, no utilice la máquina.
Llévela a un taller de servicio oficial para reparar.
•
Un cable de alargue no debe usarse enrollado porque hay
riesgo de sobrecalentamiento.
•
La máquina se debe enchufar a un enchufe con masa.
•
Compruebe que la tensión de red concuerda con la que
se indica en la placa de características de la máquina.
•
No utilice nunca una máquina defectuosa. Siga las
instrucciones de mantenimiento, control y servicio de este
manual. Algunas medidas de mantenimiento y servicio
deben ser efectuadas por especialistas formados y
cualificados. Vea las instrucciones bajo el título
Mantenimiento.
•
Nunca deje que terceros utilicen la máquina sin
asegurarse primero de que hayan entendido el contenido
de este manual de instrucciones.
•
Las personas y los animales pueden distraer y hacer
perder el control de la máquina. Por consiguiente, el
operador debe estar siempre concentrado en su trabajo.
•
Tener en cuenta que las ropas, el pelo largo y las joyas
pueden atascarse en piezas móviles.
Interruptor
El interruptor se usa para arrancar y parar la máquina.
Control del interruptor
•
Arrancar la máquina pulsando el interruptor.
•
Parar la máquina pulsando el interruptor.
•
Un interruptor defectuoso debe ser cambiado por un taller
de servicio oficial.
Instrucciones generales de
seguridad
•
No utilizar la taladradora sin antes haber leído y
comprendido el contenido de este manual de
instrucciones.
!
¡ATENCIÓN! Existe siempre riesgo de
sacudidas eléctricas al usar máquinas
eléctricas. No usar la máquina en
condiciones climáticas desfavorables y
evitar el contacto del cuerpo con pararrayos
y objetos metálicos. Seguir siempre las
instrucciones del manual para evitar daños.
24 – Spanish
¡ATENCIÓN! Existe siempre riesgo de
accidentes por apriete al trabajar con
aparatos con piezas móviles. Usar guantes
protectores para evitar lesiones.
Transporte y almacenamiento
Para proteger la taladradora y las brocas contra daños, no
almacenar ni transportar la taladradora con la broca
montada.
Guardar la taladradora en un espacio cerrado con llave para
que sea inaccesible a niños y personas no autorizadas.
Guardar la taladradora y el soporte en un lugar seco y con
temperatura sobre cero.
PRESENTACIÓN
Motor de taladradora y soporte
Soporte DMS160
Esperamos que su máquina le proporcione plena satisfacción
y le sirva de ayuda por mucho tiempo en adelante. Tenga en
cuenta que este manual de instrucciones es un documento
de valor. Siguiendo sus instrucciones (de uso, servicio,
mantenimiento, etcétera) puede alargar considerablemente
la vida útil de la máquina e incrementar su valor de reventa.
Si vende su máquina, entregue el manual de instrucciones al
nuevo propietario.
La adquisición de alguno de nuestros productos da acceso a
asistencia profesional con reparaciones y servicio en caso
necesario. Si la máquina no fue adquirida en un distribuidor
oficial, preguntar en la tienda de compra la dirección del taller
de servicio más cercano.
Husqvarna Construction Products se esfuerza
constantemente por mejorar la construcción de sus
productos. Por consiguiente, Husqvarna se reserva el
derecho a introducir modificaciones de diseño sin previo
aviso y sin compromisos ulteriores.
DMS160 A
DMS160 AT
DMS160 Gyro
DMS160 A/AT
El soporte se fija con tornillo de expansión.
•
Hay disponibles como accesorios un colector de agua y
una placa de vacío para fijar la columna por aspiración.
Motor de taladradora DMS160
DMS160 AT
•
DMS160 AT es un sistema modular que permite la
perforación inclinada y tiene función de giro.
DMS160 Gyro
•
La DSM160 es una taladradora eléctrica destinada a
perforar agujeros en hormigón, ladrillo y diferentes
materiales pedregosos.
•
La taladradora es de diseño modular y fácil de montar.
•
La máquina tiene una gama de velocidades para brocas
de diámetro (ø) de 120 mm / 4,75 pulgadas.
•
El diseño del acoplamiento mecánico deslizante (SMC Slide Mechanical Clutch) proporciona la toma de potencia
más alta y se puede ajustar desde el exterior.
•
La máquina está diseñada para perforación con soporte.
•
La máquina es refrigerada por agua.
•
La máquina tiene doble aislamiento e indicador de
corriente.
•
La máquina funciona mejor si no se sobrecarga. Dejar
como máximo encendido el diodo luminiscente amarillo
del indicador de carga/corriente (LCS-Load Control
System). Como máximo 10 minutos en carga máxima.
Luego, la máquina debe hacerse funcionar sin carga
durante unos 2 minutos.
•
DMS160 Gyro es un sistema modular con columna
telescópica para fijar el motor de taladradora.
•
El puntal telescópico tiene una longitud máxima de 3,1 m
y se puede prolongar en 0,75 m con un módulo
prolongador.
•
Sólo se puede usar un módulo prolongador.
•
Para cambiar los ajustes basta con una llave fija (24/30
mm) y una llave Allen (8 mm).
La columna de perforación es girable progresivamente en
360°.
•
Las ruedas de transporte son desmontables.
Spanish
– 25
MONTAJE
Montaje del soporte - DMS160 A/AT
Montaje del soporte - DMS160 Gyro
DMS 160 Gyro
2
DMS 160A
4
DMS 160 AT
DMS160 A/AT
•
3
1
Perforar un agujero (15 mm) en la pared e insertar
golpeando los tornillos de expansión.
20 Fijar la placa base. Comprobar cuidadosamente que el
expansor está bien fijado.
7
DMS160 AT
•
La columna de perforación se monta en el soporte
angular de la placa base. Apretar el tornillo de fijación con
una llave Allen de 8 mm. La columna de perforación se
puede girar 360° progresivamente y se fija en cada
posición con el tornillo de fijación (Allen de 8 mm).
5
6
8
•
La columna de perforación se coloca en la inclinación
deseada apretando la tuerca con una llave de 24 mm. Si
se utiliza la placa de vacío, comprobar que la base no sea
porosa y pueda soltarse del suelo o la pared. Comprobar
que la bomba de vacío tiene capacidad para fijar por
aspiración la placa de vacío. Motor de vacío adecuado,
Husqvarna VP200.
9
!
¡ATENCIÓN! La placa de vacío no se debe
utilizar nunca para perforar techos. Su uso
descuidado o erróneo puede provocar
heridas graves o mortales al usuario o
terceros.
26 – Spanish
10
11
MONTAJE
Perforación en paredes
6
5
Perforación en suelos
2
3
6
7
2
5
4
3
7
4
1
1
Placa base con tornillo de fijación.
1
Tornillo de seguridad
2
Tornillo de puntal y tornillo de fijación
2
Tornillo de puntal y tornillo de fijación
3
Manija de fijación
3
Manija de fijación
4
Mango en L
4
Mango en L
5
Columna de perforación
5
Tornillo de seguridad
6
Tornillo de puntal y tornillo de fijación
•
Bajar la columna de perforación con el mango en L.
7
Contratuerca
•
Comprobar que el tornillo del puntal entra en el casquillo
de fijación.
8
Motor de taladradora DMS160
•
•
Colocar la placa base con la longitud de la columna de
perforación desde la pared y el tornillo del puntal
enroscado. Para perforar a más de 1,5 metros de altura,
el tubo exterior grueso debe estar orientado hacia arriba;
y al revés para perforar a menos de 1,5 metros de altura.
Comprobar que el puntal está fijado en la placa base con
el tornillo de fijación.
Apretar la tuerca de seguridad con una llave de 30 mm y
la manija de fijación.
•
Fijar el puntal telescópico contra el techo. Usando el
agujero más cercano del tubo interior perforado. Fijar con
la manija de puntal y apretarla con una llave de 24 mm.
Sin apretar demasiado.
•
Colocar el soporte en la posición deseada.
•
Soltar la manija de fijación y girar la columna de
perforación. Bajar la columna de perforación con el
mango en L.
6
Fijar el tornillo del puntal en el casquillo de fijación con el
tornillo de fijación y la tuerca. Apretar con llaves de 24 mm
y 30 mm.
•
Montar el motor de taladradora DMS160 en la columna de
perforación.
•
•
Girar hacia atrás la columna de perforación con el motor
de taladradora hasta la posición deseada contra la pared.
Apretar la manija de fijación.
Fijar el puntal telescópico contra el techo con el
mecanismo de puntal. Apretar la última parte con una
llave de 24 mm, sin apretar demasiado. El puntal
telescópico tiene una longitud máxima de 3,1 m y se
puede prolongar en 0,75 m con un módulo prolongador.
•
Inclinar la columna de perforación hacia atrás y subirla,
fijándola con el mango en L y la tuerca. Para la
perforación inclinada, aflojar el mango en L e inclinar la
columna de perforación en al ángulo deseado, apretando
la tuerca con una llave de 30 mm.
•
Controlar la posición de la broca. Enroscar el tornillo de
puntal contra la pared para fijar la columna de
perforación. Fijar con una tuerca de seguridad, 30 mm.
Utilizando una regla de madera como separador. La
columna de perforación se puede girar 360°
progresivamente y se fija en cada posición con el tornillo
de fijación (Allen de 8 mm).
•
Para mayor seguridad de la columna de perforación se
puede usar una fijación de expansión. La fijación se
ajusta contra el tornillo de puntal y se fija en la pared con
un tornillo de expansión. Fijar con una tuerca de
seguridad de 30 mm.
Perforación en techos
1
Tornillo de puntal y tornillo de fijación
2
Contratuerca
3
Tornillo de puntal y tornillo de fijación
Spanish
– 27
MONTAJE
•
Colocar el soporte en la posición deseada.
•
Comprobar que el tornillo de puntal en la columna de
perforación está enroscado. Levantar la columna de
perforación y bloquearla en posición vertical con la tuerca
de seguridad.
•
Comprobar que la broca está en posición correcta. Fijar
el puntal telescópico contra el techo con el mecanismo de
puntal.
•
Enroscar el tornillo de puntal contra el techo para fijar la
columna de perforación. Fijar con una tuerca de
seguridad, 30 mm. Utilizando una regla de madera como
separador.
•
Para mayor seguridad de la columna de perforación se
puede usar una fijación de expansión. (Disponible como
accesorio.) La fijación se ajusta contra el tornillo de puntal
y se fija en la pared con un tornillo de expansión. Fijar con
una tuerca de seguridad de 30 mm.
!
¡ATENCIÓN! La placa de vacío no se debe
utilizar nunca para perforar techos. Su uso
descuidado o erróneo puede provocar
heridas graves o mortales al usuario o
terceros.
28 – Spanish
ARRANQUE Y PARADA
Antes de arrancar
Perforación en techos
!
!
¡ATENCIÓN! La placa de vacío no se debe
utilizar nunca para perforar techos.
Utilizar un colector de agua para impedir que
entre agua en la máquina. La máquina debe
cubrirse con un plástico o similar para
impedir que entre agua en ella, pero no
deben taparse las bocas de entrada y salida
de aire.
¡ATENCIÓN! Antes de arrancar, observe lo
siguiente:
La máquina se debe enchufar a un enchufe
con masa.
Compruebe que la tensión de red concuerda
con la que se indica en la placa de
características de la máquina. Asegúrese de
que no haya terceros desautorizados en la
zona de trabajo.
!
¡ATENCIÓN! Antes iniciar la perforación,
comprobar que todos los tornillos de
fijación están bien apretados.
!
Hay riesgo de accidentes graves si el núcleo
de perforación de hormigón permanece en
la broca al sacar el motor de taladradora / la
broca del suelo, la pared o el techo.
Comprobar que en el piso inferior no hay
personas que puedan ser dañadas por la
caída de núcleos de perforación de
hormigón.
Comprobar que:
•
•
El interruptor esté intacto. Si no está intacto, debe
cambiarlo un técnico autorizado.
La máquina y sus equipos están correctamente
montados:
- La broca está bien fijada.
- El soporte está bien montado.
- La máquina está fijada en el soporte de forma adecuada.
¡ATENCIÓN! Sólo se puede usar un módulo
prolongador.
Arranque
•
Activar la refrigeración por agua.
•
Presionar completamente el interruptor.
•
Empezar bajando la broca con la empuñadura de
alimentador.
Parada
!
¡ATENCIÓN! La broca continúa girando unos
instantes después de parar el motor. No
detener la broca con las manos. De hacerlo,
hay riesgo de daños personales.
•
Utilice el equipo de protección personal. Vea las
instrucciones bajo el título Equipo de protección personal.
Parar la máquina pulsando el interruptor.
•
La refrigeración por agua está conectada en la máquina.
Refrigeración
Hacer funcionar la máquina sin carga durante unos minutos
para enfriar el motor.
Spanish
– 29
TÉCNICA DE TRABAJO
Instrucciones generales de trabajo
!
!
¡ATENCIÓN! Este capítulo trata las reglas de
seguridad básicas para trabajar con la
taladradora. La información no puede
sustituir nunca a los conocimientos,
formación y experiencia práctica de un
profesional. Si en alguna situación hay
inseguridad en cuanto a seguir empleando
la máquina, consultar con un experto.
Consultar al distribuidor, al taller de servicio
o a un usuario de taladradoras
experimentado. No se debe emplear la
máquina en aplicaciones para las que el
usuario no se considera plenamente
cualificado.
¡ATENCIÓN! La sobreexposición a las
vibraciones puede provocar problemas
circulatorios y dolencias de carácter
nervioso, especialmente en personas con
patologías circulatorias. Acuda a un médico
si nota síntomas corporales que puedan
relacionarse con la sobreexposición a las
vibraciones. Son ejemplos de tales síntomas
la pérdida de sensibilidad, el 'cosquilleo', las
'punzadas', el dolor, la pérdida o reducción
de la fuerza normal o los cambios en el color
y la superficie de la piel. Estos síntomas se
presentan normalmente en dedos, manos y
muñecas. Los síntomas pueden aumentar
en temperaturas frías.
•
No usar en condiciones climáticas desfavorables. Por
ejemplo, niebla densa, lluvia, viento fuerte, frío intenso,
etc. Trabajar con mal tiempo es cansador y puede crear
condiciones peligrosas, por ejemplo suelo resbaladizo.
•
Antes de comenzar a trabajar con la máquina, controle
siempre que el lugar esté libre y que los pies estén bien
afirmados al terreno. Controle posibles obstáculos en
caso de movimientos repentinos. Asegúrese de que no
haya elementos que puedan caer y provocar daños al
trabajar con la máquina.
•
Mantenerse apartado de la broca cuando el motor está en
marcha.
•
Controle que la zona de trabajo esté bien iluminada para
lograr un entorno seguro.
•
Comprobar que en la zona que se va a perforar no haya
tuberías ni cables eléctricos instalados.
•
Al emplear la máquina, hágalo con el cable detrás suyo
para evitar dañarlo.
•
No abandonar nunca la máquina sin vigilar, con el motor
en marcha. Las brocas rotativas comportan riesgo de
accidentes graves.
•
Desenchufar siempre el contacto para paradas
prolongadas del trabajo.
•
No sobrecargar la máquina. La sobrecarga puede dañar
la máquina.
30 – Spanish
•
Mantener las herramientas afiladas y limpias para que el
trabajo sea más seguro.
•
Controlar siempre la parte posterior de la superficie en la
que sale la broca al penetrar. Impedir el acceso cercando
la zona de trabajo y procurar que no haya riesgo de daños
personales o materiales.
•
Parar siempre la máquina antes de trasladarla.
•
Un operador nunca debe trabajar solo; siempre debe
haber otra(s) persona(s) cerca. Así, además de tener
ayuda para montar la máquina, también puede recibirse
asistencia en caso de accidente.
•
Mantener todas las piezas en perfecto estado y
comprobar que todos los elementos de fijación estén bien
apretados.
TÉCNICA DE TRABAJO
Empleo de la máquina
Sacar el destornillador y colocar la tapa del acoplamiento
deslizante.
•
Mantener las manos apartadas del husillo de taladro y la
broca cuando funciona la máquina.
•
Prestar atención a las fugas de aceite o de agua.
Perforación a la intemperie
Usar siempre cables de empalme homologados para uso en
intemperie.
Cambio de broca
1
Desenchufar la máquina.
2
Preparar:
Indicación de carga/corriente (sistema de
control de carga LCS).
La máquina funciona mejor si no se sobrecarga. Dejar como
máximo encendido el diodo luminiscente amarillo del
indicador de carga/corriente (LCS-Load Control System).
Como máximo 10 minutos en carga máxima. Luego, la
máquina debe hacerse funcionar sin carga durante unos 2
minutos.
- La broca nueva.
- Las llaves fijas incluidas en la entrega, de 24 mm y 32 mm.
- Grasa hidrófuga.
3
Desmontar la broca vieja con las llaves fijas.
4
Aplicar grasa hidrófuga en la rosca de la broca nueva.
5
Montar la broca con las llaves fijas.
Acoplamiento deslizante (SMC)
La máquina está equipada con un acoplamiento mecánico
deslizante (SMC).
Tensar el acoplamiento deslizante, de este modo:
•
Soltar la tapa del acoplamiento deslizante.
2
1
3
•
Fijar la tuerca de gancho con cuidado con un
destornillador plano ancho en una de las cuatro ranuras
de la tuerca.
•
Girar 15 grados el husillo de taladro con una llave fija de
27 mm.
Spanish
– 31
MANTENIMIENTO
Mantenimiento del motor de
taladradora
Cambio del motor y la caja de cambios
1
Fijar la máquina en un tornillo de banco o similar, con el
husillo de taladro hacia abajo.
2
Soltar las tapas de las escobillas con un destornillador
plano ancho.
3
Sacar las escobillas con cuidado.
4
Quitar los cuatro tornillos que fijan el motor en la caja de
cambios.
5
Soltar el cable de tierra de la tapa de la caja de cambios
(aplicable solamente a 230 V).
6
Desmontar la máquina con cuidado.
7
Cambiar el módulo que es necesario sustituir. Usar grasa
Castrol MS3 Molybden en la caja de cambios.
8
Armar el motor con la caja de cambios.
9
Enroscar los tornillos.
¡IMPORTANTE! El control y/o mantenimiento de la
máquina debe hacerse con el motor parado y el enchufe
desenchufado.
La vida útil de la máquina se alarga considerablemente si se
utiliza, cuida y mantiene correctamente.
Limpieza
•
•
Mantener limpia la máquina y la broca para que la
perforación se pueda hacer de forma segura.
Para que la máquina tenga siempre una buena
refrigeración, las aberturas de paso del aire refrigerante
deben mantenerse libres y limpias. Limpie regularmente
la máquina con aire comprimido.
Suministro eléctrico
!
¡ATENCIÓN! No usar nunca cables dañados,
puesto que pueden causar daños
personales graves e incluso mortales.
Compruebe que el cable y el cable de empalme está intacto.
Si se daña el cable, no utilizar la máquina. Llevarla a un taller
de servicio oficial para reparar.
Reparaciones
10 Poner las tapas de escobillas.
Cambio de la pieza trasera
1
Aflojar los cuatro tornillos y la manija de fijación de la
parte trasera de la máquina.
2
Cambiar las dos placas deslizantes cuando se va a
cambiar la pieza trasera.
3
Atornillar la pieza trasera con los cuatro tornillos.
Enroscar la manija de fijación.
¡IMPORTANTE! Las reparaciones de todo tipo deben ser
efectuadas por técnicos autorizados, únicamente. De este
modo se evita someter a los operadores a grandes riesgos.
32 – Spanish
MANTENIMIENTO
Cambio de escobillas de carbón
Mantenimiento del soporte
Las escobillas deben desmontarse y revisarse regularmente.
Cada semana si la máquina se utiliza a diario, o a intervalos
más largos si se utiliza con menor frecuencia. La superficie
de desgaste debe estar regular e intacta.
Ambas escobillas deben cambiarse siempre en la misma
oportunidad, pero de una en una. Procedimiento de cambio:
1
Sacar las escobillas con cuidado. Si quedan menos de 6
mm en las escobillas, hay que cambiarlas.
3
Montar las escobillas nuevas.
4
Poner las tapas de escobillas.
5
Dejar la máquina funcionando en ralentí durante 10
minutos para hacer el rodaje de las escobillas nuevas.
Mantenimiento diario
2
¡IMPORTANTE! Desmontar el motor de taladradora. En lo
referente al mantenimiento del motor de taladradora, ver el
capítulo pertinente.
Soltar las tapas de las escobillas con un destornillador
plano ancho.
2
1
Limpieza y lubricación
Compruebe que los tornillos y las tuercas estén
apretados.
Compruebe que la unidad de interruptor funciona de
forma segura.
3
Limpie la parte exterior de la máquina.
4
Revise y limpie las aberturas de aire refrigerante.
5
Compruebe que el cable y el cable de empalme está
intacto.
•
Para obtener un funcionamiento óptimo es muy
importante mantener el soporte limpio y en orden.
•
Se recomienda limpiar el soporte con lavado a alta
presión y secarlo.
•
Aceitar todas las piezas móviles del soporte. Usar grasa
estándar para prevenir la corrosión de las superficies de
contacto.
Reparaciones
¡IMPORTANTE! Las reparaciones de todo tipo deben ser
efectuadas por técnicos autorizados, únicamente. De este
modo se evita someter a los operadores a grandes riesgos.
Mantenimiento diario
1
Compruebe que los tornillos y las tuercas estén
apretados.
2
Limpie la parte exterior de la máquina.
Spanish
– 33
DATOS TECNICOS
Motor de taladradora DMS 160
Motor eléctrico
Monofásico
Tensión nominal, V
230/100-120
Potencia nominal, W
1560
Amperaje nominal, A
230 V
6A
100-120 V
13A
Peso, kg
5,9
Diámetro de broca, mm
Diámetro máximo de broca, con soporte
120 mm (4,7')
Rosca de husillo
Int. 1/2” R
Conexión de agua
G 1/4'
Velocidad del husillo, ralentí, r.p.m.
Verde 1
1100
Verde 2
980
Verde 3
840
Velocidad del husillo, r.p.m.
Amarillo
700
Rojo
640
Emisiones de ruido (vea la nota 1)
Nivel de potencia acústica medido dB(A)
102
Nivel de potencia acústica garantizado LWA dB(A)
103
Niveles acústicos (vea la nota 2)
Nivel de presión acústica en el oído del usuario, dB(A)
89
Niveles de vibraciones (vea la nota 3)
Empuñadura, m/s2
<2,5
Nota 1: Emisiones sonoras en el entorno medidas como potencia sonora (LWA) según la norma EN 12348.
Nota 2: Nivel de presión sonora conforme a EN 12348. Los datos referidos del nivel de presión sonora tienen una dispersión
estadística habitual (desviación típica) de 1,0 dB (A).
Nota 3: Nivel de vibración conforme a EN 12348. Los datos referidos del nivel de vibración poseen una dispersión estadística
habitual (desviación típica) de 1 m/s2.
34 – Spanish
DATOS TECNICOS
Soporte DMS 160
Altura, mm
DMS 160 A altura, mm
840
DMS 160 AT altura, mm
900
DMS 160 Gyro altura, mm
1900-3100
Carrera, mm
600
Diámetro máximo de broca (mm)
120
Peso, kg
DMS 160 A
10,5
DMS 160 AT
12
DMS 160 Gyro
31,4
Juego de herramientas DMS 160 AT
0,3
Juego de herramientas DMS 160 Gyro
0,8
Peso, kg (accesorio extra)
Placa de vacío
2,5
Colector de agua
0,7
Módulo prolongador I
2,9
Módulo prolongador U
2,9
Fijación de expansión
0,8
Declaración CE de conformidad
(Rige sólo para Europa)
Husqvarna AB, SE-433 81 Göteborg, Suecia, teléfono: +46-31-949000, declara por la presente que los bastidores Husqvarna
DMS 160 motor de perforadora, DMS 160 A/AT/Gyro, a partir del número de serie del año 2010 en adelante (el año se indica
textualmente en la placa de identificación, seguido del número de serie), cumple con las siguientes disposiciones de la
DIRECTIVA DEL CONSEJO:
•
2006/42/CE «relativa a máquinas» del 17 de mayo de 2006.
•
2004/108/CEE, ”referente a compatibilidad electromagnética”, del 15 de diciembre de 2004.
•
2006/95/CE del 12 de diciembre de 2006 relativa a equipos eléctricos.
Se han aplicado las siguientes normas: EN ISO 12100:2003, EN 55014-1:2006, EN 55014-2/A1:2001, EN 61000-3-2:2006, EN
61000-3-3/A1/A2:2005, EN 12348/A1:2009.
Göteborg, 29 de diciembre de 2009
Henric Andersson
Vicepresidente, jefe de la sección de cortadoras y maquinaria para la construcción
Husqvarna AB
(Presentante autorizado de Husqvarna AB y responsable de la documentación técnica.)
Spanish
– 35
SYMBOLERKLÄRUNG
Symbole am Gerät:
Sicherstellen, dass die Gabel um das Innenrohr
greift. Mit einem geeigneten Schraubenschlüssel
anziehen.
WARNUNG! Das Gerät kann falsch oder
nachlässig angewendet gefährlich sein und
zu schweren oder gar lebensgefährlichen
Verletzungen des Benutzers oder anderer
Personen führen.
Die Mutter mit einem 30-mmSchraubenschlüssel anziehen. Die
Sicherungsmutter am L-Griff überprüfen. Die
Mutter muss angezogen sein.
Lesen Sie die Bedienungsanweisung
sorgfältig durch und machen Sie sich mit
dem Inhalt vertraut, bevor Sie das Gerät
benutzen.
WARNUNG! Beim Bohren bildet sich
Staub, der beim Einatmen
Gesundheitsschäden hervorrufen kann.
Einen zugelassenen Atemschutz tragen.
Für gute Belüftung sorgen.
Benutzen Sie immer:
•
Einen zugelassenen Schutzhelm
•
Einen zugelassenen Gehörschutz
•
Schutzbrille oder Visier
•
Atemschutzmaske
Sonstige Symbole/Aufkleber am Gerät
beziehen sich auf spezielle
Zertifizierungsanforderungen, die in bestimmten
Ländern gelten.
Dieses Produkt stimmt mit den geltenden
CE-Richtlinien überein.
Symbole in der
Bedienungsanweisung:
Umweltkennzeichnung Das Symbol auf
dem Produkt oder der Verpackung gibt an,
dass dieses Produkt nicht im Hausmüll
entsorgt werden darf. Zur Entsorgung ist es
stattdessen an eine entsprechende
Recyclinganlage für elektrische und
elektronische Geräte zu übergeben.
Kontrollen und/oder Wartungsarbeiten
sind bei abgeschaltetem Motor und
abgezogenem Stecker durchzuführen.
Durch eine korrekte Entsorgung dieses
Produkts tragen Sie dazu bei, mögliche negative
Auswirkungen auf Ihre Umwelt und Mitmenschen zu
verhindern. Durch eine unsachgemäße Entsorgung dieses
Produkts können Schäden entstehen.
Stets zugelassene Schutzhandschuhe
tragen.
Regelmäßige Reinigung ist notwendig.
Ausführliche Recyclinginformationen zu diesem Produkt
erhalten Sie von Ihrer Kommune, Entsorgungsunternehmen
für Hausmüll oder dem Geschäft, in dem Sie das Produkt
erworben haben.
Beim Bohren in Decken sicherstellen, dass
kein Wasser in die Maschine eindringen
kann. Ein geeignetes Wasserauffanggefäß
verwenden und die Maschine in Plastikfolie
wickeln, dabei aber Luftein- und -auslass aussparen.
Visuelle Kontrolle.
Eine für die Größe geeignete Bohrmaschine
wählen. Der max. Bohrdurchmesser ist auf der
Maschine angegeben.
Schutzbrille oder Gesichtsschutz
müssen benutzt werden.
Einen für die jeweiligen Arbeiten geeigneten
Bohrer verwenden.
Ø
Last/Stromanzeige (LCS – Load
Control System)
Sicherstellen, dass die Decke hält. Die
Decke muss massiv sein.
36 – German
INHALT
Inhalt
SYMBOLERKLÄRUNG
Symbole am Gerät: ......................................................
Symbole in der Bedienungsanweisung: .......................
INHALT
Inhalt ............................................................................
WAS IST WAS?
Bestandteile der Bohrmaschine ...................................
WAS IST WAS?
Bestandteile des Ständers ...........................................
SICHERHEITSVORSCHRIFTEN
Maßnahmen vor der Verwendung einer neuen
Bohrmaschine ..............................................................
Persönliche Schutzausrüstung ....................................
Sicherheitsausrüstung des Gerätes .............................
Kontrolle, Wartung und Service der
Sicherheitsausrüstung des Gerätes .............................
Allgemeine Sicherheitsvorschriften ..............................
VORSTELLUNG
Bohrmotor und Ständer ...............................................
Bohrmotor DMS160 .....................................................
Ständer DMS160 ........................................................
MONTAGE
Ständermontage - DMS160 A/AT ................................
Ständermontage - DMS160 Gyro ................................
STARTEN UND STOPPEN
Vor dem Start ...............................................................
Starten .........................................................................
Stoppen .......................................................................
ARBEITSTECHNIK
Allgemeine Arbeitsvorschriften ....................................
Benutzung des Geräts .................................................
WARTUNG
Bohrmotorwartung .......................................................
Ständerwartung ...........................................................
TECHNISCHE DATEN
Bohrmotor DMS160 .....................................................
Ständer DMS160 ........................................................
EG-Konformitätserklärung ...........................................
36
36
37
38
39
40
40
41
41
41
42
42
42
43
43
46
46
46
47
48
49
50
51
52
52
German
– 37
WAS IST WAS?
Bestandteile der Bohrmaschine
1
Bohrspindel
8
Verriegelungsknopf
2
Wasseranschluss
9
4 Schrauben für Vorschubrückwand und Getriebe
3
Schrauben lösen, mit denen Getriebe und Motor befestigt
sind.
10 Vorschubgriff
4
Schalter
5
Deckel der Rutschkupplung (SMC)
6
Kohlebürstenabdeckung
7
Last/Stromanzeige (LCS – Load Control System)
38 – German
11 Vorschubrückwand
12 PRCD Fehlerstromschutzschalter
13 Schraubenschlüssel
14 Bedienungsanweisung
WAS IST WAS?
Bestandteile des Ständers
1
Teleskopstempel 40
11 L-Griff
2
Bohrsäule
12 Bedienungsanweisung
3
Bohrmotor DMS160
13 Verlängerungsmodul U (Als Zubehör erhältlich.)
4
Wandschiene
14 Verlängerungsmodul l (Als Zubehör erhältlich.)
5
Stempel/Verriegelungsmechanismus
15 Expanderhalterung (Als Zubehör erhältlich.)
6
Deckenplatte
16 Wassergefäß (Als Zubehör erhältlich.)
7
Sohlenplatte (GB 40 T) mit Transporträdern
17 Vakuumplatte (Als Zubehör erhältlich.)
8
Expander Winkelsohlenplatte
18 Werkzeugsatz DMS160 AT
9
Stempelschraube und Sicherungsschraube
19 Werkzeugsatz DMS160 Gyro
10 Gegenmutter
German
– 39
SICHERHEITSVORSCHRIFTEN
Maßnahmen vor der Verwendung
einer neuen Bohrmaschine
•
Vor Benutzung des Geräts die Bedienungsanleitung
gründlich durchlesen.
•
Dieses Gerät ist für das Bohren in Beton, Backstein und
diversen Steinmaterialien konstruiert und vorgesehen.
Jegliche andere Nutzung ist unzulässig.
•
Das Gerät ist für industrielle Anwendungen und die
Benutzung durch erfahrene Bediener ausgelegt.
•
Montage des Bohrers überprüfen, siehe Abschnitt Bohrer
auswechseln.
•
Kontrollieren, ob Kabel und Verlängerungskabel intakt
und in gutem Zustand sind.
•
Am Arbeitsplatz Ordnung halten. Unordnung bringt
Unfallgefahren mit sich.
Persönliche Schutzausrüstung
!
WARNUNG! Bei der Benutzung des Gerätes
muss die vorgeschriebene persönliche
Schutzausrüstung angewendet werden. Die
persönliche Schutzausrüstung beseitigt
nicht die Unfallgefahr, begrenzt aber den
Umfang der Verletzungen und Schäden. Bei
der Wahl der Schutzausrüstung einen
Fachhändler um Rat fragen.
•
Schutzhelm
•
Gehörschutz
•
Schutzbrille oder Visier
Stets mit gesundem Menschenverstand
arbeiten!
•
Atemschutzmaske
Es ist unmöglich, alle denkbaren Situationen zu beschreiben,
die beim Gebrauch der Bohrmaschine auftreten könnten.
Stets vorsichtig vorgehen und mit gesundem
Menschenverstand arbeiten. Situationen vermeiden, denen
Sie sich nicht gewachsen fühlen. Wenn Sie sich nach dem
Lesen dieser Anweisungen immer noch unsicher fühlen, wie
Sie vorgehen sollen, bitten Sie einen Fachmann um Rat,
bevor Sie fortfahren. Zögern Sie nicht, Ihren Händler oder uns
anzusprechen, wenn Sie Fragen zum Gebrauch der
Bohrmaschine haben. Wir sind gerne für Sie da und helfen
Ihnen beim optimalen und sicheren Einsatz Ihrer
Bohrmaschine.
•
Feste, griffsichere Handschuhe.
Ihr Husqvarna-Händler sollte die Bohrmaschine regelmäßig
überprüfen und notwendige Einstellungen und Reparaturen
vornehmen.
•
Eng anliegende, kräftige und bequeme Kleidung tragen,
die volle Bewegungsfreiheit gewährt.
•
Stiefel mit Stahlkappe und rutschfester Sohle.
•
Ein Erste-Hilfe-Set soll immer griffbereit sein.
Alle Informationen und Daten dieser Bedienungsanleitung
galten zum Zeitpunkt der Drucklegung.
!
!
WARNUNG! Unter keinen Umständen darf
die ursprüngliche Konstruktion des Gerätes
ohne Genehmigung des Herstellers
geändert werden. Es ist immer
Originalzubehör zu verwenden. Unzulässige
Änderungen und/oder unzulässiges
Zubehör können zu schweren oder sogar
tödlichen Verletzungen des Anwenders oder
anderer Personen führen.
WARNUNG! Bei der Nutzung von Produkten,
die schneiden, schleifen, bohren, feine
Schleifvorgänge ausführen oder Material
formen kann es zu einer Bildung vom Staub
und Dämpfen kommen, die schädliche
chemische Substanzen enthalten.
Informieren Sie sich über die Beschaffenheit
des Materials, mit dem Sie arbeiten und
tragen Sie einen geeigneten Atemschutz.
40 – German
SICHERHEITSVORSCHRIFTEN
Sicherheitsausrüstung des Gerätes
In diesem Abschnitt werden einzelnen Teile der
Sicherheitsausrüstung des Gerätes beschrieben, welche
Funktion sie haben und wie ihre Kontrolle und Wartung
ausgeführt werden sollen, um sicherzustellen, dass sie
funktionsfähig sind. (Siehe Kapitel Was ist was? um
herauszufinden, wo die Sicherheitsdetails an Ihrem Gerät zu
finden sind).
!
WARNUNG! Bei Arbeiten an Produkten mit
beweglichen Teilen herrscht stets
Klemmgefahr. Schutzhandschuhe tragen,
um Verletzungen zu vermeiden.
•
Arbeiten Sie niemals mit dem Gerät, wenn Sie müde sind,
Alkohol getrunken oder Medikamente eingenommen
haben, da hierdurch Sehkraft, Urteilsvermögen oder
Körperkontrolle beeinträchtigt werden können.
WARNUNG! Benutzen Sie nie ein Gerät mit
defekter Sicherheitsausrüstung. Die
Sicherheitsausrüstung muss überprüft und
gewartet werden. Siehe die Anweisungen
unter der Überschrift Kontrolle, Wartung und
Service der Sicherheitsausrüstung der
Bohrmaschine. Finden sich Mängel bei der
Kontrolle des Geräts, ist eine
Servicewerkstatt zur Reparatur
aufzusuchen.
•
Tragen Sie persönliche Schutzausrüstung. Siehe die
Anweisungen unter der Überschrift Persönliche
Schutzausrüstung.
•
Tragen Sie das Gerät niemals am Kabel, und ziehen Sie
niemals den Stecker am Kabel aus der Steckdose. Achten
Sie darauf, dass Kabel und Verlängerungskabel nicht mit
Wasser, Öl oder scharfen Kanten in Berührung kommen.
Darauf achten, dass die Kabel nicht in Türen, Zäunen o.
ä. eingeklemmt werden. Es besteht sonst die Gefahr,
dass Gegenstände unter Strom gestellt werden.
Kontrolle, Wartung und Service der
Sicherheitsausrüstung des Gerätes
•
Kontrollieren, ob Kabel und Verlängerungskabel intakt
und in gutem Zustand sind. Eine Verlängerungsschnur für
den Außenbereich verwenden. Das Gerät nicht benutzen,
wenn das Kabel beschädigt ist, sondern zur Reparatur in
eine autorisierte Servicewerkstatt geben.
•
Keine zusammengerollte Verlängerungsschnur nutzen,
um eine Überhitzungsgefahr zu vermeiden.
•
Das Gerät muss an ein geerdete Steckdose
angeschlossen werden.
•
Kontrollieren, ob die Netzspannung mit der auf dem
Geräteschild angegebenen übereinstimmt.
•
Niemals mit einem defekten Gerät arbeiten. Die
Wartungs-, Kontroll- und Serviceanweisungen in dieser
Bedienungsanweisung sind sorgfältig zu befolgen.
Gewisse Wartungs- und Servicemaßnahmen sind von
geschulten, qualifizierten Fachleuten auszuführen. Siehe
die Anweisungen unter der Überschrift Wartung.
•
Lassen Sie niemals jemand anderen das Gerät benutzen,
ohne sich zu vergewissern, dass die Person den Inhalt
der Bedienungsanweisung verstanden hat.
•
Menschen und Tiere können zu einer Ablenkung und
damit zum Verlust der Kontrolle über das Gerät führen.
Konzentration und Fokussierung auf die Aufgabe sind
daher stets erforderlich.
•
Bedenken, dass Kleidung, langes Haar und Schmuck in
beweglichen Teilen hängen bleiben können.
!
WICHTIG! Service und Reparatur des Gerätes erfordern
eine Spezialausbildung. Dies gilt besonders für die
Sicherheitsausrüstung des Gerätes. Wenn Ihr Gerät den
unten aufgeführten Kontrollanforderungen nicht entspricht,
müssen Sie Ihre Servicewerkstatt aufsuchen. Beim Kauf
eines unserer Produkte wird gewährleistet, dass
Reparatur- oder Servicearbeiten fachmännisch ausgeführt
werden. Sollte der Verkäufer Ihres Gerätes nicht an unser
Fachhändler-Service-Netz angeschlossen sein, fragen Sie
nach unserer nächstgelegenen Servicewerkstatt.
Schalter
Der Schalter ist zum Starten und Abstellen des Gerätes zu
benutzen.
Kontrolle des Schalters
•
Das Gerät durch Betätigen des Schalters starten.
•
Das Gerät durch erneutes Betätigen des Schalters
ausschalten.
•
Defekte Schalter sind von einer autorisierten
Servicewerkstatt auszutauschen.
Allgemeine Sicherheitsvorschriften
•
Arbeiten mit der Bohrmaschine dürfen erst ausgeführt
werden, wenn Sie zuvor den Inhalt dieser
Bedienungsanleitung gelesen und verstanden haben.
!
WARNUNG! An elektrisch betriebenen
Geräten besteht stets die Gefahr von
elektrischen Schlägen. Ungünstige
Witterungsbedingungen sowie einen
Körperkontakt mit Blitzableiter und
metallischen Gegenständen vermeiden.
Stets die Vorgaben in der
Bedienungsanleitung befolgen, um Schäden
auszuschließen.
Transport und Aufbewahrung
Um Bohrmaschine und Bohrer vor Beschädigungen zu
schützen, das Gerät nicht mit angebrachter Bohrkrone
verwahren oder transportieren.
Das Gerät in einem abschließbaren Bereich aufbewahren, wo
es weder für Kinder noch für Unbefugte erreichbar ist.
Bohrmaschine und Ständer trocken und frostfrei
aufbewahren.
German
– 41
VORSTELLUNG
Bohrmotor und Ständer
Ständer DMS160
Wir hoffen, dass Sie mit Ihrer Maschine über lange Jahre
zufrieden sein werden. Denken Sie daran, diese
Bedienungsanleitung sicher aufzubewahren.Die genaue
Befolgung ihres Inhalts (Verwendung, Service, Wartung usw.)
verlängert die Lebensdauer der Maschine erheblich und
erhöht zudem ihren Wiederverkaufswert.Sollten Sie Ihre
Maschine verkaufen, händigen Sie dem neuen Besitzer bitte
auch die Bedienungsanleitung aus.
Mit dem Erwerb unserer Produkte erhalten Sie professionelle
Hilfe bei Reparaturen und Service, falls doch einmal etwas
passieren sollte. Haben Sie das Gerät nicht bei einem
unserer Vertragshändler gekauft, fragen Sie dort nach der
nächsten Servicewerkstatt.
Husqvarna Construction Products ist stets bestrebt, die
Konstruktion der Produkte zu verbessern. Husqvarna behält
sich daher das Recht vor, ohne vorherige Ankündigung und
ohne weitere Verpflichtungen Konstruktionsänderungen
einzuführen.
DMS160 A
DMS160 AT
DMS160 Gyro
DMS160 A/AT
Das Stativ wird mit einer Spreizschraube befestigt.
•
Als Zubehör sind ein Wassergefäß und eine Vakuumplatte
zur Anbringung des Ständers lieferbar.
Bohrmotor DMS160
DMS160 AT
•
Bei DMS160 AT handelt es sich um ein Modulsystem, das
sich durch Winkelbohrung und Drehfunktion auszeichnet.
DMS160 Gyro
•
Beim Modell DMS160 handelt es sich um eine elektrische
Bohrmaschine, die zum Bohren in Beton, Backstein und
diversen Steinmaterialien vorgesehen ist.
•
Die Bohrmaschine ist modular aufgebaut und einfach zu
montieren.
•
Das Gerät besitzt einen Drehzahlbereich für einen
maximalen Bohrdurchmesser von 120 mm.
•
Die Konstruktion der Rutschkupplung (SMC - Slide
Mechanical Clutch) stellt die optimale Leistungsaufnahme
sicher und ermöglicht eine Verstellung von außen.
•
Das Gerät ist für Bohrarbeiten mit Ständer vorgesehen.
•
Das Gerät verfügt über eine Wasserkühlung.
•
Es ist doppelt isoliert und mit einer Stromanzeige
ausgestattet.
•
Das Gerät liefert seine beste Leistung, wenn es nicht
überlastet wird. Daher sollte höchstens die gelbe
Leuchtdiode an der Last-/Stromanzeige (LCS - Load
Control System) aufleuchten. Max. 10 min max. Last,
danach das Gerät mindestens 2 min ohne Last betreiben.
42 – German
•
DMS160 Gyro ist ein Modulsystem mit Teleskopständer
zur Befestigung des Bohrmotors.
•
Der Teleskopstempel ist maximal 3,1 m lang, kann jedoch
mit einem Verlängerungsteil um weitere 0,75 m verlängert
werden.
•
Es darf höchstens ein Verlängerungsteil verwendet
werden.
•
Zur Änderung der Einstellung sind nur ein
Schraubenschlüssel (24/30 mm) und ein 8-mmInbusschlüssel erforderlich.
Die Bohrsäule ist stufenlos um 360° drehbar.
•
Die Transporträder lassen sich abmontieren.
MONTAGE
Ständermontage - DMS160 A/AT
Ständermontage - DMS160 Gyro
DMS 160 Gyro
2
DMS 160A
3
DMS 160 AT
4
DMS160 A/AT
•
Ein Loch (15 mm) in Boden oder Wand bohren und die
Spreizschrauben anbringen.
1
20 Die Sohlenplatte verschrauben. Genau kontrollieren, ob
der Expander richtig fest sitzt.
DMS160 AT
•
Die Bohrsäule wird auf die Winkelbefestigung der
Sohlenplatte montiert. Sicherungsschraube mit dem 8mm-Inbusschlüssel anziehen. Die Bohrsäule kann um
360° gedreht und mit der Sicherungsschraube (8-mmInbus) stufenlos in der gewünschten Position arretiert
werden.
7
5
6
8
•
Die Bohrsäule auf den gewünschten Winkel einstellen,
indem die Mutter mit einem 24-mm-Schraubenschlüssel
festgezogen wird. Bei Verwendung einer Vakuumplatte
sicherstellen, dass die Unterlage nicht porös ist, damit die
Platte sich nicht von Fußboden oder Wand lösen kann
Sicherstellen, dass die Vakuumpumpe das Ansaugen der
Vakuumplatte bewältigt. Als geeigneter Vakuummotor
kommt das Modell Husqvarna VP200 in Frage.
9
!
WARNUNG! Die Vakuumplatte darf nie bei
Deckenbohrungen verwendet werden. Durch
nachlässige oder falsche Handhabung
können schwere Verletzungen oder tödliche
Unfälle von Anwendern oder anderen
Personen verursacht werden.
10
11
German
– 43
MONTAGE
Bohren in Wänden
6
5
Bohren im Boden
2
3
6
2
5
7
4
3
7
4
1
1
Sohlenplatte mit Sicherungsschraube.
1
Sicherungsschraube
2
Stempelschraube und Sicherungsschraube
2
Stempelschraube und Sicherungsschraube
3
Verriegelungsknopf
3
Verriegelungsknopf
4
L-Griff
4
L-Griff
5
Bohrsäule
5
Sicherungsschraube
6
Stempelschraube und Sicherungsschraube
•
Bohrsäule per L-Griff einklappen.
7
Gegenmutter
•
Sicherstellen, dass sich die Stempelschraube in der
Sicherungshülse befindet.
8
Bohrmotor DMS160
•
•
Die Sohlenplatte mit der Länge der Bohrsäule von der
Wand aufstellen, wobei die Stempelschraube
eingeschraubt sein muss. Bei Bohrungen oberhalb von
1,5 m muss das grobe Außenrohr nach oben gedreht
sein, bei Bohrungen unterhalb von 1,5 m ist es
umgekehrt. Überprüfen, ob der Stempel mit der
Sicherungsschraube in der Sohlenplatte befestigt ist.
Sicherungsschraube mit einem 30-mmSchraubenschlüssel anziehen und Verriegelungsgriff
arretieren.
•
Den Teleskopstempel bis zur Decke hochfahren und im
passenden Loch im gelochten Innenrohr arretieren. Mit
dem Stempelgriff an der Decke befestigen, allerdings
nicht zu fest, und den Griff mit dem 24-mmSchraubenschlüssel festschrauben.
•
Ständer in die gewünschte Position bringen.
6
Die Stempelschraube mit Sicherungsschraube und
Mutter in der Sicherungshülse verriegeln. Mit 24- und 30mm-Schraubenschlüssel anziehen.
•
Den Teleskopstempel mit dem Stempelmechanismus an
der Decke befestigen. Das letzte Stück mit einem 24-mmSchraubenschlüssel festziehen, jedoch nicht zu fest. Der
Teleskopstempel ist maximal 3,1 m lang, kann jedoch mit
einem Verlängerungsteil um weitere 0,75 m verlängert
werden.
•
Verriegelungsgriff lösen und die Bohrsäule herausdrehen.
Bohrsäule per L-Griff einklappen.
•
Bohrmotor DMS160 an der Bohrsäule anbringen.
•
Bohrsäule mit dem Bohrmotor in die gewünschte Stellung
an der Wand zurückdrehen. Verriegelungsgriff arretieren.
•
Die Bohrsäule nach hinten winkeln und hochklappen
sowie mit dem L-Griff sichern. Beim Winkelbohren wird
der L-Griff gelöst und die Bohrsäule auf den gewünschten
Winkel eingestellt. Dazu die Mutter mit einem 30-mmSchraubenschlüssel anziehen.
•
Lage der Bohrkrone prüfen. Die Stempelschraube zur
Fixierung der Bohrsäule in die Wand einschrauben. Mit
30-mm-Sicherungsschraube sichern. Einen Holzstab
zwischenlegen. Die Bohrsäule kann um 360° gedreht und
mit der Sicherungsschraube (8-mm-Inbus) stufenlos in
der gewünschten Position arretiert werden.
•
Zur zusätzlichen Sicherung der Bohrsäule kann eine
Expanderhalterung verwendet werden. Die Halterung
wird an die Stempelschraube angepasst und mit einer
Spreizschraube in der Wand fixiert. Mit einer 30-mmSicherungsschraube sichern.
44 – German
MONTAGE
Bohren in der Decke
1
Stempelschraube und Sicherungsschraube
2
Gegenmutter
3
Stempelschraube und Sicherungsschraube
•
Ständer in die gewünschte Position bringen.
•
Sicherstellen, dass die Stempelschraube in der Bohrsäule
eingeschraubt ist. Die Bohrsäule hochklappen und
senkrecht per Sicherungsmutter arretieren.
•
Prüfen, ob sich die Bohrkrone in der richtigen Position
befindet. Den Teleskopstempel mit dem
Stempelmechanismus an der Decke befestigen.
•
Die Stempelschraube zur Fixierung der Bohrsäule in die
Decke einschrauben. Mit 30-mm-Sicherungsschraube
sichern. Einen Holzstab zwischenlegen.
•
Zur zusätzlichen Sicherung der Bohrsäule kann eine
Expanderhalterung verwendet werden. (Als Zubehör
erhältlich.) Die Halterung wird an die Stempelschraube
angepasst und mit einer Spreizschraube in der Wand
fixiert. Mit einer 30-mm-Sicherungsschraube sichern.
!
WARNUNG! Die Vakuumplatte darf nie bei
Deckenbohrungen verwendet werden. Durch
nachlässige oder falsche Handhabung
können schwere Verletzungen oder tödliche
Unfälle von Anwendern oder anderen
Personen verursacht werden.
German
– 45
STARTEN UND STOPPEN
Vor dem Start
Bohren in der Decke
!
!
WARNUNG! Die Vakuumplatte darf nie bei
Deckenbohrungen verwendet werden.
Wasser in einem Gefäß auffangen, um ein
Eindringen in das Gerät zu verhindern. Das
Gerät mit Folie o.s.ä. abdecken, damit kein
Wasser eindringen kann. Dabei keine
Lufteinlässe und Luftauslässe blockieren.
WARNUNG! Vor dem Start ist Folgendes zu
beachten:
Das Gerät muss an ein geerdete Steckdose
angeschlossen werden.
Kontrollieren, ob die Netzspannung mit der
auf dem Geräteschild angegebenen
übereinstimmt. Sorgen Sie dafür, dass sich
im Arbeitsbereich keine Unbefugten
aufhalten.
!
WARNUNG! Vor Bohrarbeiten prüfen, ob alle
Sicherungsschrauben vorschriftsmäßig
angezogen sind.
!
Wenn der Betonkern beim Herausziehen von
Bohrmotor/Bohrer aus Boden, Wand oder
Decke im Bohrer verbleibt, kann es zu
schweren Unfällen kommen.
WARNUNG! Es darf höchstens ein
Verlängerungsteil verwendet werden.
Dafür sorgen, dass sich keine Personen in
der darunterliegenden Etage befinden, die
durch herunterfallende Betonteile verletzt
werden können.
Folgendes sicherstellen:
•
Der Stromschalter muss intakt sein. Ist dies nicht der Fall,
muss er durch einen autorisierten Servicetechniker
gewechselt werden.
Starten
•
Die Wasserkühlung drehen.
•
Den Stromschalter ganz eindrücken.
•
Die Bohrkrone per Vorschubgriff nach unten bewegen.
Stoppen
•
Das Gerät und die dazu gehörenden Ausrüstungsteile
müssen korrekt montiert sein:
- Der Bohrer muss fest angezogen sein.
- Das Stativ ist ordnungsgemäß montiert.
- Die Maschine ist ordnungsgemäß am Stativ befestigt.
•
•
Tragen Sie persönliche Schutzausrüstung. Siehe die
Anweisungen unter der Überschrift Persönliche
Schutzausrüstung.
Die Wasserkühlung muss mit dem Gerät verbunden sein.
46 – German
!
WARNUNG! Die Bohrkrone dreht sich nach
dem Abschalten des Motors noch eine Weile
weiter. Die Bohrkrone keinesfalls mit den
Händen stoppen. Dadurch können
Verletzungen auftreten.
Das Gerät durch erneutes Betätigen des Schalters
ausschalten.
Kühlung
Das Gerät einige Minuten lang unbelastet laufen lassen, um
den Motor abzukühlen.
ARBEITSTECHNIK
Allgemeine Arbeitsvorschriften
!
!
WARNUNG! Dieser Abschnitt behandelt die
grundlegenden Sicherheitsvorschriften bei
der Arbeit mit einer Bohrmaschine. Diese
Informationen können natürlich in keiner
Weise die Ausbildung und langjährige
Erfahrung eines Fachmanns ersetzen. Wenn
Sie in eine Situation kommen, die Sie in
Bezug auf die weitere Anwendung des
Geräts verunsichert, lassen Sie sich von
einem Experten beraten. Fragen Sie Ihren
Händler, Ihre Servicewerkstatt oder einen
erfahrenen Bohrmaschinennutzer. Meiden
Sie alle Arbeiten, für die Sie sich nicht
ausreichend qualifiziert fühlen!
•
Bei längeren Arbeitsunterbrechungen stets den Stecker
ziehen.
•
Das Gerät darf nicht überlastet werden. Eine Überlastung
kann Schäden am Gerät verursachen.
•
Scharfes und sauberes Werkzeug ist die Voraussetzung
für sicheres Arbeiten.
•
Stets die Rückseite der Fläche prüfen, die von der
Bohrkrone durchbohrt wird. Arbeitsbereich sichern sowie
absperren und sicherstellen, dass weder Menschen noch
Material zu Schaden kommen.
•
Vor einer Standortveränderung stets das Gerät
ausschalten.
•
Niemals allein arbeiten. Es muss sich stets eine weitere
Person in der Nähe befinden. Diese kann Ihnen bei der
Gerätemontage sowie bei etwaigen Unfällen helfen.
•
Alle Teile in funktionstauglichem Zustand halten und dafür
sorgen, dass alle Befestigungsteile sorgfältig festgezogen
sind.
WARNUNG! Personen mit
Blutkreislaufstörungen, die zu oft
Vibrationen ausgesetzt werden, laufen
Gefahr, Schäden an den Blutgefäßen oder
am Nervensystem davonzutragen. Gehen
Sie zum Arzt, wenn Sie an Ihrem Körper
Symptome feststellen, die darauf hinweisen,
dass Sie übermäßigen Vibrationen
ausgesetzt waren. Beispiele für solche
Symptome sind: Einschlafen von
Körperteilen, Gefühlsverlust, Jucken,
Stechen, Schmerzen, Verlust oder
Beeinträchtigung der normalen Körperkraft,
Veränderungen der Hautfarbe oder der Haut.
Diese Symptome treten üblicherweise in
Fingern, Händen und Handgelenken auf. Bei
niedrigen Temperaturen können sich diese
Symptome verstärken.
•
Vermeiden Sie es, das Gerät bei schlechtem Wetter zu
benutzen. Z.B. bei dichtem Nebel, Regen oder Wind,
großer Kälte usw. Das Arbeiten bei schlechtem Wetter ist
sehr ermüdend und kann gefährliche Umstände
herbeiführen, z. B. Rutschgefahr.
•
Beginnen Sie niemals mit der Arbeit, bevor der
Arbeitsbereich frei ist und Sie einen sicheren Stand
haben. Achten Sie auf eventuelle Hindernisse, die im
Wege sein können, wenn Sie sich plötzlich bewegen
müssen. Stellen Sie sicher, daß kein Material
herunterfallen und Schäden verursachen kann.
•
Stets Abstand zur Bohrkrone halten, wenn der Motor läuft.
•
Sorgen Sie dafür, daß der Arbeitsbereich ausreichend
beleuchtet ist, damit Sie sicher arbeiten können.
•
Sicherstellen, dass keine Rohrleitungen oder Stromkabel
im Bohrbereich verlaufen.
•
Darauf achten, dass das Kabel bei der Arbeit hinter Ihnen
liegt, damit es nicht beschädigt werden kann.
•
Niemals das Gerät unbeaufsichtigt mit laufendem Motor
stehen lassen. Rotierende Bohrkronen können zu
schweren Verletzungen führen.
German
– 47
ARBEITSTECHNIK
Benutzung des Geräts
Rutschkupplung (SMC)
•
Mit den Händen nicht zu nahe an die Bohrspindel
kommen, wenn das Gerät läuft.
Das Gerät ist mit einer mechanischen Rutschkupplung
(SMC) ausgestattet.
•
Auf Öl- oder Wasserleckage achten.
Die Rutschkupplung wie folgt spannen:
•
Den Deckel der Rutschkupplung lösen.
Bohren in Außenbereichen
Nur Verbindungskabel verwenden, die für den Gebrauch im
Außenbereich zugelassen sind.
2
Bohrerwechsel
1
Den Netzstecker ziehen.
2
Folgendes bereit legen:
1
3
- Den neuen Bohrer.
- Die mitgelieferten Schraubenschlüssel, Größe 24 und 32
mm.
- Wasserfestes Fett.
3
Den alten Bohrer mithilfe der Schraubenschlüssel
entfernen.
4
Das Gewinde des neuen Bohrers mit wasserfestem Fett
bestreichen.
5
Den Bohrer mithilfe der Schraubenschlüssel anbringen.
•
Die Sicherungsmutter vorsichtig mit einem breiten
Schlitzschraubendreher in einem der vier Schlitze der
Sicherungsmutter lösen.
•
Die Bohrspindel mit einem Schraubenschlüssel der
Größe 27 mm um 15° drehen.
Schraubendreher abnehmen und Deckel der
Rutschkupplung wieder anbringen.
Last/Stromanzeige (LCS – Load Control
System)
Das Gerät liefert seine beste Leistung, wenn es nicht
überlastet wird. Daher sollte höchstens die gelbe
Leuchtdiode an der Last-/Stromanzeige (LCS - Load Control
System) aufleuchten. Max. 10 min max. Last, danach das
Gerät mindestens 2 min ohne Last betreiben.
48 – German
WARTUNG
Bohrmotorwartung
Motor- und Getriebewechsel
1
Das Gerät mit der Bohrspindel nach unten in einem
Schraubstock o.s.ä. befestigen.
2
Die Kohlebürstenabdeckungen mit einem breiten
Schlitzschraubendreher lösen.
3
Die Kohlebürsten vorsichtig herausnehmen.
4
Die vier Schrauben herausdrehen, die Motor und
Getriebe verbinden.
5
Das Erdungskabel vom Getriebedeckel lösen (nur bei 230
V).
6
Das Gerät vorsichtig auseinandernehmen.
7
Das auszutauschende Modul ersetzen. Für das Getriebe
das Molybdänfett Castrol MS3 verwenden.
8
Motor mit dem Getriebe montieren.
9
Schrauben festdrehen.
WICHTIG! Kontrollen und/oder Wartungsarbeiten sind bei
abgeschaltetem Motor und abgezogenem Stecker
durchzuführen.
Die Lebensdauer Ihres Geräts lässt sich erheblich
verlängern, wenn es korrekt benutzt, gepflegt und gewartet
wird.
Reinigung
•
•
Gerät und den Bohrer sauber halten, um ein sicheres
Bohren zu gewährleisten.
Damit das Gerät immer ausreichend gekühlt wird,
müssen die Kühlluftöffnungen frei und sauber gehalten
werden. Das Gerät regelmäßig mit Druckluft durchblasen.
Stromversorgung
!
WARNUNG! Niemals beschädigte Kabel
verwenden. Diese können schwere
Verletzungen bis hin zur Todesfolge
verursachen.
Kontrollieren, ob Kabel und Verlängerungskabel intakt und in
gutem Zustand sind. Das Gerät mit beschädigtem Kabel nicht
benutzen, sondern zwecks Reparatur an eine autorisierte
Servicewerkstatt einsenden.
Reparaturen
10 Kohlebürstenabdeckung wieder festschrauben.
Wechsel der Rückwand
1
Die vier Schrauben und den Verriegelungsgriff auf der
Geräterückseite lösen.
2
Die beiden Gleitplatten beim Wechsel der Rückwand
ebenfalls ersetzen.
3
Rückwand mit den vier Schrauben wieder befestigen.
Verriegelungsgriff eindrehen.
WICHTIG! Sämtliche Reparaturen dürfen nur von
autorisiertem Reparaturpersonal ausgeführt werden. Diese
Vorschrift soll verhindern, dass der Bediener großen
Gefahren ausgesetzt wird.
German
– 49
WARTUNG
Austausch der Kohlebürsten
Ständerwartung
Kohlebürsten regelmäßig herausnehmen und kontrollieren.
Wenn das Gerät täglich benutzt wird, sind die Kohlebürsten
einmal pro Woche zu kontrollieren. Durch geringere Nutzung
verlängern sich die Kontrollintervalle. Die Verschleißfläche
muss gleichmäßig und unbeschädigt sein.
Reinigung und Schmierung
Die beiden Kohlebürsten müssen stets zum gleichen
Zeitpunkt ausgewechselt werden, jedoch eine nach der
anderen. Folgendermaßen vorgehen:
1
Die Kohlebürstenabdeckungen mit einem breiten
Schlitzschraubendreher lösen.
WICHTIG! Bohrmotor ausbauen. Wartungshinweise für
den Bohrmotor, siehe Bedienungsanleitung.
•
Der Bohrständer muss saubergehalten werden, damit es
einwandfrei funktionieren kann.
•
Der Ständer wird einer Hochdruckwäsche unterzogen
und danach abgetrocknet.
•
Alle beweglichen Ständerteile schmieren. Standardfett
benutzen, um Korrosion an Anliegeflächen zu verhindern.
Reparaturen
2
Die Kohlebürsten vorsichtig herausnehmen. Wenn
weniger als 6 mm an den Bürsten vorhanden sind,
müssen sie ausgetauscht werden.
3
Neue Kohlebürsten einsetzen.
4
Kohlebürstenabdeckung wieder festschrauben.
5
Um die neuen Kohlebürsten vorzubereiten, das Gerät 10
Minuten lang im Leerlauf betreiben.
Tägliche Wartung
1
Schrauben und Muttern nachziehen.
2
Kontrollieren, ob die Schaltereinheit sicher funktioniert.
3
Das Gerät äußerlich reinigen.
4
Kühlluftöffnungen prüfen und reinigen.
5
Kontrollieren, ob Kabel und Verlängerungskabel intakt
und in gutem Zustand sind.
50 – German
WICHTIG! Sämtliche Reparaturen dürfen nur von
autorisiertem Reparaturpersonal ausgeführt werden. Diese
Vorschrift soll verhindern, dass der Bediener großen
Gefahren ausgesetzt wird.
Tägliche Wartung
1
Schrauben und Muttern nachziehen.
2
Das Gerät äußerlich reinigen.
TECHNISCHE DATEN
Bohrmotor DMS 160
Elektromotor
1-phasig
Nennspannung, V
230/100-120
Nennleistung, W
1560
Nennstrom, A
230 V
6A
100-120 V
13 A
Gewicht, kg
5,9
Bohrkronendurchmesser, mm
Max. Bohrkronendurchmesser mit Ständer
120 mm
Spindelgewinde
Innengew. 1/2 Zoll R
Wasseranschluss
G 1/4 Zoll
Spindeldrehzahl, Leerlauf, U/min
Grün 1
1100
Grün 2
980
Grün 3
840
Spindeldrehzahl, U/min
Gelb
700
Rot
640
Geräuschemissionen (siehe Anmerkung 1)
Gemessene Schallleistung dB(A)
102
Garantierte Schallleistung LWA dB(A)
103
Lautstärke (siehe Anmerkung 2)
Schalldruckpegel am Ohr des Benutzers, dB(A)
89
Vibrationspegel (siehe Anmerkung 3)
Handgriff, m/s2
<2,5
Anmerkung 1: Umweltbelastende Geräuschemission gemessen als Schallleistung (LWA) gemäß EN 12348.
Anmerkung 2: Schalldruckpegel gemäß EN 12348. Berichten zufolge liegt der Schalldruckpegel normalerweise bei einer
Ausbreitungsklasse (standardmäßige Ausbreitung) von 1,0 dB (A).
Anmerkung 3: Vibrationspegel gemäß EN 12348. Berichten zufolge liegt der Vibrationspegel normalerweise bei einer
Ausbreitungsklasse (Standardabweichung) von 1 m/s2.
German
– 51
TECHNISCHE DATEN
Ständer DMS 160
Höhe, mm
DMS 160 A höhe, mm
840
DMS 160 AT höhe, mm
900
DMS 160 Gyro höhe, mm
1900-3100
Hublänge, mm
600
Max. Bohrdurchmesser (mm)
120
Gewicht, kg
DMS 160 A
10,5
DMS 160 AT
12
DMS 160 Gyro
31,4
Werkzeugsatz DMS 160 AT
0,3
Werkzeugsatz DMS 160 Gyro
0,8
Gewicht, kg (Zubehör)
Vakuumplatte
2,5
Wassergefäß
0,7
Verlängerungsmodul l
2,9
Verlängerungsmodul U
2,9
Expanderhalterung
0,8
EG-Konformitätserklärung
(nur für Europa)
Husqvarna AB, SE-433 81 Göteborg, Schweden, Tel.: +46-31-949000, versichert hiermit, dass Bohrmaschine und Ständer
Husqvarna DMS 160 Bohrmotor, DMS 160 A/AT/Gyro von den Seriennummern des Baujahrs 2010 an (die Jahreszahl wird im
Klartext auf dem Typenschild angegeben, mitsamt einer nachfolgenden Seriennummer) den Vorschriften folgender RICHTLINIEN
DES RATES entspricht:
•
vom 17. Mai 2006 „Maschinen-Richtlinie' 2006/42/EG
•
vom 15. Dezember 2004 ”über elektromagnetische Verträglichkeit” 2004/108/EWG.
•
vom 12. Dezember 2006 „betreffend elektrische Betriebsmittel' 2006/95/EG.
Folgende Normen wurden angewendet: EN ISO 12100:2003, EN 55014-1:2006, EN 55014-2/A1:2001, EN 61000-3-2:2006, EN
61000-3-3/A1/A2:2005, EN 12348/A1:2009.
Göteborg, den 29. Dezember 2009
Henric Andersson
Vice President, Head of Power Cutters and Construction Equipment
Husqvarna AB
(Bevollmächtigter Vertreter für Husqvarna AB, verantwortlich für die technische Dokumentation.)
52 – German
EXPLICATION DES SYMBOLES
Symboles sur la machine:
Contrôler que la fourche agrippe l’oeillet intérieur.
Serrer avec une clé adéquate.
AVERTISSEMENT! La machine utilisée de
manière imprudente ou inadéquate peut
devenir un outil dangereux, pouvant causer
des blessures graves voire mortelles à
l’utilisateur et aux autres personnes
présentes.
Bloquez l’écrou à l’aide d’une clé de 30 mm.
Contrôlez le contre-écrou sur la poignée en L.
Vérifiez qu’il est serré.
Lire attentivement et bien assimiler le
manuel d’utilisation avant d’utiliser la
machine.
AVERTISSEMENT! Pendant le perçage,
la poussière générée peut occasionner
des blessures si elle est aspirée. Utilisez
une protection respiratoire approuvée.
Veillez à disposer d’une bonne ventilation.
Toujours utiliser:
•
Casque de protection homologué
•
Protecteurs d’oreilles homologués
•
Lunettes protectrices ou visière
•
Masque respiratoire
Les autres symboles/autocollants
présents sur la machine concernent des exigences de
certification spécifiques à certains marchés.
Symboles dans le manuel:
Ce produit est conforme aux directives CE
en vigueur.
Les contrôles et/ou les entretiens
doivent être effectués avec le moteur à
l’arrêt et la prise électrique
débranchée.
Marquage environnemental. Ce symbole
figurant sur le produit ou sur son emballage
indique que ce produit ne peut pas être traité
comme déchet ménager. Il doit être collecté
et amené à une installation de récupération
appropriée de déchets d’équipements
électriques et électroniques.
Toujours porter des gants de protection
homologués.
En veillant à ce que ce produit soit
correctement éliminé, vous pouvez contribuer à prévenir les
conséquences négatives potentielles sur l’environnement et
les hommes, qui pourraient sinon être le résultat d’un
traitement incorrect des déchets de ce produit.
Pour des informations plus détaillées sur le recyclage de ce
produit, contactez votre commune ou le magasin où vous
avez acheté le produit.
En cas de forage au plafond, s’assurer que
l’eau ne risque pas de couler dans la
machine. Utiliser un récipient adéquat pour
recueillir l’eau et recouvrir la machine de
plastique en laissant libres l’admission et l’échappement d’air.
Un nettoyage régulier est
indispensable.
Examen visuel.
Porter des lunettes protectrices ou une
visière.
La perceuse doit être appropriée et adaptée
aux dimensions du perçage à effectuer. Le
diamètre de perçage maximal est indiqué sur la
machine.
Utilisez un foret approprié au travail à
effectuer.
Ø
Indication de charge/de courant
(LCS-Load controll system).
Contrôlez la résistance du plafond. Le
plafond doit être solide.
French
– 53
SOMMAIRE
Sommaire
EXPLICATION DES SYMBOLES
Symboles sur la machine: ............................................
Symboles dans le manuel: ...........................................
SOMMAIRE
Sommaire .....................................................................
QUELS SONT LES COMPOSANTS?
Quels sont les composants de la perceuse? ...............
QUELS SONT LES COMPOSANTS?
Quels sont les composants du support? ......................
INSTRUCTIONS DE SÉCURITÉ
Mesures à prendre avant d’utiliser une perceuse neuve
Équipement de protection personnelle ........................
Équipement de sécurité de la machine ........................
Contrôle, maintenance et entretien des équipements de
sécurité de la machine .................................................
Instructions générales de sécurité ...............................
PRÉSENTATION
Moteur de forage et support ........................................
Moteur de forage DMS160 ...........................................
Support DMS160 ........................................................
MONTAGE
Montage du support - DMS160 A/AT ...........................
Montage du support - DMS160 Gyro ...........................
DÉMARRAGE ET ARRÊT
Avant de démarrer la machine .....................................
Démarrage ...................................................................
Arrêt .............................................................................
TECHNIQUES DE TRAVAIL
Méthodes de travail ......................................................
Utilisation de la machine ..............................................
ENTRETIEN
Maintenance du moteur de forage ...............................
Entretien du support ....................................................
CARACTÉRISTIQUES TECHNIQUES
Moteur de forage DMS160 ...........................................
Support DMS160 ........................................................
Assurance de conformité UE .......................................
54 – French
53
53
54
55
56
57
57
58
58
58
59
59
59
60
60
63
63
63
64
65
66
67
68
69
69
QUELS SONT LES COMPOSANTS?
Quels sont les composants de la perceuse?
1
Broche
8
Manette de verrouillage
2
Raccord de l’eau
9
3
Vis qui maintiennent ensemble le moteur et la boîte de
vitesses.
Vis (4 unités) pour la plaque arrière d’avance et la boîte
de vitesses
10 Poignée d’avance
4
Interrupteur
11 Plaque arrière d’avance
5
Couvercle de l’accouplement à glissement (SMC)
12 Interrupteur différentiel PRCD
6
Couvercle des balais de charbon
13 Clés
7
Indication de charge/de courant (LCS-Load controll
system).
14 Manuel d’utilisation
French
– 55
QUELS SONT LES COMPOSANTS?
Quels sont les composants du support?
1
Poteau télescopique 40
11 Poignée en L
2
Pilier de forage
12 Manuel d’utilisation
3
Moteur de forage DMS160
13 Module d’extension U (Disponible comme accessoire.)
4
Rail mural
14 Module d’extension l (Disponible comme accessoire.)
5
Poteau/mécanisme de verrouillage
15 Fixation d’expansion (Disponible comme accessoire.)
6
Plaque de plafond
16 Collecteur d’eau (Disponible comme accessoire.)
7
Piétement (GB 40 T) avec roues de transport
17 Plaque de sous-pression (Disponible comme accessoire.)
8
Piétement d’ébarbage et d’extension
18 Kit d’outils DMS160 AT
9
Vis de poteau et vis de blocage
19 Kit d’outils DMS160 Gyro
10 Contre-écrou
56 – French
INSTRUCTIONS DE SÉCURITÉ
Mesures à prendre avant d’utiliser
une perceuse neuve
•
Équipement de protection
personnelle
Lisez ce manuel d’utilisation attentivement avant de
commencer à utiliser la machine.
•
Cette machine est conçue pour le perçage du béton, des
briques et de différents types de pierres. Toute autre
utilisation est incorrecte.
•
La machine est conçue pour des applications industrielles
et destinée à des opérateurs expérimentés.
•
Contrôlez le montage du foret, voir chapitre
Remplacement du foret.
•
Contrôler que le câble et la rallonge sont entiers et en bon
état.
•
Assurez-vous que le poste de travail est bien rangé. Le
désordre augmente les risques d’accident.
!
AVERTISSEMENT! Un équipement de
protection personnelle homologué doit
impérativement être utilisé lors de tout
travail avec la machine. L’équipement de
protection personnelle n’élimine pas les
risques mais réduit la gravité des blessures
en cas d’accident. Demander conseil au
concessionnaire afin de choisir un
équipement adéquat.
•
Casque de protection
•
Protecteur d’oreilles
•
Lunettes protectrices ou visière
•
Masque respiratoire
•
Gants solides permettant une prise sûre.
•
Vêtements confortables, robustes et serrés qui
permettent une liberté totale de mouvement.
•
Bottes avec coquille en acier et semelle antidérapante.
•
Une trousse de premiers secours doit toujours être
disponible.
Utilisez toujours votre bon sens
Il est impossible de prévoir toutes les situations que vous
pouvez rencontrer lorsque vous utilisez une perceuse. Soyez
toujours prudent et utilisez votre bon sens. Évitez les
situations que vous n’êtes pas sûr de maîtriser. Si, après avoir
lu ces instructions, vous n’êtes toujours pas sûr de la
procédure à suivre, demandez conseil à un expert avant de
poursuivre. N’hésitez pas à prendre contact avec votre
revendeur ou avec nous si vous avez des questions sur
l’utilisation de la perceuse. Nous sommes à votre disposition
et vous conseillons volontiers pour vous aider à mieux utiliser
votre perceuse en toute sécurité.
Laissez au revendeur Husqvarna le soin de contrôler
régulièrement la perceuse et d’effectuer les réglages et les
réparations nécessaires.
Toutes les informations et toutes les données indiquées dans
ce manuel d'utilisation étaient valables à la date à laquelle ce
manuel a été porté à l'impression.
!
!
AVERTISSEMENT! Ne jamais modifier sous
aucun prétexte la machine sans
l’autorisation du fabricant. N’utiliser que des
accessoires et des pièces d’origine. Des
modifications non-autorisées et l’emploi
d’accessoires non-homologués peuvent
provoquer des accidents graves et même
mortels, à l’utilisateur ou d’autres
personnes.
AVERTISSEMENT! L’utilisation de produits
tels que des ciseaux, des disques, des
forets, des disques fins ou des formes peut
générer de la poussière et des vapeurs
pouvant contenir des substances chimiques
toxiques. Vérifiez la composition du matériel
avec lequel vous travaillez et portez un
masque respiratoire adapté.
French
– 57
INSTRUCTIONS DE SÉCURITÉ
Équipement de sécurité de la
machine
Ce chapitre présente les équipements de sécurité de la
machine, leur fonction, comment les utiliser et les maintenir
en bon état. Voir au chapitre Quels sont les composants?
pour trouver leur emplacement sur la machine.
!
AVERTISSEMENT! Ne jamais utiliser une
machine dont les équipements de sécurité
sont défectueux. Les équipements de
sécurité doivent être contrôlés et
entretenus. Reportez-vous aux instructions
du chapitre Contrôle, maintenance et
entretien des équipements de sécurité de la
machine. Si les contrôles ne donnent pas un
résultat positif, faites réparer votre machine
par un atelier d’entretien.
Contrôle, maintenance et entretien
des équipements de sécurité de la
machine
IMPORTANT! L’entretien et la réparation de la machine
exigent une formation spéciale. Ceci concerne
particulièrement l’équipement de sécurité de la machine. Si
les contrôles suivants ne donnent pas un résultat positif,
s’adresser à un atelier spécialisé. L’achat de l’un de nos
produits offre à l’acheteur la garantie d’un service et de
réparations qualifiés. Si le point de vente n’assure pas ce
service, s’adresser à l’atelier spécialisé le plus proche.
!
•
Éviter d’utiliser la machine en cas de fatigue, d’absorption
d’alcool ou de prise de médicaments susceptibles
d’affecter l’acuité visuelle, le jugement ou la maîtrise du
corps.
•
Utiliser les équipements de protection personnelle. Voir
au chapitre Équipement de protection personnelle.
•
Ne jamais porter la machine par le câble et ne jamais
débrancher la prise en tirant sur le câble. Conserver tous
les câbles et toutes les rallonges loin de l'eau, de l'huile et
des bords tranchants. Veiller à ce que le câble ne soit pas
coincé dans des portes, des clôtures ou d'autres
équipements similaires. Des objets pourraient alors être
sous tension.
•
Contrôler que le câble et la rallonge sont entiers et en bon
état. Utilisez une rallonge prévue pour une utilisation à
l’extérieur. Ne pas utiliser la machine si le câble est
endommagé, la confier à un atelier d'entretien agréé pour
réparation.
•
N’utilisez pas la rallonge lorsqu’elle est enroulée afin
d’éviter toute surchauffe.
•
La machine doit être branchée à une prise de terre.
•
Contrôler que la tension secteur est conforme aux
indications sur la plaque de la machine.
•
Ne jamais utiliser une machine qui n’est pas en parfait état
de marche. Suivre dans ce manuel d’utilisation les
instructions de maintenance, de contrôle et d’entretien.
Certaines mesures de maintenance et d’entretien doivent
être confiées à un spécialiste dûment formé et qualifié.
Voir au chapitre Entretien.
•
Ne jamais laisser d’autres personnes utiliser la machine
sans s’être assuré au préalable que ces personnes ont
bien compris le contenu du mode d’emploi.
•
Des personnes ou des animaux peuvent détourner
l’attention de l’opérateur et l’amener à perdre le contrôle
de la machine. C’est pourquoi l’opérateur doit toujours
être attentif et concentré sur son travail.
•
Attention! Les habits, les cheveux longs et les bijoux
peuvent se coincer dans les parties en mouvement.
Interrupteur
L'interrupteur est utilisé pour démarrer et arrêter la machine.
Contrôle de l'interrupteur
•
Démarrez la machine en appuyant sur l’interrupteur.
•
Arrêtez la machine en appuyant sur l’interrupteur.
•
Un interrupteur défectueux doit être remplacé par une
atelier d’entretien agréé.
Instructions générales de sécurité
•
Ne travaillez pas avec la perceuse sans avoir lu et compris
au préalable le contenu de ce manuel d’utilisation.
!
AVERTISSEMENT! Il existe toujours un
risque de choc avec les machines
électriques. Évitez de travailler par mauvais
temps ainsi que tout contact du corps avec
du métal/un parafoudre. Suivez toujours les
instructions du manuel d’utilisation pour
éviter tout dommage.
58 – French
AVERTISSEMENT! Le risque de coincement
est toujours présent lors de travail avec des
produits comportant des éléments mobiles.
Utiliser des gants de protection pour éviter
les blessures personnelles.
Transport et rangement
Pour éviter d’endommager la perceuse et le foret, ne stockez
ni ne transportez la perceuse avec le trépan monté.
Stockez la perceuse dans un endroit verrouillable à clé, de
façon à ce qu’elle soit inaccessible aux enfants ainsi qu’aux
personnes non autorisées.
Stockez la perceuse et le support dans un endroit sec et à
l’abri du gel.
PRÉSENTATION
Moteur de forage et support
Support DMS160
Nous espérons que cette machine vous donnera toute
satisfaction et qu’elle vous accompagnera pendant de
longues années. N’oubliez pas que ce manuel d’utilisation est
important. En suivant les instructions qu’il contient (utilisation,
révision, entretien, etc.), il est possible d’allonger
considérablement la durée de vie de la machine et
d’augmenter sa valeur sur le marché de l’occasion. En cas de
vente de la machine, ne pas oublier de remettre le manuel
d’utilisation au nouveau propriétaire.
L’achat de l’un des nos produits garantit une assistance
professionnelle pour l’entretien et les réparations en cas de
besoin. Si la machine n’a pas été achetée chez l’un de nos
revendeurs autorisés, demandez l’adresse de l’atelier
d’entretien le plus proche.
Husqvarna Construction Products travaille constamment à
améliorer la construction de ses produits. Husqvarna se
réserve donc le droit de procéder à des modifications de
construction sans avis préalable et sans autres
engagements.
DMS160 A
DMS160 AT
DMS160 Gyro
DMS160 A/AT
Attacher le support à l’aide de vis d’expansion.
•
Un collecteur d’eau et une plaque de sous-pression pour
le support sont disponibles comme accessoires.
Moteur de forage DMS160
DMS160 AT
•
DMS160 AT est un système modulaire permettant
l’ébarbage et la rotation.
DMS160 Gyro
•
DMS160 est une perceuse électrique conçue pour le
perçage du béton, des briques et de différents types de
pierres.
•
La perceuse est constituée de modules et facile à monter.
•
La machine comporte une plage de régime pour les
trépans d’un diamètre de 120 mm / 4,75 In.
•
La construction de l’accouplement (SMC-Slide
Mechanical Clutch) offre une puissance de sortie
maximale et la possibilité de réglage depuis l’extérieur.
•
Cette machine est conçue pour être montée sur un
support.
•
La machine est refroidie par eau.
•
La machine comporte une double isolation et un
indicateur de courant.
•
La machine fonctionne de manière optimale si elle n’est
pas trop sollicitée. Laissez le voyant jaune de l’indicateur
de charge/de courant (LCS-Load Control System) allumé.
Charge max. de 10 min. La machine doit ensuite tourner
à vide pendant 2 min.
•
DMS160 Gyro est un système modulaire avec support
télescopique pour la fixation du moteur de forage.
•
Le poteau télescopique est d’une longueur maximale de
3,1 m, mais peut être prolongé de 0,75 m à l’aide d’un
module d’extension (équipement supplémentaire).
•
Un seul module d’extension doit être utilisé.
•
Seules une clé à ouverture fixe (24/30 mm) et une clé
hexagonale (8 mm) sont nécessaires pour modifier les
réglages.
Le pilier de forage pivote sur 360°.
•
Les roues de transport sont démontables.
French
– 59
MONTAGE
Montage du support - DMS160 A/AT
Montage du support - DMS160 Gyro
DMS 160 Gyro
2
DMS 160A
3
DMS 160 AT
4
DMS160 A/AT
•
1
Percez un trou (15 mm) dans le mur et enfoncez les
boulons d’expansion.
20 Vissez le piétement. Contrôlez soigneusement que la vis
d’expansion est bien ancrée.
DMS160 AT
•
Le pilier de forage se monte sur la fixation angulaire du
piétement. Serrez la vis de blocage à l’aide d’une clé
hexagonale de 8 mm. Le pilier de forage peut pivoter de
360° et être verrouillé en continu sur la position souhaitée
à l’aide de la vis de blocage (fixation hexagonale de
8 mm).
7
5
6
8
•
Le pilier de forage peut être réglé sur la position souhaitée
en serrant l’écrou à l’aide d’une clé de 24 mm. Si la plaque
de sous-pression est utilisée, vérifiez que la base n’est
pas poreuse et ne risque pas de se détacher du sol ou du
mur. Vérifiez que la pompe à vide possède la capacité
nécessitée par la plaque de sous-pression. Un moteur de
vide approprié est le Husqvarna VP200.
9
!
AVERTISSEMENT! N’utilisez jamais la
plaque de sous-pression pour un perçage au
plafond. Une utilisation erronée ou
négligente peut occasionner des blessures
graves, voire mortelles pour l’utilisateur ou
d’autres personnes.
60 – French
10
11
MONTAGE
Forage dans un mur
6
5
Forage dans le sol
2
3
6
7
2
5
4
3
7
4
1
1
Piétement avec vis de blocage.
1
Vis de blocage
2
Vis de poteau et vis de blocage
2
Vis de poteau et vis de blocage
3
Manette de verrouillage
3
Manette de verrouillage
4
Poignée en L
4
Poignée en L
5
Pilier de forage
5
Vis de blocage
6
Vis de poteau et vis de blocage
•
Rabattez le pilier de forage avec la poignée L.
7
Contre-écrou
•
Vérifiez que la vis du poteau se positionne dans la
rondelle de blocage.
8
Moteur de forage DMS160
•
•
Placez le piétement avec la longueur du pilier de forage
depuis le mur. La vis du poteau doit être vissée. Si le
perçage est effectué à une hauteur supérieure à 1,5 m, le
gros tube extérieur doit être orienté vers le haut ; si le
perçage est effectué à une hauteur inférieure à 1,5 m, il
doit être orienté vers le bas. Contrôlez que le poteau est
verrouillé dans le piétement à l’aide de la vis de blocage.
Serrez le contre-écrou avec une clé de 30 mm et
verrouillez à l’aide de la poignée de verrouillage.
•
Attachez le poteau télescopique au plafond en
choisissant le trou le plus proche du tube interne perforé.
Serrez à l’aide de la poignée du poteau et vissez à la fin
avec une clé de 24 mm sans serrer trop fort.
•
Placez le support sur la position souhaitée.
6
Verrouillez la vis du poteau dans la rondelle de blocage
avec la vis de blocage et l’écrou. Serrez avec les clés de
24 et 30 mm.
•
Coincez le poteau télescopique contre le plafond à l’aide
du mécanisme du poteau. Serrez à la fin à l’aide d’une clé
de 24 mm sans serrer trop fort. Le poteau télescopique
est d’une longueur maximale de 3,1 m, mais peut être
prolongé de 0,75 m à l’aide d’un module d’extension
(équipement supplémentaire).
•
Desserrez la poignée de verrouillage et tournez le pilier
de forage. Rabattez le pilier de forage avec la poignée L.
•
Montez le moteur de forage DMS160 sur le pilier de
forage.
•
Tournez le pilier de forage avec le moteur de forage sur la
position souhaitée contre le mur. Verrouillez la poignée de
verrouillage.
•
Remettez en place, sortez le pilier de forage et attachez
avec la poignée en L et l’écrou. En cas d’ébarbage, la
poignée en L doit être desserrée et le pilier de forage doit
être réglé sur l’angle souhaité en serrant l’écrou à l’aide
d’une clé de 30 mm.
•
Contrôlez la position du trépan. Vissez la vis du poteau
sur le mur pour attacher le pilier de forage. Consolidez
avec un contre-écrou de 30 mm. Utilisez une règle en bois
comme entretoise. Le pilier de forage peut pivoter de 360°
et être verrouillé en continu sur la position souhaitée à
l’aide de la vis de blocage (fixation hexagonale de 8 mm).
•
Pour attacher de manière encore plus sûre le pilier de
forage, une fixation d’expansion peut être utilisée. La
fixation est réglée contre la vis du poteau et attachée au
mur à l’aide d’un boulon d’expansion. Consolidez à l’aide
d’un contre-écrou de 30 mm.
Forage dans le plafond
1
Vis de poteau et vis de blocage
2
Contre-écrou
3
Vis de poteau et vis de blocage
French
– 61
MONTAGE
•
Placez le support sur la position souhaitée.
•
Contrôlez que la vis du pilier de forage est bien vissée.
Sortez et verrouillez le pilier de forage en position
verticale à l’aide de l’écrou.
•
Vérifiez que le trépan est sur la position correcte. Coincez
le poteau télescopique contre le plafond à l’aide du
mécanisme du poteau.
•
Vissez la vis du poteau contre le plafond pour attacher le
pilier de forage. Consolidez avec un contre-écrou de 30
mm. Utilisez une règle en bois comme entretoise.
•
Pour attacher de manière encore plus sûre le pilier de
forage, une fixation d’expansion peut être utilisée.
(Disponible comme accessoire.) La fixation est réglée
contre la vis du poteau et attachée au mur à l’aide d’un
boulon d’expansion. Consolidez à l’aide d’un contre-écrou
de 30 mm.
!
AVERTISSEMENT! N’utilisez jamais la
plaque de sous-pression pour un perçage au
plafond. Une utilisation erronée ou
négligente peut occasionner des blessures
graves, voire mortelles pour l’utilisateur ou
d’autres personnes.
62 – French
DÉMARRAGE ET ARRÊT
Avant de démarrer la machine
Forage dans le plafond
!
!
AVERTISSEMENT! Contrôler les points
suivants avant la mise en marche:
Utilisez un collecteur d’eau pour éviter
l’infiltration de l’eau dans la machine. La
machine doit être recouverte avec du
plastique ou matériau similaire pour
empêcher l’infiltration d’eau; cependant, la
prise d’air et l’orifice d’échappement ne
doivent pas être recouverts.
La machine doit être branchée à une prise
de terre.
Contrôler que la tension secteur est
conforme aux indications sur la plaque de la
machine. Veiller à ce qu’aucune personne
non autorisée ne se trouve dans la zone la
travail.
!
AVERTISSEMENT! Contrôlez, avant de
commencer à percer, que toutes les vis de
fixation sont bien serrées.
Des accidents graves risquent de se
produire si le bloc en béton reste sur le foret
quand il est retiré du sol, du mur ou du
plafond.
!
•
L’interrupteur n’est pas endommagé. Si ce n’est pas le
cas, il doit être remplacé par un réparateur agréé.
La machine et son équipement sont montés
correctement:
Démarrage
•
Activez le refroidissement par eau.
•
Enfoncez entièrement l’interrupteur.
•
Abaissez d’abord le trépan à l’aide de la poignée
d’alimentation.
Arrêt
- Le trépan est fixé correctement.
- Le support est monté correctement.
- La machine est attachée correctement sur le support.
AVERTISSEMENT! Un seul module
d’extension doit être utilisé.
Contrôlez que personne, à l’étage inférieur,
ne risque d’être blessé par les chutes des
blocs de béton.
Effectuez les contrôles suivants:
•
AVERTISSEMENT! N’utilisez jamais la
plaque de sous-pression pour un perçage au
plafond.
!
AVERTISSEMENT! Le trépan continue à
tourner un moment après l’arrêt du moteur.
N’arrêtez pas le trépan avec les mains. Il
peut en résulter des blessures.
•
Utiliser les équipements de protection personnelle. Voir
au chapitre Équipement de protection personnelle.
Arrêtez la machine en appuyant sur l’interrupteur.
•
Le refroidissement par eau est raccordé à la machine.
Refroidissement
Laissez la machine tourner à vide une minute environ pour
refroidir le moteur.
French
– 63
TECHNIQUES DE TRAVAIL
Méthodes de travail
!
!
AVERTISSEMENT! Ce chapitre traite des
consignes de sécurité de base lors du travail
avec une perceuse. Aucune information ne
peut néanmoins remplacer l’expérience et le
savoir-faire d’un professionnel. Dans
l’éventualité d’une situation rendant la suite
du travail incertaine, consultez un expert.
Adressez-vous au revendeur, à l’atelier de
réparation ou à un utilisateur expérimenté
de la perceuse. L’utilisateur se doit d’éviter
toute utilisation qu’il ne maîtrise pas
suffisamment!
AVERTISSEMENT! Une exposition excessive
aux vibrations peut entraîner des troubles
circulatoires ou nerveux chez les personnes
sujettes à des troubles cardio-vasculaires.
Consultez un médecin en cas de symptômes
liés à une exposition excessive aux
vibrations. De tels symptômes peuvent être:
engourdissement, perte de sensibilité,
chatouillements, picotements, douleur,
faiblesse musculaire, décoloration ou
modification épidermique. Ces symptômes
affectent généralement les doigts, les mains
ou les poignets. Ces symptômes peuvent
être accentués par le froid.
•
Ne pas travailler par mauvais temps: par exemple en cas
de brouillard épais, de pluie, de vent violent, de froid
intense, etc. Travailler par mauvais temps est fatiguant et
peut créer des conditions de travail dangereuses telles
que le verglas.
•
Ne jamais commencer à travailler avec la machine sans
avoir le champ libre et les pieds bien d’aplomb. Identifier
les obstacles éventuels dans le cas de déplacement
inattendu. S’assurer qu’aucun matériau ne risque de
tomber et de provoquer des blessures ou des dommages
lors de travail avec la machine.
•
Tenez-vous à bonne distance du trépan quand le moteur
tourne.
•
S’assurer que l’éclairage de la zone de travail est suffisant
pour que l’environnement de travail soit de toute sécurité.
•
Vérifiez qu’ aucun tuyau ni câble électrique ne traverse la
zone de travail.
•
Veiller à avoir le câble derrière soi lors de l'utilisation de la
machine pour ne pas risquer de l'abîmer.
•
Ne laissez jamais la machine sans surveillance avec le
moteur en marche. Lorsqu’il tourne, le trépan augmente le
risque de blessures.
•
Débranchez toujours la machine en cas d’interruption
prolongée du travail.
•
Ne sollicitez pas la machine excessivement. Une
surcharge peut endommager la machine.
64 – French
•
Utilisez toujours des outils aiguisés et propres pour
augmenter la sécurité pendant le travail.
•
Contrôlez toujours la partie arrière de la surface traversée
par le trépan. Délimitez la zone de travail et vérifiez que
personne ne peut être blessé ni aucun matériau
endommagé.
•
Arrêtez toujours la machine avant de la déplacer.
•
Ne travaillez jamais seul, mais toujours avec une
personne à proximité. Cette personne peut aider à monter
la machine, mais aussi intervenir en cas d’accident.
•
Assurez-vous que toutes les pièces sont en état de
fonctionnement et que tous les éléments de fixation sont
correctement serrés.
TECHNIQUES DE TRAVAIL
Utilisation de la machine
Retirez le tournevis et replacez le couvercle sur
l’accouplement à glissement.
•
Gardez les mains éloignées de la broche et percez
lorsque la machine tourne.
•
Attention aux fuites d´huile et d’eau.
Perçage à l’extérieur
Utilisez toujours des câbles de raccordement agréés pour
une utilisation à l’extérieur.
Indication de charge/de courant (LCSLoad controll system).
La machine fonctionne de manière optimale si elle n’est pas
trop sollicitée. Laissez le voyant jaune de l’indicateur de
charge/de courant (LCS-Load Control System) allumé.
Charge max. de 10 min. La machine doit ensuite tourner à
vide pendant 2 min.
Remplacement du foret
1
Débranchez la machine.
2
Préparez:
- Le nouveau foret.
- Les clés à ouverture fixe fournies, 24 mm et 32 mm.
- De la graisse résistant à l’eau.
3
Retirez le foret à l’aide des clés à ouverture fixe.
4
Étalez de la graisse résistant à l’eau sur le filetage du
nouveau foret.
5
Montez le foret à l’aide des clés à ouverture fixe.
Accouplement à glissement (SMC)
La machine est équipée d’un accouplement à glissement
mécanique (SMC).
Tendez l’accouplement à glissement de la manière suivante:
•
Desserrez le couvercle de l’accouplement à glissement.
2
1
3
•
Verrouillez l’écrou prudemment en introduisant un
tournevis à lame plate et large dans une des quatre
encoches de l’écrou.
•
Tournez la broche à l’aide d’une clé à ouverture fixe de 27
mm 15°.
French
– 65
ENTRETIEN
Maintenance du moteur de forage
Remplacement du moteur et de la boîte de
vitesses
1
Installez la machine avec la broche tournée vers le bas
dans un étau ou outil similaire.
2
Retirez le couvercle des balais de charbon à l’aide d’un
tournevis à lame plate et large.
3
Retirez prudemment les balais de charbon.
4
Dévissez les quatre vis qui maintiennent le moteur et la
boîte de vitesses.
5
Détachez le câble de terre du couvercle de la boîte de
vitesses (concerne uniquement 230 V.).
6
Démontez doucement la machine.
7
Remplacez le module devant être remplacé. Utilisez la
graisse Castrol MS3 Molybden dans la boîte de vitesses.
8
Assembler le moteur et la boîte de vitesses.
9
Serrez les vis.
IMPORTANT! Les contrôles et/ou les entretiens doivent
être effectués avec le moteur à l’arrêt et la prise électrique
débranchée.
Une utilisation, un entretien et une maintenance corrects de
la machine permettent de prolonger considérablement sa
durée de vie.
Nettoyage
•
•
Nettoyez la machine et les forets afin de garantir la
sécurité pendant le perçage.
Pour que le refroidissement de la machine fonctionne
correctement, les ouvertures de l'air de refroidissement
doivent être propres et ne pas être bouchées. Nettoyer
régulièrement la machine à l'air comprimé.
Alimentation électrique
!
AVERTISSEMENT! N’utilisez jamais de
câbles endommagés car ils peuvent
entraîner des blessures graves, voire
mortelles.
10 Revissez les couvercles des balais de charbon.
Contrôler que le câble et la rallonge sont entiers et en bon
état. N’utilisez pas la machine si le câble est endommagé,
mais confiez-la à un atelier d’entretien agréé pour la
réparation.
Remplacement de la plaque arrière
1
Dévissez les quatre vis et la poignée de verrouillage à
l’arrière de la machine.
Réparations
2
Remplacez les deux plaques de glissement quand la
plaque arrière doit être remplacée.
3
Vissez la plaque arrière à l’aide des quatre vis. Vissez la
poignée de verrouillage.
IMPORTANT! Toutes les réparations doivent être
effectuées par des réparateurs agréés. Ceci permet d’éviter
que les opérateurs ne soient exposés à des risques
importants.
66 – French
ENTRETIEN
Remplacement des balais de charbon
Les balais de charbon doivent être démontés et contrôlés
régulièrement. Chaque semaine en cas d’utilisation
quotidienne de la machine ou à intervalle plus long si la
machine est utilisée moins souvent. La surface d’usure doit
être lisse et intacte.
Réparations
IMPORTANT! Toutes les réparations doivent être
effectuées par des réparateurs agréés. Ceci permet d’éviter
que les opérateurs ne soient exposés à des risques
importants.
Les deux balais de charbon doivent toujours être remplacés
au même moment, mais un à la fois. Procédez comme suit:
Entretien quotidien
1
1
S’assurer que toutes les vis et tous les écrous sont bien
serrés.
2
Nettoyer l’extérieur de la machine.
Retirez le couvercle des balais de charbon à l’aide d’un
tournevis à lame plate et large.
2
Retirez prudemment les balais de charbon. S’il reste
moins de 6 mm sur les balais, remplacez-les.
3
Insérez des charbons neufs.
4
Revissez les couvercles des balais de charbon.
5
Laissez tourner la machine à vide pendant 10 minutes
pour roder les nouveaux charbons.
Entretien quotidien
1
S’assurer que toutes les vis et tous les écrous sont bien
serrés.
2
Contrôler que l'unité de l'interrupteur fonctionne en toute
sécurité.
3
Nettoyer l’extérieur de la machine.
4
Contrôler et nettoyer les ouvertures de l’air de
refroidissement.
5
Contrôler que le câble et la rallonge sont entiers et en bon
état.
Entretien du support
Nettoyage et graissage
IMPORTANT! Retirez le moteur de forage. Pour l’entretien
du moteur de forage, reportez-vous au chapitre
Maintenance du moteur de forage.
•
Pour qu’il continue à fonctionner correctement, il est
essentiel que le support de forage soit toujours propre.
•
Le support doit être nettoyé avec de l’air comprimé, puis
séché.
•
Graissez les éléments mobiles du support. Utilisez une
graisse standard afin d’éliminer tout risque de corrosion
sur les surfaces de contact.
French
– 67
CARACTÉRISTIQUES TECHNIQUES
Moteur de forage DMS 160
Moteur électrique
Monophasé
Tension nominale, V
230/100-120
Puissance nominale, W
1560
Courant nominal, A
230 V
6A
100-120 V
13 A
Poids, kg
5,9
Diamètre du trépan, mm
Diamètre maximal du trépan, avec support
120 mm (4,7”)
Filetage de la broche
Int. 1/2” R
Raccord de l’eau
G 1/4'
Régime de broche, à vide, tr/min
Vert 1
1100
Vert 2
980
Vert 3
840
Régime de broche, tr/min
Jaune
700
Rouge
640
Émissions sonores (voir remarque 1)
Niveau de puissance sonore mesuré dB(A)
102
Niveau de puissance sonore garanti LWAdB(A)
103
Niveaux sonores (voir remarque 2)
Niveau de pression acoustique au niveau des oreilles de
l’utilisateur, dB(A)
89
Niveaux de vibrations (voir remarque 3)
Poignée, m/s2
<2,5
Remarque 1: Émission sonore dans l'environnement mesurée comme puissance acoustique (LWA) selon EN 12348.
Remarque 2: Niveau de pression sonore conformément à EN 12348. Les données reportées pour le niveau de pression sonore
montrent une dispersion statistique typique (déviation standard) de 1,0 dB (A).
Remarque 3: Niveau de vibrations conformément à EN 12348. Les données reportées pour le niveau de vibrations montrent une
dispersion statistique typique (déviation standard) de 1 m/s2.
68 – French
CARACTÉRISTIQUES TECHNIQUES
Support DMS 160
Hauteur, mm
DMS 160 A hauteur, mm
840
DMS 160 AT hauteur, mm
900
DMS 160 Gyro hauteur, mm
1900-3100
Course, mm
600
Diamètre de perçage max. (mm)
120
Poids, kg
DMS 160 A
10,5
DMS 160 AT
12
DMS 160 Gyro
31,4
Kit d’outils DMS 160 AT
0,3
Kit d’outils DMS 160 Gyro
0,8
Poids, kg (équipement supplémentaire)
Plaque de sous-pression
2,5
Collecteur d’eau
0,7
Module d’extension l
2,9
Module d’extension U
2,9
Fixation d’expansion
0,8
Assurance de conformité UE
(Concerne seulement l’Europe)
Husqvarna AB, SE-433 81 Göteborg, Suède, tél. : +46-31-949000, déclarons que la perceuse et les supports Husqvarna moteur
de forage DMS 160, DMS 160 A/AT/Gyro à partir des numéros de série de l’année de fabrication 2010 et ultérieurement (l’année
est indiquée en clair sur la plaque d’identification et suivie du numéro de série) sont conformes aux dispositions des DIRECTIVES
DU CONSEIL :
•
du 17 mai 2006 ”directive machines” 2006/42/CE
•
du 15 décembre 2004 ”compatibilité électromagnétique” 2004/108/CEE.
•
du 12 décembre, 2006 "relatives aux équipements électriques" 2006/95/CE.
Les normes harmonisées suivantes ont été appliquées: EN ISO 12100:2003, EN 55014-1:2006, EN 55014-2/A1:2001, EN 610003-2:2006, EN 61000-3-3/A1/A2:2005, EN 12348/A1:2009.
Göteborg, le 29 décembre 2009
Henric Andersson
Vice-président, responsable des découpeuses et équipements de construction
Husqvarna AB
(Représentant autorisé d’Husqvarna AB et responsable de la documentation technique.)
French
– 69
´®z+UI6¶0N¨
´®z+UI6¶0N¨
GB - Original instructions, ES - Instrucciones originales, DE - Originalanweisungen, FR - Instructions d’origine
www.husqvarnacp.com
1153412-20
2009-12-29
´®z+UI6¶0N¨
´®z+UI6¶0N¨