1
Quick start guide
Guide d'utilisation rapide
Guía de utilización rápida
Bedienungsanleitung
Guida all'uso
Gebruikershandleiding
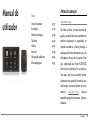
Manual do utilizador
Parrot ASTEROID Mini
English
.......................................................................................................................................................................13
Français
.......................................................................................................................................................................33
Español
.......................................................................................................................................................................55
Deutsch
.......................................................................................................................................................................75
Italiano
.......................................................................................................................................................................97
Dutch
.......................................................................................................................................................................117
Português
.......................................................................................................................................................................137
www.parrot.com
4
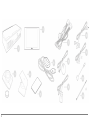
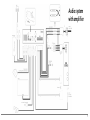
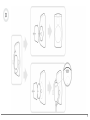
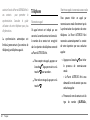
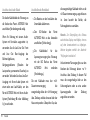
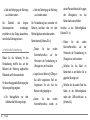
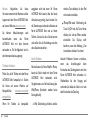
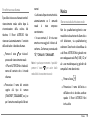
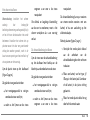
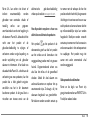
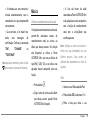
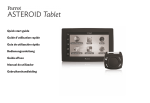
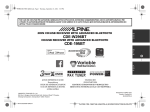
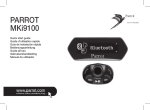
Boîtier électronique / Electronic box / Caja electrónica / Elektronikgehäuse / Centralina elettronica / Caixa electrónica / Elektronicakastje
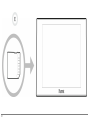
Ecran / Screen / Pantalla / Display / Display / Ecrã / Scherm
Télécommande (pile 3 V - CR2032) / Remote control (3 V - CR2032 battery) / Mando a distancia (pila 3 V - CR2032) / Fernbedienung (Batterie 3 V CR2032) / Telecomando (Pila 3V – CR2032) / Telecomando (Pilha de 3V – CR2032) / Afstandsbediening (Batterij 3V – CR2032)
Support de fixation de l’écran / Craddle / Soporte de fijación de la pantalla / Bildschirmhalterung / Supporto di fissaggio display / Suporte de fixação do
ecrã / Schermsteun
Adhésif / Adhesive tape / Adhesivo / Klebstoff / Adesivo / Adesivo / Plakband
Dongle GPS / GPS dongle / Dongle GPS / GPS-Empf ängers / Antenna GPS / GPS-Dongle / Dongle GPS
Câble ISO / ISO cable / Cable ISO / ISO-Kabel / Cavo ISO / Cabo ISO / ISO-kabel
Câble télécommande / Remote control cable / Cable mando a distancia / Fernbedienungkabel / Cavo telecomando / Cabo do telecomando /
Afstandsbedieningkabel
Câble écran / Screen cable / Cable pantalla / Displaykabel / Cavo display / Cabo do ecrã / Schermkabel
Microphone / Microphone / Micrófono / Mikrofon / Microfono / Microfone / Microfoon
Câble USB / USB cable / Cable USB / USB-Kabel / Cavo USB / Cabo USB / USB-kabel
Rallonge USB-iPod / USB-iPod cable extension / Alargador cable USB-iPod / Verlängerungskabel USB-iPod / Prolunga USB-iPod / Extensão
USB-iPod / Verlengkabel USB-iPod
Serre câble / Cable fastener / Sujetacable / Kabelklemme / Fascetta serracavi / Kabelklem / Braçadeira de cabo
5
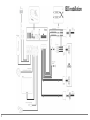
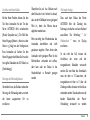
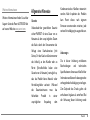
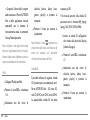
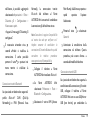
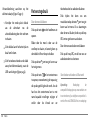
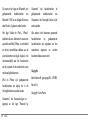
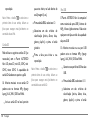
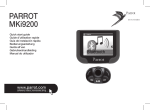
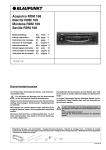
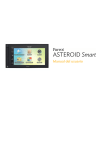
ISO installation
6
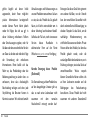
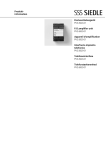
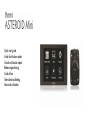
Audio system
with amplifier
7
8
9
10
11
12
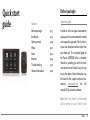
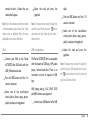
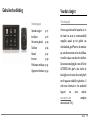
Quick start
guide
Before you begin
About this guide
Content
Before you begin
Installation
Getting started
Phone
Music
Internet
Troubleshooting
General information
p.13
p.14
p.20
p.21
p.22
p.25
p.27
p.28
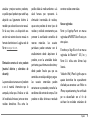
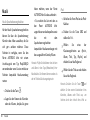
In order to limit our paper consumption
and as part of our environmentally friendly
and responsible approach, Parrot prefers
to put user documents online rather than
print them out. This simplified guide to
the Parrot ASTEROID Mini is therefore
limited to providing you with the main
instructions that will make it easy for you
to use the device. More information can
be found on the support section of our
website, www.parrot.com: the full
manual, FAQs, tutorials, and more.
Note: iPod® and iPhone® (in iPod mode)
will be referred to as an "iPod" in this
English
13
manual.
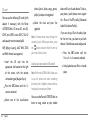
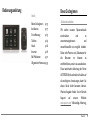
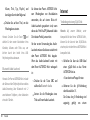
Software updates
Download the latest update for free (and
consult the update procedure) on the
Parrot ASTEROID Mini support page on
our website www.parrot.com. These
updates will enable you to receive new
features and improve the product’s
compatibility.
Warnings
All functions requiring an increased
attention should only be used while the
vehicle is stationary. Your safety and the
one of the other road users prevails over
phone calls, music and driving assistance
14
English
applications. Be responsible: drive
carefully and pay full attention to your
surrounding. Parrot denies any liability
should you choose not to respect this
warning.
Use the Parrot ASTEROID Mini with a
reasonable volume level so that you can
hear all external noises while driving.
The Parrot ASTEROID Mini includes
NdFeB magnets which can damage objects
sensitive to magnetic fields (pacemakers,
credit cards, mechanical clocks…).
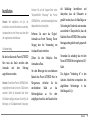
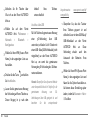
Installation
Note: We advise our customers to have the
Parrot ASTEROID Mini fitted by a certified
Parrot installer.
Before you begin
Installing the Parrot ASTEROID Mini is
done by inserting it between the car
stereo and the vehicle.
Note: If your car stereo is not fitted with ISO
connectors, you need to purchase an ISO
adapter cable to simplify the wiring
procedure.
Refer
to
the
Vehicle
compatibility section on the Parrot
ASTEROID Mini support page to check
whether an ISO adapter is necessary on your
vehicle.
Start by removing the car stereo from your
vehicle. You may need release keys to do
so.
Refer to your car stereo’s wiring diagram.
Before you install the individual
components, check that the installation
locations have been selected in such a way
that the cable length is sufficient to
connect every element. Once the
installation is complete, make sure that no
cables are pinched or trapped.
Use only the ISO cable provided with the
Parrot ASTEROID Mini.
The connection number indications in the
next sections correspond to the
connections represented on the diagrams
p.6 / 7.
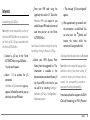
Connecting the power cable
Connecting the audio cable
1. Unplug the battery before installing
the power cable.
Join the vehicle audio cable to the
connector of the Parrot ASTEROID Mini
(Connections 1A and 2).
2. Connect the ISO male connectors of
the Parrot ASTEROID Mini to the car
stereo (Connection 3).
If your vehicle is equipped with an
amplifier, use the Front and Rear Line Out
outputs on the electronic box to avoid
saturation problems such as popping in the
speakers, background noise etc. Use one
or two jack cable(s) to connect the Parrot
ASTEROID Mini Line out outputs to your
vehicle audio system (Connection 1B on
the diagram p. 7).
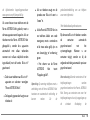
3. Join the vehicle’s power supply cable
to the ISO female connector of the
Parrot ASTEROID Mini (Connection
4).
The red wire of the Parrot ASTEROID
Mini cable must correspond to the
constant +12V supply, the orange wire to
the ignition +12V and the black wire to
ground. Check that the orange wire is not
connected to the constant +12V supply, as
English
15
you could run down the vehicle’s battery.
Note: In order to check the wiring, connect
the screen before placing it on the
dashboard. Refer to the Checking the wiring
section for more information.
On some vehicles, there is no
ignition +12V on the vehicle’s connectors.
You must therefore connect the orange
power supply wire to the fuse box or
another ignition power source.
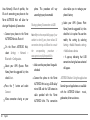
in 2 and mute in 3 are only suggested mute
locations : the choice of the mute-in jack
depends
on
your
car
stereo’s
configuration. Test and verify the mute on
the vehicle then connect the free yellow
wire on the ISO cable to the audio
system’s corresponding mute-in jack
(connection 5).
Installing the electronic box
Connecting the mute cable
Avoid installing the electronic box near
heating or air-conditioning system or on a
spot directly exposed to sunlight.
The mute function is used to cut the
sound of your car stereo to enable the
sound of the Parrot ASTEROID Mini
(music, phone calls etc.). Mute in 1, mute
Make sure the electronic box stays fixed
once it is installed and that it will not move
while you are driving.
Carefully reinstall the car stereo. Do not
16
English
force. If you are short of space behind the
car stereo to install the electronic box,
consider installing it in the glove box.
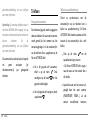
Checking the wiring
To perform the installation check, turn the
ignition on then off once the Parrot
ASTEROID Mini is installed: the message
“Goodbye!” must be displayed.
If it is not the case, it is necessary to
inverse the positions of the red and orange
wires. Indeed, the red wire of the power
cable must be connected to the
permanent 12V, the orange wire to the 12V
ignition and the black wire to the ground.
This can be done simply by reversing both
fuse holders located on the Parrot wiring
(connection 7).
Installing the microphone
The optimum location for the microphone
is in the centre of the vehicles roof near
the rear view mirror. The microphone
ideally needs to be less than 60cm’s from
the users mouth pointing directly towards
them with no obstructions.
Please take care when routing the
microphone cable through the vehicle to
the desired location, we recommend
routing alongside existing manufacture’s
wiring looms securing as you go making
sure the microphone cable is not pinched
or trapped.
Warning: Do not run the microphone cable
in such a way as to obstruct or interfere
with the vehicles operation or cause injury
to its occupants. In particular vehicle safety
device such as airbags and other SRS
systems.
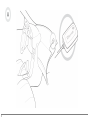
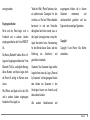
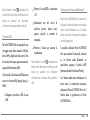
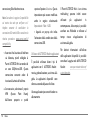
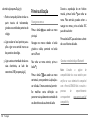
Installing the GPS receiver
Stick the GPS Receiver in an unobstructed
area inside the car.
Athermic windshields and windows with a
built-in antenna can interfere with GPS
reception and reduce the reliability of
information from navigation applications.
The GPS antenna is located on
the side where "Parrot
ASTEROID GPS" is written and
where the star-shaped logo is.
This logo must always be
directed towards the sky.
If your vehicle has an athermic windshield,
stick the GPS Receiver on the windshield
on the non athermic area. The side where
the star-shaped logo is must be stuck on
the windshield (diagram B p.9).
Note : The non athermic area of the
windshield depends on the model of your
vehicle. It is usually located near the rear
view mirror.
If your vehicle does not have an athermic
English
17
windshield, stick the GPS Receiver on the
dashboard. The side where the starshaped logo is must be visible (diagram A
p.8).
To make sure the adhesive tape adheres
well :
clean the area with an appropriate
cleaning product before sticking the
support ;
once you have stuck the support on
the dashboard, wait for approximately
2 hours without handling it.
Installing the USB cables
Connect the USB cables to the Parrot
ASTEROID Mini. We recommend you
connect all audio cables to the Parrot
ASTEROID Mini even if you do not plan on
using them. Route the audio cables to a
suitable location in your vehicle such as
the glove box or arm rest compartment. It
may be necessary to drill a hole in your
dashboard to do so. Avoid using USB
extension cables.
Make sure you connect the iPod cable to
its specific USB port. "iPod" is written
above it.
To guarantee an optimal reception quality
we recommend you do not connect your
18
English
internet USB key 3G on the Parrot
ASTEROID Mini directly : use the USB
cable to install your device on the
dashboard (or any other open area).
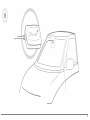
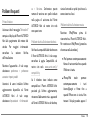
Installing the screen
Warning: Avoid any installation which
could hinder the use of any important
command or hinder the driver's visibility.
Do not install the Parrot ASTEROID Mini in
the airbag deployment area or in a possible
head impact area. Make sure it is not
exposed to the air stream from air vents.
Stick the support on the dashboard
(diagram C p.10).
To make sure the adhesive tape adheres
well :
clean the area with an appropriate
cleaning product before sticking the
support ;
once you have stuck the support on
the dashboard, wait for approximately
2 hours without handling it.
Remember to remove your screen when
leaving the vehicle to avoid tempting any
would-be thieves and to prevent
prolonged exposure to sunlight.
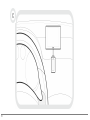
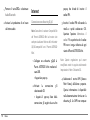
Installing the remote control
Stick the remote control support on your
dashboard. To do so, use the adhesive
tape located under the support.
To make sure the adhesive tape adheres
well :
clean the area with an appropriate
cleaning product before sticking the
support ;
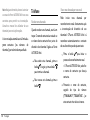
2. Insert a 3V CR2032 battery into the
remote control. Make sure the
battery is correctly positioned.
3. Put the circular plastic part back by
turning it counterclockwise.
once you have stuck the support on
the dashboard, wait for approximately
2 hours without handling it.
To connect the remote control to the
electronic box (diagram D p.11) :
There are two ways to supply power to the
remote control : with a battery or by
connecting it to the electronic box.
1. Remove the circular plastic part on
the back of the remote by turning it
clockwise.
To supply power with a battery (diagram D
p.11) :
2. Connect the remote control cable
into the battery compartment and
turn it counterclockwise.
1. Remove the circular plastic part on
the back of the remote by turning it
clockwise.
3. Connect the remote control cable to
the electronic box, next to the USB
connectors (diagram p.6).
English
19
Getting started
Navigating through the menus
Press the
menu.
button to access the main
Browse through the menus by turning the
jogwheel and confirm by pressing the
jogwheel.
Press the
menu.
button to get back to previous
Press the
button to access the pop-up
menu corresponding to the current
application. The pop-up menu allows you
to change several settings or browse more
easily through the content of your audio
source or phonebook.
20
English
Press the button to get to the track list if
a song is currently being played. While
navigating through the menus, press the
SRC button to get to the Now Playing
screen.
Connecting a phone via Bluetooth
ASTEROID Mini, the 2 devices will
automatically connect when they are
turned on (as well as B luetooth® features)
and in proximity of each other.
1. From your phone, start a B luetooth
peripheral search and select «Parrot
ASTEROID Mini».
Note : Refer to the compatibility page of our
website to check if your phone is
compatible with the Parrot ASTEROID Mini
and to consult the specific pairing
procedures for the most common phones :
www.parrot.com/uk/compatibility.
2. The pairing procedure depends on
your phone model:
If you are using the Parrot ASTEROID Mini
with your phone for the very first time, you
must initially pair both devices. Once your
telephone is paired with the Parrot
If the Parrot ASTEROID Mini
and your phone display two
codes, verify that the codes are
identical, then either confirm
If the phone asks you to enter
the B luetooth PIN code, enter
“0000”.
or invalidate.
> The Parrot ASTEROID Mini
screen will display “Pairing
successful”.
Note: Depending on the model of your
phone, you may need to authorize the
connection to the Parrot ASTEROID Mini to
allow further automatic connections. Refer
to the user guide of your phone for more
information.
Synchronising the phonebook
With most of the phones supporting
Bluetooth technology, the phonebook is
automatically synchronized in the system’s
memory. Each time you change your
directory, synchronisation will start
automatically the next time the Parrot
ASTEROID Mini and your phone are
connected.
Phone
Warning: Only the contacts stored in the
phone memory are synchronized. If your
contacts are stored in your SIM card
memory, transfer them onto your phone
memory.
An incoming call is indicated by a ringtone.
The name of the caller is announced if his
number is recorded in the phonebook of
the phone connected to the Parrot
ASTEROID Mini.
Note: Depending on the model of your
phone, you may need to authorize the
access to your contacts to the Parrot
ASTEROID Mini. Refer to the user guide of
your phone for more information.
To answer the call, press the
button. Press the
button to end
the call.
The automatic synchronization is limited
to 5000 contacts (or phone numbers) for
each paired phone.
Receiving a call
To refuse the call, press the
button.
English
21
Making a call via voice recognition
You can make a call using voice recognition
directly after automatic synchronization.
The Parrot ASTEROID Mini will
automatically recognize the contact you
wish to call.
button to launch the
1. Press the
voice recognition feature.
> The Parrot ASTEROID Mini asks
you the name of the contact you want
to call.
2. Say the name of the contact and the
type
of
number
(«WORK»,
«MOBILE»...) if there are several
numbers associated to your contact.
> The call is automatically launched if
22
English
the voice tag is correctly understood.
If it is not the case, a confirmation
message is asked. Confirm by saying
«YES» or «CALL».
Note: At any time, press the
exit voice recognition mode.
button to
Music
Using vocal music search
The voice recognition function allows you
to select the artist / album you want to
hear via voice recognition. This function is
only available if you are using the Parrot
ASTEROID Mini with a USB / SD / iPod
peripheral.
1. Press the
button.
2. Say the name of the artist / album
when asked to do so.
> The list of audio sources connected
to the Parrot ASTEROID Mini and
applications compatible with the
vocal music search function which
contain the artist / album that you
selected will appear.
4. Select the track and press the
jogwheel.
Note: Check the albums and artists names
in the metadatas of your music files. These
names may be different from the ones
displayed on your music files titles.
Note: To browse more easily through the
content of your iPod, press the
button
and select the first letter of your track /
album / artist.
iPod
USB storage device
1. Connect your iPod to the Parrot
ASTEROID Mini USB cable with the
USB / iPod extension lead.
2. Press the SRC button until the iPod
source is selected.
3. Select one of the classification
criteria (artist, album, songs, genres,
playlist) and press the jogwheel.
The Parrot ASTEROID Mini is compatible
with the majority of USB keys / MP3 audio
player / external hard drive. There is no
restriction in terms of capacity of USB
keys.
cable.
2. Press the SRC button until the USB
source is selected.
3. Select one of the classification
criteria (artist, album, songs, genres,
playlist) and press the jogwheel.
4. Select the track and press the
jogwheel.
Note: To browse more easily through the
content of your USB storage device, press
the
button and select the first letter of
your track / album / artist.
MP3 (mpeg1 layer3), AAC, WAV, OGG
and WMA formats are supported.
1. Connect your USB device to the USB
English
23
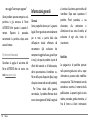
SD card
You can use the following SD cards (with
adapter if necessary) with the Parrot
ASTEROID Mini : SD, micro SD , mini SD,
SDHC, mini SDHC, micro SDHC. The SD
card capacity must not exceed 32Gb.
MP3 (Mpeg 1 Layer3), AAC, WAV, OGG
and WMA formats are supported.
1. Insert the SD card into the
appropriate slot located on the right
of the screen, with the contact
surface facing you (diagram E p.12).
2. Press the SRC button until the SD
source is selected.
3. Select one of
24
English
the
classification
criteria (artist, album, songs, genres,
playlist) and press the jogwheel.
4. Select the track and press the
jogwheel.
Note: To browse more easily through the
content of your USB storage device, press
the
button and select the first letter of
your track / album / artist.
Audio player connected via Bluetooth
Note: The Parrot ASTEROID Mini allows you
to use the phone and audio streaming
functions from 2 different phones without
having to disconnect one of them.
You can use the Parrot ASTEROID Mini to
listen to songs stored on your mobile
phone or B luetooth audio device. To do so,
your phone / audio device must support
the B luetooth A2DP profile (Advanced
Audio Distribution Profile).
If you are using a B luetooth audio player
for the first time, you have to pair both
devices. If both devices are already paired:
1. Press the SRC button until the
Bluetooth Audio source is selected.
2. Start playback on your B luetooth audio
player.
Internet
Connecting a 3G / 4G key
Note: Refer to the compatibility section of
the Parrot ASTEROID Mini on our website to
get the list of 3G / 4G keys compatible with
the Parrot ASTEROID Mini.
1. Connect a 3G key to the Parrot
ASTEROID Mini using a USB cable.
> A pop-up will appear.
OK to activate the 3G
2. Select
connection.
> A Status of 3G connection pop-up
appears, followed by another pop-up
which asks for your PIN code.
3. Enter your PIN code using the
jogwheel, then select OK. Check the
Memorise PIN code option if you
would like your PIN code to be stored
each time you turn on the Parrot
ASTEROID Mini.
Note: You will be able to change this setting
by selecting Settings > Netw ork > 3G Key.
4. Select your APN (Access Point
Name) from the suggested list. This
information is available in the
documentation provided with your 3G
key. If your APN is not in the list, you
can add it by selecting Settings >
Network > 3G Key > Configuration >
New access point.
> The message "3G key configured"
appears.
5. Wait approximately 30 seconds until
the connection is established. You
can also press the
button and
browse the menus while
connection is being established.
the
Sharing a phone 3G connection via Bluetooth
Note: Refer to the compatibility page of our
website to check if your phone allows 3G
connection sharing via Bluetooth and to
consult the corresponding procedure :
www.parrot.com/uk/compatibility.
If you have a phone that supports the DUN
(Dial-Up Networking) or PAN (Personal
English
25
Area Network) B luetooth profiles, the
B luetooth connecting your phone to the
Parrot ASTEROID Mini will allow for
sharing of the phone's 3G connection.
1. Connect your phone to the Parrot
ASTEROID Mini via B luetooth.
2. On the Parrot ASTEROID Mini,
select Settings > Network >
Bluetooth > Configuration.
3. Select your APN (Access Point
Name) from the suggested list, then
check Select .
4. Press the
Connect.
button and select
5. Allow connection sharing on your
26
English
phone. This procedure will vary
according to your phone model.
Sharing a phone 3G connection via USB
Note: Refer to the compatibility page of our
website to check if your phone allows 3G
connection sharing via USB and to consult
the
corresponding
procedure
:
www.parrot.com/uk/compatibility.
1. Make sure that your phone’s keypad is
unlocked.
2. Connect the phone to the Parrot
ASTEROID Mini using a USB cable/
micro-USB and the USB extension
cable provided with the Parrot
ASTEROID Mini. This connection
also enables you to recharge your
phone’s battery.
3. Select your APN (Access Point
Name) from the suggested list, then
check the Select option. You can then
modify this setting by selecting
Settings > Mobile Networks settings
> Mobile Access device.
> A pop-up indicating that USB
connection sharing has been activated
will appear.
ASTEROID Market : Using the applications
Several types of applications are available
with the ASTEROID Market : music,
geolocation, driver assistance...
All applications may not be available in all
countries. The use of some applications
may need prior subscription.
The Parrot ASTEROID Mini is a
multitasking device: several applications
can run simultaneously. For example, you
can listen to a Webradio station and use a
driver assistance application at the same
time.
For more information about installing and
using the available applications, refer to
the ASTEROID Market web page :
www.parrotasteroid.com/
asteroidmarket.
Troubleshooting
Before you begin
Make sure the “Goodbye” message is
displayed on the Parrot ASTEROID Mini
screen when you turn the ignition off.
Refer to the Checking the wiring section
for more information.
page on our website www.parrot.com.
Problems while using the phone function
Make sure your phone is compatible with
the Parrot ASTEROID Mini. To do so,
refer to the compatibility page on our
website
:
www.parrot.com/uk/
compatibility.
Reset the Parrot ASTEROID Mini. To do
so, select Settings > Advanced settings >
Restore factory settings.
If your phone is compatible with the
Parrot ASTEROID Mini and if you
already have the latest software update:
Make sure you have the latest software
update on your Parrot ASTEROID Mini. To
do so, select Settings > About > Device
Version. Compare this number with the
one on the Parrot ASTEROID Mini support
1. Delete the pairing on the Parrot
ASTEROID Mini. To do so, tap
Settings > Advanced settings >
Factory settings.
2. On your phone, erase the Parrot
English
27
system from the list of B luetooth
peripherals (or reboot your iPhone).
3. Repeat the pairing procedure for the 2
devices.
Problems while using the music function
Reboot your iPod / iPhone before
connecting it to the Parrot ASTEROID
Mini. To reboot your iPhone / iPod:
iPod: press Menu and the centre
button simultaneously until the iPod
reboots.
iPhone: Press the On/Off button and
the Home button simultaneously
until the iPhone reboots. Do not
touch the screen when the message
28
English
“Slide to shutdown” appears.
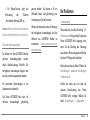
General information
Note: this procedure will not erase any of
your data.
Some problems may occur if the iPod / SD
card / USB device is already connected to
the Parrot ASTEROID Mini before you
turn on the ignition. Connect the iPod / SD
card / USB device once the ignition is
turned on.
For more information
Refer to the Parrot ASTEROID Mini
support
page
on
our
website
www.parrot.com.
Warranty
Without prejudice of legal warranty, Parrot
contractually warrants during 12 months
from the date of initial purchase by the
consumer
(except
wearing
parts
guaranteed for 6 months) that the product
is free from defects in materials and
workmanship, upon presentation of proof
of purchase (date, place of purchase,
serial number of the product) to the
retailer or Parrot. During the contractual
warranty period, the defective product
must be returned in its original packaging
to the after-sales service of the retailer.
After inspection of the product, Parrot will
proceed, at its option, to the replacement
or the issue a credit note to the exclusion
of any other remedy.
Warranty does not cover: upgrading of the
software items of the Parrot products with
Bluetooth cell phones for compatibility
purpose, data recovery, deterioration of
the external aspect due to normal wear of
the product, any damage caused by
accident, misuse, misapplication, or nonParrot products.
Parrot is not responsible for storage, loss
or damaged to data during transit or repair.
Any product wrongfully declared to be
defective will be returned to sender and
inspection, process and carriage costs will
be invoiced to him.
Modifications
The explanations and specifications in this
guide are given for information purposes
only and may be modified without prior
notice. They are deemed to be correct at
time of going to press. The utmost care
has been taken when writing this guide,as
part of the aim to provide you with
accurate information. However, Parrot
shall not be held responsible for any
consequences arising from any errors or
omissions in the guide, nor for any damage
or accidental loss of data resulting directly
or indirectly from the use of the
information herein. Parrot reserves the
right to amend or improve the product
design or user guide without any
restrictions and without any obligation to
notify users. As part of our ongoing
concern to upgrade and improve our
products, the product that you have
purchased may differ slightly from the
model described in this guide. If so, a later
version of this guide might be available in
electronic format at Parrot’s website at
www.parrot.com.
Correct disposal of This Product (Waste
Electrical & Electronic Equipment)
This marking
shown on the product or
its literature, indicates that it should not
be disposed with other household wastes
at the end of its working life. To prevent
possible harm to the environment or
English
29
human health from uncontrolled waste
disposal, please separate this from other
types of wastes and recycle it responsibly
to promote the sustainable reuse of
material resources.
Household users should contact either
the retailer where they purchased this
product, or their local government office,
for details of where and how they can take
this item for environmentally safe
recycling. Business users should contact
their supplier and the terms and
conditions of the purchase contract. This
product should not be mixed with other
commercial wastes for disposal.
Registered Trademarks
Parrot and the Parrot logo are registered
30
English
trademarks of PARROT SA.
The Bluetooth word mark and logos are
registered
trademarks
owned
by
Bluetooth SIG, Inc. and any use of such
marks by Parrot S.A. is under license.
Bluetooth QDID : B013841, B013839, [-]
"Made for iPod / iPhone" means that an
electronic accessory has been designed to
connect specifically to iPod or iPhone
respectively, and has been certified by the
developer to meet Apple performance
standards. Apple is not responsible for the
operation of this device or its compliance
with safety and regulatory standards.
iPod and iPhone are trademarks of Apple
Inc, registered in the US and others
countries
All other trademarks mentioned in this
guide are protected and are the property
of their respective owners.
Gracenote, the Gracenote logo and
logotype and "Powered by Gracenote" are
either
registered
trademarks
or
trademarks of Gracenote Inc. in the United
States and/or other countries.
Identification N. 394 149 496 R.C.S. PARIS
Parrot S.A.
Copyright © 2012 Parrot. All Rights
Reserved.
This device complies with Industry Canada
licence-exempt
RSS
standard(s).
Operation is subject to the following two
conditions: (1) this device may not cause
interference, and (2) this device must
accept any interference, including
interference that may cause undesired
operation of the device.
This equipment complies with FCC’s and
IC’s RF radiation exposure limits set forth
for an uncontrolled environment.. The
antenna(s) used for this transmitter must
be installed and operated to provide a
separation distance of at least 20 cm from
all persons and must not be collocated or
operating in conjunction with.
English
31
32
Guide d'utilisation
rapide
Avant de commencer
A propos de ce guide
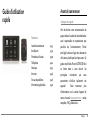
Sommaire
Avant de commencer
Installation
Première utilisation
Téléphone
Musique
Internet
En cas de problème
Informations générales
p.33
p.34
p.40
p.42
p.43
p.46
p.48
p.50
Afin de limiter notre consommation de
papier et dans le cadre de notre démarche
aussi responsable et respectueuse que
possible de l’environnement, Parrot
privilégie la mise en ligne des documents
utilisateurs plutôt que leur impression. Ce
guide simplifié du Parrot ASTEROID Mini
se limite donc à vous fournir les
principales
instructions
qui
vous
permettront d’utiliser facilement cet
appareil.
Vous
trouverez
plus
d’informations sur la section Support de
notre site web www.parrot.com : notice
complète, FAQ, didacticiels...
Français
33
Note : Pour une meilleure lisibilité, l’iPod®
et l’iPhone® seront désignés par le terme
"iPod" dans ce manuel.
Avertissements
Les fonctions requérant une attention
prolongée doivent uniquement être
utilisées lorsque le véhicule est à l’arrêt.
Votre sécurité et celle des autres usagers
de la route prime sur les appels
téléphoniques, la musique ou les
applications d'aide à la conduite. Soyez
responsable : conduisez prudemment et
prêtez attention à votre environnement.
Parrot dégage toute responsabilité si vous
choisissez d’ignorer cette mise en garde.
34
Français
Mise à jour
Téléchargez gratuitement la dernière mise
à jour de votre produit sur notre site web
www.parrot.com section Support. Ces
mises à jour vous permettront de
bénéficier de nouvelles fonctionnalités et
d’améliorer la compatibilité de votre
produit.
Installation
Note: Nous vous recommandons de faire
appel à un professionnel pour cette
installation, notamment à l'un de notre
réseau d'installateurs agréés.
Avant de commencer
L'installation du Parrot ASTEROID Mini
consiste à l'insérer entre l'autoradio et le
véhicule.
Note : Les câbles fournis avec le Parrot
ASTEROID Mini sont équipés de connecteurs
ISO. Si votre autoradio n’est pas équipé de
connecteurs ISO, vous devez vous procurer
un câble adaptateur ISO afin de permettre
le montage. Consultez la section
Compatibilité véhicules sur la page support
du Parrot ASTEROID Mini pour vérifier la
nécessité d'un câble adaptateur.
Commencez par retirer l’autoradio
d’origine de votre véhicule. Cette
opération peut nécessiter des clés
d’extraction.
Consultez le schéma électrique de votre
autoradio.
Avant de fixer les différents éléments du
Parrot ASTEROID Mini dans l’habitacle,
connectez les différents câbles sur le
boîtier électronique. Avant de fixer
durablement les composants, contrôlez
les longueurs de câbles et vérifiez que les
emplacements soient choisis de sorte que
les longueurs de câbles suffisent pour
relier les pièces détachées les unes aux
autres. Assurez-vous que les câbles du
Parrot ASTEROID Mini ne se retrouvent
pas pliés ou coincés à l’issue de
l’installation.
Utilisez impérativement le câble ISO
fourni avec le Parrot ASTEROID Mini.
Les indications "Connexion #" dans les
prochaines sections correspondent aux
connexions représentées sur les schémas
p.6 / 7.
Connecter le câble audio
Reliez les faisceaux audio du véhicule aux
connecteurs du Parrot ASTEROID Mini
(Connexions 1A et 2 sur le schéma p.6).
Si votre véhicule est équipé d’un système
audio avec amplificateur, utilisez les
sorties jack Line Out Front et Line Out
Rear sur le boitier électronique pour
éviter tout problème de saturation
(claquement dans les haut parleurs,
souffle permanent, etc.). Reliez ces
sorties Line Out à votre système audio en
utilisant un ou deux câbles jack pour relier
le Parrot ASTEROID Mini à votre système
audio (Connexion 1B sur le schéma p.7).
Connecter le câble d'alimentation
la
batterie
avant
1. Débranchez
l’installation du câble d’alimentation.
2. Branchez le connecteur ISO mâle du
Parrot ASTEROID Mini à l’autoradio
Français
35
(connexion 3).
3. Reliez les faisceaux alimentation du
véhicule au connecteur ISO femelle du
Parrot ASTEROID Mini (connexion 4).
Le fil rouge du câble doit correspondre
au +12V permanent, le fil orange au 12V
après-contact et le fil noir à la masse.
Vérifiez que votre fil orange n’est pas
connecté au 12V permanent, vous
risqueriez de décharger la batterie du
véhicule.
Note : Afin de procéder à la vérification de
l’installation, connectez d’abord l’écran
sans le placer sur le tableau de bord.
Consultez la section Vérifier l’installation
pour plus d’informations.
36
Français
Sur certains véhicules, il n’y a pas de +12V
après contact sur les connecteurs du
véhicule. Il est alors nécessaire de
brancher le fil d’alimentation orange sur la
boite à fusible ou sur une autre source
d’alimentation après contact.
Connecter le câble Mute
La fonction Mute permet d’interrompre le
son de votre autoradio pour laisser place
au son du Parrot ASTEROID Mini
(musique, communications etc.). Le choix
de l’entrée Mute (Mute in 1, mute in 2 ou
mute in 3) dépend de la configuration de
votre autoradio. Identifiez l'entrée Mute
puis connectez la au fil jaune libre sur le
câble ISO (connexion 5).
Installer le boitier électronique
Evitez d’installer le boîtier près du
chauffage ou de la climatisation ou à un
endroit exposé au soleil.
Assurez-vous que le boitier
immobile après son installation.
reste
Une fois le boitier installé, ne forcez pas
lors de la remise en place de l’autoradio. Si
la place derrière l’autoradio est
insuffisante, envisagez par exemple le
démontage de la boite à gants.
Vérifier l'installation
Allumez puis coupez le contact de votre
véhicule une fois le Parrot ASTEROID
Mini installé : le message « Au revoir »
doit alors s’afficher à l’écran.
Installer le microphone
Note : Certains véhicules disposent d’une
temporisation : le Parrot ASTEROID Mini ne
s’éteindra qu’au bout d’un certain temps
après avoir coupé le contact ou retiré la clé,
sans ouvrir ni fermer les portes du véhicule.
Nous vous recommandons de faire glisser
le câble dans la gouttière derrière le joint
de la portière.
Si ce n’est pas le cas, vous devez inverser
les positions des fils rouge et orange. En
effet, le fil rouge du câble d’alimentation
doit être connecté au 12V permanent, le fil
orange au 12V après-contact et le fil noir à
la masse. Cette opération s’effectue
simplement en inversant les deux cosses
situées sur le câblage Parrot (connexion 7)
.
Si le câble passe au dessus des pédales,
assurez-vous qu’il est bien fixé.
Avertissement: Ne faites pas passer le câble
du microphone dans les systèmes de
chauffage, de ventilation, de climatisation
ou devant les airbags latéraux.
Assurez-vous que le microphone est
installé le plus près possible de la tête de
l’utilisateur. La distance idéale est de 60
cm. Installez de préférence le microphone
près du rétroviseur intérieur.
Orientez le microphone vers la bouche de
l’utilisateur.
Installation du dongle GPS
Fixez le dongle GPS sur une surface plane,
dans une zone sans obstacle à l'intérieur
de l'habitacle.
Les pare-brises athermiques et les vitres
avec antenne incrustée peuvent interférer
avec la réception GPS et réduire la fiabilité
des informations liées aux applications de
navigation.
L'antenne GPS du dongle se
trouve sur le côté où est écrit
"Parrot ASTEROID GPS" et où
se trouve le logo en forme
Français
37
d'étoile. Ce logo doit toujours
être orienté vers le ciel.
Si votre véhicule dispose d'un pare-brise
athermique, fixez le dongle GPS sur le
pare-brise au niveau de la zone non
athermique. Le côté sur lequel se trouve
le logo en forme d'étoile doit être collé sur
le pare-brise (schéma B p.9).
Note : La zone non athermique du parebrise dépend du modèle de votre véhicule.
Elle se trouve généralement au niveau du
rétroviseur.
Si votre véhicule ne dispose pas d'un parebrise athermique, fixez le dongle GPS sur
le tableau de bord. Le côté sur lequel se
38
Français
trouve le logo en forme d'étoile doit être
visible (schéma A p.8).
Pour assurer une bonne fixation du
support :
nettoyez la surface de montage avant
de coller le support ;
correspondants de votre vide poche ou
boîte à gant. Pour cela, il peut être
nécessaire de percer un trou à l’intérieur
de votre tableau de bord. Dans la mesure
du possible, évitez l'utilisation de
rallonges USB de plusieurs mètres.
Installation des câbles USB
Le câble USB sur lequel vous connecterez
la rallonge iPod doit impérativement être
connecté au port USB blanc prévu à cet
effet. Vous trouverez l’indication "iPod" au
dessus de celui-ci.
Connectez les câbles USB au Parrot
ASTEROID
Mini.
Nous
vous
recommandons de connecter tous les
câbles du Parrot ASTEROID Mini, même si
vous ne prévoyez pas forcément de les
utiliser. Faites ressortir les connecteurs
Afin de garantir une qualité de réception
optimale, ne connectez pas votre clé 3G
directement sur le Parrot ASTEROID
Mini : utilisez un câble USB afin de
l'installer sur le tableau de bord (ou toute
autre zone dégagée).
après fixation du support, patientez
environ 2 heures sans le manipuler.
Installer l'écran
Avertissement : Evitez toute installation
pouvant
entraver
l’utilisation
de
commandes importantes ou pouvant
réduire la visibilité du conducteur.
N’installez pas l'écran là où il pourrait être
propulsé par l’ouverture d’un airbag ou à
proximité d’une bouche d’aération ou d’air
conditionné du véhicule.
après fixation du support, patientez
environ 2 heures sans le manipuler.
Afin d’éviter les risques de vol et
d’exposition prolongée au soleil, pensez à
retirer votre écran lorsque vous quittez
votre véhicule.
Installer la télécommande
Collez le support en plastique sur votre
tableau de bord (schéma C p.10).
Collez le support de la télécommande sur
votre tableau de bord en utilisant l'adhésif
situé en dessous de celui-ci.
Pour assurer une bonne fixation du
support :
Pour assurer une bonne fixation du
support :
nettoyez la surface de montage avant
de coller le support ;
nettoyez la surface de montage avant
de coller le support ;
après fixation du support, patientez
environ 2 heures sans le manipuler.
La télécommande peut être alimentée de
2 manières : avec une pile ou en la
connectant au boitier électronique.
Pour alimenter la télécommande par pile
(schéma D p.11) :
1. Retirez la pièce en plastique
circulaire au dos de la télécommande
en la faisant pivoter dans le sens des
aiguilles d'une montre.
2. Insérez une pile de type 3V CR2032
dans l'emplacement prévu à cet effet.
Assurez-vous que la pile est
correctement orientée.
3. Remettez en place la pièce en
plastique circulaire en la faisant
Français
39
pivoter dans le sens inverse des
aiguilles d'une montre.
Pour connecter la télécommande au
boitier électronique (schéma D p.11) :
1. Retirez la pièce en plastique
circulaire au dos de la télécommande
en la faisant pivoter dans le sens des
aiguilles d'une montre.
2. Connectez le câble au niveau de
l'emplacement prévu pour la pile et
faites-le pivoter dans le sens inverse
des aiguilles d'une montre.
3. Connectez l'autre extrémité du câble
sur le boitier électronique, à côté des
connecteurs USB (schéma p.6).
40
Français
Première utilisation
Naviguer dans les menus
Appuyez sur la touche
menu principal.
pour accéder au
Naviguez dans les menus en tournant la
molette, et validez en appuyant sur la
molette.
Pour revenir au menu précédent, appuyez
sur la touche .
Appuyez sur la touche
pour accéder au
menu contextuel, correspondant à
l’application en cours d’utilisation. Le
menu contextuel vous permet notamment
d'avoir
accès
aux
fonctions
supplémentaires de l'application, de
modifier certains réglages, ou de parcourir
plus rapidement le contenu de votre
répertoire ou de votre source audio.
Pendant la lecture d’un fichier musical,
appuyez sur la touche pour revenir au
menu. A l’inverse, lorsque vous naviguez
dans les menus, appuyez sur la touche SRC
pour revenir au lecteur.
Connecter un téléphone via Bluetooth
Note : Consultez la page compatibilité de
notre site web pour vérifier si votre
téléphone est compatible avec le Parrot
ASTEROID Mini et consulter la procédure
d'appairage
correspondante
:
www.parrot.com/fr/compatibility.
Si c’est la 1ère fois que vous utilisez un
téléphone avec le Parrot ASTEROID Mini,
vous devez tout d’abord appairer les deux
appareils. Une fois votre téléphone
appairé avec le Parrot ASTEROID Mini, la
connexion entre les 2 appareils sera
automatique dès que les 2 appareils seront
allumés à proximité, avec la fonction
B luetooth® activée.
1. Depuis votre téléphone, lancez une
recherche
de
périphériques
B luetooth® puis sélectionnez «Parrot
ASTEROID Mini».
2. La procédure d'appairage dépend
alors du modèle de votre téléphone :
Si le téléphone vous invite à
entrer le code PIN B luetooth,
entrez «0000».
Synchroniser le répertoire du téléphone
Si le Parrot ASTEROID Mini et
votre téléphone affichent deux
codes, vérifiez si ces codes sont
identiques puis confirmez ou
infirmez.
Avec la plupart des téléphones B luetooth,
le répertoire est automatiquement
synchronisé avec la mémoire du système.
Chaque fois que vous modifierez votre
répertoire, la synchronisation se relancera
automatiquement à la connexion suivante.
> L’écran du Parrot ASTEROID Mini
affiche « Appairage réussi».
Note : Sur certains téléphones, vous devrez
autoriser la connexion au Parrot ASTEROID
Mini pour permettre la connexion
automatique. Consultez le guide utilisateur
de
votre
téléphone
pour
plus
d'informations.
Avertissement:
Seuls
les
contacts
enregistrés dans la mémoire du téléphone
se synchronisent avec le Parrot ASTEROID
Mini. Si vos contacts sont enregistrés dans
la mémoire de la carte SIM, transférez-les
dans la mémoire du téléphone. Consultez le
guide utilisateur de votre téléphone pour
plus d'informations.
Note : Sur certains téléphones, vous devrez
Français
41
autoriser l'accès du Parrot ASTEROID Mini à
vos contacts
pour permettre la
synchronisation. Consultez le guide
utilisateur de votre téléphone pour plus
d'informations.
La synchronisation automatique est
limitée à 5000 contacts (ou numéros de
téléphone) par téléphone appairé.
Téléphone
Recevoir un appel
Un appel entrant est indiqué par une
sonnerie. Le nom du contact est énoncé si
le numéro de ce contact est enregistré
dans le répertoire du téléphone connecté
au Parrot ASTEROID Mini.
Pour accepter cet appel, appuyez sur
la touche
. Appuyez ensuite sur la
touche
pour raccrocher.
Pour refuser cet appel, appuyez sur la
touche
.
Emettre un appel via reconnaissance vocale
Vous pouvez initier un appel par
reconnaissance vocale directement après
la synchronisation du répertoire de votre
téléphone. Le Parrot ASTEROID Mini
reconnaitra automatiquement le contact
de votre répertoire que vous souhaitez
appeler.
pour initier
1. Appuyez sur la touche
le processus de reconnaissance
vocale.
> Le Parrot ASTEROID Mini vous
demande le nom du contact que vous
souhaitez appeler.
2. Prononcez le nom du contact suivi du
type de numéro («BUREAU»,
42
Français
«PORTABLE»...) si ce contact
dispose de plusieurs numéros.
> L’appel vers ce contact est
automatiquement
initié
si
la
commande vocale a été bien
comprise.
> Dans le cas contraire, le Parrot
ASTEROID Mini diffuse un message
de confirmation. Confirmez en
prononçant «OUI», «APPELLE» ou
«APPELER».
Note: A tout moment, appuyez sur la
touche
pour annuler la procédure
d'appel.
Musique
Utiliser la reconnaissance vocale musicale
La fonction reconnaissance vocale
musicale vous permet de sélectionner via
reconnaissance vocale les artistes ou
albums que vous souhaitez écouter. Cette
fonction est disponible si vous utilisez le
Parrot ASTEROID Mini avec un
périphérique de type iPod / USB / SD, ou si
vous utilisez une application musicale
compatible avec cette fonction.
1. Appuyez sur la touche
télécommande.
sur la
lorsque le Parrot ASTEROID Mini
vous y invite.
> La liste des sources audio
connectées au Parrot ASTEROID
Mini et des applications musique
compatibles
avec
la
fonction
reconnaissance vocale contenant
l'artiste / album que vous avez choisi
apparait.
Note : Vérifiez les noms des artistes et
albums dans les tags (métadonnées) de vos
fichiers musicaux. Ceux-ci peuvent être
différents de ceux affichés dans le titre de
votre morceau.
2. Enoncez le nom de l'artiste ou de
l'album que vous souhaitez écouter
Français
43
Utilisation avec un iPod
1. Connectez votre iPod au câble USB
auquel la rallonge iPod est connectée.
2. Appuyez sur la touche SRC jusqu'à
sélectionner iPod.
3. Sélectionnez un des critères de
classement
(artiste,
album,
morceaux, playlist) et appuyez sur la
molette.
4. Sélectionnez un morceau et appuyez
sur la molette.
Note : Appuyez sur la touche
et
sélectionnez la première lettre de votre
artiste, album ou morceau pour naviguer
plus facilement dans le contenu de votre
44
Français
iPod.
Utilisation avec une clé USB
Le Parrot ASTEROID Mini est compatible
avec la majorité des clés USB / baladeurs
MP3 / disques dur externes. Il n’existe
aucune restriction au niveau de la capacité
des clés USB.
Les fichiers musicaux sur votre clé USB
peuvent être au format MP3 (mpeg1
layer3), AAC, WAV, OGG ou WMA.
3. Sélectionnez un des critères de
classement
(artiste,
album,
morceaux, playlist) et appuyez sur la
molette.
4. Sélectionnez un morceau et appuyez
sur la molette.
Note : Appuyez sur la touche
et
sélectionnez la première lettre de votre
artiste, album ou morceau pour naviguer
plus facilement dans le contenu de votre clé
USB.
1. Connectez votre périphérique USB
sur le câble USB.
Utilisation avec une carte SD
2. Appuyez sur la touche SRC jusqu'à
sélectionner USB.
Vous pouvez utiliser les cartes SD
suivantes (avec adaptateur si nécessaire)
avec le Parrot ASTEROID Mini : SD, micro
SD , mini SD, SDHC, mini SDHC, micro
SDHC. La capacité de la carte SD ne doit
pas dépasser 32Go.
Les fichiers musicaux sur votre carte SD
peuvent être au format MP3 (mpeg1
layer3), AAC, WAV, OGG ou WMA.
la
carte
SD
dans
1. Insérez
l’emplacement prévu à cet effet, situé
sur le côté droit de l'écran (schéma E
p.12).
2. Appuyez sur la touche SRC jusqu'à
sélectionner SD.
3. Sélectionnez un des critères de
classement
(artiste,
album,
morceaux, playlist) et appuyez sur la
molette.
4. Sélectionnez un morceau et appuyez
sur la molette.
Note : Appuyez sur la touche
et
sélectionnez la première lettre de votre
artiste, album ou morceau pour naviguer
plus facilement dans le contenu de votre
carte SD.
Utilisation avec un lecteur audio Bluetooth
Note : Le Parrot ASTEROID Mini vous permet
d’utiliser la fonction téléphonie et
streaming audio via Bluetooth avec 2
téléphones différents, sans avoir à
déconnecter l’un des 2 appareils.
stockés sur un lecteur audio Bluetooth, si
celui-ci supporte le profil A2DP
(Advanced Audio Distribution Profile).
Si vous utilisez le lecteur audio pour la
1ère fois, vous devez tout d’abord
l'appairer au Parrot ASTEROID Mini. Si le
lecteur audio est déjà appairé au Parrot
ASTEROID Mini :
1. Appuyez sur la touche SRC jusqu’à
sélectionner Bluetooth Audio.
2. Lancez la lecture d’un morceau sur
votre lecteur audio.
Vous pouvez utiliser le Parrot ASTEROID
Mini pour écouter des fichiers musicaux
Français
45
Internet
Connexion avec une clé 3G / 4G
Note : Consultez la section compatibilité du
Parrot ASTEROID Mini sur notre site web
pour afficher la liste des clés 3G / 4G
compatibles avec le Parrot ASTEROID Mini.
1. Connectez une clé 3G au Parrot
ASTEROID Mini par l’intermédiaire
d’un câble USB.
> Un pop-up apparait.
2. Sélectionnez OK pour activer la
connexion 3G.
> Un pop-up Etat de la connexion 3G
apparait, suivie d'une autre pop-up
vous demandant votre code PIN.
46
Français
3. Entrez votre code PIN en utilisant la
molette puis sélectionnez OK.
Cochez l'option Mémoriser le code
PIN si vous préférez que le code PIN
ne vous soit pas demandé à chaque
redémarrage du Parrot ASTEROID
Mini.
Note: Vous pourrez par la suite modifier ce
réglage en sélectionnant Pa ra m ètres >
Résea u > Clé 3G.
4. Sélectionnez votre APN (Access
Point Name) dans la liste proposée.
Cette information est disponible dans
la documentation fournie avec votre
clé 3G. Si votre APN ne figure pas
dans la liste, vous pouvez l'ajouter en
sélectionnant Paramètres > Réseau >
Clé 3G > Configuration > Nouveau
point d'accès.
> Le message "Clé 3G configurée"
apparait.
5. Patientez environ 30 secondes
jusqu'à ce que la connexion soit
établie. Vous pouvez également
appuyer sur la touche
et naviguer
dans les menus pendant que la
connexion s'établit.
Partage de connexion 3G via Bluetooth
Si vous disposez d’un téléphone
supportant le profil B luetooth DUN (DialUp Networking) ou PAN (Personal Area
Network), la connexion via B luetooth de
votre téléphone au Parrot ASTEROID Mini
vous permettra de partager la connexion
3G du téléphone.
4. Appuyez sur la touche
sélectionnez Connecter.
Note : Consultez la page compatibilité sur
notre site web pour vérifier si votre
téléphone permet le partage de connexion
3G via Bluetooth et consulter la procédure
correspondante : www.parrot.com/fr/
compatibility.
5. Autorisez le partage de connexion sur
votre téléphone. Cette procédure
diffère selon le modèle de votre
téléphone.
1. Connectez votre téléphone au Parrot
ASTEROID Mini via Bluetooth.
2. Sur le Parrot ASTEROID Mini,
sélectionnez Paramètres > Réseau >
Bluetooth > Configuration.
3. Sélectionnez votre APN (Access
Point Name) dans la liste proposée
puis cochez l'option Sélectionner.
et
Partage de connexion 3G via USB
Note : Consultez la page compatibilité sur
notre site web pour vérifier si votre
téléphone permet le partage de connexion
3G via USB et consulter la procédure
correspondante : www.parrot.com/fr/
compatibility.
1. Assurez-vous que le clavier de votre
téléphone est déverrouillé.
2. Connectez le téléphone au Parrot
ASTEROID Mini en utilisant le câble
USB / micro-USB fourni avec votre
téléphone. Vous pouvez également
le connecter en utilisant la rallonge
USB fournie avec le
Parrot
ASTEROID Mini. Cette connexion
permet également de recharger la
batterie de votre téléphone.
3. Sélectionnez votre APN (Access
Point Name) dans la liste proposée
puis cochez l’option Sélectionner.
Vous pourrez par la suite modifier ce
réglage en sélectionnant Paramètres
> Réseau > USB.
> Un pop-up indiquant l’activation du
partage de connexion USB apparait.
Français
47
ASTEROID Market : Utiliser les applications
Vous avez la possibilité d'utiliser plusieurs
types d'applications avec le ASTEROID
Market : musique, géolocalisation, aide à la
conduite.
Les applications
disponibles
sont
différentes selon le pays d'utilisation.
Certaines applications peuvent nécessiter
un abonnement.
Le
Parrot
ASTEROID
Mini
est
multitâches : plusieurs applications
peuvent être utilisées en même temps.
Vous pouvez par exemple écouter une
Webradio et utiliser une application d'aide
à la conduite en même temps.
Pour plus d'informations sur l'utilisation
48
Français
des applications disponibles, consultez la
page web de l'ASTEROID Market :
www.parrotasteroid.com/
asteroidmarket.
En cas de problème
Avant de commencer
Assurez-vous que le message “Au revoir”
apparait bien sur l’écran du Parrot
ASTEROID Mini lorsque vous coupez le
contact du véhicule. Consultez la section
Vérifier
l’insta lla tion
pour
plus
d’informations.
Réinitialisez
l’appareil.
Pour
cela,
sélectionnez Paramètres > Paramètres
avancés > Réinitialiser.
Vérifiez que vous avez la dernière mise à
jour sur le Parrot ASTEROID Mini. Pour
cela, sélectionnez Paramètres > A propos
> Version. Comparez ce numéro de
version avec celui indiqué sur la page
support du Parrot ASTEROID Mini sur
notre site web www.parrot.com.
Problème liés à la fonction téléphonie
Consultez la page compatibilité de notre
site web pour vérifier si votre téléphone
est compatible avec le Parrot ASTEROID
Mini.
Si votre téléphone est indiqué compatible,
et si votre Parrot ASTEROID Mini dispose
déjà de la dernière mise à jour, supprimez
l'appairage entre les 2 appareils sur le
Parrot ASTEROID Mini et sur votre
téléphone, redémarrez les 2 appareils puis
réétablissez la connexion entre les 2
appareils.
Problèmes liés à la fonction musique
Réinitialisez votre iPod / iPhone avant de
le reconnecter au Parrot ASTEROID Mini.
Pour réinitialiser un iPod / iPhone (cette
procédure n’effacera aucune donnée):
iPod : appuyer simultanément sur
Menu et sur le bouton central jusqu’à
ce que l’iPod redémarre.
Parrot ASTEROID Mini lorsque vous
mettez le contact. Réessayez en
connectant le périphérique après avoir mis
le contact.
Pour plus d'informations
Consultez la FAQ disponible sur la page
support du Parrot ASTEROID Mini.
iPhone / iPod touch : appuyer
simultanément sur le bouton On/Off
et le bouton Home jusqu’à ce que
l’iPhone redémarre. Ne touchez pas
l’écran quand le message “Slide to
shutdown“ apparaît.
Certains problèmes peuvent apparaitre si
le périphérique est déjà connecté au
Français
49
Informations générales
Garantie
Sans préjudice de la garantie légale et de
l’application des articles L.211-4, L.211-5 et
L.211-12 du code de la consommation et
des articles 1641 à 1646 du code civil
français,
PARROT
garantit
contractuellement pendant une durée de
12 mois à compter de la date d’achat initial
effectué par le consommateur (sauf
pièces d’usure garanties 6 mois), que le
produit est exempt de défaut de matériaux
et de fabrication, sur présentation de la
preuve d’achat (date, lieu d’achat, n° de
série du produit) au revendeur ou à Parrot.
Pendant
la
durée
de
garantie
50
Français
contractuelle, le produit défectueux devra
être retourné dans son emballage d’origine
auprès du service après-vente du
revendeur. Après inspection du produit,
Parrot procèdera, à son choix,
au
remplacement ou à l’émission d’un avoir à
l’exclusion
de
tout
autre
dédommagement.
La garantie ne couvre pas la mise à jour des
logiciels inclus dans les produits Parrot
avec des téléphones mobiles Bluetooth à
des fins de compatibilité, la récupération
de données, la détérioration extérieure
due à une usure normale du produit, tout
dommage causé par accident, une
utilisation anormale ou non autorisée du
produit, un produit non Parrot.
Parrot n’est pas responsable du stockage,
de la perte ou de l’endommagement des
données durant le transport ou la
réparation. Tout produit s’avérant non
défectueux sera retourné à l’expéditeur et
les frais de traitement, de vérification et
de transport lui seront facturé.
Modifications
Les explications
et
spécifications
contenues dans ce guide utilisateur ne
sont fournies qu’à titre d’information et
peuvent être modifiées sans notification
préalable. Ces informations sont correctes
au moment de l’impression et le plus grand
soin est apporté lors de leur rédaction afin
de vous fournir des informations les plus
précises possible.
Cependant, Parrot S.A. ne saurait être
tenu responsable, directement ou indi
rectement, des éventuels préjudices ou
pertes de données accidentelles résultant
d’une erreur ou omission au sein du
présent document. Parrot S.A. se réserve
le droit d’amender ou améliorer le produit
ainsi que son guide utilisateur sans aucune
restriction ou obligation de prévenir
l’utilisateur. Dans le cadre de l’attention
portée par Parrot S.A. sur l’amélioration de
nos produits, il est possible que le produit
que vous avez acheté diffère légèrement
de celui décrit au sein du présent
document. Dans ce cas, vous pourrez
éventuellement trouver une nouvelle
version du guide utilisateur au format
électronique sur le site www.parrot.com.
Comment recycler ce produit - Déchets
d’équipements
électriques
et
électroniques
Le symbole
sur le produit ou sa
documentation indique qu’il ne doit pas
être éliminé en fin de vie avec les autres
déchets
ménagers.
L’élimination
incontrôlée des déchets pouvant porter
préjudice à l’environnement ou à la santé
humaine, veuillez le séparer des autres
types de déchets et le recycler de façon
responsable. Vous favoriserez ainsi la
réutilisation durable des ressources
matérielles. Les particuliers sont invités à
contacter le distributeur leur ayant vendu
le produit ou à se renseigner auprès de
leur mairie pour savoir où et comment ils
peuvent se débarrasser de ce produit afin
qu’il soit recyclé en
respectant
l’environnement. Les entreprises sont
invitées à contacter leurs fournisseurs et à
consulter les conditions de leur contrat de
vente. Ce produit ne doit pas être éliminé
avec les autres déchets commerciaux.
Marques déposées
Parrot, les logos Parrot sont des marques
enregistrées de PARROT SA en France et
dans d’autres pays.
Français
51
Le nom et le logo Bluetooth sont des
marques déposées de Bluetooth SIG, Inc.
et toute utilisation de ces derniers par
Parrot S.A. est faite sous licence.
iPod et iPhone sont des marques d’Apple,
Inc. déposées aux États-Unis et dans
d’autres pays.
"Made for iPod / iPhone" signifie qu'un
accessoire
électronique
a
été
spécialement conçu pour se connecter,
respectivement, avec un iPod ou un
iPhone et est certifié par le concepteur
comme répondant aux normes de
performance d'Apple. Apple décline toute
responsabilité relative au fonctionnement
de ces accessoires ou à leur conformité
aux normes réglementaires et de sécurité.
52
Français
Le nom « Gracenote », le logo Gracenote,
le graphisme Gracenote, la mention
« Powered by Gracenote » sont des
marques ou des marques déposées de
Gracenote aux États-Unis et/ou dans
d’autres pays.
Toutes les autres marques de commerce
et marques déposées mentionnées dans
le présent document sont protégées par
Copyright et sont la propriété de leurs
propriétaires respectifs.
Déclaration de conformité pour le CE
Parrot SA, 174 quai de Jemmapes, 75010
Paris, France, déclare sous son unique
responsabilité que le produit décrit dans
le présent guide utilisateur est en
conformité avec les normes techniques
EN300328 (v1.8.0),
EN301489-1/-17
(v2.1.1), EN300220-2 (V2.3.1), EN609501: 04/2006 / A11: 2009 / A1 : 2010 / A2 :
2011, suivant les dispositions de la
directive R&TTE 1999/5/EC, ainsi qu’avec
les exigences de la directive EMC
2004/108/CE, de la directive 2006/95/CE
relative aux appareils à basse tension et de
la directive Automobile 72/245/CEE
amendée par la directive 2009/19/CE.
Le présent appareil est conforme aux CNR
d'Industrie Canada applicables aux
appareils radio exempts de licence.
L'exploitation est autorisée aux deux
conditions suivantes : (1) l'appareil ne doit
pas produire de brouillage, et (2)
l'utilisateur de l'appareil doit accepter tout
brouillage radioélectrique subi, même si le
brouillage
est
susceptible
d'en
compromettre le fonctionnement.
Cet appareil est conforme aux limites
d’exposition au rayonnement RF stipulées
par la FCC et l’IC pour une utilisation dans
un environnement non contrôlé. Les
antennes utilisées pour cet émetteur
doivent être installées et doivent
fonctionner à au moins 20 cm de distance
des utilisateurs et ne doivent pas être
placées près d’autres antennes ou
émetteurs ou fonctionner avec ceux-ci.
Les installateurs doivent s’assurer qu’une
distance de 20 cm sépare l’appareil (à
l’exception du combiné) des utilisateurs.
Parrot S.A.
RCS Paris 394 149 496
Copyright © 2012 Parrot. Tous droits
réservés
Français
53
54
Guía de utilización
rápida
Antes de comenzar
A propósito de este manual
Índice
Antes de comenzar
Instalación
Primera utilización
Teléfono
Música
Internet
En caso de problema
Información general
p.55
p.56
p.62
p.64
p.65
p.68
p.70
p.72
Con el fin de limitar nuestro consumo de
papel y como parte de nuestra actuación lo
más responsable y respetuosa posible con
el medio ambiente, Parrot prefiere poner
en línea los documentos para los usuarios
en lugar de imprimirlos.
Este manual simplificado del Parrot
ASTEROID Mini se limita por tanto a
aportarle las principales instrucciones que
le permitirán utilizar el aparato con
facilidad. Podrá encontrar más información
en la sección Apoyo al cliente de nuestra
página web www.parrot.com: manual
Español
55
completo,
preguntas
softwares didácticos...
frecuentes,
esta advertencia.
Actualización
Nota: En este manual, se utiliza el término
"iPod" para denominar tanto a iPod® como
a iPhone®.
Advertencia
Las funciones que requieran una atención
prolongada se deben utilizar únicamente
cuando detenido. Su seguridad y la de las
demás personas que circulan por la
carretera es más importante que las
llamadas telefónicas, la música o que las
instrucciones del GPS. Sea responsable:
conduzca con prudencia y preste atención
a su entorno. Parrot no asumirá ninguna
responsabilidad si usted opta por ignorar
56
Español
Descargue gratis la última actualización del
producto en nuestra página web
www.parrot.com, sección Apoyo al
cliente. Las actualizaciones le permitirán
disfrutar de nuevas funciones y mejorar la
compatibilidad del producto.
Instalación
Nota: Le recomendamos que acuda a un
profesional para realizar esta instalación,
especialmente a alguno de nuestra red de
instaladores certificados.
Antes de comenzar
La instalación del Parrot ASTEROID Mini
consiste en su instalación entre la radio y
el vehículo.
Nota: Los cables incluidos con el Parrot
ASTEROID Mini van equipados con
conectores ISO. Si la radio no viniera
equipada con conectores ISO, deberá
comprar un cable adaptador ISO para
facilitar el montaje. Consulte la sección
Compatibilidad de vehículos en la página
de soporte del Parrot ASTEROID Mini para
comprobar si necesita un cable adaptador.
Empiece retirando la radio del vehículo. Se
pueden necesitar llaves de extracción para
realizar esta operación.
Consulte el esquema eléctrico
cableado de la radio del vehículo.
de
Antes de instalar los distintos elementos
del Parrot ASTEROID Mini, revise la
longitudes de los cables para comprobar
que se han elegido de manera que las
longitudes de los cables sean suficientes
para conectar las distintas piezas entre sí.
Cerciórese de que los cables del Parrot
ASTEROID Mini no quedan doblados o
pinzados tras la instalación.
Utilice obligatoriamente el cable ISO
suministrado con el Parrot ASTEROID
Mini.
Las indicaciones "Conexión #" en las
secciones siguientes corresponden a las
conexiones
representadas
en
los
esquemas de la p.6 / 7.
Conexión del cable de audio
Conecte el mazo de cables de audio del
vehículo a los conectores del Parrot
ASTEROID Mini (Conexiones 1A y 2).
Si el vehículo tiene un sistema de audio
con amplificador, utilice las salidas Jack
Line Out Front y Line Out Rear de la caja
electrónica para evitar problemas de
saturación (chasquido en los altavoces,
soplo permanente, etc.). Conecte estas
salidas Line Out a su sistema de audio
utilizando uno o dos cables jack para
conectar el Parrot ASTEROID Mini a su
sistema de audio (Conexión 1B en el
esquema de la p.7).
Conexión del cable de alimentación
1. Desconecte la batería antes de instalar
el cable de alimentación.
2. Conecte el conector ISO macho del
Parrot ASTEROID Mini a la radio
(conexión 3).
3. Conecte
el
mazo
de
cables
Español
de
57
alimentación del vehículo al conector
ISO hembra del Parrot ASTEROID Mini
(conexión 4).
El cable rojo del cable debe estar
conectado a los +12V permanentes, el
cable naranja a los 12V después del
contacto y el cable negro a masa.
Compruebe que el cable naranja esté
conectado a bajo contacto/llave. De lo
contrario, podría descargar la batería del
coche.
Nota: Para proceder a la verificación de la
instalación, conecte primero la pantalla sin
insertarla en el salpicadero. Consulte la
sección Comprobar la instalación para más
información.
58
Español
Algunos vehículos no tienen toma de +12V
después de contacto en los conectores del
vehículo. En estos casos, se debe conectar
el cable de alimentación naranja a la caja de
fusibles o a otra fuente de alimentación
después de contacto.
Conexión del cable Mute
La función Mute permite interrumpir el
sonido de la radio para dejar paso al sonido
del Parrot ASTEROID Mini (música,
comunicaciones, etc.). La elección de la
entrada Mute (Mute in 1, mute in 2 o mute
in 3) depende de la configuración de la
radio. Localice la entrada Mute y conéctela
al cable amarillo libre en el cable ISO
(conexión 5).
Instalación de la caja electrónica
Evite instalar la caja cerca de la calefacción
o de la climatización o en un lugar
expuesto al sol.
Asegúrese de que la caja queda inmóvil
tras su instalación. Procure dejar espacio
libre alrededor del disipador del producto
para facilitar la evacuación del calor.
Una vez instalada la caja electrónica, no
ejerza fuerza al volver a montar la radio en
su sitio. Si no hay suficiente espacio detrás
de la radio, la alternativa puede ser
desmontar la guantera.
Atención: No toque la centralita mientras
se encuentra en funcionamiento. La
temperatura de la superficie puede ser alta.
Comprobar la instalación
Instalación del micrófono
Encienda y corte el contacto del vehículo
una vez que el Parrot ASTEROID Mini esté
instalado: el mensaje "Adiós" debe
aparecer en la pantalla.
Se aconseja pasar el cable por la canaleta
que está por detrás de la junta de la
puerta.
Si no ocurre esto, deberá invertir las
posiciones del cable rojo y el naranja. El
cable rojo de la alimentación debe estar
conectado a los 12V permanentes, el cable
naranja a los 12V después del contacto y el
cable negro a masa. Esta operación se
realiza fácilmente invirtiendo los dos
terminales del cableado Parrot (conexión
7).
Si el cable pasa por encima de los pedales,
asegúrese de que quede bien sujeto.
Advertencia: No pase el cable del micrófono
por los sistemas de calefacción, ventilación
o climatización o por delante de los airbags
laterales.
Asegúrese de que el micrófono quede
colocado lo más cerca posible de la cabeza
del usuario. La distancia ideal es de 60 cm.
Instale el micrófono preferentemente
cerca del retrovisor interior.
Oriente el micrófono hacia la boca del
usuario.
Instalación del dongle GPS
Instale la mochila GPS en una superficie
plana, en una zona libre de obstáculos en
el interior del habitáculo.
Los parabrisas térmicos y las lunas con
antena integrada pueden interferir con la
recepción GPS y reducir la fiabilidad de los
datos relacionados con las aplicaciones de
navegación.
La antena GPS de la mochila se
encuentra del lado en el que se
puede leer "Parrot ASTEROID
GPS" y donde figura el logo en
Español
59
forma de estrella. Este logo
siempre
debe
quedar
orientado hacia el cielo.
Si su vehículo dispone de parabrisas
atérmico, instale la mochila GPS en el
parabrisas, a la altura de la zona no
atérmica. El lado en el que figura el logo en
forma de estrella debe pegarse en el
parabrisas (esquema B p.9).
Nota: La zona no atérmica del parabrisas
puede variar según el modelo de vehículo.
Normalmente suele estar a la altura del
retrovisor.
Si su vehículo no dispone de parabrisas
atérmico, instale la mochila GPS en el
cuadro de mandos. El lado en el que figura
60
Español
el logo en forma de estrella debe quedar
visible (esquema A p.8).
Para garantizar una buena fijación del
soporte:
limpie la superficie de montaje antes
de pegar el soporte;
tras la fijación del soporte, espere
unas dos horas sin manipularlo.
guantera. Para ello, puede ser necesario
hacer un agujero dentro del salpicadero.
Evite utilizar alargadores USB siempre que
sea posible.
Para garantizar una calidad de recepción
óptima, no conecte su pendrive 3G
directamente al Parrot ASTEROID Mini,
utilice un cable USB para instalar el
accesorio en el salpicadero (u otra zona
despejada).
Installation de los cables USB
Conecte los cables USB al Parrot
ASTEROID Mini. Le recomendamos que
conecte todos los cables del Parrot
ASTEROID Mini, aunque no haya previsto
utilizarlos. Haga salir los conectores
correspondientes de la bandeja o de la
Instalación de la pantalla
Advertencia: Evite realizar una instalación
que pueda obstaculizar el uso de los
mandos importantes o pueda reducir la
visibilidad del conductor. No instale la
pantalla donde pueda ser propulsada por
la apertura de un airbag o cerca de una
boca de aireación o de aire acondicionado
del vehículo.
Pegue el soporte de plástico en el cuadro
de mandos (esquema C p.10).
Para garantizar una buena fijación del
soporte:
limpie la superficie de montaje antes
de pegar el soporte;
tras la fijación del soporte, espere
unas dos horas sin manipularlo.
Para evitar riesgos de robo y de exposición
prolongada al sol, no olvide retirar la
pantalla al abandonar el vehículo.
Instalación del mando a distancia
Pegue el soporte del mando a distancia en
el cuadro de mandos utilizando el adhesivo
situado en la cara inferior del mismo.
Para garantizar una buena fijación del
soporte:
limpie la superficie de montaje antes
de pegar el soporte;
tras la fijación del soporte, espere
unas dos horas sin manipularlo.
El mando a distancia puede funcionar con
dos tipos de alimentación: con una pila o
conectándolo a la caja electrónica.
Para hacer funcionar el mando con pila
(esquema D p.11) :
1. Retire la pieza de plástico circular en
la cara posterior del mando a distancia
girándola en sentido de las agujas de
un reloj.
2. Introduzca una pila de tipo 3V CR2032
en el alojamiento previsto para ello.
Asegúrese de que la pila está
correctamente orientada.
3. Vuelva a colocar la pieza de plástico
circular haciéndola girar en sentido
contrario al de las agujas de un reloj.
Para conectar el mando a distancia a la caja
electrónica (esquema D p.11) :
1. Retire la pieza de plástico circular en
la cara posterior del mando a distancia
girándola en sentido de las agujas de
Español
61
un reloj.
2. Conecte el cable en la zona prevista
para el alojamiento de la pila y gírelo
en sentido contrario al de las agujas
de un reloj.
3. Conecte el otro extremo del cable a la
caja electrónica, junto a los
conectores USB (esquema p.6).
Primera utilización
navegando en los menús, pulse el botón
SRC para volver al lector.
Navegar en los menús
Pulse el botón durante 2 segundos para
visualizar las últimas 6 aplicaciones
utilizadas o en uso actual.
Pulse el botón
principal.
para acceder al menú
Navegue en los menús girando la rueda y
valide pulsando el botón central del Parrot.
Para volver al menú anterior, pulse el
botón .
Pulse el botón
para acceder al menú de
contexto, correspondiente a la aplicación
que se está utilizando.
Mientras se está leyendo un archivo de
música, pulse el botón
para volver al
menú. Al contrario, cuando esté
62
Español
Pulse el botón SRC para seleccionar la
fuente de procedencia de los archivos de
audio.
Conectar un teléfono móvil
Nota:
Consulte
la
página
de
compatibilidad de nuestra página web
para verificar si su teléfono es compatible
con el Parrot ASTEROID Mini y consultar el
procedimiento
de
emparejamiento
correspondiente:
www.parrot.com/es/
compatibility.
Si es la primera vez que utiliza el teléfono
con el Parrot ASTEROID Mini, primero
deberá emparejar ambos aparatos. Una vez
emparejado el teléfono con el Parrot
ASTEROID Mini, la conexión entre los dos
aparatos será automática en cuanto los dos
aparatos estén encendidos y a proximidad
con la función B luetooth activada.
1. Desde su teléfono, inicie una
búsqueda de periféricos B luetooth® a
continuación,
seleccione "Parrot
ASTEROID Mini".
2. El procedimiento de enlace depende
del modelo de teléfono:
- Si el teléfono le solicita el código
PIN B luetooth, introduzca «0000».
- Si el Parrot ASTEROID Mini y el
teléfono muestran dos códigos,
compruebe si los códigos son
idénticos y confirme o invalide.
> La pantalla del Parrot ASTEROID
Mini indicará “teléfono enlazado".
Nota: En algunos teléfonos, deberá
autorizar la conexión al Parrot ASTEROID
Mini para permitir la conexión automática.
Consulte la guía de usuario de su teléfono
para más información.
Sincronizar la agenda del teléfono
Con la mayoría de teléfonos Bluetooth, la
agenda se sincroniza automáticamente en
la memoria del sistema. Cada vez que
modifique su agenda, la sincronización se
reiniciará automáticamente en la siguiente
conexión.
Advertencia: Sólo se sincronizan los
contactos guardados en la memoria del
teléfono. Si los contactos están guardados
en la memoria de la tarjeta SIM, deberá
transferirlos a la memoria del teléfono.
Consulte la guía de usuario de su teléfono
para más información.
Nota: En algunos teléfonos, deberá
autorizar la conexión al Parrot ASTEROID
Mini para permitir la conexión automática.
Consulte la guía de usuario de su teléfono
para más información.
La sincronización automática está limitada
a 5.000 contactos (o números de
Español
63
teléfono) por cada teléfono emparejado.
Teléfono
Recibir una llamada
La llamada entrante se anuncia con una
melodía. Se anuncia el nombre del
contacto si el número de ese contacto está
guardado en la agenda del teléfono
conectado al Parrot ASTEROID Mini.
Para aceptar la llamada, pulse el
botón
del mando a distancia o el
botón verde que aparece en la
pantalla. A continuación, pulse el
botón
del mando a distancia o el
botón rojo de la pantalla para finalizar
la llamada.
Para rechazar la llamada, pulse el
64
Español
botón
del mando a distancia o el
botón rojo que aparece en la pantalla.
Hacer una llamada por reconocimiento de voz
Puede
hacer
una
llamada
por
reconocimiento de voz directamente
después de sincronizar la agenda del
teléfono. El Parrot ASTEROID Mini
reconocerá automáticamente el contacto
de su agenda al que desea llamar.
para iniciar el
1. Pulse el botón
proceso de reconocimiento de voz.
> El Parrot ASTEROID Mini le pedirá
el nombre del contacto al que desea
llamar.
2. Diga el nombre del contacto seguido
del tipo de número (“OFICINA”,
“MÓVIL”…) si el contacto tiene
varios números.
> La llamada a ese contacto se hará
automáticamente si la instrucción de
voz ha sido comprendida.
> En caso contrario, el sistema manos
libres emitirá un mensaje de
confirmación. Confirme diciendo
“SÍ”, “LLAMA” o “LLAMAR”.
Nota: En cualquier momento, puede pulsar
el botón
del mando a distancia para
anular el procedimiento de llamada.
Música
Utilización del reconocimiento de voz
El reconocimiento de voz y la función de
reconocimiento de voz musical le permite
seleccionar los artistas o los álbumes que
desea escuchar. Esta función se encuentra
disponible cuando utiliza el Parrot
ASTEROID Mini con un periférico tipo
iPod/USB/SD, o si utiliza una aplicación
musical compatible con esta función.
1. Pulse el botón
distancia.
> La lista de fuentes de audio
conectadas al Parrot ASTEROID Mini
y de aplicaciones de música
compatibles con la función de
reconocimiento de voz que contienen
el artista/álbum elegido se muestran
en pantalla.
Nota : Compruebe los nombres de los
artistas y álbumes en las etiquetas
(metadatos) de sus archivos de música. Ésta
puede diferir de lo que se muestra en el
título de la canción.
del mando a
2. Pronuncie el nombre del artista o del
álbum que desea escuchar cuando el
Parrot ASTEROID Mini se lo indique.
iPod
1. Coecte el iPod al cable iPod.
2. pulse la tecla SRC hasta seleccionar
Español
65
iPod.
3. Seleccione uno de los criterios de
ordenación (artista, álbum, canción,
género, lista de reproducción) y pulse
la rueda de selección.
4. Seleccione la canción y pulse la rueda
de selección.
Nota: Pulse el botón
y seleccione la
primera letra de su artista, álbum o
canción para navegar más fácilmente por
el contenido de su iPod.
USB
El Parrot ASTEROID Mini es compatible
con la mayoría de memorias USB/
reproductores de MP3/discos duros
66
Español
externos.
No existe ninguna restricción de capacidad
de las memorias USB.
Los archivos de música de la memoria USB
pueden estar en formato MP3 (mpeg1
layer3), AAC, WAV, OGG o WMA.
1. Conecte su dispositivo USB al cable
USB.
la rueda de selección.
Nota: Pulse el botón
y seleccione la
primera letra del artista, álbum o canción
para navegar más fácilmente por el
contenido del periférico USB.
Tarjeta SD
3. Pulse sobre la canción para iniciar la
reproducción.
Se pueden utilizar las siguientes tarjetas
SD (con adaptador según los casos) con el
Parrot ASTEROID Mini : SD, micro SD,
mini SD, SDHC, mini SDHC, micro SDHC.
La capacidad de la tarjeta SD no debe
superar los 32 Gb.
4. Seleccione uno de los criterios de
ordenación (artista, álbum, canción,
género, lista de reproducción) y pulse
Los archivos de música de su tarjeta SD
pueden estar en formato MP3 (mpeg1
layer3), AAC, WAV, OGG o WMA.
2. Pulse el botón SRC del mando a
distancia y seleccione USB.
1. Inserte la tarjeta SD en el alojamiento
previsto para ello situado (esquema E
p.12).
2. Pulse el botón SRC y seleccione SD.
También puede pulsar en Explorar
para navegar por el contenido de su
tarjeta SD.
3. Seleccione uno de los criterios de
ordenación (artista, álbum, canción,
género, lista de reproducción) y pulse
la rueda de selección.
4. Pulse sobre la canción para iniciar la
reproducción.
Nota: Pulse el botón
y seleccione la
primera letra del artista, álbum o canción
para navegar más fácilmente por el
contenido de su tarjeta SD.
Utilización con un lector de audio Bluetooth
Nota: El Parrot ASTEROID Mini le permite
utilizar la función de telefonía y flujo de
audio vía Bluetooth con dos teléfonos
distintos, sin tener que desconectar uno de
los dos aparatos.
está acoplado al Parrot ASTEROID Mini:
1. Pulse el botón SRC hasta seleccionar
Bluetooth Audio.
2. Inicie la lectura de una canción en su
lector de audio.
Puede utilizar el Parrot ASTEROID Mini
para escuchar archivos de música
guardados en un lector de audio Bluetooth
si éste soporta el perfil A2DP (Advanced
Audio Distribution Profile).
Si utiliza el lector de audio por primera
vez, primero deberá vincularlo al Parrot
ASTEROID Mini. Si el lector de audio ya
Español
67
Internet
Conexión con un dispositivo 3G / 4G
Nota:
Consulte
la
sección
de
compatibilidad del Parrot ASTEROID Mini
en nuestra página web para ver la lista de
dispositivos 3G compatibles con el Parrot
ASTEROID Mini.
1. Conecte un dispositivo 3G/4G al
Parrot ASTEROID Mini a través del
cable USB.
>Aparecerá una ventana emergente
(pop-up).
2. Active la conexión 3G seleccionando
OK.
3. Utilice la rueda para introducir su
68
Español
código PIN y seleccione OK. Marque
la opción Memorizar si prefiere que
no se le pida el código PIN cada vez
que se encienda el Parrot ASTEROID
Mini.
Nota: Más adelante, podrá modificar este
ajuste seleccionando Ajustes > Inalámbrico
y redes > Ajustes de redes móviles.
4. Seleccione su APN (Access Point
Name) en la lista que aparece. Esta
información se encuentra disponible
en la documentación facilitada con su
dispositivo 3G. Si su APN no figura en
la lista, puede añadirlo seleccionando
Parámetros > Red > Dispositivo 3G >
Configuración > Punto de acceso
personalizado > Nuevo punto de
acceso.
> Aparece el mensaje "Dispositivo 3G
configurado".
5. Espere unos 30 segundos mientras se
establece la conexión. También
puede pulsar el botón y navegar por
los menús mientras se establece la
conexión.
Conexión vía Bluetooth
Si su teléfono soporta el perfil B luetooth
DUN (Dial-Up Networking) o PAN
(Personal Area Network), la conexión vía
B luetooth del teléfono con el Parrot
ASTEROID Mini le permitirá compartir la
conexión 3G del teléfono.
Nota:
Consulte
la
sección
de
compatibilidad del Parrot ASTEROID Mini
en nuestra página web para ver la lista de
dispositivos 3G compatibles con el Parrot
ASTEROID Mini.
1. Autorice compartir la conexión en su
teléfono. Este procedimiento puede
diferir según el modelo de móvil.
2. Conecte el teléfono al Parrot
ASTEROID Mini vía B luetooth.
3. En el Parrot ASTEROID Mini,
seleccione Parámetros > Red >
Bluetooth > Configuración.
4. Seleccione su APN (Access Point
Name) en la lista que aparece y
marque la opción Seleccionar.
5. Pulse el botón
Conectar.
y seleccione
6. Autorice la conexión compartida en
su teléfono. Este procedimiento
puede variar según el modelo de
teléfono.
Compartir una conexión 3G vía USB
Nota:
Consulte
la
página
de
compatibilidad en nuestra web para
comprobar si su teléfono permite compartir
la conexión 3G vía USB y consultar el
procedimiento
correspondiente:
www.parrot.com/es/compatibility.
después
conéctelo
al
Parrot
ASTEROID Mini utilizando un cable
USB/micro-USB.
Esta
conexión
también permite recargar la batería
del teléfono.
2. Seleccione su APN (Access Point
Name) en la lista que aparece y
marque la opción Seleccionar. Más
adelante, podrá modificar este ajuste
seleccionando Parámetros > Red >
USB.
> Aparecerá una ventana emergente
(pop-up) indicando la activación de la
conexión compartida vía USB.
1. Asegúrese de que el teclado de su
teléfono está desbloqueado y
Español
69
ASTEROID Market:Utilizar las aplicaciones
Puede utilizar varios tipos de aplicaciones
con el ASTEROID Market : música,
geolocalización, ayuda a la conducción,
navegación embarcada y puntos de interés
conectados. Las aplicaciones disponibles
son diferentes según el país de utilización.
Algunas aplicaciones pueden necesitar
una suscripción.
El Parrot ASTEROID Mini es multitarea: se
pueden utilizar varias aplicaciones a la vez.
Por ejemplo, puede escuchar una Radio
por internet mientras utiliza una aplicación
de ayuda a la conducción.
Para más información sobre la utilización y
la instalación de las aplicaciones
70
Español
disponibles, consulte la página web del
soporte del ASTEROID Market :
www.parrotasteroid.com/asteroidmarket
En caso de problema
Antes de comenzar
Asegúrese de que, al cortar el contacto de
su vehículo, aparece en la pantalla del
Parrot ASTEROID Mini el mensaje
"Adiós". Consulte la sección Comprobar la
instalación para más información.
Reinicie el aparato. Para ello, seleccione
Preferencias > Preferencias Avanzadas >
Configuración Fábrica.
Compruebe que tiene instalada en el
Parrot ASTEROID Mini la última
actualización. Para ello, seleccione
Parámetros > Acerca de > Versión.
Compare este número de versión con el
indicado en la página de soporte del Parrot
ASTEROID Mini en nuestra página web
www.parrot.com.
Función de telefonía
Compruebe la compatibilidad del teléfono
con el Parrot ASTEROID Mini. Para ello,
consulte la página de compatibilidad en
nuestra
web:
www.parrot.com/es/
compatibility.
Si su teléfono aparece como compatible y
si el Parrot ASTEROID Mini ya tiene la
última
actualización,
elimine
el
emparejamiento entre los 2 aparatos en el
Parrot ASTEROID Mini y en su teléfono,
apague y vuelva a encender los 2 aparatos y
restablezca la conexión entre los mismos.
Función música
Reinicie el iPod/iPhone antes de volverlo a
conectar al Parrot ASTEROID Mini. Para
reiniciar un iPod/iPhone (el proceso no
borrará ningún dato):
iPod: pulse simultáneamente el
Menú y el botón central hasta que se
inicie de nuevo el iPod.
ASTEROID Mini en el momento de poner
el contacto. Pruebe de nuevo conectando
el dispositivo una vez puesto el contacto.
Para más información
Consulte la página de soporte del Parrot
ASTEROID Mini en nuestra página web
www.parrot.com.
iPhone/iPod
touch:
pulse
simultáneamente el botón On/Off y
el botón Home hasta que el iPhone se
reinicie. No toque la pantalla cuando
aparezca el mensaje "Slide to
shutdown”.
Puede producirse algún problema si el
dispositivo ya está conectado al Parrot
Español
71
Información general
Garantía
Sin perjuicio de la garantía legal, el
producto tienen una garantía contractual
de 12 meses desde la fecha de compra
inicial efectuada por el usuario, que cubre
cualquier defecto de materiales y de
fabricación presentando la prueba de
compra (ticket de caja, factura) al
distribuidor. Mientras esté vigente la
garantía
contractual,
el
producto
defectuoso deberá ser devuelto en su
embalaje original al servicio posventa del
distribuidor. PARROT procederá, a su
elección, a la sustitución o la emisión de
un abono con exclusión de cualquier otra
72
Español
compensación. La garantía no cubre la
pérdida de datos, los daños causados por
accidente, un uso anormal o no autorizado
del producto o un producto que no sea
Parrot. Parrot no se responsabiliza del
almacenaje, pérdida o deterioro de los
datos durante el transporte o la
reparación.
Cualquier
producto
considerado no defectuoso será devuelto
al remitente y le serán facturados los
gastos de gestión, de comprobación y de
transporte.
Modificaciones
Las explicaciones y especificaciones
contenidas en este manual son
meramente informativas y pueden ser
modificadas sin previo aviso. Se
consideran correctas en el momento de
enviar la publicación a imprenta. Este
manual se ha redactado con el máximo
cuidado, con el fin de proporcionarle una
información precisa. Sin embargo, Parrot
no asume responsabilidad alguna por las
consecuencias derivadas de los errores u
omisiones que pueda haber en el manual,
ni por los daños o pérdidas accidentales de
datos
que
se
produzcan
como
consecuencia directa o indirecta del uso
de la información aquí contenida. Parrot se
reserva el derecho a modificar o mejorar el
diseño del producto o el manual de usuario
sin restricciones y sin la obligación de
notificárselo a los usuarios. En aras de
actualizar y mejorar nuestros productos,
es posible que el producto que usted haya
adquirido sea ligeramente distinto al
modelo que se describe en este manual.
En tal caso, tiene a su disposición una
versión más reciente de este manual en
formato electrónico en la página web de
Parrot: www.parrot.com.
Eliminación correcta de este producto
(material eléctrico y electrónico de
descarte)
La presencia de esta marca en el producto
o en el material informativo que lo
acompaña, indica que al finalizar su vida
útil no deberá eliminarse junto con otros
residuos domésticos. Para evitar los
posibles daños al medio ambiente o a la
salud humana que representa la
eliminación incontrolada de residuos,
separe este producto de otros tipos de
residuos y recíclelo correctamente para
promover la reutilización sostenible de
recursos materiales. Los
usuarios
particulares pueden contactar con el
establecimiento donde adquirieron el
producto, o con las autoridades locales
pertinentes, para informarse sobre cómo y
dónde pueden llevarlo para que sea
sometido a un reciclaje ecológico y seguro.
Los usuarios
comerciales
pueden
contactar con su proveedor y consultar las
condiciones del contrato de compra. Este
producto no debe eliminarse mezclado
con otros residuos comerciales.
Marcas registradas
Parrot y el logotipo Parrot son marcas
registradas de PARROT SA en Francia y en
otros países.
El nombre y el logo B luetooth son marcas
registradas de Bluetooth ® SIG, Inc. y
Parrot S.A. utiliza estos últimos bajo
licencia.
“Made for iPod / iPhone” significa que un
aparato electrónico fue especialmente
diseñado para conectarse a un iPod o un
iPhone, respectivamente, y fue certificado
por un desarrollador con el fin de
satisfacer los resultados estándares de
Español
73
Apple. Apple no es responsable del
funcionamiento de este dispositivo o de
su conformidad con las normas de
seguridad y regulatorios.
iPod y iPhone son marcas de Apple, Inc.
registradas en Estados Unidos y en otros
países.
Gracenote®, el logo y el logotipo
Gracenote, y el logo "Powered
Gracenote" son marcas registradas
marcas comerciales de Gracenote, Inc.
Estados Unidos y/o en otros países.
de
by
o
en
Todas las demás marcas comerciales y
marcas registradas citadas en el presente
documento están protegidas por Copyright
y son propiedad de sus respectivos
propietarios.
74
Español
Copyrights
Identification N. 394 149 496 R.C.S. PARIS
Parrot S.A.
Copyright © 2012 Parrot.
Bedienungsanleitung
Bevor Sie beginnen
Inhalt
Bevor Sie beginnen
Installation
Erste Nutzung
Telefon
Musik
Internet
Bei Problemen
Allgemeine Hinweise
p.75
p.77
p.83
p.85
p.86
p.88
p.91
p.93
Zu diesem Leitfaden
Wir wollen unseren Papierverbrauch
einschränken
und
so
verantwortungsbewusst
und
umweltfreundlich wie möglich handeln.
Daher zieht Parrot es vor, Dokumente für
die
Benutzer
im
Internet
zu
veröffentlichen,anstatt sie auszudrucken.
Diese vereinfachte Anleitung des Parrot
ASTEROID Mini beschränkt sich daher auf
die wichtigsten Anweisungen, damit Sie
dieses Gerät leicht benutzen können.
Weitere Angaben finden Sie im Bereich
Support
auf
unserer
Website
www.parrot.com: Vollständige Anleitung,
Deutsch
75
häufige Fragen, Lernsoftware...
Hinweis: Aus Gründen der besseren
Leserlichkeit werden der iPod® und das
iPhone® (im Musikmodus) in dieser
Anleitung
als
„iPod“
bezeichnet.
Kompatible Telefone oder Tablet-Computer
werden als „Smartphone“ bezeichnet.
und achten Sie auf Ihre Umgebung. Parrot
übernimmt keinerlei Haftung, falls Sie
beschließen,
diese
Warnung
zu
ignorieren.
Nutzen Sie den Parrot ASTEROID Mini in
einer vernünftigen Lautstärke, so dass Sie
jederzeit während der Fahrt auch noch
Außengeräusche wahrnehmen können.
Warnhinweise
Funktionen, die Ihre Aufmerksamkeit für
längere Zeit in Anspruch nehmen, dürfen
nur bei stehendem Fahrzeug ausgeführt
werden. Ihre eigene Sicherheit und die der
anderen Verkehrsteilnehmer hat Vorrang
vor
Telefonanrufen,
Musik
oder
Anwendungen zur Fahrhilfe. Seien Sie
verantwortungsvoll: Fahren Sie vorsichtig
76
Deutsch
Update der Software
Das letzte Update Ihres Parrot ASTEROID
Mini können Sie kostenlos von unserer
Website www.parrot.com aus dem
Bereich Support herunter laden (und sich
gleichzeitig über das Update-Verfahren
informieren). Dank dieser Updates
können Sie neue Funktionen nutzen und
die Kompatibilität des Parrot ASTEROID
Mini verbessern.
Sie können Aktualisierungen auch
herunterladen
wenn
das
Parrot
ASTEROID Mini mit dem Internet
verbunden ist. Die Verfügbarkeit wird in
der Informationsleiste angezeigt.
Installation
Hinweis: Wir empfehlen, sich für die
Installation an einen Fachmann zu wenden,
insbesondere an eine Person aus dem Netz
der zugelassenen Installateure.
Vorbemerkung
Bei der Installation des Parrot ASTEROID
Mini muss das Gerät zwischen dem
Autoradio
und
dem
Fahrzeug
angeschlossen werden.
Hinweis: Die mit dem Parrot ASTEROID Mini
mitgelieferten Kabel sind mit ISO-Steckern
versehen. Sollte Ihr Autoradio über keine
ISO-Stecker verfügen, müssen Sie sich für die
Montage ein ISO-Adapterkabel besorgen.
Schauen Sie auf der Support-Seite unter
"Kompatibilität Fahrzeuge" des Parrot
ASTEROID Mini , um die Notwendigkeit eines
Adapterkabels zu überprüfen.
Entfernen Sie zuerst das OriginalAutoradio aus Ihrem Fahrzeug. Dieser
Vorgang kann die Verwendung von
Ausbauschlüsseln erfordern.
Ziehen Sie den
Autoradios zu Rate.
Schaltplan
Ihres
Vor dem Befestigen der verschiedenen
Bauteile des Parrot ASTEROID Mini im
Fahrgastraum,
schließen
Sie
die
verschiedenen
Kabel
an
das
Elektronikgehäuse
an.
Vor
dem
endgültigen Anschluss der Bauteile bitte
die
Kabellänge
kontrollieren
und
überprüfen, dass die Einbauorte so
gewählt wurden, dass die Kabellänge zur
Verbindung der Einzelteile untereinander
ausreichend ist. Überprüfen Sie, dass die
Kabel des Parrot ASTEROID Mini nach der
Montage weder geknickt noch gequetscht
werden.
Verwenden Sie unbedingt das mit dem
Parrot ASTEROID Mini mitgelieferte ISOKabel.
Die Angaben "Verbindung #" in den
nächsten Abschnitten entsprechen den
abgebildeten Verbindungen in der
Abbildung auf S.6 / 7.
Deutsch
77
Anschluss des Audio-Kabels
Die Audio-Kabelbündel des Fahrzeugs an
die Stecker des Parrot ASTEROID Mini
anschließen (Verbindungen 1A und 2).
Wenn Ihr Fahrzeug mit einem AudioSystem mit Verstärker ausgestattet ist,
verwenden Sie die Jack Line Out Front
und Line Out Rear-Ausgänge des
Elektronikgehäuses,
um
Sättigungsprobleme
(Knacken
der
Lautsprecher, permanentes Rauschen) zu
vermeiden. Verbinden Sie diese Line OutAusgänge mit Ihrem Audio-System mit
einem oder zwei Jack-Kabeln, um den
Parrot ASTEROID Mini mit Ihrem AudioSystem (Verbindung 1B in der Abbildung
S.7) zu verbinden.
78
Deutsch
Anschließen des Netzkabels
1. Die Batterie vor der Installation des
Stromkabels abklemmen.
ISO-Stecker
des
Parrot
2. Den
ASTEROID Mini an das Autoradio
anschließen (Verbindung 3).
Kabelbündel
für
die
3. Die
Spannungsversorgung des Fahrzeugs
mit der ISO Buchse des Parrot
ASTEROID
Mini
verbinden
(Verbindung 4).
Die rote Kabelader muss der +12VDauerstromversorgung,
die
orangenfarbige Ader der 12V-Versorgung
über Zündung und die schwarze Ader der
Masse entsprechen. Überprüfen Sie, dass
die orangenfarbige Kabelader nicht an die
12V Dauerstromversorgung angeschlossen
ist. Sonst besteht die Gefahr, die
Fahrzeugbatterie zu entladen.
Hinweis: Zur Überprüfung des Einbaus
zunächst das Display anschließen, ohne es
auf dem Armaturenbrett zu befestigen.
Weitere Angaben enthält der Abschnitt
"Prüfung der Installation".
An bestimmten Fahrzeugen gibt es an den
Steckern des Fahrzeugs keinen +12 VAnschluss über Zündung. In diesem Fall
muss die orangenfarbige Ader an den
Sicherungskasten oder an eine andere
Spannungsquelle
über
Zündung
angeschlossen werden.
Anschluss des Mute-Kabels
Mit der Mute-Funktion können Sie den
Ton Ihres Autoradios für den Ton des
Parrot ASTEROID Mini unterbrechen
(Musik, Gespräche usw.). Die Wahl des
Mute-Eingangs (Mute in 1, Mute in 2 oder
Mute in 3) hängt von der Konfiguration
Ihres Autoradios ab. Suchen Sie den
Mute-Eingang und schließen Sie ihn an die
freie gelbe Kabelader des ISO-Kabels an
(Verbindung 5).
Montage des Elektronikgehäuses
Vermeiden Sie es, das Gehäuse neben der
Heizung, der Klimaanlage oder an einem
der Sonne
ausgesetzten Ort zu
installieren.
Überprüfen Sie, ob das Gehäuse nach
dem Einbau fest sitzt. Achten Sie darauf,
dass um den Kühlkörper herum genügend
Platz ist, damit die Wärme besser
abgeleitet werden kann.
Bitte vorsichtig den Wiedereinbau des
Autoradios durchführen und nicht
gewaltsam vorgehen. Wenn hinter dem
Autoradio nicht genügend Platz für die
Elektronikbox vorhanden sein sollten,
dann kann auch ein Einbau in das
Handschuhfach in Betracht gezogen
werden.
Prüfung der Anlage
Dazu nach dem Einbau des Parrot
ASTEROID Mini die Zündung des
Fahrzeugs einschalten und anschließend
ausschalten: Die Mitteilung " Auf
Wiedersehen " muss im Display
erscheinen.
Ist das nicht der Fall, müssen die
Anschlüsse
der
roten
und
der
orangefarbenen Kabelader vertauscht
werden. Die rote Ader des Stromkabels
muss mit dem 12 V Dauerstrom, die
orangefarbene mit den 12 V über die
Zündung und die schwarze mit der Masse
verbunden werden. Dazu brauchen nur die
beiden
Kabelschuhe
der
ParrotVerkabelung vertauscht zu werden
Deutsch
79
(Verbindung 7).
Installation des Doppel-Mikrofons
Wir empfehlen, das Kabel entlang der
Vertiefung der Türdichtung zu führen.
Wenn das Kabel oberhalb der Pedalen
verläuft, darauf achten, dass es richtig
befestigt ist.
Hinweis: Das Mikrofonkabel darf nicht in
der
Heizungs-,
Belüftungsoder
Klimaanlage oder vor den seitlichen
Airbags verlaufen.
Achten Sie darauf, dass das Mikrofon so
nah wie möglich in der Nähe des Kopfes
des Benutzers installiert ist. Die ideale
Entfernung beträgt 60 cm. Das Mikrofon
80
Deutsch
wird am Besten in der Nähe des
Rückspiegels im Innenraum angebracht.
Das Mikrofon auf den
Benutzers ausrichten.
Mund
des
Installation des GPS-Dongle
Befestigen Sie den GPS-Dongle im
Inneren der Fahrgastzelle auf einer
ebenen Oberfläche in einem Bereich ohne
Hindernisse.
Die athermischen Windschutzscheiben
und Fensterscheiben, mit integrierter
Antenne, können mit dem GPS-Empfang
interferieren und die Zuverlässigkeit, der
mit
den
Navigationsanwendungen
verbundenen
Informationen,
beeinträchtigen.
Die
GPS-Antenne
des
Empfängers befindet sich auf
der
Seite,
wo
"Parrot
ASTEROID GPS" steht und
sich das sternförmige Logo
befindet. Dieses Logo muss
immer zum Himmel zeigen.
Wenn Ihr Fahrzeug eine athermische
Windschutzscheibe hat, befestigen Sie
den GPS-Dongle auf der Höhe des nichtathermischen
Bereichs
an
der
Windschutzscheibe. Die Seite, auf der
sich das sternförmige Logo befindet, muss
auf die Windschutzscheibe geklebt
werden (Abbildung B S.9).
Hinweis: Wo sich der nicht-athermische
Bereich der Windschutzscheibe befindet,
hängt vom Modell Ihres Fahrzeugs ab. Er
befindet sich im Allgemeinen auf der Höhe
des Rückspiegels.
Wenn Ihr Fahrzeug keine athermische
Windschutzscheibe hat, befestigen Sie
den GPS-Dongle am Armaturenbrett. Die
Seite, auf der sich das sternförmige Logo
befindet, muss sichtbar sein (Abbildung A
S.8).
Für die ordnungsgemäße Befestigung der
Halterung wie folgt vorgehen:
Die
Montagefläche
vor
dem
Aufkleben der Halterung reinigen.
Nach der Befestigung der Halterung
ca. 2 Stunden warten.
Anbrigen die USB-Kabel
Montage des Displays
Schließen Sie die iPod®- und USB-Kabel
den Parrot ASTEROID Mini an. Wir
empfehlen, alle Kabel des Parrot
ASTEROID Mini anzuschließen, auch
wenn Sie nicht unbedingt planen, sie zu
verwenden.
Führen
Sie
die
entsprechenden Steckverbindungen über
das Ablage- oder Handschuhfach heraus.
Achtung: Installieren Sie das Gerät nicht so,
dass die Nutzung wichtiger Befehle oder die
Sicht des Fahrers beeinträchtigt werden.
Installieren Sie das Display nicht dort, wo es
beim
Auslösen
eines
Airbags
weggeschleudert werden könnte, und auch
nicht in der Nähe eines Lüftungsausgangs
des Fahrzeugs.
Um eine optimale Empfangsqualität zu
gewährleisten, schließen Sie Ihren 3GStick oder GPS-Dongle nicht direkt an den
Parrot ASTEROID Mini an: Verbinden Sie
das Zubehör mit einem USB-Kabel am
Armaturenbrett (oder einer anderen
übersichtlichen Stelle).
Kleben Sie die Kunststoffhalterung auf Ihr
Armaturenbrett (Schema C S.10).
Für die ordnungsgemäße Befestigung der
Halterung wie folgt vorgehen:
Die
Montagefläche
vor
dem
Aufkleben der Halterung reinigen.
Deutsch
81
Nach der Befestigung der Halterung
ca. 2 Stunden warten.
Nach der Befestigung der Halterung
ca. 2 Stunden warten.
Um
Diebstahl
und
längerer
Sonnenexposition
vorzubeugen,
empfehlen wir, das Display abzunehmen,
wenn Sie das Fahrzeug verlassen.
Die Fernbedienung kann entweder mit
Batterien betrieben oder mit dem
Elektronikgehäuse verbunden werden.
Installation der Fernbedienung
Kleben Sie die Halterung für die
Fernbedienung mithilfe des auf der
Rückseite der Halterung angebrachten
Klebebands auf Ihr Armaturenbrett.
Für die ordnungsgemäße Befestigung der
Halterung wie folgt vorgehen:
Die
Montagefläche
vor
dem
Aufkleben der Halterung reinigen.
82
Deutsch
Batteriebetrieb (Schema D S.11) :
Sie
den
runden
1. Drehen
Kunststoffverschluss
auf
der
Hinterseite der Fernbedienung im
Uhrzeigersinn, um ihn zu lösen.
2. Legen Sie eine Batterie 3V CR2032 in
das dafür vorgesehene Fach ein.
Vergewissern Sie sich, dass die
Batterie richtig eingelegt ist.
Sie
den
runden
3. Setzen
Kunststoffverschluss wieder
an
seinen Platz und drehen Sie ihn gegen
den
Uhrzeigersinn,
um
das
Batteriefach zu verschließen.
Anschluss an das
(Schema D S.11) :
Elektronikgehäuse
Sie
den
runden
1. Drehen
Kunststoffverschluss
auf
der
Hinterseite der Fernbedienung im
Uhrzeigersinn, um ihn zu lösen.
2. Schließen Sie das Kabel im
Batteriefach an und drehen Sie es
gegen den Uhrzeigersinn.
3. Schließen Sie das andere Ende des
Kabels an das Elektronikgehäuse
neben den USB-Anschlüssen an
(Schema S.6).
zurückzukehren. Umgekehrt gelangen Sie
bei der Menü-Navigation durch Drücken
der Taste „SOURCE“ zurück zum AbspielLaufwerk.
Erste Nutzung
Menü-Navigation
Drücken Sie die Taste
Hauptmenü zu gelangen.
, um
ins
Drehen Sie zur Menü-Navigation am
Reglerrad und bestätigen Sie durch
Drücken der mittleren Parrot-Taste.
Um
zum
vorherigen
Menü
zurückzukehren, drücken Sie die Taste .
Drücken Sie die Taste
, um ins
Kontextmenü zu gelangen (je nach der
gerade benutzten Anwendung).
Drücken Sie während des Abspielens
einer Musikdatei die Taste , um zu Menü
Drücken Sie 2 Sekunden lang die Taste ,
um die letzten 6 Anwendungen, die Sie
genutzt haben oder nutzen, anzuzeigen.
Drücken Sie die Taste SRC, um die Quelle
Ihrer Audio-Dateien auszuwählen.
Kopplung Ihres Bluetooth-Mobiltelefons
Hinweis: Prüfen Sie auf unserer Website
unter dem Thema „Kompatibilität“, ob Ihr
Telefon mit dem Parrot ASTEROID Mini
kompatibel ist, und beachten Sie die
jeweilige
Zuordnungsmethode:
www.parrot.com/de/compatibility.
Wenn Sie zum ersten Mal ein Telefon mit
dem Parrot ASTEROID Mini nutzen, dann
müssen Sie zunächst die beiden Gerät
zuordnen. Wenn Ihr Telefon dem Parrot
ASTEROID Mini zugeordnet ist, dann
erfolgt die Verbindung beider Geräte
automatisch, sobald die beiden Geräte
nicht
weit
voneinander
entfernt
eingeschaltet werden und die B luetooth®Funktion aktiviert ist.
1. Von Ihrem Telefon aus starten Sie
eine
Suche
nach
B luetooth®
Peripheriegeräten und wählen dann
"Parrot ASTEROID Mini" aus.
2. Das Kopplungsverfahren hängt vom
Modell Ihres Telefons ab:
Deutsch
83
Wenn Ihr Telefon Sie auffordert,
den
Bluetooth-Pincode
einzugeben, geben Sie „0000“
ein.
Wenn der Parrot ASTEROID
Mini und Ihr Telefon zwei Codes
anzeigen, prüfen Sie, ob diese
Codes identisch sind und
bestätigen Sie dies oder brechen
ab.
> Das Display des Parrot
ASTEROID Mini zeigt an:
"Kopplung erfolgreich".
Hinweis: Bei bestimmten Telefonen müssen
Sie die Herstellung der Verbindung mit dem
Parrot ASTEROID Mini für die automatische
84
Deutsch
Verbindungsherstellung gestatten. Nähere
Informationen entnehmen Sie bitte dem
Benutzerhandbuch Ihres Telefons.
Verwendung des Adressbuchs
Bei den meisten B luetooth-Telefonen
werden die Kontakte im Speicher des
System automatisch synchronisiert. Nach
jeder Änderung Ihres Verzeichnisses wird
die Synchronisation bei der nächsten
Verbindung automatisch neu gestartet.
Achtung: Nur die im Speicher Ihres Telefons
erfassten Kontakte werden synchronisiert.
Wenn Ihre Kontakte im Speicher der SIMKarte abgelegt sind, müssen Sie sie in den
Speicher des Telefons transferieren. Nähere
Informationen entnehmen Sie bitte dem
Benutzerhandbuch Ihres Telefons.
Anmerkung: Je nach Modell Ihres
Telefongeräts werden Sie auf dem Telefon
gegebenenfalls
aufgefordert,
die
Übertragung
des
Verzeichnisses
zu
bestätigen.
Die automatische Synchronisation ist auf
5000 Kontakte (oder Telefonnummern)
pro zugeordnetem Telefon begrenzt.
Einen Anruf über Spracherkennung tätigen
Telefon
Anrufannahme
Ein eingehender Anruf wird durch einen
Klingelton angezeigt. Der Name des
Kontakts wird angesagt, wenn die
Nummer dieses Kontakts in dem mit dem
Parrot ASTEROID Mini verbundenen
Telefonverzeichnis aufgeführt ist.
Wenn Sie den Anruf annehmen
möchten, drücken Sie die
Taste.
Wenn Sie den Anruf
möchten, drücken Sie die
ablehnen
Taste.
Sie können einen Anruf direkt nach der
Synchronisation Ihres
Telefonverzeichnisses durch
Spracherkennung initiieren. Der Parrot
ASTEROID Mini erkennt automatisch den
Kontakt Ihres Verzeichnisses, den Sie
anrufen wollen.
, um die
1. Drücken Sie die Taste
Spracherkennung zu initiieren.
> Der Parrot ASTEROID Mini fragt Sie
nach dem Namen des Kontakts, den
Sie anrufen wollen.
diesem Kontakt mehrere Nummern
zugeordnet sind.
> Der Kontakt wird automatisch
angerufen,
wenn
die
Sprachanweisung richtig verstanden
wurde.
>
Ansonsten
kommt
vom
Freisprechsystem
eine
Bestätigsmeldung. Bestätigen Sie mit
"JA", "RUF AN" oder "ANRUFEN".
Hinweis: Durch Drücken der Taste
den
Spracherkennungsbetrieb wieder verlassen.
2. Sagen Sie den Kontaktnamen und
anschließend die Art der Nummer
("BÜRO",
"HANDY"...),
sofern
Deutsch
85
Musik
Musik-Spracherkennungsfunktion
Mit der Musik-Spracherkennungsfunktion
können Sie über die Spracherkennung
Künstler oder Alben auswählen, die Sie
sich gern anhören möchten. Diese
Funktion ist verfügbar, wenn Sie den
Parrot ASTEROID Mini mit einem
Anschlussgerät vom Typ iPod/USB/SD
verwenden oder wenn Sie eine mit dieser
Funktion kompatible Musikanwendung
nutzen.
1. Drücken Sie die Taste
.
2. Sagen Sie den Namen des Künstlers
oder des Albums, den/das Sie gerne
86
Deutsch
hören möchten, wenn der Parrot
ASTEROID Mini Sie dazu auffordert.
> Es erscheint die Liste mit den an
den
Parrot
ASTEROID
Mini
angeschlossenen Audioquellen sowie
die
mit
dem
Spracherkennungsfunktion
kompatiblen Musikanwendungen mit
den ausgewählten Künstler/Album.
Hinweis: Prüfen Sie die Namen der Artisten
und Alben in den Tags (Metadaten) Ihrer
Musikstücke. Die Namen können anders als
der im Titel des Stücks angezeigte sein.
iPod
1. Schließen Sie Ihren iPod an das iPodKabel an.
2. Drücken Sie die Taste SRC und
wählen Sie iPod.
Sie
eines
der
3. Wählen
Klassierungskriterien aus (Artist,
Album, Titel, Typ, Playlist) und
drücken Sie auf das Reglerrad.
4. Wählen Sie den Titel aus und drücken
Sie auf das Reglerrad.
Hinweis: Drücken Sie die Taste
und
wählen Sie den ersten Buchstaben Ihres
Künstlers, Albums oder Titels aus, um
leichter durch den Inhalt Ihres iPod zu
browsen.
SD-Karte
Folgende SD-Karten (gegebenenfalls mit
Adapter) können Sie mit dem Parrot
ASTEROID Mini nutzen: SD, micro SD,
mini SD, SDHC, mini SDHC, micro SDHC.
Die maximale Speicherkapazität der SDKarte beträgt 32 GByte.
Die Musikdateien auf Ihrer SD-Karte
können im Format MP3 (mpeg1 layer3),
AAC,
WAV,
OGG
oder
WMA
abgespeichert sein.
1. Setzen Sie die SD-Karte am hierfür
vorgesehenen Platz an der rechten
Seite des Displays ein (Abbildung E
S.12).
2. Drücken Sie die Taste SRC und
wählen Sie SD.
Sie
eines
der
3. Wählen
Klassierungskriterien aus (Artist,
Album, Titel, Typ, Playlist) und
drücken Sie auf das Reglerrad.
4. Drücken Sie auf den Titel, um die
Wiedergabe zu starten.
Hinweis: Drücken Sie die Taste
und
wählen Sie den ersten Buchstaben Ihres
Künstlers, Albums oder Titels aus, um
leichter durch den Inhalt Ihrer SD-Karte zu
browsen.
USB-Stick
Der Parrot ASTEROID Mini ist mit den
meisten
USB-Sticks/MP3-Playern/
externen
Festplatten
kompatibel.
Hinsichtlich der Kapazität der USB-Sticks
bestehen keine Beschränkungen. Die
Musikdateien auf Ihrem USB-Stick können
im Format MP3 (mpeg1 layer3), AAC,
WAV, OGG oder WMA abgespeichert
sein.
Sie
Ihr
USB1. Schließen
Anschlussgerät an das USB-Kabel an.
2. Drücken Sie die Taste SRC und
wählen Sie USB.
Sie
eines
der
3. Wählen
Klassierungskriterien aus (Artist,
Deutsch
87
Album, Titel, Typ, Playlist) und
bestätigen Sie mit dem Reglerrad.
4. Drücken Sie auf den Titel, um die
Wiedergabe zu starten.
Hinweis: Drücken Sie die Taste
und
wählen Sie den ersten Buchstaben Ihres
Künstlers, Albums oder Titels aus, um
leichter durch den Inhalt Ihres USBPeripheriegeräts zu browsen.
Bluetooth-Audio-Laufwerk
Hinweis: Der Parrot ASTEROID Mini erlaubt
den Gebrauch der Telefoniefunktion und des
Audio-Streaming über Bluetooth mit 2
verschiedenen Telefonen, ohne Abstecken
eines der 2 Geräte.
88
Deutsch
Sie können den Parrot ASTEROID Mini
zum Wiedergeben von Musikdateien
verwenden, die auf einem B luetoothAudio-Laufwerk gespeichert sind, wenn
dieses das Profil A2DP (Advanced Audio
Distribution Profile) unterstützt.
Vor der ersten Verwendung des AudioLaufwerks müssen Sie dieses zunächst mit
dem Parrot ASTEROID Mini koppeln.
Wenn das Audio-Laufwerk bereits mit
dem Parrot ASTEROID Mini verkoppelt
ist:
1. Drücken Sie die Taste SRC und
wählen Sie Bluetooth-Audio.
2. Starten Sie die Wiedergabe eines
Titels auf Ihrem Audio-Laufwerk.
Internet
Verbindung mit einem 3G/4G-Stick
Hinweis: Auf unserer Website, unter
Kompatibilität des Parrot ASTEROID Mini,
können Sie die Liste mit den 3G/4G-Sticks
einsehen, die mit dem Parrot ASTEROID Mini
kompatibel sind.
1. Schließen Sie über das USB-Kabel
einen 3G/4G-Stick an das Parrot
ASTEROID Mini an.
> Es erscheint ein Popup-Fenster.
2. Aktiveren Sie die 3G-Verbindung
durch Auswählen OK.
Der Status der 3G-Verbindung wird
angezeigt, gefolgt
von
einem
weiteren Popup-Fenster, in welchem
Sie aufgefordert werden, Ihren PINCode einzugeben.
3. Geben Sie anhand des Einstellrads
Ihren PIN-Code ein, und wählen Sie
anschließend OK. Haken Sie die
Option PIN-Code speichern an, wenn
Sie vermeiden möchten, dass Sie bei
jedem
Neustart
des
Parrot
ASTEROID Mini nach dem PIN-Code
gefragt werden
Hinweis: Sie können diese Einstellung später
ändern, indem Sie Parameter > Wireless und
ohne Netz > Mobiles Datennetz auswählen.
Wählen Sie aus den Anschlussgeräten Ihren
3G/4G-Stick, wählen Sie PIN vergessen,
anschließend Vergessen.
4. Wählen Sie Ihren APN (Access Point
Name) in der angezeigten Liste aus.
Diese Information ist in der mit Ihrem
3G-Stick
mitgelieferten
Dokumentation verfügbar. Wenn Ihr
APN nicht in der Liste enthalten ist,
können Sie diesen hinzufügen, indem
Sie Parameter > Netzwerk > 3G-Stick
>
Konfiguration
>
Neuer
Zugangspunkt auswählen.
Es erscheint die Meldung "3G-Stick
konfiguriert".
5. Warten Sie ca. 30 Sekunden, bis die
Verbindung aufgebaut ist. Sie können
ebenfalls die Taste
drücken und
während des Aufbaus der Verbindung
in den Menüs blättern.
Anschluss über Bluetooth
Wenn Sie ein Telefon besitzen, welches
das Profil B luetooth® DUN (Dial-Up
Networking) oder PAN (Personal Area
Network) unterstützt, haben Sie anhand
der Verbindung über B luetooth Ihres
Telefons an das Parrot ASTEROID Mini
die Möglichkeit der gemeinsamen
Nutzung einer 3G-Verbindung des
Telefons.
Hinweis: Überprüfen Sie auf unserer
Website, unter Kompatibilität, ob Ihr
Telefon für die gemeinsame Nutzung von
3G-Verbindungen über Bluetooth geeignet
ist und beachten Sie die entsprechende
Vorgehensweise:
www.parrot.com/de/
compatibility.
Deutsch
89
1. Schließen Sie Ihr Telefon über
B luetooth an den Parrot ASTEROID
Mini an.
2. Wählen Sie auf dem Parrot
ASTEROID Mini Präferenzen >
Netzwerk
>
Bluetooth
>
Konfiguration.
3. Wählen Sie Ihren APN (Access Point
Name) in der angezeigten Liste aus.
Auswählen.
4. Drücken Sie die Taste
Sie Anschließen.
und wählen
5. Lassen Sie die gemeinsame Nutzung
der Verbindung auf Ihrem Telefon zu.
Dieser Vorgang ist je nach dem
90
Deutsch
Modell
Ihres
unterschiedlich.
Telefons
Anschluss über USB
Falls Ihr Telefon die gemeinsame Nutzung
einer
3G-Verbindung
über
USB
unterstützt, schließen Sie Ihr Telefon mit
einem USB-Kabel/USB-Mikrokabel (nicht
mitgeliefert) an den Parrot ASTEROID
Mini an, um somit die gemeinsame
Nutzung der 3G-Verbindung des Telefons
nutzen zu können.
Hinweis: Überprüfen Sie auf unserer Website
unter Kompatibilität ob Ihr Telefon für die
gemeinsame
Nutzung
von
3GVerbindungen über USB geeignet ist und
beachten
Sie
die
entsprechende
Vorgehensweise:
compatibility.
www.parrot.com/de/
1. Überprüfen Sie, dass die Tastatur
Ihres Telefons gesperrt ist und
schließen Sie es mit dem USB-Kabel/
USB-Mikrokabel an den Parrot
ASTEROID
Mini
an.
Diese
Verbindung erlaubt auch
den
Austausch der Batterien Ihres
Telefons.
2. Wählen Sie Ihren APN (Access Point
Name) in der angezeigten Liste und
haken Sie die Option Auswählen an.
Sie können diese Einstellung später
ändern, indem Sie Parameter > Netz >
USB wählen.
> Ein Popup-Fenster zeigt die
Aktivierung
der
Funktion
„Persönlicher Hotspot USB“ an.
Hinweis: Nähere Informationen entnehmen
Sie bitte der Bedienerführung Ihres Telefons.
Gebrauch der Anwendungen
Sie können mit dem ASTEROID Market
mehrere
Anwendungstypen
nutzen:
Musik, Geolokalisierung, Fahrhilfe. Die
verfügbaren Anwendungen hängen vom
Land ab, in dem sie angewendet werden.
Für bestimmte Anwendungen ist ein
Abonnement erforderlich.
Der Parrot ASTEROID Mini kann für
mehrere
Anwendungen
gleichzeitig
genutzt werden. Sie können z. B. ein
Webradio hören und gleichzeitig eine
Anwendung zur Fahrhilfe nutzen.
Weitere Informationen über die Nutzung
der verfügbaren Anwendungen sind der
Website von ASTEROID Market zu
entnehmen:
www.parrotasteroid.com/
asteroidmarket.
Bei Problemen
Vorbemerkung
Überprüfen Sie, dass die Mitteilung "Auf
Wiedersehen" richtig auf dem Display des
Parrot ASTEROID Mini angezeigt wird,
wenn Sie die Zündung des Fahrzeugs
ausschalten. Weitere Angaben enthält der
Abschnitt "Prüfung der Installation".
Reinitialisieren Sie das Gerät. Wählen Sie
Einstellungen > erweiterte Einstellungen
> Werkseinstell.
Stellen Sie sicher, dass Sie über die
neueste Aktualisierung des Parrot
ASTEROID Mini verfügen. Wählen Sie
dafür Einstellungen > Allgemeines >
Deutsch
91
Version.
Vergleichen
Sie
diese
Versionsnummer mit der Nummer auf der
Supportseite des Parrot ASTEROID Mini
auf unserer Website www.parrot.com.
Sie können Aktualisierungen auch
herunterladen
wenn
das
Parrot
ASTEROID Mini mit dem Internet
verbunden ist. Die Verfügbarkeit wird in
der Informationsleiste angezeigt.
Telefonie-Funktion
Prüfen Sie, ob Ihr Telefon mit dem Parrot
ASTEROID Mini kompatibel ist. Gehen
Sie hierzu auf unsere Website auf
Kompatibilität:
www.parrot.com/de/
compatibility.
Wenn
92
Ihr
Deutsch
Telefon
als
kompatibel
angegeben wird und wenn Ihr Parrot
ASTEROID Mini bereits über die letzte
Aktualisierung verfügt, dann löschen Sie
die Zuordnung zwischen den 2 Geräten am
Parrot ASTEROID Mini und an Ihrem
Telefon. Starten Sie die 2 Geräte erneut
und stellen Sie die Verbindung zwischen
den 2 Geräten wieder her.
Musik-Funktion
Reinitialisieren Sie Ihren iPod/Ihr iPhone,
bevor das Gerät wieder mit dem Parrot
ASTEROID Mini verbunden
wird.
Vorgehensweise zur Reinitialisierung des
iPod/iPhone (hierdurch werden keine
Daten gelöscht):
iPod: Gleichzeitig auf Menü und die
mittlere Taste drücken, bis der iPod
sich wieder einschaltet.
iPhone/iPod touch: Gleichzeitig die
Taste On/Off und die Taste Home
drücken, bis sich das iPhone wieder
einschaltet. Das Display nicht
berühren, wenn die Meldung „Zum
Ausschalten schieben“ erscheint.
Manche Probleme können entstehen,
wenn
das
Anschlussgerät
beim
Einschalten der Zündung bereits mit dem
Parrot ASTEROID Mini verbunden ist.
Wiederholen Sie den Vorgang und
verbinden Sie dabei das Gerät erst nach
dem Einschalten der Zündung.
Weitere Informationen
Weitere Informationen finden Sie auf der
Support-Seite des Parrot ASTEROID Mini
auf unserer Website www.parrot.com.
Allgemeine Hinweise
Garantie
Unbeschadet der gesetzlichen Garantie
sichert PARROT für eine Dauer von 12
Monaten ab dem ursprünglichen Datum
des Kaufs durch den Konsumenten bei
Vorlage eines Kaufnachweises (mit
Datum, Ort des Kaufs und Seriennummer
des Artikels) an den Händler oder an
Parrot (Verschleißteile haben eine
Garantie von 6 Monaten) vertraglich zu,
dass das Produkt keine Material- oder
Herstellungsfehler aufweist. Während
des
Garantiezeitraums
muss
das
fehlerhafte
Produkt
in
seiner
ursprünglichen
Verpackung
dem
Kundenservice des Händlers retourniert
werden. Nach Inspektion des Produkts
kann Parrot dieses nach eigenem
Ermessen ersetzen oder erstatten, jede
weitere Entschädigung ist ausgeschlossen.
Änderungen
Die in dieser Anleitung enthaltenen
Beschreibungen
und
technischen
Spezifikationen dienen ausschließlich der
Information und können Änderungen ohne
vorhergehende Ankündigung unterliegen.
Zum Zeitpunkt des Drucks galten die
enthaltenen Angaben als zutreffend. Bei
der Verfassung dieser Anleitung wurde
Deutsch
93
größte Sorgfalt auf deren Inhalt
angewendet, damit Ihnen möglichst
präzise Informationen
bereitgestellt
werden können. Parrot haftet jedoch
weder für Folgen, die sich aus ggf. in
dieser Anleitung enthaltenen Fehlern
oder Unterlassungen ergeben, noch für
Schäden oder den versehentlichen Verlust
von Daten als direkte oder indirekte Folge
der Verwendung
der
enthaltenen
Informationen. Parrot behält sich das
Recht vor, das Produktdesign oder die
Bedienungsanleitung zu ändern bzw. zu
verbessern, ohne dass diesbezüglich
Beschränkung vorliegen und ohne jede
Verpflichtung, die Benutzer hiervon in
Kenntnis zu setzen. Wir sind stets bemüht
94
Deutsch
Aktualisierungen und Verbesserungen an
unseren Produkten vorzunehmen. So kann
es sein, dass das Produkt das Sie gekauft
haben, sich leicht unterscheidet vom in
dieser Anleitung beschriebenen Modell.
Sollte das der Fall sein, steht eine neuere
Version
dieses
Handbuchs
in
elektronischer Form auf der Parrot
Website www.parrot.com zur Verfügung.
Korrekte Entsorgung dieses
(Elektromüll)
Produkts
Die Kennzeichnung auf dem Produkt bzw.
auf der dazugehörigen Literatur gibt an,
dass es nach seiner Lebensdauer nicht
zusammen
mit
dem
normalen
Haushaltsmüll entsorgt werden darf.
Entsorgen Sie dieses Gerät bitte getrennt
von anderen Abfällen, um der Umwelt
bzw. der menschlichen Gesundheit nicht
durch unkontrollierte Müllbeseitigung zu
schaden. Recyceln Sie das Gerät, um die
nachhaltige
Wiederverwertung
von
stofflichen Ressourcen zu fördern. Private
Nutzer sollten den Händler, bei dem das
Produkt gekauft wurde, oder die
zuständigen Behörden kontaktieren, um in
Erfahrung zu bringen, wie sie das Gerät auf
umweltfreundliche
Weise
recyceln
können. Gewerbliche Nutzer sollten sich
an Ihren Lieferanten wenden und die
Bedingungen
des
Verkaufsvertrags
konsultieren. Dieses Produkt darf nicht
zusammen mit anderem Gewerbemüll
entsorgt werden.
Eingetragene Marken
Parrot und die Parrot-Logos sind in
Frankreich und in anderen Ländern
eingetragene Marken der Firma PARROT
SA.
Der Name „Bluetooth“ und das B luetoothLogo sind eingetragene Marken der Firma
Bluetooth® SIG, Inc., und jegliche Nutzung
dieses Namens und dieses Logos durch
die Parrot SA erfolgt im Rahmen einer
Lizenz.
iPod, iPhone und Apple sind in den USA
und in anderen Ländern eingetragene
Marken der Firma Apple, Inc.
"Made for iPod / iPhone" bedeutet, dass
ein elektronisches Zusatzgerät für den
Anschluss an iPod und iPhone-Modelle
konstruiert ist und vom Entwickler
dahingehend zertifiziert wurde, dass es
den Apple-Leistungsnormen entspricht.
Apple übernimmt keine Verantwortung
für den Betrieb dieses Geräts oder die
Einhaltung
von
Sicherheitsund
gesetzlichen Standards.
eingetragenen Marken, die in diesem
Dokument
vorkommen,
sind
urheberrechtlich geschützt und das
Eigentum ihrer jeweiligen Eigentümer.
Copyright
Copyright © 2012 Parrot. Alle Rechte
vorbehalten.
Gracenote®, das Gracenote-Logo und die
Logoschriftart sowie das Logo „Powered
by Gracenote“ sind eingetragene Marken
oder Marken von Gracenote in den
Vereinigten Staaten von Amerika und/
oder anderen Ländern.
Alle
anderen
Handelsmarken
und
Deutsch
95
96
Guida all'uso
Prima di iniziare
Indice
Prima di iniziare
p.97
Installazione
p.98
Primo utilizzo
p.104
Telefono
p.106
Musica
p.107
Internet
p.110
Problemi frequenti p.113
Informazioni generali p.114
A proposito di questa guida
Per limitare il nostro consumo di carta e
nell’ambito
della
nostra
azione
responsabile
volta
alla
tutela
dell’ambiente,
abbiamo
scelto
l’immissione on line dei documenti
destinati agli utenti, che quindi non
saranno più stampati. La presente guida
semplificata del Parrot ASTEROID Mini si
limita quindi a dare le principali istruzioni
che vi consentiranno di utilizzare
facilmente questo apparecchio. Troverete
maggiori informazioni nella sezione
Supporto
del
nostro
sito
web
www.parrot.com.
Italiano
97
Nota: In questo manuale, il termine "iPod"
verrà utilizzato per indicare iPod e iPhone.
da poter sentire in qualsiasi momento i
rumori esterni durante la guida.
Avvertenza
Aggiornamento del software
Le funzioni che richiedono un'attenzione
prolungata devono essere utilizzate solo a
veicolo fermo. La propria sicurezza e
quella degli altri utenti della strada sono
più importanti delle telefonate, della
musica o delle applicazioni di assistenza
alla guida. Mantenere un comportamento
responsabile: guidare con prudenza e
prestare attenzione al proprio ambiente.
Parrot declina ogni responsabilità nel caso
in cui si decida di ignorare tali avvertenze.
Scaricate
gratuitamente
l’ultimo
aggiornamento del Parrot ASTEROID Mini
nel nostro sito web www.parrot.com, alla
sezione Supporto. Questi aggiornamenti vi
permetteranno di utilizzare le nuove
funzionalità e di migliorare la compatibilità
del Parrot ASTEROID Mini.
Utilizzare il Parrot ASTEROID Mini con un
livello di volume ragionevole, in maniera
98
Italiano
Installazione
Nota: Per eseguire l'installazione, si
raccomanda
di
ricorrere
ad
un
professionista esperto, rivolgendosi in
particolar modo alla nostra rete di
installatori autorizzati.
Prima di iniziare
L'installazione del Parrot ASTEROID Mini
consiste nell'inserirlo tra l'autoradio e il
veicolo.
Nota: I cavi forniti in dotazione con il
Parrot ASTEROID Mini sono provvisti di
connettori ISO. Se l'autoradio non è dotata
di connettori ISO, occorre procurarsi un
cavo adattatore ISO per consentire il
montaggio.
Consultare
la
sezione
Compatibilità veicolo alla pagina di
assistenza di Parrot ASTEROID Mini per
verificare l'eventuale necessità di un cavo
adattatore.
Incominciare
rimuovendo l'autoradio
originale dal veicolo. Questa operazione
potrebbe richiedere l'uso di chiavi di
estrazione.
Consultare
lo
dell'autoradio.
schema
elettrico
Prima di fissare i vari elementi del Parrot
ASTEROID Mini nell'abitacolo, collegare i
diversi cavi alla centralina elettronica.
Prima di fissare definitivamente i
componenti, controllare le lunghezze dei
cavi assicurandosi che le varie posizioni
vengano scelte in modo tale che i cavi
siano sufficientemente lunghi da collegare
i vari elementi l'uno all'altro. Accertarsi
che, al termine dell'installazione, i cavi del
Parrot ASTEROID Mini non risultino
piegati o incastrati.
Si raccomanda di utilizzare il cavo ISO
fornito con il Parrot ASTEROID Mini.
Le indicazioni "Connessione #" nelle
prossime sezioni corrispondono alle
connessioni rappresentate negli schemi a
pag. 6 / 7.
Collegamento del cavo audio
Collegare i fasci di cavi audio del veicolo ai
connettori del Parrot ASTEROID Mini
(connessioni 1A e 2).
Se il veicolo è dotato di un impianto audio
con amplificatore, utilizzare le uscite Jack
Line Out Front e Line Out Rear presenti
sulla centralina elettronica per evitare
problemi di saturazione (colpi negli
altoparlanti, soffio permanente, ecc.).
Collegare le uscite Line Out all'impianto
audio utilizzando uno o due cavi Jack per
collegare il Parrot ASTEROID Mini
all'impianto audio (connessione 1B sullo
schema a pag.7).
Italiano
99
Collegamento del cavo di alimentazione
veicolo.
Collegamento del cavo Mute
1. Scollegare la batteria prima di installare
il cavo di alimentazione.
Nota: Per procedere alla verifica
dell'installazione, collegare innanzitutto il
display senza sistemarlo sul quadro
comandi. Per maggiori informazioni
consultare
la
sezione
Verifica
dell'installazione.
La funzione
Mute
permette
di
interrompere l'audio dell'autoradio per
lasciare spazio a quello del Parrot
ASTEROID Mini (musica, conversazioni,
ecc.). La scelta dell'ingresso Mute (mute
in 1, mute in 2 o mute in 3) dipende dalla
configurazione dell'autoradio. Individuare
l'ingresso Mute e quindi collegarlo al filo
giallo libero sul cavo ISO (connessione 5).
2. Collegare il connettore ISO maschio del
Parrot ASTEROID Mini all'autoradio
(connessione 3).
3. Collegare i fasci di cavi di alimentazione
del veicolo al connettore ISO femmina
del
Parrot
ASTEROID
Mini
(connessione 4).
Il filo rosso del cavo deve corrispondere
al +12V permanente, il filo arancione al 12V
post-contatto e il filo nero alla massa.
Verificare che il filo arancione non sia
collegato al 12V permanente: si
rischierebbe di scaricare la batteria del
100
Italiano
Su alcuni veicoli il +12V post-contatto non
è presente sui connettori dell'automezzo.
In tal caso, è necessario collegare il filo di
alimentazione arancione alla scatola dei
fusibili o ad un'altra sorgente di
alimentazione post-contatto.
Installazione della centralina elettronica
Non installare la centralina vicino al
riscaldamento o al climatizzatore né in un
punto esposto al sole.
Dopo l'installazione, assicurarsi che la
centralina sia saldamente fissata. Lasciare
attorno al radiatore dell'apparecchio lo
spazio sufficiente per facilitare la
dispersione del calore.
Installata la centralina, risistemare
l'autoradio senza forzare. Se lo spazio
dietro
l'autoradio
è
insufficiente,
prevedere ad esempio lo smontaggio del
vano portaoggetti.
Attenzione: non toccare la centralina
mentre è in funzione. La temperatura
superficiale potrebbe essere molto alta.
Verifica dell'installazione
Accendere e quindi spegnere il motore del
veicolo dopo avere installato il Parrot
ASTEROID Mini : il messaggio "
Arrivederci " dovrà comparire sul display.
Se il messaggio non appare, invertire le
posizioni dei fili rosso e arancione. In
conclusione, il filo rosso del cavo di
alimentazione deve essere collegato al 12V
permanente, il filo arancione al 12V postcontatto e il filo nero alla massa. Questa
operazione si effettua semplicemente
invertendo i due capicorda posti sul
cablaggio Parrot (connessione 7).
Installazione del doppio microfono
che sia saldamente fissato.
Avvertenza: Non fare passare il cavo del
microfono negli impianti di riscaldamento,
ventilazione e climatizzazione o davanti
agli airbag laterali.
Assicurarsi che il microfono sia installato il
più
vicino
possibile
alla
testa
dell'utilizzatore. La distanza ideale è di 60
cm. Installare il microfono preferibilmente
accanto al retrovisore interno.
Orientare il microfono verso la bocca
dell'utilizzatore.
Si raccomanda di fare scivolare il cavo nella
canalina di scolo dietro la guarnizione della
portiera.
Se il cavo passa sopra i pedali, assicurarsi
Italiano
101
Installazione del dongle GPS
Fissare il dongle GPS su una superficie
piana, in una zona priva di ostacoli
all'interno dell'abitacolo.
I parabrezza atermici e i vetri con antenna
integrata possono interferire con la
ricezione GPS e ridurre l'affidabilità delle
informazioni legate alle applicazioni di
navigazione.
L'antenna GPS è situata sul lato
in cui compaiono la dicitura
"Parrot ASTEROID GPS" e il
logo a forma di stella. Questo
logo deve sempre essere
rivolto verso l'alto.
Se il veicolo possiede un parabrezza
102
Italiano
atermico, fissare il dongle GPS sul
parabrezza a livello della zona non
atermica. Il lato su cui compare il logo a
forma di stella deve essere incollato al
parabrezza (schema B a pag.9).
Nota: La zona non atermica del parabrezza
dipende dal modello del veicolo. Questa
zona è solitamente situata a livello del
retrovisore.
Se il veicolo non possiede un parabrezza
atermico, fissare il dongle GPS sul quadro
comandi. Il lato su cui compare il logo a
forma di stella deve essere visibile
(schema A a pag.8).
Per assicurare un corretto fissaggio del
supporto:
pulire la superficie di montaggio
prima di incollare il supporto;
dopo avere fissato il supporto,
attendere circa 2 ore senza
maneggiarlo.
Installazione del cavo USB
Collegare i cavi iPod®, e USB al Parrot
ASTEROID Mini Si consiglia di collegare
tutti i cavi del Parrot ASTEROID Mini
anche se non si prevede necessariamente
di utilizzarli. Far uscir fuori i connettori
corrispondenti dal proprio ripostiglio o
vano portaoggetti. A tale scopo, potrebbe
essere necessario realizzare un foro
all’interno del cruscotto. Nei limiti del
possibile, evitare l’utilizzo di prolunghe
USB.
Per garantire una qualità ottimale della
ricezione, non collegare la propria chiave
3G direttamente sul Parrot ASTEROID
Mini: utilizzate un cavo USB per installare
l’accessorio sul cruscotto (o altra zona
libera).
Installazione del display
Avvertenza: Evitare qualsiasi installazione
che possa intralciare l'uso di comandi
importanti o ridurre la visibilità del
conducente. Non installare il display dove
potrebbe essere scagliato dall'apertura di
un airbag o in prossimità di una bocchetta
di aerazione o dell'aria condizionata del
veicolo.
Incollare il supporto in plastica sul quadro
comandi (schema C a pag.10).
Installazione del telecomando
Per assicurare un corretto fissaggio del
supporto:
Incollare il supporto del telecomando al
quadro comandi servendosi dell'adesivo
presente nella parte inferiore.
pulire la superficie di montaggio
prima di incollare il supporto;
Per assicurare un corretto fissaggio del
supporto:
dopo avere fissato il supporto,
attendere circa 2 ore senza
maneggiarlo.
pulire la superficie di montaggio
prima di incollare il supporto;
Per evitare i rischi di furto e di esposizione
prolungata al sole, rimuovere il display
quando si lascia il veicolo incustodito.
dopo avere fissato il supporto,
attendere circa 2 ore senza
maneggiarlo.
Il telecomando può essere alimentato in
due modi: con una pila oppure
collegandolo alla centralina elettronica.
Per alimentare il telecomando con una pila
Italiano
103
(schema D a pag.11) :
1. Rimuovere l'elemento tondo in
plastica posto sul retro del
telecomando, facendolo ruotare in
senso orario.
2. Inserire una pila del tipo 3V CR2032
nell'apposito
alloggiamento.
Assicurarsi che la pila sia orientata
nella giusta direzione.
3. Riposizionare l'elemento tondo in
plastica, facendolo ruotare in senso
antiorario.
Per collegare il telecomando alla centralina
elettronica (schema D a pag.11) :
1. Rimuovere l'elemento tondo in
plastica posto sul retro del
104
Italiano
telecomando, facendolo ruotare in
senso orario.
il
cavo
a
livello
2. Collegare
dell'alloggiamento per la pila e farlo
ruotare in senso antiorario.
3. Collegare l'altra estremità del cavo
alla centralina elettronica, a fianco dei
connettori USB (schema a pag.6).
Primo utilizzo
Navigazione nei menu
Premere il tasto
principale.
per accedere al menu
Navigare nei menu girando la rotella e
confermare premendo il tasto centrale
Parrot.
Per ritornare al menu precedente,
premere il tasto .
Premere il tasto
per accedere al
menu contestuale, corrispondente
all’applicazione in corso d’uso.
Durante la lettura di un file musicale,
premere il tasto per ritornare al menu.
Inversamente, per tornare al lettore
quando si naviga tra i menu, premere il
tasto SRC.
Tenere premuto il tasto per 2 secondi
per visualizzare le ultime 6 applicazioni
utilizzate o in corso di utilizzo.
Premere il tasto SRC per selezionare la
sorgente dei file audio.
Accoppiare un telefono cellulare
Nota: Consultate la pagina Compatibilità
del nostro sito web per verificare se il
telefono è compatibile con il Parrot
ASTEROID Mini e quindi consultare la
relativa procedura di abbinamento:
www.parrot.com/it/compatibility.
Se è la prima volta che si utilizza un
telefono con il Parrot ASTEROID Mini, è
innanzitutto necessario abbinare i 2
apparecchi. Una volta abbinato il telefono
con il Parrot ASTEROID Mini, la
connessione tra i 2 apparecchi si stabilirà
automaticamente
non
appena
si
troveranno accesi nelle vicinanze e con la
funzione B luetooth® attivata.
1. Dal telefono lanciate una ricerca di
periferiche B luetooth® e quindi
selezionate "Parrot ASTEROID Mini".
2. La procedura di abbinamento dipende
quindi dal modello del telefono:
"0000".
Se Parrot ASTEROID Mini e il
telefono visualizzano due codici,
assicurarsi che siano identici e
quindi confermare o annullare.
> Sul display di Parrot ASTEROID
Mini apparirà il messaggio
"Abbinamento riuscito".
Nota: Su alcuni telefoni, per consentire la
connessione
automatica,
occorre
autorizzare la connessione a Parrot
ASTEROID Mini. Per maggiori informazioni
consultate la documentazione del telefono.
Se il telefono chiede di inserire il
codice PIN B luetooth, digitare
Italiano
105
Sincronizzazione della rubrica telefonica
Con la maggior parte dei telefoni
B luetooth,
la
rubrica
viene
automaticamente sincronizzata con la
memoria del sistema. Ogni volta che la
rubrica
viene
modificata,
la
sincronizzazione
si
riesegue
automaticamente
alla
connessione
successiva.
Avvertenza: Solo i contatti salvati nella
memoria del telefono si sincronizzano con il
Parrot ASTEROID Mini. Se i contatti sono
salvati nella memoria della scheda SIM, è
necessario trasferirli nella memoria del
telefono. Per maggiori informazioni
consultare la documentazione del telefono.
106
Italiano
Nota: Su alcuni telefoni è necessario
autorizzare l'accesso del Parrot ASTEROID
Mini ai contatti per consentire la
sincronizzazione.
Per
maggiori
informazioni consultare la documentazione
del telefono.
La sincronizzazione automatica è limitata a
5.000 contatti (o numeri telefonici) per
telefono abbinato.
Telefono
Per ricevere una chiamata
Le chiamate in entrata sono segnalate da
una suoneria. Il nome del contatto è
annunciato se il numero di tale contatto è
registrato nella rubrica del telefono
collegato al Parrot ASTEROID Mini.
Se si intende accettare una chiamata
in entrata, premere il tasto
. Per
terminare la chiamata, premere il
tasto
.
Se si intende rifiutare una chiamata in
entrata, premere il tasto
.
Per effettuare una chiamata
È possibile iniziare una chiamata tramite il
riconoscimento vocale subito dopo la
sincronizzazione della
rubrica
del
telefono. Il Parrot ASTEROID Mini
riconoscerà automaticamente il contatto
della rubrica che si desidera chiamare.
per iniziare il
1. Premere il tasto
processo di riconoscimento vocale.
> Il Parrot ASTEROID Mini chiederà il
nome del contatto che si intende
chiamare.
2. Pronunciare il nome del contatto
seguito dal tipo di numero
("LAVORO", "CELLULARE", ecc.) se
per il contatto sono disponibili diversi
numeri.
> La chiamata di questo contatto inizia
automaticamente se il comando
vocale
è
stato
compreso
correttamente.
> In caso contrario, il kit viva voce
emette un messaggio di richiesta di
conferma. Confermare pronunciando
"SÌ", "CHIAMA" o "CHIAMARE".
Nota: In qualunque momento è possibile
premere il tasto
per uscire dalla
modalità di riconoscimento vocale.
Musica
Ricerca musicale ad attivazione vocale
Met de spraakherkenningsfunctie voor
muziek kunt u de artiesten of albums die u
wilt beluisteren, via spraakherkenning
selecteren. Deze functie is beschikbaar als
u de Parrot ASTEROID Mini gebruikt met
een randapparaat zoals iPod / USB / SD, of
als u een muziektoepassing gebruikt die
compatibel is met deze functie.
1. Premere il tasto
.
2. Pronunciare il nome dell'artista o
dell'album che si desidera ascoltare
quando il Parrot ASTEROID Mini
invita a farlo.
Italiano
107
> Comparirà l'elenco delle sorgenti
audio connesse al Parrot ASTEROID
Mini e delle applicazioni musicali
compatibili con la funzione di
riconoscimento vocale e contenenti
l'artista/l'album prescelto.
Nota : Verificate i nomi degli artisti e degli
album nei tag (metadati) dei file musicali.
Possono infatti esservi differenze rispetto a
quanto visualizzato nel titolo del brano.
1. Collegare l'iPod al cavo iPod.
2. Premere il tasto SRC e selezionare
iPod.
108
Italiano
4. Premere il brano per avviarne la
riproduzione.
Nota: Premete il tasto
e selezionate la
prima lettera dell'artista, dell'album o del
brano per spostarvi più facilmente
all'interno del contenuto dell'iPod.
Scheda SD
iPod
3. Selezionate
classifica (artista, album, brani,
genere, playlist) e premete la
manopola.
uno
dei
criteri
di
È possibile utilizzare le seguenti schede
SD (se necessario, con adattatore) con il
Parrot ASTEROID Mini : SD, micro SD,
mini SD, SDHC, mini SDHC, micro SDHC.
La capacità della scheda SD non deve
superare i 32 GB.
I file musicali presenti sulla scheda SD
possono essere in formato MP3 (mpeg1
layer3), AAC, WAV, OGG o WMA.
1. Inserire la scheda SD nell'apposito
slot situato sulla destra del display
(schema E a pag.12).
2. Premere il tasto SRC e selezionare
SD.
3. Selezionate uno dei criteri di
classifica (artista, album, brani,
genere, playlist) e premete la
manopola.
4. Premere il brano per avviarne la
riproduzione.
Nota: Premete il tasto
e selezionate la
prima lettera dell'artista, dell'album o del
brano per spostarvi più facilmente
all'interno del contenuto della scheda SD.
Chiavetta USB
Parrot ASTEROID Mini è compatibile con
la maggior parte delle chiavette USB, dei
lettori MP3 e degli hard disk esterni. Non
esiste alcun limite per quanto concerne la
capacità delle chiavette USB.
I file musicali sulla chiavetta USB possono
essere in formato MP3 (mpeg1 layer3) o
WMA.
1. Collegare la periferica USB al cavo
USB.
2. Premere il tasto SRC e selezionare
USB.
3. Selezionate uno dei criteri di
classifica (artista, album, brani,
genere, playlist) e premete la
manopola.
4. Premere il brano per avviarne la
riproduzione.
Nota: Premete il tasto
e selezionate la
prima lettera dell'artista, dell'album o del
brano per spostarvi più facilmente
all'interno del contenuto della periferica
USB.
Utilizzo con un lettore audio Bluetooth
Nota: Parrot ASTEROID Mini consente di
utilizzare la funzione telefonia e streaming
audio tramite Bluetooth con 2 telefoni
diversi, senza che sia necessario scollegare
uno dei 2 apparecchi.
È possibile utilizzare Parrot ASTEROID
Mini per ascoltare file musicali archiviati
su un lettore audio Bluetooth se
ques'ultimo supporta il profilo A2DP
(Advanced Audio Distribution Profile).
Se il lettore audio viene utilizzato per la
prima volta, è innanzitutto necessario
abbinarlo al Parrot ASTEROID Mini. Se il
lettore audio è già abbinato al Parrot
ASTEROID Mini :
Italiano
109
1. Premere il tasto SRC e selezionare
Audio Bluetooth.
Internet
2. Avviare la riproduzione di un brano
sul lettore audio.
Connessione con chiavetta 3G/4G
Nota: Consultare la sezione Compatibilità
del Parrot ASTEROID Mini sul nostro sito
web per visualizzare l'elenco delle chiavette
3G/4G compatibili con il Parrot ASTEROID
Mini.
1. Collegare una chiavetta 3G/4G al
Parrot ASTEROID Mini mediante il
cavo USB.
> Apparirà un pop-up.
la
connessione
3G
2. Attivate
selezionando OK.
> Apparirà il pop-up Stato della
connessione 3G seguito da un altro
110
Italiano
pop-up che chiede di inserire il
codice PIN.
3. Inserite il codice PIN utilizzando la
rotella e quindi selezionate OK.
Spuntate l'opzione Memorizza il
codice PIN se preferite che il codice
PIN non vi venga richiesto ad ogni
riavvio di Parrot ASTEROID Mini.
Nota: Questa regolazione può essere
modificata anche in seguito selezionando
Impostazioni > Rete > Chiavetta 3G.
4. Selezionate il vostro APN (Access
Point Name) dall'elenco proposto.
Questa informazione è disponibile
nella documentazione fornita con la
chiavetta 3G. Se l'APN non compare
nell'elenco, è possibile aggiungerlo
selezionando Impostazioni > Rete >
Chiavetta 3G > Configurazione >
Nuovo access point.
> Apparirà il messaggio "Chiavetta 3G
configurata".
5. È necessario attendere circa 30
secondi affinché si stabilisca la
connessione. È anche possibile
premere il tasto
e spostarsi nei
menu mentre si stabilisce la
connessione.
Connessione tramite Bluetooth
Se si possiede un telefono che supporta il
profilo
B luetooth® DUN
(Dial-Up
Networking) o PAN (Personal Area
Network), la connessione tramite
B luetooth del telefono al Parrot
ASTEROID Mini consente di condividere
la connessione 3G del telefono stesso.
Nota: Consultare la pagina Compatibilità
sul nostro sito web per verificare se il
telefono consente di condividere la
connessione 3G tramite Bluetooth e quindi
consultare
la
relativa
procedura:
www.parrot.com/it/compatibility.
1. Collegate il telefono a Parrot
ASTEROID Mini mediante B luetooth.
Parrot
ASTEROID
Mini
2. Su
selezionate Preferenze > Rete >
Bluetooth > Configurazione.
3. Selezionate il vostro APN (Access
Point Name) dall'elenco proposto e
quindi
spuntate
l'opzione
Selezionate.
4. Premete il tasto
Connetti.
e selezionate
5. Autorizzate la condivisione della
connessione sul telefono. Questa
procedura può essere diversa a
seconda del modello di telefono.
Connessione tramite USB
Se si possiede un telefono che supporta la
condivisione della connessione 3G tramite
USB, collegare il telefono al Parrot
ASTEROID Mini con un cavo USB/microUSB (non fornito) per condividere la
Italiano
111
connessione 3G del telefono stesso.
Nota: Consultare la pagina Compatibilità
sul nostro sito web per verificare se il
telefono consente di condividere la
connessione 3G tramite USB e consultare la
relativa procedura: www.parrot.com/it/
compatibility.
1. Accertarsi che la tastiera del telefono
sia sbloccata, quindi collegarlo al
Parrot ASTEROID Mini servendosi di
un cavo USB/micro-USB. Questa
connessione consente anche di
ricaricare la batteria del telefono.
2. Se necessario, selezionare il proprio
APN
(Access
Point
Name)
dall'elenco proposto e quindi
112
Italiano
spuntare l'opzione Seleziona. Questa
impostazione può essere modificata
anche in seguito selezionando
Impostazioni > Rete > USB.
> Apparirà un pop-up che indica
l’attivazione della condivisione della
connessione USB.
Utilizzare le ASTEROID Market applicazioni
È possibile utilizzare diversi tipi di
applicazioni con il ASTEROID Market :
musica, geolocalizzazione, assistenza alla
guida. Le applicazioni disponibili sono
diverse a seconda del paese di utilizzo.
Alcune applicazioni possono richiedere un
abbonamento.
Il Parrot ASTEROID Mini è un sistema
multitasking: possono infatti essere
utilizzate
più
applicazioni
in
contemporanea. Ad esempio, è possibile
ascoltare una Webradio e utilizzare al
tempo
stesso
un'applicazione
di
assistenza alla guida.
Per ulteriori informazioni sull'utilizzo
delle applicazioni disponibili è possibile
consultare la pagina web dell'ASTEROID
Market:
www.parrotasteroid.com/
asteroidmarket.
Problemi frequenti
Prima di iniziare
Assicurarsi che il messaggio "Arrivederci"
compaia sul display del Parrot ASTEROID
Mini allo spegnimento del motore del
veicolo. Per maggiori informazioni
consultare
la
sezione
Verifica
dell'installazione.
Resettare l'apparecchio. A tale scopo,
selezionare preferenze > preferenze
avanzate > impost.predef.
Accertarsi di avere installato l'ultimo
aggiornamento disponibile sul Parrot
ASTEROID Mini. A tale scopo,
selezionare Impostazioni > Informazioni
su > Versione. Confrontare questo
numero di versione con quello indicato
nella pagina di assistenza del Parrot
ASTEROID Mini sul nostro sito web
www.parrot.com.
Problemi relativi alla funzione telefonia
Verificare la compatibilità del telefono con
il Parrot ASTEROID Mini. A tale scopo,
consultare la pagina Compatibilità sul
nostro sito web: www.parrot.com/it/
compatibility.
Se il telefono viene indicato come
compatibile e il Parrot ASTEROID Mini
possiede già l'ultimo aggiornamento,
rimuovere l'abbinamento tra i 2 apparecchi
sul Parrot ASTEROID Mini e sul telefono,
riavviarli entrambi e quindi ripristinare la
connessione tra di essi.
Problemi relativi alla funzione musica
Resettare
l'iPod/iPhone
prima
di
riconnetterlo al Parrot ASTEROID Mini.
Per resettare un iPod/iPhone (procedura
che non cancella alcun dato):
iPod: premere contemporaneamente
Menu e il tasto centrale fino a quando
l'iPod non si riavvia.
iPhone/iPod
touch:
premere
contemporaneamente
i
tasti
Accendi/Spegni e Home fino a
quando l'iPhone non si riavvia. Non
toccare il display quando appare il
Italiano
113
messaggio "Scorrere per spegnere".
Alcuni problemi possono comparire se la
periferica è già connessa al Parrot
ASTEROID Mini quando si accende il
motore.
Ripetere
la
procedura
connettendo la periferica dopo avere
acceso il motore.
Per ulteriori informazioni
Consultare la pagina di assistenza del
Parrot ASTEROID Mini sul nostro sito
web www.parrot.com.
114
Italiano
Informazioni generali
Garanzia
Senza pregiudizio alcuno per la garanzia
legale, Parrot garantisce contrattualmente
per 12 mesi, a partire dalla data
dell'acquisto iniziale effettuato dal
consumatore
(ad
esclusione
dei
componenti soggetti ad usura, garantiti per
6 mesi), che questo prodotto è privo di
difetti del materiale e di fabbricazione,
dietro presentazione al rivenditore o a
Parrot della prova d'acquisto (data, luogo
d'acquisto e numero di serie del prodotto)
. Per l'intera durata della garanzia
contrattuale, il prodotto difettoso dovrà
essere riconsegnato nell'imballo originale
al servizio di assistenza post-vendita del
rivenditore. Dopo avere ispezionato il
prodotto, Parrot procederà, a sua
discrezione,
alla
sostituzione
o
all'emissione di una nota di credito, ad
esclusione di ogni altra forma di
risarcimento.
Modifiche
Le spiegazioni e le specifiche riportate
nella presente guida sono solo a scopo
informativo e possono subire modifiche
senza preavviso. Tali informazioni sono da
considerarsi corrette al momento della
pubblicazione. La presente guida è stata
redatta prestando grande attenzione, al
fine di fornire ai clienti informazioni
precise e attendibili. Tuttavia, Parrot non
può essere ritenuta responsabile per
eventuali conseguenze derivanti da
omissioni o errori nella presente guida, né
per eventuali danni o perdite accidentali di
dati causati direttamente o indirettamente
dall’uso delle informazioni ivi contenute.
Parrot si riserva il diritto di modificare/
migliorare il prodotto o la guida per
l’utente senza limitazione alcuna e senza
l’obbligo di notifica agli utenti. Poiché il
costante impegno dell’azienda è volto a
garantire continui aggiornamenti e
miglioramenti, il prodotto acquistato
dall’utente
potrebbe
risultare
leggermente diverso dal modello descritto
nella presente guida. In tal caso, verificare
la disponibilità di una versione aggiornata
della guida in formato elettronico nel sito
Web
di
Parrot
all’indirizzo
www.parrot.com.
Corretto smaltimento del prodotto
(rifiuti
elettrici
ed
elettronici)
(Applicabile nei Paesi dell’Unione
Europea e in quelli con sistema di raccolta
differenziata) Il marchio riportato sul
prodotto o sulla sua documentazione
indica che il prodotto non deve essere
smaltito con altri rifiuti domestici al
termine del ciclo di vita. Per evitare
eventuali danni all‘ambiente o alla salute
causati dall‘inopportuno smaltimento dei
rifiuti, si invita l‘utente a separare questo
prodotto da altri tipi di rifiuti e di riciclarlo
in maniera responsabile per favorire il
riutilizzo sostenibile delle risorse
materiali. Gli utenti domestici sono
invitati a contattare il rivenditore presso il
quale è stato acquistato il prodotto o
l‘ufficio locale preposto per tutte le
informazioni
relative
alla
raccolta
differenziata e al riciclaggio per questo
tipo di prodotto. Gli utenti aziendali sono
invitati a contattare il proprio fornitore e
verificare i termini e le condizioni del
contratto di acquisto. Questo prodotto
non deve essere smaltito unitamente ad
altri rifiuti commerciali.
Il nome e il logo Bluetooth® sono marchi
Italiano
115
depositati di Bluetooth® SIG, Inc. e il loro
utilizzo da parte di Parrot S.A. avviene in
condizioni di licenza.
Parrot e i loghi Parrot sono marchi
registrati di PARROT SA in Francia e in
altri paesi.
“Made for iPod / iPhone” significa che
l’accessorio
elettronico
è
stato
appositamente progettato per collegarsi
all’iPod / iPhone e che è stato certificato
dal produttore come conforme agli
standard prestazionali di Apple. Apple non
è responsabile del funzionamento del
dispositivo o della sua conformità ai
requisiti di sicurezza.
iPod e iPhone sono marchi di Apple, Inc.
depositati negli Stati Uniti e in altri paesi.
116
Italiano
Gracenote®, il logo e il logotipo Gracenote
e il logo "Powered by Gracenote" sono
marchi commerciali registrati o marchi
commerciali di Gracenote, Inc. negli Stati
Uniti e/o in altri paesi.
Tutti gli altri marchi citati in questa guida
sono protetti e di proprietà dei rispettivi
titolari.
Copyrights
Identification N. 394 149 496 R.C.S. PARIS
Parrot S.A.
Copyright © 2012 Parrot.
Gebruikershandleiding
Voordat u begint
Over deze gids
Inhoudsopgave
Voordat u begint
Installatie
Het eerste gebruik
Telefoon
Muziek
Internet
Problemen verhelpen
Algemene informatie
p.117
p.118
p.124
p.126
p.127
p.130
p.132
p.134
Om ons papierverbruik te beperken en in
het kader van onze zo verantwoordelijk
mogelijke aanpak op het gebied van
milieubehoud, geeft Parrot er de voorkeur
aan om documentatie online beschikbaar
te stellen in plaats van deze af te drukken.
Deze vereenvoudigde gids voor de Parrot
ASTEROID Mini geeft u dus slechts de
belangrijkste instructies die u nodig heeft
om dit apparaat makkelijk te gebruiken. U
vindt meer informatie in het onderdeel
Support
van
onze
website
www.parrot.com:
complete
documentatie, FAQ…
Dutch
117
Opmerking: Ten behoeve van de
leesbaarheid worden de iPod® en de
iPhone® in deze handleiding aangeduid
met de term "iPhone".
een redelijk geluidsvolume. Zo kunt
tijdens het rijden altijd horen wat zich
buiten afspeelt.
Updates
Waarschuwingen
De functies die langere tijd de aandacht
opeisen, mogen alleen gebruikt worden
wanneer de auto stilstaat. Uw veiligheid
en die van de andere weggebruikers is
belangrijker dan telefoongesprekken,
muziek of rijhulpmiddelen.
Wees
verantwoordelijk: rijd voorzichtig en let op
uw omgeving. Parrot
wijst
elke
verantwoordelijkheid af indien u deze
waarschuwing negeert.
Gebruik de Parrot ASTEROID Mini met
118
Dutch
Download gratis de laatste update voor uw
product op onze website www.parrot.com
gedeelte Hulp. Via deze updates
profiteert u van nieuwe functies en een
verbeterde compatibiliteit van uw
product.
Installatie
Opmerking: Wij adviseren om deze
installatie te laten uitvoeren door een
vakman, met name een installateur die is
aangesloten bij ons netwerk van erkende
installateurs.
Voordat u begint
De installatie van de Parrot ASTEROID
Mini bestaat erin het apparaat tussen de
autoradio en het voertuig te plaatsen.
Opmerking: De kabels die worden geleverd
bij de Parrot ASTEROID Mini zijn voorzien
van ISO-aansluitingen. Als uw autoradio
niet is uitgevoerd met ISO-aansluitingen,
moet u een ISO-adapterkabel kopen om de
montage te kunnen uitvoeren. Zie het
gedeelte over voertuigcompatibiliteit op de
hulppagina van de Parrot ASTEROID Mini
om te controleren of u een ISOadapterkabel nodig heeft.
Verwijder eerst de originele autoradio uit
uw voertuig. Het kan zijn dat u hiervoor
speciale sleutels nodig heeft.
Raadpleeg het elektrisch schema van uw
autoradio.
Sluit voordat u de verschillende
onderdelen van de Parrot ASTEROID Mini
in de auto vastzet, eerst de verschillende
kabels aan op het elektronicakastje. Wacht
met het definitief vastzetten van de
onderdelen tot u de kabellengtes
gecontroleerd heeft en zeker weet dat de
kabelloop zodanig gekozen is dat de kabels
lang genoeg zijn om de onderdelen op
elkaar aan te sluiten. Overtuig u ervan dat
de kabels van de Parrot ASTEROID Mini na
afloop van de installatie nergens geknikt
zijn of bekneld zitten.
Gebruik alleen de bij de Parrot ASTEROID
Mini geleverde ISO-kabel.
De aanwijzingen "Aansluiting #" in de
volgende paragrafen komen overeen met
de aansluitingen in de afbeeldingen op
pag.6 / 7.
De audiokabel aansluiten
Sluit de audiodraden van het voertuig aan
op de aansluitingen van de Parrot
ASTEROID Mini (Aansluiting 1A en 2).
Als uw voertuig voorzien is van een
audiosysteem met versterker, gebruikt u
de uitgangen Jack Line Out Front en Line
Out Rear op het elektronicakastje om
verzadigingsproblemen (kraken van de
luidsprekers, permanente ruis, enz.) te
vermijden. Sluit deze Line Out-uitgangen
aan op uw audiosysteem met behulp van
een of twee jackkabels om de Parrot
ASTEROID Mini op uw audiosysteem aan
te sluiten (Aansluiting 1B in de figuur op
pag.7).
Dutch
119
De voedingskabel aansluiten
1. Ontkoppel de accu voordat u de
voedingskabel aansluit.
2. Sluit de ISO-stekker van de Parrot
ASTEROID Mini aan op de autoradio
(aansluiting 3).
3. Sluit de voedingskabel van het voertuig
aan op de ISO-stekkerbus van de Parrot
ASTEROID Mini (aansluiting 4).
De rode draad van de kabel moet worden
aangesloten op de +12V continuspanning,
de
oranje
draad
op
het
12V
inschakelcontact en de zwarte draad op de
massa. Overtuig u ervan dat de oranje
draad niet is aangesloten op de 12V
continuspanning, omdat u anders het
120
Dutch
risico loopt dat de accu van het voertuig
wordt ontladen.
Opmerking: Sluit om de installatie te
controleren eerst het scherm aan zonder dit
op het dashboard te plaatsen. Raadpleeg
het onderdeel "De installatie controleren"
voor meer informatie.
Sommige voertuigen hebben geen +12V
inschakelcontact op de aansluitingen. In
dat geval moet de oranje voedingsdraad
worden aangesloten op de zekeringdoos of
een andere geschikte voedingsbron.
De mutekabel aansluiten
Met de functie Mute kunt u het geluid van
de autoradio onderbreken om naar de
Parrot ASTEROID Mini te luisteren
(muziek, communicatie, enz.). De keuze
voor een van de mute-ingangen (mute in 1,
mute in 2 of mute in 3) hangt af van de
configuratie van uw autoradio. Kies de
juiste mute-ingang en sluit die vervolgens
aan op de vrije gele draad van de ISO-kabel
(aansluiting 5).
Het elektronicakastje installeren
Installeer het elektronicakastje niet in de
buurt van de verwarming of airco, noch op
een plek waar het blootstaat aan de zon.
Zorg ervoor dat het kastje na installatie
onbeweeglijk vast zit. Houd ruimte vrij
rond de radiator van het product om de
warmte te kunnen afvoeren.
Als het kastje eenmaal geïnstalleerd is,
mag het niet meer worden geforceerd
tijdens installatie van de radio. Als de
ruimte achter de autoradio onvoldoende
is, kunt u bijvoorbeeld overwegen het
handschoenenkastje te demonteren.
De installatie controleren
Zet het contact van uw voertuig aan en uit
zodra de Parrot ASTEROID Mini
geïnstalleerd is. Het bericht "Tot ziens"
moet nu op het scherm worden
weergegeven.
Als dat niet zo is, moet u de rode en gele
draad omwisselen. De rode draad van de
voedingskabel moet worden aangesloten
op de 12V continuspanning, de oranje
draad op het 12V inschakelcontact en de
zwarte draad op de massa. Dit doet u door
de twee kabelschoenen op de kabels van
Parrot te verwisselen (aansluiting 7).
Installatie van de dubbele microfoon
Wij raden u aan om het snoer door de goot
achter de afdichting van de deur te leiden.
Als het snoer boven de pedalen langs
loopt, maak het dan goed vast.
Waarschuwing: Leid het microfoonsnoer
niet door het verwarmings-, ventilatie- of
aircosysteem en laat het niet voor de
zijairbags langs lopen.
Installeer de microfoon zo dicht mogelijk
bij het hoofd van de gebruiker. De ideale
afstand is 60 cm. Installeer de microfoon
bij
voorkeur
dicht
bij
de
achteruitkijkspiegel.
Richt de microfoon op de mond van de
gebruiker.
Installeren van de gps-dongle
Bevestig de gps-dongle in de auto op een
vlak oppervlak zonder obstakels.
Warmtewerende voorruiten en voorruiten
met geïntegreerde antenne kunnen zorgen
voor storing van de gps-ontvangst,
waardoor
de
gegevens
van
navigatietoepassingen
minder
betrouwbaar worden.
Dutch
121
De antenne van de gps-dongle
bevindt zich aan de kant van het
sterlogo en de inscriptie
"Parrot ASTEROID GPS". Dit
logo moet altijd naar de lucht
gericht zijn.
Bevestig de gps-dongle op het nietwarmtewerende deel van de voorruit als
uw voertuig een warmtewerende voorruit
heeft. De kant met het sterlogo moet op
de voorruit geplakt worden (zie figuur B
pag.9).
Opmerking: De plaats van de nietwarmtewerende zone op de voorruit
verschilt per automodel. Meestal zit deze
zone bij de achteruitkijkspiegel.
122
Dutch
Bevestig de gps-dongle op het dashboard
als uw voertuig geen warmtewerende
voorruit heeft. De kant met het sterlogo
moet zichtbaar zijn (zie figuur A pag.8).
Zorg dat de steun goed vastzit door:
het montageoppervlak te reinigen
voordat u de steun vastlijmt;
wacht na het lijmen van de steun
ongeveer 2 uur voor u de steun
manipuleert.
Installatie van de USB-snoeren
Sluit de iPod®-snoeren, de USB-snoeren
aan op de Parrot ASTEROID Mini. Wij
raden u aan om alle snoeren van de Parrot
ASTEROID Mini aan te sluiten, zelfs als u
niet noodzakelijk van plan bent om ze te
gebruiken. Trek de overeenkomstige
aansluitingen door uw rommelbakje of
handschoenenkastje naar buiten. Mogelijk
moet u daarvoor een gat in uw dashboard
boren. Vermijd indien mogelijk het gebruik
van USB-verlengsnoeren.
Het iPod-snoer moet absoluut op de
daartoe voorziene, witte USB-poort
aangesloten worden. Boven deze poort
staat "iPod".
Voor een optimale kwaliteit van de
ontvangst mag u uw 3Gstick niet
rechtstreeks op de Parrot ASTEROID Mini
aansluiten: gebruik een USB-kabel om het
accessoire op het dashboard (of een
andere vrije zone) te plaatsen.
Het scherm installeren
Waarschuwing: Installeer het scherm
zodanig
dat
belangrijke
bedieningselementen goed toegankelijk zijn
en het zicht van de bestuurder niet wordt
belemmerd. Installeer het scherm niet op
plaatsen waar het door een geactiveerde
airbag kan worden geraakt, noch in de
buurt van een opening van het ventilatie- of
aircosysteem van het voertuig.
Lijm de plastic steun op het dashboard
(figuur C pag.10).
Zorg dat de steun goed vastzit door:
het montageoppervlak te reinigen
voordat u de steun vastlijmt;
wacht na het lijmen van de steun
ongeveer 2 uur voor u de steun
manipuleert.
Om diefstal en langdurige blootstelling
aan de zon te voorkomen, moet u het
scherm verwijderen als u uw voertuig
verlaat.
De afstandsbediening installeren
Lijm de steun voor de afstandsbediening
op het dashboard met behulp van de
kleefstrip aan de onderkant van de steun.
manipuleert.
De afstandsbediening kan op 2 manieren
van stroom worden voorzien: met een
batterij of via een aansluiting op het
elektronicakastje.
Batterij plaatsen (figuur D pag.11) :
1. Verwijder het ronde plastic deksel
aan
de
achterkant
van
de
afstandsbediening door het rechtsom
te draaien.
het montageoppervlak te reinigen
voordat u de steun vastlijmt;
2. Plaats een batterij van het type 3V
CR2032 in het batterijvak. Controleer
of de batterij in de juiste richting
geplaatst is.
wacht na het lijmen van de steun
ongeveer 2 uur voor u de steun
3. Plaats het ronde plastic deksel terug
door het linksom te draaien.
Zorg dat de steun goed vastzit door:
Dutch
123
Afstandsbediening aansluiten op het
elektronicakastje (figuur D pag.11) :
1. Verwijder het ronde plastic deksel
aan
de
achterkant
van
de
afstandsbediening door het rechtsom
te draaien.
124
Het eerste gebruik
Door de menu's bladeren
Druk op de toets
openen.
om het hoofdmenu te
2. Sluit de kabel aan in het batterijvak en
draai hem linksom.
Blader door de menu's door aan de
scrolknop te draaien, en bevestig door op
de middelste Parrot-knop te drukken.
3. Sluit het andere uiteinde van de kabel
aan op het elektronicakastje, naast de
USB-aansluitingen (figuur pag.6).
Druk op de toets
het vorige menu.
Dutch
om terug te keren naar
Druk op de toets
om het contextmenu
te openen, overeenkomstig de toepassing
die op dat ogenblik gebruikt wordt. Aan de
hand van het contextmenu kunt u met
name bepaalde instellingen wijzigen of
sneller door de inhoud van uw
telefoonboek of uw audiobron bladeren.
Druk tijdens het lezen van een
muziekbestand op de toets , om terug te
keren naar het menu. Als u daarentegen
door de menu's bladert, drukt u op de knop
SRC om terug te keren naar de lezer.
Door het menu van de bronnen bladeren
Druk op de knop SRC, om de bron van uw
audiobestanden te selecteren.
Een telefoon verbinden via Bluetooth
Opmerking:
Raadpleeg
de
compatibiliteitspagina op onze website om
te controleren of uw telefoon compatibel is
met de Parrot ASTEROID Mini en raadpleeg
de bijbehorende koppelingsprocedure:
www.parrot.com/nl/compatibility.
Als uw telefoon vraagt om de
pincode voor B luetooth voert u
Als u voor het eerst een telefoon met de
Parrot ASTEROID Mini gebruikt, moet u
de twee apparaten eerst koppelen. Als uw
telefoon met de Parrot ASTEROID Mini
gekoppeld is, worden de 2 apparaten
automatisch met elkaar verbonden
wanneer ze in elkaars nabijheid worden
ingeschakeld, met de functie B luetooth®
geactiveerd.
"0000" in.
1. Zoek via uw telefoon naar B luetooth®apparaten en selecteer vervolgens
"Parrot ASTEROID Mini".
2. De koppelingsprocedure hangt van uw
telefoon af:
Als de Parrot ASTEROID Mini en
uw telefoon allebei een code
weergeven, moet u controleren
of de twee codes gelijk zijn en
een bevestiging of ontkenning
geven.
> Het scherm van de Parrot
ASTEROID
Mini
toont
"Koppelen gelukt".
Opmerking: Op sommige telefoons moet u
verbinding met de Parrot ASTEROID Mini
toestaan om automatisch verbinding te
kunnen
maken.
Zie
de
gebruikershandleiding van uw telefoon
voor meer informatie.
Het telefoonboek synchroniseren
Bij de meeste B luetooth telefoons worden
de
contacten
automatisch
gesynchroniseerd
met
het
systeemgeheugen. Wanneer u uw
contacten wijzigt, worden ze bij de
volgende verbinding automatisch opnieuw
gesynchroniseerd.
Waarschuwing: Alleen de contacten uit het
telefoongeheugen
worden
gesynchroniseerd met de Parrot ASTEROID
Mini. Breng uw contacten over naar het
telefoongeheugen als ze zijn opgeslagen op
de
simkaart.
Raadpleeg
de
Dutch
125
gebruikershandleiding van uw telefoon
voor meer informatie.
Opmerking: Op sommige telefoons moet u
de Parrot ASTEROID Mini toegang tot uw
contacten verlenen om de synchronisatie te
kunnen
uitvoeren.
Zie
de
gebruikershandleiding van uw telefoon
voor meer informatie.
De automatische synchronisatie is beperkt
tot
5000
contacten
(of
telefoonnummers)
per
gekoppelde
telefoon.
Telefoon
Een gesprek aannemen
Een inkomend gesprek wordt aangegeven
door een beltoon. De naam van het contact
wordt gemeld als het nummer van het
contact opgeslagen is in de contactenlijst
van de telefoon die is aangesloten op de
Parrot ASTEROID Mini.
Als u dit gesprek wilt aannemen,
drukt u op de toets
. Druk
vervolgens op de toets
om het
gesprek te beëindigen.
Als u dit gesprek wilt weigeren, drukt
u op de toets
.
126
Dutch
Bellen via spraakherkenning
Direct na synchronisatie met de
contactenlijst van uw telefoon kunt u
bellen via spraakherkenning. De Parrot
ASTEROID Mini herkent automatisch het
contact uit uw contactenlijst dat u wilt
bellen.
om de
1. Druk op de toets
spraakherkenning te starten.
> De Parrot ASTEROID Mini vraagt u
naar de naam van het contact dat u
wilt bellen.
2. Spreek de naam van het contact uit,
gevolgd door het soort nummer
("KANTOOR", "GSM"...) als dat
contact
verschillende
nummers
heeft.
> Als het gesproken commando goed
begrepen is, wordt automatisch
begonnen met bellen.
> Is dat niet het geval, dan wordt om
bevestiging gevraagd door het
handsfree systeem. Bevestig door
"JA", "BEL" of "BELLEN" TE
ZEGGEN.
Let op: druk op ieder ogenblik op de toets
om de spraakherkenningsmodus te
verlaten.
Muziek
De spraakherkenning voor muziek gebruiken
Met de spraakherkenningsfunctie voor
muziek kunt u de artiesten of albums die u
wilt beluisteren, via spraakherkenning
selecteren. Deze functie is beschikbaar als
u de Parrot ASTEROID Mini gebruikt met
een randapparaat zoals iPod / USB / SD, of
als u een muziektoepassing gebruikt die
compatibel is met deze functie.
1. Druk op de toets
> De lijst met audiobronnen van de
Parrot ASTEROID Mini verschijnt,
waarop de muziektoepassingen met
spraakherkenningsfunctie
worden
aangegeven die de door u gekozen
artiest of het album kunnen
aanbieden.
Opmerking: Controleer de namen van de
artiesten en albums in de tags (metadata)
van uw muziekbestanden. Ze kunnen
verschillen van de weergave in de titel van
het nummer.
.
2. Noem de naam van de artiest of het
album dat u wilt beluisteren wanneer
de Parrot ASTEROID Mini u daarom
vraagt.
iPod
1. Sluit uw iPod aan op de iPod-kabel.
2. Druk op de toets SRC en selecteer
Dutch
127
iPod.
3. Kies één van de indelingscriteria
(artiest, album, nummers, soort,
playlist) en druk op de scrolknop.
4. Kies het muziekbestand en druk op de
scrolknop.
Let op: druk op de toets
en selecteer de
eerste letter van uw artiest, album of
nummer, om gemakkelijker door de inhoud
van uw iPod te bladeren.
SD-kaart
U kunt (indien nodig met adapter) de
volgende SD-kaarten gebruiken met de
Parrot ASTEROID Mini : SD, micro SD ,
mini SD, SDHC, mini SDHC, micro SDHC.
De capaciteit van de SD-kaart mag niet
groter zijn dan 32 GB.
De muziekbestanden op uw SD-kaart
kunnen de indeling MP3 (mpeg1 layer3),
AAC, WAV, OGG of WMA hebben.
1. Steek de SD-kaart in de daartoe
bestemde sleuf aan de rechterkant
van het scherm (figuur E pag.12).
2. Druk op de toets SRC en selecteer
SD.
3. Kiest u één van de indelingscriteria
(artiest, album, nummers, soort,
playlist) en drukt u op de scrolknop.
4. Druk op het nummer om het af te
spelen.
Let op: druk op de toets
en selecteer de
eerste letter van uw artiest, album of
nummer, om gemakkelijker door de inhoud
van uw SD-kaart te bladeren.
USB-stick
De Parrot ASTEROID Mini is compatibel
met de meeste USB-sticks, MP3-spelers
en externe harde schijven. U kunt USBsticks met elke capaciteit gebruiken.
De muziekbestanden op uw USB-stick
128
Dutch
kunnen de indeling MP3 (mpeg1 layer3),
AAC, WAV, OGG of WMA hebben.
1. Sluit uw USB-randapparaat aan op de
USB-kabel.
2. Druk op de toets SRC en selecteer
USB.
3. Kiest u één van de indelingscriteria
(artiest, album, nummers, soort,
playlist) en drukt u op de scrolknop.
4. Druk op het nummer om het af te
spelen.
Let op: druk op de toets
en selecteer de
eerste letter van uw artiest, album of
nummer, om gemakkelijker door de inhoud
van uw USB-apparaat te bladeren.
Audiospeler via Bluetooth
Opmerking: Met de Parrot ASTEROID Mini
kunt u telefoneren en audio streamen via
Bluetooth op 2 verschillende telefoons,
zonder dat u een van de twee apparaten
hoeft los te koppelen.
U kunt de Parrot ASTEROID Mini
gebruiken om muziekbestanden te
beluisteren die zijn opgeslagen op een
Bluetooth audiospeler, als de speler het
profiel
A2DP
(Advanced
Audio
Distribution Profile) ondersteunt.
ASTEROID Mini :
1. Druk op de toets SRC van de
afstandsbediening (of druk op Muziek
op het scherm) en selecteer Audio
Bluetooth.
2. Speel een nummer
audiospeler.
af
op
uw
Als u de audiospeler voor het eerst
gebruikt, moet u hem eerst koppelen aan
de Parrot ASTEROID Mini. Als de
audiospeler al gekoppeld is aan de Parrot
Dutch
129
Internet
Verbinding maken met een 3G-stick
Opmerking:
Zie
het
compatibiliteitsgedeelte van de Parrot
ASTEROID Mini op onze website voor de lijst
van 3G/4G-sticks die compatibel zijn met de
Parrot ASTEROID Mini.
130
vervolgens een andere pop-up waarin
u uw pincode dient in te vullen.
3. Voer uw pincode in met behulp van de
scrolknop en selecteer vervolgens
OK. Vink de optie 'pincode
onthouden' aan als u niet wilt dat
steeds om de pincode wordt gevraagd
bij elke herstart van de Parrot
ASTEROID Mini.
1. Sluit een 3G-stick aan op de Parrot
ASTEROID Mini met behulp van een
USB-kabel.
> Er verschijnt een pop-upvenster.
Opmerking: U kunt deze instelling later
wijzigen via Instellingen > Netw erk > 3Gstick.
2. Selecteer OK om de 3G-verbinding te
activeren.
> Er verschijnt een pop-up met de
status van de 3G-verbinding en
4. Selecteer uw APN (Access Point
Name) in de lijst. Deze informatie
staat in de bij uw 3G-stick geleverde
documentatie. Als uw APN niet in de
Dutch
lijst staat kunt u hem toevoegen via
Instellingen > Netwerk > 3G-stick >
Configuratie > Nieuw toegangspunt.
>
Het
bericht
"3G-stick
geconfigureerd" verschijnt.
5. Het duurt ongeveer 30 seconden om
de verbinding tot stand te brengen. U
kunt ook op de toets
drukken en
door de menu's navigeren terwijl de
verbinding tot stand wordt gebracht.
3G-verbinding delen via Bluetooth
Indien uw telefoon het profiel B luetooth
DUN (Dial-Up Networking) of PAN
(Personal Area Network) ondersteunt,
kunt u via de B luetooth verbinding van uw
telefoon Parrot ASTEROID Mini het 3G-
netwerk van de telefoon delen.
Opmerking:
Ga
naar
de
compatibiliteitspagina op onze website om
te controleren of uw telefoon deling van de
3G-verbinding via Bluetooth ondersteunt.
Daar vindt u ook de bijbehorende
procedure:
www.parrot.com/nl/
compatibility.
1. Verbind uw telefoon met de Parrot
ASTEROID Mini via Bluetooth.
de
Parrot
ASTEROID
2. Op
Miniselecteert u Instellingen >
Netwerk > Bluetooth > Configuratie.
3. Selecteer uw APN (Access Point
Name) in de lijst en vink vervolgens
de optie Selecteren aan.
4. Druk op de toets
Verbinden.
en selecteer
5. Geef op uw telefoon toestemming
voor het delen van de verbinding.
Deze procedure verschilt per
telefoontype.
3G-verbinding delen via USB
Opmerking:
Ga
naar
de
compatibiliteitspagina op onze website om
te controleren of uw telefoon deling van de
3G-verbinding via USB ondersteunt. Daar
vindt u ook de bijbehorende procedure:
www.parrot.com/fr/compatibility.
1. Zorg dat de toetsen van uw telefoon
ontgrendeld zijn.
2. Verbind de telefoon met de Parrot
ASTEROID Mini via de bij uw
telefoon geleverde USB/micro-USB
kabel. U kunt de telefoon ook
aansluiten met de USB-verlengkabel
die geleverd is bij de Parrot
ASTEROID Mini. Via deze verbinding
kunt u tevens de batterij van uw
telefoon opladen.
3. Selecteer uw APN (Access Point
Name) in de lijst en vink vervolgens
de optie Selecteren aan. U kunt deze
instelling
later
wijzigen
via
Instellingen > Netwerk > USB.
> Er verschijnt een pop-up die
activering van de gedeelde USBverbinding aangeeft.
Dutch
131
De toepassingen gebruiken
U kunt meerdere soorten toepassingen
gebruiken met de ASTEROID Market :
muziek,
geolocatie,
rijhulp.
De
beschikbare toepassingen verschillen per
land waarin de autoradio gebruikt wordt.
Voor bepaalde toepassingen hebt
mogelijk een abonnement nodig.
u
De
Parrot ASTEROID Mini
kan
multitasken: er kunnen verschillende
toepassingen tegelijk worden gebruikt. U
kunt
bijvoorbeeld
een
webradio
beluisteren
en
tegelijkertijd
een
rijhulptoepassing gebruiken.
Ga voor meer informatie over het gebruik
van de beschikbare toepassingen naar de
132
Dutch
webpagina van de ASTEROID Market:
www.parrotasteroid.com/
asteroidmarket.
Problemen verhelpen
Voordat u begint
Controleer of het bericht "Tot ziens" op
het scherm van de Parrot ASTEROID Mini
verschijnt wanneer u het contact van het
voertuig uitzet. Raadpleeg het onderdeel
"De installatie controleren" voor meer
informatie.
Reset het apparaat. Hiertoe kiest u
voorkeuren > geavanceerde voorkeuren >
fabrieksinstel.
Controleer of de laatste update
geïnstalleerd is op de Parrot ASTEROID
Mini. Selecteer daartoe Instellingen >
Informatie > Versie. Vergelijk dit
versienummer met het nummer op de
hulppagina van de Parrot ASTEROID Mini
op onze website www.parrot.com.
Opmerking: U kunt de updates voor uw
Parrot ASTEROID Mini ook downloaden als
het apparaat verbonden is met internet. In
de meldingsbalk wordt aangegeven of er
een update beschikbaar is.
Problemen met de telefoonfunctie
Controleer of uw telefoon compatibel is
met de Parrot ASTEROID Mini. Ga
daarvoor naar de compatibiliteitspagina op
onze
website:
www.parrot.com/nl/
compatibility.
Als aangegeven wordt dat uw telefoon
compatibel is en als uw Parrot ASTEROID
Mini al van de laatste update voorzien is,
maakt u de koppeling tussen de twee
apparaten ongedaan op de Parrot
ASTEROID Mini en uw telefoon, start u
beide apparaten opnieuw op en brengt u
de verbinding tussen de twee apparaten
opnieuw tot stand.
Problemen met de muziekfunctie
Reset uw iPod/iPhone voordat u opnieuw
verbinding maakt met de Parrot
ASTEROID Mini. Een iPod / iPhone
resetten doet u als volgt (met deze
procedure worden geen gegevens gewist):
iPod: druk gelijktijdig op Menu en op
de middelste knop tot de iPod
opnieuw opstart.
iPhone/iPod touch: druk tegelijkertijd
op de knop On/Off en op de knop
Home tot de iPhone opnieuw opstart.
Raak het scherm niet aan, wanneer
het bericht "Zet uit" verschijnt.
Sommige problemen
kunnen
zich
voordoen als het randapparaat al met de
Parrot ASTEROID Mini is verbonden
wanneer u het aanzet. Probeer het
nogmaals door pas verbinding te maken
nadat u het apparaat heeft aangezet.
Voor meer informatie
Zie de hulppagina van de Parrot
ASTEROID Mini op onze website
Dutch
133
www.parrot.com.
Algemene informatie
Garantie
Onverminderd de wettelijke garantie,
geeft PARROT voor dit product een
contractuele garantie van 12 maanden op
materiaal- en productiefouten (met
uitzondering van slijtdelen, waarvoor een
garantie van 6 maanden geldt). De garantie
gaat in op de aankoopdatum en kan worden
opgeëist door het aankoopbewijs (datum,
aankoopplaats, serienummer van het
product) te tonen aan de verkoper of aan
Parrot.
Tijdens
de
contractuele
garantieperiode wordt het defecte
product in de oorspronkelijk verpakking
teruggestuurd naar de klantenservice van
134
Dutch
de verkoper. Na inspectie van het product
gaat Parrot naar eigen keuze over tot
vervanging of uitgifte van een tegoedbon,
met uitsluiting van elke andere
schadeloosstelling.
Wijzigingen
De uitleg en de specificaties in deze
gebruikershandleiding worden uitsluitend
gegeven ter informatie en kunnen zonder
voorafgaande
kennisgeving
worden
gewijzigd. Deze informatie was correct bij
het ter perse gaan en de grootste zorg
werd gewijd aan de samenstelling ervan,
om u zo nauwkeurig mogelijke informatie
te verschaffen.
Parrot S.A. kan echter niet direct of
indirect
verantwoordelijk
worden
gehouden voor eventuele schade of
toevallig
verlies
van
gegevens
voortvloeiend uit een fout of weglating in
dit document. Parrot S.A. behoudt zich het
recht voor het product of de
gebruikershandleiding te wijzigen of
verbeteren zonder enige beperking en
zonder verplichting om de gebruiker
daarover te informeren. In het kader van
de aandacht die Parrot S.A. schenkt aan de
verbetering van onze producten, kan het
product dat u hebt gekocht enigszins
verschillen van het in dit document
beschreven product. In dat geval kunt u
misschien een nieuwe versie van de
elektronische
gebruikershandleiding
vinden op de website www.parrot.com.
Hoe dit product te recycleren - afvoer van
elektrische en elektronische producten
Het symbool
op het product of de
documentatie geeft aan dat het product
aan het einde van de levensduur niet
weggegooid mag worden met het gewone
huisvuil. Ongecontroleerde afvoer van
afval kan het milieu of de gezondheid
schaden. Scheid dit afval daarom van
andere afvalsoorten en recycleer het op
verantwoorde wijze. Zo draagt u bij tot
duurzaam hergebruik van grondstoffen.
Particulieren worden verzocht contact op
te nemen met de verkoper die hen het
product verkocht heeft of bij de gemeente
inlichtingen in te winnen over hoe en waar
ze dit product zo kunnen afvoeren dat het
op milieuvriendelijke wijze kan worden
hergebruikt. Bedrijven worden verzocht
contact op te nemen met hun leveranciers
en de voorwaarden in het verkoopcontract
te raadplegen. Het product mag niet
samen met ander commercieel afval
worden weggegooid.
Gedeponeerde handelsmerken
Parrot en de logo's van Parrot zijn
geregistreerde merken van PARROT SA in
Frankrijk en andere landen.
Dutch
135
De naam en het logo van Bluetooth zijn
gedeponeerde
handelsmerken
van
Bluetooth ® SIG, Inc. en elk gebruik hiervan
door Parrot S.A. gebeurt onder licentie.
Gracenote" zijn handelsmerken of
gedeponeerde
handelsmerken
van
Gracenote in de Verenigde Staten en/of
andere landen.
Het logo “Made for iPod / iPhone”
betekent dat een elektronisch accessoire
specifiek voor iPod / iPhone, is ontwikkeld
en dat zijn ontwikkelaar voldoet aan de
prestatienormen van Apple. Apple is niet
verantwoordelijk voor het functioneren
van dit systeem of de conformiteit ervan
met de veiligheidsnormen.
Alle andere in dit document genoemde
handelsmerken
en
gedeponeerde
handelsmerken zijn eigendom van hun
respectieve eigenaren en
worden
beschermd door auteursrecht.
iPod en iPhone zijn gedeponeerde
handelsmerken van Apple, Inc. in de
Verenigde Staten en andere landen.
Gracenote®, het Gracenote-logo en logotype en het logo "Powered by
136
Dutch
Copyrights
Identification N. 394 149 496 R.C.S. PARIS
Parrot S.A.
Copyright © 2012 Parrot.
Manual do
utilizador
Antes de começar
Ìndice
Antes de começar
Instalação
Primeira utilização
Telefone
Música
Internet
No caso de problemas
Informação geral
p.137
p.138
p.144
p.146
p.147
p.149
p.152
p.153
Acerca deste guia
De modo a limitar o nosso consumo de
papel, e no ambito do nosso procedimento
tambem responsavel e respeitando ao
maximo o ambiente, a Parrot privilegia a
colocacao online dos documentos para os
utilizadores, em vez de os imprimir. Este
guia simplificado do Parrot ASTEROID
Mini limita-se a fornecer-lhe as principais
instrucoes, que lhe irao permitir utilizar
facilmente este aparelho. Encontrara mais
informacoes na seccao Suporte do nosso
website
www.parrot.com:
Manual
completo, perguntas frequentes, software
didactico…
Português
137
Nota: Para uma melhor legibilidade, iPod®
e iPhone® serão designados pelo termo
"iPhone" neste manual.
ouvir a qualquer momento os ruídos
exteriores durante a condução.
Actualizações
Avisos
As funções que necessitam de uma
atenção prolongada devem ser utilizadas
apenas quando o veículo está parado. A
sua segurança e a dos outros condutores
está acima das chamadas telefónicas,
música ou aplicações de ajuda à condução.
Seja responsável: Conduza com prudência
e preste atenção ao que o rodeia. A Parrot
recusa qualquer responsabilidade caso
escolha ignorar esta advertência.
Utilize o Parrot ASTEROID Mini com um
nível de volume razoável, de modo a poder
138
Português
Descarregue gratuitamente a última
actualização do seu produto no nosso
website www.parrot.com na secção
Suporte. Estas actualizações irão permitirlhe beneficiar de novas funcionalidades e
melhorar a compatibilidade do seu
produto.
Instalação
Nota: Recomendamos que contacte um
profissional para proceder a esta
instalação, em especial na nossa rede de
instaladores certificados.
Antes de começar
A instalação do Parrot ASTEROID Mini
consiste em inseri-lo entre o auto-rádio e
o veículo.
Nota: Os cabos fornecidos com o Parrot
ASTEROID Mini vêm equipados com
conectores ISO. Se o seu auto-rádio não vier
equipado com conectores ISO, deve
adquirir um cabo adaptador ISO para
permitir a montagem. Consulte a secção de
Compatibilidade dos veículos na página de
suporte do Parrot ASTEROID Mini para
verificar se é necessário um cabo
adaptador.
Comece por retirar o auto-rádio de origem
do seu veículo. Esta operação pode
necessitar de chaves de extracção.
Consulte o esquema eléctrico do seu
auto-rádio.
Antes de fixar os diferentes elementos do
Parrot ASTEROID Mini no habitáculo,
conecte os diferentes cabos na caixa
electrónica. Antes de fixar duravelmente
os
componentes,
controle
os
comprimentos dos cabos e certifique-se
de que os locais destes são escolhidos de
modo a que os comprimentos de cabo são
suficientes para ligar as peças amovíveis
umas às outras. Certifique-se de que os
cabos do Parrot ASTEROID Mini não ficam
dobrados ou torcidos após a instalação.
Utilize obrigatoriamente o cabo ISO
fornecido com o Parrot ASTEROID Mini.
As indicações "Conexão #" nas próximas
secções correspondem às conexões
representadas nas imagens p.6 / 7.
Se o seu veículo vier equipado com um
sistema de áudio com amplificador, utilize
as saídas Jack Line Out Front e Line Out
Rear na caixa electrónica, para evitar
qualquer problema de saturação (estalido
nos altifalantes, sopro permanente, etc.).
Ligue estas saídas Line Out ao seu sistema
de áudio, utilizando um ou dois cabos jack
para ligar o Parrot ASTEROID Mini ao seu
sistema de áudio (Conexão 1B na imagem
p.7).
Ligar o cabo da alimentação
Conectar o cabo de áudio
Ligue os feixes de áudio do veículo aos
conectores do Parrot ASTEROID Mini
(Conexões 1A e 2).
1. Desligue a bateria antes de instalar o
cabo da alimentação.
2. Ligue o conector ISO macho do Parrot
ASTEROID
Mini
ao
auto-rádio
Português
139
(conexão 3).
3. Ligue os feixes de alimentação do
veículo ao conector ISO fêmea do Parrot
ASTEROID Mini (conexão 4).
O fio vermelho do cabo deve corresponder
ao de +12V permanente, o fio cor-delaranja ao de +12V pós-contacto e o fio
preto ao de terra. Certifique-se de que o
seu fio cor-de-laranja não está ligado ao de
12V permanente, pois arriscar-se-ia a
descarregar a bateria do veículo.
Nota: De modo a proceder à verificação da
instalação, ligue primeiro o ecrã sem o
colocar no painel de bordo. Consulte a
secção "Verificar instalação" para obter
mais informações.
140
Português
Em determinados veículos, não existe fio
de +12V pós-ignição nos conectores do
veículo. Depois, é necessário ligar o fio da
alimentação cor-de-laranja na caixa dos
fusíveis ou noutra fonte de alimentação
após o contacto.
Conectar o cabo Mute
A função Mute permite interromper o som
do seu auto-rádio para dar lugar ao som do
Parrot
ASTEROID
Mini
(música,
comunicações, etc.). A escolha da entrada
Mute (Mute in 1, mute in 2 ou mute in 3)
depende da configuração do seu autorádio. Identifique a entrada Mute, depois
conecte-a ao fio amarelo livre no cabo ISO
(conexão 5).
Instalar a caixa electrónica
Evite instalar a caixa perto do aquecimento
ou ar condicionado, ou num local exposto
ao sol.
Certifique-se de que a caixa permanece
imóvel após a instalação. Deixe espaço em
torno do radiador do produto para facilitar
a evacuação do calor.
Quando a caixa estiver instalada, não force
durante a colocação do auto-rádio. Se o
espaço
atrás
do
auto-rádio
for
insuficiente, tente, por exemplo, a
desmontagem do porta-luvas.
Verificar a instalação
Instalação do duplo microfone
utilizador.
Ligue e depois corte o contacto do seu
automóvel quando tiver o Parrot
ASTEROID Mini instalado: A mensagem
"Adeus" deve aparecer no ecrã.
Recomendamos que faça deslizar o cabo
pela ranhura atrás da junta da porta.
Instalação do dongle GPS
Se não for o caso, deverá inverter as
posições dos fios vermelho e cor-delaranja. Na verdade, o fio vermelho do
cabo da alimentação deverá ser ligado a 12V
permanente, o fio cor-de-laranja a 12V
pós-contacto e o fio preto à terra. Esta
operação é efectuada simplesmente
invertendo os dois terminais que se
encontram nos cabos da Parrot (conexão
7).
Se o cabo passar por cima dos pedais,
certifique-se de que fica bem fixado.
Aviso: Não passe o cabo do microfone pelos
sistemas de aquecimento, ventilação ou ar
condicionado, ou à frente dos airbags
laterais.
Certifique-se de que o microfone fica
instalado o mais próximo possível da
cabeça do utilizador. A distância ideal é de
60 cm. Instale, de preferência, o
microfone perto do retrovisor interior.
Oriente o microfone para a boca do
Fixe o dongle GPS sobre uma superfície
plana, numa zona sem obstáculos no
interior do habitáculo.
Os pára-brisas atérmicos e os vidros com
antena incrustada podem interferir com a
recepção do GPS e reduzir a fiabilidade das
informações ligadas às aplicações de
navegação.
A antena GPS do dongle está
no lado onde está indicado
"Parrot ASTEROID GPS" e
onde se encontra o logótipo em
forma de estrela. Este logótipo
Português
141
deve ser sempre orientado
para cima.
o logótipo em forma de estrela deve estar
visível (esquema A pàg.8).
Para assegurar uma boa fixação do suporte:
Se o seu veículo possuir um pára-brisas
atérmico, fixe o dongle GPS no pára-brisas
ao nível da zona não atérmica. O lado onde
está o logótipo em forma de estrela deve
estar colado no pára-brisas (esquema B
pág.9).
Nota: A zona não atérmica do pára-brisas
depende do modelo do seu veículo. Ela
encontra-se habitualmente ao nível do
retrovisor.
Se o seu veículo não possuir um párabrisas atérmico, fixe o dongle GPS no
painel de instrumentos. O lado onde está
142
Português
Limpe a superfície de montagem
antes de colar o suporte;
Após a fixação do suporte, espere
cerca de 2 horas sem o manusear.
Instalação do cabo USB
Conecte os cabos do iPod® e USB ao Parrot
ASTEROID Mini. Recomendamos que
conecte todos os cabos do Parrot
ASTEROID Mini, mesmo que ache que
não os vai utilizar. Faça os conectores
correspondentes
saírem
pelo
compartimento para moedas ou porta-
luvas. Para isso, poderá ser necessário
fazer um buraco no interior do seu painel
de bordo. Na medida do possível, evite a
utilização de extensões USB.
O cabo para iPod deve obrigatoriamente
ser ligado à porta USB branca prevista para
este efeito. Encontrará a indicação iPod na
parte superior desta.
De modo a garantir uma qualidade de
recepção óptima, não conecte a sua pen 3G
directamente no Parrot ASTEROID Mini:
Utilize um cabo USB, de modo a instalar o
acessório no painel de bordo (ou outra
zona afastada).
Instalar o ecrã
Aviso: Evite qualquer instalação que possa
impedir a utilização de comandos
importantes ou que possa reduzir a
visibilidade do condutor. Não instale o ecrã
onde possa ser atirado devido à activação
de um airbag ou perto de uma saída de
ventilação ou de ar condicionado do
veículo.
Cole o suporte de plástico no seu painel de
instrumentos (esquema C pág.10).
cerca de 2 horas sem o manusear.
De modo a evitar riscos de roubo e de
exposição prolongada ao sol, retire o ecrã
quando sair do veículo.
Instalar o telecomando
Cole o suporte do telecomando no seu
painel de instrumentos utilizando o
adesivo na parte inferior deste.
Para assegurar uma boa fixação do suporte:
Para assegurar uma boa fixação do suporte:
Limpe a superfície de montagem
antes de colar o suporte;
Limpe a superfície de montagem
antes de colar o suporte;
Após a fixação do suporte, espere
cerca de 2 horas sem o manusear.
Após a fixação do suporte, espere
O telecomando pode ser alimentado de 2
modos: com uma pilha ou ligando à caixa
electrónica.
Para alimentar o telecomando com pilha
(esquema D pág.11) :
1. Retire a tampa de plástico circular na
parte traseira do telecomando,
girando-a no sentido dos ponteiros do
relógio.
2. Insira uma pilha do tipo 3V CR2032 no
local previsto para este efeito.
Certifique-se de que a pilha é
colocada correctamente.
3. Volte a colocar a tampa de plástico
circular, girando-a no sentido inverso
ao dos ponteiros do relógio.
Para
ligar
o
telecomando
à
caixa
Português
143
electrónica (esquema D pág.11) :
144
Primeira utilização
1. Retire a tampa de plástico circular na
parte traseira do telecomando,
girando-a no sentido dos ponteiros do
relógio.
Prima o botão
principal.
2. Ligue o cabo no local previsto para a
pilha e gire-o no sentido inverso ao
dos ponteiros do relógio.
Navegue nos menus rodando o botão
giratório e valide, premindo no botão
central Parrot.
3. Ligue a outra extremidade do cabo na
caixa electrónica, ao lado dos
conectores USB (esquema pág.6).
Para voltar ao menu anterior, prima o
botão .
Português
Navegar nos menus
para aceder ao menu
Prima o botão
para aceder ao menu
contextual, correspondente à aplicação a
ser utilizada. O menu contextual permitelhe modificar certas definições ou
percorrer mais rapidamente o conteúdo do
seu directório ou da sua fonte de áudio.
Durante a reprodução de um ficheiro
musical, prima o botão
para voltar ao
menu. Pelo contrário, quando estiver a
navegar nos menus, prima o botão SRC
para voltar ao leitor.
Prima o botão SRC para seleccionar a fonte
dos seus ficheiros de áudio.
Conectar um telemóvel por Bluetooth
Nota:
Consulte
a
página
de
compatibilidade do nosso website para
verificar se o seu telemóvel é compatível
com o Parrot ASTEROID Mini e consulte o
processo
de
emparelhamento
correspondente:
www.parrot.com/uk/
compatibility.
Se for a 1ª vez que utiliza um telemóvel
com o Parrot ASTEROID Mini, deve
primeiro emparelhar os dois aparelhos.
Quando o telemóvel estiver emparelhado
ao Parrot ASTEROID Mini, a conexão
entre os 2 aparelhos será automática
quando os 2 aparelhos forem ligados perto
um do outro com a função B luetooth®
activada.
1. A partir do seu telemóvel, inicie uma
procura de dispositivos B luetooth®
Depois seleccione "Parrot ASTEROID
Mini".
2. O processo de emparelhamento
depende então do modelo do seu
telemóvel:
Se o telemóvel o convidar a
inserir o código PIN B luetooth,
mais informações.
insira "0000".
Sincronizar o directório do telemóvel
Se o Parrot ASTEROID Mini e o
seu telemóvel apresentarem dois
códigos, verifique se os códigos
são idênticos e depois confirme
ou anule.
> O ecrã do Parrot ASTEROID
Mini
apresenta
"Emparelhamento efectuado com
sucesso".
Com a maioria dos telemóveis B luetooth, o
directório
é
sincronizado
automaticamente com a memória do
sistema. Sempre que modificar o seu
directório, a sincronização é reiniciada
automaticamente na conexão seguinte.
Nota: Nalguns telemóveis, deverá autorizar
a conexão ao Parrot ASTEROID Mini para
permitir a conexão automática. Consulte o
manual de utilizador do seu telemóvel para
Aviso: Apenas os contactos gravados na
memória do telemóvel são sincronizados.
Se os seus contactos estiverem guardados
na memória do cartão SIM, transfira-os
para a memória do telemóvel. Consulte o
manual de utilizador do seu telemóvel para
mais informações.
Português
145
Nota: Nalguns telemóveis, deverá autorizar
o acesso do Parrot ASTEROID Mini aos seus
contactos para permitir a sincronização.
Consulte o manual de utilizador do seu
telemóvel para mais informações.
A sincronização automática está limitada a
5000 contactos (ou números de
telemóvel) por telemóvel emparelhado.
Telefone
Receber uma chamada
Quando receber uma chamada, ouvirá um
toque. O nome do contacto é anunciado se
o número deste contacto fizer parte do
directório do telemóvel ligado ao Parrot
ASTEROID Mini.
Para aceitar esta chamada, prima o
botão . A seguir, prima o botão
para terminar a chamada.
Para recusar esta chamada, prima o
botão
.
146
Português
Fazer uma chamada por reco vocal
Pode
iniciar
uma
chamada
por
reconhecimento vocal directamente após
a sincronização do directório do seu
telemóvel. O Parrot ASTEROID Mini irá
reconhecer automaticamente o contacto
do seu directório que deseja contactar.
para iniciar o
1. Prima o botão
processo de reconhecimento vocal.
> O Parrot ASTEROID Mini pede-lhe
o nome do contacto que deseja
contactar.
2. Pronuncie o nome do contacto,
seguido do tipo de número
("TRABALHO", "TELEMÓVEL"...) se
este contacto tiver vários números.
> A chamada para este contacto é
iniciada automaticamente, caso o
comando de voz seja compreendido
correctamente.
> Caso contrário, o kit mãos-livres
emite
uma
mensagem
de
confirmação. Confirme, pronunciado
"SIM",
"CHAMAR"
ou
"TELEFONAR".
Nota: A qualquer momento, prima o botão
para cancelar o processo de chamada.
Música
Utilizar o reconhecimento vocal musical
A função de reconhecimento vocal musical
permite-lhe seleccionar através do
reconhecimento vocal os artistas ou
álbuns que desejar escutar. Esta função
está disponível se utilizar o Parrot
ASTEROID Mini com um periférico do
tipo iPod / USB / SD, ou se utilizar uma
aplicação musical compatível com esta
função.
1. Prima o botão
.
2. Diga o nome do artista ou do álbum
que deseja escutar quando Parrot
ASTEROID Mini lho pedir.
> A lista das fontes de áudio
conectadas ao Parrot ASTEROID Mini
e das aplicações musicais compatíveis
com a função de reconhecimento
vocal com o artista/álbum que
escolheu aparece.
Nota: Verifique os nomes dos artistas e
álbuns nas tags (metadados) dos seus
ficheiros musicais. Estes podem ser
diferentes dos apresentados no título da
sua faixa.
iPod
1. Conecte o seu iPod ao cabo do iPod.
2. Prima o botão SRC e seleccione iPod.
3. Prima a faixa para iniciar a sua
Português
147
reprodução.
Nota: Prima o botão
e seleccione a
primeira letra do seu artista, álbum ou
faixa para navegar mais facilmente no
conteúdo do seu iPod.
Cartão SD
Pode utilizar os seguintes cartões SD (se
necessário) com o Parrot ASTEROID
Mini : SD, micro SD , mini SD, SDHC, mini
SDHC, micro SDHC. A capacidade do
cartão SD não deve ser superior a 32Gb.
Os ficheiros musicais no seu cartão SD
podem estar no formato MP3 (mpeg1
layer3), AAC, WAV, OGG ou WMA.
1. Insira o cartão SD no local previsto
148
Português
para este efeito, no lado direito do
ecrã (imagem E p.12).
2. Prima o botão SRC e seleccione SD.
3. Seleccione um dos critérios de
classificação (artista, álbum, faixa,
género, playlist) e prima o botão
giratório.
4. Prima a faixa para iniciar a sua
reprodução.
Nota: Prima o botão
e seleccione a
primeira letra do seu artista, álbum ou
faixa para navegar mais facilmente no
conteúdo do seu cartão SD.
Pen USB
O Parrot ASTEROID Mini é compatível
com a maioria das pens USB / leitores de
MP3 / discos rígidos externos. Não existe
qualquer restrição ao nível da capacidade
das pens USB.
Os ficheiros musicais na sua pen USB
podem estar no formato MP3 (mpeg1
layer3), AAC, WAV, OGG ou WMA.
1. Conecte o seu periférico USB no cabo
USB.
2. Prima o botão SRC e seleccione USB.
3. Seleccione um dos critérios de
classificação (artista, álbum, faixa,
género, playlist) e prima o botão
giratório.
4. Prima a faixa para iniciar a sua
reprodução.
Nota: Prima o botão
e seleccione a
primeira letra do seu artista, álbum ou
faixa para navegar mais facilmente no
conteúdo do seu dispositivo USB.
Utilizar com um leitor de áudio Bluetooth
Nota: O Parrot ASTEROID Mini permite-lhe
utilizar a função de telefonia e streaming de
áudio através de Bluetooth com 2
telemóveis diferentes, sem que tenha de
desconectar um dos 2 aparelhos.
Pode utilizar o Parrot ASTEROID Mini para
ouvir ficheiros de música armazenados
num leitor de áudio Bluetooth, se este
suportar o perfil A2DP (Advanced Audio
Distribution Profile).
Se utilizar o leitor de áudio pela 1ª vez,
deve primeiro emparelhá-lo ao Parrot
ASTEROID Mini. Se o leitor de áudio já
estiver emparelhado ao Parrot ASTEROID
Mini :
1. Prima o botão SRC e seleccione Audio
Bluetooth.
2. Inicie a reprodução de uma faixa no
seu leitor de áudio.
Internet
Conexão com uma pen 3G
Nota:
Consulte
a
secção
de
compatibilidade do Parrot ASTEROID Mini
no nosso website para conhecer a lista de
pens 3G/4G compatíveis com o Parrot
ASTEROID Mini.
1. Ligue uma pen 3G ao Parrot
ASTEROID Mini através de um cabo
USB.
> Abre-se uma janela pop-up.
2. Seleccione OK para activar a conexão
3G.
> Aparece uma janela pop-up do
estado da conexão 3G, seguida de
Português
149
outra janela pop-up a pedir-lhe o seu
código PIN.
3. Insira o seu código PIN utilizando o
botão giratório e seleccione OK.
Escolha a opção Memorizar o código
PIN se preferir que o código PIN não
lhe seja pedido em cada ligação do
Parrot ASTEROID Mini.
Nota: A seguir, poderá modificar esta
definição seleccionando Pa râ m etros > Rede
> Pen 3G.
4. Seleccione o seu APN (Access Point
Name) na lista proposta. Esta
informação está disponível na
documentação fornecida com a sua
pen 3G. Se o seu APN não aparecer na
150
Português
lista, pode adicioná-la, seleccionando
Parâmetros > Rede > Pen 3G >
Configuração > Novo ponto de
acesso.
> Aparece a mensagem "Pen 3G
configurada".
5. Espere cerca de 30 segundos até que
a conexão seja estabelecida. Também
pode premir o botão e navegar nos
menus enquanto a conexão é
estabelecida.
Partilha da conexão 3G por Bluetooth
Se tiver um telemóvel que suporte o perfil
B luetooth DUN (Dial-Up Networking) ou
PAN (Personal Area Network), a conexão
através de B luetooth do seu telemóvel ao
Parrot ASTEROID Mini permite-lhe
partilhar a conexão 3G do telemóvel.
Nota:
Consulte
a
página
da
compatibilidade no nosso website para
verificar se o seu telemóvel permite
partilhar a conexão 3G por Bluetooth e
consultar o respectivo procedimento:
www.parrot.com/uk/compatibility.
1. Conecte o seu telemóvel ao Parrot
ASTEROID Mini via Bluetooth.
Parrot
ASTEROID
Mini,
2. No
seleccione Parâmetros > Rede >
Bluetooth > Configuração.
3. Seleccione o seu APN (Access Point
Name) na lista proposta, depois
escolha a opção Seleccionar.
4. Prima o botão
Conectar.
e
seleccione
5. Autorize a partilha de conexão no seu
telemóvel. Este procedimento difere,
de acordo com o modelo do seu
telemóvel.
Partilha da conexão 3G por USB
Nota:
Consulte
a
página
da
compatibilidade no nosso website para
verificar se o seu telemóvel permite
partilhar a conexão 3G por USB e consultar
o
respectivo
procedimento:
www.parrot.com/fr/compatibility.
1. Certifique-se de que o teclado do seu
telemóvel está desbloqueado.
2. Conecte o seu telemóvel ao Parrot
ASTEROID Mini utilizando o cabo
USB/micro USB fornecido com o seu
telemóvel. Também pode conectá-lo
utilizando a extensão USB fornecida
com o Parrot ASTEROID Mini. Esta
conexão permite também recarregar a
bateria do seu telemóvel.
3. Seleccione o seu APN (Access Point
Name) na lista proposta, depois
escolha a opção Seleccionar. A seguir,
poderá modificar esta definição
seleccionando Parâmetros > Rede >
USB.
> Aparece uma janela pop-up a indicar
a activação da partilha de conexão
USB.
ASTEROID Market : Utilizar as aplicações
Pode utilizar vários tipos de aplicações
com o ASTEROID Market : Música,
geolocalização, ajuda à condução. As
aplicações disponíveis são diferentes de
acordo com o país de utilização.
Algumas aplicações podem necessitar de
uma subscrição.
O Parrot ASTEROID Mini é multi-tarefas:
Várias aplicações podem ser utilizadas em
simultâneo. Por exemplo, pode escutar
uma Webradio e utilizar uma aplicação de
ajuda à condução em simultâneo.
Para obter mais informações acerca da
utilização das aplicações disponíveis,
consulte a página web do ASTEROID
Português
151
Market:
www.parrotasteroid.com/
asteroidmarket.
No caso de problemas
Parrot ASTEROID Mini no nosso website
www.parrot.com.
Antes de começar
Nota: Também pode descarregar as
actualizações do seu Parrot ASTEROID Mini
quando este estiver ligado à Internet. A
disponibilidade de uma actualização é-lhe
indicada na barra de notificação.
Certifique-se de que a mensagem "Adeus"
aparece no ecrã do Parrot ASTEROID Mini
quando cortar o contacto do veículo.
Consulte a secção "Verificar instalação"
para obter mais informações.
Reinicie o aparelho. Para isso, seleccione
Preferências > preferências avançadas >
predefinições.
Verifique se tem a última actualização no
Parrot ASTEROID Mini. Para isso,
seleccione Parâmetros > Acerca > Versão.
Compare este número da versão com
aquele indicado na página de suporte do
152
Português
Problemas ligados à função de telefonia
Verifique a compatibilidade do seu
telemóvel com o Parrot ASTEROID Mini.
Para isso, consulte a página da
compatibilidade no nosso website:
www.parrot.com/uk/compatibility.
Se o seu telemóvel for indicado como
compatível, e se o seu Parrot ASTEROID
Mini já tiver a última actualização, elimine
o emparelhamento entre os 2 aparelhos no
Parrot ASTEROID Mini e no seu
telemóvel, reinicie os 2 aparelhos e depois
volte a estabelecer a conexão entre os 2
aparelhos.
Problemas ligados à função da música
Reinicie o seu iPod / iPhone antes de
voltar a fazer a ligação ao Parrot
ASTEROID Mini. Para reiniciar um iPod /
iPhone (este procedimento não apagará
quaisquer dados):
iPod: Prima em simultâneo Menu e o
botão central até que o iPod seja
reiniciado.
iPhone / iPod touch: Prima em
simultâneo o botão On/Off e o botão
Home até que o iPhone seja
reiniciado. Não toque no ecrã quando
a mensagem "Faça deslizar para
desligar" aparecer.
Podem aparecer alguns problemas se o
periférico já estiver conectado ao Parrot
ASTEROID Mini quando efectuar o
contacto. Volte a tentar, conectando o
dispositivo após ter efectuado o contacto.
Para obter mais informações
Consulte a página de suporte do Parrot
ASTEROID Mini no nosso website
www.parrot.com.
Informação geral
Garantia
Sem prejuízo da garantia legal, a PARROT
garante contratualmente, por um período
de 12 meses a partir da data de compra
inicial efectuada pelo consumidor
(excepto peças de desgaste garantidas 6
meses), que o produto está isento de
defeitos no que respeita aos materiais e ao
fabrico, mediante apresentação do
comprovativo de compra (data, local de
compra, nº de série do produto) ao
revendedor ou à Parrot. Durante a vigência
da garantia contratual, o produto
defeituoso deverá ser devolvido na sua
embalagem de origem ao serviço pós-
Português
153
venda do revendedor. Após inspecção do
produto, a Parrot procederá, à sua escolha,
à substituição ou emissão de um haver,
excluindo qualquer outro dano.
Modificações
As explicações e especificações contidas
neste manual do utilizador apenas são
fornecidas a título informativo e podem
ser modificadas sem aviso prévio. Estas
informações estão correctas aquando da
impressão e foi prestada a maior atenção
aquando da sua redacção para lhe fornecer
informações com a maior precisão
possível.
No entanto, a Parrot S.A. não irá assumir
qualquer responsabilidade, directa ou
154
Português
indirecta, por prejuízos ou perdas de
dados acidentais resultantes de um erro
ou omissão no presente documento. A
Parrot S.A. reserva-se o direito de alterar
ou melhorar o produto, bem como o
respectivo manual do utilizador, sem
qualquer restrição ou obrigação de avisar o
utilizador. No âmbito da atenção prestada
pela Parrot S.A. para melhorar os nossos
produtos, é possível que o produto que
adquiriu seja ligeiramente diferente do
descrito no presente documento. Neste
caso, poderá eventualmente encontrar
uma nova versão do manual do utilizador
em formato electrónico no website
www.parrot.com.
Como reciclar este produto – Resíduos de
equipamentos eléctricos e electrónicos
O símbolo
no produto ou respectiva
documentação indica que não deve ser
eliminado, no termo da sua vida útil, com
os outros resíduos domésticos. Tendo
conta que a eliminação incontrolada dos
resíduos pode prejudicar o ambiente ou a
saúde humana, por favor, separe-o dos
outros tipos de resíduos e recicle-o de
forma responsável. Dessa forma, irá
favorecer a reutilização sustentável dos
recursos
materiais.
Pede-se
aos
particulares que contactem o distribuidor
que lhes vendeu o produto ou que se
informem junto da câmara da sua
residência para saberem onde e como
podem eliminar este produto para que seja
reciclado respeitando o ambiente. Pedese igualmente às empresas que contactem
os seus fornecedores e consultem as
condições do respectivo contrato de
venda. Este produto não deve ser
eliminado com os restantes resíduos
comerciais.
é feita sob licença.
Unidos e/ou outros países.
Todas as marcas comerciais e marcas
registradas mencionadas no presente
documento são protegidas por Direitos de
Autor e são propriedade dos seus
respectivos proprietários.
Marcas registradas
O logótipo “Made for iPod / iPhone”
significa que foi desenvolvido um
acessório electrónico especificamente
para o iPod / iPhone e que o seu fabricante
certifica que responde às normas de
desempenho Apple. A Apple não se
responsabiliza pelo funcionamento deste
dispositivo ou pela sua conformidade com
as normas de segurança.
Parrot, os logótipos Parrot são marcas
registradas da PARROT SA em França e
noutros países.
iPod e iPhone são marcas da Apple, Inc.
registradas nos Estados Unidos e noutros
países.
Parrot S.A.
O nome e o logótipo Bluetooth são marcas
registradas da Bluetooth ® SIG, Inc. e
qualquer utilização destas pela Parrot S.A.
Gracenote®, o logo e logótipo Gracenote, e
o logo "Powered by Gracenote" são marcas
comerciais
registadas
ou
marcas
comerciais da Gracenote nos Estados
Copyrights
Identification N. 394 149 496 R.C.S. PARIS
Copyright © 2012 Parrot.
Português
155
156
157
158
Technical support
If you have any questions regarding your Parrot product, contact our hotline by phone or using our technical contact form available on our
website (support section).
China :
[+86] 755 8203 3307
Europe :
[+33] 1 48 03 60 69 (Spoken languages : French, English and Spanish)
France :
01 48 03 60 69
Germany :
0900 1727768
Hong Kong : [+852] 2736 1169
Italy :
[+39] 02 59 90 15 97
Spain :
[+34] 902 404 202
UK :
[+44] (0)844 472 2360
USA :
[+1] (877) 9 Parrot (toll free)
Our hotline is at your disposal from Monday to Friday. Refer to our website for more information about the service hours.
FCCID:RKXMKi2