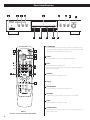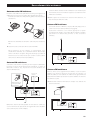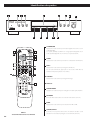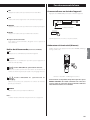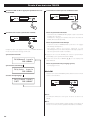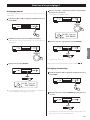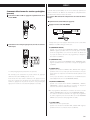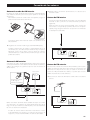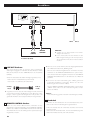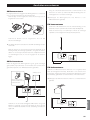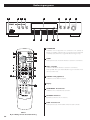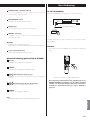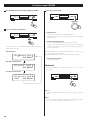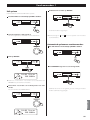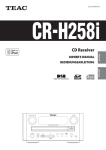
1
CQX1A1521Z
Z
T-R650
OWNER’S MANUAL
ENGLISH
AM/FM Stereo Tuner
MANUEL DU PROPRIÉTAIRE
BEDIENUNGSANLEITUNG
MANUALE DI ISTRUZIONI
FRANÇAIS
MANUAL DEL USUARIO
HANDLEIDING
ESPAÑOL
DEUTSCH
ITALIANO
NEDERLANDS
CAUTION: TO REDUCE THE RISK OF ELECTRIC SHOCK, DO
NOT REMOVE COVER (OR BACK). NO USER-SERVICEABLE
PARTS INSIDE. REFER SERVICING TO QUALIFIED SERVICE
PERSONNEL.
The lightning flash with arrowhead symbol, within an
equilateral triangle, is intended to alert the user to the
presence of uninsulated “dangerous voltage” within the
product’s enclosure that may be of sufficient magnitude
to constitute a risk of electric shock to persons.
The exclamation point within an equilateral triangle is
intended to alert the user to the presence of important
operating and maintenance (servicing) instructions in the
literature accompanying the appliance.
< Do not expose this apparatus to drips or splashes.
< Do not place any objects filled with liquids, such as vases, on the
apparatus.
< Do not install this apparatus in a confined space such as a book
case or similar unit.
< The apparatus draws nominal non-operating power from the
AC outlet with its POWER or STANDBY/ON switch not in the ON
position.
< The apparatus should be located close enough to the AC outlet so
that you can easily reach the power cord plug at any time.
< The mains plug is used as the disconnect device, the disconnect
device shall remain readily operable.
< If the product uses batteries (including a battery pack or installed
batteries), they should not be exposed to sunshine, fire or excessive
heat.
< Caution should be taken when using earphones or headphones
with the product because excessive sound pressure (volume) from
earphones or head-phones can cause hearing loss.
IMPORTANT SAFETY INSTRUCTIONS
1)
2)
3)
4)
5)
6)
7)
8)
9)
10)
11)
12)
13)
14)
2
Read these instructions.
Keep these instructions.
Heed all warnings.
Follow all instructions.
Do not use this apparatus near water.
Clean only with dry cloth.
Do not block any ventilation openings. Install in accordance with
the manufacturer’s instructions.
Do not install near any heat sources such as radiators, heat
registers, stoves, or other apparatus (including amplifiers) that
produce heat.
Do not defeat the safety purpose of the polarized or groundingtype plug. A polarized plug has two blades with one wider
than the other. A grounding type plug has two blades and
a third grounding prong. The wide blade or the third prong
are provided for your safety. If the provided plug does not fit
into your outlet, consult an electrician for replacement of the
obsolete outlet.
Protect the power cord from being walked on or pinched
particularly at plugs, convenience receptacles, and the point
where they exit from the apparatus.
Only use attachments/accessories specified by the manufacturer.
Use only with the cart, stand, tripod, bracket,
or table specified by the manufacturer, or
sold with the apparatus. When a cart is
used, use caution when moving the cart/
apparatus combination to avoid injury from
tip-over.
Unplug this apparatus during lightning storms or when unused
for long periods of time.
Refer all servicing to qualified service personnel. Servicing is
required when the apparatus has been damaged in any way,
such as power-supply cord or plug is damaged, liquid has been
spilled or objects have fallen into the apparatus, the apparatus
has been exposed to rain or moisture, does not operate normally,
or has been dropped.
WARNING: TO PREVENT FIRE OR SHOCK HAZARD,
DO NOT EXPOSE THIS APPLIANCE TO RAIN OR
MOISTURE.
CAUTION
< DO NOT REMOVE THE EXTERNAL CASES OR CABINETS TO EXPOSE
THE ELECTRONICS. NO USER SERVICEABLE PARTS ARE WITHIN!
< IF YOU ARE EXPERIENCING PROBLEMS WITH THIS PRODUCT,
CONTACT TEAC FOR A SERVICE REFERRAL. DO NOT USE THE
PRODUCT UNTIL IT HAS BEEN REPAIRED.
Contents
Thank you for choosing TEAC. Read this manual carefully to
get the best performance from this unit.
Before use . . . . . . . . . . . . . . . . . . . . . . . . . . . . . . . . . . . . . . . . . . . . . . . . . . . . 3
Connection . . . . . . . . . . . . . . . . . . . . . . . . . . . . . . . . . . . . . . . . . . . . . . . . . . . 4
Connecting Antennas . . . . . . . . . . . . . . . . . . . . . . . . . . . . . . . . . . . . . . . . . 5
Before use
Read this before attempting any operations.
< The voltage supplied to the unit should match the voltage as
printed on the rear panel. If you are in any doubt regarding this
matter, consult an electrician.
Basic operations . . . . . . . . . . . . . . . . . . . . . . . . . . . . . . . . . . . . . . . . . . . . . . 7
< Choose the installation location of your unit carefully. Avoid
placing it in direct sunlight or close to a source of heat. Also avoid
locations subject to vibrations and excessive dust, heat, cold or
moisture.
Listening to FM/AM . . . . . . . . . . . . . . . . . . . . . . . . . . . . . . . . . . . . . . . . . . . 8
< Do not place the unit on an amplifier/receiver.
Parts Identification . . . . . . . . . . . . . . . . . . . . . . . . . . . . . . . . . . . . . . . . . . . . 6
Preset Tuning . . . . . . . . . . . . . . . . . . . . . . . . . . . . . . . . . . . . . . . . . . . . . . . . . 9
Preset Tuning (Remote Control) . . . . . . . . . . . . . . . . . . . . . . . . . . . . . . 11
< Do not open the cabinet as this might result in damage to the
circuitry or electrical shock. If a foreign object should get into the
unit, contact your dealer or service company.
PTY Search . . . . . . . . . . . . . . . . . . . . . . . . . . . . . . . . . . . . . . . . . . . . . . . . . . . 14
Setting the Clock . . . . . . . . . . . . . . . . . . . . . . . . . . . . . . . . . . . . . . . . . . . . . 16
Setting the Daily Timer . . . . . . . . . . . . . . . . . . . . . . . . . . . . . . . . . . . . . . . 16
< When removing the power plug from the wall outlet, always pull
directly on the plug, never yank the cord.
< Do not attempt to clean the unit with chemical solvents as this
might damage the finish. Use a clean, dry or slightly damp cloth.
Sleep timer . . . . . . . . . . . . . . . . . . . . . . . . . . . . . . . . . . . . . . . . . . . . . . . . . . 18
< Keep this manual in a safe place for future reference.
Troubleshooting . . . . . . . . . . . . . . . . . . . . . . . . . . . . . . . . . . . . . . . . . . . . . 19
Specifications . . . . . . . . . . . . . . . . . . . . . . . . . . . . . . . . . . . . . . . . . . . . . . . . 20
Maintenance
If the surface of the unit gets dirty, wipe with a soft cloth or
use diluted neutral cleaning liquid. Be sure to remove any fluid
completely. Do not use thinner, benzine or alcohol as they may
damage the surface of the unit.
3
ENGLISH
RDS . . . . . . . . . . . . . . . . . . . . . . . . . . . . . . . . . . . . . . . . . . . . . . . . . . . . . . . . . 13
Connection
T-R650
A
B
C
R
L
TUNER
(LINE IN)
REMOTE
CONTROL
Amplifier (A-R650)
A LINE OUT jacks
B REMOTE CONTROL jack
These jacks transmit an analog 2-channel audio signal. Connect
these jacks to the TUNER jacks of the amplifier (A-R650) with a
stereo RCA pin cable.
If you have TEAC A-R650, connect this jack to the A-R650’s
remote control jack wi†h remote control connection cord.
Convenient system control operations are available.
< When you tune in a station, the input selector of the A-R650 is
set to “TUNER” automatically.
Make sure to connect the cable as follows:
white plug q white jack (L: left channel)
red plug q red jack (R: right channel)
White (L)
Red (R)
CAUTION:
< Switch off the power to all equipment before
making connections.
< Read the instructions of each component you
intend to use with this unit.
White (L)
Red (R)
< Be sure to insert each plug securely. To prevent hum and noise,
avoid bundling the signal interconnection cables together with
the AC power cord or speaker cables.
When you want to use the remote control functions, connect
the REMOTE CONTROL jack of each component by a remote
control connection cord.
< You can use the remote control unit UR-431 (provided for
A-R650). Aim the remote control unit at the A-R650 to operate
this unit.
Note:
The remote control unit is not provided for this unit.
C AC power cord
After all other connections are complete, connect the plug to the
AC wall socket.
< Be sure to connect the power cord to an AC outlet which
supplies the correct voltage.
< Hold the power plug when plugging or unplugging the power
cord.
4
Connecting Antennas
FM Indoor Antenna
AM Indoor Loop Antenna
The high-performance AM loop antenna provided with this unit is
sufficient for good reception in most areas.
To stand the loop antenna on a surface, fix the claw to the slot in
the antenna base.
Connect the lead-type FM antenna to the FM 75Ω socket, extend
the lead and tune in your favourite station (see page 8).
Adjust the antenna in a suitable location like a window frame or
wall which gives the best reception and then fix the antenna in
that position with thumbtacks or the like.
ENGLISH
Connect the loop antenna‘s wires to the AM antenna terminals.
< Make sure to connect the black wire to the GND terminal.
Place the antenna on a shelf or hang it on a window frame, etc.,
in the direction which gives the best reception. Keep all other
wires such as power cords, speaker wires or interconnected wires
as far away as possible from the antenna.
FM Outdoor Antenna
AM Outdoor Antenna
If the AM loop antenna provided does not deliver sufficient reception
(often due to being too far from the transmitter or in a concrete
building, etc.), it may be necessary to use an outdoor AM antenna.
AM Outdoor
Antenna
In an area where FM signals are weak, it will be necessary to use
an outdoor FM antenna. Generally, a 3-element antenna will be
sufficient; if you live in an area where the FM signals are particularly
weak, it may be necessary to use one with 5 or more elements.
< Disconnect the FM indoor antenna when using an outdoor
antenna.
Make sure to connect
the black wire to the
GND terminal.
Use either a high quality commercially available AM antenna or,
if not available, an insulated wire more than 5 m long, strip one
end, and connect this to the terminal as shown.
The antenna wire should be strung outdoors or indoors near a
window. For better reception, connect the GND terminal to a
reliable ground.
< Even when using an outdoor AM antenna, do not disconnect the
AM loop antenna.
5
Parts Identification
A
B
C
D
E
J
K
F
L
M
G
H
I
N
A STANDBY/ON
a
b
M
c
d
K
L
Press this button to turn the unit on or put in the standby mode.
The standby indicator lights red when the unit is in the standby
mode. When the unit is turned on, it goes out.
B TIMER
Press this button to turn on or off the timer function.
C DAILY
H
G
J
C D
B
Press this button to set the timer.
On the remote control, press and hold the TIME ADJ button for
more than 2 seconds.
D TIME ADJ
Press this button to adjust the clock.
E Display
e
F TUNING MODE
Press this button to change the tuning mode.
G FM MODE
In FM mode, use this button to select stereo or monaural.
H BAND
Press this button to select FM or AM.
I TUNING/SELECT
UR-431
Remote control unit provided with A-R650
6
Turn this knob to tune in a station, to select a preset station, or to
select a menu item.
Basic operations
J RDS
Press this button to select the RDS mode.
How to turn the unit on or off
Press the STANDBY/ON button to turn the unit on.
K FILE
Use this button to assign names to the preset stations.
L MEMORY
Press this button to store preset stations into memory.
standby indicator
M ENTER
Press this button to enter your selection.
N Remote sensor
When using the remote control unit, point it towards the remote
sensor.
Remote control unit (provided with A-R650)
a ON
Press this button to turn the unit on.
ENGLISH
The standby indicator goes out.
Dimmer
Each time you press the DIMMER button, the display changes as
follows:
b STANDBY
Press this button to turn the unit standby mode.
c
(Manual tuning UP DOWN button (AM/FM))
Use this button to tune in a station and select the preset number
for the station at manual preset.
d
(Preset tuning UP DOWN button (AM/FM))
Use this button to select the preset number for the station.
Normal q Dimmed q Display off
e DIMMER
Press this button to dim the display.
This function is available only when the REMOTE CONTROL
jack of the T-R650 and the A-R650 are connected with a
remote control connection cord.
Note:
The remote control unit is not provided for this unit.
7
Listening to FM/AM
1 Select FM or AM by pressing the BAND button repeatedly.
3 Select the station you want to listen to.
2 Select the desired tuning mode.
Manual tuning mode
Turn the TUNING/SELECT knob until the station you want to
listen to is found.
The frequency changes by a fixed step (FM: 50 kHz steps, AM: 9
kHz steps).
Each time the TUNING MODE button is pressed, the tuning mode
changes as follows:
Manual tune
FM
< Manual
tune >
108.00MHz
Auto tuning mode
Turn the TUNING/SELECT knob to begin auto tuning.
When a station is found, the unit tunes in the station
automatically. Repeat this step until the station you want to
listen to is found.
< Press the ENTER button to stop the auto tuning. (on the front
panel of the unit)
< Use the TUNING button (
) when using the remote control
unit.
Preset tuning mode
See page 9 to 13.
Auto tune
FM
<
Auto tune >
108.00MHz
FM Mode
Pressing the FM MODE button alternates between Stereo mode
and Mono mode.
Preset tune
FM < Preset tune >
CH01
108.00MHz
Stereo:
FM stereo broadcasts are received in stereo and “Stereo” is
displayed.
Mono:
Select this mode when the signal is weak. Reception will be
forced monaural, reducing unwanted noise.
8
Preset Tuning 1
Manual Preset
You can store up to 30 FM and 30 AM stations.
4 Within 4 seconds, select the preset number for this station.
Turn the TUNING/SELECT knob.
1 Select AM or FM by pressing the BAND button repeatedly.
FM 10:00 Stereo
CH12
108.00MHz
See the previous pages for the procedure of tuning.
ENGLISH
2 Tune in the station you want to store.
5 Within 4 seconds, press the MEMORY button.
The station is stored.
3 Press the MEMORY button.
< To store more stations, repeat steps 2 to 5 .
Presetting Automatically
1 Select FM or AM by pressing the BAND button repeatedly.
FM 10:00 Stereo
CH -108.00MHz
< If you do not operate within 4 seconds after pressing the
MEMORY button, presetting will be cancelled.
2 Press and hold the MEMORY button for more than 2
seconds.
Up to 30 of the best received stations in your area will be stored
automatically.
9
Preset Tuning 2
How to select preset stations (FM/AM)
1 Select AM or FM by pressing the BAND button repeatedly.
You can assign names to the preset stations. (Up to 4 characters)
When the FILE button is pressed, the assiggned name is displayed
instead of the clock. Press the FILE button again to return to the
nomal display (clock).
Assigning the Names to the Preset Stations
1 Select a preset channel you want to assign the name in the
“Preset tune“ mode.
< Or you can assign the name to the current tuned station, and
preset it into the memory.
2 Select the preset tuning mode.
Press the TUNING MODE button repeatedly until “Preset tune” is
displayed.
2 Hold down the FILE button for more than 1.5 seconds.
FM < Preset tune >
CH01
108.00MHz
3 Select a preset channel by turning the TUNING/SELECT
knob.
FM
---- 03:01
CH09
92.50MHz
“----” appears, and the first “-” flashes on the display.
3 Select a character using the TUNING/SELECT button.
The selected preset channel is tuned in.
Available characters:
10
Preset Tuning 1 (Remote Control)
4 Press the ENTER button.
Manual Preset
You can store up to 30 FM and 30 AM stations.
1 Select AM or FM by pressing the BAND button repeatedly.
The next “-” flashes.
Up to 4 characters can be used per station.
Repeat steps 3 and 4 to input characters.
5 Press the MEMORY button.
or
button to select the station you want
to store.
FM
BBC- 03:01
CH__
92.50MHz
“CH__” flashes.
6 Select a preset channel to store the station using the
TUNING/SELECT knob.
3 Press the MEMORY button.
7 Press the MEMORY button.
FM 10:00 Stereo
CH -108.00MHz
< If you do not operate within 4 seconds after pressing the
MEMORY button, presetting will be cancelled.
The assigned name is kept in memory.
If the old name is in memory, it will be overwritten.
continue to next page q
11
ENGLISH
2 Press the
Preset Tuning 2 (Remote Control)
4 Within 4 seconds, press the
or
button to select the
preset number for this station.
FM 10:00 Stereo
CH12
108.00MHz
Presetting Automatically
1 Select FM or AM by pressing the BAND button repeatedly.
2 Press and hold the MEMORY button for more than 2
seconds.
You can also use the numeric buttons.
< When you use the numeric buttons, press the TUNER button of
the remote control first.
Up to 30 of the best received stations in your area will be stored
automatically.
For instance, to select preset number 25, first press the TUNER
button, and then press “2” and “5”.
To select numbers less than 10, press “0” and then the number. As
an example, to select number 5, press “0” and “5”. (Optionally, you
may press just the number “5” and then wait a few seconds.)
5 Within 4 seconds, press the MEMORY button.
The station is stored.
< To store more stations, repeat steps 2 to 5 .
12
RDS 1
How to select preset stations
1 Select AM or FM by pressing the BAND button repeatedly.
The Radio Data System (RDS) is a broadcasting service which allows
stations to send additional information along with the regular radio
programme signal.
RDS works on the FM waveband in Europe only.
1 Tune in an FM station (see page 8).
2 Press the RDS MODE button.
Each time the RDS MODE button is pressed, the RDS mode is
changed as follows:
PS (PROGRAM SERVICE)
When you select PROGRAM SERVICE, “PROGRAM SERVICE” will
blink for about 3 seconds and then the programme service
name or a station’s name will be displayed. If there is no
programme service data, the frequency will be displayed.
The selected preset channel is tuned in.
For instance, to select preset number 25, first press the TUNER
button, and then press “2” and “5”.
To select numbers less than 10, press “0” and then the number. As
an example, to select number 5, press “0” and “5”. (Optionally, you
may press just the number “5” and then wait a few seconds.)
PTY (PROGRAM TYPE)
When you select PROGRAM TYPE, “PROGRAM TYPE” will blink
for about 3 seconds and then the programme type will be
displayed.
RT (RADIO TEXT)
When you select RADIO TEXT, “RADIO TEXT” will blink for about
3 seconds and then the news of stations composed of up to 64
symbols will be displayed.
If there is no radio text data, RDS mode will be automatically
switched to PROGRAM SERVICE mode.
TA (TRAFFIC ANNOUNCE)
When you select TRAFFIC ANNOUNCE, “TRAFFIC ANNOUNCE”
will blink for 3 seconds and then the unit searches for a traffic
announcement.
< When a traffic programme is found, the TRAFFIC ANNOUNCE
mode is switched to PROGRAM SERVICE mode.
If the station currently selected is transmitting a traffic program
signal, the RDS mode will be switched to PROGRAM SERVICE
mode without searching for a traffic program.
CT (CLOCK TIME)
Displays the information about times provided from the station.
When you select CLOCK TIME, “CLOCK TIME” will blink for about
3 seconds and then the clock time will be displayed.
13
ENGLISH
2 Select a preset channel by the numeric buttons.
RDS 2
PTY Search
You can search for stations by programme type.
The clock setting of this unit is automatically adjusted
according to the CLOCK TIME (CT) data.
If you tune in an RDS station broadcasting incorrect CT data,
the clock might be wrongly adjusted, and that may eventually
affect the timer operation.
When you do not want the clock of this unit to be set according
to the CT data, turn off the auto clock adjustment.
1 Select FM by pressing the BAND button repeatedly.
< No matter which RDS mode is selected, the unit receives CT
data and adjusts the clock.
To turn off the auto clock adjustment, press and hold the
RDS MODE button for more than 8 seconds.
2 Press the RDS MODE button for more than 2 seconds.
< To turn on the auto clock adjustment again, press and hold
the RDS MODE button for more than 8 seconds.
< When the auto clock adjustment is turned off, CLOCK TIME
is not displayed.
3 Select the desired programme type (PTY).
Turn the TUNING/SELECT knob to select an item
Select your desired one from among 31 kinds of PTY programmes.
The programme type will blink.
4 Press the ENTER button.
Searching starts.
< When the broadcast whose programme type you have selected
is found, searching stops and the programme type will be
displayed.
< If the broadcast of selected programme type is not found during
PTY Search, it will stop at the beginning frequency.
< If you want to stop searching, press the RDS MODE button.
14
31 kind of PTY programmes:
Phone In:
programme in which the public expresses its view by phone.
News:
brief announcements, events, public opinion, reports, actual
situations.
Travel & Touring:
travel reports.
Current Affairs:
a kind of suggestion including practical announcements other
than news, documents, discussion, analysis and so on.
Leisure & Hobby:
programmes concerning recreational activities.
Jazz Music:
jazz music.
Country Music:
country music.
Sport:
sports related programmes.
National Music:
national music.
Education:
educational and cultural information.
Oldies Music:
music from the so-called golden age of popular music.
Drama:
all kinds of radio concert and serial drama.
Folk Music:
folk music.
Cultures:
all aspects of national or local culture including religious events,
philosophy, social science, language, theatre, and so on.
Documentary:
documentaries.
Science:
programmes on natural science and technology.
Alarm-Alarm!:
a programme notifying an emergency or a natural disaster.
ENGLISH
Information:
daily information or reference such as weather forecast, consumer
guide, medical assistance and so on.
Alarm Test
Varied Speech:
popular programmes such as quiz, entertainment, private
interview, comedy, satire and so on.
Pop Music:
programme on commercial, practical and popular songs, and sale
volume of discs, etc.
Rock Music:
practical modern music generally composed and played by
young musicians.
Easy Listening:
popular music usually lasting for less than 5 minutes.
Light Classics M:
classical music, instrumental music, chorus, and light music
favoured by non-professionals.
Serious Classics:
orchestra including great operas, symphony, chamber music and
so on.
Other Music:
other music styles (Rhythm & Blues, Reggae, etc.).
Weather & Meter:
weather reports, forecast.
Finance:
financial reports, commerce, trading.
Children’s Progs:
children’s programmes.
Social Affairs:
social affairs.
Religion:
religious programmes.
15
Setting the Clock
< The unit uses the 24-hour clock.
1 Press the TIME ADJ button.
Setting the Daily Timer 1
This function is available only when REMOTE CONTROL jacks of
the T-R650 and the A-R650 are connected with a remote control
connection cord.
< Adjust the clock before setting the timer.
1 Press the DAILY button.
C-time 00:00:00
CH12
108.00MHz
The hour value flashes.
On time 00:00:00
CH12
108.00MHz
2 Turn the TUNING/SELECT knob to set the current hour, and
press the ENTER button.
“On time” appears on the display, and the hour value flashes.
< When you use the remote control, press the TIME ADJ
button for 2 or more seconds.
2 Turn the TUNING/SELECT knob to set the start time (hour),
and press the ENTER button.
C-time 10:00:00
CH12
108.00MHz
The hour is set, and the minute value flashes.
3 Turn the TUNING/SELECT knob to set the current minute,
and press the ENTER button.
On time 07:00:00
CH12
108.00MHz
The hour is set, and the minute value flashes.
The clock starts from 00 second.
16
3 Turn the TUNING/SELECT knob to set the start time
(minutes), and press the ENTER button.
5 Turn the TUNING/SELECT knob to set the stop time
(minutes), and press the ENTER button.
ENGLISH
Off time00:00:00
CH12
108.00MHz
The on-time is set. “Off time” appears on the display, and the hour
value flashes.
Off time09:15:00
CH12
108.00MHz
Now the timer setting is stored in memory.
4 Turn the TUNING/SELECT knob to set the stop time (hour),
and press the ENTER button.
Off time09:15:00
CH12
108.00MHz
The hour is set, and the minute value flashes.
17
Setting the Daily Timer 2
Sleep timer
To turn on the timer
1 Press the TIMER button repeatedly until “Timer On” is
displayed.
The timer indicator (
) is appeard right side on the display.
Timer indicator
Timer On
This function is available only when the REMOTE CONTROL
jack of the T-R650 and the A-R650 are connected with a
remote control connection cord.
The power can be switched off after a specified amount of time.
Press the SLEEP button repeatedly until desired time appears on the
display.
90
2 On A-R650, select “TUNER” by tuning the INPUT SELECTROR
80
. . . . . . . 10
OFF (Normal display)
(or pressing one of the TUNER button of remote control
unit of A-R50).
3 Press the STANDBY/ON button of the remote control unit
of A-R650 to turn all the units standby.
< When the timer is turned on and the source is AM or FM, the
timer indicator lights up on the display of this unit.
< When the on-time comes, all the units connected by remote
control cords turn on together. On this unit the last station is
turned in, and on the A-R650, the last source is selected.
< When the off-time comes, all the units connected by remote
control cords turn into standby.
< After setting timer, it is possible to turn on or turn off the timer
when in the standby mode by pressing timer button.
To turn off the timer
Press the TIMER button repeatedly until “Timer Off” is
displayed.
Timer indicator ( ) is disappeard on the display.
18
SL: 90 (80, 70 60, 50, 40, 30, 20 or 10)
The power will be switched off 90 (80, 70, 60, 50, 40, 30, 20 or
10) minutes later.
Normal display
The sleep timer is off.
< If you want to check the remaining time, press the SLEEP button
once. The remaining time will be displayed for 2.5 seconds, and
return to the normal display.
Troubleshooting
If you experience any problems with the unit, please take a
moment to look through this chart and see if you can solve the
problem yourself before you call your dealer or a TEAC service
centre.
No power
eCheck the connection to the AC power supply. Check and make
sure the AC source is not a switched outlet and that, if it is, the
switch is turned on. Make sure there is power to the AC outlet
by plugging another item such as a lamp or fan.
To reset your unit to the factory default
If your unit is not working properly, it might help to reset it to the
factory default.
This will clear your settings (including pass keys) and other user
settings (preset stations etc.).
Hold on TIMER button and Band button for a few second.
Cannot listen to any station, or signal is too weak.
eMake sure the antenna is properly connected.
eTune in the station properly.
eInstall the antenna again after relocating it to a better reception
position.
eAn external antenna may be required.
ENGLISH
No sound
eCheck the connection to the amplifier.
eCheck the operation of the amplifier.
T-R650 will be factory default setting.
Sound is noisy.
ePlace the antenna as far away from a TV or a CD player as
possible.
eIf a TV or a CD player is near the unit, turn it off.
Though the broadcast is stereo, it sounds monaural.
ePress the FM MODE button.
If normal operation cannot be recovered, unplug the power
cord from the outlet and plug it again.
19
Specifications
FM Tuner
Tuning range . . . . . . . . . . . . . . . . . . 87.50 - 108.00 MHz (50 kHz steps)
Usable sensitivity. . . . . . . . . . . . . . . . . . . . . . . . . . . . . . . . . . . . . . . . . . 6 dBμ
Harmonic distortion . . . . . . . . . . . . . . . . . . . . . . . . . . . . . . . . 0.8 % (Mono)
1.2 % (Stereo)
Signal-to-Noise ratio . . . . . . . . . . . . . . . . . . . . . . . . . . . . . . .70 dB (Mono)
65 dB (Stereo)
Stereo separation . . . . . . . . . . . . . . . . . . . . . . . . . . . . . . . . . . 35 dB (1 kHz)
Preset stations . . . . . . . . . . . . . . . . . . . . . . . . . . . . . . . . . . . . . . . . . . . . . . . .30
AM Tuner
Tuning range . . . . . . . . . . . . . . . . . . . . . . . 522 - 1,629 kHz (9 kHz steps)
Usable sensitivity. . . . . . . . . . . . . . . . . . . . . . . . . . . . . . . . . . . . . . . . . 55 dBμ
Harmonic distortion . . . . . . . . . . . . . . . . . . . . . . . . . . . . .1.5 % (at 74 dBμ)
Signal-to-Noise ratio . . . . . . . . . . . . . . . . . . . . . . . . . . . 45 dB (at 80 dBμ)
Preset stations . . . . . . . . . . . . . . . . . . . . . . . . . . . . . . . . . . . . . . . . . . . . . . . .30
General
Power Requirement . . . . . . . . . . . . . . . . . . . . . . . . . . . . . .AC 230 V, 50 Hz
Power Consumption . . . . . . . . . . . . . . . . . . . . . . . . 9 W (Standby: 0.5W)
Dimensions (W x H x D) . . . . . . . . . . . . . . . . . . . . . . 435 x 85 x 295 mm
Weight (Net) . . . . . . . . . . . . . . . . . . . . . . . . . . . . . . . . . . . . . . . . . . . . . . 3.2 kg
Operating temperature . . . . . . . . . . . . . . . . . . . . . . . . . . . . +5˚C - +35˚C
Operating humidity . . . . . . . . . . . . . . . . . 5% - 85% (no condensation)
Storage temperature . . . . . . . . . . . . . . . . . . . . . . . . . . . . . . –20˚C - +55˚C
Accessories
AM Loop Antenna x 1
FM Lead-type Antenna x 1
Stereo RCA cable x 1
Remote control connection cord x 1
Owner’s Manual (this document) x 1
Warranty Card
< Design and specifications are subject to change without notice.
< Weight and dimensions are approximate.
< Illustrations may differ slightly from production models.
20
For European Customers
Information for Users on Collection and Disposal of Old
Equipment and used Batteries
These symbols on the products, packaging, and/or
accompanying documents mean that used electrical and
electronic products and batteries should not be mixed with
general household waste. For proper treatment, recovery and
recycling of old products and used batteries, please take them
to applicable collection points, in accordance with your national
legislation and the Directives 2002/96/EC and 2006/66/EC.
By disposing of these products and batteries correctly, you
will help to save valuable resources and prevent any potential
negative effects on human health and the environment which
could otherwise arise from inappropriate waste handling.
For more information about collection and recycling of old
products and batteries, please contact your local municipality,
your waste disposal service or the point of sale where you
purchased the items.
Information on Disposal in other Countries outside the
European Union
These symbols are only valid in the European Union. If
you wish to discard these items, please contact your local
authorities or dealer and ask for the correct method of
disposal.
Note for the battery symbol (bottom right two symbol
examples):
This symbol might be used in combination with a chemical
symbol. In this case it complies with the requirement set by the
Directive for the chemical involved.
Sommaire
Merci d’avoir choisi TEAC. Lisez ce manuel avec attention
pour obtenir les meilleures performances possibles de cet
appareil.
Avant utilisation . . . . . . . . . . . . . . . . . . . . . . . . . . . . . . . . . . . . . . . . . . . . . 21
Avant utilisation
Lisez ceci avant d’essayer d’utiliser l’appareil.
< La tension d’alimentation de l’appareil doit être celle indiquée à
l’arrière de l’appareil. En cas de doute, contactez un électricien.
Identification des parties . . . . . . . . . . . . . . . . . . . . . . . . . . . . . . . . . . . . . 24
< Choisissez avec soin l’endroit où vous placerez votre appareil.
Évitez de le placer directement au soleil ou près d’une source de
chaleur. Évitez aussi les endroits sujets à des vibrations, à de la
poussière excessive, à la chaleur, au froid ou à l’humidité.
Fonctionnement de base . . . . . . . . . . . . . . . . . . . . . . . . . . . . . . . . . . . . . 25
< Ne placez pas l’appareil sur un amplificateur/récepteur.
Branchements . . . . . . . . . . . . . . . . . . . . . . . . . . . . . . . . . . . . . . . . . . . . . . . 22
Raccordement des antennes . . . . . . . . . . . . . . . . . . . . . . . . . . . . . . . . . 23
Écoute d’une émission FM/AM . . . . . . . . . . . . . . . . . . . . . . . . . . . . . . . 26
Sélection d’un préréglage . . . . . . . . . . . . . . . . . . . . . . . . . . . . . . . . . . . . 27
< N’ouvrez pas le coffret car cela peut endommager le circuit ou
causer un choc électrique. Si un objet étranger pénètre dans
l’appareil, contactez votre revendeur ou le service après-vente.
Sélection d’un préréglage (télécommande) . . . . . . . . . . . . . . . . . . . 29
RDS . . . . . . . . . . . . . . . . . . . . . . . . . . . . . . . . . . . . . . . . . . . . . . . . . . . . . . . . . 31
Recherche par type de programme (PTY) . . . . . . . . . . . . . . . . . . . . . 32
Réglage de l’horloge . . . . . . . . . . . . . . . . . . . . . . . . . . . . . . . . . . . . . . . . . 34
< Quand vous débranchez le cordon d’alimentation de la prise
murale, tirez toujours sur la fiche et non pas sur le cordon.
< N’essayez pas de nettoyer l’appareil avec des solvants chimiques
cela pourrait endommager la finition de l’appareil. Utilisez un
chiffon propre et sec ou légèrement humidifié.
Réglage de la minuterie quotidienne . . . . . . . . . . . . . . . . . . . . . . . . . 34
< Conservez soigneusement ce mode d’emploi pour référence
ultérieure.
Dépannage . . . . . . . . . . . . . . . . . . . . . . . . . . . . . . . . . . . . . . . . . . . . . . . . . . 37
Caractéristiques techniques . . . . . . . . . . . . . . . . . . . . . . . . . . . . . . . . . . 38
Entretien
Si la surface de l’appareil est sale, nettoyez-la avec un chiffon
doux ou utilisez une solution de nettoyage neutre diluée. Veillez
à ce qu’il ne reste pas de produit sur l’appareil. N’utilisez jamais de
diluant, de benzène ou d’alcool, ceux-ci risquant d’endommager
la surface de l’appareil.
ATTENTION
< N'exposez pas cet appareil au ruissellement ni aux éclaboussures.
< Ne placez aucun objet contenant du liquide, tel qu'un vase, sur
l'appareil.
< N'installez pas cet appareil dans un espace confiné comme une
bibliothèque ou similaire.
< L'appareil tire un courant de veille nominal de la prise secteur
quand son interrupteur POWER ou STANDBY/ON est à l'arrêt.
< L'appareil doit être placé assez près de la prise de courant pour que
vous puissiez à tout moment attraper facilement la fiche du cordon
d'alimentation.
< La fiche d'alimentation sert de dispositif de déconnexion et doit
donc toujours rester accessible.
< Si le produit utilise des piles/batteries (y compris un pack de
batteries ou des piles installées), elles ne doivent pas être exposées
au soleil, au feu ou à une chaleur excessive.
< PRÉCAUTION pour les produits qui utilisent des batteries
remplaçables au lithium : remplacer une batterie par un
modèle incorrect entraîne un risque d'explosion. Le modèle de
remplacement doit être le même ou l'équivalent.
< Des précautions doivent être prises en cas d'utilisation d'écouteurs
ou d'un casque avec le produit car une pression sonore excessive
(volume trop fort) dans les écouteurs ou dans le casque peut
causer une perte auditive.
21
FRANÇAIS
Extinction différée. . . . . . . . . . . . . . . . . . . . . . . . . . . . . . . . . . . . . . . . . . . . 36
Branchements
T-R650
A
B
C
R
L
TUNER
(LINE IN)
REMOTE
CONTROL
Amplificateur (A-R650)
ATTENTION :
< Mettez hors tension tous les appareils avant de faire les
raccordements.
< Lisez attentivement le mode d’emploi de chacun des éléments
que vous souhaitez utiliser avec cet appareil.
< Lorsque vous vous calez sur une station, le sélecteur d’entrée de
l’A-R650 se règle automatiquement sur “TUNER”.
A Prises LINE OUT
< Vous pouvez utiliser la télécommande UR-431 (fournie avec
l’A-R650). Dirigez la télécommande vers l’A-R650 pour faire
fonctionner cet appareil.
Ces prises transmettent le signal audio analogique à 2 canaux.
Connectez ces prises aux prises TUNER de l’amplificateur
(A-R650) au moyen d’un câble stéréo à fiches RCA (Cinch).
Veillez à brancher :
la fiche blanche q la prise blanche (L : canal gauche)
la fiche rouge q la prise rouge (R : canal droit)
Blanc (L)
Rouge (R)
Blanc (L)
Rouge (R)
< Assurez-vous que chaque fiche est bien enfoncée. Pour éviter
tout ronflement ou bruit parasite, ne regroupez pas les câbles
de signal avec le cordon d’alimentation secteur ou les câbles
d’enceinte.
B Prise REMOTE CONTROL
Si vous avez un A-R650 TEAC, connectez cette prise à la prise
REMOTE CONTROL de l’A-R650 au moyen d’un cordon de
connexion de télécommande. Vous avez alors accès aux
fonctions suivantes de commande pratique du système :
22
Si vous souhaitez utiliser les fonctions de commande à distance
(télécommande), raccordez la prise REMOTE CONTROL de
chaque élément à l’aide d’un cordon de télécommande .
Note :
La télécommande n’est pas fournie avec cet appareil.
C Cordon d’alimentation secteur
Une fois tous les autres branchements terminés, connectez la
fiche du cordon d’alimentation à une prise secteur.
< Veillez à brancher le cordon d’alimentation à une prise secteur
fournissant la tension de courant correcte.
< Pour débrancher le cordon d’alimentation de la prise murale,
tirez directement sur la prise, ne tirez jamais sur le cordon.
Raccordement des antennes
Antenne cadre AM intérieure
L’antenne cadre AM à haute performance fournie pour l’appareil est
suffisante pour une bonne réception dans la plupart des régions.
Pour faire tenir l’antenne droite, fixez la griffe sur la fente à la base
de l’antenne.
L’antenne filaire doit être tendue à l’extérieur ou à l’intérieur près
d’une fenêtre. Pour une meilleure réception, raccordez le bornier
GND à une terre fiable.
< Même quand vous utilisez une antenne AM extérieure, ne
déconnectez pas l’antenne cadre.
Antenne FM intérieure
Connectez l’antenne FM filaire à la prise FM 75Ω, déployez la et
calez vous sur votre station préférée (voir page 26).
Positionnez l’antenne à un endroit approprié tel qu’un
encadrement de fenêtre ou mur qui offre la meilleure réception
puis fixez-la en utilisant des punaises ou des accessoires
similaires.
Branchez les extrémités de l’antenne cadre aux prises d’antenne
AM.
< Assurez-vous de connecter le fil noir au bornier GND.
FRANÇAIS
Placez l’antenne sur une étagère ou suspendez-la à un
encadrement de fenêtre, etc. et orientez-la dans la direction qui
donne la meilleure réception. Éloignez autant que possible de
l’antenne tous les autres fils tels que cordons secteur, câbles
d’enceinte ou d’interconnexion (modulation).
Antenne AM extérieure
Si l’antenne cadre fournie ne permet pas une réception satisfaisante
(souvent en raison de l’éloignement de l’émetteur, ou dans un
immeuble en béton, etc.), il peut être nécessaire d’utiliser une
antenne AM extérieure.
Antenne FM extérieure
Dans les zones où les signaux FM sont faibles, il sera nécessaire
d’utiliser une antenne extérieure. En général une antenne à 3
éléments suffira ; si vous résidez à un endroit où les signaux FM sont
particulièrement faibles il peut être nécessaire d’utiliser une antenne
à 5 éléments ou plus.
< Débranchez l’antenne FM intérieure lorsque vous utilisez une
antenne extérieure.
Utilisez une antenne de haute qualité en vente dans le commerce,
ou sinon un fil isolé de plus de 5m de long dénudé à une extrémité
et raccordé à la prise comme indiqué.
23
Identification des parties
A
B
C
D
E
J
K
F
L
M
G
H
I
N
A STANDBY/ON
a
b
M
c
d
Appuyez sur cette touche pour mettre l’appareil en service ou en
veille (Standby).
Le voyant Standby est allumé en rouge quand l’appareil est en
veille. Quand l’appareil est en service, le voyant est éteint.
B TIMER
Appuyez sur cette touche pour activer ou désactiver la minuterie.
K
L
H
G
J
C D
B
C DAILY
Appuyez sur cette touche pour régler la minuterie.
Sur la télécommande, appuyez sur la touche TIME ADJ et
maintenez-la pressée plus de 2 secondes.
D TIME ADJ
Appuyez sur cette touche pour régler l’horloge.
e
E Afficheur
F TUNING MODE
Appuyez sur cette touche pour changer le mode de syntonisation.
G FM MODE
En mode FM, cette touche sert à choisir entre stéréo et mono.
H BAND
Appuyez sur cette touche pour sélectionner FM ou AM.
I TUNING/SELECT
UR-431
Télécommande fournie avec l’A-R650
24
Ce bouton vous permet de trouver une station de radio ou de
sélectionner une station préréglée ou un élément de menu.
Fonctionnement de base
J RDS
Appuyez sur cette touche pour sélectionner le mode RDS.
Comment allumer ou éteindre l'appareil
Appuyez sur STANDBY/ON pour mettre en marche l’appareil.
K FILE
Cette touche sert à assigner des noms aux stations préréglées.
L MEMORY
Appuyez sur cette touche pour mémoriser les stations préréglées.
Indicateur Veille/On
M ENTER
Appuyez sur cette touche pour valider votre sélection.
N Capteur de télécommande
Quand l’appareil est en service, le voyant est éteint.
Pour utiliser la télécommande, dirigez-la vers le capteur de
télécommande.
Atténuateur de luminosité (Dimmer)
Chaque fois que vous appuyez sur la touche DIMMER, l’affichage
change comme suit:
a ON
Appuyez sur ce commutateur pour allumer l’appareil.
b STANDBY
Appuyez sur ce commutateur pour faire passer l’appareil en
mode de veille (standby).
c
touches HAUT/BAS de syntonisation manuelle
Utilisez ces touches pour trouver une station et sélectionner le
numéro de mémoire (preset) de la station en préréglage manuel.
d
touches HAUT/BAS de syntonisation de
préréglage
Utilisez ces touches pour sélectionner le numéro de mémoire
(preset) pour la station.
Normal q Assombri q Affichage hors service
Cette fonction est disponible uniquement quand les prises
REMOTE CONTROL du T-R650 et A-R650 sont connectées
avec un cordon de connexion de télécommande. Utilisez la
télécommande fournie avec le A-R650.
e DIMMER
Utilisez cette touche pour atténuer l’afficheur.
Note :
Le boîtier de télécommande n’est pas fourni avec cet appareil.
25
FRANÇAIS
Boîtier de télécommande (fourni avec l’A-R650)
Écoute d’une émission FM/AM
1 Sélectionnez FM ou AM en appuyant répétitivement sur la
3 Sélectionnez la station que vous souhaitez écouter.
touche BAND.
2 Sélectionnez le mode de syntonisation souhaité.
Chaque fois que vous appuyez sur la touche TUNING MODE, le
mode de syntonisation change comme suit :
Syntonisation manuelle
FM
< Manual
tune >
108.00MHz
Syntonisation automatique
FM
<
Auto tune >
108.00MHz
Sélection d’un préréglage
Mode de syntonisation manuelle
Tournez le bouton TUNING/SELECT jusqu’à ce que vous trouviez
la station de votre choix.
La fréquence change par intervalles fixes (FM : intervalle de
50 kHz, AM : intervalle de 9 kHz).
Mode de syntonisation automatique
Tournez le bouton TUNING/SELECT pour lancer le réglage
automatique de fréquence.
Dès qu’une station est trouvée, l’appareil se cale
automatiquement sur la station. Répétez cette étape jusqu’à ce
que vous ayez trouvé la station souhaitée.
< Appuyez sur la touche ENTER pour arrêter la syntonisation
automatique. (sur le panneau frontal du T-R650)
< Servez-vous du bouton TUNING (
) si vous employez la
télécommande
Mode de syntonisation de préréglage (preset)
Voir les pages 27 à 31.
Mode FM
Appuyer sur la touche FM MODE permet d’alterner entre le mode
Stéréo et le mode Mono.
FM < Preset tune >
CH01
108.00MHz
Stéréo :
Les émissions FM stéréo sont reçues en stéréo et “Stereo” est
affiché.
Mono :
Sélectionnez ce mode quand le signal est faible. La réception est
forcée en son mono, mais les parasites indésirables sont réduits.
26
Sélection d’un préréglage 1
Préréglage manuel
Vous pouvez mémoriser un maximum de 30 stations FM et de 30
stations AM.
4 Dans les 4 secondes, sélectionnez le numéro de préréglage
(preset) pour cette station.
Tournez le bouton TUNING/SELECT.
1 Sélectionnez AM ou FM en appuyant répétitivement sur la
touche BAND.
FM 10:00 Stereo
CH12
108.00MHz
2 Syntonisez la station que vous souhaitez mémoriser.
Reportez-vous à la page précédente pour la procédure de
syntonisation.
5 Dans les 4 secondes, appuyez sur la touche MEMORY.
FRANÇAIS
La station est mémorisée.
3 Appuyez sur le bouton MEMORY.
< Pour mémoriser d’autres stations, répétez les étapes 2 à 5 .
Préréglage automatique
1 Sélectionnez FM ou AM en appuyant répétitivement sur la
touche BAND.
FM 10:00 Stereo
CH -108.00MHz
< Si vous ne faites rien dans les 4 secondes après avoir appuyé sur
la touche MEMORY, le préréglage sera annulé.
2 Maintenez pressée la touche MEMORY pendant plus de 2
secondes.
Un maximum de 30 stations parmi les mieux captées dans votre
région sont mémorisées automatiquement.
27
Sélection d’un préréglage 2
Comment sélectionner les stations (FM/AM)
préréglées
1 Sélectionnez AM ou FM en appuyant répétitivement sur la
touche BAND.
Vous pouvez affecter des noms aux stations préréglées. (4 caractères
maximum)
Quand vous appuyez sur les touches FILES, les noms affectés sont
affichés à la place de l'horloge. Appuyez de nouveau sur la touche
FILE pour retourner à l'affichage normal (horloge).
Asignación de nombres a las presintonías
1 Sélectionnez le canal préréglé auquel vous souhaitez
affecter le nom en mode “Preset tune“
< Ou vous pouvez affecter le nom à la station actuellement
syntoniser et la prérégler en mémoire.
2 Sélectionnez le mode de syntonisation de préréglage.
Appuyez répétitivement sur la touche TUNING MODE jusqu’à ce
que “Preset tune” apparaisse.
2 Mantenga pulsado FILE más de 1,5 segundos.
3 Sélectionnez un canal préréglé (preset) en tournant le
bouton TUNING/SELECT.
FM
---- 03:01
CH09
92.50MHz
“----” apparaît et le premier “-” clignote sur l'affichage.
3 Seleccione un carácter con el botón TUNING/SELECT.
Le canal préréglé sélectionné est syntonisé.
Caracteres disponibles:
28
Sélection d’un préréglage 1 (télécommande)
4 Pulse el botón ENTER.
Préréglage manuel
Vous pouvez mémoriser un maximum de 30 stations FM et de 30
stations AM.
1 Sélectionnez AM ou FM en appuyant répétitivement sur la
touche BAND.
Le “-” suivant clignote.
Se pueden usar 4 caracteres por emisora.
Repita los pasos 3 y 4 para introducir los caracteres.
5 Pulse el botón MEMORY.
2 Appuyez sur la touche
ou
pour sélectionner la
station que vous voulez mémoriser.
FRANÇAIS
FM
BBC- 03:01
CH__
92.50MHz
“CH__” clignote.
6 Sélectionner un canal préréglé pour mémoriser la station
en utilisant le bouton TUNING/SELECT.
3 Appuyez sur la touche MEMORY.
7 Appuyez sur le bouton MEMORY.
FM 10:00 Stereo
CH -108.00MHz
< Si vous ne faites rien dans les 4 secondes après avoir appuyé sur
la touche MEMORY, le préréglage sera annulé.
Le nom affecter est conservé en mémoire.
L'ancien nom qui se trouve en mémoire est remplacé par le
nouveau.
Suite à la prochaine page q
29
Sélection d’un préréglage 2 (télécommande)
4 Dans les 4 secondes, appuyez sur la touche
ou
afin
de sélectionner le numéro de preset pour cette station.
Préréglage automatique
1 Sélectionnez FM ou AM en appuyant répétitivement sur la
touche BAND.
FM 10:00 Stereo
CH12
108.00MHz
2 Maintenez pressée la touche MEMORY pendant plus de 2
Vous pouvez aussi employer les touches numériques.
secondes.
< Quand vous utilisez les touches numériques, appuyez d’abord sur
la touche TUNER de la télécommande.
Un maximum de 30 stations parmi les mieux captées dans votre
région sont mémorisées automatiquement.
Par exemple, pour sélectionner le preset numéro 25, appuyez
d’abord sur la touche TUNER, puis sur “2” et “5”.
Pour sélectionner des numéros inférieurs à 10, appuyez sur “0”
puis sur le numéro. Par exemple, pour sélectionner le preset
numéro 5, appuyez sur “0” puis sur “5” (sinon, vous pouvez juste
appuyer sur le numéro “5” et attendre quelques secondes).
5 Dans les 4 secondes, appuyez sur la touche MEMORY.
La station est mémorisée.
< Pour mémoriser d’autres stations, répétez les étapes 2 à 5 .
30
RDS 1
Comment sélectionner les stations préréglées
(presets)
1 Sélectionnez AM ou FM en appuyant répétitivement sur la
touche BAND.
Le Radio Data System (RDS) est un service radio qui permet aux
stations émettrices de diffuser des informations complémentaires
parallèlement à l’émission radio elle-même.
Le système RDS fonctionne uniquement sur la bande FM en
Europe.
1 Syntonisez une station FM (voir page 26).
2 Appuyez sur la touche RDS MODE.
2 Sélectionnez un canal préréglé (preset) à l’aide des touches
Chaque fois que vous appuyez brièvement sur la touche RDS
MODE, le mode RDS change comme suit :
numériques.
PT (PROGRAM TYPE)
Quand vous sélectionnez PROGRAM TYPE, “PROGRAM TYPE”
clignote pendant environ 3 secondes et le type de programme
est affiché.
Le canal préréglé (preset) sélectionné est syntonisé.
Par exemple, pour sélectionner le preset numéro 25, appuyez
d’abord sur la touche TUNER, puis sur “2” et “5”.
Pour sélectionner des numéros inférieurs à 10, appuyez sur “0”
puis sur le numéro. Par exemple, pour sélectionner le preset
numéro 5, appuyez sur “0” puis sur “5” (sinon, vous pouvez juste
appuyer sur le numéro “5” et attendre quelques secondes).
RT (RADIO TEXT)
Quand vous sélectionnez RADIO TEXT, “RADIO TEXT” clignote
pendant environ 3 secondes puis des informations envoyées
par la station et composées au maximum de 64 symboles sont
affichées.
S’il n’y a pas de données de radiotexte, le mode RDS bascule
automatiquement sur le mode PROGRAM SERVICE.
TA (TRAFFIC ANNOUNCE)
Quand vous sélectionnez TRAFFIC ANNOUNCE, “TRAFFIC
ANNOUNCE” clignote pendant 3 secondes et l’appareil
recherche une annonce d’informations routières.
< Si un programme d’informations routières est trouvé, le mode
TRAFFIC ANNOUNCE bascule sur le mode PROGRAM SERVICE.
Si la station sélectionnée transmet un signal de programme
de trafic, l’appareil passe du mode RDS au mode PROGRAM
SERVICE sans recherche d’un programme de trafic.
CT (CLOCK TIME)
Affiche l’heure émise par la station.
Quand vous sélectionnez CLOCK TIME, “CLOCK TIME” clignote
pendant environ 3 secondes et l’heure est affichée.
31
FRANÇAIS
PS (PROGRAM SERVICE)
Quand vous sélectionnez PROGRAM SERVICE, “PROGRAM
SERVICE” clignote pendant environ 3 secondes, puis le nom du
service de programmes ou le nom de la station est affiché. S’il
n’y a pas de données de service de programmes, la fréquence
de la station est affichée.
RDS 2
Recherche par type de programme (PTY)
Vous pouvez rechercher des stations par type de programme.
Le réglage de l’horloge de cet appareil se fait automatiquement
en fonction des données CLOCK TIME (CT).
Si vous vous connectez à une station RDS diffusant des
données CT incorrectes, l’horloge sera mal réglée, ce qui risque
de perturber le fonctionnement de la minuterie.
Pour que l’horloge ne soit pas automatiquement définie selon
les données CT, désactivez le réglage automatique de l’horloge.
1 Sélectionnez FM en appuyant répétitivement sur la touche
BAND.
< Quel que soit le mode RDS sélectionné, l’appareil reçoit les
données CT et ajuste l’horloge.
Pour ce faire, maintenez la touche RDS MODE enfoncée
pendant plus de 8 secondes.
2 Maintenez pressée la touche RDS MODE pendant plus de 2
secondes.
< Pour réactiver le réglage automatique de l’horloge,
maintenez la touche RDS MODE enfoncée pendant plus de
8 secondes.
< Lorsque le réglage automatique de l’horloge est désactivé,
le message CLOCK TIME ne s’affiche pas.
3 Sélectionnez le type de programme (PTY) souhaité.
Tournez le bouton TUNING/SELECT pour choisir une option.
Sélectionnez votre type préféré parmi les 31 types de
programmes (PTY) disponibles. Le type de programme clignote.
4 Appuyez sur la touche ENTER.
La recherche démarre.
< Quand une émission du type que vous avez sélectionné est
trouvée, la recherche s’arrête et le type de programme est affiché.
< Si aucune émission du type sélectionné n’est trouvée pendant la
recherche PTY, l’appareil retourne à la fréquence de départ.
< Si vous souhaitez interrompre la recherche, appuyez sur la touche
RDS MODE.
32
31 types de programme PTY:
News (nouvelles) :
communiqués, événements, sondages, reportages, situations
vécues.
Current Affairs (informations générales) :
suggestion incluant des annonces pratiques, à l’exception des
nouvelles, documents, débats, analyses, etc.
Information (informations pratiques) :
informations pratiques du jour ou informations de référence,
telles que prévisions météo, guide du consommateur,
informations médicales utiles, etc.
Sport :
émissions sportives.
Phone In :
émissions au cours desquelles les auditeurs s’expriment en direct.
Travel & Touring (voyages) :
émissions à caractère touristique.
Leisure & Hobby :
émissions sur les activités de loisirs.
Jazz Music :
musique de jazz.
Country Music :
musique country.
National Music :
musique militaire et patriotique.
Education :
informations culturelles et éducatives.
Oldies Music :
musique de l’âge d’or de la musique pop.
Drama (théâtre) :
tous types de concerts et séries dramatiques radiodiffusés.
Folk Music :
musique folk.
Cultures :
émissions portant sur les cultures locales ou nationales, y compris
les émissions religieuses, la philosophie, les sciences humaines,
les langues, le théâtre, etc.
Documentary :
émissions documentaires.
FRANÇAIS
Science :
émissions sur les sciences de la nature et la technologie.
Alarm Test (tonalité d’essai)
Alarm-Alarm! :
avis d’alerte ou de catastrophe naturelle.
Varied Speech (variétés) :
émissions grand public telles que jeux, variétés, interviews,
émissions comiques ou satiriques, etc.
Pop Music (musique de variétés) :
émissions de musique, de variété, ou hit-parade, etc.
Rock Music :
musique moderne, généralement composée et interprétée par
de jeunes musiciens.
Easy Listening (musique grand public) :
musique grand public durant généralement moins de 5 minutes.
Light Classics M (musique légère) :
musique classique, instrumentale, chorale, et musique légère
s’adressant à un public de non spécialistes.
Serious Classics (musique classique) :
musique orchestrale incluant opéras, musique symphonique,
musique de chambre, etc.
Other Music (autres styles musicaux) :
autres styles musicaux (Rhythm & Blues, Reggae, etc.).
Weather & Meter (météo) :
informations et prévisions météorologiques.
Finance :
informations financières, commerciales, boursières.
Children’s Progs (enfants) :
émissions pour enfants.
Social Affairs (société) :
vie collective et sociale.
Religion :
émissions à caractère religieux.
33
Réglage de l’horloge
< L’horloge de l’appareil est au format 24 heures.
1 Appuyez sur la touche TIME ADJ.
Réglage de la minuterie quotidienne 1
Cette fonction est disponible uniquement quand les prises REMOTE
CONTROL du T-R650 et de l’A-R650 sont connectées au moyen d’un
cordon de connexion de télécommande.
< Réglez l’horloge avant la minuterie.
1 Appuyez sur la touche DAILY.
C-time 00:00:00
CH12
108.00MHz
La valeur des heures clignote.
2 Tournez le bouton TUNING/SELECT pour sélectionner
On time 00:00:00
CH12
108.00MHz
l’heure et appuyez sur la touche ENTER.
“On time” apparaît dans l’afficheur et la valeur des heures
clignote.
< Si vous utilisez la télécommande, appuyez sur la touche
TIME ADJ durant au moins 2 secondes.
2 Tournez le bouton TUNING/SELECT pour sélectionner
l’heure de démarrage (heure) et appuyez sur la touche
ENTER.
C-time 10:00:00
CH12
108.00MHz
L’heure est définie et la valeur des minutes clignote.
3 Tournez le bouton TUNING/SELECT pour sélectionner les
minutes et appuyez sur la touche ENTER.
On time 07:00:00
CH12
108.00MHz
L’heure est définie et la valeur des minutes clignote.
L’horloge démarre à 00 seconde.
34
3 Tournez le bouton TUNING/SELECT pour sélectionner
l’heure de démarrage (la minute) et appuyez sur la touche
ENTER.
L’heure de démarrage est définie. “Off time” apparaît dans
l’afficheur et la valeur des heures clignote.
l’heure d’arrêt (minute) et appuyez sur la touche ENTER.
FRANÇAIS
Off time00:00:00
CH12
108.00MHz
5 Tournez le bouton TUNING/SELECT pour sélectionner
Off time09:15:00
CH12
108.00MHz
Le réglage de la minuterie est enregistré.
4 Tournez le bouton TUNING/SELECT pour sélectionner
l’heure d’arrêt (heure) et appuyez sur le bouton ENTER.
Off time09:15:00
CH12
108.00MHz
L’heure est définie et la valeur des minutes clignote.
35
Réglage de la minuterie quotidienne 1
Extinction différée
Pour mettre la minuterie en service
1 Appuyez répétitivement sur la touche TIMER jusqu’à ce
que “Timer On” apparaisse.
Le témoin de minuterie ( ) apparaît du côté droit de l’afficheur.
Témoin de minuterie
Timer On
2 Sur l’A-R650, sélectionnez “TUNER” avec le sélecteur
d’entrée INPUT SELECTOR (ou en appuyant sur une des
touches TUNER du boîtier de télécommande).
3 Appuyez sur la touche STANDBY/ON de la télécommande
de l’A-R650 pour mettre l’ensemble des appareils en veille.
< Lorsque la minuterie est activée et que la source choisie est AM
ou FM, le témoin de la minuterie s’allume dans l’afficheur de
l’appareil.
< Lorsque l’heure de démarrage définie est atteinte, tous les
appareils reliés par cordons de télécommande s’allument. Sur
l’appareil, la dernière station est rappelée et sur l’A-R650, la
dernière source est sélectionnée.
< Lorsque l’heure d’arrêt définie est atteinte, tous les appareils reliés
par cordons de télécommande se mettent en veille.
< Après avoir réglé la minuterie, il est possible de l’activer ou de la
désactiver en mode de veille (standby) en appuyant sur la touche
Timer.
Pour mettre la minuterie hors service
Appuyez répétitivement sur la touche TIMER jusqu’à ce que
“Timer Off” apparaisse.
Le témoin de minuterie ( ) disparaît de l’afficheur.
36
Cette fonction est disponible uniquement quand les prises
REMOTE CONTROL du T-R650 et A-R650 sont connectées
avec un cordon de connexion de télécommande. Utilisez la
télécommande fournie avec le A-R650.
L’appareil peut s’éteindre après un laps de temps déterminé.
Appuyez sur le bouton SLEEP à plusieurs reprises jusqu’à ce que
la durée désirée apparaisse sur l’affichage.
SL:90 (80, 70, 60, 50, 40, 30, 20 ou 10)
L’appareil s’éteindra au bout de 90 (80, 70, 60, 50, 40, 30, 20 ou
10) minutes.
Affichage normal:
La fonction d’extinction différée “sleep timer” est éteinte.
< Si vous voulez consulter le temps restant, appuyez sur le bouton
SLEEP une seule fois. Le temps restant apparaîtra sur l’affichage
pendant 2,5 secondes, puis les données initiales réapparaîtront.
Dépannage
En cas de problème avec l’appareil, prenez le temps de lire ce
tableau et de voir si vous pouvez résoudre le problème tout seul
avant de faire appel à votre revendeur ou au service après-vente
TEAC.
L’appareil ne s’allume pas.
e Vérifiez que l’appareil est bien branché à la prise secteur. Vérifiez
que la prise d’alimentation secteur n’a pas d’interrupteur et si tel
est le cas, vérifiez que l’interrupteur est bien enclenché. Vérifiez
que la prise délivre bien du courant en branchant un autre
appareil électrique, une lampe ou un ventilateur par exemple.
Pour retrouver les réglages d’usine par
défaut de votre appareil
Si votre appareil ne fonctionne pas correctement, le ramener aux
réglages d’usine par défaut peut peut-être vous aider.
Cela annulera vos réglages (y compris le mot de passe) et les
autres réglages personnels (stations préréglées, etc.).
Maintenez quelques secondes les touches TIMER et Band.
Pas de son.
e Vérifiez le raccordement à l’amplificateur.
e Vérifiez le fonctionnement de l’amplificateur.
Impossible d’écouter une station ou le signal est trop faible.
e Vérifiez que l’antenne est correctement raccordée.
e Réglez correctement la station.
e Réinstallez l’antenne après l’avoir placée à un endroit
permettant une meilleure réception.
e Une antenne extérieure peut s’avérer nécessaire.
FRANÇAIS
Le son est bruité.
e Placez l’antenne le plus loin possible de la télévision ou du
lecteur CD.
e Si une télévision ou un lecteur de CD est proche de l’appareil,
éteignez-le.
Bien que la diffusion soit en stéréo, le son sort en mono.
e Appuyez sur la touche FM MODE.
Si malgré ces indications, vous ne parvenez pas à faire
fonctionner normalement l'appareil, débranchez le cordon
d'alimentation du secteur et rebranchez-le.
37
Caractéristiques techniques
Tuner FM
Plage de syntonisation . . . . . . . . 87,50 - 108,00 MHz (pas de 50 kHz)
Sensibilité utilisable . . . . . . . . . . . . . . . . . . . . . . . . . . . . . . . . . . . . . . . 6 dBμ
Distorsion harmonique . . . . . . . . . . . . . . . . . . . . . . . . . . . . . 0,8 % (mono)
1,2 % (stéréo)
Rapport signal/bruit . . . . . . . . . . . . . . . . . . . . . . . . . . . . . . .70 dB (mono)
65 dB (stéréo)
Séparation stéréo . . . . . . . . . . . . . . . . . . . . . . . . . . . . . . . . . . 35 dB (1 kHz)
Stations préréglées (presets). . . . . . . . . . . . . . . . . . . . . . . . . . . . . . . . . . .30
Tuner AM
Plage de syntonisation . . . . . . . . . . . . . 522 - 1.629 kHz (pas de 9 kHz)
Sensibilité utile. . . . . . . . . . . . . . . . . . . . . . . . . . . . . . . . . . . . . . . . . . . 55 dBμ
Distorsion harmonique . . . . . . . . . . . . . . . . . . . . . . . . . . 1,5 % (à 74 dBμ)
Rapport signal/bruit . . . . . . . . . . . . . . . . . . . . . . . . . . . . 45 dB (à 80 dBμ)
Stations préréglées. . . . . . . . . . . . . . . . . . . . . . . . . . . . . . . . . . . . . . . . . . . .30
Général
Alimentation . . . . . . . . . . . . . . . . . . . . . . . . . . . . . . . . . . . .CA 230 V, 50 Hz
Consommation . . . . . . . . . . . . . . . . . . . . . . . . . . . . . . . 9 W (veille : 0,5 W)
Dimensions (L x H x P) . . . . . . . . . . . . . . . . . . . . . . . 435 x 85 x 295 mm
Poids (net) . . . . . . . . . . . . . . . . . . . . . . . . . . . . . . . . . . . . . . . . . . . . . . . .3,2kg
Température de fonctionnement . . . . . . . . . . . . . . . . . . . +5˚C - +35˚C
Humidité de fonctionnement . . . . . .5% - 85% (sans condensation)
Température de stockage . . . . . . . . . . . . . . . . . . . . . . . . . –20˚C - +55˚C
Accessoires
Antenne cadre AM x 1
Antenne filaire FM x 1
Cordon de connexion de télécommande du système x 1
Câble stéréo à fiches RCA/Cinch x 1
Mode d’emploi (ce document) x 1
Carte de garantie
< Les caractéristiques et la présentation sont sujettes à modification
sans préavis.
< Les poids et les dimensions sont approximatifs.
< Les illustrations peuvent légèrement différer des modèles de
production.
38
Pour les consommateurs européens
Information pour les utilisateurs sur la collecte et
l’enlèvement des équipements et piles usagés
Ces symboles sur les produits, emballages et/ou documents
d’accompagnement signifient que les produits électriques
et électroniques ainsi que les piles usagées ne doivent pas
être mélangés avec les déchets domestiques ordinaires. Pour
un traitement, une récupération et un recyclage corrects des
produits anciens et des piles usagées, veuillez les rapporter au
point de collecte concerné, conformément à votre législation
nationale et aux directives 2002/96/EC et 2006/66/EC.
En jetant correctement ces produits et piles, vous aiderez
à sauvegarder des ressources précieuses et éviterez tout
effet potentiellement négatif sur la santé humaine et sur
l’environnement qui pourrait sinon découler d’une gestion
inappropriée des déchets.
Pour des informations plus détaillées sur la mise au rebut et le
recyclage de vos anciens appareils et piles, veuillez contacter
votre mairie, le service de traitement des ordures ou le magasin
dans lequel vous avez acheté ces articles.
Information sur la mise au rebut dans d’autres pays
extérieurs à l’Union Européenne
Ces symboles ne sont valables qu’en Union Européenne. Si
vous désirez éliminer ces articles, veuillez contacter votre
administration locale ou votre revendeur et leur demander
la méthode correcte de mise au rebut.
Note pour le symbole (les deux exemples en bas à
droite) :
Ce symbole peut être associé à un symbole chimique. Dans ce
cas, il indique une conformité avec les impératifs définis par la
directive pour le produit chimique en question.
Contenido
Gracias por seleccionar TEAC. Lea detenidamente este manual
para obtener el mejor rendimiento posible de esta unidad.
Antes de comenzar . . . . . . . . . . . . . . . . . . . . . . . . . . . . . . . . . . . . . . . . . . 39
Conexión . . . . . . . . . . . . . . . . . . . . . . . . . . . . . . . . . . . . . . . . . . . . . . . . . . . . 40
Conexión de las antenas . . . . . . . . . . . . . . . . . . . . . . . . . . . . . . . . . . . . . 41
Antes de comenzar
Lea esto antes de continuar.
< La tensión de voltaje suministrada a la unidad debe coincidir
con la tensión de voltaje indicada en el panel trasero. En caso de
dudas, consulte con un electricista.
Ajuste del temporizador diario. . . . . . . . . . . . . . . . . . . . . . . . . . . . . . . . 43
< Elija cuidadosamente el emplazamiento de la unidad. Evite los
lugares expuestos a la luz directa del sol o cerca de una fuente
de calor. Evite también los lugares expuestos a vibraciones o a un
exceso de polvo, calor, frío o humedad.
Escucha de FM/AM. . . . . . . . . . . . . . . . . . . . . . . . . . . . . . . . . . . . . . . . . . . 44
< No coloque la unidad encima de un amplificador/receptor.
Identificación de las piezas . . . . . . . . . . . . . . . . . . . . . . . . . . . . . . . . . . . 42
Presintonización . . . . . . . . . . . . . . . . . . . . . . . . . . . . . . . . . . . . . . . . . . . . . 45
Presintonización (mando a distancia) . . . . . . . . . . . . . . . . . . . . . . . . . 47
RDS . . . . . . . . . . . . . . . . . . . . . . . . . . . . . . . . . . . . . . . . . . . . . . . . . . . . . . . . . 49
Búsqueda PTY . . . . . . . . . . . . . . . . . . . . . . . . . . . . . . . . . . . . . . . . . . . . . . . 50
Puesta en hora del reloj . . . . . . . . . . . . . . . . . . . . . . . . . . . . . . . . . . . . . . 52
Programando el temporizador diario . . . . . . . . . . . . . . . . . . . . . . . . . 52
Desconexión programada . . . . . . . . . . . . . . . . . . . . . . . . . . . . . . . . . . . . 54
Solución de problemas . . . . . . . . . . . . . . . . . . . . . . . . . . . . . . . . . . . . . . . 55
Especificaciones . . . . . . . . . . . . . . . . . . . . . . . . . . . . . . . . . . . . . . . . . . . . . 56
< No abra la carcasa de la unidad, ya que pueden producirse daños
en los circuitos o descargas eléctricas. Si entra algún objeto
extraño en la unidad, póngase en contacto con su distribuidor o
centro de servicio.
< Cuando desconecte el cable de alimentación de la toma de
corriente, tire siempre del enchufe, nunca del cable.
< No intente limpiar la unidad con soluciones químicas, ya que
se podría dañar el acabado. Utilice un paño limpio, seco o
ligeramente humedecido.
< Guarde este manual en un lugar seguro para futuras consultas.
Mantenimiento
PRECAUCIÓN
< No exponga este aparato a salpicaduras ni goteras.
< No coloque sobre este aparato objetos que contengan líquidos,
como por ejemplo vasos.
< No instale este aparato en espacios cerrados como estanterías o
similares.
< Este aparato libera corriente nominal no válida para el
funcionamiento a través de su conector de alimentación aunque
los interruptores POWER o STANDBY/ON estén apagados.
< El aparato deberá colocarse lo suficientemente cerca de una
toma de corriente, de modo que usted puede alcanzar fácilmente
la clavija del enchufe del cable de alimentación en cualquier
momento.
< La clavija del enchufe del cable de alimentación (de corriente)
es el dispositivo de desconexión, por lo cual deberá permanecer
siempre en buen estado de funcionamiento.
< Si el producto utiliza pilas (ésto incluye las baterías incorporadas
y los "packs"), se evitará su exposición directa al sol, al fuego o a
cualquier otra fuente de calor excesivo.
< PRECAUCIÓN con los productos que emplean baterías de
litio reemplazables: existe peligro de explosión si la batería se
reemplaza por otra de tipo incorrecto. Reemplácela sólo por otra
igual o de tipo equivalente.
< Lleve cuidado si utiliza auriculares con este producto, ya que
excesiva presión sonora (volumen) en los auriculares puede causar
pérdida auditiva.
39
ESPAÑOL
Cuando deba limpiar la superficie de la unidad, pase un paño
suave o utilice un líquido limpiador neutro diluido. Asegúrese de
eliminar todo exceso de líquido. No utilice diluyente, bencina ni
alcohol ya que pueden dañar la superficie de la unidad.
Conexión
T-R650
A
B
C
R
L
TUNER
(LINE IN)
REMOTE
CONTROL
Amplifier (A-R650)
PRECAUCIÓN:
< Desconecte la corriente de todos los equipos antes de realizar las
conexiones.
< Lea las instrucciones de cada uno de los componentes que
pretenda usar con esta unidad.
Estos terminales transmiten una señal de audio analógica
de 2 canales. Conecte estos terminales a los terminales de
sintonizador (TUNER) del amplificador (A-R650) con un cable a
RCA estéreo.
Asegúrese de conectar el cable de la siguiente manera:
conector blanco q terminal blanco (L: canal izquierdo)
conector rojo q terminal rojo (R: canal derecho)
Blanco (L)
Rojo (R)
< Asegúrese de insertar firmemente cada conector. Para evitar
ruidos y zumbidos, no junte los cables de interconexión de
señal con el cable de alimentación de CA o los cables de los
altavoces.
40
Si tiene un TEAC A-R650, conecte este terminal al terminal
del mismo nombre del A-R650 con el cable de conexión de
control remoto. Así le será más cómodo controlar el equipo con
algunas funciones.
< Cuando sintonice una emisora, el selector de entrada del
A-R650 se ajusta automáticamente a “TUNER”.
A Terminales LINE OUT
Blanco (L)
Rojo (R)
B Terminal REMOTE CONTROL
Si desea usar las funciones del mando a distancia, conecte el
terminal REMOTE CONTROL de cada componente con el cable
de conexión de control remoto y ponga el interruptor REMOTE
CONTROL SELECTOR del panel posterior del T-R650 en ”SYSTEM”.
< Puede utilizar el mando a distancia US-431 (suministrado para
el A-R650). Apunte el mando a distancia hacia el A-R650 para
controlar esta unidad.
Nota:
No se suministra mando a distancia con esta unidad.
C Cable de alimentación de corriente
Después de realizar todas las demás conexiones, conecte el
enchufe a la toma eléctrica.
Asegúrese de conectar el cable de alimentación a una toma de
corriente que suministre el voltaje correcto.
Al enchufar o desenchufar el cable de alimentación, sujételo
siempre por la clavija del enchufe.
Conexión de las antenas
Antena de cuadro de AM interior
La antena de cuadro de AM de altas prestaciones suministrada para
esta unidad es suficiente para una recepción óptima en la mayoría
de las zonas.
Para instalar la antena de cuadro sobre una superficie, asegure la
pinza en la ranura de la base de la antena.
< Aunque utilice una antena de AM exterior, no desconecte la
antena de cuadro.
Antena de FM interior
Conecte la antena de FM de tipo monocable a la toma FM 75Ω,
extienda el cable y sintonice su emisora favorita (consulte la
página 44).
Ajuste la antena en una posición apropiada, como el marco de
una ventana o una pared que permita obtener una recepción
óptima y luego asegure la antena en esa posición con chinchetas
u otras fijaciones adecuadas.
Conecte los cables de la antena de cuadro a los terminales de la
antena de AM.
< Asegúrese de conectar el cable negro al terminal GND (tierra).
Coloque la antena sobre un estante o suspéndala del marco de
una ventana, etc., en la dirección que ofrezca la mejor recepción.
Mantenga el resto de los cables, como los cables de corriente,
cables de altavoces o cables de interconexión tan lejos como sea
posible de la antena.
Antena de AM exterior
Antena de AM
para exterior
Asegúrese de conectar
el cable negro al
terminal de tierra (GND).
Antena de FM exterior
Para las zonas en donde las señales de FM son débiles, será necesario
utilizar una antena de FM exterior. Una antena de 3 elementos será
suficiente en la mayoría de los casos; si reside en una zona con
señales de FM particularmente débiles, es posible que necesite
utilizar una antena de 5 o más elementos.
< Desconecte la antena de FM interior cuando utilice una antena
exterior.
Utilice una antena de AM de buena calidad de las que se venden
en el mercado o, en su defecto, un cable aislado de más de 5 m de
largo, uno de cuyos extremos se deberá pelar y conectar al terminal,
tal como se observa en la ilustración.
El cable de antena deberá extenderse hasta afuera o hasta
la proximidad de una ventana en el interior. Para mejorar la
recepción, conecte el terminal GND a una toma de tierra fiable.
41
ESPAÑOL
Si la antena de cuadro de AM suministrada no ofrece una recepción
correcta (suele deberse a una distancia excesiva desde el transmisor,
edificios de hormigón, etc.), quizá sea preciso usar una antena de
AM de exterior.
Identificación de las piezas
A
B
C
D
E
J
K
F
L
M
G
H
I
N
A STANDBY/ON
a
b
M
c
Pulse este botón para encender o poner en reposo (modo
“standby”) esta unidad.
El indicador de modo “standby” se ilumina en rojo cuando la
unidad está en reposo. Cuando la unidad está encendida, el
indicador se apaga.
d
B TIMER
K
L
H
C D
Pulse este botón para activar o desactivar la función del
temporizador.
G
J
B
C DAILY
Pulse este botón para ajustar el temporizador.
En el mando a distancia, pulse y mantenga pulsado el botón TIME
ADJ durante más de 2 segundos.
D TIME ADJ
Pulse este botón para ajustar el reloj.
e
E Pantalla
F TUNING MODE
Pulse este botón para cambiar el modo de sintonización.
G FM MODE
En el modo de FM, utilice este botón para seleccionar estéreo o
monoaural.
H BAND
Pulse este botón para seleccionar FM o AM.
UR-431
Mando a distancia suministrado con el A-R650
42
Ajuste del temporizador diario
I TUNING/SELECT
Gire esta mando para sintonizar una emisora, seleccionar una
emisora presintonizada o seleccionar un elemento del menú.
Cómo encender y apagar la unidad
Pulse el botón STANDBY/ON para encender la unidad.
J RDS
Pulse este botón para seleccionar el modo RDS (Sistema de Datos
por Radio).
Indicador de espera/encendido
K FILE
Utilice este botón para asignar nombres a emisoras
presintonizadas.
L MEMORY
Pulse este botón para guardar las presintonías en la memoria.
M ENTER
Pulse este botón para introducir su selección.
Utilice este botón para cambiar el modo de sintonización
mientras escucha una emisora de FM o AM.
Cuando la unidad está encendida, el indicador se apaga.
Atenuador de iluminación
Cada vez que pulsa el botón DIMMER, la pantalla cambia de la
siguiente manera:
N Sensor remoto
Cuando utilice el mando a distancia, apúntelo hacia el sensor
remoto.
ESPAÑOL
Mando a distancia (suministrado con el A-R650)
a ON
Pulse este botón para encender la unidad.
b STANDBY
Pulse este botón para poner la unidad en modo de reposo
(standby).
c
Botones ARRIBA y ABAJO de sintonización
manual
Use estos botones para sintonizar una emisora y seleccionar
el número de presintonía de una emisora en el modo de
presintonización manual.
d
Botones ARRIBA y ABAJO de presintonización
Use estos botones para seleccionar el número de presintonía de
una emisora
Normal q Luz atenuada q Pantalla apagada
Esta función está disponible solamente cuando el conector
REMOTE CONTROL del T-R650 y el A-R650 están conectados
por un cable de control remoto. Utilice el mando a distancia
suministrado con el A-R650
e DIMMER
Use este botón para atenuar la pantalla.
Nota:
No se suministra mando a distancia con esta unidad.
43
Escucha de FM/AM
1 Seleccione FM o AM pulsando repetidamente el botón
3 Seleccione la emisora que desea escuchar.
BAND.
2 Seleccione el modo de sintonización deseado.
Modo de sintonización manual
Gire el mando TUNING/SELECT hasta encontrar la emisora que
desea escuchar.
La frecuencia cambia en pasos fijos (FM: pasos de 50 kHz,
AM: pasos de 9 kHz).
Cada vez que pulsa el botón TUNING MODE, el modo de
sintonización cambia como sigue:
Modo de sintonización automática
Gire el mando TUNING/SELECT para comenzar la sintonización
automática.
Al encontrar una emisora, la unidad la sintoniza
automáticamente. Repita este paso hasta encontrar la emisora
que desea escuchar.
Sintonización manual
FM
< Manual
tune >
108.00MHz
Sintonización automática
FM
<
Auto tune >
108.00MHz
Presintonización
< Pulse el botón ENTER para detener la sintonización automática.
(del panel frontal del T-R650)
< Utilice el botón TUNING (
) cuando use el mando a distancia
Modo de presintonización
Ver páginas 45 a 49.
Modo FM
Si pulsa el botón FM MODE, se alternará entre los modos estéreo
y monoaural.
FM < Preset tune >
CH01
108.00MHz
Stereo:
Las transmisiones en FM estéreo se reciben en estéreo y se
enciende “Stereo”.
Mono:
Seleccione este modo cuando la señal sea débil. La recepción
cambiará a monoaural, reduciendo los ruidos no deseados.
44
Presintonización 1
Presintonización manual
Puede memorizar hasta 30 emisoras de FM y 30 de AM.
4 Seleccione el número de presintonía para esta emisora en
menos de 4 segundos.
Gire el mando TUNING/SELECT.
1 Seleccione AM o FM pulsando repetidamente el botón
BAND.
FM 10:00 Stereo
CH12
108.00MHz
2 Sintonice la emisora que desea memorizar.
Para obtener detalles sobre el procedimiento de sintonización,
consulte la página anterior.
5 Pulse el botón MEMORY en menos de 4 segundos.
Se memorizará la emisora.
ESPAÑOL
< Para guardar más emisoras, repita los pasos 2 a 5 .
3 Pulse el botón MEMORY.
Presintonización automática
1 Seleccione FM o AM pulsando repetidamente el botón
BAND.
FM 10:00 Stereo
CH -108.00MHz
< Si no hace nada en los 4 segundos posteriores a pulsar el botón
MEMORY, se cancelará la presintonización
2 Pulse el botón MEMORY durante más de 2 segundos.
Se memorizarán automáticamente hasta 30 emisoras con la
mejor recepción de su zona.
45
Presintonización 2
Cómo seleccionar las emisoras presintonizadas
(FM/AM)
1 Seleccione AM o FM pulsando repetidamente el botón
BAND.
Puede asignar nombres a las presintonías. (Hasta 4 caracteres)
Cuando pulsa el botón FILE, se muestra el nombre asignado en lugar
del reloj. Pulse el botón FILE nuevamente para volver a la pantalla
normal (reloj).
Asignación de nombres a las presintonías
1 Seleccione un canal presintonizado al cual quiera asignar
un nombre en el modo “Presintonía“.
< O puede asignar el nombre a la emisora actualmente sintonizada,
y presintonizarla en la memoria.
2 Seleccione el modo de presintonización.
Pulse repetidamente el botón TUNING MODE hasta que se
visualice “Preset tune”.
2 Mantenga pulsado FILE más de 1,5 segundos.
FM < Preset tune >
CH01
108.00MHz
3 Seleccione un canal presintonizado girando el mando
TUNING/SELECT.
FM
---- 03:01
CH09
92.50MHz
Se muestra “----“ y el primer “-“ destella en la pantalla.
3 Seleccione un carácter con el botón TUNING/SELECT.
Se sintonizará el canal memorizado seleccionado.
Caracteres disponibles:
46
Presintonización 1 (mando a distancia)
4 Pulse el botón ENTER.
Presintonización manual
Puede memorizar hasta 30 emisoras FM y 30 AM.
1 Seleccione AM o FM pulsando repetidamente el botón
BAND.
El siguiente “-“ destella.
Se pueden usar 4 caracteres por emisora.
Repita los pasos 3 y 4 para introducir los caracteres.
5 Pulse el botón ENTER.
2 Pulse el botón
o
para seleccionar la emisora que
desee almacenar.
FM
BBC- 03:01
CH__
92.50MHz
ESPAÑOL
“CH__“ destella.
6 Seleccione un canal de presintonía para guardar la emisora
mediante el mando TUNING/SELECT.
3 Pulse el botón MEMORY.
7 Pulse el botón MEMORY.
FM 10:00 Stereo
CH -108.00MHz
< Si no hace nada en los 4 segundos posteriores a pulsar el botón
MEMORY, se cancelará la presintonización.
El nombre asignado se guarda en la memoria.
Si existe un nombre anterior en la memoria, se sobrescribe.
continúa en la página siguiente q
47
Presintonización 2 (mando a distancia)
4 En menos de 4 segundos, pulse el botón
o
para
seleccionar el número de presintonía para esta emisora.
Presintonización automática
1 Seleccione FM o AM pulsando repetidamente el botón
BAND.
FM 10:00 Stereo
CH12
108.00MHz
También puede utilizar los botones numéricos.
2 Pulse el botón MEMORY durante más de 2 segundos.
< Cuando utilice los botones numéricos, pulse primero el botón
TUNER (sintonizador) del mando a distancia.
Se memorizarán automáticamente hasta 30 emisoras con la
mejor recepción de su zona.
Por ejemplo, para seleccionar el número 25 de presintonía,
primero pulse el botón TUNER y después pulse “2” y “5”.
Para seleccionar números inferiores a 10, pulse “0” y después el
número. Como ejemplo, para seleccionar el número 5, pulse “0”
y “5”. Opcionalmente, puede pulsar sólo el número “5” y después
esperar unos segundos.
5 Pulse el botón MEMORY en menos de 4 segundos.
Se memorizará la emisora.
< Para guardar más emisoras, repita los pasos 2 a 5 .
48
RDS
Cómo seleccionar las emisoras presintonizadas
(FM/AM)
1 Seleccione AM o FM pulsando repetidamente el botón
BAND.
El Sistema de Datos por Radio (RDS) es un servicio de radiodifusión
que permite a las emisoras enviar una información adicional junto
con la señal de radio habitual.
El RDS funciona solamente con la banda de FM en Europa.
1 Sintonice una emisora de FM (consulte la página 44).
2 Pulse el botón RDS MODE.
2 Seleccione un canal de presintonía mediante los botones
numéricos.
Cada vez que se pulsa el botón RDS MODE, el modo RDS
cambiará como sigue:
PS (SERVICIO DE PROGRAMA)
Si selecciona PROGRAM SERVICE, la indicación “PROGRAM
SERVICE” parpadeará durante aproximadamente 3 segundos
y aparecerá el nombre del servicio de programa o el nombre
de una emisora. Si no hay datos del servicio de programa, se
visualizará la frecuencia.
Se sintonizará el canal memorizado seleccionado.
Por ejemplo, para seleccionar el número 25 de presintonía,
primero pulse el botón TUNER y después pulse “2” y “5”.
Para seleccionar números inferiores a 10, pulse “0” y después el
número. Como ejemplo, para seleccionar el número 5, pulse “0”
y “5”. Opcionalmente, puede pulsar sólo el número “5” y después
esperar unos segundos.
RT (TEXTO POR RADIO)
Si selecciona RADIO TEXT, la indicación “RADIO TEXT” destellará
durante aproximadamente 3 segundos y luego se visualizarán
los mensajes de las emisoras compuestos por un máximo de 64
caracteres.
Si no hay datos de texto por radio, el modo RDS cambiará
automáticamente al modo PROGRAM SERVICE.
TA (AVISOS DE TRÁFICO)
Si selecciona TRAFFIC ANNOUNCE, la indicación “TRAFFIC
ANNOUNCE” destellará durante 3 segundos y luego la unidad
buscará avisos de tráfico.
< Cuando se encuentre un programa de tráfico, se cambiará del
modo TRAFFIC ANNOUNCE al modo PROGRAM SERVICE.
Si la emisora seleccionada actualmente está transmitiendo una
señal de programa de tráfico, el modo RDS cambiará al modo
PROGRAM SERVICE sin buscar un programa de tráfico.
CT (DATOS HORARIOS)
Visualiza la información sobre la hora suministrada por la
emisora.
Si selecciona CLOCK TIME, la indicación “CLOCK TIME” destellará
durante aproximadamente 3 segundos y luego se visualizarán
los datos horarios.
49
ESPAÑOL
PTY (TIPO DE PROGRAMA)
Si selecciona PROGRAM TYPE, la indicación “PROGRAM TYPE”
destellará durante aproximadamente 3 segundos y luego se
visualizará el tipo de programa.
RDS 2
Búsqueda PTY
Podrá efectuar la búsqueda de emisoras por el tipo de programa.
La puesta en hora del reloj de esta unidad se realiza
automáticamente de acuerdo con los datos CLOCK TIME (CT).
Si sintoniza una emisora RDS que esté emitiendo datos CT
incorrectos, el reloj podría quedar incorrectamente ajustado,
lo cual podría afectar eventualmente al funcionamiento del
temporizador.
Si usted prefiere que el reloj de esta unidad no se ajuste con los
datos CT, simplemente desactive el ajuste automático del reloj.
1 Seleccione FM pulsando repetidamente el botón BAND.
< Independientemente del modo RDS seleccionado, la unidad
recibe los datos CT y ajusta el reloj conforme a ellos.
Para desactivar el ajuste automático del reloj, pulse y
mantenga pulsado el botón RDS MODE durante más de 8
segundos.
2 Pulse el botón INFO/RDS MODE durante más de 2 segundos.
3 Seleccione el tipo de programa que desea (PTY).
Gire el mando TUNING/SELECT para seleccionar un apartado.
< Para volver a activar el ajuste automático del reloj, pulse y
mantenga pulsado el botón RDS MODE durante más de 8
segundos.
< Cuando se desactiva el ajuste automático del reloj, CLOCK
TIME no se visualiza.
Seleccione un programa determinado a partir de la clasificación
de 31 tipos de programas PTY. El tipo de programa destellará.
4 Pulse el botón ENTER.
Se inicia la búsqueda.
< Cuando se encuentre la emisora que esté difundiendo el tipo
de programa que ha seleccionado, la búsqueda se detiene y se
visualizará el tipo de programa.
< Si no se encuentra ninguna emisora que esté difundiendo el tipo
de programa seleccionado durante la búsqueda PTY, se detendrá
en la frecuencia inicial.
< Si desea detener la búsqueda, pulse el botón RDS MODE.
50
31 tipos de programas PTY:
News (noticias):
Informaciones breves, eventos, opinión pública, crónicas,
situaciones reales.
Current Affairs (actualidad):
Todo tipo de sugerencias incluyendo informaciones prácticas que
no sean noticias, documentos, tertulias, análisis, etc.
Information (información):
Información diaria o referencias como el pronóstico del tiempo,
guías para consumidores, asistencia médica, etc.
Sport (deporte):
Programas relacionados con deportes.
Education (educación):
Información cultural y educativa.
Drama (dramáticos):
Todo tipo de conciertos de radio y seriales dramáticos.
Cultures (culturas):
Todos los aspectos de la cultura nacional o local incluyendo
eventos religiosos, filosofía, ciencias sociales, lenguaje, teatro, etc.
Science (ciencia):
Programas de ciencias naturales y tecnología.
Varied Speech (hablados varios):
Programas populares como concursos, programas de
entretenimiento, entrevistas privadas, comedias, sátiras, etc.
Phone In (de intervención telefónica):
Programas en los que el público expresa su punto de vista por
teléfono.
Travel & Touring (viajes y rutas):
Crónicas de viajes.
Leisure & Hobby (ocio y aficiones):
Programas relacionados con actividades de recreo y lúdicas.
Jazz Music (música de jazz):
Música de jazz.
Country Music (música country):
Música country.
National Music (música nacional):
Música nacional.
Oldies Music (música de todos los tiempos):
Música de la denominada “época de oro” de la música popular.
Folk Music (música folk):
Música folk.
Documentary (documental):
Documentales.
Alarm Test (prueba de alarma)
Alarm-Alarm! (¡alarma, alarma!):
Un programa que notifica emergencias o desastres naturales.
ESPAÑOL
Pop Music (música pop):
Programas sobre canciones populares y comerciales, ventas de
discos, radio fórmula, etc.
Rock Music (música rock):
Música moderna generalmente compuesta e interpretada por
músicos jóvenes.
Easy Listening (escucha fácil):
Música popular que generalmente dura menos de 5 minutos.
Light Classics M (música clásica ligera):
Música clásica, instrumental, coros y música ligera “no
profesional”.
Serious Classics (música clásica seria):
Orquestas incluyendo grandes óperas, sinfonías, música de
cámara, etc.
Other Music (otra música):
Otros estilos musicales (Rhythm & Blues, Reggae, etc.).
Weather & Meter (tiempo y meteorología):
Informes y pronósticos metereológicos.
Finance (finanzas):
Crónicas financieras, comerciales y económicas.
Children’s Progs (programas infantiles):
Programas para niños.
Social Affairs (acontecimientos sociales):
Acontecimientos sociales.
Religion (religión):
Programas religiosos.
51
Puesta en hora del reloj
< La unidad utiliza un reloj de 24 horas.
1 Pulse el botón TIME ADJ.
Programando el temporizador diario 1
Esta función está disponible solamente cuando los terminales
REMOTE CONTROL del T-R650 y del A-R650 están conectados por un
cable de control remoto.
< Ponga en hora el reloj antes de programar el temporizador.
1 Pulse el botón DAILY.
C-time 00:00:00
CH12
108.00MHz
El valor de las horas destella.
2 Gire el mando TUNING/SELECT para seleccionar la hora
On time 00:00:00
CH12
108.00MHz
actual y luego pulse el botón ENTER.
Aparece ”On time” (horario de encendido) en la pantalla y el valor
de las horas destella.
< Cuando utilice el mando a distancia, pulse el botón TIME
ADJ durante 2 o más segundos.
2 Gire el mando TUNING/SELECT para definir el horario de
inicio (hora) y pulse el botón ENTER.
C-time 10:00:00
CH12
108.00MHz
La hora queda definida y el valor de los minutos destella.
3 Gire el mando TUNING/SELECT para seleccionar los minutos
actuales y luego pulse el botón ENTER.
On time 07:00:00
CH12
108.00MHz
La hora queda definida y el valor de los minutos destella.
El reloj se pone en marcha desde 00 segundos.
52
3 Gire el mando TUNING/SELECT para definir el horario de
inicio (minutos) y pulse el botón ENTER.
Off time00:00:00
CH12
108.00MHz
El horario de encendido queda definido. Aparece ”Off time”
(horario de apagado) en la pantalla y el valor de las horas destella.
5 Gire el mando TUNING/SELECT para definir el horario de
parada (minutos) y pulse el botón ENTER.
Off time09:15:00
CH12
108.00MHz
Ahora la programación del temporizador ha quedado
memorizada.
ESPAÑOL
4 Gire el mando TUNING/SELECT para definir el horario de
parada (hora) y pulse el botón ENTER.
Off time09:15:00
CH12
108.00MHz
La hora queda definida y el valor de los minutos destella.
53
Programando el temporizador diario 2
Desconexión programada
Para encender el temporizador
1 Pulse repetidamente el botón TIMER hasta que se visualice
“Timer On”.
El indicador de temporizador (
la pantalla.
) aparece en la parte derecha de
indicador de temporizador
Timer On
Esta función está disponible solamente cuando el conector
REMOTE CONTROL del T-R650 y el A-R650 están conectados
por un cable de control remoto. Utilice el mando a distancia
suministrado con el A-R650
El sistema se puede programar para la desconexión tras un
periodo de tiempo especificado.
Pulse el botón repetidas veces hasta que aparezca la lectura de
tiempo deseada.
2 En el A-R650, seleccione “TUNER” (sintonizador) girando el
mando INPUT SELECTOR (o pulsando el botón TUNER del
mando a distancia).
90
80
. . . . . . . 10
OFF (Pantalla normal)
3 Pulse el botón STANDBY/ON del mando a distancia del
A-R650 para poner todas las unidades en el modo de
reposo (standby).
< Cuando se activa el temporizador y la fuente es AM o FM, el
indicador del temporizador se enciende en la pantalla de esta
unidad.
< Cuando llega la hora de encendido, se encienden conjuntamente
todas las unidades conectadas por medio de los cables de control
remoto. En esta unidad se sintoniza la última emisora y en el
A-R650 se selecciona la última fuente.
< Cuando llega la hora de apagado, todas las unidades conectadas
por medio de los cables de control remoto se ponen en el modo
de reposo.
< Después de ajustar el temporizador, es posible activar o desactivar
el temporizador mientras la unidad está en modo de reposo
(standby) con sólo pulsar el botón TIMER
Para apagar el temporizador
Pulse repetidamente el botón TIMER hasta que se visualice
“Timer Off”.
El indicador de temporizador (
54
) desaparece de la pantalla.
SL:90 (80, 70, 60, 50, 40, 30, 20 ó 10)
La unidad se apagará cuando transcurran 90 (80, 70, 60, 50, 40,
30, 20 ó 10) minutos, respectivamente.
Pantalla normal
Desactivado el temporizador de desconexión automática.
< Si quiere saber el tiempo que falta para la desconexión, pulse una
vez el botón SLEEP. El tiempo restante se visualizará durante 2,5
segundos, y se restablecerá la pantalla normal.
Solución de problemas
Si surge algún problema con la unidad y antes de ponerse en
contacto con su distribuidor o centro de servicio TEAC, consulte
la siguiente tabla y considere si usted mismo puede resolver el
problema.
No hay corriente.
e Compruebe la conexión a la red. Compruebe que la fuente
de corriente no es una toma con interruptor y que, si lo es, el
interruptor no está activado. Compruebe que hay corriente
en la toma de corriente conectando otro aparato como una
lámpara o un ventilador.
Para devolver a su unidad los ajustes
predeterminados de fábrica
Si su unidad no está funcionando correctamente, se aconseja
reinicializarla a los ajustes predeterminados de fábrica.
Esto eliminará las configuraciones (incluyendo las contraseñas) y
otros ajustes de usuario (presintonías, etc.).
Mantenga pulsados el botón TIMER y el botón BAND
durante unos segundos.
No hay sonido
e Compruebe la conexión al amplificador.
e Compruebe que el amplificador funciona correctamente.
No puede recibirse ninguna emisora, o la señal es demasiado
débil.
e Compruebe que la antena está conectada correctamente.
e Sintonice bien la emisora.
e Instale de nuevo la antena, colocándola en una mejor posición
de recepción.
e Puede que sea necesaria una antena externa.
El T-R650 tendrá ahora los ajustes por defecto que vienen de
fábrica.
Sonido con ruido.
e Aleje la antena lo máximo posible del televisor o reproductor de
CD.
e Si hay un televisor o reproductor de CD cerca de la unidad,
apáguelos.
ESPAÑOL
Aunque la emisión es en estéreo, se recibe en mono.
e Pulse el botón FM MODE.
Si no se restablece el funcionamiento normal, desconecte el
cable de corriente de la toma eléctrica y vuélvalo a conectar.
55
Especificaciones
Sintonizador de FM
Rango de sintonización . . . . 87,50 a 108,00 MHz (en pasos de 50 kHz)
Sensibilidad útil . . . . . . . . . . . . . . . . . . . . . . . . . . . . . . . . . . . . . . . . . . . 6 dBμ
Distorsión armónica . . . . . . . . . . . . . . . . . . . . . . . . . . . . . . . . 0,8 % (Mono)
1,2 % (Estéreo)
Relación señal/ruido . . . . . . . . . . . . . . . . . . . . . . . . . . . . . . .70 dB (Mono)
65 dB (Estéreo)
Separación estereofónica. . . . . . . . . . . . . . . . . . . . . . . . . . . 35 dB (1 kHz)
Emisoras memorizadas . . . . . . . . . . . . . . . . . . . . . . . . . . . . . . . . . . . . . . . .30
Sintonizador de AM
Rango de sintonización . . . . . .522 a 1, 629 kHz (en pasos de 9 kHz)
Sensibilidad útil . . . . . . . . . . . . . . . . . . . . . . . . . . . . . . . . . . . . . . . . . . 55 dBμ
Distorsión armónica . . . . . . . . . . . . . . . . . . . . . . . . . . . . . 1,5 % (a 74 dBμ)
Relación señal/ruido . . . . . . . . . . . . . . . . . . . . . . . . . . . . 45 dB (a 80 dBμ)
Emisoras memorizadas . . . . . . . . . . . . . . . . . . . . . . . . . . . . . . . . . . . . . . . .30
General
Requisitos de corriente . . . . . . . . . . . . . . . . . . . . . . . . . CA 230 V , 50 Hz
Consumo eléctrico . . . . . . . . . . . . . . . . . . . . . . . 9 W (en espera: 0,5 W)
Dimensiones (An x Al x Pr) . . . . . . . . . . . . . . . . . . . 435 x 85 x 295 mm
Peso . . . . . . . . . . . . . . . . . . . . . . . . . . . . . . . . . . . . . . . . . . . . . . . . . . . . . .3,2kg
Temperatura de funcionamiento . . . . . . . . . . . . . . . . . . . +5˚C - +35˚C
Humedad de funcionamiento . . . . . . 5% a 85% (sin condensación)
Temperatura de almacenamiento . . . . . . . . . . . . . . . . . –20˚C - +55˚C
Accesorios
Antena de cuadro de AM x 1
Antena de FM monocable x 1
Cable de conexión de control remoto del sistema x 1
Cable RCA estéreo x 1
Manual del usuario (este documento) x 1
Tarjeta de garantía
< El diseño y las especificaciones se encuentran sujetos a cambios
sin previo aviso.
< Las dimensiones y pesos son aproximados.
< Las ilustraciones pueden diferir ligeramente de los modelos de
producción.
56
Para consumidores europeos
Información para consumidores sobre recogida y
eliminación de equipos viejos y pilas usadas
Estos símbolos en los productos, embalajes y/o documentos
que los acompañan significan que los productos eléctricos
y electrónicos y las pilas no deben mezclarse con la basura
doméstica. Para que los productos viejos y las pilas usadas
reciban un tratamiento de recuperación y reciclaje adecuado,
por favor llévelos a los puntos de recogida pertinentes, de
acuerdo con la legislación de su país y de las Directivas
Europeas 2002/96/EC y 2006/66/EC.
Deshaciéndose correctamente de estos productos y de las pilas,
usted contribuye a conservar recursos valiosos y a prevenir
cualquier efecto negativo potencial sobre la salud humana
y el medioambiente que podrían derivarse de una gestión
incorrecta de estos residuos.
Para más información sobre la recogida y el reciclaje de
productos viejos y pilas usadas, por favor contacte con su
ayuntamiento, con el servicio local de recogida de basuras o
con el punto de venta donde los adquirió.
Información sobre cómo deshacerse de estos productos
en otros países fuera de la Unión Europea
Estos símbolos solamente son válidos en la Unión Europea.
Si desea deshacerse de estos productos, por favor contacte
con las autoridades locales o con su distribuidor e infórmese
del método adecuado para ello.
Nota para el símbolo de las pilas (los 2 ejemplos de
símbolos abajo a la derecha):
Este símbolo podría utilizarse junto a un símbolo químico. En
tal caso cumple con lo dispuesto por la Directiva para cuando
hay elementos químicos involucrados.
Inhalt
Vor der ersten Inbetriebnahme
Vielen Dank, dass Sie sich für ein TEAC-Produkt entschieden
haben. Bitte lesen Sie diese Anleitung sorgfältig durch, um
die Leistung des T-R650 optimal nutzen zu können.
Lesen und beachten Sie die folgenden Hinweise, bevor Sie
den T-R650 in Betrieb nehmen.
Vor der ersten Inbetriebnahme . . . . . . . . . . . . . . . . . . . . . . . . . . . . . . . 57
Anschlüsse . . . . . . . . . . . . . . . . . . . . . . . . . . . . . . . . . . . . . . . . . . . . . . . . . . 58
Anschließen der Antennen . . . . . . . . . . . . . . . . . . . . . . . . . . . . . . . . . . . 59
Bedienelemente und deren Funktion . . . . . . . . . . . . . . . . . . . . . . . . . 60
Grundlegende Bedienung . . . . . . . . . . . . . . . . . . . . . . . . . . . . . . . . . . . . 61
UKW/MW-Wiedergabe . . . . . . . . . . . . . . . . . . . . . . . . . . . . . . . . . . . . . . . 62
Senderspeicherplätze (Presets) . . . . . . . . . . . . . . . . . . . . . . . . . . . . . . . 63
< Die Spannung, an der der T-R650 betrieben wird, sollte den
Angaben auf der Geräterückseite entsprechen. Falls Sie diesbezüglich Zweifel haben, kontaktieren Sie bitte einen Elektrofachmann.
< Achten Sie beim Aufstellen des T-R650 darauf, dass er nicht
direkter Sonneneinstrahlung oder anderen Wärmequellen ausgesetzt ist. Vermeiden Sie Betriebsorte, an denen der Receiver
Erschütterungen, hoher Staubeinwirkung, extremer Hitze, Kälte
oder Feuchtigkeit ausgesetzt ist.
< Stellen Sie den T-R650 nicht auf einen anderen Verstärker
(Endstufe)/Receiver.
Senderspeicherplätze (mittels Fernbedienung) . . . . . . . . . . . . . . . . 65
RDS (Radio Data System) . . . . . . . . . . . . . . . . . . . . . . . . . . . . . . . . . . . . . 67
PTY-Suche . . . . . . . . . . . . . . . . . . . . . . . . . . . . . . . . . . . . . . . . . . . . . . . . . . . 68
Einstellen der Uhrzeit . . . . . . . . . . . . . . . . . . . . . . . . . . . . . . . . . . . . . . . . 70
Einstellen des Timers . . . . . . . . . . . . . . . . . . . . . . . . . . . . . . . . . . . . . . . . . 70
< Öffnen Sie nicht das Gehäuse, da dies Schäden an der Elektronik
oder einen Stromschlag verursachen kann. Falls ein Fremdkörper
ins Geräteinnere eingedrungen ist, kontaktieren Sie Ihren
Fachhändler oder ein autorisiertes Servicecenter.
< Achten Sie beim Ziehen des Netzsteckers darauf, dass Sie stets
am Stecker ziehen und niemals am Kabel.
Einschlaftimerfunktion . . . . . . . . . . . . . . . . . . . . . . . . . . . . . . . . . . . . . . . 72
Hilfe bei Funktionsstörungen . . . . . . . . . . . . . . . . . . . . . . . . . . . . . . . . . 73
Technische Daten . . . . . . . . . . . . . . . . . . . . . . . . . . . . . . . . . . . . . . . . . . . . 74
< Versuchen Sie nicht, den T-R650 mittels chemischer Lösungsmittel
zu reinigen, da dies zu Schäden an der Gehäuseoberfläche führen
kann. Verwenden Sie ein sauberes, trockenes Tuch.
< Bewahren Sie diese Bedienungsanleitung an einem sicheren Ort
auf, so dass Sie jederzeit etwas nachlesen können.
Wartung und Pflege
57
DEUTSCH
ACHTUNG
< Vermeiden Sie Aufstellungsorte, an denen der T-R650 Tropf- oder
Spritzwasser ausgesetzt ist.
< Platzieren Sie keine mit Flüssigkeiten gefüllten Objekte, wie etwa
Vasen, auf dem T-R650.
< Installieren Sie den Tuner nicht in geschlossenen Möbeln, wie
etwa einem Bücherschrank oder einem geschlossenen Regalsystem.
< Der T-R650 bezieht auch im Bereitschaftsmodus – POWER- oder
STANDBY/ON-Schalter befinden sich in der Stellung „Standby” –
geringen Ruhestrom aus dem Stromnetz.
< Platzieren Sie den T-R650 so, dass die Wandsteckdose, an der Sie
den Tuner angeschlossen haben, jederzeit leicht zugänglich ist.
< Achten Sie darauf, dass Netzstecker und -kabel stets in einwandfreiem Zustand sind.
< Falls in diesem Produkt Batterien (das Akkupack oder
austauschbare Trockenbatterien) verwendet werden, dürfen
diese nicht direkter Sonne, Feuer oder großer Hitze ausgesetzt
sein.
< ACHTUNG: Bei inkorrekt vorgenommenem Batteriewechsel
besteht Explosionsgefahr. Verwenden Sie zum Austausch
ausschließlich Batterien des gleichen oder gleichwertigen Typs.
< Achten Sie auf Ihr Gehör, wenn Sie Ohr- oder Kopfhörer am
T-R650 betreiben. Zu hoher Schalldruck von Ohr- oder Kopfhörern
kann zu Hörschäden oder -verlust führen.
Falls die Gehäuseoberfläche des T-R650 verschmutzt ist, verwenden Sie zum Reinigen ein weiches Tuch oder milde Seifenlösung.
Achten Sie darauf, dass vor der erneuten Inbetriebnahme
keine Flüssigkeitsrückstände mehr vorhanden sind. Verwenden
Sie keinen Verdünner, Benzin oder Alkohol, da dies die
Gehäuseoberfläche beschädigen kann.
Anschlüsse
A
B
C
Wandsteckdose
R
L
TUNER
(LINE IN)
REMOTE
CONTROL
Verstärker (A-R650)
A LINE OUT-Buchsen
Über diese Buchsen wird ein analoges Stereo-/ZweikanalAudiosignal ausgegeben. Verbinden Sie diese Buchsen mittels
RCA (Cinch) Kabels mit den TUNER-Buchsen des Verstärkers
(A-R650).
Achten Sie darauf, dass das Kabel wie folgt angeschlossen ist:
weißer Stecker q weiße Buchse (L: linker Kanal)
roter Stecker q rote Buchse (R: rechter Kanal)
weiß (L)
rot (R)
weiß (L)
rot (R)
< Vergewissern Sie sich, dass alle Verbindungen korrekt und sicher
vorgenommen wurden. Um Brummen sowie Rauschen vorzubeugen, sollten Signalverbindungskabel nicht parallel oder
gebündelt mit Netz- oder Lautsprecherkabeln verlegt werden.
VORSICHT:
< Schalten Sie vor dem Herstellen von Verbindungen alle Geräte aus.
< Lesen und beachten Sie die Hinweise in den
Bedienungsanleitungen aller Komponenten,
die Sie zusammen mit diesem Tuner betreiben
möchten.
< Wenn Sie einen Sender wählen, wird der Eingangswahlschalter
des A-R650 automatisch auf „TUNER” gestellt.
Wenn Sie die Fernbedienungsfunktionen verwenden möchten,
verbinden Sie die REMOTE-CONTROL-Buchsen jeder Komponente mittels Fernbedienungskabel und stellen Sie den REMOTE
CONTROL SELECTOR-Schalter an der Rückseite des T-R650 auf
„SYSTEM”.
< Sie können die zum Lieferumfang des A-R650 gehörende
Fernbedienung UR-431 verwenden. Richten Sie diese zur
Bedienung des Tuners auf den A-R650.
Falls der REMOTE CONTROL SELECTOR-Schalter in der Position
„SINGLE“ steht, richten Sie die Fernbedienung bitte auf den
Sensor des T-R650.
Hinweis:
Die Fernbedienung gehört nicht zum Lieferumfang des T-R650.
C Netzkabel
B REMOTE CONTROL-Buchse
Sofern Sie einen TEAC A-R650 besitzen, verwenden Sie das
mitgelieferte Fernbedienungskabel, um die REMOTE CONTROLBuchsen des T-R650 und des A-R650 miteinander zu verbinden.
Anschließend können Sie die umfangreichen Systemsteuerungsmöglichkeiten nutzen.
58
Verbinden Sie den Netzstecker mit einer Wandsteckdose, nachdem Sie alle anderen Verbindungen hergestellt haben.
Achten Sie darauf, dass die verwendete Steckdose die korrekte
Spannung liefert.
Halten Sie beim Anschließen bzw. Trennen des Netzkabels grundsätzlich den Netzstecker fest, und nicht das Kabel.
Anschließen der Antennen
MW-Rahmenantenne
Die zum Lieferumfang des T-R650 gehörende Hochleistungs-MWRahmenantenne gewährleistet in den meisten Gebieten gute
Empfangsergebnisse.
Wenn Sie die Antenne auf einer ebenen Fläche aufstellen möchten, rasten Sie die Befestigungsklammer im dafür vorgesehenen
Schlitz des Antennenstandfußes ein.
Der Antennendraht sollte außen oder innen in der Nähe eines
Fensters angebracht werden. Zur weiteren Verbesserung des
Empfangs, verbinden Sie die GND-Klemme mit einer zuverlässigen Erdleitung (Hauserde).
< Auch bei Verwendung einer MW-Außenantenne sollte die
MW-Rahmenantenne nicht vom Tuner getrennt werden.
UKW-Zimmerantenne
Verbinden Sie das Anschlusskabel der Rahmenantenne mit den
MW-Antennenanschlüssen des T-R650.
Schließen Sie die UKW-Wurfantenne an der FM 75Ω-Antennenbuchse an. Strecken Sie den Antennendraht auf seine gesamte
Länge aus, und stellen Sie die Empfangsfrequenz Ihres bevorzugten Senders ein (siehe Seite 62).
Richten Sie die Wurfantenne an einer geeigneten Stelle, wie
einem Fensterrahmen oder einer Wand auf beste Empfangsqualität aus, und befestigen Sie die Antenne in dieser Position
mit Reißzwecken, Druckstiften oder ähnlichen geeigneten
Befestigungsmitteln.
< Achten Sie darauf, dass der schwarze Antennendraht an die GNDKlemme angeschlossen ist.
Platzieren Sie die Antenne auf einem Regal oder hängen Sie
sie beispielsweise in einem Fensterrahmen auf. Richten Sie die
Rahmenantenne auf beste Empfangseigenschaften aus. Achten
Sie bitte darauf, dass andere Leitungen, wie Netz-, Lautsprecheroder Verbindungskabel, so weit wie möglich von der Antenne
entfernt sind.
MW-Außenantenne
Falls die mitgelieferte MW-Rahmenantenne keine ausreichende
Empfangsqualität liefert (oft aufgrund von zu großer Entfernung
zum Sender oder Verwendung in einem Stahlbetongebäude, usw.),
kann die Verwendung einer MW-Außenantenne erforderlich sein.
Schließen Sie den
schwarzen Draht am
GND-Anscluss an.
In Gebieten mit eingeschränktem UKW-Empfang kann die Verwendung einer UKW-Außenantenne erforderlich sein. Normalerweise
verbessert eine Dreielementantenne die Empfangsqualität ausreichend. Falls die UKW-Empfangsbedingungen an Ihrem Wohnort
allerdings besonders ungünstig sind, kann es erforderlich sein, eine
Antenne mit fünf oder mehr Elementen zu verwenden.
< Bei Verwendung einer Außenantenne sollte die UKW-Zimmerantenne vom Tuner getrennt werden.
Verwenden Sie entweder eine hochwertige, handelsübliche
MW-Antenne, oder, falls diese nicht verfügbar ist, einen isolierten Draht von mehr als 5 m Länge. Isolieren Sie ein Ende ab und
schließen dieses, gemäß der Abbildung, an der Klemme an.
59
DEUTSCH
MW-Außenantenne
UKW-Außenantenne
Bedienelemente und deren Funktion
A
B
C
D
E
J
K
F
L
M
G
H
I
N
A STANDBY/ON
a
b
M
c
Mittels dieser Taste schalten Sie den T-R650 ein oder in den
Bereitschaftsmodus (Standby).
Die Standby-Anzeige leuchtet rot, wenn sich der Tuner im
Bereitschaftsmodus befindet. Nach dem Einschalten erlicht die
Anzeige.
d
B TIMER
K
L
Diese Taste dient zum Ein-/Ausschalten der Timerfunktion.
H
G
J
C D
B
C DAILY (täglich)
Mittels dieser Taste nehmen Sie Timereinstellungen vor.
Bei Verwendung der Fernbedienung, betätigen Sie die TIME ADJTaste länger als zwei Sekunden.
D TIME ADJ
Betätigen Sie zum Einstellen der Uhrzeit diese Taste.
e
E Display
F TUNING MODE
Mittels dieser Taste wechseln Sie den Senderabstimmmodus.
G FM MODE
Bei UKW (FM) Betrieb dient diese Taste zum Auswählen von
Stereo- oder Monoqualität.
H BAND (Frequenzband)
Mittels dieser Taste können Sie zwischen UKW (FM) und MW (AM)
Empfang umschalten.
UR-431
Die zum Lieferumfang des A-R650 gehörende Fernbedienung
60
Grundlegende Bedienung
I TUNING/SELECT
Dieser Drehregler dient zur Senderabstimmung sowie zum Auswählen eines Speicherplatzes (Presets) oder eines Menüpunkts.
Ein-/Ausschalten des T-R650
Betätigen Sie zum Einschalten der Komponente die STANDBY/
ON-Taste.
J RDS
Mittels dieser Taste können Sie den RDS-Modus wählen.
K FILE
STANDBY/ON-Anzeige
Mittels dieser Taste können Senderspeicherplätzen Namen zugeordnet werden.
L MEMORY (Speicher)
Diese Taste dient zum Speichern von Sender-Presets.
Nach dem Einschalten erlicht die Anzeige.
M ENTER (Eingabe)
Mittels dieser Taste bestätigen Sie Ihre Auswahl.
N Fernbedienungssensor
Sofern der REMOTE CONTROL SELECTOR-Schalter des T-R650 auf
„SINGLE“ steht, empfängt dieser Sensor die Steuerungsbefehle
der Fernbedienung (siehe Seite 52)
Dimmer
Bei jedem Drücken der DIMMER-Taste wechselt die Anzeige
folgendermaßen:
Fernbedienung (im Lieferumfang des A-R650)
a ON
Mittels dieser Taste schalten Sie den T-R650 ein.
b STANDBY
Mittels dieser Taste versetzen Sie den T-R650 in den Bereitschaftsmodus.
d
Manuelle Senderabstimmung (UP DOWN-Tasten)
Diese Tasten dienen bei manueller Senderabstimmung zum
Einstellen der gewünschten Empfangsfrequenz eines Senders
sowie zum Auswählen der Nummer des gewünschten Senderspeicherplatzes (Presets).
DEUTSCH
c
Normal q Abgeblendet q Licht aus
Sie können das Display des T-R650 abblenden, wenn die
REMOTE CONTROL-Buchsen dieser Geräte und des A-R650
mit dem Fernbedienungskabel verbunden sind.
Preset-Senderabstimmung (UP DOWN-Tasten)
Diese Tasten dienen zum Auswählen der Speicherplatznummer
eines Senders.
e DIMMER
Mittels dieser Taste können Sie die Displayhelligkeit einstellen.
Hinweis:
Die Fernbedienung gehört nicht zum Lieferumfang des T-R650.
61
UKW/MW-Wiedergabe
1 Betätigen Sie zum Auswählen von FM (UKW) oder AM (MW)
3 Wählen Sie den gewünschten Sender aus.
wiederholt die BAND-Taste.
2 Wählen Sie den gewünschten Senderabstimmmodus.
Manuelle Senderabstimmung
Stellen Sie mittels TUNING/SELECT-Regler die Empfangsfrequenz
des gewünschten Senders ein.
Der Frequenzwert ändert sich in festen Schritten (UKW: in
Schritten von 50 kHz, MW: in Schritten von 9 kHz).
Automatische Senderabstimmung
Starten Sie die automatische Senderabstimmung durch Drehen
des TUNING/SELECT-Reglers.
Sobald ein Sender gefunden wird, stellt der T-R650 dessen
Empfangsfrequenz optimal ein. Wiederholen Sie diesen
Vorgang, bis der gewünschte Sender gefunden ist.
Bei jedem Betätigen der ENTER-Taste wechselt der Abstimmmodus, wie folgt:
Manuelle
Senderabstimmung
FM
< Manual
tune >
108.00MHz
<
Preset-Senderabstimmung
Eine detaillierte Beschreibung der Preset-Senderabstimmung
finden Sie auf den Seiten 63 bis 67.
Umschalten der Wiedergabequalität
Automatische
Senderabstimmung
FM
< Betätigen Sie zum Beenden der automatischen Senderabstimmung die ENTER-Taste. (auf der Vorderseite des T-R650)
< Betätigen Sie bei Verwendung der Fernbedienung die TUNINGTaste.
Auto tune >
108.00MHz
Betätigen Sie zum Umschalten zwischen Stereo- und Monowiedergabe die FUNCTION/FM MODE-Taste.
PresetSenderabstimmung
FM < Preset tune >
CH01
108.00MHz
Stereo:
UKW-Stereosendungen werden in Stereoqualität wiedergegeben,
und die Meldung „Stereo” wird im Display angezeigt.
Mono:
Wählen Sie „Mono“, um Rauschen und Verzerrungen bei eingeschränktem UKW-Stereoempfang zu reduzieren. Die Wiedergabe
erfolgt nun in Monoqualität, wodurch unerwünschte Störungen
vermindert werden.
62
Senderspeicherplätze (Presets) 1
Manuelle Preset-Belegung
Bis zu 30 UKW- sowie 30 MW-Empfangsfrequenzen können im
T-R650 in Presets gespeichert werden.
4 Wählen Sie innerhalb von vier Sekunden die Nummer des
Presets, in dem Sie diesen Sender speichern möchten.
Drehen Sie am TUNING/SELECT-Regler.
1 Betätigen Sie zum Auswählen von AM (MW) oder FM (UKW)
wiederholt die BAND-Taste.
FM 10:00 Stereo
CH12
108.00MHz
2 Stellen Sie die Empfangsfrequenz des zu speichernden
Senders ein.
Details zur Senderabstimmung finden Sie auf der vorherigen Seite.
5 Betätigen Sie innerhalb von vier Sekunden die MEMORY-
Taste.
Der Sender ist gespeichert.
3 Betätigen Sie die MEMORY-Taste.
< Wiederholen Sie zum Speichern weiterer Sender die Bedienschritte 2 bis 5 .
Automatische Preset-Belegung
1 Betätigen Sie zum Auswählen von FM (UKW) oder AM (MW)
wiederholt die BAND-Taste.
DEUTSCH
FM 10:00 Stereo
CH -108.00MHz
< Die Senderabstimmung wird automatisch beendet, falls innerhalb
von vier Sekunden nach Betätigen der MEMORY-Taste keine
weitere Taste betätigt wird.
2 Betätigen Sie die MEMORY-Taste länger als drei Sekunden.
Bis zu 30 Sender, die in Ihrem Empfangsgebiet beste Empfangsqualität liefern, werden automatisch gespeichert.
63
Senderspeicherplätze (Presets) 2
Aufrufen von Sender-Presets (UKW/MW)
1 Betätigen Sie zum Auswählen von AM (MW) oder FM (UKW)
wiederholt die BAND-Taste.
Sie können den Sender-Presets Namen zuweisen. (Bis zu 4 Zeichen)
Wenn die FILE-Taste gedrückt wird, wird der zugewiesene Name
anstelle der Zeit angezeigt. Drücken Sie die FILE-Taste erneut, um
auf normale Anzeige (Uhrzeit) zurückzuschalten.
Senderpresets mit Namen versehen
1 Wählen Sie einen Preset-Kanal, dem Sie den Namen im
Modus “Preset-Abstimmung“ zuweisen wollen.
< Oder Sie können den Namen dem aktuell abgestimmten Sender
zuweisen und diesen als Preset im Speicher ablegen.
2 Wählen Sie Preset-Senderabstimmung aus.
Betätigen Sie wiederholt die ENTER-Taste, bis die Meldung „Preset
tune” im Display angezeigt wird.
2 Betätigen Sie die FILE-Taste und halten Sie diese länger als
1,5 Sekunden nieder gedrückt.
FM < Preset tune >
CH01
108.00MHz
3 Wählen Sie durch Drehen des TUNING/SELECT-Reglers
die Nummer des gewünschten Speicherplatzes (SenderPresets) aus.
FM
---- 03:01
CH09
92.50MHz
“----“ erscheint, und der erste “-“ blinkt im Display.
3 Wählen Sie mittels TUNING/SELECT-Taste den gewünschten
Buchstaben aus.
Der T-R650 stellt die Empfangsfrequenz des gewählten SenderPresets ein.
Zur Verfügung stehen:
64
Senderspeicherplätze (mittels Fernbedienung) 1
4 Betätigen Sie die ENTER-Taste.
Manuelle Preset-Belegung
Bis zu 30 UKW- sowie 30 MW-Empfangsfrequenzen können im
T-R650 in Presets gespeichert werden.
1 Betätigen Sie zum Auswählen von AM (MW) oder FM (UKW)
wiederholt die BAND-Taste.
Der nächste „-“ blinkt.
Für die Namensgebung können jeweils bis zu vier Zeichen
verwendet werden.
Wiederholen Sie die Bedienschritte 3 und 4 für jedes Zeichen.
5 Betätigen Sie die MEMORY-Taste.
2 Stellen Sie mittels
oder
Taste die Empfangsfrequenz des Senders ein, den Sie speichern möchten.
FM
BBC- 03:01
CH__
92.50MHz
“CH__“ blinkt.
6 Wählen Sie einen Preset-Kanal zum Speichern des Senders
mit dem TUNING/SELECT-Regler.
3 Betätigen Sie die MEMORY-Taste.
DEUTSCH
7 Drücken Sie die Taste MEMORY.
FM 10:00 Stereo
CH -108.00MHz
< Die Senderabstimmung wird automatisch beendet, falls innerhalb
von vier Sekunden nach Betätigen der MEMORY-Taste keine
weitere Taste betätigt wird.
Der zugewiesene Name ist im Speicher abgelegt.
Wenn der alte Name im Speicher ist, wird er überschrieben.
Fortsetzung auf der folgenden Seite q
65
Senderspeicherplätze (mittels Fernbedienung) 2
4 Wählen Sie innerhalb von vier Sekunden mittels
oder
Taste die Nummer des Presets, in dem Sie diesen Sender speichern möchten.
< Wiederholen Sie zum Speichern weiterer Sender die Bedienschritte 2 bis 5 .
< Die Speicherplatzbelegung wird automatisch abgebrochen,
wenn die MEMORY-Taste nicht innerhalb von vier Sekunden nach
Auswahl der Preset-Nummer betätigt wird.
Automatische Preset-Belegung
1 Betätigen Sie zum Auswählen von FM (UKW) oder AM (MW)
wiederholt die BAND-Taste.
FM 10:00 Stereo
CH12
108.00MHz
Preset-Nummern können auch mittels Zifferntasten eingegeben
werden.
< Betätigen Sie bei Verwendung der Zifferntasten zuerst die TUNERTaste auf der Fernbedienung.
2 Betätigen Sie die MEMORY-Taste länger als drei Sekunden.
Beispiel: Um die Preset-Nummer „25“ einzugeben, betätigen Sie
zuerst die TUNER-Taste und anschließend die Tasten „2” und „5”.
Zur Eingabe von Nummern, die kleiner sind als „10“, betätigen Sie
bitte zuerst die „0” und dann die entsprechende Zifferntaste.
Beispiel: Um die Preset-Nummer „5“ einzugeben, betätigen Sie
die Tasten „0” und „5”. (Sie können auch nur die Taste „5“ betätigen und anschließend einige Sekunden warten.)
5 Betätigen Sie innerhalb von vier Sekunden die MEMORY-
Taste.
Der Sender ist gespeichert.
66
Bis zu 30 Sender, die in Ihrem Empfangsgebiet beste Empfangsqualität liefern, werden automatisch gespeichert.
RDS 1 (Radio Data System)
Aufrufen von Sender-Presets
1 Betätigen Sie zum Auswählen von AM (MW) oder FM (UKW)
wiederholt die BAND-Taste.
RDS (Radio Data System) ist ein Service, der es Rundfunkanstalten
erlaubt, neben dem Sendesignal zusätzliche Textinformationen auszustrahlen.
Der RDS-Dienst wird ausschließlich in Europa und nur von
UKW-Sendeanstalten angeboten.
1 Stellen Sie die Empfangsfrequenz eines UKW-Senders ein
(siehe Seite 62).
2 Betätigen Sie die RDS MODE-Taste.
2 Wählen Sie mittels Zifferntasten die Nummer des ge -
wünschten Speicherplatzes (Sender-Presets) aus.
Bei jedem Betätigen der RDS MODE-Taste wechselt der RDSModus, wie folgt:
PS (PROGRAM SERVICE)
Wenn Sie PROGRAM SERVICE wählen, blinkt „PROGRAM
SERVICE” etwa drei Sekunden lang. Danach wird der Name des
Programmdienstes oder des Senders angezeigt. Falls keine
Programmdienstdaten übertragen werden, wird die Empfangsfrequenz angezeigt.
Der T-R650 stellt die Empfangsfrequenz des gewählten SenderPresets ein.
Beispiel: Um die Preset-Nummer „25“ einzugeben, betätigen Sie
zuerst die TUNER-Taste und anschließend die Tasten „2” und „5”.
RT (RADIO TEXT)
Wenn Sie RADIO TEXT wählen, blinkt „RADIO TEXT” etwa drei
Sekunden lang. Danach werden die neuesten Nachrichtenmeldungen des Senders, die bis zu 64 Zeichen umfassen können,
angezeigt.
Falls keine Radiotextdaten übermittelt werden, wird automatisch auf PROGRAM SERVICE-Anzeige umgeschaltet.
TA (TRAFFIC ANNOUNCE) (Verkehrsmeldungen)
Wenn Sie TRAFFIC ANNOUNCE wählen, blinkt „TRAFFIC
ANNOUNCE” etwa drei Sekunden lang. Danach sucht der T-R650
nach Verkehrsmeldungen.
< Sobald ein Verkehrsprogramm gefunden wird, wechselt RDS
automatisch zur PROGRAM SERVICE-Anzeige.
Falls der aktuell gewählte Sender Verkehrsmeldungen überträgt,
wird ohne vorherige Suche nach einem Verkehrsprogramm zur
PROGRAM-SERVICE-Anzeige gewechselt.
CT (CLOCK TIME)
Die von einem Sender übertragenen Zeitdaten (Uhrzeit) werden
angezeigt.
Wenn Sie CLOCK TIME wählen, blinkt „CLOCK TIME” etwa drei
Sekunden lang. Danach wird die aktuelle Uhrzeit angezeigt.
67
DEUTSCH
Zur Eingabe von Nummern, die kleiner sind als „10“, betätigen Sie
bitte zuerst die „0” und dann die entsprechende Zifferntaste.
Beispiel: Um die Preset-Nummer „5“ einzugeben, betätigen Sie
die Tasten „0” und „5”. (Sie können auch nur die Taste „5“ betätigen und anschließend einige Sekunden warten.)
PT (PROGRAM TYPE)
Wenn Sie PROGRAM TYPE wählen, blinkt „PROGRAM TYPE” etwa
drei Sekunden lang. Danach wird der jeweilige Programmtyp
angezeigt.
RDS 2 (Radio Data System)
PTY-Suche
Sie können Sender anhand des Programmtyps auswählen.
Die interne Uhr des T-R650 wird automatisch zu den empfangenen CLOCK-TIME (CT) Daten synchronisiert.
Falls Sie einen RDS-Sender eingestellt haben, der inkorrekte
CT-Daten überträgt, zeigt die interne Uhr möglicherweise
ebenfalls eine inkorrekte Zeit an. Dies kann schließlich zu unerwünschten Beeinträchtigungen des Timerbetriebs führen.
Schalten Sie die automatische Uhrzeitsynchronisation aus,
wenn Sie nicht möchten, dass die Uhr des T-R650 zu den empfangenen CT-Daten synchronisiert wird.
1 Betätigen Sie zum Auswählen von FM (UKW) wiederholt die
BAND-Taste.
< CT-Daten werden unabhängig vom gewählten RDS-Modus
empfangen und die interne Uhr wird zu diesen Daten synchronisiert.
2 Betätigen Sie die RDS MODE-Taste länger als drei
Betätigen Sie die RDS-MODE-Taste länger als acht Sekunden, um die automatische Uhrzeitsynchronisation zu
deaktivieren.
Sekunden.
3 Wählen Sie den gewünschten Programmtyp (PTY).
< Betätigen Sie die RDS-MODE-Taste ebenfalls länger als acht
Sekunden, um die automatische Uhrzeitsynchronisation
wieder einzuschalten.
Wählen Sie mittels TUNING/SELECT-Regler das gewünschte
Programmgenre aus
< Wenn die automatische Uhrzeitsynchronisation deaktiviert
ist, wird CLOCK TIME nicht angezeigt.
Wählen Sie unter 31 unterschiedlichen PTY-Programmen den
gewünschten Programmtyp aus. Der Programmtypname blinkt.
4 Betätigen Sie die ENTER-Taste.
Der Suchlauf startet.
< Sobald ein Sender gefunden wird, der den gewünschten Programmtyp ausstrahlt, stoppt der Suchlauf und der Programmtyp
wird im Display angezeigt.
< Falls während der PTY-Suche kein Sender gefunden wird, der den
gewünschten Programmtyp ausstrahlt, stoppt der Suchlauf bei
der Frequenz, ab der die Suche gestartet wurde.
< Durch Betätigen der RDS MODE-Taste kann der PTY-Suchlauf
gestoppt werden.
68
31 unterschiedliche PTY-Programme:
News:
kurze Ansagen, Ereignisse, öffentliche Meinung, Berichte, aktuelle
Situationen
Current Affairs:
Stellungnahmen, einschließlich praktischer Anregungen außer
Nachrichten, Dokumentationen, Diskussionen, Analysen, usw.
Information:
tägliche Informationen oder Berichte, wie etwa Wettervorhersagen, Verbraucherberatung, medizinische Hinweise, usw.
Phone In:
Programme mit telefonischer Beteiligung der Zuhörer
Travel & Touring:
Reiseberichte
Leisure & Hobby:
Programme über Freizeitaktivitäten
Jazz Music:
Jazz-Musik
Country Music:
Country-Musik
Sport:
Sport-bezogene Programme
National Music:
nationale Musik (Schlager, Chanson, usw.)
Education:
Bildungs- und kulturelle Informationen
Oldies Music:
Musik aus der so genannten „guten alten Zeit“
Drama:
Hörspiele, Konzerte und Serien aller Art
Folk Music:
Volksmusik
Cultures:
nationale oder regional-kulturelle Belange aller Art, einschließlich
religiöser Veranstaltungen, Philosophie, Sozialwissenschaften,
fremdsprachige Programme, Theater, usw.
Science:
Programme zu Naturwissenschaften und Technologie
Documentary:
Dokumentationen
Alarm Test
Alarm-Alarm!:
Warnmeldungen vor Notsituationen oder Naturkatastrophen
Varied Speech:
Unterhaltungsprogramme, wie Quizshows, Interviews, Comedy,
Satire, usw.
Pop Music:
Popmusik, kommerzielle, populäre Songs, Hitparaden, CDVerkaufszahlen, usw.
Rock Music:
Rockmusik, zumeist von jungen Musikern komponierte und
gespielte Titel
DEUTSCH
Easy Listening:
populäre Musikstücke, jeweils meist kürzer als fünf Minuten
Light Classics M:
klassische Musik, Instrumentalmusik, Chor sowie leichte Unterhaltungsmusik
Serious Classics:
klassische Orchestermusik, einschließlich Opern, Symphonien,
Kammermusik, usw.
Other Music:
weitere Musikstile (Rhythm & Blues, Reggae, usw.)
Weather & Meter:
Wetterberichte und -vorhersagen
Finance:
Börsen-, Handels-, Wirtschaftsberichte
Children’s Progs:
Kinder- und Jugendprogramme
Social Affairs:
soziale Belange
Religion:
Programme mit religiösen Inhalten
69
Einstellen der Uhrzeit
< Die Uhrzeit wird vom T-R650 im 24-Stundenformat angezeigt.
1 Betätigen Sie die TIME ADJ-Taste.
Einstellen des Timers 1
Diese Funktion ist verfügbar, wenn die REMOTE CONTROL-Buchsen
des T-R650 und des A-R650 mittels Fernbedienungskabel verbunden
sind.
< Stellen Sie die korrekte Uhrzeit ein, bevor Sie den Timer programmieren.
1 Betätigen Sie die DAILY-Taste.
C-time 00:00:00
CH12
108.00MHz
Der „Stundenwert“ blinkt.
2 Stellen Sie den aktuellen „Stundenwert“ mittels TUNING/
SELECT-Regler ein. Betätigen Sie danach die ENTER-Taste.
On time 00:00:00
CH12
108.00MHz
„On time” erscheint im Display, und der „Stundenwert“ blinkt.
< Betätigen Sie bei Verwendung der Fernbedienung die TIME
ADJ-Taste länger als zwei Sekunden.
2 Stellen Sie mittels TUNING/SELECT-Regler den „Stunden-
wert“ der Startzeit ein, und betätigen Sie die ENTER-Taste.
C-time 10:00:00
CH12
108.00MHz
Der „Stundenwert“ ist eingestellt und der „Minutenwert“ blinkt.
3 Stellen Sie den aktuellen „Minutenwert“ mittels TUNING/
SELECT-Regler ein. Betätigen Sie danach die ENTER-Taste.
On time 07:00:00
CH12
108.00MHz
Der „Stundenwert“ ist eingestellt und der „Minutenwert“ blinkt.
Die aktuelle Uhrzeit wird, beginnend ab einem Sekundenwert
von „00“, angezeigt.
70
3 Stellen Sie mittels TUNING/SELECT-Regler den „Minuten-
wert“ der Startzeit ein, und betätigen Sie die ENTER-Taste.
Off time00:00:00
CH12
108.00MHz
Die Einschaltzeit ist programmiert. „Off time” erscheint im Display,
und der „Stundenwert“ blinkt.
5 Stellen Sie mittels TUNING/SELECT-Regler den „Minuten-
wert“ der Stoppzeit ein, und betätigen Sie anschließend
die ENTER-Taste.
Off time09:15:00
CH12
108.00MHz
Die programmierten Timerzeiten wurden gespeichert.
4 Stellen Sie mittels TUNING/SELECT-Regler den „Stundenwert“
der Stoppzeit ein, und betätigen Sie die ENTER-Taste.
DEUTSCH
Off time09:15:00
CH12
108.00MHz
Der „Stundenwert“ ist eingestellt und der „Minutenwert“ blinkt.
71
Einstellen des Timers 2
Einschlaftimerfunktion
Aktivieren der Timerfunktion
1 Betätigen Sie wiederholt die TIMER-Taste, bis „Timer On”
im Display angezeigt wird.
Die Timer-Anzeige ( ) erscheint rechts im Display.
Timer-Anzeige
Timer On
Diese Funktion steht nur zur Verfügung, wenn die REMOTE
CONTROL-Buchsen des T-R650 und A-R650 mit dem
Fernbedienungskabel verbunden sind. Verwenden Sie die mit
dem A-R650 mitgelieferte edienung.
Das System kann nach einer vorprogrammierten Zeitdauer
ausgeschaltet werden.
Betätigen Sie wiederholt die SLEEP-Taste, bis der gewünschte
Zeitwert im Display angezeigt wird.
2 Wählen Sie mittels INPUT SELECTOR-Schalter am A-R650
„TUNER“ aus (oder betätigen Sie die TUNER-Taste auf der
Fernbedienung).
90
3 Betätigen Sie die STANDBY/ON-Taste auf der Fernbedie-
nung des A-R650, um alle Komponenten in den Bereitschaftsmodus (Standby) zu versetzen.
< Wenn beim Einschalten des Timers als Signalquelle „AM“ oder
„FM“ ausgewählt ist, leuchtet die Timer-Anzeige im Display des
T-R650.
< Bei Erreichen der Startzeit schalten sich alle mittels Fernbedienungskabel verbundenen Komponenten gemeinsam ein. Am
T-R650 wird der zuletzt empfangene Sender eingestellt, und am
A-R650 wird die Signalquelle gewählt, die zuletzt aktiv war.
< Bei Erreichen der Stoppzeit werden alle mittels Fernbedienungskabel verbundenen Komponenten in den Standby-Modus versetzt.
< Nachdem die Timereinstellung abgeschlossen ist, kann der Timer,
durch Betätigen der TIMER-Taste, ein- oder ausgeschaltet werden,
sofern sich der T-R650 im Bereitschaftsmodus (Standby) befindet
Deaktivieren der Timerfunktion
Betätigen Sie wiederholt die TIMER-Taste, bis „Timer Off” im
Display angezeigt wird.
Die Timer-Anzeige ( ) im Display erlischt.
72
80
. . . . . . . 10
OFF (Die normale Displayanzeige)
SL:90 (80, 70, 60, 50, 40, 30, 20 oder 10)
Das System wird nach 90 (80, 70, 60, 50, 40, 30, 20 oder 10)
Minuten abgeschaltet.
Die normale Displayanzeige
Die Einschlaftimerfunktion ist deaktiviert.
< Zum Überprüfen der noch verbleibenden Zeitspanne betätigen
Sie bitte die SLEEP-Taste. Die noch verbleibende Zeitspanne wird
2,5 Sekunden lang im Display angezeigt. Danach erscheint im
Display automatisch wieder die vorherige Anzeige.
Hilfe bei Funktionsstörungen
Falls beim A-R650 etwaige Funktionsstörungen auftreten sollten, versuchen Sie bitte, anhand der folgenden Hinweise selbst
Abhilfe zu schaffen, bevor Sie sich an Ihren Fachhändler oder ein
autorisiertes TEAC-Servicecenter wenden.
Keine Strom-/Spannungsversorgung
eÜberprüfen Sie die korrekte Verbindung zwischen T-R650 und
Wandsteckdose. Falls die Steckdose schaltbar ist, schalten Sie
sie ein. Überprüfen Sie die einwandfreie Funktion der Steckdose,
indem Sie beispielsweise einen Ventilator oder eine Lampe
daran anschließen.
Wiederherstellen der Werkseinstellung
Falls am T-R650 Fehlfunktionen auftreten, kann das Wiederherstellen der Werkseinstellung möglicherweise Abhilfe schaffen.
Hierdurch werden alle Einstellungen (inklusive Zugangsschlüssel)
und andere Benutzereinstellungen (Sender-Presets, usw.) auf die
werkseitigen Werte zurückgesetzt.
Betätigen Sie gleichzeitig einige Sekunden lang die TIMERund die BAND-Taste.
Keine Wiedergabe
eÜberprüfen Sie die Verbindung zum Verstärker.
eÜberprüfen Sie die einwandfreie Funktion des Verstärkers.
Keine Wiedergabe oder das Signal ist zu schwach
eÜberprüfen Sie, ob die Antenne korrekt angeschlossen ist.
eStellen Sie die Empfangsfrequenz des Senders exakt ein.
eRichten Sie die Antenne erneut auf beste Empfangsqualität aus.
eMöglicherweise benötigen Sie eine Außenantenne.
Der T-R650 wird auf die Werkseinstellung zurückgesetzt.
Rauschen während der Wiedergabe
e Platzieren Sie die Antenne möglichst weit entfernt von
TV-Geräten sowie CD/DVD-Playern.
eFalls dies nicht möglich ist, schalten Sie TV-Geräte sowie CD/
DVD-Player aus.
eMöglicherweise sorgt eine Außenantenne für Abhilfe.
Obwohl die Sendung in Stereoqualität ausgestrahlt wird,
erfolgt die Wiedergabe in Mono.
eBetätigen Sie die FM MODE-Taste.
Falls die Funktionsstörung weiterhin besteht, ziehen Sie den
Netzstecker und warten Sie ungefähr zwanzig Sekun den,
bevor Sie ihn wieder anschließen. Hierdurch wird der interne
Mikroprozessor zurückgesetzt (Reset).
DEUTSCH
73
Technische Daten
Hinweise für Kunden in Europa
Entsorgung elektrischer oder elektronischer Geräte sowie
verbrauchter Batterien
UKW-Tunerteil
Empfangsbereich . . . . . . . . . . . . . . . . . . . . . . . . . . . . 87,50 - 108,00 MHz
(in Schritten von 50 kHz)
Nutzempfindlichkeit . . . . . . . . . . . . . . . . . . . . . . . . . . . . . . . . . . . . . . 6 dBμ
Klirrfaktor . . . . . . . . . . . . . . . . . . . . . . . . . . . . . . . . . . . . . . . . . . 0,8 % (Mono)
1,2 % (Stereo)
Signal-Rauschabstand . . . . . . . . . . . . . . . . . . . . . . . . . . . . .70 dB (Mono)
65 dB (Stereo)
Stereokanaltrennung . . . . . . . . . . . . . . . . . . . . . . . . . . . . . . . 35 dB (1 kHz)
Senderspeicherplätze (Presets) . . . . . . . . . . . . . . . . . . . . . . . . . . . . . . . .30
MW-Tunerteil
Empfangsbereich . . . . . . . . . . . . . . . . . . . . . . . . . . . . . . . . 522 - 1,629 kHz
(in Schritten von 9 kHz)
Nutzempfindlichkeit . . . . . . . . . . . . . . . . . . . . . . . . . . . . . . . . . . . . . 55 dBμ
Klirrfaktor . . . . . . . . . . . . . . . . . . . . . . . . . . . . . . . . . . . . . 1,5 % (bei 74 dBμ)
Signal-Rauschabstand . . . . . . . . . . . . . . . . . . . . . . . . 45 dB (bei 80 dBμ)
Senderspeicherplätze (Presets) . . . . . . . . . . . . . . . . . . . . . . . . . . . . . . . .30
Allgemein
Spannungsversorgung . . . . . . . . . . . . . . . . . . . . . . . . . . .AC 230 V, 50 Hz
Leistungsaufnahme . . . . . . . . . . . . . . . . . . . . 9 W (Bereitschaft: 0,5 W)
Abmessungen (B x H x T) . . . . . . . . . . . . . . . . . . . . 435 x 85 x 295 mm
Gewicht . . . . . . . . . . . . . . . . . . . . . . . . . . . . . . . . . . . . . . . . . . . . . . . . . . 3.2 kg
Betriebstemperatur . . . . . . . . . . . . . . . . . . . . . . . . . . . . . . . . +5˚C - +35˚C
Betriebsluftfeuchtigkeit . . . . . . . . . . . 5% - 85% (nicht kondensierend)
Lagertemperatur . . . . . . . . . . . . . . . . . . . . . . . . . . . . . . . . . . –20˚C - +55˚C
Zubehör
MW-Rahmenantenne x 1
UKW-Wurfantenne x 1
Fernbedienungskabel x 1
Stereo RCA (Cinch) Kabel x 1
Bedienungsanleitung (dieses Dokument) x 1
Garantiekarte
< Änderungen in Design und technischer Ausstattung vorbehalten.
< Alle Gewichtsangaben und Abmessungen sind Näherungswerte.
< Abbildungen können geringfügig von den Produktionsmodellen
abweichen.
74
Sofern Geräte, deren Verpackung oder Batterien mit dem Symbol
einer durchgekreuzten Abfalltonne gekennzeichnet sind oder
in der jeweiligen Dokumentation darauf hingewiesen wird,
bedeutet dies, dass deren Entsorgung gemäß der RICHTLINIEN
2002/96/EG sowie 2006/66/EG des EUROPÄISCHEN PARLAMENTS
UND DES RATES bezüglich Elektro- und Elektronik-Altgeräte geregelt ist.
Sämtliche elektrischen und elektronischen Geräte sowie verbrauchte Batterien müssen demgemäß, getrennt vom Restmüll,
den von der jeweils zuständigen städtischen, Landes- oder
Bundesbehörde dazu bestimmten, gesonderten Wertstoffsammlungen zugeführt werden.
Die korrekte Entsorgung elektrischer oder elektronischer Geräte
trägt in hohem Maß der Vermeidung möglicher negativer
Konsequenzen für die Umwelt und damit auch für Ihre eigene
sowie die Gesundheit Anderer bei.
Weiterführende Informationen bezüglich der Entsorgung Ihrer
elektrischen oder elektronischen Geräte sowie verbrauchter Batterien erhalten Sie auf Anfrage bei ihrem zuständigen Stadtbüro, der Abfallentsorgungsgesellschaft oder dem
Händler, bei dem Sie das Gerät ursprünglich erworben haben.
Hinweise zur Entsorgung in Ländern außerhalb der
Europäischen Union
Diese Symbole sind ausschließlich für Mitgliedsländer der
Europäischen Union wirksam. Bei Fragen zur Entsorgung in
anderen Ländern wenden Sie sich bitte an die zuständigen,
lokalen Behörden oder Ihren Fachhändler.
Hinweis zum Batteriesymbol (unten rechts):
Dieses Symbol wird möglicherweise zusammen mit der
Bezeichnung eines chemischen Elements verwendet. Dies weist
darauf hin, dass die entsprechende Richtlinie zur Entsorgung der
genannten Chemikalie anzuwenden ist.
Indice
Prima dell’uso
Vi ringraziamo innanzi tutto per aver scelto TEAC. Per ottenere
le massime prestazioni dall’apparecchio qui descritto vi
raccomandiamo di leggere con cura il presente manuale.
Prima di usare l’apparecchio raccomandiamo di leggere
quanto segue.
Prima dell’uso . . . . . . . . . . . . . . . . . . . . . . . . . . . . . . . . . . . . . . . . . . . . . . . . 75
Collegamenti . . . . . . . . . . . . . . . . . . . . . . . . . . . . . . . . . . . . . . . . . . . . . . . . 76
Collegamento delle antenne . . . . . . . . . . . . . . . . . . . . . . . . . . . . . . . . . 77
Identificazione delle parti. . . . . . . . . . . . . . . . . . . . . . . . . . . . . . . . . . . . . 78
Operazioni di base . . . . . . . . . . . . . . . . . . . . . . . . . . . . . . . . . . . . . . . . . . . 79
Ascolto delle bande FM e AM. . . . . . . . . . . . . . . . . . . . . . . . . . . . . . . . . 80
< L’apparecchio deve essere alimentato alla tensione riportata sul
pannello posteriore. In caso di dubbio si raccomanda di chiedere
a un elettricista.
< Il punto in cui collocare l’apparecchio deve essere scelto con
attenzione. In particolare occorre evitare l’esposizione diretta
al sole o la vicinanza alle sorgenti di calore. Non lo si deve
inoltre sottoporre a eccessive vibrazioni né usarlo in ambienti
eccessivamente polverosi, caldi, freddi o umidi.
< L’apparecchio non deve essere impilato su un amplificatore o un
ricevitore.
Presintonizzazione . . . . . . . . . . . . . . . . . . . . . . . . . . . . . . . . . . . . . . . . . . . 81
Presintonizzazione (telecomando) . . . . . . . . . . . . . . . . . . . . . . . . . . . 82
RDS . . . . . . . . . . . . . . . . . . . . . . . . . . . . . . . . . . . . . . . . . . . . . . . . . . . . . . . . . 85
Ricerca PTY . . . . . . . . . . . . . . . . . . . . . . . . . . . . . . . . . . . . . . . . . . . . . . . . . . 86
Regolazione dell’orologio . . . . . . . . . . . . . . . . . . . . . . . . . . . . . . . . . . . . 88
Impostazione del timer giornaliero . . . . . . . . . . . . . . . . . . . . . . . . . . . 88
< Non si deve aprire l’apparecchio, poiché ciò potrebbe causare
il danneggiamento della circuiteria interna o divenire causa
di scosse elettriche. Qualora vi penetrino corpi estranei si
raccomanda di rivolgersi al proprio punto di vendita o alla società
di assistenza.
< Per sfilare il cavo di alimentazione dalla presa di rete lo si deve
afferrare direttamente per la spina anziché per il cordone.
Sleep Timer (spegnimento ritardato) . . . . . . . . . . . . . . . . . . . . . . . . . . 90
Risoluzione dei problemi . . . . . . . . . . . . . . . . . . . . . . . . . . . . . . . . . . . . . 91
Caratteristiche tecniche . . . . . . . . . . . . . . . . . . . . . . . . . . . . . . . . . . . . . . 92
< Non si deve pulire l’apparecchio con solventi chimici, poiché
queste sostanze ne danneggerebbero la finitura esterna. Per la
pulizia si deve usare piuttosto un panno pulito e asciutto oppure
leggermente inumidito.
< Si raccomanda infine di conservare questo manuale in un luogo
sicuro per poterlo consultare in caso di necessità.
Cura
ITALIANO
ATTENZIONE
< Non esporre questo apparecchio al rischio di ricevere spruzzi
d’acqua o di altri liquidi.
< Non appoggiarvi sopra oggetti contenenti acqua o liquidi di altro
genere.
< Non installare questo apparecchio in uno spazio ristretto come il
vano di una libreria o un ripiano simile.
< Questo apparecchio quando l’interruttore di accensione (POWER /
STAND BY) è nella posizione STAND BY consuma una insignificante
quantità di corrente.
< Questo apparecchio deve essere collocato sufficentemente vicino
alla presa di corrente affinchè questa possa essere raggiunta con
facilità in ogni momento.
< La presa di corrente deve essere considerata come il mezzo per
isolare l’apparecchio e pertanto dovrà essere sempre facilmente
raggiungibile.
< Batterie (pacchetto di batterie o le batterie installate) non
dovranno essere esposte a calore eccessivo come luce solare,
fuoco o altre fonti di calore.
< ATTENZIONE: pericolo di esplosione se la batteria viene sostituita
in modo scorretto. Sostituire solo con lo stesso tipo o equivalente.
< Nell’utilizzo di cuffie si raccomanda di non alzare il volume ad alti
livelli per evitare che ciò provochi danni al vostro udito.
Se le superfici dell’apparecchio si sporcano, per pulirle è
sufficiente strofinarle con un panno morbido ed eventualmente
inumidito con un liquido di pulizia neutro diluito. Dopo la pulizia
si deve rimuovere qualsiasi traccia di liquido. Non si devono usare
solventi, benzina né alcol, poiché queste sostanze potrebbero
danneggiare le superfici trattate.
75
Collegamenti
T-R650
A
B
C
R
L
TUNER
(LINE IN)
REMOTE
CONTROL
Amplificatore (A-R650)
ATTENZIONE:
< Prima di collegare fra loro i vari apparecchi si raccomanda di
spegnerli.
< Prima di procedere con il collegamento di un componente si
raccomanda di leggerne il manuale d’uso.
B Presa REMOTE CONTROL
Avendo a disposizione un TEAC A-R650, si potranno effettuare
utili operazioni di controllo del sistema:
Collegare la presa REMOTE CONTROL del sintonizzatore alla
presa REMOTE CONTROL di un apparecchio A-R650 tramite il
cavetto del telecomando in dotazione all’amplificatore.
A Prese LINE OUT
Queste prese forniscono il segnalo audio analogico a 2 canali.
Esse vanno collegate alla prese TUNER dell’amplificatore A-R650
usando un cavo con spinotto RCA stereo.
Collegare il cavo nel seguente modo:
Spina bianca q Presa bianca (L: canale sinistro)
Spina rossa q Presa rossa (R: canale destro)
Bianco (L)
Rosso (R)
< Quando si sintonizza una stazione il selettore INPUT SELECTOR
dell’A-R650 seleziona automaticamente “TUNER”.
< È altresì possibile usare il telecomandoUR-431 fornito con
l’A-R650. Puntandolo verso l’A-R650 si potrà così gestire questo
apparecchio.
Nota:
Questo apparecchio non è provvisto di telecomando.
Bianco (L)
Rosso (R)
C Cavo di alimentazione CA
< Le spine devono essere inserite a fondo nelle relative prese. Per
prevenire la formazione di ronzii e rumore è raccomandabile
non far scorrere i cavi del segnale con il cavo di alimentazione
CA o quelli dei diffusori.
76
La spina di alimentazione deve essere inserita nella presa di rete
CA solo dopo avere completato tutti gli altri collegamenti.
< Ci si deve accertare che la presa cui si collegherà il cavo di
alimentazione eroghi la corretta tensione.
< Il collegamento e lo scollegamento del cavo di alimentazione
devono essere eseguiti afferrandolo solo per la spina.
Collegamento delle antenne
Antenna AM a telaio per interni
L’antenna AM a telaio ad alte prestazioni fornita per l’uso con questo
apparecchio normalmente offre una buona ricezione in ogni area.
Per poterla collocare su un piano d’appoggio la si deve innanzi
tutto fissare all’apposita base.
Antenna FM per interni
Collegare l’antenna FM a filo alla presa FM 75Ω, stendendola
quindi bene e regolando il sintonizzatore sulla stazione desiderata
(vedere a pagina 80).
Il filo dell’antenna deve essere posizionato in un luogo adatto, ad
esempio sul telaio di una finestra o su una parete, orientandolo
opportunamente sino a quando si ottiene la miglior ricezione
possibile e, quindi, fissandovelo con puntine da disegno o in
modo analogo.
Collegare i cavi dell’antenna a telaio ai rispettivi terminali AM
dell’apparecchio.
< Il cavo nero deve essere collegato al terminale GND (terra).
L’antenna deve essere posizionata su un ripiano oppure fissata
in altri punti, ad esempio al telaio di una finestra, orientandola
nella direzione che fornisce la miglior ricezione possibile. Il cavo
di alimentazione, i cavi dei diffusori e quelli d’interconnessione
devono essere mantenuti il più lontano possibile dall’antenna.
Antenna AM per esterni
Se l’antenna AM a telaio fornita con l’apparecchio non garantisce
una ricezione sufficiente (spesso a causa dell’eccessiva lontananza
dal trasmettitore o della schermatura opposta dalle pareti in
cemento armato) potrebbe rendersi necessario usare un’antenna
AM per esterni.
Antenna AM
per esterni
Antenna FM per esterni
Nelle zone in cui il segnale FM è debole può rendersi necessario l’uso
di un’antenna FM per esterni. Normalmente un’antenna da 3 direttori
è sufficiente; se tuttavia il segnale FM è particolarmente debole
potrebbe essere necessario ricorrere a una da 5 o più direttori.
< Quando si usa un’antenna FM per esterni si deve scollegare
quella per interni.
Il cavo nero deve
essere collegato al
terminale GND (terra).
ITALIANO
Tra quelle disponibili in commercio si raccomanda di usare un’antenna
AM di alta qualità o, qualora non disponibile, un cavo isolato di
lunghezza superiore a 5 metri collegando una delle estremità alla
presa dell’apparecchio nel modo mostrato qui sopra.
Il cavo dell’antenna dovrà quindi essere fissato all’esterno
dell’edificio oppure all’interno vicino a una finestra. Per migliorare
ulteriormente la ricezione si dovrebbe collegare la presa GND
(terra) a un affidabile punto di massa.
< Anche quando si usa un’antenna AM per esterni si suggerisce di
non scollegare l’antenna AM a telaio.
77
Identificazione delle parti
A
B
C
D
E
J
K
F
L
M
G
H
I
N
A STANDBY/ON
a
b
M
c
d
Accende l’apparecchio o lo porta in standby.
Quando il sintonizzatore è in modalità di attesa (standby)
l’indicatore di standby è illuminato di colore rosso. Quando l’unità
è accesa, la luce si spegne.
B TIMER
Attiva o disattiva la funzione timer.
K
L
H
G
J
C D
B
C DAILY
Imposta il timer.
D TIME ADJ
Regola l’orologio.
E Display
e
F TUNING MODE
Questo tasto permette di cambiare il tipo di sintonia.
G FM MODE
Durante l’ascolto delle stazioni FM seleziona la modalità stereo o
mono.
H BAND
Questo tasto seleziona la gamma di frequenza FM oppure AM.
I TUNING/SELECT
UR-431
Telecomando in dotazione all’amplificatore A-R650
78
Ruotando questa manopola si sintonizza una stazione, si seleziona
una stazione preimpostate oppure un’opzione di menù.
Operazioni di base
J RDS MODE
Questo tasto attiva la funzione RDS.
Come accendere e spegnere l’apparecchio
Accendere l'apparecchio premendone il tasto di accensione.
K FILE
Questo tasto assegna un nome alle emittenti preselezionate.
L MEMORY
Indicatore di standby/accensione
Salva in memoria le stazioni preimpostate.
M ENTER
Premendolo si conferma la selezione fatta.
Durante l’ascolto delle stazioni FM od AM cambia la modalità di
sintonizzazione.
Quando l’unità è accesa, la luce si spegne.
N Sensore remoto
Verso questo sensore deve essere puntato il telecomando.
Dimmer
Telecomando in dotazione all’amplificatore
A-R650
Ogni volta che si preme il tasto DIMMER la luminosità del display
cambia nel seguente ordine:
a ON
Premere questo tasto per accendere l’apparecchio.
b STANDBY
Premere questo tasto commutarlo in standby.
c
(Il tasto per salita e discesa di sintonizzazione
manuale(AM/FM))
Questo tasto
o tasto
sintonizzare la stazione e
selezionare un canale preimpostato.
d
(Il tasto per salita e discesa di sintonizzazione
preimpostata (AM/FM))
Questa tasto serve selezionare un canale preset.
e DIMMER
Premendo il tasto DIMMER si oscura il display.
Normale q Parzialmente oscurato q Display spento
Questa funzione è disponibile esclusivamente quando
con il cavo di telecomando si collegano fra loro le prese
REMOTE CONTROL del T-R650 e dell’A-R650. Si può quindi
usare il telecomando dell’A-R650.
ITALIANO
Nota:
Questo apparecchio non è provvisto di telecomando.
79
Ascolto delle bande FM e AM
1 Selezionare FM o AM premendo ripetutamente il tasto
3 Selezionare la stazione che si desidera ascoltare.
BAND.
2 Selezionare la modalità di sintonizzazione desiderata.
Modalità di sintonizzazione manuale
Ruotare la manopola TUNING/SELECT sino a individuare la
stazione da ascoltare.
La frequenza varia a passi fissi (FM: 50 kHz e AM: a passi da 9
kHz).
Ogni volta che si preme il tasto TUNING MODE la modalità di
sintonizzazione cambia nel seguente ordine:
Modalità di sintonizzazione automatica
Ruotare la manopola TUNING/SELECT per avviare la sintonia
automatica.
Quando l’apparecchio trova una stazione la sintonizza
automaticamente. Ripetere questo passo sino a trovare la
stazione desiderata.
Sintonizzazione manuale
FM
< Manual
tune >
108.00MHz
Sintonizzazione automatica
FM
<
Auto tune >
108.00MHz
Sintonizzazione preimpostata
< Per interrompere la sintonizzazione automatica è sufficiente
premere il tasto ENTER. (sul pannello anteriore del T-R650)
< Quando si usa il telecomando, utilizzare il tasto tuning (
).
Modalità di sintonizzazione preimpostata
Vedere pagina 81-85
Modalità FM
Premendo il tasto FUNCTION/FM MODE si alterna tra modalità
stereo e modalità mono.
FM < Preset tune >
CH01
108.00MHz
Stereo:
Le stazioni FM sono ricevute in modalità stereofonica e appare
inoltre “Stereo”.
Mono:
Si suggerisce di selezionare questa modalità quando il segnale è
debole. Benché essa diventi forzatamente monofonica si ottiene
la riduzione dei rumori indesiderati.
80
Presintonizzazione 1
Presintonizzazione manuale
L’apparecchio può memorizzare sino a 30 stazioni FM, 30 stazioni
AM.
4 Entro 4 secondi selezionare il numero di preimpostazione
da assegnare alla stazione.
Ruotare la manopola TUNING/SELECT.
1 Selezionare AM o FM premendo ripetutamente il tasto
BAND.
FM 10:00 Stereo
CH12
108.00MHz
2 Sintonizzare la stazione da memorizzare.
Per la procedura di sintonizzazione si prega di vedere la pagina
precedente.
5 Entro 4 secondi premere il tasto MEMORY.
La stazione è così memorizzata.
3 Premere il tasto MEMORY.
< Ripetere i passi da 2 a 5 per salvare altre stazioni.
Preimpostazione automatica (solo con le
bande FM e AM)
1 Selezionare FM o AM premendo ripetutamente il tasto
BAND.
FM 10:00 Stereo
CH -108.00MHz
ITALIANO
< Se non si effettua alcuna operazione entro 4 secondi dopo aver
premuto il tasto MEMORY, le stazioni preselezionate verranno
cancellate .
2 Premere per oltre 2 secondi il tasto MEMORY.
Verranno così memorizzate automaticamente le 30 stazioni più
forti disponibili nella zona.
81
Presintonizzazione 2
Presintonizzazione 1 (telecomando)
Come selezionare la stazioni FM e AM
preimpostate
Alle stazioni preimpostate si può assegnare un nome (di lunghezza
non superiore a 4 caratteri).
Quando si preme il tasto FILE, anziché l'orologio appare il nome così
assegnato alla stazione. Per ripristinare la visualizzazione dell'orologio
è sufficiente premere nuovamente il tasto FILE.
1 Selezionare AM o FM premendo ripetutamente il tasto
BAND.
Assegnazione del nome alle emittenti preset
1 Nella modalità “Sintonizzazione preimpostata“ selezionare
il canale preimpostato al quale si desidera assegnare un
nome.
< Alternativamente si può assegnare il nome alla stazione
attualmente in ascolto e preimpostarla quindi in memoria.
2 Selezionare la modalità di sintonizzazione preimpostata.
Premere ripetutamente il tasto TUNING MODE sino a quando
appare “Preset tune”.
2 Tenere abbassato il tasto FILE per più di 1,5 secondi.
FM < Preset tune >
CH01
108.00MHz
3 Selezionare un canale preimpostato ruotando la manopola
TUNING/SELECT.
FM
---- 03:01
CH09
92.50MHz
Appare “----” con il primo carattere “-” lampeggiante.
3 Scegliere un carattere, con il tasto TUNING/SELECT.
L’apparecchio sintonizza così il canale preimpostato selezionato.
Sono disponibili i caratteri:
82
4 Premere ENTER.
Presintonizzazione manuale
L’apparecchio può memorizzare sino a 30 stazioni FM, 30 stazioni
AM.
1 Selezionare AM o FM premendo ripetutamente il tasto
BAND.
Diventa lampeggiante l’indicazione “-” successivo.
Per il nome di ciascun’emittente si possono usare fino a 4
caratteri.
Per impostare tutti i caratteri, ripetere i passi 3 e 4 .
5 Premere il tasto MEMORY.
2 Selezionare un canale preimpostato premere il tasto
tasto
o
.
FM
BBC- 03:01
CH__
92.50MHz
“CH__” lampeggia.
6 Con la manopola TUNING/SELECT selezionare il canale di
preimpostazione in corrispondenza del quale salvare la
stazione:
3 Premere il tasto MEMORY.
ITALIANO
7 Premere il tasto MEMORY:
FM 10:00 Stereo
CH -108.00MHz
< Se non si effettua alcuna operazione entro 4 secondi dopo aver
premuto il tasto MEMORY, le stazioni preselezionate verranno
cancellate ..
Il nome assegnato rimane così salvato in memoria.
Se in precedenza ne era già stato assegnato uno esso viene
sovrascritto.
continua a pagina seguente q
83
Presintonizzazione 2 (telecomando)
4 Entro 4 secondi, premere il tasto
o
per selezionare
il numero di preselezione per questa stazione.
Preimpostazione automatica (solo con le
bande FM e AM)
1 Selezionare FM o AM premendo ripetutamente il tasto
BAND.
FM 10:00 Stereo
CH12
108.00MHz
Per quest’operazione si possono anche usare i tasti numerici del
telecomando in dotazione all'amplificatore A-R650.
2 Premere per oltre 2 secondi il tasto MEMORY.
< Quando si utilizzano i tasti numerici del telecomando, premere il
tasto TUNER del telecomando per primo.
Verranno così memorizzate automaticamente le 30 stazioni più
forti disponibili nella zona.
Esempio, per selezionare il canale 25, premere il tasto TUNER, e
poi i tasti “2” e “5”.
Per selezionare numeri minori di 10, premere “0” e poi il numero.
Esempio:, per selezionare il numero 5, premere “0” e “5”. (In
alternativa, si può premere solo il tasto “5” e poi aspettare qualche
secondo)
5 Entro 4 secondi premere il tasto MEMORY.
La stazione è così memorizzata.
< Ripetere i passi da 2 a 5 per salvare altre stazioni.
84
RDS 1
Come selezionare la stazioni FM e AM
preimpostate
1 Selezionare AM o FM premendo ripetutamente il tasto
BAND.
L’RDS (Radio Data System) è un servizio di radiotrasmissione
attraverso il quale le stazioni possono inviare informazioni aggiuntive
insieme al normale segnale radio.
Esso è disponibile solo in Europa nella banda FM.
1 Sintonizzare la stazione FM desiderata (vedere a pagina
80).
2 Premere il tasto RDS MODE.
2 Selezionare un canale preimpostato usare i tasti numerici
del telecomando in dotazione all’amplificatore A-R650.
Ogni volta che si preme il tasto RDS MODE la modalità RDS
cambia nel seguente ordine:
PS (PROGRAM SERVICE)
Quando si seleziona PROGRAM SERVICE per circa 3 secondi
lampeggia sul display “PROGRAM SERVICE” e appare quindi
il nome del servizio oppure quello della stazione. Se i dati sul
servizio non sono disponibili appare la frequenza.
PT (PROGRAM TYPE)
Quando si seleziona PROGRAM TYPE per circa 3 secondi
lampeggia sul display “PROGRAM TYPE” e appare quindi il tipo
di programma.
L’apparecchio sintonizza così il canale preimpostato selezionato.
Esempio, per selezionare il canale 25, premere il tasto TUNER, e
poi i tasti “2” e “5”.
Per selezionare numeri minori di 10, premere “0” e poi il numero.
Esempio:, per selezionare il numero 5, premere “0” e “5”. (In
alternativa, si può premere solo il tasto “5” e poi aspettare qualche
secondo)
RT (RADIO TEXT)
Quando si seleziona RADIO TEXT per circa 3 secondi lampeggia
sul display “RADIO TEXT” e appaiono quindi le notizie (messaggi
di testo) fornite dalla stazione sino a un massimo di 64 caratteri.
Se non vi sono messaggi di testo disponibili l’apparecchio passa
automaticamente dalla modalità RDS alla modalità PROGRAM
SERVICE.
TA (TRAFFIC ANNOUNCE)
Quando si seleziona TRAFFIC ANNOUNCE per circa 3 secondi
lampeggia sul display “TRAFFIC ANNOUNCE” e quindi
l’apparecchio avvia la ricerca degli annunci sul traffico.
CT (CLOCK TIME)
Mostra l’ora fornita dalla stazione.
Quando si seleziona CLOCK TIME per circa 3 secondi lampeggia
sul display “CLOCK TIME” e appare quindi l’ora.
85
ITALIANO
< Quando l’apparecchio trova un programma di notizie sul
traffico passa dalla modalità TRAFFIC ANNOUNCE alla modalità
PROGRAM SERVICE.
Se la stazione attualmente selezionata trasmette un programma
sul traffico l’apparecchio passa automaticamente dalla modalità
RDS alla modalità PROGRAM SERVICE senza ricercare altri
programmi analoghi.
RDS 2
Ricerca PTY
Le stazioni possono altresì essere ricercate per tipo di programma.
La regolazione dell’orologio dell’apparecchio avviene
automaticamente usando i dati CLOCK TIME (CT).
Qualora si sintonizzi una stazione RDS che diffonde dati CT non
corretti l’orologio potrebbe regolarsi in modo altrettanto non
corretto, compromettendo così il corretto uso del timer.
Per impedire l’orologio di regolarsi in base ai dati CT è
sufficiente disattivarne la funzione di regolazione automatica.
1 Selezionare FM premendo ripetutamente il tasto BAND.
< L’apparecchio riceve i dati CT e regola quindi l’orologio a
prescindere dalla modalità RDS selezionata.
Per disattivare la funzione di regolazione automatica
dell’orologio si deve premere per oltre 8 secondi il tasto
RDS MODE.
2 Premere per oltre 2 secondi il tasto RDS MODE.
3 Selezionare il tipo di programma (PTY) desiderato.
< Per riattivare la funzione di regolazione automatica
dell’orologio si deve premere nuovamente per oltre 8
secondi il tasto RDS MODE.
Con la manopola TUNING/SELECT selezionare l’elemento
desiderato.
< Quando la funzione di regolazione automatica dell’orologio
è disattivata l’indicazione CLOCK TIME non appare.
Sono disponibili 31 tipi di programma PTY. Il tipo di programma
selezionato inizia a lampeggiare.
4 Premere il tasto ENTER.
L’apparecchio avvia così la ricerca.
< Quando l’apparecchio individua l’emittente che trasmette il
tipo di programma selezionato arresta la ricerca e ne mostra sul
display il tipo.
< Se durante la ricerca PTY non trova l’emittente che trasmette
quello stesso tipo di programma l’arresta alla frequenza iniziale.
< Per interrompere la ricerca è sufficiente premere il tasto RDS
MODE.
86
31 tipi di programmi PTY:
Phone In:
programmi liberi di opinione pubblica condotti telefonicamente.
News:
brevi annunci, eventi, programmi di opinione pubblica, servizi e
situazioni attuali.
Travel & Touring:
servizi di viaggi.
Current Affairs:
tipi di suggerimenti, compresi gli annunci di tipo pratico, ad
eccezione di notiziari, documenti, discussioni, analisi e altri.
Information:
informazioni quotidiane o di riferimento quali previsioni
meteorologiche, consigli per i consumatori, assistenza medica e
così via.
Sport:
programmi sportivi in genere.
Education:
informazioni didattiche e culturali
Drama:
tutti i tipi di programmi a puntate e di concerti radiofonici
Cultures:
tutti gli aspetti della cultura locale o nazionale compresi gli eventi
religiosi, filosofici, sociali, linguistici, teatrali e così via.
Science:
programmi scientifici e tecnologici
Leisure & Hobby:
programmi sulle attività ricreative.
Jazz Music:
musica jazz.
Country Music:
musica country.
National Music:
musica nazionale.
Oldies Music:
la cosiddetta "golden age" della musica pop.
Folk Music:
musica folcloristica.
Documentary:
documentari.
Alarm Test
Alarm-Alarm!:
notifica di emergenze o disastri naturali
Varied Speech:
programmi popolari quali quiz, intrattenimento, interviste private,
commedie, satira e così via.
Pop Music:
programmi sulla musica popolare commerciale, sulla vendita di
dischi e così via
Rock Music:
musica moderna generalmente composta ed eseguita da giovani
musicisti
Easy Listening:
musica leggera normalmente di durata inferiore a cinque minuti
Light Classics M:
musica classica, strumentale, cori e musica leggera eseguita da
musicisti non professionisti.
ITALIANO
Serious Classics:
musica d'orchestra comprendente opere, sinfonie, musica da
camera e così via
Other Music:
altri generi musicali (Rhythm & Blues, Reggae e così via).
Weather & Meter:
servizi e previsioni meteo.
Finance:
servizi finanziari e commerciali.
Children’s Progs:
programmi per bambini.
Social Affairs:
questioni sociali.
Religion:
programmi religiosi.
87
Regolazione dell’orologio
< L’apparecchio usa un orologio nel formato 24 ore.
1 Premere il tasto TIME ADJ.
Impostazione del timer giornaliero 1
Questa funzione è disponibile esclusivamente quando con il cavo
di telecomando si collegano fra loro le prese REMOTE CONTROL del
T-R650 e dell’A-R650.
< Prima d’impostare il timer è necessario regolare l’orologio.
1 Premere il tasto DAILY.
C-time 00:00:00
CH12
108.00MHz
Il valore delle ore inizia a lampeggiare.
2 Ruotare la manopola TUNING/SELECT sino a regolare le ore
attuali e, quindi, premere il tasto ENTER.
On time 00:00:00
CH12
108.00MHz
Sul display appare “On time” e il valore “ora” inizia a lampeggiare.
< Quando si utilizza il telecomando, premere il tasto TIME ADJ per 2
secondi.
2 Ruotare la manopola TUNING/SELECT sino a regolare l’ora
di attivazione del timer e, quindi, premere il tasto ENTER.
C-time 10:00:00
CH12
108.00MHz
Le ore sono così impostate e contemporaneamente inizia a
lampeggiare il valore dei minuti.
3 Ruotare la manopola TUNING/SELECT sino a regolare i
minuti attuali e, quindi, premere il tasto ENTER.
On time 07:00:00
CH12
108.00MHz
L’orologio si avvia da 00 secondi.
88
Le ore sono così impostate e contemporaneamente inizia a
lampeggiare il valore dei minuti.
3 Ruotare la manopola TUNING/SELECT sino a regolare i
5 Ruotare la manopola TUNING/SELECT sino a regolare i
minuti di attivazione del timer e, quindi, premere il tasto
ENTER.
minuti di disattivazione del timer e, quindi, premere il
tasto ENTER.
Off time09:15:00
CH12
108.00MHz
Off time00:00:00
CH12
108.00MHz
L’istante di attivazione del timer è così impostato. Sul display
appare “Off time” e il valore “ora” inizia a lampeggiare.
4 Ruotare la manopola TUNING/SELECT sino a regolare
L’impostazione del timer è così salvata in memoria.
l’ora di disattivazione del timer e, quindi, premere il tasto
ENTER.
ITALIANO
Off time09:15:00
CH12
108.00MHz
Le ore sono così impostate e contemporaneamente inizia a
lampeggiare il valore dei minuti.
89
Impostazione del timer giornaliero 2
Sleep Timer (spegnimento ritardato)
Per attivare il timer
1 Premere ripetutamente il tasto TIMER sino a quando
appare “Timer On”.
Sul display si accende l’indicatore del timer (
).
l’indicatore del timer
Timer On
Questa funzione è disponibile esclusivamente quando con il
cavo di telecomando si collegano fra loro le prese REMOTE
CONTROL del T-R650 e dell'A-R650. Si può quindi usare il
telecomando dell'A-R650
L’alimentazione può essere tolta dopo un intervallo predefinito.
Premere ripetutamente il tasto SLEEP finché compare sul display
l’intervallo desiderato.
2 Sulla A-R650, selezionare “TUNER” con il selettore INPUT
SELECTOR (o premendo un tasto del telecomando TUNER).
90
80
……… 10
OFF (Nelle condizioni normali del display)
3 Con il tasto STANDBY/ON del telecomando dell’A-R650
portare in standby tutti gli apparecchi collegati.
< Quando si attiva il timer mentre è selezionata la sorgente AM o
FM sul display di questo apparecchio appare il relativo indicatore
di timer.
< Quando giunge l’istante di attivazione del timer tutti gli
apparecchi connessi attraverso i cavi di telecomando si
accendono contemporaneamente. Questo apparecchio
sintonizza l’ultima stazione usata mentre l’A-R650 seleziona
l’ultima sorgente usata.
< Quando giunge l’istante di disattivazione del timer tutti gli
apparecchi connessi attraverso i cavi di telecomando si portano
contemporaneamente in standby.
< Dopo aver regolato il timer è possibile accenderlo o spegnerlo
premendo il tasto timer quando ci si trova nella modalità di
stand-by
Per disattivare il timer
Premere ripetutamente il tasto TIMER sino a quando appare
“Timer Off”.
Scompare allora dal display l’indicatore del timer ( ).
90
SL:90 (80, 70, 60, 50, 40, 30, 20 o 10)
L’alimentazione verrà tolta dopo 90 (80, 70, 60, 50, 40, 30, 20 o
10) minuti.
Nelle condizioni normali del display
La funzione Sleep Timer è disattivata.
< Volendo controllare quanto tempo manca allo spegnimento,
premere una volta il tasto SLEEP. Il tempo restante verrà
visualizzato per 2,5 secondi, poi verrà ripristinato il normale
display.
Risoluzione dei problemi
In caso di problemi con l’apparecchio si prega di leggere questa
sezione per ricercare da sé le soluzioni e, in caso d’insuccesso, di
rivolgersi al proprio punto di vendita o a un centro di assistenza
TEAC.
Non arriva la corrente
e Verificare che la spina del cavo d’alimentazione sia inserita a
fondo nella presa di rete. Per verificare se c’è corrente nella
presa di rete, provare ad inserirvi un altro apparecchio, come un
ventilatore o un phon.
Per ripristinare l’apparecchio alle impostazioni
predefinite
Se l’apparecchio inizia a non funzionare correttamente si può
provare a ripristinarne le impostazioni predefinite o di fabbrica.
Questa operazione annulla tuttavia le impostazioni della
rete (compresa la password) e le altre impostazioni definite
dall’utilizzatore (stazioni preimpostate, ecc.).
Per inizializzare manualmente le impostazioni occorre
premere il tasto TIMER e di tasto BAND.
Assenza totale di suono
e Verificare i collegamenti all’amplificatore.
e Verificare il funzionamento dell’amplificatore.
Impossibile ascoltare un’emittente radio, oppure il segnale è
troppo debole.
e Verificare che l’antenna sia correttamente collegata.
e Sintonizzare l’emittente in modo corretto.
e Spostare l’antenna in una nuova posizione che garantisca una
migliore ricezione.
e Può darsi che sia necessaria un’antenna esterna.
Suono disturbato.
e Installare l’antenna il più lontano possibile dal televisore o dal
lettore di CD.
e Se, vicino al sintonizzatore, fossero in funzione un televisore un
lettore di CD, spegnerli.
L’apparecchio quindi si accende usando le impostazioni
predefinite in fabbrica.
Si riceve un segnale mono anche se la trasmissione è
stereofonica.
e Premere il tasto FM MODE.
Se non si riuscisse a ripristinare il normale funzionamento,
provare a staccare il cavo d’alimentazione dalla presa di rete,
e poi inserirlo di nuovo.
ITALIANO
91
Caratteristiche tecniche
Per I clienti europei
Disposizioni relative allo smaltimento di vecchi apparecchi
e di pile scariche
Sintonizzatore FM
Gamma di sintonizzazione . . . . . . . . . . . . . . . .Da 87,50 a 108,00 MHz
(a passi di 50 kHz)
Sensibilità utile . . . . . . . . . . . . . . . . . . . . . . . . . . . . . . . . . . . . . . . . . . . . 6 dBμ
Distorsione armonica . . . . . . . . . . . . . . . . . . . . . . . . . . . . . . 0,8 % (mono)
1,2 % (stereo)
Rapporto segnale-rumore . . . . . . . . . . . . . . . . . . . . . . . . .70 dB (mono)
65 dB (stereo)
Separazione stereo . . . . . . . . . . . . . . . . . . . . . . . . . . . . . . . . . 35 dB (1 kHz)
Stazioni preimpostate . . . . . . . . . . . . . . . . . . . . . . . . . . . . . . . . . . . . . . . . .30
Sintonizzatore AM
Gamma di sintonizzazione . . . . . . . . . . . . . . . . . . . Da 522 a 1.629 kHz
(a passi di 9 kHz)
Sensibilità utile . . . . . . . . . . . . . . . . . . . . . . . . . . . . . . . . . . . . . . . . . . . 55 dBμ
Distorsione armonica . . . . . . . . . . . . . . . . . . . . . . . . . . . 1,5 % (a 74 dBμ)
Rapporto segnale-rumore . . . . . . . . . . . . . . . . . . . . . . 45 dB (a 80 dBμ)
Stazioni preimpostate . . . . . . . . . . . . . . . . . . . . . . . . . . . . . . . . . . . . . . . . .30
Caratteristiche generali
Alimentazione . . . . . . . . . . . . . . . . . . . . . . . . . . . . . . . . . . .230 V CA, 50 Hz
Consumo elettrico . . . . . . . . . . . . . . . . . . . . . . . .9 W (in standby: 0,5 W)
Dimensioni (largh x alt x prof) . . . . . . . . . . . . . . . . 435 x 85 x 293 mm
Peso . . . . . . . . . . . . . . . . . . . . . . . . . . . . . . . . . . . . . . . . . . . . . . . . . . . . . 3,2 kg
Temperatura d’uso . . . . . . . . . . . . . . . . . . . . . . . . . . . . . . . . . +5˚C - +35˚C
Umidità d’uso . . . . . . . . . . . . . . . . . Dal 5% all’85% (non condensante)
Temperatura di conservazione. . . . . . . . . . . . . . . . . . . . . –20˚C - +55˚C
Accessori
N. 1 antenna AM a telaio
N. 1 antenna FM a filo
N. 1 cavo di controllo di sistema
N. 1 cavo stereo con spinotto RCA
N. 1 manuale di istruzioni (questo documento)
N. 1 cartolina di garanzia
< L’aspetto e le caratteristiche tecniche dell’apparecchio sono
soggette a modifica senza preavviso.
< Il peso e le dimensioni sono approssimati.
< Le illustrazioni mostrate in questo manuale potrebbero differire
lievemente dall’aspetto dei modelli di produzione.
92
La presenza di questi simboli sugli apparecchi, sugli imballi, e/o
sulla documentazione a loro allegata, significa che gli apparecchi
elettrici usati e le pile scariche non devono essere mescolati agli
altri rifiuti domestici. Per un corretto smaltimento, stoccaggio
e riciclaggio di questi materiali si prega di portarli in un centro
abilitato come previsto dalle leggi vigenti in materia del vostro
paese e secondo le direttive europee 2002/96/EC e 2006/66.
Lo smaltimento corretto di questi prodotti e delle pile, permette
di risparmiare preziose risorse e di prevenire possibili effetti
nocivi alla salute e all’ambiente che deriverebbero invece
inevitabilmente da uno smaltimento inappropiato.
Per maggiori informazioni circa lo smaltimento ed il riciclaggio
di vecchi prodotti e di pile scariche, pregasi contattare l’ufficio
competente del vostro Comune o chiedere al rivenditore dove
avete acquistato questi o altri prodotti simili.
Informazioni riguardanti lo smaltimento in Paesi non-UE.
Questi simboli sono validi solo nei Paesi membri UE. Se
volete saperne di più relativamente allo smaltimento di
questo tipo di prodotti, vi raccomandiamo di chiedere
informazioni alle autorità locali del vostro paese.
Nota sui simboli relativi alle pile (esempi di due simboli in
basso a destra ):
Questo simbolo può essere usato assieme ad un simbolo chimico.
In questo caso significa che sono state seguite le direttive relative
alla sostanza chimica utilizzata.
Inhoud
Voordat u begint
Dank u dat u voor een TEAC apparaat heeft gekozen. Lees
deze handleiding aandachtig door om optimaal plezier van
uw nieuwe aanwinst te hebben.
Lees het onderstaande aandachtig voordat u het apparaat in
gebruik neemt.
Voordat u begint . . . . . . . . . . . . . . . . . . . . . . . . . . . . . . . . . . . . . . . . . . . . . 93
Aansluiten . . . . . . . . . . . . . . . . . . . . . . . . . . . . . . . . . . . . . . . . . . . . . . . . . . . 94
< De plaatselijke netspanning dient overeen te komen met de
spanning die op de achterzijde van het apparaat is aangegeven.
Raadpleeg in geval van twijfel uw leverancier of een elektricien.
Aansluiten van antennes . . . . . . . . . . . . . . . . . . . . . . . . . . . . . . . . . . . . . 95
Bedieningsorganen . . . . . . . . . . . . . . . . . . . . . . . . . . . . . . . . . . . . . . . . . . 96
Basis Bediening . . . . . . . . . . . . . . . . . . . . . . . . . . . . . . . . . . . . . . . . . . . . . . 97
Luisteren naar FM/AM . . . . . . . . . . . . . . . . . . . . . . . . . . . . . . . . . . . . . . . . 98
< Kies de plaats waar u het apparaat opstelt met zorg. Vermijd
plaatsen in direct zonlicht of in de nabijheid van een
warmtebron.
Vermijd ook plaatsen die aan trillingen onderhevig zijn en
plaatsen met veel vuil, stof, warmte, koude of vocht.
Voorkeurzenders . . . . . . . . . . . . . . . . . . . . . . . . . . . . . . . . . . . . . . . . . . . . 99
Voorkeurzenders (Afstandsbediening) . . . . . . . . . . . . . . . . . . . . . . . 101
RDS . . . . . . . . . . . . . . . . . . . . . . . . . . . . . . . . . . . . . . . . . . . . . . . . . . . . . . . . 103
PTY-zoeken . . . . . . . . . . . . . . . . . . . . . . . . . . . . . . . . . . . . . . . . . . . . . . . . 104
Klok gelijkzetten . . . . . . . . . . . . . . . . . . . . . . . . . . . . . . . . . . . . . . . . . . . . 106
Timer instelling - Dagelijks . . . . . . . . . . . . . . . . . . . . . . . . . . . . . . . . . . . 106
< Plaats het apparaat niet op een versterker/receiver.
< Open het apparaat niet daar dat kan leiden tot schade aan het
inwendige of elektrische schokken. Neem in geval van problemen
contact op met uw leverancier of een servicetechnicus.
< Trek om de stekker uit het stopcontact te nemen altijd aan de
stekker en nooit aan het snoer.
Sleeptimer functie . . . . . . . . . . . . . . . . . . . . . . . . . . . . . . . . . . . . . . . . . . 108
Problemen. . . . . . . . . . . . . . . . . . . . . . . . . . . . . . . . . . . . . . . . . . . . . . . . . . 109
Technische gegevens . . . . . . . . . . . . . . . . . . . . . . . . . . . . . . . . . . . . . . . 110
< Maak het apparaat nooit schoon met chemische middelen daar
dit de afwerking kan aantasten. Gebruik een schone, droge,
zachte doek.
< Bewaar deze handleiding op een veilige plaats om later nog eens
te raadplegen.
Onderhoud
Wanneer het apparaat vuil is, maak het dan schoon met
een zachte, droge doek, eventueel bevochtigd met water
waaraan een paar druppels van een mild reinigingsmiddel zijn
toegevoegd. Maak het apparaat daarna goed droog. Gebruik
nooit oplossende vloeistoffen zoals benzine, verdunner, enz.
Deze stoffen kunnen de afwerking aantasten.
NEDERLANDS
< Stel het apparaat niet bloot aan spatten of druppels.
< Plaats geen vazen met vloeistof op het apparaat.
< Plaats dit apparaat niet in een afgesloten ruimte zoals een
boekenkast.
< Het apparaat neemt een verwaarloosbaar vermogen op wanneer
de POWER of STANDBY/ON schakelaar niet op ON (aan) staat.
< Plaats het apparaat voldoende dicht bij het stopcontact om indien
nodig op elk moment gemakkelijk bij de netstekker te kunnen.
< Het apparaat wordt alleen door de netstekker uit te nemen van
het lichtnet gescheiden, zorg daarom dat deze altijd bereikbaar is.
< Wanneer in het product batterijen aanwezig zijn (zoals een accu
of losse batterijen) deze niet blootstellen aan zonlicht, vuur of
excessieve warmte.
< WEES VOORZICHTIG met producten waarin losse lithium batterijen
worden gebruikt; bij verkeerd inzetten of gebruik van een verkeerd
type bestaat de kans op explosie. Uitsluitend vervangen door
hetzelfde of equivalent type.
< Wees voorzichtig bij het aansluiten en losnemen van oortelefoons
of een hoofdtelefoon omdat extreem luid geluid uw gehoor
ernstig kunnen beschadigen.
93
Aansluiten
T-R650
A
B
C
R
L
TUNER
(LINE IN)
REMOTE
CONTROL
Versterker (A-R650)
LET OP:
< Schakel de spanning van alle apparatuur uit alvorens de
apparaten te verbinden.
< Lees de handleiding van elk apparaat dat u met dit apparaat wilt
verbinden.
A LINE OUT (Lijnuitgang)
B REMOTE CONTROL
afstandsbediening)
(aansliuting
Wanneer u ook een TEAC A-R650 bezit, verbind dan deze
afstandsbediening aansluiting met de afstandsbediening
uitgang van de A-R650 om het gehele systeem te kunnen
bedienen.
Deze uitgang geeft een analoog 2-kanalen
audiosignaal af. Verbind deze uitgang via een stereo
cinch-kabel met de TUNER ingang van de versterker (A-650).
< Wanneer u op een zender afstemt, wordt automatisch “TUNER”
als bron voor de A-R650 gekozen.
Wanneer u de functies van de wilt gebruiken, verbind dan
de REMOTE CONTROL aansluiting van alle apparaten via een
afstandsbedieningskabel.
Verbind de kabel als volgt:
witte plug q witte ingang (L: linkerkanaal)
rode plug q rode ingang (R: rechterkanaal)
< U kunt de UR-431 afstandsbediening (geleverd bij de
A-R650) gebruiken. Richt de afstandsbediening op de A-R650
om het apparaat te bedienen.l.
Wit (L)
Rood (R)
Wit (L)
Rood (R)
< Druk de pluggen goed aan in de aansluitingen. Voorkom
ruis en brom door de signaalkabels niet te bundelen met de
netsnoeren.
Opmerking:
Er wordt geen afstandsbediening bij dit toestel geleverd.
C Netsnoer
Steek de stekker van het netsnoer pas in een stopcontact nadat
alle andere verbindingen gemaakt zijn.
< Verbind het apparaat uitsluitend met een stopcontact dat de
juiste spanning voert.
< Houd de stekker vast bij het verbinden of ontkoppelen van het
netsnoer.
94
Aansluiten van antennes
AM-kamerantenne
De “high-performance” bijgeleverde AM-ringantenne is voldoende
voor een goede ontvangst in de meeste gebieden.
Druk het lipje van de ringantenne in het antennevoetje om de
ringantenne neer te zetten.
Hang de antennedraad buitenshuis of binnenshuis in de
buurt van een raam op. Verbind de GND aansluiting met een
aardingspunt voor een betere ontvangst.
< Ontkoppel de AM-ringantenne niet wanneer u een
AM-buitenantenne gebruikt.
FM-kamerantenne
Verbind de FM-draadantenne met de 75Ω aansluiting, rol de
draad uit en stem op uw favoriete zender af (zie bladzijde 98).
Plaats de antenne bij een raamkozijn of muur de ontvangst
optimaal is en bevestig deze met bijvoorbeeld punaises.
Verbind de draden van de ringantenne met de AM
antenne-aansluitingen.
< Het zwarte draad moet beslist met de GND aansluiting worden
verbonden.
Plaats de antenne op een kast of hang aan het raamkozijn in de
richting waarbij de ontvangst optimaal is. Zorg dat alle andere
draden en snoeren, bijvoorbeeld netsnoeren, luidsprekersnoeren
en verbindingssnoeren, zo ver als mogelijk van de antenne
liggen.
AM-buitenantenne
Indien de bijgeleverde AM-ringantenne geen goede ontvangst
geeft (omdat u bijvoorbeeld te ver van zenders of in een betonnen
gebouw bent), dient u een AM-buitenantenne gebruiken.
AM Buitenantenne
Let erop dat de zwarte
ader met de GND (massa)
wordt verbonden.
FM-buitenantenne
Gebruik een FM-buitenantenne wanneer u in een gebied bent
waar de FM-signalen zwak zijn. Normaliter is een antenne met
3-elementen voldoende; indien in uw gebied de FM-signalen echter
zeer zwak zijn, gebruik dan een antenne met 5 of meer elementen.
< Ontkoppel de FM-binnenantenne indien u een buitenantenne
gebruikt.
NEDERLANDS
Gebruik een in de handel verkrijgbare AM-antenne van goede
kwaliteit, of gebruik een geïsoleerde draad van meer dan vijf
meter en verbind dat uiteinde met de aansluiting als hierboven
afgebeeld.
95
Bedieningsorganen
A
B
C
D
E
J
K
F
L
M
G
H
I
N
A STANDBY/ON
a
b
M
c
d
K
L
Indrukken om het apparaat in te schakelen of in standby te
zetten. De standby indicatie licht rood op wanneer het apparaat
in standby staat; zodra het is ingeschakeld, licht het groen op.
B TIMER
Druk op deze toets om de timerfunctie te activeren of annuleren.
C DAILY - Dagelijks
H
G
J
C D
B
Indrukken om de timerfunctie te activeren of annuleren.
Druk op TIME ADJ op de afstandsbediening en houd deze meer
dan 2 seconden vast.
D TIME ADJ - Klok gelijkzetten
Indrukkens om de klok in te stellen.
E Display
e
F UNING MODE - Afstemfunctie
Indrukken om een afstemfunctie te kiezen.
G FM MODE - FM-functie
Bij FM kiest u hiermee mono of stereo.
H BAND - Afstembereik
Druk op deze toets om FM of AM of internet-radio te kiezen.
UR-431
Bij de T-R650 geleverde afstandsbediening
96
Basis Bediening
I TUNING/SELECT - Afstemmen/Kiezen
Voor het afstemmen op een zender, kiezen van een
voorkeurpositie of een menu item.
In- en Uitschakelen
Druk op STANDBY/ON om het apparaat in- of uit te schakelen.
J RDS MODE/RDS Functie
Indrukken om een RDS-functie te kiezen.
K FILE/Opslaan
Standby/Aan Indicatie
Voor het opslaan van een naam voor een zender.
L MEMORY - Geheugen
Indrukken om een zender op een voorkeurpositie in het
geheugen op te slaan.
M ENTER
Indrukken om de keuze te bevestigen.
Bij het luisteren naar FM of AM kiest u hiermee de afstemfunctie.
N Sensor afstandsbediening
Standby/On-indicator gaat uit wanneer het apparaat wordt
ingeschakeld.
Dimmer
Door iedere druk op de DIMMER toets, verandert het display als
volgt:
Richt de afstandsbediening op deze sensor.
Afstandsbediening (geleverd bij de A-R650)
a ON - Aan
Indrukken om het apparaat in te schakelen.
b STANDBY
Indrukken om het apparaat in standby te zetten.
c
d
Zelf afstemmen (Hoger/Lager)
Indrukken om een zender af te stemmen of een voorkeurpositie
te kiezen.
Voorkeurzenders kiezen (Hoger/Lager)
Indrukken om een voorkeurpositie te kiezen.
Normaal q Gedimd q Display uitgeschakeld
Deze functie kan uitsluitend worden gebruikt wanneer de
REMOTE CONTROL aansluitingen van de T-R650 en A-R650
middels een afstandsbedieningskabel zijn verbonden.
Gebruik de afstandsbediening die bij de A-R650 is
geleverd.
e DIMMER
Indrukken om de display te dimmen.
Note:
Bij dit apparaat wordt geen afstandsbediening geleverd.
NEDERLANDS
97
Luisteren naar FM/AM
1 Kies FM of AM door herhaaldelijk op BAND te drukken.
3 Kies de gewenste zender.
2 Kies de gewenste afstemfunctie.
Zelf afstemmen
Zoek de gewenste zender met TUNING/SELECT.
De frequentie verandert in stappen (FM: sskip the blue words 50
kHz, AM: 9 kHz).
Telkens wanneer u op TUNING MODE drukt, verandert de
afstemfunctie als volgt:
Zelf afstemmen
FM
< Manual
tune >
108.00MHz
Automatische afstemfunctie
Door aan TUNING/SELECT te draaien, start het zoeken.
Zodra een voldoende sterke zenders is gevonden wordt deze
optimaal afgestemd. Herhaal deze stap totdat de gewenste
zender is gevonden.
< Druk op ENTER om het automatisch afstemmen te stoppen. (op
het voorpaneel van de T-R650)
< Gebruik TUNING wanneer u via de afstandsbediening werkt.
Voorkeurzenders kiezen
Zie pagina 99 tot 103.
Automatisch afstemmen
FM
<
Auto tune >
108.00MHz
FM-functie
Druk op FM MODE om te schakelen tussen stereo en mono
weergave.
Voorkeurzenders kiezen
FM < Preset tune >
CH01
108.00MHz
Stereo:
Stereo FM-uitzendingen worden stereo ontvangen en “Stereo”
icht op.
Mono:
Kies mono indien de signalen zwak zijn. De ontvangst wordt nu
mono, maar ongewenste ruis wordt verminderd.
98
Voorkeurzenders 1
Zelf opslaan
5 Druk binnen 4 seconden op MEMORY.
U kunt maximaal 30 FM en30 AM zenders opslaan.
1 Kies AM of FM door herhaaldelijk op BAND te drukken.
De zender wordt nu opgeslagen.
2 Stem de zender die u wilt opslaan af.
Zie de voorgaande voor informatie over het afstemmen.
< Herhaal stappen 2 t/m 5 voor het opslaan van meerdere
voorkeurzenders.
Automatisch opslaan van voorkeurzenders
1 Kies FM of AM door herhaaldelijk op BAND te drukken.
3 Druk op MEMORY.
2 Houd MEMORY langer dan 2 seconden ingedrukt.
FM 10:00 Stereo
CH -108.00MHz
< Wanneer u niet binnen 4 seconden na het indrukken van
MEMORY kiest, vervalt het voorinstellen.
4 Kies binnen 4 seconden een voorkeurpositie voor deze
zender.
Kies een nummer met TUNING/SELECT.
Maximaal 30 van de in uw gebied goed te ontvangen zenders
worden automatisch opgeslagen.
NEDERLANDS
FM 10:00 Stereo
CH12
108.00MHz
99
Voorkeurzenders 2
Voorkeurzenders kiezen
1 Kies AM of FM door herhaaldelijk op BAND te drukken.
U kunt namen voor de geprogrammeerde voorkeurzenders invoeren.
(maximaal 4 tekens)
De ingevoerde naam verschijnt in plaats van de klok wanneer u op
de FILE toets drukt. Druk nogmaals op de FILE toets om weer het
normale display (de klok) te tonen.
Geprogrammeerde zenders een naam geven
1 Kies het geprogrammeerde voorkeurkanaal waarvoor u
een naam wilt invoeren tijdens de “Geprogrammeerde
afstemfunctie“.
< U kunt ook een naam invoeren voor de zender waarop is
afgestemd en deze in het geheugen vastleggen.
2 Kies de voorkeurzender-afstemfunctie.
Druk herhaaldelijk op TUNING MODE tot “Preset tuner” verschijnt.
2 Druk de FILE-toets langer dan 1.5 seconde in.
FM < Preset tune >
CH01
108.00MHz
3 Kies een voorkeurzender met TUNING/SELECT.
FM
---- 03:01
CH09
92.50MHz
“---“ verschijnt en het eerste “-“ knippert op het display.
3 Selecteer een karakter met de TUNING/SELECT-toets.
De gekozen zender wordt afgestemd.
Beschikbare tekens:
100
Voorkeurzenders (Afstandsbediening) 1
4 Druk op de ENTER-toets.
Zelf opslaan
U kunt maximaal 30 FM en 30 AM zenders opslaan.
1 Kies AM of FM door herhaaldelijk op BAND te drukken.
De volgende “-“ knippert.
Tot en met 4 karakters kunnen per zender gebruikt worden.
Herhaal stap 3 en 4 om de karakters in te voeren.
5 Druk op de MEMORY-toets.
2 Druk op
of
om de zender die u wilt opslaan af te
stemmen.
FM
BBC- 03:01
CH__
92.50MHz
“CH_“ knippert.
6 Kies met de TUNING/SELECT knop een voorkeurkanaal
waaronder u de zender wilt programmeren.
3 Druk op MEMORY.
7 Druk op de MEMORY toets.
FM 10:00 Stereo
CH -108.00MHz
De ingevoerde naam blijft in het geheugen bewaard.
Indien er reeds een naam was ingevoerd, zal deze door de
nieuwe naam worden overschreven.
Lees verder op de volgende pagina q
101
NEDERLANDS
< Wanneer u niet binnen 4 seconden na het indrukken van
MEMORY kiest, vervalt het voorinstellen.
Voorkeurzenders (Afstandsbediening) 2
4 Druk binnen 4 seconden op
of
voorkeurpositie te kiezen voor deze zender.
om een
De zender wordt nu vastgelegd.
< Herhaal stappen 2 t/m 5 voor het opslaan van meerdere
voorkeurzenders.
Automatisch opslaan van voorkeurzenders
1 Kies FM of AM door herhaaldelijk op BAND te drukken.
FM 10:00 Stereo
CH12
108.00MHz
U kunt ook de cijfertoetsen gebruiken.
< Om de cijfertoetsen op de afstandsbediening te gebruiken, dient
u eerst op TUNER te drukken.
2 Houd MEMORY langer dan 2 seconden ingedrukt.
Om bijvoorbeeld 25 te kiezen, drukt u eerst op TUNER, en
vervolgens op “2” en “5”.
Om een nummer lager dan 10 te kiezen, drukt u op “0” en
vervolgens op het gewenste nummer. Om nummer 5 te kiezen,
drukt u op “0” en dan op “5”. Ook kunt u gewoon op “5” drukken
en een paar seconden wachten.
FM 10:00 Stereo
CH12
108.00MHz
5 Druk binnen 4 seconden op MEMORY.
102
Maximaal 30 van de in uw gebied goed te ontvangen zenders
worden automatisch opgeslagen.
RDS
Kiezen van voorkeurzenders
1 Kies AM of FM door herhaaldelijk op BAND te drukken.
Radio Data System (RDS) is een systeem waarmee zenders behalve
de normale radioprogrammasignalen ook extra informatie
uitzenden.
RDS werkt uitsluitend in Europa op de FM-band.
1 Stem op een FM-zender af (zie bladzijde 98).
2 Druk op RDS MODE.
2 Kies een voorkeurzender met de cijfertoetsen.
Telkens wanneer u op RDS MODE drukt, verandert de functie als
volgt:
PS (Zender identificatie)
“PROGRAM SERVICE” knippert ongeveer 3 seconden wanneer u
PROGRAM SERVICE kiest. De naam van het programma of van
de zender verschijnt in de display. Wanneer er geen informatie
beschikbaar is, verschijnt de frequentie.
PT (PROGRAM TYPE)
“PROGRAM TYPE” knippert ongeveer 3 seconden wanneer u
PROGRAM TYPE kiest. Het programmatype verschijnt in de
display.
De gekozen voorkeurzender wordt afgestemd.
RT (RADIO TEXT)
“RADIO TEXT” knippert ongeveer 3 seconden wanneer u
RADIO TEXT kiest. Vervolgens verschijnt het door de zender
uitgezonden nieuws met maximaal 64 tekens in de display.
Indien er geen radiotekstdata worden ontvangen, zal
automatisch PROGRAM SERVICE worden gekozen.
TA (Verkeersinformatie)
“TRAFFIC ANNOUNCE” knippert ongeveer 3 seconden wanneer
u TRAFFIC ANNOUNCE kiest. Het apparaat zoekt vervolgens naar
een zender met verkeersinformatie.
< TRAFFIC ANNOUNCE verandert naar PROGRAM SERVICE zodra
een programma met verkeersinformatie is gevonden.
Indien de huidige zender verkeersinformatie uitzendt,
blijft de tuner bij PROGRAM SERVICE en wordt niet naar
verkeersinformatie gezocht.
103
NEDERLANDS
CT (Juiste tijdz)
“CLOCK TIME” knippert ongeveer 3 seconden wanneer u “CLOCK
TIME” kiest, waarop de door de zender uitgezonden tijd in de
display verschijnt.
RDS
PTY-zoeken
U kunt zenders aan de hand van het programmatype zoeken.
De ingebouwde klok wordt automatisch aan de hand van de
CLOCK TIME (CT) gelijkgezet.
Indien u op een zender afstemt die in een andere tijdzone
staat, zal de klok een verkeerde tijd aangeven, wat ook de
werking van de timer kan beïnvloeden.
Annuleer het automatisch gelijkzetten wanneer u de
ingebouwde klok niet door de CT-data wilt laten gelijkzetten.
1 Kies FM door herhaaldelijk op BAND te drukken.
< Het apparaat ontvangt de CT data en zet de klok gelijk,
ongeacht welke optie u voor de RDS-functie heeft gekozen.
Voor het annuleren van het automatisch gelijkzetten,
dient u de DS MODE toets langer dan 8 seconden
ingedrukt te houden.
< Voor het weer activeren van het automatisch gelijkzetten,
dient u de RDS MODE toets langer dan 8 seconden
ingedrukt te houden.
2 Druk langer dan 2 seconden op RDS MODE.
3 Kies het gewenste programmatype (PTY).
Kies met TUNING/SELECT welk type u wilt zoeken.
< CLOCK TIME verschijnt niet wanneer het automatisch
gelijkzetten is uitgeschakeld.
U kunt kiezen uit 31 verschillende programmatypen (PTY). Het
gekozen programmatype knippert.
4 Druk op ENTER.
Het zoeken start.
< Het zoeken stopt zodra een uitzending van het door u gekozen
programmatype is gevonden en het programmatype verschijnt
in de display.
< Indien er met PTY-zoeken geen uitzending van het gekozen
programmatype wordt gevonden, stopt het zoeken bij de
oorspronkelijke frequentie.
< Druk op RDS MODE indien u het zoeken voortijdig wilt stoppen.
104
31 Typen programma’s:
Social Affairs:
Sociale informatie.
News:
Korte meldingen, evenementen, meningen, reportages,
actualiteiten.
Religion:
Religieuze programma’s.
Current Affairs:
Onderwerpen buiten het nieuws, documentaires, discussies,
analyses, enz.
Phone In:
Programma’s met informatie van de luisteraar zelf, meestal per
telefoon.
Information:
Dagelijkse zaken zoals weer, consumentenrubrieken, medische
rubrieken, enz.
Travel & Touring:
Reisverslagen.
Sport:
Aan sport gerelateerde programma’s.
Education:
Onderwijs en culturele informatie.
Drama:
Alle soorten radioconcerten en hoorspellen.
Cultures:
Alle nationale of lokale cultuur zoals religieuze evenementen,
filosofie, sociale wetenschap, taal, theater, enz.
Science:
Programma’s over wetenschap en technologie.
Varied Speech:
Populaire programma’s zoals een quiz, ontspanning, interviews,
comedies, satire, enz.
Pop Music:
Programma’s met populaire muziek.
Rock Music:
Programma’s met rock muziek.
Leisure & Hobby:
Programma’s over hobby en vrijetijdsbesteding.
Jazz Music:
Jazzmuziek.
Country Music:
Country & Western muziek.
National Music:
Nationale muziek.
Oldies Music:
Programma’s met “gouwe ouwe” muziek.
Folk Music:
Volksmuziek
Documentary:
Documentaires
Alarm Test
Alarm-Alarm!:
Een programma in geval van nood of een natuurramp.
Easy Listening:
Rustige populaire muziek.
Light Classics M:
Lichte klassieke muziek voor niet-professionals.
Serious Classic:
Klassieke muziek voor gevorderden.
Other Music:
Andere muziekstijlen zoals Rythm & Blues, Reggae, enz.
NEDERLANDS
Weather & Meter:
Weerberichten, voorspellingen.
Finance:
Financiële informatie, handel.
Children’s Progs:
Programma’s voor kinderen.
105
Klok gelijkzetten
< De klok heeft een 24-uurs cyclus.
1 Druk op TIME ADJ.
Timer instelling - Dagelijks 1
Deze functie kan uitsluitend worden gebruikt wanneer de REMOTE
CONTROL aansluitingen van de T-R650 en de A-R650 via een kabel
zijn verbonden.
< Voordat u de timer kunt instellen, eerst de klok gelijkzetten.
1 Druk op DAILY.
C-time 00:00:00
CH12
108.00MHz
De uren knipperen.
2 Stel de uren in met TUNING/SELECT en druk vervolgens op
ENTER.
On time 00:00:00
CH12
108.00MHz
”On time” verschijnt in de display en de uren knipperen.
< Bij gebruik van de afstandsbediening houdt u TIME ADJ
langer dan 2 seconden vast.
2 Verdraai de TUNING/SELECT knop om de starttijd (uur) in
te stellen en druk vervolgens op de ENTER toets.
C-time 10:00:00
CH12
108.00MHz
Het uur is ingesteld en de minuten knipperen.
3 Stel de minuten in met TUNING/SELECT en druk vervolgens
op ENTER.
On time 07:00:00
CH12
108.00MHz
De klok start bij 00 seconden.
106
De uren zijn ingesteld en de minuten knipperen.
3 Stel met TUNING/SELECT de starttijd (minuten) in en druk
vervolgens op ENTER.
Off time00:00:00
CH12
108.00MHz
De starttijd is nu ingesteld. ”Off time” verschijnt in de display en
de uren knipperen.
5 Stel met TUNING/SELECT de stoptijd (minuten) in en druk
vervolgens op ENTER.
Off time09:15:00
CH12
108.00MHz
De timerinstelling wordt nu opgeslagen.
4 Stel met TUNING/SELECT de stoptijd (uren) in en druk
vervolgens op ENTER.
NEDERLANDS
Off time09:15:00
CH12
108.00MHz
De uren zijn ingesteld en de minuten knipperen.
107
Timer instelling - Dagelijks 2
Sleeptimer functie
Activeren van de timer
1 Druk herhaaldelijk op TIMER totdat “Timer On” verschijnt.
De timer indicatie (
) verschijnt rechts in de display.
Timer indicatie
Timer On
Deze functie kan uitsluitend worden gebruikt wanneer de
REMOTE CONTROL aansluitingen van de T-R650 en A-R650
middels een afstandsbedieningskabel zijn verbonden.
Gebruik de afstandsbediening die bij de A-R650 is geleverd.
Na enige tijd kan de stroom uitgeschakeld worden.
Druk meerdere keren op de SLEEP-toets totdat de gewenste tijd
in het display verschijnt.
2 Op de A-R650 kiest u “TUNER” met de INPUT SELECTOR (of
door op TUNER op de afstandsbediening te drukken).
3 Druk op STANDBY/ON van de afstandsbediening van de
90
80
. . . . . . . 10
OFF (Normaal display)
A-R650 om alle.
< Indien de timer is geactiveerd en AM of FM als bron is gekozen,
licht de timer indicatie in de display op.
< Zodra de starttijd is bereikt, worden alle via
afstandsbedieningskabels verbonden apparaten ingeschakeld.
De tuner stemt af op de laatst gebruikte zender en op de A-R650
wordt de laatst gebruikte bron gekozen.
< Zodra de stoptijd wordt bereikt, worden alle via
afstandsbedieningskabels verbonden apparaten in standby
gezet.
< Na het instellen van de timer kan de timer vanuit standby worden
in- of uitgeschakeld door op TIMER te drukken.
Annuleren van de timerinstelling
Druk herhaaldelijk op TIMER totdat “Timer Off” verschijnt.
De timer indicatie ( ) in de display dooft.
108
SL:90 (80, 70, 60, 50, 40, 30, 20 of 10)
De T-R650 schakelt na 90 (80, 70, 60, 50, 40, 30, 20 of 10)
minuten automatisch uit.
Normaal display
De sleeptimer staat uit.
< Als u de resterende tijd wilt controleren drukt u een keer op de
SLEEP-toets. De resterende tijd verschijnt 2,5 seconde in het
display waarna het display naar de normale stand terug gaat.
Problemen
Controleer de volgende punten indien u een probleem met
het apparaat heeft en kijk of u het probleem zelf kunt oplossen
alvorens uw leverancier of de servicedienst van TEAC te
waarschuwen.
Geen netspanning
e Controleer het stopcontact waarop u het apparaat heeft
aangesloten spanning voert en of het mogelijk uitgeschakeld
is.-Controleer met een lamp, een ventilator of dergelijke of er
spanning op het stopcontact staat.
Apparaat terugzetten in de fabrieksinstellingen
Indien het apparaat onjuist functioneert, kan het terugzetten in
de fabrieksinstellingen het probleem mogelijk oplossen.
Alle door u gemaakte instellingen (voorkeurzenders, etc.) worden
hierdoor echter gewist.
Houd TIMER en BAND tegelijk een paar seconden
ingedrukt.
Geen geluid
e Controleer de verbinding met de versterker.
e Controleer de instellingen/van de versterker.
Geen ontvangst of het signaal is te zwak.
e Controleer of de antenne(s) correct zijn aangesloten.
e Stem de zender correct af.
e Installeer de antenne opnieuw nadat u mogelijk een plaats met
een betere ontvangst heeft gevonden.
e Mogelijk is het aansluiten van een externe antenne
noodzakelijk.
De T-R650 wordt nu teruggezet in de fabrieksinstelling.
Het geluid vervormt/ruist.
e Houd de antenne zover mogelijk uit de buurt van een TV of
CD-speler.
e Schakel een eventueel in de buurt staande TV of CD speler uit.
De ontvangst is stereo, het geluid is mono.
e Druk op FM MODE.
Als normale bediening niet meer mogelijk is trek dan de
stekker uit het stopcontact en steek hem vervolgens na 20
seconden weer terug in het stopcontact.
NEDERLANDS
109
Technische gegevens
Voor Europese Klanten
Informatie voor Gebruikers Over het Verzamelen en
Verwerken van Oude Apparatuur en Gebruikte Batterijen
FM-tuner
Afstembereik . . . . . . . . . . . 87,50 - 108,00 MHz (stappen van 50 kHz)
Bruikbare gevoeligheid . . . . . . . . . . . . . . . . . . . . . . . . . . . . . . . . . . . . 6 dBμ
Harmonische vervorming . . . . . . . . . . . . . . . . . . . . . . . . . . 0,8 % (mono)
1,2 % (stereo)
Signaal-/ruisverhouding . . . . . . . . . . . . . . . . . . . . . . . . . . .70 dB (Mono)
65 dB (Stereo)
Stereo kanaalscheiding . . . . . . . . . . . . . . . . . . . . . . . . . . . . . 35 dB (1 kHz)
Voorkeurzenders . . . . . . . . . . . . . . . . . . . . . . . . . . . . . . . . . . . . . . . . . . . . . .30
AM-tuner
Afstembereik . . . . . . . . . . . . . . . . 522 - 1.629 kHz (stappen van 9 kHz)
Bruikbare gevoeligheid . . . . . . . . . . . . . . . . . . . . . . . . . . . . . . . . . . . 55 dBμ
Harmonische vervorming . . . . . . . . . . . . . . . . . . . . . . 1,5 % (bij 74 dBμ)
Signaal-/ruisverhouding . . . . . . . . . . . . . . . . . . . . . . .45 dB (bij 80 dBμ)
Voorkeurzenders . . . . . . . . . . . . . . . . . . . . . . . . . . . . . . . . . . . . . . . . . . . . . .30
Algemeen
Lichtnetvoeding . . . . . . . . . . . . . . . . . . . . 230 V, 50 Hz wisselspanning
Opgenomen vermogen . . . . . . . . . . . . . . . . . . . . 9 W (Standby 0,5 W)
Afmetingen (B x H x D) . . . . . . . . . . . . . . . . . . . . . . . 435 x 85 x 295 mm
Gewicht . . . . . . . . . . . . . . . . . . . . . . . . . . . . . . . . . . . . . . . . . . . . . . . . . . 3,2 kg
Bedrijfstemperatuur . . . . . . . . . . . . . . . . . . . . . . . . . . . . . . . . +5˚C - +35˚C
Vochtigheid . . . . . . . . . . . . . . . . . . 5% - 85% (geen condensvorming)
Opslagtemperatuur . . . . . . . . . . . . . . . . . . . . . . . . . . . . . . . –20˚C - +55˚C
Accessoires
AM-ringantenne x 1
FM-draadantenne x 1
Systeembedieningssnoer x 1
Stereo cinch-kabel x 1
Handleiding (dit document) x 1
Garantiekaart x 1
< Ontwerp en technische gegevens zijn zonder voorafgaande
kennisgeving wijzigbaar.
< Het gewicht en afmetingen zijn bij benadering.
< De afbeeldingen verschillen mogelijk iets van de werkelijke
apparaten.
110
Deze symbolen op de producten, de verpakking en/of
bijbehorende documenten, betekenen dat gebruikte elektrische
en elektronische producten en batterijen niet met het huisvuil
mogen worden weggegooid. Voor een juiste behandeling,
verwerking en recycling van oude producten en gebruikte
batterijen kunt u terecht bij de daarvoor aangewezen depots
in overeenstemming met de plaatselijke wetgeving en de
richtlijnen 2002/96/EU en 2006/66/EU.
Door deze producten en de batterijen correct te behandelen,
helpt u waardevolle materialen te behouden en eventuele
negatieve effecten op de gezondheid en het milieu ten gevolge
van onverantwoorde behandeling te voorkomen.
Nadere informatie over het verzamelen en recyclen van oude
producten en batterijen kan de plaatselijke milieudienst u geven
en anders de leverancier van het product.
Informatie over het Afvoeren in Landen Buiten de
Europese Unie
Deze symbolen gelden alleen voor de Europese Unie en
wanneer u deze producten wilt afvoeren, neem dan contact
op met de plaatselijke autoriteiten of uw leverancier voor de
juiste wijze van afvoeren.
Opmerking over het batterij symbool (hieronder rechts
twee voorbeelden):
Dit symbool kan worden gebruikt in combinatie met een
chemisch symbool. In dat geval voldoet het aan de eisen als
gesteld in de richtlijn voor desbetreffende chemicaliën.
111
Z
TEAC CORPORATION
1-47 Ochiai, Tama-shi, Tokyo 206-8530, Japan Phone: (042) 356-9156
TEAC AMERICA, INC.
7733 Telegraph Road, Montebello, California 90640 Phone: (323) 726-0303
TEAC CANADA LTD.
5939 Wallace Street, Mississauga, Ontario L4Z 1Z8, Canada Phone: (905) 890-8008
TEAC MEXICO, S.A. de C.V
Río Churubusco 364, Colonia Del Carmen, Delegación Coyoacán, CP 04100, México DF, México Phone: (5255)5010-6000
TEAC UK Ltd.
Suites 19 & 20, Building 6, Croxley Green Business Park, Hatters Lane, Watford, Hertfordshire, WD18 8TE, U.K. Phone: (0845) 130-2511
TEAC EUROPE GmbH
Bahnstraße 12, D-65205 Wiesbaden-Erbenheim, Deutschland Phone: 0611-71580
This appliance has a serial number located on the rear panel. Please record the
model number and serial number and retain them for your records.
Model number
Serial number
0410. MA-1583A