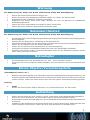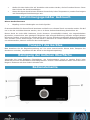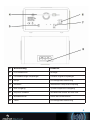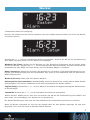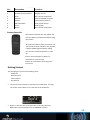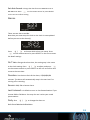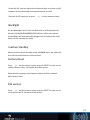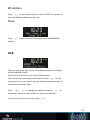
1
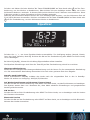
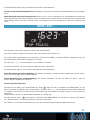
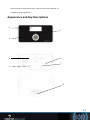
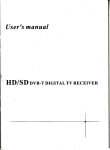
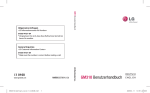
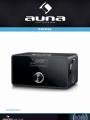
Dabstep 10022782 Warnung Zur Reduzierung der Gefahr von Brand, elektrischem Schlag und Beschädigung: • Setzen Sie dieses Gerät nicht dem Regen aus. • Stellen Sie keine mit Flüssigkeiten gefüllten Gefäße, wie Vasen, auf dieses Gerät. • Ausschließlich das empfohlene Zubehör verwenden. • Reparieren Sie dieses Gerät nicht selbst. Wenden Sie sich zur Wartung an qualifiziertes Kundendienstpersonal. • Lassen Sie keine Gegenstände aus Metall in dieses Gerät fallen. • Stellen Sie keine schweren Gegenstände auf dieses Gerät. Netzkabel/Netzteil Zur Reduzierung der Gefahr von Brand, elektrischem Schlag und Beschädigung: • • • • • • • Gewährleisten Sie, dass die Spannung der Stromversorgung dem auf diesem Gerät angegebenen Wert entspricht. Stecken Sie den Netzstecker vollständig in die Steckdose ein. Ziehen Sie nicht am Kabel, knicken Sie es nicht und stellen Sie keine schweren Gegenstände darauf. Fassen Sie den Stecker nicht mit nassen Händen an. Fassen Sie den Stecker beim Herausziehen an seinem Korpus an. Verwenden Sie keinen beschädigten Netzstecker oder eine beschädigte Steckdose. Installieren Sie dieses Gerät so, dass das Netzkabel sofort aus der Steckdose gezogen werden kann, wenn Störungen auftreten. Netzadapter • Der Netzadapter kann mit Wechselstrom von 220 - 240 V betrieben werden. • Verwenden Sie einen geeigneten Steckeradapter, wenn der Stecker nicht in die Netzsteckdose passt. Kleine Objekte/Verpackungsteile (Plastikbeutel, Karton, etc.) • Bewahren Sie kleine Objekte (z.B. Schrauben und anderes Montagematerial, Speicherkarten) und Verpackungsteile außerhalb der Reichweite von Kindern auf, damit sie nicht von diesen verschluckt werden können. Lassen Sie kleine Kinder nicht mit Folie spielen. Es besteht Erstickungsgefahr! Achtung •Gerät Stellen Sie keine Quellen offener Flammen, z.B. brennende Kerzen, auf das Gerät. Aufstellung • • • • Stellen Sie das Gerät auf eine trockene, ebene, wasserfeste und hitzebeständige Oberfläche. Suchen Sie einen Aufstellort, an dem Kinder nicht an das Gerät gelangen können. Die Steckdose muss leicht zugänglich sein, um im Notfall das Gerät schnell vom Stromkreis trennen zu können. Installieren oder positionieren Sie dieses Gerät nicht in einem Bücherregal, Einbauschrank oder einem sonstigen engen Raum. Stellen Sie eine gute Belüftung des Gerätes sicher. 2 • • Stellen Sie das Gerät nicht auf Verstärker oder andere Geräte, die heiß werden können. Diese Hitze könnte das Gerät beschädigen. Setzen Sie dieses Gerät keinem direkten Sonnenlicht, hohen Temperaturen, starker Feuchtigkeit und übermäßigen Erschütterungen aus. Bestimmungsgemäßer Gebrauch Dieses Gerät dient zum • Empfang und zur Wiedergabe von Audio-Quellen. Es ist ausschließlich für diesen Zweck bestimmt und darf nur zu diesem Zweck verwendet werden. Es darf nur in der Art und Weise benutzt werden, wie es in dieser Gebrauchsanleitung beschrieben ist. Dieses Gerät ist nicht dafür bestimmt, durch Personen (einschließlich Kinder) mit eingeschränkten physischen, sensorischen oder geistigen Fähigkeiten oder mangels Erfahrung und/oder mangels Wissen benutzt zu werden, es sei denn,sie werden durch eine für ihre Sicherheit zuständige Person beaufsichtigt oder erhielten von ihr Anweisungen, wie das Gerät zu benutzen ist. Kinder sollten beaufsichtigt werden, um sicherzustellen, dass sie nicht mit dem Gerät spielen. Transport des Gerätes Bitte bewahren Sie die Originalverpackung auf. Um einen ausreichender Schutz beim Transport des Gerätes zu erreichen, verpacken Sie das Gerät in der Originalverpackung. Reinigung der äußeren Oberfläche Verwenden Sie keine flüchtigen Flüssigkeiten, wie Insektensprays. Durch zu starken Druck beim Abwischen können die Oberflächen beschädigt werden. Gummi- oder Plastikteile sollten nicht über einen längeren Zeitraum mit dem Gerät in Kontakt sein. Bedienelemente 3 Nr. Bezeichnung Funktion 1 LCD-Bildschirm Anzeige 2 Fernbedienungs-Empfänger Infrarot-Signal-Empfänger 3 Knopf Grundlegende Bedienung 4 Antenne Verbessert DAB/UKW-Empfang 5 AUX Eingang 3,5mm-Kopfhörer-Ausgang 6 AN/AUS-Schalter Schaltet das Gerät an oder aus 7 Netzanschluss Dient der Stromzufuhr 8 Taste Grundlegende Bedienung 4 Fernbedienung Denken Sie daran, die Plastik-Lasche aus dem Batteriefach zu ziehen, bevor Sie die Fernbedienung verwenden. Drücken Sie mit ihrem Daumen die Lasche am Batteriefach herunter und ziehen Sie dieses heraus. Setzen Sie eine Batterie des Typs CR2025 (3V) ein und achten Sie darauf, dass Sie die Batterie mit der Plus-Seite nach oben einlegen. Achtung: Falsche Batterie-Typen könnten bei Verwendung u.u. explodieren. Inbetriebnahme Folgende Produkte sind Teil des Lieferumfangs: •Hauptgerät •Netzadapter •Fernbedienung •Bedienungsanleitung • Verbinden Sie mit dem Netzadapter den Netzanschluss auf der Rückseite des Geräts mit einer Steckdose. Schalten Sie das Gerät auf der Rückseite ein. Wenn Sie das Gerät das erste Mal starten, geht das Radio automatisch in den DAB-Modus und sucht nach verfügbaren DAB/DAB+ Sendern. 5 Drücken und halten Sie STANDBY/MODE auf dem Gerät oder auf der Fernbedienung, um in den Standby-Modus zu wechseln. Zeit, Datum und jeder aktive Wecker werden auf dem Display angezeigt. Wenn Zeit und Datum noch nicht eingestellt wurden zeigt das Display „00:00 00-00-0000“ an. Drücken und halten Sie im Standby-Modus die Taste STANDBY/MODE auf dem Gerät oder Fernbedienung, um das Gerät in den Betriebsmodus zu schalten. auf der Funktionen Drücken Sie STANDBY/MODE auf dem Gerät oder MODE auf der Fernbedienung, um durch die Modi zu schalten: DAB -> UKW -> Bluetooth -> AUX-Eingang / Drehen Sie am Lautstärke-Rad oder drücken Sie Mit der Taste schalten Sie den Sound stumm. auf der Fernbedienung, um die Lautstärke anzupassen. Haupt-Menü und Einstellungen Drücken und halten Sie MENU/INFO auf dem Gerät oder MENU auf der Fernbedienung, um zu den Einstellungen zu gelangen, völlig gleich in welchem Modus Sie sich gerade befinden. Drücken Sie < / >, um das Untermenü auszuwählen und drücken Sie OK auf der Fernbedienung oder SELECT auf dem Gerät, um zu bestätigen. Zeit-Einstellungen Drücken Sie < / >, um die Stunde einzustellen. Drücken Sie OK auf der Fernbedienung oder SELECT auf dem Gerät, um zu bestätigen. Drücken Sie < / >, um die Minuten einzustellen. Drücken Sie OK auf der Fernbedienung oder SELECT auf dem Gerät, um die Uhrzeit abzuspeichern und zur Datums-Einstellung zu wechseln. Drücken Sie < / >, um den Tag einzustellen. Drücken Sie OK auf der Fernbedienung oder SELECT auf dem Gerät, um zu bestätigen und zum Monat zu wechseln. Drücken Sie < / >, um den Monat einzustellen. Drücken Sie OK auf der Fernbedienung oder SELECT auf dem Gerät, um zu bestätigen und zum Jahr zu wechseln. Drücken Sie OK auf der Fernbedienung oder SELECT auf dem Gerät, um das eingegebene Datum zu bestätigen. Auto-Update Die Zeit kann manuell eingestellt oder automatisch via DAB oder UKW bezogen werden. Drücken Sie OK auf der Fernbedienung oder SELECT auf dem Gerät, um zu bestätigen. Das Radio wird nun die Uhrzeit automatisch aktualisieren, sobald es einen DAB/UKW-Sender mit RDS-Signal empfängt. Wenn Sie Stromverbindung unterbrochen wird, werden Datum und Uhrzeit auf den Standard „00:00 0000-0000“ zurückgesetzt. Es wird daher empfohlen die Auto-Update-Funktion zu nutzen. Anzeige-Format (12/24 hour): Wählen Sie zwischen einer 12-Stunden- und einer 24-Stunden-Anzeige. Drücken Sie OK auf der Fernbedienung oder SELECT auf dem Gerät, um die Einstellung zu bestätigen. Datums-Format: Stellen Sie das Format der Datums-Anzeige auf MM-TT-JJJJ oder TT-MM-JJJJ. Drücken Sie OK auf der Fernbedienung oder SELECT auf dem Gerät, um die Einstellung zu bestätigen. 6 Wecker 2 Weckzeiten stehen zur Verfügung Hinweis: Sie müssen erst die Uhrzeit einstellen oder Auto-Update aktiviert haben, bevor Sie den Wecker verwenden können. Drücken Sie < / >, um den gewünschten Wecker auszuwählen. Drücken Sie OK auf der Fernbedienung oder SELECT auf dem Gerät, um den Wecker zu bestätigen. Weckzeit (On Time): Stellen Sie die Weckzeit ein. Die Einstellung funktioniert auf die gleiche Weise wie bei der Uhrzeit. Drücken Sie < / >, um den gewünschten Wert einzustellen. Drücken Sie OK auf der Fernbedienung oder SELECT auf dem Gerät, um zum nächsten Objekt zu wechseln. Dauer (Duration): Stellen Sie die Dauer des Weckrufs ein. Es stehen 15/30/45/60/90 Minuten zur Verfügung. Der Weckruf stoppt nach der eingestellten Zeit, wenn er nicht deaktiviert oder der SchlummerModus aktiviert wird. Weckruf (Source): DAB, UKW oder Buzzer-Weckton Zuletzt gehört (Last listended): Standardmäßig wird beim Weckruf der zuletzt gehörte Radio-Sender wiedergegeben. Sie können stattdessen auch einen eingespeicherten Sender wählen. Täglich (Daily): Drücken Sie < / >, um den Weckruf einzustellen auf täglich/einmalig/am Wochenende/ an Wochentagen. Lautstärke: Drücken Sie < / >, um die Lautstärke des Weckrufs einzustellen Wecker An/Aus: Wählen Sie an oder aus und drücken Sie OK auf der Fernbedienung oder SELECT auf dem Gerät, um zu bestätigen. Der Wecker ist nun gespeichert. Die Wecker-Einstellungen sind über die Taste ALARM auf der Fernbedienung schnell zu erreichen. Wenn ein Wecker eingestellt ist, wird ein Uhr-Symbol oben auf dem Display angezeigt. Es wird auch angezeigt, wenn sich das Gerät im Standby-Modus befindet. 7 Drücken und halten Sie beim Weckruf die Taste STANDBY/MODE auf dem Gerät oder auf der Fernbedienung, um den Wecker zu deaktivieren. Oder drücken Sie eine beliebige andere Taste, um in den Schlummer-Modus zu wechseln. In diesem Fall wird der Weckruf nach 5 Minuten erneut aktiviert. Diese 5 Minuten werden in einem Countdown auf dem Display angezeigt. Während des Schlummer-Modus können Sie eine beliebige Taste drücken, um die Schlummer-Zeit auf 5/10/15/30 Minuten einzustellen. Drücken und halten Sie die Taste STANDBY/MODE auf dem Gerät oder auf der Fernbedienung, um den Schlummer-Modus zu deaktivieren. Equalizer Drücken Sie < / >, um einen Equaliser-Modus auszuwählen. Zur Verfügung stehen: Normal, Classic, Jazz, Pop, Rock, Sprache, Mein EQ. Drücken Sie OK auf der Fernbedienung oder SELECT auf dem Gerät, um zu bestätigen. Bei Mein EQ (MyEQ), können Sie die Klang-Eigenschaften selbst einstellen. Die Equaliser-Einstellungen sind über die Taste EQ auf der Fernbedienung schnell zu erreichen. Hintergrundbeleuchtung Stellen Sie die Helligkeit der Hintergrundbeleuchtung und die Dauer für die automatische Abschaltung ein. Die automatische Abschaltung dimmt das Licht nach einer gewissen Zeit ohne Eingabe. Standby nach Inaktivität Dieser automatische Standby schaltet das Gerät nach der eingestellten Zeit in den in StandbyModus. Es stehen zur Verfügung: AUS/2/4/5/6 Stunden Auf Werkseinstellungen zurücksetzen (Factory Reset) Drücken Sie OK auf der Fernbedienung oder SELECT auf dem Gerät, um das Zurücksetzen zu bestätigen. Das System startet dann neu. Beachten Sie, dass dabei sämtliche Einstellungen und gespeicherten Sender gelöscht werden. SW Version Drücken Sie OK auf der Fernbedienung oder SELECT auf dem Gerät, um zu bestätigen und die Version der Firmware einzusehen. Bluetooth-Version Drücken Sie OK auf der Fernbedienung oder SELECT auf dem Gerät, um zu bestätigen und die BluetoothAdresse des Geräts einzusehen. 8 Sleep-Funktion Drücken Sie , um die Zeit der Sleep-Funktion einzustellen. Das Gerät schaltet dann nach 15/30/45/60/90 Minuten ab. DAB Das Symbol rechts oben zeigt die Stärke des DAB/DAB+ Signals. Die erste Textzeile zeigt den Namen des Senders an. Die zweite Zeile zeigt Details zum Sender an. Drücken Sie INFO, um Frequenz, Bit-Rate, Signal-Stärke, Programm-Typ oder Datum anzeigen zu lassen. Drücken Sie < / >, um den Sender zu wechseln und drücken Sie OK auf der Fernbedienung oder SELECT auf dem Gerät, um zu bestätigen. Wenn Sie den Sender neu scannen möchten, drücken Sie SCAN. Drücken und halten Sie MENU/INFO auf dem Gerät oder MENU auf der Fernbedienung, um zum DAB-Menü zu gelangen. Sie können einen vollen Scan vollziehen oder manuell die Sender suchen. 9 Im DAB-Modus gibt es zwei weitere Menüpunkte im Hauptmenü: Sender aufräumen (Prune Station): Bestätigen, um Sender zu entfernen, die gelistet aber nicht verfügbar sind. DRC/Dynamik-Bereich-Kompression: Wenn Sie in einer Umgebung mit Lärmbelastung Musik mit einem großen Dynamik-Bereich hören, kann es sinnvoll sein, diesen Bereich zu komprimieren. Das macht leise Klänge lauter und laute Klänge leiser. Die Optionen bei der Kompression sind Aus, Niedrig oder Hoch. UKW (FM) Das Symbol rechts oben zeigt die Stärke des UKW-Signals. Die erste Textzeile zeigt die Frequenz oder den Namen des Senders an. Die zweite Zeile zeigt Details zum Sender an. Drücken Sie INFO, um Signal-Stärke, Programm-Typ (nur bei RDS-Signal) oder Datum anzeigen zu lassen. Drücken Sie < / >, um die Frequenz um 0,05Mhz zu ändern. Drücken Sie SCAN, um zum nächsten UKW-Sender zu wechseln. Im UKW-Modus gibt es zwei weitere Menüpunkte im Hauptmenü: Such Einstellungen (Scan Setting): Sie können einstellen, ob alle Sender empfangen werden sollen, oder nur solche mit einem starken Signal. Audio-Einstellungen (Audio-Setting): Sie könne einstellen, ob Sie via UKW ein Mono- oder ein Stereo-Signal empfangen möchten. Senderspeicher (Preset) oder drücken und halten Sie MENU/INFO, um ins Drücken Sie im DAB- oder UKW-Modus die Taste Menü zu gehen und wählen Sie „Preset Store“. Drücken Sie < / >, um die Nummer des Senderspeichers zu wählen und drücken Sie OK auf der Fernbedienung oder SELECT auf dem Gerät, um den Sender zu speichern. Jedem Modus stehen 10 Senderspeicherplätze zu Verfügung. oder drücken und halten Sie MENU/INFO, um ins Menü zu gehen und wählen Drücken Sie die Taste Sie „Preset Recall“, um die gespeicherten Sender aufzurufen. Die Tasten 1-10 auf der Fernbedienung rufen den entsprechenden Speicherplatz direkt auf. 10 Bluetooth Drücken und halten Sie auf der Fernbedienung, um das Gerät für andere Bluetooth-Geräte sichtbar zu machen, damit beide miteinander gekoppelt werden können. Oder drücken und halten Sie MENU/ INFO, um ins Menü zu gehen und wählen Sie mit SELECT „discoverable“ (sichtbar). Sobald das Gerät ein Mal mit einem anderen Bluetooth-Gerät gekoppelt ist, werden beide Geräte sich automatisch miteinander verbinden, sobald Sie in Reichweite sind und Bluetooth eingeschaltet ist. auf der Fernbedienung oder drücken und halten Sie MENU/INFO, um ins Menü zu gehen Drücken Sie und wählen Sie „Device List“ (Geräteliste), um zu sehen, mit welchen Geräten das Radio gekoppelt ist. / / auf Die Musik-Wiedergabe vom Bluetooth-Gerät kann gesteuert werden, indem Sie der Fernbedienung drücken. Alternativ können Sie auch < / > auf dem Gerät drücken, um zum vorherigen bzw. nächsten Titel zu wechseln. Drücken Sie SELECT auf dem Gerät, um Musik abzuspielen, oder diese zu pausieren. AUX-Eingang Es ist möglich andere Audio-Geräte über ein 3.5mm-Klinke-Kabel mit dem Radio zu verbinden. Die Musik aus dem externen Gerät wird dann über das Radio wiedergegeben. Technische Eigenschaften Modell-Nr.: DAB8813BT Beschreibung DAB/DAB+/UKW-Radio mit Bluetooth Display 2 Zeilen x 16 Stellen + Symbole DAB / DAB+ Band III (174-230 MHz) UKW 87.5 – 108.0 MHz, mit RDS Netzadapter 12V / 1500mA Stromverbrauch im Standby-Modus <1W Betriebstemperatur 0°C – 35°C Anschlüsse AUX-Eingang Abmessungen 218 x 115 x 126mm Gewicht 1,6 11 Stromversorgung: 220-240V 50/60Hz Der Hersteller dieses Produktes ist die CHAL-TEC Vertriebs- + Handels GmbH, Wallstraße 16, 10179 Berlin. Konformitätserklärung Dieses Produkt entspricht den folgenden Europäischen Richtlinien: 2004/108/EG (EMV) 2006/95/EG (Niederspannung) 2011/65/EG (RoHS) Elektroaltgeräte Befindet sich die obige Abbildung (durchgestrichene Mülltonne auf Rädern) auf dem Produkt, gilt die Europäische Richtlinie 2002/96/EG. Diese Produkte dürfen nicht mit dem normalen Hausmüll entsorgt werden. Informieren Sie sich über die örtlichen Regelungen zur getrennten Sammlung elektrischer und elektronischer Gerätschaften. Richten Sie sich nach den örtlichen Regelungen und entsorgen Sie Altgeräte nicht über den Hausmüll. Durch die regelkonforme Entsorgung der Altgeräte werden Umwelt und die Gesundheit ihrer Mitmenschen vor möglichen negativen Konsequenzen geschützt. Materialrecycling hilft, den Verbrauch von Rohstoffen zu verringern. CHAL-TEC Vertriebs- + Handels GmbH; Wallstraße 16; 10179 Berlin, Germany 12 User Manual Thank you very much for buying the DAB8813BT. DABSTEP In order to let you freely operate the product and fully enjoy the overbalancing happiness it brings you, we have introduced each function of the player in detail in this user manual. Please carefully read this user manual before use and keep for future reference. Safety Precautions Do not drop the DAB8813BT DABSTEP and do not expose it to liquid, moisture or humidity. These might lead to damage to the device. If the DAB8813BT DABSTEP is moved from a cold environment into a warmer one, do let it adapt to the new temperature before operate the device. Otherwise, it might lead to condensation and cause malfunctions in the device. Do not use the DAB8813BT DABSTEP in the dust environment as dust can damage the interior electronic components and lead to malfunctions in the device. Protect the DAB8813BT DABSTEP from strong vibrations and place it on stable surfaces. Do not attempt to disassembly the DAB8813BT. DABSTEP. Only use the power adaptor delivered with the DAB8813BT. DABSTEP. Never touch the power plug with wet hands and never pull on the power cable when pulling the plug out of the power socket. 13 DABSTEP and Make sure the electrical voltage specified on the DAB8813BT its power plug is corresponding to the voltage of the power socket. Incorrect voltage will destroy the device. If the DAB8813BT DABSTEP is not using for a long period of time, disconnect it from the power supply by unplugging the power plug. This is to avoid the risk of fire. Always power off the DAB8813BT DABSTEP when cleaning it. Never use any harsh or strong solvents to clean the DAB8813BT DABSTEP since these may damage the surface of the device. Dry, soft cloth DABSTEP is extremely dirty, it is appropriate; however, if the DAB8813BT may be wiped off with a slightly moist cloth. Make sure the device is dried off after cleaning. When you are necessary to ship the DAB8813BT, DABSTEP store it in its original package. Save the package for this purpose. If you have to dispose the device in the future, note that it should not be disposed with household waste. Bring it to a reception point for the recycling of electrical devices. Consult your local authority or retailer for recycling advice. Appearance and Key Descriptions 1 2 3 14 retailer for recycling advice. the recycling of electrical devices. Consult your local authority or retailer for recycling advice. Appearance and Key Descriptions Appearance and Key Descriptions 1 2 1 2 3 3 4 6 4 6 5 7 7 5 8 No. Description Functions 1 LCD dot matrix screen Display 2 Remote control interface IR signal receiver 3 Knob Basic control of operation 4 Antenna Enhance DAB/FM reception 5 AUX IN 3.5mm jack for audio in 6 ON/ OFF switch Power on/off control 15 No. Description Functions 1 LCD dot matrix screen Display 2 3 4 Remote control interface Knob Antenna IR signal receiver Basic control of operation Enhance DAB/FM reception 5 6 7 AUX IN ON/ OFF switch DC IN 3.5mm jack for audio in Power on/off control Power Supply 8 Button Basic control of operation Remote Controller Remember to pull out the clear plastic tab from the battery compartment before using the remote. To remove the battery from the remote, use your thumb to press and pull it out. Replace it with aRisk CR2025 type 3V of battery, Caution: of explosion batterytaking is care to insert with thetype. positive (+) side replaced by an itincorrect up. Dispose of used batteries according to the instructions. Caution: Risk of explosion of battery is replaced by an incorrect type. Dispose of used batteries according to the instructions. Getting Started The packaging box contains the following items: DAB8813BT DABSTEP Getting Started Remote Control Power adaptor The packaging box contains the following items: User Manual DAB8813BT Remote Control DABSTEP and plug Connect the power adaptor to the back of the DAB8813BT Power adaptor DABSTEP. into power socket. Switch it on at the back of the DAB8813BT. User Manual Connect the power adaptor to the back of the DAB8813BT and plug into power socket. Switch it on at the back of the DAB8813BT. When it is the first time running the device, the radio will enter DAB mode and automatically scan the DAB/DAB+ stations. 16 When it is the first time running the device, the radio will enter DAB mode and automatically scan the DAB/DAB+ stations. When it is the first time running the device, the radio will enter DAB mode and automatically scan the DAB/DAB+ stations. Press and hold STANDBY/MODE on the unit or on the remote control to enter standby mode. The time, date and any Press hold STANDBY/MODE on the unit the have activeand alarm icon display on the screen. If theortime andondate remote control to enter standby mode. The time, date and any not set, the display shows 00:00 00-00-0000. active alarm icon display on the screen. If the time and date have not set, the display shows 00:00 00-00-0000. During standby mode, press and hold STANDBY/MODE on the unit or on the remote control to turn the radio to operation During standby mode, press and hold STANDBY/MODE on the unit mode. or on the remote control to turn the radio to operation mode. DAB8813BT Functions DAB8813BT Functions Press STANDBY/MODE on the unit or on the remote control to swap among the modes below: Press STANDBY/MODE unit or DAB FM Bluetoothonthe Aux-in swap among the modes below: on the remote control to DAB FM Bluetooth Aux-in Rotate the reel or press / on the remote control to adjust volume. Press on the remote control to mute the sound, press Rotate reel or press on the remote control to adjust it againthe to resume the sound. / volume. Press on the remote control to mute the sound, press it again to resume the sound. Main Menu and Settings At any operation modes, you press and hold MENU/INFO on the unit or press on the remote control to do configurations. Press to choose the submenu and then press contorl or press SELECT on the unit to confirm. / on the remote Time setup Set Time/date: Press Press / to set the hour unit. on the remote contorl or press SELECT on the unit to confirm and move to minute unit. Press / to adjust the minute, then press on the remote contorl or press SELECT on the unit to end the clock setting and move to date settings. Press / to set the day unit. Press on the remote contorl or press SELECT on the unit to confirm and move to set the month unit. Press / to adjust, press on the remote contorl or press SELECT on the unit to 17 to choose the submenu and then press contorl or press SELECT on the unit to confirm. on the remote Time setup Set Time/date: Press Press / to set the hour unit. on the remote contorl or press SELECT on the unit to / to adjust confirm and move to minute unit. Press on the remote contorl or press the minute, then press SELECT on the unit to end the clock setting and move to date settings. / to set the day unit. Press on the Press remote contorl or press SELECT on the unit to confirm and move / to adjust, press to set the month unit. Press on the remote contorl or press SELECT on the unit to / to confirm and move to set the year unit. Press on the remote contorl or press adjust the year, then press SELECT on the unit to end the date setting. Auto update: Choose updating time and date from DAB or FM on the remote contorl or press SELECT or any radio, press on the unit to confirm, the radio will automatically update the current time when receiving a DAB station or FM station with RDS. If the power supply is removed and replugged, the time and date reset to default (00:00 / 00-00-0000) so that you may manually set it again. It is recommended to set auto update. Then you have not to set the time again even replugged power supply, the clock updates immediately once the unit receive station of DAB/FM with RDS. Alternatively, you may set to be no time update from the radio. Set 12/24 hour: Change the display of time in 12-hour mode on the remote contorl or press or 24-hour mode. Press SELECT on the unit to confirm setting. Set date format: Change the date format to MM-DD-YYYY or DD-MM-YYYY. Press on the remote contorl or press SELECT on the unit to confirm setting. 18 Alarms or 24-hour mode. Press on the remote contorl or press SELECT on the unit to: confirm Set date format Change setting. the date format to MM-DD-YYYY or DD-MM-YYYY. Press on the remote contorl or press SELECT Set date format : Change on the unit to confirm setting. the date format to MM-DD-YYYY or DD-MM-YYYY. Press on the remote contorl or press SELECT on the unit to confirm setting. Alarms Alarms There are two alarms avaible. Note that you must setup the clock or the clock is auto updated before you can set the alarm(s). Press / to choose which alarm you setup. Press on the remote contorl or press SELECT on the unit to enter the detail settings. On Time: Change the alarm time, the setting way is the same / to adjust, and press as the clock setting. Press on the remote contorl or press SELECT on the unit to confirm and move to the next item. Duration: Set the time limit of the alarm, 15/30/45/60/90 minutes. The alarm will automatically stop in the set time if no turning off or snoozing. Source: DAB, FM or buzzer alarm. Last Listened: It is default to turn on last listened station if you choose DAB or FM alarm. You may also set it to be your saved preset station. Daily: Press / to change the alarm to Daily/Once/Weekends/Weekdays. 19 choose DAB or FM alarm. You may also set it to be your saved preset station. Daily: Press / to change the alarm to Daily/Once/Weekends/Weekdays. Volume: Adjustion the alarm volume bar by pressing / . Alarm On/Off: Choose On/Off and press on the remote contorl or press SELECT on the unit to confirm. The alarm wil be saved then. Shortcut for alarm setting is on the remote control. When the alarm(s) is/are set and saved, there will be a clock icon at the top of the display. The clock icon will also clearly display on the standby mode screen. to During alarm, press and hold STANDBY/MODE or press stop the alarm. Or you may press any key on the unit or any key on the remote control (except keys STANDBY/MODE and ) to enter snooze mode. It alarms again in 5 minutes after entered snooze mode. It will show the 5-minute count down on the display. In the snooze mode, you may set the snooze time to 5/10/15/30 minutes by pressing any key on the unit or any key on the remote control (except keys STANDBY/MODE and ) . To turn snooze off, simple press and hold or press . Equaliser Press / to choose EQ - Normal, Classic, Jazz, Pop, Rock, Speech, My EQ and press on the remote contorl or press SELECT on the unit to confirm. Under My EQ, you can adjust the treble and bass, and turn on/off loudness to the optimised sound performance you like. Shortcut for EQ setting is to press on the remote control. 20 Rock, Speech, My EQ and press press SELECT on the unit to confirm. on the remote contorl or Under My EQ, you can adjust the treble and bass, and turn on/off loudness to the optimised sound performance you like. Shortcut for EQ setting is to press on the remote control. Backlight Set the backlights of On level and Dim level, and the duration of timeout (On/10/20/30/45/60/90/120/180 sec). With set timeout, the backlight will automatically change from on level to dim level when no one controls the radio. Inactive Standby When set the inactive standby mode, off/2/4/5/6 hour, the radio will turn off the radio function in the set time. Factory Reset Press on the remote contorl or press SELECT on the unit to confirm factory reset. The system will then restart. Note that the settings, stored preset stations will be removed after factory reset. SW version Press on the remote contorl or press SELECT on the unit to view the version of firmware of the system. BD address Press on the remote contorl or press SELECT on the unit to view the Bluetooth address of the unit. 21 view the version of firmware of the system. BD address Press on the remote contorl or press SELECT on the unit to view the Bluetooth address of the unit. Sleep Press minutes. to turn off or set the sleep time of 15/30/45/60/90 DAB The icon on the top right corner of the display shows the strength of the DAB/DAB+ signal. The first row of the text is the name of DAB station. The second row is the details of the station, press to veiw the frequency, bit rate, signal strength and the programme type of the station and today’s date. / to change the stations and press Press the remote contorl or press SELECT on the unit to confirm. If you want to rescan the station, press on . 22 Press and hold MENU/INFO on the unit or press on the remote control to enter the DAB menu. You can do Full scan or Manual tune. of the FM signal. The first row of the text is the frequency or the name of FM station. In DAB mode, there are two more items in the main menu: The second row is:the details of the the station, pressthat are listed tobut Prune Station Enter to remove stations view the signal strength and the programme type of the FM RDS not available. station and today’s date. Press : If you/are listeningto withdynamic 0.05HMz perin a DRC to make music tuning with a high range step. noisy environment, you may wish to compress the audio dynamic Press scan on the remote control goloud to next FMquieter. station. range. This make quiet sounds louder,toand sounds In FM mode, are off, twolow more items in the main menu: You can then there turn DRC or high. Scan setting: You can set to receive the strong stations only, or all stations FM Audio setting: You can set to receive the stereo or mono FM signal. The icon on the top right corner of the display shows the strength Preset 23 In DAB or FM mode, press and hold or press and hold MENU/INFO to go to menu, then choose ‘Preset store’ to save the station. Press / to select the number and on the remote control or press SELECT then press on the unit to store station. There are 10 presets for each mode. Press or press and hold MENU/INFO to go to menu, then choose ‘Preset recall’ to recall the stored preset station. Shortcut of 1-10 on the remote control can recall the preset station by pressing numbers 1-10 directly. Bluetooth Press and hold on the remote control on the device to make the unit ‘discoverable’ for pairing with other Bluetooth devices. Or press and hold MENU/INFO to go to menu, then choose and press SELECT ‘discoverable’ for pairing with other Bluetooth devices. DABSTEP has connected to the device via Bluetooth, Once DAB8813BT it will automatically reconnect to these devices next time 24 they are in range. And have their Bluetooth function switched on. on the remote control or press and hold Press MENU/INFO to go to menu, then choose ‘Device list’ to view the paired Bluetooth device list. Music playback from the Bluetooth device can be adjusted by pressing / control or pressing / on the DAB8813BT DABSTEP remote / on the device to previous track or next track and pressing SELEC on the devce to play/pause. Aux in It is possible to connect other audio device and DAB8813BT using a 3.5mm audio cable for playback of the music from the other audio device via the DAB8813BT DABSTEP unit. 25 Troubleshooting Error Remedy The device does not switch on or turned off suddenly. 1. Check if the power adaptor is connected properly. 2. The device may malfunction when used in areas with strong radio interference. The device will work properly again once there is no more interference. 3. The normal function of the product may be disturbed by strong Electro-Magnetic Interference. If so, simply reset the product to resume normal operation by following the instruction manual. In case the function could not resume, please use the product in other location. No sound. 1. Turn on the sound as it may be muted. 2. Increase the volume. 3. (AUX-in mode) Check if the audio cable connected properly and the volume of the source is large enough. No signal or hiss in DAB 1. Check/move the antenna. Also try to or FM mode. adjust the length of antenna. 2. Move the radio to other location. Alarm does not work. 1. Switch on the alarm. 26 2. Due to the volume setting, refer to the solutions of “No sound”. 3. The source of alarm was set to be station but there is no network connection. Change the source of alarm or reconfigure the connection. Remote control does not 1. Check if any obstacle between the work well. remote control and the receiver. 2. Low battery of the remote control, change the battery. 27 Specifications Model number Description Specifications Display FM Model number DAB/DAB+ Description Power adaptor Display Connections FM DAB/DAB+ Standby mode power Power adaptor consumption DAB8813BT DAB/DAB+ and FM Radio with Bluetooth 2 line x 16 characters + icons 87.5 – 108.0 MHz, RDS supported DAB8813BT DABSTEP 174 – 230 MHz (Band III) DAB/DAB+ and FM Radio with Bluetooth 12V1.5A 2 line x 16 characters + icons DC IN (power supply) 87.5 – 108.0 MHz, RDS supported AUX IN (3.5mm jack) 174 – 230 MHz (Band III) <1W 12V1.5A Connections Operating temperature Dimensions Standby Weight mode power consumption Operating temperature Dimensions oC DC (power supply) 0 oCIN- 35 AUX IN (3.5mm jack) x 126mm(D) 218mm(L) x 115mm(H) <1W 1.6kg Weight 1.6kg 0 oC - 35 oC 218mm(L) x 115mm(H) x 126mm(D) CHAL-TEC Vertriebs- + Handels GmbH; Wallstraße 16; 10179 Berlin, Germany 28