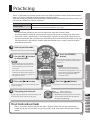
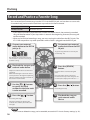
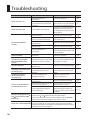
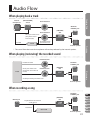
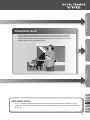
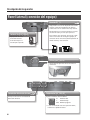
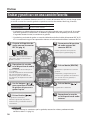
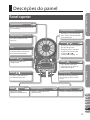
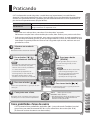
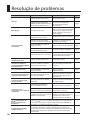
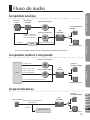
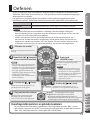
1
English
Deutsch
Français
Italiano
Español
Português
Nederlands
*
5
1
0
0
0
2
9
5
2
7
-
0
1
*
For the U.K.
IMPORTANT: THE WIRES IN THIS MAINS LEAD ARE COLOURED IN ACCORDANCE WITH THE FOLLOWING CODE.
BLUE:
NEUTRAL
BROWN: LIVE
As the colours of the wires in the mains lead of this apparatus may not correspond with the coloured markings identifying
the terminals in your plug, proceed as follows:
The wire which is coloured BLUE must be connected to the terminal which is marked with the letter N or coloured BLACK.
The wire which is coloured BROWN must be connected to the terminal which is marked with the letter L or coloured RED.
Under no circumstances must either of the above wires be connected to the earth terminal of a three pin plug.
For EU Countries
This product complies with the requirements of EMC Directive 2004/108/EC.
FEDERAL COMMUNICATIONS COMMISSION
RADIO FREQUENCY INTERFERENCE STATEMENT
For the USA
This equipment has been tested and found to comply with the limits for a Class B digital device, pursuant to Part 15 of the
FCC Rules. These limits are designed to provide reasonable protection against harmful interference in a residential
installation. This equipment generates, uses, and can radiate radio frequency energy and, if not installed and used in
accordance with the instructions, may cause harmful interference to radio communications. However, there is no guarantee
that interference will not occur in a particular installation. If this equipment does cause harmful interference to radio or
television reception, which can be determined by turning the equipment off and on, the user is encouraged to try to correct the
interference by one or more of the following measures:
– Reorient or relocate the receiving antenna.
– Increase the separation between the equipment and receiver.
– Connect the equipment into an outlet on a circuit different from that to which the receiver is connected.
– Consult the dealer or an experienced radio/TV technician for help.
This device complies with Part 15 of the FCC Rules. Operation is subject to the following two conditions:
(1) this device may not cause harmful interference, and
(2) this device must accept any interference received, including interference that may cause undesired operation.
This equipment requires shielded interface cables in order to meet FCC class B limit.
Any unauthorized changes or modifications not expressly approved by the party responsible for compliance could void the user’s
authority to operate the equipment.
For Canada
NOTICE
This Class B digital apparatus meets all requirements of the Canadian Interference-Causing Equipment Regulations.
AVIS
Cet appareil numérique de la classe B respecte toutes les exigences du Règlement sur le matériel brouilleur du Canada.
WARNING
For C.A. US (Proposition 65)
This product contains chemicals known to cause cancer, birth defects and other reproductive harm, including lead.
ENG
DEU
FRA
ITA
ESL
POR
NLD
Look What You Can Do!
The VT-12 is the ideal tool for improving your vocal skills.
You can use the VT-12 anytime and anywhere—by yourself or in a group, at home or in the studio.
Checking Your Pitch
The VT-12 can detect the pitch not only of a single voice, but also of two voices!
When singing harmony with another person, you can use it to check that
you’re both singing the correct pitches.
As a Metronome
The VT-12 can provide a guide tone to help you keep the correct tempo when
you’re singing alone, or when practicing a cappella or with a vocal group.
2
Checking Pitch
Vocal Training
The VT-12 provides an effective way to warm up or to practice vocal exercises.
You can use the built-in tracks to practice vocalizing before a choral or live
performance, or use it to polish your vocal technique and expression.
Practicing
Metronome
ENG
DEU
What are tracks?
FRA
ITA
The VT-12 contains built-in tracks that you can use when practicing (warming up or
exercising). In addition to the built-in tracks, you can also record your own favorite songs
(p. 14).
ESL
POR
NLD
3
Contents
Look What You Can Do!. . . . . . . . . . . . . . . . . . . . . . . . . . . . 2
Panel Descriptions. . . . . . . . . . . . . . . . . . . . . . . . . . . . . . . . 5
Top Panel. . . . . . . . . . . . . . . . . . . . . . . . . . . . . . . . . . . . . . . 5
Side Panel (Connecting Your Equipment). . . . . . . . . 6
Before You Use the VT-12. . . . . . . . . . . . . . . . . . . . . . . . . . 8
Installing the Batteries. . . . . . . . . . . . . . . . . . . . . . . . . . . 8
Turning the Power On. . . . . . . . . . . . . . . . . . . . . . . . . . . 9
Using the DoReMi Sheet. . . . . . . . . . . . . . . . . . . . . . . . . 9
Tips for Using the VT-12 . . . . . . . . . . . . . . . . . . . . . . . . 10
Using the Stand. . . . . . . . . . . . . . . . . . . . . . . . . . 10
Checking the Pitch. . . . . . . . . . . . . . . . . . . . . . . . . . . . . . . 11
Practicing . . . . . . . . . . . . . . . . . . . . . . . . . . . . . . . . . . . . . . . 13
Record and Practice a Favorite Song . . . . . . . . . . . . 14
Using the Metronome. . . . . . . . . . . . . . . . . . . . . . . . . . . . 15
Troubleshooting. . . . . . . . . . . . . . . . . . . . . . . . . . . . . . . . . 16
Audio Flow. . . . . . . . . . . . . . . . . . . . . . . . . . . . . . . . . . . . . . 17
Main Specifications . . . . . . . . . . . . . . . . . . . . . . . . . . . . . . 18
USING THE UNIT SAFELY. . . . . . . . . . . . . . . . . . . . . . . . . . 19
IMPORTANT NOTES . . . . . . . . . . . . . . . . . . . . . . . . . . . . . . 22
Before using this unit, carefully read the sections entitled: “USING THE UNIT SAFELY” (p. 19) and “IMPORTANT NOTES”
(p. 22). These sections provide important information concerning the proper operation of the unit. Additionally, in
order to feel assured that you have gained a good grasp of every feature provided by your new unit, Owner’s manual
should be read in its entirety. The manual should be saved and kept on hand as a convenient reference.
Copyright © 2012 ROLAND CORPORATION
All rights reserved. No part of this publication may be reproduced in any form without the written permission of
ROLAND CORPORATION.
Roland is a registered trademark of Roland Corporation in the United States and/or other countries.
4
Panel Descriptions
Pitch indicator
Checking Pitch
Top Panel
p. 11
This shows the pitch or inaccuracy in
your vocalization.
Internal speaker
The guide tone, metronome
sound, and tracks are played
from this speaker.
Internal microphone
Use this to check your voice or
to record your voice.
[ ] [ ] buttons
p. 11
Use these to select the guide
tone that you want to hear.
This shows information such as
the selected track number or the
metronome tempo.
You can change the reference
pitch by pressing the [ ] button
and [ ] button simultaneously
(p. 12).
[
][
Practicing
Display
] buttons
[
Use these to modify settings.
] button
p. 11
Turns the guide tone on/off.
The guide tone is sounded at
equal-tempered pitches.
[REVIEW] button
] button
Plays back the recorded sound so
you can check how you did.
Use this to play/stop the
metronome or track.
[
] button
p. 15
Selects Metronome mode.
Metronome
[
[WARM-UP] button
Selects Warm-up mode.
p. 13
[EXERCISE] button
p. 13
Selects Exercise mode.
ENG
DEU
FRA
ITA
ESL
POR
NLD
5
Panel Descriptions
Side Panel (Connecting Your Equipment)
REC IN jack
p. 14
An external audio device, such as an
audio player or radio/cassette player, can be
connected here using a cable with a stereo
mini plug.
OUTPUT/PHONES jack
You can record your favorite songs via this
jack and use them when practicing.
Separately sold
headphones or an external
speaker can be connected
here.
To make this connection, connect a cable
between the output jack (e.g., headphone
jack) of your external audio device and this
jack.
Strap hole
A commercially available strap can be
attached here.
Pitch detection switch
This selects the pitch detection
method.
p. 11
[MIC VOLUME] switch
This adjusts the microphone volume.
H: High volume
L:
Low volume
OFF: Monitor off
* If this switch is in the “OFF” position, the pitch
cannot be detected.
6
Panel Descriptions
Checking Pitch
[POWER] button
p. 9
Hold down this button to turn the
power on/off.
[VOLUME] dial
This adjusts the volume of the
internal speaker or headphones.
Practicing
DC IN jack
Connect the AC adaptor (PSB-6U; sold
separately) here.
* Use only the specified AC adaptor
(PSB-6U), and connect it to an AC outlet
of the correct voltage. Do not use any
other AC adaptor, since this may cause
malfunction.
Place the AC adaptor so the side with
the indicator (see illustration) faces
upwards and the side with textual
information faces downwards.
The indicator will light when you plug
the AC adaptor into an AC outlet.
Metronome
Caution when making connections
ENG
• To prevent malfunction and equipment failure, always turn down the volume, and turn off all the units
before making any connections.
DEU
• If you’re using an external speaker, feedback (a whine or howl) can occur depending on the position of the
external speaker relative to the internal microphone. If this occurs, take the following steps.
1. Changing the orientation of the internal microphone.
2. Relocating internal microphone at a greater distance from external speakers.
3. Lowering volume levels.
4. Set the [MIC VOLUME] switch to the “OFF” position.
FRA
ITA
ESL
POR
NLD
7
Before You Use the VT-12
Installing the Batteries
Insert the batteries (two AA batteries) as shown in the illustration, taking care to observe the
correct polarity.
Cautions when using batteries
• As the batteries run low, the display will indicate
.” When this occurs, please install fresh batteries.
“
• If used improperly, batteries may explode or leak
and cause damage or injury. In the interest of safety,
please read and observe the following precautions.
• Carefully follow the installation instructions for
batteries, and make sure you observe the correct
polarity.
• Avoid using new batteries together with used
ones. In addition, avoid mixing different types of
batteries.
• When using rechargeable batteries and a charger,
use only the combination of rechargeable batteries
and charger specified by the battery manufacturer.
• If operating this unit on batteries, please use
alkaline batteries or rechargeable Ni-MH batteries.
• Remove the batteries whenever the unit is to
remain unused for an extended period of time.
• If operating this unit on batteries, please disconnect
the AC adaptor from this unit.
• Never keep batteries together with metallic
objects such as ballpoint pens, necklaces,
hairpins, etc.
• Even if batteries are installed, the unit will turn off
if you connect or disconnect the power cord from
the AC outlet while the unit is turned on, or if you
connect or disconnect the AC adaptor from the unit.
• Used batteries must be disposed of in compliance
with whatever regulations for their safe disposal
that may be observed in the region in which you
live.
8
• Incorrect handling of batteries, rechargeable
batteries, or a battery charger can cause leakage,
overheating, fire, or explosion. Before use, you must
read and strictly observe all of the precautions that
accompany the batteries, rechargeable batteries, or
battery charger.
• Expected battery life under continuous use:
Alkaline: 6 hours
* These figures will vary depending on the
specifications of the batteries and the actual
conditions of use.
Before You Use the VT-12
* Once everything is properly connected (p. 6), be sure to follow the procedure below to turn on
their power.
1
Hold down the [POWER] button until the
power turns on.
Practicing
2
Set the [VOLUME] dial to the minimum
position.
Checking Pitch
Turning the Power On
Cautions about the power
Metronome
• Power to this unit will be turned off automatically after 30 minutes have passed without any of its
buttons being pressed (including time that metronome is sounding), or 30 minutes have passed since
playback of a track has stopped.
• Before turning the unit on/off, always be sure to turn the volume down. Even with the volume turned down,
you might hear some sound when switching the unit on/off. However, this is normal and does not indicate a
malfunction.
• This unit is equipped with a protection circuit. A brief interval (a few seconds) after turning the unit on is
required before it will operate normally.
Using the DoReMi Sheet
By affixing the included DoReMi sheet to the pitch indicator, you can use the DoReMi indications
to check the names of the notes.
If you want to check the names of the notes when using movable “Do” solfege, affix the DoReMi
sheet with “Do” positioned at the note name of the tonic you’re using.
ENG
DEU
FRA
ITA
ESL
DoReMi sheet
* Before using the DoReMi sheet, be sure to remove the backing paper and the blue protective
sheet.
POR
NLD
9
Before You Use the VT-12
Tips for Using the VT-12
Hold the VT-12 in your hand and sing in the posture shown by the illustration.
Use headphones if you want to check the accuracy of your pitch while playing a track or the
metronome.
Using headphones will make pitch detection more accurate. It will also make it easier for you to
hear the recorded sound.
Use headphones
About 30 cm
(12 inches) away
Keep your back straight
MEMO
Should you encounter any of the situations described below, check the setting of the [MIC
VOLUME] switch (p. 6).
• Pitch indicator is unresponsive, or does not respond as it should.
• Volume of sound from the microphone is low.
Using the Stand
You can use the stand to keep the VT-12 upright.
When using the VT-12 with a group, the stand provides a convenient way to place the VT-12
upright on a desk or table.
When doing so, you should keep the VT-12 about 1 m (40 inches) away from the singers.
10
* To return the stand to its original position, fold it inward until it clicks into position.
Checking the Pitch
1
Select the type of pitch detection.
MONO EQUAL: One voice will be detected using
equal temperament.
CHORD EQUAL: Two voices will be detected using
equal temperament.
CHORD JUST: Two voices will be detected using
just intonation (major).
Checking Pitch
You’ll probably want to begin by checking your pitch.
The VT-12 is able to check the pitch of not just one, but two voices simultaneously.
This makes it convenient for checking the pitch of two people singing harmony.
MEMO
The key for just intonation is determined by the lower pitch.
If the VT-12 is sounding a guide tone, the key is determined by the
guide tone. If a guide tone is being sounded, only one voice can be
detected.
Press the [
Practicing
2
] button.
Before you start vocalizing, sound the guide tone (equal tempered) to
hear the correct pitch.
MEMO
You can use the [ ] button and [ ] button to change the guide
tone.
3
Vocalize, and check your pitch.
Vocalize the pitch that you intend to match.
Metronome
The note name that is closest to the detected pitch will light.
Gets brighter as the discrepancy in pitch grows smaller; gets dimmer if
the pitch discrepancy increases.
If a guide tone is sounding, the note name of the guide tone will also
light.
Indicates the amount of pitch discrepancy.
Lit:
Unlit:
Pitch is flat
MONO EQUAL
Pitch is correct
ENG
Pitch is sharp
CHORD EQUAL
* If the pitch indicator does not
respond even when you are
vocalizing, check the setting of
the [MIC VOLUME] switch (p. 6).
CHORD JUST
DEU
The high note is flat
relative to the low note
The pitch interval
between the two notes is
correct
The high note is sharp
relative to the low note
FRA
ITA
ESL
POR
NLD
11
Checking the Pitch
Changing the reference pitch
1. Press the [
] button and [ ] button simultaneously.
The display will indicate the current reference pitch.
2. Use the [
][
] buttons to specify the desired reference pitch.
Range: 415–465 Hz (default value: 440 Hz)
* If you do nothing for a predetermined amount of time, the indication of the reference pitch
will disappear, and the unit will automatically return to the pitch checking mode.
3. Press the [
] button and [ ] button simultaneously.
The indication of the reference pitch will disappear, and the unit will automatically return to the
pitch checking mode.
* During the playback of Preset tracks, the reference pitch is fixed at 440 Hz.
What is just intonation?
Just intonation is a method of tuning that ensures pure fifth and third intervals.
If you select just intonation, you’ll need to specify the tonic (for a major scale this will be C)
that’s appropriate for the key of your song.
The VT-12 will assign the lower of two voices as the tonic.
If a guide tone is sounding, the guide tone will be the tonic.
About pitches in just intonation
The VT-12 can detect just intonation pitches only in a major key.
If the guide tone is C, the pitches are calculated using the following ratios.
Equal temperament (cent)
C#
D
D#
E
F
0
100
200
300
400
500
Just intonation (cent)
0
71
204
316
386
498
Ratio
1
25/24
9/8
6/5
5/4
4/3
Equal temperament (cent)
Just intonation (cent)
Ratio
12
C
F#
G
G#
A
A#
B
600
700
800
900
1000
1100
569
702
773
884
1018
1088
25/18
3/2
25/16
5/3
9/5
15/8
Practicing
Warm-up mode
Exercise mode
This contains tracks for vocalization practice that will warm up your voice.
This contains tracks for improving your vocal technique, such as enhancing your
breathing control and broadening your vocal range.
Checking Pitch
The VT-12 provides two practice modes: Warm-up mode and Exercise mode. Each mode contains
tracks (p. 3) that are ideal for the corresponding type of practice.
Since the sound you produce while practicing is automatically recorded to the relevant tracks, you
can listen to it afterwards (Review function).
MEMO
For more about practicing, you can also refer to the separate “Practice Guide.”
It provides helpful advice on vocalizing and singing, and tips for practicing with each track.
* Each time a track is played back, a new recording is started. If you play back a track that was
previously recorded, the sound that was recorded on that track will be overwritten. If you stop
the playback of a track within 3 seconds after the moment it was started, sound will not be
recorded on that track.
Select a practice mode.
Practicing
1
The button of the selected mode will light.
2
6
Use the [ ] [ ] buttons
to select a track.
The recorded sound will begin playing.
If nothing is recorded, the display will
indicate “---.”
Press the [
] button.
The track will play back, and recording of the
sound will begin.
4
Sing along with the track.
As you sing, pay attention to your own pitch and
to the pitches of the track that’s playing.
MEMO
Depending on the track you’ve
selected, you may be able to turn
on/off the sounding of the vocals of
the track by pressing the [REVIEW]
button during playback of the
recorded sound.
5
Press the [
Metronome
MEMO
• By repeatedly pressing the button
for the mode you selected, you can
switch between preset tracks and
user tracks.
• If not even one user track has been
recorded, the display will indicate “U--.”
• For details on the tracks, refer to the
separate “Track List.”
3
Press the [REVIEW]
button.
] button.
Track playback and sound recording will stop.
Lit:
Pitches you sing
Blinking: Pitches of the track
* With some tracks (User tracks and certain
Preset tracks), the unit will not indicate
the pitches by blinking.
ENG
DEU
FRA
ITA
Preset tracks and user tracks
ESL
The VT-12 contains built-in preset tracks (001–) for each mode. You can also record tracks
via the REC IN jack and use them as user tracks (U01–U10). (User tracks are common to both
modes.)
POR
NLD
13
Practicing
Record and Practice a Favorite Song
You can record your favorite songs into the VT-12 via the REC IN jack, and use them as user tracks.
A recorded song can be used in both Warm-up mode and in Exercise mode.
Track length
Maximum 10 minutes (per track)
Number of tracks
Maximum 10 tracks
* If you select a previously recorded track number and record into it, the previously recorded
song will be overwritten. If you stop within 3 seconds after beginning to record, the song will
not be recorded.
* When you’ve finished recording a song, you must unplug the cable from the REC IN jack. The
VT-12 will not perform any other operations while a cable is plugged into the REC IN jack.
1
Connect your external
audio device to the REC IN
jack (p. 6).
8
Disconnect your external
audio device from the REC
IN jack.
Try practicing with the user track you
recorded (p. 14).
The display will alternately indicate
“rEc” and “U**”; the VT-12 is ready to
record the song.
2
Play back the song on your
external audio device.
Adjust the volume of the sound to be
captured.
While monitoring the sound on the internal speaker or through headphones,
adjust its volume using the controls on
the external audio device.
3
4
Use the [ ] [ ] buttons
to specify the track
number at which the track
is to be recorded.
Press the [
] button.
Recording will begin.
During recording, the display will
indicate “rEc” and the pitch indicator
will light.
7
Press the [REVIEW]
button.
Playback of the recorded song will
start.
Check to make sure the song was
recorded correctly. If the song was not
recorded, the display will indicate “---.”
6
Press the [
] button.
Recording will stop.
5
Play back the song on
your external audio
device.
MEMO
If you want to delete the songs you’ve recorded, restore the VT-12 to its factory settings (p. 23).
14
Using the Metronome
You may want to practice by singing at the tempo of the metronome.
* A new recording will start each time you sound the metronome. The previously made
recording will be overwritten. If you stop the metronome within 3 seconds, the sound will not
be recorded.
* A maximum of 10 minutes can be recorded in metronome mode. When 10 minutes have been
exceeded, recording will stop. The metronome will continue sounding even after recording
stops.
Checking Pitch
The sound is automatically recorded while the metronome is playing, so you’ll be able to listen to
yourself afterward (the Review function).
* You cannot set the time signature.
1
Press the [
] button.
2
Use the [ ] [ ] buttons
to adjust the tempo.
Range: 30–250
3
Press the [
] button.
The metronome will begin playing, and
recording of the sound will begin.
The [ ] button will blink in time with the
tempo.
6
Press the [REVIEW]
button.
The recorded sound will start playing.
Playback will stop when you press the
] button.
[
5
Press the [
] button.
Metronome
MEMO
You can also set the tempo by
tapping the [ ] button at the
desired timing (the Tap Tempo
function).
Practicing
The VT-12 will enter Metronome mode.
The display will indicate the current
tempo value.
The metronome and sound recording
will stop.
MEMO
You can also play the metronome while a
guide tone (p. 11) is sounded.
ENG
DEU
4
Sing in time with the metronome.
As you sing, be aware of the pitches you’re singing.
FRA
Lit: Guide tone and pitch you’re
singing
ITA
ESL
POR
NLD
15
Troubleshooting
Problem
Items to check
Power won’t turn on
Could the batteries be
exhausted?
Is the specified AC adaptor (PSB6U; sold separately) connected
correctly?
Power won’t turn off
No sound/Insufficient
volume
Insufficient volume from the
internal speaker
The volume level of the
instrument connected to
OUTPUT/PHONES jack is
too low.
Is “Err” shown in the display?
Are connections with other
devices correct?
Could the volume of a connected
external speaker be lowered?
Is the [VOLUME] dial set
appropriately?
Is the [MIC VOLUME] switch set
appropriately?
During track playback, the
and pitch indicators light
frequently.
Install fresh batteries.
Check the connection once
again. Never use any AC adaptor
other than the specified model.
First, make sure that all tracks are
stopped and all song captures
are complete; then, you can turn
off the power.
Check the connections again.
Check the settings of the
connected device.
p. 8
p. 7
–
p. 6
–
p. 7
Select the appropriate setting.
p. 6
Could headphones be
connected?
Could the batteries be
exhausted?
Install fresh batteries.
Could you be using a connection Use a connection cable that does
cable that contains a resistor?
not contain a resistor.
–
p. 8
–
Adjust the volume appropriately.
p. 7
Recording can be carried out for
a maximum of ten minutes (per
song).
–
Adjust the volume on the
external audio device.
–
Select the appropriate setting.
Check the pitch in a location
without excessive noise.
Set it to an appropriate value.
During the playback of Preset
tracks, the reference pitch is fixed
at 440 Hz.
In order to allow for the quick check of the pitch during track
playback, the and pitch indicators will light rapidly.
If you play back what has been recorded by pressing the [REVIEW]
button, these indicators will light in the normal manner.
Power to this unit will be turned off automatically after 30 minutes
have passed without any of its buttons being pressed (including
Power turns off unexpectedly
time that metronome is sounding), or 30 minutes have passed since
playback of a track has stopped.
16
Page
Adjust the volume appropriately.
If headphones are connected, no
sound will be produced from the
internal speaker.
Is the [VOLUME] dial set
appropriately?
Could you be attempting
Recording stops while you’re
to record for more than ten
recording a song
minutes?
Insufficient volume or
Are you recording at the
distorted sound in a
appropriate volume?
recorded song
Is the [MIC VOLUME] switch set
appropriately?
Could you be trying to check the
Pitch is not detected/Unexpitch in a noisy location?
pected operation occurs
Is the setting for the reference
pitch appropriate?
Sound is distorted
Action
p. 6
–
p. 12
–
–
Audio Flow
When playing back a track
[MIC VOLUME]
switch
Checking Pitch
Internal
microphone
Pitch detection
OUTPUT/
PHONES jack
Pitch detection
[VOLUME]
dial
Vocal part of the track
(only with certain
Preset tracks)
Recorded
Track
Accompaniment
part of the track
Internal speaker
Practicing
* The sound from the internal microphone will not be produced by the internal speaker.
When playing (reviewing) the recorded sound
Pitch detection
Recorded sound
Pitch detection
[VOLUME]
dial
Metronome
Track
Vocal part of the track
(only with certain Preset
tracks)
OUTPUT/
PHONES jack
Accompaniment part of the track
Internal speaker
When recording a song
OUTPUT/
PHONES jack
REC IN jack
Playback from the external
audio device
ENG
DEU
[VOLUME]
dial
FRA
ITA
ESL
Recorded
POR
User track
Internal speaker
17
NLD
Main Specifications
Roland VT-12: Vocal Trainer
Tuner
Tuning Range
C2 (65.4 Hz)–A5 (880.0 Hz)
Tuning Accuracy
+/-1 cent
Reference Tone
Reference Pitch: A4 = 415–465 Hz (1 Hz steps)
Reference Tone Range: A3–G#5 (24 notes in the chromatic scale)
Metronome
Tempo
30–250, Accuracy: +/-0.1 %
User Track
Track Length
Maximum 10 minutes (per track)
Number of tracks
Number of tracks: Maximum 10 tracks
Input/Output
Nominal Input Level
Input Impedance
REC IN jack: 0 dBu
REC IN jack: 9.5 k ohms
Output Level
OUTPUT/PHONES jack: 15 mW + 15 mW (In case 16 ohms load)
Recommended Load Impedance 16 ohms or greater
Others
Speaker
Mono
Connectors
OUTPUT/PHONES jack (Stereo miniature phone type)
REC IN jack (Stereo miniature phone type)
DC IN jack
Display
7 segments, 3 characters (LED)
Pitch indicator
Power Supply
Alkaline battery (AA, LR6) or Rechargeable Ni-MH battery (AA, HR6) x 2,
AC adaptor (PSB-6U: sold separately)
Current Draw
380 mA
Expected battery life under
continuous use
Alkaline (AA, LR6): Approx. 6 hours
* These figures will vary depending on the specifications of the batteries
and the actual conditions of use.
Dimensions
70 (W) x 134 (D) x 28 (H) mm
2-13/16 (W) x 5-5/16 (D) x 1-1/8 (H) inches
Weight
150 g / 6 oz (including batteries)
Accessories
Alkaline battery (AA, LR6) x 2
DoReMi sheet
Owner’s manual
Practice guide
Track list
Options (sold separately)
Carrying pouch (OP-RP1)
AC adaptor (PSB-6U)
* When purchasing an AC adaptor, be sure to specify the adaptor (from
the list that follows) that is designed for the region in which it will be
used, and the voltage supplied there. (PSB6U-120/PSB6U-230EU/PSB6U230UK/PSB6U-240A) (sets containing PSB-6U and power cord).
* 0 dBu=0.775 Vrms
* In the interest of product improvement, the specifications and/or appearance of this unit are
subject to change without prior notice.
18
USING THE UNIT SAFELY
About
WARNING and
CAUTION Notices
Used for instructions intended to alert the
user to the risk of death or severe injury
should the unit be used improperly.
Used for instructions intended to alert the
user to the risk of injury or material
damage should the unit be used
improperly.
* Material damage refers to damage or
other adverse effects caused with
respect to the home and all its
furnishings, as well to domestic animals
or pets.
About the Symbols
The symbol alerts the user to important instructions or
warnings.The specific meaning of the symbol is
determined by the design contained within the triangle. In
the case of the symbol at left, it is used for general
cautions, warnings, or alerts to danger.
The symbol alerts the user to items that must never be
carried out (are forbidden). The specific thing that must
not be done is indicated by the design contained within
the circle. In the case of the symbol at left, it means that
the unit must never be disassembled.
The symbol alerts the user to things that must be
carried out. The specific thing that must be done is
indicated by the design contained within the circle. In the
case of the symbol at left, it means that the power-cord
plug must be unplugged from the outlet.
ALWAYS OBSERVE THE FOLLOWING
WARNING
WARNING
Do not disassemble or modify by yourself
Do not place in an unstable location
Do not open (or modify in any way) the
unit or its AC adaptor.
Make sure you always have the unit
placed so it is level and sure to remain
stable. Never place it on stands that
could wobble, or on inclined surfaces.
Do not repair or replace parts by yourself
Do not attempt to repair the unit, or
replace parts within it (except when this
manual provides specific instructions
directing you to do so). Refer all
servicing to your retailer, the nearest
Roland Service Center, or an authorized
Roland distributor, as listed on the
“Information” page.
Do not use or store in the following types of locations
Subject to temperature extremes (e.g.,
direct sunlight in an enclosed vehicle,
near a heating duct, on top of heatgenerating equipment); or are
• Damp (e.g., baths, washrooms, on wet
floors); or are
• Exposed to steam or smoke; or are
• Subject to salt exposure; or are
• Humid; or are
• Exposed to rain; or are
• Dusty or sandy; or are
• Subject to high levels of vibration and
shakiness.
Use only the specified AC adaptor and the correct
voltage
Use only the specified AC adaptor (PSB6U), and make sure the line voltage
at the installation matches the input
voltage specified on the AC adaptor’s
body. Other AC adaptors may use a
different polarity, or be designed for
a different voltage, so their use could
result in damage, malfunction, or
electric shock.
Use only the included power cord
Use only the attached power-supply
cord. Also, the included power cord
must not be used with any other device.
Do not bend the power cord or place heavy objects on it
ENG
Do not excessively twist or bend the
power cord, nor place heavy objects
on it. Doing so can damage the cord,
producing severed elements and short
circuits. Damaged cords are fire and
shock hazards!
DEU
FRA
ITA
ESL
POR
NLD
19
WARNING
WARNING
Avoid extended use at high volume
Do not drop or subject to strong impact
This unit, either alone or in combination
with an amplifier and headphones
or speakers, may be capable of
producing sound levels that could
cause permanent hearing loss. Do not
operate for a long period of time at a
high volume level, or at a level that is
uncomfortable. If you experience any
hearing loss or ringing in the ears, you
should immediately stop using the unit,
and consult an audiologist.
Protect the unit from strong impact.
(Do not drop it!)
Don’t allow foreign objects or liquids to enter unit
Never allow foreign objects (e.g.,
flammable objects, coins, wires) or
liquids (e.g., water or juice) to enter
this product. Doing so may cause short
circuits, faulty operation, or other
malfunctions.
Turn off the unit if an abnormality or malfunction
occurs
Immediately turn the unit off, remove
the AC adaptor from the outlet, and
request servicing by your retailer, the
nearest Roland Service Center, or an
authorized Roland distributor, as listed
on the “Information” page when:
• The AC adaptor, the power-supply
cord, or the plug has been damaged;
or
• If smoke or unusual odor occurs; or
• Objects have fallen into, or liquid has
been spilled onto the unit; or
• The unit has been exposed to rain (or
otherwise has become wet); or
• The unit does not appear to operate
normally or exhibits a marked change
in performance.
Adults must provide supervision in places where
children are present
When using the unit in locations where
children are present, be careful so no
mishandling of the unit can take place.
An adult should always be on hand to
provide supervision and guidance.
20
Do not share an outlet with an unreasonable number of
other devices
Do not force the unit’s power-supply
cord to share an outlet with an
unreasonable number of other devices.
Be especially careful when using
extension cords—the total power used
by all devices you have connected
to the extension cord’s outlet must
never exceed the power rating (watts/
amperes) for the extension cord.
Excessive loads can cause the insulation
on the cord to heat up and eventually
melt through.
Do not use overseas
Before using the unit in a foreign
country, consult with your retailer, the
nearest Roland Service Center, or an
authorized Roland distributor, as listed
on the “Information” page.
Handle batteries carefully
• Batteries, rechargeable batteries,
or a battery charger must never be
recharged, heated, taken apart, or
thrown into fire or water.
• Never expose batteries, rechargeable
batteries, or a battery charger to
excessive heat such as sunshine, fire
or the like.
• Incorrect handling of batteries,
rechargeable batteries, or a
battery charger can cause leakage,
overheating, fire, or explosion.
Before use, you must read and
strictly observe all of the precautions
that accompany the batteries,
rechargeable batteries, or battery
charger.
• When using rechargeable batteries
and a charger, use only the
combination of rechargeable batteries
and charger specified by the battery
manufacturer.
CAUTION
Place in a well ventilated location
The unit and the AC adaptor should
be located so their location or position
does not interfere with their proper
ventilation.
Grasp the plug when connecting or disconnecting the
AC adaptor
Always grasp only the plug on the AC
adaptor cord when plugging into, or
unplugging from, an outlet or this unit.
Periodically clean the AC adaptor’s plug
At regular intervals, you should unplug
the AC adaptor and clean it by using
a dry cloth to wipe all dust and other
accumulations away from its prongs.
Also, disconnect the power plug from
the power outlet whenever the unit is to
remain unused for an extended period
of time. Any accumulation of dust
between the power plug and the power
outlet can result in poor insulation and
lead to fire.
Manage cables for safety
Try to prevent cords and cables from
becoming entangled. Also, all cords and
cables should be placed so they are out
of the reach of children.
Avoid climbing on top of the unit, or placing heavy
objects on it
Never climb on top of, nor place heavy
objects on the unit.
Do not connect or disconnect the AC adaptor with wet
hands
Never handle the AC adaptor or its
plugs with wet hands when plugging
into, or unplugging from, an outlet or
this unit.
Disconnect everything before moving the unit
Before moving the unit, disconnect the
AC adaptor and all cords coming from
external devices.
CAUTION
If there is a possibility of lightning strike, disconnect the
AC adaptor from the outlet
Whenever you suspect the possibility of
lightning in your area, disconnect the
AC adaptor from the outlet.
Handle batteries carefully
If used improperly, batteries may
explode or leak and cause damage
or injury. In the interest of safety,
please read and observe the following
precautions (p. 8).
• Carefully follow the installation
instructions for batteries, and make
sure you observe the correct polarity.
• Avoid using new batteries together
with used ones. In addition, avoid
mixing different types of batteries.
• Remove the batteries whenever
the unit is to remain unused for an
extended period of time.
• Never keep batteries together with
metallic objects such as ballpoint
pens, necklaces, hairpins, etc.
• Used batteries must be disposed of in
compliance with whatever regulations
for their safe disposal that may be
observed in the region in which you
live.
Handle leaking batteries carefully
• If fluid has leaked from a battery, make
sure not to touch it with your bare
hands.
• If any of the leaking fluid gets into
your eyes, the loss of vision may
result. Do not rub your eyes; use clean
water to flush them thoroughly. Then,
promptly see a doctor.
• Burning of the skin or dermatitis may
result if fluid has gotten onto your
skin or clothing. Use clean water to
flush affected areas thoroughly; then,
promptly see a doctor.
• Using a soft cloth, carefully wipe any
remaining fluid from the inside of the
battery compartment. Then, install
new batteries.
ENG
DEU
FRA
ITA
Unplug the AC adaptor from the outlet before cleaning
ESL
Before cleaning the unit, turn it off and
unplug the AC adaptor from the outlet
(p. 7).
POR
NLD
21
IMPORTANT NOTES
Power Supply
• Do not connect this unit to same electrical outlet
that is being used by an electrical appliance that
is controlled by an inverter or a motor (such as a
refrigerator, washing machine, microwave oven, or
air conditioner). Depending on the way in which
the electrical appliance is used, power supply
noise may cause this unit to malfunction or may
produce audible noise. If it is not practical to use a
separate electrical outlet, connect a power supply
noise filter between this unit and the electrical
outlet.
• The AC adaptor will begin to generate heat after
long hours of consecutive use. This is normal, and
is not a cause for concern.
• To prevent malfunction and equipment failure,
always make sure to turn off the power on all your
equipment before you make any connections.
• Power to this unit will be turned off automatically
after 30 minutes have passed without any of
its buttons being pressed (including time that
metronome is sounding), or 30 minutes have
passed since playback of a track has stopped.
Power Supply: Use of Batteries
• When installing or replacing batteries, always turn
this unit off and disconnect any other devices you
may have connected. This way, you can prevent
malfunction and damage.
• The life of the supplied batteries may be limited,
since its primary purpose was to enable testing.
• If operating this unit on batteries, please use
alkaline batteries or rechargeable Ni-MH batteries.
• If operating this unit on batteries, please
disconnect the AC adaptor from this unit.
• Even if batteries are installed, the unit will turn off
if you connect or disconnect the power cord from
the AC outlet while the unit is turned on, or if you
connect or disconnect the AC adaptor from the
unit.
Maintenance
• For everyday cleaning wipe the unit with a soft,
dry cloth or one that has been slightly dampened
with water. To remove stubborn dirt, use a cloth
impregnated with a mild, non-abrasive detergent.
Afterwards, be sure to wipe the unit thoroughly
with a soft, dry cloth.
22
• Never use benzine, thinners, alcohol or solvents of
any kind, to avoid the possibility of discoloration
and/or deformation.
Placement
• Using the unit near power amplifiers (or other
equipment containing large power transformers)
may induce hum. To alleviate the problem, change
the orientation of this unit; or move it farther away
from the source of interference.
• This device may interfere with radio and television
reception. Do not use this device in the vicinity of
such receivers.
• Noise may be produced if wireless
communications devices, such as cell phones,
are operated in the vicinity of this unit. Such
noise could occur when receiving or initiating a
call, or while conversing. Should you experience
such problems, you should relocate such wireless
devices so they are at a greater distance from this
unit, or switch them off.
• Do not expose the unit to direct sunlight, place
it near devices that radiate heat, leave it inside
an enclosed vehicle, or otherwise subject it to
temperature extremes. Excessive heat can deform
or discolor the unit.
• When moved from one location to another where
the temperature and/or humidity is very different,
water droplets (condensation) may form inside
the unit. Damage or malfunction may result if
you attempt to use the unit in this condition.
Therefore, before using the unit, you must allow it
to stand for several hours, until the condensation
has completely evaporated.
• Depending on the material and temperature of
the surface on which you place the unit, its rubber
feet may discolor or mar the surface.
You can place a piece of felt or cloth under the
rubber feet to prevent this from happening. If you
do so, please make sure that the unit will not slip
or move accidentally.
• Do not put anything that contains water on this
unit. Also, avoid the use of insecticides, perfumes,
alcohol, nail polish, spray cans, etc., near the unit.
Swiftly wipe away any liquid that spills on the unit
using a dry, soft cloth.
Repairs and Data
Copyrights/Licence/Trademark
• Please be aware that all data contained in the
unit’s memory may be lost when the unit is sent
for repairs. Roland assumes no liability concerning
such loss of data.
• It is forbidden by law to make an audio recording,
video recording, copy or revision of a third party’s
copyrighted work (musical work, video work,
broadcast, live performance, or other work),
whether in whole or in part, and distribute,
sell, lease, perform, or broadcast it without the
permission of the copyright owner.
Additional Precautions
• Please be aware that the contents of memory can
be irretrievably lost as a result of a malfunction, or
the improper operation of the unit.
• Use a reasonable amount of care when using the
unit’s buttons, sliders, or other controls; and when
using its jacks and connectors. Rough handling
can lead to malfunctions.
• When disconnecting all cables, grasp the
connector itself—never pull on the cable. This way
you will avoid causing shorts, or damage to the
cable’s internal elements.
• To avoid disturbing others nearby, try to keep the
unit’s volume at reasonable levels. You may prefer
to use headphones, so you do not need to be
concerned about those around you.
• Some connection cables contain resistors. Do
not use cables that incorporate resistors for
connecting to this unit. The use of such cables
can cause the sound level to be extremely low,
or impossible to hear. For information on cable
specifications, contact the manufacturer of the
cable.
• Do not use this product for purposes that could
infringe on a copyright held by a third party. We
assume no responsibility whatsoever with regard
to any infringements of third-party copyrights
arising through your use of this product.
• Purchasers of this product are NOT permitted to
extract said content in original or modified form,
for the purpose of distributing recorded medium
of said content or making them available on a
computer network.
• MMP (Moore Microprocessor Portfolio) refers to a
patent portfolio concerned with microprocessor
architecture, which was developed by Technology
Properties Limited (TPL). Roland has licensed this
technology from the TPL Group.
• This product contains eCROS integrated software
platform of eSOL Co.,Ltd. eCROS is a trademark of
eSOL Co., Ltd. in Japan.
• Company names and product names appearing
in this document are registered trademarks or
trademarks of their respective owners.
Returning to the Factory Settings
Here’s how to return the VT-12 to its factory-set condition.
* This will erase all recorded sound and user tracks.
* If the batteries have insufficient power (“ ” appears in the display), you won’t be able to
restore the factory settings. In such cases, you should replace the batteries with new ones, or
use an AC adapter; then you can proceed with restoring the factory settings.
1. While simultaneously holding down the [
turn the power on.
] button, [ ] button, and [
] button,
ENG
The display will indicate “Factory reset.”
If you decide to cancel the operation, press either the [
2. Press the [
DEU
], [WARM-UP], or [EXERCISE] button.
FRA
ITA
] button.
ESL
The VT-12 will be returned to its factory-set state.
* Do not turn off the power while the pitch indicator
and
POR
are lighting alternately.
NLD
23
ENG
DEU
FRA
ITA
ESL
POR
NLD
Verwendungsmöglichkeiten
Das VT-12 ist das ideale Werkzeug zur Verbesserung Ihrer Gesangsfähigkeiten.
Sie können das VT-12 jederzeit und überall verwenden – alleine, in der Gruppe, zuhause oder im Studio.
Überprüfen Ihrer Tonhöhe
Das VT-12 kann nicht nur die Tonhöhe einer einzelnen Stimme erkennen, sondern
auch die von zwei Stimmen!
Beim Singen von Harmonien mit einer anderen Person können Sie den VT-12
dazu verwenden, zu überprüfen, dass Sie beide in der richtigen Tonhöhe singen.
Verwendung als Metronom
Das VT-12 kann einen Führungston bereitstellen, der Sie beim Sologesang,
beim Üben von A-Capella-Gesang oder mit einer Gesangsgruppe dabei
unterstützt, das richtige Tempo einzuhalten.
2
Überprüfen der Tonhöhe
Gesangstraining
Das VT-12 ist eine effektive Hilfe zum Einsingen oder für Gesangsübungen.
Sie können die integrierten Tracks zum Üben vor einem Chor- oder Liveauftritt
oder zur Optimierung von Technik und Ausdruck Ihres Gesangs verwenden.
Üben
Metronom
ENG
DEU
Was sind Tracks?
FRA
ITA
Das VT-12 enthält integrierte Tracks, die Sie beim Einsingen bzw. Üben verwenden können.
Zusätzlich zu den integrierten Tracks können Sie auch eigene Lieder aufnehmen (S. 14).
ESL
POR
NLD
3
Inhalt
Verwendungsmöglichkeiten. . . . . . . . . . . . . . . . . . . . . . . 2
Beschreibung des Bedienfeldes. . . . . . . . . . . . . . . . . . . . 5
Die Bedienoberfläche . . . . . . . . . . . . . . . . . . . . . . . . . . . 5
Seitenansicht (Anschlussmöglichkeiten für
Geräte) . . . . . . . . . . . . . . . . . . . . . . . . . . . . . . . . . . . . . . . . . 6
Vor der Verwendung des VT-12. . . . . . . . . . . . . . . . . . . . 8
Einsetzen der Batterien. . . . . . . . . . . . . . . . . . . . . . . . . . 8
Einschalten des Geräts . . . . . . . . . . . . . . . . . . . . . . . . . . 9
Verwenden der DoReMi-Scheibe . . . . . . . . . . . . . . . . 9
Tipps für die Verwendung des VT-12. . . . . . . . . . . . 10
Verwenden des Ständers. . . . . . . . . . . . . . . . . 10
Überprüfen der Tonhöhe. . . . . . . . . . . . . . . . . . . . . . . . . 11
Üben. . . . . . . . . . . . . . . . . . . . . . . . . . . . . . . . . . . . . . . . . . . . 13
Aufnehmen und Üben zu einem Lied. . . . . . . . . . . 14
Verwenden des Metronoms . . . . . . . . . . . . . . . . . . . . . . 15
Mögliche Fehlerursachen. . . . . . . . . . . . . . . . . . . . . . . . . 16
Die Audio-Signalwege . . . . . . . . . . . . . . . . . . . . . . . . . . . 17
Technische Daten. . . . . . . . . . . . . . . . . . . . . . . . . . . . . . . . 18
SICHERER BETRIEB DES GERÄTS. . . . . . . . . . . . . . . . . . . 19
WICHTIGE HINWEISE. . . . . . . . . . . . . . . . . . . . . . . . . . . . . 22
Vor dem Betrieb des Gerätes lesen Sie bitte die folgenden Abschnitte sorgfältig durch: „SICHERER BETRIEB DES
GERÄTS“ (S. 19) und „WICHTIGE HINWEISE“ (S. 22). Diese Abschnitte enthalten wichtige Informationen über die korrekte
Bedienung des Geräts. Um sicherzustellen, dass Sie mit dem gesamten Funktionsumfang Ihres neuen Geräts vertraut
sind, sollten Sie die Bedienungsanleitung vollständig lesen. Bewahren Sie die Anleitung an einem sicheren Platz auf
und verwenden Sie diese zu Referenzzwecken.
Copyright © 2012 ROLAND CORPORATION
Alle Rechte vorbehalten. Diese Publikation darf weder ganz noch teilweise in jedweder Form ohne schriftliche
Genehmigung durch die ROLAND CORPORATION reproduziert werden.
Roland ist eine eingetragene Marke der Roland Corporation in den USA und/oder anderen Ländern.
4
Beschreibung des Bedienfeldes
Tonhöhenanzeige
S. 11
Zeigt die Tonhöhe oder
Ungenauigkeiten Ihres Gesangs an.
Integrierter Lautsprecher
Integriertes Mikrofon
Über diesen Lautsprecher
werden der Referenzton, der
Klang des Metronoms und die
Tracks ausgegeben.
Mit diesem können Sie Ihre
Stimme überprüfen oder
aufnehmen.
Tasten [ ] [ ]
Display
Mit diesen können Sie den
wiederzugebenden Referenzton
auswählen.
Hier werden Informationen wie
die Nummer des ausgewählten
Tracks oder das Tempo des
Metronoms angezeigt.
Sie können den Referenzton
ändern, indem Sie die Tasten
[ ] und [ ] gleichzeitig
drücken (S. 12).
Tasten [
[
]
Verwenden Sie diese zum
Ändern der Einstellungen.
Schaltet den Referenzton ein/
aus. Der Referenzton wird in
gleichmäßig temperierten
Tonhöhen wiedergegeben.
[REVIEW]-Taste
]-Taste
Gibt den aufgenommenen Klang
wieder, sodass Sie Ihre Aufnahme
überprüfen können.
Startet/stoppt das Metronom
oder den Track.
[
]-Taste
S. 11
S. 15
Wählt den Metronom-Modus
aus.
Metronom
[
]-Taste
S. 11
Üben
][
Überprüfen der Tonhöhe
Die Bedienoberfläche
[WARM-UP]-Taste
S. 13
Wählt den Modus für das Einsingen aus.
[EXERCISE]-Taste
S. 13
Wählt den Übungsmodus aus.
ENG
DEU
FRA
ITA
ESL
POR
NLD
5
Beschreibung des Bedienfeldes
Seitenansicht (Anschlussmöglichkeiten für Geräte)
REC IN-Buchse
S. 14
Hier können Sie mithilfe eines Kabels mit
Stereo-Miniklinke ein externes Audiogerät
wie z.B. einen MP3-Player, ein Radio oder
einen Kassetten-Abspielgerät anschließen.
Sie können über diese Buchse Ihre eigenen
Lieder aufnehmen und diese zum Üben
verwenden.
OUTPUT/PHONES-Buchse
Hier können Sie separat
erhältliche Kopfhörer
oder einen externen
Lautsprecher anschließen.
Zum Herstellen dieses Anschlusses verbinden
Sie die Ausgangsbuchse (z. B. die Kopfhörerbuchse) Ihres externen Audiogeräts mit dieser
Buchse.
Tragebandhalterung
Hier können Sie ein separat erhältliches
Trageband befestigen.
Schalter für die
Tonhöhenerkennung
S. 11
Ermöglicht die Auswahl der Methode
für die Tonhöhenerkennung.
[MIC VOLUME]-Schalter
Regelt die Lautstärke des Mikrofons.
H: Hohe Lautstärke
L:
Geringe Lautstärke
OFF: Monitor aus
* Wenn sich dieser Schalter in der Position „OFF“
befindet, kann die Tonhöhe nicht erkannt werden.
6
Beschreibung des Bedienfeldes
Überprüfen der Tonhöhe
[POWER]-Taste
S. 9
Halten Sie diese Taste gedrückt, um
das Gerät ein- bzw. auszuschalten.
[VOLUME]-Regler
Ermöglicht die Regelung der
Lautstärke des integrierten
Lautsprechers oder des Kopfhörers.
Schließen Sie hier den Netzadapter
(PSB-6U, separat erhältlich) an.
* Verwenden Sie ausschließlich den
passenden Netzadapter (PSB-6U),
und schließen Sie diesen an eine
Netzsteckdose der richtigen Spannung
an. Verwenden Sie keinen anderen
Netzadapter, da hierdurch Fehlfunktionen
auftreten können.
Üben
DC IN-Buchse
Platzieren Sie den Netzadapter so,
dass die Seite mit der Anzeigeleuchte
(siehe Abbildung) nach oben und die
beschriftete Seite nach unten weist.
Die Anzeige leuchtet auf, wenn Sie den
Netzadapter an eine Netzsteckdose
anschließen, die Strom führt.
Metronom
Vorsicht beim Herstellen von Verbindungen
• Regeln Sie zur Vermeidung von Fehlfunktionen und Gerätefehlern immer die Lautstärke herunter, und schalten
Sie alle Geräte aus, bevor Sie Anschlüsse vornehmen.
ENG
DEU
• Bei Verwendung eines externes Lautsprechers können in Abhängigkeit von der Position dieses Lautsprechers
zum integrierten Mikrofon Rückkopplungen (Pfeifgeräusche) auftreten. Gehen Sie in diesem Fall
folgendermaßen vor:
1. Ändern Sie die Ausrichtung des integrierten Mikrofons.
2. Stellen Sie das integrierte Mikrofon in größerem Abstand zu den externen Lautsprechern auf.
3. Regeln Sie den Lautstärkepegel herunter.
4. Setzen Sie den [MIC VOLUME]-Schalter auf die Position „OFF“.
FRA
ITA
ESL
POR
NLD
7
Vor der Verwendung des VT-12
Einsetzen der Batterien
Setzen Sie die Batterien (zwei AA-Batterien) wie in der Abbildung dargestellt ein, und achten Sie
auf die richtige Polarität.
Hinweise zur Verwendung von Batterien
• Bei geringer Batteriespannung wird im Display
„
“ angezeigt. Setzen Sie in diesem Fall neue
Batterien ein.
• Bei falscher Handhabung können Batterien
explodieren oder auslaufen und Schäden oder
Verletzungen verursachen. Lesen und beachten
Sie daher im Interesse der Sicherheit die folgenden
Vorsichtsmaßnahmen.
• Befolgen Sie sorgfältig die Installationsanweisungen
für die Batterien, und achten Sie auf die richtige
Polarität.
• Vermeiden Sie es, neue Batterien zusammen mit
alten bzw. gebrauchten Batterien zu verwenden.
Vermeiden Sie auch das Mischen von Batterien
verschiedener Sorten bzw. Typen.
• Nehmen Sie die Batterien aus dem Gerät heraus,
wenn dieses längere Zeit nicht benutzt wird.
• Bewahren Sie Batterien nicht zusammen mit
metallischen Gegenständen wie Kugelschreibern,
Halsketten, Haarnadeln usw. auf.
• Gebrauchte Batterien müssen gemäß den
gesetzlichen Bestimmungen Ihrer Region
entsorgt werden.
8
• Eine unsachgemäße Handhabung von Batterien,
Akkus oder Akkuladegeräten kann zu Undichtigkeiten,
Überhitzung, Feuer und Explosionen führen. Lesen Sie
vor der Verwendung alle den Batterien, Akkus oder
Akkuladegeräten beigefügten Sicherheitshinweise,
und beachten Sie diese genau.
• Wenn Sie Akkus und ein Ladegerät verwenden,
verwenden Sie ausschließlich die vom Akkuhersteller
angegebene Kombination aus Akkus und Ladegerät.
• Wenn Sie dieses Gerät mit Batterien betreiben,
verwenden Sie entweder Alkalibatterien oder
Ni-MH-Akkus.
• Trennen Sie den Netzadapter vom Gerät, wenn Sie
es mit Batterien betreiben.
• Auch bei eingelegten Batterien wird das Gerät
ausgeschaltet, wenn Sie das Netzkabel an den
Netzanschluss anschließen oder von diesem trennen
oder wenn Sie den Netzadapter anschließen oder
trennen, während das Gerät eingeschaltet ist.
• Voraussichtliche Batterielebensdauer bei Dauernutzung
Alkalibatterien: 6 Stunden
* Je nach Batteriespezifikationen und den
tatsächlichen Verwendungsbedingungen kann es
zu Abweichungen von diesen Angaben kommen.
Vor der Verwendung des VT-12
Überprüfen der Tonhöhe
Einschalten des Geräts
* Nachdem alle Verbindungen ordnungsgemäß hergestellt wurden (S. 6), gehen Sie zum
Einschalten des Geräts folgendermaßen vor.
1
Halten Sie die [POWER]-Taste gedrückt,
bis sich das Gerät einschaltet.
Üben
2
Stellen Sie den [VOLUME]-Regler auf die
niedrigste Position.
Hinweise zur Stromversorgung
Metronom
• Dieses Gerät schaltet sich automatisch aus, wenn für 30 Minuten keine Taste gedrückt wird (dies gilt auch
bei laufendem Metronom) oder 30 Minuten nach der Beendigung der Wiedergabe eines Tracks.
• Achten Sie immer darauf, die Lautstärke herunterzuregeln, bevor Sie das Gerät ein- oder ausschalten. Selbst
bei heruntergeregelter Lautstärke sind möglicherweise Geräusche zu hören, wenn Sie das Gerät ein- oder
ausschalten. Dies ist normal und keine Fehlfunktion.
• Dieses Gerät ist mit einer Schutzschaltung ausgestattet. Nach dem Einschalten entsteht eine kurze Betriebspause
von einigen Sekunden, bis das Gerät normal arbeitet.
Verwenden der DoReMi-Scheibe
Wenn Sie die mitgelieferte DoReMi-Scheibe an der Tonhöhenanzeige befestigen, können Sie
mithilfe der DoReMi-Anzeigen die Namen der Noten überprüfen.
Wenn Sie bei Verwendung des beweglichen „Do“-Solfège die Notennamen überprüfen möchten,
befestigen Sie die DoReMi-Scheibe mit dem „Do“ über dem Notennamen der von Ihnen
verwendeten Tonika.
ENG
DEU
FRA
ITA
ESL
DoReMi-Scheibe
POR
* Entfernen Sie vor der Verwendung der DoReMi-Scheibe das hinterlegte Papier und die blaue
Schutzfolie.
NLD
9
Vor der Verwendung des VT-12
Tipps für die Verwendung des VT-12
Halten Sie das VT-12 in der Hand, und singen Sie in der in der Abbildung dargestellten Haltung.
Verwenden Sie Kopfhörer, wenn Sie während der Wiedergabe eines Tracks oder des Metronoms
die Genauigkeit Ihres Tons überprüfen möchten.
Durch die Verwendung von Kopfhörern lässt sich die Tonhöhe zuverlässiger ermitteln. Es ist zudem
einfacher, den aufgenommenen Klang zu hören.
Kopfhörer verwenden
Ca. 30 cm
Abstand
Rücken gerade halten
HINWEIS
Wenn eine der folgenden Situationen auftritt, überprüfen Sie die Einstellung des
[MIC VOLUME]-Schalters (S. 6).
• Die Tonhöhenanzeige reagiert nicht bzw. nicht so, wie sie sollte.
• Die Lautstärke des Mikrofontons ist gering.
Verwenden des Ständers
Sie können den integrierten Ständer verwenden, um das VT-12 aufrecht hinzustellen.
Wenn Sie das VT-12 mit einer Gruppe verwenden, können Sie das Gerät mithilfe des Ständers
aufrecht auf einen Tisch stellen.
In diesem Fall sollte der Abstand des VT-12 zu den Sängern ca. 1 m betragen.
* Um den Ständer wieder in seine Ausgangsposition zu bringen, klappen Sie ihn nach innen,
bis er hörbar einrastet.
10
Überprüfen der Tonhöhe
1
Wählen Sie einen Typ für die Erkennung der
Tonhöhe aus.
MONO EQUAL: Es wird unter Verwendung
gleichmäßiger Temperierung eine
Stimme erkannt.
CHORD EQUAL: Es werden unter Verwendung
gleichmäßiger Temperierung zwei
Stimmen erkannt.
CHORD JUST: Es werden unter Verwendung der
reinen Stimmung zwei Stimmen
erkannt (Dur).
2
Drücken Sie die [
Üben
HINWEIS
Die Tonart für die reine Stimmung wird von dem tieferen Ton festgelegt.
Wenn das VT-12 einen Referenzton ausgibt, wird die Tonart von dem
Referenzton festgelegt. Bei Ausgabe eines Referenztons kann nur eine
Stimme erkannt werden.
Überprüfen der Tonhöhe
Einer der wesentlichen Funktionen des VT-12 ist, die von Ihnen gesungene Tonhöhe zu überprüfen.
Das VT-12 kann nicht nur die Tonhöhe einer Stimme, sondern die von zwei Personen gleichzeitig
überprüfen die gemeinsam singen.
]-Taste.
Geben Sie den Referenzton aus (gleichmäßig temperiert), bevor Sie
mit dem Singen beginnen, damit Sie den richtigen Ton hören.
HINWEIS
Verwenden Sie die Tasten [ ] und [ ], um den Referenzton zu ändern.
3
Überprüfen Siedie gesungene Tonhöhe.
Falls Sie falsch gesungen haben sollten, versuchen Sie nun, den richtigen Ton zu treffen.
Metronom
Der Name der Note, die sich am nächsten an dem erkannten Ton befindet,
leuchtet.
Die Anzeige leuchtet heller, wenn sich der Tonunterschied verringert,
und sie leuchtet schwächer, wenn sich der Tonunterschied vergrößert.
Wenn ein Referenzton erklingt, leuchtet dessen Notenname ebenfalls.
Zeigt den Umfang der Tonabweichung an. Beleuchtet:
Unbeleuchtet:
Ton zu tief
MONO EQUAL
Ton ist richtig
ENG
Ton zu hoch
DEU
Die hohe Note ist relativ
zu der tiefen Note zu tief.
* Wenn die Tonhöhenanzeige
nicht reagiert, obwohl Sie
singen, überprüfen Sie die
Einstellung des
[MIC VOLUME]-Schalters (S. 6).
CHORD EQUAL
CHORD JUST
FRA
ITA
Das Tonintervall zwischen
den beiden Noten ist richtig.
ESL
Die hohe Note ist relativ
zu der tiefen Note zu hoch.
POR
NLD
11
Überprüfen der Tonhöhe
Ändern des Referenztons
1. Drücken Sie die Tasten [
] und [ ] gleichzeitig.
Im Display wird der aktuelle Referenzton angezeigt.
2. Verwenden Sie die Tasten [
][
], um den gewünschten Referenzton einzustellen.
Bereich: 415–465 Hz (Standardwert: 440 Hz)
* Wenn während eines bestimmten Zeitraums keine Eingabe erfolgt, erlischt die Anzeige des
Referenztons, und das Gerät kehrt in den Modus zur Tonhöhenüberprüfung zurück.
3. Drücken Sie die Tasten [
] und [ ] gleichzeitig.
Die Anzeige des Referenztons erlischt, und das Gerät kehrt in den Modus zur
Tonhöhenüberprüfung zurück.
* Während der Wiedergabe der voreingestellten Tracks ist der Referenzton auf 440 Hz festgelegt.
Was ist reine Stimmung?
Reine Stimmung ist eine Stimmmethode, die reine Intervalle der Quinte und der Terz
gewährleistet.
Wenn Sie die reine Stimmung auswählen, müssen Sie die Tonika festlegen (auf der
Dur-Tonleiter ist dies C), die der Tonart Ihres Liedes entspricht.
Das VT-12 legt die tiefere der beiden Stimmen als Tonika fest.
Wenn ein Referenzton ausgegeben wird, ist dieser die Tonika.
Informationen zu Tönen in der reinen Stimmung
Das VT-12 kann Töne reiner Stimmung nur in einer Dur-Tonart erkennen.
Wenn der Referenzton C ist, werden die Tonhöhen in den folgenden Verhältnissen
berechnet.
Gleichmäßige Temperierung
(Cent)
C#
D
D#
E
F
0
100
200
300
400
500
Reine Stimmung (Cent)
0
71
204
316
386
498
Verhältnis
1
25/24
9/8
6/5
5/4
4/3
F#
G
G#
A
A#
B
600
700
800
900
1000
1100
569
702
773
884
1018
1088
25/18
3/2
25/16
5/3
9/5
15/8
Gleichmäßige Temperierung
(Cent)
Reine Stimmung (Cent)
Verhältnis
12
C
Üben
Einsingmodus
Übungsmodus
HINWEIS
Weitere Informationen zum Üben finden Sie im separaten „Übungshandbuch“.
Dort finden Sie hilfreiche Anleitungen zur Artikulation und zum Singen sowie zum Üben mit
den einzelnen Tracks.
* Mit der Wiedergabe eines jeden Tracks wird eine neue Aufnahme gestartet. Wenn Sie einen
zuvor aufgenommenen Track wiedergeben, wird der auf diesem Track aufgenommene Klang
überschrieben. Wenn Sie die Wiedergabe eines Tracks innerhalb von 3 Sekunden nach dem
Start wieder beenden, wird der Klang nicht auf diesem Track aufgenommen.
Wählen Sie einen
Übungsmodus aus.
Üben
1
Dieser Modus enthält Tracks zur Gesangsübung, mit denen Sie Ihre Stimme
aufwärmen können.
Dieser Modus enthält Tracks zur Verbesserung Ihrer Gesangstechnik wie die
Verbesserung der Atemtechnik und die Erweiterung Ihres Stimmumfangs.
Die Taste des ausgewählten Modus
leuchtet.
2
6
Verwenden Sie die Tasten
[ ] [ ], um einen Track
auszuwählen.
]-Taste.
Der Track wird wiedergegeben, und die
Aufnahme des Klangs beginnt.
4
Singen Sie mit dem Track mit.
Achten Sie während des Singens auf Ihre eigenen
Töne und die Töne des wiedergegebenen Tracks.
HINWEIS
In Abhängigkeit von dem
ausgewählten Track können Sie
die Wiedergabe des Gesangs des
Tracks ein- oder ausschalten, indem
Sie während der Wiedergabe
des aufgenommenen Klangs die
[REVIEW]-Taste drücken.
5
Drücken Sie die [
Metronom
Drücken Sie die [
Drücken Sie die
[REVIEW]-Taste.
Die aufgenommene Musik wird
wiedergegeben.
Wenn keine Aufnahmen vorhanden
sind, wird im Display „---“ angezeigt.
HINWEIS
• Durch wiederholtes Drücken der Taste
für den ausgewählten Modus können
Sie zwischen voreingestellten und
benutzerdefinierten Tracks wechseln.
• Wenn nicht mindestens ein
benutzerdefinierter Track aufgenommen
wurde, wird im Display „U--“ angezeigt.
• Weitere Informationen zu den Tracks
finden Sie in der separaten „Track-Liste“.
3
Überprüfen der Tonhöhe
Das VT-12 verfügt über zwei Übungsmodi: Einsingmodus und Übungsmodus. Jeder Modus
enthält Tracks (S. 3), die besonders für die entsprechende Übungsart geeignet sind.
Der während des Übens erzeugte Klang wird mit den entsprechenden Tracks aufgenommen,
sodass Sie sich diesen anschließend anhören können (Überprüfungs- oder Review-Funktion).
]-Taste.
Die Wiedergabe des Tracks und die Aufnahme
des Klangs werden beendet.
Beleuchtet: Der von Ihnen gesungene Ton
Blinkend: Die Töne des Tracks
* Bei einigen Tracks (benutzerdefinierten
Tracks und voreingestellten Tracks) zeigt das
Gerät die Tonhöhen nicht durch Blinken an.
ENG
DEU
FRA
ITA
Vorgegebene Tracks und benutzerdefinierte Tracks
Das VT-12 enthält für jeden Modus integrierte vordefinierte Tracks (001–). Sie können über die
REC IN-Buchse auch Tracks aufnehmen und diese als benutzerdefinierte Tracks verwenden
(U01–U10). (Benutzerdefinierte Tracks werden für beide Modi gemeinsam verwendet.)
13
ESL
POR
NLD
Üben
Aufnehmen und Üben zu einem Lied
Sie können eigene Lieder über die REC IN-Buchse auf dem VT-12 aufnehmen und diese als
benutzerdefinierte Tracks verwenden. Aufgenommene Lieder können sowohl im Einsingmodus
als auch im Übungsmodus verwendet werden.
Track-Länge
Maximal 10 Minuten (pro Track)
Anzahl der Tracks
Maximal 10 Tracks
* Wenn Sie die Nummer eines zuvor aufgenommenen Tracks auswählen und für diese eine
Aufnahme ausführen, wird das zuvor aufgenommene Lied überschrieben. Wenn Sie die
Aufnahme nach 3 Sekunden beenden, wird das Lied nicht aufgenommen.
* Nach der Beendigung der Aufnahme eines Liedes müssen Sie das Kabel von der REC IN-Buchse
trennen. Das VT-12 führt keine anderen Operationen aus, solange ein Kabel an der REC
IN-Buchse angeschlossen ist.
1
Schließen Sie Ihr externes
Audiogerät an der REC
IN-Buchse an (S. 6).
Wenn im Display abwechselnd „rEc“
und „U**“ angezeigt wird, ist das VT-12
bereit für die Aufnahme.
2
Geben Sie das Lied auf
dem externen Audiogerät
wieder.
Stellen Sie die Lautstärke des
aufzunehmenden Klangs ein.
Stellen Sie die Lautstärke des Klangs
während seiner Überwachung
über den integrierten Lautsprecher
oder über Kopfhörer mithilfe der
Bedienelemente auf dem externen
Audiogerät ein.
3
4
Trennen Sie Ihr externes
Audiogerät von der REC
IN-Buchse.
Üben Sie mit dem von Ihnen
aufgenommenen benutzerdefinierten
Track (S. 14).
7
Drücken Sie die [REVIEW]Taste.
Die Wiedergabe des aufgenommenen
Liedes beginnt.
Überprüfen Sie, dass das Lied richtig
aufgenommen wurde. Wenn das Lied
nicht aufgenommen wurde, wird im
Display „---“ angezeigt.
Wählen Sie mithilfe
der Tasten [ ] [ ] die
Track-Nummer aus, an
deren Position der Track
aufgenommen werden soll.
6
Drücken Sie die
[
]-Taste.
5
Die Aufnahme beginnt.
Während der Aufnahme wird im
Display „rEc“ angezeigt, und die
Tonhöhenanzeige leuchtet.
14
8
Drücken Sie die
[
]-Taste.
Die Aufnahme wird beendet.
Geben Sie das Lied auf
dem externen Audiogerät
wieder.
HINWEIS
Wenn Sie die aufgenommenen Lieder löschen möchten, setzen Sie das VT-12 auf die
Werkseinstellungen zurück (S. 23).
Verwenden des Metronoms
Der Gesang wird während der Wiedergabe des Metronoms automatisch aufgenommen, sodass
Sie im Anschluss Ihren Gesang anhören können (Überprüfungsfunktion).
* Bei jeder Wiedergabe des Metronoms wird eine neue Aufnahme gestartet. Dabei wird die
vorherige Aufnahme überschrieben. Wenn Sie das Metronom innerhalb von 3 Sekunden
anhalten, wird der Gesang nicht aufgenommen.
* Im Metronom-Modus können maximal 10 Minuten aufgenommen werden. Nach dem Ablauf
von 10 Minuten wird die Aufnahme beendet. Die Wiedergabe des Metronoms wird auch nach
dem Ende der Aufnahme fortgesetzt.
* Die Taktart kann nicht eingestellt werden.
1
Drücken Sie die
[ ]-Taste.
Verwenden Sie die Tasten
[ ] [ ], um das Tempo
anzupassen.
Bereich: 30–250
HINWEIS
Sie können das Tempo auch
einstellen, indem Sie im gewünschten
Tempo auf die [ ]-Taste tippen
(Tipp-Tempo-Funktion).
Drücken Sie die [
]-Taste.
Das Metronom beginnt mit der Wiedergabe,
und die Aufnahme des Gesangs beginnt.
Die [ ]-Taste blinkt synchron zum Tempo.
6
Drücken Sie die
[REVIEW]-Taste.
Der aufgenommene Klang wird
abgespielt.
Die Wiedergabe wird angehalten,
wenn Sie die Taste [
] drücken.
5
Metronom
3
Üben
Das VT-12 wechselt in den
Metronom-Modus.
Im Display wird der Wert des aktuellen
Tempos angegeben.
2
Überprüfen der Tonhöhe
Sie können beim Üben im Tempo des Metronoms singen.
Drücken Sie die
[
]-Taste.
Das Metronom und die Aufnahme des
Gesangs werden beendet.
HINWEIS
Sie können das Metronom auch wiedergeben, während ein Referenzton (S. 11) ertönt.
ENG
4
Singen Sie synchron zum Metronom.
Achten Sie beim Singen auf die Tonhöhe.
DEU
Beleuchtet: Referenzton und von
Ihnen gesungener Ton
FRA
ITA
ESL
POR
NLD
15
Mögliche Fehlerursachen
Problem
Das Gerät lässt sich nicht
einschalten
Das Gerät lässt sich nicht
ausschalten.
Zu prüfende Elemente
Maßnahme
Sind die Batterien
möglicherweise leer?
Setzen Sie in diesem Fall neue
Batterien ein.
Ist der empfohlene Netzadapter
(PSB-6U, separat erhältlich)
korrekt angeschlossen?
Wird im Display „Err“ angezeigt?
Wurden die Anschlüsse mit
den anderen Geräten richtig
ausgeführt?
Ist die Lautstärke eines
angeschlossenen externen
Lautsprechers heruntergeregelt?
Kein Ton/unzureichende
Lautstärke
Unzureichende Lautstärke
des integrierten
Lautsprechers
Die Lautstärke des an die
OUTPUT/PHONES-Buchse
angeschlossenen Instruments
ist zu niedrig
Der Ton ist verzerrt
Überprüfen Sie noch einmal
den Anschluss. Verwenden Sie
niemals einen anderen als den
empfohlenen Netzadapter.
Bevor Sie das Gerät ausschalten
können, müssen alle Tracks
gestoppt und die Aufnahme aller
Lieder muss abgeschlossen sein.
Überprüfen Sie die Anschlüsse
erneut.
Prüfen Sie die Einstellungen des
angeschlossenen Geräts.
S. 8
S. 7
–
S. 6
–
Ist der [VOLUME]-Regler richtig
eingestellt?
Ändern Sie die Lautstärke
entsprechend.
S. 7
Ist der [MIC VOLUME]-Schalter
richtig eingestellt?
Nehmen Sie die richtige
Einstellung vor.
S. 6
Sind Kopfhörer angeschlossen?
Falls ein Kopfhörer angeschlossen
ist, wird der
Ton nicht über den integrierten
Lautsprecher ausgegeben.
Sind die Batterien
möglicherweise leer?
Setzen Sie in diesem Fall neue
Batterien ein.
Verwenden Sie ein
Verbindungskabel mit einem
Widerstand?
Verwenden Sie ein
Verbindungskabel ohne
Widerstand.
Ist der [VOLUME]-Regler richtig
eingestellt?
Ändern Sie die Lautstärke
entsprechend.
–
S. 8
–
S. 7
Die Aufnahme wird während
Haben Sie versucht, länger als
der Aufnahme eines Liedes
zehn Minuten aufzunehmen?
beendet
Es können maximal zehn Minuten
pro Lied aufgenommen werden.
–
Unzureichende Lautstärke
Erfolgt die Aufnahme in der
oder verzerrter Klang in
richtigen Lautstärke?
einem aufgenommenen Lied
Passen Sie die Lautstärke des
externen Audiogeräts an.
–
Die Tonhöhe wird nicht
erkannt/es kommt zu
unerwarteten Operationen
Ist der [MIC VOLUME]-Schalter
richtig eingestellt?
Nehmen Sie die richtige
Einstellung vor.
Stellen Sie den richtigen Wert ein.
Während der Wiedergabe der
voreingestellten Tracks ist der
Referenzton auf 440 Hz festgelegt.
Um ein schnelles Überprüfen der Tonhöhe während der Wiedergabe
Während der Wiedergabe von zu ermöglichen, blinken die Tonhöhenanzeigen und .
Tracks blinken die TonhöhenWenn Sie die mithilfe der [REVIEW]-Taste aufgenommenen
anzeigen und .
Aufnahmen wiedergeben, leuchten diese Anzeigen normal.
Das Gerät wird unerwartet
ausgeschaltet
16
Seite
Ist die Einstellung für den
Referenzton richtig?
Dieses Gerät schaltet sich automatisch aus, wenn für 30 Minuten
keine Taste gedrückt wird (dies gilt auch bei laufendem Metronom)
oder 30 Minuten nach der Beendigung der Wiedergabe eines Tracks.
S. 6
S. 12
–
–
Die Audio-Signalwege
Integriertes
Mikrofon
[MIC VOLUME]Schalter
Tonhöhenerkennung
OUTPUT/
PHONES-Buchse
Gesangsanteil des
Tracks (nur bei einigen
voreingestellten Tracks)
Aufgenommen
Track
Tonhöhenerkennung
[VOLUME]Regler
Überprüfen der Tonhöhe
Bei der Wiedergabe eines Tracks
Begleitsanteil
des Tracks
Integrierter Lautsprecher
Üben
* Der Ton des integrierten Mikrofons wird nicht über den integrierten Lautsprecher ausgegeben.
Bei der Wiedergabe (Überprüfung) des aufgenommenen Klangs
Tonhöhenerkennung
Aufgenommener Klang
Gesangsanteil des
Tonhöhenerkennung
Tracks (nur bei einigen
voreingestellten Tracks)
[VOLUME]Regler
Metronom
Track
OUTPUT/
PHONES-Buchse
Begleitsanteil des Tracks
Integrierter Lautsprecher
Bei der Aufnahme eines Liedes
OUTPUT/
PHONES-Buchse
REC IN-Buchse
Wiedergabe über das externe
Audiogerät
[VOLUME]Regler
ENG
DEU
FRA
ITA
ESL
Aufgenommen
POR
Benutzerdefinierter Track
Integrierter Lautsprecher
17
NLD
Technische Daten
Roland VT-12: Gesangstrainer
Stimmgerät
Stimmbereich
C2 (65,4 Hz)–A5 (880,0 Hz)
Stimmgenauigkeit
+/-1 Cent
Referenzton
Referenztonhöhe: A4 = 415–465 Hz (in Schritten von 1 Hz)
Bereich des Referenztons: A3–G#5 (24 Töne der chromatischen Tonleiter)
Metronom
Tempo
30–250, Genauigkeit: +/-0,1 %
Benutzerdefinierte Tracks
Track-Länge
Maximal 10 Minuten (pro Track)
Anzahl der Tracks
Maximal 10 Tracks
Eingang/Ausgang
Nomineller Eingangspegel
REC IN-Buchse: 0 dBu
Eingangsimpedanz
REC IN-Buchse: 9,5 kOhm
Ausgangspegel
OUTPUT/PHONES-Buchse: 15 mW + 15 mW (bei einer Last von 16 Ohm)
Empfohlener Lastwiderstand Mindestens 16 Ohm
Weitere
Lautsprecher
Mono
Anschlüsse
OUTPUT/PHONES-Buchse (Stereo-Miniklinke)
REC IN-Buchse (Stereo-Miniklinke)
DC-IN-Buchse
Display
7 Segmente, 3 Zeichen (LED)
Tonhöhenanzeige
Stromversorgung
2 Alkalibatterien (AA, LR6) oder Ni-MH-Akkus (AA, HR6),
Netzadapter (PSB-6U, separat erhältlich)
Stromverbrauch
380 mA
Voraussichtliche
Batterielebensdauer bei
Dauernutzung
Alkalibatterien (AA, LR6): ca. 6 Stunden
* Je nach Batteriespezifikationen und den tatsächlichen
Verwendungsbedingungen kann es zu Abweichungen von diesen Angaben
kommen.
Abmessungen
70 (B) x 134 (T) x 28 (H) mm
Gewicht
ca. 150 g (einschließlich Batterien)
Mitgeliefertes Zubehör
2 Alkalibatterien (AA, LR6)
DoReMi-Scheibe
Bedienungsanleitung
Übungshandbuch
Track-Liste
Zusätzliches Zubehör
(separat erhältlich)
Tragetasche (OP-RP1)
Netzadapter (PSB-6U)
* Achten Sie beim Kauf eines Netzadapters (aus der folgenden Liste) darauf,
dass dieser für die Region und die Spannung vorgesehen ist, in der er
verwendet wird. (PSB6U-120/PSB6U-230EU/PSB6U-230UK/PSB6U-240A)
(Sets bestehend aus PSB-6U und Netzkabel).
* 0 dBu = 0,775 Vrms
* Änderungen der technischen Daten und/oder des Designs sind möglich und bedürfen keiner
besonderen Ankündigung. Für Druckfehler wird keine Haftung übernommen.
18
SICHERER
BETRIEB DES GERÄTS
SICHERHEITSHINWEISE
Hinweise zur Vermeidung von Feuer, elektrischen Schlägen oder Verletzungen von Personen
WARNUNG
VORSICHT
Diese Warnungen sollen auf die Gefahren
hinweisen, die bei unsachgemäßem
Gebrauch des Gerätes bestehen.
Dieses Zeichen wird verwendet, um auf
das Risiko von Verletzungen oder
Materialschäden hinzuweisen, die bei
unsachgemäßem Gebrauch des Gerätes
entstehen können.
* Die o.g. Faktoren beziehen sich sowohl
auf häusliches Inventar als auch auf
Haustiere.
WARNUNG
Dieses Symbol macht auf wichtige Hinweise und
Warnungen aufmerksam. Das Zeichen im Dreieck gibt
eine genaue Definition der Bedeutung (Beispiel: Das
Zeichen links weist auf allgemeine Gefahren hin).
Dieses Symbol weist auf Dinge hin, die zu unterlassen
sind. Das Symbol im Kreis definiert dieses Verbot
näher (Beispiel: Das Zeichen links besagt, dass das
Gerät nicht geöffnet bzw. auseinandergenommen werden
darf.)
Dieses Symbol weist auf Dinge hin, die zu tun sind.
Das Symbol im Kreis definiert diese Aktion näher
(Beispiel: Das Zeichen links besagt, dass der
Netzstecker des Gerätes aus der Steckdose zu ziehen
ist).
WARNUNG
Nicht selbst auseinanderbauen oder modifizieren
Nicht auf instabilen Flächen aufstellen
Öffnen Sie das Gerät oder den
Netzadapter nicht, und verändern Sie
diese in keiner Weise.
Stellen Sie sicher, dass das Gerät stets
eben und stabil steht. Platzieren Sie es
nicht auf instabilen Ständern oder auf
schiefen Standflächen.
Nicht selbst reparieren oder Teile austauschen
Versuchen Sie nicht, das Gerät zu
reparieren oder darin enthaltene Teile
auszutauschen (außer in Fällen, für die in
dieser Anleitung genaue Anweisungen
erteilt werden). Wenden Sie sich bei
allen Reparaturen an Ihren Fachhändler,
ein Roland-Service-Center in Ihrer
Nähe oder an einen der autorisierten
Roland-Vertriebspartner, die auf der Seite
„Informationen“ aufgeführt sind.
Das Gerät nicht unter den folgenden
Umgebungsbedingungen verwenden oder lagern
Extreme Temperaturen (z.B. direktes
Sonnenlicht in einem geschlossenen
Fahrzeug, in der Nähe einer
Heizungsleitung, auf Wärmequellen)
• Feuchtigkeit (z.B. Bäder, Waschräume, nasse
Fußböden)
• Dampf oder Rauch
• Hoher Salzgehalt in der Luft
• Hohe Luftfeuchtigkeit
• Regen
• Staub oder Sand
• Starke Vibrationen oder Erschütterungen
Nur den angegebenen Netzadapter und die richtige
Spannung verwenden
Verwenden Sie ausschließlich den
angegebenen Netzadapter (PSB-6U),
und achten Sie darauf, dass die
Netzspannung mit der auf dem
Netzadapter angegebenen
Betriebsspannung übereinstimmt.
Andere Netzadapter verwenden
möglicherweise umgekehrte
Polarität oder sind für andere
Spannungen ausgelegt, daher kann
deren Verwendung zu Schäden,
Fehlfunktionen oder elektrischen
Schlägen führen.
Ausschließlich das mitgelieferte Netzkabel verwenden
Verwenden Sie ausschließlich
das angebrachte Netzkabel. Das
mitgelieferte Netzkabel darf nicht für
andere Geräte eingesetzt werden.
Das Netzkabel nicht übermäßig biegen und keine
schweren Gegenstände darauf abstellen
ENG
DEU
Verdrehen oder biegen Sie das Netzkabel
nicht zu stark, und stellen Sie keine
schweren Gegenstände darauf. Dadurch
kann das Kabel beschädigt werden, was
zu Unterbrechungen und Kurzschlüssen
führen kann. Schadhafte Kabel können
Brände und elektrische Schläge
verursachen!
FRA
ITA
ESL
POR
NLD
19
WARNUNG
Hohe Lautstärke über längere Zeit vermeiden
Dieses Gerät kann einzeln oder in
Kombination mit einem Verstärker und
Kopfhörern/Lautsprechern Schallpegel
erzeugen, die zu dauerhaftem
Gehörverlust führen können. Betreiben
Sie das Gerät nicht über längere Zeit mit
hoher oder unangenehmer Lautstärke.
Sobald Sie eine Beeinträchtigung Ihres
Gehörs oder ein Klingeln in den Ohren
bemerken, sollten Sie den Betrieb des
Geräts sofort einstellen und sich an
einen HNO-Arzt wenden.
Weder Fremdkörper noch Flüssigkeiten in das Gerät
eindringen lassen
Achten Sie darauf, dass in das Gerät keine
Fremdkörper (z.B. brennbare Objekte,
Münzen oder Drähte) oder Flüssigkeiten
(z.B. Wasser oder Saft) eindringen. Dies
kann zu Kurzschlüssen, Fehlfunktion
oder sonstigen Störungen führen.
Das Gerät bei unnormalem Verhalten oder Fehlfunktion
abschalten
Wenn einer der folgenden Fälle eintritt,
schalten Sie das Gerät unverzüglich
aus, ziehen Sie den Netzadapter aus
der Steckdose, und wenden Sie sich an
Ihren Fachhändler, ein Roland-ServiceCenter in Ihrer Nähe oder an einen der
autorisierten Roland-Vertriebspartner,
die auf der Seite „Informationen“
aufgeführt sind:
• Der Netzadapter, das Netzkabel oder
der Stecker wurde beschädigt.
• Rauch oder ein ungewöhnlicher
Geruch tritt auf.
• Gegenstände oder Flüssigkeiten sind in
das Gerät gelangt.
• Das Gerät war Regen (oder sonstiger
Feuchtigkeit) ausgesetzt.
• Das Gerät scheint nicht normal
zu funktionieren oder weist
eine deutliche Änderung der
Leistungsfähigkeit auf.
Kinder müssen durch Erwachsene beaufsichtigt werden
Wenn das Gerät in der Gegenwart
von Kindern verwendet wird, achten
Sie darauf, dass das Gerät nicht
unsachgemäß bedient wird. Es sollten
immer beaufsichtigende Erwachsene
anwesend sein.
20
WARNUNG
Nicht fallen lassen oder starken Stößen aussetzen
Schützen Sie das Gerät vor starken
Stößen.
(Lassen Sie es nicht fallen!)
Keine übermäßige Anzahl von Geräten an einer
einzigen Steckdose betreiben
Betreiben Sie den Netzadapter
nicht zusammen mit einer zu
großen Anzahl von Geräten an einer
einzigen Netzsteckdose. Seien Sie
besonders vorsichtig beim Einsatz
von Verlängerungskabeln – die
Gesamtleistung aller an der Verlängerung
betriebenen Geräte darf die für das
Verlängerungskabel angegebene
zulässige Leistung (Watt-/Ampere-Zahl)
nicht überschreiten. Übermäßige Last
kann dazu führen, dass sich die Isolierung
erhitzt und ggf. schmilzt.
Nutzung des Gerätes im Ausland
Bevor Sie das Gerät in einem anderen
Land betreiben, wenden Sie sich an
Ihren Fachhändler, ein Roland-ServiceCenter in Ihrer Nähe oder an einen der
autorisierten Roland-Vertriebspartner,
die auf der Seite „Informationen“
aufgeführt sind.
Batterien vorsichtig behandeln
• Sie dürfen Batterien, Akkus oder
Akkuladegeräte niemals neu aufladen,
erhitzen, in ihre Einzelteile zerlegen
oder in Feuer oder Wasser werfen.
• Setzen Sie Batterien, Akkus oder das
Akkuladegerät keiner übermäßigen
Hitze aus, wie z.B. Sonnenlicht, Feuer o.ä.
• Eine unsachgemäße Handhabung
von Batterien, Akkus oder
Akkuladegeräten kann zu
Undichtigkeiten, Überhitzung, Feuer
und Explosionen führen. Lesen Sie vor
der Verwendung alle den Batterien,
Akkus oder Akkuladegeräten
beigefügten Sicherheitshinweise, und
beachten Sie diese genau.
• Wenn Sie Akkus und ein Ladegerät
verwenden, verwenden Sie
ausschließlich die vom Akkuhersteller
angegebene Kombination aus Akkus
und Ladegerät.
VORSICHT
In gut belüfteten Räumen verwenden
Das Gerät und der Netzadapter sollten
so aufgestellt werden, dass Aufstellort
und Position nicht die erforderliche
Luftzufuhr beeinträchtigt.
Beim Anschließen oder Trennen des Netzadapters
am Stecker greifen
Halten Sie das Netzkabel des
Netzadapters stets am Stecker, wenn
Sie diesen in eine Steckdose oder in das
Gerät stecken oder ihn herausziehen.
Den Stecker des Netzadapters regelmäßig reinigen
Sie sollten in regelmäßigen Abständen
den Netzadapter aus der Steckdose
herausziehen und die Kontakte am
Stecker mit einem trockenen Tuch von
Staub und anderen Ablagerungen
befreien. Ziehen Sie den Netzstecker auch
dann aus der Steckdose, wenn das Gerät
längere Zeit außer Betrieb ist. Jegliche
Staubansammlung zwischen Netzstecker
und Steckdose kann die Isolierung
beeinträchtigen und zu Bränden führen.
Kabel sicher verstauen
Sorgen Sie dafür, dass sich die Kabel
und Leitungen nicht verdrehen oder
verheddern. Achten Sie außerdem
darauf, dass sich jegliche Kabel und
Leitungen außerhalb der Reichweite
von Kindern befinden.
Nicht auf das Gerät steigen und keine schweren Objekte
auf diesem abstellen
Steigen Sie niemals auf das Gerät, und
stellen Sie keine schweren Gegenstände
darauf ab.
Den Netzadapter nicht mit nassen Händen berühren
Fassen Sie den Netzadapter oder seine
Netzkabel niemals mit nassen Händen
an, wenn Sie ihn in eine Steckdose
oder in das Gerät einstecken oder ihn
herausziehen.
Vor dem Bewegen des Geräts alle Verbindungen
trennen
Bevor Sie das Gerät bewegen, ziehen Sie
den Netzadapter sowie alle Kabel von/
zu externen Geräten heraus.
Vor dem Reinigen den Netzadapter trennen
Bevor Sie das Gerät reinigen, schalten
Sie es aus, und ziehen Sie den
Netzadapter aus der Steckdose (S. 7).
VORSICHT
Bei heraufziehendem Gewitter den Netzadapter von der
Steckdose trennen
Bei angekündigtem oder
heraufziehendem Gewitter sollten
Sie immer den Netzadapter aus der
Steckdose ziehen.
Batterien vorsichtig behandeln
Bei falscher Handhabung können
Batterien explodieren oder auslaufen und
Schäden oder Verletzungen verursachen.
Lesen und beachten Sie daher im
Interesse der Sicherheit die folgenden
Vorsichtsmaßnahmen (S. 8).
• Befolgen Sie sorgfältig die
Installationsanweisungen für die
Batterien, und achten Sie auf die
richtige Polarität.
• Vermeiden Sie es, neue Batterien
zusammen mit alten bzw. gebrauchten
Batterien zu verwenden. Vermeiden
Sie auch das Mischen von Batterien
verschiedener Sorten bzw. Typen.
• Nehmen Sie die Batterien aus dem
Gerät heraus, wenn dieses längere Zeit
nicht benutzt wird.
• Bewahren Sie Batterien nicht
zusammen mit metallischen
Gegenständen wie Kugelschreibern,
Halsketten, Haarnadeln usw. auf.
• Gebrauchte Batterien müssen gemäß
den gesetzlichen Bestimmungen Ihrer
Region entsorgt werden.
Undichte Batterien vorsichtig behandeln
• Wenn aus einer Batterie Flüssigkeit
austritt, berühren Sie diese nicht mit
den bloßen Händen.
• Wenn diese Flüssigkeit in die Augen
gelangt, kann dies zum Erblinden
führen. Reiben Sie nicht die Augen,
sondern spülen Sie sie gründlich
mit sauberem Wasser. Suchen Sie
anschließend unverzüglich einen Arzt
auf.
• Wenn Batterieflüssigkeit in Kontakt
mit der Haut oder Kleidung gelangt,
kann dies zu Hautverbrennungen
oder Hautentzündung führen. Spülen
Sie die betroffenen Stellen gründlich
mit sauberem Wasser, und suchen Sie
unverzüglich einen Arzt auf.
• Wischen Sie sorgfältig restliche
Batterieflüssigkeit aus dem
Batteriefach. Legen Sie dann neue
Batterien ein.
ENG
DEU
FRA
ITA
ESL
POR
NLD
21
WICHTIGE HINWEISE
Stromversorgung
• Schließen Sie das Gerät niemals an die gleiche
Netzsteckdose wie andere elektrische Geräte
an, die mit einem Wechselrichter betrieben
werden (z.B. Kühlschrank, Waschmaschine,
Mikrowellenherd oder Klimaanlage) oder einen
Motor enthalten. Je nach der Art und Weise, in
der das elektrische Gerät verwendet wird, können
die von diesem erzeugten Interferenzen in der
Netzversorgung zu Fehlfunktionen oder hörbaren
Störgeräuschen führen. Wenn es nicht möglich
ist, eine gesonderte Steckdose zu verwenden,
schalten Sie einen Netzentstörfilter zwischen
dieses Gerät und die Netzsteckdose.
• Der Netzadapter wird nach andauerndem
mehrstündigem Gebrauch recht warm. Dies
ist normal und kein Grund zur Beunruhigung.
• Schalten Sie zur Vermeidung von Fehlfunktionen
und Geräteschäden immer alle Geräte aus, bevor
Sie Verbindungen herstellen.
• Dieses Gerät schaltet sich automatisch aus, wenn
für 30 Minuten keine Taste gedrückt wird (dies gilt
auch bei laufendem Metronom) oder 30 Minuten
nach der Beendigung der Wiedergabe eines Tracks.
Stromversorgung: Verwendung von Batterien
• Beim Einsetzen oder Austauschen der Batterien
sollten Sie dieses Gerät immer ausschalten
und die Verbindungen zu jeglichen anderen
angeschlossenen Geräten trennen. Auf diese Weise
vermeiden Sie Fehlfunktionen und Beschädigungen.
• Die Lebensdauer der mitgelieferten Batterien
kann eingeschränkt sein, da ihr Hauptzweck darin
besteht, Produkttests zu ermöglichen.
• Wenn Sie dieses Gerät mit Batterien betreiben,
verwenden Sie entweder Alkalibatterien oder
Ni-MH-Akkus.
• Trennen Sie den Netzadapter vom Gerät, wenn
Sie es mit Batterien betreiben.
• Auch bei eingelegten Batterien wird das Gerät
ausgeschaltet, wenn Sie das Netzkabel an den
Netzanschluss anschließen oder von diesem
trennen oder wenn Sie den Netzadapter
anschließen oder trennen, während das Gerät
eingeschaltet ist.
Wartung
• Zur regelmäßigen Reinigung wischen Sie das
Gerät mit einem weichen, trockenen oder leicht
angefeuchteten Tuch ab. Um hartnäckigen Schmutz
zu entfernen, verwenden Sie ein mit einer milden,
nicht scheuernden Reinigungslösung getränktes
Tuch. Wischen Sie danach sorgfältig mit einem
weichen trockenen Tuch nach.
22
• Verwenden Sie kein Benzin oder Verdünnungsmittel,
Alkohol oder sonstige Lösemittel, um Verfärbungen
und/oder Verformungen zu vermeiden.
Aufstellung
• Der Einsatz des Geräts in der Nähe von
Leistungsverstärkern (oder anderen Geräten mit
großen Transformatoren) kann ein Brummen
verursachen. Um dieses Problem zu umgehen,
ändern Sie die Ausrichtung dieses Geräts,
oder stellen Sie es in größerer Entfernung zur
Störquelle auf.
• Dieses Gerät kann den Empfang von Radio- und
Fernsehsignalen stören. Verwenden Sie dieses
Gerät nicht in der Nähe solcher Empfangsgeräte.
• Es können Geräusche entstehen, wenn Geräte zur
drahtlosen Kommunikation wie z.B. Mobiltelefone
in der Umgebung dieses Geräts verwendet
werden. Diese Geräusche können beim Starten
eines Anrufs oder beim Auflegen oder während
der Verbindung entstehen. Sollten Sie Probleme
dieser Art haben, verwenden Sie die MobilfunkGeräte in größerer Entfernung zu diesem Gerät,
oder schalten Sie sie aus.
• Setzen Sie das Gerät keinem direkten Sonnenlicht
aus, stellen Sie es nicht neben Heizgeräten auf,
lassen Sie es nicht in einem geschlossenen
Fahrzeug liegen, und setzen Sie es auch sonst
keinen extremen Temperaturen aus. Übermäßige
Hitze kann zu Verformungen oder Verfärbungen
des Geräts führen.
• Wenn das Gerät von einer Umgebung in eine
andere mit sehr unterschiedlicher Temperatur
und/oder Luftfeuchtigkeit transportiert wird,
können sich Wassertröpfchen (Kondensation) im
Geräteinneren bilden. Es können Schäden oder
Fehlfunktionen auftreten, falls Sie versuchen,
das Gerät unter diesen Bedingungen zu
betreiben. Bevor Sie das Gerät verwenden, lassen
Sie es mehrere Stunden lang stehen, bis die
Kondensation vollständig verdampft ist.
• Je nach Material und Temperatur der Fläche,
auf der Sie das Gerät abstellen, können sich die
Gummifüße des Geräts verfärben oder auf der
Fläche Spuren hinterlassen.
Sie können dies verhindern, indem Sie ein Stück
Filz unter die Gummifüße legen. Achten Sie in
diesem Fall jedoch darauf, dass das Gerät nicht
wegrutschen kann.
• Stellen Sie keine Wasser enthaltenden
Gegenstände auf das Gerät. Vermeiden Sie
außerdem die Verwendung von Insektiziden,
Parfüm, Alkohol, Nagellack, Spraydosen usw. in
der Nähe des Geräts. Nehmen Sie schnell alle
Flüssigkeiten, die auf das Gerät gelangen, mit
einem trockenen, weichen Tuch auf.
Reparaturen und Daten
Urheberrecht/Lizenz/Marke
• Beachten Sie, dass im Gerät gespeicherte Daten
bei Reparaturen verloren gehen können. Roland
übernimmt für solche Datenverluste keine
Haftung.
• Es ist gesetzlich verboten, von urheberrechtlich
geschützten Materialien eines Dritten
(z.B. musikalischen Werken, visuellen Werken,
Ausstrahlungen oder Live-Auftritten) in Teilen
oder als Ganzes ohne Genehmigung des
Urheberrechteigners Ton- oder Videoaufnahmen
anzufertigen, diese zu kopieren oder zu verändern
und sie zu verbreiten, zu verkaufen, zu verleihen,
aufzuführen oder zu senden.
Zusätzliche Vorsichtsmaßnahmen
• Beachten Sie, dass der Speicherinhalt aufgrund
einer Fehlfunktion oder unsachgemäßen Bedienung
des Geräts unwiederbringlich verloren gehen kann.
• Seien Sie hinreichend vorsichtig bei Betätigung
der Tasten, Regler und anderer Bedienelemente
sowie beim Anschließen von Kabeln an den
Buchsen des Geräts. Ein grober Umgang kann
zu Fehlfunktionen führen.
• Verwenden Sie dieses Produkt nicht auf eine Weise,
die das Urheberrecht Dritter verletzen könnte.
Roland übernimmt keinerlei Verantwortung für
eine Verletzung des Urheberrechts Dritter bei Ihrer
Verwendung des Produkts.
• Käufer dieses Produkts sind NICHT berechtigt,
die benannten Inhalte in ursprünglicher oder
modifizierter Form zu extrahieren, um Medien mit
diesen Inhalten zu verteilen oder diese in einem
Computernetzwerk zur Verfügung zu stellen.
• Greifen Sie Kabel beim Trennen stets am Stecker.
Ziehen Sie niemals am Kabel. Auf diese Weise
vermeiden Sie Kurzschlüsse und Schäden an den
inneren Bestandteilen der Kabel.
• MMP (Moore Microprocessor Portfolio) bezieht
sich auf ein Patent-Portfolio aus dem Bereich der
Mikroprozessor-Architektur, das von Technology
Properties Limited (TPL) entwickelt wurde. Roland
hat diese Technologie von der TPL Group lizenziert.
• Halten Sie die Lautstärke des Geräts auf einem
vernünftigen Maß, um die Nachbarschaft nicht
unnötig zu stören. Sie können Kopfhörer verwenden,
um Ihre Mitmenschen nicht zu beeinträchtigen.
• Einige Anschlusskabel enthalten Widerstände.
Verwenden Sie für Anschlüsse an diesem Gerät
keine Kabel mit Widerständen. Die Verwendung
solcher Kabel kann dazu führen, dass der
Signalpegel sehr niedrig oder sogar unhörbar ist.
Informationen über die technischen Daten Ihrer
Kabel erhalten Sie vom jeweiligen Hersteller.
• Dieses Produkt verwendet eCROS-integrierte
Software der eSOL Co.Ltd.eCROS ist ein
Warenzeichen der eSOL Co.Ltd. in Japan.
• Die in diesem Dokument genannten
Unternehmens- und Produktnamen sind
eingetragene Marken bzw. Marken ihrer
jeweiligen Eigentümer.
Zurücksetzen auf die Werkseinstellungen
So setzen Sie das VT-12 auf die Werkseinstellungen zurück:
* Dadurch werden alle aufgenommenen Klänge und Tracks gelöscht.
* Wenn die Batteriespannung unzureichend ist (im Display wird „ “ angezeigt), können die
Werkseinstellungen nicht wiederhergestellt werden. In diesem Fall müssen Sie die Batterien
durch neue ersetzen oder den Netzadapter verwenden. Anschließend können Sie mit der
Wiederherstellung der Werkseinstellungen fortfahren.
1. Halten Sie die Tasten [
Gerät ein.
], [ ] und [
] gleichzeitig gedrückt, und schalten Sie das
ENG
Auf dem Display wird „Factory reset“ angezeigt.
Um den Vorgang abzubrechen, drücken Sie entweder die Taste [
2. Drücken Sie die [
DEU
], [WARM-UP] oder [EXERCISE].
FRA
]-Taste.
ITA
Das VT-12 wird auf die Werkseinstellungen zurückgesetzt.
* Schalten Sie das Gerät nicht aus, während in der Tonhöhenanzeige
abwechselnd leuchten.
ESL
und
POR
NLD
23
ENG
DEU
FRA
ITA
ESL
POR
NLD
Explorer vos capacités
Le VT-12 est l’outil idéal pour vous aider à améliorer vos performances vocales.
Vous pouvez utiliser le VT-12 en toute occasion et où vous le souhaitez, en vous entraînant seul ou en
groupe, chez vous ou dans un studio.
Vérification de la hauteur de note
Le VT-12 peut détecter la hauteur de note non seulement d’une voix, mais
également de deux voix.
Lorsque vous chantez en harmonie avec une autre personne, vous pouvez
vérifier que vous chantez tous deux à la bonne hauteur.
Utilisation comme métronome
Le VT-12 peut fournir un son de référence qui vous aidera à garder le tempo
correct lorsque vous chantez seul, ou lorsque vous pratiquez a cappella ou au
sein d’un groupe vocal.
2
Vérification de la hauteur de note
Entraînement vocal
Le VT-12 vous permet de vous échauffer la voix ou de pratiquer des exercices
vocaux de manière efficace. Vous pouvez utiliser les morceaux inclus pour
pratiquer des vocalises avant une chorale ou une performance sur scène,
ou encore les utiliser pour affiner votre technique et votre expression vocales.
Entraînement vocal
Utilisation du métronome
ENG
DEU
Présentation des morceaux
FRA
ITA
Le VT-12 est livré avec des morceaux que vous pouvez utiliser lors de vos exercices
(échauffement de la voix et exercices). En plus des morceaux inclus, vous pouvez
également enregistrer vos propres chansons favorites (p. 14).
ESL
POR
NLD
3
Table des matières
Explorer vos capacités. . . . . . . . . . . . . . . . . . . . . . . . . . . . . 2
Description de l’appareil . . . . . . . . . . . . . . . . . . . . . . . . . . 5
Panneau supérieur. . . . . . . . . . . . . . . . . . . . . . . . . . . . . . 5
Panneau latéral
(branchement de votre équipement). . . . . . . . . . . . . 6
Avant d’utiliser le VT-12. . . . . . . . . . . . . . . . . . . . . . . . . . . 8
Installation des piles. . . . . . . . . . . . . . . . . . . . . . . . . . . . . 8
Mise sous tension de l’appareil . . . . . . . . . . . . . . . . . . 9
Utilisation de la fiche DoReMi. . . . . . . . . . . . . . . . . . . . 9
Conseils d’utilisation du VT-12. . . . . . . . . . . . . . . . . . 10
Utilisation du pied. . . . . . . . . . . . . . . . . . . . . . . . 10
Vérification de la hauteur de note. . . . . . . . . . . . . . . . . 11
Entraînement vocal. . . . . . . . . . . . . . . . . . . . . . . . . . . . . . 13
Enregistrement et pratique d’un morceau favori. . 14
Utilisation du métronome. . . . . . . . . . . . . . . . . . . . . . . . 15
Dépannage. . . . . . . . . . . . . . . . . . . . . . . . . . . . . . . . . . . . . . 16
Flux audio. . . . . . . . . . . . . . . . . . . . . . . . . . . . . . . . . . . . . . . 17
Principales caractéristiques techniques . . . . . . . . . . . 18
CONSIGNES DE SÉCURITÉ. . . . . . . . . . . . . . . . . . . . . . . . . 19
REMARQUES IMPORTANTES. . . . . . . . . . . . . . . . . . . . . . 22
Avant d’utiliser cet appareil, veuillez lire attentivement les sections intitulées : « CONSIGNES DE SÉCURITÉ » (p. 19)
et « REMARQUES IMPORTANTES » (p. 22). Ces sections fournissent d’importantes informations relatives au bon
fonctionnement de l’appareil. Nous vous invitons également à lire le Mode d’emploi dans son intégralité pour vous
familiariser avec chacune des fonctionnalités de votre nouvel appareil. Vous devez conserver ce manuel sous la main afin
de pouvoir vous y reporter au besoin.
Copyright © 2012 ROLAND CORPORATION
Tous droits réservés. Aucune partie de cette publication ne peut être reproduite sous quelque forme que ce soit sans
l’autorisation écrite de ROLAND CORPORATION.
Roland est une marque déposée de Roland Corporation aux États-Unis et/ou dans d’autres pays.
4
Description de l’appareil
Vérification de la hauteur de note
Panneau supérieur
Témoin de hauteur de note
p. 11
Montre la note juste ou le défaut de
justesse dans votre vocalisation.
Enceinte interne
Le son de référence, le son du
métronome et les morceaux sont
joués à partir de cette enceinte.
Microphone interne
Utilisez le microphone
pour vérifier votre voix ou
l’enregistrer.
Boutons [ ] [ ]
p. 11
Cet écran affiche des
informations telles que le
numéro de morceau sélectionné
ou le tempo du métronome.
Vous pouvez modifier le son
de référence en appuyant
simultanément sur le bouton
[ ] et le bouton [ ] (p. 12).
Boutons [
Bouton [
][
]
]
Utilisation du métronome
]
Bouton [REVIEW]
Utilisez ce bouton pour lancer/
arrêter le métronome ou le
morceau.
Bouton [
p. 11
Permet d’activer ou de désactiver
le son de référence. Le son de
référence est calibré sur les notes
à tempérament égal.
Utilisez ces boutons pour
modifier les réglages.
Bouton [
]
Entraînement vocal
Écran
Utilisez ces boutons pour
sélectionner le son de référence
que vous souhaitez écouter.
p. 15
Permet de sélectionner le
mode Métronome.
Permet de jouer le son enregistré
afin de vérifier vos performances.
Bouton [WARM-UP]
Permet de sélectionner le mode
Échauffement.
p. 13
Bouton [EXERCISE]
p. 13
Permet de sélectionner le mode
Exercice.
ENG
DEU
FRA
ITA
ESL
POR
NLD
5
Description de l’appareil
Panneau latéral (branchement de votre équipement)
Prise REC IN
p. 14
Vous pouvez connecter ici un périphérique
audio externe, par exemple un lecteur audio
ou un lecteur de radio/cassette, au moyen
d’un câble équipé d’une mini-prise stéréo.
Vous pouvez enregistrer vos chansons
favorites par l’intermédiaire de cette prise
et les utiliser lors de vos exercices.
Prise OUTPUT/PHONES
Vous pouvez raccorder
ici un casque ou une
enceinte externe
(vendus séparément).
Pour effectuer ce branchement, reliez cette
prise et la prise de sortie (par exemple la prise
casque) de votre périphérique audio externe
au moyen d’un câble.
Orifice pour dragonne
Vous pouvez fixer ici une dragonne
(disponible dans le commerce).
Commutateur de détection de note
p. 11
Ce commutateur sélectionne la méthode
de détection de note.
Commutateur [MIC VOLUME]
Ce commutateur permet de régler le volume du
microphone.
H : Volume élevé
L : Volume faible
OFF : Moniteur désactivé
* Si le commutateur est en position « OFF »,
la note ne peut pas être détectée.
6
Description de l’appareil
p. 9
Maintenez ce bouton enfoncé pour
mettre l’appareil sous/hors tension.
Vérification de la hauteur de note
Bouton [POWER]
Molette [VOLUME]
Permet de régler le volume de
l’enceinte interne ou du casque.
Entraînement vocal
Prise DC IN
Branchez ici l’adaptateur secteur (PSB-6U ;
vendu séparément).
* Utilisez uniquement l’adaptateur
secteur spécifié (PSB-6U) et raccordez-le
à une prise secteur de tension
correcte. N’utilisez aucun autre
adaptateur ; cela pourrait entraîner des
dysfonctionnements.
Positionnez l’adaptateur secteur de
telle sorte que le côté avec témoin
(voir illustration) soit dirigé vers le
haut, et le côté avec informations
textuelles soit dirigé vers le bas.
Le témoin s’allume lorsque vous
branchez l’adaptateur secteur sur une
prise secteur.
Utilisation du métronome
Précaution lors des branchements
• Pour éviter tout dysfonctionnement ou une panne de l’appareil, veillez à toujours baisser le volume et
à éteindre tous les appareils avant de procéder à des branchements.
ENG
• Si vous utilisez une enceinte externe, un effet Larsen (sifflement) peut se produire selon la position de
l’enceinte externe par rapport au microphone interne. Si ce phénomène se produit, prenez les mesures
suivantes.
1. Modifiez l’orientation du microphone interne.
2. Éloignez le microphone des enceintes externes.
3. Baissez le volume.
4. Réglez le commutateur [MIC VOLUME] sur la position « OFF ».
DEU
FRA
ITA
ESL
POR
NLD
7
Avant d’utiliser le VT-12
Installation des piles
Insérez les piles (deux piles AA) comme indiqué sur l’illustration, en veillant à observer la polarité
correcte.
Précautions d’utilisation des piles
• Lorsque les piles sont proches d’être épuisées,
l’écran indique « ». Vous devez alors installer
des piles neuves.
• Un mauvais usage des piles peut entraîner
une explosion ou une fuite, et provoquer des
dommages et des blessures. Pour une utilisation
sûre, veuillez lire et respecter les consignes
suivantes.
• Conformez-vous strictement aux instructions
d’installation des piles, et respectez la polarité
correcte.
• Évitez d’utiliser des piles neuves avec des piles
usées. Évitez également de mélanger différents
types de piles.
• Retirez les piles de l’appareil chaque fois que
ce dernier n’est pas utilisé pendant une longue
période.
• Ne conservez jamais les piles à proximité d’objets
métalliques, par exemple des stylos à billes, des
colliers, des épingles à cheveux, etc.
• Vous devez vous débarrasser des piles usagées
conformément aux réglementations de mise au
rebut en vigueur dans votre région.
8
• Une manipulation incorrecte des piles, des piles
rechargeables ou d’un chargeur de piles peut
provoquer une fuite, une surchauffe, un incendie ou
une explosion. Avant toute utilisation, vous devez lire
et respecter toutes les consignes afférentes aux piles,
aux piles rechargeables ou au chargeur de piles.
• Si vous utilisez des piles rechargeables et un
chargeur, utilisez uniquement la combinaison de
piles rechargeables et de chargeur spécifiée par le
fabricant de piles.
• Si vous utilisez l’appareil sur piles, utilisez des piles
alcalines ou des piles rechargeables Ni-MH.
• Si vous utilisez l’appareil sur piles, débranchez
l’adaptateur secteur de l’appareil.
• Même si les piles sont installées, l’appareil s’éteint
si vous connectez ou déconnectez le cordon
d’alimentation de la prise secteur pendant que
l’appareil est sous tension, ou si vous connectez
l’adaptateur secteur à l’appareil ou l’en déconnectez.
• Durée de vie prévue des piles en cas d’utilisation
continue :
Piles alcalines : 6 heures
* Ces données peuvent varier selon les caractéristiques
techniques des piles et les conditions d’utilisation.
Avant d’utiliser le VT-12
Vérification de la hauteur de note
Mise sous tension de l’appareil
* Une fois tous les branchements corrects effectués (p. 6), veuillez suivre la procédure ci-après
pour mettre l’appareil sous tension.
1
Entraînement vocal
2
Réglez la molette [VOLUME] sur la position
minimum.
Maintenez le bouton [POWER] enfoncé
jusqu’à ce que l’appareil s’allume.
Mises en garde concernant l’alimentation
Utilisation du métronome
• L’appareil s’éteint automatiquement dans les 30 minutes suivant la dernière opération sur un bouton
(y compris la durée pendant laquelle le métronome est actif), ou 30 minutes suivant la fin de la lecture
d’un morceau.
• Avant d’allumer ou d’éteindre l’appareil, veillez à toujours baisser le volume. Même si vous avez baissé le
volume, il se peut que vous entendiez des sons lors de la mise sous/hors tension de l’appareil. Ce phénomène
est toutefois normal et ne signale pas un dysfonctionnement.
• Cet appareil est équipé d’un circuit de protection. Il faut un bref intervalle (quelques secondes) après la mise
sous tension de l’appareil pour qu’il fonctionne normalement.
Utilisation de la fiche DoReMi
En apposant la fiche DoReMi fournie sur le témoin de hauteur de note, vous pouvez utiliser les
indications DoReMi pour vérifier le nom des notes.
Si vous souhaitez vérifier le nom des notes à l’aide d’un solfège « Do » amovible, apposez la fiche
DoReMi en positionnant le « Do » comme nom de la note de tonique que vous utilisez.
ENG
DEU
FRA
ITA
ESL
Fiche DoReMi
POR
* Avant d’utiliser la fiche DoReMi, veillez à retirer le papier de protection et la feuille protectrice bleue.
9
NLD
Avant d’utiliser le VT-12
Conseils d’utilisation du VT-12
Tenez le VT-12 dans votre main et chantez en adoptant la position indiquée sur l’illustration.
Utilisez un casque si vous souhaitez vérifier la justesse de votre note lors de la lecture d’un
morceau ou de l’utilisation du métronome.
L’utilisation d’un casque permet une détection plus précise de la note. Il vous aide également
à mieux entendre le son enregistré.
Utilisez le casque
Respectez une
distance
d’environ 30 cm
Tenez votre dos droit
MEMO
Si l’une des situations décrites ci-dessous se présente, vérifiez le réglage du commutateur
[MIC VOLUME] (p. 6).
• Le témoin de hauteur de note ne répond pas, ou ne répond pas comme attendu.
• Le volume sonore du microphone est bas.
Utilisation du pied
Vous pouvez utiliser le pied pour tenir droit le VT-12.
Si vous utilisez le VT-12 avec un groupe, le pied vous permet de placer facilement le VT-12 en
position verticale sur un bureau ou une table.
Il est conseillé dans ce cas de respecter une distance d’1 mètre entre le VT-12 et les chanteurs.
10
* Pour remettre le pied dans sa position d’origine, pliez-le vers l’intérieur jusqu’à ce qu’il
s’enclenche en place avec un déclic.
Vérification de la hauteur de note
1
Sélectionnez le type de détection de la hauteur de note.
MONO EQUAL : Une voix est détectée en utilisant
le tempérament égal.
CHORD EQUAL : Deux voix sont détectées en
utilisant le tempérament égal.
CHORD JUST : Deux voix sont détectées en
utilisant l’intonation juste (majeur).
Vérification de la hauteur de note
Votre première démarche consistera probablement à vérifier votre hauteur de note.
Le VT-12 est capable de vérifier la hauteur de note non seulement d’une voix, mais de deux voix à la fois,
ce qui facilite la vérification de la hauteur de note de deux personnes chantant en harmonie.
MEMO
2
Appuyez sur le bouton [
].
Avant de commencer vos vocalisations, jouez le son de référence
(à tempérament égal) pour entendre la note correcte.
Entraînement vocal
La tonalité de l’intonation juste est déterminée par la note la plus grave.
Si le VT-12 produit un son de référence, la tonalité est déterminée
par ce son de référence. Si un son de référence est produit, une
seule voix peut être détectée.
MEMO
Vous pouvez modifier le son de référence à l’aide du bouton
[ ] et [ ].
Vocalisez et vérifiez votre hauteur de note.
Utilisation du métronome
3
Vocalisez sur la note recherchée.
Le nom de la note la plus proche de la hauteur de note détectée s’allume.
La luminosité augmente à mesure que l’écart avec la note juste
diminue ; elle diminue si l’écart augmente.
Si un son de référence est en train d’être joué, le nom de note du son
de référence s’allume également.
Indique l’écart par rapport à la note.
Allumé :
Éteint :
La note est bémol
MONO EQUAL
La note est correcte
ENG
La note est dièse
* Si le témoin de hauteur de note
ne répond pas alors même que
vous êtes en train de faire des
vocalises, vérifiez le réglage du
commutateur [MIC VOLUME] (p. 6).
CHORD EQUAL
CHORD JUST
DEU
La note aiguë est bémol
relativement à la note grave
L’intervalle de note entre
les deux notes est correct
La note aiguë est dièse
relativement à la note grave
FRA
ITA
ESL
POR
NLD
11
Vérification de la hauteur de note
Modification de la hauteur de note de référence
1. Appuyez sur le bouton [
] et le bouton [ ] simultanément.
L’écran indique la hauteur de note de référence actuelle.
2. Utilisez les boutons [
][
] pour spécifier la hauteur de note de référence souhaitée.
Plage : 415–465 Hz (valeur par défaut : 440 Hz)
* Si vous n’effectuez aucune opération pendant une durée prédéterminée, l’indication du
diapason de référence disparaît, et l’appareil revient automatiquement au mode de vérification
de la hauteur de note.
3. Appuyez sur le bouton [
] et le bouton [ ] simultanément.
L’indication du diapason de référence disparaît, et l’appareil revient automatiquement au mode de
vérification de la hauteur de note.
* Pendant la lecture des morceaux pré-enregistrés, le diapason de référence est défini sur 440 Hz.
Qu’est-ce que l’intonation juste ?
L’intonation juste est une méthode d’accordage permettant d’atteindre des intervalles de
quinte et de tierce purs.
Si vous sélectionnez l’intonation juste, vous devez spécifier la tonique (pour une gamme
majeure, ce sera le Do) adaptée à la tonalité de votre morceau.
Le VT-12 assigne la plus grave des deux voix comme tonique.
Si un son de référence est en train d’être joué, il sera la tonique.
Hauteur de note dans l’intonation juste
Le VT-12 ne peut détecter des notes à intonation juste que dans une tonalité majeure.
Si le son de référence est Do, les hauteurs de note sont calculées à l’aide des ratios suivants.
Tempérament égal (cent)
Do#
Ré
Ré#
Mi
Fa
0
100
200
300
400
500
Intonation juste (cent)
0
71
204
316
386
498
Ratio
1
25/24
9/8
6/5
5/4
4/3
Tempérament égal (cent)
Intonation juste (cent)
Ratio
12
Do
Fa#
Sol
Sol#
La
La#
Si
600
700
800
900
1000
1100
569
702
773
884
1018
1088
25/18
3/2
25/16
5/3
9/5
15/8
Entraînement vocal
Mode Échauffement Contient des morceaux destinés à la pratique de vocalises conçues pour chauffer votre voix.
Mode Exercice
MEMO
Pour plus d’informations sur les exercices, veuillez vous référer au « Guide d’entraînement vocal »
séparé.
Ce guide fournit des conseils utiles sur les vocalisations et le chant, ainsi que des conseils
d’entraînement accompagnant chaque morceau.
* À chaque lecture de morceau, un nouvel enregistrement est démarré. Si vous lisez un morceau
qui a été précédemment enregistré, le son enregistré sur ce morceau sera écrasé. Si vous
interrompez la lecture d’un morceau dans les 3 secondes suivant son démarrage, le son ne sera
pas enregistré sur ce morceau.
Sélectionnez un mode
d’entraînement.
Le bouton du mode sélectionné s’allume.
2
Pour sélectionner un morceau,
utilisez le bouton [ ] [ ].
6
MEMO
• En appuyant plusieurs fois sur le bouton
du mode sélectionné, vous pouvez
basculer entre morceaux pré-enregistrés
et morceaux d’utilisateur.
• Si vous n’avez pas encore enregistré
un seul morceau d’utilisateur, l’écran
indique « U-- ».
• Pour plus de détails sur les morceaux,
référez-vous à la « Liste de morceaux »
séparée.
Appuyez sur le bouton [
La lecture du son enregistré démarre.
Si aucun son n’est enregistré, l’écran
indique « --- ».
MEMO
Selon le morceau que vous avez
sélectionné, appuyez sur le bouton
[REVIEW] pendant la lecture pour
activer ou désactiver le son de la
partie vocale du morceau.
].
La lecture du morceau démarre ainsi que
l’enregistrement du son.
4
Chantez en même temps
que le morceau.
Lorsque vous chantez, prêtez attention à vos
propres notes ainsi qu’aux notes du morceau en
cours de lecture.
5
Appuyez sur le bouton [
].
Utilisation du métronome
3
Appuyez sur le bouton
[REVIEW].
Entraînement vocal
1
Contient des morceaux conçus pour améliorer votre technique vocale, par exemple
renforcer votre maîtrise du souffle et étendre votre tessiture.
Vérification de la hauteur de note
Le VT-12 fournit deux modes d’entraînement : le mode Échauffement et le mode Exercice. Chaque
mode s’accompagne de morceaux (p. 3) adaptés au type d’entraînement correspondant.
Le son que vous produisez lors de vos exercices étant automatiquement enregistré sur les
morceaux correspondants, vous pouvez l’écouter après coup (fonction REVIEW).
La lecture du morceau et l’enregistrement du
son s’arrêtent.
Allumé : Notes que vous chantez
Clignote : Notes du morceau
* Sur certains morceaux (morceaux d’utilisateur
et certains morceaux pré-enregistrés),
l’appareil n’indique pas les notes en clignotant.
ENG
DEU
FRA
ITA
Morceaux pré-enregistrés et morceaux d’utilisateur
ESL
Le VT-12 inclut des morceaux pré-enregistrés (001–) intégrés pour chaque mode. Vous pouvez
également enregistrer des morceaux via la prise REC IN et les utiliser comme morceaux
d’utilisateur (U01–U10). (Les morceaux d’utilisateur sont communs aux deux modes.)
POR
NLD
13
Entraînement vocal
Enregistrement et pratique d’un morceau favori
Vous pouvez enregistrer vos morceaux favoris dans le VT-12 par l’intermédiaire de la prise REC IN
et les utiliser comme morceaux d’utilisateur.
Une chanson enregistrée peut être utilisée à la fois en mode Échauffement et en mode Exercice.
Longueur de morceau
10 minutes maximum (par morceau)
Nombre de morceaux
10 morceaux maximum
* Si vous sélectionnez un numéro de morceau précédemment enregistré et que vous enregistrez
dessus, la chanson précédemment enregistrée sera écrasée. Si vous arrêtez dans les 3 secondes
suivant le début de l’enregistrement, la chanson ne sera pas enregistrée.
* Une fois que vous avez fini d’enregistrer une chanson, vous devez débrancher le câble de la prise
REC IN. Le VT-12 n’effectue aucune autre opération tant qu’un câble est branché sur la prise REC IN.
1
Branchez votre
périphérique audio externe
sur la prise REC IN (p. 6).
8
Débranchez votre
périphérique audio
externe de la prise REC IN.
Essayez de vous exercer avec le
morceau d’utilisateur que vous avez
enregistré (p. 14).
L’écran indique alternativement
« rEc » et « U** » ; le VT-12 est prêt à
enregistrer la chanson.
2
Jouez la chanson sur votre
périphérique audio externe.
Réglez le volume du son à enregistrer.
Tout en surveillant la sortie du son
sur le haut-parleur interne ou via le
casque, réglez son volume à l’aide des
commandes du périphérique audio
externe.
3
4
Utilisez les boutons [ ] [ ]
pour spécifier le numéro de
piste sur lequel le morceau
doit être enregistré.
Appuyez sur le bouton
[REVIEW].
La lecture de la chanson enregistrée
commence.
Vérifiez que la chanson a été
correctement enregistrée. Si la
chanson n’a pas été enregistrée, l’écran
indique « --- ».
6
Appuyez sur le bouton
[
].
L’enregistrement s’arrête.
Appuyez sur le bouton
[
].
L’enregistrement démarre.
Pendant l’enregistrement, l’écran
indique « rEc » et le témoin de hauteur
de note s’allume.
14
7
5
Jouez la chanson sur
votre périphérique audio
externe.
MEMO
Si vous souhaitez supprimer les chansons que vous avez enregistrées, restaurez les réglages
usine du VT-12 (p. 23).
Utilisation du métronome
Le son est automatiquement enregistré pendant que le métronome est en marche. Vous pourrez
ainsi vous écouter après (fonction REVIEW).
* Un nouvel enregistrement démarre à chaque fois que vous activez le métronome.
L’enregistrement précédent est écrasé. Si vous arrêtez le métronome dans les 3 secondes,
le son ne sera pas enregistré.
* Vous pouvez enregistrer un maximum de 10 minutes en mode Métronome. Au terme de
10 minutes, l’enregistrement s’arrête. Le métronome continue de fonctionner même après
l’arrêt de l’enregistrement.
* Vous ne pouvez pas configurer la signature temporelle.
1
Appuyez sur le bouton [
].
Entraînement vocal
Le VT-12 passe en mode Métronome.
L’affichage indique la valeur de tempo
actuelle.
2
Pour régler le tempo, utilisez
les boutons [ ] [ ].
6
Plage : 30–250
MEMO
Vous pouvez également régler le
tempo en appuyant sur le bouton
[ ] au rythme souhaité (fonction
Tap Tempo).
Appuyez sur le bouton [
Appuyez sur le bouton
[REVIEW].
La lecture du son enregistré démarre.
La lecture s’arrête lorsque vous
].
appuyez sur le bouton [
].
Le métronome se met en marche et
l’enregistrement du son démarre.
Le bouton [ ] clignote en rythme avec le
tempo.
5
Utilisation du métronome
3
Appuyez sur le bouton
[
].
Le métronome et l’enregistrement du
son s’arrêtent.
MEMO
Vous pouvez également activer le
métronome pendant l’émission du son de
référence (p. 11).
4
Vérification de la hauteur de note
Vous souhaiterez peut-être vous entraîner en chantant sur le tempo du métronome.
Chantez en rythme avec le métronome.
Pendant vos exercices de chant, prêtez attention aux
notes que vous chantez.
ENG
DEU
Allumé : Le son de référence et la
note que vous chantez
FRA
ITA
ESL
POR
NLD
15
Dépannage
Problème
L’appareil ne s’allume pas
L’appareil ne s’éteint pas
Points à vérifier
Action
Les piles sont peut-être épuisées ? Insérez des piles neuves.
p. 8
L’adaptateur secteur spécifié
Revérifiez le branchement. N’utilisez
(PSB-6U ; vendu séparément) est-il jamais un adaptateur secteur autre
correctement connecté ?
que le modèle spécifié.
p. 7
« Err » s’affiche-t-il à l’écran ?
Vérifiez tout d’abord que tous les
morceaux sont arrêtés et que tous
les enregistrements de chanson
sont terminés. Vous pouvez ensuite
éteindre l’appareil.
Les branchements aux autres
périphériques sont-ils corrects ?
Revérifiez les branchements.
Le volume d’une enceinte externe Vérifiez les réglages du périphérique
connectée a peut-être été baissé ? connecté.
Pas de son/volume
insuffisant
Volume insuffisant de
l’enceinte interne
–
p. 6
–
La molette [VOLUME] est-elle
correctement réglée ?
Réglez le volume de manière
adéquate.
p. 7
Le commutateur [MIC VOLUME]
est-il correctement réglé ?
Sélectionnez le réglage approprié.
p. 6
Le casque est peut-être connecté ?
Si le casque est connecté, aucun son
ne peut sortir de l’enceinte interne.
Les piles sont peut-être épuisées ? Insérez des piles neuves.
Le niveau de volume de
Vous utilisez peut-être un câble
l’instrument connecté à la
de connexion contenant une
prise OUTPUT/PHONES est
résistance ?
trop bas.
Utilisez un câble de connexion sans
résistance.
p. 8
–
La molette [VOLUME] est-elle
correctement réglée ?
L’enregistrement s’arrête
lorsque vous enregistrez
une chanson
La durée d’enregistrement ne
Vous enregistrez peut-être depuis
peut pas excéder dix minutes (par
plus de dix minutes ?
chanson).
–
Volume insuffisant ou
son déformé dans une
chanson enregistrée
Enregistrez-vous au volume
adéquat ?
Réglez le volume sur le périphérique
audio externe.
–
Le commutateur [MIC VOLUME]
est-il correctement réglé ?
Sélectionnez le réglage approprié.
Pendant la lecture des
morceaux, les témoins de
hauteur de note et
s’allument fréquemment.
L’appareil s’éteint de
manière inattendue
Réglez le volume de manière
adéquate.
–
Le son est déformé
La hauteur de note
n’est pas détectée/une
opération inattendue
a lieu
16
Page
Vous essayez peut-être de
Pour vérifier la hauteur de note,
vérifier la hauteur de note dans un
choisissez une pièce peu bruyante.
endroit bruyant ?
Réglez-le sur une valeur appropriée.
Le réglage du diapason de
Pendant la lecture des morceaux
référence est-il approprié ?
pré-enregistrés, le diapason de
référence est défini sur 440 Hz.
Pour vous permettre de vérifier rapidement la hauteur de note pendant
la lecture des morceaux, les témoins de hauteur de note et s’allument
rapidement.
Si vous appuyez sur le bouton [REVIEW] pour lire les enregistrements, ces
témoins s'allument de manière normale.
L’appareil s’éteint automatiquement dans les 30 minutes suivant la
dernière opération sur un bouton (y compris la durée pendant laquelle
le métronome est actif ), ou 30 minutes suivant la fin de la lecture d’un
morceau.
p. 7
p. 6
–
p. 12
–
–
Flux audio
Vérification de la hauteur de note
Lors de la lecture d’un morceau
Microphone
interne
Commutateur
[MIC VOLUME]
Détection de
hauteur de note
Prise OUTPUT/
PHONES
Partie vocale du
morceau (uniquement
avec certains morceaux
pré-enregistrés)
Morceau
Molette
[VOLUME]
Partie d’accompagnement
du morceau
Enceinte interne
* Le son provenant du microphone interne ne sera pas produit par l’enceinte interne.
Lors de la lecture (vérification) du son enregistré
Entraînement vocal
Enregistré
Détection de
hauteur de note
Détection de
hauteur de note
Son enregistré
Détection de
hauteur de note
Molette
[VOLUME]
Partie d’accompagnement du morceau
Enceinte interne
Utilisation du métronome
Morceau
Partie vocale du
morceau (uniquement
avec certains morceaux
pré-enregistrés)
Prise OUTPUT/
PHONES
Lors de l’enregistrement d’une chanson
Prise OUTPUT/
PHONES
Prise REC IN
Lecture à partir du
périphérique audio externe
ENG
Molette
[VOLUME]
DEU
FRA
ITA
ESL
Enregistré
Morceau d’utilisateur
POR
Enceinte interne
17
NLD
Principales caractéristiques techniques
Roland VT-12 : Entraîneur vocal
Tuner
Plage d’accordage
C2 (65,4 Hz)–A5 (880,0 Hz)
Précision d’accordage
+/-1 cent
Tonalité de référence
Hauteur de note de référence : A4 = 415–465 Hz (par pas de 1 Hz)
Plage de tonalité de référence : A3–G#5 (24 notes dans la gamme
chromatique)
Métronome
Tempo
30–250, précision : +/-0,1 %
Morceau d’utilisateur
Longueur de morceau
10 minutes maximum (par morceau)
Nombre de morceaux
Nombre de morceaux : 10 morceaux maximum
Sortie/entrée
Niveau d’entrée nominal
Impédance d’entrée
Prise REC IN : 0 dBu
Prise REC IN : 9,5 k ohms
Niveau de sortie
Prise OUTPUT/PHONES : 15 mW + 15 mW (charge 16 ohms)
Impédance de charge
recommandée
Autres
16 ohms ou davantage
Enceinte
Mono
Connecteurs
Prise OUTPUT/PHONES (type téléphone miniature stéréo)
Prise REC IN (type téléphone miniature stéréo)
Prise DC IN
Écran
7 segments, 3 caractères (DEL)
Témoin de hauteur de note
Alimentation électrique
Pile alcaline (AA, LR6) ou pile rechargeable Ni-MH (AA, HR6) x 2,
adaptateur secteur (PSB-6U : vendu séparément)
Consommation
380 mA
Pile alcaline (AA, LR6) : environ 6 heures
Durée de vie prévue des piles
en cas d’utilisation continue * Ces données peuvent varier selon les caractéristiques techniques des piles
et les conditions d’utilisation.
Dimensions
70 (L) x 134 (P) x 28 (H) mm
Poids
150 g (piles comprises)
Pile alcaline (AA, LR6) x 2
Fiche DoReMi
Mode d’emploi
Guide d’entraînement vocal
Liste des morceaux
Pochette de transport (OP-RP1)
Adaptateur secteur (PSB-6U)
Accessoires
Options (vendues
séparément)
* Lorsque vous achetez un adaptateur secteur, veillez à spécifier l’adaptateur
(dans la liste suivante) adapté à la région d’utilisation et à la tension qui y est
fournie. (PSB6U-120/PSB6U-230EU/PSB6U-230UK/PSB6U-240A) (ensembles
contenant le PSB-6U et le cordon d’alimentation).
* 0 dBu=0,775 Vrms
* À des fins d’amélioration constante du produit, les caractéristiques techniques et/ou
l’apparence de cet appareil peuvent être modifiés sans préavis.
18
CONSIGNES DE SÉCURITÉ
AVERTISSEMENT
Ne démontez pas l’appareil et n’y apportez aucune
modification par vous-même
N’ouvrez pas (ni ne modifiez d’aucune
façon) l’appareil ou son adaptateur
secteur.
Ne réparez pas l’appareil et ne remplacez pas des pièces
par vous-même
N’essayez pas de réparer l’appareil ou
d’en remplacer des pièces (sauf si le
présent manuel fournit des instructions
spécifiques dans ce sens). Pour toute
opération de maintenance, prenez
contact avec votre revendeur, avec le
centre de service Roland le plus proche
ou avec un distributeur Roland agréé
(voir la page « Information »).
N’utilisez et ne stockez jamais l’appareil dans l’un des
emplacements suivants
exposé à des températures élevées (par
exemple lumière directe du soleil dans
un véhicule fermé, près d’un conduit
chauffé, sur un dispositif générateur de
chaleur) ;
• embué (par exemple salles de bains,
cabinets de toilettes, sur sols humides) ;
• exposé à la vapeur ou à la fumée ;
• exposé au sel ;
• humide ;
• exposé à la pluie ;
• poussiéreux ou sableux ;
• soumis à de fortes vibrations et secousses.
AVERTISSEMENT
Ne placez pas l’appareil sur une surface instable
Assurez-vous que l’appareil est toujours
placé sur une surface plane et qu’il est
stable. Ne le placez jamais sur un support
susceptible d’osciller ou sur des surfaces
inclinées.
Utilisez exclusivement l’adaptateur secteur spécifié et la
tension correcte
Utilisez exclusivement l’adaptateur secteur
spécifié (PSB-6U). Assurez-vous également
que la tension du secteur correspond à la
tension d’entrée indiquée sur l’adaptateur
secteur. Les autres adaptateurs secteur
pouvant utiliser une polarité différente
ou être réservés à une tension différente,
leur utilisation risque de provoquer des
dommages, des dysfonctionnements ou
une décharge électrique.
Utilisez exclusivement le cordon d’alimentation fourni
Utilisez exclusivement le cordon
d’alimentation fourni avec l’appareil.
De plus, le cordon d’alimentation fourni
ne doit pas être utilisé avec un autre
appareil.
Ne pliez pas le cordon d’alimentation et ne placez pas
d’objets lourds dessus
Ne tordez ni ne pliez le cordon
d’alimentation de manière excessive,
et ne placez pas d’objets lourds dessus.
Vous risqueriez de l’endommager et
de provoquer de graves dommages
ou des courts-circuits. Les cordons
endommagés présentent un risque
d’incendie et d’électrocution.
ENG
DEU
FRA
ITA
ESL
POR
NLD
19
AVERTISSEMENT
Évitez l’utilisation prolongée à volume élevé
Utilisé seul ou en association avec un
amplificateur et des casques stéréo
ou des haut-parleurs, cet appareil
peut produire des niveaux sonores
susceptibles d’entraîner une perte
auditive définitive. Ne travaillez pas
pendant longtemps à un niveau
de volume élevé ou à un niveau
inconfortable. Si vous constatez une
perte auditive ou des bourdonnements
d’oreille, vous devez immédiatement
cesser d’utiliser l’appareil et consulter
un spécialiste.
Ne laissez pas des objets étrangers ou des liquides
pénétrer dans l’appareil
Ne laissez jamais des objets étrangers
(par exemple, objets inflammables,
pièces, câbles) ou des liquides (par
exemple, de l’eau ou du jus) pénétrer
à l’intérieur du produit. Cette situation
pourrait entraîner des court-circuits,
un mauvais fonctionnement ou des
dysfonctionnements.
Mettez l’appareil hors tension en cas d’anomalie ou de
dysfonctionnement
Mettez immédiatement l’appareil
hors tension, débranchez l’adaptateur
secteur de la prise de courant
et demandez une opération de
maintenance à votre revendeur, au
centre de service Roland le plus proche,
ou à un distributeur Roland agréé
(voir la page « Information ») dans les
situations suivantes :
• l’adaptateur secteur, le cordon
d’alimentation ou la prise, sont
endommagés ;
• en cas de fumée ou d’odeur
inhabituelle ;
• des objets ou du liquide se sont
introduits dans l’appareil ;
• l’appareil a été exposé à la pluie (ou
s’est embué de quelque autre façon) ;
• l’appareil ne semble pas fonctionner
normalement ou vous notez
une modification notable des
performances.
Si des enfants sont présents, ils doivent être surveillés
par des adultes
Lors de l’utilisation de l’appareil dans
des lieux où des enfants sont présents,
prenez les précautions nécessaires pour
éviter toute mauvaise manipulation de
l’appareil. Un adulte doit toujours être
présent pour assurer la supervision et
l’assistance.
20
AVERTISSEMENT
Évitez de laisser tomber l’appareil ou de le soumettre à
des chocs importants
Protégez l’appareil des chocs
importants.
(Ne le laissez pas tomber !)
Ne branchez pas l’appareil sur une prise à laquelle sont
raccordés de nombreux appareils
Le cordon d’alimentation de l’appareil
ne doit pas partager une prise murale
à laquelle sont raccordés de nombreux
appareils. Soyez particulièrement
vigilant lorsque vous utilisez des
cordons prolongateurs : la puissance
totale utilisée par l’ensemble des
appareils reliés à la prise murale du
cordon prolongateur ne doit jamais
dépasser la puissance nominale (watts/
ampères) du cordon. Des charges
excessives peuvent provoquer un
réchauffement de l’isolation du cordon
et parfois même sa fonte.
N’utilisez pas l’appareil à l’étranger
Avant d’utiliser l’appareil dans un pays
étranger, prenez contact avec votre
revendeur, le centre de maintenance
Roland le plus proche ou un distributeur
Roland agréé (voir la liste dans la page
« Information »).
Manipulez les piles avec précaution
• Ne jamais recharger, chauffer,
ou démonter les piles, les piles
rechargeables ou un chargeur de piles,
ni les jeter dans l’eau ou dans le feu.
• Ne jamais exposer les piles, les piles
rechargeables ou un chargeur de
batterie à des températures élevées,
telles que les rayons directs du soleil,
un feu ou autre source de chaleur.
• Une manipulation incorrecte des
piles, des piles rechargeables ou d’un
chargeur de piles peut provoquer une
fuite, une surchauffe, un incendie ou
une explosion. Avant toute utilisation,
vous devez lire et respecter toutes les
consignes afférentes aux piles, aux piles
rechargeables ou au chargeur de piles.
• Si vous utilisez des piles rechargeables
et un chargeur, utilisez uniquement la
combinaison de piles rechargeables et
de chargeur spécifiée par le fabricant
de piles.
ATTENTION
Placez l’appareil dans un endroit bien aéré
L’appareil et l’adaptateur secteur doivent
être placés de sorte que leur position ne
nuise pas à une ventilation adéquate.
Lorsque vous branchez ou débranchez l’adaptateur
secteur, saisissez-le par la prise
Saisissez toujours uniquement la prise
du cordon de l’adaptateur secteur
lorsque vous branchez, ou débranchez,
une prise murale ou le présent appareil.
Nettoyez régulièrement la prise de l’adaptateur secteur
Vous devez régulièrement débrancher
l’adaptateur secteur et le nettoyer à
l’aide d’un chiffon sec afin de débarrasser
les broches de toute la poussière et
d’autres dépôts accumulés. Débranchez
également la prise de courant de la prise
murale chaque fois que l’appareil n’est
pas utilisé pendant une longue période.
L’accumulation de poussière entre la
prise de courant et la prise murale peut
entraîner une isolation insuffisante et
provoquer un incendie.
Respectez les consignes de sécurité lors de la manipulation
des câbles
Essayez d’éviter que les cordons et les
câbles ne s’entremêlent. Ces cordons et
câbles doivent également être placés
hors de portée des enfants.
Évitez de monter sur l’appareil ou de placer des objets
lourds dessus
Ne montez jamais sur l’appareil et ne
déposez jamais d’objets lourds dessus.
Veillez à ne jamais brancher ou débrancher l’adaptateur
secteur lorsque vous avez les mains mouillés
Ne manipulez jamais l’adaptateur secteur
ou ses prises avec les mains mouillées
lorsque vous procédez au branchement
ou au débranchement d’une prise
murale ou du présent appareil.
Débranchez tous les cordons avant de déplacer
l’appareil
Avant de déplacer l’appareil,
débranchez l’adaptateur secteur et tous
les cordons d’appareils externes.
Débranchez l’adaptateur secteur de la prise avant le
nettoyage
ATTENTION
S’il y a un risque de foudre, débranchez l’adaptateur
secteur de la prise murale
Chaque fois qu’il y a un risque de
foudre dans votre zone, débranchez
l’adaptateur secteur de la prise murale.
Manipulez les piles avec précaution
Un mauvais usage des piles peut
entraîner une explosion ou une fuite,
et provoquer des dommages et des
blessures. Pour garantir une utilisation
sûre, veuillez lire et respecter les
consignes suivantes (p. 8).
• Conformez-vous strictement aux
instructions d’installation des piles,
et respectez la polarité correcte.
• Évitez d’utiliser des piles neuves avec
des piles usées. Évitez également de
mélanger différents types de piles.
• Retirez les piles de l’appareil chaque
fois que ce dernier n’est pas utilisé
pendant une longue période.
• Ne conservez jamais les piles à
proximité d’objets métalliques, par
exemple des stylos à billes, des
colliers, des épingles à cheveux, etc.
• Vous devez vous débarrasser des
piles usagées conformément aux
réglementations de mise au rebut en
vigueur dans votre région.
Manipulez avec précaution les piles présentant des
fuites
• Si du liquide s’est échappé d’une pile,
faites attention à ne pas la toucher à
mains nues.
• Si le liquide provenant de la pile entre
en contact avec vos yeux, vous risquez
de perdre la vue. Ne vous frottez pas
les yeux et rincez-les abondamment
à l’eau. Ensuite, consultez rapidement
un médecin.
• Si du liquide s’est répandu sur votre
peau ou sur vos vêtements, il peut
entraîner des brûlures cutanées ou
une dermatite. Rincez abondamment
les zones touchées avec de l’eau.
Ensuite, consultez rapidement un
médecin.
• À l’aide d’un chiffon doux, essuyez
doucement tout liquide résiduel
du compartiment interne de la pile.
Installez ensuite de nouvelles piles.
ENG
DEU
FRA
ITA
ESL
Avant de nettoyer l’appareil, mettez-le
hors tension et débranchez l’adaptateur
secteur de la prise murale (p. 7).
POR
NLD
21
REMARQUES IMPORTANTES
Alimentation électrique
• Ne branchez pas cet appareil sur une prise
électrique déjà utilisée par un appareil électrique
contrôlé par un onduleur (par exemple,
un réfrigérateur, un lave-linge, un four microondes ou un climatiseur) ou qui comporte un
moteur. Suivant le mode d’utilisation de l’appareil
électrique, le bruit induit peut provoquer un
dysfonctionnement de l’appareil ou produire
un bruit audible. Si, pour des raisons pratiques,
vous ne pouvez pas utiliser une prise électrique
distincte, branchez un filtre de bruit induit entre
cet appareil et la prise électrique.
• Au bout de longues heures consécutives
d’utilisation, l’adaptateur secteur va commencer
à produire de la chaleur. Cela est normal et ne
pose aucun problème.
• Avant de procéder à un branchement, mettez tous les
appareils hors tension. Cela vous permettra d’éviter tout
dysfonctionnement et/ou dommage des appareils.
• L’appareil s’éteint automatiquement dans les
30 minutes suivant la dernière opération sur un
bouton (y compris la durée pendant laquelle le
métronome est actif ), ou 30 minutes suivant la fin
de la lecture d’un morceau.
Alimentation : utilisation des piles
• Lors de l’installation ou du remplacement des
piles, veillez à toujours éteindre l’appareil et à
débrancher les autres appareils que vous avez
éventuellement connectés. Vous pourrez ainsi
éviter les dysfonctionnement et les dommages.
• L’autonomie des piles fournies peut cependant
être limitée, car elle est essentiellement destinée
à tester l’appareil.
• Si vous utilisez l’appareil sur piles, utilisez des piles
alcalines ou des piles rechargeables Ni-MH.
• Si vous utilisez l’appareil sur piles, débranchez
l’adaptateur secteur de l’appareil.
• Même si les piles sont installées, l’appareil s’éteint
si vous connectez ou déconnectez le cordon
d’alimentation de la prise secteur pendant que
l’appareil est sous tension, ou si vous connectez
l’adaptateur secteur à l’appareil ou l’en déconnectez.
Entretien
• Pour le nettoyage quotidien de l’appareil, utilisez
un chiffon doux et sec ou un chiffon légèrement
imbibé d’eau. Pour retirer les traces tenaces,
utilisez un chiffon imprégné de détergent doux
et non abrasif. Essuyez ensuite en profondeur
l’appareil à l’aide d’un chiffon doux et sec.
22
• N’utilisez jamais d’essence à nettoyer, de diluants,
d’alcool ou de solvants de quelque sorte que ce
soit, afin d’éviter tout risque de décoloration et/ou
de déformation.
Positionnement
• Lorsque l’appareil est utilisé à proximité
d’amplificateurs de puissance (ou de tout autre
équipement contenant de gros transformateurs de
puissance), un bourdonnement peut être audible.
Pour corriger ce problème, modifiez l’orientation de
l’appareil ou éloignez-le de la source d’interférence.
• Cet appareil peut interférer avec la réception radio
et télévision. N’utilisez pas l’appareil à proximité
de récepteurs de ce type.
• Il peut y avoir production de bruit si des appareils de
communication sans fil (par exemple, des téléphones
portables) sont utilisés à proximité de l’appareil.
Ce bruit peut se produire lors de la réception ou
de l’émission d’un appel, ou encore pendant une
conversation. Si vous rencontrez ces problèmes, vous
devez soit déplacer les appareils sans fil concernés à
une plus grande distance de l’appareil, soit les éteindre.
• N’exposez pas l’appareil à la lumière directe du soleil,
ne le placez pas à proximité d’appareils qui émettent
de la chaleur, ne le laissez pas à l’intérieur d’un véhicule
fermé et ne le soumettez pas de quelque manière
que ce soit à des températures élevées. Une chaleur
excessive peut déformer ou décolorer l’appareil.
• En cas de déplacement d’un endroit vers un autre où
la température et/ou l’humidité sont très différentes,
des gouttelettes d’eau (de la condensation) peuvent
se former à l’intérieur de l’appareil. L’appareil peut
alors présenter des dysfonctionnements ou être
endommagé si vous essayez de l’utiliser dans ces
conditions. Par conséquent, avant d’utiliser l’appareil,
vous devez le laisser reposer pendant quelques
heures, jusqu’à ce que la condensation se soit
complètement évaporée.
• Selon le matériau et la température de la surface
sur laquelle vous placez l’appareil, il est possible
que les pieds en caoutchouc la décolorent ou la
détériorent. Pour éviter cela, vous pouvez disposer
un bout de feutre ou de chiffon sous les pieds en
caoutchouc. Ce faisant, assurez-vous que l’appareil
ne risque pas de glisser ou d’être déplacé
accidentellement.
• Ne placez aucun récipient contenant de l’eau
sur cet appareil. Évitez également d’utiliser des
insecticides, des parfums, de l’alcool, du vernis
à onglet, des vaporisateurs, etc. à proximité de
l’appareil. Essuyez rapidement tout liquide renversé
sur l’appareil à l’aide d’un chiffon sec et doux.
Réparations et données
Copyright/Licence/Marque commerciale
• Gardez à l’esprit que toutes les données
contenues dans la mémoire de l’appareil risquent
d’être perdues lorsque ce dernier est envoyé en
réparation. Roland décline toute responsabilité
relative à une telle perte de données.
• L’enregistrement audio, l’enregistrement vidéo,
la copie ou la révision, ainsi que la distribution, la
vente, la location, la performance ou la diffusion
de matériel sous copyright (œuvres musicales ou
visuelles, diffusions, performances sur scène, etc.)
appartenant à un tiers en partie ou en totalité sans
autorisation du propriétaire du copyright sont
interdits par la loi.
• N’utilisez pas cet appareil pour des actions qui
enfreindraient un copyright détenu par un tiers.
Nous déclinons toute responsabilité en matière
d’infraction de copyright tiers émanant de votre
utilisation de cet appareil.
• Les acheteurs de ce produit ne sont PAS autorisés
à extraire ledit contenu sous sa forme originale ou
modifiée en vue d’une distribution de supports
enregistrés dudit contenu ou d’une diffusion sur
un réseau d’ordinateur.
Précautions supplémentaires
• Gardez à l’esprit que le contenu de la mémoire
peut être définitivement perdu en cas de
dysfonctionnement ou de mauvaise utilisation
de l’appareil.
• Manipulez avec suffisamment de précautions
les boutons, curseurs et autres commandes de
l’appareil, ainsi que les prises et les connecteurs.
Une manipulation un peu brutale peut entraîner
des dysfonctionnements.
• Lors du branchement/débranchement de tous les
câbles, saisissez le connecteur et ne tirez jamais sur
le câble. Vous éviterez ainsi les courts-circuits ou
une détérioration des éléments internes du câble.
• Pour éviter de déranger vos voisins, efforcez-vous
de maintenir le volume de l’appareil à des niveaux
raisonnables. Vous pouvez également utiliser un
casque d’écoute afin de ne pas déranger votre
entourage.
• Certains câbles de connexion contiennent
des résistances. N’utilisez pas de câbles qui
comportent des résistances pour la connexion
de cet appareil. Avec ce type de câble, le niveau
sonore peut être extrêmement faible, voire
inaudible. Pour plus d’informations sur les
spécifications de câble, prenez contact avec le
fabricant du câble.
• MMP (Moore Microprocessor Portfolio) désigne un
portefeuille de brevets relatifs à une architecture
de microprocesseur, qui a été développée par
Technology Properties Limited (TPL). Roland
a obtenu la licence de cette technologie auprès de
TPL Group.
• Ce produit contient une plate-forme logicielle
intégrée eCROS de eSOL Co.,Ltd. eCROS est une
marque déposée de eSOL Co.,Ltd. au Japon.
• Les noms d’entreprise et de produit mentionnés
dans le présent document sont des marques ou des
marques déposées de leurs propriétaires respectifs.
Restauration des réglages d’usine
Voici comment restaurer les réglages d’usine du VT-12.
* Cette opération effacera tous les sons et morceaux d’utilisateur qui ont été enregistrés.
* Si le niveau de charge des piles est insuffisant (« » apparaît sur l’écran), vous ne pourrez pas
restaurer les réglages d’usine. Dans ce cas, insérez de nouvelles piles ou utilisez un adaptateur
secteur. Vous pouvez alors poursuivre la restauration des réglages d’usine.
1. Tout en maintenant enfoncés simultanément le bouton [
bouton [
], mettez l’appareil sous tension.
], le bouton [ ] et le
ENG
L’affichage indique « Factory reset ».
Si vous décidez d’annuler l’opération, appuyez sur le bouton [
2. Appuyez sur le bouton [
DEU
], [WARM-UP] ou [EXERCISE].
FRA
].
ITA
Les réglages d’usine du VT-12 sont restaurés.
* Ne mettez pas l’appareil hors tension pendant que les témoins de hauteur de note
sont allumés alternativement.
ESL
et
POR
NLD
23
ENG
DEU
FRA
ITA
ESL
POR
NLD
Tutte le funzioni del VT-12
Il VT-12 è lo strumento ideale per migliorare le proprie abilità vocali.
È possibile usare il VT-12 ovunque e in qualsiasi momento, da soli o in gruppo, a casa o in uno studio di
registrazione.
Controllo della tonalità
Il VT-12 è in grado di rilevare la tonalità non solo di una singola voce, ma anche di due voci.
Mentre si canta con un'altra persona, è possibile usarlo per controllare di
cantare entrambi con la tonalità corretta.
Metronomo
Il VT-12 può fornire un suono guida che aiuta a rimanere a tempo quando si
canta da soli o quando ci si esercita a cappella o con un gruppo vocale.
2
Controllo della tonalità
Allenamento vocale
Il VT-12 offre un modo efficace di scaldare o esercitare la voce. È possibile
utilizzare le tracce incorporate per esercitarsi con i vocalizzi prima di una
performance corale o dal vivo oppure utilizzare lo strumento per affinare la
propria tecnica ed espressione vocale.
Esercitazione
Metronomo
ENG
DEU
Cosa sono le tracce?
FRA
ITA
Il VT-12 contiene tracce incorporate che possono essere utilizzate per scaldare la voce o
esercitarsi. Oltre alle tracce incorporate, è anche possibile registrare i propri brani preferiti
(pag. 14).
ESL
POR
NLD
3
Sommario
Tutte le funzioni del VT-12. . . . . . . . . . . . . . . . . . . . . . . . . 2
Descrizioni dei pannelli . . . . . . . . . . . . . . . . . . . . . . . . . . . 5
Pannello superiore. . . . . . . . . . . . . . . . . . . . . . . . . . . . . . 5
Pannello laterale
(collegamento dei dispositivi) . . . . . . . . . . . . . . . . . . . 6
Prima di utilizzare il VT-12. . . . . . . . . . . . . . . . . . . . . . . . . 8
Installazione delle batterie. . . . . . . . . . . . . . . . . . . . . . . 8
Accensione . . . . . . . . . . . . . . . . . . . . . . . . . . . . . . . . . . . . . 9
Utilizzo del foglio DoReMi. . . . . . . . . . . . . . . . . . . . . . . 9
Suggerimenti per l'uso del VT-12. . . . . . . . . . . . . . . . 10
Uso del cavalletto. . . . . . . . . . . . . . . . . . . . . . . . 10
Controllo della tonalità. . . . . . . . . . . . . . . . . . . . . . . . . . . 11
Esercitazione. . . . . . . . . . . . . . . . . . . . . . . . . . . . . . . . . . . . 13
Registrare ed esercitarsi su un brano preferito. . . 14
Uso del metronomo. . . . . . . . . . . . . . . . . . . . . . . . . . . . . . 15
Risoluzione dei problemi. . . . . . . . . . . . . . . . . . . . . . . . . 16
Percorso audio. . . . . . . . . . . . . . . . . . . . . . . . . . . . . . . . . . . 17
Specifiche principali . . . . . . . . . . . . . . . . . . . . . . . . . . . . . 18
UTILIZZO SICURO DELL'UNITÀ . . . . . . . . . . . . . . . . . . . . 19
NOTE IMPORTANTI. . . . . . . . . . . . . . . . . . . . . . . . . . . . . . . 22
Prima di utilizzare questa unità, leggere attentamente le sezioni intitolate “UTILIZZO SICURO DELL'UNITÀ” (pag. 19) e
“NOTE IMPORTANTI” (pag. 22), che contengono importanti informazioni sul corretto impiego dell'unità. È inoltre consigliabile leggere per intero il Manuale dell'utente, per assicurarsi di aver compreso appieno tutte le funzioni offerte
dalla nuova unità acquistata. Si consiglia di conservare e tenere a portata di mano il Manuale come riferimento utile.
Copyright © 2012 ROLAND CORPORATION
Tutti i diritti riservati. Nessuna parte di questo documento può essere in alcun modo riprodotta senza autorizzazione
scritta di ROLAND CORPORATION.
ROLAND è un marchio di fabbrica registrato di Roland Corporation negli Stati Uniti e/o in altri paesi.
4
Descrizioni dei pannelli
Indicatore della tonalità
Controllo della tonalità
Pannello superiore
pag. 11
Mostra la tonalità o l'imprecisione dei
vocalizzi.
Altoparlante interno
Il tono guida, il suono del
metronomo e le tracce vengono
riprodotti da questo altoparlante.
Microfono interno
Consente di controllare la
propria voce o di registrarla.
Pulsanti [ ] [ ]
Visualizza informazioni quali il
numero della traccia selezionata
e il tempo del metronomo.
][
]
Pulsante [
Consentono di modificare le
impostazioni.
Pulsante [REVIEW]
]
]
Seleziona la modalità
metronomo.
pag. 11
Attiva e disattiva il tono guida. Il
tono guida viene riprodotto con
temperamento equabile.
Riproduce l'audio registrato
in modo da poter verificare le
proprie performance.
Consente di riprodurre/arrestare
il metronomo o la traccia.
Pulsante [
]
pag. 15
Metronomo
Pulsante [
Esercitazione
Consentono di selezionare
il tono guida che si desidera
ascoltare.
È possibile cambiare il tono
di riferimento premendo il
pulsante [ ] e il pulsante [ ]
contemporaneamente (pag. 12).
Display
Pulsanti [
pag. 11
Pulsante [WARM-UP]
Seleziona la modalità di
riscaldamento.
pag.13
Pulsante [EXERCISE]
pag. 13
Seleziona la modalità di
esercitazione.
ENG
DEU
FRA
ITA
ESL
POR
NLD
5
Descrizioni dei pannelli
Pannello laterale (collegamento dei dispositivi)
Ingresso REC IN
pag. 14
A questo ingresso è possibile collegare un
dispositivo audio esterno, come un lettore
audio, mediante un cavo con un mini jack
stereo.
È possibile utilizzare questo ingresso per
registrare i brani preferiti e utilizzarli per
esercitarsi.
Per eseguire il collegamento, collegare un
cavo tra l'uscita (ad esempio quella per le
cuffie) del dispositivo audio esterno e questo
ingresso.
Uscita OUTPUT/PHONES
È possibile collegare a
questa uscita cuffie o
altoparlanti esterni venduti
separatamente.
Passanti per laccetto
È possibile fissare qui un laccetto, una
maniglia o una bretella disponibile in
commercio.
Interruttore rilevamento tonalità
pag. 11
Consente di selezionare il metodo
di rilevamento della tonalità.
Interruttore [MIC VOLUME]
Regola il volume del microfono.
H: Volume alto
L:
Volume basso
OFF: Monitor disattivato
* Se questo interruttore è nella posizione “OFF”,
non è possibile rilevare la tonalità.
6
Descrizioni dei pannelli
Controllo della tonalità
Pulsante [POWER]
pag. 9
Premere questo pulsante per
accendere/spegnere l'unità.
Manopola [VOLUME]
Regola il volume dell'altoparlante
interno o delle cuffie.
Esercitazione
Ingresso DC IN
Collegare qui l'adattatore CA (PSB-6U;
venduto separatamente).
* Utilizzare soltanto l'adattatore CA
specificato (PSB-6U) e collegarlo a una
presa CA con una tensione di corrente
appropriata. L'utilizzo di altri adattatori
potrebbe causare guasti.
Posizionare l'adattatore CA in modo che il
lato con l'indicatore sia rivolto verso l'alto
e il lato con le informazioni di testo sia
rivolto verso il basso (vedere la figura).
L'indicatore si illumina quando l'adattatore
CA viene inserito in una presa CA.
Metronomo
Avvertenze per l'esecuzione dei collegamenti
ENG
• Per prevenire malfunzionamenti e guasti dei dispositivi, abbassare sempre il volume e spegnere tutte le
unità prima di eseguire qualsiasi collegamento.
DEU
• Se si utilizza un altoparlante esterno, potrebbe verificarsi una retroazione (un fischio o un sibilo) a seconda
della posizione dell'altoparlante esterno rispetto al microfono interno. In tal caso, eseguire la procedura
seguente.
1. Cambiare l'orientamento del microfono interno.
2. Riposizionare il microfono interno a una maggiore distanza dagli altoparlanti esterni.
3. Abbassare i livelli del volume.
4. Regolare l'interruttore [MIC VOLUME] sulla posizione “OFF”.
FRA
ITA
ESL
POR
NLD
7
Prima di utilizzare il VT-12
Installazione delle batterie
Inserire le batterie (due batterie AA) come indicato nell'illustrazione, rispettando la polarità
corretta.
Avvertenze sull'uso delle batterie
• Quando le batterie stanno per scaricarsi, sul display
”. In tal caso è necessario
viene visualizzato “
installare batterie nuove.
• Se utilizzate in modo improprio, le batterie potrebbero esplodere o subire perdite di liquidi e causare
danni o lesioni. Per garantire le misure di sicurezza,
leggere e osservare le seguenti precauzioni.
• Seguire attentamente le istruzioni di installazione
per le batterie e assicurarsi di osservarne la
corretta polarità.
• Evitare l'utilizzo di batterie nuove insieme ad altre
usate. Evitare inoltre di utilizzare tipi diversi di
batterie contemporaneamente.
• Rimuovere le batterie ogni volta che l'unità deve
restare inutilizzata per un periodo di tempo
prolungato.
• Non conservare mai le batterie insieme a oggetti
metallici quali penne a sfera, collane, mollette e
così via.
• Le batterie usate devono essere smaltite in conformità alle normative per il corretto smaltimento
vigenti nella propria area di residenza.
8
• Un uso errato delle batterie, delle batterie
ricaricabili o del caricabatterie può causare
perdite, surriscaldamenti, incendi o esplosioni.
Prima dell'uso, è necessario leggere e osservare
rigorosamente tutte le precauzioni relative alle
batterie, alle batterie ricaricabili o al caricabatterie.
• Quando si utilizzano batterie ricaricabili e un
caricabatterie, utilizzare solo la combinazione di
batterie ricaricabili e caricabatterie specificata dal
produttore delle batterie.
• In caso di utilizzo dell'unità a batterie, scegliere
batterie alcaline o batterie Ni-MH ricaricabili.
• In caso di utilizzo dell'unità a batterie, scollegare
l'adattatore CA dall'unità.
• Anche se le batterie sono installate, l'unità si spegne
se si collega o si scollega il cavo di alimentazione
dalla presa CA mentre l'unità è accesa o se si collega
o si scollega l'adattatore CA dall'unità.
• Durata prevista delle batterie con uso continuo:
Batterie alcaline: 6 ore
* Questi dati variano a seconda delle specifiche
delle batterie e delle effettive condizioni d'uso.
Prima di utilizzare il VT-12
Controllo della tonalità
Accensione
* Dopo aver collegato correttamente ogni dispositivo (pag. 6), seguire la procedura indicata di
seguito per l'accensione.
1
Esercitazione
2
Regolare la manopola [VOLUME] sulla
posizione minima.
Tenere premuto il pulsante [POWER]
finché l'unità non si accende.
Avvertenze sull'accensione/spegnimento
Metronomo
• L'unità si spegne automaticamente se non si preme alcun pulsante per 30 minuti (anche se il metronomo è
in funzione) oppure se sono trascorsi 30 minuti da quando è stata interrotta la riproduzione di una traccia.
• Prima di accendere o spegnere l'unità, assicurarsi sempre di abbassare il volume. Anche con il volume
disattivato, all'accensione o spegnimento dell'unità potrebbe essere riprodotto un suono. Si tratta tuttavia di
un comportamento normale che non indica un malfunzionamento.
• Questa unità è dotata di un circuito di protezione. Dopo l'accensione, è necessario un breve intervallo (alcuni
secondi) prima che l'unità inizi a funzionare normalmente.
Utilizzo del foglio DoReMi
Attaccando il foglio DoReMi in dotazione all'indicatore di tonalità, è possibile utilizzare le
indicazioni DoReMi per verificare i nomi delle note.
Se si desidera controllare i nomi delle note mentre si usa il solfeggio con il metodo del do mobile,
apporre il foglio DoReMi con “Do” posizionato in corrispondenza del nome della nota tonica in uso.
ENG
DEU
FRA
ITA
ESL
Foglio DoReMi
* Prima di utilizzare il foglio DoReMi, assicurarsi di aver rimosso la carta sul retro e la pellicola
protettiva blu.
POR
NLD
9
Prima di utilizzare il VT-12
Suggerimenti per l'uso del VT-12
Tenere in mano il VT-12 e cantare mantenendo la postura indicata nell'illustrazione.
Utilizzare le cuffie se si desidera controllare la precisione dell'intonazione mentre si riproduce una
traccia o si usa il metronomo.
L'uso delle cuffie consente di rilevare la tonalità in modo più preciso. Consente inoltre di sentire
più facilmente l'audio registrato.
Utilizzare le cuffie
Circa 30 cm
di distanza
Tenere la schiena in
posizione eretta
MEMO
Nel caso in cui si verifichi una delle situazioni descritte di seguito, verificare l'impostazione
dell'interruttore [MIC VOLUME] (pag. 6).
• L'indicatore di tonalità non risponde o risponde in modo imprevisto.
• Il volume del suono proveniente dal microfono è basso.
Uso del cavalletto
È possibile utilizzare il cavalletto per tenere il VT-12 in posizione verticale.
Quando si utilizza il VT-12 in gruppo, il cavalletto consente di appoggiare comodamente il VT-12 in
posizione verticale su una scrivania o un tavolo.
In questa modalità, è consigliabile posizionare il VT-12 a una distanza di circa un metro dai
cantanti.
* Per riporre il cavalletto nella posizione originale, piegarlo verso l'interno finché non scatta in
posizione.
10
Controllo della tonalità
1
Selezionare il tipo di rilevamento della tonalità.
MONO EQUAL: Viene rilevata una sola voce
mediante temperamento equabile.
CHORD EQUAL: Vengono rilevate due voci
mediante temperamento equabile.
CHORD JUST:
Vengono rilevate due voci
mediante l'accordatura naturale
(maggiore).
Controllo della tonalità
Il controllo della tonalità è la prima operazione da eseguire.
Il VT-12 è in grado di controllare la tonalità anche di due voci contemporaneamente.
Questa funzione facilita il controllo del tono di due persone che cantano insieme.
MEMO
La tonalità per l'accordatura naturale viene determinata dal tono più basso.
Se il VT-12 riproduce un tono guida, la tonalità viene determinata
dal tono guida. Durante la riproduzione di un tono guida è
possibile rilevare una sola voce.
Premere il pulsante [
Esercitazione
2
].
Prima di iniziare i vocalizzi, riprodurre il tono guida (con
temperamento equabile) per ascoltare il tono corretto.
MEMO
È possibile utilizzare i pulsanti [ ] e [ ] per modificare il tono
guida.
3
Iniziare i vocalizzi e controllare la tonalità.
Emettere vocalizzi nel tono con cui si intende cantare.
Metronomo
Il nome della nota più vicina alla tonalità rilevata si illuminerà.
L'illuminazione si intensifica man mano che ci si avvicina alla tonalità
corretta e si smorza quando il divario aumenta.
Durante la riproduzione di un tono guida, viene illuminato anche il
nome della nota del tono guida.
Indica il livello di discrepanza del tono.
Acceso:
Spento:
La tonalità tende al
bemolle
MONO EQUAL
* Se l'indicatore del tono
non risponde nemmeno
durante i vocalizzi, controllare
l'impostazione dell'interruttore
[MIC VOLUME] (pag. 6).
CHORD EQUAL
CHORD JUST
La tonalità è corretta
La tonalità tende al diesis
ENG
La nota alta tende al
bemolle rispetto alla nota
bassa
DEU
L'intervallo del tono tra le
due note è corretto
ITA
FRA
ESL
La nota alta tende al diesis
rispetto alla nota bassa
POR
NLD
11
Controllo della tonalità
Modifica del tono di riferimento
1. Premere il pulsante [
] e il pulsante [ ] contemporaneamente.
Sul display verrà indicato il tono di riferimento corrente.
2. Utilizzare i pulsanti [
][
] per specificare il tono di riferimento desiderato.
Intervallo: 415-465 Hz (impostazione predefinita: 440 Hz)
* Se non si esegue alcuna operazione per un determinato periodo di tempo, l'indicazione del
tono di riferimento scompare e l'unità torna automaticamente alla modalità di controllo della
tonalità.
3. Premere il pulsante [
] e il pulsante [ ] contemporaneamente.
L'indicazione del tono di riferimento scompare e l'unità torna automaticamente alla modalità di
controllo della tonalità.
* Durante la riproduzione delle tracce preimpostate, il tono di riferimento è fisso a 440 Hz.
Che cos'è l'accordatura naturale?
L'accordatura naturale è un metodo di accordatura che assicura intervalli di quinta e di
terza puri.
Se si seleziona l'accordatura naturale, sarà necessario specificare la tonica (che per una
scala maggiore sarà C) appropriata per la tonalità del brano.
Il VT-12 imposterà come tonica la più bassa delle due voci.
Se si sta riproducendo un tono guida, verrà impostato come tonica.
Informazioni sui toni nell'accordatura naturale
Il VT-12 è in grado di rilevare l'accordatura naturale solo in una tonalità maggiore.
Se il tono guida è C, i toni vengono calcolati utilizzando i rapporti seguenti.
Temperamento equabile
(cent)
C#
D
D#
E
F
0
100
200
300
400
500
Accordatura naturale (cent)
0
71
204
316
386
498
Rapporto
1
25/24
9/8
6/5
5/4
4/3
F#
G
G#
A
A#
B
600
700
800
900
1000
1100
569
702
773
884
1018
1088
25/18
3/2
25/16
5/3
9/5
15/8
Temperamento equabile
(cent)
Accordatura naturale (cent)
Rapporto
12
C
Esercitazione
Modalità di riscaldamento Contiene tracce per gli esercizi di vocalizzo che consentiranno di scaldare la voce.
Modalità di esercitazione
Contiene tracce per migliorare la propria tecnica vocale, ad esempio potenziando
il controllo della respirazione e ampliando l'estensione vocale.
MEMO
Per ulteriori informazioni sulla modalità di esercitazione, fare riferimento al “Manuale di
esercitazione” disponibile separatamente. Questo documento fornisce consigli utili sulle
tecniche di vocalizzo e canto e suggerimenti per esercitarsi con ogni traccia.
* Ogni volta che si riproduce una traccia, viene avviata una nuova registrazione. Se si riproduce
una traccia registrata in precedenza, il suono registrato su tale traccia viene sovrascritto. Se
si interrompe la riproduzione di una traccia entro 3 secondi dall'inizio, sulla traccia non viene
registrato alcun suono.
Esercitazione
1
Selezionare una modalità
di allenamento.
Il pulsante della modalità selezionata
si illuminerà.
2
6
Utilizzare i pulsanti [ ]
[ ] per selezionare una
traccia.
MEMO
A seconda della traccia
selezionata, è possibile attivare o
disattivare l'audio della parte vocale
della traccia premendo il pulsante
[REVIEW] durante la riproduzione
del suono registrato.
].
La traccia verrà riprodotta e avrà inizio la
registrazione del suono.
4
Cantare insieme alla traccia.
Mentre si canta, prestare attenzione al
tono della propria voce e ai toni della
traccia riprodotta.
5
Premere il pulsante [
Metronomo
Premere il pulsante [
Premere il pulsante
[REVIEW].
Inizierà la riproduzione del
suono registrato. Se non è stato
registrato alcun suono, sul display verrà
visualizzato “---”.
MEMO
• Premendo ripetutamente il pulsante
della modalità selezionata, è possibile
passare dalle tracce preimpostate alle
tracce utente e viceversa.
• Se non è stata registrata nemmeno
una traccia utente, sul display verrà
visualizzato “U--”.
• Per informazioni dettagliate sulle
tracce, fare riferimento all' “Elenco
tracce” disponibile separatamente.
3
Controllo della tonalità
Il VT-12 offre due modalità di allenamento: la modalità di riscaldamento e la modalità
di esercitazione. Ogni modalità contiene tracce (pag. 3) ideali per il tipo di esercitazione
corrispondente.
Il suono prodotto durante le esercitazioni viene registrato automaticamente nelle tracce
interessate, in modo da poterlo riascoltare in seguito (funzione Review).
].
La riproduzione della traccia e la registrazione
del suono verranno interrotte.
Acceso:
Toni della voce del cantante
Lampeggiante: Toni della traccia
* Per alcune tracce, come le tracce dell'utente ed
alcune tracce preimpostate, l'unità non indica la
tonalità lampeggiando.
ENG
DEU
FRA
ITA
Tracce preimpostate e tracce utente
Il VT-12 contiene tracce preimpostate (001–) per ogni modalità. È inoltre possibile registrare
tracce mediante l'ingresso REC IN e utilizzarle come tracce utente (U01–U10). Le tracce utente
sono comuni a entrambe le modalità.
13
ESL
POR
NLD
Esercitazione
Registrare ed esercitarsi su un brano preferito
È possibile registrare i brani preferiti nel VT-12 mediante l'ingresso REC IN e utilizzarli come tracce
utente.
Un brano registrato può essere utilizzato sia in modalità di riscaldamento che in modalità di
esercitazione.
Lunghezza traccia
Massimo 10 minuti (per traccia)
Numero di tracce
Massimo10 tracce
* Se si seleziona il numero di una traccia registrata in precedenza e si registra su di essa, il brano
registrato precedentemente verrà sovrascritto. Se si interrompe la registrazione entro
3 secondi dall'inizio, il brano non verrà registrato.
* Al termine della registrazione di un brano, è necessario scollegare il cavo dall'ingresso REC IN. Il
VT-12 non eseguirà altre operazioni finché un cavo rimane collegato all'ingresso REC IN.
1
Collegare il dispositivo
audio esterno all'ingresso
REC IN (pag. 6).
8
Scollegare il dispositivo
audio esterno
dall'ingresso REC IN.
Provare a esercitarsi con la traccia
utente registrata (pag. 14).
Sul display verranno visualizzati
alternativamente “rEc” e “U**”; il VT-12 è
pronto per registrare il brano.
2
Riprodurre il brano sul
dispositivo audio esterno.
Regolare il volume del suono da
acquisire.
Controllando il suono sull'altoparlante
interno o tramite cuffie, regolarne il
volume con i controlli del dispositivo
audio esterno.
3
4
Utilizzare i pulsanti [ ] [ ]
per specificare il numero di
traccia in corrispondenza del
quale deve essere registrata
la traccia.
Premere il pulsante
[
].
La registrazione verrà avviata.
Durante la registrazione, sul display
verrà visualizzato “rEc” e l'indicatore
del tono lampeggerà.
7
Premere il pulsante
[REVIEW].
La riproduzione del brano registrato
verrà avviata.
Verificare che il brano sia stato
registrato correttamente. Se il brano
non è stato registrato, sul display verrà
visualizzato “---”.
6
Premere il pulsante
[
].
La registrazione verrà interrotta.
5
Riprodurre il brano sul
dispositivo audio esterno.
MEMO
Se si desidera eliminare i brani registrati, ripristinare le impostazioni di fabbrica del VT-12 (pag. 23).
14
Uso del metronomo
È possibile esercitarsi cantando a tempo con il metronomo.
1
Premere il pulsante [
].
Esercitazione
Il VT-12 entrerà in modalità metronomo.
Sul display verrà indicato il valore del
tempo corrente.
2
Utilizzare i pulsanti [ ]
[ ] per regolare il tempo.
6
Intervallo: 30-250
MEMO
È possibile impostare il tempo
anche toccando il pulsante [ ]
in corrispondenza dell'intervallo
di tempo desiderato (Tap Tempo
function).
Premere il pulsante [
Premere il pulsante
[REVIEW].
Inizierà la riproduzione del suono
registrato.
Premendo il pulsante [
],
la riproduzione verrà interrotta.
].
Il metronomo entrerà in funzione e avrà inizio
la registrazione del suono.
Il pulsante [ ] lampeggerà a tempo con il
metronomo.
5
Metronomo
3
Controllo della tonalità
Il suono viene registrato automaticamente mentre il metronomo è in funzione, in modo che sia
possibile ascoltare la propria performance in seguito (Review function).
* Ogni volta che si mette in funzione il metronomo verrà iniziata una nuova registrazione, che
si sostituirà alla registrazione precedente. Se si interrompe il metronomo entro 3 secondi, il
suono non verrà registrato.
* In modalità metronomo è possibile registrare per un massimo di 10 minuti. Superati i 10
minuti, la registrazione verrà interrotta. Il metronomo continuerà a funzionare anche dopo
l'interruzione della registrazione.
* Non è possibile impostare il tempo.
Premere il pulsante
[
].
Il metronomo e la registrazione del
suono verranno interrotti.
MEMO
È possibile azionare il metronomo anche
mentre si riproduce un tono guida (pag. 11).
ENG
4
Cantare a tempo con il metronomo.
Mentre si canta, prestare attenzione ai toni della voce.
DEU
Acceso: Tono guida e tono della voce
FRA
ITA
ESL
POR
NLD
15
Risoluzione dei problemi
Problema
Il dispositivo non si
accende
Il dispositivo non si
spegne
Assenza di audio/Volume
insufficiente
Elementi da controllare
Azione
Pagina
È possibile che le batterie siano
scariche?
Installare batterie nuove.
pag. 8
L'adattatore CA specificato (PSB6U; venduto separatamente) è
collegato correttamente?
Verificare di nuovo il collegamento.
Non usare mai un adattatore CA
diverso dal modello specificato.
pag. 7
Sul display è visualizzato “Err”?
Assicurarsi innanzitutto che tutte le
tracce siano state interrotte e che
tutte le acquisizioni siano complete.
A questo punto è possibile spegnere
il dispositivo.
–
I collegamenti con gli altri
dispositivi sono corretti?
Verificare di nuovo i collegamenti.
È possibile che il volume di un
altoparlante esterno collegato
sia abbassato?
Controllare le impostazioni del
dispositivo collegato.
La manopola [VOLUME] è
regolata in modo appropriato?
Regolare il volume in modo
appropriato.
L'interruttore [MIC VOLUME] è
Selezionare l'impostazione
impostato in modo appropriato? appropriata.
–
pag. 7
pag. 6
È possibile che le cuffie siano
collegate?
Se le cuffie sono collegate,
dall'altoparlante interno non verrà
prodotto alcun suono.
Volume insufficiente
dall'altoparlante interno
È possibile che le batterie siano
scariche?
Installare batterie nuove.
Il livello del volume dello
strumento collegato
all'uscita OUTPUT/
PHONES è troppo basso
È possibile che si stia
Utilizzare un cavo di collegamento
usando un cavo di collegamento
che non contiene un resistore.
contenente un resistore?
Il suono è distorto
La manopola [VOLUME] è
regolata in modo appropriato?
Regolare il volume in modo
appropriato.
La registrazione di un
brano si interrompe
prima del termine
Si sta tentando di registrare un
brano lungo più di dieci minuti?
La registrazione può essere effettuata
per un massimo di dieci minuti (per
brano).
–
Volume insufficiente
o suono distorto in un
brano registrato
Si sta registrando con il volume
appropriato?
Regolare il volume nel dispositivo
audio esterno.
–
L'interruttore [MIC VOLUME] è
Selezionare l'impostazione
impostato in modo appropriato? appropriata.
Tono non rilevato/
Funzionamento
imprevisto
Si sta cercando di controllare il
tono in un luogo rumoroso?
Controllare il tono in un luogo non
eccessivamente rumoroso.
Impostarla su un valore appropriato.
Durante la riproduzione delle tracce
preimpostate, il tono di riferimento è
fisso a 440 Hz.
Per consentire il controllo rapido del tono durante la riproduzione della
Durante la riproduzione
della traccia, gli indicatori traccia, gli indicatori di tono e appaiono lampeggianti.
di tono e si illuminano Se si riproduce la registrazione premendo il pulsante [REVIEW], questi
frequentemente.
indicatori si illumineranno in modo normale.
L'impostazione del tono di
riferimento è appropriata?
Il dispositivo di spegne
inaspettatamente
16
pag. 6
L'unità si spegne automaticamente se non si preme alcun pulsante per
30 minuti (anche se il metronomo è in funzione) oppure se sono trascorsi
30 minuti da quando è stata interrotta la riproduzione di una traccia.
–
pag. 8
–
pag. 7
pag. 6
–
pag. 12
–
–
Percorso audio
Microfono
interno
Interruttore [MIC
VOLUME]
Controllo della tonalità
Durante la riproduzione di una traccia
Rilevamento del tono
Uscita OUTPUT/
PHONES
Rilevamento del tono
Manopola
[VOLUME]
Parte vocale della traccia
(solo con determinate
tracce preimpostate)
Registrata
Traccia
Parte di accompagnamento della traccia
* Il suono prodotto dal microfono interno non verrà prodotto dall'altoparlante interno.
Durante la riproduzione (verifica) del suono registrato
Esercitazione
Altoparlante interno
Rilevamento del tono
Suono registrato
Rilevamento del tono
Manopola
[VOLUME]
Metronomo
Traccia
Parte vocale della
traccia (solo con
determinate tracce
preimpostate)
Uscita OUTPUT/
PHONES
Parte di accompagnamento della traccia
Altoparlante interno
Durante la registrazione di un brano
Uscita OUTPUT/
PHONES
Ingresso
REC IN
Riproduzione dal dispositivo
audio esterno
Manopola
[VOLUME]
ENG
DEU
FRA
ITA
ESL
Registrata
POR
Traccia utente
Altoparlante interno
NLD
17
Specifiche principali
Roland VT-12: Vocal Trainer
Accordatore
Gamma di accordatura
C2 (65,4 Hz)-A5 (880,0 Hz)
Precisione dell'accordatura
+/-1 centesimo
Tono di riferimento
Tono di riferimento: A4=415-465 Hz (passi a 1 Hz)
Intervallo del tono di riferimento: A3-G#5 (24 note della scala cromatica)
Metronomo
Tempo
30-250, Precisione: +/-0,1 %
Traccia utente
Lunghezza traccia
Massimo 10 minuti (per traccia)
Numero di tracce
Numero di tracce: Massimo10 tracce
Ingresso/Uscita
Livello di ingresso nominale
Ingresso REC IN: 0 dBu
Impedenza di ingresso
Ingresso REC IN: 9,5 k ohm
Livello di uscita
Uscita OUTPUT/PHONES: 15 mW + 15 mW (casse con carico da 16 ohm)
Impedenza di carico consigliata 16 ohm o maggiore
Altro
Altoparlante
Mono
Connettori
Uscita OUTPUT/PHONES (tipo jack mini stereo)
Ingresso REC IN (tipo jack mini stereo)
Ingresso DC IN
Display
7 segmenti, 3 caratteri (LED)
Indicatore del tono
Alimentazione
2 batterie alcaline (AA, LR6) o batterie Ni-MH ricaricabili (AA, HR6),
Adattatore CA (PSB-6U: venduto separatamente)
Portata attuale
380 mA
Durata prevista delle batterie
con uso continuo
Batterie alcaline (AA, LR6): circa 6 ore
* Questi dati variano a seconda delle specifiche delle batterie e delle
effettive condizioni d'uso.
Dimensioni
70 (L) x 134 (P) x 28 (A) mm
Peso
150 g (incluse le batterie)
Accessori
Batterie alcaline (AA, LR6) x 2
Foglio DoReMi
Manuale dell'utente
Manuale di esercitazione
Elenco tracce
Custodia protettiva (OP-RP1)
Adattatore CA (PSB-6U)
Optional (venduti separatamente)
* Quando si acquista un adattatore CA, scegliere quello che nell'elenco che
segue è indicato come specifico dell'area geografica in cui verrà utilizzato,
con la tensione appropriata. (PSB6U-120/PSB6U-230EU/PSB6U-230UK/
PSB6U-240A) (set contenenti PSB-6U e un cavo di alimentazione).
* 0 dBu=0,775 Vrms
18
* Allo scopo di migliorare il prodotto, le specifiche e/o l'aspetto di questa unità sono soggetti a
modifiche senza preavviso.
UTILIZZO SICURO DELL'UNITÀ
AVVISO
Non disassemblare o modificare l'unità
Non aprire né modificare in alcun modo
l'unità o il relativo adattatore CA.
Non riparare o sostituire le parti
Non tentare di riparare l'unità o di
sostituirne parti interne, ad eccezione
dei casi in cui il presente manuale
fornisca istruzioni specifiche indicando
all'utente le modalità di esecuzione
di tali operazioni. Per qualsiasi tipo di
assistenza, rivolgersi al proprio fornitore,
al Centro di assistenza Roland più vicino
o a un distributore Roland autorizzato,
in base all'elenco della pagina
“Informazioni”.
Non utilizzare o conservare l'unità in luoghi:
soggetti a temperature eccessive (ad
esempio, alla luce solare diretta in
un veicolo chiuso, vicino a una fonte
di calore, su apparecchiature che
generano calore);
• bagnati (ad esempio, bagni, lavanderie,
pavimenti bagnati);
• esposti al vapore o al fumo;
• soggetti a esposizione salina;
• umidi;
• esposti alla pioggia;
• polverosi o sabbiosi;
• soggetti a livelli elevati di vibrazione e
tremolio.
AVVISO
Non collocare l'unità in una posizione instabile
Assicurarsi che l'unità sia sempre
posizionata in piano e in modo stabile.
Non posizionarla mai su aste che
potrebbero oscillare o su superfici
inclinate.
Utilizzare solo l'adattatore CA specificato e la tensione
di corrente appropriata
Utilizzare solo l'adattatore CA specificato
(PSB-6U) e assicurarsi che l'emissione di
corrente al momento dell'installazione
corrisponda alla tensione di corrente
in ingresso specificata sul corpo
dell'adattatore CA. Altri adattatori CA
potrebbero utilizzare una polarità diversa
o essere indicati per una tensione di
corrente diversa, pertanto il loro utilizzo
potrebbe causare danni, guasti o
produrre scosse elettriche.
Utilizzare solo il cavo di alimentazione in dotazione
Utilizzare solo il cavo di alimentazione
collegato. Inoltre, il cavo di
alimentazione in dotazione non deve
essere utilizzato con nessun altro
dispositivo.
Non piegare il cavo di alimentazione né posizionare
oggetti pesanti su di esso
ENG
DEU
Non sottoporre a torsione né piegare in
modo eccessivo il cavo di alimentazione,
né posizionare oggetti pesanti su di
esso. In caso contrario, è possibile che
il cavo venga danneggiato, causando
la rottura di elementi e producendo
cortocircuiti. I cavi danneggiati
costituiscono un rischio di incendi e di
scosse elettriche.
FRA
ITA
ESL
POR
NLD
19
AVVISO
AVVISO
Evitare l'uso prolungato a volumi elevati
Non far cadere l'unità né sottoporla a urti di forte entità
Questa unità, da sola o in abbinamento
con un amplificatore e cuffie o casse,
è in grado di produrre livelli di suono
che possono causare la perdita
permanente dell'udito. Non lasciare in
funzione l'unità per periodi di tempo
prolungati a un livello di volume elevato
o fastidioso. Se si verifica perdita
di udito o si avvertono ronzii nelle
orecchie, è necessario interrompere
immediatamente l'utilizzo dell'unità e
consultare uno specialista dell'udito.
Proteggere l'unità da urti di forte entità.
Non farla cadere.
Evitare che corpi estranei o liquidi entrino nell'unità
Evitare che corpi estranei (ad esempio
oggetti infiammabili, monete, fili) o
liquidi (ad esempio acqua o bevande)
entrino nell'unità. Ciò potrebbe
causare cortocircuiti, guasti o altri
malfunzionamenti.
Spegnere l'unità in caso di anomalie o
malfunzionamenti
Spegnere immediatamente l'unità,
rimuovere l'adattatore CA dalla presa
e richiedere assistenza al proprio
fornitore, al Centro di assistenza Roland
più vicino o a un distributore Roland
autorizzato, in base all'elenco nella
pagina “Informazioni”, quando:
• l'adattatore CA, il cavo di
alimentazione o la spina è
danneggiata;
• si verifica emissione di fumo o di
odore insolito;
• nell'unità sono caduti oggetti o sono
stati versati liquidi;
• l'unità è stata esposta a pioggia (o si è
bagnata in altro modo);
• l'unità non funziona normalmente o
manifesta un cambiamento evidente
nelle prestazioni.
L'uso dell'unità deve essere supervisionato da persone
adulte in caso di presenza di bambini
Se si utilizza l'unità in luoghi in cui
sono presenti bambini, controllare che
l'unità non venga utilizzata in modo
improprio. L'uso dell'unità deve essere
sempre supervisionato e controllato da
un adulto.
20
Non utilizzare una presa a cui è collegato un numero
eccessivo di altri dispositivi
Per collegare il cavo di alimentazione
dell'unità a una presa di corrente, non
utilizzare una presa a cui è collegato
un numero eccessivo di altri dispositivi.
Prestare particolare attenzione quando
si utilizzano prolunghe; la potenza
massima utilizzata da tutti i dispositivi
collegati alla presa della prolunga non
deve mai superare la potenza prevista
(watt/ampere) per la prolunga in uso.
Carichi eccessivi possono causare il
surriscaldamento del materiale isolante
del cavo e provocarne la fusione.
Non utilizzare l'unità all'estero
Prima di utilizzare l'unità in un paese
straniero, consultare il proprio fornitore,
il Centro di assistenza Roland più vicino
o un distributore Roland autorizzato,
in base all'elenco della pagina
“Informazioni”.
Maneggiare con cautela le batterie
• Mai ricaricare, riscaldare, smontare o
gettare nel fuoco o nell'acqua batterie,
batterie ricaricabili o caricabatterie.
• Mai esporre batterie, batterie
ricaricabili o caricabatterie a fonti di
calore eccessivo, ad esempio luce
solare, fuoco o simili.
• Un uso errato delle batterie, delle
batterie ricaricabili o del caricabatterie
può causare perdite, surriscaldamenti,
incendi o esplosioni. Prima dell'uso,
è necessario leggere e osservare
rigorosamente tutte le precauzioni
relative alle batterie, alle batterie
ricaricabili o al caricabatterie.
• Quando si utilizzano batterie
ricaricabili e un caricabatterie,
utilizzare solo la combinazione di
batterie ricaricabili e caricabatterie
specificata dal produttore delle
batterie.
ATTENZIONE
ATTENZIONE
Collocare l'unità in un luogo ben ventilato
In caso di temporale, scollegare l'adattatore CA dalla presa
Posizionare l'unità e l'adattatore CA in
modo che la posizione non interferisca
con la corretta ventilazione.
Qualora si sospetti la possibilità
di fulmini nella zona, scollegare
l'adattatore CA dalla presa.
Afferrare la spina per collegare o scollegare l'adattatore CA
Maneggiare con cautela le batterie
Afferrare sempre solo la spina del cavo
dell'adattatore CA quando si collega o si
scollega una presa o questa unità.
Se utilizzate in modo improprio, le
batterie potrebbero esplodere o
subire perdite di liquidi e causare
danni o lesioni. Per garantire le misure
di sicurezza, leggere e osservare le
seguenti precauzioni (pag. 8).
• Seguire attentamente le istruzioni
di installazione per le batterie e
assicurarsi di osservarne la corretta
polarità.
• Evitare l'utilizzo di batterie nuove
insieme ad altre usate. Evitare inoltre
di utilizzare tipi diversi di batterie
contemporaneamente.
• Rimuovere le batterie ogni volta che
l'unità deve restare inutilizzata per un
periodo di tempo prolungato.
• Non conservare mai le batterie insieme
a oggetti metallici quali penne a sfera,
collane, mollette e così via.
• Le batterie usate devono essere
smaltite in conformità alle normative
per il corretto smaltimento vigenti
nella propria area di residenza.
Pulire periodicamente la spina dell'adattatore CA
A intervalli regolari, è necessario
scollegare l'adattatore CA e pulirlo
utilizzando un panno asciutto per
eliminare tutta la polvere e altri
accumuli dai relativi denti. Inoltre,
scollegare la spina dalla presa di
alimentazione ogni volta che l'unità
deve restare inutilizzata per un periodo
di tempo prolungato. Eventuali
accumuli di polvere tra la spina e
la presa di alimentazione possono
provocare uno scarso isolamento
elettrico e causare incendi.
Verificare sempre la sicurezza dei cavi
Evitare che cavi e fili elettrici si
aggroviglino. Inoltre, è necessario
posizionare tutti i cavi e i fili elettrici
fuori dalla portata di bambini.
Evitare di salire sull'unità e di collocare oggetti pesanti
su di essa
Non salire mai sull'unità né collocare
oggetti pesanti su di essa.
Non collegare o scollegare mai l'adattatore CA con mani
bagnate
Non maneggiare mai l'adattatore CA
o le relative spine con mani bagnate
quando si collega o si scollega una
presa o l'unità.
Scollegare ogni elemento prima di spostare l'unità
Prima di spostare l'unità, scollegare
l'adattatore CA e tutti i cavi provenienti
da dispositivi esterni.
Scollegare l'adattatore CA dalla presa prima di pulirlo
Prima di effettuare la pulizia dell'unità,
spegnerla e scollegare l'adattatore CA
dalla presa (pag. 7).
Maneggiare con cautela le batterie che presentano
perdite
• Qualora dovesse fuoriuscire del
liquido da una batteria, non toccarla
con le mani nude.
• Se il fluido fuoriuscito entra a contatto
con gli occhi, potrebbe verificarsi la
perdita della vista. Non strofinarsi
gli occhi. Usare acqua dolce per
sciacquarli a fondo, quindi rivolgersi
subito a un medico.
• Potrebbero verificarsi bruciature della
pelle o dermatiti qualora il fluido entri
a contatto con la pelle o i vestiti. Usare
acqua dolce per sciacquare a fondo
le aree interessate, quindi rivolgersi
subito a un medico.
• Usare un panno morbido per
rimuovere il fluido residuo all'interno
del vano batterie, quindi installare le
nuove batterie.
ENG
DEU
FRA
ITA
ESL
POR
NLD
21
NOTE IMPORTANTI
Alimentazione
• Non collegare l'unità alla stessa presa elettrica
utilizzata contemporaneamente da un
altro apparecchio elettrico controllato da
un invertitore o un motore (ad esempio un
frigorifero, una lavatrice, un forno a microonde
o un condizionatore d'aria). In base al modo
in cui l'apparecchio elettrico viene utilizzato, il
rumore dell'alimentazione potrebbe causare il
malfunzionamento dell'unità o produrre rumore
sonoro. Se non è pratico utilizzare una presa
elettrica separata, collegare un filtro per rumore
dell'alimentazione tra l'unità e l'apparecchio
elettrico.
• L'adattatore CA inizierà a generare calore dopo
molte ore di uso consecutivo. Questo è normale e
non deve destare preoccupazioni.
• Per evitare malfunzionamenti e guasti dei
dispositivi, spegnere sempre tutti i dispositivi
prima di eseguire qualsiasi collegamento.
• L'unità si spegne automaticamente se non si
preme alcun pulsante per 30 minuti (anche se
il metronomo è in funzione) oppure se sono
trascorsi 30 minuti da quando è stata interrotta la
riproduzione di una traccia.
Alimentazione: uso delle batterie
• Quando si installano o si sostituiscono le batterie,
spegnere sempre l'unità e scollegare qualsiasi
altro dispositivo eventualmente collegato. In tal
modo è possibile prevenire malfunzionamenti e
danneggiamenti.
• La durata delle batterie in dotazione potrebbe
essere limitata poiché sono fornite allo scopo di
consentire il test dell'unità.
• In caso di funzionamento dell'unità a batterie,
utilizzare batterie alcaline o batterie Ni-MH
ricaricabili.
• In caso di funzionamento dell'unità a batterie,
scollegare l'adattatore CA dall'unità.
• Anche se le batterie sono installate, l'unità
si spegne se si collega o si scollega il cavo di
alimentazione dalla presa CA mentre l'unità è
accesa o se si collega o si scollega l'adattatore CA
dall'unità.
Manutenzione
• Per la pulizia quotidiana, strofinare l'unità con un
panno soffice e asciutto o leggermente inumidito
con acqua. Per rimuovere lo sporco ostinato,
utilizzare un panno imbevuto di un detergente
delicato e non abrasivo. Successivamente,
assicurarsi di strofinare completamente l'unità con
un panno soffice e asciutto.
22
• Non utilizzare mai benzina, diluenti, alcool o
solventi di alcun tipo, per evitare la possibilità di
scoloramento e/o deformazione.
Posizionamento
• L'utilizzo dell'unità vicino ad amplificatori di
potenza (o altre apparecchiature contenenti
trasformatori di potenza di grandi dimensioni)
potrebbe causare un ronzio. Per ridurre il
problema, modificare l'orientamento dell'unità o
allontanarla dall'origine di interferenza.
• Questo dispositivo potrebbe interferire con la
ricezione di apparecchi radio e televisivi. Non
utilizzare questo dispositivo in prossimità di tali
ricevitori.
• Se si utilizzano dispositivi di comunicazione
wireless, ad esempio telefoni cellulari, in
prossimità dell'unità, è possibile che si produca del
rumore. Tale rumore potrebbe verificarsi quando
si riceve o si effettua una chiamata o durante
la conversazione telefonica. Se si verificano tali
problemi, è necessario riposizionare i dispositivi
wireless allontanandoli dall'unità o spegnerli.
• Non esporre l'unità alla luce solare diretta, non
posizionarla in prossimità di dispositivi che
irradiano calore, non lasciarla all'interno di
un veicolo chiuso o sottoporla in altri modi a
temperature eccessive. Il calore eccessivo può
deformare o scolorire l'unità.
• Quando l'unità viene spostata da un luogo
a un altro in cui la temperatura e/o l'umidità
sono molto diverse, è possibile che si formino
delle goccioline d'acqua (condensa) all'interno
dell'unità. Se si tenta di utilizzare l'unità in
tali condizioni, potrebbero verificarsi danni o
malfunzionamenti. Pertanto, prima di utilizzare
l'unità, è necessario lasciarla spenta per diverse
ore finché la condensa non sia completamente
evaporata.
• A seconda del materiale e della temperatura della
superficie su cui poggia l'unità, i piedini di gomma
potrebbero scolorire o rovinare la superficie.
Per evitare che ciò avvenga, è possibile collocare
un pezzo di feltro o panno sotto i piedini di
gomma. In tal caso, assicurarsi che l'unità non
scivoli o non si sposti in modo accidentale.
• Non collocare sull'unità alcun oggetto contenente
acqua. Evitare inoltre l'uso di insetticidi, profumi,
alcool, smalto per unghie, bombolette spray ecc.
accanto all'unità. Asciugare rapidamente eventuali
liquidi versati sull'unità utilizzando un panno
morbido e asciutto.
Riparazioni e dati
Copyright/Licenza/Marchio di fabbrica
• Tenere presente che tutti i dati contenuti nella
memoria dell'unità potrebbero andare perduti
quando l'unità viene inviata in riparazione. Roland
non si assume alcuna responsabilità in merito a
tale perdita di dati.
• È proibito dalla legge effettuare una registrazione
audio o video, copiare o revisionare un lavoro di
terze parti protetto da copyright (lavoro musicale
o video, trasmissione, performance dal vivo o
altro), in tutto o in parte, nonché distribuire,
vendere, dare in locazione, eseguire o trasmettere
tale lavoro senza l'autorizzazione del proprietario
del copyright.
Precauzioni aggiuntive
• Tenere presente che il contenuto della memoria
potrebbe andare irrimediabilmente perduto
in seguito a un malfunzionamento o all'uso
improprio dell'unità.
• Utilizzare i pulsanti, i cursori o altri controlli,
nonché i jack e i connettori dell'unità prestando
attenzione. Una manipolazione poco attenta può
causare guasti.
• Quando si scollegano tutti i cavi, afferrare il
connettore senza mai tirare il cavo. In tal modo si
eviterà di causare cortocircuiti o di danneggiare gli
elementi interni del cavo.
• Per evitare di provocare disturbo ai vicini,
cercare di mantenere il volume dell'unità a livelli
ragionevoli. È preferibile utilizzare le cuffie, in
modo da assicurarsi di non provocare rumori
molesti alle persone nelle vicinanze.
• Alcuni cavi di collegamento contengono resistori.
Non utilizzare cavi con resistori incorporati per il
collegamento di questa unità. L'utilizzo di tali cavi
può causare una riduzione eccessiva del livello del
suono o la produzione di suono non udibile. Per
informazioni sulle specifiche dei cavi, contattare il
produttore del cavo.
• Non utilizzare questo prodotto per scopi che
potrebbero violare i diritti di copyright di
proprietà di terze parti. Roland non si assume
alcuna responsabilità di alcun tipo in merito a
qualsivoglia violazione dei diritti di copyright
di terze parti derivante dall'uso del prodotto da
parte dell'utente.
• Gli acquirenti del prodotto NON sono autorizzati
a estrarre il suddetto contenuto in formato
originale o modificato, allo scopo di distribuire
una registrazione di tale contenuto o di renderlo
disponibile su una rete di computer.
• MMP (Moore Microprocessor Portfolio) indica un
portafoglio di brevetti riguardanti l'architettura
dei microprocessori, sviluppata da Technology
Properties Limited (TPL). Roland ha ottenuto in
licenza questa tecnologia dal gruppo TPL.
• Questo prodotto contiene la piattaforma software
integrata eCROS di eSOL Co.,Ltd. eCROS è un
marchio di eSOL Co.,Ltd. in Giappone.
• I nomi delle aziende e dei prodotti citati in questo
documento sono marchi di fabbrica registrati o
marchi di fabbrica dei rispettivi proprietari.
Ripristino delle impostazioni di fabbrica
Di seguito è illustrato come ripristinare le impostazioni di fabbrica del VT-12.
* Con questa operazione verranno cancellati tutte le tracce utente e tutti i suoni registrati.
* Se la carica delle batterie non è sufficiente (sul display è visualizzato “ ”), non sarà
possibile ripristinare le impostazioni di fabbrica. In tal caso, è necessario sostituire le batterie
con batterie nuove o utilizzare un adattatore CA, quindi procedere con il ripristino delle
impostazioni di fabbrica.
1. Tenendo premuti contemporaneamente i pulsanti [
], [ ] e [
], accendere l'unità.
Sul display verrà indicato “Factory reset”.
Se si decide di annullare l'operazione, premere il pulsante [
2. Premere il pulsante [
DEU
], [WARM-UP] o [EXERCISE].
FRA
].
ITA
Verranno ripristinate le impostazioni di fabbrica del VT-12.
* Non spegnere l'unità mentre l'indicatore del tono
alternativamente.
ENG
e
ESL
si illuminano
POR
NLD
23
ENG
DEU
FRA
ITA
ESL
POR
NLD
¡Mire todo lo que puede hacer!
El VT-12 es la herramienta ideal para mejorar su técnica vocal.
Puede usar el VT-12 en cualquier momento, en cualquier lugar; solo o en grupo; en casa o en un estudio
de grabación.
Compruebe el tono de su voz
El VT-12 no solo puede detectar el tono de una sola voz, sino de dos voces.
Cuando canta en armonía con otra persona, puede usarlo para comprobar
que las dos voces cantan en el tono correcto.
Úselo como metrónomo
El VT-12 puede proporcionar un tono de guía para ayudarle a mantener el
tempo correcto cuando canta solo, o cuando practica una melodía a capela
o con un grupo vocal.
2
Comprobación del tono
Práctica vocal
El VT-12 proporciona una forma eficaz de calentar o de practicar ejercicios
vocales. Puede usar las pistas incluidas para practicar la vocalización antes de
una actuación coral o en directo, o puede usarlas para mejorar su técnica y
expresión vocales.
Prácticas
Metrónomo
ENG
DEU
¿Qué son las pistas?
FRA
ITA
El VT-12 incluye varias pistas que puede utilizar para practicar (calentamiento o ejercicios).
Además de estas pistas incluidas, también puede grabar sus propias canciones favoritas
(pág. 14).
ESL
POR
NLD
3
Contenido
¡Mire todo lo que puede hacer! . . . . . . . . . . . . . . . . . . . . 2
Descripción de los paneles . . . . . . . . . . . . . . . . . . . . . . . . 5
Panel superior. . . . . . . . . . . . . . . . . . . . . . . . . . . . . . . . . . . 5
Panel lateral (conexión del equipo) . . . . . . . . . . . . . . 6
Antes de usar el VT-12. . . . . . . . . . . . . . . . . . . . . . . . . . . . . 8
Colocación de las pilas . . . . . . . . . . . . . . . . . . . . . . . . . . 8
Encendido de la unidad . . . . . . . . . . . . . . . . . . . . . . . . . 9
Utilización de la hoja DoReMi. . . . . . . . . . . . . . . . . . . . 9
Sugerencias de utilización del VT-12 . . . . . . . . . . . . 10
Uso del soporte. . . . . . . . . . . . . . . . . . . . . . . . . . 10
Comprobación del tono. . . . . . . . . . . . . . . . . . . . . . . . . . 11
Prácticas . . . . . . . . . . . . . . . . . . . . . . . . . . . . . . . . . . . . . . . . 13
Grabar y practicar con una canción favorita . . . . . 14
Uso del metrónomo. . . . . . . . . . . . . . . . . . . . . . . . . . . . . . 15
Solución de problemas. . . . . . . . . . . . . . . . . . . . . . . . . . . 16
Flujo del audio. . . . . . . . . . . . . . . . . . . . . . . . . . . . . . . . . . . 17
Especificaciones principales. . . . . . . . . . . . . . . . . . . . . . 18
UTILIZACIÓN SEGURA DE LA UNIDAD. . . . . . . . . . . . . 19
NOTAS IMPORTANTES. . . . . . . . . . . . . . . . . . . . . . . . . . . . 22
Antes de utilizar esta unidad, lea atentamente las secciones tituladas “UTILIZACIÓN SEGURA DE LA UNIDAD” (pág. 19)
y “NOTAS IMPORTANTES” (pág. 22). En ellas encontrará información importante acerca de la utilización correcta de la
unidad. También es aconsejable leer íntegramente el manual del usuario para familiarizarse y conocer bien todas las
funciones del equipo nuevo. El manual se debe guardar en un lugar accesible para consultas futuras.
Copyright © 2012 ROLAND CORPORATION
Todos los derechos reservados. Se prohíbe la reproducción de cualquier parte de esta publicación, en cualquier
formato, sin la previa autorización por escrito de ROLAND CORPORATION.
Roland es una marca comercial registrada de Roland Corporation en los Estados Unidos y/o en otros países.
4
Descripción de los paneles
Indicador de tono
Comprobación del tono
Panel superior
pág.11
Muestra el tono o la falta de precisión
de la vocalización.
Altavoz interno
El tono de guía, el sonido del
metrónomo y las pistas se
reproducen por este altavoz.
Micrófono interno
Use este micrófono para
comprobar o grabar su voz.
Botones [ ] [ ]
pág.11
Sirven para seleccionar el tono
de guía que desea oír.
Muestra información como el
número de la pista seleccionada
o el tempo del metrónomo.
Puede cambiar el tono de
referencia pulsando el botón [ ]
y el botón [ ] al mismo tiempo
(pág. 12).
Botones [
][
Prácticas
Pantalla
]
Botón [
Sirven para modificar los ajustes.
]
pág.11
Activa o desactiva el tono de
guía. El tono de guía suena en
tonos de igual temperamento.
Botón [REVIEW]
]
Reproduce el sonido
grabado para poder comprobar el
resultado.
Sirve para reproducir o detener
el metrónomo o la pista.
Botón [
]
Selecciona el modo
Metrónomo.
pág.15
Metrónomo
Botón [
Botón [WARM-UP]
pág.13
Selecciona el modo Warm-up para
calentamiento.
Botón [EXERCISE]
pág.13
Selecciona el modo Exercise para
ejercicios.
ENG
DEU
FRA
ITA
ESL
POR
NLD
5
Descripción de los paneles
Panel lateral (conexión del equipo)
Conector REC IN
pág.14
Aquí puede conectar un dispositivo de audio
externo, como un reproductor de audio o
radiocasete con un cable miniclavija estéreo.
Conector OUTPUT/PHONES
Aquí puede conectar
un altavoz externo
o auriculares que se
venden por separado.
Puede grabar sus canciones favoritas a través
de este conector y usarlas para practicar.
Para realizar esta conexión, conecte un cable
entre el conector de salida (por ejemplo, el
conector de los auriculares) del dispositivo de
audio externo y este conector.
Orificio para la correa
Puede colocar aquí una correa de venta en
comercios.
Conmutador de detección de tono pág.11
Conmutador [MIC VOLUME]
Sirve para seleccionar el método de
detección del tono.
Ajusta el volumen del micrófono.
H: Volumen alto
L:
Volumen bajo
OFF: Monitor apagado
* Si este conmutador está en la posición “OFF”,
el tono no se puede detectar.
6
Descripción de los paneles
Comprobación del tono
Botón [POWER]
pág. 9
Mantenga pulsado este botón para
encender o apagar la unidad.
Mando [VOLUME]
Ajusta el volumen del altavoz
interno o de los auriculares.
Conecte aquí el adaptador de CA (PSB-6U,
se vende por separado).
* Utilice únicamente el adaptador de
CA especificado (PSB-6U) y conéctelo
a una toma de CA del voltaje correcto.
No utilice ningún otro adaptador de
CA; si lo hace, podría provocar un
funcionamiento defectuoso.
Prácticas
Conector DC IN
Coloque el adaptador de CA de manera
que el lado en el que se encuentra el
indicador (véase la ilustración) quede
hacia arriba, y el lado que contiene el
texto informativo quede hacia abajo.
El indicador se iluminará cuando el
adaptador de CA se conecte a una
toma de corriente.
Metrónomo
Precaución al realizar las conexiones
ENG
• Para evitar que el equipo funcione de manera deficiente o sufra algún daño, baje siempre el volumen
y apague todas las unidades antes de proceder a realizar cualquier conexión.
DEU
• Si va a utilizar un altavoz externo, puede producirse cierto retorno (un silbido) en función de la posición
del altavoz externo respecto del micrófono interno. Si esto sucediera, lleve a cabo los pasos siguientes:
1. Cambie la orientación del micrófono interno.
2. Coloque el micrófono interno más lejos de los altavoces externos.
3. Baje los niveles de volumen.
4. Ajuste el conmutador [MIC VOLUME] en la posición “OFF”.
FRA
ITA
ESL
POR
NLD
7
Antes de usar el VT-12
Colocación de las pilas
Coloque las pilas (dos pilas AA) como se muestra en la ilustración, teniendo cuidado de respetar la
polaridad correcta.
Precauciones al usar pilas
• A medida que las pilas se van agotando, la pantalla
mostrará “
”. Cuando esto suceda, coloque pilas
nuevas.
• Si se utilizan mal, las pilas pueden explotar o perder
líquido, y causar daños y lesiones. Por razones de
seguridad, lea las siguientes precauciones y obsérvelas
siempre.
• Siga al pie de la letra las instrucciones de colocación
de las pilas y asegúrese de observar la polaridad
correcta.
• No utilice pilas nuevas y pilas usadas al mismo
tiempo. Asimismo, no utilice a la vez distintos tipos
de pilas.
• Extraiga las pilas cuando no vaya a utilizar la unidad
durante un periodo prolongado de tiempo.
• No guarde nunca las pilas con objetos metálicos
como bolígrafos, horquillas, collares, etc.
• Las pilas usadas se deben desechar de acuerdo con
la normativa correspondiente vigente en su lugar
de residencia.
8
• La manipulación incorrecta de las pilas, pilas
recargables o cargador de pilas puede provocar
pérdidas de líquido, recalentamiento, incendios o
explosiones. Antes de todo uso, debe leer y observar
estrictamente todas las precauciones relativas a las
pilas, pilas recargables o cargador de pilas.
• Cuando utilice pilas recargables y un cargador, utilice
únicamente la combinación de pilas recargables y
cargador especificada por el fabricante de las pilas.
• Si va a utilizar esta unidad con pilas, use pilas alcalinas
o pilas de Ni-MH recargables.
• Si va a utilizar esta unidad con pilas, desconecte de
ella el adaptador de CA.
• Incluso con las pilas puestas, la unidad se apagará
si conecta o desconecta el cable de alimentación
de la toma de CA estando la unidad encendida, o si
conecta o desconecta el adaptador de CA a la unidad.
• Duración estimada de las pilas con un uso continuo:
Alcalina: 6 horas
* Estas cifras pueden variar en función de las
especificaciones de las pilas y las condiciones reales
de uso.
Antes de usar el VT-12
Comprobación del tono
Encendido de la unidad
* Una vez que está todo bien conectado (pág. 6), asegúrese de seguir el procedimiento
de encendido que se indica a continuación.
1
Mantenga pulsado el botón [POWER]
hasta que la unidad se encienda.
Prácticas
2
Ajuste el mando [VOLUME] en su posición
mínima.
Precauciones con la alimentación
Metrónomo
• Este dispositivo se apagará automáticamente cuando hayan transcurrido 30 minutos desde la última vez
que se tocó un botón (incluido el tiempo que el metrónomo está sonando) o 30 minutos desde que se
detuvo la reproducción de una pista.
• Antes de encender o apagar la unidad, asegúrese siempre de bajar el volumen. Incluso con el volumen
bajado, podría oírse algún sonido al encender o apagar la unidad. No obstante, esto es normal y no indica
ningún fallo de funcionamiento.
• Esta unidad está equipada con un circuito de protección. Es necesario un breve intervalo de tiempo
(unos cuantos segundos) después del encendido para que funcione con normalidad.
Utilización de la hoja DoReMi
Acople la hoja DoReMi incluida al indicador de tono y podrá usar las indicaciones DoReMi para
comprobar los nombres de las notas.
Si desea comprobar los nombres de las notas cuando usa el solfeo “Do” móvil, acople la hoja
DoReMi con la palabra “Do” colocada en el nombre de la nota tónica que va a usar.
ENG
DEU
FRA
ITA
ESL
Hoja DoReMi
* Antes de usar la hoja DoReMi, asegúrese de retirar el papel del dorso y la lámina protectora de
color azul.
POR
NLD
9
Antes de usar el VT-12
Sugerencias de utilización del VT-12
Sujete el VT-12 en la mano y cante en la postura mostrada en la ilustración.
Use auriculares si desea comprobar la precisión de su tono mientras reproduce una pista
o el metrónomo.
La utilización de los auriculares proporcionará una detección del tono más precisa. Con ellos
también podrá oír el sonido grabado más fácilmente.
Utilizar auriculares
Alejar unos 30 cm
Mantener la espalda recta
RECUERDE
Si se presenta alguna de las situaciones siguientes, compruebe el ajuste del conmutador
[MIC VOLUME] (pág. 6).
• El indicador de tono no responde o no responde como debiera.
• El volumen del sonido del micrófono es bajo.
Uso del soporte
Utilice el soporte del VT-12 para mantenerlo de pie.
Cuando use el VT-12 con un grupo, el soporte ofrece una forma muy práctica de mantener el
VT-12 de pie en una mesa.
Si decide utilizarlo así, asegúrese de que el VT-12 se encuentra a 1 m de distancia de los cantantes.
10
* Para volver a poner el soporte en su posición original, pliéguelo hacia dentro hasta que oiga
el chasquido que indica que está en su sitio.
Comprobación del tono
1
Seleccione el tipo de detección de tono.
MONO EQUAL: Se detectará una sola voz con
temperamento igual.
CHORD EQUAL: Se detectarán dos voces con
temperamento igual.
CHORD JUST: Se detectarán dos voces mediante
entonación justa (mayor).
Comprobación del tono
Por regla general, lo primero que hace todo el mundo es comprobar su tono.
El VT-12 puede comprobar no solo el tono de una persona, sino de dos voces al mismo tiempo.
Esto resulta muy práctico para comprobar el tono de dos personas que cantan en armonía.
RECUERDE
La clave de entonación justa queda determinada por el tono más bajo.
Si el tono de guía del VT-12 está sonando, la clave queda
determinada por el tono de guía. Si el tono de guía está sonando,
solo se puede detectar una voz.
Pulse el botón [
Prácticas
2
].
Antes de empezar a vocalizar, haga sonar el tono de guía
(temperamento igual) para oír el tono correcto.
RECUERDE
Puede usar los botones [ ] y [ ] para cambiar el tono de guía.
3
Vocalice y luego compruebe su tono.
Vocalice el tono que pretende alcanzar.
Metrónomo
Se iluminará el nombre de la nota más próxima al tono detectado.
La iluminación se hará más brillante cuanto más se acerque al tono
correcto, y más oscura cuanto más se aleje de él.
Si está sonando un tono de guía, el nombre de nota del tono de guía
también se iluminará.
Indica la cantidad de discrepancia del tono. Iluminado:
No iluminado:
El tono es bemol
MONO EQUAL
El tono es correcto
ENG
El tono es agudo
DEU
La nota alta es bemol
respecto a la nota baja
* Si el indicador de tono no
responde ni siquiera cuando
está vocalizando, compruebe
el ajuste del conmutador [MIC
VOLUME] (pág. 6).
CHORD EQUAL
CHORD JUST
FRA
El intervalo de tono entre
las dos notas es correcto
ITA
La nota alta es aguda
respecto a la nota baja
POR
ESL
NLD
11
Comprobación del tono
Cambio del tono de referencia
1. Pulse los botones [
] y [ ] simultáneamente.
La pantalla indicará el tono de referencia actual.
2. Use los botones [
][
] para especificar el tono de referencia deseado.
Rango: 415–465 Hz (valor predeterminado: 440 Hz)
* Si no hace nada durante el periodo de tiempo predeterminado, la indicación del tono de referencia
desaparecerá y la unidad volverá automáticamente al modo de comprobación del tono.
3. Pulse los botones [
] y [ ] simultáneamente.
La indicación del tono de referencia desaparecerá y la unidad volverá automáticamente al modo
de comprobación del tono.
* Durante la reproducción de las pistas predefinidas, el tono de referencia está fijado en 440 Hz.
¿Qué es “Entonación justa”?
Entonación justa es un método de afinación que garantiza intervalos puros de quinta y
tercera.
Si selecciona entonación justa, tendrá que especificar la nota tónica (para una escala mayor
será C) que sea adecuada para la clave de su canción.
El VT-12 asignará la voz más baja de las dos como la tónica.
Si está sonando un tono de guía, este será la tónica.
Acerca de los tonos en entonación justa
El VT-12 puede detectar tonos de entonación justa únicamente en clave mayor.
Si el tono de guía es C, los tonos se calculan con las relaciones siguientes.
C
C#
D
D#
E
F
Temperamento igual
(centésima)
0
100
200
300
400
500
Entonación justa
(centésima)
0
71
204
316
386
498
Relación
1
25/24
9/8
6/5
5/4
4/3
F#
G
G#
A
A#
B
Temperamento igual
(centésima)
600
700
800
900
1000
1100
Entonación justa
(centésima)
569
702
773
884
1018
1088
25/18
3/2
25/16
5/3
9/5
15/8
Relación
12
Prácticas
Modo Warm-up
Incluye pistas para practicar la vocalización que le calentarán la voz.
Modo Exercise
Incluye pistas para mejorar la técnica vocal, como la mejora del control de la
respiración y el aumento del rango vocal.
RECUERDE
Para más información sobre las prácticas, consulte también la “Guía de ejercicios”.
En ella encontrará consejos útiles sobre vocalización y canto, así como algunas sugerencias
para practicar con cada pista.
* Cada vez que se reproduce una pista, se inicia una grabación nueva. Si reproduce una pista
en la que ya se había grabado anteriormente, se sobrescribirá el sonido que se grabó en ella.
Si detiene la reproducción de una pista antes de que hayan transcurrido 3 segundos desde su
inicio, no se grabará el sonido en esa pista.
Seleccione un modo de
práctica.
Prácticas
1
El botón del modo seleccionado se
iluminará.
2
6
Use los botones [ ] [ ]
para seleccionar una pista.
].
La pista se reproducirá y empezará a grabarse
el sonido.
4
Cante al son de la pista.
A medida que canta, preste atención a su
propio tono y a los tonos de la pista que
se está reproduciendo.
RECUERDE
En función de la pista que haya
seleccionado, podrá cambiar entre
silenciar/oír la parte vocal de la
pista pulsando el botón [REVIEW]
durante la reproducción del sonido
grabado.
5
Pulse el botón [
Metrónomo
Pulse el botón [
Pulse el botón [REVIEW].
El sonido grabado empezará
a reproducirse. Si no hay nada grabado,
la pantalla mostrará “---”.
RECUERDE
• Si pulsa reiteradamente el botón del
modo seleccionado, podrá cambiar
entre las pistas predefinidas y las
pistas de usuario.
• Si aún no se ha grabado ninguna pista
de usuario, la pantalla mostrará “U--”.
• Para más información sobre las pistas,
consulte la “Lista de pistas”.
3
Comprobación del tono
El VT-12 ofrece dos modos de práctica: el modo Warm-up para calentamiento y el modo Exercise
para ejercicios. Cada modo incluye pistas (pág. 3) idóneas para el tipo de práctica correspondiente.
Durante la sesión de práctica el sonido se graba automáticamente en las pistas correspondientes
para que pueda escucharlo más tarde (función de revisión Review).
].
Se detendrán la reproducción de la pista
y la grabación del sonido.
Iluminado:
Tonos que canta
Parpadeante: Tonos de la pista
* Con algunas pistas (pistas de usuario y
determinadas pistas predefinidas), la unidad no
indicará los tonos mediante parpadeos.
ENG
DEU
FRA
ITA
Pistas predefinidas y pistas de usuario
ESL
El VT-12 incluye pistas predefinidas (001–) para cada modo. Pero también se pueden grabar
pistas a través del conector REC IN y usarlas como pistas de usuario (U01–U10). (Las pistas de
usuario son comunes a ambos modos.)
POR
NLD
13
Prácticas
Grabar y practicar con una canción favorita
Puede grabar sus canciones favoritas en el VT-12 a través del conector REC IN y usarlas luego como
pistas de usuario. Una canción grabada se puede usar en los dos modos: Warm-up y Exercise.
Duración de pista
10 minutos como máximo (por pista)
Número de pistas
10 pistas como máximo
* Si selecciona un número de pista en el que ya se había grabado antes, y graba en él, la canción
que había grabado se sobrescribirá. Si detiene la grabación antes de que hayan transcurrido
3 segundos desde el inicio, la canción no se grabará.
* Cuando haya acabado de grabar un canción, debe desenchufar el cable del conector REC IN. El
VT-12 no realizará ninguna otra operación mientras el cable esté enchufado al conector REC IN.
1
Conecte el dispositivo de
audio externo al conector
REC IN (pág. 6).
8
Desconecte el dispositivo
de audio externo del
conector REC IN.
Pruebe a practicar con la pista de
usuario que ha grabado (pág. 14).
La pantalla indicará alternativamente
“rEc” y “U**”; el VT-12 está listo para
grabar la canción.
2
Reproduzca la canción
en el dispositivo de audio
externo.
Ajuste el volumen del sonido que se
va a capturar.
Cuando compruebe el sonido emitido
por el altavoz interno o por los
auriculares, ajuste su volumen con
los controles del dispositivo de audio
externo.
3
4
Use los botones [ ] [ ]
para especificar el número
de pista en el que se va a
grabar la pista.
Pulse el botón [
].
La grabación comenzará.
Durante la grabación, la pantalla
mostrará “rEc” y el indicador de tono
se iluminará.
7
Pulse el botón [REVIEW].
Comenzará a reproducirse la canción
grabada.
Compruebe y asegúrese de que la
canción se ha grabado correctamente.
Si la canción no se ha grabado, la
pantalla mostrará “---”.
6
Pulse el botón [
La grabación se detendrá.
5
Reproduzca la canción
en el dispositivo de audio
externo.
RECUERDE
Si desea eliminar las canciones que ha grabado, restaure los valores predeterminados
de fábrica del VT-12 (pág. 23).
14
].
Uso del metrónomo
1
Pulse el botón [
].
Use los botones [ ] [ ]
para ajustar el tempo.
Rango: 30–250
RECUERDE
También puede definir el
tempo tocando el botón [ ] en
el momento deseado (función Tap
Tempo).
Pulse el botón [
].
El metrónomo empezará a sonar y se iniciará
la grabación del sonido.
El botón [ ] parpadeará de forma
sincronizada con el tempo.
6
Pulse el botón [REVIEW].
El sonido grabado empezará a
reproducirse.
La reproducción se detendrá cuando
pulse el botón [
].
5
Pulse el botón [
Metrónomo
3
Prácticas
El VT-12 entrará en modo Metrónomo.
La pantalla indicará el valor del tempo
actual.
2
Comprobación del tono
Quizá desee practicar cantando al tempo del metrónomo.
El sonido se graba automáticamente mientras el metrónomo está sonando, así que podrá
escucharse después (función Review).
* Cada vez que hace sonar el metrónomo, se inicia una grabación nueva. La grabación realizada
anteriormente se sobrescribirá. Si detiene el metrónomo antes de que hayan transcurrido
3 segundos, el sonido no se grabará.
* En el modo Metrónomo se puede grabar un máximo de 10 minutos. Cuando se han superado
los 10 minutos, la grabación se detendrá. El metrónomo seguirá sonando incluso después de
detenerse la grabación.
* No es posible ajustar la signatura de tiempo.
].
Se detendrán el metrónomo y la
grabación del sonido.
RECUERDE
También puede reproducir el metrónomo
cuando suena el tono de guía (pág. 11).
ENG
4
Cante al tiempo del metrónomo.
Cuando cante, tenga en cuenta los tonos.
DEU
Iluminado: Tono de guía y tono que está cantando
FRA
ITA
ESL
POR
NLD
15
Solución de problemas
Problema
Lo que hay que comprobar
Acción
¿Podrían estar las pilas agotadas? Coloque pilas nuevas.
La unidad no se enciende
La unidad no se apaga
No hay sonido o el volumen
es insuficiente
Compruebe otra vez la conexión.
¿Se ha conectado correctamente
No utilice nunca un adaptador
el adaptador de CA especificado
de CA distinto al modelo
(PSB-6U, se vende por separado)?
especificado.
Primero, asegúrese de que todas
las pistas se han detenido y que
todas las capturas de canciones
¿Aparece “Err” en la pantalla?
han finalizado; ahora ya puede
apagar la unidad.
¿Se han conectado los demás
dispositivos correctamente?
Compruebe otra vez las
conexiones.
¿Podría estar bajo el volumen de
un altavoz externo conectado?
Compruebe los ajustes del
dispositivo conectado.
¿Está el mando [VOLUME] bien
ajustado?
Ajuste bien el volumen.
¿Está el conmutador [MIC
Seleccione el ajuste adecuado.
VOLUME] en el ajuste adecuado?
¿Hay auriculares conectados?
Si ha conectado unos auriculares,
no saldrá ningún sonido por el
altavoz interno.
pág. 8
pág. 7
–
pág. 6
–
pág. 7
pág. 6
–
Volumen insuficiente por el
altavoz interno
¿Podrían estar las pilas agotadas? Coloque pilas nuevas.
El nivel de volumen del
instrumento conectado al
conector OUTPUT/PHONES
es demasiado bajo
¿Está utilizando un cable de
conexión con resistencia?
Utilice cables de conexión sin
resistencias.
El sonido se oye distorsionado
¿Está el mando [VOLUME] bien
ajustado?
Ajuste bien el volumen.
La grabación se detiene
mientras se está grabando
una canción
¿Está intentando grabar más de
diez minutos?
La grabación puede tener un
máximo de diez minutos
(por canción).
–
Volumen insuficiente o
sonido distorsionado en una
canción grabada
¿Está grabando a un volumen
adecuado?
Ajuste el volumen del dispositivo
de audio externo.
–
¿Está el conmutador [MIC
Seleccione el ajuste adecuado.
VOLUME] en el ajuste adecuado?
El tono no se detecta o se
produce una operación
inesperada
Durante la reproducción de
la pista, los indicadores de
tono y se iluminan con
frecuencia.
La unidad se apaga
inesperadamente
16
Página
¿Está intentando comprobar el
tono en un lugar con ruidos?
Compruebe el tono en un lugar
sin ruido excesivo.
pág. 8
–
pág. 7
pág. 6
–
Seleccione el ajuste adecuado.
¿Es correcto el ajuste del tono de Durante la reproducción de las
pág. 12
pistas predefinidas, el tono de
referencia?
referencia está fijado en 440 Hz.
Para poder comprobar rápidamente el tono durante la reproducción
de la pista, los indicadores de tono y se iluminan con rapidez.
–
Si reproduce lo que ha grabado ya pulsando el botón [REVIEW], estos
indicadores se iluminarán de la manera habitual.
Este dispositivo se apagará automáticamente cuando hayan
transcurrido 30 minutos desde la última vez que se tocó un botón
–
(incluido el tiempo que el metrónomo está sonando) o 30 minutos
desde que se detuvo la reproducción de una pista.
Flujo del audio
Micrófono
interno
Conmutador
[MIC VOLUME]
Detección de tono
Conector
OUTPUT/PHONES
Parte vocal de la
pista (solo con
determinadas
pistas predefinidas)
Grabado
Pista
Detección de tono
Mando
[VOLUME]
Comprobación del tono
Cuando se reproduce una pista
Parte de acompañamiento
de la pista
Altavoz interno
Prácticas
* El sonido del micrófono interno no se emitirá por el altavoz interno.
Cuando se reproduce (revisa) el sonido grabado
Detección de tono
Sonido grabado
Detección de tono
Mando
[VOLUME]
Metrónomo
Pista
Parte vocal de la pista
(solo con determinadas
pistas predefinidas)
Conector
OUTPUT/PHONES
Parte de acompañamiento de la pista
Altavoz interno
Cuando se graba una canción
Conector
OUTPUT/PHONES
Conector REC IN
Reproducción en el dispositivo
de audio externo
ENG
DEU
Mando
[VOLUME]
FRA
ITA
ESL
Grabado
POR
Pista de usuario
Altavoz interno
17
NLD
Especificaciones principales
Roland VT-12: Entrenador vocal
Afinador
Rango de afinación
C2 (65,4 Hz)–A5 (880,0 Hz)
Precisión de afinación
+/-1 centésima
Tonalidad de referencia
Tono de referencia: A4 = 415–465 Hz (incrementos de 1 Hz)
Rango de tonalidad de referencia: A3–G#5 (24 notas de la escala
cromática)
Metrónomo
Tempo
30–250, Precisión: +/-0,1%
Pista de usuario
Duración de pista
10 minutos como máximo (por pista)
Número de pistas
Número de pistas: 10 pistas como máximo
Entrada/Salida
Nivel de entrada nominal
Impedancia de entrada
Nivel de salida
Impedancia de carga
recomendada
Otros
Conector REC IN: 0 dBu
Conector REC IN: 9,5 k ohmios
Conector OUTPUT/PHONES: 15 mW + 15 mW
(en casos de 16 ohmios de carga)
16 ohmios o más
Altavoz
Mono
Conectores
Conector OUTPUT/PHONES (tipo telefónico estéreo en miniatura)
Conector REC IN (tipo telefónico estéreo en miniatura)
Conector DC IN
Pantalla
7 segmentos, 3 caracteres (LED)
Indicador de tono
Fuente de alimentación
Pila alcalina (AA, LR6) o pila de Ni-MH recargable (AA, HR6) x 2,
adaptador de CA (PSB-6U: se vende por separado)
Consumo
380 mA
Duración estimada de la pila con
un uso continuo
Alcalina (AA, LR6): Aprox. 6 horas
* Estas cifras pueden variar en función de las especificaciones de las pilas
y las condiciones reales de uso.
Dimensiones
70 (anchura) x 134 (fondo) x 28 (altura) mm
Peso
150 g (pilas incluidas)
Pila alcalina (AA, LR6) x 2
Hoja DoReMi
Manual del usuario
Guía de ejercicios
Lista de pistas
Funda de transporte (OP-RP1)
Adaptador de CA (PSB-6U)
Accesorios
Opciones (se venden por
separado)
* Cuando vaya a comprar un adaptador de CA, asegúrese de que
el adaptador (consulte la lista que sigue) es el adecuado para la
región donde se va a utilizar y tiene la tensión correcta. (PSB6U-120/
PSB6U-230EU/PSB6U-230UK/PSB6U-240A) (estos modelos incluyen el
adaptador PSB-6U y el cable de alimentación).
* 0 dBu = 0,775 Vrms
* Con el fin de mejorar el producto, las especificaciones y/o el aspecto de la unidad pueden
modificarse sin previo aviso.
18
UTILIZACIÓN SEGURA DE LA UNIDAD
ADVERTENCIA
ADVERTENCIA
No desmonte ni modifique la unidad usted mismo
No coloque la unidad en un lugar inestable
No abra, ni modifique de ninguna
forma, la unidad o el adaptador de CA.
Asegúrese de que la unidad esté
siempre colocada sobre una superficie
plana, nivelada y estable. No la coloque
nunca sobre soportes que puedan
moverse ni sobre superficies inclinadas.
No repare ni sustituya ninguna pieza usted mismo
No intente reparar la unidad ni sustituir
ninguna de sus piezas internas (salvo
cuando en este manual se proporcionen
instrucciones específicas que le
indiquen que lo haga). Si la unidad
necesitara algún tipo de reparación,
póngase en contacto con su proveedor,
con el centro de servicio Roland
más cercano o con un distribuidor
autorizado de Roland de los que se
indican en la página de información.
No use ni guarde la unidad en lugares
Expuestos a temperaturas extremas (por
ejemplo, bajo la luz solar directa en un
vehículo cerrado, cerca de un conducto
de calefacción, encima de algún equipo
que genere calor, etc.); o que están:
• Mojados (por ejemplo, cuartos de baño o
suelos mojados).
• Expuestos al vapor o a humos.
• Expuestos a entornos salinos.
• Húmedos.
• Expuestos a la lluvia.
• Con polvo o arena.
• Expuestos a altos niveles de vibración y
sacudidas.
Utilice únicamente el adaptador de CA especificado
y la tensión correcta
Utilice exclusivamente el adaptador de
CA especificado (PSB-6U) y asegúrese
de que la tensión de la línea de
alimentación es la misma que la tensión
de entrada indicada en el adaptador de
CA. Otros adaptadores de CA pueden
usar una polaridad distinta o estar
diseñados para otras tensiones, por
lo que su uso podría provocar daños,
desperfectos o descargas eléctricas.
Utilice exclusivamente el cable de alimentación incluido
Utilice exclusivamente el cable de
alimentación suministrado con el
equipo. Del mismo modo, el cable de
alimentación incluido tampoco se debe
usar con ningún otro dispositivo.
No doble el cable de alimentación, ni coloque objetos
pesados sobre él
ENG
DEU
FRA
No doble ni retuerza excesivamente el
cable de alimentación, ni ponga objetos
pesados sobre él. Todo ello podría
dañar el cable, cortarlo o provocar
cortocircuitos. Los cables dañados son
peligrosos, ya que pueden provocar
incendios y descargas eléctricas.
ITA
ESL
POR
NLD
19
ADVERTENCIA
Evite un uso prolongado a mucho volumen
Esta unidad, utilizada de manera
independiente o combinada con un
amplificador y auriculares o altavoces,
puede generar niveles acústicos
susceptibles de provocar una pérdida
permanente de audición. No la utilice
durante periodos prolongados de
tiempo con un nivel de volumen elevado,
ni a un volumen que resulte molesto.
Si experimenta alguna pérdida de
audición o un zumbido en los oídos,
debe dejar de utilizarla inmediatamente y
consultar a un otorrinolaringólogo.
No permita que caigan objetos extraños ni líquidos
en la unidad
No deje que caigan objetos (por
ejemplo, objetos inflamables, monedas
o alambres) ni líquidos (agua u otras
bebidas) en el interior de este producto.
Si esto sucediera, podrían producirse
cortocircuitos, un funcionamiento
incorrecto u otros desperfectos.
Apague la unidad si se produce alguna anomalía
o desperfecto
Apague la unidad inmediatamente,
retire el adaptador de CA del enchufe y
póngase en contacto con su proveedor,
el centro de servicio Roland más cercano,
o con un distribuidor Roland autorizado
de los que se indican en la página de
información, siempre que:
• El adaptador de CA, el cable de
alimentación o el enchufe estén
dañados.
• La unidad genere humo u olores raros.
• Haya caído algún objeto, o se haya
derramado algún líquido, en el interior
de la unidad.
• La unidad haya estado expuesta a la
lluvia, o se haya mojado por cualquier
causa.
• La unidad parezca no funcionar con
normalidad o muestre un cambio
notable en su rendimiento.
En los lugares donde haya niños debe haber un adulto
que los supervise
Cuando la unidad se utilice en algún
lugar donde haya niños, hay que tener
cuidado de que la unidad no se manipule
incorrectamente. Es recomendable que
siempre haya un adulto disponible para
supervisar y asesorar.
20
ADVERTENCIA
No deje que la unidad se caiga ni sufra un impacto
fuerte
Proteja la unidad contra los impactos
fuertes.
No deje que se caiga.
No utilice la misma toma de corriente con un número
elevado de dispositivos
No enchufe el cable de alimentación de
la unidad a la misma toma de corriente
donde ya hay bastantes otros dispositivos
enchufados. Tenga especial cuidado si
utiliza cables de extensión. La corriente
total de todos los dispositivos conectados
a la toma del cable de extensión no debe
exceder nunca de la potencia nominal
(vatios/amperios) del cable. Una carga
excesiva podría hacer que se calentara
el material de aislamiento del cable y
llegara a fundirse.
No utilice la unidad en el extranjero
Antes de utilizar la unidad en otro país,
póngase en contacto con su proveedor,
el centro de servicio Roland más cercano,
o con un distribuidor Roland autorizado
de los que se indican en la página de
información.
Manipule las pilas con cuidado
• Las pilas, pilas recargables o un
cargador de pilas nunca se deben
recargar, calentar, desmontar ni arrojar
al fuego ni al agua.
• No exponga nunca las pilas, pilas
recargables o cargador de pilas a
temperaturas excesivas: sol directo,
fuego, etc.
• La manipulación incorrecta de las
pilas, pilas recargables o cargador
de pilas puede provocar pérdidas de
líquido, recalentamiento, incendios o
explosiones. Antes de todo uso, debe
leer y observar estrictamente todas las
precauciones relativas a las pilas, pilas
recargables o cargador de pilas.
• Cuando utilice pilas recargables y
un cargador, utilice únicamente la
combinación de pilas recargables y
cargador especificada por el fabricante
de las pilas.
PRECAUCIÓN
Coloque la unidad en un lugar con buena ventilación
La unidad y el adaptador de CA se
deben colocar en un lugar y una
posición que permitan una ventilación
adecuada.
Cuando vaya a conectar o desconectar el adaptador de
CA, sujete el cable por el enchufe
Siempre que vaya a enchufar o
desenchufar el adaptador de CA a una
toma de corriente o a la unidad, sujete
exclusivamente el enchufe del cable del
adaptador.
Limpie periódicamente el enchufe del adaptador de CA
Desenchufe el adaptador de CA
periódicamente y límpielo con un paño
seco para eliminar el polvo y la suciedad
acumulados en las patillas. Asimismo,
desenchufe el cable de alimentación
de la toma de corriente siempre que
la unidad no vaya a utilizarse en un
periodo de tiempo prolongado. La
acumulación de polvo entre el enchufe
del cable de alimentación y la toma de
corriente puede reducir el aislamiento y
provocar un incendio.
Utilice los cables con seguridad
Trate de evitar que los cables se
enreden. Además, todos los cables
deben estar fuera del alcance de los
niños.
No se suba encima de la unidad ni coloque objetos
pesados sobre ella
No se suba nunca a la unidad ni coloque
objetos pesados sobre la misma.
No enchufe ni desenchufe el adaptador de CA con las
manos mojadas
Cuando vaya a enchufar o desenchufar
el adaptador de CA o su enchufe
de una toma de corriente o de esta
unidad, asegúrese siempre de tener las
manos secas.
Desconecte todo antes de mover la unidad
Antes de mover la unidad, desconecte
el adaptador de CA y todos los cables
procedentes de dispositivos externos.
Desenchufe el adaptador de CA de la toma de corriente
antes de limpiar la unidad
PRECAUCIÓN
Si existe la posibilidad de que se produzcan rayos,
desenchufe el adaptador de CA de la toma de corriente
Siempre que exista la posibilidad de
que se produzcan rayos en su región,
desenchufe el adaptador de CA de la
toma de corriente.
Manipule las pilas con cuidado
Si se utilizan mal, las pilas pueden
explotar o perder líquido, y causar daños
o lesiones. Por razones de seguridad, lea
las siguientes precauciones y obsérvelas
siempre (pág. 8).
• Siga al pie de la letra las instrucciones
de colocación de las pilas y asegúrese
de observar la polaridad correcta.
• No utilice pilas nuevas y pilas usadas
al mismo tiempo. Asimismo, no utilice
a la vez distintos tipos de pilas.
• Extraiga las pilas cuando no vaya a
utilizar la unidad durante un periodo
prolongado de tiempo.
• No guarde nunca las pilas con objetos
metálicos como bolígrafos, horquillas,
collares, etc.
• Las pilas usadas se deben desechar
de acuerdo con la normativa
correspondiente vigente en su lugar
de residencia.
Manipule con cuidado las pilas que pierden líquido
• Si alguna pila pierde líquido,
asegúrese de no tocarla con las manos
desprotegidas.
• Si le entra líquido en los ojos, podría
sufrir una pérdida de visión. No
se frote los ojos; use agua limpia
abundante para lavárselos bien y
acuda a un médico lo antes posible.
• Si le cae líquido de la pila sobre la
piel o la ropa, podría provocarle
quemaduras en la piel o dermatitis.
Use agua limpia abundante para
lavarse bien las zonas afectadas y
acuda a un médico lo antes posible.
• Utilice un paño suave para limpiar
con cuidado cualquier resto de
líquido que quede en el interior
del compartimento de las pilas.
A continuación, ponga pilas nuevas.
ENG
DEU
FRA
ITA
Antes de limpiar la unidad, apáguela y
desenchufe el adaptador de CA de la
toma de corriente (pág. 7).
ESL
POR
NLD
21
NOTAS IMPORTANTES
Fuente de alimentación
• No conecte la unidad a la misma toma de corriente
que un aparato eléctrico controlado por un inversor
o un motor (como un frigorífico, una lavadora, un
microondas o un aparato de aire acondicionado).
Dependiendo de cómo se utilice dicho aparato
eléctrico, el ruido de la fuente de alimentación
puede hacer que la unidad no funcione
correctamente o genere ruidos perceptibles. Si no
existe la posibilidad de usar otra toma de corriente,
conecte un filtro de ruido de fuente de alimentación
entre la unidad y la toma de corriente.
• El adaptador de CA empezará a calentarse después
de varias horas de uso continuado. Esto es algo
normal y no tiene consecuencias.
• Para evitar que el equipo funcione de manera
deficiente o sufra algún daño, asegúrese siempre
de apagar todas las unidades antes de proceder
a realizar las conexiones.
• Este dispositivo se apagará automáticamente
cuando hayan transcurrido 30 minutos desde
la última vez que se tocó un botón (incluido
el tiempo que el metrónomo está sonando) o
30 minutos desde que se detuvo la reproducción
de una pista.
Fuente de alimentación: Uso con pilas
• Cuando vaya a colocar o cambiar las pilas,
apague siempre la unidad y desconecte todos los
dispositivos que haya conectados. De esta forma,
puede evitar posibles fallos de funcionamiento
y daños.
• La vida útil de las pilas suministradas puede ser
limitada, ya que su finalidad principal es permitir
la realización de pruebas.
• Si va a utilizar esta unidad con pilas, use pilas
alcalinas o pilas de Ni-MH recargables.
• Si va a utilizar esta unidad con pilas, desconecte
de ella el adaptador de CA.
• Incluso con las pilas puestas, la unidad se apagará
si conecta o desconecta el cable de alimentación
de la toma de CA estando la unidad encendida,
o si conecta o desconecta el adaptador de CA
a la unidad.
Mantenimiento
• Limpie la unidad diariamente con un paño suave
y seco, o ligeramente humedecido en agua.
Para eliminar la suciedad resistente, utilice un paño
humedecido con un detergente suave no abrasivo.
A continuación, no olvide secar bien la unidad con
un paño suave y seco.
22
• No utilice aguarrás, alcohol ni disolventes de
ningún tipo, para evitar que la unidad se deforme
o decolore.
Colocación
• El uso de la unidad en las proximidades de
amplificadores de potencia (u otros equipos con
grandes transformadores de potencia) puede
producir zumbidos. Para mitigar este problema,
cambie la orientación de la unidad o aléjela de la
fuente de la interferencia.
• Esta unidad puede interferir en la recepción de
señales de radio o televisión. No utilice la unidad
en las proximidades de este tipo de receptores.
• La utilización de dispositivos de comunicación
inalámbricos, como teléfonos móviles, en las
proximidades de la unidad puede originar ruidos.
Estos ruidos pueden producirse al recibir o hacer
una llamada, o durante la conversación. Si observa
este problema, aleje el dispositivo inalámbrico de
la unidad o apáguelo.
• No exponga la unidad a la luz directa del sol,
no la ponga cerca de aparatos que emitan calor,
no la deje dentro de un vehículo cerrado, ni la
someta a temperaturas elevadas. El calor excesivo
puede deformar o decolorar la unidad.
• Si se traslada la unidad a un lugar cuyas
condiciones de temperatura o humedad sean
sustancialmente diferentes, es posible que en
su interior se origine condensación. El uso de la
unidad en este estado puede dañarla o producir
un funcionamiento deficiente. Por lo tanto, antes
de utilizarla en tales circunstancias, déjela en
reposo varias horas, hasta que la condensación
se haya evaporado por completo.
• Dependiendo del material y de la temperatura de
la superficie donde coloque la unidad, las patas de
goma podrían decolorar o estropear la superficie.
Para evitarlo, coloque un paño o fieltro debajo de
las patas. Si lo hace, asegúrese de que la unidad
no se puede mover ni caer accidentalmente.
• No coloque nada que contenga agua encima de
esta unidad. Asimismo, evite el uso de insecticidas,
perfumes, alcohol, esmalte de uñas, aerosoles, etc.,
cerca de la unidad. Limpie rápidamente cualquier
líquido que se derrame en la unidad con un paño
seco y suave.
Reparaciones y datos
Derechos de autor / Licencias / Marcas comerciales
• Tenga en cuenta que todos los datos contenidos
en la memoria de la unidad se pueden perder
si se realizan reparaciones en la unidad. Roland
no asume responsabilidad alguna en lo que
respecta a la pérdida de datos.
• La ley prohíbe realizar grabaciones de audio,
grabaciones de vídeo, copias o revisiones del
trabajo de terceros protegido por derechos de autor
(trabajos musicales, de vídeo, difusión, actuación
en directo, entre otros), ya sea parcialmente o en
su totalidad; también prohíbe distribuir, vender,
alquilar, representar y difundir dichos trabajos sin el
permiso del propietario de los derechos de autor.
Otras precauciones
• Tenga en cuenta que el contenido de la memoria
se puede perder irremediablemente como
consecuencia del mal funcionamiento o uso
incorrecto de la unidad.
• Utilice los botones, mandos, enchufes y conectores
de la unidad con los cuidados necesarios. Una
utilización incorrecta puede provocar desperfectos.
• Siempre que desenchufe algún cable, sujete el
enchufe propiamente dicho, no tire nunca del cable.
De este modo evitará provocar cortocircuitos o
daños a los elementos internos del cable.
• Para evitar molestias a terceros, mantenga el
volumen de la unidad en un nivel razonable. Podría
interesarle utilizar los auriculares para no tener que
preocuparse de si molesta a otras personas.
• Algunos cables de conexión incorporan resistencias.
No utilice cables con resistencias para conectar
esta unidad. Este tipo de cables puede provocar
que el nivel de sonido sea extremadamente bajo
o inaudible. Para obtener más información sobre las
especificaciones de un cable determinado, póngase
en contacto con el fabricante del cable en cuestión.
• No utilice este producto para cualquier finalidad
que pueda infringir los derechos de autor propiedad
de un tercero. Roland declina toda responsabilidad
por cualquier infracción de los derechos de autor
de terceros derivada del uso que se haga de este
producto.
• Los compradores de este producto NO están
autorizados a extraer el contenido mencionado
en su formato original o modificado, con el fin de
distribuir el medio grabado de dicho contenido o
ponerlo a disposición de otras personas en una red
informática.
• MMP (Moore Microprocessor Portfolio) hace
referencia a una cartera de patentes relacionadas
con la arquitectura de microprocesadores
desarrollada por Technology Properties Limited
(TPL). Roland utiliza esta tecnología bajo licencia
de TPL Group.
• Este producto contiene la plataforma de software
integrada eCROS de eSOL Co.,Ltd. eCROS es una
marca comercial de eSOL Co.,Ltd. en Japón.
• Los nombres de empresa y los nombres de
productos mencionados en este documento
son marcas comerciales registradas o marcas
comerciales de sus respectivos propietarios.
Restablecimiento de la configuración de fábrica
Así es como se restablece la configuración de fábrica del VT-12.
* Esta acción borrará todos los sonidos y pistas de usuario que se hayan grabado.
* Si las pilas no tienen suficiente carga (aparecerá “ ” en la pantalla), no podrá restablecer la
configuración de fábrica. En tal caso, sustituya las pilas por otras nuevas o use el adaptador de
CA, y entonces proceda al restablecimiento de la configuración de fábrica.
1. Al tiempo que mantiene pulsado los botones [
], [ ] y [
], encienda la unidad.
ENG
La pantalla indicará “Factory reset”.
Si decide cancelar la operación, pulse cualquiera de los botones [
2. Pulse el botón [
DEU
], [WARM-UP] o [EXERCISE].
FRA
].
ITA
El VT-12 recuperará su configuración de fábrica.
* No apague la unidad mientras el indicador de tono
alternativamente.
ESL
y
estén iluminándose
POR
NLD
23
ENG
DEU
FRA
ITA
ESL
POR
NLD
Veja o que você pode fazer!
O VT-12 é a ferramenta ideal para aprimorar suas habilidades vocais.
Você pode usar o VT-12 a qualquer momento e em qualquer lugar — sozinho ou em grupo, em casa ou em
um estúdio.
Verificando sua afinação
O VT-12 pode detectar a afinação não apenas de uma, mas também de duas vozes!
Ao cantar em harmonia com outra pessoa, você pode usá-lo para verificar se
vocês estão cantando na afinação correta.
Como um metrônomo
O VT-12 pode fornecer um tom guia para ajudá-lo a corrigir o ritmo quando
você estiver cantando sozinho, praticando a capella ou ainda com um grupo
vocal.
2
Verificando a afinação
Treinamento vocal
O VT-12 oferece uma maneira eficiente de aquecer ou praticar exercícios
vocais. Você pode usar as faixas embutidas para praticar vocalizações antes
de um coro ou de uma performance ao vivo, ou usá-las para melhorar sua
expressão e técnica vocal.
Praticando
Metrônomo
ENG
DEU
O que são faixas?
FRA
ITA
O VT-12 contém faixas embutidas que você pode usar para praticar (aquecendo ou exercitando).
Além das faixas embutidas, você também pode gravar suas músicas favoritas (pág. 14).
ESL
POR
NLD
3
Sumário
Veja o que você pode fazer!. . . . . . . . . . . . . . . . . . . . . . . . 2
Descrições do painel. . . . . . . . . . . . . . . . . . . . . . . . . . . . . . 5
Painel superior. . . . . . . . . . . . . . . . . . . . . . . . . . . . . . . . . . 5
Painel lateral (conectando seu equipamento) . . . . 6
Antes de usar o VT-12. . . . . . . . . . . . . . . . . . . . . . . . . . . . . 8
Instalando as pilhas. . . . . . . . . . . . . . . . . . . . . . . . . . . . . 8
Ligando o equipamento. . . . . . . . . . . . . . . . . . . . . . . . . 9
Usando a folha DoReMi. . . . . . . . . . . . . . . . . . . . . . . . . . 9
Dicas de uso do VT-12. . . . . . . . . . . . . . . . . . . . . . . . . . 10
Usando o suporte. . . . . . . . . . . . . . . . . . . . . . . . 10
Verificando a afinação. . . . . . . . . . . . . . . . . . . . . . . . . . . . 11
Praticando. . . . . . . . . . . . . . . . . . . . . . . . . . . . . . . . . . . . . . . 13
Grave e pratique uma música favorita. . . . . . . . . . . 14
Usando o metrônomo. . . . . . . . . . . . . . . . . . . . . . . . . . . . 15
Resolução de problemas . . . . . . . . . . . . . . . . . . . . . . . . . 16
Fluxo do áudio. . . . . . . . . . . . . . . . . . . . . . . . . . . . . . . . . . . 17
Especificações principais. . . . . . . . . . . . . . . . . . . . . . . . . 18
USO SEGURO DA UNIDADE. . . . . . . . . . . . . . . . . . . . . . . 19
OBSERVAÇÕES IMPORTANTES. . . . . . . . . . . . . . . . . . . . 22
Antes de usar este equipamento, leia com atenção as seguintes seções: “USO SEGURO DA UNIDADE” (pág. 19)
e “OBSERVAÇÕES IMPORTANTES” (pág. 22). Essas seções oferecem informações importantes sobre o uso correto
do equipamento. Além disso, para que você conheça todos os recursos do seu novo equipamento, o Manual do
proprietário deve ser lido por completo. O manual deverá ser guardado em local de fácil acesso para consultas
futuras.
Copyright © 2012 ROLAND CORPORATION
Todos os direitos reservados. Nenhuma parte desta publicação poderá ser reproduzida em qualquer formato sem
permissão por escrito da ROLAND CORPORATION.
Roland é uma marca registrada ou uma marca da Roland Corporation nos Estados Unidos e/ou outros países.
4
Descrições do painel
Indicador de nota
Verificando a afinação
Painel superior
pág. 11
Mostra a nota ou uma imprecisão em
sua vocalização.
Alto-falante interno
O tom guia, o som do metrônomo e as faixas são reproduzidos
neste alto-falante.
Microfone interno
Use-o para verificar sua voz
e gravá-la.
Botões [ ] [ ]
pág. 11
Use-os para selecionar o timbre
guia que deseja ouvir.
Exibe informações como
o número da faixa selecionada
ou o ritmo do metrônomo.
Você pode alterar a afinação
de referência pressionando
os botões [ ] e [ ]
simultaneamente (pág. 12).
Botões [
][
]
Botão [
Use-os para modificar as
configurações.
Botão [REVIEW]
]
]
pág. 11
Liga e desliga o tom guia.
O tom guia soa em notas de
temperamento igual.
Reproduz o som gravado para
que você possa verificar como
se saiu.
Use-o para reproduzir/parar
o metrônomo ou a faixa.
Botão [
]
pág. 15
Seleciona o modo
Metronome (Metrônomo).
Metrônomo
Botão [
Praticando
Visor
Botão [WARM-UP]
Seleciona o modo Warm-up
(Aquecimento).
pág. 13
Botão [EXERCISE]
pág. 13
Seleciona o modo Exercise (Exercício).
ENG
DEU
FRA
ITA
ESL
POR
NLD
5
Descrições do painel
Painel lateral (conectando seu equipamento)
Conector REC IN
pág. 14
Um dispositivo de áudio externo, como um
reprodutor de áudio ou um reprodutor de
áudio/fita cassete, pode ser conectado a ele
usando um cabo com um plugue estéreo em
miniatura.
Conector OUTPUT/PHONES
Você pode gravar suas músicas favoritas por
meio desse conector e usá-las durante a prática.
Os fones de ouvido ou um
alto-falante externo vendidos
separadamente podem ser
conectados aqui.
Para fazer essa conexão, conecte um cabo
entre a saída (por exemplo, a entrada para
fone de ouvido) do seu dispositivo de áudio
externo e esse conector.
Abertura para cordão
Um cordão disponível no mercado pode ser
colocado aqui.
Botão de detecção de afinação
Seleciona o método de detecção de
afinação.
pág. 11
Botão [MIC VOLUME]
Ajusta o volume do microfone.
H: volume alto
L:
volume baixo
OFF: monitor desligado
* Se esse botão estiver na posição “OFF”, a afinação
não será detectada.
6
Descrições do painel
Verificando a afinação
Botão [POWER]
pág. 9
Pressione esse botão para ligar
e desligar o equipamento.
Dial [VOLUME]
Ajuste o volume do alto-falante
interno ou dos fones de ouvido.
Conecte o adaptador AC (PSB-6U; vendido
separadamente) aqui.
* Use somente o adaptador AC especificado
(PSB-6U) e conecte-o a uma tomada AC
de tensão correta. Não use nenhum outro
adaptador AC, pois isso poderá causar
mau funcionamento.
Praticando
Conector DC IN
Posicione o adaptador AC de modo que
o lado do indicador (veja a ilustração)
fique voltado para cima e o lado com
informações de texto fique voltado
para baixo.
O indicador acenderá quando você
conectar o adaptador à tomada AC.
Metrônomo
Tome cuidado ao fazer conexões
ENG
• Para evitar mau funcionamento e falha do equipamento, sempre abaixe o volume e desligue todos os
equipamentos antes de estabelecer quaisquer conexões.
DEU
• Se você estiver usando um alto-falante externo, pode ocorrer microfonia (um gemido ou uivo), dependendo
da posição do alto-faltante externo relativa ao microfone interno. Se isso ocorrer, siga as etapas a seguir.
1. Troque a orientação do microfone interno.
2. Reposicione o microfone interno a uma distância maior dos alto-falantes externos.
3. Abaixe os níveis de volume.
4. Coloque o botão [MIC VOLUME] está na posição “OFF”.
FRA
ITA
ESL
POR
NLD
7
Antes de usar o VT-12
Instalando as pilhas
Insira as pilhas (duas pilhas AA), como mostrado na ilustração, tomando cuidado para observar a
polaridade correta.
Cuidados ao usar pilhas
• Quando as pilhas ficarem fracas, o visor indicará
.” Quando isso ocorrer, instale pilhas novas.
“
• Se usadas inadequadamente, as pilhas poderão
vazar ou explodir, causando danos ou ferimentos.
Para fins de segurança, leia e observe as seguintes
precauções.
• Siga cuidadosamente as instruções de instalação
das pilhas e verifique se observou a polaridade
correta.
• Evite usar pilhas novas junto com pilhas
usadas. Além disso, evite misturar tipos de pilhas
diferentes.
• Remova as pilhas sempre que o equipamento
permanecer sem uso por um período prolongado.
• Nunca mantenha as pilhas junto com objetos
metálicos como canetas esferográficas, colares,
grampos de cabelo, etc.
• As pilhas usadas devem ser descartadas em
conformidade com todas as normas de segurança
de descarte da região em que você vive.
8
• O manuseio incorreto das pilhas, das pilhas
recarregáveis ou de um carregador de pilhas pode
causar vazamentos, superaquecimento, incêndios
ou explosões. Antes de usar, leia e observe com
cuidado todas as precauções inclusas nas pilhas,
pilhas recarregáveis ou no carregador de pilhas.
• Ao usar pilhas recarregáveis e um carregador, use
somente a combinação de pilhas recarregáveis
e carregador especificada pelo fabricante das pilhas.
• Durante a operação deste equipamento com pilhas,
use pilhas alcalinas ou recarregáveis de Ni-MH.
• Se estiver operando este equipamento com pilhas,
desconecte o adaptador AC do equipamento.
• Mesmo se as pilhas estiverem instaladas,
o equipamento será desligado se você conectar
ou desconectar o cabo de força da tomada AC
enquanto o equipamento estiver ligado ou se você
desconectar o adaptador AC da unidade.
• Expectativa de duração da pilha em uso contínuo:
Alcalina: 6 horas
* Esses valores variam dependendo das especificações
das pilhas e das condições reais de uso.
Antes de usar o VT-12
* Depois que tudo estiver devidamente conectado (pág. 6), observe com cuidado o procedimento
abaixo para ligar o equipamento.
1
Mantenha o botão [POWER] pressionado
até que o equipamento seja desligado.
Praticando
2
Coloque o dial [MIC VOLUME] na posição
mínima.
Verificando a afinação
Ligando o equipamento
Cuidados com a energia
Metrônomo
• Esse equipamento será desligado automaticamente depois de transcorridos 30 minutos sem que
qualquer de seus botões seja pressionado (incluindo o tempo que o metrônomo esteja tocando),
ou 30 minutos desde que a reprodução de uma faixa tenha sido interrompida.
• Antes de ligar ou desligar o equipamento, sempre abaixe o volume. Mesmo com o volume abaixado, você
poderá ouvir algum som quando o equipamento for ligado ou desligado. Isso é normal e não indica mau
funcionamento.
• Este equipamento possui um circuito de proteção. É necessário um breve intervalo (alguns segundos) após
ligar o equipamento antes que ele opere normalmente.
Usando a folha DoReMi
Afixando a folha DoReMi incluída no indicador de nota, você pode usar as indicações DoReMi para
verificar os nomes das notas.
Se você quiser verificar os nomes das notas usando um solfejo móvel “Dó”, afixe a folha DoReMi
com “Do” posicionado no nome da nota da tônica que você estiver usando.
ENG
DEU
FRA
ITA
ESL
Folha DoReMi
* Antes de usar a folha DoReMi, certifique-se de remover o revestimento de papel e a folha
protetora azul.
POR
NLD
9
Antes de usar o VT-12
Dicas de uso do VT-12
Segure o VT-12 em suas mãos e cante na postura mostrada pela ilustração.
Use fones de ouvido se quiser verificar a precisão de sua afinação quando reproduzir uma faixa ou
usar o metrônomo.
O uso de fones de ouvido tornará a detecção de afinação mais precisa. Isso também facilitará
a audição do som gravado.
Use fones de ouvido
Distante 30 cm
Mantenha sua postura reta
MEMO
Se encontrar alguma das situações encontradas abaixo, verifique as configurações do botão
[MIC VOLUME] (pág. 6).
• O indicador de nota não responde ou não responde como deveria.
• O volume do som do microfone é baixo.
Usando o suporte
Você pode usar o suporte para manter o VT-12 reto.
Ao usar o VT-12 com um grupo, o suporte oferece uma maneira conveniente de colocar o VT-12
reto sobre uma mesa.
Ao fazer isso, você deve manter o VT-12 cerca de 1 m distante dos cantores.
* Para voltar o suporte para sua posição original, dobre-o para dentro até que ele faça um clique.
10
Verificando a afinação
1
Verificando a afinação
Você provavelmente vai querer começar verificando sua afinação.
O VT-12 é capaz de verificar a afinação de não apenas uma, mas duas vozes simultaneamente.
Isso é conveniente para verificar a afinação de duas pessoas cantando em harmonia.
Selecione o tipo de detecção de afinação.
MONO EQUAL: Uma voz será detectada usando
temperamento igual.
CHORD EQUAL: Duas vozes serão detectadas
usando temperamento igual.
CHORD JUST:
Duas vozes serão detectadas
usando entonação justa (maior).
MEMO
A tonalidade para entonação justa é determinada pela menor afinação.
Se o VT-12 estiver tocando um tom guia, a tonalidade será determinada
pelo tom guia. Se um tom guia estiver sendo tocado, somente uma voz
será detectada.
Pressione o botão [
Praticando
2
].
Antes de começar a vocalização, toque o tom guia (em temperamento
igual) para ouvir a afinação correta.
MEMO
Você pode usar os botões [ ] e [ ] para trocar o tom guia.
3
Vocalize e verifique sua afinação.
Vocalize a afinação que você deseja alcançar.
Metrônomo
O nome da nota mais próxima à afinação detectada acenderá.
Fica mais brilhante se a discrepância na afinação diminui; fica mais
apagada se a discrepância na afinação aumenta.
Se um tom guia estiver sendo reproduzido, o nome da nota do tom guia
também acenderá.
Indica a quantidade de variação da afinação.
Aceso:
Apagado:
Afinação está baixa
MONO EQUAL
Afinação está correta
ENG
Afinação está alta
* Se o indicador de nota não
responder mesmo quando você
estiver vocalizando, verifique
o ajuste do botão [MIC VOLUME]
(pág. 6).
CHORD EQUAL
CHORD JUST
DEU
A nota alta está baixa em
relação à nota baixa
O intervalo de afinação
entre as duas notas está
correto
A nota alta está alta em
relação à nota baixa
FRA
ITA
ESL
POR
NLD
11
Verificando a afinação
Alterando a afinação de referência
1. Pressione os botões [
] e [ ] simultaneamente.
O visor indicará a afinação de referência atual.
2. Use os botões [
][
] para especificar a afinação de referência desejada.
Faixa: 415–465 Hz (valor padrão: 440 Hz)
* Se não fizer nada por um determinado período de tempo, a indicação da afinação de
referência desaparecerá e o equipamento retornará automaticamente para o modo de
verificação de afinação.
3. Pressione os botões [
] e [ ] simultaneamente.
A indicação da afinação de referência desaparecerá e o equipamento retornará automaticamente
para o modo de verificação de afinação.
* Durante a reprodução das faixas predefinidas, a afinação de referência é fixada em 440 Hz.
O que é entonação justa?
Entonação justa é um método de afinação que assegura intervalos puros de quinta e terceira.
Se você selecionar a entonação justa, precisará especificar a tônica (para uma escala maior,
será C) apropriada para a tonalidade da sua música.
O VT-12 atribuirá a menor das duas vozes como a tônica.
Se um timbre guia estiver sendo reproduzido, o timbre guia será a tônica.
Sobre afinações em entonação justa
O VT-12 pode detectar afinações em entonação justa somente em uma tonalidade maior.
Se o timbre guia for C, as afinações serão calculadas usando as seguintes razões.
Temperamento igual
(centésimo)
C#
D
D#
E
F
0
100
200
300
400
500
Entonação justa (centésimo)
0
71
204
316
386
498
Razão
1
25/24
9/8
6/5
5/4
4/3
F#
G
G#
A
A#
B
600
700
800
900
1000
1100
569
702
773
884
1018
1088
25/18
3/2
25/16
5/3
9/5
15/8
Temperamento igual
(centésimo)
Entonação justa (centésimo)
Razão
12
C
Praticando
Modo Warm-up
Contém faixas para prática de vocalização que irão aquecer sua voz.
Modo Exercise
Contém faixas para aprimorar sua técnica vocal, como melhorar seu controle de
fôlego e aumentar sua amplitude vocal.
MEMO
Para saber mais sobre práticas, consulte o “Guia de prática” separado.
Ele fornece instruções úteis sobre vocalização e canto, além de dicas para praticar cada faixa.
Verificando a afinação
O VT-12 oferece dois modos de prática: o modo Warm-up (aquecimento) e o modo Exercise
(exercício). Cada modo contém faixas (pág. 3) que são ideais para o tipo de prática correspondente.
Como o som produzido durante a prática é gravado automaticamente nas faixas pertinentes, é
possível ouvi-lo posteriormente (função Review).
* Cada vez que uma faixa é reproduzida, uma nova gravação é iniciada. Se você reproduzir uma
faixa que foi previamente gravada, o som que foi gravado nessa faixa será substituído. Se você
interromper a reprodução de uma faixa em até 3 segundos após o início, nenhum som será
gravado nessa faixa.
Selecione um modo de
prática.
Praticando
1
O botão do modo selecionado acenderá.
2
6
Use os botões [ ] [ ]
para selecionar uma faixa.
O som gravado começará a tocar.
Se nada estiver gravado, o visor
indicará “---”.
MEMO
• Pressionando repetidamente o botão
do modo selecionado, você pode
alternar entre as faixas predefinidas e as faixas do usuário.
• Se não houver qualquer faixa de
usuário gravada, o visor indicará “U--”.
• Para obter detalhes sobre as faixas,
consulte a “Lista de faixas” em separado.
Pressione o botão [
MEMO
Dependendo da faixa selecionada,
é possível ligar/desligar o som
dos vocais na faixa pressionando
o botão [REVIEW] durante a
reprodução do som gravado.
].
A faixa será reproduzida e a gravação do som
começará.
4
Cante junto com a faixa.
Enquanto estiver cantando, preste atenção à
sua afinação e às notas da faixa reproduzida.
5
Pressione o botão [
Metrônomo
3
Pressione o botão
[REVIEW].
].
A reprodução da faixa e a gravação do som
serão interrompidas.
Aceso:
Notas que você canta
Piscando: Notas da faixa
* Em algumas faixas (faixas do usuário e certas
faixas predefinidas), o equipamento não
indicará as notas piscando.
ENG
DEU
FRA
ITA
Faixas predefinidas e faixas do usuário
ESL
O VT-12 contém faixas predefinidas embutidas (001–) para cada modo. Também é possível
gravar faixas por meio do conector REC IN e usá-las como faixas do usuário (U01–U10).
(As faixas do usuário são comuns aos dois modos.)
POR
NLD
13
Praticando
Grave e pratique uma música favorita
Você pode gravar suas músicas favoritas no VT-12 por meio do conector REC IN e usá-las como
faixas do usuário.
Uma música gravada pode ser usada tanto no modo Warm-up como no modo Exercise.
Duração da faixa
Máximo de 10 minutos (por faixa)
Número de faixas
Máximo de 10 faixas
* Se você selecionar o número de uma faixa previamente gravada e gravar nele, a música gravada
anteriormente será substituída. Se você parar dentro de 3 segundos após o início da gravação,
a música não será gravada.
* Quando tiver concluído a gravação, retire o cabo do conector REC IN. O VT-12 não realizará
qualquer outra operação enquanto um cabo estiver ligado ao conector REC IN.
1
Conecte seu dispositivo de
áudio externo ao conector
REC IN (pág. 6).
8
Desconecte seu dispositivo
de áudio externo do
conector REC IN.
Tente praticar com a faixa do usuário
que você gravou (pág. 14).
O visor indicará alternadamente “rEc” e
“U**”. O VT-12 está pronto para gravar
a música.
2
7
Reproduza a música em
seu dispositivo de áudio
externo.
A reprodução da música gravada iniciará.
Ajuste o volume do som a ser
capturado.
Ao monitorar o som no alto-falante
interno ou através de fones de ouvido,
ajuste o volume usando os controles
no dispositivo de áudio externo.
3
4
Verifique se a música foi gravada
corretamente. Se a música não foi
gravada, o visor indicará “---”.
6
Use os botões [ ] [ ]
para especificar o número
de faixa no qual a faixa
será gravada.
Pressione o botão [
A gravação iniciará.
Durante a gravação, o visor indicará
“rEc” e o indicador de nota acenderá.
Pressione o botão
[REVIEW].
Pressione o botão [
].
A gravação será interrompida.
].
5
Reproduza a música em
seu dispositivo de áudio
externo.
MEMO
Se você quiser apagar as músicas gravadas, restaure as configurações de fábrica do VT-12 (pág. 23).
14
Usando o metrônomo
1
Pressione o botão [
].
Praticando
O VT-12 entrará no modo metrônomo.
O visor indicará o ritmo atual.
2
Use os botões [ ] [ ]
para ajustar o ritmo.
6
Faixa: 30–250
MEMO
Também é possível definir o
ritmo tocando no botão [ ] no
andamento desejado (a função
Tap Tempo).
Pressione o botão [
Pressione o botão
[REVIEW].
O som gravado será reproduzido.
A reprodução será interrompida ao
].
pressionar o botão [
].
O metrônomo começará a tocar e a gravação
começará.
O botão [ ] piscará em sincronia com o ritmo.
5
Pressione o botão [
].
O metrônomo e a gravação do som
serão interrompidos.
Metrônomo
3
Verificando a afinação
Você pode querer praticar cantando no ritmo do metrônomo.
O som é gravado automaticamente enquanto o metrônomo estiver tocando. Assim, você poderá
ouvir a si próprio posteriormente (a função Review).
* Uma nova gravação será iniciada cada vez que o metrônomo for tocado. A gravação feita
anteriormente será substituída. Se você interromper o metrônomo dentro de 3 segundos,
o som não será gravado.
* Podem ser gravados no máximo 10 minutos no modo do metrônomo. Quando os 10 minutos
tiverem sido ultrapassados, a gravação será interrompida. O metrônomo continuará a soar,
mesmo após a interrupção da gravação.
* Não é possível definir a fórmula do compasso.
MEMO
Você também pode tocar o metrônomo
enquanto um, tom guia (pág. 11) estiver
soando.
ENG
4
Cante em sincronia com o metrônomo.
Enquanto estiver cantando, preste atenção às notas
que você canta.
DEU
Aceso: Timbre guia e afinação na qual
você está cantando
FRA
ITA
ESL
POR
NLD
15
Resolução de problemas
Problema
Não liga
Não desliga
Itens a verificar
Ação
Página
As pilhas podem estar fracas?
Instale pilhas novas.
pág. 8
O adaptador AC especificado
(PSB-6U; vendido separadamente)
está conectado corretamente?
“Err” aparece no visor?
As conexões com os outros
dispositivos estão corretas?
Verifique novamente a conexão.
Nunca use um adaptador
AC diferente do modelo
especificado.
Primeiro, certifique-se de que
todas as faixas foram interrompidas e todas as capturas de som
foram concluídas; então, você
pode desligar.
Verifique novamente as conexões.
O volume de um alto-falante
Verifique as configurações do
externo conectado está abaixado? dispositivo conectado.
Sem som/volume
insuficiente
Volume insuficiente no
alto-falante interno
pág. 7
–
pág. 6
–
O dial [VOLUME] está ajustado
adequadamente?
Ajuste o volume adequadamente.
pág. 7
O botão [MIC VOLUME] está
ajustado adequadamente?
Selecione o ajuste adequado.
pág. 6
Há fones de ouvido conectados?
Se os fones de ouvido estiverem
conectados, não será produzido
som no alto-falante interno.
As pilhas podem estar fracas?
Instale pilhas novas.
O nível do volume do
instrumento ligado ao
Você está usando um cabo de
conector OUTPUT/PHONES conexão com um resistor?
está muito baixo.
Use um cabo de conexão sem
resistores.
–
pág. 8
–
O som está distorcido
O dial [VOLUME] está ajustado
adequadamente?
Ajuste o volume
adequadamente.
A gravação para durante a
gravação de uma música
Você está tentando gravar por
mais de dez minutos?
A gravação pode ser realizada
por no máximo dez minutos
(por música).
–
Volume insuficiente ou
som distorcido em uma
música gravada
Você está gravando no volume
adequado?
Ajuste o volume no dispositivo
de áudio externo.
–
O botão [MIC VOLUME] está
ajustado adequadamente?
Selecione o ajuste adequado.
pág. 7
pág. 6
Você está tentando verificar a
Verifique a afinação em um local
A afinação não é
–
detectada/ocorre operação afinação em um local barulhento? sem barulho excessivo.
inesperada
Defina um valor apropriado.
A configuração para a afinação de Durante a reprodução das faixas
pág. 12
referência é apropriada?
predefinidas, a afinação de
referência é fixada em 440 Hz.
Para possibilitar a verificação rápida da afinação durante a reprodução
Durante a reprodução, o
da faixa, o e parae os indicadores de nota piscarão rapidamente.
e os indicadores de
–
nota se acendem com
Se você tocar o que foi gravado pressionando o botão [REVIEW], os
frequência.
indicadores se acenderão de maneira normal.
Esse equipamento será desligado automaticamente depois de
transcorridos 30 minutos sem que qualquer de seus botões seja
O equipamento desliga
pressionado (incluindo o tempo que o metrônomo esteja tocando),
–
inesperadamente
ou 30 minutos desde que a reprodução de uma faixa tenha sido
interrompida.
16
Fluxo do áudio
Microfone
interno
Botão [MIC
VOLUME]
Detecção de afinação
Conector OUTPUT/
PHONES
Parte vocal da faixa
(apenas com certas
faixas predefinidas)
Gravada
Faixa
Detecção de afinação
Dial
[VOLUME]
Verificando a afinação
Ao reproduzir uma faixa
Parte de
acompanhamento da faixa
Alto-falante interno
Praticando
* O som do microfone interno não será produzido pelo alto-falante interno.
Ao reproduzir (analisar) o som gravado
Detecção de afinação
Som gravado
Detecção de afinação
Dial
[VOLUME]
Metrônomo
Faixa
Parte vocal da faixa
(apenas com certas
faixas predefinidas)
Conector
OUTPUT/PHONES
Parte de acompanhamento da faixa
Alto-falante interno
Ao gravar uma música
Conector
OUTPUT/PHONES
Conector REC IN
Reprodução de dispositivo de
áudio externo
ENG
DEU
Dial
[VOLUME]
FRA
ITA
ESL
Gravada
POR
Faixa do usuário
Alto-falante interno
17
NLD
Especificações principais
Roland VT-12: Treinador Vocal
Afinador
Faixa de afinação
C2 (65,4 Hz)–A5 (880,0 Hz)
Precisão da afinação
+/-1 centésimo
Timbre de referência
Afinação de referência: A4 = 415–465 Hz (de 1 em 1 Hz)
Intervalo do timbre de referência: A3–G#5 (24 notas na escala cromática)
Metrônomo
Ritmo
30–250, precisão: +/-0,1 %
Faixa do usuário
Duração da faixa
Máximo de 10 minutos (por faixa)
Número de faixas
Número de faixas: Máximo de 10 faixas
Entrada/saída
Nível de entrada nominal
Conector REC IN: 0 dBu
Impedância de entrada
Conector REC IN: 9,5 k ohms
Nível de saída
Conector OUTPUT/PHONES: 15 mW + 15 mW (no caso de carga de 16 ohms)
Impedância de carga
recomendada
16 ohms ou mais
Outros
Alto-falante
Mono
Conectores
Conector OUTPUT/PHONES (tipo P10 miniatura estéreo)
Conector REC IN (tipo P10 miniatura estéreo)
Conector DC IN
Visor
7 segmentos, 3 caracteres (LED)
Indicador de nota
Fonte de alimentação
Pilhas alcalinas (AA, LR6) ou pilha recarregável Ni-MH (AA, HR6) x 2,
Adaptador AC (PSB-6U: vendido separadamente)
Consumo
380 mA
Expectativa de duração da pilha
em uso contínuo
Alcalinas (AA, LR6): Aproximadamente 6 horas
* Esses valores variam dependendo das especificações das pilhas e das
condições reais de uso.
Dimensões
70 (L) x 134 (P) x 28 (A) mm
Peso
150 g (incluindo pilhas)
Acessórios
Pilhas alcalinas (AA, LR6) x 2
Folha DoReMi
Manual do proprietário
Guia de prática
Lista de faixas
Opcionais (vendidos
separadamente)
Bolsa de transporte (OP-RP1)
Adaptador AC (PSB-6U)
* Ao comprar um adaptador CA, certifique-se de especificar o adaptador
(da lista a seguir) que é projetado para a região na qual ele será usado,
e a tensão fornecida. (PSB6U-120/PSB6U-230EU/PSB6U-230UK/PSB6U240A) (conjuntos que contêm o PSB-6U e cabo de força).
* 0 dBu=0,775 Vrms
* Com a finalidade de aprimorar o produto, as especificações e/ou aparência deste equipamento
estão sujeitas a mudanças sem aviso prévio.
18
USO SEGURO DA UNIDADE
AVISO
Não desmonte ou faça qualquer modificação por si
mesmo
Não abra (ou faça qualquer
modificação) no equipamento ou no
seu adaptador AC.
Não repare ou substitua peças por si mesmo
Não tente fazer reparos ou substituir
peças dentro do equipamento (exceto
quando indicado especificamente
pelas instruções do manual). Procure
o revendedor, o Centro de Serviços
Técnicos da Roland ou um distribuidor
autorizado da Roland, conforme listado
na página “Informações”.
Não use ou armazene nos seguintes tipos de locais
Sujeitos a temperaturas extremas
(por exemplo, luz solar direta em
veículos fechados, próximo a um duto
de aquecimento, em cima de um
equipamento que gere calor) ou
• Molhados (por exemplo, banheiros,
lavatórios ou pisos molhados) ou
• Expostos ao vapor ou à fumaça ou
• Sujeitos à exposição a sal ou
• Úmidos ou
• Expostos à chuva ou
• Empoeirados ou com areia ou
• Sujeitos a altos níveis de vibração e
instabilidade.
AVISO
Não o coloque em um local instável
Certifique-se de que o equipamento
esteja sempre em superfícies planas e
estáveis. Nunca o deixe em suportes
que possam tombar ou em superfícies
inclinadas.
Use apenas o adaptador AC especificado e a tensão
correta
Use somente o adaptador AC (PSB-6U)
especificado e verifique se a voltagem
da instalação corresponde à voltagem
de entrada especificada no adaptador
AC. Outros adaptadores AC podem usar
uma polaridade diferente ou terem sido
projetados para uma voltagem diferente,
portanto, o uso desses adaptadores pode
resultar em danos, mau funcionamento e
choques elétricos.
Use apenas o cabo de força incluso
Use apenas o cabo de força fornecido.
Além disso, o cabo de força incluso não
deve ser usado em outros dispositivos.
ENG
Não dobre o cabo de força e não coloque objetos
pesados sobre ele
DEU
FRA
Não torça demais ou dobre o cabo de
força e não coloque objetos pesados
sobre ele. Isso pode danificar o cabo e os
componentes e provocar curto-circuitos.
Cabos danificados representam perigo
de choque e incêndio!
ITA
ESL
POR
NLD
19
AVISO
AVISO
Evite o uso por muito tempo com volume alto
Não derrube ou submeta a fortes impactos
Este equipamento, sozinho ou com um
amplificador e fones de ouvido ou
alto-falantes, pode produzir níveis
sonoros capazes de provocar perda
permanente da audição. Não use por
períodos longos com volume alto
ou com volumes desconfortáveis. Se
você perceber perda de audição ou
um zumbido no ouvido, interrompa
o uso imediatamente e procure um
otorrinolaringologista.
Proteja o equipamento de fortes
impactos.
(Não o deixe cair!)
Não permita que objetos estranhos ou líquidos entrem
no equipamento
Nunca permita que objetos estranhos
(por exemplo, objetos inflamáveis,
moedas, fios) ou líquidos (por exemplo,
água ou suco) entrem nesse produto.
A entrada pode causar curtos circuitos,
falha na operação ou outras falhas de
funcionamento.
Caso ocorra um mau funcionamento ou anormalidade,
desligue o equipamento
Desligue imediatamente o equipamento,
remova o adaptador AC da tomada
e procure o revendedor, o Centro de
Serviços Técnicos da Roland ou um
distribuidor autorizado da Roland,
conforme listado da página “Informações”
quando:
• O adaptador AC, o cabo de força ou
o plugue estiverem danificados; ou
• Ocorrer fumaça ou odores fora do
comum ou
• Objetos tiverem caído ou líquido
derramado em cima do equipamento;
ou
• O equipamento tiver sido exposto
à chuva (ou molhado); ou
• O equipamento não funcionar
normalmente ou funcionar de forma
diferente.
Os adultos devem realizar a supervisão em locais em
que houver crianças presentes
Ao usar o equipamento em locais
em que há crianças presentes, seja
cuidadoso para que seu tratamento não
seja inadequado. Deve haver sempre
um adulto disponível para fornecer
supervisão e orientação.
20
Não compartilhe a tomada com um número indevido de
outros aparelhos
Não ligue o equipamento na mesma
tomada junto com vários aparelhos.
Tenha cuidado especial ao usar
extensões — a potência total usada por
todos os dispositivos conectados nunca
deverá ultrapassar
a potência nominal (watts/ampéres)
da extensão. A carga excessiva pode
fazer com que o isolamento do cabo
aqueça e até mesmo derreta.
Não use em países estrangeiros
Antes de usar o equipamento em países
estrangeiros, procure o seu revendedor,
o Centro de Serviços Técnicos da Roland
mais próximo ou um distribuidor
autorizado da Roland, conforme listado
da página “Informações”.
Manuseie as pilhas cuidadosamente
• As pilhas, pilhas recarregáveis ou
o carregador de pilhas nunca
deverão ser recarregados, aquecidos,
desmontados ou lançados ao fogo ou
na água.
• Nunca exponha as pilhas, as pilhas
recarregáveis ou um carregador de
pilhas a calor excessivo, como a luz do
sol, fogo ou semelhante.
• O manuseio incorreto das pilhas,
das pilhas recarregáveis ou de um
carregador de pilhas pode causar
vazamentos, superaquecimento,
incêndios ou explosões. Antes de usar,
leia e observe com cuidado todas as
precauções inclusas nas pilhas, pilhas
recarregáveis ou no carregador de
pilhas.
• Ao usar pilhas recarregáveis e
um carregador, use somente a
combinação de pilhas recarregáveis
e carregador especificada pelo
fabricante das pilhas.
CUIDADO
Coloque em um local bem ventilado
O equipamento e o adaptador AC
deverão ser colocados em um local
ou posição que lhes proporcione uma
ventilação adequada.
Segure a tomada ao conectar ou desconectar o
adaptador AC
Ao colocar ou tirar da tomada ou desse
equipamento, segure somente pelo
plugue do cabo do adaptador AC.
Limpe periodicamente o plugue do adaptador AC
Em intervalos regulares, desligue o
adaptador AC e limpe-o com um pano
seco para tirar toda poeira e outros
acúmulos dos contatos. Além disso,
desconecte o cabo de força da tomada
sempre que o equipamento permanecer
sem uso por períodos prolongados.
Qualquer acúmulo de poeira entre o
plugue e a tomada pode resultar em
deficiência no isolamento e causar um
incêndio.
Cuide dos cabos
Tente evitar que fios e cabos fiquem
embaraçados. Além disso, todos os fios
e cabos devem ser colocados em locais
fora do alcance de crianças.
Evite subir no equipamento ou colocar objetos pesados
sobre ele
Nunca pise ou coloque objetos pesados
em cima do equipamento.
Não conecte ou desconecte o adaptador AC com as mãos
úmidas
Nunca manuseie o adaptador AC ou
seus plugues com as mãos molhadas
ao ligar e desligar da tomada ou desse
equipamento.
Desconecte tudo antes de mover o equipamento
Antes de mover o equipamento,
desconecte o adaptador AC e todos os
outros fios dos aparelhos externos.
Desligue o adaptador AC da tomada antes de limpar
o equipamento
Antes de limpar o equipamento,
desligue a energia e desconecte o
adaptador AC da tomada (pág. 7).
CUIDADO
Se houver possibilidade de raios, desconecte o
adaptador AC da tomada
Sempre que suspeitar da possibilidade
de raios na sua área, desconecte o
adaptador AC da tomada.
Manuseie as pilhas cuidadosamente
Se usadas inadequadamente, as pilhas
poderão vazar ou explodir, causando
danos ou ferimentos. Para fins de
segurança, leia e observe as seguintes
precauções (pág. 8).
• Siga cuidadosamente as instruções
de instalação das pilhas e verifique se
observou a polaridade correta.
• Evite usar pilhas novas junto com
pilhas usadas. Além disso, evite
misturar tipos de pilhas diferentes.
• Remova as pilhas sempre que o
equipamento permanecer sem uso
por um período prolongado.
• Nunca mantenha as pilhas junto
com objetos metálicos como canetas
esferográficas, colares, grampos de
cabelo, etc.
• As pilhas usadas devem ser
descartadas em conformidade com
todas as normas de segurança de
descarte da região em que você vive.
Manuseie as pilhas com vazamento cuidadosamente
• Se houver vazamento de fluido de
uma pilha, certifique-se de não tocá-lo
com as mãos desprotegidas.
• O contato de qualquer quantidade
de fluido com os olhos pode resultar
em perda da visão. Não esfregue os
olhos, use água limpa para lavá-los
completamente. Em seguida, procure
um médico imediatamente.
• O contato do fluido com a pele ou as
roupas pode resultar em queimaduras
ou dermatites. Use água limpa para
lavar as áreas afetadas completamente
e procure um médico imediatamente
em seguida.
• Com um tecido macio, limpe
cuidadosamente o fluido
remanescente da parte interna do
compartimento da pilha. Em seguida,
coloque pilhas novas.
ENG
DEU
FRA
ITA
ESL
POR
NLD
21
OBSERVAÇÕES IMPORTANTES
Fonte de alimentação
• Não ligue este equipamento na mesma tomada
elétrica que esteja sendo usada por aparelhos
domésticos que sejam controlados por inversores
ou motores (geladeira, máquina de lavar, forno de
micro-ondas ou ar-condicionado). Dependendo
da forma como o aparelho elétrico estiver sendo
usado, o ruído na alimentação poderá fazer com
que o equipamento não funcione corretamente
ou poderá produzir ruído audível. Se não for
possível usar uma tomada separada, conecte um
filtro de linha entre esse equipamento e a tomada
elétrica.
• O adaptador AC começará a gerar calor após
muitas horas consecutivas de uso. Isso é normal
e não é motivo de preocupação.
• Para evitar o mau funcionamento e falhas no
equipamento, lembre-se sempre de desligar todo
o equipamento antes de fazer qualquer conexão.
• Esse equipamento será desligado automaticamente
depois de transcorridos 30 minutos sem que
qualquer de seus botões seja pressionado
(incluindo o tempo que o metrônomo esteja
tocando), ou 30 minutos desde que a reprodução
de uma faixa tenha sido interrompida.
Fonte de alimentação: uso das pilhas
• Ao instalar ou trocar as pilhas, sempre desligue
o equipamento e desconecte todos os outros
dispositivos que estejam conectados. Dessa maneira,
você pode evitar danos e mau funcionamento.
• No entanto, a duração das pilhas fornecidas pode
ser limitada, já que seu objetivo principal
é possibilitar o teste.
• Durante a operação deste equipamento com pilhas,
use pilhas alcalinas ou recarregáveis de Ni-MH.
• Se estiver operando este equipamento com pilhas,
desconecte o adaptador AC do equipamento.
• Mesmo se as pilhas estiverem instaladas,
o equipamento será desligado se você conectar
ou desconectar o cabo de força da tomada AC
enquanto o equipamento estiver ligado ou se
você desconectar o adaptador AC da unidade.
Manutenção
• Para a limpeza diária, passe um pano limpo, seco
e macio ou levemente umedecido com água sobre
o equipamento. Para remover manchas difíceis,
use um pano molhado com detergente suave,
não abrasivo. Em seguida, seque completamente
o equipamento com um pano limpo, macio e seco.
22
• Nunca use benzina, tíner, álcool ou qualquer
tipo de solvente para evitar a possibilidade de
descolorir ou deformar o equipamento.
Posicionamento
• O uso deste equipamento perto de amplificadores
(ou outros equipamentos com grandes
transformadores) pode induzir a formação
de zumbidos. Para reduzir o problema, mude
a direção do equipamento ou mova-o para mais
longe da fonte de interferência.
• Este aparelho pode interferir na recepção de rádio
e televisão. Ele não deve ser usado perto desses
tipos de receptores.
• Aparelhos de comunicação sem fio, como aparelhos
de telefone celular, podem produzir ruídos quando
usados perto desse equipamento. Esse tipo de ruído
pode ocorrer ao fazer ou receber uma chamada, ou
durante uma conversação. Se esse tipo de problema
ocorrer, mude os aparelhos sem fio de lugar de
modo a ficarem mais longe deste equipamento ou
desligue-os.
• Não exponha o equipamento diretamente ao sol,
não o deixe próximo a aparelhos que irradiem
calor, não o deixe dentro de veículos fechados ou
exposto a temperaturas elevadas. O calor excessivo
pode deformar e descolorir o equipamento.
• Ao mover o equipamento de um local para outro
onde a temperatura e/ou umidade seja diferente,
gotas de água (condensação) podem se formar
dentro do equipamento. Se você tentar usar
o equipamento nessa condição, poderá ocorrer
dano ou mau funcionamento. Portanto, antes de
usar o equipamento, você deverá esperar algumas
horas até que a condensação tenha evaporado
por completo.
• Dependendo do material e da temperatura da
superfície onde você colocar o equipamento,
os pés de borracha podem desbotar ou danificar
a superfície.
Coloque um pedaço de feltro ou pano embaixo
dos pés de borracha para evitar que isso aconteça.
Se você fizer isso, verifique se o equipamento não
vai escorregar e cair acidentalmente.
• Não coloque nada que contenha água neste
equipamento. Evite também o uso de inseticidas,
perfumes, álcool, esmalte, aerosóis etc. próximo
ao equipamento. Seque com cuidado qualquer
líquido que for derramado sobre o equipamento
com um pano macio e seco.
Reparos e dados
Copyrights/Licença/Marca registrada
• Esteja ciente de que todos os dados contidos na
memória do equipamento podem ser perdidos
quando ele é enviado para reparo. A Roland não
assume nenhuma responsabilidade em relação
à perda de dados.
• São proibidas por lei a gravação em áudio ou em
vídeo, a cópia ou a revisão de obra de terceiros
protegida pelo direito autoral (obra musical, em
vídeo, transmissão, performance ao vivo ou outra
obra), no todo ou em parte, além da distribuição,
venda, aluguel, execução ou transmissão sem
a permissão do detentor dos direitos autorais.
Cuidados adicionais
• Esteja ciente de que o conteúdo da memória
pode ser perdido de maneira irrecuperável em
decorrência de um mau funcionamento ou do
uso inadequado do equipamento.
• Seja cuidadoso ao usar os botões, controles
deslizantes e outros e também ao usar os plugues
e conectores. O uso sem cuidado pode ocasionar
mau funcionamento.
• Ao desconectar todos os fios, segure sempre pelo
conector — nunca puxe pelo fio. Isso evitará curtos
circuitos e danos aos componentes internos dos fios.
• Para evitar incomodar os vizinhos, mantenha
o volume do equipamento em níveis razoáveis.
Se preferir, use fones de ouvido, assim não
precisará se preocupar com as pessoas ao redor.
• Alguns cabos de conexão possuem resistores.
Não use cabos com resistores para conectar este
equipamento. O uso desses cabos pode tornar
o nível de som extremamente baixo ou inaudível.
Para obter informações sobre as especificações
dos cabos, entre em contato com o fabricante do
cabo.
• Não use este produto para fins que possam
infringir direitos autorais de propriedade
de um terceiro. Não assumimos nenhuma
responsabilidade no que diz respeito a qualquer
infração de direitos autorais de terceiros
decorrente do uso deste produto.
• Os compradores deste produto NÃO têm
permissão para extrair o referido conteúdo na
forma original ou modificada com o propósito
de distribuição de gravações do conteúdo ou
disponibilização dele em redes de computadores.
• MMP (Moore Microprocessor Portfolio) é um
portfólio de patentes referentes à arquitetura do
microprocessador, desenvolvida pela Technology
Properties Limited (TPL). A Roland licenciou essa
tecnologia do TPL Group.
• Este produto contém a plataforma de software
integrado eCROS da eSOL Co.,Ltd. eCROS é uma
marca registrada da eSOL Co.,Ltd. no Japão.
• Os nomes de empresas e de produtos exibidos
neste documento são marcas registradas ou
marcas de seus respectivos proprietários.
Retornando às configurações de fábrica
Estas são instruções para retornar o VT-12 às condições definidas pela fábrica.
* Isso apagará todos os sons gravados e as faixas do usuário.
* Se as baterias tiverem energia insuficiente (“ ” aparece no visor), não será possível restaurar
os ajustes de fábrica. Nesses casos, você deve substituir as baterias por novas ou usar um
adaptador CA; então você poderá prosseguir com a restauração dos ajustes de fábrica.
1. Mantendo o botão [
], o botão [ ] e o botão [
ENG
] pressionados, ligue o equipamento.
DEU
O visor exibirá “Factory reset”.
Se você decidir cancelar a operação, pressione o botão [
2. Pressione o botão [
], [WARM-UP] ou [EXERCISE].
FRA
ITA
].
ESL
O VT-12 retornará o estado configurado de fábrica.
* Não desligue o equipamento enquanto o indicador de nota
e
POR
estiver piscando.
NLD
23
ENG
DEU
FRA
ITA
ESL
POR
NLD
Ontdek wat u allemaal kunt doen!
De VT-12 is het ideale hulpmiddel om uw zangvaardigheden te verbeteren.
U kunt de VT-12 altijd en overal gebruiken, alleen of in groep, thuis of in de studio.
De toonhoogte controleren
De VT-12 kan de toonhoogte detecteren van één stem, maar ook van twee stemmen.
Als u samen in harmonie zingt met een andere persoon, kunt u de VT-12
gebruiken om te controleren of u beiden in de juiste toonhoogte zingt.
Als een metronoom
De VT-12 heeft een begeleidingstoon die u kan helpen het juiste tempo te
behouden wanneer u alleen zingt, of wanneer u a capella of met een zanggroep
oefent.
2
De toonhoogte controleren
Zangtraining
De VT-12 is bijzonder geschikt om uw stem op te warmen of om zangoefeningen
te doen. U kunt de ingebouwde nummers gebruiken om het vocaliseren voor
een kooruitvoering of een liveoptreden te oefenen of u kunt het apparaat
gebruiken om uw zangtechnieken en zangexpressie bij te schaven.
Oefenen
Metronoom
ENG
DEU
Wat zijn nummers?
FRA
ITA
De VT-12 bevat ingebouwde nummers die u kunt gebruiken bij het oefenen of opwarmen.
Naast de ingebouwde nummers kunt u ook uw eigen favoriete liedjes opnemen (p. 14).
ESL
POR
NLD
3
Inhoud
Ontdek wat u allemaal kunt doen! . . . . . . . . . . . . . . . . . 2
Paneelbeschrijvingen. . . . . . . . . . . . . . . . . . . . . . . . . . . . . 5
Bovenpaneel. . . . . . . . . . . . . . . . . . . . . . . . . . . . . . . . . . . . 5
Zijpaneel (Uw apparatuur aansluiten). . . . . . . . . . . . 6
Voordat u de VT-12 gebruikt. . . . . . . . . . . . . . . . . . . . . . . 8
De batterijen plaatsen. . . . . . . . . . . . . . . . . . . . . . . . . . . 8
Het apparaat inschakelen. . . . . . . . . . . . . . . . . . . . . . . . 9
Het DoReMi-blad gebruiken. . . . . . . . . . . . . . . . . . . . . 9
Tips voor het gebruik van de VT-12 . . . . . . . . . . . . . 10
De standaard gebruiken. . . . . . . . . . . . . . . . . . 10
De toonhoogte controleren . . . . . . . . . . . . . . . . . . . . . . 11
Oefenen. . . . . . . . . . . . . . . . . . . . . . . . . . . . . . . . . . . . . . . . . 13
Een favoriet liedje opnemen en oefenen. . . . . . . . 14
De metronoom gebruiken. . . . . . . . . . . . . . . . . . . . . . . . 15
Problemen oplossen. . . . . . . . . . . . . . . . . . . . . . . . . . . . . 16
Audiostroom . . . . . . . . . . . . . . . . . . . . . . . . . . . . . . . . . . . . 17
Belangrijkste specificaties. . . . . . . . . . . . . . . . . . . . . . . . 18
HET APPARAAT VEILIG GEBRUIKEN. . . . . . . . . . . . . . . . 19
BELANGRIJKE OPMERKINGEN. . . . . . . . . . . . . . . . . . . . . 22
Lees zorgvuldig onderstaande hoofdstukken voordat u dit apparaat gebruikt: “HET APPARAAT VEILIG GEBRUIKEN”
(p. 19) en “BELANGRIJKE OPMERKINGEN” (p. 22). Deze hoofdstukken bevatten belangrijke informatie over de juiste
bediening van het apparaat. Lees bovendien de gehele gebruikershandleiding om er zeker van te zijn dat u elke
functie van uw nieuwe apparaat goed begrijpt. De handleiding moet als handige referentie worden bewaard en
voorhanden zijn.
Copyright © 2012 ROLAND CORPORATION
Alle rechten voorbehouden. Niets uit deze uitgave mag op enige manier worden gereproduceerd zonder
schriftelijke toestemming van ROLAND CORPORATION.
ROLAND is een gedeponeerd handelsmerk van Roland Corporation in de Verenigde Staten en/of andere landen.
4
Paneelbeschrijvingen
Toonhoogte-indicator
p. 11
Interne luidspreker
Deze geeft de toonhoogte of
de onnauwkeurigheid van het
vocaliseren weer.
Interne microfoon
De begeleidingstoon, het
metronoomgeluid en de nummers
worden via deze luidspreker
afgespeeld.
Gebruik deze om uw stem te
controleren of op te nemen.
[ ] [ ]-knoppen
Display
Gebruik deze om de
begeleidingstoon die u wilt
horen, te selecteren.
p. 11
U kunt de referentietoonhoogte
wijzigen door gelijktijdig op de
[ ]-knop en de [ ]-knop te
drukken (p. 12).
[
[
]-knoppen
Gebruik deze om de instellingen
te wijzigen.
Hiermee schakelt u de
begeleidingstoon in/uit. De
begeleidingstoon wordt
afgespeeld bij toonhoogtes met
gelijkzwevende stemming.
]-knop
[REVIEW]-knop
Gebruik deze knop om de
metronoom of het nummer af te
spelen en te stoppen.
[
]-knop
Selecteert de
metronoommodus.
p. 11
Metronoom
[
]-knop
Oefenen
De display geeft informatie weer
zoals het geselecteerde nummer
of het tempo van de metronoom.
][
p. 15
Toonhoogte controleren
Bovenpaneel
Speelt het opgenomen geluid af
zodat u kunt controleren hoe u
het er vanaf hebt gebracht.
[WARM-UP]-knop
Selecteert de opwarmmodus.
p. 13
[EXERCISE]-knop
p. 13
Selecteert de oefenmodus.
ENG
DEU
FRA
ITA
ESL
POR
NLD
5
Paneelbeschrijvingen
Zijpaneel (Uw apparatuur aansluiten)
REC IN-aansluiting
p. 14
U kunt hier een extern audioapparaat, zoals
een audiospeler of radio/cassettespeler, met
een stereo mini-jackkabel aansluiten.
OUTPUT/PHONES-aansluiting
U kunt uw favoriete liedjes opnemen met
behulp van deze aansluiting om ze te
gebruiken terwijl u oefent.
U kunt hier een apart
verkrijgbare hoofdtelefoon
of externe luidspreker
aansluiten.
Als u deze aansluiting wilt gebruiken, sluit u
een kabel aan tussen de uitgang (bijvoorbeeld
van de hoofdtelefoon) van uw externe
audioapparaat en deze aansluiting.
Riemgat
U kunt hier een in de handel verkrijgbare riem
bevestigen.
Schakelaar voor toonhoogtedetectie
Hiermee selecteert u de gewenste
methode voor de detectie van de
toonhoogte.
p. 11
[MIC VOLUME]-schakelaar
Hiermee past u het volume van de microfoon aan.
H: Volume is hoog
L:
Volume is laag
OFF: Monitor is uitgeschakeld
* Als deze schakelaar op “OFF” staat, kan de
toonhoogte niet worden gedetecteerd.
6
Paneelbeschrijvingen
Toonhoogte controleren
[POWER]-knop
p. 9
Houd deze knop ingedrukt om het
apparaat in en uit te schakelen.
[VOLUME]-wiel
Hiermee past u het volume van de
interne luidspreker of hoofdtelefoon
aan.
Sluit de netstroomadapter (PSB-6U, apart
verkrijgbaar) hier aan.
* Gebruik alleen de opgegeven
netstroomadapter (PSB-6U) en sluit
deze aan op een stopcontact met de
juiste spanning. Gebruik geen andere
netstroomadapter. Dit kan tot storingen
leiden.
Oefenen
DC IN-aansluiting
Plaats de netstroomadapter met de
zijde met de indicator (zie afbeelding)
naar boven en de zijde met de
tekstinformatie naar beneden.
De indicator licht op als u de
netstroomadapter in een stopcontact
steekt.
Metronoom
Waarschuwingen bij het aansluiten
ENG
• Zet het volume altijd op nul en schakel alle apparaten uit voordat u aansluitingen maakt om defecten of
storingen aan de apparatuur te voorkomen
DEU
• Als u een externe luidspreker gebruikt, kan akoestische feedback (piepend of loeiend geluid) optreden
afhankelijk van de positie van de externe luidspreker ten opzichte van de interne microfoon. Als dit gebeurt,
voert u de volgende stappen uit:
1. Wijzig de richting van de interne microfoon.
2. Plaats de interne microfoon verder van de externe luidsprekers.
3. Verlaag het volumeniveau.
4. Stel de [MIC VOLUME]-schakelaar in op “OFF”.
FRA
ITA
ESL
POR
NLD
7
Voordat u de VT-12 gebruikt
De batterijen plaatsen
Plaats de batterijen (twee AA-batterijen) zoals getoond in de afbeelding en zorg ervoor dat u de
juiste polariteit gebruikt.
Waarschuwingen bij het gebruik van de batterijen
• Als de batterijspanning laag is, wordt “
”
weergegeven op de display. Als dit gebeurt, moet u
nieuwe batterijen plaatsen.
• Bij verkeerd gebruik kunnen batterijen ontploffen
of lekken en schade of letsel veroorzaken. Uit
veiligheidsoverwegingen dient u de volgende
voorzorgsmaatregelen te lezen en na te leven.
• Volg de installatie-instructies voor batterijen
nauwkeurig en zorg ervoor dat u de juiste
polariteit gebruikt.
• Combineer geen nieuwe batterijen met oude.
Combineer bovendien ook geen verschillende
soorten batterijen.
• Verwijder de batterijen als het apparaat langere
tijd niet zal worden gebruikt.
• Bewaar batterijen nooit samen met metalen
voorwerpen zoals balpennen, halskettingen,
haarspelden enzovoort.
• Gebruikte batterijen moeten worden verwijderd
in overeenstemming met geldende reglementen
voor veilige opruiming die van kracht zijn in uw
regio.
8
• Onjuist gebruik van batterijen, oplaadbare batterijen
of het oplaadapparaat kan lekkage, oververhitting,
brand of explosie veroorzaken. Voordat u de batterijen,
oplaadbare batterijen of het oplaadapparaat in
gebruik neemt, dient u alle bijgeleverde voorschriften
en instructies te lezen en op te volgen.
• Gebruik alleen oplaadbare batterijen en
oplaadapparaten die worden aanbevolen door de
fabrikant van de batterijen.
• Als u batterijen gebruikt voor dit apparaat, raden
wij u aan alkalinebatterijen of oplaadbare
NiMH-batterijen te nemen.
• Koppel in dit geval ook de netstroomadapter van
het apparaat los.
• Zelfs als er batterijen zijn geplaatst, zal het apparaat
uitschakelen als u het netsnoer aansluit op of
loskoppelt van het stopcontact wanneer het apparaat
is ingeschakeld, of als u de netstroomadapter aansluit
op of loskoppelt van het apparaat.
• Verwachte levensduur van de batterijen bij
voortdurend gebruik:
Alkaline: 6 uur
* Deze waarden variëren afhankelijk van
de batterijspecificaties en de werkelijke
gebruiksomstandigheden.
Voordat u de VT-12 gebruikt
Toonhoogte controleren
Het apparaat inschakelen
* Als alle apparaten correct zijn aangesloten (p. 6), volgt u de onderstaande procedure om de
apparaten in te schakelen.
1
Houd de [POWER]-knop ingedrukt totdat
het apparaat wordt ingeschakeld.
Oefenen
2
Stel het [VOLUME]-wiel in op de
minimumstand.
Waarschuwingen bij het in- en uitschakelen van het apparaat
Metronoom
• Dit apparaat wordt automatisch uitgeschakeld 30 minuten nadat de knoppen voor het laatst zijn gebruikt
(zelfs wanneer de metronoom wordt gebruikt) of 30 minuten nadat het afspelen van een nummer is gestopt.
• Zet het volume altijd op nul voordat u het apparaat in- of uitschakelt. Zelfs als het volume volledig op nul
staat, kunt u nog geluid horen wanneer het apparaat wordt in- of uitgeschakeld. Dit is normaal en wijst niet
op een defect.
• Dit apparaat is uitgerust met een beveiligingscircuit. Het duurt even (een paar seconden) voordat het
apparaat normaal functioneert nadat het is ingeschakeld.
Het DoReMi-blad gebruiken
Door het meegeleverde DoReMi-blad op de toonhoogte-indicator te bevestigen, kunt u de
DoReMi-tekens gebruiken om de namen van de noten te controleren.
Als u de namen van de noten wilt controleren wanneer u het relatieve solmisatiesysteem
(Movable Do of “verplaatsbare do”) gebruikt, plaatst u het DoReMi-blad zodat de “Do”
overeenstemt met de nootnaam van de tonica (of grondtoon) die u gebruikt.
ENG
DEU
FRA
ITA
ESL
DoReMi-blad
* Zorg ervoor dat u het schutblad en het blauwe blad verwijdert, voordat u het DoReMi-blad
gebruikt.
POR
NLD
9
Voordat u de VT-12 gebruikt
Tips voor het gebruik van de VT-12
Houd de VT-12 in de hand en neem de houding aan die in de afbeelding wordt getoond, wanneer u zingt.
Gebruik een hoofdtelefoon als u de nauwkeurigheid van uw toonhoogte wilt controleren terwijl
een nummer of de metronoom wordt afgespeeld.
Als u een hoofdtelefoon gebruikt, zal de toonhoogtedetectie nauwkeuriger gebeuren. U zult ook
makkelijker het opgenomen geluid kunnen horen.
Gebruik een hoofdtelefoon
Ongeveer 30 cm
verwijderd
Houd de rug recht
MEMO
Controleer de instelling van de [MIC VOLUME]-schakelaar (p. 6) als zich een van de volgende
situaties voordoet.
• De toonhoogte-indicator reageert niet of reageert niet naar behoren.
• Het volume van het geluid van de microfoon is te stil.
De standaard gebruiken
U kunt de standaard gebruiken om de VT-12 rechtop te plaatsen.
Als u de VT-12 in groep gebruikt, kunt u de standaard gebruiken om het apparaat rechtop op een
bureau of tafel te plaatsen.
Als u dit doet, moet u de VT-12 ongeveer 1 m van de personen die zingen, houden.
10
* Als u de standaard in zijn oorspronkelijke positie wilt terugplaatsen, buigt u deze naar binnen
totdat deze in de positie vastklikt.
De toonhoogte controleren
1
Selecteer het type toonhoogtedetectie.
MEMO
MONO EQUAL: Er wordt één stem gedetecteerd met
gelijkzwevende stemming.
CHORD EQUAL: Er worden twee stemmen gedetecteerd
met gelijkzwevende stemming.
CHORD JUST:
Er worden twee stemmen gedetecteerd
met reine stemming (majeur).
Toonhoogte controleren
U wilt waarschijnlijk starten met uw toonhoogte te controleren.
Met de VT-12 kunt u de toonhoogte van twee stemmen tegelijk controleren.
Het apparaat is dus heel geschikt om de toonhoogte te controleren van twee personen die in
harmonie samen zingen.
De toonsoort voor reine stemming wordt bepaald door de lagere
toonhoogte.
Als de VT-12 een begeleidingstoon weergeeft, wordt de toonsoort
bepaald door de begeleidingstoon. Als een begeleidingstoon
wordt weergegeven, kan er slechts één stem worden gedetecteerd.
Druk op de [
Oefenen
2
]-knop.
Voordat u begint met het vocaliseren, laat u de begeleidingstoon
(gelijkzwevend gestemd) weerklinken om de juiste toonhoogte te horen.
MEMO
U kunt de [ ]-knop en de [ ]-knop gebruiken om de
begeleidingstoon te wijzigen.
3
Vocaliseer en controleer uw toonhoogte.
Vocaliseer de toonhoogte die u wilt zingen.
Metronoom
De naam van de noot die het dichtst bij de gedetecteerde toonhoogte
ligt, licht op.
Wordt helderder wanneer het verschil in toonhoogte kleiner wordt,
wordt donkerder wanneer het verschil in toonhoogte groter wordt.
Als er een begeleidingstoon wordt weergegeven, licht de naam van de
noot van de begeleidingstoon ook op.
Geeft het verschil in toonhoogte op. Opgelicht:
Gedoofd:
Toonhoogte is te laag
MONO EQUAL
Toonhoogte is juist
ENG
Toonhoogte is te hoog
DEU
De hoge noot is te laag ten
opzichte van de lage noot
* Als de indicator voor de
toonhoogte niet reageert, zelfs
niet wanneer u vocaliseert,
controleert u de instelling van de
[MIC VOLUME]-schakelaar (p. 6).
CHORD EQUAL
CHORD JUST
FRA
Het interval in toonhoogte
tussen de twee noten is juist
ITA
De hoge noot is te hoog ten
opzichte van de lage noot
POR
ESL
NLD
11
De toonhoogte controleren
De referentietoonhoogte wijzigen
1. Druk gelijktijdig op de [
]-knop en de [ ]-knop.
De display geeft de huidige referentietoonhoogte aan.
2. Gebruik de [
][
]-knoppen om de gewenste referentietoonhoogte op te geven.
Bereik: 415–465 Hz (standaardwaarde: 440 Hz)
* Als u niets doet gedurende een vooraf ingestelde tijd, verdwijnt de indicatie van de
referentietoonhoogte. Het apparaat zal automatisch terugkeren naar de modus voor het
controleren van de toonhoogte.
3. Druk gelijktijdig op de [
]-knop en de [ ]-knop.
De indicatie van de referentietoonhoogte verdwijnt en het apparaat keert automatisch terug naar
de modus voor het controleren van de toonhoogte.
* Tijdens het afspelen van de vooraf ingestelde nummers, wordt de referentietoonhoogte
vastgelegd op 440 Hz.
Wat is reine stemming?
Reine stemming is een manier van stemmen die reine kwinten en tertsen garandeert.
Als u reine stemming selecteert, moet u de tonica (voor een majeurladder is dat C)
opgeven die geschikt is voor de toonsoort van uw liedje.
De VT-12 zal de laagste van de stemmen als de tonica aanwijzen.
Als een begeleidingstoon wordt gebruikt, zal deze de tonica zijn.
Informatie over toonhoogtes in reine stemming
De VT-12 kan toonhoogtes met reine stemming alleen detecteren in een majeurtoonsoort.
Als de begeleidingstoon C is, zullen de toonhoogtes worden berekend met de volgende
verhoudingen.
Gelijkzwevende stemming
(cent)
C#
D
D#
E
F
0
100
200
300
400
500
Reine stemming (cent)
0
71
204
316
386
498
Verhouding
1
25/24
9/8
6/5
5/4
4/3
F#
G
G#
A
A#
B
600
700
800
900
1000
1100
569
702
773
884
1018
1088
25/18
3/2
25/16
5/3
9/5
15/8
Gelijkzwevende stemming
(cent)
Reine stemming (cent)
Verhouding
12
C
Oefenen
Opwarmmodus
Deze bevat nummers voor het vocaliseren om uw stem op te warmen.
Oefenmodus
Deze modus bevat nummers voor het verbeteren van uw stemtechniek, zodat u
uw ademhaling beter onder controle hebt en uw stembereik vergroot.
MEMO
Voor meer informatie over het oefenen, raadpleegt u de afzonderlijke “Oefengids”.
Deze handleiding bevat nuttig advies over het vocaliseren en het zingen, en tips voor alle
nummers die u kunt gebruiken om te oefenen.
* Telkens wanneer een nummer wordt afgespeeld, start er een nieuwe opname. Als u
een nummer afspeelt dat eerder is opgenomen, zal het geluid dat op dat nummer was
opgenomen, worden overschreven. Als u het afspelen van een nummer stopt binnen de
3 seconden nadat het is gestart, wordt het geluid op dat nummer niet opgenomen.
Selecteer een modus.
Oefenen
1
De knop van de geselecteerde modus
licht op.
2
6
Gebruik de [ ] [ ]-knoppen
om een nummer te selecteren.
]-knop.
Het nummer wordt afgespeeld en de
geluidsopname wordt gestart.
4
Zing mee met het nummer.
Let bij het zingen goed op uw eigen
toonhoogte en op de toonhoogtes
van het nummer dat wordt afgespeeld.
MEMO
Afhankelijk van het nummer dat u
hebt geselecteerd, kunt u mogelijk
het afspelen van het zanggedeelte
van het nummer in- en uitschakelen
door op de [REVIEW]-knop te
drukken tijdens het afspelen van het
opgenomen geluid.
5
Druk op de [
Metronoom
Druk op de [
Druk op de
[REVIEW]-knop.
Het opgenomen geluid wordt afgespeeld.
Als er niets is opgenomen, geeft de
display “----” weer.
MEMO
• Als u de knop voor de geselecteerde
modus herhaaldelijk indrukt, kunt u
schakelen tussen de vooraf ingestelde
nummers en de gebruikersnummers.
• Als er geen gebruikersnummers zijn
opgenomen, geeft de display “U--” weer.
• Raadpleeg de afzonderlijke
“Nummerlijst” voor meer informatie
over de nummers.
3
Toonhoogte controleren
De VT-12 biedt twee modi om te oefenen: de opwarmmodus (WARM-UP) en de oefenmodus
(EXERCISE). Elke modus bevat nummers (p. 3) die geschikt zijn voor het overeenkomstige type
oefeningen dat u wilt doen.
Het geluid dat u produceert tijdens het oefenen, wordt automatisch opgenomen op de
betreffende nummers, zodat u het achteraf kunt beluisteren (de REVIEW- of controlefunctie).
]-knop.
Het afspelen van het nummer en het
opnemen van het geluid worden gestopt.
Opgelicht: De toonhoogtes waarin u zingt
Knipperend: De toonhoogtes van het nummer
* Bij sommige nummers (gebruikersnummers en
bepaalde vooraf ingestelde nummers) zal het apparaat
de toonhoogtes niet weergeven door te knipperen.
ENG
DEU
FRA
ITA
Vooraf ingestelde nummers en gebruikersnummers
De VT-12 bevat voor elke modus ingebouwde, vooraf ingestelde nummers (001–). U kunt
ook nummers opnemen via de REC IN-aansluiting en deze gebruiken als gebruikersnummers
(U01–U10). (Gebruikersnummers worden gebruikt in beide modi.)
13
ESL
POR
NLD
Oefenen
Een favoriet liedje opnemen en oefenen
U kunt uw favoriete liedjes met behulp van de REC IN-aansluiting op de VT-12 opnemen en deze
gebruiken als gebruikersnummers.
U kunt een opgenomen liedje gebruiken zowel in de opwarmmodus als in de oefenmodus.
Nummerlengte
Maximum 10 minuten (per nummer)
Aantal nummers
Maximum 10 nummers
* Als u een eerder opgenomen nummer selecteert en vervolgens opneemt, wordt het vorige
liedje overschreven. Als u stopt binnen de drie seconden na de start van de opname, wordt het
liedje niet opgenomen.
* Als u gereed bent met de opname van een liedje, moet u de kabel loskoppelen van de REC
IN-aansluiting. De VT-12 kan geen andere bewerkingen uitvoeren als er een kabel is
aangesloten op de REC IN-aansluiting.
1
Sluit uw externe
audioapparaat aan op de
REC IN-aansluiting (p. 6).
De display geeft afwisselend “rEc” en
“U**” weer. De VT-12 is gereed om het
nummer op te nemen.
2
Speel het liedje af op uw
externe audioapparaat.
Pas het volume aan van het geluid dat
moet worden opgenomen.
Terwijl u het geluid op de interne
luidspreker of via de hoofdtelefoon
controleert, kunt u het volume
ervan aanpassen met behulp van de
bedieningselementen van het externe
audioapparaat.
3
4
Gebruik de
[ ] [ ]-knoppen om
het nummer op te geven
van het liedje dat moet
worden opgenomen.
Druk op de [
]-knop.
De opname wordt gestart.
Tijdens het opnemen geeft de display
“rEc” weer en de indicator van de
toonhoogte brandt.
8
Koppel uw externe
audioapparaat los van de
REC IN-aansluiting.
Probeer te oefenen met het
gebruikersnummer dat u hebt
opgenomen (p. 14).
7
Druk op de
[REVIEW]-knop.
Het afspelen van het opgenomen
liedje wordt gestart.
Controleer of het liedje correct is
opgenomen. Als het liedje niet is
opgenomen, geeft de display “----” weer.
6
Druk op de [
]-knop.
De opname wordt gestopt.
5
Speel het liedje af op uw
externe audioapparaat.
MEMO
14
Als u de liedjes die u hebt opgenomen, wilt verwijderen, herstelt u de fabrieksinstellingen van
de VT-12 (p. 23).
De metronoom gebruiken
Toonhoogte controleren
U kunt oefenen door te zingen op het tempo van de metronoom.
Het geluid wordt automatisch opgenomen terwijl de metronoom speelt, zodat u nadien naar
uzelf kunt luisteren (de REVIEW- of controlefunctie).
* Telkens wanneer u de metronoom laat weerklinken, wordt er een nieuwe opname gestart.
De eerder gemaakte opname wordt overschreven. Als u de metronoom binnen de drie
seconden stopt, wordt het geluid niet opgenomen.
* U kunt maximaal 10 minuten opnemen in de metronoommodus. Als deze 10 minuten zijn
overschreden, stopt de opname. De metronoom blijft klinken, zelfs nadat de opname is
gestopt.
* U kunt de maatsoort niet instellen.
1
Druk op de [
]-knop.
2
Gebruik de
[ ] [ ]-knoppen om het
tempo aan te passen.
Bereik: 30–250
3
Druk op de [
]-knop.
De metronoom wordt afgespeeld en de
geluidsopname wordt gestart.
De [ ]-knop knippert volgens het tempo.
6
Druk op de
[REVIEW]-knop.
Het opgenomen geluid wordt
afgespeeld.
Het afspelen zal stoppen als u op de
[
]-knop drukt.
5
Druk op de [
]-knop.
De metronoom en de geluidsopname
worden gestopt.
Metronoom
MEMO
U kunt het tempo ook instellen
door op het gewenste tempo op
de [ ]-knop te drukken (de Tap
Tempo-functie).
Oefenen
De metronoommodus van de VT-12
wordt ingeschakeld.
De display geeft de huidige
tempowaarde aan.
MEMO
U kunt de metronoom ook laten afspelen
wanneer er een begeleidingstoon (p. 11)
wordt weergegeven.
ENG
4
Zing op het tempo van de metronoom.
Let tijdens het zingen op de toonhoogtes waarin u zingt.
DEU
Opgelicht: De begeleidingstoon en
de toonhoogte waarin u
zingt
FRA
ITA
ESL
POR
NLD
15
Problemen oplossen
Probleem
Apparaat kan niet worden
ingeschakeld
Apparaat kan niet worden
uitgeschakeld
Controle
Actie
Is de batterijspanning te laag?
Plaats nieuwe batterijen.
Is de opgegeven
netstroomadapter (PSB-6U,
apart verkrijgbaar) correct
aangesloten?
Controleer de aansluiting
opnieuw. Gebruik geen
andere netstroomadapter dat het
opgegeven model.
Zorg ervoor dat alle nummers zijn
Wordt “Err” weergegeven op het gestopt en alle liedjesopnames
scherm?
zijn voltooid. Schakel vervolgens
het apparaat uit.
Zijn de andere apparaten
correct aangesloten?
Controleer de aansluitingen
opnieuw.
Staat het volume van een
Controleer de instellingen van het
aangesloten externe luidspreker
aangesloten apparaat.
te laag?
p. 8
p. 7
–
p. 6
–
Is het [VOLUME]-wiel juist
ingesteld?
Stel het volume juist in.
p. 7
Is de [MIC VOLUME]-schakelaar
juist ingesteld?
Selecteer de juiste instelling.
p. 6
Is de hoofdtelefoon
aangesloten?
Als de hoofdtelefoon is
aangesloten, wordt het geluid
niet via de interne luidspreker
uitgestuurd.
Te laag volume van de
interne luidspreker
Is de batterijspanning te laag?
Plaats nieuwe batterijen.
Het volumeniveau van
het instrument dat is
aangesloten op de OUTPUT/
PHONES-aansluiting is te
laag.
Gebruikt u een verbindingskabel met weerstand?
Gebruik een verbindingskabel
zonder weerstand.
Het geluid is vervormd
Is het [VOLUME]-wiel juist
ingesteld?
Stel het volume juist in.
De opname stopt wanneer u
een liedje opneemt
Probeert u een opname te
U kunt maximaal gedurende tien
maken die langer duurt dan tien
minuten (per liedje) opnemen.
minuten?
–
Te laag volume of vervormd
geluid in een opgenomen
liedje
Is het juiste volume ingesteld
voor de opname?
Pas het volume op het externe
audioapparaat aan.
–
Is de [MIC VOLUME]-schakelaar
juist ingesteld?
Selecteer de juiste instelling.
Probeert u de toonhoogte
te controleren in een luide
omgeving met veel ruis?
Controleer de toonhoogte in een
ruimte waar geen ruis is.
Geen geluid / Volume te
zacht
De toonhoogte wordt niet
gedetecteerd / Er treedt een
onverwachte bewerking op
Stel deze in op een correcte
waarde. Tijdens het afspelen van
de vooraf ingestelde nummers,
wordt de referentietoonhoogte
vastgelegd op 440 Hz.
De toonhoogte-indicators voor en lichten snel op, zodat u de
toonhoogte tijdens het afspelen van nummers snel kunt controleren.
Als u de opname afspeelt door op de [REVIEW]-knop te drukken,
lichten deze indicators op de normale manier op.
Dit apparaat wordt automatisch uitgeschakeld 30 minuten nadat de
knoppen voor het laatst zijn gebruikt (zelfs wanneer de metronoom
wordt gebruikt) of 30 minuten nadat het afspelen van een nummer
is gestopt.
Is de instelling voor de
referentietoonhoogte correct?
Tijdens het afspelen
van nummers lichten de
toonhoogte-indicators voor
en regelmatig op.
Het apparaat wordt
onverwachts uitgeschakeld
16
Pagina
–
p. 8
–
p. 7
p. 6
–
p. 12
–
–
Audiostroom
Interne
microfoon
[MIC VOLUME]schakelaar
Toonhoogtedetectie
OUTPUT/
PHONES-aansluiting
Vocale gedeelte van
het nummer (alleen
bij bepaalde vooraf
ingestelde nummers)
Opgenomen
Nummer
Toonhoogtedetectie
[VOLUME]-wiel
Toonhoogte controleren
Als u een nummer afspeelt
Begeleidingsgedeelte
van het nummer
Interne luidspreker
Oefenen
* Het geluid van de interne microfoon wordt niet uitgestuurd via de interne luidspreker.
Als u het opgenomen geluid afspeelt (controleert)
Toonhoogtedetectie
Opgenomen geluid
Vocale gedeelte van
het nummer (alleen
Toonhoogtedetectie
bij bepaalde vooraf
ingestelde nummers)
[VOLUME]-wiel
Metronoom
Nummer
OUTPUT/
PHONES-aansluiting
Begeleidingsgedeelte
van het nummer
Interne luidspreker
Als u een liedje opneemt
OUTPUT/
PHONES-aansluiting
REC IN-aansluiting
Afspelen van het externe
audioapparaat
ENG
DEU
[VOLUME]-wiel
FRA
ITA
ESL
Opgenomen
POR
Gebruikersnummer
Interne luidspreker
17
NLD
Belangrijkste specificaties
Roland VT-12: Vocal Trainer
Tuner
Stembereik
C2 (65,4 Hz) – A5 (880,0 Hz)
Stemnauwkeurigheid
+/- 1 cent
Referentietoon
Referentietoonhoogte: A4 = 415–465 Hz (stappen van 1 Hz)
Bereik van referentietoon: A3–G#5 (24 noten op de chromatische
toonladder)
Metronoom
Tempo
30–250, Nauwkeurigheid: +/- 0,1 %
Gebruikersnummer
Nummerlengte
Maximum 10 minuten (per nummer)
Aantal nummers
Aantal nummers: Maximum 10 nummers
Invoer / Uitvoer
Nominaal ingangsniveau
Ingangsimpedantie
REC IN-aansluiting: 0 dBu
REC IN-aansluiting: 9,5 k ohm
Uitgangsniveau
OUTPUT/PHONES-aansluiting: 15 mW + 15 mW (bij een belasting van 16 ohm)
Aanbevolen
belastingsimpedantie
Overige
Luidspreker
Mono
Aansluitingen
OUTPUT/PHONES-aansluiting (stereo mini-jack)
REC IN-aansluiting (stereo mini-jack)
DC IN-aansluiting
Display
7 segmenten, 3 tekens (LED)
Toonhoogte-indicator
Voeding
Alkalinebatterij (AA, LR6) of oplaadbare NiMH-batterij (AA, HR6) x 2,
netstroomadapter (PSB-6U, apart verkrijgbaar)
Stroomverbruik
380 mA
Verwachte levensduur van
de batterijen bij voortdurend
gebruik
Alkaline (AA, LR6): ca. 6 uur
Afmetingen
70 (B) x 134 (D) x 28 (H) mm
Gewicht
150 g (inclusief batterijen)
Alkalinebatterij (AA, LR6) x 2
DoReMi-blad
Gebruikershandleiding
Oefengids
Nummerlijst
Accessoires
Opties (apart verkrijgbaar)
18
16 ohm of hoger
* Deze waarden variëren afhankelijk van de batterijspecificaties en de
werkelijke gebruiksomstandigheden.
Beschermhoes (OP-RP1)
Netstroomadapter (PSB-6U)
* Als u een netstroomadapter koopt, moet u controleren of de adapter
(in de onderstaande lijst) ontworpen is voor de regio waarin deze zal
worden gebruikt en de spanning van die regio. (PSB6U-120/PSB6U230EU/PSB6U-230UK/PSB6U-240A) (sets met PSB-6U en netsnoer).
* 0 dBu = 0,775 Vrms
* Met het oog op productverbetering, kunnen de specificaties en/of het uitzicht van dit toestel
worden gewijzigd zonder voorafgaande kennisgeving.
HET APPARAAT VEILIG GEBRUIKEN
WAARSCHUWING
Demonteer het apparaat niet zelf en breng er geen
wijzigingen in aan
Open het apparaat of de
netstroomadapter niet (en voer er geen
wijzigingen aan uit).
Repareer het apparaat niet zelf en vervang geen
onderdelen ervan
Probeer het apparaat niet te herstellen of
onderdelen ervan te vervangen (behalve
als deze handleiding specifieke instructies
geeft om dat te doen). Laat het onderhoud
over aan uw handelaar, het dichtstbijzijnde
Roland Service Center of een erkende
Roland-verdeler, zoals vermeld op de
pagina “Informatie”.
Gebruik het apparaat niet en sla het niet op op
plaatsen die
aan extreme temperaturen worden
blootgesteld (bv. rechtstreeks zonlicht
in een gesloten voertuig, in de buurt
van een verwarmingsleiding, op
materiaal dat warmte produceert);
• nat zijn (bv. bad, wasruimte, op natte
vloeren);
• worden blootgesteld aan damp of rook;
• worden blootgesteld aan zout;
• vochtig zijn;
• aan regen worden blootgesteld;
• stoffig of zanderig zijn;
• worden blootgesteld aan hoge
trillingsniveaus en schokken.
WAARSCHUWING
Plaats het apparaat niet op een instabiele ondergrond
Zorg ervoor dat het apparaat altijd
horizontaal en stabiel is geplaatst.
Plaats het nooit op een standaard
die kan wankelen of op aflopende
oppervlakken.
Gebruik alleen de opgegeven netstroomadapter en de
juiste spanning
Gebruik alleen de opgegeven
netstroomadapter (PSB-6U) en
zorg ervoor dat de netspanning
van de installatie overeenkomt
met de invoerspanning die op de
netstroomadapter is vermeld. Andere
netstroomadapters kunnen een
andere polariteit hebben of bedoeld
zijn voor een andere spanning, zodat
deze schade, defecten of elektrische
schokken kunnen veroorzaken.
Gebruik alleen het meegeleverde netsnoer
Gebruik alleen het meegeleverde
netsnoer. Gebruik het meegeleverde
netsnoer niet met andere apparaten.
Verdraai of buig het netsnoer niet overmatig en plaats
er geen zware voorwerpen op
ENG
DEU
FRA
Verdraai of buig het netsnoer niet
te sterk en plaats er geen zware
voorwerpen op. Hierdoor kan het
snoer zowel inwendig als uitwendig
beschadigd raken en kan er kortsluiting
ontstaan. Beschadigde snoeren kunnen
brand of schokken veroorzaken!
ITA
ESL
POR
NLD
19
WAARSCHUWING
WAARSCHUWING
Vermijd overmatig gebruik aan een te hoog
volumeniveau
Laat het apparaat niet vallen en bescherm het tegen
zware schokken
Dit apparaat kan, apart of in combinatie
met een versterker en hoofdtelefoon of
luidsprekers, geluidsniveaus produceren
die permanente gehoorschade kunnen
veroorzaken. Gebruik het apparaat niet
langdurig aan een hoog volumeniveau
of aan een niveau dat oncomfortabel
is. Als u gehoorverlies of oorsuizingen
ervaart, moet u onmiddellijk stoppen
met het gebruik van het apparaat en
een audioloog raadplegen.
Bescherm het apparaat tegen zware
schokken.
(Laat het niet vallen!)
Laat geen vreemde voorwerpen of vloeistoffen in het
apparaat komen
Zorg ervoor dat er nooit vreemde
voorwerpen (bv. brandbare
voorwerpen, munten, draden) of
vloeistoffen (bv. water of sap) in het
apparaat terechtkomen. Hierdoor
kunnen kortsluiting, slechte werking of
andere defecten ontstaan.
Schakel het apparaat uit als het afwijkend reageert of
er een defect optreedt
Schakel het toestel onmiddellijk uit,
trek de netstroomadapter uit het
stopcontact en vraag onderhoud aan bij
uw handelaar, dichtstbijzijnde Roland
Service Center of een erkende Rolandverdeler, zoals vermeld op de pagina
“Informatie” als:
• de netstroomadapter, het netsnoer of
de stekker beschadigd zijn;
• er rook of ongewone geuren uit het
apparaat komen;
• voorwerpen of vloeistof in het
apparaat zijn terechtgekomen;
• het apparaat aan regen is blootgesteld
(of op een andere manier nat is
geworden);
• het apparaat niet normaal lijkt
te werken of opmerkelijk anders
functioneert.
Volwassenen dienen toezicht te houden op plaatsen
waar kinderen aanwezig zijn
Als het apparaat wordt gebruikt op
plaatsen waar kinderen aanwezig zijn,
dient u erop te letten dat het apparaat
niet ruw wordt behandeld. Er moet altijd
een volwassene in de buurt zijn om
toezicht te houden en advies te geven.
20
Laat het apparaat geen stopcontact delen met een
buitensporig aantal andere apparaten
Laat het netsnoer van het apparaat
geen stopcontact delen met
een buitensporig aantal andere
apparaten. Wees vooral voorzichtig
met verlengkabels. Het totale
stroomverbruik van alle apparaten die
u op de verlengkabel hebt aangesloten,
mag nooit het maximumvermogen
(watt/ampère) voor de verlengkabel
overschrijden. Buitensporige belasting
kan de isolatie van de kabel opwarmen
en uiteindelijk doen smelten.
Gebruik het apparaat niet in het buitenland
Raadpleeg uw handelaar, het
dichtstbijzijnde Roland Service Center
of een erkende Roland-verdeler, zoals
vermeld op de pagina “Informatie”,
vooraleer u het apparaat in het
buitenland gebruikt.
Ga voorzichtig om met batterijen
• U mag de batterijen nooit opnieuw
opladen, opwarmen, uit elkaar halen
of in vuur of water gooien.
• Stel batterijen, oplaadbare batterijen
of een oplaadapparaat nooit bloot
aan overmatige warmte zoals zonlicht,
vuur enzovoort.
• Onjuist gebruik van batterijen,
oplaadbare batterijen of het
oplaadapparaat kan lekkage,
oververhitting, brand of explosie
veroorzaken. Voordat u de batterijen,
oplaadbare batterijen of het
oplaadapparaat in gebruik neemt,
dient u alle bijgeleverde voorschriften
en instructies te lezen en op te volgen.
• Gebruik alleen oplaadbare batterijen
en oplaadapparaten die worden
aanbevolen door de fabrikant van de
batterijen.
OPGELET
Plaats het apparaat op een goed geventileerde locatie
Plaats het apparaat en de
netstroomadapter zo dat de ventilatie
van het apparaat en de adapter niet
worden verstoord.
Houd de stekker vast als u de netstroomadapter
aansluit of loskoppelt
Neem altijd alleen de stekker van
de netstroomadapter vast bij het
aansluiten op en het loskoppelen van
een stopcontact of dit apparaat.
Maak regelmatig de stekker van de netstroomadapter
schoon
U moet regelmatig de netstroomadapter
loskoppelen en schoonmaken met een
droge doek om al het stof en andere
ophopingen te verwijderen van de
polen. Trek ook de stekker uit het
stopcontact als het apparaat langere tijd
niet zal worden gebruikt. Stofophoping
tussen de stekker en het stopcontact
kan leiden tot slechte isolatie en brand
veroorzaken.
Ga op een veilige manier om met de kabels
Zorg ervoor dat de snoeren en kabels
niet in de war raken. Plaats alle snoeren
en kabels ook buiten het bereik van
kinderen.
Voorkom dat u boven op het apparaat gaat staan of er
zware voorwerpen op plaatst
Ga nooit op het apparaat staan en
plaats er geen zware voorwerpen op.
Neem de netstroomadapter nooit vast met natte
handen bij het aansluiten of loskoppelen
Neem de netstroomadapter of de
stekkers ervan nooit vast met natte
handen bij het aansluiten op of
loskoppelen van een stopcontact of dit
apparaat.
Koppel alles los voordat u het apparaat verplaatst
Koppel de netstroomadapter en alle
snoeren los van externe apparaten
voordat u het apparaat verplaatst.
Trek de netstroomadapter uit het stopcontact voordat u
het apparaat schoonmaakt
Schakel het apparaat uit en trek de
netstroomadapter uit het stopcontact
voordat u het apparaat schoonmaakt (p. 7).
OPGELET
Trek de netstroomadapter uit het stopcontact als u
bliksem verwacht in uw omgeving
Koppel de netstroomadapter los van
het stopcontact als u bliksem verwacht
in uw omgeving.
Ga voorzichtig om met batterijen
Bij verkeerd gebruik kunnen
batterijen ontploffen of lekken en
schade of letsel veroorzaken. Uit
veiligheidsoverwegingen dient u de
volgende voorzorgsmaatregelen te
lezen en na te leven (p. 8).
• Volg de installatie-instructies voor
batterijen nauwkeurig en zorg ervoor
dat u de juiste polariteit gebruikt.
• Combineer geen nieuwe batterijen
met oude. Combineer bovendien ook
geen verschillende soorten batterijen.
• Verwijder de batterijen als het
apparaat langere tijd niet zal worden
gebruikt.
• Bewaar batterijen nooit samen met
metalen voorwerpen zoals balpennen,
halskettingen, haarspelden enzovoort.
• Gebruikte batterijen moeten worden
verwijderd in overeenstemming met
geldende reglementen voor veilige
opruiming die van kracht zijn in uw
regio.
Ga voorzichtig om met lekkende batterijen
• Als er vloeistof uit een batterij is
gelekt, moet u ervoor zorgen dat u
deze niet met blote handen aanraakt.
• Als de lekkende vloeistof in de ogen
komt, kan dit leiden tot verlies van
het gezichtsvermogen. Wrijf niet in
de ogen. Spoel ze overvloedig met
schoon water. Raadpleeg vervolgens
onmiddellijk een arts.
• Als de vloeistof op uw huid of kleding
terechtkomt, kan daardoor de
huid verbranden of kan dermatitis
ontstaan. Gebruik schoon water om
de aangetaste plekken grondig af te
spoelen en raadpleeg snel een arts.
• Gebruik een zachte doek om de
restanten van de vloeistof voorzichtig
uit de batterijhouder te verwijderen.
Plaats vervolgens nieuwe batterijen.
ENG
DEU
FRA
ITA
ESL
POR
NLD
21
BELANGRIJKE OPMERKINGEN
Voeding
• Sluit dit apparaat niet aan op een stopcontact
dat tegelijkertijd door een elektrisch apparaat
wordt gebruikt dat door een signaalomzetter
of een motor (zoals een koelkast, wasmachine,
microgolfoven of airconditioner) wordt bestuurd.
Afhankelijk van de manier waarop elektrische
apparaten worden gebruikt, kan ruis van de
stroomvoorziening defecten aan dit apparaat of
hoorbare ruis veroorzaken. Als het niet praktisch is
om een apart stopcontact te gebruiken, plaats dan
een ruisfilter voor de stroomvoorziening tussen dit
toestel en het stopcontact.
• De netstroomadapter kan warm worden na enkele
uren ononderbroken gebruik. Dit is normaal en
geen reden tot bezorgdheid.
• Schakel altijd alle apparaten uit voordat u
aansluitingen maakt om defecten of storingen aan
de apparatuur te voorkomen.
• Dit apparaat wordt automatisch uitgeschakeld
30 minuten nadat de knoppen voor het laatst zijn
gebruikt (zelfs wanneer de metronoom wordt
gebruikt) of 30 minuten nadat het afspelen van
een nummer is gestopt.
Voeding: Gebruik van batterijen
• Schakel het apparaat uit en koppel andere
apparaten die met het apparaat verbonden zijn,
los als u batterijen plaatst of vervangt. Op die
manier voorkomt u defecten en/of schade.
• De levensduur van de geleverde batterijen kan
beperkt zijn aangezien deze hoofdzakelijk voor
testdoeleinden zijn gebruikt.
• Als u batterijen gebruikt voor dit apparaat, raden
wij u aan alkalinebatterijen of oplaadbare
NiMH-batterijen te nemen.
• Koppel in dit geval ook de netstroomadapter van
het apparaat los.
• Zelfs als er batterijen zijn geplaatst, zal het apparaat
uitschakelen als u het netsnoer aansluit op of
loskoppelt van het stopcontact wanneer het apparaat
is ingeschakeld, of als u de netstroomadapter aansluit
op of loskoppelt van het apparaat.
Onderhoud
• Gebruik een zachte, droge doek of een doek die licht
bevochtigd is met water om het apparaat dagelijks
af te vegen. Gebruik een doek die met een zachte,
niet-schurende zeepoplossing is bevochtigd om
hardnekkig vuil te verwijderen. Veeg vervolgens het
apparaat grondig schoon met een zachte, droge doek.
22
• Gebruik geen benzine, verdunningsmiddelen,
alcohol of oplosmiddelen om verkleuring en
vervorming te voorkomen.
Plaatsing
• Als u het apparaat gebruikt in de buurt van
eindversterkers (of andere apparatuur met grote
eindversterkers) kan er ruis ontstaan. Om het
probleem te verhelpen kunt u het apparaat
opnieuw richten of verder van de storingsbron
plaatsen.
• Dit apparaat kan radio- en televisieontvangst
verstoren. Gebruik dit apparaat niet in de buurt
van dergelijke ontvangers.
• Ruis kan ontstaan als draadloze
communicatieapparaten, zoals gsm’s, in de buurt
van dit apparaat worden gebruikt. Dergelijke ruis
kan ontstaan als een oproep wordt ontvangen
of gemaakt of tijdens gesprekken. Verplaats
dergelijke apparaten zodat ze zich op een grotere
afstand van dit apparaat bevinden of schakel ze
uit als u dergelijke problemen ervaart.
• Stel het apparaat niet bloot aan rechtstreeks
zonlicht, plaats het niet in de buurt van
warmtebronnen, laat het niet achter in een
gesloten voertuig en stel het niet bloot aan
extreme temperaturen. Overmatige warmte kan
het apparaat vervormen of verkleuren.
• Bij verplaatsing van een locatie naar een andere
waar de temperatuur en/of vochtigheid sterk
verschilt, kunnen er waterdruppels (condensatie)
gevormd worden in het apparaat. Er kunnen
schade of defecten ontstaan als u het apparaat in
deze toestand gebruikt. Laat het apparaat daarom
enkele uren liggen voordat u het apparaat gebruikt
zodat de condensatie volledig is verdampt.
• Afhankelijk van het materiaal en de temperatuur
van het oppervlak waarop u het apparaat plaatst,
kunnen de rubberen voetstukken mogelijk het
oppervlak verkleuren of ontsieren.
U kunt een stuk vilt of stof onder de rubberen
voetstukken plaatsen om dit te voorkomen. Zorg
er in dit geval voor dat het apparaat niet verschuift
of per ongeluk in beweging komt.
• Plaats geen voorwerpen die water bevatten op het
apparaat. Vermijd ook het gebruik van insecticiden,
parfum, alcohol, nagellak, spuitbussen, enz. in de
nabijheid van het apparaat. Verwijder onmiddellijk
alle vloeistof die op het apparaat gemorst wordt
met een droge, zachte doek.
Reparaties en gegevens
Auteursrechten / Licenties / Handelsmerken
• Het is mogelijk dat alle gegevens in het
apparaatgeheugen worden verwijderd als het
apparaat voor herstelling wordt verzonden.
Roland kan niet aansprakelijk worden gesteld voor
dergelijk gegevensverlies.
• Het opnemen met geluids- of beeldmateriaal,
het kopiëren of reviseren van materiaal (muziek,
beelden, uitzendingen, liveoptredens enzovoort)
dat geheel of gedeeltelijk eigendom is van een
derde, en het distribueren, verkopen, leasen,
uitvoeren of uitzenden ervan is wettelijk niet
toegestaan zonder de toestemming van de
auteursrechteigenaar.
Extra voorzorgsmaatregelen
• Houd er rekening mee dat de inhoud van het
geheugen onherstelbaar verloren kan gaan als
gevolg van een defect of onjuist gebruik van het
apparaat.
• Draag voldoende zorg bij het gebruik van
de knoppen, schuifknoppen of andere
bedieningselementen van het apparaat en bij
het gebruik van aansluitingen en ingangen.
Ruw omgaan met de apparatuur kan defecten
veroorzaken.
• Neem het aansluitstuk vast als u kabels loskoppelt.
Trek nooit aan de kabel. Op die manier vermijdt
u kortsluitingen of schade aan de inwendige
elementen van de kabel.
• Houd het volume van het apparaat binnen
de perken om te vermijden dat u andere
personen stoort. Misschien gebruikt u liever een
hoofdtelefoon en hoeft u zich geen zorgen te
maken over uw omgeving.
• Sommige kabels bevatten weerstanden. Gebruik
geen kabels met weerstanden om aansluitingen
op dit apparaat uit te voeren. Het gebruik van
dergelijke kabels kan het geluidsniveau extreem
verlagen of zelfs onhoorbaar maken. Neem
contact op met de fabrikant van de kabel voor
informatie over kabelspecificaties.
• Gebruik dit apparaat niet voor doeleinden
die kunnen leiden tot een inbreuk op de
auteursrechten van een derde. Wij zijn
niet verantwoordelijk voor inbreuken op
auteursrechten van derden die ontstaan uit uw
gebruik van dit apparaat.
• Ze hebben niet het recht deze inhoud in de
oorspronkelijke of een gewijzigde vorm te
extraheren met als doel het distribueren van
opgenomen media van deze inhoud of het
beschikbaar maken ervan op een computernetwerk.
• MMP (Moore Microprocessor Portfolio) verwijst
naar een patentportfolio in verband met de
architectuur van microprocessoren, die werd
ontwikkeld door Technology Properties Limited
(TPL). Roland heeft deze technologie in licentie
genomen van de TPL Group.
• Dit product bevat het met eCROS geïntegreerde
softwareplatform van eSOL Co.,Ltd. eCROS is een
handelsmerk van eSOL Co.,Ltd. in Japan.
• Bedrijfs- en productnamen in dit document zijn
gedeponeerde handelsmerken of handelsmerken
van hun respectieve eigenaars.
De fabrieksinstellingen herstellen
U kunt als volgt de fabrieksinstellingen van de VT-12 herstellen.
* Hiermee worden alle geluidsopnamen en gebruikersnummers gewist.
* Als de batterijen onvoldoende capaciteit hebben (“ ” verschijnt op het scherm), kunt u de
fabrieksinstellingen niet herstellen. In dergelijke gevallen moet u de batterijen vervangen
door nieuwe batterijen of een netstroomadapter gebruiken. Vervolgens kunt u doorgaan met
het herstellen van de fabrieksinstellingen.
1. Houd gelijktijdig de [
het apparaat in.
]-knop, de [ ]-knop en de [
Op het display wordt “Factory reset” weergegeven.
Als u de bewerking wilt annuleren, drukt u ofwel op de [
2. Druk op de [
]-knop ingedrukt en schakel
ENG
DEU
]-, de [WARM-UP]- of de [EXERCISE]-knop.
]-knop.
ITA
ESL
De fabrieksinstellingen van de VT-12 worden hersteld.
* Schakel het apparaat niet uit als de toonhoogte-indicator
FRA
en
POR
afwisselend oplichten.
NLD
23
For EU Countries
For China
For the U.K.
IMPORTANT: THE WIRES IN THIS MAINS LEAD ARE COLOURED IN ACCORDANCE WITH THE FOLLOWING CODE.
BLUE:
NEUTRAL
BROWN: LIVE
As the colours of the wires in the mains lead of this apparatus may not correspond with the coloured markings identifying
the terminals in your plug, proceed as follows:
The wire which is coloured BLUE must be connected to the terminal which is marked with the letter N or coloured BLACK.
The wire which is coloured BROWN must be connected to the terminal which is marked with the letter L or coloured RED.
Under no circumstances must either of the above wires be connected to the earth terminal of a three pin plug.
For EU Countries
This product complies with the requirements of EMC Directive 2004/108/EC.
FEDERAL COMMUNICATIONS COMMISSION
RADIO FREQUENCY INTERFERENCE STATEMENT
For the USA
This equipment has been tested and found to comply with the limits for a Class B digital device, pursuant to Part 15 of the
FCC Rules. These limits are designed to provide reasonable protection against harmful interference in a residential
installation. This equipment generates, uses, and can radiate radio frequency energy and, if not installed and used in
accordance with the instructions, may cause harmful interference to radio communications. However, there is no guarantee
that interference will not occur in a particular installation. If this equipment does cause harmful interference to radio or
television reception, which can be determined by turning the equipment off and on, the user is encouraged to try to correct the
interference by one or more of the following measures:
– Reorient or relocate the receiving antenna.
– Increase the separation between the equipment and receiver.
– Connect the equipment into an outlet on a circuit different from that to which the receiver is connected.
– Consult the dealer or an experienced radio/TV technician for help.
This device complies with Part 15 of the FCC Rules. Operation is subject to the following two conditions:
(1) this device may not cause harmful interference, and
(2) this device must accept any interference received, including interference that may cause undesired operation.
This equipment requires shielded interface cables in order to meet FCC class B limit.
Any unauthorized changes or modifications not expressly approved by the party responsible for compliance could void the user’s
authority to operate the equipment.
For Canada
NOTICE
This Class B digital apparatus meets all requirements of the Canadian Interference-Causing Equipment Regulations.
AVIS
Cet appareil numérique de la classe B respecte toutes les exigences du Règlement sur le matériel brouilleur du Canada.
WARNING
For C.A. US (Proposition 65)
This product contains chemicals known to cause cancer, birth defects and other reproductive harm, including lead.
English
Deutsch
Français
Italiano
Español
Português
Nederlands