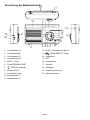
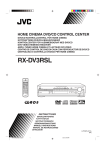
1
SA-123 DAB+ Tragbares DAB+ /FM Radio mit PLL Tuner Radio portable DAB+/FM avec syntoniseur PLL Radio portatile DAB+/FM con tuner PLL Portable radio DAB+/FM with PLL tuner BEDIENUNGSANLEITUNG Bitte lesen Sie diese Beschreibung sorgfältig durch und heben Sie sie für spätere Informationen auf. MANUEL D’UTILISATION Nous vous prions de lire attentivement ce manuel et de le conserver comme future référence. MANUALE D’USO Vi preghiamo di leggere attentamente questo manuale e di conservarlo come futuro riferimento. USER’S MANUAL Please carefully read this instruction book and keep it for future reference. Anordnung der Bedienelemente 18 16 17 2 1 15 13 12 11 10 9 8 9 19 20 2 34 5 6 14 9 7 1. Vorwahltaste 1/5 12. SCAN – automatische Suche 2. Vorwahltaste2/6 13. 3. Vorwahltaste 3/7 14. Tragriemen 4. Vorwahltaste 4/8 15. LCD 5. SHIFT - Taste 6. Taste FM/DAB & DAB 7. MENU/SELECT-Taste 16. Lautsprecher + DISPLAY-Anzeige 17. Antenne 18. Stellbügel 8. Ein/Aus-Taste 19. Kopfhöreranschluss 9. Lautstärkenregler 20. Stromanschluss 10. Sendersuche (-) 11. Sendersuche (+) Page 2 Hintergrundbeleuchtung (Batteriebetrieb) Drücken Sie eine beliebige Taste um die Hintergrundbeleuchtung des Display zu aktivieren. Der Display wird für 5 Sekunden beleuchtet und schaltet danach aus. Hintergrundbeleuchtung (Netzbetrieb) Im Stromnetzbetrieb bleibt die Hintergrundbeleuchtung andauernd eingeschaltet. Batteriebetrieb Das Gerät kann mit 6 AA/LR06 1.5V Batterien betrieben werden (nicht inbegriffen). Batteriedeckel an der Rückseite des Gerätes in Pfeilrichtung schieben und die Batterien unter Berücksichtigung der Polaritäten (+/-) einlegen und Deckel wieder schliessen. Vorsichtsmassnahmen Batteriebetrieb Beim Einlegen der Batterien darauf achten, dass die Polaritätsweichen mit den Angaben auf der Rückseite des Gerätes übereinstimmen. Niemals alte und neue Batterien mischen. Immer alle Batterien gemeinsam auswechseln. Niemals Standardbatterien, alkalische oder wiederaufladbare Batterien gemischt einlegen. Immer nur einen Batterietyp verwenden. Sollte das Gerät längere Zeit nicht benutzt werden, die Batterien entnehmen. Andernfalls kann es durch Auslaufen der Batterien beschädigt werden. Niemals Einwegbatterien aufladen, da dies zu Überhitzung und Beschädigung führen kann (halten Sie sich and die Richtlinien der Batteriehersteller). Jeweils alle Batterien auswechseln und nur einen Batterietyp verwenden. Beachten Sie die örtlichen Entsorgungsvorschriften. Nur Batterien der angegeben Grösse und Art verwenden. Vorsicht: Benutzen Sie den Tragriemen nur wenn das Gerät mit Batterien betrieben wird. Gerät nicht am Tragriemen mitführen wenn es am Stromnetz angeschlossen ist. Ständer Der Ständer befindet sich an der Rückseite des Gerätes. Kopfhöreranschluss Das Gerät verfügt über einen Stereo-Kopfhöreranschluss. Einen Kopfhörer oder Ohrhörer (nicht mitgeliefert) mit niedrigem Widerstand (8-16ohm) und 3.5mm Stereojack an den Kopfhöreranschluss an der linken Seite des Gerätes anschliessen. Wenn der Kopfhörer angeschlossen ist, wird der Lautsprecher automatisch desaktiviert. Hinweis: Lautes Musikhören kann Gehörschäden verursachen. Wenn Sie Kopfhörer benutzen, deshalb die Lautstärke zunächst niedrig einstellen und langsam steigern bis der Ton angenehm und klar gehört wird. Page 3 Allgemeiner Betrieb DAB&DAB+ Mit DAB&DAB+ (Digital Audio Broadcasting) d.h. mit der digitalen Tonübertragung ist ein neues Zeitalter der Sendetechnik angebrochen, die sich erheblich von der herkömmlichen analogen Sendetechnik unterscheidet. Mit diesem neuen System muss nicht mehr eine ganz bestimmte Frequenz gesucht und eingestellt werden, sondern der DAB&DAB+ Empfänger gibt eine Liste aller Radioprogramme/-Sender an, die mit einem Tastendruck empfangen werden können. Die Senderliste ist im Abschnitt Funktion DAB& DAB+ genauer beschrieben. Vor dem Einstellen der DAB& DAB+-Funktion sicherstellen, dass die Antenne voll ausgefahren ist. 1. Stromadapter an das Stromnetz anschliessen. 2. Das andere Ende mit dem DC IN Anschluss verbinden und Ein/Aus Schalter drücken. 3. FM/DAB&DAB+ Taste drücken und das Radio startet automatisch die Sendersuche und nach 1520 Sek. spielt das Radio den ersten Sender. HINWEIS: Sollte auf dem Display „Service not available“ (Betrieb nicht verfügbar) erscheinen, konnte während der Suche kein DAB-Sender gefunden werden. Platzieren Sie das Gerät an einem Ort mit besserem Empfang. Die Signalstärke wird auf dem Display angezeigt (siehe Displayfunktionen). 4. Gewünschte Lautstärke mit dem Lautstärkeregler einstellen. 5. SCAN-Taste drücken und das Radio beginnt nun die Sendestationen abzutasten. Hinweis: SCAN-Taste einmal drücken und das Radio startet den Suchlauf nach lokalen Sendern (11B-12D), drücken und halten der SCAN-Taste für ca. 2 Sek. um eine komplette Abtastung zu starten (5A-13F). Während des Suchprozesses zeigt der Display die gefundenden Sender, z.B.: Scanning... 17 ■■■■■■■■ Die Symbole in der zweiten Displayzeile stellen einen Balken dar, der den Fortschritt des Abtastungsprozesses anzeigt. Die Nummer in der ersten Zeile steht für die Anzahl der erfassten Sendestationen, die im Verlauf des Suchprozesses immer mehr werden. Wen die Suche abgeschlossen ist, spielt das DAB Radio den ersten Sender der Liste. Die Sendestationen sind nach Nummern und alphabetisch in der Liste geordnet. Die Senderliste wird gespeichert, d.h., wenn Sie das Radio erneut einschalten, werden die Sender nicht mehr neue gesucht. Wenn keine Sendestationen erfasst werden, prüfen Sie, ob Ihr Wohngebiet für digitalen Tonempfang abgedeckt ist. Umschalten der DAB& DAB+ Sender Die verfügbaren Sender mit der Taste (Tune +/-) durchgehen. Die Sender werden am Display angezeigt. Wenn der gewünschte Sender angezeigt wird, die MENU-Taste drücken und das Radio stellt den gewünschten Sender ein. Page 4 Abtasten der DAB&DAB+ Sender Es gehört zum Funktionsprinzip des DAB& DAB+ Radios, dass ständig neue Sendestationen und Servicefunktionen aufgenommen werden. Wenn Sie wissen möchten, ob neue DAB& DAB+ Sender verfügbar sind, starten Sie die Suche mit der SCAN-Taste. DAB&DAB+ - Vorwahl Sie können bis zu 8 DAB-Sender den Vorwahltasten zuordnen. Schalten Sie den Sender ein, den Sie einer Vorwahltaste zuordnen möchten. Drücken Sie etwa 3 Sekunden die VORWAHLTASTE (1-4) oder SHIFT (5-8) an der Vorderseite des Radios. In der zweiten Displayzeile erscheint nun die Meldung „Preset 1 saved“ (Vorwahl 1 gespeichert). Wiederholen Sie den Vorgang mit den Tasten „2/6“, „3/7“ und „4/8“ oder SHIFT-Taste und entsprechende Vorwahltaste (5-8) gleichzeitig für ca. 3 Sekunden um die Vorwahlsender einzustellen. In der zweiten Displayzeile erscheint nun die gespeicherte Vorwahl. Wiederholen Sie den Vorgang bis alle 8 Vorwahlsender gespeichert sind. Einschalten eines DAB-Vorwahlsenders Radio einschalten. Vorwahltaste oder SHIFT-Taste und Vorwahltaste gleichzeitig drücken, um die Nummer des gewünschten Vorwahlsenders einzustellen. Löschen eines DAB-Vorwahlsenders DAB Vorwahlsender können nicht einzeln gelöscht werden, aber überschrieben. Wenn Sie z.B. einer bestimmten Vorwahltaste einen neuen Sender zuordnen möchten: Stellen Sie den neuen Sender ein und drücken Sie die Vorwahltaste (1-8) so lange, bis die Meldung „Preset # saved“ (Vorwahl # gespeichert) am Display erscheint. Dasselbe gilt, wenn Sie den Sender der Vowahl 5-8 zuordnen möchten, d.h. drücken Sie zuerst die die SHIFT-Taste und dann gleichzeitig etwa 3 Sekunden lang die Vorwahltaste (5-8). Ändern der Informationsanzeige zum DAB-Sender Sie können die Informationen ändern, die an der zweiten Displayzeile angezeigt werden, wenn Sie einen DAB-Sender hören. Dabei können Sie zwischen 9 unterschiedlichen Informationen wählen, die unten aufgeführt sind. Wenn Sie die Informationsanzeige ändern möchten, drücken Sie die DISPLAY-Taste. Page 5 • Dynamic Label Segment (DLS): bedeutet, dass Sie Informationen im Textformat erhalten, die der DAB-Sender liefert. Dabei kann es sich um Informationen wie Liedertitel oder Programmdetails handeln, die der Radiosender ausstrahlt. Press DISPLAY BBC Radio 5 DLS S c r o li n g Live Press DISPLAY • Signalqualität: zeigt die Empfangsqualität des Signals an. BBC Radio 5 Live ■ ■ ■ ■ □ ■ ■ ■ ■■ ■ ■ ■ • Program Type – PTY (Programmtyp): hierbei handelt es sich um die Beschreibung des Programmtyps des DAB-Senders, die vom Radiosender ausgestrahlt wird. Press DISPLAY • Multiplex Name: es wird der Multiplexsender des gesendeten Programms angezeigt. Press DISPLAY BBC Radio 5 Live 5 Liv e News • Frequenz: es wird die Frequenz des gesendeten Programms angezeigt. BBC Radio BBC N a t i on a l D A B+ Press DISPLAY BBC • Signalfehlerrate: Fehler im Sendesignal können durch das System selbst korrigiert werden. Der Umfang der Fehlerkorrektur wird als numerischer Wert angezeigt, zwischen 0-15 bedeutet gute Empfangsqualität. Grenzwerte sind Werte zwischen 16-30. Wenn der Wert höher als 30 liegt, versuchen Sie die Antenne besser auszurichten. Radio Freq: 5 Live 2 2 5 . 64 0 M H z Press DISPLAY BBC Radio Signal 5 e r r or Live 8 Press DISPLAY • Signalinformation: Anzeige der digitalen Uebertragungsrate und der Signalart. BBC • Zeit: Anzeige der Uhrzeit, die vom Radiosender ausgestrahlt wird. Press DISPLAY Radio 192kbs BBC / 5 Live ACC Radio 5 Live 5 Live 12:18:00 • Datum: zeigt das Datum, das vom Radiosender ausgestrahlt wird. Press DISPLAY BBC RadIo 2 6 / 0 8 / 2 0 08 Page 6 Reihenfolge der Sender Mit dieser Funktion können Sie die Reihenfolge der Sender beim Durchgehen der Liste festlegen. Um eine der Optionen zu wählen, drücken Sie etwa 5 Sekunden die MENU/SELECT-Taste, bis die Meldung “DAB Station list” (DAB Senderreihenfolge) am Display erscheint. Hinweis: MENU/SELECT –Taste erneut drücken um die Option zu bestätigen. Tune -/+-Taste drücken um die gewünschte Option anzuzeigen. Die folgenden 3 Optionen stehen zur Verfügung. • Alphanumerisch Hierbei handelt es sich um die werkseitige Standardeinstellung. Die Sender erscheinen numerisch und dann alphabetisch geordnet. • Ensemble Die Liste wird nach dem gesamten vorhandenen Programmpaket geordnet. • Valid Mit dieser Option wird die Senderliste so geordnet, dass die aktiven Sender erscheinen. Manuelles Tunen (einstellen) Es besteht die Möglichkeit, bestimmte Senderkanäle/Frequenzen manuell einzustellen und der Senderliste beizufügen. Hilfreich für diese Funktion ist die Ausrichtung der Antenne, um den Empfang bestimmter Sendekanäle/Frequenzen zu optimieren. Taste SELECT/MENU drücken und für ca. 3 Sekunden halten, danach Tune +/- drücken, bis „Manual tune“ (manuelles Tunen) am Display erscheint und mit SELECT/MENU bestätigen. Sendekanal/Frequenz mit der Tune +/- -Taste wählen und mit SELECT/MENU bestätigen. In der ersten Displayzeile erscheint ein Viereck. Die Position dieses Vierecks gibt die Signalstärke an, d.h. je weiter rechts das Viereck liegt, um so stärker ist das Signal. 5A 174.928MHz □ Antenne so ausrichten, dass die Signalstärke optimiert wird. SELECT/MENU-Taste für 3 Sek. drücken und auf dem Display erscheint STATION LIST (Senderliste), erneut SELECT/MENU-Taste drücken um wieder in den DAB Normalbetrieb zu wechseln. Dynamic Range Control – DRC (Dynamikbereich Steuerung) Mit der DRC-Funktion wird der Komprimierungsgrad erweitert oder aufgehoben, um die Unterschiede des Dynamikbereichs der verschiedenen Radiosender auszugleichen. So kann beispielsweise bei einem Radiosender, der vorwiegend Popmusik ausstrahlt, der Komprimierungsgrad sehr hoch sein, da die Musik konstant laut gehört wird, während ein Sender mit klassischer Musik die Dynamik eher wenig oder gar nicht komprimiert, da alle hohen und tiefen Töne genau im Detail zu hören sein müssen. Page 7 Es können drei DRC-Stufen eingestellt werden: • DRC off Keine Komprimierung • DRC high Maximale Komprimierung (werkseitige Standardeinstellung) • DRC low Geringe Komprimierung SELECT/NENU-Taste drücken und halten. Am Display erscheint die Meldung „Station list“ (Senderliste). +/- - Taste drücken bis ‘DRC’ erscheint. Taste SELECT/MENU drücken. Ein Symbol erscheint auf der ersten Displayzeile “*” und die aktuelle DRC-Stufe wird auf der zweiten Displayzeile angezeigt. +/- - Taste drucken um eine der drei Stufen einzustellen, die in der zweiten Displayzeile angezeigt werden. Wenn die gewünschte Stufe erscheint, die Taste SELECT/MENU drücken. Menu SELECT/MENU-Taste drücken, bis “Menu” am Display erscheint. Press MENU Station list Local scan Station name and information DRC high DRC low Full scan DRC off Manual tune Press UP/DOWN Ensemble DRC Valid Station order DAB Main menu FM Info SW version Page 8 Fabrikeinstellungen (Factory reset): Die gespeicherten Sender des DAB& DAB+/FM Radios können folgendermassen auf die Fabrikeinstellungen zurückgestellt werden: SELECT/MENU Taste im DAB oder FM-Modus drücken und halten um > MAIN MENU > System Setup > Factory reset zu wählen. Am Bildschirm erscheint "Press Display" zum Bestätigen. DISPLAY Taste drücken zum Bestätigen und es erscheint "RESTARTING..." bevor eine neue Sendersuche gestartet wird. Sprache Es ist nur eine Auswahl vorhanden – Englisch. FM-Funktion FM- Funktion einstellen. FM/DAB&DAB+-Taste drücken. Am Display erschein die Anzeige “FM”. Im FM-Modus erscheint die Frequenz des Senders, der gerade eingestellt ist, dahinter steht “St” wenn Stereo aktiviert ist. Im FM-Modus können Sie die Sender entweder automatisch oder manuell suchen. Wenn Sie automatisch abtasten möchten, kurz die SELECT/MENU-Taste drücken und das Radio tastet daraufhin alle verfügbaren Sendestationen ab, die gerade ausstrahlen. Die Frequenz des jeweiligen Senders erscheint in der oberen Displayzeile. Für die manuelle Suche drücken Sie kurz die +/- - Tasten. Die Frequenz wird jeweils in 50kHz-Schritten vorwärts oder rückwärts im FM-Band angezeigt. Wenn Sie die Tasten +/- gedrückt halten, zählt die Anzeige in 50kHz-Schritten vor bzw. Zurück, bis die gewünschte Frequenz erreicht ist und Sie die Taste loslassen. Abtast-Einstellungen SELECT/MENU-Taste drücken und halten und danach +/- Taste bis SCAN SETTING erscheint. Erneut SELECT/MENU drücken und mit +/- Taste „Strong stations only“ (nur Sender mit starkem Signal) oder „All stations“ (alle Sender) wählen und mit SELECT/MENU bestätigen. Audio-Einstellungen SELECT/MENU-Taste drücken und halten und danach +/- Taste bis AUDIO SETTING erscheint. Erneut SELECT/MENU drücken und danach +/- Taste um “Stereo oder Mono” oder “nur Mono" zu wählen, bestätigen Sie mit SELECT/MENU-Taste. Page 9 Speichern und Abrufen von Vorwahlfrequenzen im FM-Modus Sie können bis zu 8 FM-Frequenzen speichern und Vorwahltasten zuordnen. Die Sender werden in einer nummerierten Liste entsprechend den zugeordneten Vorwahltasten (1-8) gespeichert. Eine Frequenz als Vorwahlfrequenz speichern 1. Radio auf die gewünschte Frequenz einstellen. 2. Vorwahltaste (1-4) etwa 3 Sekunden lang drücken, bis die Meldung “Preset Stored” (Vorwahl gespeichert) am Bildschirm erscheint. 3. SHIFT-Taste und entsprechende Vorwahltaste (5-8) etwa 3 Sekunden lang drücken, bis “Preset Stored” (Vorwahl gespeichert“ am Bildschirm erscheint. Eine Vorwahlfrequenz aufrufen 1. Kurz die entsprechende Vorwahltaste (1-4) drücken, danach erscheint die abgespeicherte Frequenz am Bildschirm. 2. Oder gleichzeitig die SHIFT-Taste und die entsprechende Vorwahltaste drücken (5-8) um die gewünschte Nummer auszuwählen, daraufhin erscheint die abgespeicherte Frequenz am Bildschirm. 3. Wenn kein Sender unter der betreffenden Vorwahlnummer abgespeichert ist, erscheint die Meldung “Preset Empty” (Vorwahl leer) am Bildschirm. Technische Daten Stromversorgung: Adapter: 7.5V 600mA ( ) Batterien: 6x1.5V (AA/LR6) – nicht inbegriffen Frequenzbereich: DAB/DAB+ Band III: 174.928 MHz (5A) – 239.200MHz (13F) Tuning Bandbreite - 11B bis 12D lokale Abtastung, 5A bis 13F volle Abtastung FM Bandbreite 87.5-108 MHz DAB Sensibilität: -98dBm oder höher DAB Adjacent Channel Rejection (Selektivität): -30dB oder höher DAB Audio Dekodierung: 64kbps - 384kbps Ausgangsleistung( bei 10% THD): 1W RMS Kopfhöreranschluss: 3.5mm Lautsprecher: 50mm Abmessungen (B x H x T): 18.5 x 11 x 4.5 cm Stromverbrauch: 4.5W Die technischen Daten können jederzeit ohne Mitteilung geändert bzw. verbessert werden. Page 10 Wichtiger Hinweis: Sollte das Gerät aufgrund elektrischer Entladung nicht richtig funktionieren, den Stecker aus der herausziehen oder die Batterien herausnehmen und die Stromzufuhr für einige Minuten unterbrechen. Batterien wieder einlegen oder erneut an das Stromnetz anschliessen. Elektrostatische Entladung Sollten Funktionsstörungen auftreten, Gerät ausstecken und wieder einstecken um den normalen Betrieb wieder aufzunehmen. UBERLASTUNG Achtung Bitte lesen sie diese Sicherheitshinweise sorgfältig bevor Sie den Adapter ans Stromnetz anschliessen. . z z z z z z z Das Gerät wird mit einem DC Adapter geliefert. Das Netzteil mit 230V ~50 Hz speisen. Gerät niemals mit anderen Spannungen betreiben, dies könnte zu Schäden führen. Das Netzteil ist nur für den Innengebrauch. Der Adapter ist verschweisst und enthält keinerlei verwendbare Teile für den Nutzer. Versuchen Sie nicht das Netzteil zu öffnen. Passt der Adapter nicht in die Steckdose, oder sollte er beschädigt sein, trennen Sie diesen vom Stromnetz und wenden Sie sich an den Kundendienst. Verwenden Sie keine beschädigten Netzteile. Wenden Sie sich an den Kundendienst. Dieses Symbol bezeugt, dass der Adapter den Normen der Klasse II entspricht und keine Erdung benötigt. Dieses Symbol bedeutet dass der Adapter nur für den Innengebrauch ist. Dieses Symbol bedeutet dass der Adapter den Normen der EU entspricht. Hinweise und Vorsichtsmassnahmen für die Bedienung Dieses Gerät ist nach den Europäischen Sicherheitsvorschriften konzipiert und konstruiert, trotzdem sind, wie bei jedem anderen elektrischen Gerät, gewisse Vorsichtsmaßnahmen erforderlich, um die besten Ergebnisse zu erzielen und Ihre Sicherheit zu gewährleisten. Lesen Sie die Bedienungsanleitung sorgfältig bevor Sie das Gerät benutzen. Bei der Installation sicherstellen, dass das Stromkabel nicht durch scharfe Ecken beschädigt wird. Gerät nicht an nassen oder feuchten Orten aufstellen, vermeiden Sie Orte mit starken Vibrationen, hoher Luftfeuchtigkeit, hohen Temperaturen, direkter Sonneneinstrahlung und Staub. Lüftungsschlitze: keine Gegenstände in die Lüftungsschlitze schieben. Strom sparen indem Sie das Gerät abschalten oder den Stecker vom Stromnetz trennen, wenn Sie das Gerät über längere Zeit nicht benutzen. Da auch der Adapter ein wenig Strom verbraucht. Benutzen Sie das Gerät nicht weiter, wenn Flüssigkeit eingedrungen ist oder Sie meinen, dass es nicht normal funktioniert oder beschädigt ist. Gerät in jedem Fall abschalten, den Stromstecker heraus ziehen und den Verkäufer fragen. Page 11 Bei Gewitter Stecker ausstecken. Dieses Gerät ist für den Heimgebrauch. Jede andere Verwendung kann gefährlich sein und die Garantie ungültig machen. Lüftung Gerät auf einer flachen Ebene platzieren und direktes Sonnenlicht oder Heizquellen vermeiden. Verdecken Sie nicht die Lüftungsöffnungen des Geräts, zum Beispiel durch Vorhänge oder Polstermöbel. Überhitzung führt zu Schäden und verkürzt die Lebensdauer des Geräts. . Reinigung Vor dem Reinigen den Stecker heraus ziehen. Geräte mit einem weichen, trockenen Lappen reinigen und chemische Substanzen vermeiden, da diese das Gehäuse beschädigen können. Batterien Entnehmen Sie die Batterien, wenn Sie das Gerät längere Zeit nicht benützen. Batterien können auslaufen und das Gerät beschädigen, wodurch die Garantie erlischt. Batterien entsprechend den örtlichen Bestimmungen entsorgen. Entsorgung der leeren Batterien / Akkus Die Rückgabe leerer Batterien und Akkus ist gesetzlich vorgeschrieben (Batterieverordnung). Die Entsorgung von leeren Batterien/Akkus mit dem Hausmüll ist verboten! Batterien/Akkus, die gefährliche Stoffe enthalten, sind an der Seite mit Symbolen entsprechend gekennzeichnet. Diese Symbole weisen auf das Verbot hin, Batterien/Akkus mit dem Hausmüll zu entsorgen. Abkürzungen für die jeweiligen Schwermetalle: Cd= Cadmium, Hg= Quecksilber, Pb= Blei. Akkus, die nicht mehr aufgeladen werden können oder leere Batterien können Sie an den Sammelstellen an Ihrem Wohnort abgeben, oder in Geschäften, in denen Batterien und Akkus verkauft werden. Auf diese Weise kommen Sie den gesetzlichen Vorschriften nach und tragen zum Umweltschutz bei! Wichtige Vorsichtsmassnahmen • • • • • Durch gewaltsames Öffnen der Deckel oder freilegen von Teilen, werden unter Spannung stehende Teile freigelegt Wenn Sie Zweifel bezüglich des Betriebs, der Sicherheit oder der Anschlüsse haben, schalten Sie Fachpersonal ein. Elektrische Geräte nicht Regen oder Feuchtigkeit aussetzen und keine Behälter mit Flüssigkeiten (z.B. Blumenwasen) darauf abstellen. Nicht dem offenem Feuer aussetzen oder in Nähe von Heizquellen aufstellen. Enthält Kleinteile, von Kleinkindern fernhalten. Page 12 Position des touches de commande 18 16 17 2 1 15 13 12 11 10 9 8 9 19 20 2 34 5 6 14 9 7 1. Touche présélection 1/5 12. Touche SCAN (Balayage) 2. Touche présélection 2/6 13. 3. Touche présélection 3/7 14. Sangle de transport 4. Touche présélection 4/8 15. ÉCRAN LCD 5. Touche SHIFT 16. Hautparleur 6. Touche FM/DAB &DAB+ 17. Antenne 7. 18. Soutien Touche DISPLAY (affichage) Touche MENU/SELECT 8. Touche ON/OFF 19. Prise STEREO OUT 9. Touche VOLUME 20. Prise d’alimentation DC 10. Touche TUNE – (Syntonisation) 11. Touche TUNE + (Syntonisation) Page 1 Rétro éclairage (Alimentation par batteries) Appuyez sur n’importe quelle touche de la radio pour activer le rétro éclairage, l’écran sera illuminé pour 5 secondes et puis il s’éteint. Rétro éclairage (Alimentation par le courant) Si l’appareil est alimenté par le courant le rétro éclairage est illuminé en permanence. Alimentation par batteries L’appareil contient 6 batteries AA/LR06 1.5V (non fournies). Démonter le couvercle des batteries en poussant la fermeture dans la direction indiquée par la flèche. Introduire les batteries en contrôlant qu’elles correspondent aux signes de polarité (+/-) indiqués et remettre le couvercle. Précautions Observez les signes de polarité au moment de la mise en place des batteries. Ne mélangez pas des batteries standard, des batteries alcalines ou des batteries rechargeables. Employez uniquement un seul type de batterie. Si l’unité n’est pas utilisée pendant un période prolongée, retirer les batteries. Dans le cas contraire, l’unité peut s’endommager. Ne mélangez pas des batteries standard et des batteries rechargeables, ceci peut causer de la surchauffe ou détérioration (suivez les recommandations du producteur). Remplacez toutes les batteries en même temps. Conformez-vous aux dispositions locales des déchets spéciaux. Utilisez seulement le type de batterie indiqué. Attention: N’utilisez pas la sangle pour emporter l’appareil quand il est relié à la prise de courant. Soutien Le soutien se trouve sur le derrière de l’appareil. Prise écouteurs Une prise pour écouteurs stéréo est fournie pour une écoute personnelle. Connectez une paire d’écouteurs ou d’oreillettes (non fournies) à basse impédance (8-16 ohms) à une fiche jack stéréo de 3.5mm. Lorsque les écouteurs sont connectés, les haut-parleurs principaux sont automatiquement débranchés. Note: L’oreille humaine s’habitue continuellement aux volumes trop élevés et, après un certain temps, vous aurez l’impression que le volume a baissé. Ce qui vous paraît normal est, au contraire, nuisible. Pour éviter cela, réglez le volume à un niveau plus bas AVANT QUE VOTRE OUÏE S’HABITUE. Page 2 Fonctionnement général DAB&DAB+ DAB ou Digital Audio Broadcasting est une technologie de radiodiffusion de la nouvelle génération et, de même que toutes les nouvelles technologies, elle est considérablement différente des méthodes traditionnelles de transmission FM analogiques. Le nouveau système ne se base pas sur la syntonisation sur une fréquence donnée mais, au contraire, il permet au récepteur DAB de fournir une Liste de stations active de tous les programmes/stations radio disponibles en appuyant sur un seul bouton. Les Listes des Stations sont décrites dans le détail au chapitre de Fonctionnement DAB de ce manuel. Avant de sélectionner la fonction DAB assurez-vous que l’antenne est tirée complètement. 1. Branchez l’appareil au réseau d’alimentation. 2. Branchez la prise de l’adaptateur à l’entrée “DC IN” de l’appareil et appuyez sur ON/OFF. 3. Appuyez sur le sélecteur DAB/FM/AUX et l’appareil se mettra automatiquement en route et fera le balayage des services DAB. Après 15 à 20 secondes, vous commencerez à recevoir la première station. a. NOTE: A ce point, l’indication “Station non disponible” pourrait s’inscrire à l’afficheur, indiquant que l’appareil n’a localisé aucune station DAB disponible durant la recherche. Dans ce cas la radio doit être déplacée à un meilleur endroit pour atteindre une réception adéquate. L’indication de la force du signal (Voir fonctionnement du bouton Affichage) peut être utilisée pour aider ce processus. 4. Utilisez le contrôle du volume pour augmenter ou diminuer le niveau de sortie du volume de la manière désirée. 5. Pour la recherche des stations appuyez sur le bouton SCAN sur le devant de la radio. La radio commencera son processus de recherche des stations. Note: Appuyez sur ‘SCAN’ et la radio commence le processus de balayage local (11B-12D); appuyez et gardez appuyé ‘SCAN’ pour environ 2 secondes et la radio commence le processus de balayage complet (5A-13F). Durant le procédé de recherche, l’afficheur indiquera la progression et les stations trouvées, par exemple : Scanning... 17 ■■■■■■■■ Les symboles sur la seconde ligne de l’afficheur sont un graphique à barres indiquant la progression du balayage. Le numéro sur la première ligne indique le nombre de stations trouvées et il augmente au fur et à mesure que le balayage progresse. Lorsque la recherche est achevée, la radio DAB se syntonisera sur la première station de la liste. Les stations sont classées par ordre numérique puis par ordre alphabétique. La liste des stations est enregistrée dans la mémoire de manière à ce que la prochaine fois que vous branchez l’appareil, vous n’avez plus besoin de faire une nouvelle recherche. Si aucune station n’a été trouvée, assurez-vous de la présence d’une couverture DAB dans votre zone. Page 3 Commutation des stations DAB&DAB+ Appuyez sur le bouton TUNE-/+ pour faire défiler les stations disponibles. Les stations s’inscriront à l’afficheur. Lorsque la station désirée s’affiche, appuyez sur le bouton ‘MENU’. A présent, la radio se syntonisera sur cette station. Balayage des Stations DAB Grâce à la nature de la radio DAB, des stations et des services supplémentaires deviennent régulièrement disponibles. Si vous désirez voir si de nouvelles stations DAB transmettent dans votre zone, vous pouvez commencer la recherche en appuyant le bouton ‘SCAN’. Présélection des stations DAB Vous pouvez programmer jusqu’à 8 stations DAB en suivant la marche ci-dessous. Syntonisez-vous sur la station que vous désirez programmer. Appuyez et gardez appuyé pendant au moins 3 secondes le bouton de PRESET (1-5) situé sur la partie frontale de l’appareil. L’inscription ’Preset1 saved’ s’inscrit sur la seconde ligne de l’afficheur. Suivre la même marche si vous désirez sélectionner les présélections 2/6, 3/7 et 4/8. Pour la présélection de la touche 5, appuyez et gardez appuyé pendant 3 secondes les touches ‘SHIFT’ et ensuite le numéro désiré ‘PRESET (1-5)’. “Preset 5 saved” s’affiche sur la seconde ligne de l’afficheur. Sélection d’une Station DAB présélectionnée Branchez le DAB. Appuyez sur le bouton de présélection correspondant OU gardez appuyé le bouton SHIFT et appuyez sur le bouton de présélection pour la station désiré. Nouvelle sélection des stations DAB présélectionnées Les présélections DAB ne peuvent pas être effacées individuellement mais elles peuvent être écrasées. Par exemple, si vous désirez changer une station présélectionnée par une autre station : syntonisez-vous sur la nouvelle station et appuyez et gardez appuyé le bouton avec le numéro de sélection présélectionné (1-8) jusqu’à ce que le message “Preset # saved” s’affiche. (Suivre la même marche si vous désirez sélectionner les présélections 5-8, mais gardez d’abord appuyé le bouton SHIFT et appuyez ensuite sur le numéro désiré (5-8) pendant environ 3 secondes) Changement Information Station DAB Vous pouvez changer les informations qui s’inscrivent sur la seconde ligne de l’afficheur lorsque vous vous syntonisez sur une station DAB. Les 9 types d’informations disponibles sont énumérés cidessous. Pour changer l’information affichée, appuyez sur le bouton DISPLAY. Page 4 • Dynamic Label Segment (DLS): c’est une information avec texte défilant fournie par la station DAB. Elle peut comprendre une information sur des titres musicaux ou sur des détails du programme et elle est fournie par le radiodiffuseur. Press DISPLAY BBC Radio DLS S c r o li n g Qualité du signal: affiche la qualité de réception du signal. • Type Programme (PTY): c’est une description du type de programme donnée par la station DAB et elle est fournie par le radiodiffuseur. • • Radio Press DISPLAY BBC Radio 5 Liv e BBC Radio BBC N a t i on a l D A B+ Radio 5 Live 2 2 5 . 64 0 M H z Press DISPLAY BBC Radio Signal 5 e r r or Live 8 Press DISPLAY BBC Heure : affichage de l’heure fournie par le radiodiffuseur. Live News BBC Taux d’erreur dans le signal : si le signal contient des erreurs, le système peut effectuer une correction. La quantité de correction du signal est affichée comme valeur numérique. Une valeur de 0-15 signifie bonne réception. Valeurs de 16-30 sont valeurs limites. Pour des valeurs supérieures à 30, essayez de régler la position de l’antenne. • 5 Press DISPLAY Fréquence : affichage de la fréquence de la transmission. Information signal: affichage du débit binaire numérique e du mode du signal. Live Press DISPLAY Nom Multiplex : affichage du multiplex qui transmet le programme. • 5 ■ ■ ■ ■ □■ ■ ■ ■■ ■ ■ ■ Freq: • Live Press DISPLAY BBC • 5 Radio 192kbs / 5 Live ACC Press DISPLAY • BBC Radio 5 Live 5 Live 12:18:00 Date : affichage de la date fournie par le radiodiffuseur. Press DISPLAY BBC RadIo 2 6 / 0 8 / 2 0 08 Page 5 Ordre des Stations Cette fonction permet de définir comment les stations ont été classées lorsque la liste des stations défile. Pour sélectionner une option, appuyez et gardez appuyé le bouton MENU/SELECT pendant environ 5 secondes, jusqu’à ce que l’indication ‘Station order’ apparaisse à l’afficheur LCD. Note: Appuyez sur MENU/SELECT pour confirmer l’opération. Appuyez les boutons TUNE -/+ pour afficher l’option désirée. Les 3 options disponibles sont énumérées ci-dessous:: • Alphanumérique Il s’agit du réglage de défaut. Ces stations sont classées par ordre numérique, puis par ordre alphabétique. • Ensemble Cette option établit une liste de l’ensemble de stations disponibles. • Valid Cette option établit une liste des stations actuellement validées. Syntonisation manuelle Vous pouvez syntoniser manuellement un canal/fréquence spécifique et l’ajouter à votre liste de stations. Cette fonction peut être utilisée pour assister le positionnement de l’antenne en vue d’obtenir la réception optimum d’un canal/fréquence spécifique. Appuyez et gardez appuyé pour environ 3 secondes le bouton MENU/SELECT, appuyez ensuite Le bouton +/- pour afficher l’inscription Manual tune’. Appuyez sur le bouton MENU/SELECT et le bouton +/- pour sélectionner le canal/fréquence. Un rectangle s’inscrit sur la première ligne de l’afficheur. La position de ce rectangle indique la force du signal ; c’est-à-dire que plus le rectangle s’affiche à droite, plus la force du signal est intense. 5A 174.928MHz □ Réglez la position de l’antenne pour obtenir la force optimum du signal. Appuyez sur le bouton MENU/SELECT pour environ 3 secondes et l’inscription STATION LIST s’affiche et puis appuyez SELECT/MENU pour retourner au service DAB normal. Dynamic Range Control (DRC) (Contrôle de la gamme dynamique) Le DRC ajoute ou enlève un degré de compression pour compenser les différences de gamme dynamique entre les stations radio. Par exemple, une station qui transmet de la musique populaire peut avoir un niveau de compression élevé, puisque l’accent est mis sur un niveau d’écoute haut constant, alors qu’une station qui transmet de la musique classique aura un niveau de compression tout petit ou nul, puisque la personne qui écoute a besoin d’entendre tous les aigus et les basses pour profiter des détails. Page 6 Il y a trois niveaux de compression: • DRC off Aucune compression. • DRC high Compression maximum (c’est la compression de défaut). • DRC low Compression faible. Appuyez et gardez appuyé le bouton MENU/SELECT. L’inscription ‘Station order’ s’affiche. Appuyez sur un des boutons +/- jusqu’à ce que la valeur ‘DRC value’ s’affiche. Appuyez sur le bouton SELECT/MENU. Un symbole “*” s’affiche sur la première ligne et le niveau courant DRC s’affiche sur la seconde ligne. Appuyez sur +/- pour sélectionner une des trois valeurs de la seconde ligne de l’afficheur. Lorsque la valeur désirée s’affiche, appuyez de nouveau sur le bouton MENU/SELECT. Menu Appuyez sur le bouton SELECT/MENU jusqu’à “Menu” s’affiche à l’écran LCD. Press MENU Station list Local scan Station name and information DRC high DRC low Full scan DRC off Manual tune Press UP/DOWN Ensemble DRC Valid Station order DAB Main menu FM Info SW version Réglages de défaut Pour rétablir les valeurs d’origine de l’usine des stations DAB/FM: Appuyez et gardez appuyé la touche SELECT/MENU en mode DAB ou FM, sélectionner MAIN MENU -> SYSTEM SETUP -> FACTORY RESET. Sur le display s’affiche “Press Display” . Pour confirmer “Réglages de défaut” appuyez la touche DISPLAY et il s’affiche RESTARTING… avant qu’une nouvelle recherche des stations sera effectuée. Langue Page 7 Une seule option est disponible – Anglais. FONCTIONNEMENT FM Sélectionnez la fonction FM Positionnez le sélecteur DAB/FM sur la fonction “FM”. Lorsque la radio est en mode FM, la fréquence de la station écoutée s’inscrit à l’afficheur, et l’indication “St” s’affiche après la fréquence, si stéréo est activé. En mode FM, vous pouvez utiliser les deux méthodes Scan automatique et la syntonisation manuelle. Pour la méthode Scan automatique, appuyez brièvement sur SELECT/MENU, le radio effectuera immédiatement le balayage de toutes les stations disponibles qui transmettent actuellement. La fréquence correspondante s’inscrira, à chaque fois, sur la ligne supérieure de l’afficheur. Pour une syntonisation manuelle, appuyez brièvement sur les boutons "+" ou “-”. La fréquence de syntonisation affichée change par tranches de 50kHz en haut ou en bas de la bande FM. Appuyez et gardez appuyés les boutons “+” ou “-” pour augmenter ou diminuer rapidement la fréquence sélectionnée par tranches de 50kHz. A l’obtention de la fréquence désirée, relâcher le bouton. Réglage balayage Appuyez SELECT/MENU et puis appuyez + ou – jusqu’à l’inscription “SCAN SETTING” s’affiche, appuyez de nouveau sur le bouton SELECT/MENU et + ou – pour sélectionner Strong stations only ou All stations. Pour confirmer appuyez la touche SELECT/MENU. Réglage Audio Sélectionnez SELECT/MENU et ensuite + ou – jusqu’à AUDIO SETTING s’affiche. Vous pouvez sélectionner “Stereo ou mono” ou “Mono only”, appuyez SELECT/MENU pour confirmer. Mémorisation et rappel des Fréquences présélectionnées en FM Pour faciliter la sélection des stations les plus écoutées, vous pouvez mémoriser jusqu’à 8 fréquences FM dans des mémoires de présélection. Les mémoires de présélection sont sous la forme d’une liste de fréquences présélectionnées numérotées de 1 à 8. Mémorisation d’une Fréquence en présélection Pour mémoriser une fréquence en présélection 1. Syntonisez la radio sur la fréquence désirée. 2. Appuyez et gardez appuyé le numéro de présélection correspondant (1-4) pendant environ 3 secondes, jusqu’à ce que l’indication “Preset Saved” s’inscrive à l’afficheur. OU 3. Gardez appuyé le bouton SHIFT, puis choisir un numéro (5-8) pendant environ 3 secondes, jusqu’à ce que l’indication “Preset Saved” s’affiche. Page 8 Rappel d’une fréquence présélectionnée Pour rappeler une fréquence présélectionnée 1. Appuyez brièvement sur un des boutons correspondant au numéro de présélection (1-4) et la fréquence correspondante qui y est mémorisée s’affiche. OU 2. Gardez appuyé le bouton SHIFT, puis appuyez sur le bouton correspondant au numéro de présélection désirée (5-8) et la fréquence correspondante qui y est mémorisée s’affiche. 3. Si, actuellement, rien n’est mémorisé dans la position, l’inscription, Preset EMPTY” (présélection vide) s’affiche. Spécifications Alimentation: Adaptateur: 7.5V 600mA ( ) Batteries : 6x1.5V (AA/LR6) Bandes de réception: DAB/DAB+ Band III: 174.928 MHz (5A) – 239.200MHz (13F) Gamme de syntonisation: 11B à 12D balayage local 5A à 13F balayage complet FM 87.5-108 MHz Sensibilité DAB: -98dBm ou mieux DAB Interférence du canal adjacent: -30dB ou mieux Décodage audio DAB: 64kbps - 384kbps Puissance audio (à 10% THD): 1W RMS Prise écouteurs: diamètre 3.5mm Haut-parleur: 50mm Dimensions (L x H x P): 18.5 x 11 x 4.5 cm Consommation d’électricité: 4.5 W En vue d’une amélioration continue de nos produits, nous nous réservons la faculté de modifier leurs spécifications sans nécessité de préavis. Attention: En cas de malfonctionnement de l’appareil dû à des décharges électrostatiques, éteignez-le et débranchez la fiche d’alimentation de la prise du réseau pour quelques minute ou enlevez les batteries. Ensuite remettez les batteries ou reinsérer la fiche au réseau. Décharge électrostatique En cas de dysfonctionnement débranchez la fiche de la prise murale et brancher de nouveau pour retourner au fonctionnement normal. Sécurité électrique Page 9 Avertissement Nous vous prions de lire attentivement les instructions de sécurité avant de brancher l’adaptateur à la prise du réseau. z z z z z z z L’appareil est fourni avec un adaptateur CA. Brancher l’alimentateur exclusivement à la prise du réseau 230V~50Hz. Ne jamais brancher à une tension différente. Ceci peut endommager l’appareil. Utiliser l’adaptateur uniquement à l’intérieur, ne l’exposer pas à l’eau. L’adaptateur ne referme aucune partie utile à l’utilisateur et ne peut pas être réparé par l’utilisateur. N’essayez pas d’ouvrir l’adaptateur. En cas de nécessité de réparation, faites appel à des technicien qualifies. Ne continuez pas à faire fonctionner votre appareil si vous avez le doute qu’il ne marche pas normalement, ou s’il est endommagé de quelque façon que ce soit, éteignez-le, débranchez la fiche d’alimentation et contactez votre revendeur. Ce symbole signifie que l’adaptateur correspond aux normes de la classe II, qui élimine le besoin d’un cordon d’alimentation à trois fils et d’un système d’alimentation avec mise à la terre. Ce symbole indique que l’adaptateur est seulement pour l’emploi à l’intérieur. Ce symbole indique la conformité de l’adaptateur aux normes CE. CE QU’IL FAUT FAIRE ET CE QU’IL NE FAUT PAS FAIRE POUR UTILISER CET APPAREIL EN SÉCURITÉ Cet appareil a été conçu et fabriqué conformément aux standards de sécurité européens mais, comme tout appareil électrique, vous devez en prendre soin pour obtenir ses meilleures performances et assurer la sécurité. Lire le manuel d’instructions avant de commencer à utiliser l’appareil. Durant l’installation de l’unité, s’assurer que le câble d’alimentation n’est ni écrasé ni endommagé par des objets avec des bords tranchants. Placer l’appareil dans un endroit adéquatement ventilé. Ne pas exposer à la lumière directe du soleil, à des températures élevées ou à proximité de sources de chaleur, des endroits poussiéreux ou humides. Ne bouchez pas les fentes de ventilation de l’appareil. Débrancher l’appareil de la prise de courant lorsqu’il n’est pas utilisé pendant une période prolongée. L’adaptateur consomme toujours un peu de courant même lorsque l’appareil est hors tension. Pour économiser le courant débranchez l’adaptateur. Ne jamais brancher ou débrancher l’alimentateur avec les mains mouillées et ne renverser jamais de liquide sur l’appareil. En cas de doute sur le fonctionnement, débranchez l’appareil et contactez un technicien expert. En cas d’orage, débrancher l’alimentateur de la prise. Cet appareil a été conçu et fabriqué conformément aux standards de sécurité européens mais, comme tout appareil électrique, vous devez en prendre soin pour obtenir ses meilleures Page 10 performances et assurer la sécurité. Le manque d’observation des indications comporte l’invalidation de la garantie. Ventilation N’obstruez jamais les ouvertures en plaçant le boîtier sur un lit, un tapis ou une surface similaire. Ceci risque de provoquer un incendie. Placez l’appareil sur une surface stable et loin de la lumière directe du soleil. Toute surchauffe risque d’endommager ou de diminuer la durée de vie de votre appareil. I di ti Nettoyage Débranchez le produit de la prise murale avant de le nettoyer. N’utilisez PAS de nettoyants liquides ou en aérosol. Utilisez un chiffon humide pour le nettoyage. Batteries Retirez les batteries lorsque l’appareil n’est pas utilisé pendant un certain temps pour éviter tout endommagement dû à une fuite ou à la corrosion. En ce cas la garantie est invalidée. Élimination Élimination batteries déchargées / accumulateurs La loi impose d’apporter les batteries et les accumulateurs épuisés dans les centres de collecte prévus à cet effet. Il est impérativement interdit par la loi de jeter les batteries déchargées et les accumulateurs avec les ordures ménagères! Les batteries et les accumulateurs contenant des substances dangereuses sont marqués avec les symboles prévus à cet effet, sur les côtés de leur boîtier. Ces symboles indiquent l’interdiction de les jeter avec les ordures ménagères. Les abréviations de ces métaux lourds sont: Cd = cadmium, Hg = mercure et Pb = plomb. L’élimination des batteries déchargées et des accumulateurs qui ne sont plus rechargeables est gratuite, en les apportant dans des centres de collecte spéciaux, ou dans n’importe quel autre endroit vendant des batteries et des accumulateurs. Ainsi faisant, vous agissez dans le respect de la loi et vous contribuez à la protection de l’environnement! Remarques de sécurité • Ne démontez pas l’appareil et n’essayez pas d’en ouvrir quelque partie que ce soit pour éviter tout risque de décharge électrique. • En cas de doute sur le fonctionnement, la sécurité ou la connexion des unités, contactez un technicien expert. N’utilisez PAS ce produit à proximité de l’eau et ne pas poser au-dessus des objets contenant de liquide (par exemple, vases de fleur etc.). Ne pas exposer l’appareil au feu ou à la chaleur excessive. Tenir hors de la portée des enfants. • • • Page 11 l é Disposizione dei comandi 18 16 17 2 1 15 13 12 11 10 9 8 9 19 20 2 34 5 6 14 7 1. Tasto preselezione 1/5 12. Tasto SCAN (scansione) 2. Tasto preselezione 2/6 13. 3. Tasto preselezione 3/7 14. Cordina di trasporto 4. Tasto preselezione 4/8 15. Schermo LCD 5. Tasto SHIFT 16. Altoparlante 6. Tasto FM/DAB &DAB+ 17. Antenna 7. 18. Supporto Tasto DISPLAY Tasto MENU/SELECT (selezione) 8. Tasto accensione / spegnimento 19. Presa STEREO OUT 9. Manopola VOLUME 20. Presa alimentazione DC 10. Tasto sintonizzazione (TUNE -) 11. Tasto sintonizzazione (TUNE +) Page 1 9 Retroilluminazione (alimentazione con batterie) Premere qualsiasi tasto del panello frontale per attivare la retroilluminazione del display. Il display si illuminerà per 5 secondi e poi se spegne. Retroilluminazione (alimentazione a corrente alternata) La retroilluminazione del display rimane accesa continuamente se l’apparecchio è alimentato dalla corrente. Funzionamento con le batterie L’apparecchio funziona con 6 batterie 6 AA/LR06 1.5V (non fornite). Smontare il coperchio del vano batterie sul retro dell’apparecchio spingendolo nella direzione indicata dalla freccia. Inserire le batterie controllando che corrispondono ai contrassegni di polarità (+/-) e chiudere il coperchio del vano batterie. Precauzioni batterie Inserire le batterie controllando che corrispondono ai contrassegni di polarità (+/-). Batterie inserite nel modo sbagliato possono danneggiare l’apparecchio. Non istallare insieme batterie standard, alcaline o ricaricabili o batterie vecchie e nuove. Se l’apparecchio non viene usato per un lungo periodo, rimuovere le batterie per evitare danni causati dalla perdita di elettroliti. Non tentare di ricaricare batterie non ricaricabili, questo può causare surriscaldamenti e rotture (seguire le direttive del produttore). Sostituire tutte le batterie insieme e utilizzare un solo tipo di batterie. Osservare le direttive locali per lo smaltimento delle batterie. Utilizzare solo il tipo di batterie specificato. Attenzione: utilizzare la cordina di trasporto solo se la radio è alimentata con le batterie. Non utilizzare la cordina per trasportare la radio quando questa è collegata alla presa di corrente. Supporto L’unità dispone di un supporto sul retro dell’apparecchio. Cuffie L'apparecchio è provvisto di terminale per cuffie stereo. Collegare una cuffia a bassa impedenza (816 ohm) o auricolari (non in dotazione) provvisti di spinotto stereo da 3,5mm. Una volta collegate le cuffie, gli altoparlanti saranno scollegati automaticamente. NOTA: Con il passare del tempo l'udito si adatta ai suoni alti continui creando l'impressione che il volume sia stato ridotto. Ciò che può sembrarvi normale in realtà può essere dannoso. Per prevenire che il vostro UDITO SI ADATTI, impostate il volume a un livello basso. Aumentare lentamente l'audio fino a quando il suono risulta chiaro e privo di distorsioni. Page 2 Funzionamento generale DAB&DAB+ La radio DAB (Digital Audio Broadcasting) o Diffusore Audio Digitale, rappresenta una nuova tappa della tecnologia delle radiodiffusioni; una nuova tecnologia, significativamente differente rispetto ai metodi tradizionali analogici di trasmissione in modalità FM. Il nuovo sistema non prevede più la sintonizzazione su una data frequenza ma prevede invece che il ricevitore DAB fornisca una Lista attiva di tutte le stazioni/programmi radio al tocco di un unico tasto. Le Liste delle stazioni sono descritte in maggiore dettaglio nella sezione Funzionamento in modalità DAB del presente manuale. Prima di selezionare la funzione DAB assicurarsi che l'antenna sia estratta completamente. 1. Collegare l'unità alla presa di corrente di rete. 2. Collegare l’altra estremità alla presa “DC IN” e premere il tasto POWER. 3. Premere il tasto DAB/FM/AUX. IN per attivare la modalità DAB. L'unità inizierà automaticamente a cercare i servizi DAB e dopo 15 - 20 secondi sarete sintonizzati sulla prima stazione. NOTA: A questo punto è possibile che sul display appaia il messaggio “Station not available” (Nessuna stazione disponibile). Questo significa che l'unità non è riuscita a localizzare alcuna stazione DAB durante la ricerca. Ciò potrebbe essere dovuto al fatto che la radio deve essere posizionata in un altro luogo per ottenere una ricezione ottimale. Come ausilio al corretto posizionamento dell'apparecchio si può usare l'indicatore di forza del segnale (vedi funzionamento del tasto Display). 1. Agire sul comando del Volume per aumentare o diminuire l'audio come desiderato. 2. Per cercare nuove stazioni premere ‘SCAN’ sulla parte frontale della radio. La radio inizierà la ricerca delle stazioni. Nota: Premere il tasto “SCAN” una volta, la radio inizia una scansione locale (11B-12D); premendo e tenendolo premuto per ca. 2 secondi la radio inizia una scansione completa (5°-13F). Durante la ricerca, il display indica la banda di progressione e le stazioni trovate, ad esempio: Scanning... 17 ■■■■■■■■ I simboli che appaiono sulla seconda riga del display rappresentano la banda di progressione indicante l'andamento della ricerca. Il numero sulla prima riga indica il numero di stazioni trovate e tale numero aumenterà con il procedere della ricerca. Una volta completata la ricerca, la radio DAB si sintonizzerà sulla prima stazione dell'elenco. Le stazioni sono elencate in ordine numerico e successivamente alfabetico. La lista delle stazioni è memorizzata in maniera tale che, una volta acceso nuovamente il sintonizzatore, l'apparecchio non dovrà più procedere alla ricerca delle stazioni. Se la ricerca non rileva alcuna stazione, verificare l'esistenza di un'adeguata copertura DAB nell'area. Page 3 Modifica delle stazioni DAB&DAB+ Per far scorrere le stazioni disponibili premere i tasti TUNE +/-. Le stazioni appariranno sul display. Una volta visualizzata la stazione desiderata premere il tasto MENU e la radio si sintonizzerà su quella stazione. Ricerca delle Stazioni DAB&DAB+ Grazie alle caratteristiche tecniche della radio DAB, si aggiungono regolarmente stazioni e servizi aggiuntivi. Se si desidera vedere se siano state introdotte nuove stazioni DAB nella vostra area, potete lanciare una ricerca premendo il tasto “SCAN”. Per selezionare le impostazioni DAB È possibile impostare fino a 8 stazioni DAB come segue. Sintonizzarsi sulla stazione che si desidera preimpostare. Premere il tasto PRESET (1-5) tenendolo premuto per 3 secondi. Il tasto si trova sulla parte frontale della radio. Apparirà il messaggio ’Preset 1 saved’ (No. preselezionato memorizzato) sulla seconda riga del display. Ripetere questo procedimento con i tasti “2/6, 3/7 e 4/8”. Per memorizzare il tasto 5 premere e tener premuto SHIFT e il tasto di preselezione (1-5) per ca. 3 secondi. “Preset 5 saved” (preselezione 5 memorizzata) apparirà sulla seconda riga del display. Ripetere il procedimento per l’impostazione delle 8 preselezioni. Selezionare una Stazione DAB preimpostata Attivare la modalità DAB premendo POWER. Premere il tasto corrispondente al numero preimpostato OPPURE tenendo premuto il tasto SHIFT e il tasto corrispondente al numero desiderato (5-8). Nuova impostazione delle Stazioni DAB preimpostate Le impostazioni DAB non possono essere cancellate singolarmente ma possono essere sovrascritte. Ad esempio, se si desidera modificare l'impostazione da una stazione a un'altra: Sintonizzarsi sulla nuova stazione, quindi premere il tasto corrispondente al numero desiderato (1-8) e tenerlo premuto fino a quando non appare il messaggio “Preset # saved”. Seguire la stessa procedura quando si desidera selezionare un numero preimpostato 5-8. In primo luogo premere il tasto SHIFT, premere quindi il tasto corrispondente al numero desiderato (5-8) tenendolo premuto per circa 3 secondi. Modifica delle informazioni della Stazione DAB È possibile cambiare le informazioni che appaiono sulla seconda riga del display quando si sta ascoltando una stazione DAB. Sono disponibili nove tipi di informazioni, come qui di seguito indicato. Per modificare l'informazione visualizzata, premere il tasto DISPLAY. Page 4 • Dynamic Label Segment – Segmenti di etichettatura dinamica (DLS): visualizza il testo di informazione che scorre, trasmesso dalla stazione DAB. Può comprendere informazioni sui titoli della musica trasmessa o dettagli del programma ed è fornito dall’emittente. Press DISPLAY BBC Radio DLS S c r o li n g BBC Radio • Tipo del programma (PTY): mostra una descrizione del tipo di programma della stazione DAB ed è fornita dall’emittente. Press DISPLAY Nome del Multiplex: specifica il multiplex che sta trasmettendo il programma. Press DISPLAY • • 5 Live ■ ■ ■ ■ □■ ■ ■ ■■ ■ ■ ■ Qualità del segnale: visualizza la qualità di ricezione del segnale. • Live Press DISPLAY • • 5 BBC Radio 5 Live 5 Liv e News Frequenza: mostra la frequenza di trasmissione del programma. BBC Radio BBC N a t i on a l D A B+ Press DISPLAY BBC Tasso d’errore del segnale (signal error rate): se il segnale di trasmissione contiene errori, il sistema può effettuare una correzione. La correzione di segnale viene visualizzata come valore numerico. Valori fra 0-15 indicano una buona ricezione del segnale, valori da 16-30 sono valori limite. Per valori superiori al 30 cercate di regolare la posizione dell’antenna. Informazioni sul segnale: mostra la velocità in bit del segnale digitale entrante e la modalità del segnale. Radio Freq: 5 Live 2 2 5 . 64 0 M H z Press DISPLAY BBC Radio Signal 5 e r r or Live 8 Press DISPLAY BBC Radio 192kbs / 5 Live ACC Press DISPLAY • • Ora: mostra l’ora trasmessa dall’emittente ed è quindi precisa. Data: mostra la data trasmessa dell’emittente. BBC Radio Live 5 Live 12:18:00 Press DISPLAY BBC RadIo 2 6 / 0 8 / 2 0 08 Page 5 5 Ordine delle stazioni Questa funzione permette di stabilire l'ordine delle stazioni quando si scorre la Lista delle stazioni. Per selezionare un'opzione premere il tasto MENU/SELECT e tenerlo premuto per circa 5 secondi, fino a quando non appare il messaggio ‘Station list (lista stazioni) sull'LCD. Nota: Premere di nuovo MENU/SELECT per confermare la scelta. Premere i tasti TUNE +/- per visualizzare l'opzione desiderata. Come qui di seguito descritto sono disponibili 3 opzioni. • Alfanumerico Questa è un'impostazione di default. Le stazioni sono ordinate in ordine numerico e quindi alfanumerico. • Ensemble Questa opzione ordina la lista in maniera che le stazioni locali che si possono ricevere saranno in cima alla lista e quelle che non si possono ricevere in fondo alla lista. • Valid Le stazioni vegono ordinate in base alla validità. Sintonizzazione manuale È possibile sintonizzarsi manualmente su un canale/frequenza specifici ed aggiungerli alla lista delle stazioni. Questa funzione è utile per posizionare correttamente l'antenna e ottenere una ricezione ottimale di un canale/frequenza specifico. Premere e tenere premuto il tasto MENU/SELECT per ca. 3 secondi e poi il tasto TUNE+/- fino a quando appare il messaggio “Manual tune”. Premere MENU/SELECT e poi TUNE +/- per selezionare la frequenza desiderata. Premere il tasto MENU/SELECT. Sulla prima riga del display apparirà un rettangolo. La posizione di questo rettangolo indica la forza del segnale; in altre parole, più il rettangolo si posiziona a destra, maggiore è la forza del segnale. 5A 174.928MHz □ Regolare la posizione dell'antenna per ottenere la forza di segnale ottimale. Premere il tasto MENU/SELECT per ca. 3 secondi e sul display apparirà STATION LIST, premere SELECT/MENU per ritornare al funzionamento normale DAB. Valore di controllo della gamma dinamica (Dynamic Range Control - DRC) La funzione DRC aggiunge o rimuove un grado di compressione per eliminare le differenze della gamma dinamica tra le varie stazioni radio. Ad esempio, una stazione radio di musica leggera di solito ha un livello elevato di compressione perché l'enfasi è posta su un livello di ascolto costantemente elevato, mentre una stazione radio che trasmette musica classica avrà una scarsa, o non avrà alcuna compressione poiché l'ascoltatore vuole sentire una fine definizione di tutti i toni alti e bassi. Page 6 Tre sono i livelli di compressione disponibili: DRC off DRC high DRC low Assenza di compressione Massima compressione (questa è l'impostazione di default) Compressione ridotta Premere e tenere premuto il tasto MENU/SELECT. Appare il messaggio "Station order" (Ordine stazione). Premere uno dei tasti +/- fino a quando non appare il messaggio "DRC value" (Valore DRC). Premere il tasto MENU/SELECT. Il simbolo “*” apparirà sulla 1 riga e l’attuale valore DRC appare sulla 2 riga del display. Premere i tasti +/- per selezionare uno dei tre valori sulla riga 2 del display. Quando appare il valore desiderato premere il tasto MENU/SELECT. Menu Premere SELECT/MENU fino a che “Menu” apre sul display LCD. Press MENU Station list Local scan Station name and information DRC high DRC low Full scan DRC off Manual tune Press UP/DOWN Ensemble DRC Valid Station order DAB Main menu FM Info SW version Impostazione dei parametri di fabbrica (Factory reset) Per ripristinare i valori di fabbrica della radio DAB/FM premere e tenere premuto il tasto SELECT/MENU in modalità DAB o FM > SYSTEM SETUP > FACTORY RESET. Sul display appare “ Press Display” . Per confermare premere il tasto DISPLAY e sullo schermo appare ‘RESTARTING…’ prima che una nuova ricerca di stazioni verrà effettuata. Page 7 Lingua Una sola opzione è presente – Inglese FUNZIONAMENTO IN MODALITÀ FM Selezionare la funzione FM Premere il tasto DAB&DAB+/FM e sul display apparirà "FM". In modalità FM, la frequenza della stazione che si sta ascoltando appare sul display, unitamente a "St" se stereo è attivato. In modalità FM, è possibile usare la scansione automatica o la sintonizzazione manuale. Per la scansione automatica, premere brevemente il tasto SELECT/MENU e la radio effettuerà immediatamente la scansione di tutte le stazioni disponibili e che stanno trasmettendo al momento. La frequenza della stazione appare sulla riga superiore del display. Per la sintonizzazione manuale, premere brevemente i tasti "TUNE+" o "TUNE-". Il display della frequenza cambierà lungo la banda FM con incrementi o decrementi di 50kHz. Premendo e temendo premuti i tasti "TUNE+" o "TUNE-" è possibile aumentare o diminuire rapidamente la frequenza desiderata con incrementi o decrementi di 50kHz. Una volta raggiunta la frequenza desiderata rilasciare il tasto. Impostazioni de scansione (Scan setting) Premere e tener premuto SELECT/MENU e usare i tasti TUNE+ o TUNE- fino a che SCAN SETTING appare. Premere SELECT/MENU e I tasti TUNE+/- per selezionare Strong stations only o All stations e confermare con SELECT/MENU. Impostazioni audio Premere e tener premuto SELECT/MENU e spostarsi nel menu con TUNE+/- fino a quando appare s “Audio setting” sul display. Premere SELECT/MENU di nuovo e selezionare “Stereo o mono” o “Mono only” con il tasto TUNE+/- . Confermare la scelta con SELECT/MENU. Memorizzazione e richiamo delle frequenze preimpostate in FM É possibile memorizzare fino a 8 frequenze FM nell'apposita memoria. Le memorie preimpostate sono sotto forma di una lista delle stazioni numerate da 1 a 8. Memorizzazione di una Frequenza preselezionata Per memorizzare una frequenza 1. Sintonizzare la radio sulla frequenza desiderata. 2. Premere e tenere premuto il tasto corrispondente del numero di memorizzazione (1-4) per circa 3 secondi, fino a quando non appare sul display il messaggio "Preset Stored" (No. preselezione memorizzato). Tenere premuto il tasto SHIFT e premere quindi il tasto corrispondente al numero di memorizzazione (5-8) per circa 3 secondi, fino a quando sul display non appare il messaggio "Preset Stored". Page 8 Richiamo di una frequenza preimpostata Per richiamare una frequenza preimpostata 1. Premere brevemente il tasto corrispondente al numero di memorizzazione della stazione desiderata (1-4) e sul display apparirà la frequenza memorizzata, OPPURE 2. Tenere premuto il tasto SHIFT e premere quindi il tasto corrispondente al numero di memorizzazione della stazione desiderata (5-8); sul display apparirà la frequenza memorizzata. 3. Se al numero richiamato non è stata memorizzata alcuna stazione, sul display appare il messaggio "Preset Empty" (Preselezione vuota). Specifiche tecniche Alimentazione: Adattatore: 7.5V 600mA ( ) Batterie: 6 x 1.5V (AA/LR6) Banda di frequenza: DAB/DAB+ Band III: 174.928 MHz (5A) – 239.200MHz (13F) Gamma di sintonizzazione: 11B a 12D scansione locale 5A a 13F scansione completa Frequenza FM: 87.5-108 MHz Sensibilità DAB: -98 dBm o meglio Rifiuto canale adiacente DAB: -30 dB o meglio Decodifica audio DAB: 64kbps - 384kbps Potenza d’uscita (al 10% THD): 1W RMS Presa cuffie: diametro 3.5mm Altoparlante: 50mm Dimensioni (L x A x P): 18.5 x 11 x 4.5 cm Consumo di corrente: 4.5 W Si riserva il diritto di apportare modifiche e miglioramenti alle suddette specifiche senza preavviso. Note importanti: In caso di malfunzionamento scollegare l’apparecchio dalla presa di corrente. Scollegare l’apparecchio dalla presa di corrente o togliere le batterie e aspettare qualche minuto. Rimettere le batterie o collegare di nuovo la presa alla corrente. Scariche elettrostatiche In caso di malfunzionamento dovuto a scariche elettriche scollegare l’apparecchio e ricollegare per ritornare al funzionamento normale. Page 9 Precauzioni Attenzione Leggere attentamente le istruzioni per ridurre il rischio di shock elettrico prima di collegare l’alimentatore alla corrente L’apparecchio viene fornito con un alimentatore a corrente alternata. z Utilizzare il prodotto solo con l’alimentatore per corrente 230V ~50Hz. Non collegare mai ad altre tensioni, questo potrebbe danneggiare l’apparecchio. z Utilizzare l’alimentatore e l’apparecchi solo all’interno. z L’adattatore è chiuso ermeticamente, non tentare di aprirlo. z z Non contiene parti riparabili dall’utente. Qualora risulti impossibile inserirla nella presa, provare a capovolgerla. Se ancora non entra, contattare un elettricista per sostituire la presa obsoleta. I cavi di alimentazione devono essere posizionati in modo tale da non camminarci sopra o da non appoggiare oggetti sopra. Prestare particolare attenzione ai cavi delle spine di alimentazione. z Questo simbolo indica che l’adattatore è conforme alle norme della classe II e che non necessità di una messa a terra. Questo simbolo indica che l’adattatore è unicamente per uso all’interno. Questo simbolo indica che l’adattatore è conforme alle regolazioni dell’Unione Europea. Istruzioni di sicurezza Questo apparecchio è stato studiato e fabbricato in ottemperanza agli standard di sicurezza europei. Tuttavia, come per qualsiasi apparecchio elettrico, è necessario prestare attenzione al fine di ottenere le migliori prestazioni e garantire un utilizzo sicuro. Leggere attentamente le istruzioni di sicurezza prima di utilizzare l’apparecchio. I cavi di alimentazione devono essere posizionati in modo tale da non camminarci sopra o da non appoggiare oggetti sopra. Evitare l’uso dell’apparecchio in prossimità di luoghi bagnati o umidi, con forti vibrazioni, con temperature estremamente alte o basse, con esposizione diretta al sole o in luoghi molto polverosi. Non introdurre mai oggetti attraverso le fessure di ventilazione. Per risparmiare energia spegnere l’apparecchio e togliere la spina dalla rete nel caso di non utilizzo per un lungo periodo, poiché l’adattatore consuma sempre un po’ di corrente anche se l’apparecchio è spento. Non continuare a usare l’apparecchio se è stato versato del liquido, se è stato danneggiato o se non lavora normalmente. Scollegare l’apparecchio dalla presa e contattare un tecnico. Scollegare l’apparecchio dalla presa di corrente durante i temporali. Page 10 Questo prodotto è stato concepito per l’uso domestico. Qualsiasi altro uso invalida la garanzia e può essere pericoloso. Ventilazione Posizionare l’apparecchio su una superficie piana e lontano dalla luce diretta del sole o da sorgenti di calore. Non ostruire le fessure di ventilazione e non posizionare sul letto o su cuscini. Il surriscaldamento danneggerà l'apparecchio riducendone la durata. Pulizia Scollegare l’apparecchio e pulirlo con un panno umido. Non utilizzare solventi chimici o detergenti, questi potrebbero danneggiare la superficie del prodotto. Batterie Togliere le batterie se l’apparecchio non viene usato per un periodo prolungato per evitare il deterioramento o danni a causa di perdite, che invalidano la garanzia. Osservare le direttive locali per lo smaltimento delle batterie. Smaltimento Smaltire l'imballo in ottemperanza alle norme vigenti. La legge vieta lo smaltimento di batterie scariche / accumulatori con i rifiuti domestici. I simboli qui accanto contrassegnano le unità contenenti sostanze pericolose e indicano tale divieto. Le abbreviazioni delle sostanze pericolose sono quelle corrispondenti ai metalli pesanti: Cd (cadmio), Hg (mercurio) e Pb (piombo). Le batterie scariche e gli accumulatori non più ricaricabili possono essere smaltiti gratuitamente consegnandoli presso gli appositi centri di raccolta, o in qualsiasi altro luogo ove sono in vendita batterie e accumulatori, In questo modo verranno ottemperati gli obblighi di legge e si contribuirà alla salvaguardia dell’ambiente. Importanti precauzioni di sicurezza • Per evitare rischi di choc elettrico o incendi non tentare l’apertura o la rimozione del coperchio. Per la manutenzione rivolgersi a personale qualificato. • In caso di dubbio sul corretto funzionamento dell’apparecchio Non tentare di riparare il prodotto in maniera autonoma. Rivolgersi a personale qualificato. • Non esporre l’apparecchio all’acqua e non appoggiare oggetti contenti liquidi sull’apparecchio (p.es. vasi di fiori.) • Tenere l’apparecchio lontano dal fuoco aperto o da fonti di calore. • Tenere lontano dalla portata dei bambini; contiene parti piccole. Page 11 Location of controls 18 16 17 2 1 15 13 12 11 10 9 8 9 19 20 2 34 5 6 12. SCAN button 2. 2/6 button 13. 3. 3/7 button 14. Handle strap 4. 4/8 button 15. LCD 5. SHIFT button 16. Speaker 6. FM/DAB &DAB+ button 17. Antenna 7. 18. Stand bracket MENU/SELECT button 8. POWER button 19. STEREO OUT socket 9. VOLUME knob 20. DC socket 10. TUNE - button 11. TUNE + button Page 1 9 7 1. 1/5 button DISPLAY button 14 Backlight function (powered by batteries) Press any of the buttons on the front panel to activate the backlight, the display will illuminate for 5 seconds and then go off. Backlight function (powered by mains) When powered by the mains the backlight will remain on at all times. Battery operation This unit operates with 6 AA/LR06 1.5V batteries (not supplied). On the rear of the unit, slide the battery compartment cover in the direction of arrow to remove it. Insert the batteries into the battery compartment observing the polarity (+/-). Replace the battery compartment cover. Battery precautions Be sure to follow the correct polarity when installing the batteries as indicated in the battery compartment. Reversed batteries may cause damage to the device. Do not mix different types of batteries together (e.g. Alkaline and Carbon-Zinc) or old batteries with fresh ones. If the device is not to be used for a long period of time, remove the batteries to prevent damage or injury from possible battery leakage. Do not try to recharge batteries not intended to be recharged, then can overhead and rupture. (Follow battery manufacturers directions.) When replacing batteries replace all the batteries at the same time with the same type. Dispose of used batteries safely at your local recycling plant. Use only the size and type of batteries specified. Caution: Please note, when the carrying strap, only use when the unit is powered by batteries. Never attempt to carry the unit when it is connected to the mains supply. Stand This unit is supplied with its own stand, this is located at the rear of the unit. To use the stand, just flip it open and then rest the unit stable surface. Headphones socket A stereo headphone socket is provided for private listening. Connect a pair of low impedance (816ohm) headphones or earphones (not supplied) with a 3.5mm stereo jack plug to the headphone socket on the left hand side of the unit. When the headphones are connected the main speaker is automatically disconnected. Please note: listening to music at high volume for a long period of time may cause damage to hearing. Before using headphones, make sure the volume is set low and gradually increase to a comfortable listening volume. Page 2 Using your DAB&DAB+ radio DAB&DAB+ or Digital Audio Broadcasting represents a new age in broadcasting technology and as with all new technologies it is significantly different to traditional Analogue FM broadcast methods. The new system no longer relies on tuning to a given frequency but instead allows the DAB receiver to provide an active Station List of all available radio programmes/stations at the touch of one button. Station Lists are described in more detail in the DAB Operation section of this manual. Before selecting the DAB function make sure that the antenna is fully extended. 1. Connect the plug of the adaptor to a suitable 13 amp mains socket. 2. Insert the other end to the “DC IN” socket and press the power button. 3. Press the “FM/DAB&DAB+” button, the unit will automatically start a scan of the DAB services and after 15 to 20 seconds the first station will begin to playback. NOTE: At this stage it is possible that the display may show ‘Service not available’, this indicates the unit has been unable to locate any available DAB stations during the search process. This may be due to the radio needs relocating to a better location in order to get adequate reception. The signal strength indication (See Display button operation) can be used to assist this process. 4. Use the Volume control to increase or decrease the sound output level as required. 5. To search for new stations, press the ‘SCAN’ button at the front of the radio. The radio will commence the station search process. Note: Press and release the ‘SCAN’ button once, the radio commence local scan (11B-12D); press and hold ‘SCAN’ button for about 2 seconds, the radio commence full scan (5A-13F.) During the search process the display indicates the progress and stations found, for example: Scanning... 17 ■■■■■■■■ The symbols on the second line of the display are a bar graph that indicates the progress of the scan. The number on the first line indicates the number of stations found and will increase as the scan progresses. Once the search has completed the DAB radio will tune to the first station in the list. Stations are listed in numerical then alphabetical order. The station list is retained in memory so the next time you switch the tuner on, the station search does not take place. If there are no stations found check that adequate DAB coverage exists in your area. Changing DAB&DAB+ stations Press either the TUNE-/+ buttons to scroll through the available stations. The stations will appear on the display. When the station you require is displayed press the ‘MENU’ button. The radio will now tune to that station. Scanning for DAB &DAB+ Stations Due to the nature of DAB radio, additional stations and services regularly become available. If you wish to see if there is any new DAB stations introduced in your area, you can initiate a search by pressing the ‘SCAN’ button. Page 3 Setting DAB Presets You can preset up to 8 DAB stations as follows. Tune to the station you wish to preset. Press and hold the ‘PRESET (1-5)’ button for about 3 seconds on the front of the radio. ’Preset 1 saved’ will be displayed on the second line of the display. Repeat this with button ‘2/6’,’3/7’and ‘4/8’ when you want to save into preset 5, press and hold the ‘SHIFT’ button and then press the ‘PRESET (1-5)’ button for about 3 seconds on the front of the clock radio. ‘Preset 5 saved’ will be displayed on the second line of the display. Continue until all 8 presets are saved. Selecting a Preset DAB Station Press the ‘Power’ button on the front of the unit. Press a preset button or hold ‘Shift’ button and press a preset button to select the station you want to listen to. Resetting the DAB Preset Station DAB presets cannot be deleted individually but they can be overwritten. For example if you wish to change a preset from one station to another: Tune into the station you want to listen to, press and hold the preset number (1-8) button until the ‘Preset # saved’ message is displayed. If you want to select preset 5-8, first hold ‘Shift’ button, then press and hold the required preset button for a about 3 seconds. Changing the DAB Station Information It is possible to change the information that is displayed on the second line of the display when listening to a DAB station. There are 9 types of information available as listed below. To change the information displayed press the DISPLAY button. Page 4 • Dynamic Label Segment (DLS): This is scrolling text information supplied by the DAB station. It may comprise information on music titles or details of the programme and is provided by the broadcaster. Press DISPLAY BBC Radio 5 DLS S c r o li n g Live Press DISPLAY BBC Radio 5 Live □ ■■■■ ■■■■■■■■ • Signal Quality Indication: To indicate the strength of receiving signal • Program Type (PTY): This is a description of the type of programme provided by the DAB station and is provided by the broadcaster. Press DISPLAY • Multiplex Name: This will show the multiplex that is broadcasting the programme you are listening to. Press DISPLAY BBC Radio Live 5 Liv e News • Frequency: This displays the transmission frequency. BBC Radio BBC N a t i on a l D A B+ Press DISPLAY BBC Radio Freq: • Signal Error Rate: If the transmission signal contains errors, the system can apply a correction. This signal error rate is a number which indicates the quality of the signal. 0-15 indicates good reception, 16-30 indicates borderline reception, try to adjust the position of the antenna if over 30 • 5 5 Live 2 2 5 . 64 0 M H z Press DISPLAY BBC Radio Signal 5 e r r or Live 8 Press DISPLAY Signal Information: This shows the digital bit rate and the signal mode BBC Radio 192kbs • Time: This displays the time and is provided by the broadcaster so will be accurate. Live ACC Press DISPLAY BBC • Date: This displays the date and is provided by the broadcaster so will be accurate. / 5 Radio 5 Live 5 Live 12:18:00 Press DISPLAY BBC RadIo 2 6 / 0 8 / 2 0 08 Station Order This function enables you to define how the stations are arranged when scrolling the stations list. Page 5 To select an option press and hold the MENU/SELECT button for about 5 seconds, until ‘DAB Station list’ displayed on the LCD. Note: Press the MENU/SELECT button again to confirm the current operation. Press the TUNE -/+ buttons to display the option you want. There are 3 options as described below. • Alphanumeric This is the default setting. The stations are arranged in numerical then alphabetical order. • Ensemble This option sorts the list by the ensembles are in. • Valid This option sorts the list by whether the station is currently marked as being valid. Manual Tune It is possible to manually tune to a specific channel/frequency and add this to the station list. This function can be used to assist the positioning the antenna to obtain the optimum reception for a specific channel/frequency. Press and hold the SELECT/MENU button for about 3 seconds, then press the UP or DOWN button to display ‘Manual tune’, press the SELECT/MENU then press UP or DOWN to select desired frequency, Press the SELECT/MENU button. A rectangle will be displayed on first line of the display. The position of this rectangle indicates the signal strength, i.e the further towards the right the greater the signal strength. 5A 174.928MHz □ Adjust the position of the antenna to obtain the optimum signal strength. Press and hold SELECT/MENU button for about 3 seconds, the LCD appear STATION LIST, then press SELECT/MENU to enter normal DAB listening mode. Dynamic Range Control (DRC) DRC adds or removes a degree of compression to compensate for the differences in the dynamic range between radio stations. For example, when a station is broadcasting popular music, may has a high level of compression applied since the emphasis is on a constant high listening level, whereas a station is broadcasting classical music, will has a little or no compression as the listener requires all of the highs and lows in the music to define the detail. There are three levels of compression: • DRC off No compression applied. • DRC high High compression applied (this is the default). • DRC low Low compression applied. Press and hold the SELECT/MENU button. ‘Station list’ will be displayed. Press the UP/DOWN buttons until ‘DRC’ is displayed. Press the SELECT/MENU button. A symbol “*” will be shown on Line 1 and the current DRC level will be displayed on Line 2. Page 6 Press the UP/DOWN buttons to select between the three values on Line 2 of the display. When the required value is displayed, press the SELECT/MENU button. Menu Press SELECT/MENU button, until the “Menu” displays on the LCD. Press MENU Station list Local scan Station name and information DRC high DRC low Full scan DRC off Manual tune Press UP/DOWN Ensemble DRC Valid Station order DAB Main menu FM Info SW version Factory reset You can delete all of the preset stations and return the DAB/FM Radio to its factory settings as follows : Press and hold the SELECT/MENU button under DAB mode or FM mode Select MAIN MENU -> SYSTEM SETUP -> FACTORY RESET according the menu tree. The display will show “ Press ‘ Display ’ to confirm reset “ Press the DISPLAY button to confirm The display will show ‘RESTARTING…’ before performing a new scan for stations. Language There is only one option presented –English. Page 7 FM OPERATION Selecting the FM function Press FM/DAB&DAB+ mode button, the display will show “FM”. When in FM mode, the frequency of the station is being listened will appear on the display. “St” will be showed if stereo is activated In FM mode, you can use Auto Scan and Manual Tuning two methods. For Auto Scan method, briefly press SELECT/MENU, the radio will immediately scan all available stations which are currently broadcasting. The frequency of that station will be on the top line of the display. For Manual Tuning, briefly press the “UP” or “DOWN” buttons. The frequency display will be changed in 50kHz steps up or down the FM band. Press and hold the “UP” or “DOWN” button will advance or decrease the selected frequency rapidly in 50 kHz steps until available station is reached. Scan setting Press and hold the SELECT/MENU button, then press UP or DOWN button until the display shows “SCAN SETTING”, then press SELECT/MENU button again, now you can press UP or DOWN button to choose Strong stations only or All stations, then press SELECT/MENU button to confirm Audio setting Press and hold the SELECT/MENU button, then press UP or DOWN button until the display shows “Audio setting”, then press SELECT/MENU button again, now you can press UP or DOWN button to choose “Stereo or mono” or “Mono only”, then press to SELECT/MENU button to confirm. Storing and Recalling Preset Frequencies in FM Up to 8 FM frequencies can be stored into preset memories. To preset memories are in the form of a list of preset locations numbered 1 to 8. Storing a Frequency as a preset To store a frequency into a preset location 1. Tune on the radio to the required frequency. 2. Press and hold the preset locations number (1-4) for about 3 seconds, until “Preset Stored” appears on the display. 3. Hold SHIFT button and then hold preset number (5-8) for about 3 seconds, until “Preset Stored” appears on the display. Recalling a Preset Frequency To recall a preset frequency 1. Briefly press the preset locations number buttons (1-4), and the current frequency stored in the Preset location will be displayed. Page 8 2. Hold SHIFT button and then briefly press preset number (5-8) to select the desired preset number, and the current frequency stored in the preset location will be displayed. 3. If nothing is currently stored in the location, “Preset Empty” will appear on the display. Specifications POWER SUPPLY: Adaptor: 7.5V 600mA ( ) Battery: 6x1.5V (AA/LR6) Receiver Bands: DAB/DAB+ Band III: 174.928 MHz (5A) – 239.200MHz (13F) Tuning Range - 11B to 12D local scan, 5A to 13F full scan FM Range 87.5-108 MHz DAB sensitivity: -98dBm or better DAB Adjacent Channel Rejection: -30dB or better DAB audio decode: 64kbps - 384kbps Power Output (at 10% THD): 1W RMS Headphones Socket: 3.5mm diameter. Speakers: 50mm Dimensions (W x H x D): 18.5 x 11 x 4.5 cm Power consumption : 4.5W Specifications are subject to change and improvement at any time without notice. Important notice: In case of malfunction due to electrostatic discharge, reset the apparatus by disconnecting from the mains supply. Disconnect from the mains, remove the batteries and leave to stand for a few minutes. Replace the batteries or re-connect to the mains supply. Electrostatic discharge In case of malfunction due to electrostatic discharge just reset the micro system (reconnection of power may be required) to resume normal operation. Page 9 Electrical Information Warning Read these electrical safety instructions carefully before connecting the AC adaptor to the mains. z z z z z z z This unit is supplied with an AC mains adaptor. This AC mains adaptor is designed to operate on AC 230V ~50Hz supply only. Connecting it to any other power sources may damage the unit. The AC mains adaptor is designed for indoor use only. The AC mains adaptor is a sealed unit. There are no user serviceable parts inside and it does not require any electrical adjustments. Do not attempt to open the AC mains adaptor. If the AC mains adaptor is not suitable for your socket, or becomes damaged, it must be replaced and disposed of in a safe and environmentally protective way. Always refer to qualified personnel. Periodically inspect the AC mains adaptor for damage. Do not use if faults or damages are found. Refer to qualified personal. This symbol indicates that the adaptor is a Class II appliance and does not require an earth connection. This symbol indicates that the adaptor is for indoor use only. This symbol indicates that the adaptor conforms to CE regulations. Safe use and care of your equipment We have designed and made this product to meet European safety standards, but as with any electrical equipment you must take care to get the longest working life from it and stay safe. Here are a few tips to help you do this. Read these instructions carefully before you try to use the equipment. Protect the power lead. You must ensure the power lead cannot be walked on, crushed, chafed or cut. Avoid harsh conditions such as wet or damp places, high humidity, strong vibration, extremely high or low temperatures, strong sunlight and places which are very dusty. Never push objects into holes and ventilation slots. To save power, switch off mains power or pull out the mains power plug when you are not using the equipment, unless the function of the equipment requires a continuous power supply. Don't continue to use this equipment if you have spilt liquids in it, if it is damaged in any way or if it does not work normally. Immediately unplug the equipment and get expert advice. Pull the mains adapter out of the wall socket during thunderstorms. This product is designed for domestic use only. Any other use may invalidate the guarantee and might be dangerous. Ventilation Place the equipment on a hard flat surface away from direct sunlight and heat sources. If it is in a cabinet, allow at least a 10cm gap all around. Don't obstruct the ventilation slots, including those underneath, with soft furnishings. Overheating will shorten the life of the equipment and increase the risk of fire. Page 10 Cleaning Disconnect the mains supply and use only a lightly dampened soft cloth. Do not use chemical solvents or strong detergents as these may damage the cosmetic finish. Batteries Remove batteries when the equipment is not to be used for a long time. Batteries left in equipment may cause damage through deterioration and corrosive leakage, invalidating the guarantee. To protect the environment please use local recycling facilities for battery disposal. Disposal Waste electrical and electronic products must not be disposed of with household waste. Please refer to the retailer from whom you purchased this item for disposal instructions. Batteries and packaging materials can be recycled using your local collection facilities. Important Safety warnings • To prevent electric shock, do not remove any cover. • If anything goes wrong, don't try and fix it yourself, get a qualified service agent to look at the product. • Do not expose this equipment to dripping or splashing or place any objects filled with liquids, such as vases, on the equipment. • Never put a naked flame source on or near this equipment. • Small parts. Do not let young children play with the equipment Page 11