1
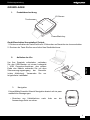
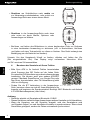
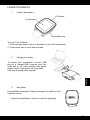
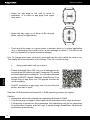
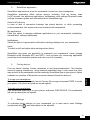
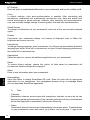
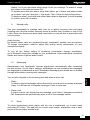
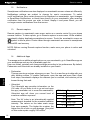
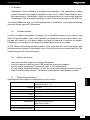
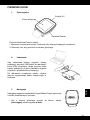
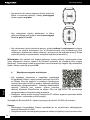
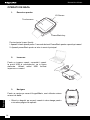
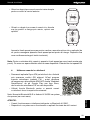
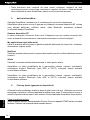
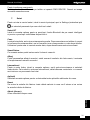
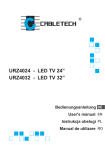
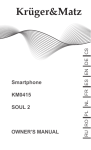
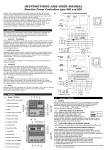
KRUGER&MATZ
SMARTWATCH CLASSIC
Română
OWNER’S MANUAL
Polski
English
Deutsch
KM0420
Bedienungsanleitung
GRUNDLAGEN
1.
Produktbeschreibung
UV Sensor
Touchscreen
Power/Back key
Gerät Einschalten/ Ausschalten/ Zurück:
1. Drücken und halten der Taste Ein/Aus für 3 Sekunden um Smartuhr ein-/auszuschalten.
2. Drucken der Taste Ein/Aus zum Aufruf des Startbildschirms
2.
Aufladen der Uhr
3.
Deutsch
Um Ihre Smartuhr aufzuladen, verbinden
Sie den USB-Stecker mit einem Ladegerät
/ USB Computer-Anschluss; das andere
Ende des Kabels verbinden Sie mit dem
Stromversorgungseingang der Smartuhr
(siehe Abbildung). Verwenden Sie nur
mitgelieferte Ladekabel.
Navigation
Krüger&Matz Smartuhr Klassik Navigation basiert auf ein paar
wesentliche Bewegungen:
• Streichen am Uhrbildschirm
Anwendungs-Seite zu sehen.
nach
links
um
die
3
Bedienungsanleitung
• Streichen am Uhrbildschirm nach rechts um
zur Uhranzeige zurückzukehren, oder zurück zur
Anwendungs-Seite aus einem oberen Menü.
Swipe the app page up or
down to skim through.
• Calculator
Streichen in
der Anwendungs-Seite nach oben
Calendar
oder unten um durch Menüs, Optionen oder
Anwendungen zu blättern.
Call Log
Music
• Berühren und halten des Bildschirms in einem bestimmtem Platz um Optionen
in einer bestimmten Anwendung zu aktivieren (z.B. in Nachrichtern, berühren
und halten auf einer Textnachricht um diese zu löschen. Das Gerät verlangt eine
Bestätigung um die Nachricht zu löschen).
Hinweis: Um den Hauptmenü Uhrstil zu ändern, drücken und halten der Uhr
(Bei eingeschalteter Uhr). Das Display zeigt vorhandene Uhrmotive. Klick
auf OK um einen Stil auszuwählen.
Using smart watch with your phone
Deutsch
4.
Benutzen der Smartuhr mit Ihrem Telefon
Please
download Sync APK into
• Bitte Sync APK in Ihr Android Telefon herunterladen
Scannen des
QR Codes
der linken Seite.
yourdurch
Android
phone
byaufscanning
Es unterstützt FW Aktualisierung und extra Anwendungen
the Installation;
QR code
right
side.
It APK/APP
Sie on
können
auch eine
andere
genannt “Mediatek SmartDevice” von Google Play oder
supports
update
and
extra steht
App Store,FW
herunterladen,
aber FW
Aktualisierung
nicht zur Verfügung.
application
installation;
• Finden Sie die BT Verbindung in der Anwendungsum sich mit Ihrem
Mobiltelefon APK/APP
zu
YouSeite,
canbenutzen
alsodiese
download
another
koppeln und beginnen die Synchronisation! Benötigt: BLE Bluetooth und Android
named
asBetriebssystems
"Mediatek
SmartDevice" from
4.3./iOS8
(oder höher).
Google
Achtung: Play or App Store, but FW upgrade
• Smartuhr arbeitet
Smartphone Bluetooth 4.0 BLE.
function
is notmit available.
• Dieses Gerät kann vielleicht einige Anwendungen anderer Hersteller nicht Unterstützen.
• Wenn
Kopplung von der
ausgeht, wird
Find
BT die
connection
inSmartuhr
app page,
usedasit Smartphone
pair wird
um Erlaubnis fragen, um und Anruflisten Kontakte zu synchronisieren. Wenn durch
withSmartWear
your gekoppelt,
phone,
then
start
to sync!
werden
die Daten
automatisch
synchronisiert
4
Bedienungsanleitung
5.
SmartWear Anwendung
SmartWear Anwendung funktioniert als ein Werkzeug um die Smartuhr durch
den Smartphone zu kontrollieren. SmartWear Anwendung bietet verschiedene
Optionen, wie z.B.: Gerätfinder, suchen nach zusätzlichen BT Geräten, Ausführen
zusätzlicher Anwendungen, Benachrichtigungen, Alarmeinstellungen, Bluetooth Modus
Einstellungen, Firmware aktualisieren und Informationen über SmartWear Anwendung.
Suchen nach BT Geräte
Im Falle einer fehlenden Verbindung zwischen zwei gekoppelten Geräten oder beim
Anschluss einer neuen Smartuhr, scannt und verbindet diese Option mit Smartuhr.
Meine Anwendungen
Wählen Sie diese Option um zusätzliche Anwendungen auf Ihrer Smartuhr zu verwalten
(Installation, entfernen, Einstellungen).
Benachrichtigungen
Wählen Sie diese Option, um auf Ihrer Smartuhr angezeigte Benachrichtigungen
zu personalisieren.
Alarmeinstellungen
Wählen Sie Alarmeinstellungen um Alarm ein-/auszuschalten und die Einstellungen
zu ändern. SmartWear Anwendung bietet Ihnen die Möglichkeit den Smartuhr Namen
einzustellen, Bluetooth Modus zu ändern (zwischen SPP und GATT), anzeigen
von Basisinformationen über Anwendungen, sowie nach verfügbaren Aktualisierungen
suchen und diese durchführen, wenn möglich.
Gerätefinder
Die Funktion Gerätefinder ortet verlegte oder verlorenes Telefon / Smartuhr. Diese
Funktion sendet einen Funkruf zum Smartphone mit Hilfe der ausgewählten Smartuhr
Anwendung; es funktioniert auch umgekehrt, die Smartuhr kann durch die SmartWear
Anwendung auf Ihrem Telefon gefunden werden. Die Option funktioniert nur unter der
Bedingung einer bestehenden Bluetooth-Verbindung zwischen den beiden Geräten.
Um Ihr Smartphone zu finden:
Aus dem Menü Ihrer Smartuhr, starten Sie die Anwendung Gerätefinder und drücken
START um Ihr Telefon zu orten. Das Telefon wird klingeln.
Um Ihre Smartuhr zu finden:
Starten Sie die Anwendung SmartWear auf Ihrem Telefon und drücken GERÄT FINDEN.
Die Smartuhr erzeugt Tonsignale.
7.
Einstellungen
Um die allgemeinen Einstellungen Ihrer Smartuhr anzupassen, gehen Sie zum
Hauptmenü, wählen das Untermenü Einstellungen (durch das
gekennzei9chnet) und wählen die Option die Sie ändern möchten.
Symbol
5
Deutsch
6.
Bedienungsanleitung
BT Einstellungen
Wählen Sie diese Option um Bluetooth auf Ihrer Smartuhr zu aktivieren/desaktivieren
und schalten die Sichtbarkeit ein/aus.
Uhr
In den Standardeinstellungen ist automatische Uhr-Synchronisierung aktiviert. Nach
dem Verbinden mit dem Smartphone wird Smartuhr automatisch Uhrzeit, Datum
synchronisieren und das Stunden-Format entsprechend den Telefoneinstellungen
anpassen. Doch nach dem Einschalten der automatisch die Synchronisation, kann
der Benutzer manuell Einstellungen bezüglich Datum, Uhrzeit und die automatische
Synchronisierung ändern.
Klang/Lautstärke
Um Klang/Lautstärke auf Ihrer Smartuhr zu ändern, wählen Sie eines davon
aus und ändern die Einstellungen.
Display
Einstellen des Smartuhr Display: einstellen der Anzahl der angezeigten Symbole
in der Menüliste, Helligkeit und Bildschirm-Ausschaltzeit.
International
Um die Spracheinstellungen zu ändern, gehen Sie zu International, schalten die
automatische Synchronisation aus und wählen die gewünschte Sprache. In diesem Menü
wählen Sie Ihre bevorzugte Kontaktanzeige: Vornahme zuerst oder Nachnahme zuerst.
Deutsch
Anwendungen
Wählen Sie diese Option um alle zusätzlichen Anwendungen aus Ihrer Smartuhr zu entfernen.
Zurücksetzen
Wählen Sie diese Option um die Werkseinstellungen wiederherzustellen.
Alle in Ihrer Smartuhr gespeicherten Daten werden gelöscht und die Uhr wird
auf die Werkseinstellungen zurückgesetzt.
Info
Wählen Sie diese Option um Information über Ihre Smartuhr zu sehen.
Anwendung herunterladen
Wählen Sie diese Option um den SmartWear QR Code anzuzeigen. Scannen Sie den
Code mit einer geeigneten Anwendung auf Ihrem Smartphone. Ihr Smartphone Browser
wird die Webseite öffnen wo Sie die Anwendung SmartWear herunterladen können.
8. Geräte
• Kalender
Smartuhr Kalender synchronisiert mit Smartphone Kalender (sobald die beiden Geräte
gekoppelt und verbunden sind). Alle Kalenderbenachrichtigungen von Ihren Smartphone
werden auch auf der Smartuhr angezeigt (sofern nicht anders eingestellt).
6
Bedienungsanleitung
• Alarm
Smartuhr Alarmfunktion arbeitet unabhängig vom Telefonalarm. Um Alarm auf Ihrer
Smartuhr zu aktivieren, gehen Sie im Hauptmenü auf Alarm und berühren das Pluszeichen
„+” auf dem Display. Sie sehen eine neue Alarmeinstellung. Geben Sie Ihre Einstellungen
ein. Zum aktivieren, streichen Sie am Bildschirm nach rechts und wählen EIN.
Um mehr als einen Alarm zu aktivieren, geben Sie im Hauptmenü zu Alarm und
streichen den Bildschirm nach oben oder unten, bis Sie wieder das Pluszeichen „+”
sehen. Befolgen Sie die oberen Anweisungen.
Um einen Alarm zu löschen, berühren und halten Sie den Bildschirm, wenn Alarm
angezeigt wird. Sie werden aufgefordert zu bestätigen; drücken Sie OK zum löschen.
9. Anrufe verwalten
Verwenden Sie Ihre Smartuhr um Anrufe zu verwalten: annehmen oder eingehende
Anrufe ignorieren und ausgehende Anrufe tätigen (wählen Sie die Nummer manuell,
wählen Sie eine Nummer aus dem Adressbuch oder aus einer Anrufliste). Sobald Ihre
Geräte gekoppelt und verbunden sind, können Sie noch immer Anrufe auf Ihrem Handy
annehmen / tätigen.
Um das Konversations-Medium zu ändern, passen Sie diese Einstellung während
des Gesprächs auf dem Smartphone - Display. Um die Standardeinstellung
Gesprächübertragung durch Smartuhr auszuschalten, gehen Sie auf Ihrem Smartphone
zu Bluetooth-Verbindungseinstellungen, wählen Smartuhr Verbindungsdetails
und schalten Telefon-Audiosteuerung aus.
10. SMS-Nachrichten
Smartphone und Smartuhr Posteingang synchronisiert sich automatisch nach
dem Verbinden der beiden Geräte. Nach Einstellungen des Benutzers, werden
Benachrichtigungen über neu eingehende SMS-Nachrichten auch auf der Smartuhr
angezeigt. Smartuhr Nachrichten ermöglicht es auch durch neuste eingehende SMSNachrichten des Handys zu blättern. Sie können auch auf die ankommenden Texte
reagieren und einen Rückruf tätigen.
• Antworten
Um eine Antwort auf eine Textnachricht zu senden, wählen Sie den gewünschten Text,
ggf. nach unten blättern und drücken Antworten. Sie werden, die Liste der VorlageNachrichten sehen. Drücken Sie, um eine Nachricht zu senden.
• Anruf tätigen
Um einen Rückruf zu tätigen, gehen Sie zur Textnachricht, ggf. nach unten blättern und
wählen Anrufen. Smartuhr wird automatisch einen Anruf an den Absender der Nachricht
tätigen.
7
Deutsch
Audiofunktion
Voreingestellt ist dass Anrufe über Smartuhr Mikrofon und Lautsprecher übertragen
werden.
Bedienungsanleitung
11. Musik
Um, Smartphone Musik-Player mit der Smartuhr zu steuern, gehen Sie zu Hauptmenü
und wählen BT Musik. Diese Anwendung ermöglicht es den Musik-Player zu steuern:
Wiedergabe / Pause, Überspringen zur nächsten / vorherigen Datei und einstellen der
Lautstärke.
12. Benachrichtigungen
Smartphone Benachrichtigungen werden auch auf dem Bildschirm der Smartuhr
angezeigt wenn nicht anders eingestellt. Benachrichtigungs-Einstellungen können nach
belieben des Benutzers geändert werden. Um die Anzeige der Benachrichtigung auf
der Smartuhr von einer Quelle ein-/auszuschalten, die Sie blockieren, zeigen Sie es
und drücken Sie blockieren möchten, werden Sie: Um aus bestimmten Quellen Ein- /
Ausschalten, Änderungen in SmartWear Benachrichtigungen eingeben, oder blockieren
Sie diese direkt auf Ihrer Smartuhr: nach erhalten von Benachrichtigungen aus der Quelle
die Sie blockieren möchten, zeigen Sie diese am Bildschirm an und drücken Blockieren;
Sie werden keine weiteren Benachrichtigungen von dieser Quelle mehr erhalten.
Deutsch
13. Fernbedienungs-Erfassung
Fernbedienungs-Erfassung in Smartuhr Hauptmenü arbeitet als Fernbedienung für Ihre
Telefon-Kamera-Funktion. Um ein Foto zu machen, gehen Sie auf FernbedienungsErfassung in Hauptmenü. Während aktiviert, kopiert Smartuhr-Display den SmartphonBildschirm. Berühren Sie den Smartuhr-Bildschirm auf dem Symbol, um ein Foto
aufzunehmen. Fotos durch Smartuhr aufgenommen, werden in der internen Smartphone
/ SD-Karte gespeichert.
HINWEIS: Bevor die Fernbedienungs-Erfassungsfunktion ausgeführt wird, stellen
Sie sicher, dass Ihr Telefon aktiv und entriegelt ist.
14. Zusätzliche Anwendungen
Um zusätzliche Anwendungen auf Ihrer Smartuhr zu verwalten und ausführen, gehen
Sie zur SmartWear Anwendung auf Ihrem Smartphone und betrachten die Liste
der verfügbaren Anwendungen.
Der Benutzer kann Anwendungen nach belieben installieren, deinstallieren
und Einstellungen ändern. Standardmäßig sind Ultraviolett und Schrittzähler und bereits
auf Ihrer Uhr installiert.
• Schrittzähler
Diese Anwendung zählt Ihre Schritte, wo immer Sie sind. Einschalten und immer
Informiert mit Ihrer täglichen Routine zu Fuß. Um Schrittzähler zu aktivieren, öffnen
Sie die Anwendung und drücken Start. Abgesehen von Schritten zeigt Smartuhr
die Distanz die Sie gegangen sind und die Anzahl der Kalorien, die Sie während dieser
Wanderung verbrannt haben.
8
Bedienungsanleitung
• Ultraviolett
Die UV-Anwendung liefert Informationen über den UV-Index. Alles was Sie tun müssen,
ist ausgehen und die Anwendung zu öffnen (achten Sie darauf, die Smartuhr nicht
zu bedecken). Die UV-Anwendung zeigt Ihnen das UV Index Bestrahlungsniveau
gegenwärtige Niveau der Sonnenstrahlenbelastung.
0-2 Niedrig
Hinweis: Der UV-Index ist ein international angewandter
3-5 Mittel
Messstandard für die Sonnenstrahlungsintensität. Die
Werte auf der Indexskala reichen von Null nach oben.
6-7 Hoch
Je höher die Zahl, desto höher die Gefahr von Haut8-10
Sehr hoch
oder Augen-Schaden. Ein Punkt auf dieser Skala
> 11 Extrem
entspricht etwa 250 mW/m2.
• Y! Wetter
Zusätzlich steht Yahoo! Wetter für die Installation zur Verfügung. Die Anwendung
bietet aktuelle Informationen zu Wetterbedingungen in jeder Stadt. Um Yahoo! Wetter
zu installieren, gehen Sie zu Meine Anwendungen in SmartWear, berühren Sie das
entsprechende Symbol und bestätigen die Installation, wenn nötig. Nach erfolgreicher
Installation wählen Sie die gewünschte Temperatureinheit und die Stadt. Um zusätzliche
Anwendung zu deinstallieren, gehen Sie zu Meine Anwendungen in SmartWear, berühren
das entsprechende Anwendungs-Symbol und bestätigen das Entfernen, wenn nötig.
Um Smartuhr Firmware zu aktualisieren, gehen Sie zur SmartWear Anwendung
auf Ihrem Telefon und wählen Firmware-Aktualisieren. Prüfen Sie zunächst,
ob Ihre Firmware-Version sich auf dem neuesten Stand befindet. Wenn nicht, wird
die Anwendung nach der letzten Aktualisierung suchen und Sie um die Genehmigung
bitten, eine Aktualisierung durchzuführen. Nach akzeptieren, wird die Anwendung
automatisch eine Aktualisierung durchführen.
HINWEIS: Vor dem Durchführen der Firmware-Aktualisierung, stellen Sie sicher, dass
sowohl Ihre Smartuhr als auch Smartphone geladen sind. Wenn der Ladezustand
der Batterie von einem der Geräte geringer ist als 60%, wird der Aktualisierungsprozess
nicht durchgeführt werden.
16. Sicherheitsanleitungen
• Verwenden Sie nur das mitgelieferte Smartuhr-Ladekabel.
• Verwenden Sie das mitgelieferte Kabel nur mit USB-kompatiblen Anschlüssen
und Ladegeräte.
• Smartuhr in extrem hohen oder niedrigen Temperaturen nicht aufladen.
• Smartuhr nicht aufladen, wenn es nass ist, da dies zu Stromschlaggefahr führen kann.
• Halten Sie das Gerät fern von Feuer. Die Batterie kann explodieren,
was zu Verletzungen oder zum Tod führen kann.
9
Deutsch
15. Firmware aktualisieren
Bedienungsanleitung
17. Technische Daten
Technische Daten können ohne Vorankündigung geändert werden.
Anforderungen Betriebssystem 4.3, iOS8 (oder höher),
Bluetooth 4.0 BLE + 2.1
Chipset MTK SOC
CPU MediaTek Aster MT2502 basierend auf LinkIt Linux System
Batteriekapazität 315 mAh
IP67
Display 1,6” (240×240 px)
Gewicht 50.3 g
Abmessungen (47x42x13 mm)
Gurt (22 mm breit)
UV Sensor
Integrierter Lautsprecher, Mikrofon
Deutsch
Die Spezifikationen können ohne Ankündigung geändert werden.
Hiermit erklär die Firma Lechpol dass sich das Gerät KM0420 im Einklang mit den grundlegenden
Anforderungen und anderen relevanten. Bestimmungen der Richtlinie 1999/5/EG befindet.
Konformitätserklärung zum Download auf www.lechpol.eu
Deutsch
Korrekte Entsorgung dieses Produktes
(Abfälle aus elektrischen und elektronischen Geräten)
(Anzuwenden in den Ländern der Europäischen Union und anderen europäischen Ländern mit
einem separaten Sammelsystem)
Die Kennzeichnung auf dem Produkt bzw. auf der dazugehörigen Literatur gibt an, dass es
nach seiner Lebensdauer nicht zusammen mit dam normalen Haushaltsmüll entsorgt werden
darf. Entsorgen Sie dieses Gerät bitte getrennt von anderen Abfällen, um der Umwelt bzw. der
menschilchen Gesundheit nicht durch unkontrollierte Müllbeseitigung zu schaden. Recyceln Sie
das Gerät, um die nachhaltige Wiederverwertung von stofflichen Ressourcen zu fördern.
Private Nutzer sollten den Händler, bei dem das Produkt gekauft wurde, oder die zuständigen
Behörden kontaktieren, um in Erfahrung zu bringen, wie sie das Gerät auf umweltfreundliche Weise
recyceln können.
Gewerbliche Nutzer sollten sich an Ihren Lieferanten wenden und die Bedingungen des Verkaufsvertrags konsultieren. Dieses Produkt darf nicht zusammen mit anderem Gewerbemüll entsorgt
werden.
Vertrieben durch LECHPOL Electronics BV, Nijverheidsweg 15 4311RT Bruinisse, Niederlande.
10
Owner’s manual
LEARN THE BASICS
1.
Product description
UV Sensor
Touchscreen
Power/Back key
Turn on/ Turn off/ Back:
1. Press and hold power key for 3 seconds to turn on/off smartwatch.
2. Press power key to enter Home screen.
2.
Charge your watch
English
To charge your smartwatch, connect USB
plug to a charger/USB computer port; the
other end of the cable connect with power
supply input in smartwatch (as illustrated).
Use only charging cable supplied.
3.
Navigation
Kruger&Matz smartwatch Classic navigation is based on few
essential moves:
• Swipe the watchface to the left to view the app page.
11
Owner’s manual
• Swipe the app page to the right to return to
watchface, or to return to app page from upper
level menu.
• Swipe the app page up or down to flip through
Menu, options or applications.
Calculator
Calendar
Call Log
Swipe the app page up or
down to skim through.
Music
• Touch and hold screen in a given place to activate option in a certain application
(e.g. in Messaging, touch and hold on a text message to delete it. The device will
ask for permission to delete selected message).
Hint: To change main menu clock style, press and hold the clock (while the clock is on).
The display will show available clock motives. Click OK to select a style.
Using smart watch with your phone
English
4.
Using smart watch with your phone
• Please download Sync APK into your Android phone by
Please
download Sync APK into
scanning the QR code on the right. It supports FW update
extra application
installation;by
You can
also download
yourand
Android
phone
scanning
another APK/APP named “Mediatek SmartDevice” from
the Google
QR code
onStore,
right
side.
Play or App
but FW
upgradeIt
function will
not be available.
supports FW update and extra
• Find BT connection in app page, use it to pair with your
application
installation;
phone, and start to sync!
You
can also download another APK/APP
Requires: BLE Bluetooth and Android 4.3./iOS8 operating systems (or higher).
named as "Mediatek SmartDevice" from
Caution:
Google
Play
orwithApp
Store,
butBluetooth
FW upgrade
• smartwatch
works
smartphones
operating
4.0 BLE.
• This device may not support some applications manufactured by other producers.
function
is not available.
• If the pairing is issued from the smartwatch, the smartphone will ask for permission
synchronize
Contacts and Call
through
SmartWear,
Findtosynchronize
BT
connection
in Logs.
appIf paired
page,
use
it pairthe data will
automatically.
with your phone, then start to sync!
12
Owner’s manual
5.
SmartWear application
SmartWear app works as a tool for smartwatch control from your smartphone.
SmartWear application offers various options, including: Find my device, scan
for BT devices, run additional applications, notifications, alert settings, Bluetooth mode
settings, firmware update and information about SmartWear app.
Scan for BT devices
In case of lack of connection between two paired devices, or while connecting
a new smartwatch, this option scans and connects with smartwatch.
My applications
Enter this option to manage additional applications on your smartwatch (installation,
deinstallation, settings adjustment).
Notifications
Select this option to personalize notifications settings displayed on your smartwatch.
Alerts
To switch on/off and adjust alerts settings select Alerts.
SmartWear app gives you possibility to customize your smartwatch’ name, change
Bluetooth mode (between SPP and GATT), look up basic info concerning application
as well as check available updates and carry one out if possible.
6.
Find my device
To locate your smartphone:
Enter Menu on your smartwatch, launch Find my Device app, and press START to locate
your phone. The phone will produce sound signals.
To locate your smartwatch:
Run SmartWear Application on your phone, and press FIND DEVICE. The smartwatch
will start producing sound signals.
7.
Settings
To customize basic settings on your smartwatch, go to main menu, enter Settings
) and select option to be adjusted.
(symbolized with
13
English
Find my device function locates misplaced or lost phone/smartwatch. This function
works by paging smartphone, using selected smartwatch app; it also works the other
way around, as the smartwatch can be located by SmartWear App on your phone. Option
available on condition of Bluetooth connection between these two devices.
Owner’s manual
BT Settings
Enter this option to enable/disable Bluetooth on your smartwatch, and turn the visibility on/off.
Clock
In default settings, clock auto-synchronization is enabled. After connecting with
smartphone, smartwatch will automatically synchronize time, date and adjust hour
format accordingly to phone settings. However, after switching auto-synchronization,
user can manually change settings concerning date, time and auto-synchronization.
Sound/Volume
To change sound/volume on your smartwatch, enter one of the two and select desired
option.
Display
Personalize your smartwatch display: set number of displayed icons on Menu list,
brightness and screen time out.
International
To change language settings, enter International, turn off auto-synchronization and select
language you prefer. While still in International, set your Contact displaying preferences:
first name first or last name first.
Applications
Select this option to remove all additional applications on your smartwatch.
Reset
To restore factory settings, choose this option; all data saved on smartwatch will
be removed, default settings will be applied.
English
About
Enter to see information about your smartwatch.
DownloadApp
Open this option to display SmartWear QR code. Scan the code with an appropriate
application on your smartphone. Your smartphone browser will go to webpage where
you can download SmartWear application.
8.
Tools
• Calendar
Smartwatch calendar synchronizes with smartphone calendar (as soon as the two
devices are paired and connected). Every calendar notifications from your smartwatch
will be also displayed on smartwatch (unless set differently).
• Alarm
Smartwatch alarm function works independently from phone alarm. To enable Alarm
on your smartwatch, enter main menu, go to Alarm, and touch plus “+” sign on the
14
Owner’s manual
display. You’ll see new alarm edition page. Enter your settings. To enable it, swipe
the screen to the right and select ON.
To enable more than one alarm, enter Main Menu, go to Alarm and swipe screen
up or down, until you’ll see plus “+”sign again. Then, follow the instructions above.
To delete an alarm, touch and hold screen when alarm is displayed. You will be asked
to confirm; press OK to delete.
9.
Manage calls
Use your smartwatch to manage calls: pick up or ignore incoming calls and place
outgoing calls (dial the number manually, select a number from Contacts or from a Call
Logs). Once your devices are paired and connected, you are still able to place/take calls
on your phone.
Audio function
By default, phone calls are streamed through smartwatch’ speaker and microphone.
To change conversation medium, adjust that setting during conversation on your
smartphone display.
To turn off the default setting of streaming conversation through smartwatch,
go to Bluetooth connection settings on your smartphone, enter smartwatch connection
details and switch off phone audio control.
10.
Messaging
Smartphone’s and smartwatch’ inboxes synchronize automatically after connecting
the two devices. As per user’s settings, notifications on new incoming text messages
are displayed on smartwatch as well. Smartwatch Messaging also allows also to browse
through latest phone incoming text messages.
• Reply
To send a reply text message, select desired text, scroll down if necessary and press
Reply. You will see list of template messages. Press to send one.
• Place a call
To place a return call, display the text message, scroll down if necessary and select
Call. Smartwatch will automatically place a call to the message sender.
11.
Music
To control smartphone music player with the use of smartwatch, go to main menu
and select BT music. This app lets you control music player: play/pause, skip to next/
previous file and adjust volume level.
15
English
You can also respond to the incoming texts and place a return call.
Owner’s manual
12.
Notifications
Smartphone notifications are also displayed on smartwatch screen unless set differently.
Notifications settings are subject to change for user’s convenience. To switch
on/off notifications from certain sources to be displayed on smartwatch, input changes
in SmartWear Notifications, or block them directly on your smartwatch: after receiving
notification from the source you wish to block, display it and press Block, you will
no longer receive notifications from that source.
13.
Remote capture
Remote capture in smartwatch main menu works as a remote control for your phone
camera function. To take a photo, go to Remote capture in main menu. While enabled,
smartwatch display duplicates smartphone’s screen. Touch the smartwatch screen on
symbol to take a photo. Photos taken through smartwatch are saved in smartphone
internal/SD card memory.
NOTE: Before running Remote capture function, make sure your phone is active and
unlocked.
14.
Additional Apps
To manage and run additional applications on your smartwatch, go to SmartWear app on
your smartphone and see list of available apps list.
User can install, uninstall and change settings according to his preferences. By default,
Pedometer and Ultraviolet are already installed on your watch.
English
• Pedometer
This app counts your steps, wherever you are. Turn it on and be up-to-date with your
daily walking routine. To enable Pedometer, open the app and press Start. Apart
from steps, smartwatch displays the distance you’ve covered, and calories you’ve
burned during that walk.
• Ultraviolet
The Ultraviolet app provides information on the
UV Index. All you have to do is go out and open
the app (remember not to cover the smartwatch).
Ultraviolet app will show you current level of
sunshine radiation exposure.
Note: The UV index is an internationally applied
measurement standard for the sunshine radiation
intensity. The values on the index scale range
from zero upwards. The higher the number, the
higher the risk of skin or eyes damage. One point
on this scale equals roughly 250 mW/m2.
16
UV Index
Exposure level
0-2 Low
3-5 Moderate
6-7 High
8-10 Very High
> 11 Extreme
Owner’s manual
• Y! Weather
Additionally, Yahoo! Weather is available for installation. The application provides
current information on weather conditions in any city. To install Yahoo!Weather go to
My Applications in SmartWear, touch the corresponding icon, and accept approval
if necessary. After successful installation, select desired temperature units and city.
To uninstall additional app, go to My Applications in SmartWear, touch appropriate app
icon and accept approval if necessary.
15.
Firmware update
In order to update smartwatch’ firmware, go to SmartWear app on your phone, and
select Firmware update. First, check whether your firmware version is up-to-date. If not,
the app will search for the latest update, and ask for approval to perform an update.
Following your acceptance, the app will automatically carry out an update.
NOTE: Before performing firmware update, make sure that both your smartwatch and
smartphone are charged. If the battery level of one of the devices is lower than 60%, the
update process will not be performed.
16.
•
•
•
•
•
Safety instructions
Use only the cable supplied to charge smartwatch.
Use the supplied cable only with USB-compliant ports and chargers.
Do not charge smartwatch in extremely high or low temperatures.
Do not charge smartwatch when it is wet, as it may cause danger of electric shock.
Keep the device away from fire. The battery could explode, causing injury or death.
English
17. Technical specifications
Specifications are subject to change without prior notice.
Requirements operating system 4.3, iOS8 (or higher),
Bluetooth 4.0 BLE + 2.1
Chipset MTK SOC
CPU MediaTek Aster MT2502 based on LinkIt Linux system
Battery capacity 315 mAh
IP67
Display 1,6” (240×240 px)
Weight 50.3 g
Dimensions couvette (47x42x13 mm)
strap (22 mm width)
UV Sensor
Build-in microphone, speaker
17
Owner’s manual
English
Specifications are subject to change without prior notice.
The Lechpol company declares that product KM0420 is consistent with the essential
requirements and other relevant provisions of directive 1999/5/EC. The proper
declaration for download from www.lechpol.eu
English
Correct Disposal of This Product
(Waste Electrical & Electronic Equipment)
(Applicable in the European Union and other European countries with separate collection systems) This
marking shown on the product or Its literature, indicates that It should not be disposed with other household wastes at the end of its working life. To prevent possible harm lo the environment or human health
from uncontrolled waste disposal, please separate this from other types of wastes and recycle it responsibly to promote the sustainable reuse of material resources. Household users should contact either the
retailer where they purchased this product, or their local government office, for details of where and how
they can take this item for environmentally safe recycling. Business users should contact their supplier
and check the terms and conditions of the purchase contract This product should not be mixed with other
commercial wastes for disposal.
Made in China for LECHPOL Zbigniew Leszek, Miętne, 1 Garwolińska Street, 08-400 Garwolin.
18
Instrukcja obsługi
PIERWSZE KROKI
1.
Opis zegarka
Czujnik UV
Ekran dotykowy
Zasilanie/Powrót
Przycisk Zasilania/Powrót, należy:
l. Nacisnąć i przytrzymać przez 3 sekundy, aby włączyć/wyłączyć urządzenie.
2. Nacisnąć raz, aby powrócić do ekranu głównego.
2.
Ładowanie
Aby naładować baterię zegarka, należy
podłączyć wtyczkę USB kabla do ładowarki/
portu USB komputera; drugą wtyczkę kabla
należy podłączyć do portu zasilania zegarka
(zgodnie z przedstawioną ilustracją).
Do ładowania urządzenia należy używać
jedynie oryginalnego kabla załączonego w
zestawie.
Nawigacja
Polski
3.
Nawigacja zegarka smartwatch Kruger&Matz Classic opiera się
na kilku podstawowych ruchach:
• Aby z ekranu głównego przejść do Menu, należy
przeciągnąć ekran zegarka w lewo.
19
Instrukcja obsługi
• Aby powrócić do ekranu zegara lub żeby wrócić do
Menu z konkretnej aplikacji, należy przeciągnąć
ekran zegarka w prawo.
• Aby nawigować między aplikacjami w Menu
głównym/dostępnymi opcjami, należy przeciągnąć
Calculator
Calendar
ekran w górę lub w dół.
Swipe the app page up or
down to skim through.
Call Log
Music
• Aby aktywować opcje konkretnej pozycji, należy dotknąć i przytrzymać w danym
miejscu na ekranie dotykowym (np. w Wiadomościach, przy wyświetlonej liście
odebranych wiadomości należy nacisnąć i przytrzymać na wybranej pozycji. Ekran
wyświetli prośbę o potwierdzenie usunięcia wybranej wiadomości).
Wskazówka: Aby zmienić styl zegara głównego, należy dotknąć i przytrzymać ekran
(przy włączonym ekranie zegara). Na ekranie wyświetlą się dostępne style zegara
głównego. Przesuwając ekran w prawo/lewo można wybrać styl zegara. Aby zatwierdzić
wybór, należy nacisnąć przycisk OK
Polski
Using smart watch with your phone
Please
download
Sync APK into
4.
Współpraca zegarka z telefonem
your
Android phone by scanning
• Aby nawiązać połączenie z zegarkiem smartwatch
the Kruger&Matz
QR code
onnależy
right
side.
It Sync APK
Classic,
pobrać
aplikację
ze Sklepu Play dla telefonu z systemem operacyjnym
supports
FW kod
update
and
extra
Android skanując
QR po prawej.
Aplikacja
obsługuje
aktualizację oprogramowania i instalację dodatkowych
application
installation;
aplikacji. Możliwe jest również ręczne pobranie
Mediatekdownload
SmartDevice ze another
sklepu Play lubAPK/APP
App Store, ale aktualizacja
Youaplikacji
can also
oprogramowania nie będzie wtedy dostępna.
• Następnie,
wejść w opcję Połączenie
BT w Menu zegarka,
sparować telefon
named
asnależy
"Mediatek
SmartDevice"
from
z zegarkiem i rozpocząć synchronizację!
Google Play or App Store, but FW upgrade
Wymagania: Bluetooth BLE i system operacyjny Android 4.3/iOS8 (lub nowsze).
function
is not available.
Uwaga:
Find
BT connection in app page, use it pair
• Smartwatch Kruger&Matz Classic współpracuje ze smartfonami obsługującymi
withłączność
yourBluetooth
phone,
then start to sync!
4.0 BLE.
• Urządzenie może nie obsługiwać poprawnie niektórych aplikacji innych producentów.
20
Instrukcja obsługi
• Jeśli połączenie zostanie nawiązane z poziomu zegarka na wyświetlaczu telefonu
pojawi się komunikat nt. wyrażenia zgody na synchronizację Kontaktów oraz Spisu
połączeń. Po połączeniu urządzeń za pomocą aplikacji SmartWear w telefonie,
dane synchronizują się automatycznie.
5.
Aplikacja SmartWear
Aplikacja SmartWear pozwala na sterowanie zegarkiem Kruger&Matz Classic z poziomu
telefonu.
Aplikacja oferuje szereg opcji i ustawień: Lokalizator, wyszukiwanie urządzeń BT,
zarządzanie dodatkowymi aplikacjami zegarka, ustawienia powiadomień i alertów,
wybór trybu Bluetooth, aktualizacje oprogramowania oraz informacje o aplikacji.
W przypadku braku połączenia między urządzeniami, za pomocą aplikacji SmartWear
(zakładka Wyszukaj urządzenia BT) można wyszukać i nawiązać połączenie z
zegarkiem.
Zakładka Moje Aplikacje pozwala zarządzać dodatkowymi aplikacjami smartwatcha
(instalacja, deinstalacja, zmiana ustawień).
Opcja Powiadomienia służy do personalizacji wyświetlania powiadomień telefonu na
ekranie zegarka.
W zakładce Alerty można włączyć/wyłączyć alerty utraty zasięgu i połączenia, a także
wprowadzić zmiany w ich ustawieniach.
Aplikacja SmartWear pozwala również na wprowadzenie spersonalizowanej nazwy
zegarka smartwatch, w celu ułatwienia wyszukiwania go wśród innych dostępnych
urządzeń bezprzewodowych.
Kolejną funkcją tej aplikacji jest zmiana trybu łączności Bluetooth pomiędzy SPP i
GATT.
6.
Polski
Po otwarciu zakładki Aktualizacja oprogramowania, użytkownik ma dostęp do
podstawowych informacji dotyczących wersji oprogramowania aplikacji oraz możliwość
ewentualnej aktualizacji oprogramowania.
Funkcja „Lokalizator”
Funkcja Lokalizatora pozwala na określenie położenia zarówno telefonu jak i zegarka.
Działanie tej funkcji polega na wywołaniu telefonu z poziomu zegarka. Lokalizator działa
również w drugą stronę: za pomocą telefonu można określić położenie zegarka. Opcja
możliwa jest po nawiązaniu połączenia Bluetooth pomiędzy urządzeniami.
Aby zlokalizować telefon za pomocą zegarka należy:
Wejść w Menu zegarka, uruchomić aplikację Lokalizator (Znajdź moje urządzenie) i uruchomić
21
Instrukcja obsługi
ją naciskając przycisk START. Telefon zacznie wydawać sygnały dźwiękowe, ułatwiające
określenie jego położenia.
Aby zlokalizować zegarek za pomocą telefonu należy:
Uruchomić aplikację SmartWear w telefonie, a następnie nacisnąć przycisk Lokalizator.
Zegarek zacznie wydawać sygnały dźwiękowe, ułatwiające określenie jego położenia.
7.
Ustawienia
Ustawienia podstawowe zegarka można bezpośrednio zmieniać i dostosowywać w
Menu zegarka, w zakładce Ustawienia oznaczonej symbolem
.
Ustawienia BT
Funkcja pozwala włączyć/wyłączyć łączność Bluetooth oraz włączyć/wyłączyć
widoczność urządzenia.
Zegar
W domyślnych ustawienia zegarka, włączona jest synchronizacja czasu. Po połączeniu
z telefonem, smartwatch automatycznie zsynchronizuje czas, datę oraz format godziny,
zgodnie z ustawieniami telefonu. W zakładce Zegar można zmienić ustawienia
dotyczące czasu i daty, włączyć/wyłączyć synchronizację z zegarkiem oraz wybrać styl
głównego zegara.
Dźwięk/Głośność
W zakładce Dźwięk można dostosować ustawienia dotyczące dźwięku. Natomiast,
w zakładce Głośność możliwa jest regulacja głośności dzwonków, powiadomień i
multimediów.
Wyświetlacz
Opcja pozwala spersonalizować ustawienia wyświetlacza: ustalić ilość ikon aplikacji
wyświetlanych na ekranie, poziom jasności wyświetlacza oraz czas, po którym ekran
przechodzi w tryb czuwania.
Polski
Język
Aby ręcznie dostosować opcję języka, należy wejść w zakładkę Język, wyłączyć funkcję
auto-synchronizacji oraz wybrać odpowiedni język. W tej samej zakładce można również
zmienić sposób wyświetlania kontaktów: najpierw imię lub najpierw nazwisko.
Aplikacje
Za pomocą tej funkcji możliwe jest odinstalowanie wszystkich dodatkowych aplikacji
znajdujących się na zegarku.
Reset
Funkcja pozwala przywrócić ustawienia fabryczne zegarka smartwatch Kruger&Matz
Classic. Po wykonaniu resetu urządzenia, wszystkie dane zostaną usunięte.
22
Instrukcja obsługi
Informacje
Zakładka podaje informacje dotyczące urządzenia.
Pobierz aplikację
Po otwarciu tej zakładki, na ekranie wyświetli się kod QR, który należy zeskanować
za pomocą odpowiedniej aplikacji na telefonie, w celu pobrania aplikacji obsługującej
smartwatcha z poziomu telefonu. Po zeskanowaniu kodu, przeglądarka w telefonie
zostanie przekierowana do strony, z której można pobrać aplikację SmartWear.
8.
Narzędzia
• Kalendarz
Kalendarz dostępny jest w Menu głównym zegarka. Po połączeniu urządzenia ze
smartfonem, wydarzenia zapisane w Kalendarzu telefonu zostaną automatycznie
zsynchronizowane ze smartwatchem. Powiadomienia powiązane z wydarzeniami
Kalendarza będą wyświetlane również na ekranie zegarka.
• Alarm
Funkcja Alarmu dostępna w zegarku działa niezależnie od aplikacji Alarmu w
telefonie. Aby zaprogramować Budzik smartwatcha, należy wejść w Menu, otworzyć
aplikację Alarm oraz dotknąć ikonę +. Na ekranie wyświetli się okno edycji nowego
alarmu. Aby włączyć alarm, należy najpierw wprowadzić wartości dla nowego
alarmu, a następnie przesunąć ekran w prawo i zaznaczyć opcję ON (WŁ.). Istnieje
możliwość zaprogramowania kilku alarmów. W tym celu, po wejściu do opcji Alarm,
należy przesunąć ekran w górę lub w dół, do momentu aż na ekranie pojawi się
ikona +; po czym, należy wprowadzić nowy alarm zgodnie z instrukcją powyżej.
Aby usunąć wybrany alarm, należy nacisnąć i przytrzymać na danym alarmie. Na
ekranie wyświetli się prośba o potwierdzenie usunięcia alarmu. Aby potwierdzić,
należy nacisnąć OK; aby anulować, należy nacisnąć Anuluj.
Zarządzanie połączeniami
Za pomocą zegarka można zdalnie zarządzać połączeniami: odbierać, bądź odrzucać
połączenia przychodzące oraz nawiązać połączenia wychodzące (wprowadzić numer
ręcznie, wybrać pozycję z listy Kontaktów lub wybrać pozycję ze Spisu połączeń).
Po połączeniu zegarka z telefonem, nadal można odbierać/nawiązywać połączenia z
poziomu telefonu.
Sterowanie audio
Domyślnie, wszystkie rozmowy odbywają się przez zegarek smartwatch Kruger&Matz
Classic. Aby prowadzić rozmowę przez słuchawkę lub głośnik telefonu, należy zmienić
tryb rozmowy na ekranie telefonu podczas trwania połączenia.
Aby wyłączyć domyślne prowadzenie rozmów przez zegarek, należy przejść w
Ustawienia łączności Bluetooth w telefonie i wyłączyć sterowanie opcją audio telefonu
przez urządzenie zewnętrzne.
23
Polski
9.
Instrukcja obsługi
10.
Wiadomości
Skrzynka odbiorcza wiadomości SMS telefonu synchronizuje się z aplikacją
Wiadomości zegarka. W zależności od ustawień użytkownika, powiadomienia o nowych
wiadomościach przychodzących wyświetlają się na ekranie zegarka. Opcja Wiadomości
pozwala na podgląd ostatnich wiadomości SMS znajdujących się w skrzynce odbiorczej
telefonu.
Zegarek Kruger&Matz Classic pozwala na wysłanie odpowiedzi do nadawcy wiadomości
lub wykonanie do niego połączenia zwrotnego:
• Odpowiedz
Aby wysłać odpowiedź SMS do nadawcy wiadomości, należy wyświetlić wiadomość,
przewinąć w dół, a następnie wybrać opcję Odpowiedz. Na ekranie pojawi się lista
szablonów wiadomości. Aby wysłać odpowiedź, należy dotknąć wybraną pozycję;
wiadomość zostanie automatycznie wysłana.
• Zadzwoń
Aby zadzwonić do nadawcy wiadomości, należy wyświetlić wiadomość, przewinąć
w dół, a następnie wybrać opcję Zadzwoń. Smartwatch nawiąże połączenie.
11.
Muzyka
Aby sterować odtwarzaczem muzyki w telefonie za pomocą zegarka, należy wejść w
Menu, przewinąć do opcji Muzyka i dotknąć ikonę, aby otworzyć. Ta aplikacja pozwala
odtworzyć/zatrzymać odtwarzanie pliku, przejść do następnego/poprzedniego utworu, a
także regulować głośność odtwarzanych plików.
Polski
12.
Powiadomienia
Powiadomienia aplikacji telefonu wyświetlają się również na ekranie zegarka. Dostępna
jest opcja personalizacji ustawień, wyświetlania powiadomień aplikacji oraz blokowania
powiadomień z wybranych źródeł. Aby włączyć/wyłączyć wyświetlanie powiadomień z
wybranych źródeł, należy wprowadzić odpowiednie zmiany w zakładce Powiadomienia
(aplikacji SmartWear na telefonie). Można również zablokować otrzymywanie
powiadomień z poziomu zegarka: po otrzymaniu powiadomienia, należy stuknąć
ekran w miejscu powiadomienia, aby je wyświetlić. Następnie, należy nacisnąć Blokuj
aby zablokować dalsze wyświetlanie powiadomień z aplikacji, z której pochodziło
powiadomienie.
13.
Aparat
Opcja Aparat w Menu głównym zegarka smartwatch pozwala na zdalne sterowanie
aparatem telefonu. Aby wykonać zdjęcie przy użyciu zegarka, należy wejść w Menu
zegarka i wybrać aplikację Aparat. Po uruchomieniu, ekran zegarka będzie powielał
24
Instrukcja obsługi
obraz rejestrowany przez aparat telefonu. Aby wykonać zdjęcie, należy nacisnąć
. Podgląd wykonanych zdjęć dostępny jest w pamięci telefonu/
przycisk oznaczony
karty microSD.
UWAGA: Przed uruchomieniem aplikacji Aparat, należy upewnić się, że telefon jest
aktywny i odblokowany.
14.
Dodatkowe aplikacje
Urządzenie smartwatch Kruger&Matz Classic oferuje możliwość używania i zarządzania
dodatkowymi aplikacjami. W zakładce Moje Aplikacje aplikacji SmartWear na telefonie,
dostępna jest lista dodatkowych aplikacji urządzenia.
Użytkownik ma możliwość instalacji, deinstalacji oraz zmiany ustawień poszczególnych
aplikacji. Domyślnie, na zegarku zainstalowane są aplikacje Krokomierz (Pedometer) i
Czujnik UV (Ultraviolet).
• Krokomierz (Pedometer)
Aplikacja liczy kroki wykonane przez użytkownika. Aby włączyć aplikację wystarczy
ją otworzyć i nacisnąć Start. Oprócz kroków, aplikacja podaje dane na temat
przebytego dystansu i szacowanej liczby spalonych kalorii w czasie używania
aplikacji Krokomierz.
Uwaga: Indeks UV jest międzynarodowym
standardem pomiaru promieniowania UV.
Wartości Indeksu mieszczą się w przedziale
0-16. Im wyższa wartość Indeksu, tym wyższe
jest również ryzyko powstania uszkodzeń
skóry lub wzroku. Jeden punkt wartości
Indeksu jest porównywalny z 250 mW/m2.
Indeks UV Stopień ekspozycji
na promieniowanie
0-2 Niski
3-5 Umiarkowany
6-7 Wysoki
8-10 Bardzo wysoki
> 11 Ekstremalny
Polski
• Czujnik UV (Ultraviolet)
Aplikacja Ultraviolet podaje wartość Indeksu
UV w mierzonym przez użytkownika miejscu.
Aby sprawdzić wartość Indeksu, należy wyjść
na zewnątrz oraz włączyć aplikację (należy
pamiętać, aby nie zasłonić zegarka, czujnik
UV znajduje się na jego tarczy). Aplikacja
pokaże wartość Indeksu UV dla danego
miejsca w danym czasie.
• Y! Weather
Dodatkowo, użytkownik zegarka Kruger&Matz Classic może zainstalować aplikację
Yahoo! Weather, która na bieżąco dostarcza informacje pogodowe dla wybranego
miejsca na świecie. Aby zainstalować tę aplikację, należy przejść do zakładki Moje
Aplikacje (apk. SmartWear), nacisnąć ikonę odpowiadającą wybranej aplikacji oraz
zatwierdzić ewentualne zapytanie o zgodę na instalację. Po zakończonej instalacji,
należy wybrać odpowiednie jednostki temperatury oraz miejsce dla którego mają
25
Instrukcja obsługi
być wyświetlane informacje o bieżących warunkach atmosferycznych.
Aby odinstalować dodatkową aplikację, należy przejść do zakładki Moje Aplikacje
(apk. SmartWear), nacisnąć ikonę odpowiadającą wybranej aplikacji oraz zatwierdzić
deinstalację.
15.
Aktualizacja oprogramowania
W celu aktualizacji oprogramowania zegarka smartwatch Kruger&Matz Classic, należy
otworzyć aplikację SmartWear oraz wybrać opcję Aktualizacja oprogramowania. Po
kliknięciu Sprawdź dostępność nowszej wersji nastąpi sprawdzenie czy obecna wersja
oprogramowania jest aktualna. Jeśli aplikacja wyszukała nowszą wersję oprogramowania,
na ekranie wyświetli się prośba o wyrażenie zgody na przeprowadzenie aktualizacji. Po
zaakceptowaniu prośby, aktualizacja zostanie przeprowadzona automatycznie.
Uwaga: przed rozpoczęciem procesu aktualizacji, należy upewnić się, że baterie zegarka
i telefonu są naładowane. Jeśli poziom baterii jednego z urządzeń jest niższy niż 60%,
nie będzie można przeprowadzić aktualizacji oprogramowania.
16.
Kwestie bezpieczeństwa
• Do ładowania zegarka należy używać wyłącznie kabla załączonego w zestawie.
• Kabel ładowarki można podpinać jedynie pod kompatybilne porty USB i ładowarki.
• Zabrania się ładowania urządzenia w miejscach o bardzo wysokiej lub bardzo niskiej
temperaturze.
• Zabrania się ładowania urządzenia jeśli jest wilgotne lub mokre; może to stwarzać
ryzyko porażenia prądem.
• Zabrania się wrzucać urządzenia do ognia. Istnieje ryzyko eksplozji baterii, a w
konsekwencji zagrożenia życia i zdrowia.
17.
Specyfikacja techniczna
Polski
Wymagania system operacyjny Android 4.3, iOS8 (lub nowsze),
łączność Bluetooth 4.0 BLE + 2.1
Chipset MTK SOC
Procesor MediaTek Aster MT2502 oparty o system LinkIt Linux
Pojemność baterii 315 mAh
IP67
Wyświetlacz 1,6” (240×240 px)
Waga 50.3 g
Wymiary koperta (47x42x13 mm)
pasek (szerokość 22 mm)
Czujnik UV
Wbudowany mikrofon i głośnik
26
Instrukcja obsługi
Specyfikacja produktu może ulec zmianie bez powiadomienia.
Niniejszym firma Lechpol oświadcza, że urządzenie KM0420 jest zgodne z zasadniczymi wymaganiami oraz innymi stosownymi postanowieniami dyrektywy 1999/5/WE. Właściwa deklaracja do
pobrania na stronie www.lechpol.eu.
Oznaczenie umieszczone na produkcie lub w odnoszących się do niego tekstach wskazuje, że po upływie
okresu użytkowania nie należy usuwać z innymi odpadami pochodzącymi z gospodarstw domowych.
Aby uniknąć szkodliwego wpływu na środowisko naturalne i zdrowie ludzi wskutek niekontrolowanego
usuwania odpadów, prosimy o oddzielenie produktu od innego typu odpadów oraz odpowiedzialny
recykling w celu promowania ponownego użycia zasobów materialnych jako stałej praktyki. W celu
uzyskania informacji na temat miejsca i sposobu bezpiecznego dla środowiska recyklingu tego produktu
użytkownicy w gospodarstwach domowych powinni skontaktować się z punktem sprzedaży detalicznej,
w którym dokonali zakupu produkt, lub z organem władz lokalnych Użytkownicy w firmach powinni
skontaktować się ze swoim dostawcą i sprawdzić warunki umowy zakupu. Produkt nie należy usuwać
razem z innymi odpadami komercyjnymi.
Wyprodukowano w CHRL dla LECHPOL Zbigniew Leszek, Miętne ul. Garwolińska 1, 08-400 Garwolin.
27
Polski
Poland
Prawidłowe usuwanie produktu
(zużyty sprzęt elektryczny i elektroniczny)
Manual de utilizare
OPERATII DE BAZA
1.
Descriere produs
UV Sensor
Touchscreen
Power/Back key
Pornire/oprire/ inapoi (back):
l. Apasati si tineti apasat pentru 3 secunde butonul Power/Back pentru a porni/opri ceasul
2. Apasati power/Back pentru a intra in meniul principal.
2.
Incarcare
Pentru a incarca ceasul, conectati-l ceasul
la portul USB al calculatorului, ca in figura
alaturata. Utilizati cablul USB furnizat
impreuna cu ceasul.
3.
Navigare
Pentru a naviga pe ceasul Kruger&Matz, sunt utilizate cateva
miscari de baza:
Română
• Glisati cu degetul pe ecranul ceasului catre stanga pentru
a vizualiza pagina de aplicatii.
28
Manual de utilizare
• Glisati cu degetul pe ecranul ceasului catre dreapta
pentru a reveni la meniul anterior.
• Glisati cu degetul pe ecranul ceasului in directia
sus-jos pentru a naviga prin meniu, optiuni sau
aplicatii
Calculator
Calendar
Swipe the app page up or
down to skim through.
Apasati si tineti apasat pe ecran pentru a active o anumita optiune intr-o aplicatie (de
Call Log
Music
ex.
pentru mesagerie
apasati si tineti apasat pe text pentru a-l sterge. Dispozitivul va
cere confirmarea stergerii textului selectat).
Nota: Pentru a schimba stilul ceasului, apasati si tineti apasat pe ceas (cand acesta este
pornit). Pe ecran vor apare diferitele stiluri de ceas disponibile. Selectati unul si apasati OK
Using smart watch with your phone
4.
Utilizarea ceasului cu telefonul
Please download Sync APK into
your Android phone by scanning
the QR code on right side. It
supports FW update and extra
application
installation;
Nota: Necesita Bluetooth
BLE si Android 4.3/iOS8 ca system
de operare (sau mai mare).
You can also download another APK/APP
ATENTIE: as "Mediatek SmartDevice" from
named
• Ceasul functioneaza cu telefoane inteligente cu Bluetooth 4.0 BLE.
• Dispozitivul
s-ar or
puteaApp
sa nu functioneze
aplicatii
furnizate
de alti furnizori.
Google
Play
Store,cubut
FW
upgrade
function is not available.
Find BT connection in app page, use it pair
with your phone, then start to sync!
Română
• Descarcati aplicatia Sync APK pe telefonul dvs. Android
prin scanarea codului QR alaturat. ACest program
suporta actualizare (update) FW ; puteti descarca
de asemenea o alta aplicatie APK/APP numita “Mediatek
SmartDevice” de pe Google Play sau App Store,
dar functia de actualizare FW nu este disponibila.
• Utilizati functia Bluetooth pentru a asocial ceasul
cu telefonul dvs si incepeti sincronizarea!
29
Manual de utilizare
• Daca asocierea este inceputa de catre ceasul intelligent, telefonul va cere
permisiunea pentru a sincroniza contactele si registrul de apeluri. Daca asocierea
este initializata de catre SmartWear, datele se vor sincroniza automat.
5.
Aplicatia SmartWear
Aplicatia SmartWear lucreaza ca si o unealta pentru control din smartphone.
SmartWear ofera optiuni cum ar fi: gasirea unui dispozitiv, scanare dispozitive BT, rularea
unor aplicatii aditionale, notificari, alerte, setari Bluetooth, actualizare software
si informatii despre SmartWear.
Scanare dispozitive BT
In cazul intreruperii conexiunii dintre cele 2 dispozitive sau pe durata conectarii altui
ceas, aceasta functie scaneaza si realizeaza conexiunea cu ceasul inteligent.
My applications (aplicatiile mele)
Intrati in aceasta optiune pentru a gestiona aplicatii aditionale pe ceasul dvs. (instalare,
dezinstalare, reglare setari).
Notificari
Selectati aceasta optiune pentru a personaliza setarile pentru notificari afisate pe ecranul
ceasului.
Alerte
Selectati in aceasta activarea/dezactivarea si setari pentru alerte.
SmartWear va ofera posibilitatea de a personalize numele ceasului smartwatch,
schimbarea modului Bluetooth (intre SPP si GATT), informatii despre aplicatie
si actualizare software.
SmartWear va ofera posibilitatea de a personalize numele ceasului smartwatch,
schimbarea modului Bluetooth (intre SPP si GATT), informatii despre aplicatie
si actualizare software.
6.
Find my device (gaseste-mi dispozitivul)
Română
ACeasta functie localizeaza telefonul daca ati uitat unde l-ati pus. Utilizeaza un serviciu
de paging cu telefonul, utilizand aplicatia specifica de pe ceas. Functioneaza si invers in
sensul ca poate localiza ceasul uitat undeva, utilizand aplicatia SmartWear de pe telefon.
Pentru localizare telefon:
Intrati in meniul ceasului, lansati aplicatia Find my Device si apasati START pentru a localiza
telefonul. Telefonul va incepe sa emita semnale sonore
30
Manual de utilizare
Pentru localizare smartwatch:
Rulati aplicatia SmartWear de pe telefon si apasati FIND DEVICE. Ceasul va incepe
sa emita semnale sonore.
7.Setari
Pentru a intra in meniul setari, intrati in meniul principal, apoi in Settings (simbolizat prin
) si selectati parametrul pe care doriti sa-l setati.
Setari BT
Intrati in aceasta optiune pentru a porni/opri functia Bluetooth de pe ceasul intelligent
si pentru a porni/opri vizibilitatea dispozitivului.
Ceas
In setarile implicite, auto-sincronizarea este pornita. Dupa conectarea cu telefonul, ceasul
isi va face sincronizarea datei, orei si formatului orar corespunzator cu cele de pe telefon.
Utilizatorul poate seta si manual aceste date, dupa dezactivarea auto-sincronizarii.
Sunet/Volum
Cu aceasta setare puteti seta sunetul /volumul ceasului.
Afisaj
Puteti personaliza afisajul ceasului: setati numarul iconitelor din lista meniu, luminanta
si temporizarea iluminarii ecranului.
International
Pentru a seta limba, intrati in aceasta optiune, opriti auto-sincronizarea si selectati
limba dorita. Cat sunteti in optiunea International, setati afisarea contactelor: cu numele
mai intai sau cu prenumele mai intai.
Aplicatii
Selectati aceasta optiune pentru a dezinstala toate aplicatiile aditionale din ceas.
Reset
Se revine la setarile din fabrica: toate datele salvate in ceas vor fi sterse si se revine
la setarile initiale de fabrica.
Română
About (despre)
Ofera informatii despre ceas.
31
Manual de utilizare
DownloadApp
Deschideti aceasta optiune pentru a afisa codul QR SmartWear. Scanati acest
cod cu un program corespunzator de pe telefon. Browserul de internet instalat pe telefonul
dvs. va va duce la pagina unde puteti descarca aplicatia SmartWear.
8.Unelte
• Calendar
Calendarul ceasului se sincronizeaza cu calendarul telefonului (atunci
cand acestea doua sunt associate si conectate intre ele). Fiecare notificare
din calendarul telefonului va fi afisata de asemenea si pe ceas (daca nu sunt
setate altfel).
• Alarma
Alarma de pe ceas functioneaza independent de alarma telefonului. Pentru
a activa alarm ape ceas, intrati in meniul principal al ceasului, mergeti la alarma
si atingeti semnul “+” pe ecra. Va apare o noua pagina de editare alarma. Intrati
in setari, glisati spre dreapta pe ecran si selectati ON.
Pentru a activa a mai mult de o alarma, intrati in meniul principal, mergeti
la alarma si glisati ecranul in sus sau in jos pana cand vedeti semnal “+” din nou.
Urmariti instructiunile de mai sus.
Pentru a sterge o alarma apasati si tineti apasat pe ecran cand este afisata
alarma. Veti fi intrebat daca doriti sa stergeti alarma, apasati OK pentru
confirmare.
9.
Gestionare apeluri
Utilizati ceasul pentru a gestiona apelutile de pe telefon: preluare, refuzare si efectuare
apeluri – formati numarul sau alegeti din agenda un contact sau alegeti un contact
din registrul apeluri.
Română
Functie audio
Implicit, apelurile telefonice sunt directionate catre difuzorul si microfonul ceasului
inteligent.
Puteti seta volumul de la telefon chiar pe durata conversatiei.
Pentru a opri setarea implicita, mergeti la setari Bluetooth la telefon , intrati in conexiunea
ceasului si dezactivati phone audio control.
32
Manual de utilizare
10.Mesaje
Casutele de intrare (inbox) de pe telefon si de pe ceas se sincronizeaza automat dupa
conectarea acestora. Toate notificarile si mesajele intrate sunt afisate sip e ceas.
Puteti de pe ceas sa raspundeti la mesaje sau sa efectuati un apel.
• Reply
Pentru a raspunde la mesajul text, selectati textul droit, derulati in jos daca este
necesar si apasati Reply. Veti vedea o lista de mesaje predefinite. Apasati pentru
a trimite unul dintre ele.
• Efectuare apel
Pentru a efectua un apel de raspuns la mesaj, afisati textul mesajului, derulati
in jos daca este necesar si selectati Call. Ceasul va initia automat un apel catre
expeditorului mesajului.
11.Muzica
Pentru a controla muzica din telefon prin intermediul ceasului, mergeti la meniul principal
si selectati BT music. Aceasta aplicatie va permite sa controlati redarea muzicii: redare/
pauza, salt la melodia anterioara/urmatoare si reglare volum.
12.
Notificari
Notificarile de pe telefon sunt afisate si pe ceas – daca nu au fost facute alte setari.
Pentru a activa/dezactiva afisarea notificarilor sau blocarea lor direct din ceas,
dupa receptionarea unei notificari de la o sursa pe care doriti sa o blocati, apasati
Block – nu veti mai primi notificari de la acea sursa.
13.Aparat
ACeasta functie pe ceas functioneaza ca si o telecomanda pentru camera de pe telefon.
Pentru a efectua o fotografie, mergeti in meniul Remote capture. Daca este activata,
ceasul afiseaza imaginea de pe telefon. Apasati pe ecranul ceasului pe iconita
pentru a efectua o fotografie. Fotografiile efctuate sunt salvate pe cardul telefonului.
Română
Nota: Inainte de a rula aceasta functie, verificati ca telefonul sa nu fie blocat
33
Manual de utilizare
14.
Aplicatii suplimentare
Pentru a gestiona aplicatii aditionale pe ceas, mergeti la aplicatia SmartWear
din telefon si vizualizati lista cu aplicatiile disponibile. Utilizatorul poate instala, dezinstala
sau efectua setari proprii corespunzator cu preferintele sale. Implicit, Pedometer
si Ultraviolet sunt deja instalate in ceas.
• Pedometer
Aceasta aplicatie Numara pasii pe care ii faceti zilnic. Pentru a activa aplicatia,
deschideti aplicatia si apasati pe Start. In afara de pasi, ceasul va afisa si distant
ape care ati parcurs-o precum si numarul de calorii arse pe durata plimbarii.
• Ultraviolet
Aceasta aplicatie furnizeaza informatii
despre indicele UV. Deschideti aplicatia (NU
ACOPERITI ECRANUL CEASULUI) si veti
afla nivelul de expunere la radiatia solara.
Nota: Indexul UV este o masuratoare
internationala standard. Valorile incep de la 0
si cu cat sunt mai mari cu atat mai mare este
riscul deteriorarii vederii sau a pielii. Un punct
din aceasta scala este aproximativ 250 mW/m2.
Index UV
Nivel expunere
0-2 Mic
3-5 Moderat
6-7 Mare
8-10 Foarte mare
> 11 Ekstrem
• Y! Weather
Acest program este disponibil pentru a fi instalat. Aplicatia furnizeaza informatii despre
prognoza vremii in orice oras. Pentru instalarea programului, mergeti in My Applications
in SmartWear, apasati iconita corespunzatoare si confirmati daca este necesar.
15.
Actualizare software
Pentru actualizarea programului, mergeti in SmartWear in telefon si selectati Firmware
update. Intai verificati daca aveti instalata versiunea actualizata. Daca nu, aplicatia
va cauta automat actualizarea pentru program si va cere confirmarea pentru instalare.
Nota: Inainte de a efectua actualizarea, verificati ca atat ceasul cat si telefonul sa fie incarcate.
Daca nivelul bateriei uneia dintre ele este sub 60%, procesul de actualizare nu se poate
realiza.
16.
Română
•
•
•
•
•
34
Instructiuni privind siguranta
Utilizati pentru incarcarea ceasului cablul furnizat in colet
Utilizati pentru conectarea la calculator a ceasului cablul USB furnizat in colet
Nu incarcati ceasul cand sunt temperature extreme (prea mici sau prea mari)
Nu incarcati ceasul cand este umezeala, risc de electrocutare
Tineti dispozitivul departe de surse de foc. Bateria poate exploda, cauzand ranirea
utilizatorului.
Manual de utilizare
17.
Specyfikacja techniczna
Cerinte system system de operare 4.3, iOS8 (sau mai mare),
Bluetooth 4.0 BLE + 2.1
Chipset MTK SOC
CPU MediaTek Aster MT2502 based on LinkIt Linux
system
Capacitate baterie 315 mAh
Grad protectie IP67
Afisaj 1,6” (240 x 240 px)
Greutate 50.3 g
Dimensiuni couvette (47x42x13 mm)
strap (width 22 mm)
Senzor UV
Microfon incorporat, difuzor
Specificatiile sunt supuse schimbarilor fara notificare prealabila.
„Compania Lechpol declară că produsul KM0420 este în conformitate cu cerinţele esenţiale şi alte
prevederi relevante ale Directivei 1999/5/CE. Declaraţia pentru descărcare este postata pe site-ul
www.lechpol.eu”
Marcajale de pe acest produs sau mentionate in instructiunile sale de folosire indica faptul ca
produsul nu trebuie aruncat impreuna cu alte reziduuri din gospod arie atunci cand nu mai este in
stare de functionare. Pentru a preveni posibile efecte daunatoare asupra mediului inconjurator sau
a san ata tii oamenilor datorate evacuarii necontrolate a reziduurilor, vă rugăm să separați acest
produs de alte tipuri de reziduuri si să-l reciclati in mod responsabil pentru a promova refolosirea
resurselor materiale. Utilizatorii casnici sunt rugati să ia legatura fie cu distribuitorul de la care au
achizitionat acest produs, fie cu autoritatile locale, pentru a primi informatii cu privire la locul si
modul in care pot depozita acest produs in vederea reciclarii sale ecologice. Utilizatorii institutionali
sunt rugati să ia legatura cu furnizorul și să verifice condițiile stipulate in contractul de vanzare.
Acest produs nu trebuie amestecat cu alte reziduuri de natura comerciala.
Distribuit de Lechpol Electronics SRL, Republicii nr. 5, Resita, CS, ROMANIA
35
Română
Romania
Reciclarea corecta a acestui produs
(reziduuri provenind din aparatura electrica si electronica)
www.krugermatz.com
is a registered trademark