1
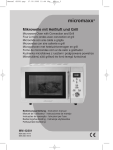
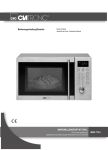
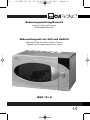
5....-05-MWG 731 H
01.08.2003 14:33 Uhr
Seite 1
R
Bedienungsanleitung/Garantie
Instruction Manual/Guarantee
Mode d’emploi/Garantie
Mikrowellengerät mit Grill und Heißluft
Microwave Oven with Grill and Hot Air Function
Appareil à micro-ondes avec grill et air chaud
MWG 731 H
5....-05-MWG 731 H
01.08.2003 14:33 Uhr
Seite 2
Inhalt
D
GB
F
Contents
Übersicht Bedienelemente . . . . . . . . . . . . . . . . . . . . . . . . . .Seite
Bedienungsanleitung . . . . . . . . . . . . . . . . . . . . . . . . . . . . . . .Seite
Garantie . . . . . . . . . . . . . . . . . . . . . . . . . . . . . . . . . . . . . . . .Seite
Control element overview . . . . . . . . . . . . . . . . . . . . . . . . . . .Page
Instruction Manual . . . . . . . . . . . . . . . . . . . . . . . . . . . . . . . . .Page
Guarantee . . . . . . . . . . . . . . . . . . . . . . . . . . . . . . . . . . . . . .Page
Aperçu des éléments de commande . . . . . . . . . . . . . . . . . . .Page
Mode d’emploi . . . . . . . . . . . . . . . . . . . . . . . . . . . . . . . . . . .Page
Garantie . . . . . . . . . . . . . . . . . . . . . . . . . . . . . . . . . . . . . . . .Page
3
4
14
3
16
26
3
28
39
5....-05-MWG 731 H
01.08.2003 14:34 Uhr
Seite 3
Beschreibung der Bedienelemente
1.
2.
3.
4.
5.
6.
7.
8.
9.
Türverschluss
Sichtfenster
Abdeckung
Antriebsachse
Gleitring
Drehteller
Zeitschaltuhr
Grillheizung
Grillständer
* Bitte die Folie auf der Innenseite auf keinen Fall entfernen!
** Die Abdeckung bitte auf keinen Fall entfernen!
3
5....-05-MWG 731 H
01.08.2003 14:34 Uhr
Seite 4
Allgemeine Sicherheitshinweise
D
•
•
•
•
•
•
•
•
Lesen Sie vor Inbetriebnahme dieses Gerätes die Bedienungsanleitung sehr
sorgfältig durch und bewahren Sie diese inkl. Garantieschein, Kassenbon und
nach Möglichkeit den Karton mit Innenverpackung gut auf.
Benutzen Sie das Gerät ausschließlich für den privaten und den dafür
vorgesehenen Zweck. Dieses Gerät ist nicht für den gewerblichen Gebrauch
bestimmt. Benutzen Sie es nicht im Freien (außer es ist für den bedingten
Einsatz im Freien vorgesehen). Halten Sie es vor Hitze, direkter
Sonneneinstrahlung, Feuchtigkeit (auf keinen Fall in Flüssigkeiten tauchen) und
scharfen Kanten fern. Benutzen Sie das Gerät nicht mit feuchten Händen. Bei
feucht oder nass gewordenem Gerät sofort den Netzstecker ziehen. Nicht ins
Wasser greifen.
Schalten Sie das Gerät aus und ziehen Sie immer den Stecker aus der
Steckdose (ziehen Sie am Stecker, nicht am Kabel) wenn Sie das Gerät nicht
benutzen, Zubehörteile anbringen, zur Reinigung oder bei Störung.
Lassen Sie das Gerät niemals unbeaufsichtigt. Um Kinder vor Gefahren
elektrischer Geräte zu schützen, sorgen Sie bitte dafür, dass das Kabel nicht
herunter hängt und Kinder keinen Zugriff auf das Gerät haben.
Prüfen Sie Gerät und Kabel regelmäßig auf Schäden. Ein beschädigtes Gerät
bitte nicht in Betrieb nehmen.
Reparieren Sie das Gerät nicht selbst, sondern suchen Sie bitte einen autorisierten Fachmann auf. Um Gefährdungen zu vermeiden, ein defektes Netzkabel
bitte nur vom Hersteller, unserem Kundendienst oder einer ähnlich qualifizierten
Person durch ein gleichwertiges Kabel ersetzen lassen.
Verwenden Sie nur Original-Zubehör.
Beachten Sie bitte die nachfolgenden ”Speziellen Sicherheitshinweise...”.
Spezielle Sicherheitshinweise für dieses Gerät
•
•
•
•
4
Achtung Siedeverzug: Beim Kochen, insbesondere beim Nacherhitzen von
Flüssigkeiten (Wasser) kann es vorkommen, dass die Siedetemperatur zwar
erreicht ist, die typischen Dampfblasen aber noch nicht aufsteigen. Die
Flüssigkeit siedet nicht gleichmäßig. Dieser sogenannte Siedeverzug kann beim
Entnehmen des Gefäßes durch leichte Erschütterung zu einer plötzlichen
Dampfblasenbildung und damit zum Überkochen führen. Verbrennungsgefahr.
Um ein gleichmäßiges Sieden zu erreichen, stellen Sie bitte einen Glasstab
oder ähnliches, nicht metallisches in das Gefäß.
Erwärmen Sie Flüssigkeiten nicht in geschlossenen Behältern.
Explosionsgefahr.
Bei Rauchentwicklung ist das Gerät abzuschalten und der Netzstecker zu ziehen . Halten Sie die Tür geschlossen, um evtl. auftretende Flammen zu
ersticken.
Der Inhalt von Babyfläschchen und Gläsern mit Kindernahrung muss umgerührt
oder geschüttelt und die Temperatur vor dem Verbrauch überprüft werden. Es
besteht Verbrennungsgefahr.
5....-05-MWG 731 H
01.08.2003 14:34 Uhr
Seite 5
•
Bitte reparieren Sie das Gerät auf keinen Fall selbst. Nach Entfernen der
Abdeckung besteht die Gefahr der Strahlenbelastung durch
Mikrowellenenergie.
•
Da im Grill- und Kombibetrieb Strahlungshitze benutzt wird, benutzen Sie bitte
nur hitzebeständiges Geschirr.
Im reinen Grillbetrieb dürfen Sie auch Metall- oder Alugeschirr benutzen. Nicht
jedoch bei Kombi- oder Mikrowellenbetrieb.
Stellen Sie nichts auf die Oberseite des Gehäuses. Diese wird heiß. Lassen Sie
die Lüftungsschlitze immer frei.
Verwenden Sie bitte den Grillständer, um das Gargut an das Heizelement heranzuführen.
D
Hinweise zum Grill- und Kombibetrieb
•
•
•
Inbetriebnahme
•
•
•
•
•
•
•
•
Möchten Sie Ihre Mikrowelle in einem Schrank, Regal o.a. unterbringen, achten
Sie bitte darauf, dass Sie an allen Seiten des Gerätes mindestens 10 cm
Ventilationsabstand zu Schränken, Wänden u.a. halten.
Entnehmen Sie alles im Garraum befindliche Zubehör, packen Sie es aus und
legen Sie den Gleitring in die Mitte. Positionieren Sie den Glasteller so auf der
Antriebsachse, dass dieser in die Ausbuchtungen der Antriebswelle einrastet
und gerade aufliegt.
Kontrollieren Sie das Gerät auf sichtbare Schäden, besonders im Bereich der
Tür. Bei Schäden jeglicher Art darf das Gerät auf keinen Fall in Betrieb genommen werden.
Um beim Betrieb Störungen anderer Geräte zu vermeiden, stellen Sie Ihre
Mikrowelle nicht in unmittelbarer Nähe von anderen elektronischen Geräten auf.
Entfernen Sie evtl. auf dem Gehäuse haftende Schutzfolien.
Bitte entfernen Sie in keinem Fall Folien auf der Innenseite der Tür.
Stecken Sie den Netzstecker in eine korrekt installierte Schutzkontakt
Steckdose 230V, 50Hz.
Entfernen Sie keine montierten Teile aus dem Garraum und nichts von der
Innenseite der Tür.
Einstellen der Uhrzeit
•
•
•
•
Drücken Sie bitte die UHR/TIMER- Taste.
Drehen Sie den ZEIT/MENÜ- Regler, bis die gewünschte Stunde eingestellt ist.
Zum Einstellen der Minuten, drücken Sie bitte erneut die UHR/TIMER-Taste
und drehen dann den ZEIT/MENÜ-Regler, bis die gewünschte Minutenanzeige
erreicht ist.
Drücken Sie bitte erneut die UHR/TIMER-Taste; die eingestellte Zeit erscheint
dann auf dem Display.
5
5....-05-MWG 731 H
01.08.2003 14:34 Uhr
Seite 6
Benutzung des Gerätes
D
Wissenswertes zum Mikrowellenbetrieb:
•
Ihr Gerät arbeitet mit Mikrowellenstrahlung, welche Wasserteilchen in Speisen in
sehr kurzer Zeit erhitzt. Hier gibt es keine Wärmestrahlung und somit auch kaum
Bräunung. Somit ist das Gerät nicht zum Trocknen jeglicher Dinge geeignet.
Erwärmen Sie mit diesem Gerät nur Lebensmittel.
Das Gerät ist nicht zum Backen in schwimmendem Fett geeignet.
Erhitzen Sie nicht zu große Mengen auf einmal. Das Gerät verliert sonst an
Effizienz.
Zur Unterbrechung des Garvorgangs drücken Sie bitte die STOPP/RESETTaste.
Erwärmen Sie keine geschlossenen Speisen, wie Eier, Würste, Glaskonserven
usw. Explosionsgefahr.
Mikrowellen liefern sofort volle Energie. Ein Vorheizen ist somit nicht erforderlich.
Der Mikrowellenherd ersetzt nicht Ihren herkömmlichen Herd. Er dient
hauptsächlich zum:
- Auftauen von Tiefgekühltem/Gefrorenem
- Schnellen Erhitzen/Aufwärmen von Speisen oder Getränken
- Bedingten Garen von Speisen
Verwenden Sie nur geeignetes Geschirr wie:
Glas, Porzellan, Keramik, hitzebeständiges Kunststoff- oder spezielles
Mikrowellengeschirr.
Bitte benutzen Sie kein Plastik- bzw. Papiergeschirr.
In der unten stehenden Tabelle finden Sie allgemeine Hinweise zur Auswahl der
Kochgeschirre bzw. Utensilien.
•
•
•
•
•
•
•
•
•
•
Gerät
Hitzebeständiges Glas
Nicht hitzebeständiges Glas
Mikrowelle
Grill
JA
JA
Heissluft Kombination
JA
JA
NEIN
NEIN
NEIN
NEIN
Hitzebeständiges Keramik
JA
JA
JA
JA
Mikrowellen Kunststoff Geschirr
JA
NEIN
NEIN
NEIN
Küchenpapier
JA
NEIN
NEIN
NEIN
Metalltablett
NEIN
JA
JA
NEIN
Metall-Grill-Ständer
NEIN
JA
JA
JA
JA
JA
JA
JA
Aluminiumfolie /-behälter
Bedienung im reinen Mikrowellen-Betrieb
1. Geben Sie die zu erhitzende Speise in ein geeignetes Geschirr.
2. Öffnen Sie die Tür und stellen Sie das Gefäß mittig auf den Glasteller. Tür bitte
schließen. (Das Gerät arbeitet aus Sicherheitsgründen nur mit fest geschlossener Tür).
6
5....-05-MWG 731 H
01.08.2003 14:34 Uhr
Seite 7
3. Drücken Sie bitte die MIKROWELLE-Taste.
4. Stellen Sie mit dem ZEIT/MENÜ-Regler die gewünschte Garzeit ein.
Die Garzeit richtet sich nach Menge und Beschaffenheit des Inhaltes. Mit etwas
Übung, lernen Sie schnell die Gardauer einzuschätzen.
Bitte beachten Sie:
5. Die Zubereitung im Mikrowellenherd geschieht sehr viel schneller als in einem
Wärmeherd. Sind Sie sich über Garzeiten nicht sicher, beginnen Sie mit einer
kleineren Stufe und garen Sie ggf. nach.
6. Die Kontrolllampe im START-Knopf blinkt. Drücken Sie bitte den START-Knopf,
das Gerät schaltet sich ein, die Lampe im Garraum leuchtet.
7. Nach Ablauf der Zeit stellt sich das Gerät aus. Entnehmen Sie dann die Speise.
Bitte beachten Sie:
Legen Sie beim reinen Mikrowellenbetrieb eine Abdeckhaube über die Lebensmittel.
So stellen Sie die verschiedenen Leistungswerte (in %) für den Mikrowellenbetrieb
ein:
Drücken Sie, zum Auswählen der Prozentwerte, die MIKROWELLE Taste
Drücken Sie:
Leistung
Beschreibung
1x
100% (P-HI)
Volle Leistung
2x
90% (P-90)
3x
80% (P-80)
4x
70% (P-70)
5x
60% (P-60)
6x
50% (P-50)
7x
40% (P-40)
8x
30% (P-30)
9x
20 % (P-20)
10x
10 % (P-10)
11x
0% (P-0)
Hoch
Mittel
Niedrig
Sehr niedrig
Bedienung im reinen Grill-Betrieb
Die Grillfunktion ist besonders geeignet zum Grillen von Kurzgebratenem, Steaks,
Koteletts, Kebabs, Würstchen und kleinen Stücken vom Hähnchen bzw. Pute.
Ebenso können überbackene Gerichte mit der Grillfunktion zubereitet werden.
Angenommen Sie möchten den Grill für 12 Minuten benutzen, dann
1. Stellen Sie bitte sicher, dass keine Programme mehr aktiviert sind.
2. Drücken Sie die GRILL-Funktionstaste.
7
D
5....-05-MWG 731 H
D
01.08.2003 14:34 Uhr
Seite 8
3. Drehen Sie den ZEIT/MENÜ-Regler auf 12:00.
4. Drücken Sie bitte den START-Knopf.
Bei der Grill-Funktion wird automatisch die höchste Leistung gewählt. Die maximale
Grilldauer beträgt 95 Minuten.
Bedienung im reinen Heißluft Betrieb
Während des Kochens mit Heißluft zirkuliert die heiße Luft im Garraum. Dadurch
werden die Speisen schneller gebräunt und knuspriger. Das Mikrowellengerät können Sie mit bis zu 10 unterschiedlichen Temperaturen programmieren und bis zu 9
Stunden, 30 Minuten voreinstellen.
Das Kochen mit Heißluft
Drücken Sie bitte die HEISSLUFT-Taste und stellen Sie die gewünschte Temperatur
ein.
Drücken Sie:
Temperatur °C
1x
230
2x
215
3x
200
4x
185
5x
170
6x
155
7x
140
8x
125
9x
110
10x
95
Angenommen, Sie möchten bei 185°C, 40 Minuten garen, dann gehen Sie wie folgt
vor:
1. Drücken Sie bitte die HEISSLUFT-Taste 4mal.
2. Drehen Sie den ZEIT/MENÜ-Regler, im Uhrzeigersinn, auf 40. Auf dem Display
erscheint "H 40". "H" steht für Stunde und die Zahl "40" steht für die eingestellten Minuten. Bitte beachten Sie, dass Sie keine Sekunden einstellen können.
3. Drücken Sie den START-Knopf.
4. Auf dem Display erscheint "40:00".
Bitte beachten Sie:
1. Maximal können 9 Stunden, 30 Minuten programmiert werden. Nachdem die
Zeit abgelaufen ist, ertönen 4 akustische Signale und das Wort "END" erscheint
8
5....-05-MWG 731 H
01.08.2003 14:34 Uhr
Seite 9
im Display. Drücken Sie die STOPP/RESET-Taste oder öffnen Sie die Tür. Das
Wort "END" erlischt.
2. Sie können während des Kochens mit Heißluft die Temperatur kontrollieren,
indem Sie die HEISSLUFT-Taste drücken.
D
Vorheizen und Kochen mit Heißluft
Sie können Ihr Mikrowellengerät so programmieren, dass Sie die Mikrowelle vorheizen und dann die Heißluft einsetzen können.
Angenommen Sie möchten das Gerät auf 170°C vorheizen und anschließend für
35 Minuten garen:
1. Drücken Sie bitte die HEISSLUFT-Taste 5mal.
2. Drücken Sie dann den START-Knopf. PREH blinkt im Display.
3. Erreicht der Ofen die programmierte Temperatur, ertönt ein Signal. Und PREH
leuchtet.
4. Öffnen Sie bitte die Tür und stellen Sie Ihr Gargut in die Mitte des Drehtellers.
5. Drehen Sie den ZEIT/MENÜ-Regler und stellen Sie die Zeit auf "35".
6. Drücken Sie erneut den START-Knopf.
Kombiniertes Nutzen des Grills und der Mikrowelle
Diese Kombination erlaubt es Ihnen, den Grill und die Mikrowelle in zwei verschiedenen Einstellungen zu benutzen.
1. Drücken Sie bitte 1 bzw. 2mal** (siehe Kombination 1 und 2 unten ) die
GRILL+MIKROWELLE-Taste, um die gewünschte Kombination einzustellen.
2. Stellen Sie jetzt mit dem ZEIT/MENÜ-Regler die gewünschte Zeit ein. Nachdem
Sie den START-Knopf gedrückt haben, beginnt die Zeit rückwärts zu laufen.
Bitte beachten Sie:
1. Es können hier bis zu 95 Minuten eingestellt werden.
2. Sie können die Einstellungen während des Kochens sehen, indem Sie die
GRILL+MIKROWELLE-Taste drücken.
Kombination 1*
Die maximale Garzeit kann bis zu 95 Minuten eingestellt werden.
Die prozentuale Verteilung von Grill und Mikrowelle beträgt 70% für den Grill und
30% für die Mikrowelle.
Angenommen Sie möchten Kombination 1 für 25 Minuten auswählen:
1. Drücken Sie bitte die STOPP/RESET-Taste.
2. Drücken Sie bitte anschließend 1mal die GRILL+MIKROWELLE-Taste
3. Stellen Sie die Zeit bitte auf "25".
4. Drücken Sie bitte den START-Knopf.
9
5....-05-MWG 731 H
D
01.08.2003 14:34 Uhr
Seite 10
Kombination 2**
Die maximale Garzeit beträgt auch hier bis zu 95 Minuten.
Die prozentuale Verteilung von Grill und Mikrowelle beträgt 55% für die Mikrowelle
und 45% für den Grill. Diese Funktion können Sie für Omeletts, überbackene
Kartoffeln und Geflügel verwenden.
Angenommen Sie möchten die Kombination 2 für 12 Minuten nutzen:
1.
2.
3.
4.
Drücken Sie bitte die STOPP/RESET-Taste.
Drücken Sie bitte 2mal die GRILL+MIKROWELLE-Taste.
Drehen Sie den ZEIT/MENÜ-Regler auf "12".
Drücken Sie bitte den START-Knopf.
Kombiniertes Nutzen von Heißluft und Mikrowelle
Das Gerät hat 4 vorprogrammierte Einstellungen. Dies vereinfacht es Ihnen, sowohl
mit Heißluft als auch mit der Mikrowellenfunktion zu arbeiten.
Drücken Sie bitte die HEISSLUFT+MIKROWELLE-Taste um die
Heißlufttemperaturen auszuwählen.
Programm
Drücken Sie
Temperatur (°C)
KOMB 1
1x
230
KOMB 2
2x
200
KOMB 3
3x
180
KOMB 4
4x
150
Möchten Sie, um einen Kuchen zu backen, eine Zeit von 25 Minuten mit "KOMB 3
einstellen:
1. Drücken Sie bitte die HEISSLUFT+MIKROWELLE-Taste 3mal.
2. Drehen Sie den ZEIT/MENÜ-Regler auf die gewünschte Zeit (25).
3. Starten Sie den Vorgang mit dem START-Knopf.
Bitte beachten Sie:
Maximal können 9 Stunden, 30 Minuten programmiert werden. Nachdem die Zeit
abgelaufen ist, ertönen 4 akustische Signale und das Wort "END" erscheint im
Display. Drücken Sie die STOPP/RESET-Taste oder öffnen Sie die Tür. Das Wort
"END" erlischt.
Sie können während des Kochens mit Heißluft die Temperatur kontrollieren, indem
Sie die HEISSLUFT+MIKROWELLE-Taste drücken.
Schnelles Auftauen von Gefriergut
Angenommen, Sie möchten gefrorene Lebensmittel auftauen und die Zeit auf
5 Minuten einstellen:
10
5....-05-MWG 731 H
01.08.2003 14:34 Uhr
Seite 11
1. Stellen Sie den ZEIT/MENÜ-Regler bis auf "08". Drücken Sie bitte die IND.Taste (Individuell).
2. Stellen Sie anschließend mit dem ZEIT/MENÜ-Regler die gewünschte Zeit ein.
(5:00 Min).
Bitte beachten Sie:
1. Als Faustregel gilt, 500g Gefriergut benötigt ca. 5 Minuten zum Auftauen.
2. Sollte innerhalb dieser Zeit das Gefriergut nicht vollständig aufgetaut sein, stellen Sie die Zeit in 1-Min.-Schritte ein.
Falls das Gefriergut in einem Kunststoffbehälter eingefroren war, empfehlen wir das
Gefriergut kurz anzutauen und dann in ein mikrowellengeeignetes Geschirr umzufüllen.
Sie können zum Auftauen bis zu 45 Minuten einstellen.
Nachdem die Zeit abgelaufen ist, ertönen 4 akustische Signale und das Wort
"END" erscheint im Display. Drücken Sie die STOPP/RESET-Taste oder öffnen Sie
die Tür. Das Wort "END" erlischt.
Kochen in mehreren Schritten
Sie können die Programme so einstellen, dass Sie die Möglichkeit haben 3 verschiedene Funktionen zu wählen.
Nehmen wir an Sie wählen das folgende Programm zum Kochen:
Schnelles Auftauen
▼
Zubereiten in der Mikrowelle
▼
Kochen mit Heißluft (ohne Vorheizen)
1. Stellen Sie den ZEIT/MENÜ-Regler bis auf "08", im Display erscheint das Wort
"Code".
2. Drücken Sie bitte die IND.-Taste (Individuell).
3. Wählen Sie anschließend mit dem ZEIT/MENÜ-Regler die gewünschte Zeit
zum Auftauen.
4. Drücken Sie bitte die MIKROWELLE-Taste zum Starten des Gerätes.
5. Drehen Sie erneut den ZEIT/MENÜ-Regler und stellen Sie die gewünschte Zeit
ein.
6. Drücken Sie die HEISSLUFT-Taste und wählen Sie die gewünschte Zeit.
7. Drehen Sie den ZEIT/MENÜ-Regler.
8. Drücken Sie den START-Knopf.
11
D
5....-05-MWG 731 H
D
01.08.2003 14:34 Uhr
Seite 12
Voreingestellte Programme
Code
01
02
03
04
05
06
07
08
CODENummer
im Display
Mengenangabe
in Gramm
Drücken Sie
Taste "IND"
Garzeit in Min.
1
140-200g
1x
5:40
2
280-400g
2x
9:40
3
420-600g
3x
13:00
4
560-800g
4x
17:00
1
250-310g
1x
2:20
2
500-620g
2x
4:00
3
750-930g
3x
5:40
4
1000-1240g
4x
7:20
-
Ohne separate
1x
2:30
Gewichtseinstellung
2x
Ind. Zeitauswahl
Gewichtseinstellung
1x
3:40
Ohne separate
1x
1:10
Gewichtseinstellung
2x
3:30
-
Ohne separate
1
170g
1x
12:00
2
300g
2x
15:00
3
540g
3x
23:00
4
800g
4x
30:00
-
-
1x
40:00
2x
Ind. Zeitauswahl
-
-
1x
Auftauen mit
ind. Zeitauswahl
Möchten Sie z. B. Pizza mit einem Gewicht von ca. 120g – 140g aufwärmen, gehen
Sie bitte vor, wie folgt:
1. Drehen Sie den ZEIT/MENÜ Knopf bis "05" und "CODE" auf dem Display
erscheint.
2. Drücken Sie 1 x die IND Taste, wird die Backzeit (1:10 Min) angezeigt.
3. Drücken Sie die START Taste.
4. Um eine Pizza mit einem höheren Gewicht aufzuwärmen, drücken Sie bitte die
ZEIT/MENÜ Taste bis "05" erscheint.
12
5....-05-MWG 731 H
01.08.2003 14:34 Uhr
Seite 13
5. Drücken Sie die IND Taste 2x, wird die Backzeit (3:30 Min) angezeigt.
6. Drücken Sie dann die START Taste.
D
Bitte beachten Sie:
Individuelles Garprogramm
1. Drehen Sie bitte den ZEIT/MENÜ-Regler zur Codenummer "07". Im Display
erscheint das Wort "Code".
2. Drücken Sie die IND-Taste. Die gespeicherte Zeit erscheint im Display.
3. Um die gespeicherte Zeit zu ändern, betätigen Sie ein weiteres mal die INDTaste. Stellen Sie nun mit dem ZEIT/MENÜ- Regler die gewünschte Garzeit ein.
4. Drücken Sie den START-Knopf.
Diese Zeit bleibt dann solange im Speicher, bis Sie eine neue Zeit eingeben, oder
der Netzstecker gezogen wird.
Zusätzliche praktische Hinweise
TIMER:
•
•
•
Halten Sie die UHR/TIMER-Taste für 3 Sekunden gedrückt.
Drehen Sie den ZEIT/MENÜ-Regler auf die gewünschte Zeit und sie erscheint
im Display.
Drücken Sie den START-Knopf.
Dieses Programm kann parallel mit dem Mikrowellenprogramm, dem Grill und dem
Heißluftprogramm benutzt werden.
Bitte beachten Sie:
Die maximal einzustellende Zeit beträgt 95 Minuten. Die rückwärts laufende Zeit ist
im Display für 3 Sekunden sichtbar. Die Uhr, bzw. die Garzeit erscheint dann wieder
im Display. Ist die eingestellte Zeit abgelaufen, ertönt ein langer Ton.
Drücken Sie die UHR/TIMER-Taste und dann die STOPP/RESET-Taste, um die Uhr
anzuhalten.
Kindersicherung
Die Kindersicherung schützt vor unbeaufsichtigtem Gebrauch des Gerätes durch
Kinder. So aktivieren Sie die Kindersicherung:
Halten Sie die STOPP/RESET-Taste für 3 Sekunden gedrückt, es ertönt ein Signal
und das Wort "LOCK" erscheint auf dem Display. Es sind alle Tasten gesperrt.
So deaktivieren Sie die Kindersicherung:
Wiederholen Sie den Vorgang. Das Wort "LOCK" erlischt.
Schnellstart -stopp
Sie können diese Einstellung für immer wiederkehrende Vorgänge benutzen. Die
Mikrowelle läuft dann auf 100%.
13
5....-05-MWG 731 H
D
01.08.2003 14:34 Uhr
Seite 14
Drücken Sie den START-Knopf in schnellen Intervallen um die Garzeit einzustellen.
Die maximale Einschaltzeit ist auf 10 Minuten begrenzt. Die Mikrowelle startet automatisch nach 2 Sekunden. Nach abgelaufener Zeit ertönt ein Signal und im Display
erscheint das Wort "END". Die Anzeige erlischt, indem Sie die STOPP/RESETTaste drücken bzw. die Tür öffnen.
Sie können die Laufzeit auch unterbrechen, indem Sie:
1. die STOPP/RESET-Taste 1mal drücken, (die Leuchte im START-Knopf blinkt).
Um den Prozess fortzusetzen, drücken Sie erneut den START-Knopf.
2. Möchten Sie den Vorgang abbrechen, drücken Sie die STOPP/RESET-Taste.
3. Sie können an Stelle der STOPP/RESET-Taste die Laufzeit auch durch Öffnen
der Tür unterbrechen.
Rezeptbücher finden Sie im Fachhandel.
Reinigung
•
•
•
•
Trennen Sie das Gerät vom Netz.
Reinigen Sie den Garraum nach der Benutzung mit einem leicht feuchten Tuch.
Reinigen Sie das Zubehör in gewohnter Weise in einem Spülbad.
Türrahmen/Türdichtung und benachbarte Teile müssen bei Verschmutzung mit
einem feuchten Tuch sorgfältig gereinigt werden.
Garantie
Wir übernehmen für das von uns vertriebene Gerät eine Garantie von 24 Monaten
ab Kaufdatum (Kassenbon).
Innerhalb der Garantiezeit beseitigen wir unentgeltlich die Mängel des Gerätes oder
des Zubehörs*), die auf Material- oder Herstellungsfehler beruhen, durch Reparatur
oder, nach unserem Ermessen, durch Umtausch. Garantieleistungen bewirken
weder eine Verlängerung der Garantiefrist, noch beginnt dadurch ein Anspruch auf
eine neue Garantie!
Als Garantienachweis gilt der Kaufbeleg. Ohne diesen Nachweis kann ein kostenloser Austausch oder eine kostenlose Reparatur nicht erfolgen.
Im Garantiefall geben Sie bitte komplette Gerät in der Originalverpackung zusammen
mit dem Kassenbon an Ihren Händler.
*) Schäden an Zubehörteilen führen nicht automatisch zum kostenlosen Umtausch
des kompletten Gerätes. Wenden Sie sich in desem Fall bitte an unsere Hotline!
Glasbruchschäden bzw. Brüche von Kunststoffteilen sind grundsätzlich kostenpflichtig!
14
5....-05-MWG 731 H
01.08.2003 14:34 Uhr
Seite 15
Sowohl Defekte an Verbrauchszubehör bzw. Verschleißteilen (z.B. Motorkohlen,
Knethaken, Antriebsriemen, Ersatzfernbedienung, Ersatzzahnbürsten, Sägeblättern
usw.), als auch Reinigung, Wartung oder der Austausch von Verschleißteilen, fallen
nicht unter die Garantie und sind deshalb kostenpflichtig!
Die Garantie erlischt bei Fremdeingriff.
Nach der Garantie
Nach Ablauf der Garantiezeit können Reparaturen kostenpflichtig vom entsprechenden Fachhandel oder Reparaturservice ausgeführt werden.
Service für unsere
Haushaltsartikel
Verschleißteile für Haushaltsartikel
(soweit diese nicht vom Fachmann
ausgewechselt werden müssen),
Ersatzkannen, Staubsaugerfilterbeutel
usw. können Sie mit Angabe des
Gerätetyps unter folgender TelefonHotline bestellen:
Service für unsere
Unterhaltungselektronik
Verschleißteile und Ersatzteile für
unsere Unterhaltungselektronik (soweit
diese nicht vom Fachmann ausgewechselt werden müssen) wie z. B.
Fernbedienungen, Bedienteilklappen,
Lautsprecherblenden usw. können Sie
mit Angabe des Gerätetyps unter folgender Telefon-Hotline bestellen:
0 21 52 / 20 06 – 888
0 21 52 / 20 06 – 666
Für technische Fragen haben wir für Sie folgende e-mail-Adresse eingerichtet:
[email protected]
Interessieren Sie sich für weitere Clatronic-Produkte?
Besuchen Sie doch einmal unsere Homepage unter
www.clatronic.de oder www.clatronic.com
Auch Ihre Bestellungen nehmen wir gerne unter o. g. Homepage-Adresse entgegen.
15
D
5....-05-MWG 731 H
01.08.2003 14:34 Uhr
Seite 16
General Safety Instructions
GB
•
•
•
•
•
•
•
•
Read the operating instructions carefully before putting the appliance into operation and keep the instructions including the warranty, the receipt and, if possible, the box with the internal packing.
The appliance is designed exclusively for private use and for the envisaged purpose. This appliance is not fit for commercial use. Do not use it outdoors (except
if it is designed to be used outdoors). Keep it away from sources of heat, direct
sunlight, humidity (never dip it into any liquid) and sharp edges. Do not use the
appliance with wet hands. If the appliance is humid or wet, unplug it immediately. Do not put it in water.
When cleaning or putting it away, switch off the appliance and always pull out
the plug from the socket (pull on the plug, not the cable) if the appliance is not
being used and remove the attached accessories.
Never leave the appliance unsupervised. To protect children from the dangers
posed by electrical appliances, make sure that the cable is hanging low and that
children do not have access to the appliance.
Check the appliance and the cable for damage on a regular basis. Do not use
the appliance if it is damaged.
Do not try to repair the appliance on your own. Always contact an authorized
technician. To avoid the exposure to danger, always have a faulty cable be
replaced only by the manufacturer, by our customer service or by a qualified
person and with a cable of the same type.
Use only original spare parts.
Pay careful attention to the following “Special Safety Instructions“.
Special Safety Instructions for this Machine
•
•
•
•
•
16
WARNING! DELAYED BOILING! During boiling, in particular when liquids
(water) are re-heated, it is possible that the boiling temperature has been reached but some of the typical bubbles of steam have not yet started to rise. The
liquid does not boil evenly. This so-called delayed boiling may lead to the sudden formation of bubbles of steam and boiling over when the vessel is removed
and slightly shaken. There is a danger of scalding! So that boiling is even, place
a glass rod or the like - but nothing metal - into the vessel.
Do not warm liquids in closed vessels. Danger of explosion.
If smoke is produced turn the device off and remove the mains plug. Keep the
door closed in order to smother any flames that might arise.
The contents of baby bottles and jars of baby food must be stirred or shaken
and the temperature checked prior to consumption. Danger of burning!
Please do not attempt to repair the equipment yourself. After removal of the
cover you risk being affected by micro wave radiation.
5....-05-MWG 731 H
01.08.2003 14:34 Uhr
Seite 17
Overview of the Controls
1
2
3
Door lock
Viewing window*
Cover**
4
5
6
Drive axle
Slide ring
Revolving tray
7
8
9
GB
Timer
Grill heating
Grill stand
* Please never remove the foil on the inside!
** Please never remove the cover!
Information concerning grill and combined operation
•
•
•
•
As irradiated heat is used during grill and combined operation please use only
heat-resistant tableware.
When operating the grill alone only metallic or aluminium tableware may be
used - but not during combined or microwave operation.
Do not place anything on top of the housing, as this becomes hot. Always keep
the ventilation slits clear.
Please use the grill stand to bring the food to be cooked up to the heating
element.
Initial Operation
•
•
•
•
•
•
•
•
In case you would like to place resp. build your micro wave oven in a cubboard
or cabinet please make sure to keep a safety distance to the cubboard of 10 cm
on each side of the equipment.
Remove all the accessories from the oven compartment, unpack them and place
the sliding ring in the middle. Position the glass plate on the drive axle such that
the plate fits into the hollow sections of the drive shaft and is lying level.
Inspect the machine for visible damage, in particular in the area of the door. If
any type of damage whatsoever is found, the machine must not be used.
In order that there is no interference from other electrical equipment during the
operation of the microwave oven, do not place your machine in the direct vicinity of other electronic equipment.
Remove any adhesive protective foil from the housing.
Please never remove the films on the inner side of the door!
Insert the plug into a correctly installed safety socket of 230 V, 50 Hz.
Do not remove any fitted parts from the oven interior nor from the inside of the
door!
Setting the Time
•
•
•
•
Please press the CLOCK/TIMER button.
Turn the TIME/MENU regulator until the desired hour is set.
In order to set the minutes, please press the CLOCK/TIMER button again and
then turn the TIME/MENU regulator until the desired minutes display is reached.
Please press the CLOCK/TIMER button again; the set time will now appear in
the display.
17
5....-05-MWG 731 H
01.08.2003 14:34 Uhr
Seite 18
Using the Oven
GB
What you should know about microwave operation:
•
Your oven works with microwave radiation which heats up water particles in food
in a very short time. There is no heat radiation and therefore no browning. For
this reason the machine is not suitable for drying objects.
Only food should be heated with this oven.
The machine is not suitable for baking in deep fat.
Do not heat too large quantities at the same time, otherwise the machine will be
less efficient.
In order to interrupt the cooking process, please press the STOP/RESET button.
Do not heat any enclosed food such as eggs, sausages, preservatives in jars,
etc, as there is a danger of explosion!
Microwaves supply a great deal of energy immediately. Pre-heating is therefore
unnecessary.
The microwave oven does not replace the traditional cooker. It mainly serves for:
- defrosting frozen or deep frozen food
- rapidly warming up or heat food or drinks
- some types of cooking food
Only suitable tableware should be used, such as:
- glass, porcelain, ceramics, heat-resistant plastic or special microwave crockery.
Please do not us plastic or paper dishes like plates, cups etc.
In the table below you will find general instructions on selecting the kitchenware
and utensils.
•
•
•
•
•
•
•
•
•
•
Machine
Microwave
Grill
Hot Air
Combination
Heat-resistant glass
YES
YES
YES
YES
Glass not resistant to heat
NO
NO
NO
NO
Heat-resistant ceramics
YES
YES
YES
YES
Microwave plastic tableware
YES
NO
NO
NO
Kitchen paper
YES
NO
NO
NO
Metal tray
NO
YES
YES
NO
Metal grill stand
NO
YES
YES
YES
Aluminium foil/container
YES
YES
YES
YES
Operation only as a Microwave
1. Place the food to be heated in a suitable piece of tableware.
2. Open the door and place the vessel in the middle of the glass plate. Then close
the door. (For safety reasons the oven only operates when the door is tightly
closed.)
3. Please press the MICROWAVE button.
18
5....-05-MWG 731 H
01.08.2003 14:34 Uhr
Seite 19
4. Set the desired cooking time using the TIME/MENU regulator. The cooking time
depends on the quantity and constitution of the contents. With a little practice
you will quickly learn to estimate the cooking time.
Please note:
5. Preparation of food in the microwave is very much faster than in a standard
oven. If you are not sure of what cooking times to set, start on a low level and
continue cooking the food again if necessary.
6. The control lamp in the START button flashes. Please press the START button.
The machine will switch on automatically and the lamp in the interior of the oven
will light up.
7. After the time has finished, the machine will switch off automatically. You can
then remove the food.
Please note:
A cover should be placed over the food when operating the microwave.
How to set the various power levels (in %) for microwave operation
In order to select the percentages, press the MICROWAVE button
Press:
Power
Description
1x
100% (P-HI)
Full power
2x
90% (P-90)
3x
80% (P-80)
4x
70% (P-70)
5x
60% (P-60)
6x
50% (P-50)
7x
40% (P-40)
8x
30% (P-30)
9x
20 % (P-20)
10x
10 % (P-10)
11x
0% (P-0)
High
Medium
Low
Very low
Operation only as a Grill
The grill function is particularly suited to grilling items which need to be cooked for a
short time, as well as steaks, cutlets, kebabs, sausages and small pieces of chicken
and turkey. In the same way you can use the grill function to prepare dishes which
need to the browned on top.
19
GB
5....-05-MWG 731 H
GB
01.08.2003 14:34 Uhr
Seite 20
If for example you would like to use the grill for 12 minutes, proceed as follows:
1.
2.
3.
4.
Please ensure that no programmes are still activated.
Press the GRILL function button.
Turn the TIME/MENU regulator to 12:00.
Please press the START button.
When the grill function is used, the maximum power is automatically selected. The
maximum grill duration is 95 minutes.
Operation only with Hot Air
During cooking with hot air, the hot air circulates in the interior of the oven. This causes the food to brown more quickly and become crisper. The microwave oven can
be programmed for up to 10 different temperatures and for up to 9 hours and 30
minutes.
Cooking with Hot Air
Please press the HOT AIR button and set the desired temperature.
Press:
Temperature °C
1x
230
2x
215
3x
200
4x
185
5x
170
6x
155
7x
140
8x
125
9x
110
10x
95
Assuming that you would like to cook at 185°C for 40 minutes, proceed as follows:
1. Please press the HOT AIR button four times.
2. Turn the TIME/MENU regulator clockwise to 40. The display will now show "H
40". "H" stands for hour, and the number "40" stands for the minutes that have
been set. Please note that it is not possible to set the number of seconds.
3. Now press the START button.
4. "40:00" appears in the display.
20
5....-05-MWG 731 H
01.08.2003 14:34 Uhr
Seite 21
Please note:
GB
1. It is possible to program up to 9 hours and 30 minutes. After the time has elapsed 4 acoustic signals sound and the word "END" appears in the display. Press
the STOP/RESET button or open the door. The word "END" will disappear.
2. While cooking with hot air it is possible to check the temperature by pressing
the HOT AIR button.
Preheating and Cooking with Hot Air
You can program your microwave oven in such a way that the microwave can be
preheated and the hot air then used.
Assuming you would like to preheat the oven to 170°C and then cook for
35 minutes:
1. Please press the HOT AIR button five times.
2. Then press the START button. PREH now flashes in the display.
3. Once the oven reaches the programmed temperature, a signal is sounded and
PREH lights up.
4. Please open the door and place the items to be cooked in the middle of the
rotating plate.
5. Turn the TIME/MENU regulator and set the time to "35".
6. Press the START button again.
Combined Use of the Grill and Microwave
This combination allows you to use the grill and the microwave on two different
settings.
1. Please press the GRILL+MICROWAVE button once* or twice** (see the
Combination 1 and 2 below) in order to set the desired combination.
2. Now set the desired time using the TIME/MENU regulator. After you have
pressed the START button the time begins to count down.
Please note:
1. Here it is possible to set up to 95 minutes.
2. You can see the settings during cooking by pressing the GRILL+MICROWAVE
button.
Combination 1*
The maximum cooking time that can be set here is 95 minutes.
The percentage distribution of grill and microwave is 70% for the grill and 30% for
the microwave.
Assuming you would like to select combination 1 for 25 minutes:
1. Please press the STOP/RESET button.
2. Then press the GRILL+MICROWAVE button once.
21
5....-05-MWG 731 H
GB
01.08.2003 14:34 Uhr
Seite 22
3. Please set the time to "25".
4. Then press the START button.
Combination 2**
The maximum cooking time that can be set here is also 95 minutes.
The percentage distribution of grill and microwave is 55% for the microwave and
45% for the grill. This function can be used for omelettes, gratinated potatoes and
poultry.
Assuming you would like to use combination 2 for 12 minutes:
1.
2.
3.
4.
Please press the STOP/RESET button.
Press the GRILL+MICROWAVE button twice.
Turn the TIME/MENU regulator to "12".
Then press the START button.
Combined Use of Hot Air and Microwave
The device has 4 pre-programmed settings. This makes it easier for you to work
both with hot air and with the microwave function.
Please press the HOT AIR+MICROWAVE button in order to select the hot air temperatures.
Program
Press
Temperature (°C)
COMB 1
1x
230
COMB 2
2x
200
COMB 3
3x
180
COMB 4
4x
150
If you would like to set a time of 25 minutes by using "COMB 3", in order to bake a
cake for example:
1. Please press the HOT AIR+MICROWAVE button three times.
2. Turn the TIME/MENU regulator to the desired time (25).
3. Start the process with the START button.
Please note:
The maximum time that can be programmed is 9 hours, 30 minutes. After the time
has finished, 4 acoustic signals are sounded and the word "END" appears in the
display. Press the STOP/RESET button or open the door. The word "END" disappears.
During cooking with hot air you can check the temperature by pressing the HOT
AIR+MICROWAVE button.
22
5....-05-MWG 731 H
01.08.2003 14:34 Uhr
Seite 23
Rapid Defrosting of Frozen Food
Assuming that you would like to defrost frozen food and set the time to 5 minutes:
1. Set the TIME/MENU regulator to "08". Please press the IND. button (individual).
2. Then use the TIME/MENU regulator to set the desired time (5:00 min).
Please note:
1. As a general rule, 500 g of frozen food requires approx. 5 minutes to defrost.
2. If the frozen food has not fully defrosted after this time, set the time at 1 minute
intervals.
If the frozen food was frozen in a plastic container, we recommend that the frozen
food is briefly defrosted and then transferred to kitchenware which is suitable for
use in a microwave.
The maximum time that can be set for defrosting is 45 minutes.
After this time has expired, 4 acoustic signals are sounded and the word "END"
appears in the display. Press the STOP/RESET button or open the door. The word
"END" disappears.
Cooking in Several Steps
You can set the programmes in such a way that it is possible to select three different functions.
Assuming you select the following program for cooking:
Rapid defrosting
▼
Preparing food in the microwave
▼
Cooking with hot air (without preheating)
1.
2.
3.
4.
5.
6.
7.
8.
Turn the TIME/MENU regulator to "08". The word "Code" appears in the display.
Press in the IND. button (individual).
Then use the TIME/MENU regulator to select the desired time for defrosting.
Please press the MICROWAVE button to start the machine.
Press the TIME/MENU regulator again and set the desired time.
Press the HOT AIR button and choose the desired time.
Turn the TIME/MENU regulator.
Press the START button.
23
GB
5....-05-MWG 731 H
GB
01.08.2003 14:34 Uhr
Seite 24
Preset Programmes
Codes
01
02
03
04
05
06
07
08
CODE
number in
the display
Quantity stated
in grams
Press the
"IND" button
Cooking time
in minutes
1
140-200g
1x
5:40
2
280-400g
2x
9:40
3
420-600g
3x
13:00
4
560-800g
4x
17:00
1
250-310g
1x
2:20
2
500-620g
2x
4:00
3
750-930g
3x
5:40
4
1000-1240g
4x
7:20
-
Without separate
1x
2:30
setting of the weight
2x
Ind. time selection
setting of the weight
1x
3:40
Without separate
1x
1:10
setting of the weight
2x
3:30
-
Without separate
1
170g
1x
12:00
2
300g
2x
15:00
3
540g
3x
23:00
4
800g
4x
30:00
-
-
1x
40:00
2x
Ind. time selection
-
-
1x
Defrosting with
ind. time selection
If you would like to heat up a pizza for example with a weight of approx. 120g 140g, please proceed as follows:
1.
2.
3.
4.
Turn the TIME/MENU button to "05" and "CODE" appears in the display.
Press the IND button once and the baking time (1:10 min) appears.
Press the START button.
In order to heat up a pizza with a higher weight, please press the TIME/MENU
button until "05" appears.
5. Press the IND button twice and the baking time (3:30 min) is displayed.
6. Then press the START button.
24
5....-05-MWG 731 H
01.08.2003 14:34 Uhr
Seite 25
Please note:
GB
Individual Cooking Program
1. Please turn the TIME/MENU regulator to code number "07". The word "Code"
appears in the display.
2. Press the IND button. The stored time appears in the display.
3. In order to change the stored time, press the IND button again. Now use the
TIME/MENU regulator to set the desired cooking time.
4. Press the START button.
This time will now remain in the memory until you enter a new time or the mains
power supply is disconnected.
Additional Practical Tips
TIMER:
•
•
•
Keep the CLOCK/TIMER button pressed for 3 seconds.
Turn the TIME/MENU regulator to the desired time and this will then appear in
the display.
Press the START button.
This program can be used parallel to the microwave program, the grill and the hot
air program.
Please note:
The maximum time that can be set is 95 minutes. The time which is counting down
remains visible in the display for 3 seconds. The clock or the cooking time then
reappears in the display. Once the set time has expired, a long sound is heard.
Press the CLOCK/TIMER button and then the STOP/RESET button in order to stop
the clock.
Child Lock
The child lock protects the device from being used by children without supervision.
The child lock is activated as follows:
Keep the STOP/RESET button pressed down for 3 seconds. A signal is heard and
the word "LOCK" appears in the display. All buttons are now blocked.
The child lock is deactivated as follows:
Repeat the above procedure. The word "LOCK" disappears.
Fast Start/Stop
You can use this setting for procedures which are often repeated. The microwave
then runs at 100%.
Press the START button at rapid intervals in order to set the cooking time. The
maximum switch-on time is limited to 10 minutes. The microwave starts automati25
5....-05-MWG 731 H
GB
01.08.2003 14:34 Uhr
Seite 26
cally after 2 seconds. After the time has expired a signal is sounded and the word
"END" appears in the display. The display goes off when the STOP/RESET button
is pressed or the door is opened.
You can interrupt the running time as follows:
1. Press the STOP/RESET button once (the lamp in the START button flashes). In
order to continue the process, press the START button again.
2. If you would like to interrupt the process, press the STOP/RESET button.
3. Instead of pressing the STOP/RESET button you can also interrupt the running
time by opening the door.
You will find recipe books at specialist bookshops.
Cleaning
•
•
•
•
Disconnect the oven from the power supply.
Clean the inside of the oven after use with a slightly damp cloth.
Clean the accessories in the usual way in soapy water.
The door frame and seal and neighbouring parts must be cleaned carefully
when dirty with a damp cloth.
This device has been tested according to all relevant current CE guidelines,
such as electromagnetic compatibility and low voltage directives, and has been
constructed in accordance with the latest safety regulations.
Subject to technical changes without prior notice!
Guarantee
The device supplied by our Company is covered by a 24 month guarantee starting
on the date of purchase (receipt).
During the life of the guarantee any fault of the device or its accessories *) ascribable to material or manufacturing defects will be eliminated free of charge by repairing or, at our discretion, by replacing it. The guarantee services do not entail an
extension of the life of the guarantee nor do they give rise to any right to a new
guarantee!
Proof of the guarantee is provided by the proof of purchase. Without proof of
purchase no free replacement or repair will be carried out.
If you wish to make a claim under the guarantee please return the entire machine
in the original packaging to your dealer together with the receipt.
26
5....-05-MWG 731 H
01.08.2003 14:34 Uhr
Seite 27
*) Damage to accessories does not mean automatic free replacement of the whole
machine. In such cases please contact our hotline. Broken glass or breakage of
plastic parts are always subject to a charge.
Defects to consumables or parts subject to wearing (e.g. motor pistons, kneading
blades, drive shafts, spare remote control, spare toothbrushes, saw blades, etc.) as
well as cleaning, maintenance or the replacement of said parts are not covered by
the guarantee and hence are to be paid!
The guarantee lapses in case of unauthorized tampering.
After the expiry of the guarantee
After the expiry of the guarantee repairs can be carried by the competent dealer or
repair service against the payment of the ensuing costs.
27
GB
5....-05-MWG 731 H
01.08.2003 14:34 Uhr
Seite 28
Conseils généraux de sécurité
F
•
•
•
•
•
•
•
•
•
Lisez attentivement ce mode d’emploi avant de mettre l’appareil en marche
pour la première fois. Conservez le mode d’emploi ainsi que le bon de garantie,
votre ticket de caisse et si possible, le carton avec l’emballage se trouvant à
l’intérieur.
N’utilisez cet appareil que pour un usage privé et pour les taches auxquelles il
est destiné. Cet appareil n’est pas prévu pour une utilisation professionnelle. Ne
l’utilisez pas en plein air (sauf s’il est indiqué que vous pouvez le faire).
Protégez-le de la chaleur, des rayons directs du soleil, de l’humidité (ne le plongez en aucun cas dans l’eau) et des objets tranchants. N’utilisez pas cet
appareil avec des mains humides. S’il arrive que de l’humidité ou de l’eau atteignent l’appareil, débranchez aussitôt le câble d’alimentation. Ne touchez pas
les parties mouillées.
Arrêtez l’appareil et débranchez toujours le câble d’alimentation de la prise de
courant (tirez sur la fiche, pas sur le câble) si vous n’utilisez pas l’appareil, si
vous installez les accessoires, pour le nettoyage ou en cas de panne.
Ne laissez jamais fonctionner l’appareil sans surveillance. Arrêtez toujours l’appareil ou débranchez le câble d’alimentation (en tirant sur la fiche et non pas
sur le câble) si vous devez vous absenter.
Pour protéger les enfants des risques engendrés par les appareils électriques ,
veillez à ce que le câble ne pende pas de l’appareil et que l’appareil ne soit pas
à portée des enfants.
Contrôlez régulièrement l’appareil et le câble. Ne mettez pas l’appareil en marche s’il est endommagé.
Ne réparez pas l’appareil vous-même. Contactez plutôt un technicien qualifié.
Pour éviter toute mise en danger, ne faites remplacer le câble défectueux que
par un câble équivalent et que par le fabricant, notre service après-vente ou
toute personne de qualification similaire.
N’utilisez que les accessoires d’origine.
Respectez les „conseils de sécurité spécifiques à cet appareil“ ci-dessous ...
Informations spécifiques de sécurité
pour cet appareil
•
•
28
Attention, ébullition à retardement : Lors de la cuisson, notamment en faisant
chauffer des liquides (eau), la température d’ébullition peut, dans certains cas,
être atteinte, sans apparition cependant des bulles typiques pour l’ébullition. Le
liquide ne bout pas d’une manière uniforme. Cette ébullition dite à retardement
peut conduire à une formation subite de bulles d’ébullition et donc d’un débordement en cas d’enlèvement du récipient suite à de légères vibrations. Risque
de brûlures. Pour obtenir une ébullition uniforme, veuillez placer une barre en
verre ou similaire - pas de métal - dans le récipient.
Ne pas chauffer de liquide dans des récipients fermés. Risque d’explosion.
5....-05-MWG 731 H
•
•
•
01.08.2003 14:34 Uhr
Seite 29
En cas d’apparition de fumées, il y a lieu d’arrêter l’appareil et de séparer la
fiche du réseau. Maintenez la porte fermée pour étouffer d’éventuelles flammes.
Il convient de remuer ou d’agiter le contenu de biberons ou de verres contenant
de la nourriture pour jeunes enfants et leur température doit être vérifiée avant
la consommation. Il y a risque de brûlures.
En aucun cas réparer l’appareil vous-même. Le couvercle ôté, il y a risque de
contamination par les rayons de l’énergie aux micro-ondes.
Description des différents éléments de commande
1
2
3
4
5
Verrouillage de la porte
Porte panoramique
Cache
Axe d’entraînement
Anneau de guidage
6
7
8
9
Plateau tournant
Minuteur
Chauffage gril
Support à grillade
* Ne retirez en aucun cas le film se trouvant sur la paroi intérieure !
** Ne retirez en aucun cas le cache !
Informations sur la marche combinée et en grill
•
•
•
•
Veuillez n’utiliser que de la vaisselle résistante à la chaleur, étant donné que la
chaleur des fonctions combinées et grill est générée par rayons.
La vaisselle métallique ou en alu peut être utilisée pour la seule fonction grill,
pas pour les fonctions combinées ou à micro-ondes.
Ne placez aucun objet sur la face supérieure du châssis. Celle-ci chauffe.
Maintenez toujours dégagées les fentes d’aération.
Pour approcher les aliments à préparer de l’élément chauffant, toujours utiliser
le support du grill.
Mise en marche
•
•
•
•
Si vous souhaitez placer votre micro-ondes dans une armoire, une étagère ou
similaire, veillez à une distance de ventilation de 10 cm au minimum entre les
armoires, les murs et parois, etc. d’une part et tous les côtés de l’appareil d’autre part.
Retirez tous les accessoires se trouvant dans l’espace de cuisson à l’intérieur
de l’appareil, déballez-les et placez l’anneau de glisse au centre. Positionnez
l’assiette en verre sur l’axe d’entraînement de sorte que celle-ci s’encliquette
dans les courbures de l’axe d’entraînement et y soit maintenue droite.
Vérifiez l’appareil en vue d’éventuels endommagements, notamment près de sa
porte. En aucun cas mettre en marche l’appareil s’il présente des dommages,
quelqu’en soit le type.
Pour éviter tout dysfonctionnement d’autres appareils pendant le fonctionnement du micro-ondes, ne pas placer ce dernier à proximité immédiate d’autres
appareils électroniques.
29
F
5....-05-MWG 731 H
F
•
•
•
•
01.08.2003 14:34 Uhr
Seite 30
Retirer toute feuille de protection en plastique se trouvant éventuellement sur le
châssis.
En aucun cas retirer des feuilles de protection se trouvant sur la face intérieure
de la porte.
Introduire la fiche dans un prise à contact protégé à 230 V, 50 Hz installée correctement.
Ne retirer aucune pièce montée de l’espace de cuisson à l’intérieur et de la
face intérieure de la porte.
Réglage de l’heure
•
•
•
•
Actionner la touche UHR/TIMER (horloge)
Tourner le réglage ZEIT/MENÜ (heure/menu) jusqu’à atteindre l’heure souhaitée.
Pour régler les minutes, actionner de nouveau la touche UHR/TIMER et tourner
ensuite le réglage ZEIT/MENÜ jusqu’à atteindre l’affichage minute souhaité.
Appuyer de nouveau sur la touche UHR/TIMER; l’heure réglée s’affiche alors
sur l’écran.
Utilisation de l’appareil
Bon à savoir sur le fonctionnement des micro-ondes:
•
•
•
•
•
•
•
•
•
•
30
Votre appareil travaille par rayons à micro-ondes chauffant en un laps de temps
très rapide des particules d’eau dans les aliments. Ceci ne génère aucun rayon
chaud et donc pratiquement pas de dorage. Par conséquent, l’appareil ne convient pas pour sécher quelque article que ce soit
Chauffer exclusivement des aliments à l’aide de cet appareil.
L’appareil ne convient pas pour la friture dans la graisse.
Ne chauffez pas de trop grandes quantités à la fois, l’appareil risquerait alors de
perdre de son efficacité.
Pour interrompre le processus de cuisson, appuyer sur la touche
STOPP/RESET (arrêt/remise en marche).
Ne pas chauffer des aliments fermés tels que les œufs, les saucisses, les conserves en verre etc.. Risque d’explosion.
Les micro-ondes fournissent une énergie maximale tout de suite. Il n’est donc
pas utile de le préchauffer.
Le four à micro-ondes ne remplace pas votre four classique. Il sert essentiellement à
- Faire congeler des aliments surgelés/congelés
- Faire chauffer rapidement des aliments ou des boissons
- Dans certaines limites, à cuire des aliments
Utiliser exclusivement de la vaisselle appropriée, tels que : verre, porcelaine,
céramique, matières plastiques résistantes à la chaleur ou de la vaisselle spéciale pour fours à micro-ondes.
Ne pas utiliser de la vaisselle en plastique, voire en carton.
5....-05-MWG 731 H
•
01.08.2003 14:34 Uhr
Seite 31
Dans le tableau ci-après, vous trouverez des informations générales relatives à
la sélection des vaisselles, voire des ustensiles à utiliser.
Appareil
Micro-ondes
Grill
Air chaud
Verre résistant à la chaleur
OUI
OUI
OUI
Combiné
OUI
Verre ne résistant pas à la chaleur
NON
NON
NON
NON
Céramique résistant à la chaleur
OUI
OUI
OUI
OUI
Vaisselle en plastique pour micro-ondes
OUI
NON
NON
NON
Sopalin
OUI
NON
NON
NON
Plateau en métal
NON
OUI
OUI
NON
Support métallique du grill
NON
OUI
OUI
OUI
Feuille / récipient en alu
OUI
OUI
OUI
OUI
Commande de la fonction pur micro-ondes
1. Placer l’aliment à chauffer dans une vaisselle appropriée.
2. Ouvrir la porte et posez le récipient au milieu sur l’assiette en verre. Fermer la
porte. (Pour des raisons de sécurité, l’appareil ne marche qu’à la porte bien fermée).
3. Appuyer sur la touche MIKROWELLE (micro-ondes).
4. À l’aide du réglage ZEIT/MENÜ, régler la durée souhaitée de la cuisson. Le
temps de cuisson est fonction de la quantité et de la texture du contenu. Avec
un peu d’expérience, vous apprendrez vite à bien évaluer la durée de la cuisson.
Attention:
5. La préparation au four à micro-ondes est beaucoup plus rapide que dans un
four à chaleur classique. Si vous n’êtes pas sûr de la durée de la cuisson, commencez par une durée inférieure que vous prolongerez le cas échéant.
6. La lampe de contrôle dans la touche START clignote. Appuyer sur la touche
START, l’appareil démarre alors, la lampe dans l’espace de cuisson s’allume.
7. La durée de la cuisson terminée, l’appareil s’éteint. Retirez alors les aliments.
Attention :
Placer une couverture sur les aliments lors de la fonction en pur micro-ondes.
31
F
5....-05-MWG 731 H
F
01.08.2003 14:34 Uhr
Seite 32
Voici comment régler les différentes valeurs de rendement (en %) pour le fonctionnement en micro-ondes:
Pour sélectionner les pourcentages, actionner la touche MIKROWELLE
Appuyer sur:
Rendement
Description
1x
100% (P-HI)
Plein rendement
2x
90% (P-90)
3x
80% (P-80)
4x
70% (P-70)
5x
60% (P-60)
6x
50% (P-50)
7x
40% (P-40)
8x
30% (P-30)
9x
20 % (P-20)
10x
10 % (P-10)
11x
0% (P-0)
Élevé
Moyen
Faible
Très faible
Commande de la fonction pur grill
La fonction grill convient particulièrement bien pour faire griller des aliments à cuisson rapide, des steaks, des côtelettes, des kebabs, des saucissons et de petits
morceaux du poulet, voire de la dinde. La fonction grill permet également la préparation de plats gratinés.
Supposons que vous souhaitez utiliser le grill pendant 12 minutes
1.
2.
3.
4.
Veuillez-vous assurer qu’aucun programme ne soit plus activé.
Actionnez la touche de la fonction GRILL.
Réglez le réglage ZEIT/MENÜ sur 12 :00.
Appuyez sur la touche START.
La fonction grill active automatiquement le rendement le plus élevé. La durée maximale du grill est de 95 minutes.
Commande de la fonction pur air chaud
Pendant la cuisson à l’air chaud, l’air chaud circule dans l’espace de cuisson. Ainsi,
les aliments dorent plus rapidement et deviennent plus croustillants. Vous pouvez
programmer l’appareil à micro-ondes à 10 températures différentes et le régler à un
retardement dans le temps allant jusqu’à 9 heures et 30 minutes.
32
5....-05-MWG 731 H
01.08.2003 14:34 Uhr
Seite 33
La cuisson à air chaud
F
Actionner la touche HEISSLUFT (air chaud) et régler la température souhaitée.
Actionner:
Température en °C
1x
230
2x
215
3x
200
4x
185
5x
170
6x
155
7x
140
8x
125
9x
110
10x
95
Supposons que vous souhaitez une cuisson de 40 minutes à 185°C, vous procéderez alors comme suit :
1. Appuyez 4 fois sur la touche HEISSLUFT.
2. Réglez le réglage ZEIT/MENÜ sur 40 en le tournant dans le sens des aiguilles.
L’écran affiche alors « H 40 », « H » symbolisant l’heure et le chiffre « 40 » les
minutes réglées. Veuillez tenir compte du fait que vous ne pouvez régler des
secondes.
3. Actionnez la touche START.
4. L’écran affiche « 40 :00 ».
Attention:
1. Vous pouvez programmer au maximum 9 heures et 30 minutes. La durée du
programme écoulée, 4 signaux sonores retentissent et le mot « END » (fin) est
affiché sur l’écran. Veuillez appuyer sur la touche STOPP/RESET ou ouvrez la
porte. Le mot « END » cesse d’être affiché.
2. Pendant la cuisson à air chaud, vous pouvez contrôler la température en
actionnant la touche HEISSLUFT :
Préchauffage et cuisson à air chaud
Vous pouvez programmer votre appareil à micro-ondes de sorte que vous
préchauffez le micro-ondes pour ensuite pouvoir le faire fonctionner à air chaud.
33
5....-05-MWG 731 H
F
01.08.2003 14:34 Uhr
Seite 34
Supposons que vous souhaitez préchauffer l’appareil à 170°C et ensuite faire cuire
des aliments pendant 35 minutes:
1. Appuyez 5 fois sur la touche HEISSLUFT.
2. Actionnez ensuite la touche START. L’écran affiche PREH.
3. Lorsque le four atteint la température programmée, un signal sonore retentit. Et
PREH s’affiche.
4. Ouvrez la porte et placez les aliments à cuire au milieu de l’assiette tournante.
5. Réglez le réglage ZEIT/MENÜ et la durée sur « 35 ».
6. Appuyez de nouveau sur la touche START.
Utilisation combinée des fonctions grill et micro-ondes
Cette combinaison vous permet l’utilisation des fonctions grill et micro-ondes à
deux réglages différents.
1. Appuyez 1, voire 2 fois** (voir combinaisons 1 et 2 ci-dessous) sur la touche
GRILL+MIKROWELLE (grill + micro-ondes) pour régler la combinaison souhaitée.
2. À l’aide du réglage ZEIT/MENÜ, réglez maintenant la durée souhaitée. Le
compte à rebours démarre lorsque vous actionnez la touche START.
Attention:
1. Ici, vous pouvez programmez une durée maximale de 95 minutes.
2. Pendant la cuisson, vous pouvez affichez les réglages en appuyant sur la touche GRILL+MIKROWELLE.
Combinaison 1*
Le temps de cuisson peut être réglé à une durée maximum de 95 minutes.
La répartition en pourcentages entre le grill et la fonction micro-ondes est de 70%
pour le grill et de 30% pour le micro-ondes.
Supposons que vous souhaitez sélectionner la combinaison 1 pour une durée de
25 minutes:
1.
2.
3.
4.
Actionnez la touche STOPP/RESET.
Ensuite, appuyez 1 fois sur la touche GRILL+MIKROWELLE
Réglez la durée sur « 25 ».
Appuyez sur la touche START.
Combinaison 2**
Ici aussi, la durée maximale de cuisson est de 95 minutes.
La répartition en pourcentages entre le grill et la fonction micro-ondes est de 55%
pour le grill et de 45% pour le micro-ondes. Vous pouvez utiliser ces fonctions pour
les omelettes, les pommes de terre gratinées et pour la volaille.
34
5....-05-MWG 731 H
01.08.2003 14:34 Uhr
Seite 35
Supposons que vous souhaitez utiliser cette combinaison 2 pendant une durée de
12 minutes:
1.
2.
3.
4.
Actionnez la touche STOPP/RESET.
Ensuite, appuyez 2 fois sur la touche GRILL+MIKROWELLE
Réglez la durée sur « 12 ».
Appuyez sur la touche START.
Utilisation combinée des fonctions air chaud et micro-ondes
L’appareil dispose de 4 réglages pré-programmés. Ceci vous permet de travailler
facilement avec les fonctions air chaud et micro-ondes.
Actionnez la touche HEISSLUFT+MIKROWELLE pour sélectionner les températures d’air chaud.
Programme
Actionner
Température (en °C)
KOMB 1
1x
230
KOMB 2
2x
200
KOMB 3
3x
180
KOMB 4
4x
150
Si vous souhaitez, pour faire cuire un gâteaux, régler une durée de 25 minutes en
« KOMB3 »:
1. Actionnez 3 fois la touche HEISSLUFT+MIKROWELLE.
2. Régler le réglage ZEIT/MENÜ sur la durée souhaitée (25).
3. Démarrez le processus à l’aide de la touche START.
Attention:
Vous pouvez programmer 9 heures et 30 minutes au maximum. La durée du programme écoulée, 4 signaux sonores retentissent et le mot « END » (fin) est affiché
sur l’écran. Veuillez appuyer sur la touche STOPP/RESET ou ouvrez la porte. Le
mot « END » cesse d’être affiché.
Pendant la cuisson à air chaud, vous pouvez contrôler la température en actionnant
la touche HEISSLUFT+MIKROWELLE.
Décongélation rapide d’aliments surgelés
Supposons que vous souhaitez faire décongeler des aliments surgelés et régler la
durée à 5 minutes:
1. Régler le réglage ZEIT/MENÜ à un degré allant jusqu’à « 08 ». Actionnez la
touche IND (individuel).
2. Ensuite, réglez la durée souhaitée à l’aide du réglage ZEIT/MENÜ (5 :00 min.).
35
F
5....-05-MWG 731 H
F
01.08.2003 14:34 Uhr
Seite 36
Attention:
1. Selon une règle de base, on compte une durée de 5 minutes pour faire décongeler 500 g d’aliments surgelés.
2. Si cette durée ne suffisait pas pour décongeler complètement les aliments surgelés, rajoutez des fractions de durée par étapes d’1 minutes chacune.
Si les aliments surgelés avaient été surgelés dans un récipient en matière plastique, nous recommandons de les faire légèrement décongeler et de les mettre
ensuite dans une vaisselle qui convient aux micro-ondes.
Pour décongeler des aliments, vous pouvez régler une durée allant jusqu’à 45
minutes.
La durée du programme écoulée, 4 signaux sonores retentissent et le mot « END »
(fin) est affiché sur l’écran. Veuillez appuyer sur la touche STOPP/RESET ou
ouvrez la porte. Le mot « END » cesse d’être affiché.
La cuisson en plusieurs étapes
Vous pouvez régler les programmes de sorte vous permettant de sélectionner 3
fonctions différentes.
Supposons que vous sélectionnez le programme suivant pour la cuisson :
Décongélation rapide
▼
Préparation aux micro-ondes
▼
Cuisson à air chaud (sans préchauffage)
1. Régler le réglage ZEIT/MENÜ à un degré allant jusqu’à « 08 », l’écran affiche
alors le mode « code ».
2. Actionnez la touche IND. (individuel).
3. Ensuite, sélectionnez la durée souhaitée pour la décongélation à l’aide du
réglage ZEIT/MENÜ.
4. Actionnez la touche MIKROWELLE pour faire démarrer l’appareil.
5. Tournez à nouveau le réglage ZEIT/MENÜ et réglez la durée souhaitée.
6. Appuyez sur la touche HEISSLUFT et sélectionnez la durée souhaitée.
7. Tournez le réglage ZEIT/MENÜ.
8. Actionnez la touche START.
36
5....-05-MWG 731 H
01.08.2003 14:34 Uhr
Seite 37
Programmes pré-programmés
Code
01
F
N° du code
Quantités indiquées
affiché
en grammes
à l’écran
Actionnez la
touche «IND»
Temps de
cuisson
en minutes
1
140-200g
1x
5:40
2
280-400g
2x
9:40
3
420-600g
3x
13:00
4
560-800g
4x
17:00
1
250-310g
1x
2:20
2
500-620g
2x
4:00
3
750-930g
3x
5:40
4
1000-1240g
4x
7:20
03
-
Sans réglage
1x
2:30
séparé du poids
2x
Sélection ind. de la durée
04
-
séparé du poids
1x
3:40
05
-
Sans réglage
1x
1:10
séparé du poids
2x
3:30
02
06
07
08
Sans réglage
1
170g
1x
12:00
2
300g
2x
15:00
3
540g
3x
23:00
4
800g
4x
30:00
-
-
1x
40:00
2x
Sélection ind. de la durée
-
-
1x
Décongélation avec
sélection ind. de la durée
Si, par exemple, vous souhaitez chauffer une pizza ayant un poids total d’environ
120 à 140 g, veuillez procéder comme suit:
1.
2.
3.
4.
Tournez le bouton ZEIT/MENÜ jusqu’à ce que l’écran affiche «05» et «CODE».
Actionnez 1 x la touche IND pour afficher la durée de la cuisson (1 :10 minute).
Appuyez sur la touche START.
Pour chauffer une pizza d’un poids supérieur, appuyez sur la touche
ZEIT/MENÜ jusqu’à l’apparition de « 05 ».
5. Actionnez 2 x la touche IND pour afficher la durée de la cuisson (3 :30 minutes).
6. Appuyez ensuite sur la touche START.
37
5....-05-MWG 731 H
F
01.08.2003 14:34 Uhr
Seite 38
Attention:
Programme de cuisson individuelle
1. Tournez le réglage ZEIT/MENÜ au numéro de code « 07 ». L’écran affiche alors
le mot « Code ».
2. Actionnez la touche IND. La durée enregistrée apparaît sur l’écran.
3. Pour changer le chiffre enregistré, actionnez à nouveau la touche IND. Régler
maintenant la durée souhaitée de la cuisson à l’aide du réglage ZEIT/MENÜ.
4. Appuyez sur la touche START.
Cette durée restera alors en mémoire jusqu’à l’entrée d’une nouvelle durée ou jusqu’à la séparation de la fiche du secteur.
Astuces pratiques supplémentaires
TIMER:
•
•
•
Maintenez enfoncée la touche UHR/TIMER pendant 3 secondes.
Réglez le réglage ZEIT/MENÜ sur la durée souhaitée et elle s’affiche alors sur
l’écran.
Actionnez la touche START.
Ce programme peut être activé parallèlement au programme à micro-ondes, au grill
et à la fonction air chaud.
Attention:
La durée maximale réglable est de 95 minutes. Le compte à rebours s’affiche à
l’écran pendant 3 secondes. Ensuite, l’heure, voire la durée de la cuisson, s’affiche
de nouveau sur l’écran. La durée réglée écoulée, un signal sonore continu retentit.
Pour arrêter l’horloge, appuyez sur la touche UHR/TIMER et ensuite sur la touche
STOPP/RESET.
Sécurité enfants
La sécurité enfants fournit une protection contre l’utilisation de l’appareil par des
enfants sans surveillance. Pour activer la sécurité enfants:
Maintenez enfoncée la touche STOPP/RESET pendant 3 secondes, un signal
sonore retentit alors et le mot « LOCK » s’affiche sur l’écran. Toutes les touches
sont bloquées.
Pour désactiver la sécurité enfants :
Répétez le procédé. Le mot « LOCK » cesse d’être affiché.
Démarrage/arrêt rapide
Vous pouvez utiliser ce réglage pour des options souvent sélectionnées. Le microondes marchera alors à un rendement de 100%.
38
5....-05-MWG 731 H
01.08.2003 14:34 Uhr
Seite 39
Actionnez à intervalles rapides la touche START pour régler la durée de la cuisson.
La durée maximale de mise en marche est limitée à 10 minutes. Le micro-ondes
démarre automatiquement après 2 secondes. La durée écoulée, un signal sonore
retentit et le mot « END » est affiché sur l’écran. Pour faire cesser l’affichage,
appuyez sur la touche STOPP/RESET ou ouvrez la porte.
Vous pouvez également interrompre l’appareil en marche en:
1. appuyant 1 fois sur la touche STOPP/RESET (la lampe dans la touche START
clignote). Pour continuer la marche, appuyez à nouveau sur la touche START,
2. Pour arrêter la marche, actionnez la touche STOPP/RESET.
3. Au lieu d’actionner la touche STOPP/RESET, vous pouvez également interrompre la marche en ouvrant la porte.
Les livres de recettes sont disponibles au commerce spécialisé.
Nettoyage
•
•
•
•
Séparez l’appareil du secteur.
Après utilisation, nettoyez l’espace de cuisson à l’aide d’un chiffon légèrement
mouillé.
Nettoyez les accessoires d’une manière classique dans un bain d’eau avec un
produit pour laver la vaisselle.
En cas de souillure, il convient de nettoyer soigneusement le cadre / le soufflet
de la porte et les parties avoisinantes à l’aide d’un chiffon mouillé.
Cet appareil a été contrôlé d’après toutes les directives européennes actuelles
applicables, comme par exemple concernant la compatibilité électromagnétique et
la basse tension. Cet appareil a été fabriqué en respect des réglementations techniques de sécurité les plus récentes.
Sous réserve de modifications techniques.
Garantie
Nous accordons une garantie de 24 mois à dater de la date d’achat (ticket de
caisse) pour l’appareil que nous vendons.
Pendant la durée de la garantie, nous éliminons gratuitement les défauts de l’appareil ou des accessoires *) découlant d’un vice de matériau ou de fabrication au
moyen d’une réparation ou, selon notre estimation, au moyen d’un remplacement.
Les prestations dans le cadre de la garantie n’entraînent aucune prorogation de la
durée de garantie et ne donnent pas droit à une nouvelle garantie !
Le justificatif de garantie est le reçu. Sans ce justificatif, aucun remplacement
gratuit ni aucune réparation gratuite ne peuvent être effectués.
39
F
5....-05-MWG 731 H
F
01.08.2003 14:34 Uhr
Seite 40
En cas de recours à la garantie, ramenez votre appareil complet, dans son
emballage d'origine, accompagné de votre preuve d'achat, à votre revendeur.
*) Les endommagements de pièces d’accessoires ne justifient pas automatiquement l’échange gratuit de l’appareil complet. Contactez alors notre centrale téléphonique! La casse de pièces en verre ou en plastique est dans tous les cas à votre
charge!
Les défauts sur les accessoires ou les pièces d’usure (p.ex. les charbons de
moteurs, crochets, courroies d’entraînement, télécommande de rechange, brosses
à dents de rechange, lames de scies etc.) ainsi que le nettoyage, l’entretien ou le
remplacement de pièces d’usure ne sont pas garantis et sont donc payants !
En cas d’intervention étrangère, la garantie devient caduque.
Après la garantie
Après écoulement de la durée de garantie, les réparations peuvent être effectuées,
contre paiement, par le commerce spécialisé ou le service de réparation.
40
5....-05-MWG 731 H
01.08.2003 14:34 Uhr
Seite 41
Technische Daten
Modell:
MWG 731 H
Spannungsversorgung:
230 V, 50 Hz
Leistungsaufnahme: Mikrowelle 1400 W
Mikrowellenleistung:
Heißluft
1400 W
Grill
1200 W
1900 W
Garraumvolumen:
30 Liter
Schutzklasse:
Ι
Dieses Gerät wurde nach allen zutreffenden,
aktuellen CE-Richtlinien geprüft, wie z.B.
elektromagnetische Verträglichkeit und
Niederspannungsdirektive und wurde nach den
neuesten sicherheitstechnischen Vorschriften
gebaut.
Technische Änderungen vorbehalten!
D-47906 Kempen/Germany · Industriering Ost 40
Internet: http://www.clatronic.de · email: [email protected]
Stünings, Krefeld • 08/03
Bitte führen Sie das ausgediente Gerät
einer umweltgerechten Entsorgung zu.